Toomai
Smash Ace

THE ROYAL ARCHIVES
PEACH'S HITBOX REPOSITORY
CURRENT COINAGE: 100
DISCLAIMER
(read this you ruffians)
The following is a combination of definite facts and approximate drawings. While the data is certain and the frames are almost certain, BrawlBox is a pain and some rotations are a tricky little piece of crap, so take the bubbles with a grain of salt.
INTRODUCTION
(text text text)
(text text text)
What's a hitbox repository, you ask? It's a place where you put hitbox-related data. Therefore, you'll see informative stuff here.
Note that this is manual drawing, not hacks. Any old sap nowadays can display hitboxes in-game, but they can only show position and size, and you can't see the character's body through them. I'm including some other info here. Not only can you see at a glance which hitbox is the sweetspot (thanks to the alongside numbers), but how big any disjoint is (transparency is cool yo) and an obvious yet unintrisuve angle indicator.
While you may be thinking "beh, this'll be approximate at best", you're not completely right. I lay out these images with up to eight decimal places of precision; usually the hardest part is measuring how big to draw things, which often makes errors obvious.
Finally - yes, I'm aware that this board already has some hitbox images. But if I recall correctly, they're small and have the inconveniences I've described above - and some of the important frames are missing from them.
LEGEND
(the interpreter)
(the interpreter)
I don't exactly do things by the book all the time. Here's the legend of stuff to look for:
Angle: The angle of a hitbox is displayed as a line. Usually, the angle is given assuming the target is to the right of the attacker; the exception is for if the hitboxes are completely behind the attacker, for which the angle will be shown as reversed. The Sakurai angle is displayed as a star shape, while the autolink angle is displayed with a dash.
Clang: Most hitboxes have a solid border. Those that do not - that is, they have a dashed border - are transcendent.
Type/Effect: The colour of a hitbox and its angle indicator/border show its type and effect - usually this is only important in the Subspace Emissary, but it's also important if you want to know which hitboxes set things on fire and such. If there's demand I'll put a legend in, but it's mostly just there for a splash of colour.
Damage/Knockback: The numbers displayed for each hitbox are its damage, base knockback, and knockback scaling (in that order).
Layering: You can tell by the images that some hitboxes are "on top" of others. These are the hitboxes that "win out" if the target is hit by more than one of the attack's hitboxes at once.
THE REPOSITORY
(it begins)
(it begins)
Peach's Hurtboxes

Hurtbox 1: Hip
Hurtbox 2: Chest
Hurtbox 3: Head
Hurtbox 4: Right upper arm
Hurtbox 5: Left upper arm
Hurtbox 6: Right lower arm
Hurtbox 7: Left lower arm
Hurtbox 8: Right upper leg
Hurtbox 9: Left upper leg
Hurtbox 10: Right lower leg
Hurtbox 11: Left lower leg
It may be a bit hard to tell in this pose, but Peach's upper arms are considered as thick as those poofy shoulder things. I'm also not really sure why they decided that - there's no easy way to put this - Peach has a big bum. Seriously, it covers half her thighs in a standing position. (It's also slightly asymmetrical.)
The colours represent which zone the hurtbox is in: lower, middle, or upper.
Jab
Hit 1

Hitbox 0: 3% damage, angle of 74, 20/100 fixed knockback, attached to left lower arm, Hand/Normal
Hitbox 1: 3% damage, angle of 78, 20/100 fixed knockback, attached to left lower arm, Hand/Normal
Hitbox 2: 3% damage, angle of 78, 20/100 fixed knockback, attached to left upper arm, Hand/Normal
Hitbox 3: 3% damage, angle of 78, 20/100 fixed knockback, attached to right upper arm, Hand/Normal
Why does the hand hitbox have an angle 4 degrees less vertical, what's the dang point.
Hit 2

Hitbox 0: 3% damage, angle of *, 30/100 knockback, attached to left lower arm, Hand/Normal
Hitbox 1: 3% damage, angle of *, 30/100 knockback, attached to left lower arm, Hand/Normal
Hitbox 2: 3% damage, angle of *, 30/100 knockback, attached to left lower arm, Hand/Normal
Hitbox 3: 3% damage, angle of *, 30/100 knockback, attached to left lower arm, Hand/Normal
Aaaaaand nothing special about this hit.
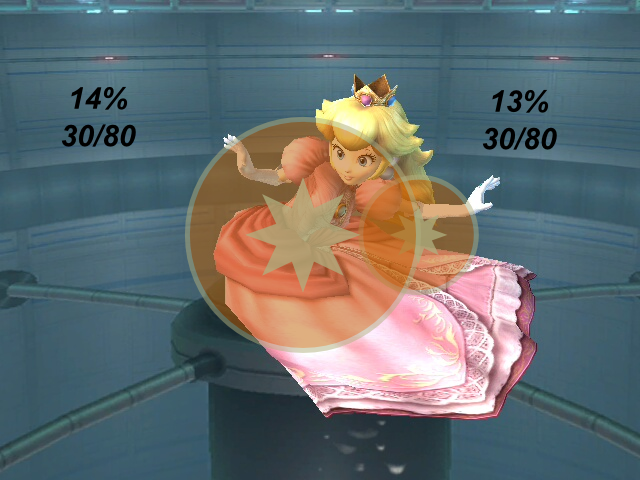
F-Tilt
Clean


Hitbox 0: 13% damage, angle of 90, 35/85 knockback, attached to right upper leg, Foot/Normal
Hitbox 1: 11% damage, angle of 100, 35/85 knockback, attached to right lower leg, Foot/Normal
Hitbox 2: 10% damage, angle of 80, 35/85 knockback, attached to right lower leg, Foot/Slash
Late

Hitbox 0: 6% damage, angle of 90, 55/50 knockback, attached to right upper leg, Foot/Normal
Hitbox 1: 6% damage, angle of 90, 55/50 knockback, attached to right lower leg, Foot/Normal
Hitbox 2: 6% damage, angle of 90, 55/50 knockback, attached to right lower leg, Foot/Normal
Interesting variety on the clean hit. Late hit not so much.
U-Tilt
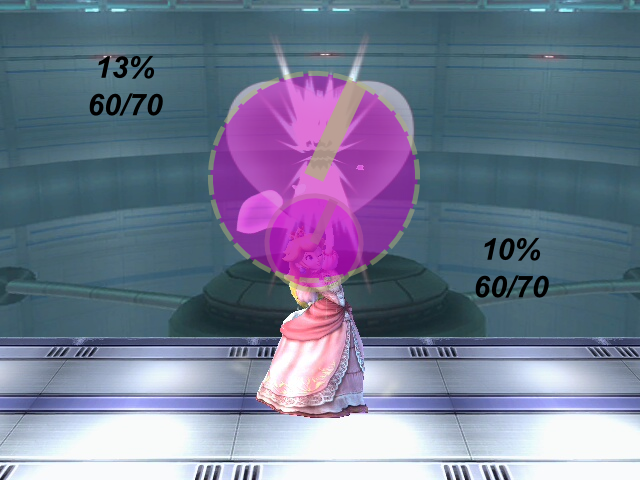
Hitbox 0: 13% damage, angle of 65, 60/70 knockback, attached to nothing, Magic/Normal, cannot clang
Hitbox 1: 10% damage, angle of 65, 60/70 knockback, attached to nothing, Magic/Normal
Quick note here: These are coded as special hitboxes, but as far as I can tell they don't use any special hitbox characteristics.
D-Tilt
On grounded targets

Hitbox 0: 10% damage, angle of 270, 60/100 knockback, attached to left hand, Hand/Normal, 30% trip chance
Hitbox 2: 10% damage, angle of 270, 60/100 knockback, attached to left hand, Hand/Normal, 30% trip chance
Hitbox 3: 10% damage, angle of 270, 60/100 knockback, attached to left hand, Hand/Normal, 30% trip chance
On aerial targets

Hitbox 1: 10% damage, angle of 80, 15/100 knockback, attached to left hand, Hand/Normal, 30% trip chance
Hitbox 2: 10% damage, angle of 270, 60/100 knockback, attached to left hand, Hand/Normal, 30% trip chance
Hitbox 3: 10% damage, angle of 270, 60/100 knockback, attached to left hand, Hand/Normal, 30% trip chance
Whoa, that main hitbox loses serious power if the opponent doesn't have both feet on the ground. You almost have to be facing the wrong way to get surprise meteors.
Dash
Hit 1
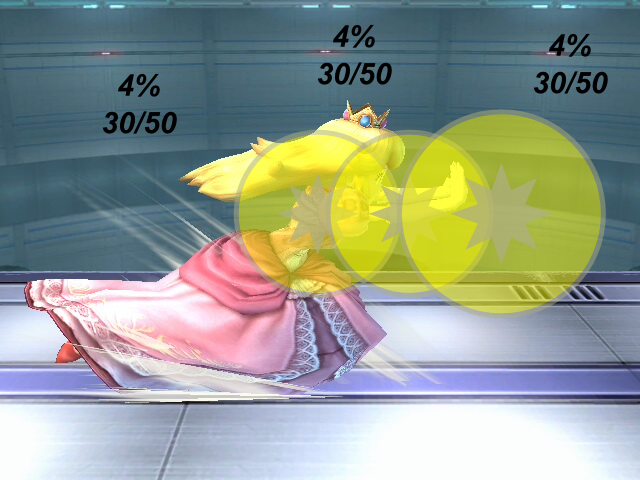
Hitbox 0: 4% damage, angle of *, 30/50 knockback, attached to nothing, Hand/Normal
Hitbox 1: 4% damage, angle of *, 30/50 knockback, attached to nothing, Hand/Normal
Hitbox 2: 4% damage, angle of *, 30/50 knockback, attached to nothing, Hand/Normal
Hit 2
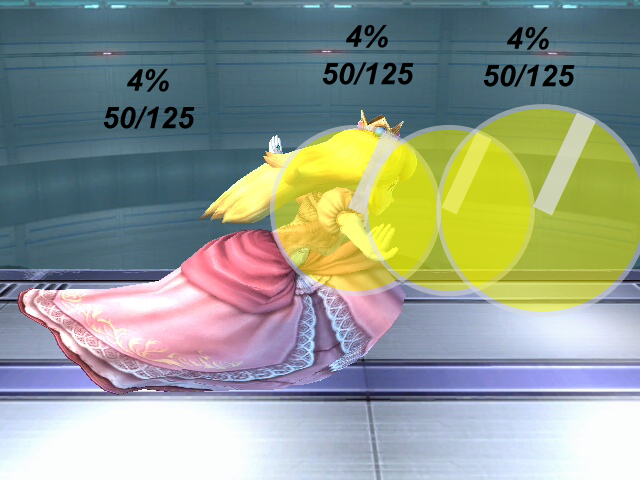
Hitbox 0: 4% damage, angle of 65, 50/125 knockback, attached to nothing, Hand/Slash
Hitbox 1: 4% damage, angle of 65, 50/125 knockback, attached to nothing, Hand/Slash
Hitbox 2: 4% damage, angle of 65, 50/125 knockback, attached to nothing, Hand/Slash
Pretty disappointing how the first hit isn't designed to lead into the second.
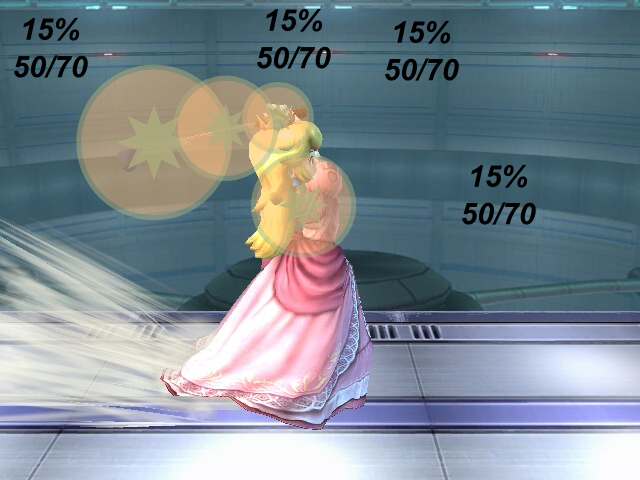
U-Smash
Clean

Hitbox 0: 15% damage (21% fully charged) (+4 on shield), angle of 90, 40/100 knockback, attached to right hand, Hand/Normal
Hitbox 1: 17% damage (23.8% fully charged) (+4 on shield), angle of 90, 40/100 knockback, attached to right upper arm, Hand/Normal
Hitbox 2: 8% damage (11.2% fully charged) (+4 on shield), angle of 75, 30/100 knockback, attached to nothing, Hand/Normal, cannot clang
Hitbox 3: 8% damage (11.2% fully charged) (+4 on shield), angle of 75, 30/100 knockback, attached to nothing, Hand/Normal, cannot clang
Late

Hitbox 0: 12% damage (16.8% fully charged) (+4 on shield), angle of 90, 40/100 knockback, attached to right hand, Hand/Normal
Hitbox 1: 10% damage (16.8% fully charged) (+4 on shield), angle of 90, 40/100 knockback, attached to right upper arm, Hand/Normal
Because the sourspots of the clean hit are at the bottom of the stack, if you can hit with any part of the sweetspot that's not covered by the top hitbox, you'll get the sweetspot even if the sourspots connect.
D-Smash

Hitbox 0: 5% damage (7% fully charged), angle of 145, 38/80 knockback, attached to nothing, Spin/Slash, 20% trip chance
Hitbox 1: 5% damage (7% fully charged), angle of 145, 38/80 knockback, attached to nothing, Spin/Slash, 20% trip chance
Hitbox 2: 5% damage (7% fully charged), angle of 145, 38/80 knockback, attached to nothing, Spin/Slash, 20% trip chance
Hitbox 3: 5% damage (7% fully charged), angle of 145, 38/80 knockback, attached to nothing, Spin/Slash, 20% trip chance
All four hits use the same hitboxes, so I'm not taking four similar pictures. This particular frame is the first frame of connection (frame 6).
F-Smash
Golf club


Hitbox 0: 15% damage (21% fully charged), angle of *, 50/70 knockback, attached to left hand grip, Weapon/Normal
Hitbox 1: 15% damage (21% fully charged), angle of *, 50/70 knockback, attached to neck, Weapon/Normal
Hitbox 2: 15% damage (21% fully charged), angle of *, 50/70 knockback, attached to left hand grip, Weapon/Normal
Hitbox 3: 15% damage (21% fully charged), angle of *, 50/70 knockback, attached to left hand grip, Weapon/Normal
Hitbox 4: 15% damage (21% fully charged), angle of *, 50/70 knockback, attached to nothing, Weapon/Normal
That huge area-covering hitbox only exists on that one frame. I guess they didn't want any dead space in the attack and so put in an artifical filler.
Frying pan


Hitbox 0: 18% damage (25.2% fully charged), angle of 80, 30/68 knockback, attached to left hand grip, Weapon/Normal
Hitbox 1: 18% damage (25.2% fully charged), angle of 80, 30/68 knockback, attached to left hand grip, Weapon/Normal
Hitbox 2: 18% damage (25.2% fully charged), angle of 80, 30/68 knockback, attached to neck, Weapon/Normal
Hitbox 3: 18% damage (25.2% fully charged), angle of 80, 30/68 knockback, attached to nothing, Weapon/Normal
Again, there's a coverage hitbox here.
Tennis racket


Hitbox 0: 12% damage (16.8% fully charged), angle of 28, 40/60 knockback, attached to left hand grip, Weapon/Normal
Hitbox 1: 12% damage (16.8% fully charged), angle of 28, 40/60 knockback, attached to left hand grip, Weapon/Normal
Hitbox 2: 12% damage (16.8% fully charged), angle of 28, 30/60 knockback, attached to left hand grip, Weapon/Normal
Hitbox 3: 12% damage (16.8% fully charged), angle of 28, 30/60 knockback, attached to neck, Weapon/Normal
Hitbox 4: 13% damage (18.2% fully charged), angle of 28, 40/100 knockback, attached to nothing, Weapon/Normal
I certainly wasn't expecting this when I was doing the documentation - it's the area-covering hitbox that's the sweetspot, and the racket's handle is weaker than the head.
Nair
Clean

Hitbox 0: 13% damage, angle of *, 20/90 knockback, attached to right hand, Hand/Normal
Hitbox 1: 13% damage, angle of *, 20/90 knockback, attached to left hand, Hand/Normal
Hitbox 2: 13% damage, angle of *, 20/90 knockback, attached to hip, Hand/Normal
Late


Hitbox 0: 10% damage, angle of *, 0/100 knockback, attached to right hand, Hand/Normal
Hitbox 1: 10% damage, angle of *, 0/100 knockback, attached to left hand, Hand/Normal
Hitbox 2: 9% damage, angle of *, 0/100 knockback, attached to hip, Hand/Normal
The frames I chose here are: First frame of clean hit, first frame of late hit, and last frame of late hit. As Peach spins around the hitboxes on her wrists track around as well; it's not worth my while to capture their complete revolutions.
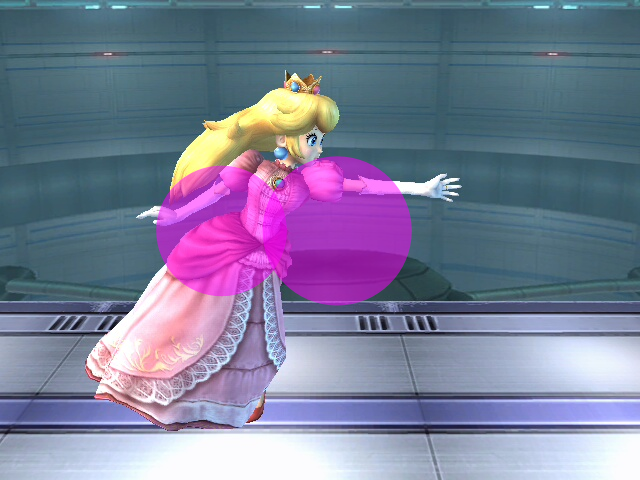
Fair


Hitbox 0: 15% damage, angle of *, 60/68 knockback, attached to left lower arm, Weapon/Normal, always knocks forwards
Hitbox 1: 15% damage, angle of *, 60/68 knockback, attached to left upper arm, Weapon/Normal, always knocks forwards
Nothing too unusual here.
Bair
Clean
Hitbox 0: 14% damage, angle of *, 30/80 knockback, attached to nothing, Butt/Normal
Hitbox 1: 13% damage, angle of *, 30/80 knockback, attached to nothing, Butt/Normal
Late

Hitbox 0: 7% damage, angle of *, 10/70 knockback, attached to nothing, Butt/Normal
Hitbox 1: 7% damage, angle of *, 10/70 knockback, attached to nothing, Butt/Normal
For those who were unaware: yes, Body and Butt are considered different types by the game. Presumably they set Body stickers to work on both after they decided that Butt stickers weren't worth it. (This also happened for Hand/Elbow, Foot/Knee, and a few others.)
Uair

Hitbox 0: 13% damage, angle of 80, 0/100 knockback, attached to left lower leg, Foot/Normal
Hitbox 1: 12% damage, angle of 80, 0/100 knockback, attached to left lower leg, Foot/Normal
Hitbox 2: 11% damage, angle of *, 0/100 knockback, attached to hip, Foot/Normal
This is the middle frame of the attack, in case you're wondering.
Dair
Hits 1-3
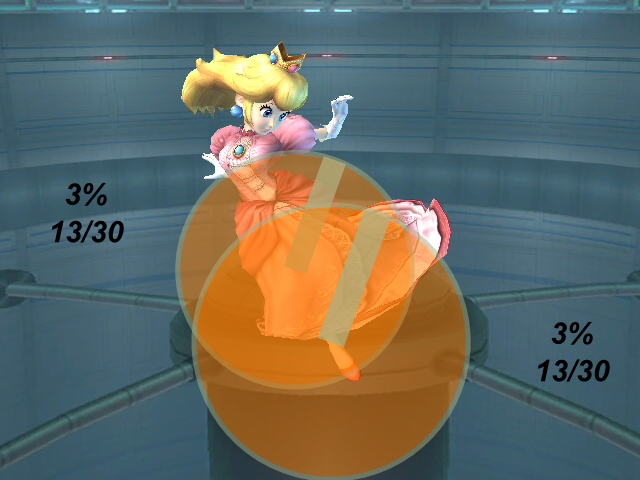
Hitbox 0: 3% damage, angle of 70, 13/30 knockback, attached to nothing, Foot/Normal
Hitbox 1: 3% damage, angle of 70, 13/30 knockback, attached to nothing, Foot/Normal
Hit 4

Hitbox 0: 5% damage, angle of 70, 40/120 knockback, attached to nothing, Foot/Normal
Hitbox 1: 5% damage, angle of 70, 40/120 knockback, attached to nothing, Foot/Normal
Since the first three hits use the same hitboxes I didn't think it was worth it to capture them individually. One thing's for sure, though - they're dang big.
Shield

Can't really say much about this.
Grabs
Standing
Running

Pivot

There's really no reason for Peach's grab range to be this short; it's like she's trying to grab with her elbow or something. On the other hand it makes the pivot grab's range seem that much longer.
Pummel

Hitbox 0: 2% damage, angle of 80, 30/100 fixed knockback, attached to left foot, Foot/Normal, cannot clang, always knocks forwards
Hitbox 1: 2% damage, angle of 80, 30/100 fixed knockback, attached to left lower leg, Foot/Normal, cannot clang, always knocks forwards
Hitbox 2: 2% damage, angle of 80, 30/100 fixed knockback, attached to left hand, Foot/Normal, cannot clang, always knocks forwards
It's a pummel. They're generally uninteresting.
F-Throw
Hit 1

Hitbox 0: 2% damage, angle of 80, 10/0 knockback, attached to right hand, Hand/Normal, cannot clang, always knocks forwards
Throw

Throw: 8% damage, angle of 45, 45/83 knockback, Throwing/Normal
Dat slap.
B-Throw
Hit 1

Hitbox 0: 2% damage, angle of 70, 10/200 knockback, attached to nothing, Butt/Normal, cannot clang, always knocks backwards
Throw

Throw: 9% damage, angle of 140, 70/40 knockback, Throwing/Normal
I haven't looked at this in-depth, but it's interesting how this move causes opponents to face the wrong way (i.e. away from the stage as they're trying to recover). I'm guessing it has something to do with throw physics, since I've never seen it happen for hitboxes.
U-Throw
Hit 1

Hitbox 0: 2% damage, angle of 80, 20/100 fixed knockback, attached to right hand, Hand/Normal, cannot clang, always knocks forwards
Throw

Throw: 6% damage, angle of 88, 70/56 knockback, Throwing/Normal
Not sure how they got away with such a small hitbox on the first hit, but I've never heard of any character escaping it, so okay.
D-Throw
Hit 1

Hitbox 0: 0% damage, angle of 270, 20/100 fixed knockback, attached to hip, Butt/Normal, cannot clang, always knocks forwards
Throw

Throw: 7% damage, angle of 108, 60/60 knockback, Throwing/Normal
Yeah that's right, this move has a meteor smash in it. Completely useless as a meteor even in team battles because of its position and feebleness, but there nevertheless.
Floor (back)
Hit 1

Hitbox 0: 6% damage (+1 on shield), angle of *, 70/50 knockback, attached to right toes, Foot/Normal, cannot clang
Hitbox 1: 6% damage (+1 on shield), angle of *, 70/50 knockback, attached to right lower leg, Foot/Normal, cannot clang
Hitbox 2: 6% damage (+1 on shield), angle of *, 70/50 knockback, attached to chest, Foot/Normal, cannot clang
Hit 2

Hitbox 0: 6% damage (+1 on shield), angle of *, 70/50 knockback, attached to right toes, Foot/Normal, cannot clang
Hitbox 1: 6% damage (+1 on shield), angle of *, 70/50 knockback, attached to right lower leg, Foot/Normal, cannot clang
Hitbox 2: 6% damage (+1 on shield), angle of *, 70/50 knockback, attached to chest, Foot/Normal, cannot clang
Floor attacks are uninteresting in general.
Floor (front)
Hit 1

Hitbox 0: 6% damage (+1 on shield), angle of *, 70/50 knockback, attached to left lower leg, Foot/Normal, cannot clang
Hitbox 1: 6% damage (+1 on shield), angle of *, 70/50 knockback, attached to left lower leg, Foot/Normal, cannot clang
Hitbox 2: 6% damage (+1 on shield), angle of *, 70/50 knockback, attached to chest, Foot/Normal, cannot clang
Hit 2

Hitbox 0: 8% damage (+1 on shield), angle of *, 70/50 knockback, attached to right lower leg, Foot/Normal, cannot clang
Hitbox 1: 8% damage (+1 on shield), angle of *, 70/50 knockback, attached to right lower leg, Foot/Normal, cannot clang
Hitbox 2: 6% damage (+1 on shield), angle of *, 70/50 knockback, attached to chest, Foot/Normal, cannot clang
This floor attack on the other hand is rather unique in that it doesn't deal 6% damage through and through.
Floor (trip)
Hit 1

Hitbox 0: 5% damage (+1 on shield), angle of *, 60/50 knockback, attached to nothing, Foot/Normal
Hitbox 1: 5% damage (+1 on shield), angle of *, 60/50 knockback, attached to nothing, Foot/Normal
Hitbox 2: 5% damage (+1 on shield), angle of *, 60/50 knockback, attached to nothing, Foot/Normal
Hit 2

Hitbox 0: 5% damage (+1 on shield), angle of *, 60/50 knockback, attached to nothing, Foot/Normal
Hitbox 1: 5% damage (+1 on shield), angle of *, 60/50 knockback, attached to nothing, Foot/Normal
Hitbox 2: 5% damage (+1 on shield), angle of *, 60/50 knockback, attached to nothing, Foot/Normal
Nothing to say here.
Edge (fast)


Hitbox 0: 6% damage (+1 on shield), angle of *, 110/100 fixed knockback, attached to hip, Butt/Normal
Pretty self-explanatory.
Edge (slow)

Hitbox 0: 10% damage (+1 on shield), angle of *, 110/100 fixed knockback, attached to left toes, Foot/Normal
Hitbox 1: 8% damage (+1 on shield), angle of *, 110/100 fixed knockback, attached to left lower leg, Foot/Normal
Hitbox 2: 8% damage (+1 on shield), angle of *, 110/100 fixed knockback, attached to chest, Foot/Normal
Surprisingly good range here.
Toad
Counter hurtbox

Counter attack

Hitbox 0: 3% damage, angle of 45, 40/180 knockback, attached to center of spore object, Typeless/Normal, indirect, absorbable, reflectable, always knocks forwards
When activated, this counter fires a total of 6 spores at various angles. I think this image catches two at maximum range.
Peach Bomber
Detector

Inert hitbox 0: attached to hip
Hitbox

Hitbox 0: 15% damage (+6 on shield), angle of 23, 50/40 knockback, attached to hip, Butt/Normal
Basically, it works like this: The hitbox does not exist until the detector hits an enemy. Pretty unnecessary implementation if you ask me.
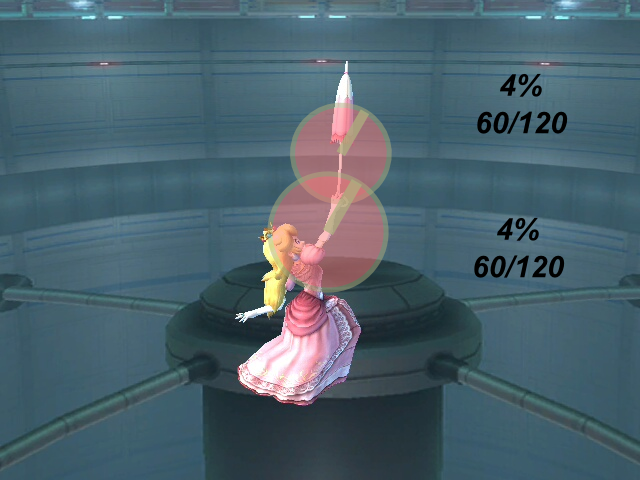
Parasol
Hit 1

Hitbox 0: 5% damage, angle of 80, 150/100 fixed knockback, attached to head, Umbrella/Normal
Hitbox 1: 5% damage, angle of 90, 150/100 fixed knockback, attached to nothing, Umbrella/Normal
Hit 2

Hitbox 0: 1% damage, angle of 80, 90/100 fixed knockback, attached to right hand grip, Umbrella/Normal, rehit rate of 8, always knocks forwards
Hitbox 1: 1% damage, angle of -, 100/100 fixed knockback, attached to right lower arm, Umbrella/Normal, rehit rate of 8, always knocks forwards
Hitbox 2: 1% damage, angle of 90, 130/100 fixed knockback, attached to hip, Umbrella/Normal, rehit rate of 8, always knocks forwards
Hit 3
Hitbox 0: 4% damage, angle of 60, 60/120 knockback, attached to right lower arm, Umbrella/Normal, always knocks forwards
Hitbox 1: 4% damage, angle of 60, 60/120 knockback, attached to right hand grip, Umbrella/Normal, always knocks forwards
Hit 4

Hitbox 0: 3% damage, angle of 80, 23/28 knockback, attached to right hand grip, Umbrella/Slash
Yes, Umbrella has its own type. Don't know why they were thinking of making umbrella stickers at some point.
Vegetable
Turnips

Hitbox 0: X% damage, angle of 30, 30/35 knockback, attached to center of turnip, Weapon/Normal, 0.4x freeze frames, indirect, rehit rate of 100, reflectable, always knocks forwards
Damage values/Probabilities

Alright, first thing you gotta know is that items do damage based on how fast they're moving on impact. It's still unknown what exactly the formula is, but what is known is that the damages provided here are the base damages - it's impossible to deal less damage than the base. Also note that some characters have weaker item throws.
Mr. Saturn
On grounded targets

Hitbox 1: 3% damage (+42 on shield), angle of 270, 10/50 knockback, attached to item's center, Weapon/Normal, rehit rate of 180, reflectable, always knocks forwards
On aerial targets

Hitbox 0: 3% damage (+42 on shield), angle of *, 10/50 knockback, attached to item's center, Weapon/Normal, rehit rate of 180, reflectable, always knocks forwards
For the curious: That's the same amount of shield damage as a non-fully charged Shield Breaker.
Bob-omb
Detector

Inert hitbox: attached to item's center, reflectable
Explosion

Hitbox 0: 25% damage (+2 on shield), angle of *, 30/90 knockback, attached to item's center, Explosive/Flame, rehit rate of 180
It's hard to say how long the explosion hitbox lasts for.
Beam Sword
Jab

Hitbox 0: 5% damage (+2 on shield), angle of *, 10/80 knockback, attached to item, Energy/Slash, always knocks forwards
Hitbox 1: 4% damage (+2 on shield), angle of *, 10/80 knockback, attached to item, Energy/Slash, always knocks forwards
Hitbox 2: 4% damage (+2 on shield), angle of 30, 10/80 knockback, attached to item, Energy/Slash, cannot clang, always knocks forwards
Hitbox 3: 5% damage (+2 on shield), angle of *, 10/80 knockback, attached to left shoulder, Energy/Slash, always knocks forwards
I'll tell you this right up front: As far as I can tell, battering item hitboxes is unexplored territory; I'm taking some pretty heavy guesses here. That said it's looking pretty sensible so far.
F-Tilt

Hitbox 0: 8% damage (+4 on shield), angle of *, 30/80 knockback, attached to item, Energy/Slash
Hitbox 1: 7% damage (+4 on shield), angle of *, 30/80 knockback, attached to item, Energy/Slash
Hitbox 2: 7% damage (+4 on shield), angle of *, 30/80 knockback, attached to item, Energy/Slash, cannot clang
Hitbox 3: 8% damage (+4 on shield), angle of *, 30/80 knockback, attached to left shoulder, Energy/Slash
Hitbox 4: 7% damage (+4 on shield), angle of *, 30/80 knockback, attached to item, Energy/Slash, cannot clang
One of the things I'm guessing on is the shoulder hitbox. It actually starts attached to the sword as the rearmost hitbox, but then a command in Peach's file says something about "hitbox 3", "left shoulder bone", and "[0,0,0]". I'm assuming it's a "move hitbox to here" command. (All other shoulder hitboxes for the Beam Sword are like this.)
Dash
Clean

Hitbox 0: 7% damage, angle of 55, 55/60 knockback, attached to item, Energy/Slash
Hitbox 1: 7% damage, angle of 55, 55/60 knockback, attached to item, Energy/Slash
Hitbox 2: 7% damage, angle of 55, 55/60 knockback, attached to item, Energy/Slash
Hitbox 3: 7% damage, angle of 55, 55/60 knockback, attached to item, Energy/Slash
Late

Hitbox 0: 5% damage, angle of 55, 55/60 knockback, attached to item, Energy/Slash
Hitbox 1: 5% damage, angle of 55, 55/60 knockback, attached to item, Energy/Slash
Hitbox 2: 6% damage, angle of 55, 55/60 knockback, attached to item, Energy/Slash
Hitbox 3: 6% damage, angle of 55, 55/60 knockback, attached to item, Energy/Slash
Some Smashers have a stronger Beam Sword dash attack that deals 11% damage, 60/75 knockback, and has no late hit. Just a heads up.
F-Smash

Hitbox 0: 12% damage (16.8% fully charged) (+6 on shield), angle of *, 50/80 knockback, attached to item, Energy/Slash
Hitbox 1: 11% damage (15.4% fully charged) (+6 on shield), angle of *, 50/80 knockback, attached to item, Energy/Slash
Hitbox 2: 11% damage (15.4% fully charged) (+6 on shield), angle of *, 50/80 knockback, attached to item, Energy/Slash, cannot clang
Hitbox 3: 12% damage (15.4% fully charged) (+6 on shield), angle of *, 50/80 knockback, attached to left shoulder, Energy/Slash
Hitbox 4: 12% damage (16.8% fully charged) (+6 on shield), angle of *, 50/80 knockback, attached to item, Energy/Slash
Note the disappointing range. Also the random transcendent hitbox in the middle.
Thrown

Hitbox 0: 5% damage, angle of *, 10/100 knockback, attached to item's center, Energy/Slash, rehit rate of 180, reflectable, stretchy, always knocks forwards
Hitbox 1: 5% damage, angle of *, 10/100 knockback, attached to item's center, Energy/Slash, rehit rate of 180, reflectable, stretchy, always knocks forwards
"Stretchy" means that the hitbox is tube-shaped instead of spherical; I had a tough time figuring out how I was going to draw it.
Peach Blossom
Hit 1

Hitbox 0: 40% damage, angle of *, 0/0 knockback, attached to grip, Typeless/Normal, no freeze frames, unshieldable
Hitbox 1: 20% damage, angle of *, 0/0 knockback, attached to grip, Typeless/Normal, no freeze frames, unshieldable
Hitbox 2: 10% damage, angle of *, 0/0 knockback, attached to grip, Typeless/Normal, no freeze frames, unshieldable
Hit 2

Hitbox 0: 0% damage, angle of 0, 0/180 knockback, attached to grip, Typeless/Sleep, no freeze frames, unshieldable
Hitbox 1: 0% damage, angle of 0, 0/130 knockback, attached to grip, Typeless/Sleep, no freeze frames, unshieldable
Hitbox 2: 0% damage, angle of 0, 0/90 knockback, attached to grip, Typeless/Sleep, no freeze frames, unshieldable
Hit 3

Hitbox 0: 0% damage, angle of 0, 0/150 knockback, attached to grip, Typeless/Sleep, no freeze frames, unshieldable
Hitbox 1: 0% damage, angle of 0, 0/90 knockback, attached to grip, Typeless/Sleep, no freeze frames, unshieldable
Hitbox 2: 0% damage, angle of 0, 0/50 knockback, attached to grip, Typeless/Sleep, no freeze frames, unshieldable
Range of this is quite a bit less than I thought it would be. Of course Peach is so small in these pictures that accurate measurement is difficult; the outer bubbles are the same size for each hit but don't look it.