
A *WIP* Guide to Marth+.

"I was able to survive another day."
Note: In no way or form should this guide be the end-all for Marth+. Strategies discussed for BRAWL can often be incorporated into BRAWL+, or even in Melee and other fighting games (and vice-versa). The growth of the metagame is done not by the foundation that it is settled on, but the continuous dedication and ambition to succeed and progress onward. You are the player that may one day lead a community, perhaps this one. You may or may not one day become a top-placing player, revered and feared by many. But the players will carry Marth to success, you will develop his character. By no means is the metagame currently concrete.
-----------------------------------------------------------------
Table of Contents
-----------------------------------------------------------------
Prologue: Why/why not to play Marth+
I. Initial Look
A. Moveset since Brawl+ "Gold" (7.0.X)
1) Jab and Tilts
2) Smash Attacks
3) Aerials
4) Grabs
5) Specials
II. Metagame
B1. Offensive Game
B1a. Traps
B1b. Combos
B1c. Landing the kill
C2. Defensive Game
C2a. Aerial Walls
C2b. Baiting and Punishing
D1. Recovery and the ledge
IV. Counterpicking and Stage Manipulation (Continual Work in Progress)
E01. ???
V. Match-ups (Continual Work in Progress)
F01. ???
VI. Videos
VI1. Matches
VI2. Combo Videos
VII. Changelog
-----------------------------------------------------------------
Prologue: Why/why not to play Marth+
-----------------------------------------------------------------
So you have picked up Brawl+ and wonder to yourself: "Who should I play?" Often, players will naturally identify themselves with favorite character archetypes after a few games. However, if you are on the more indecisive side, here's a very basic rundown of Marth+:
You'll like Marth+ if you...
- Love grab-centric characters
- If you like long-ranged characters
- Love to easily set-up traps that are difficult for your foes to escape
- Love to juggle
- Love small combos and strings that give you positional advantage
- Want a strong 'soft counter' character
Unfortunately there's no character archetype that is universally appealing. Marth+ may not be for you if...
- You hate swatting and avoiding projectiles
- Hate getting juggled yourself
- Have a tendency to disregard optimal spacing of moves given the situation
- Dislike the tendency to die rather early
- Dislike weak close-ranged options
- Dislike weak and linear recoveries
- Want to set the pace of the match safely (usually via projectiles)
- Want to combo consistently into kill moves
- Hate predictable kill options.
-
Now there looks to be more cons than pros to Marth+. However! Let us not judge by quantity over quality; the quality of Marth+'s pros are astounding. You'll feel right at home if you like relatively easy to pick up characters with a few gimmicks and tools for the advanced players. More or less, people have a tendency to call character's like Marth+ "easy to pick up; difficult to master."
-----------------------------------------------------------------
I. Initial Look
-----------------------------------------------------------------
Marth's Moveset
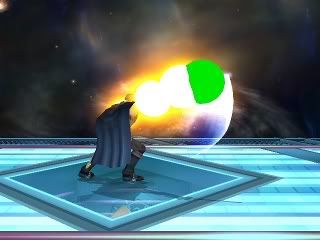
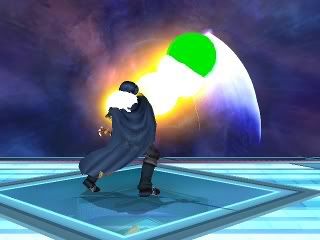
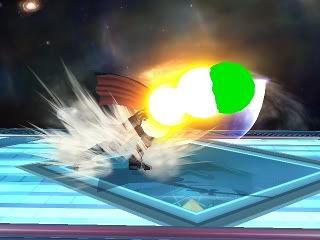
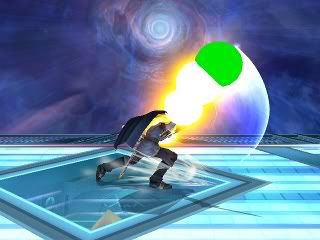
Key:
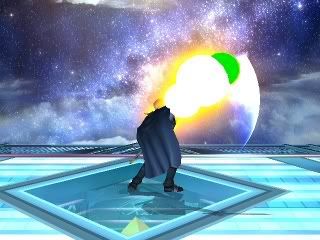
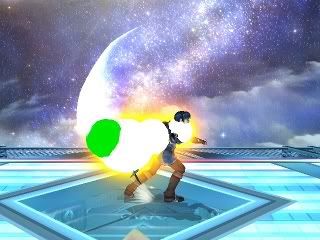
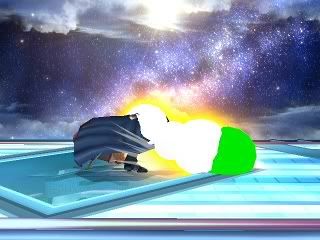
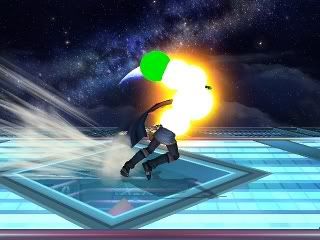
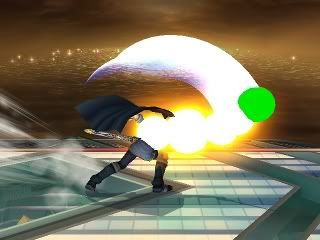
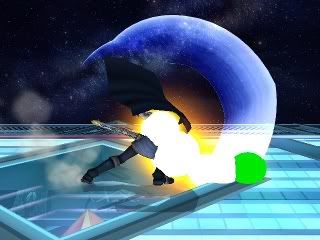
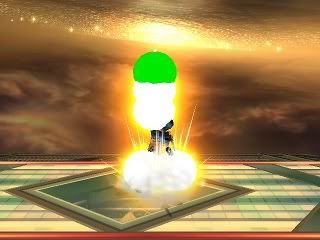
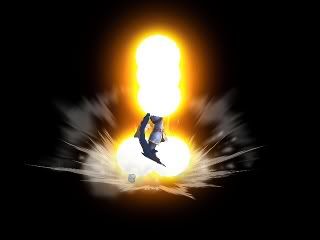
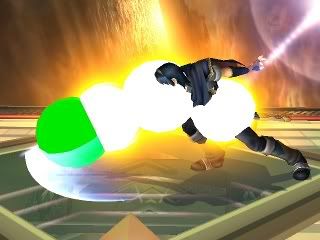
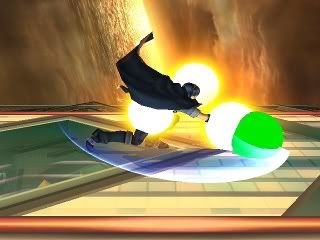
Yellow Sphere = normal hitboxes
Green Sphere = "Tip" hitboxes
Red Sphere = Meteor Smash/"tip" hitboxes
[collapse=1) Jabs and Tilts]Key:
Yellow Sphere = normal hitboxes
Green Sphere = "Tip" hitboxes
Red Sphere = Meteor Smash/"tip" hitboxes
Jab
~*Brawl+ Changes:*~
~*Change Reception:*~
Eh, the hitlag on the jabs' tips was increased to compensate for Brawl+'s hitlag constant (the "hit" effect of moves) being lowered from vanilla Brawl. It just makes the move slightly easier to react to on hit and to SDI from (if you are on the other end as a foe).
-Move Utility-
First Jab: The first jab is a pretty good anti-air move. Your sword covers you quite nicely from the front, and is basically a GTFO move. It's very quick (hitbox comes out on frame 4) and it can be interrupted into any other action on frame 28. One of the safer moves in Marth's arsenal. Use it to mix-up shield pressure, get aerial-heavy characters off you, and so forth.
You can also use the non-tip hit on opponents that have just hit the ground and did not tech to induce a forced getup. This will force the opponent to literally get up and will be vulnerable to any move you use during that time. Generally use it to get a free grab, or set up for a kill with a Smash move (generally Forward or Down Smash).
Second Jab: The second jab? Eh...if you are trying to swat the foe away, use this to complete the jab sequence (which will usually cause you to tip the second Jab should the Jabs combo into one another). Usually, if you manage to send opponents into the air with the second Jab, you can attempt to capitalize with an aerial string. It isn't very useful but it carries near-identical stats to the first jab. The hitbox stays out a frame longer though.
Dash Attack
~*Brawl+ Changes:*~
-Move Utility-
Dash Attack is certainly not a good move. It is rather slow and also has a ton of commitment lag (50 frames). While arguably the weakest link in Marth's arsenal, when tipped it is a decent kill move. Depending on DI, you could use this after a Forward Throw. But...the move is particularly good for edgeguarding!
On linear recoveries that have a tendency to not sweetspot the edge (but have a huge "GTFO" protective hitbox in front of them), like Link's, Toon Link's, Wolf's, Fox's, Mario's, and Charizard's Up-Bs can be intercepted with a tipped Dash Attack. The lunge animation will mean the sword is disjointed enough to retaliate without you being hurt in the process...if done correctly.
In the Falco versus Marth match-up, you can intercept a Falco that shoots high Short Hop Lasers with Dash Attack. The low swoop Marth does is enough to bypass the laser and hit Falco in his lag. This little gimmick won't work against frame perfect Short Hop Lasers and is in no way a reliable form of approach!
The trickiest part of using Dash Attack is learning the distance one covers before the hitbox comes out (which is on frame 13). Memorizing the distance it covers pre-hitbox will allow you to utilize its few strengths correctly.
Forward Tilt (Ftilt)
~*Brawl+ Changes:*~
-Move Utility-
Forward Tilt is really a larger Jab with kill potential should you land a tip but also more commitment lag (36 frames). That being said, you can largely use in the same manner as Jab. The range of the move is best further out (where the tip is) and can be used effectively to pressure foes that are on platforms shielding. It'll force them into a hitstun-like state forcing them to tech! Tech chase or Jab them for a forced get-up!
But...more on platform pressuring later.
Up Tilt (Utilt)
~*Brawl+ Changes:*~
~*Change Reception:*~
The end-lag of Up Tilt has been reduced from 41 frames to 32 total commitment frames. The frame speed changes have buffed up Up Tilt's utility to roughly the same level as Melee Marth's Up Tilt.
-Move Utility-
Up Tilt is used to juggle (into itself a few times then into an aerial), pressure opponents on platforms, and is basically the bread-and-butter of every juggle trap. The initial swipe comes out quite fast: an impressive 6 frame start-up. On opponents around Marth's height, you can use this move in a manner similar to Jab as a GTFO move. On shorter opponents this is largely ineffective as despite the appearance, hitboxes won't reach below Marth's waist even though the sword swing GFX makes it appear otherwise.
The last active frames of the move can be used a kill move. It is rare to be able to land this part of Up Tilt though, but if you do, the knockback rivals the strength of Snake's Up Tilt.
It has enough Knockback Growth to be a powerful juggler and combo stapler at low and mid-percents, and grow into a semi-effective kill move at later percents.
Down Tilt (Dtilt)
~*Brawl+ Changes:*~
~*Change Reception:*~
The knockback values of the non-tip (flub) Down Tilt hits were tweaked slightly to reduce the length of Down Tilt wall locks. This also makes some Down Tilt -> grab/other move combos obsolete or only applicable in very specific percentages.
-Move Utility-
This is undeniably one of Marth's better moves. This is Marth's all-in-one poke move. The move is decently fast, coming out on frame 7, and its end-lag is very minute, only 23 full frames of commitment until you can change your action. When tipped on shields, the move can push away at shields enough to save you from retaliation, and you can regain ground and pressure in with aerials, another Down Tilt (beware though; multiple Down Tilts will cause you to move slightly forward which will leave you vulnerable to punishment). It can be used as an approach move when Dash Canceled into on grounded opponents.
Wall Lock: On stages with walls, landing a Down Tilt will allow you to continually lock opponents squished between you and a wall by mashing Down Tilt. Percentages vary depending on the foe's weight, but on middle and heavyweights it is easy and free damage. On lightweights like Jigglypuff you will get less than favorable results and it may not be advisable at all to attempt a wall lock.
Down Tilt is best used however, to invoke favorable reactions. You are Down Tilting against an opponent near the ledge; save an attempt at a counter attack, you can cover: 1) Spotdodge 2) Rolling 3) Jumping and Airdodges. You are poking at a shield or safely out of your grounded opponent's range, forcing them to go into the air. You Down Tilt at a downed opponent, the foe tries to Get-Up Attack and you shield: landing you a grab. These are only a few examples of Down Tilt's utility and necessity in any Marth's repertoire.
One must note however, that the move is not very useful on opponents like Meta Knight, Jigglypuff, or Kirby (characters that are typically in the air). Note how Down Tilt has no hitbox to protect from airborne attacks. But used correctly and the move becomes very difficult to punish.
[/collapse]
~*Brawl+ Changes:*~
Code:
Hitlag Multiplier: 0.70x->0.80xEh, the hitlag on the jabs' tips was increased to compensate for Brawl+'s hitlag constant (the "hit" effect of moves) being lowered from vanilla Brawl. It just makes the move slightly easier to react to on hit and to SDI from (if you are on the other end as a foe).
-Move Utility-
First Jab: The first jab is a pretty good anti-air move. Your sword covers you quite nicely from the front, and is basically a GTFO move. It's very quick (hitbox comes out on frame 4) and it can be interrupted into any other action on frame 28. One of the safer moves in Marth's arsenal. Use it to mix-up shield pressure, get aerial-heavy characters off you, and so forth.
You can also use the non-tip hit on opponents that have just hit the ground and did not tech to induce a forced getup. This will force the opponent to literally get up and will be vulnerable to any move you use during that time. Generally use it to get a free grab, or set up for a kill with a Smash move (generally Forward or Down Smash).
Second Jab: The second jab? Eh...if you are trying to swat the foe away, use this to complete the jab sequence (which will usually cause you to tip the second Jab should the Jabs combo into one another). Usually, if you manage to send opponents into the air with the second Jab, you can attempt to capitalize with an aerial string. It isn't very useful but it carries near-identical stats to the first jab. The hitbox stays out a frame longer though.
Dash Attack
~*Brawl+ Changes:*~
Code:
None that I know of!Dash Attack is certainly not a good move. It is rather slow and also has a ton of commitment lag (50 frames). While arguably the weakest link in Marth's arsenal, when tipped it is a decent kill move. Depending on DI, you could use this after a Forward Throw. But...the move is particularly good for edgeguarding!
On linear recoveries that have a tendency to not sweetspot the edge (but have a huge "GTFO" protective hitbox in front of them), like Link's, Toon Link's, Wolf's, Fox's, Mario's, and Charizard's Up-Bs can be intercepted with a tipped Dash Attack. The lunge animation will mean the sword is disjointed enough to retaliate without you being hurt in the process...if done correctly.
In the Falco versus Marth match-up, you can intercept a Falco that shoots high Short Hop Lasers with Dash Attack. The low swoop Marth does is enough to bypass the laser and hit Falco in his lag. This little gimmick won't work against frame perfect Short Hop Lasers and is in no way a reliable form of approach!
The trickiest part of using Dash Attack is learning the distance one covers before the hitbox comes out (which is on frame 13). Memorizing the distance it covers pre-hitbox will allow you to utilize its few strengths correctly.
Forward Tilt (Ftilt)
~*Brawl+ Changes:*~
Code:
None that I know of!Forward Tilt is really a larger Jab with kill potential should you land a tip but also more commitment lag (36 frames). That being said, you can largely use in the same manner as Jab. The range of the move is best further out (where the tip is) and can be used effectively to pressure foes that are on platforms shielding. It'll force them into a hitstun-like state forcing them to tech! Tech chase or Jab them for a forced get-up!
But...more on platform pressuring later.
Up Tilt (Utilt)
~*Brawl+ Changes:*~
Code:
-Frame speed change: [1.400x Frame 13]The end-lag of Up Tilt has been reduced from 41 frames to 32 total commitment frames. The frame speed changes have buffed up Up Tilt's utility to roughly the same level as Melee Marth's Up Tilt.
-Move Utility-
Up Tilt is used to juggle (into itself a few times then into an aerial), pressure opponents on platforms, and is basically the bread-and-butter of every juggle trap. The initial swipe comes out quite fast: an impressive 6 frame start-up. On opponents around Marth's height, you can use this move in a manner similar to Jab as a GTFO move. On shorter opponents this is largely ineffective as despite the appearance, hitboxes won't reach below Marth's waist even though the sword swing GFX makes it appear otherwise.
The last active frames of the move can be used a kill move. It is rare to be able to land this part of Up Tilt though, but if you do, the knockback rivals the strength of Snake's Up Tilt.
It has enough Knockback Growth to be a powerful juggler and combo stapler at low and mid-percents, and grow into a semi-effective kill move at later percents.
Down Tilt (Dtilt)
~*Brawl+ Changes:*~
Code:
-Hitbox 1: KBG increased to 44 from 40
-Hitbox 1: KBG increased to 49 from 40; BKB increased to 40 from 25
-Hitbox 2: KBG increased to 49 from 40; BKB increased to 36 from 20The knockback values of the non-tip (flub) Down Tilt hits were tweaked slightly to reduce the length of Down Tilt wall locks. This also makes some Down Tilt -> grab/other move combos obsolete or only applicable in very specific percentages.
-Move Utility-
This is undeniably one of Marth's better moves. This is Marth's all-in-one poke move. The move is decently fast, coming out on frame 7, and its end-lag is very minute, only 23 full frames of commitment until you can change your action. When tipped on shields, the move can push away at shields enough to save you from retaliation, and you can regain ground and pressure in with aerials, another Down Tilt (beware though; multiple Down Tilts will cause you to move slightly forward which will leave you vulnerable to punishment). It can be used as an approach move when Dash Canceled into on grounded opponents.
Wall Lock: On stages with walls, landing a Down Tilt will allow you to continually lock opponents squished between you and a wall by mashing Down Tilt. Percentages vary depending on the foe's weight, but on middle and heavyweights it is easy and free damage. On lightweights like Jigglypuff you will get less than favorable results and it may not be advisable at all to attempt a wall lock.
Down Tilt is best used however, to invoke favorable reactions. You are Down Tilting against an opponent near the ledge; save an attempt at a counter attack, you can cover: 1) Spotdodge 2) Rolling 3) Jumping and Airdodges. You are poking at a shield or safely out of your grounded opponent's range, forcing them to go into the air. You Down Tilt at a downed opponent, the foe tries to Get-Up Attack and you shield: landing you a grab. These are only a few examples of Down Tilt's utility and necessity in any Marth's repertoire.
One must note however, that the move is not very useful on opponents like Meta Knight, Jigglypuff, or Kirby (characters that are typically in the air). Note how Down Tilt has no hitbox to protect from airborne attacks. But used correctly and the move becomes very difficult to punish.
[collapse=2) Smash Attacks]
Forward Smash (Fsmash)
~*Brawl+ Changes:*~
Code:
-Tip hitbox size increased from 3.0->3.3 to match graphic better
-Weak hitbox shifted outwards by 0.3 to maintain equal tipping area
-All hitboxes have a trajectory of 40 degrees over special angle 361.
-SDI Capacity Multiplier: 0.00x->1.00x (Tip)The hitbox size adjustments and translations will make landing tips more consistent as the hitbox and graphics will now match each other better. The removal of "Sakurai Angles" will make Forward Smash a more effective kill move by sending at more favorable trajectories (Sakurai Angles more or less send the opponent more and more vertically as their percents go up. This effectively screws over your killing power). A SDI window now exists for the sake of your opponent. If he is hit by the tip while trying to recover back onstage, he can SDI into the stage and attempt to tech!
-Move Utility-
This move be either a friend or enemy. Its shield knockback is a decent mention, and can be a last ditch effort to get foes that are shielding by the ledge offstage again. The hitboxes come out earliest at frame 8, and the Falchion will be stretched at its furthest on frame 11 before the hitboxes terminate a frame later. If you manage to tip with it it will KO most foes at 70-100%. If you flub it it is only a mediocre kill option not worth mentioning. To keep it short and simple: This is the move of ends. It does not begin; its sole purpose is to end.
To flesh that out a bit, when you are done with your platform trap and are ready to try to edgeguard or kill, on platforms only slightly higher than the top of your head, you can Forward Smash right beneath them. When you are done tech chasing, you can try to Dash Cancel a Forward Smash. Done with a Forward Aerial string? Try to Forward Smash for the finale if you think it will land.
Landing the move is crucial. Tipped or flubbed, the wind-down of Forward Smash will prove disastrous should it whiff (48 frames of commitment). Do not commit to the same mistakes countless other new Marth players make and attempt to Forward Smash at everything that move and breathes. Only use it if you are positive it will hit or at the very least make sure the probability of it hitting is tilted in your favor.
Up Smash (Usmash)
~*Brawl+ Changes:*~
Code:
-Suction hitboxes shifted inward (X axis) from 9->3.5 and -9->-3.5 respectively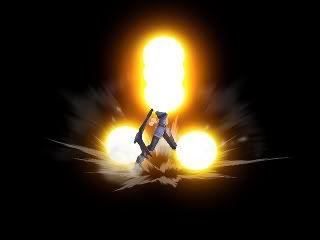

You can see from this comparison chart of vanilla Brawl to Brawl+ that the suction hitboxes by the foot have been moved in, reducing Up Smash's overall horizontal range. This makes it somewhat harder to punish descending foes, but only slightly. Not too bad of a nerf on Marth.
-Move Utility-
Up Smash is actually a very good move, probably his best Smash Attack in overall usability. The move comes out pretty quick (frame 8) and has the least amount of commitment lag in comparison to his other Smash Attacks. As said before, this move can be used to punish opponents trying to land from a juggle, effectively sending them back up into the air. It like Forward Smash can also be used to end a platform trap. Works somewhat decently for tech chases too since the foot hitboxes will suction into the 'meat' of the move. Since you can use Up Smash at any point in Marth's dash, it's the easiest kill move to combo into. You can combo into it with Forward Throw, Forward Aerial, etc. Unlike Marth's other Smash Attacks, Up Smash is used not only to end traps and combos, but it can also start them too! You must note that the horizontal range on the move is horrible though, and so unless your opponent is explicitly in some sort of defending/disadvantageous state (airdodging to the ground, rolling, or teching), it's probably not very wise to mindlessly rush in with a Up Smash (or any Smash for that matter).
Down Smash (Dsmash)
~*Brawl+ Changes:*~
Code:
-First Slash: Hitboxes 2 and 3 have had trajectories changed from special angle 361 to 75 degrees.
-Second Slash: Hitboxes 2 and 3 have had trajectories changed from special angle 361 to 60 degrees.The removal of "Sakurai Angles" on Down Smash oddly enough nerf Down Smash's usefulness. These hits used to be "flub" hits (closest to Marth's body) that would knock your opponent horizontally like a slightly strong flub hit of Forward Smash. Now that the angles have been homogenized, this tactic is no longer viable.
-Move Utility-
This move comes out ridiculously quick for one of Marth's kill moves. The first slash makes it to the opponent around frame 6 (although the hitboxes are active on frame 4 to catch spotdodgers right on top of you), and the second slash (slightly weaker) comes out around frame 18-20. Down Smash has a lot of power in its hits, and if tipped is stronger than even Fox's Up Smash! However, like many of Marth's other moves, Down Smash is horrible if it whiffs. Should you miss the mark, you are stuck in commitment lag for 62 frames, a little over a full second.
Down Smash is mostly used to punish rollers, spotdodgers, as well as punish those who tech or even better, missed a tech and is now forced to ground roll. This is also, in my opinion, the best move to use upon getting a Forced Get-Up from Jab. The tip hitbox is not deceptively like Forward Smash's hitboxes, so learn the placement of the blade carefully and you'll get very favorable KOs at equally favorable percentages.
-----------------------------------------------------------------
II. Metagame
-----------------------------------------------------------------
B1. Offensive Game
----------------------------
D1. Recovery and the ledge
----------------------------
Recovering with Marth has always been straightforward. However, this does not exactly mean easy. With no sweetspot ledges to promote staying safe on stage and to deter ledgestalling, Marth's recovery has weakened slightly. As Marth, you should hopefully NEVER be on the other side of the ledge, but such situations are sometimes...inevitable.
Recovery
The key step to recovering is in fact...DI. Good Directional Influence will allow you to live to higher percents, as well as give you a good starting place offstage to try to float toward the ledge. Typically horizontal attacks can be DI'd upward so the trajectory is distorted into hitting near the angles of the stage (stages are shaped rectangular-like).
Depending on how far away you are from the stage, you may mix up how you recover. However, it is almost ALWAYS safer to attempt to recover low then try to jump right up onto the stage, save your double jump if possible to mix up recovery times in hopes of grabbing the ledge.
Recovery moves:
Dolphin Slash
Relatively unchanged from Brawl. It has good vertical reach and typically is used as the "last resort" on any recovery attempt. Gauging the correct distance on this is important, since if you poke your head on the stage slightly, you may get hit with no chance to survive. You can angle it slightly horizontal in either right or left by pressing northeast or northwest on the directional pad. You can also go fully vertical by purely pressing up.
Shield Breaker
A very situational recovery move with little utility most of the time. Fully charge it up in midair and it will send you flying in that direction with a gargantuan momentum boost. If only charged in any way but full charge, it gives you a slight momentum boost. Manually B-sticking (never ever assign your controller true B-sticking for Marth) it will give you an extra boost in the direction to B-sticked it.
Generally there is only two times this move should ever be considered for recovery:
- You DI'd correctly and are now at the edge of the stage's death boundaries. The ledge seems a little far away and you are rather high up. You can charge this to gain horizontal distance to get closer to the ledge. If done correctly at a precise time, you can even sweetspot the ledge from it.
- You are hit by a weakhit projectile (Falco's lasers, Wolf's lasers, peanuts, arrows, etc.) and have lost aerial momentum. This is bad as the chance of you recovering has just been severely reduced. Use Shield Breaker (charged fully if you were hit relatively high; read Falco laser wall for edgeguarding, or just a tap (with a manual B-stick if you wish) in the direction of the ledge). No matter how little, recovering some of your horizontal momentum is necessary.
Stalling moves while recovering:
Marth's recovery, no matter how you mix it up...is extremely linear. A full Shield Breaker sends you in roughly a 40 degree angle descending EVERY TIME, and Dolphin Slash has never been anything BUT linear. The key to successful recovery against competent opponents is mixing up when you execute the final Dolphin Slash.
Counter
Counter is extremely laggy and bound to be punished regardless of where you use it. However, at higher altitudes, it's a good stall if used sparingly due to keeping horizontal momentum and slowing down fall speed. One could say it's even good as a Counter hitbox is present for a few frames, allowing you to possibly not get hit by anti-aerial-momentum moves like Falco's lasers. However, this is a gimmicky stall at best, and should be used with caution.
Dancing Blade Hit 1
Dancing Blade is a more popular stall, coming out at frame 4 and ending frame 30. Safer to use overall, it keeps horizontal momentum and slows fall speed. If you are to stall at all, use this most of the time. You can do multiple to vary the stall and end it with a Dolphin Slash for the ledge. However, be careful in inputting other Dancing Blade hits, as those are laggier in cooldown and don't stall at all. You may fall to your death instead of stalling.
Also it can be B-sticked for a slight horizontal boost. If done correctly, the first hit's red coloring will look jagged. Manually B-stick to the direction of choice to get this little boost. If you use DBN1 (Dancing Blade Neutral 1; referring to the same thing here) after a second jump, you get an extra vertical boost. As Marth, you should appreciate these little boosts every chance you get.
-----------------------------------------------------------------
V. Videos
-----------------------------------------------------------------
I'm going to tell this to everyone upfront; I'm going to be elitist about this. I'm only going to put up videos of high-level Marth players.
I will strive to make this a section where you can watch something that will let you learn something from it. As the metagame progresses I may remove older footage in place of newer footage, as different tactics become dominant, more popular, etc. Please do not be offended if your video gets turned down. Simply work harder to get yourself to a good enough skill level where people will be ASKING for your videos. Remember as a community we are striving to better ourselves.
VI1. Matches


")
 .
.