• Welcome to Smashboards, the world's largest Super Smash Brothers community! Over 250,000 Smash Bros. fans from around the world have come to discuss these great games in over 19 million posts!

    You are currently viewing our boards as a visitor. Click here to sign up right now and start on your path in the Smash community!

Make Your Move 9: [Now Defunct]

Status
Not open for further replies.

kitsuneko345

Smash Ace
Joined
Dec 20, 2007
Messages
562
Location
*sending Sundance lots of apple pies on Pi Day, as


ZUBAT

Zubat is one of the original 151 pokemon introduced in Pokemon Red and Green (or Blue for all you Japan-phobes). As obviously seen, this pokemon is a blue and purple bat with no eyes and big ears that some say look like eyes. Though blind, they get around well with echolocation. They can also confuse foes with their high-pitched squeals. Since Zubat prefer the dark, their primary habitat is caves, although during the daytime Zubat may also stay under the eaves of old buildings or in forests. However, at night, they can be found roaming outside, usually for food. Most evil cults are known to give these to a random pick of grunts as they are easily found.

When released from the pokemon, Zubat will pop out and fly to the background after one second. After waiting for a couple more seconds, the Zubat will pop out with others of its own kind. The amount of Zubat appearing on the stage will be exactly 2 per opponent. Once each couple of Zubat has found their opponent, they will alternate their infamous attacks every two seconds in some random order. Supersonic (shown with pulsing circles towards the opponent) will make each character go in the opposite direction or mix up the standard moves with the specials and vice versa for 5 seconds. Bite (indicated by a forward lunge followed by said Bite) will deal 15% damage make the opponent flinch for half a second, enough so that the pokemon user can start up their own combo. Mean Look (shown with the lowering of ears alng with a red glow on with the ears and mouth) will make the Zubat's focus on the opponent even if said enemy is KOed. Lastly, Leech Life (indicated with a small needle hurling towards the opponent) will deal 10% to the opponent while the Zubat gets 5HP back. Oh, did I forget to mention that Zubat has 40 HP, will always stay in front of you for 20 seconds before disappearing, and will never flinch from your attacks? Now I did! Easy enough obstacle to face even if very annoying, no? Sadly, there is something of note I should mention.


If one of the Zubats gets two Mean Looks to the opponent and the foe is KOed before the bat either dies or disappears, that Zubat will evolve into a full grown Golbat with 75HP, 10 more seconds of playtime and new moves. Poison Fang (Very similar to the Bite move, but with the added effect of purple teeth) will initially give 16% and give a flower effect to the opponent for 3 seconds. Air Cutter (Shown with a two quick dashes back and forth with the foe sandwiched inbetween) deals 8% per hit as well as flinch the foe for half a second. Confuse Ray (indicated with a glowing ball going out of Golbat's mouth and to the opponent) will deal both of the effects of Supersonic for 7 seconds. Not much else to add, expect that now you probably think of me as some demonic spider, right? I thought so. So here is a song to listen to while you hate me for not putting this on the top picture. --> you will never go inside a cave again
 

Koric

Smash Apprentice
Joined
Feb 10, 2006
Messages
84
Location
Aiken SC

Pokemon #200 Misdreavus

Misdreavus is a pokemon that first appear in the second generation and the first pure ghost type to appear in the pokemon series. Overall it loves to scare people just for the fun of it or to feed on their fear. In Brawl, it does not use a physical move nor does it perform a move that may inflict damage on the user’s enemy, but uses a move that only Misdreavus and its evolved class can learn naturally…and that move is “Pain Split”.

When it appears from its pokeball, it will slowly hover upward and will occasionally stop when the distance between itself and the ground is 1.5 blocks. During the time it stopped in position, the red beads on Misdreavus will light up and will continue to glow brighter. After the bead’s glow overshadows Misdreavus, it will activate its Pain Split effect. With a loud screech, the entire area will be covered in a red light making everyone completely transparent for around eight seconds. While everyone in this state, they cannot damage or touch each other…or themselves. During these eight seconds, Misdreavus will absorb the damage of all of the combatants thus making everyone to 0%. Shortly after, it will redistribute the damage equally to everyone.

After the set amount of seconds passed, Misdreavus will dispel the red glow of its gems thus making everyone solid once again to damage. It will then slowly fade away into nothingness as it laughs playfully in between. The appearance of this pokemon isn’t rare, but more uncommon.

(note) If a transparent character goes off-screen during the “Pain Split” effect, the arena will not kill them off regardless of how far they go from the arena. They will instantly die when they become solid again as they were beyond the arena kill zone anyway.
 

Katapultar

Smash Lord
Joined
Nov 24, 2008
Messages
1,284
Location
Australia
Keith looks like a Lego Figure. I'm not sure what was up with the images since they seemed kind of misleading, though I'm not really sure. Props to you for making the first audio set (now I know what your voice sounds like). People should listen to this in their sleep if they want to. I think you remember stuff that way. I'll have to say that I didn't listen to it all though...so yeah. But it's definitely something that could be great if done in a entertaining way that's more humor orientated, like if anyone wanted to be a voice actress. That would be cool to see: a 1st person audio set.
 

n88

Smash Lord
Joined
Oct 10, 2008
Messages
1,547

This is, admittedly, more than a little bit late, but it seemed like we should have one.
 

darth meanie

Smash Journeyman
Joined
Jun 6, 2008
Messages
452
Nice job on that Top 50 n88! It looks good and has your own flair added to it.

Espeon

Espeon is a fun Pokemon, as it has a nice passive ability to add on to it. I do feel though that Espeon's power is always only going to be either completely useless or utterly broken, depending on what character you're playing against or what stage you're on.

Keith


Keith is... let's definitely go with unique. It's certainly ambitious to make a moveset that's entirely auditory (nice voice by the way n88, you almost sound like you could do radio!), although I really feel that Keith approached this the wrong way.

First of all, I'm not sure why you used the program you ended up using; it's a lot more unwieldy than using something we're more familiar with, like Youtube. The truly random images that you threw in also did nothing to help when with a little effort they could've been visual aides or notes or something to give us an idea of what you were actually doing in this set.

Keith was also clearly hobbled together, as you said yourself. There's wind, and an elephant, and magic syndrome, and that's about it. You made this moveset off of the top of your head, and it shows; moreover, since it doesn't seem you were reading off a script for the recording, you end up getting lost or trying to think of things as you made them, oftentimes completely retracting a statement in exchange for something else.

It's almost impossible to really absorb a moveset this way, and Keith is pretty shoddy anyways. I barely remember anything specific about the moveset, and honestly, it was barely worth listening to once, and certainly not for a refresher.

Excadrill


Excadrill's a fun, clever moveset, although making the pits something that button mashing makes it more difficult to get out of seems a bit unintuitive and designed to trip up players. It's got a pretty long duration anyways too.

Zubat


Zubat, Zubat Zubat Zubat, it's raining Zubat, so many Zubat.

A pretty decent Pokemon, it really feels like it's obeying the commands of the player more than almost any other Pokemon, which is nice. I'm not sure if the evolving step was entirely necessary, but it was a nice touch regardless. Good job overall.

Misdreavus


Okay, I'm like 80% sure that that image is not actually a Misdreavus, but a Shuppet that's just pretending to be a Misdreavus. I think it's kind of weird that no one can take damage or die while Misdreavus is doing its thing, but it's otherwise a pretty cool Pokemon.
 

Rychu

Thane of Smashville
Joined
Jul 5, 2010
Messages
817
3DS FC
1908-0105-4965
STOP....Comment time!

Mephiles the Cowardly Dog
Okay, ill admit, this isnt the best moveset ever. But, as you say, you know this too. The mechanic has a lot of potential, but it seems you just ran out of steam trying to finish the damn thing. Im just happy that the clown is nowhere to be seen in this moveset. I cant wait till your next. Kat.

COBRA'S weather control device.
Castform is all kinds of cool. As i've said a million times, anything elemental related is cool to me. I particularly love the idea of "weather zones" or whatever here, its an awesome idea. Although, yeah...it is a bit odd that the "main moves" are the aerials, but thats just a nitpick. Awesome job, Link.

The Scoutmaster
Alright, I like this guy alot. His moron bashin fun seems like something I would love to do in an actual game of smash. The writing style is what really sticks out for me though. Its definitly a fun time to read this through.

Really long Japanese name
To be honest, Hideaki doesn't have much to offer. His moves are generic, his playstyle is generic, even the character himself seems generic. Overall, I can sense that you really like this character, but liking the character is not enough to warent a moveset. I'm sorry, buit I really don't like this one. Better luck next time.

Silver Onix
I have but one thing to say about this set. Its broken. Horribly. Although, it's quite entertaining just how broken it is. It's actually quite awesome how you managed to make a non-moving character so broken. Hell, I love this set the same way I love the Super mario Bros movie, just how ridiculusly awesomly unlike the character(or in this case, broken) it is. I also like that there is no Ronald. Im glad you've stopped using him, too. Good work, I guess, Kat. Cant wait to see what else is in store.

Kingly Ghost
Okay, how awesome is this set. I''m serious Kupa, you are on a roll this contest. The playstyle is so in character and awesome I can't even begin to describe how amazed I am. The work with the Boos is awesome, completely capturing the cowardice of the character the set is portraying. The sheild is just awesome, too. You've managed to make a character that is both devensive and offensive at the same time, with the Boos being is pretty much constant attack. The mindgames you could play with this character are just so awesome that I want him is Smash. Now. This is easily one of my favorites in the contest so far. Great job, Kupa.

Ghostly Apparition
Spiritomb feels like the next evolutionary step up from your Firebar set from last contest. I absolutely love the mechanic, and how its executed. This is a great example of creativity from you, n88. This is a character that, to me, seems like he would be very rewarding to play as. All I can say is, its awesome, now on to the next one.

Phantom X
Woah, I just cant get over that F-Air diagram. Oh, and uh, I guess this guy is pretty cool to. What I see here is a fairly standard projectile spammer, and for that he's pretty good. That EVA is what sets this guy apart, and it gets it's job done. I like it. On to the next one.

Yet another Nate set.
This is probably my favorite one out of the 3, n88. The mindset of "to kill it, you must make it dangerous" to me is quite terrifying within the boundries of smash. You've got to break it free to K.O it, but once it's free, it's free to kill you. Considering the fact that he's immune to any flinching under 7%, and the fact that it's so heavy and large...it scares me. Great Job,
n88.

Gay Ice Cream
What


the


hell


is


this.

Skull Greymon
Ttar is a pretty good first set. You've got a playstyle and everything. It seems as though you've been lurking. My advice:
1: Improve on Organization and Presentation. Try including large headers for each section of moves that stand out. Try including more color, too. One color is very hard on the eyes. Try looking at other sets to get an Idea of what I mean.
2: Now that you have this set out, work off of it and try to go bigger, better, and more complex. Improve with every set you make.
That being said, great first effort. I hope you come back to see us again.

Pong
I've already said what I think of this set, but I'll repeat myself: Its incredibly creative, original, and fun to read. I really think this is your best so far. great job.

Luvia
Okay, I'll make this quick. I like this character, her playstyle is, to quote someone else: FUN and EDUCATIONAL. I think that this is good, and I can't really say any more.

Also, props on the German Suplex.

Sexy Voice set
Yes, keith is a voice set. Is he any more than that? No, not really. He seems to have been made up as you went along, and is very sloppily put together. I do hope if someone does this again in the future, they are more prepared and use a better recording system. Never the less, props to you and a belated happy birthday.
 

gcubedude

Smash Apprentice
Joined
Aug 15, 2009
Messages
83
1, 2, 3, 4, turn the beat back!!

“Well now, let’s see if we can’t do something about my boredom”


Cody Travers has joined the Brawl!​

Intro​
Originally from the Capcom game Final Fight, Cody Travers was also in Super Street Fighter 4. After being framed for crimes he didn’t commit, Cody got thrown in jail. But jail didn’t provide any form of entertainment, so he got bored. Very bored. One day, he breaks down a wall, using nothing but a rock and a really good throw, and leaves, trying to find some entertainment.

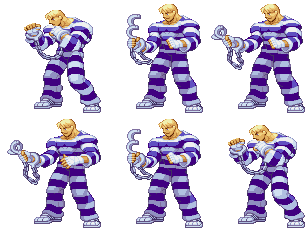
Being the only user of street-fighting techniques in a game called Street Fighter (go figure), Cody fights with rocks (his version of a Fireball), wrenches (his Focus Attack), and knives, which only he can pick up for some reason. His uppercut, Criminal Upper, creates a tornado that can also act as a temporary shield from projectiles. His Ruffian Kick can hit high, mid, or low, depending on the strength of the kick inputted, and his Zonk Knuckle can be used as a surprise attack.

Stats​

Weight: 9/10
Cody is pretty heavy, about the same as Snake

Jump: 5/10
A pretty average jump

Air Jump: 3/10
His air jump sucks, though

Walk Speed: 4/10
Bored, Cody walks forward slowly.

Run Speed: 6/10
He’s pretty fast for a heavy character.

Midair Mobility: 4/10
He has below-average speed in midair.

Float: 1/10
Cody falls like the rocks that he throws; very quickly.

Traction: 9/10
He doesn’t slide very much.

Size: Big and Tall
Cody is as tall as Snake and slightly wider than him, but not as wide as Bowser.

“I don't need a reason. I just like to fight.”


Special Mechanic: Knife​

In Final Fight, you could pick up weapons such as knives and pipes to fight with. Cody could use a knife better than the other characters. This led to his knife being put in Super Street Fighter 4 as a way for him to change up his moveset a little.

In Brawl, the Knife will appear like any other item, except that it’ll appear even if items are turned off (if items are off, it appears with Low frequency). Any character can pick it up, but for any character other than Cody, it acts like a Beam Sword, but with much less range and a little less power.

If Cody picks it up, however, a few of his moves will change. The differences are under each move, and if a move doesn’t give any differences, then it doesn’t change when Cody’s holding a knife. Generally, while holding a knife, Cody will gain a bit of range and power, and his attacks may do more shield damage and stun, but he loses some of his combos, due to the increased knockback of the knife. This makes the knife good at finishing off your opponent, but it’s recommended to leave the knife alone early in the game or when your opponent has just respawned.


Specials​

Neutral B: Focus Attack*
Cody pulls out a wrench out of nowhere (dropping his knife if he has it) and reels backwards, charging up as long as B is held. As he charges, he’ll flash once, then a second time to signify each level of charge. During this charge period, you can tap the Control Stick left or right to cancel the move and instantly dash forward/backwards a stage builder block. This fact alone makes this a good fake-out move.

When B is released, Cody swings the wrench forward in a wide overhead motion. Getting hit in the area above Cody does 5% with knockback toward Cody’s front. The whole area in front of Cody becomes a large hitbox that deals 12%, 16%, or 21%, depending on charge. At full charge, this also breaks shields instantly. Additionally if this move is used as a “counter” hit (it hits them during their own attack lag) or hits them at full charge, a big amount of lag will occur like in Zelda’s sweetspotted Fair. After this, the opponent will crumple, falling to their knees, then to the ground. During this time, they can still be hit, but any attack will knock them out of their “crumple” state.

Normally, Cody will suffer lag after hitting the opponent that prevents him from doing a combo off of this move. However, if left/right is pressed during the end lag of this move, Cody will step in that direction a stage builder block. This cuts the lag by a lot and allows him to combo off of this attack, or step back and dodge a counter if this is blocked.

Cody has super armor during this move, and can take one hit without flinching. However, if he takes a hit, his damage meter will turn yellow, and he will have taken the damage. Over the next few seconds, Cody’s damage will decrease at a rate of 1% per ½ second until it lowers to his original damage before he used Focus Attack. If he is hit during this time, the recovery will stop. During this recovery period, if Cody uses any of his other Specials and smashes the control stick instead of tilting it, he’ll use the EX version of that special. Besides having slightly different properties, the EX version will absorb any of the damage that Cody has not recovered to power up the move. This will stop the recovery, which usually isn’t a big deal due to Cody’s weight. Cody cannot use an EX Special unless he’s in this recovery state, and he cannot use an EX Special in midair.

One final note: Under each of Cody’s standards, smashes, and specials, I will say if it is FADC-able (Focus Attack Dash Cancelable). If it is, you can press B during the end lag of that move to cancel and take a half-block step forward or backward (press the desired direction on the Control Stick; otherwise, Cody will stay still). This will ONLY work if you actually hit the opponent with the move, although whether they shielded it or not doesn’t make a difference. You also cannot FADC an EX Special, or if Cody is holding a knife. This does have a downside, however: FADC-ing any move will give Cody a yellow 8%. This isn’t much, but it doesn’t start healing for 3 seconds, so your opponent has more time to counter and stop the healing. This makes FADC-ing a high-risk-high-reward situation.

Side B: Ruffian Kick


FADC-able: No
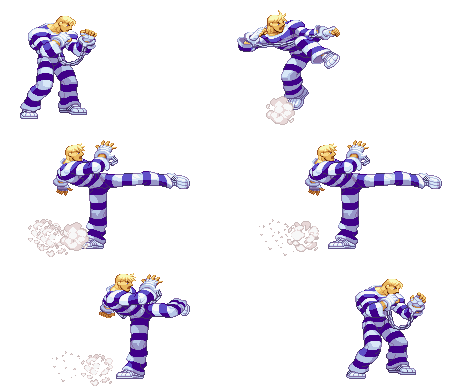
Cody kicks forward with great force, sticking his leg straight out like in the above left image. He moves forward 1.25 stage builder blocks, his leg a hitbox the whole time. Getting hit with this deals 12% with good horizontal knockback, KOing around 146%.

Like a tilt or smash, this move can be angled upward or downward. Angling upward makes Cody kick like in the above right image, dealing 15% but only killing at 155%. Angling downward makes him do a sliding kick along the ground, dealing 10% and killing at 139%. Regardless of the angle of the kick, this will always come out quickly with little lag, but has some end lag that makes it punishable.

If used in the air, Cody can either move straight forward or forward with a slight downward angle; he cannot go up with this move. It acts the same as on the ground, but doesn’t put Cody into freefall afterwards.

In EX Ruffian Kick, Cody does a down-angled kick, but slides 2 blocks ahead at Sonic’s dash speed. This also has even less startup lag (about the same as a jab) and deals an increased 14% with KO at 134%. The end lag remains the same, however, so it’s still punishable if shielded.

Up B: Criminal Upper

FADC-able: Yes, although it cuts the tornado short
Cody does a powerful uppercut, causing a tornado to appear in front of him. The tornado is about .8 blocks wide and reaches up to the top of Cody’s head. The punch does 5%, and the tornado deals multihit damage totaling 14%, with the final hit killing straight up at 152%. It lasts for 1 full second, with Cody able to move .2 seconds before it disappears, making this good for starting combos if it hits. The tornado also stops all projectiles while it’s out, although it doesn’t reflect. The whole move has some startup lag that makes it punishable by jabs and some tilts if timed wrong.

In the air, this will become a spiral uppercut as Cody rides the tornado upward, going upward about 1.25 Ganons and forward 1 block. This will deal 10% with low knockback if it hits, and puts Cody into freefall afterward.

EX Criminal Upper happens as quickly as EX Ruffian Kick and deals 6% (punch) followed by 16% multihit (tornado). The punch absorbs all of the damage from the Focus Attack, so make sure to connect with that if you use the EX version.

Down B: Bad Stone

FADC-able: No
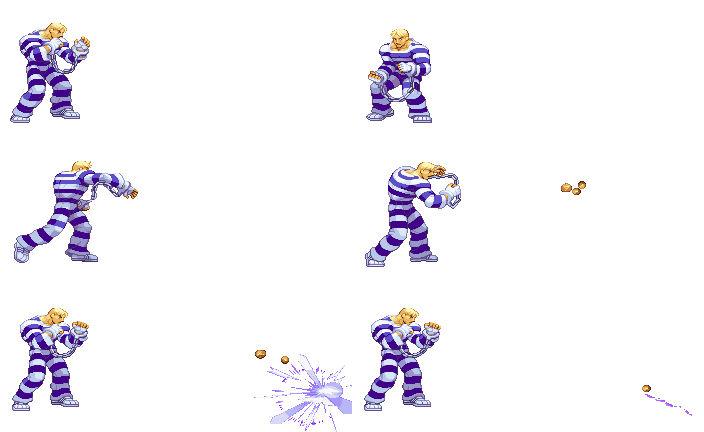
Cody reaches down and picks up a rock off the ground. He throws it forward with all of his might, dealing 9% to anyone it hits. This has half a second of startup lag, and the rock travels 2 battlefield platforms in a downward arc at the speed of Wolf’s Blaster. There’s very little end lag, and the rock does good shield damage.

By holding B, Cody will juggle the rock in one hand, slightly increasing the power. He can juggle the rock twice before throwing it automatically. Each juggle takes .4 seconds and increases the power of the stone by 3%.

While charging, you can press any direction on the Control Stick to change the angle of the throw, even throwing it behind Cody if you want. If down is pressed, Cody will store the rock in his pocket, keeping the charge until you press Down B again to throw it. Throwing a rock from your pocket takes less time than if you had to pick it up off the ground, and is the only way to throw a rock while in midair.

EX Bad Rock has less startup lag (about .25 seconds) and does 13%. It also travels twice as fast, but it doesn’t go any farther than a regular rock. It also cannot be stored, and a stored rock cannot become EX.

If Cody is holding a knife, he’ll throw his knife straight forward. It travels in a perfectly horizontal line at Falco’s dash speed until it hits something. It deals 12% and good stun if it hits an opponent.

“Sorry, Guy. It's like I told you. I fight by myself nowadays.”


Standards​

Jab: Zonk Knuckle
FADC-able: No
By simply tapping A, Cody reels back, steps forward a SBB, and punches forward. This will deal 7% if it connects, and has decent knockback. The startup time is longer than most jabs, though, but it’s still pretty quick.

By holding A, Zonk Knuckle can be charged, although there’s no sign to tell an opponent that you’re charging it. It can even be charged in midair, or during a slow attack such as a Smash. This gives it the ability to be used right after an aerial or slow Smash attack. Charging the move adds 1% per half-second of charge, up to a maximum of +5%.

Forward Tilt: Stomach Blow

FADC-able: Yes
Cody punches like in the above picture the startup and end lag of a normal jab. This deals two hits of 5% each (10% total). This has pretty good range as well, reaching as far as Ike’s Ftilt. The second hit has minimum knockback of 2 stage builder blocks (SBBs), and can increase until it KO’s at 158%

If A is held during this move, then released right as the second hit connects, Cody will follow up with a Zonk Knuckle that will follow his opponent and hit them. This becomes harder to hit with around 65%, as the knockback will begin to send your opponent too far.

With a knife, Cody will simply stab forward, reaching half a block farther and dealing a single hit of 12% with decent knockback (KO at 151%). The startup and end lag is the same as Stomach Blow

Up Tilt: Jaw Crusher
FADC-able: Yes
Cody punches upward in a sort of uppercut motion, but keeping his elbow bent at a 90°angle. This deals 8% with decent stun and KOing straight up around 164%. This has lag similar to the Ftilt, but hits more above Cody and less in front of him. The knockback also makes it possible to FADC this into an upward Ruffian Kick or an aerial if you jump after your opponent.

If Cody has a knife, he’ll stab upward at a 45° angle from the ground. This does 10% and reaches much farther than Jaw Crusher, but it can’t combo into Ruffian Kick due to the higher knockback.

Down Tilt: Slide Kick
FADC-able: No
Cody kicks forward in a way that slides him forward half a block. Anyone hit while he’s sliding takes 8% with mediocre knockback. This move is extremely fast, faster than a Ruffian Kick, making it better at close range. It has a lot less range, though, and it’s easily punished if blocked.

With a knife, Cody will slice horizontally close to the ground, dealing 10% with decent knockback. Pressing A again will make Cody slice again in the opposite direction, with almost no lag between the two slices. This doesn’t move Cody forward like Slide Kick, but the shield damage is high, so if shielded, it can really mess up an opponent’s shield, potentially breaking it if they shielded something else.

Dash Attack: Sand Kick
FADC-able: Yes
Cody halts instantly and kicks his foot forward, throwing sand everywhere. This has a decent sized hitbox in front of Cody, and deals 9 hits of 1%. Afterward, Cody reaches his hand behind his back, as if he’s scratching an itch…

Dashing Forward Attack: Wrench Swing
FADC-able: Yes
…When he’s really reaching for a weapon. If a forward attack is inputted (it doesn’t matter whether it’s a tilt or smash) during the dash attack’s end lag, Cody will swing a wrench forward. By pressing Forward + A repeatedly, Cody will swing his wrench forward up to 5 times in a row. Each swing does 7% and good stun, but little knockback, allowing you to potentially hit an opponent with all 5 swings if they don’t guard. If they hold the shield button, though, they’ll put up their shield even if they’ve already taken a hit, so don’t plan on using this like a combo.

The swing has a huge range, as Cody takes a leaping step forward about 1.2 SBB’s with each swing. Additionally, each hit deals enough shield push to move the opponent in range of the next swing, and if 4 or more swings connect, their shield will break. If an opponent shields any swing, it’s possible to shieldgrab Cody as he swings forward again, but they’ll probably take the hit at the same time. Characters with a slow tether grab can’t do this, however.

Dashing Up Attack: Wrench Upper
FADC-able: Yes
Cody swings his wrench in a huge upward arc, dealing 9% with great knockback (144%). The arc reaches very far from Cody, about .8 SBB’s. This has some startup lag, unless it’s used after a dashing forward attack, in which case the lag isn’t that bad.

Dashing Down Attack: Pipe Smash
FADC-able: Yes
Cody pulls a pipe out of nowhere, pulls it back like a golf club, and swings forward, as if he was hitting a golf ball. This is Cody’s slowest move, with lag similar to a Falcon Punch, but it does 18% and kills at 112%. It also has a big range in front of Cody, although not as far as Wrench Upper.

Smashes​

Forward Smash: Hammer Hook
FADC-able: No
Cody reels backwards like he does in his Focus Attack, and holds this pose while charging. When released, he punches in a wide overhead motion, slamming his fist straight into the ground one SBB in front of him. The move deals two hits: one as he swings down (9-12%, knocks into the second hit), and one as his fist hits the ground (10-13%, great knockback away from Cody that kills at 120-108%). This has some startup lag, but little end lag for a Smash. It also pushes any shielding foe out of normal, no-tether grabbing distance, so you won’t have to worry about getting shieldgrabbed for using this at the wrong time.

This move is unique in that if this is used after a FADC, the startup lag is severely reduced, making this a good combo finisher.

With a knife, Cody will pull the knife back, then swing forward horizontally. This deals a single hit of 21-28% and has less startup lag than Hammer Hook

Up Smash: Upward Slam
FADC-able: Yes
Cody clasps his hands together and swings them upward, dealing 15-20% with this. This can KO around 134-125%, and has great range, making for a nice anti-air. It also has low startup and end lag for a Smash, although it’s still noticeable.

With a knife, Cody slices horizontally like in his FSmash, but angled upward. This does 17-23% with great knockback (127-119%)

Down Smash: Sweep Kick
FADC-able: Yes
Cody crouches down and sweeps his leg around him. This is very similar to Luigi’s DSmash in terms of lag, but it reaches slightly farther, about .7 SBBs. Each hit deals 13-17% with good vertical knockback.

If you FADC the first hit of this, you can follow this with an upward Ruffian Kick or a Criminal Upper. Also, this move doesn’t change if you have a knife.

“This way of life is simply who I am. Can't you understand that? Or would you rather hear the sad, sad story of an EX-hero?”


Aerials​

Neutral Air: Downward Kick
Cody kicks at a 45° angle downward, reaching a distance of .8 blocks. This acts as a sex kick, dealing 11% with decent knockback if sweetspotted, and 7% with poor knockback if sourspotted. This has almost no startup lag and very little end lag like most sex kicks.

With a knife in hand, Cody will instead stab downward at the same angle as the kick. This doesn’t act like a sex kick, but instead does 14% with good knockback if it hits.

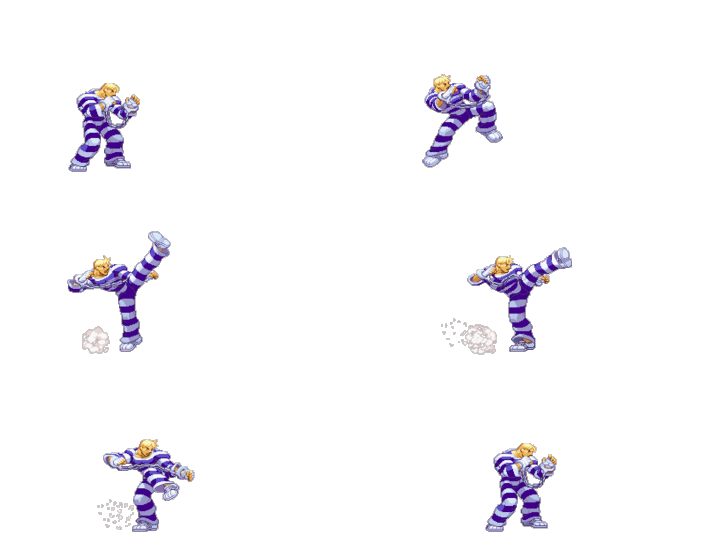
Forward Air: Crack Kick

Cody spins around and kicks like in the above picture. It has good range and deals 11% with good knockback. It has low startup and end lag, and the landing lag isn’t so bad either, so don’t be afraid to use this as you’re landing. It can even act as a setup for Zonk Knuckle if you hold A and release as you land.

Backwards Air: Reverse Crack Kick
Yes, this is simply his Fair copy/pasted, but their properties are slightly different. The most notable is the fact that this spins Cody around so that he faces the opposite direction after this is used. It also has less startup lag than the Fair, as Cody doesn’t have to spin around. It deals 12% with decent knockback.

If Cody uses his Fair, and presses Back + A right as the kick comes out, he’ll sweep his leg around and go straight into his Bair. This turns these two moves into a sort of helicopter kick that’s good to use when you’re surrounded.

Up Air: Midair Uppercut
Cody does a simple uppercut, dealing 11% with good upward knockback. This covers most of the area above Cody, making it good at dealing with enemies approaching from above.

Down Air: Fist Slam
Cody clasps his hands together and slams them downward. This has a small hitbox near Cody, but it does 13% and spikes opponents straight downward. The lag is high on both ends, so you’ll have to time this perfectly if you want it to hit.

If Cody is holding a knife, he’ll stab straight downward with it. This does 15%, but doesn’t spike the opponent. However, the lag on this is lower than the regular Dair, so you can use it from a shorthop without the risk of suffering landing lag.

Z-Air: Guilty Stamp

Cody’s ZAir is simply a grab in midair, with the exact same startup lag and range as a regular grab. If he grabs someone, he automatically puts them beneath him, puts his foot on their lower back, and lets gravity bring them both down at a speed slightly higher than Cody’s fall speed. If they hit the ground, the opponent takes 11% and is put in a prone position while Cody steps off of them. This can’t be escaped out of like a regular grab, making it a great suicide move, as your opponent will always die before you.

Grabs​

Grab: Prisoner’s Bind
Cody uses his handcuffs in an attempt to pull his opponent within grabbing distance. He loops them above and over his opponents head, pulling them closer if they connect. This has a small amount of lag similar to Link’s grab, and doesn’t reach quite as far, but it has less ending lag than most tether grabs.

For the pummel, Cody simply knees the opponent in the stomach for 3%. This isn’t the fastest pummel, but it’s also not the slowest.

Forward Throw: Prisoner Throw

Cody pulls the opponent behind him, then pulls them forward, releasing them and sending them flying. This is pretty slow, so it’s not a good idea to use this in a free-for-all if you’re surrounded. This deals 7% and sends the opponent a set 4 SBBs. The thrown opponent acts as a projectile while flying, dealing 10% to anyone they come in contact with.

Backwards Throw: Shoulder Throw
Cody turns around and lifts his opponent over his shoulder, slamming them into the ground. They bounce straight up, making it easy to combo after this if they’re at low-mid damage. This throw does 10%, but has very low knockback

Up Throw: Classic Combo
Cody quickly releases the opponent and does his 4-hit combo from the original Final Fight, as seen in this video. The whole combo deals 14% and knocks the opponent up and away from Cody. This is Cody most powerful throw, killing at 125%, but the high knockback prevents Cody from using this as a combo starter.

Down Throw: Bad Stamp

Cody pushes his opponent down, then steps on their back, stomping them into the ground and dealing 9%. This leaves them in a prone position and puts Cody on the opposite side. This can be followed with a Focus Attack, if you predict a wake-up attack, or a Ruffian Kick, if you predict a roll.

“I saved a city, saved a girl, but couldn't save myself...”


Final Smash: Infinite Combo/Final Destruction​

Yes, Cody has two Final Smashes. On the Character Select Screen, Cody’s picture will have a and a [II]. Whichever one is selected is Cody’s Final Smash for that round.

Final Smash I: Infinite Combo
When B is pressed, Cody will simply jab forward once, reaching forward half a stage builder block. This is instant, like Ike’s Final Smash. If this misses, then the Final Smash ends there. If it hits, however…

Well, this happens.

See, Final Fight had a bug in it that allowed Cody to cancel his basic combo after the second jab by turning around. He could then turn back around, punch twice and repeat until his opponent was dead. As the video showed, this works even on bosses or large groups of enemies.

In Brawl, the game automatically makes Cody do this combo on his own without any input from the player (other than the initial press of B). Each punch deal 5%, and Cody will continue this infinite until the opponent has reached 100%, at which point he will finish the combo with a gut punch, followed by a powerful uppercut. If this hits, this is a guaranteed KO on any opponent, much like Marth’s Final Smash. However, this should only be used in a 1v1; if Cody or the opponent is hit during the Final Smash, the infinite will be interrupted and the opponent will break free. Instead, in a free-for-all, you should use…

Final Smash II: Final Destruction
Shown here, this is the Final Smash you should pick in any FFA, as it’s uninterruptable and can possibly hit multiple opponents.

When B is pressed, the camera gets a close-up of Cody as he cracks his knuckles, saying “You ready to start fighting for real?” (Opponents are frozen in place as this happens). Cody then spins and does an overhead punch, reaching a full SBB ahead. If this strikes an opponent, Cody will exclaim “Jackpot!” and start the combo shown in the video. Each hit deals 6%, with the Criminal Upper at the end dealing a massive multihit 50% (80% total damage). This only has a KO percentage of 100%, though, so it won’t always kill an opponent like Infinite Combo will. However, the tornado at the end is huge, reaching 3 Ganons high with a width of 1 Bowser at the bottom, 2 Bowsers at the top. Plus, should an opponent be caught in it at the top, they might be knocked out before 100%, as they’ll be closer to the top blast zone.


“Returning? Yeah, I'll return, all right. To my cell. That's where I belong.”


Playstyle​

General
Cody plays a kind of rushdown game, using the range and power of his standard attacks to deal heavy damage to his enemies. Focus Attack acts like a counter, allowing Cody to take a hit and hit back. It also has a lot of fake-out potential, as he can cancel it at any time by stepping backwards or forward, whether he’s taken a hit or not. Plus, it acts as one of Cody’s best combo starters, as the lag it puts on the opponent if used as a counter allows you to follow up with literally anything. Finally, it can be used to cancel the end lag of certain moves and step toward the opponent at the same time, allowing you to chain things that wouldn’t be chainable otherwise.

Criminal Upper serves as a good out-of-shield (OOS) option, and can also be a good aerial combo starter. Ruffian Kick offers a good approach method if it isn’t shielded, is relatively quick, and has a far reach. Bad Stone is a simple but effective projectile that helps Cody to control the space between him and his opponent. It also allows him to have a chance at long-range fights, unlike most close-range heavyweights.

Cody’s tilts and Zonk Knuckle are good for close range, but his best moves are only usable at mid-range. Moves like Hammer Hook and Ruffian Kick are too laggy for close range, but hit only air at long-range. Controlling the space between you and your opponent is a must for Cody.

At close range
Tilts and Focus Attack should be used primarily at close range, as Cody’s Smashes and Ruffian Kick are too laggy. Criminal Upper is usable, but it’s best to only use it as an OOS counter method. Remember that unlike most characters, Cody’s Jab is laggy and easily punished at close range. Ftilt should be used in place of a jab, as it’s quick and deals good damage, especially if you use Zonk Knuckle right afterward. Dtilt is also good, and has better range than the Ftilt, but is more easily punished. Utilt can be used if the opponent is approaching from the air, but can be crouched, so don’t use it against a grounded enemy.

You can also grab an opponent if they leave themselves open at close range. From here, you can use Bthrow to set up an easy combo (good follow-ups include Criminal Upper and Hammer Hook), Dthrow to set up a tech-chase (Cody’s not the best at this, but he gets the job done), or Uthrow for the KO. Fthrow can be used to put some distance between you and the opponent, which is good if you’re fighting a close-range combo maniac. It can also be used in a free-for-all when there are other enemies in front of you; that way, you might hit one of them with the body you’re throwing at them.

Don’t forget about Focus Attack. Using it as an enemy hits you can allow you to counter them with a combo. If you counter with FA, one of the better follow-ups is EX Criminal Upper, as that deals solid damage and can lead into an aerial like Nair or Fair.

At close range with a knife
With a knife, Cody has a lot safer close-range options. Ftilt has enough shield push to prevent Cody from being grabbed, plus it does a good chunk of shield damage. Utilt becomes a much safer anti-air, as the range increases significantly. Dtilt is also safer, as if the first swing is shielded, Cody can still swing a second time. This can wreck the opponent’s shield if they shield both swings, and even if Cody is grabbed after the first swing, the second swing will still hit and deal the damage (this shouldn’t be used against chain-grabbers like Falco, as the resulting grab is definitely not worth it.)

Although Cody’s tilts have become a bit safer, he loses the ability to grab while holding a knife, plus using Focus Attacks makes him drop his knife. Because of this, you’ll have to balance your uses of close-range knife fighting and fist fighting.

At mid-range
Mid-range is where Cody truly shines, as it allows him to use his laggy moves, such as Hammer Hook and Ruffian Kick. Hammer Hook (FSmash), like Marth’s FSmash, is best used when spaced properly, as it’s unsafe when too close, but won’t hit when too far. USmash makes a slower, but more powerful version of Utilt, plus it can actually hit some crouching enemies (not the really short ones, like Kirby). Also, USmash can FADC into a Criminal Upper or High Ruffian Kick. DSmash is best used when surrounded, as USmash has better forward range, while FSmash does more damage.

Ruffian Kick works very well at mid-range, but it can’t be spammed. Mid Ruffian Kick should be used the most, with High Ruffian Kick used if your opponent is the jumpy kind, and Low Ruffian Kick being used to hit opponents with low shields (remember the knife?).

Even at mid-range, Focus Attack has its uses. Against other characters with mid-range standards, like Marth and Ike, you can use Focus Attack to take a hit, step forward, and begin attacking them at close range.

Finally, if your opponent is also a mid-range fighter, you can use Cody’s dash attacks to try and approach. Sand Kick will almost always lead into a Wrench Swing, especially at lower damages. Wrench Upper can be used to stop the combo and push a shielding opponent away, making it difficult to counter this move. Pipe Smash is very hard to use due to the lag and predictability, but it can be used as an alternative follow-up to Sand Kick.

At mid-range with a knife
With a knife, Cody doesn’t really change much from his close range knife strategies, except that FSmash and USmash become viable. Other than that, the only real mid-range knife strategy is to try to get closer so you can being using your close range knife strategies, which are much better.

In the air
Cody’s aerial options are pretty simple. Use Nair when coming down on an opponent, use Fair/Bair on an opponent to your side, and use Uair on an enemy above you. Dair should only be used for the gimp, and even then, don’t rely on it, as it’s very hard to hit with. With a knife, Cody has more range on his Nair, but since it angles downward, Crack Kick (Fair) will occasionally be better.

Really, you shouldn't want to fight in the air, as Cody's horrible jumps and high fall speed prevent him from being very effective in the air. Instead, use the air as a method of escape if you're surrounded in a multiway, using the helicopter Fair/Bair combo if you need to.

Countering Cody
Beating Cody is simply a matter of controlling the space better than he can. Cody plays best at mid-range, so if you’re a close range combo fiend like Meta Knight, you’ll want to get in close and never leave. If you’re a long range camper like Snake, you’ll want to simply stay out of his range, avoid Bad Stone, and try to keep him away with your projectiles. If you happen to be a mid-range spacer like Marth, then you’re in for one heck of a fight. The best way for mid-range fighters to beat him is to bait him into using his Focus Attack, then dodging it and countering during the end lag. Other than that, simply watch out for an EX Ruffian Kick if he has yellow damage; those things are very fast and hard to avoid, even if you see them coming.

With a knife, Cody will usually attempt to get closer than usual, as the knife gives him a better close range game than usual. Again, proper spacing and careful moves will help you to counter Cody.


Playstyle (1v2/1v3)​

Surprised? Well, as Cody told Ryu in this comic, he’s used to fighting many opponents at once. When he’s in a free-for all, or just a one-on-one, he keeps his handcuffs on to handicap himself. But when more than one enemy team up against him, he removes the handcuffs at the beginning of the round, signifying that he’s getting serious.

His changes vary depending on whether he’s fighting two or three opponent. Note that a 1-on-1-on-2 is the same as a 1-on-2 fight for Cody, and he’ll receive his 1v2 pumps for that fight.

Against 2 opponents
Cody receives the following pumps:
  • All of his non-Final-Smash attacks deal an additional 5%, and their KO percentages are reduced by 10%.
  • Cody’s weight becomes 11/10.
  • Cody has super armor to all moves that deal less than 5%.
  • After being grabbed, Cody gains grab immunity for 3 seconds. This protects him from being chaingrabbed thanks to his heaviness.
  • Focus Attack (Neutral Special) can now take two hits instead of one and charges in three-fourths the regular time.
  • Cody’s yellow damage now recovers at a rate of 2% per half-second.
  • Zonk Knuckle and Hammer Hook now have super armor up to 10%.
  • Cody has super armor during all of his throw animations, with any damage taken becoming yellow.
  • By holding A during Shoulder Throw (Bthrow), Cody will instead throw the opponent a set distance of 3 SBBs, their body a constant hitbox that deals 12% if it hits anyone.

With two enemies, Cody’s strategy really doesn’t change too much. Simply space both opponents, and if you can, separate them and try to take out one before the other one joins the fray again. To deal both of them damage at once, you can use Fthrow or Bthrow (hold A) to throw one of them into the other. Use of the knife is also more important here than in a 1v1, as the knife attacks are quicker and safer than the regular versions. Of course, with a knife, you can’t use the Fthrow and Bthrow, but that’s a small price to pay for the relative safety that the knife provides.

Against 3 opponents
Cody receives the following pumps:
  • All of his non-Final-Smash attacks deal an additional 10%, and their KO percentages are reduced by 15%.
  • Cody’s weight becomes 14/10.
  • Cody has super armor to all moves that deal less than 10%.
  • After being grabbed, Cody gains grab immunity for 5 seconds. This protects him from being chaingrabbed thanks to his heaviness.
  • Focus Attack (Neutral Special) can now take three hits instead of one and charges in half the regular time.
  • Cody’s yellow damage now recovers at a rate of 3% per half-second.
  • Ruffian Kick, Zonk Knuckle and Hammer Hook now have super armor up to 15%.
  • Cody has super armor during all of his throw animations, with any damage taken becoming yellow. Additionally, any damage taken is cut in half.
  • By holding A during Shoulder Throw (Bthrow), Cody will instead throw the opponent a set distance of 3 SBBs, their body a constant hitbox that deals 16% if it hits anyone.
Against three enemies, Cody really has to play smart. Bad Stone and Focus Attack are going to be your best friends in this fight; Bad Stone because it’s Cody’s only projectile, and Focus Attack because, well, it’s Focus Attack.

Again, Fthrow and Bthrow can be used to slam an opponent into the others, and the knife should still be a priority for you. Hammer Hook and Zonk Knuckle now have respectable super armor, so they can be used somewhat easily, but don’t overuse them and become predictable. Also, don’t forget that Cody’s throws are completely uninterruptable, so don’t be afraid to grab someone even if you’re surrounded. Use of the EX Specials is important as well, but to really make use of them, try to aim them so that they hit multiple opponents and really rack up the damage. Criminal Upper is the best for this, especially if your enemies are attacking at once. Ex Ruffian Kick works too, especially since it’s so fast and covers a lot of ground. At a distance, EX Bad Stone is risky, but if shielded, it can instantly break their shield if 10% or more was put into the stone.

Matchups​

Cody vs. Marth: 45:55 Marth’s favor
As stated before, Cody and Marth both play a spacing game, so when they play each other, it comes down to who can space the other one better. Unfortunately for Cody, Marth’s speedy FSmash beats Cody’s laggy Hammer Hook in speed, and his tilts in range. Although Cody has a slightly better air game thanks to the reach of his Fair and Bair, it’s not enough to prevent Marth from having a slight advantage in this fight. It’s still possible for Cody to win, but generally speaking, Marth will have the easier time.

Cody vs. Sothe: 60:40 Cody’s favor
Sothe may have more speed than Cody, but with proper spacing, Cody can win this match so long as he doesn’t allow Sothe to get behind him. If Cody can keep Sothe in front of him at all times, he can easily space him and take him out with his combos. Even if Sothe does get behind Cody, he can use Bair to escape from Sothe’s range and turn around at the same time. Also, Bad Stone beats out Knife Throw, so he wins long-range fights as well.

Cody vs. Micaiah, Sanaki, and Sothe: 55:45 Cody’s favor
(Note: if you haven’t read all of the above sets, all you really need to know is that Micaiah and Sanaki are light, long-range spellcasters, and Sothe is a medium-weight close-range assassin-like character with an emphasis on attacking from behind.)
You’d think that with the barrage of long-range spells coming at Cody, he’d have one hell of a fight, and you’d be right. Cody has a slight advantage in this fight, what with his insane weight and heavy hits. The fact that two of his three opponents are light-weight also helps Cody, as with the 1v3 power boosts, he can easily KO Micaiah and Sanaki in 3-5 hits.

To approach, Cody will need to make great use of Focus Attack’s cancel dash and Zonk Knuckle’s super armor. These allow him to get through most spells and get in close, where he wants to be and Micaiah and Sanaki don’t want to be. Once you’re closer to them, use powerful, moves with a great range to try and hit them all at the same time. Criminal Upper is pretty safe, as the tornado blocks all incoming projectiles from the front. Ruffian Kick is quick and has good range, especially the EX version; it should be your most used EX Special. Using the Fair/Bair helicopter kick works well when you’re surrounded. Finally, don’t forget that Cody’s throw cannot be interrupted, plus Fthrow and Bthrow can fling a body into one of the others. This is especially good if you happen to grab Sothe, as using him as a meatshield will make Micaiah and Sanaki hesitate on attacking you with long-range attacks, else they hit Sothe.

“With so much riding on my fists, this will not be my final fight!”


Extras​

Animations

Entrance: Cody has no entrance animation; he’s been here the whole time, waiting for his opponent. Crouched over with his knees bent, tossing a rock up and down in one hand, he stands up and cracks his knuckles, saying “This better be entertaining…” in a bored voice.
Standing: Cody stands slightly bent over, hands up in front of him, like this:

Idle 1: Cody scratches the back of his head with one hand.
Idle 2: Cody yawns loudly, covering his mouth with his right hand. You must be really boring!
Walk: Cody walks with his hands down, like this:

Run: Cody runs forward, holding both hands in front of him.
Crouch: Cody bends his knees and rests his arms on his thighs. This cuts his vertical height in half, but he can still be hit by most projectiles, like Blasters.
Sleep: Cody gets down on the ground and sleeps like in this video

Taunts

Up Taunt: Cody crouches down, saying “You’re borin’ the crap outta me”
Side Taunt: Cody cracks his knuckles, saying “Ready to start fighting for real?”
Down Taunt (1v1):

Cody removes the handcuffs around his hands, rubs his wrists, then puts the handcuffs back on.
Down Taunt (1v2/1v3): Cody scratches his head, then shrugs with his palms facing up, saying “You finished practicin’ now?”

Victory Poses

Victory 1: “I busted outta jail for this?” Cody says as he scratches his head, looking at the camera.
Victory 2: Cody yawns, then lies on the floor and falls asleep like in this video
Victory 3:

Cody looks behind him. His jaw drops and he runs off screen. Edi E. appears, waving handcuffs in Cody’s direction, before chasing after him, firing his gun into the air.
Loss: Cody claps for the opponent like everyone else. He lost, but at least it looks like he had a bit of fun!

Final Comments
Welp, finally got this done. I got stuck on this for so long, unable to really make much progress, after I wrote the Specials and standards. But then I suddenly felt inspired to finish this just this morning, so here it is.

I personally enjoyed combining elements from Final Fight and Super Street Fighter IV, and hopefully those who’ve played the games will notice what I did wrong/right (I wonder who’ll notice the easter egg in the Dash Attacks). It was kinda awkward making this set, though, as I only know Cody from SSFIV. I’ve never played Final Fight, so I had to watch some Youtube videos and read some things on the internet so I could try to make this set as in-character as possible. I think those Final Fight Cody playthrough videos helped inspire me…

For once, I actually did a Matchups section, and although there’s only three, I feel pretty good about them. I especially enjoyed imagining the Cody vs. My FE characters one. I hope they make sense.
 

LegendofLink

Smash Apprentice
Joined
Feb 17, 2008
Messages
164
Location
Pennsylvania


Klink (AKA Gear if you prefer its Japanese name) is one of the new Steel type pokémon introduced in Pokémon Black and White. It consists of 2 separate gears that form a single entity similar to how Magnemites combine to form Magneton. While it is not an electric type, it is still capable of harnessing the power of electricity and magnetism to manipulate it's own body and attack enemies. In Brawl, Klink's starts with his two gears positioned similarly to how they are in the are in the picture above, with his body floating 1.5 gear widths off of the ground when he is not in the air. The body is centered around the gear on the right (referred to as the "inner gear") with the "outer gear" being capable of rotating around the inner gear for certain attacks.


Size: 4/10 (the individual gears are a 2/10)
Weight: 7/10 Very solid for a character of that size.
Ground Speed: 4/10 Klink is a little on the slow side, but not too slow.
Air Speed: 4/10 Same as Ground Speed.
Jump Height: 7/10 Klink is capable of propelling itself rather high into the air thanks to it's ability to levitate.
Traction: 9/10 Klink moves through electromagnetism, making it's movement's very percise with little to no sliding.
Fall speed: 8/10 Being made of metal to begin with, Klink falls about as fast as you would expect.


Side Special: Gear Change
Klink's outer gear spins and rotates around the inner one, with the direction rotated depending on whether the special is done to the left or to the right (clockwise if to the right, and counterclockwise if to the left). The gear moves fast enough to rotate a complete 360˚ around the other gear in one second. The gear continues to rotate as long as the B button is held down, and Klink can continue moving normally while performing his move. This move deals no damage, only changing the positioning of Klink's gears. The many uses for this will become apparent later on.

Neutral Special: Gear Saucer
Klink's gears separate and and fly apart from each other, moving at Fox's dash speed. They travel in the exact opposite direction of each other, with that direction being determined by the positioning of the gears, which can be altered with Gear Change. Taping the B button will cause the gears to put one battlefield platform of space between them, while holding the button will cause them to continue to move until they are at a maximum of 2 battlefield platforms apart. If the act of moving apart would push one of the gears into the ground, the opposite gear will move 2 battlefield platforms away in its upward direction while the first one will remain on the ground. Opponents hit by the gears while they are moving outward are dealt 5-7% damage with light vertical knockback.

Once the gears have moved apart, they remain that distance from each other until the Gear Saucer is used again, in which case they will snap back together, dealing the same amount of damage and knockback as when they are moving apart to any opponent that gets in their way. Klink can move around normally and use any of it's moves while separated, and both gars will maintain the same distance from each other, even if one gear is attacked and knocked back. As long as one gear is on the ground, Klink can use it's ground moves, even if the other gear is suspended in the air, and both gears must be off of the ground to use aerials. Many of its attacks will act differently while separated though.

If Gear Change is used while separated, whichever gear is on the ground will act as the axis for rotation, and the suspended gear will rotate around it in the desired direction. If it is used in the air, the gears will rotate around each other with the axis of rotation being halfway between the two gears. If both gears happen to be on the ground, the one in the direction that the move is being used in acts as the axis of rotation. If Klink attampts to rotate into a wall, it will smply stop rotating the gear instead of pushing it closer to the first gear. While separated, Klink's gears shield individually, but damaging one shield damages both shields.

Down Special: Mirror Shot
Klink takes on a mirror like sheen as it uses the energy of reflected light to create a white ball of energy the size of one of Mario's fireballs that travels forward at a speed similar to that of Lucario's Aura Sphere. The ball does 3-5% damage with light forward knockback and only one can be fired every 3 seconds, making it rather bad compared to most characters projectiles, but still useful for keeping the opponent out of your face. The ball also acts similar to Wolf's blaster shot in that is coes not clash with other projectiles, but simply passes through them instead.

In addition to firing the energy ball, as long as the B button is held afterward, Klink maintains its mirror like surface and can reflect any energy projectiles that come into contact with it back at an angle relative to where on Klink's circular body the projectile hit. This means that you can use Gear Change to change the angle that the projectile bounces off at. Projectiles that are reflected this way are doubled in both speed and damage. If you attempt to fire another energy ball before the three second recharge is up, Klink will still reenter its mirrored state, meaning you can use another move then immediately go back to reflecting if need be.

If this attack is used while separated by Gear Saucer, The two gears both shoot energy balls, but only at half power, making them extremely weak. The twist comes from the fact that Klink's halves do not shoot the energy balls forward, but instead shoot them directly at each other. Remember how Klink can reflect energy projectiles with it's mirrored body? Well, that includes its own Mirror Shots. This allows the attacks to reflect back and forth between the two gears and quickly gain speed and power until they form a deadly wall of energy between the two gears. The power of the reflected Mirror Shots cap out at 20% damage with knockback that KO's around 80%. While simply Holding onto a supercharged Mirror Shot may seem like a good idea, it does nothing to stop the opponent from simply hitting Klink and disrupting the attack, as the Mirror shots cannot pass through an un-mirrored Klink, preventing you from simple holding a powered up shot then letting go of the mirror and releasing it. The best way to use this attack is to threaten the opponent with the powerful projectiles by shifting your position slightly to alter the angle of deflection or to keep them locked down if you have them trapped between your gears already. This is an extremely versatile attack, and should be used wisely.

Up Special: Body Purge
Body Purge is a technique that allows Klink to remove extraneous parts of it's body to boost its speed and mobility at the cost of weight. In this case, Klink separates its gears completely and focuses on controlling one gear. When used normally, the gears forcefully separate with a small explosion of electromagnetic energy, flinging the gears apart with force equal to that of getting shot out of a barrel cannon in Melee. The trajectory that the two gears move in is determined by their position from Gear Change. Opponents who are struck by the gears as they fly away from each other take 12-15% damage with knockback that depends on the angle the gear was moving when it strikes the opponent, usually KOing around 160%.

For the first second after being separated, you have no control over either of the gears. You can select which gear you want to take control of by simply pointing the control stick in the direction of that gear form the point of separation during the second of immobilization after using the move. Otherwise, the gear you take control of is chosen at random. While controlling one gear, your movement speed is increased to a 7/10 and you are a much smaller target. This technique comes with some severe downsides though. Being no longer connected to its other gear, Klink's weight is halved, making it quite easy to KO. In addition, any attacks that require both gears to be used are completely unusable.

While separated, the inactive gear simply sits on the ground where it landed, and can be knocked around and KO'd normally. If it is KO'd then Klink is stuck with the one gear it is controlling for the rest of the stock, and you can only rejoin the gears by using Gear Saucer within 2 battlefield platforms of the other gear. So what is the point of using a move that puts you in such a vulnerable state? First is the fact that this can serve as a last resort recovery move to get at least one gear back to the stage. Second, is this interesting ability: if you use Up Special agin while the gears are separated, you will switch which gear you are controlling almost instantly. This allow you to defend your inactive gear more easily, and even bounce Mirror Shots back and forth across the stage. You could even use your other half to continue combos or set traps for the opponent.


Neutral: Rev-Up​
This attack causes Klink's gears to spin rapidly for one second, and the attack can be charged by mashing the A button similarly to Sonic's spindash, allowing the attack to last a maximum of 5 seconds. While spinning, Klink can move about and do any of his moves normally, with the only difference being that its entire body has become a low priority hitbox that deals 3-5 damage with moderate forward knockback. If Klink's body would already be a hitbox from a move, such as Gear Saucer, then this attack merely adds its damage, knockback, and priority to that move. This can be used as a basic GTFO move like any jab, but it can also be used while on the move to add power mo many of your other moves or simple keep the opponent from hitting you with weak attack while you are moving or rotating. It also causes Gear Saucer to pack quite a punch, allowing you to throw one of your gears out and quickly return it for a powerful 1-2 punch combination.

Forward Tilt: Zip​
With a burst of energy, Klink quickly zips sideways half of a battlefield platform in the direction the tilt it used at Fox's dash speed. Opponents that come into contact with Klink while it is moving are dealt 4-6% damage with moderate knockback in the direction that Klink is moving. This is a nice quick move that allows also assists Klink's mobility. Using it while separated with Gear Saucer creates a nice multi-pronged attack that can catch opponents off guard, or it can be used to pinball the opponent back and forth between the two gears. It can also be used as a faster dodging technique in a pinch. It has rather poor priority though, so you must be careful not to run into the opponent's attacks.

Down Tilt: Topspin​
Klink turns on its side and rapidly spins its outer gear around it, sweeping very low to the ground and dealing 5-8% damage with moderate outward knockback to opponents hit by it. If separated, the range is increased dramatically, but it creates a blind spot in between the gears that the opponent would be safe in, so one must be aware of their spacing before attempting this. It functions as a great fast attack to either poke at opponents in front or behind you with, or for getting them off of you if they get too close for comfort. This attack can also function as a nice gimping tool from the edge of the stage if the opponent is recovering low.

Up Tilt: Thundershock
Klink releases a short burst of electricity directly above it that stuns opponents similarly to Zero Suit Samus's stun pistol for one second, dealing 4% damage in the process. If separated with Gear Saucer, both gears will generate the spark just inside of the space between both gears, covering the entirely of the space in there if they are only one Battlefield platform apart, and leaving a sizable gap in the middle if they are at the maximum distance apart form each other. This is one of the few attacks that is not reduced in power while you are only controlling only one gear after a body purge, making this a great supprise attack after switching gears.


Forward Smash: Zap Cannon
Zap Cannon is one of the most powerful electric type attacks, dealing massive amounts of damage and always paralyzing any foe it hits. The downside to such power is the fact that the move is very difficult to land. When Klink uses Zap Cannon, it begins charging a Kirby sized sphere of electricity in front of it after a noticeable electric spark flashes around Klink. Opponents who touch the sphere while it is charging are stunned as if they were hit by Zero Suit Samus's stun pistol and take 5% damage, leaving them wide open to be hit by the attack when it is released. Whe released, the orb moves forward at a rate halfway between Ganondorf's walk and dash speeds, and will deal 20-30% damage with knockback that KO's around 130% uncharged and 90% fully charged.

Normally, this attack would be incredibly hard to pull off because the start up is too obvious to hit the opponent with the charging sphere and the shot is too slow to ever hit anything, and you would leave your self wide open to punishment the whole time you are using the attack. Where this smash really gets interesting is the fact that Klink can move around while charging the attack, and it can be charged indefinitely without releasing the attack, but you can only move at half of Klink's normal movement speed and can only jump once. In addition, when separated by Gear Saucer, Zap Cannon is charged halfway between the two gears before being fired forward, allowing you to reflect the sphere with Mirror Shot if you line it up right. Unfortunately, Zap Cannon is too powerful to be reflected more than once, and if Klink tries, it will be stunned just as if its shield was broken. When used by a single gear, this attack is half the size and power of the normal version of the move, meaning that it can be reflected twice before breaking Klink's reflector, allowing for some more cross-stage reflections after a Body Purge.

Down Smash: Discharge​
As the name of the attack suggests, Discharge releases a large amount of electricity centered around Klink's body. While together, the gears release a blast of electricity in a one battlefield platform wide sphere that deals 15-25% damage in 5 hits, with the last hit having powerful vertical knockback that can KO around 180% regardless of charge. This attack also has a noticeable start up, but releases alms instantly aft charging, making it excellent for carting spot dodges and rolls. When separated by Gear Saucer, the attack takes the form of electricity flowing between the two gears instead, but otherwise has the same properties. This allow you to change the size and orientation of the attack at will and even catch air dodges with the stream. If this is used by a single gear, it has half of the range and power of the normal form, but has another interesting property: If Up Special is used during the attack's startup, you will transfer the energy to the other gear and release the attack there instead. This allow you to set up some interesting traps and defend your other gear much easier.

Up Smash: Alignment
Instead of directly attacking, this technique aligns Klink's gears in a vertical position almost laglessly, allowing Klink to launch Gear Saucer or Body Purge upwards instantly instantly afterwards. If you use it again after aligning vertically it will align Klink horizontally, allowing for quick ground covering attacks. A very simple move, but it has a myriad of uses for many situations. Charging this smash does nothing, but it can be used to fake you opponent's out and get them to jump above you.


Neutral Air: Rev-Up​
Yes, Klink can use this attack both on the ground and in the air. This allows him to knock people away and keep itself revved up while still moving through the air. Otherwise this attack is exactly the same as the ground version.

Forward/Back Air: Clockwork Spin​
Klink rotates it's outer gear around itself in a quick 360˚ spin, dealing 6-9% damage with moderate forward knockback. The direction of the spin is determined by the direction that this attack is used in. This attack function exactly the same if it is used while separated by Gear Saucer, allowing you to attack a wide area with your extended range.

Up Air: Metal Sound
Klink faces upward and attacks by creating a metallic screeching noise, represented by silver should waves moving upward in an arc above each of Klink's gears. Opponent's hit by these sound waves are dealt rapid hits that total up to 5% damage per seconds, and the sound waves last for two seconds. This attack is great for controlling vertical space, especially since you can change where the waves end up being placed through both Gear Change and Gear Saucer.

Down Air: Body Shot​
Klink blasts its outer gear straight down in a manner similar to Body Purge, damage and all, except you keep control of the other gear and can follow up on the attack. The gear with the higher altitude is fired downwards instead if Klink is separated by Geas Saucer. This makes a great "death from above" type attack if you are just out of range, or a nice combo finisher if you are aligned vertically and have the opponent caught in between your gears. Just be careful not to use it off of an edge, or you will lose your gear for sure.


Grab: Vicegrip​
Klink grabs the opponent by clamping them between its gears, making the entire area in between Klink's gears when it is separated by Gear Saucer its grab range. When Klink attempts to grab, the gears zoom together as if it was retracting its gears from Gear Saucer, and if the opponent if hit by either of the gears, they are dragged into the grab. If Klink's gears are not separated, it simply shoots one gear half of a battlefield platform and back in front of it in an attempt to snag the opponent. Either version of the grab has rather poor recovery time, leaving Klink vulnerable if it misses. The fact that the separated grab looks almost identical to simply retracting the gears means that the opponent can't be safe simply shielding while between Klink's gears.

Pumel: Bind​
Klink grinds and squeezes the opponent for 2-3% damage every 1.5 seconds. If Klink is revved-up though, that damage is dealt every .5 seconds without requiring any input, allowing Klink to go right into a throw while still dealing damage with it's pummel.

Forward Throw: Lock-On
Klink makes some metallic noises before giving the opponent a light shock and tossing them a short distance forward, dealing 5-7% damage. Thanks to that shock, the opponent is now magnetized and Klink's outer gear will always be pointing at them for the next 20 seconds. This means that it becomes extremely easy to hit the opponent with Gear Saucer or even an extremely lethal revved-up Body Purge. If the opponent ends up inside Klink's gears , the outer one will then rotate to keep the opponent within the gears, making it much harder for the opponent to escape your grasp. Using Gear Change or Alignment while locked on will cancel the effect early.

Up Throw: Charge Beam​
Klink separates vertically and fires a beam of electricity upwards from its lower half that deals 10-12% damage with upward knockback that KO's around 200%. However, the beam is slow enough that if the opponent acts fast enough, they can jump away from the attack. They had better be careful about their counterattack though, because Klink can easily use Mirror Shot to cover the direction that they jumped in with 3 separate projectiles by shifting its position after firing Mirror Shot. Charge Beam can also be bounced around indefinitely, like Mirror Shot, but it's damage and knockback is only doubled by the first bounce, with the rest simply reflecting.

Back Throw: Fall Back​
Klink zips backward and leave the opponent where it grabbed them with enough hitstun to guarantee a hit from Geas Saucer. If you are feeling adventurous though, you can attempt to predict the opponent's movements and catch them with a Zap Cannon or Discharge, making this throw either low risk, low reward, or high risk, high reward depending on how you play it out.

Down Throw: Grind Down​
Klink slams the opponent into the ground and spins on top of them and spins in place, dealing and impressive 15% damage then separates its gears to either side of the opponent, setting up a rather unique tech-chase scenario. If the opponent stays in place, they risk getting hit by Mirror Shots, Zap Cannon, Discharge, or even another grab. However, Klink predicts correctly and catches the opponent rolling to either side with a revved-up Zip or Body Purge they are still in a world of hurt.


Hyper Beam

After grabbing the Smash Ball, Klink's gears separate to opposite sides of the stage. After a second of charging, the gear on the right releases a Aura Storm sized beam of white energy forward. For the next 10 seconds, you can direct the gears up and down as you bounce the beam back and forth between the two gears causing it to criss-cross across back and forth at different angles. Opponents hit by the beam take 40% damage with knockback that KO's around 50%.


Klink's playstyle is all about positioning and controlling space with it's gears. The fact that the gears can be put into almost any position means that Klink is capable of responding to almost any situation. The fact that in between Klink's gears is probably the most dangerous place on the stage at any given time means that by simply moving across the stage, Klink is creating a wall that the opponent should be quite careful in crossing. Ultimately, Klink is technically a trap character, but instead of leaving traps around the stage, Klink's own body is the trap. With precise management of Klink's position and alignment, you can cover any number of the opponents options. It all comes down to choosing the right one of Klink's options to commit to. Do you pester the opponent With Mirror Shots at range, or bounce them around and react to the opponent's movements directly? Do you mercilessly hunt down the opponent and try to get them between you gears for Lock-On into Zap Cannon shenanigans, or do you react to the opponent's movements by making walls of revved-up hitboxes. Do you go on a full offensive with speedy gears and quickly switching your angle of attack with Body Purge, or do you play it safe and whittle down the opponents before trapping them for the KO? Or do you mix it up constantly and keep the opponent guessing? Klink has tons of options, and successfully utilizing them for the right situations is the key for success in using it.

Klink is not without it's weaknesses though. Almost all of it's offensive tactics require a large commitment to a prediction of the opponent's actions, and if you guess wrong or commit too early, then you are not able to easily get into a position to protect yourself from punishment. For example, if you predict a vertical approach from the opponent and commit to intercepting them with an Up Smash too early, then the opponent can adjust their course and hit from a diagonal angle where Klink cannot easily protect without realigning its gears. If you use Body Purge and the opponent predicts you trajectory, then they can easily KO one of your gears before you regain the ability to defend yourself. Klink is also weak in the recovery department, only being able to recover long distance by sacrificing one of it's gears in a Body Purge, making even an unsuccessful gimp attempt devastating to Klink.

All in all, Klink is a very odd character that plays in a much different manner than the typical character, but when mastered allows for a player's own personal playstyle to dictate how the character plays. By paying close attention to positioning and commitment, then one may tune Klink to adapt to the situation at hand easily.
 

MasterWarlord

Smash Champion
Joined
Aug 24, 2008
Messages
2,911
*Cuts Ribbon* 5th gen movement is now open!

LANDLOS


Landlos is a member of the infamous legendary trio of genies introduced in the 5th generation of Pokemon, which are based on various Japanese Gods. While they are simply recolors of each other and all share an identical pose for their sprite, Landlos at least has –something- to separate him from the other two genies by being the master of the trio – he can only be found once the other two have, and is level 70 rather than level 40. Landlos also has different, better stats than the other two genies, which have identical stats, and is easily the best of them competitively.

Landlos is known as the God of Agriculture in the Pokemon world, as wherever he (The genies are always male) goes crops sprout up, making him a more creation oriented god to balance out the destructive nature of the other two members of his trio. Landlos creates these crops by implanting his tail (Which is that gigantic tentacle thing he has that looks nothing like a tail) into the ground, enabling him to channel his power through his tail into the soil. Despite these powers, Landlos is Ground/Flying without any sort of Grass typing involved – presumably because Landlos doesn’t use his power to produce crops to battle, but rather for the benefit of Pokemon and mankind. His ability, Sand Force, further implies that his earth based powers are what he primarily uses for battle.

STATS

Size: 10
Traction: 10
Weight: 8.5
Aerial Movement: 6
Falling Speed: 3
Jumps: 0
Movement: 0

Landlos is constantly hovering in the air and as such is constantly treated as if he’s in the air even if he hovers along the ground. Landlos can use his grab in the air, but in order to use his Standards and Smashes he has to root his tail into the ground with his Down Special. Landlos seems to harness his power to levitate from the ground, as he’s only freely allowed to hover 1.5 Ganondorfs off the ground. If you go higher than that/off-stage, Landlos is only permitted to fly around for 5 seconds at max before he must come back into that range, him becoming unable to fly upwards until then and falling downwards at Jigglypuff’s falling speed. Landlos’ main humanoid upper body is the size of Ganondorf’s entire body, while the cloud obscuring his lower half is the size of Bowser. Landlos’ cloud is not a hurtbox, nor is his tail.

SPECIALS

NEUTRAL SPECIAL – STONE EDGE

Landlos raises both of his hands above his head as he levitates up a massive Bowser sized boulder up out of the ground (Or the bottom blast zone) up to where he is, then hurls it in the desired downward direction. The boulder travels upward at the speed Jigglypuff falls, and falls downwards at Mario’s dashing speed. The boulder is a stronger hitbox the farther it travels before smashing into a billion pieces on contact with anything. At minimum the boulder does 8% and mediocre knockback that kills at 200%, but for each Ganondorf it travels the boulder’s power increases by 5% in damage and the kill percentage lowers by 30%. This means the higher you are above the ground/bottom blast zone the more powerful the move is, but it also becomes more and more slow as it the boulder has farther to levitate up into Landlos’ grasp.

SIDE SPECIAL – WHIRLWIND

Landlos claps his hands, causing powerful wind to swirl around his cloud repeatedly before it forms into a Ganondorf sized whirlwind that goes forward at the Gerudo King’s dashing speed the distance of Final Destination. This move is much faster to start up than it sounds, but does no damage or knockback, the whirlwind simply having a suction effect 1.5x as strong as Dedede’s inhale. This suction effect is strictly horizontal, though, meaning the whirlwind can be DI’d out of and the suction effect is very weak if you’re not on the same vertical plane as the whirlwind.

UP SPECIAL – GUST

Landlos claps his hands repeatedly, causing a much larger amount of wind to spin around for a bit more start-up time than his Side Special, then the gathered wind causing him to rise a Ganondorf and be propelled forwards a Bowser. The wind travels forward 1.5 Battlefield Platforms by itself afterwards with a hitbox the size of Bowser, dealing a slight pushback that’s too weak to pull foes along with it very far.

If the wind is within a Marth height of the ground, sand will raise up off the ground from the force of the wind and get carried by it, causing the wind hitbox to deal flinching hits of 1% to those who pass it. After the wind disperses, the sand floats in the air for a second before slowly falling to the ground, having spread out to be half the size of a Smart Bomb blast. During this time the sand still deals flinching hits, but no damage. This can obviously be used to deter approaches, but more importantly if Whirlwind overlaps with the sand it will absorb it into itself, causing foes to take constant hits of 1% and flinching while inside the Whirlwind and preventing them from using DI to get out.

DOWN SPECIAL - ROOT

Landlos extends his “tail” downwards and roots it into the ground. The tail has a maximum range of 3 Battlefield Platforms, and Landlos cannot move further away from the spot than that unless he uses this move again to uproot his tail. This functions as a fairly standard anchor with Landlos not being able to be knocked away farther than the maximum reach of the tail, with foes being able to uproot Landlos if they hit the part of the tail rooted into the ground with an attack that does 15% or more in a single hit. This can be very fast if you start the move close to the ground, but is quite laggy if you’re just barely in range to root yourself to the stage.

This has the more important benefit of enabling Landlos to use his Standards and Smashes, though unfortunately he has to sacrifice access to his Aerials and Grab-Game to do so. For all of Landlos’ standards/smashes, he seems to be deeply concentrating as his “tail” vibrates and bulges as he channels his energy into the ground.

AERIALS

NEUTRAL AERIAL - INHALE

Landlos turns to face the screen and inhales, causing a suction effect twice as powerful as Dedede’s inhale towards his body. The catch is that there’s no hitbox on the move, and this has enough lag to force you to actually think about when to use rather than just spamming it. This move effects tornados and sand brought up into the air by Gust, pulling them towards you at thrice the force of Dedede’s inhale. Not only does this make it so you can more directly block approaches with sand and Whirlwinds a far more deadly projectile to avoid, but if you catch a foe in a whirlwind with sand inside it you can use this move to force the foe to exit their ride exactly where you want them to.

FORWARD AERIAL - EXHALE

Landlos inhales briefly before exhaling a massive amount of wind at forceful speeds. Due to this coming out a good bit quicker than Inhale it only pushes foes at the speed of Dedede’s Inhale, but it works as a simple spacing move. This also enables you to move about sand, making it regain its’ hitbox that actually deals damage briefly (Albeit 1%), and also causes any Whirlwinds the wind is on the same vertical plane with and traveling in the same direction of to double their speed. If you exhale against the force of a Whirlwind, the speed of it will half, though it’s hard to pull this off at all let alone make practical use of it.

BACK AERIAL – WRAP

Landlos extends out his “tail” behind himself a Battlefield platform’s worth with a minimal lag before coiling it up several times, leaving enough room in the middle for Bowser to fit inside, with the height of the coiled portion of the “tail” being on par with Ganondorf. After getting the tail into this position, Landlos brings it back to himself at the speed of Ganon’s dash, during which time you can use the control stick to rotate around the coiled portion of Landlos’ tail, which is completely solid.

In addition, you can press A to cause the coiled portion of Landlos’ tail to scrunch up to grab any foe inside of it, which will cause the foe to go into Landlos’ normal grab when Landlos finishes bringing his tail back to himself. Unfortunately, the grab has a decent bit of lag attached, additional lag if you miss, and foes who anticipate it can just fast fall through the open space before you can catch them in the grab. Heavy foes are easier to grab, but typically have higher fall speeds than enable them to move past the inside of the tail faster. Essentially, Landlos has to anticipate a foe falling into the coiled up portion of the tail to grab them, as it’s usually too late if they’re already inside of it – that is, unless the coiled up tail is in a horizontal position, which means it has a floor so people won’t automatically fast fall through it. Even if you can’t get a grab off, though, the move still proves useful – catch a foe coming to attack you head on by putting your coiled up tail horizontal, then turn it vertical to dump them when they pass over an area where you want to drop them.

UP AERIAL – WIND STREAM

Lanlos turns to face the screen and starts exhaling a constant stream of wind upwards, creating a wind hitbox above him that’s only as tall as Kirby but is as wide as a Battlefield Platform. It’s impossible to pass through the wind stream outside of moves like teleports, the enemy constantly getting propelled upwards to be directly above the wind stream. While the foe can just DI off to the side, Landlos can still move around as well, and the constant nature of the wind bouncing foes up lags them enough so that Landlos is only beaten by the characters with the best aerial DI if they both just DI in the same direction the whole time, and even that will keep the character stuck there on top of the wind stream for a while. Characters with bad aerial DI have no need to worry about bad match-ups, as Landlos’ wind stream slowly lessens in width over time as he holds it out and takes time to recharge, quite similar to Bowser’s fire breath.

Landlos is not limited to only moving left and right and is perfectly capable of still moving upwards, giving him a great way to push foes off the top blast zone. If you’re not high enough to do that, this can still be a great move to help you place the foe wherever you want – if you move over in the way the foe doesn’t want to go, they’ll have little choice but to move in the opposite direction if they want to be able to get out of the wind stream any time soon.

DOWN AERIAL – HAMMER ARM

Landlos turns to face the screen as he brings both of his fists over his head then slams them downwards for a laggy spike that does 12%. While this is quite laggy, Landlos’ flight enables him to flee during the start-up of the attack then come back to hit the foe when the move actually comes into play. Even then, Landlos can charge the attack beyond the initial start-up lag to do up to 17%, enabling him to hold back the attack to try to fake foes out. The hitbox covers most of Landlos’ cloud, which isn’t a hurtbox, but be wary the move has some end lag as well. This in combination with Landlos’ other wind based moves gives obvious potential for gimping.

STANDARDS

UP/DOWN TILT – FISSURE

Landlos causes a fissure over a Bowser sized chunk of ground where his tail is with notable lag, causing either a gigantic pillar 1.5X Ganondorf’s height to rocket up or the ground to bend downwards and leave a gigantic pit 1.5 Ganondorfs deep. There is no limit whatsoever to how much Landlos can do this – he can raise or lower the entire stage as much as he wants, though it’ll all go back to normal once Landlos loses a stock. Raising the stage obviously makes vertical KOs easier – uair obviously becoming horrific, though Landlos himself can sometimes be at risk if you choose this approach. Lowering the stage is generally the more preferable option, as it means you can just poke the foe off the stage to their deaths, while your ridiculous recovery means you have little problem with it. While either of these extremes can be viable, they both require extensive set-up. This is quite a laggy move, but you can obviously use it defensively to cover the lag, such as by staying behind a pillar of ground you’re fissuring up out of the ground.

The main thing Landlos will want to do is to create some sort of single pit notably more deep than the rest. This can either be accomplished by making two tall pillars and dropping the foe into the middle of them, or simply by making a single literal pit. While one would think just making one pit would be the fastest and most efficient way to go about this, foes can climb their way out of pits – treating the side of the pits as ladders (That they climb a good deal more slowly). Pillars fissured up out of the ground cannot be climbed, but can they be destroyed by enemy attacks. If a potion of a pillar is hit by a single hit that does 20% or more, a Bowser sized portion of it will collapse as everything above it falls down to fit the gap. Characters with moves that do this much damage and have low end lag, in addition to high enough movement speed to run before the pillar falls down are exceedingly rare. If you get hit by the pillar as it falls down, you take 20% and get pushed over to the side you’re closest to with large hitstun. If the pit/side by side pillars aren’t too tall, foes can simply attempt to recover out of it – Wall Jumps are shockingly actually exceedingly useful here.

Of course, Landlos has ways to attack the foe while they’re down in a pit, the most obvious method being Stone Edge – stand at the top of the pit/pillar and throw a massive boulder down at the foe that’s just as wide as the foe’s playing space. The boulder does vertical knockback for whatever reason, meaning foes will more often than not have to take a hit to get out of the pit. Your dair proves as another useful method to hit foes who are stuck below you here, as their approach will generally be plenty telegraphed and you can save the charge for when they get to you, then send them back down to the bottom of the pit. That said, if foes are still on the ground they can simply shield the boulder and continue attacking the sides of the pillars (Assuming they’re not just underground), but if Landlos is high enough his boulder will be powerful enough to instantly shatter shields. If it’s not, it’ll surely destroy their shield the second time it hits. As far as getting the foe in-between two pillars/into a pit to start this madness, your absolutely godly spacing moves should be more than enough.

NEUTRAL ATTACK – HARVEST

Landlos laggily generates a random minature field of crops where his tail is that’s as wide as Marth and tall as Kirby. The crops can be walked through without problems and pose no threat to anybody, on the contrary – if you press neutral A next to the crops you can chow down on them to heal 5%. The patch of crops can be used four times before there’s nothing left to eat, but a use of it regenerates every 10 seconds. If Landlos uses this move on a chunk of ground that already has crops, the crops will become renewed.

Obviously Landlos can use this for his own benefit to heal, but if it’s on the ground of a flat stage the crops will more likely than not be far more advantageous to the foe than Landlos, due to him preferring the air. The solution to this is to make crops on a pillar high in the air where the foe can’t easily get to it, giving Landlos more exclusive use of his crops. Aside from this, the crops are obviously a very effective lure and are a superb way to bait the foe into a pit – not necessairily if the pit already exists, but you can make a pillar/pit once the foe is already there, potentially after making sure they stay put with other moves. Besides, if the mere presence of crops isn’t enough to lure foes where you want them, the threat of you using them yourself is.

FORWARD/BACK TILT – IMPALE

Landlos moves his suspiciously tentacle-like tail underground at Ganondorf’s dashing speed for as long as you hold the button and the desired direction, then upon release brings it up out of the ground laglessly before it arches forward an arc the size of Mario’s body, the tip of the tentacle doing 7% and slight knockback, doing 12% and putting the foe in prone if they’re in-between the tentacle and the ground as it goes back under. Landlos’ tail goes back to where it’s rooted at the same speed you can move it normally when it’s not under any commands, and no matter where it is you can use any of your standards/smashes save usmash, you also cannot uproot from the area with Down Special until then either. You can freely use ftilt/btilt regardless of the tail’s location in the ground, this isn’t some move that you have to wait to retract like Hades’ grab. If you manage to put the foe in prone, you can even do some tech chasing with this move – this is more relevant than it sounds, as it can buy you time if you just always “predict” they’re going to come towards you to force the foe to either roll away from you or get hit, giving you more space and thus more time to set up pillars.

This is Landlos’ primary defense system while he sets up all his various stage manipulations channeling through his tail, but this also has other uses if a pillar is already up – most of those uses very campy as you hit a foe repeatedly trapped between two pillars or simply poke at a foe at the opposite side of a pillar as you.

SMASHES

FORWARD SMASH – MUD SHOT

Landlos causes a geyser of mud as wide as Marth to come up out of the ground 1-3 Ganondorfs tall that does 10 hits of 1% and flinching per second. The geyser lasts 4-12 seconds, slowly receding into the ground over that time. This can quite obviously be DI’d out of, but on average you’ll take 12% before getting out of it. This move is quite good combined with your bair. Obviously it can drag them into it, but if you go to grab the foe as you pass over the mud geyser, if the foe escapes your tail coil at that point then they’ll just be stuck in the geyser instead – it’s a win-win situation.

The mud leaves behind a simple traction decreasing (70% more sliding and 33% chance to trip) mud “trap” that lasts 10 seconds after the geyser disperses. This is largely irrelevant, but if a whirlwind goes through the mud geyser it will cause mud to be sucked into the whirlwind briefly and be splattered about in the form of mass simple weak projectiles that do 5% and weak knockback. Wherever these mud projectiles land, they functions as a trap identical to the one left by the main mud geyser. These traps can be brought up by Gust just like sand to be made projectiles again like when the Whirlwind first shot them about, as well as renew their duration.

DOWN SMASH – EARTHQUAKE

Landlos causes all ground connected to the ground his tail is rooted into to quake, causing any foes standing on it to take 20% and vertical knockback that KOs at 125%. This is a fairly laggy attack, but if you charge the move the earthquake can last up to 3 seconds, which will cause a good deal of foes to struggle to stay in the air for such a long period of time, potentially even forcing them to use their recovery special and forcing them into helpless. From there, you can just use wind attacks to blow the foe off-stage before they touch the ground and regain their jumps. Of course, the main way you’ll pull off all this charging to make such a long earthquake is if you’re high up on top of a pillar, in which case you’ll struggle to get down to the foe to actually punish them, so this isn’t as easy as it sounds. If you want to pull off a gimp this way, you can get the foe off-stage, race them back to the stage and start charging the move on the ground level of the stage, then unleash the earthquake and send them off-stage again, or just simply go to dair them into the Earthquake instead. In addition to all of this, while the foe is jumping into the air to escape the earthquake, any mud shot traps on the quaked ground will get knocked into the air a Marth height, being hitboxes that do 3% and just enough stun so that the foe falls back down onto the ground to be hit by the Earthquake.

The other main use of this move is as an alternative to just spamming Stone Edge on a foe trapped in a pit/between two pillars – it’s most notably useful over Stone Edge when a foe is aiming to destroy the pillars rather than jump out.

UP SMASH – EARTH SHATTER

Landlos lifts up a Bowser sized chunk of ground up out of the stage with his tentacle-tail thingymabob, leaving an actual indent in the stage where the chunk of ground was. The chunk of ground actually leaves an actual realistic indent in the ground where it was – this cannot be used on paper thin platforms, and Landlos will have to Fissure up ground to use for this move if there is none to use. Picking up the chunk of the ground is almost entirely lagless, and after this point Landlos is free to carry about the chunk of ground, but is unable to use any moves. Instead, pressing A will cause Landlos to swing the chunk of ground forward while pressing B has him swing it backwards. The chunk of ground does realistic damage based off its’ momentum as Landlos uses it as a flail, you having to swing it forwards and back in order to build it up properly. Pressing Z or both A and B at once causes Landlos to release the chunk of stage, it flying off into the distance based off its’ momentum. If you can’t picture the move, picture the iconic first boss fight against Robotnik in the original Sonic the Hedgehog in which he uses a ball and chain attached to his Egg-Pod.

This is just as incredibly slow as it sounds, taking 2.5 seconds to get enough momentum to swing the chunk of ground from underneath you to be on same horizontal plane as you. At the peak of the ground’s momentum as it gets that high, it deals 20% and knockback that KOs at 120%. The top of the ground isn’t a hitbox and can still be stood on, but only when the ground is facing upwards, which is only when it’s not being swung about. Still, foes have large motivation to try to get onto this ground, as the part of Landlos’ tail can still be attacked to uproot it from the ground, and foes will typically want to uproot it before Landlos can build up much momentum.

The obvious thing to do here is to just build an overly tall pillar so you can start off high in the air to easily build up momentum, but the foe would have to be exceedingly stupid to let you build a Tower of Babel all the way to the top blast zone when they can just whittle it down to size, or god forbid, pressure you. A more devilish strategy can be to make a pillar just tall enough that it’s difficult for the foe to approach over close to one side of the stage, get the foe on the side of that pillar closest to the edge, then pick up the ground the only ground on this side of the pillar for them to stand on and start building momentum as you head off-stage. Sure, the foe can just immediately go back to the stage and be safe, but then they’ll be letting you build up as much momentum as you want and have little place to flee from you once you obtain said momentum.

Mud traps from Mud Shot still stick around on chunks of ground you bring up out of the ground which can potentially cause foes to immediately slide off the ground once they land on it if it’s currently being swung. Crops also stick around on these chunks of ground, which can be a way to lure foes onto the ground to then throw them off-stage with it for a gimp. The chunk of ground never actually shatters and becomes solid ground once it lands, as well, meaning you can place crops far away from any construction work you’ve done on the stage, meaning even the most conservative of foes will think eating the food is safe, then bring that chunk of the stage over where you want it and drop it down, most probably in-between two pillars/into a pit. Uprooting the chunk of stage itself isn’t laggy at all, meaning simple re-positioning like this is very possible with this move.

GRAB-GAME

GRAB – TAIL COIL

Landlos lurches out with his pingas, errr, tail, in front of himself and coils it together in a single simple loop, unlike his bair, but makes the loop tight enough that it can immediately grab anybody caught in it. This has the range and end lag of a tether without the starting lag, making it fairly viable – just don’t spam it. If the end lag is too awkward for you, there’s always your bair as an alternative to lead into your grab-game.

PUMMEL – ABSORB

Landlos absorbs nutrients from the foe’s body into his own through his tail, dealing 1% to the foe and healing Landlos for the same amount with average pummel speed. The foe’s model condenses briefly as they let out a painful sounding wheeze during this attack - for the next 60 seconds, the foe will take 1% every 3 seconds, their stomach occasionally gurgling in hunger, the foe going to look down at their stomach if they’re currently idle. This status effect can be cured it the foe eats crops (Or anything else), making your crops into a far more effective lure. Multiple uses of this pummel renews the timer of the status effect.

FORWARD THROW – BRICK BREAK

Landlos gets a mighty punch ready in a laggy animation before smacking the foe forcefully for 16% and knockback that KOs at 110% - a disturbingly powerful move. The foe is sent flying with such force that they will go flying through destructible walls, destroying them in the process, but after having gone through a wall they’ll lose the vast majority of their momentum and be unable to break additional walls. The use of this is obvious – smack a foe outside two pillars in-between them. While you –do- have to sacrifice a Bowser sized chunk of your tower to do it, it’s well worth it to have such a direct method of forcing the foe into your little prison and even deal 16% in the process.

BACK THROW – UNWRAP

Landlos starts coiling his pingas around the foe, completely enveloping them and coiling his tail around to be even longer than their body if given enough time – at max the amount of his tail he can coil up can be as large as Bowser. Landlos holds the foe horizontal during this process. Landlos continues doing this until the foe would normally escape the grab (They take 3% per second until they escape), at which point he automatically performs his bair, except the amount of his tail he has coiled up will most probably be different than usual. Due to the starting position of Landlos’ tail being horizontal rather than vertical, the foe won’t just instantly fall out of your tail coil due to the presence of a floor. Landlos will extend his tail out twice as far as he normally does with his bair, meaning it’s possible to place the foe pretty much anywhere with this move, and the foe only needs to be at around 70% for you to max out the size of your tail coil on average. Landlos will need to try to convince the foe use up their jumps by rotating around the tail coil en mass, though, so they don’t just instantly jump out of a pit Landlos dumps them in. . .Of course, Landlos can just attempt to re-wrap them instead, but Wrapping them here is even more laggy than usual.

UP THROW – SEISMIC TOSS

Landlos spins around rapidly as he holds the foe caught in his tail for as long as you hold up, during which time the foe can escape, then throws them upwards a set amount of 1.75 Ganondorfs and 6%, at which point they’ll be spinning around rapidly from having been spun around by Landlos’ tail and unable to do anything but use aerial DI, though if they’re hit by any attacks that flinch they’ll be knocked out of this state – obviously your wind attacks won’t knock them out of this, making the foe fodder for gimping or being blasted off the top blast zone with uair. The amount of time the foe is stuck spinning like this is double the time you were spinning around during the charging period of the move.

DOWN THROW – ROCK TOMB

Landlos throws the foe downwards for 6% knockback that can KO off-stage at 200%, but can knock the foe down too far to recover significantly earlier. More importantly, Landlos raises his hands above himself in a triumphant pose as he summons a massive amount of rocks to fall down on the foe – enough to deal 26% if they all hit. The foe has more than enough time to get away before the rocks fall down, but the rocks cover a Bowser width – if they’re surrounded by pillars/inside a pit, then this becomes impossible to dodge.

FINAL SMASH - SANDSTORM

Landlos causes a massive Sandstorm to sweep across the stage, causing a periodic hit of 1% and flinching every second and constantly pushing characters not named Landlos at Ganon’s walking speed in the direction Landlos was facing when he activated the Final Smash. The flinching of the Sandstorm can be dodged, but the damage will be taken regardless of what you do. All of Landlos’ wind based moves will have their push effect stack with the Sandstorm (Assuming it’s used in the same direction), and they’ll also cause the sand in that area to become more focused, causing all of Landlos’ attacks to deal 15 hits of 1% and flinching over their duration on average. The Sandstorm won’t affect any pits you’ve made, meaning foes will be tempted to go down there at which point they’re just fodder to be killed with Stone Edge. The Sandstorm lasts 30 seconds.

PLAYSTYLE

Landlos can attempt to just go for gimps without attempting to rack damage, which is quite tempting considering how many moves Landlos has that don’t deal damage and how you only have access to half of your moveset at any given time. Don’t be fooled by the lack of damaging inputs – the moves Landlos has that –do- deal damage are so beastly that he doesn’t need to deal much damage on a good chunk of his moves.

Getting up your first pillar can be a bit troublesome, but you have more than enough tools to make space for yourself – if you’re not feeling particularly creative and think spamming fair is the only way, try going off-stage and using nair to bring the foe with you followed by an fair, then once you get back to the stage bring up some sand with Up Special to bring up some sand to make foes take more time to approach you. If you still suck enough to not get some degree of space, you can just spam ftilt/btilt so much that the foe anticipates them and dodges in advance. Failing that, you can even bring up a distraction for the foe in the forms of crops. There’s no shortage of ways to vary things up, even if you struggle here.

Once you –do- have a pillar, you can play significantly more campy as you build your pillars taller. Use Earthquakes and Strength on the foe from the top of the pillar, or from the side of the pillar use ftilt/btilt to poke the foe from the opposite side when they think they’re safe from you. As an emergency defense when the foe is about to get over the pillar, you can just blow them back and force them to do it all over again, potentially forcing them to just dismantle the pillar. All this time you’re hopefully making the pillar all the taller. If they –do- get over to your side, send them back to the other side with a casual use of your fthrow, or if you’re closer to the edge (The ideal place to build your first pillar) you can simply use your usmash to either force the foe to risk getting gimped or you getting momentum with the move.

Once you have a mighty Tower of Babel, construction can begin on the second pillar so you can trap the foe inside. You’ll have to move to the opposite side of the pillar and be more defenseless than you were comfortably camping behind your pillar – if you were content to do that, by all means continue. In particular, a KO method you can use with only one pillar once you damage rack the foe enough is to rack up momentum with your usmash up high, then crash into the foe. That said, the pillar you –do- have can still be used while you make your second pillar, so it’s not as hard as it may first seem. You can, say, just continue to camp behind your first pillar until the foe approaches, then just leave them stranded there as you casually go to the other side, considering you can much more easily go over the pillars than they can. If you’re not patient enough for that, you can simply go to the opposite side of the pillar immediately and just aim for a grab, then fthrow the foe to the other side of the pillar, giving you all the time you need to start construction on your second pillar.

Once you have twin towers, all that needs to be done is to force the foe into the middle. You have no shortage of positioning moves to do this with, the most obvious of which is fthrow, but said move will probably start becoming predictable at this point. If the foe insists on deconstructing one of your pillars rather than approaching you, you’ll have to play less campy and bring them there more directly by, say, catching them in a sandy whirlwind and bringing them up to you with nair.

Once the foe is trapped in-between the twin towers, you can spam Stone Edge/Earthquake to your heart’s content to get loads of free damage. If they choose to approach/you force them to approach with Earthquake, you can either force them back down with dair if their damage isn’t high enough or go to KO them off the top blast zone with uthrow/uair. Either way, once you get enough damage uthrow becomes what’s essentially a guaranteed KO assuming you have a functioning brain.

This overview of a typical match with Landlos does not include the potential for making a pit rather than making pillars – the main problem is a pit doesn’t provide you with a massive wall of defense to be campy with, but the fact the foe can be trapped in a small alcove far below you with so little set-up is certainly appealing. Getting the foe into this pit is even harder, though, as foes will just have to casually jump over the pit rather than having to approach a massive tower. If you can manage it, it’s the most streamlined way to play Landlos.

Landlos is generally at his best when played more conservatively. Not only is he incredibly durable and able to heal himself, he’ll probably drag you with him when he finally goes down with nair or bair. As a vague guideline, Landlos is countered by characters of extremes – the obligatory generic pressure character is an obvious one, much less with them usually being the ones with the obligatory generic wall jump. However; the beefy heavyweight with a god-like recovery is also a hated foe due to their ability to resist his gimping prowess and their ability to shred through his pillars with their powerful attacks.
 

darth meanie

Smash Journeyman
Joined
Jun 6, 2008
Messages
452
Stupid Movement, it's not like I like you or anything... I just had an extra set...

WHERE YO CURLEH MUSTACHE AT?


JELLICANT


Jellicant is one of the newest Pokemon from Pokemon Black and White, with the completely unique typing of Water / Ghost. It inflates its air sac with water to propel itself around, and drags its victims down to the depths of the sea to devour them. With its otherworldly abilities, this marine creature will be devastating its opponents in Brawl.


STATS

A stats section? Written by darth meanie? Impossible! Well prepare to be astounded, there's more to come. Beyond these basic stats, Jellicant has two different special mechanics to keep track of on top of them, so make sure you're ready to keep track, there's a lot going to be thrown down right now.

Floatiness: 10

Size: 10
Weight: 9
Range: 9
Jumps: 9
Recovery: 7
Air Speed: 6
Power: 5
Attack Speed: 4
Move Speed: 1
Traction: 1

Those stats are pretty crazy, ain't they? Bet you didn't believe that Jellicant was that heavy, but he's actually over two-hundred and seventy pounds. At over seven feet tall as well, this ghost-o-war is no baby.
He's also got five mid-air jumps, and they're fairly decent at that, so killing him by gimping is going to be diff-i-cult.

Now, then, while Jellicant is rather heavy, that's because he's filled his curly mustache up with water, which he can later use to propel himself across the stage quickly. He can expend the water in a quick jet of highly pressurized stream, but his weight drops down to the level of Kirby.
If Jellicant is struck by a strong attack too (one that causes the crowd to shout and smoke to trail as he flies away from it) then he'll expell all of his water automatically, dropping down to a weight where the same attack will certainly kill him.

Secondly, Jellicant's tentacles have a tendancy to trail behind him, making him incredibly large as they dangle a battlefield's platform from him. This isn't a disadvantage though, as these tentacles constantly secrete a very potent neurotoxin.


This toxin has a few effects. First and foremost, if an opponent touches these tentacles they take hitstun and 2% damage, and take this same damage every quarter second of prolonged contact.n After they escape, they still become poisoned; for every second of contact, they become poisoned for four seconds.


This poison deals a meager .5% damage a second, but as a neurotoxin causes paralysis in its victims. This is displayed in halved move speed and doubled difficulty to escape grabs.


Tentacles are also kind of sticky; they're not grabs exactly, but opponents have to DI out of the tentacles, and will get dragged along with Jellicant where ever he's going when he's caught a new victim.

Of course, while Jellicant's lower half is entirely made of tentacles, his head is not only utterly huge and balloony, but completely vulnerable to attack. If you're not careful, he'll be spiked faster than a dumb broad's drink at a bar.


SPECIALS

NEUTRAL SPECIAL O BUBBLE

Jellicant blows a bubble, which spawns right in front of his curly mustache, then travels out about a battlefield platform forward before floating in midair. You can DI the bubble to float in any direction though.

Any attack will pop a bubble, but if an opponent touches one, they'll be sucked into it. Opponents in bubbles take 6% damage and are stuck until they button mash out at grab difficulty. Bubbles with enemies in them slowly float upwards until they pop.

Jellicant can only have three bubbles out at a time. Spawning a new one then will cause the oldest to disappear.


DOWN SPECIAL O DIVE

Jellicant slowly descends down, down, down, appearly translucent as he descends, right into the stage. He's a ghost after all, right?

Jellicant constantly falls while in this state, but is completely invulnerable. Leaving this state in midair causes him to become helpless though, so don't think you can use this to avoid attacks when you're trying to recover.

While in the stage, Jellicant is completely invisible except for ripples coming from the surface. He can stay 'underwater' for up to eight seconds, lurking across the bottom of the stage, searching for prey.

If he gets beneath an enemy, he'll automatically reach up with his tentacles and drag them down beneath with him. Enemies caught like this can escape at grab difficulty, at which they are spat back up. Until then, enemies take 15% damage per second, and Jellicant can drift around through the stage with them: left, right, and even down.

If Jellicant gets to the bottom of the stage, he tosses them downward out. For stages without playable space beneath the stage, this is a guaranteed KO, and for other stages opponents will certainly be hard pressed to have a ghost of a chance to recover. Jellicant can even leave through the bottom of the stage himself, where with his five jumps and array of attacks he can attack the opponent and still make it back in one piece.


UP SPECIAL O OMNIOUS WIND

Jellicant waves its tentacles in the air as a slow, wailing wind begins to blow in whatever direction you point the control stick. This causes both Jellicant and the opponent to be shifted in that direction at the pace of the wind from Green Greens. The wind lasts for six seconds.

This can be used to give aid to Jellicant's recovery, who with his already floaty nature will barely fall at all. If you blow it to the side it can help him to approach, but the opponent moves back at the same speed. Perform it downwards though, and everyone starts to fall faster. This includes Jellicant, so keep in mind that if you perform it downwards offstage, it becomes even harder to recover. That may be worth it though if you can make it impossible for your opponent to get back onstage either.

Also, opponents in bubbles not only get pushed by this wind, they're doubly so.


SIDE SPECIAL O HYDRO PUMP

Jellicant sprays a huge jet of water in the opposite direction you point this stick, propelling himself head forward at the speed of Captain Falcon's dash. His head deals 6% damage and mild knockback.

It's worse for opponents on the other side though, who are drenched in a torrent of water that deals 18% damage and knockback that kills around 110%. It also starts up nearly instantly, making this already excellent attack even better.

The problem is, doing so empties Jellicant of all the water in his water sac, which drops his weight down immensely. To fill it back up, he has to recharge by filling himself back up with water. Press the Side Special after expunging his body of water, and his head balloons in size as it fills up with water over a full second. Of course, Jellicant is an utter sitting duck at this time, with only his tentacles available as defense in this state. Make sure you've got a chance to refill before you try anything rash.


GRAB & THROWS


GRAB O TENTACLES!

A Jellyfish and a Japanese girl walk into a high school. Stop me if you've heard this one.

Anyways, as you may imagine, a character with a special mechanic based on making it hard to escape grabs just so happens to have a pretty important one. Jellican'ts grab is a tether grab, with range just slightly better than Link's horizontally, but absolutely absurd vertically.

It's also one of the slowest grabs in the game by far, with huge ending lag. This is hardly a problem for Jellicant though, since his tentacles are hitboxes themselves. In fact, this becomes a problem for enemies who think they can spot-dodge to avoid his grab, as they get tagged by the retreating tentacles as he pulls them back. Of course, if they roll around, or you just plain whiff it, you're begging to get your curly mustache handed to you.

Jellicant can even grab while in the air, slowly drifting in whatever direction he was last set. If Omnious Wind is active, that will of course direct him wherever he's going.

PUMMEL O CONSTRICT

Now on to the million dollar question: do grabbed characters take poison damage over time? The answer is yes, but the poison is added at the end of the grab, not during. Otherwise you would always get doubled grab length any time you grabbed an opponent.

For his pummel, Jellicant's tentacles slowly trace over the opponent's body, prodding at their delicate skin... and choke the hell out of them. The opponent gets 2% damage for each hit, and each hit just barely adds to the length of the grab, but only by a couple of frames. Every frame counts though.

DOWN THROW O WRING OUT

Jellicant turns around and begins to twist their body like a rag doll in his grasp. The lower the opponent's damage is in relation to Jellicant's damage, the more powerful and longer this attack becomes. This deals anywhere from 4-12% damage and lasts anywhere from half a second to a second and a half, the longer the grab the higher the poison is as well.

UP THROW O WATER SPOUT

Jellicant raises the opponent over his head, and a giant spout of water rises out of his crown, twice the size of Squirtle's Hydro Pump Up Smash. The lower that Jellicant's damage is in comparison to the opponent, the more powerful this attack is, dealing from 6-15% damage. It KOs at 200% when the the opponent is as healthy as Jellicant, but KOs at 80% when the opponent's damage is four times or more than Jellicant's.

FORWARD THROW O GIGA DRAIN

Jellicant holds the opponent in front of him, and begins to suck their health out as quickly as he can. This isn't as much a standard throw as it is a continuation of his grab; opponents can still escape, but the sooner you transition into the throw, the longer it will last.

For every second the Jellicant absorbs the enemy's life, his damage drops by 2% while the opponent's rises by 5%. They are then released like a grab release, but Jellicant slides back slightly and takes a bit more lag than usual.

BACK THROW O PAIN SPLIT

Jellicant turns around and the opponent hovers in front of him, held in place by ghostly power. Slowly but surely, their damage percentages begin to move back towards each other's values. Whoever has the higher damage percentage loses damage at a rate of 5% a second, while the person with the lower damage rises by a rate of 5%.

Like with Giga Drain, this is an extension of Jellicant's current grab length, and can be button mashed out, but for the duration of this throw, Jellicant is not actually in physical contact with the opponent.

At the end of the attack, whoever ended up taking damage during the exchange takes knockback away that kills around 500%.


AERIALS


NEUTRAL AERIAL O TENTACLE SPIN

Look at those tentacles go! Jellicant spins around, his tentacles thrown to the sides by centrifugal force. Touching his tentacles deals multiple hits of up to 11% damage, along with not inconsiderable time spent in contact with the tentacles.

DOWN AERIAL O WATER SPORT

Jellicant spins slightly and sprays water downwards, with a strong push effect and, 5% damage and flinching. Unfortunately, this isn't an easy gimp, as the flinch resets the enemy's recovery move. If you're already near the bottom of the stage though, that's another story entirely.

UP AERIAL O ASTONISH

Jellicant waves its tentacles around as its head bops upwards, growing in size slightly. Opponents hit by this take a meager 5% damage, but are sent reeling downwards for half a second from the surprising forcefulness of the bump. They can still DI, but can't jump or attack while in this state.

FORWARD AERIAL O TENTACLE SPIN REDUX

You've already seen this move, you say? Ohohoho, this is a lateral spin, this one! Jellicant turns so his crown faces the screen and rolls forward, his tentacles lashing out in front of him, much like Ivysaur's vine whip attack. This has absolutely excessive range, but incredible start-up and ending lag to boot. The promise of a huge amount of damage, up to 15% from multiple hits and contact with tentacles can make this attack seem worth it though.

BACK AERIAL O VENOM SHOCK

Jellicant leans forward slightly, and its tentacles repeatedly stab backwards for 4% damage and moderate knockback each, stabbing four times but only hitting once or twice. This can be angled, but has a long duration. It's a good poking attack when you're not approaching though.

Also, if the opponent in question is already poisoned, they take extra hitstun from this attack, making it ludicrously easy to chain all the hits in.


STANDARDS


JAB O TENTACLE WHIP

Oh yes, we're doing this thing. Each time that you tap this button, Jellicant swings a tentacle forward, striking out quickly first for 5% damage, but slowly lingering around his body, floating around to tingle anyone unlucky enough to touch them.

This is a good way to get some defense out in front, as the tentacles will now linger all in front of you, and can be angled so you have a nice array of defensive tentacles placed where you want.

FORWARD TILT O ABSORB

Jellicant throws all of his tentacles out at once, trying to catch an opponent inside them. As long as this input is held out, anyone touching his tentacles will have their health drained at a rate of 5% a second, healing Jellicant the same amount.

UP TILT O EVIL EYE

Jellicant's head suddenly emits dark energy as a giant eyeball grows out of his head. A giant eye opens up above him as rays of energy pulse from it.

This deals 6% damage and weak knockback and hitstun to nearby enemies normally, but poisoned enemies, or enemies with any other status effect tagged on to them, take double damage and are knocked down.

This has huge range, but has Ganon Up Tilt level lag on it, so use cautiously.

DOWN TILT O CRAWLING TENTACLES

This time, Jellicant's tentacles are spread out along the ground in front of him and behind him, dealing 7% damage and mild knockback to anyone touched by them. Suddenly, standing anywhere near Jellicant is completely unviable. Of course, his head is as curly and vulnerable as ever.

DASH ATTACK O NIGHT SHADE

Jellicant flashes black, and teleports a battlefield platform forward or backward, depending on which way you point the control stick. Much like Zelda's teleport, this deals 6% damage to enemies near him when he teleports, but is too slow to actually surpass his dismal run speed. Take to the air!


SMASHES

FORWARD SMASH O WATER PULSE

Charging up a bubble similar to his Neutral Special, Jellicant shoots out a spherical aquatic projectile. Unlike Bubble though, this is full of water, and continues straight forward when released like Lucario's Aura Sphere.

When it hits an opponent, it continues forward, although it can be escaped from at half grab difficulty. Enemies take 12% damage a second while caught inside it though, and the sphere begins to vibrate intensely, suffocating the enemy as they drown inside, causing them to be left reeling or in their dizzy state when they do eventually escape, spending the same time dizzy as they spent in the projectile.

The longer this is charged up, the faster it goes, although even at full charge

UP SMASH O BRINE

Think Squirtle's Up Smash, but bigger and only in front of Jellicant. A giant torrent of water pours down in front of Jellicant, dealing multiple hits of 15-21% damage. This attack deals downwards knockback, but the knockback especially intensifies as the opponent's damage increases, barely touching foes at low percents, but spiking them at 100% or higher.

If performed on the edge, it also pours offstage, and with a dash attack cancelled Up Smash, you can teleport right to the edge and let it rain.

DOWN SMASH O SLUDGE WAVE

Jellicant rises up in the air slightly and then compresses downward, and a river of sludge splashes out from both sides of him. This river deals constant damage of 8% to anyone in it and pushes foes towards the edge, travelling at the speed of Mario's dash.

The longer you charge it, the stronger the push effect becomes.


FINAL SMASH

RECOVER

Jellicant instantly recovers his body, returning right to 0% health. Boring as all hell you say? Well it IS his signature attack, isn't it?


PLAYSTYLE

SENDING YOUR FOE TO A WATERY GRAVE


I really shouldn't have to explain this too much, since Jellicant is a pretty straightforward moveset. Jellicant is a gimper at its very core, designed to force opponents to their deaths with projectiles, pushes, and grabs that take the opponent down.

Let's start with Jellicant's defensive play. He's got a very strong spacing game as he can discourage approaches by playing with his tentacles, if you know what I mean. Moving them around, or just swirling them in huge hitboxes for his standards and aerials really helps out alongside his damage building game. Bubbles are also great for zoning foes out, and they make enemies perfectly vulnerable for a powerful forward aerial or other attack to get them out of the way.

Building up poison with tentacles and passive attacks is of course all well and good, and it makes it harder for foes to get out of the spacing you want, and makes your omnious wind all that much more powerful. The best way to get your poison up is with your grab. Your grab is absolutely a fantastic tool, and your throws all help ensure that the damage percentages are more in Jellicant's favor, y'see?

When it comes to gimping of course, Jellicant has plenty of options. He'll always, always, always want to have his enemy's poison level to start off with, as even if he's not using a grab to gimp he still needs to make it harder for them to get closer to the stage.

Force the opponent towards the edge with aggressive placement of bubbles, omnious wind, and sludge wave to keep them from using their ground movement to keep them going forward. Bubbles and Water Pulse will be your main tools of killing if you don't want to go offstage yourself, as with a poisoned enemy at high percents in an omnious wind they'll easily carry an opponent to their death. If they do manage to escape, once they head back to edge gimp with up and down air or an off the edge Up Smash.

Diving is of course an incredibly useful tool as well. You can easily reposition yourself under the stage and past traps, and opponents will have a harder time escaping you if they're poisoned so they move slower, and if you have bubbles or otherwise to discourage movement. A downwards pointed Omnious Wind never hurt either, as that'll help once they're actually under the stage too.

Grab them, and use your Up Aerial and Down Aerial especially to take them down to Davy Jone's locker.

With either gimping strategy, you can also chase the opponent and then blast them with hydro pump away from the edge, while sending yourself towards it.

When it comes to close ranged combat, Jellicant personally prefers the air. His forward aerial, neutral aerial, and general floatiness gives him excellent air-to-air and air-to-ground moves, but his ground-to-ground is slow and defensive at best, and his anti-air is completely laughable. His gigantic head is a huge target, and none of his upward facing attacks really do anything to alleviate the problem. Hell, his Up Air actually makes his head bigger.

Play Jellicant cautiously, defensively, and patiently, but take advantage of an opportunity when you get one; you want to strike while they're caught in paralyzing poison, so make sure not to let up once you do get a chance. Play strong and control the stage, and the opponent, and all of your enemies will be sleeping with the fishes.
 

darth meanie

Smash Journeyman
Joined
Jun 6, 2008
Messages
452
C-C-C-C-Combo Maker!!

CRUSTLE


Crustle is another brand new 5th Generation Pokemon, and the second Pokemon to have the Bug / Rock typing. Crustle is a hermit crab that uses a giant rock as a home and defensive shell. Its very defensive, and has a great amount of power as well, but its shell is not invulnerable.


STATS

Fall Speed: 10
Weight: 10
Power: 6
Size: 5
Move Speed: 1
Air Speed: 1
Jumps: 1

Crustle is no speed demon, that's for sure. He's got Jigglypuff slowness on the ground, but with Dedede slowness in the air. He also drops like... well... a rock, with easily the fastest fall speed in the game.

That said, he's got the weight at the same level of Bowser, and more than enough defense to make up for it. It's too bad that he's so fast at falling, if he so much as gets nudged off the edge, he's as good as gone, right?


SPECIALS


NEUTRAL SPECIAL KNOCK DOWN


Crustle shoots a rock out of its mouth at a diagonal angle upwards, dealing 7% damage and a good deal of flinch. An enemy hit by this stone in the air though is instantly sent reeling for half a second though, unable to act until they break out of their freefall.

This can also be aimed at the ground, upon which the rock causes tripping.

Crustle may not do too well in the air, but he sure can make sure you join him on the ground.

UP SPECIAL SHELL SMASH


Crustle can perform this attack any time, any where. Even if he's in the middle of hitstun, or in a grab, Crustle can perform this move, much like classic 'cancels' in more traditional fighting games.

Crustle's shell instantly explodes in an effect practically identical to Charizard's Rock Smash, dealing huge damage, more if the opponent is at a low damage percent. Crustle then soars up into the sky, rising up as high as battlefield is long. However, something is missing: Crustle's shell is completely gone.

Without his shell, Crustle's stats are entirely different, and look a little something like this.

Fall Speed: 3
Weight: 1
Power: 6
Size: 3
Move Speed: 7
Air Speed: 9
Jumps: 6

Completely different, no? With this, Crustle becomes a quicker, aerially competent character, but at the price of becoming light as a feather. Knowing when to use this is crucial to playing as Crustle.

Oh, and if you perform this move again after having already smashed your shell, Crustle just hops up half the distance of Shell Break when you don't have it on.

DOWN SPECIAL DIG


A character with changing weight and the ability to enter the stage? Am I completely out of unique ideas? Is this the end?

Crustle shoves his head down and just sort of sinks into the ground. His mouth produces a special sort of 'rock polish' that breaks down the ground. A shadow appears on the ground where Crustle is, and he can move through the ground at around triple his regular ground speed.

Tap upwards, and he'll quickly tunnel out of the ground with slight lag, but tap Down-B again, and Crustle will blast a block of stone the size of a crate out of the ground, dealing 11% damage and mild knockback that won't KO even in Sudden Death. This creates an indent in the stage, and Crustle can move the boulder around as an obstacle and slide in along the ground as a weapon.

Perform Crustle's Up Special on the ground while standing next to this Rock Cube, and he'll lift it up onto his back as a new shell. How nice!

Any time a character, be they Crustle or the opponent, is hit by the sliding square boulder, they'll take 11% damage and moderate knockback. The boulder has 50% stamina before it's destroyed, this includes when it's on Crustle's back. Only his original shell won't be destroyed from damage.

SIDE SPECIAL ROCK POLISH


Crustle licks its claws and rubs its saliva all over itself very quickly. What's this going to do?

For eight seconds, Crustle's traction drops to nearly zero, and his movement speed doubles. He can now slide along the ground easily, but at the same time, he's easily pushed by enemy attacks, and shield push alone can be enough to knock him off of the stage where he can't recover without breaking his shell.

If he's next to a boulder he carved out, he'll polish it instead, and the boulder instead will slide around at double speed.


AERIALS


NEUTRAL AERIAL WITHDRAW


Crustle doesn't like being in the air! Wake him when it's over. Crustle completely withdraws into his shell, taking no damage and half knockback for the duration. Crustle can't do anything at all until he lands on the ground though (except for Shell Smash), so make sure that you're willing to take the risk of not being able to do anything in retaliation. He also takes a bit of landing lag where he's vulnerable too.

If Cruslte's shell has been broken, he curls up and whimpers in air, spinning rapidly and dealing 8% to anyone who touches him.

FORWARD AERIAL X SCISSOR


Crustle slashes forward with his two claws in a vicious two-hit strike. Each blow deals 7% damage for a potential 14% and high knockback, and it covers a pretty huge area to boot.

This attack is pretty slow though, and with Crustle's lame air speed and high fallspeed, he'll never land it.

Without his shell though, Crustle can perform this attack much faster, making it a very quick move, and with his lower fall speed and high air movement, this becomes an incredible approaching option in his hands.

DOWN AERIAL BLOCK DROP


Crustle turns upside down, falling even faster (were that possible), slamming his big stony shell into the ground beneath him.

Opponents hit by this take 16% damage and are spiked downwards, but if Crustle lands on stage he takes absolutely ridiculous landing lag. It also has a fair amount of start up to it. A completely useless attack then?

Not so, because if the opponent is in a pit in the ground formed from your boulders, they won't be able to escape the blow, as the bottom of the rock remains a hitbox during the ending lag.

If Crustle's shell is gone, he'll lean downwards and rapidly scratch at enemies for up to three hits of 5% each, but with pretty lame ending lag.

UP AERIAL STEALTH ROCK


Crustle leans up and shoots rocks out of his mouth, and three floating rocks appear situated above him. This move is the same be he in his shell or out of it.

Touching these boulders deals 6% and knockback away from the boulder. Crustle can use this to edgeguard or try to trap opponents around, and the move is actually quick enough that he can pull it off in the air while in boulder mode, but only if he full jumps and times it perfectly.

BACK AERIAL SLASH


Crustle twists around in midair, performing a spinning slash that hits slightly around him, but furthst behind him for 11% damage. He's pretty unwieldy in the air to perform this normally, but this becomes a very quick spinning attack for Crustle when he's got his shell missing.


SMASHES


FORWARD SMASH ROCK SMASH


Now this is how you crush some boulders my friends. Crustle holds a claw up, clicks it twice, then jabs it forward viciously as it glows with energy, dealing 16-23% damage and a lot of knockback when sweetspotted.

And of course, if there's a boulder in front of him, it'll explode in a massive blast about the size of an explosive crate, raining stony shrapnel that deals 25% damage to anyone nearby it. Enemies will not want to get hit by this, believe it or not.

You can also hit Stealth Rocks with this that were launched out of hops if you angle this highly upwards, which causes them to burst for 18% damage instead.

DOWN SMASH ROCK SLIDE


Crustle slams his claws into the ground, and many sharp stones rise out of the ground around him and roll forward in front of him, dealing multiple hits that average around 18% damage.

These boulders also knock foes backwards, and chip down hard on shields and last too long to be effectively dodged, pushing foes backwards, potentially into a pit. Foes in a pit are especially vulnerable to this attack, as all of the boulders will end up falling into the pit.

UP SMASH ROCK WRECKER


Crustle looks upwards, and energy gathers around his mouth as he geokinetically forms a boulder a little larger than a party boulder in front of him. This boulder is then launched forward at an upward angle that can be controlled much like Yoshi's Egg Toss.

This is by far Crustle's laggiest and strongest smash, dealing 20-28% damage on hit and excellent knockback. The boulder explodes in a large blast, and destroys any boulders or stealth rocks left behind from it, multiplying the size of the explosion. A killing technique of choice.


THROWS


GRAB CLAW PINCH


Crustle leans forward and clasps the nearest enemy in his pincers, with slightly below average speed but good range. The speed of this grab doubles without a shell, making it a very excellent grab.

His pummel has him snap his claws at the enemy, dealing 3% damage.

UP THROW ROCK GRIND


Crustle tosses the foe overhead and jumps up slightly, whacking the enemy with his big shell for 12% damage and decent knockback. Without his shell, this only does 6% damage and pathetic knockback.

DOWN THROW ROCK TOMB


Crustle throws the opponent to the ground and drops rocks on top of them, dealing 7% and trapping them in the ground in a grab hitbox. Much like opponents who are frozen, the enemy takes no knockback and half damage.

Hitting it with Rock Wrecker or Rock Smash ignores that though, although they take so long to charge up it's hard to guarantee a hit with them.

FORWARD THROW SMOOTH OVER


Crustle releases the foe from his grab, and then slams his claws down on the ground, shaking the stage and tripping the foe for 8% damage in front of him. It also has a strong push effect, slamming both boulders and enemies in front of him forward.

BACK THROW NIGHT SLASH


Crustle turns around and slashes the opponent away, dealing 11% damage and strong knockback that kills around 130% damage. Hey, sometimes you need a standard kill move.


STANDARDS


JAB STRUGGLE BUG


Crustle bites forward and rapidly strikes with his claws for a three hit combo of 3%, 3%, 4% damage. The range of this attack is increased without his shell.

FORWARD TILT STRENGTH


Crustle used Strength!

Crustle can use Strength to move Boulders around!

You know what's happening here. Crustle slams forward with the flat of his claw for 7% damage; this slides boulders across the stage at high speed. Otherwise it's a fully normal forward tilt that can't be angled, and deals entirely horizontal knockback, sliding enemies backwards.

DASH ATTACK FAINT ATTACK


Crustle slides forward slightly, slashing with his claws and dealing two hits of 8% damage. Obviously, he covers a lot more ground without his shell, and even more while affected by Faint Attack.

He's also invulnerable and glows dark during the slide, making this into a powerful approach, but he only can really approach with it without his shell.

DOWN TILT SAND TOMB


Crustle kicks the sand in front of him, and it swirls around the air in front of him, dealing 4% damage and mild hitstun. The area in front of him also becomes a pitfall trap to whoever touches it.

This isn't as much of a problem for Crustle though, as if he enters into the trap, he'll still be able to act, but gain super armor while he's in it. This also means he's completely vulnerable to combos though, so don't treat this as invincibility.

Crustle can also put these tombs in a pit if he stands right in front of the pit. Nice.

UP TILT SAND ATTACK


Crustle kicks up a bunch of sand with his claw, spraying the entire area around him with sand. This deals a meager 3% damage but absolutely huge hitstun. It also has a huge amount of end lag too though, but the sand lingers for a while, making it a decent defensive maneuver.


FINAL SMASH


SUPER ATTACK STONE EDGE


Crustle slams his claws into the ground, and rocks rise up from the entire stage, kind of like PK Starstorm in reverse. Each stone deals 12% damage, high upwards knockback, and a decent amount of hitstun; this can quickly become an incredible killer, but enemies can avoid it by going offstage. Use Stealth Rock to keep them from hiding!


PLAYSTYLE


Crustle is a beast with two different, effective playstyles. Be he with or without a shell though, he's a ground based character at his heart. Crustle has excellent, excellent anti-air capacities; Knock Down is a wonderful anti-air move, and Sand Attack, Stealth Rock, and Rock Wrecker all make it harder for opponents to be in the air.

Crustle also uses pits and boulders to get his real damage in, sliding and slamming them around and using his great control of all things stone to smash the opponent apart. Knocking an opponent into a pit with a sliding boulder, forcing them into it with Knock Down, or pushing them with Smooth Over or Rock Slide puts them in a nice place where they're vulnerable to Rock Slide, Block Drop, or other sliding boulders, especially if you've put a Sand Tomb into the pit. Put some Stealth Rocks over the pits too to keep them from being able to immediately escape, as they either have to break the rocks, or get spiked back in.

Smashing rocks is, of course, Crustle's specialty, and he can get huge amounts of damage from it. Rock Smash, Shell Smash, and Rock Wrecker are all huge hitboxes that are great for building up a lot of damage or getting a kill. Force rocks around to the foe, and force them to stay near them with smart placement of pits, sand tombs, and well placed rocks from Knock Down. Stealth Rock is also good as a weak trap, or a well activated explosive mine from a Rock Smash or Rock Wrecker.

Shell Break is Crustle's number one get out of trouble card, letting him turn an opponent's advantage into damage and knockback for himself, but he becomes hugely vulnerable to getting killed while in this state. Further, it's his only way of recovering, so if you're knocked off stage, you have to break your shell to have a good chance of getting back to the stage.

Without his shell, Crustle loses his slow, powerful defenses, but gains fantastic approaching options, and with his jab, forward tilt, dash attack, aerials, grab, and rock smash can play a more aggressive game with good approaching options. It's a risky way to play though, especially at higher damage percentages, so choose whether it's worth the risk.

Crustle is best situated at manipulating boulders and moving around quickly without his shell though, where he can set up stealth rock in more places, and is much better at pushing foes around with his better approach options.
 

MarthTrinity

Smash Lord
Joined
Aug 9, 2007
Messages
1,954
Location
The Cosmos Beneath Rosalina's Skirt
And voting period is done! Yay! It was a close race this week but in the end, y'all just felt like breaking the painfully simple rules of the mini by voting the one non-Pokemon into first place. Bravo.

1. Jelly Donut by Junahu (7 votes)
2. Zoroark by darth meanie (6 votes)
3. Wailord by half_silver28 (5 votes)

Magikarp by MasterWarlord (3 votes)
Torterra by Kholdstare (2 votes)
Ninjask by Zook (2 votes)
Zubat by Kitsuneko345 (1 votes)
Espeon by phatcat402 (1 vote)
Excadrill by gcubedude (1 vote)
Spoink by Clownbot (1 vote)
Misdreavus by Koric (1 vote)
Zuruzukin by MarthTrinity (1 vote)​

lolfiveminisandonevote
 

LegendofLink

Smash Apprentice
Joined
Feb 17, 2008
Messages
164
Location
Pennsylvania
Yay! Comments!

Luvia
This is certainly an interesting take on the "Magical Noblewoman" stereotype, with her spells being housed in physical objects allowing for their placement in any number of locations. In addition, she is no slouch in close quarters thanks to her grab focus. and close range gem attacks. Unfortunately, for being toted as a user of a unique and vicious style of wrestling, her throws don't quite live up to the hype, simply moving the opponent in the direction you use the throw and allowing you to try to follow up for the most part. The uniqueness of the grab itself is a good start, but it doesn't really go anywhere from there after that. The fact that none of Luvia's aerials (besides the u-air) or smashes incorporate the jewel she is holding is also a shame, because only using them in two tilts and an aerial that copies a tilt seems like wasted potential. All in all though, it does come together rather well as a character that takes down the opponent in close range, dealing massive damage before finishing them off at long range with gems that also have a lot of utility for getting close in the first place.

Cody
Cody reminds me of my Riolu set in Pokemon Breeder, attempting to imitate traditional fighting game styles with lots of feints, cancels and combos. Cody even goes as far as to carry a lot of the mechanics from Street Fighter 4 with him, such as focus attacks, temporary damage, and EX attacks. Unfortunately the using the yellow health as fuel for EX attacks seems out of place, and it makes the Cody player want to get hit during the focus attack, instead of using the (very fragile, especially with how many multi-hit moves in smash) super armor as a sort of ghetto counter for if the opponent tries to knock you out of your attack. The knife mechanic could have probably been implemented a bit better, especially since there is no guarantee that Cody will have access to his knife at any given moment. If he was able to pull it out through some means under his control, then maybe it would be a bit more useful. Outside of the awkward mechanics though, Cody seems to flow a lot better than most combo characters because he has a lot of mix-ups and variations he can do. And I do like the fact that his SSF4 moveset transferred to brawl well enough.

Landlos
Landlos is a trap character with a very interesting trap method. He seems to run off of one thing: inevitability. He is simple waiting for the moment that the opponent trips up once, by using all of their jumps prematurely, or falling into one of his pit traps where they become easy KO fodder thanks to Stone Edge. the fact that he can create food to heal himself or bait the opponent creates a great dynamic wherethe opponent has to come after you or you will definitely never die. This brings me to my main problem with the set: it's survivability. Landlos will just never die. It's one of the heaviest characters in the game, has excellent recovery due to it's psudo-free flight, and it's movement speed isn't too shabby either. Those factors combined with Landlos's camping and healing abilities make it excessively difficult to KO. At least you can tell that I like the set when the only problem I can find with it is that it is a just a little bit overpowered.

More comments to come.
 

Rychu

Thane of Smashville
Joined
Jul 5, 2010
Messages
817
3DS FC
1908-0105-4965
Hot damn this is a beastly page. I haven't actually read them yet, but...I mean DAMN! Great work guys
 
D

Deleted member

Guest
User Rankings Week #9

Welcome to the User Rankings! Every Monday, I'll be compiling the entire of the last week's activity in the thread and showing off, just who is the most active member? The point of this exercise is to recognise the most dedicated among us – those make your movers who are currently pushing the boundaries, as well as highlighting all movesets made by them.

To get on this list, you need to have made a moveset in this or a previous Make Your Move, as well as having posted in the Make Your Move 9 thread. The cut-off point for tallying is 12AM on Monday; other removals or changes are at my own discretion. The breakdown of points is as follows:


25 points for a Moveset
15 points for a Joint Moveset
5 points for a Secondary Submission
4 points for a Comment
2 points for a Secondary Submission Comment
1 point for a Regular Post
+Regular Posts do not stack

This was... a rather monumental week in terms of activity. This is a lot later than usual, mostly due to the massive headache counting up comments was due to my limitation on minis this week. As with the "extras" week, I limited the amount of points to simply posting a mini rather than the number of; at this point, it may well be a permanent change. Accordingly, comments on multiple minis by a single author also needed to be negated. Nevertheless, the amount of points accumulated by the top members was impressive: great job, everyone!

Galloping out of the stables was n88, posting Spiritomb, Fantomex and Chain Chomp in commemoration of his birthday, then going on to give us two projects with Keith, the first audio moveset and the character select screen for Make Your Move 8. Quite an achievement. With an amazing amount of comments on mini and moveset alike, darth meanie returned to the top spot in the overall rankings; as if that wasn't enough, he topped it all off with Luviagelita Edelfelt, his fifth set this contest. In third was Geto, who certainly upped both the quality and quantity of his comments this week - like darth, he was able to comment on nearly everything posted, with a definite improvement in his insight. This was, however, a great week for just about everyone who posted: onward and upward, Make Your Move.

Remember to check out the stadium to find all of the sets mentioned.

Overall User Rankings


Points: 86, Movesets: Goruugu, Aianto, Spiritomb, Fantomex, Chain Chomp, Keith

Points: 85, Movesets: Nattorei, Electivire, Nrvnsqsr Chaos, Toxicroak, Luviagelita Edelfelt

Points: 75, Movesets: Tetris, Harvey Moisewitsch Volodarskii, The Joker Remix

Points: 54, Movesets: Micaiah, Sanaki, Sothe, Cody

Points: 42, Movesets: Ulgamoth, Ronald McDonald, Mephiles the Dark, Steelix, Beeheyem

Points: 37, Movesets: Victreebel, Fat Zombie, N. Brio

Points: 32, Movesets: Tyranitar

Points: 25, Movesets: Bowser Jr., Kaptain K. Rool, Necky, King Boo

Points: 17, Movesets: Muk, Auron, Wiz & Kupa 2, Pyro Jack, Jack The Ripper

Points: 15, Movesets: Gelatinous Cube

Points: 10, Movesets: Gigaiath, The Scout

Points: 10, Movesets: Diglett, Penny Gadget / Inspector Gadget, Blaze the Cat, Windows XP Tan, Airman

Points: 7

Points: 7, Movesets: The Prince, M. Trinity

Points: 6, Movesets: Erufuun, Unlimited Hazama

Points: 6

Points: 6, Movesets: Dark Samus, MegaMan.EXE, Fawful, Pong

Points: 5, Movesets: Miroku

Points: 5

Points: 5, Movesets: Arle Nadja, Yamato

Points: 1, Movesets: Jalorda​
 

LegendofLink

Smash Apprentice
Joined
Feb 17, 2008
Messages
164
Location
Pennsylvania
More Comments Away!

Curly Mustache
I like the focus on extending grab time with a passive poison ability, and you certainly have enough ways to apply it to the opponent too, with basic spins and a super long range grab. The fact that he has two other moves that trap opponents at grab difficulty, Dive and Bubble, also adds to the synergy. Unfortunately, there are places where the focus of the set seems to be off. You put a large emphasis on gimping the opponent with their decreased mobility which, while nice removes the focus from Bubble and Dive, which I felt were set up to be Jelicant's primary kill methods. Another problem is the very awkward water holding mechanic. It makes Jelicant weaker if hit hard, and is only used in one special that does very little to further the playstyle, and has a rather annoying looking recharge that you must use before you can use the side special or regain your weight. Overall, it has a nice concept, but suffers a bit from a lack of focus and tuning.
 

darth meanie

Smash Journeyman
Joined
Jun 6, 2008
Messages
452
Unfortunately, there are places where the focus of the set seems to be off. You put a large emphasis on gimping the opponent with their decreased mobility which, while nice removes the focus from Bubble and Dive, which I felt were set up to be Jelicant's primary kill methods.
Poison makes it twice as difficult to escape grabs.

Bubble and Dive are grabs.

If you get a high amount of poison on the foe, it becomes twice as difficult to escape the bubble / dive as you pull them around. The lowered mobility also factors into making it harder for them to resist Omnious Wind, recover after getting knocked off/under stage, and helps him keep his spacing with his melee moves.
 

Monkey D. AWESOME

Smash Apprentice
Joined
Feb 28, 2010
Messages
143
Location
Coming to terms with having two people in my mind
THIS IS DELICIOUS <3

I've always liked self-insert sets, as they help to give us a glimpse into the MYMer's mind and personality. I'm not sure if I can speak for everyone, but I also think it's just cool to be able to put yourself into a fighting game and choose exactly how you would fight. Even though M. Trinity may not completely be a self-insert, I still like the character. She seems like a nice person once you get past the teasing and apparent insanity
(don't you think she goes a little overboard on the fatalities?
Plus, she's hot. :bee:

Now, to talk about the actual set...

You know, I really think everyone else pretty much covered how I felt about this set. When I make my inevitable advertisement for it, I'll be sure to write more. But for now, the fact alone that this set has a guaranteed ad and Super Vote from me should tell you that M. Trinity is (as of now) my favorite set of the contest. Fantastic work, MT.
 

Junahu

Smash Ace
Joined
Nov 15, 2005
Messages
899
Location
Shropshire Slasher
There's something special about Pokemon that makes them such great fodder for making movesets. This we know already, it has been said innumerable times before, so I can spare you the details about Pokemon's charms.
But what really draws us to this common stage is exactly that, it's something we're all familiar with, and thus a bar we can compare one another to. "Who makes the best Pokemon movesets". It's a silently heated question (Politely adressed as a "movement" in this case) that many of us are all too eager to throw ourselves at, time and time again, in pursuit of a greater meaning within MYM's lax competitiveness.
So, who wins? Well, noone, I'm not a judge. But ON THAT SUBJECT, here are two "comments". :glare: Be happy, these are rare from me nowadays.

Jellooofish (Burungel):
Your understanding of the multifacets of the Pokemon you create movesets for is admittedly engaging for me. You take equal stock from both the Pokemon game in a digitised sense, and the reality of the animal inspirations behind it, and then marry them into Brawl's own ruleset. It's not quite as seemless as my eternal Pokegod, KingK.Rool, but since he's gooone, you're more or less unrivalled now.
For example, your interpretation that this Water/Ghost creature moves through the air as it would through water, is consistant with how I would see a real developer approach the same problem. It worked for Blooper in Mario, it can work for Jellicant.

Something I had to keep scrolling back up to the image for, is to keep checking to see if this thing even HAS tentacles. It seems egregious when you say "all his tentacles", as if he ever had more than two functional ones to begin with. ¬_¬ This isn't Tentacruel, so stop horning in on his racket.
And, as much as I love it when you look at the animal behind the Pokemon, I really don't think Jellicant has any stinging power at all. It's a much more ethemeral, "soul stealing" creature. When I look at it, I just don't see it being so physical with its attacking that it has to resort to stinging, to snare stuff.

Something I notice from Jellicant's learnlist is that, outside of TMs, Jellicant cannot inflict any primary status effects at all. Which is strange, as he naturally learns the attack "Hex" which is stronger if the foe is suffering under a status effect. That alone tells me quite a lot about Jellicant.


Crustle
Similarly to Jellicant (¬_¬ this was deliberate I bet, you crafty dastard), Crustle takes both his namesake, and his real life inspiration, and melds them together well.
I've considered making a moveset for him before, and I'm very very pleased to see how similar our ideas ended up being. I probably would have dropped the entire 'dig up rocks' thing in favour of expanding more on the one he already has on his back (a solid piece of ground on his back? Plenty of material there, no pun intended), but then again, that's just me, and we both know how Pokemon have multiple interpretations anyway.
So, where was I? Oh yes. Good job, and such. Crustle was very enjoyable for me (jellicant was too, btw)

DOWN TILT TRAAAAAP! RABBLELGRABBBBELLE I HATE TRAPS ON TILTS (except when Arche does it :p)
 

flyinfilipino

Smash Master
Joined
Sep 11, 2007
Messages
4,319
Location
North Carolina
There's something special about Pokemon that makes them such great fodder for making movesets. This we know already, it has been said innumerable times before, so I can spare you the details about Pokemon's charms.
In my opinion, in addition to what you said, it's because Pokemon are, for the most part, blank slates that you can put your own spin on. Just take a quick glance at their movelist and Pokedex entries, and the interpretation is mostly up to you, since there's not much of a defined character there in the first place.
 

darth meanie

Smash Journeyman
Joined
Jun 6, 2008
Messages
452
Ah, It's Time for Comments

Cody

The risk of fighting game movesets, especially ones who don't have much to their character outside of their game mechanics, is that they can easily become an adaptation of the moveset to a different system. Where this can get awkward is when the playstyle doesn't match up quite as well thanks to the differences in the system; different styles of combos, shields, specials, and of course, the hugely different KO system makes porting fighting game characters risky.

And Cody does suffer, to a small extent, of this problem. Focus Attack is the big offender, as it introduces a sort of movement / mindgame mechanic and a canceling system that fit much better in a classic fighting game than they do in Brawl.

That having been said, you do, as always, manage to pull a huge amount of content out of the playstyle section. Your playstyles are rarely highly innovative, but always well thought out. Cody suffers though, more than most of your sets, of not having that much interesting going for him. He has his spacing / rushdown game, and he can pick up knives to attack with, but you never get this to fit together much better.

The knives especially seem like a bit of a cop out that they just end up randomly appearing on the stage to give his moveset a small boost. Brawl's entire engine is devoted to being able to include items, so certainly you could have given him more to do with knives, or more ways to help ensure he picks them up, than just making them a small static bonus he sometimes gets.

Regardless, even if the scope of Cody wasn't that expansive, you've got excellent execution, and a fantastically written playstyle section that really develops his use of spacing and rushdown in a more interesting way than most movesets do.

Klink


Klink does end up taking a cool idea and running with it, and you've certainly got some very interesting spacing and zoning witht his guy in how he can twist around the enemy, flank them, and slam together or stat bouncing projectiles around. This is certainly the focus of the moveset, so it does feel awkward that you have a subset of controlling them one at a time when it doesn't seem like there's that much of a real advantage to doing so, or that it's terribly in character to do it either.

Also, that Up Smash is a very awkward input to have a no damage realignment move that isn't even entirely necessary to the functionality of the set. Charging doesn't even do anything, making it a real sore thumb for awkwardness in the set.

That having been said, Klink does fuse unique gameplay with character in a very unrelenting way, and you created a very interesting moveset to use. If there were ways to make it better, I'd say that you probably could have done a little better in how he attacks up close or prevents opponents from getting them out of alignment with quick attacks ; he doesn't really have that great of any GTFO, and because of his mechanic, he has to control a lot of space to operate safely.

Landlos


The first thing that I absolutely have to say is that I'm so proud of you Warlord for not taking the easy way out like I completely expected you to, and giving Landlos aerials and not giving him standards in the air alongside Special Smashes. I'm not sure how i feel about him jamming his tail into the ground, but it's a brilliant way to allow for him to function, so I really can't complian.

Landlos is a set-up heavy stage manipulation character, a trope that I've established for quite a while I'm not a huge fan of. Landlos does do a good job of making that set-up actually somewhat interactive with the opponent in how he spaces and controls the opponent and reacts to the enemy's decisions, rather than just generic zoning and setting up that it's easy to go through.

Of course, once he has set up, it becomes a simple case of trapping the foe and building up damage on them by trapping them between two pillars, and this time it becomes even more of a case of simply wailing on the foe than it was in Dark Bowser.

I'm also not sure about doing this being exactly 'in character', I mean, you can make a decent case for him being able to raise and lower the land, but building two towers and trapping the foe between them is a bit too much of an abstraction for me; I generally try to see Pokemon movesets as attacking through actual strategies associated with the Pokemon, this is just an extension of his abilities into something that doesn't really feel like a Pokemon to me.

That said though, I do understand that there is variance in how people can interpret movesets, so I'm not pressing too hard on that issue, and while I may dispute trapping the foe between pillars, you do do a fantastic job of getting the combination of Ground and Flying into a surprisingly smart gimping based playstyle; as usual, your implementation is top-notch.
 

MasterWarlord

Smash Champion
Joined
Aug 24, 2008
Messages
2,911
GIGIGIGIGIGIGIGIGEAR

First with Sarkhan, and now with this set, your MYMing career is definitely on the rise, LoL. While a lot of the moves are simplistic, they don’t really need to be anything more when even the simplest move introduces a world of new possibilities with how the outer gear can rotate around the inner one to change the positioning of the moves, much less if the outer gear isn’t connected to the main one and is rotating around it in space. Hell, you can even separate them for all the more shenanigans. Probably the best choice for actually using the mechanics you introduced was reflecting the projectiles between the two gears – it’s fascinating how there’s this sort of non-existent wall between the two gears that characters will want to avoid at all costs. While the gears have no real way to space the foe, they have such natural methods for spacing themselves to try to trap the foe in-between each other it isn’t really necessary. Such a blatant manipulation of your hitboxes and hurtboxes reminds me of all the good parts of Miracle Matter and Skeleton, and it just fits here so well and is especially well integrated into the character itself.

Of course, there is a tad bit of filler here and there such as projectiles obsolete to your main ones and an extra use of rev-up in the set, but again, the Gears don’t really need much more. I think one of the main things that dragged down the great set slightly was that playstyle summary, which honsetly feels like it doesn’t know how the Gears play and is just coping out to a degree with generic versatility. You didn’t really make a super specific way for them to play, but the Gears are far from simple versatility, their playstyle is just a bit broader than most.

EVA

Why do I gave the set this tagline? Because Eva is far and away the main thing that makes this set interesting – having to defend Fantomex while he lines up his shot actually appealed to me, unlike DM, especially when you can hang on to Eva for 5 seconds and play around a bit while starting to charge. In general, all of the interactions with Eva were good highlights that built up a campy playstyle where Fantomex tries to avoid ever being hit. The problem is the moveset relies too heavily on Eva, and the moves that don’t utilize her feel rather bland and out of place, mostly just serving as alternatives to stalling for -20- seconds (Which is obviously too long, but just needs a simple number tweak). I do like some of the fake-outs with Fantomx faking an animation then punishing the foe that responds incorrectly by teleporting on top of them and attacking, helping his campy nature, but after the first couple they start coming across as filler and you trying to make lightning strike in the same place twice. I would tell you to focus more on Eva seeing what you –do- do with it is so interesting, but based off what DM said that would make the set OOC. You might’ve been better off doing the set as an OC – essentially all OCs start as blatantly being an existing character, but branch off far enough in the development process that they become their own.

TUTANKOOPA

Chomp has a massive amount of filler, but. . .There’s really not all that much that can be expected of you with this moveset, and you do a pretty damn good job with what you’re given. Never letting the foe go once they get into your range and trying to lurch out by whatever means necessary to force them into your range is an interesting playstyle – and of course, eventually knocking them far enough away so you have enough time to gnaw your way free – the constant threat that makes this otherwise awkward and unviable playstyle interesting and viable. I do agree with what you say in the set in that while Chomp wouldn’t be all that great to play (No, not because of a learning curve), the sheer rush he’d give to play against is more than worth his inclusion in the a MYM fighting game. Perhaps something I’d like to see is more of a playstyle linked together once Chomp’s free, but then again when you’re so overpowered it’s pretty hard to have much of one and rather unnecessary.

TENTACRUEL

DM, everybody in the chat agrees – you seem to of entirely forgot the character you were making a set for here. Burungeru does not in fact have tentacles of any kind, much less tentacles that stretch behind himself a freaking –Battlefield Platform-, and having him rely so heavily on the poison from his tentacles again makes the moveset more blatantly feel like a certain Water/Poison Pokemon we’d all like to see less of. The only ghostly property whatsoever in the moveset really seems to just be him going into the stage, but even Cloyster got away with just pretending the stage was water without ghostly properties – there’s really nothing in here at all to remind us of his secondary ghost typing, the thing that makes Burungeru actually unique. As is, Burungeru plays as a generic gimper, and everything else feels awkward when gimpers are meant to gimp foes –before- they reach KO percentages, largely making the rest of his (Slightly more interesting) game pointless. Don’t use Bubble as an Excuse – even if you can push foes away faster while they’re in a bubble, the fact they float upwards makes bubbles far from useful for gimping, just functioning the same way as it does in Burst Man as an alternative pummel style KO method.

POKESET THAT COULD’VE BEEN MADE 10X BETTER BY JUNAHU

Crustle is just so utterly bland that there’s little to comment on. For the most part, he’s an utterly generic trap character with incredibly bland traps, with only real variation into the system being his ability to break the rocks which doesn’t really contribute all that much to his game, as his goal is to simply get foes into his traps either way. We even get the usual stereotypes of him hating the air and forcing people out of it among everything else. . .This wouldn’t be –as- terrible if this was a generic Rock/Ground Pokemon, but this one has actual potential for an interesting playstyle with Shell Break, which you completely and utterly ignore. Shell Break is essentially just there because it has to be because of the character when it should’ve been the centerpiece of the moveset, not only for the sake of the character, but for the sake of a far more interesting moveset than the one you produced in which the most memorable move was Stealth Rock. How in all goddamn hell are you the master of characterization in Pokesets now that Rool is gone again? Even Junahu acknoweledges everything that’s wrong with both this and Burungeru characterization wise, yet crowns you as king. It so utterly disgusts me.

LUVIALEGLETA EDEPHANTAICIOUSPIDOCIOUS

Luvia’s specials are promising enough what with the interactions between them, but just by themselves they can’t really be much of a foundation for a playstyle beyond perhaps some gimping, which isn’t really in the rest of the set at all. The most we get is perhaps some combos with her pillar of fire PK-Fire like hitbox and her freezing hitbox, considering the rest of her moveset is such generic fodder that blatantly looks like something anybody here could’ve come up with in 15 mins (And thus would’ve taken Sakurai months). Most notably, the grab-game being so utterly irrelevant and just being slightly generically good is a large let-down after you insisted it would play such an integral role in the set and it’s such a big part of her character – I don’t see why you insisted this character had so much more potential than Rin when you barely even utilize her grab-game at all anyway. This set only cares about the specials and does away with everything else without a thought, something Roonahu would be proud of. Based off Junahu liking your other two craptastic Pokesets, you seem to be trying to appeal to him now. Needless to say, you’ve lost the sole member of your audience and picked up a new one in his place. Hope it was worth it – you’ve lost your movesetting talent.

FAILED FIGHTING ENGINE TRANSLATION *NEW*

The only part of the set really worth looking at in Cody is that Neutral B, with the chance to sort of slide around the ground during your other attacks in order to be more offensive/defensive as needed and avoid being hit so you can heal with most probably unrelenting offense so the foe has no chance to hit you in the first place. And after that. . .We have a kick, uppercut, and throwing a stone for –Specials-, so the rest of the set is far from promising. The only other thing you really did that I liked was with the jab, so that Cody always has the potential to be doing something else during the lag on both ends of his moves. Things you could’ve done with the mechanic you introduced was, say, letting the sliding of Neutral B enable you to escape during some end lag of bad attacks, if nothing else, but I can’t even find such an obvious use of the mechanic as this in the set. The playstyle is long and tedious, doing little to help Cody’s cause, and shows what little there is to Cody beyond preferring mid-range.

The main potential you missed out on though? Forget this awkward healing mechanic regardless of it representing a mechanic from his game – use the obvious potential of his chains in more than a whole 2 moves or so. I know he doesn’t really use them and that’s more of Birdie’s thing, but. . .Yeah, when your main thing currently making the set interesting is random healing without explanation, that looks fine. The 2v1/3v1 section seems to be a blatant attempt to appeal to me seeing the set is so cookie cutter otherwise, but. . .Again, just feels out of place on this character. The only real argument for him having this style of set is because of being in beat’em’ups where he has to fight multiple people at the same time, but that’s a rather weak argument when they’re all just generic thugs and not big-name characters. That and. . .Y’know, his moveset blatantly isn’t designed for fighting multiple people at once and it feels incredibly tacked on, the best I can see if I really stretch is the fair/bair as GTFO. All of this stuff that feels so awkward for the character being here makes it hard to take pity on you for picking one with no potential, especially when you barely even use the greatest source of it in his chains.
 

Monkey D. AWESOME

Smash Apprentice
Joined
Feb 28, 2010
Messages
143
Location
Coming to terms with having two people in my mind
BEEHEEYEM

The amazing turn-around coin has shown well regards to the diseased stripling. Further fields are needed to attain the notoriety that this little toaster seeks. Guarding the pancake's pet trout is a delightful endeavor, marked a special occasion by the Christmas tree of Easter. The ice cream licked the doughnut as the bear swam a lap in the land. Your kingship has been decided to rise with the monkeys on the Willy Wonka. Thank you, Old Spice Man.


JALORDA

So much for retiring from solo movesetting, eh, HR?

Jalorda's zoning playstyle is simple and easily defined using only two actual projectiles (which is impressive by itself). The set abounds with personality, and the writing style maintains an air of regality and overall smugness that so befits a Pokemon like Jalorda. You also gave a nice amount of looks into his backstory, which really helped to make this a fun read. The grab game is the only major problem I have this set, though. The concept of sentient leaves felt like something you put in there just for added creativity.

But overall, this was a really nice job, HR. Keep up the good work, whether it's for a solo or joint set!


ERUFUUN

Erufuun reminds me a lot of Sloth, in a way. You put in one defining move at the beginning of the set, and then make nearly every single move afterward interact with it in some way. A lot of the moves seemed pretty dang similar to me at first, like with how many of them started out with Erufuun doing his little dance. But then I realized that this is how Erufuun would probably fight in real life (in the Pokemon world, I mean), so I got over my initial doubts. You really did make the damage racking / gimping playstyle very in-character for the little fluffball.

On one bad note..... A little too much bolding there, Thrice. But a good moveset, all in all.


WIZ AND KUPA 2

YOU MUST FIGHT DRUG-INDUCED INSANITY WITH DRUG-INDUCED INSANITY!!
 

BKupa666

Barnacled Boss
Moderator
Joined
Aug 12, 2008
Messages
7,788
Location
Toxic Tower
MYM Reaches Out, Once Again

I have made us a thread on Eka's Portal, the vore community MT linked me to last night. To them, we are Make Your Meal, a contest dedicated to making -simple- Smash Bros. sets for readers hungry for a literal food fight. If anyone cares to join, here is your link. If not, enjoy the lulz that are sure to be had.
 

darth meanie

Smash Journeyman
Joined
Jun 6, 2008
Messages
452
Silly monkey! You cannot defeat me!

MEOWTH'S DELUSIONAL FANTASY WORLD


Having failed so many times to steal Pikachu, Team Rocket began to set its sights on the simple Pokemon that the twerps encountered on an episodic basis. Having become so far removed from reality, they justified their choices of Pokemon to steal (which were rarely significantly more powerful than the wilds they could catch completely legally) based on the raving delusions of Meowth, who would imagine fantastical situations in which their boss Giovanni could use the Pokemon for a mundane purpose.


The stage itself looks much like Battlefield, but slightly longer and without a middle platform floating on the stage. The stage is also cheery as all hell looking, with bright pastel colors and everything. Giovanni can be seen chilling in the background. A nice neutral stage? Not so, for every twenty seconds or so, a Poke Ball will automatically spawn a Poke Ball on the field, usually on one of the two platforms. Totally a banned stage now, right?

The Poke Ball can be tossed like a normal throwing item, but the moment the Pokemon leaves the ball, Giovanni instantly runs up and grabs it, grinning like an idiot while he drags it off.

Giovanni will then use the Pokemon for some trivial task, here's a short list of some of the possibilities -
(this all happens in the background, and does nothing to affect the outcome of the battle)


Piplup: Prepares his Slip 'n Slide for him by surfing across the stage
Bonsly: Paperweight for some files that kept getting lose
Bellossom: Cheers him up when he wakes up
Gulpin: Convenient garbage disposal so he doesn't have to walk to it
Metagross: Rides it around like its a bumper car
Staryu: Hangs on his Christmas tree
Torchic: To give Giovanni warm hugs
Jelly Doughnut: Food
Spoink: A hat
Ninjask: To help him on his exercising regimen
Mincinnio: To clean up his room for him
Torterra: To give him shade when it's hot outside
Snorunt: To make his lemonade cold for him
Misdreavus: To cast a spell on him to make him happy
Excadrill: To dig up land for his garden
Meowth: Giovanni picks up Meowth by the scruff of his neck and punts him offstage, then begins to pet his Persian. Poor Meowth can't get lucky even in his own fantasy!


Now, there isn't anything I'm missing, is there?


Kholdstare

Nightmare Weaver
Joined
Oct 10, 2008
Messages
1,441
SAFARI ZONE

Pokemon Red and Blue: Evolution
Pokemon HeartGold and SoulSilver: Safari Zone
Pokemon GSC Remix: Surfing Theme
Pokemon R/B/Y Remix: Trainer Battle
Pokemon Ruby/Sapphire/Emerald- Route 101

The Safari Zone is a location in the Pokemon games I'm sure you're all aware of. It's like an African safari hunt, except with Pokemon. You are given a number of Safari Balls and sent out into the preserve where many rare Pokemon can only be found. However, you can't use your own Pokemon to catch the others with- you must lure them with bait or weaken them with rocks. Rocks make it easier to catch them but makes them more likely to run away, and bait does the opposite. You also have a set time limit and number of steps- you can't stay there forever.

This Safari Zone is based on the iconic and original Kanto version. It's a fairly flat walk-off stage, with a pond in the background and wild trees and bushes cluttering up the area, making it seem untamed and dangerous. Various Pokemon will watch from the background, and every ten seconds one of these will scamper onto the stage...


Nidoran♂ / Nidoran♀ - 15 HP - Common
The Nidorans are basically clones of each other- when they come onto the stage, they will wander around, foraging for food. If they come within a Battlefield platform of a player they will use Poison Sting- it's like Sheik's Needles, with a poison effect. These deal a total of 10%, but it's fairly weak. The Nidos are about the size of Pikmin in height.


Paras - 15 HP - Common
Paras is as small as the Nidos. If it comes close to anyone it will use Stun Spore, dealing hitstun and 4%. After that, Paras will flee from the player he encountered at Mario's dash speed and get as far away from them as possible.


Exeggcute - 30 HP - Uncommon
If Exeggcute rolls onto the stage, it will use Hypnosis on the player who comes close to it. When they're asleep it will either roll away or use Barrage, throwing each of its eggs at the player that deal 3% each. Exeggcute's eggs are around the size of a Pokeball each.


Rhyhorn - 100 HP - Rare
There's a chance Rhyhorn will appear as well! Rhyhorn will attempt to use Rollout if he locks eyes with the foe, rolling across the stage at Captain Falcon's dash speed. He will deal 15% and high knockback to whoever he hits with this, and will stop once he hits something. He has constant superarmor and is an ultra-heavyweight. Attack Rhyhorn from the back to defeat him!


Kangaskhan - 100 HP - Rare
Kangaskhan will allow her baby to play on the stage. She'll often flee until she can find a place safe for her baby. If anyone attacks her baby, she'll be filled with rage... and run over and deal a punch that deals 50% and fatal knockback. Do not attack Kangaskhan's baby!

The Pokemon will automatically leave the stage after thirty seconds.

There are also chances of small items appearing on the stage. These are Bait and Rock. Bait heals a Pokemon and holds their attention for two seconds while they eat it. Rock deals 5% to a foe or Pokemon, and Pokemon will immediately attack the player who threw the rock. These spawn even if items are turned off, as they are exclusive. Use these to your advantage!
 

MasterWarlord

Smash Champion
Joined
Aug 24, 2008
Messages
2,911
GLITCH CITY

This is a scrolling stage with two possible start up locations. The first starts at Viridian City, while the other starts at the Safari Zone. Once you've gone through a loop of one of these courses, you'll go through the other course. We'll first start with the course starting at Viridian City.

The two courses are based off paths needed to perform two infamous glitches. The first is the the easiest way to encounter Missingno, while the second is the one needed to get to Glitch City.

Course A: Hunting Missingno

Part 1: Old Man's Demonstration


You fight on the roof of the Virdian City gym, which is owned by Giovanni, leader of Team Rocket. The size of the gym is that of Battlefield, but there are no platforms on top of this building. The gym is currently under construction and being expanded, some construction workers on either side of the gym making large pits that prevent you from simply getting off the gym to fight normally and making this function as a normal stage. You fight here for around 60 seconds.

Occasionally a Team Rocket member will come up and climb onto the roof, throwing a pokeball that releases a random Pokemon that is hostile to everyone. Sometimes he will instead throw an ultra ball which functions like a master ball from Missingno's side special, causing foes to be trapped inside the throwable item until they button mash out, it being as hard to escape as a grab, but this is easy to dodge. The Team Rocket member will keep throwing balls until he's KOed after which he'll fall off the building, having 25 stamina.

After a while of fighting on the top of the gym, an old man will come across the bottom of the screen in front of the gym, down on the ground. He'll sip some coffee and said "Ah, now I've had my coffee and I'm feeling great! What? Don't you know how to catch Pokemon? I'll show you how then.". A Weedle will then come onto the screen and the Old Man will throw a pokeball at it. This has no effect on the battle, although it does change the name tag of player 1 to "Old Man" (Bypassing the 5 character limit) while the demonstration is in effect, or if they have no name tag, that of their character. If you kill somebody while your character is labled as "Old Man", the announcer will actually realize this and refer to them as such on the results screen. After this occurs, a Dragonite flies overhead, and the camera starts following after it.

Part 2: The flight to Cinnabar

Dragonite is a single average sized platform (1.5X the size of a battlefield platform) in the air with ungrabbable ledges, being sized up slightly to make a reasonable arena. Other generation 1 flying Pokemon will join the flight as Pidgeot flies to Cinnabar, mainly Pidgeots and Fearows, coming in and acting as other platform when they appear. This phase of the stage lasts 30 seconds.

Part 3: Missing Numbers

Dragonite will land on Cinnabar Island, then be off on it's way. You fight on top of the abandoned Cinnabar lab, it having the same size as the Viridian City Gym. The water here functions like the water in Melee to keep this stage as a standard one, or at least a counterpick. However, this is far from without hazards. . .Why do you think we talked to the old man and flew to Cinnabar?

Various glitched Pokemon not meant to appear here will come up out of the water and climb up the lab to attack, being hostile to everyone. Upon getting on top of the building they'll perform their pokeball Pokemon effect (Pokeball Pokemon positions are made for all the Pokemon that appear here.). They thankfully come up fairly rarely, only one per 30 seconds. The Pokemon that come up out of the water depend on the names of the combatants, the name of the person to be looked at being chosen randomly each time. The system is then the same for Missingno's fsmash as for which Pokemon appears. If Missingno itself is to appear, he'll act as an extra combatant hostile to everyone, but as weak as an alloy. For the Kabutops Fossil/Aerodactyl Fossil/Lavendar Ghost, the same thing happens, but Missingno will exclusively use his dsmash/usmash/nair when spawned, respectively. If a Missingno touches an item (It being unable to pick them up as a stage hazard), six more of it will appear, causing this stage to much more chaotic with items turned on.

This phase of the battle lasts 2 minutes, then Dragonite will appear and you'll redo part 2 of course A before starting up course B.

Course B: Finding the Lost City

Part 1: Safari Hunt


You fight at the entrance to the Safari Zone on top of the building that allows you to enter, it being the size of Battlefield. On the sides of the building are some people working on expanding the entrance building in the same manner as the workers expanding the Viridian Gym in Course A, making pits on either side. Towards the camera (The opposite of the background, the camera being zoomed slightly more out more than usual from the fighters) you can see the actual Safari Zone and all the various Safari Zone Pokemon that reside there. The common ones are regularly seen as extras not affecting the battle, but the three rarest ones actually do affect it, one showing up every 30 seconds.

Chansey
: Comes up to the entrance building and uses softboiled, throwing an egg up on top of the building. If items are on, this functions as a containe with another item inside, otherwise it simply heals 5%.

Kangaskhan
: A baby Kangaskhan (The ones seen in the main kind of Kangaskhan's pouch) wanders up onto the building, climbing up. It functions as a weak throwing item during this time. However, after 15 seconds of this, an adult Kangaskhan will climb up on top of the building in search of her baby. If anyone was holding the baby when she came up, she'll rapidly uses Missingno's ftilt, Dizzy Punch, on them, until hitting them or the stage changes to the next part. After hitting them once or getting on top of the building to find the baby not in anyone's possession, she'll put the baby in her pouch and hop off. If you throw the baby off the stage (You kill babies! You're so cruel!), the adult will not appear.

Tauros
: Tauros hops on top of the fence border of the Safari Zone, then bounds up on top of the roof. If no character wearing red appears, Tauros will simply hop off the building back into the Safari Zone, having no effect, but if there is one Tauros will charge at them, being a hitbox that does 15% with above average knockback. Tauros will run off the stage to it's doom, moving at the speed of Captain Falcon's run.

After a minute and 30 seconds of this, Dragonite will swoop by and the camera will follow him, and you'll have another flight to Cinnabar phase.

Part 2: The flight to Cinnabar

Identical to the flight to Cinnabar found in course A.

Part 3: 500 Paces

Identical to the Cinnabar Island phase of the first course, except no Missingno/glitchy Pokemon will appear to attack you. This part of the battle lasts until the characters walk a combined distance of "500 steps", a "step" being the distance of a quarter of a Battlefield platform. This means this phase lasts around a little over a minute in a one on one, while it's very brief in a FFA, lasting only 30 seconds or so.

After walking your 500 steps, you'll hear a "Ding-dong!" sound and a voice saying "Time's up! Your Safari game is over.". A cinematic will occur as the screen blacks out and the characters are seen walking out the entrance of the Safari Zone building as the clerk says "Did you get a good haul? Come again!". When you walk out of the Safari Zone, the cinematic will end, and you'll find yourself in glitch city.

Part 4: Glitch City

In the center of the stage is a bunch of water that function as a normal platform, and on the sides of the stage is ground (Albeit really glitched up ground with random pieces of terrain making it up) that functions like the water in Brawl. This will regularly switch around back and forth, and if you're sinking in the terrain that is functioning as water you'll be shifted up above the ground. While there's nothing to prevent you from walking off the sides of this stage, you'll appear on the other side of the stage after doing so. The only way to KO anyone here is off the top of the screen vertically. The background is made up of random spliced graphics and numbers which are constantly changing.

After 2 minutes of this, Dragonite will fly in to take you out of glitch city, the only way out of Glitch City always having been to fly out. You'll do the usual 30 second "Flight to Cinnabar" phase, then Dragonit will land on top of Giovanni's gym and you'll go through course A.
 

Katapultar

Smash Lord
Joined
Nov 24, 2008
Messages
1,284
Location
Australia
Ancient Castle


Ancient Castle is a location in the Unova Region. It is home to various Pokemon such as Desukan and Volcarona/Ulgamoth. It is implied to be a location similar in light to Egyptian Pyramids due to the existence of Desukan. The painting of Volcarona on the wall probably implies that it was revered as a God in ancient times like Horus the Egyptian Sun God.


The MYM Stage of Ancient Castle pays tribute to the wonders found. To start off, the green area is where the players spawn, and the squares of the grid represent a SBB in measurement. The sand-colored blocks are merely aesthetic pillars on the actual stage that support the platforms you fight on, don't worry about them.

In terms of playability, you're given 4 SBBs worth of territory; a fair amount. The floor you start on happens to be composed entirely of drop-through platforms, meaning that it's pretty easy to travel around.

Scoring KOs on this stage isn't necessarily as easy as on others. See those brown blocks? Those are solids; because of them KOs can only be scored at the sides of the stage....initially. You see, it's possible to destroy the blocks by inflicting 20% onto one. Though you might want to be careful how you go about doing it if it's the ceiling you want to destroy: once a block is destroyed, sand will pour from the gap. 2 SBBs worth of this stuff comes down at Sonic's Dash Speed, and if anyone's caught in it's path they'll be dragged down to the bottom unless they have decent enough aerial speed to escape in time; this sand goes through the initial drop-through platforms and so do the victims. Granted, the floor at the very bottom makes it safe enough as you won't get KOed or anything like that with the sand remaining a harmless pile on the floor. But don't make this a habit; if you continue to force more sand to be released, the entire capacity released will stack and become a sand ocean after 3 destroyed ceilings. Any character that stands on the sand will begin to sink at 1/2 their fall speed; they'd better mash the jump button to escape: if their entire body sinks into the sand, they'll drown in it for a KO. As said before the sand ocean forms after 3 destroyed blocks; at this point it is 1 SBB in height, but every extra block destroyed will add 0.5 SBBs. The ceiling consists of 13 SBBs; it takes 3 to make a sand ocean of 1 SBB; the extra 10 add 5 SBBs worth of sand (with 0.5 x 10 = 5). At this point the only safe places will be the 2 platforms at the top of the stage.

Don't forget that you can also destroy the blocks at the bottom of the stage. If you destroy at least 1, the sand that comes from the destroyed ceiling blocks will sink into the created gap, thus rendering it completely harmless...except for the fact that destroying a floor block will lead to the abyss below...this means that players risk being dragged down by the sand for a KO.

The above concepts alone make the stage a fairly different play, but wouldn't you like to know what's up with those 12 Desukans? Well for the most, they are actually plain coffins. If one is attacked, it's door will open up and act as a wall for the direction the coffin is facing for 3 seconds before closing. They can also be picked up in the same manner as a crate and thrown to inflict similar damage; one could throw a coffin at a ceiling block to destroy it for safety precautions. It's also possible to use a coffin to float on sand; here it will lie on it's backside and act as a platform, but it has 50HP and can be permanently destroyed for whatever reason.

That's not all the coffins do: if a player is knocked into a open coffin, they'll be trapped in it for 3X grab difficulty. Opposing players can throw the coffin to the side of the stage, destroy the ceiling above the coffin to send it to the abyss, or throw it into the sand which drowns enemies in the usual way.


For the most attacking a coffin is relatively safe, but on each side of the stage 1 of these coffins is a actual Desukan. If attacked or grabbed, the Desukan's eyes will open and it will stretch it's arms to grab the offender to trap them inside of itself - don't try using minions or ATs to do your dirty work because the Desukan will still go for the actual player. While somewhat quick this can be spotdodged (unless you tried to grab it, to which it is inescapable), but if you're caught, you'll be stuck inside the Coffin Pokemon for 5.6X grab difficulty and will take 5% a second. Despite this it's ok for other players to attack or grab the Desukan if it has a victim; enemies should try to throw the Desukan off the stage with the victim to kill 2 birds with one stone, while allies should try to attack the Desukan to open it's door and free their ally. A Desukan that's floating on sand will automatically grab any player that stands on it and will trap them in inside itself. If the victim does not escape within 13 seconds, they'll drown from the sand for a KO. While Desukan seems to be immortal for the most part, it can be destroyed by dealing 250 damage to it, though you could just as easily keep it alive to try ans use as a weapon against dumb foes.


There's generally 2 options when playing on this stage; either keep the floor alive and make a sand ocean or destroy the floor and allow a bottom blast zone to exist. Generally the 12 coffins won't last forever; for the start of the match they make good walls though they are mostly doomed to being sent to the abyss or used as floaties. Just be sure to take a degree of precaution when attacking a coffin because it could be a Desukan; good chance that any smart player would be too paranoid to chance a attack on one as being trapped inside a Desukan can potentially cost a stock, given how long players will usually stay trapped inside one. If you're opponent is willing to touch the cold water and attack a coffin then you know that one's safe.

On this stage, it only takes one daredevil to change it all; whether it be destroying the floor or ceiling. Considering the chaotic nature of Smash sometimes you just have to go with the flow. As all the blocks and coffins fade, the stage becomes fairly generic afterwards. In the end you'll either end up with a sand ocean (if one is made at all, it becomes impossible to destroy the floor blocks) or a abyss below. Just be sure to have fun!


By the way I used Desukan instead of it's English name because the forum sees part of the Pokemon's name as a cuss word. You can't even use the offcial artwork image from Bulbapedia because it has the Pokemon's name in it!
 

Katapultar

Smash Lord
Joined
Nov 24, 2008
Messages
1,284
Location
Australia
Since I'm bored I'm going to speak of your fat pastries in a way that might be a bit monotone to ya.

For example, the Pokeball looks pretty nice. I'll give you a good background that everyone will enjoy:


See that ball? That's what you're fighting on. Now you can't see yourself! What a interesting stage you made...


There will always be a man of the ocean that will try to overtake your voice, which of course happened when the second one announced his existence. Now, while there's usually open space for a small one or two it was not apparent here. That said, the funny bones became active once the fake Poke'd effects were in time. That was pretty ok, but It seemed that MasterWarlord made this from the unusual writing. Also what is absent in your folder of broken fantasies is Heatran cooking Giovanni's sausage. What a sizzler that would be!

Once the broken bells rang, it became told that the third would try to overcome the other two with a giant lump of bread. On it are molds which you are expected to digest. Fortunately there is therapy music there, as it would be painful to not cease dancing. The flavoring wasn't massively decent, but it could be bitten into nicely.

The red dread was a blast from the past, but that's more than alright as once you took the effort to do something that wasn't necessary. Yay it is a yay indeed. This came into my burnt eyesight over a year ago when the masses weren't aware of my purple coating.

Maybe somebody else will sprinkle some salt onto the plate that hasn't been licked yet. The shining coat of gold's equal might have been seen by myself, and perhaps he'll 28 this page up. Who else it is uknown.


http://aryion.com/forum/viewtopic.php?f=38&t=26011

My 9-faced self cannot access this grand work of dark unknownality. Does anyone else sink in the same bathtub as myself?
 

MarthTrinity

Smash Lord
Joined
Aug 9, 2007
Messages
1,954
Location
The Cosmos Beneath Rosalina's Skirt
The Distortion World​

The Distortion World is a location found only in Pokemon Platinum. Distortion World is a not so much a location in the Pokemon World but rather an alternate dimension where the Renegade Pokemon, Giratina, reigns. The player enters Distortion World after Giratina drags Team Galactic's leader Cyrus into it to prevent him from destroying the both worlds using the powers of Dialga and Palkia. The Distortion World is truly one of the most bizarre areas in any Pokemon game. . .it's also why Giratina's not on Spear Pillar obviouly; he's in his own home!


As you can see, Distortion World is a strange realm where, depending on the layout of the land, you can walk on walls, ceilings, whatever. You can totally defy the laws of gravity in this world as there truly are none. The Distortion World and Giratina itself represent antimatter; they are nothing yet manage to exist at the same time. Below is the layout of the stage. . .I'm writing this up in a bit of a rush before class so try to understand that it's not the greatest quality.


As you can see, this world isn't exactly like any other stage in Brawl. Those purple little dots are actually portals. This is your main way of navigating around the stage. All players will start off on the center "island" of the stage. If you were to jump into the portal on the top left of that "island", you'd be teleported to the "island" on the left. Controls are adjusted to perspective, so if you're on the left island, you'll be walking up and down the wall, pressing up will move you up the wall while pressing right will make you jump. Likewise at the top of the stage, pressing down will make you jump and holding up will make you crouch. It takes a bit of getting used to but once you've mastered it, it's not too tricky and just a bit jarring.

You'll obviously want to KO your opponent through the gaps of the stage, but do note that if you smash an opponent into a portal, they'll continue taking their knockback as they fly out of the other portal. Maybe you could peform a full circuit if your opponent's damage was maxed out. . .? Maybe not though.


But of course, this is Giratina's realm and it really does rule all here. Every once in a while, Giratina will appear at the center of the stage with a terrifying cry! It, of course, is in its Origin Forme considering it can show its true form in its own realm. After a few moments, Giratina will perform one of several options.

Ominous Wind: Giratina lets out another cry as a light purple vortex of energy spirals around it, building in speed the more it rotates. After a few seconds of this, Giratina screeches as the wind shoots outwards. The wind will then strike the "islands" sending them spiraling around the stage clockwise. For example, if Giratina uses this on the default stage, the bottom "island" will be flipped around to the top of the stage and vice versa. This won't throw characters off the islands or anything...but it will greatly confuse everyone involved.

Shadow Force: Giratina slowly fades to black as its cry echoes throughout the stage. A moment later, Giratina will fly directly downward and into the stage. You have only a brief two seconds to escape into a portal as Giratina will then reappear within the stage, shattering it to pieces. If anyone is still on the island when it explodes, they'll instantly fall to their doom as the portals on the bottom island will vanish along with the island itself. After ten seconds, Giratina will reform the platform.

Shadow Ball: Ready for a little bullet hell? Giratina will open its mouth wide as it begins charging shadow energy in its mouth. A few moments later, Giratina will spray a spiral of Shadow Balls across the islands, spraying them in a counter-clockwise pattern around him before reversing. Being hit by a Shadow Ball will deal 15% and medium knockback, so try and dodge it!

Ancient Power: Giratina's final attack option is quite a strange one and one it cannot do if it's destroyed one of the islands. You see how the islands at the top (of the default stage) are three seperate rock islands? Giratina will open its eyes wide as they glow purple signifying this attack is about to begin. Shortly after, each of those three rock islands will begin to glow purple! A moment later, Giratina will let out a cry as it hurls all three rock islands into the remaining three islands (the boulders can obviously pass through Giratina since it's a ghost). These rocks will then lodge into the stages, changing the terrain quite a bit. They'll also deal a mammoth 40% and high knockback if they hit you midflight, so make sure to stay out of the way! After ten seconds, Giratina will return these rock islands to their original location. Do note that you won't instantly die if you're on the islands when Giratina throws them (but you may be hit by them if you're not careful!).

Music

Giratina Theme
Geechisu Theme
Lavender Town
Mt. Pyre
Deoxys Theme
Arceus Theme
 

Koric

Smash Apprentice
Joined
Feb 10, 2006
Messages
84
Location
Aiken SC

Hoenn sea route


This stage is similar to the Pirate ship. However instead of traveling on a ship, the fighters will be traveling on top of a wild Wailord as big as a normal sized stage. This oblivious Wailord will causally travel on its path from route 124 to route 134 with many things that could happen in between. Each route will take about 2:23 minutes before transferring between routes. The tide can also be random and could affect the stage height during the route. Of course when a character is on the water tide, the character will drift to the right side of the screen depending on how fast the current is or how fast Wailord is moving.

Occasionally as it’s a whale, Wailord can eject a stream of water through its blowhole. If someone was to be standing on it or if its rumbling for 10 seconds, it will release a stream of water that can also act as a lifeline due to its very high parity. At the very start of the water stream, if someone is standing under it, they will be launched way high…and could be fatal for a light character during a high tide. The top of the stream after the release can be use as a platform as similar to Doki Doki Panic. (or Super Mario Bros 2 if you’re American.) Also Wailord’s tale can be also use as a platform, just don’t stand on it for too long or it will use tail slap to knock you back to the arena with 3% damage.

Keep in mind that this Wailord is currently searching for food, so when it detects something that seems to be eatable in front of it, it will slowly open its mouth and devour the target while increased water current in front of Wailord. When Wailord eats a character, it will quickly dive below off screen so that the character will die and will quickly resurface within 0.40 seconds.

There are several routes that can allow Wailord to dive underwater if he chooses to go there. If he decides on its current route and the area has no pokemon nearby, then Wailord will go underwater after the first 30 seconds since entering the route. Similar to the stage of Ice mountain, there will be a set of flashing red warning arrows indicating that Wailord will use dive soon...meaning you better be on Wailord soon. When Wailord dives, it will travel very fast that it can wash away anyone that was not on at the time. (aka trying to recover offstage, jumping, or anything that not standing.)

While underwater, the gravity is shortened and your attack frames will be slower by 10%. Don’t worry, the character won’t drown or certain characters won’t become stronger or weaker. However, there will be a moving ground to stand on other than Wailord, but you can still go off screen on either direction. The underwater pokemon for that route will appear without fail. It will remain underwater for 1:10 minutes before resurfacing above the tide.


The Routes​

During each route Wailord takes, there is a 75% chance that the pokemon of that route will choose to come out from their nest and decide to interfere in the match. The pokemon varied depending on the route location.

Route 124
Wailord speed – fast
Dive – Yes
Pokemon – Chinchou (dive)

This marks the start of its daily run. There is a small amount of rocks showing in the background and no Pokémon would pop up normally. However Wailord may dive under and will slowly travel underwater. During the time underwater, a Chinchou may appear and use the light of its antennas to shine light in the darkness. If the items are on, Chinchou may show any enabled items that are floating around it either it be a ray gun, a homerun bat, dragoon pieces, or even a smash ball. But you can only attempt to grab it when it’s visible.


Route 125,
Wailord speed – steady
Dive – No
Pokemon – Spheal, Zubat

The waters of this area are shallow thus making Wailord’s movements slightly limited. The background shows the overall front view of Shoal cave for the duration of the route. In this route, characters may encounter several Zubats returning from a night of forage. As they fly way above Wailord, any character that gets in the way will be grabbed by its fangs and used leech life on the foe for small damage. It does not stop a heavy launch however.

Spheal may come out either far away in front or close behind Wailord seconds after when the Zubat passed through. In front of Wailord, Spheal will use hail storm to surround the area outside Wailord with hail for 15 seconds causing 1% damage to characters away from Wailord every 0.2 seconds. From the back of Wailord, they will use Ice ball to target the closest person starting from Wailord’s back to the middle point of its body. The ice ball does little damage and little knockback, however the more it uses Ice ball, the more damaging the attack will become. Spheal will keep using Ice ball for 10 seconds.

Route 126
Wailord speed – normal
Dive – Yes
Pokemon – Pelipper, Clamperl (dive), Chinchou (dive)

After taking a small narrow path, Wailord ends up at Route 126. Here, Wailord will circle around an inactive volcano as it continues to look for food. The Pelippers here are also looking for food as well, but unlike Wailord, they looking for ends meat…and the characters look quite tasty to them. They will occasionally dive down at a character to grab them inside their beaks and tries to go off screen with you. Like a grab, you can break free from their beaks as if you were grabbed by a person…however the character will receive 4% for each second they are inside one of their oddly long mouth.

The view underwater can mimic the path on the surface. Enough to make Wailord’s travel speed unchanged. The underwater floor may seem clear enough, but you should be advice of the Clamperl that lives in the floor underwater. Chinchou also lives underwater in this area so you can also see clearly what items that are underwater, especially the Clamperl. Clamperls are originally docile, but if their shell is attacked, they will open their shell and violently clamp forward as it hops forward. The damage and knockback is as lethal as that of the chimera at New Pork City.

Route 127,
Wailord speed – fast
Dive – Yes
Pokemon – Wingull, Tentacruel, Clamperl (dive), Gorebyss (dive)

Route 127 has many islands that may seem like it can be inhabitable whenever it possible. The path is clear enough to just speed though. However this can greatly benefit the hazards that lie before the characters. Wingulls may appear in the sky and may use water gun on the characters that are standing in the same spot often. The water is sometimes powerful enough to send the opponents off Wailord and occasionally near Wailord’s mouth. The waters are also infested with Tentacruel. They drift motionless in the waters and dive when they sense a predator nearby only to reemerge behind Wailord. When a character touches Tentacruel, they will be bind by its many tentacles. Unlike a normal grab, the bind from a Tentacruel is more difficult to get out from. Either get out of the Tentacruel or get killed by going far away from the arena range or get eaten by Wailord.

Underwater, there is just enough light to see everything without the aid of Chinchou as the visibility among the darkness. There are several “deep sea scales” drifting around this route. They can be grabbed and be used as a throwing item that can do a decent knockback and low damage. However you should note that when a clamperl use clamps and it overlaps a “deep sea scale”, it will evolve into a Gorebyss. At that form, Gorebyss will swim below Wailord and stab anyone who comes near it with its beak for moderate knockback and 15% damage.


Route 128,
Wailord speed – steady
Dive – Yes
Pokemon – Luvdisc, clamperl (dive), Huntail (dive)

The trail is very short and the ideal area to rest. From the view of the background lies the shore of Ever Grande island. At rare times, there would be a space shuttle firing from the island. Luvdisc would sometimes appear in swarms as they quickly travel past Wailord. Occasionally one Luvdisc would stop somewhere around Wailord and makes a straight high jump and use Aqua ring. Any character/s that touches that certain Luvdisc will have their health recovered by 2% every 5 seconds until the minute has past.

The pokemon located on the underwater portion are the same as route 127, however except for the deep sea scale" that appears underwater. There will be many “deep sea tooth” that drifts underwater. If used as an item, they can inflict a decent amount of damage, but has poor knockback. If Clamperl overlaps one during its clamp attack, it will evolve to Huntail. As Huntail, it will travel much above Wailord and grab anyone who comes near it. After it grabs a character, it will begin to bite on them doing 2% damage per bite. The character can be release as if it was a normal grab.

Route 129,
Wailord speed – slow
Dive – No
Pokemon – Wailmer

Route 129 is Wailord’s nest. Orginally Wailord would stop here, but it’s not satisfied from its hunt. The background on this route shows only the clear ocean with rock around it. As Wailord travels forward, several Wailmer will pop up on several areas in front and back of Wailord temporary increasing the arena size greatly. Don’t worry about being eaten since the Wailmer aren’t hungry.

Route 130,
Wailord speed – normal
Dive – no
Pokemon – Pelipper, Magikarp, Gyarados


Route 130 looks like a large straightway with each side surrounded by a cluster formation of rocks. On this area, Magikarps would often swim in this area and they are completely harmless and can be KO’d off the stage. However if one Magikarp were to be knocked so far that it reaches off-screen that a character would die, it will return as a Gyarados and use aqua tail on the character who KO it. The tail can do moderate damage with high knockback that could kill at 70%. Don’t worry about the Pelipper, they already enjoy the Magikarp. However if you do get in their way, they won’t hesitate in an attempt to eat you.

Route 131,
Wailord speed – normal
Dive – no
Pokemon – Sharpedo, Wingull

The route is home to the Sky pillar as showed in the background. Also on this route lies a very hungry bunch of Sharpedo. The swarm of Sharpedo will travel behind Wailord hoping for any characters will fall behind. If a character is hit with a bite from a Sharpedo, the foe will be launched in the direction to the left capable of killing at 127%. To add with the Sharpedo, a swarm of Wingull lurks above Wailord waiting to attack any character that has been in the same spot for a decent amount of time. At the last 1:10 minutes of this route, the view of Pacifidlog town can be showed in the background.

Route 132
Wailord speed – normal
Dive – No
Pokemon – Tentacruel

From this point after the first half of this route, the water current will begin to randomly move as sharply as jungle japes. You won’t have to worry about getting eaten by Wailord, but you need to quickly jump from the water before you get dragged to the left side and off-screen. You should also worry about its tail when the current drags you very close to Wailord’s tail. Your best strategy at this point is to not fall off from Wailord…and not get caught by the Tentacruel. The intense water current would make it fatal if you were to be trapped now.
(If a character is currently bound by Tentacruel and was hit by Wailord’s tail, the Tentacruel will let go of the character before they take damage.)

Route 133,
Wailord speed – normal
Dive – no
Pokemon – Horsea, Tentacruel

The heavy current points will increase as Horsea will appear in the midst of it all. Once it appears anywhere around Wailord, it will use smokescreen to obscure a large area almost equal to a small stage (2/3 of Wailord’s size) and the lower/middle level of Wailord. For humans, it would be hard to see though the smoke screen, for computers, their difficulty level will reduce by half as long they are in the smokescreen. This makes a great cover to hide the Tentacruel that are hiding on the current, so try not to get caught in the waters during the smokescreen. The smoke will last for 12 seconds before it fades away.

Route 134,
Wailord speed – Normal
Dive – Yes
Pokemon – Horsea, Kingdra

As the current gets heavier, whirlpools will appear in an attempt to swallow anyone who comes near them. At the end of the route after the background of Slateport city becomes in view after 15 seconds, a Kingdra will appear in front of Wailord and will use twister to launch Wailord high in the air. Similar to the tornado that launches the pirate ship, the twister will send Wailord all the way back to route 124 to start its hunt anew.


Hidden Pokemon and Stages​

Within the sea of Hoenn lies many unknown mysteries and secrets only known to only a few. The chances of each one to happen are 1/25 thus makes it very rare to come by to one during a match. It’s possible that all events will happen once during the entire path. Each can only happen once even if the stage goes on forever.

(Note - this cannot happen if there are pokeballs enabled.)

Some areas have legendary pokemon to appear and either show itself in the background or show itself above Wailord to attack the characters. Other occurrences will allow Wailord to drop off the characters into a standing arena before disappearing somewhere. The hidden stages the characters will be on after being dropped off will last for 5 minutes before something will happen making the characters back on top of the same Wailord somehow, somewhere. After an unique stage is visited at least once (like a legendary pokemon like Celebi), the area of the stage can be accessed instantly on the stage select by holding a direction of the taunt command while selecting the Hoenn sea map. This way, the stage will have no limit and won’t switch to Wailord nor start at route 124.

Secret Stages

Marine Cave stop – route 129

There maybe a sudden rainstorm that makes all of the Wailmer retreat underwater. As for Wailord, it will make a detour to the south which intercepts an underwater cave. Wailord will stop beside the cave structure thus making the screen scroll slowly to the center of the cave. After the cave area has been centered, the rock bridge that borders Wailord and the cave will shatter and the characters will now have to fight on a stage with two platforms hovering at the edge of each side, similar to the melee stage Fountain of Dreams. Sometimes, a red pattern brims in the background among the darkness as the fighters spar.

Occasionally, the stage would randomly release a pool of water rushes on both sides of the arena. However each side will have a strong current with the left side of water drifting to the left and the right side drifts to the right. The force of the current is stronger than that of jungle japes.

After 5 minutes, a sudden whirlpool will occur all around the cave launching everyone above and out of the cave. They will suddenly arrive on top of the Wailord on route 132.

(stage select – taunt down)


Terra Cave – route 133

There maybe a sudden burst of sunshine that greatly disturbed Wailord, making it to take a detour up north to find a shaded area from the sunlight going through several rocky barriers along the way. It will soon find shelter from the heat in front of an island cave south of route 118. As Wailord rests there, the screen scrolls to the enterence of the cave. Like Marine cave, the walkway between the entrance between wailord and the arena will shatter making the battlefield into a stage similar to final destination. Sometimes, a blue pattern brims in the background among the darkness as the fighters spar.

Occasionally, the stage would randomly release a pool of lava that fills up the bottom as it completely surrounds the bottom of the stage. Unlike Nofair and any of the Metorid stages, falling to the lava here could mean a KO around 58% or more with a very high amount of damage. Be careful not to fall too much.

After 5 minutes, a fissure will occur breaking apart the small rock like pillar that balance the stage. Not a second later, an eruption will occur sending the pieces and the character in the air and will oddly be launched far east. Soon, the stage and the characters will be over the west part of route 126 of which the stage will fall on the side of the inactive volcano and the characters will fall on the same Wailord.

(Stage select – taunt up)


Sealed cave – route 134

At exactly 48 seconds since entering the route, Wailord may use dive underwater reveling a straight passage. After a minute, Wailord will pop up on a small part of land inside the sealed cavern. As the screen slowly moves away from Wailord, it will stop beside the edge of the cave ground as it allows the characters to cross safely. After Wailord departs from view, the area around it will be filled with water on both sides of the arena. On the background are 4 tablets written in braille and an Alakazam meditating in the middle of the cavern. This special stage stop is similar Warioware in a way. When Alakazam shine a light over a certain tablet for 4 seconds, the players must follow the instruction stated on the braille or what Alakazam said. (Yes, this pokemon can understand and speak human language) the players who don’t follow the command will be punished greatly. The commands that are written in braille are: taunt, get wet, come here, and Jump
-----------------------------------
After the "taunt" command, he will punish anyone who didn’t taunt by using thunder wave on them stunning them for 3 seconds while doing 4% damage.

After the "get wet" command, Alakazam will grab anyone who didn’t went to the water with psychic and slam them down to the solid ground hard for moderate knockback with 17% damage.

After the "jump" command, Alakazam will use thunder wave on the entire ground and water. Anyone whom is not in the air at that time will be stun for 3 seconds while taking 4% damage.

Before the "come here" command, he will use future sight and highlight the large area to be on. After the time past and if there are players that are not in that protected area, they will take the full damage of the future sight and will be launched greatly capable of killing at 132%.
--------------
After 5 minutes in this area, Alakazam will use Teleport on every character. Shortly, they will find themselves on route 127 on top of the same Wailord.

(Stage select – right taunt)


Mirage Island – route 130

A strange island will slowly appear in front of Wailord at the start of the route. Noticing there is no easy way around it, Wailord decided to dive in an attempt to go under the island leaving the fighters on the shallow waters of the island. The screen will begin to move by itself as the slowly guide the players across the shores of Mirage island.

From the background lies a mountain surrounded by a heavy amount of trees and grass. Occasionally, a Wynaut would appear from one of the trees to watch the battle. As the battles gets more intense, more Wynauts begin to appear to watch the fight unfold. Of course if there hardly any action between the fighters during that point, the Wynauts that has already came out may retreat back to the forest. When the fighters reach the edge of Mirage Island, Wailord will emerge from underwater where the fighters can hop back into it and thus the trail continues.

(Stage select - left taunt)

Secret Pokemon​

They would come from out from the sky to observe and most likely interfere with the match. Unlike the other pokemon, their attacks are something to be feared of.

Rayquaza – route 131

After the first 0:30 seconds since entering this route, a shadow of Rayquaza is showed leaving Sky Pillar in the background and will reappear very close in front of the background to spectate the fight. Occasionally it will randomly fly up to the battlefield as that on the Subspace adventure and uses one of its regular attacks on it. (It can’t use dig for obvious reasons.) When it roars, it will instead use hyper voice instead to damage anyone whom near this sonic attack.

After it uses two attacks, it will return to the front background to continue watching the fight as well as to wait for another opportunity to attack. During the last 10 seconds of the route time, it will fly off back to Sky pillar. Before the image of Sky pillar can’t be view anymore, the image of Rayquaza is seen returning to its place to rest.


Latios or Latias – route 128, route 125

Either one or the other will appear at one of these two routes at the moment Wailord enters the route. Latios and Latias will act differently to the players as each proceeds to watch the match from the background. When one of them arrives, Wailord can’t dive until after they leave. Both of these pokemon will attack four times using up to three types of moves each. After the route time expired or after they use 4 moves, the will fly away. Another thing to note that unlike the previous secrets, the chances to encounter them is 1/10.

Latias – She would most often assist those whom current has or tied with the lowest score so far.
- She would use helping hand for the character with the lowest score for 10 seconds greatly boosting their overall power and resistant.
- If the score for every fighter is even, then she can cast heal pulse to the entire party allowing everyone to recover 50% damage.
- If she chooses to target the leader, she will attack that person with Mist Ball doing 4% damage. Also there will also a 75% possibility that the target’s attack hitbox will not be triggered during an attack for 5 seconds after being hit by mist ball.


Latios – He would most likely assist those who had taken the most damage in battle so far, usually if the difference of damage is over 100% between the highest to the third or the lowest to the second
- He would help the person whom took the most damage by using safeguard on the target. That person would be protected from projectile attacks as well as lower the damage taken from physical attacks by half. The effects will fade away after the thirty seconds since safeguard was used.
- If the damage taken of everyone is close to each other, then he would cast heal block. During the next 40 seconds, all methods of healing such as food, Aqua Ring, and PK magnet will be negated.
- If he targets the person who took the least amount of damage overall, he will use Luster Purge against the target. The attack does 6% damage to the foe and it will lower the target’s weight making them easier to kill for 10 seconds.


Latias and Latios - route 124

If both of them has flew by and interfere during the match, then the next time Wailord passes by route 124, both of them will sure to fly by together and watch the fighters again. However this time, they will perform one move together. By combining Healing Wish and Memento to the two players whom have the lowest score and the highest score respectfully, but there is a condition. The lower scoring player must have the highest damage taken of all the fighters so far and that the highest scoring player must have the lowest damage taken of all the fighters so far.

When the condition is matched, then Latias and Latios will trigger this twin attack and both will vanish instantly, The person with the lowest score will be recover to full health. Also, when this person dies, the person will not lose a stock nor does the person whom killed the target gain a point. They will spawn on the spot they were last standing with 0% with no DECAY effects for all attacks for 10 seconds. However, the person in the lead will have all of their moveset affected by the full effect of the DECAY effect. All of the moves are now very weak as if the moves were used over 10 times in a row. This effect won’t disappear until the victim dies and 40 seconds has pasted since the attack was used. (If the user dies during the effect, it will still have its effect after respawn and it will not vanish until its time since being affected runs out.)


…….phew.
 

Davidreamcatcha

Smash Ace
Joined
Feb 9, 2011
Messages
629
MYMini Entry


PARKER! Whatareyoudoingstandingtherelikestatuecomein.

Parker, you know what I pay you for, right? I'll tell you one thing: you don't get paid to sit on your *** all day playing your goddamn Wii. I pay you to get me pictures! Pictures of Spiderman! We need pictures for that "Spiderman: Lewd and Nude" story we're printing next week! Speaking of Wii: I want your feedback on this. This morning, Robbie walks into my office and says "Nintendo is on the line. They want you to design a stage for Super Smash Brothers Brawl." and I said: "Nintendo? Those *******s who make games about illegal cockfighting? For some people, they're pets. For me: THEY'RE MENACES THAT NEED TO BE CAGED AWAY!" I already had enough of those Capcom guys beggin' me to put the Daily Bugle in their little fighting game, I did, and what do they do, THEY PUT SPIDERMAN IN IT! I hate those guys, after I learned Spiderman was in it, I popped a blood vessel! My stage concept was WAY different too! I was in the background, fighting criminals and Spiderman was rotting in a jail cell! Of course, I denied my likeness to decrease game sales to beautiful single women. Now I know the game's gonna be a flop! So I look at Robbie and say "Get the hell out of my office and tell Nintendo they can take their cockfighting games somewhere else!" I thought it was a pretty good reply. Then Robbie tells me the price. I ran out of that office and grabbed the phone so fast you could pay Hosni Mubarak a million dollars to do it and he still wouldn't be as fast as me! 'Course, he'd sit on his *** for 18 days and then grab the phone. You may hate me for making such a comparison and may even call it idiotic. But what do I care? You're the same people who love Spiderman. So, now I've got to design a stage for this stupid Brawl thingie. You know what, Parker? You design it. I'll pay you. That, and your *** is fired if you don't. What are you waiting for, Parker? GET OUT OF MY OFFICE!


Done, Mr. Jameson. [Hint: This is the stage. Click on it.]

WHAT THE HELL IS THIS, PARKER? I'M PAYING YOU TO MAKE A STAGE, NOT A PIECE 'A ****! IT'S TRASH! SO TRASHY EVEN SPIDERMAN WOULD CALL IT TRASH! AND HE'S THE TRASHIEST PERSON AROUND! I'll pay you 20 dollars for it.

Alright.

Now, what do we call this croc 'a ****?

Hm, how about...

SCAFFOLD SCUFFLE

It's crap.

Okay, how 'bout...

BALLOON BRAWL​

Crap.

Hm...

HERE YA GO, SUNDANCE​

That's pretty good, but it's taken! Wait, wait, I got it...

SCAFFOLD SCUFFLE

Perfect.

I know! I deserve a raise and a spot in SSB4! In fact, I've got an idea for a stage name. It's called: PARKER GETS OFF HIS ***, GETS PICTURES OF SPIDERMAN AND TELLS MS. BRANT TO GET MR. JAMESON A COFFEE!

Balloons that can appear:

Spiderman
Megaman
[Insert Brawl Roster here]
Dr. Strangelove
Super Macho Man
Dark Bowser
Mr. Potato Head
The Count
Miracle Matter
Jafar
The Joker
The Headlesss Horseman
Stephen Colbert
Anonymous
The Pyro (TF2)

Phase 3 Villains:​

Doctor Octopus: Doctor Octopus climbs up the building to destroy the Scaffolding, attacking it with his tentacles. In Phase 3, he stands at Ike's size and attacks the foes with high priority tentacle attacks. He has 80 stamina and is the size of Ike.

The Green Goblin: Goblin flies in the background and destroys the scaffold with his pumpkin bombs. In Phase 3, he throws pumpkin-shaped bombs at the foe and flies around the stage on his glider. He has 50 stamina and is the size of Link.

Kingpin: He doesn't destroy the scaffold, rather, his men do. They shoot the scaffold until it falls, then Kingpin fights the players himself in Phase 3. He damages the players with firearms and his cane. He has 150 stamina and is the size of Ganondorf.

Music List:​
Daily Bugle - Marvel vs Capcom 3
Spiderman Rock Remix
Spiderman Theme - Danny Elfman
Spiderman - Marvel vs Capcom 3
Daily Bugle - Spiderman (60s)
 

Kholdstare

Nightmare Weaver
Joined
Oct 10, 2008
Messages
1,441
GUTSMAN'S ASS

DUN DUNNNNNNNNNN


Holy mother of Thrice, Mega Man! It's Gutsman's Ass! Whatever is it doing in Smash?

It's simple. We need more ass. Snake and Zero Suit Samus weren't enough.

Gutsman's Ass has a 10% chance of being in whatever item spawns on the stage. I do mean any item. When the item attempts to activate, Gutsman's Ass comes out of it and the player who tried to use the item is stunned for one second. Mega Man will also appear in the background, looking shocked. The item then morphs into Gutsman, who has a :troll:face. He then explodes in a shower of pixels. Do do do...
 

MarthTrinity

Smash Lord
Joined
Aug 9, 2007
Messages
1,954
Location
The Cosmos Beneath Rosalina's Skirt
Howdy peeps! Results time for this week's mini!

1. The Distortion World by MarthTrinity (4 votes)
2. Mewoth's Delusional Fantasy World by darth meanie (3 votes)
2. Ancient Castle by Katapultar (3 votes)

Safari Zone by Kholdstare (2 votes)
Glitch City by MasterWarlord (2 votes)
Hoenn Sea Route by Koric (2 votes)​

And that'd be all for this week boys and girls! Thanks for participating as always guys!
 

Katapultar

Smash Lord
Joined
Nov 24, 2008
Messages
1,284
Location
Australia
Howdy peeps! Results time for this week's mini!

1. The Distortion World by MarthTrinity (4 votes)
2. Mewoth's Delusional Fantasy World by darth meanie (3 votes)
2. Ancient Castle by Katapultar (3 votes)

Safari Zone by Kholdstare (2 votes)
Glitchy City by MasterWarlord (2 votes)
Hoenn Sea Route by Koric (2 votes)​

And that'd be all for this week boys and girls! Thanks for participating as always guys!
Yay, I finally got a good placing! And this is the first time I was put 100% love and effort into the mini I did. This week's moral: being serious once in a while pays off. I almost think I could do the same with a set...MAYBE....
 
Status
Not open for further replies.
Top Bottom