• Welcome to Smashboards, the world's largest Super Smash Brothers community! Over 250,000 Smash Bros. fans from around the world have come to discuss these great games in over 19 million posts!

    You are currently viewing our boards as a visitor. Click here to sign up right now and start on your path in the Smash community!

Make Your Move 9: [Now Defunct]

Status
Not open for further replies.

darth meanie

Smash Journeyman
Joined
Jun 6, 2008
Messages
452
Yay, I finally got a good placing! And this is the first time I was put 100% love and effort into the mini I did. This week's moral: being serious once in a while pays off. I almost think I could do the same with a set...MAYBE....
I'm horrified of what a serious set from you might look like.


He stares into your soul...
 
D

Deleted member

Guest
User Rankings Week #10

Welcome to the User Rankings! Every Monday, I'll be compiling the entire of the last week's activity in the thread and showing off, just who is the most active member? The point of this exercise is to recognise the most dedicated among us – those make your movers who are currently pushing the boundaries, as well as highlighting all movesets made by them.

To get on this list, you need to have made a moveset in this or a previous Make Your Move, as well as having posted in the Make Your Move 9 thread. The cut-off point for tallying is 12AM on Monday; other removals or changes are at my own discretion. The breakdown of points is as follows:


25 points for a Moveset
15 points for a Joint Moveset
5 points for a Secondary Submission
4 points for a Comment
2 points for a Secondary Submission Comment
1 point for a Regular Post
+Regular Posts do not stack

This week marks the tenth of Make Your Move 9 - with just over eighty sets, we're still far outpacing Make Your Move 7 and 8. However, the comparison is faulted, as this contest seems to be the paradigm shift we've all been waiting for in terms of activity; no longer is the game one reliant on veteran movesets and comments, but one seemingly entirely dependant on the leadership's commentary and newcomers slowly trickling down and assimilating with a much broader membership than we had last year. More than ever, it comes down to individuals in Make Your Move to be productive... which is what these user rankings are all about.

This week was a bit of a blow-out again for darth meanie, popping out two sets in the fifth gen movement with Jellicant, and then Crustle. Considering his awful activity last week and his recent passing of the five-hundred mark overall, it's just another week to top up to who is easily the most active member in Make Your Move 9: good job, sir. Next up was MasterWarlord - who "cut the ribbon" of the fifth gen movement with a lovely little Flying / Ground genie; Landlos, who was arguably the best-received of the entire collection. Alongside a plethora of comments, he landed his first spot in the top three. Of course, the other moveset that peaked most interest was Klink, coincidentally posted by the third place Make Your Mover this week, LegendofLink. Much on the rise, as always.

One final note: next Monday, I will be off galavanting in the great US of A. Unfortunately, this trip would be made a lot more frustrating if I had to carry around and take responsibility for a laptop or take time out to construct the user rankings at some internet café with a memory stick. Expect a two-weeker on the Monday after that one.

Remember to check out the stadium to find all of the sets mentioned.

Overall User Rankings


Points: 68, Movesets: Nattorei, Electivire, Nrvnsqsr Chaos, Toxicroak, Luviagelita Edelfelt, Jellicant, Crustle

Points: 58, Movesets: Victreebel, Fat Zombie, N. Brio, Landlos

Points: 41, Movesets: Mr. Minecraft, Pokémon Breeder, Sarkhan Vol, Castform, Klink

Points: 33, Movesets: Diglett, Penny Gadget / Inspector Gadget, Blaze the Cat, Windows XP Tan, Airman, Emolga

Points: 17

Points: 10, Movesets: Gigaiath, The Scout

Points: 7, Movesets: The Prince, M. Trinity

Points: 6, Movesets: Ulgamoth, Ronald McDonald, Mephiles the Dark, Steelix, Beeheyem

Points: 5, Movesets: Arle Nadja, Yamato

Points: 1, Movesets: Tetris, Harvey Moisewitsch Volodarskii, The Joker Remix

Points: 1, Movesets: Muk, Auron, Wiz & Kupa 2, Pyro Jack, Jack The Ripper

Points: 1

Points: 1, Movesets: Bowser Jr., Kaptain K. Rool, Necky, King Boo​
 

flyinfilipino

Smash Master
Joined
Sep 11, 2007
Messages
4,319
Location
North Carolina
I hate to be really nitpicky, but it's "Jellicent", not "Jellicant". It's been spelled the second way all over this thread. I mean, as far as I know, it's spelled with an "e" even though the name isn't "officially" confirmed yet. But it will be! :bee:
 

Kholdstare

Nightmare Weaver
Joined
Oct 10, 2008
Messages
1,441
Baibanira

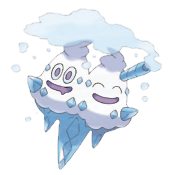
Baibanira might be the tastiest looking Pokemon out there. It's one of the Generation V Pokemon introduced in Black and White, and he's known as the Blizzard Pokemon. Yes, he is based on ice cream. Vanilla, to be exact. That straw sticking out of his head is actually a horn that can unleash a furious snowstorm if Baibanira gets angry. He's also said to frequently cover his surroundings in heavy snow. Oh, and you see how he has two faces? In Smashes the faces make the same noises and reaction, only with slightly different voices. When they're synchronized they sound like demon-possessed, eight year old siblings, which is kinda creepy.

Baibanira is about the size of Jigglypuff. He is extremely floaty but not fast in movement. His jumps are alright, and his air speed is fair. He's a fairly lightweight character, however. He also floats slightly above the ground- enough to avoid terrain but not enough to avoid low attacks. Because of this you'll want to stay in the air most of the time.

Specials

Up Special *♦* Blizzard
Baibanira puts on a playful "angry" face and snow and wind billow out of his horn! After one second, during which Baibanira is vulnerable, the screen is covered by a vicious snowstorm! The storm makes visibility quite low, as now the only things you can see are the silhouettes of the characters and the solid part of the stage. Everything else, traps, minions, items, even pieces of the stage, are invisible.

You may be asking, how is this a recovery? Because in the Blizzard, Baibanira has unlimited jumps. That's right, unlimited jumps. This is a huge factor in his air game, as well as the best recovery in Smash, bar none.

There's also a good bit of snow covering the ground. This snow slows characters who don't float off the ground by 25% of their movement speed. Snow can be overwritten by traps and fluid lingering hitboxes like Bowser Jr.'s goo, but one half second after they disappear the snow returns- this only happens in the blizzard, however. The harsh winds also blow characters back in the direction Baibanira was facing when he used this move.

The blizzard lasts twenty seconds, and Baibanira must wait twenty seconds after it dies down to use it again. The snow lingers on the ground for five seconds after the storm ends before it melts away. Both the storm and the snow itself are key components in Baibanira's playstyle, so try to have both out as much as you can.

Neutral Special *♦* Powder Snow
Baibanira laughs and pours snow out of his horn like those snow machines you see at ice rinks. The snow piles up underneath him to be as tall as Mario and twice Baibanira's width, over 0.3 seconds. This is an alternate method of creating snow out of a blizzard, and this snow lasts about eight seconds. One thing I didn't mention is the snow is slightly fluid, meaning it can spread out, but only by a little. It's also affected by wind, which is obviously going to be useful when you come across a couple of Baibanira's other moves. This has little lag.

Side Special *♦* Icy Wind
Only one of Baibanira's heads blows out a wind that blows snow along like a leafblower blows leaves. It has the reach of a Battlefield platform and makes it pile up more the closer Baibanira is to it. This also exerts a weak wind effect on the foe, but nothing serious. If you double-tap this, both of Baibanira's heads blow together, creating a strong burst of wind. This lance of wind travels two Battlefield platforms and gathers up any snow around it and spins it like a deadly missile. Foes who get trapped in this hellish attack are jumbled around and take various hits of 1%. At the end of the attack any snow caught in it all forms one big pile, being as tall as Ganondorf if it gathered two Battlefield platforms worth of snow. This is mainly for moving around your snow and reshaping the terrain in a snowstorm to confuse the foe. It has a good bit of lag, so use it sparingly.

Down Special *♦* Flash Freeze
Baibanira laughs again and their eyes flash blue, emitting a frosty gaze. Anything directly in front of them is frozen solid, and I do mean anything. Stage parts, items, traps, the foe... whatever is in the space equal to Baibanira's hurtbox directly in front of him is frozen. If it's a foe or minion, they turn into an ice statue after taking 5%. This locks them in place for a second, aka hitstun, but it also grants them immunity to damage while they're frozen and the half second after they thaw. They can take knockback in this state, however.

If there isn't a foe there, Baibanira will freeze a trap, item, or stage part/hazard in front of him. This includes his own snow. Traps and items frozen will become inactive for two seconds, unable to be used for anything except maybe a dull throwing item if they can be picked up. If they hit anything they're likely to shatter. If there's neither of those, Baibanira will freeze the ground in front of him, making an area slightly shorter than a Battlefield platform icy. Of course, since Baibanira floats he doesn't have to worry about icy terrain. :troll:

Freezing snow will lock it in the shape its currently in, turning it into solid icy terrain. Again, Baibanira has many hippos if he uses this after a snowstorm. Trolling potential is limitless with this move. If you wish to unfreeze anything, simply use this again on it.

Standards

Jab *♦* Ice Breath
Baibanira's heads blow ice out their mouth like Ice Kirby, if you've ever played any of the Kirby games. The icy breath forms a spinning ball as big as Jigglypuff in front of Baibanira, and does minor hits of 1-2% and low knockback, with a chance of freezing like the Ice Climber's Side Special. This is mainly your run of the mill jab, but it does have great priority and a wind effect, so it's quite unusual in that aspect.

Side Tilt *♦* Snowflake in a Whirlwind
Baibanira leans forward and spins like a top, dealing fair hits of 2-3% that do okay knockback. Any snow he hits with this will send it fanning out in front of him, dealing 4% and good knockback. The best part of it is that he can use Flash Freeze to quickly freeze the snow in place in mid-air, forming an icy ramp, which is pretty neat.

Up Tilt *♦* Snowballing
Baibanira summons any snow (or the foe, in an unusual grab) above him with a magnetic-like force, then sends them rolling forward in a comical snow ball. The more snow he gathers before releasing this, the bigger the snow ball will be. The foe can button mash to get out of this, since they don't want to keep having 3% dealt to them when their face hits the ground, but Baibanira can Flash Freeze the snowball to make it even deadlier and harder to escape. It even gathers momentum going down a slope! Contact with a small snowball (the size of a Barrel on its side) deals nothing, a medium deals 2%, and a large (thrice the size of a small ball) deals 4%. A frozen snowball deals double this. And this is just at a slow speed- for every Ganondorf height the ball rolls down, it deals 2% more damage contact. If the foe is hit by a snow (not ice) ball, they will be trapped in it, but only if it's larger than them (think Katamari). In the same vein as Katamari, it will deal more damage the more crap it picks up. This move can easily get crazy if you have the right set-up.

Down Tilt *♦* Cold Front
Baibanira spins again, this time creating a mini-cyclone of air around him. The air is not much wider than Baibanira's hurtbox, and is twice as tall as Ganondorf. This deals 5% damage and blows the foe caught in it a tremendous height up, but never enough to KO. This is your main way to get the foe high in the air where you like them. Follow this up with a Blizzard for lulz.

Smashes

Side Smash *♦* Ice Beam
The staple of ice type Forward Smashes is the almighty Ice Beam. Baibanira charges the beam of frosty energy and releases it after an extensive charge period. The beam is thin but effective, as it freezes the foe on contact (Brawl-style) and deals 12-28%. Its main strength is it pierces through shields, making it great for pressure. The downside is it's easily dodged if you predict it. an uncharged beam is as long as a Battlefield platform and a fully charged one is thrice that. It has an ending cooldown of three seconds.

If it is released in a blizzard it will hang in the air, acting as an impromptu drop-through platform. This can be hidden by the snowstorm as well as something to gather snow on, but it lasts as long as the snowstorm does. The snow on top of it will fall down and pile on top of that it falls on, making a thicker patch of snow. The platform is as slippery as icy terrain. One more feature of it is that it can be broken if it's dealt 12-28%, depending on the charge. Use this to shift the foe's knowledge of the stage around in a snowstorm.

Up Smash *♦* Acid Armor
Baibanira's body, or the "ice cream" part of it at least, turns chocolate with a laugh from Baibanira. Yep, bet you didn't see that one coming. Any snow Baibanira is touching also becomes chocolate, as well as snow touching that snow. It spreads at a rate of a Stage Builder block every 0.01 seconds. The duration of this effect lasts for one half second at no charge and two seconds at a full charge.

Now, this chocolate-like snow is not fit for consumption, as you may have inferred from the move name. It actually deals 10-20% damage and good-high knockback to any foe who touches it. This is one of the reasons you need to spread snow on the stage, as this is a great damage racking and KO move. It also forces foes into the air, where Baibanira resides most of the time. Not to mention the fact in a snowstorm the foe has an even harder time of anticipating it, although if you spam this when you always put up a blizzard it will become predictable.

It is also lethal to a foe imprisoned in Baibanira's Down Smash, since it can dish out 20% in one hit. Yes, the regular roaming snowman can be turned to chocolate as well to make him an even greater threat. Chocolate don't fight fair. Just be warned, this move is quite laggy, so you cannot just spam it. It also consumes any snow it transformed to use this move, so don't blow it!

Down Smash *♦* Snowman
Baibanira forms a realistic duplicate of itself out of snow, which if you didn't have any to hover over when you used this move Baibanira will create at the expense of extra lag. The smash is fairly quick with snow to use. The snowman, as we will call it, acts as an impromptu sandbag with varying stamina depending on the charge of the smash. A low charge can take about 12% of damage before crumbling, but a full charge can take as much as 30% damage.

So what purpose does this serve? In a blizzard, the magic of Pokemon and the winter season makes it come alive in a Frosty the Snowman-like fashion- it will move about, mimicing your movement style. It won't attack, but it will definitely look like you. This is fun for mindgames since the foe can't tell which one is you in a snow storm. They'll attack the wrong one and leave them open for attack by you.

You can use Flash Freeze on the snowman to double its health and make it an impassable wall. This is useful for making it harder for the foe to get at you in a snowstorm, since it's now a trap and is invisible. Unfreezing the snowman doubles any damage it took, so this isn't recommended.

You can also use this next to a snow pile a foe is standing in to form a snowman around them. It'll actually be a comical snowman, with a goofy expression on their faces, making Baibanira giggle when he's done using the move. They have to break out of the snow by attacking it from the inside- it takes 12% to break out of an uncharged attack, and you can probably guess how much it takes to get out of a fully charged one. Freezing it also makes it even more harder for the foe to escape.

Aerials

Neutral Aerial *♦* Mist
Baibanira spins around and a cloud of mist comes out of his horn, like in his picture. The mist blankets him as he falls, obscuring him. This can be used to stealthily pull off an aerial or some other action in the air. It can reduce a foe's visibility as well, since it has a diameter of three Baibaniras. If it's used in a blizzard, it will freeze in place, with ice crystals visibly hanging in the air. Foes who enter the frozen mist take 1% every half second. Use this to make a zone of discouragement in your blizzard. The normal mist fades immediately after Baibanira hits the ground, but the frozen version lasts four seconds.

Forward Aerial *♦* Ice Shard
One of those pieces of ice shoots out of Baibanira's body forward, about two Battlefield platforms. It deals 3% and flinching, with a chance to freeze. It's extremely lagless and a great way to needle your foe in the air. It's also very quick, so it's hard for the foe to dodge, especially if you have a mist up.

Backward Aerial *♦* Snow Funnel
Baibanira exerts a backwards wind effect on the foe or any snow in front of him. He will suck them through his body, dealing 10% and a high chance of freezing. Any snow pulled through is piled behind him, possibly causing the foe to get bogged down in it. Use Flash Freeze or Icy Wind on it for maximum ****. This has the range of a Battlefield platform.

Up Aerial *♦* Iceflake
Baibanira forms a snowflake design around him while laughing. The snowflake is just smaller than the mist, cleverly hiding it from view. It deals 7% and a great chance of freezing. What's best about it is it lingers for one second after you end the attack. The iceflake shatters after dealing damage once. Use this to make you a giant hitbox in a snowstorm.

Down Aerial *♦* Hail
Baibanira spins around like a top, sending deadly ice fragments plummeting to the ground. This functions much like a continuous version of Sheik's needles; it traps the foe into a combo of death that can deal 12% a second with little to no knockback. This certainly makes it hard for a foe to recover if they're underneath you. The downside is you have to be high up to use it effectively, as shorthopping it won't do.

In a snowstorm this is an all together different attack. Baibanira will summon a hailstorm that sends hail randomly across the screen. These hailstones deal 2% and some hitstun. The main strength of it is that in the blizzard it's really hard to distinguish the hailstones from the regular mishmash of the snow storm. Its unpredictability is also a plus. Storm hail lasts for ten seconds and can only be used once per storm.

Grab Game

Grab *♦* Entice
Baibanira's grab is quite odd. He makes himself look and smell delicious to the foe, and if they're in range they'll come over and try to eat him! Too bad for them... you know what happens when you stick your tongue to a frozen pole? If you've seen A Christmas Story, you surely do. The foe's tongue (or face) gets stuck to Baibanira, and he giggles gleefully. The grab has fairly average range out of all the grabs, and doesn't have any extra priority or strength. When the foe's trying to button mash out of the grab, they will look like they're trying to forcibly yank their tongue from Baibanira with a pained expression on their face.

Side Throw *♦* Snow Plow
Trying to throw the foe forwards or backwards will result in Baibanira either moving forward, plowing into the foe, or moving backwards and dragging them back with you. Some things to note here. The foe is continuously trying to break out of the grab while you are doing this, so you won't get far. However, moving forward sets them right in front of you when they break out, and they may not realize immediately they did break out of the grab. Use this moment to grab them again. This can work as an effective chaingrab, if the foe's reaction time is poor. If your reaction time is poor, however, you're likely to get hit. This also moves them twice as fast on slippery terrain. Use this to your advantage.

Up Throw *♦* Cherry On Top
Baibanira throws the foe on top of him like a topping on an ice cream sundae and they take 8% from the sheer cold of Baibanira's body. They hop off, holding their back, jumping a distance of about twice Ganondorf's height up.

Down Throw *♦* Sprinkles
Baibanira sheds a few pieces of ice on the ground... they oddly look like sprinkles... then he... oh no... he wouldn't... he SLAMS THE FOE DOWN ON THEM :scared: OH THE HUMANITY :scared:. This does 7% and good knockback, but the damage done to the foe's dignity... it's too much for a damage percent...

Final Smash
Final Smash *♦* Avalanche
Baibanira is REALLY angry now... he cries out and the top of the screen caves in on the foes! Indeed, large chunks of rocks that deal 20% and high downward knockback drop from the top of the screen at random. This and all the snow and rumbling going on makes it hard for the foe to avoid the rocks... however it's not totally unavoidable. This lasts for ten seconds.


Playstyle
Baibanira is about chaos, deception, and stage control. His snow and ice can cover a large area and generally get in the foe's way. He can survive the most in the air, where he can damage rack, but his set up is on the ground.

Blizzard is usable for any occasion, so get used to using it. A lot. It can set up your snow quickly, but it doesn't last as long as Neutral Special snow. It also lets you dominate in the air. You'll be saying scoops haagen dazs all day while you batter them around in the blizzard. It can hide your Ice Beam platforms, ice walls, and various other stage hazards you generate. Its wind effects help you approach by pushing you close to the foe or retreat by pushing them away. Be wary if you're facing a trap character, but that's not a problem mostly since you can stay in the air all the time. Use DTilt to force the foe up if they like to hide on the ground. Likewise, Hail is great for pushing them down to earth if they give you too much trouble in the air. Acid Armor is more or less undetectable in a Blizzard, likewise goes for frozen Mist. These make the Blizzard a dangerous, dangerous place to be in.

Powder Snow is ideal for specialized snow and ice structures. You can spam it on top of itself to create a mountain of ice, and in turn a glacier with Flash Freeze. Then, roll a snowball down the mountain to knock the foe offstage. Create ramps for it with Forward Tilt, or knock the foe into it with the same moves. Flash Freeze is a very useful move for nearly everything you do, so utilize it. Icy Wind is great for using snow as an offensive tool. Push them back with an unrelenting spear of snow to play defensively, or use it offensively by pushing them into a rolling snow ball or something. Wind is invisible in a blizzard, too, making their trip in it an even lovelier one.

Ice Beam can create drop-through platforms in a blizzard, allowing you to reshape the fighting arena at whim. This is also useful for freezing the foe outside of a blizzard so you can set up some things. It's one of your few sniping moves, so use it at a long range if you want to. Acid Armor, mentioned before, is a very good KO move if you have dominance on the stage with all your snow and whatnot. Anything Baibanira creates that is made of snow can be affected by this. This is especially useful for your snowman and snowball. The snowman is also good for mindgames, hassling the foe, and a defensive bodyguard of sorts. With an active hitbox it becomes a deadly ally.

If you want to damage rack, create a zone of discouragement with mist and needle the foe with Ice Shard. Pressure them with the snowman as chocolate, or trap them in a snowball between two ice walls to get some easy damage. When it comes to KOing, use the snowball, wind attacks, or acid armor. In conclusion, Baibanira is a master of attrition, wearing the foe down with countless tactics. As long as they're in your icy domain they'll be weakened to the point of freezing to death. That's what it means to play as Baibanira.


Junahu

Smash Ace
Joined
Nov 15, 2005
Messages
899
Location
Shropshire Slasher
MYmini entry


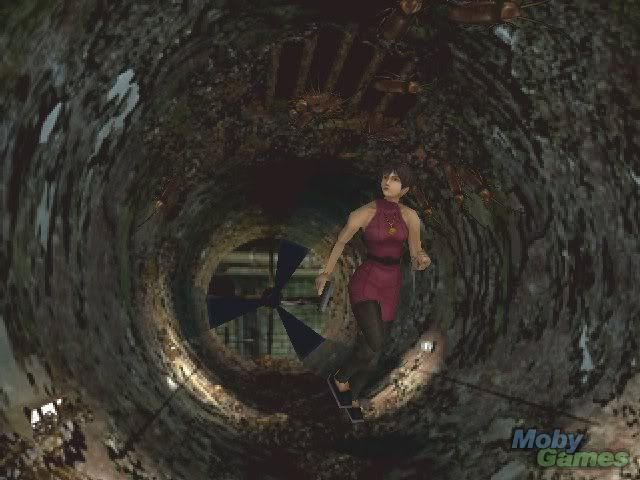
Ada...
Ada Wong
Sexy, Sophisticated.. and totally not a Super Spy working with Wesker. Ada Wong is the 5th Survivor of Resident Evil 2. Except, she dies... but not really.

Sent to retreive a sample of the new mutagenic toxin called the G Virus, Ada uses her wiles and cunning to manipulate Leon S Kennedy (or, "Mr Scott"), a Rookie cop caught in the zombie outbreak. Eventually, she develops feelings for his honest chivelry, despite her ernest efforts to ditch him.
At the climax of the game, Ada is killed in some way (Either by being shot and falling several stories, or by being slammed into a power generator and bleeding out. Pick your poison, they're both equally uncanonical) but somehow survives off-camera.

As an Assist Trophy (yes, that's what she is), Ada is rather concerned with her own well being. She spends her time retreating from all sources of danger, and only lasts a disgustingly short 5 seconds in the fight before ditching her summoner. "Ada, wait!" indeed. She will only attack if cornered, or if she finds a perfectly fine spot to snipe from.
Her weapon of choice is a simple Handgun. She can aim it in any of 8 directions, and fires 2 shots per second towards her target. Sounds underwhelming enough, but please be aware that these are actual bullets, and bullets are LETHAL. They travel at an instantaneous speed, appearing onscreen for only a single frame, and have a limitless range. Basically, when she pulls the trigger, if you're anywhere in the path of the bullet, you'll be struck instantly. These babies deal 23% damage, and spike the foe down to the ground too, so you seriously do not want to be hit. She'll shoot you down into the prone position, then shoot you again the moment you get back up, or worse, shoot you again while you're down.
The best way to handle Ada, is to keep her from getting into a comfortable position. Continually hassle her with projectiles or traps, but always leave her somewhere to retreat to. If you leave her with no other option, she'll start shooting, regardless of the danger she's in.


William Birkin

A scientific genius, and busom buddies with his ol' pal Wesker, Birkin developed the self mutating G Virus. The Virus hyper stimulates cell regeneration whenever the host body suffers any trauma. The end effect is, so long as it keeps pace with its growing appetite, the host cannot die unless completely immolated. Problem is, this regeneration has a high mutation rate, so every time the host is revived, it is rendered more of a monster than before.
Birkin was forced to use this virus to save himself, after he was gunned down by a team of Umbrella special operatives. Soon, the effects of the toxin overcame his conciousness, and his only concerns were reduced to "Eat", attacking everyone in sight. In a rather twisted development, Birkin was instinctively drawn to his own daughter, both because of his lingering fatherly memories, and because the G virus was looking for a similar host to impregnate. Icky.
But don't worry, the combined efforts of Leon, Claire, and an exploding train, eventually put an end to the madness.


In Brawl, William appears as a Fiend, which in layman's terms, is an Assist Trophy that autosummons itself and attacks everyone. In comparison to other fiends, William is not initially much of a threat, but he does hang around for 2:30 minutes, so it's hard to just ignore him. William can always be made to flinch, if an attack hits him in an eye. Sounds tricky? Don't worry, this guy has massive eyes.
Still, attacking William is not the best of ideas. As he takes damage, he mutates into new forms, each one being more dangerous than the last. Expert players may wish to make William mutate on purpose, and lure him into attacking the other players...

William Birkin also appears as a boss in the SSE, and is pretty much identical to the fiend version, although in SSE, he has slightly faster, but fixed, movement/attack patterns


Form 1
This is William's initial form. Still human, but mad as hell. He strides towards any foe he can, before slamming his pipe down on their heads. His walking is actually the second fastest of all his forms, but the attack itself is as laggy as a Warlock Punch. If it somehow does hit someone, they take 17% damage and are buried in the ground temporarily. Birkin will take this opportunity to prepare another swing, so his victim needs to retreat as soon as they can to avoid another pounding.

If William takes 50% damage in this form, he will mutate into..


Form 2
Birkin's trademark claw is now fully developed, and he has sadly lost his original face. He's a lot more sluggish in approaching his victims now, and that eye is an easy target to target. However, he has a few new attacks that can actually be a threat. His first is a simple horizontal slash. It has terrific range, deals 22% damage, and KOs from 80%. The slash also reflects projectiles. It's still a bit on the slow side, but it's much faster than that stupid pipe.
If the foe strays a bit closer to Birkin, they'll find themselves grabbed suddenly, by his human hand. He lifts the foe up into the air, and skewers them with his claw, dealing 35% damage, though very little knockback.
Finally, Birkin can perform a quick punch with his human arm, dealing 4% damage and spacing the foe well for a slash.

After 75% damage in this form, william mutates AGAIN...


Form 3
In his third form, William becomes completely unrecognisable, growing a multitude of additional arms and claws. He's a little faster than his second form, and a lot bigger. He walks with his main claws raised above his head. This is a permenant natural hitbox that acts like spikes on contact. The fact that he is so tall, and his arms so long, makes it very difficult to jump over him.
Once he is close enough, he typically uses his main attack, which is a series of 4 approaching slashes with his four arms. He takes one step forth with each slash, beginning with the two vestigial limbs, and finishing with those gigantic main arms. The first two hits rack a total of 23% damage, comboing smoothly into the third and forth hits, which deal a total of 30% damage and knockback that KOs from 90%. Retreating from this is simply not an option, given how far the attacks reach, and the fact he moves forwards during them.
Occasionally, Birkin will attempt to grab using the two vestigial limbs. It's a sluggish grab that leaves his eye very exposed if it misses. But if it lands, Birkin will immediately slam his two main claws into the squishy foe, dealing 40% damage and knockback that KOs from 60%.
His final possible attack is much like his first, even having the same startup animation. But, just before he starts slashing, he turns around and swipes once behind him, catching any foe who tried to roll behind him with 24% damage and upward knockback KOing at 95%.

A further 100% damage to this form sends Birkin into his fourth form...


Form 4
Form number 4 is no longer even a humanoid. He's a monster dog from hell, and the fastest of all the forms by a huge margin. He dashes around the stage, jumping on and off platforms at complete random. So long as he's moving, he deals 17% damage on contact, and horizontal knockback that KOs from 140%. If he lands on a foe after a jump, he will bury them, and spend some time ripping them apart with his gaping mouth (dealing 12% damage every second). This is typically the best time to try to attack him, as otherwise he is too fast to consistantly hit.
Occasionally, Birkin slows down by just a bit. This indicates that he will try to grab the next foe he comes in contact with, impaling them in his innumerable fangs (20% damage). He'll then dash to the edge of the stage, and toss the foe away. This is usually a KO, no matter what the foe does. But they can still be saved if Birkin is made to flinch (hit that eye!) before he manages to throw them.
A final note, if there are no platforms on the stage, Birkin may still jump occasionally, especially if there are airborne foes to nail.

75% damage is needed to reduce Birkin to his 5th, and final form...


Form 5
No longer even resembling anything at all, this amorphous blob wishes nothing more than to devour. If anything touches that mouth of his, he will eat it. Even if you hit is with a disjointed attack, he'll still chow down on you. Not that you'd want to attack him now anyway, as he's invincible for the rest of his stay (In SSE, he has 120% stamina). In this form, Birkin counts as solid ground, so foes may stand on him, if they so wish.
But, other than the threat of instant death, this form of Birkin is actually the easiest, simply because of how immobile it is. He can send tentacles out to drag himself around, or turn around, but not only is this especially slow, but if the tentacles recieve 30% damage each, they will retract, preventing Birkin from doing.. anything for 5 seconds. However, if you just blunder into a tentacle, it will grab you, and attempt to drag you into his mouth. By this stage, you may have too much damage to be able to escape in time, so avoid those tentacles like the plague.
If foes are just standing on him like cowards, Birkin may send a couple of tentacles to snatch them off of him. Again, this is not too hard to avoid, the tentacles have a maximum range of 3 stagebuilder blocks, and have a very sluggish movement speed.

Of course, if you've reached this stage of Birkin by working together, this may be the point where your opponent stabs you in the back, and knocks you into Birkin for the instant KO. This more or less applies to all his forms, and all fiends in general, but getting all the way to the 5th form, only to be betrayed by your temporary teammate... that just hurts.


G-Larva/G-Adult

William Birkin, one of the only known G carriers, had the ability to implant embryos into other life forms. Unfortunately, the hosts of these embryos quickly reject them, forcing the embryo to burst out from inside the host in a rather brutal fashion. Lacking a host, the embryo then quickly (like, in seconds) mutates into a full adult, fully capable of creating embryos of its own. The downside to this is that the G-adult has an especially short lifespan, dieing naturally in a matter of hours. [By the way, that image shows a G-adult, vomitting a G-larva]

You won't find a G-adult easily in brawl, but the G-larva can be found lurking in random crates. They're pretty small, but they make a mad dash for the closest player, attempting to latch onto them like a Pikmin. Any attack at all will dispatch a G-larva instantly, even once it has latched onto a player. But if a G-larva manages to stay attached to a player for 4 seconds, it will tunnel into their body, making a nice cosy home for itself to grow and feast. Yum.
After about 12 seconds inside, the G-larva bursts out from their host, dealing 20% damage and crippling them with hitstun for 2 seconds. And the bad news doesn't end there. The G-larva, quite full of tasty meat, mutates rapidly into a G-adult, a monstrous hulking creature, that vomits out a new G-larva once every second. That could end up real bad, real fast, so the best course of action is to kill the G-adult by dealing 100% damage to it. If you don't, you'll find yourself quickly swamped my numerous G-larva, and eventually, even more G-adults making even more G-larva. Yikes.
 

AlwaysCute

Smash Rookie
Joined
Feb 16, 2011
Messages
2

Hello. I've been lurking around here for some time and decided to join in the fun. I want to do the best I can to make a good impression and pass. The only problem is that the character I have in mind is a bit awkward for a fighting-game. How do you make a moveset for a schoolgirl with no fighting experience? If anybody's done this before, can they show me an example?
 

i8pie

Smash Apprentice
Joined
Nov 18, 2010
Messages
81
I realize I don't have much credibility (I'm having such a big block on this Chaotix idea), but I'll try to give some advice. There's no need to stress about your character having no fighting experience; Captain Falcon didn't have any before Smash and in MYM there are even characters that don't even 'fight' at all in the traditional sense. You could make punch kick characters if you want but don't feel your character choices are limited to these.

As for the School Girl question, don't try to look at this from a fighting experience perspective because Smash, heck even Capcom ignore this at times (I don't remember Arthur being able to do some of the stuff he does in MvC3, especially use swords). Look at this from a character perspective. It helps if you know a LOT about the character (if they're obscure this is easier). Think, "how would they react to a situation like Smash?" Now envision how they'd KO. What did you get? I know what I got. I got the idea she'd run straight away. As for KO's...


(That's Eyeshield BTW, 1st Volume)

Star KO of course. Now that you've got a vague idea of what she might play, from there you could work on how she'd achieve this. Maybe all her inputs make her move forward, but really quickly. Maybe she also has no traction so she'd always really be 'moving' or running, just to keep her in character when she does inputs. Maybe her specials make her drop her items while she runs, like bannana peels or something, making her an unwitting camper. You can see there's already heaps of potential, and that's just built on the idea of running away.

You don't have to make her run though, nor do you have to listen to me though. If you feel that's not right for her, then just do what you want her to do. Just my thoughts, and how I'd approach the character.
 

Rychu

Thane of Smashville
Joined
Jul 5, 2010
Messages
817
3DS FC
1908-0105-4965

Hello. I've been lurking around here for some time and decided to join in the fun. I want to do the best I can to make a good impression and pass. The only problem is that the character I have in mind is a bit awkward for a fighting-game. How do you make a moveset for a schoolgirl with no fighting experience? If anybody's done this before, can they show me an example?
Okay, I'd say look at M. Trinity from this contest, as well as XP Tan. We dothings here that would never be in a fighting game :p. Anyway, welcome to MYM!
 
D

Deleted member

Guest
What did I do to deserve this lame Pikachu clone to comment; Emolga is an effortless combination of simple mechanics and inter-move interactions that define the Pokemon movements, be it in Make Your Move 7 or Make Your Move 9. Much like with Airman, you hype up the fact that you're able to deflect projectiles: once you tell us the down special, it's quite the reveal to finally realise how his playstyle pieces together. Granted, this isn't the most complex idea I've ever read – but it's pretty great for Emolga, as a rather undefined personality and you also get in plenty of characterisation that makes him seem like a charming little marsupial.

There is a very notable finesse to the way you structure and present the set: as always, you're one to keep the secret from the reader until the last moment. I've mentioned Airman, but you also did this with Nurse Joy – honestly, the fact you can pull something like that off successfully multiple times is saying something. As is your current trend, the set centres around a big mechanic – controlling projectiles you force upon the opponent – while also creating a basic moveset that works mostly in highlighting who or what the character is. It works, and yet I can't help feeling that this is becoming a bit of a trope for you, Junahu. Then again, I've probably just described ninety-percent of current-day movesets... oops.

What is easily overlooked is the abhorrently appealing writing style that is another common sight in your sets, it's a basic organisation, even more so than Diglett, but it compliments the simplistic makings of the set in a becoming way to be sure. It reads like a dream; there's nothing to get stuck on, as you take the logical steps in explaining each move without patronising the reader. And while I say all of this, I do hope your next project is a little more “uncomfortable” for you as a set maker, as much as I enjoy your levels of activity right now.

Onto Baibanira, strangely lacking comments at the moment. It creates a playstyle centred similarly to how we've seen icy Pokemon depicted many a time; what it lacks in originality, it makes up for in the typical Kholdstare wit and mockery here and there, while presenting some interesting takes on otherwise explored ideas. Considering this is an unreleased generation of Pokemon, it's hardly a good criticism to say it doesn't take advantage of the Pokemon: you make perfect use of the ice cream gimmick of the Pokemon with the more comical parts of the set, for example.

The playstyle of the set suffers particularly from the fact it has already been played out plenty before in sets like Abomasnow or even Glaceon, but it functions as a nice interlude in some traps. These sometimes revolving around storing resources, creating a very bulky-sounding Pokemon: especially with an ice cream being the base, this is a little odd. Honestly, I really loved what you did with the grabs – mocking, while at the same time utilizing the ice cream moniker of Baibanira, but I wish you had taken it even further, forgetting the difficulty inheritant to that. For such a bizarre design that has created so much controversy among the Pokemon fanbase and beyond, Baibanira comes off a little... dull.

Of course, the set is saved somewhat by your as-ever brilliant writing, letting the reader sit back and enjoy some happiness being sung to them by the internet-penmanship of one Mr. Kholdstare. As you have before, you take advantage of this to get some laughs out of a few filler inputs – again, reasonable given what you had to work with and always welcome. In all, I wasn't blown away by this set or anything [note: and I'm suddenly reminded how much I miss Emolga's puns], but it's a fine one-day Pokemon moveset and brilliant if you consider just how insanely hard it has to be to try and make a moveset for a sentient ice cream.
 

AlwaysCute

Smash Rookie
Joined
Feb 16, 2011
Messages
2
I realize I don't have much credibility (I'm having such a big block on this Chaotix idea), but I'll try to give some advice. There's no need to stress about your character having no fighting experience; Captain Falcon didn't have any before Smash and in MYM there are even characters that don't even 'fight' at all in the traditional sense. You could make punch kick characters if you want but don't feel your character choices are limited to these.

As for the School Girl question, don't try to look at this from a fighting experience perspective because Smash, heck even Capcom ignore this at times (I don't remember Arthur being able to do some of the stuff he does in MvC3, especially use swords). Look at this from a character perspective. It helps if you know a LOT about the character (if they're obscure this is easier). Think, "how would they react to a situation like Smash?" Now envision how they'd KO. What did you get? I know what I got. I got the idea she'd run straight away. As for KO's...


(That's Eyeshield BTW, 1st Volume)

Star KO of course. Now that you've got a vague idea of what she might play, from there you could work on how she'd achieve this. Maybe all her inputs make her move forward, but really quickly. Maybe she also has no traction so she'd always really be 'moving' or running, just to keep her in character when she does inputs. Maybe her specials make her drop her items while she runs, like bannana peels or something, making her an unwitting camper. You can see there's already heaps of potential, and that's just built on the idea of running away.

You don't have to make her run though, nor do you have to listen to me though. If you feel that's not right for her, then just do what you want her to do. Just my thoughts, and how I'd approach the character.
Thanks a lot i8pie! This advice is a big help in envisioning how the way I could see my character as a moveset.

Okay, I'd say look at M. Trinity from this contest, as well as XP Tan. We dothings here that would never be in a fighting game :p. Anyway, welcome to MYM!
Hello Getocoolaid and thanks for the advice! I'll be sure to check up the movesets you mentioned even though I've never heard of their character anywhere else.
 

Junahu

Smash Ace
Joined
Nov 15, 2005
Messages
899
Location
Shropshire Slasher
Landlos:
It's nice to see you acknowledging (and even raiding) the established canon of your past movesets, bringing ideas back and applying a fresh new spin to them (Anchoring, Ground raising, slow Tornado projectiles that can absorb stuff to make it stronger).
Landlos has the usual (and almost expected by this point) stock of clever ideas that play off one another throughout the moveset. Something I'm becoming a bit envious of, is your ability to make every attack relevant in a very real sense. You take great pains to justify every move you make, outright refusing to make an attack that doesn't find use with at least two of the sets 'themes'.

Something I initially found a little off, is the tail rooting mechanic, which sounded somewhat pointless. At first I thought it was just an excuse to have Landlos use aerials while 'on' the ground. Eventually I realised how the need to switch between the two modes, better repesents to diametric nature of Landlos' two elements; GROUND and FLYING

My only actual problem with the set, isn't with the set at all. Landlos himself just seems like an impossible Pokemon to figure out. It's hard to see him having any character to exploit, beyond the fact that he looks identical to two other Pokemon. So, given what you had to work with, you actually exceeded my expectations in regards to characterising Landlos. Your introductory paragraphs in particular, went a long way in showing how much thought you put into how Landlos works.

I wonder, with Neutral A making/refreshing crops... how does Landlos actually eat them? The input to eat them is identical to the one that laggily refreshes them.


SmashDaddy said:
Emolga is an effortless combination of simple mechanics and inter-move interactions that define the Pokemon movements, be it in Make Your Move 7 or Make Your Move 9. Much like with Airman, you hype up the fact that you're able to deflect projectiles: once you tell us the down special, it's quite the reveal to finally realise how his playstyle pieces together. Granted, this isn't the most complex idea I've ever read – but it's pretty great for Emolga, as a rather undefined personality and you also get in plenty of characterisation that makes him seem like a charming little marsupial. --

-- And while I say all of this, I do hope your next project is a little more “uncomfortable” for you as a set maker, as much as I enjoy your levels of activity right now.
What a lovely comment this is. It's much appreciated when a reader takes the effort to understand a set on a more intimate level. Or, at least, hides the negative commentry among plenty of positives.
I have gotten fond of revealing a secondary layer of a moveset only after you've read everything else about it. It's a trick that tries to get the reader to understand each move in two different ways; as a standard attack, and as a piece of a greater special mechanic. Airman is that concept in its purest form, giving the reader a completely unexplained projectile, without any context for them to chew on. Nurse Joy and Emolga are a bit more lax, hiding a key detail until the end, but still showing throughout the set, how that detail plays into the attacks. Arche takes another step back by giving the reader something that they believe is the full set, before springing a 'surprise!' right at the end that suddenly changes how those attacks can be used.
I should probably stop doing that now, seeing as everyone has gotten accustomed to it already


I realize I don't have much credibility (I'm having such a big block on this Chaotix idea), but I'll try to give some advice. There's no need to stress about your character having no fighting experience; Captain Falcon didn't have any before Smash and in MYM there are even characters that don't even 'fight' at all in the traditional sense. You could make punch kick characters if you want but don't feel your character choices are limited to these.

As for the School Girl question, don't try to look at this from a fighting experience perspective because Smash, heck even Capcom ignore this at times (I don't remember Arthur being able to do some of the stuff he does in MvC3, especially use swords). Look at this from a character perspective. It helps if you know a LOT about the character (if they're obscure this is easier). Think, "how would they react to a situation like Smash?"

You don't have to make her run though, nor do you have to listen to me though. If you feel that's not right for her, then just do what you want her to do. Just my thoughts, and how I'd approach the character.
This is pretty incredible advice, seriously. It makes me happy to see people approach movesets from a more character-centric perspective

As for the problem of making movesets for genuinely weak characters, it is a rather difficult hurdle to jump. The key is to look for a unique way that person can handle their fights that ultimately fits in with their personality (Penny Gadget [MYM9], Nurse Joy [MYM8], Negative Man [MYM6]).
 

kitsuneko345

Smash Ace
Joined
Dec 20, 2007
Messages
562
Location
*sending Sundance lots of apple pies on Pi Day, as
It might not be in Marvel VS Capcom, but it's still revelant dammit!


Cohdopian Embassy

This Los Angeles Building from the year 2019 was the location of Miles Edgeworth's last case in Ace Attorney Investigations: Miles Edgeworth. This structure was used to rekindle the conflict between two nations: The Kingdom of Allebahst and The Republic of Babahl. Both of the nations use the building to try to reconsile and eventually become the Princpality of Cohdopia, their previous moniker before they split apart.

The stage for brawl is condensed into four parts to make this easier for the everyone to understand. Only upward KOs can be regularly used on the stage, although there are other possibilities available in certain cases. If you don't want to be spoiled for the game Ace Attorney Investigations, then don't read the second paragraph of each part of the stage; Although there are other elements pertaining to each part, they don't neccesarily have to be there (although it will enhance the experince from the game.


Rose Garden

All the players will start in this part of the stage: two of them will be on the extreme left and right side, the third near the right side of the dirt pathway, and the last top of the podium , which has collapsed onto the pool. This stage is as long as Fox's Landmaster from spike to barrel. People will be seen running away from the stage not because of the brawlers suddenly appearing in the background, but because the spotlight will show a shadow of the famed thief Yatagarasu will appear on the flag in the background. While the people are running away, the statues and lights will be knocked around, making the spotlight disappear. The sword of the left statue will land exactly on the brawler's path to deal 5% damage, but because the sword didn't break off, it can't be used as a item. Spotlights will still flicker on and off every two seconds to blind the fighters, making them attack in the opposite direction. The water on the course can make the character drown, but the time from the end of drowning to the actual KO is a suprisingly long 5 seconds.

The pool is actually very deep, being about one and a half Giga Bowsers tall. It is possible to drown the pool by hitting on the brass leaves five times, making them bend so that no water will flow onto the pool. The pool will slowly drain out in five seconds once both brass leaves bent out of shape. 25 seconds after the pool is empty, the leaves will be back to its original shape and water will fill the pool back up in ten seconds time. Whenever the pool is completely filled out, occasionally an idiot (Read Larry Butz) in a Steel Samurai will pop out of the pool with what appears to be a metallic baby at hand. Footstool jumping on the character will make him go back in the water; if you don't within five seconds, the man will get out before dropping the baby into the pool, forcing him to go back in.


Open-air Stage

Located to the right of the Rose Garden, the Open-air stage is said to be an exact mirror to the Rose Garden. However, there are notable differences. For one, the pool is replaced will what appears to be a center of a circus ring instead and is almost solid. Second, scaffolding on the right side of this part makes the stage have a similar feel to Flat Zone 2's Fire Stage. Thirdly, a Bowser-high temporary fence separates this part of the stage into two, but the fence can be easily destroyed with a smash attack (it will always appear within 15 seconds of it's destruction). Lastly, a banner on top of where the pool would be will act as a soft platform. Also of note is that for the first fifteen seconds, the third level of scaffolding will have green fire gush out, dealing 4% and minor knockback and making you unable to go to the Secretariat's office at that time (skip the spoiler for information on this part of the stage).

In actuality, the pool is still on the stage, but the tarp covers it up. Attack the tarp five times with downward moves to break the tarp and make the pool appear. The banner on the tarp will break as well once the pool appears. This pool is affected on how the pool on other side is like: if the Garden's pool is drown out, the pool on the stage is drowned out as well. This is due to a tunnel in the bottom of the pools that the players can go through no problem. The tarp will reappear one minute after its intial breaking, but only when the pool is completely filled up.


Secretariat's office

The Babahlese secretariat's office, now all burned up from the strange fire, is located on the third floor of Babahlese building. Easily enterable via the scaffolding and open window, not much can be said about the room itself. The only platform would be the Zelda-sized statue near the middle of the room. Fire users be warned though: too much heat in the room (10 fire moves touching any part of the room) in too little time (10 seconds) can reignite the room and cause a explosion to appear inside and project out the window. The explosion gives out 25% damage and high knockback towards the left, forcing you out of the room. Fire will block out the room for fifteen seconds after the explosion happens.

Hitting the famed statue 10 times will cause the statue to open up and reveal that it holds drugs inside. Once the drugs are all taken out through attacks, the statue will then appear to float up like magic. In actuality, the statue is held up via a pulley system made from strong coil wires. Attacking the statue on its right side will cause it to go left and (if the statue is not it's original position) vice versa. The stronger the attack, the farther the statue goes and hits other opponents with the same damage as the original attack. It takes two Warlock Punches to make the statue go to the other side of the stage and into the Ambassador's Office.


Ambassador's Office

The Allebahstian ambassador's office is probaly the most normal part of the stage. However it's hard to get into because there is no platforms to help you get onto there. Being a simple flat room, there is nothing of note that is usual about this stage.

In the far corner of the room you can see a dog eating a bundle of hot dogs in boxes. These hotdogs can heal you 25% damage, but be forewarned as Missile the dog will chase after you until you get out of the room and will deal 10% damage and slight knockback if his bite connects to you. The statue from the Secretariat's room can get in here up until it is on top of the dark mark of the room seen in the picture above. The statue will still have the properties even inside of the room itself, but the farthest it can go to the left is that mark.

Now that we are done here I will provide two pictures to help understand the stage: one for the people who didn't spoil themselves, and the other for those who did.

Safe: http://i410.photobucket.com/albums/pp187/Kits_Hits/ColphiaEmbassysafe.png

Spoiler: http://i410.photobucket.com/albums/pp187/Kits_Hits/ColphiaEmbassyspoiler.png
 

Koric

Smash Apprentice
Joined
Feb 10, 2006
Messages
84
Location
Aiken SC

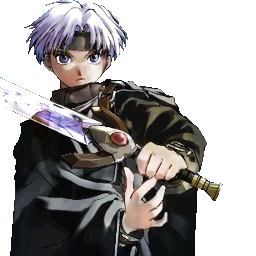
Schezo Wegey


Schezo is a dark wizard whom also specialized in dark magic who appear in the Madou Matatori and puyo puyo series. Though his abilities in his mastery of the sword and magic abilities are impressive, He still longs for more power, especially from those stronger than him which is why he often battle Arle. A bad habit of his is when he threatens or wishes to take his/her power, he would say "I want you" or "be my desire" by mistake. Because of this oddly habit, he is often referred to as a pervert. Poor Schezo...
In brawl, his height is slightly smaller than Marth with his blade shrouded in dark flames.

Weight - 5.3/10
Walk – 4.9/10
Run - 5/10
Jump – 5.1/10
second jump - 5/10
Air movement speed – 5.2/10
fall speed – 4.8/10
traction - 5/10


Schezo, in compression to most of the characters, is pretty much about average in terms of his physical structure and defense including running walking falling, and such. The only thing that is different from the rest is his overall attack power and his range in both attacks and projectiles including with a moderate attack and recovery speed, it makes him capable fighter regardless.

His projectiles are more unique than many others in the game. His magic is fully capable of tracking the opponent. In a tactical scenario, he would be effective in battle overall. But in terms of playing him in a team battle, it may not be a good choice to use his special attacks frequently. His projectiles tend to target the closest person in front of him. So there could be a good chance that few of his attacks could also hit your teammates by mistake. So…he’s best off fighting in a 1vs1 or a Free for all than in a team battle.

Special attacks

A lot of his special attacks are mainly homing/projectiles that can be useful depending on the situation.

Special B - Seeking sword - (1%-8%)


He will throw his sword forward as it twirling by itself. The sword will freely launch itself to the target as it travels like Samus’s homing missile for 2.9 seconds. Even though the sword is more agile than Samus’s homing missiles and can travel as fast as Falco’s blaster, its tracking really sucks. It could be easily dodged once and never has to worry coming back to you. After that time if it hits nobody, it will then make its way back to Schezo’s procession. If it did hit someone, then the sword will stop and slowly move upward as it slash the foe 8 times as it binds the opponent into place with each hit doing 1% damage until it releases the foe upward providing a little set knockback. After damaging the foe, it will travel back to Schezo.

After throwing the sword, he will quickly return to his normal stance, however HE WILL BE DISARMED AND WON’T BE ABLE TO USE HIS SWORD BASED ATTAKCKS. If Schezo attacks the same foe the sword has currently trapped or if he overlaps his sword, the sword will instantly cease its attack and goes back to him, however he won’t be able to use any of his sword attacks until he touch the ground. (Schezo’s knockback takes priory.)

When disarmed, he will replace his sword attacks with a dark magic version of the same attack. This will overall lower his range is lowered by 4/10 of a stage block than the usual attack. Also the attack effect may change, but mostly become weaker since he doesn’t have his blade.

If the sword collides with a hitbox from a thrown solid item or from a character’s heavy sword attack, then the sword will bounce off its target and land to the solid ground with its blade pierced to the ground. At that point, anyone can pick up Schezo’s sword and can use it as a battering item for damage slightly lower than the beam sword. If an attack reaches the front handle of the blade, then its knockback will become similar as that to the beam sword. When thrown, it can be thrown for a moderate damage of 11%-14% and poor knockback. When the item goes out of the arena as an item, it will reappear into Schezo’s procession.

If the weapon owner (AKA Schezo) grabs it, he can use it as an item as well. By pressing B allows him to reequip the sword.


Side B – dark magic (2%-5%)

By a simple swing of his wrist, he can release a trail of dark wave that travels forward from his position that travels on solid floors and walls similar to Pikachu’s neutral B for around 2.7 seconds before it will disappear (Ground type). It can also disappear when it hits an enemy or goes outside the arena. When it hits the edge of a platform or the arena, it will simply fall as if it was a raindrop. After it lands to the ground, it can reform its shape and change its original path depending on the closest opponent.

This attack has a normal and fast version. By tapping on the controller stick instead of tilting will make the initial attack travel 2.5 times faster than the normal. The normal type has a purplish black color on it capable of killing at 182%. However, the fast version has a violet color on it and does half the damage and knockback from its slower counterpart. If two of different speeds collide with each other, it will result in an explosion of darkness that covers lots of range and could kill around 88%. (Two of the same color cannot collide.)

When done in the air, the attack is executed into the shape of a dark eagle (Air type). This sort of dark magic projectile travels forward in the air at first, but then slowly slows down and sharply dives when it slightly within range below or above the opponent. Upon collision with a floor or ceiling, it will split into its ground type and moves forward or backwards depending on where the nearest opponent is. When the eagle like trails hits a wall, it will split into a dark trail and travel downward or upward depending on where the opponent is at. If a dark eagle trail hits an opponent instead of a wall, it will damage the opponent, but it will evaporate and won’t split into a ground type dark trail.
Unlike the ground type, the air type form doesn't disappear by time.

It may not look like it, but he does need his sword for this attack. He won't be able to execute this attack without it.


Down B – Focused blast

Schezo will clinch his hands together and unleash an attack focusing on the enemy current position or a nearby enemy position of which a purple circle will appear on the blast spot. Later, a dark blast will surround at that position doing damage to anyone who is within range. Its power varied from the distance from Schezo to the target point. From the moment he chinches his hands is when the attack is active. The further the target spot is away from the user, the longer for the attack to execute and wider the blast would become as well as the damage and knockback. The power of this attack is weak, but can kill greatly if the target is far or very far from the target position. So basically this attack is about location, location, and location. The range of the blast can also very from how much distance. After executing this attack, he will return to his normal stance, but cannot use this attack again until the previous is completely finished.

Damage = 2% X distance
Attack delay = 0.08 X distance
Kill power = 240% - (distance X 11) ~ distance cannot exceed more than 20
Blast range = 0.2 blocks x distance ~ distance cannot exceed more than 20


For example, if the distance between Schezo and the target point is 6 stage builder blocks away, then it will take 0.48 seconds to execute. It would kill at 174% from that distance doing 12% damage. This attack has an unlimited damage but it has a limit on its knockback if the target is 20 or more stage builder blocks away. The lowest this attack can kill at 20% with is blast range covering around 4 stage builder blocks assuming if the target is that far away and hit.
This attack doesn’t use the effects of DECAY regardless how many times its use.

Note: if the distance is less than a block away, then this attack will not have an attack delay, but it would only have a little set knockback not capable of killing and 1% damage. A purple circle will not appear to mark the set position.
(He can use this attack when disarmed)


Up B - Warp attack. (1% - 12%)

He will spin around once as he will place dark energy into his sword. Afterward, he will throw his sword in the direction of the controller. After the sword quickly travels 7 blocks, he stops the sword’s movement as it continues to quickly spin binding and slicing anyone near the center of the radius quickly for up to 6 times. During that time, he will warp from his position in front of his sword is with and after grabbing his blade in front of him, executes a powerful cross slash as he turns around. He will be in a helpless state after this.
This attack has a high knockback rating can kill at 119%.


If he’s disarmed when executing this attack, then he will just quickly air dash instead of attacking. The air dash can cancel itself when he overlaps a ledge and has less traveling range than the sword version.


Standard attacks

A portion of his attacks are separated on sword and physical attacks making his range variable. The average range for his sword attacks covers 8/10 of a stage builder block while his physical attacks (mainly kicks) cover 3/10 in average. One thing to note is that a few of his kick attacks can drain a good portion of the opponent’s shield. Depending if Schezo is disarmed or not may alter several of his basic attacks.


Standard A – first strike (1%-9%)

A sequence of attacks that can do 5 hits or repeat…maybe

First hit (1%)
He will kick the foe to the mid area of the foe using his left leg. This attack has no growth knockback a very low set knockback capable of only flinch the opponent.

Second hit (1%)
Schezo will quickly change from his mid kick to a side kick using his right leg. This attack also has no growth knock and a very low set knockback.

(If Schezo is disarmed, then it will skip to the fourth hit)

Third hit (2%-3%)

Schezo will swing his sword horizontal to follow up his right kick attack. This attack has little growth knockback, but its not capable of killing anyone below 200%. If it does launch the opponent, then they will be sent upward while slightly moving forward. For a sword attack, its range covers 6/10 of a stage builder block

Fourth hit (no damage)
Schezo will fire a very small blast that can freeze the current frame of the opponent for 0.6 seconds stopping the enemy’s hitbox and ignoring the gravity around during the time. Contrast to his sword attacks, this attack has equal range of them…but its priority is very low considering. Depending on how the attack button is used varies his next attack.
(If Schezo currently disarmed, the attack will end here)

Fifth hit (1%) repeated
Schezo will perform a barrage of sword thrusts in front of him alternating from high, mid, and low. Each hit will push the opponent slightly forward and will end when the user stop tapping the attack button.

Fifth hit (2%-4%) normal
Schezo can attack with a decent downward slash. This attack can cover slightly more range than his other sword attacks and can kill around 176% assuming that the victim is Mario. This attack is capable of negating other sword attacks. If the opponent is near the sword handle, then the original damage and knockback of this attack will increase by thirty percent as the opponent is engulf in dark flames.


Tilt A - thrust attack (6%-13%)

Schezo will thrust his sword forward covering much range...this attack can be altered depending on the direction of the tilted controller. From a sword attack, its range covers nine tenths of a block and can launch the foe forward normally capable of killing at 178% and moves a half stage builder block forward during this attack. If the hit is very close to the handler of the sword, they will be engulf in a small dark flame and the original damage of this attack will increase by 5 percent with a little hitlag and afterward reducing its original knockback by sixty percent.

When disarmed, he will unleash a wave of dark energy that only does 3% with a small set knockback and range.


Down A - crouching kick (2%-5%)

Schezo performs a straight kick as he crouches on the ground. This attack has an extremely little growth knockback and it does a set knockback that can promote a high chance of tripping depending on the enemy weight and current damage. When this attack hits an airborne enemy, it will push them away from Schezo. This attack’s range covers three tenth of a stage block. This attack overall is 30% faster than Zelda’s tilt down attack. Also this attack can drain 35% shield power if defended.
(He can use this attack when disarmed.)


Up A - crescent slice (4%-10%)

He will slash his sword vertical counter clockwise covering the top of his position covering not only above him, but also a little in front and behind him as well. By height, the range of this attack covers seven tenths of a stage block, but it is a rather slow attack, but much quicker than Ike’s up smash. This attack can kill at 124%. (187% if the opponent is elsewhere other than above Schezo.)


Dash attack - cross slash (6%-17%)

Before stopping, Schezo will perform a horizontal slash attack as he turns around. This attack is fairly weak capable of launching the foe upward after impact, but if this attack hits the sweet spot, then it could kill at 137% as it launches the foe straight forward. If this attack connects very close to the sword handler, then this attack original damage increases by three percent. Its set and growth knockback will increase by twice as it engulfs the foe in dark flames.

When disarmed, he will stop after taking one more step while extending both of his palms in front of him as he emits dark energy. This attack does 2%-3% damage and can launch the foe upward with little growth knockback. This attack has a hitbox that last for most of the attack.


Neutral air – whirlwind attack (2%-12%)


Schezo will extend his sword as he quickly spins up to two times in the air capable of providing 4 hits alternating between in front and behind Schezo doing 2% damage each and covering around a third of a block. After completing the second spin, he will use his sword to perform a powerful upward slash capable of killing at 143% as it launches the foe upward-forward from his position. The spin is rather quick, but the execution after the last hit has long frames making it rather long to recover from the attack as long he remains in the air.

Without his sword, he can still execute it, but both its style and range will be different. He will spin around two times as he extends both of his arms as he emits dark enemy from both of his palms providing 4 hits both back and front from his position doing 1% damage. He will then execute a powerful kick attack after completing the second spin that can kill at 123%, The attack speed of the entire attack is the same as that if he had his sword.


Forward air - solid swing (7%-16%)

He will take his sword over his head and swings down with moderate force and speed. Alone this attack can kill at 127%, but when the opponent is hit near the sword handle, the knockback is shifted from forward-upward to straight downward as it engulfs the foe in dark flames. The damage does not change when this effect applied. Overall the attack duration is a little shorter than his basic jump.

When disarmed, he will perform a powerful punch attack downward fused with dark energy. If it hits, the enemy will be launched downward with moderate set knockback…but not enough to kill even Ganondorf. This attack does 4%-6% damage.


Back air - double attack (8%-18%)

He will turn around behind him as he swings his sword in a horizontal cross slash doing 5%. After that he will perform a spinning kick powered by his dark magic as he turns back around to his air position providing 11% damage at its max. The first is capable of killing at 160%, but the second hit can kill at 105% in a dark flame, but his kick has low range only covering 2/10 of a stage builder block. Each hit is capable of launching the foe forward while slightly going upward. The kick attack can drain 65% shield power if blocked
If the first hit strikes near the handle of the blade, then the original damage will increase by ten percent, but it will replace the original knockback with a stun effect that last for 0.3 seconds. Enough time for him to connect with the next kick attack.

When disarmed, his first attack will be a straight kick that does over less than half of the sword in damage. The only positive difference from this version and the sword is that the possibility to stun when the first hits is absolute.


Up air - Moon slash – (3%-7%)

With his sword in place, he can perform a very quick aerial somersault as he cuts around his area completely. The style of the attack is similar to ROB’s neutral air except its much faster and it rotates counter-clockwise. This attack has a fast attack and recovery frames, but for a sword attack, it covers 6/10 of a stage builder block. If the attack connects very close above the user, then this attack can kill at 146% as it sends the foe upward, else it would kill slightly over 200%. The knockback is varied depends on where the hitbox connects the opponent like if its hits 7:00 from his position, then the opponent will be launched downward while going backwards from Schezo’s position.

When disarmed, this attack is replaced with Schezo raising his arm upward and releasing a stream of dark magic that can hit 4 times doing 1% each. The frames of the entire attack are long enough that it will take just less than a second. This attack hardly has any knockback as it can only make the opponent flinch.


Down air - Eagle strike (4%-11%)

He can dive downward while going forward of his position like ZSS, sonic and sheik, however instead of diving downward while moving slightly forward. He will travel downward-forward in a 45% angle as he dives while in a kicking position. Upon connecting with the ground he will unleash a dark wave that has the radius as big as half of a stage builder circle, however it cannot damage nor make the opponent flinch, but it still could kill at 169% if the opponent is very close to the dark wave. (The wave can go through small platforms.) If the opponent is hit before he hits the ground, then the opponent will be launched forward heading downward from Schezo’s position. If he connects before he hits the ground and the opponent is on the ground, then the opponent will take the hit, but with only a small set knockback with no growth knockback…to take the full effect of the dark wave that proceed after he hits the ground.
(He can use this attack when disarmed.)


Forward smash – Dark slash (11%-19%)


He will deliver a powerful and long range attack covering a full stage block. During the attack recovery, by pressing the attack button, he can quickly kick behind him and follow it up with a powerful rising upward slash attack as he turns around behind him that has the same damage properties as his first swing, but has more range. This attack is capable of killing at 116% alone, but if the opponent is near the sword hander, then the original attack knockback will increase by fifteen percent and the original damage will increase by forty percent followed by a minor hitlag in during the effect.

If he’s disarmed, then the attack will change that Schezo will release a heavy amount of dark energy that can do 18%-27% damage uncharged…but the set knockback is very little regardless. Unlike the rest of the unarmed versions, the frame rate is much longer than the sword version. If he doesn’t have a sword for the next hit, the attack sequence will end.

The kick part of the attack can only do 2% while dealing a little set knockback upward to be in range and helpless for his next attack. This kick can also drain 75% of the foe’s shield power.


Up smash – Pulsar 2% -24%

Similar to Mewtwo's up smash, He can create a void of darkness of the size of his head in a whisk of his palm above him. The moment of the attack would reach its end, the pulsar would widen about twice its size before disappearing. This attack can hit up to 7 times and can kill at 126%
(He can use this attack when disarmed.)


Down smash – Channler 7%-14%

He will chinches his two palms together and chants a dark spell. As soon he starts speaking, a dark wave of energy blasts from his position covering a decent range both sides of Schezo. After the dark wave disappears, a second wave will appear before the previous wave. That wave is more powerful than the first, but covers less range. The first wave can kill at 168% while the second can kill at 115%.
(He can use this attack when disarmed.)


Throws

Oddly over half of his throws doesn't need to be revolved around the sword. His throws can bring multiple options depending if he's armed or not.

grab and attack – darkness injection (1%-2%)
He attacks by emitting dark magic from his left palm to the foe’s face. This attack is oddly slow comparing to other characters whom can do the same damage as a grab attack.
(He can use this attack when disarmed.)


Forward throw – dark rays

First he will throw the opponent slightly only doing a small set knockback to the foe. After the throw (similar to mewtwo) he will randomly fire 3 to 12 small ray blasts from his palm each doing 1% damage each as they travel upward-forward traveling at different angles. Normally he will fire 4 to the opponent but occasionally he would fire 5-7 or more…but that’s very rare if he fires more than that. The rays can also damage other opponents other than the victim he’s throwing.
(He can use this attack without his sword.)


Back throw – Back slash (4%-7%)

He will dash behind the opponent as he swings his sword hard horizontal. This attack can kill at 197%

When disarmed, he will perform a rolling throw. It does 2%-4% damage, but unlike the rest of his disarmed attacks, it can actually kill someone. For this attack, it can kill at 134%


Up throw - dark force (2%-9%)

He will hold the opponent above him burning the foe with dark flames four times causing 1% damage each before he unleash a dark blast from above his position greatly damaging the foe capable of killing at 157% The blast can also harm others.
(He can use this attack when disarmed.)


Down throw – Spinning saw (6% - 16%)

His sword will glow in dark flames before he will point his hand to the ground below the opponent. Suddenly the dark energy aura shaped as a buzz saw will slowly rise from the ground quickly spinning in place like a saw ignoring the fact that it’s on the ground. The attack will hits 5 times until the last hit which send the foe will be launched forward in an upward arc. After the finishing hit, the magical spell instantly disappears back to Schezo’s hand. This attack can attack other opponents as well.
Schezo will return to his normal stance usually after this attack made its third hit.

When disarmed, the attack will change that he will slam his opponent to the grown and deliver an elbow drop. It only does 3%-6% damage and with very little set and growth knockback. The attack recovery speed for this kind of attack is as quick as Falco, so you can try to chain the elbow drops.


Final smash - Magic Circle.
35%-65%

(note : the binding circle is three times bigger than this.)​

He will quickly cast a golden magic circle in front of him binding anyone who overlaps the circle. Then he draws his sword and starts slashing quickly 15 times at each angle and position of the circle so fast that it’s like he's warping between each slice doing 2% damage each. At the end with a simple snap of his fingers, he will shatter the circle using magic attack that releasing everyone upwards with a knockback so heavy that it will surely kill them...but most likely as the result of the damage racked up on them.

He cannot do his final smash unless he has his sword with him.


Strategies

While he has good sword ranged attacks as well as loads of ranged projectiles, it might be best to keep a mix of both attack and projectile. The projectiles can be easily predictable and depending on some situations, like of the seeking sword missed or the opponent is near you in the air when you just executed a ground type dark magic attack.

Getting the different dark magic trails to collide would take some time as well as some distance for an efficient kill move, but also keep in mind that these small projectiles can also travel on the walls and ceilings as well like Pikachu’s thunder jolt (neutral B attack). If collide near or below the ledge, the implosion can be an excellent tactic to use as an edge guard that can be almost sure to make it harder for anyone trying to recover…except the flying types.

His spinning sword and down throw attacks can allow multiple ways to follow up during the sword attacking or after the sword releasing the opponent upward afterwards if you’re close. Actually, depending on how the seeking blade is used could greatly determine how your chances for victory. There are a lot of possibilities to do during the sword’s attack that could easily result in a chain at a low percentage.

Taunts

Taunt 1 – He will point his sword straight forward and will say “Your power…will is mine” in Japanese. If there a female character in the arena, there will be a 5% chance that he would say: “You power…be all mine” by mistake. This chance will be way higher if Arle is on the arena.

Taunt 2 – He will look down to his left hand as he forms dark energy roams around it for 1.70 seconds. Afterwards, he will resume his stance.

Taunt 3 – He will make his sword vanish completely and chinches both of his arms as he looks forward of his position. He would look confident before he will resummons his sword out of nowhere.
 

half_silver28

Smash Ace
Joined
Apr 25, 2008
Messages
862
Location
MYM, Ohio
I’m going to try and keep these comments short, since I do have a tendency to drone on and on.

So we have the long-awaited Dormammu set from n88, it’s a pretty good one. Dormammu is a pretty interesting combination of a camper and minion character, using his large amounts of flame not only to protect himself but to force his minions where he wants them. He’s also got some nice stuff in his teleportation to move around himself and minions to really irritate the foe. He hardly seems to have trouble KOing despite the lack of KO moves: his insane range (especially vertically) combined with his minions’ laser attacks can easily force the foe off blast zones once they have a good amount of damage on them.

The biggest problem of this set is the awkward control thing you have working in the neutral aerial. It seems unnecessarily counter-intuitive to have to hold out the attack instead of just having it last for a few seconds with Dorm being free to attack. And he already has a way to light himself ablaze with the up tilt anyhow. Dorm doesn’t really have a whole lot of business in the air anyway so it seems kind of pointless. Dorm also is pretty overpowered, but he’s also canonically overpowered, so I can kind of look past that. And the whole 3v1 thing added onto the end seems like a cop-out, though Dorm is among the more suitable candidates to be 3v1. Overall this was a pretty enjoyable set that I think probably matches Aianto for your best this contest. Great Job.


And there’s Koric’s third moveset: Schezo Wegey. He does have some cool ideas in his specials with his thrown sword holding opponents in place to be hit with his other ranged moves. And the two versions of his side B working together to form a ranged KO move is a brilliant way to KO them when they’re stuck in the sword’s attack. And with the down B being more powerful against foes who are farther away, Schezo appeared to be a campy character judging just from the specials. Unfortunately, the set’s focus seems to die a bit after that. While some of Schezo’s sword moves do well at holding the foe in place to be hit by his thrown sword on the rebound, many of them are more blatant rush-down moves with a ton of alternate inputs designed to catch the foe off-guard. Some of these alternate inputs don’t even make a lot of sense, such as the move he can use during the end lag of his forward smash (a backwards kick followed by a powerful sword attack). And there’s the whole part where he not only has alternate attacks to use when without his sword, but he creates a dark version of his sword to do those moves anyway when disarmed. This kind of defeats the whole purpose of Schezo losing his sword temporarily to attack: he’s practically just as powerful without his sword.

A lot of the same organizational and technical issues that were present in Yamato are still present here. I know that English isn’t your first language, but it confuses me a bit when you begin most move descriptions with “Schezo will” or “Schezo can”. You even got the wording correct in the down tilt description when you say “Schezo performs a straight kick”. You should try to start all your move descriptions in a similar manner: assuming that the player is using Schezo in real time and just used that particular input. There’s also the strange order you put your moves in, including aerials as part of the standard attacks. You should really put the aerials after all the other standard attacks, and give them their own section. I wouldn’t say this was a bad set, but I preferred Yamato personally. The main problem is simply that Schezo doesn’t seem to know if he wants to be a camper or a close to mid-range rushdown character. But you still have some good ideas in there, so keep working at it!


More comments may or may not come later (wary). Also I completely failed at keeping Schezo's comment short <.<
 

half_silver28

Smash Ace
Joined
Apr 25, 2008
Messages
862
Location
MYM, Ohio
forgive the double post, but I want to get my mini out


By all accounts, this is a rather straight-forward mid-90's R&B song by an artist who's been mostly irrelevant for ten years. How can a random R&B song defined by not-so-subtle sexual innuendo and a beat with a cartoon sound effect relate to Brawl?


. . . . .


PONY!!!!!! :mad:
http://www.youtube.com/watch?v=_KXf3kwjKQ0


This creepy-looking costumed dude from the anime Full Metal Panic? Fumoffu, unofficially known as "Pony", enters Brawl as a Fiend summon. This guy's "Pony" moniker is appropriate in more ways than one: he's obsessed with ponytails. His appearances in the series consist of him preying on innocent girls and forcibly giving them ponytails with the brush and string he carries with him. ...what? Isn't that what every self-respecting perverted stalker does? :ohwell: And just to add to the creepy factor, the only word he's capable of saying while in-character is "Pony". While not a particularly violent predator, Pony is certainly not a character you'd like to meet in a dark alley.

His appearance in Brawl stays true to his obsessions, as he will actively seek out any foe who has long hair upon his summoning (this includes males). Pony runs as fast as Ike and has Mario's jumping ability. Once he comes within a battlefield platform of a character with long hair, he springs into action. He dramatically whips open his overcoat to reveal his weapons of choice: a brush and some string (and exposing his chest in the process O_o). He then pursues his target relentlessly, now having Captain Falcon's dash speed. If he manages to catch up with them he'll instantly grab them and run into the background. He then does... things... to the his victim. Things that cannot be seen due to Pony's overcoat blocking the view. The only clues to what's truly going on are the screams of the victim and Pony's constantly muttering of "ponyponypony". After ten seconds, Pony steps to the side to admire his work: his prone victim now has a medium-length ponytail (even if their hair was originally longer than that). Satisfied, Pony will disappear afterwards, leaving his victim with 20% more damage. They retain the ponytail that was forced upon them for the rest of their current stock.

Before Pony comes within range of a suitable victim, he simply prowls the stage at random, though he will move towards any long-haired foe within his line of sight. If any fighter who does not have long hair approaches Pony, he'll attack them with a quick lunging attack that deals 13% damage and medium-high knockback with an impressive range of one Battlefield Platform. If a character ends up right next to Pony, he'll attack with a very fast bite that deals 8% and low knockback, often following up on it with his lunging attack. Once he rips open his coat and starts dashing after a long-haired fighter, contact with him deals 13% damage and medium knockback. Pony sticks around for 20 seconds normally, but he will only stay for 10 if there are no long-haired characters in the match.

Of course, I haven't mentioned that Pony can be attacked. He doesn't have a damage counter though, and he takes very little knockback and hitstun from attacks. However, he's perfectly vulnerable to tripping moves, and it takes him a lengthy .7 seconds to get up once tripped (he becomes immune to tripping for one second once he stumbles). And then there's his pony head, which DOES have its own damage counter. If 50% damage is dealt to his head, it flies off of him. Pony immediately holds his hands in front of his face in shame and lets out a depressed murmer of "pony..." before disappearing. Pony covers his face so quickly that it's impossible to make out his true identity. Being an creepy pony-tail obsessed madman is a pretty rough profession, ya know.
 

darth meanie

Smash Journeyman
Joined
Jun 6, 2008
Messages
452
Hey n88, this time I didn't steal your idea!

Guile Theme Goes With Comebacks


So, you're playing as Mario against Meta Knight. You got gimped early on, and you just can't keep up in the damage race. Suddenly, in a burst of instinct, you manage to land a forward aerial to spike him back into the stage, and this song starts playing.

If you're either two stocks behind, or one stock behind and behind in damage percent, the game starts to keep a hidden 'Guile Meter' counting. The Guile meter is filled up by performing flashy techniques, surviving close calls, and performing counters or landing attacks out of shields. This slowly drains, so make sure to press your advantage.

Once you've filled the 'Guile Threshold' (ten Guile points) the game makes a random dice roll every time you perform another action that fills up the Guile Meter. The higher the Guile Meter is, the more likely you succeed. (every ten points adds twenty percent to the chance of success) If you succeed the roll, for the next two minutes, the classic Guile theme from Street Fighter II plays.

The Guile Meter is filled up by the following actions:


  • Performing a combo: 1 point for each hit in the combo (natural combos don't count)
  • Perfect Shielding: 1 point
  • Landing an attack out of shield after blocking an attack: 1 point
  • Sending the opponent flying: 1 point
  • Hitting an opponent in the middle of an attack: 1 point
  • Landing after being sent into the magnifying glass: 2 points
  • Outprioritizing the opponent with an attack: 5 points
  • Landing a 'counter' move: 5 points
  • Spiking the opponent: 5 points
  • Landing after being edgehogged: 5 points
  • Having the crowd cheer for you: 10 points

So, what happens when the Guile theme starts playing? Well, your attacks get some invulnerability on start-up, have greatly decreased end lag, and increased damage, knockback and hitstun. Wow, overpowered much? Well there is a catch.

Each hit must be timed perfectly to the beat of Guile's theme in order to get the benefit. It's like a built-in combo video in-game!

Of course, the greatest benefit to the Guile Theme is the psychological aspect. Once this song starts playing, there isn't anything stopping you anymore.
 

Katapultar

Smash Lord
Joined
Nov 24, 2008
Messages
1,284
Location
Australia
Dragula​

by Rob Zombie​


Dragula is the most well-known single made by renowned film director and producer Rob Zombie.

"Dragula" (who is essentially Rob Zombie himself) is a supreme Lord of Darkness and Death who you have to fight as a boss on his own turf for whatever plot-related reason (I'm hoping for a mini in the last week where we can make a mini-SM where we can use minis for bosses, stages and so on). The set-up is very simple; you fight Dragula on a simple walk-off the width of Final Destination with aesthetic hellfire in the background. Dragula himself has 1,200 HP and is the size of Ganondorf, making for a fairly challenging boss fight. Be sure to watch the linked video to the song as it contains A LOT of reference to the fight...so much that the song itself is in fact playing during the boss fight and will temporarily stop if you pause the game. The song itself determines everything that Dragula will do, with Dragula taking the lyrics quite literally. While this may make him seem easy and predictable at first glance he hits fast and hard so be cautious.


0:00 - 0:08 (Superstition)
As the battle opens with a eerie soundtrack Dragula readies himself by menacingly cracking his knuckles. You're free to score as many hits on him as you can, but be careful as a creepy zombie man will sneak up from behind your starting position. He is invincible and will lunge at Ganondorf's speed and if he gets you he'll hold onto you for 3X grab difficulty, stroking you for 3% a second. This may seem insignificant but it's quite troublesome for the next phase...

0:09 - 0:16 (Hell's Drag-Racer)
Dragula teleports offscreen before 2 jesters run from the former's side of the screen at Fox's Dashing Speed simultaneously. Getting hit by the 2 inflicts 11% that KOs horizontally at 250%, though you can either footstool or hit them with a decent move to knock them down. The jesters will automatically kill the creepy zombie when they run into it.

At 0:12 Dragula will drive onscreen with a drag racer at 1.5X Sonic's Dash Speed; getting hit by the speed demon inflicts 35% that kills at 120% so be careful NOT to get hit by this. If the drag racer goes over a trap, the zombie, the knocked down bodies of the jesters or is hit by a move with Smash power it'll break down in the middle of the stage and become a platform you can use as Dragula teleports offscreen to safety - if you don't like the platform you can destroy it with 40% worth of damage. If the drag racer moves offscreen 2 more jesters will run from your side of the screen so it's recommended to knock the drag racer out to prevent this from happening. Once this phase ends all jesters and zombies automatically vanish.

0:17 - 0:31 (Hellfire Beat)
Dragula teleports to the middle of the stage, facing the screen as he calls forth green hellfire. From 0:16 to 0:18 Dragula will raise his hands as he summons green hellfire; at 0:21 the fire will immediately engulf a Smart Bomb's worth of area around him until 0:23. You have exactly 5 seconds of forewarning for this move and for a good reason: getting hit by this move inflicts 20% per 1/10 seconds being stuck in it for a total of a inescapable 300% that sends it's victims flying for a instant KO. You DO NOT want to get hit by this move for so many reasons: anyone who's KO'ed by the stream of hellfire will not get to use their next character until the next phase.

At 0:24 Dragula teleports 2 guitarists to his sides; they inflict 5% a second each with their soundwaves but can be killed with 5% worth each if you don't want to suffer extra damage.

At 0:27 Dragula teleports 2 drummers to his sides IF either one or both guitarists were killed with the drummers replacing the guitarists. These guys can be killed with 10% worth, initiating a shockwave not unlilke Tabuu's Offwave that inflicts 15% that kills at 146%. Remember that you have to dodge 2 of these.

At 0:29 Dragula dismisses the drummers as he releases hellfire from the ground in 2 bursts during 0:29 and 0:30 each; getting hit by either one of these inflicts 20% with set knockback upwards 3 SBBs. You can still attack Dragula here though he doesn't make it easy.

0:32 - 0:38 (Walk of the Boneyard - Pandemonium Lyrics #1)

Dead I am the one, Exterminating son
Slipping through the trees, strangling the breeze


Dragula teleports back to his starting point as he stands in place during 0:32 to 0:35, pointing at you at 0:33. If you can predict his teleporting position you can get a few shots on him, but be careful as he'll immediately walk up to you at Ganondorf's Dash Speed from 0:36 to 0:39, leaving hellfire behind as he walks; the spread fire stands a SBB tall that inflicts 10% with set knockback upwards 2 SBBs. If Dragula reaches grab-range, he'll raise you into the air as he chokes the life out of you for 50% per 1/2 a second; he'll let you go after the phase with you entering you downed state. If you don't want him to choke you, it's possible to use the destroyed drag racer as a platform to make it impossible for Dragula to reach you.

If Dragula KO'ed anyone with his hellfire attack he'll be engulfed in flames that extend 1 SBB for the entire phase; this makes him invincible and essentially extends his damaging range when he attempts to pursue you, the fire doing 30% KOing at 100% if it touches you. Also Dragula will destroy any traps that he walks into and can teleport above you with with Yoshi-bomb proportions to damage you if you try to camp.

0:39 - 0:46 Clown Festival Part 1


Dragula teleports offscreen once again as fake Pennywises float down from the top of the screen; 1 for 50% Dragula has taken or simply just 1 if Dragula hasn't taken 50% yet. If Dragula has KO'ed one of your characters, a Pennywise clone will use it's Down Special (in the air) to re-animate it's corpse with the usual 15HP and HP-Draining effects but with LV9 AI, immediately attacking you with the small amount of time they have. The (other) Pennywise clones will use their D-airs to land on ground with the same effect as in air except it knocks you up instead of down...considering how fast Pennywise's D-air is you'll want to take care to avoid this. If one of the Pennywise clones manages to land, he'll spam his Side Special at you from a distance or use his Neutral Special at close range...the damage a clone would heal from biting you will instead go to Dragula....beware! That said, a Pennywise clone has 30HP and can be killed before it does significant damage.

0:47 - 0:54 (Doomed Creation - Pandemonium Lyrics #2)

Dead I am the sky, watching angels cry
While they slowly turn, conquering the worm


Insta-wiping all his minions, Dragula teleports back to the middle of the stage when suddenly all your allies that Dragula has killed suddenly return to fight with you, complete with angel wings on their backs that give them infinite second jumps! They'll be at Lv9 AI, but beware: if you don't inflict 50% +60% for every ally that was resurrected before the phase ends ALL your allies will be destroyed in a green hellfire explosion akin to a Blast Box blast; getting hit by the blast(s) does 30% per that kills at 150%. If you're hit by any of these blasts all the damage done to Dragula during the current phase is reversed into healing for him...if you know that you won't be able to inflict the necessary amount of damage, make sure you dodge the blasts at all costs! Though if you can inflict the necessary damage on Dragula the revived allies will retreat and their stock will be added onto your count. This phase is essentially a gamble; play it right to win.

0:55 - 1:09 (Drag Racer Torture - Pandemonium Lyrics #3)

Dig through the ditches,
And burn through the witches
I slam in the back of my
Dragula

Dig through the ditches,
Burn through the witches
I slam in the back of my
Dragula


Dragula once again teleports offscreen, and for the entire 14 second phase, Dragula will attempt to run you over with his drag racer but in a manner unlike Hell's Drag Racer: Dragula races across the screen in the exact duration of one line of the above lyrics, making it hard to dodge...he'll also get a special effect based on which of the 4 lines he's singing at the time:
  • 1: Dragula mows through all traps, walls and pits. This makes it impossible to trap him during the phase.
  • 2: Any female character struck in this phase takes 45% of fire damage with set knockback upwards 3 SBBs as well as getting burnt for fire that halves their power and cuts their speed by 3/4 for the rest of the phase. Since it happens twice it can potentially stack. Non-Females take 30% that kills at 130%.
  • 3: Those touched by the drag racer are 'grabbed' and have to press a random button that appears on the screen of A, B, or Z within the very short time limit or else they'll be dragged to the edge of the screen, be deposited there and get hit by the next potentially fatal attack:
  • 4: Those hit by the drag racer take 50% that kills at 60%. Extremely dangerous.

Dragula is invulnerable during this time; it's possible to attack him with a trap in any time other than lyric 1, but he'll only take the damage from it.

1:10 - 1:17 (Musical Death)
At 1:10, 2 drummers will teleport to your sides and perform their attack from Hellfire Beat. Afterwards 2 guitarists will teleport to your sides and perform their damaging shockwave from Hellfire Beat. At 1:14 the drummers and guitarists will teleport to where you are in a square shape if you didn't kill them, with the guitarists turning into drummers now, doing their shockwave attack 2 times in a row before the phase ends...this is surprisingly easy to dodge as all the shockwaves will hit you at the same time. Basically one of Dragula's more merciful attacks. If you think you can, try attacking Dragula during this time but try not to risk it too much.

1:18 - 1:25 (Machine From Hell - Pandemonium Lyrics #4)

Dead I am the pool, spreading from the fool
Weak and want you need, nowhere as you bleed


Removing his drummers and guitarists from the game, Dragula instantly spreads hellfire from both sides of himself; this does no damage but the moment the fire reaches where you are the robot from the soundtrack's image (at the top) appears in front of you; it acts as a wall and is 1.5X the size of Ganondorf. It has a massive 150HP which you have to break down in order to destroy it and reach Dragula.

1:26 - 1:32 (Dread Blanket)
Dragula turns to face you as he raises his hands to create a hellish wind that prevents you from moving or gaining any momentum from your attacks or recoveries. If you didn't destroy the robot from before it will now start to attack you at 1:28 with shockwaves that inflict 21% to you per second.

1:33 - 1:40 (Blood-Like Revenge - Pandemonium Lyrics #5)

Dead I am the rat, feast upon the cat
Tender is the fur, dying as you purr


Dragula teleports offscreen as he summons any minions from the previous phases above that you've killed, excluding animated corpses. You don't have to destroy them all, simply dodge their onslaught as they all try to destroy you...this becomes extremely hard if the robot from the last phase is still around, as the wind Dragula made from before is still keeping you in place until you destroy the robot.

1:41 - 1:54 (Drag Racer Torture 2 - Pandemonium Lyrics #6)

Dig through the ditches,
And burn through the witches
I slam in the back of my
Dragula

Dig through the ditches,
Burn through the witches
I slam in the back of my
Dragula


The exact same thing as Drag Racer Torture - Pandemonium Lyrics #3, Dragula once again teleports offscreen, and for the entire 14 second phase, Dragula will attempt to run you over with his drag racer but in a manner unlike Hell's Drag Racer: Dragula races across the screen in the exact duration of one line of the above lyrics, making it hard to dodge...he'll also get a special effect based on which of the 4 lines he's singing at the time:
  • 1: Dragula mows through all traps, walls and pits. This makes it impossible to trap him during the phase.
  • 2: Any female character struck in this phase takes 45% of fire damage with set knockback upwards 3 SBBs as well as getting burnt for fire that halves their power and cuts their speed by 3/4 for the rest of the phase. Since it happens twice it can potentially stack. Non-Females take 30% that kills at 130%.
  • 3: Those touched by the drag racer are 'grabbed' and have to press a random button that appears on the screen of A, B, or Z within the very short time limit or else they'll be dragged to the edge of the screen, be deposited there and get hit by the next potentially fatal attack:
  • 4: Those hit by the drag racer take 50% that kills at 60%. Extremely dangerous.

Dragula is invulnerable during this time; it's possible to attack him with a trap in any time other than lyric 1, but he'll only take the damage from it.

1:55 - 2:11 (Brought Forth To Doom - Pandemonium Lyrics #7)

Do it baby, Do it baby
(1:55 - 2:00)

(2:00 - 2:05)

Do it baby, Do it baby
Burn like an animal
(2:06-2:11)


Dragula makes himself available for you to attack in a way to tempt you...seems nice you should take it. Except that as soon as he gets to 2:08 at the last line (Burn like an animal), he'll surround the entire screen in a hellish black fire for 1 second per attack dealt onto him...touching this fire at all is a instant KO and it is completely impossible to dodge. If you attacked him more than 3 times during the phase he'll force your allies to spawn more quickly than usual depending on how many hits he was dealt...if you hit him TOO many times he could easily wipe your entire party out with this move and give you a insta-Game Over. The only way to prevent him from using this attack at all is to not attack him at all during the 16 seconds. If you really must risk it all attacking him, make sure it finishes him off for good. If not, stick to planting traps and summoning.

2:12 - 2:18 (2nd Cycle of Clownageddon)


Dragula teleports as Ronald McDonald takes his place in the background...he'll perform the above gesture with the same amount of lag, creating a Smart Bomb sized explosion wherever you were...getting hit inflicts 90% that KOs at 30%...Donald will essentially keep performing the same action above over and over, making more explosions. By the way, if you are KO'ed by any blasts, the image of children will appear and they'll taunt you by laughing at your face. That said, this move is extremely dangerous, you'll need to keep on spotdodging in order to save your hide. Fortunately the blasts won't affect any traps or summons you planted beforehand as that would kind of make the 16 second break pointless....

2:19 - 2:26 (Vampire Deity - Pandemonium Lyrics #8)

Dead I am the life, dig into the skin
Knuckle crack the bone, 21 to win


Ronald McDonald teleports offscreen with Dragula taking his place to re-appear wherever you are. If you fail to dodge his sudden grab, Dragula will dig his newly clawed arm into your body to suck blood from you at 10% per second, healing himself the same amount...the grab is 5X harder to escape and if you can't get out before the phase ends he'll throw you off the screen for a instant KO with him having healed himself 60%.

If you dodged his grab with preferably a Roll Dodge, Dragula will teleport again but this time he'll attempt to run you over with his drag racer...21 times. You'd better have good aerial stalling or else you'll feel the pain, as it's essentially impossible to dodge his maniacal driving skills. He'll do the same amount of damage as Hell's Drag Racer.

By the way, if you dodge ALL the attacks from this phase, your character will get a green aura around them...as long as they are not hit by any attacks, they'll instantly defeat Dragula if they hit him 21 times...sounds good...but it could be a trap. Don't let your guard down.

By the way, you can use your traps on Dragula to knock him down when he's trying to run you down, which will cause his drag racer to explode and have Dragula teleport offscreen. He'll still take the damage and you'll still get the bonus of 21: with a few seconds at your hand this would be a good idea to continue set-up time.

2:27 - 2:33 (Return from Scrap)
Dragula teleports to the middle of the screen with 2 drummers at his side. These guys will attempt the same trick from way back at Hellfire Beat, damaging you with their wave. The only difference here is that their wave only goes as far as 2.5 SBBs and Dragula will attempt to walk towards you and strangle you in the same manner as Walk of the Boneyard - Pandemonium Lyrics #1. You're left with small amount of space since it's hard to move around with the drummers in the middle of the screen. The best thing to do would be to try and damage Dragula with traps and summons. Otherwise if he tries to choke a player, the player with the 21 bonus can try to attack him and finish him off for good...

2:34 - 2:42 (Closing Darkness - Pandemonium Lyrics #9)

Dead I am the dog, hound of hell you cry
Devil on your back, I can never die


Dragula dismisses the drummers before summoning the same robot from Machine From Hell - Pandemonium Lyrics #4, except the robot positions itself behind Dragula. It'll attempt to shoot hellfire at you as a projectile with similarity to Wolf's Blaster as a way of playing keep away with you. If you can get to it the robot will be destroyed with one good swing while you can try and finish off Dragula once and for all...

---


If you failed to defeat Dragula before the song finished from there, he'll simply make the song start over again...

But if you defeat him, he'll transform into his true form...


The Skeleton Tyrannosaurus Rex Lord of Hell and Evil, Tyrann-Dragula


Based off one of Zombie's TBA films with questionability of how it would fit in as a "horror film", Tyrann-Dragula is the size of Giga Bowser, perhaps a bit wider, boasting 800HP. He is, fortunately a far easier target this time, so shouldn't have too much trouble taking down this monstrosity. Zombie's Superbeast song plays during the battle. A far more fast-paced treat for your ears.

Hellish Jaws
Tyrann-Dragula walks up to you in bite range before attempting to bite at you with it's teeth. The attack does not inflict any knockback but rather victims are placed in it's jaws for a grab; suffering 10% a second. The next player is automatically bought out if there is one, and they have to inflict 100% on Tyrann-Dragula to release the victim. If Tyrann-Dragula gets the victim in it's jaws up to 250% they'll fall lifeless on the floor for a KO. By the way if Tyrann-Dragula uses this on your last character it's a game over...that said, if Tyrann-Dragula has a victim in it's mouth it will not use this move.

Urban Puppets
Tyrann-Dragula points in front of it to give life to skeletons that rise from the ground. The skeletons have 75HP and take knockback like a middle-weight. They do nothing more than wander around aimlessly though it would be in your best interest to destroy them as soon as possible...

Purple Demon
Tyrann-Dragula points it's small arm towards you before firing a purple mist from it's hand. The mist travels across the screen in a cone shape at MK's Dash Speed. Getting hit results in Specials being taken away for 0.5 seconds for every 1% you have. If any skeletons get in the way they'll turn into witches. They have the same amount of HP but will stand still and try to slowly grab you if you get near it. Here it will turn you into a Hamburger, where you have to escape with 2X grab difficulty. If you don't escape while Tyrann-Dragula doesn't have a victim in it's mouth, it will slowly walk up to you and try to eat you for a instant KO.

Red Demon
Tyrann-Dragula points it's small arm towards you before firing a red mist from it's hand. The mist travels across the screen in a cone shape at MK's Dash Speed. Getting hit results in Aerials being taken away for 0.5 seconds for every 1% you have. If any skeletons get in the way they'll turn into Bomb-ombs with the same effect.

Demon Charge
Tyrann-Dragula rears it's head before charging forth the entire screen in a way similar to Beast Ganon...getting hit does 78% KO'ing at 45%. It's not too hard to dodge but easily keeps your guard up.


---


Once he's lost all his HP, Tyrann-Dragula will start to crumble as the dimension around it shatters, being destroyed along with the monster itself. The players find themselves where they started in the first place, happy. One thing's for sure though, and that's that they had a hell of a time.


Rychu

Thane of Smashville
Joined
Jul 5, 2010
Messages
817
3DS FC
1908-0105-4965
Smooth Criminal​

Smooth Criminal is a song by musical god Micheal Jackson. It appears here as an assist trophy.

When this amazingness is unleashed, Micheal Jackson will appear as he did in the music video, with his signature white fadora and suit. The Smooth Criminal song will begin to play, and the stage will transform into a dance club. Micheal Jackson now grows to 2 Ganondorfs height, and takes center stage. The fight takes place on a stage the size of Final Destination. Micheal will begin dancing and dancing and dancing and dancing, with any hit by him dealing 13% damage. After 30 seconds of madness, the mafia comes, to which Micheal responds with shooting up the place with a Tommy gun. The police chase him off stage, running over all brawlers in their path. Fighting then resumes as normal.
 

Rychu

Thane of Smashville
Joined
Jul 5, 2010
Messages
817
3DS FC
1908-0105-4965
Made up on the spot mini is made up on the spot.
 

Koric

Smash Apprentice
Joined
Feb 10, 2006
Messages
84
Location
Aiken SC
Johnny Cash - The Ring Of Fire


When the song begins to play, the bottom of the arena will be covered in a sea of fire as high as 2 stage blocks. The fire itself will act as a barrier to prevent anyone from falling below the stage disregarding the knockback priority. When someone falls into the flames of fire, they will be launched with a set knockback. It won’t kill the victim regardless, but is enough to get anyone back on a balanced arena like Final destination. The victim will also receive 3%

Every time someone falls into the flames, the flames will rise by 0.2 stage builder blocks. The damage will slightly increase every time the flames rise. Regardless how many times the flames has rose, it cannot reach to the point that it would overlap a ledge. There maybe a point that the flames will be too high that it can kill lightweight and some middleweight characters. When there is a ledge within a stage block above the flames, the fire itself will stop rising whenever more people fall into it. The flames will only last as long as the entire song.
 

Junahu

Smash Ace
Joined
Nov 15, 2005
Messages
899
Location
Shropshire Slasher

Ashmyany Ozmiana Church


The scene of one of the more disturbing events of the Poland-Russia November Uprising, Ashmyany church is where some 500 villagers, seeking refuge against Russian attack, were slaughtered.

SmashDaddy's fun fact: After this event, Ashmyany was repopulated with Jews and renamed "Ozmiana"

What does this have to do with music? Well, the Revolutionary Etude was written about the November Uprising, by a patriotic Chopin, who at the time was travelling across Europe. It was a big blow to Chopin to hear that his home country was being even further crushed under the heel of Russia, while the rest of Europe refused to help.


Ok, what does this have to do with Smash Brothers? Well, Ashmyany Church is a selectable stage. It's an entirely flat stage, with the church looming ominously in the background. Despite what you may think, this is NOT a walk-off stage. The stage is much like Battlefield, a flat chunk of earth suspended miles above the ground. The backdrop of Ashmyany is also very similar to te idyllic hills of Battlefield, though since it's set in Lithuania, it's a bit more geographically accurate.

During gameplay, several villagers toil away at meaningless daily tasks such as carrying pails of water, tilling soil and chasing chickens. They do so in both the background and the foreground, making the stage seem rather busy, when in reality it's a pretty standard empty platform.
Though usually green and grassy, if certain "wintery" music is chosen for this stage, it will likewise become snowy, with the entire surface of the stage losing traction, and the villagers concentrating on more snow based chores

90 seconds into the match, dusk falls on the church, and whatever music was set for that stage gradually fades out into eerie silence. From behind the church, a 12 strong line of Russian Cavalry, storm out, sweep across the front of the stage, then disperse, chasing the distraught villagers into the church. As they sweep across the stage, the Cavalry are rather dangerous, dealing 34% damage and trampling players into the ground. There are too many of them to attempt to roll past, or to shield the onslaught, so your only chance is to either jump over all twelve of them (the cavalry don't travel particularly fast, and the line is as long as the stage itself, so to clear all of them, most characters will need to use all their jumps), or just hang onto a ledge like the planking coward you are.

After this event, night falls, some screaming is heard from inside the church and... that's it. The music gradually fades back in, but the stage is now completely empty, and remains so for the remainder of the match.

What? Did you expect the stage to loop? People DIE when they are killed you know. :glare:


Music on this stage://
Revolutionary Etude (duh)

Revolutionary Etude (Eternal sonata version)
Continuous Divider
Endure and Resist
Someone's Evening, Someone's Daybreak
Grim Purpose
Opposition Resignation

Under the apple tree
Dirge of the fourteenth
Black Rose
Sanity Effect
Jade's Theme
Door of Destiny
 

Rychu

Thane of Smashville
Joined
Jul 5, 2010
Messages
817
3DS FC
1908-0105-4965
People die when they're KILLED? My mind has been blown! :0
 

MarthTrinity

Smash Lord
Joined
Aug 9, 2007
Messages
1,954
Location
The Cosmos Beneath Rosalina's Skirt

Oh you -WISH- you were this gay Meta Knight. Anyway, this is Sebastian Roth or as he's more commonly known as, Sin With Sebastian. Basically, this guy makes super gay, super catchy Eurodance music that will get into your head and never, ever, ever leave. Ever. Sin With Sebastian is probably best known within the MYM community for his insanely catchy song "Shut Up and Sleep With Me". . .but he has some other catchy tunes such as "Golden Boy" and "Fuck you (I Am In Love)".

Anyway, Sebastian appears in Brawl as a Fiend representing his song "Shut Up And Sleep With Me". There's a link to the song if you haven't heard it somehow by the way.

Now onto what this Fiend actually does. When summoned, everything in the game goes mute as the opening bit from the song plays; everyone is going to shut up (and sleep with him?) by force! Well, not him exactly. You see, Sebastian in his songs usually has that same bored look on his face as he does random, totally not suggestive stuff, like eating an ice cream cone or being covered in fruits. This sort of applies to Brawl in the sense that Sebastian himself doesn't do much (except sing his totally catchy song). What you really need to worry about are the oiled up guys!

Yes, you read that right. When Sebastian is summoned, four oiled up, incredlibly buff men in speedos will come out. These men are Ganondorf's size and move around the stage at Mario's walk speed, dancing to the insanely catchy tune of "Shut Up And Sleep With Me". If you get within a Kirby width of one of these guys, they'll begin grinding up against you! This deals a solid 4% per half second your caught within their gyrating and is slightly harder to escape than a normal grab (for some reason). Now the main problem here is if you get caught by multiple gyrating men. If you do, it'll be even harder to escape and you'll be taking damage from all of them every half second! If you somehow manage to get caught by all four at once, your damage percentage will rise tremendously in a very, very short amount of time.

So where's the "Fiend" part of this? Well, Sebastian himself has 80% stamina and will only vanish (along with the oiled up men) if his stamina is fully depleted. If however Sebastian is attacked, not only will all of the muscle men turn to "attack" you, a massive rainbow colored laser beam will fall from the heavens around Sebastian (the laser being two Battlefield platforms wide), dealing 15% and medium-high knockback. This isn't instant however so you have plenty of time to run in, attack and run out. Once his stamina is reduced to zero, Sebastian will fly off the top blast zone while surrounded by a bright pink beam of light. Anyone caught in this beam of light as Sebastian leaves will be pulled up as well; watch out for this last ditch "attack"!
 

flyinfilipino

Smash Master
Joined
Sep 11, 2007
Messages
4,319
Location
North Carolina
And now for some Assist Trophies!


Ke$ha

Everyone's favorite trashy songstress appears in Smash! Tonight, she'll fight 'til she sees the sunlight! When Ke$ha is summoned, she exclaims in an auto-tuned voice, "The party don't start 'til I walk innn!" Then, she'll run around the stage in a tipsy fashion at Mario's dash speed, chasing after the nearest foe. When she's near a foe, she'll gather a pile of glitter in her hands and blow a cloud of it straight forward. The cloud covers a Battlefield platform's length, and if anyone is struck by it, they'll be stunned as if their shield was broken. So make sure you're following close behind so you can take advantage of it! But that's not the end of the fun! The glitter stays on the ground, and if a foe touches it, they'll trip, then start rolling around in the glitter, obviously caught in the ecstasy of the moment. The only way to snap out of it is to mash buttons, or get hit. Ke$ha and her glitter stay on the field for 20 seconds before vanishing.


Willow Smith

Hey, it's Will Smith's 9-year old daughter! She whips her hair back and forth...and of course, she brings this to Smash Bros. as well.


As soon as she appears on the stage, "Whip My Hair" will start playing as the background music (well, specifically the repetitive chorus). From there, Willow will start whipping her hair back and forth in a circular fashion with the range of Meta Knight's Mach Tornado. If a foe is hit by her hair, they'll take 15% damage and be knocked away with above average knockback. Every couple of seconds, Willow will run to a different area of the stage and then resume whipping her hair back and forth. Additionally, while Willow's on the field, any female characters and Marth may stop whatever they're doing and whip their hair back and forth a couple of times too (though this does no damage). Willow stays on the field for 20 seconds.


Katy Perry

It's Katy Perry! She kissed a girl and she liked it, plus, she PMSes like a b**** (I would know). Watch out though, she might melt your popsicle.


Katy has a couple of different attacks, both of which utilize her boobs. The first one, as seen above, involves firing large globs of whipped cream all over the stage. She'll turn and face the screen and let loose at various vertical angles, firing two shots per second for 5 seconds. The shots of cream have range similar to a Cracker Launcher shot, and foes hit by them take 5% damage and become covered in the stuff. This causes them to start falling if they're hit in midair, and the only way out is to button mash or get hit (same goes for grounded foes who happened to get hit as well).


Katy's second attack is a bit more dangerous. As you can see above, she'll face one direction as her boobs begin to sparkle. She's going to let her colors burst! Suddenly, she'll shoot fireworks from her chest! The explosives are fired at a rate of three per second for 6 seconds. They have similar range to a Cracker Launcher, and Katy will move her breasts up and down slightly to cover more ground. Foes hit by the colorful, sparkly projectiles will take 15% damage and be sent flying with high knockback.

After completing both of her attacks, Katy disappears.


Lady Gaga

Last but not least, it's Lady Gaga! She wants everyone in this Love Game to Just Dance. The Paparazzi can't read her Poker Face, and she doesn't like it when Alejandro calls on her Telephone.

When she's summoned onto the field, watch out! You've been caught in a Bad Romance!


Lady Gaga strikes the pose pictured above, and an enormous pillar of flame immediately erupts behind her. The initial explosion covers a range as wide as a Smart Bomb explosion, and foes caught by it take 20% damage and are sent flying vertically with high knockback. The pillar of flame continues to burn, however, and it's as tall as the highest Battlefield platform. Foes that make contact with it become trapped and continuously take 10% damage per second.

This may seem like a bit much, but luckily, Lady Gaga is kind of a rare Assist Trophy summon. She and her fire stay on the field for 10 seconds.
 

darth meanie

Smash Journeyman
Joined
Jun 6, 2008
Messages
452
Hippo In The City


There's a hippo in New Pork City! Just like the Ultimate Chimera has a chance of appearing in the middle of a brawl, so does this even more monstrous entity. The hippo wanders around fairly quickly, with its theme song narrating its journey around the metropolis, singing about whatever specific location the hippo happens to be in at any one time. The hippo doesn't do any damage, but while it wanders around anyone who is touched by it is pushed away with surprisingly strong force, enough to gimp foes accidentally. He'll also randomly collapse, which pitfalls anyone around him, but does no damage.

If the hippo is hit by any attack over the course of the match, it dies a slow and horrible death, falling through the stage into the river below. A long, jazzy trumpet solo accompanies the occasion.

Also, there is an extremely low chance that the Ultimate Chimera may just be a hippo in disguise. Confound that hippo and its trolling ways!
 

n88

Smash Lord
Joined
Oct 10, 2008
Messages
1,547
I did intend to have a much larger catch-up session, but I'm so far behind that I thought it might be easier to do this in installments, and these comments were beginning to collect dust, so here they are. . .​

Gray Knight by Pizzamasta


Gray Knight is a nifty little set, and quite a strong effort. He's got a few little problems, but you do display an impressive aptitude for playstyle and move interactions, which makes for a pleasant read. You do an excellent job of making the bushes central to the Gray Knight's playstyle, and manage to build them up to the point where they don't feel like just a generic portal mechanic. Good job on that.

The set does have a few flaws, though. The completely skipped-over aerial section comes across as odd, and the set does feel a touch underpowered, on the whole. You also have a few moves that are centered on putting the foe in the air, but it seems like Gray Knight has somewhat limited options in the air, so I don't think he'd really want them there.

The set isn't really hurt much, if at all, by the fact that English isn't your first language. You write better than some native English-speakers I know. Overall, Gray Knight is quite the fun little package, and shows a lot of promise. I'm hoping to see more from you.​


Muk by Smash Daddy

I actually got to preview Muk, but I understand it went through some changes before it was posted and afterward, so I'll take another look-see before passing judgement.

The writing style does make Muk a tricky read in places, with a few move descriptions that I had to read twice to really get what was going on. I also feel like some of the logic regarding the spread of sludge is a little hazy - if the sludge is spreading outward to the sides, shouldn't it also be spreading underneath Muk? In which case, shouldn't he always have those buffs from being on sludge? Dash Attack also reminds me of wrk's Gengar quite a bit.​

But those are for the most part fairly minor quibbles. Overall, I do like what you've done here, making Muk into a stage-consuming monster with plenty of emphasis on making the environment as hazardous as it could possibly be. Not my favorite moveset of this contest, but I believe it was finished very quickly in that wonderful rush to get as many sets out as possible on opening day. I do quite like it, overall.​

Aradia by crash826

You've already got the creativity thing down, which is impressive for somebody with only two movesets under their belt. Aradia is full of strong concepts, a lot of fun moves, and a few really stellar moves whose mechanics could potentially be developed into whole sets that make for a pleasant read. You even have a fairly intersting take on time travel, although it could stand to be better explained.

Now, I've got two major gripes with the set. The first, I'm sure you've heard already, is the lack of playstyle. I don't remember the last time a veteran MYMer posted a moveset that didn't have a playstyle section, and this is largely because all movesets should have something tying them together, some ultimate goal or method of play that all its attacks contribute to in some way. I'm confident that writing a good playstyle section is within your capabilities after reading Aradia, and it's definitely something I'll be looking for in future sets of yours.

My second problem with the set is that a lot of attacks are either overly creative or very oddly placed. Take Down Tilt for example. Bringing back the ghosts of fighters who have been slain is a pretty neat idea, but it coems across as weird that Aradia does it with her Down Tilt, rather than a Special or perhaps a Smash, which are typically where a character's most important/creative inputs go, whereas Tilts are usually a touch more basic. Still, Aradia is a set that makes me think you can do even better than what you've got here, and I hope that turns out to be the case.


The Prince by TheKingOfAllCosmos

I do have to agree with Rool's Olimar comparison. It seems like a cop-out to say "Yeah, what he said" as part of a comment, but I'd rather put that out there and look at some different aspects of the moveset than focus on trying to say the same thing as someone else for a whole comment.

The Prince is hilarious, and extremely well-written, as I'm sure you know, MarbleTable, and also features a very strong central mechanic. I'm not that familiar with Katamari (I'm sure the King will be disappointed), but The Prince's playstyle seems to be drawn straight out of the games, which makes for an interesting and unique fighter, what with his focus on rolling over foes. (and their various minions/traps) Makes for an interesting take on an aggressive character that isn't just "lolcombolots"

The Prince does feel a little too powerful in the air for my liking. The aerial game does fit into the playstyle well, but for someone characterized as being a wussy just a few inputs ago, it's a little odd to see him heaving the Katamari around like the Hulk. Maybe his aerial game could have centered around something like knocking the foe into your Katamari instead?

Electivire by darth meanie

Electivire is a pretty interesting set, and the way Motor Drive is implemented is quite clever, allowing Electivire to shift from offense to defense as the match goes on. I once had a few ideas for Electivire, but you've got Motor Drive down far better than I did. The only thing that bothers me about it is that he can route his electricity into himself to increase his power, which has some bizarre and confusing implications when you think about how electricity works, but it's a magical monster that lives in a tiny ball, and forcing him to rely on outside sources of electricity would be (HIPPO), so bah humbug.

As always, you do a great job with character, effectively portraying Electro Electivire as a physical powerhouse as well as a walking dynamo, and you have all those nifty little interactions that help flesh out Motor Drive, which I'm very happy to see. The set feels extremely strong overall, but I don't think it's among your very best. The combo focus is extremely well-executed, and actually fairly unique, which is impressive, as that can be extremely tricky with combos, but really not all that interesting to read. There were a few moves that I found myself only skimming through to get to whatever came next.

There's also that terrible fanart at the bottom of the moveset. (WARY)
 

Kholdstare

Nightmare Weaver
Joined
Oct 10, 2008
Messages
1,441
Hippo In The City


There's a hippo in New Pork City! Just like the Ultimate Chimera has a chance of appearing in the middle of a brawl, so does this even more monstrous entity. The hippo wanders around fairly quickly, with its theme song narrating its journey around the metropolis, singing about whatever specific location the hippo happens to be in at any one time. The hippo doesn't do any damage, but while it wanders around anyone who is touched by it is pushed away with surprisingly strong force, enough to gimp foes accidentally. He'll also randomly collapse, which pitfalls anyone around him, but does no damage.

If the hippo is hit by any attack over the course of the match, it dies a slow and horrible death, falling through the stage into the river below. A long, jazzy trumpet solo accompanies the occasion.

Also, there is an extremely low chance that the Ultimate Chimera may just be a hippo in disguise. Confound that hippo and its trolling ways!
Look at that hippo go.
 

Davidreamcatcha

Smash Ace
Joined
Feb 9, 2011
Messages
629
Well, Smooth Criminal's already done. There goes my Mini entry...

BUT WAIT! Maybe I can disguise my mini as some other song that people are bound to know!

But what?

.......!


THE MONSTER MASH

The first thing you may notice upon entering this game mode is that all the characters have had some sort of make-over. That's right, game mode. And it's online-only. Eat that, Sakurai. As I was saying, everyone whose appearance wasn't scary or at least, nightmare fuel has had a makeover, animations have been changed and all voices are reduced to grunts, groans and moans. Main movesets, despite some slightly changed animations, are intact. Some characters get to keep their appearance (The Infected, Headless Horseman, etc) But others have been changed, here's some examples:

Wario - Zombie Wario
Ganondorf - Frankenstein
Fox - Werewolf
Luigi - Dracula (The Transylvania Twist!)
Mr. Potato Head - Mummy, tosses his own body parts (they regrow).
Kamek - Generic Witch
John Marston - Undead Nightmare Marston

Get the idea?

After selecting your characters and the stage, your character's intro is replaced by coming to life in a random part of the stage. Gene Wilder, in his role of Dr. Fronkenstien takes the Announcer's place here, announcing "It's alive!". At the top right corner of the screen, you can see the number of points you have to beat, this can be adjusted in the options screen.

Few things you may notice about the stages, it's always night-time in this mode, the Monster Mash is always playing and the stage is populated with people!

That's right, innocent little children are walking around, trick-or-treating. Buildings are in the background, destroyable. The idea of this game-mode is that you have to destroy everything before your opponent can. There are many destroyable things on this stage, buildings, houses, trick-or-treaters, each nets a certain amount of points. Your damage and knockback against the opponent is reduced by half, and neither of you can grab eachother, meaning larger characters aren't going to die as easily.
 

Monkey D. AWESOME

Smash Apprentice
Joined
Feb 28, 2010
Messages
143
Location
Coming to terms with having two people in my mind
ANIMAL I HAVE BECOME

Here's an assist trophy based on Three Days Grace's popular
(and overused in Anime Music videos)
song, "Animal I Have Become!"

A completely normal man is summoned onto the stage. He looks around in confusion, as he wonders how he became surrounded by an Italian plumber, a pink puffball, a rodent that shoots lightning from its cheeks, and a sexy blonde-haired woman wielding a laser whip locked together in combat. Alas, the man does not have much time to worry, as he soon begins a terrible transformation. "Animal I Have Become" begins to play as fur begins to form on his skin. The man clutches his head in pain, hunches over on all fours, and lets out a feral cry as he is encased in a bright light. The light then fades to reveal a horrifying beast unlike anything mankind has ever seen...


... Don't look at me like that! That little bunny's got a vicious streak a mile wide! And as soon as you step within a Battlefield-sized area around it, it'll show you! The Werebunny will lunge at you at the speed of one of Pit's arrows. If it connects, it'll latch on and start to horrendously maul you. The attack can deal up to 25% damage, and if this were a realistic game, it would leave you as nothing but a pile of bones! Luckily, it only deals flinching damage, and the Werebunny can be easily knocked off and KO'd like a Pikmin.


************
I have a better MYmini coming later today, but I just wanted to get this off my chest.
 

Katapultar

Smash Lord
Joined
Nov 24, 2008
Messages
1,284
Location
Australia
ANIMAL I HAVE BECOME
This is my favorite mini made so far this week because it has a picture of a bunny (flyinfilipino's set of AT singing women come second in terms of coolness and greatness). Aside from that, I'm impressed at the way you wrote about your concept. Wonder what your 'better' mini will be.
 

Hyper_Ridley

Smash Champion
Joined
Dec 21, 2007
Messages
2,299
Location
Hippo Island
PARAMORE – PLAYING GOD​


The SSE is now replaced with this masturful work of Smash Bros literature!


*ahem*


SCTAMAN JOHN – SCATMAN​


Scatman John, or simply “The Scatman”, is known for his epic scat rythms combined with catchy music. Born with an extreme case of stuttering, The Scatman was able to turn his disability into top-tier music that continues to inspire those with speech impediments while providing everyone, regardless of the way you speak, with some awesome tunes.

Scatman John joins the brawl as an Assist Trophy. Upon appearing, he’ll jump into the background and start up with his signature scatting, going along with the rhythm of the music. On moving stages he hops onto his own little platform complete with a microphone. But hey, why not join in the fun? As the Scatman says, “If I can do it, so can you.” After about 10 seconds, the Scatman says, “Repeat after me, it's a scoobie oobie doobie scoobie doobie melody!”

After speaking, a note chart appears at the bottom of the screen with those lyrics inside of it. A small music note flies by the top of the chart, and as it passes each word, you have to press the attack button for your character to “sing” the lyric! Of course, your character still attacks when you do this, and the fight does not stop while everyone tries to scat, so you need to do attacks that won’t leave you vulnerable while still hitting all of the notes (you can still hit notes while in an attack animation). Anyone who successfully gets the entire line is rewarded with a burst of motivation that increases their damage for the next 7 seconds! After watching the combatants attempt his challenge, the Scatman bows and disappears.
 

Kholdstare

Nightmare Weaver
Joined
Oct 10, 2008
Messages
1,441
CARAMELLDANSEN

Caramelldansen (‘The Caramel Dance’) was a song released by the Swedish popgroup Caramell in 2001 from their album Supergott. Happy Hardcore DJ Speedycake sped it up, creating the Caramelldansen Speedycake remix. Some bright spark looped a GIF of two characters from the game/anime Popotan doing a bunny dance to the chorus, and its popularity exploded.

Caramelldansen quickly spread out of control across the internet as people made over 16,000 of their own parodies featuring other fictional characters performing the dance, and other variations. It was quickly adopted by the anime community and often featured at conventions- seriously, play it at a con and watch as every cosplayer in earshot starts dancing.

Warning: you will never get this song out of your head. Ever.

The video.

When you grab an Assist Trophy, this music plays instead of something coming out of the trophy. What happens next? Well... as you can probably tell from the image up top... everyone turns kawaii desu ne~ and starts to DANCE! While this music plays. Even you. Not just fighters will dance, though... any sentient being on the stage will dance with you. Even bosses will dance, if you happen to get this nifty assist. Imagine Tabuu, Master Hand, or Duon dancing to this...
 

Junahu

Smash Ace
Joined
Nov 15, 2005
Messages
899
Location
Shropshire Slasher
For all those reeeally lazy people who don't want to go through the hassle of clicking on a link to find out what wacky thing we're doing this week; ...here's this week's MYmini (copy-pasted straight from MT's Sunday Recap no less)

MYmini #12: The Tube
Another simple MYmini with a lot of options to it, this time we’re focusing on TV! Yes TV, if you’re like me, you don’t watch it much anymore…but there’s usually that one show that you never like to miss. Basically, we want you to pick out one of your favorite TV shows (or maybe a show you hate, yay for parody!) and make us an extra based on it! Nothing specific here, so long as it’s a TV show it’ll work. We will -NOT- be accepting movies for this mini however. I don’t care if they air Saw 2 every freakin’ Saturday night on SyFy, it’s still not a TV show and thus, will not be counted.
 
Status
Not open for further replies.
Top Bottom