yes!, review this.
Tournaments do allow cosmetically modified controllers but that's the extent of it. for opening the controller, someone suggested a flathead with some pressure. i personally would use a "Triwing Screwdriver"(but a 1.8mm FlatHead works too) because it's a specific fit to the screw. you can find one on eBay for about $6. it also does other Nintendo products so it's not a complete waste. I just used it for my controller and i'm 100% satisfied with it. I believe someone said that spray paint will make ur controller stickier. I don't agree. What I've found is that depending on how many layers of paint and clear coat you apply, it'll come out a bit rougher or very smooth. As for the actual process, here's a quick run through:
1. Open controller, remove innards carefully (REMEMBER HOW TO PUT IT BACK TOGETHER!)
2. Wash the shell, making sure to get all the grime from the sides (yuck)
3. After drying it (towel, blowdryer, airdry, whatever works)
4. Sand down the entire surface lightly with 600 grit sandpaper (i actually dont remember the #, find the highest grdade sandpaper u can at homedepot. btw, this is to give the paint a better surface to stick to)
5. Aplly Primer
6. Apply spraypaint color of choice. I used 3 coats and let the paint dry according to the can's instructions (i used a paint made specfically for plastic, but my friend used one made for wicker chairs since he wanted that color. and suppose it works because in the end, you'll be covering everything with clearcoat)
7. When you're done with letting the color COMPLETELY dry, u can either sand it lightly again, or not. i forgot to sand it again, but my controller still looks beautiful so i suppose it isn't needed.
8. Start applying your clear coat the same way you did your color. suggest ~4 coats. my friend chose more coats and it came out very smooth. he likes it that way, but i prefer what he calls "rough and ready"
9. Fight off your temptation and let the sucker completely dry.
10. Reassemble. Enjoy
Other Info:
- there is this little device for spray cans that they sell at your hardware store. it looks like a gunhandle and goes on top of the spraypaint nozzle. i suggest you buy this because it gives you more control of the pressure at which you spray. don't hestitate at it's ~$4 price. it's worth it.
- some quick spraypainting tips:
1) start and stop spraying away from the controller. the initial sprays tend to shoot out large droplets, something that you don't want. you want a nice even spray so everything is nice and smooth.
2) practice your pressure and motion on newspaper to get the hang of things.
3) keep a constant speed and motion when you spray the controller.
4) do NOT be tempted to go back and forth with one spray. some people can do this, but i suggest you do everything in small spurts of single passes.
5) make sure you have good lighting so that you can see where you haven't covered with color yet.
6) do NOT reassemble until 24 hours after your final layer of clear coat. RESIST all temptation.
- along with coloring my controller, i painted my buttons too. i painted A, B, and Z white. and left X, Y, R, L grey. it came out oh so nice. BUT, my archnemesis, friction, eventually reared his ugly head and the original plastic is showing through the sides of my A and B buttons because of the intense rubbing against the shell. o well, i can go back and paint it. if you choose to do like as did and paint your buttons, i suggest 2 LIGHT coats of primer, 2 coats of color, 3 LIGHT coats of clearcoat. i say light because you don't the primer+color+clear getting so thick that it no longer slides in the hole easily.
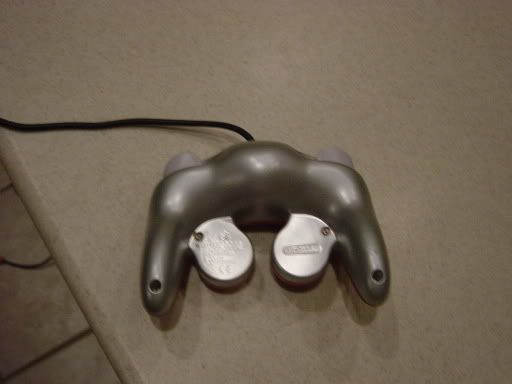
- also, you've gone this far, might as well do the controller plug too! use masking tape to cover the silver part, use masking tape to cover the cord as close as you can to the plug. then put the controller with the remaining unexposed cord into a plastic grocery bag for protection. follow the same steps to color the plug.
- when painting the controller, you'll find that it's difficult to get the area between the 2 pods (i dont know the real term) that house the c-stick and d-pad. don't be tempted to spray those areas without keeping constant motion of the can. just try an up-down motion, then some diagonal motions. you'll get it.
all the supplies should not cost you that much. i think the cost and the effort was all worth it in the end because my controller is very noticable in a crowd of original colors. it does however put more pressure on you to perform well because people see you elite controller and expect you to be just as elite (@_@)
there are dyes availible that bond to the plastic. this can be good since you won't have to worry about chipping. painting this controller is essentially like painting a computer case/mouse and there are several guides out there. you can skim those so that you are more confident going into this.
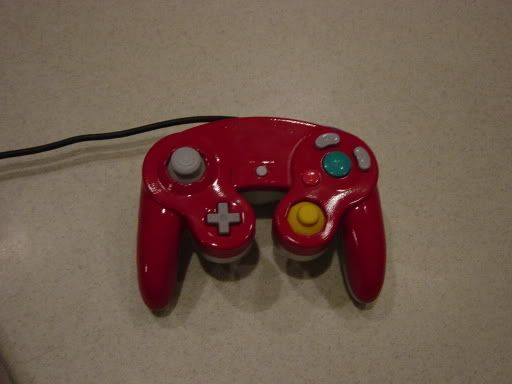
here's a picture of my controller if you're curious. i chose powder blue because it was different but not too extreme and painful to my retinas like neon green (my original choice haha). as you can see, the control stick is interchangable with the c-stick. i did this purely for aesthetic reason. i doubt it gives you any gameplay advantage. maybe in a FPS, but not in smash. in fact, it might cause you to do the wrong aerial since the control stick is fatter...o well, i like the uniformity.
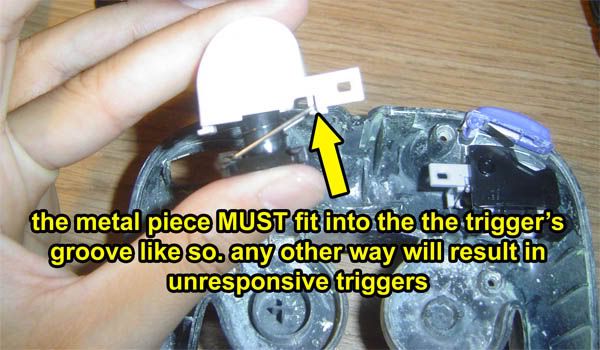
if you are careful with remembering how things were when u took it apart, you would have noticed this. just to make sure though:
i used a brand called "painter's touch" for plastics. there is a brand called krylon which is the most expensive and probably the best. i dont think you need to dish out the extra cash though. but then like i said, my friend used some paint for wicker chairs @_@ and that worked out fine for him.
1) no, you don't have to sand the primer. the nature of the primer itself should allow enough adhesion to the color paint.
2) when you start to sand the bare controller (with very fine sandpaper, 600 grit should work), the plastic will turn opaque, slightly white and that should be enough, nothing too serious.
3) i recommend a facemask in case you breathe in paint particles, lots of newspaper, a pair of steady hands and this bad boy:
NG7 Found this site for LED Lights:
http://www.porkchopsammiches.com/tendomod/ledmod.html
Q&A
Q: What should you worry or be careful about when you open the controller(will anything fall out, or is anything easy to break)
A: open the controller upside-down, nothing will fall out because most of the pieces are stuck between teh top shell and the circuit board. take part the innards slowly, remembered where things go and how they go in. don't worry it's really simple and nintendo uses quality plastics :^) you shouldn't worry too much.
Q:How long do you dry it, does the paint tell you or does the controller surface require more or less time to dry.
A:the spraypaint can should give you specific instructions for drying. they suggest applying additional layers either within the hour or after 24 hours. i don't understand why the times are so different, but maybe it has to do with how the paint cures (dries). the nintendo controller plastic isn't anything special so u can treat it just like any other plastic. actually, to be honest, i started applying 1-2 hours after each coat because i couldn't stand to wait. my paint job doesn't have a scratch on it till this day.
Q:How hard is it to put back together?
A:3. it's as easy reassembling as it was assembling. don't worry about it, it's as if nintendo meant for you to take it apart ^_^
Many people used this guide to paint their conroller
I'll add the pics in later

 enjoy...

")