• Welcome to Smashboards, the world's largest Super Smash Brothers community! Over 250,000 Smash Bros. fans from around the world have come to discuss these great games in over 19 million posts!

    You are currently viewing our boards as a visitor. Click here to sign up right now and start on your path in the Smash community!

Make Your Move 8: -TOP 50 POSTED-

D

Deleted member

Guest
Thanks for the replies on those comments, guys.

This is awkward... perfect time for a moveset post, but I don't think anyone has one. Nothing week?
 

UserShadow7989

Smash Journeyman
Joined
Aug 13, 2007
Messages
315
Thanks for the replies on those comments, guys.

This is awkward... perfect time for a moveset post, but I don't think anyone has one. Nothing week?
I don't think anyone does. I haven't heard anything in the chat, and neither of my sets (The Three Stooges and my OC) are anywhere near finished. I think it's the higher standards we've set for ourselves. Back in MYM 1/2/3/4 you could throw something together in a few minutes worth of work and it'd be fine. Now you've got to really work at it to get recognition.

That's probably the reason there aren't many newcomers, despite the fact this thread is in a much more frequented board then the last few. It was intimidating for me back in MYM5, and look how much tougher things have gotten.
 

superlucario

Smash Apprentice
Joined
Apr 24, 2010
Messages
78
Location
your shadow
Can I make one and if I can here is is.

Carecter Will Treaty From the Rangers Apprintice books

First off speicels

B: Pretty much links arrows but SUPER BUFFED at full charge hits 50% but takes 5 seconds for full charge. Every second it adds 10 damage

SideB: Throws knives 10 damage no lag

DownB: turns invisible until he attacks or charges for a attack.

UpB: Shoots Arrow with rope attached to it Kinda like grapple but goes on until you let go of B.

Ok now to the smashes

Side Smash: Uses Short sword and stabs forward. 12% damage

Down Smash: Throws 2 daggers 1 right, 1 left. 6%damage.

UpSmash: Shots 3 upwerds Super Powerful about the same damage as snakes Utilt.

Here are his tilts and Dash attack


Dash attack: Runs rolls forwerd then shots arrow 6% damage.

Utilt: does a backflip hitbox is whole body real weak but high knockback. 2%

Stilt: Slashes in a X shape. 6% each slash.

His colors.

Hes cloak changes colors
 

Katapultar

Smash Lord
Joined
Nov 24, 2008
Messages
1,284
Location
Australia
Interesting that you're making a moveset for a character from a novel. That's an extremely rare sight in MYM. Basically though I don't really know anything about the character; if you could get a picture for Will Treaty and some background information that would be really cool. Also a full set of standards, smashes, aerials, grabs and a final smash would be coolies.
 

darth meanie

Smash Journeyman
Joined
Jun 6, 2008
Messages
452
Hariyama


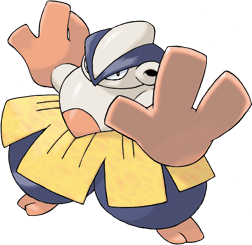
Hariyama is the Arm Thrust Pokemon. A powerful fighter with a heavy build, Hariyama practices the art of Sumo, a wrestling style originating in Japan. He is extremely durable and powerful, able to dislodge a moving train from its tracks in a single straight arm punch.

Stats


  • Weight: 10
  • Size: 10
  • Grab: 10
  • Power: 8
  • Fall Speed: 4
  • Jumps: 4
  • Attack Speed: 2
  • Move Speed: 2
  • Air Speed: 1


Hariyama is the definition of a super-heavyweight. He weighs even more than Bowser, and is barely budged until he's past 100% damage. Along with that though is an incredible slowness; he moves as fast as Ganondorf and is an even bigger target. Of course, if that was all there was too it, this would be a boring moveset, wouldn't it?


Grab and Throws

Grab – Humongous Reach

Hariyama has an excellent, excellent grab. He has the biggest non-tether grab range in the game, slightly beating out even Ivysaur, and it's not all that laggy, all things considered, although it's one of the slower grabs in the game. Hariyama clutches any foe unfortunate enough to be in range of his massive hands and holds them still.

Pummel – Reeling Spin

Hariyama lifts the opponent over his head and begins to spin them around, dealing 2% with each spin. Beyond making the opponent dizzy, spinning the foe over Hariyama's head also means that after Hariyama throws them, they'll be in a reeling state, where they cannot attack or recover. If Hariyama gets the opponent up to a high percentage, he can pummel them, then throw them off the edge, leaving them reeling so they can't recover. Grab the opponent, then knock them out of the ring; that is the key to a sumo match.

Even if Hariyama doesn't throw the opponent, if they escape the grab while being pummeled, they'll be dizzy when they escape, giving Hariyama a slight frame advantage, but not enough to regrab.


Up Throw– Seismic Toss

Hariyama spins around, building up momentum, then tosses the foe straight up into the sky, dealing 9% damage. They land a little forward of Hariyama, landing on the ground, or possibly offstage. The attack has set knockback that won't ever KO, but has a long period during which the foe is reeling, and cannot act. This is good for following up.

The enemy can tech when they hit the ground if they're no longer reeling, but land prone if they still are, making it great for following up with some attacks on the ground at mid percentages. At kills, Seismic Toss is more effective against fastfallers, where the extra reel time is more important than the greater height gained, while less effective against floaters.


Down Throw – Submission

Hariyama tosses the foe forward lightly, dealing 5% damage and mild knockback, good for tossing opponents offstage, but leaves them just outside of his grab range for a follow-up grab. It's more effective as a KO move than Seismic Toss against floaty characters, but opponents spend slightly less time reeling than they do from the Up Throw.

Down Throw can also be used as part of a chaingrab when onstage, which will be explained in more detail below.


Forward Throw – Great Shove

Hariyama slams his two gigantic hands forward, pushing foes away along the ground and dealing 9% damage. While it doesn't leave foes reeling, it can push foes halfway across Final Destination even at mid percentages, making it a good way to move combat towards the edge for your throws to work more effectively. You can't shove a foe offstage with this though, as they'll grab the edge as they're flung off.

Back Throw – Vital Throw

Turning around with the enemy, Hariyama spins twice before tossing them behind him for 10%. This has the most horizontal range of all of his throws, and has a balance of reeling and hang time that makes it at least satisfactory for scoring a KO against fallers of all speeds. It's great for tossing a foe who tries to roll around you back off the stage for the KO.


Specials

Neutral Special – Sumo

Hariyama spreads his two arms out wide, and reaches forward, slamming his arms forward to grab anyone ahead of him. This is slightly slower than his normal grab, but has even better range, deals 6% damage, and more importantly, Hariyama has Super Armor for the duration of the attack. If he whiffs it though, he takes about a quarter of a second of ending lag during which he no longer has Super Armor, making it risky to throw out. The attack also has a long duration, making it difficult, but not impossible, to spot dodge.

Since Hariyama has Super Armor and a grab hitbox, this move is very hard to override. In fact, the only way to get past it is either to get out of it's long range, perform a tricky spot dodge, or grab Hariyama back himself.

So, entirely superior to a regular grab? Not quite, because in addition to being slightly slower, Hariyama doesn't actually immediately put the foe intot he grab state. Instead they both go into a 'sumo' state, and both characters grab each other. Both players must now button mash to try to grab the other one, doing about 1% damage every three taps.

Besides button mashing, two other factors affect the outcome of the sumo match. First, Hariyama automatically gets a 50% boost to effectiveness for initiating the sumo, giving him a significant advantage over foes. However, the player who is at a higher damage percentage also gets a moderate boost, depending on how much more damage they have than the other.

Hariyama can also use this Special when a foe has grabbed him, putting them into a sumo match until one of them can gain control of the grab. However, because the opponent grabbed Hariyama first, they get the 50% advantage. This can save Hariyama against chaingrabs and infinites though, as he gets the advantage instead if his damage percentage is too high.

Oh and one more thing. Sumo can be used so that Hariyama can chaingrab with his Down Throw at high percentages; foes land just out of reach of his grab, but after pummeling the foe, he has enough time to still hit them with Sumo. This can be good for getting foes towards the edge, but remember that Sumo is less effective as foes reach high percentages; if you are at a low percentage yourself when you try this, you may end up being grabbed yourself!


Up Special – Body Slam

Hariyama doesn't actually learn Body Slam. To which I reply, “Wait, what?” Anyways, Hariyama performs this move he absolutely should know by jumping up and forwards into the air, rising a short distance before plummeting back down, belly first. When he lands, he slams his stomach on the ground, dealing upwards of 11%, more damage the higher the distance he fell. Enemies caught under his voluminous frame are tripped until Hariyama pulls himself back up, a process that takes nearly a second. Hariyama has the advantage if he catches an opponent with this move, and if he predicts how they escape the trip properly he can land another grab or his Down Smash as a follow up.

This move can also be used to suicide KO enemies, and has the added advantage of ensuring that the enemy is KO’d first before you, a crucial advantage on the final stock. Hariyama can perform Body Slam while he has an enemy grabbed, but not in a sumo status, making this easier to land or suicide with. Opponents can button mash out during the start up of Body Slam though, so it isn’t a sure thing against enemies at low percentages.

Finally, Hariyama gets more distance out of this attack when he’s at a higher damage percentage. Even at very high percentages, this recovery will only reach ‘above average’ in distance gained, but it can make it more powerful, and slower, when used as an attack. It’s not reliable except as an option out of a grab, but you can sometimes catch opponents stuck in hitstun with this move as well.


Side Special – Block

Using his large hands as a shield, Hariyama throws his arms forward, his hands acting as invulnerable shields. No attack can harm his hands, but attacks they block will still follow through as if they hit something, instead of being blocked. Hariyama can protect himself until the enemy is stuck in their end lag, and then follow up with another attack. The angle of his arms can be controlled through DI, so he can protect nearly his entire body with them.

This can also be very good against projectiles, preventing opponents from taking advantage of his slow speed and wailing on him from afar. This isn’t a substitute for your shield though, as it takes a few frames to start and stop, but can certainly be a major advantage in certain situations. His hands can’t be walked through, but can be dodged around, so you can ‘push’ a foe away slightly with this move as well.


Down Special – Belly Drum

Slamming his big meaty claws against his chest, Hariyama begins to stomp back and forth in a battle dance. After a noticeable period of start-up, he begins to drum his stomach, gaining super armor at the expense of dealing 5% damage to himself a second. When released, Hariyama beats his hands against his belly one more time, sending shockwaves that deal 7% damage and knocks enemies trying to wail on you during your vulnerability out of the way.

After this attack, Hariyama’s super armor remains, making him impossible to budge for as long as you held down the attack, or up to three seconds. It also gives a boost to the damage of Hariyama’s next attack, increasing its damage by 50% and its knockback by 25%. This is great for closing the distance between yourself and the opponent, giving you time to approach and encouraging them to come and hit you while you’re vulnerable. It also helps you set up to use one of your non-throw KO moves. Sure, you’ll probably take a ton of damage when you use this, but who cares? You definitely can tank more damage than your opponent can, and it only ensures that the next Sumo you land will result in you grabbing the foe.


Standards

Jab – Arm Thrust

Behold Hariyama’s signature attack! Hariyama rapidly slams his palms forward in strong, open handed punches. Each punch deals 6% damage and has disgusting range, pushing foes away from Hariyama and inflicting significant hitstun. Hariyama can usually only land this move once or twice, maybe three times in a row before the opponent is pushed out of it, but it knocks enemies away very effectively, and is good for trying to push the fight towards the edge. It has a fair bit of start lag for a jab though, so make sure that you time it right.

Forward Tilt – Fake Out

Hariyama spreads his arms out wide, and leans far forward, slamming them both together. Say, this sounds familiar doesn’t it? Indeed, the beginning of this move looks almost identical to Hariyama’s Sumo. Unlike with Sumo though, Hariyama does not have Super Armor for this attack. Instead, he has Anti-Grab armor, making him able to ignore any enemy attempts to grab him. He claps his enormous hands in front of him, dealing 9% damage and a huge amount of hitstun, making this very good for following up with an Arm Thrust. Mix this move into your repertoire to make it harder for foes to get a handle on how to react to your attacks, or use it as part of a ground combo.

Down Tilt – Knock Off

Reaching upwards, Hariyama slams his left hand down in a ferocious, fluid movement, slapping the ground in front of him. This is a slow, and fairly short ranged, but powerful attack, dealing around 10% damage and tripping foes. It has a fair bit of end lag, so even if you hit with it, you’ll have to react to your opponent’s response from being tripped. You can follow up from this attack, but comboing out of it is out of the question.

Up Tilt – Revenge

Hariyama swings his arm up in a powerful blow, whacking anyone above or in front of him hard. Another slow attack, it deals 12% damage and a fair amount of upward knockback, but not enough to KO until the opponent is at a very high percentage. This attack is more dangerous during Hariyama’s Belly Drum though; if Hariyama is hit by an attack during the start up of this move, it nearly doubles in power, dealing 19% damage. Lure the foe in, and give them the uppercut, or knock them upwards and away.

Dash Attack – Belly Slam

Running forward, Hariyama spins and brakes with one foot, sliding shoulder first towards the opponent. Before he stops though, he lifts his foot back up, spinning back around and slamming his belly into the opponent. His gut deals a good 12% damage to opponents and a great deal of knockback, but it has slow knockback growth, making it a poor KO move.

Also, once Hariyama slams his belly, he has Super Armor, making this move invaluable for approaching, even when an opponent is preparing a big attack. It’s only a few frames of Super Armor though, so it’s still risky, especially against attacks with long, lingering hitboxes. Hariyama also moves a fair distance using this attack, so despite its ending lag, he can use this to close the distance against camping opponents as well.


Smashes

Forward Smash – Force Palm

Hariyama takes a single step back, holds one arm up, and then takes three quick steps forward, slamming his open hand ahead. His hand, glowing with a faint blue light, acts as a grab hitbox; if he touches an opponent with it, he holds them still in his hand, and an explosion of blue light knocks them away with light knockback.

Force Palm deals 18-29% damage, but also deals a huge amount of hitstun to foes. Against heavy foes at low percentages, Hariyama can perform a short chaingrab with Force Palm for up to 30% damage; this move is no longer useful as a combo move at higher percentages, as it knocks foes too far away, and Hariyama is too slow. Even then though, this move is still useful for knocking opponents forward, allowing you to move combat closer to the edge where you can KO with your throws.


Down Smash – Battle Stomp

Hariyama squats down, placing his hands on his legs as he breathes deep, charging this attack. When released, Hariyama stomps with his left foot, then his right, then his left again, each step releasing a shockwave along the ground, damaging enemies with a character’s radius of him for 8-12% damage. This attack is powerful as a follow up for any of Hariyama’s tripping attacks; if you predict that they will try to roll behind you or stand up, you can immediately hit them with this.

Otherwise, it’s a strong move to force opponents away on the ground or discourage approaches, and as his fastest smash, can even be used to finish a combo. Due to the way Hariyama’s combos push opponents away though, you probably won’t be able to hit an opponent with all three stomps at the end of a true combo. It has a fair bit of end lag too though, and even as his fastest smash, it’s still pretty slow.


Up Smash – Focus Punch

Stepping back again, his fist glows with a white light. Hariyama closes his eyes, concentrating his power. When released, he opens his eyes, and a moment later, swings his arm upward in a wide, arcing uppercut. This smash deals 25-38% damage, and has a humongous range as well. On the flip side though, it’s also one of the slowest smashes in the game, just barely outspeeding King Dedede’s Forward Smash. So it’s a useless filler move? Not quite.

When combined with the power of Belly Drum, this becomes a hideously powerful attack, and Hariyama can now absorb enemy blows with his Super Armor. If you can land it, it’s an easy KO even at mid percentages after the Belly Drum boost. However, any dolt with half a brain will likely want nothing more than to get far away from this attack. You can make it harder to get away by preceeding this move with Fake Out, which has the added advantage of Anti-Grab armor to make it completely impossible to stop, but you’ll generally need good prediction of your opponent’s movement in order to land this attack. You can however guarantee landing this attack after a Seismic Toss, but only against floaty characters, and even then only if you have reeled them long enough. Against foes who just won’t let Hariyama bring them to the edge of the ring, this is a good secondary KO option.


Aerials

Neutral Aerial – Whirlwind

This is one of Hariyama’s level-up moves. If I hear a complaint about Pokemon Syndrome, there will be no mercy. Hariyama leans slightly forward, closing his eyes. He then claps his hands together in front of him, releasing a whirlwind around him, pushing nearby foes away. It’s a gimping move, plain and simple. Use it to follow up after sending an opponent reeling, or get that last bit of distance to knock the enemy close to the edge, or even off the edge after a throw like Seismic Toss. It can get you closer to the edge by forcing the opponent to retreat as you approach as well. However, this move also has a significant amount of start and end lag, so if you do it too close to an enemy, you’ll be punished.


Up Aerial – Smelling Salt

Sumo wrestlers would spread sacred salt over the ring in order to purify it for their match. Hariyama and Makuhita are the only two Pokemon to learn this attack by level-up, and this attack is a reference to that part of sumo culture. This is also why Hariyama has Brine as a Heart Scale move (worry not, it won’t be in this moveset). The more you know.

Hariyama reaches into his trousers and quickly throws a handful of salt in a cloud forward, dealing 6% damage to anyone within it. This attack deals no hitstun, but if a foe is suffering from hitstun, it immediately ends it, but deals 12% damage instead. If a foe is reeling, it will knock them out of their reeling status, but deal 12% damage as well. This is perfect out of a shorthop to end a combo with, or to get extra damage out of a throw before you’re ready to KO someone with it.

It also frees allies of hitstun in Team Brawl, so if you’re on a team with King Hippo and fighting Mr. Sandman, this is good for inciting mindless rage.


Forward Aerial – Shove

Hariyama shoves his hands forward, pushing anyone nearby away. This not entirely slow attack deals 6% damage and has a push effect, but deals no hitstun at all. Because of that, enemies who are helpless or reeling that Hariyama hits with this remain helpless, making it an excellent addition to his gimping repertoire.

It can also be used out of a shorthop as a more aggressive, in your face way to push your opponent back. Be careful though, as the lack of hitstun also means you are open to attack. With Belly Drum on your side, you can sometimes make do with that. Even better; close the distance with an opponent with this, and then whack them with Revenge as they try to hit you back with it.


Back Aerial – Reversal

Hariyama looks behind him and narrows his eyes, then reaches out and grabs the foe behind him for 7% damage. They then switch positions, but Hariyama doesn’t let go. Instead, they must both DI against each other to control where they land, much like with Bowser’s Koopa Claw. As usual with Hariyama though, the advantage to control the direction does not lie with the one with less damage, but the one with more. The opponent can also button mash to escape though, so you can’t use this to forcibly suicide KO an opponent at low damage. You as well can release the foe by tapping the A button.

If you both land feet first on the ground, and Hariyama is still grabbing the foe, you then enter a ‘sumo’ state. However, if you DI in the direction Hariyama is facing, (the direction he was originally facing) then he will land on top of the opponent, dealing damage like he would if he landed a body slam. On the other hand though, if you end up leaning in the direction of the opponent, he will land on top of you, dealing 9% to you. While you are in your prone state from this, they land on your belly and take set knockback into the air at the end of this attack, making you both effectively in a neutral position still.

Reversal can help reposition you and the enemy, and even be part of a suicide KO as well. It’s not exactly a reliable attack, but at a high percentage Hariyama can use it to great effect and get momentum back on his side. Be careful not to use it too close to the edge if you do not wish to suicide KO though, as if you don’t, your opponent will likely end up pushing you back.


Down Aerial – Diving Drop

Hariyama raises his arms up and spins in place, now rapidly falling down. Opponent caught as he falls are kicked down for 8% damage, and when Hariyama lands, he creates a shockwave like in his Down Smash, this one dealing 11% damage.

This is the way for Hariyama to get back out of the air when he’s knocked upwards, and can even be used to spike opponents, but the fast falling means you’ll likely die as well. When used to land though, Hariyama notably takes zero landing lag from doing so, sticking the landing. You can now immediately get right back into the fight where Hariyama is most comfortable fighting.


Final Smash

Super Attack – Sumo Match

Hariyama reaches forward like when he uses Sumo, now invincible. If he grabs an enemy, they are both magically transported into a sumo ring for a match. Both characters grab on to each other, and must now try to shake the other one with the control stick or Wii Remote to knock the other one out of the ring or to the ground for a KO.

Pushing forward will knock the enemy towards that side of the ring, while pushing down will attempt to force them down. Pulling up on the control stick will try to lift the opponent up; if you can lift them off their feet, you throw them out of the ring. By pulling back on the control stick, you can try to switch places with the opponent, although this is highly telegraphed and the foe can counter by pulling back as well.

It’s not as simple as flailing on the control stick though; after one character attempts to move the character, the other character can block the opponent’s movement and counter with a push or pull of their own. It takes rapid reflexes and nerves of steel to effectively counter an opponent though, so you’ll have to be the aggressor too in order to knock the foe out of the ring.

Hariyama, like in his Neutral Special, has the natural advantage in this competition; he’s pushed less and pushes more than the opponent. Don’t get cocky though, because even with your handicap, a cunning player can use your smash against you and defeat you.


Combos and Follow Ups

While normally I’m adverse to making a section like this, I feel that Hariyama is a character who really absolutely needs you to understand his combo and follow up game so he can approach and force the battle to the edge where he wants it. This is therefore a list of his various ways chaingrabs, combos, and follow-ups that he has at his disposal.
– Trip Follow Ups
Hariyama can trip an opponent with a successfully landed Up Throw, Up Special, Down Tilt, or Back Aerial. After tripping a foe, you must predict how they respond, whether they roll behind you, roll away, use a get up attack, or stand up. If they roll behind you or stand up, you can use your Down Smash to push them away and keep the pressure on. You can also attempt to grab them, although you will have to turn around first if they roll. If they use their get up attack, Sumo is a perfect response. If they roll back, you have no attacks that will be a certain hit, but you force them to move backwards, and hopefully towards the edge. Keep the pressure up with your Forward Air, Forward Smash, or Dash Attack.
– Hitstun Comboing
Don't run away, this isn't like Mr. Sandman's! Hariyama can deal a fair bit of hitstun with Arm Thrust, Fake Out, and Force Palm, and can hit opponents during their ending lag with a successfully parried attack using Block. This is when you want to force them back with a move like Shove, Belly Slam, Block or Force Palm again.

– Chaingrabbing
At very low percentages, Hariyama has a chaingrab he can use with Force Palm, while its knockback is very low. This usually only works on other heavyweights though. At higher percentages though, you can still follow up with moves like his Dash Attack and Fair, or even his Jab to move the opponent back.

Hariyama can also chaingrab with his Down Throw, but only when both characters are at high percentages; he has to first use his pummel to send them reeling from the throw in order to be able to follow up, and he can only guarantee landing it when he uses Sumo for it. This has the side effect of making it less effective if you knock the opponent’s damage to high as well though, as if you rack their damage too high, they’ll be able to break out of your sumo attack and grab you instead.


Playstyle

Hariyama faces an interesting dilemma. In order to KO the foe, he needs to force them to the edge to toss them out of the arena with his throws. While this is all well and good, Hariyama is a very slow character and can easily be outrun by the majority of the cast. In order to bring them to the edge, Hariyama has to combine short combos, pushing, and aggressive approaching, all on a very slow character.

So, how does he achieve this? A few things help him. Super Armor is invaluable to his cause, and the ability to move unhindered through the use of Belly Drum is a godsend for his approaches. Block also lets him stall out almost all projectile games, meaning that enemies will either come to him, or let him come to them. Hariyama also has a few combos and chaingrabs, listed above, to help him with forcing the opponent back and building up damage.

Even with these options though, Hariyama is still a slow attacker and a slow character, it isn’t easy to pull any of this off. Landing a single grab with Hariyama is huge for him though, as it massively expands his options; Seismic Toss has a dozen different options to play out of, from Smelling Salt to Shove to Whirlwind to practically anything else you might want to hit them with. Don’t forget that he can Body Slam opponents with his Up Special during a grab, knocking him and his opponent into the air and forward, and letting him follow up on their response to being tripped.

Use Sumo with deliberation though; throwing it out will encourage foes to stay out of range and whack you during the end lag; your regular grab is less punishable, and doesn’t risk the opponent being able to regrab you instead. Be patient. Hariyama is the heaviest character in the game, he can absorb more damage than anyone else, and probably will have to in order to get his KO. This is also part of the reason why Hariyama will be better at some aspects of fighting when he is at a higher damage percentage; he’s naturally going to be higher than the foe during the fight! This is where his chaingrab and Sumo really show their effectiveness, when the stock gets down to the end.

Suicide KOing is another option Hariyama has, and he has a few ways to do it; Body Slams, Reversal, even just going offstage and going down with them using Whirlwind or Shove. Body Slam can be especially dangerous as its range increases with damage; using it out of a grab can be very effective for finishing off a foe. Both Reversal and Body Slam risk the opponent breaking out if they are at a low percentage though. Balance the opponents percentage with your own for these. The other options are riskier, as enemies might be able to break out or escape and return to the stage while you are left offstage, falling, and looking rather silly.

As for other KO options, your Up Tilt and Up Smash are really your best bets. These are best used after Belly Drum for them to both hit harder and to avoid being punished for them. Revenge isn’t exactly a reliable attack for KOing, and Focus Punch is too slow to be a move you want to count on, but if you just can’t get an opponent to behave, these are your last resort. Focus Punch can also be used to finish off floaters after a Seismic Toss too, as floaty characters tend to be especially annoying to kill.

With Hariyama, patience and pressure go hand in hand as you must outthink and outplay your opponent for every step until you can finally toss them out of the ring. Sumo is a sport that borders on an art form; play steadily and strong to win.


Match-Ups

VS Jigglypuff – 45/55

Jigglypuff is an aerial focused, floaty character, a horrible combination for Hariyama to face. Her amazing air speed allows her to outmaneuver Hariyama in the air, and he has little to sway her except the occasional Whirlwind or Reversal. Factor in her very low fallspeed and great jumps, and killing her with a throw before an insane percentage is unthinkable. Yes, for once, Jigglypuff is an excellent survivalist.

Of course, Jiggs has her own problems. Hariyama is a superheavyweight, and the Balloon Pokemon isn't known for being exactly the strongest of fighters. Simply put, she isn't budging Hariyama either. Worse for her, her pitiful range means that Hariyama can use Block to pretty much stop every single attack she has, from Rollout to her aerials. Of course, with her attack speed and quick aerial movement, Hariyama is going to have a hard time blocking her as she meanders around the field.

And it's also going to be a good bit difficult grabbing her too; Jigglypuff doesn't spend much time on the ground either. She has to come down at some point though, which is a great opportunity to hit her with a Sumo while she can literally do nothing to you as she comes down.

When it comes to kills, Revenge is a good one as she'll likely be hanging in the air over you and chipping away with attacks. Focus Punch will also kill her at ridiculously low percentages if you can land it. You have at least one assured kill against her once she gets around 175% or so. An Up Throw after a good few Pummels will leave her reeling even by the time she gets down to your level; nail her with a Focus Punch and watch as she's catapulted into the stratosphere.

Of course, you just let a Jigglypuff character survive to 175%, so you shouldn't be feeling to proud of yourself at all.


VS King Dedede – 65/35

King Dedede is the reason, or at least part of the reason, you can use Sumo against an opponent who has grabbed you. You're even easier to infinite than Donkey Kong; a single grab would be instant death were you not able to cancel it out. While Dedede will be able to knock your damage up higher than his every time he grabs you, he won't be able to bring you straight to death.

And this is where the fun begins. First of all, Dedede's not going to have an easy time landing that grab. You outrange his grab, and can use Fake Out to ruin him when he tries to go in for the grab, which he probably will, a lot. Sumo and Belly Drum are basically massive lures for him. When it comes to movement and fighting style, Dedede is actually exactly the kind of guy you want to fight. He's got very slow movement, both on the ground and in the air, and he's the fastest faller in the game. Combine that with a repertoire of moves that makes him want to get close to you, and suddenly that infinite of his isn't looking so hot.

Force him to the edge, using Force Palm to get an early chaingrab in, and follow up with aggressive use of your moves to push him back. Once you've got him near the edge, go for the KO; even at a mid percentage you can take him down. Even if he breaks out of the reeling state, his jumps, though many, are very small, and if he has to use his Up Special, blow him away with Whirlwind.

Of course, a good Dedede player isn't going to make this easy, and that infinite is very dangerous. At the end though, although he can get damage on you better, you can KO him better. And that's what really matters.


VS Drifblim – 0/100

Oh look, an air based character who falls upwards and almost never has to touch the ground or risk being grabbed. How wonderful.


Driflblim is such a troll.
 

goldwyvern

Smash Ace
Joined
Nov 25, 2008
Messages
519
Location
Holy keys locked in the jet, Batman!
HARIYAMA: Very nice grab-centric set youve made here, Darth. This takes what I find to be the most underrated thing about Cairne, the fighting between two characters within a grab, and turns it into a full-on playstyle while still having the sumo-like fighting style of simply knocking or throwing the foe out of the ring and some moves that are fitting of a fighting-type pokemon. All his moves are focused on getting a foe offstage and making sure they cant even attempt to recover while your gimping them, Focus Punching them to death if they refuse to have such a thing happen. Very simple, in-character moveset with the only glaring thing that irks me is that beyond being in-character and removing some hitstun to allow for gimping, Smelling Salt doesnt have a lot of reasons to be there, unlike some of Hariyama's other moves. I can see why its there, though. Overall good set, Darth, and its good you made this week have something to put in the recap.

EDIT: Oh, cool. 1 more post to 500. I probably wont post until I have a set then (WARY)
 

flyinfilipino

Smash Master
Joined
Sep 11, 2007
Messages
4,319
Location
North Carolina
@Hariyama: Aha, a moveset! We can always count on darth_meanie.

This is the first one that I've really read in a while so I'm a bit rusty, but here are my impressions. Hariyama isn't exactly the flashiest fighter, but you did everything you could with him (or it, really) and seemed to display a good understanding of his fighting style (and sumo in general). It's all about the little details, here. The grab/throw mechanic is pretty cool. I like the idea of Sumo, but just to be clear, the end result is just a regular grab? How much damage needs to be done in order for one character to win the sumo match? Body Slam is a little underwhelming as a copy of Bowser's Flying Slam (that I guess sometimes requires a grab first), but I guess it works. Belly Drum is kind of boring, but I suppose it's necessary for some of Hariyma's moves to work.

The rest of Hariyama's moves work for me. Good job making full use of his erratic (for a Fighting-type) and unique movelist. Smellingsalt is kind of meh, though, especially as an Up Aerial. The Final Smash is also meh; it's just a flashier rehash of the Neutral Special, sorta. Though I can't really think of anything better off the top of my head, so I guess this is just a little nitpick.

Overall, neat little moveset for an underappreciated Pokemon, DM. :bee:
 
D

Deleted member

Guest
You know, there was a time, not long ago, that I considered doing a one-day Hariyama moveset… didn’t turn out so well, but yours is, predictably, very good. It’s somewhat derivative and suffered a little from the ‘Punch Out!!’ syndrome of having so many generic grabs and punches, but with a very flowing playstyle, it all comes together nicely.

For one thing, I must say I love your use of pressure moves to keep the opponent on their toes – Hariyama is an absolute monster at close-to-midrange, simply devouring pretty much anything he comes into contact with. However, this being a contrast to Jason, you are able to well-establish the glaring flaws of the character’s slow speed, difficulty to handle floaty characters and lack of priority in the air.

The ‘damage phenomena’ of Scarmiglione and now Hariyama is constantly upping whatever I had thought up in Von Kaiser: I just love how he not only is resistant to knockback, but also gains buffs through the playstyle on his damage percents. Your interactions with the ‘belly drum’ are perfectly in-line with the game and figuratively blow the rest of the contest out of the water in terms of cognitively-linked punishing or pressuring. It is quite impressive also that, though Hariyama is a slow character, you’re able to diversify his set enough to give him options whatever the situation, making his flowchart possibly the largest yet.

Not to say the moveset is long – quite the opposite, like the Komodo Bros, you’ve packed quite the decent amount of detail into it. There is as well somewhat of an oddity around certain moves, where you tempt that he may not be able to damage or knock out with certain moves when it is entirely irrelevant; this isn’t King of Fighters, the presumed is that every move will blast zone at a point. I would rather not nitpick with particular moves; it only comes off as slightly weird, but I felt it popped up one too many times. Just to throw all of my negatives out there, it’s readable, yet hardly great organisationally, besides which it is far down on my list of wants for a Hariyama moveset.

The writing style is typically great, with far less instances of despondencies among the complex sides of the whole grabbing and literally faking out shebang. In the chatroom, you covered all the minor confusions I had felt within the first five minutes of reading the set, therein I was able to piece it together – with things like the higher damage effects soon becoming obvious. It’s simple, without insulting the reader’s intelligence. You also avoided any kind of Pokémon syndrome and labelled the interactions both in the moveset as well as at the end, so hat’s off to you.

So, in all, I congratulate this set on borrowing some great concepts from the past – the double grab [indeed] from Cairne, the ‘Punch Out!!’ knack for generic moves, the damage mechanic: but never in a way not beneficial to the playstyle. This commitment to the ever-present flowchart almost makes the section for it and the then pretty redundant match-ups rather unnecessary, as it’s crystal clear far before that just how Hariyama plays; very good work, DM.


Edit: Oh, and a final note: totally copied the lameness of the PO movesets with that horrid final smash. Yeah, it's not important, but I did laugh at that. :chuckle:

And hi FF!
 

Hyper_Ridley

Smash Champion
Joined
Dec 21, 2007
Messages
2,299
Location
Hippo Island
So I wasn't planning on posting in the thread yet until I had a moveset ready, but I decided to get in a comment for Hariyama.

The "reeling pummel" mechanic works out nicely, almost like an in-smash type of pummel KO move, lol. The damage mechanic for Sumo was also nifty, allowing him to escape chain grabs while also preventing himself from infiniting the opponent, good work.

While Hariyama is in many ways a typical slow grab-abuser in the vein of Zangief, Iron Tager, every Warlord set ever (smirk2), he puts a nice additional layer of depth on things through his knock-down pressure. My Weavile PSA set dabbles in this, so I approve of the concept. (y) It's all also very in character for a sumo-themed character (loved the smelling smalt intro).

Now for something negative...I'm don't think Belly Drum would work. Soki in Tatsunoko vs Capcom has a move pretty much exactly like it, only it starts up instantly with no health cost, lasts much longer, and he can heal with it too. Guess what? It's nearly useless, because his slow attacks and movement combined with a lack of projectiles means the opponents can simply run away until the effect wears off. And since Smash Bros offers more mobility options than TvC, I honestly doubt that poor Hariyama will find much mileage out of Belly Drum (and Soki has insane melee and grab range just like Hariyama with his grab being instant btw). If it buffed his movement speed I could see some potential.

This section applies to everyone as a general rant
Also, I really don't like when people use terms such as "It has a fair bit of start lag for a jab". That means NOTHING unless I know how fast it is compared to moves overall. Some people say Lucario's Jab is piss-poor for jab speed, but it's still one of the faster moves in the game. Ganon's Utilt is THE slowest move in the game, and MK's DSmash is one of the fastest moves in the game. Remember, Hariyama's not gonna be using his jab to only to counter other jabs, he's gonna be using it against all other moves, so it's better to know how it fares overall.

To end this on a positive note, this is a pretty fun set. I'm not sure if it's "ZOMG top 10 pokesets are gonna be turned on its head", but it gave me a reason to post in the thread for once, that has to be worth something. ;)
 

Junahu

Smash Ace
Joined
Nov 15, 2005
Messages
899
Location
Shropshire Slasher
Hariyama;
Awesome, a Pokeset that would (mostly) work brilliantly in Brawl, and a moveset that fully epitomises a particular fighting style. Hariyama manages to be clever, without being pointlessly complicated, and there's a strong, practical grounding to everything Hariyama does.
I love how much thought you put into the way Hariyama looks and moves during attacks. The visual details give each attack (other than the lame "toss" throws) real punch. In particular, Force Palm is so awesome to imagine.

For some reason, reading your sets always gives me this wierd sensation that the character is too strong, with no gaps or real weaknesses.
It's probably because of the way you present your movesets to the reader; introduce an idea that sounds like it shouldn't work, then systematically prove to them that it can and does work, progressively dispelling any potential counters with each new attack.
I do love this way of presenting the moveset, as a moveset that starts off weak, snowballs into an exciting, ferocious force. But it always leaves me with the feeling that there's no consistant way to beat the character.
Still, I love your method of story telling, and right now, I don't know which I prefer more, yours or MasterWarlord's


My only real complaint for Hariyama (go ahead and ignore the nitpicks) is that Super Armor is cheap. It's supposed to be something circumstantial you can tweak to your advantage, not the centerpiece of the entire playstyle. Personally, I would have preferred to see a version of Block, that Hariyama could move during, rather than the lightswitch super armor of Belly Drum.


and the nitpicks;
Smelling Salt struck me as ill placed as the only move that doesn't involve a slap, palm, stomp or grab. It's also a pretty useful, special looking move.. kind of like a Special really...

Fake-Out suffers from "mindgame syndrome" a terrible affliction where a move that looks like another move gains random magical properties just for the sake of mindgames. Anti-Grab armor? Is there any physical reason two attacks that look identical can have two completely opposing kinds of armor?

Darth Meanie said:
Enemies caught under his voluminous frame are tripped until Hariyama pulls himself back up, a process that takes nearly a second
This is the first time I've ever seen someone claim getting squashed under a fat character "trips" them, and still maintain a straight face. I mean, try forcing them into the prone position instead, it's basically the exact same thing, isn't it?


"Hyper Nitpicker" said:
I really don't like when people use terms such as "It has a fair bit of start lag for a jab". That means NOTHING unless I know how fast it is compared to moves overall.
Really? I think it's perfect for inputs to be compared in terms relative to other moves from the same input. Considering the insane variety of attacks in general, an overall "this is fast" or "this is slow" means NOTHING. Comparing it to the average of the input let's people visualise the attack better, as people have a good general idea of how fast a jab is, and they can then extrapolate from that, what a slow jab is. But on the other hand, if you asked me how fast a fast attack in general was, I wouldn't know.
And if DM said the jab was a fast attack, it would colour the reader's opinion, making them believe that Hariyama's attacks are faster than they really are.​
 

n88

Smash Lord
Joined
Oct 10, 2008
Messages
1,547


As a brief note, the duration of the D-Special is supposed to be ten seconds, not six. (ONO)​
 

BKupa666

Barnacled Boss
Moderator
Joined
Aug 12, 2008
Messages
7,788
Location
Toxic Tower
HAIRY AMA
Just the other day, I was looking around the Smashwiki for inspiration on mechanics of Smash that hadn't been utilized much in MYM, ala shielding. Reeling was one of the few that I passed over for what I have now. When I saw that it was implemented in Hariyama's grab right off the getgo, I knew he'd be a good set. And I was right. Hariyama proves that a character can have a multi-layered, interesting playstyle, without pushing too many boundaries.

Reading a character's get-up options and punishing them is already a sizeable part of Smash, and an aspect of it that has been surprisingly underused in MYM. Hariyama pulls it off without relying on it, which I think helps it shine the most. I mean, a whole set dedicated to knocking a foe down and punishing them would get stale quick. Hariyama's alternate options for comboing and even suiciding with an opponent keep him fresh. I would like it more if he expanded on this concept more, rather than focusing on Down Smash and more grabs. This isn't a major issue, but is more of a personal opinion of mine. Otherwise, Hariyama is one of the few Pokesets I can actually read in one sitting, without getting distracted. It's the overall flow of the set that does this for me. Hariyama flows like a goddamn river! He's easily better than Probopass, and may be better than Abomasnow. I'll see how my opinion of him changes in the future. Terrific first set, for sure.
 

Hyper_Ridley

Smash Champion
Joined
Dec 21, 2007
Messages
2,299
Location
Hippo Island
I'll fully read and comment Dark Samus in a bit (I'll say for now that the mechanic is simply amazing), but right now I'm going to have an intelligent converstion with a fellow philosopher MYMer

Junahucrates said:
Really? I think it's perfect for inputs to be compared in terms relative to other moves from the same input. Considering the insane variety of attacks in general, an overall "this is fast" or "this is slow" means NOTHING. Comparing it to the average of the input let's people visualise the attack better, as people have a good general idea of how fast a jab is, and they can then extrapolate from that, what a slow jab is. But on the other hand, if you asked me how fast a fast attack in general was, I wouldn't know.
And if DM said the jab was a fast attack, it would colour the reader's opinion, making them believe that Hariyama's attacks are faster than they really are.​
See, the reason WHY I don't like input-based measurements is because any input can realistically have any range of a given property, and Sakura takes advantage of this in Brawl. Smashes can be really fast (MK or Fox DSmashes) or really slow (Ike's FSmash). Tilts can be really fast (Shiek's ftilt) or really slow (Ganon UTilt), aerials can be really fast (MK's Nair) or really slow (Snake's Fair). Power-wise, same thing. Ganon's Fair is really strong while Wolf's Nair is really weak, Dedede's Utilt is pretty strong while Mario's Utilt isn't that strong. Telling me a move is "slow for *input*" doesn't do really mean much to me, because its the individual move that determines the properties, not the arbitrary button input..

Telling me that Hariyama's jab is "slow for a jab" either means to me that the move is slow, period (making the "for a jab" irrelevant), or that it's still a pretty fast move and therefore the "slow" part is misleading.
 

darth meanie

Smash Journeyman
Joined
Jun 6, 2008
Messages
452
Dark Samus

So now even n88 is making an image moveset now. These things used to be rare treats, now everyone's got GIMP, Photoshop, and a will to make pretty pictures.

First of all, I thought the Phazon mechanic was a pretty clever idea. Genius, in fact. You can overpower your own character, and justify it by making their mere presence increase the opponent's strength too. The Phazon also encourages opponents to charge up their chargable moves even more, which is a sweet way to manipulate your foe's behavior.

Unfortunately, you never really capitlaized on that sort of thing. Really, Dark Samus is pretty underpowered; with the exception of her Down Air, all of her moves are pretty weak; her smashes include missiles that don't combo into each other, a jump that deals 4% damage, and a defensive ring that reduces the power of projectiles; something that seems eclipsed just by her regular shield. Other moves have dreadfully low damage; the nair does a whopping 1%.

You also have a bunch of spelling errors; Photoshop doesn't have a spellcheck, but you can paste it into word to check these things to make sure if you don't wanna scan over it or risk missing something. You also have a few things to improve with writing style; when you mention being able to use certain moves out of the Up Special and Up Smash, but we don't know what those moves are, it's just confusing.

When I look at the moveset as a whole, it's not a bad set. You've clearly stepped up ideas with move interactions and such, but it's a moveset that reflect the past of movesetting and philosophy. The creativity in most of the moves and general feel of the set is reminiscent of the Make Your Move 5 era, but don't take that as a bad thing; it's a natural progression of improvement that I had to go through too.

Basically, as for improvement for you, it comes down to improving your balance, a smoother writing style, and a more well-developed playstyle. You have the beginnings of some ideas with the air mobility with the Up Special and Up Smash, but they are never really developed; you don't press how exactly the follow up these moves or why they're useful. Similarly, ideas like the Phazon Pool sort of exist in a vacuum; you never even mention it in the playstyle. Same goes for the invisibility; you need to expand on these ideas more in order to really make a set that will wow me.


Hariyama Responses

Since it's a lot to respond to at once, and thank you everybody for the prompt comments; I'll just be talking about some of the general things that were hit on.

The Down Special was something that I was conflicted with, and I wasn't quite satisfied with how it turned out. I knew it fit character and fit playstyle, but it felt like the kind of brute force solution to Super Armor that I'm not a big fan of. I would think that being able to entice grabs would help alleviate some of the problem of foes running away, but I understand the point. A short-term speed boost could work, but in the end I just really don't like that I ended up throwing it in as just a stat booster. Originally I wanted to make Super Armor a part of other moves, like Revenge, but ended up cutting that to make Belly Drum work. Ah well though.

As for the Fake Out 'pointless mindgames', in my mind at least, I sort of thought of it not as Hariyama having random protection against grabs, but more as him sort of ignoring being grabbed as he tried to hit the opponent. I could've differentiated those, but I'm not sure how it would've worked. Regardless, Fake Out being a lure for opponents expecting Sumo seemed perfect, and Fake Out is one of Hariyama's level up moves, so I thought it would work fine.

And as for Smelling Salt, I really don't know what to say here. It's a semi-signature move, as the only way for a Pokemon outside the Makuhita family to get it is by breeding or being Smeargle. It works in playstyle, I can't imagine it working any other way and still being Smelling Salt... I digress though.

It feels like I'm starting to cement flow as my real strength here; I noticed that it was one of the major things MasterWarlord pointed out talking about Probopass and Abomasnow in his Top 10 Pokesets, and it's one of the things that is a strength in Hariyama. I do try to tell movesets as a story; set up what the character's weakness is, and then how they get around it. As Rool is liable to (repeatedly) quote, "Probopass can't move! Garbage tier, right?"

I don't think he's broken though, he struggles to pin the opponent down and has to play a very heavy pressure game to keep the opponent pinned to the edge, and although he's good at surviving and has solid attacks, he can only really get his KOs when he's got the opponent pinned to the edge. Of course, it becomes easier once they're at higher damage percentages when he can chaingrab with his Down Throw, but only as long as his damage is still about as high as the opponent's.

I think he's pretty balanced, but my style of setting up the moves definitely lends to that feeling. And I'm okay with that; I prefer to think in terms of what is possible, what can be done, and what is fun to do than what you can't do. I've mentioned before that I buy into the Capcom theory of balance: break everything. It's more fun that way, although I obviously hold back on the breaking aspect when it comes to movesetting in MYM.

I definitely enjoyed making this set, and I managed to pull more character out of him than I initially expected to be able to. Hariyama really did have a ton of potential in my book, and he was fun to envision. I spent more time detailing more interesting animations than I usually do too in this set. So there you go.

It doesn't seem to me like Hariyama really struck home with anyone though, even if most people liked it, which kind of disappoints me. I'd thought that the way I approached fighting better at high damage; how you want to keep your damage above the opponent's in order to be effective at Sumo, and how he really approached close range grab game and his KO system would have made him stand out a little bit more. Really though, he just got released, and we'll see how people think of him come a month or two; I hope he'll age better than Abomasnow ended up doing.
 

MarthTrinity

Smash Lord
Joined
Aug 9, 2007
Messages
1,954
Location
The Cosmos Beneath Rosalina's Skirt
STRIKE MAN!
STRIKE MAN!
GO! FIGHT!
WIN!
Strike Man is a Robot Master in the recently released Mega Man 10 and as such, is one of the bosses Mega Man must fight before confronting Dr. Wily. Found in a stadium-esque stage, Strike Man was originally a batting-practice robot until he malfunctioned due to Roboenza. Strike Man however has been known to have a rather foul temper; he once hit a batter he disliked with a pitch, sending him to the hospital. Strike Man is also known to get upset if he gives up too many hits. Strike Man’s weapon is the Rebound Striker; a deadly ricocheting baseball that increases in power the more it bounces. Rebound Striker is Sheep Man’s weakness whereas Triple Blade (Blade Man’s weapon) is Strike Man’s weakness; Block Devil in Wily’s Castle is also weak to Rebound Striker.

Playlist is HERE

(Stats)

Fall Speed: 8/10
Traction: 7/10
Size: 7/10
Aerial Movement: 7/10
Movement: 6/10
Weight: 6/10
Recovery: 5/10
Jumps: 5/10

Most of these stats are fairly self-explanatory; Strike Man is a baseball player, he needs good traction, good hustle and a good air game to field the ball properly, brawling is no exception! For a good size comparison, Strike Man is about the size of Jigglypuff or a Party Ball; he is however higher off the ground than Jigglypuff and his crouch is not even CLOSE to how good Jiggs’ is.

(Specials)

Neutral Special: Rebound Striker
Strike Man’s signature move is one of his most playstyle relevant as well! Taking a pitching pose, Strike Man forcefully hurls a small (about the size of a gooey bomb) pink baseball forward (or diagonally downward if used in midair) at the speed of Samus’ Neutral Special. This baseball will fly forward (or diagonally upward/downward if you tilt up or down slightly while using it) at the same speed until it hits a wall, an opponent or an opponent’s attack. If it hits an opponent, this move will deal a solid 6% and low knockback. Once it hits something it will do one of two things, both of which are -INCREDIBLY- important to keep in mind:

1.) If Strike Man’s Rebound Striker hits an opponent or an opponent’s attack, the Striker will automatically fly back towards Strike Man’s direction with a 1/4th speed increase. The damage and knockback of the Rebound Striker will also increase by 1/4th.

2.) If Strike Man’s Rebound Striker hits a wall or another stationary part of the stage the Striker will automatically ricochet off the wall diagonally up or down (at random) with a 1/4th speed increase. The damage and knockback of the Rebound Striker will also increase by 1/4th.

Regardless of whether or not the Striker hits an opponent or a part of the stage, there’s something of the utmost importance you need to know about this move; once the Rebound Striker hits ANYTHING, the hitbox becomes dangerous to you! So the hitbox is now active to you too huh…? Good thing this move has such low priority; you can smack it right back at your opponent! Yep, that’s right, funny that Strike Man can play the ultimate game of dodgeball isn’t it? If you hit a Rebound Striker after it’s been reflected, the damage, knockback AND speed will be increased by ½ from its original stats, struck back by an opponent again and the move will be increased by ¾’s from its original stats. And of course, since it’s Strike Man’s own move…of course he gets the final hit in! After being reflected for the fourth time, the Rebound Striker will now do DOUBLE the damage and knockback (killing at as low as 80% now!) it originally would’ve done AND it moves at twice the speed of a normal Rebound Striker! To sweeten the deal, the move now has infinite priority! That’s right, after the fourth rebound, the Rebound Striker is not only twice as deadly, but it’s impossible to knock back, hard as hell to dodge and will even shatter shields instantly! This is of course all assuming that the opponent plays your little game…but the alternative to that is dodging a flurry of Rebound Strikers or taking a repeated 6%…who knows? Maybe the foe will get lucky and Strike Man will strike out? Keep in mind that the ball will always fly back at whoever hit it before you and cannot hurt or be hit again by the person who “threw it” last. If the stage “hits” it however, the hitbox will be active to anyone and everyone! Only four Rebound Strikers can be on stage at one time and will not vanish until they’ve flown off the stage.

Side Special: Catching and Pitching
Strike Man punches into his gloved hand twice (for a bit of start up lag) before “kneeling” down into a catching stance for as long as you hold the button. What? He has no knees, he can’t really “kneel”. Anyway, any PROJECTILE attack that hits Strike Man (including but not limited to energy projectiles, thrown items, explosives, etc.) in the front will, instead of hitting him, be caught in his glove! At this time, Strike Man is free to throw the projectile back at the foe…oh, and you can release the button now at this point.

But just hurling a random object at your foe isn’t that interesting now is it? Why would a pro baseball robot just THROW the item back when he could pitch it and be much cooler and showy? And really, wouldn’t just straight up hurling stuff at a foe be predictable after a while? That’s where Strike Man’s mastery of all things baseball comes into play; he’s an awesome pitcher if you didn’t know. Keep in mind that this can also be used in midair. If performed in the air, Strike Man will hover in place as he pitches the ball but will fall if no pitch is used within two seconds, Strike Man will enter a free fall and most likely die. Also keep in mind that while pitching in midair, Strike Man will pitch any pitches that would normally go forward diagonally downward.

Neutral Special Button: Fastball
Once you have something in your mitt, simply tapping the Special button will cause Strike Man to pitch the projectile forward laglessly at three times its normal speed! Sounds deadly right? Well…not so much. For whatever reason (probably because he doesn’t have enough power behind throwing it…) the projectile will deal half as much damage and knockback as it normally would…granted, it’s still fairly effective if the opponent through…oh…I don’t know, a hammer head or a bob-omb at you?

Neutral Special Button: Fireball Strike
Aha! It’s the name of his theme, how clever! Anyway, once you press and hold the Special button, Strike Man will begin turning the projectile over and over in his hand as it glows red! If you throw it like this, it will fly at the same speed as it normally would if the opponent used it and deal the same knockback and damage. Nothing too impressive really…but if you hold it to maximum charge (about the length of a Reverse Falcon Punch)…the projectile will burst into flames! At this time, the attack will move twice as fast and deal twice as much knockback and damage! Don’t expect to land this one too often though…

Forward Special Button: Curveball​
Strike Man throws the projectile forward and…! It’s curving around the opponent?! This is truly one of Strike Man’s weirder pitches; the curveball will cause the projectile to fly forward indefinitely until it hits a wall or flies off the stage. The moment it “touches” an opponent tough…it curves around them and flies into the background before curving back onto the stage! How weird…needless to say this does no damage or knockback but…what’s the use? Well…for one it travels at the speed the projectile would normally travel at and essentially looks identical to the uncharged Fireball Strike…useful mindgames to punish people who try and dodge it? Oh! And since it curves into the background? Yeah, it’ll actually hit spotdodgers; seems like they would’ve been better off taking one for the team…probably would’ve dodge it that way!

Down Special Button: Sinker​
Strike Man throws the projectile at the ground before him causing it to spin in place for a while before shooting across the stage at twice the speed it would normally move at! While the projectile spins, it deals 1% on contact ultimately dealing up 6% just from that! Once this pitch hits a foe, it deals the regular damage the projectile would normally deal…it is however quite easy to simply jump over.

Up Special Button: Changeup
Strike Man looks straight up and then hurls the projectile violently into the air…so hard that it even flies off screen! After about half a second, the projectile then rockets back towards the ground two Battlefield platforms before Strike Man! This’ll deal double the normal damage and knockback…but it’s surprisingly difficult to land against competent opponents…

Back Special Button: Screwball
The only way to stop an opponent who’s behind you (once you grab a projectile, you can’t turn around until you’ve thrown it!), Strike Man throws the projectile forward a ways…before it goes spiraling past him at twice the normal speed! This’ll not only move twice as fast, but it makes the projectile twice as powerful both knockback and damage wise! The downside however is quite apparently, with the ball shooting past him, Strike Man spirals in place, dizzy for a full second before he regains his composure.

Neutral Standard Button: Blinkball
There’s only one pitch for the Standard button and that’s the Blinkball! Physically, it looks the same as the same as the uncharged Fireball Strike or the Curveball…but unlike those, the Blinkball does no damage under ANY circumstances! That’s right, this pitch is purely mindgames…in fact, it’s not even a pitch! Strike Man will go through the motions of pitching, heck, you’ll even see the projectile be pitched…but in reality, he’s still holding onto it! If the illusion hits a foe, it does nothing at all, not even flinching knockback…it just phases through them. Have the foe swinging at air with this so you can pelt them with a -REAL- pitch!

Up Special: Fly Ball
Extending out both arms to his side, Strike Man begins to spin VERY rapidly, becoming a blur as he spins! Physically, this move looks very much like Meta Knight’s Mach Tornado (fortunately for opponents it doesn’t have Mach Tornado’s insane priority) and will actually give him both horizontal and vertical lift slightly greater than that of the Mach Tornado! So how is this move any different than your basic Meta Knight **** move? Well, first of all, it’s a move Strike Man actually uses in game, no I didn’t just rip off a good move! Second of all, Strike Man will throw out FOUR Rebound Strikers upon activation of the move, two to each side!

This is a pretty effective recovery and a great “get away from me” attack…but it also has its canon downside; after spinning at such speed, Strike Man will be vulnerable for a full ¾’s of a second once he lands as he rocks in place, visibly dizzy. Use with caution; you could easily get one of your Rebound Strikers back in your face during your recovery time!

Down Special: Line Drive
Strike Man will roll up into, what else? A ball! He’ll then take two small hops and then a great hop that is actually determined by you, the player! If you simply tap this input, Strike Man will take two short hops (that will go about a Pokeball width each) before taking a massive, horizontally moving jump that will move you a full Battlefield platform in the direction you’re facing!

If you hold the button however, Strike Man will take the two short hops mentioned above followed by a massive VERTICAL jump that will take him almost two Ganondorf heights upwards (while only about a Kirby width forward). Either way you decide to use this move, you’ll be a moderately high priority hitbox (so you’ll shrug off most projectiles but still eat it from physical attacks) that will deal 8% upon making contact with Strike Man. It also takes about two seconds to fully finish the move. That being said, this has a number of uses; not only will it reflect any Rebound Strikers that may be heading back towards you while in ball form, it also allows you to successfully approach against people who may be trying to beat you out by camping against you.


(Standard Attacks)

Neutral Combo: Balk
In baseball, a balk is an illegal motion performed by a pitcher which results in an immediate dead ball (IE the base runners can’t advance). In Brawl, a balk is Strike Man’s neutral combo. So with that in mind…Strike Man suddenly and erratically swings his gloved hand forward (at the speed of Ganondorf’s jab) as if pitching. If one were to come in contact with this, they’d take 3% and flinching knockback. However this has several other applications. The first and most obvious are the potential mindgames. Because of the fact that this looks like a pitch (much like in your Neutral Special), you can easily catch a foe off guard with it when no Rebound Striker is thrown.

Aside from that, if you hit a Rebound Striker with this move, its attributes will change considerably. Regardless of how many times the Rebound Striker has been reflected, the next time it hits an object, player or the stage, the Rebound Striker will pop, dealing no damage but flinching if an opponent is within a Kirby width of the burst.

Dash Attack: SAFE!
Strike Man drops down and does your traditional baseball slide with his glove raised the total length of a Battlefield platform.. Getting hit by a sliding Strike Man will deal a poor 3% and tripping, but there are ultimately two outcomes to Strike Man’s dash attack.

1.) If you catch a projectile while sliding (such as one of your own Rebound Strikers or an opponent’s projectile) Strike Man will automatically stand up after the slide and “field it”. Upon standing up, Strike Man will pitch the projectile with the power of a Fireball Strike (double damage/knockback and double speed of the original projectile) directly forward.

2.) If Strike Man does NOT catch any projectiles while sliding, he’ll immediately stand up and make the “Safe!” sign with his hands, attempting to chop any opponents to either side of him. This deals a weak 3% and is ultimately fairly useless…it can however be used to deflect Rebound Strikers.

Side Tilt: Bunt
Contrary to the name, this is the key move you’ll be using to deflect Rebound Strikers back at your foe. In one quick movement, Strike Man swings his gloved hand back and will stay in this pose forever. No really, until you release the button, Strike Man will stay in this position. The moment you release, Strike Man will, fairly laglessly, swing his arm forward dealing 2% and flinching knockback. If the button is just tapped, Strike Man will simply swing instantly with no stalling. VERY important for using the Rebound Strikers effectively; just remember that timing is everything, swing too early or too late and you’ll be smacked by your own Rebound Striker.

Up Tilt: Brushback
Strike Man’s up tilt is very similar to his side tilt in the aspect that they both can be held until you want to use them and both are used primarily for reflecting Rebound Strikers. Upon pressing utilt, Strike Man will bend his knees(?) slightly. Upon releasing, Strike Man will jump up a Kirby height and forcefully swing his gloved hand above him while sweeping forward. This strike will deal 4% and a weak diagonal spike. It will however spike any Rebound Strikers into the ground causing its priority, damage and speed to increase quickly…but it’ll also be going diagonally upward, potentially over the opponent’s head!

Down Tilt: Breaking Ball
Breaking Ball acts as Strike Man’s “failsafe” of sorts and is actually very useful providing something went wrong with your master scheme. In short, pressing the input for this move causes Strike Man to stamp the ground with rage, something’s got him upset for sure! Being hit by this stamping deals about 3% and moderate “get away” knockback. So why is Strike Man so angry? Well, because something went wrong with his Rebound Strikers of course! We all know how glitchy Brawl can be at times and we all know how many sets out there can bend and shape the terrain and mess with all kinds of stuff…so this is why the down tilt is a crucial move for Strike Man.

If the down tilt is used while there are Rebound Strikers -ANYWHERE- on the stage (as long as they’re yours that is!) the Rebound Strikers will suddenly fall to the ground and pop! Upon popping, anyone near them (within a Kirby width) will trip providing they’re on the ground of course. No damage, no knockback, nothing. So why is this helpful? Well usually, the Rebound Strikers will bounce a maximum of four times the proceed uninterrupted off the stage with their insanely high priority…but the stage always has greater priority. If the Rebound Striker gets caught bouncing on a part of the stage, it’ll bounce there until the match ends. Thus, if you make a big enclosed cube stage and throw out all four Rebound Strikers, you’ll not be able to use your Neutral Special again (as you can only have four out at once!). The down tilt will almost instantly pop all of your Strikers on the stage allowing you to once again use them as you please instead of being limited by the Strikers glitching. That being said, the tripping isn’t anything to sneeze at either.


(Smash Attacks)​

Side Smash: Pickoff
As you charge this Smash, Strike Man will take up a pitching stance with his eyes constantly shifting back and forth. Upon release of the Smash, Strike Man will throw a Rebound Striker forward a distance determined by its charge (Battlefield platform uncharged, ¾th’s of Final Destination fully charged). Once the ball has reached its maximum distance, it’ll burst in a tiny explosion that’ll deal 13-18% depending on the charge (being hit by the ball before this will deal minimal damage) and medium-high knockback. This is a good alternative to use as one of Strike Man’s KO move; if your opponent won’t play with you, force them too by whipping these out!

That being said…it’s called Pickoff for a reason! At anytime during the charging process, if you hold away from the direction that Strike Man is facing, he’ll, upon release of the smash, spin around and throw the ball in THAT direction. Quite handy if your opponent’s one of those teleporting fiends or if they have a partner!

Up Smash: Strike Out
Strike Man hops slightly in place as the move charges, holding one hand behind him and his gloved hand before him. Upon releasing the smash, Strike Man will then throw one to three Rebound Strikers diagonally upward (45 degree angle) depending on how long your charged it. These Strikers however vanish upon making contact with anything.

Each of these Strikers does a different amount of damage and knockback. The first Striker will only deal 4% and little to no knockback, the second Striker will deal 5% and low-medium knockback and the third Striker will deal 10% and medium-high knockback. Keep in mind though that unless your opponent is TRYING to get hit by all three Strikers, they’ll most likely only get hit by one or two at the most due to the knockback of the second one. If at all possible, try and catch the opponent with the third Striker or have a partner knock them into it; that’s the Striker that’ll knock them out!

Down Smash: Double Play
While charging, Strike Man rolls rapidly into ball form and begins spinning in place much like Sonic. Instead of spinning from side to side however, Strike Man jumps up a short ways (a Kirby height to a Ganondorf height) depending on the charge. Strike Man will then fall to the ground creating a shockwave a Bowser width long to both sides.

At minimum charge, this attack will deal 6% and a 30% chance of tripping…while at full charge, it’ll cause 10% and medium knockback. The best use for this move however is that even at minimum charge, it’ll deflect Rebound Strikers both with the shockwave and with Strike Man himself. Hitting Strike Man while he bounces however will only deal 3% and downward spike…right into the shockwaves!


(Aerials)​

Neutral Aerial: Sacrifice Fly
Strike Man’s nair acts as a grab of sorts and is, oddly enough, more defensive than offensive. Strike Man extends both arms to his side and does a quick 360 degree spin. If anyone is within arms reach of Strike Man as he spins, he’ll grab hold of them, spin them with him and release them to the opposite side. This does no damage and, oddly enough, no knockback. Instead, the foe will simply keep the momentum they had going…so if you catch a foe with this mid attack, they’ll keep on going once they’re on the other side of Strike Man. A handy move indeed, not so much useful for gimping or anything as it is for stopping opponent’s from gimping you…just make sure their ahead of or behind you; it won’t catch foes from above.

Also keep in mind that, if Friendly Fire is on, Strike Man can use this to give his partner a bit more “oomph” to their recovery OR take a hit for them by swapping places, hence the name.

Forward Aerial: Shutout
Strike Man’s one aerial that isn’t helpful when it comes to aiding teammates…it is quite useful when it comes to reflecting Rebound Strikers! Curling up into a ball, Strike Man lunges forward a Kirby width fairly laglessly and with some considerable speed. Any Rebound Strikers that hit Strike Man during this lunge will automatically be deflected back.

Any opponent (or partner) hit by this lunge however…will take 5% and be instantly foot stool jumped by Strike Man. This can effectively be used as a gimping tool or a way to extend Strike Man’s recovery…just make sure it counts; if you miss, you’ll enter a free fall! Also be aware that you’re quite easy to knock around during this attack, a disjointed hitbox like Marth’s fair or just a generally powerful move like DK’s fair will put the hurt on you quite fast.

Back Aerial: Robbing Runs
A ball just out of Strike Man’s reach, what a shame, guess he’ll be missing it huh? Not with this power play! When the buttons are pressed Strike Man will suddenly leap backwards a ways (similar in distance to Diddy’s Side Special) with his glove raised over him! At this point, Strike Man acts as a low priority hitbox that deals 5% and weak horizontal knockback. It does however serve the more important mission however of snagging any projectiles out of the air that may come in contact with Strike Man allowing him to throw them in midair. It’s a more reliable way to catch projectiles in the air than his Side Special basically and can also be used as a good way to retreat (despite its landing lag)…but it has a far, far more awesome usage too…

We all know what the term mean; when you rob a run, you do an amazing over the fence catch to stop the other team from scoring! Strike Man can do this too! How? You know when an opponent hits you with a particularly powerful move, usually when you’re at higher percents and you fly away corkscrewing? The bit where if a friend or foe touches you, they’ll usually be knocked away a bit as you hurtle off the blast zone? Strike Man can rob those. If a partner is sent rocketing off stage, use Strike Man’s speed to get there followed by his bair to ensure you’ll be a bit ahead of your partner. If done properly, Strike Man should grab them out of the air like a normal projectile! You can even pitch them in any of the ways mentioned in the Side Special; just be advised that they’ll take damage from your hurling them around too! This can also be used AGAINST opponents. Say you partner knocks someone off but you want to make SURE they’re going down for the count! Run up and snatch them out of the air then Screwball them backwards off stage!

Up Aerial: Tag Up
With moderate start up lag, Strike Man throws his gloved hand upwards…only to have his glove fly straight up! Yes, Strike Man’s glove will fly a full Ganondorf height upward before it comes falling back down to him. If a partner, projectile or opponent is caught in the glove as it flies upwards, they’ll be brought back down to Strike Man where he can then pitch them as he pleases. Be cautious though; only one other player can be grabbed at a time…not only that…but you’re perfectly vulnerable until your glove returns to you. By itself, no damage or knockback are caused at all by this attack.

One thing to keep in mind about all these moves that can snatch up opponents. Unless they’re at about 80% or more, they’ll most likely break out of the grab fairly quickly before you can pitch them. While it certainly is an effective strategy, it won’t be too easy pull off with the opponent fighting back and all.

Down Aerial: Pull Hitter
Strike Man quickly rolls up into a ball and then plummets downward, his glove extended below him (somehow) as he falls. If an opponent makes contact with Strike Man himself as he spins, they’ll take slight knockback and 5% damage, nothing too impressive really.

If the opponent/a projectile is grabbed however by Strike Man’s gloved hand, he’ll instantly enter his mid-air pitching stance and be able to pitch the opponent/a projectile like in the Side Special. While this could be used for gimping theoretically, it’s fairly obviously telegraphed (with fair start up lag and bad landing lag) and cannot be canceled unless Strike Man catches a foe, touches the ground or falls off the stage. It CAN however be used to rescue a partner who has fallen below the stage in combination with the Change Up pitch…


(Grabs and Throws)​

Grab: For his normal grab, Strike Man makes a no thrills grab with his non-gloved hand. Yaaay…for his dash grab however, he actually makes a dramatic diving catch in an attempt to grab them. The normal grab is very short range but very fast whereas your dashing grab is also very fast, long range but
-INCREDIBLY- laggy upon missing.
Pummel: Golden Sombrero
Yes, that is actually a baseball term. Yes, I laughed too. Strike Man’s pummel however is surprisingly simple; Strike Man simply smacks them with his free hand; it’s a bench-clearing brawl! It is a fairly fast pummel however…that being said, it only does 1% per smack.

Forward Throw: RBI
Strike Man reaches down and snatches up the foe by their legs! Holding them like a bat, Strike Man throws a Rebound Striker up in the air and then bats it forward with the opponent’s body! Upon making contact with the ball, the opponent will take 5% and be dropped to the ground, taking another 1% in the process. Like his good buddy Silver however, Strike Man’s throws do considerably more damage to bystanders! Anyone hit by the Rebound Striker batted by Strike Man will take 8% and decent horizontal knockback!

Back Throw: Hike!
Strike Man glances around for a moment before nodding and throwing the opponent between his legs! Unfortunately, Strike Man seems to have forgotten he’s not exactly high off the ground…this actually causes Strike Man to fly forward as the opponent flies backwards! The opponent will fly backwards one Battlefield platform whereas Strike Man will fly FORWARD one Battlefield platform! The unlucky tossed foe receives a weak 4% while any opponent hit by Strike Man will take 6% and low horizontal knockback. Something tells me you’re better off sticking to baseball Strike Man…

Up Throw: Pop Up
Putting some serious strength into it, Strike Man hurls the foe off screen (much like Kirby’s uthrow)…but they don’t come down? Yes, this is truly one of the longest throws in the game. After throwing the opponent up in the air, you’ll regain control of Strike Man who will now be looking towards the sky with his glove raised. At this point, you cannot jump or attack…so you’re fairly vulnerable. Exactly a second and a half later, the opponent will come rocketing downwards towards Strike Man who will, of course, start sweating anime-esque sweat drops before diving forward a Bowser width, leaving the poor foe to smash into the ground. Upon hitting the ground, the opponent will take a solid 7%. Any foe hit by the falling foe will take 9% and be pitfalled and any foe hit by Strike Man as he dives out of the way will take 4%.

Keep in mind that if the opponent is thrown up into a platform, they’ll just take the 9% and the rest of the animation won’t play.

Down Throw: Beanball
The only Strike Man throw that can’t effect multiple targets, Beanball is a painful one. Upon pressing down, Strike Man will jump back and throw a Rebound Striker directly at the opponent’s head. Upon being hit, the opponent will take a solid 9% and instantly crumple to the ground (so no knockback) for about a second and a half.

A rather basic throw but an undeniably useful one; use this when you want some breathing room for you or a partner to take care of other things (such as the other opponent or trap set up, not that Strike Man himself has any…).


(Final Smash)
-Grand Slam-

You knew this was coming; it’s the ultimate play in baseball for crying out loud! That being said, Strike Man’s Final Smash can be a tad tricky to land! Upon activation of the Final Smash, Strike Man will begin waving his arms, seemingly to rally an unseen crowd! At this, Strike Man’s theme will begin to play (at the stadium-esque part) but…nothing else happens? What is this a pep rally?! Nope! Strike Man has to press the B button -AGAIN- to actually use his Final Smash! With another tap of the B button, Strike Man will roll in place as the “CHARGE!” theme plays for a little over a second. Once the theme is done, Strike Man will rocket forward and Sonic’s dashing speed (or if the B button is held, he’ll bounce forward in arcs at Sonic’s dash speed) Regardless of whether you tap or hold the button, if Strike Man makes contact with any foe as he spins forward, he’ll pull them along with him! If Strike Man reaches an edge, he’ll simply turn around and go the other way so make sure not to try this on a small platform!

Anyway, once you’ve rolled up a foe, you’ll suddenly appear at a stadium in a little mini-cutscene! Strike Man will stand on the pitcher’s mound and pitch every opponent he rolled up towards…nobody?! There’s no batter? What madness is this?! With amazing speed, Strike Man will roll rapidly towards the batter’s box, whip out a bat and point to the fences. He’ll then take a massive swing at each opponent that passes by him, sending each rocketing clear over the fence for an easy home run…and a KO!

That’s right, if you’re rolled up, you stand absolutely zero chance of survival! That being said, you’ve got a bit of time to clear out of the way and it’s only one stock lost! Could be worse; at least it’s not Landmaster cheap!


Solo Playstyle - Pitching Machine

So Strike Man’s the Robot Master for you, huh? Good choice! You’ve picked a character who’s very versatile when it comes to both 1v1 and 2v2 matches. Let’s first of all cover 1v1 matches.

So first of all, you’ll want to build up damage on the opponent. Damage building can be done in many, many ways…but it can be kind of tricky as Strike Man’s attacks don’t do a whole lot of damage on their own. Strike Man’s Rebound Strikers are the obvious choice for damage building; a fast projectile that can be increased damage wise; win, win right? Well that’s providing the opponent “bats” them back to you. There’s a pretty good chance they will though as it gives them potential to hit you as well as distracting you with the ball game so they’re not getting pummeled by a near endless onslaught of Rebound Strikers. Try to mix things up though; if you think your opponent may try and leap the Striker and attack from the air, use up tilt to spike the ball into the ground and up into their face! Alternatively, use your Neutral Combo to trick the opponent into batting at a false Striker and follow it up with a real one while their stunned. While the down tilt may seem situational for glitches…it’s also very useful for stunning a foe long enough to pelt them with another Striker.

Speaking of Strikers, keep in mind your Side Special at all times. Projectile campers are Strike Man’s dream match as it gives him plenty of ammo to hurl right back in their faces. Not only this, but Strike Man creates more than enough ammo of his own, especially with reflecting Strikers and whatnot. Always remember your pitches too. Most of them are fairly self-explanatory but they’re each useful for their own situation and very versatile. If your opponent hurls a powerful projectile your way, consider throwing it back as a fast ball. The increased speed and already high damage of it should more than make up for the damage cut it gets.

So for damage racking, you have your Strikers and any number of your normal attacks. They’re mostly fast enough to use safely…but they’re also fairly short range. So in short, Rebound Strikers are easily your best method for both damage racking AND KO’ing. With that in mind though, your Smashes should work well enough to KO if your opponent just refuses to play catch with you but don’t rely on them too heavily.

Aerials are mostly going to be used for gimping as their true potential doesn’t really shine through until you’re playing team battles. With that in mind, know that dair, fair nair and fair are all useful gimping tools…dair and fair however are fairly dangerous to use solo though as there’s a high potential for a self-destruct if your opponent catches on.

Strike Man’s grabs and throws are a tad too weak to be truly effective in a singles match but they’re certainly useable. Consider using your pummel instead though to rack up some quick damage.

Mindgames are also a GREAT idea for Strike Man to utilize. Your Neutral Combo and Side Tilt look similar animation wise and, essentially, serve very similar purposes. While your opponent may think you used a side tilt to reflect it back, in reality you could’ve used the Neutral A which would end up stunning the opponent for a short time. Likewise, if you use the Blinkball after catching a projectile, Strike Man will throw nothing; especially useful against twitchy opponents or simply to mix up your strategy. Your Change Up can also be used to effectively mindgame. Side Smash can also be used throw an opponent off; if you’re charging in one direction and they roll past you, spin around and smash them in the face with it. It won’t do a whole lot of damage but it’ll get them out of your hair for a moment. One last good trick is proper use of the dtilt; wait until your opponent goes to swing, take the balls out of the air and Strike them when they get to their feet!


Team Playstyle - All-Star Game

Strike Man’s forte is in Team Battles, plain and simple. Here he has a much easier time KO’ing, peppering opponents with Rebound Strikers AND he even has a partner backing him up!

First of all, Rebound Strikers become even easier to use as you no longer need to make the opponent play…but can simply play with a partner! Batting the Rebound Strikers back and forth and then having the partner spot dodge while Strike Man sends it rocketing past is an excellent strategy if you have some breathing room. If you don’t, Strike Man works extremely well with trap characters too as his Strikers will usually rebound off of standing traps. Not only this, but you have twice as many opponents to peg with them making accuracy much less of an issue.

Strike Man’s main catch with partners is that he can, to an extent, almost always save them. All of Strike Man’s aerials (excluding his fair) are EXTREMELY useful when it comes to saving a partner, whether it be from an attack or from falling off the edge. Catching an opponent and pitching them (Change Up is most effective) will almost always save them from falling off the edge.

Another great benefit of team matches is, Strike Man’s smash attacks are all the more useful when you don’t have an opponent breathing down your neck. You can also be a lot less accurate with the side and up smashes while fighting multiple opponents.

Throws also get a major buff in team matches. Like Silver the Hedgehog, most of Strike Man’s throws will hurt teammates for more damage than the person actually being thrown. That being said, you’ll have to watch out that you’re hurting the opponent’s teammate and not your own.


(Taunts)​

Up Taunt: You’re Out!
Strike Man does the classic “out!” sign; perfect for using after KO’ing someone with a Rebound Striker.

Side Taunt: Home Safe
Strike Man sweeps his arms to both side as if to make the “Safe!” sign. A good one to use if someone makes an impressive return to stage or if Strike Man saves a partner…

Down Taunt: Showoff
Strike Man holds up his hand his pointer finger extended as a Rebound Striker forms on the tip of his finger. He spins the ball about a bit before flipping his hand around and catching it in his palm.


(Win Poses)

Win Pose 1: Struck Out
Strike Man throws three Rebound Strikers into the air before catching each and hurling them forcefully at the camera which, of course, breaks instantly. Not so rough Strike Man!

Win Pose 2: Strike ‘Nado
Strike Man is in the middle of the screen spinning rapidly as seen in his Up Special, hurling Rebound Strikers everywhere! The opponents are all running about aimlessly in an attempt not to be hit but, Strike Man doesn’t seem to care! After a few moments, Strike Man stops, falling to the ground with dizzy swirls in his eyes and birds floating above his head.

Win Pose 3: Strike Zone
One of the pitching machine enemies from Strike Man’s MM10 stage is on the win screen while Strike Man is on the other side. The pitching machine will constantly pitch baseballs which Strike Man will either bat off screen and wave his arms excitedly around afterwards…or miss and stamp the ground.

Win Pose Against Sheep Man: Sheep Man seems embarrassed by his loss (or maybe a bit…sheepish?) and tries to hide in his clouds. Strike Man however wants to rub it in and constantly keeps knocking Sheep Man out of his clouds with Rebound Strikers! Don’t be so mean Strike Man…!

Win Pose Against Chill Man: The win screen is covered with ice statues which Strike Man doesn’t find that amusing! He proceeds to hit each one with a Rebound Striker until he hits the last one…which is actually Chill Man! Chill Man falls over, dizzy swirls in his eyes as Strike Man sweatdrops and shakes his head (body?) This win pose was written at four in the morning. Upon rereading it I realized it made little sense and ultimately decided to leave it in unedited.


(Extra Extras)​

Crowd Chant: Instead of chanting Strike Man’s name, when Strike Man has the crowd’s support, they’ll start clapping like they do at :54 of his music.

Easter Egg: Gold Sombrero
As an extra (and totally cosmetic only) little Easter Egg for Strike Man’s pummel, if the opponent is hit four times consecutively with this move, they’ll take on a golden hue for the remainder of the match (or until Strike Man pummels them again). Likewise, if pummeled five times, they’ll glow a platinum, silverish color. Six times will make them (once again, purely cosmetic) appear as if they just grabbed a Metal Box. These are references to the Gold, Platinum and Titanium Sombreros which, in baseball, means four, five and six strike outs in one game respectively.

Random Glitch: Here’s a random little glitch to try out as Strike Man; just know offhand that it won’t be helping you very much and just looks kinda cool!

Setup: What you need to do to pull off this glitch is jump under a stage somewhere, Battlefield is probably the easiest place to pull this off. As you make your first jump down there, toss a Rebound Striker diagonally upwards so that it hits the bottom of the stage. Quickly (and I mean QUICKLY) double jump towards it and activate your Side Special. If done correctly, Strike Man should be under the middle of the stage suspended in midair via his Side Special (that’s not the glitch mind you!). At this point, input Up and B to throw a change up (aka throw the ball straight above you) immediately followed by another Side Special to recatch it. Do this process four times so that the Rebound Striker is at double its normal stats and with untouchable priority…at this point the results kick in!

Results: Well you’re gonna get hit by the Rebound Striker as it’ll be too fast to catch at this point (even if you could catch it with your Side Special; it’ll even break that!). The fun thing however is that you’ll take massive upward knockback from the Rebound Striker…which will knock you into the stage…which will knock you into the Rebound Striker. Essentially, you’ll pinball between the two for a while until the Rebound Striker goes off the bottom of the stage. At the speed you’re moving at, you’ll easily get in two or three bounces before rocketing off the bottom of the stage. A fairly useless glitch but a fairly awesome one if I do say so myself; Brawl’s Kamikaze G&W Glitch?


(SSE Role)

The SSE starts off as normal with the Mario vs. Kirby fight in the Stadium. Once the fight is over, the two shake hands when suddenly, a commotion starts! Mario runs to see what’s going on but, instead of being hit by some random unexplained cannonball, a pink Rebound Striker smashes Mario off into the horizon!

Strike Man laughs as he lands on the center platform, the crowd of people booing as Petey captures the princesses as normal. Kirby steps in though to confront the two leading to a slightly different battle than in the SSE. . .

Boss Battle: Petey Piranha
Essentially, this is a near identical version of the Petey fight already seen in Brawl with one glaring difference; you’re fighting Strike Man at the same time! Strike Man’s AI isn’t terribly difficult in this match though so he’s more of a distraction than anything; in fact, he’ll mostly spam Rebound Strikers the whole time! This is actually a good thing though, when you hit a Rebound Striker back, it’ll auto-seek Petey, dealing a bit of damage to him in the process. Other than that though, you’re fighting the same fight you already have before; once Petey’s beaten, the fight ends regardless of whether you KO’d Strike Man or not.

Petey keels over instead of randomly bursting into flames as he does in the current SSE. Furious at Petey’s failure, Strike Man stamps the ground. At this time, Wario appears and kidnaps Peach/Zelda as usual causing Kirby to run to the Warp Star with the other. Strike Man realizes the bomb is about to blow and gives chase to Kirby who, in return, smashes him with his hammer, sending Strike Man flying in the opposite direction of Kirby and the princess.

A considerable time later, at the ruins of the abandoned castle…the cutscene where Marth stands in the ruins plays as the army of Primids approach. After Marth raises his sword to the air however…Strike Man crash lands within the group of Primids causing an explosion from impact! You then play through the stage as Marth and eventually reach the cutscene where Meta Knight appears. Meta Knight and Marth clash swords for a bit before they realize the Primids are practically on top of them! They go back to back, ready to fight the approaching army when suddenly, a white blur leaps from the group and right above them! Strike Man begins spinning in a rapid circle above the two, launching Rebound Striker after Rebound Striker causing multiple Primids to drop. Dropping down, Strike Man gives Meta Knight and Marth the thumbs up with his back turned; that done, the trio then attacks the remaining Primids! After that, Strike Man’s role is pretty minimal. He helps take down Galleom and makes it to Subspace with the rest of the group. It's assumed that Strike Man joins the "hero team" after the incident in the Stadium due to the Ancient Minister's lack of caring that Strike Man would've been lost to the Subspace Bomb as well.

At this time however, the Subspace area changes a bit…in the area where Kirby would normally go solo to rescue everyone, he almost immediately finds and activates Strike Man’s Trophy in a cutscene. Kirby and Strike Man then proceed through the level but periodically stop for two more mini-cutscenes to play; one where Kirby and Strike Man find Chill Man’s Trophy and another where the three characters find Sheep Man’s Trophy.

Shortly after finding Sheep Man’s Trophy, a large wall of subspace blocks off both sides of the group as a strange machine appears in the background. The machine appears to be a group of three tubes with a large screen above them; inside each tube is a Primid. Meet Smash Archive.

Boss Battle: Smash Archive
Smash Archive is a boss closely based on the Weapons Archive from Mega Man 10. In MM10, Weapons Archive appears as described above except with weird cubes with cones attached to them in place of the Primids. A Robot Master from a previous MM game appears on the screen and the cube drops down, using a pattern similar to the Robot Master displayed on screen. Smash Archive is very similar to that. . .

Your three opponents are from the three previous Smash games (or the two previous Smash games and then a Brawl rep). These three opponents are Smash 64’s Pikachu, Melee’s Fox and Brawl’s Meta Knight. Top tier terror. eh? Once the machine appears in the background, the stage you’re fighting on will change to one similar in structure to Final Destination; you have to KO all three opponents to defeat the boss. Keep in mind that you’re not actually fighting said character; just a Primid using their moveset so the hitboxes will be a bit shorter than usual and you can probably start KO’ing them at around 80%. Also be aware that the Primids all have different health meters AND can switch out at random. Say you get the Meta Knight Primid up to 100% and he then switches out with the Pikachu Primid. Pikachu Primid will then appear on stage with 0%…that being said, once Meta Knight Primid comes back into play, you’ll have a super easy time KO’ing him since he’ll return to the damage he had when he switched out. You’ll know which Smasher you’re fighting as their image will be displayed on the big screen above you (complete with the original graphics!)

64 Pikachu: Ah, good ol’ Pika returns once again to his nightmarish 64 form. That being said, you have a few advantages. First of all, Pikachu only has two throws, forward and back. Second of all, he has no Side Special. That being said…since this IS Smash 64 Pikachu…his throws are INSANELY overpowered. Needless to say the 64 Pikachu Primid is a bit grab happy as his throws will do nice damage and knockback to you. He also has a nasty habit of spamming his Thunder Jolt (Neutral B) which, if you’re using Strike Man, is surprisingly beneficial as you can catch them and pitch them right back at him!

Melee Fox: Complete with wavedashing may I add! Yes, Melee Fox is a fast, powerful little pest who can pull off some nasty combos. If you’re too far from him, he’ll spam his laser. Get too lose however and he’ll try and fsmash/usmash you away! If things get too heated for him, he may just wavedash out of there! His shine is as ridiculously powerful as ever. . .fortunately he loses a good amount of his reach in Primid form.

Brawl Meta Knight: Do I really need to cover this guy? He’s a pest, an absolute beast; he’s S-tier for a reason folks! Primid Meta loves to use his ‘nado lots however and will sometimes even try and pull off his Side Special on stage. That being said, he knows his dsmash is good and he’ll make good use of that as well as his lightning fast aerials. Fortunately, Primid Meta doesn’t have the crazy sword Meta Knight does so his range is cut and his priority doesn’t eat through everything

Once all three Primids in Smash Archive are beaten, the machine explodes, clearing the path for our group! Kirby and the Robot Masters continue through the stage until they’ve almost cleared it when…! Another wall of Subspace?! Smash Archive again?! The same machine from last time appears but…now it’s Make Your Master Archive!

Boss Battle: MYM Archive​
You know the name of the game from last round; this one is no different! The only difference is that instead of fighting characters from previous Smash games, you’ll be fighting three Robot Masters created by some mysterious forces exclusively for this Archive (AKA: They’re made by MYMers). The three Robot Masters you’ll have to confront are Bubble Man, Tomahawk Man and Galaxy Man!

Bubble Man: First up is the Mega Man 2 rep made by agidius; Bubble Man. Bubble Man, as you may or may not remember, has quite the problem KO’ing you. That being said…he’s surprisingly good at damaging you lots and stopping your approaches with Bubble Lead. He does have his classic weakness of not being able to move properly without the assistance of his attacks though. Also keep in mind Bubble Man’s special weakness; he takes double damage from spikey objects; Chill Spikes anyone? Like Tomahawk Man, Bubble Primid will do his best to stay away from you.

Tomahawk Man: Next up is the Mega Man 6 rep made by Plorf; Tomahawk Man. Tomahawk Primid just LOVES spamming his Neutral Special and that’s what he’ll do for most of the fight. He won’t bother with any of his tricks or traps, he’ll just flat out lay into you with a slew of projectiles from his Silver Tomahawk to his Triple Feather. On top of this, he loves to spam his Side Smash and aerials if you manage to get too close…which isn’t entirely easy as Tomahawk Primid -LOVES- to jump away from you as much as possible.

Galaxy Man: Finally, the Mega Man 9 rep made by KingK.Rool; Galaxy Man. As you may remember, Galaxy Man is all about sucking you in with his Black Hole Bombs. He also has a slew of projectile enemy droids that he’ll use against you. Unlike the previous two “Primid Masters”, Galaxy Man won’t flee from you, instead, he’ll try to keep YOU in place with his Black Hole Bombs! That being said, Galaxy Man isn’t too challenging of an opponent and should go down before not too long…

Once all three “Primid Masters” are defeated, the machine explodes, ending the level.

(Match-Up)

Strike Man and Nurse Joy vs. The Komodo Bros. – 70/30 Strike Man and Nurse Joy

Surprising, no, that the two characters specifically designed to dominate in a team environment get so outright destroyed in this match-up? So how exactly do the Bros. get owned so badly? Simply put, they have a bloody hard time keeping their unlikely opponents down. Strike Man has several moves designed specifically to save his partners. Nurse Joy also can save her partner…and HEAL her partner. But guess what? Strike Man can even heal Joy if he throws her syringes back at her. Joy can also use Defense Curl without fear; if she’s ever sent into a free fall, Strike Man can simply toss her back on stage. Moe’s gimping game? Strike Man’s nair leaves him gimping thin (or fat) air!

But of course, what are the Komodo Bros. all about? Well their scimitars of course! But…they only have four between the two of them, right? And they count as projectiles sooooo…with a fast and well-played Strike Man, one slip up with a scimitar winds up with it in Strike Man’s mits where the Komodo Bro. either takes the full force of the scimitar to the face…or watches as Strike Man hurls it off the edge. Strike Man’s dash attack can easily snatch a downward headed scimitar out of the air and field it off stage before the Komodos know what’s going on! Not only that, but Joy’s makeshift walls can stop them entirely!

But clearly the Komodos have their grab game, right? Well yes and no. While it may seem like a good idea for Joe to tether himself to someone…if he does so to Strike Man, he’s pretty much just screwed himself over. How so? Strike Man’s Up Special will absolutely **** him with Rebound Strikers. And you know that down side of Strike Man’s Up Special? Totally negated with Nurse Joy on team. How so? Well she can just toss a syringe into him. A moment of flinch and 6% healing is vastly preferable to a good deal of vulnerability.

Moe’s whole roll forcing game is also thrown out of wack most likely due to the sheer number of Rebound Strikers on stage at a time as well as his partner. What about Joe’s assassination attempts? Well if Nurse Joy’s got Strike Man’s back, it’s hardly a concern…and even if Joe does get in, a short hoped nair will have him stabbing at nothing

And this is hardly even scratching the surface of all the ways Joy can make Strike Man an unstoppable killing machine. BitterHerb and XAttack will literally make him a floor mounted pitching machine with absolutely deadly Rebound Strikers. The one down side Nurse Joy has while partnered with Strike Man is that she can’t easily knock his Rebound Strikers back; Strike Man will be doing most of the batting himself it seems. That being said, Joy’s fsmash sets up a healable wall just ASKING to have Rebound Strikers thrown at it.

So while the Bros may have been designed for 2v2, the sheer endurance the Strike Man/Joy team has is insane, simply put. Using Strike Man’s rescuing moves (or Joy’s for that matter) in combination with the ability for the team to heal one another and they’re quite literally unkillable. Combine this with Strike Man’s insanely useful ability to rid the Komodos’ of their weapons with relative ease and you have a match up that’s quite difficult for the Bros. to win.


__________________________________

And so concludes Strike Man. I was really having fun making the set...but then I got around the time when he was almost done and just felt really bleh about it. Regardless of how I feel, I hope y'all enjoy it! Will comment Dark Samus and Haryiama for sure!

Also, thanks to agidius for the SSE pictures and Wizzerd for the header picture!
:006:
 

flyinfilipino

Smash Master
Joined
Sep 11, 2007
Messages
4,319
Location
North Carolina
Ooops, I forgot about Dark Samus at the top. >.< Sorry, n88, maybe I'll get back to her!


@Strike Man: Did you play baseball when you were a kid, MT? I didn't.

I don't know anything about the actual Robot Master, but Strike Man here is a fun set! Your writing style and humor are always on point, MT, and make the set a lot of fun to follow along with. The Rebound Strikers sound annoying and probably are, though they're probably very effective as well. Well, I can't imagine they'd be as effective on say, Final Destination, maybe, what with the openness of the stage and all. And just to clarify, do the Rebound Strikers in Strike Man's Smashes and Throws not count towards the 4 ball limit?

I like the Side Special and I love how there are several different variations of pitches that go with it. It give Strike Man some versatility and a learning curve(ball). I like all the mindgames possible, too; it'd drive me nuts! All the baseball references in the rest of his moves give the moveset a nice, educational (in a fun way) feel; it's pretty much the quintessential baseball moveset too, now. The special catching tricks in the Aerials, while really cool, seem pretty situational. Also, the Back Throw is kind of random. I appreciate all the extras, as well, even that random glitch!

Overall, you've got a really cool moveset here, MT, and I enjoyed reading it. I can tell you had fun with it! :bee:


@Dark Samus: Nice job here with an image moveset, n88. Some other images might have been nice, though, and as someone said above, spell check would've polished it some more (there were many "teh"s instead of "the"s).

The moveset itself, however, was pretty nice. There was kind of a lack of personality in the writing, though (or maybe it's just a lack of personality in the character). The Phazon mechanic is pretty true to character, though it might be a little excessive. I personally would switch the Neutral Special and Side Special around (poor Kirby would be stuck with a totally lame copy ability). Also, how long does the Lock-On last, forever? Down Special is pretty generic and doesn't get mentioned a lot, although I know it's something Dark Samus does.

Dark Samus's Tilts and Smashes are alright and expected for a projectile-based character, although Down Smash is pretty useless, methinks; a regular shield is good enough for stopping projectiles and not taking any damage from them. I like how the Neutral Aerial seems like a cliche forcefield at first but ties in with the other aerials too. The Throws are alright, with the exception of the situational Up Throw, which I disagree with. The Final Smash is an underwhelming super-buff, although that's just my opinion.

Overall, Dark Samus doesn't really blow me away, but he/she/it/Metroid comes together pretty well. Good work, n88! :bee:
 

Junahu

Smash Ace
Joined
Nov 15, 2005
Messages
899
Location
Shropshire Slasher
I think he's pretty balanced, but my style of setting up the moves definitely lends to that feeling. And I'm okay with that; I prefer to think in terms of what is possible, what can be done, and what is fun to do than what you can't do. I've mentioned before that I buy into the Capcom theory of balance: break everything
oh, I'm certainly not telling you to stop. If we all started talking about how weak our characters are, MYM would be a very glum place.
Back when I made Joe Calzaghe, I remember MasterWarlord telling me how overpowered he sounded. To fix that, rather than change how it was written, or compromise the design, I made only negative matchups. After having set up my character for the entire moveset/playstyle section, there was no need to keep talking positives. The important thing was to establish what his weaknesses were, so the reader could really get a full grip on how he plays.


Strike Man:
I love what you've done with the rebound strikers, I really do. With so many open roofed levels in Brawl, any literal interpretation of the strikers would have fallen flat. So instead you took what the projectiles were intended to represent, and played of of that instead.
There's a strong thematic cohesion throughout the moveset, and a real sense of fun, without actually sacrificing any of the bigger picture in return. This is really the kind of movesets Robot Masters should have; strongly themed, entertaining, and with one strong central mechanic

Still, I definitely do not approve of any move (especially aerials) which mimmics, or has the effect of a special when it hits. This is something Hariyama is guilty of too, albeit not as much as the catch happy Strike Man. The thing that makes this a genuine complaint though, is how his Side Special cannot grab foes to use as pitching ammo, yet his aerials can. And it makes me wonder, why you specifically state he can use Side Special in midair, if so many of his aerials undermine it.


Coming so soon after Hariyama, it seems we have a trend of sets representing sports and fighting styles more than their base character. It works for Hariyama and Strike man, because they are their sports personified, but I worry about what else may come of this trend.


heeee, I've already fallen behind on comments. :ohwell:
 

Monkey D. AWESOME

Smash Apprentice
Joined
Feb 28, 2010
Messages
143
Location
Coming to terms with having two people in my mind
DARK SAMUS

I mostly agree with DM. You had an amazing concept going on with the phazon. With it, any character (no matter how weak they are) can kick a**. Broken characters become god tier; God tier characters become Chuck Norris.

But why doesn't Dark Samus get to use it? And after you introduced the phazon in all of its wonder, you then dropped it in the trash. Truly a waste. In my opinion, a very underpowered and bottom tier set.

And to think, I criticized Darth Meanie for being harsh in MYM7. :ohwell:
 

MasterWarlord

Smash Champion
Joined
Aug 24, 2008
Messages
2,911
HARIYAMA

http://www.youtube.com/watch?v=I6jEUg_JOws

Generally the worst quality of these three audio comments as I wasn't quite feeling myself with a brain fart, but it's also the only truly positive one.

STRIKE MAN

http://www.youtube.com/watch?v=TJSunZgJwSw

I'm fairly neutral on Strike Man. I can't say I'm a fan but I certainly can't say I dislike.

DARK SAMUS

http://www.youtube.com/watch?v=3TRZS2uuCRc

And Dark Samus. . .Worst for last. Nothing wrong with the actual video, if anything it's the easiest to watch, coming in at 5:47 to the 9 minutes of the other two videos.
 

Junahu

Smash Ace
Joined
Nov 15, 2005
Messages
899
Location
Shropshire Slasher
REVENGE of the revenge of the 4 hour Moveset

A President,
a Duke...
and..

a murderer..


Regal Bryant


:mad:Just... LOOK AT HIM! Miserable, murderous monster. He doesn't even deserve a shiny moveset!:mad:


..About..
A repentant criminal, who seeks his own punishment for murdering his fiance.
Though he refuses to fight with his hands, he is still a relentless machine in battle, dominating his opponent with ferocious volleys of kicks.

And while he is a murderer, he is also the respected president of the Lezereno company, a Duke of teth'ealla, and even a fantastic cook


..Stats..
Weight: 9/10
More than just being muscular and heavy, Regal is weighed down by his shackles and greaves

Height: 9/10
Regal is almost as tall as Ganondorf

Jump Height: 4/10 & 9/10
Regal is surprisingly adept at jumping in midair

Movement Speed: 3/10
Regal is, frankly, slow. You could probably drag a tree faster than he can jog

Aerial Speed: 5/10
Regal likes to get the drop on his targets, literally crushing them under his boots

Attack Speed: 7/10
Regal attacks quickly, and without mercy. What he lacks in movement, he more than makes up for in relentlessness.

Knockback Power: 5/10
Regal's attacks usually keep the foe quite close

Damage: 9/10
Regal has steel capped greaves. Being kicked with those would be agonising

Direct Attack Range: 8/10
Regal is tall, and he has towering legs, and he attacks with his legs. So yeah, Regal probably has the furthest reaching jointed attacks in the game

Murderousness: 256/10
There is no redeeming a murderer like him. He deserves to die.


..Attacks..

Jab: [4% x 2]
Regal 'tests the waters' by very gently jabbing the air with his left boot. Once he has a mark, and A is pressed again, Regal lunges forth with a brutal close quarters knee to the stomach. Both attacks have roughly equal range, but Regal exposes himself performing the second hit, if the first hit didn't connect.
This causes the foe to stagger backwards (between 0.4-1.5 stagebuilder blocks, depending on the foe's weight and damage) and then double over in pain. From there, and until they move, or jump, any A attack they attempt will be their D-tilt, and any B attack they attempt will be their Down-B.
F-Tilt: [2%, 2%, 2%...]
Regal looses a relentless assault of kicks and roundhouses to the foe ahead of him, roughly 3 kicks every second. The tiny backwards knockback, and gaps between each kick, make this extremely easy to DI away from, even after just 1 hit.
On the flipside, the relentless flurry of kicks is great against shields. That's not to say it breaks them easily. Instead, each kick delivers a large amount of shield-stun and shield push, pushing the foe away while leaving Regal with the advantage in combat.
U-Tilt: [10%]
Jumping into the air, Regal performs an arcing, crescent kick in front of him that knocks the foe up with him. While this is generally a good, fast move all round, it can be very easily punished if shielded or spot-dodged
This attack leaves both Regal and his foe in midair, and at generally the same height. Naturally, at high or low percentages, the foe may be knocked higher or lower than Regal jumps
D-Tilt: [9%]
Regal performs a quick sweeping kick across the ground ahead of him. The range is excellent, and the duration is almost as long as most spotdodges, though the attack is extremely low to the ground. Foes that can levitate, even a little, have nothing to fear, and everyone else can jump it easily..
The knockback pops the foe up and towards Regal, and foes will need to DI away from him to avoid a follow up attack. But, again, it is the people who shield the blow who suffer most. The shield stun is noticeable (just not enough to get another D-tilt in) and the "shield-push" is a "shield-pull" in this case, dragging the foe in.
Dash-Attack: [7%]
Regal hops into the air, turns, and performs a falling dropkick that floors the foe and sends them skidding a short distance across the ground. Since Regal also pratfalls himself by performing the dropkick, this leaves both players lieing facedown, a few stagebuilder blocks apart (weight and damage do affect the distance)
Note// Regal is left facedown with his back facing the foe
Like the D-tilt and F-tilt, the shield stun of this attack is excellent. The range is good, the duration of the hitbox lasts until Regal actually hits the ground, and there is virtually zero end lag (other than the fact Regal is left in the prone position). But it's still pretty obvious which attack Regal will use, when he starts "running".
Face-Down (Prone)Attack: [11%]
Regal springs from his hands, launching himself backwards like a torpedo up to 3.5 stagebuilder blocks (DI dependant). His legs deliver good horizontal knockback (won't KO till 200% though) until he's back on his feet at the end of the attack.
If the Dash Attack landed, the foe will have to roll away from Regal to avoid getting hit. If the foe doesn't roll away, and assuming Regal reads the foe right, this attack WILL land. If this attack takes Regal off-stage, he will KO himself, unfortunately.


F-Smash: [10-23% x 3]
Regal unleashes a brutal series of three straight kicks (one low, one high, and then one square in the center) in front of him, performing a slight flourish as he switches legs between kicks. The first two kicks deal good knockback (But KO all the way at 240%), while the last one deals excellent knockback that can actually KO at a reasonable 120%. There is very little startup or endlag, though the lengthy duration will leave Regal very open to counterattack.
It's physically impossible to hit with all three kicks, unless either the foe is desperately DI'ing TOWARD you, or they're trapped against a wall
D-Smash: [10-18% x 2]
Regal finally runs out of clever, subtle moves, and stomps the ground in frustration, twice. The first stomp affects the ground just around Regal, knocking foes directly into his second stomp, which pins them to the ground in a manner that is pretty "grablike"
The range either side is pitiable, and the end lag upon missing is severe, but the first stomp does at least hit into the background and foreground, hitting all those people who have been rolling behind you up until now.
D-Smash (Pummel): [2%]
Once a foe is pinned underfoot, Regal twists his boot left and right, grinding down on the foe relatively quickly.

D-Smash (F/B-Throw): [3%]
Regal shunts the grounded foe with his foot in the chosen direction, leaving them a short distance either in front or behind Regal, and in their prone position.
The foe must take care not to roll past you, otherwise Regal can simply regrab them with D-Smash again.
D-Smash (U-Throw): [N/A]
Regal simply releases the foe from under his boot, while still leaving them in the prone position.
If the opponent is not quick in noticing Regal has let them go, he can stomp them again with D-Smash
D-Smash (D-Throw): [11%]
Regal watches the foe sternly. If they attempt to struggle during that brief moment (if they move the control stick at all), Regal will kneedrop onto them before hopping away, still leaving the foe lieing prone.
But, if the foe doesn't take the bait, they escape from the grab and stand up, leaving Regal momentarily stunned.
U-Smash: [15-34%]
Borrowing from Ganondorf's big book of awesome, Regal arcs his leg up over his head, then slams it down into the ground. ¬_¬ He does this attack much much faster than the Gerudo king. I was just mentioning him for the sake of describing the motion involved.
If he hits while arcing his leg, the foe is dragged along the duration of the entire move, taking the damage and knockback only at the end. The slam into the ground knocks foes up and away at an obtuse angle and distance that is tricky for Regal to chase after. This is Regal's, shortest smash attack, making it relatively easy to spot-dodge.
This attack slams tons of shield-damage and shield-stun onto any foe that tries to shield, though it pushes the opponent too far away to follow up with another shield stun move.

In addition, if the foe was lieing prone before getting hit by the U-Smash, they will be buried in a pitfall effect, setting themselves up for pretty much any attack Regal chooses when they escape.


N-Air: [4%, 7%]
Tumbling forewards in the air, Regal coils his legs up, before slamming them down below him. The first hit as he tumbles knocks the foe up and away from Regal, making it impossible to connect with the second hit as he slams his feet down (which delivers fairly tame downwards knockback). This is a generally quick attack, with both hits coming out quite quickly, though the range leaves much to be desired.
If Regal lands as he slams his feet down, he will instantly leap back up again, leaving him in a position to follow up on the still reeling foe (assuming, of course, that the first hit landed)
F-Air: [10%]
Regal snaps his leg foreward into a traditional flying kick (albeit angled upwards). It's fast on both ends, knocks the foe down and away a decent distance, directly KOing from the edge of the stage at 160%. It's also pretty easy to connect with (assuming the foe is slightly above Regal). The kick is punishable if air-dodged, and the landing lag is monstrous, should Regal hit the ground mid-kick
This kick does give excellent shield stun, enough to counteract the landing lag, should Regal ever feel like approaching with this. And, naturally, this move is excellent against the vast-majority of mid-air shields, again thanks to the shield-stun.
B-Air: [13%]
Regal spins around, leading into a sharp knee to the foe's stomach. The range is pretty bad, extending very little beyond Regal's body, and there's also the sting of some end lag. It is moderately quick to start up though, and deals excellent hitstun, albeit with no knockback.
Like Regal's Jab, his B-air leaves the foe doubled over in pain; forcing their next attack to be either a D-air or a D-Special. This effect can be dispelled early, by either landing, or grabbing a ledge.
If Regal hits an opponent who is already standing on the ground, they suffer the same effect from Regal's jab (i.e. nothing but D-tilts and D-Specials until they move or jump). They also suffer far less hitstun, leaving the foe at an advantage while Regal recovers from the landing lag.
D-Air: [5% x 2]
Hunching up slightly, Regal swifty jabs below him with one leg, then the other. Both hits are pretty weak, they don't even deal any noticeable knockback. It also has some startup lag, even though the attacks themselves are like greased lightning
There is absolutely no landing lag with this attack, making it a reasonable follow up when the foe techs the landing from a F-Air.
U-Air: [8%]
Nurse Joy Regal, performs a RANDOM FLIPKICK... which isn't so random if you think about it. Regal turns to face the screen then flips head over heels, viciously kicking the foe down towards the ground. It only hits above Regal, so he would have to be in a precarious position to try to gimp with it.
Though the startup lag is shocking, Regal does at least have air-dodge properties during it, only becoming vulnerable as he performs the kick

Grab: [6%]
Swearing to himself that he would never use his hands as tools of death again, Regal instead headbutts the foe to the ground...
...naturally, into their prone position. It's laggy, so... don't use it unless you have a spot dodge twitchy opponent...or just don't use it at all. It's a total gag input anyway


..Specials..

Neutral Special: "Spin Kick"
Regal hops into the air and performs a 360 degree spin kick, hitting in front and behind him, along with hitting both the background and the foreground too. There is some start lag, but virtually zero end lag
If you do connect with this attack, the foe does not take any damage, nor any knockback. They are dragged along for the rest of the spin kick, leaving them directly in front of Regal and completely 'disorientated'. This disorientation forces the foe to either move or jump, before they can Shield, Roll or Dodge again. This naturally leaves the foe at a huge disadvantage.
While undeniably useful, the start lag makes this a little tricky to use. Generally, the best time to use Spin Kick, is when the foe tries to roll behind Regal, or when they're getting into a predictable spot-dodging pattern, or simply when they're expecting a quicker attack they can avoid.
Side Special: "Mirage"
Regal slides forewards about 5/7 the distance of the average roll. It's super quick, and you can turn Regal around mid-slide by tilting the analogue stick in the opposite direction. There's a brief period after the move ends when Regal cannot move left or right, but can still attack.

A slide that's quicker than rolling. With all the rolling the retreating the foe will be doing, it's easy to see how useful this could be.
But that's ALL this move does. There's no counter, super armor, flinch resistance or dodge involved. There's no attack hidden in there, no secret buff to your next attack, nothing. Just the slide.
It's a mobility move through and through; useful for chasing and for beating the foe to the punch when they try to roll. Using this move in the air can give Regal the strategic advantage in midair combat, though the lack of horizontal mobility afterwards can be a death sentence.
Down Special: "Eagle Rage" [10%]
A flying corkscrew kick, either directly down, or up to 60 degrees left/right. Regal will rocket off, feet first, in your chosen direction until he either hits the ground, or plants his feet in someone's face. In the case of the latter, he will spring off of them in the opposite direction, from the sheer recoil of landing this crazy kick.
The kick shunts the foe away a set distance, though it's not very far at all. In fact, it's probably his weakest attack for knockback, certainly not enough to secure a gimp when offstage.
Eagle Rage is very much an aimable stall-then-fall, including the landing lag. However, If you don't aim it left or right, there is no 'stall', and Regal simple rockets downwards immediately.
In addition, if you hit with Eagle Rage, you're free to perform another Eagle Rage almost immediately afterwards.
Onstage, a horizontal Eagle Rage is Regal's best chance at approaching; especially if he spots a moment of weakness in the foe's camping. A laggy attack, or a mis-thrown projectile is all Regal needs before he can Eagle Rage right up to his foe.
If the foe shields against a horizontal Eagle Rage, they take a strong deal of shield-push.

Up Special: "Rising Dragon" [13%]
Regal kicks hard off of the ground, leaping and twirling 4 stagebuilder blocks into the air. Anyone next to him on the ground takes a moderate amount of hitstun, but no knockback, while anyone hit by him as he rises takes light knockback down and away from Regal. Regal doesn't enter freefall after use.
While the properties of this move are all excellent, and it would be an excellent recovery in any other circumstance, Rising Dragon has some trouble when used in midair. Mainly, Rising Dragon only flies up 1.75 stagebuilder blocks if used without solid ground beneath Regal's boots. Which means Rising Dragon isn't nearly as effective, when you actually NEED it. booo!
Still, if you need to recover the full 4 stagebuilder blocks, you can substitute solid ground for the opponents face, providing you're roughly within footstool jumping distance of them.
Rising Dragon is best used onstage as a sort of emergency escape, followed by an Eagle Rage, to launch Regal to the opposite end of the stage.
Offstage, this is a good option for gimping with, saving his own bacon in the process. Even the knockback as Regal rises is usefel, gimp-wise.


..Final Smash..

Revenge
While we could just have Regal use his Super Hi Ougi attack as his Final Smash, that would be boring and uncreative. So instead, let's have someone else appear onstage and use THEIR "Super Hi Ougi attack"!


You need a strong attack? Very well, 50% output should be sufficient

So, this little juggernaut slams down next to Regal, from the top of the screen, stunning everyone within two stagebuilder blocks of her (going through all kinds of super armor and shielding/dodging). That includes Regal sadly, who was still stuck in the lag of activating the Final Smash
And it only gets worse from there, Presea doesn't think too highly of the criminal who murdered her sister, so instead of attacking the other players, she wails on Regal instead. She performs THIS [0:49-1:01] incredible display of overkill, which deals 300% damage in its entirety, and explosive knockback at the end that KOs at 60%. So that's Regal KO'd, for sure (¬_¬ Even Valozarg, Onix and Envy would have a hard time surviving this, so of course Regal is doomed).
So it's a Final Smash that KO's Regal. Why bother using it? While Presea's combo is focused on Regal, it's a pretty gigantic combo, and anyone within 3/4 Final Destination's distance of her will be caught up in it as collateral damage (the final explosion takes up the entirety of Final Destination). That naturally includes everyone Presea stunned as she first appeared.
So in all likelyhood, this Final Smash will kill everyone and everything in the match all at once. If you think of it that way, this is actually a pretty reliable Final Smash, and the simple threat of it will make most players run in fear.


..Playstyle..

Hariyama + Moe + Super Macho Man + Hector

Regal seems like quite a mess at first sight, and a pointless amalgamation of better movesets. Maybe he is, after all, I wrote him in four hours

But his goals are very simple, get in the foe's face and convince them to retreat further and further towards the edge, where he can KO or gimp them. It's actually the general flow to most characters in general, but since Regal specialises in it, he can be extremely formiddable.
Regal is almost like a solid brick wall when it comes to trying to barge past him, and all of his attacks are harder to follow up when the foe specifically DI's AWAY from him. If the foe pushes against Regal, they will be at a severe disadvantage

Regal does enjoy making the foe shield his attacks, but not in a "now I break your shield" or a "now I grab you" way. In fact one weakness of Regal's, is his lack of a shield penetrating grab, so even if he wanted to, he couldn't grab a shielding foe. Instead, a shield gives Regal the chance to push the foe backwards, closer to the edge. F-tilt is the safer, quicker choice, while U-Smash also greatly damages the shield, reducing the foe's options even more.
When shielded, his D-tilt can lead directly into a jab, which pretty viciously forces them to move if they want to avoid using a specific attack. And with the foe having to either run or D-tilt, Regal's Dash-attack becomes an option. And landing THAT, opens up his Prone attack for use, which can really knock the foe way back towards the edge.

So instead, the foe tries spot-dodges and rolls. Regal's Jab, F-tilt, D-tilt, D-Smash, F-Smash and N-Special are all tools against spot-dodgers, whle the D-Smash and N-Special are pretty direct ways to deal with people rolling behind Regal. Regal can care less if the foe rolls away from Regal, since that takes them closer to the edge, which is his goal anyway.

And the final option for avoiding Regal; jumping. Regal's F-Air and U-Air are excellent for snapping the foe out of the air, and B-Air works to encourage the foe to land.
And N-air and D-air work well in pushing the advance even in midair. Landing a short hopped N-air leads into a F-air at most percentages, unless the foe DIs away, and a F-air leads into a D-air, unless the foe rolls away from Regal

While camping Regal is certainly an option, and probably the best way to deal with him in general, his Up and Down Specials are potent tools in helping Regal approach. And camping near an edge simply reduces the work Regal has to do

Regal's Side Special is almost universally useful in persueing a foe, or repositioning himself during a foe's roll. And in midair, Regal can connect with B-air, then use Side-Special to get to the other side of the foe and nail them with his F-air. It's a deadly combination, that will kill almost anything offstage. But it's not in any way a true combo, as the hitstun from B-air wears off just before Regal can unleash the F-air.

Once he does suceed in getting the foe to the edge, it's typically time for Regal to go fo the KO. The final hit of F-Smash is his strongest attack, knockbackwise, if you can somehow contrive a way for the foe to dodge the first two hits. Failing that, his U-Smash becomes a potential KO option from the edge, starting at 120%.
If the foe is still quite healthy, it may be worth trying to gimp them offstage, though it should be warned that Regal's recovery beyond his high second jump is quite low. If Regal does go offstage, F-air, B-air, N-Special, D-Special and U-Special are all decent options for gimping, and the U-Special doubles as a makeshift recovery if you use the foe as a makeshift platform.

--aaaaaaand, I'm out of time--
 

flyinfilipino

Smash Master
Joined
Sep 11, 2007
Messages
4,319
Location
North Carolina
Hooray for page 7!

@Regal: So, I don't know anything about this guy or where he comes from, but let's just go with it! He doesn't fight with his hands at all, which is kind of interesting. All of his attacks are kicks, which sounds kind of dull, but I'm sure he has redeemable "playstyle". I feel like the Jab and Forward Tilt could have been switched around, seeing as how the F-Tilt is pretty much like a Jab. I like the effect on the current Jab, though (also repeated in the Back Aerial). I'm having a hard time picturing how slow the Down Tilt must be. You mention his prone attack, but I'm not sure what direction the attack goes. That Down Smash is pretty unique and I like it...but it seems like a copout for regular grab/throws. I don't blame you though, this is a 4-hour moveset. Weird Final Smash.

I can already hear the cries of "generic!" and other insults, but I think Regal's pretty polished for a 4-hour effort. Better than anything I could come up with. Thanks for bringing life to the thread, Junahu. :bee:


I'm working on something myself in an effort to foster activity, but now I'm kind of stuck, and by the time I get it done with, the thread will be alive again!
 

JOE!

Smash Hero
Joined
Oct 5, 2008
Messages
8,075
Location
Dedham, MA


For the few who have no clue as to what a Spartan Soldier is:

Educational Video


The Spartan, as you can see, has an interesting build to him. Being a well-built man, he is about the size of Captain Falcon, but 60lbs of equipment makes him as heavy and mobile(walk/run/jumps/air) as Solid Snake. Depending on his weapon, he either sports average or amazing range. His primary weapon, the Doru Spear, gives him a reach equivalent to DDD's ftilt at nearly all times. When that fails however, he is left to his Xiphos, a deadly short sword that gives him a reach akin to Toon Link. These weapons give him above average power, with the Doru being slower but devastating, and the Xiphos having speed and great damage. There is also his impressive Aspis Shield that can kill just as well as it defends!

Yet his most pecular stat is his horrible recovery, a mere 1/10! While his Up B, among other moves, can increase his reach by nailing the edge or a wall with his Doru, (creating a new "edge", and giving him back a jump) he mainly has to rely on his second jump to recover. However, a recovery is only relevant if you need it. (smirk)

MECHANIC: BRONZE ARMOR

Now for the reason the Spartan doesn't need a recovery: armor!

The Spartan Hoplite was covered head to toe with their Corinthian Helmet, Bronze Curass (Breastplate) and Greaves. This left only their eyes, neck and a narrow portion of their waist vulnerable, which were then easily covered by their massive Aspis Shield that reached from their chin to their knee. In Smash, this is emulated similar to the way Link's shield works but in a much more effective manner. If any attack hits the Shield at any point, it will simply clank off like hitting a shielding opponent normally would. Instead of the conventional shiled characters get, pressing R puts the Spartan into a shielding position, where slowly moving the control stick moves the shield around to protect him from nigh any direction without shield decay, and with grab immunity. He is however vulnerable from behind as it takes longer for him to set up and recover from the shield position, and lacks dodges aside from his Air Dodge.

The rest of his formidable armor subtracts damage taken from attacks that hit the Spartan, rendering him invulnerable to some attacks (going off shield physics, meaning he can suffer shield push/stun) and/or weakening other moves significantly. Battering/slashing attacks such as punches and sword strikes have a hefty 7% shaved off. Elemental attacks, which essentially encompass anything such as lasers, flames, etc, Suffer a 3.5% penalty due to his armor being designed to fight metal, not magic. Over time this armor weaknes however, losing 1% of deflection for every 10% damage taken. Throws bypass the protection somewhat, lowering the values to 5% and 2.5% for the respective types.


WEAPONS
As mentioned in the Stats, the Spartan wields both the Doru Spear and Xiphos Short Sword.

The Doru, being his primary weapon, is what he defaults to when starting a stock. His attacks are mostly thrusts and stabs with it, but the spearhead has razor-sharp blades on it's sides as well, leading to some slashing attacks at range. The Doru unfortunately has 25% HP if hit in the shaft (non-tip area), with 2% protection, leaving you at a major range disadvantage if it is broken. While broken, the Doru's two remaining halves count as toss-able items for a brief amount of time, and do about 6% damage. The Doru can also be lost if you miss with Javelin Toss, and it goes off the edge/etc. Another bonus to wielding the Doru is that at the tip, there is allways an active, momentum-based hitbox. What this means is, depending on the speed at which you impact the spear-tip, you will be taking 1-4% with either flinching or minor KB. How this is factored is that dashing/falling/jumping and nailing the spear will do 1-2% based on the character's speed (faster dashers, faster fallers, and faster flyers take 2%, and vice versa). being KB'ed onto the tip will do 3-4%, as you are usually travelling faster than normal, and is divided by whether or not you are hit hard enough to create that small "trail" of smoke behind you for the 4%. This does factor into your spear-based attacks, which is all the more reason to keep your spacing while using it for the excellent punishing power.

The Xiphos has pitiful reach compared to your cherished Doru, but it does make up for that in other ways. To start, all of it is deadly, not just the tip. The Xiphos' attacks also involve more slashing motions, which have more lee-way when it comes to hitting, as opposed to trying to "tipper" everything with the Doru. That said, the Xiphos has nowhere near the KO power of the Doru, but it is faster and allows you to use counter moves out of some of your shield abilities.


NEUTRAL: TIDE OF BRONZE
The classic formation for the Spartan, he bring shis shield up in front of him, taking about the same time as whipping out a Spacey Reflector, with his Doru/Xiphos at ready to the side of it. As mentioned earlier, the Shield makes him essentially impervious to all attacks that hit it, leaving only his back/head/feet/Doru vulnerable. He is however limited to his slow walk speed, and cannot turn around while doing this until he actually ends the move by pressing B or A again, making flanking risky but rewarding for the foe..

While it is great to have a walking shield imput whenever you want, the true beauty of this move is it's speed and versatility. You can esentially bring it up whenever you want as long as you arent using the shield for any other purpose. For example, you could thrust the Doru with Ftilt, and during the end lag of bringing it back, hold B to bring the shield up. This doesn't cancel the lag of many moves, but rather just makes the lag safer. Speaking of lag, you can use your Jab in a special interaction while in Tide of Bronze, making it more powerful as you slam the foe onto the ground with your shield, you can begin a new imput with your weapon (such as when you bring up the shield during the end lag of an attack) as your shield is brought away from a defensive stance. This makes for a very powerful counter considering the shield has, well, shield priority vs attacks, and you can quickly strike after they've been pushed back.

It is important to note that while airborne, swinging your shield in front of you causes you to break alot of momentum, as well as begin fast-falling automatically, making it good even for DI (and unique in that is the only true aerial shield. No, Pit's doesn't count).


SIDE: WAR CHARGE
Opposite to Tide of Bronze, War Charge takes the Spartan into a fast, offensive state. Taking a similar pose to ToB, and after a short yell, the Spartan will run forward slightly faster than his dash speed until you press an input or hit something/an edge, in which case he will either come to a slightly laggy halt (think end lag of Ike side B), or just do his dash attack if you pressed A specifically.

Beyond being a generic means of transportation, this move does have a more offensive purpose. If you collide with a foe while charging forward, you will push them with your shield (they will be in hitstun) for as far as you run. This then ends with the foe knocked back with set KB of about a SBB in front of you, as well as taking about 5%. This is prime for spacing many attacks after this great approach (such as bringing up ToB as they get up, then counter-attacking from there). As an added bonus, with the Doru you can actually impale a foe at the beginning of the move, doing 12% and making it much more likely that the foe goes along for the ride.

Unlike with Tide of Bronze, this maneuver has alot of risk, as an evasive foe can simply dodge with good timing, and get behind you, able to capitalize on your poor spacing as you halt your momentum.Your shield also offers no "protection" like ToB.


UP: JAVELIN TOSS

As mentioned earlier, this move is one of the main means of which you would switch to your Xiphos, and one of the only means of recovery if within reach of an edge/wall for the Spartan if he no longer has a second jump.

Essentially the love-child between Yoshi's Egg and Link's Arrow, you can hurl your massive Doru in an aim-able arc, with distance decided by how long you hold down B, and a max distance of the length of FD, and a max height similar to the egg. However the throw is twice as laggy as Yoshi's, taking time to both aim and recover from the launch. To make up for this rather slow start, the launched Doru does incredible damage, nailing foes for 18% and having a hitbox that is essentially a battlefield platform flying at the speed of a half-charged arrow from Link.

Taking the extreme damage is only the least of a foe's worries though. When hit directly by the Doru, instead of being KB'ed, the spear will impale itself through the foe, and either carry them on it's trajectory, or impale them to the ground in their "prone" position for as long as the spear is lodged in them. While impaled, a foe must save themselves similarly to how you get out of a grab: button mash, DI, etc. As with other grab-like moves, the higher % the harder it is to break free, but once they do, your spear is broken. Luckily, you can press Up B again near them to rescue your Doru, but it be best to capitalize with a War Charge or Dtilt on the prone foe, would it not?

If blocked, the Doru will bounce off the enemy shield (after first doing some hefty shield damage), and take 10% damage. It then will become a toss-able weapon for the foe. They can either toss it offstage, or back at you, but unless it's another Spartan, their toss will only do 10%, with no impalement.


DOWN: PHALANX FORMATION / COUNTER-SLASH
For his final special maneuver, the Spartan takes full advantage of his Doru's lethal tip. Hunkering down behind his shield, he raises his prized spear to a 45 degree angle, but is able to move it slightly up and down to about 60 and 30 degrees as well. While in this position he is immobile for as long as B is held, but contact with the spear does 2.5 times the damage! 2.5 - 10% for those who don't feel like doing the math. While on it's own it can be a decent counter to someapproaches if timed right, it truly shines in a team setting where an ally can use you as both a deterrent to approaches, and a weapon to toss foes against! Unfortunately you are prone to attacks from behind and above you, and you put your Doru at risk to being attacked as you will be immobile for over a second.

When the Spartan is relying on his Xiphos, he takes on a position nigh identical to his Tide of Bronze, but with a key difference in that he holds his sword right behind his shield, as opposed to the side. Unlike Tide of Bronze, the shield only protects vs projectiles (like Link), but if hit with a melee-range attack, the Spartan will quickly swing the shield to his side and do a vicious horizontal slash with his Xiphos, always doing 8% and killing starting at about 160%. A fairly tricky counter, not only can he walk while doing this, but it can fool foes into thinking he is doing Tide of Bronze, or vice versa, altering their strategy into you or your team's favor.


JAB: BRONZE WALL​
Taking about the same time as Falcon's Ftilt, the Spartan places his shield before him and gives a mighty shove forward. While disgustingly simple, this mere push has a variety of uses. First, it automatically pushes a foe an entire SBB away from you, without doing damage and with shield priority. This alone can keep many approaches at bay if timed right, as it makes them do as the move says: hit a Bronze Wall. This may make it the most intriguing move the SPartan posesses for the "wall" property of the move (along with the fun looking easter egg of arrows and spears sticking to your shield for a time). A lot of moves such as spacey side-b's halt when they hit walls, and combined with the push-back it leaves them open for a moment for a good hit.

Another use is to bounce thrown projectiles back at attackers. Granted, it takes good timing, doesn't send the projectile as far as the tosser would, it is always useful to get pesky things such as grenades away from yourself.


DASHING: JOUST / SNARE
With Doru in hand, the Spartan does a horizontal sweep to get the spear right in front of him, before plunging it forward for an impressive reach of 2 SBB's! Like all the spear attacks, that range is impressive by itself, but unlike most, the shaft is actually a hitbox as well! If a foe is hit when the Doru is brought in front of them, they will be tripped and take 5% damage, where as getting hit by the actual tip in the thrust does 12%, along with KB similar to DK's dash attack, but killing around 130% due to the higher damage. Now both tripping and killing a foe from afar are excellent qualities, but when it's all added up, you are essentially committed to an attack taking as much time as the Falcon Punch. Thankfully the ability to use it during War Charge nullifies it somewhat by giving you a set-up, abd also makes it great in team settings. Imagine having one foe impaled with you for the ride, only to trip him, and then hit his buddy with the tip of the Doru!

When using the Xiphos, it is thankfully a much quicker, taking about as long as Link's dash attack, yet less versatile maneuver. Simply put, the Spartan will slash low with the Xiphos, hitting foes in the legs/whatever and causing them to trip, as with the 1st hit of Joust. He will then keep moving (similar to Sonic and Squirtle's dash attacks, making it safe vs most shields) and do 8% damage. Not the most interesting move, but as mentioned it trips the foe, keeps the Spartan moving, and is yet another good option to end War Charge with, or set the foe up for an ally.


FORWARD: THRUST
The bread and butter of the Spartan's arsenal, even more so than Tide of Bronze! It is also deceptively simple, almost being a clone of DDD's infamous Ftilt with the same lag and range (with the Doru), but the similarities end there. The most obvious difference is the ability to angle the attack up and down, and that it hits naturally higher than DDD's, making it a rather diverse poke. It does a decent 11% (7% with the Xiphos, along with the speed of Link's ftilt) and has high base KB, making it a ranged version of Falcon's Utilt in terms of power. Unlike Falcon, the Spartan lacks the fleet-footedness to follow that up. However, thrust is one of two moves that can interact with his shield with offensive lag-canceling. After the ToB Jab, thrust can be used as the shield is put away, and Fsmash can be used as the end lag of Thrust comes into play, making it risky to try and spot-dodge the maneuver, as well as playing a key role in racking up damage for the Spartan as he is sure to hit as he combines Tide of Bronze with his Tilts and Smashes to become an impenetrable wall of hitboxes.


UP: SLASH
As mentioned above, Slash is the second move that has the offensive lag-cancellation property, as he can use his shield-arm freely (and vice-versa). As with thrust, it is also rather simple. With the Doru, you swing the deadly tip in a long-ranged arc from left to right, with a slight diagonal influence (think the arc in Wolf's Ftilt), with each hit doing 5% and KB comparable to the average jab in that it probably wont ever kill. What really gives this an edge over Thrust however is it's speed, only taking as long as Bowser's Jab. It also has a hitbox on the shaft for about 2% and flinching on each swing, making this a great damaging tool later on when thrust will send foes too far, as you are bound to hit with at least 2 parts of this attack.

The Xiphos' Slash is much different however, becoming a more conventional Utilt in regards to the hitbox. Here the Spartan swiftly swings the Xiphos in an upwards arc in front of him from the ground to above his head, about the same speed and arc as Yoshi's Utilt, doing 9% and vertical KB that can kill starting at 160%. Fairly straightforward, but unique in that it is one of the few attacks the Spartan possess that knock the opponent into the air, and is of course lag-cancellable like the Doru version.

These two tilts will be central to your damage-racking, as they have they can be done directly out of Tide of Bronze, keeping you and your ally safe as your impenetrable defense is maintained through a constant flurry of shielding and attacking. This simle strategy is what makes the Spartan such a formidable force to approach, as it'd be like running into a brick wall...with spike on it. Fortunatley for you, the foe must approach in order to effectivley attack you from behind.


DOWN: STUNNING STRIKE
This brutal maneuver is one of two moves that showcase the Aspis' ability to brutally attack as well as it defends. Looking, down, the Spartan will punch his shield-arm toward the ground at a similar speed to his Jab. While this can only hit downed/prone opponents (which as you have read he has multiple methods of getting them that way), it has the special property of resetting their "prone" timer, similar to a Jab-lock, along with doing a decent 10%. Pressing A immediately after will have the Spartan kick the stunned opponent away from himself as he gets up, doing 6% and horizontal KB that kills starting at 180%. This, along with ending/start lag of the shield-portion, prevent the Spartan from simply infiniting the opponent while prone. If you have an ally however, they can easily capitalize on the stunned opponent for you.

NOTE: There is a very situational exploit, as you may have imagined, involving two Spartans alternating this move on the same foe. It is slightly difficult to pull off due to needing to be spaced and timed *just* right, along with the need of being a 2 on 1, but the results when it all comes together is sheer hilarity.


FORWARD: SHIELD BASH
As with the Stunning Strike, Shield Bash also displays that the greatest defensive tool, is also the Spartan's best offensive weapon! Having about the speed, and slightly more range than Ganon's Jab, the Shield Bash has the Spartan punch his Aspis at the opponent's skull, putting his entire weight into it as he leans to the side so the killer edge hits. As a bit of trivia, when measured on SPIKE's "Deadliest Warrior", the Spartan Shield when used like this delivered over 40g's of force to a the skull of a human replica. In a 50mph car crash, you're likely to only experience a little over 30g's, and not condensed into one area. In Smash, and outside of Warlordian sets, we don't really see instant-kills like this, so to emulate the sheer power, the Shield Bash will deliver an impressive 19-28% damage, and begin killing as low as 90% uncharged!

The true power of the move however is in it's base knockback. Delving into the mechanics of Smash, base KB is the value an attack has for it's launching power naturally, such as the Knee of Justice which has relatively high KB no matter what % you're at. Knockback Growth is the value that is multiplied to the base KB by the damage % the foe is at when they receive KB, so a move with set KB would have 0 growth, whereas scary smashes such as Luigi's Poke of Death have extreme Kb growth, allowing them to kill relatively early. The Shield Bash has insane base Kb, but relatively little growth. This assures you will always launch the foe a good distance (4 SBB's at 0%), but wont really kill them straight-up until around 90+ %. What is even more terrifying is that this shield move has that offensive lag-cancellation, meaning you can do this after F or Utilt, making an attempt to dodge the Doru or Xiphos a deadly invitation to be nailed by the Aspis!


UP: IMPALEMENT
Back to that fun mechanic touched upon in Javelin Throw, Impalement has that brutal grab-box at the tip of the Doru once again! Taking a step back, the Spartan readies his trusty spear, holding it slightly more toward the middle, before thrusting it forward for about 3/5 the range of thrust. This motion has about the same lag as Ganon's Fsmash, but with slightly more ending lag on whiff. If you hit a foe with the tip, they will clasp the shaft with both hands, struggling to get free (and have taken 13%).

This is where the real fun begins! Unlike a normal smash, this move cannot be charged until you have impaled the foe! Once impaled, holding A will begin charging the smash for up to the standard 2 seconds, in which the foe must pull free of the spear by button mashing/etc. However, having taken 13% from the grab is similar to have been pummeled a ****-ton, meaning that it will take much longer than usual to escape, which leaves more time for charging, or for an ally to wail on the foe. Once the charging is done, the Spartan then flings his Doru toward the sky, acting like a catapult to the victim as they are sent off diagonally upwards behind him! This will kill from 140-120 based on charge alone, but with an ally adding on the damage, it can kill much sooner in a team setting.

The move is much more limited when using the Xiphos. Being much faster, with lag akin to Mario's Fsmash, the Spartan will stab forward, also impaling the foe, then slash upwards once inside, doing 3% on the initial stab, and 10-15% based on charge, launching the foe horizontally upward and killing from 170-150%. While lacking in power, this version of the smash is great for damage racking.


DOWN: DISEMBOWEL
The reverse of Impalement, Disembowel is actually better when used with the Xiphos. With it, the Spartan unleashes a fatal flurry of cuts, starting with a horizontal slash to the foe's legs, tripping them to the air dramatically for 2-4%. He then will slash them downwards in the mid section while in mid-air, slamming them to the ground for another 2-4%, before finally stabbing down on them, and ripping out for a hefty 6-9%! This process takes as long as Link's jab sequence to complete, and leaves the foe downed, and we all know how much the Spartan loves a downed opponent! An extra 10-17% damage tacked onto said opponent is also welcome.

With the Doru, the attack becomes a huge horizontal sweep with the edge of the spear tip, reaching as far as Impalement. Getting hit will do 12-17%, and horizontal KB that can kill around 160-140%. While not a bad move per say, taking slightly longer than Ike's ftilt to pull off, it has little use other than an emergency kill move due to the lower KB. It does have one redeeming feature in that as you swing, the back end of the spear becomes a hitbox behind you, doing half the Damage and KB of the tip's damage. This makes for a situational answer to flanking, as it can catch a foe off-guard with it's nigh lagless animation (the longer half takes longer to "swing").


When Grabbing, the spartan reaches out with his Shield arm, giving him rather average Grab range, akin to Ike or such, and plants his Doru in the ground, spear head up. This allows him to use his Xiphos once he has his opponent, as it is much more practical at such a range. He uses the bottom of the Xiphos' handle for his pummel, bashing his opponent's head at a rate of 2 hits a sec, for 1.5% a pop.


FORWARD: ARM-BREAKER
The Spartans are the inventors of modern-day Olympic wrestling, yet in their day there we no rules to prevent injury. The Spartans were trained since they were young in this art, and often times maimed or even killed each other with their brute strength while doing so! Obviously we cant go around breaking bones here (impaling with spears is OK tho), so in Smash the Spartan brings his training to the field by first swiftly punching the foe in the gut, causing them to keel over. He then puts his shield arm on their head, while putting his free arm under their arm and wrenching back into a shoulder-lock, which in reality would dislocate a shoulder and possibly break the upper-arm bone depending on how you twist the arm back. here however, the foe receives a hefty 12%, and is left in a lengthy staggering animation, where they try and recover from the brutal attack to their limb.

Staggering has the foe walk backwards for about a SBB and rub their arm for .5 seconds, in which time the Spartan is either grabbing his Doru out of the ground, or unsheathing his Xiphos. Either way the throw will be frame-neutral for both parties. This means while, you can't CG the opponent or take too much advantage, they are in a position to be hit by the spear, approach you again if need be, or easy pickings for your ally as they stagger.


BACKWARD: CEMENT MIXER
An ancient move with a modern name, the Cement Mixer in wrestling refers to when you roll backward with your foe, balancing them on your leg then kicking them off behind you. this can be used from essentially any situation as long as you can grasp the arms or shoulders, and have one foot between theirs. In the case of the Spartan, he will grasp the foe and fall to his back, taking about as long as the landing lag from Bowser's Bair, and launch them upwards behind himself for set KB of 1.5 SBB's. This gives them 4% for being launched, then another 2% when they hit the ground.

If the Doru is in play, which means it is planted behind the Spartan as he does his throws, the foe will be thrown on top of it, impaling themselves for 6%, and having to try and free themselves once again. The Spartan has limited time to capitalize on this, having to choose to quickly get his spear back with Up B, use an aerial on the opponent, or to set up his defenses again, as his ally capitalizes on the foe-on-a-stick.


DOWN: BULLDOG
The Bulldog is the probably most reliable counter-move in wrestling today, a simple slamming of the head in a downwards direction, combined with putting an arm under their's, leads to an instant flip to the ground, and usually a pin if you keep arm control. Usually only accomplished by punishing a huge mistake in the sporting world (such as not looking at wtf your opponent is doing), the Spartan forces them into this position by slapping their head down, into an oncoming knee for 3%. After being stunned by this, the Spartan uses his brute strength to lift the opponent in the air, flip them to their back and slam them to their prone position for 4%, while leaving him in his crouching position. While not the most damaging throw, it is the most advantageous for the Spartan himself, as he can immediately Dtilt or Utilt (he has his Xiphos) or even Dsmash the foe as he is right on top of them.


UP: STAB
Using the Xiphos, the Spartan does his most brutal throw yet! He first stabs it into their gut, doing 3% much like in Impalement. Unlike his Usmash however, he then will grunt as he raises the foe skyward, still stuck on the sword mind you, and then powerfully fling them forward for 5%! This is his most powerful throw move, being able to kill horizontally at 150% near edges, however it's low damage output and lack of real setups like his other throws means it's uses will be limited. Granted, it can fling foes offstage to be intercepted by an aerial team mate, or by Javelin Toss if you feel like showing off.


NEUTRAL: KICK
A fairly standard aerial, but any kick to the face by a huge guy wearing solid bronze grieves is bound to hurt something fierce! Essentially, the Spartan does a motion similar to Lucario's Fair, but with his leg only reaching half the height as the Pokémon. If hit, a foe will receive 6%, and relatively weak KB in a downwards angle, that wont really kill until some stupid % not worth mentioning. What makes this move stand out however is the stunning power of the grieves themselves! When hit, foes will be in the reeling/footstool state when in the air, and be tripped (with pushback) if grounded. This can give you a great setup into Javelin Toss, or any ranged maneuver from a friend, as the foe is either reeling offstage, or tripped and away from you. Be warned of decent landing lag, as he lands crouched.


FORWARD: LUNGE
No, he doesn't become a detective.

Instead, the Spartan will increase his airspeed just a tad, as he plummets forward with his Doru in an over-hand position, screaming for a good .5 second free-fall with the same start up as Toon Link's Dair. During which time, the Spartan acts like a manned version of Javelin Toss. Anyone touched by the spearhead will be impaled, and go along for the ride until he hits solid ground....or not.

Once impaled, they take 9% + momentum, then another 6% once they hit the ground, where the Spartan will yank his Doru from them, leaving them with time to roll away/etc as he re-positions. While not as damaging, nor positionally advantageous as Javelin Toss, Lunge offers similar effects and great damage, along with incredible speed (compared to Toss), in exchange for range and safety.

With the Xiphos, he has the same animation, yet with much shorter range, and slightly different hitbox properties. instead of impaling a foe, he will drag the sword through them, doing 8% and diagonal KB (more horizontal than vertical) that can kill at around 150%. As mentioned previously, dragging through foes equates to a constant hitbox capable of slicing through multiple opponents at once on his path.

Lunge is also his second form of "recovery", alongside Javelin Toss, in that he can stab the edge of a stage/wall, and create a temporary ledge for himself out of his Doru or Xiphos. Standard edge rules apply here, although jumping for him is a tad laggy as he must yank out his weapon while doing so.


UP: PIKE / HEADSPLITTER
Looking upward, the Spartan swings his Doru up to a vertical position next to him, the tip a good Mario's height above him as he then falls naturally for .5 seconds. While falling, contact with his spear does a steady 10% damage, along with vertical KB that kills starting at 140%. He even lands like this for a moment to increase the duration of the move! Great for both KOing and Juggling, however his lack of air speed means he is limited to prediction, even with it's good reach, to hit. Fortunately plenty of allied attacks send foes straight down into it, or up far enough for an easy strike...

With the Xiphos the Spartan uses a devastating attack called headsplitter. Reaching far above his own head, he will slam his sword above and in front of himself in a similar manner to Link's Ftilt. Hitting with the swing as it comes down will launch the foe upwards for 7%, and kill at 160%, but sweet-spotting in front of him where the arc ends will create a vicious spike, slamming a foe to the earth for 14%, killing usually around 90%! Most likely your main method of KOing off-stage, headsplitter isn't without drawbacks, as although the swing is similar to Link's, the fact that he must bring the sword up while still falling makes it a tricky maneuver to land well. However, it is alot easier to land once you have kicked them with Nair, just make sure you have a jump left.


BACKWARD: SWINGING SHIELD
Looking back, the Spartan raises his shield arm so his Aspis is in a horizontal position. While he does this, his other arm punches forward, making him spin swiftly in mid-air, and striking anyone behind him with his mighty shield! Taking about as long as Samus' to pull off, being hit by the shield will do 14%, and kill horizontally starting at 120%. He lacks the grounded power like in Shield Bash, but it is one of few moves that can hit behind him, comes out fast enough, and is a powerful kill move. Like shield bash however, it lacks a lot of range (for him), but it does slice right past most other aerials.


DOWN: PENDULUM
A great attack no matter what weapon you have, Pendulum if the Spartan's solution to juggling, that is if he ever finds himself being juggled. With his Doru, he will spin it around once in a huge arc below himself for 7%, and 4% with the opposite end as he repositions. This does ok KB to either side, and takes about as long as Ike's Nair in total, but it wont kill until past 180% at least. That said, it has amazing reach and thus a great ability to clear out an area to land safely, and set up your defensive stances, along with doing OK damage.

With the Xiphos, as always he trades range for speed. He slashes in a downwards arc below his feet in half the time it takes to do so with the spear, but for only 5%, and KB that shouldn't kill. Opposite the Doru version as well, instead of clearing the area to land down safely due to end lag, landing during the Xiphos' pendulum will auto-cancel your landing lag. Mostly preference based, but each should easily get you down to earth safely.


The Spartan grabbed the Smashball!

After Pressing B, and being within 1 stage builder block of your victim, the screen Zooms in as the Spartan yells.....


ok, you shouldda seen this coming:


SPARTAN BOOT

Yes, the Spartan screams "SPARTAAA!!!!!!" at the top of his lungs, and proceeds to boot his foe in slow motion, much like Leonidis here. The boot does a hefty 50% damage, and knocks diagonally downwards. A sure KO if near pits of death...or the edges of a stage.


So here we have a rather intriguing character. A defensive force the likes we have never seen before! He auto-shields attacks, has counters galore, and even impales his victims on a spear. Beyond his unique shielding and armor, his attacks by themselves seem to put up a fortress, with his Doru's epic reach, and lag-cancellation into his Tide of Bronze or Shield bash, or just the various methods he locks down or makes the foe prone are enough to deter any threat. However, that isn't to say this barrier is without it's weak points.

As mentioned in his stats, the Spartan has mobility comparable to that of Solid Snake. Not exactly the nimblest of fighters, he must rely on the Spartan way of never retreating, and always putting up a front that is insurmountable by any opponent. Luckily Phalanx, Tide of Bronze and War Charge let him do just that by letting him take the fight wherever he wants it to be. A foe is camping? Tide of Bronze and walk over there in safety. A foe is approaching? Meet him head-on with War Charge, and send him packing. Someone trying to go above? Get into Phalanx Formation and spike them from the air! Even beyond his specials, all his moves are designed to keep the foe either under control by being on the wrong end of a Doru, or in front of him by forcing a retreat or approach toward him. However, if that wall is breached at any point, there is little the Spartan can do besides rely on his natural armor to save himself, but even that can be a hindrance. Some characters will be able to abuse this if given the chance, as with less damage taken comes less knockback, and with that comes locks and combos that no other character could be susceptible to, even if it would take forever just to get him to 20%. Another danger is gravity, as Spartans were mere humans underneath their rugged exterior, and without a proper recovery, being flung offstage may mean certain doom!

And yet, it all works out in the end as long as you stick to the Spartan's simple, yet lethally effective strategy of being a human wall. It is what made them so legendary at the battle of Thermopalae, where 300 brave soldiers stood their ground for days, killing 200,000 Persians in their wake. Spacing both your shield and attacks are key to keeping you onstage, with your armor being just some insurance against lucky blows. But all the armor and shielding in the world cannot save you from poor playing, as when you let just one mistake leak an attack past your defenses, it could all go downhill from there.

However, the Spartans while formidable alone, were unstoppable as an army! the Spartan carries his unique style to a unique roll in team battles: being a "living" obstruction or hazard. Clever players can find many uses of a mobile shield, or simply taking advantage of the many ways he can stick opponents with the Doru, or get them while they're down from his many moves that render the opponent prone to his Ally's mercy. The possibilities are nigh endless, with almost all styles and characters meshing with what the Spartan brings to a team!

As long as you have keen skill, or a good friend to watch your back, you will become the Deadliest force Brawl has ever seen.


oh, and then there's this:


Kirby gains access to Tide of Bronze, along with the Special jab out of it, however he has no real weapons to use...


~~~~~~~~~~~~~~~~~~~~~~~~~~~~~~~~~~~~~~~~~~


(chew)
 

flyinfilipino

Smash Master
Joined
Sep 11, 2007
Messages
4,319
Location
North Carolina
@Spartan Warrior: It's like 300 all over again, huh?

Spartan Warrior is a pretty cool moveset for a generalized soldier guy. He seems to continue the recent trend of movesets that exemplify a certain athletic event (Spartan fighting and grappling, I guess? You know what I mean. :p). He's well-written and pretty clear and straightforward, with nice little headers and things. You get a little too "number-y" in places, most notably in the F-Smash, but it doesn't get too crazy. It kind of makes me hope that movesetting hasn't become so complicated that it's keeping newcomers away

The Spartan seems like a pretty tough character to hurt and, of course, he's quite dangerous. It fits him well. I like the use of the shield in battle in the appropriate places, as well as having a back up weapon if the spear is broken. Is his regular shield any different from Tide of Bronze? If not, I would've liked to see some sort of differentiation there. I can't really nitpick any other attacks in particular, since the moveset fits together pretty well, IMO. The attacks might seem a little generic, but they seem very effective and fun to wail on people with (and this is a generic guy, anyway). The moveset feels kind of educational, in places. Nice Final Smash, btw. :)

Overall, I think Spartan Warrior's a pretty cool moveset. You took a generic fighting style and sold it to me, at least. It was apparent you put a lot of work into selling it, too. Nice one, JOE!. :bee:

Where is everyone?
 

JOE!

Smash Hero
Joined
Oct 5, 2008
Messages
8,075
Location
Dedham, MA
Thanks for the comment Flyin, and his normal shield imput has him crouched behind his shield, able to move it up and down sort of like pit's Down B, where as Tide of Bronze has him as a mobile shield
 

Monkey D. AWESOME

Smash Apprentice
Joined
Feb 28, 2010
Messages
143
Location
Coming to terms with having two people in my mind
Yay for my longest comment

THIS! IS! SPARTA!!!

I was wondering what the set that you were working on was, and all I can say is... Wow.

Having a literal "Ultimate Shield" is awesome, and it's funny to imagine Luffy's Gear Third bouncing off of it (a true WTF? moment :laugh:). I'm glad that you kept it as the Spartan's best killing weapon, which many people wouldn't know to.
I'm also surprised that you watch "Deadliest Warrior," too. It's a great show, isn't it?
I also like the idea of it only covering one side of the Spartan, making it so that one mistake can cost him the match.

The Doru and Xiphos combo also works great. The Spartan really has to be careful to make sure his spear isn't broken, but even if it is, he's not completely doomed. I do think that the player should have a choice over what weapon to use at the beginning, but I guess that'd be uncharacteristic of the Spartan. Impaling people seems a little weird for the Smash series, but who cares? It's not like they're spewing blood and guts everywhere, right? ...... Right? :laugh:

On a finishing note, the Spartan is a great set. Making movesets for normal people is very hard to pull off, but when that happens, it's almost always guranteed a vote.
 

Monkey D. AWESOME

Smash Apprentice
Joined
Feb 28, 2010
Messages
143
Location
Coming to terms with having two people in my mind
double post

BOSS: BELLAMY "THE HYENA"

Bellamy is a villain from the "One Piece" series. He's a rookie pirate captain with a bounty of 55 million beli (One Piece currency). Bellamy is a firm believer in the upcoming "New Age," in which pirates apparently no longer chase their dreams. Because of that, Bellamy laughs at anyone with grand dreams, including Luffy.

Bellamy ate the Bane Bane no mi (Spring-Spring fruit), which allows him to turn his legs into springs. With this, he can jump with extreme speed and power, crashing into opponents with huge momentum. Despite this, he's one of the weakest pirates Luffy has ever faced, and was knocked out in a single unstretched punch (after Bellamy stole treasure from one of Luffy's friends).

Poor little noob... :laugh:

ATTACKS FROM 100 TO 25% HEALTH

SPRING SNIPE: As soon as the battle begins, Bellamy transforms his legs into springs and jumps off the screen. "SPRING SNIPE!!" Bellamy yells this and rockets at where the player stands (at the speed of Rayquaza when it flies down into the ground), causing 18% damage with good knockback. Afterwards, he jumps off the screen and repeats the progress. There's a fair amount of lag from the moment of impact to the next jump. If the player hits Bellamy during this time, he falls unconscious for about five seconds. This gives the player time to beat him up as much as they can before he gets back up.

ATTACK USED AT 25% HEALTH

SPRING HOPPER: After Bellamy's nearly been defeated, he gets up (no matter if the player just knocked him out) with a angry expression on his face. "Now the real show begins..." He crouches down and builds up power in his legs before he begins to bounce around the screen so fast that Bellamy dissapears. This goes on for a good seven seconds. "DIIIIEEEEE!!!" When Bellamy finishes screaming this, dodge. He crashes into where the player's standing at Light-Arrow-speed, causing an instant KO. But after this, Bellamy does nothing. Absolutely nothing. Just finish the poor guy off.


As you can see, Bellamy's probably first-boss-material. Please comment on this like you would a moveset. Thanks! I hope you liked it!
 

darth meanie

Smash Journeyman
Joined
Jun 6, 2008
Messages
452
Sorry everyone for basically disappearing off the face of the earth, was busy with finals, followed by a massive wave of apathy that robbed me of the will to do, well, anything. Going to power through these comments though, because you deserve it.

Strike Man

Strike Man has a solid base concept in using the Rebound Strikers to ricochet attacks and play a weird baseball/ping pong fusion. However, while it works as a sort of playstyle focus, it feels like you try to make it support the entire moveset. The standards all feel like they're only there to manipulate the mechanic, and it feels like your scraping for inputs to fit the Rebound Strikers. Your usual energetic writing style actually backfires here, as it feels less like excitedly going over options and more like desperately trying to cover up flaws.

The pitching mechanic is another good part of the moveset, but it gets confused with the aerials that do more or less the same thing. It feels like Strike Man is trying to take a good idea, and pitches it at me over and over again almost the exact same way instead of changing up his throws. Moves like the Down Smash don't really seem to know where they fit into the the rest of the moveset, moves like the Down Tilt are blatantly situational mechanic manipulators, and the Up Special launches out 4 Neutral Specials at the end. Sure, it's got end lag to balance it, but it feels like I'm seeing the same thing over and over again.

While I see his usefulness in a two-player setting, and that really seems to me to be where he'd be able to compete, it just doesn't feel like he's got too much going for him. The throws 'from Silver', which didn't altogether impress me then don't impress me now, as it still feels like basically a random bonus rather than a part of the playstyle.

Altogether, I wasn't very impressed with Strike Man, I'm sorry to say. He has a few cool ideas, but you keep beating me over the head with a bat with them instead of weaving them with any other ideas, and as a result the playstyle feels sort of stilted. He doesn't really flow much, and too many moves are just sitting there unconnected.

Regal Bryant

Regal is a fairly good job with a couple hours work, and you manage to make a character who attacks only with kicking not boring to read through, so you get props for that. I wasn't really impressed with this set though. The moveset has a fair amount of flow to it, and does what it does, with dodge roll reactions and shield pushing well, but it doesn't do anything new really. He's basically a focused Brawl character, moving opponents to the edge for the KO better than most others can.

I grant it to you, you do a good job of it and make the most out of that idea, but the idea is when you get down to it rather basic, and beyond the shield push and modified grab doesn't have anything new to bring to the table. It's a very flowing, but boring moveset.

Spartan

I really like the Spartan actually. His highly defensive, moving fortress style works well in character, and creates a setup-less defensive character, which is always nice. You use a lot of historical and wrestling knowledge to give the moveset a sense of being grounded in reality, which is a cool touch to the moveset.

You also pulled out a bunch of interesting moves, even when juggling two different weapons simultaneously, and it comes together pretty well.

If there's one thing I have to complain about, and there is, it's that the playstyle section doesn't do this set justice. You make a lot of allusions to how he abuses grounded opponents or when he should be able to use his spear as opposed to his sword, but you never expand on it. I felt that this was a habit from yours from our Mewtwo joint set, but you really need to expand on your ideas instead of just keeping them hidden like this.

Overall though, it's my favorite set of yours yet, and it feels a lot more flowing than Samus did. Great job JOE!
 

Katapultar

Smash Lord
Joined
Nov 24, 2008
Messages
1,284
Location
Australia
Im going to comment on MYM8's first boss moveset: Bellamy (lol he has a pink tank top, and is also tan but has blonde hair. You know what that means?).

In my opinion, Bellamy is a excellent boss set. Why? He's 1st boss material. Like Petely, he only has 2 attacks, but they work very well in conjunction with each other. I just like the fact that he literally tries to go all out and kill you, but you can own him with a few attacks (I presume. He probably only has like, 30HP, but still uses his big attack even if you beat him easily). This is so fitting for a 1st boss. (funny that I thought 'what?' when I saw he only had 2 moves but then I saw that he was a 1st boss)

With boss movesets, I reckon there should be a indicator of when you'd fight them in game (like what you've done). The good thing about boss movesets is that mym doesn't very have high expectations for them, so we can have a bit more fun with them. Your moveset has literally inspired me to make a boss moveset for the fun of it.

Also, boss movesets should be their own catagory underneath the main movesets 'MYM8' on the Stadium - if we can get enough boss movesets, that is.
 

Monkey D. AWESOME

Smash Apprentice
Joined
Feb 28, 2010
Messages
143
Location
Coming to terms with having two people in my mind
Im going to comment on MYM8's first boss moveset: Bellamy (lol he has a pink tank top, and is also tan but has blonde hair. You know what that means?).

In my opinion, Bellamy is a excellent boss set. Why? He's 1st boss material. Like Petely, he only has 2 attacks, but they work very well in conjunction with each other. I just like the fact that he literally tries to go all out and kill you, but you can own him with a few attacks (I presume. He probably only has like, 30HP, but still uses his big attack even if you beat him easily). This is so fitting for a 1st boss. (funny that I thought 'what?' when I saw he only had 2 moves but then I saw that he was a 1st boss)

With boss movesets, I reckon there should be a indicator of when you'd fight them in game (like what you've done). The good thing about boss movesets is that mym doesn't very have high expectations for them, so we can have a bit more fun with them. Your moveset has literally inspired me to make a boss moveset for the fun of it.

Also, boss movesets should be their own catagory underneath the main movesets 'MYM8' on the Stadium - if we can get enough boss movesets, that is.
Thanks for the nice comment, Kat! I literally made Bellamy in thirty minutes.
Screw 4-hour sets, try less than one!.... Actually, I think that'd be a train wreck.
He has about the same HP as Petey, but it doesn't matter; You're still gonna own him. :p And I can make more boss-sets, if you want. I'm currently working on a joint moveset with JOE, though.

EDIT: Aren't you going to comment on movesets?
 

Junahu

Smash Ace
Joined
Nov 15, 2005
Messages
899
Location
Shropshire Slasher
Regal Bryant:
Now I can take a step back and comment my own 4 hour set.

It's a boring as hell set of course, and terribly posted so soon after everyone else's efforts. But I still like how relevant each move was to his goals, without becoming too tightly interlocked to be useful on their own. It's a simple case of nullifying defensive manouvers by counteracting them too well, but it seems to work, without the obligatory spiteful countering that so many of my sets seem to suffer from

It was really just me chipping in my own interpretation of the "force foes to the edge" idea(¬_¬ though ironically, my own Hector moveset tried this before). With such a difficult character, and under the time limit, I got to see a lot of the instinctual errors I make when under pressure. So making Regal was quite helpful to me.
I really reccommend others try this out once in a while, either to flush old habits into the open, or just as a means to give closure to some of the wierder ideas bouncing around in their heads.


Spartan Warrior:
This moveset is pretty intense, staying practical under even the strictest of definitions, while still delivering a sly new concept. It's well explored, (if a little scattered in its conveyance) and there's no way anyone could accuse you of underthinking things.
And it's nice to see you don't just assume every reader knows all the Smash terminology we take for granted. It may feel like an injecture whenever you make these asides, but they are nonetheless useful in keeping everyone on the same page (or thereabouts; you use 'CG' as if it was like ordering a Coke)

Surprisingly, I'm conflicted about the organisation, and I'm starting to see a little truth behind MasterWarlord's "E-Card" complaints. The organisation is startling, suitable, crisp and powerful. But it also feels a little hollow, it's too much in places, and not enough in others.
I'm sure that sounds hypocritical coming from me, but I rarely get the chance to appraise a moveset with excellent aesthetics, so I take it as a chance to see what it must be like for people to look at my sets. I did it with Sho, and I'm doing now it with Spartan

now, complaints. yay.

There's an excessiveness to this moveset that is quite repellent, with a surprising amount of waffle, ballooning simple moves out into multi-paragraph monster-reads, and with numerous different submechanics knotting around eachother too tightly to differentiate between.
The Xiphos, takes a lot of momentum out of the set. It detracts from his main mode of play, which is to keep the foe at arm's length, when you suffix most moves with a scrappy close range option
The similarities between all of his various shielding options is overwhelming (having one that let's you angle the shield, and then a different one for angling the spear, is too much). While you could argue as to each method's neccessity, and you could even argue that each method needed to be seperate, there is still the sensation that you could have simplified things significantly, without sacrificing any of his flow in return.

Bitesize summary of complaint for MW to misquote at some point in the future: Spartan Warrior seems to suffer from being "too much to digest", even when the concepts themselves are relatively simple.
 

Wizzerd

Smash Ace
Joined
Feb 24, 2009
Messages
929
Hariyama

Yay, yet another grab based set. I doubt this will shake up the Top 10 Pokesets like you said, but it's a nice effort all the same.

My first main complaint is that Sumo should really be Hariyama's regular grab. It in all honesty sounds better in most situations - a little more lag is cancelled out by the super armor to punish attacks with in my eyes, and I'm not entirely convinced that the button mashing phase balances it... Hariyama mains would be bound to be more practiced with button mashing than their opponent since they're so dependent on it, especially since they might need to master it to escape grabs... he still should have a simple grab and it's good that you recognized that, but right now I think it needs a little retooling.

That being said, Hariyama's still a fairly strong Pokeset. He definitely goes into grabs very deeply and uses them uniquely as pressure tools, and all the littler components to the playstyle like the comboing and super armor add to it very well. The super armor works similarly to an idea I've had for a while, so it has to be worth something right? (wary)

Overall, Hariyama's a solid set from you. I wouldn't say it would rank on my favorite Pokesets, but it's a good set all the same.​

Dark Samus

What a big step up this is, n88. I wasn't expecting much of this given your subpar MYM6 works (if solid for a newcomer) and single rushed MYM7 set, but ultimately this is a big step up. It still isn't that good, but given how much you've improved with it I can't wait to see how you improve in the future.

The fact that it's an image set means that it's nicely organized, but ironically you still have presentation problems. There are lots of typos as meanie said, but I'll focus on your writing style. The mechanic's phrasing, as fascinating as it is, is somewhat confusing; you seem to suggest that Dark Samus is supposed to use the phazon herself (or maybe that's just me :dizzy:, but you didn't say anything to the contrary when you introduced it) and it seems vaguely underdetailed, mainly in how exactly they give moves projectiles. The rest of the set seems to suffer from it too. You don't detail things much in certain cases, such as how long down tilt phazon puddles last, and you seem to be missing spaces after a bunch of periods.

With that all being said, Dark Samus actually has a playstyle. It mainly exists on the virtue of the mechanic, but it exists - hit and run camper. The mechanic is actually fairly well done, actually; encourages Dark Samus to actually use her moves judiciously like Vile. I liked that in Vile and I like it here. Unfortunately, the playstyle summary is somewhat underdetailed. You cover how to use her phazon mechanic, but you don't really go over the meat and potatoes of actually damage racking and KOing save for the very last sentence in the playstyle. Still, this is a highlight, it's just not executed perfectly.

Ultimately, for all my critique, I found Dark Samus a fairly enjoyable read. It isn't great, but like I said, it's a massive step up. I can't imagine what your next set will be like if it improves from this as much as this improved from your previous sets.​

Strike Man

An MT set! I admit I haven't been overwhelmingly positive about your sets in the past, but hopefully I can enjoy this one a little more than the others.

So basically, Strike Man plays like a vanilla Zelda boss - throw a projectile which can be reflected and keep reflecting it yourself - and this is a concept that's been touched on before in MYM, if not to this extent. My main issue though, is that a bunch of moves suffer from a similar problem to Bear Hugger. They're only useful in relation to a mechanic - in this case there seems to be an excess of moves that are only good as the best way to reflect Rebound Strikers in certain situations, such as forward tilt.

That being said, Strike Man has a nice playstyle going for him. It's better in FFA than in regular matches unlike Clefable, but it's still fine in regular matches and works great in FFA. The ramifications in teams are astounding - act as an auto-reflector - and I'm definitely going to be daydreaming about how characters like Vile would work in tandem with him.

That being said, I found your playstyle summary a little loose in places. It doesn't seem to have much linearity (probably not the word I was looking for) and is leaning towards move-by-move in places. Some of it seems like it could have been directly said in the description for Rebound Striker itself... it's overall not a very good summary like for Silver.

So overall, Strike Man suffers from a couple of typical MT problems. That said, if you get past them it's a fairly solid set. I might even call it my favorite of yours...​

¬_¬ I'll catch up with Regal and Spartan later
 
D

Deleted member

Guest
Man, I’ve left things a while in terms of commenting and there are just three movesets to catch up on? That’s disturbing to me just a little.

So, Dark Samus: more so than Scarmiglione, this moveset stumped me. The writing style, the long individual mechanics on most moves, the weak interactions between moves, eek. It’s not that this is a bad moveset – I feel it probably is your strongest, Nate. You introduce a very ambitious mechanic to start, but, as Warlord said, it is soon forgotten and every move after seems to have some quirky after-effect that really doesn’t link in with much else; there’s no great playstyle there-in.

I’ll put it down to your relatively new status as a MYMer, but there are a few rookie mistakes. You do tend to waffle on with the details; you don’t seem to quite understand the method of writing moves in that you either describe playstyle connections, effects, or interactions, or miscellaneous details alongside the actual move, but with consistency. The inconsistency is what makes this moveset such a pain to read, as you really muddle through the descriptions of each move without making key connections in prose. It’s part of an overall problem here, in that Dark Samus has a weak, non-flowing playstyle.

Though that didn’t sound too good, compared to your past works, it’s actually rather much of a leap in terms of quality. Every move is pretty unique: there’s a lot of creative use of the archetype you bring forth with the “corrupted space marine.” If you could only crack these splendid off-shoots down to a scientific flow of ideas, it would be a great moveset.

There are also some minor problems; grammar and spelling is sometimes bad due to the image being un-checkable by spell check, the colours you chose are a bit mind-numbing on revolution – along with the silly creative moves, you have a lot of chaff which is also kind of generic. What’s obvious here is that it’s not so much the lack of potential in the moveset or any big problems in development, but you, Nate, just need some more time to develop your own skills. There is some promise here, though, so I do hope to see you back sooner-rather-than-later having taken all criticism to account. Good MYMing.

Also, what Wiz said about Dark Samus having an obvious playstyle eludes me completely. A playstyle shouldn’t be some hidden part of the background, it’s crucial. For some reason, this whole disagreement reminds me of Lucy’s organisational way of invisible sections, though I can’t remember her having an invisible playstyle section. Bah – in the least, Dark Samus is on-par with Jason Voorhees in flow, so it really isn’t that bad. But I’m droning on way too long now, in what probably hasn’t been a productive comment.


With that painful writing out of mine out of the way, time to move on to Junahu’s latest four-hour output, this time in the form of Regal Bryant, who’s already pushing the Jun status quo of ‘only characters no one has ever heard of’ by starring in a very popular Tales game… in America.

This character always struck me as somewhat like Rufus from Final Fantasy VII, except without being a massive douchebag. Also had a really lulzy back-story that meant he had to keep his hands tied… even when the fate of the world hinged on his victory. You know, if given the choice between your stupid, lonely existence with its Dew-chugging marathon challenges, or saving thousands of lives from being enslaved to a demi-God, I would like to think I wouldn’t tie my hands behind my back and fight with half of my body. And you also know you’re in no mind to comment when you go off on that kind of tangent. -.-

I was genuinely surprised to see this wasn’t an image set, though I don’t know why, as I bet Joe wasn’t one either: it’s still pretty; good for four hours. In all, I feel you did Regal justice, what with his limited kicks-only potential – you stay true to the character throughout. Allow me to address a point you’ve made many times, on how keeping in-character, even in playstyle is crucial, as I feel this moveset is a perfect example of how to replicate a character on a playstyle-level. It feels very Regal-like to pressure a foe to the edge in a barrage and then assault them off of the stage, somehow – probably due to his brawler fashions and it suits his in-game persona to a tee, good stuff.

Looking at it from a purely outward position, it doesn’t quite stand up to what it is inspired by. Again I go to Warlord’s comments – it doesn’t feel like Hector at all, besides the [necessary] generic inputs, it does, however, borrow lots from Hariyama and the whole shield thing would be attributed to Super Macho Man’s foray. It’s a little odd that it goes there, seeing as that moveset was barely cold when Regal was posted. However, the Moe stomp grab, shield mechanics and pressuring does fit Regal, so it’s certainly forgivable and I would prefer more people combine ideas like this as opposed to falling flat on their faces because they’re afraid they’ll be castrated for ‘plagiarism.’

There are a few things that can easily be criticised; the writing style is under-par for you, compared to movesets like Team Rocket or Cutesy, although in four hours, I’d hardly expect a masterpiece. The match-ups are… non-existent in this, a very much playstyle moveset. The final smash is basically a lame super attack, but this is also the only time you link in a move with the game, making it seem lazy. Maybe it’s due to the final smash playstyle moveset of yours winning MYM7 (oy vey, high expectations), but I expect your final smashes not to lack bones. It’s all rather minor, though.

Very glad someone made a decent Regal Bryant moveset, ever. I don’t think we’ve seen any ToS movesets since before MYM5 at least, so it’s lovely to see it get representation, especially from a credible MYMer. I look forward to your next project, quite a bit.


Sadly, I don't feel I have enough time nor energy on the hottest day in about twenty years in my country to be commenting on a moveset with as much promise as Spartan Warrior has. I'll leave that for another day, but I will get around to it much faster than these previous two. I kind of feel like I have, to use a word in this commentary, waffled on a bit, but I really needed to get past this block - it has been a struggle to get through, but I feel I can keep up with MYM now for a long while. Onward and upward.

I also somehow forgot Strike Man. Eurgh. Tomorrow!
 

JOE!

Smash Hero
Joined
Oct 5, 2008
Messages
8,075
Location
Dedham, MA
Spartan Warrior:
This moveset is pretty intense, staying practical under even the strictest of definitions, while still delivering a sly new concept. It's well explored, (if a little scattered in its conveyance) and there's no way anyone could accuse you of underthinking things.
:bee:

this was actually made for two reasons: 1) I recently found I had Spartan ancestry, 2) I wanted to delve into smash mechanics that we rarely ever use here in MYM.

And it's nice to see you don't just assume every reader knows all the Smash terminology we take for granted. It may feel like an injecture whenever you make these asides, but they are nonetheless useful in keeping everyone on the same page (or thereabouts; you use 'CG' as if it was like ordering a Coke)
the whole acronym thing is an old habit from the City of Heroes forums (had to even stop myself from calling it CoH). There we abbreviate EVERYTHING since we have to deal with 232029739837298637386 different effects/powers/etc, which we all know off hand <.<;

But yeah, I also like to stout my knowledge of the game's engine and mechanics :p

Surprisingly, I'm conflicted about the organization, and I'm starting to see a little truth behind MasterWarlord's "E-Card" complaints. The organization is startling, suitable, crisp and powerful. But it also feels a little hollow, it's too much in places, and not enough in others.
I'm sure that sounds hypocritical coming from me, but I rarely get the chance to appraise a moveset with excellent aesthetics, so I take it as a chance to see what it must be like for people to look at my sets. I did it with Sho, and I'm doing now it with Spartan
*shrug* Blame it on the concussion...

*looks down*

no commentary on the actual moves / moveset? D:

now, complaints. yay.

There's an excessiveness to this moveset that is quite repellent, with a surprising amount of waffle, ballooning simple moves out into multi-paragraph monster-reads, and with numerous different submechanics knotting around each other too tightly to differentiate between.
What sub-mechanics? everything he does can be done by smash characters currently in brawl (except his passive armor). Lag canceling is actually very common if you mean that.

The Xiphos, takes a lot of momentum out of the set. It detracts from his main mode of play, which is to keep the foe at arm's length, when you suffix most moves with a scrappy close range option
His main mode of play is to be hyper-defensive via just being tough...and defensive. That and if he had the spear the whole time he'd be OP as his range is ridiculous, and the Spartan used both the Doru AND Xiphos constantly in battle. They also do the same thing in the set: punish approaches. In the case of the Doru, it prevents successful approaches and the Xiphos punishes successful ones with quick slashes at close range.

The similarities between all of his various shielding options is overwhelming (having one that let's you angle the shield, and then a different one for angling the spear, is too much).
How so? That is disgustingly simple compared to most things you see in MYM. Shielding makes him stationary with the ability to angle the shield, just like shielding in a 3D Zelda game. Tide of Bronze makes him walk like link, having the shield cover his front, and Down b has him stationary behind the shield while he uses the Spear as a stage hazard so to speak. How is that overwhelming? (the other uses of the shield are offensive...)

While you could argue as to each method's necessity, and you could even argue that each method needed to be separate, there is still the sensation that you could have simplified things significantly, without sacrificing any of his flow in return.
see above

Thanks for the comment Juno :bee:. Perhaps I could have been a tad clearer, but as I've johned said before, I did this set while recovering from a concussion >.>


And speaking of in-smash mechanics, I thought I'd bring up a list of ten things rarely used creatively in MYM, that are present in smash (that the spartan didn't use):

1) Teching

Probably the most difficult to focus on, yet most useful mechanic in smash, teching is when you shield/dodge JUST as you hit a surface, doing a special animation where you jump/flip/etc off the surface, negating KB and lag.

Not *much* could be done with this, but who knows, it could become some crazy new stage control mechanics for some lucky set.

2) Dodging

Yes, we have a plethora of crap that "hits dodges" ala going into the background/etc, but do we have anyone that does something unique with their own dodges?

The *only* example I can think of, and even then it's TAME, is in Paper Mario where he could walk in the BG via his Neutral B

3) Clashing

Clashing occurs when two hitboxes meet and have equal "priority", making them clash and cancel out.

The most obvious thing I can see from this is something like a Fencer, who after clashing can then quickly parry the other strike to do some damage, etc.

4) Crawling

Used occasionally, but not as something of significance or creativity beyond "___ can crawl"

Some neat stuff can come of this, as it is rather open-ended. One fun thing I came up with was for a canceled electivire set, where his "crawl" had him shuffle his feet like a kid would do on a carpet....building up a charge (smirk)

5) Gliding / Glide attack

Everyone knows what gliding is from Zard, Pit and the Bat, and we all know they each have a Glide-Attack to go with it.

I'm honestly surprised this isn't a more common feature, as it gives you two extra imputs that most characters wont have. However, I guess there is the catch that your character must be able to fly/etc first off.

6) Edge Attacks / Situationals

We used to include these all the time, but even then they were nothing special.

I'd like to see a set that actually had relevant edge attacks or get-up attacks, seeing how prevalent "prone"-ing characters is these days, and the edge is always unexplored.

7) Wall Cling / Jump / Etc

The ability to "cling" to a surface is present in a few smash characters, as is the ability to hop off of one.

Touched on slightly with Samus Remick's Spider Ball, and some of Rider's specials, the ability to cling to or even walk on walls is rarely thought about.

8) Water

We can swim in it, we can slip on it and we can be pushed by it.

However, the only times I think Ive seen it used extensively were in Shellder and my Feraligatr. What gives? Sure we've also had out rain powers here and there, but thieve almost always been the same shtick. Water has some neat potential for shenanigans guys.

9) Reflecting / Reversing

As seen in the spacies, mewtwo and mario, the ability to reflect stuff and turn people around is quite fun.

Why has nobody tries to do stuff with Mario's cape mechanics? Or make a trap character with a bunch of reflectors o that when he shoots, depending on how he angled the stuff he can get you from any which way!

10) Trapping

Only seen in Yoshi, trapping is when you got a foe literally "trapped" in something, as yoshi does with his egg-lay.

This seems like the easiest thing to whip out in a set, yet you never see it. Instead everyone does grab hit-boxes and such...where are the neat things like force field traps, cages, etc?


And for your curiosity, the mechanics I used in the Spartan that are all but unseen in MYM:

Shielding , Damage Reduction , Character Collision , Wall Grab (spearing the wall to recover) , Jab-Locking (Dtilt) , Temporary Weaponary , Lag Cancelation , Momentum Damage.


Thats my little rant about that. But furthermore, id like to propose a new movement:

Everyone pick 1 or 2 (or more if you feel!) of the mentioned "unsung smash mechanics", and make a set focusing on them. Who knows what everyone could think up? :p
 

Monkey D. AWESOME

Smash Apprentice
Joined
Feb 28, 2010
Messages
143
Location
Coming to terms with having two people in my mind
this was actually made for two reasons: 1) I recently found I had Spartan ancestry, 2) I wanted to delve into smash mechanics that we rarely ever use here in MYM.
You're a Spartan?! AWESOOOOOOOOOOOOOOOOOOOOOOOME!!!!:bigthumbu

Everyone pick 1 or 2 (or more if you feel!) of the mentioned "unsung smash mechanics", and make a set focusing on them. Who knows what everyone could think up? :p
I think Luffy's remake will have a few of these with his "rubber body" mechanic. All I have to do first is finish Raichu with you (and maybe William Wallace), and then it's PIRATE TIME!! :chuckle:
 

JOE!

Smash Hero
Joined
Oct 5, 2008
Messages
8,075
Location
Dedham, MA
I wouldnt remake Luffy 1 mym after he first appeared....

especially as he's your only non-boss moveset.

Why not try out his buddy with the 3 swords?
 

Monkey D. AWESOME

Smash Apprentice
Joined
Feb 28, 2010
Messages
143
Location
Coming to terms with having two people in my mind
I wouldnt remake Luffy 1 mym after he first appeared....

especially as he's your only non-boss moveset.

Why not try out his buddy with the 3 swords?
That's why I'm trying to do a couple of movesets before I remake him. I do have a lot of good ideas for Luffy, and I really want to put him in my story mode. But if push comes to shove (meaning "if he isn't made by the end of MYM8"), I'll just put his original moveset in and say that his power's been nerfed.

I hadn't really thought of doing a moveset for Zoro...... Not a bad idea. :bee:
 
D

Deleted member

Guest
As promised, I’m commenting on Strike Man today – whodafunkit, my keeping to a schedule of commenting. It turns out that this is actually a very fun moveset to read and to analyse, so it was well worth my time.

First of all, I immensely enjoyed your writing style and quips: I complained about this a lot with some of Warlord’s work, but it’s handled better here. Most moves individually do not drag on; I felt much of my gratification in reading came from your interesting and personal approach. The organisation is clean, structured and suitable. I must say that your playlist was pretty bad – I skipped all those official songs and most of the Mega Man music is the same track, but different remixes: why, rhetorically.

Onto the actual moveset and oh boy this is a polarising one, really. The concept is absolutely stuck on what Strike Man represents – a boss who throws baseballs, but you go way over-the-top in the amount of ways to pitch. There seem to be an endless amount of ways to deliver; to the point that I don’t feel a player could ever possibly use a good amount of them. On the other hand, the versatility of Strike Man is undeniable, as he has a pitch for every occasion and you could place the order of commandeering this juggernaut on the idea of ‘high-level play’ taking advantage of this very messy collection of moves. It’s just that, never in the moveset does it feel like you truly have a control over all of these different moves, it doesn’t feel cohesive.

I was highly impressed by how you handled the rebound striker and squeezed so much potential out of the barebones Strike Man and baseball themes. Even down to the throws and airs, it’s all on-topic and fitting – on that note, however, these moves seem almost completely separate and defunct from the rest. The set has a flow problem anyway, but added to it a disconnect where throws and airs aren’t strongly-connected to much else, we’re in unfamiliar territory.

Don’t get me wrong, though, this approach is part of what I talked about initially – there’s unique playstyle in Strike Man, only tied down by the inane amounts of similar moves. Ignoring that, you do have a working, non-flowing playstyle that rightfully relies on lots of rebound strikes and controlling the stage, which is far more suitable than a Hariyama-style flowchart. I kiddingly call this the “Venn diagram” approach, where the character is reactionary – Strike Man is the first time I’ve seen this approach work in a tangible and suitable way.

I don’t think that a flowing playstyle would be suitable for the moveset – he’s a boss who was designed to fight the player, so I totally agree with your perhaps haphazard decision to avoid a rule-of-thumb flowing playstyle that would make Strike Man into a character like Subaru. Not every moveset has to be like that.

But really, it’s those lovely extras that got me. Definitely a reminder for me of Shanoa, who also had extras with some actual effort put into them that were relevant to the moveset. It’s just so much nicer to end on a healthy batch of fan fiction and a decent match-up than a terrible final smash. So being as it may a conflicting moveset for me, this is definitely the one to beat this far into MYM8.


Spartan Warrior is next up. First of all, don’t use percentages in moveset descriptions – it’s confusing when you say “7% is shaven off,” and such things. No big deal, but pretty much the first thing I thought of when reading the moveset.

I’m going to have to agree with what Junahu has said in Spartan Warrior being comprised of simple concepts, but written in a way which is repugnant to read at times. While you do have your moments – such as the Lunge pun – there is a hell of a lot of ‘waffling’ and ‘ballooning’ of details beyond what is acceptable. It’s a real pain to see that much text to read for what is always a simple playstyle-centric slash or thrust.

Again, I’ll have to agree on the whole Xiphos thing – it would have been better to leave it with the Doru Spear, which is both appropriate and extremely productive in the best parts of the playstyle. I just don’t see the point of the knife, aside from giving a close-range option, but only when you break the spear – at which point many of Spartan’s other options are no longer viable and he becomes a sitting duck. Honestly, that part is reminiscent of Jason Voorhees just a little.

As much as you slip up on a few things there, I do like the basic concept and the amount of work put into Spartan Warrior is commendable. Except some slight typing errors and a slight enlargement problem, the organisation is impeccable. Pressuring with a shield is certainly new, yet it somehow seems familiar to Hariyama or Regal Bryant. Most of my negativity probably stems from this whole “pressuring to the edge” phenomena which has really reaped any of the love I had for the concept. That banter aside, it’s a very good and fitting theme of playstyle for SW.

In all, I wasn’t mightily impressed by Spartan Warrior; it has a serious problem in being read, partly due to the big text and otherwise the writing and it’s hardly brimming with excitement due to the nature of Junahu-like generic slashes, which are fine for the character. The balance issues, with a combined counter-tether and making the saving grace temporary makes this dangerously close to clinically-underpowered as well.

As much as I’d like to say it all balances out with the good of the organisation and thematic style, it simply does not and I feel you have plenty to work on for your next project.


Oh ho ho, Smady, what, stars? What is this madness? Well, my curious friend, I have gone to the [non-]painstaking process of rating all movesets thus far in the contest on my first page post, also available through my signature image link. I basically figured that we hadn't done anything of this sort since MYM1 for silly 'fun rules' and it seems like a good practice in promoting friendly in-thread competition; remember that this is all my impressions, not that of MYM as a whole.

I decided to list the ratings in terms of star rating, then by the first moveset of that group posted to try and counter-act some vote splits. I also have them linked up to my comments, which I'll go back and edit ratings into soon. If anyone wants to start up their own sort of thing like this, go ahead - in fact, I'd love you to. I'd appreciate any feedback on this experiment of mine as well, just to know I'm wuv'd. :chuckle:
 
Top Bottom