Toomai
Smash Ace

THE OTHER CASTLE
BOWSER'S HITBOX REPOSITORY
CURRENT COINAGE: 100
DISCLAIMER
(Oi! Read this you brickhead!)
The following is a combination of definite facts and approximate drawings. While the data is certain and the frames are almost certain, BrawlBox is a pain and some rotations are a tricky little piece of crap, so take the bubbles with a grain of salt.
INTRODUCTION
(And this too, or you'll be a sorry dust bunny!)
(And this too, or you'll be a sorry dust bunny!)
What's a hitbox repository, you ask? It's a place where you put hitbox-related data. Therefore, you'll see informative stuff here.
Note that this is manual drawing, not hacks. Any old sap nowadays can display hitboxes in-game, but they can only show position and size, and you can't see the character's body through them. I'm including some other info here. Not only can you see at a glance which hitbox is the sweetspot (thanks to the alongside numbers), but how big any disjoint is (transparency is cool yo) and an obvious yet unintrisuve angle indicator.
While you may be thinking "beh, this'll be approximate at best", you're not completely right. I lay out these images with up to eight decimal places of precision; usually the hardest part is measuring how big to draw things, which often makes errors obvious.
LEGEND
(And keep reading!)
(And keep reading!)
I don't exactly do things by the book all the time. Here's the legend of stuff to look for:
Angle: The angle of a hitbox is displayed as a line. Usually, the angle is given assuming the target is to the right of the attacker; the exception is for if the hitboxes are completely behind the attacker, for which the angle will be shown as reversed. The Sakurai angle is displayed as a star shape, while the autolink angle is displayed with a dash.
Clang: Most hitboxes have a solid border. Those that do not - that is, they have a dashed border - are transcendent.
Type/Effect: The colour of a hitbox and its angle indicator/border show its type and effect - usually this is only important in the Subspace Emissary, but it's also important if you want to know which hitboxes set things on fire and such. If there's demand I'll put a legend in, but it's mostly just there for a splash of colour.
Damage/Knockback: The numbers displayed for each hitbox are its damage, base knockback, and knockback scaling (in that order).
Layering: You can tell by the images that some hitboxes are "on top" of others. These are the hitboxes that "win out" if the target is hit by more than one of the attack's hitboxes at once.
THE REPOSITORY
(Now we start for real! Pay attention you damp sacks of wet pants!)
(Now we start for real! Pay attention you damp sacks of wet pants!)
Bowser's Hurtboxes

Hurtbox 1: Chest
Hurtbox 2: Hip
Hurtbox 3: Mouth
Hurtbox 4: Head
Hurtbox 5: Right upper arm
Hurtbox 6: Left upper arm
Hurtbox 7: Right lower arm
Hurtbox 8: Left lower arm
Hurtbox 9: Right upper leg
Hurtbox 10: Left upper leg
Hurtbox 11: Right lower leg
Hurtbox 12: Left lower leg
Hurtbox 13: Right foot
Hurtbox 14: Left foot
While Bowser's feet are big enough to deserve their own hurtboxes, I don't see why they're made as small as they are. Also, note that the shape of Bowser's back can vary quite a bit as he bends around. Finally, Bowser's head, arms, and legs don't get packed into his shell animation-wise; they just get tucked in a bit, so the belly area is a bit fatter than it looks when he's in his shell (I have no idea how to draw this).
The colours represent which zone the hurtbox is in: lower, middle, or upper.
Jab
Hit 1

Hitbox 0: 5% damage, angle of 30, 45/100 fixed knockback, attached to left lower arm, Hand/Slash
Hitbox 1: 5% damage, angle of 50, 30/100 fixed knockback, attached to left lower arm, Hand/Slash
Hitbox 2: 5% damage, angle of 83, 18/100 fixed knockback, attached to left lower arm, Hand/Slash
Don't know if you already know this, but Bowser has arms of steel - for his jab and all his tilts, the arm he's swinging is intangible for the same frames the hitboxes are out. All that said, I still think the hitboxes of a claw swipe should, y'know, cover his claws.
Hit 2

Hitbox 0: 5% damage, angle of *, 50/100 knockback, attached to right lower arm, Hand/Slash
Hitbox 1: 5% damage, angle of *, 50/100 knockback, attached to right lower arm, Hand/Slash
Hitbox 2: 5% damage, angle of *, 50/100 knockback, attached to right lower arm, Hand/Slash
Nothing very special about the jab, really.
F-Tilt


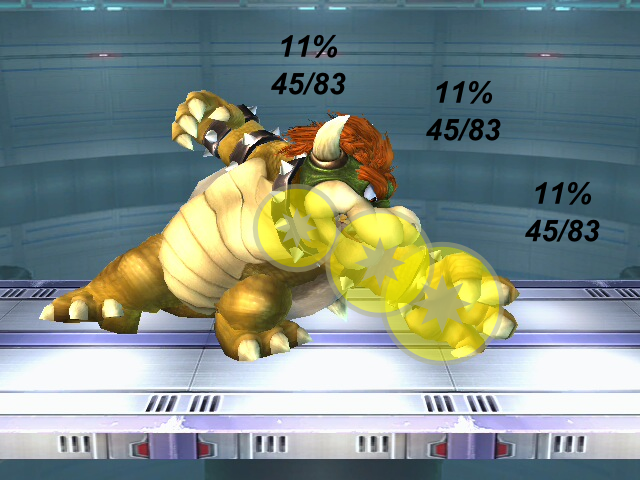
Hitbox 0: 11% damage, angle of *, 45/83 knockback, attached to left shoulder, Hand/Normal, 40% trip chance (only when angled down)
Hitbox 1: 11% damage, angle of *, 45/83 knockback, attached to left lower arm, Hand/Normal, 40% trip chance (only when angled down)
Hitbox 2: 11% damage, angle of *, 45/83 knockback, attached to left lower arm, Hand/Normal, 40% trip chance (only when angled down)
What's wrong with Bowser's right heel here. Might want to get that checked out.
U-Tilt


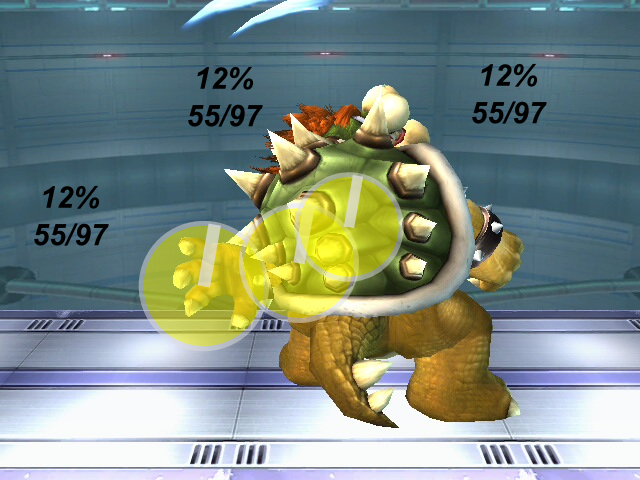
Hitbox 0: 12% damage, angle of 100, 55/97 knockback, attached to left shoulder, Hand/Slash
Hitbox 1: 12% damage, angle of 100, 55/97 knockback, attached to left lower arm, Hand/Slash
Hitbox 2: 12% damage, angle of 100, 55/97 knockback, attached to left lower arm, Hand/Slash
These are frames 8, 9, 10, and 13.
D-Tilt
Hit 1

Hitbox 0: 14% damage, angle of *, 20/100 knockback, attached to right lower arm, Hand/Slash, 30% trip chance
Hitbox 1: 14% damage, angle of *, 20/100 knockback, attached to right lower arm, Hand/Slash, 30% trip chance
Hitbox 2: 14% damage, angle of *, 20/100 knockback, attached to right lower arm, Hand/Slash, 30% trip chance
Hitbox 3: 14% damage, angle of *, 20/100 knockback, attached to right shoulder, Hand/Slash, 30% trip chance
Hit 2

Hitbox 0: 11% damage, angle of *, 12/100 knockback, attached to left lower arm, Hand/Slash, 30% trip chance
Hitbox 1: 11% damage, angle of *, 12/100 knockback, attached to left lower arm, Hand/Slash, 30% trip chance
Hitbox 2: 11% damage, angle of *, 12/100 knockback, attached to left lower arm, Hand/Slash, 30% trip chance
Hitbox 3: 11% damage, angle of *, 12/100 knockback, attached to left shoulder, Hand/Slash, 30% trip chance
This is pretty bad. It's a claw attack but the hitboxes only reach to Bowser's palms. Pretty sure they made a mistake with this one.
Dash
Clean

Hitbox 0: 11% damage (+1 on shield), angle of 80, 120/30 knockback, attached to Bowser's movement, Head/Normal
Hitbox 1: 11% damage (+1 on shield), angle of 80, 120/30 knockback, attached to Bowser's movement, Head/Normal
Late

Hitbox 0: 8% damage (+1 on shield), angle of 80, 80/30 knockback, attached to Bowser's movement, Head/Normal
Hitbox 1: 8% damage (+1 on shield), angle of 80, 80/30 knockback, attached to Bowser's movement, Head/Normal
Well I suppose this one makes a decent amount of sense, though the hitboxes for the clean hit look too low.
U-Smash
Clean

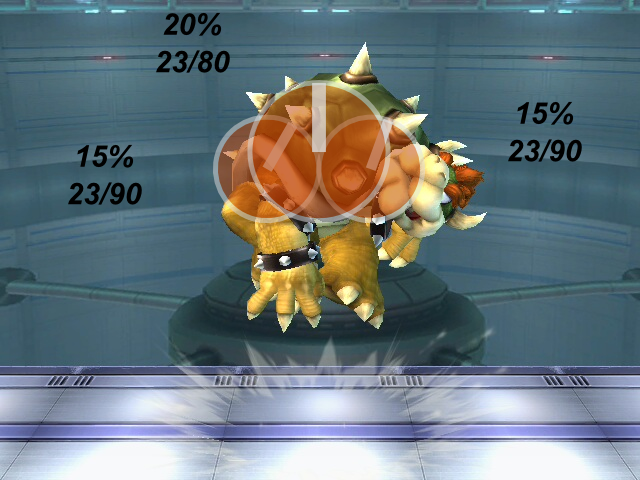
Hitbox 0: 20% damage (28% fully charged), angle of 90, 23/80 knockback, attached to Bowser's movement, Body/Slash
Hitbox 1: 15% damage (21% fully charged), angle of 70, 23/90 knockback, attached to Bowser's movement, Body/Slash
Hitbox 2: 15% damage (21% fully charged), angle of 120, 23/90 knockback, attached to Bowser's movement, Body/Slash
Late
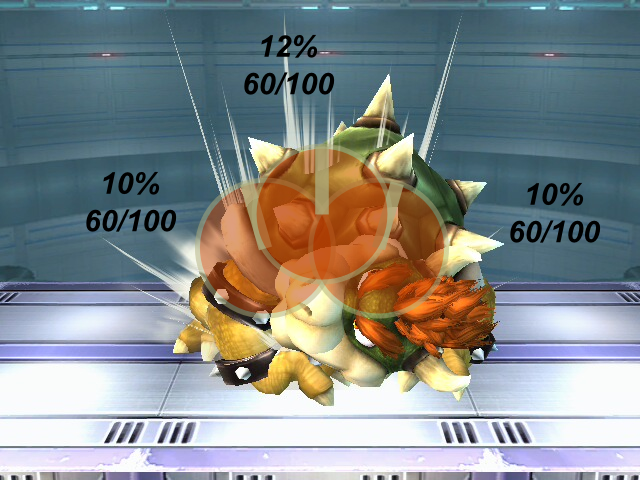
Hitbox 0: 12% damage (16.8% fully charged), angle of 90, 60/100 knockback, attached to Bowser's movement, Body/Normal
Hitbox 1: 10% damage (14% fully charged), angle of 74, 60/100 knockback, attached to Bowser's movement, Body/Normal
Hitbox 2: 10% damage (14% fully charged), angle of 74, 60/100 knockback, attached to Bowser's movement, Body/Normal
The late part can only hit grounded opponents, never aerial ones.
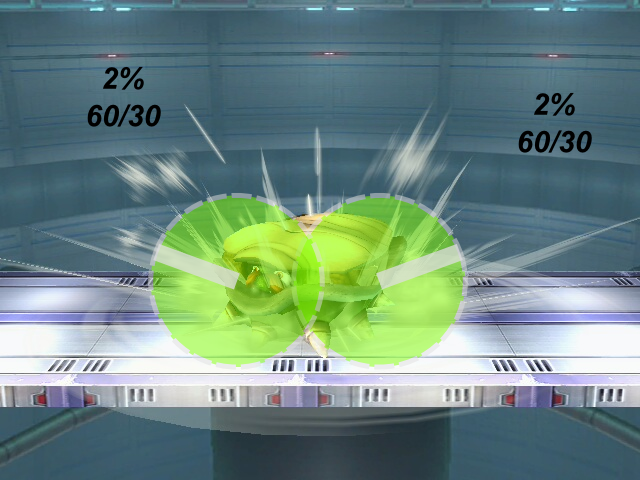
D-Smash
Hits 1-6
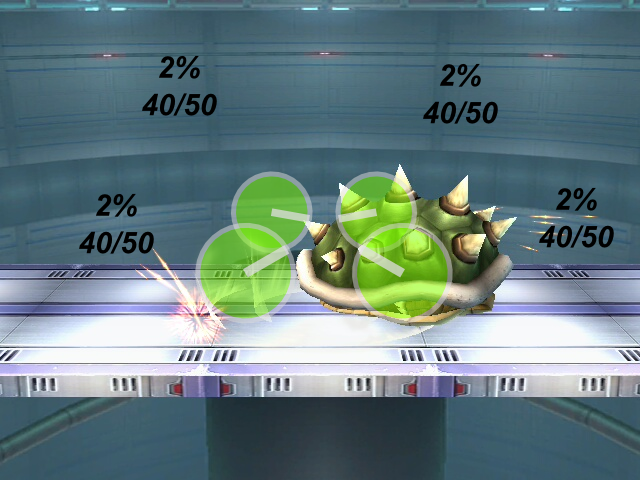
Hitbox 0: 2% damage (2.8% fully charged), angle of 150, 40/50 knockback, attached to nothing, Spin/Slash
Hitbox 1: 2% damage (2.8% fully charged), angle of 150, 40/50 knockback, attached to nothing, Spin/Slash
Hitbox 2: 2% damage (2.8% fully charged), angle of 190, 40/50 knockback, attached to nothing, Spin/Slash
Hitbox 3: 2% damage (2.8% fully charged), angle of 190, 40/50 knockback, attached to nothing, Spin/Slash
Hit 7

Hitbox 0: 9% damage (12.6% fully charged), angle of 65, 40/140 knockback, attached to nothing, Spin/Slash
Hitbox 1: 9% damage (12.6% fully charged), angle of 65, 40/140 knockback, attached to nothing, Spin/Slash
Hitbox 2: 9% damage (12.6% fully charged), angle of 65, 40/140 knockback, attached to nothing, Spin/Slash
Hitbox 3: 9% damage (12.6% fully charged), angle of 65, 40/140 knockback, attached to nothing, Spin/Slash
Note how the hitboxes are independent of Bowser's rotation - even as his shell spins back and forth the hitboxes stay in the same spot, never budging or rotating.
F-Smash
Hit 1

Hitbox 0: 10% damage (14% fully charged), angle of 60, 30/130 knockback, attached to neck, Head/Normal
Hit 2

Hitbox 0: 23% damage (32.2% fully charged), angle of *, 25/81 knockback, attached to neck, Head/Normal, 1.2x freeze frames
Hitbox 1: 21% damage (29.4% fully charged), angle of 60, 25/81 knockback, attached to neck, Head/Normal, 1.2x freeze frames
Varying the spacing of an f-smash will change the launch angle by 23 degrees (Sakurai angle is about 37). Don't think it's too important but it's there.
Nair
Clean

Hitbox 0: 13% damage, angle of *, 20/80 knockback, attached to chest, Spin/Normal
Late

Hitbox 0: 9% damage, angle of *, 20/80 knockback, attached to chest, Spin/Normal
Eh, nothing unexpected.
Fair


Hitbox 0: 13% damage, angle of *, 40/80 knockback, attached to left lower arm, Hand/Slash
Hitbox 1: 12% damage, angle of *, 40/80 knockback, attached to left lower arm, Hand/Slash
Hitbox 2: 11% damage, angle of *, 40/80 knockback, attached to left lower arm, Hand/Slash
I tried an extremely long time and couldn't get a picture of the move's last frame (frame 11). You'll have to settle for frame, like, 10.6 or something.
Bair
Clean
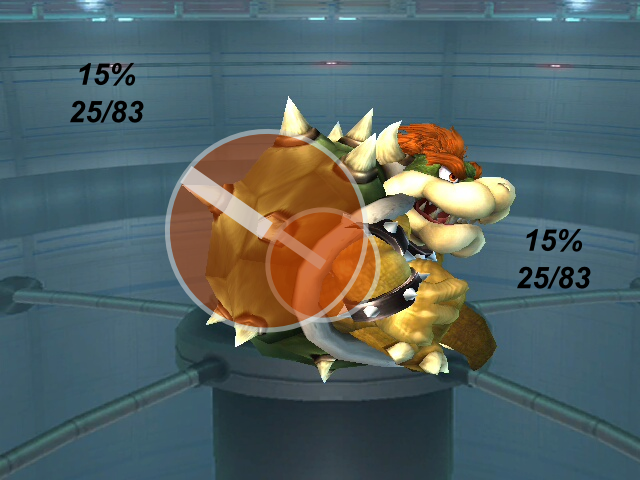
Hitbox 0: 15% damage, angle of 35, 25/83 knockback, attached to chest, Body/Slash
Hitbox 1: 15% damage, angle of 35, 25/83 knockback, attached to chest, Body/Slash
Late
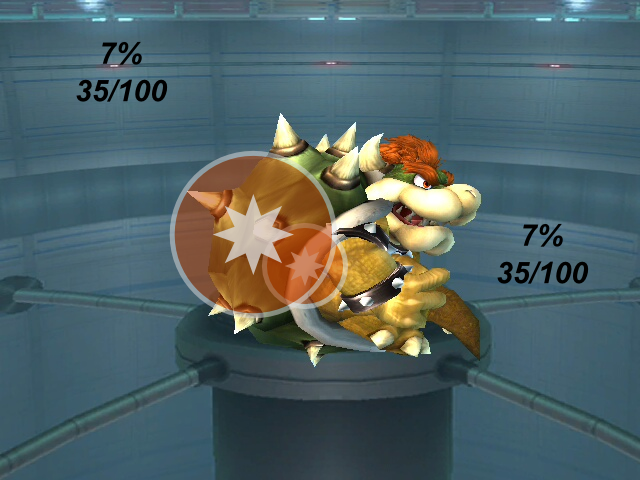
Hitbox 0: 7% damage, angle of *, 35/100 knockback, attached to chest, Body/Slash
Hitbox 1: 7% damage, angle of *, 35/100 knockback, attached to chest, Body/Slash
Note that Bowser's body is intangible while the hitboxes are out, meaning the safe range is actually pretty good here. Though the smaller hitbox is rather pointless.
Uair
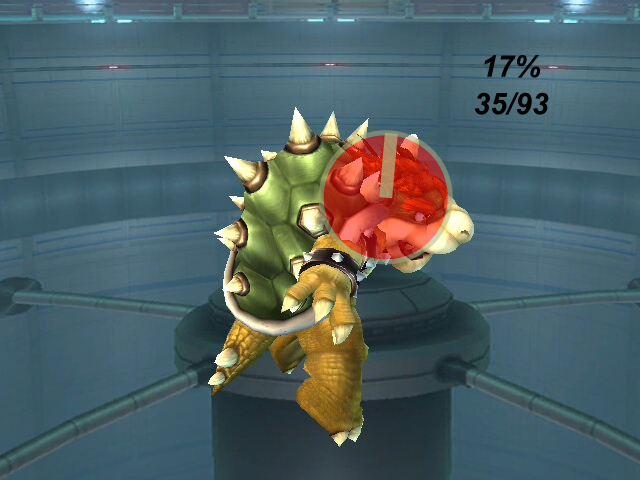


Hitbox 0: 17% damage, angle of 85, 35/93 knockback, attached to head, Head/Normal
Yes, his nose pokes out, but that's fine because it and the head are intangible for ten frames.
Dair
Hits 1-8

Hitbox 0: 3% damage, angle of 80, 10/100 fixed knockback, attached to nothing, Spin/Slash
Hitbox 1: 3% damage, angle of 80, 10/100 fixed knockback, attached to nothing, Spin/Slash
Hit 9

Hitbox 0: 3% damage, angle of 270, 10/100 knockback, attached to nothing, Spin/Slash
Hitbox 1: 3% damage, angle of 270, 10/100 knockback, attached to nothing, Spin/Slash
Landing
Hitbox 0: 2% damage, angle of 20, 60/30 knockback, attached to nothing, Spin/Slash, cannot clang
Hitbox 1: 2% damage, angle of 20, 60/30 knockback, attached to nothing, Spin/Slash, cannot clang
Yeah this is a bad move, but I still thought it would have a bit more range than this. The landing on the other hand covers a fair bit.
Shield

Hard to say whether the shield covers all of Bowser even at max size.
Grab
Standing

Running

Pivot

Bowser's grabs are pretty normal rangewise.
Pummel

Hitbox 0: 3% damage, angle of 80, 30/100 fixed knockback, attached to head, Head/Normal, cannot clang, always knocks forwards
I'm surprised the hitbox for this is so high up.
F-Throw

Throw: 10% damage, angle of 45, 60/50 knockback, Throwing/Normal
Not much to say about this.
B-Throw

Throw: 10% damage, angle of 45, 60/50 knockback, Throwing/Normal
Yes that's right, it's 100% identical to the f-throw. The only difference is that it's 17 frames faster to execute.
U-Throw
Hits 1-8

Hitbox 0: 1% damage, angle of 0, 0/100 knockback, attached to Bowser's movement, Spin/Slash, cannot clang, always knocks forwards
Throw

Throw: 2% damage, angle of 70, 120/100 fixed knockback, Throwing/Normal
I'm sure most people wouldn't read much about this throw anyway.
D-Throw
Hit 1

Hitbox 0: 12% damage, angle of 0, 0/100 fixed knockback, attached to waist, Body/Normal, cannot clang, always knocks forwards
Hitbox 1: 12% damage, angle of 0, 0/100 fixed knockback, attached to head, Body/Normal, cannot clang, always knocks forwards
Throw

Throw: 0% damage, angle of 50, 75/30 knockback, Throwing/Normal
Ever wondered how a 12% attack could be so weak? Here's how - the part that launches the enemy does no damage.
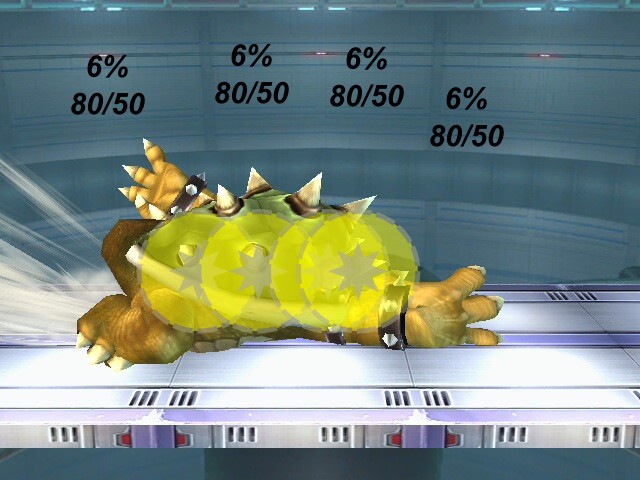
Floor (back)
Hit 1

Hitbox 0: 6% damage (+1 on shield), angle of *, 80/50 knockback, attached to nothing, Hand/Normal, cannot clang
Hitbox 1: 6% damage (+1 on shield), angle of *, 80/50 knockback, attached to nothing, Hand/Normal, cannot clang
Hitbox 2: 6% damage (+1 on shield), angle of *, 80/50 knockback, attached to nothing, Hand/Normal, cannot clang
Hitbox 3: 6% damage (+1 on shield), angle of *, 80/50 knockback, attached to nothing, Hand/Normal, cannot clang
Hit 2
Hitbox 0: 6% damage (+1 on shield), angle of *, 80/50 knockback, attached to nothing, Hand/Normal, cannot clang
Hitbox 1: 6% damage (+1 on shield), angle of *, 80/50 knockback, attached to nothing, Hand/Normal, cannot clang
Hitbox 2: 6% damage (+1 on shield), angle of *, 80/50 knockback, attached to nothing, Hand/Normal, cannot clang
Hitbox 3: 6% damage (+1 on shield), angle of *, 80/50 knockback, attached to nothing, Hand/Normal, cannot clang
I ain't gonna lie, I disagree with how short this looks. That being said however, the numbers agree; I did some extra measurements based on stage builder blocks being 20 units big and came up with pretty much the same result. From what I can tell from BrawlBox, the arm positions would have lined up better on the first hit frame when the arm isn't fully extended (not that it makes any more sense).
Floor (front)
Hit 1

Hitbox 0: 6% damage (+1 on shield), angle of *, 80/50 knockback, attached to nothing, Body/Normal, cannot clang
Hitbox 1: 6% damage (+1 on shield), angle of *, 80/50 knockback, attached to nothing, Body/Normal, cannot clang
Hitbox 2: 6% damage (+1 on shield), angle of *, 80/50 knockback, attached to nothing, Body/Normal, cannot clang
Hit 2

Hitbox 0: 6% damage (+1 on shield), angle of *, 80/50 knockback, attached to nothing, Foot/Normal, cannot clang
Hitbox 1: 6% damage (+1 on shield), angle of *, 80/50 knockback, attached to nothing, Foot/Normal, cannot clang
Hitbox 2: 6% damage (+1 on shield), angle of *, 80/50 knockback, attached to nothing, Foot/Normal, cannot clang
This one on the other hand looks pretty reasonable.
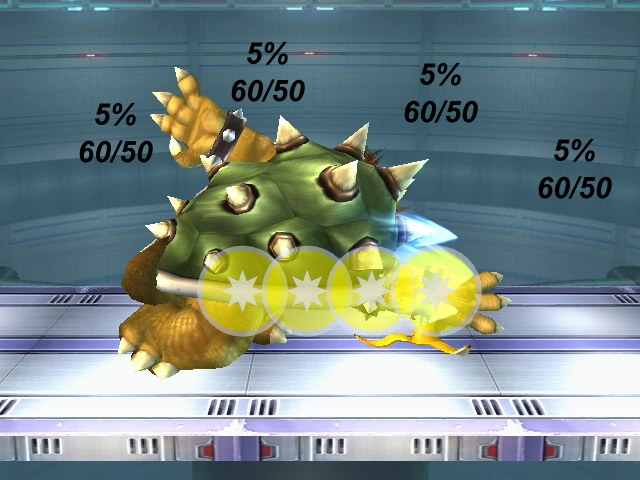
Floor (trip)
Hit 1

Hitbox 0: 5% damage (+1 on shield), angle of *, 60/50 knockback, attached to nothing, Hand/Slash
Hitbox 1: 5% damage (+1 on shield), angle of *, 60/50 knockback, attached to nothing, Hand/Slash
Hitbox 2: 5% damage (+1 on shield), angle of *, 60/50 knockback, attached to nothing, Hand/Slash
Hitbox 3: 5% damage (+1 on shield), angle of *, 60/50 knockback, attached to nothing, Hand/Slash
Hit 2
Hitbox 0: 5% damage (+1 on shield), angle of *, 60/50 knockback, attached to nothing, Hand/Slash
Hitbox 1: 5% damage (+1 on shield), angle of *, 60/50 knockback, attached to nothing, Hand/Slash
Hitbox 2: 5% damage (+1 on shield), angle of *, 60/50 knockback, attached to nothing, Hand/Slash
Hitbox 3: 5% damage (+1 on shield), angle of *, 60/50 knockback, attached to nothing, Hand/Slash
Oh noes, the testing banana crept into the shot!
Edge (fast)


Hitbox 0: 8% damage (+1 on shield), angle of *, 110/100 fixed knockback, attached to chest, Spin/Normal
Hitbox 1: 8% damage (+1 on shield), angle of *, 110/100 fixed knockback, attached to hip, Spin/Normal
Not bad as far as edge attacks go. Except for the fact he's only intangible for 4 frames.
Edge (slow)
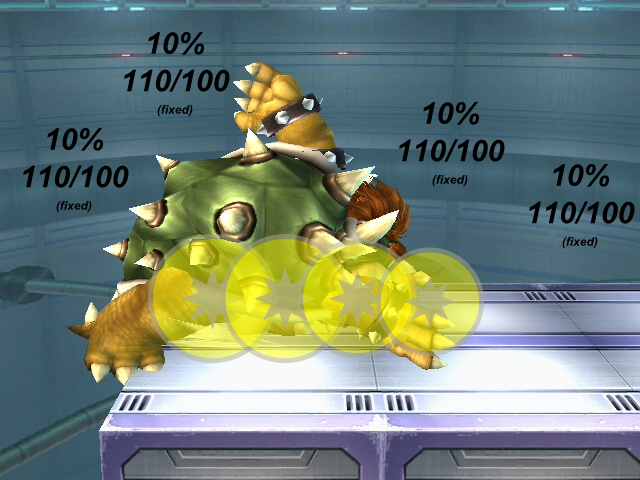
Hitbox 0: 10% damage (+1 on shield), angle of *, 110/100 fixed knockback, attached to nothing, Hand/Normal
Hitbox 1: 10% damage (+1 on shield), angle of *, 110/100 fixed knockback, attached to nothing, Hand/Normal
Hitbox 2: 10% damage (+1 on shield), angle of *, 110/100 fixed knockback, attached to nothing, Hand/Normal
Hitbox 3: 10% damage (+1 on shield), angle of *, 110/100 fixed knockback, attached to nothing, Hand/Normal
Not much to say about this.
Fire Breath

First 7 frames: 2% damage, angle of 55, 9/30 knockback, attached to flame object, Typeless/Flame, 1.25x SDI ability, 0.5x freeze frames, indirect, absorbable, reflectable, always knocks forwards
After 7 frames: 1% damage, angle of 55, 5/20 knockback, attached to flame object, Typeless/Flame, 1.25x SDI ability, 0.5x freeze frames, indirect, absorbable, reflectable, always knocks forwards
Unlike most other projectiles, Bowser's fire breath is entirely particle-based. Unfortunately for people like me, that means there's no way to accurately position their hitboxes (though their size is legitimate).
Flying Slam
Ground grab

SSE hitbox 0: 13% damage, angle of 70, 60/80 knockback, attached to nothing, Hand/Slash, always knocks forwards
SSE hitbox 1: 13% damage, angle of 70, 60/80 knockback, attached to nothing, Hand/Slash, always knocks forwards
SSE hitbox 2: 13% damage, angle of 70, 60/80 knockback, attached to nothing, Hand/Slash, always knocks forwards
Air grab

SSE hitbox 0: 13% damage, angle of *, 60/80 knockback, attached to nothing, Hand/Slash, always knocks forwards
SSE hitbox 1: 13% damage, angle of *, 60/80 knockback, attached to nothing, Hand/Slash, always knocks forwards
Throw

Throw: 18% damage, angle of 60, 80/50 knockback, Throwing/Normal
Yeah that's right, the move has more range against Tabuu's goons than opposing Smashers. Also, the grab has like double range in the air.
Whirling Fortress
Ground hit 1

Hitbox 0: 11% damage (+3 on shield), angle of 80, 70/80 knockback, attached to nothing, Spin/Normal
Hitbox 1: 11% damage (+3 on shield), angle of 80, 70/80 knockback, attached to nothing, Spin/Normal
Ground hit 2

Hitbox 0: 5% damage, angle of 90, 80/50 knockback, attached to nothing, Spin/Slash
Hitbox 1: 5% damage, angle of 90, 80/50 knockback, attached to nothing, Spin/Slash
Ground hit 3

Hitbox 0: 3% damage, angle of 70, 50/50 knockback, attached to nothing, Spin/Slash, only hits grounded opponents
Hitbox 1: 3% damage, angle of 70, 50/50 knockback, attached to nothing, Spin/Slash, only hits grounded opponents
Air hit 1

Hitbox 0: 10% damage (+3 on shield), angle of 80, 80/60 knockback, attached to nothing, Spin/Normal
Air hit 2

Hitbox 0: 3% damage, angle of 84, 50/20 knockback, attached to nothing, Spin/Slash
Air hit 3

Hitbox 0: 2% damage, angle of 84, 50/20 knockback, attached to nothing, Spin/Slash
Calling them "hits" is a bit misleading, since the move can only hit an opponent once.
Bowser Bomb
Hop

Hitbox 0: 4% damage, angle of 85, 110/100 fixed knockback, attached to nothing, Body/Normal, cannot clang
Drop
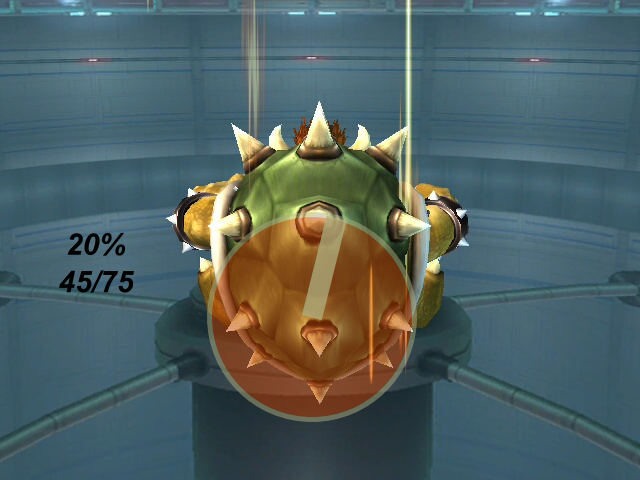
Hitbox 0: 20% damage (+5 on shield), angle of 76, 45/75 knockback, attached to nothing, Body/Normal
Landing
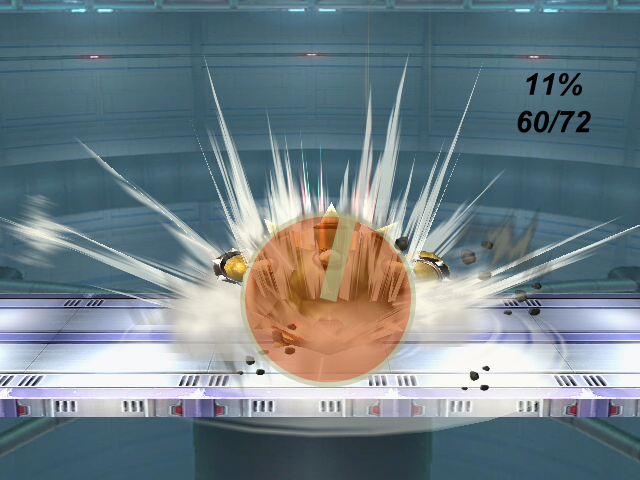
Hitbox 0: 11% damage (+5 on shield), angle of 76, 60/72 knockback, attached to nothing, Body/Normal, only hits grounded opponents
The drop hitbox is the same whether the move is begun on the ground or in the air.