• Welcome to Smashboards, the world's largest Super Smash Brothers community! Over 250,000 Smash Bros. fans from around the world have come to discuss these great games in over 19 million posts!

    You are currently viewing our boards as a visitor. Click here to sign up right now and start on your path in the Smash community!

Make Your Move 25: Moveset Design Contest — Contest is Donezo! MYM 26 Starts March 17th!

Slavic

Ask not the sparrow how the eagle soars
Joined
Jun 5, 2013
Messages
757
Location
taco bell, probablyn't
WELCOME TO MAKE YOUR MOVE 25!

Hey there, welcome to Make Your Move! Make Your Move (or MYM) is a moveset writing contest, where you can design a moveset for absolutely any character you want and show your writing and game design talent! By "any character," we really do mean any character – Nintendo, third-party, TV, comics, film, novels, OCs, ancient mythology, or even Real Life! There's no real limit on the character you can pick in terms of source medium. We focus on sets made in the Smash Bros. engine, most commonly Smash Ultimate as it's the current entry in the series. If you want, though, you can write for Smash 4, Brawl, Project M, or even Melee and 64 if you so choose. Whatever character and game you pick, give it your best shot!!

MYM Overview
Moveset Creation

A moveset is made up of 23 inputs:​
  • 4 Special Moves [ Neutral | Down | Side | Up ]
  • 5 Standard Attacks [ Jab | Dash Attack | Forward Tilt | Down Tilt | Up Tilt ]
  • 3 Smash Attacks [ Forward | Down | Up ]
  • 5 Aerial Attacks [ Neutral | Forward | Back | Up | Down ]
  • 6 Grab-Game Inputs [ Grab | Pummel | Forward Throw | Back Throw | Down Throw | Up Throw ]
  • Plus a Stats Section [ Movement | Size | Weight | any Unique Mechanics | etc. ]
You can list them in whatever order you want. Most movesets list Special Moves first, since their unique properties often tie a moveset together as a "core" and can be relevant to the rest of the moves. For example, Shulk's Monado Arts change up how the rest of his moves are used, so it'd be helpful to list his Special Moves at the beginning. Similarly, a character's Stats should go in the beginning bit.​
Outside of that, the order varies a lot, but moves are almost always grouped together into the five sections bullet-pointed above. Do whatever you'd like here!​
Other optional things you might want to include:​
  • Image of the character [ Recommended! ]
  • Intro writeup for the character [ Recommended! ]
  • Final Smash [ Recommended! ]
  • Taunts
  • Custom Specials
  • Situational Attacks [ Ledge Attack | Getup Attack ]
  • Miscellaneous Flavor [ Home Stage | Alternate Costumes | etc. ]
Having trouble writing a set? Just post in the thread or DM one of the five Leaders listed later in this post! We're always happy to check out WIP sets and provide feedback. :)
Traditionally, movesets are posted in the thread itself, as regular posts. However, a good number of MYMers instead host movesets offsite, such as with Google Docs, for the sake of formatting control, reliability or the like. For Google Docs in particular, there is a handy [ TEMPLATE ] you can use. If you're signed into Docs, just hit file > make a copy and you're good to go.​
Commenting

"Famous writers got to where they are due to reading a large amount of literature, and it’s the same with movesets. Commenting forces you to articulate that knowledge and put it to word; the helpfulness of this exercise cannot be overstated."
After reading a moveset, why not share your thoughts on it? That's what a Comment is! You can share your impressions, give advice / feedback on what you think could be improved, and / or praise the moveset's strengths. Just anything you want to say after reading the set! The author of the set'll really appreciate it! Also, do leave a Like on sets you read and enjoy, which while not as strong as a Comment still gets the idea across to an extent.​
Not only is reading and Commenting movesets helpful for the author of the set, but it can also help the Commenter's skills improve by learning from other sets' strengths and weaknesses. Also, in order to Vote at the very end of Make Your Move 25, a user must post [ at least 10 Comments ] throughout the course of the contest, to demonstrate that they have read enough movesets to give an informed vote.​
Ranking

If you want to take Commenting a step further, why not start your own [ Rankings ]? Rankings are a post (in the thread or otherwise) where you list the sets you've read, and say how good you think each set is. Many Rankings use a ten-star system, but other systems are definitely possible. Five-star, category-based, and other types of Rankings have all been used in the past, so just use whichever format you'd like. One common theme is "Ranking images," a funny or cool image posted along with each set's Ranking.​
You'll see Rankings from a lot of experienced MYMers, but anyone is free to make one of their own! You might want to consider putting them in a spoiler tag to avoid clogging up too much space, though this is not required. This also has the handy benefit of resizing images to be more uniform.​
I wouldn't be shy about making rankings, even if you're fairly new: They're ultimately an expression of how you feel of a set, which everyone has, and only through practice does someone become good at something. Several folks started their first rankings ages ago, back when they were but humble newbies, after all. We're always looking for more, so don't be worried or shy! :)

Contest's End

In the past, each Make Your Move contest ended around the time one hundred movesets had been posted in that contest. Ever since Make Your Move 19, however, a strict deadline has been used instead. For MYM25, that deadline is [ September 10th ]. Don't miss it!​
At the end of a contest, it's a MYM tradition to vote on all the sets posted in the thread! Any user who has posted at least 10 Comments may submit a Vote to one of the Vote Gurus via a Smashboards DM. You have 35 Votes to award to movesets you think deserve it, split between these categories:​
  • 20 Weak Votes [ 2 Points ]
  • 16 Regular Votes [ 5 Points ]
  • 8 Super Votes [ 9 Points ]
Give these Votes to sets you like, and the set with the most points wins! You don't have to use every single Vote, but you can't go over the maximum for each category.​
You may also choose to upgrade some of your Votes into [ Vote Pluses ], if you think that some sets in a Vote category on your list stand out among the rest. You may upgrade one Super Vote into a Super Vote Plus, making it worth 11 Points instead of 9 Points. The other two Vote types may each have three Vote Pluses, becoming worth 1 Point more than usual. Traditionally, your Super Vote Plus is given to the set you thought were the best, your Regular Vote Pluses to the Regular Votes you thought were the best and the Weak Vote Pluses to the Weak Votes you thought were the best. There are no actual rules to how you use your Vote Pluses, though.​
For a visual aid, here is FrozenRoy's votelist from Make Your Move 21, which used every vote it could!​
It goes without saying, but you can't vote on your own sets. Normally this would give those who vote a disadvantage in terms of placing well, so there are measures in place to compensate those who vote with extra points.​
Immediately after the contest ends, there is a Voting Period, where everybody has time to read movesets they missed, compile a Vote List, and submit it to the Vote Gurus. After that, the Leaders will work hard on completing the Top Fifty, a ranking of the top-voted movesets!​
Despite the name, the Top Fifty no longer always has fifty movesets, due to the deadline changes made in MYM19. Instead, any moveset with at least two Votes of any kind, OR at least one Super Vote, is eligible for the Top Fifty. Note, however, that the MAXIMUM sets that can get on remains fifty: If 51 sets qualify, then one of them isn't making it! It's posted in the thread along with some fanfare, as per tradition. Will your set place on the Top Fifty?​
For the Top Fifty, the Leaders will break ties when needed. There'll always be raw voting data available, so you can peek behind the curtain if you'd like.​
Beyond The Thread
MYM-Operated Communities and Sites

Make Your Move has a very active Discord chat, where all the discussion happens. There's a handy [ LINK ] to join it right away! Feel free to pop in and say hello after reading the rules.​
The Bunker [ LINK ] and The Stadium [ LINK ] have been around for ages, and collectively have racked up more than half a million views since their inception. You'll find comprehensive moveset lists for each contest dating back to MYM's halcyon days in the pre-Brawl era, and no shortage of resources, listicles and analyses.​
More recently launched, and still under construction, the MYM Hub [ LINK ] also boasts several moveset lists and articles of its own.​
Unaffiliated Resources

KuroganeHammer [ LINK ] and UltimateFrameData [ LINK ] both are treasure troves of technical details about moves in Smash Ultimate, as well as a handful of other games such as Smash 4. The latter even offers frame-by-frame hitbox visuals for every single attack in the game! Check them out if you want a reference point for how much damage a move should deal, how quick it should be, or anything like that.​
The Smash Wiki [ LINK ] also has a decent amount of data, including statistics like character jump height, terminology, Smash Bros trivia from across the series, and more information of possible interest.​
Redditor u/Nachowcheese has created an exhaustive spreadsheet [ LINK ] with KO percentages and trajectories for each of Ultimate's attacks, as experienced by the middling Mii Swordfighter from the center of Final Destination.​
There exists a thread on Smashboards [ LINK ] which houses GIFs for some characters' attack hitboxes. The data is from Smash 4 and not Ultimate, but it's still a handy resource for the range and animation of moves.​
Art of Smash [ LINK ] is a video series by Izaw about the intricacies of how Smash 4 is played. The first four videos are a little bit outdated, since Smash Ultimate has changes from Smash 4 (see the next paragraph for a better resource). The useful part is the videos that come after: an expansive list of character-specific videos, going over lots of tricks, combos, and techniques which can inspire moves in a MYM set. Most important, perhaps, is the videos' emphasis on the "playstyle" of a character, or the method by which one makes a moveset feel like a cohesive whole. In MYM, understanding this concept separates the wheat from the chaff.​
There's also an ongoing sequel series to Art of Smash, called Art of Smash Ultimate, made by the same person and for the same purpose: [ LINK ]
Leadership

The organizers of Make Your Move, the [ Leaders ] of the community make sure everything keeps running smoothly here in our little contest. Leaders are generally well-respected and usually very seasoned MYMers, sometimes having been in the community since MYM's inception! Feel free to hit us up via Smashboards or Discord if you want to chat, we're here to help.​
Here's some of our Leadership's crispest, freshest sets to date:​
FrozenRoy | "Froy" | "Roy"

Our Boy, But Cold
First Contest
Make Your Move 12​
First Set
Scizor​
Highest Placing
1st [ Sho Minamimoto - MYM14 ]
Total Movesets
108, as of MYM24​
Notable Franchises
Touhou [ Shou Toramaru - MYM23 (12th) | Utsuho Reiuji - MYM22 (19th) | Remilia Scarlet - MYM14 (8th) ]
Warcraft [ Baron Rivendare - MYM16 (13th) ]
RWBY [ Weiss Schnee - MYM15 (14th) ]
League of Legends [ Viktor - MYM16 (8th) ]
Dark Souls [ Artorias the Abysswalker - MYM18 (11th) ]
Defense of the Ancients 2 [ Anti-Mage - MYM18 (17th) ]
Yu-Gi-Oh! [ Night's End Sorcerer Remix - MYM15 (21st) ]
The World Ends With You [ Sho Minamimoto - MYM14 (1st) ]
Pokémon [ Elekid - MYM22 (38th) | Poochyena - MYM22 (43rd) | Poliwag - MYM21 (39th) | Toxicroak - MYM21(34th) | Haunter - MYM20 (18th) ]
Star Wars [ Count Dooku - MYM17 (18th) ]
Kingdom Hearts [ Xaldin - MYM21 (6th) | Lexaeus - MYM21 (21st) ]
Street Fighter [ Alex - MYM22 (17th) ]
Mega Man [ Elpizo - MYM21 (28th) | Copy X - MYM21 (24th) ]
Wakfu [ Nox - MYM22 (11th) | Quilby - MYM22 (6th) ]
Jojo's Bizarre Adventure [ B. Polneraff - MYM22 (9th) | Hol Horse - MYM22 (2nd) ]
Final Fantasy [ Rufus Shinra - MYM23 (4th) ]
Fire Emblem [ Hubert von Vestra - MYM24 (22nd) ]
Fate/Grand Order [ Morgan - MYM23 (4th) | Gareth - MYM23 (16th) | Fairy Knight Gawain - MYM23 (17th) | Minamoto-no-Raikou - MYM23 (25th) ]
Xeno [ KOS-MOS -MYM23 (3rd) ]

UserShadow7989 | "US" | "Professor Hawke"

[No Image Found]​
Thinks This is NaNoWriMo
First Contest
Make Your Move 5​
First Set
Revolver Ocelot​
Highest Placing
1st [ “Lucky” Louise - MYM23 ]
Total Movesets
55, as of MYM24​
Notable Franchises
Original Character [ “Lucky” Louise - MYM23 (1st) | Hina Merrel - MYM23 (3rd) | Naomi Faren - MYM22 (8th) | Rime Marz - MYM21 (8th) | Knightly Witch Garnet - MYM18 (14th) | Bubble Witch Marin - MYM24 (15th) | Slime Witch Dahlia - MYM22 (21st) | Hopper - MYM24 (34th) ]
Mega Man [ PlanetMan.EXE - MYM21 (18th) | Colonel.EXE - MYM18 (35th) ]
Jojo's Bizarre Adventure [ Enya Geil - MYM24 (26th) | Cioccolata - MYM22 (32nd) ]
Pokemon [ Butterfree - MYM19 (21st) | Tangrowth - MYM18 (36th) | Honchkrow - MYM24 (33rd) ]
Yu-Gi-Oh! [ Maximillion Pegasus - MYM24 (5th) | Dragonmaid Hauskee - MYM22 (15th) | Dragonmaid Tillroo - MYM22 (30th) ]
Touhou [ Wriggle Nightbug - MYM23 (10th) ]
Donkey Kong [ Bleak - MYM23 (23rd) ]
Final Fantasy [ Cid Highwind - MYM24 (23rd) ]
Product Mascots [ Fruity Yummy Mummy - MYM24 (46th) ]
Real Life People [ The Three Stooges - MYM24 (18th) ]

BKUPA666 | "Kupa"

Heavyweight Champ
First Contest
Make Your Move 3​
First Set
Timon & Pumbaa​
Highest Placing
1st [ Bowser Jr. - MYM9 | Walter White - MYM24 ]
Total Movesets
95, as of MYM24​
Notable Franchises
Donkey Kong [ Baron K. Roolenstein - MYM10 (4th) | Necky - MYM9 (10th) | Dixie Kong - MYM24 (20th) | Kritter - MYM22 (33rd) ]
Mario [ Bowser Jr. - MYM9 (1st) | Bowser - MYM11 (5th) | Gooper Blooper - MYM12 (17th) ]
Luigi's Mansion [ Jarvis - MYM12 (6th) | King Boo - MYM9 (8th) | Amadeus Wolfgeist - MYM23 (13th) ]
Disney [ Edgar - MYM10 (17th) | Professor Ratigan - MYM12 (19th) | Gaston - MYM11 (22nd) ]
Pixar [ Mr. Potato Head - MYM8 (3rd) | Syndrome - MYM24 (9th) | Slinky - MYM8 (16th) ]
Horror [ Pennywise the Dancing Clown - MYM10 (2nd) ]
Marvel [ Mysterio - MYM23 (5th) | Vulture - MYM22 (14th) | Kingpin - MYM22 (37th) ]
Dark Crystal [ skekSil, the Chamberlain - MYM22 (5th) | skekMal, the Hunter - MYM23 (20th) ]
Punch-Out!! [ Soda Popinski - MYM24 (24th) ]
Breaking Bad [ Walter White - MYM24 (1st) ]

KATAPULTAR | "Kat"

Connoisseur of Ninjas and McDonalds
First Contest
Make Your Move 5​
First Set
Tsuru Tsurulina III​
Highest Placing
1st [ Chou-Chou Infinite - MYM16 ]
Total Movesets
116, as of MYM24​
Notable Franchises
Anime [ Yui Hirasawa - MYM21 (9th) | Shinobu - MYM21 (11th) | Catarina Claes - MYM24 (12th) | Reigen Arataka - MYM22 (22nd) | Asagao - MYM24 (29th) | Ritsu Tainaka - MYM24 (45th) ]
Mugen Souls [ Chou-Chou Infinite - MYM16 (1st) | Altis - MYM16 (18th) | Marina Cannonvale - MYM18 (27th) ]
Yu-Gi-Oh! [ Tri-Brigade Ferrejit the Barren Blossom - MYM24 (7th) | Dragonmaid Chame - MYM23 (11th) | Dragonmaid Nasary - MYM22 (18th) | Dragonmaid Parla - MYM22 (24th) ]
Atelier [ Ayesha Altugle - MYM23 (21st) | Shallotte Elmius - MYM21 (21st) | Regina Curtis - MYM17 (22nd) | Lucille Ernella - MYM24 (32nd) ]
Horror [ Ghostface - MYM20 (3rd) | Pennywise the Dancing Clown - MYM23 (8th) | Jason Voorhees - MYM8 (N/A) ]
Zettai Bouei Leviathan [ Ziz - MYM20 (14th) | Leviathan - MYM15 (27th) | Bahamut - MYM16 (30th) ]
Disgaea [ Judge Nemo - MYM16 (4th) | Salvatore the Magnificent - MYM14 (4th) | Magic Knight - MYM14 (35th) ]
My Hero Academia [ Himiko Toga - MYM21 (10th) | Ochako Uraraka - MYM23 (19th) ]
Fate/Grand Order [ Jeanne d'Arc (Alter) - MYM23 (14th) | Minamoto-no-Raikou - MYM24 (25th) | Kiyohime - MYM23 (32nd) ]
Ace Attorney [ Luke Atmey - MYM13 (14th) | Armie Buff - MYM22 (27th) ]
JoJo's Bizarre Adventure [ Funny Valentine - MYM15 (4th) ]
SNK [ Hotaru Futaba - MYM23 (15th) ]
Original Characters [ Yin Manacuff - MYM24 (19th) | Liz Eird - MYM19 (20th) | Waki Nagamori - MYM24 (28th) | Niva - MYM24 (39th) ]
Naruto [ Hidan - MYM21 (36th) | Hotaru Tsuchigumo - MYM24 (42nd) ]

SLAVIC | "Slavic"

Assigned Tony Hawk at Birth
First Contest
Make Your Move 14​
First Set
Spider​
Highest Placing
2nd [ Seto Kaiba - MYM24 ]​
Total Movesets
36, as of MYM24​
Notable Franchises
Pokemon [ Regirock - MYM17 (30th) | Alolan Golem - MYM21 (38th) | Castform - MYM16 (48th) ]
Fire Emblem [ Donnel - MYM16 (24th) | Lyn - MYM24 (36th) ]
Mario [ Clawgrip - MYM16 (33rd) | Kammy Koopa - MYM21 (47th) ]
Anime [ Ira Gamagori - MYM19 (8th) | Sucy Manbavaran - MYM19 (24th) | Rintaro Okabe - MYM21 (48th) ]
My Hero Academia [ Tomura Shigaraki - MYM24 (21st) | Katsuki Bakugo - MYM22 (31st) ]
Mortal Kombat [ Kano - MYM22 (39th) ]
Yu-Gi-Oh! [ Seto Kaiba - MYM24 (2nd) | PaniK - MYM22 (26th) ]
Puella Magi Madoka Magica [ Mami Tomoe - MYM23 (7th) | Madoka Kaname - MYM24 (13th) ]
Spyro the Dragon [ Gnasty Gnorc - MYM23 (26th) ]
X-Men [ Magneto - MYM24 (43rd) ]
Resident Evil [ Claire Redfield - MYM24 (27th) ]

Rules

This goes without saying, but MYM abides by the [ RULES ] set in place by the folks in charge of this website, so keep that in mind! Please remember to report posts that break the rules, instead of replying to them.​

And that's pretty much it! Go have fun writing, reading, and critiquing sets. Write your moveset, carve your legacy, Make Your Move!​
 
Last edited:

Rychu

Thane of Smashville
Joined
Jul 5, 2010
Messages
810
3DS FC
1908-0105-4965
Though it has nothing to do with me.

When somebody finds that treasure...

The world will be turned upside down!

Oh Yes!

It will be found!

That day will come!


ONE PIECE!


IS!


OUT THERE!


1646888484252.png


(A Rychu & FrozenRoy Joint)​
 
Last edited:

BKupa666

Barnacled Boss
Moderator
Joined
Aug 12, 2008
Messages
7,788
Location
Toxic Tower
"I LAUGH AT YOU. MUSHROOM HEADS. PATHETIC THINGS. ... I WILL GIVE YOU A SPECIAL REWARD FOR SETTING ME FREE. YOU WILL LOVE IT."


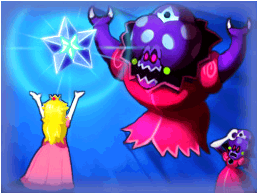
Elder Princess Shroob is the leader of the alien Shroob race and the final boss of Mario & Luigi: Partners in Time. The Elder Princess is a true relic of the mid-2000s, when Nintendo of Japan gave second-party developers the creative leeway to go hog-wild with the Mario universe, introducing bizarre characters and nightmarish plots, up until top brass had a collective meltdown over Super Paper Mario and started clamping down on these sparks of inspiration in the name of quality assurance. Can't have today's impressionable youth getting attached to aspects of the Mario IP that aren't being marketed at Super Nintendo World or as part of a LEGO set...

...Ahem. In any case, Partners in Time's plot hinges on a massive Shroob invasion that took place while the mainline Mario cast were babies. Because this all conveniently has faded from everyone's present-day memory banks, Peach's inaugural voyage in E. Gadd's time machine takes her back to the very day the Shroobs launched their assault. The game's climax reveals that Peach managed to imprison Elder Princess Shroob inside the time machine's power source, the Cobalt Star, and shatter it into pieces, before getting ambushed by the game's purported main villain, Princess Shroob. In chasing after her, the Mario Bros. come to realize the scope of the Shroobs' hostile takeover. Turns out, the extraterrestrial fungi had left their dying home planet and sought to conquer other worlds, in the case of the Mushroom Kingdom capturing Toads on an industrial scale and draining their "vim" as a fuel source.

Though the vanilla Princess Shroob orchestrates most of the game's plot events, the Elder Princess wastes no time making an impression during her limited screentime, erupting from the Cobalt Star after the Bros. mistakenly reunite its shards. Over
the course of her fight, the Elder Princess abuses an armada of flying Shroob saucers, batting around, crushing and detonating her underlings like disposable objects in her quest to destroy the Marios. Backed into a corner, the Elder Princess also (further) hulks out, triggering a power source in her crown to sprout eldritch tentacles and grow her move pool. Even in death, the royal Shroob attempts one last Hail Mary, force-feeding Bowser her mushroomized corpse to possess him, avenge her sister and foreshadow the ubiquity of vore in AlphaDream's sequel. mmmMMMMmmm!

STATISTICS

Size ( o ) 10
Weight ( o ) 10 / 132 units (3rd, between King K. Rool and Donkey Kong)
Aerial Movement
( o ) 8 / 1.155 units (19th, tied with Bowser, Cloud and others)
Ground Movement
( o ) 6 / 1.76 units (37th, tied with Mario, Bayonetta and others)
Fall Speed
( o ) 5 / 1.55 units (45th, tied with Mewtwo, Palutena and others)
Jumps
( o ) 3.5 (comparable to K. Rool)


Unsurprisingly, this oversized purple alien makes her heavyweight mark, standing just as tall as the biggest boys among Ultimate's ranks. Elder Princess Shroob's oversized mushroom head offsets a slightly slimmer lower half, keeping her in that massive size range where just one wrong move or misinput can give many characters' players the chance to turn their brains off and carry out combo flowcharts to get her well past 50% — the so-called "heavy tax."

Outside of this glaring vulnerability, however, Shroob's movement might well shock those who take her hulking design at face value. She's able to charge around the stage at a decent clip, shaking the screen with some noticeable controller rumbling as she keeps pace with that pesky plumber. Shroob's alien origins also lend to decent aerial control while retaining her option to fastfall like a rock if she wishes to return to solid ground. Her idle stance has her breathe heavily in and out while flexing her pincer-like claws menacingly. Every now and then, Shroob will cross her arms disapprovingly or clasp them together above her head in a strange, wiggling stretch, appearing to mimic Peach's similar animation.

Unless otherwise stated, KO percentages are on Mario from the middle of Final Destination.


SPECIALS

NEUTRAL SPECIAL - UNIDENTIFIED FUNGAL OBJECT


Elder Princess Shroob roars, commanding an alien flying saucer to spin into being with an otherworldly jingle. These hover 1.5 training stage squares off the ground, roughly the size of Kirby crouching, with a small window through which blinking eyes are visible, and a purple Shroob head poking out its top. Functionally, you could liken this animation to summoning a Pikmin, albeit over 20 frames compared to Olimar's eight. Tap the input multiple times, and Shroob will summon up to three saucers in quick succession, each with their own distinct eye color: red, then yellow, then light blue.

Each individual saucer pauses in front of Shroob for 15 more frames after being summoned before zipping behind and beginning to trail her. She's capable of summoning saucers both in the ground and in midair. In the latter case, saucers appear at the aerial point where Shroob called upon them, rather than having their spawn points track her descent, and then, after their pause, take the most direct flight path to her current location, zooming at Captain Falcon's dash speed.

From a movement standpoint, Elder Princess Shroob's saucers behave comparably to Pikmin, lining up behind and trailing their ruler as she moves and jumps around. However, that's where most similarities begin and end. Saucers are rather more robust than the plucky fauna, with a set 25 HP apiece compared to 5-11 HP. They're also more vulnerable, capable of taking damage even when passively following Shroob instead of only when in active use.


It follows, then, that Shroob ought to take care when and where she orders out the alien craft. Foes can start chipping away at their health as soon as they manifest in front of her, during the brief window before they move to her back. This often becomes relevant when Shroob is bringing out saucers in midair. While she's capable of generating backup while falling when launched high and far enough away from immediate danger, ranged foes have a bit longer to take frontal shots at her underlings as they zoom down to catch up with her.


When hit, saucers are sent flying rear over teakettle, about as far as Kirby at 0%, becoming a circular hitbox about as large as the dreamy puffball. Their damage and knockback output depends on how forcefully they were hit. A saucer launched with something light, like a jab's third hit, will inflict a single hit of 8% and knockback KOing around 150%. Stronger attacks, however, result in saucers beginning to inflict multiple hits that pull foes as they tumble along their trajectory. A moderate launch, perhaps from your average tilt or uncharged Smash, has saucers inflict three rapid 3% hits, followed by a 5% launcher that can KO around 130%.


And a strong launch, akin to that from a strong tilt or charged Smash, results in saucers dealing four light 3% hits before a 6% strong hit capable of polishing off a stock at 110%. Once launched, saucers will pause for 40 frames at the end of their hitstun trajectory before zipping along the most direct path back to Elder Princess Shroob. If a hit fully depletes a saucer's HP, however, the craft will flash red as it careens away, exploding in a Wario-sized blast at the point where it ordinarily would inflict its final hit at the end of its launch path. These explosions deal a robust 23% and knockback KOing at 85%.

Opponents aren't the only ones capable of striking the Shroob saucers. In typical Bad Boss fashion, Elder Princess Shroob can smack them about to her liking to deck foes up to mid-range. She appreciates the ability to use this tactic out of her saucer-summoning animation, from which she can react after 15 frames. Coupling together the tail end of a saucer's appearance and its 15-frame pause, Shroob can immediately proceed with an attack to send the craft flying at one of several different angles.

In a vacuum, it's a rather telegraphed option, but one with significant mix-up potential. Foes moving in on Shroob must remain on their toes as to whether she intends to let the saucer she's bringing out benevolently follow her or become volatile cannon fodder — especially if she combines both approaches in spawning multiple saucers. At high levels of play, Shroob can even move around, launching saucers into each other from different vantage points such that they pinball around the skies in glorious chaotic fashion. Some of them may die, but it's a sacrifice...she is willing to make.

Elder Princess Shroob's alien firepower isn't without risk — enemy attacks are capable of turning her saucer hitboxes against her. Aggressive foes can be predictive and try smacking a saucer immediately after it appears in front of Shroob, though poorly timed, this can backfire as she beats them to the punch or otherwise punishes their insolence. The danger is abated somewhat, albeit not eliminated with saucers Shroob has launched. Foes can damage these spinning saucers but unlike Dedede's oft-maligned Gordos, attacks won't immediately launch them back at their master. Rather, weaker moves will trade, as the saucer hitbox continues through to hit their target, while sufficiently strong attacks will clank, stopping the saucer prematurely and giving them a window to wallop it back at Shroob.

Opponents also can shield saucers to stop them in this fashion, albeit at the cost of 4-12% bonus shield damage, depending on an individual saucer's launch strength, plus an extra 10% if it explodes. Snagging a saucer with shield can be a tempting proposition for racking up extra damage against Shroob, though in the right hands, she can put the fear of god in foes by charging them alongside her saucer — potentially even locking them in shield with the craft such that she can pull off a shield break. Shroob's weight grants her somewhat of a buffer against saucer damage, letting her endure hits past damage thresholds at which a light breeze would send most characters rocketing offscreen. Of course, given the rate at which her big body will be accruing damage in many matches, it never hurts to brush up on your DI for those make-or-break survivability scenarios.


How can Shroob play around with saucers?
The Elder Princess Shroob's saucer utility doesn't begin and end at smacking them in opponents' direction — far from it. Should the player hold Neutral Special down more than 25 frames, the derangeable despot will take more direct control of any saucers directly behind her at that point. Past that threshold, an alien cackle will sound, signifying the player's ability to input a direction to issue a command to Shroob's saucers.

With multiple crafts in tow, an immediate input after 25 frames has only the saucer most closely following Shroob carry out the command. Holding Neutral Special for 20 additional frames before a command results in the second-closest saucer joining in, with 20 frames beyond that prompting all three saucers to take part. Shroob can't issue commands to saucers not immediately following her, though if an external saucer flies back to her while she's preparing a command input, it becomes available as part of her repertoire. A shield or dodge input will have Shroob cancel out of her command stance. On average, Shroob enjoys more potent benefits from commands involving multiple saucers, albeit at the cost of putting more of her precious crafts at risk — and herself at potential risk from them — in the process.


With a forward input, Elder Princess Shroob can sic her saucers on a character or attackable construct within six training stage squares horizontally and two squares vertically. She'll automatically target a sole subject in her sights with a release of the control stick, while, with multiple targets, a purple mushroom-shaped crosshair appears that can be flicked back and forth among her choices and locked on with a repeat press of B. In either case, the one, two or three saucers commanded will soar over to that target, taking the most direct linear path at the speed of Samus' charge shot.


Once they're within a square, with a five-frame startup, the saucer(s) will circle the chosen opponent or construct at a rapid pace, projecting a green tractor beam horizontally inward to freeze them briefly in place in their tumble animation. This lasts a hair longer than Mewtwo's Confusion regardless of the number of crafts involved. Immediately afterward, each saucer in the mix stops circling and immediately lowers a mechanical ray gun appendage from its underside, which fires a bolt of energy inward at their target. This inflicts 5% and a moment of stun followed by below average set knockback that won't KO. Individual saucers' energy shots are staggered 15 frames, hitting their victim one after the other and keeping them in place until the final one meets its mark. Afterward, the saucers will pause 40 frames before returning to their master as a collective. In FFAs, external characters who make contact with the saucer circle's center aren't caught in the tractor beams, though they can take damage from any bolts being fired.


A forward command represents an alternative option, beyond directly launching saucers with attacks, that Shroob can use to threaten space at mid-range. By comparison, the damage and knockback output is less immediately rewarding, and sufficiently fast or ranged foes can bat away incoming saucers before they enter circling range. That said, Shroob can react reasonably quickly after ordering her saucers outward, generally faster than she can after physically hitting one of her crafts. Depending on the range at which the saucers caught their target, and how long they're pinned in place from the multiple bolts, Shroob can close the gap and smack her captive foe with a follow-up hit — whether midway through the crafts' assault or immediately after their bolts zap them out. A victim snagged at close range, or by three saucers at once, could even find themselves vulnerable to an uncharged Smash for a kill confirm.

Of course, should Shroob not wish to damage her own saucers in this punishment process, she'll have to center herself above or below her target such that her hitbox only impacts her victim. Alternatively, at the ledge, Shroob can command saucers out to scoop up offstage foes, who might find themselves forced to recover prematurely to either dodge the crafts or launch them away. Their bolts will hardly ever KO a recovering foe, outside of a potential stage-spike at high damage levels. Timed well, though, the saucers can pile on a bit more damage or, close enough to the stage, pop them up for Shroob to smack them away for good.

A few miscellaneous items: if Shroob sends saucers out after an opponent or construct within six squares at the time of the input, but that then exits this range while the crafts are in transit, the saucers will pause momentarily at max range, their eyes peering back and forth confusedly for a second, before returning. This also will transpire if the targeted character times a dodge or roll right as one or more saucers enters range, though they'll still fire tractor beams to snag shielding victims. And, in casual matches, saucers can be commandeered to target items. In these situations, a saucer won't fire a tractor beam upon reaching the object but rather will laglessly position it on its domed head before flying back to Shroob, who automatically picks it up as the saucer zips back behind her.


A downward input has Elder Princess Shroob quickly hop a minuscule distance into the air, making room for her one, two or three saucers to zip beneath her and bunch together to provide the good princess a hovering platform. From there, Shroob gains access to controllable flight, at least for a limited time. While toted around atop one or more saucers, Shroob stands stationary, able to use grounded attacks, shield or spot dodge. Lighter control stick presses have her fly while facing in that direction, while a hard directional press turns her platform around in midair. Shroob is free to exit her makeshift platform at any point with a jump or roll (manifesting as a directional air dodge). Players also can cancel her saucer flight by holding B more than 25 frames and repeating the command input. Once Shroob voluntarily leaves her pedestal, or if she's knocked off or her flight time otherwise ends, her saucers will pause in place before flying back to her.


As might be suggested by her saucers' eyes squinting in anguish, lugging Shroob's great weight around is no small feat, and one more effectively accomplished with the power of alien teamwork. A single saucer can escort her around for up to 1.5 second at the aerial equivalent of Ganondorf's dash speed. These stats jump up to three seconds at Snake's dash with two saucers, and a maximum of five seconds at Mario's dash speed with all three saucers. Shroob can soar offstage to a limited degree, though she'll bump up against an invisible wall if she tries exceeding Steve's block-building boundaries. And for good balancing measure, once Shroob has used this command, she must touch down on solid ground before doing so again.

Shroob boasts great offensive versatility while cruising through the skies. There's the obvious movement mix-ups from darting in and out of potential attack range to bait adverse reactions. Attacking out of saucer movement also can prove beneficial in bullying foes across the stage or better timing sweetspots on some moves. Without a full three-saucer platform, Shroob can spawn one or two saucers at a fixed point in midair before moving away. What direction she chooses, and how far she travels, determines what path that craft will take to reach her once its initial pause ends — which, in turn, influences potential angles and timing for Shroob in launching it.

More simply, Shroob can use certain downward attacks to launch one or more saucers carrying her out of platform formation. While a great way to threaten foes leaping up after her platform, the removal of one or more saucers from a multi-saucer platform shortens Shroob's remaining flight time. She'll automatically drop if she's exceeded a lesser platform's max flight time beforehand with a larger platform (i.e. more than 1.5 second on a two- or three-saucer platform then reduced to one saucer).

Shroob's saucer flight benefits extend beyond free flight, too. While flying in a given horizontal direction, that side of Shroob's platform takes on a light hitbox. Depending on how many saucers she's standing on, and thus how fast she's moving, Shroob's platform inflicts 4-12% and near-vertical knockback KOing from 210-170%. While pretty small potatoes in a vacuum, ramming a foe this way with good timing serves as a grade-A combo starter for Shroob, who can time her own attack atop her platform to intercept that victim as they're launched up into her face. This later can become a KO setup for her stronger attacks, especially if she bumps a foe out of a badly-timed air dodge near the screentop. Against shields, saucer rams inflict 3-9% in extra shield damage and rebound Shroob's platform 0.5-1.5 training stage square. She's able to capitalize on the bonus damage to put a big dent in enemy bubbles, and likely even shatter them if she's glided at them with a Smash sufficiently charged.


While all these perks are well and good, Shroob and her saucers are in several key ways more vulnerable while in transit with this command. Two or three saucers don't enhance her platform's size all that much, as they're grouped up closely enough to cover 1.5 squares horizontally, compared to one square for a single saucer. That said, that proximity makes it far easier for enemy attacks, especially big sweeping ones, to hit multiple saucers at once, whittling down their health while knocking them away to cut short Shroob's flight. Particularly well-placed moves can launch both Shroob and her saucers; should such a move finish off a saucer, it might even launch Shroob into that craft's explosion for a particularly humiliating combo. Grounded or proximity-based traps effectively can create no-fly zones for Shroob as she attempts to avoid these sorts of drawbacks.

Last but not least, an upward input prompts Elder Princess Shroob's chosen number of saucers to quickly move in from behind and begin closely circling her at chest height. In doing so, each saucer takes on a light 3% hitbox, briefly stunning victims in front of Shroob. The frequency of hits depends on how many saucers are in Shroob's rotation, with each craft making one rotation over 75 frames. A single spinning saucer in a vacuum won't combo into itself unless an opponent decides to sit in place and enjoy the scenery.


On the other hand, three saucers' each are staggered apart by 25 frames, gaining the ability to chain into each other up to high damage levels. A third consecutive saucer hit inflicts a touch of outward knockback, keeping foes from getting caught indefinitely among the hitboxes. Individual saucers remain in their spinning formation until they're launched out by an attack or nick a shield, upon which they're pushed back behind Shroob in a brief dazed animation. The princess also can call off the animation early if B is held more than 25 frames and the command input is repeated.

In some ways, Shroob's spinning saucers function as a more high-risk, high-reward analogue to Mega Man's leaf shield. Similar to the Blue Bomber, Shroob can move into opponents to catch them in her saucer hitboxes and rack up damage. By contrast, however, she's free to attack and shield with her saucers still out, rendering her offensive and defensive states that much more potent. There's the obvious approach of landing an attack on a victim while they're caught among saucers, or grabbing a target and holding them there for some bonus damage.

Spinning saucers also give Shroob access to ready-made attack mix-ups, as she can choose whether to throw out quick attacks in between gaps in the saucers circle or smack one or more out as they pass by. A multi-saucer setup is among Shroob's best bets for smacking several crafts out in different directions, at the cost of her being more limited in terms of which attacks she can throw out if she doesn't want to knock away saucers. A single saucer, meanwhile, requires more precise timing to connect with a target, but can still clinch a stock, for example, if Shroob has kept it circling while using other saucers as part of a platform command to cruise offstage after a target.

Saucer rotations' offensive capabilities bleed over into Shroob's defensive opportunities while in the midst of this command. Here, saucers continue to spin whenever Shroob is shielding, circumstantially giving her a better breather from lightweight combo mashing, albeit far from a perfect one — more on that in a second. The saucers also remain in effect as Shroob dodges or rolls. While predictable if overused, Shroob can surround herself with saucers before using such a defensive maneuver to get in an opponent's face, simultaneously protecting herself while catching her victim out with a saucer hitbox, such that she can follow up with her own physical attack.

And separately, while Shroob is airborne with spinning saucers, the crafts' circular movement modifies her air and fall speeds slightly. Each saucer adds 0.05 unit to her air speed, up to a maximum of 1.305 units (4th, behind Mewtwo) with three saucers, while subtracting 0.07 unit from her fall speed, reducing her to a minimum 1.34-unit floor (49th, under Palutena, Olimar and others). While potentially a short-lived boost if Shroob chooses to bat away saucers, the tweaks can come in handy in allowing her to press an aerial advantage or cross up a shield, or else in retreating from a target or approaching her recovery from different vantage points.


Despite the array of possible benefits, foes prepared to deal with spinning crafts can quickly turn this command against Shroob, often with even more efficacy than her other two command options. For starters, because of Shroob's large frame, her saucers don't cover her head or the lower part of her body, leaving both vulnerable to attack as usual. Her saucers will continue to circle if she's directly knocked back, but her saucers' proximity — and thus, her enemy's greater likelihood of knocking them into her — can render her disadvantage that much greater.

A smart opponent could either launch an ill-timed spinning saucer into Shroob as a combo starter, or else knock both Shroob and a saucer outward at the same time, such that an exploding saucer extends the combo or saucers launched nearby restrict her possible escape paths. Meanwhile, if Shroob opts to hastily shield while surrounded by circling saucers, opportunistic opponents could smack a saucer into her bubble. The resulting shieldstun can render her a sitting duck for a follow-up strike, potentially a grab, though if there are multiple saucers to contend with, foes will have to be quick in throwing, lest the remaining circling crafts interrupt them. In essence, at her best, Shroob's spinning saucers can help her offset and far surpass the downsides one might attribute to your stock heavyweight, but if thrown out carelessly as a mindless salve, can exacerbate them worse than otherwise might be the case.

A few more housekeeping items to wrap up this gargantuan Special — with a Shield Special input, Elder Princess Shroob can rearrange the order of saucers directly following her. Over a quick 20 frames, the second-closest craft in line takes the place of the closest, which scoots to the back of the bus. While individual saucers don't have distinct properties, akin to something like a Pikmin, Shroob can exert some management over which saucer, with its own distinct stamina at any given moment, is most quickly accessible to her via a command. Saucers will begin emitting smoke once they've dropped to 10 HP or lower, a boon for Shroob in keeping track of which crafts she can get a bit more mileage out of using and abusing, and which, for better or worse, soon will bring about a real blast.


DOWN SPECIAL - TIME HOLE


From solid ground only, Elder Princess Shroob raises her arms, her eyes flashing white with alien magic as the stage beneath her emits a rumbling noise. A split second later, she opens a tear in the space-time continuum, manifesting as a one-square swirl of yellow and pink in front of her. This is one of Partners in Time's time holes, used by the Bros. to travel between the Mushroom Kingdom's past and present and later wielded by Shroob to preserve attack patterns for later in her battle. In Smash, the princess is able to put time holes to a similar use.

Once the rift is open, she enters a charging state, glowing with purple energy for up to two seconds. Over certain frame intervals in this stance, she'll harness progressively stronger temporal magic to log one of the latest non-Special attacks she used before opening the time hole — starting with her most recent move, followed by the second and third-most recent, each visibly represented as a brief energy surge around her. Shroob's charge ends automatically after she's logged three time hole attacks, with the hole immediately closing afterward. Players can cancel the stance early with a dodge or defensive input, at the cost of Shroob losing any in-progress attacks she was logging; she also loses all move-logging progress if she's attacked out of her charge.

While Shroob must spend 50 frames channeling time energy to log her first prior attack, this charge requirement drops slightly in saving subsequent attacks, to 40 frames for a second move and 30 frames for the third and final one. In essence, while Shroob can open multiple time holes to log individual most recent attacks in piecemeal fashion, players who have carefully curated which specific three moves they've performed before using Down Special are rewarded by getting to log them more efficiently.

Either way, opening and leveraging time holes is far from an effortless process. Fortunately, while charging, Shroob enjoys super armor against attacks dealing less than 10% to stave off campers zoners.
Enemies also can't just mindlessly rush in to interrupt Shroob, as upon contact with her time hole, characters are pulled in and shot a moderate distance after 25 frames, as if from a barrel cannon, taking 10% in the process. This set knockback won't KO, but can put some healthy vertical distance between Shroob and her foe, such that she can keep pushing her luck logging a past move or cancel out to try threatening their landing.


In any case, once Shroob has at least one previous attack logged, her real temporal shenanigans can begin. Press B at the same time as an attack input Shroob has saved via time hole, regardless of its recency order, and a ghostly purple duplicate of the alien aristocrat will appear and repeat that attack! These spooky silhouettes most closely resemble Shroob's ghost form from
her bonus Shrowser boss fight. Here, her ghost duplicate appears and attacks right in front of her, overlapping with her somewhat, before poofing away, barring B-Air, upon which it does the same behind her. Ghosts cannot be dealt damage or knockback, though foes can clank with them using moves with damage output within 9%.

During time attacks' startup, players can tap the control stick in the opposite direction, effectively letting Shroob's duplicate perform stuff like turnaround Smashes or reversed B-Airs. Shroob can only summon a ghost to perform each time attack she has logged once, though duplicates can use the same move twice or thrice if it occupies two or three slots among her previous three normal attacks. From a control standpoint, Shroob does not undergo lag in calling upon time ghosts but rather can proceed right into a different movement or attack. When using logged aerials, duplicates spawn at Shroob's midair level and copy whatever prior trajectory she used for that input — a rising aerial vs. a fastfalled one, for instance — as she continues to fall below. And crucially, players also can use ghost inputs at any point while Shroob is not in hitstun, including over the course of her regular attack animations.

The duplicate attacks function identically to Shroob's regular versions, albeit with 0.75x their regular damage and knockback. Only one duplicate can be present at a time, keeping Shroob from spamming multiple ghosts all at once. And use of a ghost attack stales all subsequent ghosts, regardless of which move they've logged, by virtue of Down Special occupying that spot in Shroob's stale moves queue. These are noteworthy nerfs for the sake of balance, albeit not ones worth Shroob getting her knickers in too much of a twist, given her general power and the situational potential for the weaker ghost variants to prolong her enemy damage windows for performing certain setups.


Needless to say, Shroob's ability to mix and match ghost attacks with her own opens up numerous doors over the course of combat. In close quarters, Shroob can lead by throwing out a quick ghost attack; if it connects, she could proceed into a combo with one of her own faster moves or capitalize on the hitstun by going for a one-two punch with a slower hit. Alternatively, the duplicate may bait out a reaction for Shroob to punish, with shield being among her favorites. Corner a shielding foe with a ghost, and if Shroob is quick enough on the uptake, she can land her grab or else take a further bite out of the bubble in an attempt to break it. If Shroob happens to have logged a stronger time move, like a Smash, careless shields can easily spell the end of an enemy's stock — unless, of course, Shroob becomes too predictable going for this setup, opening the door for smart foes to goad her into wasting the time attack crucial for making it happen.

Meanwhile, time ghosts initiated during one of Shroob's attacks generally will be the ones to follow up, catching opponents in her hitstun such that they deal better knockback, courtesy of the extra damage Shroob just inflicted. Depending on the specific move logged, Shroob can alter her ghost's timing and direction to cover enemy movements she's predicted — having a duplicate attack behind her to cover an inward roll, for instance, or staggering its appearance to catch out a spot dodge. And naturally, a ghost can poof into being after Shroob has attacked, providing defense during her often unfortunate end lag so she can continue to press offensively or retreat.

Used well at higher levels of play, ghosts can become a truly dangerous force, as Shroob can throw out up to three duplicate attacks while directly throwing her weight around. This often can manifest in an alternating fashion — Shroob attack, ghost attack, Shroob attack and so on — or with Shroob stepping forward so as to advance on foes with multiple ghosts in succession, waiting for the right opening to join in. Executed to perfection, these strings can take on the appearance of a heavyweight Ice Climbers combo, albeit one actually intended without use of an exploit. Alternatively, while ghosts cannot be made to move around regularly, Shroob can trigger one logged move before buffering another that stands to combo into the first — two consecutive U-Tilts, for a basic example. That way, a single duplicate can perform two or three logged attacks without interruption, rather than disappearing and reappearing multiple times in between moves.

Getting to these points, however, is no small feat for Shroob. Logging time hole attacks is a committal undertaking Shroob often must do whenever she finds openings, and factoring in what her most recent three moves are at any given point, unless she's comfortable freestyling her approach. Otherwise, or if the player has neglected to track their latest attacks, Shroob can throw out the desired move before initiating her time hole, at the cost of telegraphing her intentions. And it's not as though Shroob can just sit on her hands and pull off an easy-bake setup whenever she chooses after this preparation. As with many Smash combos, she must take into account her specific foe's percentage and weight, and potentially switch gears on the fly if the approach she was building toward no longer is optimal.

Thankfully, Shroob can put her ghosts to work smacking around more than just opponents. Having a duplicate smack a spawned saucer expands the galaxy of offensive possibilities that much further for Shroob. Without having to wait through end lag, she's free to tail along behind a ghost-launched saucer to bully opponents, perhaps by striking them out of its multiple hits or applying further shield pressure. She and a ghost, or vice versa, also can quickly strike the same saucer with two attacks, either launching it more forcefully in one direction or mixing up its trajectory midstream to confuse an opponent. Situationally, an aerial ghost can knock a saucer toward the ground such that Shroob can fastfall to greet it and send it careening back into the skies.

Shroob will have to temper this saucer volleyball if she doesn't wish to eat into a craft's HP. If it's an explosion she's going for, however, logged ghosts can help her get there that much quicker, and at potentially lesser risk to herself in cases where a foe knocks the saucer back at her. Naturally, Shroob must make gameplay decisions as to whether to use ghosts for combos vs. smacking saucers. Depending on her recent attacks, she might opt to log and set aside different moves for the two applications, or else shoot for moves that have utility in both respects. Explore different applications for different temporal duplicates, and Shroob can truly give her opponents' clocks a cleaning!

A mechanical overview on logging time hole attacks to finish this Special: Shroob cannot log attacks unless she previously has used at least one, stomping in a brief failure animation if she tries. If Shroob uses Down Special with her full three time ghosts logged, she'll begin overwriting those moves, starting with the oldest, third most recent attack in the queue. Shroob won't start overwriting ghost attacks until she reaches her three-duplicate capacity. That means, in cases where she wants to preserve a second or third most recent time hole attack, she can continue logging moves with Down Special, just so long as she has created space in the queue from having ghosts use up other logged moves first.

With multiple Down Special uses, Shroob can re-log part or all of the same string of recent attacks. For example, Shroob can save one ghost jab with a first time hole and then another ghost jab with a second hole if she hasn't attacked again in the interim. Alternatively, if she's logged one ghost jab with Down Special, used F-Tilt and then logged two more Down Special moves, Shroob will have access to a duplicate F-Tilt, jab one and jab two saved, in that recency order. And while Shroob's move history resets with each stock, she'll carry over any ghosts she's saved before getting KOed so as to not get snowballed while playing time hole catch-up.


SIDE SPECIAL - SHROOB CHOMP


A metallic purple orb slightly smaller than Kirby appears in Elder Princess Shroob's arms as she hunches inward slightly in a charge state over 12 frames, chuckling darkly to herself as she begins caressing it. Upon release, the orb's red eyes and jaws open over 15 frames with an audible gleam, revealing itself as a Shroob Chomp right before it lunges outward in an linear trajectory with a patented Chomp bark. Shroob holds her pet's chain as it rushes outward two to six training stage squares, depending on charge time, up to a one-second maximum.

The Chomp's lunge can be angled up to a moderate diagonal slant up or down as Shroob is charging. In typical Chomp fashion, Shroob's pet lunges to its chain length at a fast pace, straining for a second upon reaching that distance as it seeks to gnash a victim in its jaws. Should it successfully do so, the Chomp will stop at that point in its trajectory and start living up to its name, while Shroob herself pauses to cackle at their misfortune. Over the course of a second, the foe takes 4% from two lighter chomps, followed by a third stronger chomp that inflicts 6% and knockback KOing around 145%.


Should a Shroob Chomp gnaw on a victim, Elder Princess Shroob will automatically reel it in afterward and stow it into hammerspace over 26 frames. Without catching a target, however, Shroob's Chomp will drop to the ground after lunging as she continues to hold its chain. In this state, Shroob enters a distinct Chomp-walking state, upon which she can move forward at her walking pace as her Chomp bobbles along. The wee beastie remains at its set distance from its master and proceeds to gnaw on any foes who touch its jaws, which have hitgrab properties — in other words, the Chomp can be shielded, though doing so carelessly might play right into Shroob's hands. The Chomp vanishes if Shroob is made to flinch during her walk, or if its head takes more than 15% after landing from its lunge.

While Shroob can only walk her Chomp back and forth in the direction it's facing, the player can forcefully hold the control stick backward for her to grab its chain in both hands and swing its sentient iron ball around in the opposite direction. The Chomp is lifted slightly off the ground and spun around at the length of its chain to face the other way, taking on a battering hitbox of 20%, 10% in extra shield damage and knockback KOing around 90%.

Players can either choose to end the animation there, letting Shroob proceed with her walk, or continue holding the control stick back and forth in an alternating rhythm. When this happens, Shroob will keep swinging her Chomp back and forth, elevating it a touch higher into the air as though performing an Olympic hammer throw. With relatively even control stick inputs, she'll spin her Chomp in place, while, with the stick held a bit longer to one side or the other, she'll ever so slowly scoot in that direction, maintaining and powering up her pet's ramming hitbox all the while.

Shroob performs each rotation over 40 frames, or 80 frames for a full circle, up to a maximum of three circles before she automatically stops spinning. Her Chomp-slinging strength increases after every two spins — rotations three and four inflict 30% and knockback KOing around 60%, and rotations five and six deal 40% and knockback KOing at 30%. Naturally, once Shroob gets going, a full-power spinning Chomp can be a terror to behold, especially with its chain at full length, not unlike Dedede strolling around with a charged jet hammer. She even mirrors the penguin monarch with super armor to attacks dealing less than 15% from her third rotation onward! It's definitely in opponents' best interest to deny her momentum from swinging a Chomp around — as each individual swing retains Shroob's 10% bonus shield damage, she's capable of shattering a max-health shield with any two rotations to a given side, or just one full-strength rotation.


That said, Shroob will need ample time and space to get anywhere near full momentum in a given match, not to mention precision in actually landing the ranged hitbox that is the Chomp's head. Should a foe surpass the Chomp, her side-to-side movement generally won't be fast enough to catch them before they move inward and inflict severe punishment. Shroob also undergoes a monstrous 86 frames of end lag upon completing her full six rotations, pausing to pant slightly from the strain. This puts some onus on Shroob to wield her Chomp with care instead of just spinning mindlessly in the hopes that she makes contact, for example, at the ledge, where a hanging foe could simply wait out her spins before getting up.

Press B while walking a Chomp, and Shroob will jerk her chain inward with force such that it ripples up and down, pulling the Chomp two squares closer over 20 frames. Conversely, the player can re-use Side B with a Chomp already onstage for the simple creature to charge another directional lunge from its present location. The Chomp cannot exceed a six-square chain but can be made to leap back out after Shroob has pulled it closer, and over a slightly lesser charge time given its existing range to boot.

Combining these two inputs, Shroob can target and snag opponents predictably attempting to leap over her Chomp to attack her. Generally speaking, interrupting Shroob's walk is best done by feigning a grounded or aerial approach, before moving in after her Chomp is committed to that direction. Shroob will instantly put her Chomp away if it reaches her, after one to three yanks, depending on chain length. She also can pull in and stow her pet over a set 26 frames if the player holds B for more than 25 frames.

Shroob is free to perform her inward Chomp jerks while a foe is in the process of getting chewed on. Each jerk inflicts an added 3% to that victim and alters the inception point for their knockback, initiating it right next to Shroob if she holds B to jerk her chain all the way in. Given that the third chomp's launch isn't all that strong, positioning it to take place closer to Shroob can put her in position to combo into an aerial at low to mid-percents. This is further enhanced if she's being circled by Shroob saucers with an upward command, letting one or two spin into her target for added damage before they're chomped into orbit.


And of course, all manner of shenanigans become possible when temporal ghosts are introduced into the fray. These are fully capable of performing attacks while Shroob is pulling in her Chomp, letting her combo or kill confirm its chews into a duplicate's strike, so long as she uses the right timing for the specific attack logged. For example, a horizontally oriented ghost attack could intercept and launch a victim being pulled in from the side mid-chews, whereas a vertical attack or aerial might be best thrown out to catch a foe immediately after they're sent flying from chew number three.

Should a Chomp grab a Shroob saucer during its lunge, it won't start chewing the underling but rather will grasp it in its teeth, like a good doggo carrying a frisbee. Contrary to the wide-eyed alarm the saucer now shows, this won't damage the craft but rather grants Shroob a degree of control over its position, at the cost of her Chomp losing its hitgrab properties. Her Chomp will carry the saucer as she walks it around, relinquishing it in place once Shroob fully yanks its chain in. This gives her a means for depositing saucers at a tailored position by yanking her chain partially back to her liking before pulling her Chomp in all the way.

Alternatively, charging and angling Side B at this time has her Chomp spit its saucer in that direction before automatically getting reeled in. This regurgitation powers the craft up from a weak to a strong saucer launch hitbox over the course of a second. Regardless of charge, however, the Chomp here inflicts a set 5% to the saucer, generally keeping it in play for Shroob to reuse later. Once relinquished or spat out, the saucer will pause for a moment before moving to return behind Shroob, creating an opening for her to smack it back out again if she so chooses.


In pitbull-esque fashion, Chomps won't release saucers even when they or their cargo are struck by outside attacks. This allows for setups where a time duplicate can wallop on a saucer as it's held down by a nearby Chomp, lowering its HP such that the ensuing spit will cause an explosion as it's sent at a target. With a foe in range, Shroob also could arrange for a ghost to knock them outward, ideally keeping them in hitstun such that her pet can immediately spit the saucer into them for a forceful launch.

Shroob is capable of casting out her Chomp in midair, with her midair descent slowing briefly as the pet strains at its chain length. Given its staggered nature, her Chomp's lunge can prove effective at catching foes out of ill-timed air dodges, giving Shroob a punish option with more range, albeit more lag and less KO power, than her regular aerials. Without grabbing a target, Shroob will simply drag her Chomp down with her and enter her regular walking state upon landing. Players also can stow her Chomp by holding B or cast it further out with Side B as usual.

The latter comes in handy for recovery mix-ups, as Chomps allow Shroob to tether to the ledge. In instances where Shroob is falling from some height offstage, she can begin charging and angling a Chomp lunge as a means for threatening would-be gimpers. It's a potentially potent, yet committal deterrent, as Shroob loses the option to immediately throw out an aerial or Up Special, and sneaky foes can bait out a linear lunge before intercepting Shroob for the real kill.

In cases where Shroob's Chomp falls down or is walked off a platform or ledge, its head will dangle down as far as its chain will allow. With sufficiently low and long platforms, Shroob is able to walk a Chomp back and forth on a lower stage level while she keeps her position above. This holds true when she's riding atop a Shroob saucer platform, letting her glide forward low to the ground to walk her Chomp, able to soar in midair after victims it ends up chomping.

Dangling Chomps offstage can intercept low recoveries and deter prolonged ledge hanging, in a manner similar to Isabelle's fishing rod. Doing so isn't effortless on Shroob's part, however, as she'll first have to yank her Chomp to the proper height and time its dangling such that her victim can't neutralize it with an attack. With some prep time, Shroob can proactively weaponize a dangling Chomp by casting it down from a saucer platform and gliding around after opponents, taking on the appearance of a deranged purple Lakitu in the process.


UP SPECIAL - FOREST'S MUSHROOMS
The gem on Elder Princess Shroob's tiara glows purple as she raises her arms skyward in a ritualistic stance over 28 frames. Afterward, she thrusts them down with a guttural growl, appearing to generate misty purple spores from her clawed hands as a sea of miniature Shroob mushrooms begins sprouting up underneath her. An input tap has the mushrooms fill in the two training stage squares underneath Shroob and ripple out 0.5 square to either side, for a three-square patch. Continuing to hold Up Special has Shroob keep pouring spores into her patch, which extends a full square to either side after 30 frames and to a two-square maximum in both directions after a second. She can spawn multiple patches across the stage given the time and space, though she's unable to have more than six total squares worth of mushrooms out at a time.

Once Shroob stops emitting spores, with 32 end lag frames, she'll begin healing 1% for every 12 frames she stands amid her shrooms. Players also have the option to keep holding the input after reaching maximum patch size for Shroob to remain in her mist-spraying state, not growing her mushrooms' coverage any further, but imbuing them with progressively stronger healing properties. An additional full second in Up Special powers patches up to heal 2% per 12 frames, and a second further brings mushrooms to their cap of healing 3% over those frames — after 208 continuous frames, or about 3.5 seconds in the input uninterrupted. A dark iteration of the stock Super Mushroom sound effect rings out as Shroob enhances a patch past these two intervals, as the mushrooms therein begin bobbling back and forth, first slowly and then more fervently, to signify their more potent perks!


In any case, Shroob's mushrooms will remain onstage for five seconds before poofing away. Reusing Up Special atop an existing patch will reset this timer, at least for the patch length Shroob refreshes with her spores, and then start enhancing its healing properties. As a balance measure, in niche cases where Shroob can stand within the overlap among multiple disparate mushroom patches, her healing rate is capped at 3% per 12 frames.

Shroob's ability to park her overlarge behind in a mushroom patch and heal is naturally a fantastic perk when her opponent is AFK. In virtually all other matches, however, getting out even a low-level mushroom patch takes some commitment on Shroob's part. Get too cute trying to spawn one, and her heavyweight frame will suffer a beating likely to leave her with a good deal more damage than she likely would have healed in dribs and drabs to begin with. Mushroom patches can more safely be established with some distance between Shroob and her target, another deterrent against camping zoning beyond Down Special's time holes, or while she has an opening right after KOing a victim.

Shroob also has strategic considerations to keep in mind with mushroom patches, depending on her matchup. Boosting Shroob's survivability on paper is always a plus, especially given her potential vulnerability to her own saucers. That said, dropping Shroob below certain damage thresholds could open her up to actual zero-to-death setups (Luigi's very well designed moveset says hi), or alternatively lower rage she otherwise could harness to polish off stocks with more brutal efficiency.


Shroob's opponents see decidedly less pleasant results upon stepping into a mushroom patch. Other characters take gradual poison damage at the same 1-3% rate per 12 frames as Shroob otherwise would have healed. What's more, should opponents take more than 7% from mushroom fumes, either in one fell swoop or over the course of the patch's onstage duration, they'll find themselves bodily transformed into a large purple mushroom themselves! These Olimar-sized fungi constitute a stun state most comparable to a slightly stronger Yoshi egg, not subjecting affected characters to knockback but freeing Shroob up to pile on bonus damage.


With the right prep time, this damage output can become copious, combining the mushrooms' continuing poison damage plus that from any time ghosts Shroob has to spare before the victim mashes out. While opponents can escape without much difficulty up until higher damage levels, they must also take heed of the small midair hop they're forced into upon doing so. During this window, Shroob can apply further pressure if she's not caught with her pants down charging a Smash attack, in which case the released victim could turn the tables back on her!

These spores' gradual damage counts toward foes' 7% mushroom transformation threshold regardless of which among multiple patches inflicted it, effectively extending their danger period as a reward for Shroob if she successfully creates multiple sets of mushrooms in quick succession. Small comfort as it may be, should Shroob grab and hold a foe within a mushroom patch, they'll also have until their regrab timer wears off before they're susceptible to being transformed. Naturally, mushroom patches become significantly more threatening in terms of how quickly they can poison and transform opponents, the more time Shroob puts into growing their coverage and increasing their potency.


At full strength, a mushroom patch will effectively instantly transform an opponent should they so much as shorthop in and out more than once. Shroob does, however, have to contend with a quirky property that becomes all the more relevant, the stronger her patches become. Each mushroom patch has a set spore percentage quantity that is expended both through the damage Shroob heals and that opponents take. A base strength patch can heal or inflict 10% before automatically dissipating, a figure that rises to 20% and then 30% with her additional time investment powering the mushrooms up.

One could be forgiven for assuming Shroob isn't faced with much choice playing around this threshold, as she's free to heal at a rate commensurate to her patch's strength while foes always take just 7% to be transformed. Her challenge comes into play where her underlings are concerned. That's because Shroob saucers and Chomps will heal at the same rate as the less-than-good princess herself as long as they respectively are hovering within two training stage squares overtop a mushroom patch or have their head sitting within one. Shroob's options are generally more straightforward where Chomps are concerned. Should lighter enemy attacks nick one's head without KOing it, Shroob can try walking, yanking or swinging her pet onto a mushroom patch to preserve its onstage longevity. She also enjoys positioning a patch such that she can yank her Chomp through it after it has latched onto a foe, piling on that much more poison damage to increase their peril upon escape.

Shroob's gameplay possibilities become more intricate when one or more saucers enter the picture. With full-stamina saucers directly in tow, Shroob can stand atop her mushrooms and heal or try forcing opponents into their midst without concern of sapping their spores. Once one or more saucers return with a dent in their HP, however, Shroob will have to share her mushrooms' healing power, up until the craft in question returns to its 25 HP cap. For example, standing in a 10% patch with a saucer below 20 HP will see Shroob split its healing so she and her craft both recover 5%. Shroob's healing will take priority in cases where an equitable split can't be achieved, like if she and three accompanying saucers land in a patch with just 1% left to disperse. And patches prioritize the lowest HP saucers in uneven cases where more than one is in need of healing.

Shroob can deny her following saucers healing by standing at a mushroom patch's edge, so her saucers are hovering over regular ground, though this can render them more likely to be attacked or weaponized against her, depending on her opponent's position. In some cases — say, if Shroob has little to no damage, or is OK healing less so as to preserve rage — she may have no compunction about letting her saucers take priority in healing. Indeed, if peppering up her saucers is the priority, Shroob can always use her platform command and glide low over a patch, exempting herself from the mushrooms' healing power to prime her crafts for future abuse. While on that subject, Shroob cannot generate mushroom patches overtop her saucers during this command.

Mushroom patches take on more fun utility once Shroob starts batting her saucers around. Individual saucers can last longer on average if Shroob happens to smack them such that their launch trajectory ends with them overtop a patch, leaving them to heal part or all of their damage during their brief stun before returning. She also can realize this benefit if her saucer's return path happens to take it overtop mushrooms or if she's standing within them as her craft's end point. Of course, if Shroob intends to launch a saucer such that it explodes, she'll want to make sure she angles her launch such that an inopportune mushroom patch doesn't rob her of that hitbox. Foes, too, will find themselves taking mushroom patches into consideration in attacking saucers, whether to avoid or minimize their healing in launching them or trying to hoist Shroob by her own petard with an explosion. With mushrooms in play, saucer tennis is no button-mashing competition, that's for certain.

Up Special manifests rather differently when used by Shroob in midair. There, she'll crouch slightly, as a purple mushroom appears underneath her, similar to those into which foes are transformed via her grounded patches. This is a charge state lasting up to one second, during which Shroob's descent initially slows before beginning to resume. On release, she bounces upward off her mushroom, which drops down up to six training stage squares before vanishing as a meek 3% stunning hitbox. Shroob's charge boosts her ascent from four to six squares, granting her a functional recovery, albeit a worse one than a comparable analogue in Banjo's Shock Spring Jump, which boosts the buddy duo six to eight vertical squares over a shorter charge time. While Shroob can deploy her Chomp tether or air dodge to reach the ledge after her jump, her recovery trends predictable once she starts getting launched offstage, especially given her 25 end lag frames before she can react upon reaching her apex.


Shroob's falling mushroom will form a base level patch upon landing on solid ground. What's more, its weak descending hitbox will count toward enemies' transformation threshold from the patch it ultimately creates, or others already onstage. By using Up Special from a shorthop or as Shroob is coming down from a landing, she can alternatively threaten opponents below her or create a safe zone for touching down. Upon initiating Up Special from a low enough shorthop, Shroob will automatically transition from her midair charging state to her spore spewing animation after landing onstage. Situationally, this can come in handy as far as mix-ups go, perhaps when Shroob has time ghosts logged with both grounded and aerial attacks. The latter could aim to knock a foe away so Shroob can stay behind and grow a larger mushroom patch, while the former can launch a foe upward so the still-airborne Shroob can bounce off her mushroom and into position for an aerial follow-up.

STANDARDS

JAB - SMACKDOWN
Elder Princess Shroob raises her left clawed hand and angrily swipes it in a downward arc, seeking to mow down any faucet-faced foes in her way. Emerging on frame 8, her smack's hitbox falls a hair short of Bowser's initial jab punch in terms of horizontal range but stretches a touch higher into the air. Shroob inflicts 6% and diagonal downward knockback that, past 20% on middleweights, sends victims at a downward angle such that they impact the ground 1.3 training stage square in front of her. Barring a tech, those foes are stage-bounced into the air in front of Shroob, two to four squares at a steep upward angle within your pedestrian percentage ranges.

From there, Shroob is positioned nicely to follow up on their possible reactions, with 18 end lag frames should she end her jab after hit one. A shield-grab can effectively counteract a good number of falling aerials; Shroob also can initiate a saucer tractor beam command if her opponent leaps away; or a dash attack, F-Tilt or daring charged Smash should they simply fall or dodge downward. Of note, Shroob can stand at a platform's edge to smack aerial foes downward and into a prone state if they land on a lower level. This situationally can serve as a deterrent to high recoveries, though Shroob's launch angle generally isn't enough to keep most offstage opponents from making it back to the ledge anyway until rather high percentages.

Onstage, Shroob must be quick on the uptake in the scenario that her opponent techs their stage impact from jab hit one, though she's still equipped to respond in kind. Stationary get-ups or standard spot dodges free Shroob up to proceed right into jab hit two — an arcing uppercut-esque swipe with her right hand that stretches out a smidge further than its predecessor, inflicting 7% and knockback KOing around 200%. It's a straightforward solid hit from which Shroob can lead into F-Air up until mid-percentages, and that renders her target vulnerable to a well-aimed launched saucer to boot. That said, with 26 end lag frames on whiff, Shroob won't want to cavalierly throw out jab hit two unless she's confident it will connect, perhaps aided with mushroom patches strategically positioned to lock off tech rolls in a given direction.


Saucers add a fun ingredient into Shroob's jab mix. Her crafts' launch angle from smack one — diagonally down, then sharply upward — is a helpful go-to option in a variety of match circumstances, able to impact foes approaching both from the ground and air without sending the saucers too far away to easily return. What's more, jab is a great faster move Shroob can throw out in between the gaps of saucers she's commanded to rotate around her. With Shroob's rotation in effect, different hit sequences become possible on opponents, depending on how many crafts she's got following her. Shroob could combo one or more spinning saucers hits into her downward smack, or vice versa, as the crafts reach out just far to nick them before they're stage bounced.

Jab hit one into a spinning saucer into jab hit two, too, serves as a functional three-hit string. With excellent timing, Shroob can strike both a foe and saucer with the same smack. This sends the two targets bouncing off the stage at the same time, such that the craft's hitbox precludes any techs and connects with the accompanying foe right after they hit the ground. And as a standalone strategy, Shroob proceeds between her two jab hits quickly enough to where she can smack out one rotating craft apiece, sending them at disparate frontal angles to create even more of a headache for incoming opponents.

While Shroob alone can't really combo together her jab hits on an enemy, a number of possible mix-ups become possible where time ghosts enter the picture. Mechanically, Shroob's time hole registers both a standalone jab hit one or consecutive jab hits one and two as single attacks, depending on which she performed over her most recent three moves. With these options in the chamber, Shroob can unlock a rather bullying damage-racking tactic, in which she walks forward and alternates between using and having a ghost perform her initial downward smack.

Timed right, she'll effectively dribble her opponent across the stage, as each subsequent jab intercepts the foe before they're stage-bounced too high out of reach. This string can end with either Shroob or her ghost pulling off jab through hit two, as the other's jab hit one holds the victim briefly in place, or opting for a different combo ender. Of course, Shroob or a duplicate might need only spank, err, smack a foe off the ground once to waylay them long enough for their counterpart to send them packing with a Smash or spinning Chomp. More defensively, a ghost's jab can prove handy in games of saucer tennis foes have initiated, whether for batting back crafts such that they can bring about an explosive payoff, or at least safely intercepting potential blows that otherwise would have been headed Shroob's way.


DASH ATTACK - SHOULDER BARGE


Elder Princess Shroob hunches and bends a shoulder forward, briefly hastening her mad rush forward to bowl through nearby onlookers. A Wario-esque maneuver featured during her first boss fight phase, Shroob's charge comes with a strong initial 14% hitbox that KOs vertically at 125%, followed by a 9% sourspot KOing closer to 160%. It's a reasonably fast burst option that comes out between frames 9-18, over which Shroob travels three training stage squares. While in motion, she'll cross up any foes shielding within a square of where she initiates the attack. With 24 end lag frames, however, Shroob generally is vulnerable to a shield-grab if she doesn't pass through her enemy's bubble, and some faster shorthopped B-Airs can punish her even if she does.


Should the player hold, rather than tap A when initiating dash attack, Shroob will up the ante in terms of her move's risk-reward factor. Here, following her nine-frame startup, she'll skid to a halt and charge in place for up to one second, flashing as though powering up a Smash attack. Upon release, Shroob immediately surges forward with significant velocity, from five to nine squares at the pace of Wonderwing. Through the entirety of this souped-up charge, she maintains a single hitbox dealing 22-29%, 10% in bonus damage to shields she speeds through and knockback KOing from 85-50%.


The staggered nature of Shroob's charged dash attack lends itself to all sorts of bait-and-switch options. Chief among them, she's able to out hasty spot dodges from those expecting the vanilla move, or dash up close, stop in place as though charging dash attack to scare a foe into shielding and then grab. That said, Shroob's charged charge carries a universal 70 end lag frames as she slowly decelerates. Predictable bum rushes are a surefire way to net Shroob a heaping plate of punishment, a consequence she might face regardless against foes straight up skilled enough to react to her attack's stop-and-start nature on the fly. As some small comforts, Shroob boasts super armor on the first third of her charge distance and crosses up enemy shields up until the last third of her charge distance. This inflicts above-average shieldstun such that, if she runs far enough past, she's not a wholly sitting duck.

Dash attack is one among a handful of moves that Shroob can soup up by way of any saucers she's got directly following her. As Shroob begins muscling forward, either with her default or charged attack, her alien underlings will speed up to keep pace, taking on weak ramming hitboxes behind her. These deal 5% apiece and low vertical knockback popping foes up lightly in place, with no real KO potential to speak of. These hits won't combo into Shroob's dash attack proper, and thus aren't especially functional for regular damage racking.


Rather, the saucers give their master added cover to make her move more defensively sound, as foes now must take care not to drop shield too soon in their haste to retaliate. In this respect, the precise distance Shroob crosses up a shield becomes more critical — a regular dash attack will push Shroob through far enough for a single saucer, the one closest behind her, to make impact, while a charged move can allow two or three saucers to ram, depending on her starting position. The first saucer's hitbox becomes active nine frames after Shroob charges into her foe's shield, with each subsequent craft staggered 25 frames apart. A single saucer trailing after default dash attack can hold a foe in shield just long enough to render the move safe for Shroob in passing through, or set her up for B-Air if they drop shield in between the two hitboxes.

A lone saucer isn't sufficient to protect Shroob following her far laggier charged dash attack, though two crafts passing through often will do so against all but the fastest foes, and three saucers can give Shroob a short window to move in and take a swing at her enemy's diminished bubble. A foe nicked by the last saucer in a two- or three-craft lineup also can find themselves in a pinch, as Shroob can close the gap during their hitstun and attempt a follow-up. Then, there are the mini-mix-ups Shroob enjoys with dash attack and saucers, where she can switch up whether she allows spawning or returning crafts to reunite with her while powering up her charge, or releases the move first so the saucers are sent flying skyward as she barges along the ground. The main fly in the ointment on Shroob's part is the risk of practiced foes parrying each saucer hitbox, or throwing out a fast out-of-shield or area-of-effect type attack to knock her craft formation askew, in both cases potentially punishing her despite her precaution.

While hurtling forward with a charged dash attack, Shroob has another movement option at her disposal — the ability to jump during the first three squares of her rush. She continues barreling forward in the animation in midair, halving the distance her charge otherwise would take her on the ground but nonetheless retaining robust forward momentum. In midair, her charge's hitbox persists but weakens a fair amount, to 12-16% and knockback KOing from 145-110%. As other key differences, Shroob discontinues her charge on impact with an aerial foe, rather than passing through, and contends with substantially less midair end lag, at 22 frames. Factoring in her weaker launch, Shroob now can combo a leaping charge into an N-Air or F-Air up through mid-percents.


That Shroob's forward momentum continues after her aerial charge animation ends can serve both as a blessing and a curse. Instead of going to land aerial dash attack itself, Shroob may leverage its forward oomph to press in on a victim with an aerial, perhaps crossing up their shield with that move's hitbox. Meanwhile, any saucers following Shroob mid-charge now can snag foes as they come out of air dodging her primary hitbox. Close enough to the end of her trajectory, Shroob then can double back with her midair jump to attempt an aerial.

While doubling back this way also is Shroob's ticket to recovering should her midair charge leave her offstage, she's playing with fire using a powerfully-charged leaping dash attack near the ledge, which can put her in a prime position to be gimped. Of note, while Shroob normally stops charged dash attack at ledges, more daring players can hold the control stick for her to barge ahead offstage, where she proceeds functionally the same as she does leaping during the attack. Situationally, this tactic can help Shroob end a recovering target's stock or pass through a foe shielding right at ledge, such that she can immediately leap back in to poke at them with B-Air.

Time ghosts can log both Shroob's regular and charged dash attack as either were used among her most three moves, down to the latter's precise level of charge and transition, if any, into midair. Control-wise, the player can trigger a duplicate's dash attack either from Shroob's actual dash or during another stationary animation by way of an instant dash attack input. Players can mix and match ghosts' regular and charged dash attacks, regardless of their order in Shroob's time hole queue. However, in cases where she's logged more than one charged dash attack, individually with distinct charge and movement properties, her time ghost defaults to the most recent version.

A ghost's vanilla dash attack is a strong poking option for Shroob at mid-range, where she can safely send the duplicate to probe her foe's defenses. Successfully land a hit, and she'll have an aerial target at which she can smack a saucer. The shield-crunching threat of both Shroob and a ghost using back-to-back dash attacks — whether from a single direction or the duplicate rushing back in the opposite direction after a cross-up from its master — often can incentivize opponents to leap up, after which Shroob can try steering them into saucer territory or a mushroom patch. And a ghost's regular dash attack also becomes a great tool for covering tech chase options, as they burst out to trample over foes' neutral get-ups and outward rolls while Shroob herself covers the opposite direction.

Intriguingly, with charged dash attacks, Shroob's ghosts do not immediately rush forward, but sit back while building to the appropriate power level, not dissimilar to one of Zelda's Phantoms. With the necessary prep time, Shroob can position a duplicate as a brief means of threatening good stretches of your standard stages, possibly timing their charge such that it sends foes soaring out of a Chomp's bites or her grab.

At her craziest, Shroob could even log three charged dash attacks, each with varying coverage, before clustering the ghosts together in quick succession so they run wild for a short, yet devastating spell. More straightforward, but still alluring for clip-hunters, she can send a ghost leaping offstage out of charged dash attack, where it can proceed right into an aerial she's logged and buffered for an onstage gimp attempt. And even with one just charged dash attack squirreled away, Shroob can order a ghost to safely set off proximity-based traps or fend off minions — maybe even blowing up wayward saucers enemies have sent her way.


FORWARD TILT - SHISH KEBAB


Elder Princess Shroob leans forward and thrusts her clawed hand forward with malice. As she does so, her arm transforms into a spike-pointed tentacle, evocative of those she materializes in her true form. With 10 startup frames, Shroob's tentacle here reaches out about as far as Incineroar's F-Tilt, sporting a spike sweetspot that inflicts 12% and outward knockback KOing around 120% from center stage, plus a weaker hitbox on its front half that deals 8% and won't KO at any meaningful percents.

As with comparable moves, Shroob can angle her appendage diagonally up for anti-air functionality, great when an opponent happens to be moving in to smack her overtop a frontal saucer. In the alternative, a downward-angled F-Tilt lets Shroob poke at recovering foes for a situational two-frame or those underneath her while she's on a low platform. With 22 end lag frames, Shroob's F-Tilt isn't the safest melee range option when shielded, though her tentacle still darts out sufficiently fast to punish poorly-timed offensive or defensive movements.

Hold, instead of tapping A during the move's startup, and Shroob will stretch her luck, extending her tentacle a touch further in the hopes that a foe will get her point. In Dharkon-esque fashion, Shroob pokes her appendage an additional training stage square for every 10 extra frames the input is held, up to an F-Tilt reaching three additional squares over 30 frames, or half a second. Her tentacle's frontal portion maintains its weak hitbox as it extends, slashing foes unsatisfyingly out of the way. However, those caught at its spike during the two-frame window it reaches its farthest extent are skewered with a violent-sounding ripping noise. These unfortunate chaps first take 14% and are suspended for a moment on Shroob's tentacle, prompting a zoom-in screen as she laughs darkly.


Afterward, she rips the tentacle back out, inflicting another 9% and launching the opponent back a moderate set amount that won't KO by itself, but generally keeps them close enough to be pelted with a saucer or chased down for a follow-up hit. As with F-Tilt's vanilla version, Shroob can angle her extended tentacle up or down to modify the point at which she can impale a target. In the latter case, her arm will lower to the ground before snaking along the stage, resuming a diagonal bend upon reaching any edges. This represents a range nerf on solid ground but opens the door for Shroob to catch foes from a greater variety of angles, including from higher platforms, ledges and atop commanded saucers.

While a definite danger, as one of the game's most damaging tilts, Shroob's tentacle stretch leaves her wide open on whiff, in an amount proportional to how far she stretched on the front end. Whereas she'll snap her appendage back in on hit, missing leaves her to retract it more gradually, over 10 additional end lag frames for every extra square she (over)extended, up to 52 end lag frames for an unsuccessful full-range F-Tilt. Shroob's longer-ranged pokes can be particularly susceptible to shields, which halt her tentacle's extension on impact. Players with reflexes quick enough to block her attempted barb near maximum range could even dart in and charge a Smash, capitalizing on a truly boss-befitting move's boss-esque period of vulnerability.

Alongside jab, F-Tilt could be considered a bread-and-butter move for Shroob in smacking saucers in the direction of her choosing. Depending on her timing, she can poke a saucer with either her vanilla sour- or sweetspot, with or without an angle, as it's materializing or returning to her to determine precisely where it's launched, and how fast. There are guessing games at her disposal as to whether she's going to stab outward from a gap in a spinning saucer ring, poke a craft outward or try comboing a saucer's light hit into F-Tilt.

Meanwhile, foes caught in saucers' tractor beam blasts can find themselves positioned perfectly to be impaled by Shroob's extended tentacle. For better or worse, if Shroob skewers one of her own underlings, the ensuing damage will reduce the poor craft past its explosive 0 HP marker after she rips her appendage out. While Shroob has less committal options for weaponizing her crafts' blasts, some players might appreciate the brutal efficiency in cutting right to the fiery chase. As one twist on this setup, if Shroob pokes through a craft hovering over a mushroom patch, it will heal just enough HP while impaled to not immediately die after launch, but from essentially any other one hit afterward — a benefit to Shroob if she wants to control its detonation closeby, but a drawback if a foe is able to beat her to the punch.


Other synergies also can emerge when Shroob uses her tentacle thrust and mushroom patches in tandem. Despite its lag, watching Shroob's tentacle suddenly erupt from her sleeve in its extended form can frighten foes into rolling or air dodging into patches, clearly no ideal scenario if they've already taken a few ticks of its poison damage. Shroob players with brilliant timing can stab through foes within a mushroom patch to up their damage intake, though even if they pass the required poison threshold, impaled characters won't transform into mushrooms, having to land from their ensuing launch first.

While spamming shorthopped aerials is technically more optimal for damage racking against mushroomized victims, an extended F-Tilt lets Shroob reliably inflict a quick 25%, counting as a hit and saving her from her end lag even if the foe mashes free midway through. Relevant to the above interactions, Shroob's extended tentacle does not count as part of her hurtbox and, thus, won't heal her if it alone is stretched into a mushroom patch.


Time ghosts introduce still more spooky fun into the proceedings where F-Tilt is concerned. At a basic level, Shroob can have a duplicate cover her end lag upon whiffing her extended poke, possibly if she's logged some frontal attack she doesn't mind losing. From an offensive standpoint, a ghost's vanilla F-Tilt is a solid option for knocking a saucer forward such that Shroob quickly can dash along behind it for added pressure. There's also a good deal of vicious satisfaction to be had in using a Chomp to yank a victim into position to be impaled by a ghost's tentacle sweetspot.

Most exciting, though, is the sheer potential the mad queen unlocks upon stabbing through a victim with the right ghost attack ready to go, or if her duplicate does so directly — a relatively maddening feat, given the tricky sweetspot and bevy of potential tentacle lengths and angles. In contrast with Shroob's comparatively easier to land Chomp chews, opponents are not launched while struck during their brief impalement window. Rather, they take full damage from the interrupting attack, as its knockback overwrites, and compounds, the directional launch they otherwise would have endured from Shroob tearing her tentacle free.

Put these ingredients together, and Shroob can attempt any number of strings, from halting an enemy's launch from something like jab or regular F-Tilt with a ghost's impalement as a functional combo extender at low- to mid-percents; to leading with a ghost's skewer and following up with an aerial or saucer smack; or even riding a saucer platform such that Shroob is aerially in position to chain a ghost's initial tentacle sweetspot into her own right afterward. The possibilities broaden further in cases where a duplicate manages to poke through a saucer. When this happens, Shroob could either smack the craft at the end of her ghost's appendage, modifying its explosive launch trajectory as a mix up, or muster a second saucer to launch in the same direction for concurrent hitbox coverage. Talk about a thorny predicament!


DOWN TILT - SWEEP


Elder Princess Shroob leans slightly toward the screen before performing a quick spin in place. Two of her true form's tentacles sprout from underneath her dress and are dragged low along the ground to slice foes as she does so. Her tentacles reach out a hair shorter than Mewtwo's tail via D-Tilt and with slightly more startup, at eight frames vs. six. In Shroob's favor, however, are her tentacles' two consecutive hits over 13 active frames, both of which mirror F-Tilt in having their own sour- and sweetspots. The main length of her tentacles inflicts 6% and pops foes lightly into the air, while their spikes produce a swordie-reminiscent slashing noise on hit, inflicting 13% and vertically oriented knockback KOing from most main stages around 135%.

While Shroob's two tentacle hitboxes won't combo into each other, they grant her a slightly longer coverage window with her hitboxes. And given her relatively painless 18 end lag frames, she's generally in a good position to follow up on her victim, regardless of whether her first or second appendage met its mark. Shroob enjoys bonafide uses for both of her D-Tilt hitboxes, with her sourspot capable of chaining together two or three times against low-damage foes, depending on their weight. Its length also is potent at tripping foes up just enough for her to land a close-ranged grab up through high damage levels, not dissimilar to Lucas. Meanwhile, her tentacles' sweetspots are juicy tools for punishing poorly-spaced defensive maneuvers and instigating potential ground-to-air combos. At max range, Shroob can safely repeat D-Tilt against enemy shields to put her target in a fight or flight situation, lest her spikes eventually poke at their feet.

Individual tentacle sweeps are generally a welcome inclusion among a time ghost's repertoire; having a duplicate use the sweep to start a combo lets Shroob take pause and proceed with the most optimal attack and timing, versus having to immediately act after sweeping to keep the string going. Timed right, D-Tilt sourspots can be snuck in among Shroob and her ghost's jab dribbling for added damage, and later become KO setups as one queen pops a target up for the other to send flying, or else grab for the first to strike again. And occasionally, against some recovering victims, Shroob can station her ghost at the ledge to attempt a two-frame with D-Tilt's lingering tentacles, freeing her up to run offstage interference from another angle.

Worth considering, as a borderline spammable standard, D-Tilt can prove beneficial for Shroob in quickly shoving undesirable attacks out of her most recent three attacks, such that a ghost can log better alternatives. The flipside, of course, is that Shroob must do more than just spam D-Tilt before kicking off Down Special if she wants her ghost to have access to the bigger punishing moves best for capitalizing on D-Tilt in the first place — or else spend time burning ghost D-Tilts to clear room for a more varied attack lineup. One difficult, yet immensely satisfying setup where multiple ghost D-Tilts can come in handy involves pressuring an enemy shield with those ethereal tentacle hits while Shroob herself builds up momentum swinging her Chomp around. If that target is baited into rolling behind the gyrating Shroob to escape her ghost's tentacles, or else casually sits in shield a tick too long, they're almost certain to pay for their indiscretion with a stock.

One could infer from the lack of saucer mentions in D-Tilt so far that Shroob's low-to-the-ground hitboxes aren't generally her best bet for smacking the aerial crafts, and they'd be right. The exceptions generally come when a saucer is returning to Shroob from a lower vantage point, with a target closing in on her from above, or when she's left to bat back a craft a foe has sent in her direction at a low angle.

While situational, either of Shroob's tentacle hitboxes are able to salvage saucer launches that otherwise would have whiffed. Sweep aggressive foes rushing in up or outward into a craft Shroob has just sent hurtling for a one-two punch, not unlike a K. Rool standard into a cannonball, possibly with fatal results if the saucer was on the verge of exploding. And D-Tilt often can become a go-to attack as Shroob is cruising around atop her saucers in platform form. Not only will she have an easier time landing D-Tilt's sweetspot through her crafts' midair mobility, but unlike with other downward oriented hitboxes, she can sweep her tentacles while on saucers freely without fear of prematurely knocking them out from underneath her!


UP TILT - ROYAL HEADER
Elder Princess Shroob crouches and tilts her oversized mushroom noggin back momentarily, before swinging it in a left-to-right arc above her head. Sharp-eyed players will notice her crown's jewel flash a bright purple right at the start of her animation. Coming out on a respectable frame 9, her headbutt affects opponents differently, depending on the the point at which they're struck during her swing. Those bonked at the apex of Shroob's headbutt take 9% and vertical knockback KOing around 140%, figures that lower and increase to 7% and 155%, respectively, right before she concludes the swing in front of her. The former comes in handy as a juggling tool on most foes, while the latter can scoop up characters directly in front of Shroob. Once that happens, U-Tilt's tolerable 26 end lag frames leaves Shroob in position to chain into at least one more headbutt immediately afterward up through mid-percentages.


However, foes hit during a two-frame window right at the start of Shroob's headbutt — typically necessitating point-blank contact at the move's inception — take a stronger electric hitbox of 15% that KOs off the screentop closer to 120%. Beyond just a strength boost, Shroob's crown-powered U-Tilt is one of a few of regular moves that also imbues victims with a nasty aftereffect — a purple tinge of mushroom spores sticks with them, inflicting 1% every second for the next 10 seconds, for 10% in total poison damage. This status effect doesn't just serve to damage rack on targets, but also enhances the potency of the spores they ingest upon landing in Shroob's mushroom patches, which as you'll recall, turn foes into fungi after they've inflicted 7% over their onstage duration.


Over the course of their aftereffects from U-Tilt's crown hitbox, foes who touch down in Shroob's 'shrooms will find they inflict poison damage at 1.5x their usual rate — or 1.5% every 12 frames in a base level patch, up to 3% or 4.5% per 12 frames in stronger, tougher-to-summon mushroom fields. With any patch being relatively committal to bring out as is, Shroob appreciates the temporary greater ease in mushroomizing her foes, with the reward of a near-instantaneous transformation if that victim so much as nicks a full-force field she's managed to spawn. Should Shroob strike a target with U-Tilt's crown hitbox for a second time while they're still suffering from spores, she won't stack its poison damage but rather refreshes the effect's timer.

In a neat parallel to mushroom patch properties, hitting saucers with U-Tilt's crown hitbox will inflict the attack's initial damage and launch before gradually healing the craft 10% over 10 seconds. This effect won't kick in if Shroob's move finishes off a saucer's HP, and it won't heal a craft above its default 25 HP. Even so, purposefully headbutting a saucer to imbue it with crown magic can grant it more longevity to carry out Shroob's bidding, while also making it harder for opponents to track just how much more damage they can endure before blowing.

With that in mind, this could be an instance where Shroob opts to swap a healing saucer to the back of her queue with Shield Special, so as to ensure it specifically sticks around for longer. Having U-Tilt's spores heal one or more saucers also is an especially nice perk in cases where Shroob wishes to hog a mushroom patch's healing properties for herself. And it's not all that hard to find chances to harness this effect, given U-Tilt's general utility for launching saucers vertically. These upward trajectories may be harnessed for general anti-air use or for vertical craft redirection, after saucers have been smacked back Shroob's way or impaled in place by a time ghost's tentacle.

When logged by a ghost, U-Tilt's benefits can be enhanced both in terms of damage racking and vertical launching. At a basic level, Shroob can stand under a low platform so both she and a duplicate can perform staggered intangible headbutts a short distance apart — great for covering enemy getups. With excellent timing, both Shroob and a ghost can headbutt a single foe back to back from underneath, initiating the second U-Tilt so it intercepts the victim out of the first's hitbox and launches them further with its added damage.

Even if the foe manages to dodge one attack, the latter can keep applying pressure as they come out of a dodge or are jarred in shield-stun. React quickly, and Shroob can track a ghost's headbutted victim skyward, such that she could true combo into U-Air or attempt U-Smash after landing on a low platform. And, if a ghost's U-Tilt baits a landing foe into air dodging, Shroob can sit tight on the ground and enjoy easier timing landing her own headbutt to clinch its sweetspot or an eventual KO. Of note, in the inverse scenario, ghosts are fully capable of inflicting their own U-Tilt spores or refreshing those from Shroob’s own crown. Now that's using your head!


SMASHES

FORWARD SMASH - A BIT OF A STRETCH
Elder Princess Shroob converts her arms into true form tentacles, stretches them down to embed them in the stage at her feet and pulls herself back one training stage square, her face contorted with exertion. Upon release, she releases her hold, rubber-banding herself forward in a low-to-the-ground arc, traveling two to four squares in a powerful body slam. While Shroob's actual F-Smash is quite fast, coming out on frame 6, she first undergoes 34 charge frames powering it up, for a combined 40-frame startup. She maintains a strong hitbox for the first half of her launch, dealing 28-36% and knockback KOing from 70-35%, and a weak hitbox for its duration, which inflicts 20-26% and KOs closer to 130-95%.

An unorthodox Smash, Shroob shifts her hurtbox while charging, letting her wield F-Smash as a pseudo-counter against shorter-ranged physical hits, or situationally pull herself into a mushroom patch to heal before releasing. Control-wise, players also must charge F-Smash opposite the direction they wish Shroob to lunge — a quirk that best befits the move's physics (pull back to attack forward) while rendering its feel that much more...alien.

Shroob is relatively safe on immediate release; her front boasts Bowser F-Smash-esque invincibility frames for her launch's first five frames, and super armor for as long as her powerful hitbox lasts. This armor dovetails with how far into her movement trajectory she can cross up shields, moving at a fast pace, around that of a fully-powered Samus Charge Shot. That said, upon landing, Shroob undergoes an unpleasant 48 end lag frames as she collects herself from her launch. Unless she's thrown herself into a mushroom patch or logged a fast ghost move for protection, she's a sitting duck up there among Ultimate's finest on whiff or against foes in position for a shield grab.

By virtue of its damage output, Shroob's F-Smash will automatically destroy saucers on hit, regardless of their health. As such, while in rare cases Shroob can F-Smash a saucer so its explosive tailspin fills air space as her body slam trajectory covers the ground, she has better options at her disposal when it comes to aiming and prolonging her crafts as threats. F-Smash is, however, far more complementary in tandem with Shroob's other saucer applications. She can achieve kill confirms by body slamming a foe she has popped up either with a rotating saucer's hit or a light ramming hit from a saucer platform she's riding on.

With the right timing and angle, Shroob also can tank hits from saucers foes have launched back her way, harnessing her invincibility or super armor frames to preserve her queenly mass that much longer. Should Shroob use F-Smash atop a saucer platform, or onstage close enough to a ledge, she'll automatically stop her forward momentum and briefly linger in midair to end her animation without propelling herself off. Players can find occasional uses for this more stationary F-Smash hitbox, like punishing foes who instinctively jump up from ledge, or guiding the saucer platform atop which Shroob is lunging at a target for scary pressure.

In the alternative, as with Shroob's charged dash attack, players can hold the control stick for Shroob to lunge off ledges. Here, she'll continue in her launch until she falls lower than her initial starting point, upon which she undergoes less than half the end lag she ordinarily would, at 20 frames. While an easy path to self-destruction in unpracticed hands, Shroob is free to throw herself past shielding foes at the ledge, only to quickly double back with an aerial or a landing turnaround grab. Launch Shroob down from higher platforms, and she can proceed right into jab, D-Tilt or a shorthopped aerial if she lands right in front of a victim; ditto for a saucer platform and follow-up aerials. Those looking to channel their inner Sephiroth could even throw Shroob off an offstage saucer platform to vindictively seal the deal against a recovering foe, at the cost of her own stock.

F-Smash is another attack for which Shroob unlocks a new variant with one or more saucers in tow. Upon release, any crafts directly following her will fan out close around her and hit her with a tractor beam, similar to that seen in her forward saucer command. This, in turn, grants Shroob a rather floatier body slam, as each saucer grants Shroob up to one additional square of distance, depending on charge — up to an eight-square launch, or almost half of Battlefield, with a fully-charged F-Smash backed by three crafts. Shroob also moves slightly slower in her arc, which now lifts her one vertical square off the ground, as opposed to right along it. And her F-Smash's damage and knockback output change noticeably; her super-armored strong hitbox now is present on the first third of her launch trajectory, with her regular weak hitbox coming out on its middle third. Her launch's back half, meanwhile, takes on a new hitbox, here inflicting 12-16% and knockback KOing from 190-155%.


There might well be match situations where Shroob prefers the comparable simplicity of her regular F-Smash, in which case she'll want to time it for when she's separated from her crafts or otherwise hasn't brought them out to follow her. However, saucered body slams can offer significant versatility in a number of match contexts, given how crafts' floatiness grants Shroob the more minimal end lag she enjoys when launching herself off ledges. Players also now have the option to cancel Shroob's lunge into a midair jump during the last third of her arc, in which case she begins traveling forward at her maximum air speed.

This can let her smack a mid-percent foe with a stronger F-Smash hitbox, before canceling her arc such that she can barrel at them with an aerial before they're out of hitstun. There's also creating guesswork for shielding foes as to whether Shroob will cross them up with her lunge itself, or jump out and fall down with an aerial once behind them. With these uses in mind, it can be a hoot for Shroob to charge F-Smash as saucers are returning, mixing opponents up as to whether she intends to explosively ram them or let them benignly return and assist her attack. The uncertainty likely is just as comforting for the underlings themselves.

F-Smash is by far one of the more threatening attacks Shroob can commit to a time ghost, as, with all Smashes, duplicates proceed right into the moves rather than undergoing charge frames. While not as powerful as their master's body slams, ghost launches effectively become a frame 6 kill switch should Shroob successfully log the sluggish move — no small feat, given the need to perform both it and the committal time hole process in relatively quick succession. Akin to DK with a fully-charged banana slamma, there's a certain fear factor for characters navigating Shroob while aware she's got this option stored away, lending to intense counterplay, whether they're trying to bait her into wasting her ghost or holding their breath to shield at just the right moment. Sometimes, that fear, more than the ghost itself, is what Shroob will want to capitalize on, perhaps in timing a shield-breaking Chomp swing or spacing an extended F-Tilt.

Some properties worth remembering for duplicate F-Smashes: for starters, ghosts begin their own body slams behind Shroob, as she does with her own launches. Timed well, Shroob can coax a frontal foe into rolling behind her, such that her ghost can slam them away. While ghosts cannot perform saucer-boosted slams, they will remember whether Shroob stopped at a ledge or launched herself past it for each F-Smash logged. It then follows that a well-placed ghost can lunge offstage, such that it can proceed into one or two aerials Shroob has logged and wall off low-recovering targets. If for god know what reason Shroob is allowed to log three F-Smashes, she's able to initiate the duplicate slams from different positions — or elevations, with a saucer platform — back to back to back, reaching a pinnacle of shield-crushing, foe-murdering goodness. Behold the power of Shroob!


DOWN SMASH - METEORIC IMPACT


Elder Princess Shroob's dress scrunches in somewhat as she crouches, almost resembling Peach charging her Super Mario Bros. 2 super jump. Upon release, she performs a bizarrely athletic, near-instant flip a short distance off the ground before landing with crushing force. Compared to Ultimate's definitive leaping D-Smashes, Shroob's lower torso has a rather limited hitbox, centered underneath her without reaching out to either side (at least with an uncharged leap). This still inflicts a respectable 23-32% and knockback KOing from 85-50%.

The meat of Shroob's D-Smash, however, comes from the circular shockwave she causes to ripple out a short distance around her. This spiky yellow energy is about one training stage square long and tall, and travels two to five squares to either side of Shroob as fast as Greninja's fully-charged Water Shuriken before dissipating. Similarly, foes caught are dragged along in four multiple rapid hits of 1-2%, which hold them in place for a final launching hit that deals 12-16% and knockback that KOs at 120-85%. This shockwave energy will disappear early if it reaches the end of a drop-through platform, though it lingers momentarily at ledges, forcing snap decisions from recovering victims who'll find themselves snagged if they spend too long hanging below.

D-Smash is a valuable, yet committal tool for Shroob in locking down portions of stage and applying pressure at mid-range. That's because she's only truly able to capitalize on her shockwave hitboxes after charging her leap, and the closer to completion, the better. Upon crashing down, Shroob undergoes a universal 42 end lag frames as she reassumes a fully upright stance, not great when an opponent can hop over her shockwave and smack her with an aerial. With that recovery period, uncharged D-Smash shockwaves that connect at their two-square maximum range can pop up most opponents just long enough for Shroob to regain control and the ability to defend herself. Any closer, however, and the shockwaves are likely to be unsafe on hit.

Charged closer to the halfway mark, Shroob's shockwaves trend more toward launching foes from their hits a few frames after she becomes mobile, freeing her up to run in and try baiting a kneejerk reaction. This is more or less the sort of charge she could expect to get off as a victim is landing from her jab's first hit or D-Tilt's pop-up hitbox. This can be leveraged to win her breathing room, as foes are threatened to leap or roll back, lest they get caught in the shockwaves themselves. And, at full shockwave charge, Shroob can catch up to her target right before they're about to get launched, letting her intervene with a fast option like jab or grab. At any charge level, Shroob also retains the option to sit stationary as her shockwaves carry victims into her mushroom patches, possibly pinning them down just long enough to take the necessary transformative ticks of damage. Shroob's shockwave properties naturally carry over to time ghosts, whose D-Smashes free their master up to run in right away for laggier punishes.

Keeping in line with Shroob's bullying feel, she and her duplicates can drag a single victim more or less across entire stage lengths by chaining together some combination of D-Smash shockwaves, jab dribbling and launched saucer multi-hits. Don't want the fun to end? Catch a shockwave victim in a Chomp's teeth as they're about to be mercifully sent away and yank them right back in! To a lesser degree, time ghosts can net Shroob better coverage on her smaller physical D-Smash hitbox, turning it into a better option for punishing rolls and dodges. Used back to back, Shroob and a duplicate's D-Smashes can rain down on a lone victim like a row of Thwomps, ensuring they're hit by at least one of them as their intangibility wears off.

Now is a good time to mention a quirk on Shroob's underside's ordinarily small landing hitbox — while the hitbox covers just a small central area beneath her by default, it expands outward as she charges D-Smash, up to reaching a short distance past either side of her dress on a fully-powered move. This renders Shroob's landing a touch easier to land in melee contexts, though it won't combo into her shockwaves. More intriguingly, it helps Shroob unlock a new assortment of D-Smash mix-ups when riding around on top of one or more saucers.

Use a D-Smash of any charge on top of saucers, and Shroob will break their formation, canceling out of their end lag and beginning to fall as they're launched in different directions. That said, how long Shroob charges determines how many crafts are sent specifically raining down on targets — almost always in explosive fashion, barring an uncharged D-Smash on full-health saucers — as opposed to being cast underwhelmingly to the side by the move's shockwaves as they reach the crafts' edges.

An uncharged D-Smash will launch down a single saucer, a landing powered up to 40 frames rains down two saucers and any further charge drops down all three in a max-sized platform. Shroob lingers in a moment of midair hitlag as her landing rains down each saucer individually, back to back in quick succession, during which she can direct her remaining crafts around to determine where they fall. This hellfire isn't an especially welcome present for offstage opponents trying to return safely to the stage. Should Shroob feel particularly nihilistic, she can try a bombing run by dropping multiple saucers down right above solid ground. This significantly increases the chances of catching foes underneath in more immediate explosions, albeit at the cost of the possible same damage to Shroob.


UP SMASH - DON'T LOOK UP


Elder Princess Shroob lifts both arms above her head and begins cackling to herself as a big black comet, pockmarked with purple craters, poofs into being between her hands. As she lifts it up and charges, the comet spins in place, growing in size from that of a Party Ball to that of a fully engorged Hothead. Upon release, Shroob doesn't slam it down, but rather goes a step beyond her source material, exerting her brute strength by crushing it into an angry burst of space dust!

Not dissimilar to Charizard's Rock Smash of yore, Shroob enjoys two hitboxes on U-Smash — a point-blank hitbox on her comet, right as she begins squeezing it, that inflicts 25-33% and vertical knockback KOing from 80-45%, and another as it's reduced to a circular dust cloud, dealing up to eight rapid multi-hits of 3-4% (24-32%), the last of which KOs between 125-90%. The royal Shroob basks for a moment in the afterglow of her feat before regaining mobility.


As with F-Smash, Shroob's actual startup upon releasing U-Smash is quite fast, at six frames, but brought down to earth by 12 charge frames as her comet materializes. The comet's strong initial hitbox then stays out for two frames, before giving way to its dusty successor for the next 35, or a hair shorter than Steve's U-Smash lava block. With this hitbox structuring, Shroob's crunchy flex can prove devastating against foes foolish enough to hold shield above her. Comets of any size will stick up through low platforms so their initial hit can take a nice big bite out of enemies' bubbles, leaving the following particle hits to poke through and launch them if they're luckily positioned or eat away their shield's remainder if they're not.

In other contexts, Shroob's disjointed comet is a great punish against poorly-thought-out air dodges and falling aerials alike — even if her strong hit doesn't land, the lingering cloud can scoop them up to be sent right back skyward. Shroob's primary stumbling blocks to watch for with U-Smash are her 45 end lag frames and her comet's lack of horizontal coverage against all but the tallest opponents. Combine those two shortfalls, and on whiff, she's susceptible to most characters just casually strolling up and charging a Smash, barring a time ghost she's saved for a rainy day.

Bring a duplicate into the equation, and Shroob opens opportunities for more safely weaving U-Smash into regular play. Should she successfully log her comet clench, a time ghost can repurpose the attack as a combo starter for its master, who no longer has to wait through the move's end lag to follow up. If an opponent knows Shroob has logged U-Smash, the threat of a duplicate throwing it out can become a strong incentive to air dodge to her side. Should she condition a foe to expect this, Shroob unlocks an effective 50/50 with her saucers' forward tractor beam command — which, if the crafts catch their victim low enough, frees her up to run over and land U-Smash on them anyway, so long as she doesn't mind the collateral damage to her minions.

And, in what Twitter might call more unga-bunga fashion, there's also simply throwing out multiple U-Smashes — from more than one duplicate or from Shroob and a duplicate back to back. This, naturally, increases Shroob's odds of catching a landing target with the comet's sweetspot or lingering dust. With immaculate timing and placement, she and a ghost could even chain one hitbox into the other, either using the sweetspot to send a foe soaring from the dust's multihits or the comet cloud to interrupt a foe's vertical liftoff from said sweetspot. With that sort of versatility, U-Smash is another option foes will want to make a point to interrupt if Shroob starts throwing it out, telegraphing intent to file it away for ghostly use.

With one or more saucers trailing along behind Shroob, the generous royal doesn't shy away from putting them to work in shouldering U-Smash's glorious load. Upon starting the move's charge, Shroob's comet does not appear in her arms, but rather above her head. Now, she gazes up and cackles with more than a hint of sadism as any following crafts zip to the space rock and, to the best of their limited ability, begin hefting it vertically into the air atop their backs. The crafts' eyes squint in pain as they float upward, lifting the comet higher at a progressively slower pace. Then, upon release, the saucers drop the comet, sending it plummeting at Bowser Bomb's speed back down into Shroob's arms, upon which she crushes it above her head as usual.

Effectively, a craft-boosted U-Smash repurposes Shroob's comet for a sort of reverse Snake mortar. Instead of enlarging, the comet remains at its default Party Ball size, its underside always inflicting 16% and spiking victims who make contact with above-average force. Rather, U-Smash charge now determining how high Shroob's saucers lift it before letting go. As a rule, the more saucers Shroob has in tow, the higher the apex to which they're able to heft their comet, at a faster rate, and the more leeway she has in sandwiching aerial foes between the comet and herself.


Foes caught directly underneath the cosmic boulder are spiked right into position for Shroob to combo into her crushing sweetspot — not excessively horrific, given this is the equivalent of an uncharged crunch, but still a one-two punch inflicting 41% and KOing early enough. Nick the falling comet's edge, and foes are spiked into prone on the ground. Should they tech their landing, faster opponents can punish the rest of Shroob's animation. However, catch a recovering opponent with a comet edge at ledge or offstage atop a saucer platform, and Shroob can send them to an abyssal end far earlier than they might otherwise expect.

A lone craft can lift a comet up to three vertical training stage squares, a distance that grows by two squares apiece with a second and third saucer. Timing-wise, crafts quickly lift comets to half their respective maximum heights, during Shroob's starting 12 charge frames, before slowing down to ascend up to the full distance over the full-second charge. As saucers suffer 1% per 20 frames of charge, this generally isn't a Smash that Shroob will want to hold longer than necessary.

In cases where a saucer keels over mid-charge, its comet now only can be boosted as high as any remaining compatriots can lift it. If a lone craft dies lifting, Shroob's comet drops by default — rarely snatching victory from the jaws of defeat, in cases where U-Smash itself was likely to miss its intended mark, but the saucer's explosive downward spiral can connect in its stead.

Comet distance reductions also come into play if foes kill off saucers mid-U-Smash charge. Unless characters do so from a range, they risk getting scooped up as the comet falls or Shroob orders it dropped early. That said, the discerning foe occasionally could find windows to force a premature comet fall, such that they can immediately move in and retaliate against its catcher during her end lag. Unlike her saucers, should Shroob be attacked out of her charge, her comet will disappear from her crafts' backs, prompting their eyes to take on a brief relieved glint before they move to reunite with her. Shroob does take on super armor during the brief window between when saucers drop a comet and when she catches it, completing the animation come hell or high water.

Deploying Shroob's enhanced U-Smash from different vantage points on or above the stage can lead to some out-of-this-world setups. Chiefly, should Shroob have saucers lift a comet up above a high platform from below, the rock won't drop back through said platform but instead shatter more immediately against its surface, with the same hitboxes Shroob would attain by crushing it. When this happens, Shroob undergoes half her regular end lag without a comet to catch. As such, not only can she ambush platform-camping maniacs with her saucers' cargo, but she can also combo into U-Air if she leaps up immediately after hitting a bullseye.

Then, there's Shroob's ability to initiate U-Smash from atop a saucer platform. Players could guide her alien pedestal to the side after one or two other saucers begin lifting, so her comet is dropped down to shatter or, with a mushroom patch on a high platform, so the lifting saucers stay within its vertical healing range for as long as possible, mitigating some of their damage from straining. The fun continues offstage, where Shroob is free to navigate her platform downward to artifically increase how far her rock falls, either into her arms or fully off the bottom blast zone.

And, as with F-Smash, Shroob can initiate her vanilla U-Smash as saucers are en route back to her, such that they start lifting after they've fully returned. Unfortunately, this magically reduces the enlarged comet back to its base size, but still can catch out those approaching from the air in a pinch. Alternatively, should Shroob smack a saucer with U-Smash, she'll blast it into a certain vertical explosion if she hits with the sweetspot. Her cloud, meanwhile, can launch crafts in a briefly delayed fashion, the survivability of which depends on how she timed its entry into her dusty multi-hits.

Also akin to F-Smash, time ghosts are unable to use saucers to lift up their own comets. Nevertheless, Shroob appreciates mixing and matching her vanilla and enhanced U-Smash in tandem with a duplicate to really put the hurt on opponents. A ghost's U-Smash sweetspot can knock a victim up until Shroob's own comet as it descends, bringing them right back down into her crushing arms to be sent skyward again — a brutal, corporeal game of Pong, if you will.

A less arduous alternative could see Shroob attempt to have her comet spike a victim into both her and her duplicate's crushes at once, such that they can achieve their regular hitbox synergies. And, with other ghost moves logged, a saucer-powered U-Smash becomes a more potent ledge-trapping option. While Shroob walls off high recoveries by having a comet lifted up at the ledge, a duplicate can proceed offstage with a mobile option like charged dash attack or F-Smash to really put her mark in a bind. Bombs away!


AERIALS

NEUTRAL AIR - BLAST CORPS
Elder Princess Shroob bends her upper torso slightly inward, opening her jagged jaws in exaggerated fashion as pink space energy wells up in her mouth. With a tapped input, she then gnashes her teeth together, causing the energy to dribble out in a rabid sort of fashion. Shroob's chomp produces a single strong hitbox after 12 frames, extending out about as far from her face as Wario's own bite to inflict 12% and outward knockback KOing around 150%. She undergoes 22 end lag frames, the last five of which can be auto-canceled upon landing.

Though not the fastest out-of-shield option, Shroob is able to wield her default N-Air out of a shorthop to fend off aerial approaches or while landing during frontal approaches. Foes bit from above can be launched into prone if they miss their tech, perfect for a combo into D-Tilt, while those at low- or mid-percents respectively are vulnerable to an U-Tilt or U-Air if Shroob acts quickly. Spaced right, Shroob also may chain an auto-canceled N-Air into a down-angled F-Tilt on a prone foe before their invulnerability kicks in. And, in terms of launching saucers, N-Air serves as a bread-and-butter aerial, giving Shroob solid control over which direction they're sent flying, so long as she's careful to time it at precisely the right aerial elevation.

In that respect, logging N-Air chomp for a time ghost grants somewhat of a breather, as the duplicate need not concern itself with landing lag. Position a ghost to use N-Air from the skies, and Shroob can fall back down to cover her opponents' resulting approach, or ideally, downward knockback and ensuing tech chase. Shroob and a duplicate can realize the same air-to-ground coverage vice versa, too, but her lack of commitment triggering a ghost specifically in midair can be wielded to make every empty-hop all the more panic-inducing.

A shot of energy:

Shroob's N-Air changes rather substantially, though in valuable fashion, with a held input. Keep the attack button pressed down for the entirety of what would normally be Shroob's chomp startup, and the eldritch queen will instead charge up her pink space energy as a spherical projectile. She fires the energy balls horizontally by default, with the option to angle them diagonally up or down during an eight-frame startup to her spit. Based on charge, energy balls vary in size from that of a Soccer Ball to Kirby; in speed from that of Villager's rocket to Wolf's laser, with a touch more oomph if Shroob spits it with maximum aerial momentum from a dash attack or saucer-powered F-Smash leap; and in distance, from six to nine training stage squares.

That said, the projectiles' physical properties remain rather middling regardless, dealing 10-13% and knockback KOing from 200-165%. Players can power balls up to a second before Shroob spits them automatically, or until she touches down, upon which she'll eat a 35-frame landing lag without shooting anything. The projectiles will ricochet off solid ground and platforms at a 90-degree angle, and vanish on impact with a strikable target.


Shroob's energy balls can be rather underwhelming by their lonesome. They offer more range than her default chomp, but a weaker hitbox unless fully charged, and poor utility for camping, given her landing lag. Where Shroob's projectiles transform into a key asset are in their interactivity with saucers. Should Shroob fire an energy ball into one of her crafts, it won't take the sphere's typical damage and knockback. Rather, the saucer becomes another surface off of which its master can ricochet the projectiles, refreshing their maximum distance and enhancing them for the better.

Should a saucer make contact with an energy ball, it will first bounce the projectile in a linear path toward any other onstage crafts not immediately following Shroob, in order from nearest to farthest. With just one saucer out, or once the ball reaches the last craft in a sequence, it will then bat the projectile in the direction of the nearest opponent. When this happens, the ball doesn't just travel at its target in a straight line but begins to hone in on them, turning from pink to red to signify this startling upgrade.


Shroob's energy balls take on a progressively stronger damage and knockback multiplier with each successive saucer they impact, to deal 1.1x, 1.3x and ultimately 1.5x their typical damage and knockback after a maximum of three saucer impacts. Each saucer ricochet also boosts the projectile with 5% in bonus shield damage, up to 15% maximum. In a vacuum, energy balls can evolve into quite a hindrance, and even a ranged KO threat for foes backed into a corner or becoming a billiards target offstage.


In practice, practiced foes can knock away the standalone or sequenced saucers for which Shroob is aiming so they don't generate a stronger honing projectile. Even if it gets to that point, the heat-seeking balls won't travel along sufficiently tight curves, and vanish on impact with the ground. As such, foes may either weave around to dodge them in much the same way they can one of Galeem or Dharkon's boss fight orbs, or go for a well-timed parry. The real danger, of course, is the distraction Shroob's projectiles can create, freeing her up to punish her victim's evasive movement through the skies with a saucer-backed U-Smash, or a kneejerk air dodge with a Smash, sweetspotted tilt or mushroom patch formation. Should she prefer two birds in the bush, versus one in her hand, Shroob could sit back and log a time ghost to save for a later interaction.

An energy boost:

Despite sparing saucers their regular damage and knockback, energy balls don't leave Shroob's crafts entirely unscathed. Instead, the projectiles coat the saucers in pink electricity, granting them a close-ranged staticky hitbox that inflicts 9% over three quick multi-hits, the last dealing knockback that KOs around 150%. This electricity stacks with the base spiraling hitboxes opponents regularly take on the receiving end of saucers Shroob's attacks have launched at them, effectively letting them KO sooner by virtue of the damage boost. Shroob's N-Air charge time determines how long this electricity remains in effect, from five to nine seconds, over which time the crafts take 1% per second. Hitting the same saucer with multiple energy balls won't stack their damage, to foes or the saucers themselves, but rather refreshes the lingering static's duration to the extent the new projectile's charge allows.

Of note, should N-Air static reduce a saucer's HP to zero, the craft will tailspin away, traveling at Robin's dash speed in a nine-square linear path before exploding as usual. Despite being a disposable cobblestone on Shroob's path to victory, the saucer has the common courtesy to angle itself at the nearest foe's position before blasting off again. Though avoidable, foes ought to keep tabs on when a saucer begins to smoke from low HP so they're not caught by surprise by this time bomb of sorts — especially if Shroob has fried a low-health craft such that her foe must navigate both it and a honing energy ball in short order. Should a foe touch an electric saucer right before it reaches 0 HP, its passive multi-hits will true combo right into its directional death throes and ultimate explosion.

As one might expect from Shroob, there's a boatload of possibilities to be explored from imbuing her underlings with a passive zapping hitbox, albeit not without risk to herself. No shortage of those result from saucers now sporting a hitbox as they return to Shroob, instead of just when launched away or in the middle of a command. As any K. Rool player worth their salt can concur, inward knockback from a disjointed source is greatly beneficial for Shroob in starting and extending combos against sandwiched foes at low- to mid-percents. Beyond that, for KO confirms, she can lurk below and lunge upward, beast-like, when returning saucers deposit foes above her, or go for a hard turnaround F-Smash read when they're knocked slightly behind her. For maximum potential carnage, try batting multiple saucers out of a spinning ring before electrifying all in sequence with N-Air, such that their shocking hitboxes briefly fill the skies as they find their way back to Shroob.

Zappy saucers remain as such while reunited with Shroob, situationally even becoming a bizarre combo breaker, as dying crafts launch themselves at foes who otherwise have her on the ropes. These electric properties remain as Shroob uses her handful of saucer-enhanced moves. For dash attack, the added shieldstun gives her charged barge a tiny frame advantage on cross-up with even just one staticky saucer in tow. On F-Smash, while only one electric saucer hitbox registers, regardless of how many are beaming Shroob along, foes take its damage and stun before that of her body slam, getting carried along briefly before being rammed with greater force. And saucers take electric damage alongside that from comet-hefting strain during U-Smash, potentially tailspinning out of lifting formation to snag foes the big rock itself.

Even more energy efficiency:

Not enough applicability for you? N-Air electricity also brings distinct benefits to each of Shroob's saucer commands. Said commands already come in handy as Shroob is trying to spit out energy balls to begin with. Shroob can avoid landing lag from charged N-Air if she has first hovered up with a saucer platform or made her fall floatier with spinning crafts. The latter formation even lets her fire a ball directly at a spinning saucer, instead of through a gap, for a close-ranged ricochet. In any case, for a forward command, electrified saucers will deal 10%, or double their regular damage, to victims they've caught in a tractor beam. Crafts zapped to death also will careen inward at their target as their compatriots continue firing their blasts, melding the hits together in energetic fashion.

Shroob is fully capable of flying around atop electric saucers in down-commanded platform formation, with their fronts now briefly carrying foes along in their multi-hits before popping them up in front of Shroob. Electricity will cause a saucer to break from the platform upon reaching 0 HP, letting Shroob glide around right beforehand to determine the direction from which it sends itself at her opponent. And in an up command ring, an electric saucer will true combo into other circling hits, starting with just one other craft, versus the usual need for all three. Put in the legwork to catch a foe in multiple spinning staticky saucers, and Shroob can be rewarded with a charged Smash on top of her underlings' already robust damage output.

Great as these perks might be, Shroob herself can be made vulnerable to her own N-Air electricity. Reflectors will send Shroob's initial ball projectile back at her at any point in its trajectory, albeit not honing in on her if it's reached that stage. And while foes must be more precise blocking and launching back electrified saucers, they're still more than capable of doing so with intangible or ranged attacks. When regular launched saucers already can put Shroob in precarious spots against adept enemy tennis players, the additional damage and stunning multi-hits resulting from her electricity really can prove to be a headache if not properly managed. As high of highs as players can achieve chasing down foes with their saucer ring or platform buzzing with alien energy, they're also tacitly accepting the lows that can result from those setups blowing up in Shroob's large ruddy face.

An energy circuit:

A curious reaction takes place when multiple N-Air energy balls bump into each other, either from Shroob shooting a second projectile at one bouncing among saucers, or a time ghost firing one ball into another. When this happens, the two balls segment in caterpillar-esque fashion and continue on together, bombarding foes they touch back to back while in hitstun. When regular balls collide, they prioritize the movement trajectory of the larger projectile, or the initial ball if both are identically sized. Honing projectiles also always take priority in a chain, regardless of ball size, and all balls in a regular chain start to hone upon bouncing at a foe from a final saucer. The largest energy ball in a chain determines how long static will blanket any saucers they impact. While challenging to pull off, given individual energy balls' relatively short duration, Shroob can have up to three projectiles chained together at a time.

Shroob most often can take advantage of energy ball chains by having a time ghost fire off a projectile in the direction of a ball she's already got bouncing off a saucer or honing in on a foe. The opponent's newfound need to duck around a lengthier projectile, versus a simpler sphere, can lead them to move in more dramatic, and thus punishable fashion. Worst case scenario, Shroob can arrange for a chain to move in on a recovering target, such that they can either dodge it or her own direct gimp attempt, but not both. On solid ground, shielding, too, becomes dicier, as opponents must sit through the shieldstun of each of a ball chain's projectiles, or else parry them back to back. That's easier said than done, given the nerves one can face dealing with chains of multiple powered-up honing balls able to effortlessly shatter shields of any size. That is, of course, if foes aren't toting a reflector, in which case they can send that chain back Shroob's way for the most humiliating self-wrought destruction this side of Sephiroth's Gigaflare.

Mechanically, as with Smashes, time ghosts do not undergo charge frames before firing off energy balls for N-Airs they have mirrored. Simply put, this better positions duplicates to shoot off weaker projectiles to interrupt enemy attacks at mid-range — try controlling space with Side Special now, Byleth! — or pitch a larger projectile into a ball chain Shroob herself has initiated. It's theoretically possible for Shroob to cobble together a chain exclusively from well-aimed ghost N-Air balls, a tactic she'll have no choice but to telegraph from a Down Special logging standpoint, but that grants her more lead time to punish her target.

Comparatively straightforward approaches with ghosts can involve having one fire an energy ball at a saucer Shroob herself is holding in a Chomp's teeth or impaling with her F-Tilt sweetspot. The former situation grants her frontal control over the projectile, as she can pull in the Chomp to influence the ball's bounce to her liking. The latter, meanwhile, lets her imbue the about-to-die saucer with electricity and switch up its launch when she yanks out her tentacle a moment later. Instead of getting cast out regularly to explode, the craft will first tailspin at her nearest foe with its stronger static, posing an even greater threat to those still daring to treat Shroob as some stock heavyweight. Anyone? Anyone? Bueller?


FORWARD AIR - SPIKED PUNCH
Elder Princess Shroob bellows while bendily raising a pincered hand, lifting her crown from her noggin before slamming it down powerfully, albeit with an air of laziness — get out of her air space! A delayed attack with 19 startup frames, Shroob's swipe boasts two hitboxes, the larger of which hits from the front to inflict 14% and knockback KOing at 130% from center stage. Those struck directly underneath her crown, on the other hand, suffer 17% and are spiked with great force, capable of KOing quite early offstage and off the screentop around 115%. Shroob wraps her attack up with 29 end lag frames as she returns her headpiece to its rightful place, reduced to 16 frames of landing lag if she touches down early.

Beyond making a mockery of Peach's counterpart attack, Shroob enjoys taking this tried-and-true aerial archetype and sprinkling it in with her saucer-driven movement options. Namely, she's able to suddenly disband a saucer platform to drop down on a target with the meaty blow, or floatily space her swipe while surrounded by a ring of crafts — perhaps launching one out or down at a mark as it passes by. There's also some standalone combo applicability, as Shroob can also spike a foe skyward before immediately launching a nearby saucer up into them with something like U-Tilt before they exit hitstun. And if Shroob nicks a target with dash attack's weak hitbox, a buffered F-Air offers a reliable launching follow-up. While unsafe on shield at all but its maximum range, her F-Air is rather scary to contend with near the ledge or offstage. There, Shroob might well find herself aiming to land her regular hitbox vs. her swipe, which in Bowser-esque fashion can be a great finisher if she's dashed or used a burst movement option to hurtle offstage without advance warning.

Shroob's time ghosts can get solid mileage logging and throwing out F-Air, given their invulnerability. Because it's futile to try interrupting a duplicate during its swipe's startup, foes caught at close range are left to block or evade the coming hit, giving Shroob more time to respond in kind. Flashier options still become available to Shroob and her ghosts with the player's mastery of turnaround aerials in landing F-Air's spike hitbox. Want to lackadaisically roll behind Shroob? Too bad, if she or a duplicate throws out one F-Air to the front while the other covers the opposite direction — or two back-to-back ghost F-Airs bide Shroob enough time to charge a Smash and apply some real hurt.

Then, if either she or a duplicate lands one stage-bouncing spike at low- to mid-percents, Shroob can dash around under her victim as they look to land. Change directions, and she may obfuscate whether she aims to dribble her victim with another regular or reversed F-Air, either directly or with a ghost, or strike with something else. Menace your target persuasively enough, and they might just panic with an air dodge in the opposite direction — and into perfect range for a thrown-out Chomp or F-Tilt skewer if Shroob herself hasn't overcommitted in the process.


BACK AIR - SILENCER
Elder Princess Shroob rears back with a frightening glare, making as though she intends to backhand her foe, which she then does, transforming her arm into a spiked tentacle for added brutality. With its disjointed nature and one-square range, this ferocious slash can best be compared to a heavy sword sweep. With 10 startup frames, Shroob's tentacle isn't even all that slow as it rends the air, dealing 7% and knockback KOing at 145% at close range, and a tipper sweetspot that inflicts 15% and KOs at 110%. Shroob then undergoes a sluggish 46 end lag frames unwinding from her slash, with a 33-frame landing lag, barring an auto-cancel window from frame 35 onward.

B-Air is a curious case of a move that, in a vacuum, should offer Shroob great protection from a shorthop in close quarters. And in several cases, the aerial still does — her tentacle swipe is potent at catching rolling enemies offguard and polishing off stocks near the ledge. As with F-Air, Shroob also benefits from the floaty protection of a saucer ring in aiming B-Air, with the option to time her slash so it snags a craft out of formation. The issue here is, B-Air is the lone move that will always catch the closest saucer directly following behind Shroob, whether or not she was aiming for it. This can be preempted to a degree — perform a turnaround B-Air, and Shroob will throw out her tentacle's hitbox during the brief pause it takes for tailing crafts to switch to her opposite side. Nevertheless, this reality can result in a degree of vulnerability for Shroob, restricting her ability to use B-Air in cases where she wants to preserve a following saucer.

Notice the use of verbiage like "snag" and "catch" with reference to saucers in the paragraph above? That's no accident — Shroob's B-Air does unlock a unique interaction in cases where she touches a craft specifically with her aerial's sweetspot. Instead of slashing her underling, Shroob will wrap her tentacle around it and roar as she winds up for a brief moment. After this eight-frame pause, she'll hurl the saucer like a frisbee, with a moderately strong horizontal launch that, as a reminder from Neutral Special, inflicts three rapid 3% hits, followed by a 5% strong hit KOing around 130% (on top of any additional damage from N-Air electrification). While weaker than a regular B-Air sweetspot, crafts travel a good ways beyond Shroob's regular reach, launched about as far as the aerial would send Kirby at 0%. Compared to her regular B-Air damage, Shroob's saucers take just 5% upon being thrown, quite a relief to them, I'm sure. With that in mind, Shroob can choose either to throw her saucer overtop a mushroom patch to rid it of most, if not all of this damage, or simply to toss it while it's already at death's doorstop to weaponize its explosion.


Should the player hold A once Shroob has grabbed a saucer, she'll perform a spin over 52 frames while holding the craft out at her slash's typical one-square range, as though she's performing a demented midair Mario B-Throw. In doing so, Shroob turns her saucer into a bludgeoning hitbox, inflicting 10% and knockback KOing around 140% as she spins it first behind her, then to her front and finally back behind her again, upon which she automatically tosses it. The player also can release the input at any point during Shroob's spin for her to toss her saucer early, becoming able to throw the craft forward, instead of backward, midway through. Also at this midpoint, Shroob becomes able to angle her saucer diagonally up or down, and hurls it with strong launch properties — four light 3% hits before a 6% strong hit that KOing at 110%.

Shroob's saucer-snatching imbues more depth into an already versatile B-Air. For starters, there's mix-up potential as to the point at which she's going to slash at a nearby saucer, either to hit it regularly with B-Air's sourspot or pick it up for further use. With crafts following or returning to Shroob, foes must be at least somewhat on guard in case she decides to turn it into a ready-made disjointed pseudo-projectile. And once she's built up a bit more oomph in spinning, Shroob can catch out rolls with a saucer throw in the opposite direction, or else send a craft careening at an angle designed to give her foe a headache — at a stage bounce or into the air as they're approaching or down offstage as they're recovering low.

Of course, it's not just opponents Shroob might want to aim for with a thrown saucer. One craft can be tossed into another to launch it in billiards-esque fashion, or an N-Air energy ball to power the sphere up, possibly start it honing and electrify the saucer in one smooth gesture. If one saucer impacts another that was coated in N-Air static, it will even take on the same original electrification status, without Shroob having to spit out additional energy balls! And though tough to aim, Shroob could show off by grabbing one saucer out of a ring and spinning it to bat the others away, filling the skies with hitboxes before she adds one more with her throw. Worth noting, if Shroob has grabbed and started to swing her closest following saucer, any others behind her won't move closer in their queue until she has completed B-Air, giving her space to carry out the move without further interruption to her entourage.

With all that said, Shroob assumes a level of risk in bringing a saucer directly into her clutches with B-Air, no matter how briefly. While she enjoys six super armor frames right as she winds up with a craft in hand, she becomes vulnerable shortly thereafter, especially if committed to her longer spin. Foes are able to attack both Shroob and her saucer in one fell swoop during this animation, potentially even detonating the craft on her for a big punish. Shroob also undergoes 36 end lag frames after throwing, ripe for a counterattack if her opponent has blocked, parried or especially launched her saucer back at her. And though Shroob's descent slows briefly as she spins, she'll throw her saucer automatically if she lands early, losing the ability to aim it on top of momentarily becoming a sitting duck.

As with other multi-variant attacks, Shroob's time ghosts cannot log B-Air's saucer version, instead saving away the regular aerial if their master tries. That's hardly a negative, though, given the tentacle slash's standalone KO power when spaced properly. Even better timing lets a ghost slice a victim outward, giving Shroob cover to grab a following saucer and spin-throw it into them while still in hitstun. Duplicates also are a boon when it comes to interacting with Shroob's own B-Air. A ghost can smack a saucer out of a spinning Shroob's clutches offensively, to modify its launch angle, or defensively, to cut Shroob's B-Air short if she has put herself in peril. And, while Shroob alone can't do so, a ghost has no problem spitting an N-Air ball into a saucer she is spinning. Beyond coating that saucer in static, this rarely can create a chance for Shroob to fortify the same N-Air ball twice with the same craft — once while she's rotating it around and then again if she manages to throw it into the energy sphere!


UP AIR - TENTACLE DRILL
With an uncharacteristically nimble flip, Elder Princess Shroob turns upside down and spins, sprouting tentacles from her dress' underside and sharpening them into a drill-like point. Her appendages stretch up one square over 10 startup frames, burrowing into victims for five rapid multi-hits over a 15-frame active period. The first four hits deal 2% and hold their target in place, where, if they're centered beneath Shroob's tentacles, they'll be launched vertically by the stronger 4% fifth hit, for 12% total, with force sufficient to KO around 140%. It's an aerial that falls into a power sweetspot where, at lower damages, Shroob can juggle a foe a few times to build damage or whittle away at their shield from underneath a platform, without inhibiting KOs later on unless she's staled the move past a certain point.

Those caught on the side of Shroob's tentacle cone, however, will forego this finishing blow and exit her drill in hitstun. In doing so, foes will roughly follow Shroob's aerial position, potentially having an opening to strike at her as she's coming out of her 22 end lag frames. That said, should Shroob fastfall with a victim caught in her hitbox's periphery, she'll drag them down, depositing them in prone, barring a fast tech, if she lands midway through. With 13 landing lag frames, Shroob can capitalize with a quick jab, D-Tilt or, if the foe times a standing getup, grab. With more setup, mushroom patches are effective at corraling reactions from foes Shroob has dragged down, perhaps enticing them into an inward roll or getup attack she then may punish with a leaping D-Smash or shorthopped D-Air.

While not as clean a vertical launching tool for saucers, Shroob's U-Air does grant her a brief pause in knocking her craft upward, capable of catching out air dodges. There's also plenty of bait potential to had for Shroob with aerial U-Air movement as a saucer is returning, fading in and out in relatively noncommittal fashion to mislead foes as to whether she's about to send the craft their way, or more situationally, up into an N-Air energy ball.

Time ghosts, too, offer dangerous new possibilities, so long as Shroob has the discipline to log U-Air with the right aerial movement. Use a duplicate's rising U-Air out of a shorthop and Shroob can threaten a surprising amount of air space directly above her without overcommitting to the skies herself. It's a great way to KO off the screentop, as landing foes struggle to fight through the disjointed ghost tentacles, and can waylay a victim in place just long enough for Shroob to charge a saucer-enhanced U-Smash, lifting a comet just high enough above them to splat down into them right after U-Air's launch.

Master the timing and spacing for a duplicate's fastfalled U-Air, meanwhile, and it can all but giftwrap approaching foes in front of Shroob. From there, the tyrannical toadstool has her pick of the litter in terms of ways to turn them into a tasty treat — ranging from damage rackers like saucer rings and mushroom patches, to a waiting Chomp's jaws to pull them back in for more, and of course, a charged dash attack or F-Smash to bring an end to their misery.


DOWN AIR - ALIEN REFLUX


Elder Princess Shroob rears up, appearing to hold her breath momentarily, before hunching over in exaggerated fashion and belching a cloud of purple gas beneath her. This cloud appears in a Party Ball-sized blast beneath Shroob after 14 startup frames, pushing away foes who nick its sides with 9% and knockback that won't KO until past 200%. Those caught directly underneath Shroob's malignant outburst, however, take 15% and are spiked with force sufficient to KO off the screentop around 135%. What's more, D-Air's sweetspot marks a return of U-Tilt's spore effect, inflicting 1% per second over the next 10 seconds and boosting her mushroom patches' potency by 1.5x.

D-Air is up there in terms of high-risk, high-reward aerials for Shroob, with the risk manifesting from perhaps her worst frame data in this section. She undergoes a disappointing 52 end lag frames readjusting from her hunched animation and — though she pauses briefly in midair upon her vomitous emission — fares even worse on the ground, with 55 landing lag frames. With that in mind, saucer rings can take off some of the edge, as the spinning crafts defend Shroob from the sides as she floats along and completes D-Air in midair instead of landing vulnerably.

With that said, Shroob's damage reward upon landing D-Air's sweetspot speaks for itself. She'll all but guarantee herself a mushroom transformation if she spikes her foe down into a patch from above, and otherwise enjoys boosting the 'shrooms' threat level in bullying her foe around the stage. Though she risks incurring landing lag in doing so, a shorthopped D-Air can pop mid-damage foes up just enough to ensure they land in a tech chase situation, potentially sticking them in a rock-and-hard-place context between Shroob and a patch. And as one might infer from her hitbox, Shroob's D-Air joins those of Ivysaur and Sephiroth in extending a touch below the ledge to spike recovering foes, letting her turn timing for low-recoveries into a matter of life and death, at the cost of being a sitting duck for ledge attacks on whiff.

Shroob's D-Air is perhaps her best bet for throwing off foes pursuing her while she's on a saucer platform. Shorthop up to cancel the formation and then blast the crafts beneath Shroob while they're pausing before returning to her, and all of the platform's saucers will come raining down, in a welcome contrast from D-Smash, the charge of which determines how many crafts are launched downward. What's more, as with U-Tilt, saucers Shroob has spat upon take her D-Air's initial damage and knockback before healing 10% over 10 seconds, so long as their HP wasn't fully depleted. Blast crafts down to bounce off the stage into a foe's face or offstage as they're recovering low, and the underlings can refresh themselves a touch as they glide back to Shroob. Just be mindful of whether that opponent can attack it back, perhaps with their recovery's hitbox, and turn the disadvantage around on her!


In a time ghost's hands — mouth? — D-Air's sweetspot requires some adjustment to effectively land, as the duplicate appears overlapping with Shroob slightly to her front at her current midair level. With that said, exactly what mileage she can get off ghost D-Airs depends largely on enemy positioning and damage. From a shorthop, a ghost's D-Air can pop up a low-damage victim akin to Ganondorf's stomp, putting them in an effective 50/50 situation for Shroob to pursue with the grounded follow-up of her choosing, if she reads their descent, jump or air dodge correctly.

In midair, Shroob can leap off an Up Special mushroom and then have a duplicate D-Air spike a foe down into it. Not only will the combined fungal damage lead to a near-instant transformation if that victim touches down in a mushroom patch, but the falling mushroom's weak hitbox will cancel out their downward momentum, freeing Shroob up to fastfall down for continued pressure. And, while the tightest window yet, Shroob can fastfall beneath a duplicate she has stationed higher up. From there, if it lands D-Air with just the right spacing, she's able to perform her own belch to double-spike the same victim for extra damage (albeit only refreshing, not extending the spore effect), and very possibly Ultimate's most humbling gimp. Your move, Ganondorf!


GRAB-GAME

GRAB - ROYAL CLUTCHES
Elder Princess Shroob bends forward, scrunching her face ominously as she grasps forward with both clawed hands. This is your standard heavyweight grab, coming out frame eight and boasting range comparable to Bowser, scaling accordingly with her pivot and dash grabs. Catch a victim, and Shroob will hold them effortlessly off the ground, regardless of height, barring niche cases like Shin-Godzilla. Whiff, and she'll look up slightly, mouth opening wider in alien shock as she undergoes half a second of end lag.

While Shroob is holding a victim, her saucers won't alter their general AI, not being your standard attacking minions to necessitate such a change. That being said, Shroob can time a grab while surrounded by a saucer ring to passively enhance her damage output, similar to Dedede with his Gordos. Against a mediocre masher, or a sufficiently damaged foe, she can let each craft collide with her victim before throwing them for as many as three additional light hits. Though more situational, Shroob also can hold a victim in the path of a returning saucer coated in N-Air electricity for a similar effect. And independent of damage racking, Shroob is capable of grabbing foes from atop saucer platforms, though once a victim is in her clutches, the control stick shifts from moving the platform to triggering her directional throws — no casually gliding off the nearest blast zone for her.

Shroob cannot have time ghosts log grab, what with it not individually counting as an attack. Duplicates can, however, perform pummels and throws, each as standalone logged moves. With inputs of grab plus B, the player will have Shroob's duplicate appear, grab and — if successful — use a logged pummel on its victim. Grab, B and a directional input, meanwhile, has the ghost do the same first two steps before proceeding into the corresponding logged throw. Should a duplicate grab a foe for a pummel, Shroob can order it to proceed right into additional pummels or a throw if she also has those attacks logged.

Ghosts will disappear automatically, releasing their victim, if they land a grab and pummel, but perform no additional logged actions after half a second. This keeps Shroob from dragging out duplicates' grab-games, having them just hold foes in place, not that she'd be able to capitalize just yet anyway. In Ice Climbers-esque fashion, Shroob pauses while a foe is in a ghost's clutches, hands on hips and cackling madly for a spell. An inverse restriction holds true, too: Shroob is not able to call upon duplicates while holding a victim of her own. These both are necessary balance guardrails to ensure Shroob's matches don't revolve around landing a regular or ghostly grab and casually holding foes as the other princess charges F-Smash.

That being said, Shroob retains no shortage of follow-ups in tandem with her duplicates. She regains the respective ability to call upon a duplicate or move around and attack after a foe has been released from her or her ghost's throw animation. In both cases, these abilities return while the grab victim is in hitstun, before they regain mobility, letting Shroob keep the pressure on to varying degrees, depending on the throw and her current position. One more balance note, Shroob and her ghosts share a regrab timer, a restriction that also carries over to other attacks that put foes in a grab-like state, namely her saucers' forward command and F-Tilt's sweetspot. And victims may be held within mushroom patches for extra poison damage, they will not become shroomified until after this regrab timer has expired.


PUMMEL - CONSTRICT
Elder Princess Shroob's arms rapidly transform into her true form's spiked tentacles as she binds them tightly around her captive, inflicting a meaty 2.5% over 21 frames. That's more than your standard heavyweight fare, which caps out at 1.6% over that same window, and yet another wrinkle Shroob must weigh alongside ramifications where her central Specials are concerned.

Shroob's pummels are of key importance to the extent that she wants to keep her time ghosts unstaled. Doing so is valuable in preserving the duplicates' KO power, given their lesser damage and knockback, plus the catch-all staling of all ghost moves across repeat Down Special uses. That said, because each pummel qualifies as an attack Shroob will log through her time hole, she must carefully consider when during a match she unstales her ghosts.

Coordinating pummels to push a few Down Special uses out of Shroob's stale moves queue after she's already logged the duplicate attacks she wishes to optimize is perfectly OK. But impatient play, where Shroob simply squeezes her victim as many times as possible to try keeping ghosts unstale, will backfire, as she logs multiple duplicate pummels instead of more useful attacks. If a Shroob ends up logging a pummel without a corresponding throw for her ghost use, and isn't immediately able to overwrite it, she can aim for her duplicate to snatch a victim near or overtop a mushroom patch, before moving them to pressure them out of their grab-release state.


FORWARD THROW - TENTACLE SLINGSHOT
Elder Princess Shroob tucks her victim into the crook of one tentacle, pokes its tip into the ground and stretches it back one training stage square before letting loose, sending the foe careening...backwards? As with F-Smash's comparable showcase of potential-to-kinetic energy, Shroob's F-Throw and B-Throw send opponents in the opposite direction, further lending to her chaotic feel in players' hands. In any case, Shroob's tentacle elasticity inflicts 9% and good horizontal knockback KOing at the ledge around 110%. While not the best KO throw of its kind, Shroob's sling nevertheless serves as an efficient stock ender should she pivot grab a target getting up from the ledge with an inward roll.

Onstage, Shroob's F-Throw can earn her valuable breathing room in cases where she wants to call out saucers, log time hole attacks or spawn mushrooms, a boon when all are varying degrees of committal during the heat of battle. Should Shroob find herself next to, but not within, a mushroom patch, she'll dip her tentacle-cradled victim briefly in for a few extra percentage points before they're released, though initiated within a patch, this same animation will stretch the foe momentarily away from the spores. Otherwise, F-Throw is the least handy among her throws from a straight-up combo standpoint, as foes past low damage generally are flung too far for Shroob or a ghost to successfuly give chase once they regain movement.

An exception comes when Shroob rubberbands her victim into a saucer's return trajectory — a context she can arrange by smacking a craft away low to the ground before grabbing a foe to her opposite side. When this occurs, the foe collides with the saucer, taking 5% and a moment of hitstun while inflicting that same damage to the alien obstruction. In these cases, Shroob exchanges F-Throw's immediate KO strength for keeping her enemy in potential follow-up range, at a proximity determined by how close her saucer was at the point she started her sling.


A craft collision within roughly three squares is enough for Shroob to run in and transition into a faster standard like jab or D-Tilt. One defensive benefit to Shroob: Because her victim will end up sandwiched between her and her saucer after F-Throw, they're less easily able to knock the craft her way in retaliation unless they've got a direction-changing move like Pikachu D-Smash or one of these newfangled "inward knockback" attacks sprouting up across modern MYM. And on the offensive side, if Shroob knocks away a saucer to where it returns with 5 HP or less, zipping a victim into it with F-Throw will guarantee they're caught in the explosion their impact brings about. Managing a single craft's stamina to that degree is no easy feat, especially in cases where Shroob now must -avoid- launching it overtop any mushroom patches, so take a moment to marinate in this KO setup's flashiness if you manage to pull it off!

BACK THROW - SHALLOW GRAVE
Elder Princess Shroob grips her victim in one tentacle and drags them with dismissive haste across the ground, as if to discard them like garbage behind her, dealing 4%. However, in an inversion on Ultimate's comparable villain throws, Shroob hangs onto her opponent with a sneaky expression as her tentacle reaches its max distance, one square behind her, and reverses that momentum, grinding them forward again far more viscerally, with force sufficient to push them into the ground! This inflicts an additional 6% and leaves them in a pitfall state, comparable in strength to K. Rool's D-Throw.

Compared to your standard burying throws, Shroob has more immediate difficulty capitalizing on her B-Throw. Up until higher damage levels, foes can mash free in the time it takes her to close the gap to where they're pitfalled, unless she happens to have cut that distance short by throwing them close enough to a ledge. That said, Shroob enjoys a fast enough first actionable frame to where, with the right time ghost logged, she can delegate walloping her target to it. Precisely what spacing she'll want to use depends on the ghost in question — F-Tilt or D-Tilt benefit from the right spacing, while F-Smash and dash attack are servicable from a little further away, though more rewarding when skillfully initiated close enough for their strong hitboxes to connect.

Those interested in styling can bring about knockback storage by landing weaker duplicate attacks, like jab or sourspot D-Tilt, so Shroob's victim exits their pitfall in punishable prone, ripe for her to keep eviscerating or to be pressured into a mushroom patch. Speaking of which, while these spores can poison pitfalled targets, they won't mushroomize characters until they've mashed out and their regrab timer has expired. In inverse cases, where a ghost has B-Throw stored, Shroob will want to position herself right in front of her duplicate as it lands grab. That way, she'll regain mobility right after her ghost pitfalls its victim, in perfect range to launch them herself.

Shroob isn't necessarily out of luck going for B-Throw without a duplicate stored. She might have trouble dashing up to her victim to land a follow-up attack, but she's totally free to stand still and smack a saucer their way! Depending on their damage and her desired outcome, Shroob could either send a saucer directly at her pitfalled foe or predictively where she believes they'll be immediately upon mashing out — in both cases helpless to send it back. Talk about bullying...

Connect with a regular spinning craft, and the opponent will be stuck in place just long enough for Shroob to approach and combo into a fast standard. An exploding craft, meanwhile, becomes a welcome finisher within that damage gray area around 100% that, for your standard D-Throw pitfall user, would be KO percent, but is still a bit too early for Shroob to reliably kill with charged dash attack or F-Smash. Alternatively, if Shroob's saucers are on sabbatical a short distance away, she may shoot an N-Air energy ball at or near her victim, or at the crafts themselves to create a more perilous environment for foes upon escaping.


DOWN THROW - ALIEN SLIME
Elder Princess Shroob slams her victim to the ground with one tentacle, holding them in place as she rears over them and lets out a terrible roar. In doing so, she actually vomits a misty purple stream of spores from her D-Air all over the foe as they protest, reusing their unique flailing animation from the Koopa King's own D-Throw. Opponents take a series of rapid multi-hits totaling 8% over about half a second in Shroob's stream, which she concludes with a final burst, sending them at a low angle that won't KO until insane percents, but will leave her victim in a tech chase situation a few squares in front of her, progressively farther away as they take damage.

Even cosmic horrors need their more basic throws for initiating combos! Most immediately comparable to Charizard's D-Throw, Shroob rounds out her iteration with the third in her trifecta of spore-inflicting attacks, joining sweetspotted U-Tilt and D-Air in dealing 1% per second over 10 seconds while making them 1.5x as susceptible to her mushroom patches. How Shroob opts to use D-Throw tends to evolve over the course of a match, depending on her goals at any given point. Her poison is definitely a boon for building damage, especially if she sandwiches her foe up against a mushroom patch. Beyond a certain point, however, her damage over time can hamper later uses of D-Throw, sending victims just far enough away to where they can get up with a moment to react after their tech chase.

On the whole, how far Shroob can take D-Throw follow-ups depends on how well she has conditioned her foe through tech chases. Similar to those picking themselves up from Ganondorf's Flame Choke, repetition is a recipe for an early KO. Roll predictably in, and Shroob is apt to land a crushing D-Smash or stylish shorthopped D-Air. Keep standing still or rolling away, and she may respectively line up a dash attack or N-Air projectile. This, naturally, becomes easier when it's a time ghost carrying out D-Throw, in which case both Shroob and a possible successive ghost are freed up to cover possible enemy reactions. By introducing unpredictability in tandem with stage control, the elder princess really can give foes a reason to hurl...their controllers, that is.

UP THROW - ARGENTINE ALIEN
A faint green tractor beam appears around Elder Princess Shroob or her time ghost from the screentop, lifting her six training stage squares vertically over about half a second as she hoists her victim over her shoulders. You've played Smash with me before, you might be able to guess what's about to happen to your character's spine next... Upon lifting Shroob to her apex, the beam vanishes, dropping her down to perform an Argentine backbreaker on her captive. Upon landing, she inflicts 15% and vertical knockback KOing around 150% from main stage levels.

While a healthy choice for immediate damage, Shroob's U-Throw doesn't offer all that much more combo potential than F-Throw beyond low percents, where she can chase her victim with U-Air or read a falling air dodge with U-Tilt. It can, however, send a victim high enough skyward to force a landing, which Shroob is perfectly content to steer with grounded mushroom patches and an U-Smash comet hoisted up above them, ready to drop at a moment's notice. As with its Kremling kounterpart, U-Throw also grants Shroob a means for boosting herself up onto a high platform, should exiting grab-game there prove advantageous, bringing her foe's KO percent down a non-negligible amount as she goes.

U-Throw presents perhaps the best chance for time ghosts to finish off victims while mirroring Shroob's grab-game. That's because, even though Shroob herself cannot move until her duplicate has thrown its foe, the player stays free to direct around any saucer platform she finds herself upon at the ghostly grab's onset. With those pieces in place, if Shroob's duplicate initiates a logged grab-into-U-Throw while its master is standing on saucers, Shroob can pilot the crafts higher into the air vertically. She'll then catch her backbreaking ghost higher up during its fall and shave down its KO percentage even lower — a welcome boost, given the dupicates' lesser base power.

Shroob also can ride saucers to scoop up a nearby ghost that has initiated U-Throw from a different level, though the timing is tighter. Even if Shroob's saucer platform isn't fast enough to catch the falling duplicate itself, the crafts' aerial momentum still may let her swing over and smack her opponent right as they're about to exit hitstun. Hey, when life gives you extraterrestrial lemons...


FINAL SMASH

FINAL SMASH - ELDER PRINCESS ARMADA
Elder Princess Shroob lets out an echoing bellow before zipping two-thirds of Final Destination horizontally in a more exaggerated version of her shoulder-barging dash attack. Up to three opponents she rams take 10% and, in cutscene form, are knocked into the iconic stained glass window of Peach's Castle, shattering it as they land on the red parapet outside. It's nighttime, and the camera pans out to overcast purple skies, utterly lousy with Shroob saucers.

All train their gun appendages on the castle and victims atop it, puny from the distance, as one larger metallic platform rises up from below. It carries the elder princess, fully transformed into her true form, to a central position among her army, as she charges a massive pink energy blast in her mouth. With a seemingly unending roar, Shroob commands all the saucers to fire at will, spitting her own blast while prompting each underling to shoot its own individual laser. Peach's Castle is demolished into rubble as the barrage makes contact, inflicting 45% and knockback KOing around 50% as everyone is transported back to the stage. Should Shroob KO at least one opponent, she'll pause briefly to laugh sadistically, hands on hips, before resuming the fight.

EXTRAS

UP TAUNT - MUSHROOM MANTRA


A pseudo-pixelated speech bubble appears above Elder Princess Shroob's head, featuring a mysterious two-character phrase, as she turns to the screen, waving her arms wildly and uttering alien gibberish. It's a phrase Shroob characters repeat regularly throughout Partners in Time, only unveiled in the endgame to translate to "destroy!"

SIDE TAUNT - SEEING RED
Elder Princess Shroob hunches over and roars furiously, puffing smoke out of her nose with a hiss as she clenches her fists and scuffs one foot, then the other against the ground. She appears as though she's about to bull charge her opponent — perfect for a lead-in to dash attack!

DOWN TAUNT - REFRESHMENT


Elder Princess Shroob roars, prompting a glass of green "vim" to either appear in her hand or be carried over to her by her closest following saucer, if it exists. She then sips down the beverage through a straw over 90 frames, healing 1% every 45 frames, before either tossing the glass carelessly into the background or smacking her saucer instantly back into formation. Healing this way is hardly the most efficient use of Shroob's time, given that mushroom patches exist, but there is potential hilarity to be had. When Shroob smacks a saucer, she deals it a measly 1%, not inflicting any stun or knockback, but detonating it on the spot if 1 HP was all it had left. This is more or less Luigi's D-Taunt on roids, with the explosion catching Shroob, too, given its point-blank nature. Give it a whirl, if your opponent is ahead in damage and all else has failed!

ENTRANCE - COBALT CRUSH
Partners in Time's Cobalt Star is seen onstage, bouncing erratically about for a moment before Elder Princess Shroob shatters her crystalline prison through sheer brute strength, growing to her regular size in a flash of energy as she lands in palpable screen-shaking fashion.

VICTORY POSE #1 - TENTACLE TAUNT
Elder Princess Shroob bellows contentedly, clasping both arms above her head in true tentacle form and waving them about in triumph — a far more menacing take on DK's comparable pose.

VICTORY POSE #2 - CHOMP CHUM
Elder Princess Shroob appears on the victory screen next to her Shroob Chomp, whose metal head she strokes a few times with an alien chuckle. Lest one mistake this for an adorable doggo moment to be shared in #off-topic, observant players might spot a scrap of clothing or personal effect from the losing character wedged in the Chomp's teeth!

VICTORY POSE #3 - SAUCER SEAT
The camera tracks Elder Princess Shroob as she strafes around atop a trio of saucers, clustered in platform formation and firing off a barrage of lasers, before eventually stopping at center stage for a mid-roar splash screen. Afterward, the crafts start dipping gradually in midair, eyes narrowed in pain from holding up their master's bulk, before hastily scooting back up, fearing the consequences for letting her down.

VICTORY THEME - SOMBER SHROOM
Elder Princess Shroob's wins see her serenaded with an orchestrally remixed snippet from her melancholy final boss theme.

LOSS POSE - SHROOB SHOCK
Elder Princess Shroob applauds slowly, mouth agape and eyes narrowed in pure hatred.

LINK TO CHANGE LOG (last updated 2/23/2023):
1. Buffed time hole duplicates with slight multiplier boost on Down Special
2. Added sound, visual effects to distinguish regular Up Special mushroom patches from enhanced ones
3. Increased damage threshold for Up Special patches to mushroomize opponents
4. Reduced end lag on extended F-Tilt when whiffed
5. Removed ledge-wrapping property of D-Smash shockwaves as balance safeguard
6. Added headers to break up N-Air
7. Clarified total U-Air damage
 
Last edited:

Katapultar

Smash Lord
Joined
Nov 24, 2008
Messages
1,251
Location
Australia
Welcome back to MYM, n88! This set gives me Forgotten and Tainted Forgotten vibes to good effect, with some stylish presentation that feels quite fitting for Hollow Knight, for my limited understanding of the series. As with Kupa, Rychu, Junahu and KholdStare, it’s astonishing that you can jump right back into MYM and throw out something that meets modern movesetting standards and practically surpasses your older sets. Alt text I am just going to straight-up associate with you, I really enjoy it as a weak to sneak in developer’s notes that you wouldn’t see in other sets outside of an Author’s Notes section at the end.

While Neutral Special has a degree of RNG, it’s actually very cool as a simple but effective way to produce bullet hell, without resorting to the more elaborate set-ups that bigger and lengthier sets use. It feels like a very “chaos-y” move, and the fact that it gets laggier to use the more balloons you have out means the absence of a limit cap doesn’t feel overpowered. Not being able to understand the lag formula isn’t even a put-off. Side Special and Up Special are simple enough Specials, but put together they’re actually cool - using the latter’s recovery trajectory to influence the flight angle of the former slash! Focus feels like a simple buffing move to not dissimilar to old MYM, but the token blast hitboxes are appreciated, and giving Vessel a giant attack boost in exchange for 24% and 3 seconds of charge time certainly makes it interesting.

Oh, but Shield Special is neat! Basically gives you a big cut to your starting lag, but the hop back makes it difficult to actually hit with the attack unless you had your back to the foe. Not seen anything like this in MYM, especially such a unique anti cross-up tool beyond moves like Down Smashes and Back Airs and so. A Shield Break mechanic isn’t something we’ve seen in a while either. I do wonder if it could tie into Vessel’s game more: use a weakened shield to scare foes into not attacking you directly, going for grabs to bypass your shield and punishing them with quick movement or a spot dodge. Maybe even shrinking your shield on purpose to scare foes with the blast hitbox, in spite of you losing a stock for it.

Points that I brought up in the chat, but will bring up again for posterity’s sake: Vessel’s kill percents feel very low, even with a well-earned 3 stacks of Focus, which does feel unrewarding when I’d be perfectly fine with those stacks making Vessel hit like a heavyweight with more speed. Dash Attack could kill at 90-110% with 3 stacks, Forward Air could be something of a Ganondorf Down Air and Forward Smash KO at… 80-50% with 3 stacks? If I recall, Ganondorf’s Forward Smash KOs between 60-30%. Could play off the balloons beyond extending combos too: exploit a foe attacking your balloon, or even have a shield damage multiplier if they shield so you can go 3 Focus stacks on them for a big kill.

Vessel is a simple enough returning set, but nonetheless charming and clean, similar to a Bubby set in a good way. I particularly appreciate seeing the new tastes you’ve acquired since you’ve been away, as I still associate you with Marvel and the occasional Star Wars, Pokemon and Mario minions.

It’s great to see another iconic OC get a modern remake! The original Jodie was quite the contender, and so is this set - it wouldn’t be ridiculous for this set to receive 3rd place as well!

Jodie has similar vibes to Pegasus and even Hina to some degree, in a series of Specials and a mechanic that allows the non-Specials to be utilized in an absolute ton of ways. Even having different power levels for moves based on the number of garments Jodie has left. But Jodie takes it to an extreme with effectively 7 Specials dedicated to being played off with her other moves, and it shows by her insane 30k+ length. Very fitting when she’s a JoJo OC! The set even nails some pretty detailed and unorthodox attack animations befitting of a JoJo character on nearly every input, like Up Special, N-air, B-air and D-Smash to name a few. Very impressive!

The set is well-designed to account for the myriad of ways that Jodie can execute her attacks. I quite enjoy how Jodie’s Reserves work: they worsen her power and movement when she has Garments out, but she can also use this to her advantage to combo off particularly weakened knockback. She packs some pretty solid damage output for a non-superhuman with her Reserves, but her kill power isn’t fantastic so she won’t be getting easy kills off of the various ways she has to trap opponents. I also like the moves that weaken in different ways with less Reserves, like the Jab’s barrage being shorter, and the fascinating design of Jodie’s Jab 1 having really short range, making it not-so ideal to have as her default Garment attack.

There’s a lot to unravel in Jodie’s attacks: her mechanics elevate what would have otherwise been simple (but still welcome!) attacks. D-tilt is fun when your Stand can use the backwards knockback to pop foes behind you, and U-tilt has tons of fun with its various hitboxes and long duration when you send your Garment in motion by throwing it. I keep forgetting that Jodie has an item in her set! F-air is your MYM’ian non-Special projectile, and I appreciate the Garment’s version having more starting lag and being slower - a separate entity that can fire off long-ranged shots to lock foes into just about any Jodie attack would feel too potent and even annoying. I definitely see the Syndrome inspiration in D-throw, which actually gets really cool if it’s used in motion to mess up the foe’s positioning and DI! And D-Smash I enjoyed for the needle coating, which is particularly neat when applied to your mobile Stand and gets especially good mileage from Up Special.

F-Smash is perhaps the most fascinating move in the set. It’s the “slow 4-6 unit ranged attack that hits hard”, seen in sets like Marin, Pegasus and Roxanne. On one hand, needing full garments and not really being able to trap foes without them prevents Jodie from being able to land the big hit effectively, but the move’s sheer slowness and big damage nerf with garments really keep it in check so it’s not absurd when you do have Garments out. And then there’s the surprise second part to F-Smash: the ability to throw out any of your garment hitboxes and apply F-Smash’s mighty hitbox to them! I don’t think this has been done before, but it’s seriously interesting and justifies the Smashes being the last input section in the set. Your grab hitbox not being a grab is especially trippy, in a good way!

All and all, Jodie is a phenomenal start to what is looking to be another brilliant contest. You and Kupa once again leading the pack and tying with big sets! Jodie might even be on par with Pegasus for me, if slightly better for some of the really fun things she can do with her moves. But who knows what this contest will bring?
 
Last edited:

Slavic

Ask not the sparrow how the eagle soars
Joined
Jun 5, 2013
Messages
757
Location
taco bell, probablyn't
(Re)Introducing User Rankings!

User Rankings are a piece of lost MYM lore, introduced and maintained by Smash Daddy way back in the day. The concept was tossed back and forth between Smash Daddy and FrozenRoy for a bit before they ended up seemingly retiring in MYM21, never to be seen again...

...Until today!

In a desperate effort to weasel myself deeper into the pockets of leadership, I come to you as a herald of the User Rankings Version Neo (also known as URv.Neo for short). So what exactly are User Rankings? Consider these a contest within a contest, run by leadership, which is used to both track and encourage and reward all users for their participation throughout the contest in the thread. Let the Top 50 be a metric of skill and let the URv.Neo be a metric of dedication. A breakdown of the points can be seen below, and raw data for the User Rankings will be kept track of here. While mechanically similar to the User Rankings of the past, now with brand-spanking-new banners, the addition of JamCon participation and victory gives a little bonus to those who love to grind out those challenges. Another new facet to hopefully spur early contest reading, comments are worth more points the faster the turnaround on them is! Joint sets, notably as they've really come to life recently, give full point value to all authors. As a final note, while every post is worth a point this is overridden by any other point value, so a posted moveset will always be 30 points and not 31.

Point Breakdown
Moveset | 30 points​
Joke Moveset | 5 points​
JamCon Participation | 7 points​
JamCon Victory | 7 points​
Comment (within 3 days) | 12 points​
Comment (within one week) | 9 points​
Comment (within two weeks) | 7 points​
Comment | 5 points​
Extras (Story mode, Spirits, Stages, etc.) | 3 points​
Post | 1 point​
To keep User Rankings alive, I will be working to update this regularly, and with full transparency on scoring. As a note, the only requirement to landing on the User Rankings list is to have a moveset posted in MYM at any point, even prior to this contest. The winner of the contest will receive a special prize which leadership is currently deciding on, so keep an eye out for tantalizing updates. If you have any questions or issues, or would like your name reformatted or changed, let me know post-haste! Without further ado, the (very) early User Ranking standings!

---

Jodie Reynolds
63 Points


Quaxly, Mrs. Quackfaster
60 Points


Broken Vessel
52 Points


48 Points


Whitebeard
34 Points


Whitebeard
33 Points


Elder Princess Shroob
30 Points


The Heavy
30 Points


4 Points
 
Last edited:

UserShadow7989

Smash Journeyman
Joined
Aug 13, 2007
Messages
305
Whitebeard Rychu Rychu FrozenRoy FrozenRoy ***

Whitebeard tackles the elements of a ground-focused, methodically slow powerhouse without compromise, and gives him the needed tools to function on a competitive level; this combined with his terraforming abilities the likes of which haven't been seen since older MYMs makes him enjoyable from both a conceptual standpoint and in regards to his polished moment to moment play. He's not made hideously slow or incompetent in the air, merely disadvantaged, and his specials and smashes see to it that he is as terrifying to face when trying to recover as it is dangerous for him when the situation is reversed.

One immediately important suggestion: I always include a clause in sets that make walls or other solid terrain to prevent infinites against them by saying someone getting smacked into them does damage to them equivalent to the attack responsible, or similar. I didn't see a clause like this listed under Neutral Special, but it should be a quick fix. It's important here since pops is already combo-food from the word go with his massive size, poor air speed, slow air attacks, and high weight.

With that out of the way, I love how well the set uses the slopes and platforms for cancels out of lag and to adjust his hitboxes. The walls feel like they could stand to have a bit more of their uses explicitly stated by comparison, but the large reach on his attacks letting him attack from behind them is an obvious and easy to assume quality. The Haki buff is really cool, but I think the set should make note of where the naginata buff's benefits come into play- Up Smash with the charging hitbox felt like a natural place, since DI is noted to get out of it well enough- the extra succ would no doubt make that harder.

That aside, the set does a nice job of making everything- especially the Specials- add up to greater than the sum of their parts. Landing cancel FAir even ties Side Special back in, a notably less earth-shattering (rimshot) Special I was worried might end up just being there to represent a cool moment but not having a strong mechanical hook like his more flashy tricks. The standard bread and butter moves are all gold, on that note- Dash Attack and Down Tilt are favorites of mine, the former being that I'm a sucker for multiple choice follow-up moves that 50/50, the latter because it's a move that's more reasonable than it first appears, but would still feel very satisfying and powerful to use.

As typical for his archetype, Whitebeard's Grab Game is pretty nice- starting off strong with a fairly unique trick to its range where you have a sort of 'goldielocks' area to stand in if you don't want to be nabbed by it that happens to overlap with the range of a number of his other attacks. Down Throw, aside from having a wonderful animation, ties a number of his other one-move tricks into his game plan smoothly. Up Throw plays into his aerial and anti-air options and ability to shoot up into the air to meet airborne opponents, Forward Throw is a powerful kill move that plays nicely off of his assorted terraforming tricks and makes the pummel's added benefit immediately relevant one more time, and Back Throw plays to a similar niche to Forward Throw in a different way.

Overall, Whitebeard is a very strong start to the contest- well done you two!
 
Last edited:

Katapultar

Smash Lord
Joined
Nov 24, 2008
Messages
1,251
Location
Australia
Now THIS is a follow-up to Law and KOS-MOS! Getting a 3rd Froy joint set is exciting, and another Rychu heavy-hitter. Right off the bat, this is raw heavyweight terraforming, not something I’d expect from Froy! If you told me to guess Rychu’s joint set partner, I would have said Smady or even Kupa. Nonetheless, this set gives off Alex vibes when you put Froy and Whitebeard Down Special in the equation.

Down Special is a particularly neat heavyweight buff seemingly inspired by Master Xehanort’s Down Special, punishing opponents for using faster, weaker moves that would be used to combo Whitebeard. Side Special is unexpectedly simple, but still good and fun for its follow-up potential on a terraformed platform. And the Neutral and Up Specials handle terraforming well without getting too insane - the latter’s ledge extension and rising stage are particularly fun, and feel balanced enough on a slow and grounded fighter.

Dash Attack, which is essentially a 5th Special, reminds me of good old Black Polnareff and Froy’s MYM15 sets with their follow-ups. Lots of fun with those forward/backwards mix-ups, and use of Whitebeard’s Neutral Special constructs! And mentioning move staling. I feel like Froy was a really good joint partner for Rychu, as Law’s melee was not Quite as polished as other veteran setmakers’ and that kept him out of SV for me. Down Tilt and Up Tilt are interesting oddball with delayed hitboxes, another interesting way to get around Whitebeard’s super heavyweight nature. Reminds me a bit of Morgan.

Down Smash again reminds me of Vander Decken in that he creates a lingering quake, and Haki Forward Smash is powerful stuff! FA, Kupa and Goliso will love that move. Up Smash is an interesting blend of Sephiroth’s Down Smash ground vs air hitbox, Corrin’s Forward Smash charging hitbox and overhead swordie Up Smash swings taken to the extreme. Neutral Air borrows from Toramaru, while the rest of Whitebeard’s Aerials are relatively simple but have a nice, solid place in his gameplan. And Forward Throw is fun stuff and a good use of the slopes and pummel gimmick!

Whitebeard is a strong Froy set, and an arguable contender for Rychu’s best set depending on your opinion of Law. That’s saying a lot! There are some slightly simple moves (Side Special, Jab, Forward Tilt, but not a huge drawback) and the base concepts might not be on par with frontrunner sets. US’s suggestion of a Haki clause to indicate range and wind hitbox benefits would also help (not something I would have thought of, just seconding the suggestion!). Nonetheless, what Whitebeard does is very good, definitely another successful joint set for Froy and One Piece set for Rychu! Tugging at the HMA heartstrings of MYM, I could see this set making a good quake on the Top 50 in lieu of its predecessors.

Also that stage extra is fantastic, just in case anyone is reading this comment and hasn’t seen the stage yet.
 

wizfoot

Smash Apprentice
Joined
Aug 12, 2020
Messages
136
Location
Make Your Move, probably
Switch FC
SW-7677-1915-7484
Oh boy, new MYM! Let's start off strong. Literally!

Ahem.

Thump.

Thump.

Thump.

Donkey Kong instantly recognizes the sound behind him as footsteps. They are heavy footsteps; rivaling even his own. He turns around. Nothing is there. He huffs a sigh of relief, turning back around. It was probably just the wi—

—GACK!

Donkey Kong looks at the human in front of him. He's larger than Donkey Kong by quite a bit, with a chest wider than Kong's arms. Donkey Kong pounds his chest in an attempt to intimidate the man, who simply laughs.

"Baby ape think he can fight big man? Is funny to me!"

Four hits and Donkey Kong is out, bananas circling his head.

Thump.

Thump.

Thump.

The man turns around. A gaggle of fighters has their fists and/or weapons raised, looking for a fight with the Russian. He simply laughs.

"Cowards think they can fight Heavy? Only if you promise not to cry after being beaten! Gwah hah hah hah!"


THE HEAVY REVS UP!
"I am Heavy Weapons Guy... and this is my changelog. She has 934 characters and lists off 15 changes at 127 words per minute. It costs $400,000 to read this changelog... for twelve seconds."

MARCH 11, 2022:

Minigun stunlock mechanics fleshed out
Sandvich heal and cooldown nerfed (150% > 100%, 15 secs > 25 secs)
Down Smash nerfed (80% kill > 133% kill)
Grappling Hook pull nerfed (pulls Heavy for less time; 3 secs > 2 secs)
Grappling Hook buffed (Tethers on frame 17 instead of 27)

MARCH 12, 2022:

Side tilt reworked; buff is now active for 3 seconds on hit, buffing Heavy's damage by 1.1x
Down tilt, dash attack, forward smash, all aerials, and all grabs fleshed out
Dash attack sweet spot percentage added
Down air sour spot percentage added
Sandvich heal buffed (100% > 125%)
New gif added to Neutral
Nair and Bair percents swapped (WHY DID I NOT REMEMBER THIS HELP)
All specials given a bit more flavor; fresh holodets, to be precise
Flavor added to jab and neutral air; fresh draniki, to be precise
Flavor added to forward smash; fresh pierogi, to be precise

"Oh my God, who touched Nataliya? ...All right...

WHO TOUCHED MY CHANGELOG?"
 
Last edited:

n88

Smash Lord
Joined
Oct 10, 2008
Messages
1,527
Tiered Ranking
More favorite stuff nearer the top. Unordered within tiers. Not an absolute scale, I'm measuring against how much I liked other stuff this contest. Tiers prone to shift around as I attempt to create more meaningful divisions. Or just change my mind.

Triumphant
Sleaze | Elder Princess Shroob, Nino, Jodie Reynolds, Remilia Scarlet, Oono Tsukuyo, Kuda Izuna, Miruca Crotze

Bodacious
Whitebeard, Valkyrie, King of Sorrow | Baseball Boys, Herminia, Hikaru, Tsukomo Sana, Alex, Walkure, Light Yagami, O. Dio, Sam Fisher, Witchcrafter Madame Verre, Cranky Kong, /v/-tan, Joey Operetta

Excellent
Quackfaster, Berkeley and Cartwright, Hammer Bro, Crewmate, Witchcrafter Haine | Meltryllis, Mad Dog, Naoto Shirogane, Hat Kid, Asbestos, Chidori Michiru, Kula Diamond, Adramelech, Kanade, Sam & Max, Ninon Joubert, Shadow Mario, Nephenee, Kosaka Wakamo, Ode Iou

Radical
Eldlich the Golden Lord, Seth, Cramorant, Saul Goodman, Onion Knight, Alolan Marowak, Marjoly, Timekeeper Cookie, Taranza, Midori Gang, Mao, Magdalena Reinier, Mai and Yui, Miracle Matter, Daniella, Nomad, Kronk/Yzma

Righteous
Wheelie, Daisy, Bucky Barnes, Jacky Bryant, Goddess Ilias, Almaz, The Sundown Kid, Slippy Toad, Blastoise

Tubular
Quaxly, Bellossom, Elimine, Akira, Asagi, Hero Prinny, Exdash Exiviq, Jo'on and Shi'on Yorigami, Isabella, Wolf Witch Veronica

Shoe
Shoe, Bipples, Giganotosaurus, Dark Blupi

Commendable
Saki Amamiya, Heavy, Firelight Ekko, Two-Face, The Dragonborn, Apothecary Gary, Roadhog, Tetsutetsu Tetsutetsu, Nostalgia Critic, King Koopa, Mephilies the Dark, Amber, Raihan, Blue, Mr. Rime
 
Last edited:

UserShadow7989

Smash Journeyman
Joined
Aug 13, 2007
Messages
305
Broken Vessel by n88 n88 ***

Welcome back to the game, nate! Broken Vessel is a solid first submission after a long hiatus, focusing on the nitty gritty details of fighting over more flashy options while still having some neat tricks up its sleeve. Down Special is a major element in the set, as is Side Special, but I'm a big fan of Up and Shield Specials too, and even Neutral Special grew on me for being a random element that's pretty enjoyable for creating delayed pressure.

There's a hiccup or two in the writing, like Forward Tilt describing the uses of its angles as "Generally, angling this attack downward makes it much easier to follow up on, but angling upward or forward will make for easier follow-ups and catch enemies more often", but nothing that makes it harder to understand. It's a fairly solid melee kit that focuses on movement and nimbly ducking in and out of melee to build up damage and keep your featherweight self safe, creating an effect fairly faithful to the boss fight that has Broken Vessel shooting about the screen and giving foes only small windows to react if the player is at the top of their game.

Characterization in this set is great, with a few tricks that mirror the knight from Hollow Knight, the infection-filled head being the only place that takes normal damage in the set (and going a step further and making it resistant to shield pokes besides!) since it's technically the thing piloting Broken Vessel, and the Jigglypuff-style shield break self-destruct with a twist of actually being a self-destruct- blowing up to try and take an overzealous foe with himself! It's an interesting take on that quirk, and it an Down Special's self-damage fit given Broken Vessel is just that- a disposable, broken vessel for the Infection.

Shield Special in general, despite being more of a 'bonus option' as you described it, might be one of my favorite tricks in a set with a good few of them. It's a high reward trick that's also high risk to abuse given what happens if your shield pops, and the combination faint back with the lag reduction makes it very nice for bait and punish plays via FTilt or even FSmash if you're feeling lucky thanks to their forward movement and reach. Jumping back to safety to use Up Special where it's normally a poor OoS choice, or turning your back to the opponent to use the movement in and fire off Up Tilt or a short-hopped BAir (or cross up as an especially spicy treat), there's a lot of fun to be had with it in exchange for the looming threat of a broken shield, and you can even use it as a threat when you have a stock lead and the foe's at high damage to make them much more gunshy about sealing the deal (though grabs are still something you have to look out for).

I do also appreciate the care you took with Down Special's buff over the course of the set, specifically with which attacks don't benefit from it. Powerhouse moves like the shield break effect aren't buffed any further since they don't exactly need it/it'd be a lot of power for the intended balance of the set, while other don't get the buff because they're meant to be combo starters, and then Forward Throw is meant to be a pure damage throw with some useful but not immediately rewarding spacing that resets to neutral.

The set does weaken a bit at the throws, which you mentioned you struggle with, but they're for the most part serviceable. They and Up Aerial are short but simple moves and don't really need a ton of depth, but one thought that comes to mind for Down Throw immediately is to consider Broken Vessel's options for how the foe will roll or stand, etc- Side Special for example would be good if they're spaced right for the nail, possibly an option against rolls back, while Down Special might defend against rolls in while giving you a stack, and the option to run in and throw up shield is a possibility if you wanna deter get-up attacks late in their stock, just as a few possible thoughts that might not work depending on distance/lag.

Broken Vessel is a fantastic returning set, and hopefully a sign of things to come given you've got more ambitious ideas in the pipeline. Nicely done, Nate!
 
Last edited:

n88

Smash Lord
Joined
Oct 10, 2008
Messages
1,527
Whitebeard by FrozenRoy FrozenRoy and Rychu Rychu
I was hoping to sneak in the first set, but this is a very on-brand opener for MYM if I had to get beat out; Whitebeard is rocking some old MYM-y tropes, as an enormous heavyweight terraforming anime man. I get the vibe some of those tropes aren't so common these days - I appreciate him being a throwback if so. I'm something of a scientist throwback myself. I've managed to go through life learning the minimum possible amount of information about One Piece and I still feel Whitebeard sprung to life very quickly here; the moves have this great bombast to them that do a lot to communicate character. The wacky bits work perfectly well taken on their own, but using them as a centerpiece also feels like a smart way to leverage and rehabilitate some of MYM's historically prevalent out-there ideas as a selling point. Those wackier ideas are applied in an admirably restrained way, with only a couple truly zany moves providing the backdrop for a technically-savvy superheavy brawler.

The counter Special was a stand-out move for me. The tension between getting different benefits based on the strength of the move is great, and I like the dynamic of being able to armor up against weak moves if the opponent is carelessly chucking them at you. It's almost a typical superheavy solution to the rushdowny lightweights of the world, but implemented in an interesting skill-gated way instead of being a flat denial to opponents that rely on that kind of thing. Really fun stuff.

Stray thoughts:
  • Heh, I didn't even realize Terry and the Street Fighters (band name) had those turnaround mechanics because I'm not a coward. Was just chatting about something like that in the Discord the other day and didn't realize it existed already.
  • "Striking at Whitebeard causes pure willpower to explode outwards from him" - let those who worship evil's might / beware my power... beard so white!
  • How many feet tall is this guy again?
  • "Whitebeard could even extend his slope with Up Special at an angle to reduce the opponent’s roll distance " from on-stage that would just yeet the slope, I thought?
  • Unsolicited Docs advice: I recommend leveraging the outline more, since it makes it super easy to jump around in a set. You've got image headers here, which you can't put in an outline, but you can put the image headers 'in front of text' and then put a text header behind them. Color that text header so that it blends into your background and doesn't show up in the transparent parts of the image header, and you've got something that can go in the outline without affecting your presentation. (It might show up to degenerates like me who manically highlight text as they read, but highlighting disrupts the aesthetic anyway)
  • There're eight different numbers in the description of Naginata 11, but none of 'em are 11.
  • My favorite part of Up Tilt is when Jason Todd comes back to life.
  • Smashes really bring back that over-the-top style of the early moves in force. Love it.
  • "The laggiest Up Smash in the game at Frame 28 has Whitebeard preparing his swing with the head shoved into the ground starting at Frame 14." Really misread that as "his head", thought this was about to be the wildest move in the set.
  • Up Smash has a reference to variant slope angles, but NSpec has them at a constant 45 degrees.
  • DAir is a slower and more powerful version of my favorite attack in the game? Sign me up.
  • Ah, the ol' reliable UAir that hits down.
  • I commend your deft avoidance of getting autocorrected to Whiteboard or Whitebread, as I continually read this name.
  • Back Throw putting someone through a wall makes them fly farther? That's anime logic if ever I've seen it.
  • Incredible stage image.
 

Katapultar

Smash Lord
Joined
Nov 24, 2008
Messages
1,251
Location
Australia
(Commented within 3 days)
Shroob’s Neutral Special is fantastic and very well-designed! The ability for Shroob and her opponents to smack away the saucers adds a ton of dimension to what would otherwise be less interesting platform or Leaf Shield-style options. Shroob has to be careful about getting saucers knocked into her from these otherwise powerful options, but if she’s clever she can make great use of the saucers with her powerful moves. Genius. I also like how the saucers start out in front of Shroob before going behind her, giving players a brief moment to hit them more easily - for better or worse - before the opposite happens. This is a very well-balanced move, which is saying a lot when there’s a ton going on.

Then it gets crazier with the Time Hole. Logging in previous attacks you’ve used is an interesting departure from the Vulture/Mysterio-style programming, but no worse as it makes Shroob’s ghosts more predictable to more balanced effect - the telegraphed nature and commitment required help mitigate what would otherwise be a potentially extreme attack.

Up Special gets a lot out of a pretty basic healing patch with the saucers and mushroom transformation on opponents - I particularly like how the damage from the weak falling mushroom Shroob jumps off can contribute to a foe’s mushroom transformation! Up Tilt, Down Air and Down Throw carry the spores over, and actually feel like good input placements for such attacks.

This set feels like a return to a more “Kupaian” style from you where many of the non-Specials can be executed in different ways (Dash Attack charge, Forward Tilt stretching, Back Air with saucers), but these feel more justified than usual thanks to Shroob’s Time Hole, and allowing her various ways to mess around with her saucers. Forward Smash is a neat use of hitbox shifting in tandem with the mushroom patches and as a pseudo-counter - I don’t think we’ve had a forward attack where the fighter attacks in the opposite direction you inputted!

The alternate options saucers provide for Forward Smash and Up Smash are neat, especially when you factor in Shroob’s ability to mix up with saucers flying to her - and that she can technically still have access to that Smash’s non-saucer variant with her time ghost. Grab game is short and sweet after the bulk of the set, and I appreciate the balance restrictions put in place for the time ghost.

If there is one aspect I am unsure of in this set, it’s the Neutral Air projectile’s ability to electrify saucers and turn them into passive hitboxes for 5-9 seconds, even if they take damage all the while. But honestly? The options the passive electric hitbox open up are really fun, like using the saucers to drag foes as they fly towards you, and the especially fun option of ricocheting your Neutral Air projectile off of saucers rotating around you. If anything, making the saucers passive hitboxes while Shroob is using them as a platform might be a bit much, but everything else the electric can do is fine.

I’m not exactly sure what she places right now, but I am quite high on Shroob - she would have gotten a Super Vote last contest for sure! You’ve outdone yourself with this ambitious and complex 28k behemoth. At this rate you might even beat out the Stooges’ wordcount?
 
Last edited:

WeirdChillFever

Smash Hero
Joined
Jun 10, 2014
Messages
6,493
Location
Somewhere Out There
465BC40D-3EC4-44D5-9293-832986243CC3.jpeg


Episode 1: New Quacks on the Block!
“Hello and welcome to the first episode of This Duckburg Life: Make Your Move Edition. Today, I will be telling a story about an eager young lad rising through the ranks. No, I’m not talking about my Uncle Scrooge, I’m talking about a creature known as a Pokémon. For the Junior Woodchuck Guidebook, I’ve travelled to a new region where these creatures live. Today I will tell the story of just one of those Pokémon, named Quaxly. I’m Huey Duck, hold onto your tails….”

Part 1: No Spain, no gain
496E5CB3-A384-40A6-AC4C-2BE3B0FF65AF.png

“And, what did you think? Do you think that Quaxly could be the new Scrooge McDuck? I’m joined here by the expert on the genealogy of my alluring ancestry, Mrs. Quackfaster. Mrs. Quackfaster is the keeper of McDuck archives and can thus tell us exactly what she thinks about the Duckling Pokémon.

Mrs. Quackfaster?

I feel like we have a new mystery on our hands, the sudden disappearance of Mrs. Quackfaster. Might this have to do with the Make Your Move contest, and if so, could she actually participate?

Part 2: A moveset for the archives

73734B0D-361C-4298-A59D-3789700AA666.jpeg

Wow, what an episode of This Duckburg Life: Make Your Move edition, with both Quaxly and Quackfaster joining the fray. This was Huey Duck for This Duckburg Life, you can let go of your tails now.”
 
Last edited:

n88

Smash Lord
Joined
Oct 10, 2008
Messages
1,527
Quaxly by WeirdChillFever WeirdChillFever
What a character choice; a good character we know quite a lot about. The lot we know? We know it, for sure. This boy is just as earnest as he is tidy. Which is to say, quite so. I like that the set's interpretation of 'this duck is tidy' is 'this duck weaponizes meticulously organized filth'. Counter-intuitive, but I'm not sure it's actually wrong! The set's a fun, breezy read. I appreciate running with a goofy character choice for a quick set and still implementing it in a pretty grounded way that has fun with its concepts and gets its comedy more from the decisions and the writing style.

The other Specials don't get brought back around quite as much as the Down, but they simply don't speak to his tidiness in the same way, so that makes a certain amount of sense. Still, they could convey earnestness as key Water Moves for a Water Type. The overall direction is possibly realistic, maybe, depending on what abilities Quaxly may or may not have, and how his character does or doesn't evolve (in the literal or figurative sense).

Stray thoughts:
  • Perverse that Defog creates fog.
  • "Quaxly’s riverboat doesn’t float on water because it’s based on the idea that a riverboat is a boat made of riverwater, automatically making it the densest thing possible" - is this a riddle?
  • "almost invisible quack-tities" - I wish the quack-tities in Howard the Duck were more invisible.
  • Pretty sure UTilt is Mega Man's UAir.
  • If I had a nickel for every time one of your sets referenced a plumeau...
  • Does Surf end when Quaxly hops out of it? I didn't catch that in Surf's description, but it's later referenced that he can use it to deposit Down with some precision, so I assume that must kill the Surf.
  • "Don’t get mad at me for using a Kirby GIF here" - I'll feel however I want to about it, thank you very much. (Delighted, as it happens)
  • "Maybe his evolution is called Divuck or something" - they're really missing the boat if no evolution features some kind of play on fowl language.
  • Galaxy brain aerials.
  • Broke: 'status effect on the enemy' DThrow. Woke: 'status effect on yourself' UThrow.
 

Katapultar

Smash Lord
Joined
Nov 24, 2008
Messages
1,251
Location
Australia
(Within 3 days)
Heavy is a character who has gotten sets as early as MYM5, but this intro gave me more insight and appreciation for his character that the others didn’t. Probably because his character has been updated over time, but nonetheless! I used to think he was just his class and he didn’t have much character, but this set’s intro changed that for me. A TF2 renaissance is looking more interesting now.

Zoner + heavyweight is of interest to MYM right off the bat. Heavy’s limited ammo per stock reminds me of Claire Redfield from last contest, a set you might be interested in for that reason, but implemented far more simply here (that’s not necessarily a bad thing!).

As with your MYM24 sets, Heavy feels lacking in a few areas. Some moves are missing important details, frame data feels a bit slow/weak, and the moves could do with more meat, though the latter you’ll pick up over time. Up Special doesn’t list how far the grappling hook goes, and it feels very slow for a tether recovery (might want to look at the frame data of other tether recoveries: frame 10-15 start-up would be more reasonable). Combined with the lack of damage and apparent lack of hitstun, it feels underwhelming, whereas Byleth and Joker’s tether recoveries have cool gameplan applications for instance. I do like the grappling hook pulling Heavy towards his opponent though! Works well with his slow speed and beefy close-up game. Might want to reduce the time it takes to reach your target to 1 second at most, as 3 seconds would be very slow movement.

(I like the healing on Down Special being gradual, but I do think healing 150% is a bit ludicrous, even if it’s over a duration longer than Jigglypuff’s Rest. Might be best to put an equally crazy cap on the healing, like 1 minute. Make it so you can still eat the sandwich before then, but you heal much, much less if you do. Like 12% over the max duration? Smash tends to put hard caps on fighters who have ways of healing themselves in their set)

The Fell Stinger esque damage boost you get from KO’ing an opponent with your Side Tilt is a cool idea! This feels like it would be more fitting on the Side Special, or even make it a universal trait on all of Heavy’s boxing glove attacks. Would be cool to reward the big guy from killing up-close instead of with his zoning attacks. You should definitely increase the duration of the damage boost though - fighters have 3 seconds of invincibility when they respawn, which is not enough time to utilize a 2.5 second buff! (you could still use it in FFA matches, but still)

The “lack of meat” I mentioned earlier is more apparent after the Specials. Listing damage, frame data and kill percents is fine! But there are many more traits in Smash moves that you could talk about. Attack range, whether the move is punishable, how useful it is against shields, what it can combo from or into and much more. Even incorporate super armor! I actually read Tifa one day before MYM25 and wrote up a comment for her thinking you were going to post her (it’s okay if you don’t want to - you woudn’t be the only one who doesn’t want to post a set they finished), and there you do talk about some of the moves Tifa’s attacks can combo into. The way the set is written, the Smashes don’t feel distinctive from each other when they’re all mainly used for killing, whereas Tifa’s Smashes had more distinctive uses described for them.

It’s hard to get a sense for how Heavy is supposed to flow as a set, and the moves don’t feel compelling or have descriptions tying them into each other. For instance: Down Tilt trips opponents, which would be a good time to talk about what moves you could follow-up with, relative to tech chasing and guessing the victim’s get-up option. You could also talk about moves that Heavy could use while pulling himself towards an opponent, what options he could threaten with and moves he could mix-up with.

Also, do Heavy’s Neutral Special bullets just lock foes in place until he stops firing? Because being able to fire for up to 10 seconds and deal up to 600% is hilariously overpowered, and the move kills at 200%! Heavy would only need to use one-third of his ammo to bring his opponent to kill percent - he does get 50 ammo back when he kills and will eventually use up his bullets in the long run, but a Bowser Fire Breath that casually gets Heavy free stocks is extreme no matter how you look at it! I’d suggest having the gun knock foes away after half a second (resulting in a far, far more tame 30%, which is still pretty solid) or limiting how long Heavy can fire for. The ammo mechanic also feels a tad underutilized when the only other moves that use Heavy’s minigun are his Up Air and Back Throw - and neither seem to be stronger then regular attacks to compensate for using up a limited resource.

On an animation note: I know you love giving every attack a GIF, but I don’t think Heavy’s Up Smash and Down Smash were the best choices animation-wise. Sure, Team Fortress 2 is a goofy game series, but for a ferocious character like Heavy it feels like he should be exerting actual effort and attacking his opponents on purpose. If you wanted to keep the current animations, you could add in an animation for the moves and use the existing GIFs as inspiration. For instance: for Down Smash, Heavy could hold up the dumbbells over his head while he’s charging; then bend his knees and fling the dumbbells down with an angry look, visually signifying that he’s attacking his opponent on purpose. Maybe he’s angry that they’re interrupting his weightlifting session? (Don’t know if that’s canon for Heavy)

The suggestions I made are pretty advanced, so don’t worry about implementing them all at once! My bigger suggestion: read other people’s sets, you can learn a lot and get some ideas on how to improve yourself. See what mileage other people get out of basic moves. With MYM25 not even two days old, it’s a good time to start reading! We do already have some intimidatingly long sets in Jodie and Elder Princess Shroob (and Whitebeard and Quackfaster to some degree, depending on one’s idea of “a long read”), but if you’re looking for something small I’d suggest Broken Vessel or Quaxly. I’d love to see you read and develop further as a setmaker! The intro write-ups, extras and GIFs you implement are fun and distinctive among our line-up of setmakers.
 

Torgo the Bear

Smash Lord
Joined
Mar 30, 2019
Messages
1,176
Location
Grinding for Maushold Family of Three
NNID
u2outofcontrol
Switch FC
SW-1209-7008-3905
Hey hey! Torgo's trying to do comments again!
Yeah so I may not really know exactly what I'm talking about all the time, but hey...if anything else, at least you'll know I actually read your set. I hope to write at least two or three paragraphs for every set I read (which, hopefully, will be all of them)... so we'll see how well I do with this. Also...putting them on the thread this time instead of a Google Doc as I'm fairly interested in the User Rankings thingy.

Whitebeard
(By Rychu and FrozenRoy)


Say goodbye to your precious stage. The concept of terraforming the stage apparently isn’t anything new to MYM, but it is to me, and based on this set alone, I think it’s really neat! It almost feels like cheating to force the stage itself to let you recover, but considering the boundaries you have, it doesn’t seem too bad. Of course, me being me, the first thing that comes to my mind is “how painful is all this terraforming for Azurda when you’re fighting on the Cloud Sea of Alrest?”

Don’t ya just love when the dash attack is literally just the fifth special? All the followup options are really neat here. I just really like the back followup honestly…slamming people into the ground with all the slopes and walls to consider sounds really fun to use. Sure, I had to reread how ripping chunks of Earth functions a bit to really get everything working in my head, but when it clicks…

Okay so this motherfrogger can punch through the sky itself. This feels really wrong, but it’s a fairly interesting move anyway.

I really like down smash. Giving the big man who's bad in the air a tool to make people wanna stay on the floor as much as possible is pretty smart. And who doesn't like making people trip? Plus, that extra effect on pitfalled opponents is absolutely terrifying and I love it.

oh okay the punching cracks in the air thing seems to be canon, now it feels slightly less weird
This side smash is really cool too. I can see players being a bit annoying with it, of course...it feels like a very good option for messing with people on the ledge, as Whitebeard should be able to capitalize pretty easily on the fact that the only seemingly safe way around this crack from the ledge is by rolling through it, I'd imagine. And that super-version...just... absolutely terrifying.

Alright, alright...all the smashes are epic here. I must admit I'm a little worried about how he can break slopes to immediately cancel his endlag on such a monster of an attack, but aside from that I feel like it's pretty fair since it's got so much lag that if a person is smart enough to dodge, they can basically get a free punish in. The whole endlag cancelling thing just feels a bit too good to me, even if it does completely destroy your setup.

nair really do just be sephiroth's fair but better
oh and it's also corrin's side b, dang
Sticking into slopes sounds ridiculous and I would love to see how a player actually makes use of that.

Down Throw obviously speaks to me as a K. Rool main

Overall, I enjoyed this set! A really good start to what should hopefully be an awesome contest!

Yeah...so...I should have my first set of the contest out within the next few days! So look forward to that, maybe? Until then, I'll be here lurking...
 

Katapultar

Smash Lord
Joined
Nov 24, 2008
Messages
1,251
Location
Australia
Nice improvement on your moveset presentation! For some reason I didn’t associate the name ‘Quaxly” with the new Pokemon when you mentioned it in-chat, thought it was another Ducktales character, but it makes a lot of sense for you as at this point you’re associated with ducks.

Quaxly doesn’t have much potential to pull from, but you do milk characterisation and writing to its full extent! (lol @ Down (Tilt/Smash) puns) I believe Side Special doesn’t mention how far it goes after its first 3 grids to reach Quaxly, but a further 3-5 grids sounds about right. Whirlpool is a fun little construct with its burst mobility and extended end lag if Quaxly abuses it, and the sheer power it offers to Surf if it runs through the whirlpool. I wonder if Quaxly is limited to one whirlpool? Probably common sense, but still.

There’s not much to say here concept-wise: the Down might not be the most compelling moveset concept, but the idea of it affecting you as well and nerfing your damage would be neat on a heavyweight fighter. Forward Smash has mileage with Whirlpool thanks to its reach - but otherwise I’m not sure how much Quaxly benefits from foes being sucked into the centre of the whirlpool given his lack of reach aside from Surf, and from what I understand the fact that he automatically swims to the other when he touches the whirlpool so he can’t enter it himself to attack the foe.

Regardless, your brand of fun writing really shone through on Quaxly, making for a quick and very entertaining read! And you have another duck on board your ship, too…
 

ZeldaFan01

Cassie Shore/Shelby Goodkind (Netflix)
Joined
Sep 2, 2014
Messages
1,255
Location
Yeah?
NNID
?
SakiAmamiya.jpg

If I Am honest I'd go w/ my moveset I had made for Saki Amamiya as a Teen (at 15 years old). It's based on the Assist trophy from SSBB, butt itis also, inspired by another moveset from a PSA maker/creator ProjectBrawl7 ProjectBrawl7 (First one to post on my Profile). He has gone MIA from Smashboards sadly. Although it seems his talents are somewhat passed on to me, in a way. So he is dearly missed!

It's very quite unfinished because I am unable to implement Saki's Final Smash correctly. But at least I was able to add his voice from the AT (Dex Manley)

Ground:
C-Button - Double Jump
B - Assist Trophy Gunshot
Up B - Twilight Princess Link's ( :link2:) Spin Attack. It was supposed to be :marth:'s but was unable to, so I added that to :roypm: instead w/out Fire Properties but, also replacing :marth: 's blue tint with red instead.
Down B - Nothing
Side B - :falco:'s Side B (Slowed/Jagged)
A Button (3x) - Beam Sword Slash. If Pressed fast enough, AT Fury Slash
Up A - Slowed :linkmelee:'s Up A, 2 slashes only
Down A - :samus2:'s Down A
Side A - :toonlink:'s Beam Sword Slash

Air:
Up A - :zerosuitsamus:'s Up A
Side A - Forward air slash w/ his own Pink Beam Sword (Cannon Gun Hybrid). Similar to :4shulk:'s Forward Air. But w/ :pikachu2:'s Electrical Properties that I was unable to remove.
Back A - Weird stationary back jab of his own that only gives 5% Damage.
Down A - :zerosuitsamus:'s but w/ :toonlink:'s Bouncy Sword Properties.

Grabs & Pummels: It's just a mix of :snake:, :linkmelee:, :foxmelee: and TP Link's Clawshot. The damage is very little. I am unable to remove the Clawshot both in Air & Ground Battle
And last our celebrated guest, :roypm:. But w/ a more "Brawl Appropriate" Model instead. Instead of just going BAM at Isaac &/or :pit:'s hair and ripping it all out from their Brawl Models.

 
Last edited:

Katapultar

Smash Lord
Joined
Nov 24, 2008
Messages
1,251
Location
Australia
Within 3 days
Welcome to MYM, ZeldaFan! Interesting little set you've got here - haven't seen anyone use stock icons of Smash characters to draw comparison to their attacks. You know what they say, a picture says a thousand words.
  • A character intro would help a lot! I don't really know who Saki is beyond his appearance as an Assist Trophy in Smash.
  • It's hard to get an identity for who Saki is and how he fights when his moves are mostly compared to existing Smash characters. That is not a bad thing in moderation, we do it a lot here in MYM! Would it be possible for you to drawn inspiration from his actual game? Maybe even add links to youtube videos, images or GIFs featuring attacks he uses in his game.
  • Basic numerical details to get a better feel for how the moves work. Stats, damage percents, knockback, KO percents (or just say low or high knockback, your choice), lag/frame data. If you have a feel for it, even mention a basic usage for the move. For example, Saki's Assist Trophy attack Neutral Special would be a good zoning tool since it's a projectile. Quaxly, Broken Vessel (n88's first post on this page) and Whitebeard on this page are some relatively short sets you can look at for an example of details you can include in your set.
  • The set still needs a Down Special, Neutral Air, Dash Attack and 3 Smash Attacks from what I understand. Alternatively, you could keep Down B as "Nothing" on purpose, but you would need to justify it! Maybe make Saki's other Specials more powerful to compensate?
Some of the lines in this set have me curious.
  • "It's very quite unfinished because I am unable to implement Saki's Final Smash correctly." Is this from a writing perspective? Like trying to balance the numbers, get the right animation or the right source material to represent Saki's character?
  • "But at least I was able to add his voice from the AT (Dex Manley)" This makes it sound like this Saki set is a mod! I'd be interested if he was, you could always add in a link to the set or clarify on this."
  • Like-wise, "Grabs & Pummels: It's just a mix of :snake:, :linkmelee:, :foxmelee: and TP Link's Clawshot. The damage is very little. I am unable to remove the Clawshot both in Air & Ground Battle" Unsure what this means. Should be easy to make changes if you're referring to a written moveset. The line also implies that Saki has access to a grappling hook in his source material.
Looking forward to seeing what changes you implement!
 

n88

Smash Lord
Joined
Oct 10, 2008
Messages
1,527
Saki by ZeldaFan01 ZeldaFan01
Howdy! I get the vibe you're describing an actual mod?

Cool if so! We tend to operate largely in the realm of the hypothetical here, but describing an actual mod you made sure as heck falls under the Air Bud principle: there's no rule against that and it sounds great. That said, MYM is really all about the writing! If you wanted to flesh this out for us a bit (and don't feel obligated if that's not what you're really interested in doing, but I think folks'd love to see it), it'd be great to get some more insight into your decisions. Why did you use the moves you did? How do they play off each other? That sort of stuff.
 

Katapultar

Smash Lord
Joined
Nov 24, 2008
Messages
1,251
Location
Australia
Joining Quaxly is… the second coming of Constance? This duck’s sheer wordcount really surprised me! I can see why when Neutral Special is quite the big boy input: the use of “Chapters” in the presentation brings Pegasus to mind, fragmenting the move comparable to Kupa’s sets, and I like how you’ve dedicated one section of Neutral Special to explaining its source material. Tidy and earnest, as a little duck would say. The writing on this set specifically reminds me of Kupa’s writing style - funny, Ducktales is a Disney franchise and Kupa likes Disney.

Gravity flipping is a great concept right off the bat - not something we see a lot in MYM! I always wondered whether anyone would tackle this concept given I did them in Niva and Hotaru last contest, but Quackfaster focuses on it a lot more and goes crazier. Foes can be gravity-flipped as well, and you can even stand upside-down on platforms! I especially enjoy the care and detail you’ve put into this mechanic, feels like a step-up to your sets from last contest, and feels perfectly balanced when there’s a limit to how far fighters can be sent flying away when gravity-flipped and it only works on the ground.

The Smashes are your usual unorthodox, MYM’ian fare. Forward Smash makes neat use of the gravity-flipping mechanics with the falling cannonball hitbox. Up Smash is pretty crazy with its potential range - I do wonder if making the archives a platform is redundant when Quackfaster can use her Side Special books and Up Special cart as platforms, and the move is a tad under elaborated as the move doesn’t seem to mention how long the archives stay out or whether Quackfaster can only have one out at a time. I do like the falling cabinets and how they interact with the Rosa Runes, though!

And Down Smash is a fun little move design-wise. What if Quackfaster could still create a trapdoor while standing on a book or cart platform if there was stage ground beneath her? This could lead to a fun scenario where you’re standing on a platform upside-down and create a trapdoor on the stage ground you gravity-flipped from - popping opponents up to your position to combo them from their set knockback! It would even work with the Rosa Rune that flipped Quackfaster up to her upside-down position in the first place. On a slightly different note, I 100% respect and admire the Easter Egg paragraph that mentions the different duck busts Quackfaster can pull out at random (and the different SFXs that can occur during the time loop trap!), and carrying it

Quackfaster’s Aerials are all rock-solid and play off of her gravity and cart shenanigans well enough without going into excessive detail. Her Standard attacks feel more simple by comparison, but are still pretty fine the way they are (though you could elaborate on Dash Attack’s knockback). Glancing at the bottom of the set, I know you intend to update this set, but I like her a fair bit as-is. For a quack suggestion, I could see Down Tilt having mileage while Quackfaster is riding atop her cart, and use the cart’s height to get a combo in? And maybe Up Tilt could have some use with the archive shelves?

Meanwhile, the grab game is crazy - somewhat reminiscent to Constance and Madoka’s out-there grabs, but taken to extremes. The idea of needing to land your grab within a certain timeframe to get bonus status effects is cool, and it does synergize with the Side Special’s anti-inertia by Quackfaster being able nerf her or her opponent’s damage to keep the status effects on them for longer.

Some of the technical details behind the ghost library feel vague though: when and how often does the ghost library appear? Does it only appear in the first 8 seconds of the match? I also wonder if there’s any visual indicator to when the ghost library appears gameplay-wise? I assume the throws are just vanilla when the ghost library isn’t out, but the throws don’t list their effects and usage when they’re not using the ghost library. The rising platform effect of the ghost library is hilariously extreme, and seems to have synergy with the Up Throw but I’m not sure what else. This all makes for a notable hiccup in an otherwise well-constructed set, but I’m sure you’ll get around to fixing it. On the plus side, I liked how the stone effect works with gravity-flipping, and Down Throw has that unexpected extreme terraforming (I don’t know how well that will sit with the more in-smash advocates of MYM, but we’ll see).

While not 100% complete, I found myself quite the fan of this set! I could see Quackfaster being a comfortable RV at the least. The presentation is a big step-up, as was Quaxly, and it’s a clear labor of love with all the references and talking about the source material. As someone who is unfamiliar with the Ducktales universe, I really appreciated all that! It definitely shows the craziness of that universe. Great to have your first truly, truly solid Ducktales set (and with 3 sets, now a franchise!) of what is no doubt your flagship franchise. Great work here!
 

Torgo the Bear

Smash Lord
Joined
Mar 30, 2019
Messages
1,176
Location
Grinding for Maushold Family of Three
NNID
u2outofcontrol
Switch FC
SW-1209-7008-3905
Broken Vessel
(By n88 n88 )

1647040139621.png

Certainly an interesting character choice, course as someone who hasn't played Hollow Knight I'm not too much aware of this thing's implications. I do like the idea of it only taking knockback from headshots. It makes a lot of sense considering that's the only living(?) part is.

The balloons are a little weird, and I'm...really not interested in learning what that equation actually means. But I can still see the move's usefulness. We could be looking at a bullet hell character at higher levels of play...
I like the idea of a power buff requiring self-damage to activate, especially on such a small lightweight. Kinda gives off a Pichu feel, and helps make the character feel a bit scarier to fight against.

All the grounded normals were pretty simple, so there's not too much to say. But I appreciate the character feeling like an honest Smash inclusion. It's all just enough that I could easily see this set in motion, unlike most sets that really make you have to focus hard...and as for that shield break bonus, I like that a lot, too. I've never seen or considered anything similar to that little mechanic, and I can see a lot of crazy match scenarios coming out because of it...

Down Smash is really neat! I like how unpredictable it can be, while still having a fair amount of logical uses. Being able to make projectiles that travel upwards is a cool thing you don't really see much of in Smash unless it's something annoying and spammable, so these are kinda refreshing...and when the balloons exist, the air can be somewhat of a minefield...

So, overall...this set was pretty short and sweet but I liked it! It really felt like something you'd legitimately get to see in a platform fighter like Smash or Fraymakers, and I found that really easy to appreciate this early in the contest when you wanna read a bunch of stuff right off the bat.
 

ZeldaFan01

Cassie Shore/Shelby Goodkind (Netflix)
Joined
Sep 2, 2014
Messages
1,255
Location
Yeah?
NNID
?
Saki by ZeldaFan01 ZeldaFan01
Howdy! I get the vibe you're describing an actual mod?

Cool if so! We tend to operate largely in the realm of the hypothetical here, but describing an actual mod you made sure as heck falls under the Air Bud principle: there's no rule against that and it sounds great. That said, MYM is really all about the writing! If you wanted to flesh this out for us a bit (and don't feel obligated if that's not what you're really interested in doing, but I think folks'd love to see it), it'd be great to get some more insight into your decisions. Why did you use the moves you did? How do they play off each other? That sort of stuff.
Ya I am describing an actual mod!!! He is really cool. I love how Dex Manley voices him AND :falco:. And noted!!
 

wizfoot

Smash Apprentice
Joined
Aug 12, 2020
Messages
136
Location
Make Your Move, probably
Switch FC
SW-7677-1915-7484
First attempt at making an actual comment:

I don’t know a lot about One Piece from what I’ve learned reading this set, Whitebeard sounds ****in’ glorious.

First things first: your formatting is beautiful. I love the edited in-Smash pictures (which I should probably end up doing). Whitebeard sounds like a character I would love to play, and I’m a big fan of the turnaround mechanics. Great job on the stage image, too!

I’m a big fan of the neutral special. It sounds like a great read technique like Ganon’s uptilt, which I’m a huge fan of. Another move I’m really fond of is his side special. The combo with his neutral special and dash attack is also amazing.

If I had to give one criticism, his forward smash just feels a bit too fast. Ganon’s forward smash is just two frames slower but in my opinion that’s enough to make it feel more balanced; maybe 29-31 frames would be a bit better, but by no means am I a frame data expert.

Imagining playing Whitebeard made me feel powerful. Great intro to MYM25!
 
Last edited:

UserShadow7989

Smash Journeyman
Joined
Aug 13, 2007
Messages
305
Elder Princess Shroob BKupa666 BKupa666 ***

This one took me a little while to read through, given the sheer girth of the set, but it was worth the time to do so. Elder Princess Shroob has a very versatile set of Specials, and the saucers and time hole in particular are played off of with every single input, with the mushroom patch getting some due attention over the course of the set. Her pet chomp on Side Special doesn't get quite as much love, but it plays into her saucers nicely and has a lot of fun interactions in and of itself.

The set is full of interactions, both natural in how many moves can benefit from the saucer platform or launch orbiting saucers into opponents, Forward Smash working nicely out of a time hole to hit rolls past Princess or it and Dash Attack letting her choose whether to go past a ledge (and thus off her saucers), etc, and hard interactions like Neutral Aerial powering said saucers up and Back Aerial hurling them like freebees over the usual knockback. Almost too many, to be honest; everything has a use and there's enough consistent mentions of things to make it all feel like it meshes cohesively, nothing's tacked on, but I do feel like at least some of the functions can be trimmed- hypocritical as that is coming from me- like the caterpillar chain of projectiles you can get going with Neutral Aerial.

I think it's mostly a matter of set length and to a lesser extent formatting. I've taken to double-entering to break up different 'ideas' within a single move when a set gets long, for example Neutral Aerial could be the attack itself and its ricochet properties and applications, two empty lines, the effects of it charging saucers, two lines, and then the caterpillar effect and remaining misc notes. It'd make it easier for my eyes to come to rest on the proper paragraph when being pulled away, and the writing is already nicely organized into these sections which is part of what kept the read relatively brisk for me.

That's me stretching for something useful to say, as Shroob is a VERY strong set that wrings every drop of potential and personality out of the one-shot main antagonist and goes crazy with it, making for a fun set to imagine playing. Each move's animation being so defined is key given the length, making it easy to picture each application or attack and think of how it would play in practice, and gets across how much flavor her source material gave her for a character banished to the end game twist section of the plot.

There is some things I'm not sure about, mind- I'm wondering what happens when she uses Back Throw atop a saucer platform, or at a ledge, for example- does she skip the unfortunate victim over the edge, or are they buried right at her... er, tendrils? I think there was one other point where something involving use on a saucer concerned me, but I can't for the life of me recall it. This is a minor hiccup at worst, though; Elder Princess Shroob is an incredibly strong set to start the contest off with, and I'm glad to see you powering on ahead with the same quality as your Heisenberg set last contest.


Heavy Weapons Guy by wizfoot wizfoot ***

Starting your second contest off running, Heavy continues the trend of your sets establishing your care for the characters in question, giving us an in-depth description of Heavy's history and personality while also describing the feel of his gameplay in Team Fortress 2, helping paint a picture of how the set is meant to feel. His stats and specials are certainly set up that way; while he's not terribly fast, Neutral Special can rack up damage quickly on far foes and Up Special can pull Heavy to them, Side Special's charge helping where a tether might not be the best plan but the need to approach is there, and Down Special makes overly defensive foes pay for not pushing him.

At the same time, Heavy still clearly functions better up close as a brick wall, or rather, 'a big angry bear who hates people' as a cut Scout line from Meet the Sandvich put it. Each section is even nicely prefaced with a bit of a summary on how he uses the moves there in general, which is a nice touch, and the assorted gifs and images spice up the presentation nicely.

I feel like the set could stand to bring up the primary (and maybe a secondary) use for each move, even if some are self-explanatory. Neutral in particular can be improved just by saying Jab is good for getting people off of Heavy, Forward Tilt is an early spacer and later proper KO option that's less committal than his Smashes in the case the little baby he's fighting manages to hang in there longer than they have a right to, Down Tilt is a good set up for his other moves that can catch rolls but has issue with short-hops, Up Tilt might juggle a bit and can deny foes trying to cross him up, Dash Attack's sweet spot is perfect for setting up either a ton of damage via NSpec or a finishing Smash, and sounds like it has good reach for using on approach/to give him a little bit of timing mix up on foes expecting him to try for the sweetspot, stuff like that.

Getting into more specific detail, I think Heavy's ammo being counted might be a bit superfluous with the sheer volume of shots and its lack of use outside of his admittedly strong Neutral Special and his Up Aerial; 200 shots isn't likely to go away before you take or lose a stock unless you're deliberately wasting it, when as-is it'd take 10 seconds of fire total to exhaust the whole supply and anything that soaks a third of that is just a decently strong hit away from the blast zone. Side Special could use a little more detail on how quickly the punch itself comes out; having it be a very fast swing feels right, letting Heavy surprise foes up close out of a botched dodge while making it a little better at range/for getting in close on foes lacking an option with good reach.

Side Tilt's damage buff wouldn't see use in a 1v1 match outside of dealing with MYMian minion sets due to its timer running out before the respawn invulnerability ran out; could be changed so that landing the hit at all gets a smaller buff with a longer duration, rather than it being specifically a kill-granted buff as in canon (with a sentence worth of text giving a nod to the difference between Smash interpretation and canon)? If so, it might be a good idea to list what moves can take advantage of the buff, and note under Side Tilt that Up Special or Side Special is ideal mid-stock for getting into range quick, or that Dash Attack and Down Throw's buries are a good way to get the buff, serving as a reward when opponents are too low in damage for Heavy to secure a kill or rev up Sasha to take advantage of Neutral Special's colossal damage output.

The Neutral, Down, and Back Aerial each make a straightforward comparison to the moves of other fighters in Smash, complete with handy gifs showing the hitboxes of the animations. This conveys a lot without inflating the word count, but a very quick note of the move's strong points (or any key differences between their versions and Heavy's or how the rest of Heavy's kit might play into them) would be appreciated, too. For the throws, one piece of general advice for grab games is to give each throw a niche- high damage but not good for a lot else, aerial or ground combo starter, a tech chase, a KO throw, etc are simple but effective examples. For Down Throw, I'd make a vague mention the duration of the bury and how it measures up against Dash Attack's sweetspot (the latter of which I think should have a longer effect given the difficulty of landing it specifically vs just grabbing the opponent).

After getting through Shroob, Heavy was a fun palette cleanser I really needed, being as direct and to the point in playstyle and description as the man it's made for. Still, a little can go a long way; just like I know you will! Thanks for being such an active part of the community, wiz.
 
Last edited:

Torgo the Bear

Smash Lord
Joined
Mar 30, 2019
Messages
1,176
Location
Grinding for Maushold Family of Three
NNID
u2outofcontrol
Switch FC
SW-1209-7008-3905
The Shroobs had begun their invasion. While most didn't know why they were here, or what they were looking for, many heroes had valiantly took up the fight against them. Jodie Reynolds was the most notable force against the Shroobs. But many others stood as well, such as Saki Amamiya and the Heavy Weapons Guy.

There was only one person who seemed to know what the Shroobs were after. One Mrs. Emily Quackfaster, working deep within the Archives, was researching a mysterious newly discovered species called "Gooballs." Gooballs were easily manipulated creatures who were instinctively curious, and could be utilized to create all kinds of large towers and bridges. Quackfaster understood that the Gooballs could be used for good but there were others who made less friendly decisions with them...

A powerful worldwide business conglomerate known as the World of Goo Corporation had sprung up almost overnight, luring in the people of the world with their many products that were made from the Gooballs. It seemed as though the Gooballs could be turned into anything; although drinks and beauty products were the most popular. The World of Goo Corporation seemed to want control over all the Gooballs in the world, in order to continue making products that would drive everyone on the planet to obsession.

But Quackfaster had learned that there was something even more sinister about the World of Goo Corporation's products. They seemed to be infused with some kind of mysterious orange goop, which certainly didn't come from the Gooballs. It was causing the people to become mindless, existing with the sole purpose of taking whatever the World of Goo Corporation had to offer. Quackfaster had found one such person, an everyday individual who had fallen prey to the Corporation's mysterious products. She took this person in, and discovered a way to cure them.

The citizen was grateful, and decided to assist Quackfaster (and her faithful assistant, Quaxly) in helping save the world by protecting the Gooballs from the World of Goo Corporation...and the Shroobs, who had come to this planet in hopes of seizing the manipulative corrupting Gooball-goop hybrids for themselves...

This citizen, known only for their former love of the World of Goo Corporation, wielded a Whistle that could draw the ever-curious Gooballs to their side. With help from a mysterious unseen Sign Painter, The Customer prepared to save the Gooballs and discover the truth behind the corrupting orange goop...
 

Katapultar

Smash Lord
Joined
Nov 24, 2008
Messages
1,251
Location
Australia
Within 3 Days
This is an interesting freestyle construct set, one I remember previewing the base mechanic for way back. The goo toss and constructs utilize physics, but leaving it up to common sense and the imagination makes for a breezier read rather than going into huge detail. The falling hitbox might be a little vague still: does it inflict any knockback, or just deal hitstun? Also, how quickly do goos move towards Customer when he uses Shield Special to recall them? For this construct-heavy set, I’d also mention that Goos and Customer’s other constructs don’t block projectiles, as otherwise it would be very easy for Customer to invalidate them.

With the sheer number of goos Customer can have out, it might be a good idea to place a hard cap on the damage if each falling Goo adds 5%. I also wonder if this set should incorporate the border limit that Steve’s blocks use, where he can’t place them too close to the blast zones? This is used in Up Special anyway, and on that note I wonder if balloons should pop if a fighter stands on floating construct for too long to prevent stalling? This construct stuff is pretty tricky to execute though, so don’t worry if you make a few mistakes!

Dash Attack gets potentially fun with the constructs with the good old classic MYM boulder- I mean, giant Goo that’s affected by slopes and edges you can make. I assume it stays out indefinitely when summoned, and has the same stamina as a regular Goo? The Neutral Air gear is an interesting hard interaction with the giant Goo too.

(I love how self-aware Up Smash is as a potentially lethal edgeguarding tool! My initial thought was that blocking off the ledge like that was unbalanced, but the amount of work necessary to get it means it’s not glaringly overpowered. I’m not worried here.) On a different note, it might be a good idea to elaborate on whether the Up Air bomb damages the fighter who destroyed it - ideally, your opponent should be able to destroy them without being harmed.

I like how the grab game quotes switch from the Sign Painter to the Tomorrow Corporation! The flavour of these throws were fun, very unexpected.

The Customer is a pretty basic construct set - not quite on the same level as fellow wall-maker Whitebeard, and it can feel a tad messy at times, but still a fun set! It’s your crazier, more MYM’ian ideas that interest me on these sets, like the Mads and their cholester-do-all. It’s enjoyable to see your personal roster pan out, and definitely looking forward to seeing you finish Luz and/or Anne/Sprig.
 

n88

Smash Lord
Joined
Oct 10, 2008
Messages
1,527
Elder Princess Shroob by BKupa666 BKupa666
For all the complexity in the specials here, it does manage to feel organic and well-considered. Control systems feel intuitive and the moves interact in logical ways. It'd still be quite a lot to actually get down-pat, but the workings feel learnable and, for the most part, discoverable (I imagine Down Special would send a lot of newbies to the Move List). There are some finer points that I can't imagine being able to put to much use in the heat of battle - like using a chomp to micro-manage a saucer's position to tee it up for an attack - but those things aren't cornerstones, so they don't bother me. The web the specials create is very cool, with the risk/reward of various saucer management options being the real highlight. The character work is also sharp here, with the couple of less-directly-adapted specials still hitting clever beats. The Down Special is a distillation of a couple different things that still feels like a great thematic representation of her (and a cool wink at the partnering-with-yourself time travel shenanigans from Partners In Time; clearly Shroob is adapting strategies from her enemies).

I love that this set feels like it has wild, robust specials without feeling like it’s got several Down Specials, which is an easy trap for sets this MYM-y. Neutral Special is a bonkers move that still feels like a Neutral Special through-and-through: bread and butter stuff that boils the character down to a signature move and has instant, obvious appeal as ‘the thing that happens when I hit the Cool Attack button’ before you plumb its depths. Tremendous.

That’s a lot of talk about just the specials, but they’re long enough to be a set on their own. The rest of the set does a great job paying off all the tricks they set up, and the amount of consideration that’s gone into it is impressive - more than once during a move description I was thinking “well what if…” and sure enough, there was a paragraph or two exploring whatever possibility had occurred to me. Plus several paragraphs about stuff that I hadn't thought of. It verges on overwhelming to read at points, but I can accept that a good chunk of it is once-in-a-blue-moon stuff, and extra saucer-driven effects are implemented in a way that doesn’t feel disruptive to the moves’ otherwise intended uses.

This is a favorite from what I've read in the time I've been back, and a huge addition to the opening day salvo of sets. Nice work!

Stray thoughts:
  • We're picking nits here, but the 'select a target' thing in NSpec, forward input does feel unnecessarily busy to control for my taste. I'd consider just having it prioritize fighters over constructs/items and then have it just pick a fighter for you if there are multiples. Could give it some principle to go off of if you don't want it to be random.
  • Inward Chomp Jerks is a very satisfying turn of phrase for whatever reason.
  • Up Special would probably benefit from some visual indicator that you’re enhancing your shrooms by holding the input after they’re grown.
  • Appreciate Up Special leveraging the complexity of her specials by implementing a ceiling and explicitly making managing her constructs one of the tough things about healing up.
  • “Obligatory heavyweight shoulder charge dash attack” is somehow still a 1500 word move. Impressive.
  • The status effect UTilt does feel a little odd? Not a deal-breaker, but I was surprised to see something like that pop up on that input without being more woven into the set. Was kinda expecting it to come back on FAir as another crown hit. (Though she did at least get a different aerial using it)
  • “Those looking to channel their inner Sephiroth could even throw Shroob off an offstage saucer platform to vindictively seal the deal against a recovering foe, at the cost of her own stock.” - Nobody lives forever.
  • The set’s a bit of a doozy to get through - the writing makes it all digestible, but the sheer length is y’know, something. I’m sure I already have longer to read this contest though.
  • “platform-camping maniacs” - I see stories about this on the news, but I think they’re just trying to scare people.
  • Just when I think I’m out of the mushroom forest…
  • The final hit on UAir sounds like it’s missing a damage percentage. (Unless it also deals 2% like the first few hits and just has stronger knockback - wasn’t clear on that from the description)
  • Up Throw is a stand-out fun animation in a set with a lot of them. Strong note to end on.
 
Last edited:

UserShadow7989

Smash Journeyman
Joined
Aug 13, 2007
Messages
305
Quaxly WeirdChillFever WeirdChillFever ***

A tidy and earnest set for a tidy and earnest starter. Can't say I'd have had it in me to make a set for a Pokemon that we know so little about yet, but it's a long standing MYM tradition being resurrected here and that seems to be a trend between Quaxly and Whitebeard, two sailors who couldn't be any more different (wonder if he'd take a liking to the little duckling?).

For the set itself, the down is an interesting debuff the set plays around while giving Quaxly a decently competent melee kit, using it both to keep Quaxly alive and serving as a downside to trying to get too messy (hitting a nice balance portraying a tidy but inexperienced recruit). I'd have been a bit interested in seeing more elaboration on Quaxly's combos like Jab and DTilt both mentioning their value in combo starting and FTilt mentioning its deficiency in that area- which raises the idea of Down actually helping FTilt and certain other moves act as combo starters when they wouldn't otherwise, escalating into a proper KO move when he shakes enough of the Down off by way of performing the combo.

There's elements of this already in Forward Aerial, and a bit more detail on combo strings and how Down can help them would be neat (I could also see it helping with Up Tilt's juggle potential for example). It might be a bit character-questionable, but the opponent nearing the end of the stock when this would apply most or Quaxly's competence not quite matching its gumption would serve as a reasonable explanation.

It's a really interesting mechanic that'd be fun to play with in practice, and wouldn't really interrupt the flow of the match to micromanage. As-is, there's still some very neat interactions like using Side Special to gather it up and push it around, Down Tilt and Down Smash getting buffed when it's around/on Quaxly, Dash Attack being useful to stop short of sliding into a pile of it where your low traction might cause an issue, etc. Moves like Forward Smash being good for precise positioning and Up Smash taking advantage of foes taking to the air to avoid Down (combined with a solid air game) gives this water fowl a strong playstyle in particular. The other Specials don't get a ton of screen time, but are all pretty neat in their own right, Side Special being a nice way to keep on opponents later in the stock (also mentioned in Forward Aerial, which I think might be my favorite standard input here) alongside Down Special being a good set up for a stronger hit.

There's a couple of spots that suffered a bit from the rush to get it and Quackfaster done opening day, but nothing major. The first spot is Neutral Aerial mentioning the leg sweetspot in two separate parts and listing different damage for them ("The leg hitbox is a sweetspot that hits at a semispike angle and deals 10.4% damage." in pararaph 2, "His legs are a little stubbier and form a sweetspot that deals 10.2% damage and directly upwards knockback!" in paragraph 4- I take it that one is meant to be the sweetspot behind Quaxly alluded to in paragraph 1?). Pummel lacks mention of damage. The ground game is a little simple, but that's hardly a bad thing, and it's fairly sensible when Quaxly is no landlubber (to our knowledge).

That said, while I did bring up a desire to see more combo strings mentioned, there's already a good few inputs like its Back and Up Aerials that make note of options available to the brave little sailor. Back Throw makes a key distinction of its Grab NOT comboing out of Surf, giving its grab game a balance of higher reward for more earnest work. BThrow even has a fun little interaction with the Whirlpool, giving it a bit more presence in the set; the grab game overall is very nice, which I appreciate given it can be a harder section for some characters. The input concepts are interesting enough and elaborated on in proper detail overall, and combined with a humorous writing style, Quaxly is a set I'm entirely Down with, and one I'm glad you took the time to make. After Pidgey, I shouldn't be surprised you're capable of wringing so much potential out of a small avian. Nice work!


Quackfaster WeirdChillFever WeirdChillFever ***

Quackfaster is currently unfinished, but for the sake of a perfect score giving advice on the portions that are done, I've done a full read through. The Specials make an amazing core, tackling a genre that hasn't really been touched on in... man, when was that Gravity Man set? Whatever the case, Quackfaster makes great use of the Rosa Runes to confuse her and her opponents' gravity, with movement manipulation in the form of her Rosa Rays, her library cart, and the ability to just snag a few mundane books to hurl at her opponent getting across her eccentricities well- that the latter can work as platforms under the effects of the Rosa Runes are a nice touch in and of themselves.

The Rosa Runes also touch very nicely on a much maligned and mostly forgotten Make Your Move fad: the control screw. While rightfully so in most cases, Quackfaster's take on it is FAR more interesting and honestly pretty cool; you still move and attack in the direction you input, but which input that is is rotated accordingly, leading to Down Aerials aiming up (which is much relief to Slavic as his stall then falls now take him beyond the Rosa Rune's optimum range to free him instead of guaranteeing him playing one stock down from the opponent) if flipped upside down, and so on. You'll still need to account for your character's change in direction, but it's more in the matter of your moves' coverage being changed (which is as much an opportunity for enterprising opponents as anything- a killer spike is now potentially a deadly off the top KO option, for example).

Her Smashes play off of her set up nicely, both in their usage and how they interact- Forward Smash's cannonball is a wonderful weapon that ties in nicely with everything, Up Smash's platform generation gives Quackfaster more than enough material to work with for her gravity shenanigans in that area at the cost of being stuck in one place compared to the more 'mobile' (for lack of a better term) Down Special tomes, and Down Smash serves as a book delete button, a payoff, a situational ledge guard, and a way to trap landings (such as from foes trying to clear a Rosa Rune with a jump). Her aerials are mostly specialized, with Neutral Aerial serving as a fine panic button/bread and butter trick in the air regardless of directional orientation and the directional aerials being more specialized tools that can change in use appropriately depending on facing.

The Standards are where the time crunch to get her out day one become clear, but this section is still technically complete if still wanting to be filled out. What's there serves as a solid outline- Down Tilt nicely defending and triggering a Rosa Rune, Jab rewarding your assorted set-ups and so on. Her Grab Game stands to end the set strong going by the described concepts, adding more trickery with stat manipulation and a tiny bit of terraforming to the mix in a way that could open up whole new worlds of interactions for the rest of her set.

I think if I had one complaint about what's already present, it's that adjusting gravity by 90 degrees instead of 180 doesn't have a ton to it yet, but that's understandable and the potential is still there; Up Smash's assorted platforms work just as fine for that as a full gravity flip, Jab already mentions the use of cart carrying Quackfaster forward during it (which a horizontal book serving as a wall going that way can work for as well- toss it behind you at a Rosa Rune, turn, and start the jab while the book shoves her along to the end of its range, could also work nicely with the cart in a Zelda Phantom shoving Wario's Bike sort of set up).

As a final note: The Ghost Library took me a moment to parse, being a shared duration for her grab effects and a delayed trap both she and her opponents need to avoid; the initial phrasing made it sound a bit like she would get a bonus effect if she threw the opponent within eight seconds of starting her grab rather than it being a duration for whatever she does to them with the throw that happens to count down from the start of landing the grab. This is more to do with my lack of reading comprehension than anything, so no worries; it’s a dang cool idea for her grab game, and I’m very excited to see the finished version of this set- if what's there so far is any indication, this is one that could've stolen a SV last contest!
 
Last edited:

BKupa666

Barnacled Boss
Moderator
Joined
Aug 12, 2008
Messages
7,788
Location
Toxic Tower
WHITEBEARD:
Kicking off MYM25, we have what I came away from reading seeing as the definitive modern terraforming set, at least as the term traditionally has been described. Neutral and Up Specials come together in near seamless fashion to offer simple to use, yet largely open-ended tools for Whitebeard to commandeer the stage to his liking. It took a few rereads to visualize how his temporary extensions of the stage/ledge functioned, but I think the sheer versatility here — pulling the stage into opponents directly to strike them or into his path to more easily grab while recovering, all within Steve's block limit — makes it my favorite of his tricks. I imagine this could create some true chaos on custom stages, where "nearest section of the stage" can vary quite drastically depending on position.

Then, there's creation of walls for interactivity in the melee, with a nice bullying feel in tandem with options like jab/F-Tilt. For better or worse, I do think Whitebeard's shattering of midair platforms is relatively easy to do while netting a meaty 15-second destruction; unless a foe is already in his face during his 45 startup frames, I'd wager they'd avoid challenging him directly. Far be it from me to stick up for mashy ladder combo-ers who must now think creatively about finishing off Whitebeard, but I might have split the difference and had him go through a bit of lag on impact with platforms, maybe with a touch of super armor. In any case, slopes are another favorite in that Whitebeard can choose whether or not to destroy them at a moment's notice, depending on whether the given attack he's using has Gura-Gura properties or no, to better his frame standing in midair. As far as MYM tropes I don't find myself tiring of, "Option for canceling grounded attack lag by becoming airborne" ranks right up there along with "Option for using grounded attacks in midair," manifested with Whitebeard's delicious stage chunk riding, near the top.

Whitebeard rounds out a truly solid set of Specials with a patented HMA command grab, setting up for frightening follows with the successive earthquake option or D-Smash, and a counter that has a lot of intriguing incentives built in. Based on how the buffs work, Whitebeard is enticed to put himself at risk trying to counter the sort of fast, weak attacks he's most susceptible to as a big body, or go after sufficiently strong attacks to achieve the Haki aura, with more powerful potential at the cost of a shorter duration. I do think there was more potential to weave some of the buff benefits in with the melee — the wind suction and range boost don't seem to come up again in moves they could render even more treacherous to avoid, like F-Tilt (the frontal armor at least gets a good 50/50 in N-Air). That's not all that major a nitpick when the rest of the melee is as cool as it is. A shortlist of my favorites: dash attack's almost Dancing Blade-esque options for counteracting enemy movements, D-Tilt's delayed shockwaves, D-Smash's shard creation, N-Air's stage spearing and the complementary spiking nature of U-Air/D-Air.

Whitebeard is confident in his genre and executes it mostly to perfection. Though he's the first set I've read this contest, I imagine he'll stay comfortably at the top of my personal MYM25 favorites list at least for a few sets (depending on how everyone's competitive caliber continues). Sublimely done FrozenRoy FrozenRoy and Rychu Rychu !

BROKEN VESSEL:
Reading through Broken Vessel, I'm brought back to why I enjoyed your sets as much as I did back in the day, and I'll echo those who already have said your apparent ease in leaping right back into setwriting as though no time had passed is majorly admirable. Broken Vessel fuses together a number of elements I both enjoy and find underutilized across MYM at large — chiefly its multiple Bowser Jr. esque hurtboxes with distinct damage vulnerability (put to even greater effect here, given its featherweight status) and reasonable RNG use. Broken Vessel could have fit right in and perhaps even won our "chance time" Jamcon last contest, on account of its Neutral Special balloons. Their random spawn points are an elegant workaround that frees Broken Vessel's player up from having to either manually guide balloon spawn points around or be directly underneath where it wants them to appear, and upon appearing, they create a chaotic form of pressure, as though the air space is slowly closing in on opponents.

Past the balloons, Broken Vessel's most intriguing attack to me is Down Special, putting itself through a self-damaging explosion in exchange for potent buffs to its non-infection attacks and upping the ante that much more on its glass cannon status. The logistics of setting this up feel reasonable — Broken Vessel can go through the relatively lengthy second necessary to trigger the explosion while foes are busy navigating balloons or in between stocks, or take a risk and try multiple explosions in a row if he's managed to blast an opponent far enough back with a first. From there, burst options like Side Special and F-Smash pose greater threats, but the buffs aren't necessarily a full-on benefit in all circumstances — for instance, U-Smash's hits being harder to chain together while focused.

In terms of miscellaneous notes, I'm a big fan of the sheer number of movement options sprinkled across Broken Vessel's attacks, from Up Special's massive cancel-able leap and Shield Special's short-yet-helpful micro-spacing hop, to B-Air's optional follow-up and B-Throw's Ken-esque backward dash. They lend themselves to a charmingly slippery playstyle feel, not too dissimilar from last contest's Kactuar. There's neat parallelism between D-Smash and D-Air as far as means for producing obstructive globs both on the ground and landing from midair. Not mentioned in the Shield Break attack, but potentially pertinent, Broken Vessel could take a stock lead and then purposefully hold out shield so as to eventually get a weaker Hero Kamikaze on command — a devilish possibility that thankfully doesn't dominate its match focus, given that it dies, too. And though it doesn't work on mobile to my knowledge, I quite enjoy the alt-text as a means for adding further color to moves (inspiration for them, meta aspects that could break up flow in writing, etc.).

Needless to say, I'm high on Broken Vessel and excited to see what surprise sets your return might yield next! n88 n88

both comments completed within three days of sets' initial postings
 
Last edited:

WeirdChillFever

Smash Hero
Joined
Jun 10, 2014
Messages
6,493
Location
Somewhere Out There
:younglinkmelee: This comment was posted within three days of the set’s creation :younglinkmelee:
Shrooby Doo! Mushroom-y Incorporated (Elder Shroob Princess by BKupa666 BKupa666 )
Wowee, what a set! Shroob is definitely a heavy-hitter, both in gameplay and in this contest. While I can’t echo the sentiment that it rivals Walter White, it’s definitely a set that treats everything it introduces with the utmost grandiose and respect, never letting any potential untapped.

Chomp is a really great case study for this: Elder Shroob really taps into the various yo-yo tricks you can do with it and the movement shenanigans that create before heading into the purpose that I imagined it to have when reading the move, being the Chomping down of Saucers. This effect of letting a move take up breathing room by just rattling down the consequences of a very basic action also means the set doesn’t suffer from basic moves or from being an over-gimmicky set: When it’s needed, Elder Shroob pumps up with momentum with a held variant or a similar Neutral-Air-esque interaction, but other times moves take a backseat or revisit an otherwise underutilized concept to mix it up such as with the poison moves.

This all gives the set an amazing flow with standout inputs, without seeming eclectic for the sake of being so (a ”problem” I noticed on Syndrome). No move is an island, even without a traditional combo game.

If I did have a negative, it’s that I found the Time Ghost to be a bit underexplained for the impact and complexity it has. To my understanding, you can input B during any point during a move to create a frame-delayed Ice Climber-y Time Ghost version of that move as long as that move was stored in the time portal thing? If that‘s correct, that’s great and you explained well, but I’m still doubting whether my understanding of the move is correct.

Overall, a great set and most of all creative, which is a feat considering how many move-storing or projectile manipulation sets there are around these parts of town.

“And now, time for a new segment on “This Duckburg Life: Make Your Move edition“: Commenting on comments!”

That’s right Huey! I feel I could improve the moveset reflection process by posting full comments back to the comments written about the sets, forcing you to really think about design choices by working out a longform comment and giving a sneak peek behind the scenes of your own moveset making process, the results of which might surprise you. In lieu of doing the front desk duty of showing newcomers what it is we do and boosting my User Engagement, it’s all a fun thing that might help everyone here.


Quaxly by WeirdChillFever WeirdChillFever


What a character choice; a good character we know quite a lot about. The lot we know? We know it, for sure. This boy is just as earnest as he is tidy. Which is to say, quite so. I like that the set's interpretation of 'this duck is tidy' is 'this duck weaponizes meticulously organized filth'. Counter-intuitive, but I'm not sure it's actually wrong! The set's a fun, breezy read. I appreciate running with a goofy character choice for a quick set and still implementing it in a pretty grounded way that has fun with its concepts and gets its comedy more from the decisions and the writing style.

The other Specials don't get brought back around quite as much as the Down, but they simply don't speak to his tidiness in the same way, so that makes a certain amount of sense. Still, they could convey earnestness as key Water Moves for a Water Type. The overall direction is possibly realistic, maybe, depending on what abilities Quaxly may or may not have, and how his character does or doesn't evolve (in the literal or figurative sense).

Stray thoughts:
  • Perverse that Defog creates fog.
  • "Quaxly’s riverboat doesn’t float on water because it’s based on the idea that a riverboat is a boat made of riverwater, automatically making it the densest thing possible" - is this a riddle?
  • "almost invisible quack-tities" - I wish the quack-tities in Howard the Duck were more invisible.
  • Pretty sure UTilt is Mega Man's UAir.
  • If I had a nickel for every time one of your sets referenced a plumeau...
  • Does Surf end when Quaxly hops out of it? I didn't catch that in Surf's description, but it's later referenced that he can use it to deposit Down with some precision, so I assume that must kill the Surf.
  • "Don’t get mad at me for using a Kirby GIF here" - I'll feel however I want to about it, thank you very much. (Delighted, as it happens)
  • "Maybe his evolution is called Divuck or something" - they're really missing the boat if no evolution features some kind of play on fowl language.
  • Galaxy brain aerials.
  • Broke: 'status effect on the enemy' DThrow. Woke: 'status effect on yourself' UThrow.
First of all, thanks again for the comment! Your stray thoughts really hit some of the points that I hoped to convey and eerily reflect the thoughts I had when writing some moves, such as the plumeau comment.

And yeah, the Personality Trait of being tidy getting worked into a mechanic where he is kinda filthy is both a nod to him not being too amazing at his job and to incorporate some Donald Duck-like frustration at some small singular goal somehow growing out of control. I originally wanted to use the move Muddy Water, but I felt it would weaponize dirt too much so that it would go against The Tidyness.

As for writing style, I definitely went for the comedy aspect here to 1. worldbuild 2. let loose after having to sort of holding back on Quackfaster for a Professional outlook. Glad to see the personality shone through, even if it is in the hammy way I played it up in the end.

Stray Thoughts:
  • “Perverse that Defog creates Fog” Yeah, but I feel it’s also one of the more effective defogging moves with the second part of the move.
  • Quaxly‘s riverboat being a river boat is the reason it sinks in water, despite being water. Usually, a material sinks if it has a higher density than the material it buoys on iirc, so the reason a boat of water sinks in water is because the idea itself is so figuratively dense that the laws of nature somehow pick up on it. Explaining The Joke for a gag you probably got, but I don’t want there be a chance for you to miss it, so there you go.
  • Surf does end when Quaxly hops out of it, like Bowser Jr.’s Clown Cart. A victim of writing a set in a good day is that you just miss to explain basic stuff.
  • I am so mad that I didn’t make a “fowl language” joke. First thing to edit in.
Nice improvement on your moveset presentation! For some reason I didn’t associate the name ‘Quaxly” with the new Pokemon when you mentioned it in-chat, thought it was another Ducktales character, but it makes a lot of sense for you as at this point you’re associated with ducks.

Quaxly doesn’t have much potential to pull from, but you do milk characterisation and writing to its full extent! (lol @ Down (Tilt/Smash) puns) I believe Side Special doesn’t mention how far it goes after its first 3 grids to reach Quaxly, but a further 3-5 grids sounds about right. Whirlpool is a fun little construct with its burst mobility and extended end lag if Quaxly abuses it, and the sheer power it offers to Surf if it runs through the whirlpool. I wonder if Quaxly is limited to one whirlpool? Probably common sense, but still.

There’s not much to say here concept-wise: the Down might not be the most compelling moveset concept, but the idea of it affecting you as well and nerfing your damage would be neat on a heavyweight fighter. Forward Smash has mileage with Whirlpool thanks to its reach - but otherwise I’m not sure how much Quaxly benefits from foes being sucked into the centre of the whirlpool given his lack of reach aside from Surf, and from what I understand the fact that he automatically swims to the other when he touches the whirlpool so he can’t enter it himself to attack the foe.

Regardless, your brand of fun writing really shone through on Quaxly, making for a quick and very entertaining read! And you have another duck on board your ship, too…
Thanks again for the comment! Your comment game last contest was on-point, we’re all just hoping to match you this time.
Moveset presentation was definitely something I experimented with. Font for the title is “Pacifico” for ”Pacific Ocean”, typeface for headers is “Playfair Display” because it’s Very Earnest to play fair. Just funny font things.

I’m glad the characterization came through and I’m surprised I managed to make something out of the literal six words given about him. The Down Smash/Tilt/Throw puns actually helped remind me to hardcode some interactions in there, so it’s all fun and functional. Then some nitpicks, one of which I edited in to fix: There can indeed only be one Whirlpool out at a time. Will probably edit in a range for Surf in a similar sense; it’s something that should be there, glad you noticed it missing!

Quaxly WeirdChillFever WeirdChillFever

A tidy and earnest set for a tidy and earnest starter. Can't say I'd have had it in me to make a set for a Pokemon that we know so little about yet, but it's a long standing MYM tradition being resurrected here and that seems to be a trend between Quaxly and Whitebeard, two sailors who couldn't be any more different (wonder if he'd take a liking to the little duckling?).

For the set itself, the down is an interesting debuff the set plays around while giving Quaxly a decently competent melee kit, using it both to keep Quaxly alive and serving as a downside to trying to get too messy (hitting a nice balance portraying a tidy but inexperienced recruit). I'd have been a bit interested in seeing more elaboration on Quaxly's combos like Jab and DTilt both mentioning their value in combo starting and FTilt mentioning its deficiency in that area- which raises the idea of Down actually helping FTilt and certain other moves act as combo starters when they wouldn't otherwise, escalating into a proper KO move when he shakes enough of the Down off by way of performing the combo.

There's elements of this already in Forward Aerial, and a bit more detail on combo strings and how Down can help them would be neat (I could also see it helping with Up Tilt's juggle potential for example). It might be a bit character-questionable, but the opponent nearing the end of the stock when this would apply most or Quaxly's competence not quite matching its gumption would serve as a reasonable explanation.

It's a really interesting mechanic that'd be fun to play with in practice, and wouldn't really interrupt the flow of the match to micromanage. As-is, there's still some very neat interactions like using Side Special to gather it up and push it around, Down Tilt and Down Smash getting buffed when it's around/on Quaxly, Dash Attack being useful to stop short of sliding into a pile of it where your low traction might cause an issue, etc. Moves like Forward Smash being good for precise positioning and Up Smash taking advantage of foes taking to the air to avoid Down (combined with a solid air game) gives this water fowl a strong playstyle in particular. The other Specials don't get a ton of screen time, but are all pretty neat in their own right, Side Special being a nice way to keep on opponents later in the stock (also mentioned in Forward Aerial, which I think might be my favorite standard input here) alongside Down Special being a good set up for a stronger hit.

There's a couple of spots that suffered a bit from the rush to get it and Quackfaster done opening day, but nothing major. The first spot is Neutral Aerial mentioning the leg sweetspot in two separate parts and listing different damage for them ("The leg hitbox is a sweetspot that hits at a semispike angle and deals 10.4% damage." in pararaph 2, "His legs are a little stubbier and form a sweetspot that deals 10.2% damage and directly upwards knockback!" in paragraph 4- I take it that one is meant to be the sweetspot behind Quaxly alluded to in paragraph 1?). Pummel lacks mention of damage. The ground game is a little simple, but that's hardly a bad thing, and it's fairly sensible when Quaxly is no landlubber (to our knowledge).

That said, while I did bring up a desire to see more combo strings mentioned, there's already a good few inputs like its Back and Up Aerials that make note of options available to the brave little sailor. Back Throw makes a key distinction of its Grab NOT comboing out of Surf, giving its grab game a balance of higher reward for more earnest work. BThrow even has a fun little interaction with the Whirlpool, giving it a bit more presence in the set; the grab game overall is very nice, which I appreciate given it can be a harder section for some characters. The input concepts are interesting enough and elaborated on in proper detail overall, and combined with a humorous writing style, Quaxly is a set I'm entirely Down with, and one I'm glad you took the time to make. After Pidgey, I shouldn't be surprised you're capable of wringing so much potential out of a small avian. Nice work!
Thanks for the comment! Your vision on the Down is definitely interesting and one I definitely share: It didn’t always end up in the set the way I wanted to in hindsight, but this comment makes me want to jump right in and make an Earnest attempt to flesh out the concept, so thanks for that!

Forward Tilt’s lack of comboability I feel is not a question of knockback but rather of the sharp horizontal angle it sends at, you’d need a lot of Down to make that work, whereas a ”fresh” Forward Tilt gains a usage as this sort of “why won’t you die” kill move.

The idea of Quaxly’s combo game helping him shake off Down is genius and again makes me want to jump back in and just take some time to put some thoughts in the set itself, even beyond ticking in blatantly missing info. If I do, I’ll make sure to let everyone know, similar to Quackfaster. Could also use that chance to work in the other specials, like using Surf as really that Koopa Clown Cart Dash-esque combo starter and Whirlpool as almost a sort of “bubble” (literal and figuratively) where Quaxly can use his aerials with increased mobility to further that combo game.

Pidgey was actually a great help to help steer the moveset towards the more water-based ideas rather than to use the wings and go for wind-gusty things. I’m sure that would’ve been a neat playstyle on its own to combine with the down, but I feel that sort of projectile manipulation is what Pidgey was already here to do.


Joining Quaxly is… the second coming of Constance? This duck’s sheer wordcount really surprised me! I can see why when Neutral Special is quite the big boy input: the use of “Chapters” in the presentation brings Pegasus to mind, fragmenting the move comparable to Kupa’s sets, and I like how you’ve dedicated one section of Neutral Special to explaining its source material. Tidy and earnest, as a little duck would say. The writing on this set specifically reminds me of Kupa’s writing style - funny, Ducktales is a Disney franchise and Kupa likes Disney.

Gravity flipping is a great concept right off the bat - not something we see a lot in MYM! I always wondered whether anyone would tackle this concept given I did them in Niva and Hotaru last contest, but Quackfaster focuses on it a lot more and goes crazier. Foes can be gravity-flipped as well, and you can even stand upside-down on platforms! I especially enjoy the care and detail you’ve put into this mechanic, feels like a step-up to your sets from last contest, and feels perfectly balanced when there’s a limit to how far fighters can be sent flying away when gravity-flipped and it only works on the ground.

The Smashes are your usual unorthodox, MYM’ian fare. Forward Smash makes neat use of the gravity-flipping mechanics with the falling cannonball hitbox. Up Smash is pretty crazy with its potential range - I do wonder if making the archives a platform is redundant when Quackfaster can use her Side Special books and Up Special cart as platforms, and the move is a tad under elaborated as the move doesn’t seem to mention how long the archives stay out or whether Quackfaster can only have one out at a time. I do like the falling cabinets and how they interact with the Rosa Runes, though!

And Down Smash is a fun little move design-wise. What if Quackfaster could still create a trapdoor while standing on a book or cart platform if there was stage ground beneath her? This could lead to a fun scenario where you’re standing on a platform upside-down and create a trapdoor on the stage ground you gravity-flipped from - popping opponents up to your position to combo them from their set knockback! It would even work with the Rosa Rune that flipped Quackfaster up to her upside-down position in the first place. On a slightly different note, I 100% respect and admire the Easter Egg paragraph that mentions the different duck busts Quackfaster can pull out at random (and the different SFXs that can occur during the time loop trap!), and carrying it

Quackfaster’s Aerials are all rock-solid and play off of her gravity and cart shenanigans well enough without going into excessive detail. Her Standard attacks feel more simple by comparison, but are still pretty fine the way they are (though you could elaborate on Dash Attack’s knockback). Glancing at the bottom of the set, I know you intend to update this set, but I like her a fair bit as-is. For a quack suggestion, I could see Down Tilt having mileage while Quackfaster is riding atop her cart, and use the cart’s height to get a combo in? And maybe Up Tilt could have some use with the archive shelves?

Meanwhile, the grab game is crazy - somewhat reminiscent to Constance and Madoka’s out-there grabs, but taken to extremes. The idea of needing to land your grab within a certain timeframe to get bonus status effects is cool, and it does synergize with the Side Special’s anti-inertia by Quackfaster being able nerf her or her opponent’s damage to keep the status effects on them for longer.

Some of the technical details behind the ghost library feel vague though: when and how often does the ghost library appear? Does it only appear in the first 8 seconds of the match? I also wonder if there’s any visual indicator to when the ghost library appears gameplay-wise? I assume the throws are just vanilla when the ghost library isn’t out, but the throws don’t list their effects and usage when they’re not using the ghost library. The rising platform effect of the ghost library is hilariously extreme, and seems to have synergy with the Up Throw but I’m not sure what else. This all makes for a notable hiccup in an otherwise well-constructed set, but I’m sure you’ll get around to fixing it. On the plus side, I liked how the stone effect works with gravity-flipping, and Down Throw has that unexpected extreme terraforming (I don’t know how well that will sit with the more in-smash advocates of MYM, but we’ll see).

While not 100% complete, I found myself quite the fan of this set! I could see Quackfaster being a comfortable RV at the least. The presentation is a big step-up, as was Quaxly, and it’s a clear labor of love with all the references and talking about the source material. As someone who is unfamiliar with the Ducktales universe, I really appreciated all that! It definitely shows the craziness of that universe. Great to have your first truly, truly solid Ducktales set (and with 3 sets, now a franchise!) of what is no doubt your flagship franchise. Great work here!


Thanks for the comment! Quackfaster is definitely a set I put a good amount of effort in, so I‘m glad you put in the time to read it!

First of all, I gotta confess that the BKupa flair is entirely and deliberately a choice on my part, considering Syndrome impressed me so much and was a way for me to try the concept that I described in my Shroob comment of big moves needing some breathing room for all the consequences to flow out first by understanding and respecting a move’s consequences. By the time I got to the Side Special I had to learn theoretical physics, which is where the set became a bit more “hard interaction-based” since understanding the consequences of removing inertia requires some specific knowledge for a heeho moveset game, but it’s something I’ll try to return to with the edits considering Shroob is a masterful indication of why this respect for moves is such a boon.

I noticed Elder Shroob uses alliteration like Quackfaster, but that was not a BKupa inspired thing: It’s based on Scrooge McDuck’s speech pattern in DuckTales (Curse me kilts, What in Dismal Downs is going on, bless me bagpipes) (Even describing his archenemy Santa Claus as “sanctimonious solstice swindler”). I’ll try to ham up that aspect in the writing next time, since it’s a pretty central theme to DuckTales’ and Duck-comics’ charm for me and more than a writing quirk.

Up Smash is supposed to only be out for like a very short while, like a second tops, to make a balance between the optimal platforming chance with less set-up and requiring quick thinking to make use of it.

I think I already did include that Down Smash interaction with the “open on lower floor if no space on current spot”, but I’ll definitely add to that to incorporate the more hard combos you can do with that, thanks!

Grab game is a doozy and something I’ll rework properly once I have more than one day to finish it. I try to keep the general feeling of it, but it does require more explanation as-is and your take on the mechanic might actually be fun to flesh out on its own.

Quackfaster WeirdChillFever WeirdChillFever ***

Quackfaster is currently unfinished, but for the sake of a perfect score giving advice on the portions that are done, I've done a full read through. The Specials make an amazing core, tackling a genre that hasn't really been touched on in... man, when was that Gravity Man set? Whatever the case, Quackfaster makes great use of the Rosa Runes to confuse her and her opponents' gravity, with movement manipulation in the form of her Rosa Rays, her library cart, and the ability to just snag a few mundane books to hurl at her opponent getting across her eccentricities well- that the latter can work as platforms under the effects of the Rosa Runes are a nice touch in and of themselves.

The Rosa Runes also touch very nicely on a much maligned and mostly forgotten Make Your Move fad: the control screw. While rightfully so in most cases, Quackfaster's take on it is FAR more interesting and honestly pretty cool; you still move and attack in the direction you input, but which input that is is rotated accordingly, leading to Down Aerials aiming up (which is much relief to Slavic as his stall then falls now take him beyond the Rosa Rune's optimum range to free him instead of guaranteeing him playing one stock down from the opponent) if flipped upside down, and so on. You'll still need to account for your character's change in direction, but it's more in the matter of your moves' coverage being changed (which is as much an opportunity for enterprising opponents as anything- a killer spike is now potentially a deadly off the top KO option, for example).

Her Smashes play off of her set up nicely, both in their usage and how they interact- Forward Smash's cannonball is a wonderful weapon that ties in nicely with everything, Up Smash's platform generation gives Quackfaster more than enough material to work with for her gravity shenanigans in that area at the cost of being stuck in one place compared to the more 'mobile' (for lack of a better term) Down Special tomes, and Down Smash serves as a book delete button, a payoff, a situational ledge guard, and a way to trap landings (such as from foes trying to clear a Rosa Rune with a jump). Her aerials are mostly specialized, with Neutral Aerial serving as a fine panic button/bread and butter trick in the air regardless of directional orientation and the directional aerials being more specialized tools that can change in use appropriately depending on facing.

The Standards are where the time crunch to get her out day one become clear, but this section is still technically complete if still wanting to be filled out. What's there serves as a solid outline- Down Tilt nicely defending and triggering a Rosa Rune, Jab rewarding your assorted set-ups and so on. Her Grab Game stands to end the set strong going by the described concepts, adding more trickery with stat manipulation and a tiny bit of terraforming to the mix in a way that could open up whole new worlds of interactions for the rest of her set.

I think if I had one complaint about what's already present, it's that adjusting gravity by 90 degrees instead of 180 doesn't have a ton to it yet, but that's understandable and the potential is still there; Up Smash's assorted platforms work just as fine for that as a full gravity flip, Jab already mentions the use of cart carrying Quackfaster forward during it (which a horizontal book serving as a wall going that way can work for as well- toss it behind you at a Rosa Rune, turn, and start the jab while the book shoves her along to the end of its range, could also work nicely with the cart in a Zelda Phantom shoving Wario's Bike sort of set up).

As a final note: The Ghost Library took me a moment to parse, being a shared duration for her grab effects and a delayed trap both she and her opponents need to avoid; the initial phrasing made it sound a bit like she would get a bonus effect if she threw the opponent within eight seconds of starting her grab rather than it being a duration for whatever she does to them with the throw that happens to count down from the start of landing the grab. This is more to do with my lack of reading comprehension than anything, so no worries; it’s a dang cool idea for her grab game, and I’m very excited to see the finished version of this set- if what's there so far is any indication, this is one that could've stolen a SV last contest!
Honestly, the fact that gravity hasn’t been done in a while is a surprise to me! Kat did put out some movesets that touched upon it, like Niva and Hotura, so I thought it was a decently common trope.

Aside from the very nice compliments about the change in orientation and Smashes, which was me just kinda vibing with the source material in an MYM-y way, I’m glad you caught the aerials being specialized. On one hand I feel like the aerials are a bit too eclectic now and with edits I plan to bring in more combos (as well as a re-orientation on the boons and banes of flipping controls) to make it more of a whole. Elder Shroob once again showed that you can have the best of both worlds there.

Standards are definitely a weak area right now, but I think some key tools in edits for that will be tying Up Tilt to the Rosa Ray Bulb Tech feature and making Forward Tilt a copy of the Golf Cane Swing of the DuckTales game, with the projectile-redirecting shenanigans it brings as well as just going over a corkboard with pins and red threads between them to put in more connections between the moves overall.

Overall, I’m cautiously optimistic: Elder Shroob (and other sets I’ll get to later) will definitely once again teach me what a moveset should be and apply it to all the things already there, on the other hand the current set is definitely the toolbox I’m going to work with and I probably won’t have inane inspiration for each and every one of the moves, so overall I’m glad that the lion’s share of the set is already appealing to you!
 
Last edited:

UserShadow7989

Smash Journeyman
Joined
Aug 13, 2007
Messages
305
Saki Amamiya ZeldaFan01 ZeldaFan01 ***

Welcome to MYM! It's nice to see a modder joining the thread (and hopefully the chat soon; hop in any time!). My knowledge of Brawl is admittedly pretty limited, so I wasn't sure what to offer in terms of advice regarding your project (excellent character choice, btw).

We admittedly tend to focus on bizarrely out-there theorycrafting, but relevant bits of general advice is mentioning the intended playstyle of the set and how it fits the character, like noting how the different tools he'll have from his component parts will play into each other (an easy point of contrast would be mentioning how his different tools and stats might make his use of those moves different from the character it came from, different combo strings he might have or lack, etc).

This is an interesting glimpse of a starting design point for mod-making, and it did give me some nostalgia for the Brawl era thinking of how the assorted moves would look. Might have to set up my old Wii and give the Subspace Emissary another run through sometime. I hope you enjoy your stay here, and wouldn't mind seeing this project progress in the thread over time. It's really nice to have you!
 

n88

Smash Lord
Joined
Oct 10, 2008
Messages
1,527
The Heavy (Weapons Guy) by wizfoot wizfoot
This is the first of yours I’ve read!

The moves are a bit under-detailed in places: Neutral Special is described as killing at 200%, but it’s never actually given a hit that doesn’t lock the foe in place, as far as I can tell. You do fill in a lot of frame data and other hard numbers, which is impressive, but some key ideas are occasionally not elaborated upon.

I think my bigger issue here, though, is that there isn’t a great sense of how to use many attacks or fit them together - if I lock someone in place with my minigun, then what? Should I just keep slamming them until they manage to DI out? Will I get a frame advantage and opportunities for better follow-ups if I stop firing of my own volition? What are my options? What are the opponents’ options? How might I play around limited ammo?

You start digging into these kinds of things a bit more as the set goes on, but it’s still pretty light touch and feels sorely missing from the Specials, which should ostensibly be the cool signature moves that form the cornerstone of the playstyle. One of your strengths is communicating how into the character you are, and why. I think you just need to channel more of that into laying out how the guy plays!

Stray thoughts:
  • I know you didn’t invent it, but I don’t love the “gimmick” label being used in movesets to describe fighter abilities and set-wide mechanics. It feels so self-deprecating!
  • Ammo is a pretty intuitive concept, you probably don’t need to reference back to another set to explain it.
  • The huge healing move feels mechanically bold. Which is good! Odd that ‘eating a sandwich’ is the flashiest thing he does, though. Kinda steals the show.
  • I was a bit surprised to not see many heavy weapons in the set? Never played TF2, can’t speak to theme, but the gun stuff feels like more of a complement to a punch-focused character.
  • So do I have to buy the yeti transformation separately or what?
  • “Don’t be confused; they’ve just turned their viewmodels off.” - respectfully, I must admit I’m confused. This gif is fast and I have no idea what I'm looking at.
 
Last edited:

GolisoPower

Smash Master
Joined
Sep 17, 2017
Messages
4,315
Case #2225: The Moves That Were Made

In the grand scheme of things, a career or journey is akin to a flower. It starts out small, like a seed, taking in everything little by little. As time goes by it grows bigger and takes in more until it matures completely and goes in full bloom. Not everything happens that way. Sometimes it withers away and dies before it could even sprout. Other times it could be eaten away by something bigger. But regardless, it's something that takes time.

That's how my own journey as an independent Minder has been. When I got my start I was tracking down lost pets, acting as a bodyguard, or retrieving stolen items. But as my career grew, so did my cases; eventually, I would be tracking down serial killers, busting underground magic cartels, and at one point even apprehending one of the Mad Wizard's test subjects. However, there's always a point where one would look at the world now, reflect on their life so far and ask themselves…

"What in the flying hell did I do to get to this point?"

I've now caught wind of an alien invasion by purple mushroom people that have been causing countless instances of Illicit usage, murder, thievery, and property damage amongst a whole mountain of charges, and I’ve been forced to team up with a pirate, a civilian with bizarre powers, and a loud man with a large rotating weapon. So much happening in the span of a week thus far, and all I could think is…

"I don't get paid enough for cases like this…"
 

ZeldaFan01

Cassie Shore/Shelby Goodkind (Netflix)
Joined
Sep 2, 2014
Messages
1,255
Location
Yeah?
NNID
?
Saki Amamiya ZeldaFan01 ZeldaFan01 ***

Welcome to MYM! It's nice to see a modder joining the thread (and hopefully the chat soon; hop in any time!). My knowledge of Brawl is admittedly pretty limited, so I wasn't sure what to offer in terms of advice regarding your project (excellent character choice, btw).

We admittedly tend to focus on bizarrely out-there theorycrafting, but relevant bits of general advice is mentioning the intended playstyle of the set and how it fits the character, like noting how the different tools he'll have from his component parts will play into each other (an easy point of contrast would be mentioning how his different tools and stats might make his use of those moves different from the character it came from, different combo strings he might have or lack, etc).

This is an interesting glimpse of a starting design point for mod-making, and it did give me some nostalgia for the Brawl era thinking of how the assorted moves would look. Might have to set up my old Wii and give the Subspace Emissary another run through sometime. I hope you enjoy your stay here, and wouldn't mind seeing this project progress in the thread over time. It's really nice to have you!
I must admit I still play SSBB (Brawl Model)... In a way, lol
& Thank you so much that's so nice.! I feel so welcome to the neighborhood. :)
 
Last edited:

Rychu

Thane of Smashville
Joined
Jul 5, 2010
Messages
810
3DS FC
1908-0105-4965
Broken Vessel

I relate to this dude so much

For a character whose entire thing is told in insinuation from environmental storytelling, the set is pretty remarkable in its characterization right down to how the little guy takes damage. I've definitely settled on the "characterization trumps all" spectrum of moveset design philosophy so this one is appealing to me right off the bat. The specials add a wonderful flavor to this - I think both up and side specials really do a good job of transcribing Hollow Knight's movement into a set. Despite its lightweight status, I think Vessel ends up being surprisingly hard to kill, and with its down special damage boost and that really, really cool shield special (which is simply chef's kiss) hits like a very fast bug-shaped truck. The little guy be duckin' and weavin' all over the place in a kind of kinetic melee that I love which works so well with the centerpiece Neutral Special. Really, the melee is here is top-notch. I agree with some of the above sentiments that the grab game is overall the weakest part of the set but it's all functional and at times still very good- while I don't think most add too terribly much to the set, I don't think they detract anything either. I do want to point out that I think that Back Throw is rad and works into its semi-bullet hell stage traps in a way that only that kind of input can. Excellent set, it's fantastic to have you back my guy.

Also, uh, sorry for stealing first set. Too hype for the contest to quit.
 
Last edited:

wizfoot

Smash Apprentice
Joined
Aug 12, 2020
Messages
136
Location
Make Your Move, probably
Switch FC
SW-7677-1915-7484
Oh boy! Elder Princess Shroob. My second favorite Mario and Luigi boss behind Dark Bowser!

To start with the positives:

I really like the down input hover on neutral special. It’s a cool addition to an already cracked moveset, and gives her some really cool options on how to approach.

Down special as a whole is super freaking cool! I really love the special-repeat you made with it. It’s definitely my favorite move in the entire set, and if EPS existed I would love to play around with it.

Up special is also pretty cool. I like the safe healing aspect. It’s a great way to punish fighters that aren’t active enough in taking down EPS.

What really struck me as cool was her tech-chasing jab. I always love tech chases (Ganon mains wya) and I especially love tech chases with neutral moves.

Side taunt leading into dash attack is a nice touch.

Finally, to cap all that off, I really like forward smash’s name. It’s cute!


Now onto the very very very few negatives:

It feels like neutral special’s strong launch explosions do have a kill percentage that’s a tad too high. I would personally increase it to 90 or 95%, but that’s just how I like to make sets.

Finally (and yes, this is my only other criticism): up smash just seems too big. Fully engorged hotheads are big things, and I feel like it would be more balanced for the full charge to be decreased to slightly smaller than that.


Overall: a fantastic set. Definitely a great start to the contest with Whitebeard from Froy and Rychu. Great job!
 
Last edited:
Top Bottom