Welcome to Smashboards, the world's largest Super Smash Brothers community! Over 250,000 Smash Bros. fans from around the world have come to discuss these great games in over 19 million posts!
You are currently viewing our boards as a visitor. Click here to sign up right now and start on your path in the Smash community!
It appears that you are using ad block :'(
Hey, we get it. However this website is run by and for the community... and it needs ads in order to keep running.
Please disable your adblock on Smashboards, or go premium to hide all advertisements and this notice. Alternatively, this ad may have just failed to load. Woops!
There are two important concepts from the Mass Effect series necessary to understand for this character - biotics and biotic explosions.
You can read about them here: Mass Effect Biotics Mass Effect Power Combos
I imagine Liara as combining aspects of the glass cannon and zoner archetypes. Average height, average walk and dash speed, below average weight, slightly floaty, good damage potential, powerful combos. Solid recovery but can be two framed.
I have opted not to give specific numbers for her stats, frame data, and damage output because this character would, I think, be quite different to anything in Smash currently, and I genuinely don't know what kind of values would be balanced. I would leave those details up to Nintendo if the character ever actually made it into a Smash game.
For anyone familiar with Liara, I am aware that I've used some biotic powers here that she never had in the Mass Effect games, but I think it was necessary to create a viable Smash moveset for her.
**Special Attacks**
Side Special - Warp
Applies a biotic field to a target that deals damage over time and reduces target armor. Affected opponents receive additional damage from other attacks while the Warp effect is active. Animation would have a purple-colored biotic field briefly appear in the air at one of two fixed distances in front of Liara (the same as Palutena's explosive flame having two fixed distances) and hit any opponent within an area of effect. Minimal shield damage and shield stun.
Also, primes biotic explosions. If an opponent affected by Warp is hit with another biotic power, a biotic explosion will occur and hit all opponents within a given range. ==> warp combos and biotic explosions are intended to be a core element of Liara's gameplay and a significant means of killing
Neutral Special - Throw
Don't let the name fool you, it's not a "throw" in Smash terms, but that is the name of the power in the Mass Effect series.
Toss your enemy through the air with this biotic blast. Animation is a small, spherical projectile of biotic energy that travels very quickly. Comes out fast, very low endlag.
Auto-targets from range but can be avoided (similar to Palutena's auto-reticle).
VERY HIGH fixed knockback but low damage. Deals no shield damage at all but with significant shield stun.
Detonates biotic explosions.
Down Special - Barrier
Surrounds the user with a high-gravity mass effect field that can absorb a fixed amount of damage before dissipating. The barrier will absorb 80% of all damage taken while active and reduce knockback by half, but also reduces Liara's movement speed and jump height. Field can be detonated before expiring to deal damage within a limited radius and detonate biotic explosions on enemies primed with a Warp effect. Has a cool-down period after dissipating. Cool-down is proportionally shortened if the field is detonated prior to absorbing the max amt of damage, but with a set minimum cool-down. Losing a stock will NOT reset the cool-down, player will still have to wait before using again.
Up Special - Biotic Charge
The character uses biotics to augment speed and strength, and charges at a target while encased in a biotic barrier. Can be angled in any direction. No damage on startup. When it hits, causes a powerful collision that deals high damage and knockback. High damage to shields. Detonates biotic explosions. Invulnerable during the charge, but high end lag that's easy to punish and 2-frame at the ledge.
**Final Smash**
Singularity/Flare
Uses biotics to form a gravitational singularity that sucks multiple enemies within a radius to a single area, leaving them floating helplessly and vulnerable to attack. After sucking opponents into the singularity, Liara focuses all of her biotic energy to unleash a huge flare dealing massive damage to anyone within the singularity and detonating massive biotic explosions as the singularity expires sending opponents flying.
**Regular Attacks**
Jab - Liara pulls out an M-6 Carnifex heavy pistol and fires at the opponent. Tap or hold A to fire up to 6 shots before needing to reload. A meter (similar to the ones for Robin's attacks) will display how many shots are remaining. Only has endlag when reloading after the 6th shot. Prior to the 6th shot, player can cancel the animation and act at any time.
Uses biotically charged ammo that applies a weakened warp effect. This warp ammo effect has a significantly shorter duration than the Warp ability (Side Special) and deals no DOT, but still primes the target for biotic explosions and increases damage taken from other attacks while the effect is active. Biotic explosions primed with ammo are also significantly weaker than explosions primed with the full Warp ability.
(Note: This jab is the one part of the moveset concept I'm really unsure about. The idea is fine for a move, but I'm not sure it works as a jab, specifically, though I'm certain it wouldn't work for any other type of move.)
Dash Attack - Liara runs and performs a jumping forward kick.
Forward Tilt - Two hit punch combo. Only the first punch comes out automatically, the second punch would be an action command.
Up Tilt - Mario-style upward punch.
Down Tilt - A low, leg sweep that hits in front of Liara. Trips grounded opponents below 30%. Sends opponent upward from 30% onward or if opponent is in the air when hit.
**Smash Attacks**
Forward Smash - Releases a cascading biotic shockwave. Multi-hit potential. Charging increases distance the shockwave travels on top of increasing damage/knockback. Lower than average smash damage but higher than average knockback and detonates biotic explosions.
Down Smash - Liara pulls out an Arc Pistol and fires an electric shock attack at the ground in front of her. Same as ZSS's d-smash but with a different gun in the animation.
Up Smash - Liara pulls out an Arc Pistol and fires an electric shock attack upwards above her head.
**Aerials**
Neutral Air - Multi-hit aerial kick combo. Similar to Ganondorf's nair with less damage and knockback.
Up Air - Upward kick, same as Mario or ZSS.
Back Air - A turning backfist attack, like Captain Falcon's.
Forward Air - A single mid-air punch. Can be angled 45 degrees up or down to change the knockback trajectory.
Down Air - Liara pulls out an Arc Pistol and fires an electric shock downwards.
**Throws**
Standard grab animation where Liara reaches out with her hand and grabs the opponent.
Pummel - Hits opponent with knee strikes.
Down Throw - Biotic slam. Biotically levitates the opponent before smashing them into the ground. Detonates biotic explosions, kill throw.
Up Throw - Biotically lifts opponent overhead and punches them upwards. Combos into up tilt at low % and up air at low to mid%.
Forward throw - Biotically levitates opponent then kicks them.
Back throw - Biotically levitates opponent in front of her then spins around and hurls opponent in the other direction.
One thing to bring up is you could just repost these sets in MYM itself. If Destructoid shares B coding you can port them right over, if not just copy + paste the post itself into the Text Editor of Smash Boards. It'd just make things easier than having to visit another site.
Your Black Mage was naturally my first to read, even if it wasn't posted first, as my own Vivi set shares many of the same character traits and abilities. They even share a few basic move ideas, but this set is far more complex than my 11 year old moveset. The specials of this set are very impressive with how meticulously complex you've made the elemental system and charging system for the specials. I do wish it was more cohesive, and it's a little hard to understand. Your terminology is alright, but it is hard to parse (we just call then neutral, side, down and up specials, and etc.) especially when you're explaining different forms of the same move. We usually break things up into a header of Specials, Standards (tilts, jab, dash attack), Aerials, Grab Game and Smashes. It just means if I want to see say, your smash attack, I have to go find it manually, as even looking for forward smash or fsmash (a short hand for forward smash) won't work.
I do appreciate how much effort you put into this project, the pictures are very nice as hand drawn art you made yourself. The essay at the end about your experiences with the series was really fun to read. I do feel like the main issue here is that you don't say enough in the later moves, and fall into the common pitfall in making sets of focusing most of your attention in the Specials section. Some of the later moves are super low detail, one short sentence that doesn't give damage % or the most basic information. Specials should get the most focus, but the later moves are important too, you can get very inventive with them (K. Rool's various belly armour attacks for example). I'm saying this without getting into the crazier things MYM does, even as a basic set, you could do a lot better after the specials.
I do have to say, even reading the set in detail, I was still a little confused because of your structure how exactly the elemental and charge systems worked. The poses aren't very clear about how they're utilized. It's all a little bit hard to follow because of how it's structured, and could be a lot clearer if you were more direct in your descriptions. Something like the elements probably didn't need to be talked about in its own section when it only appears in a couple of moves. The status effect move was cool, but also felt a little redundant with Doom and Death. Those could've been really interesting if you dug more into how they looked. Despite how you made your own images, you didn't get for example the great FF9 Doom and an image to go along there. It'd really help to have some more images of this very engaging visual series.
Overall, this is a charming and very unique set. If you could shift gears and post more approachable sets, and improve on your later moves, I'd love to see your passion focused in that direction. Still, I enjoyed reading about your experiences with FF and this set has some issues but I can understand the decisions you made. Pretty interested to see how you do White Mage.
White Mage is less complex than Black Mage, although I'm not sure if it's the better set as it is awkward trying to make a healer playable in a fighting game. You basically do as best as you can in porting the various FF spells into Smash. Here I came to understand the way "poses" work more, and I think it'd probably make more sense to simply have a pop-up menu like the recently unveiled DQ Hero. This pose system is just very confusing and I don't quite get the visual or intuitive reason why a player would understand why the various poses lead to different specials. The core idea of multiple specials does make sense, as White Mage has plenty of potential moves, but the execution could be much better.
Another thing about this dual set of sets is that you have two sets of aerials/standards for "held" and non-held aerials and standards. In Smash, this isn't a thing, and I'm not sure if I like just having two sets of aerials/standards. If a move or two had it or the held move was a stronger smash attack-like aerial that'd make more sense. When the moves are totally different, it just seems wasteful.
You do at least acknowledge how strong it is to have a heal and the various buffs, but as in Black Mage frankly, I'm not sure what's the overall playstyle here. You have a lot of different options but there's so many moves here that have little consistency for her playstyle. I do appreciate again how many different FF moves you bring in here, but it'd be a better set if you found ways to use up less moves and get the most out of the specials. It's all a bit muddled and hard to see the core playstyle behind simply having so many moves to utilize.
As you can guess when I made a Vivi moveset, a set for Freya piques my interest. At the time I made Vivi, I planned to make a set for Garland (random I know) but someone else said they wanted to make Freya. She's a popular character for sets, though this might the first I've seen finished. It's interesting reading about how you drew her image and came to make every little design decision.
Now I'm really not sure about why there's multiple specials here, I assume custom specials? Those were discontinued after 4, but that's the best guess I have here. Generally I think customs are a bit of a mistake as it leads to using up good potential on something most players would never see and ends up muddling the playstyle a little. For example, if Lancet wasn't the third neutral B, it could've been a good Dash Attack animation. Personally, I think it doesn't help the set having so many specials again, and Trance could've been in the core set and not final smash. However there's a lot of good ideas in the specials interpreting Freya's abilities into Smash. She's a little abstract and forceful in FF9, so it's very cathartic to see a streamlined version. She plays very technically though again, is held back by all these redundant specials.
As with your other sets it does fall off after the specials, and largely ignores damage %s and other key details. It was even more fun than Black Mage to read your experience in FF9 as one of my favourites growing up. You make a good point about how quickly she forgives Beatrix after what she does. They kind of dropped the ball in Freya's development. When she rejoins the party later she may as well be lobotomized, and that's a big complaint with FF9 ignoring some of the party member development. Personally my favourite character was Steiner. As someone who has played the game over and over since it came out, I tend to use very unorthodox parties just for the sake of it. These essays are my favourite part of your sets, though I would like a focus on readability and details if you post future sets.
Hope I posted some useful feedback for you. I really hope you do more FF9 sets as I always enjoy these.
Just so you know Final Fantasy 5 is my favorite and Destructoid defaults to the dark theme for non members for some reason it is hard to read. And yeah I did get real feedback finally
What I meant by "Held" I mean as in the way Ryu has 2 sets of air and ground attacks he doesn't have to turn around for a strong or weaker attack in the air like most characters. I have a big section coming including that for all characters and it will explain my moves a lot better including my knockback feature from Weak to Devastating which includes damage ranges I wasn't going that deep in detail for every single move. And yes when I meant by full moveset I have the defaults and customs for example (Side 2 or 3). I described the Special Moves the best way I could even used examples of existing moves and having multiple moves to change playstyles is called being versatile. Redundant moves is basically every Custom other than Mii's and Palutena look at Sakurai for that including Sonic's 2 (Spin Dashes) for Side and Down Specials.
I already said a healer like White Mage would be very hard to use in a game like this when shes a team player but there are characters that don't use anything other than Up Special already like Palutena and Jigglypuff shes an upgrade of Palutena to me at least.
For Freya Lancet is her Held Dash Attack her normal attack in FF IX dash towards the enemy then spins with a thrust. And do you know how powerful (Trance) is? No way that's not gonna be a Final Smash as a Special Move would be as powerful as Cloud's (Limit Break) which is basically mini Final Smashes.
My Normal Attacks are much much more creative than whats in Smash already and I can't make them outrageous their just Normal Attacks not Special Moves supposed to be simple. I labeled each type of move with <( )> with space in between them.
Poses for Black Mage at least means the direction they are used in I mean Front is basically his default pose from the first game, Up is his casting pose from later retro FF games, Side is just him putting his arms to the sides to cast around himself on both sides and Down is putting his hands on the ground to send something below or have something like his (Quake) move coming from he ground. And how could you say he doesn't use elementals for most his specials? Hes a mage only all ups and 1 down doesn't use an elemental.
Glad you liked my experiences I moved that down cause I got complaints about not getting to the moveset early enough and people would just move on before even getting there. For Freya's story it ended after Cleyra she had 1 task left and is to avenge her people she had more reason then anyone else
Hey A Bowl Of Cereal
I hope you develop these further as you seem to have ideas you’re excited to share with us. I would recommend using the Edit Post function in the future as Smashboards has anti-spam guidelines. Another tip for visibility would be to use white text on a dark background or the inverse; the move sets are nigh unreadable in their current state.
My least polished character I could have done better but I have to move right now other than my Honorable Mentions because I had trouble fitting Master and Crazy Hand in they are really small compared to the rest. My Honorable Mentions don't fit the criteria for this contest they only have Special Moves and no photos. Maybe later I'll fully develop them and post them here but I really have to focus on this last section i'm doing first which is gonna be rough.
Character Name: Android 17
-----------------------------------
Tagline: Android 17 Joins The Battle!
-----------------------------------
Height: 10 ft.
-----------------------------------
Weight Class: Middle-Heavy
-----------------------------------
Jab: A stomach level punch.
Jab + Hold A Button: A medium kick.
Jab + Longer A Button Hold: A rapid punching session.
Rapid Jab + A Button Release: A roundhouse kick.
F-Tilt: A strong stomach level punch.
U-Tilt: A jumping uppercut.
D-Tilt: A low shin kick.
-----------------------------------
Side Smash: A charging elbow.
Up Smash: Unknown
Down Smash: Unknown
Dash Attack: Sliding Sweep
-----------------------------------
Forward Aerial: A 12-6 elbow.
Upward Aerial: An upward kick.
Downward Aerial: A double axe handle.
-----------------------------------
Neutral Special: Ki Blast (Android 17 fires a Ki Blast. Tap the B button repeatedly to fire six Ki Blasts.)
Side Special: Acrobatic Assault (Depending on which side you're on, Android 17 will either jump to the left or right side of the screen, and then dash towards the opponent. You can follow up with an aerial attack soon after.)
Up Special: Fake Out (Android 17 jumps and falls to the ground. This is a good attack if you want your opponent to bring up your shield, then go for a grab.)
Down Special: Power Blitz (This attack has two phases. The first phase involves Android 17 charges up two balls of yellow energy in his hands. In this phase, Android 17 is only vulnerable to counter down specials, down aerials, and Final Smashes, although you can pause the charge up by rolling. The second phase is usable once the attack is charged up. In this phase, Android 17 fires the two energy spheres at the opponent. The damage dealt depends on how charged up the spheres are.)
-----------------------------------
Grab: Android 17 grabs the opponent.
Pummel: Punches the opponent in the stomach with his Top Gear attack.
Forward Throw: Lunges forward and strikes the opponent with his knee.
Up Throw: A downward palm strike.
Down Throw: Stomps on the opponent's head.
-----------------------------------
Final Smash: Super Electric Strike (Android 17 creates a green ring of energy with both of his hands, sending it towards his opponent(s). When used on the ground, Android 17 will jump back before firing the attack.)
-----------------------------------
Side Taunt: Tightens his glove saying "This looks like fun."
Up Taunt: Turns around while saying "So... you've got a wish, huh?"
Down Taunt: Sits down while saying "Show some respect for nature."
-----------------------------------
Idle Animation 1: Turns around while facing his opponent, tightening his glove.
Idle Animation 2: Closes his eyes and crosses his arms for a few seconds.
-----------------------------------
Victory Pose 1: Pulls his hair back while facing the player on the stage he fought on while the Dragon Ball FighterZ victory theme plays.
Victory Pose 2: Tucks his hair back on the stage he fought on and faces the player and says "You're better than I expected." while the Dragon Ball FighterZ victory theme plays.
----------------------------------- Boxing Ring Title:
The Park Ranger
Reapress by Munomario777
was the first set of the contest posted, and I believe was responsible for the spicy food conversation a few months back but who can say for sure. This Fakemon builds off one of the less discussed statuses in Smash with the Superspicy Curry, and while a bit goofy of a concept it's a great way to handle a character who is a sentient pepper. For forcing a specific condition on the opponent as a core idea of the set, Reapress does it with a good idea of balance. The relevant effect is hardly gamebreaking for an opponent, and Reapress can both be hurt and benefit directly from the application depending on how she plays, all without forcing the opponent into an unfun game. The tools to make use of both the Spore Plants and Flame Body are present throughout the set, weighted very heavily in the Specials and Smashes but popping up frequently enough to never feel like the rest of the set is just filling space. The Spore Plants themselves are a neat way of applying the effect instead of just a standard Pokemon attack like Will-o-Wisp, and despite being a Pokemon set never falls into anything approaching Pokemon Syndrome.
One area I feel Reapress would enjoy an addition would be some aerial which can provide the spicy spore effect, as only having it available from grounded plants or a grounded f-tilt limit some of the fun this set can have. I feel like nair would be an excellent place to put it, personally, with just a slight change in the animation to allow for spores to be released. I might be missing out on some aspect of the balance, but it leaves the set feeling wanting by having no easy interaction within the aerials to get foes spitting flames. Another thing which stood out to me in the set was the usage of Flame Body; on one hand, I enjoy the application of Flame Body as a storable buffing stand, while on the other hand it's a very abstract way to interpret it. When it comes down to what matters, I think the mechanics of Flash Fire and Flame Body are used well in the set, but I'm not a big fan of the portrayal of Flame Body.
All in all, Reapress is a pleasantly light read, with Muno giving a solid presentation for the set. Separating the application of each move from the description and highlighting the key stats makes a set easy to follow (too bad I'll never do it unless I do). However, there are spots where the set feels hollow, where it feels some of the mechanics would have slotted in very neatly to add to the set, and some of the moves come off as bland rather than spicy. One final gripe I personally have with the set is that having the Spore Plant bound to a u-spec uppercut is extremely weird to me, but this doesn't break the set.
Who is this guy?
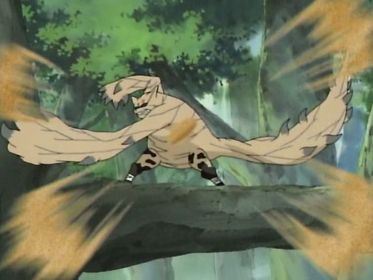
Gaara is a character from Naruto designed as a foil to the protagonist. He had the same circumstances as Naruto as a child but due to his father wanting to turn him into a hateful weapon to defend his village he grew up living only for himself and killing others rather than making friends and showing compassion. When Naruto beat him he realized he was on the wrong path and decided to be more like Naruto and made peace with his village where he became the Kazekage
Gaara can control sand with ninjitsu because of the One-Tailed Shukaku living inside him that also was a bloodthirsty monster that made Gaara a sociopath. Gaara could partially transform into the Shukaku but if the Shukaku took complete control over Gaara's body it would go on a murder rampage. Gaara eventually gets it removed but still can control sand. Gaara also is protected by a sand shield that is his mother's love after death protecting him from threats even he doesn't see coming. This is why Rock Lee was the first person to ever land a wound on Gaara
Special Trait
Gaara has a limited supply of sand like Inkling has a limited supply of ink. All of his attacks used sand and if he runs out he just has to rely on taijutsu. Sand can be regenerated with Shield Special like Inkling or by doing any Special Attack (holding it)
Special Attacks
Neutral Special - Sand Shuriken (1%)
Gaara flicks a shuriken (ninja star) made of sand at the enemy about twenty feet forward. Quick and weak this projectile is more for pressuring enemies than racking up damage. When the shuriken hits an enemy it crumbles into just sand and falls to the ground even if it hits shields leaving a fine little disk
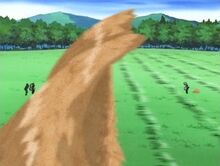
Forward Special - Sand Tsunami (13%)
Gaara yells "Sand Tsunami" and thrusts his palms forward. Sand will rush from his position in a thick wave that's a little shorter than him and goes about 10 feet's distance in front of him. The sand keeps flowing like a water hose rather than a surfing wave and if it hits it does good knockback. It lasts on the screen about a second before it disappears. It leaves about a 3 inch thick layer of sand on whatever ground the Tsunami rolled over. If you are an enemy, jumping over the end and landing on the middle part only deals half damage and but traps you there
Up Special - Desert Suspension (10%)
Gaara uses sand to create a platform capable of supporting his weight which he keeps suspended in the air with his chakra. The sand platform rises up about 15 feet very quickly and then crumbles into falling sand. The platform will do damage to enemies who touch it and Gaara can't move while on it but can preform attacks in the middle of the move! When the sand platform crumbles he goes into helpless state and it leaves a big pile on the ground like a sand dune
Down Special - Armor of Sand (no damage)
Gaara can also wear sand like armor in addition to having his sand shield. This activates it, using up 10% of his sand up front and while it is active drains sand to replace chips that fall off at the rate of a percent of his sand equal to the damage dealt to him. He still takes knockback while he has sand armor but takes no damage to his health percentage (the armor soaks it up). The armor also does no damage to enemies and makes him slower because it requires a lot of chakra from him. Toggling this again will make the armor fall off, and if any sand falls off Gaara even if it's from being hit it crumbles into a pile on the ground. Gaara needs at least 25% sand to even do this move
Shield Special - Collect Sand
Gaara has a shield special like Inkling! If you hold B while shielding Gaara will cross his arms and focus as he draws in all of his sand he has scattered on the ground. He is vulnerable while doing this but any sand collected goes back into his gourd and replenishes his stockpile. If sand falls offstage or is destroyed in some way like Kirby inhaling it (gross!) this will refill that too. If sand is coming back to Gaara, it will slide along the ground until it gets within three feet of him and then it floats into the air and snakes into his gourd. If enemies are standing on moving sand they get pulled with it and the pull is stronger the thicker the sand is. For instance with the aftermath of Sand Tsunami they have to run against the sand to not get pulled but if it's just a thin layer like from his shuriken just walking will stop them from being pulled and running will make them break free. If they stand still they will get pulled no matter what. Running against the sand flow is like running on a treadmill
Normal Attacks
Jab (4%)
Gaara kind of slaps with his left then right then at the end slaps with both hands at the same time. The slaps are not very strong but every time he slaps he does a spray of sand that falls to the ground after. The spray is like a sword slash and has a curve to it because it comes in from the side. Leaves a thin long layer of sand after each sand spray
Forward Tilt (6%)
Gaara shoves both hands forward like shoryuken and a cloud of sand is thrown from his palms. The cloud is the size of Ridley but round and can do its total damage with a lotta small hits if the enemy stood in the cloud for the whole time it is out. The cloud floats for a second then falls to the ground in a thin pile that is as wide as it was as a cloud. The hand shove is just a weak attack if no sand is there to use
Up Tilt (9%)
Gaara summons a spike out of sand when he punches up. The punch is actually a strong move but the spike is a little stronger. It pops enemies up off the ground for Gaara to follow up with a combo move. The sand leaves a small triangular pile after the spike at Gaara's feet
Down Tilt (5%)
Gaara shouts "Scatter" and throws his fist down which makes a pile of sand fall on the enemy. It bounces them off the ground and always appears above the enemy if they are close enough to Gaara if not it falls in front of him like three feet away. The sand is his height and width but is just a collum not a sand clone. Of course it leaves a pile on the ground one wider than his spike but not as tall. The fist is an okay power attack
(This is a WIP I plan on adding the other attacks later, I just needed some place to post it so I didn't lose progress!)
Update: Miriam has been put on hold until the Switch version of Bloodstained: Ritual of the Night gets patched up.
In her place, I'm writing a moveset for V from Devil May Cry 5. I REALLY like V's playstyle in Devil May Cry 5. In fact, he's mine favourite among Dante, Nero, and himself. That said, I'd actually been planning a moveset for him for a very long time. As of now, the V moveset is...well, finished. Despite his tactical playstyle and steep learning curve, his moveset was surprisingly easy for me to write. Took me less than two hours. It's all on paper right now, though.
As for Jason, he's been taking longer than intended, due to an unforeseen obstacle. Towards the end of Blaster Master Zero 2, you switch to a different character--and once you save, you can't use Jason anymore. That said, I've had to start a new game to get Jason's moves down. Still, though, the game is phenomenal; a perfect series revival. There are HUGE improvements over the original. I'd definitely recommend it to any retro gamer.
As for the secret WTF character, that one's moveset is figured out, too. Again, though, it's all on paper at the moment.
Once again I'm going to run the 5k/10k word challenge. In this age of super long sets, making a set that is 5000 or less, or 10000 or less words can be a challenge, if only for your own ego! So I devised this challenge to encourage more experimental, shorter sets than the norm. To qualify, simply make a set that is 5001>or 10001>words. And yes, anything already posted will count. It would help to notify me in some way, or put it in the set somewhere, and the reward will be the same as last time: a lottery to choose a set for me to make! There's still one on the books from last MYM that I plan to make this MYM, so keep an eye out for that one.
Introducing... Bizarro Day!
This was an idea I cooked up yesterday that garnered some interest. The idea is simple, MYMers produce sets the opposite of what they'd normally do. For example if you only make heavyweights, you make a set for a lightweight. But you can go much further than that! If you only make anime sets, make one for a cartoon, if you make predominantly villains, make a protagonist. You can go as far or as little as you want in making the opposite day work, the further you go, the more fun it will be. As it's opposites, I hope it will not be successful.
The tentative date I'm setting for this is one month from now on September 19th. There's no prize for this one, just a bit of fun.
Back to commenting with Naomi and this is a good one to start on as the first set of the MYM. This set reminds me a little of my super old Weezing and Koffing sets, as far as "create a resource [in this case water] and flood the stage." In Naomi's case this has the depth of utilizing her Water Shift as a melee attack across it all, and that's a very fun choice to bridge together the complex set up and melee. Besides that, the set has a fun application of creative set up and spacing the magic around the water.
I'm always a fan of moves like the fsmash in this set. It has a fun speed element you can alter with charge and with her other set up like down special, makes for a lot of playgroundish variance. The nair has some Touhou-like qualities to it where it hits a water source and generally is one of the best moves. The set has some pretty interesting choices like the jab summoning a water sphere, her utilt umbrella that reflects her own water, and I believe Rime Marz had a similar dsmash creating a sort of bomb. The set is always inventive and has great animations.
I do feel some interactions could be somewhat more creative, mostly the smashes. The usmash just adds a multiplier to existing moves, where it seemed as if you could maybe work off it a little more? The dsmash while inventive, doesn't really do much to pay off on water. The fsmash even seemed a little thin on pay off. As smashes are the strongest KO moves, it just felt like they needed stronger pay off, as Naomi already has so much feeding into her set up on other moves.
I don't like the 10 second bubble on bthrow. It's a long time to give the foe a constant water resource for Naomi to abuse. I would reduce it to 5 seconds, and then you might be justified in adding some statuses.
This set overall is pretty great I'd say, more for its individual moves than the overall playstyle. Practically every move could easily be promoted to specials in another set, while mostly avoiding the pitfalls of being too special to be a melee move. The set is focused a good deal on melee or direct hitboxes despite a heavy set up focus. The playstyle is a little muddled, as there's a lot of ways to build and manipulate set up, but not a lot of ways to easily get pay off on it, so it may in practice be even a little underpowered in my opinion. That's something you definitely could try to edit, but even as is, it's still really impressive. Very nice work US!
Poochyena up next and this is a short and sweet one, which is nice after a behemoth like Naomi! This set has some shortcomings and while it's far from your best, it could have been so much worse in less able hands. It's a dog who bites. You get a lot out of that just with how Feint Attack and Crunch work, crafting a very focused rushdown playstyle. It only works well and isn't incredibly generic because of your knowledge of hurtbox shifting, sweetspots and general balance. Poochyena is pretty weak if not for his various counter-measures such as his smashes and combos, but that makes a lot of sense, given it's a first stage Pokemon. I do appreciate that this set hits the right tone for a weak Pokemon and still has plenty of strengths regardless.
It's a typical lightweight combo-er and at the same time, very much a bait-and-punish character. All the better for a biting dog! It should make the foe scared. At the same time he is so lightweight, and his moves besides Snarl tend to have mediocre range. The set could've gone even farther with its high set up rushdown if anything, and is definitely justified when it dips its toe into heavily debuffing the opponent.
I did have some issues with some of the status effects on smashes in particular. Landing a move as a "counter" is pretty hard, I would recommend being liberal in handing out the trample effect from Hero ftilt/Palutena to these moves at the minimum. Even then, these effects are not very distinctive visually, or particularly strong given you have to either get lucky or play exceedingly well to land these status effects. When Crunch already exists, I don't know if status effects were even the right idea here. After seeing how fun Kacrackle Slash is to dair a Freezie'd opponent off stage, I'd just make Ice Fang freeze the opponent for some damage racking/KO if they were hit off stage. I would try to write more visually distinctive, inventive effects like that for Thunder Fang and Fire Fang. Personally I'd move Fire Fang's effect to ftilt, but failing that, I'd at least add some more visual flair to Fire Fang (maybe the actual Crunch effect and a freeze frame), and Thunder Fang's effect feels a little obtuse in general for the foe.
That's pretty much all my criticism on the set. It's a simple set, and one that largely works quite well, it's obvious what you intended and I'd say you largely succeeded. The only thing that's a little iffy for me is the use of all these TM biting moves, but as it's on the biting dog Pokemon it seems acceptable. Good stuff.
Pidgey is quite impressive for a set, for Pidgey. I don't know what I expected but a set full of hurtbox shifting, pecking away figuratively and literally at the foe, is great characterisation. Pidgey is surprisingly heavy on set up, perhaps too much, but it's never uninteresting or unimaginative. It's also pretty much what you'd expect as far as concepts because what can you do, it's Pidgey.
The set has some really nice animations, Khold pointed out Brave Bird and Tailwind already and I agree those are two of the best. The visceral animations of the nair and dair, calling back to Plant and Corrin, were really good choices too. The set has a lot of good picks for animations. I do think the hurtbox shifting and jumping around is a little much in moves like bair and down smash, though it's not like he has armour for these moves so balance-wise, I'd hardly say they're OP.
I don't have a lot of complaints on this set besides the amount of set up and strength of the wind hitboxes. Every piece of set up has a short lifespan, at most a few seconds with Gust/Sand Attack, but Pidgey can still be pretty oppressive with 2 tornados and feathers to shoot at the foe from afar. I'd just limit Gust to one at a time. As for the wind hitboxes, the up B is pretty insane for the amount of wind it creates underneath Pidgey, which would insta KO a lot of characters off stage as a low commitment gimp. The set up by itself isn't that bad, but the amount of wind in this set could get positively annoying especially if you're a newer player. I would tone it down across the board.
Overall this set is very good, and makes sense for Pidgey. It never really oversteps the mark into feeling like a Pidgeot set with its moves all being lightweight-ish and working around his small hurtbox. While it's a little too oppressive right now, it makes sense Pidgey would be a zoner, as spamming sand attack/gust is all it's known for, and it's clever the way you applied this to the playstyle. All in all, might be one of your best WCF, besides of course the legendary Kilton.
You may remember me from last year as the creator of... two very bad sets. I stand by my Arle set, and have worked on it as a general baseline for her, but SpongeBob in particular was not being that well thought out, and more of a proof of concept.
Well, this time I'm going to try again, but this time I think I understand what the fundamentals of Smash are, and what I need to do to create a cohesive character instead of a mess.
Tamaki Damo
Gotta say, its nice seeing another set from you after all this time, Reiga, and its not for a character I'd have expected from you. That said, it is a fun choice, and the writing style playing him up as perfect/handsome is legitimately funny. I definently had fun reading the set, and concept-wise, its not half bad. The process of melting the opponent down to worsen their stats and make them more vulnerable to Tamaki's coins and bills as weapons is a fun idea, and one made more interesting by the fact that its done via the disjointed stand. You translate the basics of these mechanics to Smash acceptably, though while I understand that a melted foe should not exactly be at top performance I can't help but feel the speed nerfs might be too extreme. Even a minor speed nerf can butcher some character's ability to combo, and a 30% lag nerf is actually just insanely powerful. Its not that hard to get either, all you need is close proximity to Damo's stand, leading to the set coming across as pretty broken at the moment. I'd suggest only making the lag increase happen at the highest stage and make it take more time to get there, as well as slightly decreasing the movement nerf.
As for the way the set executes these concepts, its mostly just a straight up damage buff on the coin/bill attacks and not much else. This allows him to rack damage really hard with his combos, and given he only really starts KOing around 120% at the earliest it is pretty critical, but it feels like that's all there is too his ability to damage a melted foe. It also feels like its a bit too easy to get them to a melted state in general, they really just have to be touching Vitamin C or the fingerprints and it feels like as the set is right now, setting that up is quite easy, especially with how fast the foe reaches a melted state. It ends up feeling more like melt is just a handicap the opponent is going to have to deal with than something that actually provides a new point of strategy between the new players, which is kind of a shame. I think if you made this effect a less automatic process and had more potential payoffs than just "damage increase on certain moves that are terribly weak otherwise", the set would be a lot more interesting to play out. As is, the writing and characterization is fun enough I'm glad I read it, and I hope to see more from you, but its not really something I think I could vote in good consciousness.
Pidgey
Pidgey is a genre I've definently seen before, blowing around projectiles and debris with wind hitboxes to create aerial pressure games. Its stuff that's been done before, but Pidgey at least does a couple spins on it to differentiate it from earlier entries in the genre, as well as having more years of balancing under its belt. While you have the feathers and sand clouds, the sand clouds actually do not end up being much of a focus of the set at all, more existing as a passive threat than anything with terribly much substance to its interactions. I do at least think its clever that Sand Attack and Gust occupy the same input due to taking the same motion to activate, but you've said on the subject of this set that Sand Attack did not end up as much of a focus as you intended and it shows. At the very least, its fairly balanced now, even if earlier drafts of the move were pretty oppressive, and it contributes some potential fun to Pidgey's ability to threaten foes in the air. The feathers feel better utilized by comparison, but I still wonder if you couldn't have done more with them. This is a Pidgey set though, so there's kind of a ceiling on how crazy you can get without it looking a little weird.
The new element this set introduces is the ability to mess with Pidgey's trajectory with tailwind. I actually like this idea a good deal, giving Pidgey the ability to reshape his hitboxes with that to allow for some pretty interesting angles of attack. This is combined with the aerials generally having somewhat interesting hitboxes to give Pidgey the ability to weave in and out and just pester foes like the annoying little bird it is to create a character who, while very underwhelming on the ground, serves as a pretty surprising threat in the air. I will say the ground game unfortunately suffers a bit for this, which is notable when its 3/5 of the input sections in a moveset and Pidgey's really does not end up all that interesting on account of this. Its an acceptable melee game for when Pidgey's not supposed to be at its most effective and at least has some focus on getting Pidgey into the air or filling niches his air game cannot casually fill, so its not bad or anything, but it definently prevents the set from being all that exciting. Still, its a set for a Pidgey, and you did a pretty good job of making it feel interesting and giving it a few surprisingly fun options despite how simplistic the character is.
Naomi
This set reminds me of the concept you had back in Frost Witch Idella of storing attacks in ice with the rune frost, which was definently the coolest part of that set and I felt it never quite got used as well as it could have. Naomi displays a higher awareness of the potential of storing attacks in its core construct(which is just water), and I found the melee served a lot of cool secondary purposes when used by the water clones. Plus you have little tricks in the set to move it around via her various means of connecting water to surprise the opponent, or you can store it in a big projectile, or perhaps you can just make all your water hitboxes stronger via Up Smash as a basic but cool enhancing move. It ends up being a pretty enjoyable playground where every move adds a bunch of neat new options for Naomi to consider, while never feeling like it would get so oppressive the opponent could not deal with it, at least unless you were playing so far ahead of them that they were never going to win the match anyway.
I honestly don't have a lot of complaints with this set, the level of complexity is definently higher than your previous works but it never really feels like something that would get to the point of being overbearing to use or play against to me, since you're smart about which moves have which effects and giving everything a clear enough visual. The biggest real complaint I have is that it feels like the set sprawls out in a ton of different directions, but doesn't ever really come back together later down the line. As cool as a lot of her options are, and they all fall back on the same tools to get started, it does feel like her playstyle ends up not having as much flow as you'd think to it because the many branches it can go off in don't come back together as well as I'd like. This isn't a huge deal breaker, or anything, but I guess if I were to compare it to Rime last contest not having all her options able to connect back to something like the bomb in some way feels like it ends up having a bit less cohesion than it could. Still a very good set and honestly if I think its worse than Rime its not by any notable margin.
Kano
Kano sure does offer a pretty big variety of options through the combination of inner rage and embedded knives, frequently allowing Kano up to four variations of every move depending on which of those is active. Inner Rage and knife embedding are both decently interesting conditions to fulfill, and you later introduce the grenade which I think was a fun tool to add on top of that to allow Kano some surprisingly early kills. With that said, I was not really impressed by the big picture of this set. There are general playstyle changes that happen when you activate inner rage or have a knife embedded, sure, but the large number of variations on moves actually feel kind of aimless, as the base moves nor any of the individual changes end up all that interesting by themselves. It feels like a set that's trying to create depth through versatility alone, with basic premises like "he can't combo well in inner rage" and "there's a light element of self-damage running through the set" that don't ever feel like they're brought to a meaningful endpoint. Kano ends up just with a lot of options, but less than the sum of its parts because there isn't much of an interesting playstyle here aside from having all those options, and versatility alone does not carry a moveset. At the very least, I will say of your opening day sets I found Bakugo a fair bit more enjoyable than this, and I'll give that one a comment as soon as I refresh my memory on it a bit.
Alex
As a follow up to the excellent Balrog from MYM20(and also Necalli, though I feel its a bit more directly to Balrog in some ways), I feel Alex shows quite well that you know how to translate Street Fighter characters to Smash in fun ways. Like Balrog, it never has to fall back on so much as a trap or projectile to get a lot out of Smashes mechanics, and this time you don't even need a meter either. Not to disparage using any of these things, its just kind of impressive to see so much come out of a set that doesn't have them. I think Forward Smash is a prime example of this, with the specials leaving Alex with some attacks that get better when you hit the foe from behind and create powerful advantage states, and also sometimes being able to demolish shields, what does FSmash do? Just turns the opponent around in a surprisingly fast smash attack, one that can lead into all these advantage states, but just ends up being total garbage against shields. While this might not come across as terribly revolutionary and not every move is as direct about this, the set comes across as extremely aware of what its doing at all times. There's strong knowledge of how Alex's moves can mix up an opponent, combo off each other, or lead off pressure situations that is consistent throughout the entire set.
The set really does not give me much of anything to complain about because of how tightly constructed the playstyle is. I can certainly say "oh X move is bland", but that doesn't really mean anything when it has enough greater context for it not to matter, or the set just needs a move like that on this input and you filled the function just fine. The set isn't totally unwilling to get a little fancy at points too, acknowledging that given the various advantage states he can already get out of his command grabs that he can afford to try something different with the boosted hitstun and crippling throws. While I do like the former plenty, I do think the later is definently stretching a bit and while it serves a solid functional purpose feels like a bit of an overly specific and slightly bizarre status effect, standing out as the one part of the set where it oversteps its otherwise elegant design a bit. I also appreciate how regularly gifs of Alex fighting Hugo specifically are used, both because the big guy has his own set to compete with Alex's and to represent their in game rivalry and representations of Hulk Hogan/Andre the Giant. The set's characterization might not be as fun as the unfair play one that Balrog had, but its not like Alex feels like a character with a ton of personality to start with so you make the most of what you've got. Excellent stuff, and one of the best sets posted thus far.
This is my moveset. There are many like it, but this one is mine. Especially since it's for an OC! I've never done one of these before, I certainly didn't get across his character in the moves as much as I could have, but I'm pretty happy with it for a first effort. i am now out of clever words to say hope you enjoy bye
Bizarro Day is now open! For this event, we shall post characters we normally wouldn't do, either for the kind of character or series from which they originate. HMAs become LFPs and constructs become dancing blades! To encourage things along I've committed to reading and commenting any set posted in this period within a day, hoo boy. On top of that, if we reach the goal of 5 sets FA and I will be doing audio comments.
Of course, it's not really a day, this will run from today until the end of the 21st PST. Lets hope the day is a terrible failure in the spirit of the event.
Kimblee is a villain from Full Metal Alchemist. His personality is a largely two dimensional psychopath who kills people for fun and says lot of edgy monologues. He is the only relevant human who willingly sides with the homunculi with full knowledge of their plan to transmute the nation into philosopher's stones. He gets no direct benefit from it in any way, he is just along for the ride because he is edgy, and the homunculi are aware enough of this they fully trust him. His alchemy gives him the ability to turn anything he touches into a bomb, generating large power explosions. Mustang largely has the same abilities as him but they are recolored with a fire aesthetic. Mustang, however, is overpowered and kills all of his enemies without effort, while Kimblee doesn't get to do much of anything relevant because he's a bad guy in Full Metal Alchemist. His ultimate fate is getting team killed by Pride, who absorbs his abilities then proceeds to not use them for anything, dying horribly.
Kimblee goes to touch the ground in front of him with his hands, transmuting the ground to explode 4 seconds later as it turns darker and darker red before exploding, dealing 16% in a Wario sized hitbox that kills at 120%. If any explosive (not a fire hitbox) hits the portion of ground that has been turned into a time bomb before this point, it will explode immediately. If two hitboxes like this hit the foe at the same time because of a time bomb, the stronger knockback is the one that will take place, but the damage of both hitboxes will be stacked on with each other. The size of the explosion hitbox, however, will combine the hitbox radiuses into 1 single hitbox, effectively doubling the size of the hitbox. The knockback will be the same as if the more powerful hitbox was hit by itself without the damage boost, with the bonus damage being effectively applied a frame after the knockback has been triggered.
As Kimblee is going to bend over at the start of the move to place his hands on the floor, he can hit an enemy in melee range to instead transmute the time bomb directly into their body. The explosion can be shielded or dodged, which opens up the opportunity for you to grab them or something with Kimblee's otherwise bad physical grab. It can also just supply a direct buff to your next explosion based attack if you manage to hit them with it in the next 4 seconds, but you must hit the foe directly, not their shield.
It is possible to hit the foe with more than 1 time bomb before the first one goes off. If they avoid the first time bomb via shield/dodging, the second one will keep going. If they are hit by it, though, the first time bomb will detonate the second one immediately for the full damage bonus! This is a quite fast move and is not difficult to hit, but has quite poor range and puts Kimblee in a frame neutral position with the foe after hitting it due to poor hitstun, which is not a position Kimblee likes to be in.
If Kimblee uses this attack in the air and does not hit a foe with it, he will instead place his hands on himself to turn himself into a bomb with the same rules as the foe. Kimblee is capable of hitting foes with the explosion on his body, and can shield it if he wants to block the explosion. If he holds the button while performing the transmutation on himself, he will detonate the bomb immediately. This is Kimblee's primary form of recovery, and he is able to do it much more casually than Snake's Down Special for that. Kimblee may not technically be super light, but the fact his recovery hurts him so much means he ends up being a very frail character. Thankfully, this move has very high base knockback, so he can still recover at low percents.
It might seem strange to want to use this on yourself outside of for recovering, but this is Kimblee's most powerful melee attack, as he can threaten to spawn a Wario sized hitbox over himself on demand. He does not have to commit to taking 16% and high knockback, as he can simply shield or dodge the explosion. This obviously makes Kimblee more predictable if he very regularly "defuses" the bomb by dodging, but being able to have it as a threat makes it a lot scarier if Kimblee manages to gain any offensive pressure. Alternatively, if Kimblee is playing defensively against a rushdown character, this is the most obvious way Kimblee can force them to respect him and give him some space without just hitting the foe to knock them away like a regular person.
SIDE SPECIAL - CRIMSON BLAST
Kimblee places his hands on the floor in front of himself to makes a series of 4 explosions 1.3X the size of Wario, each of which deals 10% and knockback that kills at 150%. The explosions show up one after the other with a small delay between each explosion, spaced about 1.6 Wario widths apart. There is small enough space between the explosions that it is impossible for any existing Smash character to stand between them.
This move covers a total of 6.4 Warios of space, so it is very easy to make this cover most of a regular stage. Assuming this move is used on the ground, the explosions will never reach beyond the edge of the platform Kimblee is standing on. If there are still more explosions left in the move, they will instead occur at the edge of the platform. This move is an extremely potent anti dodge move at the ledge, as well as on platforms. It doesn't let you use the range of the move as effectively, that way, but it's an extremely versatile attack.
It does not take long for the first explosion in the attack to come out, but the move has a long duration as Kimblee must channel the 4 explosions, still in lag for that entire time. The explosions can potentially combo into each other at low percents, potentially all 4 of them at 0% unless the foe is Pichu or Jigglypuff, but even Bowser won't be comboed by all 4 at even so much as 10% damage. It won't combo for 3 explosions for long either.
Kimblee can smash this input to instead cause the first explosion to spawn 6.4 Warios in front of him, then have the other 3 explosions spawn towards himself. This makes the comboing property of the move significantly more useful, as it allows Kimblee to chain explosions as the foe is knocked towards him. At overly specific percentages, Kimblee can potentially do a sort of """chain grab""" with this attack, by using the smashed version of Side Special on a foe, then using it again in the opposite direction as they get sent the other way. However, this is not only percentage specific, but also requires Kimblee to be in a very specific position with enough stage on either side of him to pull it off. Based off the percentage, Kimblee can make up for it based off where exactly he is positioned when performing this attack, limiting where some of the explosions come up by having the ledge limit the range.
Kimblee is capable of dropping through platforms while channeling this attack, similar to King K. Rool's Neutral Special. The explosions will still occur in the same position as if Kimblee had stayed put on the platform, enabling him to retreat while keeping the explosions above himself as a very powerful defensive/anti-air tactic.
If this move is used in the air, the explosions will be significantly weaker considering he doesn't have any ground to explode. The hitboxes will be only half as large and significantly less powerful, dealing only 5% damage. Considering this move's potential to combo into itself, this is not entirely bad, although the smaller hitboxes make it a lot harder. The explosions will all still be in a line from where Kimblee first used the attack in the air, while he is still able to move through the air during this time. If he lands on the ground after having started the aerial version, the remaining explosions will be grounded explosions as if he had been performing the move from the ground at that point for the entire time. This can let you potentially combo the weaker aerial explosions into the bigger explosions by using shorthops. Combined with dropping through platforms, this gives Kimblee a surprising amount of mobility during this otherwise high commitment attack, and gives him unparalleled control of the stage. If he's using the aerial version, he can also just cancel it outright, if needed, by just grabbing the ledge, which cancels the move instantly.
The explosions in this move are capable of hurting Kimblee. This should not happen under normal circumstances, as even if Kimblee is interrupted out of the move, the explosions have brief hitbox durations. However, if Kimblee stands close to a ledge, he can interrupt himself out of the move early by having an explosion spawn over top of himself. This is mostly useful with the smashed version of the move, as Kimblee can stand a certain distance away from the ledge to only hit himself with a later explosion rather than the first explosion. This can allow Kimblee to knock himself in the same direction he blasted the foe, and if his percentage was lower he'll get out of hitstun faster to be able to combo into something else. It is not possible for Kimblee to move forward in the air to hit himself with the aerial version of the attack to continue the suicidal combo further, as Kimblee is still affected by gravity when using aerial Side Special, so the explosions will occur above him.
You can still potentially get a very long chain of Side Special with proper positioning on both yourself and the foe based off both of your percentages. Time bombs unfortunately cannot help very much with this with this combo, as this move deals horizontal knockback while time bombs deal vertical knockback, and the higher knockback of a time bomb will out-prioritize this move's knockback if this sets one off. This is useful to fire onto a time bomb on the ground, though, to increase the size of the last explosion in a Side Special to potentially make it hit a foe that it wouldn't have otherwise and power it up. As far as synergy with a foe who has been hit by time bomb, the massive range/ability to fire the 4 explosions in place at the ledge makes this a strong anti-dodge move.
DOWN SPECIAL - BLAST OFF
Kimblee transmutes the ground underneath himself, making a transmutation deeper inside of the earth that explodes a portion of the ground underneath himself. This does not explode the ground immediately under him, but instead causes an underground explosion which propels the ground Kimblee is standing on very high up into the air. This can be unstorably charged for up to 2 seconds, and the ground chunk will be shot 2-5 Ganondorfs up into the air based off charge. The Bowser sized ground chunk is not a hitbox as it goes up, just a drop through platform. It will hang in the air briefly as it reaches its apex, then become a hitbox as it falls back down, dealing 20% and a powerful downwards spike. When it hits the floor, anybody crushed underneath it will still take 20%, but be pitfalled for a duration slightly shorter than K. Rool's dtilt.
This moves actively terraforms the stage as a Bowser sized hole is left in the stage where the ground chunk was shot up into the air. This will never completely destroy a portion of the stage, always leaving a platform with no depth at the minimum. If the platform already had no depth that this move was used on, this move just doesn't terraform at all. When the ground chunk comes back down into the stage, the hole will be filled back up again, and anybody standing in the hole will get pitfalled on top of the regular ground of the stage. Kimblee cannot be hit by the main hitbox of this move, but can be pitfalled by the ground chunk if he is not careful. The spike and the pitfall are two different hitboxes, so it is possible for foes to be spiked into the hole then get immediately pitfalled if they're hit in the dead center of the hitbox.
This move enables Kimblee to produce a ground chunk out of nothing if he's not playing on Battlefield, which is very useful to use with his Side Special. Kimblee can retreat away as he falls down while making four explosions in place on top of the ground chunk, prohibting the foe from riding the safe flat top of the ground chunk like he can. Challenging Kimblee for ownership of the platform is foolish when he has this technique at his disposal, and lets him rain down hell on his enemies safely while threatening foes with the delayed hitbox of the ground chunk falling.
Time Bombs are very useful with the delayed nature of this attack. If the move is charged longer, there is a longer delay in the amount of time before the hitbox runs out, and the hitbox will be out for longer once it is out. In addition, time bombs do vertical knockback, so if a foe is hit by a time bomb, they can be hit directly upwards into the falling ground chunk. If you manually hit a foe afflicted by Time Bomb with an explosion attack that does not do vertical knockback that is weaker than Time Bomb, it will also be redirected into vertical knockback, very useful for this context.
The temporary terraforming done by this move is useful in context of Side Special, as it will artifically limit the range of the attack by treating the hole in the ground as a "ledge". This gives you another ledge to use besides the literal ledges to play around with Side Special's spacing. If you use the smashed version of Side Special, you can have the explosions show up on the opposite side of the hole, but the explosions will always stop once they reach the hole like it's a ledge. This can also be used to hit another platform that's farther away from you, such as hitting the opposite Battlefield platform, but once the explosions start, they will always all be stuck on that one platform. You can potentially do a drivebyshooting of a Battlefield platform as you get shot up on a ground chunk, starting up your Side Special right as you pass one.
Using Down Special while standing on top of a ground chunk from Down Special will immediately detonate it, causing 8 small ground chunks to fly out in radial directions from where it exploded, each one dealing 7% and minor knockback, but this is a very quick move and covers a ton of space all around Kimblee, as the projectiles travel Final Destionation's distance before they vanish if they don't come into contact with the ground, and will travel through drop through platforms. This means the ground chunk won't drop back down into the floor, but it will automatically regenerate 2 seconds later if this happens.
If the ground chunk had a time bomb in it, this will only detonate a portion of the ground when it goes off, firing one small ground chunk directly downwards, and two small ground chunks at downwards 45 degree angles. This main ground chunk is still just as powerful as it falls, and this explosion will suddenly boost the ground chunk up into the air slightly by a Ganondorf, which can delay the hitbox. If the ground chunk is hit by 2 time bombs, the second time bomb will just explode the ground chunk directly as if Kimblee had used Down Special on it, so you can't keep it in the air forever this way. Still, the downward small ground chunk projectile can potentially combo the foe to be knocked into the hole made by the move, which makes it extremely difficult to avoid being crushed, potentially impossible if the ground chunk was low enough already, especially if Kimblee intervenes.
If the time bomb detonates on the piece of ground Kimblee is using Down Special on at the same time as he uses the move on the floor, the ground chunk will be propelled an extra 2 Ganondorfs up into the air, making it blast off into the sky like a rocket and be an extremely delayed hitbox, but requiring extensive set-up from Kimblee for what is ultimately a temporary threat.
If used in the air, this attack just has Kimblee jut out his hand below himself to make a small explosion that occurs on the first surface directly below himself, whether that's a foe or the floor. Foes must be within 1.5 Ganondorfs of Kimblee to be targetable by this move, but other surfaces have no range cap. This is a fairly quick attack with a Wario sized hitbox, dealing 9% and average strength downwards knockback, that is translated into vertical knockback on grounded foes. This lets Kimblee launch grounded foes up into the air towards himself wherever he is using the move. This attack has obvious use with its potentially very long range, although Battlefield platforms can potentially block Kimblee from abusing it. You can't just say to not play on Battlefield, either, as Kimblee loves Battlefield. Using this move from long range is encouraged, as it will propel the foe up towards Kimblee to combo into something and/or be overridden by Time Bomb's knockback.
The aerial version of the move is still quite good as a melee range attack due to its high speed, but the issue with it is that Kimblee is vulnerable to aerial Down Special's explosion. Shorthopping this attack doesn't work out well for Kimblee unless he retreats backwards with it.
Kimblee having Incineroar's counter means that foes are naturally going to favor grabs against him moreso than against other characters, but time bombs will make that difficult for them! If a time bomb would detonate during a throw animation, on either Kimblee or the foe, their plan is ruined. It's yet another layer to keep in mind when time bombs are in play, as in that state you are now much less vulnerable to grabs.
NEUTRAL SPECIAL - PAIN ADDICTION
Kimblee beckons the foe to come to him like the Captain Falcon taunt while saying something edgy about how life is meaningless and how much he enjoys pain, while pretending this is a very deep philosophical statement. If Kimblee is hit during this edgy monologue, he will interrupt it with a sarcastic snigger and laugh, effectively functioning as a counter like Incineroar's Revenge that will buff the power of his next attack that lands that does damage. If an attack is already in motion when Kimblee gets a pain addiction stack, such as a time bomb, it will not get the buff. The attack must be initiated after attaining the buff. Beware that like Incineroar, Kimblee's buffs can be beat out of him by throwing him. Like all counters, grabs will ignore Kimblee during the counter phase.
His power is buffed by a fair bit less than Incineroar unfortunately, but unlike the heel cat Kimblee is more than happy to inflict pain on himself and trigger his own counter, and it is a slightly faster move. Countering a Time Bomb inflicted on yourself can be a valuable alternative to just dodging it. While Kimblee is in the successful counter animation, he can still counter something else, so he can counter one of his own explosions and a foe's attack at the same time for a double power boost. This will only happen two times after the initial counter, to prevent any exploits with the foe potentially infiniting Kimblee. In addition, if a foe just shields or dodges a time bomb on their body, Kimblee is capable of punishing this by countering the Time Bomb hitbox that spawns over them so that he still gets use out of it.
Kimblee can use a setup with the Down Special ground chunk to get an extremely advantageous state. Kimblee can counter the ground chunk falling down into the floor to crush him to get a huge boost. This is very telegraphed and the foe can knock you out of it, but it's much more dangerous for them to come and risk getting hit by the falling ground chunk without being able to counter it like Kimblee can. This provides Kimblee with an extremely advantageous position that he can pressure enemies from.
Just camping and farming power boosts in a mindless fashion is not always effective. The power boosts can all be lost by being hit by one grab, and you are still taking damage in order to just potentially deal damage that may not even get dealt. The power boosts only become especially worth it if it's the difference between killing your opponent or not, which can only be done at very opportune moments or by countering multiple hitboxes simultaneously. Countering a foe and your own attack simultaneously is very important to keep up that offensive momentum. It can also be outright easier to do it than just countering the foe's attack normally, as extending the counter window makes it easier to counter the foe's attack. Hitting the foe towards the falling ground chunk or having a time bomb on yourself/the foe puts massive pressure on the foe and enables you to immensely punish them if you predict correctly.
Kimblee cannot counter his Side Special because of it being a channeled attack.
SMASHES
FORWARD SMASH - M'LADY
Kimblee tips his fedora during the charging animation, then and throws it like a boomerang, traveling a platform in the chosen direction and able to go off the current platform it was fired upon rather than being bound to that platform, unlike Kimblee's Side Special. The fedora deals 6-8.4% and knockback that kills at 350%, absolutely pitiful. The fedora's hitbox renews when it reaches the full range and turns back around, enabling it to hit foes a second time on the way back.
Kimblee is in lag for this entire process until the fedora comes back to him and he puts it back on his head, but can detonate the fedora at any time by pressing the attack button again and snapping his fingers. The detonated fedora has a Wario sized hitbox that deals 13-18.2% damage, with knockback that kills at 140-110%. Kimblee is out of lag fairly fast upon detonating the fedora, although if he detonates the fedora in his face stupidly it will hurt him, so he must wait for it to travel at least a bit away from him to not do that. Kimblee cannot use his fsmash for 8 seconds after detonating a fedora, at which point he gets a new fedora. If he does not want to wait, using fsmash before that will have him take out a new fedora over about 40 frames of lag.
The move comes out quite fast and the fedora travels through the air quickly. If the fedora hits a foe as it is traveling outwards, it will travel fast enough to get them again on the return trip, or travel fast enough to get ahead of the foe so Kimblee can hit them with the explosion. Ideally, you want to hit a foe with the fedora back towards you at the outer edge of the range so that the foe ends as closeby as possible for potential combo abuse. The weak knockback on the fedora hitbox is ideal for that, although the ending lag of putting the fedora back on Kimblee's head requires extremely ideal knockback to get a particularly good Side Special combo going afterwards. The end lag is much lower if Kimblee detonates the fedora, but the knockback is higher and less desirable for comboing. This can still work at low percentages, but spacing requirements are still pretty demanding.
The detonated fedora still deals knockback in the direction the fedora was traveling when it blew up. Using this move at the ledge to send the fedora traveling a platform off the edge before detonating the fedora at the tip of the range can be a very powerful KO move, moreso than the move's only average kill power otherwise would have, and demands a lot of respect from Kimblee at the ledge. Alternatively, if Kimblee's back is to the ledge, he can use the fedora boomerang to knock the foe behind him off the ledge with weaker knockback, but knockback that still puts them into a disadvantage state. Even with improper spacing and high percents, this move lets you easily dump the foe in whichever direction you want. Even if you can't place the foe directly on top of a time bomb, falling ground chunk, or a transmutation circle, knocking them in the general direction of one or off the stage can rarely go wrong in amplifying the pressure.
UP SMASH - GROUND ZERO
Kimblee crouches down and places his hands on the ground, transmuting the ground underneath him to shatter. This will a cause a stream of small rocks to be blown upwards out of the ground, dealing This will deal 8-11.2% damage over several flinching hits, with the final one killing people vertically at 220-190%. This has a big vertical hitbox that reaches twice Kimblee's height and is slightly wider than he is. This is Kimblee's slowest smash to start, but is hard to punish due to lower ending lag in tandem with the large range.
If the rocks hit a target that they can damage, they will embed themselves inside of the foe, piercing into their body. Kimblee did not just perform a simple earth transmutation, but transmuted the rocks to explode a few seconds later, meaning that after the initial hitbox, the foe will take another hit of 10-14% and vertical knockback that kills at 180-140%, as all the pebbles detonate, again with vertical knockback. This will cause the main knockback on the foe to be taken higher into the air, artificially increasing that weak kill percentage of 180% to something more desirable, killing 40% earlier or so. This attack’s true knockback will also scale with charge moreso than most other attacks, since both knockbacks will scale rather than just one.
This is a very powerful effect if the foe has a time bomb, as the foe will take non explosive knockback to take them closer to the blast zone, before the second hit’s explosive knockback is overwritten by the more powerful time bomb’s vertical knockback for a very potent kill method. This can become quite the terrifying move when you have a time bomb, as it will kill sooner than basically anything else when combined with one. Alternatively, you can just use the usmash while standing on top of ground that has a time bomb in it to get the more powerful version of the move without placing a time bomb directly into the foe. The move also greatly benefits from standing on top of platforms, real or artificial ones made by Kimblee, which both synergize very well with him. This move has largely no combo potential due to Kimblee remaining in lag to detonate the rocks if he successfully performs the first hit.
Hitting with this attack largely requires evasive use around platforms, or to combo into it from something else. It’s an awkward move to hit with in neutral if the foe is grounded, so he should really only go out of his way to do an elaborate set-up into it if it will directly kill a foe for him in a time bomb context. As an anti air, it is fine at doing its job, and it is much easier to just casually throw into an entirely vertical combo just because it’s easier to hit off of there.
DOWN SMASH - TRANSMUTATION CIRCLE
Red alchemic lightning energy comes from Kimblee's fingertips as he sweeps the energy beam forwards along the ground on either side of himself, reaching out a Bowser width to either side. The lightning is weak and deals 8-11.2% and knockback that won't reasonably kill people, dealing several flinching hits as it drags foes along towards the end. Kimblee is moving the energy beams around in a very deliberate pattern to quickly carve a transmutation circle into the ground. This results in the hitbox first moving foes outward for the first half, before bringing them back in towards the middle at the end.
If Kimblee presses attack a second time after this part, Kimblee detonates the transmutation circle he made, dealing 17-23.8% and knockback that kills at 125-90%. This is very powerful, and the luxurious range on this move combined with respectable frame data makes this a pretty easy move to hit with - much, much easier than other moves that are this powerful. Unfortuntaley, Kimblee is also vulnerable to his dsmash's explosive hitbox, so only the first part is what he's getting a net gain on for damage.
Kimblee dealing knockback to himself can be used for comboing, but the dsmash explosive does radial knockback. If Kimblee is at the center of the explosion by just immediately detonating it, his knockback will be vertical. For the foe take vertical knockback as well, they must have been dragged in by the hitbox and been hit by the entire second half of the dsmash, otherwise they'll be knocked in some other direction Kimblee can't capitalize on as easily. This knockback can be overriden if the dsmash was not charged with a time bomb on the foe, as the more powerful knockback on the time bomb will make its vertical knockback override the dsmash knockback, ideal for further comboing as the foe travels with Kimblee.
If Kimblee does not detonate the transmutation circle, it will stick around, and Kimblee will detonate it with lag comparable to Snake's Down Special whenever he next inputs dsmash, regardless of his location. This trap has a finite duration in that it can be destroyed by any character, including Kimblee, walking over it twice to get rid of the detailed lines etched into the floor. If Kimblee does not want this to happen, he will have to jump over the transmutation circle. Regardless, if Kimblee can keep around a remote bomb somehow, it can obviously be advantageous to him as he drags a foe into it with Side Special or something.
The first half of the dsmash is still a powerful attack that is very much worth been used by itself. The lightning can bring foes into close range while giving a slight frame advantage to Kimblee. This is Kimblee's best move to "combo" melee range attacks into, but nothing will true combo into it outside of his jab. This would be one of Kimblee's most valuable moves by itself, though it can't be spammed because of the existence of the other half of the attack. If the foe out of the way to destroy the trap, Kimblee doesn't really care that much, because it gives him access to the advantage state gaining dsmash again, it's very win-win for him. If you can make foes afraid enough of the trap, you can condition their behavior and pressure them with more stuff to be worried about, while gaining more free access to the red lightning lasers.
GRAB-GAME
GRAB - IMPALE
Kimblee has no need to use a basic grab when he is so physically weak, he instead impales his target with a spike directly for his grab, coming up out of the ground in front of him at a 45 degree angle. Kimblee’s grab is more comparable to a tether grab for lag and range, as the spike will extend forwards in front of Kimblee retracting back into the ground if it misses, all of which time Kimblee is stuck in lag during. If the foe is impaled successfully, Kimblee will place his hands on the spike and stare at the foe in an edgy fashion for the “grabbing” animation. If the foe breaks free of the grab before they are thrown, the spike will crumble to dust harmlessly.
Kimblee does not have a close range quick grab to rely on for his melee game, meaning he really does not want enemies to get too close to him if he can help it. Compared to most tether grabs, this has slightly less horizontal range and more vertical range, potentially able to snatch a shorthopping foe out of the air and punishing foolish approaches.
PUMMEL – DIG IN
The spike digs deeper into the impaled foe, dealing 4.5% in a very slow pummel.
FORWARD THROW - SPIKE BOMB
Kimblee detonates the lower half of the spike connected to the ground, dealing 9% and diagonal knockback that kills at 140%, pretty good if not incredible. The poor angle makes this hard to combo with, and the knockback is more horizontal than vertical, meaning it will kill at the side blast zone if it does kill. The other part of the spike impaled into the foe remains in the foe's body, and Kimblee has transmuted one of his time bombs into the other half of the spike, which means he's effectively placed a time bomb inside of the foe. This effectively gives you an alternate method of landing Time Bomb on foes, and the fact it's a grab is a very powerful technique, because you can pummel the foe to delay the timer on a time bomb in their body that they may already have.
The only real difference between landing a time bomb with this attack and landing it with one directly on their body is the time bomb is hidden away inside of their flesh, rather than their flesh being the time bomb. This means hitting the foe with explosive attacks will not detonate this time bomb, and it will instead always go off at the designated time 3 seconds later. While this means foes will have more opportunities to dodge the time bomb than they would otherwise, this will enable you to hit the foe and make them take knockback before they get again and take the knockback from their new position while still in hitstun, if you time it all properly. This throw's knockback is already pretty good, meaning the foe will spend a decent amount of the time bomb's timer coming back to the stage in a disadvantage state at which point you can heavily pressure them.
BACK THROW - CONSTRICT
Because impaling the foe simply wasn't enough, Kimblee transmutes the spike impaled into the foe to wrap around them, uprooting itself from the ground. Kimblee steps around to the other side of the foe to use his hands to make sure the spike is going around them, even though the transmutation is doing most of the work. After that, Kimblee transmutes a basic explosion to send the foe flying, dealing 10% and knockback behind where he was initially standing that kills at 150%. As the foe is flying, the spike keeps constricting around their body tighter and tighter until it does so tightly enough that it combusts, dealing an additional 6% to the foe and causing the foe to enter their footstooled/prone state. This will cancel out any knockback the foe was taking, and provides more stun to this throw than it would otherwise.
The base knockback on this throw would normally be too high for comboing, but the extra stun at the end makes it vaguely possible at low to middling percentages to try to combo with that Side Special. The knockback is mostly horizontal, so if you have a long runway of stage for the throw behind you, you can make the foe enter prone rather than footstooled. This will enable you to get tech follow ups where the combo would've normally otherwise stopped, should you use Side Special correctly. Side Special's hitbox also varies wildly based off how close Kimblee himself is to the ledge.
The constriction canceling the foe's knockback applies to any knockback the foe is taking, not just knockback from this throw. If the foe had a time bomb, the vertical knockback of the time bomb can instead be canceled, leaving the foe vulnerable to vertical combos. There are enough freeze frames on the time bomb going off that the constriction hitbox will come into play before it does on the bthrow, making this better for comboing than the bthrow's knockback despite the time bomb's higher knockback, getting cut off earlier into the knockback. Alternatively, if you have a spike bomb from fthrow, you can time it to go off at the same time as the constriction to deal basically no knockback to the foe whatsoever and keep the foe in stun for a longer duration. Getting 2 grabs off in such a short time span is difficult, but by the time you get the second grab the timing should work out for you almost automatically, since little time should be left before the spike bomb goes off.
UP THROW - ROCKET SPIKE
Kimblee places his hands on either side of the spike that has impaled itself through the foe to transmute bombs into it, then transmute the ground underneath the foe to blow them upwards into the sky for 7% and knockback that kills at 170%. This can be used pretty easily for comboing knockback given the base knockback is low, especially if there is a falling ground chunk.
However, there is more to the throw that prevents it from being used for this as easily. After a small delay as the foe should be reaching the apex of their vertical knockback, the spike inside of their body will detonate, causing them to take an additional 8% and knockback that greatly varies. Both sides of the spike impaled into the foe explode, so whichever side has more spike will do the knockback, and if it's more biased towards one side the knockback will be more powerful. This means the closer range the foe was to Kimblee when they were hit, the knockback will be aimed behind where Kimblee was standing, whereas if he just barely hit the foe with edge of the grab's range, the foe will instead take forwards knockback. Pummeling digs the spike deeper into the foe, so will bias the throw more towards backwards knockback. It takes 5 pummels to drive a spike that has barely poked the foe entirely through their body, and it is very rare Kimblee has time for more than 1 pummel. This can kill at up to 110% if the spike is entirely one way, making this a potentially very powerful throw. Facing out towards the ledge and trying to catch a foe recovering on the tip of the spike can be terrifying, and feeds into Kimblee's playstyle of mid-range combat quite well.
If the spike is perfectly even on either side of the foe's body, the knockback will instead end up as downwards back to Kimblee, which is perfect for combo fodder. This is very specific and unforgiving, and the distance a pummel digs into the foe will often go over that exact distance needed. Still, it's possible a pummel may correct it if you underimpaled a foe, whereas overimpaling a foe can't be fixed, so it's still more advisable to use the full extent of the grab's range when trying to get mileage out of this attack.
DOWN THROW - HUMAN TRANSMUTATION
Kimblee transmutes the spike already impaled into the foe to fuse as a part of their body, with the edges of the spike impaled into their body turning the color of the foe's skin and that portion of their body turning more rocky in a grotesque fashion. Kimblee then casually kicks the foe away for 8% and mostly horizontal knockback that won't reasonably kill ever, but will get the foe out of his face and is unuseable for combos.
The spike will now function as part of the foe's hurtbox and makes them much easier to combo with anything you so please. A large portion of the spike will be inside of the foe so you don't get the spike's entire distance on either side of them, but you're still getting a good bonus half Bowser width on average added on either side of the foe. This is biased against smaller enemies, as less spike inside of their body means more outside for you to hit, while larger enemies won't suffer from this quite as much. Based off where the foe was grabbed, there may be more spike on one side of their body than the other, as well as based off how many pummels you landed.
The extra hurtbox will be destroyed whenever the foe has taken 10% damage on the spikes from attacks Kimblee lands. The only real way Kimblee will realistically hit the foe without hitting the spike is with his Side Special spawning hitboxes that aren't directly connected to himself, though Side Special is also the main move that will benefit from extended combos with the bigger hurtbox on the foe. The foe is even hit away horizontally at the end of the move to space them pretty easily for a Side Special, even if this won't combo into it directly.
The foe can destroy their own spike by attacking it, but will only deal half the normal damage they would to the spike. If Kimblee doesn't use this move to directly land something he wouldn't otherwise thanks to the foe's bigger hurtbox, just capitalizing on the foe attacking the spike and leaving themselves vulnerable can net him a hit he wouldn't have got without dthrow. You can potentially block the hitboxes of these moves from coming out to protect the spike by countering the foe, preventing them from destroying their own spike.
Performing a second dthrow on the foe will passively destroy the previous spike before fusing the new one to the foe's body.
STANDARDS
JAB - EXPLOSION ART
Kimblee stays crouched low to the ground for the duration of while he holds his repeating jab, creating a series of Wario sized explosions in front of himself along the ground. The first one spawns a Kirby width in front of himself, and the second a third spawn a Wario width in front of the previous explosions. After that, the explosions start occurring backwards, coming closer to Kimblee, then going back out from him again. This will keep repeating for as long as Kimblee holds jab. Each of these small explosions deals 4% and juggles the foe with light set knockback in the direction of where the next explosion is going to happen. The foe can escape the explosions by moving out of the attack as they are knocked towards one of the outermost explosions, though has no real hope to escape if they are being knocked into another explosion that is not on the edge.
This jab has a pretty luxurious hitbox, but the damage output is lower compared to other repeating jabs. Kimblee is also extremely vulnerable at point blank range without either a more standard jab or melee range grab to defend himself, and may have to resort to something like his counter.
The jab finisher will cause the next explosion in line to deal 8% and knockback in the direction it otherwise would have to kill at 190%. This is still weak, but is versatile for the potential to send foes behind Kimblee. The most practical combo is making the outer hit 3 be the big explosion to send foes back towards Kimblee as the jab ends, leading into combos at low percentages, mostly into Side Special, though at super lower percentages other moves or even an additional jab. This is how Kimblee would most naturally use the move anyway, though options remain for Kimblee to send the foe in whatever direction he wants. If a foe is anticipating the big explosion on hit 3, they may potentially not hold the correct direction on the control stick to escape the repeating jab, enabling it to go longer than it otherwise should.
The position of the jab hitboxes does not reset on each use of jab, but is instead remembered as Kimblee picks up where he left off when he uses jab again, which can let him have a rather specifically placed longer ranged hitbox with the speed of a jab. If Kimblee just casually presses A a single time, he will just get the bigger 8% explosion, which has a slightly larger hitbox. Saving explosion 3 to use at a later time can be quite powerful as a combo extender, although leaves Kimblee even more exposed at close range with the bigger blind spot he'll have with his jab. If you want to use it defensively here, you'll want to use the full repeating jab to bring the explosions back towards yourself, forming a sort of small wall of hitboxes.
DASHING ATTACK – UNDERHANDED
Kimblee skids forwards to a stop as he crouches down and punches at where a human enemy’s feet would be, trying to trip up his target. This deals 7% and will trip people if the move is not in the stale moves list, otherwise it will deal useless knockback that kills at 275% Kimblee can rarely combo off of. This is a very casual comboing move, and while it can’t combo into itself, it can very easily be used again after another move in a combo. The stale move aspect prevents it from being nearly as abuseable as it otherwise could be, meaning Kimblee will only get a couple of trips out of this move per stock. This move is outright punishable on hit at low percentages if it fails to trip the foe!
Using this move out of neutral may feel awkward due to Kimblee generally disliking foes at super close range, but, you can treat the distance Kimblee moves during the move, since it’s a dashing attack, as a decent gap closer, letting it function as somewhat of a mid-range attack, catching enemies by surprise who expect him to keep his distance. While Kimblee doesn’t have DACUS at his disposal given he’s not a Brawl set, Kimblee can still do simple dashing up smashes to mix up with his dashing attack if needed, if he doesn’t want to travel quite as far as his dashing attack takes him.
FORWARD TILT - KIMBLEE PUNCH
Kimblee does an exaggerated punching motion forwards, having as much lag as Bowser's ftilt which is reasonable, but Kimblee's arm isn't nearly as large as that so it's harder to hit with. If Kimblee punches someone with his fist, he will open his fist up to use the transmutation circle tattooed onto his palm to cause an explosion on the foe. He's way too weak physically to do that much with an ordinary punch. The punch explosion deals 11% and knockback that kills at 135%, which is nothing to scoff at. This is just a sweetspot, though. If Kimblee hits the foe with his arm, he deals only a paltry 6.5% and knockback that kills at 250%.
The move comes out fast and can serve as a decent panic button, but like Bowser's ftilt has a lot of ending lag after the punch comes out where Kimblee holds his hand out in place. This is not from him being winded, but Kimblee instead has an edgy smirk during the ending lag. If anyone hits his fist during the ending lag, the regular hitbox will spawn over his fist as he causes an explosion on whatever hit him, with his fist having superarmor. This serves as a psuedo counter where you either hit the foe or counter something, but the range is quite specific and rewards Kimblee for not having foes next to him in point blank range when they're in melee combat.
The reward on this is rather pitifully weak for a "counter", especially since Kimblee has a perfectly fine counter with a much better reward than this move. Your goal is still to just hit with the hitbox as a general rule, but it's a nice failsafe and leaves foes heavily on their toes when fighting Kimblee. You can use this move to control space if you're confident the foe is going to be in that general area as an educated guess, and generally get a good result.
The explosion on this attack, including the counter, can still detonate time bombs, which can make this attack significantly more threatening than it would be otherwise, turning the counter from plan B to plan A. Time bombs in general are when the foe should be predictable enough for this kind of attack to thrive and be incredibly safe to throw out as your response to almost anything. The only thing you have to worry about all that much is avoiding the sourspot.
UP TILT - EXPLODING PILLAR
Kimblee transmutes a stone pillar out of the ground in front of himself which is as tall as he is. As it first comes out, it deals 8% with vertical launching knockback that kills at 180%, but with a high base. After creating the pillar, Kimblee can press the button a second time to detonate the pillar in a hitbox slightly larger than itself, dealing 12% and radial knockback that kills at 140%. These two hits will not combo into each other, but this is a very good move against dodges and shields. Kimblee does not have to detonate the pillar, so if he just hit the foe with the pillar he can stop the move and continue going about his business. Having a move that is good against defensive options is very scary to a foe with a time bomb on their person.
If the pillar is not detonated, it will stick around for 2 seconds before retracting into the ground over the course of another second. The main body of the pillar does not obstruct gameplay, but the top functions as a drop through platform. This is much more casual to use Kimblee's Side Special platform shenanigans with as opposed to the giant ground chunk, letting Kimblee move while using what is arguably his most powerful move, and threatening with it. It is particularly useful when the platform is retracting down into the ground, as it lets Kimblee have a perch while still bringing him down to aim at grounded enemies.
Pressing utilt in front of or while standing on a pillar will detonate that pillar. The radial knockback of the explosion can be useful for combos to potentially lessen their knockback and send them towards Kimblee's direction, especially if he was standing on the pillar. While the ending lag of this move isn't terribly long, detonating the ground you're standing on will interrupt Kimblee's ending lag as he enters his aerial state, enabling him to immediately follow up if he manages to position the foe to be sent his way.
You can also set up a time bomb inside of a pillar, which will transfer it to the ground when it retracts down or just detonate when you detonate the pillar. The inverse also applies, as any time bomb on the ground will be transferred to the pillar if you use utilt over it. This makes the hitbox significantly more powerful with the time bomb and larger with the utilt, and effectively lets you move the trap to more directly threaten with it as a hitbox. If Kimblee manages to use the platform threateningly besides the fact it's a potential hitbox, it will give him tons of leverage to pressure the foe, bait their actions, and punish them horribly for it.
DOWN TILT - SAND BOMB
Kimblee transmutes the ground in front of himself into sand, extending forwards about two thirds of a platform's width. The sand by default will be pushing foes towards the middle of itself at the rate of Dedede's inhale to foes standing on the ground, dealing up to 7%, but not flinching the foe or dealing any other kind of stun. In the middle of the sand is a bomb transmuted into the ground, which will deal a simple 8% and vertical knockback that kills at 160%. This attack comes out fast, though Kimblee is stuck in it for a while. After Kimblee exits the move, the sand will keep going for an additional 2 seconds, though the bomb in the middle will be gone.
Multiple dtilts can stack the force of their pull with themselves, and the damage from the sand. The duration is small enough that it's impractical to make more than two overlap, with the third only overlapping for a very brief time. This move can be angled horizontally, which will change the position of the bomb to be at the edge of the move's range or right in front of Kimblee. Angling the move also changes the direction the sand pushes the foe, as it will always push the foe towards the location of the bomb. The waves of sand do visibly go in a certain direction, but it's not a super obvious effect and in a heated battle, it may not be immediately obvious to the foe where the bomb is. If a foe wants to be safe against this move, they will want to jump over the entire stretch of sand to avoid all the potential locations Kimblee can place the bomb. After all, if the foe is just immediately over the location where the bomb spawns at the start, they won't have time to see where the sand is pushing anyway.
Stacking the sands pushing in the same direction can make it much more difficult for the foe to resist the pull without jumping, forcing air combat and generally an attacking move from the foe, which can be met with one of Kimblee's counters. Kimblee can also position two sand streams to push in opposite direction to try to maximize the damage from the sand itself and keep the foe stuck in place, while he goes to punish them with something else.
Using this move at the ledge with less than two thirds of a platform between you and it will stifle the range of the move, and bunch up the sand together. More sand over itself will heighten the damage and force of the push, even if it is in a much smaller space. This can bunch up damage more quickly and push the foe into the space that deals hitstun and knockback with no time for them to do anything about it, though does not control as much space. The move always prioritizes having the bomb over the sand if there is not enough space.
If there is a dsmash circle or a time bomb in the ground, you can position the bomb so that the sand pushes foes into that instead. The simplest way is to just overlap the other hitbox with the dtilt's bomb, but you may want to block off the dtilt hitbox to be in a "failsafe" position, where the foe would go if they successfully dodged your main goal. Keep in mind there is no visual indicator where the dtilt bomb is besides where the sand is going, which is not immediately obvious. Dsmash in general is an amazing move to use while the sand is going for the extra 2 seconds after the move is over.
AERIALS
NEUTRAL AERIAL - KNEE OF INJUSTICE
Kimblee extends his arms above himself to either side, and brings his knee forwards to batter his enemies with. His knee deals 9% and knockback forwards that kills at 155%, while his arms do 7% and vertical knockback that kill at 220%. Kimblee holds out this pose for a while, which turns this move into a more typical sex kick nair. This means that in the second half of the move, the hitboxes get weaker. The knee will now deal 7% and knockback that kills at 190%, while the arms deal 5.5% and knockback that kills at 350%.
The move has very few frames on it where a hitbox is not present, with most "lag" just being the duration of the attack. The lingering nature and quick speed of the move can be a decent way to threaten a foe in close range when there is a time bomb on you or them.
This move very rarely kills, and you have much better options for that. It is generally preferable to hit with the weaker hitboxes later on in the attack to better lead into combos. The arms hitbox especially get pitifully weak, easily comboing into another move. Hitting them later on in the move also means you're stuck in lag for a lesser time. Just throwing this move out immediately as a panic button in point blank range can certainly be done, but the lingering nature of the move rewards using it as a gap closer, before the foe is knocked back into your comfort zone.
FORWARD AERIAL - PSYCHO GRIP
Kimblee extends forward his hand to grab the target with his fingers outstretched, almost like a claw. If his hand comes in contact with a damageable target, he'll immediately transmute a bomb into their body that explodes, dealing 11% and knockback that kills at 135% with a high base. If he hits with his arm, he gets a simple physical hitbox that deals 6.5% and knockback that kills at 250%, but still with too high of a base to be useful for comboing. The attack is not great at close range, as hitting with the arm makes the foe effectively "immune" to Kimblee's hand.
This attack can be angled 45 degrees up or down like some ftilts can be. The potential power of the explosion can be significantly scarier if aimed downwards on a foe who is off the stage. The range is not as good horizontally if Kimblee moves his arm diagonally, but it can be a good tradeoff to knock the foe in a different direction. Angling the attack also makes it much easier to position the hand so the foe hopefully approaches into it, as you effectively want to block off your arm hitbox from being able to hit.
If Kimblee lands during the attack, he will enter the ending lag of his ftilt, given this move has the same power as that move. This gives Kimblee's hand the counter properties as he holds it out, giving it superarmor and triggering the hitbox if it gets damaged. The fair naturally lingers out a while without the counter based ending lag of the ftilt, but it can be extended even further by landing towards the end. Kimblee's arm will stay angled how you had it during the fair when he transitions into the ftilt, which cannot normally be angled.
Assuming you are just ignoring the arm hitbox, the move is best used at approaching or retreating, moving through the air during its duration to get the hand into the ideal position. If you jump high enough into the air while using this move, you have the choice to either land and prolong the move to counter an attack, or keep it going and get out of the move more quickly. If you're going to trade with the foe with aerial priority that has both attacks go through anyway, it makes more sense to get the superarmor from the grounded version instead.
BACK AERIAL - KILLER'S SWIPES
Kimblee gets an edgy grin on his face as he does a series of deranged swipes behind himself. The swipes are coming from Kimblee, so they're not that strong, but they're very frantic and deranged, dealing 10% over the course of several hits and stunning the foe in place before sending them flying off with radial knockback that kills at 165%. Once Kimblee has hit a target he can damage with bair, he will float in mid-air for the duration of the attack as a handful of freeze frames take place over the course of the attack for dramatic effect. Gravity resumes once the flurry of swipes are over.
The longer nature of the attack, when it hits, makes it good to catch a foe for a time bomb and keep them there until it blows up. A grab can accomplish much the same thing, but this is much lower risk to land than a tether grab. While you don't want to land during this move if you miss with it, Kimblee will still stall in the air if he manages to hit a foe's shield with this attack. The freeze frames will translate to improved shield stun, which will make sure the foe cannot retaliate against Kimblee during the move. Bair is another good offensive move to use with timb bomb pressure, and it is one of his most reliable panic buttons against a foe in close range with no strings attached.
UP AERIAL - RING OF EXPLOSIONS
Kimblee transmutes a large amount of small explosions the size of Mario's head above himself in the shape of a ring. The circle is about 1.1X Bowser's height and width, giving enough room that Bowser could fit inside of the ring without getting hit if he magically floated inside of it for the duration of the hitbox. Each explosion deals 7% and radial knockback that kills at 250%, but you cannot be hit by more than one explosion. You can't be ping ponged around inside of the explosion ring.
The move technically does have a point blank hitbox above Kimblee, but it's so close to him that it's not the most practical. The blind spot of the uair generally signifies the range Kimblee does not want his opponent in anyway, so this is a decent "training wheels" move. Ideally, the sweetspot to combo the foe at is at the bottom of the top explosion hitbox so they are hit back down towards him for combos. The weak knockback of this fast attack and the large range in general makes it a strong combo piece moreso than one in neutral due to the gigantic blind spot, but Kimblee's natural playstyle should hopefully keep the foe out of this move's blindspot anyway if he is played properly.
Aside from the radial knockback letting Kimblee potentially send foes towards himself or at advantageous angles, the large range of the hitbox also makes it good for comboing. This will juggle much better than other moves, being the one move Kimblee can hit with where other moves can't due to the giant vertical range, assuming Kimblee can aim it properly to utilize that range. If using the move for combos, Kimblee should be able to move to send the foe wherever he wants with this move. While the foe will eventually be sent too far for that at higher percentages, this will still be useful until it stops comboing, as if this can't combo, nothing else Kimblee has can combo vertically given the large range on this move.
DOWN AERIAL - AIR BOMBING
Kimblee extends his palms downwards to cause a transmutation a good Bowser width below himself or so, creating an explosion that deals 12% and vertical knockback that kills at 145%. This is a very fast move, and while it won't spike an off-stage foe, it is a very, very easy move to hit them with in that context. It's easiest to use it against recovering enemies in general, as it lets you keep a safe distance from the foe without any real risk of the foe getting in close and personal. This move is fast enough to be spammable, and at low percentages serves as a comboing piece due to knocking foes towards Kimblee.
If the hitbox on this move would reach the ground, it won't spawn inside the stage but will instead explode the ground open. This increases the horizontal size of the hitbox, and boosts the power to 16% and knockback that kills at 115%, which is incredibly strong for such a fast move. The catch is that Kimblee is vulnerable to his dair, so if he just shorthops the move he'll hit himself. This can be used to Kimblee's advantage for comboing his enemies if his percentage is lower than the foe's, knocking him alongside the foe while he gets out of hitstun first, much like with time bombs. This is more high commitment than a time bomb, though, in that Kimblee can't dodge or counter his own bomb nearly as easily.
Kimblee can still move through the air while he is creating the explosion, and the explosion's hitbox is based off where he first input the move. It is possible to explode the ground and for Kimblee to just barely move out of the way, to get the more powerful hitbox without hitting himself. This is still very awkward and predictable if spammed, meaning on-stage use of this move in neutral should be limited, but it can be a fantastic defensive manuever to get that ideal spacing Kimblee wants, by putting the explosion between him and the foe. If the foe is catching on to this, he can just go for the suicidal combo instead.
FINAL SMASH - ABSORBED
Pride appears in a cinematic and absorbs Kimblee into his shadows, copying him and gaining all of his abilities. You might think this would be a buff to Kimblee's moveset while playing as Pride or something, but you'd be wrong. Instead, Pride just uses his shadows to unleash a series of shadowy tentacles all over the main stage, which flail about and do an extensive 30% with heavy knockback that can kill people quite easily. After it's done, Kimblee will paralyze Pride from within his body as he says an edgy judging comment, and a random obscure good aligned Full Metal Alchemist character will sneak up behind Pride and kill him in one hit effortlessly while he is paralyzed. This will prompt Pride to **** Kimblee out of his shadows like nothing happened as he leaves the stage and gameplay continues.
Since the Bizzaro Day event is still going and I had something that fit the bill on hand, I powered through and finished this lovely set: introducing the Pig Monkey classification Pokemon itself: Primeape!
Armie is a witness to the first part of the final case in Ace Attorney: Spirit of Justice, in which the identity of her archaeologist papa's murderer is disputed. Two months before the case, Armie lost her mama and the use of her legs in an arson attack. She developed an intense fear of fire, and had to be taken out to the countryside and home-schooled by her papa.
Armie communicates to the outside world using a drone she made, which is pretty impressive for a 12-year old girl. The drone has a voice modifier, and while talking through it Armie puts on a drill sergeant persona because her mama was in the military. Much of her appearance is done through the drone, leaving her identity a mystery until partway through her case. The case brings up traumas from her past, but in facing her fears Armie provides vital testimony in uncovering her papa's killer. No spoilers on that here - go play the game or watch it, because SoJ is one of the best games in the AA series and Smady (and Warlord, I'm sure) would recommend it.
STATS
Size: 3 "Mario" (technically 150cm tall)
Weight: 110 (above Samus)
Ground Speed: 1.07 (below Incineroar and pre-patch Piranha Plant)
Jump: 2 (Little Mac)
Air Speed: 0.7 (below Dedede)
Fall Speed: 1.8 (Mega Man)
Traction: 1.5 (well above Sonic, highest in the game)
Armie is very slow and clunky, as expected of someone who relies on a wheelchair to move around. On the other hand, she is a surprisingly small and bulky target with great survival capabilities. Damage and knockback to the wheelchair (from below or behind Armie) are cut to 0.88x and 0.95x respectively, but this leaves Armie more susceptible to being juggled.
Armie has incredibly good traction due to being in a wheelchair, because otherwise it wouldn't be a very safe wheelchair. This basically means that Armie stops very easily from her dash and doesn't get pushed very far in her shield. Unfortunately, Armie's out-of-shield options tend to be limited (or at least predictable) when staving off pressure, so the high traction can actually backfire on her. But that is to be expected of a recluse.
((DRONE))
Armie typically deploys her drone to attack. By holding A or B during such a move, Armie will whip out a remote control from beneath her seat and pilot her drone manually, giving the player control of it once the attack ends. Done in midair, the drone will hover in place to attack and can be moved sideways. Fastfalling is assigned to Armie, but she will retain any prior momentum she had before attacking. Bringing out the remote in midair adds 2 frames of starting lag onto Aerials.
The drone is scaled up in Smash to match the Beetle item. but is still smaller than any Smash character. It has a mediocre dash (1.6, Ryu), but amazing aerial mobility like Jigglypuff and with 9 midair jumps. The drone is pitifully light (50) and has 17HP; short-circuiting and its eyes flickering red with its health is reduced to 5%. Armie cannot move while the drone is being grabbed or in hitstun, as this somehow causes her remote to spark and malfunction like it's taking damage too. If the drone is destroyed, it'll explode at the apex of its stun and so will Armie's remote, preventing her from sending out another drone for 7 seconds - but she can still use the drone for her attacks as she utilises a more rusty grey version that lacks the "eyes" or "moustache" of the original. The drone is healed 2.5% every second it is not being used, and takes roughly 5 seconds to regain its health from critical.
If Armie was attacked while controlling the drone, it will disappear and the player will regain control of her. This can also be done manually by shielding or dodging as the drone, both inputs assigned to Armie herself. This means that the drone cannot defend except through movement and attacks and needs to be utilised offensively for the best results. Some attacks allow Armie to act herself while still keeping the drone out, which will hover in place and not burden Armie with any stun if it was attacked. These attack give Armie ways to defend herself beyond the predictable and potentially punishable acts of shielding or dodging. If the drone fastfalls or crouched, Armie will perform her own crouch.
SPECIALS
((UP SPECIAL-- <O< --EJECT))
A spring built into the seat ejects Armie like a rocket! She goes considerably high at 10.5 grids before a parachute opens up, which slows her descent and enhances her air speed to match the drone's. Like Peach's Parasol, you can fastfall to temporarily enter helpless and reach ground quicker, but opening and closing the parachute does have a bit of lag. Armie looks uneasy while parachuting, as one would naturally be when exposed and high off the ground. This turns to mild panic when you close the parachute.
Airborne, the wheelchair falls as a hitbox that deals 10% with decent knockback or 12.5% with strong knockback on a 55* angle close-up. As such, ejecting in midair is a touch slower than ejecting off the ground. If the wheelchair lands, it'll remain as a construct that can be thrown and knocked around similarly to a barrel, dealing up to 14% close-up or 11% from afar. The wheelchair travels notably farther than other heavy items and has slightly less throwing lag due to being lighter than something like a barrel, but opponents can knock it out of the air with decently strong attacks. The wheelchair has some unique functions as a heavy item: it can be smash thrown by holding A, and can be grabbed in midair in which case the holder can move sideways and fastfall but not jump or dodge. If the wheelchair was grabbed from behind and from the ground, it'll be held by the push handles and can be wheeled around without inhibiting the user's movement speed. The holder can cancel this into a shield or press A to carry it like a regular throwing item. The catch is that the wheelchair is in a position where foes can easily smack it into the holder - and while it's a bit quicker to throw, it can only be thrown sideways to get shoved and roll along the ground. The whelechair deals 12-9.5% from this with knockback on a low angle, though you'll generally need to hit close-up or from fairly high percents to start a tech situation. The wheelchair has a function that prevents it from rolling offstage, as Armie uses that wheelchair and it wouldn't be very safe if it slipped so easily. Shields - but not parries - can halt the wheelchair's rolling.
If Armie lands in her wheelchair, she'll suffer no landing lag, but if she lands anywhere else she'll suffer harsh landing lag as a new wheelchair spawns beneath her and the old one disappears (unless it was being held by another character or taking knockback, in which case it will disappear immediately afterwards). This can be avoided by grabbing the ledge or being struck, both causing Armie to get a new wheelchair, but her weight is drastically reduced to a light 85 units without the extra bulk. And grabbing the ledge is predictable and punishable, to say nothing about Armie's slow and vulnerable descent. You can avoid this by recovering low to snap the ledge, though Armie has no ascending hitbox to protect her.
Armie can deploy the drone and use its aerials while parachuting, but not Specials or U-air as otherwise she'd damage her parachute. By holding B when using this move, the drone can be deployed behind Armie before she's ejected, holding the chair from behind and falling with it, potentially capitalising on the knockback. You can press up anytime during the fall to have the drone hover and hold the wheelchair in place to throw, at the cost of some slight lag, or you can just keep up held from inputting the move to have the drone not fall but be able to act quickly. This is particularly useful offstage where the drone can throw and even the wheelchair back onto the stage (smash throw A is best for this) with its multitude of jumps.
While controlling the drone, Armie will automatically parachute back to the stage or towards her wheelchair if it was onstage and beneath her. You can even throw the wheelchair at the parachuting Armie to catch her; leaving her free to act, regaining her bulk and having her jumps and recovery refreshed if the wheelchair had touched the ground, the wheelchair keeping its momentum if it still had some when touching Armie. Control remains with the drone however, and requires you to use up and commit to your air dodge to regain control of Armie before she lands - not really worth it. You can relinquish control of the drone anytime per usual, causing Armie to close her parachute and then reopen it for annoying lag overall. So while this move can be used to stall from high up, having the drone fight for you is a big commitment due to its lack of defences and the lag Armie has to go through if she wants to switch in. The great height from the recovery can backfire on Armie as she is left open to enemy attack, but if she wants to be closer to the ground she'll have to start the recovery offstage and give the drone a slow start as it has to deal with the wheelchair.
((DOWN SPECIAL---LANDMINES))
A large rusty mine is dropped from the wheelchair's underside through a built-in trap door, taking a notable 22 frames to deploy. Set in ground, the mine is triggered when a target stands over it for 5 frames; flashing and beeping progressively faster before exploding after 45 frames. It's no doomsday device, but still a fairly large and strong blast that deals 14% in upwards knockback that Armie is immune to. The trouble here is pinning the foe down long enough for the blast. The mine disappears if not triggered after 12 seconds, and only one can exist at a time. The drone will not trigger landmines due to hovering (or maybe special programming by Armie?).
Armie can trigger her own mine, and will typically do this while grounded if she did not jump or dash immediately or drop it while dashing. Instead of being damaged, Armie is popped 1 grid upwards by the blast due to the wheelchair taking the brunt of it, having her ground actions cancelled and receiving a generous horizontal momentum boost on top of having her gravity greatly lowered. The blast here is muffled to hit close to either side or the full distance below for 8% and average knockback that can in fact true combo into an aerial at lower percents. The move-cancelling and the punish aspect of the mine are the real prizes here, hampered only by the starting lag, the muffled blast's short range and the fact that Armie has a very limited time to utilise the cancel if she commits to it. Utilising the hop increases the landing lag Armie experiences by 9 frames as the chair gets damaged somewhat; only lasting for 5 seconds, but able to stack if she does another hop within that time. The lag isn't severe, but can prevent Armie from using landed aerials to their full potential.
This move gives Armie a hitbox to deploy from her wheelchair while parachuting. The wheelchair alone can trigger the blast, and will in fact get bounced up a significantly higher 5 grids due to not being weighed down by Armie. The chair deals 10% and decent upwards knockback to opponents, and if makes contact with Armie she can act like she did the bomb hop - though her Up Special and her jumps won't get refreshed, and she'll still receive the landing lag penalty. But it's good if you want to act quicker, and can open up some potential Armie combos even without taking the drone into consideration.
((SIDE SPECIAL --- MISSILE SALVO))
Take aim, soldier! The drone's eyes glow green and a laser points from its "mouth" as Armie brings her goggles down over her eyes and leans forwards with a focused expression. A square crosshair runs from the drone while you hold the control stick, up to 18 grids forwards at high speeds. This can be moved up and down freely. Holding B to deploy the drone while airborne will have it hover in place while targeting.
When the crosshair touches a target, it'll blink red and mark the target with a red crosshair, even if they dodged or were invincible. Up to 4 crosshairs can be applied in one session, but you can keep moving the crosshair afterwards. If no targets were marked on release, the drone will look strangely disappointed, and Armie will throw up her googles and stare in disbelief for some end lag. The crosshair goes a minimum of 2.5 grids forwards if the control stick was tapped; not very far, but it does cut a lot of end lag for whiffing as Armie doesn't set her expectations too high.
If at least one target was marked on release, Armie will shout "Fire!" (or "Fiiiire!" if all 4 missiles were deployed) in a masculine voice through her remote's voice modifier. On her signal the drone will fire its rocket-like missiles one by one, starting with the most recently marked target and finishing with the first to be marked. These missiles are small, travel moderately fast and deal a surprisingly decent 8.5% on contact - if they were moving in a straight line. Missiles travel 1.5x the distance the crosshair was sent out going forwards.
Missiles home in on their target, but they require a wide berth to curve (around 4 grids of leeway) and slow down depending on the degree of their curving, hardly notable if it was a slight adjustment but moving sluggishly when changing directions. Depending on its speed, a missile can deal anywhere between 7% on even the slightest curve (typically to hit a low target) or only 4%. A missile can potentially move up or down if allowed to curve widely enough, but it cannot turn back the way it came. It will still attempt to align itself with its target vertically however - jumping around can potentially make the missile last indefinitely, but all missiles will automatically disappear after 5 seconds. Nonetheless, it is possible for Armie to knock foes into the missiles and bounce them off slightly for combos if the knockback was low enough. If a slow missile travels 4 grids in a straight line, it will speed back up over 3 grids to potentially deal its max damage. If a marked target disappears, the missile will keep going in a straight line. Missiles will immediately disappear if Armie uses this move again, so they can't be used to make new missiles.
This move has a "sweetspot" that occurs if the crosshair was released while it was overlapping a target, which is not easy given how fast it moves. Doing so causes a more bulky army green and red missile to pop out from beneath the drone, adding a 5th projectile to its armada. This is always fired first. This missile travels notably faster than the normal variety, can make slightly tighter curves and goes twice as far as the crosshair went. It also deals a lot more damage: 16.8% if it went in a straight line with strong shield damage, or 21.7% if you tapped the control stick though this requires spacing and to be started closer up. Otherwise the missile deals 12.7-8.6% from a curve, but it won't lose power from making a slight curve. This missile explodes on contact with targets or a surface in a fairly large blast that can potentially 2-frame opponents. Also notable is the difference in speed between this and a regular missile: if foes attempt to parry or dodge to avoid the missile's high shield damage, Armie can fake out by passing the crosshair over them and catching out their lag with the slower, weaker missile.
If the crosshair was not horizontally aligned with the drone on release, the missiles will be fired on an angle based on the difference in alignment - barely notable if the crosshair was shifted slightly, like a last minute thing, but being 4 grids apart from the drone vertically will cause the missiles to be fired diagonally. This can be useful for dealing with aerial approaches by moving the crosshair up, but you need to plan ahead and it can be somewhat predictable. It can also be useful for adjusting the missiles' speed by making them curve towards their targets to catch them off-guard.
Your mine, wheelchair and even Armie herself are potential targets for missiles. The missiles will detonate Armie's mine and knock her stray wheelchair around, though in the case of Armie herself the missile will magically fly past her. Having all these constructs out not only increases the missile count without having to rely on opponents, but also makes getting the 5th missile easier when you have something stationary to mark. It is perfectly possible to mark an opponent and finish with a construct behind them, so that they can be damaged by the 5th missile while still having to deal with the missile homed on them.
If a missile hits an unmarked opponent (even when shielding, but not parrying) before the missile marking them does, the missile for them will home on them more sharply without suffering a speed or damage cut, contributing damage and knockback that can potentially seal the deal for your 5th missile. It is even possible to hit a shielding opponent with all 5 missiles in rare situations, in which case you'll break their shield. The firing order essentially punishes opponents for being between you (the drone) and your constructs, like ignoring your mine or even rushing past the drone to attack Armie. You can have the drone throw the wheelchair forwards and set up a mine as it rolls along the ground, so that you have 2 constructs to target and can do this all while Armie is parachuting. Such complex military tactics are not beyond Armie.
The bullets form a thin, but surprisingly bright (projectile) hitbox that covers 11 grids over 10 frames, but it can be held out for up to 60 frames by either mashing or holding B before the drone runs out of ammo - it can only hold so many bullets in that tiny gun! The tiny bullets are fired very rapidly, one every 2 frames (anywhere between 5-30 bullets), and though weak they nonetheless lock struck opponents in place and can drag them if Armie was falling. The first 5 bullets are the strongest, dealing 1.4% apiece (7%). Bullets 6-10 deal 0.8% apiece (4%), 11-15 deal 0.6% (3%), 16-20 deal 0.4% (2%), 21-25 deal 0.3% (1.5%) and 26-30 deal 0.2% (1%), dealing 18.5% if they all connect. This counts as one hit for the purpose of staling, regardless of how long the move was held out for. You can choose to set the drone before or after firing.
The bullets deal hitstun appropriate to their damage output. The earlier you end the attack, the longer the foe will remain stunned, but the less damage you'll deal overall. End it asap, and you'll get a good frame advantage that can open up foes or even start a combo close-up, which is well-deserved given this move has some starting lag to it, but not too much. Firing all the way puts you at frame neutral with the opponent, or a slight frame advantage if you hit close-up: in addition to dealing the most damage, this is useful in midair where you can drag opponents down with you from a distance. By setting the drone in midair, you can also keep opponents pinned as you fall, which is good for spacing and offers extra utility. For instance, if you start up this move at the foe lands and they react to it by jumping, you could counter this by placing the drone pre-fire so you can intercept their jump. The bullets are effective against shields - you can stop firing early and the foe will probably hold up their shield for too long expecting more shots, giving you time to follow-up - offering more incentive to jump as the bullets will naturally outlast rolls.
You can hold the control stick before firing to adjust the bullets' output. You can hold up or down to have the drone tilt in that direction as it fires, but it's very slow and only covers 30 degrees when held for the full second. Nonetheless, this can be used to lift a grounded opponent up into the air or vice-versa (maybe into a mine?), and the bullets will ricochet off any floor or ceiling they hit.
By holding forwards, the bullets will appear brighter, longer and will make more of an impact they hit their target. Each bullet pushes its target back slightly, but the damage output and hitstun are distributed more evenly from start to finish - a 7:3 ratio - meaning you deal less damage and hitstun at the start, but more near the end. A foe is pushed back as far as 1.5-5 grids, but never out of the barrage if they reach the edge. If you go through the entire barrage, you'll deal some decent knockback that's good for zoning and can KO at 180%, or much earlier considering this attack's range and how the drone works.
STANDARDS
((JAB --- ATTENTION!))
Leaning forward, Armie whips out an olive green megaphone and shouts through it, obviously to give orders! She shouts "Objection!" or "Hold it!" at random, but not in a girl's voice because the megaphone has a voice modifier that makes her sound like a drill sergeant. This even comes with the Ace Attorney series iconic speech bubble behind Armie in the background, like the bubble is granting her magical lawyer powers that grant this move a hitbox, and not because of the megaphone. There is also a chance that she will borrow "Gotcha!" from Apollo Justice if she lands a direct hit, which makes sense because he was involved in her case (and incited her papa's killer). The shouting is mixed in with a faint whine and static, which become a bit louder when Armie finishes her line. Armie will not shout for another 2.5 seconds, to keep the move from getting too annoying and because it's not a Special. Even though the AA speech bubbles make it look like one!
The megaphone produces a conical soundwave that fluctuates in length when the attack is held. It comes out relatively fast and decently-sized, a good panic button, doing a minimum of 3 hits dealing 2.2% if you just tapped the input. This will typically push the opponent to near the end of the wave, and functions almost like a spacing Jab 1 if you just end it there. This is useful, as unlike the majority of fighters Armie dislikes having opponents close to her face, preferring them to be at arm's length. The Jab is safe at max range, though it pushes targets/Armie back out of range for another Jab follow-up. It is slightly unsafe close-up, unless the opponent continues to hold up their shield...
When you hold the attack, it becomes a typical multi-hitting Jab that can rack up (potentially high) damage and ends with a finisher. This doesn't push opponents as far, and even pulls them towards Armie here and there. A moment into the attack, when Armie would stop shouting "Objection!", the soundwave will shrink to around the length of a jointed Jab. Opponents near the edge of the soundwave will be released from the attack, but opponents hit close-up at the start or who DI towards Armie for whatever stupid reason will remain trapped in the soundwave. If Armie ends the attack here, she won't do a finisher and can follow-up all the same as if you just tapped the input - only with a bit more damaged tacked onto the opponent. If the opponent gets released and jumps or retreats or throws out an attack that outranges Armie's, she can end the attack and react to them - but she also has to be careful about opponents who anticipate this and rush at her during her end lag.
If Armie continues shouting, the blare will become extra high-pitched and cover an abnormal length for a Jab. This covers roughly 4 grids and is perfectly capable of 2-framing opponents, providing you have the spacing. At this point the blare becomes transcendent, and stays like this for a few hits during which you can choose to just land the finisher to be safe. That's because the blare will then die down to its regular size, releasing opponents who were no longer in range, and will not occur again for another 1.2 seconds of shouting. The soundwave beyond the regular range is a sweetspot that deals 2-3x more damage to opponents and additional shieldstun, actually dealing surprisingly good shield damage for just a few hits near max range. Its range can easily catch opponents released from the small soundwave who didn't retreat or snuff out approaches with a preemptive shout. When the soundwave dies down to its regular size, there is a brief window where Armie will not perform the finisher and just end the attack more safely. This is easier to time if an opponent was trapped prior due to hitlag, and can be a great way to exploit additional shield stun from the sweetspot. Maybe throw out a mine, deploy the drone or ready the Side Special.
The finisher has Armie lean further, almost out of her chair, and shout louder in what results in a very harsh whine - or shouting "Gotcha!" if she hadn't shouted a line at least 1.5 seconds prior. This extends the soundwave slightly, and deals damage based on where the wave hit from. This is typically 5% with strong base diagonal knockback that provides you with comfortable spacing, but it's not reliable for KO'ing because that's what the bombs and guns and wheelchairs are for. The sweetspot deals 10-14%, and only slightly better knockback, but having better range means it has a greater chance of actually KO'ing. The knockback here is normally diagonal per usual, but it will actually be upwards and slightly towards Armie if the foe was hit by a section of the wave below Armie, or vice-versa being downwards if they were hit above Armie. The former is particularly dangerous near the ledge, and can result in a foe next to it being stagespiked. The shield damage can be pretty meaty from the sweetspot, but at the cost of not being able to follow up as well as if you just kept the attack going and ended it asap.
The first hit gives foes little time to punish it up-close if you leave it there. But maybe foes will hold down their shield for too long expecting more hits. The third hit can be parried, but it foes did not react quickly enough (like a Jab or something that came out within 3 frames), they will just get caught in the barrage if Armie kept it going. On that note, the barrage can work well with keeping an opponent in place, maybe for a delayed attack like the mine, and the shouting is timed so that you will get 1-2 hits from the expanded wave in before a mine beneath you explodes and cancels the attack - provided you didn't have an opponent caught in the attack, because hitlag will naturally extend the hitbox's duration. The set-up seems a bit obvious, and you can't really fake-out because end lag means you'll still be on the mine when it explodes, but you can pressure a foe caught in the sweetspot quite easily from this.
The drone's soundwave is more consistent and never fluctuates in size. As such, it will not pull opponents in much as you hold it out, but you will get more hits from hitting at max range.
((DASH ATTACK --- SARGE BARGE))
Armie glances down at the chair's wheel and tucks her head in tensely. For good reason, as Armie quickly deploys a mine from beneath her wheelchair. This resembles a silvery, futuristic mine with a flashing red light at the centre, but you only get a glimpse at best. Armie keeps going after dropping the mine. When she passes it, the mine will immediately explode - and propel the wheelchair!
The wheelchair flies just off the ground, 3 grids before it crashes down shakily. Then it quickly rolls to a stop over another 3 grids, Armie wincing from the blast and the landing. This deals 13.6% and rather strong knockback close-up, a reliable KO move, or 9% and remarkably less knockback later on. As Armie travels far on this move, the knockback of either hitbox isn't particularly convenient at very low percentages. They position opponents behind Armie for maybe a B-air at best, unless there was no ground to cover because you used this move near a ledge. Around low percents, the sweetspot positions opponents above or in front of Armie and is easy to follow up on, maybe start a gimp as you're closer to the ledge. It takes mid-high percents and positioning for the sourspot to start doing this, though this gives Armie a slightly bigger frame advantage over the sweetspot if she pulls it off. You can drop the drone off before or after attacking if needby, one way to set up for a missile at low percents.
This move is relatively slow to start up, though none too telegraphed until the flashing mine is revealed beneath the wheelchair, and low end lag that makes potential follow-ups possible. The mine is deployed during the second half of the starting lag. If Armie is attacked during that time, the mine will stick around for two seconds (or until this move is used again) before exploding on its own, bouncing Armie like her Down Special mine if she was close-by. This tends to be the case if Armie look very low/no knockback, and can in fact save her if she took a move that dealt high hitstun and nothing else as the grenade cancels the stun. That's because enemy attacks can and will set off the grenade if they hit low enough, which deals 15% and the same strong knockback of the dash attack's sweetspot to victims - towards Armie. The mine will also get set off if an opponent stands on or near it 45 frames after it is dropped, so they will still get caught out with relatively laggy or long-duration attacks.
The "mine drop" works like Snake's grenade in that it acts as a pseudo-counter. It doesn't come out on frame 1 and requires more precise timing to pull off, but Armie gets a hitbox even if the foe doesn't attack her. If foes see the move coming, they should probably pressure Armie, because the sweetspot is quite safe on shields (despite the fact that they block Armie from moving past the foe) and she'll need time to get into range with her very low dashing speed. But the sourspot is not really safe on shields. This move is also safe against parries and spot dodges because Armie moves past the foe. Another use of the 'counter' is to intentionally let yourself get hit by a projectile just to drop the mine, using it to bounce yourself or deter opponents from approaching, but you'll take damage from doing this.
Both ramming hitboxes can be punished by shield, as they block Armie from going past the shielder, but if they parried or dodged Armie will be safe as she rolls past them.
Burst move for rushing through opponents. Can surprisingly combo if you start it close-up. Can leave the drone behind to pressure shielding opponents or position yourself for a missile.
((F-TILT --- FAIL-SAFE))
With a commanding sweep, Armie pins her remote to the armrest with her other hand and holds down the joystick forcefully. This is an order for the Sarge to charge! The drone rushes 3 grids forwards a bit slower than it normally dashes, its head lowered so it can give the enemy a taste of its propellers. On reaching its goal, the drone will tilt further so it faces downwards and halts its momentum using the propellers that are now facing forwards. The propellers prove a little too effective however, as moments later it gets shot back towards Armie like a torpedo! Armie somehow catches her drone at the last second like it's a basketball, and gets pushed 2 grids backwards from its momentum for her troubles.
The drone deals 7.5% with set knockback and good shield damage close-up. This confirms into the max range hitbox, which deals 10% and solid base knockback on a low angle that can start techs early on - though it won't KO near the ledge until 140%. Hitting during the first half of the drone's flight past the first hitbox nets you 8% and average diagonal knockback. Hitting during the second half nets you 4 hits that drag opponents along for 1.5% apiece, but stops just short of the max range hitbox. The drone's propellers extend cartoonishly for this attack and form a diagonal hitbox that's slightly taller than Armie, having good vertical and horizontal range. The drone is at its strongest on the way back, dealing 13% and solid knockback towards Armie. This deals good shield damage and enough stun to give Armie a good frame advantage. Foes hit by the dragging hitbox have a very short window to react to the propulsion hitbox, but if they shielded around max range the stun will lock them into the rebound for extra shield damage.
This attack comes out faster than you'd expect for its range, but it's fairly punishable close-up because the drone doesn't fly out that fast. And yet the drone is easier to handle from a distance because of its speed, functioning as a disjointed hitbox that can clash with attacks (and is easy to beat out during the dragging portions). The drone can be placed and controlled at the end of its flight as it skids to a halt cartoonishly over 1 grid, ending the attack there with low lag. This can be a strong mix-up out of the dragging hits where the drone can pivot grab, or out of any of the other hitboxes in general, but it is not really worth using just for the sake of positioning the drone ahead of you. This can be a good move to cancel with your mine to avoid getting punished, especially if you get the tech as the air boost can lead itself into a tech chase.
This can be useful attack with your back to the ledge, a position Armie finds relatively comfortable given her shut-in nature. While the placed drone can deal with opponents who roll away from Armie, they can easily just roll towards her for a punish, but they have to be careful about doing this near the ledge where she can better intercept them with her other tools. The advancing drone can be a good defensive tool, especially against airborne opponents as they can't clash with its hitbox. Even scarier is if opponents shield the drone relatively close-up on the way back in, because being at the ledge will stop Armie from getting pushed back by the drone - and let her confirm into a tilt or even a grab if she times that well after the foe's blockstun. You could even use the time to deploy a mine close-up.
The drone hovers in place and in the same position when ordered to use this move remotely, having a good duration to it. This deals 9% with solid diagonal knockback if it hits early, or 8-7% with knockback that gets slightly weaker later in. But hitting at the last moment nets you the 10% with mostly-horizontal knockback like hitting with the max range hitbox of the Armie variant. This is an intercepting move that can be punished if shielded, but foes will typically need to be quick about it or Armie could dispel the drone and act on their end lag.
((U-TILT --- HAIR TRIGGER ALERT))
Armie holds her drone out diagonally upwards and winces as its propellers go vertical and stab upwards cartoonishly far, then swing back down to either side without missing a beat. The stab is a fast disjoint that deals 11% that KOs at 140%, able to set up into Armie's mid-ranged attacks at low percents. Like Banjo and Kazooie's U-tilt, it will not hit shorter opponents in front of Armie, but it is a great anti air to work around opponents jumping to avoid your mine and your projectiles. When the propellers slam down, hitting in an upside down L-shape above and in front of Armie, they deal 6% and light knockback: up and slightly towards Armie with the hitbox in front of her, or just straight up with the hitbox above her. The propeller in front of Armie can combo into the sweetspot at low percents to ward off opponents, or the propeller above Armie at higher percents which can in turn set up for a killing U-Smash or B-air. This is a fast move for how strong the sweetspot is, but the propellers do not have all that much range to them. If you want to hit with the sourspot in front of Armie and not the sweetspot, you'll have to space the attack a bit.
The drone attack has it perform the same action, but this time it just stabs straight up. Sadly, it does not have as much range as Armie's attack due to not having her body and her outstretched arms to hold it out, but they do still have decent reach (about as much as a sword hitbox). The falling propellers now deal inwards knockback to the other side of the drone, which can combo into the sweetspot at low percents or push foes towards/away from Armie, possibly setting up into a combo if you dismiss the drone right then and there. On an opposite note, when Armie takes control of the drone from this attack, she'll do so with it more or less overlapping her as she it pulls it back in during the end lag. Instead of going forward propeller into upwards propeller, it is possible to just take control of the drone and go into its sweetspot, which gives Armie the option of a hit that spaces and can potentially KO. This is useful, because space is something Armie appreciates for her U-Smash.
((D-TILT ---DIFFUSION STAMP))
Armie cannot physically crouch. Instead, she she'll shift her wheelchair so the back upholstery is in the background, so that Armie is facing the screen halfway and leaning away uneasily. This leaves only her legs down from the shinguards as hurtboxes, the rest of her body darkened slightly to indicate that it's immune to attack.
Armie can in fact "crawl" during this attack, but in doing so she will pilot the drone low to the ground at its walking/running speed. This is also the drone's crouch and crawl when it is being controlled. It is entirely vulnerable even if Armie was in control and can set off mines, bouncing it like it performed a footstool jump if it was against the exploding mine. If the drone bounced or you jumped while "crawling", you will take control of the drone instead of Armie, the latter causing it to jump lower off the ground. But if you performed the D-tilt, Armie will attack instead but the drone will stay out. The drone is capable of being sent offstage, in which case it will fall at half its regular falling speed.
For this pragmatic attack, Armie will grab hold of the armrests and swing her back into the upholstery, tilting herself back and actually lifting herself off the ground. This shifts her crouching hurtbox to place it up to her head. Then she'll swing herself back forwards to "stomp" as hard as she can with her wheelchair, creating a tacky shockwave in front of her to give the move more range. This is a rather slow D-tilt, but Armie will raise herself back very early. This effectively works as a pseudo-counter and like a quicker (but slightly lower and shorter) version of K. Rool or Incineroar's D-Smashes. It could be used to catch opponents attacking your vulnerable drone up-close, but its real worth lies elsewhere. For one, you can use it to counter the enemy's own D-tilt. Better yet, it can be used to avoid ledge attacks, even certain rising recoveries that could poke past the ledge before the foe grabbed hold of it, something like Marth's Dolphin Slash for instance. If the foe fears a low recovery from this, you could send your drone offstage via a crawl to harass them if they went for a high recovery.
The wheelchair is a short-ranged, but powerful hitbox which deals 16% and purely horizontal knockback that can kill quite early at the ledge. It can also launch opponents behind Armie if they were hit closer to the back of her, which can be particularly relevant if you were camping against the ledge. Like her fellow chair-user Okumura, if the opponent tries to roll behind Armie while she was facing the ledge - like to perform a B-throw for instance - they will be in range to get hit from behind, which is a deadly hard counter indeed. This move is totally safe against shields, and can lead into pressure or a free hit close-up.
The wheelchair stomp has a hitbox that bizarrely hits 2 grids below Armie. This deals 10% and average or so mostly-upwards knockback. You can go for another D-tilt at low percents if the foe caught the ledge, bring them to your level for combos at mid percents or just go for a smash attack finisher or what not at higher percents. This hitbox can also hit opponents on platforms below Armie. Aside from this hitbox, the shockwave in front of Armie deals 10% and mostly-upwards while having decent range, able to lead into U-tilt at lower percents while not being super-useful at mid/high percents aside from spacing, though it can KO at around 140%. Unfortunately, the shockwave hits so low that it can be overcome by short-hops.
Contrary to Armie's slow stomp, the drone's D-tilt is a quick, spammable sweep of its arm that deals 3% and pushes the foe back a bit, able to hit multiple times at lower percents. Quite comparable to another robot R.O.B's D-tilt. The tipper is able to trip opponents. The arm doesn't have fantastic range, but the drone being so low to the ground - level with its sweeping arm - makes it very annoying to hit out of this attack - Armie will even smirk when the drone hits with this move, like she's enjoying the foe's suffering! Combined with the drone's crawl, this can just make foes want to go after Armie herself, and indeed they can just roll behind the drone if they get tripped - but if they make themselves too predictable, the drone can just catch them out from behind like with the F-Smash below. The drone can also be beaten out with stronger attacks, but between its ability to weave in and out by crawling and Armie able to dispel it, attacking the drone might not be worthwhile unless Armie was in range for the attack.
Unlike other attacks, Armie cannot manually control her drone from this move unless she "crawled" to bring it out. This is worth noting, because if Armie does take control of the drone after attacking foes will have no way to tell whether she or the drone were being controlled... while she remains crouching, that is. This can be used to deceptive effect: throw out your stomping D-tilt after setting out the drone, and if the foe shielded/dodged it you can just take control of the drone. If the foe attacked high expecting another Armie D-tilt, you can just fake-out with the low drone to poke them, which will likely be safe while crouching if they went for a high attack. And if they say jumped to avoid the chair stomp and possibly intercept Armie high, you could just jump with the drone to intercept them.
Finally, being able to move the drone back and forth while still being able to go into an Armie D-tilt (or Down Special) can be a useful set-up into combos. Like chair hitbox into a distant drone, but this tends to be rather predictable and impractical unless you say, hit a foe at the ledge. Easier is if you use the chair hitbox below you to pop the opponent up, which requires you to move the drone a shorter distance.
SMASHES
The drone can use Smashes in midair.
((F-SMASH --- FIRE HAZARD))
Armie brings her googles down over her eyes and pulls out a switch that resembles a black stick grenade that's red on the bomb portion. Sticking her thumb down on the top portion, Armie sweats profusely as a massive flamethrower pops out beneath her hovering drone, even bigger than the drone itself. Could it be...?
Indeed, soldier. Release the controls and Armie will pull her thumb away from the switch, starting up the flamethrower from which intense fires spew! The sight and smell of the flames causes Armie to drop the switch and clutch her heart as she hyperventilates, but she gets over it surprisingly fast as she puts on a brave face. Maybe she's trying to get over her fears? As uncharacteristic as it seems for Armie to utilise fire, she did actually consider equipping with a drone with a flamethrower in one piece of dialogue from Spirit of Justice. This move has a lot of starting lag due to Armie's hesitation, but the rest of the move makes up for that.
The flames extend 3 grids ahead of Armie and deal 19-26% that KOs at 100-70% no matter where they hit. This launches on a low angle close to Armie or diagonally from max range. The flames linger like a multi-hitting attack, but they are just one hitbox. There is also a separate late hitbox that extends 3.5 grids from Armie and deals 10-15%, perfectly capable of hitting the foe's shield from the first hit, and hits low enough to 2-frame. The foe can parry the second hit or punish Armie close-up with something really quick, because if they don't react quickly enough they'll get caught by the second hit. This only works at low charges however; higher charges will yield higher hitstun that will lock a shielding foe into the second hit and deal them high damage. Shield push is also nice, to the point where at max range you can push the foe and if their shield was weakened enough get them with the second hit. It helps that this move has surprisingly low end lag, giving Armie a breather or putting her in a position where she can pressure the opponent or follow up with a projectile play. It can be a good defensive move, but it must be used preemptively or preferably out of a pressure situation where the foe is slow to react to you. At very low percents, it is possible to chain the first hit into the second to deal 29-41%, but this is fairly difficult to accomplish. Shield damage from your missiles can make this a particularly scary move for opponents; and you can just charge this move to catch out their spot dodges if they try that, with plenty of leeway given the move's duration.
If this move was charged at least halfway, the flames will actually linger on the stage for twice the amount of time for 2.5x as long as this move was charged for. These flames deal no damage, which might seem nonsensical except the lingering flames that Petey Piranha spews from Piranha Plant's Final Smash also deal no damage. Seriously. That's not to say they are just there for effects however, for they can be used as targets for your Side Special missile, which will use up the flames on contact. When a missile passes flames, it will catch fire and have its damage increased by 1.1x. This is not necessarily the missile that targeted the flames, but rather the first missile that passed the flame, possibly the one targeting the opponent. The extra knockback can potentially ruin a missile chain, but it also results in extra hitstun that can lock a shielding opponent into subsequent missiles. If Armie stood next to the flames or any fire-based attack, she will tremble and hug herself, but this is merely an idle animation and nothing that actually debilitates her, for this is not a MYM5 set.
The drone's attack is a relatively quick, short-ranged burst of fire that deals the sourspotted damage of Armie's fire attack. The burst will also cause the drone to fly back 1/2-1 Final Destination based on charge, still falling if it was airborne, for the same duration as Armie's attack would last for. The flying drone deals 6% and light backwards knockback on contact, which will more often than not lead into flame attack unless you hit at the end. You can use the side of the stage to weakly stagespike with the flying hit into the flame attack to keep it there, but as these flames don't have much range it is not all that rewarding.
If the drone flew into Armie, she will catch it and the two will go flying back for 3/4s of the drone's remaining distance. The hitbox has its damage increased to 10%, and the drone's flames will immediately get powered up like Armie's version - in which the flying hitbox will connect into the close hit of her attack. If you can hit with the drone's attack and then have it fly into Armie, it can be particularly good for mass spacing as she wheels back across the stage. It is also excellent for catching opponents who get behind the drone to attack Armie carelessly, especially from closer up where you don't have to commit to a charge to build up distance to reach Armie. This version is also good for the simple fact that the drone's attack comes out quicker than Armie's, and can be used to artificially cut the high starting lag on her version.
((U-SMASH --- ARMS RACE))
A mischievous look on her face, Armie lowers the goggles over her head as she messes with the drone's remote enthusiastically, to do something far more effective and less tacky than making the foe take out a gun. Instead, the drone will tilt all the way back so it's facing upwards, and those missiles will retreat into its body - only to be replaced with one giant missile, even bigger than the drone itself!
As you charge this move, the big missile will rattle and smoke and build up flames from its exhausts like a rocket about to take off, Armie eyeing it intently. On release, the missile will shoot up as Armie watches in half-amazement (she did make it after all), shading her eyes when the missile goes high above her.
The missile deals 12% with solid upwards knockback (KOs at 150%) as it explodes on contact, or 16% that KOs at 120% above Armie. It's quick to fire and travels fast, so it can work well as an anti-air follow up or a tool for intercepting recoveries when Armie has plenty of firepower to the sides. It can even be aimed up to 30 degrees if you tilt the control stick. At no charge, the missile will rise 4 grids and then come back down after a slight delay, only to explode halfway down (2 grids) in a vaguely box-shaped blast. The blast is big enough to scrape the top of Armie's head, and deals an even stronger 18% with diagonal knockback that KOs at 110%. The missile is fast and thin enough that the blast can act as something of a hard read that better covers Armie from above, and can even intercept air dodges that were not perfectly timed or relatively staled. This is good for deterring opponents from staying directly above Armie - between her drone, Up Special and potential stall-then-falls, Armie dislikes opponents being above her more often than not, and with her poor mobility she has a difficult time spacing herself for this.
As powerful as this move seems, it does have one major downside: end lag that's almost as harsh as a guilty verdict. That's because Armie spends a bit too much time admiring the missile, wanting to see what becomes of it. Furthermore, the propulsion of the missile sends the drone crashing into the ground and buries. Armie then notices the drone, holding her head in frustration, as the drone comically pulls itself out and shakes off the dirt indignantly. This makes the move a hard commitment, especially close-up where the missile is stronger. If Armie misses, she'll be eating a laggy move like a smash attack. The good news is the missile won't disappear if Armie got attacked, and can in fact hit opponents if they went to punish her and stayed around for too long. The blast makes this move barely safe against shields. Unfortunately, the blast will not hit opponents who were shorter than Armie (very few of the cast), or most characters who were crouching, and they are still able to hit her from mid-range or projectiles so if anything the blast tends to be a deterrent for close-ranged moves like grabs.
This is a move that massively benefits from your mine. On top of cancelling all of that end lag, you get to keep the missile out as a projectile. This can downright combo into one of your aerials (or vice-versa), and the very threat of the missile and the blast can make opponents easier to predict. The threat above you works very well with the mine bounce, to keep opponents ahead of you where you can go in for an offensive. You could even angle the missile so it lands ahead of you and use the blast to pressure opponents. Finally, you could just overcharge so that you don't get a missile at all. This might seem useless, but if you were charging a smash attack when the mine exploded it will bounce Armie 1.2x farther and faster, which can be useful for getting the jump on the foe if they were desperate to avoid the missile - like if you deliberately angled it towards them. When angling the missile forwards, Armie can use it as a target for her Side Special and blow it up early with her Neutral Special bullets.
Charging for the first 3/4s of a second, the missile will travel anywhere between 4.5-7 grids and deal an extra 1-2% (knockback scales with damage) on both hitboxes. It will descend and explode from the same distance as uncharged, but as the missile travels farther the explosion will be slightly more delayed the longer you charged. This can be used to better catch out air dodges, perhaps mess up an opponent's timing. But above all, the blast will come in later into Armie's lag, so if the foe shields the missile they will just end up giving her a frame advantage that can lead into more shield damage or a grab. The only downside is that this gives the foe more time to punish Armie, and charging this move does make it more telegraphed. If you finish the charge as late as possible however, it becomes possible to pressure opponents out of the blast.
Just before you reach the 3/4s charge, the missile will flash red to indicate that you're about to reach full charge, and should fire the missile to get the aforementioned blast delay. Because if you full charge the missile, it will turn that angry red and travel 11 grids while dealing an extra 3% on contact. There is a more notable delay when the missile descends, reaching Armie moments when she can act, and it will not explode in midair. Instead, it will bury itself in the ground for around 4-6 seconds (additional time based on 1+-3 second overcharge), on which it will disappear quietly.
The buried missile effectively functions as a super mine. If an opponent steps over it (not rolls), it will immediately detonate for that nasty, fully-charged explosion damage that can be made worse if you charged the move past the 1 second. The missile itself deals diagonal knockback in the direction Armie was facing, very dangerous at the ledge or even starting a clever combo. You can also hit with the blast itself, which deals the same damage as the missile but this time the diagonal knockback is based on which side of the blast the foe was hit from. This is especially dangerous, because Armie can just run over the missile to detonate without harming herself, getting herself an insta-bounce but obviously without the ability to cancel stationary attacks (only moves like Dash Attack and landing aerials) - even bounce the drone off of it. She could even drop her wheelchair on the missile to cover her Up Special, or gun down the missile with her Neutral Special if she can get low enough for it like going offstage (the chaingun is normally fired too high to hit the missile) or using the drone, or push the foe into it. The missile is busted if Armie can get it out, but that's only fair given it is an absolutely massive commitment with the lag and the delay - something you can only really do while the foe is recovering - or if you don't mind getting punished out of your end lag. The pay-off is that the missile is raw stage control, something that can really scare opponents into staying away from Armie so she can have that extra time to camp and use her drone. And when the missile is about to expire, she can just use it as a target for her Side Special.
If the missile wasn't already deadly enough, Armie or the drone can grab it as an item! For Armie, she will hold it under one arm rather cautiously, in spite of having made the missile. The missile is a touch slow to throw and travel and will start to arc down on 3-4 grids, on which it will pick up speed and travel at its usual high speeds it goes during the U-Smash. Thrown upwards, it will fall when it would arc down, plummeting at those high speeds, whereas throwing it sideways will cause it to rocket down on a 45 degree angle. The missile deals its usual mine damage if it hits an opponent, but will cause Armie or the drone to bounce if they hit close-up, possibly towards the foe for a combo at low percents, but if it lands it will just bury itself into the ground again or explode if it wasn't fully charged. The missile will have its timer paused while being held and thrown, which can serve the simple purpose of re-positioning it or getting use of one that's about to disappear. Armie can even catch missile while she's parachuting and throw them to defend herself.
Like the F-Smash, the drone can use and charge this move in midair. This has pretty obvious applications in the air, like being able to fire off the uncharged version for a surprise star KO. The move even has uses below the ledge, as the missile will explode closer to the ground to catch recovering opponents, and if it was angled towards the stage so it landed before it exploded it will explode on contact with the ground. Finally, the missile can get buried in the ledge, in which case it will stay there and explode when it would normally do so under normal circumstances. It will not explode on contact with a target unless it was a red, fully-charged missile, in which case it is a pretty mean ledge trap but it tends to be more useful onstage. The threat of a missile can force foes to confront the drone from the side, or even use their air dodge in an not-so-idea situation to avoid the missile, and maybe eat a drone B-air for their troubles. Of course, using the missile at all is risky given the lag, but Armie likely won't get punished if she was far away or airborne.
When the drone fires its missile in midair, the force of the missile will send it plummeting twice the distance the missile went. If the drone hit the ground or the bottom blast zone, it will explode and get destroyed right there from the impact. This actually cuts the end lag right there as Armie snaps back to reality in shock, but at the cost of losing the drone and having to wait to spawn it again. It's essentially a trade-off, but one that can be very worthwhile as it lets Armie exploit her missile or leave herself less open, without having to rely on the mine so she can actually fully charge the missile. You also get the drone's raw positioning ability, like being able to fire a fully-charged missile from far beneath the ledge so it'll land earlier and Armie can exploit the mine earlier. The drone will land into ground or the blast zone more often than not, unless it was very high up on a low-no charge (a trade-off for what can be a very early kill near the top of the screen) or roughly level to the ledge on similar charge levels. So the higher up you were offstage when using this move, the more you'll need to charge it to destroy the drone and cancel the lag, or else you will be leaving Armie open. But on the other hand, deliberately going low just to be able to destroy the drone with an uncharged missile is very predictable.
((D-SMASH---EXCAVATION))
In memory of her beloved papa, Armie has a drill peek out from beneath her seat as she fiddles with a tablet frantically while charging. Once released, she'll throw her goggles over her eyes and cover her ears as the drill shoots down and through the earth beneath her! Very dangerous, but I'm sure the girl genius knows what she's doing.
The excavation sends bits of rock and debris flying out from beneath Armie, a low but generously wide hitbox with a duration to match. This deals 6 hits to opponents: 5-6.2%, 4-4.8%, 2.8-3.5%, 2.8-3.5%, 2-2.5% and 1.8-2.2% for up to 17.4-22.7%, the hits getting weaker into the attack as the debris gets smaller. This finishes with solid knockback, on a relatively low lag behind Armie close-up or diagonally away from her from farther away, able to KO near the ledge at 100% at full charge. It is a simple move that can stuff grounded approaches and gives Armie some much needed breathing room close-up. The fact that she can use this while controlling her drone greatly helps. Just be careful: it is not very good against shields (they can punish it from most distances), and foes can get around the low hitbox with short-hops and aerial approaches. And while useful for intercepting, Armie will want to hit at the start to get the most damage due to the way the damage is distributed in the move.
If you held A on the third or fourth hit over solid ground, the drill will stab further into the ground and shatter it. This terraforms the stage to create a pit for Armie, which is slightly deeper than she is tall and sloped so that fighters can run along it. Despite its depth, the pit can still be created near the ledge, even on stages with lips where there would not be a realistic amount of depth to create an Armie-tall pit. The pit gives Armie a "trench" to have enemy fire pass over her without compromising her camping game, which is much appreciated when she's controlling the drone and at the risk of being hit by a stray projectile. The pit lasts for 8 seconds, but it will not go away if Armie was occupying it. Creating a new pit will remove the oldest one.
The trench is formed immediately and before knockback from the debris occurs. If you dealt the low-angled knockback to the enemy, they will get knocked into the slope for a guaranteed tech chase at any percentage! (unless they teched of course) You could even use this move again, which doubles as a way to intercept rolls towards you, but it's not an infinite or anything because the range you'll hit from will typically yield the diagonal knockback. Also, watch out: while you can get the pit on a shielding opponent, if they hit you with a move dealing low-angled knockback they can use your tech chase against you! They can even do this to punish you for hiding inside of your pit.
Drilling a mine will cause it to detonate early and cancel the rest of the attack, dealing only 1 hit as a result. The first hit dealing the most damage helps for what it's worth. Close-up, you'll get the juicy knockback of the mine, but Armie can still confirm into a quicker aerial like her F-air even from a distance. Hitting a shielding opponent is not a confirm, but the mine adds a good amount of shield damage, and you're now in a good position to apply pressure. Either way, this can be a good time to use your Up Special. Another benefit is that you can hold A (essentially double-tap it) to have the drill make the pit and drag the foe down, which is a safer and quicker way to make the pit, but is not as much of a confirm and requires you to have the mine planted beneath you in the first place.
Your U-tilt works well from a pit, as the sweetspot is safe against shields and can push them back and pressure the opponent, possibly to get into position for your U-Smash or B-air. Or for the F-Smash flames, which will bend around the stage and are not inhibited by the indented terrain if Armie was in the pit.
AERIALS
((ARMIE N-AIR---NEUTRALITY BURST))
Armie swings her chair to almost face the screen as she sweeps her hand to toss out what appear to be 6 miniature grenades. These are sent out in a hexagon formation around Armie, two to either side and four diagonal, like a tilted honeycomb. They are spaced apart enough so that Armie could squeeze between two of them, so they don't travel too far out. They linger for as long as your average sex kick N-air and start out by moving with Armie, but upon reaching their full length they will hover in place until the move ends. This move has slightly more starting lag than other sex kick N-airs.
Each bomb technically deals 5.5% and low knockback as they explode on contact. The low and mid bombs launch diagonally, while the high bombs launch on a low angle. The knockback is normally outwards, but if opponents were hit inside of the honeycomb they will receive inwards knockback that can cause them to get hit into another bomb, provided you didn't hit too late into the attack. Hitting with the low or mid bomb towards Armie will cause the foe to get knocked into the higher bomb on the opposite end (low bomb into mid bomb into high bomb), while the high bomb will knock foes into the other high bomb. By hitting with the low bomb early on, it is possible to hit with up to 3 bombs for 16.5%, while still dealing low comboing knockback at the latest point of the attack, in which Armie can follow up the easiest. This does require foes to be roughly below Armie where the move has a blind spot, and for her to DI to either side depending on which side of her she wants the foe on. Be aware that the bombs will disappear if Armie lands, but if this was timed very well she can use this to cut out some of the end lag and combo even more effectively from a 3-bomb chain.
If multiple bombs hit at the same time, they will have their damage output and knockback combined. Two bombs will deal 11% with knockback that's better for spacing, while three bombs - the most that can hit a single target at the same time - will deal 16.5% and strong knockback that's one of Armie's most powerful aerials, safe on shields, but you do need to hit close to land it. The launch trajectory varies based on which bombs hit: a low and middle will still deal diagonal knockback, but a middle and high will deal knockback between a low and diagonal angle. Same applies if a low, medium and high bomb all hit at the same time. It is also possible to hit with two low or high bombs on opponents below or above you from very close-up: in this case, they will receive downwards or upwards knockback.
If a moving bomb was attacked by an opponent, it and the two bombs to either side will detonate in a decent-sized blast. This functions as a counter for all intents and purposes, and a good combo-breaker if you can pull it off. Unfortunately, the counter window is very short, and attacks with decent reach can still hit Armie. It's not all bad though, because the attack could interrupt Armie out of her lag and possibly be used to follow up on the foe, especially if it was something like a multi-hitting attack that failed to launch. Moves with good disjointed reach can safely detonate the bombs without worry. The bomb counter can act as pressure close-up in tandem with the stronger blasts, but the move does have starting lag and can be dodged, on top of having blind spots above and below Armie. The bombs can be used to apply stage control in the right situation.
Once the bombs are set out, they can be safely attacked and destroyed like Mr. Game and Watch's ill-fated bomb. The difference here is that Armie has 6 bombs, so if the foe's hitbox didn't have wide enough coverage they may still get hit by a lower bomb. This does mean that the move is not all that good for walling out opponents or approaching, more as something while they're playing defensive or being pressured. In some situations, it can be useful to set behind you as you're being bounced forwards by a mine.
If Armie moved into one of the 4 bombs to either side, by either falling and DI towards one of the low bombs or using this attack from a forwards/backwards jump, that bomb will detonate and can be used to catch out opponents from a little farther with the blast.
If the attack ended in midair and all of the bombs were still around, the bombs will all detonate inwards for a blast that covers the entirety of the "honeycomb" shape and deals 18% with strong diagonal knockback. It can be especially powerful for KO'ing closer to the top of the screen, dropping the bombs as you fall and using them as coverage. And the knockback can potentially be used to start combos from a mine bounce. The bombs can also be used for coverage above Armie from a short or full hop, even doing a fake-out with a fastfall to say, catch out stall-then-falls intending to plough through the bombs and maybe react with an U-Smash or spot dodge.
By landing near an opponent with this move and the right positioning, when the bombs are going out and following Armie, you could have the low-mid bombs go off on their shield, then fall on them so that the high bomb hits them from above - and potentially pokes through their shield if it was weakened enough, potentially from the earlier hits. This only works on very tall opponents, and better if they were wider so you have bit more leeway with how you can hit with the moving bombs. If you had a pit however, you will be positioned lower than the foe and the high bomb can hit practically anyone on higher ground than you. With this move's counter properties and shield pressure, it can be very annoying to overcome in a pit, on top of Armie being able to jump and land to use it as a trap if they try to go over her.
Despite not using the drone, you can set it before or after using this attack like any other move.
((DRONE N-AIR --- TRICK SAW))
The drone turns on its side, so its propellers are facing the screen, and whirs them for a full-coverage aerial. This is a brief dragging hitbox that deals 3 hits of 2.7% followed by some spacing diagonal knockback that doesn't really scale. The drag is brief given the low-risk nature of the drone (especially offstage) - if you want to drag the foe as effectively as other dragging moves, you'll have to catch them again, and this move does have a bit of end lag. If you do drag the foe to the ground however, they'll end up close to you and in a position where you can easily pressure them for follow-ups such as your D-tilt or F-Smash or grab. This can be useful against short-hopping opponents, as the propellers do come out fast.
((F-AIR --- LITTLE BOY'S FINGER))
Armie points Phoenix Wright style along with the drone - without even controlling it! That's Ace Attorney logic for you. You don't get any speech bubbles here, for Armie shouts no clear words, but the raw dual pointing power provides her with the strength to justify this move's hitbox. In this case, the drone is the one doing most of the work.
This move starts out fast as Armie and the drone point their fingers at human length, a close-ranged hitbox dealing 10%. It comes out with Sakurai knockback that pushes foes along at low percents, will start techs at mid percents and eventually KO near the ledge at 170%. This is good for set-ups if Armie lands to cancel it, but it is a bit unsafe against shields.
On being pointed, the drone's arm will quickly extend to an impressive 3 grids. The base half of the arm deals the same damage of the early hit, while farther away it deals 6% and half as much knockback that's better for comboing at higher percents. If the hand hits, it will deal 12% and a surprising amount of hitstun and shield stun (possibly from being pointed at) that makes this move safe on shields when landing with good timing, and can pressure and position opponents for your Side Special. The actual hit consists of some stun, followed by high knockback that will KO at the ledge at 100% when fresh. The finger gets pointed for a moment it gets swung up on a 30 degree angle and then pulled back towards the drone. This can find use for reaching opponents when you were in a pit.
As Armie lacks air speed, she gets an aerial that's got good range for its speed and is useful for pressuring the opponent at mid-range, like preemptively jumping or landing at them. One particularly devious tactic is to start it close to the ground, in range for the hand, but fake out that hitbox by landing just before the hand would fully extend. As the hand is good against shields, the foe may want to parry or spot dodge to avoid it, for it can also intercept jumps - but if they did dodge or parry a fake-out, Armie will get a frame advantage over them. The move is also good with mine jumps in spite of its range, for Armie can push the foe along and catch up to them for another F-air at percentages where they may get knocked out of range. And if Armie ended up too close where the move was not safe, she can just cross-up into her B-air which is good close-up, or deploy an N-air to deter opponents from getting behind her.
The drone's attack only reaches half as far and completely lacks the sweetspot, probably because Armie isn't pointing with it. This one is basically a way to push the foe along the stage, mixing it up with the close and far hits based on the foe's percentage. It is always unsafe against shields and takes a bit to recover, so some degree of commitment is required in using it despite the safety of the drone.
This is also the drone's B-air, but 1.1x stronger and also slower as it swings its arm around in a backhand. The knockback is also on a lower angle. The slowness means that the drone has a hard time pressuring opponents behind it without using a jump to turn around, or just landing. It can punish Armie for over-committing to an aerial assault if she can't land quickly enough to turn the drone to face the foe if they rush past it to attack her, like with the offstage U-Smash missile.
((B-AIR --- FAT MAN GRINDER))
Armie bangs her head against the backseat to tilt the wheelchair back as she starts spinning the wheels furiously. The swung back upholstery deals 5% and average downwards knockback that will almost always knock foes into the wheels. These grind opponents for 5 hits of 3%, only to finish with surprisingly strong knockback as Armie gives one last spin with all her might. This launches on a 55* angle and KOs near the ledge at 105%, probably because the attack has such a HMA-ish name. The wheels have an invisible hitbox that give them a bit more range than you'd expect, mostly right behind Armie.
The upholstery and wheels are both active at the same time. This attack can deal as much as 17% if the foe is hit by the upholstery and then into the second wheel hitbox, or just 15% if you snag with the wheels from the get-go. Both values are high for such a fast move. It is possible to land the upholstery hitbox without it connecting into the wheel hitbox to get an easy spike, but Armie's poor air speed makes this a challenge. She must either land the hitbox right at the end, generally by hitting an opponent above her - or be moving at speeds she cannot achieve on her own, only with the mine.
If Armie lands in the middle of this move, the wheelchair will swing back upright and create a shockwave that hits 2 grids away from either side of the front wheel of the wheelchair. This deals 8% and rather decent diagonal knockback, but it will KO near the ledge later than the wheel hitbox. This is perfectly capable of poking through shields. And even if it doesn't, if Armie was moving sideways as she landed she'll go rolling roughly 4.5 grids in that direction when she lands, leaving the move safe on account of her retreating. Depending on which side of the foe she landed (through a shield cross-up, usually), she can either knock them away from where she rolls for spacing, or knock them towards her a follow-up at lower percents. Even go for another B-air at higher percents.
This move has low lag, is completely safe against shields and still deals quite a lot of damage. As much as 22% if you hit with the upholstery (5%), then wheel hitboxes 2-4 (3%, 3%, 3% = 9%) and finally the landing hitbox (8%). The dragging hitbox and low knockback angle make it very dangerous offstage, and Armie can go quite far with it due to her excellent recovery. Of course, it's only fair that Armie gets such a move to compensate for her abysmal mobility.
This move is not foolproof. The attack has fairly low range despite the invisible hitboxes on the wheels, and is not helped by said poor air speed. Easy to outrange. Armie's head is also a blind spot behind her, as is the rest of her body. So while this move wins out against shields and defensive options, it loses to opponents who challenge it from above or preemptively short hop, which isn't that big of a read when it's a B-air. Of course, opponents also have to watch out for your U-Smash. These various downsides mean that Armie has to earn what would otherwise be an easy move for any aerodynamic character to land. It can be useful as something of an approach in a short-hop, jumping out of a pit where you'll land early and from a bomb jump (particularly D-Smash) where you air speed is enhanced.
As the wheels spin beneath Armie, it can be a good pseudo D-air or landing tool, despite the blind spot in front of Armie. The landing hitbox also functions as a safe landing tool to compensate for Armie's air speed, so that's reason for opponents to pressure or juggle Armie when the shockwave gives her good spacing. An anti-air with good range or something like an U-Smash (that offers invulnerability) can beat out the short-ranged wheels from above, but Armie has other options for this. She can drop the wheelchair with her Up Special, at the cost of leaving herself very open to attack. Or better yet, midair jump if she can or use her stall-then-fall D-air to bait out the anti-air.
Despite not deploying the drone for the attack, Armie can still set it before or after this move or when she lands. The latter can be quite useful for spacing if Armie rolls herself away with a landing shockwave.
((U-AIR --- RUSSIAN ROTATION))
The drone's propellers gain speed and grow cartoonishly until they spin rapidly like a blender. This deals 3 dragging hits of 2.75%, followed by unimpressive upwards knockback on account of the drone's very real potential to catch and ladder opponents with its sheer aerial prowess. The drone can also drag opponents left and right with its air speed. This isn't too hard to dodge, and the propellers are close enough to the drone that they can be outranged or beaten out with armour. The "bump" on top of the drone is not a hitbox, and can in fact be exploited to attack the drone mid-attack even if you don't have impressive range or disjointed hitboxes. Foes can also bypass the drone and exploit the move's duration to attack Armie if she was within reach.
The drone changes in Armie's hands as she holds it above her uneasily. The KO potential is poor here as Armie falls much faster than her drone, but her arms and the drone experience invulnerability that in turn increases the move's reach. It is much better suited for grounded set-ups like into an U-Smash, but can also set-up into diagonally upwards attacks if you caught an opponent at the edges of the propeller.
By holding A as Armie, she'll let go of the drone and it'll hover 2 grids upwards while carrying any foe it catches, much better suited for spacing and setting foes high up. You can then buffer with B to take control of the drone and continue the onslaught with its air speed if you wish, being an alternative to spacing Armie from her drone to just throwing it.
((ARMIE D-AIR---SUICIDE DROP))
Armie looks down anxiously as she raises her hands and slams them into the armrests. This causes the wheelchair to plunge like a falling bomb, similar to the good doctor's stall-then-fall D-air - and probably the animation he would use if one was described in his move! The plunge starts out fast and hard, going 8 grids but slowing down for the last 3 grids. It deals 18% and deadly mostly-horizontal knockback if it hits at the start. Hitting later on nets you 12% with strong knockback, while hitting on the last 3 grids deals 9.5% and decent upwards knockback. The plunge has low starting lag, and very low end lag if it ends in midair.
If Armie lands during the first 5 grids of the plunge, she'll generate a shockwave on either side for coverage. This deals damage based on the strength of the plunge at the time: 12% at the sweetspot or 9.5% midway. The plunge deals considerable damage to shields while the shockwave can shield poke, but otherwise the end lag is harsh. Getting the sweetspot shockwave is particularly deadly and can shield poke even a healthy shield, but this requires Armie to start the plunge low to the ground where she can be attacked. The sourspot landing can also punish Armie as she slows near the end of her descent, but she can't be punished against shields. This is a predictable move to use offensively due to Armie's poor air speed, but the pressure it can apply to jugglers attempting to exploit her lack of mobility cannot be understated. It's also useful near the ledge where Armie hit a shield and potentially cancel the plunge at the same time.
Contrary to the move's name, Armie can use this move offstage without dying as she can easily recover from the height she falls from. This makes it a surprisingly safe gimp offset only by her air speed, though you still need good skill and timing to land the very fatal sweetspot.
Like Strangelove's D-air, Armie's plunge has a hard interaction with her own mine. This causes the mine to immediately explode on contact and bounce Armie per usual, refreshing her jumps and recovery like she landed normally. This can be used to bypass the harsh end lag and is easy to do when you can set the mine in midair - but you're not likely to hit a foe with the plunge at the same time, due to the short window of having to drop the mine and then plunge as Armie falls fast. The mine can also explode early if a foe was over it for whatever reason, but this can leave them open to the plunge or vice-versa if they bat Armie away. It's a predictable set-up, but one with decent utility behind it as Armie can use the air speed boost from the bounce for mobility or just fake-out opponents to do a ranged attack.
((DRONE D-AIR --- GROUNDED!))
The drone tilts down and its eyes flash red as the little hand pops out for a downwards punch! Surprise attack, Sarge! This reaches 3 grids below the drone and damages based on where it hit. Close-up is 12% with solid base downwards knockback, but it won't KO offstage until 250% on account of the drone being a low-risk option offstage - and that this move isn't actually that slow. The arm deals 8% with average knockback, mostly-downwards against grounded opponents or mostly upwards against airborne opponents, with a sex kick hitbox that lingers to deal 0.88x the arm's sweetspot damage. Meanwhile, the fist deals 13.5% and good upwards knockback that's superior for star KO'ing to the U-air. This can even catch out opponents dodging through the drone to avoid U-air chains, but given the distance you need to land the fist you'll probably have to use a midair jump to space yourself.
This move is valuable for poking at grounded opponents from above when combined with the drone's stellar aerial prowess. The arm and hand are not a part of the drone's hurtbox, and can actually soak up weak projectiles (dealing 5% or less) to protect Armie. The arm's sex kick can wall off opponents approaching Armie, and if they back away or hesitate they may give the drone spacing for its projectiles. If the drone poked at least half of its arm into the ground however, the arm will lose the lingering sex kick hitbox, but when the hand pops out it'll deal 6% and knock opponents towards the drone for its spiking hitbox for a total of 18%, which hits low and is able to shield poke. As the drone can move all the while, you can essentially choose where to spike the foe to some degree, preferably offstage or towards Armie who can follow up herself.
GRAB
Armie snickers as she whips out a shiny futuristic remote control, quite different from the remote she uses to control her drone. That's because this remote causes a pair of incomplete-looking robotic arms to pop out from the back of the wheelchair! The arms spring forth to snatch up whatever is in front of Armie, which is actually a fair distance while not being too slow for a ranged grab. Armie's dash grab actually has less range, around the same as an average dash grab (which is a shame given her poor dash). Her pivot grab actually comes out quite fast and far given the arms pop out from behind the wheelchair, but there's a lot of end lag as Armie has to spin herself around for the grab. This also causes a slight delay before Armie can start pummeling or throwing from a pivot grab, which can result in less pummel time or just having to commit to your throw right away at low percentages.
If the grab misses, the arms will short-circuit just before touching each other, jaw dropping as Armie hastily flicks a switch to have the arms retreat back into the wheelchair. Guess those prototype wheelchair arms need some more work. If the grab succeeds, Armie will look back and forth between her captive and the remote, eager to try out her new toy. If the foe escapes from the grab, the arms will fall apart from their struggle and Armie will look on in shock. At least she can still use this grab again!
This move can catch out whiffed attacks from surprisingly far away, thanks to Armie's solid traction and the grab's range. Unfortunately, these traits also make the grab a bit ineffective close-up, because it's easier for the foe to smack you first or just spot dodge. Armie can use this grab while controlling her drone, which will hover in place during the grab. The grab's range means that Armie doesn't have to be too close (given she can't move while controlling the drone). It is a good mix-up to the D-Smash while controlling the drone, because that move has a long duration, is better closer-up and can be answered to with shields.
The drone has its own grab it can use by holding Z while you're controlling it, a short-ranged swipe to the collar. The standing grab is fast, but its range is unremarkable and the fact that the drone can't shield means you obviously can't use it to punish whiffs. The dash grab has range as the drone lunges, and the pivot grab has even better range, on par with Armie's grab range, and a surprisingly good duration. Just be warned: these two grabs have rough end lag as the drone kind of wobbles and pulls itself towards its extended arm, time that the opponent can use to ignore the drone and run up to Armie.
The drone can grab Armie by the wheelchair (or the wheelchair itself). If Armie/the chair was grabbed from the front, the drone will swing around to the back. This can be exploited with a pivot grab to make use of its range while dashing past the wheelchair, without having to commit to the move's duration or end lag. Armie can also grab her drone if there were no opponents in range, which will always face away from her.
When the drone grabs Armie/the wheelchair or vice-versa, you can tap Z/the grab button again to have the grabbed target do their own grab. This extends your grab range. Better yet, Armie/the drone can act even if the secondary grabber whiffs their grab. It's only fair though, because herding yourself with the drone is a risky affair when you can both be grabbed at the same time. The secondary grab is executed the same as the grab that grabbed that grabber (grabbing the drone with a dash grab will have it do its own dash grab, even pulling the wheelchair along as it does), but pivot grabs are done in the direction the first grabber was facing instead of having the second grabber spinning around. This can be effective if the drone was being grabbed by the wheelchair, just a shame that Armie's dashing speed and dash grab are so lackluster.
Armie can use this grab while parachuting, as the wheelchair does all the grabbing, but it will immediately fail if the wheelchair was airborne - unless the drone was the grab target. If the wheelchair was rolling along the ground, it will immediately come to a stop on grabbing a target.
Mines have their explosion timers reset and delayed while Armie or a grabbed target are over one. The trouble is grabbing your opponent fast enough before it explodes. The earlier you grab, the better (preferably from a dash grab), but delaying your grab at the right time can potentially save you as Armie can cancel the end lag with the blast.
((PUMMEL --- RUSSIAN SHOCK))
With the press of a button, electricity pumps through the arms and into the opponent with a loud, satisfying crackle. This deals 2% in what is a decent pummel that helps with staling alright. And if you wait a moment after pummeling the foe, more electricity will get pumped into them to deal them an additional 1%. The animation here is a bit long and seems underwhelming, because it gets you much less damage than repeated pummeling - and the foe can escape all the while. This tends to be the case at low percentages. If anything, it can punish Armie for not committing to a throw or another pummel, but that's not a huge deal. What the additional shock does do is additional damage over time: 1.2% every 30 frames for 150 frames (two and a half seconds), indicated by sparks around the victim. This deals 6% by itself and 9% when the damage of the pummel is taken into account.
The drone's pummel is to simply shake the target, which deals 0.9% but is fast and more effective for refreshing staleness - useful in the context of aerials.
If the wheelchair is grabbing the drone which is grabbing the foe, or vice-versa, they will both pummel at the same time. The drone will use its pummel while the wheelchair shocks the drone, damaging both it and the opponent. This results in extra pummel damage at the cost of the drone, but more to come on that soon. The drone will repeatedly pummel if you held Z, but the chair will only pummel every time you tap the input, so you can safely apply the shock delay without losing damage on the drone's pummel. If the target escapes from the the grab, the grabber of that grabber will not be interrupted and can throw as usual - maybe even catch the foe during their grab release.
If you pressed B while grabbing the drone, the arms will repair it instead of dealing damage at twice the rate, and can even apply the delay effect. This can in fact be used to increase the drone's HP to 30 - possibly saving it given the healing can be delayed - but this extra health will not be restored over time while the drone is on standby, or if it got destroyed. The drone also moves a bit slower when it has surplus health, which can deprive it of some of its combo potential. There's also the issue of set-up time, but you don't have to worry about this if the drone managed to land its grab. If the drone had a target while being repaired, it will pummel them normally, giving you the time to heal the drone without the foe interrupting you.
Pummeling with a wheelchair being held by the drone will have the drone wheel Armie 1 grid forwards (or backwards if you held the control stick back) for each pummel. This can be used to wheel yourself over a nearby mine instead of having to grab while atop of one.
When a target gets shocked by the main wheelchair pummel (not the delayed pummel), their body acts as a hurtbox that can damage targets outside for 4% and light radial knockback. This is mostly relevant with the drone, and will in fact stun opponents for just long enough that you can throw the drone into them (with your grab, not item-throwing) to deal additional damage. It essentially functions as a jab for all intents and purposes, but the drone is small enough that opponents can easily get around this, or just hit the drone itself as the electricity does have priority. It can also be a sneaky way to punish dodges against the drone's grab, but then again it doesn't have much grab range to begin with unless you were dash grabbing or pivot grabbing.
If the drone is destroyed by electricity from this pummel, it will explode right then and there. Not a small-time blast, but a big mushroom cloud explosion like the drone had a microscopic nuke built into it. Who knows? The blast is roughly 2/3rds the radius of Hero's Kamikaze, on account of not being nearly as costly to use, but it still comes with the same dramatic pause if there was a target in range for it. And though Armie shields herself and doesn't have a D-Smash bomb shelter at her disposal, the blast does not harm her. The only real cost to exploding the drone is the 7 second cooldown, but that is trivial compared its power.
The blast deals 30% and KOs from the centre of the stage at 100%, but of course KOs earlier near the ledge or the top of the screen. Sadly, an aerial blast is not quite as strong, only 1/2 the radius of Kamikaze and dealing 22% that KOs at 145%. That's because you don't have to pummel the drone to explode it, you can also apply delayed electricity (without needing to grab the foe) so you can attack with the drone and catch the foe out with attacks. This is easy enough if you can pressure the foe into defense, and you might even break their shield even with an aerial blast if their shield was damaged enough. The foe can stop the blast by destroying the drone before it destroys itself, but timing is key. Armie can fake-out by withdrawing the drone, but beware: withdrawing the drone will not negate the damage. The drone won't destroy itself on standby or even if you send it back out, but it will still take damage, and it will not get healed over time while on standby. Thus, electrocuting the drone for the purpose of detonating it is a commitment, one with consquences if Armie backs out of it.
The electric damage on the drone is delayed if Armie/the wheelchair grabs the foe but not the drone.
((F-THROW --- GIVE ME 50 LAPS!))
The arms shove the opponent forwards as Armie wipes her brow in relief, odd given she was eager just a moment ago. This only deals 3% with low knockback on a low-ish angle, but it gives Armie a solid frame advantage over her target. Armie might be slow, but she still has enough ranged attacks to pressure like her NSpec, F-tilt, F-Smash and D-air, or even burst in with a dash attack. It is basically a combo throw at lower percentages, but becomes less useful at higher percents as the knockback scales and Armie has better options - like for KO'ing.
If Armie can throw the foe into a drone she was controlling, however, you may get a guaranteed combo off of it depending on how the foe was aligned with it. Maybe even throw them into the exploding drone. This can punish the opponent for running past a drone and heading straight for Armie. To make things easier, if the foe flies directly into the drone, it will follow them for the course of their knockback, but only for a maximum of 10 grids.
The drone's throw is identical, and even has Armie wipe her brow during the animation - unless the foe was knocked towards her, in which case she'll panic a little. But the player will be anything but panicked, because they get to combo from this, follow up with a hit that's stronger than what the drone can dish out! Other than that, it is a basic combo starter that the drone can arguably exploit better than Armie herself, due to greater mobility.
If you held the control stick to perform this throw with Armie/the wheelchair, Armie will switch to the drone's remote as a drone hovers over behind the captive. If you were controlling a drone prior, it will get recalled to use in this throw, and if it was electrocuted you won't suffer any recalling penalties. If the drone was grabbing the foe and being held by the wheelchair arms, the wheelchair arms will take over as the drone swings behind the captive.
As Armie plays with the drone's remote, the mechanical arms will detach themselves from the wheels and swivel around without letting go of the foe - and attach themselves to either side of the drone! A close fit, but it still works. With this, the drone dashes across the stage at its regular dashing speed while dragging the foe behind it, so long as you keep holding the control stick. This deals dragging damage like Ridley's Side Special, but only 2/5ths as much. When you let go of the foe, reach a ledge or they escape on their own, they will receive identical damage and knockback to the default throw through the drone's momentum. But the knockback is only 2/3rds as strong if the foe escapes. The drone will keep on dashing without missing a beat, even going offstage, but it can stop moving easily enough from this throw a moment into the foe's knockback. If you want to let go of the foe early and still keep on moving, you'll have to let go of the control stick for just a bit, and hold A to confirm that you want to control the drone instead of Armie (you can just hold the button during the throw).
This particular throw can give Armie a decent amount of spacing, even at 0%. At low percents, the drone will outmove the foe before it can stop and they will end up behind it. This can be a good position to put the foe between the drone and Armie/the wheelchair for a Side Special set-up. You can do this at higher percents, but it will take longer to position yourself and by then the foe could intercept the drone. Around mid-percents, when the foe ends up positioned very close to the drone or right in front of it, this is a near-guaranteed combo so long as you commit to it. And at higher percents, you're in a good position to gimp and finish the foe with just the drone.
Dragging the foe along the ground can be tempting for raw spacing and some damage. But if you mistime it and the foe escapes, you may find yourself stupidly dashing right past them - denying yourself a follow-up and potentially giving the foe space to attack Armie. And if the foe was quick enough, they could get in before the one-second grab cooldown expires, so Armie has one less option to defend herself with up-close. It may be better to just let go of the control stick to throw the foe on your own terms, even if that means sacrificing damage and spacing at lower percents.
The fact that you can choose whether to control Armie or the drone can lead into 50/50 situations, depending on the foe's percentage and their positioning. This is most effective when the foe ends up behind the drone (low percents, escape) without you needing to keep on dashing, as that would mean taking control of the drone. The foe is now sandwiched between Armie and the drone: if they go after one, they risk being attacked by the other. Armie is the obvious target to punish, but the drone is fast and can potentially catch them before they can do that. The more evenly-spaced the two targets are, the better.
You can also get a 50/50 at higher percents by dispelling the drone instead of starting up a gimp, and just use the space to throw out some missiles.
Using this throw on a drone will have the arms hurl it 8 grids forwards. This deals 6% and hitstun that can follow into a tilt/quick aerial or pressure into a smash attack. But the drone is punishable against shields, is treated like a projectile (in that it can be reflected and deals less damage to shields) and has some lag when thrown, though it does travel decently fast. Foes can smack the drone out of the air, though. If you're a quick shot, this move will connect from a shock pummel to the drone that caught the opponent from the side. This move damages the drone when it hits something, which is a shame because it can be a good lead into the drone blast.
((B-THROW --- TURNABOUT UNLOADER))
One of the arms goes limp by the wheelchair's side. The other arm surges with electricity, like it took the power of the limp arm, and heaves the shocked opponent behind the chair with all its might. This produces enough momentum to swing the wheelchair around, but it almost tilts onto its side and is only saved by the limp arm pushing it upright. This sends Armie into a panic for a moment, enough that she doesn't get to revel in the foe's launching or sigh in relief.
This throw deals 9% and strong knockback on a low angle, leaving the foe slightly electrocuted for their knockback. At low percents, it can space for the sweetspot of the Side Special. This gets great mileage out of a mine behind you, as an extra target for the crosshair or 50/50 by choosing to overlap the crosshair with either the opponent or the mine. At mid/high percents, this move will force a tech situation that is excellent with your projectiles or the drone. Otherwise this is a strong kill throw near the ledge, not quite Incineroar level but enough to reward Armie and punish opponents if you've been camping at the ledge (which is common if you've been sitting back and controlling the drone).
This is a particularly nasty throw inside a pit. That's because it keeps the foe low enough to prone on the side of the pit! This can be teched of course, but the window to do that is a bit short. If the foe fails, then you basically got yourself a free hit. Even if they tech, you can still get a free hit if you time it will, the D-Smash in particular covering both options and hitting close-up to yield its maximum damage. You do lose the spacing and potential KO option near the ledge by being in a pit, but the free hit is nothing to scoff at, or you could use another throw.
If the foe is thrown into a mine or next to one, the light electricity on them will cause it to detonate immediately, dealing its 14% but diagonal backwards knockback instead of upwards. This basically "extends" the knockback, and though the launch angle is less favourable for gimping high recoveries can be intercepted with the drone or your U-Smash. You need spacing for the mine, but even if you don't pull it off the mine being there is still favourable for Side Special follow-ups, or to make recovery for the foe more difficult.
The drone is slightly laggier to throw behind you, as the wheelchair has to turn around, but it travels faster, deals 10% (but only the usual 6% to itself) and more hitstun that can potentially lead into a smash attack.
((U-THROW --- MARK UP))
The arms swing the foe up above Armie and release them to go flying, Armie tilting her head back and shading her squinting eyes to get a good look at this. This deals 6% with average base knockback, and is more or less the upwards version of the F-throw with a few changes. The animation is a bit slower, but the extra knockback does help with spacing for your U-tilt or charging an U-Smash or just safely starting a combo with the drone. Unlike the F-throw, the knockback will continue to open up combo opportunities even at higher percents. Thus, it's a good throw to use in a situation where the other throws would fail to KO the opponent, and you don't have any other set-ups to exploit.
Like F-throw, you can hold up to have the arms detach from the wheelchair and onto the drone to have it drag the foe. In this case, they are carried up to the top of the screen at the same rate as K. Rool's helicopter recovery - you can even move back and forth just like with that recovery. Once you let go, they will get thrown up by the arms for the same effect as the regular variant, and you can go to control the drone to start some obvious combos. Even carry them up to the top of the screen for a star KO at 170%. Or just get yourself some extra spacing. When the foe escapes, they'll do so with a bit of hitstun and the drone will continue to fly for as long as you held the control stick, technically up to 5 seconds but there's no reason to do that when Armie is left open. You do have to be careful with the foe's escape timer and pay attention to when they start shaking, or else they'll get the drop on Armie, literally. If you're clever, however, you can intercept them with your D-air or U-Smash, possibly putting them in a sandwiched situation similar to the F-throw only vertical.
((D-THROW --- SURGE OFF))
The arms hoist the opponent over the wheelchair and pump them with electricity. If Armie was in the chair, she will hunch and hold a hand to her head as she looks up with uncertainty, like she's worried that the foe will fall on her. The arms deal 5 hits of 1% as the foe is raised dramatically, before they get dunked into the ground Rooligan-style. Instead of getting buried, the foe simply takes one last hit of 10% and strong base knockback on a relatively high angle. This is Armie's best KO throw from the centre of the stage (at 150%), only natural given its flashiness, but the B-throw is better when you have your back to the ledge. After performing this throw, Armie will undergo an optional animation where she looks proud of herself, no doubt for the damage she caused.
This is Armie's best throw for raw damage. This alone can make it useful at low percents despite not being able to combo on its own, along with the spacing. It can set up for your U-Smash or a drone. Better yet, it can combo into a drone you had controlled prior, similar to the F-throw, but the drone will not chase opponents that hit it. The other major difference is the knockback angle of the throw, being suited to working with a drone from high above as opposed to one low to the ground. This can punish opponents who avoided the drone's juggling to attack Armie, but as throwing doesn't give the drone back its jumps or anything excessively jumping beforehand can diminish juggling and follow-up opportunities. That being said, the hitstun/frame advantage on this throw is notably superior to the F-throw's, so it foe does end up close to the drone you'll have more time to follow-up, even charge the U-Smash a little.
The drone's throw only deals 10%, half as much knockback and has a brisk duration. The base knockback is still decent, which can mean U-Smash. This is generally the better throw if you want space or even adjust yourself according to Armie, and is useful with the knockback being vertical as you won't accidentally launch the foe towards Armie - unless she was parachuting, but then you should just use the Side Throws instead.
If the arms throw an opponent into a mine or next to one, the results will be electrifying. The mine will explode in a 2.3 grid radius, and deal an enhanced 22% and powerful upwards knockback that will straight-up kill before 100%. Definitely one of Armie's best KO methods.
The blast pushes Armie (and the drone if it was within range) back the exact distance required to sweetspot the Side Special, assuming the ledge wasn't in the way, and paralyzes the foe for about one second before they receive their knockback. You could even attack the foe within that time to deal extra damage to them, though you only really have time to do something like your Neutral Special or Dash Attack. And you don't really want to interrupt their knockback if it would result in a KO. You could also send a missile after the opponent, or even use the time to plant another mine or set-up the drone. And if the foe's percentage was low, you could always follow up with an U-Smash.
When the electrified foe is slammed into the ground, an electric shockwave is sent out 4.3 grids to either side of Armie. This deals 5% and tripping to opponents. If there was a mine in the way, it will charged with electricity for 6 seconds, which adds to its lifetime if it would disappear before then. The mine will instantly explode on contact with an enemy, dealing them 17% and some hitstun before popping them up for high knockback, but not quite as high as dunking the enemy into the mine. The mine will still run on a timer if Armie steps on it. The mine functions as stage control, which is nice in the context of this throw because it gives the foe less options for landing. But if they have to, they can just roll around the mine to trigger it in exchange for possibly leaving themselves open.
Using this throw on the drone will just release it.
FINAL SMASH
((TURNABOUT MACHINE))
Calling out "Open the floodgates!" or "See how you like my newest creation!", Armie smirks as she whips out a golden remote from under her set, pressing a button while gazing at the sky eagerly. A Dracula-tall, bronze alien-like robot drops down like a Landmaster pre-Ultimate, an upscaled version of the robotic statue seen in the background of Archie Buff's study room. Robotic arms pop out from the machine's legs and latch onto the wheels of Armie's wheelchair, keeping her suspended where she performed the Final Smash. From here, Armie vigorously works the remote with the glee of a child playing a video game, activating many of the robot's mechanisms.
Something like a sink faucet pops out from the robot's back and produces a deluge of water. It does nothing until it hits the ground, on which it flows forwards like the water on Kalos Pokemon League and sweeps opponents away. This is a reference to the flood in the mountain cave that Apollo Justice experiences in the final case, installed so Armie has a countermeasure against future fires! Meanwhile, the robot's eyes open up and fire a red Falco-esque laser to the nearest for every 1.5 seconds, traveling at Mario's dashing speed and dealing 10-12% that KOs at 130-165% depending on whether or not the FS was activated with the Smash Ball or meter. If that's not satisfying enough, you get to control the drone immediately and suffer no cooldown if it's destroyed during the Final Smash, adding to the chaos. The Final Smash lasts for 4-6 seconds, during which Armie is invincible.
((NEUTRALITY))
Armie looks around in confusion and amazement as screens of static monochrome surround her, in different sizes like computer screens all playing an obscured black and white movie. Could this be... the infamous Neutrality Zone? Indeed, Armie is in fact the reincarnation of Dr. Strangelove! Why do you think the set had all of those references to the man?
The Neutrality Zone basically makes Armie invincible for 10 seconds, which is to say it negates all hitboxes that would make contact with her - or any of her teammates that were within 4 grids of her, including the drone. That's not all however, as missiles will rain down on Armie every 2.5 seconds, which deal 18% and high diagonal knockback to anyone caught in their blast when they hit the stage. That's because there are people out there who want to kill the reincarnation of Dr. Strangelove. The missiles are actually made of fire, probably from Ninetales, as well as raw blood because those were probably sent out by Valozarg. After 10 seconds, the god-like Neutrality Zone powers will fade from Armie and she'll hang her head in disappointment.
((CLASSIC MODE --- TURNABOUT HANDICAP))
- Regal Bryant (MYM8)
- Kenji and Hisao (MYM11)
- Emi Ibarazaki, Rin Tezuka, Lily and Hanako (MYM12)
- Sloth (MYM15)
- Luke Atmey (MYM13, reference to ???)
- Giant Metal Giga Bowser and Crazy Hand (reference to Strangelove's alien hand) - both deal half as much damage
- Dr. Strangelove (MYM7), followed by Gold Dr. Strangelove
Ennard is an animatronic villain who primarily appears as the main antagonist of Five Nights at Freddy's: Sister Location, later appearing in the non-canon Ultimate Custom Night as a selectable character. Forewarning: this introduction and moveset will contain massive spoilers for the game and series, as there’s no way around that writing this character’s moveset. Ennard only appears on Night 5 of Sister Location… and this is quite complicated to explain! First and foremost, the animatronics in Sister Location really don’t like their job and want to do all they can to escape, but to escape, they need to fool the humans into believing they aren’t animatronics…
Ennard is in fact a fused abomination of every animatronic in the game and this is why he looks quite messy, asymmetrical and his movements are more erratic than the average FNAF animatronic. The Sister Location animatronics are collectively known as Circus Baby's Entertainment and Rental. Circus Baby herself is the “ringleader” of the group and main force in manipulating events. The animatronics use a machine called the “Scooper” to remove their innards and fuse together into one giant monstrous animatronic, Ennard, to confront the main character, and canonically win! When they win, well, it isn’t pretty. The protagonist Michael Afton is “scooped” himself and Ennard then proceeds to wear Afton’s skin as a disguise to escape the Sister Location.
Ennard is seen in a peculiar set of cutscenes showing Michael Afton’s body degrade over time until he becomes a purple corpse. Afton vomits a bunch of wires and Eyes into a sewer before collapsing on the ground, this is how Ennard finally escapes into the outside world. Later on Ennard would take on the visage of Molten Freddy for Five Night at Freddy’s: Pizzeria Simulator where he and other animatronics who survived the events of Five Nights at Freddy’s 3 are finally burned to death in the grand finale of the Five Nights franchise… for now. In this appearance, Molten Freddy instead has a male voice replacing Baby’s in Sister Location and has shed all of what made Ennard unique, basically unrecognizable. The collective threw out Baby for the corpse incident who went her own way, becoming Scrap Baby, who dies in fire alongside Molten Freddy.
Ennard isn’t a mere concoction of random animatronics, specifically taking various parts of all the group. He takes Baby’s chest, Ballora’s head and lower torso, Funtime Freddy’s arms and Funtime Foxy’s legs. This is shown by the dissected remaining pieces of the other animatronics that can be found eerily lying on the floor after the scooping process is finished. Ennard is a unique character in FNAF for a number of obvious reasons concerning what he is, but also his achievement in escaping the Sister Location. Throughout the series animatronics attempt to kill, abduct or escape but Ennard is one of the few to succeed, and in a very methodical way because of Baby’s plan to lure Michael Afton into a well laid trap.
Specials thanks to UserShadow7989 for his great help giving me advice on this series/character, I’m not sure this set could’ve been made if not for his helpfulness.
STATISTICS
Size: Standing Ridley height-ish, Bowser width (28 small training blocks tall) Weight: 145 Weight Units (Ultra Heavyweight) Run Speed: 2.3 (7th/Top Tier) Air Speed: 0.9 (Bottom 10/Very Slow) Fall Speed/Gravity: Ganondorf (Average/Mid Tier) Initial Dash: 1.76 (Bottom Tier)
Ennard is an absolute monster. He’s the size of Ridley stood up during his infamous taunt, 10 weight units heavier than Bowser. Ennard is slightly hunched over too, so would tower over standing Ridley if he had the same taunt animation. Ennard’s initial dash is not impressive because he transitions onto a quadruped running animation, similar to DK or K. Rool. Once his dashing has started however he becomes the fastest super heavyweight in Smash Ultimate, though he sports poor traction. In the air Ennard suffers heavily for his cumbersome animatronic body and has an average fall speed, encouraging a largely ground-based playstyle from the get-go. Ennard’s idle and other basic animations showcase Ennard’s personality as he constantly twitches and moves his wires around, eerily prepared to strike at any time. His jumps are two average, somewhat cumbersome looking leaps, comparable to Ganondorf. These statistics are from this resource and the height/size comparisons can be seen in this image. KO percents in this set are on an average middleweight at the middle of Final Destination.
WIRE BODY
Ennard’s body is comprised of hastily stitched together animatronic parts and wires, and while it isn’t fragile, it is prone to being stripped off by the kind of firepower present in Smash Bros. For every 5% that Ennard takes, this will cause a strip of wires to fall out of his body and harmlessly drop to the ground. These wires are only roughly the same size as a Gyro, and have no hitbox. They do however take damage and will dissipate if a foe deals them 10% damage, destroying them forever, though Ennard will respawn having fully restocked his body of wires. When left on their own too, the wires will dissipate after 10 seconds or when Ennard is KO'd.
Every time one of these chunks of wires falls away it has a visible effect on Ennard’s body. He doesn’t get any smaller or have any change to his hurtbox, but his insides look thinner and more scraggly, slightly affecting his weight every time. For every chunk of wires lost, which I’ll be calling a wireframe from here on out, Ennard loses 1.5 weight unit points. This caps out at losing 10 wireframes at once bringing Ennard’s weight down to a respectable 130, at which point, Ennard is left looking slightly more vulnerable, and yet no less intimidating, as that is still right around K. Rool’s weight in Ultimate. After reaching this lower cap Ennard will continue to shed wireframes however, but they will now only linger for 5 seconds before they dissipate and have no further effect on Ennard.
Ennard only needs to walk over/touch the wireframes for them to naturally re-attach to his body. They will wriggle up into his animatronic body on their own in an oddly natural animation. Ennard has no way to regrow lost wires so if the foe gets him on the defensive and combos away several at once, he has to fight back for stage control to get back what he lost. The loss of weight is a big deal as Ennard is a massive target for combos and inevitably will lose many of his wireframes over the course of a normal match. There are other uses for these wireframes and not losing all of them say, off-stage where they fall to the blastzone and instantly die, is a core of Ennard’s playstyle. Their duration being halved is a huge issue and Ennard really doesn’t want to get combo’d off stage or be trapped at the ledge.
Some moves can use up wireframes to become stronger; this will be signified by the often used “glean” on Ennard’s HUD icon. This will not appear if Ennard no longer has the wireframes left necessary to use the move. When not stated, wireframes will be ejected behind Ennard, and they have to be out for at least 60 frames before Ennard can pick them up again, or be attacked by the foe.
SPECIALS
NEUTRAL SPECIAL: EYE FOR AN EYE
Ennard turns his mask to face completely forwards, holding a hand over his face to obscure exactly what is going on, and begins firing a tiny Eye out of his mask at a low angle towards the ground. The Eyes travel at the speed of Fox’s laser and come out 2 every 20 frames. This Eye is only the size of a Pokéball and its exact appearance greatly varies in colour as shown. As a projectile the Eyes are comparable to the Mega Buster dealing only 1.5% a hit but coming out fairly fast, only slightly slower and having a little more end lag than MegaMan’s move ftilt. The Eyes deal gradually less hitstun and after a few hits of very little stun, only deal damage, so this will get easily punished at a close range. The Eye will only travel forward a battlefield platform length before hitting the ground. Ennard is so tall this can technically be used as an anti-air early on, and is great at a mid-range to stop foes trying to crawl under many of Ennard’s high-placement hitboxes.
The Eye doesn’t go away once it lands on something, but instead attaches and like a Sticky Bomb, stays in place there for the next 10 seconds or until the foe destroys it using the same mechanics as a Yellow Pikmin. For each second it stays on the foe, it will deal a gradual 1% damage, and this can stack up to 4 times, destroying the oldest if a 5th one lands on the same foe. The Eyes can stick to the ground too, having the same limit of 4 on stage at a time. Foes can destroy these Eyes if their 10HP is depleted and like wireframes, they do not take damage from Ennard. Unlike wireframes, these are not picked up by Ennard if he walks over them if on their own.
Eyes will gather up any wireframes they touch and become a sentient, slug-like machine where the Eye has now become the “head” and will start to move in the direction of Ennard on stage. This mostly happens when an Eye is shot onto the ground and Ennard fights on top of where he’s placed his Eyes. The Eye will gradually become stronger as it gathers up more wireframes. For every wireframe, the Eye’s size will grow from just being as big as a Gyro (naturally) to being up to 5x as big as one when collecting up to 10 wireframes at once, and its speed increases from only a sluggish DK walk to DK’s dash speed. The slug-like minion has HP of 15-30HP, growing stronger depending on the amount of wireframes. When only one Eye is present in this abomination, it has no attacks, but will deal passive damage, ranging from 1-5% a second to any foes that touch the mess of wires. Once the Eye and wire connect up too, their duration is added together and multiplied by 2, so an Eye with 7 seconds left and a wire with 8 seconds left, will be around for 30 whole seconds before it dies!
Multiple Eyes can be in the same wireframe mess, which I will now call a Metal Slug and each additional Eye becomes an actual eye for the Metal Slug. The added “brains” lets the pile of wires have attacks to utilize. The first one comes at 2 Eyes. The Metal Slug will solidify if a foe comes within a touching distance, causing them to trip if they try to run over the pile of wires. This forces the foe to jump over the wires, making them highly predictable, or be forced to destroy them if they hadn’t already. Normally the Metal Slugs are not solids and will be forced forward by a foe moving into them, but here will make the foe trip in front of them, and this itself can be useful to split up the foe between Ennard and the slug for higher pressure – you really don’t want that situation as the foe to say the least.
At 3 Eyes in one Metal Slug it will react to a foe being within a longer distance, comparable to Ness’ dtilt range, by creating a stabbing knife of wires that stabs forwards at the foe dealing 4-8% damage. The strength depends on the amount of wireframes and the knockback ranges from weak flinching to weak knockback at the high end. The stab has high end lag and leaves open the Metal Slug to be easily destroyed, though Ennard if he is not KO’d will obviously punish the foe anyway in that situation. If Ennard is in the same range and the foe is not, then the Metal Slug will use the move to instead touch Ennard and instantly reconnect.
The maximum amount of Eyes, 4, will have the Metal Slug instead of merely dying pathetically, explode! Wires fly everywhere in an extremely messy explosion animation where the Eye itself pops in a disgusting display of gore. This explosion ranges in size from the size of Wario at its smallest, to as big as a Bob-Omb explosion at its biggest, dealing 5-20% and able to KO from 250-180%! This does still kill the Metal Slug and losing four Eyes is a loss, though considering they are totally passive anyway, it’s still very, very low commitment set up, the real loss is the wireframes.
When an Eye attaches to the foe, any wireframes the foe happens to step on will wriggle up the foe the same way they do to Ennard. The wireframes can no longer be destroyed by the foe, they now have to destroy the Eye to stop this creepy collection of sentient wires crawling up their body. If the eye is destroyed, then the wireframes fall harmlessly to the floor. The wireframes will head for where the Eye is and are quite slow to get there, so this is effectively slower on bigger characters but not to a super relevant degree. It takes just 2 seconds for them to reach the top of Ridley’s head where an Eye is blatantly as high as it could be in an existing Ultimate character. If the wireframes do get to the Eye this will make it stronger, up to 4x the HP of a Yellow Pikmin when the cap of 4 wireframes make it to the Eye, making it far harder to destroy for the foe. Once attached to the Eye, it will appear to have an outer shell of protective wires, pretty freaky-looking on any character. Usually the limit is 4 wireframes climbing the foe at a time, but additional Eyes on the foe will add another 2 wireframes able to get aboard an opponent, capping out at all 10, and utilizing all 4 Eyes on stage at a time, this is obviously very unlikely to happen in a normal match.
The Eye by itself won’t have any further effect and the foe should want to get rid of it immediately, as any wireframe on the foe at all due to the Eye has a very nasty effect. When Ennard lands a melee blow on the foe, the wireframes will all jump back, reattaching themselves to Ennard! The Eye will even remain on the foe to add insult to injury. That isn’t all either as this causes damage and hitstun to the foe, dealing 5% per wireframe and light-heavy hitstun, depending on how many (up to 4) wireframes were crawling up their body. This is more-or-less a poison that can build up on the foe if they don’t make sure to get the Eyes off, but the Eyes can even attach themselves to foes just walking or touching on the Eyes put on stage, making it more challenging than a simple Pikmin. The amount of hitstun at 1 wireframe using an average melee move only is enough to make this a slight frame advantage but 2, will combo into Ennard’s fastest moves at close range, 3 into his faster long-range moves, and at 4 will combo into his fastest smash. These Metal Slugs may seem harmless, but not given the right amount of respect can be deadly.
The foe will even get wireframes attached if they attack Ennard close range, especially from below, and pummelling him will absolutely attach these things if they have an Eye on their body. This is a small way for Ennard to passively discourage too much of a melee combo offensive, though only if he landed an Eye in the first place, be it directly or because of a trap laid on the stage.
DOWN SPECIAL: VARIABLE SCENT RELEASE
Ennard turns towards the screen and tilts up his head, then exhales out a bright pink gas from the mouth segment of his mask. As he blows out the gas, Ennard's body glow brightly pink as a reference to how the Funtime Foxy contribution to Ennard is what allows him this power. The gas spreads out to either side of Ennard a short distance but doesn't expand much further than that, obscuring Ennard first only halfway down, but over the course of 5 seconds floats upwards and will cover Ennard's entire hurtbox for most of the 5 seconds before it dissipates entirely, as well as anything else on stage similarly to Piranha Plant's Poison Gas. Obscuring gas for this long may seem powerful, but any attack by foes will dissipate the area their hitbox landed on, encouraging them to take the risk and jump around nairing the area. Ennard can take a gamble himself to punish them, or simply wait it out and counter-attack them if they were careless, turning it into a cat-and-mouse game. The start up of the move is quite long, taking 30 frames to come out, but only 10 frames of end lag, overall the move takes around a second/60 frames to complete. For such a big commitment the move deals its fair share of damage dealing 2% 4 times a second with no flinching for up to 40% damage if the foe is caught by the move.
Ennard has a limited supply of the gas as his body glows red as if overheated for another 5 seconds after the gas has dissipated. Ennard will only be able to spit out a few small clouds of gas that don't dissipate and travel only a little in front/behind Ennard, lasting for 2 seconds dealing the same damage. Ennard has to wait another 5 seconds without use of the down special before being able to fully utilize his gas again. Ennard can charge this weaker version of the move to instead constantly emit a weak pink gas for 1% damage a second to himself and foes who touch him, this deals no knockback or hitstun. The point of this is that Ennard will no longer automatically pick up wireframes or hinder his own Metal Slugs, at the cost of constant damage. This also means he will shed more wireframes naturally over time, if he wishes to shift his playstyle to a messier, set up intense one. Any wireframes Ennard touches while emitting this gas will be inactive for a further 3 seconds and can't be reabsorbed, and simply sit in place not attacking if they had any Eyes on them. This is not all bad however, as it lets Ennard "pause" his set up and is his best way to create set up by causing self-damage, and as an ultra heavyweight, doesn't might shedding some weight and making himself less combo food in certain match ups.
Ennard is not Funtime Foxy and this gas originally was meant to placate children to abduct, for Ennard it not only fails to do anything like that (assumably it would make a foe fall asleep if it worked as intended). In fact the gas not only fails at its intended purpose, but will deal passive damage to Ennard, and neutralize any Metal Slugs/wireframes hit by the gas. The metallic wireframes will start to produce static and sit in place, still dealing damage to foes in this state, but not able to attack. Ennard takes a fraction of the damage a foe does by standing in the gas, up to 10% over the 5 seconds. Ennard will even produce wireframes from this self damage, who can't immediately rejoin as they come out into the gas and are neutralized. However, over the next 5 seconds after taking that damage, Ennard will passively heal back 5% of that 10%.
The obscuring gas is powerful for Ennard as it can potentially cover up his bad initial dash and start chasing down a foe, or simply to attack using his long-range hitboxes. He's no Piranha Plant with its Down B, but Ennard does have plenty of long range moves to abuse. This comes at a cost however - namely the self-damage attached to the move. As the move neutralizes Metal Slugs and wireframes Ennard can tactically use this to then shoot Eyes into them and avoid reabsorbing them if he so chooses. There's a mix of positive and negative to the move for either use as a camping move or to leap out of it to surprise foes, then use it as stage control when on the offence, but mostly positive. This is held in check by the move having a long start up/duration and the limit of using its full strength only once every 10 seconds, if Ennard can win neutral to get there in the first place.
SIDE SPECIAL: BABY SITTING & DANCE CLASS
This move varies based on if it's pressed or smashed, the same way as Samus' missiles work. For the pressed version Ennard's hand glows red as he stretches out his arm. Out of the arm Ennard's wires fuse together and fall down as one of Baby's Bidybabs, only comprised entirely of wire with no other colour or texture. Bidybabs are roughly the size of a Mr. Saturn item and the start-up of the move is a little shorter than the Mechakoopa for Ennard. The Bidybab takes a chunk of wireframe as it's created, worth 2 wireframes or 10% damage to Ennard. If Ennard hasn't got 2 wireframes available the wire Bidybab looks considerably rougher having fewer wires comprising their body. Bidybabs either have 9HP or 20HP depending on if they were made with any wireframes.
The Bidybab’s behaviour varies depending on whether it was made with wireframes or not. If it wasn’t, the Bidybab will simply patrol forward at the same speed as a Mechakoopa does and if it comes in contact with a foe, will hunker back clumsily, then lunge in a headbutt towards the foe to deal 5% damage and very low knockback. The Bidybab will break into wires upon landing the move or hitting the ground again but not be able to be picked up, as it took none to create, dissipating into nothing. If they hit a shield, they will deal a small amount of shield push but harmlessly fall back much like the pathetic way Mechakoopas work against shields, and dissipate harmlessly. Ennard can only have one Bidybab out at a time so it being a worse Mechakoopa is pretty bad. Ennard really needs to approach at the same time to get much out of this version of the Bidybab; it does at least help to cover his initial dash or force a foe’s approach.
The wireframes version is far stronger as the chunkier baby has something resembling an AI. Instead of the headbutt the Bidybab will attach itself in an almost instant (2 frame) grab if a foe gets in close range. The Bidybab will grab onto the foe like Diddy does during his Monkey Flip, interrupting them in a proper grab state and performs its jump scare… before exploding! The explosion deals 12% damage and high knockback to KO at a diagonal angle at 150%. Ennard can interrupt Bidybab by grabbing the foe or destroying it, as the Bidybab unlike his wireframe or Eyes is vulnerable to friendly fire. The Bidybab will die harmlessly if it has its health depleted however. Ennard can stop the explosion by killing the Bidybab as it grabs the foe, in which case the Bidybab deals only a tiny 1% damage as it grabs a foe, but will lock the foe into whatever other move was used to destroy the Bidybab and hit the foe potentially at the same time. This can make it risky to try peppering the Bidybab as it opens up weaker moves used by Ennard to finish it off. When a Bidybab is sent out of a Poison Gas cloud too, this will deal around 5% off the bat, as they fall just out of the gas’ range due to the arm animation, this can be good and bad to let Ennard casually destroy it/hit the foe into a KO confirm, but may mean the Bidybab is outright KO’d too, though out of the obscuring gas, is a great mix up option. Ennard can simply wait out the explosion and obviously is the right thing to do when the foe is at the KO percent.
The advanced Bidybab will leave a pile of 2 wireframes whether destroyed by depleting its HP, or exploding on the foe. As the foe is launched far away this is much safer for Ennard to casually walk up and recollect his wires, though does mean he can’t chase the foe down. Another benefit of this Bidybab is that if it does explode on the foe, it won’t fully be destroyed, it’s kind enough to leave two of its own Eyes on the foe’s body! These act the same as neutral B Eyes that Ennard fires, but only attach to the foe if there aren’t already a full amount on the stage at that time, attaching only one if there’s already 3 on the stage.
Bidybabs that are created in the air are by default the weaker version to prevent Ennard wasting 2 wireframes every time he wants to use the move in the air. Bidybabs made in the air like this will drop straight down at the speed of Dedede’s fall speed and are a weak hitbox dealing 4% damage, only launching foes very lightly away horizontally. It’s primarily good as a way to ledge or frame trap, though is only about as useful as Mechakoopa in this regard.
For the smashed version of the move, Ennard performs the same animation only his hand glows blue instead of red. At the end of his arm a Minireena is created. These are Ballora’s minions, like the Bidybab they only resemble the shape of the original, and are made up entirely of wires instead. The Minireena is roughly the size of a Purple Pikmin largely because of their outstretched ballerina-posed arms. The same as Bidybabs, the Minireena eat up 2 wireframes if they are available, or cost nothing, and their HP can be 10HP or 20HP, stronger if they have wireframes. Their appearance makes them look even worse than the Bidybabs as no wireframes means they don’t have the arms outstretched on top and more resemble a spinning top than a ballerina.
The weaker version will fall twice as fast as the Bidybab does and as it does, both Minireenas deal a stronger 6% and a little higher knockback, so are the superior choice to go for off-stage gimps. When the Minireena hits ground, the weaker version will spin in place for a moment before launching off at the speed of Fox’s dash, dashing across the stage, falling down if it goes off stage or off a platform, and will happily fly off to its death at a blast zone, not caring if it hits a foe or not. If it does hit a foe it deals a respectable 7% damage and low knockback, comparable to a 2/3rds charged Gyro. This won’t KO until fairly late, but is low committal enough, it’s quite decent. Unlike the Bidybag this deals very little shield push and is easy to dodge around due it going faster, far more of an offensive minion.
The wireframes Minireena like the Bidybabs one has a more complex pattern. It will slowly turn in place and not leave its spot. Minireenas will instantly grab onto any foe that touches it, even if shielding and pushed into the Minireena, tugging from below. This deals 1% 3 times a second and can only be interrupted by the foe killing the Minireena, jumping away or rolling away, as dodging or shielding will not affect the Minireena. The Minireena will give the foe considerably worse traction, and shorten their first jump to 0.9x its normal height. The foe’s ground movement is also nerfed to 0.9x its normal speed. The Minireena will be harmlessly turned into wires if destroyed at a distance but will deal high hitstun to a foe as it’s destroyed if they’re grabbed on, clamping its hands on them in one last act of spite for 8% damage. This deals no knockback, but leaves the foe open to Ennard to abuse this.
Ennard can again friendly fire the Minireena. This lets him reach past the foe and destroy the Minireena if the foe tries to dodge, or even with some of his moves, reach past and destroy the Minireena on purpose if the foe shields or tries to dodge. The Minireena’s spite will linger beyond those options, encouraging the foe to jump more than to attack it if Ennard is in range to punish. There can only be one Minireena out at once too, so this will function as another sort of trap for Ennard, one he can easily set up himself, and like the Bidybab will also drop wireframes once destroyed.
Ennard can fire his Eyes into the Bidybab or Minireenas, causing the Eye to pop out of where it attached. This doesn’t count as one of his Eyes allowed on stage, and merely changes the AI of his more advanced minions to instead constantly approach him instead, rather than sitting in place or mindlessly patrolling the stage. The Minireena approaches at the speed of Fox’s dash speed, like its weaker variant. This can be used to pressure the foe. The Eye is destroyed along with the Bidybab or Minireena when they are destroyed. As purely a hitbox or attack, this is very useful as if the foe dodges an Eye or rolls past it, but a Bidybab or Minireena is behind them, it may immediately turn around and grab them anyway.
UP SPECIAL: JUMP SCARE
Ennard squats down into a quadruped stance and buckles his legs down, taking a short moment before leaping into the air! Ennard leaps 1.5x as far as Dark Dive, though goes purely vertical. As he leaps his entire body is a powerful hitbox dealing 12% damage and will KO at 100% straight up at the start of the move, decaying like a sex kick to only deal 5% for most of the move’s duration, and low knockback. If no further button is pressed Ennard enters helpless at his normal fall speed and has a small amount of horizontal control again comparable to Dark Dive’s control. This means that Ennard’s recover is quite bad if you consider his poor aerial control too. Ennard does gain super armour as he rises though, so it’s very hard to gimp directly if he can just get in range to ledge snap.
Ennard can sacrifice 3 wireframes to charge the move further – during the start up the wire frames fall away from Ennard’s limbs as if they were breaking away on a space shuttle, all 3 dropping straight down in a horizontal line. Ennard travels instead 3x the distance of Dark Dive and gives him far more aerial control during his helpless fall, able to move horizontally as quickly as his dash speed. If used off stage, these wire frames are likely lost to the blast zone, making it a last resort. The dive retains its super armour all that time and the start of the move, while slower to come out, deals an incredible 20% damage and will KO from 80%, decaying to deal 14% and KO at 120% in most of its duration after the start. This gives Ennard a very powerful mix up for foes trying to land comparable to Bowser’s usmash and its pressure, though the end of the move leaving him in helpless makes it a big gamble.
Ennard can perform a powerful fall if the special button is pressed again, working the same way as Cloud’s Climhazzard Up B. Ennard will instead of entering helpless, launch himself right back down, unable to ledge snap so effectively guaranteeing his own death off stage, how in-character! Ennard aims all four limbs at the ground as if he was a spider landing on a captured fly. This is an incredibly powerful hitbox that has the same power/speed as Dedede’s Super Dedede Jump on foes, able to fully break shields on landing on the ground. This retains the same armour for its duration, though has devastating end lag if it does land on the stage. Its one weakness is that its quake hitbox when it lands causes only a small earthshaking hitbox on either side as Ennard lands for 3% damage and weak hitstun. This move is very easy to punish, and best utilized only as a very hard read. This will also only work if Ennard didn’t ledge snap to cancel the move before it reached its peak, as Cloud’s is one of the few up Bs in Ultimate to not ledge snap.
Ennard can sacrifice 3 wire frames to power up the falling part of the move too. The wire frames eject from Ennard on all sides of his body, causing him to spin around so that he faces back first to the stage as he falls. Ennard deals even greater damage now, 5% stronger than Super Dedede Jump, and if he lands on stage will create an explosion around him of debris that will expand to hit the edges of all the platforms on Battlefield if landed in the very middle, easily covering his end lag. This explosion deals 13% and strong knockback able to KO vertically from 105%, and lingers long enough it can’t be dodged, at best forcing the foe to shield. This reduces the end lag to the point it’s difficult to punish besides with fast, long range projectiles, or if the foe was right in front of Ennard and shielded the explosion first. The wire frames fall to either side of Ennard, 2 behind him and 1 front side, so it’s easy to get back at least 1.
As any good horror slasher does, Ennard comes back from the brink of death! If he has 4 wire frames, Ennard can press B again as he hits solid ground to shoot out wires onto his four limbs, letting him perform a unique wall crawl similar to what he does in FNAF: SL. The player can then command Ennard to crawl either to the left or right on the surface, able to walk upside down at his dash speed on the surface for up to 3 seconds, before he will fall off into helpless. Ennard will be aiming to ledge snap before this happens and can’t do this on platforms, only the stage proper. If he doesn't snap to the ledge Ennard will cancel out of the crawl laglessly once he's right side up, on stages with no ledges. This gives Ennard super armour and means he can’t be pineappled or stage spiked so long as he hits the stage. If he has to use 3 wireframes first to reach the stage, this does eat up 7 wireframes permanently, but is more than worth it to save the stock. Any foe caught by this rampaging spider-like Ennard takes rapid hits of 4% and hitstun.
SMASHES
FORWARD SMASH: THE SCOOPER
Ennard rears back his right arm and holds it behind his body; his head twitching erratically, the arm begins to reform using wires into the shape of the infamous Scooper from FNAF: Sister Location! This has 22 frames of start up – for the charge animation Ennard holds the scooper behind his back. Once ready Ennard performs an uppercut motion to stab using the newly-formed Scooper, dealing a massive 25% damage to foes and able to vertically KO uncharged from 75%! The move is even stronger at a sweetspot located just before the tip of the scooper, where the “scooping” would technically be taking place, dealing an additional 5% damage and able to KO from 50% with additional knockback growth. This is easily Ennard’s strongest move, but on top of 22 frames of start up, has considerable end lag too as Ennard has to wait for his Scooper to reform back into his normal hand.
The Scooper has massive range, reaching as far as Ganondorf’s Doriyah fsmash forwards and having a huge range as it scoops up in a quarter-circle area. This doesn’t have the awesome range of Doriyah as it becomes a stabbing motion before it can cover that much stage. The Scooper can be angled, the Scooper instead will be aimed to hit closer to the ground, which also delays the hitbox a little to come out later when hitting airborne foes, and sends at a lower angle to KO horizontally earlier. The up angle more resembles the Doriyah usmash instead, if only the front half of it, and functions as a good anti-air. There are sourspots on Ennard’s arm as he performs the move dealing a much weaker 18% uncharged to KO at 90%, though the majority of the hitbox deals 25%. The more powerful 30% sweetspot can be played around with by angling as a powerful anti-air to catch out foes trying to air dodge around the move.
When the Scooper manages to land its powerful sweetspot on a foe, it punctures their body for prolonged hitlag, playing a sound effect of metal hitting flesh. The foe is launched away, but Ennard’s Scooper visibly has something obscured inside of it that reforms back into Ennard from the foe. The end lag is just as long, but as the scoop has successfully scooped out something, it will retract more forcefully becoming its own hitbox that deals 15% damage and knockback backwards that will KO from 200%, most of the time dealing low base knockback with high growth so that it will reel in any other foes it hits to put them behind Ennard. This is useful for throwing them into Ennard’s gas, or pulling them in from off stage. The same effect happens not only when hitting foes with the scoop but if any of Ennard’s wireframe creations are hit by the Scooper – as it counts as part of his body, it will scoop up the wireframes to be reabsorbed. One of the easiest ways to accomplish this if with a Bidybab or Minireena grabbed onto the foe’s back on the other side of Ennard so that if he misses the foe, he’ll still hit his minion and the Scooper will reel back hitting the foe too.
The Scooper has another more powerful effect if it lands on the foe’s back. The hitlag is turned into a full freeze frame like Ridley’s down special as a grosser slurping sound effect plays and the Scooper reels back in an even larger amount of obscured substance from the foe’s body. The retracting hit has a marginally stronger hitbox dealing 18% and KOing at 160%, though is entirely the same as a hitbox. The substance when retracted fully to Ennard will visibly colour his wires the same hue as the foe’s shield colour, and this signifies that he has gained an extra 2-4 wireframes (more for more charge) that will be coloured the same way as the foe's shield. This is a huge boon to Ennard and the only way to gain back wireframes, and resets when Ennard loses a stock. When the wireframes are hit out of Ennard he loses the colouring. This isn’t as hard to land as on other characters because of Ennard’s playstyle of hiding in his gas, his various Pikmin-like minions and his fast dash speed letting him set up for the Scooper from a well-spaced distance.
UP SMASH: WIRE WHIP
Ennard hunkers down and twitches around in his body, charging up both arms on either side as he looks upward, striking up using his wire arms to whip upward in a strike that reaches almost as far as Simon or Richter’s usmash! Ennard uses both arms to whip creating a gigantic hitbox covering a huge area above his head. This deals a respectable 20% damage and will KO uncharged from 85%. The move has 15 frames of start up – a huge improvement on the slower fsmash but has higher end lag, as those wires have to retract all the way back, making it comparable to usmashes such as K. Rool’s in Ultimate.
As part of start up the whips will first lie on the ground next to Ennard before he strikes them into the air, lying around about a Bowser width either side. As they whip, this creates a weak hitbox that deals 8% and merely gets the foe out of Ennard’s face. The whips naturally pick any wireframes on the stage as part of Ennard’s own arm. However before it’s absorbed the wireframes will be add to the whip and then absorbed at the end of the smash.
A wireframe will create a clump of further wires on the whip that will add to the hitbox’s size and shape, even during the initial 8% hitbox. Any foe hit by the clump of wires at that point, will instead be combo’d into the 20% hitbox later, making it a true confirm. This is situational, though it does mean foes have to be wary of fighting Ennard in melee range of his wireframes. This helps to mix up when Ennard simply walks up and retakes his wireframe, or can bait a foe into trying to punish him for trying that.
The whip won’t destroy any Minireenas or Bidybabs it hits in the start up of the move like this, instead wrapping them around the whip and tossing them up into the air! What this effectively does varies based on each. The Bidybab will merely be tossed a Ganondorf height, rise and fall with the same hitbox as when it normally falls, delaying when it will next attack. In the air the Bidybab can still grab foes in range, so this can be used to force foes to either attack or air dodge out of the way of its grab. The Bidybab and Minireena won’t take damage from the 20% hitbox, but will take 8% from being grabbed by the whips, leaving the default Bidybab with no wireframes at only 1HP. The Bidybab and Minireena are launched just before the whips come out, so it is possible to combo a Bidybab grabbing a foe into the usmash itself too.
A Minireena greatly depends on what version was tossed up. The default, weaker Minireena is a far stronger hitbox in of itself and will be tossed up 2 Ganondorf heights, taller than the whips themselves, and has the same more powerful hitbox than the Bidybab when falling or when risen. The Minireena is able to vertically KO especially if tossed up on a platform. The whips during start up are actually long enough to wrap around Minireenas on the stage below platforms, and by charging, can wait for the default ones to come into range too. The Minireena will then launch off in the same direction it was going when it falls back to the ground again. The advanced Minireena unlike the Bidybab cannot grab foes in midair. This Minireena remains a hitbox until it lands, then can grab the foe. This instead is useful as a frame trap, as the moment it does land, the foe has to avoid touching the Minireena. Ennard can use this pressure to get much needed stage control, and any attacks the Minireena tanks in midair, so long as it doesn’t die, can get it closer to death, a good thing for its spiteful last resort attack.
DOWN SMASH: PURPLE BEAM
Ennard ducks down close to the ground and leans back his head, then quickly jolts it forward and vomits a stream of disgusting wires and Eyes forwards. Foes hit by this will be dealt 15% uncharged and can KO from 105%, a far cry from Ennard’s other powerful smashes at the benefit of far better speed. Despite not being purple, this will be referred to as the Purple Beam for simplicity's sake. As mentioned earlier, this is fast enough to be a direct combo out of an Eye that has four wireframes attached to it on the foe. The messy grey clump of metal travels very fast at an almost flat 45 degree angle before hitting the ground 0.6x a battlefield platform further on, and the beam itself is roughly half the length but equal to the width of Thoron, a huge hitbox. Despite appearing like a projectile this is a massive disjoint so cannot be reflected. This has the fastest start up of the smashes at 12 frames and the lowest end lag, though it only hits forwards and not both directions like most dsmashes. Despite this, Ennard when ducked this low to the ground does become a massive hurdle to attempt rolling behind, impossible for any Ultimate cast member during the short start up of the move.
Ennard may charge up the move further to not only power up the strength of the move, firing out more wires and Eyes as the charge grows stronger, increasing the size of the wires shot out to at max charge be 0.75x the full length of Thoron, expanding the range of the move by the same multiplier. When charged the dsmash will begin to add to any Metal Slugs on stage, adding 1-3 wireframes worth of wires to then depending on the move’s charge. The Metal Slug will look visibly weaker than usual and degrades over time, losing a wireframe every 3 seconds until back to its original composition.
When fired at one of Ennard's Eyes, the wires will coalesce around them. A full Purple Beam that is uncharged will make an Eye into a level 2 wireframe Metal Slug, while anything less than that will only get it to 1 wireframe worth of wires. When the Purple Beam is charged further, it will start to cap out at half charge with 4 wireframes in a full beam's worth of firepower, and at full charge will instantly create a 4 wireframe Metal Slug over firing over an Eye a small amount. These Metal Slugs will however not gain any additional HP. This works firing at a foe that has an Eye on them too - but has to hit the part on the foe's body where the Eye is located. This sets up well for a direct combo from a melee move if the Eye is Beam’d successfully, back into Purple Beam itself again when the foe takes the maximum amount of hitstun as the most optimum punish. This does require a great deal of pressure from Ennard as the Metal Slug on the foe will lack any of the defensive HP buffs it’d normally have added.
The Purple Beam will react uniquely when fired through the Poison Gas that Ennard creates. As the wires fired in the move are composed of throwaway wires they quickly decompose once fired into the gas, the wires creating static as they’re being fired. After reaching the max range the wires and Eyes combust into flames that linger at the end of their trajectory in a lingering hitbox, dealing rapid 1% damage up to 5 times, enough to make the move combo into Ennard’s faster options. This can make the dsmash a great option in the obscuring gas as Ennard also ducks down to avoid some attacks.
STANDARDS
JAB: ELECTRICIFY
Ennard punches out an arm straight down, able to hit even the lowest non-crouching character in Ultimate, dealing a solid 5% damage and low knockback. This is one of his fastest moves at frame 5, and has great range for the first hit of jab, as well as low end lag. After the initial hit Ennard can either do a rapid jab or continue to press jab. The rapid jab has Ennard grab his arm using his remaining hand while electricity courses through his body to his hand, where it sends off sparks for a powerful rapid jab hitbox. The foe takes rapid 1% damage at the same rate as the Koopalings' jab and flinching knockback until they DI away and out of the move. The rapid jab as with many others, including in Ultimate, is an easy way for Ennard to delay the foe in place. Specifically for Ennard it lets him stun the foe a moment for his minions, ranging from the Bidybabs, Minireenas and Metal Slugs to reach the foe, or simply to wait it out for a Metal Slug to get closer to him behind his own back.
The Gentleman/jab finisher version of the move when pressed instead has Ennard punch his other arm forward in a mirror fashion dealing 4% damage and a guaranteed combo after the first hit with great speed, then a final head bash using his mask for 3% damage, sending the foe at the Sakurai angle. The head bash comes out quick but lingers for a disproportionate amount of frames, though despite these long active frames and overall duration, still has low end lag and can combo into Ennard’s high range moves at low percents. The bash keeps the foe grounded at low percents and will be able to KO from 150%. As the move comes out originally so fast, this could be argued as one of Ennard’s most reliable KO options so long as the foe is high enough in percent.
The last hit of the jab using the mask has the unique Trample property shared by Palutena’s shield moves. The mask will go right through other moves with normally higher priority. This is important in Ennard’s playstyle because of his Wire Body mechanic, as this will still count towards it if he takes damage but when he wins trades, he can very easily get back any wireframes that were lost. This allows for Ennard to trade with powerful hitboxes but suffer none of the negative repercussions of losing wireframes. It may seem counter-productive as the third hit in a jab combo, but it simply means that if the foe was brawling Ennard when he jabbed, they have to give him a huge deal of respect in case he chooses to Gentleman them. The rapid jab finisher if used instead, will contrary to that stall out the match further as the foe has to space a disjointed melee move, try to use a projectile or jump over the hitbox to punish Ennard’s static electricity. The potential for the mix up is also boosted by being usable in gas, where the foe can easily wonder into the third hit of jab not knowing Ennard mashed through the first two hits.
DASH ATTACK: FALLING GIANT
Ennard twitches and pulls back his massive upper body, before collapsing forwards into a decrepit pile of wires that reforms back into Ennard in a gloriously long end lag fitting for a dash attack. This is highly comparable to Dedede’s body slam dash attack for lag, but has a much bigger hitbox, and is stronger, dealing 18% damage and able to KO from 65%. Ennard’s a much bigger hurtbox than Dedede so that hurts the foe as far as the move throwing out a safe jab to stump it, but he also has a slight lean back at the start of the move and his dash speed contributes far better to the move than Dedede’s very slow dash speed. This is still a huge read for Ennard to use out of his amazing dash speed rather than, for example, his fast jab, but will keep the foe on their toes just in case.
This move will push Ennard forward a good Bowser width as a pile of wires, reforming at the end of the fall. Ennard can instead angle left, or middle moving the mask’s location to choose to reform his pile of wires to the left or at the middle of his Bowser-sized pile of wires instead. This acts as a nice mix-up to stop a huge punish, though is obviously easy to counter just grabbing Ennard or getting close enough this doesn’t matter. Ennard can use this to scoop up any Metal Slugs or wireframes in front of him on the stage, useful as a way to force throws from mindlessly attacking the Metal Slugs or wireframes. This does leave Ennard open for punishment if that’s his entire game plan, however as the wireframes are a permanent resource to lose, even tanking a hit on the other end of a dash attack isn’t the worst thing that could happen.
FORWARD TILT:BON-BON APPETIT
Ennard’s hand changes shapes into a strangely rabbit-like shape resembling Funtime Freddy’s Bon-Bon, then quickly punches forward while curling up the rabbit ears into a fist. This has 7 frames of start up lag, a few frames shy of the jab, but still packs a punch as it deals 9% damage and will KO from 100%. This can be angled up or down, only altering the damage marginally up/down respectively and changing the angle from a near horizontal one to almost straight diagonal up and down to the right. This is still important though as because of Ennard’s size, even a basic punch has a huge amount of range to it, and can easily combo out of his Eyes and Metal Slug combo on the foe at level 2 or 3. The resemblance is only in the shape as this is another creation of Ennard’s that is made up entirely of wires and being that it doesn’t speak or act like Bon-Bon, this is more than a little unsettling if you like Bon-Bon.
The move has a special follow-up where the Bon-Bon lookalike will perform the jump scare Bon-Bon does in FNAF:SL where its face opens up revealing the inner animatronic. The wires open up the fist uncurls, as where the face would be on Bon-Bon extends in size opening flaps of metal everywhere. This adds a considerable amount to the end lag and the new hitbox now deals a lower 6% damage and radial knockback. This is a useful tool as Ennard doesn’t have a lot of dynamic hitboxes like this and as it can be angled, can potentially force the foe into a tech chase situation if hit into the ground, or to set up a juggle hit from below.
When the fake Bon-Bon hits an Eye on the stage, including from a Metal Slug, they will make a clanking sound and be sucked into the eyeball area of where Bon-Bon would normally have eyes. This deletes the Eye from the stage, though it won’t have the same effect on those connected to the foe. The Eye will show up the next time ftilt is used and cause any loose wire frames within a battlefield platform of the hitbox that haven’t been hit by an Eye yet, to start moving of their own volition like a 1 wireframe Metal Slug in Ennard’s direction. This only last for half a second after the move’s active hitbox activated, and the Metal Slug are merely a weak hitbox that does 3% and flinching knockback to foes. However this can be ridiculously strong if Ennard can manage to trap a foe between Ennard and a wireframe loose on the ground, as the foe will then be caught between the two hitboxes and very easily shield poked by the very low wireframe moving like a slug on the ground.
When the fake Bon-Bon gets 2 Eyes, the follow-up of the move changes – when the Bon-Bon performs the jump scare the eyes will bulge out forward like a cartoon, becoming small hitboxes that shoot as far as an average ftilt does forward, giving the already great range a further boost. While the Eyes only do 4%, they will stick themselves inside a foe if landed, so long as the limit isn’t currently capped on stage. The Bon-Bon then loses these Eyes. This combo of the Bon-Bon moving the wireframes and the follow-up potentially shooting Eyes into the foe can immediately get the foe to the point where they’re infected by multiple Eyes and multiple wireframes at once, leading to Ennard’s best KO confirms such as his down smash.
UP TILT: ARM SPIN
Ennard spins an arm around in a mechanical-looking, unnatural way, going around so fast that the move is far shorter than it'd be otherwise, hitting for a decent 7% damage and low-medium knockback, only able to KO from super high percents. The arm comes out at a great frame 5 initially but will only launch foes up and a little away from Ennard so can't be used to combo except at 0%. The middle of the move where it sends the foe straight up can reliably combo into NAir or UAir at mid-percents, then finally mirrors the first hit knocking the foe behind Ennard. The end lag of the move is not bad either as Ennard's hurtbox doesn't move much itself, besides moving back and forth to brace for utilt.
This is the go-to move both for starting combos and collecting any spare wire frames, in front or behind Ennard on the stage. This will scoop them up in a moment and Ennard's arm has a disjoint in this move on the very end, at his hand. This means that properly spaced, it becomes impossible for the foe to punish Ennard for picking up wire frames.
DOWN TILT: STOMP SCARE
Ennard raises a foot halfway up his massive body, higher than some characters stand, and then stomps forcefully into the ground! This deals a great 12% damage and has a shockwave extending as far as K. Rool's down tilt that pops foes into the air for 3% damage, easily leading into a combo using NAir, or setting the foe up to land into a Minireena or Bidybab. As his foot stomps down, Ennard emphatically twitches around his masked face in ecstasy.
Ennard can spend 1 wireframe to do another stomp in place immediately after the last. Rather than use the same foot however, Ennard takes a step forward and stomps with his other foot. This deals 5% damage and will combo out of the first dtilt. This moves Ennard forward as far as Banjo's down tilt. Ennard will launch the foe at a low, weaker angle than the first hit, enabling him to combo more easily at a close range using his up tilt if the foe DIs in, or by reading them drifting back or staying place with NAir or similar aerials like UAir.
As he presses the foe down with his second stomp, the shockwave is expanded to hit 2x the range. The further away half of this shockwave is the same as the normal shockwave, but the first half is buffed. It now deals 8% and launches foes a good distance, being a perfect juggling tool. The entire earthshaking hitbox has a 50% chance to trip, in which case this is another way to activate a strong tech chase for Ennard.
GRAB GAME
GRAB:CRANE GAME
Out of Ennard’s chest area comes a massive metallic arm, thickly built and comprised all out of wires, this has the same general shape as the Koopaling grab though is absolutely a tether grab, having average lag for a tether grab and reaching around as far as Samus’ grab. Ennard kneels down before he fires the arm from his chest to allow him to hit any grounded foe, even the super low fringe cases, and this is another nice move to minimize his size. When a foe is grabbed, they are reeled back in to be grabbed at melee range by Ennard. If it fails, Ennard’s head twitches to the side curiously, wondering why he failed.
This is another move that is an important pillar in the obscuring Gas that Ennard can create. As a tether it can catch out foes who were trying to bully from outside the gas, especially coming into play when the foe will be trying to hit at the edges of the gas with their longest-range melee attacks to see what’s going on behind it. As Ennard is barely covered by the gas due to his massive hurtbox, just hitting around the edges is a tempting way to let the foe know what’s going on, and this is the number one way to catch them off guard. If they try to do that and attack Ennard at the same time, plenty of more offensive melee ways to punish them that way too.
Ennard can’t normally cannibalize his own minions but this is the one exception. Any Bidybabs, Minireenas or Metal Slugs that are caught by the metal arm will be immediately retracted back inside of Ennard’s body, as a sound effect of crunching metal plays. This is the one way Ennard has to manually gain back any wireframes he’s spent on any minions, though has the obvious drawback of lag. In Ultimate simply whiffing a grab can result in losing a stock, Ennard has to have already won stage control pretty hard to afford to do this. It does however have deceptively, slightly lower end lag than the normal grab does. It will also destroy any eyes it grabs instantly. Minions can damage the foe, but will not attempt to grab them while they are grabbed by Ennard, and will not attempt to perform any grab hitbox on the foe again until 1 second has passed to prevent any infinites.
For the pummel, Ennard will inspect the foe’s face close up for a moment before pounding his very mask into their face, revealing for a split frame his animatrionic face that’s famously seen in all the FNAF jump scares. The first hit of this is slow and deals 2.5% damage a pop, then is much faster for every recurring hit, dealing 1.5% damage each. As in the jab the mask has trample priority. The trample is not relevant to the foe being grabbed but can be a handy, situational tool if the foe had their own traps or projectiles out on stage waiting to punish Ennard for the grab. This is especially relevant in the Ultimate meta with characters like Snake or Pac-Man, and Ennard needs every tool he can get his hands on at his size and weight.
FORWARD THROW: COMPARTMENT CARGO THROW
Ennard’s crane arm from inside his chest grabs the foe, and retracts the foe entirely inside of Ennard into the secret apartment built for Funtime Freddy! Have a fun time. Ennard glitchily twitches all over as crunching sounds can be heard emitting from inside of Ennard, dealing constant hits of 2% damage. After a short while of this, the foe is forcibly launched out of the compartment as the door swings open wildly, dealing 8% damage and firing the foe at an almost straight horizontal angle. All of the hits together deal a damaging 14% to the foe and while it won’t KO until well over 200%, this sets up well for Ennard to harass the foe if they were fired off stage, or to then approach with his great dash speed to punish as they hit the ground. At low percents, this can’t be tech’d when the foe hits the ground and will directly combo into most standards (besides dash attack), though can be tech’d at high percents. This leads into a potential 50/50 where if read, Ennard can punish a normal get up with a powerful dsmash or grab, or punish a tech get up or roll with a jab or even a dash attack in the most fortunate of hard reads.
Ennard can turn this into a Cargo Throw by pressing the button again. Ennard will spend 1 wireframe to cause an echo-y locking sound to play and electricity to shock the compartment, Ennard twitching wildly as he is allowed to walk, and even go off stage. The foe then has to mash out using the same mechanics as DK’s Cargo Throw. Every second inside of the compartment will deal the foe 4% passive damage, and like Cargo Throw, if the foe escapes early they will be released at frame neutral along with Ennard. The foe will break out twice as easy as a normal Cargo Throw, Ennard has to press the button again to use up another wire frame to play the same effects again, this will lengthen the Cargo Throw’s duration to that of a normal DK Cargo Throw. A final wireframe can be spent, capping out at 3, to make it 1.25x as hard to mash out of as DK’s Cargo Throw.
One significant thing to keep in mind is that these wireframes are used up on the compartment, and do not come back normally, so if you don’t get a KO or gimp attempt out of this, it may not even be worth it. Instead the compartment chest area on Ennard will look sore for another 20 seconds after the move ends, and takes that long for the wireframes to naturally recover. On one hand, this means that Ennard doesn’t have to go collect a wireframe anywhere on stage, but depletes his total wireframe count so that it can easily run out and makes him easier to KO.
At the end of the Cargo Throw if the foe hasn’t mashed out, Ennard can fire the foe out of his compartment up, left, right or down. The up throw of the compartment will deal 6% damage and lightly juggle the foe into the air. This can’t be tech’d, so is perfect if Ennard somehow managed to get all the way below the stage to throw the foe to certain death, despite what you’d expect making this the best way to KO foes if Ennard wants to spend all his wireframes on the move. The left and right versions of the move are largely mirrored, shooting the foe at a horizontal angle, only turning around for the one that would turn him around. This deals 5%/6% for the front/back version of the throw and is perfect to space a foe at a straight angle forward, setting up for a gimp attempt. If Ennard can get low enough he can use this to stage spike the foe too DK Cargo style, but unlike the up version, can be tech’d. The down version only deals 3% damage and very lightly fires the foe out, almost releasing them without any firepower to it at all. This is largely just for on-stage shenanigans as the foe will be in frame disadvantage for Ennard to punish them, and can land on top of them with any of his aerials.
As Ennard can have access to his insanely good Jump Scare up special from off stage using up all his wire frames, it’s possible to suicide and make it back to the stage. Just having the 3 wire frames enabling him to get the higher Jump Scare is good enough, though to truly suicide most characters he’d have to have the full 7 wireframes available to dump, and then can never use them again if the foe wasn’t on their last stock, so has to fight in a severely gimped state. As far as deep KO cargo throws go, this one requires a huge deal of commitment.
UP THROW: WIRE TORTURE RACK
Ennard brings the foe in uncomfortably close and partially absorbs them into his wire body, wrapping his wires around them like a snake and constricting them for 5% damage! After enough squeezing the foe is popped out and laughed upward for high base knockback and 11% damage, for a good 16% damage overall. This has high base knockback but will only KO from around 180 on the stage, unless used on a platform, where it becomes the strongest KO throw on a top BF platform. Though this move only KOs fairly late, its high base knockback will set up the foe nicely for a juggle or vertical KO.
During the torture rack wrap on the foe Ennard will squeeze more than just life out of the foe when inside of his Poison Gas. This interaction occurs whether inside of an actual Poison Gas cloud created by the Down B, or if Ennard has turned on his passive, weaker Poison Gas. The Gas will be pumped inside the foe, though not in a horribly gorey way, simply shown by the wires stabbing the foe and glowing pink. When the foe is released from their knockback they will have an effect similar to Hot Curry, breathing the passive gas out of their mouths for the next 7 seconds. Foes have a similar pained animation for this, more painful than curry, because they aren't an animatronic who is meant to store chemicals (most of the time). This does a passive 1% damage a second to the foe. Ironically, this will deal damage to Ennard too following the same rules as his Gas normally does, and has no other ill effects on the foe normally just as is the case for Hot Curry in Smash Ultimate.
A foe that has this unfortunate status effect has more to worry about than just pure damage of course. When Ennard lands his dsmash on a foe and manages to hit this gas, it will ignite into a fire and cause an explosion! This explosion is the size of a Bob-Omb explosion and deals 15% damage on top of the dsmash's normal damage. The explosion will KO vertically at 105%, though the knockback will default to whatever is stronger between the two moves. This works on foes who are prone too, but they can abuse invincibility to avoid the resulting explosion. This passively forces the foe to play more careful and even to attack in front of their mouth to dispel any lingering gas, as it works the same way as normal Gas too.
The gas will only linger for half a second and does not have any obscuring effects like the normal gas, nor does it wear away at wireframes in the same way. This effect cannot stack. Ennard can avoid taking any damage from the foe if he uses the passive Poison Gas that turns it on all the time, as these two forms of Gas damage also do not stack on Ennard. The foe will breathe the gas onto any Bidybab who grabs them, and this can lead them to accidentally destroying it – depending on if Ennard can punish them for this or not, this can be good or bad. The effects in general for this also differ greatly depending on the foe’s height and mouth placement, as very tall characters like Ennard won’t naturally be hit in the mouth by dsmash. To help this, a short trail of gas will follow the foe’s mouth, so if they are in prone or hit to the ground it is possible to instead hit that to create the explosion.
BACK THROW: TRIP WIRE
Ennard releases the foe for a moment and rears back both arms behind his head, then whipping them down at the foe's legs, wrapping around them, or simply the bottom of the foe's model on characters with no legs. Ennard scoops the foe off the ground and flings them up over his head in the opposite direction, dealing 15% and dealing strong knockback, able to KO at the ledge from 135%. As it sends the foe over Ennard's head, and he is very tall, this will be hard pressed to KO, as it also sends at a diagonal up angle. This does force the foe to recover high though, which leads them to being easily frame trapped by Ennard's Side B, and allows Ennard to not go particularly deep to attack the for off-stage either in his gimp attempts.
Ennard can enhance the move by pumping 2 wireframes into the throw at its start up. The whipping arms will not just fling the foe, but bash them against the stage on the other side for 5% damage, bash them back on the front side for a further 5%, then one last time behind Ennard for 11% and slightly higher knockback than the normal bthrow. This adds up to an amazing 21% damage off of a throw, higher than any throw in Ultimate's default roster. More than that it lets Ennard bash the foe into the stage around him so that he can hit the foe into his own Bidybabs, Metal Slugs, Minireenas and into any lingering Poison Gas. It's also useful in that any Metal Slugs or wireframes that touch Ennard's arm during the bashing can be absorbed.
DOWN THROW: WIRE TETHER
Ennard pushes the foe a short distance away and twitchily erects a large wire from his chest, stabbing the foe in their front for 10% damage and sending them at the Sakurai angle! This will never KO, because when the foe reaches a battlefield platform distance from Ennard, the new, metallic tether will kick in, sticking Ennard and the foe together for the next 7 seconds, or until the foe destroys the tether's 20HP.
While the tether is active, it technically defaults to a combination of half movement speed, and half weight for who will win if both characters move in the opposite direction. Whoever has the highest in both will be able to pull the other character in their direction. If close enough, this instead ends in a stalemate where neither character can move. A character standing idle will be pulled along while only reducing the other to 0.9x their normal speed. The tether will start to kick in when they move in opposite directions. When one character is in the air, weight is taken into account far more. The character in the air can be pulled around harmlessly so long as they are much lighter than the one on the ground, and if both characters are in the air, the rules for half movement speed/weight apply again. In short, Ennard will literally always win in the struggle because he weighs from 130-145 weight units and his dash speed is top tier, so the foe will always be struggling to push him in any direction.
This is quite a nightmare for most foes fighting Ennard unless they win neutral and can casually destroy the tether and its 20HP. If Ennard wins neutral, he can keep chasing the foe down despite his powerful moves that would normally hit the foe too far away to chase them further. The tether has many positive effects on Ennard's playstyle as it keeps the foe from camping Ennard, who while having a lot of good traps/minions to throw out cannot deal well with projectiles and has to get stage control to set up in the first place. The best move to showcase how powerful this is, is up special. While it won't drag the foe into the air, it will almost always hit the foe because of the tether pulling him towards the foe, and if the foe is below him the follow-up is equally far harder to dodge.
When inside of Poison Gas, the metal tether will start to degrade like wireframes do. This will make the metal decay and immediately cause the wires to unfurl, becoming looser. This extends the tether to be 1.5x as long and reduces its HP by 1HP for every second it is in the Poison Gas, though will never outright destroy the tether that has to be done by the foe. This can be more useful in some match-ups where Ennard can camp the foe with his Eyes, or zero wireframe Minireenas and Bidybabs.
Ennard will forcibly rip the tether from the foe's chest if he regrabs them while the tether is still active dealing 20% damage and able to KO from 140% at a diagonal angle, one of his most powerful throws. This is not that difficult to do either considering his tether grab, though is harder to do because of how the tether falls apart in the middle of Poison Gas. This is most easily achieved by reading when a foe is just mindlessly attacking the tether, as the metal arm of the grab is a disjointed hitbox (like most tethers) so will beat out any poorly spaced melee hitbox that didn't directly hit Ennard. When grabbed and the tether has degraded Ennard instead pulls out this tether in a dramatic single motion for 14% damage. This cripples the foe in place, like a Level 2 Focus Attack or Ridley's Down B. This lets him simply combo into a faster tilt, such as his jab or utilt, before the foe regains control.
AERIALS
NEUTRAL AERIAL:ELECTRICAL STORM
Ennard twitches more than usual in the air and pulls in his limbs closer to the body, creating static sparks that turn his entire body into a hitbox that drags foes along, very similar in functionality to Mewtwo’s neutral aerial, ending in a weak radial hitbox. This deals rapid hits of 2% damage that can add up to 16% if all hits land, and Ennard’s massive frame is likely the biggest hitbox technically available in his set. This has forgiving short start lag and low landing/end lag. The issue in this move is simply that while technically its range is good, like other super heavyweight nairs, this doesn’t actually go far beyond Ennard’s own hurtbox so has lacking offensive capabilities, and is easily beat out by any disjointed attack.
When landed the move has an electric shockwave upon landing that travels a short distance both ways across the stage dealing 4% damage and light knockback popping the foe off the ground. It’s faster for Ennard to end in the air by a few frames, giving him enough time to attempt an air dodge, or use another jump. This isn’t incredibly relevant except for being a useful mix up utilizing Poison Gas to trick foes trying to come in and juggle Ennard.
Most of Ennard’s body will just hit foes weakly away at the end of the move. There are sweetspots that are stronger located on Ennard’s arms and legs, dealing 4% and double the knockback, able to not KO, but space a good distance. Ennard’s mask has weak super armour and deals 5% to foes, with straight up vertical knockback. The move has very little reach beyond Ennard’s own hurtbox, so if foes get hit by this, they deserve the easy juggle this then creates, if they tried to trade with a melee attack.
The foe can be dragged down into any of Ennard’s set up such as his Poison Gas, or just allows Ennard to drop down on top of his Metal Slugs or on top of his minions where they can punish the foe in his place. Off stage this can function as a strangely useful gimp against weaker recoveries or characters trying to go deep and use melee moves, and getting dragged to oblivion as a suicide-lite move. Ennard isn’t necessarily dead either particularly if he has at least 7 wireframes left to sacrifice so he can jump back up to climb up the bottom side of a stage. This is mostly just a nice pressure tool in those cases, so that Ennard isn’t as susceptible to off-stage gimps, even if in practice this wouldn’t happen all that often.
FORWARD AERIAL: SCARPERING SCRAPE
Ennard looks forward to the side with his mask and faces his body more horizontally in that direction too, then swings all of his four limbs wildly beneath him like a crazed bird flapping its talons. The metallic arms will do an impressive 9% at first, degrading as a sex kick over the long duration of the move to 7%. The knockback is not high, but not low enough to truly work as a combo move either, rather just being a good way to space the foe. Ennard has such massive limbs this attack has considerable reach, hitting foes on the ground if he was just above a battlefield platform. The limbs will all do their own damage/knockback and will rarely combo except from against other big hurtboxes, comparable to how the Gordo might hit Bowser a couple of times.
The limbs come out a little in front but mostly below Ennard, the first limb striking at foes at it swipes down and ends by striking a little behind Ennard too, all the limbs following the same pattern. Over the course of the move, this will first hit the foe a little in front and down, able to spike off-stage though not very powerfully, and eventually will hit foes directly behind Ennard for the same knockback. There's a sweetspot just below Ennard where the limbs will hit foes straight down for a proper spike on par with K. Rool's DAir. This is one of the most tricky ways to fool a foe into getting spiked if they hang onto the ledge too long, as the move looks like it's just trying to scare them away from getting up normally. It can even cover multiple options at ledge in this way, but is obviously punishable by ledge attacks if too close, or waiting it out if too far away.
This move has a huge amount of hitboxes to utilize as various parts of the move's animation. When launching foes forward at the front and backwards, Ennard can drift around the foe next to the stage and stage spike them. Ennard has a mediocre air speed so this is more of a hard read than a genuine mix up, as he has to manoeuvre is massive hurtbox into position in advance. This is another reason why Poison Gas can be really helpful, and perhaps the best example of when airborne Poison Gas is great. Ennard can buffer the start of the move and drift over the side of the ledge as the move ends, to go for a stage spike that's impossible to predict. This pressures foes from going low if Ennard conditions them by using the gas at the ledge, rather than going for a gimp, he can then mix them up by actually going for a gimp. This is needed for Ennard to get a drop on foes as normally going off stage is suicidal for his aerial averse statistics.
BACK AERIAL: WIRE DRILL
Ennard braces both arms in his front and then punches them both backwards as wires gather around them, creating a large singular drill of wires! This impressive looking creation of wires is a huge hitbox, comparable to the Koopalings fsmash drill in size and does one powerful hit of 16% damage and sends foes at a diagonal, mostly horizontal angle, to KO from 90%. Off stage this is a great KO move, though will obviously never spike. The move has a generous hitbox at the tip and for most of the drill that deals the powerful hitbox, though there is a sourspot closer to Ennard's main body that deals only 14% and will KO at 120% instead.
The bair has the same start up lag as Mario's FAir, and being that it doesn't spike and thus only works as an off-stage gimp, or at fairly high percents, it's saved somewhat by its huge range and average end lag. What helps salvage it too is that it's another hurtbox-shifting move in Ennard's set as he ducks in his feet as he goes to perform the drill. This can let Ennard sweep in over an opponent's attack. The move will also turn around Ennard, and given his lumbering aerial statistics, this is a crucial aspect to keep in mind.
On stage the move's huge hitbox and how it's shaped make it a perfect way to pressure shields and shield poke. The move can strike right at the corner of a shield with ease and will push the foe away enough they will find it hard to punish the end lag, spaced correctly. This depends on the foe's shield/the foe exactly and requires some good timing/spacing on Ennard's part, but becomes fairly good as a RAR back aerial when this is mastered.
UP AERIAL: MASK IN THE BOX
Ennard pops his mask down and squirrels it into the rest of his body, quickly popping it back up as a small, but fully super armoured hitbox that has trample status like his other mask moves. The mask deals a weak 6% damage and weak juggling knockback, able to combo into itself once at 0%, though this is obviously unlikely to happen in a normal match. A mask might sound like a small hitbox but due to Ennard’s size, the move has the fastest start up of any of Ennard's aerials and low end lag. On landing, the mask will still pop up for the same hitbox, at the cost more awkward landing lag. Given the type of juggling move it is, that's a good trade-off to be able to activate the uair even faster if the foe is trying to trade from in the air, as yet another strong anti-air option for Ennard.
This move can be enhanced by pressing the same button again as a follow-up, spending 1 wireframe if it is available. At the apex of where the mask will pop out, two Eyes will shoot out of the top of the mask as well, firing all the way off the top of the screen as disjointed hitboxes! These Eyes act independently off the Eye counter and don’t follow the same rules, merely being hitboxes around 1.5x the size of a normal Eye dealing 6% damage and weak upwards knockback. The real purpose of this is to pressure foes who are trying to land and high in the air, most likely because of a uthrow or up smash that sent them there. Ennard’s height alone means much of his basic set easily gets foes high in the air to punish them and go for the potential star KOs when a foe is getting too cute close to the top blast zone.
DOWN AERIAL: PREDATORY POUNCE
Ennard enters a classic stall then fall animation where he dips his mask-covered head back in midair, and flips over in midair before falling, all four limbs level and pointed towards the ground! Ennard falls at a high speed for a stall then fall, collapsing down with a powerful 18% damage spiking hitbox that has a 15% damage landing hitbox, and a small 3% hitbox shockwave on either side upon landing. The start up for this is naturally high, and the landing lag is also poor. The move will come to a natural end in midair after going down 3 Ganondorfs and due to Ennard's recovery potentially being great, this can be used in creative ways to chase the foe far under the stage. Ennard doesn't have any armour or special defence during the move however, so will get beat out by any recoveries that have those bonuses.
The stall is a nice built-in dodge button too because of its animation where Ennard uncharacteristically flips backwards to make his limbs all level before the fall. This lets him dodge out of the way of moves directly beneath him that would only barely touch his hurtbox, then immediately punish. The falling hitbox has a huge range itself too as Ennard stretches his massive body out to both sides. This gives the hitbox the insane range of 1.5x Bowser's width.
When Ennard lands, similarly to his up special, wireframes can be sacrificed to perform a follow-up. When 3 wireframes are available Ennard will fire out all these wireframes underneath his limbs as he lands, seeming to "ingrain" them into the stage like a bunch of metallic roots. This gives the move far faster landing lag comparable to an average FAir in Ultimate, getting rid of most of the risk involved in the move. As it's much faster, this means that nothing short of a dodge will suffice for the move, because the foe will end up getting hit by Ennard after he lands if they simply try to roll, and the move will destroy shields if it lands both hitboxes like Super Dedede Jump typically does.
The wireframes used up in this follow-up will remain ingrained in the stage for another 5 seconds equally placed along the stage, and re-appear as normal wireframes once that time has elapsed. This is mostly a negative for Ennard as he loses them for that time, but also means if the foe does whiff, the foe can't hit him away and immediately destroy the wireframes. For this short time, Ennard is able to draw on these underground wireframes to power up any moves that use wireframes, but has to be stood on top of this patch of ground to do so. This simply means that any moves that require wireframes will utilize the wireframes embedded in the ground. This has Ennard passively and yet forcibly drain the wires out of the ground through his feet during the relevant part of any move. In some match-ups this can be a good strategy to have any wireframes available against a particularly aggressive foe.
FINAL SMASH
THE PERFECT DISGUISE: A SMASH BROS NEWCOMER
Ennard rises up both arms and pierces the ground beneath him in his super attack, summoning a web of wires that rapidly dig across the ground in front of him, covering a huge range that expands across the entirety of FD and will wrap around the stage like a Hothead item. The one weakness of this is that it can’t go off-stage, similar to Ennard’s normal playstyle. The wires are unblockable and will launch the foe into a canned cutscene. This only works on one foe at a time, anyone hit after that (the lucky ones) will instead be dealt 40% damage and launched to be KO’d at 60%.
For the foe that was hit first – very much the unlucky one – they are teleported to a scene similar to the Scooping Room in FNAF: Sister Location, as the game enters a first person perspective. What can be seen is the Scooper pointed at the foe, and the above image of Ennard, minus his outer shell/mask looking on as the Scooper does its work, stabbing right into the camera and the foe. The foe then immediately loses a stock.
Strangely, the action cuts back to the match and despite losing that stock, Ennard has disappeared and the foe remains! Only when the foe, which is now for some reason using Ennard’s HUD and stock count, is KO’d, or 10 seconds pass does the foe finally respawn! However if this charade continues for long enough – a full minute – this disguise starts to fall apart just as it did to the Michael Afton in FNAF:SL. Their character model becomes tinted more and more heavily purple and after a minute passes, collapse in a stamina match KO, spitting out a Purple Beam-style mess of wires and eyes from Ennard. He then respawns as Ennard. For all the time that he is disguised inside of the foe Ennard will use the foe’s moveset. In a 1v1 match, this simply KOs the foe immediately and they respawn to fight themselves in a mirror match.
Hey. This set isn't an opposite set. In fact, it's quite the opposite, I'd like to think, but I'm still submitting it to the Opposite Day event because... uhhh... why not, really? It's the opposite of what Warlord would make and I think that's good enough. [artwork source]
Mina is an original character from the same universe as Hee-mo, albeit only becoming relevant several years after Hee-mo singlehandedly ruined the National Pet Fight League. A few years after it shut down, a far worse fate came to befall the entire world, starting with a strange event out in the depths of the jungle. A strange mutation in the DNA of a plant out in the woods caused it to grow explosively, and take on strange, outright mystical properties. As soon as it was consumed by an animal, the effects of the DNA began to spread through the ecosystem, and the jungles exploded forth into human society, overrunning cities as the wildlife became so overwhelming even the military could not hold it back. To make matters worse, rather than giving superpowers, the gene is specifically incompatible with the human body, resulting the swift death of anyone who consumes food with that contains it. The human population was cut to a mere tiny fraction of its former self, desperately trying to cultivate food they could still eat while securing themselves against the horrific wildlife that lurked outside.
To combat this gene that seemed like the perfect storm of disaster for humanity, scientists brought it into a lab to study it, and create a counter, a gene that would neutralize its effects. While its creation was successful, spreading it back into the environment was proving incredibly difficult, as it failed to spread on its own merits at nearly the rate of the gene it was meant to neutralize. They needed someone to spread it for them, someone who could fight back the encroaching tide that was going to bring about humanity's extinction. That was where Mina Aquila came in, an engineered super soldier of sorts who was picked as the person to fight back the tide of monstrous wildlife. A spirited young woman, she was picked for her almost absurd optimism in the face of what seemed like an unstoppable threat, when almost every other candidate seemed like they barely had the spirit to go on. Given the ability to create plants from her body, she was able to proliferate the counter-gene in a way that was not possible before, and also protect humanity from the encroaching threat.
While initially her work was not especially successful, due to effectively working alone, that all changed when she encountered a strange stray creature, a descendant of one of the creatures from the National Pet Fight League. A guinea pig-like creature that walked around on two legs, Mina rescued it and took it into her care. Grateful for its rescue, and somehow still uncontaminated by the mutating gene, it agreed to be genetically engineered to aid Mina in her attempt to fight back the tide. The guinea pig took on the name Ginny, and Mina quickly took to parading him around as a symbol of hope for the human populace, partially on the basis that as far as she was considered, he was an incredibly cute creature. Mina holds the (possibly incredibly stupid) believe that cute mascots have a kind of power with people, and seeing one fight back the monsters of the world really might be what the world needs. Taking on a ridiculous and somewhat flamboyant magical girl persona to go along with her mascot pet, the duo began to actually push back the tide of monsters and revitalize humanity's hopes.
Eventually, however, Mina would have to face the source of this gene, the ultimate antithesis to the power of cuteness that she claims to channel. Hee-mo, absorbing the blood of countless humans and animals alike, had evolved to the point its sheer hatred created a bioweapon in its body that would annihilate all of humanity, the very gene that had caused the explosion of monsters and plant life. Now having developed full sapience and speech, Hee-mo had only grown vastly more powerful since creating the gene by absorbing the new lifeforms it had created in massive quantities, and upon seeing Mina made it his mission to wipe her out and crush the hope she had created for humanity. More than happy to try and break her spirit, Hee-mo happily told her of the unsettling underbelly of the pet fighter league that drove him to become the monster of pure hatred he is today, and that the cuteness she cherished was a poison only destined to create more monsters like him even if she were to succeed. In the face of such an overwhelmingly powerful enemy whose very existence questions the value of adorable mascots, can Mina and Ginny truly prevail?
Appearence
Mina is not a particularly tall woman, standing at 5'4", but she makes her presence known with her over the top color scheme. She has bright pink hair that comes down a bit past her shoulders, with a short side ponytail. Wearing a knee-length pink skirt and purple tights underneath it, the ridiculous look is amped up by her choice of shoes, sneakers with a small image of Ginny on the side of each. Her shirt has some rather frilly sleeves is a slightly less bright shade of pink that her skirt and hair, with purple coloration on the inside of the frills. While they're hard to see as they're very tiny and colored to blend into her clothes, there are a few rectangular metal chips on her body which were placed there to augment her abilities. They're that hard to see because she wants it to look like she's magical, even if her powers are technically biological and mechanical in nature.
Ginny's body is guinea pig based, but his face looks like your standard happy anime animal with big eyes and an eager smile usually on his face. Think very much along the lines of Pikachu. His fur is a brownish orange color and he stands at about a third Mina's height when standing on his two feet. His front paws are modified to be a bit more hand-like, with short stubby but still functional fingers. He is a bit fat, even by Guinea Pig standards, probably because Mina spoils him with too much food, but it doesn't seem to impair his fighting abilities.
Stats
Mina stands at a bit under Marth's height and about the same width, which doesn't make her a small target. That said, she does have a pretty great crouch/crawl, able to press her body surprisingly close to the ground and move at a not terrible rate along the ground, so in terms of avoiding hits you at least have that. This is important because as far as weight goes, Mina is depressingly frail, clocking at 79 units and tying Pikachu and Kirby to fit in with the actual cute mascot characters. Her mobility stats are okay, but nothing to write home about, with the most notable one being that her gravity is quite low and her jumps go pretty high. This gives her nice air time, but her air speed is a bit below average so its not as easy to use as you might want. Low gravity also means you die off the top of the screen even easier. Her run speed is okay, clocking in at 1.815, putting her above Rosalina and below Pit.
As a side note, Ginny will usually either cling to Mina's back while she's moving about, or get on her shoulders when she's standing in place. You can deploy him to fight for you in the moveset, and we'll get to how. He's a third Mina's height and, while wide for his size, overall a very tiny hurtbox. When he's out fighting for Mina he can take 30% before he is KO'd, disappearing in a puff of smoke. He'll pop back up on Mina's shoulder 5 seconds later, seemingly appearing out of nowhere. While Ginny is gone, Mina's expressions get a bit more serious and distraught, and she expresses slight relief to see him come back.
Specials
Neutral Special - Petal Storm
Raising one arm forward, Mina releases a stream of petals from her sleeves and the frills on her arm. The stream can be angled up or down by pressing up or down during the firing animation, and pressing forward or backward will cause the color of the petals fired to change. By default, she fires purple petals from her arm, which come out as a series of six tiny projectiles that come out in a line and deal 2% each. Each petal flinches, except the final one, which actually deals knockback that will KO around 240%. They only travel 3/4ths the length of a battlefield platform before losing this hitbox, and start to just lazily drift along in the air in slightly more erratic, random-looking paths where they deal 1% and no flinch on contact. They overall move forward very, very slowly at this point, traveling a bit faster than Luigi's fireballs on the initial release but then only traveling forward 2 battlefield platforms over the course of their 4.75 second lifespan.
While the paths the petals take look randomized, they cycle between two sets of flight paths, switching to the next one each time you fire this move off. They mostly just bob up and down in the air, with the width and height of how far it goes up and down depending on which petal it is. The danger zone from the original hitbox where you can be hit by a petal is about the height of Ganondorf, but given how weak these petals are its really not a big deal if the opponent gets hit by one. The start up lag on this move is also not fast, having the equivalent of above average lag for a Smash Attack, so its a bit hard to just litter the air with these, but if you get enough space there's technically no cap on the amount of petals out. That said, they disappear on contact with the opponent, the ground, or basically any construct, so its hard to get THAT much mileage out of them.
These purple petals are the basic variety, the razor petal. If you tilt forward, however, you'll get red petals that will only deal 1% and flinching on their initial flight and no damage or knockback at all once they've reached the secondary, less powerful part of the range. They do at least push the opponent back and flinch enough you won't get punished on hit. They'll do nothing while attached to an opponent at first, until you get 5 or more petals attached to them. Then they will start glowing red, and will hum three times at one second intervals before exploding. Once a petal has stuck to the opponent it will stay there for 8 seconds, giving it a longer lifespan now that it has something to cling to. The petal blast is by default as big as a Bob-omb blast, dealing 14% and knockback that KOs at 155%, making it much more powerful than the razor petals in exchange for being harder to actually pull off. It can be shielded or dodged, and opponents will see it coming, but it can also layer a second hitbox for the opponent to dodge if you use it properly, so its not just worse.
The explosive petals can stack if you manage to get 6 or more on the opponent, increasing the damage by 2.8% for each additional petal past the first 5. The knockback will scale with the normal smash knockback formula for this, pushing the KO percent down to scary low percentages once you get 8 or more petals. Obviously you can only get to 6 off a single shot of this move, so you're going to have to do some setup to land a bigger blast. The explosion is also increased by .2x the size of a Bomb-omb blast for each petal past the fifth. The power does cap out eventually at 15 petals, because at that point the opponent will almost certainly die in the explosion.
The last kind of petals you can produce are pink petals, produced by tilting backward. These have the same minuscule power as the explosive variant when first released, and also are liable to stick to the opponent, but this time only during the initial hitbox at the start of their range. These petals serve two different purposes depending on whether they're attached to the opponent or just floating about in the air. If attached to the opponent, they will react to Mina attempting a grab, exploding into thin vines that extend off the opponent's body to allow her to grab them, effectively giving her a tether grab without the added lag. The tether has a base range of only 0.1 Battlefield Platform horizontally toward Mina from the foe with one petal, but for each petal on the opponent adds another 0.1 Battlefield Platforms worth of range. On top of this, Mina's throws upgrade if you have 5 or more pink petals on the opponent, and those upgrades actually scale in quality the more you have. That said, you'll waste the pink petals on the opponent if you grab outside the extended reach they give you. Like with explosive petals, they fade 8 seconds after clinging to an opponent. In an FFA with multiple opponents, Mina will simply have the vines extend off the nearest one to her.
Lingering in the air, the petals serve a different, but similar purpose. If Mina uses an attack that uses her melee combat abilities, like a punch/kick/headbutt/whatever, pink petals within range will swarm in to surround her for that attack, powering it up. Only petals within a half of a battlefield platform of Mina will be pulled to her for these attacks, and 0.5 seconds after the end of the end lag will return to their normal flight pattern, continuing from right in front of Mina's body. The fact that they will follow Mina's position means she can drag them around a bit to keep the buff going on multiple melee strikes, though the still have a short lifespan and if you get hit out of the way you're going to lose the buff. You need three pink petals in range to trigger any buffs, but some moves can use more than that to get a bigger one.
As a final note, a small red number will appear next to the opponent's portrait to indicate the number of explosive petals on them if any are attached. A pink number will appear slightly to the right of it if any pink petals are attached. This makes it easier for both the Mina player and the opponent to keep track of her petals.
Side Special - Go Ginny Go!
Mina points her hand out and shouts the name of the move as Ginny jumps off her body and rolls forward, traveling forward 2 battlefield platforms at Fox's dash speed. Ginny is a hitbox that deals 8% and KOs at 230%, which for a projectile that's a bit on the slow end to fire is adequate but not amazing. You can angle this move up or down to get different results, with the upward version having Ginny jump in an arc that goes just as far, but only dealing 6% and diagonally mostly forward knockback that KOs at 270%, traveling at the same speed and going in an arc that goes up about 1.2 Ganondorf heights. The downward variation will have Ginny only travel half as far and 3/4ths as fast, but then spin around on the ground in a similar animation to Wario's Down Smash. The initial hitbox on the downward version only deals 5% and knockback that will basically never kill, but the spin actually deals a solid 11% and upward knockback that KOs at 175%. While the area it covers is not terribly big because of Ginny's body, it at least lingers a little while. The end lag on this move is enough that the combo potential of all of these is a bit limited, but Fair can still at least get the job done, especially if its buffed with pink petals for reasons we'll get to.
Ginny will hop back to Mina from his position after the move is over, his jump pointed directly at her but not homing in on her. This lunge deals the same damage and knockback as the upward variation of the move, and allows Ginny to function a bit like Link's boomerang. That said, if Mina gets out of the way of Ginny's return jump, or is knocked out of the way, Ginny will just end up landing where Mina was... or possibly plummeting off the edge if she was off stage or high above the air near the edge of it. If he falls off an edge, you'll have to wait for him to respawn, which is definitely not ideal. As an aside, if used in the air, Ginny will travel in a slightly downward arc during the forward and downward versions of this move, and will need to land to perform the spin at the end of the downward variation or jump. If Ginny is left sitting around, subsequent uses of Side Special will just have Mina call out his name and have him jump back to her the same way as he attempted to the first time. There are uses for having Ginny out on stage, and we'll get to those as the set goes on, but if you come into contact with him he will climb back on Mina's back.
If Ginny passes by a petal, he will store it in his cheek pouches, which are admittedly a hamster thing and not a guinea pig thing. That said, the NPFL probably spliced some hamster genes in there. This stores them away, causing their timer not to tick down while Ginny has them, and also increasing the damage of any of his lunges or rolls by 0.5% for each petal collected. That may not sound like much, but it can add up considering how many petals you can throw out. Ginny can collect a maximum of 20 petals for a 10% increase to all his damage, which will also push his power into KOing range. In the down variant, his roll on the ground actually recieves twice as much of a bonus from petals he has stored away, meaning you can potentially add 20% to its damage to make it deal a ludicrous 31% with super powerful knockback. That said, actually getting a large number of petals attached to this hitbox is pretty hard, but if you send him rolling through a few of them it will still turn this move into an actually serviceable KO move.
Once Ginny has returned to you with flower petals stored away, the next use of Side Special will cause Ginny to blow all the petals he's stored away back out in front of Mina with minimal lag, with the same hitbox they had on their initial release. This means if you somehow stored 20 of the purple petals, this is a low lag attack that deals 40%, which is pretty absurd but good luck getting that kind of setup. This does reset the timer on petals before they vanish, so its a pretty useful tool for refreshing their existence. You can also, of course, use this to accumulate more petals by having Ginny repeatedly jump through clouds of them Mina throws out and then hit the foe with all of them at once to potentially deal either massive damage, set up a ludicrously powerful time bomb, or beef up Mina's melee immensely. Or you can just repeatedly use him as a powerful projectile. Just keep in mind that Ginny is fairly frail and if he is KO'd, you lose all the petals you've stored up.
Down Special - Fruit of Life
Enthusiastically doing a twirl on one foot, Mina briefly becomes a hitbox that deals 8% and knocks opponents away a fixed distance of one battlefield platform. Unfortunately this hitbox is pretty close range and the set knockback means you'd never get much of a traditional combo out of it, but that's not really the point of this move. At the end of her twirl, Mina chucks forth a seed from her hand, which flies up a short distance into the air before burying itself on the ground in front of her. The seed is half the size of a Pokeball and only deals 4% and a flinch, and if you use this move off stage the seed will just fall off the edge and do nothing. If there's any ground for it to land on, however, it will plant itself in it. The seed toss part of this move makes the whole affair end up pretty laggy, but you probably won't be punished if you land the first hit at least.
5 seconds after landing on the ground, the seed will grow into a small tree, about the same height as Villager's tree but not nearly as wide at the top. This tree has 25 stamina, but any "big" hit of 15% or more will topple it instantly. The tree has a single red fruit dangling from it, which Mina can pick off the tree as though she were picking up an item. This functions as a throwing item, dealing 8% on a normal throw and 12% on a smash throw, with the former dealing underwhelming knockback that will only KO at 300% and the latter dealing knockback that KOs at 160%. You can also press A to eat the fruit, healing 6%. This is not a huge heal and acquiring the fruit is not terribly easy to begin with, but its something to help with Mina's severe durability problems in a pinch. Using it as a throwing item is also potentially powerful, as throwing items generally provide a great deal of projectile pressure/combo utility, but its a bit difficult to get.
You can feed this fruit to Ginny when he's out on stage, and if you do he will make some pleased squeaking noises as he performs a special attack! The red fruit will cause him to fly up a Kirby height above his current position and spin with a red aura around him in the air, the red aura extending his hitbox to actually be a bit larger than Kirby. He spins for a solid 1.3 seconds, a hitbox the whole time that deals 11% and radial knockback that KOs at 200%. The lingering nature of this is what makes it strong, as it provides something for Mina to combo the opponent off with her attacks, or just zone the opponent out of a significant area of space. You can also potentially use this a bit like the bumper item against an off stage opponent, which sounds terrifying until you consider how short this lasts and the fact that it will probably cause Ginny to plummet to his death. As a final note, Ginny is totally invincible during this move, so this can serve to protect him if you need to.
Stored flower petals will slightly buff this move, with each stored purple petal increasing the damage by 0.8%. If you get 20 purple petals specifically that makes this a very powerful hitbox, but this means you'd need to max out Ginny on just purple petals. Red petals will slightly increase the range of the red aura around Ginny, doubling its size at 8 petals and tripling it at 20. Pink petals will increase the duration of the spin, by 0.2 seconds per petal, allowing Ginny to function a lot more like a proper bumper. There is a lot of setup required to get to this point, but the end result is a potentially impressively strong and long lasting hitbox for Mina to play off if you get that far. Or you can just assure an off stage opponent dies with this, because recovering through a particularly large and long lasting version of this is hell on earth.
The tree will generate more fruit over time, creating one every five seconds it remains out on stage. This is good, because the tree does not take friendly fire from Mina and she can only have one out at a time, so if it sticks around you don't have to worry about losing access to your healing or the powerful attack it gives Ginny. The foe can still easily destroy your tree, mind you, and they will want to if you're holding onto a fruit for a very specific reason. If you throw a second fruit to Ginny while he's already whirling about, a big pink heart will form around Ginny. He will then fire a pink laser in Mina's direction, and Mina will respond by firing her own pink laser. These two beams have infinite range and deal 15% and upwards knockback that KOs at 110%, and at the centerpoint of their collision there is a Bowser-sized and heart shaped explosion that deals 25% and upwards knockback that KOs at 70%. This hitbox is massive, basically as big as whatever the space between Mina and Ginny is, and takes surprisingly little lag on Mina's end to pull out her part of it. As such, the opponent REALLY does not want Mina getting two fruits, as then it no longer matters what Ginny's petal collection is, this is about to hurt.
Up Special - Butterfly Ascent
Large purple butterfly wings burst from Mina's back as an excited expression crosses her face, before she dives in any of the eight directions, similar to Pikachu's quick attack. Her flight is considerably slower than Pikachu's, but she goes a tiny bit further, dealing 6% and weak horizontal knockback that will lightly bump the opponent out of the way on contact, but no more than that until the foe is at insanely high percents. Like Pikachu's quick attack, there's an initial burst of flight in a given direction, and then you can angle it in another direction to send yourself flying in that direction, basically serving as two quick bursts of movement back to back.
When Mina launches herself in a given direction, she produces a small wind hitbox around herself that pushes things in the opposite direction. This not only shoves opponents lightly, but also pushes around petals, refreshing them into their original hitbox of dealing 2% with purple petals and 1% with the other two varieties, traveling .75 Battlefield Platforms before going back to their lazier flight pattern. You can occasionally use this to cheese recoveries, but the wind hitbox is pretty small against her body, and requires a pretty specific positional setup for both yourself and the opponent, so while potentially a scary option its very situational.
On her second burst of movement, the power of the wind hitbox will actually increase, as well as its size by a very slight margin. Aside from just improving the move's ability to gimp, it will also increase how far the petals fly before reverting to their pattern to 1.25 battlefield platforms. In addition, the sharp edges of the purple petals will cause their damage to scale considerably now that they got shoved around by a more powerful wind hitbox, dealing 3.5% per petal instead now and actual knockback that's slightly more than a flinch. They'll still combo together pretty reliably until absurd percents, meaning you can get a lot of damage out of reusing your purple petals like this. The other petal types are only buffed to dealing 1.5% and the usual flinch, but if you have a lot of them out the extra damage can add up.
If Mina's flight comes into contact with Ginny or a cloud of pink petals, she can press a direction on contact with them to either draw in power from the pink petals or have Ginny give her a boost, allowing her an additional "launch" every time you do this. Five pink petals have to be within half a battlefield platform for this to work, and they are used up. Ginny can only do this once per flight. The thing that's scary about this, however, is that each "launch" increases the power of the wind hitbox Mina creates another stage. This will cap out at five jumps, which is pretty hard to achieve, but if you hit the foe with the still small windbox on the fifth jump they will actually be launched quite far by the wind hitbox, enough that if you hit it at the edge of the stage a character with a particularly weak recovery will not be able to make it back, let alone off stage.
The power of the purple petals that come into contact with this scales pretty dramatically. At 3 launches, they each deal 6% and knockback that KOs at 280%, which runs the unfortunate downside that they no longer combo together once you reach around 70% or so. That said, below those percentages you sometimes can just hit the foe for 36% out of nowhere with this with very specific positioning, which is pretty scary. They'll also fly 1.75 battlefield platforms in length at 1.5 times their initially fired speed. At 4 launches, the distance increases to 2.25 battlefield platforms at 2.25 times their initially fired speed, and purple petals now deal 14% and knockback that KOs at 125% on contact. They no longer combo together barring some pretty bizarre circumstances, but if you line them up right this can make for a surprisingly effect KO projectile. At 5 launches, they go 2.75 battlefield platforms almost instantly, dealing 25%, and KO at 55%. The setup required to actually land this is an incredible stretch, you have to launch the petals out behind you into the opponent after specifically the final bounce which you needed Ginny and 2 pink petal clouds or 3 pink petal clouds to achieve. That's not terribly easy, but your reward is a hard to dodge projectile that will obliterate a shield and still hit afterwards, while also being hard to dodge and having immense range. You've earned that kind of power if you set it up properly, especially since angling it right is a weird prospect.
The other two types of petals do not crank up their power nearly as much, only raising to 2%, then 3%, then 5%, but it does at least increase their flight range. As a recovery move, with all the fancyness out of the way, this is actually pretty solid on its own, with huge recovery reach even if the hitbox is not great and it lacks the potential offensive abilities that Pikachu's Quick Attack has with its cancelling options. It can also situationally gimp people and recover simultaneously if you have an off stage pink petal cloud. This is a very potentially powerful move, but even if you're not getting its niche power output, its a good recovery.
As a final note, Mina can cancel out of this move, but the requirements are fairly specific. Mina can only cancel it at the end of a launch, so she cannot cancel right as she's about to gain an additional jump from Ginny or a pink petal cloud. She also cannot use this after her last launch, as she just goes into helpless in that case. That said, this means you can cancel after a jump off a petal cloud or Ginny, and then still have one more use of Up Special left over, free to pressure the foe with your aerials. The other downside to consider, however, is that Mina takes 4 frames to cancel out of the move, making it a lot more awkward for her to do some kind of ladder combo setup than say, Bayonetta, and can possibly end up with her at a frame disadvantage if improperly used. While these conditions are awkward, the sheer level of mobility this gives you is insane and lets you go for gimps and consecutive pressure you could never manage otherwise.
Standards
Jab - Branch Combo
Mina conjures a branch in her hand, covered in small purple flowers. As she's doing so she jabs it forward, with a bit less lag overall than Ganondorf's jab while dealing 3% and very slight horizontal knockback. This will combo into the next hit of jab at low percents but otherwise is not a great combo tool, instead taking on the role of a spacer at higher percents. Given Mina's lackluster close range options without pink petals around, its nice to have a quick spacer, but its unfortunately not as fast as a lot of jabs in the game so you won't get quite as much out of it as you'd hope. At very low percents you can combo this into Forward Tilt if the foe is not at the edge of the move's range, which makes it a bit easier to set up combos with that move as we'll get to.
The second hit of this move turns it into a repeating jab, as Mina starts spinning the staff in front of herself in a circle. While it reaches slightly forward, it turns incredibly fast and will actually cover most of her body except parts of her back, giving this move quite a bit of coverage to ward off approaches. Rather than dealing rapid damage, however, it instead knocks the opponent away with 4% and medium set radial knockback. This serves to space the foe to a safe distance away from Mina, where she can abuse the enormous range her smashes give. Its worth keeping in mind that Mina's smashes are not all that strong without a bit of setup and this doesn't combo directly into them, but it does put you at a range and spacing advantage.
This staff spin also combines nicely with Ginny's attack when fed an apple. As both of these are static hitboxes that have decent knockback, the foe can easily get bounced between the two of them for a surprisingly powerful burst of damage if you're close enough for this to hit the opponent into them. That said, you have to be very close to get this working at low percents as the base knockback of Ginny's own spin is not very powerful, and at higher percents the foe will escape for a peculiar reason. If the time between the foe getting hit is short enough, they will instead go flying past Mina as her staff hitbox cannot hit the same target multiple times within a specific, small window. This window is a couple frames longer than it takes for the foe to get knocked from her branch into Ginny at the full distance this attack can knock the foe, so if the foe comes flying past you fast enough you will either hit with the back of the hitbox and knock them away or whiff entirely, ending the combo. They can also directional influence out of this trap, but they'll usually take 2-3 hits from Ginny and Mina each, taking approximately 30-45% in the process depending on a couple factors. Also keep in mind the closer you are to the opponent, the lower a percentage they'll need to get knocked past you as they will collide with your spear faster. At very specific percents you can get 4 hits from both, which will deal about ~50%, an absurd amount to get off a jab, but you need a pretty specific setup to pull it off.
The last hit, which can be performed out of the infinite combo, has Mina take a long stride forward and smack her branch against the ground. This deals 5% and mediocre diagonal knockback that KOs at 220%. If you're using the infinite jab version to stuff approaches but the foe weaves around it, this gives you a last chance to knock them away anyway, but considering there isn't any good way to combo into it this finisher is not all that great. That said, sometimes with the right setup any hit that is okay at starting combos will be good enough to work, and it gives you a backup option to smack the opponent out of their approach if need be. As a final note, the way the three hits chain together is actually safe on shield if you combo Jabs 1-3 together, as Jab 2 and 3 will push the opponent far enough away to give Mina some space even if they do shield. If the foe is particularly close you can actually land 2 hits of Jab 2 on shield, which is a non-insignificant amount of shield damage, too.
Forward Tilt - Flower Palm
Mina thrusts out her hands, palms forward, in an attack that only deals 7% and weak horizontal and slightly vertical knockback will only KO at downright unreasonable percents. The range on this move is not great, and it does not come out as fast as you might hope for this type of move, but the end lag is really low so it'll combo nicely into your aerials. While excellent at starting combos, its range and the fact that a number of similar moves beat it out in terms of lag prevents this move from being terribly reliable.
This move's weaknesses are covered for some by the buff Mina gets from lingering pink petals coming to her side. The petals will form a multi hit in front of her at the start of this move, adding an additional 3 hits of 1% at the start of this move and dragging opponents into the main hitbox. This extends the range forward to give this actually well above average melee range, and also the petal hits will strike slightly earlier in the start lag, cutting out both this move's major weaknesses. This means Mina has an exceptionally good way to start combos as long as she has a pink petal swarm around her, which is one of her most important reasons for leaving those lying around.
This move has a follow up where Mina will shoot a spinning white flower from her palms, which travels slowly forward at King Dedede's dash speed and deals 6% and weak upward knockback. At low percents, usually below 50% unless a foe is exceptionally heavy, this combos out of the base hit and puts the foe higher up in the air for more vertically oriented combos. Unfortunately, using this as a combo tool is extremely situational, because the end lag is quite a bit worse than the original move to the point you're going to get punished on hit for it at super low percents, though in about the 30%-50% range it sets up nicely for your Fair/Up Tilt even if it doesn't true combo into them.
The real incentive behind the second hit of the forward tilt has nothing to do with chaining the two hits together, even if that can very situationally maximize your damage output. No, what you want to use this for is the fact that this is a slow projectile, which is useful for two purposes. One, the fact that it moves slower than Mina means she can dash ahead of or alongside it to supplement an approach. While that's pretty useful, the other niche it fills is helping Mina land her powerful projectiles. A lingering projectile gives the opponent something else to dodge while Mina has Ginny return to her with a bunch of flower petals in his mouth, or firing a heart beam between the two of them, or if Mina is sending wind boosted razor petals at the foe with Up Special. This creates a very light version of what is sometimes called a "bullet hell" scenario, but given how potentially powerful a lot of Mina's projectiles are having something that makes them that considerably harder to avoid is still a godsend.
Up Tilt - Petal Strike
Mina strikes upward with her hand, her fingers pressed together into a karate chopping motion. A little flower forms at the peak of her strike, which serves as the sweetspot of this move. Mina's arm and hand deal 6% and weak upwards knockback that will not KO until very late, while the flower deals 7% and significantly stronger upward knockback that KOs at 230%. This is a bit worse of a combo tool than Forward Tilt, as it does not as nicely lead into your Fair or Nair due to having slightly worse lag on the end and greater knockback. The good news is that this move comes quite fast and has decent range thanks to the flower extending it, making it a pretty solid anti-air.
Nearby pink petals will flock to the flower sweetspot, increasing its power to 10% and knockback that KOs at 175% with the bare minimum number of petals. This actually scales with the number of pink petals around, improving to 12% and knockback that KOs at 150% with 6, and if you get to a pretty ambitious 12 it will power up all the way to dealing 16% and knockback that KOs at 100%. 12 petals is the power cap on this move, but keep in mind that this is a fast move to come out with decent range, and the flower's size actually does scale up a bit the more pink petals you have, though the increase is so small it will only reach 1.5x its base size with the maximum number of petals.
So what's this move good for? Simple, its a somewhat safe combo/anti-air tool without any pink petals that, while not exceptional at either job, suffices as necessary basic melee for Mina. If you have pink petals around, this instead converts into an emergency KO move. A lot of Mina's KO moves are, while flashy and powerful, kind of difficult to actually pull off in practice and require some complex layering of hitboxes. While there's still a setup requirement here, once you have it this is a very simple, no nonsense kill move that opponents in the air around Mina have plenty of reason to be scared of.
Down Tilt - Rolling Plants
Placing one hand on the ground, Mina causes a bunch of flowers and vines to raise out of the ground and move forward in a clump, dealing 3 hits of 1% that drag the opponent along before a final hit of 5% that pops the opponent up into the air. The mass of plants is a bit smaller than Kirby and goes forward about twice his width forward, giving this attack good range and covering a nice area of space in front of Mina while she's pressed her body close to the ground. While Mina channels this move for a bit and the position is awkward so she can't combo off it well at all, it does hold the opponent in hitstun quite a bit longer than some and has decent positioning ability, so it can set up delayed hits like the time bomb or Ginny flying into the foe pretty nicely. While not as good for it as Jab for spacing purposes, the fact that Mina has compressed her hurtbox so much makes this a good spacer if you want to play super defensive, which is not a bad idea if you have absolutely no setup going.
If Ginny is just standing around doing nothing and the plants roll into him, Ginny will be pushed into a roll by the plants, going forward about 1.2 battlefield platforms with the same rolling hitbox as an unangled Forward Tilt. This is a nice way to turn a static Ginny into a threat again, and can potentially double up on the hitboxes of this move to make it hard to dodge. Its also one of your main ways to reposition him without actually calling him back to you, still not allowing you to necessarily make tiny adjustments to his position but letting you pick a somewhat more idealized one. These plants will not roll of the edge of the stage, and they don't push Ginny quite as hard as the initial roll sends him, so he won't go off the ledge from this move either.
Dash Attack - Lightforce Strike
Pink energy concentrates around Mina's fist as she punches forward, ribbons of light spinning about as they trail off her fist. This unfortunately looks a bit more impactful than it is, dealing 12% and mostly horizontal knockback that KOs at 145%, and comes out a bit on the slow side. Mina actually does have some super armor on this move as the light energy is working to protect her a bit, but only from attacks that deals 13% or less and not covering too much of the attack. Mina will actually slide back half a battlefield platform after the impact as long as she hits a foe, and the base knockback is a pretty significant component of the power. This is useful, as it means near a ledge this KOs noticeably earlier, and at lower percents it serves as a great way to get distance if Mina just wants to camp or set up a bit. The attack slides Mina a good distance forward so it has some nice reach to it, though because of the nature of the knockback its not necessarily the best approaching tool if you want to follow up on it.
This move is actually really safe on shield, because of the sheer distance it creates between Mina and the foe as it pushes their shield quite far. This move also has noticeably higher shield damage than usual, which has a bit of utility because Mina has an extremely long ranged shield poke on her Forward Smash. It also means if you slide the foe into a strong enough Ginny hitbox, you might just get a shield break. As Mina's dashing grab is honestly rather terrible, this serves as an okay substitute for the purposes of countering shields out of a dash. It can also just be used as a solid pressure tool against a foe who is trying to shield Ginny or your other projectiles to avoid that problem more easily than dodging them will.
Pink petals give a pretty straightforward buff to this move if you have the minimum requirement, buffing the damage to 14% with the knockback increasing accordingly. It also slightly increases the number of super armor frames and causes Mina to slide forward slightly further and faster. While this scales up with more petals, the damage increasing by 1% for every three pink petals beyond the minimum requirement and the range and super armor scaling a bit further as well, it doesn't scale by that much, the attack only going a maximum of 1.4x as far with 10 petals with super armor frames covering most of the attack's start lag and the entire hitbox. The damage caps out at 18% with a 15 petal requirement required to make it happen. That said, while the changes are on some level subtle, they allow this move to perform its strengths just that little bit better, getting easier shield breaks and ledge kills. While its not a unique buff, that doesn't mean its not a useful one.
Smashes
Forward Smash - Vine Snare
Once again conjuring her flowery branch, Mina then swings it forward, a vine extending out from the tip to give this move downright massive range. While the full reach is similar to the infamous Belmont Forward Smash, its comprised of two different hitboxes. The first is the branch that makes up the first 2/5ths of the reach, and deals 12%-17% and knockback that KOs at 150%-110%. Given this move is fairly laggy, this is honestly not the KO power you would hope for. That said, a lot of Mina's KO tools are pretty situational, so sometimes having this as a fallback option is worthwhile. Also, if you want to layer out another KO hitbox alongside Ginny leaping about and a forward tilt flower, this will do the job. The staff disappears in a burst of petals for the end lag, which is actually shockingly short, giving this hitbox a situational secondary purpose at medium percents. Sometimes you just want the foe out of your face to do setup, and if you pull this off the low end lag means you can get right into throwing out petals and seeds without the foe to worry about.
The vine hitbox is the more exciting part of this move, as it will deal 14%-20% and knockback that will instead send the opponent sliding right into Mina's face, indicated by the vine clearly curling inward after its been cast out. Because the end lag is so low, this suddenly leads into Mina's close range options, giving her the ability to start combos from surprisingly far away. This is all that much more effective if you have pink petals to enhance your close combat abilities, or red/purple petals pile on additional damage or start up a time bomb effect. You can also situationally pull them into the path of Ginny coming back to you or a forward tilt flower projectile. The utility of this move is not to be underestimated.
This move can be angled up or down, with the upwards version having her strike out at a 30 degree upward angle, which gives the move a lot of vertical reach. If angled low, she'll instead swing the branch and vine out close to the ground, actually allowing this move to shield poke. Shield poking on such a laggy move might not sound great, but it can actually be better than you'd think if the opponent is trying to block a bunch of your projectiles, which might mean they leave their shield up longer than they'd usually like to. As a side note, the branch KOs slightly earlier if you hit with it in the upward angled version, and a bit later if you KO with it in the down angled version, while having its knockback tilted further upward in the up angled variant of the move as well.
If the vine part of this move hits Ginny, Mina will reel him in, as he continues to perform whatever hitbox he currently has out. This can allow you to pull Ginny back in and make him mobile on the little spin he performs at the end of down angled Side Special, or scarier yet a Down Special spin given how much area that will cover. You can also use this to situationally "rescue" Ginny from an approaching foe, or pull him through more petals from a lower platform. Ginny will return to Mina's side after being reeled in, and Ginny will not be reeled in if the vine hitbox connects with a foe as well.
Down Smash - Storm of Petals
Spinning her arms around twice, Mina summons a small storm of wind around herself, dealing rapid hits of 1% that add up to 15-21%, the last hit dealing mostly upward diagonal knockback that KOs at 180%-140%. This comes out with average lag for a smash, and its weak power is actually made up by quite sizeable range, covering an area similar to the range of Ike's Forward Smash on both sides of her and going up about a Kirby height above her. The wind pulls the opponent in and tosses them around a bit in the hitbox while its active, always ending with them near the top of the hitbox once it ends. The end lag is enough you won't really follow up with combos most of the time, but you can at least chase the opponent with Up Special if you have the right setup going and go into your aerials at an advantage state.
This sucks in any petals within reach of the hitbox, as well as slightly outside of the range. This renews the initial hitbox of petals for this move as they're whirled around Mina, and while its not likely that all of petals you reel in will hit the opponent, its likely you'll hit with about two thirds of them. With purple petals this can add a LOT of damage to the opponent and make this hitbox genuinely scary, while red explosive petals and especially pink petals become easier to actually stick to the opponent in addition to adding a bit of damage themselves. Any petals released at the end of the move will go flying forward away from Mina's body, actually having their duration refreshed and initial hitbox restored as they fly away from her.
There's a "follow up" to this move that is a bit unique, in that you can perform it while the hitbox is going rather than just afterwards. This follow up will have Mina stop the windstorm as she circles her arms a third time, ending with her pointing at Ginny and making finger guns. This will cause the windstorm to appear around Ginny, ruffling his fur a bit as the same hitbox this move would usually make appears around the guinea pig instead. Any petals that get caught in this version of the move will actually get stored away by Ginny, and if he currently has an active hitbox it will keep going, but the opponent will be pulled into it by the multihit, usually tacking on another 6%-12% depending on positioning and charge before whatever hitbox Ginny had is applied.
This is also where the opponent's current position in the wind storm comes in, as they'll be launched out on whatever side of the storm they're currently on, at a higher angle the higher they are in the storm. If you master the timing on this, you can actually send the opponent flying from Mina's windstorm into Ginny's, and given Ginny can have a potentially much stronger KO hitbox and you'll get some additional damage from Mina's part of the move, this can actually be a shockingly effective KO move. That said, it does require you to line up your angles right, which isn't practical with every jump path Ginny will take. That said, there absolutely is merit to extending Ginny's hitboxes just by itself and easily drawing in large amounts of petals for him to store away, but keep in mind that Mina is vulnerable as she is stuck performing her silly little finger guns motion the entire time Ginny is surrounded by the wind storm. Note that if the foe is released from the storm early and flung away, the knockback they take is a bit weaker than the hitbox at the end of the storm, only KOing at 240%-200%.
If Ginny is still attached to Mina, the follow up becomes slightly more traditional. They can still stop the storm at any point, at which point Ginny and Mina will both hold a hand up to the sky as a huge surge of wind ruffles Mina's clothes and both of their hair, blasting upwards around them. The foe is not sent flying away from Mina in this variation of the move as the wind storm will instead just drop them in front of her, but there is a brief window during which the opponent can react, with either an exceptionally fast move, a dodge, or a shield. If they are hit by it, however, this deals 10%-14% and upward knockback that KOs at 90%-55%, by far Mina's strongest KO move that isn't locked behind setup. Unfortunately, you're probably still going to want some form of setup to land this, as otherwise the opponent has room to safely react properly. Perhaps an explosive petal countdown or a falling apple will do the trick.
Speaking of falling apples, this move will launch apples on the ground and even still in trees up into the air as though smash thrown. If you threw an apple up into the air you can launch it right back up there to pressure the foe further with this move, create a surprise projectile for a foe trying to destroy your tree, or just add another layer of disjointed threat to Ginny. If the follow up version of this move where Mina and Ginny are together is landed, it will launch the apple harder than a smash throw, going 1.5x as far and dealing 16% and upward knockback that KOs at 100%, which is an exceptionally powerful upward projectile to have access to and makes the follow up useful for things other than specific timing setups. Also the Mina and Ginny follow up will launch up petals caught in with power equal to that of the fourth wind hitbox of Up Special, so you can possibly use it to throw some pretty powerful projectiles up into the air.
Up Smash - Laser Light Show
Clasping her hands together and then raising them over her head, Mina unleashes a pillar of light around herself. This pillar is actually a bit fuzzy in shape and has sparks flying off it, making it look a bit more like a tower of pink and purple fireworks explosions. As it covers her over her body, this pillar is a bit thicker than Palutena's Up Smash and only goes a tiny bit less high, giving it some absurdly nice coverage in a continued trend for Mina's Smashes. It is, unfortunately, the slowest move of the bunch, coming out on a regrettable Frame 21, so you're going to need a good read or a projectile setup to land this. This move deals 17%-24% and upward knockback that KOs at 120%-75%, so if you do land it the power is actually pretty respectable. The hitbox is not active nearly as long as Palutena's Up Smash, but it can still catch out poorly timed dodges as it lasts for 7 frames, and its power does not decay at all during that time.
This move changes a bit when Ginny has stored away flower petals, but not in terms of the initial hitbox. What happens, however, is that when the pillar dissipates, it instead dissipates into flower petals. These petals are actually made of light, looking more like the outline of something produced by fireworks that put logos and faces in the sky. The light petals created are pseudo-copies of the flower petals Ginny has stored away, with a couple key differences we'll get to. Pink petals will be released from the bottom of the pillar, purple petals from the middle, and red petals will be released from the top. If someone was hit by the pillar hitbox, they absolutely will get hit by these petals during the hitstun, but since they deal no knockback of their own they will not interrupt the knockback the pillar itself deals.
These pseudo copies suffer one major downside compared to regular petals, their existence is incredibly fleeting. They'll only drift a small distance away from the edge of the pillar before fading away, not even lasting until the end of Mina's end lag. Ginny cannot store these copies either, but the one way you can get them to stick around is if they end up clinging to an opponent, in the case of pink or red petals. In terms of function, they are similar to the petals after their initial hitbox, except the pink ones will cling to opponents in this case(as that's all they're good for with their incredibly short existence) and the purple ones will deal 2% rather than 1%, but still no flinch. While purple petals will not increase the knockback of the main move as they add their damage separately, their damage will be dealt before the knockback, so you can effectively at least cut down the KO percent by however much damage they deal. This is not insignificant when storing away, say, 10 purple petals is actually not THAT hard, and even if you don't get an early KO 37%-44% off one attack is nothing to sneeze at.
This is a bit less powerful for layering petals than you'd hope, as they'll fan out in all directions from the center of the pillar. If you hit an opponent on say, the side of the pillar rather than the middle, they will probably only be hit by the equivalent of half your stored petals. Similarly, if the foe's hurtbox collides about 3/4ths from the top of the pillar, they'll be hit by a combination of red and purple petals rather than just red or purple. Basically, what petals you will hit the foe with is conditional on where you hit, but you'll want the foe to be directly above you when you land this if you want to get the maximum amount of mileage out of it. If you don't quite hit the opponent with this move, the good news is you might at least get to land a couple compensation petals that fly off it, though given this move's lag you're probably about to get horribly punished, so its not really worth it if you whiff. Just slightly less terrible if you do have Ginny loaded up with a lot of petals.
As an easter egg, if you have 20 red petals stored specifically, when they burst out they will appear in the shape of Ginny's face rather than just scattering randomly. This slightly alters the hitbox of the move, but is mostly just there as a fun easter egg. Though that said, red petals are probably the strongest variant to use with this move on average, given the powerful time bomb effect is a bit more dangerous than extended grab reach or just some bonus damage.
Aerials
Neutral Aerial - Light Kick
With pink energy wrapping around her leg, Mina kicks out in front of her, dealing 10% and diagonally upward knockback that KOs at 225% in a move which has its solid melee range actually extended a bit by the light magic around her. This isn't an exceptionally fast move, but it combos out of some of Mina's stronger combo starters, and the kick lingers around for a bit, though the light quickly fades away and once it does the move only deals 5% and mostly horizontal knockback that KOs at 275%, but because of the way its scales this hit is actually worse for comboing. On that note, if Mina hits with the light around her leg, she skips most of the move's end lag, as she cancels right out of it, but otherwise the end lag is not good. At the very least, the landing lag is actually a bit better than the end lag, so if you're using this move right above the ground its better than it otherwise would be.
There's another factor worth considering with this move that makes it a bit better than it sounds at first glance. While Mina's leg is covered in pink energy, its actually just completely invulnerable, and the rest of her body has light super armor while its out, blocking attacks that deal less than 8%. This makes this move great for helping Mina with approaches... though the problem is the light part of the kick only lasts 3 frames and if you hit with the non-light part of the kick your approach is not going to get off to a great start.
Pink petals increase the duration of the pink light covering of the kick, increasing by 3 frames if you have the minimum requirement and then another 1 frame for every pink petal brought in towards Mina. Because of the sex kick properties of this move and the fact that Mina's air speed is actually elevated slightly while the kick is still lit up, this actually makes the whole "approach the foe with pink petals" thing a lot easier as you won't just get knocked out of it so easily. Given being knocked away from the pink petals will put you back into a much weaker state of melee combat, having a tool like this to play defense and offense at the same time while they're out is pretty important.
If you're going on a long off stage chase with Up Special, its a bit impractical to ask yourself to have a second set of pink petals out that far away to use this move with most of the time. Obviously if you do, you can give the opponent a hell of a time recovering as between this and the upcoming Fair, you have a lot of ways to just make their recovery attempt miserable. That said, the ability to power through an opponent's attempt to get through you with an invulnerable hitbox, no matter how brief, is still useful in this kind of scenario, and the knockback both scales enough that at high percents it can finish opponents off near a blast zone and is weak enough early on that it can keep combos going. While I talk about the second hit being garbage, if you have a really good looking recovery path toward the stage, getting near the blast zone and landing the last hit actually KOs at surprisingly low percents given the base knockback.
Forward Aerial - Petal Swipe
With tiny petals surrounding her hand, Mina swipes it forward with a bit of flowery flare. This is a weak move, only dealing 6% and small knockback that takes a while to scale into anything significant, but it is fast to the point it can combo into itself at low percents. This is very much your standard combo aerial, it can make for some decent damage strings at lower percentages and its fast speed lets you pressure opponents off stage at higher percentages thanks to Mina's excellent recovery. Its not as strong as some Fairs of this type in Ultimate, like Lucina's, but as far as Mina's basic melee moves go, this is one of her better ones.
The petal bonus to this move is actually one of the best ones, as with the minimum petal requirement it will actually cut the knockback scaling of the attack a bit to allow it to combo into itself better. While this is a small change on paper, it means the combo strings into the move itself will go longer, piling on more damage and allowing this move to more easily position and stall for Ginny/a falling fruit/explosive petals to with the opponent. In addition, every 2 petals past the minimum requirement up to 6 additional petals will shave a frame off the start lag, allowing this to combo out of more of Mina's moveset and combo into itself even longer. A good pink petal setup lets you pull off some shockingly damaging strings with this, not even factoring in using it to stall for your projectiles.
A nice little pressure situation you can create for the foe is if they're near a cloud of pink petals and Mina has just been boosted toward one by Ginny or another pink petal cloud, there's now two nasty situations for them to worry about. Either Mina can jump to another, more ideal position using the pink petal cloud, or start going in for a Fair pressure chain. Most opponents have at least some options to outrange Mina if she does go for the Fair, given its not that long ranged a move, or can punish her on a well timed dodge or shield, but if you dart out of the way and then do something different, like recall Ginny, chuck an apple at them, or use your Bair, you can punish that reaction. Despite no longer being able to hurt the foe, clouds of pink petals really do become a dangerous place for them to stand.
Back Aerial - Brilliant Strike
Forming her branch in her hands again, this time with the purple flowers on it growing and the tip of the branch glowing with pink energy, Mina slams the branch down behind her in an arc. This is a bit on the slow side for an aerial, but not so slow as to actually be impractical, just a bit tricky to use. It deals 13% and slightly upward diagonal knockback that KOs at 165% from center stage, which means off stage its a serviceable KO move. As per usual with Mina's laggier moves, also keep in mind any projectiles you have going around the stage to help landing this, as worrying about this move and Ginny at the same time off stage can definitely be enough to get Mina a kill.
The pink energy at the end of the branch isn't entirely for show. While she's swinging it, it serves as a pretty precise sweetspot that deals 15% and KOs at 140% from center stage, and while its pretty hard to land a well spaced Bair can net you an even earlier kill than usual. The big thing about this sweetspot, however, is what happens when you hit the ground with the branch. The energy will explode out of the tip in a tall wave that goes about 3/4ths Bowser's width past the edge of the staff, giving it an absurd range boost. This part of the range is also just as powerful as the sweetspot, making this move genuinely kind of absurd at first glance. This amplifies how good it is to use this move out of your Up Special, as the initial hit from Up Special will already put them at slight disadvantage from the hitstun, and now you can hit them from an absurd range in front of them. Even if you started an Up Special lunge right in front of the foe, you'll have an option to hit them from behind!
This all sounds nice and there's a lot of mix-ups you can do between this, Fair, and Up Special, that get all the more worrying with the potentially strong purple petal hitboxes or Ginny thrown in. But there is a catch. You see, in Ultimate, most landing lag is extremely short and not a big problem to worry about. The landing lag on this attack, however, is horrendous. You will get punished horribly if you whiff this attack, something Mina with her frail weight and low gravity absolutely does not want to deal with. Fortunately the end lag of the base version is not so bad, but if you're committing to the landing hitbox you better be sure you're going to hit, or if you don't, that something else will immediately after.
You can do a bit of a teamup attack using this move near Ginny, as Ginny will actually form a little force field around the part of himself the tip of the staff hits to activate the wave of energy even in the air, potentially. This also just bounces the branch off his force field and as such cancels the horrible landing lag, instead giving her even less landing lag than her normal aerial version. If Ginny is returning to you in the air, you can throw this out as a big surprise for opponents who thought they got around Ginny, and you won't have to worry about the kind of punishment you'd usually recieve if you screw up. This even allows you to use this huge hitbox offstage, and while that sounds amazing do keep in mind its a bit specific to pull off. If the tip of the stick hits thrown item, such as a fruit, the same result happens, but the item is destroyed and Mina's branch is not bounced back up so she still takes the terrible lag at the end of the swing, but it offers you a backup way to activate this off stage or another trick you can pull with an apple.
Up Aerial - Breeze's Pull
Mina raises one hand over her head as winds begin spinning in a circle above her, dealing rapid hits of 1% that add up to 8%, followed by a final hit of 4% that KOs at 185%. This has solid range, and while the power is not especially high if you follow a foe high into the air with Up Special this can actually score a pretty early KO off a chase from Up or Down Smash. There's also a suction hitbox above the move pulling people towards the orb, indicated by slight wind lines in the air it effects, and while the pull is rather weak except when you're pretty close to the orb, the area affected is a really wide arc that goes out surprisingly far from Mina. This is, for the record, not always a good thing. This attack is a bit punishably slow and sometimes you'll accidentally pull foes into better range to hit you, so you have to be a bit careful with this move.
This has a fairly useful effect on petals, in that it pulls any petals in reach of the wind towards you, and while they're moving they reactivate their initial hitboxes. This means purple petals flinch and pink petals can now latch onto opponents again, with the former aspect actually making this move much easier to land in the presense of purple petals. While on paper the explosive petals get the least benefit out of this move, this does make them easier to actually hit the opponent with them. If you're not pulling pink petals to the opponent, as a virtue of them being on opposite sides of the wind pull from them, you can also use this to get pink petals elsewhere on the stage right to you to utilize them for recovery if you're going for an off stage gimp, or approaches otherwise. The petals are sucked in at the speed they're initially fired out, so they're much more strongly affected by this than opponents
Ginny is also pulled in the direction of the wind, more lightly than the petals but more heavily than opponents. This can allow you to redirect his flight path into opponents potentially, or reposition him while he's spinning from a fruit. Speaking of fruit, that will also get slightly redirected by the wind, mostly just layering on another inconvenient hitbox for opponents to dodge.
Down Aerial - Magical Cannon
Summoning her branch one more time and pointing it downward at a slightly angle forward, Mina begins charging energy in the tip of the branch for a moment, before firing out a beam of pink magic. This has start up lag even higher than the Bair(by a small margin), and long duration that makes it surprisingly good at catching out air dodges if used properly. Up close, the beam deals 8% and a weak spike, and starts off quite thin, before widening out as it goes down to its maximum range of 1.4 Ganondorf heights below Mina. It widens out more as it gets closer to the bottom and also increases in power, capping out at 16% and a pretty strong spike that's comparable to ROB's Dair. The end lag is also a bit long, so yeah you're going to get punished like hell if you whiff this, at least on paper.
When I mention Mina can pursue the foe off stage for gimps, this is basically your finisher in that regard. This move might not be fast, but the huge disjointed hitbox, large duration, and spiking properties absolutely make up for it as if you get above the foe its actually quite hard to recover through. This is one of the best places to drop a fruit, actually, giving the foe something else to worry about while this attack is preparing, and Up Special is excellent for setting yourself up to be above the foe to finish them off with this even if you're not both near the bottom blast zone. The rest of your aerials unfortunately do not link into it that easily, which holds back the power it offers some. That said, where it does synergize with the rest of your set is sometimes, you can use it to wall off foes to protect Ginny or a tree from harm with the big hitbox raining down from above.
I didn't bring this up as an option because its the last one you want to use, but you can use Ginny to set up kills with this off stage. He can be an extra jump for Up Special or an extra hitbox to pressure the foe into the finishing laser, but the problem with bringing Ginny off stage to do either of those things is if he's doing those, he will likely die. Sometimes, if that's what you need to do to win the match, that's what you need to do, but between stocks this will put you on the back foot to not have Ginny around for all the pressure and setup he offers to your set. Also if you screw it up and the foe DOES get back, you'll definently be on the wrong foot. Its also really not something Mina as a character would want to do, but that's not stopping you the player if you want to do it. I mean, you'll get Hee-mo's approval, and I think a lot of MYM aligns more with him anyway.
Grab Game
Grab - Capture
Mina reaches forward to try and grab the foe in a fairly unimpressive grab at base value, completely average in every respect. Her dash grab is actually worse, having both less range off her body and slightly worse lag. The good news, however, is that your pink petals stuck to the foe are here to help, making this move quite easy to land if you do have some on them, and buffing your throws on top of that if you have enough. If you have enough petals on the foe to buff your throws, you do get a visual indicator of the foe being noticeably bound up in Mina's vines, otherwise they'll just disappear as they pull the foe into her standard grip.
Pummel - Petal Annoyance
Mina takes one hand off the opponent and sprays their face with petals, which similar to the copied petals from Up Smash instantly disappear after hitting the foe. These are actually different colored from the ones on her Neutral Special, with blues, greens, and whites being the typical colors seen. She'll occasionally mutter something like "please calm down" or "it'll be okay" to the opponent in this case, indicating she's probably trying to chill the opponent out with pretty flowers, but that's going to fly on absolutely nobody in Smash Brothers. Not even herself in mirror matches, she's not in the mood for her clone's nonsense. All flavor aside, this deals fairly rapid hits of 1%, making it a decent but unremarkable pummel.
As an aside, some characters will noticeably react to this pummel. Animals like Kirby and Pikachu or small children like Ness or Young Link will express more confusion than annoyance. Characters like Ganondorf and Mewtwo will give very unamused looks, as they are not coveting that wind this time. Characters with a strong disdain for the natural world like Ridley or Senator Armstrong should he ever get a set(he got mad about cherry blossoms in a cutscene once, what a guy) will express active disgust at the petals being blown in their face.
Forward Throw - Purify
Mina pulls the foe into what looks like a hug with an understanding look on her face, and closes her eyes to concentrate. Light flows out of her body into the foe as she attempts to remove the corrupting, aggressive influence from their body with her magic. After a brief period of startup, pink energy surges out of the foe in a blast of light, sending them flying backward with only 4%, but diagonal knockback that will KO at around 120% at the ledge. This is because purification is not a painful process, but it causes quite a reaction regardless. This is Mina's KO throw and all things considered, its actually pretty good, as her KO moves are frequently less than stellar. Having pink petals on the foe gives Mina access to a surprisingly practical KO move, though if you're near the center of the stage or the opposite side its still going to kill pretty late.
The explosion of life energy from the foe's body has some secondary utility. In an area as wide and tall as a battlefield platform around Mina, all of Mina's constructs as well as Ginny benefit from the excess life energy released. First of all, Ginny will be healed by the life energy, restoring 10 HP if he is within the radius or hanging out on Mina at the time the blast goes off. This 10 HP worth of healing can actually overheal Ginny, going over his base HP stat of 30, and potentially increasing it to as much as 45 HP. All petals will have the duration of their existence extended by another 4 seconds, continuing on their paths as normal. If a tree has no fruit currently on it, it will grow another fruit, making this an easier way to activate the powerful but situational love beam. If the tree does currently have a fruit, it will turn golden instead of red, causing it to heal 10% instead of 6% and dealing 1.2x as much damage when thrown.
Each kind of petal gets a bit of an individual buff from this move, and all of them will visibly glow while affected by it. Purple petals become stronger hitboxes, dealing 2% and a flinch while lying around and lingering, and also making all the variants where they are blown around a bit stronger too (3% at initial velocity, 7% at 3 Up Special uses, 18% with knockback that KOs at 100% at 4 Up Special uses, 32% and knockback that KOs at 30% with 5 Up Special uses). Glowing red and pink petals count for 3 petals for every 2 of them latched onto the foe or used to buff an attack, allowing you to get more value out them. This makes all 3 varieties of petal a lot scarier for the duration of their existence.
If you've spent 5 or more pink petals on this grab, it gets a bit better, as the overflow of life energy sticks on the foe's body for a bit, starting at only 4 seconds but extending by another second for every 2 pink petal used beyond the minimum. Any petals they or the aura extending a short distance off their body touch become glowing petals, making lingering fields of purple or red petals vastly more dangerous and buffing up Mina more if she comes into fight them with an aura of pink petals on her. Ginny is also healed 3 HP per second while in the aura's range, which mostly just matters if he's on Mina's back while she's fighting the foe or if the foe tries to kill him off. The foe is unfortunately not leaking enough life energy to do anything productive to your trees. This allows you to use this buff on your constructs a fair bit more proactively, but the excess of life energy does not last very long, so you're going to have to make the most of it.
Down Throw - Team Up
Pink energy swirling around her hands, Mina called out Ginny's name, causing him to respond differently depending on whether you have him on your person or not. If he is with Mina, this becomes a very good throw where Ginny will roll out a battlefield platform in front Mina(or closer, if there's a ledge), Mina will blast the opponent to Ginny for 5%, and Ginny will headbutt the opponent right back to Mina, dealing 8% and mostly horizontal knockback right back to Mina that will eventually scale to kill at 250%. Since Mina comes out of lag once she launches the foe to Ginny, I don't think I need to tell you how good this is for combos. This true combos into Bair of all things at certain percentages, gives the opponent extremely little time to react to moves like Forward Smash or Down Smash, and will combo into Fair/FTilt/Jab super casually. If you want to get particularly wild, you can even go for a Neutral Special out of this, it will work a good percentage of the time and serves as one of the best ways to stick a bunch of red or pink petals on the foe.
Pink petals buff this move up a bit further, but probably the least of any of your throws. It just boosts the damage of Mina's initial hit to Ginny by 3% if you hit the initial requirement and another 1% for every 2 petals beyond that, This is fine because, for all the reasons I've mentioned, this throw is really really good, to the point it may become your main incentive for landing the grab and honestly just one of Mina's best options in general. The problem is, you do have to have Ginny on your person to use it, and a lot of Mina's set works better under the assumption Ginny is out on the stage, and Mina's grab is frankly underwhelming. If Ginny just spat out a whole bunch of pink petals though, the fact that you now have a grab with frankly preposterous range that goes into this throw is an absolutely terrifying threat for the amount of passive pressure and advantage it gives you over the foe.
If Ginny is out on the stage, this throw changes for the worse most of the time. Mina will instead launch the foe with weak knockback that's still not great for comboing and the same 5% the first hit of this move deals, albeit it does get boosted by pink petals to be a bit more respectable. That said, the direction of the knockback is a bit unique, as Mina will always aim the foe right at Ginny. If Ginny has stored up a lot of petals, this turns this into a sort of alternate KO throw if its actually enough to propel the foe into Ginny. If Ginny is weaker, it still puts you at enough frame advantage you might be able to improvise some combos anyway, possibly using Up Special to get into position to do them. If Ginny is spinning from a fruit in the right position, you can sometimes outright pull off combos you never could with the original move, like at mid-high percents and the proper distance and petal count actually just true comboing into Up Smash of all things. So while on paper this throw gets worse with Ginny out, its pretty setup dependent.
If Mina knocks a foe into a static Ginny out on the stage who is just sitting around waiting to do something, Ginny will smack the foe into ground by flopping onto them, dealing 6% and proning the foe. This isn't quite as good for combos on paper, but sometimes works into down angled Forward Smash which is a great starter, and also puts the foe at a disadvantage state far away from Mina, which is great time to throw out more petals or reposition things in an ideal fashion.
If Ginny is outright KO'd, Mina will just send the foe forward as though Ginny were there, and then remember she doesn't have him at her side with a disappointed sigh. This actually puts a bit more end lag on this throw than you'd want and generally makes it pretty terrible when Ginny's not around, but it can occasionally be good for spacing.
Up Throw - Light Surge
Mina charges both her hands with pink energy and tosses the foe slightly up into the air for 2%, before hitting them higher into the air as though serving a volleyball. This second hit deals 8% and upward knockback that KOs at 255%. At low percentages, it combos nicely into Up Tilt or Fair, but its not nearly as good at combos as the Down Throw. That said, sometimes you just do not have Ginny available because he's been KO'd, or he's not in a good spot on stage. In that case, this throw is a perfectly acceptable back up and you'll just have to take what you can get, even if its not exciting. And while its definently worse than Down Throw when you have the good version of it available, its not strictly worse. Sometimes you have a very vertical setup with your petals, and this will just work better than the options Down Throw goes into at that percent.
If you have more pink petals around to upgrade the move, it boosts the damage to 11% and the knockback to KO at 180%, and then the knockback and damage will keep climbing fairly steadily from there at a rate of 0.75% per pink petal. There becomes a point where this is a better kill throw than FThrow, and that point is sooner than you think if you're on a platform or you're at the wrong ledge. If its not enough to kill the opponent, for that matter, you can potentially use Up Special to get to the opponent near the top blast zone with an Up Aerial and get the kill anyway. There are times where this is a good kill throw and frankly Mina needs every KO option she can get because of how wonky her Smashes are in that regard, so getting it off your potentially ludicrous range grab is another purpose for this throw even if its not exciting.
Back Throw - Ginny's Favorite
A slightly mischevious smirk appears across Mina's face as she places a hand on the foe, causing a vine covered in berries to sprout along their body and wrap around them. She then says "Ginny, I've got your favorite!" as she chucks the opponent behind, her followed by Ginny squeaking with excitement. She then just chucks the opponent behind her almost dismissively, still clearly happy with herself for the little plan she's conducted. The berries stick to the foe and mostly don't really do anything for 4 seconds, falling off after that and disappearing. The actual throw deals 8% and mediocre knockback that KOs at 260%, and doesn't really set up the best for Bair, but you can still go into it if you want too. It might work out considering what the berries are for.
The berries primarily serve as motivation for Ginny, who will go out of his way to get the berries back from the opponent. He will move about 1.4x faster on all moves and deal 1.2x as much damage, and on top of that, he develops a tendency to home in on the opponent. If he's rolling along the ground below the for and they're in the air, he'll leap up to meet them. He'll extend his range another .5 battlefield platforms if the foe is just past where he'd usually stop. And perhaps most excitingly, when Mina calls out to Ginny, Ginny will not home in on her anymore, he homes in on the foe. The amount of pressure this creates is immense, especially if Ginny is loaded up with petals and is an actually super dangerous KO hitbox. Even when he's whirling around from a fruit, he'll still lightly home in on the foe at about half Incineroar's dash speed, which while slow is still at least something worth taking note of.
Upon hitting the foe, Ginny will eat the berries wrapped around them, and as such revert to his normal pattern of trying to return to Mina instead. Ginny will not do this if the foe shields or dodges, but he will overshoot the foe quite a bit if he whiffs them with his attack, so they'll at least have some breathing room to weave around him. This none-the-less creates immense pressure on the foe, and you can only magnify it by throwing out moves like the Forward Smash to reposition Ginny, Down Smash to increase the size of his hitbox and make it more devastating, or Up Aerial to pull Ginny right back into a foe who thought they narrowly dodged out of the way. This is a pretty scary pressure situation, but Ginny's extreme aggression toward the foe can be taken advantage of to get him killed if the foe plays it smart, so this is a bit of a high risk, high reward tactic that could easily cost you Ginny for a little while, as well as a lot of your petals.
With 5 or more petals on the foe, the berry duration increases to 6 seconds, making this throw a bit better at keeping up the pressure you're applying. But if you want the real boost to this move, you're going to need 10 or more pink petals, which will double up on the amount of berries Mina puts on the opponent. Twice as many berries means Ginny will not eat them all on his first pass, and as such will be able to home in on the foe like this for two attacks. The berry duration also increases to 8 seconds. You can send Ginny right back at the foe as soon as he's already hit them with fairly little lag to Mina herself, just the little bit needed to command him, which is a downright insane amount of pressure that makes even a petal-free Ginny kind of scary. After all, two weak back to back knockback hits disjointed from Mina's own lag is a great way for her to set up a smash, or layer on a bunch of petals, or just make absolutely sure the foe gets hit by a petal time bomb. This is very powerful stuff, but the 10 pink petal requirement is not easy to reach, so keep that in mind.
If Ginny is KO'd, Mina will sound kind of depressed and demotivated when she says her line at the start of the move, but she'll still say it. This actually does prompt Ginny to come back 2 seconds faster than he otherwise would, so hey, the berries did motivate him a bit.
Elekid, the Electric Pokemon
Type: Electric
Weight: 51.8 LBs.
Height: 2' 00"
Ability: Static
Hidden Ability: Vital Spirit
When it hears the crash of thunder, Elekid's mood improves. It can be useful to record that sound and play it when Elekid's feeling down. Even in the most vicious storm, this Pokémon plays happily if thunder rumbles in the sky. It rotates its arms to generate electricity, but it tires easily, so it charges up only a little bit. When its horns shine a bluish white, that's the sign it's fully charged. You'll get a shocking jolt if you touch it!
Statistics
Elekid is a speedy l'il Mon. While not the fastest thing in the game, it is tied for Pikachu at 17th in run speed and 12th in Walk Speed, so it'll be zooming around pretty well. At the same time, Elekid is fairly light, barely escaping featherweight with 84 weight (one below Zelda who is 62nd). Size-wise he is rather small, think like a slightly taller Kirby with two plugs on his head. Traction is reasonably high, allowing tight turns. Elekid's crouch isn't Kirby-sized low, but is fairly low.
Aerially, Elekid is speedy, with speed equal to the default Mii Swordfighter (18th). You'll also be falling fast, with fall speed equal to Pichu for 6th. Unlike Pichu, Elekid has the normal 60% fast fall speed, which means he can do even crazier shenanigans with fastfall landing! Both of Elekid's jumps are fairly good, but not near the best.
Specials
Neutral Special: ThunderPunch
Elekid rapidly swings his arm, Donkey Kong style, as he charges up a vicious ThunderPunch! This takes slightly less time than charging up a Giant Punch, but otherwise follows the general rules on this kind of storable charge in terms of how to store it and so on. If you release the attack as soon as possible, you just get a 6% damage move whose knockback isn't even safe on hit. So don't do that. At maximum charge, the punch is weaker than Donkey Kong's by a noticeable margin: It only deals 20% damage and it kills 35% later than Donkey Kong's move. The starting lag is not bad, but the ending lag is punishable unless at range, and especially on whiff.
What helps Elekid out is that the punch isn't the only part of the attack! When Elekid punches, a shock wave of electricity is shot out of his fist (visually, it kind of looks like the move Thunder Wave in its XD/Colosseum incarnation), slightly taller than Elekid itself. This begins happening once Elekid is at 1/3rd charge and it travels anywhere from 3/4ths of a Battlefield Platform to 1.5 Battlefield Platforms depending on charge. Damage is 8%-14%, with high hitstun but pretty weak knockback. Even at a range, Elekid gets a combo off of this if he hits it, so it is pretty useful! It also allows Elekid to potentially swing his punch at range for safety in exchange for the lesser hitbox.
This is where it is important I mention that there is more to ThunderPunch than just the hitbox. Elekid has a little meter under his portrait, his charge, and if you read the Pokedex entries then you'd know that this is how Elekid will be filling it up! As Elekid swings his arms, the charge meter fills up. Elekid's charge meter fills up fully with a single ThunderPunch's full charging, so it is extremely easy to keep track of. Partially filling the Charge meter is meaningless. It does nothing.
When the Charge meter is filled completely, Elekid enters a Charged State. In his Charged State, his movement stats are increased: His ground speed increases from Pikachu (17th) to Zero Suit Samus (6th) in run speed. Same with walk speed, which is a change of 12th to tied for 5th. Aerially, Elekid increases from Mii Swordfighter's air speed (18th) to Wolf/Lucario's (tied 6th). It's a pretty substantial increase, overall. Many of Elekid's individual moves get buffs or changes during his Charged State, although not ThunderPunch, most of which do not take any meter. Additionally, Elekid's Static ability activates while he is in his Charged State. Any non-projectile attack that strikes Elekid deals 3% damage to the attacker, in addition to increasing the ending lag of the attack that hit Elekid by 3 frames. On multi-hit attacks, this only applies to the first hit of the multi-hit that hits Elekid.
The meter drains at a steady time limit, lasting a total of 15 seconds, so while it is somewhat long it isn't THAT long. When Elekid is in his Charged State, white-blue sparks of electricity spark between his plug, making it easy to see visually. After that, you have to charge up a ThunderPunch again to enter your Charged State again. You might notice why the ability to safely throw out ThunderPunch at range is important now: Elekid can only fill his meter by CHARGING a ThunderPunch, so if he has a fully charged ThunderPunch on hand, he actually cannot enter his Charged State because he can't charge his ThunderPunch! Thus, Elekid's gameplay centers around two self-feeding concepts: Finding time to charge your ThunderPunch, and finding time to use your ThunderPunch effectively (be it comboing into a hit, a read, or firing it off at range to safely pressure the foe + get to charge again).
Up Special: Thunderbolt
Elekid shoots out a bolt of lightning from his plug, which he can then control much like the Mother Boy's PK Thunder: Elekid's lightning is of the tight turning variety and lasts slightly longer than Ness'. Elekid's deals 7% damage and light knockback with Ness style knockback direction. The thunderbolt will disappear if it hits an opponent and as a projectile is vulnerable to being Pocketed, Reflected and so on. So just like Ness and Lucas, Elekid can have some serious issues with his recovery getting messed up, be it by anti-projectile methods or the opponent intentionally taking the hit.
You know where the second part of this is going. If Elekid hits himself with the Thunderbolt, then he will be launched in that direction with power that can be compared to Ness' PK Thunder 2. It deals 3% less damage and KOs 12% later, but the increased duration and tighter turning allows Elekid to mindgame with it more compared to those two, and Elekid has other advantages. The lag on both this and the Thunderbolt 1 version are about the same as Ness' PK Thunder.
During his Charged State, Elekid can get a LOT trickier with this. By pressing B while the thunderbolt is out, Elekid can cancel the stance out while the thunderbolt remains out, travelling for 2.5 seconds in the same direction it was going when Elekid let go of it. On top of that, Elekid can use Thunderbolt while one is out! Only 2 can be out though, so Elekid cannot spam it hard or anything. This nonetheless is huge, as it gives Elekid a more solid projectile, it makes it better for Elekid recovering (he won't enter helpless until the 2nd PK Thunder is used, so even if the first PK Thunder gets interfered with he can recovery with another) and there's another tricky bit to it.
Run into a Thunderbolt that's out and about and Elekid will rocket off in the direction is traveling with his Thunderbolt 2 hitbox! That's right: Elekid can turn these Thunderbolt 1 hitboxes into his very powerful Thunderbolt 2 hitbox, turning these stage control projectiles into extremely potent and flashy, if very risky, kill moves. Elekid can do a lot with this and it is one of his most powerful tools during his Charged State. Do note, however, that every Thunderbolt that Elekid fires off takes 1 second worth of bar out of him when he is in a Charged State. This keeps Elekid from camping with it in this form, and also serves as a bit of an additional natural limiter on how strong his stage control + stage control kill power can get. It's very worth it, though.
Side Special: ThunderCrash
Elekid scrunches down, electricity sparking between its plugs, before it kicks off with its legs, pushes back with its arms and launches forward plug-first! This damaging, dashing strike goes about 1.25 Battlefield Platforms tilted and 2 Battlefield Platforms smashed, with moderate starting lag. Striking an opponent deals a fairly hefty 13.3% damage and electrical hitstun on the foe: The foe is held in place for a bit before being launched away, Elekid starting to go through his ending lag. Elekid stops at the first fighter hit and has fairly long ending lag, which means this attack is punishable on shield fairly trivially. Elekid stops at the first opponent he hits, but will keep travelling if the opponent is intangible via dodging or what have you.
During Elekid's Charged State, Elekid can cancel this move's ending lag on hit! He can cancel it into a jump no matter what. On the ground, he can also cancel it into a dash, any Standard or any Smash. In the air, he can cancel it into an air dodge or an aerial. If Elekid hits an opponent, he can cancel into a move that comes out fast enough to hit the opponent before they are launched for additional damage. Importantly this works if you hit a shield, meaning that you can cancel into a move that is safe on shield, or try to jump away to avoid a punish. This makes your Side Special a very scary move when in your Charged State, able to rush in to the opponent and face minimal punishment if your opponent defends. It's a strong approaching tool.
Elekid can use this move once in the air before going into helpless. Elekid's Up Special is rather unreliable and he doesn't even have a Ness-style double jump, so this secondary means of recovery is appreciated. It is very linear and predictable though, so edgeguarding is a serious concern.
Down Special: Thunder
Elekid clutches his arms close as electricity begins to surge through his body, before flinging his arm backs with a little yell as a bolt of lightning shoots from its spark! This bolt travels far enough to go half a Ganondorf through the top platform of Battlefield if used from the main platform of it. The bolt itself deals 10% damage and moderate upwards knockback. While it isn't really a kill move in power, the fact its knockback is even decent combined with its range means you could poke someone high in the air and get a pretty clean kill situationally. Elekid's body is a hitbox at the start of the bolt traveling upwards, dealing 16% damage and knockback that kills 10% later than Pikachu's Thunder-body hitbox. This move is kinda laggy on both ends though, moreso in the ending lag department than the starting lag department. Elekid does a little fist pump during the ending lag of this move, enjoying the crashing sounds of the Thunder it produces!
Compared to Pikachu's Thunder, Elekid has the weakness of no Thunderspiking on this hit, Elekid's is laggier, and the fact the bolt goes up makes it easier to react to if you're above Elekid. On the other had, the stronger hitbox coming out at the start means that part comes out faster, it's better as a traditional anti-air since the bolt fires upwards to cover opponents above Elekid quickly and it can be used for off the top kills. They both have their pros and cons.
During Elekid's Charged State, the Thunder won't just disappear once it reaches the top of its range, but instead collects into a thunder cloud. If it hits a ceiling or something, by the way, then the cloud collects there. After 3 seconds, the Thunder drops back down, dealing 10% damage: The cloud is a spiking hitbox when it shoots out the bolt, while the bolt itself deals simple knockback away with its damage if it hits the opponent. If the bolt hits Elekid, then he will enter his 16% damage hitbox state, which can allow Elekid some strong positioning for a potent hitbox with good timing (especially if he has prepared some Thunderbolts as well!). While this does allow Elekid to spike and adds to the stage control, it is obviously very predictable given the timing involved.
If Elekid gets hit by the Thunder (NOT just from releasing it), then it will turbo-charge his Static during that Charged State! In addition to the 3% damage + 3 frames from the first strike, the opponent will take an additional 3% damage and have the starting lag of their next attack increased by 3 frames. Note that this can't stack, since the opponent would need to start another attack (and thus take the damage + lag) in order to get hit again and have it applied again. This effect lasts for the duration of the Charged State, needing to be done again when Elekid begins a new Charged State. Also note that since the Thunder takes 3 seconds to drop down, the most you could apply this to is just under 12 seconds of the Charged State (3 seconds + the time it took for the initial Thunder to travel) and that is if you used it the instant you entered your Charged State. Also, be aware that trying to gun for the Thunder just for this Static boost is a bit predictable and since the body Thunder hitbox has long ending lag just trying to go for it can get you easily punished. You might instead threaten to go for it, then counter the opponent planning to stop you.
One interesting thing you can do with this attack is get the Thunder landed on you when you run out of Charged State! If you do, then it will actually charge Elekid up for 3 seconds, allowing him to use his "Empowered" Charge State: This can be used to kind of "extend" your Charge State and is the only way to enter it without using your ThunderPunch. You could, in theory, even keep throwing out Thunders while in his Charged State to allow himself to keep getting hit and continue being charged without ThunderPunch, a little bypass if you will. Don't get too excited, though: Given the entirely predictable nature of Thunder dropping, it is insanely easy to stop, and you would need to be constantly releasing Thunders within 3 second windows, which isn't really feasible. Note that if you have any time left on your Charged State, it won't re-up it or anything, so being hit with 1 second left only gives you 1 second of empowered time. It can be better to delay a Thunder so you might be hit after the Charged State ends due to this instead.
Only 1 Thunder cloud can be out at once. Using Thunder while it is out simply causes the new Thunder not to collect into a cloud and vanish like normal.
Standards
Jab: Generator Punch
Elekid's Jab is a rapid jab with a finisher. Elekid swings his arm around him quickly, dealing rapid hits of 1.2% in a pretty close range around him. This is pretty quick to start and it's high hit rate means it racks up damage fast, but it has really low range for a rapid jab. The jab finisher is a simple straight punch forward with Elekid's fist sparking. It deals 4.3% damage and knockback that will basically reset neutral with Elekid having a small advantage. It has pretty low ending lag for a jab, so it is really hard to punish.
Sadly, Elekid's arm isn't fast enough to make any charge here normally. But if you're in your Charged State, it is enough to HOLD one. While Elekid is rapid jabbing, his Charged State timer does not go down! So you can mix in just using this very low commitment Jab to pause the timer, even using it as a kind of anti-camping measure if the opponent keeps trying to run out the clock. Do note that you're still committing to a move, so you need to release it in time to be safe: Given the low range of the rapid hit, it's pretty unlikely the foe will just fall into it after all.
The reward for just landing it there is minimal, but holding a charge isn't all that the Jab allows Elekid to do: It also allows Elekid to focus it! By jabbing for at least half a second, Elekid's fist will crackle with electrical power, showing that he has concentrated charge onto his fist! This will cause Elekid's next JOINTED MELEE attack that hits after the jab finisher to deal an additional 1.3x hitstun as the opponent is electrically shocked all over to enable stronger combos, in addition to a flat +2% damage to it. Elekid's Jab Finisher also now deals 6.3% damage, a small boost. The fact it is only Elekid's next melee attack means he can set the attack up with something like Up Special first, allowing a bit more combo play, or you can instead go for more raw combos with attacks like Forward Tilt or Down Tilt. Also note that it is only Elekid's next melee attack that hits, so you can use melee + disjointed attacks to set up as well, or whiff and keep the empowerment.
Note that this means Elekid can, in theory, keep using his Jab to gain these collected charges as long as he doesn't actually HIT it, although hitting is still good in this situation as the increased hitstun allows Elekid to get in a small combo. This doesn't stack the power of the ability, but instead increases the number of attacks empowered. So if Elekid, say, did this three times then his next three attacks have this empowered charge. This can allow Elekid to pull off some really crazy combo strings! Elekid loses this collected charge when his Charged State ends, but the jab itself pausing your charge timer helps give you time to use it.
Forward Tilt: ThunderSwat
Elekid steps forward and performs a swinging forward swat with its arm, which crackles lightly with electricity. The step forward gives this move more range than most of Elekid's jointed attacks, his small body means his range is not impressive usually, and it deals 6% damage close to Elekid's arm and 8% with an electrical effect if you hit with the tip of it. The sourspot can cause the opponent to be put into a tech situation at low percents (Around 15%~ on Mario) and can potentially combo into a Dash Attack or shorthopped aerial when at more mid percents. The sweetspot deals higher hitstun before launching the opponent which makes it able to combo at low percents although it isn't great for that. You'll normally go into a Forward Aerial. Now, if you add in Jab's collected charging to increase the hitstun, it actually becomes a really good combo move! In particular, Elekid can get a grab out of this until some rather high percents with fast fingers, which is highly valuable. It kills at like 185% but can be useful to launch opponents off stage before that obviously. It is fairly fast to end and Elekid steps back to his starting position when it ends which adds additional safety. Starting lag is slightly faster than average.
In Elekid's Charged State, this move receives a simple buff of 2% damage to each hit. It also now deals additional shieldstun and shieldpush, making it safe on shield at all ranges. This makes it a key move to cancel Side Special into if you hit a shield, as you'll get some solid shield damage in while being totally free from punishment. Aside from that, it is essentially the same move. Since it has good range and low lag, it's pretty dang solid as a neutral tool, so feel free to throw it out freely and see how enemies respond to it!
Up Tilt: HeadPlug
Elekid leans back as electricity sparks between its plugs once, then headbutts upwards! It's a very swift movement: Imagine Dedede's Up Tilt, except faster but with less range. Elekid's head plugs are intangible during this move but are a part of the move's hitbox, which makes it a very effective anti-air in a Mario Up Smash manner. The hit itself deals 6% damage and light upwards popping knockback that is deal for starting a combo: Neutral Aerial, Forward Aerial and Up Aerial will be your primary follow-up options. Like Elekid's other two Standards, it is pretty low commitment when it comes to lag. Can hit very close grounded foes, but unsafe on shield.
Elekid's plugs will keep surging with electricity during Elekid's Charged State, causing them to become a potent sweetspot! This sweetspot deals 12% damage and has highly increased knockback that will kill at 165%. This is mostly good, although at low percents Elekid actually doesn't want to hit with the sweetspot because starting a combo is more dmaaging, and at mid percentage it varies on if you want the combo or the strong aerial chase. At around 95%, this move becomes a "50/50" style move with Thunder to kill the opponent off the top: Elekid can jump up and launch a Thunder and it'll kill the foe, but the opponent absolutely has time to air dodge. But if they air dodge too early (be it before Thunder is used or with bad timing on the bolt), Elekid can fire the bolt later/it will linger long enough to still hit. This makes the sweetspot a lot more potent once the opponent gets high up. Even if the opponent air dodges, they've used up their one air dodge, which is a huge boon for Elekid covering their landing (for example, with an Up Tilt). Do note Elekid needs to follow their DI as well.
Down Tilt: Shock Kick
Crouching down, Elekid jabs his foot forward as a very fast (if also short range) motion. This isn't as ultra spammable as, say, Ness or Lucas, but nonetheless it is an extremely fast move with low ending lag. It should be noted this foot jab has quite small range, even for Elekid's attacks, which can make it kinda awkward. This move deals 3% damage and lightly pops up opponents: Thanks to the very low ending lag, this move links into any really fast attack. It can link into Up Tilt, both the sourspot (until late) and Charged State sweetspot (starting around 90%), a Forward Tilt, a Jab (you would almost always rather link into Up tilt than this), or multiple aerials including Down Aerial, Neutral Aerial and Forward Aerial. A lot of these attacks are DI and damage percent dependant, so it can be tricky to figure out what works: aerials generally work later and Forward Tilt or Jab are very safe links. The Up Tilt sweetspot at 90% is especially important: At 95%, Up Tilt's sweetspot leads into a 50/50 with a Thunder, so you can absolutely go Down Tilt -> Up Tilt -> Thunder 50/50 as a surprise and actually rather dangerous kill option. Elekid's other super strong kill options tend to be risky or punishable for Elekid, being able to turn your combo move into a 50/50 is valuable.
While this is an all around good combo starter, the Charged State causes sparks to fly out from Elekid's foot, adding additional range in a sweetspot that deals 6% damage and higher knockback plus inwards knockback. This makes a lot of combos above true at most percents and allows Elekid to get a free grab off of a successful conversion, which is a very powerful technique. Elekid can also go for the harder option of a smash attack read, primarily via Forward Smash, where if they don't air dodge they get creamed. And that's when you can get REALLY cheeky: If you have a fully charged ThunderPunch, you can throw THAT out, and if the opponent air dodges with timing to avoid a Forward Smash, you'll smash them with the ThunderPunch when they come out of air dodge lag! This is risky, if the opponent waits they can air dodge the ThunderPunch itself and punish well, but it is a mixup you can throw in to get some surprise kills. Something else to consider? These sparks obviously are NOT a jointed melee hitbox, so if your jab's primed you up, you can use this to create some pretty goofy combo strings. Down Tilt Sparks -> Neutral Aerial -> Up Tilt -> Neutral Aerial -> Forward Aerial, for example, shuffling in things such as Up Tilt as you please!
Down Tilt suffers from having quite low range at a base. It is unsafe on shield, but the opponent must punish quickly: If the opponent waits, then a 2nd Down Tilt can be fast enough to interrupt the grab or to shield-poke a foe hit by it multiple times. And while a good combo starter, it DOES require Elekid to get in very close, which can also be very dangerous. So it is a powerful but risky tool. Becomes a LOT better in your Charged State thanks to the extra range.
Dash Attack: Electro Ball
Elekid tumbles forward, performing a roll as electricity sparks around him, in a manner not unlike some platformer mascots. This move has two distinct and important hitboxes: The stronger early hitbox and the weaker late hitbox. The early hitbox is when Elekid starts the roll and has electricity sparking around him, dealing 9.5% damage and killing at around 162%: This is not especially strong, but it can serve as an auxilary kill move if your harder-to-hit kill moves aren't working, and it can start edgeguards although the diagonal angle on this hit tends to send foes kinda high for that. But in those situations, you can instead try to catch a landing, something Elekid is plenty adept with given moves like Up Tilt and Down Special.
The late hit only deals 6.5% damage, but it deals low knockback that is largely horizontal and lightly vertical: While this can sometimes cause a tech situation, most commonly this just creates a combo instead. At most relevent percents (who cares at 250%!), this will combo into a Forward Tilt, although Elekid may need to move forward slightly to hit it. Sometimes, mostly at early percentages, you can do stuff like Dash Attack -> Dash Attack -> Forward Tilt, you can get a Neutral Aerial off it at times, you get the idea. With a jab power up ready, this combos into Forward Smash until mid percents. It stops comboing too late to be a true kill confirm, but is EXCELLENT at bullying opponents offstage. It's a solid combo starting move. Dash Attack is reasonably fast to start up and not too laggy, but since it'll pretty much always end with Elekid right in front of the foe, is terribly unsafe on shield nonetheless. Elekid travels half a Battlefield Platform in distance.
In Elekid's Charged State, this attack gains a more potent sweetspot as electricity blasts out of Elekid, dealing a much more whopping 14% damage and killing at 110%: This attack is still reasonably fast to throw out, so this can be a pretty surprising kill with reasonable power. Elekid also travels noticeably faster and now travels a full Battlefield Platform: The strongest hitbox is only at the very start, the normal sweetspot for the first 1/3rd of the hitbox and then the weaker hitbox on the rest of the move. Aside from that, though, the move remains the same.
Smash Attacks
Forward Smash: ThunderCrush
Elekid leans back, then bashes forward with one of his arms while it surges with electricity. This move deals 14%-19.6% damage and kills at 110%-80%. This move comes out at Frame 18, 2 frames earlier than a move with comperable range to Wolf's F-Smash (but smaller), in addition to ending on Frame 44 (one frame earlier than Wolf). This move serves a similiar purpose to Wolf's F-Smash, which is bullying out shields: This is safe at pretty much any range and deals fairly high damage, pushes opponents away enough to be safe and has fairly low ending lag for a smash attack. So it's pretty fast (although if you whiff rather than hitting a shield, punishable still) and pretty powerful, making it one of Elekid's bread and butter attacks.
When cancelling from Side Special, your options are generally Forward Tilt or this. Forward Tilt is the safer option due to greater reach and speed, but FOrward Smash is more damaging: If you can get a Forward Smash, go for it, but a fair amount of times you will go for a Forward Tilt due to it's higher range. When you can cancel side Special into Forward Smash, it will end up dealing a good amount of shield damage, so use that moment to go on the offensive.
In a general gameplan sense, Elekid will want to use this as an aggressive tool, and particularly to force foes to shield and react. The opponent shielding this means Elekid gets to punish their options afterwards. Up Tilt, Up Smash, Neutral Aerial or Forward Aerial will all stuff jumping approaches or retreat. Down Smash is excellent at punishing roll ins and Back Aerial is also effective, as is Elekid grabbing the foe, which Elekid can also do if the foe tries to just hold shield, or Elekid can go for ANOTHER F-Smash although this can be punishable if the opponent sees it coming. If it catches someone out, you'll do high damage and can potentially fish a kill. The best counter is to shorthop or full hop and use an aerial, avoiding the attack and striking at Elekid. This, however, can be dangerous due to Elekid having strong anti-air options like Down Special, Up Tilt and Up Smash.
If you want to get flashy, you can launch out a Thunderbolt and try to have it in place to hit you when you hit the opponent's Shield. Launching into Thunderbolt 2 with the F-Smash damage will assuredly break the opponent's shield, after which you can do whatever the hell you want, and you can potentially hit a rolling opponent or something too. This is really hard to set up, you'll usually need to either launch a Thunderbolt behind you and have it follow you and then run up, or launch it near a platform you'll F-Smash on or something. Very rewarding, very difficult. In theory, you could even HIT with F-Smash and Thunderbolt with absurd timing!
During Elekid's charged state, this move gains a small damage buff to 16%-22.4% damage and kills at 100%-68%. On top of that, electrical sparkls fling out of Elekid's hand and around it right after the move ends, dealing very rapid hits of 2%, 4 in total. This hitbox is impossible to hit if you hit with the main hitbox, barring some truly bizarre circumstances, but they will combo against a shield and deal some additional shield damage if the opponent shields. It also might catch out a spot dodge or something if the timing isn't crisp. It isn't a ton, but it is generally useful.
Up Smash: Static Surge
Elekid holds up both of his arms as electricity sparks between his plug, before his hands touch against the plug, causing an electric circle of energy to circle outwards, pulsing and dealing multiple hits of 1.5%-2.1% damage, which adds up to four hits and 6%-8.4% total. This is followed by a final explosion of electricity, which deals 12%-16.8% and has pretty high launching power, enough to kill at about 90%-66%. Visually, it looks kinda like Mega Man's Up Smash. This move has some laggy startup and laggy ending lag, but it deals high damage and kills early: The electricity is disjointed, which is pretty useful as an anti-air that can hit foes without hitting Elekid necessarily.
You'll usually be searching for this move in landing situations or trying to trap the foe, since just hitting it raw isn't very easy. If the opponent is expecting an Up Tilt or an aerial, throwing out an Up Smash can catch an air dodge or otherwise snag the foe: Using this with Up Tilt itself is actually particularly potent, as the opponent might not expect you going for such a powerful option instead of damage or what have you, especially since it is slow and you WILL get punished if they avoid it. This is particularly true due to a peculiar property of the move, as the electrical sparks are strong enough here to electro-magnetically draw in the opponent, a weak "suction" effect that can allow Elekid to pull people into the attack from further than you might expect! If you wanna flex on the opponent a lot, throw this out after a Forward Smash on shield: It's a truly hard read, but you can potentially catch someone getting in with a jump and end their stock right there! Throwing this out when the opponent expects a Thunder can be a mixup too.
It should be noted the suction will affect Elekid's Up Special while it is out as a projectile, which can be pretty dangerous, as Elekid can threaten to either jump into the Up Special at an angle (allowing different vectors of attack) or run under it and threaten an Up Smash, which will suck it into him and allow him to Up Special along the ground (although it'll be angled slightly down and thus not go as far). And if the opponent is too afraid, then Elekid is going to get a free approach with the opponent under pressure and that is always valuable!
When a Thunder drops on Elekid from a Charged State Thunder cloud, one of two special effects can take place on Elekid, depending on what Elekid is doing at that moment. If Elekid is charging or starting the Up Smash, it causes the Up Smash to reach full charge instantly, Elekid launching the attack right then and there with reduced starting lag (about half of the normal post-charge lag) as the electricity floods through him! This obviously requires some solid timing, but it allows Elekid to use this normally laggy attack with surprising swiftness, and the fully charged version has TONS of kill potential! Don't expect this to land often, though. The other option is to hit DURING Elekid's attack, which will cause the pulse to instantly enter its explosion-of-energy stage, expanding out rapidly until it is about 1.5x the size of a maximum Charge Shot. This will always true combo out of the multi-hit if the opponent was caught in it. This causes the hitbox of the attack to be boosted by 1.4x as well, IN ADDITION to whatever Elekid charged up, meaning Elekid can potentially do a gross 1.8x that'll equal 21.6%-38.88% damage! That maximum damage, of course, would require you to charge for a full second in preparation for a bolt that only drops at a specific 3 second time, and was released in Charged State. If you can set it up, you DESERVE that massive damage! It also will kill at 66%-20%, soooo you'll almost certainly get a kill off of a fully charged one. Finally, if Elekid is hit during his ending lag, it just leads to the normal 16% damage Thunder hitbox.
While in Elekid's Charged State, this move gains a few buffs, the most easily noticeable being that the suction effect on this attack is markedly increased. Not only does this buff Elekid's game when catching landing opponents, pulling them in from fairly far distances, it also gives Elekid a greater range to pull in Up Special, and the Up Special will actually turn around if it is facing the wrong way from the powerful magnetic pull! Elekid can get a lot more mileage out of an Up Special approach with this level of control, although do keep in mind that Up Smash as an attack is a commitment, so you can't just throw this freely. You could even combine this with your Side Special's cancel ability, Up Smashing to bring an Up Special back around and either strike the opponent or Thunderbolt 2 at them for great shield damage! This requires a good deal of work from Elekid, but is rewarding in return.
The other primary buff it gains involves Elekid's Thunder cloud, the storming cloud attracting the static electricity pulsing around Elekid's arms, shooting out a bolt of electricity aimed right at the cloud! This bolt's distance is equal to whatever distance would be needed to reach the thunder-cloud, but it will only trigger if Elekid is within a Smart Bomb radius of the cloud, so keep that in mind. This thunderbolt deals 10% damage and light-moderate knockback in the direction it travels, meaning it will send foes hurtling towards the thunder cloud. With proper timing, most hits will lead to a combo into the cloud's falling bolts if used towards the end of a cloud's lifespan, so you can get in a sweet 20% damage and spike the opponent down. You can also just, in general, use this as a way to strike at opponent's outside of Elekid's normal Up Smash range, especially good for opponents on platforms as you can poke at them from below while covering further options with the bolt. Do note that the bolt will stop if it hits a solid such as stage, wall or a solid platform, but it WILL go through "soft" dropdown platforms like Battlefield's.
Down Smash: Electro-Geyser
Elekid punches the ground once with one of its fists, dealing 5%-7% damage: The punch creates a very small surge of electricity in front of Elekid, which deals the same damage. This knockback is very minimal and is primarily designed to go into the second punch, which has Elekid perform a stronger punch that creates more of a forward explosion of electricity with some moderate range to it. The entire attack, electricity and all, deals 8%-11.2% damage, for a total of 13%-18.2% damage. This won't kill until pretty late, like 160%-135%, so it mostly gets foes off of you. The electrical part of both hits has a very slight amount of additional hitstun, but this very rarely matters. The first hit comes out quite fast, but the electrical spark is fairly small, and since Elekid is punching in front of him it has somewhat short initial range. The 2nd hit has pretty good range, though, as the electrical explosion covers a good distance in front of Elekid. This move is safe on shield if spaced correctly, but if you hit too close then the 2nd explosion won't push enemies away enough for it to be safe. The opponent might be forced into a suboptimal punish regardless, though, like a Dash Attack or something.
This move is noticeably stronger during Elekid's Charged State. The range of the first hit's electricity is increased and it has more of an explosive look to it and, perhaps most importantly, Elekid gains a third hit: Elekid raises both of his hands above his head, clasping them together, before slamming them hard onto the ground in front of him! This creates a large, half Battlefield Platform range electrical explosion, with it being more vertical as it goeso n (looking like an outwards explosion). Like the base hitbox, the entire hitbox deals the same amount of damage, and it deals 13%-18.2% damage, essentially doubling your damage output if you hit it! It also now kills at a much stronger 105%-76%.
This move, however, can be kinda tricky to hit. It takes a while for Elekid to start the third hit, so if you actually LAND the 2nd hit, then the foe can be launched too far away for the third to connect! There's a few ways to land the 3rd hit. First off, if you hit with this move really close, then the third hit will probably come out fast enough to still snag the foe unless they are at quite high percentages. Another big way to do so is through roll, air dodge (if the opponent is landing) or side step reads. If the opponent sidesteps the first two hits, they will come back into the battlefield right in time to get hit by the third strike, still taking plenty of damage and potentially death. Similar things are true of rolls. Finally, the opponen might miss the 2nd hit entirely, like by DI-ing up and in if they're hit close, in which case the third hit will then connect.
While the third hit has high ending lag, this move has good shieldstun and high shield push, so it is safe on shield! This is actually really scary since normally shield is a good option against Down Smash (at minimum you stopped the attack and are fairly neutral). The third hit means Elekid is going to get a lot of shield damage and be safe with some advantage. If Elekid wants to be really cheeky, then he can try rushing forward and doing a raw F-Smash, which will absurdly destroy the foe if they keep shielding. Do watch out for the high ending lag if you whiff entirely, though, as this makes it plenty more punishable.
Aerials
Forward Aerial: EleKick
Elekid performs a quick, spinning screw-dropkick in front of him, in a manner not unlike the chimp Diddy Kong. This move has two hits, the early strong hit and the late weak hit. The early hit deals 11.5% damage and has solid knockback, but it doesn't really scale to kill well. It only kills at 180%, but with solid base which it builds off of, it works really nicely as a launcher tool to get the foe offstage, where Elekid can launch Thunderbolts, cover ledges with Thunder and otherwise trying to keep the foe from coming back. This also is the hit you'll get most of the time when comboing, which makes it an effective and high damaging combo finisher. This move's lag is pretty close to Diddy Kong's FAir.
The late hit deals only 7% damage and is rather weak. In the air, this mostly serves as a punishment for messing up the timing of your combo with the early hit. On the ground, however, this can combo into itself once or twice at low percents or into a Neutral Aerial if you land with it, usually by fastfalling. You can also mix up with a dash-in grab, which is pretty solid. The downside is that this move isn't particularly safe on shield, so going for this on the ground is risky, at least for a combo. You could instead throw out FAirs while retreating: This usually makes it safe on shield and can make a little difficult wall for the opponent to get past. You can also mix up the timing, as the first hit is safe on shield if properly spaced and then fastfallen to land during or what have you. Also, it can be safe when crossed up. The additional aerial mobility that Elekid gains during his Charged State can be useful for weaving this move as a wall and varying your timing up even more, but this move gains no specific Charged State bonus.
Neutral Aerial: Static Spin
Elekid spins around twice with his arms outstretched as if to clothesline the foe, arms crackling lightly with electrical energy. This is a multi-hit attack, but it only has two hits which deal 3% damage each. The 2nd hit sends opponents at a low angle mostly in front of Elekid that is prime for follow-up combos, ESPECIALLY when Elekid is close to the ground. Some of Elekid's best general pressure is to Neutral Aerial with nearby ground, platforms are especially nice on stages that have them, and either trying to go for more Neutral Aerials, bouncing them away with a Forward Aerial, rushing forward with a grounded move to combo or aggress depending on the foe's falling speed and damage percent: Fastfallers are particularly susceptible to Neutral Aerial -> Up tilt, which can lead to Neutral Aerial -> Forward Aerial off of it. Up Aerial can also be a follow-up. Moves like grab or ThunderPunch mix up opponents not reacting if you just combo or, say, delaying a ThunderPunch and a foe panic-dodging into getting hit. This move is fast to start-up and has fairly low ending lag, and lower landing lag, so it is mostly safe, but the spin does mean Elekid can be punished due to the move's duration at times.
The Charged State has the electricity surge in Elekid's arms and cover its body some as well, causing Elekid to spin significantly faster and adding a third spin of 3% to increase the damage to 9%. A very small amount of the move's ending lag is essentially "converted" into additional duration here, making it slightly better at catching foes out, but even just the damage buff is pretty strong here due to how much it is used as a combo tool ot mixed into Elekid's gameplay. That little extra damage adds up! The increased air speed of Elekid also allows Elekid to essentially drag opponents around some with this, which is good for positioning, maybe with a Thunder or Thunderbolt around?
Up Aerial: Shock Arm
Elekid raises one arm to the sky, electricity balling up in his hand and surging around it. This multi-hit hitbox deals 3 hits of 4% each for a total of 12% damage, with the last hit dealing knockback that kills at a kinda medioce 155%, although that can still be kinda solid as a killing option, especially since Elekid is fairly solid at getting opponents into the air. This move also is fairly fast to start-up, with the ending lag being moderate. At very low percents, this opens up a combo 1-hit-after combo, and depending on the character and DI this CAN combo into Down Special until more moderate percents. This move has solid duration that can make it tricky to avoid, especially when considering this move has a similar "suction" effect to Up Smash, drawing in nearby opponents that are just out of range, and also making it easier for Elekid to drag opponents around. but it also means the move is more punishable than it's more modest ending lag suggests due to the high duration or even opponents using the suction to approach more strongly!
During your Charged State, each hit deals an additional 1% for a total of 15% and the last hit now kills at 145%, but that is by far the most minor of effects on this attack! As another minor effect, the electric static-suction of the base move is somewhat boosted, allowing Elekid to drag in people from somewhat further away. These are both minor effects compared to the larger ones Elekid gets, though! If Elekid is within a Smart Bomb radius of his Thunder, a bolt of electrical discharge will shoot FROM the cloud towards Elekid, fizzling against solids with the same rules as Up Smash. The electric ball from Elekid's Up Aerial calls a weaker bolt than Up Smash, only 8% damage, but the light knockback towards Elekid is prime either to combo directly into the Up Aerial...or more. In addition, the fact the lightning bolt is aimed towards Elekid along with Elekid being able to move as an aerial compared to the stationary Up Smash, so you can do some pretty funny stuff with it. For example, going off stage and covering a ledge with Up Aerial while a bolt shoots out above the ledge. The bolt will curve towards the electrical ball if it gets close enough due to suction, so Elekid can use this to pull off some slight tricks with direction as well.
The increased electrical energy from the ball will also shoot into Elekid if he lands DURING the attack, charging him up for just a brief moment and allowing him to not have any additional landing lag if he lands at any point during the attack, which is quite generous for autocanceling. Combined with the Thunder cloud's bolt and this turns from just "hit them into Up Aerial" to a move with a ton of potential follow-ups depending on the foe's percent and positioning, including kill confirms with Forward Smash or Up Smash and some potentially disgusting combo chains if you had a jab hitstun-increasing effect ready given the bolt does not require a melee hit! There's more to this move than meets the eye, so enjoy it.
Down Aerial: ThunderTwirl
Elekid raises his arms up as he begins to twirl rapidly for a drill kick-style attack! This causes Elekid to deal multiple hits of 1.5% damage that will total 9% damage if all six of the hits connect with this hitbox being based around Elekid's feet. The exact knockback of this hit depends on if the foe is grounded or airborne. Grounded opponents are kept on the ground the entire time, with the last hit pushing them away in whatever direction Elekid is traveling. If Elekid is not moving, it pushes them the direction Elekid is facing. Landed properly, this leads into a grab or Down Tilt until you get a fair deal into medium percents, at which point you can go for 50/50s involving stuff like grab and Forward Smash, or on some characters true combo into a ThunderPunch instead (on ones you can't, you can land the weaker disjointed ThunderPunch hitbox). Airborne opponents get hit upwards with a rather light hitbox, which will almost always combo into an Up Aerial although higher percents may require a double jump. Lag is about average on all ends when it comes to these kind of drill kick moves.
In a Charged State, both Elekid's feet and arms will spark with electrical power, granting Elekid a few options! First off, though, the leg-based drill kick hitbox deals 0.5% extra damage with each hit, boosting its total damage to 12% total. Knockback is not changed, however. The tip of Elekid's arms, far above him, are a sweetspot that sends opponents hurtling downwards with a powerful 14% damage spike! This is a rather small hitbox and since most of Down Aerial's hitboxes are further down it tends to leave Elekid extremely vulnerable if he misses thanks to the long duration. The rest of Elekid's arms are a weaker hitbox that deals 10.5% damage and sends opponents away from Elekid with moderate knockback that doesn't really kill much, enough to be happy you tacked on some damage but you aren't getting any more off of it.
During Elekid's Charged State, Elekid gains a brand new hitbox when landing on the ground ala Falco's Forward Aerial, although the hitbox depends on how much of the drill kick Elekid had left. Elekid will continue drilling against the ground, sending out sparks of electrical energy around itself! Each hit doesn't have much range (about 1/4th or less of a Battlefield Platform), each of which deal 2% damage and deal knockback that draws the opponent in further. The amount of hits here depends on the number of drill kicks Elekid had left, with the amount of sparks being released being the same as number of kicks Elekid had left. So if you landed at the very start, that is six sparks, and with the last kick only one spark. Just like how Elekid's swinging arms allow him to gather some energy as it spins in place, in this case causing an increasing range as Elekid spins. So, the earlier you land, the more range it can get, up to between 1/3rd and a half of a Battlefield Platform if you land with the first kick!
Elekid's arms are a hitbox the entire time, starting off with the same 11% damage hitbox as most of the arm has like normal, with the sweetspot also becoming this hitbox. As Elekid spins, the hitbox gets progressively stronger, dealing an additional 1% damage, but particularly increasing the knockback more and more! By the last hit, if you spun 6 times, the attack now deals 17% damage and kills off the top at an impressive 80% damage! Do realize this is pretty hard, since hitting with any prior hitbox will naturally send the opponent flying before you get to max power, and you need to land early for it...although even at only 3-spin power, it at least kills at 115%. The sparks hitbox will NEVER combo into this, so you can't just get it easy there. The easiest way for you to get a hit here is a pretty hard air dodge read or an opponent doing something laggy for the last hit, anyway. The more moderate versions serve as easier, but less rewarding ways to catch out air dodges.
Back Aerial: Electro-Spin
Elekid spins and performs a very swift, short range kick behind him. Think more like Jigglypuff than like Donkey Kong. This move doesn't have the best range to it, but it comes out fast and deals 8% damage. The knockback is at a shallow angle, quite horizontal, which can make it solid when you're using it on offstage enemies. This also gives it some pretty good use on-stage: Opponents hit usually are put in a tech situation until late percents, which offers a vantage point that other aerials you have don't necessarily do. This can help serve as a walling out move as well. While it is slightly laggier than average it is definitely not "slow" and it has low ending lag, which makes it a safe way to try and space out people going behind you.
Note that you don't get any combos or whatnot in the air, so it ends up being a pure spacer there. If you're looking for damage output and combos, head to the rest of your air game instead.
Grab Game
Grab: Shocking Grip
Elekid performs a quick swipe forward with both of his arms. This grab has pretty low range, thanks to Elekid's stubby arms and all, but it is one of the fastest grabs in the game! You do have to get used to the low grab range, though. Increased speed during your Charged State can help. Elekid's dash grab is the exact opposite of his normal grab, with a lunge forward giving it impressive range, but it is really punishable if whiffed. You won't use it as much, but it is an option.
Pummel: Shock
Elekid quickly shocks the opponent in his grasp, dealing 0.8% damage with a fast pummel. During the Charged State, this damage is doubled to 1.6% per pummel, so you can get some strong damage with it.
Up Throw: Plug Slam
Elekid grips the opponent, placing them on top of his plugs, and leaps into the air as electricity surges out of the plug! Elekid leaps into the air high enough that, from the bottom platform of Battlefield, they will reach the side platforms of Battlefield (but of course not the top platform) and slam opponents into that. Elekid can actually angle the Up Throw when he is leaping up, able to leap about half a Battlefield Platform to the left or right with max angle and able to angle in-between like Fire Fox as well. Elekid then slams into the ground in an electrical, slamming burst! Elekid can move in the air as well, up to an additional half Battlefield Platform left or right if he holds the entire time. Elekid cannot willingly go off a platform or ledge with this, in general working ala R.O.B.'s Up Throw.
As an animation note, Elekid leaps up with the opponent with the same orientation as on the ground. At the peak of the leap, Elekid flips the opponent so Elekid is on top, the opponent on his plugs and facing down. This is actually important! Remember Thunder and Elekid's Thunderbolt? Well, since they rely on hitting Elekid, Elekid's position is important! So, if you want to hit Elekid while he is leaping up, you'll want the Thunderbolt to come from behind, for example. If you have a Thunder coming down, you want to time it to hit you after you reach the apex of your throw, so you can be in the right direction to be Thundered. This is also one big reason the ability to move around with this throw is so important, as it can lead into some strong kill options with Thunder and Thunderbolt, especially in your Charged State, and one of Elekid's more deadly option if he can set it up right, although the predictability can be an issue.
Don't fret too much if you don't get this, though, as Up Throw here is your main kill throw. Elekid's sparking plugs deal four hits of 1.5% damage on the way up, while the final slam deals 6% damage with killing power, enough to kill at 136%! This can kill earlier on platforms, which is relevant with the leap upwards which can get you higher up. The repositioning also can be relevant if you're instead using this to set up a landing scenario. Even if you can't set up a Thunderbolt 2 or Thunder, you can set yourself up to hit near to one and work off it. You also can position yourself closer to the ledge if looking to cut off options that way, or towards center stage if there are more platforms nearby, or what have you. Try Up Tilt if you're looking for a combo catch move, or Up Smash if you're looking for a kill catch move!
Down Throw: ThunderSlam
Elekid hoists the opponent up, then slams them into the ground for 5% damage, popping them lightly in front of Elekid. Up Throw might be your kill throw, but THIS is your combo throw, and in particular it is a good combo tool with Dash Attack: Depending on WHEN you Dash Attack, you can hit with almost any of its hitboxes! The Charged State sweetspot can be hit, but no at kill percents, up to like 80% on Mario before they get too far, but all the other hitboxes can be timed right to hit. You can go into NAirs, you can reverse into a BAir, you can often run under and Up Tilt. As long as it isn't laggy, you can do it. Forward Smash is out.
In Elekid's Charged State, Elekid will hoist the opponent onto his plug before slamming them down, which adds in three electric-blue shocks of electrical energy to add in 3% more damage before slamming the opponent down for a now-increased 6% damage for a total of 9% damage! The electrical blue static sticks around the opponent for the next 4.5 seconds, although it doesn't have an instant obvious effect. The next electrical attack that Elekid uses will cause the opponent to be drawn about 1/4th of a Battlefield Closer towards Elekid as the attack starts with a damage-less static spark. This will use up the effect, but it can allow Elekid to extend combos outside of normal for his combo throw, and also allow Elekid to utilize a range extender outside of those situations. Sometimes, it could even lead to a kill attack, like ThunderPunch out of this!
Note that this only triggers off of electrical attacks, so you can use non-electrical attacks to keep it ready for later, such as his Up Tilt/Down Tilt outside of Charged State or his Forward Aerial.
Forward Throw: Arc Thunder
Elekid grips the opponent tightly, spinning them in one of his arms three times for three hits of 0.5% damage, before scraping the opponent against the floor and underhand-tossing the foe forward! That deals three more hits of 0.5%, then a final hit of 5%, for a total of 8% damage. This knockback is at a shallow angle, although it is one that the opponent can jump out of past low percents (at low percents, it is a tech situation). Elekid gets frame advantage on this that allows him to do two options. The first is to run forward and pressure the opponent. If the opponent jumps in panic, then it is especially good for Elekid, because he gets a landing situation and no double jump from the foe to avoid them! The other is to, say, charge up his ThunderPunch. This move is excellent for giving you the space to rev up that arm and start to swing for the fences!
The Charged State buffs this move in a few ways. The first six hits are doubled from 0.5% to 1% damage, making this a significantly more damaging move at 11%. The other bonus effect is much more interesting, as electricity collects under the opponent as they scrape the ground. Once they're tossed away, it shoots out! This projectile travels the ground and goes 1.2x the distance the opponent was thrown, stopping if it hits walls, ledges or what have you. It only deals 6% damage and light knockback popping the foe up (albeit with solid hitstun), but it works very well because the opponent has to react to it once they're thrown away! In particular, a natural reaction to avoid it is to jump, which is exactly what Elekid wants for his many anti-air options!
Back Throw: Storm Spin
Elekid grabs the foe and begins to spin rapidly, electricity crackling and sparking around it, before releasing them and sending them flying! This is a highly damaging throw that deals multiple hits of 2%, for a total of 6%, and a launching hit of 8% for a total of 14%. This move has good base knockback, but the scaling is poor enough that it kills only at 168%. This is your alternative spacer alongside Forward Throw, but rather than allowing aggression, it is able to set up pretty solid offstage situations, and has kill power (especially at the ledge!). It also does more damage in exchange for the lack of follow-up options. The opponent's body is a hitbox that deals 6% damage and light knockback to anyone they hit, for those sick FFA interactions.
While in his Charged State, each of Elekid's first three hits deal an extra 1%, making this move deal a rather strong 17%! The launch power, however, is unchanged. The opponent's body is also now electrified while being used as a weapon, dealing 13% damage that kills at 140% to anyone it hits. Obviously situational, but useful!
Less situational is the additional effect of the foe being electrified, which persists for a total of 6 seconds! As the yellow electricity visibly courses through their body, they'll be taking a few effects. First off, any Thunder clouds that shoot down directly at the nearest opponent who is afflicted by this if they are within 2/3rds of a Smart Bomb radius of said thunder cloud, making it a lot more of a directly threatening trap. This is particularly true when using this Back Throw to set-up ledge situations, as it can cover lots of recovering options or threaten an off-stage spike! The foe will similarly attract a Thunderbolt projectile with the same suction as Elekid's Up Smash and Up Aerial, except centered around the opponent rather than Elekid obviously, with its suction power being halfway between the uncharged and charged state of Elekid's Up Smash. The projectile from Forward Throw will travel 1.3x as fast while traveling at an opponent under this effect as well, although naturally this will be hard to achieve with using two throws. If you use Back Throw on an opponent under this effect already, it add 6 seconds to the timer but does not increase the effects.
Both of these allow Elekid to be aggressve against the opponent, perhaps instead deciding to use the free space from the foe setting up a Thunder cloud or Thunderbolt even thanks to these benefits. Opponents need to be fairly aware of Thunderbolt's positioning especially, as it can lead to Elekid being able to perform Thunderbolt 2 combos otherwise impossible because of the foe being much more manipulatably mobile! For example, sending an opponent behind you or positioning them with something like NAir so you get to move through them at a Thunderbolt chasing them, then leading into a Thunderbolt 2 as it crashes into you! You get some real tricks with this attack.
Final Smash: Volt Tackle Surge
Elekid grabs in front of him as his entire body surges with energy! If Elekid catches a foe with this hopping grab, the attack begins, with Elekid surging around the entire screen like a ball of lightning, switching between electrocuting the foe on his sparkplug and beating the foe up with a variety of punches and kicks. This entire process deals 50% damage over many hits: Opponents hit by this high flying and electrocuting act take 20% damage and are knocked away, although they may be hit 2 or even 3 times. The Final Smash ends with Elekid taking the opponent off his sparklplug and double-fisted punching them into the ground for 20% damage and knockback that kills at the same time as Mii Brawler's Final Smash.
With Final Smash meter on, halve all of the damage numbers.
That's a wrap! Thanks to everyone who contributed to Bizarro Day, we got 10 sets! That's a good deal more than I had expected, and we got a few surprising additions, such as Khold's moveset (I won't spoil it for anyone who missed it), the best FMA villain, n88's revenge, among others.
For the record the sets posted over the Bizarro Day period were: Lakitu, Kimblee, Primeape, Armie, Ennard, Whisper, Fenn, Khold's Zelda set, Mina, and Elekid. Impressive!
In the future we might be doing other fun events, so stay tuned!
Who better to comment these than the person you'd least expect to do Anything related to MYM at the moment?
Get ready for...
BIZARRO COMMENTS (except they'll be regular comments)
MasterWarlord
starts the event off with Kimblee. Terraforming is present in this explosive set in a cool way, blasting the stage from within, and is done in a surprisingly technical way. The standards of terraforming are left out of the set, because at this point in MYM it's pretty well known what a floating platform and a pit in the ground do from a general standpoint. This keeps the move refreshing, focusing on the more interesting tech like using the ledge to shorten SSpec's range or detonate from within with any number of moves. The explosion gameplay in the Specials keep the same powerset varied while creating a cohesive, fluid playstyle, and it's particularly interesting to me for reading given my first set of the contest was Bakugo. Comboing off of Crimson Blast by blasting yourself after the foe at the ledge is terrifying and absolutely fun, which feels like a running theme for this set. A lot of the attacks are intimidating, even outside the Specials, and at times feel like it might be too much in certain parts. Notably is the Up Smash, a big explosive hitbox (which is fine) that embeds foes with miniature time bombs. Combined with Time Bomb, the foe is hard combo'd into hit after hit, lifting them up towards the blast zone. This isn't blatantly broken and requires set up, but gets to be a bit on the scary side of moves.
Another area this set particularly excels at is the Grab Game, which is extremely interesting and enjoyable thanks to the actual grab's spike. It does much of what someone would expect, leaving further time bombs on opponents as they're thrown for different trajectories and effects, turning the grab into a delayed rocket on the foe. However, the Down Throw is the most interesting in both concept and practice. Adding to the foe's hurtbox is a neat trick, and well justified within Kimblee's powers. It's a universally useful effect for any character, though Kimblee himself doesn't need it as much as other characters do, with the wide number of AoE explosive hitboxes in his set. It's still conceptually cool, and a great way to round out the throws. I don't have much to say about the standards and aerials, outside of UTilt and DTilt feeling very clunky for tilts, but I don't think this is an oversight and plays into the set justifiably well. This is a fun and relatively easy read that does some very cool stuff with both terraforming and explosions, both presenting and executing a lot of cool ideas throughout it.
Primeape, by UUserShadow7989
, is the next stop on the Bizarro train, and a Pokemon I once wanted to visit for a set. Primeape is a brief read, expected for a Bizarro day set, but does pack a lot into a tiny little body, much like the character itself. The set very much operates within the context of the Specials, strung together by the breads and butters of Primeape. The set functions like a full-bodied version of Doomfist's The Best Defense from a few contests ago, turning Primeape into both a comeback king and a steamroller as getting combos or being combo'd both lead to Primeape gaining his excellent armor advantage state. Similar to Kimblee, it feels like Primeape can get very scary, able to fly around the stage with crazy speed and superarmor, which feels fitting for Primeape but also seems like it could be overwhelming given how easy it is for Primeape to gain and maintain his armor. The use of a counter that doubles as a buff is really great, passively punishing an opponent for a bad read as opposed to the opposite. There's not much to talk about the set outside of the Specials, as is the nature of Fighting-type Pokemon a lot of the moves come down to beatdown standards rather than gimmicky pseudo-specials or projectiles. It's not an exceptional set, but for a Pokemon like Primeape its both suitable and enjoyable.
Because this is Bizarro comments, and not because I just missed the set on my first pass through, we're heading back to look at UUserShadow7989
with Lakitu next! Lakitu feels considerably more interesting and fleshed out than Primeape does, holding a more MYM-ian flavor with minion and stage control focus. The set has a great deal of references to Lakitu throughout both the main games and the spinoffs, combined in a really satisfying set. The Specials are conceptually strong, with both SSpec and USpec being expected moves. However, the NSpec pseudo-pocket is a clever way to incorporate Mario Maker into the set, and helps give Lakitu even more visual similarities to the Koopalings in Smash, able to launch projectiles out of his "car". DSpec is probably my favorite of the Specials, really unexpected and clever with the golden coin buff on pretty much any entity for different purposes. We even get a minion in the Smashes with the Piranha egg, and each one of these minions and buffs is given exactly enough depth to stay interesting and flesh the set out without going overboard and becoming a slog.
Unlike Primeape, Lakitu continues to be interesting throughout the entire set, with an obvious highlight being the fishing rod Grab Game + Cargo Throw. The ability to hook his minions and eggs onto the fishing pole as a mixup into a normal hitbox is pretty fun as well, plus it makes a non-standard grab much safer by giving it a "plan B" option. Another really cool move is the dash attack, a rare occurrence where the fighter stops moving and the hitbox continues forward. It's a really great way to make a realistic dash attack for a character who doesn't want to approach the foe necessarily. There's a lot of fun references to Mario Kart through the set as well with the different flags and the light-up traffic light, helping set Lakitu apart from any similar character. Thanks to how mobile and slippery Lakitu is, he doesn't even feel as clunky as sets who do similar minion control and set up. Outside of a few inputs (I brought up the SSpec Input switch in the Discord) it's a short but packed set and very enjoyable.
"Eight years. Not a word from the feds, nothing from those Halloween costume-wearing bozos up there over at Stark Tower. And then all of a sudden, this little bastard in red tights shows up, and he thinks he can tear down everything I've built. Really? I'm gonna kill him."
The vast majority of MYMarvel movesets are for amalgamations of the characters from their appearances across different media over the years. This set, however, centers specifically on Vulture as he appears in the 2017 film "Spider-Man Homecoming," portrayed by Michael Keaton.
In this latest retelling of Spidey's story, Vulture, real name Adrian Toomes, starts off as the blue-collar head of a New York-based salvaging team. The team is shunted from its biggest job yet, cleaning up the aftermath of the Avengers' run-in with the Chitauri, thanks to a new government venture bankrolled by Tony Stark. Facing the loss of livelihood, Toomes withholds a truckload of alien nuts and bolts, jumpstarting a new business designing weapons to sell on the black market.
His heists to pilfer knick-knacks left over from previous Marvel films, along with the mechanical wingsuit he uses in the process, are what earn him the "Vulture" name — though Toomes personally sees aliases as too "pro-wrestling" for his liking. The wingsuit marks perhaps the character's biggest departure from his comics counterpart: rather than consisting solely of green winged tights, this Vulture's suit functions as an airborne Swiss Army knife, with propeller turbines, wire anchors, metal talons and razor-sharp feathers. In other words, it's great for selling action figures and even greater for turning what was once one of Spidey's simpler rogues into a formidable force.
In terms of personality, Vulture has no scruples about keeping his business afloat by any means necessary, up to and including outright murdering the 15-year-old web-slinger. Rather than grandstanding, however, Vulture is emphatic about, and succeeds for years at, keeping his criminal operation off the Avengers' radar. He has no interest in conquest on any scale but instead in providing for his family as best he can, even keeping Spidey from harm in two separate shows of gratitude for keeping its various members safe. Vulture's development has resulted in him becoming a fixture near or at the top of many fan MCU villain rankings — that, plus the fact that he's one of the rare few to survive his film's events, opening the door for more development in the future. (At least before a certain Mouse had to throw that all into flux in the months since I wrote this. . .).
STATISTICS
Weight>>>8.5 / 108 units(9th, tied with Samus and Bowser Jr.)
Aerial Movement>>>8 / 1.208 units(12th, tied with Mario, Donkey Kong and others)
Size>>>8 Fall Speed>>>7.5 / 1.78 units(17th, tied with Ridley)
Ground Movement>>>3 / 1.5 units(68th, between Ike and King Dedede)
Jumps>>>1.5(comparable to Snake)
By default, Vulture keeps his suit's metal wings retracted, walking around and dodging as a humanoid not too dissimilar from Snake. The suit wings then automatically expand and retract like Meta Knight's when Vulture jumps or otherwise transitions to or from animations. They're downsized in comparison to their massive film counterpart but still protrude a bit into the foreground and background as non-tangible extensions of Vulture's model. For his dash animation, Vulture also transitions into a leisurely glide, leaving his hurtbox ever-so-slightly more horizontally vulnerable but less so vertically. The wingsuit lends Vulture a weightiness more justified than the heft Smash arbitrarily ascribes to characters "carrying gear" they actually pull from hammerspace, though he falls a hair short of qualifying as a true heavyweight, at least outside Smash forums where everyone heavier than Mario gets that label.
Unless otherwise stated, KO percentages are on Mario from the middle of Final Destination.
SPECIALS
NEUTRAL SPECIAL - FLIGHT OF THE WINGSUIT
A tap of B has Vulture press a button on his wingsuit's hand control mechanism to start its turbines whirring and glowing with blue Chitauri energy. The input puts Vulture in a stance, appearing to program the mechanism, during which the player can direct the control stick in a pattern of their choosing for up to 1.5 second, able to cancel out at any time with another press of B, or a dodge or shield, as with Giant Punch. Spending longer in the stance does not power up the ensuing move, as it is not functionally an attack. Rather, the next time the player taps B, Vulture presses a button again for his wingsuit to fire up over three frames and lift him into controlled flight, carrying him along whatever trajectory the player previously input. If the player held B without inputting a flight path, Vulture simply will hover in place for up to five seconds.
The player can control flight distance and speed as variables with regard to Vulture's wingsuit. The suit travels one-third of Final Destination for each 0.25 second the stick is held during the initial stance, for a two-Final Destination maximum. The force the player uses in directing the control stick determines flight speed, ranging from a default of Peach's dash speed with gentle inputs to a maximum of Sonic's dash with smash inputs. The determined distance and speed in turn influence Vulture's airtime, as even a minuscule distance can be prolonged with a slow flight speed while at top speed longer distances can be completed in virtually no time.
Vulture functionally is in his midair state while in flight, able to freely perform aerials while continuing along his flight path. Vulture can trigger his controlled flight at any point when he's not in hitstun, including at any point during an attack animation, even while charging a Smash attack. If Vulture triggers Neutral Special during a grounded attack's startup or charge, he can lift off before the actual attack begins, giving him limited means to perform those moves during his flight path too. He enters his regular falling animation if his flight path wraps up in midair. Though he can program and trigger a flight path in midair, he's unable to use Neutral Special to do so a second time until he reaches solid ground to prevent infinite flight.
Vulture can be hit out of his flight path by any move that causes him to flinch. If he's on track to soar into an attack or hazard, after the first 20 frames of flight, he can laglessly drop out of a path early with a dodge or a tap of B, albeit not during attack animations. Canceling a flight path before it's complete lets Vulture keep the remainder of the programmed path, able to restart it where he left off with another tap of B at any point, including in midair. There's no formal limit for how many times the player can stop and start Vulture's flight, though the 20-frame buffer between stops means he cannot do so indefinitely to stall. By holding down B for 30 frames, the player can overwrite Vulture's flight path, whether or not he's flown any of it, able to enter in a new one with a fresh tap of B if they so choose.
Beyond the obvious recovery function, Vulture's flight paths open up a number of offensive and defensive possibilities for him. The sudden nature of flight can prove handy both when he wants to rush in and pressure opponents or zip out of the way of whatever attacks they're throwing out. He can soar around up to a maximum two Final Destination lengths in one continuous path - and either at one continuous speed or multiple varying speeds - or split one path up over multiple bursts of flight. Taking to the skies works wonders in letting Vulture transcend moving around as your standard clunky above-average-weight. That is, so long as he avoids predictability in repeating just a few token flight paths, or carelessness in breaking away too often to program in new paths.
SIDE SPECIAL - DECOY DRONE
Vulture clicks his hand controller for a winged hovercraft, about half a Battlefield platform long and slightly thicker, to emerge from his backpack over 25 frames and become a solid platform with ledges. By default, the drone travels horizontally forward, one Vulture height above the ground, though during the startup, the player can direct the drone in any of the seven other compass or diagonal directions instead, with a downward input placing the drone under Vulture's feet. The drone travels back and forward half of Final Destination's length at a default speed comparable to the floating Smashville platform, with the player able to speed this up to Link's dash speed with a smashed input. A second input of B during the startup also has Vulture freeze the drone at the start of its trajectory as a stationary platform. Vulture can have two drones onstage at a time, with each vanishing after 20 seconds left to their own devices.
The drone can be directed to travel in more creative formations too. Should Vulture input a Neutral Special flight path and then tap B standing atop a drone, the path will be transferred into the drone, carrying him along as it starts flying at the trajectory and speed originally programmed for the wingsuit. The drone will continue traveling until it reaches the path's end, upon which it will resume its linear pattern or become stationary again. If the player holds B and inputs the direction of a drone (before the 30-frame window that would qualify as erasing a flight path) without standing atop it, Vulture also can remotely transfer a path into a drone, a 20-frame process. If there are multiple drones in the same direction, how hard the control stick is input determines which drone receives the path. Any transferred flight paths can immediately be returned to Vulture's wingsuit with a tap of B.
Vulture cannot summon more than one drone in midair, and he can only program a single Neutral Special flight path from atop a drone until he lands again on non-drone ground, deterring stalling and infinite flight. Characters also will fall off of any drone they've stood on for more than five cumulative seconds while in the air, until they've touched non-drone ground once again. Vulture can, however, transfer a single flight path from drone to drone while standing on one, albeit with the 20-frame buffer. With foresight, remotely transferring a helpful flight path between drones still grants Vulture a superb recovery option beyond his regular wingsuit, albeit a potentially riskier one. Drones have 35 HP that can be depleted to destroy them, upon which the construct will explode in a Wario-sized blast dealing 23-24% and knockback KOing around 100%, with Vulture both able to destroy and suffer damage from his own drones. Characters can tech off of drones but will otherwise deal 5-8% to the constructs upon getting launched into them.
Sending out a drone or two dramatically boosts Vulture's mobility options, which already were nothing to sneeze at. He now can apply and remove the varying speeds, trajectories and stop-and-start times of his regular wingsuit flight to and from platform constructs of his own creation. With a smartly-programmed flight path, players can put a drone underneath Vulture and briefly glide around on it as a personal platform to pressure or space against an opponent, before abruptly hopping up and soaring into wingsuit flight to adjust their approach at an opportune moment. The inverse, soaring onto a drone and transferring a flight path into it, also can be handy, especially if Vulture finds himself on the platform with a victim he's trying to relocate. Hopping between two drones with punctuated periods of flight can further compound Vulture's command of the skies, though less-proficient players still can play around plenty leaving a drone stationary or in its original linear path. And, of course, factoring in the drones' explosive nature, Vulture can temporarily turn an area of airspace into a danger zone with the right programming for a damaged drone, or even set one on a collision course with a beneficial hitbox.
DOWN SPECIAL - MATTER PHASE SHIFTER
Vulture takes a Pokeball-sized metal pod out of his pocket and holds it as a throwing item, with slightly more lag than Snake pulling out a grenade. Once thrown, the pod will stick to any solid surface it hits as a non-solid object. A second input of Down Special has Vulture click his controller to activate the pod. After five frames, this turns the surrounding Battlefield platform of space translucent purple and intangible for a time, wrapping around ledges and walls depending on placement. On solid flat ground, opponents who overlap with the pod during intangibility suffer a pitfall effect comparable to DK's headbutt and trip if they touch the purple ground without overlapping. Drop-through platforms up to Battlefield platform length fade away in their entirety, while a hole that length opens up on longer drop-through platforms, like that on Smashville.
Thrown pods inflict 2-3% and slight stun upon hitting an opponent. Characters can catch and toss pods, dealing the same light damage if they hit Vulture. He cannot activate a pod while an opponent is holding it, though he'll always retain control of its intangibility, not becoming vulnerable to the pitfall or tripping if, say, it's reflected back at him. Pods cannot be picked back up once thrown once they're in place. Left to their own devices, pods last for 30 seconds before vanishing, during which Vulture can repeat the input to flicker them on and off as many times as he wishes. However, each pod only allows up to 10 cumulative seconds of intangibility, after which it will vanish. There's a seven-second cooldown after one pod expires before Vulture can pull out a replacement. He can place up to two pods onstage at a time; a tapped Down Special input prompts Vulture to extract a second pod after he's placed the first while a smashed input results in him activating the existing placed pod. With two placed pods, Down Special influences whichever one is closer to him at the time. As with Neutral Special, Vulture can activate pods whenever he's not in hitstun, including at any point during an attack animation. If a second pod lands on an aerial platform that already holds one, including a drone, activating the intangibility won't trigger both pods at once, but rather will drop the second pod down onto the stage below.
In terms of basic gameplay, pods can both temporarily invalidate drop-through platforms and encourage opponents to jump more in avoidance of the grounded traps, giving Vulture leeway to go on the offensive with his aerials. A grounded pod with range wrapping around a ledge will not remove the ledge but rather will move it back to where the intangibility ends, which in most cases is lower down the side of the stage, closer to the blast zone. This can let Vulture quickly alter opponents' targets in recovering, potentially resulting in them overshooting onto the stage and getting punished. Vulture also can alter the ledge to remove it from the grasp of opponents hanging there to stall, starting them falling and forcing them to recover a second time, or briefly restrict their get-up options to jumping or air dodging, both exploitable options.
A number of more creative possibilities open up when the pods are used in tandem with Vulture's wingsuit flight and drones. The solid nature of drones means the pods can attach more easily to their surface or underside, after which Vulture can trigger intangibility to drop any passenger standing on top. The abrupt change from standards to aerials stands to throw some opponents off guard or even result in them buffering non-optimal attacks or dodges Vulture can punish. If he's riding atop a drone, however, he can suddenly drop through and trigger wingsuit flight to begin an aerial pursuit (without first having to leap up from the drone to avoid transferring the flight path to it). As the drop cancels characters out of attack animations, Vulture can ride a drone at a victim and, for example, charge a Smash attack to try baiting a dodge before falling through and going to town.
Depending on what flight pattern he's programmed, Vulture also can gain the upper hand against an opponent he's fighting on top of a drone, perhaps dropping them through, zooming out of range of a retaliatory aerial and then right back in to strike back. And, in other situations, Vulture could use intangibility either to throw off an opponent trying to land on a solid drone, or snag someone trying to drop through what they anticipated would be a translucent one. The latter option can put them in landing lag or even cause them to blow the drone up on themselves if they're spamming aerials. Vulture can of course turn a drone intangible if an opponent threatens to blow it up prematurely, or if his own stray attack threatens to put him in range of the blast. The primary downside Vulture faces in using pods is the level of commitment involved, as outside of situational means, if he wastefully places a pod, he'll have to burn through its intangibility and endure the cooldown before trying again.
UP SPECIAL - SCAVENGER'S TALONS Vulture hunkers down slightly as his steel talons protrude from his boots, gripping any ground below. Upon release, his wings shoot out to propel him upward in a vertical leap at speed comparable to Pit's Up Special, as his talons tear an earth chunk out of the stage if the ground was solid (with the stage not terraforming in response). Vulture can charge his jump like a Smash attack, albeit with the option of canceling out with a shield or dodge, traveling up one standing Ridley with no charge and three standing Ridleys with the full second of charge. Before releasing the input, the player can alter Vulture's leap about 30 degrees diagonally in either direction. The charge also influences the size of the earth chunk he removes, from one to four training stage squares. Vulture himself has no hitbox during his ascent, though if anyone stands a short distance to either side of him as he uproots an earth chunk, they'll take 4-5% and brief stun. Vulture can briefly slow his descent if he begins charging in midair, and though he obviously won't pull an earth chunk out of thin air, opponents suffer 15-23% and a moderate to powerful spike if they're making point blank contact with his talons at the instant his leap begins.
Distance-wise, this more traditional recovery is serviceable if Vulture is offstage with his wingsuit flight exhausted or has a programmed flight path not conducive to making it back onstage. That being said, its linear nature all but requires Vulture to initiate it from under the ledge, which combined with the charging period and 20-frame end lag can make it predictable. Vulture likely will find himself getting more mileage out of the move onstage, where he can use the move during wingsuit flight to diverge from a programmed path without canceling out of it, resuming the path at his leap's end. He also can leap up and initiate wingsuit flight laglessly at any point during his ascent, starting his flight path from different vantage points. Vulture can't, however, leap up with Up Special in midair after doing so from the ground, nor can he leap with the move more than once in midair without first landing on solid non-drone ground.
By default, Vulture grips onto earth chunks until he reaches the apex of his jump, upon which he kicks the square mass directly downward with his talons before retracting them. With an additional Up Special input, the player can prompt him to drop a chunk at any point earlier during his leap, or kick it at a 30-degree angle diagonally downward in the opposite direction of an additional input angled to either side. Earth chunks drop at Kirby's fall speed and automatically shatter upon contact with regular solid ground or a victim, dealing a base 19-31% and knockback KOing from 110-75%, depending on size. Shattered chunks also burst into earth shards, which expand outward to the chunk's original size over 45 frames, linger an additional 15 frames, and, also depending on size, deal five to nine hits of 3%, with stun similar to the residual hits of Charizard’s old Rock Smash. The chunks will, however, remain intact if they land on a drop-through platform or a drone.
While airborne or onstage, chunks can take 25-45% from any character, including Vulture, before they're shattered into shards. The shard hitbox doesn't prevent foes from destroying chunks, though it will expand into them if they don't back off quickly. Vulture thankfully is not vulnerable to shards from his own earth chunks. Up to two earth chunks of any size can be present onstage at a time, and left to their own devices, the chunks will vanish after 15 seconds. If Vulture puts a Down Special pod on a sitting chunk and then tosses it onto solid ground, it will remain transparent until the pod reactivates, upon which it shatters as a delayed trap option.
If an earth chunk is sitting on a platform, Vulture can leap up with and toss it again by standing atop it and initiating Up Special. He also can land on or fly onto an airborne chunk as it falls, able to leap up with and toss it again if he hasn't already exhausted Up Special in midair. If he has, additional Up Special uses still let him briefly grip the chunk and kick it side to side, with no charge or vertical boost. Multiple tosses can help Vulture more accurately target opponents with the chunks or else try to land them on platforms or drones, from where Down Special pods can then be triggered to drop them down as traps. While it entails some setup, Vulture can turn a platform or a drone holding a chunk transparent and stand atop it as it falls, ready to leap back up with it or time an angled toss to crunch a foe underneath.
If he opts to initiate wingsuit flight midway through Up Special, Vulture will carry the earth around in his talons, much like the car in the above GIF. He's unable to use other attacks in this state but gains access to a temporary damage sponge, available to be tossed in retaliation at opponents who get too cute spamming aerials of their own. He's not limited to holding it directly, either. By directing the control stick up or down while Vulture is carrying a chunk in wingsuit flight, he'll lower or raise it using his suit's grappling wire. This not only reinstates Vulture's access to other attacks during his flight path but lets him extend a chunk down up to one Ganondorf, creating a true aerial wall of pain with the proper set-up.
The grappling wire and its cargo react to the momentum of Vulture's flight path; for instance, if the player programs a path horizontally back and forth at top speed, the chunk becomes a powerful wrecking ball of sorts. Foes can take anywhere from 12-26% and knockback KOing from 135-70%, depending on how much momentum a chunk has when it slams into them. Swinging chunks also carry out 10-25% shield damage when swung at a low to moderate speed, with a chunk traveling at full momentum shattering shields in a single hit. Vulture can cancel out of his flight while dangling a chunk, simply dropping it from a lower point with no momentum and slinging it forward varying distances if he does. Opponents can, however, stand atop a chunk and, if Vulture isn't careful, attack him or deal 5% to the wire to make him drop it early. One workaround he can try arranging for this is to attach a pod to an earth chunk, turn it translucent as a foe times a dodge and then return it to solid state as it swings back for a big hit.
And earth chunks aren't the only constructs Vulture can carry around in his talons. Should Vulture initiate Up Special from atop a drone, he'll lift it up and carry it around with the same mechanics and capabilities. This can be a handy way for Vulture to reposition drones in midair without standing on top and piloting, as they resume their original movement patterns once tossed or dropped. Unlike earth chunks, drones do not build momentum being swung around with the grappling wire, but still can be dangled down into range of attacks that will detonate them, far enough away from Vulture that he's not caught in the crossfire. And in terms of movement options, Vulture can casually drop a drone out of his flight path, land on it and immediately transfer the path into the aircraft. This lets him make that transition more smoothly than having to land or fly onto the drone first, though he cannot then use Up Special to pick the drone back up a second time before landing on the stage.
GRAB-GAME
GRAB - TALON CLUTCH
Vulture leans backward as his wingsuit activates, levitating him briefly in place as he swipes his steel talons forward as far as Dedede's grab range. If he clutches a victim, he'll pull them in and stomp onto them, restraining them against the ground. Opponents who break free from this state do so more horizontally and close to the ground compared to the arc of a traditional grab escape. Though Ultimate's mechanics prevent Vulture from automatically re-grabbing his victim using a fast burst of wingsuit flight, he can still manipulate the situation to his liking, for example by having the victim break free onto a space he's about to render transparent by activating a pod, or while standing on one edge of a drone that puts them within immediate range of a follow-up attack. Vulture's grab comes out quickly enough on frame 8 and lasts a little longer than your average physical grab, at 9 frames, though as he lands, his first actionable frame comes later on than most non-tether variants at frame 52.
Vulture's pivot grab emerges four frames later, enhancing its range a short distance, while his dash grab comes out on frame 13 and propels him forward half a Battlefield platform as he levitates. This on its own, or supplemented with wingsuit flight activated immediately after the dash grab, can let Vulture dart in and grab foes from a fair distance away, though in either case, he's vulnerable upon missing, with a first actionable frame of 85 as he lowers his legs back down. It might behoove Vulture players going for dash grab out of wingsuit flight to prepare a trajectory that puts distance between them and their target immediately following the grab, in case they whiff or the opponent dodges.
If Vulture successfully grabs a victim after initiating wingsuit flight, or begins flying after grasping a foe, he'll drag them around in the air, dangling them by one appendage. He's fully capable of using his pummels and throws in this state, giving him new tools for handling opponents against the backdrop of his other constructs. That being said, victims can break free with increasing ease the faster Vulture is soaring around above his default flight speed, preventing him from just casually dragging victims to a blast zone at low percentages. It follows, then, that Vulture often will want to initiate grabs near drones, earth chunks and the like so even slower flight won't take as long to put him and his victim close enough for a payoff.
PUMMEL - IRON FIST
Vulture leans down and punches his victim against the ground, his fist enclosed in one of his suit's metal controlling gizmos for extra oomph. Each strike deals a meaty 5% but the pummel on the whole is one of the slowest in the game, requiring about 45 frames for one punch. Still, the extra damage can serve as a reward for Vulture in landing a grab if he happens to do so without any constructs within useful range. The hitbox for his punching animation also can become situationally useful in a few ways. With the grounded version of pummel, Vulture's fist impacts the stage beneath him as well as his opponent, which, if he's standing on a destructible drone, can grant him access to self-sacrificial damage or a KO tradeoff.
In addition, unlike other pummel animations, Vulture's punch continues on even after a victim breaks free. On the ground, foes immediately dashing up to punish him are vulnerable to 3-4% and a brief flinch at close range as his fist hits the ground. In the air, however, his fist deals the regular 5% and spikes with above-average strength, comparable to the aerial version of DK's Hand Slap. It's not an option he can reliably land by any means, but it certainly ought to weigh on the minds of foes who break free from his aerial grab and mindlessly leap back up to punish Vulture. That they might be more cautious and distanced from him as a result is something he can factor in in deciding how to follow up.
FORWARD THROW - GUILLOTINE
Vulture impales his victim on the bladed tip of one wing for an initial 4% and lifts them up in front of him over a one-second period. At any point during the first 45 frames of the move, the player can input A for Vulture to hastily retract his wing, dealing 5-6% and popping his victim up a short distance in the air. After this point, Vulture will slam his foe to the ground, underneath the wing and the remaining blades along its length, dealing 13-14% and diagonal knockback KOing around 130%. There's versatility baked into the move depending on whether Vulture wants to position his foe for an easy (or easier) aerial follow-up or prefers guaranteed damage. In the air, unless Vulture slams his foe down onto a platform or drone, both versions of the throw deal 5-6%, though the slam hurls the victim downward with moderate force as a pseudo-spike. Performed on top of a drone, Vulture's wing also will deal the 13-14% to the construct, which in tandem with his pummels can help him detonate it on a victim if he has a damage or stock lead.
BACK THROW - IMPALE Vulture uses his talons to kick his victim behind him in the air, dealing a light 4%, before slicing a protruding feathered blade from his wings in a downward arc behind him to deal 10% and pin his foe against the stage. The victim ends the throw in their prone state, able to use a roll, stand up or use a get-up attack, the latter of which will hit Vulture if he simply stands in place. Unlike Snake, who ends D-Throw facing his victim, Vulture faces away, requiring a bit more creative thinking for a follow-up beyond "lol press U-Tilt past a certain percentage." Fortunately, he's got no shortage of options in that regard, the most straightforward of which is darting away before performing a quick turnaround dash grab, propelled by his levitation.
He can try restricting his opponent's options with a transparency pod placed within rolling distance to either side, or reading his victim's choice with a corresponding flight path (to swoop backward with B-Air if they roll away, for example, or up and quickly back down if they use a get-up attack). Increasing his array of options further where flight is concerned, Vulture takes approximately half a second between when he kicks and impales his victim, letting the player quickly navigate him to he impales his victim into prone on a drone or stage chunk. With the former construct, as with F-Throw, he'll deal the 10% in impact damage to the drone, too, with the possible ensuing explosion hitting him if he uses the throw atop the aircraft but not if he's further away in the air. Though Vulture doesn't have a truly standout KO throw, situational F-Throw aside, proper planning can let him supplement both of the previous two throws with drone explosions and turn grab-game into a truly harrowing experience for those at higher percentages.
DOWN THROW - CARRYING CARGO On the ground, Vulture hunches over, straining slightly for 30 frames before leaping a Ganondorf and a half into the air over an additional 45 frames, pulling an earth chunk two training stage squares large up in his talons while continuing to clutch his victim on top of it. He proceeds with the chunk identically to his Up Special, able to kick it down or directionally before or at his jump's apex, or initiate wingsuit flight to carry it, and victims who don't immediately escape, along for a time. Though the foe's grab escape timer is reset, akin to DK's F-Throw, once the throw animation starts, they don't face much immediate danger, as the liftoff alone deals just 4-5%. Foes who don't escape before Vulture kicks the earth chunk away, however, take 15% from his point-blank range talons and are put into their prone state on top of the chunk as it begins falling. And from there, they must perform a get-up option and hop off the construct before it impacts the ground, lest they be subject to the five to nine hits of 3% from it shattering.
With proper setup, Vulture can cut their time to do so short by tossing the chunk down onto a platform or drone. Despite Vulture's multiple methods for racking up damage with D-Throw, competent button mashers often can break away during his ascent, though that certainly doesn't mean they're out of the woods, as they'll likely escape into an airspace with Vulture at close range, carrying an earth chunk primed for use in bludgeoning them. Indeed, the ability to generate a chunk from a throw in close quarters with a victim, instead of always needing time and space to pull one up with Up Special, is a real benefit to Vulture. He of course can't take advantage of this with no ground beneath him in midair, though being able to pull his victim up a short distance - including as a brief diversion from wingsuit flight - and then drop or directionally toss them can be a nice, no-frills perk as well. If Vulture initiates this throw while standing on a drone, he'll carry it and his opponent around, able to toss both at once the same as an earth chunk. As the drone resumes its original movement pattern after being tossed, Vulture often will have an easier time directly following up on the prone victim it's holding, compared to one on a falling earth chunk.
UP THROW - ASCENT
Vulture begins flying upward at Luigi's dash speed, gripping his opponent, whose grab escape timer is reset as they rise. After 20 frames, the Vulture player is able to tap A for him to roughly kick his victim downward, dealing 10-11% and a moderately-strong spike that, if done against solid ground, will KO off the top around 175%. First and foremost, this is a positioning throw, with Vulture able to fly up through drop-through platforms before depositing victims on top. He also gains access to some neat mix-ups, depending on where his pod placement. With drones, Vulture can activate a pod, fly up through the transparent aircraft and then turn the pod off immediately before or after dropping the victim, placing them on top. Alternatively, he could turn on a pod as a foe is right about to be kicked down onto a platform, potentially turning their attempt to tech into an aimless air dodge, ripe for the punishing.
Like with aerial D-Throw, Vulture also can temporarily divert from his wingsuit flight path with U-Throw's ascent (or vice versa). Used in tandem, he could grab a victim, fly offstage and then initiate U-Throw to try spiking them, though his ascent often will make it easier for victims to escape compared to aerial F-Throw, barring situations where he grabs a victim while on a drone hovering below the ledge. Vulture can ascend for a maximum of two seconds; though he can't perform a suicide KO off the top blast zone, on account of dying first, his ensuing kick can bounce victims into vertical KOs at progressively lower percentages, the higher the platform or drone they land on is in the air.
AERIALS
NEUTRAL AIR - AIRBORNE ARMOR Vulture reaches his wings around himself in a sphere a slight bit larger than a Party Ball, spinning twice vertically before unfolding. The hitbox on his wings comes out between frames 7-30, dealing four hits of 3% and slight stun, with the first actionable frame falling on frame 50. The player also can tap A within the first half of the duration of the move's hitbox for Vulture to immediately burst his wings outward from their sphere shape with more aggression. This leaves him vulnerable for an extra one-third of a second but gives his wings a strong point-blank hitbox, dealing 15-16%, knockback KOing around 125% and decent shieldstun, for the first five frames after they burst out.
From a shorthop or while traveling along in wingsuit flight, Vulture either can needle his opponents with multiple N-Airs or, if it's looking as though they're turtling behind their shield to land a grab, throw them off with the stronger hitbox. Also, of note, while Vulture's wings are wrapped around him in the sphere shape, their metal grants him a degree of damage-based super armor. He can tank up to 15% in this state, letting him fly into weak to moderately-strong attacks before expanding his wings as a psuedo-counter of sorts, though if this threshold is exceeded, he'll enter his helpless animation and fall into prone state upon landing. The wings' stamina is retained through multiple uses of N-Air, resetting either after it's fully depleted or seven seconds pass.
FORWARD AIR - SCISSORS
Vulture reaches one wing forward a Battlefield platform, with part of it extending into the background as he spreads apart the feather blades at its tip before slicing them together with force. He carries out the animation over 64 frames, with a weak hitbox along the wing between frames 7-16 and a stronger, albeit rather close-range one encompassing just the scissoring blades through frame 20, somewhat comparably to a slower Peach F-Air. The first hitbox deals 7-8% and below-average set knockback, while the second deals 17-18% and strong diagonal knockback KOing around 110%.
The hitboxes don't combo into each other, and though Vulture can use a shorthopped F-Air in place to try deterring approaches, he's definitely not safe progressing forward to pressure foes with multiple F-Airs on account of the end lag. With wingsuit flight, however, he can more effectively space the move, either using the weaker hitbox to push opponents around or (more likely) going for the semi-difficult-to-land blade hitbox as a KO option. When hanging from the ledge, Vulture can hop slightly above the stage lip and use F-Air's good range to slash opponents away if they're repeatedly using shorthop F-Air/B-Air in place nearby, as mediocre players are wont to do. Indeed, with good timing, he even could turn the tide of a match this way if he and his opponent both have significant damage.
With drones, Vulture, and whichever F-Air spacing he chooses to pursue, a new series of explosive (pun intended) mix-up possibilities are opened up. In scenarios where a drone has low HP, Vulture can surge in as though he intends to blow it up with both the first and second hits of F-Air (which can combo on drones as, unlike opponents, they take no knockback). Immediately afterward, he can either follow through and detonate the aircraft with F-Air's strong hitbox, or feint away after the weak hitbox, before punishing any defensive maneuvers opponents on or near the drone have taken. Alternatively, throwing out F-Air near an intangible drone can condition opponents to fast-fall down or air dodge, as a result of the threat that Vulture will suddenly turn it solid and blow it up with hitbox number two.
BACK AIR - PIERCE Vulture turns slightly while stabbing a single wing behind him, poking it just a bit less than a Battlefield platform horizontally. He carries the move out over roughly the same timeframe as Banjo's B-Air or Ridley's F-Air, albeit performing just a single strike rather than three. Foes right up against Vulture's back as he initiates the stab take a beefier 16-17% and horizontal knockback KOing around 120% while those struck through the remainder of the move take 11-12% and knockback KOing around 185%. The threat of the stronger hitbox can serve as a deterrent against foes just rushing down Vulture in disadvantage, though despite its range the stab is hardly safe on shield except when used the maximum range away. That being said, against an airborne opponent, Vulture often can string together multiple regular-hitbox B-Airs to push them around, before backing off slightly with wingsuit flight to space the stronger hitbox for the potential kill. This also can serve as a quality follow-up tool on opponents put into prone via B-Throw, especially if Vulture initiates the throw from atop a drone - putting himself at risk of the explosion but with the payoff of restricting the distance his foe can roll away, increasing the likelihood he can catch them with B-Air's strong hitbox.
UP AIR - SPREADING ONE'S WINGS Vulture faces the screen, lifting his wings above his head and horizontally to either side, appearing to create a platform as long as one of Battlefield's before instantly snapping the wings together. He retains his wings in the platform formation for 20 frames by default, though by holding the input, the player can stagger the second part of the move up to 40 frames. His snap deals more damage the closer a victim is to the center of the wing platform, with an inner hitbox dealing 14-15% and knockback KOing around 130% and an outer one causing 9-10% and knockback KOing closer to 180%.
Vulture's wings will catch falling victims during the first part of the move and turn their landing lag against them, with the wings capable of absorbing up to 15%, past which the opponent will cause Vulture to plummet in his helpless state, similarly to if his N-Air armor were penetrated. He's not going to beat back, say, a Bowser or Ganondorf D-Air, but Vulture often can prolong an opponent's air time by snagging and hitting them as they attempt to land back on solid ground - especially if they do so in a predictable way getting off of a drone. The strong vertical knockback often will give him a moment of breathing room to think over how best to follow up with his other aerials, though U-Air juggling isn't really his strong suit.
DOWN AIR - TALON STOMP
Vulture's talons emerge as he enters a streamlined stall-then-fall, plummeting down in a manner comparable to Ridley. As he falls, his legs take on a spike hitbox, coming active on frame 11 to deal 12% and enough force to KO a victim bounced off the stage off the screentop at 165%. Though Vulture normally drops until he reaches solid ground, D-Air used out of wingsuit flight brings him right down to the stage, where he can continue in his path using near-grounded aerials to pursue opponents. He'll most likely self-destruct if he uses D-Air offstage, though with a flight path stored, he can plummet one time before activating the wingsuit partway through his descent to fly back up. On or offstage, this initial plummet can bait an air dodge or shield from a victim, after which Vulture can follow up with the real thing. If Vulture drops down onto an earth chunk or drone he’s dangling via grappling wire, he’ll instantly regrab it as he continues his flight path, as opposed to having to reel the wire back up manually.
This can come in especially handy with the aerial's secondary application: Rather than damage or vertically launch grounded opponents, Vulture will automatically grab characters on top of whom he lands, pinning them against the ground. This complicates matters for players who want to do the Quickplay strategy of "stand underneath aerial character and shield," and makes running up to punish a bit scarier, especially if Vulture begins doing empty short- or full-hops. If he lands on an opponent using D-Air out of wingsuit flight, he'll automatically begin carrying the victim around the remainder of his path. Beyond smoothly transitioning Vulture down from and back into the air, opponent in tow, the surprise of a sudden D-Air grab might ever-so-slightly slow an opposing player's reaction time in beginning to mash free, giving Vulture those extra few frames to do as he pleases. More situationally, Vulture can drop down and grab a foe standing on a dangling earth chunk or drone. In doing so, he enters the same cargo throw-esque grab animation that follows his D-Throw, carrying his victim pinned atop the construct. Landing this option is rare but essentially a free 15% for Vulture, as he can kick the opponent down without undergoing D-Throw's usual startup.
STANDARDS
JAB - CHITAURI BLASTER
Vulture pulls out one of his standard black market weapons and fires a single spherical purple blast, a tad smaller than Kirby. He fires the blast over the same timeframe as Samus firing a charge shot, though his projectile travels at a slower rate, approximately that of one of K. Rool's cannonballs, up to three-quarters of Final Destination or until it hits a target or surface. Opponents struck suffer 7-8% and a moment of hitstun, also comparable to charge shot, before taking knockback that can KO around 180%. Though Vulture fires the blast horizontally by default, the player can angle it diagonally up or down during the startup period, giving him surprising versatility in aiming through wingsuit flight. The blast deals an extra 10% in shield damage but normally is not a great melee option unless an opponent runs up and shields stupidly, or if Vulture fires the blast diagonally down as a brief get-off-me option. That's not to say he can't reap the benefits of a no-frills blast contributing extra damage, stun and knockback to an aerial string.
Of note, fired against drones or earth chunks, the blast will serve as a disintigrator, destroying the constructs in a single hit and bringing about their respective explosion and shard hitboxes. Vulture can put the blast on a collision course with a drone or chunk either by directly firing it or by tossing a construct in the slow-moving projectile's path. Opponents really don't want to find themselves at ground zero of the collision; the blast's damage will stack on top of that from the constructs, as they take the stronger of the two moves' knockback (the drone explosion and the weapon blast, respectively). These more threateningly-aimed blasts lend a layer of tension around a portion of stage, with the potential side effect of opponents playing more predictably for a time. From a more defensive perspective, Vulture also can shoo away foes trying to destroy drones or grounded chunks by blasting a jab projectile their way.
DASH ATTACK - DERVISH Vulture sticks his wings out and spins once as he jets forward a short distance over 40 frames. His wings pack a strong hitbox right when the move is initiated, dealing 12-13% and knockback KOing around 140%, and a regular hitbox over the rest of his spin dealing 9% and below-average set horizontal knockback. Used as a surprise attack, Vulture can launch away and get breathing room from opponents with his spin, though it shouldn't be used willy-nilly on account of being unsafe on shield. Vulture isn't limited to one full spin, however, as the player can simply tap the input to have Vulture perform a half spin, with just the move's initial strong hitbox. They also can hold the input for Vulture to perform up to three consecutive spins, traveling one-half of Final Destination in the process and able to whittle down, albeit not fully destroy an enemy shield.
While spinning, he changes the direction he's facing approximately every 20 frames, and remains facing that way if the player releases the input. Timed right, this can lead to some helpful mix-ups for Vulture in approaching opponents, especially if he initiates wingsuit flight in the middle of dash attack. The midair spinning gives him a limited window during which he can turn around in the middle of a flight path, creating some uncertainty as to whether he'll end the move facing toward or away from his opponent. Vulture also can get some mileage out of the lingering hitbox on his wings, though opponents can somewhat easily punish his vulnerable lower torso if he's not careful.
FORWARD TILT - CLEAVE
Vulture lifts one wing and stabs its outer half into at the stage a half-platform in front of him over the timeframe of Ike's F-Tilt, his feather blades enlarging slightly as he slashes downward. Opponents sliced as his wing descends take 13% and knockback KOing around 135%, while grounded opponents struck as his wing impacts the stage (around frame 14) take 15% and enter their prone state. In a vacuum, it's a semi-sluggish melee option foes can predict and work around, though Vulture does have workarounds, not the least of which involves soaring up to a victim at high speeds right as the grounded hitbox is about to land. The player also can hold down the input for Vulture to keep his wing stuck in the ground up to an additional second, like your typical clumsy video game boss. Upon release, he'll instantly yank the wing out, with a hitbox dealing 6-7% and below-average set knockback; though not a truly strong counterattack, it does present a sneaky way for Vulture to fling away aggressive opponents if he whiffs the initial move.
In terms of other uses, the stab deals an extra 20% in shield damage, meaning it often will serve as the logical follow-up if Vulture manages to deplete a chunk of an opponent's shield with his spinning dash attack. Though his wing doesn't spike, reaching out over the ledge with F-Tilt often is Vulture's best bet for two-framing an offstage victim. And, for prone opponents, the threat of Vulture slicing down with a second F-Tilt (and landing the initial slicing hitbox) often is enough to encourage a hasty get-up option, which if they're not careful can bring them into harm's way - for example, a Down Special pod or a Chitauri blast. If Vulture manages to stab a victim into prone on a drone, he has a clear shot at blowing up the construct with another attack and catching them in the explosion.
DOWN TILT - STEEL SPARKS
Vulture pokes a wing tip forward, close to the ground, slightly slower than Wario's D-Tilt on account of a moment of start-up, but reaching out a tad further, slightly less than a Battlefield platform. The poke deals 2-3% with a bit of stun and comes with 33-percent chance of tripping grounded opponents. Used at a range, Vulture's wing can shield-poke victims or knock those standing on platforms or drones off the side into their tumble state, though its slightly staggered speed restricts D-Tilt from comboing into itself on foes past low percentages. That's not to say Vulture can't initiate combos out of D-Tilt with other moves, however, with jab or F-Tilt from a slight distance, U-Tilt at point-blank range and grab all being possible contenders.
If the player repeats D-Tilt within 20 frames of the initial input (similarly to Link's F-Smash), Vulture will strike his wing quickly against the ground in retracting it, sparking a small area of fire in front of him. It takes 40 frames overall for the fire to come out, covering slightly less than a Battlefield platform horizontally and a Pokeball vertically, and dealing rapid hits of 2-3% over their five-second duration. The hits inflict flinch and push victims gradually to the flames' outer edge, with a maximum possible damage output of 35% if the victim has a metal or giant status effect, or otherwise Smash DIs into the flames for the lulz. Vulture can have up to two spark patches onstage at once, after which any additional two-hit D-Tilts performed during this time create sparks that vanish immediately after the move's 58-frame duration.
The traps created can be effective obstacles, able to snag foes tripped from the first hit of D-Tilt or force those further away into the air when approaching Vulture. If Vulture is at close range upon pitfalling a victim with a Down Special pod, striking a spark patch over where they sit buried also can pile on a nice bit of extra damage. With wingsuit flight, he can fly up and strike platforms to place flame traps there, and then drop them down if he's already placed Down Special pod there, restricting landing options around a segment of stage. And, if the sparks are placed on one of Vulture's drones, their damage output will eventually reduce the aircraft's HP to zero, even if it was at full durability. This can effectively turn the constructs, ordinarily harmless unless blown up with an attack, into ticking time bombs of sorts, traveling either in set or custom formations. As with F-Air, he also can create a mix-up situation to confuse opponents near or on drones, creating uncertainty as to whether he's going to use both D-Tilt inputs to set a drone ablaze or just poke at them with the initial strike. As with many drone-related strategies, however, this isn't without risk for Vulture; though he does not take damage from his own fire traps, he remains vulnerable to exploding drones.
UP TILT - UPDRAFT Vulture hunches over slightly and lifts his wingsuit's turbines a Squirtle above him, where they whir for 56 frames, similar to Palutena's U-Tilt. Their hitbox varies depending on whether the player taps or holds the input to initiate the move. A tapped U-Tilt results in a series of five light hits of 2%, with a moment of hitstun but no real knockback to speak of at the end. Though smaller characters can Smash DI out after the first few hits if they're caught on the outskirts of the hitbox, Vulture can chain together multiple U-Tilts or combo into a shorthopped aerial if the victim is larger or caught at the turbine's center. A held input, on the other hand, gives the turbines a strong hitbox, dealing 13-14% and vertical knockback KOing around 130%, right as they emerge from Vulture's back at point blank range, plus a vertical wind hitbox akin to G&W's U-Air for the duration of the move. The first U-Tilt variant can combo into the latter, which in turn serves as a good utility aerial launcher for Vulture in forcibly transitioning opponents from the ground to the skies. Even independently, though, both versions are bread and butter tools for Vulture in poking through platforms, including higher-up ones he can hover underneath via wingsuit flight. If he's cornered a victim near the top blast zone, either the hitbox or wind from his strong U-Tilt also can seal the deal for the KO.
SMASHES
FORWARD SMASH - BUZZSAW
Vulture reaches both wings above his head, feather blades extended, before slamming both down into the ground with force, over a slightly shorter timeframe than Ganondorf's F-Smash. As with Corrin's F-Smash, his wings come with a lingering hitbox as the Smash is charging, reaching about a Luigi above his head to deal flinching hits of 1% that can catch victims in the stronger second hit, which deals 23-35% and diagonal knockback KOing from 100-65%. It's a relatively straightforward KO option, and one Vulture can land after catching opponents that try to jump at him with aerials or leap over his head to attempt a grab, though he's vulnerable from the front while charging.
Used in midair during a flight path, Vulture will descend down in place during the slam at Dedede's Up Special fall speed. Now, as opposed to always launching foes diagonally, Vulture's wings will knock opponents in differing trajectories, depending on their positioning at the moment of impact. Opponents who graze the top of Vulture's wings during the first few frames of the slam will take strong vertical knockback, while those hit during the remainder of the slam take the diagonal knockback as usual. Beyond that, opponents caught underneath Vulture as he descends downward after slamming will be spiked powerfully, with knockback KOing off the screentop from 120-95%. If Vulture lands using F-Smash out of a flight path, he'll exit out of the remainder of the path, with it being stored for the next time he uses Neutral Special.
Vulture suffers a smidge more end lag than even Ganondorf does with F-Smash descending onto the stage, and can even self-destruct if he uses it too low offstage without a highly specific flight path programmed to get him back to safety. He can, however, try to circumvent this by landing on a drone (that has enough health to not be destroyed by the F-Smash hitbox) and then immediately turning it transparent, letting him cancel out of the cooldown. Onstage, Vulture can hold out F-Smash's lingering blade hitbox while flying around, attempting to nudge foes into position for him to land whichever of the slam's three knockback trajectories will prove most ideal for him in the moment. Drones and falling earth chunks can prove helpful in reducing opponents' aerial means of escape in this process, and a crafty Vulture player could plug in a seemingly noncommittal flight plan that in practice could be telegraphing any of the three slam knockback angles, remaining as unpredictable as possible up until the last second.
DOWN SMASH - ANTI-GRAVITY GUN
Vulture extracts one of the anti-gravity guns he manufactures, facing the screen and firing it at the ground over 54 frames to create a plume of blue energy to either side. The energy reaches up Olimar's height and extends from half to three quarters of a Battlefield platform in either direction, depending on charge time. The damage output is comparatively low for a slow Smash at 6-11%, though the knockback aims to compensate. On account of their anti-gravity nature, the plumes come with an abnormally high base launch rate that, at full charge, will send a victim with moderate damage halfway up to Battlefield's blast zone at a fast speed. The energy won't actually KO until close to 200%, on account of pitiful knockback scaling, but the sheer distance a successful hit can put between Vulture and an opponent makes D-Smash one of his best breathing-room options - and one that can launch foes right up into a perilous airspace to boot.
Used in midair, with no ground to shape the energy around him, Vulture instead fires a horizontal blue beam down at Peach's dash speed. The beam is as thick as a fully-charged ROB laser, growing from one to 1.5 Battlefield platforms long and from a maximum travel distance of one to three Marths, depending on charge. The aerial energy deals much the same damage and knockback as its grounded counterpart, though with slightly weaker launching properties to keep it from prematurely KOing characters off the top blast zone. The beam passes travels through opponents it hits and drop-through platforms, though it vanishes on impact with solid ground. Either the grounded or aerial versions of the anti-gravity energy will boost Vulture's drones and earth chunks a set distance vertically, up to the halfway point of Final Destination's top blast zone. This can help him in launching the constructs into opponents - a drone into an opponent's ongoing hitbox, for instance - or simply prolonging their time onstage, in the case of the chunks. Other occasional uses Vulture can find in D-Smash include firing it at a chunk he's dangling with grappling wire to immediately regrab it, or at a drone beneath him in midair to instantly bring it up under his feet.
And the last target Vulture is capable of boosting into the air with the anti-gravity energy is...himself. Vulture can fastfall or use a downward flight path into his own energy to launch himself skyward, taking no damage and traveling up a set distance (halfway up to Final Destination's blast zone) rather than his damage determining his launch height (he can't KO himself off the screentop, either). Unlike with a flight path, Vulture can't control his ascent, but if he finds himself in need of getting some air without a corresponding path ready to go, or wants to save his flight for a different elevation, harnessing the anti-gravity energy can prove serviceable. Indeed, it may be his preferred method for vertical travel in situations where he wants to progress skyward with a drone or stage chunk close by - he can fire the energy down onto the construct before zipping down to be sent upward side by side with it, rather than programming or carrying it up himself.
UP SMASH - SPEAR Vulture brings his wings together above his head, creating a single triangular point that reaches up one Luigi, before extending his talons and boosting from one to three Ganondorfs into the air over 58 frames. The wing spike has an initial strong hit of 21-37%, with knockback KOing from 105-75%, and a lighter rising hit amounting to 15-27% and KOing from 135-95%. Coming out on frame 7, this can be a pretty scary KO option when initiated against foes on a low platform, and though Vulture is pretty dangerously vulnerable if he whiffs, he'll land with his talons still out if his ascent ends within an Olimar of a platform, dealing a light 4-5% and stun to foes beneath. A comparatively simple move next to his other Smashes, U-Smash also is another move Vulture can use in briefly diverging from a flight path, here halting his horizontal momentum in the process as a way to pause and avoid an attack without canceling the path altogether. It's also a disjointed hitbox he can use to destroy drones without fear of the following explosion.
The solid aircraft will halt Vulture's ascent if the player charges the move only partway, so the damage isn't enough to destroy it, though his wings still will poke through the drone to hit opponents on top. This trick can come in handy against opponents attempting to navigate the drones or those caught in landing lag from an aerial (for example, from a drone Vulture suddenly has switched from transparent to solid underneath them). More riskily, Vulture can ascend through a drop-through platform with U-Smash and try using the weak landing hitbox to send a victim into their tumbling state off the side, potentially letting him either soar down and follow up with an aerial or pursue a jab lock combo against them on the ground, a drone or a ground chunk. And on a more basic level, his wings' intangibility makes them a valuable tool against opponents who get too predictable or careless in landing. With help from a flight path, Vulture can move himself underneath opponents attempting to fall down with an aerial and intercept their attack with his wings, potentially even KOing at higher percentages or close enough to the screentop.
FINAL SMASH
FINAL SMASH - CONCRETE TOMB
Vulture soars horizontally forward three-quarters of Final Destination at top speed, launching victims he hits into a cutscene. Inside an empty urban warehouse, the characters sit stunned as Vulture's wingsuit can be seen zipping around, knocking down a series of concrete pillars holding the structure together. The suit eventually flies over and attaches to Vulture, who fires a purple blast from one of his weapons at the roof while soaring out a hole in the ceiling. The projectile topples the building down onto his victims in the forms of tons of rubble, dealing 46% and knockback KOing around 60%, as the screen reverts back to the stage and Vulture descends down from above to return to fighting.
PLAYSTYLE
Just as there's more than one way to skin a cat, as the expression goes, there are a whole multitude of paths Vulture can take in pursuit of victory, no pun intended. As a central move, his wingsuit flight lends as much simplicity or complexity to a match as the player is prepared to handle. Beginners likely will find themselves leaning on straightforward linear bursts of offensive or defensive flight at one constant speed to start, before graduating on to more complex strategies, like programming different speeds into a single flight path and canceling out right as Vulture is about to speed up or slow down to throw off opponents. With drones in the mix, the player can start experimenting by transferring in custom flight paths, letting Vulture maneuver a mobile aerial platform while using standard grounded attacks.
Then, weaving all the movement options together at top level play, Vulture can plug in preemptive paths intended to be flown either using his wingsuit or one or more drones, seeking strings on opponents based on where he can reasonably foresee a given combo of grounded and aerial attacks carrying them, or to recover from approximately where he's poised to be launched offstage. The common thread across all levels of play is that, eventually, in-game circumstances will shift to where Vulture's existing flight path no longer is of use, and could even bring his stock to an abrupt end if left uncorrected. This isn't to say Vulture can't salvage some pre-programmed paths with the proper setup and perhaps some creativity. Proper recollection of his current trajectory plus situational awareness of whether it's likely to bear fruit, and how, are key in determining when it's time to wipe the slate clean and try again.
With his combination of construct traps, Vulture tends to focus on controlling his opponent's vertical position, using strong aerials and threatening hitboxes to pressure characters back and forth between the ground and air in racking damage. Depending on the match at hand, Vulture may choose to prioritize getting some combination of a drone, transparency pod or earth chunk placed before programming in a flight path, at least until he can feel out how his opponent tends to react - and react, they must, if you aim a chunk at them or send a drone horizontally before shaving off its stamina with some disjointed strikes. Though their pitfalling capability has value in its own right, transparency pods often hold the most payoff when used to supplement the other constructs, such as to wall off part of the stage with the threat of dropping a chunk down from a platform or temporarily pausing its shattering hitbox on solid ground. The precise number and types of constructs Vulture has at any given time inevitably will vary, and summoning more isn't a huge commitment - with D-Throw, he even can pull out chunks of earth in the middle of a throw - but as with flight paths, getting predictable going for the same set-ups is a sure path to defeat.
Fortunately, Vulture's constructs can be integrated in with his regular melee gameplay easily enough, eliminating what otherwise might be a choice between obsessively tending to the creations and engaging an opponent. With Up Special, Vulture can carry around drones and earth chunks at varying levels of control. With a construct gripped in his talons, Vulture has a damage sponge beneath his hurtbox that will blow up in foes' faces if carelessly attacked and destroyed, and that can be hurled back at them to bait a dodge, letting him pursue with an appropriate melee attack. A drone or chunk dangled with grappling wire, on the other hand, can turn into a dangerous swinging hitbox to coax opponents up into the air, and into range of Vulture's aerials. Also worth pointing out is their nature as cumbersome platforms for foes to navigate, whether dangled, thrown, sitting onstage or coasting around - the grabbable ledges of a dangled drone, for instance, aren't ideal when Vulture's right above and ready to fall down with D-Air. Vulture faces few limits in terms of ways to position these constructs, whether through new flight paths, repeated Up Special tosses or D-Smash energy, and temporarily removing a stage's platforms with pods only increases the wiggle room he has in doing so. Working in supplements like jab gun blasts and D-Tilt spark patches then can serve to increase his damage output still further.
Without proper set-up either through a flight path or his selection of constructs, Vulture can struggle under pressure at melee range. His disjointed wings can push away foes going for unga-bunga shorthop aerial approaches but in melee combat, the startup on a number of Vulture's offerings does him no favors. Several of Vulture's close-range attacks, like downward-aimed jab, F-Tilt's second hit, D-Smash and N-Air, are geared toward putting space between him and his victim, meaning he's not doomed to become combo food the second a foe gets in his face. That being said, if he's too slow to go for a tactical reset to neutral, and otherwise has no recovery plan in order, Vulture can find himself locked off from the stage, haplessly pushed back further and further as he tries to snap to the ledge with regular Up Special.
Fortunately for Vulture, a handful of his moves offer him an escape route if he finds a flight path no longer meets his needs mid-match, or otherwise is on the brink of punishment. Though dangerous off-stage, F-Smash can bring Vulture down to the stage in a pinch, while U-Smash lets him pause and ascend a short bit vertically mid-path before continuing onward. D-Smash boosting, meanwhile, can send Vulture skyward for a better vantage point, letting him take to the air without devoting flight path mileage to vertical gains. With a construct or opponent in tow, D-Throw and U-Throw, respectively, also can allow for surprise deviations, as Vulture breaks from flight to ascend and toss his cargo in the middle of what might have previously appeared to be a predictable path. Combined with regular flight around his drones and stage chunks, these options grant Vulture pretty unparalleled command of his own positioning onstage, a valuable feature in instilling uncertainty as to exactly how he's going to come at his foes (perhaps best demonstrated with B-Throw follow-ups or mix-ups from the multiple hitboxes of F-Air and D-Tilt).
Darting in with a grab as a foe gets too close for comfort generally is a good way for Vulture to turn the tide, as several of his throws bring him into the air as his victim falls back to earth, and into the sort of mid-range where he's best at poking around. Once he's scavenged for sufficient damage, Vulture can sandwich opponents between threatening construct hitboxes and spaced KO options ranging from F-Air and B-Air to F-Smash and U-Smash, charged in midair after liftoff from wingsuit flight. Depending on his opponent, KOs off the top blast zone can be just as viable as those off the side, thanks to U-Throw off high drones or a well-spaced U-Tilt. Some of the crazy set-up big-brain plays Vulture can achieve are marvels to behold - charging F-Smash while dropping an earth chunk down to explode a drone all on one foe caught in D-Tilt flames, to name one. Just don't fly too close to the sun, so to speak, or Vulture can face some embarrassing losses, including from the lack of a flight path back from deep offstage or getting launched into his own drone.
EXTRAS
UP TAUNT - PREDATOR'S PRIDE Gazing slightly upward, Vulture mutters "Hot dog..." in an awestruck manner.
SIDE TAUNT - MAINTENANCE Vulture stretches out both wings and, one at a time, uses a welding torch around their turbine areas, appearing to make repairs to his suit.
DOWN TAUNT - HELMET HURL In a fit of anger, Vulture reaches up, removes his helmet and tosses it to the floor in the background, grousing "Idiots..." to himself. Doing so lets the player control Vulture in his unmasked state, during which an additional D-Taunt has him pull out and put on a new helmet to return to his default appearance.
ENTRANCE - FLY BY Vulture soars in from the foreground, hovering briefly in place from a good distance up before dropping down with an audible metallic thunk.
VICTORY POSE #1 - HEIST HOMECOMING Vulture flies in and deposits a wire crate of stolen MCU tchotchkes on the ground, before removing his helmet and stating, contented, "Business is good."
VICTORY POSE #2 - FILLING ORDERS Vulture faces partially away from the screen, standing at a metal work bench and using a welding torch in tooling around with a large purple-glowing gun of some sort.
VICTORY POSE #3 - TOUCH DOWN Vulture flies in a loop before touching roughly down, skidding along the ground with his talons extended in a Ridley-esque manner to create a few sparks before posing, wings outstretched.
VICTORY THEME - SPIDER-MAN VILLAINY Vulture's victory jingle is an orchestrated snippet from the classic Spider-Man theme albeit with ominous-sounding instrumentals and in a minor key, a little evocative of the music that plays when Ridley or Dark Samus win.
LOSS POSE - GROUNDED Vulture claps regularly, with his expression betraying just a touch of grudging respect for a worthy adversary. His wings remain outstretched and sparking slightly in the background.
LINK TO CHANGE LOG (last updated 12/27/2019): 1. Clarified Neutral Special wingsuit operations with no flight path programmed
2. Capped length of time characters can stand on drones during cumulative air time before landing onstage
3. Clarified Down Special inputs used in extracting and activating multiple transparency pods
4. Clarified Down Special properties in altering ledge locations
5. Implemented brand-new Back Throw
6. Clarified mechanics of Down Throw when initiated from atop a drone
7. Fleshed out Forward Air with uses in relation to drones
8. Created consistency with wing armor mini-mechanic in Neutral Air, Up Air
9. Clarified mechanics of Down Air grab hitbox on a victim standing on a drone
10. Revamped Down Tilt to include initial melee hitbox
11. Tweaked tapped Up Tilt variant to grant combo-starter properties
12. Fleshed out Forward Smash with multiple directional knockback properties in midair
13. Slightly nerfed Down Smash knockback
14. Fleshed out Down Smash with new self-boosting property, used in midair
15. Fleshed out Up Smash with information on momentum-pausing, intangibility, uses around platforms and drones
16. Made general damage/knockback buffs for Forward Smash; knockback buff for Up Smash
17. Fleshed out playstyle with information on options for deviating from flight paths, resulting benefits
Not gonna lie, I was pretty impressed to see a set of this quality come out of you so fast! This set feels a lot more confident in what it is doing than Kingpin, while also doing stuff overall more interesting in my opinion.
The core of Vulture's moveset comes from some pretty interesting Specials. His Neutral Special allows him to utilize a preset flight path (that you, of course, create) in order to move while attacking, including not just aerials, but with careful timing some stuff like Smash attacks, which you can even start this move in the middle of charging! Vulture can then place drone-airpods across the stage with Side Special, giving him a variety of vantage points to attack from. And THEN, he can transfer his flight paths to these drones, to create moving platforms and other such interactables. To top it all off, Vulture can use his Down Special to turn them intangible, along with objects such as drop-down platforms. This is a bit confusing when it comes to stuff like ledges, and the set sometimes does stuff like forget the drones (for example the Up Throw, which you've already said you'll fix), but for the most part it is an extremely cool base. I've wanted to do stuff like the flight path for a while (and it isn't like it's never been done I think) and Vulture not only uses it as a cool concept, but it is executed well. Unless I missed something, I don't see any way for Vulture to infinitely recover or necessarily obnoxiously stall, while providing a lot of options with his other attacks and stuff like his drones that feel really creative. Especially since how you draw up your flight plans will change depending on your opponent, both for offense and defense.
In fact, if anything, I feel like this is something that could be emphasized a bit more: The set could do with some more specifics on stuff like Flight Plan combos and follow-ups or some examples of defensive flight plans. Surely, for example, Vulture has some combos that work better vs. fastfallers and some vs. slow-fallers, I could see fastfallers allowing Vulture to move more slowly and draw out his moves, for example, while zooming places quickly works better vs. slow-fallers. Hell, sometimes, you might even zoom past fastfallers! On this note, despite the fact that the flight plan is really fun with stuff like combos (and being able to creatively come up with flight plan combos on the fly), Vulture lacks a single basic ground to air combo starter or launcher! I'm not saying we need to be Sheik out here, but even characters like Ganondorf have some basic combos, and Vulture feels rather lacking. I would also say this simply means that Vulture is lacking much in an area that could be really fun. Imagine the mixups on an aerial launcher when you have so many possible ways to plan your flight and the enemy doesn't know what you're going to do!
Personally, I would recommend Up Aerial become an aerial launcher, probably a combo tool at minimum at low percents (maybe a combo tool at more percents with good flight planning? You could have a whole branch of follow-ups here!), over what's currently there, which even if it COULD combo right now really doesn't serve the kind of combo-launcher role I am thinking of. You could keep the animation, or make it more of an upward claw-kick, or do something entirely different! I just think this kind of simple glue move would add a LOT to the set. Especially since I feel if the set has one weakness, a fair amount of the time the knockback feels like it could be more focused on purpose, a lot of kinda general mediocre killing moves in here.
Enough about some negatives, let's get to something I really liked in the set: A really cool ground chunk! I think the simplicity yet intricity of this one was really well done. Vulture isn't some earth manipulate who is going to be changing the chunk around, it's more a representation of something the Vulture does in a lot of media, grabbing stuff and chucking it at people. And insteadof random background objects, its a ground chunk! The way the chunk works with stuff like intangibility on Down Special is really fun, since you can play a lot of tricks with it, and the way it shatters consistently yet specifically makes it really fun to play with, with later moves such as Down Throw adding to them, it works well, and I liked the idea of being able to swing it around and toss it then grab it later. Tossing it and then grabbing it later especially feels Vulture-esque character-wise, I like how this set makes you feel like you're soaring around freely, grabbing the foe and grabbing objects and circling them and whatnot. I do wonder if he should have a bit better jumps to go with this.
Lessee, some other highlights in here...FAir has a cool animation and some interesting applications in the set, It's unspoken but the double hitbox can also play around with droids. Will Vulture pull back and not blow up a damaged drone with the 2nd hitbox or will he stay there and hit it? You might even wanna give it a little mention in the move. I thought Forward Throw's use as a combo or kill move was kinda fun. Jab is an extremely simple projectile that adds a LOT to Vulture's game. Just being able to threaten, from a distance, any drone blowing up adds a lot to how Vulture can pressure people, plus having a simple projectile in general with stuff like Flight Path. Dash Attack's cross-up ability is fun and Up Smash is an exceedingly simple move but just having this powerful, platform poking/landing catching tool works so well into Vulture's playstyle of stuff like intangible platforms (and would work better if he had a launcher move!). I also thought Down Aerial being a stall than fall that has a specific grab hitbox was kinda weird but really cool in how it's used. You wanna just shield my landings and punish? Good luck! The grab really is meaningful here and given how much Vulture grabs people with his talons in battle makes perfect sense. Oh, and the pummel is something I thought was very creative and took advantage of Vulture's unique mechanics.
Circling the wagon back around to some complaints, Down Tilt making fire felt odd and kinda out of place to me, and this move feels like it should have some kinda wing hitbox rather than just the fire. Discussing it with FA, the idea of making it a two-part move ala Link's F-Smash came up, which I think is a pretty good idea, especially since it offers soem mixup potential. If you're on a drone, will Vulture be willing to do the 2nd hit and make it a time bomb, or will he stay at one hit, for example. Even on the ground it offers a mixup against some dodges or whatnot. F-Smash is a bit weak knockback-wise, I would knock the kill percents down 20% or so, considering Vulture has few strong KO options and what it is compared to (plus it just feels kinda weak with the damage/animation as-is). Down Smash should have less base knockback, as it could be absurdly cheesy with platforms or low blast zones to just get cheap early percent kills, and bringing it down to 2/3rds or something shouldn't actually hinder its use at all while stopping dumb edge cases. Down Throw neglects to mention what happens on a drone, along with some other issues I mentioned in private chat like Down Special's control scheme currently not making sense (I would make tap place a device and hold activate the closest one).
Overall, I thought Vulture was a very good set, albeit one that does still have some potential waiting to be unlocked. It has a strong base, it's melee is usually pretty good and well executed, the playstyle is crisp and refreshing, core concepts are presented and executed well, it just needs some polish around the sides and some more focus. I liked it a lot more than Kingpin and it feels like a set that, at minimum with some edits (at the least stuff like the DSpec one that just fix oversights), couldd end up an SV or an RV+ from me by the contest's end, which given how soon it's been since you returned is really astounding. Good work!
EDIT: I see that you already clarified Down Throw and edited Down Smash while I wasn't looking. Consider those complaints null, and me liking the set that much more!
Primeape is, like, fine. It's a pretty short set that cuts to the point, so it's an easy read, but I do feel it could use some expansion at points. Don't expect a Vulture-sized comment here, but let's get into it.
Anger Point is a fun mechanic! It is basically a reverse Perfect Defense, where it's instead getting a bonus to getting in once you're in disadvantage, rather than pushing the advantage state forward. Neutral special is a pretty good use of it and I like how its use evolves depending on Primeape's anger point. The staling mechanic is neat, though I wonder quite how much use Primeape would truly get from it. Side Special is neat, but saying he gets Anger Point armor when cancelling seems confusing to me. Since it has a hitbox throughout, shouldn't it have the armor the entire time either way? This is another move where I like how it changes with Anger Point, making it one of the centerpieces of the set. The Smashes are all solid, the idea of Primeape just stomping his way across the stage is really funny but in a fitting way, there's nothing amazing but it is solid.
The standards are fine, although I feel like there's some missed chances, I was kind of surprised Down Tilt's bury didn't get stronger with more Anger (which can also lead to a stronger looking stomp), something I am going to bring up now is I want more numbers from this set. Normally I am fine with more general descriptions, but when F-Throw vs. B-Throw are talking about differences in KO percent and Dash Attack is saying it is "A stronger kill option than it sounds", I at least what some ballpark of the numbers (plus I like having number ballparks anyway). It was a bit of a bother to me. Speaking of throws, the cargo throw just kinda seems, there? The throws are mostly basic but fine, but the Cargo Throw just feels there, also I feel like the animation could be angrier given Primeape, maybe even have the throw's purpose change with Anger Point scaling?
I'll also take this not to say I thought the set had kinda lackluster animation in various points, like the fact Up Special's actual hit isn't really described, Forward Tilt to a degree, the aforementioned Cargo Throw, some stuff like F-Tilt. There are some good ones here for sure (D-Throw, the Smashes, Dash Attack) though, but I think for a smaller set like this, it can be a bit of a magnified issue.
Overall, Primeape is a simple enough combo-er style set who wants to be hyper-aggressive, even if it ends up hurting him. Character fitting! The mechanic and a few moves kinda carry the set, but there's enough here I find it low end votable, but not a ton to talk about and it is mostly just, fine. Glad you got it out!
Armie Buff is the first Ace Attorney set in some time, and the first AA set by Kat in many years! This is not the first character I might have expected to get a set, but originating from the excellent Spirit of Justice, I was very excited to read this set!
Strangely, this set was a slow burner for me after my initial read and only after letting it sit for a while in my mind did I come to fully appreciate its craftsmanship. There's no big flashy concept in this set: you control a drone and at times, the drone gets its own move in a pseudo 2-in-1 moveset. Despite that the 2-in-1 is not a massive mechanic, rather a passive part of the set that is ever present. This is part of why my first reaction to the set was more lukewarm, but the devil is in the details. It's really commendable how despite the straightforward approach to this character it manages to squeeze out so much creativity while having a pretty flawless execution.
I'll be honest, I am not wholly satisfied in the way the drone works. It's just a bit clunky for my liking and would require a good deal of learning from the player. At times it gets away from the set a little, but it's not a huge issue, it works fine.
First on the specials, the Strangelovian up special is a move we rarely see in MYM, and it's put to full use here as a way to rain down projectiles on foes and make the most of Armie's stall-y defensive approach. As in all your sets, this has a surprising amount of depth despite on the face of it, being quite a simplistic idea. Armie's wheelchair and basic movement severely impairs her ability to camp so she has to make use of times like during her up B and clever use of the drone to get the most out of that. The land mines are a pretty well-tread concept, having done the same idea in my Chalis set last MYM, but it's necessary to give Armie some more mobility, without ruining the delicate balance of her long-range, glass cannon playstyle.
Jab is one of those examples of where the set is at its weakest in the tackiness that can pop up. In this instance, I'm pretty much okay with it, and the move is fairly interesting, though doesn't work into the playstyle super well. However the dash attack animation is great, and the uses of it as a counter is pretty genius. I want to point out the dash attack and ftilt as examples of one of the great things about your sets: the animations. The dash attack despite being for someone in a wheelchair, utilizes the mine as a way to give the right oomph to the animation so that it looks correct on the satisfying dash attack input. The ftilt is the same, making the drone torpedo back at Armie.
It's really impressive how instinctively you craft these high momentum and impactful moves, then layer on top of these well-crafted animation with great detail on how they work into the playstyle. I wasn't able to articulate this as well in the past, but it became more obvious to me watching videos posted by Roy in chat how important it is to have these "key frames" where moves have an obvious stop and start, where the climax of the animation has a very identifiable frame. Despite not being an expert on game design necessarily, it's quite amazing how well you've incorporated this principle into your movesets. Let alone when on a character who can barely move in a wheelchair, who could easily justify redundant similar animations, great stuff! This applies to the extremely satisfying well animated dtilt, and less so to the utilt, though I think utilt is one of the weaker moves, though it functions decently as a generic combo starter.
The smashes are the real meat of the traps and projectiles Armie can set up, as compared to the more passive hitboxes she creates on specials that are for more evergreen strategies. The fsmash and usmash largely function as great punishment on the foe for too carlessly approaching towards the pretty vulnerable Armie and the only issue I have with them is it's a tad bit tacky for her to be shooting fire when she's afraid of it... but you do address it with the idle animation plus she's referenced having one, which is a great catch. The usmash is one of the core moves, practically deserving of being a special, and makes very creative if light handed work of missiles. Again the detail is where the depth comes through. The dsmash terraforming works very well into her set though I more just accept this here because you know, what else is she going to do? Nonetheless, it no doubt works great into her playstyle and is executed well, so no complaints.
We get into the aerials next and I do really like the neutral aerial. It has many complexities and deftly uses them to make a great, unique GTFO move. One other negative of this set is that I do feel the drone aerials just kind of exist, they aren't bad, I'm just not sure they were really necessary. The FAir is a great use of the classic AA "Objection!" animation and definitely makes sense in the context of her playstyle. The BAir is surprisingly versatile and despite what you'd expect, stands out very well from the other aerials, this is why I can forgive some tackiness in the FAir. Every aerial really stands out on its own both for animation and purpose.
The grab game is a shocking (get it?) final push of quality in the set. I did not expect such a fascinating mechanic on the grab for this character and really enjoyed all the nuances introduced on the pummel. This has to be one of the best pummels in ages. It's where the drone comes into its own as a great mix up tool and it has so many fun outcomes to being manipulated. I think at times, things like the mine blowing up out of dthrow and the land mine's capability for self damage have some selective logic, AKA are tacky. It's not a huge problem, but probably one of the few areas that could be improved in the set. Ignoring that, the rest of the grab game is quite impressive too, partially for what it chooses to not do. I enjoy Rooligan's dthrow a lot, but this would not be the set for it and simply making it a strong KO throw is a great fitting spin on the move. The Rooligan propeller-esque uthrow doesn't even try that and I appreciate it, making it all the more original and well designed instead being a spacer or combo starter at low percents, or a solid traditional KO throw at higher percents.
And of course, that final smash is simply fantastic.
Overall this set is yet another excellent one from you Kat. If I had some seals to give out, you would definitely get one. I feel like your sets if anything are becoming a little under-appreciated as like the trusty race horse that always performs well, you always have a strong sense of game design. On an objective level it's undeniable that you're a great designer and have a firm grip on how to construct a set and playstyle. We could all learn a thing or two about your restraint in MYM's ego-centric era. I would not say this is one of your best, but it is still great!
Sorry to not have read your other set yet Bubby, but as the very much not opposite Whisper fell on Bizarro Day, that's where I'm obligated to begin. This set is a little different from your usual as I don't recall many comic characters, or ones that have such a preset personality, compared to the likes of Blupi anyway. I don't have a whole lot to say about this set in all honesty, just a few things that stuck out to me. The base is pretty well done at least in how it executes the Wisps and the simple interactions between the laser and her set up. It's nothing extraordinary but it's pretty well thought out.
The grab and the RNG elements in the secondary grab stuck out to me very hard as a negative. She does at least have a set melee range grab, though. Rolling the dice to get that secondary grab in practice would be very irritating and is a much worse integration of RNG than in Hero, where it is limited to one special and a passive crit mechanic on Smashes. It's not completely terrible as she does have a basic grab but it is bad.
Another thing I will say on the negative side is that in spite of the character having a preset personality that's apparently well liked, it doesn't come across very well in this set. There's not much flair to any of the animations that gives across much of any character at all. The moves are all very, very basic after the specials. Even compared to the most basic Smash set in written form they'd at least go into some more detail on the different hitboxes and playstyle applications of the moves. I don't really get much of a sense of passion for the character here. I don't mind it being a shorter set at all, that's fine, but compared to a set like say, Elekid it doesn't get the most out of its shorter word count. In any case, thanks for contributing to Bizarro Day, albeit in a not very opposite way!
Fenn is somewhat like "Shantae" as a creative experiment, being from a fake game and a fake Smash Bros game in the far flung future. This is like how Shantae is inevitably going to be added as DLC #5 of the season pass, eh? Just like Shantae though in all seriousness, this is an interesting experiment on how to approach a moveset from a writing perspective. I definitely enjoyed that aspect.
Fenn mostly makes bank off of her flask mechanic. It's fairly simple and straightforward, having a meter and units that empty the flask, and the intuitive ability to set down the flask. It feels very ROA-ish in the way it's executed. The waterfall-esque mechanic of using the running water is a nifty mechanic to tie in the melee later in the set. It all runs into itself and makes for a compelling playstyle. Does seem a bit too ambitious to have tried for the unarmed 2-in-1 style set but unironically I can respect your attempt here, even if you needed a lot more time to fully deliver on that difficult concept.
I do feel the set falls apart a little bit by the time the aerials and throws come about. These moves are really basic. I wouldn't say they're necessarily bad, there's just nothing much to say about them really. You can sense by this time reading through Fenn the set was being rushed, but if nothing else these moves do serve a purpose and are differentiated well enough. I do wish her aerials had some more variety, like a multihit or a sex kick, or a combo starter. If you're going for basic, may as well nail the basics. The throws are harder to pinpoint in the same way for lack of variety but feel even more basic than the aerials.
To end on a positive note, the first few sections, specials, standards and smashes do have some highlights. The jab and dash attack have simple, imaginative applications for using the water stream. The smashes changing when the flask loses water was smart, and very impressive given the set was done in such a tight time frame to have that much thought put into it, though I do wish the set had more development time to well... develop that idea further. The set does feel very original too despite it joking about it ripping off Spring Man and co. This feels like one you could go back to and improve quite heavily if you wanted. Nonetheless, a respectable effort and I'm grateful for your Bizarro contribution Lex, thank you.
When you have two Electivires what comes next? Well Elekid of course! These Pokémon sets of yours are always a nice bite size treat Roy. There's very little to fault, the set has a practiced and reachable bar in sight it wants to match, then it matches that expectation! It's hard to criticize these sets all that much because they're objectively about as good a set as can be imagined for the character.
The mechanic is pretty much Diet Electivire in that rather than an intensive meter, Elekid has a simpler charge system based around his Thunder Punch. It's obviously a small liberty to take but ties really well into your Electivire set. I have to say I really dig the connections you make here between your Electivire set and Elekid from the overarching playstyle to individual moves, almost feeling like a "prequel" to the Electivire sets. It'd be interesting to see Electabuzz attempt to bridge the two.
The set then largely follows the Roy Pokémon set formula... of success! This is to make simple moves and have a mechanical spin on them, resulting in what is a complex playstyle comprised of simple moves. All you really need to do is cherry pick some of the best applications of said mechanic, to see why this is such a winning strategy to making a set. For example the dtilt having inwards knockback is a fun spin on the Ness/Lucas dtilt, adding a sweetspot to utilt, adding an extra spin to nair, even a simple addition like the suction on usmash is fun to imagine in action.
The set's one real downfall in my opinion is the throws feel a little bit bland compared to everything else. It's all fairly simple already, the throws are just a bit too basic. That aside, the set obviously has quite a simple playstyle as well, which makes sense given it is Elekid, though it almost gets to the point of being a flowchart. Everything improves with Charged State and there's not a lot of depth to the mechanic ultimately. That's fine and I still think this is a good set, it's just hard to get too excited about.
Overall, I did enjoy this set and would point to it as a positive example of how to do basic things. There's still good characterisation here - Elekid feels like a mix of the Tasmanian Devil and electricity monster, despite the obvious lack of flash. Thanks for the contribution on Bizarro Day Roy and good work!
I have to say, after Kingpin and Vulture, two amazing character choices, the sky is the limit for you Kupa! Vulture does not disappoint either getting right into the meat of what we all came for manipulating his flight suit and a plethora of fascinating gadgets. The way flight path is handled in this set is one of those interesting concepts everyone has thought about at one point but never been implemented, and you thought of every possible problem in this mechanic. There’s no way to abuse it for infinite recovery, the control scheme is perfectly planned out, the damage even is very logical from top-to-bottom it’s just a super solid idea implemented flawlessly. The introduction of drones could’ve been a reductive generic minion but you linked it right into the way flight path works in a fascinating way, able to switch between the flight path from the suit into the drone is just awesome and the little nuances this creates when you switch is covered well. The down B is probably the single most flashy thing Vulture does in the film that jumps out immediately for its potential and once again, you hit it out of the park here, taking a risk letting Vulture delete platforms and move the ledge. Despite these risks the set delivers on these ideas in a compact and balanced way!
The up B is perhaps the most surprising of the specials as it delivers yet another great concept, I definitely did not imagine a ground chunk being introduced let alone all the other things this move introduces. You craft the melee aspects right into the flashy mechanics side of the set too, as the satisfying way you can claw into foes and destroy chunks in your big metal talons; it’s both complex and intuitively satisfying at the same time. My mind was kind of blown when you managed to work in the whole tether mechanic too where Vulture is holding up the chunk or drone beneath him as he flies along. When I finished the specials here it was truly like I had gone back to the golden age of Kupa back in good old MYMX.
I did say already to you I feel this set peters out, and it does start in the grab game. If this set managed to keep up the excellent quality of the specials it’d be a fantastic set. It’s still good, and definitely better than Kingpin, but is carried hard by its excellent specials.
The grab game is where a few minor issues stick out. Foremost, the dthrow and uthrow feel a little too similar. The uthrow felt a little antiquated and in action would be a little cheap to use as a gimp move. This isn’t just OP because of the thoughtful way you balanced the move, but there’s not a whole lot of substance to the move outside of that. Likewise the bthrow sort of exists for the gimmick of doing a horizontal ladder to KO sideward, which is very cool, but in practice is one of those things that are very hard to balance. If foes can just DI to escape it I’d rather just have a solid KO bthrow.
The aerials are fairly solid though I do think there’s a little too much armour on the moves, and in the least there needs to be an overarching mechanic to said armour and not just on the aerials, something like K. Rool’s belly armour. I also did not really like down aerial as a grab. A little weird to me having a move so similar to an existing one, and yet this one has a grab attached onto it, like a straight up buffed version of the Ridley dair. Vulture’s aerials also borrow a bit too much of Ridley’s set for my liking, in his bair a little, but very clearly in his uair and dair. It’s not a big issue, just would look a bit odd in game next to Ridley.
The standards for me were the highlight besides the specials. The ftilt and dash attack were clever ways to play on the flight path mechanic, being a way to slam the brakes on the foe a la Corrin’s side B in the ftilt plus the unique follow up. The dash attack letting you play with your facing and have a couple of hitboxes is simple, but effective in this playstyle. The jab was alright, though I felt it didn’t go into enough depth about how much a Mega Buster-like jab would affect his overall playstyle and how this would effectively weaken him up close assuming it’d be quite a lot slower than most jabs to come out. The dtilt I just dislike, and while I like utilt, I am not sure it’d be that useful in game considering his propensity to be above foes. My personal suggestion is to combine the two and make the current utilt the new dtilt where he aims down and does the long attack to his drone if he’s on it as a double duty for self-damage and for its offensive properties. This would have enough long duration to be punished and not used as a self damaging move primarily, except in advantage, so would avoid awkwardly using it like a set up move as the current version does. FA and I discussed it and he had a cool idea too keeping it more like the trap it is right now. I’d just make a new utilt personally that worked into his combo game.
I’ll be honest, I just didn’t like the smashes. The usmash is probably my favourite as simply jumping up in the middle of his flight path is really awesome, and while the move is very simple, it’s at least unique in the context of his mechanics. There could be a lot more to it, but I have nothing against the move. The fsmash is also mostly fine but I would’ve liked the core hitbox to have more of an impact. It’s basically a strong, large hitbox ignoring the Corrin esque part and I don’t really get how it works into this playstyle more than any other character. The interaction where he goes down in midair, while intuitive, feels a little tacked on. I didn’t like dsmash for a couple reasons: it’s weird that it doesn’t KO until very late – it could have high base knockback and KO reasonably early – and the interaction seems quite tacked on. The two worse smashes in my opinion stood out because what they added to the excellent flight suit special felt like it had much less thought put into it than the flight path itself while not really adding much of their own.
I wanted to write out a fairly long comment to give an accurate impression of my feelings on this set, because it has some really good stuff, and a few parts I strongly dislike. Mostly I just want the dtilt and smashes looked at as those are pretty much dragging it down. Even if you went into some more depth on the smashes before the interaction that’d be cool, I simply want more to bite into before you get to the interactions. If you handled literally every problem I mentioned this would turn into potentially an excellent set, but I wouldn’t expect that, just focusing on the those 4 moves would be more than enough to raise this from good to very good. In any case, this is nothing if not amazing progress from Kingpin even if it’s a diamond in the rough. I’ll just say at the end here too, this set is excellently written and has great presentation with all the GIFs, you are a great writer. I hope you stick around for a long time Kupa!
SARCOPHACURSE:
Time to dip my toe back into this whole commenting thing, starting with some first-page movesets. Not ever having played Yo-Kai Watch, this is a really neat character concept, and you get a lot of mileage using things like his "lid" and jet to differentiate what could otherwise be pretty bland standards. Beyond that, I think 'Curse does a reasonably solid job dipping his toe into a few different neat moveset focuses, though with the potential for further exploration in a number of them. The mummy minions, for example, are handy enough in terms of low-HP annoyances that can be (hilariously) thrown around to trigger a specific one of their three attacks, and 'Curse has multiple useful tools for getting them around, with the most versatile being F-Throw. I find myself wishing, however, he had options to prompt the mummies to use their drain or curse moves, or even further interactions beyond hitting them around or gilding them - say, electrocuting them or lighting them on fire with D-Smash or a jet standard, respectively, to trigger some different hitbox or movement on their part. Maybe if he manages to breathe the Neutral Special curse gas onto a mummy, it could do something as well? I also wonder if there weren't a direction you could've gone where 'Curse's own mummy exits his body and begins ambling around camouflaged in among the minions, with it carrying some sort of tradeoff for the player. Someone in chat mentioned having the mummy pop out during certain moves beyond Neutral Special and potentially suffer more damage as an incentive for opponents to use weaker moves that won't penetrate 'Curse's armor...that, also, could be a great idea in terms of adding nuance. Speaking of armor. . .
As a heavyweight main, I also like where you started to go with the Gilded Guard - it's a concept that automatically adds depth to 'Curse's standards, in that they now have optimal uses both when he's his regular self and when he's got the extra armor. This is, of course, developed further with his option for debuffing a foe with Neutral Special. Against any given opponent, will 'Curse want to gild himself, leave his opponent at their regular strength and power through them (if they're a flimsy combo character, for instance), or gild himself and debuff his opponent, incentivizing them to become more predictable with slower, stronger attacks that, as a downside, could cut through even his stronger armor? And then, 'Curse strictly debuffing his opponent comes with its own sacrifices, like losing the ability to combo out of N-Air. Where I start to feel some contradiction, on the flipside, is that it's emphasized multiple times that 'Curse prefers the air ... where Tough Guy armor, as it functions in Smash, isn't active (chat informs me this may or may not be the case - will have to test). More or less, 'Curse wants himself gilded whenever possible so he can remain viable on the ground, but to have that not translate to his bread-and-butter aerials in any meaningful way feels off (I might add an explainer that the mechanic functionally is Tough Guy armor on the ground, but with some additional affect in midair). It also is unusual that D-Throw alone in the moveset gives 'Curse the ability to trade his remaining armor for a stronger hit (unless this also is what you mean re: armor "automatically breaking" if 'Curse is hit during U-Throw). And balance-wise, I'm a little wary of F-Throw resetting opponents' curse timers, given the pretty significant 15-second duration and how, despite the punishable end lag, 'Curse likely won't have too much trouble fishing for and landing a grab at some point due to its great range.
To summarize, I like where 'Curse started to go in terms of minion interaction and armor but in several ways was left wanting more. I'm lukewarm now and am prepared to like the set more if/when you ever made some tweaks or additions.
ARMIE BUFF:
Does this mean we're going to have to write match-ups for an Armie Challenge?
Not to belabor a point others have probably made in the years I was on hiatus from MYM, but you've definitely come a long way from those early days, when a Katapultar set evoked images of Jason Vorhees. Talk about growth in terms of moveset design. I bring this up in part because I think one of Armie's strongest points is in awareness of all the different sorts of movement options that could come in handy mid-match, and a versatility in being able to achieve them as a supplemental use to various moves. The mine boost is the most focused-on, of course, but rolling backward from F-Tilt, the landing application for B-Air and her catching the drone via F-Smash stand out as other strong examples. It's like a more nuanced version of Ryu/Ken's movement in some ways, similarly to how I also view the drone controls as a better version of the Luma mechanic. Rather than just generically serving as a tool for follow-ups, either itself or by keeping a victim in place for the main character to smack, Armie's drone goes down some pretty complex rabbit holes with concepts that naturally stem from a 2-in-1 dynamic, like a dual grab and one character healing/hitting the other. Both, I feel, were pulled off pretty brilliantly here, though within the writing, I sometimes had to go back and reread moves to ensure I was grasping exactly what inputs were necessary to trigger a certain option within a move, factoring in controls both for Armie and the drone.
As far as function-related items that gave me pause, there were extra features on a few moves I did see as veering into tacky territory - I didn't mind the shockwaves as a visual representation of a larger hitbox for the great D-Tilt (where you acknowledge the tackiness, to your credit) but felt they veered too close to HMA territory for my liking with landing D-Air and especially B-Air, being forceful enough to roll Armie forward (in an admittedly cool movement option, mind). And though you mention the precedent with Petey - who probably shouldn't be looked to for any sort of positive precedent in terms of movesets, heh - lingering fire hitboxes that deal no damage feel 'off.' But beyond that, I came away from Armie with a largely positive impression. In terms of other observations, I'll echo what Smady said in praising the "key frame" component, with Armie slamming her armrests or leaning against her seat to indicate to the player their inputted moves are forthcoming (plus minor personality flourishes like her cringing/getting excited programming certain moves). I like the sheer versatility on moves like Side Special, with the myriad of targets Armie can aim at and all the resulting flight patterns the projectiles can take on as a result, plus U-Smash, where the missile effectively can serve as a stage control tool, item, trap and positioning tool for Armie (used in tandem with a mine). That's the sort of complexity where, applied within a lesser set, one could come away feeling a lack of focus, but given the constant cross-references between moves and soft/hard interactions, that's a test I feel Armie passed with flying colors. Looking forward to seeing what else you've got in store for us next, with Kunai and any other offerings you've got planned this contest.
I hope this comment is helpful given how you wanted some advice in chat.
Let's start with something I think this set does good, which is the Specials base. Whisper has a pretty solid and interesting base of Specials here, with a basic flamethrower-esque laser that you can bounce off solid objects, then introducing the Down Special crystals which can refract the laser in a playground-style where you set it up how you want, along with the Side Special refrecting it to turn it into a temporary AoE damage dealer. Side Special is a solid ground-riding Special that you can turn into a temporary and stronger stationary trap, which has some pretty cool uses. One thing I would personally add: Make it so you can press back on the control stick when making it a temporary trap to reverse it's direction, I'll go a bit more into why I think that'd be cool later. The missile explosion with it is a cool, basic interaction as well, with Whisper able to use the missile as a strong basic tool in her somewhat campier toolkit.
So, we have a strong basis. The key then is how to build around this basis. Let's talk some fundamentals here. The tilted Side Special is a zoning tool that rolls along the ground. What are the options the opponent has? To jump over it, to shield it and try to run after it, to use a special reflective option like Fox's Down Special, or to deal 10% or more damage to it. This means that when you're using this move, one of these is the expected result: It isn't like the opponent is gonna eat your moves, after all! This same basic principle applies to Whisper's missile and laser as well, giving Whisper a basic playstyle of launching a projectile and finding a way to get advantage of it, usually by reacting to it.
I'm gonna bring this to a Smash example for a moment, with Wolf in Smash Ultimate. The Art of Wolf video by IzawSmash would be a good example for this. When wolf fires off a laser, it isn't just about hitting with the Laser. It's about getting a positive result out of the laser. If the opponent jumps over the laser, meet them with an aerial or Up Smash. If the opponent shields, see about getting a grab in, and so on and so forth. Note that this is just how the playstyle starts, not ends: When you hit a move, you then convert that move in a variety of ways, and a wide variety of moves that can do different things.
So, let's take a look at Whisper for a moment, utilizing that same principle in relation to her projectiles. There's two ways you can respond after firing off a projectile: Reacting to the opponent approaching, or approaching the opponent behind the projectile. The former would be, say, anti-airing a jumping opponent. The latter would be something like grabbing a shielding opponent or comboing a hit opponent. Given that Side Special's tilted version specifically talks about opponents jumping over it as an option and Down Special being so good at stopping people in the air, I am going to use it as a bit of a point.
So, if jumping is a major option against one of Whisper's strong tools/strong neutral tools, what we wanna do is go into her anti-airs. This is something the set DOES do...kiiinda. The thing is a lot of times the anti-air moves just say "it anti-airs" but doesn't talk about it much, it just tells us it CAN hit them. What are the situations it is good as an anti-air, compared to Whisper's other anti-air options, and when would you use them? For example, Up Tilt has super armor on Whisper's head, so it is probably good against opponents shorthop attacking over the Side Special! You also could use it against opponents landing in landing situations. But the set doesn't really make the connection of using Up Tilt to go with Side Special, and perhaps as importantly, it doesn't tell us much about if you do anti-air the foe with it. It says it combos at low percents, but otherwise is a spacer, and that's it. We don't have any indication of how well it combos compared to other combo options, what it might combo into, if this is a good reward for Whisper off of using it or if it's more "safe but less rewarding" given the super armor and so on. All we get in the set is "It's an anti-air and it can combo" and in the end that doesn't give us much.
This continues with other options in the set, like Up Smash. it's an anti-air with strong knockback, but a bit more mediocre damage. Is it just something you anti-air with at kill percents, or is it worth launching people up and catching landings with Whisper, given she has an Up tilt with super armor and this fast Up Smash? Is this Up Smash fast enough to be safe when anti-airing behind a Side Special, or is it still kind of risky if they get a read on it and a more punishable option? Is it reactable? It's an anti-air and it hits hard, but that's about all we get. There's also aerials to consider, as jumping up to meet the opponent is another anti-air option, especially against full hops: What aerials does Whisper use to meet opponents who, say, full hop over her Side Special? I am guessing Neutral Aerial or Up Aerial? But neither particularly are mentioned as it or go into it, so who knows, if at all. Or maybe Full Hop jumps are a bit of a weakness for her? If so, you can go into detail on how that affects her set. For example of she's weak against full hops, she might want to set crystals out in a way to refract them at full hop jump angles, which can be mentioned and weaves into the set, or to launch her missiles at a full hop angle as a mixup.
By discussing all of this and making it fit together into a cohesive whole, you create a deeper playstyle than "it anti-airs". Right now, the core concepts are there for this, but how it plays out is frustratingly unknown and it feels like it lacks much to it, coming out as a blander set with stuff like "oh, it anti-airs, moving on". Also, this is one reason I think Side Special turning around would be a fun idea, as you can turn it around when a jump over it occurs and thus have it still pressure the foe if you predict it, which is a really cool mixup possibility.
This kind of thing goes further into the set. For example, let's say we want to approach as Whisper, especially since she's meant to be versatile and not a full camper. Well, the set doesn't really go into any detail on that. It says some moves combo, but which ones are good combo starters, and which are just good for being IN a combo? When you're approaching, what moves are you looking to use, especially if you're approaching behind behind a projectile? Perhaps you can use Dash Attack and be safe with a projectile for movement, or perhaps it is still unsafe? Are you looking for Forward Tilt to begin a combo, or maybe an aerial? The set itself is mum on how Whisper approaches, the good and the bad of moves to approach, and just kinda says "Here's some moves that combo." which doesn't give much.
I would also say this set has little themes it doesn't follow-up on, I am going to say gimping being a notable one, as this first gets introduced as an idea in the Side Special with being able to send the spiky weapons off the ledge, along with some stuff like Down Aerial, but the set never really discusses what Whisper does best or worst when she gets the foe off stage. Are there any especially good moves for her tu ose if the foe is on the ledge, Down Smash can probably cover a good number of ledge options, maybe? I think some move changes and focus on discussing could make this a good little "subtheme", maybe instead making Forward Aerial more of a Ganondorf F-Tilt style knockback but more downward oriented, so it can send opponents at a low angle for starting sn edgeguard, and if you hit it on an opponent jumping over SSpec it will hit them down into it if they aren't too high? F-Throw could also have use for throwing the foe off to get offstage shenanigans going, maybe a lower horizontal angle there too? Can you place crystals in a way that is good for keeping people off ledges or off stage? Maybe DAir could spike or she could be able to go reeeally deep off stage due to DAir giving her a vertical boost as long as she saves the DAir.
These are also just how Whisper deals with advantage, another way you can look at moves and talk about their depth is how her moveset works in disadvantage, or when she's in trouble. What does she use to get people off of her, just NAir, is that good or bad compared to other characters and options? Maybe Down Smash has enough range and speed to be good to get people off her. Maybe she has moves specifically good at spacing the opponent far enough away to get breathing room to begin sending out your projectiles again. Stuff like that.
I think i've gone through enough of the specifics of overall playstyle, so now I'll go through some individual move thoughts and ideas. Up Aerial is extremely strong for a UAir (AFAIK anyway) and it feels a bit bizarre to be so strong compared to other options given from what I can tell it is also a pretty dang fast move, I would consider making it weaker OR slower to make it less polarizing, although I would still make it a good kill move to fit in with Whisper's overall playstyle as it seems. Whisper feels like she could perhaps use her Wisps a bit more, maybe with something like a multi-use attack ala Meta Knight F-Tilt or Link F-Smash, with each hit using a different Wisp? You could also play around with it by allowing different options depending on where you end. Like, say, a Cyan F-Tilt 2 that you can end to mix up with Forward Smash (either they predict it and don't instantly dodge or they dodge and get hit coming out or whatnot) or something.
This brings me to the grab, which is why the set is not currently at least a 5/10 WV, the Wisps being totally randomized is just crummy feeling and to play with when they are all specific toolbox-y kinda moves. Personally, I would make it so the wisp you use is whatever your last used wisp is, which also would give some playstyle use to the visuals of Whisper keeping her last used wisp weapon active on her, and would allow the player to plan around which Wisp grab they have access to, and allow you as a designer to work them into the moveset with consistency! For example, imagine if the multi-F-Tilt idea could allow you to use a grab off of Cyan, because the Cyan Wisp is so fast, so you can convert into a grab and into throws. Another good option would simply be to cycle them in a set cycle every time you use the alternate grab, which allows Whisper to very consistently plan around the Wisp grab. I would also consider giving some of the Wisps MORE specialized uses, maybe a Wisp who goes at a shorthop angle to anti-air people shorthopping? If you made it the Pink Wisp, it'd also be a grab option right after using the tilted SSpec!
Finally, the grab I will note has a lot of personality on the wisps, which is why I'm so sad the set feels like it has little character to Whisper in her attack animations, which might be part of why the set can feel like a sleepy read tosome. It isn't like she needs to be bombastic on every move, but for example if she's a more quiet character and how she is, maybe she could have a neutral expression on some moves you'd expect more expression. Maybe she is really focused, or maybe when she uses REALLY strong moves like her Smashes she has more of an angry look like when she's using the hammer in the intro? I don't know the character as well as you do, so I don't want to give as many specific advices here, but good animations that convey personality can really help a set com to life and are great for a set. I will say I thought the Up and Down taunts were good characterization and am glad you did extras.
I've rambled on quite a lot now, so I hope you found that all helpful. I tried to really go nitty gritty on the basics since you were asking for help. Feel free to ask me any time for more advice and if I'm available I am glad to help!
A very late congrats to everyone for managing to get out so many sets for opposite day. My audio comments should be ready within a day or two, apologies for the delay.