• Welcome to Smashboards, the world's largest Super Smash Brothers community! Over 250,000 Smash Bros. fans from around the world have come to discuss these great games in over 19 million posts!

    You are currently viewing our boards as a visitor. Click here to sign up right now and start on your path in the Smash community!

Make Your Move 19 - Top 46 Posted!

JOE!

Smash Hero
Joined
Oct 5, 2008
Messages
8,075
Location
Dedham, MA
MYM ANNOUNCEMENT:

Hello everyone, just a reminder that all sets are due by end of day tomorrow, July 11th! Afterwards the posting period of MYM 19 will be coming to a close, so get those last minute additions squared away!
 

Slavic

Ask not the sparrow how the eagle soars
Joined
Jun 5, 2013
Messages
757
Location
taco bell, probablyn't
SUCY MANBAVARAN

Sucy Manbavaran is one of the protagonists from Trigger's Little Witch Academia. Hailing from Southeast Asia to attend classes at Luna Nova Magical Academy, Sucy looks most like a stereotypical witch of stories, with pale skin, eerie purple hair, a constant stoop, and has a fascination with mushrooms, potions, and poisons. Sucy gets in misadventures with her friends and classmates Lotte and Akko, the latter of which serves as Sucy's guinea pig for many experiments. Sucy is the most level-headed of the three witches, despite her occasional sadistic nature, and seems unfazed by Akko's emotional outbursts. While of average skills at spellcasting and broom-riding, Sucy is gifted at chemistry, able to create hyper-potent potions capable of melting minotaurs into puddles.

STATS
Sucy's stats match what one expects from a spooky magical schoolgirl; small, light, and fairly fast, Sucy tends to prefer not being hit to the alternate. While technically taller than Toon Link, due to her slouch she levels out at about the same height. At 92 units, Sucy weighs just between Palutena and Diddy Kong, a little on the light side for her size. While walking, Sucy's arms seem to disappear into her cloak, amplifying her spectral appearance, and she travels along slowly at Ryu's walk speed. While running, she does pick up a fair bit of speed luckily, giving Rosalina a run for her money. Sucy's ground jump is fairly average, at about Ness' abilities, but Sucy's aerial jump is covetable, similar to Zero Suit Samus' double jump. In the air, Sucy is mobile, on par with Mewtwo's airspeed, but floats slowly back down to the stage like Kirby does.

SPECIALS
NEUTRAL SPECIAL - HARVEST


By holding this move, Sucy will wave her wand in a harmless motion towards the ground. Around her feet, three mushrooms sprout up from the stage: on the left will be a tall, thin mushroom, topped with a blue cap, which is an Air Shroom; in the middle, a small mushroom, uniformly dark purple in color, which is a Tox Shroom; on the right, a stocky mushroom with the classic red and white pattern, known as a Life Shroom. Sucy will reach down and pluck one of the mushrooms depending on the next input used; down has Sucy choose the Tox Shroom, left will pick the Air Shroom, and right will have her snatch up the Life Shroom. Outside of specific inputs, Sucy will hold onto this mushroom, acting more of a cosmetic difference than a true item, and the mushroom cannot be knocked or otherwise removed from her hand.

As a fungus fanatic, simply holding one of these mushrooms will enthuse Sucy and provide her a latent buff to her stats. The buffs aren't game-changing, but are still a boon to Sucy with no trade-offs outside of her ability to only hold one mushroom at a time. The Tox Shroom gives Sucy a damage buff to all of her offensive moves of 1.1 times, rounded up so every move gains a minimum boost of 1% damage. Moves that explicitly increase in damage by using the Tox Shroom are unaffected by this buff. While carrying the Life Shroom, the inverse of this is true, and Sucy will receive a small protection from attacks that filters out .1 times the damage dealt, again with a minimum of 1% removed from hits on her. The Air Shroom acts a bit different while held by Sucy, giving her a buff to her jumps and a debuff to her fall speed. Sucy's ground jump is boosted to Pikachu's, her double jump to Falco's, and her fall speed drops to Jigglypuff's, having the largest impact out of all the mushrooms.

If this move is tapped, rather than held, Sucy will swoop down to the ground and pick her favorite, a Tox Shroom, off the ground, which serves as the default mushroom for this set. Similarly, if used in the air Sucy will quickly locate and extract a Tox Shroom from her robes. Both instances are much faster to grab a mushroom, but don't allow Sucy to handpick the best mushroom for the situation. Should Sucy use this move while holding a mushroom already, she will discard the old one harmlessly as she picks a new one.

SIDE SPECIAL - ENLARGE
Used on its own, Sucy points her wand forward and casts a hex, predated by a bright light from the tip of Sucy's wand that lasts for 22 frames. The spell manifests itself as a jagged bolt of magical energy, traveling roughly two-thirds of a BFP from the tip of the wand directly ahead of Sucy. The spell has some gentle homing, but will not adjust in wild directions from its path. If the spell connects with a foe, they will take 6% damage and suffer from an unpleasant... side effect. For a brief moment, the struck foe will expand as though they had collected a Super Mushroom. They are still flinching while large, so this won't backfire on Sucy, and will last 10 frames, enough to cover Sucy's recovery from the spell and throw out a fast move to start up a combo. Used in the air, this move comes off faster, at 18 frames, giving Sucy some aerial leverage. The opponent, however, is merely a guinea pig for this spell, not the intended recipient. Rather, this spell is designed for use on Sucy's mushrooms, and gains different effects whenever Sucy is carrying a mushroom. These variations also come off much faster at 17 frames on the ground and 15 frames in the air. With the exception of the Tox Shroom, tapping the input will have the move continue until canceled or hit out of.

While grounded and carrying a Tox Shroom, Sucy will cast her hex on the mushroom and hold it forward as it quickly expands. Covering Sucy's middle half, this mushroom will stay expanded for 25 frames before quickly shrinking back to its normal size. The massive mushroom acts as a counter for Sucy, making up for a long startup time with a solid number of active frames to counter with. Should the mushroom be struck by an attack, a spray of toxic spores will erupt outwards from it, similar to Peach's counter. The cloud of spores, which only last a few frames, deals the same damage it takes with flinch. The size of the cloud, however, is dependent on the damage of the attack that activated the counter. If struck by a 1% damage hit, the cloud is half the size of Peach's counter, and increases all the way up to a cap at 50% damage and above to having a diameter half the size of Final Destination. Of course, this is a rare treat only gifted by the strongest of the strong in Make Your Move. Hitting Sucy behind while this counter is active is safe, activating the counter on the opposite side of her.

When used in the air, after the mushroom expands Sucy will swing it around in a circle for an additional 15 frames. While spinning the mushroom, Sucy can move left or right a BFP, giving a bit of horizontal recovery. Sucy's fall is only marginally slowed, though, limiting this move as a recovery option. The mushroom itself is more elongate than wide, compared to the grounded version, stretching from Sucy about half a BFP. The mushroom itself hits foes for 10% damage with weak knockback, better for giving Sucy breathing room than killing. In addition to the damage of the raw mushroom, a trail of toxic spores is left behind Sucy as she travels, dealing 5% flinchless damage to any foe who inhales them. After spinning once, Sucy is left in her helpless state as the mushroom shrinks back to normal.

On the ground, using this move while Sucy holds an Air Shroom will have her cast her spell as the mushroom creates a shield in front of her. Rather than blocking physical attacks, as the Tox Shroom does, the Air Shroom will reflect any projectiles back away from Sucy. The projectile's speed will remain the same as when it hit the mushroom, and the damage of the projectile will be increased by 1.5 times should it hit an opponent. The mushroom will also block physical attacks, but not counter them, and will only take up to 25% damage from non-projectile moves. This move can also be held indefinitely, unlike the Tox Shroom, but has 20 frames of recovery as the mushroom deflates back to its former self.

When used in the air with an Air Shroom, the mushroom will expand rapidly as it's hexed, held above Sucy and turning into a parachute. This mushroom greatly slows Sucy's fall speed, as one would expect, and lasts until Sucy cancels out of it or is hit by a move. The top of the parachute deals 5% damage on the top of the mushroom, but very minor knockback. The parachute provides decent horizontal control, allowing Suzy to move a BFP in either direction for each drop in her height she falls.

When the Life Shroom is held by Sucy when used on the ground, she will cast her spell on the mushroom as it expands, lifting the larger mushroom over her head and shoulder like an umbrella. Unlike the other versions of this move, this doesn't block or reflect any damage sent at Sucy. Instead, while this move is used Sucy will twirl the mushroom above her head as green spores fall from it over her body. As long as this move is used, this dust will heal Sucy slowly; every 20 frames, Sucy will have 1% damage alleviated from her. Healing is a powerful ability, of course, and there are a few caveats to this. The recovery when ending the move is more extreme than the other forms of this move, taking a full 32 frames from ending the move to the FAF. This might not be as terrible if the mushroom provided any protection, but given that Sucy is more or less helpless, this move will see more sparing use.

Used in the air, the Life Shroom provides an entirely different effect. As the mushroom expands, Sucy swings it under her body and stands on the underside of the mushroom. Cosmetic green spores spill over the mushroom under Sucy as the mushroom slows her decent, though not as much as the Air Shroom does, but provides exceptional horizontal control beyond what either the Tox or Air Shrooms give. Excellent for horizontal recovery, this move does not have any hitboxes, once again meaning that Sucy is very vulnerable while using the move. The recovery on this move is fairly expeditious, luckily, though it ultimately puts Sucy back in helpless should she not land back on the stage.

DOWN SPECIAL - WITCH'S BREW

When used, Sucy will wave her wand as the tip begins to glow. 22 frames later, a cast iron witch's cauldron spawns in the air in front of her, immediately plummeting down due to its massive weight. On the purely offensive side, this cauldron does decent damage when it slams into opponents, at a very nice 11%. The knockback is even better, at base able to KO at 90% and beyond, though with very low scaling. Once on the stage, the cauldron loses its hitbox and becomes solid, acting as a barrier on either side and can be stood on safely. Should the stage under the cauldron for any reason vanish the cauldron will fall again, reactivating the hitbox.

The cauldron is about Kirby's size, and remains as a construction on the stage until its 50 health is depleted. The cauldron shows visual indication of its damage, becoming more cracked as it takes hits. When the cauldron is destroyed, it explodes in a splash of mysterious green brew, scalding nearby foes for 5% damage. As long as a cauldron remains on the stage, Sucy is unable to spawn a second one, so picking a good spot to deploy her cauldron is essential. When used in the air, Sucy will aim her wand straight down and spawn the cauldron underneath her., and this actually saves 2 frames from the grounded version. If truly desired, this move can be held on reserve to give Sucy a great off-stage gimp, as once off-screen Sucy can produce another freely. However, this strategy misses out on a big aspect of Sucy; potion creation.

Sucy can use the cauldron to combine ingredients to create poisons and potions to use. Sucy can use this input while within arms reach of her cauldron while holding a mushroom, and she will drop her current mushroom in the cauldron in a very quick motion that takes 5 frames. By dropping any two mushrooms into the cauldron, the surface of the liquid inside will begin to bubble. After a second of this boiling, the fluid inside of the cauldron will have changed color based on the ingredients used. From this point on, Sucy can use this move with empty hands next to a cauldron and she will quickly fill a vial with the concoction. Each combination of mushrooms creates a unique potion, a total of six options, but the general function of the potions are the same; they act as throwing items equivalent to capsules, which explode on impact with anything and deal a default 3% damage to any opponents. Opponents hit by a potion will have a faint color around them for the following five seconds, matching whatever potion they were hit by. A nice bonus to the potions is that they work hand in hand with the mushrooms from Harvest, as the shrooms do not count as normal items. The different combinations of mushrooms and the potions they produce are listed below.

As the Tox Shroom is Sucy's favorite of the mushrooms, the Toxic Potion, made from solely Tox Shroom, is her go to for corrosive cocktails. In addition to the 3% damage dealt from the hit of the bottle, the foe will flinch from the hit as they take another 10% damage from being drenched in the toxic mixture. Additionally, for the next five seconds foes will have their damage taken multiplied by 1.1 times, with a minimum of the 1% increase. A mix of a Tox Shroom and a Life Shroom will produce a Poison Potion, a slow damaging poison. Once soaked in this potion, the opponent will take rapid damage over the next five seconds. Foes will take 1% damage every 20 frames, dealing up a total of 18% damage when the vial is included in this. However, the foe suffers from no hitstun from being hit by one of these potions, meaning this mixture is terrible for interrupting attacks.

A combination of a Tox Shoom and an Air Shroom, the Petrifying Potion will inflict flinch on the opponent and give them a temporary buff on their weight, adding 10 units of weight to the foe. In addition to the increase in weight, foes have their jumps weakened to 80% of their normal height. This effect lasts for a full five seconds.
Two Air Shrooms combined will create an Air Potion. This potion deals great knockback in addition to the 3% damage from simply hitting the foe, vertically launching the opponent with enough force to 90% and above, making this potion one of Sucy's best option for killing foes. Additionally, for the next five seconds the foe will take increased base knockback from attacks by 15 units.

A combination of an Air Shroom and a Life Shroom will create a Cloud Potion, which acts opposite of the Petrifying Potion. For five seconds after being hit, foes will become lighter by 10 units, and will have their jump height increased by 20%. While this makes it more difficult for Sucy to combo the opponents, she can better KO them while affected by this potion. Finally, two Life Shrroms combined will create a beautiful Life Potion. This potion can be thrown straight down and will actually affect Sucy herself, as she will heal 8% of her damage. This potion can also be thrown at opponents, where it will deal 3% damage on impact and immediately heal off 8%, a net loss of 5% damage for the opponent. For the next five seconds, the opponent will also heal 1% damage per second. Surely there's no benefit to using this potion on foes, right?

Well, in addition to the immediate and lingering effects of the potion, as long as the opponent is discolored from a potion they will be susceptible to certain effects from some of Sucy's other attacks. In particular, opponents affected by the Life Potion are susceptible to the most potent of these effects, and Sucy may very well want to capitalize on these effects. The additional effects from potions all last five seconds as listed, but can be overwritten by a second potion effect. However, the timer on any single potion cannot be extended, and there's a three second cooldown before the same potion can affect the foe. Once a cauldron has a potion in it, it will remain that mixture until changed, and should the cauldron be broken it will splash the elixir as though it were a larger potion.

UP SPECIAL - BROOMSTICK

Sucy waves her wand and in a matter of 8 frames a broomstick appears beneath her. Like any respectable witch, Sucy flies around on a broomstick, and when used on the ground, Sucy will kick off the ground and launch herself upwards. Similar to Charizard's Fly when used from the ground, this provides mostly vertical distance with poor horizontal control, lifting Sucy two and a half BFPs into the air. When used from the air, the startup is increased, taking 15 frames to launch. However, Sucy can then input a direction similar to Fox's Fire Fox, allowing her a greater range of recovery. Sucy becomes a hitbox while using this move, soaring into foes to deal 6% damage with alright knockback, which KO's starting at 155%. Sucy is left helpless after this move, so she must make a choice when recovering to use either her broomstick or Enlarge.

If Sucy has a potion in her hand while using this move, she can choose to use it at any point by entering either the Standard or Special input. The former will have her throw the potion directly ahead of her. This can be useful on approaches, getting Sucy in close so she can hit the foe with both a potion and her broom. Additionally, if used on the very tail end of the move, Sucy can give this move phenomenal range in any direction. Use the latter input and Sucy will instead smash the potion over herself. Sucy will be unharmed, but will be surrounded by a small cloud of the potion for the remainder of the move. If Sucy runs into any foes while surrounded by this cloud, they will take an additional 1% damage from the attack and will be enchanted by the potion's effect. This gives Sucy good coverage, deterring foes from interrupting her recovery, but also lacks the strength of being struck by a vial and has more finite range, trading off utility for safety.

This move also changes a bit depending on whether or not Sucy is holding one of her mushrooms. The move listed above is how the move functions on its own with no mushroom in hand. The Tox Shroom gives the move more power when held by Sucy, plowing into opponents for 10% damage after the Tox Shroom boost. The knockback also gains a buff, allowing her to to KO foes from 140% onward. While holding an Air Shroom, this movie carries Sucy farther, giving her a whole three BFPs of recovery. Additionally, Sucy gains more horizontal control when used from the ground. The Life Shroom bulks Sucy's attack up while held, and gives her armor during the flight of the move. She can still be knocked out of the move during the startup of the move, but her actual recovery cannot be interrupted while holding the Life Shroom.

SMASHES
FORWARD SMASH - SLINGSHOT
Sucy pulls out a small wooden slingshot as she charges this attack. By default, she will load the weapon with a small rock during the charging animation. Sucy then releases the slingshot, catapulting the rock forward. This move has excellent range, launching a fast projectile that covers three-fourths the distance of Final Destination. The rock is also small, however, making it a hard projectile to hit with. Sucy can adjust the angle of the move slightly up and down as well, but with a very finite range that limits the move to in front of her. The rock deals between 10% and 15% damage, depending on charge, and lacks a bit in the knockback department, starting to KO at a relatively lofty 155%. This is an excellent ranged Smash as one can tell, and on top of the high speed and range projectile, Sucy recovers quickly from the move. While holding a potion, Sucy can and will load the vial in place of the rock as she charges the move. Once released, the move is functionally identical until hitting a foe. The vial shatters as if thrown, dealing an additional 3% damage with the damage from the Smash, and soaking the opponent with whatever effect the potion delivers. Should the Air Potion be used for this move, the knockback from the move will be overwritten by the potion's higher knockback.

Any mushrooms held by Sucy will also help contribute to this move, altering how the slingshot behaves. The Tox Shroom gives the slingshot a bit more oomph on the release. Not only does this provide a damage boost of 2% to the projectile, but the slingshot will fire the rock or potion farther as well, allowing Sucy to pinpoint foes from an entire Final Destination away, giving her supreme control over the ground. If Sucy instead has an Air Shroom in her hand, she will gain significantly more vertical range with this move, able to aim anywhere within a 90 degree arc in front of her. In addition to this wider range, the projectile will also deal more knockback on a hit, launching foes vertically with force to KO at a much nicer 120% damage and above. If the potion used during this is the Air Potion itself, the KO threshold is lowered even further, allowing KOs as low as 75%, making this Sucy's absolute best killing move should she hit with it. Finally, the Life Shroom gives the property seen from Broomstick, giving Sucy armor on the charge of the move while holding it.

UP SMASH - ARC LIGHT
Sucy stoops close to the ground as she charges magic in her wand. As the move gains power, the tip of the wand glows, with its aura of light increasing with charge. Sucy lowers her height a fair deal while charging this move, which might help her avoid some high reaching projectiles. Upon release, Sucy springs back up, swinging her wand over her head. Sucy drags her wand through the air for a total of 15 active frames, leaving a faint trail of magic behind it. The actual wand will deal between 14% and 19% damage when striking foes, throwing them vertically with the force to KO starting from 135%. The trail left behind the wall deals a static 5% non-flinching damage to any opponent that makes contact with it, covering Sucy fully from the top side. Sucy has 14 frames of recovery from this animation, which can leave her vulnerable to counterattacks.

In a vacuum, this is Sucy's strongest smash in terms of both strength and knockback, but in practice comes off as the weakest, as both the other smashes can depend on bonus damage through the use of potions. To make up for this handicap, this move can utilize mushrooms in a manner similar to Enlarge. Should Sucy be holding a mushroom when using this move, she will stoop down and, instead of charging her wand, will begin waving it in circles around the mushroom, casting her enlargement spell on it. The mushrooms do have increased startup and recovery compared to the default form of this move, but it's mostly negligible and remains constant between all mushroom forms.

When the Tox Shroom form of this move is released, Sucy will swing it like she would her wand. The mushroom is comparable in size to a Home Run Bat topped with a Green Shell, to give perspective on its hitbox. The swinging on the mushroom, as well as the active frames on the other mushroom variants, is increased to 20 frames as it is swung, taking a bit more time to finish. Similar to the wand, the mushroom leaves behind a trail, though its trail is made from toxic spores and not magical dust. The actual hit from the mushroom has increased strength, swinging into opponents and dealing between 18% and 25% damage. Knockback from the move gains a very slight buff, but the damage is the big plus with the Tox Shroom. The mushroom's hitbox is also generous, giving a decent range both vertically and horizontally above Sucy.

Holding an Air Shroom, Sucy will stand back up and, rather than swinging the mushroom, will 'stab' it straight into the air above her. The Air Shroom starts off tall and thin, with the cap of the mushroom tightly bound to the bottom of the stem. This initial hit of the move comes off very fast, but the thin hitbox can be hard to hit with. When it does hit, it will deal a slight increase in damage from the default of the move, ranging between 16% and 22% damage. The knockback on this move is much greater, however, launching foes vertically with force to KO from 95% damage, a good reward for hitting a small hitbox. After the initial hit, the mushroom will quiver for a few frames before the cap unfolds, giving the mushroom an umbrella-like appearance that covers a the same range as the previous versions of this move above Sucy. This part of the mushroom deals a bit less damage on hit, dealing the same as the default form of this move (14% - 19%). The knockback on this form of the move takes a bit of a hit as well, starting to KO at 110% and beyond.

While using a Life Shroom, Sucy will cast her spell on the fungus and lift it in the air directly above her. Visually, this is similar to the startup for the Air Shroom variant, though the stem of the mushroom is shorter and the cap slightly wider than the initial portion of the aforementioned version. Unlike the Air Shroom, this mushroom only hits above Sucy and will not expand like the former does. This mushroom has a slight increase in damage, 15% - 21% damage, and a small buff to knockback, KOing at 125%. While this variation may seem pointless compared to the others, simply a harder to hit and slightly better version of the default, the Life Shroom gives a neat property for this move. Should the Life Shroom connect with a foe, not only will it damage them but will actually sap a bit of health, incentivizing this mushroom over others. Specifically, the mushroom will drain a third of the damage it deals as it launches the foe, healing Sucy between 3% and 7% of her damage.

DOWN SMASH - MAGIC MISSILE
Sucy lifts her wand up above her head, pointing it to the stage in front of her. As she charges the move, magical energy manifests in the tip of the wand. Upon release, Sucy fires a blast of magic from this position at the stage directly in front of her. This blast is similar to Enlarge, a bolt of energy, and Sucy will aim her wand and drag this spell across the stage up to a half of a Battlefield Platform from her. This animation takes 10 frames to complete, and little recovery on Sucy's side. This magical bolt deals solid damage, compared to the two other default smashes, dealing between 12% and 17% damage. The bolt also has good knockback, throwing foes at the Sakurai angle with the ability to kill starting from 135% damage.

The mushrooms Sucy can hold provide some unique utilities to this move, though the move stays more or less the same. With the Tox Shroom out, this move gains more power, boosting the strength up to 16%-22% damage. The Air Shroom increases knockback, as expected, allowing this move to KO at 120% and above. The Life Shroom gives a more unique effect, and Sucy will instead start from the end of the range of the attack and end the move at her feet. While not a power boost in any way, this helps to eliminate the telegraphing of the move. As a small cosmetic effect, the spell will change color to match the mushroom used.

This spell has volatile effects when used on foes who had recently been affected by one of Sucy's potions, which is where the true power of this attack lays. The effect varies from potion to potion wildly, giving Sucy reason to brew to the situation. When this is exploited, the potion effect on the opponent will be used up, no matter how much time they still had.

When an opponent affected by a Toxic Potion is hit by this move, the magic will amplify the lingering toxic nature of the potion, melting through the opponent to deal a burst of potent damage on top of the hit from the attack. This manifests as a splash of purple liquid bursting from the target, dealing an additional 10% damage to the target and they are launched as normal. The splash surrounding the foe will also hit nearby opponents, dealing a weak 3% damage to them with only minor flinching. While the foe suffers from the effects of the Poison Potion, hitting them with this move will agitate the poisons. This will cause the foe to suffer from several small bursts of poison as it pulses through their body. This will affect foes over the course of three seconds. At the beginning of each second, a small cosmetic splash of green poison will emanate from the foe, dealing 3% flinching damage each time. In addition to more damage, this is great for interrupting foes and leaving them open to Sucy's attacks.

When an opponent is struck by this move while still under the influence of the Petrifying Potion, they will take no extra damage and will take no knockback at all. This is because they are quickly turned to solid stone as the spell increases the potions effect, a unique 60 frame state that prevents the foe from moving or being knocked back from attacks. This leaves the foe entirely open to as many combos as Sucy can fit in a second. Opponents who are petrified cannot be affected by any of Sucy's potions or other effects, only able to be damaged. Should this move hit an aerial opponent, they will turn to stone and plummet straight down. If Sucy can manage to hit an offstage opponent, this this move becomes a very potent edge guarding tool.

While still affected by the Cloud Potion, opponents will take the normal damage and knockback from the smash. In addition, the foe will be obscured by a cloud, similar to the Smoke Ball, a light blue in color. This cloud lasts for five seconds, during which the opponent, and any other foes the cloud touches, will take 2% flinchless damage per hit. The Air Potion will make the opponent far more susceptible to knockback when hit by this move, as a result of the purebred nature of the potion. While not a fun, cutesy effect like some of the other variations, this makes this move very threatening, as foes will be launched with far more force vertically, able to KO foes from 95% and beyond. While this number might not seem absurd compared to some of Sucy's other options, this combines with the increased knockback from the foe being affected by the Air Potion already, giving a solid kill potential.

Finally, being affected by a Life Potion and being struck by this move has the most potent effect, as described earlier. After being struck by the move, opponents will be frozen for a 15 frame period as red magic swirls around their body, able to be damaged but not knocked around as seen earlier. After this period the magic reenters the opponent, creating a small burst of magic that deals 5% damage to anyone around the foe. The foe will take 10% damage in addition to the initial hit of the move, and will be launched vertically with force to KO from 90% damage. A very powerful move, this depends on Sucy hitting a foe with a healing potion and then following up on it.

STANDARDS
JAB - WAVE OF A WAND
Sucy begins her jab with a simple downward swish of her wand in front of her. A quick motion, this strikes foes for 2% damage with minor stun. Ultimately a very standard move, inputting it repeatedly will allow Sucy to place a levitation spell on her wand and let it go in front of her. With each further use of this move, the wand will rotate in a a very fast circle, dealing an additional 2% to anyone struck. Every time the move is used the wand will travel farther from Sucy, leaving a trail of magic behind it. Sucy's wand can travel up to a maximum of one and a half BFP from her before reaching the cap on its distance. The trail left behind the wand deals a flinchless 2% damage to anyone in it every second. The finisher on this jab is an uppercut performed by the wand, a quick upward stab that deals a final 3% damage and weak vertical knockback. The reach on this jab is great but the farther the wand has traveled from Sucy the longer it will take to return to her, ranging from nearly instantly to 10 frames. As the wand flies straight back to Sucy, it remains a hitbox that deals 2% damage and knocks opponents towards Sucy. If Sucy is disrupted while using this move in any way, the wand will poof into nothing and reappear in Sucy's hand, eliminating the magical trail.

As par for the course, Sucy's mushrooms change how this move acts. The trail left behind the wand will match the color of the mushroom held by Sucy, indicating a change in the effect of the spell. The Tox Shroom will increase the damage of the trail, upping from 2% to 4%, though still without any flinch. The Tox Shroom also allows Sucy to use the move more rapidly, shaving a few frames off all the animations. This allows Sucy to send this out with more speed, eliminating a bit of the risk. The Air Shroom actually adds some heft to the trail, adding hitstun to the magical hitbox, giving more protection from counterattacks. The Air Shroom will also increase the general range of the attack, allowing Sucy to use this move for up two 2 BFPs.

The Life Shroom has more unique effects than the other mushrooms. The trail left behind the wand will actually heal foes at a rate of 2% per second, rather than harming them. All is not useless, however, as the foe will sustain the slight discoloration for the next five seconds as though hit by a Life Potion. This does mean the gradual healing over time, but it also gives Sucy a foothold for her potent spells that demolish opponents affected by the Life Potion. The other aspect of this mushroom is that when the wand reaches its maximum range it will double back and return to Sucy, rather than lingering at maximum range. If the wand reaches Sucy again, she can continue to use the move to send it back out, creating a never-ending oscillation.

FORWARD TILT - POINT BLANK
Sucy performs a sudden jab forward with her wand, brandishing it as a tiny sword. This initial stabbing portion deals 10% damage before any buffs, a decent chunk given the speed of the move. The tip of her wand acts as a sweetspot for this move, dealing the same damage but powerful horizontal knockback capable of KOing at 75% damage, making this a great move for ending a stock. Hits on other parts of the wand having negligible knockback. However, Sucy's small, slow stature combined with her short disjoint on her wand make this less effective than other tippers such as Marth. In addition to this stabbing maneuver, Sucy will follow up the move with a short, close range blast of magic, giving a little safety on the move. This magical burst emanates directly from the tip of Sucy's wand in a fraction of a moment after the initial stab and takes up the space of a Smart Bomb (NOT its explosion). Foes hit will take less damage, as it deals 6%, and knockback that launches foes a short distance, KOing around the 200% range. One of Sucy's most reliable and consistent moves, hitting the foe in any capacity (aside from on a counter obviously) tends to be safe, with high knockback on a sweetspot or extended hitbox following the ultra-low knockback sourspot.

While Sucy's mushrooms do not come in to play for this move aside from the buffs they provide, the opponent suffers a static effect should they be coated in any of Sucy's potions when hit by the magical burst of this move. For the first five potions, Sucy will deal a little extra damage (8%) and knockback to the opponent, allowing her to KO in the mid hundreds range. However, as mentioned the Life Potion effects are more potent, and here the foe will take an increased 10% damage and much higher knockback, allowing KOs around 90%. If Sucy can get the foe coated in her Life Potion, she can easily perform a quick KO with either portion of this move, making it a staple for her set.

UP TILT - FIREWORKS
Sucy points her wand to the sky, acting as a short range jab for a weak 4% damage should foes be within range. Following this initial point, Sucy fires a spell from her wand a little similar to her DSmash. This orb of magic produced flies up one Sucy above herself at a fast speed before erupting into a burst of energy. The initial bolt deals 11% damage with mediocre knockback, making it a decent choice earlier in a stock for close range attacks. The real power of the move comes from the explosion, roughly the range of an expanded Hothead, which hits foes for a weaker 8% damage but good knockback away from the epicenter of the explosion, allowing her to KO foes from 125%, giving Sucy some more variety for her kill moves and making a great follow up for some of her later moves such as her Back and Up Throws.

While Sucy holds one of her mushrooms, she will alter the spell a bit to make it both more fun and more powerful. Holding a Tox Shroom will have Sucy fire a purple orb of magic which will create a skull shaped explosion. The radius, while a little abnormally shaped, will also be a bit larger, making for an easier hit. The damage on the move will increase, allowing the initial orb to deal 15% damage and the explosion to deal 12%. On the other hand, the knockback on the move is decreased and only begins KOing around 140%. The Air Shroom will create a blue ball of magic which ultimately erupts into a mushroom-shaped explosion, again with a slight range increase. While the damage on the move is decreased to 8% and 6% respectively, the knockback on the move sees a drastic increase, allowing the explosion to KO from 85% on hit. Finally, a held Life Shroom will create an adorable heart-shaped explosion from a pink-red ball of magic. The damage and knockback on the initial burst of magic remains unchanged, but the explosion becomes a fast two-stage move. The first half, as the heart appears, deals the same damage and knockback as the standard form of this move, but will heal all the damage dealt to the foe back to Sucy as the foe is knocked away. Following the formation of the heart, it will crack down the middle, falling to either side a little bit as the damage and knockback see a significant increase to their max available in this move, making it highly potent. However, this no longer retains the health sapping abilities.

DOWN TILT - OVERGROW
Sucy stoops over and prods at the stage in front of her with her wand lazily in a quick and harmless motion. A few frames later an entanglement of grass and thistles grows from the ground, coming up to about half of Kirby's height. On its own, this bundle of foliage will hit foes for 7% damage. The upward growth of the plants will also launch opponents vertically with high scaling and low base knockback, starting to KO at 145% damage and above. There's a bit of ending lag as Sucy examines the growth of the plant for research, only able to act again once the plant has retreated back into the ground. This is a fairly average tilt on its own but gains its utility from the compounded effects from Sucy's alchemy.

While holding any of her mushrooms, the weeds this attack produces will be swapped out with mushrooms of the same variety. Tox Shrooms deal increased damage and knockback, upping the hit to 11% damage that can KO from 125% and above. The Air Shroom will also deal increased damage, though only boosted to 9%, and rather than increased knockback will deal some solid hitstun with minor knockback, keeping foes locked in place for another hit. Of course, the foe will be knocked out of this move eventually, preventing infinite mushrooming. With the Life Shroom, this move becomes another health-stealing move, though the move gains no damage or knockback boost. Sucy will simply recover half the damage she deals with this move, not a gameplay changer but a nice bonus.

This move has unique properties should the opponent be covered in any of Sucy's potions while she holds a mushroom in her hand. The opponent will find themselves overgrown by the mushroom of that type, a cosmetic effect which places tiny mushrooms across the body of the foe. This treats the opponent as being coated in a potion for seven seconds, though only the Tox Potion, Air Potion, and Life Potion are represented as their corresponding mushrooms are available for this move. This move is the only way to reset the timer on a potion effect, and unlike potion effects being exhausted the mushrooms will remain after being hit from moves like the Down Smash until the timer is up. While mushroomed, foes cannot be affected by a second potion effect. After the seven seconds are up, the mushrooms will fall off from the body and disappear, giving the opponent the same effect invincibility as the potions.

DASH ATTACK - LOW RIDER
Out of her dash, Sucy will perform a short leap into the air as her broomstick materializes under her. Sucy then zooms forward at an increased speed, body low to her broom, becoming a hitbox that deals 10% damage to foes. At the very beginning of the move, Sucy actually deals slightly less damage, only 8%, as her broomstick materializes. Foes are also knocked upwards with high knockback, able to KO from 130% onward. Sucy travels around one and a fourth BFP with this move, giving some fair distance. At the end of the move, Sucy hops off her broom and regains her composure as the broom vanishes, giving this move 15 frames of ending lag to be punished with.

Sucy can actually perform a 180 degree change in direction during the move should she wish by tapping the opposite direction. Sucy will spin around and lose her momentum as she faces the camera, dropping the damage done by the attack to 3% with very little knockback. During this sensitive period Sucy is vulnerable to counter attacks, but if timed properly gives Sucy an escape method should she change her mind on attack. This pivot isn't quite fast enough to catch foes off of a dodge on reaction, but a predicted dodge can give Sucy the upper hand. After pivoting, Sucy will travel a distance of one BFP before the move ends. Sucy can only pivot one time over the course of the move.

Naturally, having mushrooms equipped gives a few advantages to Sucy's moves. The Tox Shroom provides this move the most obvious buffs; while equipped Sucy will fly farther and hit harder, making this the obvious offensive option. As for the specifics, Sucy will now fly a distance of one and three fourths BFP before ending the move, a nearly 50% increase in range. On the turnaround, Sucy will continue flying one and a fourth BFP in the opposite direction, a smaller buff on her backpedaling range but still an increase.

With the Air Shroom equipped, this move gets a little funky. In addition to the knockback increase from the mushroom, Sucy will gain vertical range, beginning to fly upwards over the course of the move on an exponential path. The distance Sucy travels remains the same, but the path bends upwards and lifts Sucy into the air. At the end of the range, Sucy will be nearly twice her height off the ground, after which her broom will vanish and drop Sucy down to the stage not in helpless. If Sucy reverses direction while in the air, she will perform a spin around at a slightly increased speed and fly back her path with additional range on the return trip rather than less, taking her a fourth of a BFP further. This can be nice for knocking foes up into the air, though followups are tricky to achieve with this, or for smacking a vertical opponent with high knockback.

The Life Shroom has the most familiar effect of all the mushrooms, replicating the armored buff from Broomstick. Obviously armor on attacks is objectively a positive buff, but here Sucy can effectively hit and run, as this eliminates the risk in performing a 180 against opponents. Additionally, Sucy now has the ability to continue pivoting, losing a fourth of a BFP each time she does so. After the range is depleted, Sucy will be forced to dismount. While Sucy enjoys having a sustainable move with armor, she can accrue plenty of damage if she relies on this for too long.

AERIALS
NEUTRAL AERIAL - MAGICAL BAT
Sucy holds her wand to her side as though preparing to hit a baseball with a bat. As she swings her wand in front of her, a magic-based bat of energy will extend from her wand, giving the move Marth's Falchion range. The move is quick, though Sucy wants a little range from the foe as her wand acts as a sour spot that only deals 5% damage with minor knockback. The bat itself will deal 9% damage with great horizontal knockback, allowing KOs from 135% and above. Sucy shakes her wand once to clear the bat from it, giving a chunk of ending lag on which she can be punished. Like similar bat moves, Sucy can actually reflect projectiles with this, a useful move in air fights given the high number of BAir projectiles in MYM. Once again, Sucy can replace her wand with one of her mushrooms when she holds them, giving more power, range, etc. The mushrooms are fairly simple in this instance; all three give the same shape and size mushroom, the same length as the original bat but with a cap that gives greater vertical range on the move. The Tox Shroom will deal increased damage but lesser knockback, allowing Sucy to dole out 14% on a hit but only KOing around 155% (still not shabby!). The Air Shroom acts the opposite, only dealing 7% damage but enough knockback to KO from 90% damage, another of Sucy's great kill moves. Finally, the Life Shroom has a slight buff to both damage and knockback, dealing 11% with the force to KO at 120%, but will also provide armor throughout all of the attack, giving her a powerful and safe aerial.

FORWARD AERIAL - BOTTLE ROCKET
In a nearly lagless motion, Sucy brings her wand up with both hands, preparing a quick spell that takes a further 10 frames to fire. Once fired, a luminous white orb, a little larger than a Pokeball, will be emitted and fired from the tip of the wand. Traveling at a pace and trajectory similar to the Luigi's Fireball, though begins to dip towards the end of its trail downward. With an effective range of one BFP, this is a relatively short-range projectile, and upon hit with an opponent will dole out a mediocre 6% damage with some minor knockback. However, at the end of the move this magic orb will 'detonate', creating a slightly larger burst of energy which deals 9% damage and stronger knockback, capable of KOing from 155%. While not truly unsafe, Sucy benefits from proper distancing from the opponent to hit the spell's sweetspot.

Given the bottle-themed name of this move, this aerial naturally benefits from Sucy holding a potion when used. With no additional startup, Sucy slaps her potion onto the tip of her wand and fires the potion forward as though it were the spell from the normal version of the move. The range on this is the same as the default version, so Sucy may want to mix it up by throwing the potion in the air rather than using this move, exchanging the damage for a greater range. Once at the end of its flight, the potion will explode in a small explosion which varies based on the potion used, giving a few tactical options to choose from. The potions will soak opponents hit in the respective color regardless if the bottle or the explosion hits, but the secondary effects are exclusive to the explosion portion of the attack. Given that this uses up whichever potion Sucy has, good distance from the opponent

The Toxic Potion has the most standard of all the effects, exploding into a cloud of purple liquid with about the same range as the normal variation of the move. The cloud deals more damage as expected, a total of 8% when the bottle is flying and the explosion dealing 13% damage, decent for a fairly safe aerial. The knockback is unchanged however. With the Poison Potion, there's actually a slight damage decrease, dealing 5% on the bottle hit. The explosion at the end consists of three blobs of green potion, each slightly smaller than a gooey bomb, which perform a short arc upwards and drop infinitely downwards in a semi-random pattern. Opponents hit by a blob will take 5% damage and a small bit of knockback. If hit by all three, opponents will take 15% damage, but the timer on the poison effect will not be added onto, and for this to occur opponents typically must be right at the potion when it detonates.

A Petrifying Potion will deal increased knockback on the first half of the move, a significant increase which allows KOs starting from 115% damage. The actual explosion of the move will produce a burst of gravel, similar to Charizard's Rock Smash but in greater number, with each rock dealing 6% damage and decent, though not killing, knockback. At lower percentages it's easy for foes to be battered around by multiple rocks, but tend to be pushed out quickly at higher percentages making this variant more useful early on in a foe's stock. The rocks vanish fairly quickly, only traveling out half a BFP in any direction. With an Air Potion, the knockback on both parts of the move is increased, and the explosion is identical to that of the Toxic Potion's. The bottle portion can begin KOing from 125%, while the explosion itself can actually KO as early as 85%, making it a very potent hit when landed.

The Cloud Potion, as its name might suggest, will create a cloud as it explodes. The bottle's damage and knockback are unchanged, but the 'explosion' loses its explosive nature, dealing no knockback to opponents. Instead, the potion will leave a lingering cloud of magic for three seconds, dealing 7% damage every 20 frames an opponent touches the cloud. As an aerial, Sucy may find it difficult to manipulate the opponent to stay in the cloud, but the damage can rack up quickly if she can. Finally, the Life Potion will have a few weird changes as customary for this wild card potion. First off, the damage on the move is unchanged, but the bottle portion has a life stealing effect as seen in other moves. Secondly, the opponent is not thrown away from the knockback on the explosion, but is rather pulled into the center if hit and held there for a few frames. This is not a proper stun but gives just enough time for Sucy to follow up, though the foe is free to act during this time.

UP AERIAL - CONDENSE
Sucy points her wand into the air and produces an array of magical bolts above her. The bolts are small and create a regular two by two array of magic. The bolts deal virtually no knockback and hit foes for a piddling 3% on hit, making this an incredibly weak move to start with. The array will rotate fully over the course of the next 15 frames (Sucy is free to move and act after summoning the bolts) and will move towards their central point as they do so. Once the bolts connect, they will create a burst of magic which deals superior damage (12%) and knockback which can KO from 135% damage. While fairly potent, the positioning and timing on this move is tricky, and should Sucy hold one of her potions she gains a more consistently useful move to use as she tosses the potion a very short distance above her, the same as the standard variation of this move. The vial shatters, and what happens after depends on the potion used. All the potions with the exception of the Life Potion act as they do in the above FAir; the Life Potion will instead give a weak spike down instead of the inward gravity, sending the foe below Sucy and allowing her follow ups with moves like her DAir.

BACK AERIAL - AGITATE
Sucy performs a rapid spin in a circle in midair, launching a small bolt of magic behind her while she does so. This spell is small and doesn't travel far, only going the range of Marth's Falchion, but travels very fast, making it hard for opponents to react to. Opponents hit by the bolt will take 10% damage and take alright knockback, with KOs starting from 130% damage. Given the speed of this move and the fact that neither Sucy's mushrooms or held potions change it, this is a great move to fire off often as there are few downsides. On top of that, this move has bonus effects on opponents should they be under the influence of her potions, as will be detailed. The Toxic Potion has a familiar effect in the linear increase in damage it sees in exchange for a bit of knockback. In a burst of purple energy, the foe will take 15% damage with backwards knockback to KO from 145%. The Air Potion has the same inverse as it always has, and the foe will take 8% damage and high knockback capable of KOs from 85%. The Life Potion takes the best of both worlds, dealing both the massive 15% damage and the ability to KO from 85%, making it a devastating move to land on the foe.

The Poison Potion and the Cloud Potion will deal the standard damage and knockback for this move, adding in their opposite effects as well. The Poison Potion will increase opponent fall speed by a scale of 25% until they land again, making this a good gimping tool if Sucy can land it, while the Cloud Potion will decrease fall speed by 25% until the opponent lands, giving Sucy opportunities for aerial combos. Finally, the Petrifying Potion will, as with the DSmash, turn the foe into stone for a brief period of time. The foe takes normal damage but no knockback, instead being forced into their own unique stall-and-fall that travels half the distance of Sheik's DAir. With great positioning, Sucy can force KOs on offstage opponents, and the foe will actually serve as a hitbox against other opponents while stoned. This will deal 6% damage to any other foe and strong knockback that can KO from 140% damage. This is unaffected by Sucy's Tox and Air Shroom buffs. Due to the potion timer, this can be tricky for Sucy to land in time, and is actually best used after her BThrow to maximize the chance of pulling the move successfully.

DOWN AERIAL - TOADSTOOL
Sucy performs a midair squat to set up this move, taking very little time, before slamming both her feet down and stretching her body, something akin to an imitation of a frog leaping from a lily pad. Sucy drops in the air a small bit, giving her some 'aim' on this aerial. One of Sucy's hardest to hit moves, should she tread on a foe despite their protest to such an act she will deal a decent 9% damage and send them careening downward as she meteor smashes them. The recovery is a little long given the move itself as she returns to her normal position 18 frames following the start of the move. While a potent gimping move, it requires Knee Smash levels of precision without the sourspot hit or the forward momentum, and as the name suggests mushrooms can help make these problems go away (much like real life).

While holding a Tox Shroom, Sucy will point the mushroom under her, which magically expands to create a platform she stands upon briefly about a crate wide. The startup and ending for this (and the other mushrooms) takes a slight hit in exchange for more versatility. Sucy loses the sweetspot on this move in exchange for a wider range and a slight increase in power, dealing 12% damage with downward knockback. Other aspects of this move, including her momentum in the air, remain unchanged. While holding an Air Shroom, Sucy will perform the same animation as above as the mushroom expands length wise, creating a long, thin stem capped with a small shroom. The mushroom reaches about a Beam Sword under Sucy, giving extended range. The move is split into two hitboxes, the stem sourspot and the cap sweetspot. The stem deals a weak 5% damage with minor knockback, while the cap acts in the same way as the original move's sweetspot, giving her more versatility and range on the meteor smash in exchange for increased lag. Finally, the Life Shroom will create a mushroom platform under Sucy in the same way the Tox Shroom does, which performs a classic stall-and-fall amplified by armor from the Life Shroom. Hit foes will take 10% damage and decent knockback away from Sucy, capable of killing from 155%.

GRAB GAME
Sucy performs a fairly standard grab for a magically inclined character, swishing her wand to cast a binding spell which holds opponents in place. The range is above average for a grab, but comes at the cost of an extended grab recovery on miss. While held, Sucy can choose to pummel the opponent as most fighters can, and she will quickly rotate the foe around in the air, battering them for 2% each hit, which is affected by the effects of the Tox Potion. Different mushrooms also play a role in the pummel, allowing Sucy some flexibility. The Tox Shroom will perform its normal function, adding 1% damage to each of Sucy's pummels, the Air Shroom will cause Sucy to lift her foes into the as she pummels them, giving a different, sometimes better vantage point for her throws, and the Life Shroom, undoubtedly the most useful in this instance, will heal Sucy for the same amount as she deals with her pummels.

FORWARD THROW - SPORE MAGIC
Sucy rotates her want around in rapid circles while the opponent is held captive by magic. Above them, several magical spores appear from the ether, glittering with energy. The spores descend onto the opponent, dealing steady damage over the course of a second which adds up to 7% total. Following the foe being spored, Sucy will flick her wand to launch the opponent away from her, dealing an extra 3% damage and popping the foe into a parabola unlikely to KO until very high percentages. Sucy can act very quickly following the throw, giving her some follow up options. Like many of her moves, mushrooms once again change how this move functions a bit. However, this is reliant on the opponent having mushrooms, as depicted in the DTilt, making these effects more work to get.

If the opponent has mushrooms over their body, they will suffer additional effects which will overwrite the previous ones for an additional three seconds. If covered in Tox Shrooms, the foe will suffer from a toxin in their system, dealing out DoT. The foe will take non-flinching hits of 2% damage every 30 frames, doling out a total of 12% when all is said. With Air Shrooms, the foes will find themselves sluggish as they are slowed down in a manner similar to a Timer. This gives Sucy an edge to predict and react to the opponent's moves, but the effect will only last the three seconds, and the speed decrease can be underwhelming compared to other slowdowns in Smash. Finally, the Life Shroom performs the health stealing that should be expected, dealing 1% damage every 30 frames and healing Sucy for 2% each time, allowing her to simultaneously deal 6% and heal 12% over the course of the effect. Unlike most of her health stealing moves, the foe is fully capable of moving and attacking Sucy as their health is sapped, acting more of a damage block rather than a full on heal.

UP THROW - LEVITATION
No magical set could be complete without a generic levitating throw, and Sucy isn't here to disappoint (or she is, she really doesn't care). One of the most straightforward moves in Sucy's kit, she bounces the opponent once against the ground, doing an initial 3% damage before launching them up into the air with an added 5% damage. The foe takes vertical knockback, though Sucy can DI it a bit to manipulate the foe to make it a little easier to hit with a move like her UTilt. The actual knockback on the move is middling; KO's only begin around the mid hundreds, keeping the foe in the same general area when the move is used throughout the fight. If holding a Tox Shroom while performing this throw, Sucy will exchange the knockback on this move for power, as she will slam the foe three times against the floor for 2% damage a hit, giving a total of 11% damage. However, the knockback only KOs up and around 200%. The Air Shroom, conversely, will lower the damage dealt while increasing the knockback. Sucy will skip the slam against the ground, using all of her power to launch to opponent up into the air with force to KO from 105% damage, making this another viable kill move. Finally, the Life Shroom provides Sucy with far greater DI when launching the foe, giving her 180 degree choice which can give her incredible positioning power.

BACK THROW - TELEPORTATION
Sucy spins the opponent through her magic before launching them ahead of her. Strange, given this is her back throw, but it becomes clear how as the opponent vanishes in a poof of smoke. Immediately they reappear behind Sucy in a similar cloud as they launch with high horizontal knockback. Any third-party foe (sorry Sonic and co.) hit by either cloud will take a weak hit of 6% damage as they are knocked slightly away. The targeted foe will take 7% damage as they travel from one cloud to another, and will start being killed at percentages around 110% and beyond. Given Sucy's weakness to pressure, this higher knockback, while near impossible to follow up on aside from a potion, allows her to get her shop set back up. Of course, it can also be used for simple killing as well!

If Sucy has her Cauldron out (which most likely she will at all times), the forward input can be used while Sucy spins the opponent to have her change the location of the teleport. As the prerequisite might suggest, the foe will launch straight out of Sucy's cauldron, taking slightly more damage at 9%. Visually, this is similar to fighters flying out of Cook Kirby's pot from Brawl, but vertical. The knockback on the throw is significantly dropped, however, starting to KO at 175%. Depending on the positioning, Sucy can use this to send the opponent miles away, giving her breathing and preparation room. On the flipside, Sucy can send the opponent into the cauldron right at her feet, giving her the opportunity for free followups. On well positioned maps, Sucy can even find platforms to stand on above her cauldron, allowing her to smack a foe with an uncharged Smash or Tilt as the opponent flies from the cauldron. If the cauldron currently contains a potion, again a likely scenario, the foe will find themselves coated in that potion as per the normal rules.

DOWNTHROW - EXTRACTION
Sucy drops the opponent prone onto the stage in front of her as she points her wand directly down at them. The foe is surrounded by a magical energy as they take a couple of hits, totaling to three hits of 3% damage each before any damage manipulation. After this particular spell has been cast, Sucy launches a blast of magical energy downward for another hit of 3% damage and knockback that bounces the foe off the stage into the air, typically above Sucy. Should Sucy be holding a potion, she will hold the opponent on the ground with her spell and pour the potion over them, dealing an additional 1% per hit except for the final blast, as well as coating them in the potion effect.

If Sucy is not holding a potion, however, and the foe is affected by a statistical buff / debuff, a glass vial will form in her hands through magic and begin to fill up over the course of the throw. Additionally, the first three hits of the move will deal an extra 2% damage per hit. Sucy is extracting the modifications from the opponent directly and concentrating them into her own potion, which can be thrown at the opponent or herself. Foes will receive both buffs and debuffs in this way, as will Sucy, so caution should be used with the potions she creates this way. Within Sucy's own kit, this is a good way to reuse powerful potions like the Toxic Potion or Air Potion, or to remove an accidental healing buff from the Life Potion. However, possibilities are endless with other fighter kits involved, giving Sucy access to some strong buffs. This being said, Sucy has no way to remove debuffs placed on her, meaning she should not use this move haphazardly. Potions created this way, unless they are strictly from Sucy's kit, don't have special unique effects for moves like DTilt or FAir, though they can be used with generic damage effects and stat changes.

FINAL SMASH
TRANSMOGRIFICATION


Sucy begins laughing maniacally like any proper witch has practiced to a T as a unique cauldron poofs in front of her. This will stop Sucy's fall in midair when used, though can't be effectively used as a recovery (I mean it's just a Final Smash so maybe don't use them as recoveries anyways). Sucy lifts up a particularly toxic looking mushroom in one hand and a small brownie in the other (the household fairy, not the delicious baked good). Tossing them in, she says in a nonchalant voice contrasting her laugh 'Hope this works...' A moment later, the cauldron and Sucy are enveloped in a large cloud of magical energy as the cauldron disappears. In its place is a mushroom monster, as tall as Giga Bowser but not as long. Sucy can be seen stuck in the cap of the mushroom monster, where she laughs sinisterly for the duration of the transformation.

The mushroom monster is incredibly slow and attacks against it will not damage Sucy since they are not one and the same. Foes above the monster can hit Sucy with moves to damage her, but she will obviously not take any knockback. The mushroom has two moves, the first of which is a standard and an overhead swipe with both claws. This reaches in an arc with a range of a BFP and will deal 15% damage and high knockback, KOing from 65% damage. The special input will have the monster bend down and breath a wide breath of spores ahead of it, dealing 10% damage every 20 frames opponents make contact with it, atop a bit of hitstun. The breath reaches half the distance of Final Destination, and due to a lack of needing balance for Final Smashes, will not decrease in range. The incredibly slow nature of the monster means it cannot pursue foes across the stage, so the breath is its only way to deal with distant enemies. After 8 seconds elapse, the mushroom monster will vanish in a puff of spores and leave Sucy back into the fight.

FLAVOR

ENTRANCE - Sucy flies onto the stage on her broomstick and jumps off. The broomstick flies back off screen of its own volition while Sucy looks entirely unenthused about the battle.​
BOXING RING TITLE - Luna Nova's Mushroom Fanatic
UP TAUNT - Sucy sighs deeply as she closes her eyes and shrugs, remarking 'it's pointless...'
SIDE TAUNT - Sucy gives a sadistic grin as she pulls out her wand, asking the foe 'do you want to be my guinea pig?'
DOWN TAUNT - Sucy pulls out a mushroom from her robe if she is not carrying one and brings it close to her face as she sniffs it. She quickly puts the mushroom back away to rejoin the fight. If holding a mushroom, Sucy will perform the same action but with the mushroom she is holding and will not put it back away afterwards.
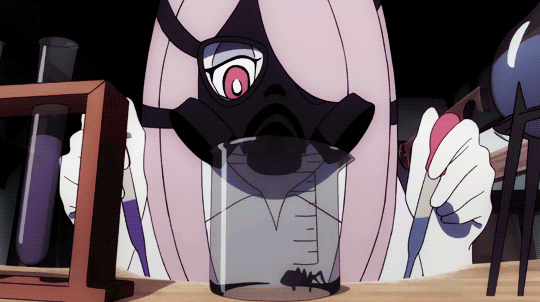
VICTORY POSE A - Sucy is seen mixing different chemicals in a test tube while wearing a gas mask. An explosion fills the screen and shows Sucy with cartoonish char across her face and hair.
VICTORY POSE B - Sucy is seen sleeping in her bed, the camera panning out to reveal her bed surrounded by a sea of mushrooms.
VICTORY POSE C - This.
VICTORY THEME - 0:09 - 0:18 of Chariot's Theme.
 

MasterWarlord

Smash Champion
Joined
Aug 24, 2008
Messages
2,902
Location
Not wasting countless hours on a 10 man community
NECRID


Necrid is a random guest character for Soul Calibur 2 and contrary to popular belief, can be argued as the most well known character made by Todd McFarlane. McFarlane was offered the chance to create an entirely unique character for the franchise, and what we got was Necrid. Understandbly upset with the crappy character created for them, Namco asked for the rights to Spawn as an additional guest character. Namco split up the three guest characters besides Necrid between the three console versions, Link for Gamecube, Spawn for Xbox, and they used their own character, Heihachi from Tekken, for the PS2 version so it wouldn't be left out either. Necrid was a very lazy addition and an original character, so he was included in all versions since he so obviously wasn't a selling point. Meanwhile, the character Todd McFarlane actually needed to promote, Spawn, was stuck to the console nobody wanted the game for and sold the most poorly of all three versions. People spoke loud and clear that they preferred Link over Spawn.

As for Necrid's actual character, he was a generic warrior who happened to find Soul Edge, an all powerful sentient sword that regularly takes the form of Nightmare/Inferno/Charade/etc. Nothing is known about Necrid up to this point, but Soul Edge corrupted him into a monster incapable of speech or rational thought, which is his current playable design. His voice clips are unintelligble gibberish that are made by playing Mitsurugi's voice clips backwards and pitched down heavily. All he knows is that he wants shards of Soul Edge to stop his "pain." His brilliant and highly villianous plot of trying to find the missing shards is to attack all random travelers he sees, hoping they just happen to have some.

His power is the ability to generate an energy version of any weapon he can think of, as if he had a Green Lantern ring or something, during which stock Star Wars Light Saber sound effects play. This means that in his moveset, he forms energy weapons of various other characters in the cast and directly steals their moves, primarily Astaroth and Cervantes. He is not a "random button" character like Charade, but instead is just a random mishmash of various moves already in the game with a very small handful of his own unique moves. He also has a unique equippable "weapon" that enables him to copy all statistical aspects of the opponent's weapon.

While his backstory is hilariously underelaborated, the fact Soul Edge itself is a shapeshifting sword that can turn into any weapon, Necrid hungers for Soul Edge shards, and that Necrid was turned into this monster directly by Soul Edge indicates that he is another monster with at least a handful of Soul Edge shards in his body, similar to Charade as yet another servant/piece of Soul Edge. Given he doesn't show up after Soul Calibur 2, it's more likely than not he was killed and/or absorbed by Nightmare. The presumed issue with Necrid being cut from future titles is that he is a guest character who's legal rights are disputed, but Todd McFarlane approved his and Spawn's return in the remastered edition of the game in 2013. It's obvious Namco had no desire to bring back this generic filler character that padded the roster of the console version.

STATISTICS
Size: 9.5
Weight: 9
Falling Speed: 8
Aerial Speed: 7
Jumps: 5
Aerial Control: 3
Ground Movement: 1.5
Traction: 0.5

Necrid is a typical slow heavyweight. While his air speed is actually decent, his high falling speed, poor jumps, and bad air control make it difficult to use. As far as movement, more notable is Necrid's low traction due to his clumsiness, lower than even Luigi's. While his terrible ground movement means he won't slide ridiculous distances, this still enables him to do long distance c sticked usmashes, grabs, and pivots.

Necrid has a similar mechanic to the Koopalings where attacks that hit most of his body only deal 0.88x the regular damage. These attacks still deal full knockback, though the lower damage will reduce the knockback taken by a miniscule amount. The exception is attacks that hit Necrid's giant glowing red core in the middle of his body, the source of the Soul Edge shards within his body. Attacks that hit his core deal 1.25x damage, which is a pretty big step-up from the 1.15x damage that attacks that hit the Koopalings' main body do. The advantage Necrid has is that his core is a fairly specific target that can't be hit from behind, rather than the entire upper half of his hurtbox.

SPECIALS

NEUTRAL SPECIAL - CHAOS

The fiery core in Necrid's chest forms into the eye of Soul Edge and blinks. After completing the blink over just 9 frames, any attack that takes place within a platform of Necrid and isn't behind him will be committed to memory by Soul Edge. If Necrid's core is hit during the attack, he takes double damage from the attack in question and will fail to copy it (Not stacking with his mechanic). Even though the move is over after a mere 16 frames, it's not without risk. Soul Edge must observe the attack when a hitbox is present in it, though if the attack doesn't have a hitbox observing any portion of it will do.

If Necrid is grabbed during this move, this will not count as hitting the core. If Necrid has already copied the enemy's grab successfully when this occurs, the eye will stay open and copy the next pummel/throw the foe does he doesn't already have, with the eye closing again after successfully copying a move or getting grab released/thrown. Some foes may be incentivized to use worse throws than their usual ones in this scenario, though if their pummel is nothing special they can give that to Necrid instead. In any case, this means it is possible for Necrid to copy full grab-games in a 1v1 context since he wouldn't be able to observe them otherwise.

Once an attack has successfully been copied, Necrid can use the copied move by double tapping the input. This will cause a green transparent energy hologram of the hitbox/construct/whatever to be formed to perform the move. The hologram will not form the entire enemy character, but instead only the parts of the move necessary for the hitbox, so only the character's arm in the case of a punch. If the attack uses a weapon of some sort or the copied character has a similar build to Necrid, he will form the weapon and/or do the attack himself directly instead of relying on Soul Edge to do it, though green energy will form on him regardless. Necrid can only copy one move of each input at a time, overwriting the previous move if he copies it again.

While the risk of Necrid taking double damage is bad, the move is so fast that copying a handful of moves to aid him shouldn't be too difficult. The real catch is that every time Necrid uses a copied move, he takes damage from making use of Soul Edge. The first time he uses a certain copied move, he will take 1.5%, then each subsequent use of that specific move he will take 1.5% more damage than he took the last time (The first use of a stolen move deals 1.5% to Necrid, the second 3%, the third 4.5%). This caps at Necrid taking 6% per use of the move, though it mercifully won't deal self damage to Necrid unless he actually passes the starting lag of the attack.

DOWN SPECIAL - SOUL CHARGE

Necrid's core glows as green energy is absorbed into his body all around him over a period of 20 frames. During the 20 frames, Necrid can input any other move he likes in order to improve it, whether or not it is copied. He can input jump + a direction for aerials and Z + a direction for throws, though can't upgrade pummels. If the move was one of his regular inputs from his personal moveset, improving it will cause him to take self damage every time he uses it like it was a copied move. All of his moves improve in various unique ways.

Improving a copied move or a regular move that has gone through its primary improvement already will improve it in the primary way everybody wants copied moves improved these days - it makes it faster. The starting lag will be cut by 5 frames for each use, down to a minimum of making moves come out in a single frame! Ending lag and duration cannot be improved. Unsurprisingly, this means Necrid has a lot of moves with bad ending lag/long duration. In order to abuse this mechanic properly, Necrid will need to find something ideal to improve from the opponent. Necrid cannot make charge times for moves like Samus' Neutral Special or smash attacks instant, only the starting lag of performing the attacks themselves.

Necrid has to suffer more than just 20 frames of lag to upgrade his moves. Upgrading a copied move with Soul Charge will cause the self damage Necrid takes when he uses it to increase by one "stack." If the move is already maxxed out at dealing 6% to Necrid every time he uses it, then instead of increasing in stacks this will deal 1% to Necrid on the spot as he uses Down Special. Generally, this only comes up if trying to greatly reduce the starting lag of a very laggy move that should be very broken with no starting lag, as the first few uses should be enough for most moves.

Improving Neutral Special will cause Necrid to be able to assign copied inputs to whatever double input he sees fit. Rather than the inputs going onto the original ones they had on the character they were copied from, they will automatically be assigned to whatever double input Necrid makes next. Grounded inputs must remain grounded inputs and aerial inputs must remain aerial inputs. Pummels and throws must stay under the same inputs though you can at least rearrange which throw is which direction. It is possible for Necrid to copy multiple grabs, and once he has grabbed someone with either his normal grab or any of his copied grabs he will have access to his regular throws and his copied throws. Mirrored inputs normally take up all inputs they cover, though with this improvement they only take up a single chosen input. While Necrid cannot normally copy custom inputs like Special Smashes and such, this improvement will also let him reassign the moves to inputs he can actually use.

SIDE SPECIAL - VOID CANNON

Necrid's core turns red hot as he raises his hands straight up into the air. Some weak embers form 1.2 platforms in front of Necrid during the starting lag of the attack. After it finishes, it turns into a pillar of flame slightly larger than Ness' Side Special that deals a single powerful hit of 18% and vertical knockback that kills at 105%. The move has large starting lag, but Necrid can hold left or right during the starting lag to move the embers up to 1.2 platforms in those directions, enabling the attack to have potentially good range or for Necrid to use it as an attack closer to himself. The attack's hitbox is significantly smaller than the flame pillar, though the fact you can horizontally redirect the hitbox anyway means it doesn't matter too much. While slow, this attack has the bonus of ignoring enemy shields, hitting through them even if the enemy perfect shielded the attack.

Improving this attack once gives Necrid the ability to charge himself with flames by hitting himself with the attack. This will cause whatever attack Necrid performs next to have the ability to ignore shields like this attack does (which all fire based attacks do in Soul Calibur). If Necrid performs a grab/throw or some other move that already ignores shields, it will not use the fire buff gained from this move. Using the fire to power up Necrid still performs the normal attack and increases the range of the hitbox to his entire body, making this fairly safe to set-up on demand. Just keep in mind that because you upgraded the attack you'll be taking some self-damage to use it.

This is an obvious move to try to speed up with all of the lag on it located at the front. The catch is that less starting lag means less time for Necrid to be able to move around the flames before they erupt into the pillar, meaning Necrid can't buff himself or be specific with where he's aiming. Necrid can potentially have a very powerful nuke button in a very specific hitbox that spawns 1.2 platforms away from him when the attack is reduced all the way down to 1 frame of lag. If Necrid is willing to tolerate slightly more lag, he can have a still very fast move but with a less precise hitbox that can be used to heavily punish rolls.

UP SPECIAL - STUPID FLAILING/SOUL FLIGHT

Necrid flails his arms frantically into the air as crying out in gibberish. His arms form a multihit hitbox above himself that deal 5 hits of 4%, with the last one knocking foes away with surprising power, KOing at 130%. Over the brief duration of the move, Necrid rises into the air the distance of Little Mac's recovery and enters helpless afterwards.

If the move is improved by soul charge, it changes almost entirely as Necrid turns to face the ground below him before Soul Edge shoots out a beam of fire to propel himself into the air. The beam travels down 1.25 platforms before vanishing, though it only deals 5 hits of 1% and flinching per second. Necrid's main body is a hitbox that deals 8% and radial knockback that KOs at 160% as going up. Necrid can charge the move like Diddy Kong's recovery, and goes up a comparable distance based off how long he charged. The catch is Necrid takes 3-13% damage based off how long he charged the attack, so be sure to not charge the move any more than you need to go. Necrid enters helpless from this, so considering the self damage it's still a pretty lackluster recovery. This attack ignores shields, meaning Necrid can at least recover without wasting an upgraded Side Special charge if he also upgrades his recovery.

The regular version of the attack, for how terrible it is as a recovery, is very fast as an attack and makes for surprisingly good combo fodder without improving it in any way. Going into helpless means Necrid will only want to use it out of a combo when he knows it can hit, and it can potentially net him a stupid 20% out of a casual up throw at low percentages. The risk for Necrid is allowing himself to be more vulnerable to getting gimped during this time. While Necrid has other options for simple combos like this at low percents, they require set-up time with Down Special or simply aren't as strong. This one is ready for Necrid right out of the box if willing to cope with the crap recovery.

Considering even the upgraded recovery is mediocre and can't be sped up due to most of the move's lag being charge time rather than starting lag, Necrid really prefers to get a recovery from the enemy if they have a remotely decent one available. This also means Necrid can keep up his original recovery for comboing purposes and potentially even as a finishing move. Up Special is one of the most direct inputs you can force the foe to do so you can observe it by simply knocking them off stage. If the foe's recovery ends up getting used a lot to the point it's starting to really hurt Necrid, he can consider upgrading his Up Special recovery at a later time.

GRAB-GAME

GRAB - LURCH

Necrid has a terrible grab with poor range and just barely average speed despite his gigantic mutated arms. Ideally in order to make use of his very powerful pummel and throws, Necrid would like to steal the enemy's grab. In the least, his weird traction gives Necrid a good pivot grab, which can be used to surprise the enemy when running away in a cowardly fashion and it looks like you're just going to attempt set up with Down Special. Necrid's traction also means he slides a decent distance after grabbing his enemies similar to Captain Falcon despite having poor ground speed.

Upgrading the grab has Necrid form Ivy's whip to use as a tether, which gives him actual range since it's a tether but horrible ending lag as you'd expect, and the start lag isn't even that good either. If you're upgrading the grab at all, though, you may as well go the whole way and at least make it start fast. Necrid unfortunately does not get a zair tether recovery out of this, though.

PUMMEL - SMACK

Necrid does a slow pummel as he punches the foe in the face for 4%. Pummels are the one input Necrid arbitrarily can't speed up to make more powerful, so this pummel is going to stay slow. If Necrid manages to copy a faster pummel, he can alternate it with the slow strong pummel to maximize the damage he can do before the foe escapes from the grab.

Pummels are a common candidate to use to refresh stale moves, though Necrid's pummel isn't going to be very helpful in that regard at all due to it being slow. However, the more moves Necrid has, the less likely the mechanic is to have any effect on him given he will have such a large variety of attacks at his disposal.

DOWN THROW - SOUL STEAL

Necrid plunges his arm into the foe's chest as it glows green, clipping through it. He then forcefully rips his arm out of the foe's body as a small explosion occurs, dealing 8% and rather generic diagonal knockback that KOs at 165%. While the knockback has a low base, the throw has too much ending lag to ever combo off of. When Necrid rips his hand out of the foe, green energy will be in his hand, a portion of the foe's soul, which he will then consume as his core flares up briefly, healing him of 5% for a net gain total of 13%.

There is more potential healing to be gained from this throw than just a mere 5%. All of Necrid's moves that damage himself from Neutral Special and Down Special will go down a single stack when dthrow is used, effectively "healing" himself of 1.5% per move in advance. If Necrid has put a lot of stacks into a single move this won't be especially helpful, but the effects are very noticable with a large collection of upgraded and/or copied moves.

Upgrading the move doesn't seem to do much of anything, but at least Necrid doesn't take self damage from upgrading it. What happens here is however much damage Necrid would normally take from using an upgraded dthrow will instead be healed from him, though it doesn't stack with the normal healing of 5% this move does. In addition, because this move removes a stack from all moves, this removes a "stack" from itself, so Necrid can't use dthrow over and over to rack up higher healing. Instead, he'll have to upgrade dthrow several times to potentially get some high end healing.

FORWARD THROW - NEW HOST

Necrid bear hugs the foe as he holds them up against his core, causing some shards of Soul Edge to embed themself into the foe. A small burst from Necrid's core occurs after this is complete, knocking the foe away from Necrid as they slide along the ground with weak knockback that kills at 220%. For the next 10 seconds, any move a foe uses twice will cause them to take 1.5% on the second use but have its starting lag reduced by 5 frames. Each use after that one will have them take 1.5% more than the previous use with 5 more frames of removed starting lag. When the 10 seconds are up, Soul Edge leaves their body and everything returns to normal, so foes don't have much time to take advantage of this effect.

If Necrid successfully copies any sped up moves, they will be added to his arsenal and be sped up a proportionate amount to how many times the foe used them without Necrid having to bother with using Down Special to do so. Necrid cannot normally combine the foe's stacks with his own stacks, normally taking whichever one is higher, but if Necrid upgrades the fthrow this becomes possible. Be careful, though, in that Necrid can still add stacks to a move even if it's already at 1 frame of starting lag, which does nothing but make him take more self damage upon using it.

If Necrid performs dthrow on the foe before the status effect expires, he will reconsume the shards and heal himself equal to an amount of damage the foe took from performing attacks. This will cure the foe of the status effect early, though, so try to use it right before it's going to expire. Of course, with Necrid's crappy grab, getting 2 throws in 10 seconds is not easy.

This throw's ending lag is pretty generous. The base knockback sends the foe about a platform in front of Necrid so he can't punish them most of the time, but if he happens to have a sped up Side Special it works great at low percents.

BACK THROW - SADISTIC CROSS

Necrid steals one of Cervantes' signature throws as he forms his two swords. He proceeds to impale them into the foe's torso one at a time, dealing 3% with each of them. Necrid grabs the hilts of these two swords and swings the foe around by them before releasing the foe behind himself, dealing a final 4% and knockback that kills at 160%.

The pair of swords remain impaled in the foe's body for 8 seconds after the throw is complete. Each second, the foe will take 0.5%, making them take another 4% over these 8 seconds that makes the throw's total damage be 14%. After the 8 seconds, the swords phase out of existence harmlessly, but if Necrid uses any attack that specifically uses Cervantes' swords, they will explode because Necrid has to use that energy to reform them in front of himself as weapons, requiring the foe to dodge/shield the hitbox on their person.

If the attack used both of Cervantes' swords, both of the swords will explode, dealing 13% and knockback that kills at 120%. If the attack only used one of the swords, the foe will take 5% and knockback that kills at 200%. These explosions have high enough base knockback to not make comboing with them super easy by themselves, but what makes it so amazing is that the explosions don't occur until the starting lag of Necrid's attack has already passed. If Necrid uses an aerial Cervantes sword attack while standing above the foe and they get hit by the explosion, they can get knocked up into his aerial that was otherwise aimed at absolutely nothing.

Upgrading this attack causes it to kill slightly earlier at 140%, which may not seem like much, but this is Necrid's primary killing throw given competent foes will always tech the uthrow when it would actually kill them, and it's the best he's getting without copying a foe's KO throw and living to tell the tale about it. If you want something better, steal it from the foe. The damage the foe takes from the energy swords being impaled in their bodies increases to 1.2% a second, giving more incentive to delay the explosions of the swords until the last second to maximize damage, though making them more predictable.

UP THROW - STRANGLE

Necrid forms Ivy's whip out of energy and wraps it around the foe's neck, then swings the foe around above his head as he takes a couple steps backwards. Necrid then slams the foe into the ground in the position where he was previously standing, dealing 14% and vertical knockback that kills at 110%.

While very powerful, this throw can be teched to avoid all effects, even the damage. The throw has little to no ending lag, though, meaning Necrid can just punish them with something else, potentially something even deadlier if he's lowered his starting lag enough. If the foe techs away from you, a sped up Side Special works well. If they roll towards you, they'll be in nearly point blank range of you and may or may not end up behind you depending on the size of the enemy, which is even easier to follow up.

If the attack is Soul Charged, Necrid will not deform the whip after the attack is finished and will keep it wrapped around the foe after slamming them, causing him to follow the foe up into the air if they fail to tech the move. He will deform it after taking most of the foe's knockback to still have a slight frame advantage over them. If the foe techs the attack, Necrid will not instantly deform the whip either and will get dragged with the foe slightly if they tech away from him, making it easier to follow up that way.

AERIALS

NEUTRAL AERIAL - VIOLATOR

Necrid takes a move from the clearly inferior Todd McFarlane creation, Spawn. Necrid spins around rapidly as he magically levitates into the air, going up the distance of Little Mac's recovery. At the height of this jump, Necrid forms Spawn's one handed axe and does a chop with it downwards as gravity kicks back in, which sends foes at a 45 degree downward angle. The spin does multiple flinching hits that drags foes with Necrid that totals to 10%, while the chop deals 9% and knockback that kills at 165%, though can send foes down towards the ground to possibly gimp them. It is still weak and doesn't qualify as a spike, downwards knockback on an aerial is just inherently powerful. During the downwards chop and ending lag, Necrid falls any distance he recovered and has a small net loss in terms of height.

While this move comes out quickly, speeding it up to 1 frame is still interesting just for the weird movement option this gives Necrid, as he flies up a portion of the move's distance before the hitbox ever comes out. Unfortunately, this move's hitbox doesn't reach out from Necrid's body at all, and so is fairly awkward to hit under normal circumstances. In order to hit with this, it's easier to use the rising portion of the move and treat the move as more of a uair. The rise is extremely helpful for increasing the move's "range" and often makes it the only move Necrid can combo with from vertical launchers such as his uthrow, which this is a guaranteed combo out of if the foe doesn't tech even without buffing this move in any way. Of course, them not teching is hardly reliable, so Necrid may need a better combo throw/launching fodder from the foe to abuse this and his Up Special.

Buffing this attack will upgrade the hitbox on Spawn's axe to be a more proper spike. The foe is now dealt knockback at less of an angle, more directly downwards at a 15 degree angle, and the move is now as strong as Rob's dair and deals 12%. This is still locked behind the first portion of the attack which makes it nearly impossible to hit with without hitting with that part of the move, though. If Necrid can launch the foe at the edge and combo into nair, this can potentially be a kill combo as the foe is spiked off stage. Too bad for Necrid how unreliable his launchers are.

FORWARD AERIAL - OVERHEAD PUNCH

Necrid swings his arm in a half circle arc in front of himself, starting with it above himself before it goes below himself, dealing 9% and low base knockback with good scaling that can kill people off at 150%. The hitbox is similar to Bowser's fair, but is faster and weaker than that move. While it doesn't come out any faster, the ending lag is low enough the move can function decently as a wall of pain, potentially even able to combo into itself at very low percents.

The only thing really holding Necrid back from using this is his horrible aerial statistics and recovery, though if the foe can be kind enough to donate their recovery this becomes a lot simpler. In order to make the foe use it so you can actually copy it, smacking the foe across the stage with this move to get them off of it works pretty well. While his upgraded personal recovery isn't the best, combining it with the foe's can let Necrid be a lot more liberal in his usage with this move.

Upgrading the move for the first time causes Necrid to form one of Cervantes' blades in his hand as he does the swing. This doesn't add much range to the attack, but is more of a sweetspot, dealing 14% and knockback that kills at 120% with a significantly higher base than the regular hitbox. This can sometimes get in the way of wall of paining a foe, but if Necrid hits the foe with his arm before following up a second time with the blade it's pretty great since the foe would've been knocked out of the combo at that point anyway.

Speeding up the move obviously makes it wall of pain and/or combo better, though keep in mind that upgrading this move in any way shape or form is a risk with how much Necrid spams it. Necrid will be taking significant self damage even if successfully wall of paining the foe, since he's using the move multiple times to do so.

Improving this attack to use a Cervantes sword enables it to trigger the explosions from Necrid's bthrow, and it's the only attack Necrid has that only uses one sword instead of both. This is not exclusively a good thing because this is quite possibly Necrid's favorite regular move, and using it will cause him to potentially trigger and waste the explosions when he doesn't need to. On the other hand, this move is already fairly fast without even being sped up, making it a good candidate to use while aiming at absolutely nothing just for an infinite range hitbox as the sword explodes, and giving Necrid a second shot if it misses since the attack only uses one sword.

BACK AERIAL - AXE SPIN

Necrid forms Astaroth's axe and spins around with it to hit behind himself. Necrid holds the axe fairly high on the otherwise long handle, preventing the move from having as good of range as it really should, but letting him get on with the attack faster. The energy axe is slashed at a slight 30 degree angle towards the ground and does 10% with fairly weak knockback at that same angle. If the knockback was purely horizontal, this wouldn't kill well up until 170%, but because of the angle it can kill enemies much earlier given it forces recovery.

This is another fairly fast attack, though is not spammable because it turns Necrid around. This isn't the worst thing in the world given it instead simply lets Necrid use his equally fast fair. While Necrid's fair is great and all and can easily punish a foe who dodged the bair, it's not going to gimp enemies, meaning Necrid has a pretty hard time actually getting that done, especially with his recovery. This isn't even that great as a so-called "spike", Necrid mostly just wants to hit with it in that context to force the foe away force enough to copy their recovery.

If Necrid upgrades his fair, this becomes one of only two aerials that doesn't use Cervantes' swords he has at his disposal, and thus one of the only two aerials he can use without detonating the bthrow swords. In order for this to work with his other aerials, Necrid will want the foe below himself, and as such the bair knocking foes back down towards the ground and having a hitbox that reaches slightly below his hurtbox is very useful in this regard. Nair, by comparison, is more for foes already above Necrid.

If the move is upgraded, Necrid will continue spinning in what was previously a portion of the ending lag to face the original direction he did at the start of the move. The axe is still a hitbox as it goes back in front of him, though most of the momentum is gone and it deals only 6% and weak forwards knockbacks that kills at 200%. This knockback is weak enough to be used for comboing, and there's practically no ending lag before Necrid can attack otherwise to make use of it at this point. This is extremely short ranged, and specifically hitting with this hitbox isn't easy. If the foe dodged the bair, the fact Necrid doesn't stay turned around anymore means he can't hit with fair and will instead have to try to DI through them to hit with this hitbox. This can be easier said than done, but if the foe was currently off-stage and recovering they may be left with little choice but to approach into this otherwise easily avoided hitbox. The attack gains more of an off-stage presence with this version given it can be more spammed with Necrid not turning around, though it is still weak enough that it's rarely going to be used to outright kill.

UP AERIAL - CROSSFIRE

Necrid forms both of Cervantes' swords and holds them out to his sides before slashing them up in an arc above his head, crossing them to either side of himself. The swords deal fairly unimpressive knockback as they go up they knocks foes at a 45 degree upward angle onto the opposite side of Necrid with 7% and knockback that kills at 180%. When the swords clash together at the end, it's a much more powerful hitbox that deals 14% and kills at 110%, though is pretty precise to hit.

After Necrid crosses his swords, he will fire bullets out of Cervantes' swords, which also happen to be gunblades. The bullets travel up at 45 degree angles up to either side of himself, moving a platform almost instantly before vanishing. The bullets deal 6% and flinching, but will cancel the knockback the foe is currently taking. The clashing hitbox knocks foes straight up and should not be interrupted by the bullets, though the weaker hitbox can combo into the bullets and turn the move into combo fodder. The move has a decent bit of start-up that can be improved, though it's never going to be especially fast given the duration of the slashes before the clashing hitbox spawns.

So long as the move's real starting lag is passed quickly, though, it can still cause instant explosions on the foe's person after having applied the bthrow, and it will be quite powerful given this uses both swords. If Necrid is a significant distance above the foe, this can kill the foe at a very low percentage as the double sword explosion causes high enough knockback to launch the foe before he hits with the sweetspot on this attack closer to the top blast zone, a potentially devastating combo. Even if the foe doesn't die, you're still looking at a 27% damage combo that is started by an infinite range hitbox. For how stupid he looks, Necrid doesn't kid around.

Improving this attack the first time causes the bullets fired at the end of the move to have infinite range. Necrid also now delays the firing of the bullets in what was previously ending lag on the old version of the move. Anyone hit by the weak slashes should still be hit by the bullets given their incredible movement speed comparable to Sheik's needles and infinite range, so it overall just makes the move safer and potentially makes the bullets combo when they wouldn't have done so otherwise.

The sluggishness of Necrid's uair makes his unupgraded Up Special more attractive with its quick starting lag, and Necrid's going to want to decide on some moves to not upgrade anyway to avoid taking piles of self inflicted damage. This makes it all the more important for Necrid to get the foe's recovery, so he can keep his terrible Up Special recovery to use as a good uair. If Necrid is too lazy to take anything else at all from the foe, the foe's recovery is an important part of his playstyle to acquire unless it's just as bad as his own, which significantly changes the match-up.

DOWN AERIAL - TWIN SWORDS DIVE

Necrid forms Cervantes' swords and magically levitates in the air as they float around him briefly before entering into his hands and actually getting into position for the attack. This stall serves as the starting lag and is rather disgustingly long, slightly longer than even the Bowser Bomb. When Necrid finally feels like attacking, he will turn upside down in mid-air and hold his swords out in front of him as he rapidly spins, going down just as quickly as the Bowser Bomb. Necrid is superarmored as he goes and is a multihit hitbox that deals several hits per second that total to 15% as he goes without stopping. As Necrid falls, he has an incredibly powerful suction hitbox, powerful enough to drag foes with him all the way to the ground if they get caught. This suction hitbox doesn't reach out beyond the move's primary hitbox at all and is strictly to prevent foes from escaping the move once they get in. On contact with the ground, there is a much more forceful individual hitbox that deals 17% and vertical knockback off the top that kills at 130%. For all of this move's ridiculous starting lag, the ending lag is very generous to compensate as Necrid simply deforms the swords at the end rather than stupidly ripping them out of the ground or something.

This attack is very difficult to hit without an upgrade, though is surprisingly difficult for foes to actually punish given he's floating during the thousand years of starting lag. The move exclusively has to be used to punish dodges to have any real chance of hitting, and to not just have the move be interrupted he has to use it a fair distance off the ground.

If the foe has Cervantes' swords impaled into their body from bthrow and this somehow hits, the foe should ideally be knocked higher up into the air into the attack so that they can be dragged down with Necrid for a longer distance and thus take more damage. This won't kill as fast as the uair combo but can get significantly more damage. If Necrid is somehow super high in the air from having a very powerful recovery, this can theoretically rack up so much damage that it can kill before the uair if done perfectly, and it's feasible to hit given the infinite range of the sword explosions, though is obviously very predictable and unrealistic. What's more realistic is using the swords to bait a dodge to punish in the first place, given foes are going to be very paranoid when Necrid's above them in the air.

Speeding the move up is obviously very, very scary given it has low ending lag, but the starting lag is so ridiculous that you're going to be at it for a pretty long time to get the move especially fast. While the ending lag itself is very generous, every time you use the move Necrid is basically teleporting to the ground so it's not like he can go for another immediate attempt at the move again, it's far from spammable. Using it closer to the ground kills a portion of the move's appeal with the damage racking, with the primary appeal being to abuse it for on demand superarmor.

The first upgrade of the attack causes Necrid to fire a bullet out of each sword when he uses this attack directly down towards the ground. These bullets deal 6% and flinching as usual, and given how fast Necrid is falling the brief flinch from them can be enough to combo into the move's main hitbox. If the foe was performing a laggy attack on the ground, the flinch's shorter stun may be undesirable, but if the foe is using a laggy attack Necrid should be trying to copy it rather than punish it anyway as fodder to speed up.

SMASHES

FORWARD SMASH - CHAOS REIGN

Necrid forms Astaroth's axe and sweeps it in front of himself vertically, starting from the ground and going upwards. During the attack, Necrid mutters some gibberish quote that Astaroth would probably find disgusting as overwriting his signature quote with this move. The attack deals 18-25% and knockback at variable angles. A portion of the knockback will always be vertical, but there is a horziontal angle to the knockback that depends on when in the attack the move hit. Hitting with the attack on the first frame causes foes to be knocked away at 55 degree angle, while hitting at the last frame causes foes to be knocked directly upwards with no horizontal component to the knockback. The move obviously is a worse killer when sending foes at weird angles, but if it hits the foe directly upwards you're looking at killing as soon as 75-45%. Other, more awkward angles will not kill until 120-80% or so.

This attack's starting lag is the main obstacle to bypass, though the duration and ending lag are not ideal either. Even by making this move fast, it's not easy for Necrid to hit with the move directly above himself given the move's duration.

The first upgrade of this move causes the move to more resemble its Soul Calibur variation by causing it to deal extra hitstun. Whenever the foe exits their knockback, they will enter their footstooled state briefly. The later in the move Necrid hits with this, the more realistic it is for him to have time to actually utilize this stun in some way. The catch is that with the foe taking more directly vertical knockback, the sooner they will be out of kill range, so it's a difficult balance. While the ending lag on the move isn't super small, this extended stun makes it possible to combo off of at low percentages, especially if you knock the foe onto a platform of some kind. The biggest obstacle can often just be getting high enough to combo the foe properly from the huge knockback, which yet again can be helped by gaining the foe's recovery. Necrid's regular Up Special will be the most common combo piece given it does technically give him a bit of distance and makes this a hugely damaging 2 piece combo if you manage to pull this crap off.

UP SMASH - BOMB

Seeing that Necrid is now in another game with Link, he decides to rip off another move from him. This is not based off of Link's Down Special, though, but instead Link's weird and completely unviable "bomb stance" from Soul Calibur (he is even more bottom tier in Soul Calibur than Smash if you can believe it). Necrid takes out a large bomb about twice the size of Link's bombs in Smash and throws it up into the air. He throws it at a very slight arc that makes it go ever so slightly forwards, traveling a Ganondorf height into the air at its apex before it comes back down, moving forward about a Wario width from Necrid by the time it hits the ground. When it lands on the ground, the bomb will continue rolling forwards for about a platform over the course of 30 frames before it explodes of its own accord. The bomb explodes on contact and deals 13-18% and knockback that kills at 150-110%.

This smash is fairly fast without Necrid bothering to improve it, and given the bomb's awkward journey to its final destination it's going to be around for quite some time. Necrid has plenty of time to throw another bomb if he wants, but he can only have out one bomb at a time, as using usmash again before that will cause the old one to explode. The explosion hitbox is 1.4X the size of the bomb, so this theoretically be used to his advantage to hit foes.

While the attack comes out fast, it is ridiculously telegraphed if Necrid is not using the move to hit foes standing above him. Necrid can use the lingering bomb as a potential threat to pressure foes into, but he must be careful given his clumsiness enables him to be hit by his own bombs so he can't just hide behind them. Necrid can throw these bombs off the edge like Villager's fsmash bowling ball, but if you can believe it this is more telegraphed than that move by comparison and is nowhere near as powerful. Performing a dashing c-sticked usmash is pretty useful, as it will make the bomb land behind Necrid. Assuming the foe is approaching him, this leaves it as more of a problem for the foe than him, and the approaching foe can suffice as a meat shield for Necrid from his own bomb.

This move gets a very important upgrade from being Soul Charged with Down Special, as it turns the bomb into an item that can be picked up at any time like Smash Bros Link's bombs. The bombs retain all of their power from the move when turned into items. Necrid can hypothetically even use the bombs to help recover like Link does, but Necrid is too stupid to think of using this move in the air unless Link gives him that brilliant and highly complex idea first. In any case, Necrid still gets a lot of use out of the bombs as items, as throwing them is the best projectile he gets in his personal moveset. Necrid can throw items just as far and quickly as anyone else, enabling him to extend combos that would otherwise long since have been over. Using the bombs during combos is the main way to prevent foes from picking them up, though Necrid is capable of detonating his bombs even if the foe is holding them by inputting usmash again. Catching/throwing items is very fast, so Necrid will probably have to usmash in advance and predict the foe catching the bomb. Even if they don't catch it, increasing the hitbox radius can sometimes net a hit anyway.

DOWN SMASH - BLADESTORM

Necrid forms Astaroth's axe and does two full rotations with the move in place after a sizable chunk of starting lag. As Necrid spins, the axe is only a hitbox as it flies through the main playing field and is not as it passes through the foreground and background. The axehead is the primary hitbox and knocks enemies away very powerfully, dealing 20-28% and knockback that kills at 125-75%. The handle, meanwhile, does a token 5-7% per hit and sucks foes in towards Necrid with set knockback.

This move has incredible reach as the axehead hitbox is 1.2X Bowser's width away from Necrid during this move, but means the move has a huge blind spot next to Necrid. While the ending lag isn't horrible, it's slow enough that the handle hitbox is unsafe on hit, giving the foe a 2 frame advantage as they are left in point blank range to punish Necrid which is pretty bad when Necrid only gets 10% out of the deal. If Necrid has created any move at all that comes out on frame 1 and manages to buffer it on the soonest possible frame, though, the foe will need a move that comes out on frame 2 to beat Necrid out and one that comes out on frame 3 to clash with him. This is an ideal way for Necrid to try to land grabs and other super close range moves. Very few characters have moves that come out by frame 2/3, though many can dodge as early by frame 2 and everyone can roll by frame 4. If they opt to just dodge, you will have significantly more time to punish the foe than you would otherwise. With a superfast move at Necrid's disposal (both for close range and to cover the distance the foe rolls away), this makes the move very powerful as the handle hitbox is now practically just as threatening to foes as the axehead hitbox. In order to have a reasonable amount of time to punish it, foes will want to go in as Necrid swings the axe behind himself the second time rather than waiting for the move to be entirely over.

The first improvement to this move gives Necrid the ability to mash during the move to keep the spin going, potentially spinning around 2 additional times for a total of 4. This means that by hitting with the handle hitbox, Necrid can rack up 20-28% just from that alone, which is exactly as much damage as the axehead hitbox does anyway, while still comboing the move into an attack with super fast starting lag. The only catch is that for each additional time Necrid spins around, he adds 2 additional frames of ending lag to the attack as he gets slightly dizzier. This would be too small for Necrid to care about most of the time, but this gives the foe more freedom to be able to punish Necrid when brought up against him at the end of the move. With a third spin, the foe needs an attack that comes out on frame 4/5, and most all characters have one that comes out by frame 6, with literally everyone having something by frame 7. How much these extra spins can be abused depends on the fastest move the opponent has available. If you're unsure and need to test, you'll still be getting 20% on the foe, while the foe only gets to retaliate with a super fast and probably weak move, the vast majority of the time a jab.

(Given the context of this move, aerials/aerial specials are ignored, as it takes at least 4 frames for everyone to jump. Only moves that would interrupt Necrid are included. Dashing Attacks also have lag to start dashing like aerials have lag to jump and are also ignored, with the fastest dash taking 8 frames to start.)
Bayonetta: Up Special (4)
Bowser: Up Special (6)
Captain Falcon: Jab (3)
Charizard: Jab (4)
Cloud: Jab (4)
Corrin: Jab/Dtilt (5)
Dark Pit: Jab/Dsmash (5)
Diddy: Jab (3)
DK: Jab (5)
Dr. Mario: Jab (2)
Duck Hunt: Jab (4)
Falco: Jab (2)
Fox: Jab (2)
Ganondorf: Jab/Grab (7)
Greninja: Jab (3)
Ike: Jab (4)
Jigglypuff: Down Special (2), Jab (5)
King Dedede: Dtilt (6)
Kirby: Jab (3)
Koopaling: Jab (4)
Link: Jab (7)
Little Mac: Jab (1)
Lucario: Jab/Utilt/Grab/Release Neutral Special (6)
Lucas: Jab (2)
Lucina: Jab/Up Special (5)
Luigi: Jab (2)
Mario: Jab (2)
Marth: Jab/Up Special (5)
Megaman: Utilt/Grab (6)
Meta Knight: Dsmash (5)
Mewtwo: Jab (6)
Mii Brawler: Jab (2)
Mii Swordfighter: Jab/Grab (6)
Mii Gunner: Down Special 1 (3), Jab/Utilt (5)
Mr. Game & Watch: Down Special (2), Jab (4)
Ness: Jab (3)
Pikmin & Olimar: Jab (4)
Pac Man: Jab (4)
Palutena: Grab (7)
Peach: Jab (2)
Pikachu: Jab (2)
Pit: Jab/Dsmash (5)
Rob: Jab/Dtilt (3)
Robin: Jab (4)
Rosalina: Utilt with Luma (3), Dtilt without Luma (5)
Roy: Jab (5)
Ryu: Jab (2)
Samus: Jab (3)
Sheik: Jab (2)
Shulk: Jab (5)
Sonic: Jab (3)
Toon Link: Jab (6)
Villager: Jab (3)
Wario: Dtilt/Down Special 55-109 seconds of charge (5)
Wii Fit Trainer: Jab (4)
Yoshi: Jab (3)
Zelda: Dtilt (5)
Zero Suit Samus: Jab (1)

Note that this attack cannot infinite into itself on any character even with instant starting lag becase of two things. First off, the attack hits behind Necrid before it hits in front of him, and secondly the inwards handle hitbox knockback is capable of pushing Necrid onto the opposite side of Necrid. Make it as fast as you want, but the attack's duration (which cannot be sped up) will easily let anybody avoid it if they're pushed in front of you and you start the hitbox beyond yourself. While it is slower to hit foes in front of Necrid with this attack, this does mean if you push foes through him with the first hit that you can easily combo a second dsmash if the move is fast enough before you finally end with a hitbox that actually hits in front of Necrid.

This technique is going to force some kind of reaction out of an enemy, and potentially enables Necrid to observe their fastest move - it's certainly the most consistent way to get the foe's jab against most characters. While jabs are already fast, improving them to 1 frame of starting lag can potentially break them into becoming jablocks. Jab cancels into other attacks easily turn into jab locks when in Necrid's capable hands! Infiniting a foe with a jab lock is very realistic and one of the easiest improvements for Necrid to do, given most jabs only need to be improved a single time to come out instantly.

While jab locking an enemy with their own faster jab, Necrid's damage will rise alongside his enemy's damage percentage, though, because it's a copied move. Depending on the jab, Necrid will almost always be dealing more damage to himself than he is to the foe, given the first hits of the kind of jabs that can do this are so weak. Even if the foe's jab is super strong, infiniting a foe with a jab lock means his stale moves list will be totally full with just the jab and it will inevitably become lower than 6%. As such, Necrid will want to use the foe's jab for jab canceling into other moves such as his dsmash more commonly, though jab locking the foe still works as a sort of psuedo "suicide KO" as you bring both yourself and the foe up to stupidly high damage percentages. Keep in mind that there are several characters in Smash who can already jab lock without having to bend over backwards to do so.

This attack presents a very tense scenario for the foe to react to, and it is only made more tense by how this move reacts to shields. This move pushes shielding foes outwards rather than inwards, which enables the handle hitbox to combo into the axehead hitbox against shields! While not normally super relevant, the axehead hitbox has 5 bonus shield damage on it. With 3 handle hitboxes + a single axehead hitbox the foe will have 35 damage dealt to their shields, +5 bonus damage for 40, leaving a full health shield with just 2 HP left! Necrid needs to charge this attack just barely for an instant break, and that can be painful with the attack's default speed, but if the move is fast enough it becomes the move's primary starting lag. Charging smashes is a slow process given it takes 60 to fully charge, so the 10~ frames needed to do this is pretty slow by a buffed Necrid's standards.

STANDARDS

JAB - WHIPSWORD

Ivy's sword is capable of transforming into a whip somehow or other, though for his previous moves Necrid cut out the useless generic sword and got to the good stuff. For this move, he forms Ivy's sword in its untrasformed state first before doing a simple slash in front of himself. The slash deals 5% and flinching. If Necrid cancels the jab here to try to combo the jab into something else, the foe will have a 4 frame advantage on him which is worse than the dsmash by 2 precious frames, though can sometimes still be useful with Necrid's 1 frame start up moves.

Continuing on with the next hit of the jab, Necrid transforms the sword into a whip properly and starts spinning it around in a circular motion in front of himself, dealing damage at a fairly low rate for a repeating jab as long as A is held down for. This repeating portion is easy to DI out of as well, so it's pretty poor all around. The jab finisher has Necrid cast out the whip forwards a full platform's length, dealing a minimum of 5% and knockback that kills at 250% that is dealt at the Sakurai angle. The longer Necrid kept up the repeating jab, the more this whip will be powered up, capping at 90 frames with 18% and knockback that kills at 100%, providing a bit of incentive to keep the terrible repeating jab going for a while so long as Necrid doesn't get too greedy and whiff the finisher entirely.

The jab finisher's range is good enough that it's not required Necrid hit the foe with the first two hits of the jab in the first place, and it would be a pretty potent attack on its own if not for the other moves stuck in front of it. If nothing else, Necrid can power up the whip before casting it off-stage at a foe trying to recover. Even the jab finisher's ending lag is low, so if Necrid manages to hit a foe close up with it at a low percent, the Sakurai angle will get a trip he has a realistic shot of punishing. At longer ranges, it becomes possible to combo that trip into a super fast Side Special, dsmash, or ftilt.

If the move is upgraded, the bad repeating jab gains some more purpose as it becomes capable of deflecting projectiles, causing them to turn around and renew their duration. Deflecting projectiles without even transferring ownership may seem pretty pathetic and useless, but now that it's traveling away from Necrid he can more comfortably observe and copy it to use it for himself! If Necrid reflected it full stop, he would not be able to observe the attack because he already "owns" it.

DASHING ATTACK - SLIDING KICK

Every character in Soul Calibur performs this for their kick dashing attack, how could the king of rip offs fail to include this in his moveset? Even the heavies like Necrid and Astaroth use it, despite it being far less effective on them...Necrid leaps as he uses his momentum from his dash to carry him and extends his legs out in front of him to kick his foes. This has painful starting lag and duration, and the kick deals 9% and knockback that kills at 170% at the Sakurai angle.

Necrid travels a pretty considerable distance over the course of the attack, a little over half a platform. The hitbox takes quite a while before it ever even comes out, so if the move is given just 1 frame of starting lag he will teleport forwards a pretty sizable distance when using this attack. The attack will trip foes consistently until pretty high percentages, though the duration of the slide prevents Necrid from capitalizing on it unless he hits the foe at the very end of the attack. This can become more feasible if sped up into a "teleporting" dashing attack, though to combo out of the trip the move still has a specific range. Making the move so fast also prevents Necrid from pushing the foe forwards with "clipping", making it possible for him to miss foes entirely who are directly in front of him. Powering up this attack decreases the base knockback value and increases the scaling, making it KO at 150% while simultaneously making it trip foes longer than it did before.

FORWARD TILT - AXE SWEEP

Necrid forms Astaroth's axe and holds it behind himself with one hand before doing a gigantic horizontal sweep of it in front of himself. The axe is in the fore/background for most of the attack and isn't a hitbox before it finally hits the main playing field for a very laggy tilt, the slowest in the game to come out besides Ganon's utilt. The axehead deals 19% and knockback that kills at 75% with very high base knockback when it finally gets there. The axehead is a full platform away from Necrid, and while it's a powerful hitbox the handle only deals 6% and set knockback away from Necrid with too much ending lag to combo off of.

The attack definitely feel like more of a fsmash and makes Necrid long for the foe's ftilt no matter what it is practically. Necrid will largely have to use his fair for simple spacing purposes in front of himself. While Necrid can really benefit from upgrading fair, with how heavily he relies on that move taking self damage every time he uses it becomes very painful.

It's hard to argue a case to invest the time to speed up this attack over comparable laggy moves like Side Special, fsmash, or dsmash because the move is so bad, as those all have more potential follow-up applications and other uses by comparison to this one. The strongest argument is simply the fact that the move is terrible, and the other attacks are more usable in their slower states.

The first upgrade to this attack will cause Necrid to gain superarmor after the first 20 frames of starting lag throughout the rest of the attack's duration. 20 frames is a pretty long time to wait, but if you decrease the move's starting lag by at least 20 frames you'll be getting that superarmor instantly. The main comparison to this move is dair, which grants superarmor for the entire fall, but that requires jumping into the air and does not last as long as this move. While being in the air can make using the superarmor more awkward, be aware that being in the air makes Necrid less vulnerable to grabs which can still casually go through his superarmor on this move.

UP TILT - TEKKEN

Necrid performs an uppercut similar to Megaman's utilt. In comparison to Megaman's utilt, the attack has significantly less horrible ending lag but does not kill nearly as fast, only dealing 8% and knockback that kills foes at 165%.

You'd struggle to recognize the fact that this move is taken from Heihachi if not for the fact that Necrid forms Heihachi's gauntlets on his arms during this attack. Heihachi wears gauntlets in Soul Calibur entirely because everybody is obligated to use a weapon of some kind, even though Heihachi just uses his fists anyway. These gauntlets don't do anything to contribute to the uppercut in any way, but at the end of the move when Necrid is done with the gauntlets he detonates them, creating a Wario sized hitbox around his arms. This deals 13% and vertical knockback that kills at 100% with slightly more hitstun and hitlag than the average attack, vaguely possible to combo off of at super low percentages. The ending lag is barely low enough to combo, and it's only possible because Necrid is left in the air at the end of this attack.

Necrid has to hit foes in front of himself with the uppercut at low percentages in order to combo into the explosion hitbox, which takes place a significant distance above Necrid given he jumps before it ever comes out. The move can potentially be a potent combo starter, though the move's tiny range in front of Necrid and the punishability make it hard to recommend too strongly.

Upgrading the attack gives Necrid the ability to detonate Heihachi's gauntlet at any time during the attack by simply pressing A again. During whatever time this explosion occurs, the hitbox on Necrid's fist briefly will stop existing to allow for this. It is still possible for the move to combo the two hits in reverse order, though requires even lower percents than comboing them in the regular order. Without Heihachi's gauntlet on Necrid's fist, the punch only deals 5% and knockback that kills at 210%, which is largely a good thing because it just makes the move more easy to combo into nair/Up Special. While Up Special outdamages nair, Necrid can combo the moves from all three guest characters if he uses Spawn's nair, as the nair won't leave him in helpless and will enable him to throw Link's bomb at the foe.

DOWN TILT - CAT CLAWS

Necrid forms Voldo's claws on both of his hands and does a simple slash of the claw into the ground. This deals 8% and simple knockback away from Necrid at an impractical 50 degree angle, killing at 200%, but the move has too much ending lag to combo. The move comes out very fast without Necrid spending 10 years to try to buff its speed and has reasonable range, functioning as his primary spacer given his other awkward standards.

When upgraded, this attack's ending lag can cancel into itself, and Necrid advances slightly with each cut as he alternates between the arm that does the attack. This move's knockback angle means it will very rarely combo into itself, but if Necrid reduces this move to only 1 frame of starting lag it becomes possible to hit the foe again a couple of times before they are knocked away simply due to how fast the move becomes.

With 1 frame of starting lag, this attack enables Necrid to move a Wario width for each press of A and enables him to travel the stage much faster than with any other method in his set. This can combo foes who are left a decent distance away from Necrid like his longer range moves can, though requires minimal improvement in comparison to those moves to be able to do so. Aside from comboing, it makes for a surprisingly good approach option. The really, really big catch is you're paying in self damage for every Wario width you move, so it only becomes all that good when he's already at kill percent regardless.

FINAL SMASH - GUEST CHARACTERS


Sakurai decides that Necrid is not enough of an incentive to buy the game and adds several other guest characters to the match. This will cause Necrid to summon 3 computer allies, all of which have a pitifully low level 4 AI and have a greatly reduced weight value to make them die more quickly than normal characters. The characters summoned are strictly 3rd party characters only, so in the existing Smash cast this limits you to Sonic, Megaman, Ryu, Cloud, Bayonetta, and Snake. Megaman is the only one of these characters who isn't particularly overpowered, and even he isn't too bad.

The AIs aren't going to provide all that much help to Necrid beyond a distraction or two, but the good news is Necrid is capable of copying allies. Necrid can build up quite a moveset from all these other characters and the chaos going around, and in FFA contexts he's perfectly capable of copying multiple moves simultaneously. Guest characters never stick around for more than one game in the world of Soul Calibur, so Necrid will want to preserve their movesets before they inevitably get cut.
 
Last edited:

Conren

Smash Apprentice
Joined
Feb 17, 2009
Messages
90
Location
Boston
NNID
Conren1
3DS FC
5086-4445-8944


ANDY

Trophy Info

A young officer in the Orange Star army. His expertise in mechanics has earned him a high ranking position. He commands his own troops despite a lack of experience.

Advance Wars

ATTRIBUTES

Weight: 80 ■■■□□□□□□□
Dash Speed: 2 ■■■■□□□□□□
Air Speed: 1.01 ■■■■■■□□□□
Fall Speed: 1.45 ■■■■■□□□□□
Jump: ■■■■□□□□□□
Air Jump: ■■■□□□□□□□
Traction: 0.382 ■■■■□□□□□□


SPECIALS
Side Special - Tank / Mobilize

Andy pulls out a radio and commands a tank to appear. The Tank rolls in from the background and stops beside Andy. The move itself is pretty quick, but it takes a full second for the tank to finish summoning.


Tank
Stamina: 50
Ground Speed: 9/10

A basic battle tank of the Orange Star Army. The Tank is a large minion that physically exists on the ground right behind the fighters, but can still be hit by attacks. It doesn't block fighters from moving past it, but it can act as a shield against projectiles. The Tank normally moves at a speed comparable to a medium walk speed, but can move up to its top speed depending on the situation, such as when being commanded to. The turret on top pivots, and the Tank tends to turn this rather then turn itself around, which doesn't really hinder it since it can move backwards just as well as it moves forward. In addition, the turret is equipped with two weapons, which can be used even while the Tank moves.

Cannon
0.4% X Stamina

The Tank shoots an explosive shell that arcs and reaches half of Final Destination on even ground. The projectile moves pretty fast, and when it explodes, by hitting either the ground or a target, it deals 20% damage that KOs at 80% (pre-hit). This attack becomes weaker the more damaged the tank becomes, a feature shared with Andy's other minions, and only deals .4% damage if the tank manages to get down to 1 stamina. Once used, this move goes on a 10 second cooldown.

Stamina: Damage%, KO%

50: 20%, 80%
40: 16%, 106%
30: 12%, 145%
20: 8%, 212%
10: 4%, 362%
1: .4%, 916%

Machine Gun
0.04% X Stamina (5 hits)

An OS soldier appears out of the top hatch and shoots the top mounted machine gun, dealing 5 hits of 2% damage when at max stamina. The bullets spray out a bit and can reach the full length of Final Destination, but go down to half power when they go halfway that length. The machine gun will angle 45 degrees up or down to hit the nearest opponent. While not very powerful, this is a very disruptive move, which can sometimes save Andy, or give him an opening. Machine Gun can be used once every 6 seconds, but if the gunner on top gets hit, he'll retreat inside and won't use the move again for 10 seconds.

If the Tank is destroyed, it can't be summoned again for 30 seconds.

While the Tank does start out powerful, it is prone to taking heavy damage due to being large and not taking any knockback, so its main cannon attack is more of a one hit wonder when left to its own devices. Its machine gun is still just as disruptive at low damages as it is at higher damages, which means that the opponent can't just ignore the Tank, even if it is badly damaged.
If a Tank or another minion is already active, side special becomes Mobilize. When using Mobilize, Andy commands the minion to move a battlefield platform length in that direction. This move doesn't use an animation, and can even be used during a different action, as long as Andy isn't flinching or otherwise incapacitated. Several Mobilize commands can be buffered. Remember that the Tank can shoot while moving, so use this often for tactical placements.

Standard Special - Infantry/Hyper Repair/Grenade

Using his radio again, Andy calls in a squad of five OS Soldiers.


Infantry
Stamina: 10 Each
Dash Speed: 3/10
Jump: 5/10

Infantry are as tall as Link. They can ground jump, but not air jump. Infantry have all around low combat stats, but they do have some strength in numbers. As a special ability, as long as infantry are active they will speed up the summoning cooldown of Andy's other units by 1.5x. This is due to the greater tactical options that infantry give. Yeah... tactics. After being defeated, Infantry can be summoned again after only 5 seconds, making them comparatively spamable.

Submachine Gun
0.05% X Stamina (6 hits)

Then Infantryman's main weapon. They shoot 6 spraying bullets that each do .5% non-flinching damage at max stamina. If all five fire, that's 15% damage over 30 hits. Bullets only reach halfway the length of Final Destination. Infantry can aim their guns in any direction, giving them a bit more versatility than their tank mounted counterparts. Infantry shoot once every 6 - 10 seconds, making them a bit unpredictable.

All in all, Infantry are annoying fighters, but easily dispatched. Since their main weapon doesn't flinch, they're actually the go to minion in team matches that have friendly turned on. The Infantry do... generally deal more damage to the opponents than to allies.
If a vehicle, such as the tank, is already active this move becomes Hyper Repair. Andy jabs his wrench forward, if it comes into contact with a vehicle he'll start repairing it while the input is held, restoring 5 stamina every second, but never going above max (obviously). While repairing, Andy cycles through different animations, such as jumping on top of the vehicle to tighten bolts with his wrench, or tapping on the threads with his wrench. Pretty much different things, but with his wrench. Andy also "snaps" on the vehicle while he's repairing, so he can even repair if the vehicle happens to move, such as when using Mobilize. While Hyper Repair is a good way to extend the lifespan of a vehicle, the main reason to use it is to restore some lost attack power to the vehicle. Perhaps even turning that Tank into a second hit wonder. This move is best used during some "down time" from Andy's opponent, since most enemies can easily out damage Andy's repair rate. Or worse, just knock him away since he becomes defenseless.

Since Infantry can't be repaired -after all they're not machines... what makes you think they could be repaired?- when they're active this move becomes a third variant: Grenade. At the press of the input, a single soldier takes out a grenade, pulls the pin, and throws it. The grenade becomes an item and explodes after a 3 second timer, dealing 10% damage and knockback that KOs at 100%. Grenades can damage Andy, as well as his Infantry. Luckily, Infantry will run or dive away from grenades to avoid being caught in the blast. The grenade can be "cooked", and even re-aimed, by catching it in mid flight with Andy. Who knows? You could even get into those item shenanigans that item spawning characters are known to do.

Down Special - Artillery/Dismiss

Andy gets on his radio yet again. This time he calls in an Artillery.


Artillery
Stamina: 40
Ground Speed: 7/10

The Artillery takes up the same space that the Tank does. It doesn't move around much, unless it doesn't have any opponents that are far enough away (explained later). It is equipped with a single weapon.

Cannon
0.6% X Stamina

The Artillery fires a single shell into the air, before arcing and crashing back down on the ground, exploding and, at max stamina, dealing 24% damage that KO's at 78%. This projectile can reach anywhere on the stage that's not protected by a ceiling. Except for, ironically, right next to the Artillery. The projectile takes a good deal longer to travel than the Tank's version, and its trajectory actually makes it easier to dodge. However, its power makes it something the opponent must watch out for. The Artillery can't fire and move at the same time, so overusing the side special with the Artillery is not recommended. This move goes on an 8 second cooldown after being used.

Stamina: Damage%, KO%

40: 24%, 78%
30: 18%, 114%
20: 12%, 177%
10: 6%, 325%
1: .6%, >999%

Just like the Tank, the Artillery can't be summoned again for 30 seconds after being destroyed.

The Artillery is at its element on more interesting stages, due to its coverage, arcing shot, and no real need to move. It's also a great anti-camping minion.
If a minion is already active, this move becomes Dismiss. Sometimes you want a different vehicle, usually when your current vehicle is so badly damaged that it would be a pain to repair it, and so, you'll need to make room for a new vehicle. And so you make room in the most sensible way possible, by ordering the current one to self-destruct. Once this command is given, the soldiers currently in the vehicle bail out. Then the vehicle shortly explodes, dealing 18% damage that KOs at 100%. This of course, counts as destroying the vehicle, putting it into its summoning cooldown. Dismissing Infantry won't cause them to explode, they just bail. Those cowards. This move is a bit unique in that it needs to be held for a moment to activate. You wouldn't want to accidently destroy your vehicle, would you?

Dismiss isn't affected by stamina, so it becomes the vehicle's strongest move once it takes around 10 damage.

Up Special - Battle Copter/Tail Rotor

One last time, Andy gets out his radio and calls in a Battle Copter. You know the drill.


Battle Copter
Stamina: 45
Air Speed: 11/10

An Orange Star air unit. The Battle Copter stays in the air at, a little below Andy's double jump reach. Its abilities make it almost like an aerial tank. The B Copter can be ordered to move past the edge of the stage, but won't usually stay there if left on its own. The B Copter is equipped with two weapons:

Air to Surface Missile
0.35% X Stamina

The B Copter shoots a single missile in the direction of its target, though it moves in a straight line after it is first shot. When the missile hits an opponent or obstacle, it explodes, dealing, at max stamina, 16% damage that KOs at 90%. After being used, this move goes on a 9 second cooldown.

Stamina: Damage%, KO%

45: 16.2%, 90%
40: 14%, 106%
30: 10.5%, 144%
20: 7%, 207%
10: 3.5%, 347%
1: .35%, 822%

Machine Gun
0.04% X Stamina (5 hits)

Very similar to the Tank mounted machine gun. This version of the weapon deals 9% damage at max stamina, with all of the disruptability of the tank version. The copter's machine gun has a different angling range, and can aim almost directly below the copter, but not quite as high as the tank's version. This move is used once every 8 seconds, and since the pilot shoots it safely from inside, it does not have the same weakness as the Tank's machine gun.

The B Copter also goes on a 30 second summoning cooldown after being destroyed. It also has a unique self-destruct animation when dismissed. The two pilots inside jump out and parachute towards the background. The copter then falls straight down before exploding.

Being able to fly, the B Copter is a very good choice in stages with a difficult layout, or that can scroll. It also tends to do better against more grounded opponents than the other minions do.
If Andy already has an active minion, this move becomes Tail Rotor. Being a mechanic, Andy carries around spare parts. For this move, he pulls out a tail rotor from a helicopter. He holds it over his head, and with a wrench causes it to spin. Andy then glides forward, and a little up. This move has great horizontal reach, but rather poor vertical reach. The spinning rotor itself does a series of 1% damage hits, but is unlikely to hit more than 5 or 6 times. If used from the ground, Andy won't move at all, which is useful since now the move can hit up to 12 times for 1% each, with a final hit that KOs at 130%.


NORMAL ATTACKS
Standard Attack
2%, 2%, 6%

A three hit jab. Holding his wrench with one hand, Andy does a downwards thwack, putting his weight into the attack. With a second press of the button, Andy swings his wrench back up, the wrench now ending a little behind him. With a third press, Andy grabs his wrench with both hands, then with a tiny jump in the air, he brings the wrench down on his foe, ending in a slightly crouched position. Not the speediest of jabs, but the wrench does give Andy a bit of extra reach, and the last hit is strong enough for a good distancer.

Upgrade - Tune-Up
Now for the upgrade mechanic. To activate an upgrade, hold the input after the last hit while overlapping one of Andy's minions. Andy then performs a special ratcheting animation on the minion for almost a whole second. Andy also "snaps" onto the minion like with Hyper Repair. As for the upgrade, Tuneup slightly increases the unit's stats, making it all around better. Movement speed gets increased by one rank, bullet attacks deal +0.5% damage per hit (not affected by stamina) while explosive attacks deal +2% more damage (again, not affected by stamina), and finally, attack timers get reduced by 1 second. Infantry can also benefit from this upgrade... because their guns upgraded. Tune-up can be stacked up to three times, each stack lasting up to 30 seconds.

Tune-up is an all-purpose upgrade which makes it great for combining with other upgrades. Like all upgrades, upgrading one infantry upgrades all of them.

Strong Side
5%, 5%, 5%

Andy pulls out a nail gun, then, while holding it with both hands and bracing himself somewhat, he unloads three nails from it that travel one BFP before falling on the ground. At point blank, each nail does 5% damage and tends to knock the foe away from the next nail. Any further than that, and each nail only does 1% damage and won't even flinch. Nails apparently make bad projectiles. One use out of this awkward ranged attack is to knock back grenades. After all, they are items, and nothing's stopping an opponent from throwing back a grenade, and some of them are even wise enough to cook it first.

Upgrade - Fast Wheels
Andy performs a riveting animation at the vehicle's wheels. Again, taking nearly a second, like with most upgrades. With this upgrade units move much faster, gaining a 1.5x boost in movement speed. Units now also gain a ramming attack (shoulder bash for Infantry) when moving at top speed, or when commanded to with Mobilize. This ramming attack does 15% damage that KOs at 120%. For Infantry it instead does 5% damage and KOs at 160%. This upgrade helps low stamina units still retain some KO power. Artillery especially benefit since they're normally vulnerable at close range. Finally, Infantry become much more disruptive. Like most upgrades, Fast Wheels lasts for 30 seconds.

Now is a good time to mention some of the difficulties in using the upgrade mechanic. Since Andy is usually vulnerable while upgrading, it does take some set-up in order to have enough time to do it, so don't expect to be able to combine many upgrades at once, unless your opponent is somewhat incompetent. It's usually better pick out a few strategic upgrades that can help you out in a given match, and treat the rest like bonuses.

Strong Down
3%, 2%, 2%,

While crouching, Andy takes out a blowtorch, while a welding mask suddenly appears on his face. Andy then lets out a blue flame on the ground. The move has a very short ending lag (the put away animation is mostly interruptible), and so can be used continuously by mashing the button. The opponent is likely to be pushed out of range after two or three attacks, however. This move can potentially combo into another attack, and combos are good on Andy since it leaves his opponent wide open for a cannon blast from his allied vehicle.

Upgrade - Grappling Threads
Andy welds extra material onto the minion's threads or boots. Sometimes a stage layout makes it difficult for a unit to move around, or even stay in combat. That's what this upgrade is for. With Grappling Threads a unit can climb up and down walls. This affects its projectiles in expected ways. This upgrade is invaluable in scrolling stages. If a vehicle is on a wall, Mobilize gets affected in an expected way (basically, imagine that your controller is aligned with the vehicle, the direction you tilt the joystick during the move is the direction the vehicle goes. A bit difficult to describe, but intuitive in practice). Since B Copters and Infantry can fly and jump respectively, they don't benefit from this upgrade as much.

Strong Up
8%
KO: 150%

Standing on one leg, Andy stretches his arm up and spins his wrench once. Then he turns around once before landing back to idle stance. The move comes out fairly fast, but has some moderate end lag. This is a good launcher, although Andy himself does not really benefit from it. His allies however, do. Copters and Artillery have and easier time hitting airborne targets with their missiles/bombs. Additionally, this combos well into a Copter ramming attack, which has a pretty good KO power since it hits in the air.

Upgrade - Reinforced Armor
With this upgrade, the unit becomes tougher. They now take half as much damage. Which, I'm sure I don't have to mention, helps them keep their power longer. They now also take a more protective role, actively trying to get between Andy and his opponent. Or an opponent, in case of multiple opponents, the choosen opponent being determined by a complex algorithm.

Dash Attack
0.8% x12

Andy takes out a drill and jabs it forward while sliding. The startup lag is pretty noticeable for a dash attack, but the ending lag is brief. This attack does several hits depending on how many times the button is mashed, up to 12 hits. Doing several hits also increases the distance traveled. Which can be used to reposition your opponent for an ally's attack.


SMASH ATTACKS
Side Smash
15% - 21%
KO: 110% - 72%

Andy takes out a sledgehammer and rears it back with both hands. Then he swings the hammer forward, and slightly upwards. Andy then loses his balance a bit and stumbles backwards, the hammer slamming behind him, Andy still holding it with one hand, before finally putting it away. This move has some above-average knockback to it. Unfortunately it is very slow, even compared to other moves with its attack power.

Andy will usually need some help from a pal in order to land this attack. Fortunately, he can summon minions for this purpose. If you time it right, you can tag someone that's locked in by machine gun fire. Hey, remember how you can use Mobilize during a different action? While charging this move, try using Mobilize when the vehicle has Fast Wheels to ram the opponent into your attack.

Down Smash
13% - 18%
KO: 130% - 88%

Andy takes out a second wrench. While charging, he faces the audience and crosses his arms. Then he crouches down, sweeping the ground with both wrenches and hitting both sides. Andy then puts away his extra wrench, twirling both wrenches as an ending animation. This move comes out fairly fast, although the hitbox itself does last for a bit of extra time. This is Andy's general purpose space clearing attack, as well as a pretty decent KO move. It also semi-spikes, making it useful for edge-guarding as well.

Up Smash
4%, (1% x6), 6% - 5.6%, (1.4% x6), 8.4%
KO: 140% - 98%

While charging, Andy takes out his buzz saw and points it down. Then he jabs it up, spinning the blade and dealing several hits, with a final hit that launches the foe upwards. This is a pretty laggy move, but it does deal a lot of damage if all hits connect. This move has noticeable freeze frames, which get increased the more it is charged. If you get good at timing your minion's attacks you can use this move to give them an opening, perhaps letting your opponent eat a cannon blast. Machine gun fire will increase the freeze frames even more, making it a useful stalling move.


AIR ATTACKS
Neutral Air
0.9% x15

Andy takes out his blowtorch again, complete with welding mask, and fires a small jet of blue flame in front of him. This attacks deals 3 hits normally but can be extended to up to 15 hits but mashing the input. The opponent gets trapped in front of and below Andy, leaving the opponent open to an ally attack.

Forward Air
2%, 0.7% x6, 4%

With an overhand, Andy reaches behind him, grabs his trusty buzz saw, then he swings it while leaning forward in one single motion. The saw blade spins while he holds it forward; dealing several trapping hits, with one final hit that knocks the opponent away. Naturally with how long this traps an opponent, this makes a good set-up for an ally, such as the B Copter, or even a team player. The landing lag is rather long, since Andy basically belly flops.

Upgrade - Super Bomb
Any uses his buzz saw on the minion, sparks flying out. This upgrade takes a whopping 2 seconds to complete. The minion's next explosive (shell, missile, or grenade) becomes more powerful, exploding into a bigger blast and dealing 1.4x damage. Although this upgrade is single use, it still has a "duration" of 40 seconds, meaning you have to wait that long to be able to use this upgrade again.

Although it comes with a drawback, this is still a useful move for its sheer power.

Super Bomb KO%s at max stamina:

Tank - 46%
Infantry - 68%
Artillery - 41%
B Copter - 58%

And you're probably thinking it. Yes, you can pick up an infantry's super grenade.

Back Air
3%, 3%

Pulling out the nail gun from his left pocket, Andy then twists backwards and quickly fires two nails. This move comes out really fast, but the nails tumble rather quickly so Andy needs to be rather high to get much range from this attack. Luckily, unlike the grounded version, these nails have some flinching power to them. Making them useful for attacking offstage opponents.

Upgrade - Sniper Scope
Andy rivets a new piece onto the machine gun of the minion. With this upgrade, minions can shoot their guns the full length of Final Destination without the damage distance penalty. Also the spray of the bullets become more narrow. This greatly improves the disruptability of minions from a distance. As a drawback, two extra seconds are added to the cooldown of the gun attack.

Down Air
8%
Meteor KO: 110%

Andy windes up this move by twisting his body and wrapping his arm around his head, holding his wrench behind him. Then he swings his wrench downwards, turning his body upside down in the process, before completing the turn and returning right-side up again. This is Andy's general purpose spike attack, albeit a weak one that comes out fast.

Upgrade - Magazine Dispersal
Andy uses his wrench to adjust the gun of the minion. With this upgrade, gun attacks now shoot 8 more bullets in addition to what they normally shoot, greatly increasing damage. This however adds and extra 8 seconds to the cooldown of the attack. The minion will generally try to get closer to enemies to deal the best damage from this upgrade. Combining this upgrade with Sniper Scope will result in more interesting than useful effects.

Up Air
0.8% x6
KO: 150%

Andy reaches into the front of his shirt, then takes out his drill and thrusts it upwards. The drill bit deals several trapping hits before a last hit that actually has some knockback to it. Then Andy puts his drill away. When smashed, Andy stalls a bit in the air when using this move, allowing a good amount of hits to land, possibly all of them.

Upgrade - Counterattack
Andy drills some screws into the minion, or infantry gun. This upgrade is relatively fast, only taking 20 frames to complete. The next time the minion is hit, they will deliver a counterattack. Vehicles will reposition themselves so that their cannon/missile is pointing at the opponent, then shoot their explosive that deals 1.2x the damage of the attack they took, with a minimum of 12% damage. Infantry, on the other hand, will actually block the attack, then strike back with a rifle hit that deals 8% damage and KOs at 130%. Each Infantry gets their own counterattack, provided they are all hit before the upgrade runs out. This is a single use upgrade, but still has a "duration" of 20 seconds.


GRAB ATTACKS
Grab & Pummel
1%...

Andy has a standard length grab with standard speed and standard difficulty. For the pummel, Andy places his wrench on the opponent's nose and ratchets it. He does this fairly fast for a pummel.

Andy also has an aeriel grab. This only works on his vehicles. He'll ride on the side of the vehicle by holding onto some part of it. If he summons a B Copter while in mid air, he'll automatically use this grab on it. Combined with Mobilize, this gives Andy the use of his ground attacks while moving, which can lead to some pretty interesting maneuvers. When grabbing the B Copter, Andy can also use his ground attacks while air born. Which consequently allows Andy to use his ground upgrades on his B Copter. Andy can let go of his vehicle by inputting grab again. Which also means that he can't grab while riding.

Forward Throw
6%

Letting go of his opponent, Andy leans back and delivers a straight kick to his opponent, tossing them forward. A red crosshair then briefly appears on the opponent. This move has... lackluster power to it. It's mostly useful for its effect.

Command - Blast Focus
A debuff that's placed on the opponent. When an opponent has blast focus, Andy's minions will prefer to target that opponent with their explosive attacks. Not very useful on one-on-one fights unless the opponent has their own minions. When this command is place on a new opponent, it clears away the debuff from the previous opponent. Blast Focus is also removed when the opponent is KO'd.

Back Throw
8%
KO: 150%

Putting his leg out, Andy pushes his opponent over his leg, making them trip behind him, then he follows up with an elbow drop. A blue crosshair briefly appears on the opponent.

Command - Keep Away
Andy's minions will prefer to keep their distance from this opponent. Unlike previous commands, this can be place on several opponents without clearing away previous ones. They still expire after being KO'd though.

Down Throw
7%

Taking a good moment, Andy Lifts up the opponent with both hands, then quickly slams them into the ground. This has some really low power to it, but that actually is a strength since Andy can follow up with another attack, even at higher damages.

Clear Command
Removes any current commands on the opponent, which can sometimes be useful.

Up Throw
8%
KO: 160%

Andy throws the opponent slightly into the air, and then he whacks them with his wrench. A silver crosshair appears on the opponent. A good launching move, which, again, benefits Andy's allies more than him.

Command - Gun Focus
Similar to Blast Focus, except Andy's minions will prefer to use their gun attacks on this opponent. Also expires after being KO'd.


FINAL SMASH
Hyper Upgrade

If Andy doesn't already have a minion out, he'll summon a Tank, even if it was in a summoning cooldown. Andy takes out all his tools at once, then dashes to his minion. He then performs very fast upgrade animations on the minion, alternating between his tools, and all the while the minion roars (unless it’s an infantry). The minion gets restored to full stamina and now glows with the smash ball energy.

Upgrade - Hyper Upgrade
The minion now does max damage regardless of stamina, and has permanent super bomb. They also accelerate much faster. Gun attacks now deal much more knockback and are capable of KOing. The cooldown for both weapon timers gets reduced to just 5 seconds. Artillery are now capable of firing while moving. For Infantry, on top of everything else, they gain a large boost to power and mobility to put them more in line with the other minions. This upgrade lasts for 10 seconds.

V2

Changes:

Grab

- Is now automatically used on Battle Copter when it is summoned in mid air.

Text:

Tank, Artillery, and Battle Copter

- Added KO power tables for explosive attacks.

Down Special (Dismiss)

- Added "...usually when your current vehicle is so badly damaged that it would be a pain to repair it.."

- Added "Dismiss isn't affected by stamina, so it becomes the vehicle's strongest move once it takes around 10 damage. "
 
Last edited:

Katapultar

Smash Lord
Joined
Nov 24, 2008
Messages
1,251
Location
Australia
* * * Ohana Matsumae * * *


Ohana is the main character of Hanasaku Iroha, a 16-year old 160cm tall lightweight female protagonist forced to move in with her estranged grandmother and work at an inn after being ditched by her single mother. At first the odds are stacked against Ohana as she makes many inevitable and clumsy mistakes, but being as energetic and passionate as she is she settles into her new after having decided to fest it up, and eventually comes to learn a lot about her surroundings and the true meaning of work.

Size 5
Weight 3
Ground Speed 6.5
Jump 5.5
Aerial Speed 7
Fall Speed 6
Traction 7


* * * Fest It Up * * *

The game decides to fest it up for Ohana by making two generic customers spawn behind her 3 seconds into the match, wearing a traditional Japanese yukata as a ding-dong sound is heard. The customers just sit there on their knees waiting for Ohana to show them some hospitality, or just fest it up for them, showing them all the wonders Brawl can offer. If Ohana can keep the customers safe for 4 seconds they'll put in a good word for her as she's healed 5% per customer, even healing past 0% if she was at full health (up to 50%), before the next set of customers appear 8 seconds after their appearance (you're given a warning of one second in advance as a warning sign flashes behind Ohana). Customers applaud players whenever somebody takes damage, and for every 20% taken gossip about Brawl will spread throughout the verse-verse that causes an extra customer to appear within 4 seconds. Up to 12 customers can be onstage at once, allowing Ohana to receive a lot of healing if she does her job well.

You don't want to fest it up too much however. Customers can be damaged by players, taking knockback like Jigglypuff at 20%, and if one -is- attacked the damage they suffered will be dealt to Ohana's percentage when they leave (Ohana can be heard awkwardly apologizing when one is attacked). It certainly doesn't help that customers can't escape from grabs on their own, nor that Ohana's damage penalty is doubled if they're KO'ed. In addition, for every 40% customers take Ohana's reputation is worsened to the point where one less customer will appear in the future, taking 3 seconds longer for the next ones to do so at an absolute maximum of 15 seconds should there be no customers. To further emphasize the importance of treating customers well, their condition is passed down from stock to stock until Ohana is removed from the match. You'd think that Ohana would be utterly crushed when foes can attack the customers after KO'ing her to rack up even more damage on her, but the amount of time she's invincible for when respawning is increased by one second for every customer out. That's the start of something, for sure.


* * * Specials * * *


Neutral Special =-= Homebred Chef
Ohana takes out a wok and shows the opponent her amazing cooking skills she developed from having to look after her lazy mother for many years. While you hold B Ohana holds the wok out as a fire hitbox that deals 9% with horizontal knockback that KOs at 200% and cooks up projectiles, cooking an omelette rice all the while. Yummy. Releasing B has Ohana flip the omelette rice over her head so it lands behind her, nicely served on a tray and ready to eat. How much it heals depends on how well you managed to cook it: once it begins sizzling, usually within a second, that's your cue to flip it, creating something extravagant enough to heal off a nice 20%. Cook it any further and the wok will catch fire, causing Ohana to look panicked as the flames spread out as a small blast of fire (dealing 17% that KOs at 130%), but only yields a burnt omelette rice that drops to the floor in front of Ohana and heals 1%. Any food Ohana cooks will also drop to the floor in front of her if she shields out of the cooking state or is attacked.

Food is meant to be eaten by customers, who spend an extra second eating what comes their way, healing Ohana the amount the omelette rice would've healed when they leave as well as bringing in an extra customer - customers will only eat one thing per stay. While Ohana and other players can eat the cooked stuff, that'd be bad service and as such Ohana will take 1.5X the healed damage after 2 seconds. Not exactly something Ohana wants to risk unless she's extremely desperate, but she has to be even more cautious of foes eating the cooking.

Side Special =-= Berserker Worker
Ohana takes out some sort of beating stick used for clearing bats out of the inn, yelling as she prods it forward like a lance. Consider this Kirby's Side Special with the range of Dedede's F-tilt, only it can be angled and deals 18% with weak base knockback but good growth, sending enemies flying at 85% and KO'ing them as early as 110%. The move also has some nice priority that'll beat out your average projectiles and locks shielding foes in place for long enough so they can't punish you, but if Ohana clashes with a stronger attack she'll get pushed back quite far (about 0.1 SBBs for every 1% more it did or every 5% it KO'ed earlier), actually taking knockback that can risk the well-being of any customers behind her.

If Ohana holds the input after the first attack, she'll run forward with the stick held out like a battering ram and is able to turn around with some lag to pursue foes that go behind her. If the input is used once again in succession however, Ohana will poke the stick out again with the speed of a normal jab, dealing 2% less and KO'ing 20% later for each hit until the later hits deal as little as 8% that KOs at 190% - the shield stun also decreases, though it's good enough for dishing out some good damage and the attack's range prevents Ohana from being shieldgrabbed by most characters. The move starts up a bit quicker in the air and halts Ohana's horizontal momentum, making it a useful option out of a short-hop or DI'ing purposes. A good move if you want to fest it up, that's for sure.

Up Special =-= Fest it Up
Ohana raises her hands as she yells the attack's name, and she almost instantaneously leaps 2 SBBs into the air before entering helpless. Foes hit by Ohana on her way up are knocked away horizontally in the opposite direction they were facing, taking 10% that can KO at 145%. The biggest downside to this recovery is how Ohana covers absolutely no horizontal distance, meaning she actually needs the healing she gets from customers despite having a recovery at all.

If the input is repeated during the move (even when Ohana is in helpless) or cancelled on ground with a double-tap, she'll fest it up with this buff and exit helpless. Ohana will now look more lively as an energetic aura surrounds her, increasing her attacking speed by 1.25 and making them deal 1.1% more, having her horizontal momentum doubled outside of dashing and being able to recovery without entering helpless. The customers will also fest it up along with Ohana, following her around at Ganon pace for the sake of having a better experience (they'll move along the ground while she moves in the air)...it's not all sunshine and rainbows for Ohana though, especially when said customers are more easily exposed to enemy attack and Ohana will stop festing it up if any one of them is attacked. Also be aware that customers will not walk over areas that are infested with traps. Ohana can also stop festing it up by her own accord, but upon stopping at all she cannot fest it up again until a new customer appears - one must fest it up with responsibility.

Down Special =-= Greeting Area
Providing she's not in the air or on a thin platform, Ohana gets down and opens a sliding door on the floor, leading to a set of stairs in the background. This becomes the area where all customers enter and exit while its open (those not next to the stairs come time will walk towards them) and doubles whatever healing benefits Ohana receives them from. On the other hand, the stairs become an obvious nesting place for foes and their machinations, and Ohana actually has to close the stairs manually by using this move on top of them before she can open up another set. That said, if a character rests atop the stairs they'll take up the space meant for customers and drive them into the background, where they'll stay invulnerable until that character budges. That'd be an ideal way for Ohana to protect customers...if she had any projectiles to fight back with. Another convenient thing about the stairs is that Ohana will respawn where they are after being KO'ed, allowing her to jump right in and protect the customers from foes trying to target them after having been knocked away.

If this attack is used in the air, Ohana gets a downwards stall-then-fall variant of the first hit of her Side Special that deals 1.2X more damage and knockback.


* * * Standards * * *


Standard =-= Slap of Sincerity
Ohana holds her arm to her side and throws out the most serious slap she can possibly muster. This comes out fast and deals 4% with great horizontal base knockback that KOs at 200%, sending foes flying pretty far even at low percentages in the opposite vein of the Side Special. If A is mashed however, the slap can be continued under the pretense of weaker hits that trap the foe until they DI or are naturally knocked away once their percentage goes up enough.

If Ohana uses this on a customer, she'll slap some sense into them, making them realize how much work she puts in as an employee. This causes the healing that customer would give to Ohana upon leaving to be given to her right away, a nice method if you're so desperate for a raise....

Don't use this move on the customers, just....please don't. They come before the employees.

Dash Attack =-= Wipe the Floor
Ohana extracts a wet towel and bends down, wiping the floor ahead of her sparkly clean as she races along with a speed stat of 4/10 while you continue to hold A, yelling vigorously all the while. The towel is a weak damaging hitbox that deals 5% with knockback that KOs at 380%, but more importantly here is that Ohana is wiping the floor of any messy stains like goop, seals or what have you in the way of traps, all while approaching the foe. It's also rewarding in the context that if you do wipe a trap away, say something like generic goop for example, the customers will see Ohana's vigor and reward her with an extra 1% for every 0.2 SBBs wide (large) the goop was when they leave, or in the case of being a simple trap she gets an extra 5% instead. Be aware that not all traps can be wiped away, only on a realistic level (she's not going to be wiping away lava or acid anytime soon).

F-tilt =-= Player
Ohana shoves both hands forward, pushing any foe she comes in contact with a Platform away on a slight downwards angle that can force them into prone, along with dealing 4%. If Ohana pushes into a stronger hitbox she's instead pushed away at an intensity based on the attack's power and takes half its damage, which can be a good spacing move to prepare for the arrival of customers after having attacked a foe. Customers will catch Ohana if she bumps into them.

U-tilt =-= Household Cleaning
Ohana thrusts the beating stick from her SSpec above her, dealing 8% that KOs at 160% right above her or 4% at the tip. This deals upwards knockback vertically or forwards diagonal knockback if it hits from the side. This has a decent duration and range while not being slow, but it leaves Ohana open from the sides.

D-tilt =-= Bow Down
Ohana's default crouching stance has her kneel calmly in a feminine manner seen before. Upon attacking, she immediately bows in a motion of utmost respect. This deals 4% and has a chance of tripping opponents.


* * * Smashes * * *


F-Smash =-= Mopper
Ohana decides to clean the floor with a mop, running ahead while dragging it behind her enthusiastically. Upon release, Ohana stops running and swings the mop like a golf club, dealing as much as 21% with knockback on a low angle that can KO as early as 115%. As Ohana runs, she wets the ground behind her, cleaning certain messes like with the Dash Attack but also giving characters a high chance of tripping when they attack or move on it (characters can trip in the middle of moving) - customers see the water as a trap and won't spawn where it is, instead spawning behind the area where Ohana started the attack. The slippery floor stays out for 5 seconds, being an ideal method for creating a gap in-between Ohana and her customers as she approaches foes while at the same time deterring them from using the floor to approach customers.

U-Smash =-= Coverage
Ohana bends down, lifting and swinging a curtain prop designed to keep people out of certain places, usually separate genders. The curtain inflicts up to 20% with knockback that KOs as early as 130% before being placed in front of Ohana as a wall. The curtain is as tall as Ganon and can take hits that deal less than 6%, but no more as anything stronger will cause it to fall over and deal a negligible 5% with set flinching to anyone on the other side before disappearing. Characters don't even have to attack the curtain, as they can simply knock it down by dashing into it or simply roll past it. The curtain is also knocked down when somebody is knocked into it and disappears after 15-30 seconds. Up to 2 curtains can be out at once, and while they're not as effective as other walls they do stop projectile spam when Ohana has no way to pressure foes from a distance. The weak nature of the curtains can also be useful as they don't hinder Ohana's movement and she can even use one in her offensive by running into it, making it land on a foe before taking advantage of the flinching.

D-Smash =-= Cleaning Duties
Ohana faces the screen and uses a broom to sweep the floor vigorously for about half a second, hitting on both sides of her. Foes caught in the sweeping suffer 20 or so hits that accumulate up to 18% before spitting them out on the other side of Ohana for knockback that can KO at 135%, on a high angle if hit in front of Ohana and on a low angle if hit behind her. This is one of the fastest smashes in the game given Ohana doesn't have to bend down to perform it, yet at the same time it has poor range and leaves the upper part of her body covered, making it easy for anyone with decent range to punish her with a F-tilt. At the very least Ohana is able to cancel the attack into a jump, shield or roll halfway so she's not completely defenseless during the long duration.

When Ohana catches a foe in the midst of her sweeping, they can expect to be trapped for well over 2.5 seconds given all the hitlag that'll take place from the multi-hitting nature of the attack, making this a useful stalling method for the departure of a customer. Ohana also creates a Kirby-sized dust cloud right outside the broom's attack range whenever she hits anything with it, on the side they were struck, lingering for 0.5 seconds while dealing 2% with high hitstun. This is not only a good way to control space in a FFA so other foes are more likely to roll towards the other side of Ohana, but also takes advantage of any stuff lying around: Ohana's sweeping reflects low-lying projectiles, clears non-hazardous traps, goopy areas and also pushes items fairly far, about 6 SBBs (this has no hitbox against them, meaning it won't break item capsules or detonate bombs). Used in shallow water such as that from a spa or in Delfino Plaza, water is splashed on either side for a mini FLUDD effect instead.

Customers will not approach an area Ohana is sweeping, but they'll still take damage if she does so when they're next to her. This isn't exactly a move Ohana can pull out freely when customers are close to her, however good it is.


* * * Aerials * * *


N-air =-=
Ohana curls into a ball to deal 8% that KOs at 200%.

F-air =-= Stubbornosity
Ohana swings her arms down in front of her, doing so 10 times over a duration that barely outlasts Snake's N-air. The range of the punches isn't that good, but a foe hit by even one will be dragged into all of them, and they each deal 1.5-2% for what could be a very powerful aerial as the last hit deals knockback in a direction based on Ohana's current momentum that KOs at 195%. This attack has some odd properties too, as it slightly increases Ohana's momentum for the entire duration and automatically ends once she's reached the apex of one of her jumps instead of dragging out. Furthermore, Ohana loses the ability to fest it up as she takes damage, performing one less hit for every 10% she has. This can be deceiving combined with how Ohana's damage percentage changes with customers, but also useful since at higher percentages Ohana won't want to keep herself open for such a long time, turning this move into a fast GTFO attack. This move's main use lies in forcing foes to go where you want them such as dragging them to the edge of the stage, putting Ohana's fast movement to good use by attacking them directly. If Ohana lands in the middle of any of the hits she'll push the opponent forward with 0.6-0.2X the efficiency of a Bumper depending on how much hits she had left.

B-air =-= Desperate Measures
Ohana turns the upper-half of her body around and shoves. This deals 10% or 5% and knockback behind her if she hits with the hands, able to be used on customers without damaging them in which case they're never pushed offstage or into a trap, and Ohana suffers extra lag by apologizing to them of which foes can use to attack her...but if they do, the customer will take note of Ohana's generosity which has Ohana heal 1.3X the damage she took. That's probably not much when she'd lose a lot more if the customer is attacked afterwards, however.

U-air =-= Headstrong Rage
Ohana seems to growl as she curls up slightly before swinging the upper-half of her body above her in an arc. This attack does more damage than it has any right to, dealing 19% with high upwards knockback that KOs at 115%, but is telegraphed and doesn't reach out that far, making it incredibly difficult to hit anyone from above given Ohana's not exactly floaty - that said, the headbutt increases any upwards momentum Ohana might have (like that from jumping), though the end lag prevents it from being used to recover even when used out of a jump or when festing it up. Ohana also takes 10% upon hitting anyone with her head, though it's usually well-worth it; Ohana is able to delay the attack for up to 3 seconds and even remain curled up when landing, making the attack useful for scaring off approaching enemies given it also covers the front and back of Ohana. If Ohana uses the attack on ground, she'll end up stumbling back a Platform's distance from the momentum and risk tumbling off the stage. Thankfully any customers she runs into will kindly catch her, however. This attack is a decent way to mix things up with the Up Special.

D-air =-= Pool Cleaner
Ohana takes out the same beating stick used for the Side Special and pokes it downwards on a 170 degree angle, dealing 12% with knockback a high angle that KOs at 220%. The stick can be kept out for up to one second as a hitbox that deals 8% with flinching knockback, where afterwards Ohana swings it upwards in a wide motion that deals 14% with horizontal knockback that KOs at 100%. The interesting thing about this attack is how the first hit produces high base knockback that wards foes from customers, while the second deals low base knockback but is extremely powerful for an aerial along with having amazing range - you'll never hit with both attacks, but rather should be using the more underwhelming first hit to scare foes away into not getting hit by the second attack.


* * * Grab * * *


Ohana's grab is surprisingly forceful, gripping foes by their collar tightly whilst looking at them on eye-level with resolve you wouldn't expect from a non-superpowered lightweight female protagonist. It obviously comes from her power to fest it up. Ohana's Pummel has her headbutt the foe's head or wherever she can reach to deal 3% to them and herself....don't laugh, Ohana gets nosebleeds easily. The Pummel is shockingly fast, enough so that she can get 10 hits on a foe even while they're at 0%, but isn't powered-up by Ohana's attempts to fest it up. This is one of Ohana's riskiest attacks, but one capable of netting her a lot of customers given its massive damage output, and a good way to spend any damage past 0% healed off if Ohana hasn't taken too much damage.

F-throw =-= Headstrong Hanasaku
Ohana begins pushing against her foe, moving them back a little before a struggle begins. Both players have to button mash in order to push the other back, the ease of which is determined by their damage percentages. The players' goal is to pin the other against the first trap, wall or ledge they come across - if Ohana wins she'll barge at the foe with all her strength to deal 22% with mostly horizontal knockback that KOs at 110%, but if she loses she'll stumble for 0.75 seconds of which gives the foe time to perform an uncharged smash or even grab her. It does not, however, give Doopliss time to do the impossible. If neither player comes to a conclusion after 10 seconds, the grab automatically ends to prevent it from potentially lasting forever.

While it may not look it, this is by-far Ohana's best KO move from the fact that the knockback from her attack will usually be applied at the edge of the stage where it'll KO earlier, as well as the fact that she'll have had plenty of time to raise the foe's damage percentage to ridiculous amounts with her pummel - not that said pummel actually gives her an advantage over the foe what with them both taking damage at the same time. No. The key to pulling this move off successfully is to have a well-looked-after customer on standby beforehand so that they end up healing Ohana's while she's in the middle of the struggle, thus easily pushing the foe off the edge of the stage for an easy KO. This move can also be used to stall for customers if used at the right place and time, who will automatically shift into the background when a struggling player moves past them as to not be involved.

B-throw =-= Rollback
Ohana pretends to be a pro-wrestler by rolling back along the floor with her foe, traveling half of Battlefield before tossing them back a very small distance that barely scales, dealing 7% and not KO'ing until past 400%. Bystanders receive the same amount of damage if they're rolled into, but really you're not going to be rolling into customers but rather away from them in the even that a foe manages to get past you. Ohana and her foe are sent sliding even further on slip'n slide terrain, and if they roll offstage the two are immediately released in a frame-neutral stance, Ohana far enough so that something like Marth's F-air would barely hit her. This isn't something you'd want to use against a foe with exceptional aerial abilities, but against heavyweights it can be a win-card as Ohana uses her F-air to stagespike them. Used on a customer, Ohana will move them to the opposite side of her in case there's a foe on the other side of her ready to attack.

U-throw =-= Upperbutt
Ohana lowers her head before smashing it into the foe's jaw with a vigorous leap, dealing 17% with low upwards knockback that barely scales and won't start KO'ing until 190%. Ohana leaps a short distance off the ground when headbutting her foe, and ends up inflicting 7% on herself from the impact. This throw isn't exactly reliant for knocking foes far and it hurts Ohana in the process, though it does keep the two characters close together and lends itself for a follow-up attack, usually with the Up Special. If this is used on a customer, they'll fling Ohana into the air as if she'd footstool jumped on them.

D-throw =-= Bad Taste
Ohana takes one second of the foe's time to demand what their least favorite food is so she can cook it for them, something that totally happened in the anime because I wouldn't have been able to make this kind of thing up myself. The foe can press A or B to fess up, which will cause Ohana to release them as she looks delighted in imagining the aforementioned food. Her Neutral Special will now have her fire out 3 copies of that food in the place of an omelette rice that can each heal up to 33%, and if the foe in question tries eating that food they'll take a second worth of hitstun one second after eating it that can stack if they eat multiples beforehand - far from worth damaging Ohana over when she can get a free smash or grab on them. More food is always better when dealing with multiple customers.

If foes refuse to tell Ohana their least favorite food, she'll look angry and smack them away for 10% and horizontal knockback that KOs at 160%. That's not all either, as the next time she grabs that foe she'll hold them in place for 1.3X longer until they decide to fess up when she uses this throw again. Ohana can hold foes for up to 2.2X longer than usual, which is deadly for two reasons: not only is Ohana able to stall for her customers for a very long time, but is able to spam her pummel to a ridiculous degree before finishing off with an U-throw. If Ohana uses this throw on a foe who's already fessed up, she merely smacks them away instead.


* * * Playstyle * * *

Ohana tends to feel more pressure than she deserves to throughout matches, having to constantly babysit customers that come by to watch. Rather than have her entire game dedicated to this however, Ohana goes about this responsibility in the most basic and natural manner possible: pressure the enemy so they don't get the opportunity to attack the customers in the first place. This ties in with the fact that Ohana has to knock enemies away to score KOs just like any other character, build up their damage, keep herself alive, so on. Aside from having dual responsibilities however, there doesn't seem to be anything really special about Ohana; she's just an ordinary girl. Ordinary isn't necessarily a bad thing, however.

Ohana's first order of business should be in deciding where she'll want to be 3 seconds into the match, as that's when customers will start coming in. It's absolutely vital for Ohana to be somewhere where she has access to the foe and restricting their space, because it's all too easy for things to go wrong if they're allowed to take control of the stage. Sitting back and putting up a curtain can work against foes with weak projectiles or none at all, though against most others Ohana will very well want to make the first move. Ohana tends to do better when approaching foes rather than being approached, as she can use her Side Special to break through projectiles or Dash Attack to clean up any goopish traps in her way, even go for typical slip'n slide with the F-Smash as a separation method come customers. Remember, Ohana has no true projectiles, summons or traps, so she's fairly easy to approach - that's why she has to set the standards, not the foe.

Ohana's close-up game is basic, but vital to her success with the customers: keep the opponent close-up, and absolutely do not let them get around you. Pull off some damage on them, and attract more customers. If Ohana can keep foes away from, she can afford to get messy. You may even want to finish with a Pummel/F-throw combo if everything's been peaceful.


* * * Final Smash * * *

Super Fest


Lots of customers suddenly appear behind Ohana, but she can't handle them all by herself! There's only one thing -to- do...fest it up with her co-workers from Kissuiso! Going clockwise, super-harsh tsundere chef-in-training Minko Tsurugi, headstrong young woman Tomoe Wajima, spoiled yet observant Yuina Wakaru who doesn't even work at said inn and shy-yet-reliable hostess Nako Oshimizu all appear behind Ohana in order to take care of the customers, telling her to take care of what needs to be done.

For the next 30 seconds, 2 SBBs worth of ground is being covered by the 4 extra girls and the customers they're tending to. Ohana is constantly being healed roughly 3-5% per second in addition to what she was being healed from any customers who were out beforehand, and does not have to worry about them being attacked - if Ohana is knocked into the working zone it'll act as a wall for her as Minko yells Balut! at her, an insult that roughly translates to smelly and ugly of which she throws at Ohana several times throughout the series. If a foe tries to enter the working zone Tomoe will smack them away with a broom for 20% that KOs at 100%, but allies can enter and will be healed 15% every second at the cost of their traps/projectiles being nullified to prevent cheap camping despite being a Final Smash. Also, Ohana will constantly be festing it up for the duration of the Final Smash; can't forget that. The Final Smash lasts for a long time, though Ohana can still be KO'ed and as such the effects are somewhat balanced out.
 

Katapultar

Smash Lord
Joined
Nov 24, 2008
Messages
1,251
Location
Australia
MARION QUINN


Height: 150cm---Weight: 4---Speed: 7---Jump: 6---Traction: 7---Wall Jump: 5
"If you think it's dangerous, don't go too far in."

Marion is a government official working out in the sticks with her bodyguard and partner Linca, tasked with carrying out anything and everything the higher-ups want at the time - including but not limited to exploring, paperwork or even catching criminals. She first appeared in Atelier Ayesha: The Alchemist of Dusk, as a supportive guardian-like figure to Ayesha after she and Linca befriend her, but later takes on the role of a superior in the sequel Atelier Escha and Logy: Alchemists of the Dusk Sky, where she has been promoted to head of the development team in the frontier town Colseit and the protagonists of this game work under her. As such, Marion has a bigger role on this game, even if most of it is confined to the workplace. Marion is shown to spirited, stubborn and determined, very prideful when it comes to getting results, but is just as prone to ranting about the troubles the higher-ups bring her. She has a fondness for cute things, but this is only brought up once in Ayesha and is irrelevant to her character as a whole.


Given she is getting a set at all, Marion's petite frame and job description naturally belie a badass with surprising skill in gun-slinging. What, did you think this was going to be another one of those Ace Attorney minion sets where you sue the enemy? Marion is perfectly capable of fighting on her own, thank you very much! This battle-confident gal keeps numerous tiny pistols underneath her cloak, as they run out of ammo quickly. She claims she could easily subdue her 2 alchemist subordinates Escha and Logy, despite clearly not having the time to train or exercise. Even Marion's partner Linca - a master swordsman of great strength - claims that she wouldn't stand a chance, and that Marion apparently has no weaknesses. The Atelier series is weird like that.

Finally getting a break from the office, Marion enters the battlefield to polish her fighting skills and put the young 'uns in their place. Will Marion put everyone else to shame with her rumored trigger-finger, or has all that time sitting in the office caught up with her?


SPECIALS

Neutral Special ~ Clear Shot
GIF
Marion whips out 2 tiny pistols and spins in place, then takes aim with style and fires like crazy. Bullets are fired off which reach 2.2 platforms ahead of Marion, and trap opponents for up to 30 hits over the course of up to 1.3 seconds before launching them on a high angle with the final hit. Once fired, Marion must commit to the attack for at least 0.6 seconds before she's allowed to stop firing halfway through. Each bullet deals anywhere between 0.5-0.25% depending on whether it hit up-close or from a distance (up to 15%), and an appropriate amount of knockback based on total damage accumulated on a victim that can deliver minimal knockback or KO as early as 160%. Marion can choose to slowly angle her guns while firing to raise or lower the stream and in turn carry victims along with it, her guns aimed diagonally by the end of the attack if she angled at the start of the move, but once Marion has committed to angling she cannot stop or change directions. The pre-firing animation gives this move a lot of starting lag, but Marion experiences virtually no end lag afterwards due to discarding her pistols instead of putting them away, allowing her to easily capitalize on the move's disruptive and zoning properties.

Used in midair, Marion experiences slightly less starting lag, but loses the ability to angle her guns. This variant doesn't drag opponents along with Marion, but rather keeps them pinned in place as she continues firing at them even as she falls, good for keeping them in midair for an air-to-ground transition. If Marion lands before she finishes firing, she can choose to rotate her guns similarly to the grounded version, should she want to position opponents somewhere specific. Marion can move back and forth very slightly while firing in midair, and can choose to fall through any drop-through platforms she would land on.

By tapping or holding the shield input halfway into the starting lag or during the latter half of this attack, Marion can actually equip her pistols as a pair of items. When thrown, these pistols more or less function as a smaller raygun, but deal 1%, no flinching and travel twice as far when bouncing off surfaces. Guns that are dropped deal no damage on contact. Despite coming as a pair, only 1 pistol is actually thrown/dropped at a time, but you can throw/drop both by holding Z during the starting lag, or throw both twice in quick succession by quickly tapping the control stick twice. You can even angle the control stick while throwing both to have them fly out on a slight angle away from each other, so they're both thrown as separate items at the same time. If 2 guns collide, they'll bounce off each other and away on a high angle, and if a thrown gun hits a stationary gun from below (say it's on a platform) the former will transfer all its momentum to the latter and take its place, similar to billiard balls. Characters holding guns still have access to their A attacks and throw them using the grab input. Unlike with regular items, characters will not have their Jab, F-tilt or D-tilt interrupted when using them to pick up a gun. Other characters cannot fire Marion's guns.

GIF

By double-tapping B while grounded and after throwing or dropping a gun still in midair or after bouncing it up in some other way, Marion will specifically aim her pistols at that gun. This has average lag on both ends, but almost no starting lag if you let Marion fire just after she threw a gun as opposed to waiting. In Atelier Ayesha, Marion is somehow able to bounce her bullets off of thin air for some of her skills, but in Smash this is explained by the bullets bouncing off of the gun Marion threw into the air, allowing them to be used as a makeshift surface to ricochet the bullets off. When doing this, the gun being fired at is slowed significantly while moving through the air. If 2 guns were thrown at the same time and/or one bounced off another gun, the bullets will actually bounce between them - starting with the (most recent) gun Marion threw and then towards the gun closest to it and so on. If Marion threw 2 guns at the same time, she will fire at one of them - based on which side you shifted the control stick towards when angling the throw - and then have the bullets ricochet towards the other gun. If any one gun hits an opponent, Marion will fire on that gun and have the bullets ricochet towards them, and ignore all other guns. If multiple opponents were hit by guns, Marion will fire at the nearest opponent.

While firing at a gun, Marion is allowed to slowly move it sideways by angling her fire. This alters the angle from which her shots bounce off, and in turn can be used to push or pull victims caught in the gunfire. If you tried to move a pair of pistols this way, they'll be split apart - Marion will focus fire on the gun closer to her - but can be put back together by inputting the opposite direction you initially moved the gun to bring them closer. When firing at multiple guns, inputting forward will have them move away from Marion while inputting backwards will bring them closer to her. If there were multiple targets, gun or opponent, you can hold the control stick vertically to have Marion fire her 2 guns at different targets - this lets Marion cover more area with her bullets, but at the cost of only dealing half as much damage and knockback with them and having to take a moment to readjust her aim if this is done while in the middle of firing normally. Bullets deal 1.4x more damage and knockback each time they ricochet off a gun; this might sound quite powerful, but you have to remember that the bullets can only cover so much area with their limited range and they don't deal much damage from a distance anyway.

Side Special ~ Paper Pusher
Marion reaches into her clothing for a small stack of papers and throws them out with a slightly annoyed expression, never one to smile when it comes to paperwork. Government documents don't really belong on the battlefield, but Marion puts them to good use here as a line of them form a paper-thin, platform-wide hitbox that deals 7% and slight knockback up-close, or 3% with no hitstun from farther away. This can be angled, and even curved when the papers are thrown out. You can also hold B to have Marion throw out the papers even further, 1 platform away from her, but they aren't a hitbox from that distance.

Once you've thrown some papers out, they stick around as a surprisingly strong construct that can withstand 10% and can even be stood on! Indeed, these are no ordinary papers: these are zettel, non-slippery and non-sticky papers created with alchemy and strengthened with quality materials. Thank you Escha! These papers can be used as a makeshift drop-through platform, but that's not to say you can just hop on them after throwing em' out in midair. Gravity and lag keep Marion from reaching the papers with her second jump, and even if she could the papers will gradually descend to the ground, while being weighed down by anyone who stands on them or even just jumps off or falls on top of them. Other than that, you're free to exploit the platformy papers closer to the ground, and they stay around until every part of the zettel lands. Marion can only have 1 paper platform out at a time, and cannot throw out a new one if an opponent was standing on the current one, in which case this move simply produces a hitbox.

Small items that are dropped - not thrown - through the zettel will pass through a small gap between the papers that form the platform, like Marion's guns for instance. Speaking of guns, the zettel serves a very obvious purpose with the NSpec in that it functions as a makeshift surface to bounce the bullets off. This allows for various set-ups, like using the zettel as a roof to bounce angled bullets between it and the ground in a zig-zag pattern, and if you can catch a foe in the stream you can pull them towards Marion by angling the stream further. You can even angle zettel vertically when throwing it out to add more variety, but this doesn't stop small projectiles from getting through the gaps nor block bigger projectiles that destroy it so it can't be used as a shield.

If Marion chose to focus fire on a gun that had passed through a paper platform or had been sitting on one prior to being thrown, the bullet(s) will ricochet towards the gun and then towards the platform before bouncing towards its next target, this occurring with every gun if multiple were being targeted. The bullets will even pass through the paper platform to bounce towards their next target, if necessary.

Up Special ~ Leap Shot
Marion leaps on a low angle with surprising agility, going almost horizontal when doing so from the ground. This is fairly quick and covers 2.5 platforms after a slight delay, or just 1.2 platforms if you lightly tapped B while grounded to start it up almost instantly, and gives Marion slight invincibility for the first few frames and a slight momentum boost at the end of it. This does not put Marion into helpless, and has a sweetspot that targets the ledge from a surprising distance to compensate for the general lack of vertical coverage. While leaping, you can hold A to have Marion catch any gun(s) she runs into along the way, and discard any item she was holding or gun if she was holding/catching a pair.

If Marion ran into someone during her leap, she'll kick off of them to leap another 1-2 platforms in your chosen direction while kicking them back for 1-3% and good knockback in the opposite direction that KOs at 220%. By starting the leap when right next to an opponent, the move outright becomes a command grab that has Marion kick off to go 1.5x farther than usual and deal 1.5x more damage and knockback to the victim. If Marion leaped along the ground by kicking off a grounded opponent, she will not go offstage.

You can press B anytime during the leap to have Marion fire off a quick barrage in the opposite direction, which has infinite range, deals 10% with no knockback and will almost always hit opponents who were kicked back. Landing will not interrupt this. The force from the fire propels Marion 1 platform farther than usual, but prevents her from grabbing ledges while shooting and puts her into helpless afterwards.

Down Special ~ Power Shot
Marion flicks a shining silver bullet 1 SBB above her, or as high as 6 SBBs by charging this move for up to 0.5 seconds. The bullet has no hitbox, and ignores everything aside from solid terrain due to being so tiny - but not impossible to see due to leaving behind a silvery energy trail. The bullet will fall back down to where it was thrown after 1-6 seconds, and if Marion was still around to catch it, and not attacked, using a non-gun attack or shielding/dodging, she'll fire it off in a silver gun. The projectile from this takes the form of a thin beam that travels the same distance the bullet did to and from Marion, dealing damage and knockback based on how far it hit from. The beam only deals 1% up-close, but deals an additional 2% for every SBB it traveled and will KO earlier. The beam KOs at 200% after going 4 SBBs (2 platforms), 100% after going 8 SBBs and an astounding 70% after going its max length of 12 SBBs, where it will deal 25%. As powerful as this is, you'll probably never pull it off for a number of obvious reasons, chief among them being the distance required to utilize the beam's full potential and how ludicrously telegraphed it is. Marion can only have 1 bullet out at a time.

The beam can ricochet off surfaces, including zettel. This might seem very limited when Marion fires the beam straight ahead of her, but she is able to catch the bullet just before or when using her gun-based attacks to aim it on the angle she would have fired those shots from. This doesn't stop Marion from using the attack she caught the bullet with, only interrupts it for a moment, and up-close the beam generally won't deal enough knockback to knock foes out of range for the attack. Marion can even bounce the beam off of guns if she caught the bullet while in the middle of using the Neutral Special.

Being able to bounce the beam is a godsend for building its power over a more confined area, the most obvious set-up being to throw out a zettel "ceiling" so the beam can bounce back and forth between the ground. Opponents aren't safe on this platform either, because zettel hit by a beam will be empowered with a brief surge of energy that stuns them and deals half the damage they would have taken from the beam, and this will stack if the beam bounces into the zettel multiple times. Afterwards, the victim receives radial knockback equal to 3/5ths of the knockback the final energy surge from the beam would have dealt - but slightly stronger if the victim was shocked multiple times. This will never deal more damage and knockback than the strongest beam, but briefly turns the zettel into a hazard and is largely there as a bonus.

By holding B when firing the beam, Marion will fire off a more concentrated beam with slightly different properties. This beam will tear through constructs instead of bouncing off of them, but will still bounce off the stage and has a slightly longer duration. This can be used to surprise opponents among zettel. What's more, if the beam passes through zettel and then hits an opponent, it will bounce back towards the zettel and then back towards the victim repeatedly until it expires. The beam can hit opponents multiple times, even if they were launched, potentially dealing catastrophic damage if the tail end of the beam was able to hit. This homing effect will also occur if the beam hit a foe first and then bounced off a surface, in which case it will fly back to them.

If the beam would make contact with Marion for whatever reason (usually by firing it towards a zettel wall), she will fire it back in the direction it came from to "reflect" it with its remaining power and distance. This can serve as another blatant means of landing the beam at its finest. With more distance between Marion and the wall, the beam has a better chance of hitting from "further" as hitting too early risks opponents being knocked out its path for weaker damage, but doing this over a more confined area can lead to some absolutely horrifying shield damage.

Marion can catch bullets during the Up Special, in which case she will fire it off as a finisher to the gun barrage if you perform that. This does not interrupt the leap itself, but you have until the leap ends to fire the beam or else you'll waste the bullet. This can act as a surefire way to hit with the beam if you can catch the bullet during the leap at all, and can act as a very powerful finisher at higher percentages because any distance Marion covers after catching the bullet is counted to distance it traveled for lengthening the beam. This is arguably the best way to utilize the bullet in close-quarters, especially when you don't have zettel handy to bounce it off.


STANDARDS

Jab (Hold) ~ Gun-Swinger
Marion twirls a pair of pistols close to her chest for as long as you held A, dealing repeated hits of 1% before automatically finishing with a pistol-whipping that deals 5% and surprisingly good knockback that KOs at 170% should a foe be caught. The hitbox on this is very small due to how tiny Marion's pistols are, but this Jab is unique in that you can have Marion hold out her pistols in any direction except behind by holding the control stick and you can freely adjust this, giving the move some more coverage for what it's worth. How far out Marion holds her pistols depends on how far you tilted the control stick. If Marion finishes the Jab while holding out her pistols, the damage is downgraded to 4-2% and vaguely-completely radial knockback based on how far out she held her pistols, much weaker than the regular version but better for comboing. The twirling hitbox can be used to damage paper platforms Marion is standing on, if necessary.

Stray guns that come into contact with the twirling pistols are automatically reflected, or bounced 1.15 Ganons up into the air if they were grounded/falling and can be juggled indefinitely this way. If the pistols were held out forcefully via a smash input, the guns will be sent flying twice as far in your inputted direction sans downwards in which case the "knockback" is flipped vertically, allowing you to launch them on all sorts of unique angles. This can be used to set up for the NSpec, and if you managed to launch a foe with the finisher after bouncing a gun (providing it was still in midair) the bullets bounced from that gun will ricochet towards them, useful if you kept them close with the weak finisher.

This move can be used to bounce bullets back up into the air by whipping the pistol into them forcefully, to further the length of the beam if it hasn't been maxed out, but otherwise Marion will catch the bullet and fire it out as soon as you do the finisher or after 1.3 seconds have passed. This isn't very helpful up-close, but lets Marion bide for the right time to fire off the beam if she's content with only firing it out in a straight line.

Jab (tap) ~ Multi-Shot
GIF
By mashing A instead of holding it down, Marion will fire her guns ahead of her indefinitely. This has no lag and resembles the NSpec for the most part, but the bullets fired appear to be smaller and as such deal abysmal damage (4.5% per second) in comparison, with no flinching. This can be aimed in any direction to have Marion keep firing in that direction after you let go of the control stick, as she stops firing for an instant to aim her pistols in the chosen direction. Alternatively, you can rotate the control stick to have Marion keep firing without pause. This is relevant, because bullets fired from this move will pass through constructs like zettel and keep guns held in place instead of bouncing off of them. By rotating the bullet stream, guns can be carried along for easy positioning, even lift them off the ground, and can be pushed towards the end of the stream with varying intensity by holding the control stick in the direction Marion was firing. By picking a new direction to fire while holding a gun in the stream, those guns will be flung towards that new angle instead of being carried along, where they can potentially hit opponents in the way or go flying further should Marion chose to stop firing there or immediately pick a different direction to fire.

Marion's guns run out of ammo with every 0.3 seconds she spends firing them, after which she casually drops them and takes out a new pair to fire over 2 frames. The guns Marion discards don't just disappear like you'd expect, but rather continue to stay around as items that can be exploited with the NSpec. These guns have no ammo left in them, Marion will just discard them and take out new guns if she tries to fire them, but if you mash A more frequently when using this move Marion will discard and replace her guns more frequently (0.1 seconds), reducing the damage she deals due to pausing more often but allowing her to fire the guns she discards once.

Marion can switch between using her 2 different Jabs anytime in the middle of using them, even fire her guns after performing the pistol-whip finisher. With both moves combined, the Jab serves as Marion's definitive way to spawn guns and then immediately generically position them however she pleases, good because that kind of set-up is not something you can afford to spend too much time on when you have a foe to fight as well.

Dash Attack ~ Blowback
Marion punches her guns out in front of her and slides forward a bit, with a bit of punishable end lag if she whiffs. This normally only deals 5% and light knockback, but Marion's guns are a sweetspot at the start of the move as she fires them at point-blank on contact, literally blasting the opponent away for 12% and high mostly-horizontal knockback as the bullets instantly explode on contact, possibly due to being coated in gunpowder. The force of this blast induces 1.3 platforms of kickback, but you can press A anytime while sliding back to have Marion brace herself to kill the momentum, should she want to position herself specifically for a falling item. This is useful for hit-and-run combined with Marion's surprising mobility, and can actually be used to perform a reverse-DACUS by inputting any smash attack during the hitlag of the blast attack as Marion slides back further than usual instead of going forward. The main purpose of hit-and-run is so Marion can retreat back quickly to catch a falling bullet; this makes the edge the most ideal place to toss the bullet, because Marion slides back pretty far and having the ledge there as a break means she doesn't have to worry about being positioned specifically to catch the bullet.

F-tilt ~ Trick Shot
Marion holds out 2 pistols and fires them into the background and foreground respectively, only for the bullets to mysteriously ricochet back into the attacking plane and collide with each other 1.2 platforms ahead of Marion. This can be angled. The colliding bullets are a powerful sweetspot that deal 15% that KOs at 120%, yet deliver surprisingly low shield damage, while sparks from the collision form a sourspot which deals 6% and low radial knockback. This is a tricky move to land because it comes out some distance ahead of Marion and doesn't have a large hitbox, but it's extremely fast and even the sourspot is rewarding at higher percentages because it can either knock foes away from Marion or towards her for a follow-up.

By throwing a single gun or pair of guns forward and continuing to hold the control stick, you can press A to have Marion use a special variant of this move that involves aiming her bullets to collide with the thrown guns. This won't work if 2 guns were thrown on separate angles. This bounces the guns back to where they were thrown, and can be repeated indefinitely to bounce them back and forth so long as you didn't let go of the control stick. While the Jab already exists for generic gun positioning, this variant is useful because shooting the guns produces the spark hitbox around them for offensive purposes, and massively deters opponents from grabbing them as doing so will cause them to get hit by the sweetspot from the bullets' collision. This can done in any direction, not just forward, and can even be done in midair. Hitting an opponent with the spark hitbox counts as hitting them with the gun itself for an NSpec homing set-up.

U-tilt ~ Cross-Snipe
Marion faces the screen and jabs her pistols out on either side of her, before pointing them at the space right above her head in a flexing pose and firing them off. The colliding bullets deal 4% and juggling knockback that KOs past 300%, but can be repeated up to 2 times in a row to have Marion fire on a higher angle than before, just above where the bullets collided before. If a foe was hit by any of the colliding bullets, however, Marion will instead fire at their location automatically, so they end up being juggled up to 3 times in a row for what results in substantial knockback altogether, with the potential to KO at around 148%. If not, the final collision point ends up originating nearly 1 Ganon above Marion.

In addition to the colliding bullets, this move produces numerous other hitboxes. For one, the individual bullets deal 4% and set knockback that knocks victims into their collision point, should this somehow connect. The pistols being jabbed at the start of the move will also knock foes into the first collision point with 2%, but this is risky because Marion leaves herself open from the sides as she commits to firing upwards. Finally, the 3rd and final bullet collision causes small x-shaped flare of sparks to shoot outwards, far enough that it can hit especially tall grounded opponents. This flare deals 6% and radial knockback that can either be basic diagonal knockback or diagonal downwards knockback depending on where it hit from, the former KO'ing at 200% while the latter KOs past 300% but is good for knocking enemies into prone or spiking them nonetheless. With all these various hitboxes, this move can be used for a variety of obvious purposes.

D-tilt ~ Rebound
Marion aims a pistol against the floor before firing a bullet that bounces off the ground and up on a very high angle. This has a touch of starting lag and poor horizontal each, but little end lag and a lot of range as the bullet could poke through the top platform of Battlefield, dealing 8% and upwards knockback that KOs at 180%. At low-mid percentages, this can be used to juggle opponents as they fall back towards Marion's line-of-sight.

If there was no ground ahead of Marion, the bullet will simply travel downwards and deal less damage on contact - 6% - but as a result it's well-suited to pulling foes up towards Marion for follow-ups. The bullet deals less damage when going down because it actually gains power when ricocheting off surfaces, capping at 16% that KOs at 120% after 8 rebounds. This is very useful atop of a paper platform, as Marion will actually poke her gun through a small blind spot so she can hit enemies beneath her. What's more, Marion can fire off a silver bullet by using this move, and will generally be her most commons means of doing so with a paper platform out due to the angle of the shot coming out allowing it to bounce back and forth between the ground and the platform many times while still moving forward.


SMASHES

Marion's Smashes utilize the 3 elements that a basic bomb can be composed of in the Atelier series - fire, lightning, ice - courtesy of her alchemist subordinates. Equipping any of these guns will have Marion use them for her Neutral Special, Jab or other Smashes in the place of her regular gun, which is good because the various elements they produce interact with zettel and guns among other things. The guns are only good for one shot before Marion casually discards them, but this is merely an aesthetic as she will automatically equip a new pair. This lets Marion wield elemental pistols for as long as she likes, but they can still be knocked out of her hands like regular items, and must content with the inability to grab outside using her USpec up-close. If Marion attempts to equip elemental pistols while already holding an item/gun, she will drop it beneath her and this can be used to spawn numerous pistols.

Elemental pistols come in pairs, if it wasn't obvious from Marion's style of gunslinging. This makes it possible for Marion to wield 2 different elements at the same time, by discarding 1 elemental gun and then picking up a different gun, applying both their elemental effects on a target at the same time but with half their usual effectiveness.

F-Smash ~ Flame Shot
Marion takes out a pair of red pistols and twirls them stylishly. She then spins on her heel and fires a flaming bullet from one of the pistols, before doing the same with the other after a short delay. Both bullets travel 1.6-2.2 platforms, and can be angled separately. Once a bullet flies out all the way or connects with something, it shatters and erupts into a Kirby-sized flame that traps victims for 5 hits of 1.6-2% before launching them for below-average knockback that KOs at 195-165%.

The flames from the bullets linger for a bit, the first set staying around until Marion finishes firing the second bullet while the second set cover most of the high end lag she suffers afterwards. If the second bullet is fired into flames from the first bullet, they mix together to create a powerful Bowser-sized explosion that can dish out anywhere between 10-22% and knockback that KOs between 140-80%, depending on charge as well as how early the second bullet collided with the flames. This is the main option to go with for kills, but just hitting with the individual flames gives Marion more stage control and is better for set-ups. With good spacing, it's possible to use the first set of flames to knock a victim into the second set providing they were positioned diagonally behind them, though this is inferior to the explosion in terms of damage and KO power.

Firing the flaming bullets at zettel will turn the whole thing into a flaming hitbox, but will only cause flinching to opponents touching the zettel the moment it was burned. Once the zettel is set ablaze, it will continue burning for 10 seconds before the fire goes out, instead of being burned to cinders like regular paper. This burning zettel deals 1% to opponents who touch it plus another 1% every 0.2 seconds they continue overlapping with it, and can no longer be stood on by any character including Marion. Firing the flaming bullets via Jab or NSpec will only burn part of the zettel rather than the whole thing.

If Marion sets the zettel on fire while standing on it, she will automatically fall off and is canceled out of whatever move she was using, great for canceling the rough end lag of this move. If Marion fires a flaming bullet at point-blank to the zettel, it will not only set the papers on fire but also pass through them to potentially damage opponents. Firing at the burning zettel again will create the usual explosion, destroying any papers engulfed by the blast, allowing Marion to pull off the explosion with the first flaming bullet to make this attack deadlier.

Guns and bullets can also be set on fire, either directly or by having them pass through burning zettel. Once ignited, both of these remain alight for 5 seconds or until they travel 1.3 SBBs. Burning guns deal 4% and actual flinching on contact with opponents, while shedding their flames behind them as a SBB-wide trail that deals 2% and flinching on contact. Shooting a burning gun via the F-tilt produces bigger, SBB-wide sparks that deal 10% that KOs at 160%. Burning bullets don't produce a hitbox, but catching them results in Marion firing off a burning beam that starts out as though it had already traveled 4 SBBs, and ignites any guns or zettel it comes into contact with after expiring. If the zettel was already on fire when hit with the burning beam, you'll get the explosion and have the beam bounce off at the same time, potentially occurring just after the zettel was set on fire if you had the beam bounce off multiple times. The beam is set alight if it hits burning zettel, in which case it becomes 1.15x stronger. With a good set-up, you can even time it so you catch a bullet and fire it off after firing the first burning bullet, to exploit the flames for various purposes.

The lingering flames from the bullets are a trait unique to the F-Smash rather than that of the fire gun. If another element if used in the place of fire when using the F-Smash, you'll still get the lingering hitbox after firing each bullet. If Marion was holding 2 different elemental guns when using this attack, she will fire them off in order of the earliest one she equipped.

U-Smash ~ Storm Shot
Marion fires a pair of yellow pistols above her, which discharge electricity from their muzzle to form a hitbox of similar size and speed to Mega Man's U-Smash. This deals 8 hits of 1.5-2.1%, followed by upwards knockback that only KOs at 200-170% but compensates with low end lag. If this move is used immediately after throwing a gun upwards, Marion will specifically aim at it by firing the bullets into the background to ricochet back into the thrown gun much like the F-tilt. This takes off one hit from the attack for every SBB away from Marion this was done (capping at 3 hits), and reduces the hitbox's size and knockback of the final hit appropriately to compensate. If Marion threw 2 guns at the same time on different angles, or threw a pair of guns one after the other, she will fire one of her guns at each of them and the hitboxes start out only being half as big and strong.

Anyone or anything struck by a lightning bullet is magnetized for 0.5 seconds for every 1% they received, or for every 2% if only 1 gun was fired. This causes guns thrown in the target's direction to curve towards them to the same degree as Pit's arrows in Smash 4, and also causes beams to curve towards them if they would barely miss. If a gun or zettel was magnetized, it'll stay suspended in midair indefinitely, until it is picked up/destroyed or the timer on its magnetism runs out. Similar to burning, magnetized zettel cannot be used as a platform. It is possible to burn and magnetize zettel and/or guns at the same time, in which case the burning guns will damage foes on contact but not causing them any flinching. Opponents who pass through magnetized zettel are magnetized for the same length of time the magnetism had remaining.

Guns that are magnetized mid-flight when traveling upwards will become suspended after reaching their peak, usually as a result of being thrown through magnetized zettel. Alternatively, guns that are thrown downwards through magnetized zettel will begin to slow down as they are influenced by the magnetism, then stop once they would have traveled 2-4 SBB past the zettel and fly back up to where they were first thrown. This occurs even if the gun would hit the ground, in which case it will release its magnetism in a SBB-wide spark which deals non-flinching 1% to opponents, and spreads its magnetism to other guns to carry them up along with it. Needless to say, this can all serve as an amazing set-up for the NSpec, especially if you combine it with the DSpec. If the gun was burning when it released its magnetic spark, that spark will deal 3% and flinching will also setting fire to other guns.

If any Smash utilizing an electric gun is charged, it will draw in magnetized guns and zettel from any part of the stage at speeds ranging between Marth or Ike's dashing speed depending on whether 2 or 1 electric gun was used for the smash. This draws zettel towards the direction the smash was inputted, but never places it lower than 1 Ganon above her.

D-Smash ~ Cold Shot
Marion crouches down and fires off icy blasts from cyan pistols aimed down on either side of her. These blasts deal 10-14% and average knockback on contact, but the center of them is a sweetspot which deals 12-16% and mostly-upwards knockback towards Marion that KOs between 180-150%, knockback which leaves victims above her at lower percentages. Alternatively, you can tilt the control stick in one direction to have Marion fire both pistols on that side of her, with more start-up lag than usual but the attack now deals 15-19% that KOs at 140-115%.

Ice bullets freeze any surface they hit for 12 seconds, and do so at a rate of 1 platform per second when fired via the Jab or NSpec. The D-Smash freeze 1-2 platforms of ground beneath Marion by default, or 0.5-1 platforms ahead of her with one gun or 1-2 platforms if she was holding both freeze guns on one side. Freezing the floor is extremely beneficial for Marion, as it increases the distance she covers when using her dash attack, DACUS and even when performing a glide toss, just like in Brawl. Performing a glide toss out of this move can be a very useful tactic, as the sweetspot positions foes above Marion to be hit by the gun she throws up (equipped after using the D-Smash) and that in turn will make them a target for the NSpec if that's used afterwards.

Freezing zettel will cause it to remain suspended for one second before it comes crashing down via the power of gravity, crushing anyone in its way for 10% that KOs at 200% or 14% that KOs at 170% if they were grounded. Needless to say, this can be quite powerful when Marion can move at the same time, but she can be hurt by the falling frozen papers if she was in their way. If the zettel was slanted, it will fall over via realistic physics. If the zettel was perfectly upright, it will stick around as a wall until somebody or something pushes it over. If the zettel was frozen from being repeatedly shot via Jab, it will not start falling until Marion stops firing at it.


AERIALS

N-air ~ Bullet Barrier
Marion turns towards the screen, holds a gun out on either side of her and fires them off in seemingly random directions, with such skill that the bullets ricochet off each other and around her to form a pseudo-barrier. This bullet barrier is slightly shorter than Marion in diameter, and drags opponents along for 10 hits of 1% followed by some weak knockback.

F-air ~ Point-Blank
Marion lays herself flat and thrusts out her guns. Hitting with the muzzles, Marion will fire at point-blank to blast victims away for 15% and strong knockback that KOs at 130%, otherwise dealing 5% and light mostly-horizontal knockback with her arm or the guns that's good for pushing opponents around and can be easily mixed up with the sweetspot as a launcher. This can be angled up to 45 degrees as Marion angles herself appropriately before thrusting her guns, increasing the move's starting lag. A useful ability, as Marion will remain flattened indefinitely after thrusting to fire a beam from the position, and the sweetspot is triggered when pointed at zettel. The Bowser-sized blast that results from such deals 8% that KOs at 160% to opponents caught in it, launching them vertically or diagonally if caught from the side. Better yet, the explosion will take on the properties of elemental bullets and can interact with zettel (or opponents) as though they were struck by one of Marion's Smashes, making this a useful, up-close alternative to altering zettel platforms - especially Marion can fire off this move while passing through the platform simultaneously.

B-air ~ Gofer Kick
Marion kicks behind her to deal 10% that KOs at 180%.

U-air ~ Action Cop
Marion lays on her back and fires her pistols above her similarly to the Mii Gunner's U-air, but with a much thinner hitbox due to how tiny her standard bullets are. The shots trap and drag opponents for 10 hits of 1% followed by one final hit dealing 2% and okay upwards knockback, but there's a shining sweetspot on the last bullet at the end of the trail that deals 14% and strong upwards knockback that can easily KO before 100% near the top of the screen. This has a bit less end lag and landing lag than the Sakurai fanboy's move to compensate for the thinner hitbox, making it more useful for dragging opponents down with Marion for follow-ups. This can also be used to juggle guns and the silver bullet up to the top of the hitbox to keep them airborne for longer, if necessary.

D-air ~ Drop Shot
Marion points a gun beneath her with both hands and fires off a stronger and more visible bullet than the norm, covering 2.5 Ganons before disappearing. This bullet will pierce through opponents, platforms and constructs while bouncing off any solid surfaces it comes across. This can be angled up to 30 degrees like the F-air. The bullet deals 10% and spiking knockback that KOs at 160% up-close, 6% and okay upwards knockback at mid-range or 3% with weaker upwards knockback for hitting near the end. While not the strongest D-air, it's pretty fast and has some good onstage potential, able to knock a spiked opponent back up into the air as it bounces off the ground and towards them before they hit the ground (it outruns launched opponents at reasonable percentages). The bullet will even bounce struck guns up past the height Marion started this move from.


GRAB

Marion's grab is a surprisingly forceful swipe as her facial expression becomes slightly stern. Upon seizing an opponent, Marion will use the force from her swipe to spin them around so their back is facing her, before restraining their arms with a hold not unlike what a police officer would perform on a criminal. With all the gun-slinging she's been doing up until now, it's easy to forget that Marion is actually a government official, no?

Pummel ~ Arrest
Marion twists her captive's arm slightly to deliver 1% and some sharp pain, though it's a bit hard to tell she's doing this animation-wise. If you held A, Marion will instead use her authority to place the victim under arrest in the one way you'd expect when doing this in MYM: by using handcuffs to tether the victim to herself. Can't have the criminal getting away, now can we? This tether is around half a platform long, but it's not the sturdiest thing given all the ruffling Marion's been doing, and breaks if the victim escapes the grab, upon being attacked by either character or when pulled taut. This will usually happen automatically when Marion throws the victim.

F-throw ~ Uppergun
Marion uppercuts the foe with both pistols for 2% to strongly launch them up for set mostly-upwards knockback, then twirls her guns stylishly and fires 4 shots at them for 2% apiece before the last shot knocks them away for low purely horizontal knockback that KOs past 250%. This isn't designed for KO'ing, but rather sets up well for an aerial at lower percentages or NSpec/F-Smash projectile at mid-high percentages, as the semi-spiking nature of the final hit makes it so foes will descend early. Cuffed to a foe, Marion will be pulled up to about 1.3 Ganons in height as the victim is launched from the uppercut, then start shooting at them while suspended in midair briefly. This is an especially good shortcut to perching yourself on a paper platform if there was one above you when using this throw.

B-throw ~ Timer Shot
Marion tosses the foe behind her for 5% that KOs at 150%, and that's all the throw does unless the input was held; followed up by a barrage of regular bullets aimed towards the target to deal them up to 18% over one second. That sounds like quite a lot for a throw, but these bullets don't cause flinching and are fairly easy to outmanoeuvre on top of only reaching 2 platforms. Higher percentages will put foes out of reach for this, but you can hold A or smash the input to have Marion fire into the background, creating a delayed hitbox in which the bullets will rebound off one another for around 3 seconds before automatically ricocheting towards the victim; creating a tiny static hitbox of colliding bullets that's easy to avoid, but Marion can at least move during this and it lasts for a longer 2 seconds to deal up to 20% in that time. It's generally better to have this tiny hitbox grounded where opponents are more likely to stay still, but that's not to say it's useless in the air as Marion's projectiles like her beams and bullets will be reflected towards the intended victim once if they strike it.

U-throw ~ Juggling Shot
Marion tosses the foe above her lightly for 2%, and ends the throw there unless you held down the input. Continuing, she'll whip out her pistols and fire at the victim like crazy for shots that accumulate 10% and drag them as high up as 2.2 Ganons over one second, finishing with a very small amount of knockback that can KO past 180%. Marion can stop firing early if she wishes to position her opponent specifically or keep them closer. The appeal here is the strong spacing, the shots pushing bullets and guns up to the top of the stream over the course of the throw and, if handcuffs are in place, Marion being pulled with her victim as they go. You can even smash the input to have Marion fire her shots diagonally outwards, bouncing off of nothing to ricochet back into the victim so they avoid passing through the attacking plane and don't juggle her objects if that is not desired.

D-throw ~ Restrain
Holding her captive's head from behind, Marion slams them into the floor to prone them and deal 4%. A simple option, but it gets better with the cuffs as they remain attached to the fighters to be exploited. The cuffs will remain attached when they move lightly such as walking, running, or rolling and will simple cause the other character to be pulled along, cuffs breaking if both characters move away from each other at the same time when they go taut. Any other form of movement will break the cuffs, but will cause the victim light hitstun if they broke it through means other than movement-based attacks, rolling or being launched. Smashing the input on a platform like zettel allows Marion to fall through it with her victim, dealing them an extra 1% for every 0.75 Ganons they fell. By holding the input, Marion and her victim will go sliding up to 1.25 platforms forward as the latter keeps going to suffer relatively minor horizontal knockback.


"My specialty; take them if you can!"

Marion strikes a cool pose, and then proceeds to fire her pistols on random angles for a few seconds. For some reason, the colorful bullets released from the pistol magically bounce off thin air, and form a sort-of barrier around Marion while she fires that traps opponents struck for up to 25% with knockback that KOs at 150%. After firing, the bullets scatter offscreen for a moment before coming back in towards the nearest opponent, and juggle them 4 SBBs up into the air for 30 hits of 1%, followed by knockback that KOs past 100%. It's not the most visually satisfying Final Smash, unless...


"I'm going all-out on you now!"


GIF

"Now let's end this, shall we? This is goodbye!"

There was a single remaining enemy past 100% and on their last stock, in which case this becomes a flashy finisher! Following up on the regular variant, Marion pops into view and fires at the victim countless times, before inevitably running out of ammo and casually discarding her guns. Shooting at the victim so many times has apparently caused them to be trapped in a large magical sphere, something Marion exploits by taking out one last gun, and aiming it at the sphere to shatter it along with the victim. After using all her power to defeat the enemy, Marion takes a moment to pose as her opponent finds themselves instantly star KO'ed.
 

Smady

Smash Master
Joined
Apr 29, 2007
Messages
3,306
Location
K Rool Avenue


PINSTRIPE


Don Pinstripe Potoroo is a boss in Crash Bandicoot, the first game of the franchise, a potoroo (kangaroo) exposed to Dr. Cortex’s Evolve Ray and turned into one of the doctor’s evil henchmen. As the name suggests, Pinstripe resembles a mafia man in his appearance as he wears a tacky suit and wields a tommy gun that he uses to spray his office in gunfire in his boss fight. As one of the game’s final bosses, Pinstripe seems to be in charge of running the chemical plant side of Cortex’s island that was bought from Papu Papu. This is called “Cortex Power,” a power plant that powers the entire island, as Pinstripe is its CEO running it out of his office. At the same time, Pinstripe is also Cortex’s personal bodyguard, seemingly only second in command to Cortex and N. Brio.

Pinstripe’s personality in Crash 1 is very unhinged, laughing maniacally as he tries to gun down Crash, jumping on furniture and destroying his office with round afrer round of bullets. The boss fight is easily won once the player realizes they can easily hide behind the furniture in Pinstripe’s office, blocking all his bullets and then safely strike at him when his tommy gun runs out of bullets after wasting them all shooting his chair. After being defeated, Pinstripe spins around and accidentally shoots the power generator positioned behind his office, unfortunately this is only placed behind glass and this causes the island to truly go into disaster mode. Eventually the island is seen burning at the end of the game, and the most obvious reason why is the power plant being destroyed. After the end of the game, Pinstripe is said to have moved to Chicago and runs a “city wide sanitation company.“ Crash Bandicoot and Crash Team Racing are his primary appearances before the series went downhill and he appeared in unpopular, obscure spin-off games.

STATISTICS

Size: Falco
Weight: Marth (90)
Walk Speed: Kirby (43rd)
Run Speed: Mii Brawler (21st)
Fall Speed: Ike (17-21st)
Gravity: Lucas (26-29th)

Pinstripe has fairly standard issue statistics. He's a fairly tall character by Smash Bros standards, as tall as Marth, but his very thin statue puts him at around the same overall amount of size and space covered as Falco. The tommy gun he always carries around is not a part of his hurtbox. He's got a low weight, on the verge of being a featherweight due to his stick thin figure. His walk speed is among the slower walks in the game, but he has a decent run/dash speed, but nothing to write home about. This is because of the animations: Pinstripe readies up his tommy gun for his walk but runs full pelt. His fall speed is fairly high but his gravity is around average, overall this makes him easy enough to KO off the top blast zone. Pinstripe's jumps consist a great first jump, using his kangaroo legs to get almost the same distance as Falco - the best first jump in the game - then a second jump that is above average too. He has a fairly low crouch. His traction is very good, one of his best generic attributes, must be from all those times he jumps on the furniture!

SPECIALS

Neutral Special: Tommy Gun Blitz


Pinstripe shoots his gun as he laughs hysterically for the first couple seconds, shooting out 20 rounds/bullets over 3 seconds until the tommy gun runs out of ammo. Every round travels the distance of battlefield, dealing 1% damage each, so up to 20% damage if every projectile lands. These are not projectiles, but disjointed projectiles like Bayonetta's bullets artes so cannot be reflected, but are eaten up by shields easily. Both the start and end lag are slightly higher than Fox's blaster. The first 10 bullets will do minor flinching knockback to combo into the the next 10, but after that the foe will become immune to the flinching knockback and be able to shield or entirely ignore the knockback of the tommy gun to attack. He can even crouch during the move to attack lower opponents.

The gun can be aimed in a 150 degree cone-shaped area around him, not shooting the 30 degrees towards the ground but can be aimed freely in any other direction at 20 degree intervals. This is pretty fast too, letting Pinstripe aim his gun straight up then quickly swing it down to shoot right in front of him in practically an instant. Pinstripe will keep trying to fire the gun as it runs empty and become angered, bashing at his gun for a further 1.5 seconds before he reloads it. This can be cancelled out of, but is actually faster than waiting for the gun to reload automatically, taking a further 3 seconds without using the neutral special for the gun to reload, The process of reloading either way makes the tommy gun glow for a moment and let out a loud sound of a clip loading into place to signal the gun is refilled.

The tommy gun can be stopped at any time to save up the remaining ammo, and the foe will stop being immune to the flinching knockback again if Pinstripe manages to push out any of the tommy gun's hits out of the stale move queue. The fact every round of the gun goes in the stale move queue means that even the lame hits that do no knockback are extremely helpful for refreshing other moves in Pinstripe's set, and on the other hand you only need to land any other move to refresh the flinching knockback again. The move has too much end lag to combo out of or back into the neutral special again, meaning it's well earned if he manages to land all 20 flinching hits in one long combo string. The gimping power of the tommy gun is lessened considerably because the aerial version deals no flinching knockback.

Up Special: Mafia Throne


Pinstripe leaps two-thirds the distance of Sonic’s Spring Jump in Smash 4 as his trusty lounge chair falls below him, refreshing his second jump if he used it already to give him a great recovery. The chair is slightly larger than the spring and falls at the same speed, dealing a higher 6% damage and marginally higher knockback at the spring’s same angle. Pinstripe can do more than just refresh his second jump, the move can be angled a little to the left or right like Roy’s Blazer up special to make Pinstripe go 30 degrees in that direction instead, kicking the chair in the opposite direction. If he hits the wall, Pinstripe can wall jump once per air trip and reuse his up special again comparable to Samus. This gives a necessary asterisk to the recovery that makes it less predictable to gimp. The chair sticks around for longer than Sonic’s spring, only dissipating when the move is used again (limiting the amount allowed at once to 1) and takes 5 seconds to go away by itself, refreshing this timer if anyone attacks the chair.

The chair is a natural wall to all of Pinstripe’s attacks so can be used against him if the foe stands behind. It can even be stood on. The chair has a set HP on top of its dissipation. When it sustains 15% damage, it will explode into wood chipping and fabric, a weak explosion dealing 7% in close proximity to the chair and medium knockback, with high amounts of hitstun. This can hurt Pinstripe as well though, so is best abused from a distance. This is easy to do with the tommy gun and as it fires so fast and has such good range, Pinstripe can easily snipe his own chair if the foe tries to hide behind it for too long. This can even help to refresh the knockback on the tommy gun by hitting the foe with the chair’s explosion then the tommy gun again. The chair will also be pushed around by attacks. The chair has a weight of 50 units, lower than even Jigglypuff. The tommy gun does no knockback besides flinching so is useless in this respect. The chair acts as a sandbag/wall to opponents as it could only really be launched at a good velocity with attacks that will destroy the chair anyway. If nudged off the ledge however, it will become a falling hitbox again dealing 6%.

Side Special: Mafia Machine Gunner


Pinstripe gestures with his hands in a gaudy way, summoning one of his Machine Gunner minions, appearing right in front of Pinstripe. They're a little taller than Pinstripe and skinnier, carrying (despite their name) two silver handguns. The Machine Gunner then shoots a frenzy of bullets, hitting for 1% twice a second, but only dealing a little hitstun on the first hit so the rest is all passive damage, with very little knockback after the first hit essentially being a "wind hitbox" due to the lack of hitstun. These shots go as far as Fox's blaster, and past the first shot more-or-less substitute for them in terms of usage. The Machine Gunner will go on shooting for 5 seconds, doing up to 10% damage, then ends by letting out its trademark laugh at the foe for a further 5 seconds before they dissipate to leave the stage. The Machine Gunners aren't too laggy to summon, but as this move has no hitbox attached to it and can be interrupted, requires a good bit of space from the foe to effectively use.

After shooting, the Machine Gunner dissipates, but can be defeated if the foe deals them 10% or more while they're out and this is most easily done during their laugh. This will prevent Pinstripe from resummoning them again for 10 seconds. Pinstripe is naturally immune to any and all damage dealt by the Machine Gunner. Pinstripe can command the Machine Gunner to fire in a different pattern when he summons them. Holding left, right, up or down will make Pinstripe do a slightly different mafia gesture that the Machine gunner knowingly nods at then re-holsters his weapon. This adds on a good 10 frames to the move, making it even laggier to summon the Machine Gunner and these all end in the same awkward laughing end lag. You can see why he'd laugh in the smash 4 roster with so many characters even more pathetic than Crash.

Holding up commands the Machine Gunner to simply shoot his weapon upwards in the same pattern as normal, basically just shooting up. Yup. Pressing right will have Pinstripe command the Machine Gunner to walk forward as he fires, walking at Fox's walk speed. Pressing down will have the Machine Gunner shoot at the floor, causing his shots to ricochet off the ground like ROB's laser if ground exists, or simply shoot off stage at a 45 degree angle if next to the edge. Pressing left has Machine Gunner turn around and shoot 30 frames between each two shots, shooting forward then turning to shoot backwards, doing this until he runs out of bullets. By holding down these inputs for any of these, the Machine Gunner will take a pause for 30 frames every two shots. This changes the way his hitstun works, now each first shot of two will deal the flinching rather than just the first two. All in all this gives plenty of versatility to how the Machine Gunner can be utilized, especially with this big guy coming up next.

Held Side Special: Barrel Thrower Thug


Pinstripe shoots his gun into the air to summon the much slower-witted minion in his arsenal, the Barrel Thrower. The big guy isn't a complete dolt but he needs this extra loud sound to realize it's time to make his timely appearance in the match. Pinstripe shooting up is a weak, the same range as his neutral special, that deals 1% damage and flinching knockback, but is mostly irrelevant as an attack. After shooting the gun, which takes a little longer than summoning the Machine Gunner, it then takes a further little while for the Barrel Thrower to come out while Pinstripe is not in lag, taking a good 40 frames to come out overall from when Pinstripe started the move. On the bright side, the moment he appears the Barrel Thrower lets out his
great laugh at the foe's expense, and gets right to business!


The Barrel Thrower will immediately, and by that I mean extremely slowly, pull out a huge barrel and toss it forward along the ground. The barrel is 1.5x the size of a Smash 4 barrel item and when tossed by the Barrel Thrower, travels at Sonic's dash speed across the ground at default. When the barrel goes down or up a slope or falls off a ledge, it follows the same physics rules as a regular barrel. As far as damage goes, the barrel will deal 10% compared to the normal barrel 15%, and all other types of collission scale accordingly, basically dealing 66% of the damage a normal barrel does. The barrel cannot damage Pinstripe, but will push him forward if it runs into the back of him (like a normal allied barrel does). This gives an unusual amount of momentum to boost him forward as the barrel travels forward. Pinstripe can casually jump over it but there is a chance it could screw him over if it somehow manages to fall off stage as he's recovering or something nutty. This is all true for Pinstripe's chair, but the barrel will rebound off any solid walls.

The barrel can be sped up or slowed down by attacking it. An attack going in its direction (attacking it from behind when it's going forward) will make it go up to 1.5x as fast, while the reverse is true for hitting it backwards, making it possibly come to stop. If the barrel stops, it dissipates in 5 seconds without further interaction, and only one barrel can be on stage at a time. The barrel's physics for this damage works on a HP scale. It treats its momentum as its HP, and when going forward normally has 15HP, every bit of damage reducing its HP and speed, going half its normal speed at 7.5HP. It reaches a max of 25HP when going downhill or sped up by attacks. It's very easy for Pinstripe to hit his barrel by shooting at it with his neutral special and crouch.

The Barrel Thrower himself is a whole different kind of minion compared to the weaker Machine Gunner. He can be defeated by dealing him 50% damage. He stands at the width of DK and height of Ganondorf. Pinstripe can use his down special again to do the same move he uses to summon the Barrel Thrower, commanding with a strong gesture for the minion to stay out but taking as much lag to do so as Dedede's Gordo Toss without any hitbox. This is kind of dangerous for the Barrel Thrower to keep getting attacked, but is more than worth it for how much lag it skips from summoning him usually, and lets Pinstripe position himself around the barrel throwing from wherever he is on stage. The problem is of course finding the space to throw out the useless summoning move while the foe doesn't just wail on Pinstripe. This is where the Machine Gunner can really come in handy as he does his own attacks.

There are a couple of other attacks the Barrel Thrower can perform if the foe comes within a certain range. Barrel Thrower tosses the barrel in an arc forwards when the nearest foe is over one battlefield platform away from Pinstripe, travelling up 1.5 Ganondorfs and 1.5 battlefield platforms away then falling almost straight down at the ground. It then hits the ground, and then rolls forward as normal. This is very slow, but can potentially gimp if the Barrel Thrower is summoned close to the ledge, and is especially dangerous if used when the Barrel Thrower is already out. This gives a very effective use for a Barrel Thrower 1.5 platforms away from the ledge. This also is very effective if Pinstripe walks in front before the Barrel Thrower appears, so the Barrel Thrower tosses the barrel over Pinstripe as he keeps attacking, perhaps with his Tommy Gun Blitz.


The barrel bounce occurs when the foe is over a Ganondorf height or higher in the air! This is the most infamous from Crash 1 as Barrel Thrower tosses the barrel at a high angle, going 2 Ganondorfs up and a battlefield platform into the air, then bouncing off the ground. The barrel will bounce a Ganondorf into the air and continue to bounce forward 1.5 DKs, giving very little room for foes to dodge unless they approach during the bounce, and giving a great anti-air as well. This is a little slower than the barrel normally goes however, comparable to King Dedede's up-angled Gordo in Smash 4. The barrel will continue bouncing until it goes off stage, another is summoned or it dissipates as normal. A fantastic approaching tool, not least because of how physics work on a midair barrel. A barrel can be made to go left or right when it takes damage, going up to half a battlefield platform in that direction as it takes up to 15% damage in one bounce. This lets Pinstripe manipulate the barrel even using his neutral special.

The barrel has other unique properties too. When it's hit by attacks such as Pinstripe's gun or the Machine Gunner's handguns, it will reflect them like a wall due to its steel coating. This can help to redirect gunfire around in a close fight, such as if an opponent is below a barrel, shooting upwards now can hit them on the way down. When dealt 12% or more in a single attack, the barrel will leak out a Kirby-wide, small green acid puddle on the ground or in the air that deals 5% and weak launching knockback. This lasts for 5 seconds and for the latter 3 seconds simply decreases traction just under half as much as ice does in Brawl. It prevents foes from teching the ground.

The barrel when airborne can act as a replacement wall for Pinstripe to jump off from his up special, letting Pinstripe follow the foe into the air in circumstances he'd normally be unable to. This mostly goes for above the stage where Pinstripe can follow a foe, then use a barrel thrown up on the way down to keep the rushdown on the foe in the air. Off stage, this works too as Pinstripe is enabled to chase the foe in a usually suicidal gimp attempt. Pinstripe can also "footstool" the barrel when overlapping it to give an extra jump, but not refresh his jumps. From below, Pinstripe using his up special will dodge behind the barrel into the background and re-appear above the barrel as he kicks off it, giving him a weak jump-sized boost into the air. This doesn't just make him invulnerable, but greatly decreases the size of his hurtbox as it goes behind the barrel in midair, leaving only parts of it on top and below the barrel.


The Barrel Thrower has other attacks too reserved for when a foe or Pinstripe gets really close. When Pinstripe jumps when overlapping the Barrel Thrower, he'll give his boss a lift into the air that's equivalent to Falco's first jump without using up his already good jumps. When a foe gets within this very close range, Barrel Thrower perform an insanely slow grab hitbox as he reaches forward in a grabbing hitbox, looking at his hands in shock if he doesn't grab anything. This takes 90 frames to occur and if he does grab an opponent, he'll put them in a three-quarters grab difficulty grab chokehold from behind. As all throws work, this will hold them in place to be shot by Pinstripe as only Barrel Thrower can technically be hit out of the move as the grabber. The foe does get some immunity when released from the grab so only very "slow" attacks like Tommy Gun Blitz will combo out of this and require to hit Barrel Thrower out of it too.

This all of course makes the Barrel Thrower into even more of a sitting duck. Pressing the move again can instruct him to leave the stage with some lag, as when he dies, he's on cooldown for 10 seconds, the same as the Machine Gunner. This also means you can't have multiple 'Throwers out on stage at one single time.

Down Special: Power Shield


Pinstripe takes out a Cortex Power remote control and presses a cartoonish button, summoning an electric field around him that quickly turns into a green reflector, with only a little more lag than Fox's down special. This is based on the Crash Team Racing item. The shield is slightly taller and wider than Pinstripe. The reflector has the normal qualities of a reflector. By putting down the Power Shield and pressing down special immediately, Pinstripe summons the "juiced up" power shield instead as Pinstripe mashes the remote control button. This has the electricity swarming around the reflector and deals a weak constant 1% damage to foes with no hitstun, pushing them away, acting as a good counter against foes trying to rush in and punish the reflector at its core. This version has end lag on par with Falco's, while the normal version is slightly laggier than Fox's, overall not being the fastest reflector in the game at all.

The Power shield can be moved if the player presses the shield button while it's out, similar to how dodges and rolls work for a normal shield. This makes Pinstripe use the remote to move the Power Shield away from being centred on him and move it around the stage at the pace of Fox's dash. It will then stay in place wherever it was placed on stage, but Pinstripe has to desummon it with lag using the special. When it's moving around, the shield has 30HP, once depleted the Power Shield is destroyed and takes 15 seconds to be summonable again, even more punishing than the Machine Gunner or Barrel Thrower. The Power Shield will retain its reflector qualities in the air, but loses its solid shield status when moved around the stage, simply becoming a semi-transparent energy shield. The only time that Pinstripe can make it into a hitbox is by again pressing down special, spamming the remote again to make the shield spasm and generated a quick electric field around it, dealing 7% damage and weak radial knockback just around the shield's hurtbox. This has some very bad lag to it however so is fairly predictable. This will cause the power shield to dissipate, but only takes 10 seconds to resummon compared to it being destroyed by the foe.

The reflector will keep reflecting Pinstripe's projectiles in the air but not the foe's. Now by moving the Juiced Up version into the air will retain some magnetic qualities due to the electric Cortex Power coursing through the shield. The Juiced Up reflector has the advantage of having a higher 45HP too. This and the grounded version will pull in Pinstripe's bullets from his Tommy Gun, the Machine Gunner's hand gun bullets and the steel barrel if they come within half a battlefield platform of the Power shield. These will become magnetized to the Power Shield's sides like the magnets in Crash Bash's pong, sticking to the outside of the Power Shield they contacted physically, hovering around the Power Shield orb. Over the course of 5 seconds, the projectile will build up electrical power before being fired off the reflector at the opposite angle, potentially going up to twice as far and dealing as much as 1.5x the damage/knockback as when normally fired when given the full 5 seconds. Cancelling the Power Shield out will end this power gathering process early and fire all projectiles off the Power Shield at an equivalent reduced power. This will however only work on Pinstripe's own set up.

Projectiles in 1.5 battlefield platforms range of the juiced up Power shield, these will be pulled towards the reflector and caused to curve around it, giving Pinstripe a stronger influence on the arcs of his projectiles. Pinstripe is limited to one Power Shield of any kind on the stage at a time, whether as a normal reflector or when it becomes disjointed, so largley has to choose between the reflector or the projectile manipulation of a midair reflector for more aggressive approaches, or to make use of the magnetism of the juiced up Power Shield.

SMASHES

Forward Smash: Crate Target Practice


Pinstripe picks up a crate and holds it behind him with one hand, showcasing some actual strength as this crate while not a big crate is around the size of Kirby, then tosses it forward as it bursts into bits hitting the ground! The crate does 13% damage and will KO at 120% with radial knockback against midweights at any charge, having uniform damage and knockback. The crate is a [?] crate from the Crash games, rotating between the [?] symbol and nothing, the basic crate. The lag on this start up is surprisingly not too bad considering the prop summon, throwing the crate is quick, but the crate only travel at roughly the speed of MegaMan's Mega Buster forward and is thus easy to dodge except at very close range. The amount of space the crate is thrown grows with charge too like MegaMan's fsmash. The crate is not actually reflectable however, but like the tommy gun's rounds, is a disjointed hitbox that goes through reflectors. It barely skims above the ground, but will hit any grounded foes no matter their height.


The crate can be destroyed when dealt 15% damage with no real downside for foes, but is dangerous to try and hit with melee hitboxes, requiring very precise timing especially when thrown further/faster to counter. When the crate smashes against a surface, it creates the same 13% damage hitbox as the crate itself, but lingers for a few frames in a slightly bigger area. The fact the crate can be destroyed can be useful for Pinstripe, as he can destroy it himself early with his minions to catch out dodging foes, but is in the lag for the move himself.

The box can be angled when thrown, giving Pinstripe the ability to throw it at a high angle, going a Ganondorf above the ground instead of skimming along it but only going half as far. The down angled version will have Pinstripe throw the crate almost directly at the ground, but lets him drop the crate at a low angle off stage too, making it comparable to Villager's bowling ball forward smash, except giving it a bit of an angle so it can't hit foes directly below the stage. However the slight angle can actually be helpful against some foes' recoveries. The damage is enough to make the barrel shoot out an acid puddle, rebounding the crate in the opposite direction and leaving a puddle between it and the barrel. This effectively forces to dodge into the air, which works well into Pinstripe's projectile.

When a Barrel Thrower has been commanded to throw items and gets in the way of a crate, they will catch it and throw it. This can let Pinstripe throw the crate up, throw it back at him like a demented game of hot potato, and even have the box hit up at a weak launching angle by the Barrel Thrower's ground pound. When the crate is thrown up, it will take a good few seconds before it falls down again due to the Varrel Thrower's strength throwing the crate compared to a huge barrel, on some stages even going off a low ceiling, so creates a nice delay for Pinstripe to take advantage of. This can actually let him shoot down the crate himself, and in the air it has a slight sway if it takes damage like the barrel to let Pinstripe push it one way or another. This can even set up the Thrower to constantly throw a crate up then recatch it. They can only throw it the one time however and will dissipate afterwards, as with any item.

The crate can be used in the air the same way the barrel can as a substitute wall to jump off, but has a couple of changes. For one thing, it's much smaller so hard to jump off in the first place, but will actually be sent in the opposite direction weakly as Pinstripe jumps off it due to its low weight. This can help Pinstripe to gimp a foe as he pushes the crate behind him in midair. The crate will not let Pinstripe dodge behind it from below like the barrel, instead Pinstripe will use the boost from his up special to break the crate in traditional Crash Bandicoot style, creating the same 13% hitbox the attack does and boosting 1.25x as far as normal. This gives a brief period of super armour too, using the same logic as Rock Smash, so Pinstripe can effectively approach from below or safely get back to the ledge.

Down Smash: Box Boot


Pinstripe takes out a TNT crate and laughs maniacally, throwing in on the ground and kicking it forward with his lanky legs. The TNT crate skids across the ground and will deal 10-14% in a more traditional smash attack than the forward smash. The TNT will go further down slopes and follows the usual logic of such moves, but on a flat surface will travel 1-1.5 battlefield platforms forward. The TNT crate sticks around in a surprise twist for the move, but will only last for 5 seconds until it dissipates without any further interaction and only one TNT crate can be on stage per Pinstripe. Pinstripe can do a follow-up input to reveal a piano wire connecting his hand to the TNT crate, using it to pull the TNT crate after only going half its usual distance then flinging it behind him for a set battlefield platform, dealing 13% damage. Either version of the attack will KO at a 90 degree angle forward/backward at 110% on midweights, the lag is not too bad but still on the slow side for a down smash, comparable to Villager's down smash.

In a surprise twist, the TNT crate actually does thing when it's out on stage! By stepping on the TNT crate, it will start to count down from 3-2-1, then explode! This deals a greater 18% damage to any foes, or pinstripe and his minions who is in its range of a Bob-Omb blast. This will KO at 85%, a very powerful hitbox that Pinstripe hardly wants used against him. Thankfully, Pinstripe can command his Barrel Thrower to toss away that pesky TNT if he gets him in range. On top of that, the ground pound will boost the TNT into the air slightly and make it start counting down, but not count down any further beyond that. When aerial, the TNT crate has far more lenient weight to knock it around with any attacks, especially useful for Tommy Gun Blitz to nudge it left or right. The TNT will also explode if it's dealt 10% after the countdown has started, and will start to countdown naturally if it's dealt 5% just after it's thrown. Pinstripe can of course take advantage of this with his Tommy Gun Blitz and with his Machine Gunner minion to shoot the hell out of the TNT crate. With how he can slightly alter the behaviour of the Gunner, he can set up a large variety of timings for the TNT to be set off.

The TNT crate works the same way as the crate for Pinstripe, but on top of that will cause the TNT crate to count down another 1 time whenever any foe stands on it. This can be very disastrous for a foe against Pinstripe as he can go out of his way to stun them with a couple bullets using Tommy Gun Blitz to force them to land on the TNT crate. The up special counts as "stepping" on the TNT crate however it's used and can push it around in midair. From below, the up special won't just burst through the TNT crate normally, instead this will hit the TNT crate a Ganondorf height into the air as Pinstripe stops in place, but still refreshes his chair one time per aerial trip (as usual). When the TNT crate has counted down to 1 however, Pinstripe will accidentally cause the explosion early as he bashes his head against the TNT, essentially a "misfire" that's only useful if Pinstripe wants a suicide KO or something. This is pretty in-character for someone as insane as Pinstripe.

The barrels can set the TNT crates off too by bouncing off them, treating the TNT and crates as walls. The crates by comparison will simply break when a barrel hits them, but make the barrel rebound like a wall as it breaks. TNT will count down, being a little sturdier, but can be caused to explode if at the 1 count. This will send the barrel in the opposite radial direction at a good tick, around 1.3x the strength of the Barrel Thrower's initial toss and increasing the damage output of the barrel by 1.3x as well. This can make it worth it for Pinstripe to suicide against the TNT crate if it assures the foe is hit by the powerful barrel. The barrel will re-assume its normal damage parameters after travelling for 2 battlefield platforms. This is like the crate throwing, a bit of a game of hot potato as Pinstripe has several unique ways to make the TNT counter count down, while the foe can only step on it try and force an explosion. Pinstripe greatly benefits from even more movement options too, as he can use the TNT crate to glide through the air and get the jump on opponents. The explosion of the TNT also is powerful enough to cause an acid puddle to emit from a barrel, so when caught together, the fleeing barrel, puddle and TNT explosion creates a fairly gigantic hitbox.

Up Smash: Target Practice

Pinstripe holds his tommy gun under his arm as he prepares to knock a foe in front of him into the air with an uppercut, having low start up before he swings his tommy gun! This deals 8-11% damage and launches a foe weakly into the air directly above Pinstripe, though can be slightly in front or behind him depending on percent. Pinstripe will then follow through with 2-4 shots from his tommy gun, each dealing 3% damage and piling on the knockback (in actuality each simply does slightly more scaling knockback than the last). This will hit the foe fairly reliably as like Falco's back and up throw, the hitbox of the gun shots' "projectiles" are extremely lenient and will only miss when the foe is at such a high percent, the first hit of the move will KO around 200%. The first shot is another weak launcher, while the second will do medium knockback, the third will KO at 180% and the fourth will KO at 160%.

Pinstripe can perform the move without regard for the melee hitbox. The shots have a very visual, almost laser-like appearance to make it apparent where they're headed, and reach 0.85, 0.95, 1.05 and 1.15x as far as Palutena's up smash up in the air, for the first, second, third and fourth shots respectively. When there are only 2-3 shots, the final shot will skip out on the weaker hits, so a 2 shot will actually KO at 160% if both land. The simple difference is piling on less damage to the foe and hitting the foe from lower on stage, as the foe is hit gradually higher and higher by concurring shots. Pinstripe can use the melee hitbox to hit up objects on stage such as his barrel and crates, this has surprisingly good knockback. For the TNT crate especially, this can act as a good mindgame depending on the charge of the move, either making the TNT go into countdown mode or making it explode outright, making the move into even more of a good anti-air.

When the move is being used, Pinstripe can choose to do a follow up input during the shots part to instead fire a shot at any target on screen. This fires a second shot very quickly after the last at up to 5 targets, including any foes, or Pinstripe's own set up like his crates, going from nearest to furthest targets, and each shots deals a set 8% damage and medium knockback. This will go quickly but Pinstripe can cancel the move at any time during shots. This move has fairly generous end lag, but is much worse using the follow up. Pinstripe can fire a further 1-3 bullets depending on charge at one single target by holding the input as Pinstripe fires at it instead of cancelling the move. This will give an inordinate amount of knockback to barrels or crates in midair, hitting them upwards a set 0.5 battlefield platforms, but Pinstripe can then focus back on trying to hit the foe after hitting the barrel or a crate, or vice versa. Hitting objects on the ground, Pinstripe won't just push them away, but hit them into the air at the same angle as Duck Hunt's can is hit by his neutral special, giving them a weak boost.

The most obvious manipulation for this outside of the barrel is the TNT crate, as Pinstripe can choose to shoot it multiple times to make it count down, or return fire on the foe. The downside of this is it is much laggier and is tricky to use well. The slight delay between shots makes it good for when a barrel or crate is about to come into range of the move. Pinstripe positioning becomes extremely important for this too, as Pinstripe can make it very difficult for the foe to come back to the stage by placing himself and his shots between them and well positioned crates or barrels. The chair gives a nice vantage point for this too when stood upon. When the Power Shield is in play, Pinstripe extends the range of the move to hit any foe on stage within a full battlefield (the stage) of the reflector, as Pinstripe does a shot at the reflector that then reflects it in the direction of the foe he selected. These are very accurate shots going directly from the gun to the direction of the target, so is fairly reliable.

STANDARDS

Jab: Mafia Shove

Pinstripe barges his shoulder upwards then downwards in a slow but barely infiniting jab that does 3% each hit but gives plenty of leeway for the foe to DI, before finishing by shooting his gun in the foe's face for 5%. If this fails, which it can, then Pinstripe will simply send the foe with weak launching knockback towards the ground or into the air at 45 degrees.This will send the foe at varying knockback depending onhow many hits of the fairly easy to escape jab they're caught by, and the move doesn't have the best range, though the jab finisher has a shocking amount of range on par with the neutral special. This will do a small amount of knockback so there is any reason to use this very laggy shot, and releasing the jab finisher at the apex of the up or down shoulder barge will have Pinstripe fire, looking as if he's just aiming his gun in that direction to the inexperienced player. This shoots the gun at a 45 degree angle, but is so laggy it'd take a long shot to actually gimp or accomplish anything on its own with.

The best use of the move outside of the obvious is in fact to hit away one target then hit the other with the shot. The default shot will go inbetween the two others, which goes at a straight diagonal, and with only a slight delay Pinstripe can elect to fire right between the two angles. By hitting a way a barrel or crate he can immediately free up his view to get a hit on the foe without even having to use his neutral special ammo. The end lag on the move is as bad as any other jab however. Another positive here is that the move despite being slow is really powerful against shields as Pinstripe's close range shoulder barge jabs away very well at the shield as technically, the downwards or upwards knockback is not counted on the purely horizontal-moving shield. This can lead to a devastating shield break on an already depleted shield, and can be surprising if Pinstripe's already spent all his neutral special rounds.

Another use for the move is simply to knock them into the ground for a weak launcher or slightly into the air, either way it's easy to great them with his minions or a barrel, and can then check their reaction with his shot itself. By firing into the ground, Pinstripe can check their get up or roll towards him, while his shot up will check them if they're knocked into the air and don't air dodge, forcing them to use it or get hit. With a Power Shield in play, this doubles up as Pinstripe can fire a shot up expecting it to come back down, so will possibly care more about what shot comes out second to possibly check all forms of reaction depending on the exact position of the reflector. The jab will not KO until around 165%, but can be lowered to as low as 150% if the foe was hit by the barge jabs at least 5 times, so the foe has far more to lose the longer they're caught in the attack. It's much harder to escape when caught in it at close range, so this creates a nice way for Pinstripe to trap the foe at super close range and at a lower percent, one of his only real "combos" by Smash 4 standards.

Dash Attack: Quick Barge

Pinstripe does a quick shoulder charge forwards, more comparable to Samus' dash attack than the legendary Ganondorf, dealing 7% and weak launching knockback into the air. Pinstripe holds his gun forward, the end of it becoming a sweetspot that deals 10% at the starting frames of the attack, able to KO at 120% on midweights. The shoulder charge sends Pinstripe forward around as much as Samus too, though has lower end lag, making it his fastest move up to this point in the set. The barrels will push Pinstripe forward or backward depending on where they are going, but give a very nice boost to the attack, or are boosted by the attack depending on what side of the barrel Pinstripe is on. From behind, Pinstripe can give a nice momentum boost to the barrel going forward, but caught behind it can himself get a very nice boost to go up to twice as far as normal. It's an especially effective move when a Barrel Thrower throws a barrel/crate towards Pinstripe, as he can then throw it out alongside the thrown crate or the barrel for a fair few options.

The tommy gun's sweetspot will have an interaction when it hits against the Power Shield reflector that has been disjointed and put out on stage by Pinstripe. This changes depending on the type of Power Shield. The regular one will simply push Pinstripe away, "reflecting" the attack in the opposite direction and turning Pinstripe around, which will send him almost the full dash range of the move back. This can be timed to hit too late to sweetspot as a mindgame. The juiced up version of the Power Shield will instead magnetize Pinstripe to the Power shield, keeping him in place and pulling him to the middle of the Power Shield at the end. If at any point the Power Shield fires off any projectiles, Pinstripe will instead be sent off, up to a battlefield platform left or right on the outside of the Power Shield. This is less powerful if Pinstripe is in the middle of the Power Shield when it goes off, but this momentum can be used to follow up on the projectiles also being shot out at the foe, as well as chase up behind any barrels being shot out by the Power Shield.

Forward Tilt: Kangaroo Kick

Pinstripe kicks out his apparent kangaroo legs forward, reminiscent of the Ganondorf forward tilt and deals a decent 10% damage with faster start and end lag compared to Ganondorf's attack. This is a little lower and thus almost impossible to duck under compared to Ganondorf and will KO the foe around 30% later than the Ganondorf version. The kangaroo kick has overly scaling knockback on crates or barrels, dealing a set battlefield platform of horizontal knockback to any barrels or crates it hits, letting Pinstripe have a very strong control over his barrels and crates sheerly based on this move. However every time he does this, the move is given tremendously bad lag on par with a smash attack. This leaves Pinstripe very open if he fails to hit with said barrel or crate, but is very good when a Machine Gunner or a Barrel Thrower is there to pick up the slack on keeping the foe busy during this extra end lag.

The move can be angled to hit even lower or higher into the air. The lower angled version will instead hit the foe off the ground and into the air, and deals tons of shield push and slides a shielding foe a fair distance back, making it great to hit a foe into such trap-like hitboxes as the barrels, TNT crates, or even into a chair or walls to hit them back into range for a further attack. The shield push makes this a positive advantage for Pinstripe, giving just enough time for the foe to drop shield or roll or dodge, but gives Pinstripe a good opportunity to grab them out of shield or punish their reaction. The high angled version deals much less shield push, but will launch foes into the air at a 45 degree angle, now KOing only 15% higher than Ganondorf but easily missed foes on the ground and instead functions as a pure anti-air. The effect on barrels or crates for the low angled version is instead to send them 1.5 battlefield platforms into the air, while the up angled version sends them 1 battlefield platform straight up into the air.

When Pinstripe makes contact with a crate or barrel using his forward tilt, a follow up standard input will make him kick off it using his "kangaroo" legs, giving him a nice kickback in the opposite direction. As he travels backwards his entire body becomes a hitbox dealing a weak 4% and minor radial knockback, but is beat out by pretty much anything due to the low damage. Depending on the angle of the move, this will at default just kick him back 1 battlefield platform while technically being on the ground. If a chair or other wall is behind him, Pinstripe can instead be hit forward to chase the foe, or tech the wall to stop there. A low angled version will hit Pinstripe weakly into the air as high as his second jump, leaving him in the air to more easily punish the opponent as he has access to both jumps and up special still. The high angled version will hit back Pinstripe along the ground much further, kicking him back 2 battlefield platforms. Unlike the default version, this kickback can be cancelled into a jump without losing the momentum, the first jump still keeping Pinstripe in the air if the jump button is held. This lets Pinstripe jump over any grounded objects like his crates, or even jump on them to then jump off, such as his TNT crate, or jump into a Barrel Thrower ready to throw him up into the air to chase the foe down. Whatever version, this is a great way to redirect the set up Pinstripe can create will pursuing the foe or simply running away.

Up Tilt: Rallying Shot

Pinstripe aims his tommy gun directly upward and fires out three consecutive shots much faster than normal, dealing enough blowback that he has to ready himself against the ground, dealing one hit of 13% damage and strong knockback but having fairly bad end lag. The attack will reach around the same area as Mii Gunner's up tilt as one solid disjointed hitbox, and will completely miss most opponents on the ground next to Pinstripe. Pinstripe's traction is reduced for the duration of the move as he steadies his aim, so can be pushed around about twice as effectively by his chair, his moving minions like his commanded Barrel Thrower, their barrels or crates as they slide or are thrown around under his control. This will make Pinstripe slide slightly left or right, letting him adjust his aim according with this small amount of movement. The power of the move allows it to cause acid to come out of the barrel and will drip down to the stage from below, creating a massive hitbox as it does so, and launching the foe higher into the air to be surely hit by both hitboxes if they're caught between Pinstripe and a barrel.

Pinstripe can time a second input of the standard button to create a slightly stronger sounding bullet shot to come out, this will not effect the hitbox of the move but will give a unique order to the Barrel Thrower if it's within a battlefield platform of Pinstripe during the move. There are three effects to choose from, per the three bullets. The first bullet will command the Barrel Thrower to walk up to Pinstripe and toss him into the air straight upwards, very useful for chasing a foe after launching them, and turns Pinstripe's body into a hitbox for the first Ganondorf he travels, along with having weak super armour, his body dealing 5% damage and weak radial knockback. The second bullet will command the Barrel Thrower to throw a very specifically angled barrel so that it ends up directly above Pinstripe after the move is finished. This lets Pinstripe jump up to the barrel and use his up special to chase the foe this way, or he can simply wait for it to pass to shoot or interact off it another way.

Finally and most unique of all for what is the easiest bullet to time, as it's anywhere near the end, the Barrwl Thrower will smash the barrel against the ground and then roll it forward with a huge dent in the barrel. The barrel will dissipate automatically after 3 seconds, but leave a trail of acid on the ground for 2 battlefield platforms of space with Pinstripe in the middle. Pinstripe can speed up or slow down the barrel using his moveset, but this acid will remain on stage for another 3 seconds dealing constant 1% damage and minor hitlag to foes. This essentially makes the foe into lava for the foe to avoid if they want to come back to the stage at all soon. The Barrel Thrower will disappear after any of these actions and doing his unique laugh, using up the Barrel Thrower.

Down Tilt: Curb Slide

Pinstripe ducks close the ground and slides across the floor as if he was a mafia action hero dodging gunfire, his feet a hitbox that deals a slightly lower amount of damage and knockback in the same angle as MegaMan's similar looking down tilt. This moves Pinstripe a little farther however due to the length of Pinstripe's legs and his height, and can be extended like the dash attack behind or in front of barrels. Sliding into a wall or TNT will stop Pinstripe in place as normally works for Smash physics, but will count as a hit against a TNT crate. The move in general is a great move to use for getting under the attacks of Machine Gunner, Barrel Throwers and their barrels, and Pinstripe's other set up as it makes Pinstripe incredibly small. This makes it a lot more useful than MegaMan's attack, reducing Pinstripe's height to his very skinny width so that he'll effectively be as small as Jigglypuff's crouch. Especially when it can be sped up, it and the dash attack can be fantastic approach tools.

Used on top of acid from the barrel that leaks out when dealt 13% will splash it forward as Pinstripe uses his down tilt, now dealing a more powerful 12% and stronger knockback than MegaMan's dash attack, able to actually KO at 135%. This is very situational, but is helped by the fact this can follow up behind the barrel so push it into a TNT crate or push it further along to get on top of acid it has created, immediately turning the acid puddle into an active, powerful hitbox. This can also budge grounded set up like the crates into the arms of the Barrel Thrower to toss, or move them into the range of its moves like the ground pound. The low amount of knockback normally also makes it a great move to use on the other side of a foe to push them into the Barrel Thrower's slow grab, as it should beat out almost any move that doesn't hit low without sending the foe too far.

AERIALS

Neutral Aerial: 24 Hour High


Pinstripe spins around and fires his gun all around his body in an animation similar to his death animation, dealing 20 hits of 2% damage as he spins twice around, 10 hits per rotation that will hit at equal distances around Pinstripe. Start and end lag for this is decent, but the problem is the long duration of the move comparable to Yoshi's down aerial. The range of the move is slightly reduced from the neutral special, only going a battlefield platform away from Pinstripe, and the landing lag is poor as Pinstripe tries to regather himself in the middle of his spin. This is one of those aerials with almost impossible to land hitboxes due to how the move works, as a foe will in most cases never be able to be hit all around Pinstripe by every single hitbox. This is a little more plausible by the fact that Pinstripe can use the Power Shield to reflect the bullets at the opposite angle, so maybe land up to 30-35% worth of damage on the foe.

The knockback of the attack varies wildly, hitting the foe away with radial knockback in the direction of the last bullet that hit them. This can deal anything from very weak knockback to KO around 120% when every single bullet lands (not happening), but will KO around 140% if 15 hits land. The final bullet that lands matters a lot for getting a suitable KO angle, otherwise very possible hitting the foe into the stage. This is made easier by Pinstripe fall speed that will easily get him below a slower falling opponent in the air and land a final hit from below. This all makes it a good move to use into a TNT crate, making it count down but also sending a barrage of hitboxes around the same area to hit any foes trying to escape from the explosion's range.

The timing of the landing can be a good mindgame along with actively trying to block the path from the neutral aerial to the TNT to trick the foe into exploding it early or trying to avoid an explosion that wouldn't occur. This is also the perfect move to use in the middle of a juiced up Power Shield to cluster the entire outside of it in bullets, though it will be hard to land all of them in the shield due to fall speed. This is easier when right next to the ground, and a perfect execution will get 15 bullets or so to orbit the Power shield. As they are even spread, this makes it a great set up for five seconds later when the bullets are shot out.

Like MegaMan's neutral aerial, this has a muzzle hitbox in close range of the tommy gun for the duration of the attack that deals 6% damage and medium knockback, acting as a good GTFO hitbox when opponents get too close. This will combo well off walls, the reflector, the chair and so forth as it will deal enough knockback to knock the foe into the wall, then be hit by the move's second pass of bullets. As a ground-to-air move, this becomes especially relevant as the medium knockback will get the foe far enough away to not punish the landing lag, making it necessarily harder to punish. Needless to say the range of this move makes it a great shield poke, a Power Shield only helps more when next to a foe to hit the back or lower portions of their shield. It's a bit like the tacky disco ball in the Wrath of Cortex credits.

Forward Aerial: Hang Out To Try

Pinstripe kicks out his feet in front of him a little like Snake's down aerial in Brawl, dealing two hits of 8%, but with the second kick being held out as a sex kick. These hits can't combo and the sex kick will eventually degrade to only dealing 5% and low knockback, while the first two hits both deal medium knockback. This like most sex kicks works well into the lag or duration of the move, as the low launching power of the 5% hitbox will not hit the foe too far to follow up, while the medium knockback of the 8% hitbox will hit the foe far enough away to prevent them from hitting Pinstripe out of the long duration of the sex kick forward aerial. The move does have decently low lag on both ends in spite of its long duration.

The move can be tech'd once per air trip if Pinstripe hits up against a wall during the first kick, doing a "wall kick" sort of move as he kicks off the wall or chair with weak knockback to the object if it can be moved. Pinstripe will then charge in the opposite direction with dive kick that deals a heightened 10% damage and variable knockback at a 45 degree lower angle than the dive kick Pinstripe performs. This can KO at the high percent of 180% on stage, but has a lot of variance depending on what is kicked off. Normal straight walls like the chair or a wall on a wall off stage, such as the wide of the stage on some Omegas, will simply make Pinstripe jump off left or righ. This angle can be changed by jumping off barrels, and even tech'd off the bottom or top of falling crates to go straight up or down. The dive kick is also a particularly good cross-up to go through shielding foes, going a full battlefield platform in distance before ending, with slightly worse end lag, but very good landing lag, making it good for a ground-to-air, anti-shield option.

The second kick can be used to tech too, giving a couple of good movement options in the air that can be used with precise timing for a good mix up. The second kick compared to the first will instead have Pinstripe do a full force kick off the wall or object, dealing it higher base knockbac on par with a powerful smash. Pinstripe will only push himself back half a battlefield platform however, turning his whole body into a weak hitbox dealing 7% and weak launching knockback. This will like the dive kick send Pinstripe in the opposite direction, so the weak launching knockback - knocking a foe above Pinstripe when horizontal - will instead knock them upwards perpendicular to the angle Pinstripe charged in opposing to the wall. Compared to the dive kick, this gives less movement, and reverses the lag to have much worse landing lag, but good ending lag in the air so is the go-to air-to-air move.

Back Aerial: Lanky Kangaroo Leg

Pinstripe does a leg thrust behind him, resembling Samus' back aerial, and deals 2% more damage and a little more knockback making it by far his strongest aerial KO move. The move has basically the same range, but as Pinstripe is far less floatier than Samus can't throw it out nearly as safely in the air. The landing lag of the move is pretty decent compared to the only okay ending lag in the air, making it a good move to transition from air-to-ground.

The move will turn around Pinstripe in midair, which is fairly important when he will be using it to land if it whiffs and can then transition into his ground game facing toward or away from the opponent. This is mostly important for his air game to then jump back into a forward aerial if the opponent is facing him, maybe to tech off his set up, or to use another back aerial, while the neutral aerial is a good option either way. Landing on the chair or other platform will greatly benefit the move in landing higher on the stage and then being able to jump right into a KO attempt with up aerial.

Up Aerial: Crescent Shot

Pinstripe curls his tommy gun overhead in a quick motion, firing a single shot again not counting towards his neutral special, creating two hitboxes. The first is a melee hitbox from the muzzle that deals 12%, and a projectile that shoots out in the first few frames that goes at a low angle into the air, using the same hitbox as neutral special does but dealing 3% damage and mild flinching knockback. The knockback from this is not enough to KO until around 170%, but this medium knockback makes it a great launcher to put the foe a good distance further into the air as a juggle, or closer to the top blast zone can start to KO ridiculously early, great in combination with Pinstripe's ability to get so high into the air. The main hitbox has three separate but identical hitboxes for the duration of the attack, hitting at three points at the left, middle and right of the attack, in this way working the same as Samus' up smash. This launches the foe in front of Pinstripe or straight up or backwards. These can be used to launch Pinstripe's set up at the foe, if he can't hit them directly.

The input can be held out after the move is used to delay the shot of the bullet to fire at the same time as any of these three hitboxes, shooting a bullet straight up or 45 degree backwards into midair instead, not increasing the lag of the move. This is a useful shortcut to hit behind or above Pinstripe without having to rely on the neutral special ammo. This can be very useful to reflect at the right angle, this gives a unique advantage for Pinstripe when he can get between these things and the foe. A shot going 45 degrees left or right will be reflected automatically up and at that same angle, hitting foes a set Ganondorf higher than Pinstripe, so perfect to hit a foe as they fall on top of Pinstripe in the air from high up. This even lets Pinstripe hit a midair barrel or crate out of the air while attacking the foe at the same time, potentially hitting the foe as they're hit upwards if Pinstripe can manage to combo the two.

Down Aerial: Bazooka Tommy Gun

Pinstripe aims his gun down and fires a barrage of three rounds at once somehow, having some start lag and a lot of end lag, but these five rounds unless reflected, absorbed or changed in some way will stick together as a single disjointed hitbox dealing 15% or 13% late and medium knockback downwards. This is comparable to MegaMan's down aerial and while the hitbox is slightly smaller (five of these rounds is not that tiny together) the knockback is a little higher, while not a super powerful gimp this will surely do the trick when off-stage. The range is also slightly higher than MegaMan's move, so can effectively snipe foes from high in the air, and at very high percents can KO even after rebounding the foe off the stage like Ganondorf's Brawl down aerial. The foe can always tech off the ground of course, but this is made harder with Pinstripe's set up, especially acid which prevents the foe from teching the ground whatsoever.

This attack can pierce the barrel's defences too as it deals over the threshold to create an acid puddle, and its great knockback can redirect the barrel easily compared to other short range melee moves by comparison, making it one of the best "reposition" moves in Pinstripe's set. This shot can of course by redirected around the stage at other angles using the Power Shield. After travelling 1/3rd of the max distance, the five rounds will separate though overlapping into technically 3 different rounds and hitboxes, and then 2/3rds of the way into 5, now each doing 3% damage instead of 13% all together. This has no effect on the move's actual power, but will have a great impact on how the move works against the TNT crate, going from making it count down, to outright destroying it all at once. The 5 separate bullets may also get separated more easily if they're caught in the Power Shield's magnetic field. From very high above the Power Shield, this can potentially split up the bullets far more than normal to give a long spread of hitboxes around the Power shield.

The crate largely works a similar way to the TNT in that it can be smashed by the down aerial or simply moved around in the air depending on what hitbox hits it. The down aerial does small kickback to Pinstripe, much less than Yoshi's up aerial so not nearly enough to help Pinstripe's recovery. This can help with some horizontal momentum to make Pinstripe land on top of his chair or platform despite his high fall speed, or simply to position himself as he falls to the ground and not enter his landing lag if he can finish the move fast enough. This is perfect for hitting a barrel just as the Barrel Thrower tosses it, piercing it for the puddle which will then be created right in front of the Barrel Thrower. This will speed up the barrel immediately as it is thrown onto the acidic ground.

GRAB GAME

Grab & Pummel

Pinstripe has a fairly simplistic grab, simply trying to snatch the foe out of the air in front of his gun and has an all-around average grab range and grab speed. His dashing grab is by far his best due to his dashing speed and the fact he will duck underneath some high reaching attacks, while his pivot grab is also a good bit better than his normal one, which helps his grab viability a good deal. Pinstripe can't grab his own minions or anything, but by pressing special will whistle for them to come over if they're within 1 battlefield platform of the grab, waiting on the sidelines for Pinstripe to command them as if he's some Egyptian king commanding his slavedrivers. This can bring over both a Barrel Thrower and a Machine Gunner if they're both within range, and can be done so long as they're not in an attacking animation while the grab is on-going.

The pummel has Pinstripe simply kick the foe in the stomach or that general area for a quick 2% damage. This is nothing too significant, but is changed drastically if the minions have been called over. The Barrel Thrower will perform an elaborate slow pummel that takes 1.3 seconds to perform as he does the DK Punch on the foe, dealing 10% and able to KO at 160% if the foe had already escaped the grab. This "pummel" takes so long that it's actually more viable to wait for the foe to grab release then get hit by the pummel as they lose their out-of-grab invulnerability from all the waiting. By comparison, the machine gunner will simply slap the foe back and forth with the comical slapping sound effect playing all the while. This does a constant 1% damage, but has a long animation that when allowed to go on after a grab release, leaves the Machine Gunner in 2 seconds of lag as he comically almost falls over because of leaning on his slapping arm. This isn't so much an easy way for the foe to kill the Gunner though they could, it means they can safely go behind the Gunner as Pinstripe has to awkwardly get around his own incompetent minion blocking the way.

Forward Throw: Baseball Bat

Pinstripe carries his gun in both hands like a baseball bat, rears up by sidestepping a short distance back, then leaps forward and swings away at the foe for 8% and good knockback, though not enough to KO until 190% on a midweight due to the low angle the foe is hit. The fact it's such a low angle does make it a good attack to simply hit the foe into any set up in front of them, or to hit them off stage as a semi-spike like angle, though it has any angle to it whatsoever. This fact means that the foe will also cover any vertical distance to get hit by any airborne projectiles or other set up out there, and come back at a likewise low angle if they're hit into a wall or chair, so will end up behind Pinstripe who can then go for a back aerial, up tilt or up smash dependant on where exactly they end up.

The Barrel Thrower when used in the throw will grab the foe from over Pinstripe's shoulder or in front of him, depending on where he was at the start. He will then crush the foe slightly, about as much as you see in grabs the for a short period alter the size of other characters for the sake of animation, throwing a more rounded opponent into the air for Pinstripe to hit. This whole process deals a further 5 instances of 1% to the foe as they're crushed up. At the end of the throw, Pinstripe will deal more knockback to the foe, KOing 15% earlier than normal, but more importantly will turn the foe into a "projectile" until they uncurl from their crushed animation and regain control. For this short while they will be able to be hit off of the Power Shield's reflector and therefore have their knockback reflected by it like a projectile, so can be redirected in any direction. with precise timing, this can even shoot them out of a juiced up Power Shield at a considerably buffed, fatal speed.

The Machine Gunner readies himself and then jumps on the opponent after they're hit by the gun-bat. They'll hop on them as if they're a crate in Crash Bandicoot, dealing 5% damage and hitting the foe into the ground, causing them to take knockback at the Sakurai angle. At low percents this simply makes it into a great follow up throw, while at high percents this makes the move deal slightly more knockback and sends the foe at a semi spike for real this time, making it the optimal gimping/off-stage throw available. This also puts the Gunner high enough in the air that Pinstripe can slip under him using his down tilt or firing under him to try and hit the foe as they get up or are off stage behind the Gunner.

Up Throw: Up the Mafia Ladder

Pinstripe grabs the for by the neck and laughs in their face, either because they're a pathetic character or he's just insane, and then tosses them upwards for 5%. The throw doesn't go far before Pinstripe targets them with his tommy gun and shoots out 5 rounds each dealing 2% damage, adding up to 10% as the foe is launched weakly by each of them, resulting in the foe getting most of the way to the top blast zone on an average sized stage. The blasters will almost always hit, like the up smash having very generous hitboxes but can miss at super high percents, and then can ever be hit by the Power Shield or other set up to be put back into use again. The move will eventually KO at the same time Falco's up throw does, so around the 230% mark on midweights.

When the Machine Gunner is around for the throw, he will follow the foe into the air with his handguns aimed at them, firing his own 5 shots as the foe is almost thrown completely. These shots each deal 1% and are shot at a notably slower pace than Pinstripe's, so end up being just below the foe as they regain control after the throw is technically over, making it much harder to get back to the stage. Depending on what side of Pinstripe the Gunner was on, this will have the effect of making it much harder for the foe to land on that side of Pinstripe as the bullets lower down will be further out, forcing the foe to land closer to Pinstripe rather than risk going into the other bullets left by the Machine Gunner.

The Barrel Thrower will ground pound where Pinstripe is standing when he throws the opponent, this will boost Pinstripe into the air just at the moment he tosses the foe. This will effect the trajectory that the Gunner shoots too, if he is also in on the throw. As the foe is hit into the air by the ground pound, they also take 4% more damage, and makes the throw have technically around a Marth of height on top of what it normally has. Pinstripe falls back to the ground for the shooting portion of the throw which is unchanged, but as he threw the foe up further this results in the foe being KO'd around 20% earlier.

Down Throw: Mob Makeover

Pinstripe grabs the opponent roughly by the neck and then rubs their face into the ground, dealing 5 hits of 1% or 1.5% if the ground has acid, before butting them with the back of his gun for another 5%, overall dealing 10 or 12.5% damage and popping the foe into the air with weak launching knockback, not far from where throw took place. If the floor is coated in acidm the throw will leave the foe in prone a platform away from Pinstripe if on acid, which is very easy to punish with the long-range tommy gin.

For the brief period of the throw where the foe is being crushed against the ground by Pinstripe, the grab invulnerability is flipped from Pinstripe (the grabber) to the foe, who for a short while is now vulnerable to any outside elements such as Pinstripe's set up. If they are hit during this period, they can be knocked out of the throw early and Pinstripe is invulnerable to any attacks that happen on his front side, though just as vulnerable from the back. This can let Pinstripe turn the foe into somewhat of a meat shield to his or any other character's attacks.

The Machine Gunner will in this throw shoot the foe against the ground as they're pushed along it, pushing them either towards pinstripe as they're launched into the air, or pushing them forward past Pinstripe to go twice as far as they take 5 hits of 1% damage from 5 handgun rounds. This will let the Gunner put the foe into a different position, similarly to the up throw. The rounds will force the foe forward in prone or in the air compared to where the Gunner is, the Gunner will keep pushing the foe forward a little with each round, potentially pushing them into or past a moving crate, barrel or anything else.

The Barrel Thrower jump into the air and deliver a flying elbow to the foe as they're being released from the throw, similar to the forward throw this takes a long time. This takes 2 seconds, even longer but if the foe is in range they will take 16% and very high knockback, able to KO at 100%. Compared to the big punch, this is an aerial, stall then fall kind of move for the Barrel Thrower to use, but leaves him open for 2 seconds as he does the attack, not an automatic part of the throw. This can potentially make the Thrower off stage as he jumps a battlefield platform and Ganondorf into the air to perform the attack. This elbow will cause a Bowser down aerial sized shockwave when he hits the ground, dealing a token 2% and the same flinching knockback to make it safe for the Barrel Thrower and giving very powerful (for a minion) hitstun for Pinstripe to abuse.

Back Throw: Rolling Stones

Pinstripe stabs his gun into the foe, dealing only 1% with the blunt end, and then turns them around, firing three shots at point blank for 4% each, knocking the foe away for strong knockback that KOs at 170% on midweights at a high angle. This is by far Pinstripe's strongest KO throw, though has its uses at low percents. The high angle and high knockback make it the best throw for simply making space, and as it puts the foe high into the air makes it great to then go into the air and follow the foe for combos at lower percents too. Once the throw can start to KO, the fact it KOs at a high angle means that Pinstripe does actively benefit from using it when stood on top of his chair or crates to give height.

The Gunner will take 5 shots at the foe either before they are thrown when they’re about to be turned around by Pinstrope, or after as they are thrown. This deals a straight 5% with no strings attached, so will make the foe have a higher percent to KO earlier when hit before the throw, or hit them after being thrown to slightly delay their DI and regaining controls to give Pinstripe a small frame advantage. Due to the long range potential for this, the bullets can get caught up by anything blocking them in midair such as Power Shields. This can be useful or useless, and largely isn’t the best use of the Machine Gunner if that’s the case.

The way the move work pretty much completely changes with the Barrel Thrower's involvement. He will take out his barrel and have Pinstripe simply toss the foe in it, then throws the foe behind himself or over the top of Pinstripe and then have it roll along the ground, depending on where Pinstripe was in relation to the Thrower, always throwing it behind Pinstripe for the back throw. This deals 15% to the foe and will make them roll across the stage, being let out of the barrel if they cross over the ledge but carrying over their momentum for a potential KO. On the other hand, Pinstripe can like his side special, alter how the barrel is thrown, throwing the foe at a bounce or into the air instead. The foe will be let out at longest 2 seconds later if they don’t go over a ledge, either below or beyond it, but can mash out using the rest of the grab difficulty time from when the throw was used.

This can give more than enough time for Pinstripe to get an advantage at high percents, letting him wail on the barrel using his super long range tommy gun to speed up the barrel to KO the foe sooner when they’re released off the ledge, or simply put them further away. He can even cause a rip in the barrel to cause acid to come out, timing it to try and cause an inconvenience for the foe when they escape (although they get the usual grab escape immunity then, so isn’t a combo). The Machine Gunner will automatically fire at the barrel at the same time he does for the normal, non-Barrel Thrower version, speeding it up by 1.5x its normal rate when throw in that way, or slowing it down to go only 0.75x the speed when on the other side of Pinstripe. This gives some variables for how the barrel moves and either makes it a far more powerful KO next to the ledge or slows it down for Pinstripe to go on the aggressive.

FINAL SMASH

Bonus Round


For his final smash, Pinstripe summons his beloved girlfriend Tawna who the camera zooms in on. As she makes the pose seen in the game, a bunch of random crates fall from two Ganondorfs above where she was summoned. These range from crates seen in the game, such as the normal crates and TNT crates, to Nitro. These green Nitro crates explode on contact with anything and do a massive 25% damage and KO at 80%, having twice the Bob-Omb explosion sized hitbox of the exploding TNT crates. Pinstripe is immune to all of this, and more than that can easily use his tommy gun to prematurely explode Nitro in the air. Around 20-30 crates fall all over the stage reminiscent of Sudden Death and the foe will have to dodge all the Nitro for 5 seconds after the 10 seconds long final smash, until they disappear on their own.


Tawna can't be hurt for the duration of the final smash but will have a unique animation if Pinstripe stands within close range of her. In a cheerleader like tossing animation, she throws Pinstripe a surreal icon of his face on it that acts as a "1up". This gives Pinstripe an extra stock in a stock match, and in non-stock matches heals his percent by a full 50%. The downside is that Pinstripe has to be in a close range to get the icon and she only gives out 2, each animation taking 4 seconds, so if he is hit out of the way will not get anything. Pinstripe responds when he gets an icon by letting out a maniacal laugh as if he's a Crash Bash character (he should be so lucky).
 
Last edited:

Smady

Smash Master
Joined
Apr 29, 2007
Messages
3,306
Location
K Rool Avenue


GOLDMAN &
THE EMPEROR


Goldman is a major villain in the shoot em up series House of the Dead, primarily appearing in House of the Dead 2 and 4. The Emperor is the final boss of House of the Dead 2 and House of the Dead Pinball. Goldman is a super rich CEO of a billion-dollar financial group that funds research into the “Genome Theory”, essentially creating zombies that create the disasters that happen in House of the Dead 2. Ultimately it is revealed that Goldman was using his billions of dollars to create a “ruler” for mankind, that he dubbed The Emperor, a powerful monster with magical powers that would punish humanity for its “original sin” of destroying nature. Goldman stands back and watches as Emperor fights the main characters in HotD2, The Emperor going out of his way to not let Goldman be hit by collateral damage in his flashy final boss fight. A link is available here (YT: House Of The Dead 2 - Final Chapter - Original Sin)

. This encounter (YT: The House of the Dead 2: Chapter 4 - Despair)
is recommended as a watch too.

The Emperor hasn’t much dialogue, stating that “I am… I am… The Emperor” but does go on to state that it will rule the world and that it hates mankind. The Emperor compared to the humanoid, middle aged man that is Goldman is a strange, jester-shaped and metallic monster, but apparently has been brainwashed to believe in the same nihilistic philosophy of Goldman. Despite the fact that The Emperor can barely remember his own name, Goldman says he will rule mankind. The truth is that with Emperor’s low intelligence and Goldman being his obvious master, Goldman would be the real ruler of the world, and Goldman despite not fighting in the final boss fight may as well be the final boss for all intents and purposes of the plot. After the final boss is over and The Emperor is defeated, Goldman commits suicide now that his world where mankind is ruled by The Emperor is not going to happen.

If you know anything about House of the Dead 2, you will know that it has terrible voice acting, most notably perhaps f Goldman whose voice actor can barely recite his lines in English. This leads to many ironically funny lines of dialogue both for the delivery and the writing, made even funnier by how serious and nihilistic Goldman sounds giving his final speech. Goldman nonetheless is the main villain of House of the Dead 2 and therefore arguably the most famous House of the Dead villain, if anything he might be the most famous HotD character given how infamous the VAing is and how Goldman is central to the plot and far more well known than The Emperor. The only other major villain that recurs may be The Magiician. Goldman re-appears in House of the Dead 4 and in the “bad” ending of HotD2, turns into a zombie and is killed as sad music plays. A sad ending to be sure.

GOLD
STATS

Size: Ganondorf/Robin
Weight: Ike (107)
Walk Speed: Mewtwo (15-16th)
Run Speed: Bowser (17th)
Fall Speed: Rosalina (56th)
Gravity: Pac-Man (52nd)

The way that Goldman and Emperor are controlled is an interesting divergence from the normal moveset. Emperor is the one controlled and hover slightly above the ground at all times in the same way that Rosalina walks and runs, but not enough to dodge any attacks. Goldman stands in the background of the stage and follows around Emperor in the way that Pokémon Trainer did in Brawl. Roughly he is the size of Robin as an ordinary man wearing a business suit. He will participate from the background as you may imagine Doc Louis would do, but we’ll get to that later. For now Emperor’s statistics must go into detail.

The size of Emperor is that of Ganondorf but hovering a little in the air so is a massive vertical target, though not as big of a width one. The walk speed and run speed are high and Emperor is generally fast as a result to make up for his huge size, and his weight is decently high up there too. Due to his levitation, Emperor has a very low fall speed and gravity that make him fall like a feather and easier to Star KO. Just as in his game, Emperor’s going to have a hard time fighting opponents who can effectively poke, juggle or camp him out of the air. Emperor has two good jumps; he almost seems to swim through the air as his subtle animation is ported almost directly from his motionless movement in his final boss fight. As the final battle of House of the Dead 2, The Emperor is a formidable adversary, but under the command of Goldman is truly devastating and at least middle tier.

The Emperor does have a unique mechanic similar to the way Koopalings’ clown car works. Most of Emperor’s metallic body takes a slightly reduced 0.95x damage from attacks. However, his weak point, his red orb “heart” takes an increased 1.1x damage, extend to knock too naturally. This means most attacks that don’t hit his heart will do slightly lower damage, significantly improving his survivability, and the heart itself is fairly high up on an already floating hurtbox so most foes won’t have the range to hit it without going into the air first. This creates a dichotomy where foes want to get above Emperor or hit it up from below, while Emperor’s floaty stats make that hard for the foe to achieve.

GOLD
SPECIALS


Neutral Special: Man Hunt Man


Goldman holds up a handgun towards the screen from the background, causing a reticule to appear just in front of Emperor firing 5 shots that do a combined 10% damage and low knockback with minor flinching as well. Each shot is a tiny bit further along than the last, pushing the foe in that direction before they take the final bullet's knockback. When a cardinal direction is pressed the reticule moves around Emperor allowing him to shoot around himself at 45 degree intervals. As a visual effect the same flashy explosion-like crack in the screen appears where Goldman shoots, as if he’s G or another HotD protagonist. In much the same way as Palutena’s neutral special, the reticule will focus in on the target, lock in place and then Goldman will fire 5 shots from his handgun before having to reload. The trick is however that Goldman is like the fat man shooting the light gun in Duck Hunt Dog’s moveset, conceptually the player is shooting the screen and thus… there is no lag for Emperor. This can therefore be performed whenever Emperor wants to, inbetween moves or whatever else. The shots come out rapidly and overall last just a bit longer than Duck Hunt Dog's forward smash, giving a decent amount of combo-ability if it lands. The trick is to obviously attack the foe at the same time they’re being shot to make the most of the lagless gunfire.


Holding down the input will instead have Goldman take out the grenade launcher from the games, and say a quote such as “burn in hell humans.” He then aims the grenade launcher at the screen for the same effect as the handgun, before firing out a single grenade out of the launcher that flies towards the screen, the grenade will deal 12% and knockback to KO at 45 degrees at 125%. When it lands on the stage it will fall and create a Bob-Omb sized explosion wherever it lands, but gives a lot more end lag for Goldman as he reloads at the end. This takes a good 3 seconds to land on stage too and Emperor is also vulnerable to it! These both cannot interfere with foes dodging into the background or anything else strange, merely a visual cue for when the grenades are going to land in the stage. Both this and the handgun can only be used by Goldman once every 8 seconds, and run on the same cooldown timer.

Down Special: Only I Have the Orbs To Rule Mankind


Emperor motions his hands to cause 4 orbs to start rotating around his body, resembling MegaMan’s Leaf Blades and their mechanics in Smash 4. This takes only about 20 frames of lag. The orbs will rotate around Emperor in the same way, only slightly more of a long arc by comparison due to how much taller Emperor is as a character. The orbs will deal 1% damage each time they pass by an opponent but only the same weak knockback as Lead Blade on contact, lasting for the same short amount of time unless the move is used again. Compared to the Leaf Blade, these are largely the same size as the leaves too.

The amount of orbs that circle Emperor can be increased by holding down special, Emperor does the same animation as even more orbs materialize around his body. This takes another 5 frames of lag for every orb that is summoned, and then another 5 frames of end lag at the end of the move. There is a limit of 16 orbs that can be active at once. This means that it's more efficient to try and get as many orbs as possible out in one go then eat the culminative end lag. The orbs are an active hitbox as soon as they're created so the foe has to watch out in being hit by them, but as with Leaf Blade their knockback is so weak it's not that threatening to just rush in. This is the first obvious time to make use of Goldman either with his handgun to hit the foe as they just stand in place trying to hit Emperor, or with the slower grenade launcher if they try to do their own camping.

The orbs can be commanded to be shot forward by Emperor if he presses the down special again, and unlike the Leaf Blades, his moveset is not limited whatsoever by having the Leaf Blade out so has access to all of his specials. The orbs will be shot forward by pressing the down special and go at a semi spike, straight horizontal angle, now dealing a higher 4% and medium knockback as they travel at Fox’s dash speed. This does have hefty lag as Emperor Stands in place, but he is actually free to move once the first orb has started firing. In fact after this start lag, the orbs will always be sync’d to Emperor and fire from where they are hovering around his body. This has a bit more lag to it than the Leaf Blade as each orb fires much faster than the Lead Blade does as a whole, but has to wait for all of them to each be fired. This can be cancelled out of with more than 4 orbed shot at once, activating the move's pretty quick ending lag.

Side Special: The Life Cycle of Nature's Creatures


Emperor charges as energy gathers around him, then waves his hand forward as he summons one of Goldman's mutations! These mutations take the form of the bosses from House of the Dead 2, but have the same texture and appearance of Emperor, all metallic and silver. This has decent lag spread out between the start and end, but most importantly Emperor can summon 5 separate creations and these get stronger the more charge time is spent on the move. The charge time will be reduced if Emperor has orbs orbiting him at the time, which are absorbed into Emperor along with the energy that is pulled inwards. Each orb that is absorbed into Emperor will reduce the charge time of the move by 5 frames. Emperor can not use all his available orbs at a time by tapping the input 1-4 times to
summon the next summon in order, rather than using it all up to go to the available summon.

As with other summons in the game like the Phantom, the creatures summoned practically have full super armour for their duration until they're destroyed. This makes them a threatening presence on stage unless the foe knows their weak point, which will cause full hitstun and knockback. Only one type of summon can be around at a time, defaulting to the next lowest when the charge falls in their area. And only two summons can be around at once. If Emperor manages to get 2 minions out at once, the move instead becomes a taunt as Emperor laughs in place and Goldman says "at last, the time for Mankind's punishment is at hand!" or some such line.

When each of these summons is destroyed, the minion will release orbs that will spin out in equal distances and directions from the middle of their hurtbox. The amount of orbs differ for each minion, equivalent to their base HP divided by 5, so a minion with 50HP would create 10 orbs. The way this looks resembles MegaMan's death animation in Smash 4. Each orb is the same one that Emperor uses in his down special and will each deal a weak 2% damage, only travelling out half a battlefield platform before they dissipate. Charging his down special, Emperor can absorb these orbs into himself to orbit around them and stop them from being lost forever. As long as they're within a battlefield platform of Emperor, they'll come towards him and be absorbed. These are expendable creations, Goldman and Emperor can both attack these minions to get their useful orbs.

Emperor can send out his orbs in his down special to help his summons. When they land on a minion, each orb will give an additional 2HP and have other effects on them that will be stated per minion, but cannot boost a minion's HP past its default cap. This can however still constantly heal a minion if a constant stream of orbs is delivered to them all at once. At the end of their life, all the orbs will be unleashed at once, greatly increasing the potential hitbox to a max of 16 that will circle all around their corpse to hit the foe or for Emperor to manipulate. When charged past their initial frame, each summon automatically gains an orb for every extraneous 5 frames of charge they are given, so have somewhat of a base to work from. When Emperor loses a stock, all his set up is destroyed.


ZEAL


Charge Time: 1-16 Frames
HP: 12

Weak Point: Entire Body

The first of the summons is Zeal, usually this pink imp/gargoyle comes as a set of two along with Kuarl, a headless axe wielder, but in the Emperor boss fight they are summoned separately. Zeal is the general shape of Dark Pit, but is around 70% as large, a small target. As his weak point is his entire body, he has no super armour.

Zeal has a few attacks reminiscent of his boss fight. Zeal for the most part will dash across the screen, going at a diagonal and ignoring solid aspects of the stage. This is mostly similar to the Kat & Ana assist trophy in Smash 4, only with the one side covered. Zeal can be hit out of this attack by any move dealing damage, but it will deal 5% damage to foes and weak knockback. Zeal's other attack pattern has him gliding up and down across the stage, dealing 4% damage and light knockback. Both moves are easily countered by the foe attacking Zeal out of them, and many attacks will simply destroy him in a single hit due to his low HP.

Perhaps the greatest benefit to having Zeal around is that when other minions are summoned alongside him, Zeal will attempt to go to the top of the stage and give out commands using his cheesy voice acting, despite just being a copy of the real Zeal. What this does is raise the AI of the other minions, although Zeal can still be easily destroyed by a foe as he only hovers 2 Ganondorf heights above the stage. When Zeal is destroyed, he will crate only 2 orbs that spiral out around him, as Zeal is agile these can be hard to retrieve for Emperor. As the weakest of the mutations that Emperor can summon, Zeal is mostly a throwaway, but adds a good amount of pressure to the foe nonetheless.

Zeal is a unique minion in that feeding him orbs wil actually increase his size entirely. From the small size of 2/3rds Dark Pit, Zeal can grow to the full size of Pit once he's fed 5 orbs. This will buff his attacks too, now dealing 7% with his gliding attack and medium knockback, and 6% with his bobbing up and down move. Zeal can be a good way to store orbs for temporary due to his low HP so they're bound to be released fairly soon if the foe ever attacks him, but making him bigger makes him a bigger target for Emperor too.


KUARL


Charge Time: 17-33 Frames
HP: 35

Weak Point: Zeal

This behemoth of a creature is Kuarl, a giant, headless axe wielder. Kuarl is 1.5x the size of Ganondorf only without a head and carries an axe roughly the size of Marth's whole body, with the head of it around the size of Kirby alone. Kuarl will stomp around the stage and charge in the direction of the nearest opponent, walking at Ganondorf's slow dashing speed until he gets in range. He will then swing his axe behind his head and swing overhead in a slow attack, but an incredibly powerful one that deals 20% damage and KOs at 110% in a meteor spike. This move is so highly telegraphed and predictable though, it's best to save it for when the foe is seriously in peril or as a way to stage control. When the axe misses, Kuarl gets it stuck in the ground and takes 1.5 seconds to remove it from the ground before repeating the same process.

When there's no Zeal around, Kuarl technically has no weak point and he'll really need that advantage to achieve much of anything on his own because of how predictable slow he moves. This does make him the best minion as a pure meat shield for Emperor and Goldman.

Kuarl has other moves, but will only use them if Zeal is overhead of the stage, Kuarl benefitting the most as in the game they are telepathically connected. This combination and boss is jointly called "Judgment." With Zeal giving assistance, Kuarl can now perform an axe swing in place. This deals 15% and while slow, is only around 30% slower than Villager's tree cutting axe swings, and goes roughly twice as far! This KOs at a low angle at 140%, so is nothing to snuff at. Another move Kuarl can now perform is a shoulder charge using his massive body and the hilt of the axe, dealing 12% damage in a remotely okay speed attack, able to KO at 150%. This has huge range due to Kuarl's size, but is only performed in very close range of opponents. This does work to give Kuarl far more of a defensive capability rather than being wailed on due to his size.

Further orbs fed to Kuarl will go directly to his axe, increasing its size be up to twice the size of Kirby. This will make the axe deal up to 10% more damage in each of its two attacks, and on top of that will increase its range massively. The axe will however lose orbs every time it hits the ground, shedding one each on either side, this can be useful however if Emperor manages to be there in time to use them himself. When Zeal is commanding Kuarl and this happens, he will attempt to bob down and absorb the orbs himself if Emperor is not in range to do so, giving himself the buff.


HIEROPHANT


Charge Time: 34-50 Frames
HP: 25

Weak Point: Chest

The second boss of House of the Dead 2, the Hierophant, is a trident-wielding fish monster that is roughly the size of Marth if he slouched over his posture. The Hierophant moves in on the closest foe at Fox's walk speed, only moving erratically and shaking like a crazy person (dare I say, someone with a neurological condition). When the Hierophant gets in range, he will try to slash at enemies with the range of Marth's sword on his huge trident, dealing 12% and medium knockback. The Hierophant's weak point is in its chest that has a rib cage that flaps open for a second every two seconds, forcing the foe to attack periodically, lengthening the life span of the Hierophant.

The Hierophant's other major attack is his overhead, giant jump slash. When the foe is over two battlefield platforms away the Hierophant will jump a massive three Ganondorf heights into the air in a stall-then-fall type attack, hovering over the foe with a good amount of DI. The Hierophant aims its trident for the ground, coming down on top of the nearest foe with a powerful strike that deals 15% and a powerful meteor smash. This is very telegraphed, taking a few seconds to last as the fall part is not very fast, but as with Kuarl works well into Emperor's pressure game.

The third attack that Hierophant can perform but only with the help of Zeal is he can stand in place and gesture forward, summoning up Mofish as disjointed hitboxes that leap forward in front of Hierophant. The way this works is mechanically quite similar to G&W's neutral special only using fish rather than KFC or chicken legs. The fish are small, again comparable to the G&W move, and made of the same metallic texture as Emperor. The fish will jump forward at around 1.5x the pace of G&W's but over a much less random area, doing 2% damage each but up to 3 a second can be summoned. This is only used when Hierophant is between 1-2 battlefield platforms away from the foe.

When fed the extra orbs, the Hierophant will gain access to a second trident that grows to be from 1/2 to the full size of the other trident with more orbs. Instead of using the fish move, from the same range (and without Zeal) Hierophant will toss the trident forward. This goes a battlefield platform forward before getting stuck in the ground, and deals 8% with medium knockback to foes. Once it hits the ground, the trident will dissipate into all of the extra orbs that were fed to Hierophant and disperse in a circular pattern around the trident. If the trident is thrown off stage, it will materialize back in Hierophant's hand once it goes past the blast zone. This can potentially make it spammable, but as the time it goes to the blast zone is quite lengthy on any big stage isn't that useful. When Hierophant is defeated, his trident releases its own orbs as well as him, and can be up to the full 5 orbs worth as well.


TOWER


Charge Time: 51-67 Frames
HP: 35

Weak Point: Mouth

Tower is a giant snake that is a similar shape to Rayquaza with its tail wrapped up behind it, but is 1.5x as tall as Ganondorf and as thick as DK, taking up a huge amount of space. It will slither across while standing up and when it comes within a short range of a foe, will try and bite with a laggy attack that takes 40 frames, but has a long range to it and does 5 3% damage multihits, stunning the foe in place for 20 frames of hitstun. This will then send the foe off at a weak launching angle 45 degrees diagonally into the air.

The weak point of the snake is whenever it bites, and this is really the crucial part to understand as Emperor. Tower has to be defended perhaps the most of all the summons to get the most out of it, as it can be easily counter-attacked and knocked out of its attack if the foe has the right timing, which is pretty obvious. The snake's head like in the games gets a unique yellow effect around its mouth when its weak point is exposed, telegraphing for the foe exactly when to attack.

The snake will slither away when it gets below 15HP, in the game this means it goes underground but due to hardware limitations of this disgusting mankind-made Nintendo console, we'll have to settle for a metallic puddle. The snake will turn into an almost non-existently thin puddle on the ground but one that stretch a ginormous 2 battlefield platforms in size and moves across the stage, with the side its head on expose by a small Kirby sized bump in the ground. When a foe comes within a short range, the snake will leap out of the puddle in a powerful bite that does 15% and KOs at 115% at a low angle. The foe can dodge this by attacking the snake's head as it re-emerges from the ground with an attack that does 12% or more. As long as it's underground, the snake is immune to damage, but when it re-emerges has massive lag before it returns to its normal attack pattern.


When Zeal is able to command the snake, it will gain another attack based on when it attacks civilians in HotD2. The snake will grab a chunk of ground in its mouth and bite it into pieces, causing 3-4 rocks to shoot out in a similar animation to Rock Smash. All of these rocks cause 3% damage and decent amounts of hitstun to the foe. This doesn't terraform the stage, but can pick up the foe if they were stood on the King Dedede-wide stretch of stage just in front of the snake. A sweetspot hitbox on this ground or just around it will take 20% damage and knockback to KO at 80%, a very precise and another slow hitbox for Emperor to try and land.

When buffed with orbs, the snake will gain a profoundly powerful second, third, fourth and fifth head. These occur with each additional head. The original, blue head retains its powerful bite, but now each other head will do its own weaker version of the bite. These all deals a straight 6% damage on top of the normal snake, overall doing up to 24% more damage if all the snakes land their hitboxes. This is practically impossible however as each snake bites at a slightly different space next to the original head's attack.
As Tower takes damage, each head will die and they take up roughly 50% more space than the original snake does, eventually taking up a huge portion of the stage. When the blue head gets down to 15HP, the second head will die and it will go into its other mode as normal. As each head dies, it will create an orb of its own for Emperor to absorb. The other snake heads don't have a weak point, but will all be stunned if the main head's is hit.


STRENGTH


Charge Time: 68-85 Frames
HP: 55

Weak Point: Head

Strength, the final of the summons and by far the most powerful one, is a giant who wields an equally giant chainsaw. Strength is twice the size of Ganondorf and his chainsaw is 1.5x as big as Ganondorf, almost as big as he is. The chainsaw is always on and does constant 2% damage up to 3 times a second though is very easy to DI out from, can stun the foe for a few hits if they get hit by it, acting in the same way as Aura Sphere. Strength moves across the stage at a good tick, with his chainsaw overhead and going at the speed of Ganondorf's dash speed. Strength's weak point is his head, which is hard to reach ignoring his chainsaw, meaning that the best time to try and attack him is during his powerful attacks.

The first attack Strength performs is a fairly simple one, simply revving up his chainsaw and performing a slow, vertical slash with it, dealing 10 multihits each dealing 3% damage and the final hit able to KO at 100%. This is a very powerful attack, but is very slow to come out, and will not combo from the idle hitbox of his chainsaw's hitbox moves forward and misses any overhead foes. This can break a shield at full health if the foe stupidly just stands in front of him during this move. The attack does amazing amounts of shield stun and will basically lock the foe in place in their shield. The move will also ignore any solid constructs on stage, chainsawing right through them.

The second attack that can be performed takes advantage of the fact that Strength actually has a good single jump to get to higher platforms. Strength can jump and then use a downwards stab, going as fast as an average stall-then-fall and doing 15% with his chainsaw and strong knockback. This can KO at as low as 105% and is not that laggy, but requires Strength to either get to a higher platform first to be used, or for him to jump first, at which point it is extremely telegraphed.

The attack gained when Zeal is in command for Strength is a long-ranged melee grab that has a decent grab speed too. It would be in the top tier of Smash 4 grabs if in the game. Strength will pick up the foe with his non-chainsaw hand and hold them up, inspecting them for a moment before throwing them into the air for 8% damage. This is medium knockback, but is just horrifying for the foe when Emperor will easily go over and hit them out of the throw. Strength himself can then use his main attack as they come back down or just use his idle chainsaw hitbox to pressure them out of the air. As the only grab the minions have available to them, it makes shielding against Strength very inadvisable.

When buffed by the orbs, Strength will be able to do his usual "charge through walls" animation from his boss fight. This is made harder by stages that don't have walls, so Emperor and the great Goldman make one for him! The orbs are summoned into a massive wall that Strength now carries around on his back, which acts as a non-solid platform for foes or Emperor to stand on for as long as Strength is around. When no foe is in close range, Strength will take out the wall and plant it on the ground in front of him, depending on the orbs he absorbed being as tall as Ganondorf or twice that height. When a foe is on the other side of the wall, Strength will charge into it, smashing it in a hitbox 1.25x its size for 20-25% damage that KOs at a high angle from 105%. This will also disperse all the orbs used to create the wall in the first place.

The wall remains if Strength dies first and has 20HP at base, with an extra 5HP for every extra wall used, having a wall around isn't the worst thing for Emperor and Goldman. It's pretty situational but can be stood on by a single character and broken through once its health is depleted, simply collapsing once its HP depletes with the orbs coming out. If another Strength is summoned, they will bash through the wall so long as a foe is in range. Get the most out of that wall, we'll wall of those disgusting humans before they destroy nature!

Up Special: Invisible to All Humans


Immediately the orbs surrounding Emperor start to rotate much faster than normal if he has any and Emperor disappears from sight as only his red core, his weak point, remains. Goldman can now move his core in any direction at the speed of his dash, able to sweetspot the ledge. For the duration of the up special, which lasts around 2/3rds as long as ROB's up special without any necessary fuel, Emperor has full super armour against attacks and only takes damage if his small core - roughly the size of a Pokeball item - is hit. At the end of the move, Emperor falls into helpless in midair if he isn't on the ground, but if he touches the ground or ledge he re-appears and his orbs stop rotating quite as fast.

For the duration of the up special the orbs will do twice their normal damage to foes and more knockback, and their fast rotation makes it very hard to hit through them to get to the core. This really depends on how many orbs the Emperor has set up however, as with very few of them this move is very non-threatening. Even when Emperor re-appears out of the move on the ground, the end lag is fairly slow and punishable. However, where Emperor himself re-appears is an even more powerful hitbox, on par with Zelda's out of her teleport, so can be used to its own advantage when Emperor doesn't have many orbs to use around his body.

Any orbs that are in touching range of Emperor during his up special will be pulled in and added to his collection during the move. This makes it doubly as a very nice way to get the orbs left over by fallen summons or that Emperor himself threw out, but obviously doesn't make the move any less punishable compared to his orb move which is much safer to use. This does make it a very good move to use to kill minions however, especially right after they do attacks that make them fairly useless for a long time like Kuarl's powerful axe swing or Strength's falling axe strike.

GOLD
SMASHES


Foreward Smash: Global Control

Emperor motions around in front of him, summoning in all the metallic orb power he can to create a globe of metal in front of him during charging, firing it forward for 15-19% damage! The foe will be dealt knockback at a largely flat angle. The size of the orb grows from only as big as Kirby to 1.5x that size at max charge. The orb travels between 1-1.5 battlefield platforms in range before it dissipates and does a little less knockback than MegaMan's Charge Shot. This has decent lag on both sides for a projectile smash, and as it is disjointed it can't be reflected as it's not technically considered a projectile.

The orb will grow even bigger if any orbs get in the way as it's shot, absorbing them into itself as it's fired forward. the orb travels at the speed of Fox's dash speed so can easily catch up with the slower speed orbs. On top of that, the orbs take a few frames to be absorbed, and for those frames the orb's area will be added to the powerful hitbox of the forward smash extending the range greatly. Orbs each add 3% damage to the attack and lower the KO power down enough that only 2 orbs make the move as powerful as MegaMan's forward smash. Up to 5 orbs can be absorbed into the forward smash, making it deal 30-34% damage and KO as low as 100% against those revolting human midweights in Smash 4.

Orbs can be absorbed not just in the way of the attack, the move can be angled up or down to instead absorb the orbs that circle Emperor. The most straightforward of the two is angling up, as this simply makes one big orb to shoot. These will be sucked into the orb and fired, boosting the power of the attack before it even comes out, both form of orbs will increase the size of the orb up to potentially the size of Bowser at max. This won't just increase the power and range of the move, but will cause a shockwave against the ground or any walls that get in the way. This shockwave ranges from 0.65-1.2x the size of Bowser's down aerial and deals 0.8x the damage of the orb itself does. This can hit both on top of the ground, but also against walls such as the one that Strength creates.


Angling the move down instead has Emperor keep his orb firing in place without absorbing the other orbs into it, but fires all other orbs that gather in place around that orb along with his forward smash. These orbs grow in size themselves with charge, but each orb not the original fsmash one will only grow to deal 10-14% damage and light knockback. The position of all the orbs is somewhat random, but will automatically space themselves out vertically, eventually creating a wall-like barrage of orbs going forward. However only one of these can hit at a time per use of the move. All the orbs sparkle with electric energy, denoting that they are now projectiles and no longer disjointed, so can be reflected or absorbed as a trade off.

If a summon was to be destroyed by these mankind-ruining orbs, the summon will dissipate instantly and all their orbs will be absorbed into the attack, but only if the attack was going to do enough damage to kill them outright. By pressing the neutral special input when a summon is in range of the move, Goldman when he is not in lag will aim his fire on that now useless minion. As those dogs of AMS say, "there is no such thing as a second chance!" This will use up the neutral special on the summon and wear them down so that the forward smash has a better chance of absorbing them. If nothing else, this can serve as good minion management to get rid of those slacking minions, probably a loser like Zeal. It doesn't matter if he calls Goldman, Sir Goldman! It's the opposite of the down special: Goldman giveth life, Goldman taketh life away!

Downword Smash: Earth Shattering Event

Emperor flies a little ways above where he usually hovers, flying out of range for low down tilts and other trap-like moves on the ground for charging, then flies down and pounds against the ground with his enlarged fist! This causes a shockwave of Emperor's metallic body to tidal wave out on either side, while the fist itself is a powerful meteor smash hitbox that deals 20-28% damage and can KO as early as 110%. This would be earlier, but has to spike off the stage first. The shockwave by comparison ranges from 0.5-1x the side of Bowser Bomb's furthest hitting hitbox around the much more slender Emperor, dealing 5-10% damage (scaling much harder than a normal smash attack does). This simply does weak launching knockback, not unuseful in of itself to get the foe into the air.

Emperor has bad lag on both sides of this move, making it seem almost unusable as it's as bad of lag as MegaMan's down smash. However by positioning himself so when he comes down, an orb is beneath him - either from his own shield of rotating orbs or on the stage itself - he can skip this lag by hitting the orb into the stage. The regular orb will not deal much damage, only dealing 10% damage as it goes down and there's little reason to believe the orb will hit anyone on the way down. What helps is that the orb will go at an angle if hit from the left or right, like a pinball (and yes, Emperor was in a pinabll game so it makes sense). Speaking of pinballs, the orb will bounce up to two times off of the foe, any summons, the ground or a wall, and travels another battlefield platform before it dissipates each time it reflects, dealing another 3% each time as it passes on from wall to wall.

The speed of the orb also increases up from Fox's dash speed, to a little above that, to Sonic's dash speed after it has reflected. It goes without saying the Strength wall, but also the minions themselves make for good things to reflect off. The power of the orb and the amount of orbs can be increased even without touching the forward smash, basically impossible to get into the down smash regardless because of how it travels away from Emperor, but Emperor does have other things he can hit into the ground. If he hits one of his summons beneath him like Zeal when he's flying around, or hits objects like Hierophant's thrown trident, or his fish, they will be absorbed into his enlargened fist and punched into the ground instead, leaving Emperor lagless. This varies wildly in power however, the shockwave can be anything from 5% and just around Emperor, to twice the width of Bowser and deal 17% damage, KOing off the top at 90% if he manages to get 10 orbs (the cap) underneath him as he does the dive into the stage. The lag when he does this is actually very good, so more than worth the set up.

The exact position of the dive can be slightly altered too by holding a diagonal left or right during the start up of the move pre-charge, this will make Emperor hover towards a summon if they're on that side of him. This will magnetize the two, creating a weak link of electricity between them and Emperor. During the charge where the fist is held above Emperor ready to be punched into the ground, orbs from the summon, or anything they created even going so far as the Mofish, wall and trident will be sucked into the fist, increasing its size for when it's punched downwards. If not careful this can kill the minion when it's low enough, as each orb will remove 5HP from it, but this will buff the melee attack by 2% and lower the KO percent that much too. When punching down, this will then make Emperor move disproportional in that direction once the charge time is over, going at a slightly diagonal as he is magnetized towards his set up. This can even hit slightly off the ledge as ledge grabbing minions, but the shockwave itself is still fully horizontal.

Again like the forward smash, Goldman can play his part by the player pressing the neutral special. This will make Goldman shoot any summons or other set up that can be moved (the trident, wall and fish can be by Goldman due to his expert knowledge on them). Goldman will aim specifically for the summons' and their set up's weak points, using his powerful handgun to pierce through their bodies and make them recoil half a battlefield platform in Emperor's direction. This will make it much easier to use them for the sake of the move, not like these worthless creatures deserve any better treatment, using up the neutral special and putting it on cooldown. Like in neutral special, Goldman can shoot around the weak spot in other directions, which can give a huge variety of shots based off each minion's unique size and the location of their weak spot.

Upword Smash: Lightning of Creation


Emperor charges up in a similar pose to his side special minion summon move, charging up magnetic electricity in his body then unleashing it in one large vertical strike similar in appearance to Thunderbolt. This lightning strike goes directly up and has a weak launching hitbox dealing 1% right next to either side of Emperor, dragging in foes extremely close range, but the main event is the huge Palutena usmash sized pillar of electricity that deals 16-20% damage and high knockback at a 45 degree angle, able to KO at that awkward angle at 130% uncharged. This is a very powerful hitbox but has poor start lag, and merely average end lag making it not the safest smash to throw out, though the considerable range certain helps.

The electricity of the move has a unique effect on any orbs that were up in the air at the time the move went off. First it channels the electricity into the orbs, making them stand in place for the duration of the strike and deal 15% themselves with strong radial knockback, though not enough to KO, this can be a useful hitbox alone. After the attack portion of the move is over, the orbs become magnetized and start to head towards Emperor's locations when he used the up smash. They will spiral down, maintaing the hitbox they have when part of the down special shield around Emperor so not a particularly strong one. If they come into contact with Emperor during this, they're automatically absorbed into his shield. If they don't and hit the ground, the orbs will create a spark of energy on the ground that deals only minimal damage, around 2% damage and the same weak flinching knockback as Pikachu's neutral special projectile. Nonetheless, it's not the most useless hitbox ever.

Emperor can use up some of his orbs during the move by pressing to do a follow up attack after, shooting up to 5 orbs into the storm as it strikes, causing a second slightly weaker strike to hit directly in the area of the last one, dealing 70% of the damage and knockback, but making the end lag even worse. Any minions on stage when the second electrical storm hits will have their movement strongly affected by magnetism, causing them to be pulled towards the area where the lightning struck, halving or doubling their movement speed going against or towards it respectively. This effect lasts for 5 seconds. This is shown by their bodies having a slightly electrical effect all around them. This doesn’t just go for minion movement, but any attacks will pull or push them as well, such as the axe strike of Kuarl, Strength’s chainsaw and Tower’s bite, letting them have some unpredictability in their range against foes, something sorely needed when they’ll be using these attacks all the time.

Summoned mutations stood directly over the storm will be thrown up into the air, from 1-2 Ganondorfs. This is very helpful for Strength and Kual for the movement, but for all the minions who have attacks requiring them go in the air: Strength, Kuarl and Hierophant, this is a fantastic way to force them there. They will perform their attack as normal, and because of the storm will be pulled in to the centre of the storm potentially too. This makes it very telegraphed but at the same time, telegraphed for Emperor as well making that whole area into somewhat of a trap. It even helps Zeal and Tower too, simply speed or slowing them down makes them a little less easy to hit as they fly around or burrow in the ground respectively.

Goldman has another of his follow up attacks here, activated by pressing special during the move. Goldman will fire shots that can come out as normal shots, or be into the electrical storm creating 5 small jolts of electricity that linger on slightly after the move ends. These can be aimed by the player and this will not interrupt any gameplay due to Emperor still being in lag, but can be allowed to shoot automatically at random parts of the electric lightning strike. Each bullet will create a disjointed electric hitbox dealing 2% and high hitstun, half of that done by Zamus’ down smash. The reticule moves around at a very fast imprecise pace, making this one of the most skilful shots Goldman has to make in the set, but can be one of the most powerful if it stops a foe punishing Emperor or stuns them to hit into the up smash. It can even cross over and hit both before and after up smash hits, although it won’t naturally combo very precise timing can lead into a devastating combo.

GOLD
STANDARDS


Jab: Lance of Longinus


Showing off his shapeshifting abilities, Emperor changes his arm into a sword or lance almost as long as the Buster Sword and slashes it forward in a complicated mesh of strikes that resembles Meta Knight’s, slashing all around him for around the same damage (a little lower) and the same knockback. The upside is of course that the range of the sword is far greater due to just how long the sword is, but is easy to DI out of. As the finisher of the jab, Emperor holds his sword and rushes it in an overhead slice for the jab finisher, dealing 4% damage and decently high damage, slightly below that of King Dedede’s surprisingly decent (for him) jab finisher. This has good enough range it can hit either side of Emperor, but begins behind him so technically is actually better for hitting foes he caught behind.

The jab is of course the perfect move to combo into Goldman’s shots, but as it can be easily DI’d out of, the mix up between going for jab finisher and using up neutral special is a tricky one to balance right as the player. What is very powerful is if Emperor can time a grenade launcher shot from Goldman just before he catches the foe in his jab, the resulting combo between the high “stun” of a jab into the grenade launcher can finish the match much sooner than the jab’s own finisher knockback. Needless to say a jab like this can also help to stun the foe long enough for Kuarl, Strength or Hierophant to get off their powerful attacks, but this requires some tricky set up to achieve with the AI of those three taken into account. As this can even hit above Emperor slightly this is a good way to get a jumping attack from them to hit the foe.

The orb shield is actually too close most of the time to ever play a part in the jab as the foe is hit away by the edge of the sword first, but by getting in close range of the foe this can be the best way to dish out damage to the foe outside of just grabbing them with the orbs on. At a very close range, the orbs will hit the foe and stack this slight hitstun with the jab as well, giving enough minor hitstun to cancel out most of their DI. This can make the jab combo for far longer than normal, though will eventually release them regardless of the orbs after stunning them in place for as long as Robin’s Wind jab does, so is not completely broken with max orbs. For the jab finisher as he rushes forward, any remaining orbs will hit against the foe too in front despite the sword behind Emperor at first, making sure that they can’t escape from the jab finisher so long as they’re still in range of it.

Dash Attack: Spike of the World’s Edge

Emperor charges forward with the stereotypical shoulder charge a lot of characters have, dealing a decent 9% damage to foes and going forward as far as Ganondorf. This does light knockback but has good end lag for a dash attack and is a great approaching tool. When the attack goes over an orb, the button can be pressed again to absorb it into Emperor’s shoulder specifically, eating up the orb but creating a spike on the tip of Emperor’s shoulder. This will generate some hitlag and slow down the move by a couple of frames, but enhances the damage and power of the move to deal 10%, and each successive orb will do the same. Each orb will also let the move go on for the same distance it would if it started at that point in the stage, so can if all the orbs are placed right, pull Emperor along the entire stage. The move also gives Emperor super armour to attacks that deal less damage than the charge does, with the cap on this move being 15%. While normally it simply launches foes, it scales well to KO at 15% damage, then it will KO around 180%, able to KO at 210% with the 14% hitbox, the only other relevant KO hit in the attack.

The shield cannot just be cheesed and absorbed into the dash attack without needing any outside orbs sadly, as the shield stays just too far of Emperor’s model at all times to do that. The orbs do help to cause the minor hitstun they sometimes can (acting the same way as the fairly unreliable Leaf Shield) to directly combo into the dash attack’s hitbox. Speaking of shields, the spike will make the attack do extra shield damage and shield stun, increasing both by up 1.1-1.5x per each orb on top of the normal shield damage multiplier. This can get a little excessive at the max damage of the move, and the size of the spike even grows slightly bigger to make a more effective poking tool. The close range shield can come in handy too when the move does good enough shield stun to get both the spike and orbs to hit at the same time. This is another example of where Goldman can use his expert timing to bridge the two hitboxes and go for a shield shatter if all cards are played right.

Foreward Tilt: Spike of the World’s Edge


Emperor absorbs all the remaining orbs around him into his arm, turning it into the same lance/sword that was seen in jab then charges forward mid-animation to slice in the air, at default performing a vertical slice that deals 10-15% (with 5 orbs) and will KO from 140-130%. Emperor can skip the absorbing part by double tapping the move. This is one of Emperor’s most important moves to KO with as it has good range, especially when he charges forward during it, and it isn’t too slow either, coming out at above average speed and having okay end lag, though nothing spectacular. The move gets a little stronger and has more range too when the orbs can be absorbed, increasing the size of the lance from having 0.8-1.2x the range of Marth’s shield breaker. This has the same anti-shield properties, although slightly lesser than shieldbreaker, it still makes for a great poking move. Due to the vertical slice, the default move actually sends foes at the Sakurai angle, so at high percents can be a good semi spike to hit the foe off stage or right into another hitbox in front of Emperor.

The chosen angle of the forward tilt, like most ftilts to be angled up or down, will change the type of weapon that is shapeshifted out of Emperor’s arm. The up angled version will instead create a full on sword with the hilt and everything, and as Emperor charges forwards he does an upwards slash, trading damage for range as he does a reduced 7-12% damage and lower, launching knockback. This can of course be a positive as the move becomes a great juggling move and the range is decent too, basically becoming the best juggle available to Emperor on the ground. The sword does far less shield damage but much more shield push so is definitely best used as a defensive move compared to the normal forward tilt.

The down angled version creates a hammer that Emperor rushes forward to slam into the ground, creating a weak, small shockwave on the ground that deals a token 1%. The hammer itself does the most damage of the three at 12-17%, a devastating ledge move too as Emperor will rush forward to do it the whole way, but is easily countered if the foe goes for a get up attack, though most other options will be checked by the shockwave to make it frame neutral. Each of the three versions can be followed up on by pressing the input yet again in front of a minion during the end lag of the move, taking a hefty amount of end lag, and using up all the orbs that might have gone into the weapon in the first place.

These weapons will now be “passed on” to the minion, as the weapon disjoints from Emperor’s model and floats over the minion, forming their weapon into either a sword, lance or hammer. It works because each of the minions is simply a metallic texture like Emperor, so the model itself only changes in shape. This will not buff them personally as is seen in the down special, but has a profound effect on their moveset. Most profound of all is on Zeal, who now gains access to the weapon and ftilt himself without the charging part, and dealing only half of what the normal move does without any orbs. This is buffed to deal up to twice the damage when Zeal himself is buffed, as he gains the strength to do these moves properly. Zeal will perform these attacks when in close range of an enemy and makes him much less of a sitting duck, but at the cost of all that end lag and any orbs. Depending on the amount of orbs used (if any) this will last for up to 20 seconds before the orbs dissipate, so is nothing too permanent either.

On Kuarl,and Hierophant, this simply means their axe or trident changes to have the lance’s great range and anti-shield, poking properties, or gains the great slashing range of the sword, or the extra damage and shockwave of the axe. These are all very helpful additions however for Kuarl’s one big attack, and on his other simple slash, can have its uses too. For that, the hammer basically resembles the ftilt version as he hits the ground again, now doing that for both moves. The hammer is especially useful for Hierophant who can make a lot of good use out of the move’s shockwave from his jumping attack, but definitely likes the simple sword, lance and hammer extensions given to his simple slash.

Strength and Tower are a little different as neither of them really gain a new weapon, instead are given a throwing weapon. Strength gains access to a new attack he actually does have in House of the Dead 2 – the throwing axe! It’s now stuck onto his leg. Now though, it can be a sword or lance too. Tower does the same, but instead of throwing the weapons, spits them out of its mouth, both gaining a throwing weapon for each. The throwing axe is a single axe he throws that goes at a slow speed comparable to Link’s boomerang at the same range but deals a powerful 8% for a projectile and light knockback, and can, as it does on Strength’s model, get stuck in the ground where it can then be hit by Emperor’s down smash. If not, it will simply spiral into an orb as the axe dissipates 5 seconds later. The sword spins slightly further but won’t lodge itself in the ground, dealing 10% damage and radial knockback so can effectively hit the foe into other attacks. The lance will be thrown a bit like Hierophant’s throwing trident, piercing through enemies and their shields to hit the other side. The lance won’t get stuck in the ground, but can for a moment get stuck in an enemy’s shield causing them a good deal of shieldstun.

Upward Tilt: Clash of Civilizations

Emperor turns his right fist into an axe head and swings it upwards in a wide arc, creating a crescent-shaped slice in the air that deals 12% and medium knockback. This reaches in front of Emperor to just behind his head. Despite the large range and shapeshifting, this is a fast move to come out, and merely a below average one for ending lag. This is good for pure spacing but little else as it won’t KO until around 160% and as a juggling move, only begins to be useful at super low percents. This is improved somewhat when Emperor is higher in the air, on a platform, on top of Strength’s wall or through some other means, and is a better juggle move when the lower end of the up tilt hits. It has a decent amount of overhead coverage, but due to how it’s used the area above and behind Emperor’s head is very slow to come out almost to the point of uselessness. The range of the move is definitely its selling point though, with such a wide-ranging crescent hitbox.

This move is perfect for clashing due to its large hitbox and the fact it does just little enough to be within 8% (the needed amount to clash) of the lowest and highest fast moves in Smash 4, as most smashes and tilts are in the 4-20% area. This wouldn’t be too important in of itself, but is helped by the fact that Goldman is lagless and can just shoot at the foe while the two combatants are in lag from the clash. This really depends then on who had the stronger attack for whether Goldman can just shoot the opponent outright fast enough, as in Smash 4 whoever in the clash had the more damaging attack has less lag, but even if Emperor is slower he can be largely covered for it by Goldman.

When an orb is within range of the slash, they can be destroyed by holding out the input making Emperor slash right through the orbs and cause them to return to his arm, increasing the power of his slash but also causing himself a small amount of hit lag. This isn’t actually such a bad thing to force a clash however, as this hitlag will cause the hitbox of the up tilt to linger to try and catch out more opponents during their attacks, although obviously requires they’re already in an attack or very gullible. The up tilt for the rest of the animation will continue dealing 2% more damage, dealing up to 22% damage if 5 orbs are absorbed into the axe head. The move will still for clashes retain the initial 12% damage to not just overpowered foes, Emperor wants that clash, but once added up the clash will use the higher number to help Emperor get the upper hand in the clash so that he’ll put the foe in much worse lag than him and get a follow up out of the exchange.

Downward Tilt: Kick the Downtrodden

Emperor leans backward in midair and for once uses his shapeshifting powers to increase the size of his foot, kicking underneath and across the floor at foes in front of him, dealing 4% and with a small chance to trip. This move can’t be spammed although it’s not too horribly slow, so can’t be abused in the same way as Ness’ down tilt. The kick if not tripping the foe does light knockback and as it drags along the ground a little, is great for shield stun, push and poking at the lower side of shields. There is a small blind spot right next to Emperor but this is naturally filled in by any orb shield that Emperor has floating around him, and this is one of the best moves to hit directly into said shield.

The orbs can be used to enhance this move by pressing the button again during the start lag where the size of the foot increases, changing the foot to instead be the same lance/sword weapon seen in the jab and ftilt. This adds a bit of lag, but the sword increases to between 1.3-1.6x the range, and deals 5-10% damage instead, becoming an even better shield poke with the considerable added range. The lance from the orbs can pierce through the ground and impale it and the foe in the same way as Corrin’s side special does at max range, but only having a small amount of hitstun on foes, this will hold them in place for long enough they may get hit by a Goldman grenade however. The foe quickly breaks away and takes a slightly reduced amount of knockback from the move, but all in all can be helpful to land other laggier moves from the heavy summons or other trap-like hitboxes on stage.

When the impale is used on any part of Emperor’s set up, the impale is not so stingy and will allow for the proper impale, as Emperor “fuses” with the minion or their set up, or an orb for up to a couple of seconds. By pressing down, Emperor will stab them and the ground and hold them both in place, preventing them from moving. This can actually be helpful on minions or certain projectiles to stop them going past an opponent or keeping them from safety, or going off stage and wasting orbs.

Pressing forward as Emperor detach from the ground but maintain the impale on the summon or whatever it is, his body elasticising so that he follows them for the next second in whatever direction they go. When first impaled the minions will suffer slight hitlag instead of interrupt their current moves in any way, so when this is chosen Emperor can let himself be carried along with a minion. As they perform a jumping attack or other movement-based attack, using their momentum as a jumping off point into his own attacks.

Finally, Emperor can press back and will leech out of the set up, up to 5 orbs worth of HP, causing them to explode into orbs if they didn’t have enough, which is quite wasteful as a way of killing set up for Emperor. This leeched orb life from whatever it is, will after a few seconds leech back out towards where it was taken from, wherever it is on stage. This will make the orbs into a hitbox again and give them a largely infinite amount of angles on stage they could travel toward, but most importantly when they do arrive if it’s a minion they’re about to buff, it gives them 10 frames of super armour. This can be timed more closely by reusing down tilt again which immediately causes the effect, but is the most effectively simple way of helping to prevent a summon’s weak point being damaged. On anything else, it simply gives them a bonus invincibility for a few seconds, so can prevent a Strength wall, axe or trident, among other things, from dissipating too quick.

GOLD
AERIALS


Neutral Aireal: Red Earth


Emperor's body grows a strong red colour as he curls up his body into more of a ball shape facing the screen, then swings out his arms and legs are four separate hitboxes that all deal 6% damage. Each limb is turned into the same lance that he first was showing off in the jab and forward tilt. While the damage isn't that impressive, the move does good knockback as merely a GTFO move. Emperor will curl himself up unnaturally small so that he can dodge attacks first and using his floaty momentum, this makes the move almost into a stall then fall type of aerial. As Emperor's body glows red before the attack, his weak point now cannot be seen for the duration of the start lag. This move's lag is not too bad, not fast with the start up but the ending lag is not too punishable.

The move has a few variables the player can adjust by pressing directions during the start lag. By pressing towards one of the four limbs, Emperor will actually move his weak point - his "heart", the red orb seen in his up special most prominently - to be held in the middle of that limb instead for the duration of the move, and for a few seconds after that. What this means is that the foe will technically be able to hit the limb to do extra damage, potentially much easier when it's on an extended out limb, but at the same time this can easily be manipulated so that it's basically impossible. The multiplier is not that strong and this is, at its core a mindgame, but as the weak point lingers for 3 seconds after the move is over the most important part is not letting the weak point get hit during the aerial itself. If the weak point is hit while moved, it will deal Emperor a worse 1.3x damage instead and return to where it was on his body in the first place.

The reward for this is that the moved weak point will now stay in that limb even when attacks are used, unless it's hit, but more importantly it changes the entire way the orb shield from the down special works. The orbs will now rotate around wherever the weak point was moved to working as its defence, whether it's on a foot or hand this will mean that the orb shield will now orbit around it the same way it did Emperor's chest. This drastically changes the way the orb shield can work, either to be more offensive with the forward foot or hand, or defensive with the back leg or arm, as well as making Emperor's weak point potentially much harder to actually hit at the same time. This will of course change the way the down special projectile is shot out as well, as it now fires out from a much different location. The orb shield will simply rotate around and ignore Emperor's body if it gets in the way of its rotation. This effects ends early if Emperor uses a move that absorbs the shield, such as his forward tilt or forward smash.

Where this effects gets really tricky is when Emperor uses his up special recovery, as the orbs will start to go into their more aggressive orbit around the weak point. Compared to the normal up special, this now resembles more the electron going around the nuclear than the normal moves does, as the orbs travel around in more of a horizontal, infinity-symbol shaped hitbox. The orbs still do the same damage however. This now lets Emperor mash the special input to make himself go slightly higher in the air, working in a similar way to Wii Fit Trainer's hula hoop up special. Off stage, this can mean that the legs can now act as a far more powerful gimping tool or the arms can act as a great tool to get to the ledge from foes trying to do a melee gimp move.

Foreward Aireal: Clash of Swords or Ideals or Philosophies


Emperor turns both his hands into swords, because he can do that, and in a slower animation than his other tilts, then hitting from above and below does a double slice with both of them for a powerful 13% damage. This is a great KO move, KOing at a low almost flat angle at 100%, fair given that the move has both high start and end lag. The move’s range is pretty good too, given that it slashes both below and in front of Emperor using the move’s two swords. The swords even have a powerful sweetspot where they both meet that deals 15% and will KO at 95%, but is only active for 1 frame at a very precise distance. This will combo if the foe literally stands in place as Emperor overlaps them from the start of the move, but is best left for a shield break situation due to how that being unviable. This could ever work using Goldman’s stun and the summons, but is really the kind of lucky combo dreams are made of.

Emperor can absorb his orbs into both swords during the start up of the move, by pressing the button again on the frames seen in the image where Emperor almost “examines” both swords. An animation the same as the one that plays at the start of forward tilt will occur where Emperor absorbs the orbs into either his left or right arm, in that order for the move too. He can either buff both or only one. Buffing both will simply make the move deal up to 10% more damage, but slow down the move even more, becoming 50 frames of start lag. This may not be all bad however, as this simply constitutes a very slow punish move that Emperor already had in bundles with his summons. The move now has a secondary hitbox too at the edge of the now much bigger swords, dealing 10% less, so basically the first version of the move untainted by orbs.

When the swords have different amount of orbs or the first sword takes all the orbs from the second, this will make one sword more powerful than the other, causing them to clash together with the greater sword pushing the other down, this affects the angle the foe is sent at, making it more towards the bottom blast zone up to 75 degrees with the top sword and likewise towards the top blast zone by powering up the bottom sword. This not only affects the angle, but will make the powerful sweetspot occur closer to Emperor with the top sword, basically next to his hurtbox at the most extreme, or at the opposite end of the attack with the lower sword. This happens much earlier in the attack for the former, much later in the latter, so all in all makes for a very slow move but one that can be used in a variety of customizable ways using orbs.

Upward Aireal: Pierce the Heavens

Emperor turns his arm into a sword and whirls it above his head in a similar motion to Ike's up aerial, dealing 9% damage and has slightly less lag than Ike's does on both ends, but roughly the same range. The attack like Ike's will KO at a decent percent, around 120% on midweights when in the air, but has a secondary hitbox just around Emperor's sword during the attack. A weak whirlwind is created with the same hitbox as MegaMan's up aerial during its first initial frames before shout out as a full on tornado. The whirlwind does strong base knockback to foes and hits foes around Emperor for 3 hits of 2% damage, but mostly just works off rage to ever KO very high in the air due to its low damage output. Another comparable move is the G&W up aerial, but without any actual wind hitbox.

The metallic whirlwind that is crated will cover for the weak spots of the summons well, but the fact it creates two hitboxes at once makes it Emperor's best move to kill off his summons while still attacking the foe. When foes are above him, Emperor can anti-air them while getting a last hit on summons so he can easily get to their orbs. The whirlwind's knockback on the foe only lasts for a few frames once Emperor is out of the move and he can't punish the foe but Goldman can shoot into the whirlwind to delay his shots. The bullets and grenade if shot into the whirlwind will be pulled around in a mini-circle in the air, practically delaying when their hitboxes appear for another 2 seconds after the move is over. This can backfire, but can also be used as a small mindgame if Emperor positions the move so he's just below or uses the move just after or before the Goldman attack shows up so the foe thinks they're safe, as well as saving himself from the self-damaging grenade under the worst circumstances.

Backward Aireal: A Sight for Saw Eyes

Emperor pokes his arm behind him in a typical back aerial motion, creating a blade that goes an average length for a weapon-based back aerial, dealing 7% and average knockback, this is one of his fastest attacks. This is a decent wall of pain as when held old, the attack does linger a sex kick for a little longer than the average sex kick, decaying to deal only 3% and light knockback.

When an orb shield is in play, Emperor can hold the input to channel it into his sword, but only during the course of the move. Unlike the forward tilt as an example, where the orbs are channelled in immediately, Emperor's sword grows over the duration of the sex kick. Up to 5 orbs can be absorbed and go directly to the sword, increasing it from merely average range and damage to the same range as Corrin's back aerial and dealing 15% damage, with almost as much knockback as Ganondorf's back aerial, but only during the final frames of the sex kick.

Emperor can choose to stop channelling orbs into the back aerial at any point in the move by releasing the button, resulting in the sword decreasing in size at the same rate. Rather than simply decreaisng its power, the sword's edge is notably blunted to become rounded and now the power of the sword deals only 3-5%. This can be very useful however, as this deals far less knockback and thus ends up being a great move to set up the foe into a follow up - even another back aerial with enough orbs! There's plenty of room to play around with the move's properties to combo from this sour spot into the amped up version, or simply mindgame the foe over its range.

Downward Aireal: Injection of Truth

Emperor looks at his arm in a similar way to how he does for his forward tilt as it turns into a lance, but more of a pointed one than before, and then starts spinning in place like a drill! Emperor then dives straight downwards and churns his drill into any opponent in his way, dealing 4 multihits that deal 4% each for 16% damage overall and low knockback after the last of the multihits. When Emperor strikes an opponent he will cause both of the characters to stall in midair and slow down to the slow floaty fall speed of Emperor for the duration of the move, making this much less of an effective gimper off stage, but as it keeps the foe more-or-less locked down for a moment does make it a great move to hit the foe into Goldman's gun or grenade launcher.

The landing of the move has a unique hitbox similar to ones like Falco's forward aerial. When Emperor lands from his down aerial, he will drill into the ground, causing a weak earthshaking hitbox on either side of him that deals 2% damage and weak knockback, enough to make the move land safely. It does then have some poor end lag, and is much faster in the air. When this landing hitbox is used on any of Emperor's set up, such as his minions or their weapons, he will instead be able to stay on top of them and drill into their hurtboxes while the standard input is continuously held. This will let Emperor drill down into them and when he jumps off, will no longer have his weak point! Depending on how much the input was held, and with some directional input given, Emperor will have sealed his weak point inside of the summon.

This has a very clear positive when put on summons: covering for their own weak points. The orb shield can now cover any minion's weak point - Zeal, the Hierophant's chest, Tower's mouth and Strength's head so that they no longer can be hit out of their super armour, so Emperor can get the most out of their powerful, slow attacks. As the weak point can potentially be placed anywhere however, the weak point of the summons can be ignored to go for a riskier options like putting the orb shield somewhere on the huge weapons of Strength's chainsaw, Hierophant's trident or Kuarl's axe. This could even be combined with the ftilt for a lot of variations, and at any point can be shot out using the down special or certain versions of the forward smash.

The weak point can only be put on the outside of any hurtbox or summon but there's no limit to what he can do this too outside of just an orb. If the weak point is hit, it will deal the damage to Emperor making this extremely risky, but will give whatever it is the same orb shield that Emperor has and not only that, he can use this disjointed weak point to fire any attacks that rely on the orb shield out of the summon or set up instead. This means the forward smash will now fire the orbs from the orb shield on the new location, but also that Emperor will build up the orb shield separately too. For melee moves like jab and ftilt, this will remove the option entirely to buff them however until the weak point returns to Emperor.

On top of the weak point and orb shield being able to put on his set up, Emperor will gain the advantage of when this effect ends 5 seconds later, the weak point will leave its new location and move unhindered by any solid structures to return to Emperor at the speed of Sonic's dash. At any point during this, Emperor can still use moves like his down special or forward smash to fire the orbs out as disjointed hitboxes, or use moves like his down smash or up tilt to hit all of the now separated orb shields. By using up special, the weak point will float out of whatever it's in and with some more lag, where it's pretty vulnerable without an orb shield, will cause Emperor to dissipate and take control of the weak point again. This can happen at any point during this whole effect too as a nice out. While the weak point is off the Emperor's hurtbox, he is still KO'd by his normal body being KO'd, but with this can potentially survive so long as he uses up special before he hits the blast zone off stage, though it is rather laggy. However this is very telegraphed so the foe may then casually go prepare a smash on where the weak point is about to re-emerge. If Emperor's main body is KO'd, the weak point dissipates too.

GOLD
GRAB GAME


Grab & Pummel: Bad End


Emperor gestures forward, instantly summoning up an average-sized middle aged man zombie... wait a minute, that's Goldman! It's harder to tell when he has no face. Zombie Goldman, in all his metallic silver glory summoned in Emperor's texture, lurches forward and grabs. This is a fairly slow grab, taking 10 frames to come out, and has a fairly bad 40 frames of end lag (near the bottom of Smash 4 grabs) but functions as a quasi-tether due to its range. This is one of the best melee grabs in Smash 4, but not as good as it sounds, as Zombie Goldman is summoned to overlap with Emperor on the ground, basically acting as if Emperor froze in place and another character was summoned to grab forward. Emperor is in lag for the duration of the grab as if he was Zombie Goldman, and Zombie Goldman is treated as if he was Emperor. As soon as the foe is thrown or grab released, Zombie Goldman dissipates.

The pummel has Emperor point forward, making Zombie Goldman take a slow bite out of the foe. This deals 3.5% damage in a slow pummel, but has some of the best damage for a throw. When an orb shield is active, Emperor's pummel when held rather than pressed will have him send an orb at the rate of an above-average pummel at Zombie Goldman. Zombie Goldman will bite the foe as normal at an optimal rate, a nice easy input shortcut befitting of our new ruler. Each orb that hits Zombie Goldman will increase his size by 1.1x, maxing out at twice his size with 10 orbs. Each orb will increase the pummel damage by 0.5%, maxing out at an insane 8.5% damage. However to get to this point takes a long time of pummelling all the orbs first so only is achievable when the foe is already at a high percentage. After the grab, all these orbs will be spent forever though, so can easily be wasted if the pummel's damage is the only thing Emperor gets out of his grab and doesn't get a throw off. Easy to do when Zombie Goldman's bite is so slow.

Foreward Throw: Zombie Parade

Zombie Goldman grabs the foe and lifts them up in his arms and dashes forward across the stage as Emperor gestures as he does for his forward smash. Zombie Goldman holds the foe above the ground and does only a token 1% twice every second he walks, but as he walks across the ground Zombie Goldman's metallic body starts to break down into liquid metal splashes against the ground and breaking up as he takes each step, eventually his legs are completely destroyed after 1.5 seconds of walking. The torso drops the foe onto the ground, the same thing happens if the zombie gets to a ledge, dealing 5% damage and bouncing them off the stage with low knockback. This at default does only around 8% damage but will put the foe a good distance from Emperor, sending them at a low angle as they're essentially dropped ofrward. Compared to most throws that change dependant on weight, this one not only gets slower, but will make Zombie Goldman go slower, at slowest only going at Ganondorf's dash speed, but going at Fox's dash speed when throwing a very lightweight character like Jigglypuff.

Zombie Goldman can be made to go further by buffing its size with orbs, increasing not only its strength, but dropping them further when the legs finally do break. Instead of being dropped from the normal height, the extra fall makes this do up to 5% more damage, capping out at 13% damage overall and now able to KO at 170% when next to the ledge. Zombie Goldman can be made to drop the foe even faster and drop the foe quick into the throw's damage if the neutral special is pressed and not already on cooldown. Goldman takes out his gun and fires at... himself! The Zombie Goldman is shot causing it to stumble forward and trip over, causing the foe to be dealt the same damage but sent at their non-techable tumble state instead. This will land them on stage but in prone, and while Emperor can't follow up on this for being too far away, he does have plenty of ways to play around the prone options a foe has with his various projectiles and summons. The timing of the shots from Goldman can drop the foe at a specific place on stage to hit into a minion preparing a slow attack when they're put in prone, or simply drop them earlier on for Emperor's benefit. The foe can also mash out early, with the grab timer continuing post-pummel for this throw.

When the Zombie Goldman walks directly into a summon, he will walk and fuse into them, giving them his orbs, and then allow the summon to grab the foe themselves. This only happens if the summon isn't already in the middle of an attack, and is stopped if Goldman can shoot out the zombie's legs first, stopping this altogether. The foe can then simply be grab released if they mashed enough, but if they weren't fast enough the now powered up summon will do their own unique throw on the foe. Emperor remains in lag for the duration of these throws too, but is free to move as soon as the foe is for a neutral frame situation.

Zeal will grab the foe and perform a dive bomb, like Kirby's up throw as an example, going up 1.5-3 Ganondorfs in the air depending on if he was buffed in his size by the orbs fully or at all. Zeal will deal 5-10% damage and can KO at 220%, up to 5% lower at max size when he is buffed, but will KO much sooner if he hits a platform, or one of Emperor's orbs in midair. This makes it a very dangerous grab in midair when Emperor has midair set up. When the up smash has been active, Zeal may have his momentum in the air changed to land with the foe in the middle of the magnetism's pull, so can be made to land on a particular trap or hitbox.

Kuarl will shove his axe into the foe's torso for 2% damage, then swing his axe behind him for 9% damage, overall dealing up to 14% damage, one of the most damaging throws from a summon. This sends the foe at a semi-spike technically still back as summons turn to face Emperor and the foe once they go for a grab on the foe, but KOs at only 250%. This is buffed to KO at 230% with buffs to Kuarl. When Kuarl has a different weapon from the ftilt, the hammer will instead do 10% damage and knock the foe into the ground for a 45 degree angle stage meteor smash that will KO at 200%. The lance will have stronger base knockback than the axe, but deal a lesser 7% damage, so is best to use on lower percent foes. The sword will send the foe up into the air at an almost vertical angle, dealing 8% damage.

Hierophant impales the foe on his trident for 5% and shoves the foe behind him, releasing them from the trident for 3% and weak knockback. When Hierophant has been buffed, this will instead have Hierophant impale the foe on his extra trident and toss it with them on it for constant 1% damage, dealing 3% a second. This will stop after dealing at best 8% damage so overall dealing 13% damage, but will throw the foe as far as the trident can go before it hits solid ground or goes too far off stage that it deals the cap in damage, destroying the trident. If it hits a wall or the stage first, it dissipates but leaves the foe in a good deal of hitstun for the follow up. This can be played into easily with Strength's wall.

Tower will bite the foe much like seen in his portion of the side special, dealing 5% damage in multihits and medium knockback as the foe is flung behind the snake. This is buffed when Tower has multiple heads as each snake head will bite at the foe, each additional head doing 2% damage, adding up to 13% damage with all 4 additional heads, and at that point able to KO at 195%, even stronger than Kuarl's base throw. At 300%, an Easter Egg occurs where the foe is eaten by the Tower snakes, similar to Bayonetta's final smash.

Strength already has a grab, but has a unique one for this. He grabs the foe and then turns around and smashes their head into the ground, dealing 4% damage, then continues to do it another 2 times for 12% damage overall. The foe is then sent at a low angle with high knockback, able to KO at 215%. If a wall gets in the way that is breakable, basically just Strength's own wall, he will grab the foe and destroy the wall with them in tow, dealing a massive 15% damage in one go and sending the foe at a high angle, able to KO at 180%. This all of course requires a ton of setup, and Strength has to already have set up the wall, as it won't work if Strength simply has a wall to put down from Zombie Goldman's orbs.

Up Throw: Choke Gold

Zombie Goldman rushes into the foe and his metallic body becomes liquefied, turning into a metallic collar around their neck. Emperor raises his hand and raises the foe in a choke hold like the most famous and evil of all fictional villains. This deals 6 hits of 2% damage and then strong upward knockback after all the choking multihits, able to KO around 25% later than Mewtwo's up throw but with the angle of Ganondorf's Flame Choke first custom special, Flame Wave. After the foe is thrown, the Zombie Goldman completely dissipates, although the collar can be shot off early with Goldman by pressing neutral special. This will release the foe early on, dealing 1/3rd or 2/3rds the knockback for a more useful, weak launcher throw. A larger Zombie Goldman will have the foe higher up in the air initially, and thus KO'd that much sooner.

Used in the middle of the stage where the up smash's magnetism effect is in play, the foe will be pulled towards the centre of the magnetism by the collar, pulling or pushing them further away from or towards Emperor depending on where the up smash was used. After travelling more than 1 battlefield platform away, the foe will be dealt 5% damage and instead of launched up, will be dealt the same knockback as Ganondorf's regular Flame Choke, hit downwards. This can put the foe off stage, but they will automatically grab the ledge if they go past it, just like Flame Choke, and won't gimp until super late due to the low damage. When brought close to Emperor, he will instead just physically grab the foe and re-absorb Zombie Goldman's orbs back into himself, then do a final 7% choke and launch the foe at a 75 degree angle and slightly more knockback than normal.

When Zeal specifically is on the stage, he will interact with the foe being choke holded by grabbing onto them during the long animation of the throw, and allow for Emperor to move the foe in the air 0.5-1.5x the speed of Fox's dash speed, depending on if Zeal has been buffed. When his size has been increased through the orb buff, he can carry the foe a further distance away. Besides his strength, around half of that formula takes into account the foe's weight too. Zeal will release the foe when the last choke hold hits, potentially dragging them higher in the air for an easier vertical KO or dragging them to/from Emperor to force the other versions of the up throw to happen.

Down Throw: Edgy Hostile Takeover

Zombie Goldman collapses on top of the foe in a similar animation to Bowser's infamous anti-damsel in distress down throw, dealing 5-10% damage depending on the size of the zombie, launching weakly off the stage of with decent knockback that will KO at 220% with the max size Zombie. After the Zombie Goldman does this, Emperor gestures harshly with his hand away from the foe and Zombie Goldman, causing him to dissipate and turn into a single orb that then fires up as a disjointed hitbox. This orb is between Kirby and Bowser's size depending on its size and travels up at the relatively slow speed of Samus' Power Missile, dealing 10-20% damage, but going in the direction the foe was thrown. This orb can KO at 150% uncharged. This should be a very easy projectile for the foe to dodge however as it isn't even shot at them while thrown, but at the moment they regain DI.

The big orb can be shot by pressing neutral special without Goldman on cooldown already. The shots will cause hitlag on the orb but not destroy it, causing a few frames of hitlag each time. When this is done later in the thrown's animation, this will delay it with hitlag later in its ascension, but with all the shots used up on the orb will delay it by a good second to now be a lingering, delayed and powerful hitbox for later in the match. This giant orb still can't be interacted with and disjointed, but will only dissipate after travelling up for two Ganodorfs into the air.

On top of the sacrificial Zombie Goldman, Emperor can send out his entire orb shield at the foe out of the down throw by pressing the standard input again, basically using his down special but aiming it towards the foe in a manner similar to Mewtwo's forward throw. Each orb will deal a much reduced 2% damage but as he can fire up to 16 orbs, this can add up to 32%, cumulatively able to KO as low as 100% when all the stars align. The orbs will only hit the first first times and is a huge variable depending on both the foe's size, their weight and percent, but unlike Mewtwo's fthrow creates far more, harder to dodge orbs, getting positively insane once more than 10 orbs are used up. This will leave Emperor in lag however once he goes past even the fifth orb shot, able to cancel it with some very bad end lag after that. Unlike the Mewtwo move, the orbs can still be used like normal orbs once they're shot out too.

Back Throw: Goldmancide


Emulating the real Goldman, Zombie Goldman grabs the foe in a bear hug and falls backwards behind Emperor, killing himself as he is crushed by the foe, dealing 10% damage and the foe is suplexed against the ground. A larger Zombie Goldman will fall back further and do up to 15% damage, able to KO from 190% at 10% damage and reducing the KO percent to 180% at the max damage, sending the foe at a fairly flat angle. Goldman himself, not liking this defamatory move perhaps, can fire at Zombie Goldman during the throw by pressing neutral special when not on cooldown. Shooting the zombie will shoot it as it falls to push it another Kirby width behind Emperor, stopping once Zombie Goldman goes off the edge.

Off a ledge, Goldman will fall below the foe but pull them down with him. The foe can attempt to tech the stage as they hit into it and take 9% damage, but this can be delayed slightly by timing the shots from the real Goldman around this precise timing. Zombie Goldman will continue to fall to his death, but if the foe doesn't tech and grab ledge, they will be pulled down with weak-medium knockback. The foe has to immediately recover to not be pulled down into the dark abyss with Zombie Goldman. Emperor can take advantage of this as he is free to move as soon as the zombie hits the foe against the ledge, so technically can be in position to punish the foe's ledge options with a minor frame advantage.

GOLD
FINAL SMASH


Witness... A New Genesis!


Upon Emperor using the smash ball, a giant television screen drops in the background of the stage and Goldman disappears from the background. As he gives a speech about how much he hates mankind and with his original VA giving a CODEC/Star Fox style speech, Goldman will be able to launch grenades at the same rate as Snake's final smash. Each of the grenades are just as powerful as the ones in neutral special, but no longer do damage to Emperor. For the duration of these 15 seconds of final smash, Emperor is controlled by a level 9 AI and mostly tries not to die besides being aggressive, so has to be baby sat a little by Goldman.

A huge cage will drop at the start of the final smash from 3 Ganondorfs above where the Smash Ball was used, opening up to reveal 1 of the 4 random boss characters from House of the Dead 2. This will contain the full, life size real version of the bosses summoned in the side special. They will have 3x as much HP as the summons do, and won't need Zeal to give them their extra attacks. Zeal and Kuarl will be summoned together as Judgement, Tower will have his maximum amount of heads to start off and Strength will have his throwing axes from the forward tilt. These will not go away upon the end of the final smash either, though do self damage to Emperor, as if they're angry at him for ripping off their designs in his boss fight.
 
Last edited:

Munomario777

Smash Master
Joined
Nov 18, 2014
Messages
3,253
Location
Charleston, South Carolina
3DS FC
0387-9596-4480
Switch FC
SW-8229-3157-8114


ZENYATTA

Zenyatta is one of the more "out there" characters from Overwatch... and that's saying something. He's, like, a spiritual robot who throws floating metal balls at people and can temporarily transcend reality for his ult... that's something else. Gameplay-wise, he's a squishy healer who also outputs a solid amount of DPS, but is super-vulnerable due to his poor mobility. In Smash, his unique gameplay mechanics also make him quite the unusual combatant!

Stats
The first thing you’ll notice about Zenyatta is that he’s almost always floating above the ground in a zen-like stance; even when crouching, he’s still a few inches above the ground. A few super-low attacks might miss him, but nothing much for the most part.

As for other stats, he’s about as floaty as you’d expect, with really low falling speed and low gravity. His air speed is a bit above-average, but what really shines is his aerial control, as he’s able to change directions more quickly than some other fighters. Zenyatta’s air speed and dash speed are about the same, as you might expect, and his traction is decent while his walk speed is average.

Zenyatta can jump an alright distance vertically, but his midair jump is “floaty” like Ness, Lucas, Mewtwo, and Melee Peach. The main effect of this is that Zenyatta can’t jump out of combos as easily, since his midair jump is slow – when he’s caught off guard and his concentration is shattered, Zenyatta has trouble dealing with it. Your jump isn’t quite as slow as the other floaty jumps, though.

There are also a couple of other downsides. First and foremost, Zenyatta’s weight is definitely an issue. He’s actually one of the lightest characters in the game, matching G&W’s weight at 75. While he can escape combos due to his floatiness (and another move you’ll see later on), Zenyatta really relies on other techniques in order to survive from getting launched. Also, since he hovers above the ground, Zenyatta is kinda vulnerable to high-hitting moves. He can crouch to significantly lower his body, but then he loses that situational ability to avoid low attacks.

SPECIALS

Neutral B: Orbs of Harmony / Discord
By default, Zenyatta’s orbs orbit him in a wide ring, much like in Overwatch. There are eight orbs in total, and they look similar to Zenyatta’s metal body (and change in color depending on his skin). In this state, the orbs assist in your melee-range attacks, acting as disjointed and, ahem, transcendent hitboxes in any attacks they’re a part of. The fewer orbs you have – more on that in a second – the weaker your attacks will become, with each orb accounting for (naturally) one-eighth of the move’s damage.

By pressing and holding the B button, you can separate the orbs from Zenyatta all at once (not individually) and move them freely by tilting the control stick. The orbs move at the same speed as PK Thunder, but letting go of the control stick in this case makes it stay still. When separated from Zenyatta, the orbs’ circular formation “faces” the camera (like, say, Palutena’s staff during nair or ftilt), rather than a roughly horizontal orbit. When you’re KO’d, by the by, the orbs will disappear and then respawn with Zenyatta.

With the orbs separated like this, they obviously won’t aid your attacks at close-range. However, they’ll still carry out the action associated with the move – except remotely. For example, if a move has all of the orbs thrust in a direction, they’ll do that same attack, except at whatever position you deployed them at. This aspect is pretty similar to Luma.

By guiding the orbs into / around an opponent, you can have them “lock onto” the foe, orbiting and following the opponent (with the circular formation still facing the screen). This acts pretty much the same – attacks are still performed remotely – except the attack may be tweaked slightly in order to hit the targeted opponent. For example, normally that thrust attack might “start” at the edge of the circle, and go outward. Here, it’d start at the opposite edge, and go inward (since the opponent is inside, not outside, the ring). The orbs will pretty much halt their movement when performing most attacks (outside of the startup lag), so if an opponent is moving / gets launched by the move, the orbs will lose track of the foe and hover in the air after the attack is completed.

By the way, if you lock your orbs onto an ally in a team battle, this “adjusting the move to hit the character” deal won’t happen. So rather than hitting the ally, which isn’t often desireable, it instead acts as a way to attack other opponents “from” the ally. Neat!

In Overwatch, Zenyatta’s signature Abilities are Orb of Harmony and Orb of Discord. Orb of Harmony applies a healing effect to the nearest ally, while Orb of Discord lowers the defenses of the nearest foe. In Smash, Zenyatta’s orbs are always in one of these two states, defaulting to Discord (the orbs glow purple). To switch between it and Harmony (the orbs glow yellow), simply tap B at any time.

The effects from Overwatch carry over, but both states have three different effects depending on how the orbs are being used. Like with attack damage, these perks lose one-eighth of their potency for each orb that’s missing from the ring.

When orbiting Zenyatta, the Orbs of Discord increase your attack power; now you deal 1.2x as much damage. Naturally, this also increases the knockback your moves deal (damage is a factor in the knockback formula). Meanwhile, the Orbs of Harmony heal Zenyatta for 2% every two seconds, forcing aggressive play from the opponent. As the Zenyatta player, it’s your job to patiently await their approach and counter it smartly and calmly. These same effects apply when the orbs are orbiting an ally. Also, note that the passive healing is paused whenever Zenyatta is in hitstun.

When deployed into empty space, the orbs serve a very different function. If an opponent is launched into the orbs by an attack that causes tumble knockback, they’ll get “caught” in the center of the ring and spun around, looking kind of similar to Mewtwo’s Confusion. After that, the Orbs of Discord will send the opponent in the same direction they were originally launched, but with 1.15x as much velocity as when they first contacted the orbs (just shy of Smash Art Shulk’s 1.18x multiplier). The closer to the orb you can start the knockback, the better, since that’s less time spent losing speed pre-boost.

Meanwhile, the Orbs of Harmony have a similar effect, but they instead send the opponent back in the direction they came from, with 0.85x the velocity. This is obviously amazing for combos and other setups, but to prevent abuse, this effect has a cooldown of just over a second. By the way, neither of these two previous effects will happen if the orbs are already in an attack animation.

Finally, the orbs also have a passive effect when orbiting an opponent. The Orbs of Harmony have pretty much the opposite that they do when orbiting Zenyatta or an ally, with the only difference being that the passive 2% of damage is dealt every three seconds as opposed to two. Still great for forcing approaches and getting the opponent closer to kill percent. Meanwhile, the Orbs of Discord reduce the opponent’s damage output to 0.85x the norm, which can also make it harder for them to KO thanks to the knockback formula.

Tapping or holding the B button in different ways lets you further control the orbs:

  • Tap, Tap: Return the orbs to Zenyatta if they’ve been deployed, or place them instantly at your current location if they’re already orbiting Zenyatta.
  • Tap, Hold: Switch the orbs’ current state and then start moving them right away.
And the ones that we’ve already gone over:
  • Tap: Switch the orbs’ current state.
  • Hold: Move the orbs until B is released.
Generally, your orbs are a powerful tool with a lot of different applications depending on the situation. Thanks to the perks of each A) position (orbiting Zenyatta, etc.) and B) state (Discord vs. Harmony), you’ll want to switch things up pretty often. For example, Discord + orbiting Zenyatta is the only way to boost your own damage output. You’ll want to consider things like that when you decide where to place your orbs at any given time.

Side B: Orb of Destruction / Orb Volley
Here’s the part where “orbs missing from the ring” actually begins to happen. With a tap of Side B, Zenyatta strikes a pose with one of his hands and fires an orb straight forward as a projectile: Orb of Destruction. It’s really quick, traveling at about the speed of a Fox laser while dealing 4% of damage and a flinch effect that turns into low-end knockback at high percents. Side B has similar lag to a single laser blast from Fox, but Zenyatta also retains the ability to walk forward and back during the move if he’s on the ground, or drift side to side in the air. In Overwatch, Zenyatta’s projectile has the special property of dealing the same damage regardless of distance (while most other weapons have decaying damage from further away). That carries over into Smash, but with the added bonus that the damage dealt by Side B also doesn’t decay with staling.

Orbs of Destruction gain a bright yellow or purple glow during their travel, encompassing the entire sphere – as opposed to the normal glow of an orb, which is more of an “aura.” Upon reaching its maximum range of half of FD’s width, an Orb of Destruction will lose its glow entirely and hover in place, becoming completely inactive and having no effect on the match. It’ll return to Zenyatta / the rest of the orbs after five seconds pass, but until then that’s one fewer orb at your disposal for attacks and passive effects. So while Side B might, at first glance, appear to be a spammable projectile, the key is knowing when to use the transcendent projectile and when to save your orbs for later.

By holding Side B, you can charge the move into Orb Volley. For every quarter-second you hold the button, an additional orb will become suspended in front of Zenyatta until the maximum of five orbs in a charge. Upon release, all of the orbs will be sent forward as Orbs of Destruction, in rapid succession. Each orb in Orb Volley has knockback which leads into the next orb, while the final one gains more knockback the more you charge Side B. It’s not enough to actually KO, but still has the ability to give Zenyatta control of the stage. By the way, during the charge itself, you can walk / drift sideways just like an uncharged Side B, making for a versatile projectile threat.

If you use Side B while the orbs are separated from Zenyatta, they’ll just fire from the ring instead of from Zenyatta’s actual position. The main thing to note is that if the orbs are locked onto an opponent, they’ll shoot into the center rather than away from it. For example, normally a Side B to the right would fire orbs from the right side of the circle to the right. If the orbs are circling an opponent, a Side B to the right fires orbs from the LEFT side of the circle to the right, so they hit the opponent in the center. Same goes for Orb Volley. Orb Volley is actually handy for forcing an airdodge if the orbs are locked onto the foe, since it’s very non-committal on Zenyatta’s part.

As for Orbs of Discord / Harmony, they have unique effects on Side B. Orbs of Discord have the same effect as they normally do – dealing more damage. The main thing to note is that the strength of the effect depends on how many orbs are used in the Side B itself, rather than how many orbs Zenyatta has in total. To compensate for this usually-lower boost, the effect is also doubled. So each uncharged Side B now deals 4.2% (which adds up over time), while a fully-charged Orb Volley has a damage output of 25%. Not only that, but Orb Volley also becomes a KO move with somewhat decent strength if you put enough charge into it, making for a scary ranged threat at higher percents. It’ll KO near the ledge at around 130% if you charge it all the way, which isn’t super-impressive but is scary in combination with the move’s range and low lag / freedom of movement.

Meanwhile, each orb fired with Harmony active only takes three-and-a-half seconds to return to Zenyatta as opposed to five. This seems small, but it allows Zenyatta to zone out the opponent more effectively using Orbs of Destruction, since throwing a few out is much less of a commitment. Still, you do have to be wary of running out, since it’s not like they return instantly or anything.
Up B: Transcendence
Zenyatta briefly enters the pose seen in this video before disappearing, leaving behind a yellow, transparent afterimage of himself in that same pose. During the next 1.5 seconds (or until you release B), Zenyatta is completely invisible and intangible. Even the game’s camera and your orbs don’t follow Zenyatta himself, instead tracking that afterimage you left behind (which stays still). Zenyatta can’t attack during Transcendence, but can move in any direction at his dash speed (including up, down, sideways, diagonal, etc) while being completely invulnerable to attacks. You can also go through anything except the stage’s natural collision while in this state, which includes walls / etc constructed by fighters. Transcendence causes helpless unless started from the ground, but has pretty low endlag if you either start and / or land on the ground. It’s still punishable, though, if you get predictable. And of course, there is a decent amount of startup on the move.

Transcendence is a very powerful tool for Zenyatta, since it allows him to slip past enemy defenses and walls while also being able to completely mix up his movement. At the same time, though, there’s a big learning curve, as not even the Zenyatta player has a read on his position. For this reason, it’s crucial for Transcendence to become second nature – you just think, and you end up where you want to be. Or something zen-sounding like that. Point is, you’ve gotta be really good to get far with this move.

One thing that really contributes to that is the fact that Zenyatta will not snap to the ledge during Transcendence. So you need to either time it so that you grab the ledge as you appear, or go around the ledge entirely and appear onstage. Fortunately, Transcendence is one of the best recovery moves in the game for this style of mixups thanks to its undetectable nature. It’s also an amazing landing option, as long as you don’t just go straight down every time and instead learn to mix up your movement.

Finally, to prevent generic spam of the move, Transcendence’s ending lag increases with each consecutive use (each use within roughly 1.5 seconds of the last), and its duration is also cut a bit.

Down B: Levitation
Your last special move is Down B, and its effects vary depending on how the orbs are being used.

When the orbs are orbiting Zenyatta, they’ll form a ring around him on the ground and project very faint yellow / purple beams onto him as he slowly lifts up into the air. Basically, Zenyatta levitates 2 SBB above the ground and stays there, without falling. You can move left and right just like normal air movement, except smashing the stick sideways turns you around. The orbs move with Zenyatta, and basically determine where the floor is; if the orbs come across a slope, they’ll ascend / descend it, with Zenyatta’s height changing along with them. If the orbs go off the edge of a platform, if Zenyatta jumps / uses Transcendence, if you reposition the orbs by holding B, or after four seconds pass, Levitation ends and cannot be used again until Zenyatta lands or grabs a ledge.

While levitating, Zenyatta has most of his moveset at his disposal, but with no orb-assisted attacks since they’re being used for Levitation itself. If the Orbs of Discord are active, Zenyatta has access to his grounded moves (jab, tilts, smashes, and grab). Meanwhile, the Orbs of Harmony give Zenyatta access to his five aerial attacks instead. One thing that Zenyatta never has access to during Levitation is defensive maneuvers, i.e. shielding or dodging. So make sure not to put yourself too much in harm’s way! Side B during Levitation is actually pretty useful, since it still fires the projectile from the ground – so it’s a good way to cover both bases at once.

If used in midair, the orbs will simply extend downward with no other effects, making for a super-long-ranged spike hitbox with somewhat weak knockback and 9% of damage. Still, this has awesome gimping potential! This also happens if the orbs are deployed into empty space.

Finally, if the orbs are locked onto a foe, they’ll form a ring perpendicular to the ground, except if they’re in midair, the ring will hover in midair, right below their current position. Afterward, they’ll attempt to “grab” the opponent via a grabbox. If this connects (which’ll usually happen unless they use either really quick mobility or a dodge), they’ll be levitated upward pretty much the same way Zenyatta is – except instead of calmly controlling it, they’ll be trapped in the attack, unable to act.

Again, the effect depends on whether the Orbs of Discord or Orbs of Harmony are active. Discord turns this into a “kill throw,” with strength similar to Marth’s uthrow, as well as dealing 8%. The main thing that makes this powerful is the fact that it can be activated on a midair opponent, bringing them closer to the ceiling. However, the Discord version of this attack also has significant endlag, so it’s punishable if the foe manages to avoid it.

Orb of Harmony, meanwhile, levitates the foe 2 SBB into the air over the course of half a second, during which Zenyatta pretty much gets a free follow-up – if he’s quick enough and close enough to capitalize on it. It’s also awesome for forcing a reaction; for example, if the opponent airdodges immediately after (in anticipation of an attack), you can catch the airdodge with a ground attack.

If the orbs are orbiting an ally, Down B will still behave this way, except it’ll simply levitate them upward a short distance while allowing the ally to act almost immediately after. So basically, you can use it to give the ally a boost in their recovery if they’ve been launched.

AERIALS
Neutral Air
Zenyatta faces the screen and strikes a meditative pose, somewhat similarly to Greninja’s nair. This melee hitbox acts as a sex kick, having a long duration and dealing 10% / 6% for the early / late hit. The move deals similar knockback to Mario’s nair, able to launch opponents either left or right depending on which side of Zenyatta they’re on.

Meanwhile, after a slightly longer delay than the startup of the melee hitbox, Zenyatta’s orbs will face the screen (if they’re not already, i.e. even if they’re orbiting Zenyatta) and begin to rotate rapidly until the sex kick ends. This acts as a rapid multi-hit, dealing 10% total across a flurry of hits, and has excellent reach since the orbs widen their orbit during the attack. The final hit deals knockback identical to the melee hitbox’s late hit.

When you’ve got the orbs with you, Nair is mainly awesome because it lets you cover a lot of space in order to stuff approaches, though the delay to the orbs is something you’ll want to look out for. The actual melee attack has no reach at all, so it’s definitely possible for an opponent to hit you out of the move altogether before the orbs start to spin. Meanwhile, with your orbs deployed, it’s a great way to control space – but don’t let the foe catch you in the Nair animation! If the orbs are locked onto a foe, they’ll actually contract rather than expanding, but other than that the move acts the same. There is a window for the foe to airdodge or jump out if they see it coming / are quick enough on the draw to do it on reaction, but you can fake them out by doing an empty short-hop. They see the short-hop, think a Nair is coming, airdodge, and then it’s your turn to punish.

Forward Air
Forward Air takes the form of a flying kick, kind of similar to Ryu’s. Zenyatta’s leg deals 9% of damage with a hitbox that lingers for about 15 frames, dealing a weak semi-spike forward that sends grounded opponents reeling backward at low percents. At high percents, meanwhile, it’s great for setting up a tech-chase. At the very start of the kick, Fair has a sweetspot at the tip of Zenyatta’s foot, dealing 13% and knockback similar to Mewtwo’s forward air. So depending on which hitbox you use, Fair can serve as either a combo tool or a kill move.

When you use Fair, the orbs will thrust forward in a combined attack, dealing 12% of damage and Lucina-fair-level knockback. When they’re orbiting Zenyatta, this thrust actually starts from a bit above the tip of the foot, adding a ton of disjointed reach. The thing about Fair, though, is that it can only be used once per short-hop, and its endlag leaves you vulnerable after the move even if you full-hop it. So a better option is often to use it right as you’re about to land, but that can get predictable since the jump makes it pretty telegraphed. Then again, this also allows you to use a tomahawk grab as a mixup!

As for when the orbs are detached from Zenyatta, by the way, Fair is a good way to get a quick directional attack out from the orbs, since it reaches pretty far and its knockback is decent enough for setting up other stuff.
Back Air
Zenyatta reaches backward with an outstretched hand, hitting opponents with his palm for a quick poke. This attack only lasts for a handful of frames, but it deals a handy, medium-strength semi-spike and 8% of damage. Bair has short landing lag, allowing you to follow up if you time it right before landing, but takes a while to end in midair. So similarly to Fair, using it immediately at the start of a short-hop leaves you vulnerable if you fail to hit an opponent. At the same time, though, Bair does autocancel from a short-hop, so using it immediately can allow for different follow-ups.*

*Aerial drifting moves as quickly as your dash, with the added bonus of no dash-skid. If you use Bair right as you land, you pretty much have to dash in order to get in range for a follow-up, since walking is too slow. Plus, a landing Bair has that added bit of landing lag. Meanwhile, an instant short-hop Bair lets you drift through the air immediately and then land in a neutral position with no lag.

The move’s main weakness is fixed if you have your orbs on you, as the ring orients itself so that it appears as a vertical line from the camera’s perspective and spins around rapidly a short distance behind Zenyatta’s palm. So it’s kind of like he’s spinning a pizza, but angled 90 degrees to the side instead of straight up. Anyway, not only does this add a bit of reach to Bair, but it also adds a lot of duration, since the 10%-damage multi-hit lasts for significantly longer than the split-second palm hitbox. Its knockback angle is also pretty nice, launching the opponent more upward than sideways with weak launching power – ideal for follow-ups! Obviously, Bair is also handy for when your orbs are deployed somewhere else, for similar reasons to Fair but with a longer duration in exchange for less horizontal reach.
Down Air
With a bit of emphasized startup lag, Zenyatta brings his legs upward before thrusting them both downward in unison, all while slightly turning toward the camera. This acts as a powerful spike, dealing 13% of damage and sending foes plummeting to their doom. The startup can make it tricky to land, but it has long downward reach and pretty low endlag for a meteor smash. It’s a good way to finish off a combo near the ledge. Onstage, Dair is notable for its ability to autocancel from a short-hop, acting as a low-percent jab-lock tool and popping opponents up at high percents. However, it has a good bit of landing lag, so watch out for that and make sure you don’t mistime it.

Your orbs will form a ring perpendicular to the ground before thrusting downward at the same time as Zenyatta’s legs do, dealing the same 13% and a spike that’s just as strong. If the orbs are orbiting Zenyatta, this basically extends the hitbox further to either side, making it easier to land and a much scarier threat both onstage and offstage. It also makes placing your orbs remotely offstage into a pretty scary threat! And similarly to Nair, if the orbs are locked onto an opponent, this can really make them panic and choose an option. It’s slow enough to airdodge or jump away from on reaction, but since Dair can autocancel, Zenyatta often has time to punish the opponent’s escape.

Up Air
Zenyatta performs a quick axe kick upward, quite the feat of flexibility. It actually hits both in front of and above Zenyatta, and is about as quick as Marth’s uair in terms of both when the hitbox comes out and how long the animation itself lasts. It deals 9% of damage and moderate upward knockback, handy for popping opponents up – either for a plain juggle / combo setup, or into your orbs. Due to your floatiness, you can actually perform Uair and then another aerial in the same shorthop.

Your orbs, meanwhile, serve as a pure power boost, thrusting themselves upward similarly to Fair… but upwards. This time it’s in the same general area as Zenyatta’s leg, meaning that you can “sweetspot” it to catch the foe in both the leg’s and the orbs’ hitbox. The orbs themselves deal 7% of damage and knockback similar to the kick itself; with both of these hits combined, Uair actually becomes a pretty viable kill option at higher percents! If the orbs are separated, this is still really handy for juggling and other combo setups.
STANDARDS

Jab
Zenyatta’s Jab is a two-hit combo: first a kind of hooking swipe (like the fifth motion in the video for Side B), and then a straight punch to follow up on that. The hits combo into each other, of course, and deal 4% and 5% respectively with typical jab knockback on the second hit. It’s nice and quick as far as jabs go, and its knockback is pretty alright for getting stage control and setting up your orbs. Jab is also a great way to relieve pressure, since it comes out fast and can get opponents out of close range.

Jab and Forward Tilt also share a unique property: since Zenyatta levitates above the ground, you can actually move forward and backward at your walk speed while using them, similarly to an aerial attack. Not only does this give Zenyatta two more aerial-like spacing tools, able to weave in and out of the opponent’s range, but it also means that after landing a Jab, Zenyatta can choose to keep advancing and put on the pressure.

Forward Tilt
Speaking of Forward Tilt, it’s based on Zenyatta’s melee attack from Overwatch: a simple yet effective kick. It actually comes out pretty quickly – only a few frames behind Jab – and hits really high up. Both Jab and Ftilt, by the way, can miss some characters if they’re crouching. Anyway, Ftilt does a hefty 12% of damage and launches the opponent with a strong semi-spike, setting up a tech-chase at low percents against fast-fallers. Meanwhile, it can KO from around 120% near the edge of the stage. The main thing to look out for is Ftilt’s ending lag, which is pretty high for a tilt.

Ftilt is a pretty scary move, all things considered. It’s rather safe on shield thanks to the strafing aspect (like Jab) – it’s similar to Ike’s nair in that it forces the opponent to choose an out-of-shield option besides a simple shield-grab. By spacing Ftilt on the opponent’s shield and then moving backward, you can see which reaction they choose, and then keep that in mind in order to later punish that habit. Ftilt becomes even scarier when the Orbs of Discord are active, since they boost the attack’s already strong knockback. One other application of Ftilt is as a way to stuff approaches; thanks to the move’s reach, you can use it to punish a hasty approach. Try zoning out with Side B and / or the self-heal granted by Orbs of Harmony, waiting for the opponent to rush in, and then punishing with Ftilt! ...Just don’t get too predictable yourself.
Up Tilt
Zenyatta flips upside down, touches the ground with one finger, and balances on it while kicking upward with one foot. Then, just like in the OW animation, the entire stage flips upside down for five seconds, causing all of Zenyatta’s opponents to fall toward the blast zo-

Sorry, been memeing on too many early MYM sets recently. Anyway, Utilt deals 10% of damage and a relatively low amount of upward knockback, which when combined with low endlag makes Utilt a great combo starter and extender. The main thing to look out for is the somewhat long startup lag – this is Zenyatta’s slowest ground attack besides his smashes. For that reason, Utilt is best used as either A) a punish after a read, or B) a distanced approach option in combination with a perfect-pivot. For B), the idea is that you stand outside of the opponent’s range, let them whiff a move, and then PP Utilt in to start a combo.

Utilt not only hits really high up, but its hitbox also extends all the way to the ground – so it can be a decent answer against crouches like Kirby’s, Pikachu’s, or Wii Fit Trainer’s. As for follow-ups, they mostly include aerial attacks. Depending on the opponent’s damage and your positioning, it’s possible to connect any aerial off of Utilt given the right circumstances.

Down Tilt
Out of his crouch – which is basically just him hovering above the ground – Zenyatta leans forward and extends both of his arms, his palms just above the ground in front of him. He then moves his hands in kind of an arc, out to either side, as if drawing a semicircle on the ground. The first hit, dealing 4%, comes when Zenyatta first extends his arms, and leads into the second hit (6%) when he sweeps them out to the side. Dtilt ends up popping the opponent lightly into the air while also sending them forward a bit, allowing for different follow-ups than Utilt – since the opponent is in front of, rather than above, Zenyatta. At low percents you can connect Jab, Ftilt, or sometimes a PP Utilt, while at higher percents you can jump in with an aerial. Dtilt is a pretty safe poke that can also start combos, but the main drawback is its low hitbox – so it usually can’t hit jumping opponents.

Dtilt, unlike the other tilts and Jab, uses the orbs, as they’ll follow in kind of a “trail” behind either hand during the second part of the move. This adds a multi-hit factor to the second part of the move, with each orb dealing an extra hit of 1% added to the end of the Dtilt – the last orb just deals the same knockback as the second hit of Dtilt normally does. This adds a bit of damage, but more importantly, it keeps the foe trapped with the multi-hits later into the animation. So you have more time to get a follow-up going, which leads to more consistent and more powerful confirms off of Dtilt depending on how many orbs you currently have.

If the orbs are separated from Zenyatta, though, Dtilt won’t have an effect on them.

Dash Attack
While dashing – which is pretty much just a faster version of his idle / walk in terms of the animation – Zenyatta raises both of his arms, still keeping his palms together in that “zen” type of pose. He basically makes a motion similar to raising a sword up above your head before slashing it down in front of you, except it’s a hefty strike with the hands themselves instead. Dash Attack has a ton of startup lag, similar to Link’s dash attack, but isn’t quite as strong, dealing 13% of damage and KOing from the ledge at around 100%. Its reach also isn’t as good by virtue of Zenyatta not having a sword.

If you’ve got your orbs with you, Dash Attack actually becomes a really scary move. The orbs basically rotate around you rapidly, dealing one 1%-damage hit per orb. This actually happens before the main attack, so the orbs pretty much drag the opponent into that finishing blow. What this basically means is that when you’ve got your orbs on you, your Dash Attack now comes out quickly and still has that scary power behind it! Like with Dtilt, the orbs won’t do anything during Dash Attack if they’re deployed remotely.
SMASHES

Up Smash
Zenyatta charges up as his orbs rapidly spin around him before six translucent arms, similar to those seen in Transcendence, appear above him and to either side for a radial attack with strong damage and knockback. Up Smash deals 15%~21%, with strong killing knockback to either side / straight upward depending on which part of the move you hit with. It’ll usually kill from around 120%~80%, but that can vary with positioning and whatnot. Point is, it’s rather powerful, but it’s also pretty dang slow to start up. So basically, it’s great for covering space and hard reads / punishes. It’s also not a terrible out-of-shield option? But that startup means it’s mainly gonna be used for punishing laggier moves that aren’t quite spaced optimally. Levitate also turns Usmash into a deadly anti-air option!

Meanwhile, the orbs basically do what you see them doing in that clip. The ring contracts tightly and spins (no hitbox) during the charge, and then blasts outward in a circle all around Zenyatta at the same time as the main attack. This deals an additional 5%~7% depending on charge, and buffs the knockback of the move as well. If the orbs are separate from Zenyatta, the remote attack instead deals 10%~14% and upward / sideways knockback a bit weaker than the normal, no-orb Usmash. Still, it’s pretty powerful, and Usmash is the main way to get a powerful charged attack going with remote orbs. If the orbs are orbiting an opponent, they’ll of course go inward instead of outward, and launch the opponent directly upward.

Forward Smash
Mystically waving his arms during the charge, Zenyatta then thrusts his arm forward with his index finger pointing out (like in the clip). This is a quicker smash attack compared to Usmash, and is still pretty strong, dealing 13%~18% and KOing from center-stage starting at around 120%~90%. Near the ledge, obviously, it’s even more of a threat. It’s a bit faster than Mario’s fsmash to come out, and has good reach to it. On shield or whiff, though, it’s quite punishable. Mainly another solid tool to look out for; Fsmash and Usmash are primarily designed as ways to punish a mistake by staying one step ahead.

The role the orbs play is similar to Dash Attack, rotating around where Zenyatta’s arm will be (like the clip) to deal 8% of damage through multi-hits over the maximum one-second-long charge. It basically traps the opponent in for the rest of the move, though they can escape by using SDI to move behind Zenyatta. The more orbs you have, though, the harder it is to escape, so that increases the time for which you can afford to charge the Fsmash. If the orbs are deployed remotely / around an opponent, the multi-hits can still trap the foe, and the last hit also launches them forward a bit (since Zenyatta himself isn’t there to deliver the final blow). It’s handy for covering a certain area for a long period of time and catching an option, but leaves you pretty vulnerable if you miss (due to Fsmash’s endlag).

Down Smash
This is your last smash attack, and it has Zenyatta clasp his hands together before spinning around and doing a bit of an odd-looking attack to either side (the motion is similar to the clip). Dsmash has pretty average speed for a move of its kind, and normally it just deals 10%~14%. The front hit, which is angled downward a bit, packs a semi-spike that’s great for tech-chases and setting up for edgeguards. The back hit, meanwhile, has more KO power behind it but has a more generic knockback angle – it kills beginning at 110%~90% from the ledge. It’s a good way to cover both sides at once, with varying rewards depending on which hit you end up landing.

If your orbs are orbiting Zenyatta, then that’s where Dsmash gets a bit more interesting. When he clasps his hands during the charge, Zenyatta first gathers his orbs, combining them into a single orb. When the attack is unleashed, Zenyatta wields Harmony energy in the front hand, and Discord energy in the back. This changes the effects of each hitbox on-hit. Note that the damage and knockback values listed depend on how many orbs you have, but that the amount of orbs put into each hit is split in half. For example, if you have six orbs on you, three of them go into the front hit and three go into the back. So these maximum damage values are for when four orbs are put into that hitbox. In the case that you have an odd number of orbs, the one that’s “favored” by default (e.g. the one which gets to have three orbs if you have five in total) is just whichever one you have activated at that time (Discord / Harmony). Finally, you can actually choose to put two-thirds of your orbs (rounding up) into one of the sides by holding that direction on the control stick – if you think that one particular hitbox will hit.

Anyway, onto what these things actually do. The front (Harmony) hit deals 13%~18% and launches the opponent at a down-and-backward 45* angle, forcing a tech lest they bounce off of the ground and be vulnerable to further follow-ups. Thanks to Dsmash’s rather low endlag, Zenyatta can react with a tech-chase! Compared to the normal front hit of Dsmash, Zenyatta is already in position, so he can more powerfully capitalize on the situation. Plus, the foe has less time to react, since the tech needs to be instant. The back hit (Discord) deals 15%~21% and instead acts as a more powerful KO hitbox, killing near the ledge from around 80%~60%. So basically, Dsmash does mostly the same basic things but becomes way scarier.
GRAB GAME

Grab
Zenyatta’s grab is pretty basic: he reaches forward and holds the foe similarly to Rosalina’s or Mewtwo’s grab, levitating the foe through mystical powers or something. As for the pummel, it’s a quick chop from the side with Zenyatta’s other hand, similar to Jab 1. It’s pretty quick for a pummel, dealing 1.5% of damage.

One other thing to note, by the way, is how Zenyatta can use Levitate to grab in midair. This affects one of your throws directly, but is also a unique tool for countering things like Ryu’s landing Focus Attack.

Finally, your throws don’t actually use the orbs directly. Instead, the focus is mainly on using the orbs for certain setups, such as attacking with the orbs after a throw for a combo. However, if the orbs are orbiting Zenyatta, you can hold B during the grab state to transfer them to the foe – just be aware that they can break out during that time, so it’s a bit of a risk.

Forward Throw
Zenyatta quickly “shoves” the opponent away with the telekinesis or whatever it is, dealing 8% of damage and Sakurai Angle knockback. So at low percents, it sends the opponent sliding backward along the ground, while at high percents it just launches them. Fthrow is best used for stage positioning, such as sending the foe directly into your deployed orbs. Also, at low percents near the ledge, the ledge-slip that results from the Sakurai Angle can lead into something like a Dair when combined with a bit of grab momentum.

If the orbs are still locked onto Zenyatta, one possible follow-up at low percents is an Orb Volley due to its long range. Meanwhile, if the orbs are on the opponent, Dair can make for a deadly spike near the ledge! However, it and most of your other slower / stronger orb attacks are only true at higher percents, since at lower percents the hitstun just isn’t long enough. Instead, it’s best used to force an airdodge (and thus a low recovery) or midair jump (and thus a punishable landing with no jump available) in order to set up more attacks.
Up Throw
After spinning the foe around with the levitation ability that I extrapolated from something in OW and isn’t actually a canon ability, Zenyatta then “throws” them upward, dealing 7% and moderate upward knockback. Normally, this throw just gets the foe above you, handy if you have your orbs deployed up there or for just punishing the foe’s landing. Like with Fthrow, if the orbs are attached to the opponent you’ll be able to either force reactions or true-combo with orb attacks.

If Zenyatta has the orbs orbiting him, they’ll surround the opponent during the throw, adding extra force to the throw. Not only does it deal an added 6% of damage, but it also KOs at similar percents to Mewtwo’s uthrow, if not a touch earlier. So watch out for that.

Back Throw
Zenyatta holds his arm directly in front of him, almost appearing to Force Choke the grabbed foe. After turning around, he then delivers a swift, Ftilt-style kick to the foe, dealing 10% of damage and moderate knockback at a higher-angle semi-spike. Its overall applications are similar to Fthrow, except it’s better at forcing low recoveries and tech-chases. In exchange, though, the foe has more time to react with DI / a tech due to the longer animation, and due to the added endlag, the follow-ups you get from having the orbs locked onto the opponent are a bit more limited.

Down Throw
Zenyatta strikes a cool pose (the first part of this clip), kicking the opponent into the ground and dealing a medium-strength spike. Normally this causes the opponent to bounce up off the ground, ripe for a powerful follow-up! Keep in mind, though, that it’s possible for the opponent to tech this. Near the ledge or during Levitate, Dthrow’s meteor smash properties take on a whole new meaning, since there’s actually room below Zenyatta to launch the foe downward in the first place.
 
Last edited:

JOE!

Smash Hero
Joined
Oct 5, 2008
Messages
8,075
Location
Dedham, MA


The man called Logan had already lived a long and violent life when he was kidnapped from his black ops team by a secret government program called Weapon X. In a high-tech lab deep in the Canadian Rockies, scientists bonded the unbreakable metal adamantium to Logan's bones, relying on his mutant healing factor to keep the experiment from killing him.

But Logan escaped the Weapon X program, and before too long drew the attention of Professor Charles Xavier, who recruited him to the X-Men as Wolverine. Despite the objections of those who saw him as more trouble than he was worth, Xavier saw Logan's inner nobility.

Wolverine constantly fights to keep his savage berserker side in check, but no matter how hard he tries, it's usually just a matter of time before he pops his claws and goes to work.


ATTRIBUTES

STATS:
Wolverine's Adamantium Skeleton weighs him down a bit, making his jumps a bit below average and giving him a stellar fall speed stat to boot. Not only does his skeleton keep him close to the ground, but so does his stature! At only 5'3", Wolverine is only barely taller than Mario himself when standing, and given his crouching low profile, he can often be a smaller target than you'd think!

Weight: 100 (:4lucario:)
Dash Speed: 1.66 (:4pit:)
Air Speed: 1.2 (:4zss:)
Fall Speed: 2.05 (:4fox:)
Gravity: 0.19 (:4fox:)
Jump: 32 Ground (:4metaknight:), 33.6 Air (:4marth:)


Rolls: Average
Wall Jump: Yes


GUARD:
Blocking for Wolverine uses the standard bubble shield as he crosses his claws to perform a defensive "X". For every whole second he is in this defensive stance, he will also regenerate 1% HP. This can make "turtling" up to heal somewhat attractive, but you must keep in mind that in doing so you are draining your own defense!


POWER TYPE: CHARGE

Wolverine is the best there is at what he does, and what he does...isn't very nice! As he fights, his power meter will fill up to a max charge where he can then unleash his Berserker Rage!

|||||||||||||||||||||||||||||||||||

All his special moves gain a new, feral twist to them to finish off foes if performed at max power, but of course also drain the charge back down to 0. As an added bonus while you decide which special to unleash onto your victims, Wolverine will automatically Regenerate 1% HP / Second as long as he is at max power. This is a great bonus, but of course only gets you so far as you do need to use your specials now and then.

Power
Each character has a meter referred to as "Power". This fills as you play and is linked to various effects and special moves. In general, Power is gained via landing attacks as well as being hit, but the latter at a very reduced rate.

Power is gained equal to 0.6x percent dealt with attacks that do not spend power, and 0.2x of damage taken / blocked. Characters often have other ways of gaining

CHARGE power types are traditional power spenders in that once they have full meter, their specials and sometimes select other moves will be changed drastically upon use, and then spend all available meter.

With a total of 35 power points to build up, a CHARGE character needs to either:

Deal 58~59% Damage
Take/Shield 175% Damage


SPECIALS

Shield Special: Berserker Rage

While you can always hold onto your meter to get auto-healing, or hide out in your shield to cool off, both have some pretty weighty drawbacks with how you actually open yourself to shield breaks, grabs or simply only last until you use a special. Luckily, Wolverine can tap into his power and focus it all into overclocking his healing factor, but at the cost of entering a Berserker Rage!

With a quick, "burst" of yellow around Wolverine and either a skyward growl or a call-out of "You messed with the wrong guy!", he will begin to regenerate from wounds over the next 10 seconds, at a rate of 1.5% a second all the while his power meter drains to 0. If you do the math, this works out to 15% healed, and while it may not seem like much for the full bar of power Logan spends, especially as you cannot gain power as your meter drains, you should keep an eye on what happens whenever you land hits while Wolvie is glowing yellow during the duration.

On top of becoming just a smidge faster overall, successfully landing his Specials or Smash Attacks will cause the foe to begin Bleeding. While a foe is under the bleeding effect, they will gain a feint, red, dripping aura that deals 1% / Second for 5 Seconds. Overall, this will add an additional 5% damage total by the time the duration ends, which is also unaffected by any sort of Damage Reduction or Immunity. While not too bad when you look at it in a vacuum, you must realize that each bleed effect can stack on top of one another to add up to exponential health loss! Multi-hit moves only apply one stack however, though their utility for combos can still prove just as viable for leading into another bleed application on a follow-up move.

Once Berserker Rage ends, any Bleeding damage being dealt will also count as being attacked by Wolverine per tick, meaning he gains Power per DoT! Every second, Wolverine will gain 0.6 Power per bleed which can act as a sort of refund for spending all his power at once, as well as an incentive to get your claws dirty as much as possible in order to keep the cycle going!


Neutral B: Skewer -----> Eviscerate

Reaching one fist back dramatically, Wolverine grunts as he punches forward to skewer foes on his claw!

While not a true grab, as opponents can shield the stab in order to punish the hefty end lag Logan suffers, upon a successful hit the foe will be frozen as they become impaled as with Corrin's side special. The initial hit of Skewer will deal a paltry 4%, but then you have a few moments to input a follow-up attack of your choosing!

The first option, and default, is performed by pressing B or A again to take a second stab at the foe with your free hand! This second stab deals 4% like the first, but instead of a Skewer effect they get stabbed off of your first claw and out and to the floor a few feet in front of you. The low angle of course opens the foe up for follow up reads on the ground or even while airborne as they are prime for a follow up swipe to ensure an edge guard. While the least damaging outright at 8%, this can of course be a valuable mix-up.

You can also press Left or Right to perform two separate "throws" as a follow-up from the initial Skewer. The forwards option will have Wolverine lift his opponent into the air as he readies his second claw for a powerful upwards slash! Dealing 8% for a total of 12%, the foe will be launched up and away at the Sakurai angle with medium power. At lower % this can offer combos, while at very high % you can even KO outright vs some foes. The backwards option has Wolverine lift the foe with both claws, dealing another 4%, and then whipping around to throw the foe hard behind himself for another 4% and high knockback at a 35* angle. The more spacing oriented option, the fling will send foes much further away even at 0%, making a follow up rather tricky, though it makes KO's near the edge a breeze! With your back to the ledge, backwards Skewer can easily start taking stocks around 120% or earlier, making for a viable KO option or better yet a high risk, high reward offstage tool as the throw will also boost Wolverine opposite the direction he throws in mid-air.

Skewer is a potent combo and KO option all in one when you are able to throw it in, which given the decent range and priority can be quite often! Things get all the more interesting though when you use your Power to go Berserk and change the move to Eviscerate.

First thing you'd notice when using Eviscerate is the signature Yellow Glow upon activation to signify you are using one of your powered specials, as well as heal for 7% damage instantly. Second thing is that Wolverine lunges both claws forwards this time to impale his enemy. Dealing 8% up from 4%, the rest of the move is actually exactly the same in terms of your three follow-up choices aside from the new animations where he digs his claw out in order to stab/slash again. What really matters here is the initial, gut-tearing double stab as both claws connecting will cause the foe to begin Bleeding for 15 seconds. Overall, this will add an additional 15% damage total by the time the duration ends, but more importantly offer up an important source of Power Gain totaling at 9 Power after 15 seconds.

Regaining 1/4 of your meter back over time is great on it's own, but combined with your own offense you can start a power-loop where Wolverine can regain his Charge very quickly. Regaining a Charge will of course allow you to try and Eviscerate again which can grant another Bleed effect to feed into Logan's frenzy either on the same target or someone else, though of course each Bleed has it's own timer. You can also go for a Berserker Rage, but that does not have instant healing nor as long of a guaranteed Bleed timer.

Skewer and Eviscerate are keystones to Wolverine's offense, able to lead into and out of many strings and keep his Berserker Rage flowing. It can Combo, tech chase, KO and in general put the pressure on foes with a mortal wound, though you gotta be careful with it. Not being a true grab, it is very easy to defend against if Logan just tries to toss it out by simply shielding and punishing accordingly. Look for your openings and you can get a ton of mileage from the Skewer, but it can't do everything...


Down B: Claw Barrage -----> Berserker Barrage
With a feral growl, Wolverine makes a huge, overhead slash with his left claw that leaves a visible tear in the air!

While looking very cool, this unfortunately does not do anything if Wolverine does not connect with a target, having him enter end lag where he can be punished. If you do connect, the slash will deal a solid 7% damage and place the foe into heavy stun just like Ryu's Focus Attack that limits their escape! From here, you can Mash B to perform follow-up slashes that move both yourself and the opponent forwards in a barrage of visible claw "tears" before the final strike sends them flying in a stylish "X" slash. Moving forwards about 1.5 platforms, the Claw Barrage will deal 24% total if fresh over a maximum 5 hits that can also catch multiple foes past the first one with each hit more or less comboing into the next. Wolverine will move forward in mid air just as well as on the ground as his fall speed is halted, assuming he keeps hitting of course, allowing you to push foes around off of ledges or off an aerial hit as well. The final hit will send outwards at a solid 40* angle with medium power, not enough to really KO outside of offstage shenanigans, and not low enough to really combo from, making Claw Barrage more of a finisher for a big chunk of damage.

Claw Barrage is more of a ferocious, all or nothing move compared to Skewer where you have more control over what you do. Here, you want to hit the starting slash then really go to town in order to maximize damage and drag foes about! The two even play nice as a neutral Skewer can set up a chase into a Claw Barrage for great output.

While there is a shred of nuance to the move normally, that goes out the window with a Charge as this turns into the potent Berserker Barrage! By mashing the B button, Wolverine will flash yellow, heal 7%, and automatically perform the barrage forward for 2 platform's distance, with twice the slashes without needing an enemy. Potentially, you can tear one target to absolute shreds with over 30% dealt in one go if they get hit by the majority of the move, or simply use the barrage as a huge area coverage move given Wolvie moves forward covered in hit boxes. Overall a straight up improvement to the move for the power investment, but hey, simple doesn't mean non-effective.


Side B: Claw Lunge -----> Berserker Lunge

Wolverine quickly takes to the air as he performs a surprisingly acrobatic leap forwards with claws outstretched!

Split into two parts, there is a very clear Sweet/Sour spot to Claw lunge based on the distance at which you come in contact with your enemy. Starting with the Sour hit, as Wolverine begins his leap he will become a full-body hit box that sort of just knocks foes out of the way at the Sakurai angle and 6% damage. It's really nothing to write home about, but it is decently fast to come out to make a Side B away from action somewhat viable. After moving about half a platform forward, and until he begins the end lag of the leap with a front flip from traveling a full 2 platforms, Wolverine's body is a Grab Box. If you do not come into contact with an enemy, Wolverine will just enter heavy end lag as he flips, and if in mid air will actually enter special fall after said flip.

Successfully grabbing a foe with this move will cause Logan to latch onto them and begin rapidly slashing and stabbing his claws into the unfortunate victim over and over again. By default this deals 4 slashes at 2% each (8% total), but by mashing the B button you can add up to 4 additional slashes (16% total). Beyond the damage increase, there is also a bit more nuance to performing the additional stabs as it effects the way that Wolverine will eventually kick-off the opponent at the end of the move. At base, with no mashing, Wolverine will end the move by kicking off the foe with the last stab, causing said stab to deal actual knockback to the foe as they are punted down and away at a 65* angle and Wolverine is in turn pushed up and away just the opposite. This spike is weak, but still potent enough to be an effective gimp option at higher percents. The more important part here is the leap Wolverine makes as it refreshes his aerial specials / jump! This allows for a very aggressive recovery where you can aim directly for the enemy in order to climb back to the stage, or at least add safety to a risky offstage lunge. With Mashing, Wolverine and his Prey will both fall at the victim's fall speed down as they are teared apart, before the final hit very weakly meteors them down as Wolverine also weakly gets pushed upwards. In contrast to the normal lunge, the damage is traded for knockback and hit stun at the end making the mash great for raw damage but a bit of a toss up in terms of further hits as you are both left in a low stun state. You still refresh your air abilities using this, though it is a risk/reward scenario between the damage and the jump you get off an enemy.

The ferocity gets pumped up to 11 though if you have a Charge, transforming into Berserker Lunge! Losing the "sour spot", Wolverine will flash yellow, heal 7%, and also be able to grab a foe at any point during the move and transition into the rapid stabs. The twist here though is that these stabs will go on indefinitely as long as you mash B! Foes will need to escape at grab difficulty, at which point Wolverine will kick off of them much like the non-mash version of the move, though the foe takes minimal knockback from the kick-off. In certain scenarios, Wolverine can even Suicide KO a foe by dragging them down to the bottom blast zone as he tears them apart!

Overall, Claw Lunge is a somewhat precise punish as while it is a grab that moves you quite swiftly over a distance, it has poor priority in actually doing so. You have to essentially chest-bump your opponent in order to grab, leaving him wide open to being swatted for the attempt. You are well rewarded though if successful as you can very easily combo given his high fall speed into a Skewer or Claw Barrage once you hop off the foe. Whiff punishing with Side B, tapping a few times to get some damage and lower your jump, then as you fall winding up the barrage or skewer can often lead to a huge string on it's own!


Up B: Tornado Claw -----> Berserker Claw

Winding his body to the side with claws outstretched, Wolverine performs a wild, spinning uppercut with his claws!

This whirling vortex of slashes travels upwards with a little wiggle room left or right depending on DI about 2/3 the height as Marth's Dolphin Slash, before causing Wolverine to enter special fall immediately unlike the floaty end to the FE move. The claws will mainly cover a large, disjointed area in front of Wolverine as he ascends, dealing multiple hits adding up to 10% before a finisher hit of 4% and high knockback at a vertical 65* angle which can cause some KO's later on. As with most of his specials, you can also quickly Mash B in order to gain additional height up to 4/3 the height of the Dolphin Slash as well as potentially get in a few more slashes for up to 15% damage on the rise up. You can of course still hit foes all around you as you spin, but the best hit boxes are always in front of Wolverine which can make even missing the edge on purpose fruitful on occasion!

While a somewhat standard recovery and anti-air usually, with a Charge you can unleash a Berserker Claw! Going the full height / hits automatically, as well as the signature yellow flash and 7% self-heal, Berserker Claw also does not have the finishing hit as it chops off the entire last portion of the move to allow Wolverine to act freely. This means he can jump, perform any special, aerial, dodge, etc right as the move reaches max height! Incredibly useful for recovery given his fast fall speed, in a pinch you can often get away with up B x2, or Up B -> Side B to make it back with a Charge available.


STANDARDS


Jab: Claw Combo

With a tap of A, Wolverine will horizontally slash he right claw forwards quickly, followed by his left, and finally a hard, scooping slash upwards with a 3rd press of A. All three hits deal 3% damage a piece, with the finisher popping foes up and away weakly for continued assaults.

It should go without question that all of Wolverine's Claw attacks are disjointed, but there is a bit more nuance than that. The hit boxes are decently sized, reaching down from Claw-tip to elbow most of the time, but only the base of the claws have the ability to safely swat away other attacks. Halfway up the claw, until the tip, the slashes Wolverine performs on all attacks are actually Transcendent! His Adamantium Claws can tear through any other character when they strike at the tips given the force, otherwise he can clash normally if he hits with the base of the claws, or his fists though the latter of course can trade damage as he makes contact. Getting up close and personal is still the preferred style of Logan despite having some reach though, as in practice the claws do not add as much "real" range when attacks can still hit his arms when he extends and the tips pass right through other attacks anyway.


Side Tilt: Claw Rake
Taking a step forward,Wolverine brings both claws to the sides and swiftly punches them up and forwards in a raking motion, covering a big area in front of himself. Hitting twice, the initial "swipe" down and out will strike foes for 3%, before the latter half of the move pops them up and away with weak-medium power for 5% at the Sakurai angle.

This has little end lag and a great duration with the double hit, though it pays for it with a bit of start up lag. Like most F tilts, you can angle the swipes up and down, though only slightly as the motion of the attack still covers roughly the same area each time.


Up Tilt: Claw Scoop
Opposite of F tilt, Wolverine holds his claws underhand as he powerfully slashes them against the ground and up into the air! Sparking against the floor, U tilt has a sweet spot the moment it stops sparking until the motion reaches about waist-height on Logan that deals a solid 10% and very high vertical knockback that can KO floatier characters. The rest of the arc continues up and in to cover quite a decent distance that can just barely poke at some platforms for 7% and much weaker knockback at an 80* angle up and away. Mainly used for "scoops" as the name implies, you often want to use this in tandem with Tornado Claw or aerials in order to keep the foe juggled.


Down Tilt: Ankle Kick
From his very low crouch, Logan will jut his foot out quickly to open up his foe. Close ranged, and not using the claws, this attack has low priority and damage at only 2%, only dealing hit stun but allowing Wolverine to act essentially instantly once his foot is extended. You can harass foes repeatedly with D tilt, or use it to poke at a shield in order to get some claw action such as Skewer up and running.


Dash Attack: Claw-Mill
From his low dash, Wolverine brings a claw out and to the side as he performs a spinning uppercut with it, covering essentially the same area as your average "Flip Kick". His other hand is close behind though, as only a beat later the same action is performed once again to make for a high-duration, multi hitting move.

Well, that is a bit of a misnomer as dash attack can really only hit twice at low percent and if you hit first with Wolverine's arm hit box. Both slashes deal 7% damage, but have vastly different hit properties. The first slash has a more outstretched hand and will send foes out and away at a 40* angle, whereas the second slash has a more curled in posture and will scoop foes in at a reverse 50* angle, right over Wolverine's head! This can allow for drastically different follow up opportunities depending on if you hit early or late, or even different finishers as the early hit has KO potential near ledges.


AERIALS

Neutral Air: Claw Copter

Wolverine extends both arms with his claws both turned out in the same direction, the front claw lower than the back, and spins twice swiftly!

Hitting low in front, and high in back, N air will hit twice for 3.5% (7% total) on either end with only the second hit having weak, Sakurai angled knockback away on either end. This isn't too detrimental though, as this has great range for Wolverine as well as minimal end lag especially as it auto-cancels on landing! After a pop up, or even when just jumping into the fray, n air is always a safe choice to slice into the action.


Forward Air: Claw Flip

Raising both claws up behind his head, Wolverine slashes them down with a strong enough force to do a front-flip, tearing through the air all the way!

Hitting in a complete half circle from top to bottom, and a little bit behind and below, F air is a bit slower than his other aerials but packs quite a punch as it deals 11% and sends foes out at a deadly 30* angle. Foes struck are essentially sent straight out at medium power thanks to gravity, and with high knockback growth the slash can easily end stocks off stage when spaced just right. Be wary of using this above ground however, as the landing lag can be quite heavy if he is not mid-flip!


Back Air: Back Stab

Looking behind himself, Wolverine leans back and thrusts a claw back and out at a 45* downwards angle swiftly, holding it in place momentarily before returning to a neutral pose.

Sort of a "sex-stab", the initial thrust will deal a solid 9% damage and hit relatively hard at a 40* angle out and away, not KOing as easily as F air but still respectable being it is much faster to come out! The rest of the duration has his claw deal only 4% damage as it hits foes that come in contact for weak, Sakurai angled knockback which can be useful for combos. Like with Nair, this has low ending lag and can auto-cancel but only during the weaker hit, which will emphasize timing with the move rather than spacing.


Up Air: Claw Splitter

Thrusting his fists straight up into the air as his body faces the camera, Wolverine pulls them apart with a spark as they clash to create a wide, arcing slash overhead!

Claw Splitter actually has a couple of different hits to take note of, starting with the initial thrust upwards. The first hit only deals 2%, and hit stun, but can be vital as you lock the foe in place for one of two secondary hits. The easiest is the two large arcs to either side that deal 4.5% each and can actually multi-hit if a foe overlaps all of them, pushing the damage to 9% total. The foe will be swept to either side with weak/medium knockback at the Sakurai angle by this motion, which can lead to decent juggles or a Nair / Fair, especially when only one side hits for the lower damage, keeping foes within arm's reach.

A smaller, lower priority hit box though is the sweet spot just as his claws separate above his head which deals a solid 9% damage and high vertical knockback! This tiny hit box needs to be spaced just right, often with the help of the initial thrust to bring the total to 11%, but can send foes flying quite easily with practice. If you get a foe up high enough with this, a Tornado Claw could be all it takes to finish the job!


Down Air: Dive Kick

Taking advantage of his Adamantium skeleton, Wolverine extends a leg and dives down at a steep 65* angle to batter foes!

A very quick aerial, Wolverine will dive for approximately 1 second until he hits something, or someone. Like similar Dive Kicks, Wolverine's has an initial hit box that is a tad stronger at 8% damage and can meteor smash foes decently well, though it won't really KO until high percents and if you go for that, you may risk death yourself given his fall speed! The rest of the kick will deal 7% damage and actually hit foes up into the air at a 60* angle. Wolverine can use this to extend combos or reverse a juggle against himself quite easily, as like with B air the end lag is minimal as long as he lands during the weaker part of the move.

Without the claws though, you do need to be wary of moves that just toss you into the fray, just like with Claw Lunge. Just like that move though, you can get tons of mileage out of the risk as a pop up either from a close to the ground D air meteor or otherwise can be invaluable for combo extensions, or just opening the foe up by landing and then continuing pressure with D tilts or a risky Claw Barrage.


SMASHES


Side Smash: X-Slash

Crossing his arms as he begins to charge this attack, upon release Wolverine will lurch forward and perform a huge, X-Shaped slash in the air!

Hitting in two parts, X-Slash has a lead-in as he whips his arms out that deals 5-7% damage that puts the foe in hit stun. Following that, the actual X is a transcendent hit box for 14-20% that launches foes out at the Sakurai angle, easily able to KO at high percent. Despite the rather large hit box vertically, Wolvie doesn't actually cover as much horizontal range as you'd think, as F tilt and even the last hit of jab reaching further. It still makes up for that given the overall area of the move allows for even vertical hits. It is best to try and challenge foes straight up with this due to the transcendent nature, as whiffing or getting shielded leaves Logan wide open for counter attack.

If the foe is Bleeding, Wolverine's smash attacks can further wound them! For 5 seconds after being hit by a Smash attack, foes get another application of Bleeding that can stack. So not only do they deal 5% more damage overall, but as long as you keep them bleeding you can keep applying the stacks even if you didn't land a charged Skewer. Speaking of, if you fully charge a smash attack you will cause the same Bleed effect on impact without Skewer's help. Additionally, fully charging vs an already bleeding target will cause a 10 second bleed effect as opposed to the normal 5! Combined with his Eviscerate and Berserker Barrage, his smash attacks carry a higher risk, great reward dynamic as his Smashes are certainly harder to land than normal moves, or a Skewer, but careful usage of them can continue a bleed chain nigh indefinitely.


Up Smash: Circle Slash

Bringing both claws down and to the side as he charges, upon release Wolverine will do a short hop as he unleashes a spinning flurry of claw swipes above himself!

Hitting three times above himself, each hit of U smash will deal 5-7% (15-21% total) over a decent area directly above yourself, with the final hit launching foes directly upwards with med-high power that can KO floaties relatively well, though not quite as well as Tornado Claw due to the height. Like all his smashes, there is a decent amount of ending lag after the spins where he recovers, but of his smashes it is relatively tame. Compared to Tornado Claw and U tilt, it is a sort of best of both worlds where you can get Up B's fast start up and some of the power of U tilt, though overall has more commitment unless you are looking to shred enemies with Bleed damage.


Down Smash: Double Slash

Reaching his arm back as if he is about to punch the ground before charging, upon release Wolverine will slash the ground in front of himself swiftly, the ground sparking as his claws make contact, and then repeats the motion behind himself with his other hand!

Dealing a solid 12-17% damage on either side of himself, the claw swipes hit low and they hit hard. Impact with either claw will send foes outwards at an astonishing 20* angle with high knockback, with the back hit having slightly more KB power than the front. This will send foes incredibly low to the ground, as well as cover a very wide area around Wolverine, allowing for a variety of coverage situations. In a tech chase, this can be a safe bet to cover many rolls as the delay between hits is enough to catch folks going behind you. The initial hit is fast enough and hits low enough to slash at recovering enemies that want to grab ledge, and if timed right you can KO outright with the reverse hit! Overall a decent smash option over F smash for horizontal KO's that offers a tad more utility than just raw power, atop of of course adding to Bleed stacks. As always though, be wary of the end lag as Wolverine recovers back to neutral from the reverse slash.


THROWS

Grab: Come 'ere, Bub

Reaching out with one hand, claws actually retracted for once, Wolverine attempts to grab the foe by their collar. Claws are great for stabbin' and slashin', but for a good grip you gotta use your hands! This overall gives Wolverine an average, if actually rather short ranged grab compared to what you may be used to with Skewer and especially Claw Lunge, though those options don't give you 4 throws to work with!

When pummeling, Wolverine actually opts for slow yet brutal stabs with his other hand, the claw still extended, which deal hits of 4% damage. If a foe is Bleeding, the timers of all Bleed Stacks are halted until they are released from Wolverine's throws as well. Get stabbin'!


Forward: Perforate

Letting go of the foe with his main hand, Wolverine quickly stabs them with his free hand, and then again with his main hand, and then once more with the other for a total of 7% damage over the fast multi-hit, popping the foe up and away at a 45* angle with medium set knockback as the final stab is more of a "punch" with the claw.

Similar to the neutral hit of Skewer, this is great for combos as the foe is kept within relative arm's reach. You can go for a dash attack, Claw Lunge, or even true combo into a Berserker Barrage! You can also sort of control the opponent and get in their heads a bit by chasing with Skewer off of a throw, keeping the branches of your punish game expanding further and further.


Back: Overhead Slam

With a grunt, Wolverine picks the foe up, and flips them up and over his shoulder behind himself to slam them into the dirt! Dealing 5%, this is his fastest throw overall as it pops the foe off the ground and away at a 45* angle, making for a great DI mix up alongside his F throw.

Many similar combos are available between F and B throw, which both tie into how Wolverine likes to keep his opponent guessing once he has his claws sunk in. DI'ing for F throw leaves you open for B throw, and vice versa. DI'ing incorrectly can then lead to one of his many follow up options, of which there are then other mix ups as well!


Up: Vertical Slash

Tossing the foe up over his head, Wolverine then performs a slash at the helpless foe's gut as they fall back towards him that sends them flying upwards with medium-high knockback and 8% damage dealt. Somewhat standard fare, this throw can lead to his juggle game at low percents, and even act as an emergency KO option at high percents thanks to some incredible knockback growth.


Down: Impale Slam

Stabbing both hands into the foe for a solid 6%, Wolverine then slams them down into the ground in front of himself for another 2% where they get popped up and away at a relatively sharp 60* angle. The knockback is set at just out of arm's reach of Wolvie unlike his F/B throws, but the angle is superb for reading on the opponent's DI to try and intercept with a menagerie of options. If they DI in, you can juggle, if they DI out you can tech chase, or anything in between.

Essentially all his throws offer mix up potential that can be well, mixed-up with his Skewer and other specials. A single grab from Wolverine may not be too painful, but what comes from it certainly is!


SUMMARY:
The best there is at what he does...
...And what he does, isn't very nice! Wolverine is a living weapon, designed to take incredible damage and dish out out just as well thanks to his mutant Healing Factor and Adamantium Claws. Both of which feed into his overall playstyle of keeping on top of foes and pressing huge percent advantages over them.

Despite his quick attacks and transcendent/disjointed claws, Wolverine actually has trouble getting in a lot of the time. He isn't incredibly fast, and lacks any form of projectile which can make camping him out quite effective. Luckily, his fast fall speed and low profile can allow for tricky movement and getting into the one opening he needs to Skewer a foe and keep on them like a rabid animal. All his specials are about keeping the foe near him, or at least closing the gap with different levels of risk and reward, even his Healing Factor when either at Max Power or during Berserker Rage can be an incentive to approach Wolverine to try and make up for the difference in percent!

Speaking of his regeneration, while it may seem like a bit of a side effect, all that percent can really add up to make Wolverine quite robust when it comes to KO'ing him. His recovery is not that bad, despite its more horizontal focus and flexibility between Up B and even Down B with a charge, which speaking of will heal him a decent amount if he uses a powered special at any time! His sheer offense can be a defense too with how he can just go HAM to keep himself safe. Getting into the opponent's head with his tech chasing and option selects gets all the sweeter with his ability to make the foe Bleed as well, essentially putting a ticking clock on their health that also feeds right into his power gain or healing. This can really rattle the competition and cause them to make risky mistakes of their own, which in turn can be punished by a swift slice of the claws.

In the end, Wolverine lives up to his reputation of being an incredibly aggressive monster in the heat of battle, and once he is on a roll, the percent differences are very hard to overcome as his opponent. Luckily, his Adamantium skeleton can weight him down at times making him very susceptible to combos as well as easily gimped himself outside of a Tornado claw right near the edge. Learn to control your Berserker Rage for when they can really be used, and you'll be sure to master Weapon-X!


EXTRAS:


FINAL SMASH : Weapon X

Zooming in on Wolverine as he lets out a feral roar, he will gain a yellow aura for the next 15 seconds which grants him Infinite Power! This means that Wolverine can use all his Berserker specials non-stop, easily cause Bleeds as Berserker Rage is also active, as well as constantly regenerate at a rate of 2%/sec on top of any Berserker Rage buffs. While it is possible to fight off the enraged Weapon-X.... good luck trying to out-slice him, Bub.


Up Taunt : Sharpening the goods

Wolverine stands up and sharpens his claws against one another twice dramatically, sparking together as they make contact.


Side Taunt : Wanna go?

Wolverine retracts his claws and takes on a disgruntled look as he stands up, and raises a fist towards the opposition as he says "Wanna go, Bub?!", as he extends his claws back out with an audible SNIKT!

If taunt is held for the duration of this, Wolverine will only show his middle claw at first.


Down Taunt : Smoke Break

Wolverine turns his back to the camera and lights up a cigar, under his breath you can hear him say "Hmph, Rookies..." as he does so. The cigar is then tossed aside into the background after a single puff unless taunt is held. If held, the cigar will stay in Wolverine's mouth until he is hit.


Tony's Snark :

Iron Man doesn't take off his mask for once, and takes on a defensive posture; "I thought Canadians were supposed to be nice?"

HULK SMASH CLAW MAN!!!


Entrance : X-Cycle

Wolverine drives his coveted X-Cycle to the stage and spins around, getting off of the motorcycle dramatically and landing in his neutral pose.


Last edited:

ForwardArrow

Smash Ace
Joined
Aug 17, 2011
Messages
502
Knight

Knight is the main antagonist of the Anima Project, a series of books/short stories made by someone whose actually made sets here before. One of four beings split from an ancient evil deity, Knight was created from said deity's raw ambition. He channeled said ambition toward killing absolutely everyone and everything he could possibly reach through hugely ambitious plans. While his somewhat lacking combat prowess, at least compared to what he would need to accomplish his goals, would normally limit him, he usually latches onto another extremely powerful character to get them to do the heavy lifting. While they do that, he works in the shadows, using his decay and corruption based abilities to give his ally the best chance of winning. Through this, he actually manages to be a fairly successful villain, managing to kill most of the living beings in several different universes on multiple occasions. In particular in the final act of his plan, he actually goes out of his way to try and outdo his former master and destroy things on a larger scale than he ever had a chance of accomplishing, and came dangerously close to succeeding, showing the raw scale of his ambition.

His weakness, however, has always been that at the end of the day he is extremely bad at making alliances. He usually forces or tricks his subordinates into working for him, which as time goes on results in more and more of them backstabbing him and forming alliances with the explicit goal to thwart his plans and kill him. There was a grand total of one person who ever voluntarily signed up to work with Knight that wasn't one of the other pieces of their master. They were six at the time, and betrayed him at the age of eight, which should really tell you a lot about how bad he is at making alliances. And every time he gets backstabbed and his plan falls apart, the consequences get more severe for him. First his plan just goes up in flames, but the second time one of his best sources of destruction just gets completely neutralized, the third time he loses his body and his master, and the fourth time he straight up dies. It probably does not help that by nature his powers and actions are needlessly cruel, there are multiple instances of him turning a former sentient being into a basically a walking hive of bugs or worms. In Smash, he now no longer has to worry about the massive build up of enemies he's made, but he no longer has anywhere to hide either.

By the way, his real name is Khnut, but one of the first people he choose to hide behind decided to call him Knight instead. Because of how hated he is in universe, the name stuck for basically everyone as they did not feel like doing him the kindness of calling him by his real name.


Appearence

Knight appears relatively human for the most part, with the main giveaway that something's amiss is the bandana he wears over his eyes. The bandana happens to be covered in eyes itself, and he has short dark hair and black robes to compliment his fairly edgy accessory. He wields a one handed sword, since its basically the only human weapon he knows how to utilize and it comes in handy from time to time.


Stats

Knight is statistically pretty similar to Robin, which probably is not the most ideal set of stats in the game to have. He's a bit taller, a tiny bit shorter than Captain Falcon's height, and a tiny bit heavier at 101 weight. His dash speed is not quite as abysmal, around the speed of King Dedede's dash, but he's clearly not a fast runner. His air speed is actually pretty similar, but he's overall noticeably floatier than Robin, having one of the slowest fall speeds in the game. He has decent if unspectacular jumps, and overall is not a statistically impressive character.


Specials

Neutral Special - Versaxis Virus
The Versaxis Virus is a creation that Knight originally made with the purpose of taking over machines, but as time went on it gradually was turned into a universal source of corruption, capable of bringing even gods to their knees after enough exposure. Here, Knight summons it forth by holding down Neutral Special as what look like purple sparks fly from his hand, floating in the air and covering a portion of the stage. They're not densely clumped together but their effect will start taking place if the opponent is inside of them, which might make the hitbox a bit weird to understand, but generally its pretty easy to tell its shaped like a rectangle with rounded edges. Knight can make about 1 Bowser sized area of Versaxis Virus after holding down the button for 40 frames, so its overall created at a fairly slow rate. The minimum area that can be created, a Kirby sized one, is created over 14 frames. The Versaxis sparks will vanish after 18 seconds. While creating Versaxis in the area, Knight's already slow fall speed is slowed significantly to make aerial setups a tad bit easier.

We'll get into the actual effects of the cloud in a moment, but first thing worth noting is that Versaxis is not like a lot of the gas clouds you usually see in MYM, it does actually have some amount of ability to listen to Knight's commands. You can press a direction to give it a command after creating it, which will alter its pattern somewhat. If you don't input a command, it will simply sit in place. If you press forward, it will actually move back and forth along the stage at a little below Robin's dash speed , turning around after traveling 3.5x its own length or the length of battlefield, whichever is shorter. Pressing backward will cause the Versaxis sparks to trail Knight at the same speed, trying to keep up with his movements and homing in on him.

Upward gives Versaxis a somewhat more complex command as it expands gradually in size over the first 5 seconds of its duration, up until its 2.5x as big as it usually is, but with the same number of sparks not clumped nearly as close together. This weakens the effect of the Versaxis virus overall, basically causing it to keep the opponent at the same stage of infection rather than increasing it over the course of their exposure to it. It will have the stronger initial effect until the first 2.5 seconds of expansion are over, however. The downward version will have the Versaxis clump up more tightly, decreasing immediately to the size of Kirby, the minimum possible size Versaxis infected area. This more dense clump of Versaxis will latch onto opponents that come into contact with it, and afflict them inescapably with the effects of the virus over the next 2.5-10 seconds, depending on the time spent charging. For the record, a Bowser sized area latches on for 4 seconds and you need to spend a full 3 seconds charging to create a 10 second duration trap, but Versaxis' effects scale over time so letting it latch on for a full 10 seconds is as powerful as you'd hope for that kind of investment. If an opponent with a clinging virus goes through a field of more Versaxis, it will tick up at 1.5x the normal rate, but you can't stack multiple clinging fields on the same opponent to make this go up too fast.

So what does Versaxis do to people inside of its infected area? Well the effect at first is little jolts of purple energy will come out of the sparks over time, dealing 1% per second. This will continue up to 5 seconds of exposure, at which point the opponent's flesh will start to decay and change to a purplish color, increasing incoming damage they take by 1.1x and increasing the damage over time to 2% per second. Another 5 seconds of exposure will cause the decay to worsen as the purple, rotting parts of them spread to more of their body. It also causes worms to start sprouting out of their skin in a gruesome visual, as the damage increases to 3%, with the multiplier becoming 1.2x as much damage and adding 1% per hit they take on top of that. Another 5 seconds, the worm infestation suddenly gets rather intense as their whole body is crawling with them, and they take 5% per second, plus a 1.3x damage multiplier with 2% added on top of that to every hit. At a full 25 seconds of exposure, they become what looks like a shambling shell of their former self, completely rotten and discolored and intensely infested with worms, taking a whopping 8% per second, a 1.5x damage multiplier with 4% added on top of that. At that point, they should be dead unless you really want to watch them suffer because you're just that edgy.

Obviously this is a pretty horrific amount of power at its ceiling, but opponents can get rid of Versaxis infection by just walking out of the sparks, at which point it will decrease its effect at the same rate it increases while inside. So if they're in the virus for 4 seconds, they'll have to leave 4 seconds for its effects to totally go away, but even if they're out for 2 seconds that's 2 more seconds Knight needs to wait for them to hit the next infection level. Of course, the variations Knight of the infection area that Knight can create will make it more difficult to actually escape, such as making huge fields where the decay will not decrease, or creating little traps that guarantee a few seconds worth if they connect. Or just put out patrolling ones, or a tailing one to make them easier to hit into, and the occasional standard one can be mixed in as well. The combinations of Versaxis clouds you make can really put the opponent in a bind... but that of course requires Knight to actually get the time to do so, which can be a bit difficult.

As an easter egg, if the opponent hits 300% at the highest stage of Versaxis, Knight will just snap his fingers and their body will fall apart into a decayed pile for an instant KO, while Knight laughs maliciously at their demise. While this particular effect won't apply on them, stamina based bosses like Master Hand, Tabuu, or numerous MYM story mode bosses can absolutely be infected by this and suffer the effects, both in terms of visuals and gameplay. Versaxis is a universal killer, after all.

Side Special - Science Experiments

A red rimmed portal appears on the ground, or slightly below Knight in the air if he happens to use it there. What comes out is going to depend on how much Knight charged the move, with more charge resulting in a different, and generally stronger summon. The start lag might be about half a second, but there's basically no end lag after the minion actually shows up, so its not an especially hard summoning move to use if you have a little space. While Knight's minions can't damage him, he can absolutely damage them, which is actually pretty useful for all types of minion. They don't take damage from Versaxis, however. Minions won't hurt each other unless Knight specifically triggers the death ability of one.

0-14 Frames - Shambler
The first minion Knight can summon is a grey humanoid that's hunched over and dripping slime from the three open holes representing eyes and a mouth that compromise its entire face. Its very thin and about the height of Marth, but its slumped over stature makes it wider and shorter than he is. It moves around in short lurches, where it moves forward at Mario's dash speed for two thirds of a battlefield platform, then stumbles around in place for a full second before it can move again. It only has 16 stamina, Its AI is pretty stupid, and will go off ledges if an opponent is in front of one and then jumps out of the way, and only pursues enemies within a Bowser length radius of it, otherwise just lurching back and forth around the area its currently in. The ooze coming out of its body is pitch black, distinguishing it a bit from the rest of the creature. They take knockback like Marth at 30%, though will take no knockback from the attack that kills them as their on death effect occurs instead.

The Shambler only really has two attacks. If it bumps into a target while running at them, it will stagger for a moment before swinging a laggy punjch at them that deals 10% and knockback that KOs at 185%, and it really won't land all that much unless Knight is providing a significant amount of support. It has another less laggy attack it uses while stumbling around in place, if the opponent comes into within a Kirby width it will puke its sludge on them, dealing 5% and weak set knockback in a much faster attack. This suffers from being rather close ranged, but its more realistic for a Shambler to actually land this compared to its punch.

When a Shambler dies its body explodes into more of the black goop, dealing 8% and weak knockback that KOs at 280% from the initial explosion. This actually leaves some residue on the opponent, which increases their fall speed and decreases their movement speed a small amount for 4 seconds. This isn't much, but it actually can screw with opponent's combos during that time to make their attempts to punish Knight significantly less brutal. The explosion doesn't reach too far beyond the shambler's body though, so even a longer ranged melee attack can avoid this unless Knight blows the Shambler up himself. It'll then leave a pile of the black ooze behind that covers a Wario width of stage, which significantly slows movement through it and gives the foe a couple more jumpsquat frames when trying to jump out of it. Its a small thing, but it is enough to slow down opponents approaching you, and the ooze lasts a lengthy 15 seconds or until dealt 40%, a bit of a chore to clean up.

The ooze in this thing's body is a place where the Versaxis virus can proliferate, which has a couple meanings here. If a Shambler stands around in a cloud of Verrsaxis for 6 seconds, all of its ooze will turn a dark purple color. This means that when it pukes on people, it will add one second worth of Versaxis timer to them in addition to dealing its damage and knockback. On top of that, when it explodes, the lingering residue prevents the timer from ticking down even out of any Versaxis fields for 4 seconds, basically functioning like a clinging of the up variant of the virus that also inhibits movement and combos. If the ooze on the ground comes into contact with a Versaxis cloud of any sort, it will function like a regular strength cloud in terms of applying the effect to the opponent while they stand in it for the remainder of its existence as it turns purple, which also applies if the cloud came from an infected Shambler.


15-29 Frames - Bloated One

Knight summons another humanoid, this one looking a lot less emaciated than the previous one. Instead, its covered in huge bulging red tumors that seem to be leaking magma, including all over its face to give it no recognizable expression. Its considerably more aggressive than the previous minion, chasing foes within 1.2 battlefield platforms of it at Ganondorf's dash speed. Unlike Shamblers it is not so stupid as to just walk off a ledge, rather just stopping at the edges of the stage. It even has a small jump, though its a pretty bad one that won't get it much of anywhere. The Bloated One is about Captain Falcon's size, but hunched over to make it wider and shorter like the Shambler. They have 25 stamina, making them fairly fragile for the amount of investment put in, but you are getting another after death effect here. They take knockback like Ganondorf at 30%.

Bloated Ones have three attacks, the first of which it will use on opponents out of its pursuit range. Unfortunately its very laggy for its effect, taking nearly a full second to charge up and having plenty of end lag, which has it spit a ball of fire that travels at Captain Falcon's dash speed for the full length of battlefield, aimed in the direction of the nearest foe. It deals 7% and upward knockback that KOs at 300%, nothing to be too excited over. If the foe is in close range, it can either pop one of its tumors in a lower lag move that causes a small explosion of fire in front of it, dealing 10% and mostly horizontal knockback that KOs at 240%. It also has a slower wind up punch it prefers to use when the foe is otherwise occupied, which deals 15% and knockback that KOs at 145%. For the record, by slower, I mean the first attack is already slow so any sane opponent should be able to get out of the way of this one.

When a Bloated One's stamina hits zero, it will stagger for 35 frames before exploding in an area 2/3rds the size of a Bomb-omb blast, dealing 17% and knockback that KOs at 110%. For the record, this is the most powerful knockback in Knight's set barring some exceptional circumstances or summoning the final minion, he really needs Versaxis' damage racking. This is still a pretty intimidating attack, and even if the main explosion hits it will send a couple meat chunks flying in all directions, traveling a battlefield platform beyond the length of the explosion and dealing 4% and a flinch. This isn't a huge deal, but it does make avoiding the blast significantly more difficult. One thing to keep in mind or perhaps be wary of is that given the damage it deals, a Bloated One exploding will also kill nearby Shamblers, potentially making a chain reaction of sorts. As an aside, foes can knock the Bloated One around while its in the process of detonating, but Knight can as well, a property that can be maliciously abused if you're smart about it.

If a Bloated One is in Versaxis, the effects will not be noticed until it explodes, at which point the meat chunks will be purple and infested with worms. For however long a Bloated One was exposed to Versaxis, these chunks of flesh will inflict 1/3rd of that duration worth of infection on the opponent, adding all the damage that would be dealt in that time immediately. This makes the chunks of flesh suddenly a much, much bigger deal to avoid, and you can create a slight bullet hell scenario for them to avoid them with multiple exploding Bloating Ones or Shamblers with some smart play. That does require an ambitious set up, but you are an embodiment of ambition, so you should try to pull it off sometime.


30-69 Frames - Infested One

The third minion also looks distinctly humanoid, but unlike the other two does not function like one, in that it comes out of the portal crawling on all fours. Its skin has moving shapes under it, looking like things are crawling under its skin, and has assorted animals claws at the end of its limbs. Its face has red voids for its eyes and mouth, and a strangely long tongue protrudes from its mouth wielding a knife. The Infested One is about as long as Ike is tall, but fairly low to the ground, making it the hardest to hit of Knight's minions. It has only one jump but said jump can go quite far both horizontally and vertically, and runs around at Mario's dash speed. It tends to be rather relentless in its assault on foes, pursuing them no matter where they are on the stage provided it can get that far. It will go off ledges, but only if it can reasonably recover from doing so. The infested one is unfortunately still quite fragile, only having 30 HP, but of course it has on death benefits so this is not strictly a downside. They take knockback like Marth at 40%, making them the easiest to knock off the ledge and not result in the on-death effect.

The Infested One has four attacks, the first of which is a simple swing of the knife that deals 6% and low knockback, in an actually fairly quick attack overall. They can also wind up a stronger stab with it that deals 13% and knockback that KOs at 140%, in a move that is actually not that absurdly laggy either, though the range isn't spectacular. They can also leap forward half a battlefield platform, slashing with their claws as they do so, for 9% and low horizontal knockback that at lower percents they can follow up on with the weaker knife slash. The final attack in their arsenal is a three part attack where they slash once with each front claw and then stab down with the knife, dealing 2 hits of 4% and then 8% and knockback that KOs at 170%. The ability of Infested Ones to actually trap opponents in multiple hits makes them fairly good abusers of Versaxis' static damage boos, as well as helping set up the more precise parts of Knight's melee game. You could use it to help set up too, but these things require a bit of an investment to produce in the first place.

On death, the infested one's body will have several small bugs burst out of it, starting out with 4 at 30 frames of charge and increasing by 2 for each subsequent 15 frames. These bugs will swarm around on the floor and have 10 stamina each, hanging around in a battlefield platform sized area around where the Infested One died. Knight cannot damage the bugs with his attacks, as he really has no reason to do so. Each of them is a bit smaller than a Pikmin, and if a foe comes within close range of one, which they'll most likely be in when an Infested One dies if they didn't kill it with a projectile, they'll jump at the foe and latch onto them. They'll bite into and occasionally even burrow into the skin, dealing 2% every other second per bug. Every 6th hit flinches, and they do bite on uneven intervals in such a fashion that if all four bugs latch on the foe will flinch once every 3 seconds, though this won't happen if they're in a grab or taking knockback to avoid interrupting it. If there are 8 latched on from a fully powered Infested One, that's one flinch every 1.5 seconds, which is horrifying, but the good news for the opponent is they can probably kill at least a couple of them pretty easily given they're a lot like Pikmin in how they're killed, and they only cling on for a max of 6 seconds anyway before falling off. Only a maximum of 8 bugs can be out on stage at a time, by the way.

Infested Ones don't really have any hard interactions with Versaxis, and they don't need them, as the damage their bugs do goes through the roof with higher levels of Versaxis infection. A flat 1% addition is a big deal on its own and it can potentially go even higher than that. They can potentially crawl on any of your other minions though if they're nearby, though they'll avoid Bloated Ones on the basis they would not logically climb on something that is partially made of magma. They'll jump off and try to latch on using the attacks of the other minion as cover, making them somewhat harder to outright destroy or avoid.

70+ Frames - Adapter Beast

The portal expands to a considerably larger size once Knight manages 70 frames of charge, producing a new monster that looks distinctly different from the rest. Its an ape-shaped creature with a lizard-like head, completely devoid of any facial features. Most likely, this is because this isn't just some poor soul Knight experimented on in a a lab, but a creation he built from the ground up. Its about 1.35x Donkey Kong's height and Bowser's width, making it quite huge. Unlike Knight's other minions, the Adapter Beast has no on death benefits... yet, anyway, and sits at an impressive 55 stamina. Rather than being aggressive toward nearby opponents, the Adapter Beast prefers to tail Knight around at a somewhat slower speed than his dash, but will go on the aggressive when Knight does and will try to block for him if Knight starts going on the defensive and shielding/dodging. It has two jumps and is willing to go offstage, but only so far as to be sure to have a safe way back. Knight can only have one Adapter Beast out at a time, and if you charge this attack past 70 frames it will increase the Adapter Beast's stamina by 5 every 5 frames beyond. If an Adapter Beast is already out the moves charge caps at 60 frames. As a final note, if Knight charges the Adapter Beast to 150 or more stamina for whatever reason, the magic will start bulging out of the portal in eerie red lumps, reminding people that they really need to stop him now before its too late. Adapter Beasts do not take knockback until they go below 30 stamina, at which point they take knockback like Bowser at 30%.

An Adapter Beast starts out with only two attacks, the first of which is slamming its hands into the ground in front of it to deal 15% and diagonal knockback that KOs at 130%, as well as creating a slight shaking hitbox for 15 frames afterward that deals 4% and lightly pops the opponent into the air. This makes the attack somewhat hard to dodge, though it does have a fair bit of windup lag and the range of the shaking hitbox is only a little longer than the slam. That being said due to its size the slam does have big range. The second attack has a tentacle burst out of the Adapter Beast's chest and impale through the opponent. This deals 10% and high hitlag before dealing knockback that KOs at 170%, and causes the Adapter Beast to upgrade one of its attacks with the life force it just sucked out. In the case of the punch, it will increase its damage 1.25x to make it a much scarier KO move, and cause the earthshaking hitbox to become about twice as wide, while the tentacle is increased to deal 15% and gains much longer range, going out nearly a battlefield platform in length from the Adapter Beast. This attack is not terribly fast, and it will upgrade prioritizing the clap first, then the tentacle stab.

It would not be an "Adapter" Beast if it did not adapt over the course of a fight, and there are a few ways it does so. First of all, every hit it takes will start to reinforce its durability, gaining 1% damage reduction every other time it takes a hit. This caps out at a whopping 7% damage reduction after 14 hits, so the opponent needs to be extremely careful when using jabs or multihits on the Adapter Beast, and Knight has every motive to do so himself as he can also hurt it. In addition, when the Adapter Beast is hit by certain attacks or sometimes succeeds in certain actions, it will learn a new attack to use to combat its opponents. There is a period of 2 seconds after the action is completed where it will start processing the new attack, and then will let out an ominous purple glow from its head when it does learn a new one. Its skin will also turn to a darker shade of purple as its damage resistance goes higher. After the basic slam is upgraded, the tentacle will always prioritize upgrading its most recently learned move.

If hit by a projectile, the first adaptation will kick in, as the Adapter Beast will gain the ability to produce a projectile of its own. Its face will unnaturally split open to reveal a spear of what looks like a pure black metal before firing it, dealing 11% and knockback that KOs at 185%. This is a bit slow, but upgrading this attack will allow it to rapid fire two more after the initial shot, making it much harder to protect against. These spears have a full battlefield worth of range, making them a worthy projectile to fight most campers. If hit at least three times by an aerial, as its current kit has no anti-air moves, it will develop a powerful one. The Adapter Beast's whole back will jut out into crimson spikes that deal 15% and knockback that KOs at 120%, in an attack that actually has low start lag and good range/coverage, which makes it rather horrifying. The good news is that the end lag on this attack is horrific for the Adapter Beast as the spikes slowly retract into its body, about 1.8 seconds. The upgrade causes the spike's tips to glow with energy and deal 19% and upward knockback that KOs at 90%, and also decreases the end lag to a more manageable 55 frames.

If an Adapter Beast takes 3 separate attacks within a second, it will gain the ability to fire sharpened scales from its body in front of it, doing rapid hits of 1%. These only hit 5 times per second so its not that hard to DI out of, and can easily be crouched below for most characters as it fires from the Adapter Beast's upper body. However with an upgrade, the scales will hit 10 times per second, making it significantly harder to DI out of and a monstrous damage builder with Versaxis affliction. The range is not that long as these are only pseudo-projectiles, going forth about 4/5ths Bowser's width. If hit by 3 attacks that deal 20% or more, it will gain a passive instead of an attack, as tiny needles will sprout from its skin. These will deal back half the damage of the attack that hit the Adaptor Beast minus 3% as needles fly off it to hit the opponent, and this is before damage reduction kicks in, making both powerful and weak attacks somewhat painful for the opponent to use. The needles can be upgraded to instead deal 3/4ths damage minus 3% back, as it technically is a damage dealing ability of the Adapter Beast, but while they can hit even disjointed hitbox users due to them splintering off the range is not that big. By the way, these also come off from attacks Knight does to the Adapter Beast, but they won't hurt him, and if they hit as the same time as one of his attacks their damage gets factored into knockback calculation, which as you might expect can be a pretty big deal.

The final two abilities an Adapter Beast can learn are acquired somewhat differently. The first will require it to land 40% worth of damage on a specific opponent, at which point the Adapter Beast will gain a new and deadly attack. It will transform its arm into a mass of tentacles with a pointed weapon at the tip, then stab forward with it in a move that is admittedly incredibly laggy, but has an enormous 1.5 battlefield platforms of range. The end of the weapon is tipped with a blade made of a material depending on who the Adapter Beast racked up damage on, specifically aiming to be their weakness. If its a Pokemon, it'll be the type they're most vulnerable too, Ganon will be on the receiving end of a replica Master Sword, a hypothetical Superman might have kryptonite, etc. If there's nothing obvious then it'll just be a blade with an opposite color scheme to the target, like a blue one for an opponent with a primarily red color scheme. This deals 30% and diagonal knockback that KOs at 70%, a kind of KO percentage Knight's moveset is almost never going to achieve otherwise. The body of the arm deals 15% and horizontal knockback that KOs at 150%, while the tentacles shooting off above and below it, 5 in total, deal 8% and weak set knockback. If upgraded however, this move will have said tentacles be tipped with the same weapons, dealing 20% and radial knockback from the point they hit that KOs at 100%.

The last ability occurs if an Adapter Beast is around while three of Knight's other minions die, causing it to gain an on death ability. If that sounds impractical to you, its not to the degree you might think it is, as with an Adapter Beast out it will probably draw a good amount of the foe's focus, leaving you a chance to make some support minions. On death, it will let out a high pitch howl that empowers every other ally it has on the stage. Knight and allied characters in team battles gain a sizeable movement speed buff, as well as a slight decrease to the lag of their attacks, about 10% off the start lag and 20% off the end lag. Your minions get a much larger speed buff, with Shamblers stumbling for only a brief moment now and having about 40% of their lag cut out, while Bloated Ones get a huge buff to the speed of their fireballs and a small one to the speed of everything else. Infested Ones gain another jump and now move at Captain Falcon's dash speed. If upgraded, the move will even affect Versaxis, causing it do its damage and build up of affliction at 1.5x the normal rate, and causing the enlarged clouds to function like regular ones. The buff lasts for 5 seconds on Versaxis with the upgrade, and 10 seconds for everything else.

While a base Adapter Beast is obviously quite powerful, its 55 stamina is not so high that it can realistically gain a ton of the above listed attacks. If you want to make a real monster of an Adapter Beast, you'll need to get its stamina even higher, though the 55 stamina version will suffice in most cases as its already very powerful.


Up Special - Rift
Knight opens another red portal, and this one depends a bit on if used on the ground or in the air. In the air it'll be above himself, and on the ground it'll be above the space right in front of him. In the case of the aerial version, he'll just pull himself through the portal magically, and then reappear out of another one in a manner that can be directed similarly to Zelda's teleport. The only difference is in this case, how far it goes depends on how hard you tilt it, varying between a little less than the full length of Zelda's recovery and a mere Bowser width warp. This recovery unfortunately lacks a hitbox, but the good news is that the landing lag is not that bad and the starting lag is not nearly as long as Zelda's Up Special. The landing lag also scales down with distance, meaning after a short jump Knight basically has none, but he does have to land on the ground to get the benefit out of this. That being said, you can possibly use this to warp out of the air into very close range of an opponent, and unusually for this setup heavy type of character Knight is surprisingly scary in very close ranges.

If used on the ground, Knight will not be the one going through the portal, but rather whatever is directly in front of him. Whatever is beneath the portal will be sucked upward after a moment, dealing 5% to opponents before they get dropped off at the end of the teleport's range. Opponents will only go 2/3rds as far as Knight or anything else does, and you cannot portal a target downward through the stage. That being said, this can move anything, with one example being putting your summons up in the air to throw off an aerial opponent, even off stage to intercept a recovery move by exploding on them. Or you can use it to drop bugs on them, and in fact you can actually move a Versaxis infected area to another part of the stage, making aerial and more specific Versaxis setups easier to achieve. The lag is a tiny bit worse than the aerial version, but still not as bad as Zelda's teleport, mostly because it has higher end lag than the aerial version does landing lag and there's a 7 frame period before the transport occurs. Still, this is a highly versatile move to your setup, and occasionally can be used to place the opponent in a very precarious situation.


Down Special - Reconstruct
Knight's whole body flickers for a moment in a counter which has a somewhat harder window to utilize than Marth's. If the opponent hits him during this time, his body will appear to actually come apart for a moment, revealing a black void like substance that was concealed beneath his human form. It will quickly reform back into his regular self as he strikes out with his sword in a counter that deals 10% and knockback that KOs at 190% plus one third of the damage and knockback of the incoming attack. This is not nearly as good at KOing early as some other counters, but if you stop a weak move the base power is nice to have. If that was all there was too it though this would be a pretty bad counter, given the timing window, but fortunately there's a bit more we can do here.

For starters, if Knight is within a Bowser width of goop or bugs when his body disassembles, you can hold A during this move to absorb them into yourself. This will provide a couple buffs, such as increasing the counter's power by 1% per bug absorbed and 3% per pile of goop absorbed. The knockback scaling will actually slightly decrease though so even with 2 goop piles and 8 bugs you're only really KOing at around 110% despite dealing over double the damage... though that's before the foe's power is factored in. Then Knight will get a slight buff, getting a 1% damage reduction from incoming attacks for each goop pile absorbed and a tiny movement speed buff for each bug absorbed, which can add up to a fairly notable amount with 8 bugs, pushing Knight to Charizard's dash speed. These buffs will fade 8 seconds after the counter is initially performed, though absorbing more bugs/goop can refresh the duration, while increasing the max power if you absorbed more that time. Do keep in mind the bugs absorbed into Knight count as ones out on the stage.

If Knight holds B while using this move, he will eject anything he's absorbed back out as an attack. This can allow him to release the bugs onto the foe after he's absorbed them if he connects with another counter. With the goop, it will simply fly forth from his blade, with this secondary hitbox going as far as Mario's fireball and dealing 5% + 2% for each released sludge puddle + 1/4th the damage and knockback of the opponent's attack, letting it counter longer range moves. Whether the sword or goop projectile hits, it will do the same slowing effect as the initial explosion of a Shambler, and will do so for 3 seconds with one goop puddle plus an additional two for each one added on top of that, making for a longer duration combo and movement disruptor. If the goop was infected with Versaxis, the bonus effect applied for a Versaxis infected Shambler's explosion is also applied here. Releasing sludge puddles also adds 2% to the damage of the main strike for each, as an FYI. All in all, this is a good way to abuse the remains of your minions in a slightly more complex way if the opponent isn't just running into their trap versions. After the 8 seconds of buff vanish however, you lose the ability to fire this stuff back out again, but at least it refreshes the cap on how many bugs you can have out.

The last benefit of this move only exists if you counter with this move inside a field of Versaxis. The Versaxis sparks will fly into Knight and do repairs on him as he breaks apart, healing him equal to the amount of damage he would've been dealt by the attack. There is however, an additional limiter here. Specifically, if Versaxis has not dealt as much damage as would be healed by this move in Knight's stock, be it from its static damage over time or damage amplification, then you'll only heal for however much damage Versaxis added to Knight's output this stock. This also uses up that energy in Versaxis, so basically if you want to heal 2 hits of 20% over two counters with this move, then Versaxis better have dealt 40% in total this stock, and if it only dealt 30% the second counter will heal you for 10% as that's how much healing is left in Versaxis. That being said, Knight loves the attrition game. His setup gives him benefits even when its taken down and Versaxis gets stronger over time, so being able to heal off its effects snowballs the match in your favor very hard if you can pull it off. All in all, these various benefits push this counter will above and beyond the utility of most counters... provided you actually land it.


Standards

Jab - Pound of Flesh
This is a three part jab, which starts with Knight swinging his sword in a quick one handed motion, dealing 3% and middling knockback that scales extremely slowly. Its a fast move with good range due to the sword, though his sword is not as long as Marth's. If you stop the Jab combo here, the end lag is low enough this can set up nicely for some combos, though its not some amazing move in that regard. That being said the relative safety here means this is the version of the move you'll use the majority of the time, just for how practical and easy to use it is.

The scarier part of this move is the second and third hits, where Knight will then have his free hand grow out claws and bury into the opponent's flesh for hit #2 of the jab. This deals 5%, and has quite a bit of lag for a Jab so you need to predict the opponent well to land this... especially considering the range is pathetic and only goes a little past his body. If you do land it though, for the third hit he does a ripping motion quickly afterward, dealing 8% and mostly horizontal knockback that KOs at 170%, and he also tears out a huge piece of the opponent's flesh when he does so. You can actually angle this final hit slightly to tear out from a different point on the opponent's body, which will become relevant in a second, and also angle the knockback closer to the ground or higher. As the first hit doesn't combo into it, the main way you'll land this is by getting an opponent's shield low enough to hit above or below it with the angled versions, or by predicting their movement so the first hit misses them but the second one doesn't. These are both difficult things to accomplish, but not impossible with help from your minions with pressure.

There are a couple things worth noting here, and one is that the wound created by this has some nice benefits. It deals 1% per second on top of the opponent's damage, increases damage dealt by Versaxis' damage over time by 1.5x as it allows Versaxis to get deeper into their body, and multiplies the damage of attacks hitting the wound by 1.2x, which stacks with Versaxis' bonuses for something potentially monstrous. It'll close in only 4 seconds despite how bad it looks, but it closes at half the rate in Versaxis fields. While this wound is created on minions, if made on an Adapter Beast one hit to the wound will not only heal it up, but cause heavier armor to manifest over it and reduce damage by 0.8x before other damage reduction, giving it points of stronger defense.

The other thing here is that Knight gets a chunk of flesh as an item he can use. It deals 4% when thrown, and it can be infected by Versaxis like the rest of the foe's flesh. If pulled from a minion, it'll deal 1/8th its time spent in a Versaxis cloud worth of Versaxis progression when it hits a foe, while a piece ripped from an enemies flesh will deal 1/4th the time spent. Any time the flesh chunk is exposed to Versaxis once removed will also count for these purposes. If the flesh chunk is ripped from a Shambler, it will be covered in ooze and stick to opponents like a Pikmin with 7 stamina, slowing them like the residue of a goop explosion while it does so. This is small but it can serve to briefly mess with their attack patterns like the other versions of this effect. If ripped from a bloated one, the chunk of flesh will initially be heated and deal 11% and vertical knockback that KOs at 160%, but that will decrease by 1% per second until it reaches the power of a normal flesh chunk, so use it fast. If ripped from an Infested One, it will explode into several extremely tiny bugs on contact, flinching 4 additional times for 0.5% each, benefitting massively from Versaxis infection obviously.

The Adapter Beast's flesh chunk will function like one from the opponent minus the heightened infection ability, so it looks like the worst one. However, 5 seconds later it grow out into a miniature Adapter Beast itself. It only has 25 stamina, and its attacks have halved power from the large version and massively nerfed range, given its only Kirby sized. In the case of the scale shot it only shoots 2-4 per second and the hand slam will not produce an earthshaking hitbox. Its rather hard for this tiny Adapter Beast to abilities due to its low stamina, but it inherits them from its "parent", upgrades, damage reduction, and all. This means you can rip pieces off a late stage Adapter Beast in its death throes to make some still scary replacements. While they get a small lag shave and movement buff when the main Adapter Beast dies if it has the on-death ability, the one thing they cannot learn for themselves is said ability.

Knight can drop flesh chunks around on the stage, leaving them around to be picked up and thrown, but they both disappear when they hit an opponent, and also vanish at twice the rate of a normal item. Still, throwing one up into the air or using an Infested One chunk is one of the actual best ways to set up the flesh rip on a foe, so this move is actually somewhat self-sufficient in that regard. He can absorb and fire them out via Down Special, basically just adding them as projectile hitboxes that will hit right before the counter strike. They'll heal Knight for 2% for each flesh chunk absorbed, some less powerful healing than the Versaxis counter but sometimes less situational as well. You lose them if you don't use them like with the goop and bugs... except in the case of an Adapter Beast flesh chunk, which will stick around forever, at the same timer to transform as before.


Forward Tilt - Overload
Knight stretches his free hand out in front of him, a glow radiating from his fingers as he does so. This can be angled up and down, and has underwhelming range and slightly annoying lag for a tilt, though hardly enough to make this move that impractical. It deals 9% and knockback that KOs at 300% angled in the direction the hitbox comes from, as well as applying a slight burning visual to the opponent. The good news about this move is the low end lag, letting it set up well for a combo potentially. This is good as Knight's combo potential is pretty decent and becomes very good with flesh chunks and Infested Ones. That being said, don't expect this to serve much of a role other than as a starter though, as the range and start lag make leading into it difficult.

The move is called Overload for a reason however, as Knight overloads the opponent with more of whatever affliction is on them. If the foe is infected with Versaxis, some more of the purple energy bolts will come out of his hand, and if they're bleeding through a wound he breaks the wound wider open. This means any damage amplification effects caused by an opponent's status effects get multiplied over once again. Say the opponent is at a 1.3x damage multiplier with an additive 2% on that from Versaxis. Instead of just dealing 13.7%, it will multiply by 1.3x and add 2% a second time, letting the move do 19.8%, hitting like a smash attack effectively! The ceiling for this without factoring in stuff from other movesets is max Versaxis and a wound, which means it deals an unholy 43.5%. If you have maxed Versaxis and a wound killing the opponent is pretty trivial anyway, but it still means this otherwise somewhat underpowered move can actually end up very powerful in relation to its speed. While the combo potential is a bit lost once the damage multiplier gets high enough, off just a wound or lower levels of Versaxis it can still function for that purpose at lower percents.

If used on a minion to deliver the finishing blow, Knight will "overload" the minion with more of it would currently explode with. The Shambler will explode in a blast of goop 1.35x as large, dealing 12% and leaving a goop puddle that is twice as wide and counts for two for the purposes of Down Special. The blast also coast the opponent in the status effect for an extra 2 seconds. A Bloated One will explode in only 10 frames and deal 1.15x as much damage in an area that is again 1.35x as large, making the blast much harder to actually avoid. An Infested One will have flying bugs shoot out of the corpse in addition to the grounded ones, which simply fly into the opponent and bite them for 3% and a flinch. That being said you get as many of them as you do grounded bugs and they all combo into each other, so you can potentially reap 24% off this. That being said they have 5 stamina and take a moment to fly out, so an opponent can just destroy them all casually if Knight doesn't do anything about it. This sadly has no real effect on Adapter Beasts, given you don't really have much incentive to actually kill those things if you can help it.

All in all, this is in some regards a limited move due to its lack of safety, but there's a lot of ways Knight can abuse it. Its not like he hasn't killed with it before.


Up Tilt - The Claw
Knight's becomes a claw-like form as he reaches it upward in a stabbing motion before curling his fingers back in, in a hitbox that has deals 7% and upward knockback that KOs at 280%. It sets up the Up Smash decently well early on, and then at medium percents goes into aerials, and it can potentially combo into itself up to 20%. Its not like DIing out is impossible in the last case though, this isn't exactly Mario's Up Tilt, but its not exactly a lacking damage racker either.

The claw curling in is actually a sweetspot that deals 1%, then 8%, then spikes. This is not a terribly strong spike but its enough you can gimp people at the ledge with it if you position very carefully at higher percents, and the 1% hit at the start means the attack gets a bit of extra mileage out of Versaxis. Due to how the spiking knockback scales with damage if there's some Versaxis buildup on the foe said ledge gimps will not be as rare as you think. The more important implication, however, is that you can just drop the opponent onto the ground in point blank range, which is really good for a number of reasons.


Down Tilt - Binding
A small portal opens in front of Knight and fires out a chain, going forward a very long range for a melee attack. The chain deals more damage the closer to Knight its used, capping at 11% up close and 5% at max range. The knockback is pretty underwhelming regardless, and while not amazingly fast the move is pretty good at poking through shields even at the end of its range due to its low hitbox. At point blank it will KO at 280%, which is more feasible for Knight than some characters and can reach a slightly more respectable number with Versaxis affliction, but that'd mostly just be relevant due to easily getting through shields.

Upon hitting with the chain there is a brief bit of hitlag, and if you've been holding A during the move the chain will hook into the opponent's body. This functions as a tether, which has a maximum length of 3/4ths of a battlefield platform from the initial portal and any distance they get sent past that will be prevented, though if its through the knockback of an attack damage to the tether equal to the attack's damage will be dealt. Interestingly, to break out of the chain the opponent has to knock it out of their body, by hitting the tether for a certain amount of damage, but the amount of damage required will depend on how close you hit this attack. If it hit at point blank range, you've got yourself a whopping 50 HP tether, at max range its only 10 HP. A 50 HP tether is a big deal for Knight given how much he wants to set up, and he can make it a lot more annoying by placing minions near the tether. Trying to avoid killing a Shambler, Bloated One, or Infested One in the wrong way while breaking a tether gives Knight a fair bit of room to breath to make a more proper Versaxis field or a higher ranking minion. Hell, if you stack it on top of an existing set up, this is the main way you can actually complete your plans of summoning an Adapter Beast. The other, very obvious implication is just keeping an opponent pinned down in Versaxis for some amount of time, though making a field of Versaxis big enough to cover this entire range is some work. If you portal an opponent connected to a chain away, the chain will disappear, giving you an option to instantly remove it, albeit a clunky one.

You can chain down your minions to get better control of them, which isn't a huge deal but sometimes you want to control the aggression of an Infested One to keep them in a specific area, or keep a Shambler from suiciding in a stupid fashion. Chaining down the Adapter Beast actually has an interesting interaction with them, as if they reach the end of the chain while attempting to do something they will attempt to break it. It takes 0.8 seconds for it to do so, and once it does it gets a 1.1x multiplier on all its damage until death. While you can't stack doing this over and over again to keep making it stronger, you can give it a bigger boost by using multiple down tilt chains on it, at which point each will add 0.2 seconds to how long it takes to break, but increases the bonus by another .1x, so if it breaks three chains then it reaches 1.3x as much power as it had before. Also note that when the chain is wrenched out of something it flings out as a brief hitbox that deals 8% and weak upward knockback that KOs at 280% along the length of the chain, not hitting whoever was tethered down but potentially giving some additional benefits to tethering up a minion.

One last thing to keep in mind is that if you have an opponent trapped at the end of a tether, it becomes significantly harder to avoid Knight's close range game by means other than zoning him off. Its a small thing, but it helps you get your close range hitboxes more easily.


Dash Attack - Charge of Shadow
Knight's form begins to fade into more of the void-like one he becomes in his Down Special, allowing him to pass through enemies as he continues dashing for a brief moment. During this part of the dash he deals 8% and backward knockback, which is notable as it can set foes up into exploding minions behind him. At the end he reforms and does a powerful clash slash that deals 15% and horizontal knockback that KOs at 145%, a fairly serviceable KO move. This is incredibly punishable on shields, but Knight has a fair few ways to abuse shields so if you've managed to get their shield low this attack can actually be rather scary. It also gets its range extended if you have heightened movement speed as he charges in his transformed state for the same amount of time, making this move slightly scarier with absorbed bugs or after the death of an Adapter Beast.

Smashes
Forward Smash - Chaos Blade
Knight performs a two-handed stab with his sword similar in appearence to Marth's shield breaker. This is a somewhat laggy and longer ranged attack that deals 14%-19% and knockback that KOs at 140%-110%, and for once it remains consistent all along the blade. Like the move its similar too visually, this does a number on shields, bringing their health low enough after an uncharged hit that landing the Jab's second and third hits becomes much easier. The end lag might not be great on this attack, but the shield stun is high enough you might be able to land it anyway if the opponent is not quick with their reflexes putting the shield down, and even then its low health may make pulling that off possible in the near future.

After the sword is impaled through the opponent, Knight will twist the blade and black shards will come flying out of the opponent's back. The initial target won't get hit by this, but the shards will fly out twice as far as the blade was buried into the opponent, giving you your actual incentive to hit up close with this. The further the part of the shard hitbox is hit with the less damage is dealt, but the more of the blade is shoved through the higher damage the shards deal. This means they'll deal 3 hits of 6%-8% and knockback that KOs at 110%-85% if the person being hit by the shards, Knight, and the initial stab victim are all closely lined up. At the max distance, which means right against the victim's back if you barely graze the victim with the blade or any further max distance, it deals 3 hits of 2%-3% and knockback that KOs at 400%-300%, though it can get a lot better thanks to Versaxis' additive damage bonus. Actually lining up three victims super close is hard, even with the tether and careful teleport use it won't come often, but stabbing through one of your minions to hit a foe with the full power of this move is quite satisfying.

There are other applications of the shard hitbox, with probably the biggest one being that you can use it to blow up a minion behind you, effectively comboing this hit into the explosion of a Shambler. Bloated Ones won't explode in a fashion quite as nice for this but at low percents it can still be a good setup to get them hit by it. Hitting them into a Shambler explosion at low percents actually lets this move combo, potentially knocking them right back into an FTilt and starting off a string of aerials to get some pretty intense damage on the opponent. While an Adapter Beast is not the happiest to be on the recieving end of this, some damage reduction can make it a not too painful way of poking opponents from behind one to make its attacks more likely to land, and charging it even a tiny bit can give you the exact 15% you need to get the Adaptor Beast its needled skin. By the way, did I mention that connecting with this attack through an Adapter Beast with needle skin is crazy powerful? Because it is. You can hit for 28%-37% and the increased damage from stacking on the needles will make it KO at 70%-45%. Pretty horrifying stuff.


Up Smash - Versaxis Core
Knight raises one hand above himself as a huge eye manifests above him, about as large as Wario. Upon appearing the eye itself deals 12%-16% and upward knockback that KOs at 190%-160%, though this is at least compensated for by its good range. This has above average lag on both ends and mostly just serves as solid anti-air once Knight gets the opponent to moderate damage percentages, being capable of a couple situational combos especially if you have flesh chunks or bugs crawling on them. That being said even you can do better for a KO move, though it can occasionally suffice at higher percents or with some amount of charging.

There are a few follow ups to this move if used in a Versaxis field, and they can be achieved by tapping or holding A. However, they cost from the same pool of stored energy that Versaxis uses for Down Special's healing, so you had better use this carefully. You can do as many follow ups as you have the energy for though.

Tapping A will have the eye radiate a a red wave as wide as it is but very thin upward in a fast attack that deals 5%-7% and upward knockback that will only KO at 360%-300%. The thing with this wave is it can actually be fired very fast, making it quite a damage builder as you can shoot off about 5 of these per second. The problem is they cost 3% from Versaxis' supply each, and once the foe hits around 100% even if they don't DI comboing these together will stop. Still, You can easily get 5 hits of this in at low percents, which with the additive bonus from Versaxis can mean quite a lot of damage. Its also an easy way to give the Adaptor Beast scale shooting evolution, which plays pretty nicely with this in how they combo into each other once you do have it.

Holding A for less than 30 frames will have it fire a small purple projectile, which inflicts 4%-6% and minimal upward knockback. While the damage on this projectile is small, there are a couple things worth noting about it. For one, its a rather slow, lingering projectile that will take nearly 1.5 seconds to travel its 2 Battlefield platform distance, making it significantly useful both for combo setups and as a slight defensive wall for Knight to abuse. Its also actually rather fast to fire, and you have some control over the angle it comes out though it will always be fired upward. Lastly, it inflicts 1 second worth of Versaxis damage instantly on whoever it connects with, which can obviously be a pretty big deal in building that up. Just keep in mind each shot here costs 7% worth of Versaxis charge, so its not exactly cheap.

If you hold A for the full 30 frames, it will instead have all the sparks in the current Versaxis field fire into the eye to create a huge purple, sparking projectile, which can be launched at any angle except ones more than 20 degrees below the horizontal of Knight. It travels at Captain Falcon's dash speed, goes 3 battlefield platforms, and deals 15%-21% and diagonal knockback that KOs at 180%-140% on contact as it explodes in a blast about half the size of a Bomb-omb blast. It also afflicts the foe with 3-4 seconds worth of Versaxis damage instantly. It will then have one of two effects depending on if it landed in a Versaxis field or not. If it did, the explosion will spread to the whole field, hitting absolutely everything inside for the same damage and infection. If not, it will create a new field slightly smaller than Bowser with no AI where it hit. This is a fantastic way to create new Versaxis on paper, as while the overall lag is technically higher to make each field attaching it to a powerful projectile is a significant upgrade. That being said, this costs a whopping 15% worth of Versaxis charge per use, so don't use it lightly, and it is still laggy.


Down Smash - Consuming Maw
Knight opens up another portal, this one appearing to be full of eyes. After a moment, the eyes will rise up in a blob like mass before splitting open into a huge mouth and biting down. This deals 18%-25% and mostly upward knockback that KOs at 140%-110%, and covers a sizeable area in front of Knight nearing on the size of Bowser. Of course, the lag is quite bad as you'd expect, and it doesn't actually KO as early as you'd hope, but the move is still a handy defensive option due to the large area of coverage. It can also hit your minions and the foe simultaneously with great ease, which obviously has its fair share of utility.

Now if you really want to make this move scary, you need to kill a minion with it, at which point the maw will devour its corpse. It'll leave the bugs/goop behind, and enough of the Bloated One for it to still explode, so don't worry about losing that. However, what it devours will determine how fast it will come out the next time, increasing in speed slightly with shamblers and more significantly with Bloated and Infected Ones. The maximum speed, which would require either 4 Shamblers or two Bloated/Infected Ones or an equivalent combination will have it come out on frame 4. That is absolutely terrifying as it lets most things combo into it, and also gives you a huge zone of fear to work with, but the opponent will see it coming and you have to sacrifice a significant amount of your setup. You'll probably have to settle for Frame 10-12 most of the time, which is still pretty greaet. If the maw consumes an Adapter Beast, it will instead grow considerably bigger, becoming 1.45x Bowser's size and dealing 23%-32% and upward knockback that KOs at 80%-55%. This is a terrifying hitbox, but you have to sacrifice an Adapter Beast to get it, so it may not feel worth it, and to get it to come out fast you'll need to sacrifice other minions as well. A trick though, is that you can sacrifice a baby Adapter Beast instead to get the same benefit, which makes things much simpler.


Grab Game

Grab - Seize
Knight simply reaches his one hand forward as it turns into its claw form, giving this grab a fairly solid if not amazing amount of range. Its an all around solid grab, though it doesn't particularly excel in any fashion. He attempts to hold smaller foes than him by the neck, while larger ones he sinks the claws into to hold them still.

Pummel - Observation
Taking his sword, Knight uses it to poke and prod the opponent in a rather slow pummel, at least by the standards of 1% pummels. However, when the opponent is taking passive Versaxis damage, and the pummel gets the additive damage bonus from Versaxis, any pummel becomes potentially quite scary to the opponent.

Forward Throw - Impale
Knight stabs his blade through the opponent and flings them forward off it, dealing 9% and low horizontal knockback that will eventually scale at around 45%, but early on this is your go to combo throw. Knight really is better at forward oriented combos, as his FTilt, Fair, Jab, and whatnot are generally better for that purpose than his Up Tilt/Up Smash/Up Aerial, and in the situation you have a fast enough one prepped this can combo into the almighty Down Smash, which is a pretty sweet deal. Its ability does fall off faster than some combo throws, but until around 85% this can chain into a fast enough Down Smash, and hypothetically even a little beyond with a giant Down Smash. At 0%-10% this won't give you a point blank tether, but it will give you one with 35-40 stamina so its hardly worth complaining about, though it loses its ability to combo into Down Tilt at all by 30% due to the vertical component of the knockback.

Back Throw - Pain Reflection
Knight puts the opponent slightly behind him and raises their soul out of their body as an orb, generally colored to represent the character's alignment with white being good characters and red being evil characters. He then crushes his hand down on it, dealing 10% and knockback that KOs at 260%. This is Knight's main KO throw, which is to say his throws are pretty bad at KOing. However, Knight will also deal 1/5th of all damage the opponent took in the last 8 seconds, meaning if you land this throw after a significant string of damage it will hit for much more, say the opponent taking 50% meaning it will 20%. This obviously will greatly improve the KO percentage, cutting it to 170% in the former case which is perfectly serviceable for a strong damage dealer like Knight.

This throw would be significantly more awkward for many characters to utilize due to the fact that most combos end not in a remotely viable position to grab the opponent. Knight's combos can be made fairly weird through use of chunks of flesh and bugs swarming on the opponent, and as such ending on a grab into Pain Reflection after a high damage combo is actually not impossible. It does require specific setup, however. Of course, just passive Versaxis damage or something like a spam of Up Smash wave hits can work reasonably well in that regard too, with even the grab and pummel itself linking into this move nicely at high stages of Versaxis. There's a lot of ways you can grind out enough percentage in 8 seconds for this move to be rewarding, but if you're not playing well this is a very lackluster throw due to the complete lack of combo potential.


Up Throw - Cruel Chains
Knight tosses the opponent upward with his free hand as a portal opens in front of him. The initial throw deals 5% and moderately high set upward knockback, which at least leads into Up Smash and its follow ups well enough. The portal will then fire a chain out, dealing 7% on contact and "dragging" the opponent back to the ground by spiking them. The chain appears to cling on as they take the knockback down before returning to the portal Knight is free to move as soon as the portal fires, letting him desync from it in a manner that makes him able to abuse the hitbox, but the foe is also free to move by the time it fires as well. As the foe is getting dragged down by a chain, it would not make sense for them to be able to tech this move, so it is untechable.

There are two situations this leaves the opponent in, dropped in front of Knight which is pretty bad, or out of the way but due to having to avoid the initial chain they're now at the mercy of Up Smash. This isn't too bad if the Up Smash is just the eye hitbox, but when Knight is in Versaxis it might actually be better to just get hit by the chain due to how much Knight can throw out from the core to make the opponent miserable. Of course, point blank range with Knight also tends to be rather unpleasant, so this move basically forces a choice where the opponent will be happy with neither option... at least provided you're able to fire it off in a Versaxis field with enough charge. If not, well, its decent for setting up a chase even if it has many disadvantages compared to FThrow.


Down Throw - Invasive Surgery
Knight pushes the opponent to the ground and not practicing anything resembling proper surgical conduct uses his sword to split the opponent open. A wide smirk comes across his face as he goes to plant something obscured by the camera inside large, bleeding surgical gash in the opponent's body, before he stitches it back up. This deals 8% and leaves the opponent in techable prone afterward. You can still see the surgical scar on their body, and after 6 seconds, it will start to pulsate, becoming more violent over the next 3. Once the 3 seconds expire, it will rupture as a huge tumor will come out, dealing the opponent 12% and upward knockback that KOs at 150%. This can of course, be spot dodged or shielded.

The tumor will remain out on the opponent's body, having 55 stamina that can be depleted either by the opponent trying to hit it like a Pikmin, or from Knight's attacks hitting it. It does not take damage from Versaxis, but being Kirby sized it adds a lot to the opponent's body, making their hurtbox far bigger. Obviously, the first thing that will come to mind is comboing the opponent, which Knight can certainly do better with the huge useless lump of flesh on them. Another, but very subdued use is that a larger opponent will have a harder time avoiding Versaxis clouds, more notable with the clinging ones but in general might lead to a situation where they could previously squeeze between them and can't now. The tumor will also go away after 15 seconds, if its somehow not destroyed in all that time. When destroyed, the tumor will leave behind a puddle of goop, which will fall through the air if its popped up there as a hitbox that deals 4% and a flinch.

There is a third, niche use to it, and that's that the opponent will usually have a lot of trouble hitting something attached to the tumor. Bugs or a chunk of Shambler flesh will stick right to it and the opponent might not be able to remove them until the tumor is already gone. This makes those effects significantly more annoying and effective, and once the tumor is gone they'll still be sticking to the opponent's body. Of course, those things actually have to cling to the tumor specifically, and if they're not aimed at it then you're out of luck as far as abusing this addition to the foe's body goes.

If Knight is next toa chunk of flesh during this throw, he can press A to pick it up and jam it into the opponent's body. This will enhance the tumor, and also add the Versaxis damage that you'd get from throwing it at them. If its just a chunk of enemy flesh, then they get a slightly bigger tumor, now 1.2x Kirby's size with 65 stamina. Getting it from minions adds an effect on top of that. If its from a Shambler, the tumor will burst into a double sized puddle of ooze. If its from a Bloated One, the tumor will come out molten and deal 19% and upward knockback that KOs at 100%. If its from an Infested One, then it'll be treated like two extra bugs on the opponent until its destroyed. If its from an Adapter Beast, it will prevent moves from leaving the stale move queue until its removed from the opponent and extending the stale move queue to hold an infinite amount, basically meaning the opponent cannot unstale their moves until its gone. The baby Adapter Beast will still come out, though after 8 seconds if hte tumor is not destroyed, and will actually have a bonus 2 stamina for every attack the opponent used while it was attached as it leeched their energy. Suffice to say, you can have a fair amount of fun making afflictions that leave the opponent absolutely miserable.


Aerials

Forward Aerial - Slash
Knight swings his sword forward in a manner similar to Marth's Forward Aerial, dealing 6% and mostly horizontal knockback to the opponent. This is one of Knight's fastest moves, and has good range on top of that, but the knockback is pretty weak overall. This is your core combo move, and in general works pretty well for that, but it'll kick into overdrive if you have a bug movement speed buff from Down Special. That makes this move very easy to link into itself with your increased air speed and can set up a lot of pain for your opponent, especially with anything to add to thte comboing potential. It is set up pretty well by Forward Throw and Forward Tilt. There's a sourspot at the handle which deals 4% and knocks foes behind you, which is actually pretty useful as your Back Aerial can allow you to go into different types of combos.

Back Aerial - Chaos Claw
Extending his claw again, Knight reaches behind himself with it and curls it upward, the claw burning with energy as he does so. This is a somewhat long lingering move, dealing 11% and mostly upward knockback that KOs at 250% with the start of the duration and then 6% and mostly horizontal knockback for the rest of it. This is at the hand, the arm only deals 8% and mostly horizontal knockback at the start and 3% and a flinch at the end. This is a decent, but not amazing wall of pain due to being a bit short ranged and having just enough lag to make it slightly awkward. You can also use this to transition into an anti-air game, which is mostly relevant if you have some Versaxis charge ready for Up Smash.

Up Aerial - Thrusting Blade
Knight thrusts his sword upward, dealing 9% and upward knockback that KOs at 235%. The range on this and is fine, as is the speed, but it struggles a bit as an Up Aerial becuase it doesn't really have a lot of coverage. Opponents above Knight in the air will find it somewhat easier to weave around this than most Up Aerials, but if Knight has a movement speed buff then its at least a little more comfortable to match them with his air speed, making landing this attack safer. That being said, Up Smash is more your go to anti-air move.

If you look closely you'll notice the hilt of the black sparking with red lightning when Knight thrusts it up, acting as a sourspot that deals 3 hits of 1% followed by one that deals 2% and slight upward knockback that the foe can punish from at low percents. This is bigger than the Knee of Justice sweetspot but not by much, so its rare you'll hit with this. However, each hit has a fair amount of hit lag, so it stalls an opponent inside Versaxis for a fair bit longer than most. Then keep in mind this Knight's main multi-hit move, and those 4 hits actually become quite considerable when you factor in the additive bonus. If you weave this in with a projectile made by Up Smash, it makes landing the sweetspot and juggling a little a bit easier, allowing you to stall the opponent in Versaxis quite a bit. The knockback will scale a lot thanks to the additive bonus and can become a reasonable KO move at high Versaxis levels.


Down Aerial - Disgusting Mortal
For once actually using his legs, Knight decides to kick downward, dealing 10% and a moderate spike that will start killing off stage around 80%. That's obviously not great, but this move is pretty fast, actually a little faster than the popular Ganondorf Down Aerial and the range is only slightly worse. It also can work if you want to go for a weird Up Tilt gimp but failed to actually get them to a necessary percent, as this can push them off the bottom blast zone. Its also a pretty good above an Adapter Beast, capable of triggering their adaptation and then making it impossible to dodge their powerful spike attack with. The lack of power certainly makes it less exciting than the King of Evil's Dair, but its functional.

Neutral Aerial - Blade Spin

Knight swings his sword around himself in a circle twice, rising very slightly into the air as he does. Each hit deals 4% and weak diagonal knockback away from Knight, and draws a tiny bit of blood from its victim. That blood will be accumulate over the attack to increase the damage, so every time this hits a target it adds 2% to the damage dealt. If it outright kills a minion, it adds 5% instead. More blood will also be drawn at each stage of Versaxis infection, meaning it will deal 3%/4%/5% /6% at higher stages. This attack has moderate duration and low start lag, but enough end lag to be punishable and somewhat harder to follow up on than you might like.

You can do a third spin with this move by tapping A during its duration, which has a slower and more predictable swing to it and still deals 4%, as well as increasing the end lag. That being said, the extra duration might let you DI onto the foe from between two minions to hit with it, with all the power built up from killing them as the blade is now thoroughly blood drenched. Or you can just use on a foe and minion, and if the opponent has something making them easier to combo like bugs/a tumor then you might be able to pull off the third hit regardless. Potentially you can also kill a Bloated One early in this move and if the opponent dodges the swing, they won't have much luck dodging the explosion.


Final Smash - Typhon and Echidna

Knight lets out a maniacal laugh as he opens a portal which appears to be fluctuating the same way as a high powered Adapter Beast one... only to grow even wider as a huge egg erupts from the ground. The opponents then have 4 seconds to prepare as the invincible, 1.4x Bowser sized egg sits on the stage, before it hatches into two massive snakes, each growing to the width of Bowser and stretching all the way well past the top blast zone. Eyes open along their body as Knight calls out "Typhon! Echidna! Bring ruin to this realm!"

For the next 20 seconds, bugs with enormous mandibles will start flying down from the top blast zone or bursting out of Typhon and Echinda's body in large quantities, about 25 over the course of the final smash. They only have one attack, which is to bite into the opponent for 8% and low knockback, and have 7 stamina, but their sheer quantity will make them quite terrifying if left alone. If three of them bite an opponent within 1.5 seconds, subsequent bites in that time period will drop flesh chunks on the ground from the opponent's body, which Knight can use for his own gain. In addition, Shamblers, Bloated Ones, and even Infested Ones will sometimes crawl out of the bodies of Typhon and Echidna, at somewhat randomly generated rates but with an average of 5-6 summoned per final smash. Shamblers are the most common and Infested Ones are the least. After 20 seconds, Typhon, Echidna, and the bugs will vanish, but the free minion setup Knight got from this move will remain on the field. They'll stick around even if Knight is KO'd by the way, only vanishing if he's completely taken out of the match or the match ends.

This also has an effect on the stage itself, as far more bugs will come out than just the amount produced to attack the stage. They'll also lay waste to everything in the background of the stage, mostly just buzzing around if you're on say Final Destination, but if plant life is shown in the background the bugs will descend upon it and devour it, leaving it a desolate wasteland. The cars on F-Zero stages will be torn apart as wrecks of them will be seen in the background. The boxing ring will get its scoreboard destroyed. Onett will be turned into a ghost town. Smashville will have all of its villagers mercilessly slaughtered in the background. That sort of thing. If there are elements that spawn like cars driving by on the aforementioned F-Zero stages, they will be greatly reduced for the duration of the final smash or in some cases outright stopped entirely. The world will slowly recover over the next 40 seconds after the final smash ends though and things will return to normal.
 
Last edited:

FrozenRoy

Smash Lord
Joined
Apr 26, 2007
Messages
1,260
Location
Las Vegas, Nevada
Switch FC
SW-1325-2408-7513
The Six Samurai - Nisashi

The Six Samurai - Nisashi is a Yu-Gi-Oh! card and one of the Six Samurai line. Can you guess what they're about? Nisashi is a dual wielding specialist, wielding a katana and a shorter wakizashi, which is represented on the card by being able to attack twice each turn, and like every other (base) Six Samurai can sacrifice itself to save another Six Samurai on the field. His attribute is wind. Little more to say than that.

Statistics

Nisashi has a size comparable to a bulkier Marth, with being just a touch shorter, but the armor makes him noticably wider, overall a slightly larger size. The armor also contributes to some weight, but Nisashi isn't a true heavyweight, and sits right between Cloud and Mega Man in girth: 101. Nisashi's ground speed is somewhat above average, at Yoshi's, with a small puff of wind blowing out behind him when he begins a dash as an aesthetic. Slightly below average traction.

Aerially, Nisashi is slightly floaty despite his heavy armor due to his wind affinity (right between Lucas and Bowser for 43rd with 1.38), and he has decently good air control and speed. He has noticably low gravity (compare to Yoshi again), making him feel floatier than he may actually be and making him easier to KO off the top. This also makes both of his jumps above average, and Nisashi can wall jump.


Mechanic: Double-Edge Technique

You probably saw this coming, but yes, Nisashi has a dual weapon wielding mechanic: During any move of Nisashi's or during the ending lag of a move, Nisashi can perform another move during it, allowing him to combo attacks (though note that he must still go through starting lag!). Most of Nisashi's attacks use his katana, meaning the second attack is performed with the wakizashi in its place. The wakizashi is 0.8x the size of the katana, so the second attack therefor usually has less range. This is not exactly 100% free to do, either, as the ending lag for doing this is the two move's combined ending lag, multiplied by 1.25x, so even moves that are usually pretty safe can be punishing, and at low %s it is less advisable to abuse.

Moves which use both of Nisashi's swords, of course, cannot utilize this and he cannot use his grab with it either.


Specials

Neutral Special: Wind Eruption

Nisashi holds his wakizashi up, pointing down and emulating the swordsman who fights for his friends, great winds swirling around him as he charges in this non-storable move. Fittingly, this move has the same charge time as Eruption. While Nisashi charges, he has a pull effect around him 1/3rd to 2/3rds of a Battlefield Platform to both sides, with it getting wider as Nisashi charges and pulling people in harder as the charge increases as well (Ganondorf's Dash Speed -> Kirby's Dash Speed). When released, Nisashi plunges his wakizashi into the ground and releases a blast of wind around himself the same distance as the pull. Getting hit by the wakizashi deals 10%-30% based on charge and KOs at 305%-110%, however the best KO power is a frame before full charge: Full charge KOs at 130%. The last bit of full charge adds 6% of the damage though, so the 1-frame-sooner version deals a decent bit less damage. The wind hitbox being blasted away deals no damage, but does knock people away 1-2 Battlefield Platforms of set knockback, it is not very tall or wide either.

Once the charge is released, the move has pretty quick actual starting lag, and the ending lag also is not that bad, good even, in part because Nisashi does not bother to pull the sword out from the ground: Instead, he leaves it sticking out of the ground, regardless of the charge of the move. While the wakizashi is in the ground, Nisashi wields his katana by itself, meaning he cannot use the Double-Edge Technique as he normally can. However, the sword can be knocked around as a projectile and otherwise interacted with, moves of Nisashi's that deal greater than 10% damage will send it flying as a projectile of varying strength, from 5%-23% that goes from flinching to KOing at 140% based on the damage and knockback of the move used to knock it out. Enemies cannot knock the sword out or interact with it. If the wakizashi goes off stage, it will respawn in Nisashi's grasp after 6 seconds of wait. This happens no matter the charge of the move and is not optional.

While the wakizashi is out of Nisashi's grip, this move may be used as normal, except that it now has extremely punishing ending lag and thus the low charge versions are not really worth it anymore. This also makes it harder to bail if enemies close in on you and use your wind during the charge to help. Nisashi can put his wakizashi back into his grasp by using Neutral Special in front of it, which simply has him grab it out of the ground swiftly, during certain other moves, by using an air dodge as if picking up an item while it is flying, or by having it go offstage and appear in his grasp.


Down Special: Counter Trap Technique

Nisashi raises his wakizashi in a defensive stance, reading himself for the classic swordsman counter. If attacked he will, as per the course, becme invincible as he counters the move with a swift Wakizashi strike, dealing 4% damage and hitstun based off of the damage the move would deal, with your average tilt leaving Nisashi and the foe roughly frame neutral...except that Nisashi can use his Double-Edge Technique to get in a hit here, which is where the true power of this counter comes in! If you can fit it, you can hit it! And stronger enemy moves, of course, mean you can fit more in...as for lag, it is slightly faster than normal on both sides, with average counter duration.

When Nisashi only has his katana, he takes a different, even more defensive stance, giving this move rather noticable ending lag. The katana is stronger and thus deals 8%, but it also has a longer swing and lacks the ability to utilize Double Edge Technique with it. Nisashi will actually leap back about half of a Battlefield Platform when countering a move while the foe takes no knockback, which means that it puts Nisashi in a good position for a low-midrange followup. So it has its own uses.


Side Special: Gale Slash

Nisashi places his swords in front of him in a scissor-like pattern, small streams of wind beginning to swirl about them, before he slashes them apart, sending the wind flying forward as a thin, slicing projectile of wind. The swords themselves are pretty strong when he slashes them apart, dealing 24% damage that KOs at 160%, however the ends of the sword and the handles are sourspots that deal only 15% and KO at 235%. The wind slash itself travels 1.33 Battlefield Platforms and deals 10% damage and pretty weak knockback, a bit more of a solid set-up than anything: The slash goes slightly faster than Nisashi and this move has low ending lag, so Nisashi can utilize this as an approach tool, however this move does have somewhat long starting lag.

When performed with just the katana, Nisashi cannot make the X motion, and so performs a somewhat wild yet simple swing forward as the wind surrounds the blade, creating a wind slash projectile that has half of the normal travelling distance, but the same damage and knockback. This slash deals a solid 18% and KOs at 190%. The force of the slash with the wind magic will cause a strong trail of wind to follow the slash, thus creating a quite temporary hitbox in the path of the sword that deals half damage and knockback, existing for ut a brief moment.

When the wind slash passes over the planted wakizashi, the wakizashi will bend as the wind slash passes over it, which has no hitbox to it. When the wind slash first finishes passing over it, the wakizashi will snap in the direction it came from, similar to a punching bag which has been punched and now springs back, smacking anyone in range for 15% damage that KOs at 175%, making this a good way to smack people who sidestep the Wind Slash, or who are hit by it at low damage percentages near the wakizashi. Finally, the sword will vibrate and move slightly back and forth for 2.5 seconds afterwards, dealing 8% damage and pretty weak knockback to anyone who hits it, servicing as a sort of makeshift trap for the swordsman.


Up Special: Eagle Slash

Nisashi holds both of his swords in front of him and thrusts them upwards, a great gust of wind aiding him in making a stabbing leap. This is overall quite similar to Marth's Dolphin Slash and deals 10% damage, with pretty weak knockback, however the veeeery start of this move is a sweetspot which deals 14% damage and surprisingly high knockback, KOing vertically at 135%. It goes the almost same distance as Dolphin Slash, just a touch higher, and has similar lag, except for a slightly laggier start, and Nisashi goes slightly faster than Marth in ascent.

Going to one sword hardly affects this move, reducing the primary damage to 8% (and the knockback hardly changes) and the sweetspot to 12% with 155% vertical KO power, and everything else is the same. A very standard recovery move.


Smashes

Forward Smash: Gale Rush

Nisashi poses in an action pose which varies based on if he has one or two swords, then rushes forward with a burst of wind behind him! This actually creates a wind hitbox behind him of sizable strength which blows people towards the direction he is rushing: This rarely sets people up for the attack, although it can, but has some interesting use in 2v2s to blow your ally alongside you for the attack. Anyway, Nisashi charges one Battlefield Platform by default at a rather high speed, which can scale up to 1.5 Battlefield Battlefields based on charge, and the move starts off fairly quickly regardless of each version.

With two swords, Nisashi rushes forward cross-armed and slashes both swords outwards with a quite powerful double-slash at the first foe he meets (not ally, even with team damage on), which deals a lot of damage and knockback, 19%-26% that KOs at 100%-75%, making it quite a potent power tool when taking the starting lag into account, and probably Nisashi's strongest KO tool that is also reliable. The downside is largely tremendously horrible ending lag, as Nisashi brings himself to a grinding halt with his feet and regains his fighting posture with both swords. Shielding or otherwise dodging the attack, therefor, tends to lead to some pretty tremendous and hard punishes.

With one sword, Nisashi takes on a much more practiced and one handed stance as he slashes cleanly at the first foe (not ally, even with team damage on) that he runs into, a quick motion which only deals 12%-16.8% damage to the foe and fairly low knockback. However, this clean and practiced cut has pretty low ending lag, which allows Nisashi to potentially use this as a combo move despite its total lack of kill power. This combines well if you have a sword behind you, because if so, then the sword will be "blown" along with you as if it was an ally, becoming an active hitbox! This onlt deals 8% damage, with downward spiking knockback against aerial opponents (somewhat weak) and standard knockback against grounded ones: At low-mid percentages, the slash combos into the sword, and the spiking knockback allows further potential knockbacks, while it serves as somewhat punish insurance at higher damage percentages and potential pressure. Learn the difference in styles, choose effectively based on situation, simple.


Down Smash: Clear Out

Another move which depends on if Nisashi has one or two blades. with two blades, pointing them downwards, Nisashi performs a clearing out down-vertical slash to both sides that starts from the middle. The very middle, where the two blades meet and start, is a potent and Rest-sized sweetspot that deals an absurd 34%-47.6% damage to foes and KOs at 70%-40%, making it pretty absurdly powerful...but this is a Rest level sweetspot in size that basically requires Nisashi to overlap with the foe. Instead, the crux of the attack is the outward slashing, which deals 17%-23.8% damage and KOs at 140%-110%, which means it is much more of a move for clearing out foes than for killing or especially strong damage, although it has solid enough starting lag and good range. Ending lag is a touch above average.

With only one sword, Nisashi instead deeply crouches down and performs a very quick, leg-level slash around himself in one, continuous motion. This comes out very fast, but the damage is pretty low, 12%-16.8% damage and knockback that only KOs at 190%-160%, although since the ending lag isn't too bad this does open the possibility for it to be a combo move, either as a starter or addition at lower percentages. If Nisashi is near a sword, then this will not hit the sword away, but instead opens up a follow-up hit option on Nishashi's part, by hitting A or A + a direction. This will cause Nisashi to grab the embedded wakizashi and leap into the air, straight up and down without a directional input or about a Bowser's width left or right if inputted that way, plummeting in a downward stab for 14% damage (regardless of charge) and decently high knockback that KOs at 140%-110%, it doesn't combo into the first hit well but is pretty good as a chase and at low percentages against some characters this can combo from the first hit for a pretty potent damaging combo. Ending lag is more average when the follow-up hit is used.


Up Smash: Triple Swipe

Like all of Nisashi's Smashes, this move changes depending on if he is wielding two-handed or one-handed style. Starting with two handed style, Nisashi will perform two quick slashes above him, Link Up Smash style, with the animation a bit more like SSB64 Link admittedly, followed by a last power slash using both of his blades at once. The first two slashes deal 6%-8.4% damage each, while the last slash deals 12%-16.8% damage, for a possible total of 24%-33.6% damage! This is quite a lot of damage for a smash attack and while it isn't Nisashi's strongest KO move, it does still KO at 90%-70% with the last hit, which is pretty good.

While this move DOES link together fairly well, people will start to fall out of the third hit as they take more damage, which means this move is actually less reliable to KO as the foe's damage percentage gets further past when it starts to KO. Or, in other words, if you're looking to KO with this move, try to do it as close to when it starts to KO as possible. The starting lag on this move actually is not too bad, maybe a touch faster than normal, but the ending lag is pretty bad, so there's a lot of room to punish.

With only one sword, Nisashi instead stabs the single sword straight up (Think Marth or Roy), striking anyone hit by it for 12%-16.8% (noticing a theme here?) damage, and knockback that KOs at about 180%-150% or so. When Nisashi strikes upwards, he will create a whirlwind around him, which only deals 7% regardless of charge, but knocks people away lightly: At mid and higher damage percentages, the angle it launches them at will usually force a tech situation. Because the one-handed version comes out fast and ends fast, this can open up various tech reads, one of the most notable being a Forward Smash which covers techs well and can open up further comboing.

If Nisashi's sword is caught inside of the whirlwind, it will blow away: At most ranges, it goes straight up rather quickly, a fast hitbox which deals 12% damage and alright knockback to those it strikes. At the edges, it is blown away only shortly, dealing 3% damage and very light knockback which has a small chance to trip until high percentages when it starts to launch people very lightly. The blade goes quite high and remains a hitbox on the way down, so it is a solid anti-air choice, while having a sword on the edges provides very light protection towards punishes and can lead to pressure on trips.


Standards

Jab: Stop Kick

One of Nisashi's rare non-sword moves, Nisashi swiftly raises and performs a fairly strong kick forward, a decently ranged single hit jab which deals 8% damage and pushes foes away well: It has high base knockback, but low knockback growth, making it effective for resetting neutral in a pretty consistant way. While this move comes out fast and is pretty range-y, it also is pretty high in ending lag for a jab, making it surprisingly punishable: Don't spam it, but use it as a fast and solid option. Since it doesn't use Nisashi's sword, you can't Double-Edged Technique it, but you don't have to worry about which sword style you are in either.

While this base move does not have much care of style, this move does have a secondary attack which can only be performed if Nisashi's kick overlaps with a planted sword. Pressing A will cause Nisashi to hook his foot around the sword and perform a swift, 360 horizontal slash. Its fast and only deals 6%, but the knockback has some ability to clear people out, although it doesn't true combo frm the kick at anything but quite low percentages. Mostly, it offers a bit more safety with proper placement.


Forward Tilt: Breeze Slash

This move has the same basics in both of Nisashi's stances, but some subtle differences. With a two handed style, Nisashi pulls back slightly, before rushing forward with a single sword held horizontally in front of him, slashing during the attack which carries him half a Battlefield Platform forward. The one handed version has Nisashi more swiftly rush forward the distance without the pull back, and he performs a swift and practiced swing that goes down-to-up vertically instead of a horizontal slash. The one handed version comes out pretty fast, while the two handed version is more of average starting lag.

The two handed version actually does slightly less damage, 8%, and the knockback is not very high. However, with two swords, Nisashi has a strong option to Double Edge another move during the attack or on hit. At low percentages, Nisashi can even chain Forward Tilts into each other as a true combo depending on the character (floatier = drops out faster), and at mid percentages it can be shielded but still pressure the foe depending. The one handed version deals more damage, 10%, and has more knockback to it, making chaining it more difficult. However, it also launches characters significantly more vertically, which can lead to some pretty nice aerial combos off of it. Both the two handed and one handed version of this move share the same ending lag, which is rather light.

Overall, this is Nisashi's premiere combo starter, with the two-handed version better for ground combos and the one-handed for aerial combos. The movement makes it useful for approaching and it can be safe on shield with the proper positioning, either by crossing the foe up or ending up near the edge of the slashing hitbox, although if you get close with the slashing hitbox you can just grab Nisashi.


Down Tilt: Leaf Cutter

With a very swift motion, Nisashi slashes at the ground under him, making a kind of crescent or half moon downwards in front of him, as if aiming to chop off the feet of a foe. This comes out lightning fast, but it has quite low damage, 6%, and the knockback is nothing to write home about, with the move having a small chance to trip. This is the two handed version of the move, and since it uses one blade, it can be Double Edge Technique'd, although the move requires some damage racking before being useful for that due to the knockback and damage making the hitstun low, but a pretty simple combo is Down Tilt into Forward Tilt in that regard. Ending lag is somewhat low but not very low.

The one handed Down Tilt is more classic, a simple poke forward with the sword that is in many ways similiar to Marth's down tilt. This inches Nisashi forward, making a small wind hitbox behind him as it does so, and deals 8% and launches the foe up slightly to set them up into the air, with the knockback being decent but overall unspectacular and KOing late, can be used for some comboing. Unlike the two handed version, this can shield poke foes pretty effectively, and the tip has a small chance to trip opponents and lead to follow-ups.


Up Tilt: Crescent Cutter

Nisashi swipes above him, starting forward and going backwards, in a manner rather reminiscient of Marth's up tilt. This attack has two distinct hitboxes, one for the first half/front and one for the second half/back. The first hit is the weaker and larger of the two, dealing 7% damage and knocking opponents behind him. The late hit deals more damage, 9%, and hits opponents to the front of Nisashi. The first hit has weaker knockback, which is pretty good for Double-Edge Techniqueing, but being behind Nisashi is awkward. The late hit deals more knockback, but comes later in the hit (meaning less duration left = quicker to chase) and hits opponents to the front of Nisashi for more natural comboing. Has pretty much the same lag as Marth's Up Tilt.

Dash Attack: Tornado Strike

Nisashi leaps forward, spinning like a drill forwards in a manner quite like Corrin's Dash Attack with both swords as wind swirls around him, dealing a large amount of hits which total up to 12%, the last hit dealing 4% but basically no knockback specifically. This move uses both swords, but the low knockback makes it one of Nisashi's best combo starters, and using both is in some ways a plus: The ability to start a combination without the added lag of Double-Edge Technique is pretty good. While the starting lag of this is somewhat long, the ending lag is very short, so it is excellent as a combo starter. Distance is roughly equal to Corrin's dash attack.

With just one sword, Nisashi instead performs a big, sweeping horizontal spin slash in front of him, stopping with one step forward for it. This deals 14% damage and is much more of a power move, KOing at 110%, but naturally it is quite laggy on both ends. The spinning animation creates a gust of wind half a Battlefield Platform in front of Nisashi that draws enemies towards him, although unless they're fairly close it won't actually draw them into the hitbox. It will, however, bring the sword closer to Nisashi if it is in the wind's path, sending it one Battlefield Platform back while being a hitbox that deals 9% damage and decent knockback, making it an excellent way to cover for this move's very long ending lag.


Grab Game

Grab: Swift Hand

Nisashi's grab is quite simple, loosening the grip on one of his swords and swiping forward with it. The range is short, but it is fast. With one hand, Nisashi can perform more of a full grab, increasing the range to average but making the ending lag closer to average too.

Pummel: Gut Kick

A simple kick to the gut, which deals 2% damage at an average speed. Not much to say here: Use it when you can get some time to pummel them for a bit of extra damage.

Down Throw: Wind Stand

A move which depends on if Nisashi has one sword or two. With two swords, Nisashi throws the opponent to the ground as he leaps into the air for 3% damage, then thrusts down to the ground ala a stall than fall, dealing an additional 10% damage on impact that sends foes flying high into the sky for a KO at around 145% or so. It does high damage and it KOs well, but it doesn't set up things well, needs both swords and killing off the top is pretty dependant on fall speed, gravity and so on.

With just one sword, Nisashi will throw the opponent to the ground, then blow a blast of wind at them, popping them lightly into the air and ending in the air himself, with the foe usually just a bit above him. The throw deals 3% damage, but the wind blast only deals 3% more damage, so the throw itself only deals 6% damage: Naturally, this is meant to lead into aerial combos, and at most percentages will do so. If the throw is angled by going down-left or down-right, then Nisashi will angle the wind blast in that direction, sending them in a very shallow angle to the left or to the right for 3% damage: This potentially allows Nisashi to chase more to either side and forces a tech situation until the foe gets some percentage on them.

If the wind blast hits the sword, which is pretty situational given how close they need to be grabbed to it, then the sword will be knocked in the appropriate direction as a weak hitbox for 3% damage, which can sometimes add a bit more damage to a combo, or can cause a prone reset if they miss tech. Not a huge bonus, but nice.


Forward Throw: Run Slash

A move which remains the same either way. Nisashi holds his blade out horizontally and runs forward about one Battlefield Platform, grinding the enemy into it as he does so for rapid hits totalling 5%, before slashing the foe for 2% damage and leaving them close to Nisashi and in front of him, with Nisashi having a very slight frame advantage. Good for adding damage and repositioning, lacks true combos but puts you in a great place to simply pressure the foe.

One can hit A or the throw button again during the throw to perform it again, without worry with two swords and only near the implanted sword when one-handed. Pressing left or right allows Nisashi to choose that direction, as well. With a two handed move, Nisashi will run the sword through the foe, causing it to be implanted in the ground behind them, while Nisashi will pick up the sword and keep it until the end if a one-handed version is performed: Both cases, essentially, allow Nisashi to switch his stance while having initiative, and perform potentially large positioning. The second throw deals the same amount of damage as the first.


Up Throw: Sword Leap

Nisashi throws the foe upwards and what happens next depends on his stance he is using: In two handed stance, he will throw his sword at the foe along with the throw, while he will stab the foe and then rise to kick them into the air one-handed. The initial throw + stab or throw + sword throw is always 8% damage (4% from throw, 4% from second hit).

For two-handed style, the sword will end up 1.25 Ganondorfd above them, then begin to plummet to the ground. and can hit opponents for more damage as well, forcing them to dodge. The sword will deal 4% damage and a weak spike if hit by the default, increasing by power 2% at a time for each half a Ganondorf it falls, up to a maximum of 1.5 Ganondorfs, after which it will deal 10% damage and be a rather strong spike. This is of course difficult, but Nisashi can charge the throw by holding A, up or the throw button after releasing the foe, sending the sword up higher and hitting 1.5 additional Ganondorfs after 1 second of charge, although ofc more charge makes the second part of the initial hit not true, so it is risky but potentially quite rewarding.

For one handed-style, the additional kick from the jumping-rise-stab adds another 4% damage, but more importantly sends the foe flying further into the air, with a total KO power of killing at 160%. Getting the foe high into the air is pretty good way to get juggle attempts, and this throw can get some cheap KOs off the top if you can get on high platforms and against floaties.


Back Throw: Kick Back

Nisashi whips the foe behind him and delivers a firm kick to their back, dealing 6% damage and sending opponents a fair distance away. This is a pure repositioning throw: It doesn't have the best follow-ups, it doesn't deal the most damage, but it is consistant between forms, puts Nisashi in a good spot to advance or retreat and gives him a frame advantage. Solid.

Aerials

Neutral Aerial: Leg It Out

Nisashi extends a leg forward with a fierce kick, one which is to many reminiscient of the natural sex kick. It, in turn, pretty much is a sex kick: It is fairly strong to come out, dealing 13% damage and hitting people off the edge from about 130% if you're close to it, while having a long duration and weakening over the course of the move until it deals merely 6% damage and quite weak knockback by the end of it. This move serves as a solid edgeguarding move for Nisashi, a fairly decent overall aerial tool and approach tool: The later hits are particularly nice for setting up combos, which can be easily done in both forms. The fact it comes out fast makes it a solid panic button, although at the same time long duration and slightly high ending lag make it punishable, and it does not have the range of Nisashi's sword moves. A solid toolbox move.

Forward Aerial: Sword Slam

In two handed style, Nisashi raises both swords and then slams them down in front of him, with damage and knockback depending on where it hits: The hilt and hands are a moderately strengthed spike which deals 12% damage, a small hitbox, but pretty good for sending enemies plummeting to their death and bringing them to the ground. The rest of the blade is perhaps more interesting, as it deals 8% damage, and actually pops foes somewhat BEHIND Nisashi: This offers Nisashi some rather unique combo opportunities, and also allows Nisashi to potentially stage spike people in front of him when going for gimps, or even as a specialized gimp. Using both swords, it cannot Double-Edged Technique, and while it has slow start-up, the ending lag is pretty short.

With one sword, Nisashi performs a down-to-up slash in front of him, which deals 9% damage and low-medium knockback: It is good for combos at low percentages, has solid range for an approaching tool, and at medium percentages can be a solid launcher from a short hop to force opponents into tech situations. It doesn't have any good KO power, but for what it does, it doesi t well. Solid lag on both ends.


Down Aerial: Double Strike

Nisashi points both swords under him, then slashes them to both sides of him, This deals multiple hits over the move which total 15% in 2%-3% chunks. The last hit knocks people up, albeit not a ton, and to the left or to the right depending on which sword they end up getting hit by (the one swinging left or right, doy Roy). It is a fairly fast move from start to finish, but as a two bladed move, is not a Double-Edge Technique available move.

With a single sword, Nisashi simply raises it up and smashes it down, think Ike-style but with more speed over power. This move only does 10% on hit, but it pops foes a decent bit above of Nisashi, for a decently solid popping move, and because it is fast on both ends, is pretty excellent from a shorthop or getting to the ground. Only a good combo tool at lower percentages, though.


Up Aerial: Flipsword

Nisashi flips one of his swords above him quickly, dealing 6% damage and light knockback: It is your usual, combo-juggle, chainable flipkick kind of move dealio. Because it only uses one sword, you can potentially quickly chain them together, and it is an aerial you can Double-Edged Technique with. Fast start-up, mediocre ending lag.

Back Aerial: Backkick

Nisashi looks behind him and performs a strong kick backwards with his leg, striking foes for 14% damage and strong knockback, enough to kill at 100%. It is a fairly standard BAir, fairly fast to come out, pretty bad ending lag, and is his strongest move for pure killing, but it has the worst reach. Not much to say here.

Final Smash: Wrath of Veralis

Nisashi raises his sword up, both if he has both, and then slams them in front of him, creating a sword beam that GNRGBERHGHREHGEVHVHVHs the foe and makes them explode for 50% damage. KOs at 80%.
 

FrozenRoy

Smash Lord
Joined
Apr 26, 2007
Messages
1,260
Location
Las Vegas, Nevada
Switch FC
SW-1325-2408-7513
The Submission Period of Make Your Move 19 has ended! Advertisement Period Begins!

We hit 60 sets, folks, meaning the special User Rankings prize will be activated when I tally them up soon!

For those who wish to vote, Ad Period begins now: Posting 3 advertisements for sets you have liked, usually a picture and a little discussion on it basically, makes you eligible to post! Ad Period will last for 2 weeks and during that time editing for sets will be allowed entirely.

After that, we will have two weeks of Ad + Voting Period. During this time, those who have advertised may vote, while those who have yet to have a last ditch time to advertise. Editsare not allowed during this time.

Have fun and get to reading, folks!​
 
Last edited:

Professor Lexicovermis

Smash Journeyman
Joined
Oct 27, 2015
Messages
273
Location
Pop Star
Wow, ad period already, eh? I'll get to work on that...

In the meantime, would someone kindly give me a comment on my Father Canine set? That way I can make any last minute changes that a more experienced MYMer may recommend...
 

Reiga

He sold diddy for a switch
Joined
Dec 8, 2014
Messages
1,256
Location
White Noise
3DS FC
1461-7646-7368
lol u thought i was dead?


Magellan
Magellan is some good **** man. There's tons and tons of cool af poison moves and interactions, with a surprisingly high level of variety, with the warden bringing tons of different venoms to toy with. All of this rad poison stuff gets tied together quite neatly by Magellan's poison body, which not only makes Magellan a giant purple man, but binds together new interactions and heightens moves while bringing in the actual poison status effect to the set, which would be rather tacky if just used as an effect on every move. Really good stuff, with some rad characterization. I give it a 50/10


Jr. Troopa
ok atm i havent read that many sets so idk if im getting some of the contests all stars here, but Jr. Troopa is a pretty solid set with amazing characterization. Throughout the set, the character of Jr. Troopa is simply put amazing to read about, from his antics of kicking sand onto the foe to him getting so desperate to beat the foe he fucking grows wings. Good stuff, solid 765/10.


Aqua Fortis
At first I kinda undermined this acidic loli, but I guess the set aged like a fine wine, and these days I can really appreciate this set's hallmarks. Since I love me some characterization, I can tell you already that the set brings in quite well the idea of a coldblooded killer cyborg with 5000+ weapons at her disposal and a blank killer emotion. The grab game really encapsulates that, with all the bloody, brainy stabbing. The character herself has tons of fun moves that can terraform the stage to fit Fortis' whims, from wanting to rain terror from above or just make a bigass hole. We've got a really strong playstyle here folks, I'll tell you. A 5 x 10^857/10.
 
Last edited:

Smady

Smash Master
Joined
Apr 29, 2007
Messages
3,306
Location
K Rool Avenue
Knight was a great surprise in the last hours of Make Your Move 19, a FA set that feels like an homage to Jin-Gitaxias, a good ole gorefest of surgeries and interaction heavy as it gets in Make Your Move. You show off just how this approach can be so fun, squeezing tons of fun little bits of synergy between his weapons, minions, the foe, status effects and so on. For a last day set that was made in a hurry, the balance and execution is surprisingly well done, not being all that much worse off than other great FA sets like Metireon and Iguana in recent memory. For an OC, it's really made to feel at home as an FA set, I'd be pretty ecstatic if I was the one who made the original character and it got a tribute this respectful.

So this set has this infestation special, a huge, impressive minion special, a portal and a counter. This is a pretty neatly laid out set of specials, and surprisingly is not that overdone in this unique combo of specials. It of course leans heavily on the minion special that has 90% of the word count in the specials. This not only makes sense, but you have some tremendously fun minions in here like Shambler and Beast Adapter, who could easily have a whole set dedicated to them, while the others are also pretty good. As far as other big moves go, I was a big fan of the smash Maw, the jab's flesh chunk is great, and I enjoyed all the little changes made to moves like forward tilt. It was a real breeze to read with all the fun interactions.

There's not much here to criticize, as while it's obvious the last input sections aren't as good, mostly the aerials, they're not awful or anything. It's pretty obvious what aerials need the most improvement too. The throws are a nice diversion from all the complexity of the earlier moves if anything but I wasn't sure if you really touched upon the low level playstyle of the character in these moves. I felt like this character who has tons of disjointed hitboxes would be a great zoner, while his weakness is clearly his weight and speed, so he'd play a bit like Robin (who strangely enough he resembles). For this sort of general playstyle, it'd be good to more fully acknowledge it in the later moves if they do end up on the simpler side, rather than fulfilling a very universal purpose.

Overall I was really happy about this set and it exceeded my expectations when it was made up until the deadline. It's actually one of my favourites and Iguana was already quite good, so this may be one of your best contests in a while considering the new format. I can only hope you do even better next contest, and thanks for all your time spent on the previews, for which you're a real champion.
 
Last edited:

Professor Lexicovermis

Smash Journeyman
Joined
Oct 27, 2015
Messages
273
Location
Pop Star
It's time for a COMMERCIAL BREAK!

Min Min


Min Min is a fun character in her source game, and Muno has done a wonderful job translating her to Smash! The unique mechanics of ARMS are adapted in a way that makes perfect sense, and all three of her Signature ARMS appear in the set!

Dr. N. Brio

N. Brio has an interesting mechanic in his Monster Transformation; his dual movesets play off his character well, and are generally a good read!

Goldman and The Emperor


I've always enjoyed sets involving multiple characters, and Goldman and Emperor are quite an interesting pair! Goldman does little work on his own, leaving much of the fighting to the Emperor; fitting for a Man-Behind-The-Monster type villain. Beyond the interesting mechanics is the set's dry tone, taking a somewhat negative opinion on the Emperor himself. Between the dry humor and interactions between Goldman and Emperor, this is an interesting read!
 

WeirdChillFever

Smash Hero
Joined
Jun 10, 2014
Messages
6,493
Location
Somewhere Out There
Quick review for Min-Min:

From what I could read (internet issues and concentration) Min Min really seems to nail the ARMS-gameplay, between the Heavy Megaton trumping everything, retraction time and poor disadvantage state.
The dragon arm gives an extra dimension as the player can employ it in different ways.
 

Slavic

Ask not the sparrow how the eagle soars
Joined
Jun 5, 2013
Messages
757
Location
taco bell, probablyn't
WHEW!


We're at the end of the contest! It may have been a sleepy run, but we really exploded here at the end! Obviously, I wish I could have gotten more sets out during the submission period, but I'm happy with Gamagori, and I've definitely put out worse sets than Sucy. There's plenty of new content to read through all at once, truly a beautiful thing to increase content by 130% in a fifth of a contest's run time. Shoutout to Joe and Bion especially for their sheer output of sets, helped keep the contest alive during the Dark Ages. But of course I'm glad every set here got posted (even if I haven't read all of them yet). As I read more of the newer sets I hope to get some comments out for them to put my criticism out there, for what it's worth, and I will hopefully have my rankings updated sooner rather than later to give an idea of where my votes are going. Without further adu, my advertisements.

YUUGAI MUSUME - NITRIC ACID - AQUA FORTIS - ACID LOLI

So maybe I was part of the movement that randomly judged this set harshly on everything including multiple concepts and font choice, but after adjusting my screen brightness and hearing out the defenses on the move concepts my opinion of this set has drastically increased. Because of that, I'm advertising this set especially to people who joined me in the bashing on this set for this or that reason. There's great characterization for Fortis between the entire army's worth of weapons combined with functional neurotoxins. In my comment I did mention that I enjoy the melting of shields, giving both foes and their shields weak points that combine great with precision attacks that Fortis can sting them with. I even revoke my complexity statement as I now understand the functional purpose of, for instance, keeping acid on the stage to help alleviate dodges and the like. If nothing else, this is a set that's brought up pretty frequently still, even if it's just for Acid Loli meme.

HOTEL MARIO ROY

Maybe it was because I was functionally dead here at the time, but I feel like Hotel Mario Roy didn't pull much attention. Easily one of the best written sets in the contest, I still snort reading over some of the moves and flavor text thrown throughout. Probably one of the weirdest source materials in the contest, Smady creates a brilliantly simple construction with the hotel and expands every aspect into an amusing and entertaining set. Warping around the stage and guiding the Bullet Bills around in weird trajectories combined with the CDi visuals really make this set shine and it is entirely worth a read through for anyone, even if just to laugh at the writing.

TURTONATOR

Turtonator is a pretty unique set, all things considered. Turtonator is a heavyweight slugger with some powerhouse moves, routinely able to KO at or just around 100% on many of his Specials and Smashes. He's also very bulky thanks to his shell's properties, which is good as he also plays a bit on the reckless side through several instances of self-damage, some of which are unavoidable for the turtle. These alone could be a cool set, but to top it off Turtonator plays very defensively for such a powerful character, relying on prediction, set up, and stage control to really send the foes off flying. Personally, this is my favorite of all Reiga's sets and I recommend a read/re-read before voting.

MAGEARNA

The reason it takes Jamie so long to make his sets.
My comment on Magearna was very recent and my opinion on the set has not changed, and I would consider it a must-read for the contest. The characterization of Magearna is stylistic and well-executed, combined with a system of great buffs/debuffs through Soul-Heart, Automize, stat drops, and tied together brilliantly with Heart Swap. This is all on top of Jamie's great knowledge of Smash Bros. gameplay, giving this set multiple layers of playstyle depth. Read my comment for more raving about the quality. (Also we only had three full Pokesets this contest??)

N. BRIO

N. Brio is a fantastic transformation set, and the fact that Monster form gets a full moveset instead of a limited one for a 10 second transformation shows some real effort. The slimes and especially gems are utilized very well, not just for stage control in Scientist form but really setting the stage for Monster form to shine. This level of interaction between transformation forms without sacrificing playstyle for the individual sets is great, and makes for an important read for this contest. On top of that, the Final Smash is amusing, though how much lower could Hotel Mario Roy devolve?

===

Of course, what would the end of a contest be without an obligatory and totally trendy proof-of-contest post regarding plans for MYM20? Honestly, probably cleaner and less cluttered, but that won't stop me! Below is my preview of sets I am currently working on to ideally have out some point next contest.


Now get out there and vote, y'all (in a few weeks). It's your duty.
 
Last edited:

lordvaati

Smash Master
Joined
Jul 7, 2006
Messages
3,148
Location
Seattle, WA
Switch FC
SW-4918-2392-4599
Sorry for the delay, getting distractions from Work, life and watching EVO does that. still a work in progress, but since I don't believe there is a finite number of times a page can be edited on Smashbords, I will just use this post to add the moveset for the character here. for now, a placeholder doodle of who I am working On:


Hawlucha


More stuff possibly at the end of this weekend, maybe Next Saturday at worst.

EDIT: seems I missed the deadline. welp, #20 it is then.
 
Last edited:

WeirdChillFever

Smash Hero
Joined
Jun 10, 2014
Messages
6,493
Location
Somewhere Out There
Muno Muno Muno, must be funo, in a squid man's world Munomario777 Munomario777
Calamari Ganon

Like Ganondorf and the pig form, Inkling can transform into a more animalistic form to unleash its potential.
It's also appeared time and time again, a bit like Muno's Inkling sets.

And although I probably missed a few sets between Octoling in MYM17 (At least I think it was 17?) and this one, the new Inkling set feels fresh, feeling like a brand new take on the cephalopod-racers we love even without bringing in the sea of potential in Splatoon 2's new content.
That said, some things do show that it's an Inkling Moveset 3K
Things like a Shield Special (That's not Bubbler at least) wouldn't feature in a first try and honestly feels like trying to clam too much in one set.

Most of these additions feel natural and a great solution to represent as many of the Splatoon mechanic as possible, such as the Cracker Launcher-esque strafing in the Charger and the Dualies, the pre-Smash slam in the best depiction of the Splat Roller possible and the smal but amazing ability to tilt the Forward Tilt to represent the Sloshers.
They feel like the full package when it comes to getting these weapons in and even if it completely goes against my point later, a roll being able to performed during the Jab would help even more with that
I also really like the new takes on existing weapons, such as making a mortar out of the Splatling gun and the jousting polearm implemented in the Dash Attack

A nitpick would be that some of these additions, like a special Disruptor throw feel like a desperate attempt of getting more subs translated to Smash and it only disrupts the cohesion of the tools presented.
Other things like this are the Dualies filling the bombs and the extra Splat Charger mapped under the Splat Bomb-button.
However, that could just be one of the differences between MYM's style of set and the sets present in Smash Bros. itself, with MYM really going out of its way to make a lot of techniques come together while Smash focusses on making one technique work.
(It could also be that all the bombs and blasts are all specials, making the moveset feel cluttery at the beginning while the set in general is quite "tame")
It was a blast to read I cannnnn't wait for your Splatoon 2 inspired set I just cannot.

Ramen's Raving Nabbits
A moveset that truly feels like it could be ported to Smash is Min-Min.
Min-Min combines most of ARMS's techniques in a set that feels unique and a true "adaptation" of ARMS's Min-Min.
ARMS' mechanics are plentiful througout, between Neutral Attack being the same as Neutral Air, the retraction to balance the set, the Forward Smash is a Megaton both literally and figuratively, as I really enjoy how it's balanced and what it brings to the set.
Min Min's flair comes to life with both Dragon's and the martial arts, with both linking back and adding to the classic ARMS base, as the Down B Dragon brings the tactics of the ARMS comboing into themselves to a new level by upping the stakes, as well as bringing a balanced and easy-to-understand version of the Charged Attacks from ARMS to Smash.
Martial arts make sure the set is not one-sided and brings a balance to the set while not undermining the weaknesses of the ARMS mechanics and bring the high mobility of ARMS to life while staying true to Min Min.
Maybe me liking the set means it's not MYMy enough though, as I do tend to like the simpler sets.
Except this set isn't simple and I still love it. It's just so clear with each and every input serving a purpose in both strenghtening the connection to ARMS as well as building a clear gameplay style or bringing nuances to it even though it brings so many to the table at once like Inkling does.
The contrast between this and Inkling is still quite big, though I don't prefer one way, as I would've enjoyed a set where the laser-firing Dragon could be detached to act like Barq just as much.

Yes, these are both Muno's sets but the rest is mean by making my page crash with their teraByte sized sets so joke's on you.
(And I also tend to enjoy sets of characters I know more)
Man now I really want to make a Splatoon moveset as well.
 

Smady

Smash Master
Joined
Apr 29, 2007
Messages
3,306
Location
K Rool Avenue
Shockwave adds to the great line up of sets you’ve gotten out this contest, really amazing output from you compared to in the past, it’s one of the best outputs of the contest by a good margin. Compared to others who have more of a bone to pick with your style, I can fully appreciate your applying mechanics then branch them out ever so slightly in the later inputs, it’s actually a fairly simple approach. This is in spite of your clear lean towards the heavy Warlordian side of interactions, the best example of this being Jestro which is a MYM12 era set, not that I even dislike that set.

This is not far off from Katapultar’s style in earlier MYMs, and Shockwave is if anything an emissary of this style, introducing the bold transformation mechanic you first used in Blitzwing and padding out all the flaws it had in that set. This is met with mixed success, but mostly success, as this set is far more aware of the problems created when you simply throw in these transformations willy-nilly, and in this respect I’d say your set making has grown the most. In the past your greatest problem was keeping your sets from simply becoming an echo of one mechanic, just going through the motions as you state how every move does a generic animation and then changes or interacts with the mechanic. A set like Shockwave, if not an extraordinary set in your competent MYM19 library, shows your progress as every move has plenty of thought and intelligent design applied to it.

You even have several complex mechanics, with his elemental orb thingamajigs, and meshes it well with the transformation. I’d say this set is actually superior to Blitzwing which felt a bit more awkward (no wonder, turning into a tank is a lot harder to work into a set than turning into a giant gun!) You even have a good, fun grab game utilizing the gun form. The only area I can think to point out for improvement is not taking full advantage of some mechanics like the mini-Shockwaves in the special, that feel a bit of an afterthought when they should play into his melee game somewhat. I also feel like honestly, in the current MYM climate if you can do without minions you’re probably best off leaving them out, as they’re the worst form of clutter if they don’t accomplish much. All in all a good set, if not your best, good job Bio.

Wolverine was not one of the better Joe sets this contest I'm afraid, and while it wasn’t just awful, it does have some major flaws. The main problem I had with this set was the healing which I felt was pretty much unnecessary. I know Wolverine can regenerate himself in the series and it's not the worst idea to implement in some way, but as direct healing it makes his playstyle very weird, and in this set it makes him overpowered too. The generic healing when he shields is one thing, I already felt that this was on the verge. A passive 1HP healed in shield a second may not sound like much, but over a whole match it would add up. By the time you get to the shield special, where he can not only heal up massive amounts but then later he can somehow life steal (for lack of a better term) by hitting opponents somehow, it becomes incredibly OP and at that point, fairly tacky/out-of-character. Even if he got blood on him, and that was the logic for the life steal mechanic, I'd think it'd make him go into a Berserker Rage, not get healing on hit. This mechanic is also not acknowledged much anyway, given that later moves don't really mention it, so I'd rather it was just scrapped. Maybe that Berserker Rage, like a speed buff of some sort, would be a better choice. I find it hard to see myself liking the set though as long the healing remains in.

As for the rest of the set, I feel myself stretching to find much else to mention as while it's competent, there's not a whole lot of playstyle especially in its current form. Due to the healing, Wolvering actually plays strangely defensive in this set as he can always back off, passively heal, build meter to get that massive heal, and while it's not too viable he could potentially turtle up and take damage to build meter into the heal. So as a result there's much less reason for him to ever approach which seems OOC for such an aggressive character. I can't say I was too impressed by the moves themselves and they largely came off as pretty dull and dreary for a character who should be over the top. I do like how you interpreted his one giant X attack that's also in MvC, and there were some other flashier moves I liked mostly in the smashes, but overall it doesn't really come together for me. It doesn't seem like it's any better than the Marvel sets where he's at least fully aggressive. I'm not expecting anything quite that flashy but the set should at least flow into a sensible playstyle. Still, let me say I'm very impressed by your MYM19 set output and really looking forward to finishing up these others I have on my reading list, and I’m pretty excited to get to those others.

Six Samurai Nisashi was definitely not one of your better sets Roy and I’m sorry you didn’t have fun making this set. I'm not sure what I can really ask of you on this one, as it does seem like a very difficult set to improve without a lot of effort. The main reason I do not like this set is the balance. The two swords together have some extremely powerful hitboxes like those sweetspots that do 35%~, the ludicrous aerials like bair (that seems to combo after the fair) and all the wind hitboxes not coming off as smart, but arbitrary additions. I don’t really get the point of these outside of some flash, and the set needs some flash I guess, but could obviously be executed better. Although you have to fight with a relative disadvantage with the sword in the ground, moves like back aerial and other single sword moves without the waki are strong enough it's not enough of an issue for the playstyle. As far as easy fixes go it's really frustrating to me how the core Eruption-style special doesn't specify how the sword works in the air, as he doesn't throw the sword down the in the air but obviously has no ground to stick it in, so you’d assume there’s some animation of him throwing the sword down (although if he continuously threw it off stage to get it back, then things get a bit weird as well). Thing is though even then, between being able to pick the sword up out of the ground casually, his ability to interact off the sword in the ground, and the uneven power between these quasi forms, the set strikes a very awkward balance.

Where the set tries to be more interesting I can't help but think you could've taken your own advice some and were really stretching on certain moves. Prime examples being the throws, even if those are clearly rushed, There’s a very unintuitive throw where you have to do other inputs in the middle, there’s a throw where Nisashi makes a giant tornado that blows his stuff into the air despite not doing it anywhere else, and finally just a sword switching throw which is obviously pretty lame, overall the only throw not bad here is the generic KO throw, which is not a high standard. I can’t say the aerials fare much better with two obvious filler moves (the bair especially is really OP when fair basically says it combos right into it and bair can KO as low as 100%). By these last two inputs the set seems very confused about what it wants to be, between the risk versus reward of dual or single wielding swords, versus some interactions off of the sword in the ground and tornadoes for a flashy stylish playstyle, and then there’s the aspect of like a weapon switch , 2-in-1 moveset. On their own any of these could’ve made for a good moveset or even made a good focal point for the playstyle, but the set feels like a mish-mash of several movesets that don’t work well together. It’s a shame that you had to go out on a low note, but I’m proud that you managed to get it out at all, and I respect that you got it out despite knowing it wasn’t exactly a good representation of your moveset quality, which I feel was pretty selfless if nothing else. Hope next thread things are easier for you.
 
Last edited:

JOE!

Smash Hero
Joined
Oct 5, 2008
Messages
8,075
Location
Dedham, MA
Smady Smady

I gotta respectfully disagree with Wolverine's healing making him defensive or OP. On the one hand, you *could* camp your shield, or camp when you have full meter, but both of those methods have counter play.

Constant shielding opens you up for grab mix ups or even shield breaks, as you have you hold for over a second to get 1%. At max power, you could try to run away but pretty much any stray hits would "out DPS" your healing, and if knocked off stage you will need a special to recover, which will spend all power and stop your healing. You could in theory play super campy, but he then has no projectiles of his own to counteract camping vs him so pot shots from most characters will still keep them in a lead, or just most stray hits as he then will need to wait like 10 seconds to heal off a tilt that took 2/3 of a second to complete.

I will say that Healing Factor could have been a bit more in character. The idea was that by tying it to attacks, you would want to go crazy on the foe for as many hits as possible, sort of making the player want to berserker rage on their opponent rather than have it be a passive effect. The same with the specials with the mashing effects. Perhaps if being hit triggered big healing instead so that you'd just go into combat recklessly?

Overall, I can agree with the rest of the comment but it's just I don't see how wolverine could viably be super defensive and "win" without being kind of... An uphill battle.
 

Smady

Smash Master
Joined
Apr 29, 2007
Messages
3,306
Location
K Rool Avenue
JOE! JOE! I definitely welcome the response here, not often we get actual discussion of sets in the thread anymore.

The thing about the balance here is that Wolverine's healing is not even within his normal set, this is entirely layered on top of his moveset. He doesn't even have to take up a space in specials because it's a shield special, and the healing you get off the meter is pretty ridiculous. The fact it's based off a meter means you can safely see how it would affect his playstyle, as with that and the shield special input it is entirely separate from the normal balance a set would have, so you can easily imagine this layered on top of any other character. If you gave the meter and healing, in the shield special mostly, to any character in Smash 4 it'd be very broken, and Wolverine himself does not feel particularly balanced to cope with this.

I don't actually blame you for this as balancing around the healing is awkward. Wolverine shouldn't be UP to make up for his healing. And while you say the passive healing is no big deal at 1% a second, I would say his shield special healing actually is very powerful. The fact you can trade it all in for a HUGE chunk of healing makes it seem like Wolverine would definitely opt for this, kind of like the way Elena was played in the USF4 metagame where her healing Ultra was the predominant competitive choice. There's no reason when it's layered on top of a normal Wolverine set you wouldn't just use the healing and ignore the other aspects of the meter, as there's really little else that will give you such insane heal %s and the life steal.

I don't even really want it to be scaled back, it just feels awkward to try and balance in without making Wolverine feel neutered or make the healing feel ineffectual, this kind of mechanic only really works on a very weak character. Elena is a good example as she pretty much needs the healing to get anywhere in that meta. Robin's healing is dependent on him landing a very difficult command grab. Smash tends to make you really earn healing outside of items, whereas Wolverine it's pretty much automatic.

As far as in character goes I just don't think it makes sense. Why is he healing from hitting foes? In the first place, healing damage in shield is a bit weird but I can accept, but making it into a huge chunk of health is too much, and stealing health when hitting a foe (which is essentially what it is) just makes no sense. I just don't feel like this can ever be fixed to make logical sense, as like I said, even if he was making them bleed that'd not logically heal him, it'd give him some form of "blood lust" rage. And obviously that is also pretty OOC.
 

JOE!

Smash Hero
Joined
Oct 5, 2008
Messages
8,075
Location
Dedham, MA
AvX final edits:

Cyclops: Completely rewritten, check out his new visuals!

Iron Man: Unibeam can now be stored by cancelling the charge. Up and Side B powered activations carry medium knockback armor.

Wolverine: Healing factor is now "Berserker Rage", which increases his passive regen slightly compared to when he sits at max power, and grants all specials and smashes the ability to stack Bleeds. All charged specials heal him for 7% upon activation, compared to the 15% that Berserker Rage would heal over time.
 

Smady

Smash Master
Joined
Apr 29, 2007
Messages
3,306
Location
K Rool Avenue
Important announcement!

We're extending the advertisement/editing period a further week, so you have until the 2nd to edit your sets. Remember to read and advertise! Only a couple of weeks remain! We'll begin one week of voting commencing the 3rd.
 

Professor Lexicovermis

Smash Journeyman
Joined
Oct 27, 2015
Messages
273
Location
Pop Star
Yo, Professor Lexicovermis Professor Lexicovermis

I read Father Canine, you can check out what I think of it in my rankings on the first page. You wanted feedback, so there you go.
Mmm. I appreciate the feedback on my sets! I also appreciate your honesty in the quality of my sets. I admit, Canine wasn't my best work. I mainly posted him to get a feel for MYM's opinions on my original universe, Innard Turmoil.

I'll work on my writing and spriting and take another shot at it next MYM!
 

IvanQuote

Smash Ace
Joined
Apr 7, 2014
Messages
853
Location
Looking for those who like Mighty No 9
NNID
ivanquote
3DS FC
1693-3075-2999
Advertising Space:

I don't particularly trust that I have good sense in voting, but I want to do so again, so here are some ads.

Shockwave by Bionichute


I was surprised how much I enjoyed reading this character; it is hands down my favorite set I've read all contest. Presentation-wise, it is top notch. With the entire set written out as an objective log entry, coupled with the personal asides, the lengthy set had no issue keeping my attention. With the damage, frame data, and KO Potential neatly organized at the top of each move, one could get the general idea of how each move worked more clearly as you go into the descriptions. The personal notes being used as a means of showing how to use it in conjunction with other moves fit well too. The use of the Regenesis orbs throughout different times helped in the moveset in conjunction with all other actions, providing great versatility overall. I'd gladly read it again.

Hotel Mario Roy by Smash Daddy


Such a weird and unique choice for a character, but it works. It's no surprise that I'm a sucker for the Koopalings and look forward to any set involving them, which is why I feel that this Roy makes great use of everything that is given to him, unlike the Roy from last contest. The hotel mechanic is integrated well into his moveset makes for a multitude of strategies. He makes full use of the Hotel Mario wackiness while still being in character. He does steal some of his siblings' moves from that game, but it makes sense in context as Roy is a bully and...well steals things from his siblings. Also the Mario and Luigi play-by-play makes the transitions very hooking and makes me want to read more and more. Great job.

Iguana by ForwardArrow


Such an unorthodox character caught my eye far before voting season started. For what appears to be a plain lil' old iguana, it has all the powers of the necronomicon and beyond. With its hellish powers and various use of manipulating rocks, one can see a demonically powerful moveset before you. With its various elemental throws, stone constructs, and crystal formations, Iguana transforms from a meager little Lizard into a foe unlike any other.
 
Last edited:

ForwardArrow

Smash Ace
Joined
Aug 17, 2011
Messages
502
Make Your Move 19 Editting Periods Now Over. Advertising Will Continue Until The 11th Of August.

You may now begin voting. FrozenRoy and I are the vote gurus, so send each of us copy of your votes. Good luck reading everyone!
 

Bionichute

Smash Champion
Joined
Jun 30, 2012
Messages
2,151

WHEN THERE'S SMOKE, THEY PINCH BACK
Roy is a very fun set, though it isn't Smady's greatest, it's still one of the sets I've had the most fun with the whole contest. There's some interesting manipulations regarding the doors and buildings, alongside enough other things to make it feel pretty... full. The writing style helps a lot, with a lot of jokes and lampshading regarding certain parts of the set, but its never enough to feel truly ironic. It also acts as good representation of Hotel Mario as a whole, which is not something I think we needed, but also something I'm glad we have.


HI, I'M TODD MCFARLANE, CREATOR OF SPAWN
Necrid has issues, like as we've talked about a ton in the chat, the Up Throw, but overall I feel its still a really good set. I actually enjoy how it makes Necrid look incredibly pathetic, with a number of completely terrible moves that exist only to be replaced with something actually competent from another character. The actual move copying is entertaining on its own as well, but I really feel like the upgrades are what make the set, even if they can get a bit unbalanced if you upgraded them enough. This is still nowhere near as good as Brio, but it is still really good.


THE LAST KNIGHT
Knight is definitely a surprising set, since its not just for an OC, but an OC with a completely non-inductive name. Knight revels in his horrible edginess, something that comes across incredibly sincerely and does make the set feel better as a result. Irony can be good in a set, as seen above, but sometimes a sincere effort, or at least one that looks sincere on the surface, is good too. The minions are obviously the highlight of the set, having quite a few interesting interactions with the rest of the set, but the Adapter Beast is the one that's clearly steals the show. Ultimately, I feel this is one of the best sets of the contest... though I have yet to read Iguana.
 

ForwardArrow

Smash Ace
Joined
Aug 17, 2011
Messages
502
Genis

This has been a very good contest for Bionichute, as he's actually gone through a lot of development and achieved a much higher average of quality. I mean, yeah, sure there's misses in there, but said misses just come from him still learning and we all produce duds every once in a while. Genis is by far Bionichute's greatest accomplishment, as he demonstrates his ability to actually make a pretty competent minion set. He manages to give the character a good amount of in depth interactions with his minions as he can basically take his Moebas and repurpose them into either buffs for his attacks or sometimes just beef them up to make them actual competent allies. While turning a minion into an attack buff might sound a little bland on paper, Bionichute gets a fair amount of different uses out of it and eventually his playstyle does evolve into a rather complex one with cool stuff like the grab game and Down Smash. It never really falls off either, keeping up fun effects even in the sections where a lot of sets reach their fall off point.

Honestly though, the high point of this set's appeal for me is the characterization. The natural ways Genis can combine and repurpose his minions really gets across his nature as a hive mind... while simultaneously his obsession with his superiority over other beings can be seen in his rather over the top attack animations and willingness to blow up even his own second in command. In fact he has multiple means of doing so, and it just really shows how bad his treatment of his own allies is. We've definently seen abusive minion sets before, but this one feels more "god who will smite his subjects for their slightest mistakes" than the typical backstabber perrsonality of that type of set, and frankly it was a cool thing to explore.

Aqua Fortis
So Fortis is a set that I actually think a surprising number of people have skipped over thus far, and it is a pretty scarily sized block of purple text that people aren't recommending to the degree they are some of the current frontrunners. It is absolutely worth your time though, as the set's both innovative and well executed. Taking a fairly bad move in Brawl, Dedede's Jet Hammer, as a centerpiece, this set refines that move into an actually very fun one which then goes on to supply a cool acid charge mechanic to a lot of her other moves. The set basically goes all out on using acid: inflicting status effects with it, burning the stage with it and making pits full of it, melting shields to create shield poke opportunities completely unique to this character, and basically getting everything it can out of the acid itself. It also uses the many weapons presented in the picture all about as well as you could ask, and in general using it to present a unique kind of pressure character that feels both balanced and satisfyingly deep.

Goldman and the Emperor

Goldman and his super weapon are some really cheesy characters, there's no denying that, and what I always love with Smady's sets is seeing him take these odd, goofy characters that are not taken very seriously and making so much out of them. Sure Goldman himself is taking a backseat in this set, but his main contribution is a powerful one as he can fire from the background to change the dynamics of many of the Emperors attack's. Its not like he can fight at all anyway, and his contribution as a constant presense adds a lot to the Emperor's own fighting style. The Emperor of course, has tons of fun as he can make orbs out of his body to use as a barrier, and then make into a ton of elaborate uses. You want to just make and fire a big orb? You can do that. You want to use them to make new attachments or weapons for your minions? You can do that. You want to change the orb's focal point your body? You can do that. You can even make a giant zombie Goldman with them for a pretty hilarious and interesting grab game, or have the orbs focus around any of the fun minions the set has to offer.

What's nice is its not like this set doesn't have a melee game worth talking about, as he can use whatever orbs he has from his supply not dedicated to something else to refine his melee attacks into either more powerful or specialized options, and combined with Goldman's gun giving the somewhat clunky Emperor a surprisingly versatile set of ways to threaten an opponent. Its good fun, and never lets up on doing cool things when it introduces great new mechanics even in the aerials! Its a strong set and one that has tons of flash in a contest that's generally been kind of restrained, so please don't miss checking it out. Beneath that intentionally cheesy organization, you'll find one of the deepest and most rewarding sets in the contest.
 

Katapultar

Smash Lord
Joined
Nov 24, 2008
Messages
1,251
Location
Australia
SCHWARZEN
aka

Iguana


Fun fact: Ido was originally going to be Lizard's ranking picture for MYM13 when I actually did rankings, but it's more fitting here because Iguana is actually evil.
Iguana is the demonically-evil spiritual successor to Lizard, a smash-hit from the infamous 13th century and perhaps the most famous/talked about set of that time - to the point of getting his very own self-contained meta challenge and pretty much being the embodiment of move-copying. I'm not sure how fitting it is for a college boy to become God, but I digress. That moveset was extreme in its sense of balance, having a character with essentially 10 weight units but insanely small size and ridiculous flight and move augmenting to compensate, but Iguana takes that cake and modernises it for the balance-hungry audience. This has become something of a trend in modern MYM setting, where one takes an old set and "updates it" as can be seen with kingpin and the Cornello-esque N. Brio.

Iguana has a similar set-up to Lizard: a move-copying NSpec, golem minions that you can steal moves from, USpec flight, DSpec counter and transmuting throws that can be used to modify your minions. Transmuting has so much moveset potential. We could get another Expanded Lizard Lore set where the magic person uses transmutation on their Specials. Hmmmm. The main difference here is that Iguana is more balanced, being a more reasonable target and having more reasonable flight speed and time. Anyone could do that, but furthermore Iguana is far less . . . cowardly than his Lizard counterpart, as he can't just summon his minions wily-nily - he has to work for them by collecting rocks. Nice hobby you got there buddy. This is accomplished by observing magic instabilities on the stage, which allow him to break it for rocks or create blasts not unlike those Lizard could through his Side Special - a cool shout-out to that move. You can also detect instabilities on opponents to influence their knockback somewhat or just create a weak spot that can be exploited through your various moves. But the real meat is in the sheer scale and elaboration of the minions, an ambitious undertaking highly worthy of praise. So elaborate, in fact, that it can be difficult to digest at times, but trust me it's quite worth it.

Iguana is a swanky set, but a part of his charm also lies in his nature as a spiritual successor and the little things FA does in referencing Lizard and creating atmosphere:
  • Using identical phrasing for the copying Neutral Special: "if a character within one battlefield platform of him performs a move, he will commit it to memory."
  • This quote: "By comparison to his counterpart Lizard, Iguana is not terribly interested in the opponent's techniques, and will only bother to remember up to five of them at a given time." This comes off as showing how arrogant he is and a good piece of characterisation. That being said, it's pretty meme that he can't improve moves or copy an entire set's worth when he's supposed to be canonically stronger than Lizard. Maybe a boss set could fix this? Then he would be the true Almighty Lizard, far more fitting for an ambitious man like him . . .
Oh, and one last thing that has nothing to do with the quality of the set: it straight-up inspired my very first OC and set of this contest, the instant I read up the bio shortly after the set was posted. In commemoration of that day, March the 26th, will henceforth be her fictional birthday.

N. BRIO
This set's timing couldn't be more fitting: being a remake of a set made exactly ten contests ago, as well as in time for N. Sane Trilogy remakes! (Are we going to get a movement for classic Crash bosses? We got Pinstripe this contest too, but still . . .) As mentioned in Iguana, this set takes a similar approach in recycling an old moveset an modernising it, only this time it's for the exact same character. The old set had a transformation mechanic with a monster form having 8 moves, but this being modern MYM the revamp gives the monster its own set - much like Father Cornello, a set that was godly (both in quality and length!). The old Brio that Rool didn't vote for is still a fun read, especially that intro, which makes that set a separate entity in itself as the new Brio is a text blast in self.

Two sets in one? No need to fear. What's really, really surprising about new Brio is that his individual moves are surprisingly short and simple. Tacking on as much as possible to give a set more meat/depth is something a lot of more ambitious sets have done over the last few contests, but here most of the hitboxes are concepts are pretty simple and most of the length comes from how they work in with the main mechanics. You have slime minions, rotating power gem platforms and monster boulders and chunks that are surprisingly more simple compared to the ones Cornello used, not really staying out super exploitable constructs. These all interact with each other, obviously. You even have an Up Special stolen from R.O.B and a monster NSpec stolen from DK with slight modifications, something you could criticise the set for if you were a nitpicky jerk but here it helps with the simplicity and something that readers can relate to while being far more excusable than with regular sets due to being 2 sets in one. What makes this simplistic approach work is how Warlord is extremely self-aware of the mechanics behind Smash/his moves and what they are supposed to do for the set, how they work in with the established mechanics. This leaves few of these "generic" moves to be boring, and makes the set comparable to a novel with bite-sized chapters. You'd be surprised at how easy of a read this set is.

This set also has some great individual moves too, as expected of a Warlord set. The scientist Side Special projectile is extremely self-aware of what the various changes caused by charging can do to affect an opponent's behaviour, one phase punishing the opponent for shielding and another not. There's also the creative healing U-throw that works phenomenally better at lower percentages while still having comboing potential in other situations, as well as a D-throw to make the opponent's tongue stupidly long to humiliate them badly. Oh, and let us not forget the delicious Final Smash that mocks the Crash of the Titans games - Warlord being an absolute master of using the Final Smash for satirical uses to hilarious extent, as seen in Necrid as well.

Brio, in my personal opinion, speaks a strong message regarding the effectiveness of simplicity when executed correctly with an intriguing mechanic - especially given it is one of the most universally-praised sets this contest. This just may be an ideal venture for MYM in future contests as the drive to put a lot of meat onto your sets, even superfluous, can result in it taking a long time to produce or even be a massive chore for others to read - something I've been very guilty of this contest.

President George Washington
While not one of the strongest sets in the contest, both canonically speaking and quality-wise, George Washington is still quite amusing and worth a look at if you've got 15 minutes of spare time. All in the presentation, this is a set that starts out serious with the Specials, the volunteers and American flag and all, and then proceeds to get more and more ridiculous with summoning various American figures and references to pop culture developed in America. I won't spoil too much, because you gotta see it to believe it. In the end, it's revealed to be something of a joke set and a tribute to that June the 4th holiday Americans have, which is unfamiliar to me because I live in Australia. Nonetheless, if you're looking for "that funny set" or a substitute for tirk's wirks or what not, then this is where you want to me.

Oh, and this set actually succeeds in being both fun and educational, my personal and long-standing moveset philosophy. No seriously, the moveset is really educational, I actually learned that George Washington was the first President of the United State among other things thanks to this moveset. Who needs history classes when you have MYM?
 

FrozenRoy

Smash Lord
Joined
Apr 26, 2007
Messages
1,260
Location
Las Vegas, Nevada
Switch FC
SW-1325-2408-7513
Announcement: Voting + Ad period has been extended until the end of August 14th. Get your advertisements and votes out before it is too late!

As a note, barring quite extrenous circumstances, there will be no more extensions.

AN ADDITIONAL REMINDER.

"When voting, you get 40 votes, including a newly introduced "Vote Plus":

8 Super Votes - 9 points (1 Super Vote Plus - 11 Points)
16 Regular Votes - 5 points (3 Regular Vote Plusses - 6 Points)
16 Weak Votes - 2 points (3 Weak Vote Plusses - 3 Points)

You may choose, as stated, 1 Super Vote, 3 Regular Votes and 3 Weak Votes to make into "Plus" votes, which get more points than a normal vote of its type. These are 100% optional, but mostly intended to give points to your favorite set each contest (the Super Vote Plus) and to sets which just miss your Super Vote (the RV Plusses) or Regular Vote (the WV plusses) list. You can of course distribute them as you want, though, if you even do."

Do not forget about the new Vote Plus System. Also do not forget that you do not need to use all of your votes.

Happy voting!
 
Last edited:

Reiga

He sold diddy for a switch
Joined
Dec 8, 2014
Messages
1,256
Location
White Noise
3DS FC
1461-7646-7368
Hey just passing by to remind you guys I've updated my rankings that I haven't updated in forever and will continue updating it through the next few days as I explode trying to read 20 sets in 3 days after I procrastinated a lot. Peace.
 

FrozenRoy

Smash Lord
Joined
Apr 26, 2007
Messages
1,260
Location
Las Vegas, Nevada
Switch FC
SW-1325-2408-7513
Turns out the 14th was a bad day for multiple people in the community.

So, instead...

VOTING + AD PERIOD WILL ACTUALLY END ON AUGUSR 15TH. ENJOY AN EXTRA DAY!
 

FrozenRoy

Smash Lord
Joined
Apr 26, 2007
Messages
1,260
Location
Las Vegas, Nevada
Switch FC
SW-1325-2408-7513
★ Miss Kobayashi ★


Kobayashi was a set which I was quite excited to see made, and in fact got made due to me pointing out that she was one of the Top 10 Katapultar sets I wanted to see. And while Kobayashi is hardly a Super Vote worthy set, it doesn't disappoint me in the least.

Kobayashi starts by taking the set in a simple direction that is amusing bit of lampshading on old Kat sets like Yutaka: That Kobayashi is a normal person and thus a pretty terrible match into most any actual smasher. The coping method? Booze, naturally! This leads into a pretty fun and labyrinthe sets of buffs and debuffs which allow Kobayashi to on the fly change how she plays the game. Swapping between terrified bystander and drunk maid otaku, Kobayashi switches between fleeing and approaching, making a surprisingly fun kinda hit and run style set.

The set undeniably has some tackiness to it, but I felt like it (largely, there's some exceptions) served to stay true and service the character ultimately, similiar to the pretty popular Kristoph Gavin from last contest. The F-Tilt was one of my favorites for this, something I kinda figured would be a pretty perfect combat animation for a Kobayashi set, and I do enjoy the various ways that Kobayashi's personality facets come to light. The set doesn't shy away from the whacky, so it is definitely worth reading.


Knight, the Engine of Chaos

Knight is my SV+ set, so it is a pretty natural set to advertise, right? The most obvious great part of this set is the Adapter Beast, one of the best minions Make Your Move has had in recent times. The self-contained and yet ever growing nature of its multiple unique evolutions means that Knight doesn't need to waste boring time setting up his minion, but that he CAN still influence it, and makes fighting the foe an important part of the minion's method of attack. While the Adapter Beast steals the show, the rest of the minions have their own pretty nice quirks, with one of my favorites being all of their unique on death effects, like the Bloated One's meaty explosion or the Shambler's icky ooze keeping people in place and spreading Versaxis poison. The Versaxis cloud is basically what I wanted from Metroid Prime's Phazon all those years ago, and seeing it come to the forefront again is quite fun.

Versaxis and more get some pretty fun interactions with Knight's awesome Jab, which takes simply removing a "pound of flesh" from the foe and his minions and turns it into a spiralling and epic move, with the mini Adapter Beasts a surprising but fun payoff, and I enjoyed the Versaxis interactions with moves like Up Smash, using it as a resource. Something else I quite enjoy about this set is that while it has plenty of minions and poison, a lot of what it does ends up being used as intimidation and for control, leading into Knight's pretty solid and fun melee game. Even the less described moves like the aerials and FAir show themselves as useful without a lot needed, the set providing context for a lot of it with existance.

The character is also expressed fairly funly in the set, despite not actually being a knight, and the minions have some striking visual design.

HALT, EVILDOER!
THE MIGHT OF THE ODINSON IS UPON YOU!
IF YOU DO NOT CEASE ADVERTISEMENT OF THIS VILE SCOURGE!
THEN THE POWER OF THE MIGHTY THOR SHALL DESCEND UPON YOU!

One of JOE's many sets of his rather epic Avengers vs Marvel series, Thor is my personal choice for the favorite of the bunch, owing strongly to what I felt was a strong set of Specials: The MIGHTY SPARK along with the pretty awesome Mighty Mjolnir boomerang Special set the table well. This unstoppable, smashing boomerang projectile was fun for me, Thor's Down Special providing epic spectacle to go with a unique take on the THUNDER FROM ABOVE concept, and some pretty dang intricate Side Special dives and my personal favorite, the Mighty Punish, a heavy whiff and punishing move with Thor charge that really gets across the playstyle of the set I feel, and seems like an electrical blast to utilize. The aesthetics taunts are a nice touch.

Thor, I feel, has a rather Ganondorf-esque playstyle, with vicious advantage states but not the best disadvantage states, which helps really get across the kinda brash, charging in head first feel of Thor as well as his quite-literally godlike power, which is a pretty impressive mix without making him seem like a villain. The F-Smash and D-Smash felt like notable examples of the good set stuff, for example, which along with some other moves (NAir comes to mind) makes him a kind of interesting set that kind of fits the mold of "bruiser" I was talking about with Electivire, the kind of set that gets in close and doesn't wanna let up. Its all great fun, to me anyway, and while The Beast is more well liked overall, my personal favorite of JOE's sets this contest.​
 
Top Bottom