• Welcome to Smashboards, the world's largest Super Smash Brothers community! Over 250,000 Smash Bros. fans from around the world have come to discuss these great games in over 19 million posts!

    You are currently viewing our boards as a visitor. Click here to sign up right now and start on your path in the Smash community!

Make Your Move 14 - This is Snake, I'm done here

FrozenRoy

Smash Lord
Joined
Apr 26, 2007
Messages
1,268
Location
Las Vegas, Nevada
Switch FC
SW-1325-2408-7513
"It-sa me, Luigi!"

Luigi

Do you know the Luigi?

Yes, of course you do. Everyone knows Luigi. This is, after all, the Year of Luigi. You're probably wondering why I am making a Luigi set. The answer is quite simple, but I will get to it in a moment. In fact, close your eyes before finishing this and think about what you've seen and the answer becomes obvious. I always did prefer Luigi to Mario. He's cool and has that underdog quality to him. Plus, green was my favorite color for a long time and it still is up there for me with colors. Purple too. Hm, I feel like I got off topic...

Oh, right! This set. It's a Luigi set and it's not a Brawl remix! Exciting, yes? But how does that work! Well, that's simple. This is not a Brawl moveset. But Froy, non-Smash movesets! D:

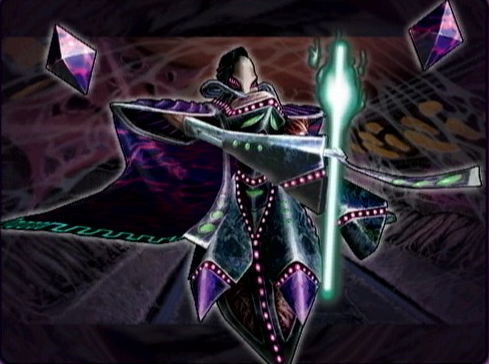
Fortunately, while this is not a Brawl moveset, this IS a Smash moveset. Because, as you may have guessed by the offical artwork above, this set is a Remix for Luigi from the original Super Smash Brothers! That's right, we are entering the old school engine and partying like it's 1999 with a remix for the original Smash Brothers! Because of that, please list this moveset as "SSB Luigi" on the moveset list.

Before we get into the moveset proper, I am going to explain some key differences between SSB and Brawl and even the latter games in general, though I will not go through every small change:

There are no Side Specials: Only Neutral, Up and Down.
There are only two throws: Forward and Back. In addition, throws are MUCH stronger in damage and knockback. There were no pummels.
Smashes could not be charged!
There is no air dodging, sidestepping, tripping, freezing, floating, gliding, tether recoveries, momentcum cancelling and DACUS did not exist! Other things were also changed.
There were also no Final Smashes.
L-Cancelling still existed and was at it's most powerful: L-Cancelling eliminated almost ALL lag on the aerial back in the day! In addition, it was known as Z-Cancelling, because it used the Z/Grab button.

...And such. Keep these points in mind as we explore SSB Luigi.


Statistics

The exact same as Luigi's in SSB! Meh movement, decent weight, quite floaty, you know what Luigi is like!

Specials

Neutral Special: Green Missile

Luigi scrunches down in a manner familiar to anyone who has taken a time machine and travelled to the present as he charges the Green Missile! It works pretty much like the later Green Missiles: Charge it up to increase power, distance and speed! It can't be stored, just like Green Missiles of later. Unlike later Green Missiles, the "misfire" does not occur randomly: Instead, if you hold it for about half a second past max charge, you'll misfire. Minimum charge deals 5% damage and little knockback with little recovery, max charge deals 17% and good knockback with good recovery and a misfire deals an excellent 25% damage with knockback that KOs at 90% and recovery that sends Luigi flying...although a misfire actually deals 5% self-damage to Luigi.

It's actually a pretty nice recovery move and Luigi can deal some decent damage with it, but the ending lag is bad. If it wasn't obvious, Luigi shoots in the direction he was facing, like how Link's boomerang worked in SSB.


Up Special: Super Jump Punch

Oh, come on, you all know this move of Luigi's and you all know I wasn't going to get rid of it. Luigi does a high jump punch, dealing a meager 1% to anyone hitting his fist on the way up, but like the SSB version it gives Luigi horizontal distance in addition to vertical. But if you hit the foe just right, by hitting them quite close and right at the start...SMAAAAAAAAAAAAASH! It turns into the FIRE JUMP PUNCH, dealing an impressive 25% damage and KOing at 60%, making it obscenely powerful. If you can hit with it, it is Luigi's best KO move, and that makes it amazing, since Luigi isn't the best at KOing. Combine it with the Green Missile and it is a great recovery, too: Especially since, in SSB, the Jump Punches were actually pretty rad in recovery height.

Down Special: Luigi Cyclone

The classic Luigi Cyclone also makes a return! Just like the original SSB, it consists of two hits: A weaker hit at the start that can set things up, but only deals 3% damage and weak knockback...and the second hit when Luigi raises his fists that deals a much stronger 16% damage and KOs at 85%. Because the Green Missile's misfire is impractical s a KO attack, this is Luigi's second-best KO attack, but is a bit easier to land than the Super Jump Punch (save for one combo...), so! Just like all Luigi Cyclones, it can gain height: Just like the SSB Luigi Cyclone, it can gain diagonal height instead of purely vertical. In addition, while it has the same highest-height potential of the original, it is as easy as the Brawl version (AKA a lot easier)!

There is one important change in this, however, which is that when you are being kept in hitstun repeatedly, you can actually break out with Luigi Cyclone! If Luigi gets hit a few times such as, say, getting stuck in an infinite or 0-to-death combo, Luigi gains the ability to Cyclone while in hitstun! This gives Luigi one of the unique distinctions of being able to break out of such combinations in the original Super Smash Brothers.


Smashes

Down Smash: Thunderhand

Luigi's hand crackles with the power of electricity and a game that hadn't yet been released, before punching the ground with it, sending out a shock of lightning about 3/4ths of a SSB Battlefield platform to both side of him. This deals 15% damage and only decent, not really KO knockback, but it does deal nice hitstun even for SSB, which can create awkward edge situations for opponents, allowing Luigi to exploit this with his excellent recovery, or to combo into his aerial game due to it's short ending lag, though it does have somewhat high starting lag. Electricity, not enough to be harmful, will linger on the stage for a few seconds in the radius where this move was used after use. Some of Luigi's attacks gain diferent properties while here!

The Green Missile will always misfire when used here, for example, although that will use up the charge. Luigi Cyclone gains an electric graphical effect and more hitstun, meaning it true combos into the second hit into high %s. The Fire Jump Punch gains a slightly larger sweetspot. And more to be discussed.


Forward Smash: Fireball

Luigi makes a circle motion with his hand as fire appears around them. This being the Nintendo 64, it looks kind of silly. Then he shoots out a fireball that, while looking the same sprite-wise, is 1.5x larger and does a good deal more damage, 17% damage to be precise. It isn't much of a KO move, though: It won't KO until the late 160%! It does, however, do two things: Like Luigi's latter fireballs, it goes straight and does not bounce. And this fireball does not disappear until it hits something or goes offscreen! This makes it an excellent approach option, especially since it's lag is merely average, and works well into Luigi's playstyle of slowing the SSB game down some with his lack of many 0-to-death combos (Especially true ones!) and his ability to break out of them.

Up Smash: Butt Monkey

Luigi does an upward headbutt with his head getting big, just like in SSB. It is pretty much the same as his SSB attack, but with a bit less KO power and a bit more reach. Still does 19% damage.

Standards

Jab: Punch, Kick, It's All in the Mind

Luigi hits with a left, then a right, then a kick. Low range, very quick. 2%, 2%, 5%. It's a Jab. It does what a Jab does. I really don't care to describe more.

Forward Tilt: LUIGI, YO!

Luigi makes a karate chop thrust with his hand, basically looking like his forward smash from Brawl, but weaker, dealing only 12% damage and somewhat weak knockback, but it does come out pretty fast. If used over electricity, it gains Smash power as his hand glows with LIGHTNING FURY!, striking for 19% and 140% KO power. In addition, a little jolt of energy will spring forward, giving it extended range for the same damage, while keeping the quick speed. Luigi doesn't have a lot of combo power, but he does have mad strength, yo.

Up Tilt: Thunder Kick

Luigi does a surprisingly acrobatic upwards kick, it looks kind of like Lucario's U-Tilt. Luigi doesn't have a lot of combo moves, but this is one of them, popping foes up for 7% damage, decent knockback and good hitstun. When Luigi wants to combo, he goes for this quick move, but using it on electricity makes a hitbox of the same strength linger for about a second, which he can use to combo against some more by popping foes into the air with hitstun, especially with his Down Aerial, or as priority protection against aerial assaults.

Down Tilt: Sweeping Kick

Luigi does your basic sweep kick with his leg. It's not all that useful of an attack, dealing 9% damage, but it pops foes higher in the air than the Up Tilt. There honestly isn't much use for this move, but hey, if I'm going for an authentic SSB experience, I need some moves you'll probably never use!

Dashing Attack: Fists of Fury

Luigi dashes forward in an all-too-similiar dashing attack animation, fists flying in a flurry of furious and fatal fisticuffs. This deals 4 hits of 5% damage for an impressively damaging attack, but is very easy to DI out of...unless it is started in electricity, which adds in stun and makes it harder to DI out of. One of Luigi's best damage rackers.

Grab Game

Grab: It's Luigi's Grab From The Original Game

It's Luigi's SSB grab FFS.

Forward Throw: ONLY Luigi

Luigi slams the foe's face into the ground, utilizing the skill he obviously learned from the Italian mafia (not really), before throwing them away. Does a total of 16% damage and KOs at 170%. Luigi can use this to begin combos if there is electricity under him as it increases the throw's hitstun. Looks cool.

Back Throw: So Long and Thanks For All The Pizza!

It's the classic around-the-world Mario character toss. It deals 13% and KOs at 100%. His third-best KO move due to ease of landing a grab, but KOs a lot later. Fwee.

Aerials

Neutral Aerial: Bringing Luigi Back

Luigi performs a kick. It's a sex kick. So hot. It deals 10% and the latter parts of it can chain into a single attack with Z-Cancelling, but he doesn't really have any extended combos to pull off with it. Good GTFO move. Decent knockback. Quick speed.

Down Aerial: Super Luigi World

Luigi performs a multi-hit drill kick, 4 hits of 2%. Like all drill kicks, it can combo into itself quite well due to Z-Cancelling, but Luigi's is quite easy to DI out of, preventing o-to-death combos...unfortunately. Proper timing and damage % can lead to a True Combo Super Jump Punch, though! It is also just a good way to tie foes up for, say, an incoming fireball or to land a grab or to deal easy damage and run away like a pansy. Utility!

Up Aerial: Overused Flip Kick Joke

Luigi performs a bicycle kick (which seems to basically be a proper term for flipkick). Deals 11% damage. Knockback is too high for comboing, but too low to KO. Maybe if you can get them up near the blast zone. At least it is quick.

Forward Aerial: Buzz Luigi with REAL KARATE CHOP ACTION!

Luigi performs his karate chop from Brawl. It functions just like it does in Brawl, except hitstun, which is higher. Shocking. I'm too tired to fetch the stats and just want to get out this one day already. It's 6:34 AM FFS.

Back Aerial: Luigi Kicks Backwards

Luigi kicks backwards. 12% damage. 200% KO power.
 

BridgesWithTurtles

Smash Champion
Joined
Apr 18, 2013
Messages
2,177
Location
The long road to nowhere
3DS FC
3523-2059-7939
Finally made some time to read through Koffing, and here's what I have to say:

What makes Koffing so interesting is that the set doesn't necessarily focus on the fact that he levitates, or lacks appendages. Instead, the set makes use of the creative gas gimmick, which is something that strikes me as pretty interesting. Smash has a lack of gaseous hitboxes, and Koffing's attacks are further made unique due to how realistically his gases react to physics. I like how there's a balance between the advantages and disadvantages of each choice made in positioning your gases, which obviously and intentionally was done to make Koffing a high-risk, high reward character, which I tend to find instantly engaging. While his playstyle seems rather straightforward, with a clear "plan" for the player to enact, Koffing also comes off as a complex character (at least in my eyes) because of how specific each move's application is, and how Koffing can be so easily handicapped if the player does not play incredibly smartly. I would certainly have trouble using the character effectively. Rollout and Dash Attack both have interesting movement properties that make Koffing seem like a perfect hit-and-run character, but, as you pointed out, other options allow him to play run-and-hit, or more commonly, as a great baiting character. Overall, I like the set. It's not astounding, but I like it well enough. My only real dislike amounts to the impression that despite how easily Koffing can be handicapped, it seems like a master Koffing player would simply dominate any other character because of how much space the gas can occupy. That, and I too am left curiously wondering: can other fire attacks set off the gas, or is that something only Koffing can do? And can other Koffing players set off another Koffing's gas? I'm assuming "yes" for the latter question.
 
D

Deleted member

Guest
Thanks for the comments on Koffing!

Koffing

My, my. In the same day, I released Bad Girl who is a total tank and Smady released his Koffing who can't take a hit but is far more subtle. I could totally make a matchup for those two... Now enough talk and HAVE AT Y -I mean let's look at the set.

It is a pretty solid field-control moveset, every move being use either to create more gas, to move the gas or taking advantage of the opponent's mistakes... due to the gas. Your second playstyle paragraph about how he forces the foe to approach reminded me of Croagunk of course who was said to rely on the same mechanics. Well I think it's better here (Sorry Froy), because the opponent actually wants to smack Koffing around to make him stop spreading the gas; then Koffing takes advantage of the opponent's mistakes with some sadistic traps and his only powerful close-ranged attacks. That makes me wonder, would Koffing be useful in high-level matches where errors are pretty rare sometimes? Koffing's player could get around that by playing creatively and not using the same strategy over and over, but his playstyle sure is risky. He could lose the match simply because of a misreading of the opponent's approach.

Also a good distance character (Like good ol' Chakravartin who is such a good example I always talk about him) could be dangerous for Koffing, who could be stopped by a good camper from setting his gas up (But perhaps I'm wrong). Also as a side-note, is it possible for the gas to be lighted up by a fire attack, or is Koffing the only one allowed to make stuff blow up?

While Koffing looks pretty fun to play, rather solid and powerful, he's still rather classical in the end and got some weaknesses that are keeping him from being a really good set. Still, it is a pretty good set I think. 6/10
Croagunk and Toxicroak were part of the inspiration. Koffing is certainly a gamble in a highly-competitive match. He has to rely on reading the opponent to win and I feel that's appropriate. For such a non-intimidating and light character, the fear of self-destruct would make any player cautious, which is again a fit for the Pokémon, in my opinion. Chakravartin is quite powerful regardless of being a camper, but Koffing does have moves that work well on campers and is one of the better characters for dodging projectiles using his speed. I have now clarified in the set that other fire attacks don't ignite the gas... that could be a huge problem for Koffing! I'm glad you liked the set.
Finally made some time to read through Koffing, and here's what I have to say:

What makes Koffing so interesting is that the set doesn't necessarily focus on the fact that he levitates, or lacks appendages. Instead, the set makes use of the creative gas gimmick, which is something that strikes me as pretty interesting. Smash has a lack of gaseous hitboxes, and Koffing's attacks are further made unique due to how realistically his gases react to physics. I like how there's a balance between the advantages and disadvantages of each choice made in positioning your gases, which obviously and intentionally was done to make Koffing a high-risk, high reward character, which I tend to find instantly engaging. While his playstyle seems rather straightforward, with a clear "plan" for the player to enact, Koffing also comes off as a complex character (at least in my eyes) because of how specific each move's application is, and how Koffing can be so easily handicapped if the player does not play incredibly smartly. I would certainly have trouble using the character effectively. Rollout and Dash Attack both have interesting movement properties that make Koffing seem like a perfect hit-and-run character, but, as you pointed out, other options allow him to play run-and-hit, or more commonly, as a great baiting character. Overall, I like the set. It's not astounding, but I like it well enough. My only real dislike amounts to the impression that despite how easily Koffing can be handicapped, it seems like a master Koffing player would simply dominate any other character because of how much space the gas can occupy. That, and I too am left curiously wondering: can other fire attacks set off the gas, or is that something only Koffing can do? And can other Koffing players set off another Koffing's gas? I'm assuming "yes" for the latter question.
The player would need to play smartly but I wouldn't go as far as saying they'd need to play incredibly smartly. He can take a few chances using the smokescreen and hit-and-run tactics until he wears the foe down. Once they're worn down, the odds are balanced out, as Koffing is already at a huge disadvantage to most characters due to his tiny weight. Think Jigglypuff, a character who excelled in Melee's competitive scene. You could even compare self-destruct to Rest, though it certainly makes sense more for Koffing. The gas may seem overpowering, but it does wear out as well, placing the impetus on Koffing to spread it out himself, which I feel is a good balancing factor. I did go edit the set and clarify that opponents can't set off the gas, thanks for pointing that out, and for a great descriptive comment, I'm very happy that so far Koffing is well-liked.
 

TheKalmarKing

Smash Apprentice
Joined
Mar 7, 2013
Messages
162
SSB Luigi

You know, I was actually interested in the premise of the set. And, well, it's true it feels like a SSB set.

It's extremely bland with only the D-Smash being remotely interesting... I mean, this is Sakurai-ish to it's very core. There is no playstyle, except if you consider "Use D-Smash to get little buffs" a playstyle. There is nothing interesting. If there is some kind of hidden in-joke hidden in the set, then you should explain it. Why did you make the set? Sure, it is a SSB set, but that should not be an excuse to miss out on creativity, playstyle and the like!

I really don't understand how this set came to life in MYM 14. I outright refuse to rate it as I consider it non-canon. Really, please- explain yourself. It outright saddens me to see a set like this coming from you of all people.

Zoboomafoo

One thing that strikes me in Zoboomafoo is the sheer number of props used. Ropes, vines, assists, closets... Problem is, you couldn't make a Zoboomafoo moveset without those props. It's not a critic- I think that for such an expository character, you translated him correctly, I'd say.

Also I find some aspects of the set to be ironically annoying. The props are okay, but such a reliance on berries and vines is kinda boring; while there is different ways of using them, it's not big differences, so it's rather repetitive. Also his constent screeching is outright bad. An always-talking character is annoying for everybody (Except if he can shoot webs or is named Deadpool). One thing that is really really weird though is how his wall-climbing could be used for recovery out of all things. I mean what, is he grabbing the oxygen? There isn't many walls floating near the blast zone in Brawl. Also it could have been greatly expanded upon; while the set would fall flat on his face on a wall-less stage, it could make it more interesting I think.

Not a bad try overall, but it's very forgettable. But don't give up! I'm sure you can improve. 4/10 (Also you should come back to the chat! Perhaps you won't see me but it's always a nice place!)
 

FrozenRoy

Smash Lord
Joined
Apr 26, 2007
Messages
1,268
Location
Las Vegas, Nevada
Switch FC
SW-1325-2408-7513
@TheKalmarKing: I was making a one day set for it and just lost interest in it past the F-Smash (I'm actually okay with what I did in the Specials), so everything after that ended up very boring and not all that good. I do like the SSB concept, at least.
 

ForwardArrow

Smash Ace
Joined
Aug 17, 2011
Messages
503
In an earlier age, a dark god once arose,
trying to claim the world for himself in a fierce
display of power. His might, however, was in a way
too great for his own good, as the forces of good
were drawn to him, like moths to a flame, and
in such a large scale battle, he could not hold a
candle to so many opponents. He ended up mocked
for being defeated so easily, and being so terribly
unsubtle amongst dark gods.
However, our dark god's story does not end there.
He's spent much time since his defeat plotting, planning
a new strategy to send the world into chaos. And now
his plans may yet come to fruition.

Dark Falz
Remix
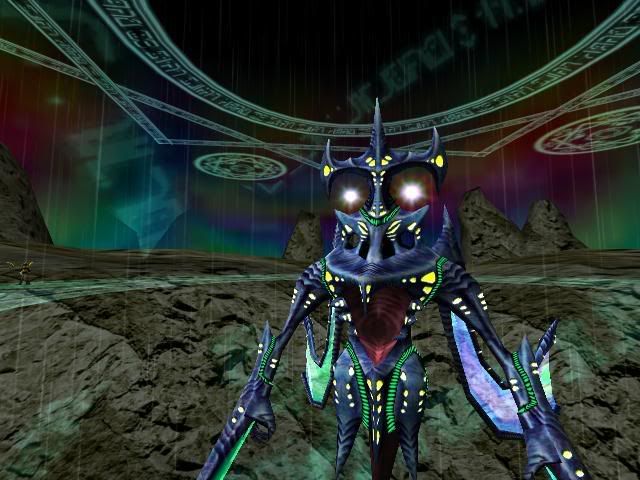
Dark Falz is the final boss of many a game in the Phantasy Star series, a dark god who rises every thousand years in a new form to attempt to destroy the Algol system. His plans are of course, thwarted by the heroes at the end of each game, but he has been known as a powerful corrupting entity too, bringing some heroes down with him and even turning them into monsters. In his appearence in Smash Bros, he appears as his third form in Phantasy Star Online, and is fought exclusively as a 3v1 boss, given his sheer strength and the nature of his abilities.
Stats
Size 20
Weight 15
Traction 11
Aerial Movement 10
Ground Movement 7
Fall Speed 2
Falz's stats definitely demonstrate his 3v1 nature, being nearly twice Ganondorf's height and a fair bit wider. What's not shown in the picture is that he also has a tail on his back that makes him a bit larger still, by giving him some additional width. For a boss, all things considered, he doesn't have that much weight, which is mitigated to a degree by his free flight. Falz has a massive 8 seconds worth of free flight at Ganondorf's dash speed, if you hold the control stick slightly in a direction as if to walk in that direction. He can increase his speed to that of Marth's dash by tapping in that direction, but this causes him to expend his flight at thrice the normal rate. These same rates are also his ground movement speeds, Ganondorf's dash speed being his walk and Marth's dash speed being his run. The free flight doesn't recharge immediately upon contact with the ground, but you get 1 second back for every 4 seconds you spend right above the ground, so it's not as if you have to spend a ton of time down there. On that note, Falz can use his grab and Smashes in the air.
Falz's massive aerial movement also works to allow him to escape from combos, because while his ability to move is decreased to a third during hitstun he can still use this to get out of the typical infinites that multiple opponents could pull off. Aside from that, Falz does escape grabs twice as quickly as normal and takes no hitstun from grab releases or throws, but that's really the extent of the bonuses he gets as a boss. As you'll see in his set, he can get all the defense he needs if he plays right.
Grab Game
Grab
Falz reaches forwards with one of his two arm-like appendages with absolutely massive grab reach, nearly double Dedede's grab range. This is a fair bit slower than most melee range grabs, but still pretty damn fast. If he grabs a foe with this, rather than going into a traditional grab game, he starts ripping out their soul from their body. A foe pretty much automatically loses their soul to this unless they break out with a third of a second, which is admittedly possible given Falz is fighting in 3v1. Once Falz rips out the foe's soul, the foe takes 10% and he will devour it, the soul then reappearing in his mouth as a small effigy of the foe. This has shockingly little ill effect on the foe, and they get their soul back if Falz is KOed and after 15 seconds are up.
While Falz is ripping out the foe's soul, he can in fact pummel them, releasing a pulse of dark energy into the foe as he rips out their soul. This gives the process of ripping out the soul an additional 1/6th of a second of lag, making it a risky maneuver, but it adds 3% to the foe and corrupts their soul. The corruption has no major effect on the foe while their soul is inside Falz, but once they get it back they'll start taking 1% per second for each time you used the pummel on them... for the rest of the entire stock. That's pretty annoying in and of itself but nothing too back breaking. That said, there are more uses for this corruption as we'll get too in later moves.
So for all this talk of removing and corrupting souls, what benefit does this actually have to Falz? Well, if a foe hits Falz while he already has a soul ensnared, the foe who had their soul ripped out will also take damage and knockback from the attack. 3/4ths of it to be precise, but it still hugely discourages foes from attacking Falz unless they want to hurt their poor ally as well. Status effects, stuns, and other such effects will also transfer. Just note that flinching hits will not even deal hitstun when carried over through a soul.
Falz cannot rip out more than one soul at a time, and does not have traditional throws on a foe he grabs, but rather can to a degree manipulate a foe's soul once he has extracted it. He can just press Z to grab again, which works largely the same except he doesn't rip the foes soul out and skips to a much faster version of the pummel that doesn't corrupt the foe's soul, and any of the four cardinal directions alongside Z for a throw.
Forward Throw
Falz takes out the foe's soul and disintegrates it into white energy before tossing it forwards as a projectile. The soul will fly around at Mario's dash speed, at first going straight but gradually trying harder and harder to home in on it's original owner. If it flies off a blast zone, then it will act like Super Sonic and simply return from beyond the blast zone, not stopping until it hits a player, or a minion. If the soul hits that opponent/minion, it will be imbued into them. This will, first of all, cause them to take the soul corruption damage instead of the soul's original owner, a minor thing but certainly a nuisance.
Second of all, the same effect that happens if a foe hits Falz while he has one of their souls occurs if that opponent is hit. 3/4ths of the damage and knockback of the attack will also be dealt to the original opponent, giving Falz a means to have his attacks deal damage to multiple opponents at once, as both of them take damage when the one with the soul is hit, a wonderful tool for a boss like himself to have. Also, this will actually free up Falz to take another opponent's soul, now that he is no longer in possession of one. Foes get their soul back if either Falz or the one who their soul was transferred too is KOed, or if the 15 second time limit is up regardless of whether the soul is imbued in Falz, the foe, or currently a projectile.
One thing to keep in mind with this attack is that it does get in the way of removing the soul of the opponent he implanted the soul into, as if he tries to take out their soul, he'll just reclaim the soul he imbued them with for himself. This makes it somewhat awkward for Falz to create a mess where every foe has effectively two hurtboxes. Aside from that, if a foe takes damage through their soul from another player and in turn had a soul imbued in them, that soul will not in turn deal damage and knockback to the foe. So you can't make chains of soul damage.
Back Throw
Falz focuses dark energy into the victim's soul for a brief period of time their body explodes with that same energy, dealing them 10% and upwards knockback that KOs at 190%. This is a somewhat laggy attack but it's made up for by the fact that it hits a foe regardless of their position on the screen. It's not particularly potent though... unless the foe's soul is corrupted, in which case they'll take another 5% and the knockback will KO 30% earlier for each unit of corruption on the foe. For that matter, it will cause the explosion of dark energy to actually hurt outside foes if the soul you are using this on is at all corrupted, albeit doing half the damage and knockback it does to the victim. The size of the explosion increases too, starting at Kirby's size at minimum and increasing by another Kirby size for each unit of corruption on the foe. Just keep in mind that the foe can spot dodge this attack to prevent it from working entirely.
Up Throw
Falz causes the foe's soul to pulsate with red energy, and then a tether of said red energy rips out of their body. Falz can control the tether as it moves at Captain Falcon's dash speed until it hits a target, be it another foe, the stage, Falz himself, a minion, whatever your preference. The tether is then set into place, the foe being tethered to that spot by a chain either a battlefield platform in length or the distance between the two targets, depending on which is longer. In the case of two foes, a minion, or Falz and a foe, control over the movement is distributed based on how heavy and fast both of them are. Speed will account for the amount of control more than weight here, so keep that in mind when using this on particularly fast characters. In Falz' case, he's both heavy and fast moving so he should have no trouble dragging most foe's around.
The tether will in fact drag both characters attached to it along when one of them takes knockback as well, as is customary of tethers, if they go beyond the maximum length of the tether. However just keep in mind that if both characters take knockback together, then both of their weights are combined for that portion of the knockback. Fall speeds are not combined, but the speed of the faster falling foe overrides. Lastly, the tether only has 35 stamina, very little in the context of a 3v1... if the foe's soul was uncorrupted. The tether's stamina increases by 15 for each unit of corruption on the foe. Keep in mind through all this that a foe can just dodge this the same way they can the Back Throw, leaving you looking like a sorry excuse for a dark god.
Down Throw
Falz once again decides to mess with the opponent's soul, this time causing three violet rings to appear around it and infuse into it. This causes the foe's eyes to flash red, and Falz seizes control of them. They'll fight for you as a fairly intelligent AI(impossible to trick into killing itself, fairly capable in combat, will sometimes but not always perfect shield, you get the idea) for the next... 1.5 seconds or until they take 5%. Wow this isn't really very effective mind control at all, is it. This also has by far the most lag of Falz' throws, making it very punishable to use at the wrong time.
Your control really works a lot better when you've corrupted the foe, as the requirements for them to escape increase dramatically with each unit of corruption, by 2.5 seconds and 15% worth of damage. With 2 or 3 units of corruption this is perfectly functional and with more this becomes some powerful mind control. And of course in the context of other players getting their souls switched around this becomes all that much more annoying to deal with, as if they try to break the victim out of the mind control manually they'll take the damage themselves.
On top of that, if you want more direct control over your new captive soul, you can A and B at the same time to switch which character you are controlling from Falz to the possessed foe. Falz also has an intelligent AI, but an extremely campy one, preferring to stay back and hide and not mess with any of his existing set ups or try to engage the foe personally. It is pretty opportunistic one though, if a foe presents a very obvious weak point then it will swoop in and get the KO for you. Meanwhile, you get to use their ally against them, running into your own attacks, destroying and ruining their team's set ups, or generally trying to kill yourself as your allies frantically try to keep you alive with grabs and their own attacks. Pressing A and B lets you immediately switch back too, and the ability to swap between two bodies makes Falz absolutely hellish to deal with when he's properly broken his victim.
Specials

Down Special
Dark Falz creates a bluish colored circle directly in front of him, which a Chaos Sorcerer, as shown above, teleports too after a reasonable amount of lag. This minion will then stick to the circle, unless Falz presses any input during the start up lag, in which case the circle will disappear after the Sorcerer is summoned. In that case, it will actually teleport to Falz' position if he ever is more than a battlefield platform away with some slight lag. Sorcerers float in mid air and do not fall, so if you place them in the air they will stay there, unless they are more than 3 Ganondorf heights above the ground. In which case, they'll descend, along with their ring, until they are that height above the stage. In either case, they are about Ganondorf's size and have 40 stamina, and Falz can have as many out as he wants a given time, though with the lag associated and how relatively fragile they are for 3v1 it isn't easy to make a large number of them.
These minions have 3 attacks, which they use based on how close or far enemies are from them. If there are no enemies within 1.5 battlefield platforms, it will shoot a fireball at the closest one once every 2 seconds. The fireball explodes on contact with a foe or the stage in an explosion the size of a Bomb-omb blast, dealing 13% and knockback that KOs at 165%. Within 1.5 battlefield platforms but outside a foe's melee attack range, it will launch a stream of frozen wind at them, pushing them away at Ganondorf's dash speed and dealing 3% per second. This wind will also freeze the foe in a block of ice if they are stuck in it for upwards of a second, at which point they have to escape with grab difficulty and the Sorcerer will proceed to focus on the next nearest foe. If the Sorcerer is within the foe's melee attack range, instead send out pulses of electricity from their staff once every .75 seconds, dealing several flinching hits that add up to 10%, the pulse covering an area the size of Bowser in front of the Sorcerer.
If you really want to keep these things alive, using the Forward Throw to imbue them with a foe's soul will make it much more difficult for foes to deal with them, as they'll have to effectively deal 30% to themselves if they want it dead, or wait out a whopping 15 seconds where it can assist Falz with many many tasks. For that matter, if the foe's soul was corrupted, these things will actually thrive off the corruption rather than taking damage, healing the same amount that the foe would take. Just keep in mind this requires you to expend a foe's soul on this task, something that Falz would likely want to keep to himself in situations of heavy pressure, so you can't just throw them a soul and expect everything to work out when you leave yourself unprotected.
Up Special
Dark Falz lets out a roar to the sky, and releases a burst of raw dark energy from his body. This wave will travel a decent distance on both sides of his body... and frankly, it doesn't deal much straight up damage to foes on it's own. Just 7% and a flinch. This move has a pretty large amount of start up lag, but at the very least it's low on end lag.
This attack becomes a lot more useful in the context of soul corruption and Chaos Sorcerers. A foe with a corrupt soul will have the energy inside them wildly flux and cover their entire body, trapping them in a grab escape with... 3/4x normal difficulty with one unit of corruption, normal difficulty with two units, 1 and a quarter with three units, etc. This also deals them 3% per second while they're trapped with one unit, increasing to 4% with two, 5% with three etc. This makes the move a strong approach deterrent and provides Dark Falz with the breathing room he needs on foes who are at all corrupted, though earlier in the match he'll need to resort to less direct methods of shutting down approaches due to the foe's souls being uncorrupted.
Chaos Sorcerers will also experience the energy flux, which has a different effect on them of drastically increasing their power. Their fireballs now deal 19% and knockback that KOs at 100% with a bigger explosion radius. The blizzard freezes in 3/4 of a second and deals 6% per second. The lightning deals 16 hits of 1% instead. The increased power comes at a cost though, in that it makes the Chaos Sorcerer unstable and causes it to take double damage from attacks. Not to mention the buff only lasts 4 seconds, not so long as to give Falz a massive advantage even if the Sorcerer isn't hurt during this time.
There is however, a major upside to the Sorcerer taking double damage. If it has a soul imbued in it, that doubled damage to the Sorcerer means that the person whose soul it is imbued with is going to be taking twice as much damage as they usually would as a side effect, and for that matter twice as much knockback. Even if the overall amount of damage they would take ends up being the same, this can sometimes make Chaos Sorcerers more awkward to kill if they are imbued with a soul as foes are unable to use their KO moves on them without dealing huge knockback to their allies.
Side Special
Dark Falz points forwards with one arm and briefly afterwards, the background on that part of the stage seems to shatter, leaving behind a warped looking black void slightly smaller than Bowser. This creates a reality tear, as well as an initial hitbox that deals 15% and high set horizontal knockback. This is a fairly laggy move on both ends, and only two tears can be on screen at the same time, with the creation of a new one resulting in the old one being removed.
So you might be wondering, what do these reality tears even do? Well, simply put if Falz or one of his minions produces a disjointed hitbox, that hitbox will fill up the entire void for as long as it is in contact with the void. So for example, if a fireball from the Sorcerers explodes and part of the explosion overlaps with a reality tear, the whole reality tear will become a part of the explosive hitbox as well. In the context of a lot of later moves, these tears can become terribly painful to deal with. That said, they only last for 7 seconds and are a hassle to make, so abusing the increased hitboxes on various attacks is not particularly easy to pull off.
However, there is one interaction that is very worth noting with them at this point. You see, if you combine this move with the Forward Throw to throw out a soul, it is possible for multiple foes and/or minions to get hit by a flying soul at the same time. In that case, the soul is split between both individuals, not returning until the 15 second timer runs out or both are KO'd, and if either of them is damaged, the owner of the soul takes the damage and knockback. Of course, due to their soul being divided up they'll take a smaller amount of damage and knockback for each individual it is split between. If it's split between 2 they take half the damage and knockback of an attack to either, if it's split between 3 they take a third, if split between 4 or more they take a fourth. While this is certainly a powerful way to make life hell for an individual whose soul you've stolen, or provide protection to a larger number of Sorcerers, just keep in mind it makes each attack backfire less and less.
Neutral Special
Dark Falz crackles with black energy before firing it forwards in a beam that travels nearby a Bowser forwards. This deals 12% and horizontal knockback that KOs at 220% and that's it... if the foe's soul is uncorrupted. If the foe's soul IS corrupted, that corruption takes on physical form as their body warps in shape and color to look similar in design to Falz or the above Chaos Sorcerers. This for the next 10 seconds, actually... gives the foe a buff, of all things. It increases the damage and knockback their attacks do by .2x for each unit of corruption on the foe, and increases their weight and movement speed by 1 for each unit of corruption on them.
So you're probably thinking what's the catch on this move, and believe me there's a pretty big one. As long as the foe is under this attacks influence, they are treated as having twice as many corruption units as usual, and this does not factor into the buffs they get from this form. While that's all fine and dandy it can still backfire on Falz, though you have to consider that the increased damage and knockback will also be dealt to their ally if you happen to have one of their souls. One move that, while difficult to execute, you should definently consider in the context of this too, is your Down Throw, because you not only get longer mind control, the individual you're controlling is considerably more powerful than they'd normally be. How this nice little boon has backfired... a shame that the lag on the back end is pretty bad, to the point that a foe at low percents might even be able to come back and use their increased power against you.
Smashes
As a general side note, Falz can charge his Smashes as long as he desires, though in a 3v1 setting, charging a Smash for longer than the max tends to be highly impractical. Fortunately, you have help in your Chaos Sorcerers. If one of them is within 2/3 of a battlefield platform of Falz when Falz charges a Smash Attack, they stop what they are doing and will begin charging the attack with him. Each Chaos Sorcerer charges the attack just as much as Falz does, so if Falz and a Chaos Sorcerer charge for 2 seconds it results in the equivalent of a Smash Falz charged himself for 4 seconds. This stacks if you have a whole bunch of nearby Chaos Sorcerers and can allow for some huge attacks... as long as you, of course, keep them alive.
If a Chaos Sorcerer was buffed up by the Up Special, it will allow it to both charge Falz' Smashes with him as well as use it's attacks, making pulling off charged Smashes a lot safer. However their attack power is reduced to what it was without the Up Special power boost.
Forward Smash
Falz backs up slightly as large amounts of black energy form in his mouth. He then releases an explosion of that black energy directly in front of him, not dealing damage and knockback, but rather an instant KO. The explosion isn't too impressively large, being slightly smaller than Bowser, but when the attack's an instant kill that isn't too bad a drawback. That said, this attack has a ton of start up lag, about as much as a Falcon Punch, and on top of that, if the foe hits you during said start up lag, it causes the attack to almost... short circuit, if you will. The energy explodes in Falz' face and sends him into shield break stun, making pulling off this attack horribly impractical even with it's power. During periods of heavy bullet hell from your minions and your Up Smash though, or when they're dealing with a foe that you've mind controlled, landing this attack is more possible.
Aside from that, this attack has a very potent side effect in the context of the Forward Throw. You see, I mentioned earlier that status effects and other side effects of attacks would transfer through souls, right? Well, so does the instant death effect of this attack. Killing multiple foes at once with this is certainly possible, albeit foes with an allies soul inside them will tend to be more careful and landing an attack with so much lag on them is difficult to say the least.
Charging this attack doesn't increase the power as instant KO is really as strong as you can get. Rather it increases the scope of this attack, as the size of the hitbox grows into a larger and larger funnel shape with the point starting at Falz' mouth, about doubling in size for every second of charge. With a few Chaos Sorcerers about, this attack becomes a lot more threatening as you can cover a huge segment of the stage with it. For every 3 seconds of charge, it will even leave behind a lingering cloud behind that is about 2/3rds the size of the uncharged attack at a set point in the cone(the first directly in front of Falz, the second diagonally upwards a battlefield platform from him, the third a battlefield platform and a half diagonally below him, the fourth two battlefield platforms in front, repeat the pattern from there). These clouds remain instant death hitboxes that last as long as the attack was charged for, making the stage absolutely hellish if you charged this for an extensive period of time, not to mention neutralizing the ability to spot dodge on those points. The one saving grace for foes is that these clouds of death actually do NOT spread through reality tears, making abusing those to make this move vastly more cheap is impossible.
Up Smash
Falz spreads his arms and conjures a large patch of light above his head, slightly larger than Bowser. Anyone who is hit by this takes 15% and knockback that KOs at 175%, which compared to Falz' other Smashes isn't very powerful. It's a perfectly valid GTFO move though and in the context of Falz' free flight can juggle foes to the top blast zone, given it actually is fairly fast by Smash Attack standards and has a large hitbox.
Charging this attack doesn't so much increase the power of the original attack as it does give it an after effect. Specifically, it causes blasts of light to fire down from the sky at them once every .4 seconds for as long as the attack was charged on the foe, which target them at the start of each .4 seconds, so as long as the foe keeps moving they should be safe. That might get problematic if they have a tether attached though, or they run through a reality tear. For that matter the blasts of light can in fact hit other opponents too, allowing for some potential fun in the context of the mind control which the foe will have more difficulty dodging now. Each blast of light deals 12% and upwards knockback that KOs at 155%.
The other scary thing about this attack is what happens in the context of a foe's soul being corrupted. Each unit of corruption increases the damage dealt by 4% and reduces the KO percentage by 20% on both the initial attack and the subsequent light bolts, and causes their rate of fire to become more compact. By which I mean, with 1 unit of corruption a bolt will fire every .35 seconds, 2 once every .3 seconds, 3 once .25 seconds, etc. This makes the bolts of light much much more difficult for the foe to reasonably avoid and far more lethal when they actually do hit. Note that this maxes at a bolt once every .1 seconds, which really should be all you need. Do note that on both this attack and other attacks in the set with bonuses on corrupted foes, if the effect is transferred via a soul imbued in the corrupted foe they will take damage based on how THEIR soul is corrupted, not how the soul of the you hit with the anti-corruption attack is corrupted.
Down Smash
Falz spawns 4 spheres around him in a square shape before launching them away from him at Marth's dash speed. Each of these deals 14% and knockback that KOs at 220%. These projectiles reflect off all surfaces and this attack is fairly fast by the standards of Smash Attacks, so Falz can undoubtedly create a fair share of bullet hell with this. It's also pretty good cover for a grab attempt as you provide obstacles for the foe to dodge while you swoop in with your flight and steal their soul, given Falz can move just as fast as the projectiles.
Charging this attack will do 3 things, one increase the damage each sphere deals by 3% and the knockback KOs 20% earlier for each second you charge. Two, it causes this attack to produce 2 additional projectiles per second charged. Three, it increases the speed of the projectiles, so they serve as worse cover for your grab on one hand... but on the other hand, become much harder to dodge. With a few Chaos Sorcerors out, this can serve as a less certain KO move than your Forward Smash, but on the other hand provide an absolutely obscene amount of things for the foe to dodge and make it absolutely hellish for the foes to get anything done until the bullet hell all dies down.
There is a way for foe's to retaliate to this though, and that is by hitting the orbs back with an attack that deals 10% or higher. This is actually fairly easy at lower levels of charge given the orbs don't travel incredibly fast, but at higher levels this is going to be more of a challenge for the foe to actually reflect due to their increased speed. Falz can reflect these himself with his own attacks so foes aren't necessarily going to have an easy time hitting him, and a mind controlled foe can reflect these back too, giving Falz a larger amount of control over his bullet hell.
Aerials

Neutral Aerial
Falz swipes one arm at the foe, dealing them 5% and a flinch, before his other arm becomes charged with energy and he swipes it through them as well, dealing 12% and knockback that KOs at 180%. The 2nd hit will actually heal Falz for as much damage as he dealt the foe... and for that matter, if the damage is dealt to another foe via soul transfer, Falz will heal the damage dealt from that too. If you're good at juggling souls then this move can greatly enhance Falz' survivability and make the soul steal damage an even worse trade off for the foe when he can just heal it off. This move is also fairly fast, and somewhat hard to dodge due to the two hit nature of it, making it serve as a solid melee defense on the very campy Dark Falz. Only problem? It can't really hit grounded opponents due to the swipes being pretty high above the ground, so that gives foes a pretty solid safe zone from this attack.

Forward Aerial
Falz fires forwards a single small blue orb, traveling forwards indefinitely at Captain Falcon's dash speed and dealing 6% and weak upwards knockback. After it hits a foe it will continue flying forwards, so you can perfectly well hit multiple foes with the same projectile if they're all in it's flight path. This can be angled up or down to have the orb gradually change it's flight path upwards or downwards as it flies forwards. There are two key things about this move that make it useful. One is that it's a very fast attack and as such serves as Falz' bread and butter projectile for camping. Two, it pushes around other projectiles of Falz', allowing you to redirect an exploding fireball from a Chaos Sorcerer to a more ideal location to go off, preserve one of the Up Smash orbs by bouncing it off the stage, or perhaps most importantly keep a soul from returning to it's original owner and keep it heading where you want it too.

Down Aerial
Falz holds out one arm and shoots a ray of light at the ground below him, traveling downwards a maximum of two Ganondorf heights. If it travels less than two Ganondorf heights to the ground, after it initially hits the ground Falz will sweep the laser forwards until it is as diagonally long as the max height attack is tall. The sweeping motion is very fast but does make this attack slightly more punishable, although at the same allows it to cover a much larger segment of the stage overall with the hitbox. On the whole, the attack deals 12% and knockback that KOs at 200%, and has some pretty bad end lag despite not much start lag.

This attack does have some ways of covering it's start lag though. For one, if you use this lower to the ground with the sweeping motion you can transfer the attack's hitbox into some reality tears, giving you much larger coverage of space and as such are much more likely to have the foes out of your face. For two, if the foe was corrupted than this attack will cause them to burst into flames due to the light trying to smite their corrupt souls, in a twist of cruel irony. This will deal them 6 flinching hits of 1% per unit of corruption after the attacks regular damage and knockback, and on top of that the damage and knockback to corrupt souls is increased in the exact same manner as with the Up Smash.

Back Aerial
Falz spins around and releases a stream of dark fire behind him, dealing several hits of 3% and weak knockback which the foe is most likely going to DI out of. Realistically, you can get 12%-18% out of this move, but if it say, overlaps with a reality tear, you might be able to trap the foe in it for the full 33% before they can escape. This also leaves behind a small lingering black flame trap that only deals 2% and a flinch, largely just serving as a slight nuisance that lasts for 6 seconds.

If this flame is still around while Falz is charging a Smash Attack, it will be drawn into the attack at a rate depending on who is charging the attack. If it's just Falz it will only approach at Ganondorf's dash speed, if there are Chaos Sorcerers involved in the charging process it will approach faster. This will somewhat enhance the properties of the Smash Attack it was absorbed into. With the Forward Smash, it causes any clouds of blackness to gain a slight radioactive property, meaning foes who come near them to take damage while they are within a short distance of a cloud at a rate depending on the number of flames(about 3% per second per flame, within a Kirby width). With the Up Smash, it causes the light attack to, rather than immediately disappearing, just decrease in size over the course of the next 1 second times the number of flames, dealing a decreasing amount of damage and knockback and a weaker side effect until it eventually fades into nothing. The Down Smash causes the orbs to explode in a fiery aura when they are reflected, dealing 10% and a flinch to anyone who reflects them other than Falz or in the case of the stage just making them more threatening when they bounce off the stage.

Up Aerial
Falz' glowing lights on his head seem to blink out for a brief instant before reappearing brighter than usual, and the area above Falz distorts, catching anyone in that space in a pseudo grab hitbox. This only lasts for a quarter of a second, and during that time you can input any direction to have Falz toss the victim in the chosen direction for 10% and knockback that KOs at 190%. Not very impressive in it's own context, but never underestimate this move in the context of the victim having another foe's soul inside them. You may throw that foe in a less than ideal direction to put the other foe in a horrible position or outright gimp them, depending on the context, making this move a very versatile way of positioning foes.

Standards

Jab
Dark Falz summons another one of the orbs from the Forward Aerial, but this time simply has it spin around his body once before disappearing. It moves a lot slower than it does in the Forward Aerial but keeps the piercing and projectile swerving properties, and while those won't come up too sometimes you'll catch one of the Chaos Sorcerers fireballs or a soul and gain a much more threatening defense, or just smash a flying Down Smash orb into the stage and redirect it's path. Since this moves slowly and is a fairly fast attack, you can potentially have a few of them orbiting Falz at any given time. If you hold A you can spawn the sphere a maximum of a Bowser length away from Falz, it rotating faster so it can make a loop around Falz in the same time span. These will in fact go through the stage, so no worries about this breaking the attack against the stage.

This attack will normally complete one loop around Falz before disappearing, but if you charge a Smash Attack it will keep rotating around Falz as long as you charge it, as the energy charging the Smash Attack also charges the sphere and keeps it moving until you finish charging. If you have a nearby Chaos Sorcerer charging with you, it causes the spheres to begin rotating faster as time goes on due to their additional energy speeding it up. The more Chaos Sorcerers you have, the faster this attack will rotate around Falz and therefore the more damage will be dealt to them as the spheres can potentially hit them several times. With a large number of spheres and sorcerers, it may even help holding down an opponent while you charge a smash further.

Forward Tilt
Falz simply performs a set of 3 slashes directly in front of him, dealing 6% each and each dealing low knockback that will combo into the later ones at low percents. The first slash is performed at a lower angle and the final slash at a higher angle, giving Falz a rare move which actually covers his entire front in addition to serving as a necessary melee defense in a set full of much flashier moves. You can at any point during the slashes cancel into another move, making this a fair bit more unpredictable too. The main flaw is that if you hit with only one hit of this at a lower percent a foe could still punish you for it even in spite of the low lag, but no move is perfect.

Dash Attack
Dark Falz simply slows to a halt while swatting forwards with one of his arms, dealing 16% and horizontal knockback that KOs at 100%. This is fairly slow by Brawl Dash Attack standards, being slightly faster than Dedede's Dash Attack, but makes up for it in sheer range and power. On top of that, it's usable in the air too! If Falz has accelerated to his "air dash" speed, Falz can use this attack and he will swing his arm in the direction he's currently flying, dealing knockback in that direction as well. Still easy to dodge or predict but this is very useful in snagging a lethal gimp due to it being quite versatile.

Down Tilt
Falz simply swats the ground with one hand, dealing 9% and knockback that pops the foe up into the air, and producing a small wave of dark energy that travels along the ground. The wave is the size of a crouching Kirby, and travels at Mario's dash speed. It deals 4% and very weak upwards knockback on contact, and will travel along the stage including going under it until it reaches the position from which it was originally created.

This move functions a lot like the Jab in that it can be sustained by charging a Smash Attack, which will keep it traveling around the stage as long as you charge. If you charge a Smash with the help of a sorcerer, it will cause the wave to flare up and increase in size, as well as damage and knockback as it travels along the stage. It maxes out at a Bowser size wave, at which point it just starts speeding up instead, but the damage and knockback will increase indefinitely. This of course, in combination with the jab, can make both approaching and directly attacking Falz as he charges his attacks a harrowing task, but keep in mind he has to have these already out on stage.

Up Tilt
Dark Falz teleports upwards about a Ganondorf height before releasing a pulse of dark energy that surrounds his body, dealing foes close to Falz 12% and some weak horizontal knockback. This attack has little start up or end lag and leaves Falz up in the air, free to follow up with one of his aerials. Feel free to dodge out of the way of a foe and nail their ally approaching you from above with Nair for some healing, or use the Dair to nail the both of them as the foe below suffers lag and the foe above hitstun.

What can make this attack more interesting is that if Falz uses it with a soul, he does not actually teleport the voodoo doll of their soul with him, rather leaving it down in front of the foe for a brief moment. This means if they were attacking Falz and missed while he had a soul on him, all they'll end up hurting is their ally. On a rare occasion you might even send said ally flying right up into your face so you can nail him with the Nair too for some additional healing. Either way, this serves as a devious pseudo counter that can easily end up causing pain for several foes at once.
 

BKupa666

Barnacled Boss
Moderator
Joined
Aug 12, 2008
Messages
7,788
Location
Toxic Tower
KOFFING
What with his absolute control over his emitted toxins, Koffing comes off as a refined modern iteration of the gas-centric MYM7 sets. Whereas he has the option to play defensively to a degree by deterring enemy approaches with the likes of Down Special and D-Air’s poison removal, his ‘running and hitting’ flows far more smoothly within his playstyle. The notion that Koffing can lock down areas of stage with sludge or his pummel, before aggressively and strategically buffeting his opponent around is quite appealing. This becomes especially noticeable when you consider that his feathery weight would be excuse enough for any other character to avoid such melee attacking. At times, the pushing together and pulling apart gas to influence its damage output seems a bit arbitrary, since all gas is potent enough as a threat, so long as enough of it is onstage. Because of this, the moves that serve this function border on filler to some extent, though I am a big fan of how gas can be spread around to boost its efficiency during self-destructions. Koffing is undoubtedly a commendable Pokeset, one that ought to be regarded as more than a lightweight this contest.

GYARADOS
I’ve read solid Gyarados bosses previously, and am happy to see him finally receive the moveset he deserves. His unique body mechanic creates more of a centerpiece than any individual move, instead allowing the shaping of his body to flow into any number of strategies. In particular, Gyarados’ handling of foes behind him through arching his body to speed up waterfalls contains an impressive amount of depth, since he can send these into tornados or strategically freeze them to influence opponents accordingly. I also sense traces of Banbollow with how Gyarados toys with opponents on his back; rather than juggling them there repeatedly, he instead prefers dealing a few crushing hits, before all but forcing his victims back on with stage summons. I do feel as though his air game warrants more attention, since it isn’t touched on much aside from Dragon Dance and the potential for richer expansion exists, with possible stuff like sloping waterfalls down at opponents or Gyarados’ back serving as a massive platform that can hold victims in tow with its slopes. Nevertheless, I’m certainly satisfied with what’s presented already, and Gyarados easily takes the cake as the best (and only, sadly) DiamondFox set so far.

SSB LUIGI
I do know the Luigi. And I do know that there are a handful of playstyle nuggets scattered within the set, namely the token move interactions within the D-Smash thunder zone. While partying like it’s 1999 is certainly novel as far as sets go, I feel it falls rather flat in terms of execution here. The old engine isn’t explored as a concept, so much as seems to have been used as an alibi for the set having fewer inputs than usual. Looking at it from this lens, and as a one day set, Luigi accomplishes exactly what it appears to on the surface level, no more, no less.
 

TheKalmarKing

Smash Apprentice
Joined
Mar 7, 2013
Messages
162
@TheKalmarKing: I was making a one day set for it and just lost interest in it past the F-Smash (I'm actually okay with what I did in the Specials), so everything after that ended up very boring and not all that good. I do like the SSB concept, at least.
It's okay, Froy. We'll just have to consider non-canon, or something like that. Bkupa's comment is certainly better htan mine anyway.

Also no Bad Girl feedback, I hate to spam that but except Smady who told me in the chat that it was a "big improvement" over Jinbe and Kat's brief description in the recap, I did not recieve any. :/
 

FrozenRoy

Smash Lord
Joined
Apr 26, 2007
Messages
1,268
Location
Las Vegas, Nevada
Switch FC
SW-1325-2408-7513
I'm making comments now, so I'll try to get one out for Bad Girl with them. :p And nah, who cares about canoncity, even bad sets need their day to show off horribleness! Besides, I've got thick skin, it doesn't bother me to hear a set of mine is bad.
 

Rychu

Thane of Smashville
Joined
Jul 5, 2010
Messages
817
3DS FC
1908-0105-4965
VOLKNERR

Volknerr (pronounced Vallk-near) is a character created by yours truly, Rychu, for the Tabletop RPG Rifts. Rifts takes place several hundred years after a fallout caused not only the near extinction of Mankind, but also opened up several dimensional rifts, introducing Magic and many magical creatures to this world, alongside alien races who saw the nuclear fallout as an opportunity to claim this new barren planet as their own. All sides decided to make an uneasy peace, and now all these creatures live alongside one and other on an Earth where running into a Goblin or Elf is just as likely to happen as running into a Wizard, Alien, or soldier wielding planet-shattering weaponry. That is to say, very common.

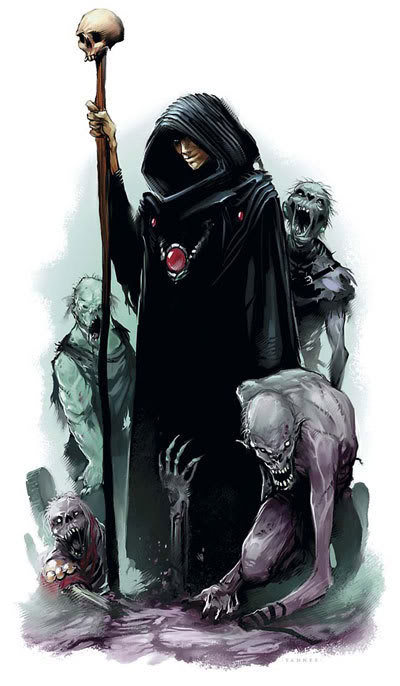
Volknerr himself is a Human and is what’s known as a Russian Necromancer, obviously a Necromancer who hails from Russia, which is new one of the most powerful nations in the world. Necromancy in the world of Rifts is a bit different from other forms, as it not only allows the user to summon the undead, but also fuse themselves temporarily with the body parts of dead creatures, their own body parts growing in size and becoming as powerful as the creature they where taken from. Volknerr, despite what the picture looks like, has a permanent (GM Approved) Dragon Claw on his left hand, making it grown to about 3 times it’s normal size, turned blood red, with huge claws and scales, as an effect of a curse combined with a spell gone awry.


The Staff he wields in-game is known as the Necronstaff, a rare Greatest Runes weapon, witch greatly increases the magical power of the user, as well as having a few tricks up it’s own sleeve, as well as a very powerful bite to it, making it a decent close rang weapon, despite Volknerr totally and completely failing in that regard. The Necronstaff itself is different from the one in the picture, though not incredibly so, as the height is roughly the same, though the top is a bit more stylized with 3 different skull, one of which is full, front and center. The staff itself looks to be made of bone as well, giving it a white, if faded, look.

He also weilds what’s known as an Impaler, which he’s affectionately dubbed “Vlad”, another rare Greatest Runes item. Impalers are swords which have 4 spikes growing out of them, which can expand at the users will, as well as the powerful curse known as Soul Eater, in which an Impaler will latch onto an opponent and drain their soul, effectively killing them in the process. Impaler are also semi-sentient and can move around on their own, but will always follow the commends of their master. Volknerr’s Impaler, Vlad, is seen at the start of the match as attached to Volknerr’s left side, as Volknerr will wield it with his Dragon Claw, his right hand is always clutching the Necronstaff. Additional aesthetics include a belt made of what looks to be animal remains, with a large satchel on his hip, along with, instead of a gem resting on his crest, the skull of a Dragon Hatchling, which is only a bit larger than the gem shown above.

As for his personality, aside from his obviously dark and deadly persona, his foot is planted firmly in the heroic side of Selfish. While he’s generally cold and generally keeps to himself, he doesn't discriminate and is willing to work with a team for the greater good (and personal gain). His word is his bond, and he will never betray a teammate, even in the face of certain death.
Stats
Size <> 8
Weight <> 5
Speed <> 3
Jump <> 3
Aerial Speed <> 6
Fall Speed <> 2
Range <> 10

In terms of stature, Volknerr is about the height of Ganondorf, though a bit thinner. His Necronstaff reaches a head and a half higher than he does, though is not part of his hurtbox. His gigantic Dragon Claw, on the other hand, is, as it’s roughly the size of one of Bowser’s hands, and is always held out in front of him. His weight is pretty accurate to his in-game hand to hand combat prowess: he can hold his own for a little bit, but is very squishy when not controlling his undead creatures. He’s slow, not one to exert himself physically, though he's fast enough to move himself around the stage if he must. Don’t let the supposed lack of staying power fool you, though, as Volknerr is very skilled in his chosen form of magic, and is very capable of holding his own in a fight.

SPECIAL ATTACKS

Down Special <> Animate the Dead
Volknerr slams his Necronstaff into the ground, muttering an unintelligible babble of magical words. As he does this, 4 corpses with rotten flesh and exposed bone raise out of the ground. at random parts of the stage. The zombies are all around the height of Link, and run forward at a pace that even Ganondorf would mock. They each have a relatively respectable 20% HP, and crumble into visible dust and bone on the stage when defeated, which stays on the stage visible for the remainder of the stock.

The Zombies attack with the generic zombie chomps and scratches that you would expect from such undead minions, with the scratch having the range of Bowser’s Jab, dealing 2% damage, and the bite having a grab hitbox that reaches the length of Mario’s grab, as the zombies grip the foe and bite into them, dealing a more respectable 10% damage. To top it all off, Zombies will automatically give chase to any opponent within a 1 SBU range of them, and only stop if the opponent leaps more than 3 SBUs into the air or runs 4 SBUs away from them. Zombies also have but 1 pathetic jump to their name, and will keep running into a wall if they can’t jump.

Another great thing is that Volknerr can have up to 15 Zombies on the stage at once, as 1 Zombie automatically raises out of the ground every 2 seconds, at a random point on the stage, provided the capacity has not reached 15. Once it does reach 15, Zombies will stop rising up, and if Volknerr wants any new ones, he’ll have to re-input the move, and even then, he must raise 4 Zombies at the start, so if any more than 11 are out when the capacity has been reached, Volknerr cannot summon any more. The Zombies are completely aligned to Volknerr and any allies he may have, though Volknerr and allies are 100% capable of destroying any Zombie they see fit.


Neutral Special <> Pile of Bones
Volknerr raises his hands toward the sky, muttering some magical enchantment for the Necro Spell Pile of Bones. After a brief bout of starting lag, Volknerr and his Necronstaff collapse into a pile of bones, resembling the ones your Zombies fall into when they are defeated. From here, Volknerr is completely immobile, but able to perform his Neutral and Side Specials effectively. Volknerr CAN be hit, however, and if he’s dealt any attack by an opponent his bones will laggily re-assemble themselves. He isn't entirely invisible either, as that Dragon Hatchling skull he wears is very much a visual indicator of where he is, even if it does somewhat blend in with the other bones, it’s still visually different (and larger) than a human skull.

Also of note is that Volknerr’s Impaler, Vlad, does not sink into the pile of bones, instead scurrying off, giving players full control. Vlad moves at a speed of 2 and is about the size and weight of Pikachu. Vlad uses the Smashes, and can still do so when being controlled directly. It can use the smashes in the air, and climb up walls because it can’t jump (the only way it’ll end up in the air is with knockback), and if it’s knocked off the stage, it’s gone for the stock. It has it’s own invisible damage meter, though by default it starts with the same damage that Volknerr has taken.

Opponents who so much as touch Vlad in passing will have it latch onto them like a parasite, and begin to suck their soul out through wherever it’s latched. Opponents will be dealt 2% damage per second with Vlad attached to them, but will also have every move in their arsenal besides specials replaced with a sword swing. Their Smashes also become absurdly powerful, each dealing 20% damage and good knockback in the direction that they where used, making Vlad an excellent repellent for Volknerr’s Zombies, if the sword weren't so heavy that the smashes are predictable and very laggy. While Vlad is attached to opponents, Volknerr can still make Vlad use it’s Smashes, which will effect foes like any other smash.

Opponents also cannot get rid of Vlad on their own, having to wait for Volknerr to call it back (which he’ll want to – they’ll tear through your Zombies with Vlad) by double-tapping the Special button. Volknerr can also use the double-tapping to release Vlad without turning into a Pile of Bones, as from here Vlad will be controlled by a fairly smart AI ally, though Volknerr still controls when Vlad uses his attacks. With this, Vlad becomes yet another thing to avoid during the match.


Side Special <> Gaseous Breath
Volknerr holds the Necronstaff forward, uttering another spell. The mouth on the staff opens up, releasing a gas that spreads about and expands at 2 SBUs per second, holding it out for 3 seconds. The gas is a sickly green color, and deals 2% damage per second to anyone standing in it. The gas cloud can be added to at anytime, but the gas itself only stays onstage for 5 seconds before dissipating. The gas cloud obscures everything that enters it, showing only vague outlines of the foes and minions trapped within. Volknerr is completely vulnerable during the beginning lag, duration, and ending lag of the move, so it’s in your best interest to defend yourself before using it.

The gas can be pushed around by wind moves, too. Trapping foes in the gas cloud with Zombies is one of the best ways to quickly rack damage and make sure the foe can’t see where they’re going to go. Another good use is to use a quick one over the corpses of dead Zombies to mask his hiding among them, making it harder for opponents to find where you hide among the bones. During the time you are in a Pile of Bones, Volknerr can secretly add on to the gas cloud, as it would be impossible to tell where the gas comes from while inside.


Up Special <> Union With The Dead
Volknerr reaches into his satchel, pulling out a pair of Dragon Wings the size of Charizard’s. He places them on his back, muttering a spell as a green aura covers him. After exactly 1 second of lag, the Dragon Wings become a part of him, allowing him to zip through the skies at the speed of Captain Falcon’s dash with full free-flight. During this time, he has access to his Smashes, Throws and Specials only, as all of his aerials and tilts have been replaced with powerful flaps of his wings, which create wind hitboxes in said direction. He stays in this state for 10 seconds before the magic wears off and the Dragon Wings fall, unusable. While this may seem like a very good move, and may even be a bit broken, here’s the thing: this is Volknerr’s only recovery. And, just like all Necromancers are limited to what supplies they have on them, so is he: he can only use this move twice per stock, as he only has 2 pairs of the rare wings with him.

STANDARD ATTACKS

Jab <> Bite
Volknerr thrusts the Necronstaff forward, reaching a full SBU forward. The center most skull on the staff then bites down, dealing a good 5% damage. It also is a grab hitbox, latching onto anyone it hits, allowing Volknerr to use directional throws in any direction he chooses for set knockback. He can use this move on any moving thing on the stage – minions, opponents, Zombies… It’s a good spacing move, as well as a great move for putting Zombies in their place.

Forward Tilt <> Sands of Time
Volknerr holds forth the Necronstaff, which begins releasing a misty White aura. The mist reaches forward a good SBU in front of Volknerr’s position, floating in the direction in almost a snake-like way. If an opponent is in the vicinity of this mist, the simply freeze in place – yes, opponents will simply freeze in their positions in the air, the freeze lasting for .5 seconds. Volknerr is totally vulnerable while casting the spell, adding to the medium lag that surrounds the move. This is a good move for getting Volknerr out of trouble, allowing him to get the hell out of dodge, as well as making opponents easier pickings for Zombies to lunge after..

Down Tilt <> Rattling Bones
Volknerr slams the Necronstaff into the ground, creating a small shock-wave that reaches 1.5 SBUs in both directions around him. Any opponents who are hit by the shock-wave are dealt 5% damage and trip, though that’s about it. Any Zombies in that are caught in the shock-wave will fall into a pile of bones, completely immobile. These Zombies will be raised alongside new Zombies whenever the Neutral Special is used, allowing you to store Zombies and cheat a little: with this, you can produce even more undead at any time, controlling where they raise to catch opponents off guard. The limit for active Zombies remains 15.

Up Tilt <> Drag Down
Volknerr reaches up with his clawed hand, jumping slightly. If he manages to come into contact with an opponent, he grabs, pulling them downward and slamming them into the ground, dealing 6% damage. Yes, this is a generic pull-down move, but it works well with several other moves, especially some of your throws, as well as getting falling or jumping Zombies in front of you.

GRAB GAME

Grab <> Dragon Claw
Volknerr reaches forward with his Dragon Clawed hand for a deceptively awesome grab range, reaching a bit farther than the fat penguin monarch. He grabs foes by the face, pulling them in very near to him, and pummels them by squeezing down on their face, dealing 3% damage each squeeze. This grab does come with a bit of heavy lag if missed, as that claw is heavy (it alone adds 1 unit to weight) and hard to control, so it takes Volknerr a quick second to recover.

Down Throw <> Stench of the Dead
Volknerr pins the opponent down with his Dragon Claw, holding the Necronstaff to their face. He releases a red mist, which covers the opponent and produces a red aura around them. After this, he gives them a whack with the handel of the Necronstaff, sliding them across the ground a good 1/2 SBU away, with 5% damage to boot. Volknerr has just cursed the opponents with Stench of the Dead, a spell which attracts all undead creatures with the smell of rotted flesh, a Zombie’s primary food source in Rifts. Any and all of Volknerr’s Zombies on the stage will turn to the cursed opponent, ignoring all other chases and foodstuffs, giving chase relentlessly for the next 5 seconds, which is as long as the aura lasts. The Zombies will now go back to their normal ways, the stench having left them, acting as they normally would. Obviously, this goes great after you freeze opponents for half a second.

Back Throw <> Death Trance
Volknerr holds opponents out in front of him, bringing the Necronstaff up to their face. This time, he releases a Black aura from the mouth of the skull, causing the opponent’s eyes to glaze over and gain a blank expression on their face. Opponents now have their movement halved and attack speed greatly reduced, resembling the Zombies in movement. Jumps and aerial movement stay the same, and the opponent can use all of their attacks normally, if a bit more slowly and punishable. This status effect lasts for 4 seconds, and besides slowing opponent’s approach, also makes them easy pickings for Zombies.

Up Throw <> Dragon Strength
Volknerr uses the great strength in his dragon hand to heave the opponent far into the air, dealing no damage but a large about of diagonal vertical knockback. Toss opponents into the air, into zombie hordes, or just get them out of your face.

Forward Throw <>Dragon Hold
Volknerr, holding the opponent, fully extends his dragon-handed arm, holding the opponent by their neck and dangling them. He whispers a single word: "feed". A single zombie pops out of the ground, grabs them, and drags them 2 SBUs away at a surprisingly fast speed.

AERIAL ATTACKS

Aerial Jab <> Swipe
Volknerr swipes forward with his Dragon Claw, reaching about 3/4ths of a SBU forward, dealing 3% damage to any opponent it comes into contact with. It also works the way Mario’s cape works, turning around projectiles and characters it contacts. This is a good way to get Zombies going in the right direction, as well as to generally protect yourself from enemies who are camping with their projectiles.

Forward Aerial <> Wind Magic
Volknerr swishes his cape forward, creating a wind hitbox the strength of on of Kirby's inhales, which travels forward 3 SBUs and is as tall as Volknerr. This can of course push opponents around, especially if there are Zombies they're running after, but it can also push around Volknerr's smoke and mists, allowing him to move his obscuring veil around at his will.
Down Aerial <> Twister
Volknerr twists and contorts his body, causing a tornado to appear underneath him. The tornado is about the size of one that would appear on Hyrule temple in the original smash, acting basically the same way to opponents, swirling them around for 7% damage and spitting them out the top for decent vertical knockback, with more of a suction effect the strength of Kirby's suck. The twister falls to the ground, and once it hits, travels (to the right, automatically) at the speed of Ganon's walk. It will continue moving for about 3 SBUs before dissipating, mixing up bones scattered around while it moves, mixing around where not only your hidden zombies are, but possibly where you are hiding among them, especially useful if you've hidden among the smoke clouds and mist.

Back Aerial <> Staff Smack
Volknerr holds his staff like a battering ram, jabbing it behind him, and pulling it back. The range is pretty good, reaching as far back as Ike is tall, dealing 7% damage to anyone it hits, dealing a bit of knockback.
Up Aerial <> Blast
Showing off a bit of offensive magic, Volknerr creates a small explosion directly above him, dealing 7% damage and decent verticle knockback. It's a decent juggling tool that can be used to knock opponents away when set-up time is needed, or for your own retreat: while you can hold your own in the air, you won't be dealing any killing blows up there.

SMASH ATTACKS


Up Smash <> Impaler Spikes
If Vlad is still at Volknerr’s side, the charging animation is the same for all of the other smashes: Volknerr grabbing it’s hilt, preparing to swing it. After charge has been released, stabs forward with Vlad, reaching a full 1 and 1/2 SBUs diagonally upwards. This swing alone does 15% damage and fairly good knockback, but is also incredibly laggy (Impalers are very heavy weapons, and Volknerr isn’t exactly the strongest human), leaving him open to attacks from the back. Notice I said from the back, as this move deals a second hit. After the first initial swing, there is a brief beat, before the 4 spikes sticking out of the Impaler (2 on top, 2 on bottom) extend out in their particular directions, each reaching another 1.5 SBUs out from the sword original hit length.

The angles of the spikes are all 30 degrees outward from each other, making this an effective wall that is hard to avoid. The entire length of the spikes are hitboxes, which deal 10% damage to any enemy they hit, along with Pinning them in place. This Impaling of the foe isn’t exactly hard to break out of, and all moves that don’t require the foe to dash are still usable in this state. Opponents, however, cannot move while pinned down, making them easy pickings for Zombie attacks. The Spikes retract themselves after 2 seconds, again making this very powerful attack very slow and very punishable if it misses.

If Vlad is independent of Volknerr, the spikes function in largely the same way, except Vlad points itself straight upwards, so the angles hit differently, but the function is largely the same. Same deal if it has attached itself to an opponent.


Forward Smash <> Charging Blow
Taking the same charging stance, Volknerr makes one adjustment to the animation: hit foot is now pointed out further than the other smashes. He then pretty much copies Ike’s Side Special, in terms of animation, charging forward 2-5 SBUs, getting dragged behind Vlad as it flies forward. It will fly the full distance, cutting through any opponents it touches, dealing 20% damage and huge upwards knockback, making this a very good KO move. As said, though, the ending lag is atrocious, leaving Volknerr open to any attack that the opponent wishes to hit him with.

If Vlad is out by itself, the move functions almost exactly the same way, the only difference being in the length Vlad can travel and the lag: the move will only reach 1-3 SBUs, along with a much shorter hitbox, as well and having the ending lag halved so that it is not quite so horrible.


If Vlad has gone and attached itself to an opponent, it will drag that opponent 1-3 SBUs in whichever direction the attack was input. Instead of using this as an opportunity to kill, Vlad actually covers itself in a magical barrier that prevents it from harming others, meaning, hey, you can drag opponents right into a gigantic zombie horde.

Down Smash <> Low Sweep
Volknerr takes the same stance as his Up Smash as he charges, making it fairly good for mind-gaming. After the relatively low charge time, Volknerr uses Vlad as an actual sword for once, delivering a low sweeping blow that deals 17% damage and good knockback to anyone it hits. The lowness of the sweep can also disrupt the bones of the Zombies, causing them to scatter when hit, mixing them up.

When Vlad is alone, it can use this move to accomplish pretty much the same goal, delivering hard blows and scattering Zombie bones. This is especially good when used in tandem with your Neutral Special, being able to more effectively hide Volknerr (all of his bones will stay in the same pile when scattered because of magic), as well as any hidden Zombies in the bones.


Final Smash <> Great Dragon
Volknerr reaches into his satchel, pulling out the various bones of a dragon hatchling. Chanting an incantation, he fuses with all of the bones, including the skull he wears around his neck, to form a dragon the size of Charizard! Here, he breathes a great fire, one which engulfs the entire screen, (so far as the side he breathes it to, best used at the left-hand side of the stage) dealing 50% damage and huge knockback to anyone it hits. Spent, Volknerr reverts back to his human form.

Playstyle section coming later.
 
Last edited:

FrozenRoy

Smash Lord
Joined
Apr 26, 2007
Messages
1,268
Location
Las Vegas, Nevada
Switch FC
SW-1325-2408-7513
I have not commented in quite a while, so Let's Comment! (Comment Corner will be updated today or tomorrow)

Coughing

We're just on a roll for pre-evos of older Pokesets, huh? Croagunk for Toxicroak, Koffing for Weezing...I wonder what else we might see like this before contest's end. Perhaps Grimer from you as well?

I find the Pummel odd in the sense of the foe giving it off as they move about. If it were, say, some kind of poisonous slime or something that would make sense, but it feels odd if Koffing is using his gas: Koffing is producind gas via his chemical whatchamjiggers and letting it out via his vents, while foes don't really have such a thing, so it feels odd to have them exuding gas.

Falcon's blaster? He wishes he had a projectile...

This is actually a pretty solid set, though. The play with the gas is fairly nice in basicness, although sometimes I think you might rely on Self-Destruct a bit too often, if that makes sense. In addition, Koffing's recovery seems a bit worse than you make it out to be, since Koffing's recovery seems quite predictable and without a hitbix aside from his trailing gas. The utilization of prone as a complimentary aspect of the set is quite well handled, I feel, as it does not devolve into making it a win-win scenario while still allowing Koffing a certain amount of ability to play around with it. So that's quite nice. One issue I had a few times is that the times seem a bit long on the moves at times, such as the smokescreen, though that is partially due to the nature of it's damage. And at times, the writing does seem confounding at times, but I am one of the worse people at understanding stuff it seems.

All the same, the playstyle is solid and strong, the characterization is good and it doesn't feel like it is filler, plus it seems quite fun to play, so I'd say I like it a fair deal. Better than...Ultron, I'd say.

Also...no Final Smash? :c

GyaRAAAAAAAAAAAAAGHdos

I will admit, I'm not the biggest fan of Gyarados movement in this set. It feels like an awkward start and not the most fitting for Gyaradoes: I agree with Kalmar that it feels like a game of Snake, though I suppose it does capture the feeling of a majestic flying Gyarados. It still feels...weird, though.

Gyarados does make up for it's awkwardness by taking good advantage of it, though. It feels much more smooth than in, say, Big Mac's Gruesome Twosome set, where the dragon felt more awkward. I quite like the use of waterfall on it, which feels unique but not disastrously odd or overpowered, and Hydro Pump is also a bit interesting, along with how Hyper Beam harkens back to RBY in how it is used. One thing that is dissapointing is something I disliked about Silver's Shana set as well: Gyarados' Dragon Dance buff is not only strong, but thanks to his movement is very easy to achieve, turning Gyarados into perhaps too MUCH of an engine of rage empowered destruction. 60% is hella insane. And does permanant mean it lasts between stocks or just on one stock? It is a definite area of improvement. I also feel like the Special Smashes were a bit of a wasted chance: I do quite like Hyper Beam, but the rest are kind of eh. Plus, for a set that spends a lot of time in the air, he lacks aerials: Couldn't you have put them on a double tap or something? It feels awkward. Finally, I don't like Wrap much.

I actually like a fair bit of the grab game: I am a fan of Dragon Tail and Rebound also seems decent, the grab itself is fine (And has fun uses given his positining abilities) and the pummel adds some character. I am not a big fan of the other two throws, though: Consume is the one I dislike most, as it feels quite out of place to me, while Slam feels a bit oddly complex compared to his grabs and while not luck based it seems difficult in a way that does not feel skillful.

But the it is fairly good. The basic standards help create a rich playstyle, the specials provide a nice centerpiece combined with the mechanic and it has a few fun extra toys to add in to it. I don't think it is as good as Koffing, but it is still above average.

Haven't Ya Ever Seen a Pink Girl Before?!

Bad Girl's problem, in my opinion, stems from a lack of clear playstyle coherence. Bad Girl clearly has something she is going for, berserker rushdown, and she actually has a pretty good starting basis for it with the beer and the Side Special and the clones, but I feel like the set really leaves something to be desired after the specials. The moves are there, sure, and they aren't that bad (usually), but they don't seem to especially fit into her berserker playstyle much or form a wider picture of a playstyle. Having moves outside the context of playstyle is fine, but here it seems like there is so much of that that there ends up being little focus and ergo less playstyle than I would like. I would have maybe liked some moves that worked with the fire more directly, such as increased damage, to make blitzing an enflamed foe more attractive, or just in general attacks that fit more of a "rushdown" approach: Bad GIrl's current moves feel more suited to a Marth many times.

Still, it is a step up from Jinbe: The attacks seem better thought out even if they didn't come out the way I'd like, the basis is stronger and more thought out and as a whole it feels more polished than Jinbe. I still can't say I liked it but...hey, improvement!

Kentucky Fried Pokemon

Blaziken's concept isn't bad and is actually kind of similiar to Bad Girl: Quick attack combos and up close and personal rushdownness. I like that kinda playstyle. Blaziken doesn't have much for it, though, in my opinion: His attack are very basic but, rather in a way that builds to an overall goal, in a way that is scattershot, and the quick attacks feel there just to be quick rather than to specificlly work into things, with the exception of the jab. I would have liked to have seen more from this, an expansion of the concept if you will...say, imagine if Blaziken could raise his speed by using a Flame Charge Special, but that Flame Charge is hard to hit unless you keep up the pressure with your quick attacks. Blaziken would then have a little more focus to his game, while at the same time adding in depth to his playstyle with this new move that mixes into it and helps deepen the experience. As it is right now, though, it doesn't feel particularly good, but my dislike of it is muted. Still, I do wish that we had seen more from this...but I look forward to what you come up with next. c:
 

TheKalmarKing

Smash Apprentice
Joined
Mar 7, 2013
Messages
162
Haven't Ya Ever Seen a Pink Girl Before?!

Bad Girl's problem, in my opinion, stems from a lack of clear playstyle coherence. Bad Girl clearly has something she is going for, berserker rushdown, and she actually has a pretty good starting basis for it with the beer and the Side Special and the clones, but I feel like the set really leaves something to be desired after the specials. The moves are there, sure, and they aren't that bad (usually), but they don't seem to especially fit into her berserker playstyle much or form a wider picture of a playstyle. Having moves outside the context of playstyle is fine, but here it seems like there is so much of that that there ends up being little focus and ergo less playstyle than I would like. I would have maybe liked some moves that worked with the fire more directly, such as increased damage, to make blitzing an enflamed foe more attractive, or just in general attacks that fit more of a "rushdown" approach: Bad GIrl's current moves feel more suited to a Marth many times.

Still, it is a step up from Jinbe: The attacks seem better thought out even if they didn't come out the way I'd like, the basis is stronger and more thought out and as a whole it feels more polished than Jinbe. I still can't say I liked it but...hey, improvement!
Thanks for da revieww (Yay my first one), and let's answer your criticism step by step.

I'll agree with you that some of her moves feel out-of-playstyle, but I think it's not that bad. Many of her moves actually are really neat when used along with the fires; for example, she could make somebody trip in her fires with her D-Tilt (Plus she can rack up some damage with her jab after that), and her grabs are pretty useful to throw the opponent in fires. You see, her main goal is both to rush is the opponent, and to take him where she wants; a basic rundown of her would be "Summon clones, set stage on fire, stun opponent". That's a very basic description, but it's still a good summary.

You can say it's not really a berserker character then, and it's not entirely wrong. She spends a lot of time setting up. But, I still think she works pretty well (I'm giving myself a 4.5 if you wanna know). But again, I admit she's kind of a Frankenstein monster, both a berserker and a stage-controller. I'll think about all of those little problems when writing Lobo! (Because yes it's official, I'm working on Lobo)
 

Katapultar

Smash Lord
Joined
Nov 24, 2008
Messages
1,284
Location
Australia
[collapse=Dark Falz]We get you are rather ambitious about the voodoo-doll concept as far as movesetting goes, though I at least appreciate the elaboration on Falz's backstory. I was pretty excited to see Chaos Sorcerers included in the set, which are actually pretty well-executed since you can program them to stay close to Falz at the start of the move for Smash charging, and without the necessity to use later moves for that kind of interaction. The Chaos Sorcerer's attacks might seem random, but actually flow into Falz attempting a grab on the foe since the ones that require them close-up don't deal knockback (falz's massive grab range compliments this too since he can grab through a minion). Thought that Falz would have a hard enough time trying to land his grab in a 3v1 setting otherwise.

As far as the voodoo doll effect is concerned, it is given greater room for more interesting exploitations because of the minions, though it does not feel dominant in the set whereas being able to summon more minions at a greater capacity, say more enemies from the Ruins level, would provide an interesting scenario where you can scare enemies into not attacking a massive group of smaller enemies by dumping a soul into one. The later parts of the set compromised by projectiles on nearly each move don't feel as though they work with the voodoo doll effect all that well and seem a bit boring (even if they are somewhat "in-character" for a video game boss), though I admittedly really liked the idea introduced in the Jab where you can keep the projectile hanging around you for protection by charging a Smash attack so you can actually land that insta-death F-Smash. Likewise, the U-tilt introduces something relatively cool in conjunction with the voodoo doll effect. Make no mistake, the set is good, though I feel it was perhaps bogged down by the emphasis on bullet hell when it seemed like you really wanted to take advantage of the voodoo effect what with remaking this character.
 

Katapultar

Smash Lord
Joined
Nov 24, 2008
Messages
1,284
Location
Australia
[collapse=Spider Man]Now this is a really awesome kind of set we've been waiting for, one where somebody actually takes a classic comic book character and gives them the 5-star treatment. This actually feels every bit like Spider Man and feels rightfully approached, which for me is practically the pinnacle of perfection when combined with the passionate presentation. My only real nitpick is why Spider Man can't magically tether his Up Special web to the sky and use it to swing around when he's actually seen doing that in his source material, because if it's just for balancing purposes I don't think it would make him overpowering or anything. If I was a Spider Man fan coming in to play this set, I would actually expect the web to do what I just described. The Neutral Special feels a tad dry what with just bluntly trapping the foe, though it would obviously feel very wrong for it to be a trap and illogical to be a generic projectile. It is okay how it is I guess. I don't have much else to say when my praise was already been concentrated at the beginning, but this is a great relic for Spider Man that the two of you should be very proud of. It will definitely get a high vote from me should the time come.
 

JOE!

Smash Hero
Joined
Oct 5, 2008
Messages
8,075
Location
Dedham, MA
Web swing hitting the sky was seriously considered. We felt that it'd be too good as its an infinite tether in a sense, and that spidey is always assumed to be swinging off of something, not just the sky. Emulating games like spiderman 2, and the movies where you do see what he swings from.

It'd also be kinda awkward that he essentially swings off the "sky" on like FD lol.
 

TheKalmarKing

Smash Apprentice
Joined
Mar 7, 2013
Messages
162
Spider-Man

Favorite set of the contest for now no questions asked. The presentation is really awesome, and the set itself is great. I wasn't disappointed in the least, it was even better than I thought. You're practically guaranteed to get my Super-Vote. A very minor complaint would be the "awkwardness" of some moves like the U-Air but Spidey's style isn't very orthodox anyway...

Also webbing the sky would be too bizarre now; perhaps it would be a good nostalgic reference, but nowadays Spidey is always pictured as using buildings as anchors. And I don't remember webbing the sky in Spiderman 2 on PS2... Or was that point fixed in Spiderman 3?


Volknerr

That's a rather ineteresting set: I like the interactions with the zombies and the fog, which is certainly an useful tool. Now my main problem is with the sword, Vlad; I can't even picture that weapon in mind, it is... a strangely shaped weapon. Also the smashes are really awkward and the mechanics behind it are quite quirky, but not in a very good way. I feel that it's one of the set's two biggest problems. The other one is- apart from some good interactions like I said before, it's not very exciting. The moves are rather bland and really, there is nothing quite unforgettable. Still, I don't dislike it entirely... So I'll give you something llike a 4.5.
 

JOE!

Smash Hero
Joined
Oct 5, 2008
Messages
8,075
Location
Dedham, MA
Spiderman 2 was the first game to show him having to swing from buildings etc.

Also, I forgot his ledge game! It's been edited in! (hippo)

And Kalmar, I keep seeing these grades you're giving. Are you doing a ranking like Froy?
 

TheKalmarKing

Smash Apprentice
Joined
Mar 7, 2013
Messages
162
Perhaps will I do a Froy-like ranking later, but for now it's just an appreciation, nothing more.
 

BKupa666

Barnacled Boss
Moderator
Joined
Aug 12, 2008
Messages
7,788
Location
Toxic Tower
DARK FALZ
I don’t know if I’ve voiced this in the past, but I’m a rather big fan of sets that steal and manipulate souls, and Falz certainly fits the bill in this regard. What differentiates him most successfully is that he doesn’t necessarily have to take advantage of stealing multiple souls, despite being a 3 vs. 1 character, in favor of simply abusing one to waylay the opposing team to the best of his ability. Implanting the soul within an enemy throws a major wrench into their plans, allowing Falz time to capitalize, while doing so into a minion renders it a more stubborn summon. The sub-centerpieces of the set are something to be proud of as well, particularly the option to switch between Falz and an enemy with D-Throw. Sabotaging the enemy team by infiltrating it is juicy enough without the added possibility of pretending to remain on their side for as long as possible to ultimately damage them more over the long run. I do question the F-Smash insta-KO a bit, since despite the difficulty in setting it up, you could probably achieve the effect of its brokenness without going to this extent. On a more minor note, I think the soul-steal could have swapped places with, say, Neutral Special and been a tad more fitting, but this is nitpicking more than anything. You’ve easily achieved what you set out to do in improving this character’s set, so hopefully, his ultimate placement follows suit as well.

Volknerr/Spidey to follow
 

BridgesWithTurtles

Smash Champion
Joined
Apr 18, 2013
Messages
2,177
Location
The long road to nowhere
3DS FC
3523-2059-7939
Wow, a lot of activity lately. I dunno if I can keep up with reading them. I can give a feedback on a couple of sets, I suppose.

Oh, boy, look what we have here...

Spider-Man is very good. Great, in fact. There's really nothing I can honestly find negative in the set. The music was a very nice touch, and fit the mood of the text very well, in addition to being so well-timed to my reading speed that it ended at the perfect moment, another plus. I can tell you put a lot of time into this, from the visuals to the audio and even into the presentation of the wording. As for the meat and potatoes of the set, everything blends well into a scrumptious spider-stew of moveset goodness. While it definitely aims at being an unorthodox playstyle - and you did manage to be creative - nothing felt "forced" in that every action is something one would expect Spider-Man to do, and no notable component of the superhero's arsenal was left out. Webbing the opponent as a cocoon suspended from the ledge is a fantastic idea that I must applaud. There's not much else to say. I really like it. Overall, it's a really great set that will certainly have a vote from me.

Moving on, Volknerr is...different. More gaseous hitboxes, I see, which is nice, but the gas/smoke-based moves don't really seem to blend with the rest of the set. I do like minion sets, but this one feels like the minions are, depending on the scenario, either all the character needs to win, or completely useless. I do like how the set can be used against itself, with Vlad being susceptible to being used against Volknerr's zombies, but when attached to opponents, Vlad seems so powerful that the zombies become pointless in protecting. Why keep slow, avoidable minions around when the sword does 20% damage per hit and can stick to the enemy? The set-ups are good; Volknerr has plenty of moves to move around his zombies and make his opponents susceptible to them. That part of the set is its shining point, in my opinion. So while it's not bad, it feels...a bit cluttered, I suppose. With some refinement, it could easily become a great minion-using moveset.
 

JOE!

Smash Hero
Joined
Oct 5, 2008
Messages
8,075
Location
Dedham, MA
Cool, somebody noticed how the music matched the set as you read it :p

Also, because I feel like it and the challenge minis are going nowhere, how about I foster some activity?


Pick a MYM14 character and make an event match for them.

how hard could it be?

(Also, no reaction to the after-credits post?)
 

Katapultar

Smash Lord
Joined
Nov 24, 2008
Messages
1,284
Location
Australia
Event Match 147 - Don't Mess With a Magician

Ever wondered how the races came to an end?
Now witness a catastrophe you can never mend.

Play As: Merlina (2 Stock)
Play Against: Gruesome Twosome, Ant Hill Mob (1 Stock each)
Stage: Mario Circuit
Music: Midna's Lament

You start off as Merlina on the left hand side of the stage, whereby the two racers are stationed on the opposite side, Twosome on the top platform and the Mob on the bottom. If you couldn't tell by the set-up, the two racers aren't interested in you but rather winning the race - both are hellbent on driving through the blast zone on the opposite side of the stage (Twosome flies to get over the platforms he's faced with), which'll cause them to loop and re-appear on the opposite platform they started from with all their momentum in-tact. Depending on the difficulty, should one racer cross 9/6/3 laps you'll get an instant game over.

And then we have our dear little Merlina, who is butt-mad at the racers for some indiscernible reason, so much she seems to want to shut them down. She has plenty of ways to do that, mainly her Side Special, Down Special and D-tilt counter that works wonders against giant characters with hitboxes on them whenever they move. One easy way to finish the Event Match is to move past the racers and wait for them to finish a lap so you can intercept them with a D-tilt counter, kicking them off the screen for a humiliating OHKO. You could also disrupt the momentum of the racer on the top platform and time it so they fall, forcing them on the same track as their rival. Should you manage to disrupt them momentum of the latter racer, you can make it so they block off their rival and take damage from them in anger, which is certainly nifty. Don't underestimate your plethora of static hitboxes, nor the Shy Guys that can come out to assist you (they appear normally on Easy, rarely on Normal and never on Hard).
 

darth meanie

Smash Journeyman
Joined
Jun 6, 2008
Messages
452
Now, I hate to bandwagon praise on a moveset, but it should come as no surprise to anyone that Spider-Man is my favorite set in this contest, bar none. JOE! and n88 prove to be a wonderful combination here, making a moveset that feels perfectly in-smash, full of depth, and unique and fun to play. I can't praise you both enough for resisting the temptation to make the web-slinger web-swing off of the top blast zone or a generic point in space. There's so much depth to be explored in the web swinging mechanic, jumping from low and high points to maneuver the stage. It's hardly a disadvantage for him either; he can still tether to ledges, and even on a stage with no platforms like Final Destination, I can imagine all sorts of neat stunts under the lip. And you further improve upon this with his quality aerial game. This is where I feel the set really does come together. You combine a solid aerial game, unique air movement options with web zip and web swing, and a unique ledge game to make him a gimper and aerial combatant that builds off of the source material and feels right at home at smash. You've even made him perfectly fun for free-for-all and team games with the throw game and other moves that feel right at home in one-on-one matches as well. The minimalistic approach you took also leaves the set with very few weaknesses to point out like I am liable to do.

Good job, plain and simple. I can foresee some complaints that the moveset doesn't spend too much time beating in more and more playstyle concepts in every move, but that's really the sets strength. If anything, you understate all the possibilities with his playstyle and leave it to the reader's imagination, a risky move that often gets penalized but I personally laud. Even the basic standard moves all fit into the basic gameplay-style Spider-Man should have. Up tilt helps him get into his aerial techniques, even a simple down tilt is a move that fits how I'd want Spider-Man to feel while playing, fast weak attacks and covering all the bases he needs to focus on his really interesting elements, instead of forcing it into moves it doesn't belong. In a contest with only two other sets I'd like to even weak vote so far, Spider-Man is leagues above the rest.
 

Kholdstare

Nightmare Weaver
Joined
Oct 10, 2008
Messages
1,441
(Also, no reaction to the after-credits post?)
Ohhh ,y god. Ohhhhhhhhhhhhh THERE IT IS THERE IT IS. THERE IT IS. OH MY GOD. EAYEAYEYAYEAHEYAHEY EYAEAAAAAAA YEAAAAAAAAAAAAAAA YEAAAAAAAAAAAAAAAAAAAAAAAAAAAAAAAAAA YEAAAAAS. I FOOUND IT. I FOUND IT. I FOUND IT. I FOUND IT. YEAH. YEAAAAAAAAAAAAAAAH. I FOUNDI IT FINALLY!!!!! YEAH!!!!! OH MY GOD. OH MY GOD I FINALLY FOUND IT. OH MY GODO. HOH MY GOD. I CAN’T BELIEVE IT. TAKE A LOOK AT HTIS EVERBODY. A LIVE SHINY PONYTA IN MY LEAF GREEN VERSION. I CAN’T BELIEVE THIS. I CAN’T BELIEVE THIS. I FINALLY GOT IT. OH MY GOD my heart is beating 100 miles per hour. i was listening to my favorite band once again. Sum 41. No Reason. Live in Ontario 2005. after 25968 encounters I HAVE FINALLY GOT IT
 

BridgesWithTurtles

Smash Champion
Joined
Apr 18, 2013
Messages
2,177
Location
The long road to nowhere
3DS FC
3523-2059-7939
Cooperative Event Match - Bomb Squad
The place is gonna blow! With no Poke Balls, it's gonna take a
whole lot of String Shot to slow these Koffing down!
Players: Spider-Man, Shadow​
Opponents: Koffing (10)​
Stage: Fourside​
Conditions: Spider-Man starts with 100% damage​
Spider-Man spawns on the top tower in the middle, Shadow spawns on the lower part of that same building to the right, and the first two Koffing spawn on the rightmost building and crane-hoisted platform on the left. In this event, Spider-Man and Shadow must work cooperatively in order to incapacitate 10 Koffing before they use Self-Destruct, which they are all set to do 15 seconds after spawning. This is accomplished by using Spidey's ledge attack, which hangs Koffing from a cocoon, safely away from the stage. Players will need to successfully encase each Koffing in web before they detonate, which causes them to cancel their programmed explosion and disappear, after which another Koffing will spawn on-stage in its place. This means that the players will only have 15 seconds to take care of the first two Koffing. Using Shadow's speed and Spider-Man's maneuverability, nearly perfect timing is required just to overcome the first hurdle.​
The key strategy in completing this event is using Shadow's Chaos Control to slow down Koffing's detonation, while also making it easier for Spidey to clean house with successful connections with his ledge attack. Spidey can also stall Koffing's detonation with his Web Shot and Back Throw, though only his ledge attack will meet the requirements to send a Koffing packing. Precise cooperation and syncrasy should be met by both players in order to clear this event; if a single Koffing uses Self-Destruct, the mission is failed.​
 

FrozenRoy

Smash Lord
Joined
Apr 26, 2007
Messages
1,268
Location
Las Vegas, Nevada
Switch FC
SW-1325-2408-7513


Sho Minamimoto is a character from The World Ends With You and the youngest Game Master ever seen in Shibuya, taking the reins at the tender age of 18. Arrogant to a fault, Sho excellences in every concievable manner of leadership possible...save for perhaps the most important skill --- he does not cooperate well with others. Sho can't resist flinging math-related jokes or a calculation during a conversation, almost approaching mental instability, and could easily be called "mental". He is a fan favorite and possibly the most popular, but most certainly the most ememtic, character from the game, with oft-repeated quotes such as "So zetta slow!" (Zetta being a prefix used for metric (SI) measurements: It is equal to 10^21 or a sextillion), SOH-CAH-TOA (The abbreviations for the mathematical terms Sine, Cosine and Tangent) and declaring "Crunch! I'll add it to the heap!" (One of Sho's hobbies is collecting massive heaps of random junk). One example of his lack of cooperation is his "Taboo Noise", which will gladly attack your teammates in Brawl and in the game attacked both Player and Reaper alike.


Sho is a fairly tall fellow, which gives him a height approximately on level within one standard deviation of Captain Falcon's, but with a slimmer frame, while his weight is within a standard deviation of Mario's. His speed is equatable to Yoshi's, but his walk is more of a confident stroll while his dash is a bit faster than Yoshi's. His traction is perfect in every form.

Aerially speaking, Sho is aerodynamic and gracefully flies through the sky with excellent control, though he is a bit slow: He is also floaty, making him easier to kill over the top. Both of Sho's jumps are top notch however, so he has amazing recovery when combined with his Up Special. Sho doesn't really have any special flying or floating or anything: He's special in other ways.


Neutral Special: Level i Flare

Sho's strongest ability takes front and center stage! It begins with Sho simply reciting digits of Pi from memory or, more specifically, reciting the first 156 digits of Pi from memory, all voice acted. It takes the same amount of time, 72 frames, to launch as Ganondorf's Warlock Punch, meaning that he is speaking 2.166666666666667 numbers per frame. Once each number has been spoken, the attack is launched!

And it is...quite the odd one. Basically, an explosion pops up wherever the foe is, no matter what, dealing 20% damage that never stales and 0 knockback, just a small flinch. This probably sounds weak, but the secret of Level i Flare is that it cannot be dodged or blocked in ANY way. Air dodge? It still hits. Invincible? Hits. Invisible? Hits. Hiding in a Fly? Hits. No matter what, where or how, Level i Flare cannot be dodged. The ONLY way to stop it is to interrupt the move by attacking Sho during it's absurdly long startup. Still, this leaves Sho a CONSTANT threat, as he can always pull this off to force an approach or the foe WILL take 20% damage. Still, the flinch is quite small, so an opponent can tank the hit to get in a solid strike against Sho, especially since it has a long cooldown time. Enough that opponents that are close to you can, even with the flinch, probably hit you with a smash attack if they just manage to not get to you. In team matches or FFAs, this move will hit everyone who can be hit: If Friendly Fire is on (like in most competitive matches), it will hit your teammates as well. Still, it's raw power cannot be underestimated.

Of course, you can also just spam it to annoy people by counting Pi digits.

Side Special: Shaking the Heart

Sho takes a deep breath as he takes out his megaphone, taking said breath for as long as you hold down B, before releasing it in a massive, megaphone'd and LOUD shout of one of his numerous quotations from the game, chosen at random. While he does so, the sigil of Taboo Noise appears in front of him, summoning a Taboo Noise before disappearing. Can we get an image of that?


Thank you. The Taboo Noise minion fights for Sho and will not personally harm him, but will gleefully hunt after teammates as well as enemies in matches such as Team or CtF, making Sho a danger to all sides. This is even if Team Attack is off: They'll still harm them, much like a Link bomb. While Taboo Noise are strong enough to damage foes on their own, one of their primary uses is simply to keep foes busy while Sho uses Level i Flare, forcing foes to come after him AND deal with minions. This can be quite a bother to deal with. As a note, it has starting and ending lag in the range of the Waddle Dee Toss.

Under the spoiler is a list of the Taboo Noise that can be summoned, in addition to how long you must hold down the Special button for this (IE if one says 30 frames and another says 40 frames, then anywhere from 30-39 frames will summon the 30 framer and 40 will summon the 40 framer and so on and so forth). Also, apologies for the small images: they were all I could find.

Taboo Noise Bestiary:
Choirfrog


Charge Time: None
HP: 20

The Choirfrog is your most basic minion and can be summoned without any charge time at all, making it the most spammable. At the same time, it is quite weak, requiring only 20 damage to dispel and not having much in the way of attacking. Despite this, their ability to be summoned many times at once is paramount. It does not move very fast and is light.

The Choirfrog only has three attacks. The first is it's jump: If it lands on a foe, it will footstool off of them, stunning them for a bit and dealing no damage. While it deals no damage, it is very quick and the Choirfrog loves to try and use it to edgeguard foes, even at the cost of it's own life. It also jumps as high as Falco's first jump, so it goes quite high. The second is inflating it's throat sac, before releasing three bubble projectiles, which lazily float forward a full Battlefield platform before collapsing. These only deal 3% damage, but they deal surprisingly high hitstun, making them extremely annoying and dangerous in groups. Fortunately, any attack hitting them will dispel them without taking damage. This attack is quick. The final attack is lashing out with it's tongue and, if anyone is caught in it's Link's hookshot level range, yanking them to the Choirfrog's position. This deals no damage, but is very useful for keeping foes away from Sho. Choirfrogs, when there are many minions, like to hide near the minions and abuse this to get foes close. Dodge it or kill the Choirfrog to mess with it, as this move has high ending lag if it misses.

The Choirfrog, while weak, is a very spammable and annoying minion who can support all of your other Taboo Noise, so don't overlook it!

Carcinopunk


Charge Time: 5 Frames
HP: 50

The Carcinopunk is your next crabby minion, created by simply holding the B button for the smallest of moments. While the Choirfrog is easily spammed and supportive, the Carcinopunk is almost entirely about survival. With 50 HP, it takes quite a while to defeat, and it is fairly heavy, though it is also very slow. It has two jumps, but both are very poor. It cannot be grabbed: Any grab will be countered by a quick pincer pinch before anything can be done.

The Carcinopunk only has two attacks and only one is a true attack. The first attack is that is simply reaching out it's pincer and snapping it, a decent ranged and quick attack that deals 5% damage and weak knockback. The Carcinopunk will always try to use this to hit the foe. The second is to bring all of itself into its shell, rendering it impervious to all damage. While this takes a while, the Carcinopunk can stay in there for a theoritically indefinite time, although it will eventually come out, especially if the foe walks away for a bit. While this may seem like a stalling tactic, a foe cannot simply camp the Carcinopunk due to other minions and Sho's NSpec, making it an effective way for the Carcinopunk to wait and then strike when the time is right. While it has high starting lag, it has quite low ending lag, making for a quick getaway when the foe is distracted.

The Carcinopunk is all about keeping the foe off guard with defensive tactics and keeping them busy. It can't do much damage, but you also can't ignore it. A good opening move is to summon a Carcinopunk followed by a Choirfrog, as the Choirfrog's ranged attacks and ability to space the foe with it's tongue work great with the Carcinopunk's defensive abilities, while both are quick to summon.

Grunge Wolf


Charge Time: 10 Frames
HP: 25

The Grunge Wolf is your first truly "offensive" Taboo Noise and will be your most basic offensive backbone minio, although his 25 HP means he does in a good 2 hits from most characters. The Grunge Wolf is a fragile speedster type, with a low weight but pretty quick ground and air speed, which combine with the low HP makes it an easily killed but offensively inclined footsoldier. One issue, however, is that it only has two attacks. It only has one jump.

It's first attack is simply to run at a foe and hit them with a simple, quick, short ranged bite for 8% damage and low-medium knockback. The Grunge Wolf will relentlessly pursue a foe it selects to do this too until it hits or fails to hit for 2 seconds, upon which it goes idle again. The other is it's "Blazing Rush" attack, where it rushes a Battlefield platform ahead at Sonic's speed, leaving behind fire in its wake. The fire will remain for about 3 seconds as a trap that deals 7% damage and light upwards knockback to anyone, including Sho, who gets into it.

Grunge Wolves are annoying because their relentless first attack makes it hard to get to Sho without either dealing with them or getting punished, although 360 attacks are an excellent way to do so, while the fire traps intermingle with Sho's playstyle to create a truly frustrating experience getting to him. As a simple offensive force, they are invaluable.

Death Metal Mink


Charge Time: 15 Frames
HP: 10

If you thought Grunge Wolves were fragile, they've got nothing on the Death Metal Mink, which is your easiest minion to defeat, with a mere 10 HP. Mink do not have the blazing speed of the Grunge Wolf, though they are still pretty fast, but are very floaty, always float lightly above the ground, even avoiding ground-based traps like Snake's mines unless tripped or some such, and have three jumps. The Mink also has a fairly wide variety of attacks, including one designed to help it overcome it's weaknesses.

The first of these is quite simple, a slash with the wing-like...thingies on their body, which functions a lot like your usual 360 NAir and deals a solid 9% with knockback that KOs at 265%. The second is much more interesting, as the Death Metal Mink rolls, sending a wedge-shaped projectile of air forwards at the speed of Wolf's blaster for about the same amount of length, dealing 12% damage and light knockback TOWARDS the Death Metal Mink: The Mink will usually try to run after this, but it will use it to keep the foe off of Sho or, like with the Choirfrog, try to bring foes into minions.

The final and most deadly of these is the Death Metal Mink's "Whirlwind Dance", as the Death Metal Mink spins rapidly in place, a quick movement with a quick startup, causing the Mink to whirlwind around the stage and pretty much always towards foes at the speed of a quick, grounded Luigi Cyclone. The Mink is utterly invincible during this time and will reflect projectiles, so there is no point in hitting it during it's 1 second duration...after that, however, the Mink suffers huge ending lag, making it easy pickings to be killed unless it is appropriately defended. The Mink will use this to defend itself and attack due to it's quick startup...OR to defend Sho from projectiles, especially highly damaging ones, by reflecting them.

The Dance and projectile make the Mink a deadly foe, but it's low HP means it requires constant support, especially since it is slowly edging into the summons that take longer to summon. Summon them when you have a solid base to work on.

Wall of Grizzly


Charge Time: 25 Frames
HP: 30

The Wall of Grizzly is your first truly well-rounded minion: With 30 HP, he usually takes a good three hits to down, and while he moves a bit slowly it isn't TOO bad. They have good weight and a normal amount of jumps and a wide variety of attacks, possessing 4 of them! Unfortunately, the Grizzly is also the first minion that takes a truly noticable amount of time to summon, so you usually can only summon it after knocking a foe away, if they are quite far away or after summoning more minions...

The first attack of the Wall of Grizzly's is a simple slash with one of it's front paws, an attack that takes about the time you'd expect a Forward Tilt too, dealing 13% damage and moderate, not-killing knockback. It is a bit slow to start up, but it has low ending lag. The next attack of it is the opposite: A quick slash with a paw, but one that comes out quite quick...but has slow ending lag. It deals the same amount of damage and knockback as the first slash. The Grizzly mixing them up can make it hard to dodge: You can tell which one he is using by looking at what paw he raises to strike. If it is the right paw, then it will be the first attack, while the left paw will be the second.

The third attack, the "Somersault Crusher", is Wall of Grizzly's most deadly attack. Scraping a claw against the ground, the Grizzly sends a shockwave along the ground for 3.141/4ths of a Battlefield platform, which deals 3% damage and trips the foe...while this is going on and shortly after he releases it, the Grizzly lunges forward one Battlefield platform at a low angle, likely catching anyone who was hit by the shockwave. Lunging on them will cause it to crush them with it's claws, dealing 15% damage and upwards knockback that KOs at 180%. At the same time, it takes a good deal of time for him to lunge when you count that he has to send out the shockwave and that this move has a lot of ending lag. Strong and dangerous to both minion and foe.

The final attack of the Wall of Grizzly is for it to howl loudly into the air, looking feral and disturbed as it stops. The Wall of Grizzly has enraged itself and powered up: All of it's attacks do TRIPLE the damage they normally do and kill THREE TIMES as fast! The Wall of Grizzly becomes a very strong ally during this...except for two problems. First, it only lasts for a small amount of time, the effect leaving after three attacks. The other is that the Grizzly has gone totally feral and will damage ANYTHING: Your other minions and even Sho himself included! The Grizzly becomes a total wildcard during this.

While the Grizzly is a very well-balanced minion and has some very powerful moves, it is also slow and a wildcard, so Sho should be careful when summoning them. Sho has trouble KOing foes though, so the tripled knockback is greatly appreciated. Don't forget about the Wall of Grizzly!

Chaoti Corehog


Charge TIme: 30 Frames
HP: 25

The Chaoti Corehog might not have as much HP as the Wall of Grizzly, but it's got other advantages: It's a bit faster (Though still not fast), has a lot smaller of a hitbox and has higher jumps, even if it has the same amount. The Chaoti Corehog only has two attacks, but both are quite deadly. Let's get right to it! There'll be a quiz after!

The Chaoti Corehog's first attack is to fire it's quills into the air, aiming them to come down at the location of the closest opponent. The quills take a moment to get there, so a non-distracted foe can dodge them somewhat easily. Quills that impact a foe deal only 1% damage. Quills will impact the stage if they land on it. The important thing is that, after two seconds, quills EXPLODE, dealing a solid 14% damage, albeit dissapointing knockback. Quills imbedded in the foe will explode as well: You better shield or roll unless you want to be ka-blooey'd! Ones on the ground are much easier to dodge: they have a very small explosive radius.

The other "attack" isn't a straight-up attack: The Chaoti Corehog turns towards the foe and bristles out it's quills for about half a second. This deals no damage unless the Corehog is hit, making it a counter. Hit the Corehog while it is like this and the quills will explode, dealing the same damage as before and quickly regrowing. The Corehog cannot be grabbed from the quill-side during this move, but you can grab it's other side.

The Corehog is a support and projectile minion, designed to aid Sho and his other minions with annoying, needling projectiles and a deadly counter. It takes a while to summon, but it's counter will allow it to stay alive long enough to be worth it. A very worthwhile minion.

Eurobeat Boomer


Charge Time: 45 Frames
HP: 35

The Eurobeat Boomer is a large, offensive but slow to summon minion. With it's fairly large size, owing to tallness and it's tail, with good weight and some good HP. The Eurobeat Boomer only has one jump, but it goes twice as high and far ad Falco's first jump, so yeah.

The Eurobeat Boomer has a few attacks. The first is to lean back on it's tail, releasing a flurry of kicks, each doing 2% up to a total of 16% damage. The hits have reverse knockback, hitting the foe TOWARDS the Boomer, so you want to DI up and/or towards it to get through the attack the quickest. The second is the Eurobeat Boomer's jumping attack, where the Boomer will jump ALL the way up and off the top blast zone, before crashing down where the foe was when it started to come down. It will stay above the top blast zone for 1 second. It does pretty good damage and high upwards knockback, dealing 19% damage and KOing at 170% respectively. The best way to dodge this is to shield or just keep moving and don't stop. High ending lag. It's final attack is, channeling both the power of Kangaskhan AND the move from it's own game, to use the joey in it's pouch pouch to perform an uppercut, dealing 9% damage but knockback that excellently sets up for follow-ups. In the air, the Eurobeat Boomer will instead swing DOWNWARDS, giving it a moderately powerful spike that still hits for 9% damage.

The Boomer doesn't have the raw power of a Wall of Grizzly or particularly special attacks, though it's jumping one is pretty cool, but makes up for it by being a well-rounded minion without any big weaknesses and good HP. It's good to pull out when you can take the lag to get it out.

Neoclassical Drake


Charge Time: 60 Frames
HP: 55

The Neoclassical Drake serves as, along with your next minion the Trance Rhino, as one of your two strongest minions and, thanks to their large charge times and high HP, almost like minibosses. The Neoclassical Drake is the weaker of the two, but it still has it's own uses. One of those is that it's nature is a good deal more aerial, with three midair jumps to go along with two normal jumps, most of good distance. It is quite heavy, as heavy as Snake, and is very large, being slightly taller than Ganondorf but slightly less wide than Bowser. With it's great 55 HP, the Neoclassical Drake serves as an amazing minion...when you can take a full second to get it out before adding in any other lag!

The Neoclassical Drake's arsenal begins fairly simple: It will swipe it's tail forward on the ground to pop foes up a set 1.5 Ganondorfs into the air with 8% damage, along with sending out a shower of sparks that deals 3% and stun just at the end of it's tail. High range. The second is pointing its wing-blades forward, releasing a sword-like spike that flies forward 1.25 (repeating, of course) Battlefield platforms forward, dealing 17% damage and and decent forwards knockback. It will continue to send them out consecutively up to 5 times before taking a breather.

The third is that the Neoclassical Drake will give a mighty flap of it's wing-blades, dealing no damage but generating a wind hitbox that will very quickly send anyone caught in it a Battlefield platform away. The final is a quick bite with it's jaw, snapping at foes for 11% damage and decent upwards knockback...it will also heal the Neoclassical Drake 5.5 HP if applicable as it absorbs soul energy from the foe. Every attack of the Neoclassical Drake's can be used in the air, although the tail swipe will not send out a spark shower unless it hits solid ground.

The Neoclassical Drake is a primarily air-based enemy whose attacks deal good damage and has good tools for bumping foes around such as the wind blast or the tail swipe, but can also deal high damage with its wing blades or heal with its bite, making it a well rounded and deadly, high powered minion. Sho won't really be able to reasonably summon a lot of them, however.

Trance Rhino


Charge Time: 70 Frames
HP: 60 HP

The Trance Rhino is your strongest and hardest to summon Taboo Noise, taking over a full second to summon and having a beefy 60 HP. Trance Rhinos are quite large as well, standing slightly wider than Bowser and about the same height, as well as weighing as much as the King of Koopas. The Trance Rhino has two somewhat poor jumps and will take half damage from any attack that hits it from the front: So...take it out from behind! Note that the Rhino has horrible traction, so it will take a while to turn around. It's ground speed is pretty fast, even if it's not tremendously so.

The Trance Rhino does not have any "true" attacks, but will constantly be charging about the battlefield, usually aiming for enemies. Hitting the Trance Rhino's horn while it is charging will deal 20% damage and KO at 125%, making it extremely deadly. The Rhino will even headbutt up to hit foes with the horn if they jump over it! With it constantly pressuring the foe, it is a constant danger. It is a constant danger to ALL: Trance Rhino's horn damages any other Taboo Noise and will even hurt Sho, making it a tremendous double-edged sword that can be used against friend and foe alike, though it will not explicitly target Sho or his Taboo Noise of course. It should be noted that, while they are not perfect at it (and may end up caught in lag, just like a real player), Taboo Noise will attempt to avoid getting hit by the Trance Rhino with jumps and other dodging.

Trance Rhino requires careful timing of dodges to avoid it and you'll want to take advantage of it's poor traction. If fought incorrectly or if mistakes are made, it is quite easy to be punished...but fight it correctly and turn it's power against Sho and it can be a wonderful asset!

...And of course, you can just spam this to annoy the foe with obnoxiously loud quotes.

Down Special: The Heap

Sho grins, declaring loudly "Crunch! I'll add it to the heap!" as he reaches into the ground. It looks like he is about to terraform the stage, but instead he just pulls out a random, junky item from it and tosses it behind him. Items include things such as cars, vending machines and the like. The items land and are about 3/4ths Bowser's width and half of Ganondorf's height and can be stacked on top of each other. It actually makes sense for Sho to be able to pull these out, you see, so let me talk about why due to frequencies...

Actually, no let's not! Why waste the time? Hahahahaha!

Anyway, Sho's reaching down to pull out his junk for the heap doesn't do damage, but the junk flying through the air deals a solid 10% and decent knockback, while being caught under it while it is landing does 18% damage and upwards knockback that KOs at 120%: this makes it one of Sho's better KO moves. At the same time, it is quite hard to hit with, as the startup lag is pretty average and it takes a moment before the junk lands. Ending lag is light, at least. Note that, while they are called items due to be a random assortment of things, they are not items in the sense of being picked uppable and the like.

The real purpose of this is to stack up giant heaps of junk up as well or other obstacles, possibly of varying height, to slow down the foe, annoy them and in general turn the garbage of the world into beautiful art. Each piece of junk in a pile gives it 20 more HP: Deplete a pile of all of it's HP and it will tumble to the ground, dealing it's initial hitboxes when it falls/lands and disappearing when it lands. Sho can be damaged by a falling junk heap, so he must be careful if he is near one and it dies, lest he be crushed under the weight of his own art. Sho will adjust the angle of the junk he throws so it'll land on top of a pile if a player uses it behind a pile that is close, allowing him to build great towering junk heaps. So with many uses, this is one of Sho's key moves.

If you want, you can just spam it to annoy the foe by telling them how much you'll be adding to your heap, though.

Up Special: So Zetta Slow!

Sho teleports away with a cry of "So zetta slow!", teleporting about a Battlefield platform in any direction. This is a very quick action and can be used to dodge attacks, especially since you can motherfactoring use it DURING an attack, such as...say..Level i Flare! You can also simply combine it to attack with a close ranged attack from a distance or lessen a whiff. You can only use this once per attack (IE no teleporting around for an eternity during your NSpec) and it actually has some decently long ending lag, so don't think that spamming it is a get out of jail free ticket! One Battlefield platform is pretty good length for a recovery, too. Sho can teleport past walls with this, allowing him unparalled movement options between his junk heaps.

Alternately, teleport around like an ass while telling the foe just HOW zetta slow they are until they beat you to death with their controller or shove the WiiMote up your behind.


Grab: Reaper's Grip

Sho grabs in front of him with his black-colored hand. It's quick. It's long ranged. It's one of the best grabs in the game. Sho can also grab his Taboo Noise with his grab, but the foe is always prioritized over grabbing Taboo Noise. There's a decillion ways I could describe this move, but I think this is the best way.

Pummel: Physical Education

Sho pummels the foe with his free fist, beating the scrap out of them. Deals 3%, but is a bit faster than you'd expect for a pummel of that much damage, so it is an excellent way to throw in some extra damage.

Back Throw: Crunch!

With a loud cry of "Crunch!", Sho begins to crunch up his opponent's body with a brutal beatdown, dealing 15% damage before tossing the foe behind him like GARBAGE. Sho will then dust off his hands and, if the foe takes a particularly long time to land, his body until the foe lands either on the ground or in one of his junk heaps.

If the foe lands in a junk heap, they will be stuck in there until they escape at half grab difficulty, at which point they will escape naturally. The foe getting stuck in a junk heap like this is a nice way for Sho to summon one of his easier to summon Taboo Noise, to teleport to the other side of the heap to escape or just to in general do whatever the factor he wants. If the foe lands on the ground, they instead land in prone.

Sho was particularly crunching up the foes body and it shows with their movement speed, which is reduced to 3.141/4ths of their normal speed, be it on the ground or in the air. Sho cannot stack this, but utilizing multiple Back Throws will reset the 5 second counter for it to recover to it's full 5 seconds, allowing Sho to keep the foe all crunched up. Combined with Level i Flare, this can be quite deadly.

Noise who have Crunch! used on them will be killed and thrown backwards, turned into fodder for a junk heap. If there is no junk heap where they land, then they will simply stay there until a junk heap is put there or until 5 seconds pass. Taboo Noise who are added to Sho's junk heaps don't add much to it's size or height, but they will add HP to it equal to however much HP they had left at death, making them an excellent way to restor or increase a junk heap's HP, especially if you want to keep a heap at the size it is at the moment.

Down Throw: Addition-Subtraction

Sho grips the foe where he grabbed them quite hard before slamming them into the ground, a loud cracking noise reverbating through the air as the foe is sent flying up from this. Sho's most damaging throw, it deals 20% and has actual KO potential, KOing at 210%. Sho mostly just uses this for it's high damage and KO potential against foes: it doesn't do anything special...to them.

Use it against a Taboo Noise and Sho will squeeze the life out of them, absorbing their energy as they dissipate into nothing. This may kill your Taboo Noise, but it heals 10% of Sho's damage, and while there are many Noise...there is only one Sho! Well, one times however many stocks you have. If you start to get low on health or have a nearly dead minion nearby, you can use this for a quick fix or to get something out of them...or if the foe is busy, maybe even just summon Choirfrogs and slaughter them for health until they come over to do something about it. Don't leave Sho alone is what I am basically saying.

Forward Throw: Tabuu

Sho releases the foe but, before they could possibly react, shoves his blackened hand into their chest (or rough equivalent) and releases a blast of energy into it, blowing them aay for 13% damage and decent damage. This is a good GTFO move, but you are unlikely to use it for that, mostly due to it's...secondary effect.

You see, a foe hit by this has the Taboo Noise symbol emblazened into wherever the hand struck, which brings both benefits and downsides. The biggest benefit is that, while your Taboo Noise minions will still attack them, they can now actually bring Taboo Noise to their side: By grabbing them and using their Pummel, they will take control of the Taboo Noise, essentially switching it to their side! They can do this even with a Trance Rhino or Neoclassical Drake, so you know that is serious. You can do the same with your pummel, actually, but they can always just do it back, especially since there is no limit to how long they can keep the symbol, save that it disappears when they die. The Pummels will not damage the Taboo Noise when they turn them to whatever side uses it. A Taboo Noise turned to the foe's side basically acts the same as while under Sho's control, but with the foe taking Sho's place and Sho taking the foe's place.

This is a pretty serious downside, but this move also has some serious upside: Foes take 3% damage per second from the Taboo Noise symbol while it is on them, non-flinching of course, so they will be constantly under strain and pressure while they have it, which can be a great disadvantage. In addition, Sho's attacks will deal 1.5x damage to a foe who has been emblazened with a Taboo Noise symbol, as his strikes and such disrupt the Taboo Noise and do some serious bad mojo to the foe. Taboo Noise minions, even ones Sho summons, do not gain the 1.5x boost. In short, Sho exchanges some of the freedom of his Taboo Noise and in return will gain a great power buff against the foe. If the foe wants to get rid of the Taboo Noise sigil on them, then they merely need to pummel Sho, which will remove it.

It is pretty fitting, isn't it? Sacrificing minions and allies so Sho can get gloriois, glorious power...

If you use this on Taboo Noise, then they will suffer the 3% per second damage as well, as the Taboo Noise sigil sends them into overdrive. Their attacks will go faster and deal 1.5x damage and knockback, in addition to any Taboo Noise gaining a quick-ish attack wherein they release a burst of energy that coverts their body for 10% damage and GTFO knockback (before buff), giving even the Carcinopunk a decent offensiv tool. There is, however, no way to reverse this process: Any Taboo Noise marked this way is fated to fade away when the damage takes away it's HP, so weigh carefully the option of buffing it versus letting it live longer. Do note you can still kill a Taboo Noise that is powered this way with your Back Throw or Down Throw, so feel free to do so if they are close to dying.

Up Throw: Prepare to be Iterated!

Sho slams his black hand into the foe's chest once more, though the angle and visual of the energetic explosion that follows makes it easily distingushable from the Forward Throw. This deels a solid 12% damage and upwards knockback that makes it a good move to get the foe away, but puts them too far away to really chase them down or anything. But it is good to throw in some damage and get them away from you.

Using this on a Taboo Noise opens up a whole otherworld of possibilities, though, as they are overwhelemed by its power, practically leaking it as they are thrown from Sho's grasp. This continues for about another 5 seconds before they completely overload and explode in a surge of energy, dealing 15% damage and decent knockback that KOs at 190% to anyone within the admittedly somewhat small explosive radius. With proper calculation, this is a significant sacrifice of a yactogram to make a much larger contribution: Sho can put foes in unenviable positions to get shelled by an explosion with proper use of Level i Flare or his other moves, plus in general having a time bomb is good. Something fun to note is that Carcinopunks will instantly retreat into their shells and then come out right after they explode: Their shells keep them from dying, but also forces your "time bomb" to be entirely stationary. Still, this can be a VERY useful tool and a great way to add some offense to the Carcinopunk.


Jab: Pi-Jab

Sho does a quick swipe with his blackened hand, dealing 3.141% damage to the foe, then swipes it back up for 5.926% damage before delivering a hard kick for 5.359% damage. This is your pretty standard jab, with decent range and lightning quick speed, but the knockback is a bit higher than your average last hit on a jab, making it a more effective GTFO move. Plus, Sho will shout out how much damage he is doing when he hits! How cool is that? This move is cooler than your average jab by at least a factor of 3.

Dash Attack: Zettabytes

Sho rushes forward with his black-covered arm held down, like it is ready to strike, and right when it seems he is going to...he teleports half a Battlefield forward, facing towards where he just teleported from, and delivers his uppercut there! This nice and meaty uppercut has some good range and smacks the foe for 11% and very upwards knockback that KOs at 192.32%. This is a very basic confusing move that expert players will see through, but even if they do, it is a pretty decent dash attack all-in-all...and it has some pretty sexyfine uses with your Up Smash, too! Ending lag is a bit high, but it also has a bit of a quick start-up.

If Sho is hit during this attack, he'll let out an annoyed "This zettabytes!" as he takes the knockback. Amusing.


Forward Tilt: What the Factor Took So Long?

Sho whips his hand forward as a bundle of grey, chain-like energy energy sweeps forward from it like a whip, travelling an absurd two Battlefields in distance. This wide-sweeping attack deals 10% damage and weak knockback. The starting lag is fairly quick, but it has a lot of ending lag for a tilt, most likely owing to it's huge size. Hitting foes away with this isn't all it can do: Hit A when it hits the foe and Sho will instead give it a good yank, sending them flying a Battlefield platform or so towards Sho. If Sho wants to force the opponent to approach him, then this is just the way to do it!

This energy will go right through your junk heaps without harming them at all and you still yank it even when it does so. Enemies yanked into junk heaps take an additional 5% damage and will be stuck in it at half grab difficulty, much like your Back Throw. No speed reduction, however! Sho likes to use this to yank foes away from whatever they are doing and place them where HE wants, like into a huge batch of monsters or slamming them so they may become part of his art.

You can also use this to pull your Taboo Noise towards you: Just like your grab, it will prioritize the foe over Taboo Noise, but hitting A while there is no foe able to be yanked will cause him to yank a Taboo Noise that way instead. This is an excellent way to reposition your Taboo Noise, but works ESPECIALLY well with Trance Rhino, as you can set it up to repeatedly go after a foe without needing to turn around. An extremely versatile tool.

Down Tilt: Inverse Matrix!

Sho once again utilizes his chain-like, greyed energy as he makes a lower sweep with it this time, range still a very long 2 Battlefield platforms. This lower sweep is a bit faster and is a bit quicker to start too, but it still takes the same amount of time to end no matter how you factor it. Getting hit by this is a bit less painful, it deals 8% damage, and will trip up foes instead of knocking them away. Just like Forward Tilt, this goes through your junk heaps.

Just like Forward Tilt, this does something special if you press A. Unlike Forward Tilt, what this does it tether the foe: Hit A and, if something other than the ground is nearby, the direction of what you want to tether when this hits and you'll tether your end of the energy whip to whatever it is! Sho can tether to the ground, his Taboo Noise or his Junk Heaps, but will not tether anything to himself. While tethering to the ground is okay, but much preferrable is to tether the foe to a junk heap: Not only does this allow a little less freedom of movement since it'll probably be tethered a bit higher than normal, but it means they can't run from a the junk heap as effectively if it falls, giving Sho more of a chance to swat the foe for damage or death. Tethering for Taboo Noise and minions is rather simple: Whoever has the most combined size and weight always carries the other around, no matter what. While this means a fair deal of Sho's minions can be pushed around, it makes Neoclassical Drakes and Trance Rhinos a true pain to fight against, ESPEcIALLY Rhinos. Try using a variety of tethers based on the situation!

Sho can also, if the attack hits no foe, tether his Taboo Noise to the ground or a junk heap. This allows him to better control their motion by restricting them to an area, allowing you to almost utilize Taboo Noise as defenders of your junk heaps. Something that holds true for both tethers is that the tether is as long as wherever the tethered object was hit. For example, if the foe was at the maximum distance away (2 BFP), then it will be a tether of 2 Battlefield Platforms in length, making it not very useful. But hit someone half a Battlefield platform away and the tether is half a Battlefield platform big, making it much more restricting. At the same time, this isn't an excellent close-range move, so it is more risky, especially with the ending lag. Tethers snap after taking 40% damage. Do the math and find out the best range for this in every battle!

Up Tilt: You're Out of Your Vector!

Sho does a swift uppercut as his blackened fist infuses with energy, crashing into the foe for a mere 7% damage and weak knockback, enough that at lower %s you can actually chain this against heavyweights like Bowser and DK for 2 or 3 times. As you may have guessed, this means that the attack is quite quick on start-up and ending, making it an excellent choice for close-up combat when your other tilts just don't cut it.

What is great about this is that energy. It's tailor-made to disrupt Taboo Noise. While this is pretty useless to you normally, this won't even hit your own Taboo Noise, it works GREAT against enemies who have had the Taboo Noise sigil seared into them, the cacophony of energy rising to a disruptive level. In short, it doubles it's damage precisely against such foes...but the knockback remains the same, which actually is a GOOD thing, as it means you can either foll0w-up with it or even try to hit them multiple times with this for MASSIVE DAMAGE! It'll also do double damage against Taboo Noise that are turned against you or controlled by other Sho, which means it is your go-to move for fighting Taboo Noise. Other players are just out of their vector when they fight a master like Sho.


Forward Smash: Do the Math!

Sho takes out his megaphone and lets out a very loud bellow of, you may have guessed it, "Do the math!". Charging has him take a big breath to increase how loud it is. The sound of this is shot out as a huge blast of sound energy, travelling forward a Battlefield platform and quite high. Enemies hit by this move take a cool 19%-22% damage and are KO'd at 140%-125%, making it one of Sho's best (and arguably, only reliable) KO moves. It also has long range...though the ending lag is fairly bad and the starting lag is only average.

The awesome thing about this move is junk heaps. Use this in front of a junk heap and it will be positively blown away by the physics involved, flying distances depending on the weight of the object (A car is heavier than a vending machine is heavier than a Neoclassical Drake is heavier than a Choirfrog etc) and distance from where Sho used the moves. Objects thrown away like this will have their hitboxes while in-flight activated and, indeed, will still do the crushing knockback when they land, allowing Sho to send a massive galut of junk projectiles forward to obliterate foes. In addition, the junk does NOT disappear when it hits the ground, but instead sticks around as per usual, allowing him to simply rebuild more junk heaps to use once more! If it goes off the edge though...it's gone.

Enemies inside junk heaps, such as from Forward Tilt and your Back Throw, will be sent flying along with the junk instead of taking this moves knockback, although they still take the damage. These enemies will have to be very careful, especially ones with similiar weight to the various junk, as flying along with the junk makes them a prime suspect to be pummeled by it as it flies and they have to make sure they do not get landed on. Enemies who are tethered are sent flying, attached to whatever junk they happen to have been tethered too, and need to avoid flying junk until the land or snap the tether, as the junk will always carry them. Tethered foes should be ESPECIALLY weary, as if they are tethered to something flying off the stage...well, snap that tethered or you ain't recovering, let me tell you.

Taboo Noise will also get crushed by falling debris, but who cares? Just make some more! For added fun, use this move a lot after a classmate has just done their math finals and see if they are suffering Post Traumatic Finals Disorder.

Up Smash: Any Tree Can Drop An Apple

Sho releases a ball of red-hot energy up above him from his hand, which goes up about 1.413 Ganondorfs into the air before exploding into 8 much smaller circles of energy which fly in 8 different directions (N, S, E, W and NW, SW, SE and NE). It should be noted that the initial ball of energy looks a lot like the moon, even including a big crater on it. These smaller projectiles stay on the screen for 1.25 seconds before dissipating. The large projectile is about the size of a standard shield, while the smaller ones are Pokeball-sized. The initial projectile deals 17%-20.2% damage and KOs at 222.22%-199.99%, while the smaller projectiles deal 8%-10% damage and don't really have much of any knockback power.

It should be noted that charge changes not just damage, but also how long it takes the projectile to ascend it's total height before fragmenting: The more you charge, the slower it takes, allowing you to better utilize the larger hitbox.

Utilizing this with your dash attack is very interesting, as when you DACUS it, Sho will still teleport and, if applicable, attack! Sneaky devil. If done properly, which involves not charging it at all, then the energy ball will start rising in the air AS you uppercut, allowing you to actually uppercut the foe INTO it! The knockback will launch the foe up...and now they'll also have to deal with the smaller projectiles launched at them and a Sho who has recovered from his ending lag. DACUSing this attack is a very strong approach. Do note that opponents can always, you know, dodge the uppercut.

The smaller projectiles will actually reflect themselves off of solid surfaces, such as platforms, the ground and your junk heaps. One of the very fun things to do is use this next to a junk heap and then, on the other side (usually via a teleport), Do some Math right over the projectiles, causing them to reflect off of all the junk as they go along and creating a veritable maelstrom of projectile hell...now imagine if the foe is tethered to the junk or happens to be caught in it from your Back Throw or Forward Tilt! What beautiful and well-calculated madness. Remember, though, that the projectiles will always only last for 1.25 seconds after they explode out of the big one, and plan accordingly.

This move has a bit high of starting lag and fairly average ending lag, so nothing special to talk about there.

Down Smash: The World is Garbage!

Sho raises a black fist high into the air before it impacts the ground harshly, sending out an explosion of energy around him that is essentially a perfect circle of precisely 50% of the size of a Smart Bomb explosion. This isn't the strongest explosion by itself, dealing 16%-19% damage with knockback that KOs at 210%-195%, but it has a few little quirks to it.

The first is that the energy is easily conducted by your junk heaps, so when the explosion occurs, it also turns any junk heap that it is touching into a hitbox as well, allowing you to turn a thought out Down Smash into a flurry of impeccably placed strikes on the foe. You can even chain reaction it by having junk heaps touching in some way or bundling them close, allowing it to go from heap to heap. The added range on an already range-y move is most excellent.

The other is that Sho will draw power from surrounding Taboo Noise for this attack: Dealing 10% Damage to any Taboo Noise within half a Battlefield platform to either side of him, meaning he will kill Minks outright, the power of the attack increases by 3.141% for each Taboo Noise who has it's energy stolen, while it KOs 5.926% sooner. It also increases the range by 5.359% per Taboo Noise done damage this way. The cool thing is that if an opponent has the Taboo Noise sigil on them, it will actually rip 10% damage from them to power up the attack, allowing you to damage foes just by starting this attack up! ...If they are in the range to have power drawn from them, of course. Sho can also draw power from Taboo Noise that the opponent has converted to his side from the Forward Throw or other Sho in the match.

The biggest downside to this attack is it is slow, reminding you of a move like D3's Forward Smash or Ike's Forward Smash: High startup lag, high ending lag. But it's ability to be a huge, strong hitbox cannot be underestimated, so opponents always have to factor this into their calculations.


Forward Aerial: Slabs of Ham

Sho does a powerful kick forward with one of his legs, dealing a keen 14% damage and surprisingly good knockback, it KOs at about 170%, making it one of his secondary killers. It also comes out pretty quick, even if it has a fair deal of ending lag. Now then, remember how I said Sho can't do anything special? That isn't strictly true: if you hit a wall or other object with this, you can hit A when you do so to walljump off of it! Considering Sho can build veritable-sized walls, this is already pretty cool, but the knockback works well for it too, as foes you hit at this close of a range will often be bounced against the wall, either wallteching and thus having the walljump be a good getaway or bouncing off of it, allowing cool followup chances.

If you want, you can tilt the control stick in a direction when you walljump, allowing Sho to actually walljump down or straight sideways, so you can really mix up your various replies! There's no way such yoctograms could computate all the variations needed to properly dodge.

Down Aerial: Celery and Horseradish

Sho reels his black arm back before slamming it down with a mighty, thundurous crash! If Sho can get foes off-stage, he can use this to try and kill them himself, as it is a 17% damaging, quite strong spike. Unfortunately, while Sho has many things, he isn't much of a gimper, and this move's long ending lag makes it punishable if he misses, especially since his recovery deals no damage. Much better is to use it over the stage, especially if you've got an Up Smash projectile under them: a blissfully executed Down Aerial into one can turn gorgeousness into gorgeousity with a single button press.

This is especially true due to the fact that this flows well with his Forward Aerial, as you can put the foe in a real bind by bouncing them off of your junk heaps and then launching this at them, or even just having the threat to do so and then doing something else, is an excellent boon. And did I mention, say, smacking foes right down into your Taboo Noise?

Up Aerial: Tons of Asparagus

Minamimoto throws an arm into the air and releases a pulse of light energy from it, doing this three times in quick succession as he brings it down overhead, each hit dealing 6% damage and dragging knockback that throws the foe from one into another. Used with appropriate speed, Sho can actually use his good air control to drag the foe into a good position a lot: if he lands against a junk heap, he'll slam the foe into it for 2% more damage and a bit of stun, just for kicks. Normally, however, Sho will simply drag the foe with him, the last hit usually putting the foe in front of him and fairly close...which makes it an interesting way to start getting the foe close to you for an aerial. Start-up is slightly slow, but quite little ending lag.

Neutral Aerial: IIIIINFINITY!

Sho flashes in and out of existance, a quick teleport, before reappearing and releasing a brilliant blast of energy that envelopes his body and pretty much only that, dealing 13.41% damage and knockback that KOs at 220%. This is a short-range attack...if you don't count the teleport. See, don't do anything, and it's just in place, which is already pretty cool, combining a quicker but lower lasting air dodge with an attack, but if you hit a directiong right during the starting lag, you'll actually teleport about half the hieght of Ganondorf in that direction and quickly perform the attack!

This, needless to say, has a lot of uses. Dodging and movement are obvious, but you can also of course teleport past your junk heaps for added movement, and you can use it to chase foes both aerially and grounded. It is also, in general, an excellent way to pop up back on the ground. So while it does little special, it has a wide variety of uses. Note that, while this will not send you to helpless, you can't use your Up Special during the same airtime as your NAir unless you get hit or do not actually teleport in a direction. You also cannot teleport in a direction multiple times with this, only in place. (AKA only 1 directional teleport per air time. No infinites!)

Back Aerial: Any Voice Can Shake The Air

Sho whips his entire body around as energy coalesces into his hand, forming a whip-like shape as he strikes it forward two Battlefield platforms, quite similiar to his Forward Tilt. It can be angled slightly up or down during startup and deals 10% damage and pretty weak knockback. It's start-up is a bit long, but the ending lag is most certainly laggy, so be careful about using this offstage!

The key thing about this is basically what you can do with Forward-Tilt: Not only will it go through heaps, but you can hit A to bring enemies towards you, either smashing them into your heaps for 5% more damage and getting stuck for half grab difficulty OR bringing them to you...but the fact it allows you to bring them to you in the air makes this a LOT different, as you can use stuff like your superb movement Neutral Aerial or your Forward Aerial against a junk heap to really put the opponent in an impossible equation! You can also snag your Taboo Noise with this, either allowing you to place them high up where they normally could not go or just plain the air or even to save them from certain doom off the side! It is these things that give it a distinct place in the world aside from simply next to Forward Tilt.


I'll Drop The Freaking Moon!

The power of the Smash Ball flows through Sho Minamimoto's veins! Such raw strength, refined through the grand sigil of the Smash Brothers franchise...yes, this is a power that surely equals the Composer's!

Sho lets out a maniacal laugh as this move is used, throwing his arms wide open and crying out "Drown in the sea of imaginary numbers!", the entire stage rumbling as Sho begins to use a move that might feel veeeeeeeery familiar...and then the moon suddenly drops down onto the stage in one big, fiery, catacylsmic event!

This deals a hefty amount of damage to basically everyone on the field, only on larger stages like Temple and New Pork City is it really avoidable, and it deals 78% damage and will KO most characters if they have taken pre-damage, so it is an amazing Final Smash. Not that the move does not actually start until he cries out his line, so it is one of the more interruptable ones, as he can be hit during his laugh to stop it. Thus, make sure you have some space when you use it. You cannot teleport during any part of your Final Smash.


Attention ALL yoctograms! This playstyle is only gonna be explained once, so FOIL: First, outer, inner, last!

Sho is the center of attention in any match, no doubt about it. Be it threatening everyone with a Level i Flare, annoying enemies with endless quotations (and delighting it's player) or summoning swarms of Taboo Noise, the nature of Sho's moveset ensures that pressure will ne properly applied and that nobody will forget him.

Level i Flare is a key move of your playstyle, as the mere threat of an unavoidable move is severely damaging, especially since so much of Sho is designed to help give him time: Be it making heaps of junk or summoning Taboo Noise, everything can be a great distraction to fire off the flare! But Sho has much more and less risky things in his arsenal: Taboo Noise can be effective minions and his junk heaps allow you to customize the stage to an extent, but the grabs are ESPECIALLY fun to play with: Crunch up foes and toss them out like garbage! Let them miscalculate as they enter the Forward Throw's situation! Turn Taboo Noise into ticking time bombs or hulked out, decaying beasts! Sho is quite dangerous when he gets off a grab, even on a Taboo Noise, which makes him useful at closer ranges.

The Taboo Noise themselves are extremely helpful, be it with the Neoclassical Drake and Choirfrog's positioning abilities, the Carcinopunk and Chaoti Corehog's unique abilities or the raw power of a Wall of Grizzly or Trance Rhino, Sho can use his Taboo Noise's vast abilities to enhance his own fighting prowess or simply subtract them from his game to create a net addition.

When you add Sho's tether into the mix, things get even better, as Sho can better keep his minions in control or utilize his heaps to a great extent: Blow away attached foes with Forward Smash! Bring it crashing down on their head while they are tethered to the ground! Create more possibilites than a supercomputer could handle by creating infinite complexities involving your Up Smash's projectile's nature of reflection with the multitude of angles from bringing down a heap! The possibilities are limitedly purely to your imagination: And sho has a LOT of that!

When he takes to the air, Sho turns into a character with a lot of options and some good control, be it teleportaking, dragging foes as he pleases or crushing them into heaps, Sho's physical aerial game makes him quite the threat in it. And when you mix in his ability to bring people right to him with his Back Aerial or place minions high up as he pleases...well, Sho simply adds another layer onto himself.

In terms of weaknesses, Sho's primary weakness is lag: Level i Flare's high ending lag means that it can still end up doing little even if you hit due to getting hit back, most of his more useful moves have high lag on one end or another and he requires setup to truly utilize his best tools. While Sho has ways to mess around with this, his good grab and U-Tilt really help here, Sho's primary weakness is to get on his ass and never give him a single femtosecond to think. Sho's strengths generally outclass his weaknesses, however.

Remember, the world's made out of numbers. Do the math and you'll find your desired solution.
 
Last edited:

valve3

Banned via Warnings
Joined
May 27, 2013
Messages
1
NITROS OXIDE


Nitros Oxide is the final boss of Crash Team Racing and Crash Bash, essentially serving as a third party antagonist character introduced for when the regular villians were made playable in spin-offs. He’s not some intergalactic dictator, he’s just some random alien from Gasmoxia who happens to own a giant ship capable of destroying planets. He challenges the “greatest racer” from every planet he lands on to a race, and should they lose he turns their planet into a concrete parking lot. What with Oxide’s advanced Gasmoxian technology enabling him to easily defeat most primitive racers, he has apparently already terminated several planets just for the hell of it, as he claims to be the reason why “there is no life on mars”.

Oxide and N. Tropy have some hilariously difficult to beat staff ghosts to beat in the game in time trial. If all of Tropy’s are defeated, he is unlocked and becomes playable. If Oxide’s are defeated, you get jack all. Something of a final “screw you” to the player from this end boss. Due to just how incredibly difficult it is to beat these times, though, it became an incredibly widespread rumor that is still believed by some more clueless people that he could be unlocked as well.

Statistics


Oxide’s machine is very wide, wide as Bowser even, but not especially tall. Most of Oxide’s personal height normally comes from his legs, but they’re all tucked inside the vehicle manning various pedals, so Oxide sits fairly low. The machine goes up to Mario’s height, while Oxide’s upper torso sticks out of the machine to go up to Marth’s height. Oxide weighs as much as Samus, the 7th heaviest character in Brawl. He has multiple jumps where the bottom of his ship flares up, having one of the higher first jumps in the game and 4 very small extra jumps like those of the Kirby characters.

Oxide is a character who builds up momentum as he goes forwards, but he doesn’t need a whole lot of time to do it. He starts at Mario’s dashing speed, and after traveling forwards half of Battlefield he’ll already be going at Sonic’s dashing speed. He can’t stop dashing once he starts going, and will keep this momentum if he goes into the air. Simply holding back, though, even in the air, will have Oxide push on the brakes for as long as you hold it, coming to a complete stop over half of Battlefield’s distance if he was going at top speed. Oxide is still perfectly capable of attacking while speeding up and breaking, and does not have a dashing attack. Oxide can also “dash” while in the air.

Oxide becomes a weak hitbox when moving, but only at high speeds. He first becomes one when he reaches Captain Falcon’s dashing speed, dealing 5% and knockback that KOs at 180% directly forwards. At top speed, he deals 10% and knockback that KOs at 150% forwards. Despite this looking rather petty, the fact that Oxide’s going so fast means it’s very, very easy to hit the foe multiple times to batter them forwards. Of course they can DI away, but it’s not like Oxide can’t move up or down during this himself.

Oxide only has traction if he’s going slower than Meta Knight’s dashing speed as otherwise he’s forced to use his breaks, in which case it’s actually quite good. His falling speed is incredibly low, Jigglypuff being the only Brawl character with a slower falling speed, giving him by far the best horizontal recovery in the game.

Oxide floats juuuuuust barely off the ground while “grounded”, but can still be hit by low attacks and most traps. That is, he can be hit by a banana peel or other traps just as small, but he can’t be hit by stuff that is inside/coating the stage without being knocked down into it, such as goop and mines like Snake’s dsmash. Oxide goes right along the ground for his crouch, and can even crawl while moving like this, still able to keep dashing and go in/out of dashing with the crawl.

Specials


Neutral Special – TNT Crate

The bottom compartment of Oxide’s ship opens up, and a Wario sized solid crate drops out. If the move is charged (unstorable) for a full second, then the crate is a nitro crate. Otherwise, the crate is TNT. Nitro crates explode on contact with any hurtbox or hitbox. TNT crates will start a 3 second countdown visible on the crate if a character lands on top of it. If a TNT crate is actually attacked by something though, it will explode –immediately-. If the attack did knockback, it will take the knockback as it explodes (Heavy as Bowser at 50% damage), moving the explosion as it does so. Regardless of the type of crate, it will explode in a Bowser sized explosion that lingers for a full second and does 22% and knockback that KOs at 80%. Oxide is vulnerable to his own crates, and his crates are vulnerable to all his attacks, even other crates.

Crates can also explode on contact with the ground if they have forceful enough momentum, such as simply being dropped from a large height. At a speed of Mario’s dash or dropping them from 4 Ganondorfs in the air, nitro will explode immediately on contact with the ground while TNT will start the countdown on contact with the ground. At 6 Ganondorfs/Zamus’ dashing speed, TNT crates will also immediately explode on ground contact.

Side Special – Concrete Blaster
Oxide shoots wet cement out either the front or back end of his ship based off the direction the move is input, and continues to shoot the wet cement until he releases the input. The cement shoots out from the ship as far as a crouching snake, though enough of it falls along the trajectory to mean that essentially a crouching Snake width worth of terrain in the selected direction will be covered in cement. Using this attack with momentum enables you to easily coat the stage, preferably shooting behind you, and shooting this move behind you serves as a good deterrent to foes chasing you in general to let you flee.

Cement takes 5 seconds to harden into concrete. Shooting a character’s feet/equivalent halves their movement speed and jumping prowess, very common by enemies simply stepping into cement laying about on the stage. They essentially have to get knocked downwards into wet cement or be hit with the move head on to get completely covered in cement, which increases their starting and ending lag by a quarter in addition. Enemies with concrete on them will lose the status effect after a second.

Concrete only covers the very surface of a stage, but any explosive hitbox like one of the crates will destroy the terrain. You’re looking at doing the whole process of putting the stage in concrete and exploding it 3 times to lower the ground so much as a Kirby height, so it’s generally more of an after thought. Interestingly, if you do go through such a process, the wet cement will not only go on the new lower surface, but will fill up the new hole up to where the terrain originally was. If you don’t re-blow it up, the stage will be good as new. Any foes inside such a pit when it hardens will get pitfalled before suffering the full normal concrete effect upon escape. Any objects inside concrete will be stuck there until pulled out by an explosion. If you put down a TNT crate counting down, the object itself could potentially be said explosion. Any earthshaking hitboxes that effect the platform and horizontal position a crate is, even if underground, will also cause them to detonate.

Up Special – Anti-Gravity Generator
The bottom compartment of Oxide’s ship opens as an anti-gravity field generator comes out. It floats in place directly beneath Oxide, no larger than a Kirby or so. The generator creates a Bowser width column that goes up 2 Ganondorfs that causes everyone in it to float upwards as fast as Jigglypuff normally falls. You can fastfall against it fine, even if you’re Jigglypuff herself. Oxide can only place one of these per air trip, but can have as many as he wants out at a time. They expire after an absurdly long 60 seconds, but can be easily destroyed earlier with a paltry 11 HP. If you place one of these underground by burying it in cement before hardening it into concrete, the anti gravity field will still stretch above the surface while the generator is essentially invulnerable underground.

Characters are not the only things vulnerable to this. Any objects can float up one of these fields. Crates of course can, as can other generators, and while raw concrete can’t it can while it’s still cement. Once it becomes full concrete, you’ve essentially created yourself a nice floating platform. You can stand on TNT crates as well, but that’s obviously. . .Not nearly as reliable for obvious reasons. Standing on floating concrete/crates does not refresh recoveries. Objects at the top of an anti-gravity field will bob up and down about a Mario height as they float in place, going against the anti-gravity field and actual gravity, making them a bit harder to avoid.

Down Special – Boost Pad

A compartment in the stage opens up underneath Oxide’s position (The move is unusable without ground of some kind underneath you) opens up to reveal a racing game boost pad, wide as Bowser. Oxide can have up to 2 on the same platform at once if they’re as wide as Battlefield or more, otherwise limited to one per platform. If Oxide goes over one, he is instantly propelled to top speed. If a foe goes over one, they will be forced to dash, and will go 1.5X faster than they do normally, with a cap of going as fast as Sonic’s dash. They cannot do anything but dash for the entirety of the boost pad, but once past it they are free to stop, albeit with traction as if they were on ice. If you think to place a boost pad directly facing a wall, then they will run against the wall for a brief .1 seconds before stopping in place, immune to the boost pad until they step off it and back onto it. Placing two boost pads directly facing one another will cause the foe to ignore the second one as they run over it. Boost pads force the user to top speed in the direction they are pointing, AKA the direction Oxide was facing when he used the move, making these quite threatening for sending enemies into a large amount of traps.

All objects can go right along a boost pad, even goop like wet cement. Goop is shot forwards at Sonic’s dashing speed, going Final Destination’s length as it slowly comes to a stop at the end of the length shot. Other objects get shot forwards the same speed, but only go Battlefield’s distance.

Boost pads and generators in combination enable you to turn your traps into projectiles. Obviously you can place one on the boost pad to just slide it along the ground, but you can have the boost pad fire it into a generator. It doesn’t have to stop and end in the anti gravity field, though that’s a perfectly good strategy, it just simply needs to pass it, as this will launch it into the air.

You can also place boost pads on opposite ends of the same platform facing each other, creating a good deal of chaos with generators and a crate constantly going back and forth. You unfortunately can’t have multiple crates out under most circumstances due to the fact that they will eventually collide and blow up, but if you can place a crate on top of another crate you can create a constantly a shifting tower of crates. Oxide, due to not actually touching the ground, can create a giant tower of crates if he so chooses without starting the 3 second countdown, creating a gigantic threat going back and forth across the stage constantly, though this is very dangerous to set up as the foe can launch just about any projectile in your direction to get you killed.

With generators, you can have additional layers of this happening higher in the stage by using floating concrete platforms for boost pads. They generally have to come down, sure, but you can have it land on another lower floating boost pad still in the air to have it go back and forth in a diagonal pattern on the way to the bottom layer, potentially. You can also be more ambitious and go for a permanent second layer, most obviously by just a massive amount of generators to lift the crate the whole way as it goes back and forth in the sky. This is unnecessary, though, as a single generator going back and forth constantly can carry a good deal of the workload. If you time the placing down of a crate, with when a generator is about to go across the bottom layer, it will end up permanently carrying the crate due to them constantly moving back and forth at the same speed!

Smashes

Up Smash – Ramp
A platform’s worth of ground in front of Oxide mechanically springs up at a diagonal slant to form into a ramp. Any poor sap who stands on the ramp as it springs up takes 10-16% and backwards diagonal knockback that KOs at 130-100%. The ramp stays up forever after this, and it goes up at a 30-70 degree angle based off how much the move was charged. Using the move in the same general area where a ramp already exists will cause the ramp to slam down back into place, pitfalling anybody underneath it and dealing 25-37%. Note that if you do this against the edge, both the end of the ramp and the ground underneath the ramp will both becomes grabbable ledges, so this doesn’t serve much effective gimping purpose.

The raised ramp will create open terrain where it previously was that can be filled in by cement. The ramp is a platform wide, but also a Kirby deep. This is your chance to create a good deal of underground TNT without much effort, or even a generator, though the generator is generally in a bad spot to do much of anything with a ramp directly above it. That said, if you attempt to raise a ramp with some terrain that is concrete and already has a generator in it, this serves as a way to make the gravity beam be aimed diagonally, for whatever good that will do you.

If this is used on a floating concrete platform, it will cause the entirety of the object to slant upwards. This is incredibly useful for creating aerial zones where you boost crates back and forth, as after it goes down you can have it be boosted diagonally upwards straight back up into the original boost pad. It’s not as straightforward as two boost pads pointing right at each other, but you can potentially get an infinite stream going this way.

Aside from infinite aerial streams of crates, there’s something very easy you can do without as extensive of set-up. If you have two boost pads at opposite ends of the stage facing each other, you can just have make two ramps a bit away from the middle of the stage facing each other. Nearly any kind of ramps will do, so long as they’re not the same distance apart from their boost pad. Even if they are, it will suffice if the ramps are at different angles from charging the usmash different amounts of time in the case of each ramp. What’s the point of this? It means that crates will almost never meet up with each other along the path if you place multiple ones, never at all if they’re close to each other in the “cycle”, preventing them from exploding early and letting you get a bigger, deadlier set-up.

Down Smash – Ejection
A compartment in the stage as wide as Bowser opens up, like when a boost pad is brought onto the stage. No boost pad is brought here, though, and instead the stage simply. . .Stays open. If a foe goes inside of the stage compartment, they will get shot out of it with 12% and vertical knockback that KOs at 150%. Oxide is much the same, but takes no damage or hitstun from this. If an object goes inside of it, it’ll get launched up the same distance, being treated as if it’s heavy as Bowser at 50%. Notably, if there was a buried object in the ground underneath the stage compartment, it will immediately get launched up out of the stage compartment. Objects cannot DI away, and thus will continually go through a cycle of getting launched and falling back inside of the stage compartment over and over. The potential for further crate chaos with the boost pads and such goes without saying. The only exception is if the terrain is slanted, in which case the knockback will be in the angle of the slant. If a second stage compartment is created, anything that lands in the first one will get launched out of the second one, and visa versa, enabling you to get further mileage out of so much as a single crate.

If a third stage compartment is created, the first one disappears, and the two that exist will now be linked. If Oxide uses dsmash in front of one that exists already, it will close up, mostly useful for sealing a crate underground, enabling you to activate it while it’s out in the open before putting it back. This can enable you to put crates underground even without concrete, but the hitbox generated from the TNT in this case, due to not causing any terrain to explode, is just an earthshaking one at the top of the ground it’s buried under.

The compartments can be broken by dealing them 50-100 damage, at which point they retract back into the stage automatically and you cannot create another stage compartment in that exact location again.

Side Smash – Tracking Missile

Oxide laggily shoots a missile out of the front/back of the ship based on input, around 1.5X as big as a Brawl Cracker Launcher cannon. The missile goes straight for a quarter second, but then goes to home in on the nearest character/minion, having no loyalty to Oxide if he’s still nearby. The missile has movement identical to Snake’s Side Special, though it’s movement is automatic and uncontrolled. This means it moves plenty fast forwards, but is very laggy to turn. Unlike Snake’s Side Special, it keeps going until it collides with something, at which point it explodes in a 1.25X Bowser sized explosion and deals 29-41% and knockback that kills at 100-75%.

Oxide is generally far more capable of outrunning these than foes due to his speed. If he wants to fire one out and get away from it immediately, he can fire it behind himself while moving, or just hastily retreat into a dsmash stage compartment. He can also guide one of these around, moving at the same speed or faster, before blazing past a foe and leaving them to deal with the missile behind him. He can also even guide it right into a dsmash stage compartment, them perfectly capable of surviving the trip.

As far as simply firing this at an enemy, sure, they can just shield it or bait it into the ground or something on a plain empty stage, not really worth the lag attached to the move. What makes this move so threatening though is a foe in the middle of a lot of TNT having to delicately guide the missile around it, as they can’t dodge the missile and the lingering explosions of the TNT both. In such a situation, foes will be trying to bring the missile back to you due to having nowhere else to really send it that’s safe. If you want to play especially risky, you can bring the fight back towards the TNT by retreating towards it and make the foe have a near heart attack, especially if you’re in the lead by stock. Your goal is to not to blow up the TNT in such a situation, but to simply take advantage of a severely limited foe who doesn’t want it to blow up either.

Aerials


Neutral Aerial – Power Shield

Oxide faces the camera forms a shield around himself similar in size to his Smash Bros shield, but a very sickly green color. The shield fades away over about the same time as the counters of the Fire Emblem characters. If Oxide is hit before then, the shield will pulsate as it is destroyed instantly, dealing 1.5X the knockback of the attack the enemy intended to hit Oxide with along with a set 11% damage. This counter is immune to grabs, and will even go off if an enemy so much as touches the shield. If the enemy did not do an attack and touched the shield, they will be knocked back a distance appropriate for their momentum. A dashing Ganondorf is knocked back about a platform, and a dashing Sonic 3 platforms, as examples. Oxide does not suffer any effects of attacks he counters with this move, not even damage. The ending lag isn’t worse than the Fire Emblem counters, but the duration is a bit longer, making it fairly punishable regardless. In addition, while you can’t grab Oxide out of the counter, firing any projectile at the counter will set it off with no penalty other than using up the projectile, like the traditional ones.

Simply having a counter at all flows well into Oxide’s game with TNT, as foes too queasy to attack in fear of hitting that will find themselves further annoyed when Oxide punishes the foe for hitting the correct target of all things. While it’s hard to actually hit with this move in the vicinity of crates due to foes not wanting to attack there anyway, correct use of it in such a scenario can make the foe incredibly paranoid and over-cautious. Aside from that, it’s also quite nice to use the move in tandem on foes with boost pads.

Forward Aerial – Ram
Oxide goes forwards very slightly as he drives his ship so that the bottom of it is pointing forwards, ramming foes with the bulk of his ship, before quickly going back into position. This deals 7% and knockback that KOs at 160%, and is a very spammable move with good range, making it a prime candidate for wall of paining. It’s a simple positioning/gimping move for the most part that also lets Oxide be remotely offensive and damage rack when necessary.

If Oxide has momentum, he really doesn’t need much of a wall of pain, since his passive hitbox basically functions as a built-in one. Instead, this move will use up all of Oxide’s momentum if it hits something, dealing knockback based off how fast Oxide was going, though the same 7%. At top speed, the foe takes knockback that KOs at 90%, whereas Oxide will get knocked back around half to a full platform based off how fast he was going as he comes to a stop, keeping him out of the blast radius of anything you knocked the foe into.

Up Aerial – Shuttle Loop
Oxide suddenly goes upwards to go in a circle, first going up, then backwards, down, then forwards back to his starting position. Oxide is a hitbox throughout the move that deals 10% and knockback that KOs at 160% in the direction he’s going. The circle is large enough for Bowser to easily fit inside the shuttle loop, and there is a wind hitbox there that pushes crates and enemies inside of it forwards, useful for positioning falling crates or positioning enemies into it.

This move varies from other up airs of this type by Oxide’s momentum. It can be useful to delay Oxide a bit without sacrificing momentum by using your brakes, for one. But you also have to keep in mind that Oxide’s current momentum will transfer to how quickly he goes through this move, potentially going through it absurdly quickly and making it much more threatening. In addition, the power of the wind hitbox varies based on momentum, pushing characters and objects forwards a crouching Snake width out from the wind hitbox at minimum and 1.5 platforms out at max.

Down Aerial – Electric Wire
The bottom compartment of Oxide’s ship opens and a stray wire about as long as Mario is tall drops out and swings forwards for a very quick move. Oxide hastily goes to reach down to the underside of his ship to stuff the wire back into the compartment awkwardly, letting out a brief muffled grumble before it closes, giving the move a price of awkward ending lag. Regardless of this lag, the fact it’s an aerial means you can retreat during the end lag fine anyway, much less with Oxide’s momentum system. Most of the wire does a token 4% and knockback that KOs at 200%, but the very tip deals 19% and a spike only slightly weaker than Ganon’s beloved dair.

This move flows pretty naturally into Oxide’s game if he is fleeing from the foe in general to produce set-ups. Simply going up into the air with his more impressive set of aerial statistics to get a decent distance above the foe, attempting to hit the foe with this move as they come up, then running off sideways in the event of a failure. Not exactly a difficult movement pattern to see Oxide doing. Bonus points if you bait the foe into approaching you from below then go over a trap.

Back Aerial – Bowling Bomb

Oxide laggily fires a Kirby sized explosive bomb from the back of his ship. This travels 2.5 platforms at Mario’s dashing speed at max before exploding, or explodes on contact with any object. On contact, it explodes in your standard Bowser sized explosion that deals 17% and knockback that KOs at 120%. The main reason it’s a back aerial is to enable you to use the move while flying, as this is yet another move of Oxide’s he is vulnerable to. The main purpose of this move is simply a reliable detonator for your explosive crates, as the missile’s trajectory is not controllable enough to be especially reliable for when you actually want to detonate it.

Standards


Neutral Attack - Laser
Oxide fires a paper thin green laser long as a crouching Snake out the front of his ship, able to angle the projectile as he chooses. It moves very quickly, Captain Falcon’s dashing speed, and deals 5% and about .2 seconds of stun, bouncing off of surfaces in a manner not unlike Rob’s laser. While it does rebound off of objects, it will vanish once it damages something that is not solid. It can travel Final Destination’s width before vanishing. It can rebound off of the bottom of floating concrete platforms and ramps, giving you some fodder to rebound off of outside of the main platform on Final Destination. The purpose of this move is basically the opposite of the bomb, it’s a projectile that’s small, fast, and controllable enough that you can direct it around the crates to easily snipe at foes.

Forward Tilt – U-Turn
A brief blast comes out of Oxide’s exhausts, dealing a token 3% and flinching to foes directly behind Oxide, before he goes forward half a platform. During this time, Oxide spins his ship around to face behind where he was originally facing, then flares up the jets a good deal harder as he jets back to his original position hastily, dealing 14% and knockback that KOs at 115%. The move obviously ends with Oxide facing the opposite position he did originally. The move has an unfortunate chunk of starting lag described in the animation, but has no lag on the other end once it gets going.

If Oxide has momentum, he will skip the blast at the start of the move to propel himself and simply start turning around before giving himself an extra push in his new direction. This will give him the briefly more powerful hitbox, but will sacrifice about a quarter of his momentum from the u-turn. Oxide obviously does not stop at his original position in this version of the move. This move is great at catching enemies who intend to spot dodge Oxide as he passes, as well as making for an excellent run and hit move, serving as a pseudo counter with less pay-off but more safety. Simply being able to turn your momentum around on-demand is also always appreciated, given how much you’re always at risk of running into an explosive.

Up Tilt – Exhaust
Oxide looks downwards to make the exhaust pipes on the back of his head face upwards. He grits his teeth as he looks up above himself without turning his head angrily before the exhaust pipes suddenly start fuming, creating a Kirby sized fire hitbox above his head that deals 10 hits of 1% and flinching per second as long as you hold the button, along with tiny set upwards knockback on each hit to prevent people from “falling through” Oxide. This attack is mostly threatening due to Oxide’s ability to move while attacking, enabling him to keep up a prolonged juggle. He can try to move people towards a certain side of the stage by moving away from it to make them DI towards it, or just match their DI to encourage enemies to DI up and away and jump into the air, where you can potentially have some other set-up waiting.

Down Tilt – Spin
Oxide spins around thrice in his ship very quickly, dealing 6% and turning the enemy around with no hitstun or knockback. It doesn’t really serve as “GTFO” since the enemy isn’t knocked anywhere, but it serves the rather obvious purpose of turning around enemies to attack explosive crates or to make them dash straight back into a boost pad they just got sent from. If the move is used with momentum strong enough to make you a passive hitbox, you will get the momentum knockback as a bonus on this attack, enabling you to both turn enemies around mid-attack while simultaneously launching them towards an explosive, requiring less specific positioning in exchange for your momentum.

Grab-Game


Grab – Tractor Beam
Oxide causes a Bowser wide column of a tractor beam to come from underneath his ship downwards, and has a range of 2 Ganondorfs downwards. The effect of the tractor beam is the same as an anti-gravity field, pushing things up at the same speed. If something actually comes into contact with the bottom of the ship during this, an actual grab hitbox takes place as it gets abducted inside of the ship (Or if they’re too big, get a portion of their body crunched inside the bottom ship door, Wario Chomp style). Obviously the grab is usable in the air, given you have to be above something to grab it. Your personal “anti gravity generator” courtesy of the grab is typically much more reliable than the ones you can put on the stage, given it needs no set-up and you can actually move around with it, or for just more basic positioning if you want something in a specific location. If necessary, you can substitute yourself for multiple generators in a set-up, taking advantage of the fact that you can actually move, and quite quickly at that. The pummel deals a fast 2% damage as some sort of drilling sound is heard inside of the ship.

Note that when Oxide “grabs” a crate, it does not force him to immediately use a throw, him not yet entering his “grab state”, only doing so once he releases the grab input. He cannot absorb more than one crate into his machine at a time, but he can first grab a crate before grabbing a foe. Oxide can grab Nitro in this way and bring it back inside his ship, so long as he’s careful to not let it touch the sides of his ship in which case it will detonate. If he absorbs a TNT crate that’s counting down, the timer will pause while it’s inside of Oxide’s ship.

Forward Throw – Blast
Oxide angles his machine slightly before shooting the contents of his vehicle out at a diagonal forwards/downwards angle with knockback that KOs at 160%. On contact with the ground, the enemy enters prone and slides along the ground as they take their knockback. If the foe goes along a boost pad while sliding along in prone, it will directly boost their knockback momentum by 1.5X rather than forcing them to dash. Damage is dealt to foes on contact with the ground, dealing 10%, them receiving no damage if this is used off-stage.

If a crate is inside the ship, it will get launched along the same trajectory, but will be launched before the foe. This means at low percents foes will not collide with the box, but at higher ones they will. It’s still possible to get your crate to collide with the foe at low percents if you launch them both towards a boost pad that’d turn them around, causing the crate to turn around mid-flight. Even if you just launch a tame TNT crate with the timer not going yet, it can still be useful, as if the foe collides against it while in prone that prevents them from rolling towards it or using their get-up attack, leaving them abusable in prone even to a character without any moves dedicated to it.

Back Throw – Revving Up
Oxide shoots the foe out a back compartment of the vehicle lightly, placing them directly behind the ship. Oxide then proceeds to rev up his vehicle as the mass exhausts on the back of the ship flare up, dealing 10 hits of 1% and flinching before blasting off forwards at max speed, dealing a final hit of 6% and backwards knockback that KOs at 175% to the foe. Obviously useful to get to top speed immediately and get some space from the foe, perhaps to get the hell out of a minefield of crates you intend to launch the foe into with this move.

With a crate and a foe, Oxide shoots them both out behind himself at the same time before shooting up his exhausts, causing the crate to immediately detonate and hit both him and the foe in a rather self destructive maneuver. Obviously the penalty for this is bad, but there’s no more direct method in Oxide’s arsenal of forcing the foe to be hit by an explosive. If you just have the TNT and no foe, Oxide will shoot the TNT back a bit further than usual, out of range of the exhausts.

Up Throw – 360 Shot
Oxide holds onto the sides of the ship with his arms as it goes upside down before launching the foe out of the bottom compartment of the ship straight up, dealing 8% and vertical knockback that KOs at 180%, but varying a lot since Oxide can grab people in the air. This is more viable than you might think, what with anti-gravity fields and aerial traps enabling a lot more juggling than would be otherwise possible. Oxide turns upright after the throw is done, snickering at the foe briefly during this slight end lag.

With TNT and a foe, Oxide opts to shoot out the TNT before the foe, again able to make them collide with it if they’re at a high enough percentage to be blasted at it at a high speed. The crate is still a threat if they aren’t, though, as it will start coming down after them thanks to gravity anyway. The foe’s alternative is dealing with Oxide below them. Of course they can DI off to the sides, but it’s Oxide’s job to ensure that they can hit by the explosive, most obviously through creative use of uair.

Down Throw – Trash Compactor
Oxide creates a dsmash stage compartment below himself assuming there is not one already, then shoots the foe downwards into it. The foe then gets shot out of either it, or any other stage compartment that exists, dealing the standard 12% and knockback that KOs at 150% when they get shot out. If you have 2 existing stage compartments, the first one will be destroyed as the one is created for this attack. If you’re well aware of this, you can make the later one be a specific place you want to send the foe that you can force them to on demand with the dthrow, assuming they’re not off-stage. Aside from shooting the foe into set-ups, you can have the stage compartment be in a floating concrete platform high up to try to actually KO with the move. The knockback on the move is always enough to send them into the generated stage compartment, otherwise being a set amount that KOs at 180%.

Oxide shoots TNT after the foe in this move for a change, though the knockback dealt to the TNT is not enough to guarantee a collision with a foe even at 0%. If you’re using this with a stage compartment, the appeal of shooting down the TNT is more of a double set-up, as you generate a stage compartment and have TNT getting shot in and out of it at the same time. If you use the move off-stage, though, the TNT crate creates an awkward moment for the foe as they must specifically recover around the crate.

Final Smash


Mothership
The bottom of Oxide’s full ship, the Oxide Station, dips down from the top blast zone, being scaled to be wider than the entirety of the stage regardless of what stage it’s on. Not just the main platform, either, it’s so large it stretches all the way to the side blast zones! After spawning, the ship will send down a single tractor beam to Oxide’s position to abduct him into the ship, sucking him up at Sonic’s dashing speed. The tractor beam is twice as wide as Bowser and has infinite vertical range. Anyone can knock Oxide out of the tractor beam, but they risk getting sucked up into the ship instead. A foe getting abducted is an insta KO, whereas Oxide getting abducted has him take control of the ship. With control of the ship, the ship shoots down a single laser from the center twice as wide as Lucario’s Final Smash with infinite vertical range, though the same power. Like Lucario’s Final Smash, you can move the laser about as it’s getting shot. After the Final Smash is complete, the ship goes up off the top blast zone and Oxide drops back down from it in his regular racing ship, spawning at the top of the screen.

Playstyle Summary


Simple play with Oxide can work as more of an aerial character who simply likes to knock enemies into traps on the ground, but this is a far cry from Oxide’s true potential. He can cover not just the stage, but the entirety of the screen with traps given enough time. Oxide may have to show some restraint, given that he is vulnerable to most of what he creates, but most of his moveset is dedicated to helping him survive in such a thriving environment of explosives, while he has enough versatility in his spacers to make life more difficult for enemies.

Where exactly is Oxide supposed to stay when the stage is covered with crates flying every which way? He can do direct pressuring to the foe if he feels like it, given he has the tools, though this places Oxide at more risk than he’s usually comfortable with if he’s not in the lead. Oxide’s direct purpose if a set-up is already thriving is to serve as bait, more than anything else, as Oxide is fantastic at punishing enemy approaches and there’s no need to pressure the foe somewhere if they’ll start coming voluntarily due to your presence. A missile is all that’s particularly needed if you want to enforce this against someone stubborn, as foes will struggle to find much else of a safe place to bring the missile other than into your face in a land filled with explosives. A particularly nice way to make use of Oxide’s momentum is to simply join the circuit of explosives you’ve created – just insert yourself in-between a couple of crates in the system and start going through it, then mandate your location as necessary when the foe comes to intercept you to knock them into one of the nearby crates.

Where Oxide is most free to be offensive is off-stage, as most of his spacers and such become much more potent gimpers there, serving as his main method of killing if his explosives are only working as threats rather than killers. Foes can feel more at home off-stage with enough on-stage explosives, making it quite easy to scare them there and start a gimping attempt. That said, there’s nothing to prevent you from extending the circuit off the stage either! You can potentially have just as deadly of circuits there as on-stage. A simple extension that can prove appealing, though, is to just have a circuit that is mostly stage bound extend just barely off the stage before getting shot back on, courtesy of a very low anti-gravity field generator that foes will find very annoying to go destroy. If crates are getting constantly shot back and forth in the general vicinity of where a foe has to go to grab the ledge, recovering can be made near impossible, as you transition back and forth from pressuring the foe towards a blast zone and back into explosives.

Event Match


Event Name: Kamikaze
Player Character: Koffing
Enemy Character: N. Oxide
Stage: New Pork City (No Ultimate Chimera)


The catch for this event match is Oxide starts the game with a perfect set-up, with an absolutely absurd amount of explosives flying around in multiple absolutely enormous circuits, taking up not only the entirety of the stage but most of the air as well. Assuming your console has not yet exploded from the sheer amount of crap being thrown around the screen, try to not get exploded yourself, will you? In any case, as Koffing, your goal is to generate as much gas throughout Oxide’s absurdly large set-up as possible, going into the path where explosives are flying during the brief intervals where there isn’t one. You don’t have to worry much about Oxide himself, as he will not react unless you approach him personally or until you detonate the explosives in his immediate area, and you spawn at the opposite side of the stage as him. At most, he’ll fire a precise jab to hit you without blowing anything up before then. Your goal is to link your gas to the general area Oxide is and to explode as much of Oxide’s set-up as possible, hopefully capturing him within it. Just don’t get too greedy with capturing most of the stage in gas, or else you’ll get caught in the set-up and explode prematurely. Koffing cannot afford any screw-ups with his weight, as even if he does somehow survive due to the high ceiling Oxide will usually come after him after such a stupid mistake. In such a world where this event match does not explode with lag, you will also struggle to trick the AI into killing itself.
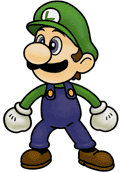
 

JOE!

Smash Hero
Joined
Oct 5, 2008
Messages
8,075
Location
Dedham, MA
JOE!'s COMMENT RANKINGS:

Trying something new here, I'm going to use this space to compile a mixture of rankings and comments.​
How it works is simple: I'll go through each set and tally up 10 highlights. Each highlight will either be Positive or Negative, and contain a bit of commentary about said highlight. I will also give Half Point highlights if something is a sort of grey area for the set.​
After they've been tallied, the amount of Positive highlights is the ranking out of 10.​
CURRENT RANKING:
  1. BUBBLE WITCH MARIN = 10
  2. -9.5
  3. - 9
  4. AXEL THE DARK HERO = 8.5
  5. CROAGUNK = 8
  6. MEGUMI KITANIJI = 8
  7. ULTRON = 7.5
  8. MACE WINDU = 7
  9. TOMOE MAMI = 7
  10. - 6.5
  11. SHADOW THE HEDGEHOG = 6
  12. HAMMER BRO. = 6
  13. SWALLOWMAN.EXE = 5.5
  14. LORD MAGNEMITE = 5
  15. JINBE = 5
  16. STARFORCE MEGA MAN = 5
  17. - 4.5
  18. - 4
  19. ANT HILL MOB
  20. - 3
  21. - 2.5
  22. - 2
  23. - 1.5
  24. - 1
  25. - .5
  26. GRUESOME TWOSOME = 0
CROAGUNK = 8 / 10
  1. +Jump physics add an interesting dynamic between normal / short hopping, and crouch-jumping. That and the usage of second jump boosting Up B is a nice touch / nod to Toxicroak.
  2. +The specials play together very well off the bat to create a coherent playstyle.
  3. +Throws are solid and work together with the other moves well, even if Dthrow outclasses Fthrow by making Croagunk advantaged instead of neutral with similar payoffs.
  4. +Mixing different types of poison adds new depth to the status effect.
  5. +High pressure focus to amplify the poison advantage.
  6. +aerials work very well with his cross-up game, all being well designed to hop around with at differing heights
  7. +Fsmash being slow is more of a strength than being fast. Think about it like this, if it is slower it is out for longer as it takes it's course, therefor giving Croagunk more time to work with it to put a foe in a corner so to speak as they in turn have to react to Vacuum wave in some (punishable) way.
  8. Upon second thought, Forward throw doesn't have much use from Dthrow aside from 4% more initial damage, seeing as the guaranteed tech-chase combined with his pressure game (much, much like his Granddaddy) would definitely lead to more damage without the need to risk the foe recuperating.
  9. Usmash and Uair seem more fillerish than anything. Utilt covers both of their jobs as Croagunk seems to want to stay grounded at all times to get the best use of his tools, well grounded as much as possible when he doesn't want to do a cross-up with Nair/Fair/Dair. Feint Attack can also counter aerials in a ballsy maneuver, can't it? But anyways, they just seem a tad lacking in use
  10. -Dash attack is completely outclassed by Side B and Roll + Ftilt when used in conjunction. The latter in fact doing everything you hype Dash attack to do but with the built-in option to fake them out and to be able to hit whenever by manually Ftilting (in either direction to boot). This wouldn't have been a negative if it weren't for the focus placed on DA when these two options are clearly better at all times.
A great way to start off MYM14, the successor to Toxicroak certainly plays like he is part of the family. In fact, he plays like his pichu almost with him being a near clone! Well, except for a handful of moves here and there. That said he has the interesting twist of being more methodical and risk vs reward than his Grandpappy who favored all-out aggression and pressure are nearly all times. Croagunk's range and lower mobilty forces him to play with the various poison effects more to get the desired effects, and even has some CQC chops like Toxi did. All in all a favorite so far.

TOMOE MAMI = 7 / 10
  1. -As much as I don't want to start a RankCom with a negative, this came out right away: what is the purpose of Fspec? Sure, it can get the foe out of your hair in order to summon guns, but in order to do this you have to have a well-telegraphed motion that only works in X area away from her, a literal invitation to rush in and beat on her straight on where she is most vulnerable. Even worse, Ftilt does everything Fspec does but better as you can still *attack* foes from it.
  2. +The depth created from Nspec alone is amazing. However, it is never directly mentioned what direction bullets KB you in, based on the smashes I'll assume it's the direction fired.
  3. +Down B is another incredible move, allowing for easier shots, tossed item play and quick smash attacks.
  4. +Smash attacks are all incredibly fun, as is Dash attack for them action movie feels.
  5. +Metagame section.
  6. +aerials work very well with her spacing game.
  7. +Final Smash being varied based on location
  8. There is important, missing info from the set. 1) direction of KB from bullets. 2) Her pummel (I mean come on). 3) How fast the ribbon from her grab pulls in.
  9. Nair and Utilt feel awkward. The former due to how it changes momentum and in other ways seems outclassed by Z/Fair for forward spacing, and Dair for escaping pressure. The Latter for how raising her arm up to answer a question is suddenly an attack.
  10. -Coming full circle, I just have to comment on the Ftilt again. The prone abuse here just feels... off given her one move that actually prones foes, and even then requiring her to try and tech-chase the foe's get up options since at the range required she's have to approach to even hit from a Marth Fsmash distance. Similarly, any other move that could prone besides possibly Down Fthrow / Dthrow share this problem when Mami shouldn't ever really be the one who approaches. I feel like if you had Ftilt be a different move altogether with it and Fspec's effects being merged, it would be completely groovy.
Reminding me of a combo of Samus and P:M Zelda, Mami is an incredibly unique take on zoning. Nspec is an amazing move that scares the crap out of approaching foes and is a metagame all in itself, with every other move working off of that aspect in harmony. A fun thought was nailing somebody with Up Spec into a smash or hail of bullets down a ledge, feels very satisfying. The one, and biggest complaint though is what you did with Fspec and Ftilt, which really detracted from the rest of the set by them just kinda being these weird trap options, but you can see the red text for that. Overall a good set.


MACE WINDU = 7 / 10
  1. +Clone Wars (aka, characterization is very spot on)
  2. +The specials each have a coherent function, with Dspec and Nspec being favorites. I like the dynamic between N and Fspec, but it seems Push would be more useful as it can be used midair?
  3. +Throws having infinite range is actually handled well. Uthrow is a great move as it offers an entirely new playstyle option.
  4. +Breaking up the playstyle gave great flow.
  5. +Counters in the Ftilt and general Lightsaber > projectiles are great and well in character, same with Shatter Point offering an "offensive" counter to well, defenses.
  6. +His combo game feels incredibly natural and intuitive.
  7. Touching on #2, nothing is said of what Nspec can do mid-air. Nor what the "force push" abilities are when his Saber is used in Uthrow. More info would be appreciated, esp with the latter.
  8. Dtilt isn't a "close range" move if it hits the entire floor of a stage.
  9. -His base stats are very high from the get-go, and having multiple jumps at that caliber is redonkulous. Hes should be toned down at base and go to the current stats with Down B. He also doesn't seem to have a weakness to offset his ability to counter most every option thrown at him + high base stats.
  10. -Up Smash and Dsmash are both Mewtwo-esque in the extreme size and lag of both. This makes them ether 100% unusable or borderline broken given the circumstances.
An awesome character with great ideas, Froy has really nailed characterization here. For the most part, given his extreme force abilities such as infinite range grab and a transcendent lightsaber, Mace is actually well balanced in that he has to out-think foes in order to actually land KO moves. However, his high base values make Down Special a little less awesome than it should be, and some over the top smash attacks hold the Jedi back.


SWALLOWMAN.EXE = 5.5 / 10
  1. +Bird Projectile is an interesting move.
  2. +Down Special has a cool anti-gimp use: try to spike you? Thanks for the recovery height!
  3. +Side B and Dair make for a legit edge-guarding option.
  4. Stale Moves
  5. While many moves delay the timing of the bird, the fact that he can just shoot out another makes it seem superfluous to try.
  6. Many moves have wind effects but don't really do anything with them.
  7. Utilt is an anti-air "counter" on a character who can dominate the airspace and has an OTG counter.
  8. While cool, there seems to be little reason to want to Dthrow for long in multi-man as you ruin his mobility.
  9. -While Dair was cool, the aerials are rather uninspired for a bird-based character.
  10. -Smashes all prevent any form of recovering high, Dair prevents all forms of recovering low. Going offstage at all vs him is a death sentance.
Swallowman... what can I say? He has a few cool ideas, a few bad ones... and a lot of average in between.


MEGUMI KITANIJI = 8 / 10
  1. +Brilliant Nspec that I'm assuming adapts the Touch Screen mechanic from the game?
  2. +Time stop creates an interesting dynamic as you are able to create the time to set-up provided you have the patience and opportunity.
  3. +Floating Mechanics allowing for choice of aerials or ground game mid-air.
  4. +Shield special is a brilliant mechanic when combined with the Specials / pummel.
  5. +Presentation using quotes from the game as headers / general feel of the set.
  6. +Very creative smash attacks
  7. Dthrow is toted as a KO option, but at 185% it is really lackluster esp. when it removes your safety pin. 5% earlier per pummel prior also doesn't help much when the pummel is slow. Ftilt is also better all-around than it.
  8. Uthrow's "thether to nothing" line is confusing, does it tether to air or just fail?
  9. Ftilt should be a special, and seems more important than his normal Side B.
  10. Uair and Dair are rehashes of moves he can already perform mid-air thanks to Up B.
Kitaniji is a solid set with excellent special moves, a fun playstyle involving composing the stage and zoning to his wishes, and with only a few minor bits here and there that keep it from being a truly excellent set.


JINBE = 5 / 10
  1. +Nspec is very fun.
  2. +Multiple uses of Down B
  3. +Cool smash attacks
  4. Dspec, while good, takes far too long to charge if he needs to constantly use it. Reducing it to 1 - 1.5 sec would be fine.
  5. Fspec doesn't seem too useful when he is fast enough to approach relatively safe already.
  6. Water focus while cool, isn't really prevalent as only a handful of areas allow him to use the mechanic.
  7. Uair seems counter-intuitive as he seems to like to juggle foes, not drag them to the ground.
  8. -Mirrored throws and aerials without real relevance. Ftilt and Utilt also seem to share a niche.
  9. -While the water effects are touched upon, much, much more could have been done with them.
  10. -Overall stale moves.
Jinbe is a solid foundation of a set, but needs more meat on his bones to be really notable.


GRUESOME TWOSOME = 0 / 10
  1. -Basic movement and stats are incredibly awkward for a playable entity. Stages like Yoshi's Island would be just impossible.
  2. -6 seconds of flight on an otherwise immovable object.
  3. -Snakes to incredible damage while needing amazing commitment to shake off.
  4. -The spider has no need to ever move around when you can instantly cover 66% of Battlefield in a web that IMMOBILIZES EVERYONE.
  5. -Webs and snakes and dragons take more time to fight an already mighty thing to try and beat, if it doesn't just fall off and die from trying to move.
  6. -Grab game is brutal with the ability to extend your grab range like, infinitely with no real downside.
  7. -For being a car, the dragon + sheer range of most things negate the need of ever like... moving at all.
  8. -What good is a smokescreen for something that fills 2/3rds of playable space on any given stage?
  9. -Fsmash is all you need.
  10. -By this point I feel the set has nothing really redeemable...
While I can assume the intention behind a vehicle based set is good... the implementation is just... why?


ULTRON = 7.5 / 10
  1. +Nspec is a cool tool in tangent with pushing and pulling foes through a group of drones.
  2. +Side B is a fun way to break up teamwork for a 3v1 set.
  3. +Drone gameplay in general is very fun to think about with the ability to Sync up. And more fun to imagine the strategy of the team facing him with how to divide the approach between him and the drones.
  4. +Stats seem well balanced for 3v1 combat.
  5. +Ability to grab 2 / 3 of the opponents at once.
  6. +Destroying your own Drones to create explosive hitboxes is very villainous and fun.
  7. +The throws and smashes are all great fun when combined with the hectic environment he creates.
  8. Uair and Fair seem a little "big" for just aerial attacks.
  9. -Synchronizing seems to belittle the ability to program your drones when the range for it to occur means you wont often have them doing their own thing unless you literally hang back and do nothing but stay up with Up B. There also seems to be little incentive to take over a drone with down B...
  10. -3v1 only, skews balance a bit if you try to imagine him otherwise.
Ultron is a good set that is held back mainly by it's limitation to 3v1, and some hiccups with how you actually go about controlling your Drones. Side B is great vs opponents,but on drones you Synch up anyways. Down B seems kinda weird to use when Ultron Prime is always safer just Synching and attacking himself. Other than that it's groovy.


LORD MAGNEMITE = 5 / 10
  1. +Hilarious.
  2. +Specials set the stage for the playstyle nicely and work very well with each other. Magnetize with Polarity mechanics is brilliant.
  3. +Ftilt is a cool target to use magnetize with.
  4. Down tilt has no function if there aren't minions?
  5. Dair has no function if there arent minions?
  6. Many attacks under detailed.
  7. More could be done with minions aside from a few moves here and there, esp when said moves only seem to function with them out?
  8. -Mirrored Nair and Jab, that both are projectile standards... (pet peeve)
  9. -Up Air is a pseudo recovery instead of an attack? Why would he need this if he flies?
  10. -Many moves are overpowered in % and KB for their ability to zero-in on targets.
L.M is a fun set to read, and while he has some great special moves to work with, I feel the rest of the set doesn't take as much advantage of it as he could have. Bonus points for the hilarity tho.


SHADOW = 6 / 10
  1. +Chaos control is handled well for it's effect, allowing Shadow to combo but not necessarily KO.
  2. +Having a super slow projectile on such a fast character is a great concept.
  3. +Up B's interaction with smash charge is a great mind game.
  4. +Cool throws, even if Uthrow might be better going a tad shorter distance? It's fine as-is tho.
  5. Ftilt feels like it should be a "Smash" version of Side B
  6. Usmash is kind of awkward in how it sucks up energy projectiles....
  7. Dsmash seems a tad too powerful in versatility when his mobility derives from Up b and general speed, unlike Sonic who's specials come together to make him extremely mobile.
  8. Fsmash and Down B feel like they have too much range, even if you have to charge them. Smart Bomb radius can be about the playable surface of Battlefield when positioned right.
  9. -*Shadow* having a Drag-down uair.... called Drag Down. Also, Fair does pitiful damage for the amount of hits.
  10. -Nair borders on being a special... perhaps if it always had like a 1SBU range and didn't decay, meaning you have to stick close-ish still but making it not as powerful as Sonic's Homing Attack?
Shadow feels almost right as a Sonic off-shoot, as he should be, and is in general characterized very well. His downfall comes with a few awkward inputs here and there where it feels like you tried to incorporate Special moves where they shouldn't be as "special", and a few questionable points of balance.


HAMMER BRO. = 6 / 10
  1. +Up B is a very creative means of recovery and stage alteration.
  2. +Nspec is an interesting projectile, getting stronger the more it hits. Does the cycle re-set after the 4th or do you just keep throwing 13% ones?
  3. +Side Smash is a nice use of the smash-charge concept, becoming a different move when (near) max charge.
  4. +Grabbing foes with the Hammer's hook, Using the hammer as part of a spinning-shell Dash Attack, and throwing the foe like his hammer are all very creative.
  5. Dair's ability to be cancelled, while cool, seems like it could be part of Down B? Especially seeing as he randomly bulks up as referance to the "big hammer bro" without staying as it...
  6. Fspec seems redundant with Nspec.
  7. Throws are very under-detailed compared to the rest of the set.
  8. While the natural shell-protection is neat, it's also just kinda "there". Does he gain Super Armor when fully shelled?
  9. -Moves are a bit on the stale side considering the array of tools hammer bros have been known to use, and doesn't work with the fact he can turn into a Bulky Bro. at all outside of 1 move.
  10. -On the flip side, Dsmash is very awkward as he creates fire, but unlike any way even Fire Bros do.
Hammer Bro. pleasantly surprised me to say the least. He has a solid foundation, but with untapped potential given how you -do- touch on the other Bro abilities such as Fire and Size, even wooden hammer but don't really go anywhere with them and opt for very simple moves. He would definitely benefit from some TLC in the creativity department and possibly altering some inputs here and there, but for what it's worth you did a great job considering the character.


AXEL = 8.5 / 10
  1. +You made tripping interesting as a damn pratfall mechanic.
  2. +Interesting summon in that it's more like an on-demand Assist Trophy more than just a minion, and Axel can choose to let it do it's thing or go on a rampage, even act as cover while "charging" down B, Usmash or the like.
  3. +The characterization is stellar, as somebody who doesn't even know the series he's from I get a clear picture of who he is. Speaking of, the use of the Guitar is probably one of the cooler/well done uses of "music attacks" I've read recently.
  4. +Side B has a very unique effect in how it's mainly an attack using an enemy vs other enemies. An excellent doubles technique.
  5. +Each move had it's own quirk to it but didn't feel "overly creative". A favorite of mine is the Back Air with the delayed hit.
  6. +Excellent Smash Attacks, and a unique Usmash the likes of which hasn't been seen since Salamence...
  7. +The guitar-playing acting as a stance and changing his moveset's properties was a fun move
  8. +The final smash is funnier the more you think about it. Given his moveset, having tons of Axels on stage with an invincible original allows him to really rock out while the others cause mayhem with his palette of enemy-screwing moves, and the Original's wide area attacks he'd be free to use.
  9. There seems to be a bunch of little details missing here and there, such as when Usmash is charged: how much is he buffed? Or when Uair is used via Down B, how much stronger is it (for example, it went from killing at 300% to 130%)?
  10. -Up B seems to come right the hell out of nowhere, and even given his magical properties just seems... weird. If there is explanation for this then it'd be cool but... yeah.
The newcomers keep rolling in, and this set is rockin' to a new kind of beat! Axel didn't seem to get much of a star-studded reception when first posted, but since I've read it I've been stunned at the conglomeration of ideas presented in a rather grounded manner. When the only complaints I have are "not getting" the Up B and some missing details, then you really got something special.


ANT HILL MOB = 3.5 / 10
  1. -Car mechanics will always be crappy for actual gameplay of Smash. Any small stage or uneven terrain makes the set pretty much crap-tier if it were playable as you could always take it to like, just even Battlefield and the slightest pushes and movement will send it off the edges constantly.
  2. +Car Mechanics aside, the specials this time around are actually pretty fun.
  3. +Implementation of Double-Tapped moves is cool.
  4. Ftilt's whole mechanic seems unnecessary when you could just hit them with a crowbar over and over reliably, with Gangsters having the needle-guns on command with the option to smash people with crowbars when close. And Dair is the very definition of a situational move.
  5. Can you attack the car from all sides? It often appears as if you can only take it on from head-on...
  6. The set is a chore to read with every move being multiple paragraphs of text, I mean dayum.
  7. -A lot of the trapping moves and HP's are wicked high considering what the car can do to abuse them.
  8. -Is there no way to flip back over after Nair? Car mechanics aside this seems unfairly harsh seeing as you then lack a conventional jumping method unless you can then Up B while upside down?
  9. Many moves are outright "specials", with Side Smash pretty much being a set in of itself that would require so much mastery of a character that can barely even play on standard non-fd stages. It feels like every move is a mini-mechanic of it's own gone too far at times and works to make the car barely have any sort of interactivity for enemies to actually fight it.
  10. On top of this, many moves are just flat out OP, such as Dtilt's FOREVER hitbox and Backthrow with cement. If timed right with a foe under your SOLID bottom, you could just be as homo as possible and stall like a ****.
While better than Master BigFox3's last car set, it is still just painfully awkward to imagine playing it or playing against it, and has a slew of personal problems as well, even if not on the scale of Twosome.


BUBBLE WITCH MARIN = 10 / 10
  1. +Perfect descriptions bring the character to life. (even if the codec was a bit lengthy)
  2. +Unique and well thought out Defensive Mechanic.
  3. +The tilts each having their own magic attached is a great addition, especially with how they only activate when "missed".
  4. +Each special adds a well defined use that weaves in and out of her other moves, especially fond of Bubble Dress.
  5. +The character is incredibly busy, taking no breaks as you play her due to the fragile nature of her defenses and how she has to actually KO. A fun touch.
  6. +The multitude of ways for her to continue to produce bubbles (reminds me of Forretress lol) is a nice touch and keeps her flow going beyond having to spam N spec all the time.
  7. +The elemental effects of her smashes provide a whole new layer of playstyle.
  8. +The mini's special mechanics are used very well, I especially like how the bubbles crafted via Shield Specials have a moment of shielding to them.
  9. +The throws and aerials are each brilliant as well, being able to effectively wall off areas in the air or even turn the foe into a "bubble".
  10. +Blast Orb is a large improvement over previous Up Tilts, and allows her to play more aggressively at the expense of her bubbles, a nice touch.
My favorite set so far, Marin was a joy to read with really only one questionable aspect with her ability to render things invisible going against her normal gameplay. Hopefully this isn't the only US production this contest.


STARFORCE MEGA MAN = 5 / 10
  1. +Nice change of pace by going through a breakdown before the set, as well as your reasoning and personal feelings for the character being put forward.
  2. +Dair cancelling into Up and Down B is cool.
  3. +Bair's "held" attack option is a neat concept for an aerial.
  4. +His grab's ability to be either a fast "normal" or a held out "tether" is fun, but are you implying that the Zair can grab people?
  5. Stale moves. Also a slight lack of Omega-Xis beyond some token moves here and there, would've though he'd be a special or such.
  6. Smash attacks always take 2 seconds to charge, and deal 1.4x the damage not double.
  7. -Moves lack many vital descriptions such as KO %'s, angles of Knockback, power of knockback (low, hi, medium), or have too little when stated for the lag associated.
  8. -Dthrow seems very OP providing he can tech-chase from it and deal 24% + from a mere regrab, or a short hopped Down B to guarantee around 40% damage from 2 moves.
  9. -Nspec having to charge for 2ish Ganon Punches is ridiculous, especially when the swapped shot-types are generally better than it in terms of speed, damage and accuracy.
  10. -Side B could have easily, easily been a standard move/jab. What about it could make it a special move? This could've been an Omega-Xis move or such.
Starforce Mega Man has some good points, and is overall fun to imagine being playable but ultimately doesn't bring much to the table that hasn't been done before in smash bros. Another problem is just some lack of info and/or questionable inputs, but don't let that deter you. Read up on some of the other sets and you'll definitely improve on the next one.
 

darth meanie

Smash Journeyman
Joined
Jun 6, 2008
Messages
452
I like the highlight method, but I think that the composite score isn't likely to be that meaningful. It might be better to just include as many highlights, positive or negative, as you need, and avoid trying to mathematically reach a score that way.
 

JOE!

Smash Hero
Joined
Oct 5, 2008
Messages
8,075
Location
Dedham, MA
Maybe, I also think it could be a good way to see what points "make" a set for me.

Lemme try with a few more sets to see how it goes...
 

darth meanie

Smash Journeyman
Joined
Jun 6, 2008
Messages
452
Good thoughts, my concept with the forward special was that it would be more useful as a move from further range, a zoning move that would prevent opponents from rushing in from further away. It can also be used in the air, especially against enemies trying to return to the stage or maneuver around her powerhouse forward defenses. The forward tilt was mostly trying to include that other element of the character. Prone abuse was not the goal alone, but an element I added in.

I meant to do an edit of her but it fell to the backburner. I'll try to get it done for sure.


EDIT: oh, did you think Mami was stuck for the duration of the forward special? She is only stuck as long as it takes her to throw the magic out. She can act freely well before the ribbons appear.
 

JOE!

Smash Hero
Joined
Oct 5, 2008
Messages
8,075
Location
Dedham, MA
Right, but during said time the foe is in no danger as she does that animation, and gets to close in. Even if she is free before the ribbons appear, the foe is most likely not in range anymore and in fact in her face.
 

FrozenRoy

Smash Lord
Joined
Apr 26, 2007
Messages
1,268
Location
Las Vegas, Nevada
Switch FC
SW-1325-2408-7513
Comment Corner updated, albeit with some...weird glitches (Like Kalmar's SSB Luigi comment making 3 collapse tags and SSB Luigi randomly getting a huge break in it no matter how I try to remove it)

Darka Falzazzo

We start with a minor grammatical nitpick: It should probably say "if Falz is KOd OR after 15 seconds" on the grab.

Dark Falz Remix is definately an improvement over the old Dark Falz, which was...not very good, to put it lightly. But Falz Remix is an excellent improvement: The addition of Chaos Sorcerers is a nice touch and I quite enjoy how you work in Falz's smash attack charge ability, while the functionality of souls being stolen is greatly improved and made less broken. The bullet hell is pretty good, though it does lead into one of the issues I have with the set: Later on, some of the projectiles seem quite superflous, making moves that seem to exist just to be another projectile. The playstyle between the bullet hell, soul corruption, Chaos Sorcerers and the F-Smash is all pretty nice, however.

Complaint-wise...I feel like you abused the Chaos Sorcerer's chargeness towards the end. They didn't really need all that stuff aside from helping Falz charge his smashes: that was already cool enough. The added stuff felt like it just bogged it down a little. I was also slightly dissapointed in how having two souls in one opponent was used. I felt that, while what is there is good, it could have been a lot better with some higher uses of this, such as stuff that does one thing to one end and another to the end stitched inside. The playstyle is good without it, but I would have loved to have seen that over the latter Chaos Sorcerer stuff and the superflous D-Tilt.

But with a solid overall playstyle combined with some creative ideas, I daresay your contest is over to a jolly good start, Sir ForwardArrow.
 

TheKalmarKing

Smash Apprentice
Joined
Mar 7, 2013
Messages
162
Comment Corner updated, albeit with some...weird glitches (Like Kalmar's SSB Luigi comment making 3 collapse tags and SSB Luigi randomly getting a huge break in it no matter how I try to remove it)
It's probably twisting SmashBoards with it's very presence. What kind of monstrosity did you create???
 
Top Bottom