• Welcome to Smashboards, the world's largest Super Smash Brothers community! Over 250,000 Smash Bros. fans from around the world have come to discuss these great games in over 19 million posts!

    You are currently viewing our boards as a visitor. Click here to sign up right now and start on your path in the Smash community!

Sugarpoultry's Homeroom /[Graphics School]\

IceEmblem

Smash Journeyman
Joined
Feb 8, 2008
Messages
417
Location
Constantly inside a R.O.B Halloween Costume
Step 0: New document ( Width 400, Height 120 )
Step 1: I used a transparent background document.
Step 2: Brushed it the way i liked it with one brush the selected colors ( used 3 different brushes, each brush used a different color )
Step 3: Then i went to Layer: new adjustments: color balance
Step 4: Then i chose the color i thought would match my siggy best.
Step 5: Then i made a new layer ( control+shift+n )
Step 6: then i drug it down so that it woud be underneath all layers.
Step 7: Then i opened my photoshop colored render.
Step 8: Then i went to image adjustments: heuateration
Step 9 Then i draged the render layer into the brushed document, placed it in the place i wanted.
step 10: Then i placed my name into it.
Step 11: Its the signature im useing now.
Are you even a member of the Graphics school? Also we have to use certain renders, and that one in your sig isnt one of them.
 

sugarpoultry

BRoomer
BRoomer
Joined
Jul 10, 2007
Messages
3,369
Location
West Jordan, Utah
Yes, In the Fray, this isn't just another critique thread ma dear. Its an actual class room, with students. I don't remember getting a PM from you. If you want to be a student, pay attention to the first post and PM me.
 

Teh Uber Parachuter

Smash Cadet
Joined
Jun 17, 2007
Messages
40
Location
Atlanta, GA
Alright, here's my attempt at assignment one:


Steps:

1. Opened Render, and cut using Magic Wand

2. Used gradient tool under Dissolve setting three times for background coloring

3. Pasted render on canvas

4. Duplicated render three times, smudging all three copies

5. Applied Stamp filter to one copy, and moved slightly right of original

6. Applied Poster Edges filter to another copy

7. Applied Glowing Edges filter to final copy

8. Staggered each copy behing original, moving further to the left

9. Added new adjustment layer with output level of 0 to 4

10. Created new layer; applied image with overlay blending

11. Added several splats using splatter brush dl'd from deviant art
 

In the Fray

Smash Apprentice
Joined
Dec 13, 2006
Messages
165
Are you even a member of the Graphics school? Also we have to use certain renders, and that one in your sig isnt one of them.
Is isnt, huh ? Well I didnt know that, it still good though :laugh: .

Yes, In the Fray, this isn't just another critique thread ma dear. Its an actual class room, with students. I don't remember getting a PM from you. If you want to be a student, pay attention to the first post and PM me.
Actually i was useing that as an application for the school, i just forgot it had to be pmed. :)
I read the first post downloaded the brushes used a tutorial, but for the pm x.x

okay ill do another one and send it to you
:)
 

sugarpoultry

BRoomer
BRoomer
Joined
Jul 10, 2007
Messages
3,369
Location
West Jordan, Utah
So Mrs. Poultry is my sig good?
Please don't nag me to comment on your pieces. I'll do it when I have time.

And yes, its much better. The colors still need work, but gradients will fix that. In fact, I might take this sig and work on it myself just so you see what I'm talking about.

Anyways, you can work on assignment 2.
 

Teh Uber Parachuter

Smash Cadet
Joined
Jun 17, 2007
Messages
40
Location
Atlanta, GA
And while I'm at it, here's Assignment 2:


I'm not as confident about this one as I am about the first one. Mostly because the tutorial made use of some things that I hadn't seen before now (I still don't get C4D's at all...). That aside, I got through it, and came up with something that isn't too terrible...
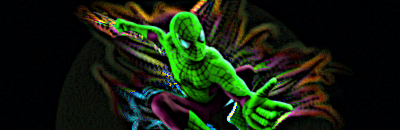
Here are my steps:

Steps: (using voodoo gfx tutorial)

1. Opened Render, and cut using Magic Wand

2. Made blank canvas and filled background with white

3. Pasted render on canvas

4. Smudged Render using the size 39 wet media brush

5. Duplicated layer twice. Set one copy to Color Dodge, one to Overlay w/ Opacity of 60.

6. Repasted Render 5 times and hid all but one copy

7. Smudged copy that was not hidden, unhid next copy

8. Smudged copy, set it to linear dodge, unhid next copy

9. Smudged copy, set it to luminosity, unhid next copy

10.Smudged copy, set it to overlay, unhid last copy, erased edges using very low opacity

11.Downloaded Disaster c4d by dogparry from DeviantArt

12.Changed hue to green and inserted between first two smudge layers

13.Applied Ocean Ripple filter to c4d, and set it to Color Dodge w/ Opacity of 60. Erased what I didn't like on it.

14.Repeated this between each smudge layer

15.Created new layer, and applied the sharpen filter on the lighten setting

16.Applied black to white gradient mask at opacity 20

17.Applied a color balance layer leaning towards a warmer yellow green hue

18.Added new layer, applied Gaussian blur w/ radius of 1.9 on lighten setting. Erased a little that I didn't like.

19.Added text at 37 opacity. Finished!
 

IceEmblem

Smash Journeyman
Joined
Feb 8, 2008
Messages
417
Location
Constantly inside a R.O.B Halloween Costume
Bad!

Assignment 2:
I really don't like this sig, the promblem i think with it is the background, you see, im not good at smudging or many other things for that matter, so i make my own backgrounds using simple brushes.

Also, i used the guide by lego slayer, but without the C4D.
 

PinkPwnageFrenzy

Smash Journeyman
Joined
Mar 13, 2008
Messages
272
Location
Bowie, MD
NNID
PinkPwnageFrenzy


http://fc01.deviantart.com/fs28/f/2008/054/9/2/Utada_Hikaru_Sig_Tutorial_by_GreenAqua.jpg

this was challenging because there was some stuff i wasn't able to do so my outcome isnt perfect but I think its the nicest sig i ever made.
Ah, you used find edges, and they said edge detect. I like the effects though, pretty neat.

I'm gonna go out on a limb and say you're using photoshop. Either those are custom filters, or they're using GIMP.
EDIT: Just read your sig shop, and you use GIMP. If PS doesn't have it, and GIMP doesn't, then who does? o_O
EDIT AGAIN: It's Paint Shop Pro.


SugarPoultry, can I be one of your students? D:

I'm well acquainted with Photoshop, but I'd like to improve, and having someone's guidance would be great.
 

sugarpoultry

BRoomer
BRoomer
Joined
Jul 10, 2007
Messages
3,369
Location
West Jordan, Utah
And while I'm at it, here's Assignment 2:

I say the outcome is very nice. I hope you learned some things from the tutorial that you can use for future sigs. Thats the most important thing I want you all to learn with this assignment. As long as you follow the tut well, and you learn something, kudos! XD

Assignment 2:
I really don't like this sig, the promblem i think with it is the background, you see, im not good at smudging or many other things for that matter, so i make my own backgrounds using simple brushes.

Also, i used the guide by lego slayer, but without the C4D.
Hmmm, its good and the clipping dots look good, but like he did in the sig, keep the closer to the render. Maybe on the other side, and put just effects on it. Notice in the tut, the over all sig is blank in the background with effects only flowing from around and behind him. Thats the sort of feel the tutorial wanted. I know you love to experiment, but doing as close as possible of what the tut suggests is what I want you to do.

I know you haven't had any formal instructions on C4D's and such, but I want you to go out and find one, paste it in, follow the instructions of the sig once again on how to use it, and show the sig again. That will be your redu. I know you like making your own backgrounds, but doing what the tutorial suggests might be better. I just want you to learn new things. :)


http://fc01.deviantart.com/fs28/f/2008/054/9/2/Utada_Hikaru_Sig_Tutorial_by_GreenAqua.jpg

this was challenging because there was some stuff i wasn't able to do so my outcome isnt perfect but I think its the nicest sig i ever made.
Um... I know you had a hard time using the tutorial, but, for the assignment I want you too. I know it can be confusing, but if you can't understand one tutorial, I am sure there is another you can try. (at least from the options I gave). Which one didn't you understand. PM me and I can help.

Practice with tutorials are important and you all need to learn sooner or later in order to get good. I promise.

Also, I had to delete my mailbox messages so I don't remember what you use, GIMP or PS?

PinkPwnageFrenzy: I can tell by your sig, you seem to know a thing or two. Just to be safe, PM me your info and such.

After that, I think that'll be all the students I take for a while. At least for now.
 

sugarpoultry

BRoomer
BRoomer
Joined
Jul 10, 2007
Messages
3,369
Location
West Jordan, Utah
Mrs. pultry can you please explain C4D?
Ok, a C4D is nothing but a graphic render with effects and such.

Examples:
http://planetrenders.net/renders/thumbnails.php?album=1
(BTW, you have to register at planetrenders.net in order to view the high quality images. Its free, and worth it. Lots of good sig makings are provided there. Very good resource.) All my students should check it out.

Usually you add them into a piece to create more 3d style/ or just prettier effects. The sig I use has 2 C4D's, the little purple things on either side of Wolf are C4D's.

Just find one you want out of the search I gave you, and try adding that to your sig.
 

SgtWikez

Smash Journeyman
Joined
Feb 14, 2008
Messages
495
Location
Connecticut
Alright I've finally collected all of my materials! I just picked up my Macbook Pro and Wacom tablet 3 hours ago and quickly went home to install the PS CS3 Trial. My original plan was to take a few days to get oriented with PS since I've never used it before, but I decided the hell with it, let's give it a shot!

I'm very proud of my results :).

- ASSIGNMENT 1 -

My steps (pardon my noobish descriptions, I'm not 100% familiar with the real terminology :bee:):

1. Create dimensions, fill with black.
2. Create layer, add in C4D found at planet renders, erase the right-hand portion of it with eraser tool.
3. Duplicate the C4D layer, edit --> transform --> flip horiz., use the move tool to move it a bit.
4. Add in Samus render with a new layer, duplicate twice.
5. With the bottom two render layers, filter --> distort --> glass. mess around with the placement a bit.
6. adjust sharpness with top render layer.
7. new layer with new C4D from planet renders, erase left-hand portion, add some blur.
8. new layer with the same C4D as in step 7. this time I used the let-hand portion and erase other parts + added blur.

I'm not sure if the border showed up in the uploaded version below, but if it didn't, I would add that in by going edit --> stroke.


The result:


Hope you like it!
 

sugarpoultry

BRoomer
BRoomer
Joined
Jul 10, 2007
Messages
3,369
Location
West Jordan, Utah
Alright I've finally collected all of my materials! I just picked up my Macbook Pro and Wacom tablet 3 hours ago and quickly went home to install the PS CS3 Trial. My original plan was to take a few days to get oriented with PS since I've never used it before, but I decided the hell with it, let's give it a shot!

I'm very proud of my results :).

- ASSIGNMENT 1 -

My steps (pardon my noobish descriptions, I'm not 100% familiar with the real terminology :bee:):

1. Create dimensions, fill with black.
2. Create layer, add in C4D found at planet renders, erase the right-hand portion of it with eraser tool.
3. Duplicate the C4D layer, edit --> transform --> flip horiz., use the move tool to move it a bit.
4. Add in Samus render with a new layer, duplicate twice.
5. With the bottom two render layers, filter --> distort --> glass. mess around with the placement a bit.
6. adjust sharpness with top render layer.
7. new layer with new C4D from planet renders, erase left-hand portion, add some blur.
8. new layer with the same C4D as in step 7. this time I used the let-hand portion and erase other parts + added blur.

I'm not sure if the border showed up in the uploaded version below, but if it didn't, I would add that in by going edit --> stroke.


The result:


Hope you like it!
I do, I really do! The effects add really nice depth to the sig. The background is awesome, simple. I like your use of the filters. There could be a little more lighting on the top. Try adding a B&W gradient to it and maybe set it to 80% or something. I think the colors are a bit too strong.

Other than that, very well done. You can try my suggestions, post it, and then feel free to start on your second assignment. ^_^
 

SgtWikez

Smash Journeyman
Joined
Feb 14, 2008
Messages
495
Location
Connecticut
Alright sounds good. For the B&W gradient, where would I put it in regard to layers? On the very top?

I'm gonna grab some sleep, but I'll work on the changes as soon as I can tomorrow.

Much appreciated, SP!
 

sugarpoultry

BRoomer
BRoomer
Joined
Jul 10, 2007
Messages
3,369
Location
West Jordan, Utah
Alright sounds good. For the B&W gradient, where would I put it in regard to layers? On the very top?

I'm gonna grab some sleep, but I'll work on the changes as soon as I can tomorrow.

Much appreciated, SP!
Yeah, over everything, make a new layer and add the gradient. And for those who don't know how, just in case, for Photoshop users, here is how:

Gradient lesson:
1. Make a new layer on top of everything.
2. Select this:

3. Once its up, select "Gradient Map."
4. Then choose whatever colors it asks you to pick or pick one on your own. The most common ones are B&W and the Violet/Orange one.
5. Then you should be able to set it to whatever you need: overlay or lighten or plain, etc etc; Experiment. ;)


ALSO! I have added better tutorials for the GIMP users. Check them out if you haven't worked on the second assignment yet. ;)
 

sugarpoultry

BRoomer
BRoomer
Joined
Jul 10, 2007
Messages
3,369
Location
West Jordan, Utah
Would you like another critiquer(?)? Obviously, I've had experience in the field. I'm always for helping out around here.
YES! I had someone else volunteer to help too, but he fell of the face of the earth. Everyone could use 2 opinions, that would help. ;) Thank you!

SgtWikez: That turned out very nice. Well done. :) Any comments O D I N before he works on his second assignment?
 

O D I N

Smash Hero
Joined
Mar 13, 2005
Messages
7,408
Location
GameAngel64's house, getting my @#% handed to me.
3DS FC
4098-3123-8629
Here's my redo:


I added in the lighting effects and toned down the color.
The colors blend nicely; you don't have too much that clashes, if anything. Some nice pentooling as well. I don't like the orange line infront of Samus; I feel it detracts too much from the focus, which would be Samus, idealy the body and head. The line to her right is fine, since that's not what we're focusing on.

Background isn't too shabby. It works nicely with the colors, like I already mentioned. :)

Also, your light source is in the wrong spot. Look at Samus; notice how the light is coming in from above left (her left)? Your light should be coming from there. You're close, but too much to the left.

Sugar, have you mentioned blurs for depth yet?
 

sugarpoultry

BRoomer
BRoomer
Joined
Jul 10, 2007
Messages
3,369
Location
West Jordan, Utah
The colors blend nicely; you don't have too much that clashes, if anything. Some nice pentooling as well. I don't like the orange line infront of Samus; I feel it detracts too much from the focus, which would be Samus, idealy the body and head. The line to her right is fine, since that's not what we're focusing on.

Background isn't too shabby. It works nicely with the colors, like I already mentioned. :)

Also, your light source is in the wrong spot. Look at Samus; notice how the light is coming in from above left (her left)? Your light should be coming from there. You're close, but too much to the left.

Sugar, have you mentioned blurs for depth yet?
Yes I have. And I have also mentioned light source several times. ;) Always pay attention to where the light is hitting the render. In Samus' case, top, directly on top in fact. Maybe slightly to the right of the top, but either way you'll be set.
 

SgtWikez

Smash Journeyman
Joined
Feb 14, 2008
Messages
495
Location
Connecticut
Thanks very much for the tips on assignment one, O D I N and sugar. I'll make some more changes on the lighting.

Worked hard today using your PS tutorial, sugar.

- ASSIGNMENT 2 -

Here are my steps:

1. Made the blank background (400 x 125).
2. Added in the render and resized/moved, blurred it a bit on some of the edges.
3. Duplicated render, smudged it.
4. Used a filter on the smudged layer: "Sprayed Strokes".
5. New layer, apply image, set to overlay.
6. Downloaded blood brushes from deviantart.com, replaced the default brush set with those.
7. Used the brush tool to add the blood effects. Following the creator's tutorial on deviant art, I added a layer of red color balance and a layer of "Levels" (altered the levels until desired effect was reached, a bunch of experimenting here).
8. Did another apply image, and tried the "Control+Alt+G" thing (not sure if it worked properly).
9. Added some thin brush effects underneath.
10. Added text.

The result:


:bee:


For some reason, imageshack and photobucket are not allowing the full versions to be uploaded so I've been saving the sigs "for web & devices" to get it to upload. This process seems to get rid of the border.
 

sugarpoultry

BRoomer
BRoomer
Joined
Jul 10, 2007
Messages
3,369
Location
West Jordan, Utah
Thanks very much for the tips on assignment one, O D I N and sugar. I'll make some more changes on the lighting.

Worked hard today using your PS tutorial, sugar.

- ASSIGNMENT 2 -

Here are my steps:

1. Made the blank background (400 x 125).
2. Added in the render and resized/moved, blurred it a bit on some of the edges.
3. Duplicated render, smudged it.
4. Used a filter on the smudged layer: "Sprayed Strokes".
5. New layer, apply image, set to overlay.
6. Downloaded blood brushes from deviantart.com, replaced the default brush set with those.
7. Used the brush tool to add the blood effects. Following the creator's tutorial on deviant art, I added a layer of red color balance and a layer of "Levels" (altered the levels until desired effect was reached, a bunch of experimenting here).
8. Did another apply image, and tried the "Control+Alt+G" thing (not sure if it worked properly).
9. Added some thin brush effects underneath.
10. Added text.

The result:


:bee:


For some reason, imageshack and photobucket are not allowing the full versions to be uploaded so I've been saving the sigs "for web & devices" to get it to upload. This process seems to get rid of the border.
You were supposed to use one of the tutorials on this. That was for the 2nd assignment:p
 

sugarpoultry

BRoomer
BRoomer
Joined
Jul 10, 2007
Messages
3,369
Location
West Jordan, Utah
Hmm? I did. I used your tutorial, the first one on the list.
Oh, you did? Ah. I see it now. I don't see any clipping masks, and the color of the blurring changed, but other than that, its not too bad. ;)

I have to run, but O D I N can comment, and I'll be on to comment later.
 

SgtWikez

Smash Journeyman
Joined
Feb 14, 2008
Messages
495
Location
Connecticut
With my sig for assignment two, I decided to try out these really nice looking blood brushes. The complicated way that you color the bloodstains lead to some issues with the color of the smudging and the functionality of the clipping masks, it seems. If you don't mind, I'll go ahead and try again with a different render and some simpler brushes.

Since there's still some people who haven't tried assignment two yet, I'm going to get a head start on my redo for it and use a Halo 3 render (I think the 3D render styles add a lot to the sig). If you're opposed to that, I'll do another redo with the Halo 2 render you suggested on the first page of the Homeroom. I have lots of free time this weekend so I don't mind the practice :bee:.


UPDATE: Don't want to double post, so here's my redo for assignment two:


I got the clipping masks to work :grin:. Huzzah!
 

Grandeza

Smash Master
Joined
Nov 11, 2007
Messages
4,035
Location
Brooklyn,New York
SP sorry to bother you , but my school work is really catching up to me and my grades are slipping so with all due respect I'm going to have to drop out of this program. Thank you so much for the help and I learned a lot in the short time I was here. Thank you for the opportunity.
 

sugarpoultry

BRoomer
BRoomer
Joined
Jul 10, 2007
Messages
3,369
Location
West Jordan, Utah
SgtWikez: Wow, for being so simple, its VERY nice!! Loved the blending, clipping masks worked very well! I'd blend the background just a tiny bit more, just to fill in the empty space on the left. The text did a nice job of doing that. Very good. :)

lukintosh: That is a freakin' sexy sig, really. But, this is only for my students bud. ;) PM me or post it in Critique Topic, which I'm sure you already did.

Grandeza: I'm sad you have to drop out. :( Really. But remember what I taught ya, keep up with this thread even if you don't do anything. Always be trying to learn new things. You were awesome. ^_^
 

Grandeza

Smash Master
Joined
Nov 11, 2007
Messages
4,035
Location
Brooklyn,New York
Thanks Sugar. I had a great time, and I plan to read through this thread and keep up with it. I definitely learned a lot from this.
 

SgtWikez

Smash Journeyman
Joined
Feb 14, 2008
Messages
495
Location
Connecticut
SgtWikez: Wow, for being so simple, its VERY nice!! Loved the blending, clipping masks worked very well! I'd blend the background just a tiny bit more, just to fill in the empty space on the left. The text did a nice job of doing that. Very good. :)
Ok cool. Thanks :bee:. For some extra practice I followed a tut in the sticky thread (posted the result on p. 552 of the Critique sticky) and I'm now working with a tutorial by ExMachina. I'll let you know when I'm done with that one so you can take a look.

Looking forward to the next assignment!
 

sugarpoultry

BRoomer
BRoomer
Joined
Jul 10, 2007
Messages
3,369
Location
West Jordan, Utah
All those who spoke with me about being a student is one now, :) *does a dance*

Be warned though, I am very very busy with finals and I might not be on for a while to help. O D I N offered to give critique, and I'm sure he'll do so in my stead.

Those who are brand new students, you can start working on the first assignment, any questions, a lot have been addressed in the thread, so I'd read through the entire thread before starting your assignments. A lot can be learned from each other. :D GOOD LUCK!
 

sugarpoultry

BRoomer
BRoomer
Joined
Jul 10, 2007
Messages
3,369
Location
West Jordan, Utah
More than happy to sub. I work two jobs, so I'll poke in when I can. ;)

Sugar, exchange your Brawl code with me sometime. ^ ^ I see you play Wolf too. >_>
Hehe yes I do. My FC list is getting pretty full right now. PM me about it. I'll add you when we get our Wii back. (we're letting some friends borrow it.)
 

Omega Nintendo Dude

Smash Rookie
Joined
Feb 3, 2008
Messages
21
Location
UTAH or NEW MEXICO.

Sigh. I couldn't finish it, This is usually the part I can never make a background with it.
I need some help.

Steps:
1. Added Samus Render and resized her.
2.Recolorized her.:chuckle:
3. Added Line and Made it GLOW AROUND HER arm.
4. Brushed the tip of her Gun with Sparks Brush and Desaturated it. [Recolored it red.]
5. Added a C4d, [Screen] and erased the bad parts.
6. Copied C4d and Lowered layer opacity 50 and blurred it?
7. Copied Samus's Visor and made it Glow!
8. Recolored the C4d Blue and Gun Glow so it shows more of a Beam.

:chuckle: I never was good at backgrounds. Or creativity for themes. And mom forced me to go to bed.:chuckle:
How did I do? Any ideas? So it's a .PNG. My comp won't let it be .PSD. Nevermind. :chuckle:

Used no tuts. I used the knowledge I gained on my own.:chuckle:
Oh shoot I see a tiny red area. I can fix that.:chuckle:
 

O D I N

Smash Hero
Joined
Mar 13, 2005
Messages
7,408
Location
GameAngel64's house, getting my @#% handed to me.
3DS FC
4098-3123-8629

Sigh. I couldn't finish it, This is usually the part I can never make a background with it.
I need some help.

Steps:
1. Added Samus Render and resized her.
2.Recolorized her.:chuckle:
3. Added Line and Made it GLOW AROUND HER arm.
4. Brushed the tip of her Gun with Sparks Brush and Desaturated it. [Recolored it red.]
5. Added a C4d, [Screen] and erased the bad parts.
6. Copied C4d and Lowered layer opacity 50 and blurred it?
7. Copied Samus's Visor and made it Glow!
8. Recolored the C4d Blue and Gun Glow so it shows more of a Beam.

:chuckle: I never was good at backgrounds. Or creativity for themes. And mom forced me to go to bed.:chuckle:
How did I do? Any ideas? So it's a .PNG. My comp won't let it be .PSD. Nevermind. :chuckle:

Used no tuts. I used the knowledge I gained on my own.:chuckle:
Oh shoot I see a tiny red area. I can fix that.:chuckle:

Have you tried smudging? So far, it looks really good. I like your C4d usage. Easy backgrounds can be attained through copying your render, and doing some different smudging. Same with clipping masks and certain splatter brushes.
 

lukintosh

Smash Ace
Joined
Sep 11, 2007
Messages
727
Location
Waiting for someone to play with
Wow Omega Nintendo Dude. Awesome C4D, as odin said. You can look for "stocks", which are professional photos. Or you could use space stocks as they look kinda cool. Just remember the copyright law.

Lol Wolf's my secondary, but I really need help with stringing combos. Any advice from sugar and odin?
 
Top Bottom