- Joined
- Apr 8, 2018
- Messages
- 11,799
- Switch FC
- SW-3204-0809-5605
Have any ideas for a Smash Bros. moveset? Feel free to post them right here, no rules or stipulations. It can be a newcomer or it can be a veteran rework.
Anyway, here's my moveset for Veyle:
Anyway, here's my moveset for Veyle:

- Default
- Alear (red/blue)
- Alfred (blue/gold)
- Diamant (red/white)
- Ivy (purple/magenta)
- Timerra (pink/white)
- Corrupted (black/red)
- Lumera (blue)
Intro: Veyle appears from a dark Warp circle.
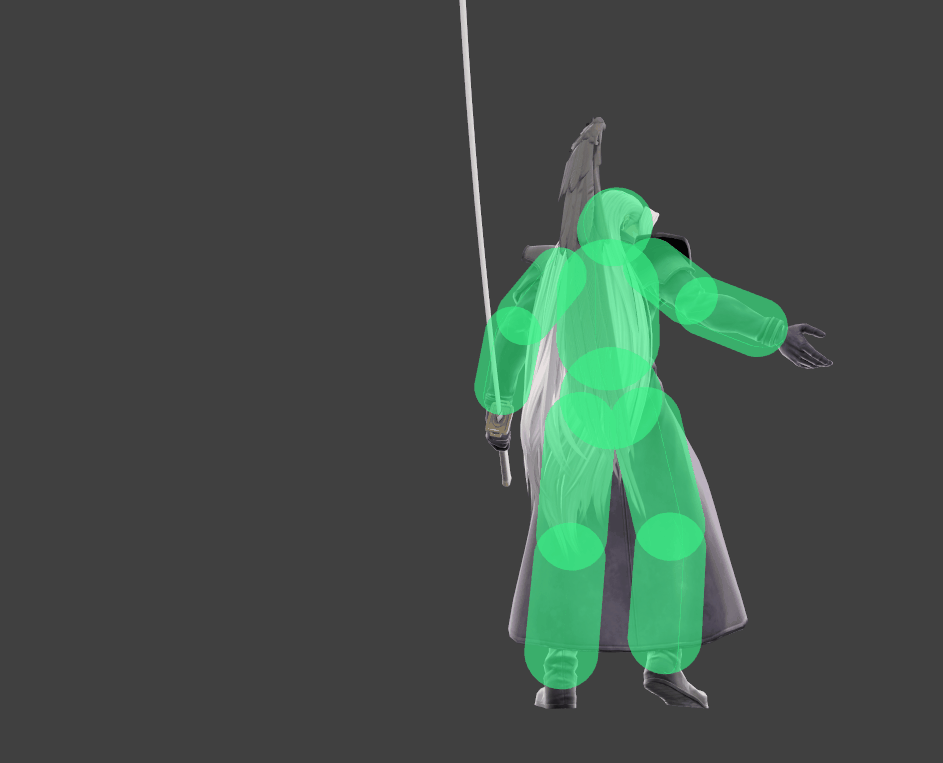
Stance/Idle 1: Her idle stance from Engage while in combat, with her knife in her right hand.
Idle 2: Veyle holds her arm with her open hand.
Idle 3: Veyle briefly clasps her knife with both hands.
Walk: Veyle carefully walks forward, knife in hand.
Dash: Veyle’s dash animation before engaging an enemy.
Damage: Veyle’s damage animation from Engage.
Jump: Similar to Palutena’s jump.
Crouch: Veyle crouches with both knees bent.
Taunts
Up: “I won’t lose!”
Side: I’m strong after all”
Down: “I hope I’ve done well.”
Winposes
1: “I just want to live in peace.” Veyle’s victory animation from Engage.
2: “We are guided by the Emblems!” Veyle strikes a pose with her older sister, Alear.
3: “Feel what I feel.” Veyle turns her back to the camera and tosses her knife into the air before catching it; based on Yunaka’s victory animation with a knife.
Applause: Veyle claps for the winner.
Icon: Falchion
Boxing Ring Title: Gentle Dragon
Star K.O.: “I can fight no moooore…!”
Victory Music: Determined Journey (Flare)
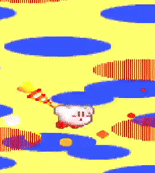
Kirby Hat: Veyle’s hair and tiara
Stance/Idle 1: Her idle stance from Engage while in combat, with her knife in her right hand.
Idle 2: Veyle holds her arm with her open hand.
Idle 3: Veyle briefly clasps her knife with both hands.
Walk: Veyle carefully walks forward, knife in hand.
Dash: Veyle’s dash animation before engaging an enemy.
Damage: Veyle’s damage animation from Engage.
Jump: Similar to Palutena’s jump.
Crouch: Veyle crouches with both knees bent.
Taunts
Up: “I won’t lose!”
Side: I’m strong after all”
Down: “I hope I’ve done well.”
Winposes
1: “I just want to live in peace.” Veyle’s victory animation from Engage.
2: “We are guided by the Emblems!” Veyle strikes a pose with her older sister, Alear.
3: “Feel what I feel.” Veyle turns her back to the camera and tosses her knife into the air before catching it; based on Yunaka’s victory animation with a knife.
Applause: Veyle claps for the winner.
Icon: Falchion
Boxing Ring Title: Gentle Dragon
Star K.O.: “I can fight no moooore…!”
Victory Music: Determined Journey (Flare)
Kirby Hat: Veyle’s hair and tiara
Jab: Veyle horizontally slashes twice (3% each hit, small knockback)
Forward+A: Veyle extends her open hand forward and a blast of dark magic burst from her palm (7%, small knockback)
Up+A: A backward overhead slash (7%, small knockback)
Down+A: A horizontal slash across the ground (5%, small knockback)
Dash Attack: A dashing horizontal slash imbued in darkness (9%, small knockback)
Edge Attack: Veyle slashes inward while climbing back up (7%, small knockback)
Get-Up Attack: A slash on both sides of Veyle (5%, small knockback)
Aerial Attacks
Air+A: Veyle unleashes a vortex of darkness around herself (11%, OK knockback)
Air Forward+A: A downward knife slash (8%, small knockback)
Air Back + A: An upward knife slash (8%, small knockback)
Air Up+A: Veyle unleashes a vortex of darkness above herself (11%, OK knockback)
Air Down+A: Veyle unleashes a blast of darkness below herself (12%, OK knockback)
Smash Attacks
Forward+A: Veyle leaps forward and performs an uppercut with her knife (16%, OK knockback)
Up+A: Veyrle raises a pillar of dark magic from the ground in front of her (16%, OK knockback)
Down+A: Veyle summons a pool of dark magic from underneath where she’s standing (16%, OK knockback)
Grab Game
Grab: Veyle grabs the opponent with dark magic.
Pummel: A horizontal slash (1%)
Forwards+Throw: Veyle pushes the opponent forward (8%, small knockback)
Back+Throw: Veyle strafes behind the opponent and slashes them (10%, OK knockback)
Up+Throw: Veyle heaves the opponent into the air (7%, small knockback)
Down+Throw: Veyle short hops and performs a downwards knife slash (9%, small knockback)
B : Obscurité; Veyle summons a slow-moving dark orb with very slight homing properties that sucks in opponents. Pressing B again while the orb is active has Veyle drop a beam of darkness down from the sky, causing an explosion (12%, OK knockback). The orb disappears after a while, but it can be used in tandem with Veyle’s side and down specials.
B + ← → : Misericorde; Veyle infuses her knife with dark magic before hopping into the air and throwing it at a slightly downward diagonal angle, hitting multiple opponents and poisoning them upon contact (4%, small knockback). If the knife hits the Obscurité orb, it instead travels in an upward diagonal angle.
B + ↑ : Fell Protection; Veyle sprouts (illusions of) dragon-like wings and flies in the direction tilted on the control stick. While the special deals no damage, the distance traveled is impressive and Veyle is completely intangible during the flight.
B + ↓ : Fell Spirit; Veyle channels draconic flames into her palms, then drives them forward with a fiery blast that restores a small portion of her Engage Meter upon contact (8%, OK knockback)
Fighter Ability: Engage
Veyle starts each battle with a full Engage Meter, one bar of which consists of a ⅓ blue line. Just be warned that the Engage Meter resets to 0 whenever she gets K.O.’d, though it refills slowly over time.
Engage Mode is activated by pressing Shield + B, after which Veyle summons her older sister Alear to fight by her side. Once Alear is summoned, Veyle’s knife is replaced with the Emblem Weapon Lyrátion, and her special moves receive new versions that use one bar of the Engage Meter.
B : Holy Aura; Veyle summons an orb of red and blue draconic flames that moves faster but travels in a straight line (8%, small knockback). Pressing B again while the orb is active has both Veyle and Alear manually detonate the orb (16%, OK knockback).
B + ← → : Dragon Blast; Veyle and Alear hop into the air and perform a downward crescent slash, firing a crescent projectile (14%, OK knockback). If it connects with Holy Aura, the crescent spins rapidly, moves faster, and hits multiple times (4% each hit).
B + ↑ : Holy Shield; Veyle and Alear sprout (illusions of) angel-like wings and fly in the direction tilted on the control stick. This attack travels far, deals a single hit (17%, OK knockback) and Veyle is completely intangible during the flight.
B + ↓ : Dragon Fist; Veyle and Alear Channel draconic energy into their palms, then drive them forward with a fiery blast (13%, OK knockback). If it connects with Holy Aura, it turns me into a red and blue fireball (18%, OK knockback).
Final Smash: Bond Blast; Veyle speeds forward and attacks with Lyrátion (4%). If it connects, Alear then immediately follows up by attacking with Libération (4%). Veyle and Alear then fly into the sky and fire a laser straight towards the ground, hitting any opponents caught by the initial attack (52%, devastating knockback). This Final Smash can be used regardless of whether or not Veyle is in Engage Mode.


 )
)