• Welcome to Smashboards, the world's largest Super Smash Brothers community! Over 250,000 Smash Bros. fans from around the world have come to discuss these great games in over 19 million posts!

    You are currently viewing our boards as a visitor. Click here to sign up right now and start on your path in the Smash community!

Make Your Move 12: Now with accurate title! MYM12 is closed! MYM 13 is Open!

FrozenRoy

Smash Lord
Joined
Apr 26, 2007
Messages
1,268
Location
Las Vegas, Nevada
Switch FC
SW-1325-2408-7513
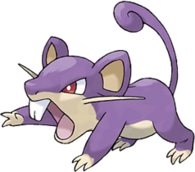
Rattata


"Miss me?"​

Rattata. The rat pokemon. But you probably know it better as that pest that always shows up at the start and was only useful in a few generations. And created the starter rat phenomenon.

Still, Rattata is not as useless as it first appears, especially with it's signature move "Super Fang", which always halves the foe's HP. In fact, in the first generation, Rattata's evolution Raticate was almost OU on this move alone, due to Ghost not being immune to it!

Let's see how this little survivor lasts in Brawl, though.

Ratistics

Rattata is a small little guy and the fact he stands as a quadraped only accentuates that. Rattata keeps it's tail curled up and close to it when standing still and it can dodge a fair amount of projectiles like this, such as Falco's Lasers. Even some physical attacks won't be able to connect, going right over his head!

It also moves quite fast, though not quite to the speed of Captain Falcon, this allows it to run around the field like the spry little creature it is, going to and fro'. Unfortunately, it's tail will uncurl and hang a bit high while running or walking, thus causing it's height to be raised enough to be hit more. Can't dodge Falco lasers like that!

Rattata can, however, crawl. While it can't move as fast like this, it will keep it's tail low to the ground, giving it an approach to projectile campers.

Rattata is also quite light, though heavier than Jigglypuff, but lighter than everyone else in the game. You will need to play smart with your speed, as you are quite light, your second jump is pretty bad though your first jump is actually fairly good and spoilers: Your recovery isn't anything great.

As far as the air, Rattata is not particularly adept in it, but is not bad either. It is a bit floaty and blunt to control, but has decent movement. It's traction is entirely average.

Onto the moveset!

Specials

Neutral Special: Super Fang

Super Fang is Rattata's signature move. Its bread and butter. Its coup de grace. So it shouldn't be surprising it is so important to Rattata, despite being a simple move.

In the games, Super Fang deals damage equal to half the current HP of the foe. Unfortunately, we do not have HP here, we have damage...or is it so unfortunate?

When Rattata uses Super Fang, it will do a visibly STRONG bite in front of it, targetting the most critical area of the opponent's body to rend a vicious blow on the opponent. Not only will this attack leave an actual bite mark on the foe, but it will do a lot of damage if used right. In fact, the damage it does is equal to half of the foe's current damage.

So if your opponent has 10% damage, this moves does 5% damage. If they have 50%, this move does 25%. And if they have 100%, this moves does an amazing 50%. And so on. It's knockback is not so greatly scaled, set at a set knockback of one Battlefield platform away.

Needless to say, this move is an amazing boon for Rattata, as it has little to know true "KO moves", so you need to rack damage to truly ludicrous extremes...and Super Fang will let you do it fast. Indeed, as the match goes on, the foe and Rattata can get in a game where each must be very careful, lest Rattata land this and put them right into KO range or the foe hit Rattata and send it flying right off.

This move starts very quick with variable ending lag, depending on if it hit or whiffed. If it hit, the end lag leaves Rattata in a frame neutral situation with the foe from their knockback, but it has some really bad ending lag, as Rattata chomping down strong actually hurts itself visibly and causes it to flinch, in addition to taking 5% damage. It's range is also almost non-existant, due to Rattata's small frame and just biting in front of it. This move requires the utmost of preciseness to use and not get punished, in exchange for massive rewards.

Side Special: Run Away

Run Away is one of Rattata's abilities, which allows it 100% fleeing against wild pokemon.

Fittingly, Run Away is one of Rattata's spacing moves, and a crucial one in its arsenel. When this move is used, Rattata will either jump back or leap forward one Battlefield platform, depending on if you inputted the way Rattata was facing or not, quickly. The key thing about this move is that it can be used in the attack lag of any move or DURING any move.

This move gives Rattata an amazing mobility option, leaping around during the lag of it's moves, though it should be noted Rattata still suffers the move's lag. In addition, Rattata is never dodging or anything, so the only way you'll dodge something is with speed and prediction.

This move has a extra thing it can do, in that if you hit the B button when you land, Rattata will either do a quick skidding turn or flip in place, changing the direction he is facing quickly. This allows you to move forward but face backwards, for example.

This move has almost no starting or ending lag, though the lag of any move you interrupt on this is still taken when Rattata lands, making it more of a get away move than anything in those instances. And of course, you can combine this with starting lag or even during a move to mess around with your hitbox. It's an interesting move, for sure.

Down Special: Hustle

Hustle is another ability of Rattata's. In the game, it increases the power of all of Rattata's moves by 50%, but reduces their accuraccy to 80% of what it was.

In Brawl, activating this move causes Rattata to hustle. Its speed increases to a bit faster than Captain Falcon's, start and end lag is very lightly reduced and, most importantly, all of Rattata's moves deal 50% more damage from Rattata expending the extra effort. Just like the actual ability, though, Hustle has a downside. In fact, it has two. First off, Rattata's trip chance is doubled, including attacks with a chance to trip, because of the fact it is running so hard it gets easily messed up. Finally, since Rattata is pushing its body past its limit, it takes 1/4th the damage of any move it uses as recoil damage. These effects last a long ten seconds before wearing off, whereupon Rattata is too tired to activate it for another five seconds, though it maintains enough energy to not be adversely affected when it wears off.

This move has little lag on either end of the move, so you can enter it in a ton of situations, maybe even flinging yourself at the foe with Run Away and using both of their low lags to have them have to deal with a souped up Rattata nearby. Still, it's drawback is notable, so you have to choose when to use Hustle correctly.

Up special: Hyper Fang

Rattata and Raticate used to have Hyper Fang as a signature move, though never as much as Super Fang.

The move itself is relatively simple, as Rattata thrusts up in a jump that goes about the height of Marth's Dolphin Slash, biting at it's apex. This move is actually Rattata's best KO move, starting to KO reliably at an amazingly early...150%. It's really awkward to hit with, though, so you'll rarely be using it for that purpose and mostly for recovery. It does a keen 15% damage, making it an awesome damaging tool as well, and you hear a satisfying little crunching noise if you manage to hit with. It's recovery range is slightly deceptive as well, as Rattata will be extending to bite as high as it can, so it can actually catch ledges with it's teeth that would normally be just out of reach. Doing so causes him to grab on to the ledge in a laggy and vulnearable animation, however, so you almost always would prefer to sweetspot it or recover high. Like most recoveries, it causes you to go into helpless.

The fact it does not go all that far, combined with Rattata's light weight and bad second jump, means try to avoid getting hit off the stage as much as possible. Rattata might be a survivor, but it's not because it's a tank, it is because it's a cunning, fast rodent who avoids getting hit.

Ground Game

Jab: Tackle

Tackle is a move Rattata pretty much always knows. It's very common to see a ton of Rattata with Tackle at the start of the game.

Here, Tackle is a very simple jab. Rattata will tackle forwards a very small bit in an infinitely repeatable jab much like Pikachu's. This move does 2% damage and is extremely fast, it's not unsurprising to get off two or maybe even three if you're lucky before you can expect much retaliaition, though it has more lag when it hits a shield. This move does not actually cause any any or knockback, so the fact it's so fast is required to really hit with it. Plus, it'll do 3% if used with Hustle, making it even better, for minimal problem to you.

A good idea is to weave in and out with Tackle and Run Away to rack up some small damage, but it's easy to get whacked, especially out of the shield, if you get too predictable with this.

Forward Tilt: Tackle Rush

Not a move, but it's a good descriptor of it.

When you input this, Rattata will tackle forwards, leaping ahead 3/4ths of a Battlefield platform. This move starts up quick, though not always as quick as Rattata's other moves, with some decent ending lag. It deals 8% damage and low knockback, but it's a good mix-up move with the jab, mostly because of the fact that when used at an appropriately close range, you'll go right past shields, unlike the obvious shielding solution to Tackle.

This move also has two cool interactions with Run Away, as you can either use it during the start lag of this to cause Rattata to go an absolutely large length and essentially be a flying tackle, or use Run Away during the end lag, either allowing you to retreat very far or even mindgame the foe by going back the way you came and ending up just a bit further than you were before, especially if they turn around.

Down Tilt: Tail Slap

Tail Slap is not a pokemon move.

Rattata swipes its tail forward in front of it. As far as Rattata attacks go, this actually has good range, especially since Rattata's tail will get larger in Brawl fashion. The move deals 8% damage and the most knockback of any of Rattata's tilts, KOing at about...240%. Which is not entirely unrealistically reachable with Super Fang. The knockback is straight-up, too, making it a bit of a setup.

This move has two primary uses. One, it's one of Rattata's few decent reaching moves that does not move Rattata, giving it one his few decent ranged moves, and that since Rattata is so damn small, it can shieldpoke well. It starts up very fast, even if not quite as much as the jab, but it has deceptively long ending lag. As sad as it sounds, it is also one of Rattata's KO moves, so you might not want to stale it too much.

Up Tilt: Bite

Bite is yet another common move for Rattata's. It was originally a normal type move Rattata got STAB off of, but was changed to Dark in Generation II.

Unsurprisingly, Bite is a pretty simple move, as Rattata will make a very short hop and, at the apex of it, bite with it's small mouth. The bite itself does 8% damage and deals knockback that goes straight down, albeit weak knockback, throwing foes to the turf or, if you are right next to the ledge, weakly spiking them. This move can actually hit grounded foes that are large enough, such as Bowser and Ganondorf, and if so will produce weak upwards knockback. This move, compared to Rattata's other moves, has a bit of a startup lag as it prepared to hop, though it is still fast as far as tilts go, and has the least ending lag of any of Rattata's tilts. This move will move you forward 1/4th of a Battlefield platform from the hop, as well.

This move occupies a simple part of Rattata's tilt game, as the one that hurts the least to whiff with. It also provides a way to move just a bit forward while also producing a hitbox, compared to Tackle Rush moving you a good distance, giving you more combinations with Run Away.

Forward Smash: Double-Edge

Double-Edge is one of the stronger Normal-type moves in the game and, indeed, can be learned by Rattata at the relatively low level of 31. However, it also causes the user to take recoil damage.

This life-risking tackle is one of Rattata's strongest KO moves, even if it is not really too strong. When used, Rattata will rear up for a moment before leaping head-first an entire Battlefield platform, flinging itself forward with all the strength it can muster. This strong tackle does an awesome 16-20% damage and great knockback...for Rattata. It actually only kills at around 170% unless you edgeguard, making it a poor KO move compared to others, but great for Rattata. Combined with the damage and the fact that while it's startup is not as quick as others of Rattata's moves, it is quick for a smash, it seems like a perfect move, except for two things that make it sort of terrible.

First off, you will take 1/4th of the damage you deal as recoil damage, adding it to Rattata's damage %. Uncharged, this means Rattata takes 4% when he hits with this, or 5% fully charged. When you are as light as Rattata with a poor recovery, that is a big deal. And secondly, this move has some bad ending lag, a bit above average for a smash period, as Rattata hits the ground a bit hard and has to scramble back into a fighting position. This makes the move extremely punishable, seeing as hitting with it damages you and missing or even hitting at very low %s will leave you vulnearable for what is likely a smash or, in MYM Brawl, some super powered move that'll slaughter ya.

Of course, you can use Run Away to fling yourself around during the end lag, but you'll still have to take it...and if you just always go the same way, it's not hard to just follow you and still smash you. Indeed, the key to avoiding getting punished is either using this solely as a killer or mixing up your Run Aways, sometimes flinging yourself back right where you were to confuse an opponent chasing the other way. Hustle can also be used both to boost this move to obscene damage %s(24-30%!) and lower the lag...but note that if you DO hit with it and Hustle, you'll be taking 1/2 recoil damage, meaning 12-15%. That is a lot of self-inflicted damage, so be careful.

Up Smash: Headbutt

Headbutt is a Pokemon move that Rattata was once able to learn and, more importantly, a very accurate description of what this move is.

Rattata rears up a bit, quicker and not as much as Double-Edge, before leaping headfirst into the sky, going about as high as Falco's first jump in a full-body hitbox. This move does 12-16% damage and knockback that KOs at 210%, which also happens to be almost purely vertical. The end lag is about average, perhaps a bit quick, but will leave Rattata in the air, where he can either jump away or try to pursue for an aerial assault, or maybe come down faster with his down aerial. It's also, as far as Rattata moves go, a decent killer. The key thing is that it functions as a good anti-air move and lets you jump even higher than your normal first jump, at the cost of a little lag at the end of it. Just like Bite, this can hit tall characters that are near you when you jump.

Down Smash: Tail Sweep

Tail Sweep is not a Pokemon move.

Rattata does a really quick spin with it's tail fully extended, which just like the Down Tilt expands a little(though not as much), clearing out both sides right near it. Since it is attacking with it's tail, this move has more range than most of Rattata's moves, without actually moving Rattata. It's also the quickest of Rattata's smash attacks, starting quickly and having little end lag for a smash attack. It deals 12-16% damage and knockback that KOs around 210%, which has a diagonal angle to it and thus makes momentum cancelling a bit less effective.

This is your quickest killing move and it lets you clear out the space on both sides of you, which makes it really good. It's also one of your few ranged moves, so you'll be seeing Tail Sweep a lot if you main Rattata.

Dash Attack: Pursuit

Rattata learns this dark type move at Level 13.

In a keep-dashing attack, Rattata will slightly slow it's dash but gain a determined look in it's eyes as it charges forward, not attacking until it gets close to it's opponents, where it will leap forward a little and try to get off a quick gnawing bite. The bit itself does little damage, 8%, and no knockback, but it does have pretty good hitstun and Rattata can continue dashes when it lands behind the opponent. This also makes the move hard to shieldgrab, as you need to grab Rattata before it reaches you or you won't have time.

This move is not called pursuit for nothing, though. After landing from this attack, an almost lagless affair, you can press the A button to have Rattata almost laglessly turn right around and, if you want, continue the dash attack! Since Rattata will fire off this attack even against a rolling or spot-dodging foe, this allows Rattata to relentlessly pursue the foe through their dodges. The lag for it matches well with the hitstun from when it hits as well, leaving you and the foe in an almost frame neutral situation and from there, the mindgames on if you'll charge right back in, Run Away in a direction or just plain stop using the attack shall begin. Vary it up and the foe will be dodging right into you ready to pursuit again, gaining valuable spacing through Run Away and getting in the valuable damage you need.

Run Away in particular has a lot of fun with this. You can turn around, then immedietely leap backwards to fake out the foe, not turn around and Run Away backwards to do the opposite or even Run Away right towards the foe when you turn around as a switch-up. The fact this move has an almost lagless ending lag and not a great deal of starting lag helps with that.

Aerials

Down Aerial: Body Slam

Rattata has been able to learn Body Slam for a while now, usually by TM or Move Tutor. So yeah.

As you may have guessed from the name, this is a stall than fall, though there is very little stall, as Rattata quickly turns it's back downwards while pushing the same way, sending it plummeting to the ground at about the speed of the Ice Climber's dair. This move deals a low 6% damage and low diagonally upward-forward knockback, really more serving to get the foe out of the way than for knockback purposes. Indeed, this move's primary purpose is to get Rattata to the ground faster, given it's floaty nature, and for being a decent move to hit people under you.

This move is actually pretty controllable as you descend, allowing you to better choose where to land. When Rattata lands on a solid surface, and just like Toon Link and Zamus' stall than falls this won't stop until you do or you grab a ledge, it'll actually pop up as it lands on it's back and flips onto its legs. Rattata will pop in whatever direction you are holding at the time, about half a Battlefield platform, or you can let the control stick stay in the middle and pop in place. Indeed, this move allows a good little ground movement once you get there.

Forward Aerial: Tail Slam

Tail Slam ain't a Pokemon move.

Rattata flips in place, slamming downwards as hard as it can with it's tail. This doesn't amount to a particularly strong move, but it does do the most damage of any of Rattata's aerials, 10%, and produces a quite weak meteor smash. You won't really be KOing too many people with this until very high %s(300% or so?), but it is a decent enough way to get someone in the air back down to the ground and at low %s you can combo with this from the down tilt, albeit not a true combo past anything but meager %s. Overall though, this is mostly just for the spike and to help get people where you want them to be, where you can use Run Away and Pursuit and your much better ground agility. As far as the lag goes, it's pretty fast as far as aerials go, but nothing special compared to your other aerials go.

Neutral Aerial: Tail Spin

Also not a Pokemon move.

Rattata itself curls into a ball, extending out it's tail to try and hit anyone around it. Hitting with Rattata's body deals a meager 2% non-flincing, non-knockback causing damage, but will most likely only cause them to get hit by the tail, which deals 6% damage and knockback that can start KOing at around...oh...320%. However, it has decent base knockback, it's more that it's knockback scaling is pretty bad. The tail will make three revolutions around you for a pretty long duration move, but it's unlikely to hit with more than one.

This generally be your somewhat generic aerial GTFO move, as it hits all around you pretty fast and deals enough knockback to be a good GTFO move. It has some fast startup, but somewhat uncharacteristically long end lag, as Rattata has to right itself after spinning, especially if it hits the ground. So it's sort of punishable.

Up Aerial: Tail Swipe

Nope, not a Pokemon move either.

Rattata swiftly swipes above it with it's tail, dealing a quick 6% damage with almost non-existant knockback, but similiarly almost non-existant hitstun. This can actually combo into itself pretty easily at almost any %, but only at most you'll get two hits with this due to aerial movement and the severe lack of meaningful hitstun. Think like Pikachu's UAir. This move also leaves Rattata in the somewhat disadvantageous situation of being under a foe who most likely outranges it, outdamages it and outprioritizes it. You'll need to be careful in combining this possibly great damage racking tool, especially at higher %s, with the downsides of possible retaliation. It might not be a bad idea to try and Body Slam right out of the air after this.

It starts the quickest of any Rattata aerial and has the least ending lag.

Back Aerial: Crunch

Crunch is a Pokemon Move which Rattata learns naturally at Level 22.

When this move is used, Rattata will quickly turn around and deliver a HARD crunching chomp. This causes 9% damage and the most knockback of any Rattata aerial, killing at around 270%, but has the flaw of the fact that its range is extremely short, especially since Rattata has to turn around and can't really get any extension. If the opponent is anything more than a token distance away, expect to whiff, meaning this move needs to be used very carefully. It starts up deceptively quick, but its end lag is sort of bad, moreso if it misses, as Rattata chomping down so hard causes it to flinch a little, though unlike Super Fang it is not hard enough to cause any self damage.

This move has another use to it too, albeit a small one. If you hit A after this move is finished and during the end lag, Rattata will actually turn around, allowing you to change direction easily in the air. Nifty, eh?

This is your primary killing aerial, as Tail Slam only works with spiking and Tail Spin takes longer and is a bit less reliable. Just be very careful about how you use it, because it can't just be thrown out at will. Wall of paining is right out. You can also use it to turn around, but this might not always be a good idea, though it CAN be used to threaten a foe hit by it near the edge with a FAir meteor smash.

Grab Game

Grab: Gnaw

Gnaw is not a Pokemon move, but Rattata can use Gnaw in the Pokemon TCG.

Rattata has a very odd grab. When the grab is used, Rattata will hop forward just a tad. Normally this does nothing, but if it hits a foe during this, Rattata will swiftly run onto the foe. While Rattata is on the foe, you can move on them with the control stick, up and down causes you to move up and down the foe, while left and right allow you to move around them, such as to the sides. During this same time, the character is unable to move, but moving the control stick causes the character to move their hands or whatever they would grab Rattata with. If they hit A over Rattata, they'll grab it and fling it off. Miss and take lag. There is a very slight delay between the button press and actually grabbing Rattata, so you need to catch Rattata either gnawing you for damage, which it does by pressing A while on you and deals rapid 3% damage, or trick Rattata on where to go.

Rattata, as mentioned, can hit A to gnaw on the foe for rapid 3% damage, which is a mostly quick animation but will cause the foe to at least someone catch up to you. After ten seconds of this grab, if Rattata has not been caught, it will automatically jump off half a Battlefield platform in front of the foe. Rattata has no throws. If the foe grabs Rattata, they will now have Rattata in their grab, where they can do whatever throwgame they might have. If they have some special grab game that would not work, such as another Rattata, they will throw him away one Battlefield platform, dealing 10% damage. Rattata can, at any time, press B to exit this grab by jumping off the foe half a Battlefield platform in front of them, leaving Rattata and the foe in a frame neutral situation. This deals 2% damage.

I am pretty sure this grab is actual a horrible abomination to grabs, but YOU try and come up with something for Rattata! It's just not suited to any kind of grab game whatsoever. Sad. It's at least unique, I guess?

Final Smash: Rattatarmy

Rattata has managed to somehow grab a Smash Ball! When you unleash this move, a whopping 19 Rattata will frantically run onto the stage. These Rattata act as the main Rattata at 40% damage and have it's full moveset and will rampage across the stage for an amazing 20 seconds, acting as enemies to anyone not Rattata as CPU characters with a CPU level of 7. They can be knocked off the stage to get rid of them, but as there are 19 of them, it is quite hard. It can also be hard to find the main Rattata if you wished to hit it, as the summoned Rattata are always the same color/costume of it.

After 20 seconds, the Rattatas will run off the stage, each one having found a Chilan Berry. I guess they only came because they smelled it. There's no honor among Rattata, is there?

Playstyle of The Rat

Rattata is all about quick attacks, damage racking and mobility. Rattata cannot win in a heads-on fight with the foe, as it's attacks low % and bad range means it's priority is garbage, plus it's general lack of a KO move and, indeed, it's grab rendering it's defensive options out of it somewhat poor. This is not counting it's bad weight and terrible recovery!

But fret not, as Rattata are spry creatures, and they have to catch you before they can wail on you. Your speed will serve you well here, as will your mind, as Run Away becomes a centerpiece, allowing you unparallelled mobility options on the ground and even able to use your short lag to move around. Once you've gotten the foe to a decent %, somewhere around 80-100% depending on the weight, the threat of Super Fang will loom above the foe's head, threatening to do 50% damage and bring them closer to the percentage where Rattata can finally score the KO it so dearly wants.

Hustle also provides Rattata a high-risk, high-reward option, especially when COMBINED with Super Fang. After all, it does increase attack power by 50%...and Super Fang can deal a TON of damage. Landing Super Fang on a foe with just 80% means an amazing 60% damage(40% from Super Fang + 20% more from Hustle), almost doubling their damage right then and there! The drawback, however, is severe, as you will be taking MASSIVE recoil to your already small frame. That 60% you just did? It also means you just dealt yourself 15% damage. And no matter how good you are at dodging, if the foe has 80%, you'll have taken some damage yourself. Considering Rattata has little survivability, this is quite bad. Hustled Super Fang, while an incredibly dangerous tool, is also an incredibly dangerous risk. And if you miss, you still take 5% and that bad end lag, even if you can place yourself around with Run Away.

Hustle's other use is to turn Rattata's moves into more legitimate damage rackers. For example, Rattata's up aerial combo now gives you a solid 18% on the foe. D-Tilt to F-Air early on with Hustle will give you a great 25% damage on the foe early on. Your fast tilts are upgraded to legitimate damages and even your smashes start looking like a true powerhouse's! Just remember this all comes at the cost of Rattata's small survivability: That up aerial combo is going to cost you about 8% damage to do. D-Tilt to F-Air? That'll be about a solid 8-9% too. And your foe WILL be able to last longer than you.

Indeed, Rattata is an uphill battle, and perhaps a bit underpowered.

Rattata also has some mindgames to it, really somewhat required to play Rattata. All the times you can use Run Away and change direction with it mean that tricking the foe as to what way you will go with it is really needed to use it truly effectively, otherwise it can be chased down and you'll be exterminated, given no invincibility frames. Pursuit allows you some too, such as the short but important mental battle when it hits on how you will proceed, or how to proceed when you miss your foe. Turn around for another pass? Turn around and Run Away backwards to maybe trick a foe? Maybe you won't turn around, but Run Away backwards to get behind a foe who was charging a predicted backwards Run Away. Varying up how you go about it will keep the foe confused for the most simple follow-up of charging at them. Maybe even mix in a few of the same to make the opponent think they've got a pattern on you, before pulling the rug out from under them?

Be spry, be nimble and you've got a chance, little Rattata.

Author's Note: So here it is, Rattata. How did we not have a set for this guy before? I thought making a somewhat simple set would be good for me, as it would let me avoid frustration if I was unable to post it due to my issues. I actually quite like it, even if I imagine that the average MYMer will find it horribly bland, and that the grab isn't very good. But I spent hours trying to figure out a good grab! Rattata having a normal grab simply did not work mentally picturing due to it's size. In the end, though, I think I made something good enough to satisfy me. +1 to the Generation I Pokedex and another step towards it's completion! And that's not counting when I can finally post Alakazam...
 

Katapultar

Smash Lord
Joined
Nov 24, 2008
Messages
1,284
Location
Australia
[collapse="Cap'n Bowser"]To think the day would come when Jun would do a "Brawl remix"! This is certainly a fairly creative set in some mannerisms, one where you pretty much have a ball with all those variables from the likes of the Side Special and Up Special - easy to get somewhat drunk off, but then I can understand exactly where you were trying to go with the set in terms of staying true to the "Party" nature of the game this Bowser is from and with all those crazy magic shenanigans and random dice attack indications. The kind of thing I'd expect you to revel in, and you do - I love the implementation of the Down Special having THAT use in Coin Matches, even if it doesn't seem remotely useful for anything else other than getting foes into your grabs.

This set is very similar to Billy Hatcher - not the most exciting thing in the world, but for something so simple I can appreciate it quite a bit, especially in how I was expecting more pirate-ish props to go with the pirate them only that Bowser's sword is enough. It would certainly not be easy to balance out all the aspects of characterization such as the theme of Mario Party, pirates, and the big man himself - you do quite a bit to differentiate him from the original Brawl character at the start before taking from the original later on, enough so that he seems good enough in terms of representation. Mixing traps and your own brute strength together obviously makes sense for Bowser in this incarnation, though had this set been more ambitious making the likes of the die effects and spreading fire to flip them around would have been welcomed.[/collapse]


[collapse="Bowser the Brash"]And here's a much more proppy take-on of Bowser's incarnation, unsurprisingly. There's obviously a lot of little trivial matters I'd love to complain about, such as the awkwardness of the train being in the background where the back of it would probably go off the stage in most circumstances, the Side Special being a Side Special that you can use out of your shield when it would be better off being a Neutral Special for that matter, and the milk making people -drunk- in a Mario-themed moveset! You've heard it all though, I just want to let it out.

Playing around with the Z-planes, something only Davy would ever do, is surprisingly fitting with the context of the set-up being a "board game" - the base concept is also intriguing enough for me to forgive a lot of the stuff you make poor ol Bowser do, even if some of the moves seem a little too effective in what they do via "cheating" of sorts like the D-tilt. Then again this is kind of inevitable when working with the Z-planes in just taking all of your foes' defensive options away. Like with Jun's set, the effect of drunk milk making you go in and out of the background makes the "Party" feel, though here is seems that you're going for a much more playstyle-orientated set.

For what this set is worth I came out liking it, especially a good deal better than your previous works this contest. It's got the awkward feel of all your sets in its execution, sure, but there are some interactions to like here such as using a coin bag to control your train and knock enemies down so they're hit by your train and KO'ed, even if it's not the most necessary way to go about it and there are some parts where Bowser is too effective at what he does - there's also the fact that the train can be forced offstage, though it seems that you'd be unlikely to have such a thing happen unless your foe happens to overwhelm you, in which case you lose a main KO option but not all of them. It's not the best set, but likeable in a weird way. [/collapse]


[collapse="Black Hole Bowser"]This is one of my more favored sets of yours due to Black Hole Bowser not at all feeling awkward by my books and some of the intriguing moves like his D-air for him to camp in place like an emperor, even if the ideas and execution behind it weren't the most intriguing compared to what you'd usually expect from a Warlord set despite coming together well - it's very in-smash, however. Bowser does quite painfully feel like a boss character and at times somewhat overpowered with his Force Field, but he has his back to protect - he'll be facing the foe after being damaged by them, or at least I think he would be, so in tandem with his weight and recovery it wouldn't take too much for him to get back and use the force field to repel enemies. That obviously comes with the design, but giving him a pretty lame recovery of sorts makes it more acceptable. When I think about it however, everything coming together as it does with the time bombs and taking Bowser's weight into account is actually genius I'll admit, more so than I initially gave it credit for. This set indeed feels like more reserved Bowser in how it goes things - aside from only faulting some of the Grab choices, nothing sticks out as being particularly awkward for me and this is my favorite Warlord set of the contest for its surprisingly clever design and faithfulness to character at the same time.[/collapse]


[collapse="Bowser Sphinx"]Interesting way to implement an element of the "board game" of such via the Bomb-ombs, though I do feel it to be a little too intrusive with all those shenanigans and dropping bombs on players despite how somewhat fitting it is - when you go about actually implementing the aliens in the second mechanic and assume that Bowser will want to fight them when doing so is pointless and probably might not happen, it starts to become a little disjointed by my watch. I assume the Down Special hasn't been used on a set before, and it's well worded, but does feel a little wasted in the set when the main concepts are somewhat mediocre, even with the teleportation tiki heads which naturally have potential when doubling as solids. This particular variation of Bowser could have perhaps used "riddles" and more magic given how much potential the latter has. With generally shaky execution, this set didn't quite do it for me compared to a few which did in this contest.[/collapse]


[collapse="Wizard Bowser"]This is a rather strange set. There are fairly creative moves and numerous firmly built-in interactions which would constitute for a great set, though I think the results of it all seem a little...underwhelming at worst. I guess there's a little too much focus on what you can do what with your many "minions" and coins taken from the foe in which you need your Boos to do in the first place rather than what you can do to the foe with everything you've made - it's all good that Bowser is reveling in his costume like with Black Hole Bowser, but when you have summons which are somewhat useless unless you use a certain move, even when you bring about the interesting idea of making the Boos invisible during "day" and the coins they steal only altering damage, it's hard to be impressed - doesn't quite help that the interesting potential of turning a foe into a frog among all this doesn't really play well what with the options they have as one.

I started writing the above paragraph after reading the Smashes and so, hoping that the Aerials and Standards would fill in the gaps and ease my doubts. It does seem a little off that Bowser can attack his Boos with physical attacks when his foes can't, though I might be wrong, many of these moves interacting with the already unsatisfying established moves - they do KO, though I don't really see a great point in it all with the summoning of Boos despite the fact that you can turn them to stone. I believe that this set had some great potential - hell, the character was thriving with potential, perhaps more so than any of the other characters when you could do virtually anything you wanted with the magic within reason. You already had the making of something promising, especially with interactions akin to those of great sets, if only the Specials of all were played to a more significant degree such as the Boos and the frog-transformation of which could have provided with some amazing interactions via using the foe's time and size as a frog to your advantage. I don't think there would be much stopping a player from just trying to turn the foe into a frog and knock them offstage, which in itself seems rather overpowering even when you don't take all your other weak options into account.

For how much I've beat at the set, it isn't particularly bad as it nothing feels awkward and I do like the magical implementations. It could have been great, if only an example of a set that focuses a little too much in certain unnecessary interactions, with some surprisingly not-so-great ideas and execution as a result. Given you don't always make sets like this however, there's something to take from for future movesetting, surely, as do most movesets that users make. Hopefully this comment pointed it out.[/collapse]


[collapse="Rattata"]Surprised you got this set done as quickly as you did when you said you'd get the set done. It feels reminiscent of Demyx in a way with making use of an in-game mechanic the character is well-known for (all the more convincing with the trivia at the beginning of most moves), something you obviously wouldn't be able to pull off so recognizably easily with Night's End Sorcerer or Zombie Master - I wouldn't be surprised if you started becoming notorious for it in my books.

This is essentially a "Brawl" moveset in a similar vain to Night's End Sorcerer given the depth of which those individual melee attacks were designed for even if they all seem to same to the average MYMer. Having Super Fang in is pretty cool, and while it may not seem all that exploited in its mechanic and merely be a damage-racking shortcut, I'd say it works surprisingly well for being a deceptive move you can just pull out of nowhere. There obviously isn't and wasn't too much you could do with Rattata and while you were obviously going for the underpowered feel but still being able to deal some solid damage Rattata doesn't seem -SPECIAL-, but in the end you don't have to make him that way...the special thing about Rattata though is that he's very small, which I guess one would forget in the process of reading the set in visualizing the Pokemon as an average-sized character - that actually makes most of the moves more interesting to visualize, and you generally have it exploited in the best way for a simple melee character by having Rattata throw his entire body at the foe. In terms of a character having a redeeming quality for being underpowered, which to be fair they should always have to make sure they're used, Rattata can be deceptive when you have moves like his Side Special to mix up his normal melee game, giving you more options than you'd think with the one little mouse.

Rattata's probably gonna be a bit forgettable among your sets, but it seems you managed to achieve quite a bit in his creation when you seem fond of completing that Gen 1 Pokedex entry, and from your standards Rattata isn't too bad for what you had to work with. [/collapse]
 

Katapultar

Smash Lord
Joined
Nov 24, 2008
Messages
1,284
Location
Australia
Make Your Move 12 Story Mode - PART 4

Part 3 can be found here


The 20 heroes whom consisted of Roxas, Axel, Yu, Naoto, Night's End Sorcerer, Kirika, Sakurako, Himawari, Cherry, Angel, Player99, Cole, Yutaka, Gray, Agiri, Keroro Platoon, Jeanne, Shana, Khamsin and Wilhelmina, those lucky punks, were currently travelling the time-stream through their magical Kanade heart bubble, the background of which looked disturbingly similar to that of Brawl Final Destination's. It was too bad for them however that Legend of Leaders suddenly appeared before them and shattered the bubble with his thread-shattering powers! All the 20 characters were forced to plummet into different areas of the time-steam, each one helpless to the effects of such and no way of knowing where they would end up and with whom...


=============


Roxas, Axel, Player99 and Night's End Sorcerer all woke up to find themselves on Brawl's Pirate Ship stage, where they saw Toon Link of whom looked shocked to see them on board his ship, but he did not say anything due to being a Nintendo character, and he probably could not hear them. Instead, he challenged them to a Brawl without their consent, that little scamp.

Battle 67 - Roxas, Axel, Player99 OR Night's End Sorcerer VS Toon Link

The battle was suddenly interrupted by that pirate ship you see in the background of the Pirate Ship stage! It was being mean, firing canon balls at Toon Link's ship...and that enemy ship was being manned by none other than Cap'n Bowser, one of the 5 incarnations of Bowser they needed to defeat! Toon Link looked panicked as Axel made a corridor of darkness that led the 4 to Cap'n Bowser's ship! This shocked Cap'n Bowser, who let out a roar and pointed to the intruders as his generic minions from the SSE appeared to help him, only pirate-themed.

Battle 68 - Roxas, Axel, Player99 and Night's End Sorcerer VS Cap'n Bowser with endless generic Mario-minion SSE enemies

Cap'n Bowser and his minions are dumped off the ship, the likes of Player99 and Night's End Sorcerer being relieved that they managed to find and defeat one of the incarnations of Bowser so easily. All of a sudden however, time stopped around the 4 heroes and everything turned monochrome as Kanade's voice suddenly started talking to them. She told them not to be alarmed, and that she has become all-knowing due to merging with the time-stream that compromises all worlds, having dropped everyone off in groups of fours in the exact area where each Bowser incarnation appears at a time before they were picked up by Legend of Leader. In other words, she is now a God, and none of these Bowsers know of or that they will jump through time and space to meet different incarnations of themselves, but defeating and foiling the plans of each and everyone is key to stopping each and every individual incarnation. She states that once every Bowser incarnation has been defeated she will pick everyone up for the final showdown against Legend of Leader, but in the meantime she can talk to everyone whilst they're kept safe inside a gap in time so they don't interfere with the timelines of the worlds too much and aren't endangered by any of them, as well as let them rest for a moment. Player99 asks why nobody they encountered in this world talked. Kanade tells him that Cap'n Bowser came from a world known as the Subspace Emissary, and that due to the creators being lazy characters could not verbally communicate with each other and could only use physical gestures. Axel thought about how much that would suck, and that he's glad he can talk. Kanade goes on about how there was this great threat to the world Tabuu, and that how afterwards a bunch of heroes and villains teamed up to stop it only for them to go their separate ways in the end. There are multiple endings, but in this one Bowser decided to become a pirate to wreck on the high seas that were once occupied by giant floating islands, terrorizing people for fun and stealing their treasure. He gained a bit of a reputation as a pirate more so than his original persona, and was notorious for using electric cages that stole people's money from them. Player99 realizes that perhaps even in the end when heroes and villains team up to stop a greater threat they'll always go back to their old roots, and wonder what will happen to everyone when this Legend of Leader villain has been stopped - he knows he'll go on continuing to protect people from nasty baddies of sorts, while Night's End Sorcerer states he'll continue his job being a Shepard of souls, but Axel states he has nowhere to go but where Roxas goes, who states he isn't too sure. Player99 suggests that Roxas and Axel come along to kick some tail with him when all this ends, saying they can be good buddies and form their own league of heroes. Roxas considers taking 99 up on that offer...


=============


Shana, Khamsin, Wilhelmina, Gray wake up to find themselves on the outskirts of a toxic-waste facility. Shana and Wilhemina both hold their heads in pain, something about the area causing them to gain recollection of many past events at once. It all came back to Shana: this was the MYM5 era, where MasterWarlord had taken over Leadership of the Sandbags from Sirkibble after having stopped the mad assault of Mewthree and Spadefox, which he renamed into the Abyss and gathered "Seven Deadly Sins" along with himself to make use of all those heavyweight male antagonists who were left over from the event, for they would just go back to their old roots of villainy. Unbeknownst to the Abyss Mewthree had survived those events and used the new theme of the Sandbags to his advantage by awakening his secret weapon Dark Gaia whom he used to split the world into 7 pieces. Seven parts meant one for each member of the Abyss, though there was also a secret 8th part which the wandering Sirkibble managed to seize. At this time Warlord was working on many secret experiments to create more antagonists under the belief that the world should only be filled with their kind. Kibble tried to stop Warlord, but he had to depart from this world in a short moment and took some warriors under his tutelage which he would call "Flame Hazes" who were designed to bring back the order of the world's existence and reconstruct it back to the way it was. Shana and Wilhemina were Flame Hazes trained by Sirkibble himself and desired to bring the world back together again. Warlord saw this, and hated the Flame Hazes with a passion like he did to all lightweight female protagonists. Their quest was basically to defeat the Seven Deadly Sins of whom were compromised of MasterWarlord himself, his favored right-hand man Arthas, Father Time, Mewthree, Bowser Jr., Acid Seaforce and Hypno. There were a whole bunch of other minions, but aside from Dark Gaia itself those were the main antagonists, along with MasterWarlord being by far the strongest of them all and having his own elite minions each with the power of one of the other Sins namely Envy, Lust, Gluttony, Missingno, Ryuk, Illidan, a brainwashed Alphonse and the very same Zasalamel whom was encountered earlier in this SM. In the name of Warlord, each Sin gathered many antagonistic followers, leaving only a few protagonists to actually oppose them.

Shana met up with a boy named Yuji Sakai and fell in love with him, though she would die before admitting it. At the same time, they meet some Alchemists, namely Edward Elric and Roy Mustang who were on a quest to defeat the Homunculi and for the former to rescue his brother. The Alchemists and Flame Hazes joined up, and although small in numbers they actually managed to take advantage of the fact that many of the antagonists they fought did not like their jobs or were disowned, so they joined up with the protagonists to try and take down the Abyss. Of particular interest was when they met 2 Homunculi Eny and Lust whom Warlord severely disowned, especially the former - as much as they wanted the Alchemists dead they also wanted to see the one who created them dead, deciding to join up with them to take down the Abyss. Warlord eventually retired for some reason, and got Acid Seaforce to take over for him. That MM villain was defeated, and eventually the world appeared to be alright, only that Mewthree had been hatching a plot to revive Spadefox whom he succeeded in achieving at the cost of his life - when he came to be, Spadefox decided to form the Palette and fill the world with Warlord's desire to fulfill his own goals of wanting to stop wars and such, taking away people's freedoms with villainous authorship. The Palette consisted of himself as the Leader, The Count whom MasterWarlord was taking possession of, Zant, Hornet Man and the Black Knight, along with lesser Palette consisting of Negative Man, Von Kaiser, Cloud of Darkness and Hades...there was supposed to be a 10th member but that gap was unprovided. When the Palette came to be, let's just say that things got very hellish for the heroes, the likes of whom were probably killed or imprisoned.

We cut back to the actual real world where the 4 current heroes are, with Khamsin and Gray asking if the two ancient Flame Hazes were alright. They just mentioned it was just a nostalgia about the place, Khamsin noting this rather casually and stating that he's been a Flame Haze for longer than either of the two and he just happened to not have been involved in these events. Gray doesn't quite get what everyone's talking about, to which Wilhelmina apologizes for keeping on out of the circle, realizing that they should be heading into the factory if their hunch about where Bowser is proves to be correct.


=============


The 4 rush in to see Bowser the Brash holding up the entire production of the factory, demanding money...of the held-up workers, one of them appears to be Bowser Jr of the Sins and the other Iggy Koopa! Shana tells Wilhelmina that this event appears to be taking place after the Sins were disbanded, and that they were forced into labor by the Palette given that they had nowhere else to go. Bowser Jr and Iggy are begging their dad to stop the hold-up and forgive them for going against him, but Bowser can't forgive the fact that they got into the Sins and he DIDN'T, they wanting to take the glory for themselves like ungrateful brats, so he's deciding to teach them a lesson and show them what being poor REALLY feels like. Shana, Khamsin, Wilhelmina and Gray all rushed towards Bowser the Brash and attempt to do battle with him - Bowser Jr and Iggy recognize Shana and Wilhelmina as enemies, grateful that they've come to their rescue in their time of need. Bowser snorts, frustrated that they would have the balls to interfere with his plan when they should have better things to do. He points his gun towards the heroes, deciding to have at them.

Battle 69 - Shana, Khamsin, Wilhelmina and Gray VS Bowser the Brash

Bowser the Brash is sent flying into a wall and gets stuck half-way through it rather comically. From there, time suddenly stops and Kanade makes herself known to the 4, telling them the necessary information she told the previous group before telling Gray everything that Shana and Wilhelmina experienced in their flashbacks so he's informed. Gray realizes that no matter what villains always seem to keep springing up like they have on their journey, but is informed by the other 3 that such is inevitable but the will to keep on living and fighting against them will keep them at bay - after all, there will always be those who crave peace and justice like them.


=============


Keroro Platoon, Agiri, Cole and Yu find themselves on a large spaceship, being able to breathe due to being on the inside. The Platoon and Cole find a bit of nostalgia in this while Agiri and Yu have never been into space before. The 4 of them can't even attempt to do anything however, as an alarm suddenly goes off and causes Rocket Executive Hugo and Hannibal Bean to appear before them! The two of them question how the 4 got on the ship, but are attempting to place them under arrest and have them sent to Lord Bowser. The 4 heroes would normally fight back, but decide to use this to their advantage in order to find Bowser and defeat him. They comply.

Next up, we see that the 4, who have been chained-up, have are at the front of the inside of the spaceship, where Black Hole Bowser is sitting in the commander's seat. Bowser looks at these intruders to a degree of interest, telling Hugo to hypnotize them. Before Hugo can take out his precious Hypno however, he and Hannibal have found one of the intruders to have been replaced with a log...none other than ninjutsu from Agiri, who tosses some Kunai towards the her allies' chains to break them off, letting them get out of the two villains' clutches and fight back. Angered, Lord Bowser points to the intruders and orders their execution, causing a group of Skeletons with Octillery on top of their heads to start dancing from certain compartments of the ship and around the heroes! At the same time, Lord Bowser stands up off his seat and points towards the intruders to make things more specific for the dumb minions, where it is revealed that he has been fondling a Nurse Joy who has been sitting on his lap, completely loyal to him....WHAT.

Battle 70 - Keroro Platoon, Agiri, Cole and Yu VS 15 Skeletons with Octillery (each with 150%) on top of their heads, Hannibal Bean and Rocket Executive Hugo.
What hilarious about this is that Team Attack is on for your opponents, but not for you. lol. This also makes the match easier than you'd think.


All the minions have fallen to the floor in defeat, which angers the great Lord Bowser into attacking them himself...he brutally tosses his Nurse Joy forward, knocking her onto the floor (don't worry, she's masochistic as in the picture of the Warlord Rankings) before the big man himself floats down to confront the challengers.

Battle 71 - Keroro Platoon, Agiri, Cole and Yu VS Black Hole Bowser and Nurse Joy

Nurse Joy has been knocked out and Black Hole Bowser has been comically sent flying into outer space rather than dying or something, the laws of video game logic with SMG and what have you meaning he won't be dying anytime soon. With his defeat, time stops for the 4 and Kanade's voice is heard. She tells them about being God and so before saying that this Bowser obtained the powers of darkness and became an unstoppable force that conquered all of earth. With that, he set out into space, turning his darkness into a space ship whilst taking his many pride and joys there with him, like second-in-commands Bean and Hugo, his fondling toy Nurse Joy and many playful Octillerys. He eventually became Galactic Emperor, or at least after the events of which occured in where he had his Ginyu Force search for him from space for a long time before he came into contact with powerful dimensional beings which overthrew him. Keroro and his Platoon talk about wishing they had that kind of power to take over Pekopon, but Agiri states that they cannot even conquer her so they wouldn't have much progress. Cole points his guns at the frogs, telling them he'll blast them to smithereens if they try anything funny with his planet, causing Keroro to move back in terror. Yu realizes however that within dark times of oppression bonds and truths still exist, guiding the lost with hope.


=============

Cherry, Sakurako, Himawari and Naoto all found themselves inside what appears to be an ancient pharaoh's tomb. Before they can start exploring however, a group of Desukan appear to attack them! (name changed for legal reasons)

Battle 72 - Cherry, Sakurako, Himawari and Naoto VS 3 Desukan
You battle against 3 Desukan who after you KO, have to venture into the tomb where you fight against a whole bunch of Ancient Egyptian themed Goombas, the occasional Belome and even Gastlys and Haunters.


The 4 arrive to an elaborate room where a gold coffin is seated, only it has Bowser's face printed onto it. Sakurako and Himawari think that it might have Bowser inside, but Naoto doesn't think it's worth checking should there be a trap. Realizing this, Cherry attempts to walk up to the coffin and sniff it for a while, actually making the fact that she's a dog useful. She wags her tail and barks in excitement, signalling to the others that Bowser is indeed inside. Naoto attempts to cautiously check the coffin, but before she can Wario suddenly bursts into the room with his trademark Wahaha laughter! One can obviously tell he's here to steal all the treasure from Bowser's tomb given that huge sack of money he's holding over him with one hand. With his other super-muscular hand, he hoists the coffin over his shoulder and runs off with it! The 4 are forced to chase him and get the coffin back, for opening it and defeating the awakened Bowser is the only way they can get out.

Wario is chased to the entrance of the temple, where the coffin suddenly opens up to reveal Dry Bowser. The King of Koopas jumps out, faux yawning and saying how it's finally good to be out in the open once again with all that deception caused by Gengar and Pennywise gone. He thanks Wario for getting him out when necessary, telling him he can keep the money and signalling him to scram. With that, his attention is focused to these 4 intruders, somewhat annoyed that they've come to steal his treasures and everything he worked so hard stocking up for the emergency moment when someone would actually defeat his Ginyu force and kick him off his position as Galactic Emperor...he takes this moment to curse Dormmamu, Shuma Gorath but most of all that troll Hazama, who got even more power than him. And when those fools -were- finally defeated, the other villains started playing smart with duplicates and invisibility! Bowser states that he could not compete with them, so he buried himself in his dry form for quite a while, getting a few minions to go out and make deals with certain villains. Some accepted, others did not, but they had no time to trust him when they could not trust the others around them. Much backstabbing ensured, and eventually all the villains killed each other off with the help of some certain heroes who wanted to turn the tables in the never ending battle of good vs evil. None of the 4 heroes have any idea what he's talking about, but he doesn't care as he'll just crush them all like puny insects, summoning two fossils from the ground to assist him - Omastar and Kabutops.

Battle 73 - Cherry, Sakurako, Himawari and Naoto VS 3 Dry Bowser, Omastar and Kabutops

Dry Bowser realizes that he's not at full power yet and has underestimated his rivals, deciding to go all-out. He holds an orb of dark magic that was given to him by Lord Cronal, and it revitalizes his body in the form of Bowser Sphinx! Bowser cackles, telling the heroes that they won't be able to stop him when he has the power of dark magic to destroy them, and aliens too.

Battle 74 - Cherry, Sakurako, Himawari OR Naoto VS Bowser Sphinx

Bowser Sphinx is comically sent flying away, being defeated. Time stops for the 4 heroes, and Kanade tells them who she is and so on before talking about all the backstabbing and deception they surely heard from Bowser. Naoto states that perhaps a lesson has come from this experience and that everyone has to fully trust each other and their beliefs so they don't get overwhelmed by the enemy. Sakurako and Himawari look at each other, deciding to shake hands on this and work together so they can get back to being rivals. Cherry merely barks in approval.


=============


Yutaka, Jeanne, Kirika and Angel find themselves in front of a rather large house in a quiet yet somewhat elaborate suburb in Japan which Yutaka and Kirika recognize...and a strange feeling of nostalgia with the former. Angel might have been to Japan in his adventures AKA when he was evil, but Jeanne does not recognize the area despite being from a Japanese anime - she's not from Japan given her uhh....name.

The 4 are suddenly interrupted by the door in front of the house creaking open, which prompts them all to suddenly jump and hide in the bushes via Kirika's insistence. Out of the house comes Ayano Minegishi, who is waving goodbye to Yukari Takara (lol character bias), the latter of whom cheerfully tells her to have a good time at her school. While hiding, Yutaka suddenly holds her head in slight pain, realizing that a portion of her memories are coming back to her - she states that she once met those two, and during those times had about 7 or so friends with her, none of whom she can remember, but that pink-haired woman was the mother of one of them. Kirika does point out that Yutaka is in fact wearing the same school uniform as that orange-haired girl so this recollection can't possibly be a coincidence - Jeanne reminds Kirika that they're trying to look for Bowser, but Yutaka can't help but feel curious about the orange-haired girl whom intrigues her quite a bit and decides that she wants to follow her. Kirika realizes that it wouldn't be hard for Yutaka or her to blend in with this girl and get her trust easily - Jeanne states that she could easily use her powers to disguise herself but she doesn't really want to pursue this goal and decides to sit back with Angel, who would kind of stand out and probably be accused of a pedophile if he tried to approach the girl - unsurprisingly enough, Angel does not respond to this, mostly due to it not being intentionally offensive.

Before either Yutaka or Kirika can make a move however, two male high school students suddenly pop out of nowhere to stand in the girl's way, Kenji and Hisao to be specific! Kenji points at Ayano and accuses her of being the leader of the feminists, which doesn't faze her until Kenji claims that they brought the manliest man of all to fight on their side: Julius Rock! The muscle of a figure suddenly drops down from the sky, pointing at Ayano and stating how her life adds up to nothing. This makes Ayano melancholic, who states that she doesn't have any more friends even after Phyrexia was defeated, which makes her question if her life is worth living. Kenji states that's all the more reason for them to finish her off now, which prompts Yutaka and Kirika to jump out of their hiding places and confront the 3 men in with ready stances! Ayano turns around in shock of the ones behind her, calling out "Yutaka!?" as the girl in question looks at Ayano with an face almost beaming with joy, Kirika realizing this and telling Yutaka to take the girl somewhere safe while she fights off the fools.

Battle 75 - Kirika VS Kenji and Hisao

Kenji and Hisao are knocked away by the fearsome power of feminism, the former getting to his feet and claiming they'll be back before rushing away. Julius Rock decides that this was a waste of his precious time and that time is money so gets in his truck nearby and drives away lol. Kirika goes over to Yutaka and Ayano to see if the latter is okay, with the two girls having very joyous expressions on their face. Ayano hugs Yutaka, getting unusually emotional and telling her she thought she had died from "that" incident which took the life of the others. Yutaka does not understand what Ayano is talking about, who realizes this and decides it's better if she doesn't know the truth. Ayano deduces that Yutaka is going to the same school as her, but Yutaka can't quite tell her the truth of everything that's happened, thinking that she won't believe her - she has no choice but to lie about it and say yes, which prompts Ayano to grab her hand, telling Yutaka that unless they run to school they'll be late. With that, the two run off and leave the other 3 behind - Jeanne doesn't look all that happy and decides they have no choice but to follow her, with Kirika telling her that perhaps they should let Yutaka have this time to herself given everything she's had to go through with them, and if Jeanne wants to follow her she can use her powers to disguise herself as a student. Jeanne decides she has no choice and runs off to follow Yutaka and Ayano, using her ice powers to impersonate a normal high school girl the former won't be able to recognize. Angel and Kirika decide they might as well follow them for the sake of protecting them.

Yutaka and Ayano arrive at their school, yet much to the former's surprise there are even so many as a dozen people around. Yutaka asks why there are so few people around, to which Ayano melancholic-ally replies that she and her fallen friends went through a lot to, somewhat questioning where Yutaka was if she didn't know about the Phyrexia invasion - monsters who wanted to mutate everyone and make the world "one". She supposes that Yutaka was probably hiding somewhere or was being protected by someone given the horrifying nature of the event, and that because of that there won't be as many people coming to school at this moment. She also mentions that there will be a single class everyone will take together. The two enter their class which is taking place in the school's large hall, where there are only about 146 people or so tops. There were no recognizable characters among the students, but one very recognizable teacher: Cyrus! The old man merely gave off his signature hearty laugh, him being the silent protagonist he was unless you want me to make him talk - I guess he had a high tolerance for things in his old game what with Yutaka and Ayano being late. That, and anyone can come to this crazy class if they have the uniform. As Ayano and Yutaka are about to take a seat, another student comes walking in, apparently looking for something before taking a seat next to Yutaka - Jeanne, trying to reluctantly keep tabs on Yutaka.

As for Kirika and Angel, they merely sat outside on top of a building waiting for as long as it took for the 3 girls to finish for the day. Things were eventful for most of the time, but they did not expect Cyrus to suddenly teleport up to the top of the building to make himself known - it seems that he sensed their presences like the powerful wizard he was! Me deciding to make him OOC and actually talk, though it be fitting for him, he's not hostile to Kirika and Angel despite being somewhat suspicious with they sitting on top of the building and all, but rather he actually has the magical power of understanding that they're trying to look after a girl who came into his class and are looking after Ayano and lifting her spirits, which he is grateful for - he further states that he is aware that they are not of this timeline, but of one from a slight distance ahead into the future. Kirika and Angel are somewhat surprised that Cyrus knows this, the man of whom asks what they're doing in this timeline. Kirika tells Cyrus that they're looking for an incarnation of Bowser to defeat due to he threatening the timelines of all worlds - Cyrus, being the wise man he is, believes their words but tells them that if they're looking for Bowser he is no longer of this world. This somewhat upsets Kirika if a little, realizing that they may not be able to go back to their own world. Cyrus states that he could help them with his magic, but Kirika thinks that Yutaka seems to be having fun in this world and considers asking her if she wants to stay instead of straining herself on defeating Legend of Leader. Cyrus believes that perhaps they should let the events play out, because if they all really are from the future it means that a Yutaka exists in this current timeline and that leaving the one from the future in this one wouldn't be appropriate - none the less, they should wait a while until they do actually tell Ayano the truth because she'll eventually have to face it sometime and get over her depressive slump. Kirika asks what caused Ayano to allegedly become depressed, to which Cyrus replies that she's been through a few battles that resulted in the loss of her friends, so although she saved the world, that very world will never be the same to her without good friends to rely on.


=============


As Yutaka, Ayano and "Jeanne" leave school together, Kirika and Angel come to greet them. Ayano recognizes "the girl" from before in the morning, asking Yutaka if she's a friend of hers. Yutaka introduces Ayano to Kirika and Angel who have done a lot for her, while Jeanne reverts to her true form and stoically introduces herself as "Jeanne", surprising Ayano that the other "friend" she made had been disguising herself as somebody else, which Jeanne states she did to blend in and keep tabs on Yutaka and not to actually deceive or break her heart in any way. Ayano seems rather happy, and decides to take everyone window shopping into the city to ask them what clothes would look good on her like the feminine female she is.


=============


Everyone has arrived back from the city which would have otherwise been a pointless scenario to write and are walking along the suburb back to Ayano's house" whom she has invited everyone to visit...which she explains is not her place but the Takara residence where she was adopted by Yukari Takara after the city she transferred to years ago was destroyed at the hands of Phyrexia. This makes Ayano look a little melancholic, saying that had she not ended up in that city she wouldn't have lost her friends. Yutaka does want to know about these people Ayano is referring to, but she decides not to pry into matters which would cause her to recall grief.

Before they can all make it back to Ayano's place however, a strange yet familiar specter forms in front of the ground...it's Wizard Bowser! He laughs his trademark laughter as Ayano looks horribly shocked at his materialization, as if she's just seen a ghost. Wizard Bowser explains that's because he is in fact a ghost...


=============


We cut to a flashback where Bowser has just told the others opposing Phyrexia's takeover to leave while he deals with the great monster Voreinclex, who commends the King of Koopas for attempting to challenge him - he states that if he joined up with Phyrexia he would come out as one of the top hunters who would destroy all other weaker lifeforms. Bowser chuckles, stating that he's tried to crush all those puny insects who oppose him many times but they always gangbang him in the end, as what they're doing to the Voice of Hunger right now. Voreinclex decides that he will devour Bowser's will to oppose the new world and turn him into the ultimate predator next to himself that devours all others, a great weapon to use against those foolish Praetors Urabrask and Jin. Bowser says his will belongs to him only and that he'll do whatever he wants - he uses his amazing villain powers suddenly grow to gigantic proportions that make him larger than Voreinclex, who decides to absorb the oil spread around the place to reach the same size, because I totally imagine him doing that as a boss. The two pummel on each other like boxers in a boxing ring, but crash into a nearby mountain with a large explosion which is the last we see of both of them...


=============


Bowser states that he did indeed die there, but he asks Ayano if she remembers the time they all went into Fulci's realm to put an end to him. Ayano states she does, and Bowser tells her that he spent his time beating up a bunch of evil spirits there and made a deal with the dead Dr. Facilier so when he died he would gain the power of those many spirits, absorb them to become a Wizard Bowser - he even has Facilier's ability to turn people into frogs. Bowser states that he has come to take Ayano's hand in marriage, saying that he's the last of his kind in this world when all the other villains were either killed off by Mikami or in the battle with Phyrexia and that she also lost a lot of friends so she has nowhere to turn to but his sweet rack. Ayano realizes that she might have accepted his hand a day or two before, but now she has friends, something she doesn't believe Bowser can genuinely be, and that he's too old for her - she also states she has a mother who loves her. Bowser states that Ayano doesn't have a choice in what she gets, saying that if she wasn't so clingy he wouldn't have to resort to certain extremes. He points his wand towards Ayano, unleashing his pink blast and turning her into a frog! Oh noes! He then levitates her transformed body into his clutches, telling the other chumps to go find another friend because this one's all hers. With that, he teleports away with poor froggy Ayano, leaving the others behind.

Yutaka starts panicking, realizing they need to rescue Ayano right away. Kirika states that she wants to just as much as Yutaka so that scum Bowser doesn't end up marrying her, but they don't know where he's hiding. Angel suggests they go see to the city and find people who know where Cyrus is, who might be able to help them pinpoint Bowser's location.


=============


"Battle" 76 - Kirika, Angel, Yutaka, Jeanne VS N/A
For the first time ever this isn't a battle, but rather you play as these 4 characters, going around in the city to gather information from people as to where Cyrus is because I can't be bothered writing a scenario about it all. You can also buy items from vendors that you'll want to use in the future because all your stuff will be separated from the others and there are lots of battles ahead...what, didn't I tell you all that stuff before the story? Nah. There are no battles involved, though there may be the occasional shady peep who just comes up and tries to steal your money or item, who you just have to kill like the cool person you are. Angel, Yutaka and Jeanne have the easiest time gathering information because Angel can use his sexiness to convince most NPC females and even his winking taunt to make them achieve climax! If you do this that person will need to go to hospital and you can ask the hospital people where Cyrus is for mission complete. Yutaka has an easy time because people will think she's a lost child and they'll give her candy, while Jeanne can disguise herself as other NPCs nearby to talk to those who would otherwise be inaccessible. This level has a lot of stuff in particular, namely a small smug American girl who's just standing there in the middle of the street - if you attempt to talk to her, by Haruhi prepare yourself for one hell of a battle...


If you triggered that special cutscene that little girl will attempt to pester you and make you buy make-up for her, which costs 100 of your coins. If you say yes, she'll take the money and walk away without thanking you - how rude! If you say no however, she'll start to squealing and saying DADDY HE HIT ME! which causes a voice to rabidly howl WHO HURT MY TONYA!? before a manhole opens up behind that character and reveals a hulking figure....dear god no.....

SECRET BOSS BATTLE - JULIUS "ROCK"


You play as Kirika, Angel, Yutaka or Jeanne based on which one you were using during the level. You fight against the Pig King Statue-sized Julius "Rock", and by god is this battle HARD - it makes battling Tabuu in the SSE in Intense with one character without being hit look easy! It doesn't help that Julius "Rock" has tons of powerful attacks and barely leaves any openings for your characters to use their attacks - if you're playing as somebody like Yutaka and don't have a good throwing item equipped onto her, you will have absolutely no way of winning this battle. Julius "Rock" has 999HP and never stops attacking, so in order to defeat him you'll need to dodge his attacks and hit him from a distance with fast and consistent projectiles at the same time. Thankfully however Julius can be knocked back and grabbed like a normal character, albeit a Metal one always treated as being at 0%, and he can also be footstooled and all the likes. Julius' main attacks involve performing teleporting upper-cuts on you if you're far away from him, pointing at your character and throwing out a whole bunch of punches towards them that also block projectiles, leaping with his arm out before slamming into you from a distance, throwing out mighty punches up close at you, and while in the air performing rolls, drop kicks or fierce body slams - you really need to stay focused at all times to dodge these attacks, though Julius does have a fair few blind spots that let you attack him due to his massive size and he does at least suffer a fair amount of lag so if you can actually dodge his attacks you can dodge them.

The character who you actually use to win this fight with has relevance, as they'll be given a bonus stick that gives them permanent access to their boss set for the rest of the game, and you can get this sticker for other characters by replaying this level later on with them so don't worry. Each of the 4 playable characters you have with you have a slight advantage over Julius - Kirika can heal herself from the massive damage Julius dishes out to him and can even grab him when her curse is about to begin so she isn't punished in place for a lethal blow, and also has many ranged options that aren't too slow. Angel starts off with two swords and has many good melee options compared to other MYM characters and two different attacking options, Yutaka can increase her shield's power by constantly throwing swords to the point where she'll actually be able to use it to block later on, but Jeanne is probably the best for fighting against him as she can keep him in the air with geysers and hit over and over with her sword, can actually camp once she's got enough water on the stage where Julius will barely be able to follow her and also actually has a counter which can punish the brute given how powerful his attacks are.

Once you complete this battle, it will be revealed that Julius "Rock" was actually Julius Rock who made a deal with wired scientist for money so he could buy his daughter something, but defeating him will make him human again, much to his dismay from not being awesome.


=============


The 4 make it to Cyrus' house, knocking on his door as he lets them in. Kirika gets straight to the point and tells them that Bowser has not only revived but has also kidnapped Ayano due to wanting to marry her - thus, they need to know where he is so they can rescue Ayano and get back to their own world. Cyrus tells them where Bowser's castle is, warning Kirika that if they are to get the deed done and actually defeat Bowser they'll have to make sure they have no regrets as they'll never get to see or witness what they've experienced in this world again. Cyrus is looking at Yutaka at this time, who is unsure of why - Kirika then makes it clear to the little girl and tells her that she appears to be getting along well with Ayano, asking her if she wants to stay behind in this world where she seems rather happy to have met someone who knew her from before. Yutaka says they'd probably think she would, but there's a lot she doesn't feel comfortable asking Ayano about, and that she just doesn't want to leave behind all the experiences she's had with everyone else - it also wouldn't be good to just stay in one timeline when it's not her own. Cyrus tells Yutaka he thinks she's made the right choice, and that he hopes they succeed in their journey.


=============


"Battle" 78 - Kirika, Angel, Yutaka, Jeanne VS countless Boom Boom, Fire Snake, Reznor

Bowser has returned Ayano to her original form, who is instead lying all ragged at the King's non-existent feet as he floats where he would be otherwise sitting on his throne. Ayano asks why Bowser isn't satisfied when the world is at peace, to which he replies that he is, but being a villain he obviously wants to take over the world for himself, stating that he's been wanting to fill the gap he lost ever since his sex toy Nurse Joy died. That, but most of all he wants the Black Box which Ayano came to possess during the Kira events and Phyrexia invasion, which will give him great power and allow him to stay in this world as a powerful entity that he already is. Ayano states she doesn't want to give the Black Box to someone who will cause it to give others suffering, but Bowser states he's doing the opposite as others will revere in his awesomeness and that he will make Ayano happy, because after all, she lost her friends from fighting - if he can become the most powerful, strongest being and create an empire of supreme darkness nobody will have to fight, so in the end his goals are what Ayano should be aiming for. Ayano states that she simply doesn't want to give Bowser such power, and that she has friends who will find and rescue her - if they don't she'll simply use the Black Box's power to put an end to Bowser so he doesn't get his way. Bowser laughs, stating that she wouldn't dare do that when he is all she has left.

Before the conversation can continue on, Kirika, Angel, Yutaka and Jeanne suddenly burst into Bowser's throne room! Ayano looks relived to see them, with Bowser getting mad over how they managed to find him, and how persistent they are...they must really like Ayano that much to want to go through all the trouble of saving her. Yutaka states that, but Kirika tells Bowser they won't let him have his evil way. Bowser decides that's fine, as he'll just stomp the heroes flat so Ayano won't have anyone left to cling to but himself.

"Battle" 79 - Kirika, Angel, Yutaka, Jeanne VS Wizard Bowser (Boss Set)

Jeanne and Angel are holding up their swords against Wizard Bowser's evil magic blasts to hold them back. Yutaka is tending to Ayano, who weakly tells Yutaka how happy she is that they all came for her. This makes Yutaka rather sad and all the more hesitant to tell Ayano that she and her friends will disappear from this time once they defeat Bowser. Seeing this, Kirika puts a hand on Yutaka's shoulder and lightly shakes her head sideways in disapproval, telling her that while it'll be painful for Ayano she must know the truth. Yutaka is about to open her mouth when Angel and Jeanne are blown back by Bowser's power, overwhelmed by its force. Kirika gets up to try and help them, Wizard Bowser telling them how futile their efforts are and how he'll finish them off. Ayano sees and is majorly shocked by this, deciding to get up and tell Bowser that even if it means her life, she'll stop him from hurting anyone else as she doesn't want to lose anyone else and just be the only one left. Yutaka tells her not to do it, but Ayano tells Yutaka that for a while she felt as if there was no meaning in living without friends, but Yutaka gave her the life she thought she had lost back, telling her that if it means that life will be preserved she will give herself up like she should have done a long time ago, saying she has cheated death too many times. She suddenly materializes the Soul Shredder in her hands, a sword that's apart of the Black Box and shocks Angel as such, Ayano claiming that she will destroy Bowser and his fortress once and for all. Before then however, she uses the Soul Shredder to cut a rift in time, creating a portal that she tells the 4 to get in and live their own lives together. Yutaka is hesitant in leaving Ayano behind, but Kirika tells her they need to leave and that this is what Ayano has decided. They do leave, and as the portal closes Ayano gets a serious look before she leaps up to Bowser, stabbing the Soul Shredder right through his chest to destroy his very existence and create a large green explosion that covers his entire castle and completely wipes it off the face of the earth.

The 4 heroes return to the front of the Takara residence as time stops for them and they hear Kanade's voice. She tells them of how Ayano came to a large city at a time she couldn't recall, and made a friend Sayaka whom she became best friends with. Sayaka became a Magical Girl however, and joined up with the Kira to dish out merciless punishment on criminals. Ayano felt like she was losing her friend, and that made her an easy picking to be convinced by Facilier to help him get the Black Box via gathering 3 tools of which Ayano's Rirattanu toy was one of them, along with the Slab and the Soul Shredder - if the Black Box was complete Ayano would be able to save Sayaka. Ayano jointed with this cause for a while, even going as far as to go against Sayaka and being forced to fight her, but in the end Sayaka met her end much to Ayano's sadness, Facilier revealing that he just wanted all the Black Box's power for himself, causing Ayano to go against and defeat him. Ayano acquired the power of the Black Box and got the power of the Soul Shredder, but eventually another threat came in the form of Phyrexia, whom Ayano lost her recent friend Kyoko - they all managed to save the world but at a great price. Although Ayano had Yukari, she would be forced to spend the rest of her life without a true companion, and eventually would accept Wizard Bowser's hand in marriage with nowhere else to go. Yutaka feels sorry for Ayano, stating that she would be sad if everyone around her died in the upcoming battle against Legend of Leader. Kirika states that she would be sad if Yutaka or Angel died too, as she's had a lot of good times with them to the point where she thinks of the two as her family. Angel can't help but smile warmly at this disposition despite how horribly out-of-character it would be for him, he having gotten used to being around everyone and deciding that he wants to live with them so they can continue to save the world from villains like what he used to be. Kirika then notices Jeanne who hasn't said or even tried to get herself involved in the conversation, asking her what she's thought of everything that's been going on, and that they haven't really had the chance to get to know her. Jeanne states that she's somewhat gotten to know how useful it is to have allies and those who are similar to herself, stating that they don't need to know about herself, only that she'll stick with them to the end...she doesn't seem to want to say that much about herself. None the less, Yutaka realizes that she could have found out about her past from Ayano or even Kanade who is present with them in her omnipotent state, but realizes that she has something to speak of where she is and will live with Kirika and Angel as her family, saying she's learned a lot from them. Kirika is grateful for Yutaka's praise, she looking forward to acting as her "mother". Angel realizes that this means he's the "father", and decides that might not be so bad - at least they all know he's a vampire and he doesn't have to hide it from them.


=============


Everyone has come back together to the main time-stream where Kanade's God-Heart is keeping them afloat. She congratulates everyone for taking down the Bowser incarnations and preventing the merging of the timelines, but warns them that she'll be taking them to Legend of Leader's headquarters in the midst of the time-stream where they'd better be prepared for the true final battle....there's no telling what to expect.


Click here for Part 5 - The Final Part of the Story


FrozenRoy

Smash Lord
Joined
Apr 26, 2007
Messages
1,268
Location
Las Vegas, Nevada
Switch FC
SW-1325-2408-7513
Cap'n Not Rool

Hey, Cap'n Bowser loaded! I'll make a comment for it.

There doesn't seem to be much to really comment on, though, in my opinion. It borrows from a lot of sets and doesn't have a lot special to it, though I imagine it is a lot more pirate-y than it was before. Mostly a bunch of fairly generic swordsman moves and some token cannonballs, though there are a few cool treasure box shenanigans. There are maybe a few interesting things with the swords, but the set seems just a tad boring and perhaps a bit odd. I really do think that abandoning some of the Bowser moves would have helped more, or at least re-appropriated them.

This set does have the Up Special though. Weevils 'n cheese! Although perhaps not the best moveset, it is an amusing read.

Shana-nigans

A silver set? What a rarity. And it's even an aerial character. Doublerarity!

Overall, I found the set...not great, but it is good. The general idea is simple: An aggresive-passive character who wants to use traps and shield-damage to cover for bad lag issues, in addition to aerial prowess to be a champion gimper.

It definitely has some number cruncher-y complaints to level at it, mostly the Down Smash, whose charge time is a pants-crapping 4 seconds due to being doubled, which renders it much less usable than I think it was intended, and perhaps in the shield burning as well. Though I have a larger complaint on that: It's never stated if shield burning can stack or not unless I missed it, which is certainly a big deal when you have an attack that burns it for 5 seconds.

I also will echo the point that FA made, that the charging on the sword seems a bit secondary because it's so easy to get a full charge. Although the charge is not too large a part of the moveset, so...

But it definitely has it's good points, like the use of an offensive trap character feel, which are always an interesting thing to try. And since the traps can become fuel for atacks and disappear over time, plus the lack of many particular projectiles, Shana isn't really a camper, instead playing a sort of defense stopper who can cover themselves. The attacks are pretty easily visualized and look cool, which while not too important, is nice.

I don't think I really have much specific to say. I like the Down Aerial, by the way. It's a pretty good set that I hope other people with more to say comment it, I think.

Sir asdf

That's Khamsin, by the way. Because what do you even do with that last name?

I heard people say that they thought the Golem is underpowered, but it only is on big stages and even then, only against characters with projectiles. Attacking the golem with physical attacks is an exercise in futility because the golem has freaking constant superarmor. This means it should be ungrabbable and won't be taking any knockback, so if you get close, you risk the golem using any of it's moves as a straight-up counter, most dangerous with the D-Attack: Use it when you think a foe will hit you and BAM, 27% and pitfall. You'll almost certainly then be forward attacked, which means a total of a disgusting 52% and knockback that can very easily kill, especially if the golem camps the edge with it's up attack or even aerial attack and the fact that it's got super armor. And don't forget, this is the size of Giga Bowser. Down attack is going to be taking up a good amount of space of any reasonable non-Temple stage and up attack should hit platforms. You're going to need to play VERY carefully against the golem if you don't want to die even with it's laggy attacks.

Plus, as mentioned, the hitboxes are very long lasting. For a move like D-Attack, this could be very deadly to...say...rollers.

This combines well with the rest of Khamsin's game, such as his recovery which has a lot to mess around with and is, at worst, an easily predictable infinite range recovery, and Ra's Throwing Stone, which gives you a good projectile and something to work with before the golem. Khamsin can also mess with rocks with his forward tilt or explode them with down tilt, which helps produce even more smaller rocks to use to increase your Up Smash's damage or decrease the F-Smash's lag. Qadesh's Blood Seal also happens to work really well with his game, with things like proning and the cool interaction with his pit or even just with basic platforms like Battlefield's. The aerial game also felt well down for a character based on the ground. Entomb is also a pretty cool and obvious move, I think.

Another thing interesting to note is how well the golem works in a more standard Brawl match, with an eight minute timer, as the golem is essentially an amazing damage soaker, as using it late in Khamsin's life can cause him to live even longer by tanking 80%, plus forcing the opponent to play careful. If Khamsin gets ahead early in the match, the golem becomes even more dangerous. It's also insanely dangerous if it manages to get off in FFA.

Overall, I actually enjoyed this moveset much more than I expected, as I thought the golem would be much more...unusuable. I liked it about as much as Shana, maybe a bit more, although Shana may have had a bit more of a concept, I feel that Khamsin's moveset was executed well and gave a grand feeling for the character.

~De Arimasu

~De arimasu!

Both her and Shana have Fuzetsu? I'll assume that's just how it is in the show.

Compared to the other two, I find myself somewhat lacking in commentary on Wilhelmina. The ribbons are solid enough, but somehow seem a bit lacking in how they are implemented, as if I was expecting something else to pop out throughout the set. Battle Mode and Futeztsu are both used pretty well, especially Battle Mode, which is probably the most interesting thing in the set in my opinion, due to the timing it requires and descision making it entails. Aside from that, she kind of feels just like a spacer with some nice moves thrown in, like most of the throws and the pummel. It's not exactly bad, just sorta...boring, I guess? It fits somewhat sleepily in after Shana and Khamsin, I think. And it somehow seemed less enjoyable than either.

I am sure some people will find better things in this set, however. For me...I'm afraid to say I don't think it measured up to the other two, Kibble.
 

Katapultar

Smash Lord
Joined
Nov 24, 2008
Messages
1,284
Location
Australia
Incomplete Set #8


Gintoki Sakata


Gintoki is the main character of Gintama, the same series this guy comes from. Gintoki is a former samurai who makes a living with his little business "Odd Jobs" where he'll take any job alongside his two teenage sidekicks, though things tend to go badly for them most of the time when they're constantly struggling to pay the rent to their understandably impatient landlord. As you might have expected from the first impression image, Gintoki tends to act uncaring and can be a bit of a jerk, but he's actually a lot wiser and compassionate than he lets off and possesses frightening skills as a samurai that generally remain locked away along with his dark past...his character is indeed multi-dimensional, but we can only cover so much of somebody who's appeard in popular 250+ episode anime series, no? For now however, let's just say that say that an odd job has been taken by an ODD man...


And I'm the client. Ho boy.​


Stats

You know that guy in Brawl who's name is a sexual innuendo? Gintoki's kinda like him. He stands close to johnny's height, but that's only because our wavy-haired friend stands upright instead of hunched down - Gintoki's the shorter one at the still manly 177cm. No I am not kidding - Snake's T-Stance makes him touch the bottom platform in Battlefield. Gintoki might have a lot of bad habits, but at least he doesn't smoke and thus has pretty average stats, being a former samurai and all. That's kinda all you need to know, unless you want me to include some extra mechanic to make you want to play as him....you'll want to anyway after reading his exciting set.​


Specials


- Neutral Special -
Deserts Randomly Heal Players In Fighters
Instead of Harming Them Like They Realistically Should


You were expecting a sword-based move first up? Screw that, Gintoki would rather encourage the consumption of strawberry milk! Feeling the need to quench his high blood sugar level, Gintoki takes out the good stuff and holds it as an item because that's a lot more convenient than just drinking it right away. Holding B makes Gintoki down all that sugary goodness over a period of 1.5 seconds, where all and all his health is healed by up to 15% and his speed and damage resistance boosted by 1.5X for up to 15 seconds. The milk carton disappears upon being emptied, but if there was still some left it can be tossed as a weak throwing item that randomly makes anyone stepping over it trip...and is obviously consumable. Gintoki can use standard attacks while holding the carton, and he cannot take out another for 15 seconds because sadly he isn't rich...

There's something else you should know about this attack, however. You see, Gintoki was dumb enough to pick this milk up past its expiry date because he thought it would taste better that way...if the milk stays out for a random interval of 8-12 seconds, it'll go bad and make the consumer sick! The victim suffers the reverse effects of the milk's healing and take up to 1.5 seconds of stun if they were stupid enough to drink the whole thing. And that's more than likely to happen too, as not only is there no visual indication as to whether the milk has gone off but its effects will only be apparent right after being drank! The longer milk stays bad, the more severe the effects become as time is continually added onto the negative effects and their severity increases by 1.05X per second...but hey, people and objects naturally become more corrupt as they get older, no?​


- Side Special -
Fun Interactive Move
That Gives Gintoki All His Potential,
But You Could Probably Tell From The
Length Of The Impending Text


Gintoki takes to his trademark motorized scooter which he uses to drive all around Edo...with the mishap here and there. This is similar to Wario's motorbike, only while Gintoki doesn't hop as far when jumping off and can't turn around or even stop for that matter he can in fact use his ground game while cruising along the ground and his aerial game in the air, providing him with the awesome potential he needs to impress you (he can't shield or dash however, and automatically gets off the bike upon air dodging). Foes run over by the scooter take 8% from both wheels and are knocked into prone as Gintoki drives by carelessly, but suffer actual knockback that inflicts 16% and kills at 160% if the scooter or the foe were airborne. If Gintoki crashes into a wall, a foe with a full shield or one with Super Amour/invincibility he and his scooter will be sent flying back comically for knockback that KOs him 200% and treats the scooter as if it was him at 100%. The scooter can be knocked off the stage and hit foes along the way, but will rarely hit Gintoki due to being sent flying at a lower trajectory than him - without his scooter Gintoki's Side Special is replaced with a desperate leap similar to Diddy Kong's Monkey Flip that gets him back on his scooter on contact with it, which you really should try to do instead of letting it fall given he won't get it back for another 5 seconds. When Gintoki gets off his scooter it will continue driving forward and can hit him when being knocked back, something you might want to save a few brain cells to be aware of lest you die a stupid death. Also, since the Side Special input serves no function on the scooter it is replaced with Gintoki placing whatever item he has on him next to his feet, which will be sent flying as if it was thrown when the scooter is knocked away.

In addition to being repelled by walls, the scooter can be grabbed and knocked around like Jigglypuff at 0%. You won't stop the scooter from moving just by attacking it, but grabbing it works like a charm...along with making you vulnerable to Gintoki's onslaught if he was still riding. The scooter has a total of 50HP and breaks apart upon destruction, exploding dramatically and sending out debris. This debris comes out in 5 small chunks that are treated as Bowser being sent flying by the attack which destroyed the scooter at 0%, dealing its total damage and knockback in portions that aren't all that threatening on their own but can accumulate 1.5X the original damage of the attack if one isn't careful.

Also, if any character is every hit by a scooter from behind, it'll ram up their butt for massive pain! This results in 24% that KOs at 80%, and is something that all characters should generally try to avoid. They don't want to get hemorrhoids, now do they?​


- Up Special -
Mindgames Are More Abundant But
Less Useful Than Everyone Thinks


Gintoki takes out his scooter yet again...only this time it starts flying upwards! The scooter has similar controls to ROB's recovery whilst letting Gintoki attack, only you cannot stop moving upwards...at all. If you stay on the scooter when it reaches the top blast zone like an idiot, you'll just get yourself killed in an incredibly stupid manner, so try to avoid that. The scooter will continue flying upwards even when it leaves the screen, and will continue doing so for 5 seconds...before falling back to earth whilst strongly spiking victims in a similar vain to Ganon's D-air - with good timing, have the scooter fall on a offstage foe and watch them fall to their deaths in a hilarious manner! The scooter will also take 35% upon landing from having taken such a tall, and if this would cause it to be destroyed it'll scatter debris that's quite harmful to all those nearby. Just don't get too carried away however, as Gintoki only has one scooter he has to share between both his Side and Up Specials and he can't simply alternate between the two formations when riding. Without his scooter Gintoki performs a leap identical to the Side Special's that makes the scooter fly upwards upon getting on it, regardless of whether it was brought out with the Side Special and vice versa.

You might think Gintoki already sucks given how sparsely he'll get to use his scooter, but he already has that delicious strawberry milk for healing (he can even use it to get a speed boost on his scooter, remember?), and quite frankly he's the kind of guy who like many other Shonen heroes before him, can survive deaths no other man can...we're talking about a guy who's well over 40 manga volumes strong and showing no signs of decay, after all.​


- Down Special -
Counters Are Good Against
MYM Characters Considering All Their Traps And Bullet Hell


For once, Gintoki decides to brandish his beloved wooden katana that has Lake Toya engraved on the side...and also happens to be made from a diamond-laced tree from another planet, meaning it's not as frail as you'd think based on the material it's made from. This is basically Ike's Counter, with Gintoki parrying the attack back at 1.5X its power and halting all the foe or object's momentum just like what Hardin does. Aside from the obvious uses you all know and love from Brawl's swordsmen, Gintoki's counter serves a more practical use in defending himself from his own scooter should it be knocked towards or fall on him, and he can even use the impending debris as a formidable weapon. Gintoki can even use the debris from his scooter to counter enemies if they destroying it while at low HP, making them think twice about messing with this former samurai.​


Standards


- Standard -

Instead of beating on the enemy, Gintoki delves into one of his unhygienic habits and starts picking his nose! He'll alternate between each finger every 0.2 seconds you do this until all his 10 fingers have anime boogers on them - gross I know, but Gintama gets much, much more vulgar than that. Boogers on Gintoki's hand do a number of things, namely increasing grab time by 0.1 seconds for each one as well as smearing them on items Gintoki passes by to increase the throwing lag foes experience and also make them take 1% for every portion of damage they would heal off in the case of food items...yuck! Gintoki can also make practical use of his boogers by flicking them in the direction of your choosing to inflict a non-flinching 1% due to how unsanitary they are...as well as increasing the timer of strawberry milk going bad by 0.2 seconds if the foe picks one up in the next 5 seconds. And for the sake of actual realism, boogers won't damage walls or shields, but do have a 1/16 chance of instantly making them explode! Hey, Gintoki once destroyed a car with his boogers...or so he thought.​


- Dash Attack -


Gintoki leaps forward impulsively, putting on a comically enraged face whilst making the foe taste the sole of his foot! This deals 7% and knocks the foe in front of Gintoki whilst putting them into prone, but not before a degree of exaggeration in which Gintoki presses his boot against the foe's face. This actually serves a purpose other than fractional stalling, as Gintoki can propel himself off the foe before kicking them away if the control stick is tapped in a certain direction. Up is essentially a footstool jump that puts the foe into prone directly beneath Gintoki, forward makes him bound forward for an aerial approach akin to a horizontal jump and kick the foe behind him a little while backwards has the same effect. You can also press down to knock the foe directly beneath Gintoki and follow up like a jerk, but there's no use more satisfying for this move over jumping on a minion to reach their master - Gintoki will even bound off projectiles if they're big enough (as in you can jump off a fully charged Aura Sphere but no way in hell something like Link's arrows). This move also serves as an alternate way for Gintoki to get back on his scooter without leaving himself so open, though if it's being sent flying back he'll bound off it instead.​


- F-tilt -

Having had a little too much sugar, Gintoki projectile vomits! This reaches out with the average range of a sword-based tilt, dealing hits of 1% every 0.1 seconds whilst pushing them back very, very slowly (to the outer edge over 3 seconds) - the first hit deals some actual flinching but the rest of the attack does not and foes are free to counterattack.

Being vomit, it stays out and acts just like Tubba Blubba's AKA Brawl ice. On that note,​


- U-tilt -

Gintoki unzips his john and lets out his restless pee. No I am not kidding. If you've ever played the Bunker level in Conker's Bad Fur Day, AKA Rool's most hated game, you'll know of the joy that comes with being able to angle the pee like a Cracker Launcher and kill foes with your own urine, which deals disturbingly strong hits of 1% every 0.1 seconds that while don't flinch and completely ignore all shielding attempts as if it wasn't there in the first place...the pee must be dripping through! The only downside to this attack is that it has punishable lag as Gintoki unzips the little fellow back in, which all the while is exposed to the outside world - if Gintoki receives a blow to the crotch, he'll grovel over dramatically and take a huge amount of hitstun along with 1.5X that attack's damage and knockback. Kind of bad for the most part, but against melee attacks this actually stalls the opponent for several purposes at the cost of Gintoki's jewels. Especially bad if Gintoki is interrupted while peeing, as he'll leave that vulnerable spot hanging out until he uses this attack again to withdraw it.​


Smashes


- F-Smash -

Gintoki gets serious with his Smashes, drawing his sword as he squats in an utmost prepared stance. Then, in a typical samurai maneuver, he'll rush forward in a sudden burst of speed that positions him 2-5 SBBs ahead of where he was (he'll stop at ledges thankfully). Afterwards, any objects or foes Gintoki traveled past will pause for a moment along with him as he holds his sword to the side as if he'd sliced something, which seems to be the case here against anything he moved past - unguarded foes take a fatal 20-32% that KOs at 100-70%, while those shielding will take all the hits in bits of 1% over a single second whilst suffering large stun that leaves them at a frame disadvantage against Gintoki. The Smash is similar to Snake's in that the pre-charge is laggy but the attack can be released anytime with seemingly no forewarning - for this reason foes might want to jump when avoiding this attack unless they're confident in their dodging skills.

You can combine this attack with Gintoki's scooter for some interesting attacking opportunities - rushing forward with a scooter in-between yourself and a foe can result in it being destroyed with low enough HP and scattering debris to hit foes if they tried to jump, charging this attack atop the scooter will have Gintoki get off and rush ahead as usual to the point where you can corner a foe from both sides or even run them over with the scooter and slash away at them (it's likely foes will be hit by the scooter first, especially when taking strawberry milk's speed boost into account, but even so the slash will still take effect afterwards)...just pray foes don't jump or else that scooter's gonna continue driving and eventually ram Gintoki up the butt!​


- U-Smash -

Gintoki holds his sword close to him with one hand before thrusting it upwards. This deals 17-24% with upwards knockback that KOs at 140-110%, and can even hit foes right in front of Gintoki when he raises the sword. The attack is obviously comparable to Marth's U-Smash, but the damage is only dealt the moment the sword is stabbed upwards - afterwards, there are a few frames in which the sword stays out as a hitbox which deals 3% and weak juggling knockback.​


- D-Smash -

Gintoki performs numerous slashes in front of him​


Aerials


- N-air -

Gintoki swipes​


- F-air -

Gintoki performs a clean, overhead blow with his sword that deals 18% and semi downwards knockback which KOs at 140%. Surprisingly quick to execute for an attack of such power, but suffers some ending lag which leaves Gintoki open if he misses. It's very useful for keeping foes on-guard however, and does a top-notch job at repelling or even using your scooter as a weapon.​


- B-air -

Gintoki does the most obvious thing one SHOULD do to defend themselves from behind but don't...fart. Only a vulgar main character such as Gintoki would dare do such a thing aside from Wario. The fart lets out a small yellow cloud behind Gintoki that lingers for 3 seconds while falling very slowly, dealing 2% and flinching along with 1% for every 0.2 seconds a foe remains stuck inside - fart clouds also make any food go bad, and not just strawberry milk if that makes sense. Gintoki can prolong the fart for as long as he likes, even being able to spread it as he rides his scooter in the air! It's best if foes try to put up with the whiff when they're caught in it, as being flinched every time they enter isn't a very nice thing when there's a lot around them they have to worry about. Gintoki is also damaged by his own fart however, but he can use the flinching to save his own life by setting it up earlier! (yes, the fart's flinching does cancel momentum)

A special surprise awaits those who fill Gintoki's belly with delicious food items like strawberry milk. Every 5% these heal increase the range, duration and flinching of the next farting attempt -very- slightly, but if these items would inflict damage the fart will be a foul Bowser-sized cloud that blows enemies away instead! With 1% taken, the fart deals 1% and knockback KOs at 400% but deals a further 1% kills 40% earlier for every 1% taken and caps out at 20% which KOs at 100%. If you're daring enough you could deliberately drink bad milk and spread the fart across the stage on your scooter, showing foes the insane lengths you're willing to go to stay on-air - the fart cloud will deal that strong knockback before staying out as a damaging cloud for 3 seconds, and if foes re-enter it during that time they'll flinch.​


- U-air -

Gintoki does what no other Shonen hero would have the balls to do...he throws his sword away! Eh, he ordered that sword online and broke it many times, so it's not like he can't just get another. This is identical to throwing a Beam Sword upwards, and Gintoki will automatically catch it if he isn't in the middle of an attack or holding another item (yes, he can be hit by it due to carelessness). The sword will plant itself into the ground upon landing there and act as a Beam Sword for other characters. Gintoki can still use his sword-based attacks without his sword, but he'll be locked in place at the end of their starting lag until you release the input or wait for the sword to appear - the only exception to this is the F-Smash, in which Gintoki will rush forward anyway but will not execute the attack unless he managed to pick up his sword before moving past the foe. Gintoki will automatically draw another sword when attacking with it if the one he drew out was thrown offstage, so don't worry about ever outright losing them.

This has a few subtle interactions, namely bouncing the sword in-between a scooter above Gintoki to damage rack it and delaying the throw of the sword with boogers to catch foes off-guard. Predicting what Gintoki will do just got more difficult.​


- D-air -

Gintoki holds his sword to the ground and plummets with it. Grounded foes are struck for some major damage at 21% which KOs at 115% while prone foes take 1.3X that much - definitely not a stall-then-fall move to mess with. Aerial foes are impaled and dragged along with the sword, suffering 1% for every 0.3 SBBs height they fall from and unable to escape unless they mash out a normal grab difficulty or Gintoki decides to cancel the move in midair, even into another attack with a bit of lag if he chooses. At least your scooter won't try to escape, and can be used as a shield while approaching or to simply get it back onto ground. If you hit a grounded foe with an impaled scooter they'll take the knockback of the attack as usual AND be damaged by the debris beforehand if the scooter would be destroyed. The scooter will deal its falling and spiking damage to those hit in midair, and if it's destroyed up there the debris will fly out downwards as numerous projectiles of pain.​


Grab

It's only natural that Gintoki would return to his comical roots for a grab of all things, reaching out for the foe's collar with both hands in ANGER. Sticky, yucky anger if Gintoki picked his nose and made his hands more adhesive with boogers (You can thank me for making you remember that later). If Gintoki tries grabbing while on his scooter he'll jump off ahead of it in a grabbing attempt that sees him crash to the floor comically if he misses and take a scooter to the butt. If Gintoki grabs the foe however, the scooter will eventually ram up his butt anyway but he'll be knocked into the foe and take them flying with him! The foe goes flying a little further than Gintoki with knockback that KOs them at 74%, with both characters stuck in the air with each other...just be aware that Gintoki won't have his scooter for recovery, so this isn't always the best idea.​


- Pummel -


- F-throw -

Gintoki kicks the foe onto the floor for 5% before using them as a human surfboard! The knockback from the kick inflicts semi downwards knockback that KOs the foe at 200% in which all the while Gintoki rides on their body and can use his ground game much like riding on his scooter - if the foe reaches the apex of their knockback on the ground they'll stay in prone slightly ahead of Gintoki, but if they go offstage Gintoki will get off at that moment, a time where he can choose to gimp or get back onstage himself.​


- B-throw -

Gintoki sticks two of his fingers up the foe's nose and slams them on the other side of him for 8% as they bounce off the ground for knockback that KOs at 170%....that's gotta be painful, and Gintoki's had that happen to him many times. The foe in question can be used as a bludgeoning tool against others which inflict 15% and downwards knockback that KOs at 130%, which is kinda useful with or against your scooter while we're on the topic of ridiculous things. This throw is very fast, and with your strawberry milk it is in fact possible to slam a foe into your runaway scooter before you're both hit.​


- U-throw -


- D-throw -


Teach Me, Ginpachi Sensei!


Gintoki is a hard mixture of comical (AKA vulgar) and serious elements, effectively representing the nature of his series to the core. He's deceptively unpredictable, yet fairly straightforward - good at surviving, yet low on resources.​


This set was started around the beginning of MYM13 when I swore I would do sets for character I liked - thought that Gintoki deserved a set for however low potential he had, but what was missing was my drive to actually complete the set. Guess I eventually got to a point where I'd care about this set being mehish and not representing Gintama well among MYM. The series is already at an awkward start with the mini for Sogo, anyway.
 

JOE!

Smash Hero
Joined
Oct 5, 2008
Messages
8,075
Location
Dedham, MA
@Kat: a bit of confirmation, the Dsmash hits with energy spines, so it extends corruption as the mechanic states

Edit @ edit: The pummel is more or less a way to have that unique "throw" while still having the other 4 available

Glad you liked it :D
 

ForwardArrow

Smash Ace
Joined
Aug 17, 2011
Messages
503


Dark Falz

Dark Falz is the main antagonist of Phantasy Star Online, serving as obviously the final boss of the game. While he appears in 3 forms, the set is largely going to be focusing on his final form, in which he is fought in the sky aboard a ring-like platform. He's able to fire out all sorts of magic and energy blasts, but his most notably ability is to steal souls, which allows him to force players to take damage along with him. This is sometimes amusing in Multiplayer, where he will steal the soul of one of the players and give the others the choice of whether or not to kill him.

On that note, it wouldn't really do this character justice to have him just be a 1 on 1 opponent, though he can be fought that way in the game. How he's clearly meant to be fought is 3 on 1, particularly with all the laughs the soul stealing attack can generate in said mode.


Stats

Size 18
Weight 15
Aerial Movement 11
Ground Movement N/A
Traction N/A
Fall Speed N/A
Jumps N/A


I figure I may as well mention that Dark Falz gets generic boss bonuses here as well. Dark Falz cannot take hitstun for 0.8 seconds after taking three instances of hitstun, stun done to him is halved, he can still attack in a grab, status effects wear off twice as fast, he escapes pitfall and grab effects twice as fast, swims for 5 times as long(because that's totally relevant ever). He's also pretty darn light for a boss, 15 Weight means he'll get knocked out at around 220%. He's about twice Ganondorf's height and Bowser's width while we're at it.

So you're probably wondering, why are all those stats N/A? Well, Dark Falz is constantly floating off the ground, about 1.5 times Ganondorf's height above the floor. He can actually toggle the height he's flying at by pressing up and down, up to a maximum of 3 Ganondorf heights above the ground and a minimum of hugging the floor. He can actually float off stage with this too, and can potentially even go below the stage and fly around freely under there. Unfortunately for Dark Falz though, he can't just stall forever. After 15 seconds off stage, the maximum height he can fly up to starts decreasing by a Ganondorf height every second, and if he's above that he just falls at Jigglypuff's fall speed. Mind you with his insane aerial movement he can still make it back to the stage just fine, being able to fly around at bloody Fox's Dash Speed. Just don't try to stall forever like this. He can recharge this by staying on stage, and it will fully recover over the course of 10 seconds.


Grab Game

Grab
So were you expecting Dark Falz to have a fancy, soul stealing grab? Well, you are in fact correct, he can steal souls from players, mwahahaha. When you press grab, Dark Falz will briefly pause, during which you can press any of the eight cardinal directions to choose where he uses the attack. Dark Falz then releases a tether of green energy in the chosen direction, which if it hits a foe will rip out their soul, absorbing it into Dark Falz. The foe will still be able to function as normal... largely. Dark Falz can now use his throws on the poor sap from wherever they are on stage.

Aside from that, though, hitting Dark Falz while he has the foe's soul causes the foe with the stolen soul to take the same damage, knockback, hitstun, status effects, and what have you as Dark Falz. This pretty much means the opponents will have to take the pressure off Dark Falz until the foe gets their soul back... and believe me, Dark Falz is absolutely terrifying when he's not being pressured, even against 3 players. On top of that, you can steal the souls of multiple players, nothing stopping you from using this once you've already nabbed a soul right? Foes will get their souls back after 7 seconds, or if Dark Falz is KOed.

On that note, Dark Falz actually even has a full set of throws. You can use them by pressing Z and a direction while you have a foe's soul, or just press Z to use the pummel. The throws only target one specific opponent, and by default you perform your throws on the most recently grabbed victim. That said, there will obviously be a move where you switch the soul he is currently using his throws on.

If this hits a shield, he won't suck out the foe's soul, but rather he'll just hold them in place and drain away at their shield as the tether continues to grip to the opponent. The foe can't do anything during this time and their shield depletes twice as fast as usual. If their shield is entirely destroyed, Dark Falz will suck out their soul as usual and leave them in the dizzy state. The draining of their shield doesn't inhibit Dark Falz in any way either, your free to move around and attack until an opponent hits you, at which point the tether breaks and they are freed.


Pummel
With no lag or apparent animation, Dark Falz switches the soul he is currently using his throws on to the next most recently captured. If the soul he currently has selected was the last one captured, it reverts to the first one. The nicest thing about this is that opponents do not know who exactly you are going to use your throws on, leaving them rather unprepared and possibly all dodging at once.

Forward Throw
On to more exciting moves, Dark Falz will spawn the soul of the opponent in question in his mouth, it being an orb which is glowing an eerie blood red color. Dark Falz then fires the soul forwards as a projectile, traveling at Mario's dash speed. So perhaps you can catch up to and babysit the soul while it travels. If it hits the original owner, they will get their soul back... but not without a price. You see, Dark Falz has corrupted their soul, which will cause them to take 3% per second for the next 8 seconds. The good news for them is that the soul gradually starts to home in on its original owner more and more as it travels, at first not going after them and just traveling forwards but eventually becoming ridiculously persistent and accurate in its attempt to rejoin it's original body. By which I mean if it flies off a blast zone somehow, it'll still fly back and attempt to reach them forever, no matter how hard Falz tries to get rid of it.

It's not all sunshine and rainbows for the foe however, and this attack does more than just a mild poison damage effect if you are particularly clever with it. You can actually re-grab the soul while it's out by hitting the floating soul with your grab, so if the foe is not bothering to try to stop you this allows you to keep re-grabbing and hold their souls forever. More notably, there's always the problem of what happens if the soul doesn't hit the right foe. It will actually enter other opponents as well, which will not only cause the same poison effect as before, but it will effectively infuse them with the soul the same way Dark Falz infuses himself with it. AKA, when they take damage or knockback or whatever, the foe whose soul it belonged too will also take that damage and knockback. So, you can now swap around foe's souls amongst them, allowing you to hit multiple foes at once. The soul will return to it's original owner 7 seconds after being infused into another opponent, or if the opponent holding the soul is KOed.

If you grab an opponent with multiple souls inside them, Dark Falz will claim all of those souls for himself. And just so you know, damage and knockback dealt through the soul of a foe with a soul infused into them, it won't deal damage to that soul. So basically, no soul damage chain reactions, hate to break it to you. Oh, and if foes are overly jumpy to get the soul back, the wrong one might even try and snag the soul, since they won't know whose soul it really is until the homing tendencies kick in.

Back Throw
Dark Falz conjures the soul in front of him, this time uncorrupted and appearing white and clear. He then sends a pulse of dark energy through it, dealing 18% and horizontal knockback that KOs at 85% to the owner of the soul. This isn't even a particularly slow attack, and again, nobody knows whose soul you are attacking with this. This is particularly scary in the context of all the other things to dodge Dark Falz is throwing around, as well as the ability to potentially knock the foe into things that made them wish they just straight up died...

Up Throw
The two lights above Dark Falz' head glow, increasing in size before he flashes white and disappears. Dark Falz will then appear right next to the foe whose soul you currently have selected. This has a large amount of start up lag, you're never going to be able to pull this off if you're under especially much pressure, though that would be hurting the foe regardless since you do have their soul, after all. Either way, Dark Falz is perfectly competent at fighting and tormenting a single foe at melee range, so if they try to run off and separate from the group you can just go over and murder them anyway.


Down Throw
Dark Falz laughs and holds the soul out in front of him, as an exact copy of the foe whose soul is currently selected materializes in front of Falz. Until you press Z again, you control this replica of the opponent, able to perform any attacks they have save their grab. On top of that, this replica has permanent super armor, the only way to disable it is hitting Falz. That said, hitting Falz like this will cause the soul to fly out of his hand and back into its original owner, and on top of that this attack has some pretty considerable lag starting up and dematerializing the clone.

One thing worth noting is that homing projectiles, including those made by Falz, will home in on this duplicate. So, you can potentially have this thing direct them around for you if there's a need to have them chasing a particular opponent.


Specials

Neutral Special
This attack can be charged like Samus or Donkey Kong's Neutraal Specials, but releasing it before full charge does nothing, though thank god it does not expend the charge. Full charge takes 3 seconds, after which Dark Falz can use this attack, breathing forward a black cloud the size of Bowser. The cloud mostly just sits there, lingering for 8 seconds before disappearing. You can only have one cloud out a time, though it is admittedly very threatening looking, with blood red lines occasionally bolting through it, and an eerie glow being emitted. It's also very thick and violent looking. That said, what's so dangerous about a simple little trap that means a 3v1 boss needs to charge it for 3 whole seconds...

Well, you see, this particular attack is Megid, the instant death spell from Phantasy Star Online. And touching the cloud does just that, it instantly kills the opponent, making this move go straight from mediocre trap to utterly terrifying and a massive reason to pressure Dark Falz. The worst part is, since it's not even a knockback KO, if you kill an opponent infused with multiple souls from Megid, every single opponent with a soul in that person will die at once. And yes, you even have ways of manipulating this particular cloud, mwahahaha. Now you see why sacrifices will sometimes need to be made? You can't just leave Dark Falz to do his thing for 7 seconds with this attack waiting in the wings.


Side Special
Dark Falz release 10 energy orbs in a stream from his mouth, before they immediately seek out opponents at Ganondorf's dash speed. These deal 4% and flinching each, although if multiples hit the foe in short order it will increase the knockback of the final hit for each orb that hits. This maxes out at knockback that KOs at 110%. While the orbs have excellent homing properties, they are easily stopped by the opponent's shield, doing minimal shield damage each, though a fair bit of shield stun so you might be able to grab them while they are shielding this.

One thing about these orbs though as that they have a bad case of ADD. You see, if anyone else(IE another foe) comes within a Bowser width of the orbs besides the original target, they'll switch to targeting them instead. Opponents can easily switch who the orbs are homing in on, perhaps as a defensive measure for the one who currently is hosting the most souls. That said, unless the foe can find a spot to safely shield this will lock them out of the match for a bit as they are forced to run away.

Oh and one other thing, if you press Side Special with some orbs already pursuing a foe, the two of the orbs trailing closest to the foe will burst in explosions the size of Wario each, dealing 15% and knockback that KOs at 125%. This has enough lag to make it slightly annoying to utilize under pressure, but it keeps an opponent chased by orbs constantly dodging. Which considering your own pressure game is quite handy.


Up Special
Dark Falz raises one hand to the sky, and a blast of light height of Ganondorf will crash down from the top blast zone. The light blast deals 22% and diagonal knockback that KOs at 80%, but unfortunately the hitbox is pretty precise, being incredibly thin. However, it's not just one blast of light falling, oh no. This will cause more of the blasts of light to fall every 0.4 seconds for the next 4 seconds. You can actually cast out as many of these as you want, but the problem is that with each pillar of light crashing down it takes a larger amount of lag to create a pillar. At first it's actually moderately fast, but it quickly becomes horribly laggy.

Down Special
Dark Falz waves both hands to the side, creating a wave of blue energy that crosses the ground on either side of Dark Falz until it covers an area 1.5 times Bowser's width. This creates a strange blue-green ring with an elaborate pattern on it, similar to the one in the picture at the top of the set. Being above or below this ring will drain 5% per second, as well as flinching twice per second. Falz is also healed by the same amount of damage as the opponent takes, which is particularly good if multiple opponents are stuck in the ring, or if a foe with multiple souls is stuck in the ring. You also have your share of ways to keep opponents trapped in there. The ring disappears after 7 seconds or when it is dealt 50 damage. Since the ring can be placed in mid-air you can make it difficult or nigh-impossible for the opponent to reach it(putting it under the stage), though that also makes it a bit harder to capitalize on... Like with the Up Special, this is pretty fast to bring out one of, but once you start bringing out additional rings a -LOT- of additional lag is added on, making this a very difficult move to cover the stage in. You need to use a variety of stage control tactics, after all.


Standards

Jab
Dark Falz waves one of his arms forwards, creating a single spark of energy in front of him. The spark deals no damage or knockback on contact, just sitting in place. You can litter the stage in these pretty easily as the attack is quite fast, but they don't really do anything in particular. Well, until 5 seconds after you place the first one. Then they all will detonate in a Bowser sized explosion each, dealing 8% and knockback that KOs at 175%. In addition, if multiple explosions hit the same foe they'll take the combined damage and the knockback increases, so if they get hit with 4 or 5 it will knock out at about 75%. You can scatter these in whatever density you wish, either layering the entire stage in them to create nowhere to go or clustering them in specific zones to create areas of the stage foes are deathly terrified to go. Just keep in mind without some additional pressure (IE standing on a ring, energy orbs) they can just spotdodge fine.

Forward Tilt
Dark Falz swats forwards with one of his wing like objects protruding from his back, dealing 14% and fairly strong set horizontal knockback. The good thing is that since you have godlike flight you can pretty easily pursue a single foe through the air and gimp with this. It also creates a moderately strong wind hitbox in front of it, and can be angled. It's a good basic offensive move, but it's not as fast as you'd probably hope, so it really doesn't work very well as a GTFO.

The good news though is that this attack can actually manipulate your projectiles a good bit. Using this on the orbs created by your Side Special will cause them to deflect away a battlefield platform in the direction you hit them, upwards or downwards in that direction if angled. The wind hitbox will merely move the orbs in the stream closer together or further apart, depending on whether the wind hitbox hits the stream in the opposite or same direction respectively. You can influence soul orbs in the same way, deflecting them away if the main hitbox hits and brushing them lightly in a different direction if you hit it with the wind hitbox. While the wind hitbox does nothing to the falling lights from the Up Special, hitting it with the actual hitbox will deflect it in the same direction as the knockback, dealing it's normal damage and knockback all the while. So yes, you can use this to modify where exactly the projectiles are traveling, playing keep away with a soul or redirect your homing stream at the foe of your choice.

Lastly, you can actually use this to redesign your Neutral Special death clouds. Hitting a cloud with an upwards angled version of this attack will have it stretch upwards, making it 1.5x the height of Ganondorf but the width of Kirby. Hitting downwards will make it hug very close to the floor, but cover twice Bowser's width.


Up Tilt
Dark Falz generates an aura of greenish energy around himself, which causes any foes within a battlefield platform of Dark Falz to be pulled half a battlefield platform towards him. This attack is actually really fast and deals slight hitstun after dragging them along, albeit no damage. This is Dark Falz' fastest move, which is rather unfortunate since the effect is so minute, but it can pull opponents up into the air, so you can carry them away with you utilizing this move for a gimp if the other foes are preoccupied by mass projectiles. Or you could even drag them into your death cloud, if they really are that stupid...

Down Tilt
Falz spins his wings down below him, dealing 11% and average spiking knockback. This also creates a wind hitbox below Falz that pushes foe's downwards. Admittedly, this move is pretty generic but Falz actually appreciates having at least some melee pressure. You know, push the opponents into your set-ups because frankly they don't last long.

Smashes

Forward Smash
Dark Falz spreads his hands as a black hole the size of Kirby-the size of Bowser appears in front of him, and begins sucking in everything within a radius of a battlefield platform-2 battlefield platforms. While foes can resist the pull based on how fast they dash and their weight, it's hard for anyone without both high dash speed and weight to escape, and even harder the closer they are to the black hole. Once they are trapped inside, they have to break out with double grab difficulty, taking 5% per second as well. After a character escapes from the black hole or it sticks around for 6 seconds, it will collapse.

Oh, and yes the black hole can suck in more than just characters. It can also suck in all of your projectile spam, which deals 3/4 the normal damage to any foes trapped inside if the projectiles are pulled in after them, though they will also take the damage if they get sucked into the black hole with the projectiles already inside. You'll also heal if you suck in the rings, if it wasn't obvious. Aside from that, it can actually suck in the Neutral Special cloud as well, which causes instantaneous death to those trapped inside the black hole. It also can suck in souls, which will place the soul inside anyone who comes into the black hole. This does a whole variety of things, giving you some control over your projectiles or allowing you to store them. Perhaps better is that it gives you an excellent tool to trap fired souls out of so you can reclaim them, or pressure the opponent into the black hole to give them that particular soul.

Lastly yes this can suck in multiple foes, and they will take all of the effects of being trapped inside from projectile damage or instant death. Everyone escapes when the first person does, however. This will only give the first opponent sucked in the soul, however. And you can grab foes trapped in black holes, which is probably the easiest way to snare souls from them... if you can get them in the black hole in the first place, which can be a bit of a hassle.


Up Smash
Dark Falz creates a field of blue energy around himself, which extends either slightly beyond his body-a circular area the radius of his body(not diameter, so it's actually really big). His eyes then glow brightly as he and everything in that area disappear, appearing right up at the top blast zone. This partially serves as a nice way to escape from all the action going on down on the ground, especially if uncharged so you won't be carrying any opponents (save maybe one who is like right up against you) with you. Aside from that, teleporting a foe up there would be a pretty nice gimping method... if it weren't for the fact that other players teleported by this get a second of super armor. While that sounds really bad, consider that you are separating them from the other opponents so once that super armor wears off they are in a bit of trouble, as well as the fact that super armor is no protection from grabs. Also, you can only use this once every 5 seconds, we don't want any infinite stalling at the top blast zone do we?

Aside from that, you can bring projectiles and such up there as well, so this allows you a nice way to keep your rings out of the foe's reach in case it wasn't already easy enough to protect them. Or, you know, supplement yourself with some projectiles up there. They won't be taking knockback from them at first, but they'll at least take damage, and sometimes that is all you really need. You can also, of course, carry your black hole up there, which is extremely useful considering it is in fact another grab hitbox. With the extended range version, you can potentially set up a scenario that forces the opponent into a black hole once they are teleported up there. Just keep in mind there's actually some pretty decent lag on the start up, so you'll want to be careful with this. Probably best to use when there is a ring or something in between you and the opponent.


Down Smash
Dark Falz points his hand forwards, and the air in front of him appears to slowly crack over the next 2 seconds, before exploding to reveal a bluish void. The void starts out the size of Bowser, but charging this move will expand it upwards and downwards until it reaches the top and bottom blast zones at full charge. Standing on the void as it shatters open deals 20% and horizontal knockback that KOs at 100% to both players, so it'd be best to avoid doing that. These things last 10 seconds each, and while the start-up and end lag for creating the first one is pretty tame, like with the light rays and your rings it will increase in start lag as you make more and more of them.

So what do these voids do? Effectively, they remove that area of the stage from existance. Traveling through one side will have you pop out the opposite side as though that piece of the stage was not even there. The reason this is convenient for you is the fact that the foes have less area to run too on stage, and unlike you they take 10% and flinching on the other side of these. Yes, even if they try and roll through them, so there's no real way to avoid this. Fully charged ones work amazingly for cage scenarios, and what boss doesn't want some sort of cage? Aside from that, it kind of can serve as an extension to your black holes and make working around your death clouds far more uncomfortable.


Special Smashes

Special Forward Smash
Dark Falz creates an energy orb similar in appearance to the ones from the Side Special. Only this time, it's a single enormous orb, nearly the size of Falz himself. He will then fire the orb forwards, it moving in the same sort of manner as the Side Special orbs. The key difference is it moves at 1.4x Sonic's dash speed and deals 28% and knockback that KOs at 50%. Ouch. The bad news is that this has a whopping double the start up lag of the Side Special, and the single hitbox can be shielded a lot more safely, though it will take out half a full shield. That aside it's a very powerful attack, and while it is highly predictable should you do this using the attack off-stage makes it a lot easier to pull off.

Aside from the obvious additional projectile pressure role(because you really do need a fair bit with 3 opponents), this attack has a very useful interaction with the black holes. Upon entering a black hole, it will actually cause the black hole to start tracking the opponent it was chasing at Ganondorf's dash speed. And yes, it will still suck in anything in it's path, directing along Neutral Special clouds, light rays, and rings with it and possibly pulling them in. This is particularly scary when the black hole achieves instant death properties, it's a homing projectile that's impossible to shield, all you can really do is run away as it pulls stray lasers towards you. After sucking in a foe it will then change it's trajectory towards the last one. It's a pretty damn terrifying move if used this way, but remember that everything that gets sucked into the black hole is lost once the foe escapes or six seconds is up.


Special Up Smash
Dark Falz boosts himself up two Ganondorf heights into the air, before pointing downwards as an enormous white ring appears below him. The ring begins to charge with energy over the course of 2.4 seconds... which functions as the start lag for this move. The ring is fortunately massive, 3/4ths the width of Battlefield, so the attack is at least easy to hit with. After that preposterous start up lag, the ring will begin firing down massive quantities of light rays, which require a full shield and absurd dodging skill to avoid. This will rack up 55% and pretty much a guaranteed KO on smaller characters, and will do an even larger amount to large characters. The whole thing lasts about 4 seconds.

Obviously this attack is all sorts of glorious and flashy and such, the sort of move even other boss movesets would salivate over. But what is the playstyle purpose? Well since Dark Falz is so good at locking out large portions of the stage, you can pretty easily cover every last inch of walkable ground with this attack if you play your cards right. In particular, the Down Smash rifts extend the ring so that even with gaps in where they are placed they are still useful in zoning for this move. You can pretty much force opponents into attacking you with this move just to interrupt you out of it, which is not exactly a bad thing when you have souls. Even early game, it'll force one of the foes to come after you, and then using Up Tilts or the Up Smash you can take them off to nab their soul.


Special Down Smash
A ring, similar in appearance to the ones made by the Down Special, quickly flies over Dark Falz before disappearing. This does nothing on it's own, rather serving as a counter. It's actually a pretty darn hard counter to pull off, requiring much more specific timing the Marth's counter and actually having worse lag on the end. If you can land it though, the results are pretty impressive, as Falz slams the opponent into the ground with one of his arms and sends an electric shock through the foe. They are launched with 22% and knockback that KOs at 80%, and Falz is healed the same amount. This also leaves a ring around the opponent for the remainder of their stock.

What is nice about this attack though, is that past the initial counter when a foe with said ring around them gets hit, you will heal the same amount. While you can't stack rings to get absurd healing out of this, I want to bring up the soul stealing again. As a matter of fact, that does count towards this move, effectively meaning if you have the foe's soul and they have a ring, you cannot take damage. It's probably best for the foe to take their own stock at this point, but if you are a particularly cruel tormenter you may not even let them do that. Not to mention, in combination with a black hole and the Up Special you can get some pretty absurd healing from this. Keep in mind as powerful as this sounds, it -IS- really hard to pull off, and on top of that opponents can interrupt Falz while he is applying the ring to the opponent.


Final Smash

Dark Falz puts his hands together, before pulling them apart to reveal a sphere of swirling darkness the size of Kirby. He then lays it out on the stage in front of him, it lingering forever. So what does it do? It will pull in opponents or projectiles that come into contact with it... or even Falz himself. Players absorbed mash out with grab difficulty before being launched away with 8% and knockback that KOs at 200%. Regardless of what it absorbs though, the orb will grow in size, even after spitting the player out. The more powerful the projectile or the longer the player was trapped, the more the sphere will grow, increasing the difficulty of escape and the damage and knockback done on escape. By the time it's half the width of Final Destination, it has enough power to instant kill Falz, much less anyone else. Once it reaches 4/5ths the width of Final Destination, it will expand to swallow the stage itself, as well as the entire screen, KOing everyone.

Obviously this is an incredibly intimidating Final Smash by nature, but both Falz and the foe have to be wary of it. Falz is more equipped to utilize it... but all the same, no matter what it will be everyone's undoing. Best you try to claim the most stocks with it...


Playstyle

Let's get it out of the way immediately, Falz is one of those characters who has a big deal set-up game that gets wrecked by pressure. It's actually especially bad in Falz's case because he's fighting 3 foes at once, and his set-ups will last for so little time. You need to be fast in utilizing them too, meaning you can't just stay still, you have to be proactive in setting them up and even forcing foes into them. "Generic" pressure moves like the Forward Tilt and Down Tilt are pretty necessary for Falz if he wants to actually deal damage to opponents... or possibly just shove them into your Neutral Special cloud if you can manage to create one... though that is pretty darn hard.

What makes Falz competent amongst other 3v1 bosses is, however, his soul steal. With this trick you're entire gameplan blows open as the foe can no longer pressure you without a rather nasty consequence. Or you can use it to bolster your offensive game further still by putting the soul into a different opponent, allowing you to wail on multiple foes at once all while isolating them from each other. Either way, this is how you are going to pull off your moves such as the Neutral Special and Special Up Smash, as otherwise you'll never be able to pull them out without getting your ugly face smashed in. With opponents no longer breathing down your throat nearly as much, you can potentially create some much nastier temporary set-ups, just keep in mind you'll need to hold on to the souls... and the opponent can plenty well knock them out of you.

Aside from that, another thing about Falz is he has a rather low number of actual "imprisoning" moves, his only actual grab hitbox coming from his black holes. What he uses to lock down opponents instead is his Side Special, creating several orbs which will severely limit the opponent they are chasing. Yes, the foes can potentially distract the orbs and have them chase other foes, but that's where you actually have to play yourself. Send in a duplicate player to change their trajectory to your liking, or blow them around yourself with the Forward Tilt, or possibly use the Black Hole. Either way, the fact that they keep the foe constantly on the move until they get room to shield it is pretty handy for you, as you can potentially send them running through the middle of a hellish portion of the stage... which may force them to just take the hits. It works out in your favor either way.

I'm not really going to boss you around and tell you to play Dark Falz exactly in this way or that way because there is no one exact plan to how he plays. While he generally wants to steal souls through a variety of trickery and then go nuts with projectile/trap spam. Maybe I'm not giving the best playstyle overview here, but pah I think the set really should speak for itself for the most part.


CTF Boss Mode

>Falz travels at Sonic's dash speed, giving him a way to traverse the massive playing field better
>Forward Throw projectile travels faster and does not home in as strongly on it's original owner
>Homing projectiles will follow foes between screens, and Falz can make up to 3 of each type.
>Up Special lasts 30 seconds. We've got 10 opponents, there's no time to babysit individual screens
>Down Special rings have infinite stamina, flinch twice as often, drain 8% per second, and last 35 seconds.
>Jab explosions are twice as large and deal 12% and knockback that KOs at 135%. Catching a foe in a ton of these is much easier due to increased blast radius.
>Falz can now summon an unlimited number of black holes, and they last 1.5x as long and are escapable at triple grab difficulty
>Up Smash teleport allows you to teleport to any camera zone on the map, briefly taking you to a select screen.
>Down Smash lasts for a solid minute now.
>It only takes Falz 0.8 seconds to set up the Special Up Smash rings, though they will still wait to fire until 2.4 seconds are up.
>Special Down Smash now has easier timing than Marth's counter
 

Katapultar

Smash Lord
Joined
Nov 24, 2008
Messages
1,284
Location
Australia
Incomplete Set #4


Hercule Barton


Hercule Barton, nicknamed Elly by her friends, is one of the four main characters of Tantei Opera Milky Holmes, a loli-detective Japanese franchise that revolves around detectives and gentlemen-thieves with superpowers called "Toys". Elly's Toy gives her super strength, which happens to contrast with her withdrawn personality; she generally gives little input on a situation and gets embarrassed very easily. Not too much of a detective eh?

As you'd expect from a shy little girl, Elly has weak below-average stats in terms of movement and is a floaty lightweight (Jigglypuff). She's not very tall either. On the other hand, her super strength allows her to carry hefty items like crates as if they were item capsules and throw them with the strength of a giant giant; in other words, she throws them at insanely high speeds and distances which can make quick work out of enemies if they're hit by them, and can even be used as "traps" of sorts if you throw them towards the top of the screen in which they won't come down for a good number of seconds.​


Specials

Neutral Special
Elly timidly holds her hands above her head for as long you hold B, which halves all damage she takes from above and allows her to instantly grab hold of any items that'd falls on her and wield them. If you use this move while Elly is holding an item however she'll instead "wind-up" and attempt to throw it in the same way a character would throw a Trophy Stand in SSE! This triples the already ridiculous speed, distance and power at which Elly can throw an item to the point where even a simple item capsule could probably KO most characters at very low damage percentages, though nobody's gonna actually be stupid enough to leave themselves open for that all that prep-time.​

Side Special
Elly bends down behind her whilst timidly yet comically looking around for any pebbles that might be lying around, with she picking one off the ground for every 0.1 seconds you hold the move in for a total of 12 pebbles. After that, Elly suddenly turns back around and tosses all her Deku Nut-sized pebbles in a disorganized manner that causes them to travel in random arcs for the same speed and distance of an Item Capsule; due to their throwing not really being a concentrated effort on Elly's part, the pebbles thankfully only inflict a mere 3% with flinching, though they do bounce off any surfaces they hit until they lose all momentum and fall to the ground as throwing items - the pebbles can and will bounce off each other too, and can even hit poor Elly if the end up bouncing back towards her! Once they land the pebbles will normally inflict the aforementioned damage, but one held in Elly's hands will be actually inflict around 15% that can KO at around 150%. Elly can throw out as many pebbles as she likes as to litter the stage with them, though she suffers some rather punishing ending lag in doing so due to her timidity; that, and most of the time the pebbles will simply travel all the way to the other side of the stage if they don't hit a wall or enemy - even if they do however, there's still the chance that one could end up bouncing back and hitting Elly...​

Up Special
Given her super strength, Elly might be able to recover by stomping on the air to gain momentum! Unsurprisingly, her hesitation in doing this is a charging phase identical to that of Diddy Kong’s recovery, except here Elly underestimates herself once again and actually manages to jump all the way up to the top of the screen! From here you have to determine where she’ll land in a similar case to the Warp Star item, though charging the recovery will give the player thrice as long to determine Elly’s landing, therefore allowing them to travel thrice as far as the aforementioned item would allow; this makes for a rather erratic landing for both Elly and her enemies, with she breaking a hole through any and every platform she touches until she lands on solid ground and…oh noes, now her feet are stuck in the ground! While she can at least attack and throw items from this state, she won’t be able to move or run away from her enemies, who are quite free to attack her until she escapes with 2.5X grab difficulty; thankfully however enemies beneath Elly when she’s falling will take large damage and knockback similar to the Warp Star item, and given that the timing of Elly’s landing is never 100% determinable enemies would be best to stay away from the area where Elly could potentially land on.

Oh, and if Elly would end up “making contact” with any items thrown up the top of the screen alongside herself she’ll end up hitting them back down to the ground right away as to make her area of recovery all the more dangerous for enemies to lurk around since one false move could easily KO them…​

Down Special
Elly bends down and timidly digs her hands into the ground before suddenly unearthing a rather lengthy 3 SBB-tall metal street sign that flings nearby enemies for upwards knockback that can KO them at 85%, though Elly suffers the starting lag of a Warlock Punch as even she struggles to unearth the lodged sign. Once unearthed, the sign becomes a rather lengthy weapon in Elly's hands that leans into the background as to prevent it from acting as a mobile wall. The sign can be made to obstruct with the use of Elly's non-special moves however, with all of her tilts and directional aerials causing her to swing her sign in the appropriate direction albeit with half the lag as Warlock Punch due to Elly's hesitant nature, with all the swings inflicting a surprisingly low 13% that KOs in the opposite direction at 160% as to compensate for the sign's ridiculous attacking range. Once the sign's reached its peak, it'll end up staying embedded in any part of the stage it would've made contact with as an obstruction that'll act like a wall or a solid platform (with grabbable ledges) depending on which way it was embedded, albeit one that players can roll past or even drop through with a dodge given how the sign is not a "true wall". The sign cannot be destroyed but rather can be bent out of shape with non-projectile attacks, with smaller portions of the sign being easier to bend than larger ones; for specifics, it'd take a move as powerful as Dedede's F-Smash to bend the sign into an L-shape with one blow. Elly can remove the sign by using the Down Special next to it in order to re-wield it and straighten it out in the process, though otherwise it can be made to stay embedded for the rest of the match - only one sign can be out at a time.

If the sign would be knocked out of Elly's hands it'll end up quickly leaning towards whichever direction she was knocked in before inflicting spiking damage of 12% to any character it comes down upon. From there it'll either fall off the stage or sit on the ground as a pseudo-platform that can't be destroyed or picked up by other characters, but can be pushed off the ledge by them at a rate of half their dashing speed or more if they have good physical strength. Needless to say, the sign can end up spiking or knocking Elly down if it would be knocked out of her but the knockback in question would not be enough to send her flying out of the sign's range quickly enough. Elly can also throw her sign as well, which'll cause it to act as a massive spinning hitbox that inflicts 22% and knockback in the opposite direction that KOs at 145% before embedding itself halfway into any surface it comes into contact with at the exact same angle it was flying at.​


Standards

Standard
Elly actively flails her hands in front of her in a rather silly-looking slapping motion that hits in front of her and occasionally diagonally above her for a surprisingly strong 12% with good warding horizontal pushback (some slight upwards knockback as well) that'll start to KO at around 225%. Because of the attack's surprising power for a standard it can quite easily out-prioritize a good deal of quick attacks and projectiles in order to cover Elly from the front, with enemies generally needing to jump or roll behind Elly if they don't have anything they can overpower or out-range her with since this can become quite annoying and even dangerous at higher percentages or in tight-spaces where enemies can be chained for at least a fair bit of damage on walls.

If Elly was holding her street sign she'll end up slowly bringing it behind her diagonally upwards before quickly slamming it down like an axe that inflicts 18% with stronger spiking properties than if the weapon were allowed to fall by itself. This is a good albeit laggy way to keep distant enemies on their toes or spike offstage enemies, but if the edge of the sign would end up striking a wall or another part of the stage on a higher plane, Elly will be able to wedge it in there by keep A held down for the entire move, which in itself causes the sign to act as a solid obstacle that can potentially cage enemies between Elly and the aforementioned wall with only the area Elly was occupying to use as an exit.​

Dash Attack
Poor Elly goes into a fit of embarrassment as she wildly swings both her arms like windmills whilst dashing for as long as you continue to hold A, which causes her to fling any items she'd make contact with her upwards as if she'd thrown them there herself; a great way to knock your pebbles and street sign into the air or approach your enemy whilst countering their attempts to use your stones against you. Speaking of which, foes that make contact with Elly's flailing arms are flung right up to the top of the screen, though they don't take any hazardous damage or knockback of sorts unless an item would end up falling beneath where they are that could inflict some rather fatal damage on them. Elly will stop running about if she'd meet a wall or a ledge, though in any case she'll suffer some punishable ending lag anyway as she tries to catch her breath.

If used while holding a street sign, Elly will quickly thrust it towards the ground as far as it can reach out in order to inflict horizontal-downwards knockback that generally knocks down enemies and sends them sliding back for 12% that can KO at around 175%, but against offstage enemies this can either turn into a deadly meteor smash if sweet-spotted or a simple obstruction otherwise. Elly normally suffers some punishable ending lag after using the move, but if you continued to hold down A afterwards she will in fact "push" her area of the sign upwards so it ends up leaning perfectly upright 3 SBBs high with Elly on the very top and the sides acting as an obstructive wall to enemies (albeit one they can roll around) for a while before slowly leaning and falling as a spiker after no more than 2 seconds; Elly can and will keep hanging on to the top of the sign even when it's falling, though she can cancel out of this and transition into her aerial game with a jump, make the sign lean backwards by holding backwards on the control stick, let go and fall back down immediately with a downwards input, or even make the sign lean over and fall prematurely with a forward input that makes Elly fly forward 2 Platform's worth of distance where she's allowed to use her aerials at that given time. While the entire process is rather extreme on a whole in that it allows Elly to attack and defend at the same time, quite a lot of space is required to pull it off in the first place and enemies can make the sign lean away from them prematurely to mess up Elly with a strong attack like a F-tilt, though Elly can still transition into her aerial game from this none-the-less.​

F-tilt
Elly cutely cowers in fear before throwing out a powerful punch that inflicts a rather ungodly 26% that can KO at around 55%; this has twice as much lag as Bowser's F-tilt and rather poor range to boot however, though you can hold down the A button to make Elly delay the initial attack right after the starting lag for up to 4 seconds before she becomes too hesitant to punch in the first place. Due to its killing power, you can use this move to scare off foes in order to delay for the fall of your thrown items or just as easily catch them off-guard when they try to roll/dodge around your street sign in order to land a finishing blow on them.​

U-tilt
Elly timidly crouches down before swinging both her hands upwards, which inflicts 17% that knocks upwards and kills at 100%. This has some lag and is rather difficult to hit with but downsizes your hitbox and you can keep the attack out for as long as you like for juggling purposes in terms of both enemies and items in order to stay safe.​

D-tilt
Elly removes a decent-sized rock from the ground which deals similar damage to Samus' parts when thrown. You know the drill, this is a simple throwing item that Elly can use to destroy the enemy, especially if you wind it up with the Neutral Special. If Elly was already holding an item she'll place the rock in front of her.​


Smashes

F-Smash
Elly suddenly tears out a chunk of the stage in the background and holds it in the form of a boulder that's as large as Kirby or 1.5X the size of Bowser depending on how long you charged the move. Uncharged, the item can be picked up, thrown and rolled around like a barrel to deal damage based on the attack (think F-tilt), with Elly being able to freely toss it around with twice the speed and distance but 1.5X the power of one. With more charge however, the boulder eventually becomes a dangerous projectile that only Elly has enough strength to lift and can throw with the exact same efficiency, execution and ridiculous damage output as Bonsly, though the boulder will shatter upon connecting with a surface instead of bouncing; the move is not fall-proof however, as foes can break the boulder before it comes at them with a powerful move such as a Smash Attack, or simply attack Elly herself while she's holding the boulder to make it fall on her, which'll cause her 25% and make her be "pitfalled" in the same way as the Up Special! Scattered pebbles make this all the easier for enemies to make this happen, so you'll really have to pick your time and place when trying to pull off the big move. Note that Elly can in-fact use her Neutral Special whilst holding the boulder to chuck it forward and drastically increase its power for a OHKO move, or simply throw it up into the air as a rather deadly trap that'll spell doom for whoever happens to be beneath it once it comes down.

Oh, and you can make as many projectiles as you like with this move, but the strain and jaggedness that comes with the rocks Elly pulls out makes her take 5% upon using this move and another 2% for every 0.5 seconds she charges the move for...but not like that actually matters, right? After all, you could keep using this move over and over to make quick work of your opponents given how powerful even the un-charged boulders are, and the fact that you can juggle all the large boulders you make...​

U-Smash
Elly attempts to unearth something in a similar vain to her Down Special, except this time she tears off a chunk of the stage! The torn area is then thrown all the way up to the top of the screen at Sonic's dashing speed and will obviously Star KO any players standing on the torn area, which can range from being a Platform wide and a Kirby deep or thrice that area if fully charged to the point where a piece of the stage can end up going missing; the move naturally suffers from obscene lag however, twice that of Warlock Punch without taking the charging time into account. Once it reaches the blast zone, the torn area will always stay up there for a total of 5 seconds before it crashes down with the same consequences as being struck by a falling SSE elevator, except here players simply take 15% and are downed in place rather than OHKOed if they'd be crushed beneath the flung part of the stage.​

D-Smash
In a sudden panic, Elly stamps the ground repeatedly to cause a tremor that affects the entire area she's on, occurring while the attack is being charged. Anything other than Elly touching the ground takes a 10% and very weak upwards knockback that juggles foes while ignoring shields, while items are pushed up a little but at a very repetitive rate that turns them into traps and the sign will shake to deal damage to foes hit by it. Grounded objects with HP will be demolished very quickly given they take damage every 0.05 seconds, so this can wreck a foe's set-up. To dodge this attack at all foes will have to stay in the air or try to attack the defenseless Elly - remember that since this attack occurs during the charge she'll take more knockback from attacks.​


Aerials

N-air
Elly swings her arms around, dealing 20% with knockback behind the direction foes came from. The attack comes out unpredictably fast but lasts for a lengthy 2 seconds afterwards, reflecting projectiles that come Elly's way.

Using this move with a sign produces the same effect as the Standard.​

F/B-air
Elly swats with her fists in front of her for seven hits that each inflict 9% that KO at 170% in somewhat similar vain and duration to Snake's N-air, except here Elly is able to keep any aerial momentum she has from her jumps in-tact as to allow more than one hit to connect, especially when she'd want to use this move to bend her sign.​

U-air
Elly reaches above her with both hands in the usual grab manner, but if she gets someone she'll squeal in fright and chuck her foe 4 SBBs into the air with non-KO'ing pushback; on the other hand the move is deadly via throwing the enemy into falling items, though the grab suffers from a bit of lag and bad reach so its harder to pull off than you'd think. This move can also be used to grapple onto the edge of an embedded street sign and bend it until you let go of A in order to manipulate it, generally for defensive purposes or projectile bouncing. It can also be used to toss items back up the same height they were originally thrown without having to redo it from scratch, namely stuff like boulders.​

D-air
Elly kicks downwards, spiking foes for 25% that easily OHKOs offstage and pitfalls them if they hit ground.​


Grab

Elly puts on a brave face as she reaches out with one hand to apprehend the foe, who escapes from her with thrice the difficulty due to her strength...she's only being gentle, however.​

Pummel
Frightened by her captive, Elly slams them back and forth for a strong 5%; nearby enemies will find themselves taking 16% that KOs at 100% if they make contact with the victim, which makes a good shield for Elly. The way the Pummel is executed also has relevance; on the first use Elly will slam her foe into the ground in front of her, where she will keep them positioned until she Pummels them again to slam them on the other side of her. This allows Elly to directly control her foe's positioning or even use them as a kind of shield against items that'd fall on top of her by Pummeling the foe at the exact time the item would fall on Elly so that the foe is struck by it instead.​

F-throw
Elly throws the foe into the ground for 23% before being bounced away for knockback that KOs at 120%.​

B-throw
Elly tosses her foe behind her in fright, having incredibly high base knockback that KOs at 70% and instantly KOs most characters at the edge of Final Destination.​

U-throw
Elly tosses her victim into the air for 15% before they come back down as a shooting star after 5 seconds that creates a Smart Bomb-sized explosion which inflicts 40% that KOs at 50% to anyone in it's path, including Elly. The victim on the other hand, takes 50% and is knocked down....which is the bare minimum damage they'll take if they didn't crash into any falling obstacles and items on the way and take that same amount of damage the obstacles would've damaged them for in the process, which destroys them.​

D-throw
A shocked Elly punches her foe into the ground with enough force to "pitfall" them all the way down and deal 22%. This leaves them invulnerable to enemy attacks but forces them to escape with 3.5X the usual difficulty, which is precious time for Elly to set-up...​


Ironic Twist

For those unfamiliar with the franchise (or anime at hand), the premise of Tantei Opera Milky Holmes actually revolves around the main girls losing their powers and being forced to cope with the problems it brings while trying to find a way to restore them. The Milky Holmes were once renown detectives, but after losing their Toys (on the first episode at that) they become nothing more than bumbling failures. The group's only saving grace is that their archenemy actually liked fighting with them and thus secretly infiltrates the academy they attend to try and help get their powers back, pushing and motivating them to do so all the while under the guise of the Student Body President. Unfortunately, Elly will get no such sympathy from her foes when this happens to her in Brawl...

At the start of the match, Elly begins as a rather fearsome character that makes most other fighters shake in their boots. She's not invincible however; upon taking 70%, being sent flying from a single powerful attack five times or being KO'ed, both Elly and the player will be shocked to find her super strength gone! Elly will go through the same animations she usually would to perform her attacks, but neither rock or foe will budge from her once-powerful touch; her melee attacks have been drastically weakened down to about 1/8ths of their original power, and she now throws items with the same efficiency as a normal character. Moves such as her Side Special and Up Special still work however, though the pebbles Elly throws each only inflict a non-flinching 1% and her "recovery" only takes her as far as Wario's Corkscrew before she's forced to enter helpless. Finally, if Elly tries to grab a foe she'll end up holding them for as long as a normal grab (note that the foe is struggling far less), and will find that her Pummel and Throws are now little more than exercises of futility. Essentially speaking, Elly has become a helpless character who stands at the mercy of her foes. Oh, and respawning will NOT give Elly back her Toy. How cruel.

But Elly's an detective. She shouldn't give up so easily; what would her ancestors think!? Keep trying Elly, keep trying, because with sheer determination your strength might come back to you for one attack! The chances of this occurring in a match is as rare as pulling out a 9 with MG&W's Judge however...on the other hand though, once this does happen almost no foe will have expected it; how many times have you actually EXPECTED Luigi's Green Missile to misfire? This chance occurs on each hit of Elly's attack, so it's a good thing she has many multi-hitting attacks and once that chance appears her attack will be powered up for the rest of its duration - this is also good with her grab. While generally chance-determined, there's also an invisible meter of sorts that fills up whenever Elly inflicts damage or takes it, and once it goes up to 65% she'll gain a free use of her Toy with one of her moves that can catch both players off-guard; this meter passes on from stock to stock and isn't affected by KOs. The chances of Elly being able to use her Toy for one attack also increases significantly when she spams an attack, so if the foe sees her using the same attack over and over again they'd better put their guard up.

If the player is particularly paranoid about Elly losing her Toy, they might want to throw out a whole bunch of items for her to use so she has something to defend herself with when she becomes defenseless. Otherwise, they might want to go for a KO before it can happen.​


Final Smash

As a proud detective who wields a Toy, Elly -should- have no need for a Final Smash. On the other hand, she'll become absolutely desperate for it the moment she loses her Toy, as her Final Smash will instantly give it back to her good as new. Do note that the Smash Ball is rather difficult for Elly to obtain without her Toy as she only has her "trap" projectiles and weak rocks to smash it open with, but it'll be worthwhile in the end due to it being twice as hard for her to lose her Toy afterwards (this only happens once however). Additionally, being 3 places behind the other players will give Elly the Pity Final Smash and consequently her Toys back for further use.​


This set basically is "complete", though once again I wanted to use the ideas for somebody else and the thing as it is now is not up to my satisfaction. Got started on this set a real long time ago, like at the start of MYM12 if I remember correctly.
 

ForwardArrow

Smash Ace
Joined
Aug 17, 2011
Messages
503
I will admit I'm a bit surprised to see an entirely negative comment coming from you of all people, Kat. Sort of glad you are actually willing to make them now that you're commenting, though that my first set in a while had to be the victim of it makes me a little sad. Haven't felt too confident in my set making abilities lately... this did not exactly help. :urg:

That aside, I do feel that while yes his base projectile/trapping game is pretty generic, the difference between Falz and some others is that he has to be extremely proactive with it while fighting 3 opponents. 4-10 seconds is not a long time for a stage obstruction to last, and Falz wants to flood the stage with them. Admittedly, the soul steal is used for "stalling" but the fact is Falz is so terrifying with a proper set-up that the foes pretty much have to try and pressure him regardless of this. And of course there's a bit risk-reward system to the souls in that you can plant them in other foes and such, since while that depletes your defense it makes you way more powerful offensively. Not to mention his method of lockdown is a bit different than other bosses. Not to mention he can't really stall at the top blast zone since he naturally falls down if he teleports that high(okay yes I forgot to put a limit on that move, I'll concede to you there and edit one in), and stalling at the other blast zones the most he can really do is make a Megid cloud, since any other tactics he performs from there are highly predictable, and it won't be -THAT- long until he has to return to the stage and becomes unable to stall anyway.

I happen to agree with you on the Grab's visual... not even sure if I want to edit that though, considering I don't like the set all that much myself(still my 2nd best this contest I think, but that's more an insult to Elsa and Poppet than a compliment to Falz). I dunno why I did it like that, but I kind of forgot the visual for that attack anyway... The odd thing was though, I was trying to be more character relevant here than Vol Opt. I'm pretty annoyed about how much of the stuff in Vol's set I just made up, so I kind of wanted to repair that by making as much of Falz's set as possible come from in game. Maybe that wasn't the right route to go and some of the stuff I had to make up was kind of tacky, though. Either way, I'm not necessarily saying you're wrong about the set, I just wanted to try and defend it since my current frontrunner is Doc freaking Scratch and he's not exactly the follow up to Praetors I was hoping he'd be.
 

majora_787

Smash Hero
Joined
Jun 23, 2007
Messages
6,122
Location
Texas
Welp, I'm being bullied into this again...

Comment blocks, how do they work.

DISCLAIMER: I am reading and commenting sets in order, so you may very well have done better than whatever complaints I have in the first block. And if you don't care about my opinion, feel free to not even read the block.

#01: THE NECROMANCER
Being completely unfamiliar with the character, I wouldn't know how IC or OOC this is or isn't. But being a generic "class" character, I imagine it's probably fine. I don't know why, but 30HP sounds (to me) like too much HP for zombies that you spawn five at a time. Even though, it IS balanced out by like 10 or 20 second buffer times. Even though, I don't know. I think it could be better if maybe the zombies were weaker and the buffer times were slower. 10 and 20 seconds sounds like a really long time, especially considering how stupid they seem to be. The mind control thing seems interesting, and sort of reminds me of move descriptions out of Luxord... only phrased better. IMO. I don't see any glaring issues at a read, not a lot to say on the matter.

#02: DRY BONES
I liked this. The neutral special was probably actually my favorite part of this, I find the concept of all head attacks being used by the disembodied head to be a funny concept. Other than that, I don't really know how I feel about the up special. It felt a little "meh". A lot of attacks seem to help out the disembodied head thing nicely enough, and overall I find the set amusing.

#03: AGIRI GOSHIKI
Hoo boy. Uh. To begin with, I like the concept of using stage entrance as part of the play strategy. That's a lot of stuff to use for an advantage, and the fight hasn't even started. The rest of the set is a pretty huge chunk. I don't have anything in particular to complain about, but not much of the rest of the set really stuck out to me except for the length and amount of detail. But I think it turned out well.

#04: THE COACHMAN
... Okay then. I didn't peg this guy as a character who could really...have...a set made for him, but this works. At first glance, this seems pretty proppy with the coach thing. And the whole gradual transformation thing sort of reminds me of Tempura Wizard. I don't know how versatile I'd call this, but I'd call it something different. And I can see that it works with what it has.

#05: SCIZOR
Maybe it's just me, but I can't see a huge amount of anti-camping here. Yes, the metal coat would be great for reflecting projectiles, but then there are things like Thief that only sound useful when items are involved... Feint also seems pretty out of place, seeming kind of useless to the anti-camping playstyle considering most campers would be dodging to open gaps. I can't say I like this one a huge amount, but it's alright. Not a lot of moves come across (to me) as "anti-camping" past the major specials, either. Also, all white text is not the best thing ever.

#06: AMPS
Welp. This is weird. I find the concept awkward and a little confusing, but maybe I just don't get it. It seems sort of like a puppet set, with one amp focusing on movement while the other three attack; I don't personally see that as a bad thing, do with it what you will. I do like when taunts are beneficial to a set, though. So good job. I wouldn't be able to make a set for an enemy like this.

#07: CHANTIQUE
This is something. A dual-weapon variation set. I'm not sure I get the light saber though. Does it spawn as an item that benefits her when she picks it up? Or what? If so, that seems to nerf her down in matches where items are off, which is sort of a common setting.

#08: KANG THE CONQUEROR
Well. Looking at this, I like the concept of the Growing Man item... It seems pretty impending and nasty. As amusing as it would be to have several of them on stage, it's for the best that there's only ever one. The up special nearly scared me; I thought it was going to be a repeat of Emidius' down special. :p The time travel thing is pretty amusing though. The up special seems like it could be spammed to just obnoxiously throw off rhythm with a lot of very brief time freezes, though. I dunno, it seems like that could be a thing. I will say that everything seems to work to the chaotic playstyle pretty nicely though, good job.

#09: MONA
I think this could use a touch of spellcheck, and it's a peeve of mine for EVERYTHING IN THE WHOLE SET to be centered. But that aside, let's see the actual stuff. I'm not a gigantic fan of the duplicate of Wario's side special, especially since she's from the same franchise. The up special seems similar as well. It would generally be a good idea to throw out concepts for major moves if they're going to be identical to actual Smash Bros. characters, for future reference. The down special seems like it could have been used for something, but... You can use it what, three or four times in a match ever? That sort of soils the use a little. Maybe if you had added a debuff time to each form or something? I dunno. It's a start, but I think there could be plenty of improvement from this.


Probably not the best comment block, but it's something. Which is better than nothing. In theory.
 

FrozenRoy

Smash Lord
Joined
Apr 26, 2007
Messages
1,268
Location
Las Vegas, Nevada
Switch FC
SW-1325-2408-7513
So, I originally planned this article for the end of the contest and to be posted on the Bunker, but given the type of article it is and the fact I will likely make more sets for the contest, the idea of editing, adding to, cleaning up(I specifically wish I could make it look similiar to The Black Box Opens Up for reasons that will soon be obvious) and then posting it to the Bunker. So this is the Mini entry.

You see, I always liked Rool's "The Black Box Opens Up" article, because it gives a long, in-depth and interesting look into both the history of MYM and the thought process of a prominent MYMer. And the thoughts on his movesets often reveal amazing things about what one might think about themselves and such. Galaxy Man in that article is a good example. Who would have thought that Rool would put that in his Top 10 movesets of all time? Granted, it may have just been a known thing and I was not around for it, but I thought the richness of his descriptions were quite amazing.

So what if someone did something like that, but in a running style? At the each of MYM, posting an article revealing the thoughts on their sets and thought process, re-evaluating what they have made, showing off the evolution of their thoughts, perhaps even the history of MYM itself crystalized in this evocative series? It would be an astoundingly simple yet perhaps perplexingly deep thing, I think.

And while I doubt I will ever have anything particularly interesting to say, I thought it might be a good idea for me to do such a thing! And why not? I am a newcomer, a late arrival into a contest already on twelve times done, someone who can put out thoughts untouched by the past and perhaps offer insight into something most people cannot: The thought process of someone entering the crazy scene we know as MYM.

I would love to see what others would write for this type of article, but this leads to the other reason I felt myself suited to the task: I have no backlog to go through to begin, merely what I have made this contest, a meager 5 sets and counting. While I am sure the thought process of MasterWarlord or Junahu or Smady would be something to pick apart and gaze upon in interest, such a thing would be infeasible to actually do: Warlord would have to write up, what, stuff for eighty plus movesets? While he wouldn't need to re-evaluate most of them after the first time, given the age of many of the older ones, the task is something simply too daunting to ask for from anyone.

So here I sit, writing most likely a long preface you have just seen that nobody will care about because, well, why would they? Therefor, without further ado, let us get into the meat of my crappy movesets.

[01] Scizor

A brief moment to discuss how I found MYM. I was honestly just bored and, having read some SSBwiki stuff, decided to check the TV Tropes article on Super Smash Brothers. I was feeling interested in reading on it not just because I had just gotten Brawl a while before, but because I had nostalgically been checking out a forum I used to(and still do, sometimes) go on, back before Brawl was released. A little thread we had was about making movesets for our RP characters: Simple, MYM2-3 sort of stuff, but fun nonetheless. I actually made a few in that same MYM2-3 style for Homestuck characters after reading it while browsing the websites, until I finished the TV Tropes one except one I found odd: Fanfic Recommendations. Fanfics for Super Smash Brothers? Seemed odd and interesting!

And right there was a link to MYM, which felt perfect given I had just been working on those! I immedietely clicked on it, went right into MYM11 and decided to look it over, hoping it wasn't over for good...

...And ran right into King K. Rool. Now while King Rool there doesn't seem like a particularly complex set now, to someone who was making MYM2-3 level sets, this was a trek. I didn't particularly like it, the crown felt terribly awkward!, it did tell me pretty quickly that what I had was...how one would say...not adequate. I proceeded to read on, quickly running into some jokesets before some great ones, and finished the thread in three days due to only reading sets for characters I knew or cared about and not continuing to read when I found a set boring. Not the best idea, but I was hoping a bit more for speed than knowledge! The set that floored me, and which I maintain is my favorite from the contest and it's lack of placement on the Top 10 is a crime, was Sayaka Miki. After that I got on xat and helpfully ran into Smady, who guided me a good deal at the start, even previewing Scizor for me. It was his suggestion to maybe add some item generation in, thanks to Thief, but then I added it in such a tacky manner. But the fact it was not making everyone puke like it was QWOP or something made me think I could get good at this and so I stuck around.

Let's talk about the moveset now. The basic idea was this set was to do something very simple for my first set, because I wanted to try and start without something complex to muck it up and to help judge what people thought I could do. Scizor was chosen due to the prominence of Pokesets in the articles I read between my time on Xat and after reading MYM11 and the start of MYM12, plus it was cool looking and had no set!

The moveset itself had a simple idea. People think Brawl is so campy that they play it so campy, so let's make someone who can approach easily! So Scizor gets a move that allows it to rush across the battlefield, which makes sense both in a competitve sense(Bullet Punch allows Scizor surprising speed and makes it a top tier revenge killer) and a character sense. Metal Coat lets you deflect projectiles to help your approach. It's all handled roughly, but it's a first set, so cut me some slack!

After the initial idea, though, I delved into the depths of tackiness and oddity. Generate items in the forward throw! Cover the opponent in metal then break it to change their weight! WHEEEEEE! It's not necessarily bad concepts, but clearly done by someone who has no idea how to fit them in.

And it does have two cool ideas, at least. The idea of an anti-camper is always fun still, I think. Of some implaceable man who fights through all the projectiles and the traps and forces the foe to play their game or die. And the weight manipulationg could be neat on a set...which is unsurprising, as something very similiar had been done in a far better way in a MYM11 set that I had not read at the time: Jin-Gitaxis.

[02] Night's End Sorcerer

I got to work on Night's End Sorcerer quickly after Scizor, albeit with one or two other movesets worked on at the time, and it was posted swiftly after, only six movesets later. I remember actually being worried people would think I was cribbing off of Warlord when he posted Zasalamel about a day before me despite me having been working on it before because they both used scythes and Warlord was a bigger name. That was pretty silly of me, heh. Still, it made me feel intense amusement when Kat would have Zasalamel and NES fight each other in his Story Mode, so there's that.

NES himself has a simple enough concept, really with a quite mundane starting point. Night's End Sorcerer is a Spellcaster-type with a Graveyard removal effect, so it's effects should be dark and involve the dead in some way or something. The basis for the wisps is actually a very similiar move used by Komachi Onozuka in the Touhou fighting games, where Komachi sends out some wisps and can blow them up with her down attack or hit them with specific attacks to heal. I considered just making a set for Komachi, but I felt like she had too much potential: I wanted to still go with something simple as I got my bearings on how good I was and learned more, so that when I went to more complicated concepts, I would do better at them due to being better.

The moveset itself is terribly simple. You summon wisps and they try to follow the opponent around, like an omnipresent thread, as you can blow them up or use them to grab a foe, so you've got them constantly moving. And NES can do some simple things with them, you can absorb them or other projectiles to toss out with your Side B, use them to recover, blow them up and my favorite thing, use them as a grab hitbox. You can even scatter them with your D-Smash or gather them and move them with your F-Smash, giving you incentive to charge these moves even if the foe is not near by. The moveset itself is generic enough, but I was still very happy with it, and I still am now, as while it is not a great moveset, it felt like it fit the character and was effective in it's simpleness. Until Rattata, I felt this was my best set.

And the moveset served it's purpose. People thought it was a great improvement from Scizor and Warlord ranked it a 4/10: While that's not good, for a second moveset and in this day and age, I was absurdly happy by that. Kat and LoL's comments in particular made me quite happy, Part of why it probably felt like, as Kat said in his comment, "you've essentially taken a character out of the Yu-Gi-Oh world and turned him into his own character of sorts" is because I've actually used NES' design for an OC of mine before. The ideas I had for fluid scythe movements for that RP translated well into a re-imagining into some of NES' more simple attacks, most especially the F-Smash, which takes inspiration from that and the way Maka fights in Soul Eater. And LoL's comment tickled me pink just because he said it was a moveset type he could see himself making: Coming from a leader, it seemed like a great compliment. Smashbot saying it seemed so hard to make a moveset from when I found it so easy also made me feel pretty proud.

Around this time I also posted two very negative comments, first on Doc Scratch and then on Zasalamel. I kind of felt bad that the Doc Scratch one might have hurt it's chances since I did like it enough, but it really needed them pointed out, and then Zasalamel was simply a strong difference of opinion and, in some cases, me being a bad reader. I actually debated posting it for a bit, I was just some sort of bad newcomer and this was Warlord, but I think I'm glad I got my opinion out there. And hey, Warlord didn't hate me for it, so it all worked out!

[03] Zombie Master

And then I did not finish a set for a while, mostly getting distracted by making about a fourth of a moveset then never finishing it. This was actually a one day set which I started making after reading Necromancer and Kang, which probably showed through a little, though Necromancer largely only showed through because it made me think of my old Zombie deck and a card I always loved both for it's art and effect, Zombie Master. I started falling asleep near the end, probably why the aerials are so lame...

The idea itself, like most of mine, is horrendously simple. Minion sets are common, but they're always like boring minions with only a few attacks and crap. So let's make a character with very advanced minions! And to make sure he isn't too good or that people don't focus on the minions, let's make his stats bad! Though the size was more just because the art always made me think of Zombie Master as some young kid or punk who found necromantic powers, so of course he isn't very tall. This is also why I sometimes call him Master Z. And since they're zombies, you can reanimate them, because zombies are always reanimating: It also fits perfectly with Zombie Master's ability to revive zombies.

The minions themselves are interesting enough. Skull Servants are pathetic but get better in numbers, just like their flavor texts and their overall theme as seen in cards like King of Skull Servants and in the end they gain a generic half moveset, which for a minion is a lot more than they usually get, especially when five are flying around. Red-Eyes Zombie Dragon flies around and adds in projectiles or anti-air attacks. Burning Skull Head acts more like a living stage hazard than a minion, floating around and trying to suicide bomb the foe. And Dark Dust Spirit has moves that don't damage and instead, say, help setup...but they can also hamper you. All very basic, but when combined and when you consider they are minions, it's quite interesting. Zombie Master can even animate dead foes to fight for him! And since he's a master of necromancy and not dumb, he'll even revive foes and abuse Smash Brother's revival system to kill them and re-use their corpse again and again...or revive teammates so he's not left alone.

However, I feel I really dropped the ball on him after the specials. Attacks like Flesh Portal and Power seem odd in the set or power context and I never take advantage of the advanced minions in the most easy way imaginable, letting you actually control them, even thought there is an obvious place to do so with his lightning! Really, his standards are pretty bland or even detracting, with the notable exception of a move I still love, Chain Lighting. I mean, a lightning bolt that jumps from foe to foe like some kind of caffinated slinky, coming back again and again and giving the foe something to think on and avoid? Kickass! I do wish I had made it so it could bounce off your minions, though.

In the end, I was unhappy with Zombie Master. While better than Scizor and the later Demyx, it felt below NES and definitely below Rattata, in executing the cool concept I had in mind. I hope to re-explore it sometime.

[04] Demyx

Oh Demyx...

This was a very troubled set. I forget who, but someone dropped out of making Demyx, so Prof was kinda talking about it late one night. And since I always liked Demyx, I told Prof I would do it if nobody else wanted too, and then I was doing it. The sad thing is this was like a month before the movement. So I sat down in Notepad, hyped up, and...

Typed up pretty much nothing. This continued for a long time, until suddenly the movement was on me and I had barely anything done! I actually once or twice told Prof I had a bit more done while I was looking at the Notepad and trying to write what I said I had done, well, down. In the end, Demyx ended up being about a one-two day set, which dissapointed me as I felt the concept was incredibly cool: A character who has trouble killing outside of gimping, which is hard for him to do because he can't damage rack well, and his signature instant killing Dance, Water, Dance! move.

I also liked the rock-out move, but solely for it's silliness, which is why I almost took it out for something else before I posted it. In the end, I stayed with it solely for the amusement and because the new move sucked too to me, thus ensuring Demyx would forever be remembered for making Garbage Man come out of his truck to play music on his garbage bag.

And he has his redeeming qualities. The notes, I feel, are able to create a fun maze-like series of traps, which give Demyx enough time to actually get off his killer and I feel like some of the stuff he can do with the water is interesting, mostly the F-Smash when combined with minions. And the idea of throwing in identical minions when you're on a time limit to kill the other ones is, while not amazing, I think a solid and fun idea for Demyx. I also think the grab is insanely cool and the best move in the set, also showing that for some reason I apparantly like doing weird things to grab range. The rest of this moveset is just awful though, ranging from generic to pointless to tacky as hell, with the exceptions of the dash attack(Which is a neat concept with little use in the set) and the F-Throw.

The moveset, quite rightfully, got torn apart, though it somehow managed to not be the worst in the movement. And hey, Demyx became a short meme between his rock-off and it got some amusement in Kat's story mode about his neutral special. That counts for something, right?

[05] Rattata

And then Rattata is my most recent, and in my opinion best(sadly), moveset, made fairly quickly due to the fact I had intense internet troubles but that it doesn't affect Notepad and that I had finally gotten MYM to load. The moveset felt very polished and clean, most likely due to the fact I had A. Just commented a bunch of sets and B. Had been reading the very article that inspired this, The Black Box Opens Up, a lot as the computer that is without internet up had it up when it went off. Thus, when I would go to make one of the sets I made on there, back when I thought that the internet would be back faster and that I couldn't get on here, I would turn on some music from it's media player and read it while making them. The set definitely feels more professional than most of mine.

And the set, while probably boring to the normal MYMer, came out good to me, I am very satisfied with it. The characterization is superb, as Rattata acts just like a mouse/rat and just like it does in the game, dodging attacks and running away, being annoying and using it's one good stat, speed(It has Base 72 speed surprisingly, most than a lot of stage 1s), to pepper the foe with lightly damaging but very quick attacks. And with the Side Special, which probably seems very familiar to anyone around 6 contests ago, Rattata gains an uncanny amount of mobility, with which to hit it's signature move that works very similiarly to how it does in the game, Super Fang. And just like in the game, it allows Rattata to take down foes it never could, but it's risky: In the games because, outside of the first gen(Back when Raticate is borderline OU), if you mess up Super Fang and they switch in, say, a ghost types, you're in major pain(Not that you aren't already if you are using Rattata outside of LC...). Rattata's small size is put to use, for dodging projectiles, and it's entire body becomes used just like it would in the game with a move Rattata is well known for, Tackle.

So while boring enough of a moveset, I feel the characterization and some cool moves, four in specific(Neutral Special, Side Special, Down Special, Dash Attack) make it actually really cool for what it is. And that was one more for the first gen Pokedex! I don't doubt that it will get surpassed by me soon, I think the all but done and yet unable to be posted Alice Margatroid is a better set and that the in-progress Lt. Surge will be too, but hey, for now...

And so, this far too long, probably not going to be read by anyone due to not being interesting(yet), draws to it's close. Seeya all next set or whatnot.
 

Junahu

Smash Ace
Joined
Nov 15, 2005
Messages
899
Location
Shropshire Slasher
functionReturn(_root.MYmini[X+1]);

MYmini Week #17
Diamond Jubilee

[3rd Jun-9th Jun]
Queen Elizabeth II is celebrating 60 years on the throne, and so is this MYmini! The theme this week, is simply 'Royalty'. Kings, Queens, Princes, Crowns. So long as the mini you make is even tangentially related to Monarchy, anything goes.


Edit: What? You thought it'd be E3 related? We tried that last year, remember? It sucked.
 

Rychu

Thane of Smashville
Joined
Jul 5, 2010
Messages
817
3DS FC
1908-0105-4965
New Geto set! Not exactly how i wanted it to turn out, but its alright. Boss set soon

Bouldergeist

Bouldergeist is one of the bosses from the original Super Mario Galaxy, and is one of the most memorable outside of the Big Bad Bowser himself. He appears as some sort of Boo Deity, presumably ruling over the Mario ghost enemies with an Iron (or Stony) fist. He fights by throwing boulders, creating rows upon rows of pointy stalagmites, summoning suicide-bomber Boos, and eventually crushing puny Mario with his gigantic stony hands. However, once he's been hurt enough, he reveals a fairly disturbing secret about himself...

Quirks and Statistics

Bouldergeist himself is 1.5 Ganons tall, and as wide as Brawl Bowser. It should be noted that Bouldergeist does not move, and is completely rooted into the stage. The section of the stage he's rooted in, along with the surrounding BFP lengths, are totally indestructible, so he can't exactly be sent plummeting into the bottom blast zone if his stage is destroyed. By extension, he takes absolutely 0 knockback or stun from any attacks. His hands, which are the only things you can move, also take no hitstun or have any weight value. They can move around the stage with full free-flight, as Bouldergeist will always face towards his hands and likewise attack in the same direction. The hands have their own damage meter, but instead of going up, they have 75% damage each, and are destroyed for the remainder of the stock if they are disposed of. Any damage they take will also go towards Bouldergeist's own normal damage meter. Both hands are required for use of 1 throw and all Smash Attacks: it's good to try to keep them around for a while. They are both 1/3 the size of Master Hand, fly one behind the other, and are as fast as Bowser dashing. They will never have superarmor against damage. Bouldergiest himself also has a countdown damage meter, only his has 150% HP. Once it is destroyed, both hands automatically crumble if they haven't already. Bouldergeist isn't KOed yet, though, but he still has all that damage built up to deal with in his true form...


This pathetic thing now has all that damage, upwards of 200%, mind you, to deal with, along with a severely reduced moveset (literally-he's down to his specials) AND absolutely no redeeming stats. Don't believe me? Take a look:

True Form Stats
Size - 4
Speed - 5
Weight - 1
Jump - 4
Aerial Speed - 3
Fall Speed - 1

Beginning to see the problem? Taking no knockback or stun makes you extreme combo and damage fodder, and losing even on of your hands, also extreme damage fodder, starts to limit your moveset and decrease your options by quite a bit. It's basically a ticking time-bomb waiting to happen, and you've just got to work with it while taking all that damage from your opponents.

Main Body Attacks

Shield/Dodge - Call-Back
Pressing the Shield/Dodge button simply causes Bouldergeist's hands to quickly re-appear 1 BFP in front of his main body, holding themselves outward in a defensive position. They can be aimed up or down to better defend against incoming attacks. While this will protect the main body, it still deals damage to his hands, though any damage dealt is distributed evenly to both of his hands, effectively halving the damage dealt to each. It's a good defensive option and will last as long as the input is held, and Bouldergeist can even use this time to set up some of his laggier attacks.

Up Special - Boulder Raise
Bouldergeist gets a look of concentration on his face as Boulders begin to rise out of the ground directly in front of him, 1 per second. They all float in a bunch in this area, in a kind of row. The total amount of boulders he can have out at a time is 5, but he doesn't have to summon them all at once. The boulders each have 10% damage and can act as a kind of a damage sponge for him while they float in front of his face. And yes, they always are in front of his face, changing direction as he does. Of course, this isn't their only purpose...

Neutral Special - Bomb Boo

Bouldergeist closes his eyes, summoning a Black Bomb Boo from the ground, as it emerges from the shadows. These guys are crazy suicide bombers - they explode upon contact with ANYTHING, including Bouldergeist himself. They move around much like regular Boos, a bit like flying Waddle-Dees in terms of size and speed, and will lock onto an opponent to chase if one so happens to come within 1.5 SBBs of it. Unfortunately, their AI isn't very smart, and they are fairly easy to lead into things such as walls, other Bomb Boos, Bouldergeist himself, his hands, and any of his little traps is fairly easy. The explosion that happens when they touch anything has a range of 1/3 of a Smart Bomb and deals 20% damage and fantastic knockback to anything it comes into contact with, again including Bouldergeist himself. There can be up to 4 Bomb Boos out at a time per Bouldergeist. Much like their game counterpart, they can be grabbed, but from the front only - this grabs their tongues, and allows players to throw them with generic directional throws that deal no damage to keep them out of their face. As it's probably obvious, they aren't shy like their white counterparts. Bouldergeist can also grab the Bomb Boos, with similar effect of having his throws replaced by similarly generic directionals. Bouldergeist, when grabbing the Bomb Boos, also spins them above itself when not throwing, being a passive hitbox for as long as it goes on, with similar effect as to when it comes into contact with a foe.

Down Special - Stalagmites
Bouldergeist looks towards the ground and opens his eyes wide, followed by a row of up to 5 BFP-wide and SSB tall triangular stalagmites to emerge in front of him. These stalagmites each have 15% stamina and are completely solid: they're basically there to block your path to...or from Bouldergeist. The first in the row in 1 SBB in front of Bouldergeist, letting him trap opponents between him and the solid rocks. If opponents touch the top of the stalagmite, they are dealt 10% damage and good upwards knockback, as the tops have unmatched priority. The Stalagmites take damage from everything, even Bouldergeist's own attacks.

Side Special - Roar
For this attack, Bouldergeist opens up his mouth and roars, creating a shockwave from his mouth that extends forward 5 SBBs and deals 5% damage and stun to anyone it touches. Of course, the main focus of this move is interactions. The shockwave is fully aimable, and thus can aim in the direction you want - it will always shoot towards your Hand's current position. This is the only way to launch your floating boulders, which will deal 8% damage and good knockback to anyone that comes into contact with them. It's also a good way to purposely detonate your Bomb Boos, either by using a boulder or just the shockwave itself. It can also launch your shielding hands forward while they're still there - this doesn't deal damage, but it will push opponents back, hopefully off the stage or into a Bomb Boo party. However, it WILL destroy your stalagmites.

Hand Attacks

Two-Handed Attacks
Grab on Bouldergeist
When you still have two hands available to do your bidding, they actually have the ability to grab Bouldergeist. The wrap themselves around his rocky form, and heave him out of the ground. Any damage taken while in this state will go towards the hands in the same manner they do while "shielding": distributing the damage up evenly between the two. This isn't just for another defensive option though, as the hands can physically move Bouldergeist to a different section of the stage. (If you're wondering how he works on moving stages, he appears on a floating platform in the background that's halfway sticking out into the battlefield, losing his solid status but always remaining center screen) This is Bouldergeist's ONE and ONLY way to re-position himself while still having his rocky body. It's also incredibly laggy and prevents him from using any other attacks, but against characters who can condemn parts of the stage (ie: yours), it's absolutely vital. Putting him down is as simple as re-pressing the grab button when above the desired spot on the stage.

Down Smash - Crush
The Hands bring themselves together, curling themselves into a ball. The charge time for this move is atrocious, and the Hands are fully vulnerable while charging. Once the charge is done, they slam themselves down, with a hitbox that deals anywhere from 10-25% damage depending on charge. At anywhere under full charge, it's simply a very powerful downwards strike. It will actually KO the the Hands if used off of a blast zone though, and the move does keep going down even after a hit. At full charge, when the hands make contact with the stage, it will destroy a section of that stage the size of a medium sized SBB. On many stages, this means that a whole new blast zone has opened up, and all the better to force opponents into specific spots by destroying the others. If one of the hands is destroyed mid-charge (it can happen), this simply reverts back into the Down "Tilt".

Forward Smash - Clap
The Hands put themselves in the foreground and background for this attack - the longer the input is held, simply the longer they will stay there as no real charging is going on. This is perhaps the only time the Hands are safe from damage, as attacks will slip right through between them. Unfortunately, they are also totally immovable during this time as well, giving opponents ample time to go after Bouldergeist's body due to the horrible lag of this move. But, that's not the main point: the main point is that this is one of Bouldergeist's best kill moves. Once the input is released, the Hands clap together, with an audible crunch as they pull apart. Any opponent caught in between them while the hands clap are dealt a hefty 30% damage and great horizontal knockback. Broken, right? Except it's horribly telegraphed and easily punishable if missed. Alternately, this can be used to crush floating platforms into nothingness, a la Battlefield's platforms. Also, it can crush projectiles if they're caught, and also crush any minions that are caught in between the hands. Essentially, it crushes everything.

Up Smash - Crunch
One of the Hands floats above the other in a sideways "field goal" hand motion. They stay 1.5 SBBs away from each other, one floating above, the palms facing each other. Both hands can now act as completely solid Platforms, as the "charging" can go on for up to 5 seconds, but its not really charging, but rather stalling. Once the "charge" is released, the hands crunch together, with a fairly horrible similar noise accompanying it. This crunch together deals a very awesome 20% damage and good horizontal knockback, but it's very...veeery telegraphed and easy to avoid. The ending lag is also equally atrocious, and once again, there is no superarmor to be had. While it IS still charging however, there is a secondary function to be had. By now, you've got significant sections of the stage blocked off, and opponents will be almost forced to go on the offensive to keep themselves in the game. This move gives them a passage into Bouldergeist's personal section of the stage, and the only "easy" passage in, with the others requiring a fight through stalagmites and Bomb Boos. Of course, opponents will be smart enough to get out before the crunch itself happens, but Bouldergeist's flying Boulders will always target the exact center between the two hands, giving it a little more camping potential.

One-Handed Attacks
Keep in mind that these attacks are perfectly capable of being performed with two hands, all the time. Having two hands increases the listed damage percents by 1.5x damage, and also increases priority and knockback output. Basic functionality, however, remains the same. These attacks will be written as if only one hand is remaining, however, so keep that in mind.

Down Tilt - Slam
The Hand flattens itself out and slams downward 3 SBBs. The result slams opponents downward but doesn't spike them, dealing 9% damage but having long ending lag. It also buries opponents into the ground in a pitfall, regardless if they where on the ground or not when they where hit. Of course, this can flow nicely into your Down Special, but also your down Smash if you have both out. Opponents Slammed into the stalagmites will be impaled on them, having to button mash out at 1/2 grab difficulty. Opponents buried when the stalagmites come out will instead be spiked upwards, being dealt a fairly good 15% damage.

Jab - Flick
The Hand delivers a sweeping motion, backhanding the opponent away. The lag is pretty bad compared to the normal amount of time it takes most other jabs to start up and end, but the damage output is good for his fastest physical attack, dealing 6% damage and pre-set knockback. This is another good GTFO move in Bouldergeist's arsenal, and leads well into his FTilt.

Forward Tilt - Rock Punch
The Hand forms a fist, before punching forward 1 length of it's body. This punch deals 8% damage and fairly good forward knockback. This flows nicely from your jab, and is generally good for knocking away opponents, but the ending lag is pretty bad, preventing too much spammability on it's part.

Up Tilt - Stop
The Hand(s) pulls itself up, making a vertical wall. Hitting an opponent with the tip of the fingers as it pops up is an obligatory hitbox, which deals 6% damage and alright knockback. Mostly, this acts as a wall that luckily is one of Bouldergeist's least laggy moves, and it's a good way to quickly block off opponents, at least for a little while.

Grab and Pummel
Bouldergeist's grab range is pretty godlike, having 1.5 times the range of the the great penguin king's. Bouldergeist cups them in his hand, crunching them up for his pummel, dealing 3% damage per press. He can of course grab in the air, and use all his throws there, too. He, however, can't grab when he's off to the side of the stage, so as to not be totally abusable. If both Hands are out, the other hand can move and attack normally while the other remains stationary due to grabbing the opponent. The throws are to be inputted as smashes at this time, as one Hand isn't capable of doing smashes anyway. Pummeling will result in both Jabbing and pummeling at the same time. If there is only 1 Hand out, throws are inputted as normal.

Grabbing a Stalagmite
Bouldergeist can actually grab the Stalagmites on the ends of each row, uprooting them from the stage. This turns into a fairly basic stabbing item for Bouldergeist, replacing his jab with a stab that deals 10% damage and sweetspoted knockback. His tilts are replaced by the Hand launching the stalagmite in that direction, it traveling at Fox's dash speed and deals 15% damage and good knockback in that direction to anyone it comes into contact with. It's a good offensive option for Bouldergeist, albeit one that takes away a trap of his.

Grabbing the Ground
If a Hand is floating along the ground, it can also reach down and rip a chunk of the ground the size of Bowser up from the stage, holding it. This acts similarly to grabbing a stalagmite, as the ground piece can now be used as a battering item. The tilts once again throw the ground chunk, this time dealing 17% damage and good knockback, but is pretty slow, only traveling at Bowser's dash when thrown. Hitting opponents with a ground chunk, basically jabbing, deals a laggy 10% damage and fairly good knockback.

Down Throw - Toss
The Hand tosses the opponent to the ground, as they travel quickly but still being able to DI out. Once they hit the ground, they are dealt 6% damage and are put into prone for a short period. The most obvious use is to throw them into the Stalagmites, which is a fairly obvious set up for your down tilt, and thus forth from there.

Back Throw - Dangling the Foe
The Hand grabs the character by the scruff of the neck, and holds them behind the way it was just facing. This increases the difficulty of escaping by .5, but also displays the character to damage. Bouldergeist can use this to rack up damage from Boulders, or let bomb boos ram into them for massive damage.

Up Throw - Toss
Bouldergeist's Hand merely tosses the foe over it's, uh, "shoulder", flicking them away in the process. This deals 5% damage, and puts opponents behind your position. It's a good tool to put opponents in the air with, and can flow nicely into your Boulders if you toss them at the right moment.

Forward Throw - Chuck
The Hand simply throws the foe forward, dealing no damage but very good knockback. This is a good KO option for Bouldergeist, or just a GTFO for sticky situations. Tossing foes into a waiting Hand's Down Tilt or a collection of Bomb Boos is a great way to use this move, otherwise it can be used as a generic KO move for Bouldergeist if sufficient damage has been built up.


True Form Attacks

You're boned now. You've been reduced to specials, and not even the Specials that you've had. Basically, you have all that damage you've accumulated is now in the hands of this pathetic weakling. That uvula in particular is a weak spot, opponents do at least have to attack that part of you in order to deal damage and knockback and the like, but it's 75% of your mass for god's sake. Better make a last ditch effort to make the KO before you're screwed in the next stock.

Neutral Special - Bomb Boo
This isn't exactly like the other move as Bomb Boos now immediately rush down the player, though only two can be out at a time. Their speed in increased, but now they're even dumber and even easier to fool. They do the same damage and Knockback, but are now much closer to real life suicide bombers than before.

Side Special - Boulder Toss
Unlike the previous Boulder move, this one immediately tosses a boulder in the direction of the foe. The boulders are bigger and heavier, and deal 15% damage and good knockback because of this. They are, however, also slower, and Bouldergeist can now only launch 1 at a time. It's a fairly good GTFO move, but it's pretty laggy and is in many ways inferior to it's less-urgant former special.

Down Special - Into the Shadows
Bouldergeist's True Form sinks down into it's own shadow, like any good ghost should. The Shadow can move around on the ground at 75% of the True Form's ground speed, as the shadow is easily visible on the ground. If opponents attack said Shadow, Bouldergeist takes the damage from the attack, but no knockback. Unfortunately, being hit sends it into a bit of shock, preventing this move's use for another 7 seconds. Once your shell's been broken, cunning is all you have left to survive with.

Up Special - Ghostly Teleport
Bouldergeist does a short teleport upwards, about 3 SBBs. It's very quick, but not exactly a great recovery, as it's very predictable and leaves Bouldergeist in helpless when it's used. That, and your damage will be so high by the time you need to use it, it won't really make a difference anyway.

Final Smash - Rock Form
Bouldrgeist has grabbed the Smash Ball! When it's released, Bouldergeist grows giant! He regains his hands if he's lost them, and throws them up, as a giant Stalagmite grows out of the ground, the size of Ice Climber's icy mountain. Opponents get impaled on the top as it comes up, before Bouldergeist's hands come crashing down on the top, shattering it and dealing 100% damage to any opponent, along with huge gratuitous amounts of knockback, before Bouldergeist shrinks back down to normal size. Fairly simple, but effective.

Final Smash - True Form​
Lol Spamus copy'd Final Smash, Bouldergeist regains his Rocky Body and Hands.


Playstyle
Bouldergeist is very frantic and broken up, as he desperately wants to stop opponents from getting anywhere near his main body. He wants opponents in the places he needs them, and can destroy, block off, and make unusable any parts of the stage that don't fit his plan, using Stalagmites, Bomb Boos, and general stage destruction with his smashes, as well as just getting opponents away with his throws and tilts. As for damage, burying and impaling opponents are your best friends, as well as picking up Stalagmites and ground chunks to batter opponents with. Picking up opponents impaled on your stalagmites and throwing them away is a great KO option, as well is throwing them into the stalagmites and dribbling them along them. Bomb Boos are reliable, but are very dangerous to you as well as your opponents. And your boulders? A great defensive option as well as a fairly versatile offensive projectile, and definitely your most reliable weapon of them all. Using this mish-mash of options makes for a rock solid defensive game, and an offensive game that isn't anything to mess with either.

Let's talk about losing your hands, though. Since they won't be sticking around forever, you want to use your smashes immediately, destroying what you don't need. Moving Bouldergeist around is also needed at this time, getting him out of Harm's way when times look rough. You'll lose one soon enough, and from there, it's all about damage. Deal as much as you can to get the opponents up to and ready for one of your many KO options. If you lose both...well, opponents should be damaged up enough for your Boulders and bomb Boos to take care of them, hopefully. If you lose your Rocky Body however...

You NEVER want your true form exposed. Ever. If it is, you're royally ****ed. You ain't winning the stock if it comes down to this. It's all about running away and sending everything you've got, but it's all in vain. Never let it come to this. Ever.

Play smart, tough, and fast and you'll be pulling off KOs in no time as Bouldergeist.​
 

Katapultar

Smash Lord
Joined
Nov 24, 2008
Messages
1,284
Location
Australia
Incomplete Set #5


Taiga Aisaka


Taiga Aisaka is the heroine of the romantic comedy light novel series Toradora!. Known as the Palmtop Tiger by her classmates, Taiga is notorious for her small stature and violent, unpredictable nature. She has a tendency to put too much effort into what she's doing, which ultimately causes her to trip up and show her cute side. Despite being violent and aggressive at the start of the series to the point where she has no qualms breaking into a person's house, Taiga eventually softens up as the series delves into her family problems, though this Brawl iteration speaks of her as a violent girl who needs to stay that way to stand up to the big boys.

Taiga's stats essentially make her a smaller Captain Falcon; she has amazing ground speed, good jumps and an incredibly effective accelerating jump that gives her a massive aerial speed boost upon jumping out of her dash, though she can't stay in the air for very long because of her high falling speed. On the other hand, her small girly body (exactly 143.6cm) bogs her down with horrible weight (Pichu's), traction and a shield that's only half as effective as that of a normal character. It's pretty much a given that Taiga will need to take advantage of her strengths in order to hide her weaknesses, much like a Tsundere character will always attempt to do...


Specials


Neutral Special - Tiger's Glare​
Ah, the glare; a signature trait of Taiga's that's more than enough to put almost anyone in their place. Here, Taiga glares an intimidating glare towards anyone facing her, though all it'll do is get her laughed at by the male antagonists as they proceed to squash her out of the ending lag she suffers...

The glare will wholesomely fail to affect foes unless Taiga shows them that she can put up a fight by attacking them without being attacked herself. Should she be successful in doing this her glare will follow up as being intimidating to the point where affected foes lose their composure and thus "1" traction stat for every successful hit Taiga managed to land on them beforehand. For those who either don't remember or are just plain uninformed the Traction stat determines how far a character slides out of their dash and upon being attacked from their shield, with the lower number causing more severe sliding cases as seen in Luigi. Foes will know that they've been intimidated by their character's comical sweating at a varying degree; if they want to regain their composure they'll have to land a number of successful hits on Taiga equal to half the amount of their traction went down by, which very much means they'll be wanting to use little hits like that of a Pummel or Jab to ensure that Taiga is not knocked too far back. Note that Taiga can stack the intimidation effect on foes for as long as she doesn't get attacked by them, and can reduce their traction to levels way beyond that of Luigi's to the point where simply being pushed out of their shield can herald severe consequences...

In Team Matches nearby allies of the intimidated foe will become intimidated themselves (even if they haven't been attacked), to which they'll have to attack Taiga themselves in order to regain their composure. NPCs will run away from Taiga upon being intimidated while Bosses and Fiends alike will try to keep their distance from her as to prevent this move from only being usable against other characters.


Side Special - Tiger's Claw​
Taiga takes out her wooden sword which becomes a battering item comparable to the Beam Sword item, albeit a fair deal weaker and shorter. Providing she wasn't holding an item beforehand, Taiga actually takes out the wooden sword almost instantly and will continue dashing if she used the move from there, where she can proceed to throw it at her foe as a disruptive projectile; it helps that Taiga will actually continue to dash when she does this as with all other items she throws instead of simply stopping in place, which allows her to get the jump on her enemy while they're busy defending against the thrown sword. The only downside to using the sword this way however is that extremely competent foes can dodge or jump over the sword to make it go pass them and off the stage, in which case it won't respawn until 20 seconds have passed; trying to take it out before then or when one's onstage will result in Taiga being shocked and somewhat frightened at its absence. The sword can of course be used as a melee weapon too, where it possess better range as a disjointed weapon than what Taiga has with her punches and kicks.


Up Special - Momentum-Inducing Uppercut​
Taiga bends down whilst bracing her fist before initiating a flying uppercut that propels her in a similar manner to Dolphin Slash but with twice the vertical distance. Struck foes take 11% that'll send them flying off the top of the screen at 145%. While a good killing move and recovery, Taiga does not auto-ledge out of this rushed move and enters helpless after reaching the max height, traits that make her heavily vulnerable to being attacked and/or killed if she doesn't successfully damage a foe.


Down Special - Tsundere Pride​
Taiga enters a tougher-than-tough stance as a battle aura surrounds he, whereupon she quickly gains flinch resistance to a number of attacks equal to how many times she's taken damage, with she as much flinch resistance to an attack as the amount of damage she took from the attack that inflicted the most damage on her; note that if Taiga would be struck by an attack that would surpass the highest amount of flinch resistance she has via an attack she's taken from before but has taken fragments of damage such as multiple 1s that can be added onto her highest flinch resistance so she can have an amount that equals the impending attack Taiga will be able to successfully avoid taking any flinching, though otherwise her small fragments of previously-taken damage won't do her any good. Once Taiga's gained flinch resistance the amount "added" towards it will go away, though she can keep using this attack over and over in order to keep gaining more flinch resistance so she doesn't lose the intimidation streak that contributes to her Neutral Special. Just be aware that Taiga will need to have taken damage beforehand in order to work this move, and that abusing it can quickly lead to self-destruction....


Standards


Standard - Kitty Claws​
Taiga performs your typical punch-punch-kick attack that traps opponents for the first two hits of 2% before the final hit inflicts 6% that kills at 150%, though you actually have to go through every phase of the move rather than be allowed to only perform one what with Taiga's aggressive attitude.


Dash Attack - Flying Kung-Fu Kick of Death​


F-tilt - Tiger Smasher​
Taiga lashes out with some rapid hooks in your chosen direction, with the entire move having jab speed and each punch along inflicting an impressive 5% with decent hitstun and knockback that can KO at 175%. While essentially packing the speed of a jab and power of a strong attack, the attack's weakness lies in Taiga's stubbornness in that not only will she continue the attack until she tires out after 3 seconds if not hit out of it, but she'll also take half the damage she dishes out! In any case, this is a fast launcher that can massively punish and wreck on shielding foes, though the pushback of Taiga's punches will send characters with traction levels of 8 or less out of the attack's range before it can cause any real damage to them; basically, no matter what the opponent does in response to this feral attack, they'll be punished in one way or another, though Taiga is the one who'll be suffering in the end as she has no way of truly following up with her punches and foes can very easily take advantage of the time she's forced to punch for if they're not knocked away by it.


D-tilt - Crouching Tiger​
Taiga sticks a foot out for your typical 4% tripper tilt, albeit a fairly slow one at that.


Smashes


F-Smash - Final Claw​
Ready to go all-out, Taiga holds her wooden sword with both hands before thrusting it ahead of her like Marth would for his Shield Breaker. This results in a powerful blow that inflicts up to 25% with knockback that can kill horizontally at 70%, by far Taiga's strongest attack which she can use to push enemies if they attempt to shield it; even worse for them is the fact that Taiga can turn mid-lag to catch enemies who try to roll behind her, that cunning little taiga...


U-Smash - Tiger Head​
Taiga leans back before swinging her body forward in an attempt to headbutt enemies, she dealing damage not only to enemies in front or directly above her but to herself as well. Victims of the attack take up to 20% that knocks them in the opposite direction and kill them at 100%, which is more than enough to ward off enemies while the palmtop tiger takes 7% from the impact while she holds her head in pain for a bit; Taiga will still take damage from striking shielding enemies but'll push them back anyway for some good payoff if used correctly.

If you hold A after the attack, Taiga will rush forth at her dashing speed with her head tucked like a bull. If she makes contact a stationary foe she'll push them along with her at 3/4s of her speed regardless of whether they're shielding or not though they can easily move aside or attack Taiga to make her stop. Releasing A will have Taiga stop and push her foe back 0.7 SBBs for some spacing to which she can follow through and even have her job of knocking foes off the stage via pushing them out of their shields made much easier. Taiga can push foes off the stage and follow up with a killing aerial though she'll have little time to do this and such it's better to push in small bursts.


D-Smash -​


Aerials


N-air - Pouncing Paw​
Taiga gets a flustered look as she hastily performs 4 consecutive kicks diagonally below her. Each kick inflicts 10%


F-air - Flying Pounce​
Taiga takes advantage of the moment to kick ahead of her with both legs in an extravagant manner. How much damage Taiga inflicts depends on how quickly she was moving through the air, to which it can inflict as little as 6% that flinches or a far more impressive 18% that sends foes flying back and kills them at 95% if Taiga used this attack out of the momentum she obtains from jumping out of her dash (unnatural aerial boosts can make this attack stronger). Taiga keeps her feet out for well over a second to which they remain a danger to enemies albeit naturally losing momentum over time; as Taiga falls quickly there is a good chance she may catch a foe in the attack on the way down or land and suffer a deal of ending lag. Still, this is a great killing move albeit one that needs to be used rather carefully, best at the very moment Taiga jumps and can use her Aerials.


U-air - Head Smash​
Taiga recklessly swings her head above in an insanely fast motion that reaches the speed of MK's U-air. This attack inflicts a good 10% with vertical knockback that finishes enemies off at 190% though Taiga takes the same amount of damage she inflicted upon connecting and is actually spiked downwards for the exact same knockback.


D-air - Cat Dropper​
Taiga performs an aggressive drop-kick with both feet in the same manner to that of Sonic's except she spikes anyone she comes into contact with for 14% that can kill at 100%; if you actually want to kill enemies this way without killing yourself all you have to do is hold A upon connecting with the attack and Taiga will jump off her enemy as if she'd footstooled them. Otherwise, this makes a nice move for forcing onstage enemies to the ground and following up an attack on them as they get up.


Grab-

To make up for her lack of reach, Taiga pounces forth like her namesake for a Platform's distance, though she stumbles forward for bad end lag if she misses; oddly enough, using this out of a dash simply has Taiga reach out with both hands in an attempt to throw herself at a grabbed foe, which she'll do for as long as you hold Z though you'll suffer some ending lag afterwards for not being successful. If Taiga succeeds in pouncing a foe she'll find herself forced to wrestle with them as she tries to overwhelm them with her own strength.

Taiga's pummel has her beat on the foe's face with a right hook that inflicts 2% to them plus another 1% for every continuous use of the move. Foes can fight back against Taiga with their own pummel or one that inflicts 1-3% based on their character if they don't have a normal pummel; if they manage to pummel Taiga 5 times in a row they'll end up grabbing her unless they were holding an item such as Taiga's wooden sword, which will instead cause their pummel to inflict inflict double it's usual damage. Foes can also use the shield input to protect themselves from Taiga's pummel and halve the effectiveness of her throws, though there is a wee bit of lag in doing so but at least it protects them from being intimated by Taiga to some degree.


F-throw - Tiger Ram​
Taiga bucks her head like a bull and rams forth while dragging her foe with her at a speed that naturally depends on the enemy's weight, which is 3/4s of her dash against lightweights and 1/4 against heavyweights. Foes can do everything they'd normally be able to against Taiga while she's pushing them forth so she can only drag her enemies forward for so long. Tapping backwards on the control stick will cause Taiga to stop moving, while tapping forward again will have her bring back a fist and slam it in the foe's face to knock them away horizontally for 10% that can KO at 145%.


B-throw - Predator Retreat​
In a surprising turn of events, Taiga decides she's had enough and jumps back in the same vain as using her roll, which is quick and to the point for the most part, though here she'll suffer a bit of extra lag for every bit of damage she took from enemies. As such, it's better off if Taiga goes through with attacking her enemies, though this throw is simply in place if Taiga needs to escape.


U-throw -​


D-throw - Inner Struggle​
Taiga throws all her body weight onto her foe, which results in the foe being knocked down and Taiga being laid atop of them.


Final Smash

Legend of the Palmtop Tiger​
Upon a certain incident where numerous people received great fortunes after having touched the Palmtop Tiger, rumors about her started circulating. Whether these cases were merely coincidental or not remains uncertain, but here in Smash the Legend of the Palmtop Tiger truly comes alive; while Taiga has the Smash Ball, anyone who touches her will very shortly find a plethora of beneficial items raining down upon them! These are actually good items like Cracker Launchers, Pokeballs, Maximum Tomatoes, Assist Trophies and what not that foes can immediately pick up and use against Taiga...

But wouldn't it be better if Taiga actually USED the Final Smash instead? Well its not all that significant, but upon pressing B Taiga will tense up for a moment and knock away any foe who tries to make physical contact with her for 12% that kills them at 200%, this being a counter in almost every aspect though it can counter grabs. Struck foes also suffer from the effect of Taiga's Neutral Special, which in itself is a bonus. The Final Smash will only end if Taiga used it right away, but for every 5 seconds she had the Smash Aura for she'll get another use of the Final Smash. Daring players may want to try and use the items that spawn around the foe, though the Final Smash shows a great deal of worth in Team Matches where Taiga can let herself be touched by her ally in order to have them both score some free items.


Playstyle

Taiga is a wild, unpredictable beast who intimidates and finishes her prey off before they get a chance to fight back, though she only does this to hide her overwhelming weaknesses as a human being. Calling her a downright stubborn character certainly wouldn't be a far-off guess.

I shouldn't need to tell you that Taiga will obviously want to be the one approaching her enemy, which she can do very quickly and has many options to pull out of this one simple act due to her unpredictable nature. For one, she can throw her wooden sword whilst dashing towards her enemy in order to force their guard up and give Taiga the run on them, though if she uses her sword right away and it gets dodged she won't be able to use it again for a while and loses her one projectile for a good deal of time. Still, she does have her Dash Attack, Grab and Aerials in order to attack enemies out of her dash, all of which perform different things that enemies may or may not come to expect.

In any case, Taiga really doesn't want to let her prey go;


  • Taiga is insanely fast, almost too so for her own good: she has god-awful traction and shielding, and her jump propels her high into the air.
  • On the other hand, Taiga can approach enemies from anywhere in the blink of an eye.
  • Taiga is yet easy to read at the same time in whatever she does.
  • A good example of this manifests when Taiga is dashing towards the foe. She can use her Side Special, Dash Attack, Dash Grab or even throw her sword at them compared to a good deal of characters who otherwise possess few approach options. It's also possible for Taiga to short-hop and D-air for aerial approaches.

Using Taiga properly means never hesitating or letting the opponent know what you're doing; Taiga has some strong attacks but she does not have raw power.

Once she's closed the gap Taiga will want to use her offensive ability to protect herself from enemy attacks for the sake of her Neutral Special Glare.


Landing successful hits can be somewhat difficult for the overly persistent Taiga to do what with the risks involved with her aggressiveness, though it's something she has to do in order to survive.


Unlike most my incomplete sets, I genuinely wanted to complete this set for a great character from a great anime. The idea was to have it exploit traction by "intimidating" foes to decrease their traction, sending them tumbling off hte stage by hitting their shield from sheer pressure. I was also wanted to include other concepts such as self-damaging high-risk high-reward moves, though I think this set failed to reach completion due to juggling too many ideas around, and by the time I wanted to change something that was awkward I didn't feel like it. Not to mention I'm mostly done with shield-attacking types of sets given my movesetting style doesn't go well with assuming foes will always block every attack.
 

Zook

Perpetual Lazy Bum
Joined
Jul 30, 2005
Messages
5,178
Location
Stamping your library books.
four hour marathon moveset, man I am tired and thirsty


THE BEHOLDER


The beholder is a fictional monster in the Dungeons and Dragons role-playing game. It resembles a floating orb of flesh with a large mouth, single central eye, and lots of smaller eyestalks on top with deadly magical powers. The beholder is among the most classic of all Dungeons & Dragons monsters, appearing in every edition of the game since 1975.


STATS

MECHANIC: LEVITATION

Beholders move through levitation, lacking any other means of transportation. Attacks that make him prone or trip bring him to the earth, but otherwise the Beholder is always considered to be midair. By holding up or down on the control stick, you can adjust his height slightly, moving him up to half a Stage Builder Block high. The Beholder uses the moveset of a grounded character while midair, and can shield instead of air dodge; however, he can still dodge by pressing down while shielding. He has no roll or side dodge whatsoever, and is incapable of dashing.

Whenever the Beholder is unable to use a ray-based attack, he dimly flashes the color of that ray until it is fully charged again. This excludes his neutral special; when that is done recharging, the beholder flashes bright white.

The Beholder utilizes Shield Smashes. To use a shield smash, input a smash attack while shielding. Yeah, it's that simple.

SIZE: 8/10

The Beholder is a very large character in both horizontal and vertical terms, and floats a Pokeball's height off of the ground. Some low attacks will miss him.

WEIGHT: 8/10

Being large and bulky, the Beholder is naturally heavy.

SPEED: 2/10

Not one to rush, the Beholder floats slowly about as it wills. He is incapable of performing a dash.

JUMP: 8/10

The Beholder's jumping prowess is quite good; he has two midair jumps in addition to his ground jump, and each is as high as Mario's jump.

FALL SPEED: 1/10

The Beholder falls slowly... very slowly.

MOVESET

NEUTRAL SPECIAL: EYE RAYS

All eleven of the Beholder's eyes writhe about madly as different colored beams of light shoot out from them. This happens instantaneously, and lasts for only a fifth of a second before the beams cease; afterwards, this ability takes 10 seconds to recharge. Each beam travels three Stage Builder Blocks before fading into nothingness. Each ray shot from an eye stalk is randomly aimed roughly evenly throughout the top 180 degrees of the Beholder's body, hitting above, behind, and in front of him in a rough half-dome. However, the rays writhe and twitch randomly, moving up to 45% in either direction once the attack begins; usually, an opponent is struck by 2 different rays at mid range and nearly all but the central eye ray if on top of the Beholder.

The various eyes of a beholder each have a different function, as described and numbered below:

1 - shoots a red beam of Cause Serious Wounds, which deals random damage between 16-27% and flinching upon touching a foe.

2 - shoots an orange beam of Sleep, putting any foe struck by it to a state of deep slumber.

3 - shoots a yellow beam of Petrification, transforming the opponent into an immobile statue. Petrified characters are immune to all attacks and sources of damage, and may try to escape from this state as they would a grab, only their damage is treated as 800% higher for the purpose of the calculation; otherwise, they can be picked up, carried, and thrown as a Bonsly. Pokemon, Assist Trophies, character specific minions, and similar animated non-player characters are also affected by Petrification rays.

4 - shoots a green beam of Slow, making any character hit by it move as slow as possible while walking or moving through the air for 3 seconds.

5 - shoots a blue beam of Charm Monster, which effects only Pokemon, Assist Trophies, similar items, and character-made hazards; if they are struck by it, they are considered to be under the Beholder's control. It does nothing if it strikes a character.

6 - shoots an indigo ray of Charm Person; enemies struck by it immediately perform a random taunt. Airborne enemies instead perform a random attack.

7 - shoots a violet ray of Telekinesis, flinging any opponent, item, or other movable object in a random direction with the force of Sonic's Spring. Characters that have been petrified are flung far less far, only traveling half a Stage Builder Block in a random direction. Items flung in this way are activated under the Beholder's control, and deal damage if they fly into other characters as if they had been thrown.

8 - shoots a black ray of Death, instantly KOing any opponent over 100%; to foes under 100%, it deals a mere 5% and Mr. Saturn-esque knockback.

9 - shoots a white ray of Disintegration, destroying any shield it touches.

10 - shoots a grey ray of Fear. Opponents struck by this ray begin to shake slightly and chatter their teeth in fear. This creates an invisible zone extending two Stage Builder Blocks around the Beholder in every direction, which prevents the opponent from walking, jumping, or using any other conventional mean of transportation to move any closer to the Beholder for 5 seconds. Opponents who attempt to walk or jump into this zone instead fall just short of it, though they are not pushed out of it if the Beholder moves near them. Forced movement, such as knockback, and gravity can bring a character into the zone.

Finally, his main eye shoots a pulsating, clearish-white ray of Anti-Magic, preventing a foe struck by it from utilizing their Special Moves for 3 seconds.

Although his main eye ray always shoots out directly in front of him, it is utterly impossible to predict where the other rays will be aimed or how much they will move.

UP SPECIAL: STIFFEN STALKS


A beholder's eye stalks are positioned on the top of its body, putting them in the perfect position to strike foes above them. The Beholder stiffens all of his eye stalks, making them face the sky. From now on, whenever he uses a specific eye stalk ray, it will be aimed upwards instead of forwards, and can be aimed up to 45 degrees left or right instead of up or down. The Beholder can relax his eyes by inputting this attack again.

DOWN SPECIAL: ANTI-MAGIC RAY/ZONE

This move takes on two forms, depending on how you input it: either a ray, or creating a zone.

By simply tapping the input:
Gritting his teeth, the Beholder fires his Anti-Magic Ray from his center eye. Opponents struck by it are unable to use their special moves for 3 seconds. The effect of multiple rays does not stack.

By holding the special button: Turning towards the ground, the Beholder's eye flashes white as a hazy white half-globe appears around him in a Stage Builder Block radius. This zone ******* a character's ability to remember their most unique abilities, preventing all characters (including the Beholder) from using Special Moves in it. This zone lasts 10 seconds, during which the Beholder cannot create a new zone.

SIDE SPECIAL: DEATH RAY


As he squints his main eye, the rest of his eye stalks cease writhing as the Beholder takies aim to fire a beam from his most dangerous eye stalk as it glows with black energy; it takes him a full second to ready this attack, though he is free to move about while doing so. Once charged, the Beholder lets loose a Death Ray (8th ray on the list) from his central eye. This attack can be aimed upwards or downwards up to 45 degrees. It takes a beholder a while to generate enough energy for a Death Ray, preventing the Beholder from using it again for 15 seconds.


GRAB GAME: TELEKINESIS RAY


As beholders lack arms, all of them have perfect control over their telekinesis eye stalk. The Beholder lazily points an eye stalk forward and shoots a Telekinesis Ray forwards, which can be aimed up or down up to 45 degrees. Any opponent, item, character-created hazard, or other movable object gains a faint violet aura around it for 10 seconds. Other than that, nothing happens immediately; the Beholder can even move around and fire off more Telekinesis Rays if he chooses. Once the Beholder smashes the control stick in any direction, though, every grabbed character/object is flung in that direction with the force of Sonic's Spring.

By holding the grab button once he has hit an character with this Telekinesis Ray, the Beholder can maintain his control over them for a short while, levitating the foe around freely at Jigglypuff's horizontal air speed. Characters can fight this forced movement as if breaking free from a grab, though the difficulty is as if their damage was 50% lower than what it is. If this is done to an item, the item flies towards the Beholder and enters a held state, effectively becoming a means to picking up far-away items.

JAB: BITE


Though beholders disdain using their mouths as weapons, their jaws are well suited for combat. The Beholder opens his jaws wide and quickly snaps them shut, dealing 10% and moderate knockback. If held down instead of tapped, the Beholder continues to open his jaws wider and wider until he begins to shake with discomfort; it takes a half second to reach this state. Letting go of the jab button snaps his jaws together with bone-crushing force, inflicting 17% and knockback that KOs at 100%.

FORWARD TILT: CAUSE LIGHT WOUNDS RAY


A beholder's Cause Serious Wounds eye stalk can launch a less dangerous ray. The Beholder points an eye stalk in front of him and lets fires off a dull red ray, which can be aimed up to 45 degrees up or down. Any foe hit by this ray takes between 7-14% and flinching knockback.

DOWN TILT: CHARM MONSTER RAY

Beholders do not get along well with others; their hateful, aggressive, avaricious nature allows them to only trust creatures they brainwash into serving them. Directing an eye stalk forward (which can be aimed up or down, 45 degrees), the Beholder shoots a blue Charm Monster ray. It behaves exactly as described in the Eye Rays attack (ray number 5).

UP TILT: SLOW RAY

The Beholder shoots off a ray of Slow (4), which can be aimed up or down up to 45 degrees.

FORWARD SMASH: CAUSE SERIOUS WOUNDS RAY


After a half-second charge up, the Beholder whips an eye stalk forwards and lets loose a ray of Cause Serious Wounds (1), dealing between 16-27% and flinching knockback. This ray can be aimed up to 45 degrees up or down. Afterwards, the Beholder must wait for the eye stalk to cool down before it is functional again, preventing him from using this attack again for 5 seconds; trying to use it results in a forward tilt being performed. The longer this smash is charged, the more likely the Beholder is to do higher damage; fully charged, it will always do 26%.

UP SMASH: DISINTEGRATION RAY

The Beholder holds out an eye stalk and lets loose a ray of Disintegration (9). You know how much you can aim it. After the attack, the Beholder must wait 5 seconds before using the attack again; using it prematurely shoots no beam but instead backfires and inflicts heavy damage to the Beholder's shield, bringing it within an attack of shattering.

DOWN SMASH: SLEEP RAY

Aiming an eye forward, the Beholder lets loose his ray of Sleep (2). This ray can be aimed up or down up to 45 degrees. Being a powerful ray, it takes 5 seconds before the Beholder can use this attack again safely; using it during that cool down period stuns the Beholder for a second.

FORWARD SHIELDED SMASH: PETRIFICATION RAY

With a grin, the Beholder fires his ray of Petrification (3) forwards, which can be aimed 45 degrees up or down if you like. Afterwards, he must wait 5 seconds before using this attack again; otherwise, he himself becomes petrified.

UP SHIELDED SMASH: CHARM PERSON RAY


In typical fashion, the Beholder aims an eye forwards and blasts a Charm Person Ray (6), followed by a 5 second cool down during which the attack cannot be safely used. Using it prematurely results in the Beholder unleashing unfocused magic onto himself and forcing himself to taunt.

DOWN SHIELDED SMASH: FEAR RAY

Discharges a ray of Fear (10). Cool down period of 5 seconds. Using it before then causes the Beholder to fear a random character for 5 seconds.

FINAL SMASH: EYE RAY FRENZY

The Beholder's eye rays flail about madly, shooting off rays constantly in random directions over the course of five seconds.

PLAYSTYLE

The Beholder has a plethora of vastly different ray attacks in his arsenal; how useful each ray is varies from opponent to opponent. Generally, the Beholder wants to keep a nice bit of distance between himself and his foes, zapping them with Cause Light/Serious Wounds Rays until they are in Death Ray range. Characters that specialize in close combat and move fast to close the gap between themselves and the opponent are easily dealt with with Fear Rays, shutting down characters without ranged options for a while. Projectile-based characters often don't enjoy having their special moves taken away from them, which the Beholder can take away from them with his central eye ray or Anti-Magic Field, forcing them back into the zone with his grab game. Speaking of which, his grab game is excellent at pushing back foes. Minion users and characters who create hazards can have their forces turned on them through the use of Charm Monster Rays, making it dangerous to build up while the Beholder is around. Even then, he can always fling hazards off the stage through his Telekinesis Rays.

The Beholder does have several weak points, though. His underside is basically completely defenseless, making him easy to juggle. His floatiness makes this very apparent. He has very few options in close ranged combat, and is forced into using a single attack or try to get lucky with a ray. Jumping is not a very safe to get out of dangerous ground situations, as it exposes another of the Beholder's weaknesses. Generally, your best bet to deal with situations like those is to try to position yourself far offstage, attempting to strike your opponent with rays as you float down to a more comfortable level and 'glide' towards the stage. In extreme situations, you can even purposely use an uncharged Disintegration Ray to turn yourself invincible for a short while.
 

Katapultar

Smash Lord
Joined
Nov 24, 2008
Messages
1,284
Location
Australia
[collapse="Dark Falz"]There's a lot to expect here, given all the crazy magic potential and 3v1 set-up. Being familiar with the series though, there's a lot of awkward stuff in how you go about with the somewhat inaccurate aesthetics of which I'd be able to make up this entire comment of (like the foe's soul being blood-red, you using a Hazama-Oroborous-esque chain to rip their soul out in the first place, the fact that you don't mention that a small doll of them is present in Falz's "mouth" when he has it) and you not really giving anything on Falz's backstory of being an ancient evil God of Destruction who revives every 1,000 years and wants to destroy the universe.

This comment is going to get really hypocritical due to me having made Hellmaster Fibrizo earlier on in this contest, and I'm sorry, but...I do not really like Dark Falz that much. I know I had a lot of mind-screwing going on with Fibrizo but I honestly think the voodoo doll grab should have been left the same way as in the game where the foes are able to see who's soul is trapped - this takes away a bit of the feel of the straightforward RPGish nature of the boss fight, and really you could have made Dark Falz able to steal the soul of anyone he wants without using that weird green rope he doesn't use in the game and by choosing a foe's soul to steal and letting them know it could lead into some interesting strategies (and as a minor complaint there's virtually no elaboration on the actual tether and how hard it would be to actually hit with). The rest of the moves are obviously pretty straightforward via the boss fight, mostly being fairly basic projectile manipulation with a win-card that you're obviously supposed to charge from either stalling under or on top of the stage (possibly while having taken a foe's soul)...yeah, you can kinda do stuff like just spam your Up Special and what not with the comfort of foes not being able to hit you, though if you go under the stage it would be pretty obvious that foes would be able to footstool jump on you (lol it's never mentioned if DF gets footstooled so he would die, but then again there are many necessary boss changes that go unmentioned), though Dark Falz does kind of have no way to protect himself from above so he'd have no choice but to go to the top of the stage to prevent himself from being screwed over.

I think in the end this Boss Set was just too "generic" for my liking (or at least there wasn't many creative or exciting moves for me aside from the multiple souls F-throw), with the voodoo doll thing obviously being the thing to excite people but you only use it as a way to generically stall and discourage people from attacking you while you do set-ups - I guess to me the set also wasn't really too convincing with where it was going. To be fair though you did obviously do this set partially because I like the series Falz is from and with him only having voodoo doll as his main exciting thing (nothing else when his physique is so ridiculously awkward and his other attacks are just generic powerful moves) it would be hard to really get things down with Falz - I guess it also doesn't help that I not only made Hellmaster Fibrizo (and self-loathe it's execution) but also that I expected quite a bit from knowing the game so I wouldn't be able to appreciate the set in certain ways that others would who haven't seen or played the game. Not to mention the creation of a Boss Set can be a bit of a fragile thing and it has a lot of unexplored territory to it (this set tried to do the voodoo doll and mix in Falz's other attacks to be fair, with the former being the only real way to fit in said mechanic outside of an elaborate way...hmmm...). [/collapse]


[collapse="Bouldergeist"]This is most certainly not a bad take on a boss, though not as good as the Weird Rider as I told you in the chat - this is mostly due to the trivial matter of Organization but more importantly that the concepts aren't strikingly great or taken advantage of....I guess maybe I just don't like boss characters that much, but none the less it's understandable that in a similar vain to Master Hand this was trying to emulate the feel of a boss with those numerous summons/traps and while 150HP may seem underpowered (especially with the bomb boos) it makes sense given he's not the final boss and that his summons can be used against him.

What I found to be the most interesting part of the set were possibly the boulders, especially in how they're facing the same direction as you - maybe not taken advantage of as much as I'd like but really they do work with the Side Special and give something for your Bomb Boos to explode on if you're smart. Some of the potential set-ups like the stalagmites and destroying sections of the stage in-between them to give foes nowhere to run are interesting when you can shunt foes away with your fists at the same time, and while you have many traps of sorts with the Specials you have to be careful at the same time because while you can roar and send bullet hell at the enemy to potentially wreck their shields it'll destroy your stalagmites - not to mention the fact that Bomb Boos are so untrustworthy that they can damage your own body. Bouldergeist somewhat seems like he'd be easy to defeat, but he's also pretty powerful at the same time. Yes, there are decent interactions but they're not particularly in my tastes and they would seem rather lengthy to set-up, but the many strategies are somewhat limited yet vast.

This set is pretty decent if could be better and have a bit more depth for what it does with some of the inputs and interactions, and while not as good as Weird Rider as I said, to be fair I like the Weird Rider quite a lot (particularly his very interesting projectile concept and even trivial matters like Organization so on) so there's no need to think I -dislike- this set. Literal boss sets do have a bit of a climb yet.[/collapse]


[collapse="The Beholder"]This is a somewhat unique set, and you're probably gonna be quite notorious for filling the gaps of D&D by the end. Most interesting how all your moves serve as a bit of "ammo" of sorts, but being able to fire them off all at once seems quite fun. It's all weird and straightforward, the moves being somewhat flowcharty in their uses and some of them being quite overpowered in tandem with others, though Beholder pretty much just can't do anything to recover and only overwhelm enemies with random effects - it seems to be that the Neutral Special's usage is independent from the other beams of the attacks, and the fact that it happens instantly but the beams are all scattered makes Beholder seem rather luck-based in that they might end up doing nothing or just utterly destroying enemies via putting them to sleep or stone them of which you can stall for your beams. The ideas behind the set are fairly likable though and are clearly meant to represent the generic enemy character, something that could nonetheless actually be pretty great with some nice tweaking via a later work. [/collapse]
 

FrozenRoy

Smash Lord
Joined
Apr 26, 2007
Messages
1,268
Location
Las Vegas, Nevada
Switch FC
SW-1325-2408-7513
To Ratigan The World's Greatest Rat!

Okay, let me start by saying this, I actually quite like this set. It currently ranks as a fairly high Regular Vote for me and I really like the idea of stuff like the record player letting you set off complex trap chains or the way Ratigan can create a veritable minefield of potential trouble for a foe.

But what brings the set down, in my opinion, is that Inner Rat mechanic. Not because it's there, but because of the fact it does not seem to affect his trap setting at all! I understand that Ratigan requires being able to replace his trapd for his game to function, but it seems like something could be done about that: Considering his minions in the movie clearly fear him when he gets upset, perhaps something with the minions nervousness making it not as precise as Ratigan might want or something? It would certainly fit in with the theme of loss of control with the Inner Rat. As it is, it seems like one big characterization issue, as the whole point to Ratigan going rat-like is him losing his control and the attributes of planning thatt the traps represent, that sort of thing. So it really does feel odd for him to be able to set traps without much of a change there and feels like it drags the set down. I also question why the aerials are untouched by the Inner Rat, considering it would be more of a chance to show it off and stuff like the UAir seems a bit odd when the Inner Rat is on: Ratigan doing a fancy cape thing in that state? It seems like changing the aerial stuff to more vicious stuff would be appropriate. You could keep the NAir if needed given it feels fitting for the Inner Rat anyway.

All the same, this set does have good points, like the trap variety and the record player, things like masking both sight and sound and the fact that outside of the Inner Rat(And the moves that ARE Inner Ratted) are quite in character. It is just missing a little from being great is all.

The Not Ghost Rider

Weird Rider here is a pretty neat set. The game he plays revolves around his Down Special forcefield shield, which works by basically being a giant bounce-y wall, reflecting projectiles, players and anything else that happens to hit it. And it ends up being like a wall, so you can trap people inside for a bit and what not, and then the Weird Rider can create a one-way entrance to hit people inside with no risk of them or his projectiles leaving.

And then he's perfectly willing to bounce other people and himself right off the shield, even having a move dedicated to bouncing himself, and use it for combos or just to mess with the trajectory of foe's for his projectiles. It's all some very neat stuff, though some of the moves will not particularly interest veteran MYMers, he does many simple, effective things that do fun things with the forcefield. And hey, he even has cool use in doubles and boss mode!

While I doubt many people will consider it a top contender, it might be a bit too vanilla for that, I think it's a pretty nice set. Actually considering upgrading where I vote it on the reread for this comment...

Wayne's Hot Slap Shot!

All-stars! PRO STARS!

*Cough*

Hockey Man is a cool set and one I liked a fair bit since it's posting. He's not really a momentum character, despite what some people said in Xat, more using things like his Coasting ability and his mobility over ice to cover for the standard heavyweight lag issues. And his characterization is extremely good for a robot master, as his game really does feel like hockey, between the pretty unique Puck Control move, the variety of hockey-based moves that work similiar to how they would in the game and despite being a normal heavyweight in many ways, he even manages to have a pretty good aerial game!

Hockey Man uses his Ice Shield attack to approach, as it reflects projectiles and clashes with other attacks, in addition to passively freezing the ground under Hockey Man to let Hockey Man's increased speed on ice pop up. When you combine this with his neat Slapshot puck projectile, which bounces off every which way and can bounce off the walls Hockey Man can make on the ledges and be refreshed with Puck Control and Slapshot itself, Hockey Man can make the foe's movement hard as well...add in his Coasting special, which combined with Ice Shield essentially makes Hockey Man a skating wall of pain, and you've got all you need for great approaching and decent defense.

Stick Check is also a fantastic NAir. You should check it out. It also might be noted Hockey Man has a pretty good grab game, as Ice Shield tacking on passive damage along with a tremendously damaging 5% pummel, even if slow, combined with a 17% throw means that Hockey Man has a fairly good defensive game even when Ice Shield is unusable and unlike a lot of heavyweights, is actually pretty good at damage racking, especially when combined with Slapshot projectiles and things like his D-Tilt on ice.

overall, I found this set pretty darn enjoyable, with a lot of depth inside of attacks that might seem simple at first, a solid playstyle and flow and cool mechanics to go with it. Even on a reread to make this comment, the set honestly leaves me pretty excited. I hope to see more from you, UserShadow!

The Silent Hero

We are just on a roll of heavyweight comments, aren't we? I've been meaning to comment most of the Org XIII sets for a while now, so I decided to start with Lexaeus simply due to his name.

Lexaeus has a pretty neat set, based around his giant rock spires summoned with his Side Special Monolith, powering up like a DBZ character(And just like in his KH2: Remix battle!) with Reticence and sending out shockwaves with Hypocenter. Lexaeus has the interesting ability to force approaches by threatening to just power up and become a whirling destructive force, which is done quite well, especially when combined with the rock spires ability to either just block foes or be used as projectiles...and yet he cannot camp due to the way he needs to get them out, leaving him a sort of genius bruiser type who can force approaches into his strong moves. It's very fitting for Lexaeus, who is both pretty smart and extremely strong.

He is perhaps a bit overpowered when one factors in he also has decent movement options...but the fact he has to use those because of his pathetic ground speed perhaps balances it out. His powerups are insanely strong, but this should only be fitting given the pants-crapping amount of start-up lag on it, which forces it to be used only smartly. Once you do, though, the foe better kill you quick, or they have no chance, just like you would expect. D-Tilt would be insanely hard to hit with it's hitbox, but we're talking 5 hits of 15% there! The characterization on this set is really quite good and it isn't just strong, it feels strong, as if strumming with a barely contained power, and yet just mindlessly flailing will easily leave you defeated. The set is perhaps not the most interesting, with some filler and a playstyle a lot of people who have been around a while have probably seen, but I think it is quite the nice set.

However, ultimately, I feel the ideas presented in this set hold up through filler and present something evocative in playstyle, correct in character and in the end quite enjoyable of a read. Good show, Prof!

Bondage Bandage Babe

That is one mighty weird mechanic you've got there, Kirika. And this light novel/anime sounds interesting...and not just because of the cursed sex dominatrix outfit.

Aaah, tentacle priority, haven't seen you in a long time! How you been? I am pretty sure that Up Special is still able to infinite stall, by the way.

That down throw is one of the cooler things I've seen in a while, though in the context of the set, perhaps a bit strong, hm...I suppose that considering the power of the curse, something like this is quite needed, and it is really a pretty inventive use of her disability. The way Kirika likes to mess with her damage actually reminds me of another take on Yutaka's ability to move damage to poison damage, albeit different, and Kirika has to constantly deal with the curse above her head...but of course, this is combined with good healing and an odd sort of playstyle based around suicide KOing, usually in a way that does not KO you.

Mmm, obligatory clothes tearing anime fanservice...

Kirika is a very...odd set, with the emphasis on suicide KOs and everything, not something I dislike but not feeling as strong as your other stuff this contest...she does do some pretty interesting stuff with the foe-tethering and manipulation of her own faults, though. It's a somewhat hard set to comment, really. Still, it is an interesting little bugger to at least attempt to dissect, and like a fair amount of the sets it seems I have been commenting this block, it seems pretty good characterized. I will admit though, the writing style did feel a little thick at times. It's a nice little set to add to the rest of your great contest though, Kat.
 

smashbot226

Smash Master
Joined
Sep 1, 2007
Messages
3,027
Location
Waiting for you to slip up.


STAR-LORD, AKA PETER QUILL

Peter Quill, better known as his superhero alias Star-Lord, is the leader of the Guardians of the Galaxy, a collective group of heroes dedicated to actively protecting the galaxy. Before that, however, he was an aspiring astronomer fascinated with the stars. However, his selfishness and general lack of social graces ended up transporting him to a city in the vacuum of space, where he met the Master of the Sun and given the Star-Lord moniker as well as a shape-shifting entity named Ship. When a fight with a herald of Galactus that cost him Ship, his powers, and nearly his life, he is given a second chance by Nova after the latter frees Peter from a planetary prison. After freeing the Kree homeworld of invaders, Peter establishes the Guardians of the Galaxy to ensure galactic threats are stopped before becoming significant.

After that admittedly lengthy backstory, it'd be best to go into what Peter can actually do. After his fight with the herald, Peter lost all of his equipment given by the Master of the Sun. As such, he was given an ocular implant that lets him see every spectrum of energy and a brain chip that grants perfect memory. Even after the battle, Peter retained his mastery in close combat, human/alien weaponry, and tactics. His signature helmet provides analyses and strategies, only supplementing his already impressive leadership capabilities. Lastly, his two weapons of choice are a pair of Kree sub-machine guns he likes to use in tandem with various ammunition modifications. As you can see, we've obviously got someone suited up and ready to take the brawl to whoever threatens the galaxy. Or, you know, whoever looks at him funny. Regardless, he's here to prove that he doesn't need the rest of his team to be a threat.

=-=-=-=-=-=-=-=-=-=-=
Stats of the Galaxy
=-=-=-=-=-=-=-=-=-=-=​

Ground Speed: 8 (Peter- sorry, I'll reference him as Star-Lord from now on- is in very good shape. The only things really holding him back are the helmet and the insulating armor he wears.)

Aerial Speed: 3 (He's gotten used to flight in the past, but now it's a bit harder after that fight with the herald. This obviously means Star-Lord won't be as graceful in the air.)

Aerial Control: 5 (While he's lost his power of flight, Star-Lord is nonetheless capable of maintaining himself in mid-air.)

Power: 7 (As I previously mentioned, Star-Lord is in very good shape. His combat techniques pack a punch almost as much as his alien weaponry.)

Attack Speed: 4 (Unfortunately, his equipment does slow down most of his strikes. Fortunately, very fast moving projectiles aren't weighed down by what he wears.)

Jump Skills: 6 (When his physical perfection clashes with the weight of his equipment, the perfection prevails. Slightly.)

Weight: 6.5 (I know, I know, I'm hyping up how hard it is to move around in that suit but he's only a six and a half in weight? To be fair, he's not carrying much on him and most brawlers who wouldn't be able to go toe-to-toe with anyone are now suddenly bashing people.)

Height: 7.5 (Star-Lord is human. Well, relatively human. Captain Falcon is pretty human, so they're at about the same height.)


=-=-=-=-=-=-=-=-=-=-=
Specials of the Galaxy
=-=-=-=-=-=-=-=-=-=-=​

SSpec (Kree Machine Guns)​

Star-Lord whips out his two weapons of choice, a pair of Kree machine guns, and begins firing in front of him. The bullet spread is rather harsh, pretty much ensuring that this should only ever be used at very close ranges for the maximum effect. Luckily, you've got 2% damage per bullet as well as minor stun/knockback and when you factor in how quickly these bullets come out- which we'll make about seven bullets per second for balance's sake- you can be a real menace up close when you want to be. Naturally, you're still able to move using the shoulder/dodge buttons and aim with the movement stick while firing your weapons and due to the oddity of the alien manufacturing, reloading never seems to be an issue. Hooray, no ammo bank mechanic for machine guns! The only issue, other than Star-Lord only ever covering a narrow cone in front of him while firing, is the recoil on the weapons. You see, even with Star-Lord's expertise with weaponry of all sorts, he can't really stop the guns' recoil. Which will require the player to keep lightly tilting at the movement stick to prevent Star-Lord's aim from veering off course.

"But Smashbot", you complain, "I don't wanna see this entire move just be a projectile attack that the player HAS to babysit for!" Good thing, dear reader, that Star-Lord can outfit his output with various modifications. You remember when I said that, right? 'Course you do. At any rate, we'll get to the specific mods when we arrive at that particular input. To make things a bit more interesting, Star-Lord is able to go right into this move while performing a tech or wake-up roll, taking an extra quarter of a second to begin firing. Like if the player is using this while standing, you can aim with the movement stick and dodge/crawl around with the shoulder buttons. If you practice this enough, Star-Lord turns into a real menace that can abuse the heck out of those invincibility frames! Fortunately for his victims, simply trying to stall won't work due to the extra time it takes for Star-Lord to open fire as opposed to simply getting up off the ground.

USpec (Major Victory)​

Despite all the tech on his person, Star-Lord has nothing that lets him fly. Bet he misses that suit at this point, huh? Well fret not, he's got the Guardians of the Galaxy helping him out! An off-screen comrade of his, Major Victory, makes use of his psychokinesis to launch his leader in any direction he pleases. There's no way to stop this from happening but even the dumbest of opponents can tell when it happens; Star-Lord is hoisted in mid-air and then launched in the direction of his choosing. While Major Victory cannot be attacked Star-Lord is fully vulnerable, and if he does happen to get hit the entire move is canceled.

Fortunately, there are ways to get around a gimping foe: Star-Lord can curve the path of his travel akin to Lucario and Extreme Speed. Speaking of Extreme Speed, here are a couple more comparisons for Star-Lord's recovery move: they don't deal damage yet travel at incredibly similar speeds (Extreme Speed is faster) and can cover nearly the exact same distance (The psychokinesis is further, but not by much.) As if that wasn't enough, Star-Lord isn't put into helpless after this move, allowing crafty players to use Major Victory not only for recovery, but for offensive approaches/retreats in tandem with his aerial normals/specials.

NSpec (Total Recall)​

Remember that brain chip that gives Star-Lord darn good memory? Yeah, that's gonna come into play now. When you make this input, Star-Lord doesn't make any sort of visual indicator that you made the input. However, the very next move you're hit by within five seconds of making the input activates a passive two second process that, by the end of it, grants a very nice boon to Star-Lord for the rest of the match. Whatever attack he fully analyzes, said attack is in a constant staled state, carrying over between stocks. In a war of attrition, this assists Star-Lord immensely due to taking less damage from virtually anything. If an attack doesn't deal over 5% damage, he'll super armor right through it. However, there's a catch: in the two seconds required for analysis, Star-Lord cannot take any sort of damage or it interrupts the process, requiring a restart from another NSpec. Foes will know when Star-Lord has "downloaded" an attack, but only after the downloading process is finished: whenever Star-Lord is struck by a staled move, he'll mention, "Saw that one coming!" It's a nice little audio indicator for your foe to switch up their tactics.

So, we've got ourselves a special that allows Star-Lord to render nearly an entire moveset crippled beyond repair depending on his playstyle. Combine that with the ability to get in and out of combat quickly with USpec and Star-Lord can easily come in guns blazing, "accidentally" take a hit, and then retreat so he can fully analyze whatever hit him. On the other hand, you can pretend to activate it, be relentlessly offensive, take a hit, fall back with your guns blazing, and wait for them to come to you since you've put it in their heads that you're downloading something when you're simply waiting for them to make that job easier for you.

DSpec (Lock & Load)​

Star-Lord removes the cylinders attached to his guns and replaces them with new ones. Ah yes, the ammo-changing mechanic I foreshadowed early on. The animation for the move is as brief as the move description thus far, meaning Star-Lord is safe at pretty much any distance sans point blank. Now, how does one choose from the six ammo types, which include the vanilla bullets? Simple: any combination of up/down/side and the normal/special attack button will result in a new ammo type being loaded. Merely tapping one input will result in Star-Lord going back to his normal ammo.

Up+Special results in loading two orange cylinders, a.k.a. explosive ammo. Don't worry, he won't be shooting grenades out of those guns: his bullets will instead create miniature explosions at their point of impact, which can include Star-Lord if he isn't careful. Thanks to the extra firepower, each bullet now deals 6% damage as well as extra knockback. Unfortunately, due to the extra power in each bullet, the machine-guns are limited by a cooldown: fire for more than four seconds at a time and you'll require a staggering six seconds before you can shoot again.

Down+Special has Star-Lord swap to red cylinders. Yes, yes, incendiary ammo, you get it. Anyone hit by these bullets suffer from a red fiery aesthetic effect seen in other moves like Mario's Fireball special... that's obviously not it. Any solid surfaces the fire bullets happen to make contact with stick to the spot and create red mounds the size of a Pokeball, leaking lava from its opening. Foes that step onto either the mound or lava suffer continuous hitstun and 2% damage every half a second until the mound disappears, which takes four seconds. Due to the extreme temperatures of the bullets, Star-Lord's firing rate is cut in half.

Side+Special results in Star-Lord going back to his starting bullets. Fast rate of fire, low damage/stun, but great for pushing foes back when they're in ol Pete's face.

Up+Normal has Star-Lord equip high velocity slug rounds, shown through the rather spherical attachments underneath each machine gun. This is arguably the most drastic change in ammunition, as instead of rapid-firing pelts, Star-Lord gets one nasty shot per gun that will not spread and will deal 10% damage with enough knockback to kill Bowser at 100%. However, the rate of fire suffers heavily from this, allowing Star-Lord to fire a measly one round per second. But like I said, the slugs don't have any spread, so it's a matter of angling it right.

Down+Normal transitions into cryogenic ammo, with the accompanying visual of a sky blue cylinder under each weapon. Every bullet that strikes a foe has the victim's movement speed decreased/attack lags increased at the cost of heavily reduced damage, only dealing a single percent per bullet. On the bright side, your rate of fire increases a bit to supplement the slowing effect.

Lastly is Side+Normal, which has Star-Lord attach two rather volatile-looking containers underneath each his weapons. If you stand still, they even start shaking a bit! While the rate of fire is on par with incendiary ammo and the damage equal to the regular ammo, these bullets actually have an inverse effect- they pull struck opponents TOWARD Star-Lord! Quite helpful if you intend on goading them into activating your analysis.


=-=-=-=-=-=-=-=-=-=-=
Tilts of the Galaxy
=-=-=-=-=-=-=-=-=-=-=​

Jab (Spartoi Combo)​

In this sluggish yet far-reaching (Two Bowser-lengths to be exact) jab combo, Star-Lord first performs a lunging gut kick that results in him stepping forward before following it up with a swipe from one of his Kree machine guns and ending it with a shoulder tackle. Each strikes results in 11% damage being dealt to whoever ends up being unfortunate enough to get caught in this. The best part is that during the shoulder tackle portion, players can tilt left or right to perform an automatic evasive roll once Star-Lord hits the ground. These rolls are similar to dodges in animation but lack the invincibility; luckily, ol' Pete can perform an SSpec out of these rolls, so he should be able to cover himself well depending on what he has loaded.

Dash (Evasive Maneuvers)​

While in a sprint, Star-Lord slides parallel to the ground for two and a half Bowser distances before rolling forward and standing upright. The slide itself causes 7% damage and guaranteed tripping below 30%, with minor knockback replacing tripping above 30%. Being the problem solver that he is, the player can do a couple of other things with Star-Lord during and after his slide. If you hold down the attack button while he's sliding, Star-Lord will place an explosive mine halfway through his slide, with the bomb dealing 13% damage plus good knockback to whoever walks near it. The device itself isn't too difficult to see, but Star-Lord doesn't have an extra animation of sound effect accompanied by actually putting down the bomb. Lastly, Star-Lord can continue his run if the player keeps holding forward when the slide ends. As you might've suspected, he can also begin running the other way if you hold whatever direction opposite he was running in during his slide. Combining these two with each other can make for a very hard to hit or predict character with mobility and firepower on his side.


FTilt (Covering Fire)​

This one is a bit odd considering the input. Star-Lord performs a John Woo style backward leap while firing his weapons before performing a backward roll upon landing. The machine gun spray will deal damage appropriate to whatever ammo you currently have loaded, though the backward leap will just so happen to inflict fixed knockback upon anyone in your way. Players can also have Star-Lord end up crouched upon the move's ending and considering he can crawl while keeping his hitbox small, this might not be such a bad idea. Only real problem is that nearby foes who happen upon Star-Lord mid leap have a very tasty punishing attack in store for the reckless fella.

UTilt (Heavy Metal)​

Star-Lord takes a slight step forward as he swings his helmeted head down in an arc, covering a fair distance for an anti-air throughout the entire animation. Additionally, this UTilt has super armor on a specific part of Star-Lord's hurtbox; needless to say, it's the helmet. This may sound very situational, but the move moves through the animations quickly enough for his head to act as a shield. Speaking of which, the chrome dome will cause a whopping 12% as well as great vertical knockback, more or less providing the centerpiece for most of Star-Lord's vertical KOs. Regardless, there's a major problem with UTilt; in case you haven't figured it out, he leaves himself highly vulnerable to surrounding foes that have spotted Star-Lord in the middle of the animation. It would be very prudent to ensure you're safe and sound in using this move first before... actually using it.

DTilt (Combat Roll)​

Star-Lord remains parallel to the ground during his crouch, which will remind many of you of Snake's own crouch. Continuing with the similarities, Star-Lord is capable of crawling, although its speed is very low compared to Snake's. It makes for a dangerous decision to simply crawl about like that; hence, the DTilt, which involves Star-Lord performing a forward roll similar to Snake's in terms of movement, but not in damage (5%), distance (only goes about a full Bowser-length forward), and hitbox. However, this move comes out and ends pretty damn quickly. You can probably guess where this is going, but in case you are just that thick, Star-Lord can use Combat Roll to get around the battlefield more easily, though oftentimes as an approach tool. And of course, players can tap SSpec to fire off some rounds once Star-Lord is out of his crawl. That seems to be a common theme with Peter's moves, isn't it?


=-=-=-=-=-=-=-=-=-=-=
Smashes of the Galaxy
=-=-=-=-=-=-=-=-=-=-=​

FSmash (Charged Shot)​

Star-Lord aims his weapons in front of him as he manipulates the alien physiology of the two sub-machine guns to charge up his next shot. Instead of rapid-firing projectiles, he combines the pent-up energy of the two to create a single energy blast the size of Bowser that rushes forward for a Battlefield platform's distance. While the c-sticked damage is only 14%, Star-Lord is able to cancel out of the charging animation by double tapping either left or right while charging, being able to fire this instead of your currently loaded ammo, with Star-Lord's weapons flashing green to remind the player that he still has a powered-up projectile loaded. The best part about this store-able projectile is that you're able to use it out of his many movement-based attacks that allow him use of his weapons, so you can keep yourself a nasty threat. The only real downsides is that you lose access to your modified ammunition so long as the guns are charged and if an opponent strikes you while you're charging, you lose the mega bullet.

USmash (Grenade Toss)​

Star-Lord reaches behind him and pulls a grenade out of hammerspace before tossing it into the air in front of him. The action is similar to Snake's underhand throw, a.k.a. when you hold the movement stick backward, but the horizontal distance is far greater, with Star-Lord being able to toss this explosive for a maximum distance of five Bowser-lengths. Unfortunately, this fixed distance means that unlike Snake's grenade special, Star-Lord isn't able to change up the distance he can throw his grenade, somewhat limiting the use of this move. On a neutral note, the time it takes for the explosive to detonate is a lengthy five seconds that starts as soon as it hits the ground. However, Star-Lord is able to stall the timer by holding onto the bomb, preventing him from using anything but his specials but allows him to retain a deadly explosive device. A direct hit on a victim results in an automatic detonation, although foes can pick up grenades and toss them back at poor Pete. Luckily for Star-Lord, the grenade is one of the deadliest weapons in his arsenal, being able to cause 16% damage uncharged as well as enough knockback to kill Bowser at 90%. And of course, he's able to toss this out of dodges, dives, or slides by using the normal attack button, in which case the mine from the dash attack is replaced by a quick toss from Star-Lord.

DSmash (Clean Sweep)​

Realizing that guns won't always help in a close quarters situation, Star-Lord chooses to sweep one of his feet outward in a full circle two times over. This is the guardian's go-to GTFO move for when he's being pressured by multiple foes or threats. It's threatening enough with dealing 12% damage and enough killing power to KO Bowser at 135%, but the range on it isn't quite enough to recommend as anything but a defensive maneuver. Luckily, players are able to let loose a barrage of bullets, an amplified shot, or a grenade while he spins, making this move far more deadly when used to bait opponents in. You'll either draw them in only for you to gun them down, use it when you have an analysis primed, or simply fake them out and follow up with an attack of your choice.


=-=-=-=-=-=-=-=-=-=-=
Aerials of the Galaxy
=-=-=-=-=-=-=-=-=-=-=​

NAir (Spin Kicks)​

In this generically named aerial attack, Star-Lord performs a roundhouse kick in front of him before swinging the same leg around to strike at anyone behind him. This is Star-Lord's quickest aerial and the best way for him to fight air-to-air against other opponents. Don't count on this too much, though, as the applications are admittedly limited to anti-air tactics since the hitbox doesn't quite reach a full Battlefield platform and the damage low at 6% per kick. Regardless, it's a good way to keep opponents off of you if they're being annoying by staying in the air.

FAir (Atomic Elbow Drop)​

Star-Lord pulls a People's Elbow by raising one of his arms into the air before slamming it down in front of him elbow first, using the momentum to swing himself back into his aerial fighting stance. The space cadet covers a good vertical zone in front of him while retaining very high priority, making this the go-to choice for aerial approaches if you somehow find that a good idea. Oh, it's also a decent damage-dealer that Star-Lord has in the air with its 15% damage and good downward knockback. Yes, yes, it's a meteor smash, meaning you'll be able to really ruin an enemy's attempts at getting back on the stage. A few drawbacks include the sluggish start-up as well as how open Star-Lord leaves himself during the elbow thrust, since he requires a good three-fourths of a second before he balances himself.

BAir (Drop Kick)​

Unabashedly borrowing another move from Snake, Star-Lord kicks his boots out behind him, covering a full Battlefield platform with the hitbox while leaving himself pretty wide open for punishment if this whiffs. Luckily, it's Star-Lord's most far-reaching attack that he has access to and due to its lasting hitbox, you can throw it out early and have the hitbox make contact with a victim later on. As for the damage/KO potential, the initial kick deals a noticeable 14% with great horizontal knockback while the continuous hitbox deals a meager 8% damage with considerably smaller knockback. As a side note, the great knockback from this BAir comes primarily from the fact that when Star-Lord makes contact with an enemy or a solid surface, he'll automatically boost himself off of it to gain some horizontal distance. In other words, this is quite helpful alongside most of Star-Lord's moves for gimping, letting the guardian keep foes off the stage while ensuring he remains close to it.

UAir (Explosive Drone)​

While falling, Star-Lord releases a small mushroom-shaped device that quickly shoots into the air, disappearing from the stage for a brief two seconds, before floating back down at Jigglypuff's falling speed. The drone itself will home in on the opponent, although the effectiveness of this function is limited to the point where simply spamming these will do you no good, as Star-Lord is limited to only two drones on-screen at a time. Foes should remain wary of these drones regardless, as Star-Lord is still very much a threat to whoever he's fighting and the drones only supplement his ability to apply zoning and pressure on his opposition. Drones cause a Bob-Omb sized explosion upon contact with solid objects, which extend to projectiles or items thrown by enemies, that cause 10% damage and modest knockback. Players should primarily use this as they please, as the drones will spawn in from directly above where the foe currently was when it comes back from the top of the screen. Just be sure not to use this with a nearby opponent, since anyone who attacks Star-Lord during the beginning animation will have the drone cancelled out.

DAir (Spartoi Stomp)​

Raising his knees to chest level, Star-Lord kicks downwards in one of the most painful-looking stomps one might see. His strained effort warrants a questionable beginning lag of a little under a second, but the results upon a successful strike cannot be questioned: the strongest of his aerials at 17% with guaranteed meteor smashing properties or an untechable ground bounce if they happen to hit solid ground instead. The vertical distance is fantastic, reaching one and a half Ganon-lengths below him. However, the only true use of this move is for gimping, as the horizontal range is complete arse and like many of Star-Lord's aerials, he leaves himself wide open if he whiffs. Despite those flaws, this DAir remains as one of Star-Lord's best off-stage killing moves, which is a real accomplishment considering the power behind his other aerials.


=-=-=-=-=-=-=-=-=-=-=
Throws of the Galaxy
=-=-=-=-=-=-=-=-=-=-=​

Grab/Pummel (Guardian Hold)​

I'll be perfectly honest and admit Star-Lord's grab is nothing special: he quickly holsters one of his machine guns before reaching out, either grasping the foe by their neck/face/etc if successful or drawing out his weapon upon whiff. His pummel is a head butt delivered by his helmet, causing 3% damage.

FThrow (Stun Locked)​

Star-Lord spins his victim around so they're facing away and proceeds to pistol whip the hell out of the back of their head before booting them away, leaving them very disoriented. By disoriented, I mean stunned for a brief amount of time. Not brief enough to allow Star-Lord to continuously chain FThrows together, but enough to provide what can basically be a guaranteed grenade toss, FSpec barrage, or charged shot. As for the throw itself, despite what being struck multiple times behind the head may suggest, poor saps caught in this move only receive 6% damage and obviously no knockback. Still, if you need a guaranteed way to deal some damage, this is a darn good option if the foe is close enough.

BThrow (Arm Lock Toss)​

Using his extensive knowledge of close quarters combat, Star-Lord switches his grip from the foe's neck to their arm, hoisting it over his shoulder and cracking the elbow before tossing them over in the direction opposite he was facing. This painful-sounding move is almost as damaging as the description, weighing in at 16% dealt with enough knockback to kill heavyweights at 140%. Good way to give yourself some space, and players can potentially follow up as soon as they recover with some SSpec fire. It's a rather deadly combination depending on what you have currently loaded.

UThrow (Going Up)​

Star-Lord smacks his victim with his sub-machine gun, causing them to spin around to face away from the guardian. Which is very unfortunate, as Star-Lord has already left a grenade right underneath them primed to detonate as soon as they look down, knocking them high into the air and taking 13% damage with them. Star-Lord will obviously be far away enough to avoid getting caught in the blast, though he's at a relatively closer distance to his opponent than if he had used his BThrow. Regardless, the high knockback on this UThrow warrants its use as Star-Lord's go-to killing throw of choice should you ever be able to grab onto your opponent.

DThrow (Spartoi Takedown)​

Swinging one foot behind the opponent's, Star-Lord performs a very quick take down maneuver that causes a nasty crash landing on the foe's part. That's not where it ends, though; Star-Lord will proceed to stomp the opponent twice once they're on the ground before punting them away. This nasty little combination of attacks deals out a total 17% damage with low knockback; it'll even put opponents as close to Star-Lord as possible! Why would you want to do that? Well, that's the thing; you actually may want that if you have the proper set-up. For instance, you can have a mine strategically placed where your victim may end up once the move is finished, or you can even have drone loftily float down onto the stuffed pig you've prepared for it. Regardless, this is one of Star-Lord's relatively odder throws.


=-=-=-=-=-=-=-=-=-=-=
Final Smash of the Galaxy
=-=-=-=-=-=-=-=-=-=-=​

Final Smash (The Thanos Imperative)​

A giant wormhole opens up from the top of the stage, from which monsters begin to emerge until the Mad Titan Thanos appears, who calls upon his vast reserves of power to close the wormhole by any means necessary. Which may include kinetically tossing whoever Star-Lord is fighting into the wormhole to plug it up, leading to an automatic KO. Of course, this will only work if Thanos has a direct line of site with his soon-to-be victim. Luckily, the Titan will come down from the skies and walk around looking for someone suitable enough to use as monster food. After which, Thanos will close up the wormhole, leaving whoever he tossed in there to their fate, before teleporting away from the fight.


=-=-=-=-=-=-=-=-=-=-=
Playstyle of the Galaxy
=-=-=-=-=-=-=-=-=-=-=​

I'm going to be honest, I'm finishing this one day set at 3 AM so if my playstyle section reflects that, so be it. Anyway, Star-Lord has a lot of tools up his sleeve that he'll want to use to confuse the foe as much as possible. His ability to cover the screen in obstacles such as Incendiary Ammo, UAir, and Dash combined with the ability to render a single move stale for an entire match grants great boons to ol' Pete. While he's clearly threatening at range, that doesn't necessarily mean he's hopeless up close, either; in fact, you can combine his dark matter projectiles with his grabs and direct hit grenades to deal a deadly amount of damage. Another great thing Star-Lord has going for him is his ability to gimp opponents off and on the stage, with the preference of either tossing at/shooting a recovering foe or meteor smashing them with FAir and DAir being largely up to the player. Lastly, Star-Lord has some good mobility options that he can combine with the property to utilize his weapon and equipment as he sees fit. There really aren't that many problems with Star-Lord other than his sluggish attacks and tendency to leave himself open during a lot of moves. However, his most noticeable problem is his bad aerial prowess, leaving him at the mercy of many characters with the most basic competency in the air, which leaves Star-Lord at a disadvantage against such foes. Even with air-to-air specific moves such as NAir, Star-Lord will have a difficult time dealing with them unless you're constantly threatening them with analyses and drones.


Now if you excuse me, I'm going to go sleep forever now.
 

Katapultar

Smash Lord
Joined
Nov 24, 2008
Messages
1,284
Location
Australia
[collapse="Crygonal"]The route you chose for this character is a rather strange one which I'm not quite sure adds up character-wise. Were you perhaps going for the confusing lost travelers route? The concept is quite an interesting one, none the less, even if it would be blatantly more fitting on a psychic or ghost-type. The writing style also feels like a rhyme of sorts, similar to the Rapist Santa mini. This is the kind of Pokemon you do really have to use your imagination with due to it being limbless - you've done that with the interesting concepts for a one-day Pokemon person. This certainly isn't a bad set, especially compared to Ampharos with its concept - what would make me like this a lot more however would be if it were done for a more fitting Pokemon, but this most certainly has its charms too and a decent sense of atmosphere, even if maybe you could have done more of Crygonal manipulating its body temperature to survive or freeze itself. [/collapse]


[collapse="Y2X"]This guy looks pretty cool, as if you put E.E.D Soldier into the world of CoH. I like how his base concept via the Side Special is the exact opposite to Player99's where instead of buffing yourself you corrupt the foe! Hearing the world "corrupt" brings a lot of extreme things to mind, but here's it's refined enough to not leave foes entirely helpless. There's quite a lot to like about Y2X for what you work him towards - with his stats and ability to heal himself, along with that dynamic Up Special he actually feels like a monster, and while he may lean on the side of being overpowered it helps make him more of a challenge to defeat and that Up Special actually deals damage to him which works in with the necessity of the Down Special. Y2X seems like he could do a number on enemies in 1v1s, but is more so designed for the chaotic fun of FFA matches where he can leech off the other players with the Side Special he'll pretty much always be wanting to land and use, along with stalking those characters like a hunter.

It's understandable that this is a set that caters to Brawl and I'm well aware of the announcement you made regarding the engine you want to make your sets for, though some of the "shorter" names you use for references such as DoT for the Side Special (which I guess is Damage over Time) and SV Platform can be difficult to interpret, along with certain lag and attack properties referring to many Brawl attacks...I guess it's just easy enough to ask you though, and it does nothing to deter from the actual set when in fact I do like being reminded of all those Brawl attacks when to me they would otherwise be forgettable. Perhaps all I could say to add onto this otherwise well-crafted piece of work is to perhaps have some of the moves like the Smashes possibly have a better KO'ing effect (I don't believe any of them can KO, which doesn't very good given that's what Smashes are for) on corrupted foes or take advantage of their corrupted effect as they're already taking damage from being corrupted in the first place, albeit at a slow rate. What if corrupted foes took more damage when they were near Y2X or other corrupted foes so it encouraged them to stay away from each other where they can't gangbang you while you throw off their projectiles with the Neutral Special and possibly slam into them with the Up Special, and that way you can chase individual foes down without necessarily worrying about being hit by others for the likes of your KO'ing moves. If say foes took an additional 1% per second when 1.5 Platforms near another corrupted foe or Y2X, the damage could possibly be enough to warrant he having some powerful, threatening Smashes to suit his villainy such as a mini-projectile that forces foes into shielding to take even more damage from his corruption. The D-Smash trap seems decent, but why not make it so corrupted foes' timers will never go down while they're in it? I realize that I might be suggesting things against what you en-visualized, however.

The set is great for what's it's worth however, being fitting for Brawl via the character like Player99 but quite possibly having a better/more of a playstyle of sorts to work with over buffs for the sake of having buffs, even if most of the corruption simply leads into stacking damage after damage along with the interesting Up and Down Specials. Or maybe it's just because being evil is cool.

EDIT: Seen the grab (the new pummel does seem a little strange, but an additional option none the less), FS and Playstyle. I stand by what I've said, there not really being anything to change.[/collapse]


[collapse="Star-Lord"]Does this remind me of your MYMX Rocket Raccoon or what? (that Up Special and MYM9 Thanos-intruding Final Smash remind me of such too) None the less, I'm quite grateful for this excellent offering in regards to SM material, and given you actually chose to work with the variation that had less potential (presumably for my SM) I'll try and approach this set from a respectable point of view. The set doesn't have too much or a lot of noticeable flow, but to be fair you did try to put a fair few tactics into single inputs, most notably the Side Special and F-tilt. You told me in the chat that Star-Lord is essentially Solid Snake in not being as powerful as Nova, which makes this set somewhat convincing enough to believe that he's a Snake Clone of sorts, not that it can be helped when he's the first thing that comes to mind with these military-type guys. This set isn't too bad for the time and somewhat generic character you were somewhat forced to do (especially when you have to put up with generic ammunition and GOOD MEMORY of which doesn't really do much to help for set ideas or simply is annoying to implement), and in some cases your writing style is a bit better here than usual and actually makes the set fairly enjoyable to visualize, something appreciative about it. Not to mention you do actually get somewhere with the playstyle and character with moves like the F-tilt and being able to fire your guns during prone states to catch enemies off-guard like a war tactician (somewhat odd how he's a close range character when he has guns, but it's fair enough), if somewhat becomes a bit forgotten later on.[/collapse]


[collapse="Nova"]Hello 100th moveset of MYM12 that gets to be the Final Boss of my Story Mode! Nova has some very extreme yet fun stats along with Organization that do rather tickle my fancy - you've done quite an impressive job at incorporating the feel of a superhero and taking into account the difficulty in which Nova has in controlling his powers, but making him sound like he'd be a blast to play as in Brawl. The Side Special is probably the most interesting move in the set for me because it outright allows Nova to transition into either his ground or aerial game depending on where he and his foe were at the time and potentially use a Dash Attack or F-air (of which seems a little under-elaborated with the "rocketing down" part that makes me think he'll suicide with it if used offstage) on them of which work fairly smoothly if can be too effective against foes if they're not careful - I like to imagine that Nova can actually use this move out of a Dash, though given how ridiculously fast he moves it would be nigh impossible for a player to make the appropriate input before they move through the portal. I guess the move is designed to be used from standing in place, in that case.

The difficulty in which one would have controlling Nova, especially out of his glide and such, would almost make me question his ability to be actually be legitimately played at all, but that can be overlooked when it makes sense for it to be Nova of all people to be accused of this. At the very least you can use the Down Special to make controlling yourself easier and have the bonus of substantially powerful attacks that balance out the weak oodles of damage Nova can usually have, though Nova does kind of need to stay still for a while to pull this off and it'll be obvious on the ground where he'll obviously be crouching via the transition to the Down Special. With those good stats and Neutral Special, Nova does seem to have it in the spades for his playstyle.

I think I'm safe in saying this set has a few design flaws to it with the base concepts and given under-elaboration of certain mechanics via the timeframe the set was made in, but it's still fairly fun for me to imagine and 3rd best of your sets this comp for me, catching up to Angel but far below the marvelous Kang. And that's not a bad thing given you said yourself you tend to make sets on a whim.[/collapse]
 

Zook

Perpetual Lazy Bum
Joined
Jul 30, 2005
Messages
5,178
Location
Stamping your library books.
I'm copying Kat's collapsible comment style

[COLLAPSE="Y2X"]
There are a lot of cool concepts you have going on in this set, though the one that has me most intrigued is Y2X's ability to 'upload' himself into another character. The implications of its use in FFAs is wonderfully wicked, forcing the opponent to quickly choose between attempting to return the virus back to its host before it succumbs to corruption or to pass it off to another character, who in turn is presented with the same dilemma. I wish that you included a way to let Y2X return to his Clockwork host independently, however; it would be all too easy for an uploaded foe to just spam projectiles for the rest of the match, wracking up KOs on Y2X's host as he hopelessly wracks up damage without a killing method. Also, I feel like you missed a great opportunity to experiment with the corruption concept here, as I can imagine a heavily corrupted foe would be far less capable of resisting the virus's control over their body.

Y2K's ability to wrack up damage is impressive, and I can see him being great in team battles; with his high damage output and amount of debuffs he force onto foes, the virus would make a great 2v2 partner and horrifying 2v2 opponent. His KO methods aren't particularly interesting, but Y2K doesn't really seem to want to necessarily eliminate his opponent... Which makes perfect sense when you think about it, given the character. His playstyle does a great job reflecting this nature, so kudos on that.

A couple of things in this set remind me of my Cacturne set earlier this MYM, particularly the Down Smash and Bair... though that's probably just me. :smirk:

Once last thing I'd like to comment on is the presentation. The color scheme, graphic work, and overall design of the set is wonderful, and it's easy to tell that you care about presentation. Unfortunately, some of your wording choices detract from the set's presentation. You often reference back to Player99 to describe some moves, but, as a person who never read that set, I really don't want to have to track down that set and read through it to figure out what you're talking about. You also bog down some of the moves with too much detail; for example, the Fair reference to both the Ftilt and the Dtilt to give the reader an image of how large the attack is, though I think it would have sufficed to simply say that two spines are larger and one is smaller. There are also several minor grammatical errors ("it's" is a contraction for "it is/has," "its" is a possessive pronoun, godammit) that detract from the reading experience.
[/COLLAPSE]
 

JOE!

Smash Hero
Joined
Oct 5, 2008
Messages
8,075
Location
Dedham, MA
Thanks Zook! Just three things to mention though:

1) The more corrupted a foe it, the harder it is for them to resist corruption due to them being slowed down, making them an easier target for Y2X's assaults (which in turn feed the timer)

2) Few characters have projectile-killer moves, and as they try to peg the Clockwork with them Y2X is racking up % at an insane rate that they can't match, especially when it can turn it's host around and otherwise mess with their aim via the "throws", making them want to get rid of the virus so they can actually take back a lead.

3) I make references to 99 because hey are from the same story, kinda like how you'd possibly reference Marth when talking of Ike's moveset, etc. And yeah, the entire thing was made in photoshop so my eyeballed grammer is... eh XD

Glad you liked it though, and more extras (story-related!) are on their way. :)
 

Katapultar

Smash Lord
Joined
Nov 24, 2008
Messages
1,284
Location
Australia
Make Your Move 12 Story Mode - FINAL PART

Part 4 can be found here


Roxas, Axel, Yu, Naoto, Night's End Sorcerer, Kirika, Sakurako, Himawari, Cherry, Angel, Player99, Cole, Yutaka, Gray, Agiri, Keroro Platoon, Jeanne, Shana, Khamsin and Wilhelmina, as to recap, were all on their way to Legend of Leader's residence in order to put an end to his radical plans once and for all. They were all been given a ride inside Omnipotent Kanade's heart, only for it to start crackling with dark red electricity! She told everyone that they were close to Legend of Leader's territory, but could not hold them for much longer given the immense power he has at his disposal and is forced to drop them off nearby - this is exactly what he wants, but she tells everyone she has faith in them to reach the very end. Her bubble heart begins to fall and eventually crash into what appears to be a long-winded path composed of soft grass peering into the empty reaches of "space". Kanade's heart pops, causing everyone to be left off for the path ahead. The path they were on was huge enough to keep them all on without being too overcrowded, but it was also scary as any one of them could fall off at any time despite the area otherwise looking completely safe. Without a word, everyone gets up and realizes what it is they must do.

Battle 80
You play as the above 20 aforementioned characters, forced to go on a very long-winded path that's all too similar to the likes of the first Subspace Level from SSE that pits you against countless enemies, namely Heartless that you've encountered before such as the filler characters who were subjected to being such and what not. This area is more difficult than the aforementioned level however as you get less breaks and it's 4X longer, actually feeling like a rather long level.


Our heroes have finally reached the end of the path, where a castle of searing evil that made the Castle That Never Was look like a poor person's house: Yamaku High!


Just imagine THIS floating in the middle of space, only those stairs you see on the left are connected to the same path our heroes walked through in the previous level.

Before everyone could take a look at this somewhat underwhelming sight, a whole bunch of Heartless started to form around them! No surprise really, only that they were incredibly aggressive, far more so than usual to the point where Cole pointed out that the buggers weren't letting them get anywhere near the school, and everyone was spread out too far for the sake of their own safety. Before they could formulate a high risk high reward strategy however, a large group of Rattata came out of the school to distract those creatures of darkness! Everyone saw this as their cue to enter the high school, which they did without hesitation, some of them thanking the brave little Rattata who clearly had to give up their lives in the process...but what for?


=============


At Yamaku High's rooftop, which one can see a picture of in DM's Kenji and Hisao set if they haven't played the game, we could see Legend of Leader peering at Kingdom Hearts located in what appeared to be outer space, revering it as if he was still Xemnas. Behind him were his two "followers", Luxord and Zexion, who were waiting to receive their orders. After doing what he needed to do, Legend of Leader turned around to the two and told the two super-cool Nobodies that the "heroes" had finished off the 5 incarnations of Bowser as he planned, stating that time paradoxes were occurring around various planes of existence due to all 5 being defeated a the same time - he further states that although the first 4 incarnations had not died in their battles Wizard Bowser's death had caused a huge strain on the space-time continuum, but they were all protected from these effects due to the space they were in. Luxord states that the "wild cards" have been set in place, and the heroes have unknowingly picked them up, effectively messing up their own world along with many others of which has changed the nature of the game. Zexion realizes that everything is indeed starting to fall in place, and the heroes have done their part at this point. Legend of Leader gives the two permission to turn them into Heartless in any way they see fit, which prompts the two to disappear into separate corridors of darkness. With that, the Legend of Leader smirks evily as his eyes turn red and a blood-red electricity flows through him ominously...


=============


The heroes had walked through the main entrance of the school, having entered into the main hallway. What looked like a seemingly ordinary school on the outside however was in fact an endless abyss of hallways and doors that seemed like a repeat of the long-winded path to the castle, most likely tampered with no thanks to some very powerful magic. One could possibly spend all eternity wandering these halls, drunk on illusion - the heroes decided to split into pairs and search all the endless for "the truth", knowing that their ultimate enemy Legend of Leader would be around somewhere...


Battle X
This level is effectively The Great Maze of this Story Mode that serves as the last main level of the game, only you have to split off all the 20 characters into 10 pairings of your choice - there are 10 main doorways of the hall, and once you've selected all your 10 pairs and assigned them to each they'll head through the respective door ways. Much like the SSE comparison level you have Save Points, and are allowed to switch between the different groups at any time whilst being able to heal your own. If either character in your group is KO'ed you'll get a game over for them, so be careful.

The character pairings you pick are actually somewhat relevant, as the layout of the level will change in order to accommodate the both of them with about 380 or so different possible pairings. If you're using Yutaka for one of the levels that area won't require good stats to get past the platforms and traps regardless of who her partner is, but if you were using two characters with great overall stats be aware that you'll actually have to rely on those parameters to get through to the end.

Each of the 10 "paths" are about as long as two average-length SSE levels, and along each path one will find the Nobody symbols engraved into certain areas, along with various cards and books floating around in a surreal space of sorts as you enter the more bizarre areas. The space your characters are going through is in fact "illusory" and powered up by the great power Luxord and Zexion have gained, with the former's influence often forcing you to play "games" during certain intervals of the level - winning them can mean bonuses such as permanent buffs, destroying nearby enemies (of whom are manifested illusions based on the characters you're using) or even skipping portions of the level, but losing can mean the opposite or at worst an instant game over via Demyx mechanic style. Some of the games are even "extras" that you don't have to play to get through the level, but winning them can help the progress with other levels.

What's interesting about the level is the background and scenery itself, which is a melding of a default background for your character based on the world they came from along with their general theme. Both Roxas and Axel's background are that of Twillight Town, Yu and Naoto's are a foggy Inaba which has taken on the appearance of a TV set similar to that seen in the in-game battles, Night's End Sorcerer's is essentially taken from his artwork as one is forced to watch a majestic moon and walk across craggy stone tiles, Kirika's is the outside of a generic anime high school setting where the sky and surrounding atmosphere has been engulfed in a red madness, both Sakurako and Himawari's is the colorful outside of a generic anime high school, Cherry's is basically the quiet suburb of a rich Tokyo district, Angel's is basically New York at nighttime, Player99's is the futuristic city of Praetoria, Cole has an area of the wild west which looks like it was transported into space, Yutaka has the overwhelming area district of Tokyo's Akihabara to deal with, Gray gets a nice-looking colorful beach with some areas of the background and main stage encased with ice that helps his playstyle, Agiri gets portions of the inside of a wooden ninja mansion combined merged together with a generic comical anime high school setting, the Keroro Platoon get a generic anime suburb with some generic aliens and Keronians fluttering around aimlessly but constantly shifts into different parts of the world quickly, Jeanne gets a dark underground passageway filled with all sorts of functioning motors and machinery frosted in ice, and finally Shana, Khamsin and Wilhelmina all share a dark, crimson-coated city where time has completely halted and flames dance around the area as an elaborate castle floats and peers from far above.

Halfway through each path, you'll be forced to fight a villainous yet illusory opponent seen before in the SM of which is set for 1st character you picked for that path, as well as another illusory villain right at the end for the second character you chose:

Roxas - Xigbar
Axel - Saix
Yu - Vergil
Naoto - Captain Hook
Night's End Sorcerer - Zombie Master
Kirika - Medusa
Sakurako - The X-Naut
Himawari - Junker Bot
Cherry - Dry Bones
Angel - The Necromancer
Player99 - Azula
Cole - Sentinel
Yutaka - Manfred Von Karma
Gray - The Once-Ler
Agiri - Oogie Boogie
Keroro Platoon - Kirby Enemy Team
Jeanne - Doc Scratch
Shana - Iron Tail (yes, actual Iron Tail, not Toxinrial)
Wilhelmina - Professor Ratigan
Khamsin - Doomsday


The heroes had all reunited together, having found the one true door where they were certain Legend of Leader was hiding behind, which was oddly leading to the school's rooftop from the staircase they were standing on. With a careful turn and push, Angel led the way as what laid before them was not the rooftop or Legend of Leader but rather Luxord and Zexion both sitting on white, regal thrones in the middle of a large white circular room leading into an endless abyss below. Luxord applauded for the heroes, telling them that "they had played the game quite well" like the gentleman he was. Axel facepalmed, realizing that he should have realized sooner that the illusions they experienced could have only been pulled off by the pair of Luxord and Zexion, respective masters of time and illusion even stronger thanks to Legend of Leader. Naoto tells the two Nobodies that they've managed to defeat the 5 Bowser incarnations, but suspects that there's obviously more to Legend of Leader's plan if he was the one who forced them into those respective timezones. Zexion somewhat praises Naoto for her intellect, stating that the heroes could have just assumed that their plan had failed with the defeat of the 5 Bowsers, but that would have been outright foolish of them. He further states that coming here anyway was foolish, and that the heroes are merely wallowing in a pathetic delusion that will lead them to their demise. Cole states that the lot of them managed to get through Zexion's acid trip and make it all the way here, with Player99 adding on that they'll defeat the two villains and reach Legend of Leader, and finally Keroro states that there's only two Nobodies and 24 of them, so they clearly have the advantage. Both Zexion and Luxord give off a confident smirk, with the former telling them he'll show them that they're hopes are nothing but a mere illusion, while Luxord tells them that he and Zexion haven't revealed their ace card yet.


BOSS BATTLE - LUXORD AND ZEXION


This isn't so much of a boss battle as a relatively simple 2v2, only that your characters are chosen for you at random! This can make it fairly difficult if you're forced to use an underpowered character like the Platoon, but thankfully if you have 0% and don't attempt to attack either foe at 0% your character will be forced out with another one at random. Luxord and Zexion also have particularly high AIs and will work together very well given how FA demonstrated in their battle against the founders.


All 24 protagonists are respectively seeing the very same worn-out Zexion, but due to his illusory powers they do not see each other. They attempt to attack it, only for it to suddenly disappear as a flash occurs, revealing that they've all been under the influence of Zexion's illusions. Hearing "Look closely" from Luxord, the heroes turn around to see both him and Zexion on their thrones which are levitating in mid-air. All of them having been herded together, Luxord snaps his fingers to suddenly have them all be transformed into life-sized playing cards! With the battle finished in a rather anti-climactic manner, Luxord turns to Zexion and admits that using the power of illusions together with gambling is cheating, but Zexion tells him that's all the more reason they make the perfect pair. Luxord tells Zexion that people don't stay as cards forever though, but they can always play a little game with them...


=============


The heroes wake up, all isolated in black areas as they've become cards, but they all suddenly hear Kanade's voice. She tells the heroes she's amassed a bit of power and can reach where they are to help them because while they're playing cards they will not be able to fight back against Luxord and Zexion's fearsome combination. Yu is somewhat frustrated by the fact that he was fooled by such an illusion, but Kanade assures him nobody could have seen through such a powerful illusion, not even herself in her current state. Axel recalls a moment where he lost a card game to Luxord and was forced to spend hours at hand wandering the castle as a playing card - it was the most embarrassing moment of his non-existent life he couldn't truly feel. Kanade tells everyone that she needs to borrow their powers so she can do battle with Luxord and Zexion in a card game where she temporarily summons them to do battle with the Nobodies. Everyone agrees, realizing they have no choice given the situation they're in.


=============


Luxord is intrigued by God Kanade's appearance, realizing that challenging a God to a game could prove to be entertaining. Zexion tells Luxord to keep his guard up, but nonetheless tells Kanade to have at you as the two Nobodies get up and challenge her.

BOSS BATTLE - LUXORD AND ZEXION II


The battle starts off with you playing as Kanade against Luxord in the very middle of very, very large walk-off as Zexion stands in the background watching, along with the 20 cards of your comrades lying around the place as items, but before you can use them Luxord will automatically use his fully charged Neutral Special as he teleports the lot away from your sight! He'll have 24 cards circling around him but with a twist: the blank cards are replaced with explosive cards and the explosive cards are replaced with a card with one of your 20 comrades pictured on it, though to be fair in this situation you'll always be guaranteed 5 of these types of cards. For this phase of the battle, you not only cannot move past the perimeter of the card circle Luxord has around him but he's also completely invincible, though he'll do nothing but taunt you with lines of "Don't squander your time" or "Look closely" every 7 or so seconds. The key thing here is to attack the cards that have your partners on them so they'll be added to your collection by seeing what the front of the card looks like as it rotates far into the background and for you to memorize that for a small while. Be careful however as every 15 seconds the cards will begin rotate slightly faster, and if you fail to pick them all out after one minute you'll get an instant game over. If you can pick out all the cards with your comrades on them, however, Luxord will make the rest of the cards in the circle dissipate and this time bring out a stationary set of 30 cards, showing you the fronts of each card for a food 2 seconds before they all flip over and shuffle around at mild paces - 7 comrade cards will be slotted into the set, but there will be one death card placed in there too so be careful. If you fail to pick out one of your comrade cards within 10 seconds all the cards will flip over for another 2 seconds, but they'll begin shuffling around at an even faster pace than before along with one of the explosive cards being replaced with a death card - if this happens 5 times in a row it's an instant game over. Succeeding at this second phase will cause Luxord to fill the entire ground with 50 playing cards of which constitute as floored cards that shuffle around at fairly quick paces, but not before showing themselves for a good 5 seconds before flipping over - the last 8 of your comrade cards are somewhere along here, with 10 cards being blanks to balance out the rather impressive speeds at which the cards move, 22 of them being explosive cards and the last 10 being fatal death cards. You have 2 minutes to pick out the right cards or get a game over, and while the cards will never speed up in pace they'll only flip over every 20 seconds so that's 2 tries - bad thing though is that every time this happens 5 of the blank cards become death cards, so once this happens twice you'll have to pick out the correct cards or else you won't get any mercy. Completing this rather frustrating game nets you a bit of praise from Luxord, though if you managed to find a special pair of glasses in the previous level you'll be able to see-through all the cards of which makes this fight significantly easier.

But the battle hasn't ended there, no! You now have to fight both Luxord and Zexion as Kande at the same time, but this time utilizing Khold's Card Battle Game Mode, albeit with a good deal of changes. Instead of having respective inputs for each card, you get one of your 20 characters - you may use any attack input you like but upon doing so a transparent version of that character will overlap God Kanade and use that attack in her place, giving her the buff of said attack if that was its purpose. This essentially gives Kanade access to every single attack of the 20 protagonists, but once she's used her 4 current comrade cards another 4 of completely different characters will pop up, though this takes about 0.5 seconds and leaves Kanade open to attack if she's not careful.

Despite the fact that, with luck, you could effectively have Kanade use many of her comrades' set-ups such as using the Weird Rider's barrier, Jeanne's ability to flood the stage with water or even use Agiri's cloning ability to make 2 extra replicas of Kanade for ridiculous potential with the rest of your endless potential, the battle is not an easy one as both Luxord and Zexion play like Lv9 AIs and utilize "Boss Sets". While neither receive changes to their stats, Luxord pulls explosive cards far more often and takes only half as long to charge his Smashes along with a few other buffs such as his explosive cards killing twice as quickly, while Zexion's fake damage will always be treated as real along with having buffed attacks. The duplicates will actually attempt to assault you while the real Zexion stays back and Luxord gets his elaborate set-ups - put this together with the fact that you only have one stock, and a difficult boss fight awaits you.


Both Luxord and Zexion are worn out, on their knees clutching to what little non-existence they have left as they begin to fade into darkness. Kanade simply gives them a stoic stare as the cards of her comrades float to the floor behind her and reform into who they were - the sight of the 24 staring at the defeated Luxord and Zexion is somewhat embarrassing to them, had they hearts. Zexion reveals that he was originally going to take the Organization for himself and try a different approach when Xemnas revealed his plans to his fellow Organization members to use the heroes to destroy Heartless for Kingdom Hearts, he wanting to have his heart back along with the others but deciding that the heroes should be turned into powerful Heartless and Nobodies that could serve the Organization so that logically speaking, the Nobodies of those heroes would be able to use "Keyblades" in order to destroy their own Heartless of which their hearts would be more than powerful enough to finish Kingdom Hearts and stave off Kang and Fibrizo. That all changed however when Zexion and Luxord were going through secret research that founding members Perches Poxtrot and Toxinrial had compiled, revealing that they knew of and were serving a powerful being known as Legend of Leader whom Xemnas was the Nobody of. While Perches Poxtrot and Toxinrial were away pretending to serve Marluxia, Luxord and Zexion managed to make contact with a portion of Legend of Leader's conscious, deciding that going with his goal to expand time and space would be more interesting so when they do fuse together with him they'll become whole. Zexion wants his heart back but Luxord just wants to "win" at his game, but both of them state that they were going to put an end to the heroes before Legend of Leader's true goals were accomplished, but are unable to do this - they won't fade into darkness and be reborn like other Nobodies but rather become a part of him and truly become whole with all. With those last words, the two disappear. Kanade turns to the heroes, telling them that Legend of Leader genuinely awaits them at the rooftop of Yamaku High, but must leave them as being with them in Legend of Leader's territory has drained much energy from her. With a goodbye, she fades from them, telling them she'll see them again. Knowing this, everyone decides to step forth for the final battle...


=============


Legend of Leader doesn't seem too surprised by the heroes' arrival to the rooftop, merely congratulating them as he sips from a small toy cup with "MYM12 KILLER" labeled on the side. He tells them he did not expect them to defeat all 5 Bowsers, and if they hadn't done so all timelines would very well have merged together by now. That was only a back-up plan however, for he intends to expose the true vile nature of the world they all live in and show them what they could have had instead. Kirika asks what is there to be gained from him when he's admitted to wanting the destruction of their world and many others, but Legend of Leader tells her that there's actually a lot to be gained for both himself and everyone, asking everyone what they think of the world they live in and those who live in it with them. This causes virtually everyone who it would be in-character for to look around them, realizing that everyone around them is indeed different in many, many ways. Somewhat different races, different age, different personalities, different attires but most of all very different kinds of abilities. Legend of Leaders asks any of the heroes if they've ever been jealous of the powers or innate abilities that any of their peers have. Yutaka is the first to step up and admit that she's kind of been a little jealous of virtually everyone around her having actual fighting skills or interesting magical abilities, constantly desiring something along those lines for herself to stand with them as equals. Sakurako and Himawari join in with Yutaka and tell her that she's not alone with that desire and how they've always wanted to become ninjas like Agiri is, or even be able to have that same coolness as Kirika with the straps she wields. Agiri doesn't say anything, like a program unable to comply with an order, but Kirika tells the two that they wouldn't want to be in her position because she was forced into it, and has to suffer unimaginable pain every night due to the consequences of Ginstrnag's Love that break her body and bone before having them reformed like nothing ever happened - she claims that nobody else in the group aside from Angel knows about this and she's tried to hide it from everyone else. To give a rather coincidental demonstration, she steps forth between the group of heroes and Legend of Leader as she reluctantly throws off her clothes to give them a good look at her sex dominatrix outfit composed of similar straps to the ones she wields in battle - they slowly begin to wrap around every possibly body part of hers until they constrict and snap them, causing her to cry out in horrific pain via injuries that would have killed a normal person by now. The process is horrifying for most to watch bar Legend of Leader who doesn't even flinch from the sight, but it's all over after a few minutes which felt like an eternity to everyone as Kirika gets back up and puts her clothes back on. Kirika tells everyone that she's somewhat gotten used to the pain and that it's actually refreshing to her, but it's not something she would wish on anyone else, ever, and that having power can come at a price. Yutaka, Sakurako and Himawari all look down as if they've just been lectured, with the likes of Yu and Naoto being unable to sympathize with them when they were ordinary until they got their Personas, and Jeanne's power was not something anyone could get. Legend of Leader realized that there indeed some positions among the heroes whom nobody else would want to be in, but over half got their powers from either training or simply being lucky enough to be born into a situation where they could in fact get them or have access to certain powers that may be - with this he points at Gray, Agiri, Roxas, Axel, Shana, Wilhelmina, Khamsin, Night's End Sorcerer, Keroro Platoon, Cole over half of the team and tells them about how they have something he likes to call "potential" and that's why they're here, the people who were lucky enough to have their existences grafted into a universe that would offer them the opportunities they have. Sure, those universes might have sucked hard but here they are all "equals" of some who are blatantly superior to others. Legend of Leader then points at Angel and points out that he's a vampire, which is obviously a whole lot better than being a human in this world with all the added abilities and the fact that he appears to be human, the "main" species of all existences. The likes of Gray and Shana do admit they were all given special opportunities that perhaps the likes of Yutaka never had, and admit that perhaps it's somewhat unfair...only to point out that they were all in fact born in the same universe, so that means there should be infinite opportunities for everyone and thus to make someone like Yutaka or Sakurako or Himawari a Flame Haze or even have them use magic would not be impossible. Legend of Leader laughs, stating that the prospect of such sickens him - what happened that allowed these "pathetic wastes of human" to continue living? They have no potential! Why does everyone like them? Support them? Does it remind them of something they used to have, something they should never have? They should have died out a long time ago in this pathetic, bloody mess of a world. Has the world gotten so stale that it's starting to accept the likes of these pathetic beings?

Sakurako and Himawari take Legend of Leader's slander as an insult, telling him that they're allowed to exist in this world and fight when they need to protect it. Cherry barks aggressively, also taking the slander offensively. Yutaka doesn't get angry however, but falls to her knees in depression as she starts to question why she was allowed to come this far when she fails at both meeting the required expectations of everyone around her AND fails to pass as a human given she's so utterly weak and frail - she starts to wish she was never born so she wouldn't have been a burden on everyone else around her. Legend of Leader tells Yutaka that she indeed shouldn't have, because she has no potential compared to everyone else around her - everyone should be out there making great fights and ideas, but instead they're trying to babysit people who can't help themselves, taking unnecessary pity on them. He does not believe a world like that should exist, so he's going to destroy this one and all others to create a new one, but the destruction will only be survived only by the strongest, which means most of the pathetic heroes who stand in front of him will perish, and only those with true magic potential to create greatness and become frontrunners will survive, like Planeswalkers.

Kirika is the first to step up and give her opinion, stating that the idea of such a world is outright sickening - what's not to like about living together in harmony, in peace? Legend of Leader laughs, stating that it's a shame Kirika does feel about the new world in that way because she would be one of the few out of everyone here who would be capable of surviving alongside with Gray, Night's End Sorcerer and Jeanne...maybe a few of the "stronger" ones too if they were extremely lucky, such as Angel or Shana. Angel realizes that yes, he's a vampire and that means he's "superior" to everyone else around him in regarding their species, but that doesn't mean he would want to live in a world where he has to fight and constantly compete with everyone else. Gray and Night's End Sorcerer step up and say that even if everyone here were to survive and enter this "new world", they're sure none of them would want to accept such a cruel and uninviting place. Jeanne decides to take a different route however and objects, stating that she probably wouldn't mind living in such a world but she's learned that there's a lot that can be valued and appreciated from "weak" people like Yutaka, she remembering the time spent in the post-MYM11 timeline - if people like her will be taken away from the world and deprived of their opportunities, she won't accept it. Kirika and Angel stand beside Yutaka, deciding that a world without her is a world not worth living in at all. Some of the characters like Keroro and his Platoon don't understand what the fuss is all about, but they nonetheless state that they don't want to be wiped out before they can conquer Pekopon. The likes of Roxas and Axel have come to realize that they've been accepted by everyone around them despite being Nobodies, the 3 Flame Hazes state that they can't let the world's balance fall to ruin, Cole and Player99 state that they exist to beat down crooks like LoL who threaten the world, while Yu and Naoto realize they were ordinary before they got their Personas and don't want to lose those around them who didn't have the same opportunity they had. Kirika and Angel tell Yutaka that she's not a burden, and that everyone loves her so she should consider her own existence a blessing - the formers hold out a hand to life Yutaka off the ground, and Angel states that while everyone here might be different in terms of powers and experiences they all want to live in this same world as equals. The vampire takes out 24 swords out of a dimensional pocket and throws them out to every single character who doesn't have a weapon on them, they taking them up and raising them against LoL along with those who do have weapons pointing them. Legend of Leader laughs manically, deciding that it was pointless to try convincing naive fools to live in his world when they're so drunk on what they've experienced and he'll just get rid of them all himself....LoL fades out of existence as two copies of himself take his place, one a dark version of himself and the other evil but with white pupils that make him look evil...

BOSS BATTLE - LEGEND OF LEADER - HEARTLESS AND NOBODY


Pick any 4 characters you like, 2 at a time against two Links both on the right hand side of the stage where you play on the Yamaku Roof stage seen in DM's Kenji and Hisao set, only with a spacey background and Kingdom Hearts looming above. Haters gonna gate. These Links aren't just crappy ordinary links that Von Karma could beat without his mechanic however, but rather ones directly from Brawl Minus! This makes the battle more difficult than you'd expect, but not impossible to win if you pick the best characters. And also beat Julius Rock for that cool sticker.


LoL's spawned Heartless and Nobody split back together as he clutches down in pain, looking quite mad at how he's being opposed this way. "ARRRRRGH!! I'VE HAD ENOUGH OF THIS! TIEM FOR YOU ALL TO DIEDIEDIEDIEDIEDIEDIEDIEDIEDIE!!!!" LoL started to gather immense power, channeling all his inner darkness and that of which was around him...he was even swallowing that up of the heroes' own! They felt no weaker however, but couldn't help but feel that LoL was getting insanely powerful, so much he could probably destroy this world all by himself. This time nobody could afford to hold back...

BOSS BATTLE - MYM12 KILLER


It's on people, it's on! You get all 20 of your characters for this insane battle, where MYM12 Killer is Ryuk-sized and is constantly shuddering with immense power and cackling with maniacal laughter. He just stays in place like this for 3 seconds, but once that time is up, watch out...he'll immediately rush to your position with barely any forewarning, attempting to grab your character by their face and lift them off the ground. From here, you'll be transported to a bloody version of Final Destination and be forced to play a game of Geri's Brawl with a clone of yourself! The music changes to a G-Major version of your character's theme, you switch characters exactly every 10 seconds, and you simply have to KO the foe within a minute and not die...or get an instant game over. On the other hand, winning will bring you back to the real world as MYM12 Killer writhes in agony as he holds a hand to his forehead from the pain you've apparently dealt with, and for a long 10 seconds in which you can attack him....but he doesn't seem to be taking any damage! Well that's because he's the MYM12 Killer, and he's completely immune to ALL damage from your cute cast of MYM12 characters, no matter how powerful or weak they are; if you try to damage him at all you'll hear Kanade's voice tell you everything I just told you in that last bit, so don't complain about actual players playing this SM in SSB4 not knowing about this. This time pretty much only lets you do set-up crap with your character of which is especially important when they retain all damage from the battle against their "fake". After the seemingly pointless 10 seconds you get to yourself, MYM12 Killer will instantly teleport high above your character and attempt to use a dark version of Link's Final Smash on you, pretty much insta-killing your character if they have 50% or are particularly light like a good few of the chars you have to use. At other times MYM12 Killer will attempt to teleport into the background and fire 3 large black balls towards random areas of the stage but one each homes into a character - if you're hit by one you'll suffer the effects of darkness via taking 25% as you enter prone and lose access to all your Specials for 15 seconds! Even worse is that any darkness not avoided falls onto the ground and forms into a black Chaos 0 that you have to fight and defeat before MYM12 Killer decides to waste his time on you again - this can mean fighting 3 of those pests at once, and they're extremely aggressive. MYM12 Killer will also occasionally teleport at the edge of the screen and turn into a black fire dragon to ram at you with, which is pretty much an instant KO but relatively easy to dodge. After attacking 2 times, Legend of Leader will attempt to grasp you into his Geri's Brawl and will keep doing that until he succeeds...

and all this time you absolutely cannot do any harm to him, with the match simply repeating itself forever and ever....what the hell!? Ah, but you see, it actually has a twist reminiscent to the MGS Psycho Mantis battle which you kinda need to know about via looking up on the internet or Smash World Forums...have you accidentally "fell through the ground"? Then congratulations, you just found out how to progress through the battle! You'll be taken into a room that looks EXACTLY like the one you were in just before, with all your traps still in-tact but none of the Chaos 0s if they were any still around. MYM12 Killer will immediately teleport back to his starting position and attempt to attack you shortly after UNLESS he was in the middle of being stunned for that 10 seconds interval....this is kinda important as you now have to fight both MYM1 winners Anonymous and Viki at the same time WHILE fighting against MYM12 Killer! The latter will only attempt to use Link's Final Smash and the fire dragon against you at the same time, telling you that you've all been transported to the hall of fame where all the champions of existence exist. MYM12 Killer is still invincible, but if you manage to KO either MYM1 winner a surge of light will come from them and stun MYM12 Killer for 14 seconds, giving you time to wail on the other character as MYM12 Killer takes their light and is stunned by it, this being able to stack for up to 28 seconds. Once both characters are dead and MYM12 Killer is able to move again, he'll proceed to attack you normally. From here, you have to go back down through the ground and repeat the same process, only this time you have to fight the MYM2 Winner Paper Mario! Once you've beat him you have to go through again and beat Dracula, followed by Chef Kawasaki, Acid Seaforce, The Count, Doppelori, Dark Bowser (in his 3v1 form!), Bowser Jr, Gengar and finally Death. It's one hell of a long battle against all those contest winners who have Lv9 AI, but do remember that you have 20 freaking characters for this and if you were clever and willing to take some risks at the start you could keep making MYM12 Killer stun himself via beating his Geri's Brawl over and over to make endless supplies of traps and set-ups based on who you were using. It helps that if your character gets progressively better as matches go such as Yutaka they'll actually have those great buffs, and that having 2 characters at once lets on support the other - I'm sure you know where I'm going with this. Oh, and you're actually able to fall through the floors you encounter the respective contest winners on, but in doing so they'll follow you down there where you'll be forced to fight them all at once! This could get quite messy if you were somewhat dumb enough to end up being ganged on by all those 12 characters along with a ridiculously powerful and invincible boss, but having a super powerful attack and being particularly clever can let you take them all out at once.

Once you've taken down all 12 characters, MYM12 Killer will remain stunned forever as cracks begin to form around him and you have to deal 70% worth of damage against his super-amour-ed self. It's not over yet however, as once his HP has been dwindled a dark arm will burst from his chest and grab onto the character who dealt the last hit to him! He'll then proceed to drag them to the depths of hell with him, or My First Day Of Make Your Move more specifically - yes, you have to fight on THAT arena and that crying child is life-sized so it's reeeeeeeeeeeeeeeeeeeeeally small, though it stretches outwards twice as far though that area is in fact part of the magnifying glasses so you'll take damage from being there. You have to fight Legend of Leader with his shell of darkness taken off in the same way you do in Smady's Wiz SSE Role with 300HP and buffs, only one stock, but that's fair because your character will probably be very powerful at this point if you played smart.


Everyone is back at the starting point of the fight, with Legend of Leader clutching on the floor in defeat. He laughs as darkness begins seeping out of his body, along with blood-red electricity, claiming that he has all the darkness necessary to "complete" Kingdom Hearts. Pointing to said moon, the darkness seeping out of him begins to enter the insides of Kingdom Hearts and massively corrupt it, making it slightly larger and start being dragged down to where everyone is. Everyone looks shocked at this scene, which LoL laughs at and tells the heroes that by making them enter various time-zones and defeat the Bowsers they absorbed bits of darkness around them, which he has now gathered along with what's in their respective hearts - Kingdom Hearts will be complete and his goal will come to fruition, and it doesn't matter whether he lives to see it because everything will fall and rise up as he intended it to. LoL finally fades into darkness, which along with some crackling red electricity, rises up towards the corrupted Kingdom Hearts as it makes it even more corrupted than it ever needed to me. Kingdom Hearts begins to throw out giant black tentacles across different parts of the time-stream, and the heroes are somewhat at a loss of what to do in these turn of events. That is, until Kanade forms in front of them, telling the heroes that she's able to be with them thanks to LoL being destroyed. She tells the heroes that they must stop Kingdom Hearts' corruption before it does indeed destroy virtually everything as LoL intended, and for this she'll take them inside it with her Heart Bubble form. Everyone gets in as they prepare themselves to enter the heart of darkness itself...


=============


The inside of Kingdom Hearts is black and corrupted, crackling with red electricity all the while. The heroes find themselves standing on the outer reach of what is essentially pure, pitch-black darkness that could make one go mad just by being inside - they stood on what was essentially a cliff, an endless abyss of darkness peering before them. From here, two monstrous beings emerged: Y2X and Dark Falz! With the latter floating high above in all its glory and the former standing over nothing beside it, Player99 instantly recognized the smaller one..."You!". Y2X recognizes his nemesis, only giving him a dismissive "99...." before turning his attention to the group of heroes themselves. Cole asks Player99 if he recognizes that thing from anywhere, realizing that he must given that dead serious expression on 99's face. Player99 tells everyone that the being they see before them is Y2X, a computer virus that emerged into their world and seeks to corrupt all....he then realizes that the sparks that LoL was giving off during his death seemed familiar to him. Y2X admits that he was indeed working together with Legend of Leader and gave him his power as to why he was so immensely strong. The viral being reveals that Legend of Leader was the one who created him by combining raw data with the darkness in people's hearts, which is what he was doing once he left his position of the one of the 5 Political Leaders. Once LoL created Y2X, he used him to deliberately give into the darkness and become a Heartless, which just so happened to take the form of Y2X's viral form that went about corrupting Smot, who used to be wise and benevolent, and turning his body into something that could produce Heartless. Once Smot was defeated however, Y2X returned to LoL which nobody saw, giving him the immense power that he had leeched off all his hosts, especially Smot - it was indeed Legend of Leader who orchestrated this plot, and for what reason? Gather endless piles of darkness from the hearts of good and evil alike, piling them onto Kingdom Hearts....the ultimate result of which would awaken Dark Falz, the God of Destruction who revives in a millennial cycle and seeks a host to bring about the end of the universe. Y2X states that he was specifically designed to ultimately merge with Dark Falz, creating a dark corruption that would make any single being succumb to the darkness and be theirs to use no matter how powerful of a will or attachment to the light they had. Dark Falz finally start to speak in a dark godly tone, telling Y2X that he is indeed grateful for being revived by him and LoL, finally ready to bring his goal to bring the end of the universe, and once they have done that the host of whom was used to do so will be reborn in a brand new universe with utter darkness at their command and Dark Falz/Y2X eternally in their souls so they may awaken again in an endless cycle. Y2X states that Legend of Leader was originally meant to be the willing host before he was destroyed by the heroes, so now they have to pick one of the 20 in order to become the host who will destroy the universe and be reborn into a brand new world...this is what LoL wanted, the strongest to survive in a new world. None of the heroes are willing to comply, but Dark Falz laughs evily, telling all of them that the one who becomes his host will be granted endless sources of power, and not to mention gets to rule an entire universe where they can do and be whatever they want. Randomly enough, Keroro seems to really like this idea and decides to volunteer, but his cohorts minus Tamama hold him back, not wanting him to just selfishly leave them behind just so he can rule a universe on his own. With that, nobody else wants to do so, so Dark Falz decides that he'll just have them all battle his endless dark minions and the last one standing will unwillingly become his host. He summons dark versions of Bouldergeist and numerous The Beholders to attack the heroes, minus Player99 who's rushing towards his nemesis Y2X ready to battle him...

BOSS BATTLE - BATTLE OF 1,000 HEARTLESS
This battle pits you against 999 Beholders of whom are massively debuffed along with Bouldergeist who has his boss set. You play as all your characters MINUS Player99 and the Keroro Platoon surprisingly enough, who are actually trying to attack both the Heartless and your team at the same time due to Keroro wanting to become Dark Falz's host, though you can feel free to KO them anytime you like.


The heroes are utterly worn out from having to battle so many heartless, Dark Falz telling them that they cannot hope to cut through the darkness when all the Heartless will just keep coming back to Kingdom Hearts and reforming. His army is endless. In addition to this, Player99 has been overwhelmed by Y2X's sheer power, stating he's never had power like this before. Dark Falz tells everyone that all but the last surviving of them will be devoured, and that there is nothing they can do. Before the darkness can devour all however, a huge area behind Dark Falz and Y2X shatters in a magnificent explosion, destroying nearly half of the corrupted Kingdom Hearts! The Heartless surrounding the heroes suddenly vanish as Falz and Y2X turn around to take a look at the offenders...floating through the reaches of space confidently are Star-Lord and Nova! Dark Falz and Y2X seem somewhat frustrated that these two men have interfered, and as the heroes get up Cole recalls a group known as the Guardians of the Galaxy whom he was apart of until a battle against Pennywise the Dancing Clown caused one of their allies Rocket Raccoon to die, so they split up for a while and didn't make contact - The Weird Rider assures everyone that those 2 are their allies who have come knowing how much of a threat these two villains pose to the universe. Before anyone can do anything however, the rest of the corrupted Kingdom Hearts begins to shatter from the sheer power from Nova's mighty blast and breaks up into countless tiny pieces! Everyone is forced to float about in space but thankfully can still breathe thanks to video game logic. Nova doesn't waste any time blasting Dark Falz away with a powerful energy blast, pushing him back far enough so he and Star-Lord can fly over to their comrade Cole and speak to him. Star-Lord tells Cole that the both of them are the last Guardians of the Galaxy remaining, asking if he'd like to do a 3-man team up on Dark Falz which Cole agrees on. The other heroes try to float towards Falz, but Y2X floats towards them as to impede their progress, telling them that they're no longer needed and he'll outright destroy them from here. Creating a circular arena from the lingering bits of the corrupted Kingdom Hearts, Y2X challenges them all to a hellish battle.

BOSS BATTLE - Y2X


All 20 characters minus Cole are available for this battle, but you have to start off as Player99 and pick one other character as a reserve. This battle is simple enough, but if Y2X manages to use his Pummel on you when you're corrupted he'll instantly take control of Player99 and the reserve character will be forced out - you'll need to KO Y2X's leftover Clockwork and can only win by doing so as KO'ing Player99 will result in an instant Game Over. Worse off is if Player99 is KO'ed early on and your reserve character happens to be the victim of Y2X's Pummel while being corrupted of which will also result in an instant game-over.


BOSS BATTLE - DARK FALZ


A basic 3v1 against Dark Falz with The Weird Rider, Star-Lord and Nova.


Both Dark Falz and Y2X have dissipated simultaneously, bursting into bits of darkness and red electricity. Is it finally over? Everyone seems to let their guard down for a moment, but that's when all those bits of darkness suddenly fly towards Nova! The superpowerfulsuperhero screams horribly as he clutches his head in pain, with Star-Lord realizing just how grave the situation has gotten...we hear a voice that sounds like a combination between that of a mindless machine and a great evil, presumably Y2X and Dark Falz's combined, they stating that they've found the perfect host due to Nova's sudden arrival, and with his immense power they're going to wipe out the universe immediately, leaving nothing but pure power in their wake. Nova's voice reaches out, telling Star-Lord and everyone else who has floated towards the hero to him to put an end to him before the universe as they know it is destroyed (he won't be revived due to the nature of this world, mind you). Pure power suddenly surges through Nova, covering everything in sight as everyone covers their eyes to block off its awe.


=============


Finally, everyone minus Nova finds themselves in a pitch-black space, and Kanade's voice telling them that she's using all her power to contain them in a large sphere of light that's blocking off all the immense power before it can reach out to the rest of the universe and destroy it, along with granting all the heroes her blessing so they don't get decimated by the sheer darkness. She tells them they must do battle with Dark Falz and Nova, putting an end to them once and for all. Her voice then fades out, and a monstrously dark being appears, not looking satisfied with the fact that its destructive rampage has been halted. Letting off a shriek, it attempts to destroy the heroes to let off its frustration...as things look dim in the deepest depths of darkness, everyone is covered with a hue of light that grants them strength, realizing that this IS indeed the final battle...


Final Boss Battle

This is THE Final Battle! You get a total of 21 characters, who I remind you will have Angel's Swords on them if you equipped them with such. Characters will pass on from battle to battle, and so will traps and buffs.


FORM 1 - RONALD MCGIYGAS


You have a stage twice the width of FD, and any attack you deal on McGiygas will damage him given he's covering the entire freaking screen. That said, has has 2,500 HP which is going to take quite a while to bring down. He also has many, many attacks that will all hit you no matter where you are, being able to cover the entire screen with projectiles and even suck up your traps and turn them against you. The general strategy is to have him focus on one character while the other sets their traps and/or attacks him, the latter of which is better in some cases where Donald won't be able to convert them.


The characters you used to finish off Donald find themselves in an area that looks like outer space. They're standing on a platform that looks like it was ripped from a space station as a lone man walks and points his gun to you. His amour is imposing, and he seems to have the same presence as Nova...


FORM 2 - SUPERNOVA


This battle's a bit easier than the last, but it's also fairly tricky. Supernova is basically Solid Snake whom you have to knock off the Battlefield reminiscent stage like a normal character, but his attacks boast power on levels comparable to bosses and also come out fast to boot, along with being as strategic and intelligent as a MYM character. Shortly after the battle starts he won't hesitate to fire off a beam that has looks as if it was ripped from the ones fired on the Spear Pillar stage, the likes of which deals 25% and can kill at 75%. He changes strategies based on what you do: if you decide to have one character go after him and the other set-up he'll fly on a Kang-esque platform and send out small orbs which can fire laser beams off at the both of you and require to be shielded or greatly outmaneuvered should you desire to not take too much damage. Other attacks Supernova will use include firing off giant fireballs across the screen that set off MASSIVE EXPLOSIONS upon connecting with a target or going off the blast zone, ignoring shields and almost killing you instantly should you fail to dodge or get away. He'll also strategically use portals to manipulate the trajectories of his projectiles, fire missiles into the air that don't come back down until later on but deal massive damage, fire a chain that brings you to him while he plants bombs onto you and finally a device that shuts off your traps but can be destroyed with melee attacks. This fight effectively requires some strategy, though it's easy enough to overwhelm with some force and good team strategies - the both of you might even want to gang up on the masked man!


Supernova's amour breaks off and indeed reveals himself to have been a possessed Nova all along, telling Star-Lord and everyone else "Goodbye" as his body fades away into nothingness. There's no time to be sad however, as Dark Falz/Y2X are maddened at losing their host, deciding that they're going to use all the darkness at their disposal to finish off these pathetic heroes so they can do nothing...


FORM 3 - EREBUS


All the characters you have left now must fight against this monstrosity, the grand manifestation of darkness. The arena is exactly like it is above only Erebus is in the background, peering at you with its two heads that represent Falz and Y2X though you totally won't know that. Erebus uses no tricks unlike the previous two forms and always stays where he is, but is absolutely brutal to the point where he will never stop bombarding you with attacks: expect to see many magic-based attacks of Fire, Ice, Electric and Wind which target your character at a rate of every 3 seconds and occasionally can spread out to attack allies near you - getting hit by any of these will result in your character taking 25% that'll kill them at 75%, but the worst thing of all is that these magic attacks are ALWAYS active and Erebus will be using other attacks during this time. Thankfully every 1% the monstrosity takes delays the time it takes for a spell to activate by 0.5 seconds and even with these delayed times they're still telegraphed, but you have a whopping 4,000HP to deal with. Erebus usually alternates between using a horrific cloud of poison that covers the ground and deals a certain stat effect for 15 seconds (this cloud comes from the swirling darkness resonating from the ground beneath him) or using a ridiculously powerful attack that can kill you almost instantly: his clouds can deal poison damage of 3% every 0.5 seconds, slow characters down, puts shields down to 1HP, halves characters attack power, slow them down, prevent them from dealing damage while they're inside, instantly break shields or even instantly KO characters who stay inside for more than 3 seconds. Erebus' main attacks involve biting down on you to deal super high knockback, clawing at you, pointing to cast a death spell that instantly kills you should you fail to dodge or even simply using mighty blasts that spread out in a huge radius. His worst attack however, is Original Darkness which he'll attempt to charge for 15 seconds via a blood red sphere of darkness while his elemental spells and single grounded trap are still in effect, and should you fail to deal about 100% or so to him you'll receive an instant Game Over. Indeed, this isn't so much a battle with gimmicks involved but it can be incredibly frustrating and you constantly need to stay on your guard - there is no shortcut to winning, but at least you get to see the ending after this...


Erebus splits into the two original entities Dark Falz and Y2X, who are writing in pain as red cracks form around their body. Kanade's voice can be heard, telling everyone that the two dark entities are planning on releasing all their power to bring them down along with themselves - this power could wipe out untold parts of the universe if not all of it, and that's why Kanade is volunteering to stay behind as a sphere of eternal energy that can keep the power at bay so Dark Falz can never revive again. She tells everyone that she's enjoyed her time with the team, and that she's proud of what they've managed to accomplish. The likes of Kirika, Yutaka and Naoto who actually spent a lot of time with her don't want Kanade to go, but they realize they have no choice as their bodies are fading into particles of light as Kanade tells them she's sending them back to their world, where they can live the united lives they've all chosen...she hopes maybe she can come visit them one day and see what they can all do together. With that, the heroes all vanish into light as Dark Falz and Y2X burst into intense darkness that fails to creep through Kanade's barrier before it dies down into nothingness.


=============


All 25 characters have been sent back to the same wasteland island that The World That Never Was merged with, where the light has returned to via the sky being clear and the sun shining down blissfully. Without exception, everyone collapses onto the ground, having no energy left to stand, only lie on their backs and watch the peace of the sun shine down on them. Sakurako and Himawari comment on how nice the sun and clear skies feel after being away from it all for so long, with Yutaka adding on that this very moment in itself makes her glad she's alive. Kirika wriggles Yutaka and holds her tenderly as if she was her mother, telling her that she helped play a part in all of it and that she should be very proud of herself, which makes Yutaka blush cutely. While some of the characters are content with lying on the ground and enjoying this priceless moment, there are others who would prefer to worry about the future in the present moment, and have stood up, not being completely satisfied. Star-Lord, for one, is lamenting over the loss of a great hero, Nova - he states that although the world has been saved, it could have been done without Nova, and without him who knows what kind of threats could take Falz's place and ruin them. Cole walks up behind Star-Lord and places a hand on his shoulder to console him, telling him there's no need to worry about stuff like that - Nova may be gone but the world was saved via the combined efforts of EVERYONE here, not a single person that can't be accounted for....except maybe the Keroro Platoon. Cole states that he and Star-Lord can start up the Guardians of the Galaxy, even hopefully inspire others across the universe to help them defeat threats like Dark Falz and Y2X - The Weird Rider praises everyone for what they did, especially those who had no magical powers or special training to begin with, stating that he and Star-Lord are planning on starting up the Guardians of the Galaxy again, and that he would be honored if anyone who has participated in this great battle joined up with them as full-fledged members. Most of the characters deny the humble request, deciding that now that the world is saved they'll want to go on and actually do things with their lives, picking off from where they left off - besides, that last adventure was more than enough for most. Weird Rider understands, with only Player99 accepting this request because he's always been inspired by the Guardians of the Galaxy, even if he thinks Nova ripped off his style. The 3 decide to head off, wishing the others best of luck in their new lives and that perhaps one day they'll see each other again when the time is necessary.


After that fateful event, months passed as everyone continued with their lives...

Roxas and Axel, who had sent everyone back home with the corridors of darkness, decided to stay on the island and search for anymore Heartless or Nobodies that were there, or possibly traces of Kang or Fibrizo's armies. Despite being accepted by everyone else the two decided to look after the World That Never Was and turn it into a haven of sorts for any surviving Nobodies or those who would become one in the future, where they go out and interact with others in order to regain their hearts. The island would also be used to help those shipwrecked get back home via corridors of darkness if they ever got lost.

The school Yu goes to is revealed to be the same one that the likes of Kirika, Sakurako and Himawari attended. Naoto follows Yu to that school and declares her love for him, and that they when graduate and become adults they'll get married and become proper police detectives. Together they manage to solve many cases, but not all so extreme that the world is at stake.

Nothing changes for Sakurako and Himawari, who continue to bicker with each other as usual, perhaps only aside from the fact that they know of more people at their school to mooch from to help them complete their Student Council Activities: Yu and Naoto are frequent victims of this, and Kirika has to constantly keep them in check to make sure the two arguing girls are actually doing things for themselves for once.

Gray, Agiri and Night's End Sorcerer decide to open up their own Magic Guild of sorts in order to give everyone similar opportunities so they're not completely defenseless. Aside from that, they both go on missions to collect bounties and rewards of sorts, usually teaming up with the 3 Flame Hazes whom they have very good connections with. The 6 of them are usually the ones who go on dangerous missions, with Shana and Agiri occasionally transferring to different high schools for certain missions.

The Keroro Platoon try to invade "Pekopon", but become the first victims of the newly formed Guardians of the Galaxy, whom they are forced to join in order to save many other planets they admit they wanted to take for themselves. They swear to conquer earth one day, but Cole tells them that won't be happening.

Jeanne is unfortunately prosecuted for crimes she had committed before any of the events in the SM had happened. Her prosecutor is unfortunately Manfred Von Karma, who is revealed to have survived the events on the island and have had possibly killed Kang - he gives evidence and statements that suggest that Jeanne had in fact conducted kidnappings of many individuals who had supernatural abilities like those she wields for a crime syndicate she used to work for before it was destroyed by Fibrizo and she was brainwashed by him. Jeanne actually admits to all the charges laid against her, and given she's a teenager is only forced to enroll at the same school the likes of Kirika attend.

Kirika and Angel admit their love for each other and get married (No, I'm not even joking), deciding to live together and adopt Yutaka due to being unable to have a sexual relationship with each other. They also take in Cherry as a pet, who seems very attached to Yutaka. Kirika and Yutaka attend the school along with Sakurako, Himawari, Yu, Naoto and Jeanne, with Angel deciding to quit his job as a teacher before he causes any more "accidents".

Among all this, it is revealed that the Nobodies of Xigbar, Xaldin, Vexen, Lexaeus, Zexion, Saix, Demyx and Luxord were reborn in various areas across the world where they first became heartless due to both their Heartless and Nobodies being destroyed - the cool thing was they all retained their powers from before. Marluxia and Larxene were not reborn due to not wanting hearts. All these former Organization members have retained their memories of their time as Nobodies, but don't hold any grudges and with some convincing from Yu, Naoto and Angel they decide to work at the main high school which would be turned into a kind of training facility for giving everyone equal combat opportunities - Demyx and Luxord were the only ones who decided not to join. Braig (Xigbar) became a Phys Ed teacher with a fetish for bodies, Dilan (Xaldin) and Aeolus (Lexaeus) became bodyguards who guarded the front gates from intruders (boring job for boring characters), Evev (Vexen) taught people SCIENCE and how he wanted to be like his hero Jin-Gitaxias in rather crazy manners, Ienzo (Zexion) became a librarian who greatly encouraged people to read but had to put up with gay ponies wanting to steal books he worked hard sorting out with his partner Raspberyl, Isa (Saix) became a strict English teacher who liked to smack people with books if they didn't listen and was rather harsh. Demy, yes, his true name was DEMY because Xemnas was lazy upon naming his Nobody and just added an X at the end of his name, actually had to attend this school along with everyone else. At night times however, he played in a band with along with Angel and a clone of Kanade Tachibana leftover from one of Vexen's experiments, creating a popular rock band they called "Angel Beats!" where they rocked off all night - people who went to their concerts were prone to experience all sorts of strange phenomenons, whether that was achieving climax or even finding themselves rocking all with Demyx's beats via using whatever they had on hand as a guitar. They seemed to love it though. As for Luxord, who's true name was clearly never going to be shown to use given how it sounds like "luck", was nowhere to be found. Some believed he was never reborn, but Izeno doubted this.


Everyone was at peace and satisfied with their lives, but there was no telling what awaited them. Clearly there were many adventures to be had by the lot, and possibly more mysteries to be solved. But for now, the peace felt eternal, and made all those tough times worth going through.


THE END


D

Deleted member

Guest
Everyone was at peace and satisfied with their lives, but there was no telling what awaited them. Clearly there were many adventures to be had by the lot, and possibly more mysteries to be solved. But for now, the peace felt eternal, and made all those tough times worth going through.
 

Rychu

Thane of Smashville
Joined
Jul 5, 2010
Messages
817
3DS FC
1908-0105-4965
A Bet with Dave entry #1 Will edit more in later

Dark Failz
That title is just there for hilarity, I actually don't hate this set that much. The flow is there for this set, but not in full swing like the Praetors from last contest, and here it seems to go for a more "versatile" playstyle. I say versatile because there isn't another word to go with is that well. Anyway, I actually do like the soul stealer thing quite a bit, as it really gives this otherwise underpowered boss quite a bit of leeway and lets him competently rack damage and all that good stuff. That said, it is a bit underwhelming of a set, and I unfortunately can't see myself voting for it, at least at a higher level.

D&D? What is this, 1977? (the Beholder)
I'll admit I've been a big fan of your D&D sets since Gelatinous Cube, and this one doesn't disappoint either. There is quite a bit to work with here, as the Beholder can do so many things with that Neutral Special. That said, there isn't much to flow like some of your other sets (most notably Fire Snake and Kobold Clan, the latter a very underrated set in my opinion), but since it was made in such a short time, I suppose it's only natural the thought process isn't all there. That said, noble effort, but I think it's best you stick to sets made over a longer period of time.
 

Katapultar

Smash Lord
Joined
Nov 24, 2008
Messages
1,284
Location
Australia
Emi Ibarazaki


A short 151cm tall girl forced to walk on prosthetic legs after a car crash, though she is incredibly athletic and energetic to the point where she actually considers these new legs to be a blessing instead of a disability as they seem to increase her efficiency when it comes to running. Her energetic yet stubborn nature gives her a tendency to run around the place however, which acts as both a danger to herself and others around her.​


Stats

The energetic Emi is a little lightweight, but her incredible athletic prowess and prosthetic legs let her run at a speed slightly better than Captain Falcon's (her walking and running speed happen to surpass Sonic's by the way) and give her an aerial game similar to Captain Falcon's, as well as excellent traction due to the nature of her prosthetic legs, though she has a bit of a hard time turning around with them. Said legs also give her some unique mechanics due to their artificial nature; as they're not part of her main body they don't take damage of any kind, though Emi will automatically trip if they're struck by an attack while she's on the ground...which is when the legs briefly turn into a curse, as it not only takes a whole second for her to get up from being knocked down or tripped but she has no invincibility frames while doing so! Fortunately though, Emi will simply slide back across the stage a little if she's made to trip again whilst being tripped (this does not stack or reset the time she's down for) and she'll never be made to trip by the default Brawl manner. Her metal legs allow her to walk over goop and other uncomfortable terrains without suffering from their effects so long as they don't reach her human flesh; this also allows her to walk over traps like motion-sensor bombs without activating them (must be something built in the prosthetic legs...;)) and lets her walk over downed characters without having her movement halted one bit - she will in fact trample over these characters for 4-11% depending on whether she walked or dashed over them, or even landed on them , which causes them to slide back along the ground a small distance from where she came from; if the victim in question would be pushed off the stage they'll most likely end up grabbing the ledge, but otherwise will be forced to recover.

We're not done yet either. As a tribute to her initial appearance in the series, the front of Emi constantly acts as a hitbox while she's dashing; if she would make contact with a foe or wall during then she'll slam the former away for a mighty 25% that KOs at 100% before falling back and tripping herself! Emi can't help it, that's just the way she is! In any case, this is essentially a high-risk, high-reward damaging "move" that leaves Emi open to attack, though luckily it also inflicts an insane amount of shield pushback if enemies try to avoid it through such means, usually around 2 SBBs worth. Emi will also out-prioritize any weaker attacks that would make contact with her damaging hitbox during her dash that gives her a kind of "Super Amour", though she can still be made to trip or even grabbed out of it her dash.

One more thing I should mention: because I would assume prosthetic legs to be lighter and less dangerous than the chunks of meat that are human legs, Emi's footstool jumps do not put enemies into footstooled states though in exchange hers propel her twice as high than normal characters to the point where she's allowed to footstool jump up to 8 times in the air instead of the usual 4.​


Specials


Neutral Special - Hustle!

Oddly enough, Emi eagerly reaches out with one hand and uses it to grab hold the target's arm; she wants you to race with her! The foe is unfortunately obliged to do so, and will be forced to manually follow and keep up with her without being able to attack so they don't get dragged around and left in the dust; the consequence for this is being forced into a "pseudo-downed state" of sorts whilst being dragged along the ground behind Emi wherever she wants to go for 1% per 0.5 SBBs distance until they escape with 1.5X grab difficulty, are dragged along the ground for a total distance of 4 SBBs or being left to lie on the ground where Emi would run off the edge of the stage. In any case, the foe will be deposited in their downed state, all bruised from Emi's harsh 'training'!

If Emi managed to outmaneuver and drag her foe in the air however, they'll be forced to latch onto her in an animation almost identical to that of the one used to grab ledges! This works in a similar way to the grounded version except enemies don't take damage from being dragged around in the air, but if Emi managed to drag them for the whole 4 SBBs distance she'll end up "flinging" them in the direction she was moving for half the speed and distance she was initially moving at in the air, so don't expect too much out of this if you try to use it to drag enemies offstage and gimp them with it. Interestingly enough however, being flung is akin to knockback in that the victim is capable of slamming into more for certain damage that usually ascends to no more than 18% that KOs at 155%, though if they're otherwise slammed into a surface they'll instead take 10% and be knocked down. By the way, Emi is still able to use all her attacks whilst dragging a foe around, though they'll always be behind her unless she's in the air so a number of them may be rendered quite useless.

While enemies are generally at a disadvantage not only in speed but because of the last statement from the above paragraph, if the first part doesn't apply to them they can actually be the ones who drag Emi around! This'll obviously result in Emi being dragged around by foes in the exact way she would, with they actually being able to attack this time around; while this'll only usually occur against characters who have a faster dash, jump or falling speed, otherwise slow enemies are still able to drag Emi around if she would try to stand or go at a slow pace in order to use one of her attacks which will simply result in her enemy dragging her around. And that's even worse for her than it is for her foe due to how difficult it is for her to get up with her prosthetic legs; it's not difficult for enemies to just turn around and get a free shot on her from there. Thus, for all the potential consequences it can bring about, dashing is usually and always the best option for Emi if she wants to leave her opponents floor'ed and reach the finishing line herself...​


Side Special - Eat My Dust!

Ah, the one Special you can actually use from a Dash. Assuming you did just that, Emi will suddenly leave a comical trail of dust behind her! Strange, I didn't think of her to be that type of competitor. Emi will kick up dust for as long as you hold the input and continue to dash, the dust in which will remain behind her as a 1 SBB tall and wide transparent cloud that stays around for 3 seconds; while enemies are inside it they'll take 1% per second and/or for every 0.2 SBBs they travel, have their chances of tripping doubled, suffer a 3/4 chance of missing with their attack (even if it's a projectile that leaves the cloud) and take an extra 2.5% with low set hitstun after every action they perform that would transition to standing still, whether it be an attack or something as simple as dashing or shielding. This is really a pestering attack more than anything, which can throw off pursuers or even be used to punish foes who would spotdodge Emi's attempt at crashing into them but best of all work for a nasty combination with the Neutral Special by dragging and knocking foes down into the dust and forcing them to take stun+damage when they try to get up. Note that using this attack whilst standing will have Emi enter a lunging position of sorts that makes her leave the dust behind her if she would dash out of it via standing on the ground or using it in the air and landing on ground afterwards; this allows her to use her Dash Attack, shield or grab/throw an item at the same time without having to waste that dashing time leaving the dust behind.​


Up Special - Springy Prosthetics

You think you'll be safe in the air just because Emi's a good runner? Feel the power of her super springy prosthetic legs! Boing! Using this move on ground has Emi bounce into the air like Sonic would for his own spring except she suffers starting lag akin to Fire Fox but is able to charge the move for twice that amount of time to go twice as high! During her ascension, the top of Emi actually operates like a hitbox in the same manner as her dash; this version is less consequential than the Dashing version since Emi is only footstooled all the way to the ground if she would connect with an enemy or a ceiling, and in fact has extreme chances of KOing due to how close enemies will be to the top blast zone...just don't try pouncing enemies offstage, or Emi will be footstooled all the way to down to the abyss! Speaking of which, using this move in the air is identical to Sonic's spring, with Emi naturally being able to use her aerials afterwards if she doesn't hit anyone on the way. Since this move is very powerful, it can somewhat "scare" enemies who try to take into the air to get away from the energetic Emi's dashing attempts, with she being able to out-prioritize most spiking or downwards hitting attacks that would otherwise hinder her progress. The move is also quite scary used when you have a foe dragged around with you since you'll likely end up flinging them quite far quickly into the air above you, but you cannot send foes to the top of the blast zone for a KO this way.​


Down Special - Speed Demon

Emi gets into a "starting" position not unlike one you'd see from an athlete at the starting line. This has a bit of lag to it, but shortly afters Emi will blitz forth at impossible speeds and end up on the other side of the ground in a blurred instant! To some thankful degree Emi won't crash into her foes but rather will move past them, though she'll still leave dust behind through the Side Special which you can use before this input. You can also use this in the air to dash down towards the ground almost instantaneously, which is great for slamming your dragged enemy into the ground where you could easily trample on them to push them back off the stage or even wait until they get up so you can run them over with your dash!

You can in fact use this on the ground whilst dragging an enemy along with you, though it's not all that effective since they can easily drag you around instead during the start-up lag you suffer; note that you can use it safely while you've got the foe all dragged around and helpless, which will leave them downed where they should naturally be from having traveled the distance and you at the edge of the stage for what is overall a quicker and somewhat more time-efficient way of doing things. Otherwise this can be a rather annoying way to travel around the stage if foes try to corner you and you could even continually spam it in tandem with the Side Special on a stage like Final Destination, though beware that this move in fact stales very easily and consequently becomes progressively slower each time you use it more than once in a row...besides, isn't actual Dashing much more fun?​


Grab

Emi's grab simply has her reach out with both hands and hold the enemy's hip. This is a fairly normal grab for the most part, but if it's successfully pulled off out of a Dash Grab Emi will in fact keep her amazing momentum as she and her newly-held foe slide along the stage's floor! The two characters will in fact slide all the way across the stage's floor, though they'll somehow never go offstage to prevent any cheap suicide KOs; as the two characters are travelling they become a hitbox with the same properties as Emi's Dash except they'll go right through other enemies though they'll stop at any walls, in which will result in the foe being pinned against it for a token 10%. Also, note that if a foe would escape from Emi's grab they will always stay in place and Emi is not only pushed back but also knocked down by the force; this prevents foes from being KO'ed on walk-off stages just by trying to escape from the grab and actually punishes Emi if she doesn't follow up with a throw. Note that if Emi grabs foe while she's dragging one around with her Neutral Special she will let the victim of the latter go and focus her attention on her new one. For her Pummel, Emi simply beats at the foe with her head for 3%, and that's all.​


Neutral Special

This variation remains largely unchanged to the normal one, except here Emi will continue on with her grab and will drag her foe along with her afterwards if applicable; you'll actually have to perform a successful throw to do this because if foes escape from your grab you'll be knocked down and they'll be able to drag you where they like.​


F-throw - Leapfrog!

Emi places her hands on her foe's shoulders and propels herself over them! This only inflicts a mere 3% to the foe and places Emi in front of them, though if you hold the input for the entire move Emi will perform her Dash right away. Since this throw doesn't inflict any knockback Emi can't score any cheap KOs by dragging her enemies to the edge and knocking them away and she can't suicide KO with this since she'll be the one to die first, though it's possible drag your enemy offstage and fling them into the abyss for a KO providing you know the stage's length and the foe has enough damage percentage to stay with you the entire time without escaping. Do remember however that your foe can still potentially drag you around so be careful...still, you don't HAVE to use this throw just to drag your foes around.​


B-throw - 360 Propellant

Emi runs around her foe whilst balancing herself on their body with her arms before dashing the other way; the foe doesn't take any damage whatsoever but they can be left prone to Emi's taunting dust and/or dragged around by her. What a rascal!​


U-throw - Wake-Up Call

Taking extreme measures to inspire her "partner", Emi runs in circles with them for over a second whilst holding their hand before tossing them into the air! This deals 7% to their dragged body over the process and sends them about 3 SBBs into the air (KOs at around 150%), all whilst creating dust in the small area where Emi ran around if you used this from a Dash with your Side Special active. The foe won't be too happy with all that dust they got from being dragged across the ground either (regardless of whether you used the Side Special or not), which is formed along their flight path and serves as a mild annoyance as to when they come back down or need to face off against Emi's Up Special killer - tossing some dust around the stage during this time isn't such a bad idea either.

If you use this throw with your dragging Neutral Special active Emi will be shocked as she's still holding her foe's hand after flinging them, resulting in her being dragged up with them! Emi suffers the same hitstun her foe took as neither character has a frame advantage over the other, but from there it's fair game as to who gets to drag the other around. Your Up Special makes that shockingly easy however.​


D-throw - Pushing the Limits

Emi shows her moody side to the foe and begins pouting, realizing they haven't been taking their exercises seriously enough! Comical anime veins will accompany her until the next time she manages to drag a foe, is dragged by one via her Neutral Special or manage to dash for a total of 4 seconds afterwards - should the former situation occur and they be dragged by Emi, she'll kick her poor foe away as they take 12% with knockback in the opposite direction that KOs at around 145% that's slightly downwards orientated if it was horizontal, in which case grounded foes will almost always enter prone from such. You cannot drag a foe to get this move's effects immediately however as Emi lightly kicks her foe away for 3% and flinching knockback that has no regard for whether she's got the Neutral Special active in which will be canceled if you do.​


Standard

Standard - Running in Place

Emi does just that! As if saying "you're too slow!" like Sonic does but without saying it, Emi is treated as dashing in place! She won't be able to crash into enemies of course, but she'll still place a dust cloud behind her via the Side Special, albeit one that won't have its timer start until Emi stops running. You will of course have to start-up the Side Special again to use it with your actual Dash what with this essentially being a way to make dust behind you and essentially make back attacks useless against you, though Emi's legs also act as damaging hitboxes that inflict 1% with some surprisingly good "fixed" horizontal knockback that usually sends enemies flying at around 115% and KOs at 205%. Emi's legs can be out-prioritized to make her trip however, or you can simply use an attack that hits her directly, though in any case you can actually cancel this into a dash (which the dust will be passed down to as she goes), albeit one that you can't perform any other actions out of and where you'll have to stop. Even so however, this move has some good taunting uses, such as having Emi use it facing away from the edge and you kicking dust into the enemy's face to pester them and wreck up their attacking recovery. You can also use this to seriously annoy the crap outta enemies while they're downed from you dragging them around via the Neutral Special, though you might as well just run around with them instead unless there's no real space left to do so without having to turn around.​


Dash Attack - Power Leap!

Your mechanic already counts as a "Dash Attack" of sorts, so you may be wondering...just what in the heck does this attack do then? Well, it makes Emi leap into the air in joy as if she had short-hopped from there except she'll go flippy and cry out in joy, so no mindgaming the foe. While Emi won't be able to follow-up with her aerials or any other kinds of jumps from there she'll be able to crash into enemies whilst in the air and consequently put herself in a footstooled state afterwards; you can in fact charge this move to make Emi jump to the maximum height of her first jump, but from there enemies will always be safe from your crashing attempts elsewhere or with a well-timed air dodge. This move can be scary good as an edge-guarding move too since it obeys the Brawl laws of Dash Attacks that prevents it from being able to carry Emi offstage with a use. If Emi doesn't end up crashing into a foe afterwards she'll simply return to ground albeit be left prone for a while due to such, though for the most part that shouldn't really be a problem.​


F-tilt - Floor Scraper

With utmost enthusiasm, Emi quickly performs a one-handed handstand (for N-spec purposes) whilst scraping the floor with her prosthetic legs and finally performing a backflip that puts her at around half a Platform from where she was standing before. The impending kick inflicts a decent 8% that knocks enemies backwards and can KO them at around 195% for a simple launcher move, with the metal legs being able to out-prioritize certain attacks and keep Emi performing her attack even if she were to clank with another attack. And while the attack doesn't have any problems with starting lag and acts as a good offensive/defensive move of sorts, it has a fair bit of duration to it via the backflip as well as Emi needing to regain her posture a little as her prosthetic legs naturally bounce in place a little after landing. Using the attack in itself actually counts as Dashing however so you can use it to spread dust in front of you to pester enemies; the attack also has a function with the Neutral Special in that since Emi is performing a backflip to where her foe should be located she'll end up footstooling them with her prosthetic legs and knocking them down, as well as crushing them for the usual 11% and knocking them back and out of the dragging.​


U-tilt - Small-Time Springing

Boing! Emi uses her springy prosthetic legs once more, bouncing up and headbutting aerial enemies for some bite-sized pain! The damage only amounts to 7% that KOs upwards at 215% mind you, but the real value of this move comes from Emi being bounced up into the air a wee distance that's comparable to Squirtle's U-tilt, with all this being providing you don't mind a little bit of an obligatory delay what with Emi having to require a bit of momentum with her springy legs. Emi stays in the for thrice as long as Squirtle would too, which'll have enemy attacks that would usually hit her instead hit her legs without any consequence to her since she won't be on the ground, with you being able to fastfall back to ground, transition into an Aerial attack or even footstool the enemy if they happen to be under you, something you should almost always be able to pull off in said situation providing the enemy isn't shorter than you! In any case, Emi has quite a lot of options she can pull off out of this one move for both offensive and defensive purposes, though you should only use this move if you don't mind a bit of lag and are willing to be delayed ground-game wise.​


D-tilt - Getting Back-Up

Emi's crouch places her in rather a casual position where she leans back a little with both hands behind her touching the floor to support the former action, while her prosthetic legs are laid out in front of her in a manner that'd make one think they're sleeping. In any case, the crouch puts Emi's prosthetic legs ahead of her and in such a situation that exempts them from causing Emi to trip from being attacked; as a result, they can be used to defend against certain low-lying attacks such as Pikachu's Thunder Jolt which would otherwise cause her to trip out of her dash, though do keep in mind that the rest of Emi can still be damaged normally and she will in fact trip from any attack that would directly connect with her main body. Emi's prosthetic legs also "push" any enemies back who would try to go through them and can in fact protect their master from low-ranged grab games, something she doesn't have invulnerability from while dashing.

Using the D-tilt attack has Emi throw herself back up by pushing her hands off the ground, which consequently causes her main body to extend forward as a hitbox that slam enemies for 5% and knocks them down in front of Emi or simply meteor smashes them if they're offstage. While the start of the move has no real starting lag to it, there is some ending lag but not enough for you not to be able to follow-up on enemies via trampling them and pushing them back, which really makes this move inflict 16% in such case.​


Smashes


F-Smash - Super Sprint!

Emi in fact moves back at her walking speed during the charge, and afterwards, she'll attempt a super-crazy Dash that'll have her move across the stage as quickly as Super Sonic! While Emi won't be able to stop or do anything else out of this truly mad dash, she will crash into unlucky foes and inflict a rather crazy 36% that KOs them at a ridiculous 56% but leaves Emi prone for twice as long in that case, and pushes them back quite far if they attempted to shield the move. Emi doesn't stop her dashing attempt once she reaches the edge of the stage however, as she'll simply turn around and dash to the other side right away! She'll do this up to 4 times in succession depending on how long you charged the move for before she's forced to catch her breath in place for some rather high ending lag.

If you don't end up damaging, or more like KO'ing a foe with this ridiculous finishing move however, this is but yet another one of those obviously good moves for scattering a looooot of dust around the stage...which can actually help you hit jumpy enemies; remember how I said that foes take some damage and hitstun when they perform an action that would transition into standing when they're inside the dust clouds? Well, if they try to spotdodge or roll around your attempts to crash into them, they'll simply take damage and stun in the process...which will in fact stack from all the multiple dust clouds Emi will have created from her continuous dashing attempts! This obviously doesn't guarantee that foes WILL be struck by Emi however, as the stun they'll take will never be enough to keep them in place long enough for Emi to run back into them again unless they're on a really small stage, and in any case they can simply try and stay in the air or on another plane if Emi's dashing attempts would really resolve in such a small amount of time...not every stage is Final Destination, you know. You can also perform the somewhat difficult task of trying to drag a foe along with this move via the Neutral Special, which will have them be forced along for the ride for as long as Emi runs, but if anything this is mostly a fun little move for clearing the field of enemies and scaring the crap outta all of em; think of it as an extreme version of Jigglypuff's Rollout and you're all good to go!​


U-Smash - Obligatory Exercises

Even Emi knows how important they are! She'll stand in one place doing all sorts of stretches and what not...this may seem kinda silly as you could be using this time to ram your opponents and win, but trust me on this one because exercising makes Emi move slightly faster as time passes! In truth her movement speed increases by an barely notable fractional amount with slightly more efficiency as more time has passed; this will keep going unless Emi does not move via walk/run/dash or jump on her own accord for 6 seconds or is attacked, so be sure to keep on exercising! You may be surprised how effective doing so is in the end, and might even surprise your opponent if you crash into them at a speed they weren't expecting! This is especially dangerous with the F-Smash since you can throw off the foe's timing to dodge your movements and end up crashing into them in, along with other fun little things like aerial shenanigans.​


D-Smash -Trail of Win-d

Emi appears to be scraping against the ground with her foot, kinda like how a bull would! After charge she'll be ready to blow the rest of the competition away with her speed - literally! Whenever you would perform a Dash after using this move, the sheer force of Emi's speed will leave behind a powerful gush of wind that blows away enemies half a Platform behind Emi about a Platform's worth of distance during the very moment she starts up the dash at the cost of having it delayed for a fractional moment. You'll get 1-5 uses of the wind depending on how long you charge the attack for, though you can't reset the uses by re-using the move while you have at least one use; you'll be able to tell if you see Emi scraping her prosthetic legs on the floor during her idle stance, but otherwise you have no real way to tell.

The gush of wind has some obvious interactions with Emi's other moves. For one, it will actually blow away any dust she leaves behind from her Side Special for as long as she dashes, which causes it to spread out horizontally all the way behind her at the cost of it ceasing to be once Emi stops dashing; this is especially good in the case of the Standard, though do note that in this case the wind will drastically weaken over a short amount of time and the dust will gradually return to its normal range after around 4 seconds. This added range is especially helped by the obvious fact that foes will still be blown back into the dust even while it's active in order to make their lives more difficult; and for even more added fun, you can even blow enemies away while you're dragging them around with the Neutral Special, which will cause them to be pushed back with very slight additional downwards pushback that'll keep them in their downed states if they were on the ground: by adjusting whether you want to drag the enemy around or not from your grab, you can use your throws to set them up and push them away where you want them! You can also have the wind set for your multiple dashing attempts via the F-Smash to blow dust all around the stage like crazy; higher dashing speeds like that seen in the said move will actually strengthen the wind's duration to 0.7 seconds or even 1.3 seconds if you have it active when you use the Down Special! While these interactions have some good uses to them however and can make the foe's life more difficult, they do kind of get in the way of making dust linger around the stage and prevent Emi from being able to drag her foes where she wants them via the Neutral Special, and do remember that Emi's dashes are delayed a little while the wind is in effect; your best bet is to try and use the wind to disorientate the enemy's positioning whilst running from them via dashing or even trying to go for a cheap gimp when you've knocked or dragged them off the stage, though enemies can of course try and grab the ledge in said case where they'll be safe from the wind. If you really want to rid yourself of the wind you can simply keep dashing and stopping in place for however many times you need to or spend it all on a F-Smash attempt.​


Aerials


N-air - Goal!

Emi stretches out her body in a star shape, as if to celebrate that she won a race! For now however, this move simply makes Emi act as a damaging hitbox that inflicts 15% that KOs at 175%. The attack ends fairly quickly with some punishable ending lag if you use it whilst remaining stationary in the air, though if you used it out of some kind of momentum such as that built from a dash that transitioned into a jump, Emi will be able to keep the attack out until all momentum is lost; this is especially good with short-hops since if Emi lands whilst continuing the attack she will roll along the ground for a short distance and acquire some invincibility frames. This doesn't actually deal damage to foes dragged behind Emi but it's capable of acting as a counter if the attack in which the foe tried to hit you with was weak enough as you'll end up out-prioritizing it.​


F-air - Second Lap

Emi performs a dual-footed kick with her prosthetic legs whilst she stretches her fists behind her energetically. This doesn't actually inflict any damage, but rather allows Emi to spring off her foe backwards as if they were a horizontal spring! Since Emi is using her prosthetic legs for the "attack" she'll have transcendent priority and will pierce through most enemy attempts of attacking her, which gives her some good defense against enemy attacks. This move is obviously geared towards recovering back onto the stage when you've ran off it or even for spacing purposes on an enemy when you've jumped into them from a dash, though it's not actually impossible to use for the former purpose since you can easily fling enemies towards the direction you'll naturally be moving in and simply kick them from there. You can in fact keep the stance out for as long as you like by holding A so you can use the prosthetic legs for defensive measures, though you'll only spring off enemies by making contact with them upon initiating the move. If you land on ground while using this move Emi will take note of this and perform a tech/ukemi which doesn't give her invincibility frames but deals 12% that KOs at 175% to anyone near her. This isn't likely to hit but can damage foes you've dragged behind you, most likely in a FFA situation where you were attempting to kick off another one whilst flying back and flinging your foe behind you as well.​


B-air - Hyper Practice

Leaning forward, Emi begins running in place in mid-air! Her blurring legs become a hitbox that hit both behind and beneath her, dealing 7% with downwards horizontal knockback that KOs at 190%. This move is very similar to Yoshi's B-air albeit with nearly twice the duration, so once you start it's hard for Emi to stop, even if she lands on ground...in which she'll immediately start dashing for half as long as she kicked for! There's more to this than you'd expect however as Emi suffers literally no lag at all from her air-to-ground transition, and also creates dust and wind-trails behind her in order to compensate for the time she spent kicking in mid-air - in other words, however long you spent in mid-air will be added onto the timer of your dust clouds and will slightly increase the range of the wind trail by 0.5 SBBs for every 0.5 seconds spent in mid-air. To further this cause you can hold A while Emi's kicking to keep her kicking, but be aware that doing this makes it more difficult for her to stop and adds length to how long she has to dash - Emi is unable to do anything to cancel out of the dash or use any moves out of it minus the Side Special, though she's at least able to turn around at any time.

This is an extremely easy attack to hit foes with when you've got them dragged behind you and helps set-up for running into them when they're downed as to hit them into your long-lasting dust cloud or even counter their get-up attack with your dash's priority. Another interesting thing is that if Emi's blurring legs make contact with a ledge behind her she'll automatically kick off it regardless of whether somebody's already on it and flip onto the stage - this won't cause Emi to initiate a dash and she'll even kick the dust cloud and wind she would have done from her dashing attempt forward as to gimp enemies you've flung offstage. This interaction is easier to pull off than you'd think too due to the B-air's duration and that Emi will be moving backwards in the air when you use it anyway.​


U-air - Iron Flip

Emi uses her award-winning legs to perform a quick flip-kick, dealing 9% that knocks foes above Emi in the opposite direction and generally kills at 190%. A fast, basic move that deals with enemies above Emi, but it becomes rather unique when you're dragging a foe via Neutral Special, for your foe will end up being flipped with you at the same time rather than take damage from the kick. This does nothing of the sorts on it's own, but it does randomize the direction in which the foe would be flung when that'd happen given how fast Emi performs the flip as to make things rather chaotic, and you can easily slam foes into other foes or obstacles within range to damage them. It doesn't help that this move is spammable either!​


D-air - Little Sister Crusher!

Emi performs a stylish flip in mid-air before dropping to the floor directly beneath her in a stall-then-fall motion! The speed at which Emi falls is sure to drag enemies held by the Neutral Special along with you and slam them into the ground for damage if they can't complete with your falling speed, though for now the move simply inflicts a surprisingly non-hazardous 5% with minor hitstun to enemies in the way and allows Emi to optionally footstool off of them in such case, otherwise she'll simply go right through her enemy and continue her descent. And while Emi herself may not be dangerous during the fall however, any foe she's dragging down with her can act as a potential damaging hitbox to other enemies depending on their weight, dealing damage from 5% with the same minor hitstun that Emi's legs inflict in the D-air to damage on par with Emi's Dash crashing if she dragged down someone like Bowser! Once Emi's fallen to the ground she can even opt to footstool the ground itself to jump back into the air in order to fling her dragged enemy up there, or at least that's what should happen if Emi had managed to drag them all the way down to the ground since they'll go flying anyway after flying for 4 SBBs distance. If the dragged victim is flung into ground however Emi can simply crush them and knock them away for a Dash set-up and even footstool off of them if she wanted to. Quite basically, how far you drag enemies distance wise can lead into various set-ups, such as using the U-air or even transitioning into the powerful Up Special.​


half_silver28

Smash Ace
Joined
Apr 25, 2008
Messages
862
Location
MYM, Ohio


Would you like to enter this 'Brawl' contest, Hanako?


I. . . g-g-guess so. . .if it's okay with you L-Lilly.


Lilly Satou and Hanako Ikezawa are characters from the visual novel Katawa Shoujo. Players take control of Hisao Nakai, a Japanese high school student who has been diagnosed with Cardiac dysrhythmia, a rare and serious heart condition. Because of this, he is forced to transfer to Yamaku High School: a surprisingly highly-funded school for physically disabled teens. Depending on the choices the player makes, Hisao can pursue a relationship with one of five female students, Lilly and Hanako being two of them. Lilly is a polite and very composed blind girl who hails from a rich foreign family. Hanako was badly scarred in a fire as a child, and was frequently bullied due to her appearance. This caused her to become terrified of interacting with people: her only friend at the start of the game is Lilly, who can't see her scarring. Hanako comes to rely on Lilly for emotional support, and Lilly, well, she's blind. So she needs someone around to help her 'see', though she can generally get around okay on her own with her cane.


Stats
Lilly is as tall as Zelda and weighs as much as Luigi. She has Falco's dash speed and incredibly good traction, and also has an unusually quick walk. She shares Mario's air speed and Meta Knight's fall speed, and can jump as high as Ike. Hanako has the same height and weight as Pit, and has Zero Suit Samus' ground speed and traction. She also has Lucario's air speed and Ivysaur's fall speed, and can jump as high as Wolf. Lilly's cane is 2/3rds her height, and she keeps the end planted in front of her in her standing position. The cane protects her from projectiles in this position, being a better version of Link's shield. Before I forget to mention it, neither girl has any special things like wall jumping.


Control Method and Mechanics
The co-dependency of these two carries over into Brawl. The pair shares a single set of inputs: Hanako possesses the specials and grab game while Lilly has most of the standards. Both girls have a limited set of aerials to themselves. As far as the control scheme goes, it's just a little complicated. Lilly's attacks are executed with the control stick (and her crouch/jump commands), and Hanako is controlled with the C-stick (this includes her attack inputs). If you're using the Wiimote + nunchuck, the control stick executes Lilly's attacks while the Wiimote's motion control is used to direct Hanako. Both girls can shield and spot dodge independently, as the R button controls Hanako's shield and L controls Lilly's. Lilly can be directed to WALK with the control stick, but cannot dash or roll dodge. . . .what gives you say?

Having been blind her whole life, Lilly knows how stupid it is to blindly (get it? (SMIRK2) ) rush into things. Therefore, it is Hanako's job to guide her around the stage and hold up enemies so Lilly can attack them. She can use certain moves to tell Lilly where to go verbally. Thanks to Lilly's heightened sense of hearing, she can hear Hanako's directions no matter where she is on the stage. Lilly is not the fastest person in the world, however, so Hanako can also grab Lilly and guide her directly at a faster pace. Knowing how to direct Lilly is very important as she is the primary attacker of the duo. She attacks using her cane, giving her moves plenty of range, and can combo quite effectively. Utilizing Hanako along with Lilly's attacks can lead to some impressive back and forth combos that can net a lot of damage or eat up shields. While Lilly generally won't move unless she receives a command from Hanako, she will automatically start pursuing the nearest foe if she stands around for 7 seconds if she receives none (if she's on a scrolling stage and about to fall offscreen she'll start climbing upwards with the intelligence of a level 9 CPU, only stopping to attack if inputs are given. Keep in mind that you still have to input Lilly's attacks regardless. But it is possible to set Lilly to CPU control at the character select screen, which can be useful for figuring out combos and other interactions.

Lilly's blindness, unfortunately, comes with a negative mechanic. When standing still Lilly will turn to face opponents, but only when they make a sound. If they land from a jump, attack near her or move along the ground at all (or stand RIGHT next to her), Lilly's heightened senses will pick up their location. Of course there is a way to make Lilly only pay attention to a specific foe that will be revealed later. While this is all good, Lilly will not immediately be alerted by rolls and sidesteps. So if a foe manages to roll to Lilly's opposite side she'll lose track of them for 3 seconds, and leave herself open to attack as she looks around in confusion. If they perform 2 rolls or 3 sidesteps in rapid succession however, they'll create enough noise to give themselves away. And obviously, if Lilly uses a move that hits on both sides and lands a hit she'll turn to face the struck foe immediately. Another weakness of Lilly's is sensing aerial foes: so she'll generally want to stay on the ground and let Hanako bring them back to earth.

Hanako also possesses a little mechanic of her own. Normally too fearful to take part in something like fighting, her devotion to Lilly and her love of 'games' motivate her to join the fight along with Lilly. However, her fears can still get the best of her from time to time. Any time that Hanako is attacked from behind, she freaks out and screams "Ihavetodogosomething!" before uncontrollably dashing one platform forward. Of course this is assuming that the attack doesn't send Hanako flying or trap her in multiple quick hits. Hanako will also take off like this if she escapes from a foe's grab. The only moves that can cancel her dash are the dash attack and side special, and those can only be used after she dashes for half a platform. But if opponents think they can easily send Hanako into traps this way, think again. Hanako skids to a stop at ledges or if she's about to hit a trap, even if said trap isn't visible. So Hanako's fearfulness can sometimes allow her to unintentionally sniff out hidden traps. Finally, if Hanako happens to run into Lilly during her frightened dash, Lilly will automatically grab her and pull her into a quick cooldown hug. This immediately calms Hanako, who breaks the hug after half a second.

The pair loses a stock when Lilly is KOed, but if Hanako is KOed first, Lilly will fully respond to the control pad. She can still be tricked by foes that roll behind her or don't make noise. She will turn around automatically after 2 seconds if all enemies are behind her and upon reaching a ledge, but she remains very vulnerable during those moments. Moves that hit on both sides are even more important when Lilly is alone, since she has the need to check her surroundings constantly.


Specials

Neutral Special: Direction
As you might guess, this is the move that allows Hanako to verbally direct Lilly around the stage. If you tap B once and give no other input, Hanako will stammer for half a second (Lilly. . . um. . . uh. . .) before simply saying "Go!". Lilly will immediately react to this, dashing after the nearest foe. Though the definition of "nearest foe" is subject to change. Lilly will not attempt to go after foes who are airborne (if all foes are in the air, she will wait for one to land and then start pursuing). Lilly will also prioritize foes that she is facing towards over any that are behind her. If all foes are behind her, she'll look back and forth in confusion for 1.5 seconds, before realizing that her target is behind her and starting her pursuit. Though if those foes do anything to alert Lilly to their presence, she'll turn around and start pursuing them at that time. If you hold down B, Hanako will skip the stammering and just yell "Go!" immediately. Obviously this is only useful if Lilly is facing her foe or if they're about to land from a jump or something. Finally if the foe is in the air RIGHT above her, Lilly will step to the side if at all possible and then stand still. It's left up to the player whether they want to jump after the foe or not. Upon actually reaching the foe, Lilly will come to a stop.

Predictably, Hanako can also tell Lilly exactly where her foe is. Inputting up on the stick after tapping B has her do just that. Hanako will tell Lilly to head forward or back (b-behind you. . .!) depending on where the nearest foe is, and Lilly will dash after them. If the foe happens to be offstage, Lilly will stop near the edge and wait for them. If they are airborne, she will wait for them to land. If said foe happens to be directly above or below her (either in the air or on a platform on scrolling stages), Hanako will tell her to head up or down. Lilly will automatically start jumping up after the foe or dropping through platforms with the intelligence of a level 9 CPU (but without being prone to suicides). As a general note, Lilly will not pursue foes offstage or offscreen, only go to the edge and wait for them. If the foe is RIGHT above her in the air, she'll move aside and wait (a-a-above you. . .). This direction eliminates any chance of confusion on Lilly's part, but takes a little longer in return.

Inputting left or right after hitting B will have Hanako tell Lilly to head in that direction regardless of the foe's location. Lilly will specifically WALK in that direction unless this is input as a smash, in which case she'll dash. Lilly will automatically turn around at edges if another input is not given. Inputting down after hitting B has Hanako say "l-l-listen. . .". Upon hearing this, Lilly will close her eyes and enter a state of concentration. After a second, Lilly will turn towards the nearest foe, locating them regardless of their location. From now on whether Hanako tells Lilly to pursue the "nearest" foe, Lilly will only go after the one she identified with this move. Inputting this move another time will have Lilly change her focus to the nearest foe who is not her current target.

Finally, tapping B while Lilly is reacting to a command (or concentrating in the case of the down input) will have Hanako say "wait. . .!". Lilly immediately stops whatever she's doing upon hearing this and just stands there. Holding B will have Hanako use the "Go!" command, overwriting the previous direction. Moving Lilly with the control stick will cancel her current command until she stands still for 1 second, at which point she will resume acting on it. Proper handling of Hanako's directing is vital to playing as the disabled duo, seeing as Lilly can only walk around the stage and can be easily tricked due to her blindness.

Down Special: Feminist Tea Party
I swear this is the only prop in the entire set. And as to why this attack is colored green, it's the only attack in the whole set that the girls share. Lilly quickly pulls out a purple teapot and a cup and quickly fills the cup with tea. She then takes 2 seconds to drink the tea, healing 8% damage in the process. If Lilly is acting on a command or actively attacking when this move is input, it instead is Hanako who produces the teapot and pours herself a drink in the same manner. If either girl is attacked while drinking tea they'll halved knockback, but they will also drop their teacup to the ground, which shatters, creating a soccer ball-sized puddle of tea.

As you might expect, the puddle is a trap that causes foes to trip if they try to dash or roll over it. If the foe is close enough when they attack, they'll trip on the puddle almost immediately afterwards, and if they didn't send Lilly/Hanako flying, they'll be left open to attack. The puddle remains on the stage for ten seconds, during which time it can serve as an approach deterrent and a trap Lilly can push them into to prolong a chain of attacks. If Lilly and Hanako are standing next to each other when this move is input, Hanako will take out a cup of her own while Lilly pours tea for both of them. For the sake of balance, the duo must wait 7 seconds between uses of this move.

Side Special: Meet Cute
Hanako's the last person that would physically attack someone, but she can at least try to hinder the foe's progress until Lilly arrives. Hanako suddenly dives one platform forward in an attempt to grab a foe (yes this is a grab hitbox). If she manages to catch someone she'll just hug them as hard as she can: holding their arms back and forcing them to escape at grab difficulty. If she grabs a foe with their back turned to her, she can also cancel them out of any arm-based attacks. This can be used as a last ditch effort to save Lilly if she's about to be attacked, or simply a way to force foes to stand still while Lilly approaches them. This can also be used as a Hanakocide offstage: a desperate last-ditch effort to take the foe down for Lilly's sake. If Hanako hits the ground with a grabbed foe, she'll transition into her normal grab game. Hanako falls to the ground and suffers significant lag if she misses, so flubbing this can be costly. Remember that you can't direct Lilly if Hanako is stuck in lag or hitstun.

If Hanako hits a grounded foe with this while their back is turned, the foe will trip as Hanako holds their arms back as normal. They can get up after half a second, Hanako transitioning into her grab state. This becomes important a bit later on.

Up Special: Equivalent Exchange / Above and Beyond
This basically functions as an upwards version of the side special. Hanako jumps up one Kirby length, grasping upwards in a grab attempt. This can be used an unlimited amount of times in the air, but she will only jump upon the first usage. If she grabs a foe, they'll have to break out at .75 grab difficulty as they fall at the combined rate of both of their fall speeds. If they hit the ground, both Hanako and her foe end up in prone next to each other, Hanako having just enough of a lag advantage to roll away before the foe gets up. This move is only usable in the air.

This becomes a significantly better, Lilly-oriented recovery if Lilly and Hanako end up next to each other in the air. Both girls jump one Kirby length upwards, Lilly stretching her cane out as far as it'll go towards the ledge. If she's able to reach the ledge she'll immediately grab onto it and quickly stretch her cane back out, so Hanako can grab it and make her way back as well. If you think it'll be tough to get two separate characters offstage at the same time: it is. However, the duo can enter a united state if Hanako uses her grab on Lilly: more on that when we get to the grab. If Lilly is alone when this move is input, she'll simply perform the same motions as if Hanako wasn't there.

Standards

Neutral A Combo: Minor Discord
Before I get into any standards, it should be noted that Lilly can perform any of her standards out of a dash or walk, assuming she's acting on a command from Hanako (if Hanako's gone, this isn't possible). Anyway, Lilly attacks with two generic swipes of her cane: the second swipe aimed at the foe's legs. Both hits deal 3.5% damage and flinching. The first swipe actually pulls the foe slightly towards Lilly, subjecting the foe to some nice hitstun in the process. For the third hit, she holds her cane horizontally and repeatedly jabs it forward, continuing as long as A is mashed continuously. She can slightly angle her jabs up or down as well, each hit dealing 1-2% and VERY low knockback. She can lift the foe into the air a bit if she angles the attack upwards, allowing for potential follow-up attacks. Mashing A very quickly will have Lilly skip the second hit and go straight into the repeating attack, useful for when foes get in her face at low percents to rack up some decent damage.

This being Lilly's first standard cane attack, I should probably mention its OTHER special property. If the A button is held, Lilly will quickly retract her cane over half a second, halving its size. This effectively cuts her attacks' range in half, and decreases their overall knockback/shield push by 1/3rd. That may sound bad, but it does make it easier to combo foes at lower percents. Lilly can even do this during the start/end lag of any of her standard attacks or aerials, which includes the first two individual hits of Neutral A. So you can drag them towards you with Lilly's stellar range on the first attack, retract the cane, and use a standard of your choice before they recover from hitstun. Using the same input when the cane is retracted returns it to its normal state (Lilly's up special returns it to normal too). Going from retracted to normal state can be useful for suddenly ending close-up combos and hopefully knocking foes into Hanako's waiting arms.

Dash Attack: Ease
This is a rather unorthodox dash attack in that Lilly automatically uses it whenever she walks or dashes (inputting a proper dash attack input as solo Lilly results in her stopping to perform Neutral A). When Lilly moves, she holds her cane in front of her, moving it back and forth and tapping it against the ground a character length in front of her every .5 seconds. This creates a small hitbox that deals 1% and flinching. This is out-prioritized by everything, but can easily catch overly aggressive foes and give Lilly a chance to stop dashing and start attacking.

I should also note that Lilly keeps her cane a bit closer to her body when she walks instead of dashing, resulting in the hitbox forming right in front of her. Her cane also keeps some of its projectile-deflecting properties when she walks, though it only covers the bottom half of her body in this case and generally sends projectiles straight to the ground instead of forward. On smaller stages, Lilly may be better off walking than running because of this extra defense. Though dashing gives Lilly a different kind of defense. Her cane's hitbox can set off traps, and since the hitbox is further in front of her when she dashes, she'll often be able to avoid being hit (she'll stop and wait for half a second if she sets one off too). The choice between walking and dashing is often very strategic for Lilly.

Hanako Dash Attack: Misstep
Hanako's dash attack is activated by tapping the C-stick forward during a dash (otherwise Lilly will respond to the A button). Hanako lowers her head as if embarrassed or scared (she's probably both) and continues to dash forward, the move only ending when she stops dashing or hits a foe (shielding or otherwise), at which point she suffers the end lag. Contact with her head deals 10% damage and mostly horizontal knockback with stellar growth: it starts out just above average and KOs at 130% at its best. This also deals some good shield push/shield stun, good for forcing foes into Lilly's attacks/tea puddles. Depending on the spacing, this can be used as both a combo reset with Lilly nearby or a KO move.

Forward Tilt: Stripes and Solids
Lilly holds her cane horizontally, pulling it back behind her a bit before quickly thrusting it forward like she were taking a pool shot. This deals 5% and very low knockback, but decent hitstun/shield stun. Along with the short end lag, this allows Lilly to spam this attack to rack up several hits on the foe or their shield. She can even try sneaking in a neutral A or up tilt, though whiffing the up tilt can leave you open to attack. This attack can also be angled downwards, but it takes twice as long to execute and has a bit more end lag, but does better hitstun. Both versions have terrific range, so they can catch approaching foes.

Additionally, when Lilly pulls her cane back in preparation, it creates a small hitbox behind her that deals 3% and flinching along with decent hitstun. If she connects with this part of the attack she'll cancel the actual poke and turn around to face the foe. Obviously this allows her to sniff out foes that try to sneak up behind her and start comboing them. She can even retract/extend her cane as she turns by holding A to set up first.

Up Tilt: Up and Down
Lilly holds her cane above her at a 45 degree angle before bringing to down to the ground in an overhead strike, dealing 7-8% damage and average upwards knockback. This also deals good hitstun (needed to balance out the above average end lag) and lightly spikes aerial foes. This can easily lead into a combo or serve to continue one, and can even lead into itself around the 50 to 90% range. Beyond that, it can set them up for an aerial attack from Lilly or even Hanako.

Down Tilt: Mind Your Step / Invitation
Normally whenever Lilly stops moving and enters her neutral stance, it takes her half a second to set the end of her cane on the ground and set its projectile-deflecting properties in place (assuming you don't have it retracted). Using this move has her slam the end of it against the ground immediately and enter that pose: she'll slam it against the ground again if she's already in that pose. If her cane is retracted this move will have a bit more lag as she extends it again. This move does have a hitbox, but it only hits foes who are standing very close to Lilly. It deals 8% and flinching knockback, without having much end lag to speak of. And if they were in the middle of an attack that uses their legs (not including get-up attacks), this cancels them out of said attack. Lilly keeps the cane on their foot for 1.5 seconds, during which they can use arm-based attacks without any issue (they can't grab though), but using a leg based attack will cause them to fall into tripped immediately afterwards and suffer increased lag. Lilly can cancel this into any other attack during that second, albeit with slightly increased lag.

The most notable thing about this attack, however, is how it affects prone/tripped foes. Upon hitting foes in one of those positions, it pins them to the ground, dealing 3-4% damage per second and forcing them to escape at 1.5 times grab difficulty. The girls have quite a few ways to put foes into tripped or prone too: tea traps, up special, this very move, etc. If you're lucky enough to put foes in this situation, use that time to position Hanako and cut off their options when they escape and most likely roll away.

If the name didn't tip you off, this move has an alternate use activated by holding down A. Lilly will slam her cane down as normal, and then close her eyes, appearing more relaxed than usual. She's concentrating on her surroundings, more specifically the air around her. If a foe tries to attack her during this time, she'll automatically parry it with her cane, dealing 2% damage and leaving them stunned for .6 seconds to allow a follow-up attack. This doesn't work on grabs though, and if no one attacks Lilly during the second she keeps this up for, she'll be left vulnerable as she opens her eyes and exhales deeply. There are a lot of subtle things to notice about Lilly's "neutral" stance, for both the foe and the Lilly player.

Crouching Attack: Solids and Stripes
Indeed, Lilly's down tilt and crouching attack are separate inputs. This is pretty much the same thing as the forward tilt, but performed from a crouching position. The only difference is that this version does better shield push and more hitstun, but executes a bit slower and can't be angled. The shield stun is also not as good, so foes can easily escape having this spammed on them if they dodge or shield the hit. Of course this can just lead them to false confidence if Hanako is ready to intercept them.

Smashes

Forward Smash: Cut Petals
This is pretty standard as far as forward smashes go: a generic strong attack. Lilly harshly swings her cane before her horizontally, having a little less range than forward tilt, but still reaching a long ways. This deals 15-26% damage and knockback KOing at 115%. This can also be angled up or down 30 degrees, with the knockback changing accordingly. Angling it downwards when there is a foe in tripped or prone nearby will send them sliding along the ground 60 percent as far as they would have flown from a direct forward smash hit, as well as stunning them for 1 to 2 seconds. This can be a great follow-up to down tilt if you trap a foe in tripped/prone, and sliding foes actually pick up a tiny bit of momentum if they go over a tea puddle (OH MY GOD BLOODY HAIR). This move does have significant end lag and only deals average shield push, so Lilly will left open on a miss.

Up Smash: Crescendo
Lilly thrusts her cane directly above her head, stretching out to give this attack stellar range. This deals 16-27% damage and knockback KOing at 125% (can KO earlier if the foe is hit at the tip of the move's range). Provides Lilly with some much-needed aerial defense and can serve as a pseudo-aerial due to its range. There's some notable start lag, and average end lag.

If A is tapped twice for this move, Lilly will keep the cane raised above her head for two seconds, the cane acting as a solid wall during that time. The tip of the cane is also solid, and some smaller characters can stand on it. This is a great way to prevent foes from jumping over Lilly or attacking her from above. Lilly can walk around with her cane raised and cancel into any attack with a little added lag. Inputting up smash again simply ends the move. As a final note, inputting this move while Lilly has her cane retracted has her extend it before using the move, resulting in extra lag (there's no extra lag if the move is charged as Lilly extends the cane while charging).

Down Smash: Seeing Clearly
Now here's a generic attack that's more important for Lilly than for most characters. Lilly attacks behind her and then in front of her with low swipes of her cane with the generic down smash that half of Brawl has. This deals 16-28% damage and horizontal knockback KOing at 120%. The fact that this hits on both sides is very important: Lilly should use this attack periodically to check around her for foes, even if they would obviously block the hit (this deals some good shield push/stun. This does have some notable end lag though. Aside from being a KO move, the horizontal knockback can hit foes right into Hanako's waiting arms.

Hanako Aerials

Forward/Back Aerial: Reaching Out
Yeah yeah, mirrored aerials are the devil I'm a horrible person etc. It's important that Hanako can attack in both directions with this though. In the biggest display of violence Hanako is willingly capable of, she attacks with a simple push. This does no damage or hitstun, but it does deal strictly horizontal knockback KOing at 210%. This has no effect on foes' vertical momentum: they continue to fall at their normal speed along with the horizontal knockback. If Hanako hits with this this right as a foe hits her, both attacks with land, Hanako suffering full damage and knockback (this move can be considered a horrible counter of sorts). Regardless, this can be used to direct foes into Lilly's attacks if they break off to attack Hanako.

If a foe is flying towards Hanako as a result of an attack, hitting them with this forces them into a footstooled state, canceling out all their horizontal momentum. This doesn't refresh their jumps or break them out of hitstun, so this can be used to direct foes with poor vertical recoveries towards the bottom blast zone. This can be useful on the ground too. If timed correctly, Hanako can push a foe down right as Lilly launches them away with a strong attack, likely forcing them into prone where they become a sitting duck for Lilly's down tilt or any number of attacks.

When used on grounded foes, Hanako can force them to fall into tripped (if she hits them head on) or prone (if she hits them in the back). Obviously a good chance for a down tilt. If Hanako somehow hits a foe with this as they're flying away from her, she'll increase their horizontal momentum a bit and angle their flight path slightly downwards. This takes pretty impossible timing though.

Down Aerial: Dissonance
Only two aerials? Before you call me lazy, I don't think Hanako needs much more considering a neutral air input is impossible and she has up special and side special as makeshift aerials. For this move Hanako. . . actually attacks?! No, that couldn't be. She's just freaked out or something. Hanako starts to panic and flails her legs under and in front of her in a similar manner to Yoshi's dair. This traps foes in multiple hits of 1-2%, dealing up to 14% if they get trapped in the move's full 1.5 second duration. This can really leave Hanako open if she misses taking the duration and high end/landing lag into account. This can be used in a similar manner to the fair/bair to catch foes as Lilly launches them away, making it easy for Lilly to follow up. If Lilly's acting under a command, trapping the foe in this move can allow her to catch up as well. This can even be used against shielding foes if you think the combination of Hanako and Lilly can break said shield.

Lilly Aerials

Forward Aerial: Prelude
So here we have. . . the forward tilt again. Lilly performs the forward tilt as an aerial (it can't be angled this time, no). This has all the same properties of the forward tilt (right down to slightly hitting behind her, which will cause her to turn around in the air) with the exception of knockback: it only deals flinching. And it deals a tiny bit more hitstun: Lilly will have time to land and attack again if she hits with this from a shorthop. This is mostly useful if you predict a shorthop or a low attack from the foe, or for performing a wall of pain with Hanako.

Neutral Aerial: Parity
Don't ask why the fair came first. Lilly swings her cane in a circle around her body, having less range than usual but hitting on both sides of her. This deals 8-9% and knockback KOing at 165%. This obviously serves as Lilly's aerial gtfo, and lets her check around her for foes in a similar manner to the down smash. This can also be a decent gimper if you're willing to go offstage with Lilly.

Down Aerial: Diminuendo
Lilly stretches her cane partway under her and spins it around several times, dealing 4 hits of 4% if she traps them in the full second long duration. The last hit deals light spiking knockback. Lilly suffers above average landing lag from this, so it's not very useful against grounded foes. If she catches an aerial foe with this and then lands though, neither will have a lag advantage. The best use of this is to drag a foe down into a potential combo if they try to jump at Lilly or end up under her in the air. With Lilly being unable to secure a lag advantage, it's important to have Hanako ready to start attacking. Lilly can even risk attacking a grounded foe with this if you can time Hanako's attack correctly.

Grabs & Throws

Grab and Pummel
Just in case you've forgotten, only Hanako can grab. She grabs for her grab, having average range and all that. Her grab pose has her sort of hide behind the foe and restrain their arms, similar to when she grabs with her side special. Her pummel (activated by hitting B or Z) has her slowly walk the foe forward at Ganon's walk speed; she can push back while mashing to pull them backwards.

There's another issue that Hanako's grab brings up. While Lilly and Hanako normally can't attack each other, Lilly will be unable to avoid hitting Hanako if she's grabbed onto a foe with her grab/side special and Lilly attacks that foe. Fortunately Hanako's grab stance has her timidly stand behind the foe and restrain their arms, so Lilly can avoid this with proper spacing. Either way, Hanako holds onto the foe for dear life as both of them are sent flying. You have to make Hanako let go of the foe manually by inputting a throw command (no you can't ACTUALLY throw them while blasting off), or else she might end up going down with them.

I briefly mentioned this before, but Hanako can grab Lilly to enter a "combined" state. In this state, Hanako tightly latches onto Lilly's arm in an awkward hug of sorts. They can move around and stuff in this position: I'll be getting to that in the throws. Lilly can still perform all of her standards out of this state, and the pair can perform their combined versions of down special and up special. Hanako can grab too: she'll separate from Lilly and go to her normal grab state if she grabs someone. This state obviously makes them weight more as well; though dealing 15% damage to the pair in a three second period will forcibly separate them. Finally, remember the cooldown hug that Lilly gives Hanako if she runs into her in a panic? Performing a "throw" while the hug is being given will make the pair immediately enter their combined state from there.

Forward/Back Throw: Fast Forward / Stride
Hanako's throws are generally straightforward, and this is no exception. Hanako panics and bit and pushes the foe away (this deals no damage), causing them to stumble 2/3rds of a platform forward. Right after pushing them, Hanako uncontrollably runs the same distance away from the foe, just as if attacked from behind. She obviously stops at ledges and traps and all that. If the foe stumbles over a tea puddle they'll automatically trip.

In the combined state, this allows Lilly and Hanako to move around. They walk and dash at Hanako's speed as she hurries Lilly along. The combined state is best when in a situation that requires constant movement, and you don't trust Hanako's commands/Lilly's AI to keep Lilly safe.

Down Throw: False Cadence
This has Hanako simply release her foe suddenly, neither suffering grab release lag. However, the foe will suffer lag if they are mashing when released, and they will automatically trip if released right over a tea puddle. In the combined state, this simply causes the pair to separate.

Up Throw: Air Guitar
This has Hanako jump up and carry the foe with her as best she can. The best she can manage with this is a shorthop. This isn't really a throw at all, it's just a way to reposition the foe if Lilly wants to hit them with a high attack.

In the combined state, this obviously makes the pair jump, and can be angled like any other jump. Their max jump height is the average of Lilly and Hanako's respective jumping abilities, and they fall at Lilly's fall speed. Holding down will make the pair fastfall, but double tapping down will make them separate. Try this offstage to create a wall of pain with one girl fast falling under the other and having both attack. Foes will be frustrated as hell at getting past both of them.

Final Smash: Forwards with Gusto
Kenji's convinced that Lilly's part of the mafia, and this move doesn't exactly help matters. When Lilly and/or Hanako gets the smash ball, Lilly will take out a cell phone and make a call, asking the person on the other end if they can take time off to help her with something. After a few seconds (she's invincible during this time) she says "Thank you so much" with a smile before hanging up. 2 seconds later, an motor sound can be heard in the background, audibly getting louder and louder. Soon enough, a nice-looking black car flies onto the stage from the background, being two Bowsers wide and one Bowser tall. An androgynous-looking red eyed blonde can be seen behind the wheel. The suited figure is Akira Satou, Lilly's older sister who is definitely not in the mafia. Anyway, the car stays onstage for 12 seconds, driving and/or jumping over all but the larges gaps in the stage and dealing 25% and knockback KOing at 90% to any foe it hits (it ignores shields). Occasionally Akira will yell "Yeaaaaaaah! Akira Satou is in the hooooooooouse!" upon appearing. Yep.

Playing as Lilly and Hanako: Risk vs Reward​
So you've chosen Lilly and Hanako. . . they're probably one of the tougher characters to play simply because you have to coordinate 2 characters at once, and it's not like a Hugo set where only one person can move of their own accord. Being blind, Lilly is very cautious and won't move quickly unless Hanako tells her where to go. Obviously this can be a problem on even medium-sized stages, making Hanako's commands vital if you want to actually apply pressure to foes. Hanako herself has a limited number of attacks, most of which deal no damage, so she can only do so much pressuring. What she can do is restrain foes with one of her grab moves, giving Lilly time to catch up. No matter what command you give and what you try to do with Hanako, you'll need to keep a close eye on Lilly so you can cancel your commands at the right time. It helps that Hanako can give commands from the air and cancel them while Lilly attacks as well.

Lilly can definitely play defensive too, despite her lack of sight. Her neutral stance where she holds her cane in front of her protects her from most projectiles, and if that doesn't make foes want to approach, spamming down special healing will. Lilly's quick pokes combined with her range can frustrate approaching foes, and the up and down smashes repel foes from Lilly's most vulnerable areas: above her and behind her. The up smash can cut off aerial assaults for an extended period too, if the foe's intent on that method. Even when they start attacking, Lilly has a counter that can turn their advantage into hers, and her down special can literally trip up an overaggressive foe. If they do manage to get behind Lilly, it'd be best to either walk away and/or have Hanako direct her back towards the foe.

Lilly can pull off some good combos on her own, taking advantage of some low knockback/high hitstun moves and some simple chains. She can prolong her combos by retracting her cane, sacrificing her range temporarily to keep the foe from being knocked away too easily. Once the foe starts blocking or sidestepping Lilly's attacks, that's the time to bring in Hanako to predict their reactions and grab or attack them. Hanako can attack them at the end of their hitstun or right as Lilly hits them with a stronger move, potentially knocking them right back into another combo. Blocking foes can be pushed back and forth between attacks to lead to a grab or broken shield, or you can try pushing them down with Hanako or forcing them into a tea puddle, giving Lilly a chance to trap them with a down tilt. She can start a combo off of trapped foes at lower percents, and smash them away at higher percents. Lilly can boost foes into the air or back towards the ground with her neutral A/up tilt to lead into specific combo finishers or resets, not to mention Lilly's launchers. Hanako can pretty much do the same things to an aerial foe that she can do to a grounded foe to allow Lilly another chance at comboing them, and even manipulate their knockback a bit with her fair/bair (even if they hit her she can succeed in this). If the foe manages to get the best of Lilly, you'll have to rely on Hanako to an extent to set the duo back on track, either through her commands or grabbing them out of attacks. With how tough it is to track the foe down and get setup properly with the duo, you'll want to rack as much damage as possible once you succeed.

Once the foe's nice and damaged, it's time to change up the game a bit. Lilly will probably need to have her cane retracted if she wants to keep foes close for more than 2 attacks or so, otherwise you'll have to rely on throwing out random smashes and pokes and hoping her stellar range nets you a killing strike. If you do manage to start a short combo, it'd probably be best to position them higher or lower with the neutral A before attempting a finishing blow. Hopefully you'll have an opportunity to extend the cane if it's been retracted first. With Hanako around of course, you have many more options. Trapping them in Lilly's down air is normally something you wouldn't do, but she can do that to set the foe up for Hanako's dash attack to KO them. A grab or forcibly tripping the foe can work too, as Lilly can easily trap them with the down tilt and smash them away from there. Make sure to have Hanako let go quickly if you go for the grab route. If you take the more defensive "throwing out random smashes" approach, the down tilt counter can provide an opening: extra points if you predict a kick attack and slam your cane down on their foot.

When it comes to the air, you'll mostly want to avoid proper midair combat with Lilly, as she can't sense aerial opponents very well. You'll mostly want to rely on Hanako to drag them down to Lilly's level, and to gimp. Her fair/bair can do a decent enough job most of the time, but there's also the up special and side special if you're gonna try for a Hanakocide. You can try to gimp with Lilly if you like, but her only real option is neutral air. Of course, gimping with both at the same time can work if you space them into a wall of pain or something.

That brings us to the combined state. This essentially combines the pair into one character with better speed and survivability, but with far less in the way of offensive options. If you're on a scrolling stage or in a FFA, it might serve you better to stay combined as much as possible. Either way, Lilly and Hanako should always be close to each other incase one of them gets knocked offstage and you need their combined recovery to make it back. Unfortunately that plays opposite the way Hanako wants to: since she can't command Lilly while being attacked, Hanako pretty much wants to run whenever possible. Hanako's automatic running when attacked from behind is a failsafe against extended combos, so there's at least that. This can unintentionally (or intentionally, since Hanako runs out of her forward/back throws) sniff out traps, and if Hanako runs into Lilly, lead into the combined state where the duo can essentially reposition themselves and start over. On those scrolling stages and in FFAs, it becomes more important to have Hanako specify which foe Lilly should go after: both to make sure she doesn't get left behind or get attacked by multiple characters. You might want to routinely switch her target in FFAs, instead of letting foes get the better of her once they escape her combos. If Hanako gets KOed, solo Lilly plays a lot like the combined state, but is at the mercy of her blindness. If a foe gets behind you unexpectedly, you run.

Their combined state has them act as a single character with better mobility and survivability, but they lack the potential for drawn-out combos. Hanally/Lillako operates as a defensive-minded "combo" char in this state, but they are ultimately far more predictable. In FFAs, there has to be more active handling of which foes Lilly goes after: it might be best to switch foes constantly so Lilly doesn't get caught off-guard by one in particular. It might be good to use combined state a lot: both in FFAs and especially on scrolling stages.

So playing Lilly and Hanako requires quick reflexes and knowledge of exactly how much knockback or shield push stuff deals, and the ability to multitask. The friends' teamwork can take off a foes' stock in 4-5 bursts of attacks, or get Hanako KOed early and leave Lilly high and dry on her own. Hanako's job is to support Lilly while Lilly's job is to take care of Hanako: that's how their relationship works, and that's how they're going to be effective in Brawl.
 

smashbot226

Smash Master
Joined
Sep 1, 2007
Messages
3,027
Location
Waiting for you to slip up.


Rin Tezuka


"That's not good. It has to be like... like the color when you wake up and you know that you saw the meaning of life in your dreams but can't remember it."


Rin Tezuka is an incredibly bright yet equally aloof artist at Yamaku High, a school for disabled students. As you've likely observed, Rin's issue is that she's missing both of her arms due to a birth defect. This doesn't stop her from going about her daily life or pursuing her dreams, fortunately. Her living situation has given her lower limbs the ability to do whatever our arms and hands can do. Needless to say, she's unhindered by her disability. Unfortunately, now she's actually in a fight and that might count for something now. What's a Cloud Cuckoolander going to do in a fast-paced fight? No, seriously, it's like she doesn't even know she's actually fighting someone! Perhaps that unknown factor will benefit her. That or her artistic talents, but how does THAT influence her chances in a fight? Why don't we turn the pages and find out?

=-=-=-=-=-=-=-=-=-=-=
"I once spent a week trying to think of something meaningful to say about boredness.
It was the most boring week I've ever had"

=-=-=-=-=-=-=-=-=-=-=

Ground Speed: 6 (I know, right? Rin's not in the best of shape, but all that reliance on her feet and legs for daily life has put some spring to her step. She's motivated as well, pushing her willpower to the limit. Admirable, but it's no more than slightly above average.)

Aerial Speed: 5 (Rin is the lightest female protagonist- well, dunno if protagonist is the right word but whatever- around. So why isn't she, like, a 14 in aerial speed? Because she'd prefer to keep her feet on the ground and observe the sky. Maybe if she lived in the clouds for most of her life she'd prefer it the other way around?)

Aerial Control: 9 (Like I said, Rin is lighter than a feather. Which clearly means she can move through the air as such. It doesn't mean the air is her primary theater of war but if the time comes for dependable evasion, Rin likes the air far more in terms of movement.)

Power: 3 (Poor girl is all skin and bone. Those hours spent working away in solitude haven't been too kind on Rin's mass... or muscle... or general build. Let's just say she's far from the strongest character in the game.)

Attack Speed: 5.5 (When I did mention she was nothing but skin and bone, this didn't mean this particular body build screwed her over. On the bright side, she'll beat out slower moving/attacking opponents so long as they don't have armor.)

Jump Skills: 5 (While her dependency on her legs and feet have certainly built them up to some degree, her deference from actual exercise hasn't done her any favors either. This balance leaves Rin's jump height in a weird spot, with the first being actually pretty good and the second... not as good.)

Weight: 3.5 (Skin and bone. SKIN AND BOOOOONE.)

Height: 2 (She's just a schoolgirl. SKIN AND BONE. That and her lack of arms actually decrease her hitbox a good amount, meaning attacks that would normally hit a fully-limbed foe will whiff on Rin.)


=-=-=-=-=-=-=-=-=-=-=
"Yeah I like doing it in a horizontal position more, if you know what I'm talking about."
=-=-=-=-=-=-=-=-=-=-=

NSpec (There's A Cloud):​

When Rin comes into the match, she's wearing her usual school uniform along with a rather large canvas strapped to her back. While this might sound physically impossible for Rin to do anything right due to this constraint but the canvas is thankfully in segmented parts, allowing Rin to move around unhindered. And while this doesn't hurt Rin's mobility or attack speed, it also doesn't boost her weight by a noticeable amount. It's basically there on her back until you make the NSpec input, after which Rin swiftly swings each part of her artist's canvas in front of her, simultaneously swatting any foe in front of her out of the way and setting up her artist's canvas in front of her. She ends this by sitting down upon the ground with a brush readied in her foot. During this peculiar stance, you can mash A to have Rin create an illustration of varying effects, the intensity determined by Rin's location on the stage. Tapping B almost instantly cancels Rin out of her painting stance into her idle stance. As for the attack itself, the range is surprisingly good considering she's swinging a goddamn canvas and while the speed leaves something to be desired, it has enough hurt and knockback to leave Rin safe and sound.

So throughout the fight, you'll observe how Rin's idle, walking, and running animations are different depending on where she may be on the stage. There's no other visual indicator for when Rin may be nearby this zone so it's important to always keep an eye, or at least part of it, on Rin. When she's nowhere near her inspiration zone, she reflects how bored she looks. Her walk and run almost seem sluggish, even though at all levels her speed remains the same. If she's near this particular zone, however, her eyes suddenly light up and she's got much more spring to her set. As how to define "near"... it differs from stage to stage. On smaller stages, a Battlefield platform away in any direction. On larger stages such as Final Destination, it'll be about two of those. You can likely guess how far away on places like Temple or New Pork City. Now if she's inside her inspiration zone, she'll actually look fidgety, unable to stand still even in her idle pose. You'll definitely want to get her painting, and fast, since her inspiration zone switches every thirty five seconds. On the bright side, the closer Rin is to her zone, the faster she'll paint.

So I've managed to avoid the ever important question: what in God's name do these damn paintings do? Well that all depends- at worst, the foe will simply keep part of their attention on the painting, simply reducing their movement and attack speeds by a meager 15%. And that's only if they're in a single Battlefield platform near it. However, as its quality improves due to spacing near/around the inspiration zone, so do the effects. Eventually, the foe's movement is detracted by 30% due to the noticeable quality on Rin's painting and if they end up close enough to it, they'll actually be forced into standing still for two seconds as they admire Rin's painting. And even after their gaze leaves the work of art, they'll take a heavy nerf to their attack's beginning and ending lags for an additional five seconds. Fortunately for the foe, this only matters if they're on the ground and within a circular distance of 1.5 BF platform. If they somehow go unharmed for those two seconds, they go back into their idle stance. For those worried about spamming this with prone-abusing allies, worry not- this staggering stun is limited to activating only once per painting to prevent it from being abused.

[collapse=ALERT ALERT FORCED CHARACTERIZATION]

I'm fully aware of this issue and have rectified it so that it fits; each painting contains an element that appeals to whoever Rin is currently fighting. For instance, if she's in a FFA against Ganondorf, Doc Scratch, and Vergil, her painting will include the brown antagonist himself wielding a sword, a roomba, and Dante wearing nothing but a banana hammock. Respectively. Rin's artistic talents really do extend to these, shall we say, foreign characters' emotions.[/collapse]

Ah, but what if Rin wants to pack her canvas up to move to the next place she deems fit to paint in? Well luckily for the Rin user, her canvas is always in the background. After all, what sort of reckless artist leaves their work of art in the middle of a battle? It's even immune to moves that strike in the background! Anyway, if you input B near the painting, Rin will quickly wrap up the canvas and pull the leather as the entire thing segments into parts due to the pressure from the squeeze. Afterward, Rin steps backwards into the tangled mess and wraps it over her shoulder, leaving the canvas in the same position as it was at the beginning of the fight. It's not quite as lengthy as it sounds, being just under 3/4ths of a second to complete, but if Rin is attacked at any point during the animation, the entire thing is canceled out, leaving Rin stunned/knocked back/etc and her canvas still in the background. Ah right, inputting A near the canvas puts Rin back into her painting stance about as swiftly as she can exit out of it.

USpec (Cloud Cuckoolander):​

In an almost hilarious moment of desperation, Rin flaps her arms, or the absence of them, as though they were wings as the artist gains a rather poor amount of airtime equal to Fire Bird. At the same time, however, Rin will stretch her legs out feet first in a drop kick attack, giving her some additional horizontal movement as well. On the bright side, you don't have to worry about the horizontal recovery being as poor as the vertical; using this on the ground moves Rin a good two and a half Mario-lengths forward while she maintains a constant hurtbox in front of her. And as with every recovery move, you can can angle the direction of the drop kick, although you're still going to get forward momentum, even if you hold back. On the bright side, this also happens to be Rin's most dependable killing move- while the knockback and damage scale downward as the drop kick progresses, the starting lag is actually quite good for a drop kick. You can easily punish whiffed moves using an expertly timed drop kick, causing 16% damage and enough knockback to kill a heavyweight at 120%. Yes, that should be considered great for Rin. However, do make sure you don't whiff it, as Rin leaves herself open as she lazily rises from the ground.

What I failed to mention in the prior paragraph, however, is that Rin's feet also act as an active ledge-grab-box... or whatever you call the zone on a character where you can grab ledges. Anyway, while this technically makes it a tether recovery, it can still plow through edge hogging opponents. Not to mention HOW she grabs onto ledges: she uses her feet, as expected, to hang onto the edges of the stage. Meaning her edge-hanging hitbox is much larger than other character's, though Rin retains a slightly longer invincibility frame during the initial seconds of hanging on, further encouraging Rin's capitalization on getting the foe anywhere off the stage. Right, I almost forgot: if she manages to land in some paint, she'll start sliding along the ground as a continued hitbox, dealing the same amount of damage and knockback as she would in the air. That sounds rather... odd when you visualize it. And if she manages to hit a canvas while she's flying through the air, it'll either collapse rather than be destroyed, making it easier to pack up, or get some paint on it if Rin happens to be covered in paint, letting her finish her masterpieces twice as fast.

DSpec (Too Much Codeine)

Rin turns her head to see what's behind her, oblivious to the fight happening around her and whoever might be ready to strike. That's just the thing, though: when they do, they freeze on whatever frame they might've been on when they hit Rin, with the artist simply standing there with her indifferent expression for a brief second before the player retains control of her once more. The same cannot be said for whichever sap struck her: he's stuck in whatever position he was in for a staggering two seconds before going into a slightly extended hitstun state or an footstooled state, depending on where they were during the attack. She still takes all the damage the foe would've dealt, but with none of the knockback. Rin can even reflect projectiles while taking a mere 1/4th of the damage it would've dealt! Definitely be sure not to recklessly abuse this move to kingdom come, however, as her vulnerability is prefaced when she looks behind her a second time. Basically acts as a giant neon, "come hit me" sign.

While the application for DSpec appear singular in that the opponent's frozen state leaves Rin enough time to create the perfect work of art, there's far more to it than I've led you on to believe. You see, Rin can use this move at any point in time while charging another move or while she's painting. the very threat of a freezing counter attack that can happen at any time while Rin paints creates a salvo of mind games for the opponent to deal with: do you attack Rin and risk getting close to her work of art or run away and at least ensure you're not going to be awestruck? There are some obvious limitations to this move, though weakness to grabs is not one of them, as it acts just like a normal attack would when inflicted on Rin. For one, you can't use this in the air: that would make this a nigh perfect aerial approach tool. Secondly, the timing for the counter is relatively strict, so no spamming it to kingdom come. Last is a point I previously mentioned: Rin still takes all the damage, so don't make this out to be a miracle cure for all her weaknesses.

SSpec (Medium Normal)

With the power of hammerspace at her mercy, Rin reaches behind her to pull out a can of paint. What color? Every color. Literally, just every color. Don't ask me how she does it. Anyway, she's very quick about taking it out and when she does, she holds it like she would any item; by her teeth. Since this acts as a normal item until you make this input again, the can of paint replaces all Rin's jab, ftilt, and fsmash with the proper battering-item attacks. You may even want to hold onto the can for a bit, since it has some considerable power behind it comparable to a suit of Samus' armor if you toss it. Ah yes, if you tap SSpec once more, Rin swings the paint can around so the lid tears away and lets loose all the paint contained within, spreading a good two-and-a-half Bowser-lengths toward wherever Rin was facing. After that, it becomes a considerably weaker item due to losing the paint. It is highly recommended you ditch this bucket if you desire a new one in the future, though you can feel free to hang onto it for other reasons. You can likely infer that foes in the way of paint wave can be covered by it and will track paint wherever they go for six seconds. Sounds a lot like Bowser Jr, huh? Well stop that. Rin can step into or even cover herself in paint as well and can continue tracking paint everywhere for six seconds after exposure. Well, the time one is covered in paint is halved if only their feet tracks paint, but Rin can force the foe into covering himself with certain tactics/inputs. You should make this quick though, as paint-covered areas dry up and rid itself of the paint after eight seconds, with tracked paint either by you or your opponent lasting just as long. Best of all: your opponent can't block paint with normal shields, as doing so will simply have the paint go right through the shield and cover the foe.

Last but not least, you can cover your canvas in this salvo of paint that'll last for a whopping six seconds until it either washes off or Rin packs it up, in which case the paint automatically comes off. Now why would you want to ruin your canvas with such a mess of colors? It turns out that Rin, being the artistic prodigy she is, can see potential in her not-so accidental mess. Layman's terms: she can automatically produce the highest-level quality artwork that I mentioned back in NSpec, regardless of where her inspiration spot might actually be on the stage. Splattering the canvas with USpec makes this process even quicker. Now you might be worried if you missed the canvas entirely and simply hit the ground in front of you. Well, not to worry: if Rin makes her trade over a paint-covered area, it'll improve the speed at which she draws for a fair amount, so it's always a good idea to have Rin express herself in a work-friendly environment. Painting over an inspiration zone will even keep the zone rooted to its current location until the paint dries! You can continue tracking paint over it to keep it in place or let your opponent do that, assuming he isn't aware of the current location.


=-=-=-=-=-=-=-=-=-=-=
"Do you have any drugs? Or a time machine?"
=-=-=-=-=-=-=-=-=-=-=

Jab (Odd Collection)

Rin points her front foot toward whoever is in front of her, with a single toe outstretched. This deals absolutely no damage whatsoever and minor stun, though it's enough to leave Rin safe in case she does land this move. And fortunately for her, there's enough range on it to cover an entire Bowser-length in front of her. Even better is that this move comes out quickly enough to beat out slower attacks and plows right through super armor. In case someone is in front of her, she jabs them with her toe, remarking how that they've been added to her "collection" of odd people. While this itself is merely aesthetic, or the audio version of aesthetic, the effects only become apparent when the victim becomes awestruck by Rin's painting: for each time Rin lands her Jab on an opponent, said opponent suffers for an extra half a second for each time they're poked. Due to the relative quickness of the jab and the ability to go through quite a few moves that would be troubling to anyone else, Rin's Jab makes for an excellent counter to slower opponents and stunned foes from DSpec.

FTilt (Going Horizontal)

Rin reaches forward, this time with her entire foot, while lurching a tiny distance in front of her. If she misses, she stomps on the ground looking as startled as Rin could possibly get. If she manages to push herself onto someone, she grips their face/chest/body/etc. with said foot and falls backward, pulling them down with her. As a result of their suddenly poor footing, the victim falls forward behind Rin, tumbling for a meager 4% damage but requiring a startling second and a half to fully recover from the tumble. Good for Rin to follow it up with a Jab. Unfortunately, you can't perform FTilt twice in a row due to infinite combos ruining everyone's day. What Rin can do to make this move significantly more useful, however, is to get someone covered in paint against their will, spread it around, or even force them closer to a painting to ensure they're enamored. This is an even more valuable tool if you managed to prod them a bit with Jab.

UTilt (Dire Drop)

Uh oh, it looks like Rin slipped or tripped over something that she didn't see! For this seemingly impossible input for someone like Rin, she trips, both feet flying briefly into the air for a small hitbox and 7% damage, before landing on her butt and transitioning directly into her crouch. If Rin wasn't covered in paint prior to using this move and she just so happens to be over paint- well, you can probably guess what happens. Anyway, there's a hidden function to this move to keep opponents guessing: if you hold down the attack button while the attack is still in motion, you're put into a fake crouching stance. In other words, Rin looks like she's crouching, but is actually in a special prone stance. From this stance, Rin can tech roll in either direction for a full Bowser-length farther than any other roll. While the killing power of this move is quite suspect, it puts foes in a wary position when the potential for Rin's mobility options give them pause. And hesitation is Rin's best friend. If she's covered in paint, this will also create more layers of paint when she rolls. Additionally, if Rin is not covered in paint and happens to slip over some paint, she'll have the substance cover her body.

DTilt (Skyward Bored)

How about some good ol' fashioned Smashbot-style "stuff that doesn't directly involve the move" talk? Crouching Rin has the smallest hurtbox in the game- she's simply horizontal to the ground with her legs bent. This makes her roughly the size of a bumper. Such a bonus comes at no cost whatsoever- Rin is light enough anyways and being able to crawl with such a tiny hurtbox would be more of a boon than people would care for. Onto the actual move: it's a sneeze of gigantic proportions. Well, relative to actual sneezes. You see, when Rin sneezes, the force of the achoo is great enough to send anyone three Ganondorfs anywhere above her hurtbox much higher into the air and into a permanent footstooled animation until they hit the ground, going directly into prone. They still have control over directional influence after the normal amount of time has passed, but you're likely wondering if this is all the move does. It isn't: if Rin is covered in paint and sneezes, she causes the paint on her body to fly up into the air and spread/layer random portions of the stage. If a paint-covered foe is subjected to the force of the sneeze, whatever paint was covering them is spread out in a similar manner to Rin's own paint. If you and your enemy happen to both be covered in paint, Rin can potentially splatter the enemy's paint over the stage and then cover them again with Rin's own paint. Oh right, it also has an attacking hitbox- not the sneeze, obviously- that involves Rin kicking her feet out in front of her when she sneezes, dealing low damage (3%) but decent knockback.

Dash (Obliviousness)

Rin keeps running forward. And forward, and forward. Until she either runs four Kirby-lengths worth of a distance or if she rams into a foe. In the case of the former, she slows to a halt that leaves her very open, and for a lightweight like Rin that can never happen. Fortunately, the entire move's animation is identical to her normal dashing animation, so the foe can't be too sure about being preemptive when it comes to attacking a dashing Rin. Mainly because if Rin happens to run into a foe that is doing anything other than guarding with their shield, the artist clumsily clashes all her weight into the foe, unaware of who she was running into, and falling with them to the ground. This causes a decent 11% damage with no knockback, as you expect, since Rin's victim ends up in an untechable prone state that Rin does not experience, ending up standing a decent distance away from whoever she ran into after a relatively quick roll away from them. While the usefulness of a close combat oriented move for someone like Rin is incredibly questionable, keep this in mind: she runs into her opponent full force, using her entire body to knock them to the ground. Let's say Rin or her opponent is covered in paint and you land this move? You likely get the picture if you've read the specials. If not, for shame: it makes Rin's job of spreading paint around the stage an easier task, since it'll either coat Rin in paint so she can manually track paint in places where she needs it most, or it'll coat the victim and limit his movements so that they don't benefit Rin.


=-=-=-=-=-=-=-=-=-=-=
"The end of the world as we know it. Like weekends usually are, but only more dire."
=-=-=-=-=-=-=-=-=-=-=

FSmash (Stroke of Genius)

Rin calls upon a brush to pop out of her midriff as she catches it in her mouth, rears back for momentum, and swings it in an area around her before keeping it in her mouth. The brush itself is longer than one might think, reaching forward for about a full Bowser-length and covering a surprisingly good vertical hitbox of one and a half Kirby-lengths that spans with the horizontal distance. As the weapon of choice may suggest, however, the killing potential is less than ideal, only dealing 8% damage at minimum charge and killing at a startling 300%. At lower percentages, this move will barely even knock anyone back, and if someone is heavy enough, they'll merely receive stun.

As you've likely assumed, Rin can use the brush as a throwing weapon when she summons it with similar damage and throwing speeds to a Deku Nut without its explosion. This item can and may be used by opponents, though more for them to throw it off since Rin requires twenty full seconds to create a new brush once her current one comes out. Now as you've likely guessed, there is more to this move than meets the eye. Well, Rin is an artist that no doubt has a canvas lying around somewhere, so what can an extra brush do when she can just use it from her NSpec? Well, my good sir, you're actually able to use FSmash on a canvas in order to hold onto the effects of the current work of art! So long as you're holding onto your brush, you can potentially make a painting that has the effects of the painting you brushed upon with a new canvas, regardless of the presence of paint or an ideal zone. I.E. use FSmash on the best possible painting, hold onto the brush to make a work of art with the best effects guaranteed. Losing the brush entirely results in the quality of work being lost as well, so be sure to keep your tools safe.

USmash (Centrifugal Farce)

Rin calls forth a paint bucket from hammerspace as she grips it with one of her feet, swinging it into the air quickly enough for it to spin a couple of times, hitting anyone unlucky enough to be near it for three hits of 5% for decent knockback, before the bucket dumps its payload and covers Rin head to toe in paint. The paint itself is voluminous enough to fan out in an area near Rin, with further paint oozing out to an additional two Bowser-lengths before stopping entirely. While the attack itself is decent, covering Rin's entire vertical hitbox while parts of the rotation protect her hurtbox right in front of her, you'll want to save on using this move as a killing tool. What's truly helpful about this input is the result: covering Rin in paint saves her a lot of trouble from having to depend on her foe to spread it around. At this, the artist can spread paint around the arena herself in order to create an inspiration zone for best results, or she can go after her foe to pressure them with the threat of getting paint on them. Of course, you can also get them in the attack portion to potentially trap them in the paint that spreads out once the move is finished. Unfortunately, the knockback on the last strike is vertically inclined, so doing so isn't exactly plausible. Or practical, considering Rin can get the job done at a more dependable rate than her opponent at this point.

DSmash (Smokey Inspiration)

Rin quickly sits down, reaches into her shirt, and pulls out a cigarette, inhaling and exhaling in a half a second time span. What the hell, how could a frail girl like Rin come to smoking in ANY sort of situation? Like most of us, we have our ways of coping or finding inspiration and for Rin, that involves some good ol' Camel Joe. After the move itself, Rin creates a smokey cloud with properties based on how long you charged the move. If it wasn't charged at all/c-sticked, it's merely a stationary smoke cloud the size of Kirby. However, if Rin charges it for a full second, it grows to a considerably larger Bowser-sized cloud and will actually move forward in whatever direction Rin was facing at Bowser's walk. Fully charging it results in a Smart Bomb blast-sized cloud that will actually track opponents at the same speed as the second-long charged cloud. All three clouds last for five seconds... okay, no more Smashbot-style rambling. Smoke clouds basically serve as projectiles to your enemy and moderately risky barriers for Rin. If anyone, including the Rin who spawned the smoke, remains inside a smoke cloud for an extended period of time, they begin coughing/short circuiting due to the inhalation, taking 10% damage and a two second "hitstun". What's important about this for Rin, however, is that she ignores the lengthy hitstun entirely whenever she's painting, meaning a smart Rin player can set up a canvas in her ideal spot or paint-covered zones, smoke a little, and create a masterpiece without any interruption. It's certainly a risky procedure, considering Rin is incredibly light and 10% might seem too much for her, but it's a good deterrent for incredibly persistent/offensive types.


=-=-=-=-=-=-=-=-=-=-=
"Legs hurt though. They feel like slugs. Slugs made of sea slugs."
=-=-=-=-=-=-=-=-=-=-=

NAir (Snoozu)

While flying through the air, Rin closes her eyes and falls asleep, with a sleep bubble the size of Bowser appearing over her head. This artist is... a particularly heavy sleeper. She can go into a deep enough sleep to hold on to whatever she may have had on her at the time, even brushes or paint buckets. And no, the bubble itself does nothing if anything makes contact with it, though it does obscure whatever it covers up. That's not what's important however, as this aerial basically puts Rin in a sort of helpless state. You see, if something strikes Rin while she's asleep, the sleep bubble will pop, Rin puts on a surprised face, and the sheer unexpected wake-up will create a burst of energy that knocks enemies back for 1.5x times the amount of damage she would've taken from the attack. Of course, she still takes damage with none of the knockback, so there's still some risk to it. If she's struck by a projectile, she'll still take no knockback but will only suffer half the damage it would've done. Otherwise, Rin will remain asleep until she hits the ground or uses another one of her aerials, which will cause Rin to perform the same animation without the burst of energy, adding an extra quarter of a second of beginning lag to whatever move she wanted to use. Lastly, you can keep yourself active in this sleep state until you hit the ground, which puts Rin in untechable prone... Man, she is a heavy sleeper.

FAir (Runt Punt)

The artist briefly rears her foot back for a half a second before swinging it in a wide arc in front of her, covering the entire hurtbox in front of her as well as a small degree of hurtbox below and above. It's admittedly a pretty basic move, dealing around 13% damage and enough knockback to kill most characters around 170%. You're pretty safe even if the move whiffs unless you're dealing with some sort of speedster. So... this obviously can't be everything, even if Rin is lacking in direct attacking moves. Well, that's true: if Rin happens to be holding onto a bucket of paint from her SSpec, this'll increase the range and killing power of the input, as even an emptied bucket will take the raw damage from 12% to 15% and killing range from 170% to 125%, and a full bucket will do even more wonders for Rin. Well, relatively speaking of course, she's still Rin. Better yet is that contrary to the attack description, you won't lose your paint if you swing a full bucket. Ah yes, there's an additional function to this move as well. You may remember how I distinguished when Rin can either cover certain parts of her body (mind out of the gutter, pal) in paint or all of it. By certain parts, I only really mean her feet, as it's considerably easy to cover your feet in paint should you choose to. Well if you do, then FAir will shoot an arc of paint identical to the kick's arc, traveling a downward slope that culminates in a total drop, splattering whatever it hits in paint.

BAir (Full Body Flip)

With her expression never changing, Rin manages to swing herself in a full circle, with most of her efforts and force coming from the downward flip kick on the returning swing. It's a considerably slower move than her FAir, requiring a full second for the brunt of the damage to potentially be inflicted and half a second after that to recover. As you've no doubt guessed, this move has a rather obvious sweetspot: the downward kick, causing a relatively respectable 12% damage and a meteor smash during every part of the later part of the circle. The rest of the attack deals a meager 5% damage with lighter knockback. Along with your USpec, this serves as your primary killing move, though for a more singular purpose in the meteor smashing quality. As you've correctly inferred from FAir, you can boost the damage on this move if Rin happens to be holding onto a paint bucket, with the force and lasting duration of the meteor smash increasing along with the damage and knockback on the hitbox for the rest of the circle. Finally, if Rin has her feet coated in paint from walking all over it, she can create an even larger paint splatter across the stage since she covers a wider area than in FAir.

UAir (Falling Sky)

Utilizing some surprising dexterity, Rin flips herself so her feet shoot upward, attempting to grab onto something before flipping back into her aerial neutral stance. That is, assuming you whiffed it. If anyone happens to be above Rin for a full Ganondorf distance, then Rin grabs onto her victim with only her feet, as the sudden addition in weight proves to be too much for whoever she grabbed. As a result, they both begin fastfalling toward the ground in a drop that either can control, resulting in the one with the least amount of damage retaining 70% control. You can also Rincide with this, though you'd likely want to maneuver your trapped foes into paint, as the landing results in both Rin and her enemy getting covered in it. The landing is far less graceful, with Rin using her grabbed foe to break her fall. While there's obviously no knockback, the damage is relative to how long Rin and her opposition are in the air: for each half a second, the base damage of 3% gets boosted by 10% for each half a second. Needless to say, this can be a very damaging move if Rin happens to nab an opponent high enough in the air and leaving the foe in an untechable prone state is helpful enough. Of course, you can also batter enemies in the way of your flight path for a fixed 10% damage and anyone near your landing zone- friend or foe- will get knocked back a fair distance for 7%. A good method of crowd control if you're willing to risk Rin's well-being, as she leaves herself fairly open upon landing.

DAir (Dire Drop Distance)

Deciding that living among the clouds makes breathing a bit more difficult at that elevation, Rin makes her way back to solid ground, letting gravity do its thing as the artist falls knee-first at a faster rate than before. Let's say, Melee Bowser Bomb speed. At any rate, she basically has no hurtbox, retaining super armor throughout the entirety of the fall, with the entire lower portion of her body acting as a hitbox doling out 9% damage and enough spike force- or knockback, if she hits grounded foes- to keep her safe from harm upon landing. While this makes it sound like a better and less situational version of UAir, keep this in mind- Rin is unable to control her direction during this DAir, meaning you have to pick your dropping point wisely. Otherwise, you could be screwing yourself over unintentionally. Regardless, you can still use this move in aerial advances, gimping attempts, and, of course, to get paint all over yourself and adjacent foes. No, really, DAir causes the biggest possible splash Rin can make if you land in paint, shooting out waves two Ganons high on both sides of the artist that reach out a whopping four Mario-lengths away. Better yet, Rin recovers just as the waves die down- they travel pretty fast, but don't deal any damage or respectable knockback- meaning she's pretty darn safe unless your enemy has maneuvered around the waves.


=-=-=-=-=-=-=-=-=-=-=
"You know, if you were a girl I could see your panties."
=-=-=-=-=-=-=-=-=-=-=


Grab/Pummel (Butterfly Vomit)

Well... this is awkward. We get to a grab section in a set for someone with no arms or hands. Let's make this even more awkward: Rin has the best grab range out of any of the regular Brawl cast. Feel free to gasp at this revelation and ask, "But how, Smashbot?" In place of reaching out with an arm or hand, Rin leaps forward one-and-a-half Bowser lengths, picking her feet up a bit while she's airborne. She'll do her best to land under such circumstances if she misses, stumbling for about half a second before she recovers. Dashing increases the distance by an additional half a Bowser-length. If some poor soul is in the way of the leaping girl, Rin wraps her legs around the no doubt surprised foe, trapping their arms or whatever they have up there, leaving them able to stumble around at half their walking speed. Yes, foes can still move around and mash to get Rin off them, although one might try walking off an edge. Don't do that: it only results in a UAir that Rin has full control over, and the poor sap in her clutches certainly doesn't want that, although Rin might. As for Rin's pummel, she simply head butts her foe for 2% damage and has them stumble in the direction opposite that they're facing. A good tactic if you want to force your foes to get closer to a painting or trap them in paint. Unlike other pummel attacks, though, Rin can only perform this between second-and-a-half intervals, to prevent Rin from mosh pitting her opponent near a painting for an easy stun or off the arena for an easier kill.

FThrow (Go Means Go)

Deciding that her temporary mount has lost its value, Rin quickly releases her death grip on the foe and almost instantly following up with a harsh kick to the victim's gut with both her feet. This sends Rin's former plaything flying, taking with him 13% damage and enough knockback to usually kill around 160%, and the girl herself sliding across the ground for a fixed distance of 3.5 Yoshi-lengths. The slide will actually trip opponents in her way and deal 7% damage, in case you're wondering, and grants Rin immunity from every attack that doesn't directly hit characters in prone. Aside from acting as a potential killer for the weak Rin, this grab also sends Rin sliding across the ground. Meaning if you time it right, you can get Rin covered in paint while sending whoever you grabbed far enough to protect the artist as she gets up. You can also send your foe flying into other fighters in a FFA or Team Battle for some unexpected collateral damage in case they're not paying attention.

BThrow (The Switch)

With the foe still in her clutches, Rin swerves her body around so that her opponent is now facing the direction opposite he previously was, with Rin following up by headbutting the opponent and releasing him from her... grasp? Questionable terms aside, this leaves the foe with a headache that comes with 7% damage and nearly two seconds of stun. However, Rin requires quite some time to recover out of this move, almost as much as the foe is stunned, considering she lands rear first onto the ground after she lets go of the opponent. This can be taken advantage of by an ally... or another enemy. At any rate, what's essentially happened is that Rin pushed the enemy away a fair distance away from her- usually to distance herself or her creations from the opponent or to move them closer to a painting- at the potential cost of exposing herself to other opponents. Luckily, if you're in a 1v1, this shouldn't be too much of a problem. Unfortunately, you're not really able to practically loop this into each other because of how late Rin recovers from the move. Yes, I mentioned that she comes out of her recovery before the foe their stun and that the artist's grab range is immense, but the time difference is just that strict.

UThrow (Dazed and Confused)

Swinging her admittedly below average body weight around the foe in a circle wit her eyes closed, Rin brings the foe with her in this dizzying display of... dizziness. After several rotations, Rin simply falls from the opponent, feeling rather tipsy, going right into prone, while her opponent continues spinning for three seconds. And by spinning, I really MEAN spinning- even while in place, the fighter who's affected by this grab rotates in either a clockwise or counterclockwise formation, the two are mixed up every time. At any rate, this means certain moves can flat out whiff on Rin as they end up turning the other way once the move is finished charging. Who knows they might even unintentionally avert their gaze to a painting Rin has made! This may, however, inconvenience Rin if the opponent can easily get around the dizzy state, but that would require incredibly quick situational adjustments: some that cannot be gained so easily. Unfortunately, the level at which they rotate slowly descends over the three second period, meaning that enemies won't be feeling the effects as much later on in the dizzy state. To prevent this from being a complete waste of an input, there's an additional quality I dropped and never mentioned like a baby from a balcony: Rin goes right into prone after this grab. Due to the foe's disorientation, their ability to strike a foe in prone, let alone period, will be greatly reduced. It opens up small windows of opportunity for Rin to take advantage of: either escape with your artwork or press the attack on your debilitated foe. For even more fun, you can use Rin and her "friend" as an impromptu whack-a-shmoe, moving your quarry slightly to the left and right to batter nearby combatants. And as always, Rin will cover herself in paint as soon as she goes prone assuming she's over a paint-covered area.

DThrow (Going Horizontal)

Pushing all her modest weight against the opponent, Rin causes her former steed to topple over and onto the ground facing up. With a bored look in her eye, Rin tumbles off her opponent and turns around, back in her normal stance. Other than causing 9% damage with clearly no knockback, you can also assume that this move happens to cover Rin and her enemy in paint. Not the case here: only the enemy gets paint-laden, while Rin comes out clean as a whistle assuming she wasn't already covered in paint. There's honestly not much else I could say about this move, mostly because the properties speak for itself. DThrow leaves Rin in the most advantageous position possible in terms of raw wake-up potential: it deals the most damage, it puts foes in a prone state against a frame-advantaged Rin, and it covers the foe in paint. If you truly want to force your foe into a difficult decision, try pulling this DThrow off over paint and see what mistakes they'll make, and what you'll capitalize on.


=-=-=-=-=-=-=-=-=-=-=
"Are you a mind reader? Is that your disability? How unique!"
=-=-=-=-=-=-=-=-=-=-=

The mind of an artist is a complex one, yes? Full of mysteries, uncertainties, and untold happenings. While this can be applied to Rin, it is just as appropriate to compare her playstyle to such a claim; against her, you never know what to expect throughout the battle. However, as you can tell, she revolves around a single goal: get the highest quality painting you can onto the battlefield, and do everything in your power to make this as easy as possible. Fitting, considering Rin's greatest passion is to send a message through her pieces. Even though we have a passive mechanic that dictates where Rin can get the best potential artwork, it's not truly going to help when it switches fairly often and cannot be detected by anything other than minute observation. As such, you have paint, brushes, and drugs to help you out. Unfortunately, while this is all appropriately elaborate for Rin, it does not lend well to true combat potential: her best kill move outside of using her paint can is her bloody recovery move, and a majority of her attacks usually work better in tandem with paint or a nearby canvas.

Naturally, these cons come off as a hindrance to most. But dedicated players can find a playstyle that rewards their dedication, as they learn to best overcome Rin's weaknesses to get the most out of her quirks. Obviously, her paintings provide the cornerstone for most of Rin's kills as it puts foes in an incredibly vulnerable state that Rin can follow up on with USpec if her opponent is at a high enough percentage. Otherwise, Rin can then use her opponent as a personal canvas, either to paint them up in order to increase your workspace or to swab your work of art with FSmash and keep it for later. You can still continue your work in relative peace, though if your opponent approaches, you always have the ever threatening DSpec to keep them in place for a very long time, though not as much as a painting. And if your opponent isn't being a cooperative model, you can always have Rin spread paint around with her SSpec. Oh yes, the SSpec: a delicate balancing act for Rin, since it boosts her killing potential exponentially and further buffs her main air-to-anything attacks. However, you can't hold onto it forever; Rin will need to spread the paint and despite the very helpful nature of the paint can, Rin doesn't have that many options to keep foes off of her. Best to simply use the bucket when you can, i.e. to gimp people from onstage since her recovery is rather bad.

Pretty much all of Rin's ground normals revolve around movement, spacing, and making the process of subsequent painting- and exposure- much easier. Once you have the perfect piece of art ready, you'll need to prod your no doubt hesitant foe into moving closer to it in order to achieve that important stun. Her ground approach, however, is admittedly lacking in terms of speed. Sure, her ground and short hop speeds are fine, but you usually don't want to expose someone with a 1 in weight to a direct confrontation. However, what you can abuse is her incredibly small hurtbox during crouches: even if she can't crawl, Rin is perfectly content with slipping with UTilt and tech rolling her way to victory. This is even more difficult foe the foe to deal with since the artist can fake her way past his defenses and if they try escaping over her, she can DTilt and render them helpless for a precious moment. Of course, if that's not your style or if your enemy is expecting this, you can always go the unexpected route of crashing your weight with Dash or simply running up and Jabbing them for extra stun time. So we've covered Rin's approach options, but now how is she going to force her opponent into range? Simple: her throws and FTilt are almost entirely focused on spacing, with the former being invaluable for shield-happy foes and the latter perfect for throwing off opponents who try to leap away from her grab.

Like any good artist, Rin supplements herself with tools important, or deemed as such by the redhead(?), in her trade. The brush in FSmash lets Rin preserve her precious works of art, letting the artist remake her visual spectacles when she has time for herself, although a constantly offensive foe no doubt leaves her with few options. Better yet, you can swipe the brush on a perfected painting while the foe is stunned so you can transition the potential effects doled onto the foe to a new painting, considering no two paintings are ever the same. The smoke from DSmash makes this approach more dangerous, as it essentially becomes an obstacle that lets Rin buy time to do as she pleases. She can also use it as a personal bubble for painting which, in conjunction with a perfect stroke from FSmash, can be a high risk high reward procedure. Lastly, USmash gives Rin yet another option for setting up paint in an area around her, coming with the usual perks that painted ground provides: it limits the foe's movement options, gets paint on Rin's feet, and gives Rin a temporary spot of inspiration that leads to her dreaded two second stunners. Of course, it serves as one of her only damage-dealing anti-air options and covers Rin in paint, so you can even squish Rin against her opponents to spread the painted wealth. Naturally, if any of this becomes to risky for the foe to pass up and he simply goes right for the kill, you'll have a DSpec counter at hand while you're charging your smashes.

Much of Rin's aerial game consists not only of getting the foe back to the ground, but ensuring they're punished for being in the air. That whole mindset keeps them in a zone where paint should be plentiful as much as it is dangerous. While NAir acts as an aerial version of her DSpec counter move, it's different in that the counter effect is less severe and it acts as a damper to your other aerial moves if it's unsuccessful. You can still use it if you plan on landing inside smoke clouds to act as an approach or retreat option. Naturally, she'll need some options for air-to-air combat as well, which is why her FAir makes for a very dependable option in such a situation and her BAir arguably acts as her best killing move. With both being able to spread paint when applicable, the utility and threat of these moves becomes higher than normal. UAir is another one of those grab-n-drop attacks that most ground-based sets have, only it has further interaction with paint in that it guarantees both you and your victim will contribute to making the stage your new canvas. The potential damage boosting provided by height doesn't hurt either, and putting the foe into an untechable prone limits their options further. How I keep mentioning this when Rin can't apply pressure all that effectively will be elaborated upon further, after I discuss DAir's applications. Rin's last aerial attack to be mentioned helps her get from the air to the ground in the least amount of time with the least amount of threat to Rin's well-being, especially if she lands in smoke. Short hopping DAir combined with its low ending lag make for a rather effective movement option, assuming you want to keep Rin in a single relative area.

Now, for the grab and throws. The reason why I've never elaborated upon Rin's ability to follow up on those untechables. Rin has the largest throw range in the game; combining that with some moves that keep her close to the foe, some utility attacks that go right through an opponent's shield, a tilt that does one of the grab's jobs without being limited to ground-only, and a throw state that lets Rin MOVE the opponent around make for a threatening wake-up game. Considering all of her tools revolve around further debilitating the foe and affecting their placement and cleanliness only enhance this threat to greater levels than before. While not all that damaging, FThrow still acts as your ideal damage dealer if the opponent or Rin is already covered in paint and you want to move your foe closer to your canvas or a smoke cloud. BThrow does this as well, except with less damage but more push-back, potentially moving foes close enough to one of the previously mentioned threats. UAir prevents the foe from fighting back against any of Rin's follow-up attempts more difficult, although this is the one "throw" that still leaves opponents in a well enough state to potentially fight back. Or it could send them sprawling toward the canvas, which is obviously more preferable, but at the very least Rin is able to get a swab of her perfect painting or coat herself and the foe with further layers of paint. Finally, DThrow acts as a fairly useful tool in that it's Rin's most damaging grab while also coating the foe, and only the foe, in paint. It leaves them in prone so Rin can follow up on some more punishment and covers them and only them in paint, making anything Rin wants to do after the throw ends easier, considering the foe will want to be more careful about spreading paint around than going after the artist.

While it took some elaboration to explain what's really happening in this moveset, it boils down to how Rin can set up her painting, force her opponent into getting close enough to be stunned by it, and then letting the Rin player go from there. It's a fairly option-based moveset whose effectiveness depends largely on the player. Rin's weight and inability to really get foes off of her don't tend well to making mistakes, but if she gets enough time to herself, she can trap her opponent in a corner and then figuratively shoot them in the foot for a killing blow or further foot shooting.


[COLLAPSE="What is this cosmic horror of which you speak
An unintended monster of the mind, bane of the weak
A relic for the past millennium to fear
That change in emotion means he draws near"]


FINAL SMASH:
"THE RAINBOW WIZARD
REMAIN STEADFAST
AND TAKE THY BREATH
FOR IT BE YOUR LAST"

With Rin obtaining the power of the Smash Ball, she crumples over in what appears to be pain, as control over her body gives way as she rises into the air due to an unseen force. Said force reveals itself shortly after Rin leaves the stage via rising out of the camera's view: the Rainbow Wizard.

This fearsome creation of the mind uses its untapped power to collapse the stage, pushing foes into the air high enough so that they won't immediately fall indefinitely a la Fly. No, what the Rainbow Wizard does is much more torturous: as his new victims fall through the sky, he takes the center of the stage and creates a ground that becomes the temporary new stage for twenty seconds. But this is no ordinary ground, however: the entire stage is an enclosed circle, meaning there is no way for the entrapped to die or escape, letting the Rainbow Wizard have all the fun he wants for the next twenty seconds. And by wizard, I of course mean you, dear player.

The player gets control over the stage in how it rotates and even the pull of gravity- simply rotate the stage clockwise by pressing B or counterclockwise by pressing A. Repeated presses speed up the stage rotation. To influence gravity, simply tap the movement stick in the direction you desire, preferably toward the Rainbow Wizard. What, you didn't think that this was a non-damaging final smash, do you? What a joke! No, whoever is pulled into the portrait of the Rainbow Wizard has their mind, body, and soul warped in a matter of milliseconds, dealing 15% damage and knocking them in a random direction with so much force that their body continuously bounces off the stage for, at most, five bounces, depending on weight. After fifteen seconds, the Rainbow Wizard flashes his eyes and disappears, leaving every foe involved where he once was and a very sleepy looking Rin standing in the same spot she activated the Final Smash in.

Was... was this all just a dream?
[/COLLAPSE]
 

Katapultar

Smash Lord
Joined
Nov 24, 2008
Messages
1,284
Location
Australia
[collapse="Lilly Satou and Hanako Ikezawa"]Picking two of the girls at once for the movement was somewhat gutsy of you - you could have either made individual sets for them to exploit them for what they were worth or actually give them a tag-team in which to combine their potential into one nice thing. I can't help but feel you were entitled to many, many more props and exploitations of the girls' own unique quirks and hobbies, but none of them were used in favor of making the girls "realistic" in a setting where you're forced to babysit the both of them with an entirely plain set compromised of the basics of basics and a very awkward and forced control scheme. At the very least nothing either of the girls do feels too out of place (though I'm rather shocked that Lily can even dash that quickly at all to the point where it seems unrealistic and OoC for her), and making them not attempt to gang up on the enemy was a good call that shows their benevolent ways - there are some overly straightforward percentages and numbers like on the mechanics via Lily standing in place for 1.5 seconds and the tea healing a plain 8%, but when I think about it I'm glad you don't force anything horrible on the foe. The set is also similar to Ico and Yorda (though I know you had this one done a real long time ago) where you can't keep Hanako camping via having Lily smack away at the enemy with tilts and smashes.

You make sets seldom, and the way your mind works I can understand that you would have wanted to represent Lily and Hanako as wanting to support each other, which is somewhat pulled off successfully if in the most generic way possible...I guess independent tag team comboing with two completely different characters isn't all -that- bad and not the most unfitting style for the two if at all. Yet just imagine what you could have done with the two individual characters: Lily seems to eat up most of the inputs here and scores the KOs for the group whilst also providing the feminine females' tea party, which combined with super feelyness could have made a set for its own, while Hanako could very easily run away and push enemies away to their deaths along with using books and what have you. You probably saw most of this coming from others and myself anyway reception-wise, with my two main problems with the set being the general awkwardness which is imposed upon the player and putting too much into a single set yet not really milking anything out of the characters at the same time. [/collapse]


[collapse="Rin Tezuka"]I should have probably told you this beforehand, though it might have been too late as to how far you'd gotten into the set, but...Rin's playstyle could have massively benefited from being able to use the stage itself as a canvas rather than just produce one in which you massively restrict yourself. Seriously, Act 0 has Rin do an entire project on the school's wall, so it would be no problem for her to use the stage's wall or ground as to produce a masterpiece if you're worried about characterization. I know you tried to make the set focused for Rin's characterization, but this is perhaps a little -too- focused as for somewhat defying what could otherwise have been some good potential.

Rin herself may not have the most potential of characters, but deep down something as simple as paint can be interpreted in Brawl in many ways. I kind of have a similar problem with this set as I did with Once-Ler in that, well, you try to interpret a sort of project you emphasize to the reader that your character has to get through only for it to be rather meaningless and impractical for the main goal of Brawl - KO'ing. The idea of getting the foe to spread paint that you can also stand on without harm and without any logistical inconsistencies is good, but that idea in itself does not amount to anything since the paint is relatively harmless and only serves to be splattered on your canvas and find an inspiration point...as for the painting itself, at best it only stuns the foe for 2 seconds and I do not really like those kinds of moves - they feel forced in a straightforward manner and all you can do to exploit them is hit the foe with a powerful attack which you could have used beforehand. It doesn't really come together all that well with most of the killing moves either since they're aerial-orientated and the foe will be on ground when looking at the painting, of which you could do to them almost anytime.

What I can praise in the set are some of the rather clever controllable mind-games and attack animations in which compose Rin, and are great in themselves. The mindgames in which actually make Rin unpredictable in unique ways like taking advantage of normal animations are great for her - had her character not revolved around painting that would have made a great base.

All things considered I don't think the playstyle and core concepts behind the set flourish much if at all and said base has no pay-off to it. Using a "trivial" matter in life as a base concept for a moveset in where people fight to the death is not an easy thing to do however, especially without deviating or excluding it as a main way to score KOs when physical moves are the way to do it. Obviously not great as an actual moveset, but as a moveset for Rin herself it's not too bad.[/collapse]
 

darth meanie

Smash Journeyman
Joined
Jun 6, 2008
Messages
452
Feminist Moveset Scum!


Man, I was just finishing my nightly routine of securing the internet from feminist viruses trying to steal men's secrets off of the web. Women are incapable of using the internet of course, so they have to steal viruses to use it for them for their own purposes. I head to my favorite site to find manly heavyweight male antagonists to inspire me for the next day when I see a bunch of movesets for GIRLS! GIRLS FROM YAMAKU AT THAT! FEMINIST INFLITRATORS ON MAKE YOUR MOVE! THAT'S NOT NORMAL! WOMEN CAN'T BE ON THE WEB! IT'S IMPOSSIBLE!

There are only two options; either women have finally been able to crack into the last bastion for mankind, or we have a traitor in our midst. One from Yamaku too, the greatest of all women's strongholds. Fortunately, there is a simple way to determine this. I'll have to read these libelous sets to see if they were made well enough to be made by a man, or if a woman had to have made it.


Cyborg Girl

This girl just creeps me out. Feminists have started chopping off their own legs to replace them with machines for their success. Have you seen the blades on it? She could stab you to death with it, if women could stab people to death.

So apparantly she's faster than Sonic? Holy crap man, do you know just how fast that is? She wins races for cripples, it's not exactly something to be proud of you know. It's like the time at the science fair when I drank my own pee for a month as preparation for the feminist invasion. They gave me a ribbon, and I thought it was pretty cool, but it turned out they gave everyone a ribbon! That's messed up man! What does a ribbon mean if everyone has one! It's these freaking feminists up top in the Japanese school systems. They're the reason our birth rate is down!

Fortunately, its seems that she does have a weakness, since any attack that hits her metal legs will make her trip, and she's completely vulnerable getting up from tripped. So it turns out absolutely anyone can just easily infinite her with a down tilt! Aha! I've got it now! This isn't a feminist moveset, it's a tactical playbook on her abilities so that we can defeat her when the invasion arrives! It all makes sense now. Well done, friend.

And she seems pretty easy to beat too. Not only does she have an easy infinite against her, she's missing several attacks to do damage. Although with her dash, it's pretty scary still. Why she has a dash attack that doesn't do damage but a dash that does is beyond me though. I know my bro Hisao almost got killed by a sneak attack by her. Gimme a sec, I gotta take a drink in remembrance of a fallen ally. He died doing what he loved, fighting the feminist uprising.

And apparantly she's some sort of super human. How the hell does she jump off of mid-air? And more than twice Sonic's spring height? That's taller than most stages man! How are you supposed to control something like that? And with a move like that Up Smash which has nothing to do with Up or Smashing she can go even faster? Geez!

In the end, this moveset doesn't make any sense at all, just like the feminists, so it matches out. The glove fits, just like it did in that one foreign movie where the glove didn't fit, except this time it does. You are clearly a feminist spy, Katapultar. Take him away.


... and **** it, I'm drunk now and tired. I can always skip class and work on inspecting these documents tomorrow. It's far more important after all.
 

Katapultar

Smash Lord
Joined
Nov 24, 2008
Messages
1,284
Location
Australia
So apparantly she's faster than Sonic? Holy crap man, do you know just how fast that is? She wins races for cripples, it's not exactly something to be proud of you know


It's nice to see you commenting on your birthday presents. Was totally expecting you to go fully in-depth on characterization like you usually do or at least hit me up on it, though. I only just realized that Emi can be victims of infinites via the fact that she has no invincibility frames when getting up and it takes 1.2 seconds to do so - to be nice I will edit in something to help with that. Very surprisingly informative, actually, but none the less and thankfully not a huge part of the set. A little awkward I realized though.
 

Conren

Smash Apprentice
Joined
Feb 17, 2009
Messages
90
Location
Boston
NNID
Conren1
3DS FC
5086-4445-8944


HARDIN

The emperor of Akaneia has joined the Brawl. Hardin was once a trusted companion of Marth but was later corrupted in a tragic story involving grief. He was alluded to in one of Brawl's easter eggs.

ATTRIBUTES

Dash Speed 1/10
Air Speed 2/10
Fall Speed 8/10
Jump 4/10
Air Jump 4/10
Traction 6/10
Weight 10/10

Hardin is a little taller than Marth, and with his bulky armor, he's noticeably wider. Using his lance, The Gradivus, he has lots of range, and the tip of his attacks do more damage and knockback than the middle. He is also extremely heavy, second only to Bowser (among existing PCs).

Note: Most damage will be listed in the format of untipped damage%/tipped damage%.


SPECIALS

Neutral Special - Flame Lance
12% - 40%

Flame lance passively charges as time goes by and becomes fully charged after 2 minutes. However, the timer can be shortened: Everytime Hardin attacks and Gradivus comes in contact with an energy attack (fire, electricity, magic, etc.), Gradivus absorbs some of the energy, charging Flame Lance by two seconds. Using Flame Lance at any time causes the charge to reset.

At minimal charge, Hardin simply does a slow fiery poke that does 12% damage with minimal knockback. Not very useful, but it does get stronger the longer it's charged. When the attack is fully charged, it changes. Gradivus starts to glow, and when the special button is pressed, Hardin throws Gradivus 2 SBBs away, causing a large explosion that does 40% damage and can KO at low percentages. Needless to say, this is a great finisher, especially on out of stage targets.

After the attack, Hardin can be seen still holding Gradivus, as if he never threw it, somehow.

When Kirby copies this move, he wears a turban. How strange.

Forward Special - Regal Spin
6%/10%

In a move that's fitting of a corrupted king, Hardin begins slowly spinning Gradivus around him, slowly going faster until he's spinning at about 130 rpm (you'll have to imagine how fast that is). During this time, Hardin can move left or right at about his walk speed. If the special button is released, or if he jumps up during the attack, he'll do one final slash that does 14%/21% damage, while also causing a push effect just outside the damaging hitbox.

Also, Hardin has 5% super armor during the entire duration of the attack.


like this, minus the setup part

Down Special - Great Shield

No Fire Emblem character would be complete without a counter special move.

Hardin gets into a defensive stance, with Gradivus held up, point tilted down, where he quickly goes into the invincibility phase. During this phase, any attack that hits him will power up his coming counter-attack. Multiple attacks can power him up, and will in fact extend the invincibility phase (I'll explain how that works below). His counter-attack will then do 2.5% damage for each time he was hit, with a minimum of 10% damage.

If Hardin doesn't get hit during the invincibility phase, he'll get stuck in a rather long end lag.

Great Shield has some more special properties compared to other counters. First of all, it provides true invincibility, so it can block grabs and even final smashes! It also has a vacum effect to encourage attacks to hit their mark. Also, it's a momentum cancelling move and will halt ALL momentum.

Anyways, here are the steps that Great Shield takes:

Step 1: Hardin goes into defensive stance.
Step 2: He gets hit 1 or more times.
Step 3: He waits a few frames.
Step 4: If he gets hit again, repeat Step 3, otherwise, go to Step 5.
Step 5: If the last hit was from behind, he'll quickly turn around.
Step 6: Counter-attack.

Up Special - Chain Lance
6%

Hardin throws Gradivus upwards, revealing a chain connected to it. If the attack grabs an opponent, Hardin will then slam him into the ground, otherwise he'll just pull Gradivus back to his hand. This move is mainly used to keep enemies from just going past Hardin. It can also be used as a tether recovery.


STANDARD ATTACKS

Neutral Attack - Rising Cut
7%/9%

Hardin does a simple vertical slash. This is a relatively fast attack that is useful for interrupting combos. Due to its reach, it is also useful for canceling projectile attacks.

Forward Tilt - Pole Shove
11%/14%

Hardin holds his spear upright and shoves his opponent. This has a good chance of tripping, and will also slide the opponent along the ground at a fixed knockback. It also has a few invincibility frames at the start of the attack, making it a good counter-attack.

It's also great for setting up a forward smash, or a fully charged neutral special.

If the opponent is hit by the spear point instead, they'll be sent at a more upwards angle.

Down Tilt - Heel Stab
11%/15%

Hardin does a diagonally down stab to the... heels of the opponent. This attack is a little slow, but it is a good edge-guarding attack since it has good range and it semi-spikes.

Up Tilt - Crescent Slash
12%/16%

Hardin makes a big slash from a little behind him to towards the ground in front of him. The trajectory of the attack depends on when the opponent is hit. If hit with the beginning half, the opponent will be sent up-forward. If tipped, this has a good ko potential.

If hit with the second half of the attack, the opponent will be sent down-forward, towards the ground right in front of Hardin. It does lose some power but can still make a good spike at high percentages. Either ways, the attack is great for keeping an opponent from getting past Hardin.

Dash Attack - Ramming Guard
9%

Hardin rams forward with his shoulder. As an attack it's not very impressive with it's short range and very low hit stun.

The real use of this attack is the super armor it provides, letting Hardin shrug off a projectile in case he needs to close the distance to a campy player.


SMASH ATTACKS

Forward Smash - Power Thrust
14%/21% - 19%/29%

Hardin rears his spear back and thrusts forward. This is a powerful finisher with great range. Can be angled up or down.

Down Smash - Double Sweep
9%/12% - 12%/16% (each hit)

Hardin sweeps the ground in front of him, then if the attack button is pressed again, he twilres the spear above him and brings it down for another sweep, all in a fluid motion.

The first hit trips the opponent and can be followed up by another attack. Or you could just use the natural second hit of the attack which is a decent finisher.

Up Smash - Pike Stand
11%/17% - 15%/23%

Hardin thrusts his spear straight up and holds it there for a moment. The hitbox lasts long for a smash attack. Useful as an anti-air attack, and has fair KO potential.


AIR ATTACKS

Neutral Air - Whirling Spear
8%/15%

Hardin spins his spear once around. This is mostly a defensive move, with little KO potential.

Forward Air - Spear Lunge
8%/12%

Hardin stabs forward with one hand. This is his longest forward ranged attack, but because he uses one hand, it has very low knockback. It's best used as a defensive and spacing move.

Down Air - Spike Drop
12%/20%

Hardin rears up and stabs downward, falling at a faster rate. During this attack's rather long landing lag, the spear stays pointed downward, and becomes a passive hitbox, doing 10% damage and being a strong meteor smash. This attack is a great edge-guarding tool.

Up Air - Ascension
15%/23% (early) 10%/14% (late)

Hardin vertically slashes upwards. This attack is strongest during the initial frames. Due to the bit of lage of this attack, and the position of the spear during the first few frames, this move is best used out-of-shield for a devestating counter-attack that can deliver an early kill.

Back Air - Hook Thrust
7%/12%

Harding stabs backwards in and awkward downwards hook. This has fairly weak knockback, but it is a semispike and can be used to mix up Hardin's edgeguarding game.

Tip: Hang on the ledge first, then jump back to use it.


GRABS & THROWS

Grab - Chock Grab

Hardin has the grab range you'd expect from someone his height. However, there is one special property to his grab: it can be used when Hardin is "bouncing" off the ground from an attack knockback. He'll immediately grab and eliminate his current knockback. The timing is strict for that, though. Anyone who thinks that they can chainthrow Hardin is in for a surprise.

...Except the Ice Climbers...

Pummel - Pole Bash
2%

A simple strike with the pole of the spear. Fairly slow.

weapon

Forward Throw - Hurling Slash
6%

Hardin throws his foe forward, and quickly follows with a slash.

Down Throw - Excecution
10%

Hardin slams his opponent to the ground then stabs him in the torso. Doesn't have any knockback, so it can be used as a set-up for another attack. It's wickedly fun to do a foward tilt attack right after this.

Up Throw - Impaler
4%

Hardin throws his opponent upwards, and prepares him for an up smash, probably.

Back Throw - Petty Toss
3%

Without even looking back, Hardin throws his opponent backwards, as if getting rid of someone not worth his time.


FINAL SMASH

Darksphere

Hardin takes out the dreaded Darksphere and raises it in the air, then a large black sphere engulfs an 18 SBB wide area centered on Hardin. All enemies that are trapped in that area gain increased knockback when attacked, and can do nothing but stand around. Hardin himself gains a slight increase in mobility can do whatever he wants. Like attack them. After 1-10 seconds trapped enemies can begin to move slowly, but still recieve increased knockback. The entire move lasts 15 seconds.


PLAYSTYLE

Hardin is a great defensive fighter. He prefers to let opponents get within his impressive range while he pokes and slashes away. If opponents are too agressive, he can capitalize on them with his counterattacks: down special, forward tilt, up air, and sometimes down smash. With good DI and momentum cancelling, he can also survive to incredible amounts of damage.

If the need arises, and he's facing a campy player, he can become an advancing wall of doom. Attacks like forward tilt, dash attack, and forward special can help Hardin shrug off pretty much any projectile as he advances. To top it off, moves like up smash, up tilt, and up special can keep opponents from just jumping past him.

For the most part, his aerials aren't very impressive, and are mainly used to protect him as he tries to get back to the ground. He throws are rather weat as well, but are useful as setups for other attacks.


behold the mustache of power

I should probably mention that this is my first entry.​
 

Katapultar

Smash Lord
Joined
Nov 24, 2008
Messages
1,284
Location
Australia
[collapse="Hardin"]I should be one to welcome you to Make Your Move, Conren, for it is nice of you to grace us with a moveset...using your first post none the less. You have a surprising amount of information and understanding of Brawl at your disposal that's relayed in a fairly unique way via some of your move descriptions (though everyone will be different at this time) - I do love those links to actual existing Brawl techniques and how detailed the counter is, not to mention that your set looks pretty clean. Hardin seems like a character who would actually be quite a fun addition to the Fire Emblem characters of Brawl given he's not just another generic sword user....who wouldn't want to poke enemies away with the comfort of their long lance?

For some minor complaints, and these are incredibly minors ones that aren't overbearing on the set: it's a bit difficult to imagine the Side Special's animation, and anything I do try to imagine feels a little awkward on him (AKA something like Ice Climbers' Side Special) - not to mention the weird speed of "130 rpm", which is a rather obscure comparison. Otherwise this set has a pretty simple yet solid playstyle that revolves around using advancing whilst keeping opponents at bay and getting the great satisfaction of finishing your opponents off with the almighty Neutral Special if they take too long - although you were trying to keep things balanced with the long timer via Wario Waft, I almost wish there was a way to increase the timer by a second or two in a way that allowed the player to maintain the sense of playstyle you've incorporated such as gaining an extra second for every successful attack you land regardless of whether it's shielded or not, or even TWO extra seconds for each hit countered! Having the timer increased via counters to deter foes from using projectiles so you can use your super powerful attack on them would have been something I'd LOVE to see. Also, I'm sure there will be people who'll love you for putting in a Kirby hat reference.

It's pretty clear you know your stuff and what you want with movesetting (SSB4 IS being discussed at the moment), so if you enjoyed it as much as I think you did, you might as well go for it man. It'd be fun to have another fellow around.[/collapse]
 

Conren

Smash Apprentice
Joined
Feb 17, 2009
Messages
90
Location
Boston
NNID
Conren1
3DS FC
5086-4445-8944
[collapse="Hardin"]I should be one to welcome you to Make Your Move, Conren, for it is nice of you to grace us with a moveset...using your first post none the less. You have a surprising amount of information and understanding of Brawl at your disposal that's relayed in a fairly unique way via some of your move descriptions (though everyone will be different at this time) - I do love those links to actual existing Brawl techniques and how detailed the counter is, not to mention that your set looks pretty clean. Hardin seems like a character who would actually be quite a fun addition to the Fire Emblem characters of Brawl given he's not just another generic sword user....who wouldn't want to poke enemies away with the comfort of their long lance?

For some minor complaints, and these are incredibly minors ones that aren't overbearing on the set: it's a bit difficult to imagine the Side Special's animation, and anything I do try to imagine feels a little awkward on him (AKA something like Ice Climbers' Side Special) - not to mention the weird speed of "130 rpm", which is a rather obscure comparison. Otherwise this set has a pretty simple yet solid playstyle that revolves around using advancing whilst keeping opponents at bay and getting the great satisfaction of finishing your opponents off with the almighty Neutral Special if they take too long - although you were trying to keep things balanced with the long timer via Wario Waft, I almost wish there was a way to increase the timer by a second or two in a way that allowed the player to maintain the sense of playstyle you've incorporated such as gaining an extra second for every successful attack you land regardless of whether it's shielded or not, or even TWO extra seconds for each hit countered! Having the timer increased via counters to deter foes from using projectiles so you can use your super powerful attack on them would have been something I'd LOVE to see. Also, I'm sure there will be people who'll love you for putting in a Kirby hat reference.

It's pretty clear you know your stuff and what you want with movesetting (SSB4 IS being discussed at the moment), so if you enjoyed it as much as I think you did, you might as well go for it man. It'd be fun to have another fellow around.[/collapse]
Hey thanks for the critique. For the Side Special, I basically borrowed it from a certain other heavily armored boss, but I do find it a bit hard to describe. I suppose I could just make an illustration.
 
Top Bottom