• Welcome to Smashboards, the world's largest Super Smash Brothers community! Over 250,000 Smash Bros. fans from around the world have come to discuss these great games in over 19 million posts!

    You are currently viewing our boards as a visitor. Click here to sign up right now and start on your path in the Smash community!

Data The Great Fairy Fountain II : Zelda Data & Research Repository

BJN39

Smash Data Ranger
Moderator
Joined
Aug 14, 2012
Messages
5,047
Location
The Zelda Boards
oh my god i'm so sorry for the quality >__>


You can see me do a pivot ftilt first, and then you can see the pivot fsmash after. Looking at it the leanback from fsmash is what's causing the slide motion (imo). I've found this has come in really handy against approaches in the air and also if someone runs at you from the ground...

I've been getting it more consistently now, but I still don't know what I'm doing... I'm just doing a pivot ftilt!
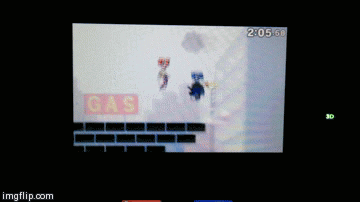
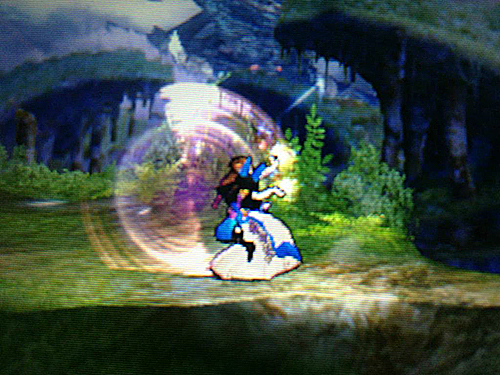
Wow that IS an impressive slide. I definitely wanna go and figure out how to consistently do this. Will share any findings and put them in the main area. Actual Zelda tech! Who'd have though!


The Great Fairy Fountain ~ Zelda Data Repository

Welcome! If you’re familiar with my previous work for Zelda in SSB4, then you’re back for even more in-depth Zelda data! This thread is the third generation of Zelda data threads on Smash World Forums with an aim for in depth and accurate data. Here you’ll find reference tables for the data on Zelda’s moveset in Super Smash Brothers: Ultimate, additionally including full raw hitbox data tables, hitbox imagery, and block advantage data in the future as the information becomes obtainable. All of the data is presented in a neat format with visuals of each move to be presented.

Obviously, the game isn’t going to be out until December, but the base thread is now ready for the release (or any demos that Zelda is present) so that the data can be implemented right away.

Base Information


Post Key
~ Post 1 - Base Information & Standard Moves
~ Post 2 - Special Moves, Grabs & Throws
~ Post 3 - Bonus


Zelda's Physical Characteristic Statistics
Statistic|Value
|

Term Descriptions
Term in Question|Description
Damage |The base damage(s) the move deals. Due to the new 1v1 damage mechanic, these are currently training mode base damage numbers.
Launch Angle |The knock-back trajectory of the hit-box. Note the unique trajectory types of the Sakurai Angle , and the Auto-Link Angle .
KO Potential |A rough number to estimate KO timings around, used by taking Mario's earliest percent on an omega stage at which he was KO'ed by the move even with correct survival DI or Vectoring. I eventually cut off moves with "N/A" if they couldn't KO by around the mid 200s.
Startup |The frames leading up to the active hitbox of an attack.
Active Frames |The frame window the hitbox of a move is active, accompanied by the total frame number.
Endlag |The cooldown window after the hitbox disappears on an attack, accompanied by the total frame number of the endlag. The move’s FAF (First Actionable Frame) is the final recorded frame of endlag.
OoS |The abbreviation for " Out of Shield ". The earliest frame an attack can hit when used as an out of shield option. Generally only applicable for aerial attacks.
Charge Frame (Smash Attacks) |The frame at which the character pauses to charge a smash attack.
AC Window (Aerials) |The Auto-Cancel Window. The frame windows during an aerial in which Zelda will land with normal landing instead of landing lag.
Landing Lag (Aerials) |The duration of time you will be forced to wait until you can act if you land an aerial during the landing lag window.
Invincible / Intangible Frames |A frame of time during a move where Zelda is invincible/intangible, meaning she won't take any damage. If the invincibility only covers part of her, it is denoted by "Partial" on the table label.

Credits
@KuroganeHammer : For getting me into data mining. <3


Grounded Moves


STANDARD ATTACK - Short Flash
*IMG*
Zelda creates a flurry of magical sparks of light from her hand.

Damage|Launch Angle|KO Potential|Startup|Active Frames|Endlag|Block Adv.
PENDING!
hit-box|hit-frame|duration|ID|GID|bone|damage|angle|BKB|WKB|KBG|size|z/y/x|element|hit-lag|SDI|clank?|shield damage|notes
X|X|X|X|X|X|X|X|X|X|X|X|X|X|X|X|X|X|X

DASH ATTACK - Magical Push
*IMG*
Zelda lunges forward, attacking with a burst of magic at her hands.

Damage|Launch Angle|KO Potential|Startup|Active Frames|Endlag|Block Adv.
PENDING!
hit-box|hit-frame|duration|ID|GID|bone|damage|angle|BKB|WKB|KBG|size|z/y/x|element|hit-lag|SDI|clank?|shield damage|notes
X|X|X|X|X|X|X|X|X|X|X|X|X|X|X|X|X|X|X

STRONG FORWARD - Mystic Sweep
*IMG*
Zelda sweeps her arm in front of her, magically enhancing her hand with a blade-like sharpness.

Damage|Launch Angle|KO Potential|Startup|Active Frames|Endlag|Block Adv.
PENDING!
hit-box|hit-frame|duration|ID|GID|bone|damage|angle|BKB|WKB|KBG|size|z/y/x|element|hit-lag|SDI|clank?|shield damage|notes
X|X|X|X|X|X|X|X|X|X|X|X|X|X|X|X|X|X|X

STRONG LOW - Trip
*IMG*
While crouching, Zelda sweeps her leg out in front of her to trip any nearby opponents.

Damage|Launch Angle|KO Potential|Startup|Active Frames|Endlag|Block Adv.
PENDING!
hit-box|hit-frame|duration|ID|GID|bone|damage|angle|BKB|WKB|KBG|size|z/y/x|element|hit-lag|SDI|clank?|shield damage|notes
X|X|X|X|X|X|X|X|X|X|X|X|X|X|X|X|X|X|X

STRONG UPWARD - Protective Sweep
*IMG*
Zelda sweeps a magically enhanced hand in a protective arc above herself.

Damage|Launch Angle|KO Potential|Startup|Active Frames|Endlag|Block Adv.
PENDING!
hit-box|hit-frame|duration|ID|GID|bone|damage|angle|BKB|WKB|KBG|size|z/y/x|element|hit-lag|SDI|clank?|shield damage|notes
X|X|X|X|X|X|X|X|X|X|X|X|X|X|X|X|X|X|X

FORWARD SMASH - Shining Palm
*IMG*
Zelda creates a powerful blast of magic in front of herself, striking multiple times.

Damage|Launch Angle|KO Potential|Startup|Active Frames|Endlag|Block Adv.
PENDING!
hit-box|hit-frame|duration|ID|GID|bone|damage|angle|BKB|WKB|KBG|size|z/y/x|element|hit-lag|SDI|clank?|shield damage|notes
X|X|X|X|X|X|X|X|X|X|X|X|X|X|X|X|X|X|X

DOWNWARD SMASH - Compass Spin
*IMG*
Zelda quickly spins, outstretching her toe to attack all around herself.

Damage|Launch Angle|KO Potential|Startup|Active Frames|Endlag|Block Adv.
PENDING!
hit-box|hit-frame|duration|ID|GID|bone|damage|angle|BKB|WKB|KBG|size|z/y/x|element|hit-lag|SDI|clank?|shield damage|notes
X|X|X|X|X|X|X|X|X|X|X|X|X|X|X|X|X|X|X

UPWARD SMASH - Power Sweep
*IMG*
Zelda sweeps a magically enhanced hand above herself, creating a deadly ribbon of light that strikes many times.

Damage|Launch Angle|KO Potential|Startup|Active Frames|Endlag|Block Adv.
PENDING!
hit-box|hit-frame|duration|ID|GID|bone|damage|angle|BKB|WKB|KBG|size|z/y/x|element|hit-lag|SDI|clank?|shield damage|notes
X|X|X|X|X|X|X|X|X|X|X|X|X|X|X|X|X|X|X


AERIAL MOVES


NEUTRAL AERIAL - Magical Spin
*IMG*
Zelda does a midair spin, outstretching magically enhanced hands to strike multiple times all around herself.

Damage|Launch Angle|KO Potential|Startup|Active Frames|Endlag|OoS|AC Window|Landing Lag
PENDING!
PENDING!
hit-box|hit-frame|duration|ID|GID|bone|damage|angle|BKB|WKB|KBG|size|z/y/x|element|hit-lag|SDI|clank?|shield damage|notes
X|X|X|X|X|X|X|X|X|X|X|X|X|X|X|X|X|X|X

FORWARD AERIAL - Lightning Kick
*IMG*
Zelda quickly spins into a midair judo kick with powerful magic centered at the ball of her foot.

Damage|Launch Angle|KO Potential|Startup|Active Frames|Endlag|OoS|AC Window|Landing Lag
PENDING!
PENDING!
hit-box|hit-frame|duration|ID|GID|bone|damage|angle|BKB|WKB|KBG|size|z/y/x|element|hit-lag|SDI|clank?|shield damage|notes
X|X|X|X|X|X|X|X|X|X|X|X|X|X|X|X|X|X|X

BACKWARD AERIAL - Reverse Lightning Kick
*IMG*
Zelda does a quick midair kick behind herself with high powered magic centered at the ball of her foot.

Damage|Launch Angle|KO Potential|Startup|Active Frames|Endlag|OoS|AC Window|Landing Lag
PENDING!
PENDING!
hit-box|hit-frame|duration|ID|GID|bone|damage|angle|BKB|WKB|KBG|size|z/y/x|element|hit-lag|SDI|clank?|shield damage|notes
X|X|X|X|X|X|X|X|X|X|X|X|X|X|X|X|X|X|X

DOWNWARD AERIAL - Meteor Heel
*IMG*
Zelda does a powerful midair stomp with one foot, with potent meteor smashing magic centered at her heel.

Damage|Launch Angle|KO Potential|Startup|Active Frames|Endlag|OoS|AC Window|Landing Lag
PENDING!
PENDING!
hit-box|hit-frame|duration|ID|GID|bone|damage|angle|BKB|WKB|KBG|size|z/y/x|element|hit-lag|SDI|clank?|shield damage|notes
X|X|X|X|X|X|X|X|X|X|X|X|X|X|X|X|X|X|X

UPWARD AERIAL - Condensed Blast
*IMG*
While airborne, Zelda aims upward and creates a large blast of condensed fire above herself.

Damage|Launch Angle|KO Potential|Startup|Active Frames|Endlag|OoS|AC Window|Landing Lag
PENDING!
PENDING!
hit-box|hit-frame|duration|ID|GID|bone|damage|angle|BKB|WKB|KBG|size|z/y/x|element|hit-lag|SDI|clank?|shield damage|notes
X|X|X|X|X|X|X|X|X|X|X|X|X|X|X|X|X|X|X


SPECIAL MOVES


NEUTRAL SPECIAL - Nayru’s Love
*IMG*
Zelda channels the power of the triforce goddess Nayru to temporarily surround herself within a crystalline barrier that reflects projectiles and damages nearby targets.

Damage|Launch Angle|KO Potential|Startup|Intangible Frames|Active Frames|Endlag|Block Adv.
PENDING!
hit-box|hit-frame|duration|ID|GID|bone|damage|angle|BKB|WKB|KBG|size|z/y/x|element|hit-lag|SDI|clank?|shield damage|notes
X|X|X|X|X|X|X|X|X|X|X|X|X|X|X|X|X|X|X

SIDE SPECIAL - Din’s Fire
*IMG*
Zelda channels the power of the triforce goddess Din to send out a wisp of fire that she can control and detonate at will to create a distant explosion.

Damage|Launch Angle|KO Potential|Startup|Active Frames|Endlag
PENDING!
hit-box|hit-frame|duration|ID|GID|bone|damage|angle|BKB|WKB|KBG|size|z/y/x|element|hit-lag|SDI|clank?|shield damage|notes
X|X|X|X|X|X|X|X|X|X|X|X|X|X|X|X|X|X|X

DOWNWARD SPECIAL - Phantom Slash
*IMG*
Zelda magically summons a suit of phantom armor. The complete phantom delivers a powerful blow with its sword, but it may also be released prematurely, its power varying depending on how many pieces of armor have compiled.

Variant|Damage|Launch Angle|KO Potential|Startup|Active Frames|Endlag
“Kick”|
“Punch”|
“Slice”|
“Slash”|
“Uppercut”|
PENDING!
hit-box|hit-frame|duration|ID|GID|bone|damage|angle|BKB|WKB|KBG|size|z/y/x|element|hit-lag|SDI|clank?|shield damage|notes
X|X|X|X|X|X|X|X|X|X|X|X|X|X|X|X|X|X|X

UPWARD SPECIAL - Farore’s Wind
*IMG*
Zelda channels the power of the triforce goddess Farore to quickly teleport a great distance in the direction of her choosing. Anyone caught by her winds will receive a deadly blow.

Damage|Launch Angle|KO Potential|Startup|Intangible Frames|Active Frames|Endlag|Landing Lag|Block Adv.
PENDING!
hit-box|hit-frame|duration|ID|GID|bone|damage|angle|BKB|WKB|KBG|size|z/y/x|element|hit-lag|SDI|clank?|shield damage|notes
X|X|X|X|X|X|X|X|X|X|X|X|X|X|X|X|X|X|X


GRABS & THROWS


GRABS - Magical Hold
*IMG*
Zelda extends magically-charges hands to catch an opponent in front of her.

Startup|Active Frames|Endlag
PENDING!
hit-box|hit-frame|duration|ID|GID|bone|damage|angle|BKB|WKB|KBG|size|z/y/x|element|hit-lag|SDI|clank?|shield damage|notes
X|X|X|X|X|X|X|X|X|X|X|X|X|X|X|X|X|X|X

PUMMEL - Hex
*IMG*
Zelda casts a hex on the opponent within her grasp, causing a small amount of damage.

Damage|Startup|Active Frames|Endlag
PENDING!
hit-box|hit-frame|duration|ID|GID|bone|damage|angle|BKB|WKB|KBG|size|z/y/x|element|hit-lag|SDI|clank?|shield damage|notes
X|X|X|X|X|X|X|X|X|X|X|X|X|X|X|X|X|X|X

FORWARD THROW - Levitation
*IMG*
Zelda telekinetically levitates her opponent, launching them forward with the wave of her hand.

Damage|Launch Angle|KO Potential|Startup|Active Frames|Endlag
PENDING!
hit-box|hit-frame|duration|ID|GID|bone|damage|angle|BKB|WKB|KBG|size|z/y/x|element|hit-lag|SDI|clank?|shield damage|notes
X|X|X|X|X|X|X|X|X|X|X|X|X|X|X|X|X|X|X

BACKWARD THROW - Reverse Levitation
*IMG*
Zelda telekinetically levitates her opponent, then turning and launching them behind herself with the wave of her hand.

Damage|Launch Angle|KO Potential|Startup|Active Frames|Endlag
PENDING!
hit-box|hit-frame|duration|ID|GID|bone|damage|angle|BKB|WKB|KBG|size|z/y/x|element|hit-lag|SDI|clank?|shield damage|notes
X|X|X|X|X|X|X|X|X|X|X|X|X|X|X|X|X|X|X

DOWNWARD THROW - Plasma Beat
*IMG*
Zelda magically pins her opponent down and unleashes waves of plasma on their back.

Damage|Launch Angle|KO Potential|Startup|Active Frames|Endlag
PENDING!
hit-box|hit-frame|duration|ID|GID|bone|damage|angle|BKB|WKB|KBG|size|z/y/x|element|hit-lag|SDI|clank?|shield damage|notes
X|X|X|X|X|X|X|X|X|X|X|X|X|X|X|X|X|X|X

UPWARD THROW - Levitation Launch
*IMG*
Zelda telekinetically levitates her opponent, launching them above herself with a spin.

Damage|Launch Angle|KO Potential|Startup|Active Frames|Endlag
PENDING!
hit-box|hit-frame|duration|ID|GID|bone|damage|angle|BKB|WKB|KBG|size|z/y/x|element|hit-lag|SDI|clank?|shield damage|notes
X|X|X|X|X|X|X|X|X|X|X|X|X|X|X|X|X|X|X
 
Last edited:

ADAPT Chance

Smash Journeyman
Joined
Sep 11, 2014
Messages
335
Location
Rhodesia [GTA]
NNID
Adaptchance
3DS FC
4613-8804-8708
Good unique information coming out of this thread.

Learned some things I need to practice.
 

BJN39

Smash Data Ranger
Moderator
Joined
Aug 14, 2012
Messages
5,047
Location
The Zelda Boards
Added all but one of the customs now! Woop.

Oh, I also finally found a way to NOT make a bunch of color tags appear when adding in more tables... xD
 
Last edited:

Kataefi

*smoke machine*
Joined
Oct 12, 2008
Messages
3,377
Location
igloo


Hey this is another one of those weird fsmashes out of a run... Gonna have to get to the bottom of this!!!
 

PrimalCarnage

Smash Cadet
Joined
Jul 6, 2014
Messages
73
Yeah the pivot stuff is good! I've been using them a lot since yesterday and it seems to stuffs speedy character's approaches even Shiek and ZSS.
 

Kataefi

*smoke machine*
Joined
Oct 12, 2008
Messages
3,377
Location
igloo
Cool fact: you can SH airdodge into bair. It's sort of like a strange spot dodge > punish type of strat if someone uses something laggy on the ground... ha!
 
Last edited:

Rion

Smash Journeyman
Joined
Nov 10, 2008
Messages
396
I thought this might serve as a nice documentation on the ridonkculous range of Zelda's Roll Cancel Pivot Grab:


Just... vacuum sucked right in there.


Right


in there.
 

Mienaikage

Smash Cadet
Joined
Oct 10, 2007
Messages
48
Location
London, UK
I don't even think you need to roll cancel for the range, but it seems to help since the roll cancel appears to stop Zelda from sliding away.
 

Rion

Smash Journeyman
Joined
Nov 10, 2008
Messages
396
I don't even think you need to roll cancel for the range, but it seems to help since the roll cancel appears to stop Zelda from sliding away.
That is the biggest thing I would say. Usually you slide a crazy amount when you pivot grab most of the time, which might make you miss it honestly.

Also, new developments:

Will it grab?


Why yes


It does.

Note here, Lucario was descending from a jump non-fastfalled. Can't quite get a good recording, but the images should spell it out fairly well.

There's a pretty noticeable height range on this grab hitbox.
 

ZombieBran

Smash Lord
Joined
Mar 28, 2014
Messages
1,645
Oh yeah, I've noticed myself catching some people out of the air.
I used to think roll cancel Pivot Grabs were unneeded for most characters outside of Little Mac but I'm really going to incorporate it into my Zelda much more.
 
Last edited:

Kataefi

*smoke machine*
Joined
Oct 12, 2008
Messages
3,377
Location
igloo
I thought this might serve as a nice documentation on the ridonkculous range of Zelda's Roll Cancel Pivot Grab:

Woah! Great! How are you doing this?

This looks like it could grab everything.

Have you tested this on, say, sheik doing fairs on our shield? I'm thinking retreating pivot grabs could be great!
 

BJN39

Smash Data Ranger
Moderator
Joined
Aug 14, 2012
Messages
5,047
Location
The Zelda Boards
OMG this are beautiful! xD "Note to self, use 1000 pivot grabs." I'll have to add these somewhere. Maybe I can turn one of the extra posts into an area where this can be held.

I thought this might serve as a nice documentation on the ridonkculous range of Zelda's Roll Cancel Pivot Grab:


Just... vacuum sucked right in there.


Right


in there.
Quoted for posterity.
 

BJN39

Smash Data Ranger
Moderator
Joined
Aug 14, 2012
Messages
5,047
Location
The Zelda Boards
Alright, noob question here, but...
What the hell is "KB"?
Knock-back.

Also, by "stats" I mean "Base KB" and "KB Growth" which have to do with how far a move knocks away at any percent, and how fast it knocks farther with percent growth respectively.
 

Rion

Smash Journeyman
Joined
Nov 10, 2008
Messages
396
It should be noted:

Today I fought against a Mario that hit me when I auto-sweetspot the ledge with Farore's. He did a bair right as I appeared, and I bounced off the ledge.

I guess there's a very small window of punishment even when you sweetspot it? It's never happened to me before. Maybe I just didn't have ledge invincibility?
 

BJN39

Smash Data Ranger
Moderator
Joined
Aug 14, 2012
Messages
5,047
Location
The Zelda Boards
It should be noted:

Today I fought against a Mario that hit me when I auto-sweetspot the ledge with Farore's. He did a bair right as I appeared, and I bounced off the ledge.

I guess there's a very small window of punishment even when you sweetspot it? It's never happened to me before. Maybe I just didn't have ledge invincibility?
Yes. There is actually at least (Probs only) ONE frame after travelling for ALL teleports where the character is tangible BEFORE their hit-box appears (Or in Palu's case, there is no hit-box.) So, basically, a teleport will lose to an active hit-box upon reappear 100% of the time.

One time I actually nailed sheik out of her vanish with a DAir on For Glory, and at least once I've gotten hit when reappearing on someone because they had a hit-box out.

I don't understand exactly how he hit you off the edge. My only guess would be a lack of invincibility? Unless they made some really weird teleport unique design where you're vulnerable for one frame at the start of a sweet-spotted ledge grab? Maybe I'll test it if I remember to... > .>


1000th post. Woop. Bow to my Lord-ness nao.
 
Last edited:

Ghirahilda

♥Smash Beauty♥
Joined
Aug 6, 2012
Messages
1,197
Location
Sorocaba
NNID
Marcelinho21
Oh I want so badly to play as Zelda, but I still need to wait the Wii U version...
 

Uncertain Title

Smash Apprentice
Joined
Sep 18, 2014
Messages
149
3DS FC
4296-3238-9292
I thought this might serve as a nice documentation on the ridonkculous range of Zelda's Roll Cancel Pivot Grab:


Just... vacuum sucked right in there.


Right


in there.
What's the button input to do this? It's driving me nuts, I must know how to do this DX
 

Krysco

Aeon Hero
Joined
Feb 27, 2014
Messages
2,005
Location
Ontario, Canada
NNID
Krysco
3DS FC
2122-7731-1180
Not sure if I'll get into Zelda or not in this game, mostly waiting till I get all of her customs before I decide. I used the Sheilda combination back in Brawl, mostly Sheik but I'd switch to Zelda if things weren't going well, if I needed a kill badly or if I was just bored of Sheik.

Really sucks how every aerial Zelda has suffers landing lag after a shorthop in this game meaning she's pretty much grounded unless you are SURE your aerial will hit and it pretty much has to be the sweetspot for the kicks. Also sucks how Farore can't go straight down from the air, before from the air you had 3 general spots you could appear: left from where you used it, right from where you used it or directly below where you used it. Now that last option is gone.

I have all of her Nayru customs, I have Din's Blaze but not custom 2, Farore's Squall but not custom 3 and Phantom Breaker but not custom 3.

Far as I can tell Nayru's Rejection seems pretty crap since it appears to have longer startup than Love and Love has a hit box anyways. Might get a few gimp kos with Rejection since it 'capes' but I'd rather Love. Passion could possibly be useful against non-projectile foes. I'm also curious if Love and/or any of it's customs have invincibility at all. If I'm not mistaken Love had some invincibility in Brawl so it could be used as a counter of sorts.

I'd like Blaze more if it took longer to explode so you could set up with it like a basic example being Blaze > bthrow into explosion kinda like P:M. Pretty sure custom 2 gets rid of Din's ability to go vertical which isn't appealing since the enemy can not only block and dodge it but also jump over it.

Squall shows your opponent where you're going and the wind box is nothing compared to the new killing power of Wind's hitbox. Pretty sure custom 3 is strictly vertical with 'comboing' hitboxs at the disappearing and reappearing points. Not sure how reliable the 'comboing' hits are and being forced to go strictly vertical makes your recovery incredibly predictable especially if you want to sweetspot the ledge.

Phantom is the one I'm on the fence about. Slash seems like crap as it is since it has to be charged (so your opponent knows what you're doing immediately) and the damn thing can be reflected. Breaker might be more useful since it says it 'wears down enemy shields rapidly' so we could get a shield break with it. -checks NinjaLink video to recall what last custom for Phantom is-
Set distance but faster? Don't know how I feel about that one IF that's what it does :/

I do like that grab trick some of you have shown that gives her crazy grab range and from what I've been able to tell Din can't be reflected? Not too big a buff but it's better than being able to be reflected. Also sorry about the long *** post. Mostly just want opinions on her customs from those who use her more than I do.
 

BJN39

Smash Data Ranger
Moderator
Joined
Aug 14, 2012
Messages
5,047
Location
The Zelda Boards
Just wanted to tell you @ Krysco Krysco Zelda's NAir and DAir can be done in a SH with auto-cancel, but the timing is pretty tight.

Also, Din's could never -really- BE reflected. At the very least, reflecting the explosion would never be able to harm the Zelda casting, as it would pretty much always be too far from her, and it can't be reflected "mid-cast" like, being able to send it back at her. This was always a neat but inherently not very useful advantage of Din's.

Unless you were talking about being able to cancel out a Din's hit-box with any normal priority attack. If so, that is still in. It's just even less necessary because of the distance and hit-box nerfs to it...
 
Last edited:

Krysco

Aeon Hero
Joined
Feb 27, 2014
Messages
2,005
Location
Ontario, Canada
NNID
Krysco
3DS FC
2122-7731-1180
Oh, would you look at that you can short hop dair and nair...still sucks not being able to fair and bair though but it's something. Also with Din I was talking about the explosion. It never had much use since as you said Zelda would be too far away but if anybody's first instinct is to reflect Din's they get hit now as opposed to being safe from reflecting it. As a Wolf player in Brawl I often reflected Din since it saved using up my shield and I could jump or roll afterwards.

Edit: Aaaand I just did a quick test and the explosion can still be reflected...dah well doesn't matter too much I suppose.
 
Last edited:

Uncertain Title

Smash Apprentice
Joined
Sep 18, 2014
Messages
149
3DS FC
4296-3238-9292
Actually, if you tap your character's image on the touch screen when in a fight, a small box will appear around your character. This box doesn't disappear when Zelda FW's, however, so you can use that to track where she's going :)
 

ZombieBran

Smash Lord
Joined
Mar 28, 2014
Messages
1,645
Actually, if you tap your character's image on the touch screen when in a fight, a small box will appear around your character. This box doesn't disappear when Zelda FW's, however, so you can use that to track where she's going :)
We know about this.

Not terribly useful for people using this outside of extreme lag.
 
Last edited:

Rion

Smash Journeyman
Joined
Nov 10, 2008
Messages
396
Some visual documentation for you all!

Auto Cancel Nair:


Auto Cancel Dair:


Nair is very easy to auto cancel, while Dair is a bit on the tighter side for timing in comparison.

I hope it helps!
____________________________________________________________

EDIT: More visual aid! Someone mentioned the SH AD Bair tech, so I thought I'd give it a bit more visualness~

Shorthop Airdodge Bair from the front:


Shorthop Airdodge Bair crossover:


Definitely useful, as using Bair right out of the airdodge sets you extremely close to the ground to hit smaller characters + the height timing is basically done for you. The only thing you need to worry about it spacing it horizontally!

Not to mention you don't HAVE to bair out of the airdodge either. Zelda will lagless land from the airdodge, so you can always mindgame your opponent as well by doing a grab instead or something! You can also do Nayru's with this too for maximum coverage if you think you'll land a hit (such as punishing a spotdodge/roll).

Just be careful not to input any actions too soon if you do an empty shorthop airdodge. There's a tiny bit of time where Zelda'll still be airborne after the airdodge, so you have to wait a split second to land first.

EDIT: A useful trick that helped me was, if you're planning an empty SH AD just hold onto the shield button for the whole duration of the jump until you land. This way, you won't have to worry about inputting shield too early and cause an airdodge lagged landing, not to mention you'll shield as soon as you're able to when you land.

This is actually pretty helpful overall for me personally, as sometimes I hit shield too early when I'm trying to getl to the ground from the air, and I end up causing a laggy landing because I airdodge JUST as I'm about to touch the ground.

Definitely should think about using this more!
 
Last edited:

BJN39

Smash Data Ranger
Moderator
Joined
Aug 14, 2012
Messages
5,047
Location
The Zelda Boards
Some visual documentation for you all!

Auto Cancel Nair:


Auto Cancel Dair:


Nair is very easy to auto cancel, while Dair is a bit on the tighter side for timing in comparison.

I hope it helps!
____________________________________________________________

EDIT: More visual aid! Someone mentioned the SH AD Bair tech, so I thought I'd give it a bit more visualness~

Shorthop Airdodge Bair from the front:


Shorthop Airdodge Bair crossover:


Definitely useful, as using Bair right out of the airdodge sets you extremely close to the ground to hit smaller characters + the height timing is basically done for you. The only thing you need to worry about it spacing it horizontally!

Not to mention you don't HAVE to bair out of the airdodge either. Zelda will lagless land from the airdodge, so you can always mindgame your opponent as well by doing a grab instead or something! You can also do Nayru's with this too for maximum coverage if you think you'll land a hit (such as punishing a spotdodge/roll).

Just be careful not to input any actions too soon if you do an empty shorthop airdodge. There's a tiny bit of time where Zelda'll still be airborne after the airdodge, so you have to wait a split second to land first.

EDIT: A useful trick that helped me was, if you're planning an empty SH AD just hold onto the shield button for the whole duration of the jump until you land. This way, you won't have to worry about inputting shield too early and cause an airdodge lagged landing, not to mention you'll shield as soon as you're able to when you land.

This is actually pretty helpful overall for me personally, as sometimes I hit shield too early when I'm trying to getl to the ground from the air, and I end up causing a laggy landing because I airdodge JUST as I'm about to touch the ground.

Definitely should think about using this more!
OMG these are lovely GiFs! This is the kinda of thing I really wanted.

I don't mean to like, put work on you or anything, but would you consider making like, simple GiFs of each move used directly, without hitting, like, just as a visual? Having GiFs was what I ideally imagined for a picture at each move. ' w '
 

Rion

Smash Journeyman
Joined
Nov 10, 2008
Messages
396
OMG these are lovely GiFs! This is the kinda of thing I really wanted.

I don't mean to like, put work on you or anything, but would you consider making like, simple GiFs of each move used directly, without hitting, like, just as a visual? Having GiFs was what I ideally imagined for a picture at each move. ' w '
I was honestly thinking about that!
 

Kataefi

*smoke machine*
Joined
Oct 12, 2008
Messages
3,377
Location
igloo
My gifs, on the other hand, are crafted by the hands of a n00b god


^Not too bad this time!! I figured out how to improve the quality!!

Anyway... look at this h8a!... He's trying to make it back on stage and kill me.

DENIED!!!
 

CandyCakes

Banned via Warnings
Joined
Sep 28, 2014
Messages
154
Nair when opponents on the ground, does is have a sour spot because I've been able to land all of them
 

Katy Parry

The Only Zelda in Indiana
Joined
May 20, 2007
Messages
3,328
Location
Indianapolis, IN
NNID
justysuxx
Do your best to not double post, please. ^^

And I pay no attention to that tier list. That grab range ALONE on Zelda could move her up to C class easily. As more techniques are discovered, the more she'll rise.

All will kneel...in time.
 

BJN39

Smash Data Ranger
Moderator
Joined
Aug 14, 2012
Messages
5,047
Location
The Zelda Boards
So, goirls iT has come to my attention there is a new 1.0.3 version out with "Balance changes" mentioned around it. I will now be going through each of these datas and looking for any apparent changes, and adding them into the slots. This may change, but for now, I'm putting little "(1.0.3)"s by any changes. Keep an eye out for any new data! *Eyes go ablaze*

Edit:

Okay, I went through each move of Zelda's to find any changes. There seem to be at least a couple true changes, and a couple POSSIBLE changes that were made:

PS, I tested it all, damages, approx KO %s, angles, etc.

NAir
* The Approximate KO % seems to be changed around a little. It KOs slightly earlier than before on the final hit AT HER HANDS while the center hit-box appears to KO slightly later. (Hands: 242% // Middle: 285%)

Standard Special [1] - Nayru's Love
* This one was probably just something I missed before when testing Nayru's Love, but apparently the center hit-boxes of the final hit are slightly more powerful than the tip hit-boxes. (Center: 277% // Tip: 349%)
* The move's IASA appears to start slightly later. Needs more testing, but when using it it felt slower, and I try to 'memorize' the visual of the IASA "Frame", and the IASA "Frame Visual" looks different than it used to, I think.

Standard Special [3] - Nayru's Passion
* The explosion hit-box feels like it has better range. It felt puny last time I tested the move, and could hardly hit above/below her, but now it feels like it can hit very well above and below her. I'm not sure 100% though if this is a true change.

Down Special [1] - Phantom Slash
* The fully charged phantom slash appears to KO slightly earlier. I'm not 100% sure, but the damage difference seems too large to just be a change-in-testing-style error. (KO%: 136% < Both hits, fully charged. Used to be 145%.)

Down Special [3] - Phantom Breaker
* Similarly to variation 1's power boost, this one appears to have a slight power NERF at full charge. But I'm FAR less sure about this one, as it was only a 4% difference. So THIS one actually could have been a testing-style-change inconsistency.

As you can see, the found changes are very small, and likely won't make an difference in custom variation choice, or competitive viability. Anything you don't see here appeared to be unchanged as far as I could tell. I even tested her pivot grab, and we can rest easy knowing it has the same range. ;)
Here are the differences I found so far after a quick, but thorough enough check of everything. As you can see, they're very small.
 
Last edited:

Xys

Smash Journeyman
Joined
Oct 30, 2014
Messages
322
Location
Lorule
3DS FC
1435-5012-4542
I find that a couple of Nayru's is good for pressuring fast characters that you can not seem to land a hit on. E.G little mac. Due to when they dodge around you they still get hit because of the hit boxes. It makes them think twice about playing games with ya.

Also during the grab down's knockback in the air you can land a lighting kick most of the time though i could not call it a combo.
 

BJN39

Smash Data Ranger
Moderator
Joined
Aug 14, 2012
Messages
5,047
Location
The Zelda Boards
So I was messing around Labbing on BF, and I ended up making/finding a bundle of neat and easy FW ledge cancel reference spots on that stage! Stay tuned as I contemplate where to put them... >w>


EDIT : Oh yeah, also, since I plan on at least getting this out before the WiiU release, is there anyone getting the WiiU version that would like to volunteer to be my tester to see if these work on SSB4 WiiU as well? We can never be too sure, just a small distance change anywhere could create, remove, or simply move the reference points.
 
Last edited:
Top Bottom