
-
Welcome to Smashboards, the world's largest Super Smash Brothers community! Over 250,000 Smash Bros. fans from around the world have come to discuss these great games in over 19 million posts!
You are currently viewing our boards as a visitor. Click here to sign up right now and start on your path in the Smash community!
It appears that you are using ad block :'(
Hey, we get it. However this website is run by and for the community... and it needs ads in order to keep running.
Please disable your adblock on Smashboards, or go premium to hide all advertisements and this notice.
Alternatively, this ad may have just failed to load. Woops!
Please disable your adblock on Smashboards, or go premium to hide all advertisements and this notice.
Alternatively, this ad may have just failed to load. Woops!
Scout's Smash 3 Rimlight Tutorial
- Thread starter Nezha the Scout
- Start date
NintenNess
Smash Journeyman
Halp!
When I gave Smash 3 Rom to Felix, he's blade looks fine.

But when I customized the Smash 3's Edge texture (into the older version of it), his blade ended up being too bright...

I didn't put any Rim to the blade itself, but on the second pics, it's too bright! X_X
I did everything correctly on Smash 3 Rim tutorial, I made bug fixes...
When I gave Smash 3 Rom to Felix, he's blade looks fine.
But when I customized the Smash 3's Edge texture (into the older version of it), his blade ended up being too bright...
I didn't put any Rim to the blade itself, but on the second pics, it's too bright! X_X
I did everything correctly on Smash 3 Rim tutorial, I made bug fixes...
Last edited:
NintenNess
Smash Journeyman
Wow, really? I guessed I kinda cracked the code.The one on the left is also the older (Smash 3) Edge texture, the newer one is more subtle.

Nezha the Scout
Eyyyyyy
I've seen this glitch before.Halp!
When I gave Smash 3 Rom to Felix, he's blade looks fine.
But when I customized the Smash 3's Edge texture, his blade ended up being too bright...
I didn't put any Rim to the blade itself, but on the second pics, it's too bright! X_X
I did everything correctly on Smash 3 Rim tutorial, I made bug fixes...
Apply an edge material to the sword's materials folder (as explained on materials 2 section).
Sometimes, a shader of one object links to other objects.
So a cause of this glitch may simply be that the object you did not rimlight, has a rimlit shader. And sometimes, you are forced to rimlight certain objects you do not want rimlit because of the other objects are tied to a same shader.
Halcreix
Smash Cadet
I made another rim lighting, this time on "Shadow Dedede" (Dark textures look awesome with rim)
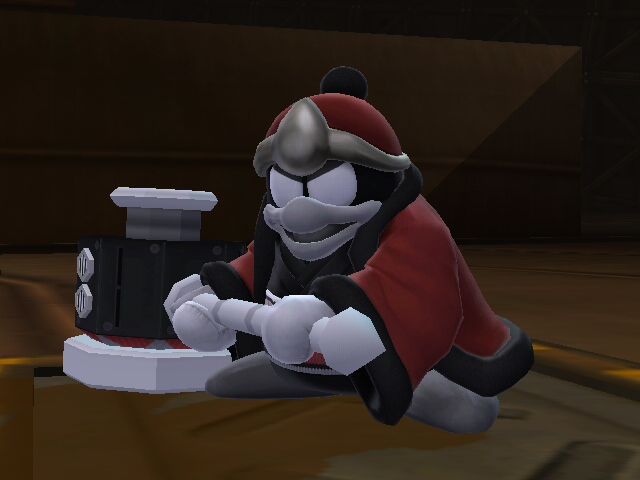
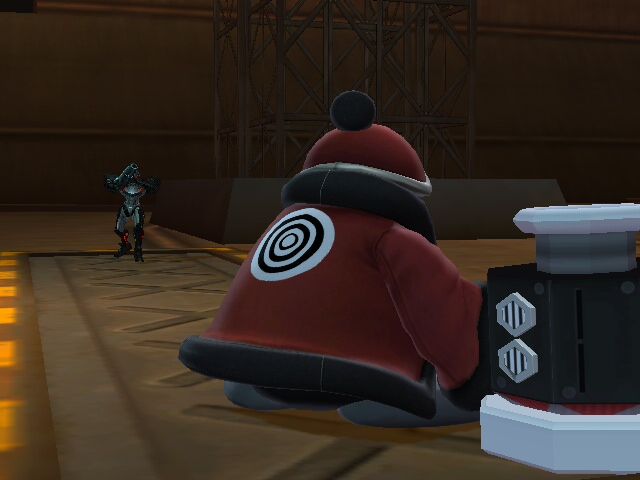
I didn't apply rim on the hammer because I was a little confused when I opened the Materials and Textures folders... Shadow Dedede has the "Delfino fix".
This was my first attempt: "Wrecking Crew Mario" (also with succesful "Delfino Fix"):
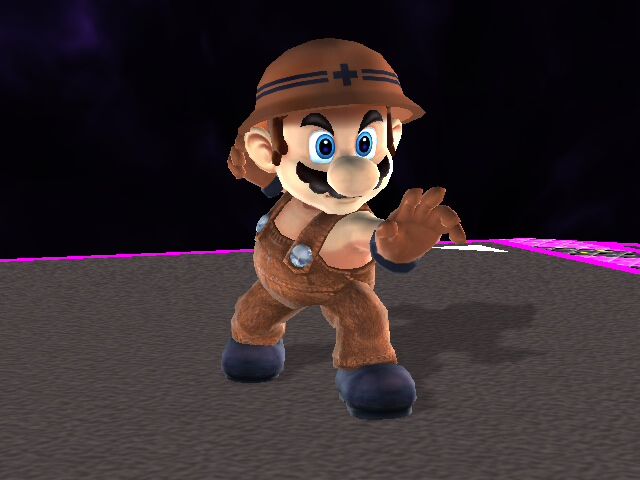
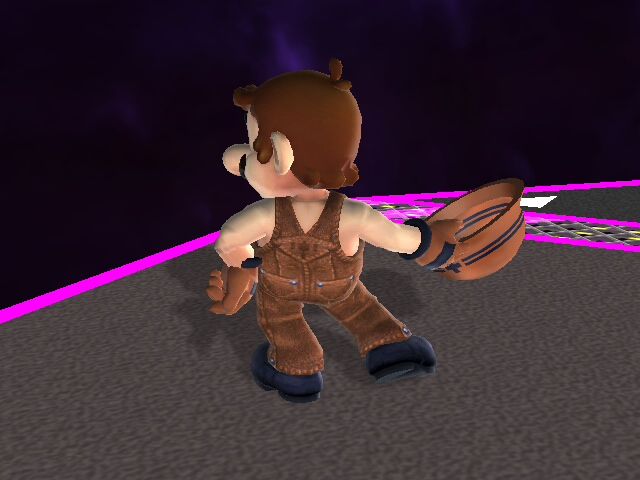
(I didn't make any of these textures, I've just added rimlighting)
I'll try some rim on "Magic Armor Link". Hope it works fine :D
I didn't apply rim on the hammer because I was a little confused when I opened the Materials and Textures folders... Shadow Dedede has the "Delfino fix".
This was my first attempt: "Wrecking Crew Mario" (also with succesful "Delfino Fix"):
(I didn't make any of these textures, I've just added rimlighting)
I'll try some rim on "Magic Armor Link". Hope it works fine :D
Nezha the Scout
Eyyyyyy
Im glad this tutorial helped many. Rimlight process is complicated to explain, I had dificulty learning it.
Can't wait to see more stuff you guys can make!
For those wondering, a delphino stage also fixes eyes on isle delphino.
Can't wait to see more stuff you guys can make!
For those wondering, a delphino stage also fixes eyes on isle delphino.
TPW_ThatOneGuy
Smash Rookie
Hey Edel/Scout, thanks for the great tutorial. Everything was clear and easy to understand! But, I have a weird glitch that's occurring with P:M's OoT Link.
I followed your tutorial to a tee, and it looks great, but the FS Eyes glitch seems to be happening in reverse - his normal eyes are wonky looking and his FS eyes work fine. I don't know how to fix it since the model seems to use Shader2 for both his normal eyes and his FS eyes


I followed your tutorial to a tee, and it looks great, but the FS Eyes glitch seems to be happening in reverse - his normal eyes are wonky looking and his FS eyes work fine. I don't know how to fix it since the model seems to use Shader2 for both his normal eyes and his FS eyes
Nezha the Scout
Eyyyyyy
I have two suggestions that might work:Hey Edel/Scout, thanks for the great tutorial. Everything was clear and easy to understand! But, I have a weird glitch that's occurring with P:M's OoT Link.
I followed your tutorial to a tee, and it looks great, but the FS Eyes glitch seems to be happening in reverse - his normal eyes are wonky looking and his FS eyes work fine. I don't know how to fix it since the model seems to use Shader2 for both his normal eyes and his FS eyes
- Edit the eye texture: grab the transparent background and make it as white as the white part of link's eyes (people call it the Sclera of the eyes, bless Google) , that would make the grey areas white allowing it to camouflage with the rest of Link's eyes.
- If that doesn't work, revert/remove the rimlight effect from the eyes, as the smash 3 rim isn't noticeable for eyes of that size or smaller.
TPW_ThatOneGuy
Smash Rookie
Okay, thanks for the help!I have two suggestions that might work:
- Edit the eye texture: grab the transparent background and make it as white as the white part of link's eyes (people call it the Sclera of the eyes, bless Google) , that would make the grey areas white allowing it to camouflage with the rest of Link's eyes.
- If that doesn't work, revert/remove the rimlight effect from the eyes, as the smash 3 rim isn't noticeable for eyes of that size or smaller.
Halcreix
Smash Cadet
More successful rims! (I'm getting the hang of this :D)
"Magic Armor Link" and "Phazon Suit Samus"

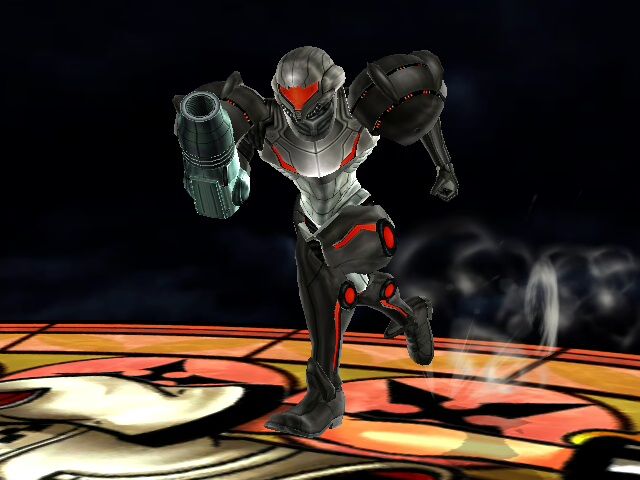
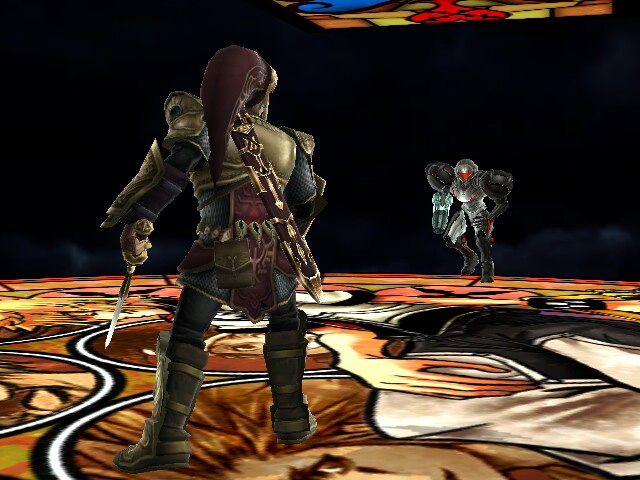
I wish I'd know how to add "shinyness" to that Link's armor.
"Magic Armor Link" and "Phazon Suit Samus"
I wish I'd know how to add "shinyness" to that Link's armor.
Last edited:
ShiningCrusader
Smash Cadet
- Joined
- Oct 13, 2014
- Messages
- 52
Great tut.
I'm wondering why I don't get anything weird on Delphino plaza, though.
I bet we could fake SSS with some tinkering but I doubt it would be very noticeable given the size of the characters on screen.
I'm wondering why I don't get anything weird on Delphino plaza, though.
I bet we could fake SSS with some tinkering but I doubt it would be very noticeable given the size of the characters on screen.
Cahalan
Smash Ace
- Joined
- Aug 23, 2014
- Messages
- 925
Try using a more intense rim light, though not too intense, for the texture you want to make "shiny"; I'll be experimenting with this and see how it looks. (Make an edge 2 texture have the rim light for the shiny texture to refer to the edge 2 texture)More successful rims! (I'm getting the hang of this :D)
"Magic Armor Link" and "Phazon Suit Samus"
I wish I'd know how to add "shininess" so that Link's armor.
However if you're talking about the "light" texture that reflects off of armor, refer to how they use it for ganondorf in smash 3 (the env gold texture)
Last edited:
ShiningCrusader
Smash Cadet
- Joined
- Oct 13, 2014
- Messages
- 52
I used it for this:

I'm currently fixing SJS's ZSS v2 model and I wanted to add rimlight to enhance the effect of the suit. I'm probably going to bump it up a little.
I don't know if I'll be able to do this for the justin bailey version though. I need to create a new shader to use a greyscale mask for that. Can anyone point me in the right direction?
ShiningCrusader
Smash Cadet
- Joined
- Oct 13, 2014
- Messages
- 52
I found a way. I just copied the settings for another stage in the shader that masked the reflections and moved the rimlight stage below it.

I'll try a softer texture on this one.
I'll try a softer texture on this one.
Nezha the Scout
Eyyyyyy
Sorry for the late reply. What you are referring to is called an env texture... I have no idea on how that is made.More successful rims! (I'm getting the hang of this :D)
"Magic Armor Link" and "Phazon Suit Samus"
I wish I'd know how to add "shinyness" to that Link's armor.
This is the double edge method in a nutshell. It may look good or bad depending on the second intensity. I added that onto the tutorial.Try using a more intense rim light, though not too intense, for the texture you want to make "shiny"; I'll be experimenting with this and see how it looks. (Make an edge 2 texture have the rim light for the shiny texture to refer to the edge 2 texture)
However if you're talking about the "light" texture that reflects off of armor, refer to how they use it for ganondorf in smash 3 (the env gold texture)
I used it for this:
I'm currently fixing SJS's ZSS v2 model and I wanted to add rimlight to enhance the effect of the suit. I'm probably going to bump it up a little.
I don't know if I'll be able to do this for the justin bailey version though. I need to create a new shader to use a greyscale mask for that. Can anyone point me in the right direction?
Nothing better than a ZSS than a glossy ZSS, looks good! You can rimlight Samus' gun also! The good news is you can export the rimlight gun model and apply it to other Samus' mods as a shortcut!I found a way. I just copied the settings for another stage in the shader that masked the reflections and moved the rimlight stage below it.
I'll try a softer texture on this one.
And...
THE TUTORIAL IS FINISHED!
I removed two techniques, since they are a bit obvious to follow:
Unrimlight: Retrace your steps into reverting the rimlight effect.
Custom Edge: Grab the edge texture... and break it, this is no longer rimlight, but hey! what a better way to blow off steam than making absolutely random things?
A PDF version will be up soon! Keep on smashing!
Last edited:
Damonj17
Smash Apprentice
- Joined
- Jun 30, 2014
- Messages
- 180
Sorry to be a bother, but when I tried it myself(Both manually and copypasting the shaders) it didn't work. Can someone rimlight this model? Yoshi and Mario Duo I was planning on using this + Smash 3 textures for my personal build.
EDIT: Grammar
EDIT: Grammar
Last edited:
Halcreix
Smash Cadet
Yeah, the same effect that Smash 3 Link's shield and sheat have. I guess it'not so complicated, but I'm talking as a total n00b in 3D modelling...Sorry for the late reply. What you are referring to is called an env texture... I have no idea on how that is made.
Nezha the Scout
Eyyyyyy
Copy pasting shaders from one model to another never works. One must rimlight from scratch. Shortcuts are the glitchy way.Sorry to be a bother, but when I tried it myself(Both manually and copypasting the shaders) it didn't work. Can someone rimlight this model? Yoshi and Mario Duo I was planning on using this + Smash 3 textures for my personal build.
EDIT: Grammar
Edit; I want this to be a help thread, not a request thread. OP updated with this.
Last edited:
Damonj17
Smash Apprentice
- Joined
- Jun 30, 2014
- Messages
- 180
I also tried doing it manually and no luck.Copy pasting shaders from one model to another never works. One must rimlight from scratch. Shortcuts are the glitchy way.
Edit; I want this to be a help thread, not a request thread. OP updated with this.
ikestercrimsombelmont
Smash Rookie
- Joined
- Oct 2, 2014
- Messages
- 19
Man I made a magic armor rim link too,everything looked fine except I had an issue,everytime I do a spin attack or charge he turns white until I charge again,does it happens to you?Maybe its me cause I find this one a little bit confusing to rim.More successful rims! (I'm getting the hang of this :D)
"Magic Armor Link" and "Phazon Suit Samus"
I wish I'd know how to add "shinyness" to that Link's armor.
ikestercrimsombelmont
Smash Rookie
- Joined
- Oct 2, 2014
- Messages
- 19
Hey Edel,what do you think about my texture edit?

It was simple and I didn't have to do rim cause it already has it but I like it,specially the eyes.
It was simple and I didn't have to do rim cause it already has it but I like it,specially the eyes.
ShiningCrusader
Smash Cadet
- Joined
- Oct 13, 2014
- Messages
- 52
While we're at it, Is the Delfino fix really necessary? I've been testing my shaders on Delfino plaza under Dolphin Emu and everything is working fine.
Taiko
Smash Ace
- Joined
- Aug 25, 2010
- Messages
- 564
That's the thing, they work fine in Dolphin, but not on an actual Wii.While we're at it, Is the Delfino fix really necessary? I've been testing my shaders on Delfino plaza under Dolphin Emu and everything is working fine.
ShiningCrusader
Smash Cadet
- Joined
- Oct 13, 2014
- Messages
- 52
Thank you. I didn't even consider that might have been the cause since Dolphin usually has more problems than the wii itself.That's the thing, they work fine in Dolphin, but not on an actual Wii.
I'll add the shader fix and test it before exporting the other colors.
Nezha the Scout
Eyyyyyy
This looks great! you can also share the texture edits on the smash3 thread for more to see!Hey Edel,what do you think about my texture edit?
It was simple and I didn't have to do rim cause it already has it but I like it,specially the eyes.
Got pictures from the one made from scratch? I'm far away from my workplace, cannot work with models... but I might pinpoint the issuesI also tried doing it manually and no luck.
Damonj17
Smash Apprentice
- Joined
- Jun 30, 2014
- Messages
- 180
I don't as I deleted it a while back. The rim lighting doesn't matter to me though, I was just hoping someone might be able to help. I'll just use the textures stand alone.This looks great! you can also share the texture edits on the smash3 thread for more to see!
Got pictures from the one made from scratch? I'm far away from my workplace, cannot work with models... but I might pinpoint the issues
ikestercrimsombelmont
Smash Rookie
- Joined
- Oct 2, 2014
- Messages
- 19
Hey scout and co. Is brawlvault down for good?Im trying to access it since yesterday and it gives me a 404 error,I checked if it was down on a page that tells you and it says it is,whats going on,is it maintenance or is it gone?Also this page was slow yesterday,maybe it was my router on this page but brawl vault is not working.
Last edited:
Nezha the Scout
Eyyyyyy
I got hacked, the same as Smasboards, they are fixing it at the moment.Hey scout and co. Is brawlvault down for good?Im trying to access it since yesterday and it gives me a 404 error,I checked if it was down on a page that tells you and it says it is,whats going on,is it maintenance or is it gone?Also this page was slow yesterday,maybe it was my router on this page but brawl vault is not working.
ShiningCrusader
Smash Cadet
- Joined
- Oct 13, 2014
- Messages
- 52
The model is complete. Still includes recolors and Justin Bailey variant.

You can get it here: http://forums.kc-mm.com/Gallery/BrawlView.php?Number=206684
You can get it here: http://forums.kc-mm.com/Gallery/BrawlView.php?Number=206684
Last edited:
ikestercrimsombelmont
Smash Rookie
- Joined
- Oct 2, 2014
- Messages
- 19
Hey scout I'm also crimsomIkester from the vault,yeah I PM Taiko mistakenly but he was ok and friendly,you can help me if you want to,I wanted to add a plastic effect to my vertex/ri/texture vintage jump man but the material thing from nanobuds tutorial doesn't work for me,my brawl box force close every time I try to do the thing and also frankly I didn't understand it that much,now what I did was add rim like I learn from your tutorial,I did everything correctly,this model has a lot of stages but I manage to add the rim light the only thing is that it has an issue I cant resolve which is explained at the vault description of the hack.here's the link go crazy with it:https://www.dropbox.com/sh/of0hmoplud904oz/AAB7oyNbIynreZtiGhqOexC2a?dl=0
Last edited:
Nezha the Scout
Eyyyyyy
I'll give it a check.
Rimlight is great to simulate plastic-ish look you are aiming for, just tweak the intensity of the edge texture an done.
I shall verify the model after college, then offer a mini picture tutorial on how to fix any issues found.
Rimlight is great to simulate plastic-ish look you are aiming for, just tweak the intensity of the edge texture an done.
I shall verify the model after college, then offer a mini picture tutorial on how to fix any issues found.
Last edited:
ikestercrimsombelmont
Smash Rookie
- Joined
- Oct 2, 2014
- Messages
- 19
Ok thanks,I just want to fix the weird invisible rim wall that shows.I'll give it a check.
Rimlight is great to simulate plastic-ish look you are aiming for, just tweak the intensity of the edge texture an done.
I shall verify the model after college, then offer a mini picture tutorial on how to fix any issues found.
ikestercrimsombelmont
Smash Rookie
- Joined
- Oct 2, 2014
- Messages
- 19
Is adding gloss the same thing or is it a different method?
NintenNess
Smash Journeyman
I know this is basically off-topic, but if I'm not mistaken, this part of the Rim Lighting tutorial also applies the same thing to emeralds. (The Materials, double rim, and the concept of it.)
Last edited:
the101
Smash Journeyman
- Joined
- Jul 11, 2014
- Messages
- 357
- 3DS FC
- 4854-7073-5738
I encountered an issue with applying rim light to Project M's Dry Bowser awhile back, but it didn't really occur to me to bring it up until now. Dry Bowser's object layout is different from Bowser's. Dry Bowser has all of his body parts under one object while Bowser's are not. For example, Bowser has "shell" and "body" objects. Dry Bowser just has "full_body". For this reason I couldn't match the texture quality exactly. You can barely tell Dry Bowser has one. However, I didn't make too much of it for that reason, but then something weird happens. Whenever Dry Bowser gets hit, his eye sockets turn completely white. I would show pictures, but I'm unable to, unfortunately. Could you clarify what happened, or on what I can do?
Nezha the Scout
Eyyyyyy

My Finished Rimlight Tutorial , and thanks to Taiko, is now available in a handy, good lookin' and 99% less typos PDF. It does not have a FAQ section unlike my tutorial thread, since that must be updated constantly.
Wait a sec, I'm not recieving notifications from this thread! Im sure Im watching it... what is going on? Its the 3rd time this happens.
I feel bad for not awnsering, sorry.
Depends on the type of Gloss, and sorry for not checking your Mario yet... I had 7 exams this last few weeks, I had no life. This week for sure I'll find the issue, bet on it.Is adding gloss the same thing or is it a different method?
Emeralds? I don't know what you meant, or what that is.I know this is basically off-topic, but if I'm not mistaken, this part of the Rim Lighting tutorial also applies the same thing to emeralds. (The Materials, double rim, and the concept of it.)
Are his eyes part of the body as well? I recommend to reverse the rimlight effect from his eyes if possible, also could be a repetitive/common misscode glitch, give it another check and see if you can unrim the eyes... if not send me the file via PM if you need a more hands on assistance.I encountered an issue with applying rim light to Project M's Dry Bowser awhile back, but it didn't really occur to me to bring it up until now. Dry Bowser's object layout is different from Bowser's. Dry Bowser has all of his body parts under one object while Bowser's are not. For example, Bowser has "shell" and "body" objects. Dry Bowser just has "full_body". For this reason I couldn't match the texture quality exactly. You can barely tell Dry Bowser has one. However, I didn't make too much of it for that reason, but then something weird happens. Whenever Dry Bowser gets hit, his eye sockets turn completely white. I would show pictures, but I'm unable to, unfortunately. Could you clarify what happened, or on what I can do?
Last edited:
the101
Smash Journeyman
- Joined
- Jul 11, 2014
- Messages
- 357
- 3DS FC
- 4854-7073-5738
Thank you. I've been busy in my studies, so I'm not sure if I'll be able to check this out soon. But when I get around to going back into Dry Bowser's files I'll let you know what happens.Are his eyes part of the body as well? I recommend to reverse the rimlight effect from his eyes if possible, also could be a repetitive/common misscode glitch, give it another check and see if you can unrim the eyes... if not send me the file via PM if you need a more hands on assistance.
Also, good luck with Smash 3's Kirby.
NintenNess
Smash Journeyman
I meant the SSE Character clones. People refer the SSE Characters as Emeralds.Emeralds? I don't know what you meant, or what that is.[/quote
Here are few of the examples with couple of characters I modified into. Like I said, it's still the same concept as Rim Lighting, the process is different. I guess I really have to make a tutorial on it later...


This is a example of Emerald PMBR's OOT Link. The reason why I didn't compare them with the same Recolor, is because I ended up replacing PMBR's OOT Link with the N64 one.

This is a another example of Emerald SJS's ZZS.
I apologize for your misunderstanding.
Last edited:
Nezha the Scout
Eyyyyyy
Ah! This is the new "thing" these days, I feel like an old timer.I meant the SSE Character clones. People refer the SSE Characters as Emeralds.
Here are few of the examples with couple of characters I modified into. Like I said, it's still the same concept as Rim Lighting, the process is different. I guess I really have to make a tutorial on it later...
This is a example of Emerald PMBR's OOT Link. The reason why I didn't compare them with the same Recolor, is because I ended up replacing PMBR's OOT Link with the N64 one.
This is a another example of Emerald SJS's ZZS.
I apologize for your misunderstanding.
So its the same concept as rimlighting huh? I'm interested. as I can apply it on certain models I have lying around. A tutorial of this would be awesome for those old timers like myself.
Odd considering that I've been modding for only a year...
Fixed a typo for ya, hope its okay.Also, good luck with Hats.
Last edited:
Nezha the Scout
Eyyyyyy
Found them:Ok thanks,I just want to fix the weird invisible rim wall that shows.

I found it odd that it doesn't freeze ingame with this error. That would fix a grand part of the issue.

Rimlight stage always goes under the base stage.
The base stage is the first to have a raster color value, its overpowered by the delphino stage only if it applies. Both shader one and two has these issues.
Check the "Shader" section of the tutorial again on how to do this.
Last edited: