• Welcome to Smashboards, the world's largest Super Smash Brothers community! Over 250,000 Smash Bros. fans from around the world have come to discuss these great games in over 19 million posts!

    You are currently viewing our boards as a visitor. Click here to sign up right now and start on your path in the Smash community!

Make Your Move 3.0: It's over, it's done, moving on.

Status
Not open for further replies.

cheap_josh

Smash Ace
Joined
Mar 24, 2008
Messages
914
Location
Northern Virginia
Haha I was just playing Godzilla Destroy All Monster's yesterday. Cool moveset. I guess you're adding the taunts and stuff later?

I'll look for your moveset Boezy, gotta find it through all these pages.

1000th thread post.
 

Mario & Sonic Guy

Old rivalries live on!
Joined
Sep 18, 2007
Messages
22,440
Location
Mushroom Kingdom
NNID
TPitch5
3DS FC
5327-1637-5096
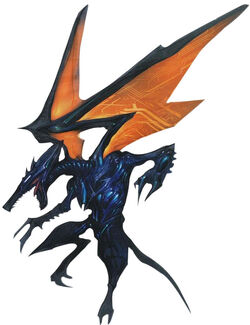
Ridley


------------------------
Stats

Power: 4
Defense: 3
Walking Speed: 2
Running Speed: 4
Recovery: 4
Jump Height: 4
Mid-air Jump Height: 2
Descent Speed: 3
Weight: 3
------------------------
Standard Attacks

neutral: Scratches the foe with his left claw. Does up to 4% damage. Press again to do a scratch with the right claw. Also does up to 4% damage. Press the third time to do a bite. That does up to 7% damage.

f-tilt: Smacks the foe with his tail. Does up to 8% damage.

u-tilt: Lunges his head upward to bite the foe. Does up to 8% damage.

d-tilt: Does a bite from a low angle. Does up to 8% damage.

dash: Thrusts his head to damage the foe. Does up to 8% damage.
------------------------
Smash Attacks

f-smash: Thrusts his head right at the opponent. It's fairly slow, but the attack can deal up to 21% damage uncharged. If fully charged, it deals up to 32% damage. On a side note, the attack delivers two hits. The first hit has no knockback, but the second hit does. The second hit must connect to be effective.

u-smash: Fires flames from above, which deals variable damage. The last hit deals the most damage. Power of the last hit increases when fully charged.

d-smash: Slams the ground, creating a shock wave around him. Deals up to 15% damage uncharged, but deals up to 23% damage when fully charged. Sends foes flying vertically.
------------------------
Aerial Attacks

n-air: Spins to damage the foe. Deals up to 8% damage.

f-air: Attempts to bite the foe. Deals up to 12% damage.

b-air: Attacks the foe with his wings. Deals up to 9% damage.

u-air: Thrusts his head upward to bite the foe. Does up to 11% damage.

d-air: Fires flames below to damage opponents. Damage is variable and can slow down Ridley's descent speed temporarily.
------------------------
Special Attacks

standard - Pyro Ball: Builds up a flame sphere from inside his mouth. The longer it's held, the more powerful it becomes. Ridley can't hold the flame in his mouth however. At full power, the fireball can deal up to 28% damage.

side - Speed Rush: Rams into the opponent at a fast speed. Deals up to 10% damage. If used while airborne, Ridley becomes helpless afterwards. Based on one of his attacks in Brawl.

up - Speed Loop: Performs a circular loop that can damage opponents. After it's used, Ridley will automatically glide. Attack deals up to 9% damage and has good knockback too. Based on one of his attacks in Brawl.

down - Power Stomp: Attempts to crush its opponent by falling on it at a high speed. If used on the ground, Ridley will jump before using the attack. The move can also send a foe flying before the actual attack executes. Deals up to 21% damage. Keep note that Ridley is vulnerable to incoming attacks for awhile after using this attack. Based on one of his attacks in Brawl.
------------------------
Other Attacks

ledge attack (<100% damage): Gets up quickly and bites the opponent. Does up to 7% damage.

ledge attack (100%+ damage): Gets up slowly and smacks the foe with his tail. Does up to 5% damage.

floor recover: Slashes the foe with his claws. Does up to 5% damage.
------------------------
Grabs & Throws

grab: Attempts to grab with his claws.

attack: Bites the foe. Deals up to 3% damage.

f-throw: Hurls the foe with his mouth. Deals up to 7% damage.

b-throw: Same as the f-throw, but in the opposite direction.

u-throw: Jumps up high and then slams the foe to the ground real hard. Deals up to 12% damage and is similar to Meta Knight's u-throw.

d-throw: Lays the opponent down and them stomps on it. Deals up to 6% damage.
------------------------
Final Smash

Omega Ridley: Ridley exposes itself to some Phazon to transform. As Omega Ridley, Ridley's attacks deal double their normal damage, and he won't flinch at all. However, he can still take damage. Unlike in the Metroid Prime games however, the transformation is temporary and lasts for about 20 seconds before Ridley returns to normal.


------------------------
Battle Entrance

Slams onto the battlefield from above.
------------------------
Taunts

/\ taunt: Does a roar while striking an intimidating pose.

<> taunt: Does a series of bite attacks to intimidate the foe. Does no damage.

\/ taunt: Does a taunt the resembles Charizard's <> taunt.
------------------------
Alternate Costumes

Recolors affect Ridley's body.

Default
Red
Blue
Green
Yellow
Black


Meta Ridley

Unlock this outfit by clearing Classic Mode as Ridley.

Recolors affect Ridley's body.

Default
Red
Blue
Green
Yellow
Black


------------------------
Side Notes

Ridley can perform up to 4 mid-air jumps.

Because of his skinny appearance, Ridley is moderately light and is also floaty.

Ridley can glide while airborne. While gliding, Ridley can attack his opponent by doing a bite attack. It deals up to 10% damage, but also cancels Ridley's gliding. If Ridley starts gliding after doing his final mid-air jump, he becomes helpless once he stops gliding. Same case for if he ends his glide after executing the third jump.

Although he's a slow walker, Ridley is quite fast when running.
------------------------
Solid Snake Codec

Snake: Otacon, what's with this dragon-like creature? It looks intimidating.

Otacon: Snake, watch yourself against Ridley. He is a merciless monster and the leader of the space pirate army. It was Ridley who killed Samus's parents, thus making her his sworn enemy.

Snake: Guess it has a huge grudge against humans.

Otacon: ..............Yeah, you could say that. Anyway, Ridley is unpredictable since he can fly around, breathe fire, and his claws are also nothing to laugh at. If you're ever gonna stand a chance, you need to avoid those things at all costs.

Snake: Yeah, I'll make sure of it.
------------------------
 

Red Arremer

Smash Legend
Joined
Nov 27, 2005
Messages
11,437
Location
Vienna

------------------------
Final Smash

Omega Ridley: Ridley exposes itself to some Phazon to transform. As Omega Ridley, Ridley's attacks deal double their normal damage, and he won't flinch at all. However, he can still take damage. Unlike in the Metroid Prime games however, the transformation is temporary and lasts for about 20 seconds before Ridley returns to normal.
Can't have enough of these "I turn super saiyajin and pwn everyone!"-Final Smashes! :D
 

Collective of Bears

King of Hug Style
Joined
Nov 10, 2007
Messages
6,507
Location
North Carolina
NNID
Gark430
3DS FC
1805-3069-0371
That was sarcasm, anyway. But hey, the thread calmed down a LOT. :)
I think I'll put my next moveset in soon, dunno if I should start now or a lil later.
Yeah. I think I'm going to toy with my current entries today, and get back to work on Saturday (Busy on Friday)
 

bivunit94

Smash Journeyman
Joined
Feb 15, 2007
Messages
364
Location
Vault 101
Reserving the Arbiter (Halo).

Sorry if he's been done...I was away on vacation and when I came back, 68 pages already. D:
 

BKupa666

Barnacled Boss
Moderator
Joined
Aug 12, 2008
Messages
7,788
Location
Toxic Tower
That codec was funny. Pretty good overall but imo you have too many basic punches and kicks. But that's just me.
I understand what you are saying, but many of his punches and kicks (his basic attack, all of his tilts and most of his throws) are actually used in the films, so even if they seem repetitive, they had source material.
 

Red Arremer

Smash Legend
Joined
Nov 27, 2005
Messages
11,437
Location
Vienna
Other Movesets by Spadefox:
Lip the Flower Fairy (Panel de Pon/Tetris Attack)
Gilius Thunderhead (Golden Axe series)
Rouge the Bat (Sonic series)
Stanislav "Spade" Serkov (Original Character)
Silver the Hedgehog (Sonic series)
Blaze the Cat (Sonic series)
Chaos (Sonic series)
Shadow the Hedgehog (Sonic series)
Numberman.EXE (Megaman Battle Network)
Sandbag (Super Smash Bros. series)
Dr. Ivo "Eggman" Robotnik (Cooperation with KoJ, Sonic series)
Kovomaka Students (Magical Starsign)


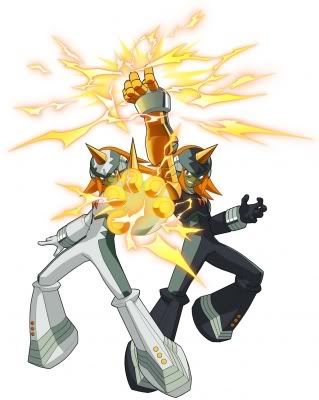
ζ∑ζ∑ζ Gemini Spark ζ∑ζ∑ζ


The digital Lords of Thunder, Gemini Spark, finally make their stand! Gemini Spark first appeared in Megaman Starforce as boss. Pat, a nice and gentle boy with split personality, whose alternative person was Ray, an evil culprit. The FM Lifeform Gemini possessed Pat-Ray, thus transforming him into Gemini Spark, with Pat being the white twin, and Ray the black one. In Megaman Starforce 2 Gemini Spark make their return, this time a bit different.

Gemini Spark is a quick opponent and uses a lot of electrical attacks. In the first game only one of the twins had HP, the other one being indestructable, in the second game, both had their own HPs, but it was the HP of one boss split into two. In both games, however, they attack rather independently. How is this moveset gonna work, you'll ask. Yes, it's another Ice Climber-moveset, but it involves more twin action. You'll see what I mean. You control the black twin, while the white one follows you. The other twin cannot be, like Nana, destroyed, only be flinched to disrupt its attacks. Gemini Spark's moveset relies heavily on their own moves and card attacks from the Starforce games, though takes several moves from other bosses, as well.

Stats
Screen Name: G. Spark
Size: 4/10 (their host is a child, remember)
Weight: 2/10
(Running) Speed: 5/10
Power: 4/10
First Jump: 6/10 - The twins jump.
Second Jump: 5/10 - The twins hop further from the spot they where at. Oh well.
Fall Speed: 5/10
Crouch: No.
Crawl: No.
Wall Jump: Yes.
Wall Cling: No
Gliding: No.

ATTACKS
Legend:
Attack: Attack Name - Description with damage indicator

Standard Attacks
A: Punch - Simple, one punch from each Gemini's "normal" arm. Not continued. Damage: 1-2% each fist.
Ftilt: Stun Knuckle - The twins send out their "power arm" in the same direction. Low knockback, But stuns the enemy for a second. Damage: 6-7%
Utilt: Elec Punch - The twins both punch upwards. Average knockback. Damage: 7-8%
Dtilt : Typhoon Dance - The twins take their hands and swirl around in a typhoon. Low knockback. Damage: 6-8%

Smash Attacks
Fsmash: Flicker Kick - The twins kick both three times in the same direction. Good knockback with the last kick, the other two have virtually none. Eletrical element. Damage: 7-8% each hit.
Usmash: Voltic Eye - Gemini Spark raise their "powerarms" upwards, shooting out a ray of electric energy in the shape of three rings. Good knockback. Damage: 18-24%
Dsmash: Elec Sword - The twins slash out electric swords, one facing each direction. The slashes are low. Good knockback. Damage: 17-23%

Aerial Attacks
Nair: Ring Attack - The twins grab each other's legs and turn into a small ring of electric destruction. Low knockback. Damage: 8-11%
Fair: Twin Slam - The controlled twin grabs the AI one and throws him in front of him. Good knockback, Damage: 9-12%
Bair: Thunder Ball - The twins sends out a small ball of electricity backwards. It doesn't fly, though, it's only in their palms. Low knockback. Damage: 6-8%
Uair: Horned Headbutt - Ow, that must hurt. The twins ram their horns into the enemy upwards. Above average knockback, sends enemy nearly straight upwards. Damage: 8-10%
Dair: Metallic Hammer - The twins slam down their "power arms" onto the enemy. Meteor Smash if both twins connect with the victim, low knockback at only one hit. Damage: Both: 12-14%, One: 6-7%

Situational Attacks
Dash Attack: Jet Attack - The twins rush quickly forward, punching the enemy standing in their way. Needs a little recovery. Medium knockback. Damage: 7-9%
Ledge Sweep (under 100%) - Black twin shoves the white one upwards before climbing up himself.
Ledge Sweep (over 100%) - White twin slashes an Elec Sword, gets up and pulls Gemini Black up.
Get up Attack (under 100%) - Both send out an Elec Punch and then get up.
Get up Attack (over 100%) - Gemini White gets up and punches around, then helps Gemini Black back to his feet.

Specials
B: Rocket Knuckle - Each twin sends their "power arm". Since both are facing their backs, they fly in both directions. The distance is short, the knockback not so bad, and the twins have to wait for their arms to return before they can proceed in attacking. Damage: 8-10%

B side: Radar Missile - The controlled twin shoots a missile, slightly homing like Samus' sometimes. Explodes on contact with obstacle or after a short distance of flying. Nice knockback. Damage: 10-12%

B up: Cloud Shot - The controlled twin sends out a cloud which quickly travels through the stage. If it contacts an obstacle, it sends out electric damage, and then disappears. It hits 4 times, and an enemy may get caught. It has virtually no knockback. Damage: 3-4% each hit.

B down: Gemini Thunder - The twins hold together the hands of their arms, exclaim "Gemini Thunder!" and, depending on where they are, the following happens:
If midair, the attack can be aimed up- or sidewards, shooting a thunderbolt down, boosting themselves upwards.
If on ground, the attack goes in the direction the twins are facing, however, shoving them back just like the airborne attack, so you may consider doing this attack NOT near a ledge. The attack has nice knockback in either way. Damage: 12-16%

Grabs, Throws
Grab and Pummel - The black twin holds the enemy while the white one punches him. Damage: 2-3% each hit
F throw - The black twin holds the enemy while the white one uses his "power arm" to punch him away. Low flying distance. Damage: 9-11%
B throw - The black twin holds the enemy, the white one slides behind the victim's back and electrocutes them while the black one lets loose. Low flying distance. Damage: 12-13%
U throw - The black twin holds the enemy, the white twin bats them upwards with an Elec Sword. Medium flying distance. Damage: 8-10%
D throw - The black twin throws down the enemy to the ground and both Geminis stomp onto them with electric feet. Ow. Damage: 11-15%

Misc. Animations
Sleeping - The twins lean on each others back, dozing.
Dizzy - The twins hold each others shoulders, moaning.

Final Smash
Satellite Admin
Yes, even Gemini Spark have a Satellite Admin guarding them. They raise their "power arms" and call upon. Randomly one of these things will occur:

Leo Kingdom - If Leo Kingdom is summoned, he appears in the background of the stage, shooting several fireballs onto the stage. They explode when contacting the floor or an obstacle. High knockback. Damage around 25%

Pegasus Magic - If Pegasus Magic is summoned, he slowly lands on a platform. Then he snickers and starts slashing semi-homing through the stage (think of that Pokemon. I forgot its name), dealing high knockback and freezing everyone, as well. Damage: 10-15% each hit

Dragon Sky - If Dragon Sky is summoned, he descends from above the place Gemini Spark stood at and inhales slowly. He then blows out his breath, coating the whole stage if smaller, a part of the stage, in it. Everyone in it will get caught, except they're able to jump over it or dodge when it's a bigger stage. It does no knockback, but all in all can do up to 50% damage if the victim is in there from the start.

On moving stages, Dragon Sky and Leo Kingdom will float along.

Taunts
Up - The two Geminis raise up their Elec Swords and let them cross.
Side - Gemini Black grins and slashes his sword while facing the player and grinning, meanwhile Gemini White looks to the side and sighs.
Down - Gemini Black points at the direction he's facing, exclaiming "Pathetic!"

Entrance
Gemini Spark simply teleports down.

Alternative costumes
- Black Gemini B, White Gemini W, Golden "Power Arms", Default
- Red Gemini B, Pink Gemini W, Bronze "Power Arms", Red Team
- Blue Gemini B, Lilac Gemini W, Silver "Power Arms", Blue Team
- Green Gemini B, Yellow Gemini W, Golden "Power Arms", Green Team
- Yellow Gemini B, Brown Gemini W, Bronze "Power Arms"
- Sky Blue Gemini B, Orange Gemini W, Silver "Power Arms"

Victory Poses
Up - Basically the same as the Up Taunt, just with Gemini Black laughing villainously.
Down - Both Geminis press together their back and point their Elec Swords at the player, Gemini Black is grinning while doing so.
Side - The Geminis high five with their "power arms", creating elecricity.

Additional Stuff~

Codec Converation
Snake: Colonel, I have two boys here, and they're heavily armed with electric attacks.
Colonel: Those two are Gemini Spark, Snake. They are a human possessed by the FM Lifeform called Gemini. They can alter between reality and digital world.
Snake: So, what should I do?
Colonel: Gemini Spark loves to cause havoc and destruction, and they use all they've got to do so. Especially the black Gemini is extremely vicious. They're fast, but they lack in attack power, something you've gotten, Snake.
Snake: A, I've got the hint there. Thanks Colonel, I'll do my best.
Colonel: Take care out there, Snake.

Kirby Hat
The helmet and "hair", as well as on of Kirby's hands turns golden and metallic.

Wii Remote Sound
A electric slash with an Elec Sword.

Unlock Message
Gemini Spark, the electric duo, now is available to play as!

Role in Subspace Emissary
Gemini Spark are part of the Subspace Army. Remember that cutscene first showing Ganondorf in the Subspace Gunship? Gemini Spark stand behind him there. Shortly before the Heroes team attacks the Gunship, Ganondorf turns around to Gemini and kills him off, deleting one of his enemies first. Kirby finds the trophy in the Subspace Area when he picks up other team members, and Gemini then join.

Logo

See that W-shaped thingie behind the Japanese characters? That's the logo, mang.


Victory Theme
Megaman Starforce Victory Jingle. Yay.

THIS MOVESET IS FINISHED. IF YOU LIKED IT, PLEASE COMMENT! THANKS!

Stage
Cyber World
Crappy Paint picture of what the stage ca. looks like

Okay, so the red block should be ~Mario's size, so you can imagine what the stage looks like. The platform upwards has a "Blue Mystery Data", which when hit, either contains an item or explodes. If the BMD is gone, it takes 30 seconds before the next one appears. On the two platforms connected by the ramp you occasionally get Virii from the Battle Network games, such as Metool (Pic). This guy swing his pickaxe and slams it into the ground, creating a shockwave, which trips someone connecting with it, damaging with 6-8%. You also get Sparkies (I think that's what their name was), who send a small ball of electricity along the floor, which goes from the place they are, up/down the ramp, until it reaches the end of the other platform connected to the ramp. These balls stun the victim and do 8-10% damage. Last but not least, you'll have Canodumbs, which appear and wait for someone to stand in front of their cannon to blast them away. High knockback, damage is about 10-13%.

Also Homestage to
Numberman.EXE

Stage Music
Megaman 3 - Sparkman
Megaman 8 - Astroman
Megaman Battle Network - Running through the Cyber World
Megaman Battle Network 4 - Battle with Myself
Megaman Network Transmission - Zero Gravity Area (Starman's Stage)
Megaman Network Transmission - Blazing Internet (Fireman's Stage)
Megaman X4 - Cyber Space
(without entry jingle) Megaman X5 - Laser Lab
(without entry jingle) Megaman X5 - Planetarium
Megaman ZX Tunes - Industrialism
Megaman ZX Tunes - Misty Rain
Megaman ZX Tunes - Ultramarine Meditation
Megaman ZX Tunes - Cannon Ball ~ Hard Revenge ~
Megaman ZX Advent Tunes - Through the Lightning
Megaman ZX Advent Tunes - Target Chaser
Megaman ZX Advent Tunes - Twisted Vine
Megaman ZX Advent Tunes - In the Wind
Megaman ZX Advent Tunes - Organic Line
 

mantlecore77

Smash Journeyman
Joined
Jul 17, 2008
Messages
440
Location
Ohio
Warning! Challenger Approaching!

Donald & Goofy, from the Kingdom Hearts games!

Background Info:
Randomly left by their King Mickey with only a myserious letter from him to clue them where to go, Donald (the castle's head wizard) and Goofy (the head knight) were sent by Minnie to find the one that Mickey requested... the wielder of the Keyblade. So Donald and Goofy set off in their Gummi Ship, and while searching in the world of Traverse Town, they stumbled upon the Keyblade Master himself: Sora.
Setting off with Sora despite beginning friction between him and Donald, Sora, Donald, and Goofy all set out on a mission to find King Mickey and solve the mystery of the stars...
(I would insert more, but I would basically be summarizing Kingdom Hearts.)

How This Moveset Will Work:
Two characters in one? Yes. Ice Climbers? No. Zelda/Sheik? Yes. This is how it's going to work between Goofy and Donald:
All of Goofy's info will be in Neon green.
All of Donald's info will be in Sky blue.
Things that are connected to both are in white.
When Donald is fighting, Goofy is in the background where Pokemon Trainer would stand, watching Donald from afar and "following" him from afar. When you execute Down B, Donald and Goofy quickly trade spots by A.) the current battler retreats and B.) the background character teleports via random teleportation to the field. It's a simple system, but if you don't know what I mean, think of it as Zelda & Shiek's change up. It's identical to that.
To alternate who will be your first character of the two, press "C" when you select Donald and Goofy on the character select screen. Donald is the default first character.

The Feel for Donald
Donald is a unique character in this: he is light, but he is not speedy. He can't jump amazingly either. His physical attacks are pretty weak. What makes Donald a worthy competitor then? His special abilities.
Though you always want to use his combos with basic attacks and use grapples and aerials and all that good stuff, Donald's true power lies within the magic that he has learned to master over the years. Imagine a weaker Ness with MUCH more powerful PK powers, and that's about what you got moveset wise.

The Feel for Goofy
Basically a polar opposite to Donald, Goofy is an amazing physical fighter. His specials are almost no different than strange physical strikes with slight twists. He is fast, can jump VERY high (for some reason, he has a great initial jump). Downsides to all of this is that he is clumsy and... well, I'll let you read the moveset instead.
Also, I should note that Goofy's shield acts like Link's shield only better. If SPRINTING (not walking or jogging) or doing his Dash A attack, Goofy's shield will block (not reflect) all the projectiles coming towards his front side! Another great pro.

Symbol

(But black & white)

Basic Statistics (Donald) (1-5)
Strength = 2: Like I said, Donald is pretty weak physically.
Dodge = 3
Recovery = 3
Speed = 2
Initial Jump = 3
Secondary Jump = 2
Weight = 2.5
Height = 2: He's a tad bit shorter than Mario standing up straight
Fall Speed = 3: Though he's a duck, his rod and jacket bring him down faster than expected.

Basic Statistics (Goofy) (1-5)
Strength = 4: Powerhouse of the two. His Smashes aren't particularly strong, but the overall percentages of his attacks are fairly high.
Dodge = 2: Being the clumsy Goof he is, Goofy is also tall and targetable and he lacks dodging skill.
Recovery = 4: His initial jump is very good, and his Up B has solid vertical recovery distance.
Speed = 3.5 = He's not as fast as Fox or Pikachu or whoever, but he's certainly not slow.
Initial Jump = 5: Like I said, amazing initial jump. Just behind Falco.
Secondary Jump = 3
Weight = 3.5
Height = 3.5: His hat peaks at the top of Link's head.
Fall Speed = 2: Oddly enough, Goofy is a floaty character. Perhaps its the strange aerodynamics & resistance of his shield? Hm...

BEFORE YOU THINK THAT GOOFY IS A DOMINANT CHARACTER OVER DONALD, REMEMBER THAT GOOFY IS CLUMSY...
...and trips a lot...

Basic Attacks
Standard "A" = Donald takes a whimpy little vertical swing of his rod at his opponent. The upside is its range.
"Double Tap" A = This is a one-two combo for Donald. After swinging his rod down, he jumps up and grasps the rod with both his hand and hits sideways. It does better damage than the first one, but has BARELY less range.

Dash "A' = Donald pokes his finger out, squawks (not literally squawk, he does that famous cry of anger), and blasts a dose of fire upon his target. Good damage, poor knockback. It has bad range too, but it doesn't cost Donald any time at all.

Tilt Forward/Back = Donald jumpes forward and flips off the front end of his opponent. He is shaking in anger with this attack: it reflects Donald's short temper. It has low damage but solid knockback, but if Donald misses, it is a futile attack with bad lag.
Tilt Upward = Donald stabs his rod into the air, but it's about at an 80 degree angle away from his front side. This attack is powerful but is difficult to aim.
Tilt Downward = Donald kicks with his foot. It's his simplest, most physically demanding attack. Bad range.


Standard "A"= Goofy punches them with his free hand, not his shield.
Double Tap "A" = Goofy follows up with a quick shove with his shield. This has knockback, but his combo finisher follows the enemy into the knockback.
Triple Tap "A" = To finish the powerful combo, Goofy slides forwards and gives the enemy a good uppercut with his shield. One of the most powerful combos in the game. The horrible downside is that Goofy is completely vunerable from the back and top in ALL three of the hits, and he suffers post-lag, especially if he doesn't finish the whiffing combo.

Dash "A" = This is a classic Goofy move from Kingdom Hearts, and it's a very unique dash! Goofy covers his eyes with fear, lowers his head below his shield, and charges forward! His shield is the hitbox and he continues to run at decent speed until you release the joystick or the A button! This can push enemies off the stage or if percentages are high, capture a foe in a strong combo! There is low lag too, but again, Goofy is completely vulnerable from the back side during the back side. This is Goofy's trademark, and probably best, physical attack.
I should ALSO address than any projectile sent towards Goofy's front side is completely deflected!

Tilt Forward/Back = Goofy puts both his hands on the handle of the shield, chuckles, and trusts his shield forward. It has great knockback, but Goofy suffers some seriously post-move lag.
Tilt Upward = Goofy wildly flails both his arms up, slapping foes above him silly with his shield & free hand. The shield does more damage and knockback, but if you are unfortunate enough to only hit with your free hand, the damage is little and knockback is not there, leaving your opponent with a free shot to the clumsily recovering goof.
Tilt Downward = Goofy sits down awkwardly and quickly and kicks his right foot straight out, squinting his eyes in anger. This is one of his better range attacks but it is extremely weak. I recommend you don't even use this move.


Smashes!
Forward/Back Smash = Donald charges up his rod like a baseball bat, swinging it behind his head as he charges. As the rod charges, it gains a small green orb of energy. When released, Donald smacks the foe across the head/torso and also releases a small blast from the orb! This is Donald's strongest physical attack and has good knockback. The bad part again is the lag, and it lasts before and after the move.

Up Smash = Donald drops his rod and takes a second to look around. He then claps his hands over him, creating a small spark of lightning over his head. If it captures a foe/item, it will electrocute the enemy for a short time and when released will send the foe soaring into the air! Bad range.

Down Smash = Donald impales his rod into the ground for a split second, and around him a tiny explosion occurs. It appears a few feet in front of and behind him, so with good aim you could be able to cause solid damage and keep your distance with Donald!


Forward/Back Smash = Goofy does a 360 in place, violently slicing the enemy's front side with the edge of his shield. It's not a particularly strong smash attack, and he suffers slighty lag after his move. However, a great up side is that it covers both sides of his body, hitting anything around him!

Up Smash = Goofy's strongest uppercut that throws him high into the air as well. It does solid damage and knockback, but Goofy goes up with the foe too, and comes down with them. If you're good at timing post-move comboes, this is the move for you.

Down Smash = Goofy unequips his shield, grabs the farthest edges of it, and slams the face of shield down into the ground in front of him. It takes a long time to execute and doesn't send the enemy very far even with high percentages, but the attack is EXTREMELY powerful!


Aerials
Neutral Air = Donald extends his hand/wing and slaps the opponent. Poor range, overall weak attack.

Forward Air = Donald flaps his wings forward, projecting his body forward for a body slam. Good damage & knockback, but it sends Donald forward slightly, leaving him open for counters.

Back Air = Donald stretches both his stubby flipper feet out and smack the opponent with the bottom of his feet. The feet enlarge cartoonishly, giving it better damage than expected.

Up Air = Donald faces the crowd, folds both his arms in, and "expands" all of his limbs, resulting in an X shaped hitbox: it hits all those that are perpendicular to Donald diagonally, like an X. The rod-holding limb does the greatest damage, and the foot on the opposite side of his rod hand becomes a spiking foot! An overall unpredictable move, but once executed his hitbox fades quickly and it takes some time for him to recover.

Down Air = Donald "flips onto his stomach in midair" and thrusts his rod downward, giving a tiny little fiery explosion off beneath him. It's a good attack, but the attack results in hitting the enemy "upward" towards the descending duck of magic.


Neutral Air = Goofy pulls back his rear end and thrusts his shield forward, making his extended feet and shield the hitbox. Average damage, good knockback if hit by feet OR shield.

Forward Air = Goofy grabs his shield with both his hands, lifts it over his head, and bashes the opponent on their head! It does good damage but surprisingly doesn't send the opponent very far at all, and this could-be spike is overrated for what it sounds like.

Back Air = Goofy flexes his arms, moves them down, and spins around. His shield harms any surrounding opponents horizontally, but Goofy is vunerable from the top and bottom side.

Down Air = Goofy kicks his right foot down as he chuckles. Average attack both with knockback, damge, lag, but it has solid range.


Donald's Specials
Like I said, Donald's true power lies within his magic. Kick back and watch the fireworks, folks.

Standard B: Aeroga = Donald stomps his feet with an angry look on his face, and then a great gust of wind appears around him, shielding off attacks! This attack has three pros and one con:
Pros
1.) Reduces damage by 25%. So an attack that usually gets 10% would probably get 8%.
2.) Reflects projectiles AS Donald casts the spell. It acts like Nayru's Love, in other words, but for much less time.
3.) If Donald dashes into an opponent when they're within 10 feet of him, he will bump them out and deal slight damage. This sets him up for powerful combos and counters, and can act as a defensive move too.
Con
Once used, you cannot cast this spell for a full minute. And the shield around him lasts for only 15 seconds or until he sustains 50% damage. The short-lived shield is very powerful and helpful indeed, but the long lasting no-barrier limit can be quite annoying in a pinch.

Side B: Blizzaga = (I was about to do Firaga, but then I thought... curses, Din's Fire...) Okay, so here's the new spell. Blizzaga. Donald can charge this move for 4 seconds. For every second it is charged, each variable of stat raises. The four variables are range, power, speed, and coverage. The first three are obvious, but the higher the coverage, the more area in front of Donald will be affected.
On the first stage, Donald releases a large snowball that goes 5 feet and deals approx. 4% damage. Enemy is frozen 1/40 times.
On the 2nd stage, Donald releases a head-sized crystal that goes 8 feet and deals approx. 7% damage. Enemy is frozen 1/35 times.
On the 3rd stage, Donald releases a half-bod sized crystal that goes 10 feet and deals approx 10% damage. Enemy is frozen 1/29 times.
On the 4th stage, Donald releases a full-body (Mario) sized crystal that goes 15 feet and deals approx 14% damage. Enemy is frozen 1/22 times.
Each spell has the same knockback, which is solid, but Donald suffers EXTREME lag if he cancels the spell halfway through charging. He cannot save the charge like Donkey Kong or Samus either, so you must use this spell when near a ledge or if you have excellent timing skills.

Up B: Magnega = Donald uses electromagnetic magic to lift himself into the air and manually be directed into a direction. If any of you guys have played Super Mario Galaxy, imagine those little orbs of gravity that catch Mario in space. This is how that move works, but the orb is wherever you place it and drags Donald in. This recovers amazing range both horizontally and vertically, but Donald is COMPLETELY vulnerable to attack and is very floaty when caught in the grabivitational orbs/attraction. You can cancel this attack with Up B again.

Down B: Firaga = This is a personally favorite special of mine, for it is original but still captures the magical skill of Donald. Donald whips his wand behind his head, charges up a fiery ball, and slams the head of his rod into the ground, releasing a line of fire ahead of him. The "line of fire" are small blasts of fire that continue along the ground, like a shockwave, until they reach an enemy/item/ledge. This attack can be charged infinitely and has little lag. Before you mark this spam for whatever reason, cosider this: when charging, Donald is vulnerable at all sides of his body, and it takes him a full 4/5 of a second to slam his rod down. If you catch him while executing the move, he will take great damage and knockback.

--------------------------------------------------------------------------

Goofy's Specials

Standard B: Goofy Turbo = Goofy charges his shield for a powerful blow. This attack can be charged like DK or Samus' Standard B: Goofy can dodge roll around to save the charging, if he is hit his charging is reset, and the final charged blow takes a short time to execute. The ultimate prize isn't just the high percentage of the attack: it's the deadly knockback of it. Because Goofy specializes with a shield, the shield is MEANT for blocking, right? Well if you can land a straight hit when this is fully charged, you can knock a foe with 0% damage up to a third of the Final Destination stage's length!

Side B: Goofy Bash = Goofy lifts his right leg up and tosses his spinning shield under his leg, like a between-the-legs basketball pass. The shield goes as far as Link's boomerang and much faster. It also serves great damage and knockback! But the downside? Goofy waits it out. He stands in that throwing position until his shield returns to him. So if you miss your target and the shield aimlessly flies away from Goofy, your opponent can land a powerful punch! But because the power & knockback is such an amazing reward, this move is an excellent asset if you can time it properly or land a for-sure hit.

Up B: Goofy Tornado = This is a mix between Link's Spin Attack and Luigi's Luigi Tornado. How? Let's find out.
On the ground, Goofy lifts his arms up to his neck and folds them out, giving him a large hitbox around him. He begins to spin in place, forming a small but just-for-show whirlwind around him. If enemies come in contact with his shield, they receive average damage and knockback. However, when you are doing this move, you are free to spin Goofy around horizontally along the ground beneath him. The move lasts for 3 seconds total, and you can cover up to a third of the Final Destination's length from spinning!
In the air, Goofy assumes the same position as on the floor but helicopters into the air. This covers poor distance but because he is decently tall and his jumps are good, this sums up to make Goofy's recovery very solid indeed!

Down B: Shield Slide = Goofy throws his shield on the ground and jumps on it and he clumsily sleds across the stage! He has three hitboxes: the shield, which is at a strange angle as Goofy is slightly angled because of his awkward stance, and his two flailing arms, which he's whipping around for balance. Again, this is another move of Goofy's that covers great range but leaves him vulnerable after the move for his time needed to recover the shield. Another downside is that if you don't cancel in time, you can find yourself sliding off the ledge with little time to recover, resulting in suicide... all in all, use this move wisely and far from the opposite ledge. If you use it in the air, he falls to the ground quickly at a 45 degree angle. His arms do no knockback but if you hit an enemy they fly away from Goofy at a 45 degree angle. Fun, isn't it?


Grabs & Throws
Donald awkwardly takes a short jump and grabs the enemy, dragging them down to his height.
Grapples = Donald takes a punch to the foe's body, with the rod in that same hand. Good damage for a grapply for Donald.

Forward Throw = Donald does a somersault with the foe contained within his roll, and he launches them with his feet at the end. Good damage & knockback but can roll Donald off the edge... and thus, Donaldcide.

Back Throw = Donald takes a 180 spin and throws the enemy with his arm, releasing with a small fiery explosion at the expense of his opponent's leave. Solid damage, but at low percentages this gives very little throwing distance.

Up Throw = Donald shows his Thundaga abilities by holding his opponent above him and shocking them with a hand-sourced lightning bolt! This electrocutes the enemy for a short time and throws them away from Donald vertically. This is his best throw but he suffers extreme post-move lag, resulting in easy counters if his foe wasn't thrown onto a stage.

Down Throw = Donald places his foe beneath him and angrily slams them with his rump and back. This is his worst throw but does decent damage.


Goofy does a basic one handed grab with his free hand. He has good grabbing range but it takes longer than a usual hand grab.
Grapples = Goofy does small taps with the face of his shield against his foe.

Forward Throw = Goofy takes the foe back and throws them down into the ground in front of him. This knocks them into the air with high percentages but doesn't do a ton of damage.

Back Throw = Goofy spins around and releases his foe on a backhanded swing to his back side. This throws the foe fairly far.

Up Throw = Goofy tosses the foe up in a spin and then punches up with his shield, smacking them even further into the air.

Down Throw = Goofy drops his foe then kicks them out. This is his weakest and least knockbacking (?) throw, but it takes little time. He suffers partial pre-move lag.


Final Smash
Disney Kingdom Pride

I avoided the "turn into Super Goof & Duck and terrorize the field!" and decided to throw in a basic ultimate-hit attack. Donald and Goofy BOTH get on the stage and go to opposite sides of the field (and are invincible) and wait there for... what? What's this?! King Mickey falls out from the top of the stage! And he lands in a position relevant to make Donald, Goofy, and him a triangle shape!
Mickey raises his golden keyblade and a golden beam shoots out of it into the sky. Donald raises his rod into the air and a bright blue beam shoots out of it, and Goofy holds up his shield and a broad, green beam shoots out of it! The three beams are extremely powerful beams and wheoever interferes with it is dealt about 20% damage and decent knockback!
But that's not all!
A triangle of pure energy forms between the Goofy, Donald, and Mickey, and whoever enters THIS field is harmed with 30% damage and even greater damage!
So if you can trap a foe within the triangle or the beams, the attack will be a success. However, if your foe is smart and you're on a large battlefield, you're more than likely to be avoided. They can simply wait it out, and when the move is over, M, D, & G take a minute to pose victoriously, and whoever executed the Final Smash waits for the othet two to leave. Ultimately, the point is this: the move is extremely powerful, but if you miss, be prepared for a punishment from post-move lag.


Other Stuff
Taunts
Up = Donald jumps in the air excitedly three times, flailing his arms with energy.
Side = Donald grunts, scowls, and taps his foot impatiently with his rod under his armpit.
Down = Donald screams angrily (his famous duck-sounding cry) and his hat goes off his head for a second.


Up = Goofy raises his shield in triumph, laughing comically.
Side = Goofy scratches his head, like he's confused, then laughs again.
Down = Goofy gives the crowd a big ol' thumbs up and winks.


Victory Poses
(NOTE: When Goofy & Donald win, they do the victory poses together)
1.) Donald & Goofy stand there modestly, just like in the picture at the top of this moveset.
2.) Donald is standing on top of Goofy's shoulders, trying to gain his balance as he holds a heavy trophy, then they fall over because Goofy clumsily falls over.
3.) Donald & Goofy stand side by side and salute each other.
4.) Donald & Goofy wield their weapons and hold them across each other in an "X" fashion, with serious faces on.

Lose Pose/Applause
Goofy is clapping with a modest smile on his face, but Donald is turned away, tapping his foot with his arms crossed.

Outfits
Standard: Donald has a blue vest & hat on; Goofy has green clothes, black vest, orange hat
Red: Donald has a red vest & hat on; Goofy has maroon clothes, black vest, orange hat
Blue: Donald has his standard outfit on; Goofy has blue clothes, white vest, white hat
Green: Donald has bright green vest & hat on; Goofy has his standard outfit on
Yellow: Donald has golden vest & white hat on; Goofy has bronze knight armor on
Other #1: Donald has his original Wizard's outfit on, Goofy has silver knight armor on
Other #2: Donald & Goofy have their "Nightmare Before Christmas" clothing on
Other #3: Donald & Goofy have their "Photon World" clothing on


Donald & Goofy's entrance are both coming out of fallen escape pods from their Gummi Ship.

Solid Snake stuff
Snake: Otacon, there's a duck here with a magical wand!
Otacon: Snake, that's Donald Duck, the wizard from Disney Kingdom.
Snake: I thought Disney was a little kid's TV show?
Otacon: Apparently it's a bit more expanded than that. Donald is a powerful wizard and a good friend to Mickey Mouse and Goofy.
Snake: How does he fight?
Otacon: Didn't you just hear me? He's a wizard! Watch out for his powerful spells and combos.
Snake: I'll be sure to do that.


Snake: Who is this guy, Otacon?
Otacon: This is Goofy Goof, Donald's partner in crime.
Snake: Why is holding a shield?
Otacon: That's his weapon of choice, Snake, don't underestimate his power just because it's a defensive tool. Goofy is much more powerful than Donald, but lacks the magical ability that Donald holds.
Snake: Really. This guy sounds more realistic to me.
Otacon: Whatever, Snake. Either way, you've got a tough cookie to break. Go at it.


MESSAGE WHEN UNLOCKED
Donald & Goofy, Mickey's loyal subjects from Disney Kingdom, have both joined the fray!
 

Smasherk808

Smash Journeyman
Joined
Jul 12, 2008
Messages
231


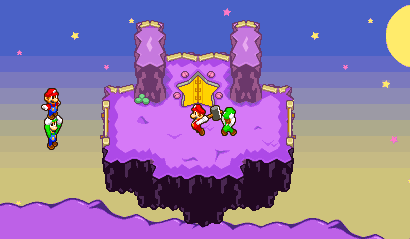
Ok heres Kirby's Friends! ChuChu, Coo, Kine, Nago, Pitch, and Rick!

HOW THIS MOVESET WILL WORK
Ok all 6 characters will be completely playable. And they all have four special attacks! What? well how do they switch then? well they switch using ther taunts! ^ and > taunt to switch to the next person and v and < taunts to switch to the previous person! The order will go alphabetically ChuChu, Coo, Kine, Nago, Pitch, Rick.

CHARACTER ABILITIES
Ok here is what special things each team member can do.
ChuChu- Has the wall cling ability and can stick to walls
Coo- Has the glide abilty and can glide though the air. Coo has multiple jumps as well
Kine- Has very good swimming time so he can float on the water very long before drowning
Nago- Nago has 3 jumps. Not short hops like kirby or jigglypuff, he has 3 full sized jumps. Each jump get longer and higher. So the second jump is higher than the first, and the third is higher than the second.
Pitch- Also has the glide ability and can glide through the air. Pitch has multiple jumps as well, but are much shorter than Coo's
Rick- Has the wall jump ability

STATS

ChuChu
Height- 1 (1.5 including bow)
Weight-1.5
Speed- 3.5
Power- 2

Coo
Height- 2
Weight- 2
Speed- 3
Power- 2.5

Kine
Height- 2
Weight- 2
Speed- 2
Power- 3.5

Nago
Height- 2
Weight- 2
Speed- 3
Power- 2.5

Pitch
Height- 1
Weight- 1
Speed- 4
Power- 2

Rick
Height- 2
Weight- 2
Speed- 3
Power- 2.5

Ok here we go with the moveset!

Fist is ChuChu


Chuchu is an octapus!

"A" STANDARD MOVES
A- Headbang- Hits enemy with her head

Damage- Low
Knockback- Low
Startup Lag- Low
Ending Lag-Low
Range- Low


Hold A- Rapid Headbang- Hits enemy with head repeatedly

Damage- Low (per hit)
Knockback- Low (per hit)
Startup Lag- Low
Ending Lag- Low
Range- Low


F-tilt- Tentacle whip- Hits enemy with one of her short tentacles

Damage-Low
Knockback- Mid-Low
Starup Lag- Low
Ending Lag- Low
Range- Low


U-tilt- Bow Hit- Swings head upward, hitting the enemy with her bow

Damage- Low
Knockback- Mid-Low
Startup Lag- Low
Ending Lag- Low
Range- Mid-Low


D-tilt- Tentacle Spin- Chuchu spins, her tentacles hitting enemies

Damage- Low
Knockback- Low
Startup Lag- Low
Ending Lag- Low
Range- Low

Dash A- Tentacle Roundhouse- Chuchu is on one tentacle, she spins and the rest of her tentacles hit the enemy

Damage- Mid-Low
Knockback- Mid-Low
Startup Lag- Low
Ending Lag- Low
Range- Mid-Low


SMASHES
Forward- Body Bash- Chuchu stands up on her back tentacles then slams her body down

Damage- Medium to High
Knockback- Medium to High
Startup Lag- Mid-Low
Ending Lag- Low
Range- Low

Down- Octo Slam- Chuchu raises all of her tentacles and slams them all down

Damage- Mid-Low to Mid-High
Knockback- Mid-Low to Mid-High
Startup Lag- Mid-Low
Ending Lag- Low
Range- Low


Up- Head Spinner
- Chuchu stands on her head and spins, her tentacles hit enemies

Damage- Medium to High
Knockback- Medium to High
Startup Lag- Mid-Low
Ending Lag- mid-Low
Range- Low


AERIALS
N-air- Aerial Spin- Chuchu spins hitting enemies with her tentacles

Damage-Low
Knockback-Low
Startup Lag- Low
Ending Lag- Low
Range- Low

F-air- Tentacle thrust- Chuchu thrusts all of her tetacles forward

Damage- Mid-Low
Knockback- Mid-Low
Startup Lag- Low
Ending Lag- Low
Range- Mid-Low


B-air- Back swing- Chuchu swings forward slightly and then swings backward her tentacles hitting enemies

Damage- Mid-Low
Knockback- Low
Startup Lag- Mid-Low
Ending Lag- Low
Range- Low


U-air- ChuChu Rocket- Chuchu squeezes all of her tentacles together, and propels upward with a headbutt

Damage- Mid-Low
Knockback- Mid-Low
Startup Lag- Low
Ending Lag -Low
Range- Mid-Low


D-air- Tentacle Slam- Chuchu slams down with a tentacle

Damage- Low
Knockback-Mid-Low
Startup Lag- Low
Ending Lag- Low
Range- Low


GRABS

To grab chuchu jumps on top of an enemy and sticks to them with suction cups

Grab A- Chuchu smacks them with a tentacle

Damage- Low
Knockback-None
Startup Lag- Low
Ending Lag- Low
Range- None


Forward throw
- Chuchu swings forward and throws the enemy

Damage-Low
Throw Distance- Mid-Low


Back Throw
- Chuchu swings backward and trows the enemy

Damage-Low
Throw Distance- Mid-Low


Up throw- Chuchu inflates like a balloon. Floats upward and drops the enemy

Damage- Mid-Low
Throw Distance-Mid- Low

Down throw- Chuchu throws them down and headslams on top of them

Damage- Mid-Low
Throw Distance- Low


"B" SPECIALS

Neutral- SPIKES-
ChuChu sends spikes flying in all directions. The spikes travel an ok distance. It has a little bit of lag. This means you cant just press B over and over sending like 10 spikes in a row.

Damage- Low (per Spike)
Knockback- Low (per spike)
Startup Lag- Low
Ending Lag- Mid-Low
Range- Medium


Forward- ICE-

Chuchu thows a snowball forward. Each snowball does about 3% but you can throw them repeatedly. You can also hold B> longer to create a bigger snowball snowballs can do a maximum 10%. Chuchu is vulnerable when charging though.

Damage- Low to Mid-Low
Knockback- Low to Mid-Low
Startup Lag- Low
Ending Lag- Low
Range- Medium (not as far as spikes)


Up- BROOM-

Chuchu Fliess on her broom! She shoots upward at an angle on her broom. Then when you get to the peak of the height she will just float there. You can then control where she goes (left and right only) a lot like peach's floating ability. Chuchu falls after awhile. If you hit someone going up it will do damage.

Damage- Mid-Low (going up)
Knockback- Mid-Low
Startup Lag- Mid-Low
Ending Lag- Low
Vertical Distance- Good
Horizontal Distance- Good


Down- PARASOL-
Chuchu spins in an upsidown parasol like a spinning top. After you press Bv you can move the analog stick to make chuchu move left or right slightly. You dont have enough time to move her very far though. This attack can score multiple hits (like ice climbers spinning hammer thing)

Damage- Low (per hit)
Knockback- Mid-Low
Startup Lag- Low
Ending Lag- Low
Range- Mid-Low


TAUNTS
>- Switches to Coo
<- Switches to Rick
^- Switches to Coo
v- Switches to Rick

next is Coo


Coo is an owl!

"A" STANDARD MOVES
A- Owl Scratch- Coo scratches with his foot

Damage- Low
Knockback- Low
Startup Lag- Low
Ending Lag- Low
Range- Low


AA- Owl Peck- After scratching with his foot press A again to make coo peck

Damage- Low, Low
Knockback- Low, Low
Startup Lag- Low, Low
Ending Lag- Low, Low
Range- Low, Low


F-tilt- Wing Slash- Coo slashes his wing forward

Damage- Mid-Low
Knockback- Low
Startup Lag- Low
Ending Lag- Low
Range- Mid-Low


U-tilt- Up Peck
- Coo pecks upward

Damage- Low
Knockback- Low
Startup Log- Low
Ending Lag- Low
Range- Low


D-tilt- Low Scratch
- Coo scratches while crouching

Damage- Low
Knockback- Low
Startup Lag- Low
Ending Lag- Low
Range- Low


Dash A- Rapid Flap- Coo Flaps his wings rapidly propelling him forward and hitting the enemy

Damage- Mid-Low
Knockback- Mid-Low
Startup Lag- Low
Ending Lag -Low
Range- Mid-Low


SMASHES
Forward- Power Slash- Coo slashes his wing vertically down

Damage- Medium to High
Knockback- Medium to High
Startup Lag- Mid-Low
Ending Lag -Low
Range- Mid-Low


Up- Coo Pecker- Coo pecks up to the right then to the left. This attack has two hits.

Damage- Mid-low to Mid-High, Mid-Low to Mid- High
Knockback- Mid-Low to Mid- High, Mid-Low to Mid-High
Startup Lag- Low
Ending Lag- Low
Range- Low


Down- Coo Pecker- Coo pecks downward to the right then to the left. This attack has two hits.

Damage- Mid-Low to Mid-High, Mid-Low to Mid-High
Knockback- Mid-Low to Mid-High, Mid-Low to Mid-High
Startup Lag- Low
Ending Lag- Low
Range- Low


AERIALS
Neutral- Wing Flap- Coo flaps his wing hurting enemies

Damage- Low
Knockback- Mid-Low
Startup Lag- Low
Ending Lag- Low
Range- Low


Forward- Double Scratch- Coo leans back and scratches twice in front of himself

Damage- Low, Low
Knockback- Low, Low
Startup Lag- Low
Ending Lag- Low
Range- Low


Back- Back Slash
- Coo Does a half-spin and slashes behind himself

Damage- Mid-Low
Knockback- Mid-Low
Startup Lag- Low
Ending Lag- Low
Range- Mid-Low


Up- Flipping Scratch
- Coo does a flip and scratches upward in the process

Damage- Mid-Low
Knockback- Mid-Low
Startup Lag- Mid-Low
Ending Lag- Mid-Low
Range- Mid-Low


Down- Talon Dive- Coo stabs down ward with his foot

Damage- Mid-Low
Knockback- Mid-Low
Startup Lag- Low
Ending Lag- Low
Range- Mid-Low


GRABS
Coo grabs the enemy with his foot

Grab A- Coo pecks the enemy

Damage- Low
Kockback- None
Startup Lag- Low
Ending Lag- Low
Range- None


Forward throw- Coo stabs forward with his foot sending the enemy forward

Damage- Mid-Low
Throw Distance- Mid-Low


Back throw- Coo throws them back and then flaps his wings creating a small gust and sending them further

Damage- None
Throw Distance- Mid-High


Up throw- Coo grabs the enemy in his beak and throws them upward

Damage- Mid-Low
Throw Distance- Mid-Low


Down throw- Coo throws them down and steps on them

Damage- Mid-Low
THrow Distance- None


"B" SPECIALS

Neutral- CUTTER-
Coo throws a big feather forward. It cuts you if hit. Goes about as far as Razor Leaf. But it is much bigger than a Razor Leaf and you can sendi out more than one at a time. You can control the feather a little bit when it is flying.. The attack takes a little bit of time so you can send feathers out pretty quickly but not in rapid succession.

Damage- Mid- Low (per feather)
Knockback- Low (per feather)
Startup Lag- Low
Ending Lag- Mid-Low
Range- Medium


Forward- SPARK-

Coo sends a stream of lightning straight forward. The attack stops when it hits someone or stops about halfway through Final Destination. If you are in the air when you do this attack it sends a stream of lightning straight down under you. Has same range just differant direction

Damage- Medium
Knockback- Low
Startup Lag-Low
Ending Lag- Mid-Low
Range- Medium


Up- FIRE-
Coo is enveloped in flames. Coo is sent upwards. Unlike Fox's up B there is very little charging time so to angle this attack you have to do it very quickly, but it is possible. This attack deals a good amount of damage. If you are in the air this attack can also be sent downward, but again you have to be quick about it.

Damage- Medium
Knockback- Mid-Low
Startup Lag- Low
Ending Lag- Mid-Low
Vertical Distance- Good
Horizontal Distance- Good (if you can control it to move that way)


Down- ICE-
Coo shoots out three icicles. One goes up diagonally to the left. One goes up diagaonally to the right. and the other goes straight up. If you are hit with an icicle you get damage, and Their is also a chance that you will get frozen. It is a small chance but there is still a chance. Like ChuChu's spike there is a little bit of lag so you cant send out a stream of like ten icicles at a time.

Damage- Low (per icicle)
Knockback- Mid-Low (pericicle)
Startup Lag- Low
Ending Lag-Mid-Low
Range- Mid-High


TAUNTS
>- Switches to Kine
<- Switches to ChuChu
^- Switches to Kine
v- Switches to ChuChu

Ok here is Kine


Kine is a fish!

"A" STANDARD MOVES
A- Fish Tail- Kine whips his tail forward

Damage- Low
Knockback- Low
Startup LAg- Low
Edning Lag- Low
Range- Low


F-tilt- Fin Slash
- Kine whips his head upwards and slashes forward with his bottom fin

Damage- Mid-Low
Knockback- Mid-Low
Startup Lag- Low
Ending Lag- Mid-Low
Range- Low


U-tilt- Dorsal Slash
- Kine whips his head downward and slashes up with his top fin

Damage- Mid- Low
Knockback- Mid-Low
Startup LAg- Low
Ending Lag - Low
Ranage- Low


D-tilt- Tail Tripper- Kine whips his tail low

Damage- Low
Knockback- Low
Startup Lag- Low
Ending Lag- Low
Range- Low


Dash A- Barrel Roll
- Kine does a barrel roll into the enemy

Damage- Mid-Low
Knockback- Mid-Low
Startup Lag- Low
Ending Lag- Low
Range- Mid-Low


SMASHES
Forward- Triple Chomp- Kine chomps three times, giving him the possibility to do 3 hits!

Damage- Low to Medium, Low to Medium, Low to Medium
Knockback - Low to MEdium, Low to Medium, Low to Medium
Startup Lag- Low
Ending Lag- Low
Range- Low


Up- Flying Fish- Kine jumps and lands on his back. His bottom fin slashes upwards when he is in the air

Damage- Medium to High
Knockback- Mediu mto High
Startup Lag- Low
Ending Lag- Mid-Low
Range- Mid- Low


Down- Tail Drop- Kine slaps his tail downward

Damage- Medium to High
Knockback- Medium to High
Startup Lag- Mid-Low
Ending Lag- Low
Range- Low


AERIALS
N-air- Air Chomp- Kine opens and shuts his mouth fast

Damage- Low
Knockback- Low
Startup Lag- Low
Ending Lag- Low
Range- Low


F-air- Aerial Tail Whack- Kine whips his tail forward

Damage- Low
Knockback- Low
Startup Lag- Low
Ending Lag- Low
Range- Low


B-air- Backwards Tail Whack
- Kine whip his tail backward

Damage- Low
Knockback- Low
Startup LAg- Low
Ending Lag- Low
Range- Low


U-air- Fish Cyclone- Kine spins fast. Kine is completely straight up and down

Damage- Mid-Low
Knockback- Low
Startup Lag- Low
Ending Lag- Low
Range- Low


D-air- Multi-Slap - Kine whips his tail downward. He whips it fast multiple times

Damage- Low (per hit)
Knockback- Low (per hit)
Startup Lag- Low
Ending Lag- Low
Range- Low


GRABS

Kine grabs enemies with his mouth

Grab A- Kine chomps down

Damage- Low
Knockback- None
Startup Lag- Low
Ending LAg- Low
Range- None


Forward throw- Kine spits the enemy out

Damage- Low
THrow Distance- Mid-Low


Back throw
- Kine spits the enemy out and whip them back with his tail

Damage- Mid-Low
Throw Distance- Medium


Up throw
- Kine spits the enemy up and then slashes them with his dorsal fin

Damage- Mid-Low
Throw Distance Medium


Down throw
- Kine spits them down ward and bodyslams on top of them

Damage- Mid-Low
Throw Distance- None


"B" SPECIALS
Neutral- STONE-
A stone appears in Kines mouth. Kine pulls his head back, and then he slams it forward. This attack is chargeable, but you cant keep the charge. This attack does 11-18% depending on the charge level. If you are in the air Kine keeps traveling down until he slams on the ground. The stone in kines mouth disappears once the attack is done.

Damage- Medium
Knockback- Medium
Startup Lag- Mid-Low
Ending Lag- Low
Range- Low


Forward- BROOM-
Kine Spits a plunger out. The plunger is retractable with about the same range as yoshi's tongue. If you hit an enemy with the plunger they stick to the plunger and recieve no damage. If an enemy is stuck to the plunger the plunger does not retract all the way. If you press B forward again then kine still shoots his plunger forward but it can slam the enemy stuck to the plunger into another enemy. Both will then recieve doamge. The enemy stuck to the plunger recieves about 5% and the one hit by the stuck player recieves damage based on the character they are hit with. For example Bowser would do a lot more damage than Kirby. The enemy stuck to the plunger gets unstuck if you use any attack besides Forward B when the are stuck on the plunger or after you use forward B once when they are stuck. Otherwise the enemy becomes unstuck after about 10 seconds.

Damage- None (initially) Low to Medium (depending on the person stuck)
Knockback- None (initally) Low to Medium (depending on the person stuck)
Startup Lag- Low (initially) Low to Medium (depening on the person stuck)
Ending Lag- Low
Range- Mid-Low


Up- PARASOL-
Kine spits a parasol out. The parasol spin like a helicopter. Kine covers pretty ok distance. If the parasol scores multiple hits. Once you are at the peak of height Kine will float down a little bit and then retract the parasol.

Damage- Mid-Low
Knockback- Mid-Low
Startup Lag- Low
Ending Lag- Mid-Low
Vertical Distance- ok
Horizontal Distance- ok


Down- SPARK-
Kine spits out a light Bulb. You can hold it as long as you want, but the lightbulb deals no dmage. If you are hit when the light bulb is out then the lightbulb will break and Kine will recieve less damage. The broken lightbulb has sharp glass edges. This hurts enemies. it only does a little bit of damage per hit per hit. If you press down B again after the glass has been broken kine will charge forward with the broken bulb. The glass will regenerate after about 15 seconds.

Also, If they screen gets completely dark for any reason (such as togepi's flash ability) Kines lghtbulb will light up!

Damage- None (with normal lightbulb) Low (with broken lightbulb)
Knockback- None (with normal lightbulb) Mid-Low (with broken lightbulb)
Startup Lag- Low
Ending LAg- Low
Range- None (for normal lightbulb) Mid-Low (for broken lightbulb)


TAUNTS
>- Switches to Nago
<- Switches to Coo
^- Switches to Nago
v- Swtiches to Coo


Next is Nago


Nago is a cat!

"A" STANDARD MOVES

A- Kitty Jab- Nago punches with his right hand

Damage- Low
Knockback- Low
Startup Lag- Low
Ending Lag- Low
Range- Low


AA- Kitty Jab- Nago punches with his right hand then left while moving forward

Damage- Low, Low
Knockback- Low, Low
Startup LAg- Low, Low
Ending Lag- Low, Low
Range- Low, Low


AAA- Kitty Jab
- Nago punches with his right hand then left then right again moving forward

Damage- Low, Low ,Low
Knockback- Low, Low ,Low
Startup Lag- Low, Low, Low
Ending Lag- Low, Low ,Low
Range- Low, Low, Low


F-tilt- Belly Bump- Nago bashes his belly forward

Damage- Mid-Low
Knockback- Mid-Low
Startup LAg- Low
Ending Lag- Low
Range- Low


U-tilt- Cat punch- Nago punches upward with his right hand

Damage- Low
Knockback- Low
Startup Lag- Low
Ending LAg- Low
Range- Low


D-tilt- Head Hit
-Nago hits the enemy with his head

Damage- Low
Knockback- Low
Startup Lag- Low
Ending Lag- Low
Range- Low


Dash A- Cat Roll
- Nago performs a clumsy summersault

Damage- Mid-Low
Knockback- Low
Startup Lag- Mid-Low
Ending Lag- Low
Range- Mid-Low


SMASHES

Forward- Cat Kick- Nago sends a strong kick forward

Damage- Medium to High
Knockback- Medium to High
Startup Lag- Low
Ending Lag- Low
Range- Low


Up- Cat Combo
- Nago punches upward with both hands then finishes it off with an upward headbutt

Damage- Low to Medium, Mid-Low to Mid-High
Knockback- Low to MEdium, Mid-Low to Mid-High
Startup Lag- Low
Ending Lag- Low
Range- Low


Down- Butt Bomb
- Nago slams down on his butt

Damage- Medium to High
Knockback- Medium to High
Startup LAg- Mid-Low
Ending Lag- Low
Range- Low


AERIALS
N-air- Flying Cat- Nago punches both hands out and kicks both legs down. Sort of in a star formation

Damage- Low
Knockback- Low
Startup LAg- Low
Ending Lag- Low
Range- Low


F-air- Mega Kitty Kick
- Nago Kicks both legs forward

Damage- Mid-Low
Knockback- Mid-Low
Startup LAg- Low
Ending Lag- Low
Range- Low


B-air- Kitty Spin-punch
- Nago does a half-spin and punches behind himself

Damage- Low
Knockback- Low
Startup Lag- Mid-Low
Ending LAg- Low
Range- Low


U-air- Mega Kitty Uppercut- Nago does an uppercut punch

Damage- Low
Knockback- Low
Startup Lag- Low
Ending Lag- Low
Range- Low


D-air- Body Slam- Nago does a body slam

Damage- Mid-Low
Knockback- Mid-Low
Startup LAg- Low
Ending Lag- Low
Range- Mid-Low


GRABS
Nago grabs right in front of him with his left hand.

Grab A- Hits enemy with his right hand

Damage- Low
Knockback- None
Startup Lag- Low
Ending Lag- Low
Range- None


Forward throw- Nago belly bashes the enemy forward

Damage- Mid-Low
Throw Distance- Medium


Up throw- Nago throws them up and punches them higher

Damage- Low
Throw Distance- Mid-Low


Down throw-
Nago throws the enemy down and sits on them

Damage- Mid-Low
Throw Distance- None


Back throw- Nago throws the enemy over his head and then falls back on top of them

Damage- Mid-Low
Throw Distance- Mid-Low


"B" SPECIALS
Neutral- PARASOL-
Parasol Pogo! Nago mounts his closed parasol like a pogo stick and jumps up. Then he slams down. It takes a little time to get for Nago to get on the parasol. Nago will stay on the parasol for a second after the attack meaning you can use again right away without the startup lag. You can also move slightly while pogoing. This attack does about 7% damage per hit. (You receive 7% damage if you are hit by the parasol coming down. Nago only deals minor damage going up. like 1-2%)

Damage- Low (going up) Mid-Low (coming Down)
Knockback- Low
Startup Lag- Mid-Low
Ending Lag- Mid-Low
Range- Low (but you can move when pogoing)


Forward- FIRE-
Nago blows a wall of flames out in front of him. The wall is only half the the size of himself. But as the wall travels it gets larger and then smaller again. The highest it gets is about twice the height of Nago. This attack does anywhere from 6-13% depending on how big the wall of flame is. So you want to try and make sure the enemy is not to close to you or to far away from you. Also if you use it continuously it will lower in damage. The lowest it goes is 2-9% though.

Damage- Low to Medium
Knockback- Low to Medium
Startup Lag- Low
Ending Lag- Low
Range- Mid-High


Up- ICE-

Nago blows cold, icy breath beneath him. This propels him upward. You can control which direction he goes when he's in the air. You can hold it for a pretty long time but Nago will get lower and lower as his breath runs out. If you are hit with Nago or if you are hit with his breath you recieve minor damage and gave a slight chance to be frozen.

Damage- Low
Knockback- Mid-Low
Startup LAg- Low
Ending Lag- Low
Vertical Distance- Good
Horizontal Distance- Bad


Down- STONE-
Nago takes a big stone and slams it down in front of him. The stone deals about good damage. If you are on the ground a cloud of dust is created as well this deal minor damage. If you are in the air Nago will slam the stone downward and continue to spin vetically once with the stone. This creates no dust cloud.

Damage- Medium (rock hit) Low (dust cloud)
Knockback- Medium (rock hit) Low (dust cloud)
Startup LAg- Mid-Low
Ending LAg- Low
Range- Low


TAUNTS

>- Switches to Pitch
<- Switches to Kine
^- Switches to Pitch
v- Switches to Kine

Ok Now its time for Pitch


Pitch is a little bird!

"A" STANDARD MOVES
A- Pitch Peck- Pitch pecks forward quickly

Damage- Low
Knockback- Low
Sartup LAg- Low
Ending Lag- Low
Range- Low


AA- Double Pitch Peck- Pitch pecks forward twice

Damage- Low, Low
Knockback- Low, Low
Startup Lag- Low, Low
Ending LAg- Low, Low
Range- Low, Low


AAA- Backflip Kick
- Pitch pecks twice then does a quick backflip

Damage- Low, Low ,Low
Knockback- Low, Low ,Low
Startup Lag- Low, Low ,Low
Ending Lag- Low, Low ,Low
Range- Low, Low ,Low


F-tilt- Spin Wing- Pitch spins hitting enemy with his wings

Damage- Low
Knockback- Low
Startup Lag- Low
Ending Lag- Low
Range- Low


U-tilt- Wing Thrust- Pitch thrusts both of his wings up

Damage- Low
Knockback- Low
Startup Lag- Low
Ending Lag- Low
Range- Low


D-Low Peck
- Pitch Pecks forward while crouching

Damage- Low
Knockback- Low
Startup Lag- Low
Ending Lag- Low
Rance- Low


Dash A- Rapid Flap
- Pitch flaps his wings rapidly propelling him forward and hitting the enemy

Damage- Mid-Low
Knockback- Low
Startup Lag- Low
Ending LAg- Low
Range- Mid-Low


SMASHES
Forward- Pitch Kick- Pitch Sticks his beak into the ground and kicks his legs forward

Damage- Mid-Low to Mid-High
Knockback- Mid-Low to Mid-High
Startup Lag- Mid-Low
Ending Lag- Mid-Low
Range- Mid-Low


Up- Jump Flip- Pitch Jumps up slightly and does two flips

Damage- Mid-Low to Mid- High
Knockback- Mid-Low to Mid-High
Startup Lag- Low
Ending Lag- Low
Range- Mid-Low


Down- Wing Slam
- Pitch Brings both of his wings up and then slams them down

Damage- Medium to High
Knockback- Medium to High
Startup Lag- Mid-Low
Ending Lag- Low
Range- Low


AERIALS

N-air- Air Peck- Pitch pecks forward

Damage- Low
Knockback- Low
Startup Lag- Low
Ending Lag- Low
Range- Low


F-air- Wing Clap- Pitch claps his wings together forward

Damage- Low
Knockback- Low
Startup Lag- Low
Ending Lag- Low
Range- Low


B-air- Back Clap
- Pitch does a half-spin and claps his wings together behind him

Damage- Low
Knockback- Low
Startup Lag- Low
Ending Lag- Low
Range- Low


U-air- Up thrust
- Pitch thrusts one of his wings upward

Damage- Low
Knockback- Low
Startup Lag- Low
Ending Lag- Low
Range- Low


D-air- Dive Bomber- Pitch dives down beak first

Damage- Mid-Low
Knockback- Mid-Low
Startup Lag- Low
Ending Lag- Low
Range- Mid-Low


GRABS
Pitch grabs the enemy with his beak.

Grab A- Pitch kicks the enemy

Damage- Low
Knockback- None
Startup Lag- Low
Ending Lag- Low
Range- None

Forward- Pitch throws the enemy and pecks them multiple times

Damage- Mid-Low
Throw Distance- Mid-Low


Up
- Pitch jumps up a little bit and throws the enemy up high.

Damage- Low
Throw Distance- Medium


Back- Pitch jumps over the enemy and kicks them from the other side

Damage- Mid-Low
Throw Distance- Mid-Low


Down- Pitch throws them down and hits them with his wing

Damage- Mid-Low
Throw Distance- None


SPECIALS

Neutral- BROOM-
Pitch spits a blue bubble forward. Hold B longer to make the bubble go higher and further. The bubbles explode on contact. Each bubble does about 6% each. You can shoot them pretty rapidly though. Each bubble gets slightly weaker if you shoot them rapidly... like mario's fireballs. Goes down to 2% at the lowest.

Damage- Mid-Low
Knockback- Mid-Low
Startup Lag- Low
Ending Lag- Low
Range- Mid-High


Forward- SPIKE-
Pitch charges forward. Pitches beak is straight out. If the beak hits an enemy it does a good amount of damage. Pitch charges forward pretty fast. If you are a bout to go off the edge you can press B to cancel. You can also switch direction during the attack by tapping the analog stick the opposite way

Damage- Medium
Knockback- Mid-Low
Startup Lag- Low
Ending Lag- Low
Range- Medium


Up- SPARK-

Pitch turns into a radio controlled mechanical bird! Pitch is also surrounded in sparks. You control where he goes for a a little less than the amount of time as Pit's up B. But the difference is if you touch pitch you receive damage. Only about 1% per hit but you can hit multiple times. So this attack is good for recovery and for damage.

Damage- Low (per hit)
Knockback- Low (per hit)
Startup Lag- Mid- Low
Ending Lag- Low
Vertical Distance- Good
Horizontal Distance- Good


Down- CUTTER-
Pitch turns into a boomerang-like blade. Pitch flys up and around and lands in the spot he started. If pitch hits an enemy it will cause minor damage. Pitch will go through enemies and pass-though platforms, But if pitch hits a solid platform then the attack stops, meaning this attack can be used as a recovery.

Damage- Mid-Low
Knockback- Mid-Low
Startup Lag- Low
Ending Lag- Low
Range- Mid- High


TAUNTS
>- Switches to Rick
<- Switches to Nago
^- Switches to Rick
v- Switches to Nago

and finally here's Rick!


Rick is a hamster!

"A" STANDARD MOVES
A- Rick Roundhouse- Rick does a roundhouse kick

Damage- Low
Knockback- Low
Startup Lag- Low
Ending Lag- Low
Range- Low


AA- Rick Punch
- Rick does a roundhouse kick followed by a punch

Damage- Low, Low
Knockback- Low, Low
Startup Lag- Low, Low
Ending Lag- Low, Low
Range- Low, Low


AAA- Rick Kick- Pick does a roundhouse kick, followed by a punch, and then finishes it off with a kick forward

Damage- Low, Low, Low
Knockback- Low, Low, Low
Startup Lag- Low, Low, Low
Ending Lag- Low, Low, Low
Range- Low, Low, Low


F-tilt- Nose Charge
- Rick dives forward nose first hitting enemies

Damage- Mid-Low
Knockback- Mid-Low
Startup Lag- Low
Ending Lag- Low
Range- Low


U-tilt- Nose Jump- Rick jumps up slightly with his nose held high and hits enemies

Damage- Mid-Low
Knockback- Mid-Low
Startup Lag- Low
Ending Lag- Low
Range- Low


D-tilit- Low Kicker
- Rick kicks while crouching

Damage- Low
Knockback- Low
Startup Lag- Low
Ending Lag- Low
Range-Low


Dash A- Hamster Headbutt
- Rick jumps forward and hits hard with his head

Damage- Mid-Low
Knockback- Mid-Low
Startup Lag- Low
Ending Lag- Low
Range- Mid-Low


SMASHES
Forward- Free Fall- Rick goes up on his tip-toes and falls straight forward

Damage- Medium to High
Knockback- Medium to High
Startup Lag- Mid-Low
Ending Lag- Mid- Low
Range- Mid-Low


Up- Hamster Kicks- Rick does a high Kick with his right foot and then a lower but still pretty high kick with his left foot

Damage- Mid-Low to High, Mid-Low to High
Knockback- Mid-Low to High, Mid-Low to High
Startup Lag- Low
Ending Lag- Low
Range- Low

Down- Hamster Stomp- Jumps up and stomps down hard

Damage- Medium to High
Knockback- Medium to High
Startup Lag- Mid-Low
Ending Lag- Low
Range- Low


AERIALS
N-air- Flying Rick Kick- Rick kicks forward then spins keeping his foot extended

Damage- Mid-Low
Knockback- Mid-Low
Startup Lag- Low
Ending Lag- Low
Range- Low


F-air- Mighty Hamster Punch- Rick throws a strong punch forward

Damage- Mid-Low
Knockback- Mid-Low
Startup Lag- Low
Ending Lag- Low
Range- Low


B-air- Nose Dive- Rick does a half-turn and dives down nose first

Damage- Mid-Low
Knockback- Mid-Low
Startup Lag- Mid- Low
Ending Lag- Low
Range- Low


D-air- Foot Clap- Rick claps his feet together below him

Damage- Low
Knockback- Mid-Low
Startup Lag- Low
Ending Lag- Low
Range- Low


U-air- Rick n' Roll- Rick does a few flips. The hair on his backs turn to spikes for a second and hurt enemies

Damage- Mid-Low
Knockback- Mid-Low
Startup Lag- Low
Ending Lag- Low
Range- Low


GRABS
Rick grabs in front of him with his left hand.

Grab A- Hits the enemy with his right hand

Damage- Low
Knockback- None
Startup Lag- Low
Ending Lag- Low
Range- None


Forward throw- Rick grabs the enemy with both hands and kicks them forward. Like a punt in football.

Damage- Mid-Low
Throw Distance- Medium


Up throw- Grbs the enemy with both hands and throws them upward

Damage- Low
Throw Distance- Medium

Back Throw-
Rick grabs the enemy by one arm and slams them down behind him.

Damage- Mid-Low
Throw Distance- Low


Down Throw
- Rick throws them down and jumps on top of them

Damage- Mid-Low
Throw Distance- None


"B" SPECIALS
Neutral- FIRE-
Rick shoots multiple fireballs forward. Works just like like Superspicy curry. You cannot hold down B and have continuously fire. You just press it once and there is a spurt of fire. Does 7-10% depending on if you are hit when you are close to rick or if you are further away.

Damage- Mid-Low
Knockback- Mid-Low
Startup Lag- Low
Ending Lag- Low
Range- Mid-Low


Forward- STONE-
Rick turns into a round stone. He rolls forward. It works like yoshi's egg roll, but it is much easier to control. It moves slower but does a little more damage. You can change direction with the analog stick and cancel by pressing B. It's slow moving means this attack isnt very good for recovery but it is good for offense!

Damage- Mid-Low (per hit)
Knockback- Mid- Low (per hit)
Startup Lag- Low
Ending Lag- Low
Range- High


Up- CUTTER-
Rick takes out his pink boomerang blade. Rick charges upward. When rick reaches the peak of his height he throws the blade upward. The blade is a boomerang... therefore it will return to Rick. Rick cannot use this attack again until he catches the boomerang or the boomerang goes off the edge. Then Rick puts the blade away. If you are hit with Rick when he is charging upward you will receive a pretty good amount of damage. If you are hit by the blade when it is thrown you will receive less damage.

Damage- Medium (Charging upward) Mid-Low (hit with boomerang blade)
Knockback- Medium (Charging Upwards) Mid-Low (hit with boomerang blade)
Startup Lag- Mid- Low
Ending Lag- Low
Vertical Distance- Good
Horizontal Distance- Ok


Down- SPIKE-
Rick leans forward. The hair on his back turns into a bed of spikes! You can hold it as long as you want, but you are vulnerable from the front and back. If an enemy hits the top they will receive about 3% but it works like the spikes in the stage creator so you can continue to fall on it and receive damage. Works well if an enemy is about to attack you from above (like Toon Link's D-air for example).

Damage- Low (per hit)
Knockback- Low (per hit)
Startup Lag- Low
Ending Lag- Low
Range- None


TAUNTS

>- Switches to Chuchu
<- Switches to Pitch
^- Switches to Chuchu
v- Switches to Pitch


FINAL SMASH
-Gooey Attack-


Gooey appears! He helps you attack! You control gooey and his partner! His partner is whatever character you used the smash ball with. Gooey flails his tongue around everywhere! If you press A or B Gooey will do an attack. The attack is based on which partner you have.

If ChuChu is your partner she will stick on your back. If you press A or B she will use her STONE abiltity. Gooey turns into a stone and chuchu holds on to him and whips him around in a circle. This deals about 10% damage if hit.

If Coo is your partner he will follow behind you. If you jump Coo will go above you and grab you with his feet. If you press A or B Coo will use his BROOM ability. Gooey will whip Coo forward holding him like a feather duster. This deals about 10% damage if hit.

If Kine is your partner he will hold you in his mouth. If you press A or B Kine will use his FIRE ability. Kine shoots a ring of flames forward. It deals 10% damage if hit.

If Nago is your partner he will follow close behind you. If you press A or B Nago will use his CUTTER ability. Nago holds gooey in front of him and shoots a cutter beam diagonally upward. This deals 10% damage if hit.

If Pitch is your partner gooey will ride on top of him. If you jump Pitch will go above Gooey and carry him with his feet. If you press A or B Pitch uses his PARASOL ability. Gooey has a closed parasol. He uses the parasol as a bat and hit Pitch into the air. If you are hit by pitch he deals 10% damage.

If Rick is your partner Gooey will ride on top of him. If you press A or B Rick will use his ICE ability. Rick will roll up into a ball. Gooey will roll up into a ball and go on top of rick. Rick and Gooey are covered in snow making them look like a snowman. They roll forward. This deals 10% damage if hit.

COLORS


ENTRANCE
All the friends appear on the stage, then all but the character you are being run off.

VICTORY POSES

ChuChu
1. Chuchu jumps and spins and then smiles. The rest of the friends are cheering behind her.

2. Chuchu's bow is flopped in frint of her face she blows and it flips to normal. The rest of the friends are cheering behind her.

3. All the friends are behind her. She runs past them and gives each of them a high five.

Coo
1. Coo looks up and yells "Coo!" "Coo!" The rest of the friends are cheering behind him.

2. Coo flies up, does a flip, and returns to the ground. The rest of the friends are cheering behind him.

3. All the friends are behind him. He runs past them and gives each of them a high five.

Kine
1. Kine pauses for a second and then spikes shoot out of his body. The rest of the friends are cheering behind him.

2. Kine pauses for a second and then he freezes into a glacier. The rest of the friends are cheering behind him.

3. All the friends are behind him. He swims past them and gives them each a high five.

Nago
1. Nago meows and then scratches his head. The rest of the friends are cheering behind him.

2. Nago hisses and then pounces to one side. Then he smiles. The rest of the friends are cheering behind him.

3. All the friends are behind him. He walks past them and gives them each a high five.

Pitch
1. Pitch pecks the ground twice, and on the third time his beak gets stuck in the ground. He struggles for a second and then pulls it out. The rest of the friends are cheering behind him.

2. Pitch is behind the crowd of cheering friends looking around confused. He then flies to the front and smiles.

3. All the friends are behind him. He walks past them and gives them each a high five.

Rick
1. Rick is seen balancing a parasol on his nose. The rest of the friends are cheering behind him.

2. Rick does a karate-style flying kick to one side, then to the other. The rest of the friends are cheering behind him.

3. All the friends are behind him. He walks past them and gives them each a high five.

LOSING POSE
All the friends are huddled together. Chuchu has a sad look. Coo claps his wings. Kine has a sad look and his eyes are closed. Nago is crouched down covering his face with his paws. Pitch is crying. and Rick is clapping.

SNAKE CODEC

Snake- What are all these animals doing here?

Meiling- They are here to fight snake! These animals are friends of Kirby

Snake- Oh right that pink puff ball?

Meijing- Yes Snake... the puff ball

Snake- So how many of these animals are there?

Meiling- There are 6 of them. Chuchu, Coo, Kine, Nago, Pitch, and Rick! and they each have there own unique abilities.

Snake- Wow thats a lot!

Meiling- You can say that again!

Snake- ...Wow thats a lot!

Meiling- Uhh... snake
 

Collective of Bears

King of Hug Style
Joined
Nov 10, 2007
Messages
6,507
Location
North Carolina
NNID
Gark430
3DS FC
1805-3069-0371
Baz, Team Big Shots, and Gigan have all been updated slightly. Mostly little things like Wiimote Sounds and Unlock messages, plus Gigan's AT. But I still want some feedback to see what I need to do.
 

Smasherk808

Smash Journeyman
Joined
Jul 12, 2008
Messages
231
Can i have some feedback on Kirby friends? It is far from done, but i just want to see if im on the right track...
 

peeup

Smash Lord
Joined
Sep 3, 2007
Messages
1,618
Location
Hartford/Mass
@Donald and Goofy moveset: You didn't dissapoint. Unique characters, especially making a character that relies heavily on his special moves. However, I honestly think you didn't make them overpowered enough. Since Donald can't do much aside from magic, I think his specials should be beefed up even more.
 

Red Arremer

Smash Legend
Joined
Nov 27, 2005
Messages
11,437
Location
Vienna
Completely done with Gemini Spark. Whew. That was not easy. x_x

Next up will be Shadow the Hedgehog. Oh my. Sonic again. XD
 

Vulcan55

Smash Lord
Joined
May 7, 2008
Messages
1,824
Location
May-Lay
[spam]Posting on an epic page.[/spam]
Teaser for all you guys eagerly awaiting M&L. (/sarcasm)

Next up will be Shadow the Hedgehog. Oh my. Sonic again. XD
I believe Shadow has been done before. Twice.
 

Red Arremer

Smash Legend
Joined
Nov 27, 2005
Messages
11,437
Location
Vienna
I believe Shadow has been done before. Twice.
Most likely, but I'll try to make him good. You know, Rouge-good.

Yes, he has been done twice before. I think I can pull him off even better, though. Gorgon's was pretty nice, but I think I can make a superior one. The other one was pretty crappy.
 

Eldrake

Smash Lord
Joined
Aug 5, 2008
Messages
1,281
This is my first entry... Prepare yourself guys.

Meet the Soldier!


The RED Soldier himself had joined the brawl to show these smashers, or maggots as he likes to call them, how a real man fights against all odds to win even the most deadliest of battles. With his Rocket Launcher, Rocket Jump, and Grenades, he can prove to be a devastating fighter in the right hands.

Soldier is a Heavyweight fighter. Soldier is a very slow fighter, got weak jumps, falls very fast, and some of his moves got low priority. However, he makes up for it with sheer power, and his survivability. His most powerful move is his Rocket Launcher. But it requires reload after four shots, so the player will have to make sure not to miss his targets.

STATS

Power: 7/10 (Quite powerful indeed)
Weight: 7/10 (You will need more than just a smash attack to get rid of this guy)
Size: As tall as Snake is (He isn't a small target, so it won't be hard to hit him)
Walking Speed: 2/10: Soldier walks slowly toward his opponent. He got a freaking Bazooka on his shoulder, how would you expect him to walk fast?
Dash Speed: 4/10: He speeds up, kicking the ground as he tries to run across with the bazooka on the shoulder.
Range: 5/10: (Soldier's range is average)
Projectile Distance: 10/10: (The rocket will fly until it hits something, or goes out of the screen)
Fall Speed: 9/10:
First Jump: 3/10:
Second Jump: 5/10:
Crouch: 8/10: Being a Soldier, he knows how to crouch. He lies down, with the highest point being his helmet.
Traction: 9/10: Blame the Rocket Launcher.
Combo: 4/10: The Soldier isn't so great at combos, but it isn't entirely impossible.
Wall Jump: No
Wall Cling: No
Crawl: Yes (What Soldier hasn't learned how to crawl?)
Glide: No
Tether: No

MOVESET

A:

Neutral Special: Rocket Launcher/Reload

Arguably the most important weapon in Soldier's arsenal. Although slow and moves only in a straight line, it can inflict great damage and knockback. Soldier can only fire one rocket at once, and when he uses up all of the rockets, he will need to reload. Rocket Launcher will be replaced by Reload, where Soldier uses two seconds to put in a new rocket into the Rocket Launcher. When Reload fills the Rocket Launcher up with four rockets, the Neutral Special will turn back to the Rocket Launcher. This move shares rockets with the Rocket Jump.

Side Special: Shovel

This special move isn't particularly impressive. It does decent damage, but got a set knockback, so it can't be used to KO your opponent unless they are standing VERY close to the side of the screen. The Soldier will try bash his foe with his shovel, knocking them back in the process. This move is quite quick, and got high priority. Try to use it often when you need to rack up damage.

Up Special: Rocket Jump

Soldier aims his Rocket Launcher downward, and shoots. He will propel himself skyhigh into the air, while getting some damage. He can't control himself in the air, and will be vulnerable for a half second when he lands. However, anyone hit by the blast will receive the same damage and knockback that the Rocket Launcher gives off. It is capable of doing a devastating meteor smash. Be warned though, that this move shares rockets with the Neutral Special, and as such the Soldier will not be able to do anything if he already used up his rockets.

Down Special: Grenade

Soldier takes out a pin of a grenade, and can then throw it in a desired direction. He can only throw one grenade at once, but the grenade can do a good amount of damage. However, if Soldier holds a grenade for too long, it will explode on himself.

Final Smash: Kritzkrieg

In Team Fortress 2, there is a class known as the Medic. They are capable of performing a special technique known as Ubercharge. Ubercharge renders both the Medic and whoever he is healing invincible against all damage, making it useful for taking out enemy sentries hindering the team's progress. However, exceptionally good Medics can have a different form of Ubercharge called Kritzkrieg. It doesn't make the healer and the patient invincible, but all the attacks the patient perform does critical damage, which means it will be alot more powerful. It fits especially with the Soldier, whom can do devastating crits with his rockets alone.

And this is exactly what he is gonna do there! He will call for the medic with his medic call, like a "MEDIC!" A medic will then rush out from nowhere, and provide the fortunate soldier with a Kritzkrieg! While delivering one of these lines.

"I am ze Übermensch!" ("I am the Overlord/Superman!")
"Now go!"
"Get zem, raus, raus!" ("Get them, go, go!")
"Stay fo-cus-ed!"
"Schnell! Go get zem!" ("Hurry! Go get them!")
"Good to go!"

The Final Smash will only last for ten seconds, so Soldier has to hurry. It's worth it as all of his attacks will receive a exceptional boost in power, which will basically guaranteed his rocket launcher to be almost a instakill if it connects.

Once the Final Smash ends and the Medic leaves, Soldier will deliver this line "You deserve a medal, Doc."

Taunt 1: The Soldier salutes by doing a 'loser' sign with his hand. He will say either, "Maggots!" "Cuh-rit"or "Leeeeft-HUT!"

Taunt 2: The Soldier begins juggling his spare rocket and grenade ammo while laughing or shouting "Screamin' Eagles!"

Taunt 3: The Soldier screams and bangs his helmet with his shovel.

Entrance: Soldier appears via a teleporter on the stage. It explodes about a second afterward for no apparent reason.

Victory Pose 1: The Soldier assumes the pose as seen in the picture, and says this line "This is my world, you are not welcome in my world."

Victory Pose 2: The Soldier laughs, and says happily "Today is a good day!"

Victory Pose 3: A explosion is heard from afar, and the Soldier is then heard screaming, and lands on the ground infront of the screen. He begins groaning.

Losing Pose: Soldier faces the screen, and claps at the winner of the match.

Alternate Colors: Blue, Green, White, Brown, and Grey.

Codec:

Snake: Hey, Otacon, who is this oddly proportioned-
BLU Spy: Greetings Gentleman.
Snake: What the!? Not this again! Somebody hacked this channel again.
BLU Spy: Don't worry, I may be a spy, but I am not going to mess you up. I am just going to give you information on the Soldier.
BLU Spy: RED and BLU has had their eyes on the other for a long while, and tried to defeat the other by sending waves of men against the other. It's making quite a mess right now as we are speaking.
Snake: Heh, sounds like a war.
BLU Spy: It is. That Soldier is a member of RED, and he is a capable opponent. He uses a Rocket Launcher and Grenades as his weapons, and can even Rocket Jump into the skies.
Snake: Sounds interesting, but won't he harm himself if he tries to Rocket Jump?
BLU Spy: He does, yes, but that doesn't mean that he isn't difficult. I would try avoid his rockets, because he will still need to reload in order to use his Rocket Launcher if it runs out...

(When Snake get's KO'ed)

Snake: Hey, Otacon, who is this oddly proportioned-
BLU Spy: Greetings Gentleman.
Snake: What the!? Not this- AAAGH!
BLU Spy: Snake? Don't tell me you got defeated! Snake?! SNAAAAAAAAKKKEEEE!!!

Note

If the Soldier is Blue as a alternate color, the Spy will be a RED Spy instead, and reverts RED and BLU with eachother.

Assist Trophy: The Engineer.

When summoned, the Engineer (Randomly RED or BLU) will immediately build something on the spot! "Dispenser going up!"

It takes seven seconds, and a dispenser will then be ready, and the Engineer will stand at it, wrench in the hand. The summoner will be healed slowly when he stands by the dispenser. However, the opponents can damage it, causing the Engineer to quickly try repair it. The opponents can always damage it faster than the Engineer can repair it. If it is destroyed, the Engineer will shout "DISPENSER DOWN!" and disappear from the stage.

However, if the dispenser stays for 25 seconds, a spy (RED or BLU depending on the Engineer) will suddenly uncloak behind the dispenser, and immediately put a sapper on the Dispenser, causing the Engineer to shout "Spy's sappin' mah dispenser!" However, the Spy kicks Engineer away before he can do something, and cloaks. When the Engineer gets up, the Dispenser explodes! "DISPENSER DOWN!" He will then disappear from the stage.

Stage: 2Fort (To be added later)

Subspace Emissary (To be added later)

I will finish this later. I am going to add more to the Soldier some other time.
 

GreatClayMonkey

Smash Lord
Joined
Sep 24, 2007
Messages
1,674
Location
Rigging the enemy base with explosives, which is l
Baz, Team Big Shots, and Gigan have all been updated slightly. Mostly little things like Wiimote Sounds and Unlock messages, plus Gigan's AT. But I still want some feedback to see what I need to do.
Baz and Team Big Shots are superb. Gigan is good to however I think Baz and Team Big Shots are a little better. I especially like Baz however as he is very creative.

@Kirby's Friends: You better do Rick justice. Chuchu and Coo look good. One thing I think however is that Nago's jumps should get longer and higher with every jump like in the game and that Pitch and Coo should have multiple jumps with pitch having more but shorter jumps.
 

cheap_josh

Smash Ace
Joined
Mar 24, 2008
Messages
914
Location
Northern Virginia
@Soldier. :D:D:D I love Team Fortress and I'm glad someone made a moveset of it. You did it justice and it's really good right now. You did stay true to the game, even with the phrases. I'll look back once finished.
 

Hyper_Ridley

Smash Champion
Joined
Dec 21, 2007
Messages
2,297
Location
Hippo Island
1) Small update to Vulturon. Added Crouching animation, Unlock info, and Wiimote sound.

2) I've decided on my next moveset. If you want a hint, look at my username. =)
 

BKupa666

Barnacled Boss
Moderator
Joined
Aug 12, 2008
Messages
7,788
Location
Toxic Tower
Bowser


The great and powerful King of the Koopas, Bowser, has crashed into the brawl!


This form of Bowser expands the extremes that normal Brawl Bowser has. This Bowser has the most power in the game, and is the heaviest. But, with his even larger girth, Bowser is the slowest character in the game, bar none. However, he does have his share of attacks that he can use to be competent in higher level play, including several nasty projectiles.

STATS

Power: 10/10: In most of the games that Bowser appears in, he's the strongest, so this stays true here

Walking Speed: 1.5/10: Bowser stomps along slowly; in his games, his slow speed balances out his power, no exception here

Dash Speed: 3/10: Not very fast at all, Bowser runs very slowly with heavy steps

Weight: 10/10: Just what Bowser is known for. It usually takes upwards of 150% to KO him

Range: 7/10: Bowser has a lot of range, but if you stay away, you're fairly safe

Projectile Distance: 7.5/10: His main projectile can go a good distance if it's charged enough

Fall Speed: 7/10: Despite his massive weight, Bowser only falls at above-average speed

Size: 10/10: Bowser is the largest character in the game, but not TOO BIG!1!1!!!1!!1!

First Jump: 3/10: A poor jump

Second Jump: 6.5/10: An above-average bound

Crouch: 3.5/10: Not very good, since Bowser is such a large character, he can still get hit easily while crouching

Traction: 8/10: Since he rarely gets any momentum, Bowser doesn't slide very much

Combo: 4.5/10: Bowser has a few attacks that he can turn into combos, but for the most part, Bowser is about power and knockback

Wall Jump: No

Wall Cling: No

Crawl: No

Glide: No

Tether: Yes

BASIC

A: Swipe: Bowser does a quick swipe with his left claws. Rather quick, with average range and no knockback. The hitbox is Bowser's claws. 4%

AA: Drill Claw: Bowser does a quick swipe, then finishes in a strong punch with his claws. This is a fast one-two combo that can come in useful at close range. This move can kill at high percents. The hitbox is Bowser's claw for the first hit and fist for the second. 9%
Origin: Super Mario RPG: - 1:56 - 2: 02

TILTS

Side A: Fist Pound: Bowser lifts his fist and pounds it down. The hitbox starts as soon as his fist is raised, and stays on his whole fist until the move finishes. This is a very strong tilt if you are hit on with his fist as it's coming down. This move has above average range, and a good deal of lag if you miss. 8%

Down A: Tail Spin: Bowser turns around rapidly, swinging his mace-like tail to clobber foes. The range here is above average, and the hitbox is Bowser's entire tail (with a sweetspot on the two spikes). This move can kill foes with higher damage levels. If missed, this move lags while Bowser turns back around. 7-9%

Up A: Horn Skewer: Bowser leans his head down and thrusts his horns into foes above him. Great knockback and range. The hitbox is the top of Bowser's head (with a sweetspot on the horns). This move doesn't lag nearly as much as his other tilts (although there is minor start-up lag). 9-12%

SMASHES

Side Smash: Shockwave Jump: Bowser leans down to charge the jump. When it's released, he leaps forward and lands HARD, with a blue shockwave going out a short distance in front of him. This is one of, if not, the strongest attack in the game, with high knockback, a hitbox on Bowser's feet, and increasable range (Bowser jumps farther the longer you charge the move). This move lags a ton if it misses, while Bowser gets up. It takes some skill to dodge, as the shockwave is designed to hit you, even if you shield or spot dodge the jump. 11-45% - only if foes hit both the stomp and shockwave when it's fully charged.
Origin: Paper Mario: TTYD (with elements from Galaxy) - 2:45 - 2:48

Down Smash: Fire Blow: Bowser crouches down and prepares to exhale a massive stream of fire. This move has about one and a half times the range of a Fire Flower. Unlike Fire Breath in Brawl and the Fire Flower, this move gives heavy damage in multiple hits, then gives high knockback on the last hit. The hitbox is the entire stream of fire, but you get more damage the closer you are to Bowser. This move doesn't lag that much, except for when Bowser stands back up. 3-27%
Origin: Paper Mario series - 0:08-0:09

Up Smash: Koopa Chomp: Bowser faces up and leans way back. When this smash is released, Bowser springs up high and gives foes a mighty chomp with his razor-sharp teeth. This has suprising range that could catch foes off-guard. This move has high knockback as well. The hitbox is most of Bowser's snout, but you get the most knockback if you are closer to Bowser when he bites. Out of all his smashes, this is the fastest, but the weakest. 6-31%


AERIALS

Air A: Star Spin: Bowser extends his arms and spins in midair, hitting foes with each arm once. This aerial lags after the spin, but hits foes pretty hard if it connects. Bowser extends his arms all the way, so this move has great range. The hitbox is all of Bowser's fists, plus a bit of his wrists. 6-15%
Origin: Super Mario Galaxy - 3:30 - 3:32

Side Air A: Double Claw Rip: Bowser tears both his claws forward in a two-hit attack (like Wolf's f-tilt). The hitbox is Bowser's claws. This move has above-average knockback and range. This move has no start-up lag, but ends with some, as Bowser turns back around after clawing. This is a pretty good combo move. 12-15%

Back Air A: Tail Bludgeon: Bowser bends his tail down and releases it (as if flicking). There is moderate startup lag, but little to none finishing. The hitbox is Bowser's entire tail (with a sweetspot on the two spikes). This has the least range of his aerials (only average), but great knockback (one of his best). 8-11%

Up Air A: Downwards Tear: Bowser pulls both of his claws up, then scratches down hard, ending with a flip. This lags greatly starting and ending, but has great knockback (the best of his aerials) and can kill foes below 100%. The hitbox is Bowser's claws, and since he is reaching up high, this has above average range as well. 13-17%

Down Air A: Super Stomp: Bowser (after pausing briefly) roars and plummets down. If you are hit just as he starts to fall, you are spiked with considerable force (one of the best spikes in the game). Otherwise, you get knocked back a long way. The hitbox is Bowser's feet, which he stretches out to get maximum range. 15-17%
Origin: Super Mario Galaxy - 3:33-3:34

OTHER ATTACKS

Downed A: Double Hammer Whack: As he jumps up, Bowser holds one of the hammers he threw in the original Super Mario Bros. and whacks back to forward quickly. This is a fast move with little lag. The range is pretty good. The hitbox is Bowser's full fist, plus the hammer. The knockback is not great, although moves from the ground aren't generally strong. 7-15%
Origin: Super Mario Bros. - 1:27

Flipped A: Breakdance Spin: Bowser strikes a pose similar to this picture, and spins on his hand, kicking foes with both feet. The knockback isn't great here either. However, the hitbox is all over Bowser's extended feet. Great range for a faceup move. There's almost no lag, except for when Bowser hops back to his feet. 8-17%

Ledge A: Firestorm: Using a shorter version of his special ability from Mario Strikers Charged, Bowser hops up and breathes fire 180 degrees in front of him. There is no knockback, but great range. You get more damage if you are closer to Bowser. 2-11%
Origin: Mario Strikers Charged - 0:38 - 0:42

Ledge A (over 100%): Flipped Spin: Bowser struggles to pull himself onto the ledge, and spins on his back to hit foes. Average range and low knockback. The hitbox is Bowser's entire body. This move has average ending lag. 5-9%
Origin: Super Mario Galaxy - 3:42 - 3:44

Dash A: Bowser Bowl: Bowser goes into his shell and curls into a ball, rolling forward a small distance. This move has above-average knockback and range. The hitbox is Bowser's entire shell (foes get knocked back more if they're hit with the front of the shell, rather than the behind). This move has ending lag if it misses, and Bowser uncurls himself. 11-14% Origin: Super Mario Galaxy - 6:22 - 6:28


GRAB

Bowser lunges forward and grabs the opponent around the throat. Above average range, from standing and running

Z: Hammer Whack: Bowser slams the foe in the side of the head with a hammer. 5%
Origin: Super Mario Bros. - 1:27

Side Throw: Fire Breath: Bowser drops the foe and breathes fire on him/her. He holds it for about 1.5 seconds. Can be DIed from after release. Little knockback. 6-17%
Origin: Super Mario 64 - 0:13 - 1:20

Back Throw: Shell Slam: Bowser throws the foe back, then spins, whacking the victim with his shell. Above average knockback, but slight lag. 14-15%

Down Throw: Bowser Bomb: Similar to his move in Melee, Bowser drops the foe (who struggles helplessly on the floor) and leaps up in cannonball position, crashing down hard. Although this move has good knockback and can kill at high damage levels, it doesn't damage nearly as much as it does in Melee. Unlike Melee, when Bowser hits the ground, he doesn't lag, he lands on his feet. Because of this, he can combo from this throw. 2-14%
Origin: Super Mario Bros. 3 - 2:25 - 2:27

Up Throw: Flying Slam: Bowser leaps up with the foe (Brawl-style) and slams down, crushing them under his weight. This has average knockback, but he and the victim can be hit out of the throw when Bowser is flipping. Toned down from Brawl. 11-13%
Origin: Super Smash Bros. Brawl - 2:08 - 2:11

SPECIALS

B: Fire Spurt: Just like in the original Super Mario Bros., Bowser blows out fire in spurt-form. This move is chargeable; charge increases power, speed, and range. At maximum range, this move covers three fourths of Final Destination. The knockback is similar to that of the Fire Primid's fire ball; average, can kill at high percents. This is a quick move with almost no lag, but cannot be spammed. 6-25%
Origin: Super Mario Bros. - 0:01 - 0:14

Side B: Mecha-Koopa Toss: Bowser tosses out a single Mecha-Koopa. These wind-up Koopas wander around the stage for 15 seconds, belching small fireballs (4-5%) and biting foes (6%). Bowser can have up to two out at a time. He throws them about 3/4 the distance of Dedede's waddle dees. They deal 8% on impact, and give low knockback. Rarely (1/97 chance), Bowser will bowl a giant bowling ball (the size of Bowser in Brawl) instead of throwing a Mecha-Koopa. As expected, these behemoths deal a lot more damage and knockback (20% on impact, 14% if hit while rolling).
Origin: Super Mario World - 0:35 - 2:10

Down B: Chain Chomp Pivot: Bowser takes his Chomp from Super Mario RPG and swings it around like he's throwing a hammer (the Olympic kind). He can't throw it, but if it hits, it deals heavy knockback. Bowser's spin is chargeable; the charge increases speed and power, of course. Bowser spins a total of 5 times before stopping, so if he misses, he is vulnerable to projectiles and attackers coming from above. Occasionally, he uses an enflamed Chomp from Super Mario Sunshine. These do fire damage, in addition to everthing else. The hitbox is the entire Chomp's head, and the range is pretty great (although these are pretty small Chain Chomps). This is a tether recovery; the Chomp will grab the edge if he's close enough (about the length of 6 Pikmin on a Pikmin Chain). 11-36%
Origin: Super Mario RPG, with elements from Mario & Sonic, and Super Mario Sunshine

Up B: Shell Shock: Bowser goes into his shell and spins rapidly for about 2 seconds, throwing off foes who are at close-range (12%). He then shoots out in the direction you choose (up, down, left, or right). The shot goes about as far as Lucario's Extremespeed, except that it deals damage along the way (5-24%). It also gives above average knockback. If you are over the stage, and you aim the shot down, Bowser's shell will slam into the ground, sending out three shockwaves (5% on first wave, 6% on second, and 7% plus average knockback on third). Through the duration of the move, the hitbox is Bowser's entire shell. If Bowser does the shockwaves, he'll land as he flips back to his feet.

FINAL SMASH

Koopa Pack, ATTACK!!!:
For Bowser's final smash, he roars epically, and the 7 Koopalings from Super Mario Bros. 3 and Super Mario World come out of fire portals and strike a pose, before they start attacking. As the Airship Theme from Super Mario Bros. 3 plays, Bowser jumps off the screen, and comes back in a controllable airship. The Koopalings can do ground-pounds (17%), shoot out in their shells (14%), breathe fireballs (12%), send out sonic screams (13-21%), and shoot magic from their wands (3-35%). They can be attacked, however; they have about 50% stamina each. The airship can land on foes for heavy damage and knockback (25-34%), but cannot rise foes off the top or run them over (although it can push them). The airship CAN: fire a barrage of 3 Bullet Bills with Side B (one goes slanted up, one goes straight, one goes slanted down, they shoot until they hit a wall/foe or go offscreen), drop 3 Bob-Ombs with Down B (they fall from the bottom of the airship and go straight down, detonating upon contact with anything), and call up Monty Moles to fire hammers from the airship's deck (Hammers are like Hammer Bros. hammers in Brawl). This Final Smash lasts for 17 seconds, before the airship flies up and away, dropping Bowser back into the fray. Bullet Bills give 17% per bullet, Bob-Ombs deal 25% per bomb, and hammers deal about 15%.


TAUNTS AND VICTORY / LOSS POSES

Up Taunt: Bowser poses like this, and laughs: "Bwa ha ha...ROOOOAAAR!!"

Side Taunt: Bowser makes this pose and stomps twice, growling menacingly

Down Taunt: Bowser does his winning pose from Mario Strikers Charged - 0:01 - 0:05

Victory Theme #1: Bowser breathes fire 360 degrees around himself and roars happily/evilly

Victory Theme #2: Bowser crashes in from the sky, posed like this, and gives his famous 'Bwa ha ha ha ha!' laugh from Super Mario 64

Victory Theme #3: Bowser puts his hands on his hips, chuckling, then does a fist pump with both fists, ending like this

Victory Theme: A heavy metal remix of this - 1:04 - 1:10

Loss: Bowser claps, noticeable unhappy

MISC.

Icon: His face, as shown on here

Alt. Costumes: Normal, blue tint, Gold shell, Strikers Charged outfit, Dry Bowser

Entrance: Enters flying in on the Koopa Clown Car, and jumps out, laughing evilly

Kirby Hat: Kirby gains Bowser's red hair and eyebrows, as well as his two horns

Wiimote Sound: 'Bwa ha ha ha ha!'

Unlocked By: Default

Shield: Bowser hides in his shell

Idle Pose: Bowser roars impatiently, looking at the screen

Forward Roll: Rolls forward, encased in his rock from Galaxy

Back Roll: Rolls backward, encased in his rock from Galaxy

Spot Dodge: He leans back in a clumsy manner

Air Dodge: Bowser does a quick backwards flip

Dizzy: Bowser sits on the ground, stars circling above his head

Credits Theme: Koopa's Theme

Sleep: Bowser lies back, snoring loudly

CODEC

Snake: Whoa, Bowser's been resized since I last saw him...

Colonel: Yes, Bowser's not holding anything back this time. His power is on full display here.

Snake: What can he do this time?

Colonel: He can use some of his minions to use offensively. Bowser also has some pretty impressive shockwaves.

Snake: He still looks pretty slow

Colonel: Well, he IS the heaviest fighter around, so it's only natural. Still, with his size comes massive destruction and range, so watch your back!

STAGE:

Bowser's Castle

Part 1: Airship strike (40 sec):

This part is basically the Halberd stage backwards. The stage will start off on a random airship. The ship will face to the left and we will see it on the side (like at Corneria in Melee). You will see an airship strike on Peach's Castle. It will fail. You will see the airship smoke up and fall to the surface. The fallen airship will enter Bowser's Castle with the smashers. Here's where the next place begins.

Part 2: Bowser's Castle (35 sec):

This part is similar to the Mushroomy Kingdom. The part will start of where the airship will go through the background floor. Then, you it will auto-scroll to the right. You will see classic enemies walk around the stage. Enemies such as Koopas and Bob-ombs can be used as items, as long as you jump on them first. You will also see thwomps, whomps, lava, spikes, fireballs, fire chains, etc. Finally, you will enter the end of world 8-4.

Part 3: The Final Battle (1 min):

Once the auto scroll slows and stops, you will see the bridge with lava under it, and everything else will look exactly like World 8-4, the only difference is that it has updated graphics, there's a horizontal moving platform, and the background is similar to the background at the end of New Super Mario Bros. An axe will appear at the right end of the stage. If anyone attacks it, the bridge will collapse from right-to-left, except for the floating platform. The lava (just like every other lava) will hurt you just like in Norfair. At the last 10 seconds, you will see a battle with 8-bit Mario and Bowser in the background, Mario will win with the axe, Bowser will fall, and the stage will slowly auto scroll again. You will see Mario meet up with 8-bit Peach. You will pass by it with no enemies. Then, the auto-scroll stops and the airship lifts you up to the air after a 3 sec. startup. You will then start from the beginning.

The stage will randomly choose where you start. However, it will most likely put you in Part 1. If you want to ensure any of the three parts, hold start and A, B, or X/Y to choose Part 1, 2, or 3, respectively.


MUSIC


Bowser's Castle (Super Mario Bros.)

Wart (Super Mario Bros. 2)
Bowser Battle (Super Mario Bros. 3/Super Mario RPG

Bowser Boss (Super Mario World)
Boss Theme (Mario & Luigi: Superstar Saga)
Hammer Bros. Battle (Super Mario Bros. 3)
Boss Battle (Super Mario Sunshine)
Retro (Super Mario Galaxy)
Angry Bowser (Paper Mario)
Ultimate Koopa (Super Mario 64)
Final Boss (Super Mario Sunshine)
Castle/Boss Fortress (Brawl)

STAGE:

Airship

You fight on the deck of an airship from Super Mario Bros. 3. Sometimes cannons in the background will fire Bob-ombs, which do about 20% and are easy to dodge, and Bullet Bills, which are hard to dodge and do about 15%. Rocky Wrenches pop up from below the deck and fling wrenches that behave exactly like Hammer Bros. hammers. Below the airship you can see the Mushroom Kingdom. About 2 min. into playing on the stage it will attack Peach's castle. Then Bullet Bills will fly up striking the ship, making it shake violently and cause explosions to happen along the deck. Then the ship speeds away and the process begins once again.


MUSIC


Koopa's Theme (Super Mario 64)

Airship Theme (Super Mario Galaxy)
Main Boss Castle (New Super Mario Bros.)
Nemesis King Koopa (Super Mario Galaxy)
Bouldergeist/Kingfin Battle (Super Mario Galaxy)
Bowser Battle (Mario & Luigi: Partners in Time)
Koopa's Road (Super Mario 64)

Also Home(s) To: Bowser Jr., Bowser's Minions, Dry Bowser

SSE ROLE

Bowser has the same cutscenes from the original Brawl SSE, but he is colored to be more accurate to Super Mario Galaxy. His voices also sounds like this now. He also has a few new cutscenes:

Bowser is first seen (before his attack on the Kongs) on the roof of his castle with Bowser Jr. Bowser is pointing out landmarks on the horizon, while Jr. looks out excitedly and proudly at the kingdom he will one day rule. Suddenly, the Master Hand appears (it is controlled by Tabuu, of course, but Bowser and Jr. do not know this) and Bowser (slightly in shock) bows before it. The hand pulls out a Dark Cannon and gives it to Bowser. It then opens a scroll that shows a trophy of Mario, and what seem to be instructions to operating the cannon. Bowser roars and laughs evilly. The hand then disappears. Bowser then hops into his Koopa Clown Car and leaves, after giving a reassuring nod to Jr., who sets off on his own.

After being revived by Dedede and beating up Ganondorf's trophy, Bowser sets off for the stairs to the Great Maze. However, Bowser Jr. (who was searching for his father the whole time) runs up happily and gives him a big hug. Bowser roars his pleasure at being reunited, then ruffles Jr.'s hair. Afterwards, Jr. revives Timon & Pumbaa, and they all set off for the Great Maze.

PROS AND CONS

PROS:

  • Strongest character in the game
  • Basic combo has great priority
  • Tilts are as powerful as weak characters' smashes
  • Smashes can kill at low damage levels
  • Aerials are surprisingly quick, and can combo well
  • Heaviest character in the game
  • Throws are very damaging
  • Fire Spurt is a great projectile that can kill
  • Chain Chomp Pivot has good range to tether with
  • Shell Shock is a bit like Sonic's Homing Attack, except faster and more damaging
  • Down Air is the strongest spike in the game

CONS

  • Slowest character in the game
  • Huge target, can't even duck to dodge attacks
  • Tons of lag on most attacks
  • Poor first jump
  • Foes can juggle him with extreme ease
  • Can be chaingrabbed
  • Up B can be gimped, and tether can occasionally miss
 

Smasherk808

Smash Journeyman
Joined
Jul 12, 2008
Messages
231
Just finished Kine on my Kirby's friends moveset! its on the previous page if anyone wants to take a look

@Kirby's Friends: You better do Rick justice. Chuchu and Coo look good. One thing I think however is that Nago's jumps should get longer and higher with every jump like in the game and that Pitch and Coo should have multiple jumps with pitch having more but shorter jumps.
I will add this stuff to the "abilities" section. Thanks for the suggestions!
 

MarthTrinity

Smash Lord
Joined
Aug 9, 2007
Messages
1,954
Location
The Cosmos Beneath Rosalina's Skirt
Just finished Kine on my Kirby's friends moveset! its on the previous page if anyone wants to take a look
Kine was always my favorite and you get bonus points for having the Lightbulb/Spark as one of his attacks xD'

One thing you forgot though is his Up Throw. The only other thing I can see that you may want to edit is the Side B, it seems like once they're stuck, the person playing Kine could just stall until the end of the match because the foe can't escape unless attacked by Kine again.
 

Smasherk808

Smash Journeyman
Joined
Jul 12, 2008
Messages
231
Kine was always my favorite and you get bonus points for having the Lightbulb/Spark as one of his attacks xD'

One thing you forgot though is his Up Throw. The only other thing I can see that you may want to edit is the Side B, it seems like once they're stuck, the person playing Kine could just stall until the end of the match because the foe can't escape unless attacked by Kine again.
Oops! i did forget the up throw... And you are right about the plunger thing i will have to modify it a little bit.

P.S.- Thanks for the bonus points :-)
 

Red Arremer

Smash Legend
Joined
Nov 27, 2005
Messages
11,437
Location
Vienna
Spadefox Studios presents...

Other Movesets by Spadefox:
Lip the Flower Fairy (Panel de Pon/Tetris Attack)
Gilius Thunderhead (Golden Axe series)
Rouge the Bat (Sonic series)
Stanislav "Spade" Serkov (Original Character)
Silver the Hedgehog (Sonic series)
Blaze the Cat (Sonic series)
Chaos (Sonic series)
Gemini Spark (Megaman Starforce)
Numberman.EXE (Megaman Battle Network)
Sandbag (Super Smash Bros. series)
Dr. Ivo "Eggman" Robotnik (Cooperation with KoJ, Sonic series)
Kovomaka Students (Magical Starsign)


††††† Shadow the Hedgehog †††††


Shadow, the Ultimate Lifeform, joins the fray. Shadow was first introduced in Sonic Adventure 2 and was the most major part of the storyline. After that, he was playable in most of the following games, and even starred in his own game: Shadow the Hedgehog. There his past is resolved, as well. He also made an appearance as Assist Trophy in Smash Bros. Brawl.

Shadow bears a lot similarities with Sonic, however, does have several things which make him differ from the blue blur. Shadow is able to use the Chaos Force for his purposes, and with the help of an Chaos Emerald, gets even stronger. He's also a lot more serious and grumpy compared to the fun-loving Sonic. Also, Shadow is one of the little characters in the Sonic franchise to use weapons.

Shadow was already entered in MYM2, twice. With this moveset I hope I can differ from those, and I especially hope that mine is better than them. Shadow is a character whom I really like, and I have practically played every game he appeared in.

Shadow's moveset is not based on very much but being a "generic" moveset. It features "normal" moves included for a Smash moveset, and moves taken from the games he has appeared in. I chose to create some attacks involving his Chaos Force. He's rather speedy, and his movement is hard to control, since he doesn't use his feet to run, but skates with his Anti-Gravitation Skates.

Stats
Screen Name: Shadow
Size: 5/10
Weight: 4/10
(Running) Speed: 8.5/10 - Only Captain Falcon and Sonic are faster
Power: 4/10
First Jump: 5/10 - Shadow simply jumps into the air.
Second Jump: 4/10 - Shadow curls himself into a ball similar to Sonic and proceeds.
Fall Speed: 2/10 - Floaty.
Crouch: Yes.
Crawl: No.
Wall Jump: Yes.
Wall Cling: No.
Gliding: No.

ATTACKS
Legend:
Attack: Attack Name - Description with damage indicator

Standard Attacks
A, A, A: Punch 'n Punch 'n Elbow - Shadow punches, then punches again with the other hand, and then rams his elbow into the enemy. Latter does a bit of knockback. Damage: Punches both: 1-3%, Elbow: 3-5%
Ftilt: - Chaos Spike - Shadow puts out his arm, sending off a small spike of Chaos Force. It does not send the enemy flying, but stabs and holds them. If the attack retracts, the victim simply falls down like if he tripped. Damage: 7-10%
Utilt: Quill Strike - Shadow turns his back upwards and jumps up to sting his enemy. Above average knockback. Damage: 6-8%
Dtilt : Skater Kick - As Shadow kneels down, he sets out a foot and kicking the enemy with it while blasting fire off of his skate. Medium knockback. Damage: 8-10%

Smash Attacks
Fsmash: Chaos Blast - Shadow sends out a red wave of chaos force. Good knockback, high range, however, Shadow needs to recover afterwards. Damage: 20-23%
Usmash: Chaos Spear - Shadow shoots up a blast of chaos energy which has the form of a spike. The charging does not change the damage or knockback, but only how high it goes up. If fully charged, the Smash has about Shadow's own size. Above Average knockback, sending the enemy straight upwards. Damage: 18%
Dsmash: Spin Kick - Shadow does a breakdance-ish kick around himself. Above Average knockback. Damage: 15-18%

Aerial Attacks
Nair: Flame Ring - Shadow curls himself into a ball and engulfs his body into flames, turning into a sphere of destruction. Medium knockback. Damage: 6-9%
Fair: Chaos Attack - Shadow curls into a ball and shoots forward. Above average knockback. Damage: 10-12%
Bair: Somersault Kick - Shadow somersaults, bursting fire out of his skates to burn the enemy behind him. Low knockback. Damage: 8-10%
Uair: Axis Attack - Shadow rotates around his axis, his head upwards. Continous hits to the enemy, low knockback. Damage: 2-4% each hit, with a total of 3.
Dair : Shadow Rocket - Shadow spins himself to gather momentum and then kicks diagonally down. Medium knockback. Damage: 6-9%

Situational Attacks
Dash Attack: Flip Kick - When launched, Shadow backflips and kicks the victim away. Above average knockback. Damage: 5-7%
Ledge Sweep (under 100%) - Shadow backflips back onto the stage, kicking anyone in his way.
Ledge Sweep (over 100%) - Shadow crawls up and sends a blast of Chaos Force to knock away everyone in his way.
Get up Attack (under 100%) - Shadow lift himself onto his arms, doing a split to kick everyone left and right and then somersaults back onto his feet... I mean, skates.
Get up Attack (over 100%) - While cloaking himself into a small sphere of Chaos Force, Shadow floats upwards. The sphere disappears as soon as he is standing again.

Specials
B: Chaos Lance - Shadow shoots three arrows out of red Chaos Force. They split up like this: <-
If a Chaos Lance hits a wall or the ground, it bounces off and continues its fly in a different angle. You can spam this attack, though it does virtually no knockback, like Fox' blaster it doesn't even flinch, and the damage is 4-6%

B side: Chaos Control - Shadow cloaks himself into purple Chaos energy and blasts off to the side, disappearing and reappearing. This move does no damage and is for side recovery purposes.

B up: Black Tornado - Shadow curls himself into a ball and starts swirling upwards. At the pace he goes at there will be a black whirlwind, catching enemies in its grasp. It will continously damage them and them send them flying with below average knockback. The Tornado has 5 hits, and each do 3-4% damage.

B down: Shadow Rifle - Shadow kneels down and takes out a rifle, aiming in the direction he's facing. This move is similar to Snake's missile, however, you have to aim the gun before firing. After the gun is fired, a bullet of red Chaos Energy shoots out quickly. If it hits, it does above average knockback. It disappears if hitting an obstacle. 8-10% damage.

Grabs, Throws
Grab and Pummel - Shadow holds the enemy, ramming a spike of Chaos Force into them and retreating it again. Damage: 3-4% each hit
F throw - Shadow slightly jumps up into the air and slams the enemy into the ground, sending them flying in an /-angle (if facing to the right). Nice distance, too. Damage: 9-11%
B throw - Basically the same as F Throw, just that Shadow backflips while throwing the victim in the same angle as F Throw, just a bit further. Damage: 10-12%
U throw - Shadow lifts up the enemy and uses Chaos Force to send him flying straight upwards. Medium distance, tho. Damage: 7-10%
D throw - Shadow throws the enemy to the ground and kicks their head. Damage: 10-14%

Misc. Animations
Sleeping - Shadow kneels and dozes.
Dizzy - Shadow, first of all stands, and is not hovering. He's holding his head in pain and does steps forward and backward.

Final Smash
Satellite Laser
This thing is like the Dragoon item. When Shadow snatches the Smash Ball, and uses it, he pulls out a remote. A crosshair appears on the stage, and wherever Shadow aims it at, there will be a powerful laserbeam blasting. Like the Dragoon, this is an instant death, except if you have below 10% damage. There it still sends you flying insanely wide. Shadow cannot be hurt by the laser, neither can he be hurt while aiming with his remote. Damage: 35-45% (depending on whether the laser just barely touches you or you get hit fully by it).

Taunts
Up - Shadow surrounds himself in a small sphere of purple Chaos energy.
Side - Shadow crosses his arms, exclaiming "Pfft... Is that all?"
Down - Shadow rides a small circle with his skates.

Entrance
Shadow rides in with a bike from G.U.N. - he jumps off and lets it crash. It's pretty the same as Wario's. Pic of Shadow riding his motorcycle, yay

Alternative costumes
- Black with red markings, white gloves and shoes, Default
- Red with black markings, white gloves and shoes, Red Team
- Blue with yellow markings, yellow gloves and shoes, Blue Team (the blue-yellow contrast is used to differ him from Sonic)
- Green with brown markings, brown gloves and shoes, Green Team
- Golden with red markings, white gloves and shoes, Super Shadow
- Crystalline form, purple with several blue markings, completely red eyes, no nose or mouth, Mephiles the Dark (Piccie)

Victory Poses
Up - Shadow holds a Chaos Emerald, stating "I don't even need this."
Down - Doomseye (Picture) floats a little, Shadow descends from above, landing next to it, stating "What's the next mission?"
Side - Shadow has his back turned at the player. He turns halfly around, his arms crossed, and making a "Hmph!"
When Sonic is among the losers - He does the Side-Victory and states "Who's the faker now, brat?"

Additional Stuff~

Codec Converation
Snake: So, is this Sonic's twin?
Otacon: You're facing Shadow the Hedgehog, Snake. He's an artifical lifeform, created out of the DNS of a hedgehog like Sonic and the Black Arms, a race of vicious extraterrestials. He has the power to control the Chaos Force easily.
Snake: So, why was he created?
Otacon: That's something I can't answer, Snake.
Snake: You should get back learning your geeky stuff, Otacon. Anyway, is there anything I should take care of?
Otacon: Shadow is a very speedy fighter, and spices up his attacks with the Chaos Force. Take care Snake, otherwise you'll get your butt kicked out there.
Snake: We'll see that, Otacon. Snake over.

Kirby Hat
Ears and the six black-red quills, as well as red "eye shadow" (similar to that markings Kirby gets when he copies Falco).

Wii Remote Sound
"Chaos... Control!"

Unlock Message
Shadow, the Ultimate Lifeform, has now entered the battle!

Role in Subspace Emissary
Unlocked in a hidden door in a stage.

Logo
This:

Though without the small bar and the writings in it. <.<

Victory Theme
Shortened intrumental version, just about from 00:15 to 00:22

THIS MOVESET IS FINISHED. IF YOU LIKED IT, PLEASE COMMENT! THANKS!

Stage
Space Colony ARK


You see the front of ARK here. Basically, this front is the battle field. The "nose" and the spikes coming out of its sides are platforms you can board. Just imagine the "nose" to be be changed in an 90 degree angle, so it's set across the spikes.
ARK slowly circles around its axis, this means that after a while you can't board the spikes and have to fight on the nose and the other way around. In the worst scenario, both places are set diagonally, making it harder to fight.
I hope it's clear what I want to say here, if there is a question, please feel free to ask. ^-^

Stage Music
Sonic Adventure 2 - Soarin' Over The Space (Cosmic Wall)
Sonic Adventure 2 - Trespasser (Lost Colony)
Sonic Adventure 2 - Supporting Me (Bio Lizard)
Sonic Adventure 2 - Throw It All Away
Shadow the Hedgehog - The Ark
Shadow the Hedgehog - Air Fleet
Shadow the Hedgehog - Black Comet
Shadow the Hedgehog - The Chosen One
Shadow the Hedgehog - I Am... All Of Me
Sonic Heroes - This Machine
Sonic the Hedgehog 06 - Aquatic Base (Level 1)
Sonic the Hedgehog - Marble Zone
(though without that victory jingle before) Sonic 3D Blast - Rusty Ruins (Act 2)
 

smashbot226

Smash Master
Joined
Sep 1, 2007
Messages
3,027
Location
Waiting for you to slip up.


Beautiful as always, Spade.

Except for his gun moves.

*RESERVED FOR*


SOL BADGUY

Sol Badguy, from the underrated Guilty Gear Series.

He brings his sword, fire magic, and bad attitude to the Brawl! Some of his moves will be based on his game attacks, such as Gun Flame, Grand Viper, and Fafnir.

He'll be the Mario of the Sword Characters, bringing a fluid blend of Strength, Speed, and Range. Watch out for this badass, fellows- he'll rival Falcon in terms of manliness!

STRENGTH- 3

SPEED- 3.5: In his games, he's slightly faster than average. As so in THIS game as well.

RANGE- 3

JUMP- 3

WEIGHT- 3.5: He'll be a bit heavier than average in this game, so he'll have SOME weak points.

SIZE- 3

CRAWL: No.

WALL JUMP: Yes.

Also, bear in mind a common theme with Sol's attacks is precision, as well as little lag on either side of the spectrum with almost ALL of his moves.
------------

GROUND ATTACKS

A: Sol punches the foe's face with little effort with his free hand. Does small damage (3%) and knockback.

A,A: Sol quickly follows up with a sidekick to the face. Does small damage (4%), slightly more than A, and slightly more knockback as well.

A>: Sol does a quick forward slice with his sword. Small range, but medium damage (7%) with mediocre knockback.

A^: Sol performs a high kick with his left foot for small damage (5%), but good vertical knockback.

AV: Sol does a sliding kick across the ground for one meter. Notorious for beating out PROJECTILES and tripping at even HIGH percentages, it has its falls. Like a long ending lag, long enough for the foe to JUST recover, and weak damage (3%).

Fsmash: Sol steps forward and lands a strong vertical slash on the foe. Great range due to the extra step, and good damage (14%) and knockback. However, the step makes this move easy to spot coming and thus, easy to avoid. IF you can get out of its range in time.

Usmash: Sol punches down into the ground, sending fire upwards around him. Good vertical range and damage (13%), nut the knockback is rather pitiful. However, it has very large horizontal range, due to the fire's spread.

Dsmash: Sol quickly slides across the ground for two character distances. Rather weak for a Smash (9%), but also has the lowest lag in his moveset, and his range is astounding.

Dash A: Sol leaps slightly into the air knee first. A dashing sex kick, basically, with small range, but high priority, as well as dealing 6% damage.

AIR ATTACKS:

Nair: Sol spins his sword around his body, whilst its on fire. Strong move, with high knockback and medium range, although this is one of his ONLY moves with a long ending lag.

Fair: Sol flips and sends a heel into the skull of his foe. A long range spike attack that has short starting lag, but long ending lag.

Bair: Sol stabs opposite of his position in the air, while his sword is enflamed. A long ranged stab with high power, but virtually no knockback.

Uair: Sol performs a flip kick in the air. A swift attack with little lag on either side and high vertical knockback, but is a short range flipkick.

Dair: Sol performs a dive kick through the air at the foe, that acts as a quicker, stronger, and more useful version of Shiek's Dair.


GRABS:

Grab: Sol holds the foe by their throat.

Pummel: Sol headbutts the poor sap into further submission.

Fthrow: Sol pushes the foe back, slashes them into the air, then slams them into the ground.

Bthrow: Sol turns around, foe still gripped, and slams their entire body into the ground, causing them to bounce back into the air. Great combo starter at lower percentages.

Uthrow: Sol headbutts the guy, tosses them into the air, and slams a fist into the ground while yelling, "GUN FLAME!" as the foe is scorched by a wave of lava and sent flying into the air.

Dthrow: Sol slams the guy's face into the ground and Sol curb stomps them twice. This leaves the foe lying face down on the ground, so it leaves Sol somewhat at a disadvantage.

TAUNTS:

Taunt 1: Sol cracks his neck with his free hand.

Taunt 2: Sol points to the foe and makes a thumbs down motion.

Taunt 3: Sol crosses his arms as flames envelop him, then gets back into a fighting stance.

SPECIALS:

B: Gun Flame- Sol sticks his sword into the ground, yelling, "GUN FLAME," as mini fire pillars shoot out from the ground forward of Sol's direction. This projectile travels for about four pillars, but stops at walls or gaps. However, if the foe IS hit, they're dragged into the entire move at lower percentages, dealing a total of 16% damage. Sol is left relatively open DURING the move, but otherwise, his lags at either end of the spectrum is low. This cannot be done in the air. This move CANNOT be reflected by any Shine, Shield, etc. It CAN be absorbed, however.

B^: Volcanic Viper- Sol performs a fiery uppercut that travels about the same distance as Fox's straight upwards Fire Fox. Hits twice, once at the very start and once during the full uppercut. This move deals good damage for a simple recovery move (12%, 9%) and has only medium beginning lag. You can aim the trajectory of this move slightly left or right to fit the direction of recovery. This move can also beat out most projectiles.

BV: Grand Viper- Sol slides across the ground in flames feet first, leaving behind a trail of purely aesthetic fire, and ends with a small uppercut into the air. Can catch foes off guard, and also is able to trip at anything higher than 130%. Otherwise, the foe is knocked far away for medium damage, and the uppercut is a decent end. However, the ending lag is HORRIBLE, as Sol remains in a "Helpless" stance after the attack, as he's sent into the air.

B>: Fafnir- Sol dashes slightly forward and sends out a volcanic punch that has amazing knockback and decent damage. THIS is Sol's go-to move for combo enders and as a killing move. However, the starting lag is long enough for the foe to see it coming and act accordingly.

FINAL SMASH: NAPALM DEATH

Sol crouches, crosses his arms together, says, "Napaaaaaaalm..."


Then leaps upward as he is surrounded by huge fire pillars that shoot across the stage alongside him, while he yells, "DEATH!" looks like this:

http://www.youtube.com/watch?v=38N67X68oxw&feature=related

IT's the VERY first one, except it spans the entire stage. The fire pillars are instant kills is touched. After the move, Sol lands back onto the ground, taking a deep breath to recover. He's wide open during this, as he takes TWICE the damage and knockback he normally does. THis is a downside, because everything else of this move is amazing.

----------

Alt Costume:

Blue- His red jacket turns blue.
Green- His red jacket turns green.
Order Sol-


----------
ETC

Symbol: An ember.

Victory 1: Sol sticks his sword into the ground and mutters something in Japanese.

Victory 2: Sol laughs at the losers and jumps away in flames.

Loss: Sol is clapping with extreme disdain on his face.

SNAKE CODEC:
Snake: This guy is inTENSE! Who is he?

Campbell: That's Sol Badguy, Snake. He's a former member of a group of Holy Knights, but he separated as a rogue and stole a Holy Sword. He's a deadly swordsman and fighter, and he has Fire Magic on his side.

Snake: So, a proper warrior, eh? Good to see SOME people still have respect around here.

Campbell: Not really. His attitude towards others is pretty rotten. Let's just say you wouldn't want him angry.

Snake: Hmm... Snake out.
----------------
SSE ROLE:

Sol Badguy... Traveling swordsman, hears of a great power threatening the lands. He goes there to settle this threat. Before EVERYTHING began, all there was was a fight, between Bowser and Sol. Sol had won, and Bowser, ashamed. Before Sol could do anything, Tabuu appeared and blew Sol away to places unknown to him...

Awakened by a strange talking bluebird, Sol looks around to see himself surrounded by forests. Deciding to join forces, him and the bird traveled through the Primid infested forests, coming to a great beast- the Shadow Dragon! Luckily, the two defeat the foul creature, trophytizing it. Sol and Falco split up when they come to a fork in the road, Sol keeping a walkietalkie given to him by Falco.

Sol runs into the sullen Wario, having his hovercraft JUST stolen, and sees Sol as a chance to make up for his failure to the Subspace Army. Fighting as Sol, defeat Wario to move on to the next cutscene, where Sol takes Wario with him as a hostage and for info, when suddenly, a great form of evil appears- Gohma, from Zelda! Chased by the creature and its Primid minions, Sol runs through the valley and runs into Ike, Marth, Pokemon Trainer, and Lucas, who fight Gohma and win.

After that, the Great Fox flies by as Sol runs to some nearby hill, and latches on to the hull- a free ride to the ultimate evil.

However, the Great Fox is soon attacked by the Halberd, and as a Space Fight ensues, Sol steals an Arwing and lands- or more like crashes- onto the Halberd and fights its Captain- R.O.B! As Sol, defeat him to discover that he is the Ancient Minister, but before more could be done, the Minister escapes on his hover feet, with Sol in close pursuit- stealing ANOTHER small ship to chase after him.

Tracking him to the Isle of Ancients, Sol decides he's seen enough- this is where he'd stand. However, his ship becomes spotted and is shot down by the giant R.O.B. Hurtling to certain doom, Sol jumps out of his ship and is miraculously saved by a passing Subspace Carrier, which is manned by several Primid. Defeat them all in a Multi-Man style fight to move on, where Sol drives straight to the newest source of terror- Subspace Base!

Sol joins the party slightly late, seeing Sonic knock off Tabuu's wings. Sol joins the fight and ultimately, the group as well.
----------------
PLZ RATE AND COMMENT.
 

majora_787

Smash Hero
Joined
Jun 23, 2007
Messages
6,122
Location
Texas
Okay, I got word from my editor, and apparently it is time for...


Death Sword, Guardian of the Arbiter’s Grounds

“REEEAAARRR!!!!!”
Bio
Death Sword, the supernatural swordsman of the Arbiter’s Grounds, joins the Brawl! His spirit was lost in the dungeon after the decay of his body, which was obviously executed or tortured because of the damage to his cloak, arm, and neck. Why he was sent to the grounds for execution is unknown, but it may have something to do with his powerful sword, which was sealed away with his soul to prevent his revival.

========================================
Stats

Power: 4/5
Speed: 2/5
Jump: 2/5
Recovery: 4/5
Control: 2/5

========================================
Weak Attacks

A: Death Sword swings the handle of his sword. Now much knockback or damage.

A, A: Death Sword swings with the handle of his sword, then spins the sword around to hit his opponent with the back end. Low damage and knockback.

Up Tilt: Death Sword stabs his sword straight up and lets it fall to his feet. Medium knockback and low damage.

Forward Tilt: Death Sword claws the opponent in front of him. Low knockback and damage.

Down Tilt: Death Sword lets his sword fall from his hands. It then rises back up into his grip. Medium damage and knockback.

Dash Attack: Death Sword rams his opponent head-first. Medium knockback, low damage.

Ledge Attack 1: Death Sword stabs his sword over the ledge before climbing up.

Ledge Attack 2: Death Sword throws his sword over the ledge before climbing up.

========================================
Smash Attacks

Up Smash: Death Sword screams, causing a shockwave to shoot upwards from his mouth. Low knockback, high damage.

Forward Smash: Death Sword slams his sword onto the ground. High knockback and damage.

Down Smash: Green ropes shoot from the handle of the sword and latch onto the ground. Medium knockback, low damage.

========================================
Special Attacks

^B: Death Rise
Death Sword holds his sword over his head and it begins spinning like a set of helicopter blades, pulling him into the air. Death Sword can move left or right while ascending. No damage dealt.

>B: Shriek
Death Sword screams at his opponent. The attack goes through shields, but doesn’t do much damage. Low knockback.

VB: Deathwave
Death Sword shoves his sword into the ground, and black shockwaves shoot from it. Low knockback, damage, and causes stun.

B: Dark Spinner
Death Sword throws a small spinner on a string away from him, then pulls it back along the ground. Low damage, medium knockback.

Final Smash: The Sword’s Seal
Death Sword vanishes, and his sword stays planted in the ground. Green ropes shoot from the handle and strap it to the ground, and a huge bolt of black lightning strikes it, creating a huge explosion. High knockback and very high damage.

========================================
Aerials

Up Aerial: Death Sword swings his sword over his head. Low damage and knockback.

Forward Aerial: Death Sword swings the flat end of his sword down in front of him. Medium damage, spike.

Back Aerial: Death Sword elbows behind him. Low damage and knockback.

Down Aerial: Death Sword dives downward head-first. Low damage and knockback.

Neutral Aerial: Death Sword performs an attack similar to his recovery. Low damage, medium knockback.

========================================
Throws

Grab: Death Sword picks his opponent up by their head.

Grab Attack: Death Sword clubs the opponent with the handle of his sword.

Up Throw: Death Sword throws the opponent up, and hits them with the flat end of his sword. Medium damage.

Forward Throw: The opponent flies from Death Sword’s grip in a cloud of dark energy. Medium damage.

Back Throw: Death Sword throws the opponent away as if to discard them. Low damage.

Down Throw: Death Sword releases his sword and the opponent, and the sword falls on them. Medium damage.

========================================
Taunts + Victory Poses

Up Taunt: Death Sword howls while pointing his sword into the air.

Side Taunt: Death Sword adjusts his head so it’s upright.

Down Taunt: Death Sword’s eyes flash red and he hisses.

Victory 1: Death Sword leans on his sword as if to rest.

Victory 2: Death Sword slashes at the camera and screams.

Victory 3: Death Sword stabs his sword toward the runners up, and makes the execution motion with it.

========================================
Other

Idle Pose: Death Sword faces forward and grips his sword with one hand. He stares into space, and swings his sword around lazily when left idle.

Losing Pose: Death Sword falls to his knees in defeat, and leans on his sword.

Shield: Death Sword holds his sword in a counter position.

Forward Roll: Death Sword flies forward and turns around.

Back Roll: Death Sword holds his sword in front of him and jumps back.

Dodge: Death Sword becomes transparent, and becomes solid again.

Air Dodge: Death Sword turns transparent, and becomes solid again.

Dizzy: Death Sword staggers around in place, dragging his sword along the ground.

Sleep: Death Sword drops his sword and slumps backwards slightly, letting his head fall onto his shoulder.

Stage Entry: Death Sword’s sword is in the ground. It removes its self, swings around in the air, and Death Sword appears holding it.

Select Screen: Death Sword howls, followed by the sound of his sword slamming on the ground.

========================================
Misc.

Codec:
Snake: Colonel, what am I fighting here? A sword?
Colonel: Be careful, Snake! It isn’t just a sword! That’s the Death Sword, an undead swordsman with great power!
Snake: A swordsman? Don’t we have enough of those here?
Colonel: Well, this swordsman has powers beyond the mortal understanding of the other competitors.
Snake: …Like a bigger sword?
Colonel: …

Kirby Hat: Kirby wears a mask on his head that resembles Death Sword’s face.

Alternate Costumes: Blue, Yellow, Dark, Red, Green, Default. In all colored costumes, Death Sword gets that color of cloak, as well as a skull with a slight tint. His dark costume gives him charred black bones and glowing red eyes.

Item: Spinner
The Spinner can be thrown, and it will then roll along the ground back to you. When returning, it can be picked up by someone else.

========================================
Stage

Sealing Room
Death Sword’s stage is none other than the sealing room within the Arbiter’s Grounds. The arena has a flat floor as well as walls. The walls have small lines running horizontally along them, and there are mounds of dirt in the backround, as well as a pair of torches. Spinners will sometimes zoom along the lines on the walls from the backround. Stalkin will sometimes sprout up from the dirt mounds and stab their spears into the stage, causing anyone who gets hit to trip. The raresy hazard, but at the same time the most dangerous, is when a poe flies through the room and takes the flame from the lantern. This makes the stage and hazards difficult to see, while you and your opponents are clearly visible.

Music
http://ca.youtube.com/watch?v=NjhGN3vCBBY (Phantom Zant + Death Sword Battle)
http://ca.youtube.com/watch?v=rgUAYQIUcaI (Stallord Battle)
http://ca.youtube.com/watch?v=YU6YGoF-19w (Arbiter’s Grounds)

========================================
Supspace Emissary
Death Sword is found in The Ruined Zoo after beating adventure mode once.

Unlock
Get 210 KO’s in a match using smash attacks.
Clear classic mode on Very Hard with Link.
Fight Death Sword in The Ruined Zoo after beating adventure mode.
 
Status
Not open for further replies.
Top Bottom