• Welcome to Smashboards, the world's largest Super Smash Brothers community! Over 250,000 Smash Bros. fans from around the world have come to discuss these great games in over 19 million posts!

    You are currently viewing our boards as a visitor. Click here to sign up right now and start on your path in the Smash community!

The NEW Guide To Spray Painting Your Gamecube Controller

Luigimitsu

Smash Apprentice
Joined
Nov 6, 2005
Messages
199
Location
London
I'm going to paint some controllers soon, looking forward to it, just want to ask something. Do I sand purple controllers just like the other colours? I'm trying it on a purple one with 400 grit sand paper, but it's just staying purple (it's gone a little whiter), so am I just meant to sand it for a long time?

The only other thing I need to know, is what screw driver can I use to take out the L and R buttons? I'm guessing it will be better to do this before spraying the plastic. I have a lot of spare controllers so it doesn't matter if something goes wrong.
 

CloudChaser071

Smash Apprentice
Joined
Oct 29, 2009
Messages
115
Sanding it is still recommended, despite spraying it with the same color. It helps the primer stick.

Also, a P0 phillips screwdriver can remove the plastic shield covering the L/R buttons. Just unscrew the two screws.
 

Luigimitsu

Smash Apprentice
Joined
Nov 6, 2005
Messages
199
Location
London
Alright, but my controller has been sanded quite a lot and still shows purple so is it ready to spray? Is this the right thing btw - http://www.amazon.co.uk/Upol-Primer-Aerosol-Spray-500ML/dp/B0039EHREQ/ref=pd_sim_sbs_auto_2 so I use that first after sanding, wait like 10 minutes, then spray the colour on? Then after some days I can use this http://www.patrolbase.co.uk/krylon-...t&utm_medium=feed&utm_campaign=googlemerchant is that right?

This is the spray paint I have, which someone just gave to me and I thought I'd use it, hopefully it's fine http://www.amazon.co.uk/Montana-Acrylic-Spray-Paint-400ml/dp/B005ESKES6 I have pink, yellow and a whitish blue colour, but if it turns out really nice and functional I might buy 1 or 2 more.

That's all I need to know, then once I have the screw driver to take L and R out I'll get started, but apart from that I've taken apart controllers and put them back together quite a lot so that will be the easy part. Thanks for the help :).
 

CloudChaser071

Smash Apprentice
Joined
Oct 29, 2009
Messages
115
When you sand it down, give it a feel. Make sure that there's not a spot where it feels smooth. As for the controller still looking purple, not sure if it's just a purple shell or if it was painted purple. When I sanded an orange controller, the whole shell was orange, so it wouldn't change colors. With a silver controller, there was a silvery finish on it, so you could easily scrape it off.

As for the primer, wait for as long as the can's instructions. I remember with my Krylon primer, it asked me to wait for roughly 2 hours if I remember correctly.

Your spray paint should be just fine.

As for the screw driver, any phillips head will work honestly.

Another thing I want to stress is STAY AWAY FROM THE CONTROLLER WHEN SPRAYING IT! I ruined 3 shells because I sprayed them too close, especially with paint. If you spray way too close, there's a very good chance you'll get vein-like lines in your work, and it just looks awful after that point.
 

Luigimitsu

Smash Apprentice
Joined
Nov 6, 2005
Messages
199
Location
London
Ok, thanks! I gotta make sure I do this properly so the tips are helpful :). Hopefully it goes well.
 

CloudChaser071

Smash Apprentice
Joined
Oct 29, 2009
Messages
115
Pretty much just spray a light coat. Don't drench the poor thing.

Also~

"STAY AWAY FROM THE CONTROLLER WHEN SPRAYING IT! I ruined 3 shells because I sprayed them too close, especially with paint. If you spray way too close, there's a very good chance you'll get vein-like lines in your work, and it just looks awful after that point."

EDIT: I really want to make another controller now...
 

Orngeblu

Smash Ace
Joined
Sep 23, 2012
Messages
748
Location
Rock Hill, South Carolina
3DS FC
0104-1846-4809
Ok. I have noted this, and well, before I try (IF I EVEN DO), I am wondering if this guide could apply to Wii Classic Controller Pro at well? Here's a picture:


AlienAllen

Smash Ace
Joined
Apr 19, 2010
Messages
655
Location
Salem, OR
What are good stats for a single LED in a clear controller?

I'm looking for a good LED to put where the rumble is and I would like to know the following stats:
-Brightness [mcd]
-Viewing angle [degrees]

Thanks.
 

CloudChaser071

Smash Apprentice
Joined
Oct 29, 2009
Messages
115
Ok. I have noted this, and well, before I try (IF I EVEN DO), I am wondering if this guide could apply to Wii Classic Controller Pro at well? Here's a picture:

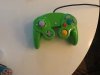
You're good. Pretty much the sand paper is there so the primer sticks a bit better.
 

AlienAllen

Smash Ace
Joined
Apr 19, 2010
Messages
655
Location
Salem, OR
I think I heated the rumble negative terminal too much accidentally. The terminal seems to have fallen off the board. I don't really know how else to describe it, but I can't solder anything to the terminal anymore. Help!
 

CloudChaser071

Smash Apprentice
Joined
Oct 29, 2009
Messages
115
If you can, attempt to trace where it leads.

You can use an exacto knife and scratch off some of the shield if you find the trace. Think of it like a vein.
 

AlienAllen

Smash Ace
Joined
Apr 19, 2010
Messages
655
Location
Salem, OR
I ended up just swapping the clear controller housing to a new circuit board. I might try your suggestion in the future, but at the moment I have just had enough of messing with controller boards.

On the bright side, I didn't mess up the new circuit board and my mod looks pretty good. I think I'm going to switch the LED colors to red and blue or possibly just red.

Here is a video of my current mod(Youtube video info gives the specific details):
http://www.youtube.com/watch?v=Pg9IMvFw6a4

I bought my parts at radio shack. I bought a blue LED to put where the rumble used to be, and two pink LEDS for the handles. I coupled a 47 ohm resistor with each LED and put all 3 LED/resistor couples in parallel. I used the flashing mod, meaning I used the rumble voltage source. The LEDs have a narrow viewing angle (30 degrees), so I am going to switch them out with 180 degree viewing angle LEDs that I ordered on ebay. The brightness on them is good at around 4000 mcd each.
 

Purpletuce

Smash Lord
Joined
Jan 3, 2012
Messages
1,316
Location
Corvallis, OR
New meta:

Dip finger in acetone.

Press finger firmly into controller, wait ~5 seconds.

Remove finger, clean with acetone.

Have your finger print in your controller forever.

Also, I put a wii nunchuck joystick in my controller, just letting everyone know that is an option, if you want a white joystick/you don't have any rubber left on your current one. I tried to switch the d-pad with a wii one for fun, but wii controllers are hard to open, any advice?
 
D

Deleted member 189823

Guest
These look really nice. Some more than others.
I would love to paint my GC controller under this design:

http://i217.photobucket.com/albums/cc5/shok192/Controllerz/todd888.jpg

Props to todd888 for such a cool idea.
I have questions, however:

Are those sticks white-colored, or are they just new/well-cared under a bright light?
I'd also like to insert what appears to be two Classic Controller sticks, as seen in this one:

http://i217.photobucket.com/albums/cc5/shok192/Controllerz/Yeroc.jpg

A friend told me they don't fit in the GC's, so how did you insert them there?
 

Slhoka

Smash Lord
Joined
Dec 21, 2005
Messages
1,710
Location
Kourou, French Guiana
I think I'm gonna paint one of my controllers too, one of these days. I don't know exactly what I'll do, but I may ask another player from Paris. He takes commissions for custom controllers, and besides painting, he actually draws on them :


For those who'd wanna see some of his other work, take a look here (look for the spoiler buttons to display the images)
 

Shikenshu

Smash Cadet
Joined
May 5, 2010
Messages
72
Location
Montreal, QC
Hey Slhoka, est-ce que tu peux demander à ton pote parisien qu'est-ce qu'il utilise pour dessiner et quelle est sa technique? Merci
 

Slhoka

Smash Lord
Joined
Dec 21, 2005
Messages
1,710
Location
Kourou, French Guiana
Hey Slhoka, est-ce que tu peux demander à ton pote parisien qu'est-ce qu'il utilise pour dessiner et quelle est sa technique? Merci
Il a mis quelques explications sur la page du sujet qu'il a créé sur les forums français :


Les manettes sont démontées, lavées, bombées, peintes puis vernies.
[For those who can't read French] So apparently, he doesn't sand them, and he makes the drawings with this brush.

Shikenshu, feel free to contact him (other people too if you want, I think he can speak English).
 

AlienAllen

Smash Ace
Joined
Apr 19, 2010
Messages
655
Location
Salem, OR
I just recently replaced the LEDs in my controller, and I like these new ones much more. As I stated earlier, I have 1 LED where the rumble would be, and 1 LED on EACH handle of the controller. Here are the new stats.

2 Volts @ 20 milliAmps Red LED(paired with ~100 ohm resistors each):
Brightness: ~4500 mcd
Viewing Angle: ~180 degrees

The high viewing angle is VERY important for the appearance of the controller. It ensures that the controller appears to light up, as opposed to shooting bright beams from the controller.

My controller has a BLACK upper casing and a CLEAR lower casing, along with 3 RED LEDs with the stats listed above. So far I am very happy with it, although I think green would pair with black very nicely as well.

FINAL NOTE: If you are putting LEDs in the controller handles, it is very important to plan out where you are running the wires so the controller closes properly. Look at the lower controller casing for areas to easily run wires, and work with the wires when closing the controller. A properly closed controller is more than worth it in the end.

I hope this information is helpful to everyone thinking about putting LEDs in their controllers, I know I was lost when I first started out. Good luck to everyone!
 

GCS Gaming Customs

https://gcsgamingcustoms.storenvy.com
Joined
Jan 2, 2013
Messages
718
Location
Mooresville, NC
I need to get into LEDs some time. I'm all painting and simple mods for now. I will probably get into actually modding when I get bored with painting, then I can sell/own my own painted custom led controllers. That would be AWESOME
 

AlienAllen

Smash Ace
Joined
Apr 19, 2010
Messages
655
Location
Salem, OR
I really want to get my hands on a fully clear controller casing so I can make some even cooler looking LED mods. Those things are expensive though. :ohwell:
 

GCS Gaming Customs

https://gcsgamingcustoms.storenvy.com
Joined
Jan 2, 2013
Messages
718
Location
Mooresville, NC
I just bought one for $15, the title + description said it was legit. Unfortunately, the seller had a 1 feedback score, so I hope I actually get it. We will see :glare:
 

GCS Gaming Customs

https://gcsgamingcustoms.storenvy.com
Joined
Jan 2, 2013
Messages
718
Location
Mooresville, NC
Of course, the controller was a crappy madcatz one. I got a refund.
Just about a week ago, I missed an Emerald Controller for $35 shipped, newly listed buy it now. I didn't know that thing was worth $70+ IM SO MAD :mad:
 

GCS Gaming Customs

https://gcsgamingcustoms.storenvy.com
Joined
Jan 2, 2013
Messages
718
Location
Mooresville, NC
Again, Ill let you know if I see one for bids. Im on eBay looking for GameCube Controller ALL the time, since I buy in bulk and sell them customized.
But, if it is a cheap buy it now, its MINE :smirk: JK Ill probably just sell it to one of you for the same price I bought it for, as long as I can see it with the LEDs

On another note, I have a controller I made you guys might like to see. It has a PS3 Stick Mod, Golden Start + D-Pad, A Blue Back and an Orange Front shell with a Falcon Stencil on the front. Don't mean to sound cocky at all, but it is definitely the best Falcon Controller Ive seen. Here it is : :falcon:

I use it when I play Falcon. I swear, I go into BEAST mode when I do, they cant escape the KNEE!!!
 
Top Bottom