Card
Smash Lord
Post Disclaimer: Note, this is a thread regarding the TOURNAMENT WORTH of the Halberd level. There should be absolutely no discussion about it's value in the Casual Scene, nor should I hear any discussions saying "Banning stages is dumb". Thanks.
It's recently come to my attention that there are a lot of mixed reactions towards the level Battleship Halberd. After coming back from a few Brawl Smash Fests in my local area, it seemed like there was almost a 50/50 split in regards to this level being Tournament Neutral or Counter-Pick. Some players we're completely accepting of the stage, others couldn't tolerate the hazards and removed it off the bat. I'm fairly certain that I have also seen the same opinions on this level on SmashBoards itself.
I am actually part of the group of players who believe that the stage Battleship Halberd is Neutral.
At our finger tips we have ourselves a brand new game. Levels are totally new for the players to explore. Halberd is one of the stages which has such an excellent Level Design, and such a unique concept, that I would just hate to see it get canned prematurely. It's also safe to assume that it is MUCH easier for a Neutral stage to change into a Counter-pick stage, than it is for a Counter-pick stage to change into a Neutral stage. Now I'm not part of the Back Room, so I figured that this is the best method to get my voice across, and hopefully get people to see why I feel this stage deserves to be Neutral.
I'll start off by saying that I am sure we can all agree that there is a general consensus that Halberd will NOT be a Banned level. There isn't anything in this stage that is immediately ban-worthy (Such as the erratic 75m stage, or the large scale New Pork City level to name a few) The reason I started this thread is because of the controversy that there is between Halberd being a Neutral stage or a Counter-picked stage. Who knows... maybe I'm just crazy and everyone in the BRoom and on the forum thinks it should be Neutral... then I would be wasting my time Oh well.
I took the time to perform some tests on this level, to get as accurate data as I possibly can in regards to the different forms that this stage takes. Halberd in actuality is divided into 3 stages, of which I will now go into detail. Stage 1 is the docking bay area, Stage 2 is whenever the Platform is flying around the Halberd, and Stage 3 is when you are fighting on the deck of the Halberd. Stage 1 only occurs once, while Stage 2 and 3 cycle indefinitely.
Stage 1: Docking Bay
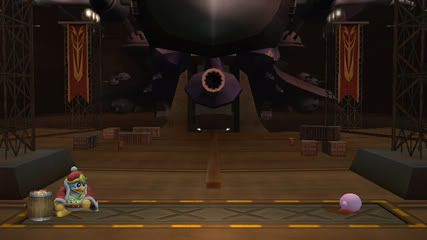
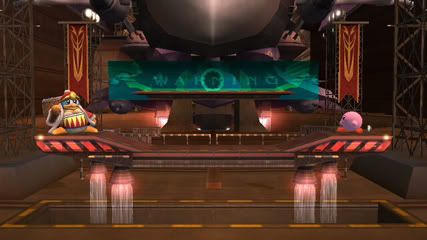
The first stage, which I call the Docking Bay, starts the users off in a completely flat arena with walk off edges. At first this seems highly abusable, but luckily it only lasts 3 seconds. After 3 seconds, the platform rises from the ground and a huge flashing WARNING sign appears. If the user falls into the hole after it closes, they can just jump through the floor and make it onto the platform. 12 seconds later, the Platform takes off and enters Stage 2. All in all, this stage lasts only 15 seconds, and there is nothing really abusable that a player could do to get the other killed during take-off. Any smart player would just stay on the platform, and as far away as possible from the Walk-Off Ledges.
It should also be noted, that as long as the player is in the air, they will survive the take-off. Logically speaking, when the main Platform takes off anyone who is not standing on it should be left behind. But this isn't the case here, as long as you are airborne you will follow the platform on take-off.
Time Spent on Stage 1: 15 seconds of a 6-minute match.
Conclusion: Neutral. User needs to be cautious on their positioning.
Stage 2: In-Flight
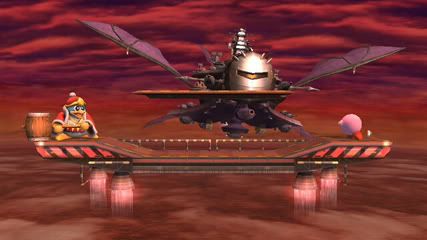
Stage 2 of the Halberd Level is pretty much where the majority of the battles will be fought. The main Platform remains in flight for approximately 1 minute and 10-20 seconds (Depends on whether you are coming from Stage 1, or from Stage 3). For all it's worth, this layout is completely neutral. It has 2 edges, 1 platform in the middle, it is completely symmetrical, and it has very average sides and ceiling length. There are no walls, walk-offs, multiple edges, ceilings, or anything level specific which could be truly abusable. The only debatable issue is that it is possible to pass through the base platform from the below, but not from above.
Time Spent on Stage 2: Approximately 2 minutes and 20 seconds of a 6-minute match
Conclusion: Neutral. Nothing Truly Abusable, No inherent & obvious disadvantages for specific characters.
Special Note: Due to the nature of the Brawl Metagame evolving, matches are beginning to last shorter and shorter. Because of this, it's possible for a Halberd match to end during the 2nd Flight of Stage 2, making it the stage where the users will fight on the longest throughout the course of a match (Because the match will never reach the 2nd Stage 3 of the cycle).
Stage 3: Halberd Deck
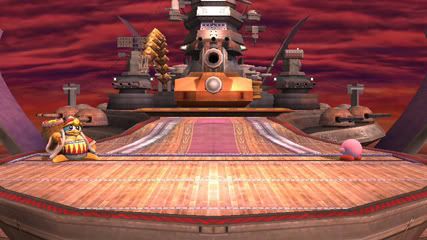
Alright, the real issue with this level that everyone seems to have a problem with... Stage 3's Hazards. Now before I get onto that, let's just examine the new layout. The stage has now become completely flat, with a central platform looming above. Once again, the stage is completely symmetrical as well, without any abusable walls or ceilings. The sides and ceiling of the level are also average. All these things considered, this stage is completely Neutral.
Now is when I have to talk about the bane of this level. The reason most people want to see this level gone from Neutral, the Combo Cannon

(special thanks to BrawlCentral for the image)
The Combo Cannon seems to really bother a lot of people. Whether it's because it has the chance to kill you at higher percents, or because it interrupts the flow of gameplay, or because of it's seemingly random properties, something about this Cannon just annoys the hell out of a lot of people. Don't get me wrong, I agree with all of the above points. It does interrupt flow, it does have a chance to kill, and it does have random properties. But I am here to explain that it is not nearly as bad as it seems.
To start, we all know by now that the Combo Cannon has 3 different hazards. Lazer Beam, Crane Arm, and Cannon Ball. It should be noted, that the Combo Cannon fires off 2, 3, or 4 hazards at random, when the users enter Stage 3.
Lazer Beam:
Warning: A gigantic targeting reticule appears over a player at random.
Duration of Warning: 5 seconds
Hazard Strikes: Lazer Locks on the 5th second, and Fires on the 6th second
Hazard Duration: Beam lasts 4 seconds (10 seconds total)
The Lazer Beam is arguably the most threatening of the 3 hazards.
It can kill! It can only kill in the upwards percentages, with proper DI it can be survived. It also has a very obvious and long warning time, and allows the players time to space themselves and avoid it.
It deals a lot of damage. It can be shielded completely, and it also does not go past the edges of the stage, even though the Reticule does.
It also is very large radius This is actually a GOOD thing. Otherwise opponents would be able to grab you when you are being targeted, and let you get punished. If an opponent grabs you, he will be damaged as well
It can split the battlefield in two. It lasts only 4 seconds. During that time, only a handful of characters can launch projectiles across. You could shield those projectiles as well. Charge up moves (Samus, Lucario) will be able to use this to their advantage.
It selects the target at random! It should not make a difference. It gives both users ample warning time. It should also be noted that this could actually be used as an ADVANTAGE during combat. It's possible for the player who is being targeted to allow for some crazy setups.
Note by Mic: Just to add if you're hit by the laser, you can actually DI out of it completly before the "knockback" frames kick in. (Though you won't have time to DI from one side of the laser to the other)
Cannon Ball:
Warning: The Cannon in the background flashes bright red in color and launches a Cannonball upwards
Duration of Warning: 6 seconds
Hazard Strikes: The Cannonball strikes the level after 10 seconds
Hazard Duration: The Cannonball falls from the top of the screen for 4 seconds (10 seconds Total)
It should be noted that the Cannon Ball does not aim at a player in particular. It simply shoots in a direction. The direction that the Ball will fall can be seen simply by looking at which angle the cannon is facing.
The Cannon Ball falls at a very slow rate, giving tons of time for any user to avoid it. Smart users though, would be able to use the Cannon Ball to their advantage, and try to bait their opponents into it, or toss them into it.
Crane Arm:
Warning: A loud Sound-effect cue. The Crane also begins to move erratically while pointing at a player.
Duration of Warning: 8 seconds
Hazard Strikes: Crane strikes at the 10th second
Hazard Duration: 2 seconds (10 seconds total)
The Crane selects a player at Random, and then begins to move around for 8 seconds before striking at the target. The Crane will follow the user it has selected with the tip of the crane, so by paying attention to the tip it is easy to see exactly who is being targeted. The strike can be easily shielded, air dodged, rolled, or sidestepped with proper timing.
There is a catch with the Crane though, which perhaps not many people have noticed or realized. After testing, it's very easy to compare the Crane Arm to a weaker-Gooey Bomb. What I mean by that is, when a player who is being targeted OVERLAPS another player, the Crane will SWITCH TARGETS! Some players might think that if the Crane is targeting them, there is nothing they can do but wait for it to strike. But in actuality it's possible to cross the Crane onto their opponent, shifting the pressure on the opponent.
So as you can see, all 3 of the Combo Cannons hazards are easily avoidable, and at the same time allow for some interesting situations, none of which are highly abusable.
One of my main points is that there isn't anything in this stage that would make you WANT to Counter-Pick this against an opponent. There is no real incentive towards choosing Halberd as a Counter-pick against your opponent.
A Quote from the SmashWiki on Counter-picking states;
The bottom line is that it comes down to the Combo Cannon, but as I listed above all of it's attacks give ample warnings to both players, and only effect 1 minute of a 6 minute match. Most often, the match will never reach the 2nd cycle of Stage 3, therefore it only affects around 30 seconds of the match. I am being very generous in saying that it'll affect 30 seconds, because I am taking into account all the warnings. In actuality it only effects a mere 9 seconds (4 seconds of Lazer, 4 seconds of Cannonball drop, 1 second of Crane Arm strike) in an entire match.
Is 9 seconds of hazards really worth putting this stage out of Neutrality?
I really love this stage. In fact it is probably my favorite stage of the entire game. It is a fantastic stage, and let's face it.... If this stage ever becomes Counter-pick, it will never be chosen by anyone, because there isn't any reason to pick it as a counter. Apart from "Oh, I'm going to counter-pick this stage (as opposed to a stage which would be actually good for counter-picking) in hopes that my opponent is an idiot and gets hit by the stage hazard to give me a marginal advantage for an extremely small portion of the match" Yet at the same time this does not work because the stage hazards can also hit you!
Alright... I think I've rambled on long enough. I just hope that through this post, everyone and TO's at least gives Halberd time to stay as a Neutral Stage.
It's recently come to my attention that there are a lot of mixed reactions towards the level Battleship Halberd. After coming back from a few Brawl Smash Fests in my local area, it seemed like there was almost a 50/50 split in regards to this level being Tournament Neutral or Counter-Pick. Some players we're completely accepting of the stage, others couldn't tolerate the hazards and removed it off the bat. I'm fairly certain that I have also seen the same opinions on this level on SmashBoards itself.
I am actually part of the group of players who believe that the stage Battleship Halberd is Neutral.
At our finger tips we have ourselves a brand new game. Levels are totally new for the players to explore. Halberd is one of the stages which has such an excellent Level Design, and such a unique concept, that I would just hate to see it get canned prematurely. It's also safe to assume that it is MUCH easier for a Neutral stage to change into a Counter-pick stage, than it is for a Counter-pick stage to change into a Neutral stage. Now I'm not part of the Back Room, so I figured that this is the best method to get my voice across, and hopefully get people to see why I feel this stage deserves to be Neutral.
I'll start off by saying that I am sure we can all agree that there is a general consensus that Halberd will NOT be a Banned level. There isn't anything in this stage that is immediately ban-worthy (Such as the erratic 75m stage, or the large scale New Pork City level to name a few) The reason I started this thread is because of the controversy that there is between Halberd being a Neutral stage or a Counter-picked stage. Who knows... maybe I'm just crazy and everyone in the BRoom and on the forum thinks it should be Neutral... then I would be wasting my time
 Oh well.
I took the time to perform some tests on this level, to get as accurate data as I possibly can in regards to the different forms that this stage takes. Halberd in actuality is divided into 3 stages, of which I will now go into detail. Stage 1 is the docking bay area, Stage 2 is whenever the Platform is flying around the Halberd, and Stage 3 is when you are fighting on the deck of the Halberd. Stage 1 only occurs once, while Stage 2 and 3 cycle indefinitely.
Stage 1: Docking Bay


The first stage, which I call the Docking Bay, starts the users off in a completely flat arena with walk off edges. At first this seems highly abusable, but luckily it only lasts 3 seconds. After 3 seconds, the platform rises from the ground and a huge flashing WARNING sign appears. If the user falls into the hole after it closes, they can just jump through the floor and make it onto the platform. 12 seconds later, the Platform takes off and enters Stage 2. All in all, this stage lasts only 15 seconds, and there is nothing really abusable that a player could do to get the other killed during take-off. Any smart player would just stay on the platform, and as far away as possible from the Walk-Off Ledges.
It should also be noted, that as long as the player is in the air, they will survive the take-off. Logically speaking, when the main Platform takes off anyone who is not standing on it should be left behind. But this isn't the case here, as long as you are airborne you will follow the platform on take-off.
Time Spent on Stage 1: 15 seconds of a 6-minute match.
Conclusion: Neutral. User needs to be cautious on their positioning.
Stage 2: In-Flight

Stage 2 of the Halberd Level is pretty much where the majority of the battles will be fought. The main Platform remains in flight for approximately 1 minute and 10-20 seconds (Depends on whether you are coming from Stage 1, or from Stage 3). For all it's worth, this layout is completely neutral. It has 2 edges, 1 platform in the middle, it is completely symmetrical, and it has very average sides and ceiling length. There are no walls, walk-offs, multiple edges, ceilings, or anything level specific which could be truly abusable. The only debatable issue is that it is possible to pass through the base platform from the below, but not from above.
Time Spent on Stage 2: Approximately 2 minutes and 20 seconds of a 6-minute match
Conclusion: Neutral. Nothing Truly Abusable, No inherent & obvious disadvantages for specific characters.
Special Note: Due to the nature of the Brawl Metagame evolving, matches are beginning to last shorter and shorter. Because of this, it's possible for a Halberd match to end during the 2nd Flight of Stage 2, making it the stage where the users will fight on the longest throughout the course of a match (Because the match will never reach the 2nd Stage 3 of the cycle).
Stage 3: Halberd Deck

Alright, the real issue with this level that everyone seems to have a problem with... Stage 3's Hazards. Now before I get onto that, let's just examine the new layout. The stage has now become completely flat, with a central platform looming above. Once again, the stage is completely symmetrical as well, without any abusable walls or ceilings. The sides and ceiling of the level are also average. All these things considered, this stage is completely Neutral.
Now is when I have to talk about the bane of this level. The reason most people want to see this level gone from Neutral, the Combo Cannon

(special thanks to BrawlCentral for the image)
The Combo Cannon seems to really bother a lot of people. Whether it's because it has the chance to kill you at higher percents, or because it interrupts the flow of gameplay, or because of it's seemingly random properties, something about this Cannon just annoys the hell out of a lot of people. Don't get me wrong, I agree with all of the above points. It does interrupt flow, it does have a chance to kill, and it does have random properties. But I am here to explain that it is not nearly as bad as it seems.
To start, we all know by now that the Combo Cannon has 3 different hazards. Lazer Beam, Crane Arm, and Cannon Ball. It should be noted, that the Combo Cannon fires off 2, 3, or 4 hazards at random, when the users enter Stage 3.
Lazer Beam:
Warning: A gigantic targeting reticule appears over a player at random.
Duration of Warning: 5 seconds
Hazard Strikes: Lazer Locks on the 5th second, and Fires on the 6th second
Hazard Duration: Beam lasts 4 seconds (10 seconds total)
The Lazer Beam is arguably the most threatening of the 3 hazards.
It can kill! It can only kill in the upwards percentages, with proper DI it can be survived. It also has a very obvious and long warning time, and allows the players time to space themselves and avoid it.
It deals a lot of damage. It can be shielded completely, and it also does not go past the edges of the stage, even though the Reticule does.
It also is very large radius This is actually a GOOD thing. Otherwise opponents would be able to grab you when you are being targeted, and let you get punished. If an opponent grabs you, he will be damaged as well
It can split the battlefield in two. It lasts only 4 seconds. During that time, only a handful of characters can launch projectiles across. You could shield those projectiles as well. Charge up moves (Samus, Lucario) will be able to use this to their advantage.
It selects the target at random! It should not make a difference. It gives both users ample warning time. It should also be noted that this could actually be used as an ADVANTAGE during combat. It's possible for the player who is being targeted to allow for some crazy setups.
Note by Mic: Just to add if you're hit by the laser, you can actually DI out of it completly before the "knockback" frames kick in. (Though you won't have time to DI from one side of the laser to the other)
Cannon Ball:
Warning: The Cannon in the background flashes bright red in color and launches a Cannonball upwards
Duration of Warning: 6 seconds
Hazard Strikes: The Cannonball strikes the level after 10 seconds
Hazard Duration: The Cannonball falls from the top of the screen for 4 seconds (10 seconds Total)
It should be noted that the Cannon Ball does not aim at a player in particular. It simply shoots in a direction. The direction that the Ball will fall can be seen simply by looking at which angle the cannon is facing.
The Cannon Ball falls at a very slow rate, giving tons of time for any user to avoid it. Smart users though, would be able to use the Cannon Ball to their advantage, and try to bait their opponents into it, or toss them into it.
Crane Arm:
Warning: A loud Sound-effect cue. The Crane also begins to move erratically while pointing at a player.
Duration of Warning: 8 seconds
Hazard Strikes: Crane strikes at the 10th second
Hazard Duration: 2 seconds (10 seconds total)
The Crane selects a player at Random, and then begins to move around for 8 seconds before striking at the target. The Crane will follow the user it has selected with the tip of the crane, so by paying attention to the tip it is easy to see exactly who is being targeted. The strike can be easily shielded, air dodged, rolled, or sidestepped with proper timing.
There is a catch with the Crane though, which perhaps not many people have noticed or realized. After testing, it's very easy to compare the Crane Arm to a weaker-Gooey Bomb. What I mean by that is, when a player who is being targeted OVERLAPS another player, the Crane will SWITCH TARGETS! Some players might think that if the Crane is targeting them, there is nothing they can do but wait for it to strike. But in actuality it's possible to cross the Crane onto their opponent, shifting the pressure on the opponent.
So as you can see, all 3 of the Combo Cannons hazards are easily avoidable, and at the same time allow for some interesting situations, none of which are highly abusable.
=*=*=*=*=*=*=*=*=*=*=*=*=*=*=*=*=*=*=*=*=*=*=*=*=*=*=*
One of my main points is that there isn't anything in this stage that would make you WANT to Counter-Pick this against an opponent. There is no real incentive towards choosing Halberd as a Counter-pick against your opponent.
A Quote from the SmashWiki on Counter-picking states;
Like I said earlier, Putting the Combo Cannon aside, this level is completely neutral. There are no obvious advantages for specific characters, and there is nothing level specific which really screws up characters. The Stage doesn't have low ceilings, it doesn't have short sides, it doesn't have walls, it doesn't have ceilings, it doesn't have low platforms, it doesn't have glitchy edges, walk off ledges, or any positional advantages for specific characters.Another form of counterpicking is stage counterpicking. This is mostly done based on the character that someone has chosen. For example, a Marth player will often pick the small Yoshi's Story (stage) because one of Marth's greatest shortcomings is his inability to fire any projectiles and his defense against them. This small stage will give characters that have projectiles less distance to fire them. This stage also favors non-projectile characters because the platforms are all close together, allowing non-projectile characters to close the gap much easier/faster. This stage also allows Marth to stand on the main platform, and use his forward smash to either side (having the tip of the sword connect with any characters on the bottom two platforms), giving him a huge advantage as the sweetspot of his sword reaches all of the bottom platforms.
Stage counterpicking can also mean that a player will choose a stage that is not suited well for his opponent's character. A good example of this can be seen when a player chooses Mute City when playing against Falco. When the platform is flying through the air, the ledges are not able to be grabbed and coupled with Falco's short-distance Up B move and predictable Forward B, it presents unfavorable conditions for a Falco trying to return to the stage after being knocked off.
The bottom line is that it comes down to the Combo Cannon, but as I listed above all of it's attacks give ample warnings to both players, and only effect 1 minute of a 6 minute match. Most often, the match will never reach the 2nd cycle of Stage 3, therefore it only affects around 30 seconds of the match. I am being very generous in saying that it'll affect 30 seconds, because I am taking into account all the warnings. In actuality it only effects a mere 9 seconds (4 seconds of Lazer, 4 seconds of Cannonball drop, 1 second of Crane Arm strike) in an entire match.
Is 9 seconds of hazards really worth putting this stage out of Neutrality?
I really love this stage. In fact it is probably my favorite stage of the entire game. It is a fantastic stage, and let's face it.... If this stage ever becomes Counter-pick, it will never be chosen by anyone, because there isn't any reason to pick it as a counter. Apart from "Oh, I'm going to counter-pick this stage (as opposed to a stage which would be actually good for counter-picking) in hopes that my opponent is an idiot and gets hit by the stage hazard to give me a marginal advantage for an extremely small portion of the match" Yet at the same time this does not work because the stage hazards can also hit you!
Alright... I think I've rambled on long enough. I just hope that through this post, everyone and TO's at least gives Halberd time to stay as a Neutral Stage.
