
Emerlad_Element
Smash Cadet
Stage Selection
A big part of competitive play in Super Smash Bros. is selecting a stage to play on, as certain stages can offer certain advantages or disadvantages to certain characters. Samus is no exception so which stage is best for her? Where should we fight certain characters? Well that's why this thread is here. Below will be descriptions of stages as well as our advantages and disadvantages on them as well. Stages will be color coded as such:
Red: Very disadvantageous and should be avoided at all costs
Orange: Offers a number of disadvantages and should generally be avoided
Yellow: Neutral. No glaring advantages or disadvantages
Green: Offers some advantages but may not always be a good choice
Blue: A stage that works well in our favor and should always be considered or chosen if available
Below the list of stages and their descriptions will be a list of optimal stage choices for every character as well as stages that should be avoided. Discussion is welcome as what is posted here is my opinion. The thread will update as the community gives their input or as the game updates.
Overview
To determine which stages are best for Samus we need to know her kill options and weight. These two characteristics determine which blast zones are best and worse for us. Things can become a little tricky here as most of the time this can be a matter of preference. For example, some may argue that Halberd is a good stage for Samus as she can kill of the top with U-Air, U-Smash, Up-B or any other upward launching attack. On the flip side, one could argue that it is a bad stage for Samus as her floatiness makes it easier for her to be killed off the top of stage as opposed to the side where she can last longer. Again situations like that come down to preference so keep that little disclaimer in mind. Samus also has a difficult time landing so that's another point to keep in mind. Below is a list of Samus' kill options and survivability.
Kill Options:
U-Tilt - Upward spike, diagonal knock back if the opponent is in the air. Kills earlier if opponent is on a platform.
U-Smash - Great upward knock back, does not connect with opponents above you on platforms.
F-Smash - Good horizontal knock back if sweet spotted, pathetic horizontal knock if sour spotted.
U-Air - Upward knock back and can kill at earlier percents if platforms are involved. Will more then likely be staled from comboing so take this one with a grain of salt.
N-Air - Decent horizontal knock back, better used for gimping.
F-Air - Decent horizontal knock back, better used for gimping.
D-Air - Sweet spot is a spike, best used for gimping off stage or with Bomb disrespect. Sour spot has good horizontal knock back and again is better used for gimping.
B-Air - One of our strongest kill moves. Good horizontal knock back, unlike her other aerials, this one doesn't have to gimp the opponent to kill.
Charge Shot - Do I even need to say anything? Kills early, and could kill from practically anywhere on the stage. Great horizontal knock back.
Screw Attack - Upward knock back. Kills earlier with platforms involved.
Survivability:
Upward blast zone - Easiest blast zone for Samus to lose a stock given her floatiness.
Side blast zones - Given Samus' weight and amazing recovery, killing Samus off the side can be a difficult feat.
Lower blast zone - The only time you should die from here is if you get spiked or just messed up your recovery. Samus has good recovery options so this blast zone should never be a problem.
I focus more on knock back in this analysis as kill percentages is meaningless from a general standpoint. In picking the most optimal stage, knock back is what matters not kill percent. From the above data; we can conclude that Samus kills off the side blast zones easier and has tools to gimp if we do not secure the kill. This being said, in a general sense, stages that have close blast zones on the side would be optimal, and that stages with low ceilings, should generally be avoided.
Stages:
Battlefield:

Battlefield is a rather difficult stage to analyze. The biggest thing to note here are the platforms. On one hand, they make chaining U-Air's together much easier and could even lead to a 0 to death and make our upward kill moves kill earlier. On the other hand, the platforms cripple our zoning game. Whether or not the platforms serve as an advantage is all a matter of preference. As far as blast zones go, this stage has somewhat of a low ceiling and side blast zones that are quite a distance from the stage. The general opinion is that this is a good stage for Samus as the platforms here help her more then they harm her.
Advantages:
 -_ellipsis_-
; Point 7 credit
-_ellipsis_-
; Point 7 credit
 DanishButrCookies
)
DanishButrCookies
)
Disadvantages:
 zblaqk
(How did I forget about that? XD)
zblaqk
(How did I forget about that? XD)
Final Destination:
.png)
Just a flat surface. FD is typically a good choice for zoning characters and this is especially so for Samus. The upward blast zone is somewhat high, though not the highest in the game, it's higher then normally. This is good for Samus as it prevents us from losing a stock off the top as easily but it's still low enough to be able to net a kill with U-Air -> U-Air -> Screw Attack combos and with U-Smash. There's nothing too special about the blast zones on the side. They're not too far out but not too close either so you may still have to gimp opponents with better recoveries. My favorite thing about this stage is its size. A flat surface means that your opponent will be forced to approach through a barrage of Missiles and Z-Airs and on top of that Charge Shots and Super Missiles will cover the entire span of the stage where as regular missiles travel a little over half of the stage before blowing up. However, the lack of platforms highlights Samus' in-ability to land safely and of course all of the movement options, mixups, and sharking abilities are also gone since there are no platforms.
Advantages:
Disadvantages:
-_ellipsis_-
)
Smashville:
This is what I consider a skill stage. A stage where no character has any real advantage, it's just a matter of who can out skill who. Samus does have some advantages here but they are minor and other characters can have the same advantages. All of the blast zones here are pretty normal, not too close but not too far; this applies to the top and the sides so there is no obvious advantage in that department. You can shark under the platform with U-Tilt and U-Air like on Battlefield but with the lack of a second, higher platform, you won't killing off the top as early as you would in Battlefield. Sharking with U-Smash is a little more useful since the platform moves, it'll move your opponent right into other blast. Will your opponent get knocked into the final blast that deals the knock back? Nope.
Advantages:
There are no glaring disadvantages here but no super amazing advantages either.
Delfino Plaza:
Platforms, low ceiling, varying terrain, walk offs, clean ocean water to dunk your friends, and a stage that you can go through, this stage has it all. I also hear this is a wonderful vacation spot. On a serious note, this stage is awesome. The ceiling in this stage is one of the lowest in the game and becomes even lower during a stage transition, pair that with platforms and you have yourself more then several 0 to death situations and touch of death combos. Just be careful, as your opponent will be able to use these to their advantage as well. As for the blast zones on the side, well that depends on which section of the stage you're on. If there are walk-offs then the side blast zone is pretty close. If there aren't any walk-offs then the blast zones are a little farther out, similar to Final Destination. If your opponent is swimming in the water, they become very easy to dunk with D-Air; just keep in mind that you are easy to dunk while swimming as well. You can approach from under the stage which can lead into some nice U-Air chains and last but not least, the stage platform is quite large to allow for heavy projectile game. A lot of what can be utilized by us here can also be utilized by our opponent but I feel it better helps us then most other characters.
Advantages:
Halberd
Halberd is like Smashville and Battlefield combined. For one, Halberd has a low ceiling meaning that kills off the top are easy to secure for us as well as our opponent. The single platform on this stage offers us a the same advantages and disadvantages as on Battlefield. For example, U-Air 0 to death chains can still be performed on this stage while the platform also cancels Z-Air. The blast zones on the side aren't too bad, about the same as Final Destination so horizontal killing is still a good option though not the one to focus on on this stage. The stage itself has two slants, one on each end of the stage makes most attacks awkward to connect. Grab especially suffers from this, use caution. Once the stage lands on the deck of the Halberd the awkward slants go away in place of 3 easily avoidable stage hazards that you and your opponent can throw each other into, it's a pretty fun way to net a kill. The deck of the ship also makes it easier to zone should you feel the need to do so.
Advantages:
A big part of competitive play in Super Smash Bros. is selecting a stage to play on, as certain stages can offer certain advantages or disadvantages to certain characters. Samus is no exception so which stage is best for her? Where should we fight certain characters? Well that's why this thread is here. Below will be descriptions of stages as well as our advantages and disadvantages on them as well. Stages will be color coded as such:
Red: Very disadvantageous and should be avoided at all costs
Orange: Offers a number of disadvantages and should generally be avoided
Yellow: Neutral. No glaring advantages or disadvantages
Green: Offers some advantages but may not always be a good choice
Blue: A stage that works well in our favor and should always be considered or chosen if available
Below the list of stages and their descriptions will be a list of optimal stage choices for every character as well as stages that should be avoided. Discussion is welcome as what is posted here is my opinion. The thread will update as the community gives their input or as the game updates.
Overview
To determine which stages are best for Samus we need to know her kill options and weight. These two characteristics determine which blast zones are best and worse for us. Things can become a little tricky here as most of the time this can be a matter of preference. For example, some may argue that Halberd is a good stage for Samus as she can kill of the top with U-Air, U-Smash, Up-B or any other upward launching attack. On the flip side, one could argue that it is a bad stage for Samus as her floatiness makes it easier for her to be killed off the top of stage as opposed to the side where she can last longer. Again situations like that come down to preference so keep that little disclaimer in mind. Samus also has a difficult time landing so that's another point to keep in mind. Below is a list of Samus' kill options and survivability.
Kill Options:
U-Tilt - Upward spike, diagonal knock back if the opponent is in the air. Kills earlier if opponent is on a platform.
U-Smash - Great upward knock back, does not connect with opponents above you on platforms.
F-Smash - Good horizontal knock back if sweet spotted, pathetic horizontal knock if sour spotted.
U-Air - Upward knock back and can kill at earlier percents if platforms are involved. Will more then likely be staled from comboing so take this one with a grain of salt.
N-Air - Decent horizontal knock back, better used for gimping.
F-Air - Decent horizontal knock back, better used for gimping.
D-Air - Sweet spot is a spike, best used for gimping off stage or with Bomb disrespect. Sour spot has good horizontal knock back and again is better used for gimping.
B-Air - One of our strongest kill moves. Good horizontal knock back, unlike her other aerials, this one doesn't have to gimp the opponent to kill.
Charge Shot - Do I even need to say anything? Kills early, and could kill from practically anywhere on the stage. Great horizontal knock back.
Screw Attack - Upward knock back. Kills earlier with platforms involved.
Survivability:
Upward blast zone - Easiest blast zone for Samus to lose a stock given her floatiness.
Side blast zones - Given Samus' weight and amazing recovery, killing Samus off the side can be a difficult feat.
Lower blast zone - The only time you should die from here is if you get spiked or just messed up your recovery. Samus has good recovery options so this blast zone should never be a problem.
I focus more on knock back in this analysis as kill percentages is meaningless from a general standpoint. In picking the most optimal stage, knock back is what matters not kill percent. From the above data; we can conclude that Samus kills off the side blast zones easier and has tools to gimp if we do not secure the kill. This being said, in a general sense, stages that have close blast zones on the side would be optimal, and that stages with low ceilings, should generally be avoided.
Stages:
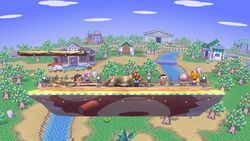
Battlefield:
Battlefield is a rather difficult stage to analyze. The biggest thing to note here are the platforms. On one hand, they make chaining U-Air's together much easier and could even lead to a 0 to death and make our upward kill moves kill earlier. On the other hand, the platforms cripple our zoning game. Whether or not the platforms serve as an advantage is all a matter of preference. As far as blast zones go, this stage has somewhat of a low ceiling and side blast zones that are quite a distance from the stage. The general opinion is that this is a good stage for Samus as the platforms here help her more then they harm her.
Advantages:
- We can kill early of the top, especially when using the platforms
- Combo game with U-Air is greatly increased thanks to platforms
- Sharking
- Can recover from farther out then most on the side given our good recovery
- 0 to death opportunities
- Smaller stage makes it easier to escape to the ledge
- Platforms allow for landing mix ups and a safe place to charge up Charge Shot
- Somewhat low ceiling
Disadvantages:
- Zoning game is crippled
- We are killed easier off the top, especially when the opponent uses platforms effectively
- Platforms cancel Z-Air
Final Destination:
Just a flat surface. FD is typically a good choice for zoning characters and this is especially so for Samus. The upward blast zone is somewhat high, though not the highest in the game, it's higher then normally. This is good for Samus as it prevents us from losing a stock off the top as easily but it's still low enough to be able to net a kill with U-Air -> U-Air -> Screw Attack combos and with U-Smash. There's nothing too special about the blast zones on the side. They're not too far out but not too close either so you may still have to gimp opponents with better recoveries. My favorite thing about this stage is its size. A flat surface means that your opponent will be forced to approach through a barrage of Missiles and Z-Airs and on top of that Charge Shots and Super Missiles will cover the entire span of the stage where as regular missiles travel a little over half of the stage before blowing up. However, the lack of platforms highlights Samus' in-ability to land safely and of course all of the movement options, mixups, and sharking abilities are also gone since there are no platforms.
Advantages:
- Somewhat high ceiling to keep us from dying off the top while still low enough for us to net kills with U-Air combos and U-Smash
- Incredible zoning potential
- Workable side blast zones
Disadvantages:
- Will be more advantageous to other zoners then it will be to us
- Difficult to land on stage
- Larger stage makes escaping to the ledge difficult
Smashville:
This is what I consider a skill stage. A stage where no character has any real advantage, it's just a matter of who can out skill who. Samus does have some advantages here but they are minor and other characters can have the same advantages. All of the blast zones here are pretty normal, not too close but not too far; this applies to the top and the sides so there is no obvious advantage in that department. You can shark under the platform with U-Tilt and U-Air like on Battlefield but with the lack of a second, higher platform, you won't killing off the top as early as you would in Battlefield. Sharking with U-Smash is a little more useful since the platform moves, it'll move your opponent right into other blast. Will your opponent get knocked into the final blast that deals the knock back? Nope.
Advantages:
- Minimal sharking capabilities under platform
- Small stage allows easy escape to the ledge
- Platform can be used to stall and charge the Charge Shot
There are no glaring disadvantages here but no super amazing advantages either.
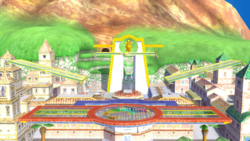
Delfino Plaza:
Platforms, low ceiling, varying terrain, walk offs, clean ocean water to dunk your friends, and a stage that you can go through, this stage has it all. I also hear this is a wonderful vacation spot. On a serious note, this stage is awesome. The ceiling in this stage is one of the lowest in the game and becomes even lower during a stage transition, pair that with platforms and you have yourself more then several 0 to death situations and touch of death combos. Just be careful, as your opponent will be able to use these to their advantage as well. As for the blast zones on the side, well that depends on which section of the stage you're on. If there are walk-offs then the side blast zone is pretty close. If there aren't any walk-offs then the blast zones are a little farther out, similar to Final Destination. If your opponent is swimming in the water, they become very easy to dunk with D-Air; just keep in mind that you are easy to dunk while swimming as well. You can approach from under the stage which can lead into some nice U-Air chains and last but not least, the stage platform is quite large to allow for heavy projectile game. A lot of what can be utilized by us here can also be utilized by our opponent but I feel it better helps us then most other characters.
Advantages:
- Low ceiling
- Close blast zones at certain points in the stage
- Easy spiking with D-Air
- Incredibly low ceilings during stage transitions can lead to ridiculous early kills
- Under stage approach
- Low ceiling (die off the top easier)
- Can be spiked easily in the water
- Some terrain does not complement a projectile game. (i.e. small islands)
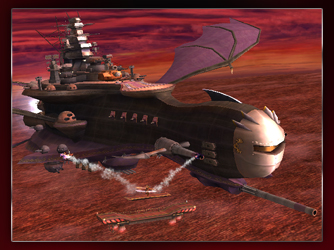
Halberd
Halberd is like Smashville and Battlefield combined. For one, Halberd has a low ceiling meaning that kills off the top are easy to secure for us as well as our opponent. The single platform on this stage offers us a the same advantages and disadvantages as on Battlefield. For example, U-Air 0 to death chains can still be performed on this stage while the platform also cancels Z-Air. The blast zones on the side aren't too bad, about the same as Final Destination so horizontal killing is still a good option though not the one to focus on on this stage. The stage itself has two slants, one on each end of the stage makes most attacks awkward to connect. Grab especially suffers from this, use caution. Once the stage lands on the deck of the Halberd the awkward slants go away in place of 3 easily avoidable stage hazards that you and your opponent can throw each other into, it's a pretty fun way to net a kill. The deck of the ship also makes it easier to zone should you feel the need to do so.
Advantages:
- 0 to death opportunities
- Under stage approach
- Platform Sharking
- Low ceiling
- Stage hazards to throw your opponent into
- Upward attacks kill earlier on the platform
- Zoning potential on ship deck
- Can wall jump off the side of the ship deck
- Slants make some attacks awkward to connect
- Low ceiling
- Stage hazards
- Platform cancels Z-Air
- Grabs are especially risky
- Difficult to zone due to slants and a small stage.
Last edited:
")