• Welcome to Smashboards, the world's largest Super Smash Brothers community! Over 250,000 Smash Bros. fans from around the world have come to discuss these great games in over 19 million posts!

    You are currently viewing our boards as a visitor. Click here to sign up right now and start on your path in the Smash community!

Make Your Move 3.0: It's over, it's done, moving on.

Status
Not open for further replies.

SirKibble

Smash Champion
Joined
May 2, 2008
Messages
2,400
Can I has feedback?
You can has. I like the floating concept, and it doesn't seem so broken now. It really makes her unique as a character, and it helps her stand out, definitely. (That's gonna be something that every Pokemon entry needs.) The descriptions are good, and she's pretty well-balanced. All in all, it's a very good moveset, though I think I liked your Dry Bones one better.
 

Iron Thorn

Smash Lord
Joined
Jun 26, 2008
Messages
1,097
Location
Going to Gamelon. I'm taking the Triforce of Spag
I kinda like my Dry Bones one better too ;P Then again Dry Bones just kinda wins at life, with or without my help.

Next is Nintendogs (Male German Shepherd/Female Beagle/Male Corgi). More Pokemon Trainer-style goodness! They're not under their owners control, because dogfighting is terrible and Michael Vick should be neutered. They're just three cuddly puppies who wandered into the Smash world (a beagle's nose takes you many places) and decided to go around biting people where they couldn't get put to sleep for it.

@Blitz:

Froslass used Ice Beam!
It's super-effective!
The foe's Torterra's face got owned!
 

Evilgidgit

Smash Apprentice
Joined
Oct 10, 2007
Messages
166
Location
England
Woo-hoo, this thread has only been going for a day and we're already deep into it. Everyone has done great movesets so far. Now it is my turn to enter the fray! Here is my first moveset, of an original character.

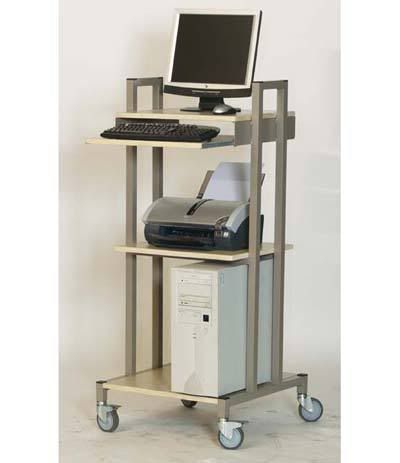
CT (Computer Trolley)

Description:
To the average person, this object may seem like an ordinary office ornament. But in reality, it is a sentient creature with great dreams of fighting in international battle tournaments, Super Smash Bros. for example. Computer Trolley, or CT for short, moves on small wheels which do make him move slow and his jumping capability is not an impressive sight, but when going downhill, CT is a fast-moving object and can harm an opponent if they are standing in the way. However, CT cannot stop when going downhill and if the slope leads to a death, then he cannot stop, unless he manages to jump quick enough.

Alternate Costumes: CT's default form has his computer monitor (his face) as a Windows XP Screen and his trolley is brown. His second form has a Mac Monitor instead and his body is black. His third form has a Windows 2003 screen and his trolley is grey. The printer and the hardrive are always present.

Stats
Height: 4/5
Weight: 5/5
Movement Speed: 3/5 (walking and running), 5/5 (when going downhill)
Jump: 2/5
Fall Speed: 4/5

Entrance: CT rolls onscreen, his computer screen flickering before a smiley face made from symbols appears on it.
Walking: CT moves slowly when walking, and his wheels squeak as he moves.
Running: CT moves relatively quick, his wheels squeaking louder and quicker.
Waiting Movements: CT's computer screen plays minesweeper briefly, or his computer mouse moves about.
Knocked Down: CT lies on his "back", his keyboard and mouse hanging from his sides. He gets back to his wheels by using his printer as a support to stand.
Sleeping: CT stands while sleeping, a continuous pattern of Z's moving diagonally across his screen.
Stunned: CT's monitor sparks and swirling symbols resembling dazed eyes appear on his screen.
Smashed Off-Screen: CT lets out a mechanized screech as he is sent flipping off-screen.

Moveset
A: CT bashes an opponent with his keyboard.
A,A,A: CT strikes an opponent with his keyboard three times, twice as a side attack and then the third as a smack on the head.
Dash Attack: CT increases in speed and suddenly brakes to a halt, the printer partially tumbling out and striking an opponent.
Side A: CT's mouse darts outward and hits an opponent.
Up A: The top part of CT's monitor blows open, hitting an enemy before closing again.
Down A: CT spins in a circle, grinding enemies under his wheels.

Side Smash: A floppy disk shoots out of CT's hardrive at an opponent.
Up Smash: A shower of sparks flies from CT's monitor.
Down Smash: CT spins in a circle, blasts of electricity shooting out of the wires wrapped around his lower section.

Aerial Attack: CT fires razor-sharp paper from his printer.
Side Aerial: Ct tilts sideways and his hardrive and printer slip out to attack an opponent.
Back Aerial: Two sound speakers hidden behind the printer and hardrive pop out and strike an opponent.
Up Aerial: A floppy disk is ejected upwards by the hardrive.
Down Aerial: CT slams to the ground, wheels spinning to grind opponents into the ground.

Grab Attack: CT seizes an opponent with his mouse, wrapping them within its wire and strikes them with his monitor.
Forward Throw: CT tosses the opponent out of his mouse wire and throw them forward.
Backward Throw: CT tosses the opponent away and then swats them with his keyboard as they go.
Up Throw: CT tosses an opponent and then performs a rather dangerous body slam on them.
Down Throw: CT tosses an opponent to the ground and then runs over them several times.

B: CD Shooter - CDs are ejected from CT's hardrive across the screen. While most are harmful ones, some may be collectable CDs.
B Side: Sound Blaster - The two sound speakers appear and fire a powerful soundwave across the stage.
B Up: Terminal Shutdown - CT leaps upwards in a sudden burst of speed and then drops to the ground like a rock.
B Down: Ctrl+Alt+Delete - CT leaps into the air three times and slams on an opponent three times.

Final Smash: Blue Screen of Death
CT blows a circuit and tumbles over on the stage. The screen background suddenly flickers like a computer screen and is replaced by the dreaded Blue Screen of Death, paralyzing opponents depening on how high their damage percentage is (0-75% avoids the attack). CT suddenly comes back online and with extra power, fires a concussion blast across the stage which will blast opponents off-screen. Those who have a low enough damage percentage are spared.

Shield: CT's shield is portrayed as a large electrical forcefield.

Taunts
Taunt 1 (Up): CT spins in a circle and his screen flashes the colours of the spectrum.
Taunt 2 (Side): CT moves back and forth, music playing, depending on what monitor CT has.
Taunt 3 (Down): The Nintendo logo flashes on CT's monitor.

Victory Poses
Pose 1: CT spins about wildly, ends up stopping facing the wrong way and then turns around to face the correct way.
Pose 2: CT swings his mouse around casually and then hits himself in the monitor with it.
Pose 3: The smiley face pops up on CT's monitor.
Losing Pose: CT sparks and crashes over.

Kirby Hat: Kirby's head is placed in a hollow computer monitor.

Snake Codec:
Snake: Otacon, why is there a computer trolley here?
Otacon: That computer trolley is a fighter, Snake, and is alive.
Snake: You are kidding!
Otacon: I wish I were. CT is a heavyweight and has little jumping skills.
Snake: Anything I should be cautious of?
Otacon: CT is like a runaway train when going down slopes.
Snake: I'll stay away from the slopes then.

Please give comments and I'll make your face the greatest in Turadine (or whatever it is?!). Next up is going to be an interesting one...I'll give you a clue - The Machine King.
 

Collective of Bears

King of Hug Style
Joined
Nov 10, 2007
Messages
6,507
Location
North Carolina
NNID
Gark430
3DS FC
1805-3069-0371
I kinda like my Dry Bones one better too ;P Then again Dry Bones just kinda wins at life, with or without my help.

Next is Nintendogs (Male German Shepherd/Female Beagle/Male Corgi). More Pokemon Trainer-style goodness! They're not under their owners control, because dogfighting is terrible and Michael Vick should be neutered. They're just three cuddly puppies who wandered into the Smash world (a beagle's nose takes you many places) and decided to go around biting people where they couldn't get put to sleep for it.

@Blitz:

Froslass used Ice Beam!
It's super-effective!
The foe's Torterra's face got owned!
Stalin used Flash Cannon!
It's Super-effective!
Frosslass got pwned!
However, she did get these for her troubles:


Sorry for the crudity of them, I've never worked with a Frosslass sprite before.
 
D

Deleted member

Guest
I'm thinking about using Lucky Day from Three Amigos as my next moveset.
 

Iron Thorn

Smash Lord
Joined
Jun 26, 2008
Messages
1,097
Location
Going to Gamelon. I'm taking the Triforce of Spag
Ah, they're good enough. *posts in moveset*

I think the idea for the N-dawgs is for them to all be on the stage at once, but for B-down to change which one you're controlling. The other dogs follow the lead one, and KOs only count for the lead dog, though some attacks just suck with only one dog. There will be the fast-but-not-good-at-jumping Corgi, the big strong German Shepherd, and the relatively balanced Beagle.

And they all have a leash as their tether recovery ;D
 

BKupa666

Barnacled Boss
Moderator
Joined
Aug 12, 2008
Messages
7,788
Location
Toxic Tower
Thanks, Heoandreo for the review

Next I will do the NEW AND IMPROVED Indiana Jones. I'm also thinking about writing a SSE, if anyone wants to suggest characters, I'll consider adding them (lots of open spots right now).
 

Verde Coeden Scalesworth

Flap and Swish~
Premium
Joined
Aug 13, 2001
Messages
34,424
Location
Cull Hazard
NNID
Irene4
3DS FC
1203-9265-8784
Switch FC
SW-7567-8572-3791
Brian - Quest 64

A Moves-
A: Staff Swing (Brian swings his staff in a diagonal position, going up from his left hand)
AA: Staff Cross (He does a sideways swipe against an enmy)
AAA: Head Stave (Brian smacks the opponent on the head, this has a 1 second delay)
Running A: Homing Arrow 2 (5 red arrows emit from his staff as he slides on the ground. They spin around it and rarely fire off at the opponents, doing small damage)
Forward A: Rock 1 (a small Rock about Brian's size arise into the air and shoots down diagonally towards the nearest opponent in front of him. The range is decent, but the chance of hitting anyone because of the delay it causes is small)
Down A: Staff Trip (this works similar to Sword Cutter, but it causes a trip upon a successful impact(via Mortal Kombat style))
Up A: Wind Cutter 1 (He throws a small blade of wind somewhat upwards, hitting anyone within its range, which is high, but damage isn't very much)
Smash A: Rock 2(Rock 3 full charge) (it can be confusing, but it works the same way including delays as Rock 1, except Rock 2 is bigger, and doesn't go as far, and Rock 3 is Huge, and stops even closer. Rock is hard to dodge unless right next to Brian because it's a 2D game...)
Smash Down A: Hot Steam 1(Hot Steam 2 full charge) (a small range of gas emits from the bottom of his Staff, burning all who comes near, but lasts barely a second. The full version has almost twice the range, but the same ammount of time)
Smash Up A: Wind Cutter 2(Wind Cutter 3 full charge) (Wind Cutter 2 sends 3 cutters upwards to two diagonal spots and one upward spot. Wind Cutter 3 does the same thing, except it also does this to the left and right, making it a decent "shield")
Air A: Wind Wall(if it hits an enemy, it may give them more weight, and slow them down) (this has a similar range to Hot Steam 1, but not as damaging, and has the effect just listed before this parenthesis)
Air Forward A: Large Cutter(he swings his staff forward, creating a large blade of wind, slicing forward for a few seconds) (it looks like Wind Cutter 1, but is obviously bigger and may make an enemy lag before moving, ie a failed L-Cancel)
Air Down A: Ice Knife(he points his staff downward and 4 blades of ice appear around him, cannot freeze, or do much, but looks rather sweet) (it has the shape of a downwards Pyramid, and makes an interesting sound. Normally, this move would sometimes Freeze an opponent, but that'd be too abuseable if it's random)
Air Up A: Fire Pillar (this works similar to Zelda's Air Up A, but an actual Pillar of flames, complete with a red aura and being quite tall. It's directly upwards, despite having a range large Diameter(about the size of Giant Pichu's Shadow)
Air Back A: Homing Arrow 1(he stabs his staff backwards, creating three red arrows that spin around it, doing mediocre damage) (the falling he doesn't apply till after he finishes the move)

B Moves-
B: Fireball 1(Fireball 2 with slight charge, Fireball 3 with full charge) (Fireball 1 has little range, but he most damage. Fireball 2 fires 2 shots of flame, with better range but less damage. Fireball 3 has, of course, 3 shots, but even lesser damage. If in the air, it'll ark towards the enemy, making it extremely easier to dodge, unless Brian is right besides them, horizontal-wise)
Down B: Water Pillar 1(Water Pillar 2 with slight charge, Water Pillar 3 with full charge) (a pillar of water, much like a huge cylinder jettisons upwards right next to Brian's faced direction. This works the same way in the air, but starts a bit lower. Water Pillar 2 is goes higher, and Water Pillar 3 goes as high as top platform of Yoshi's Story(n64) from the bottom of the stage(the actual stage, not the screen))
Forward B: Cyclone (quite simple, as he fires a literal tornado complete with whirling sounds and bad coloring towards the opponent. If fired at an opponent when facing the opposite way, the range is cut severely.)
Up B: Return/Exit(Return teleports him a certain distance equal to 1/3 inches times his current damage, directly towards the edge, and it will grab the edge if
applicable. Exit is the same as Mewtwo's Teleport, but only is in use while on the ground.)

Grabs-
Z: Grab
Z + A: Head Stave (works the same as the AAA version, but can be done constantly)
Z Forward: Fire Bomb(he launches them forward in a lowball shot while they're encased in flames)
Z Downward: Ice Wall(light blue clouds appear around Brian, possibly freezing the enemy, doesn't move them very far or do much damage though)
Z Upward: Wind Walk(just throws them high into the sky, and the character launched goes much slower for 5 seconds than normal, this includes falling speed)
Z Backward: Rolling Rock(the character is sent rolling on the ground backwards a few feet, if it hits someone, there's a small chance the hit character may join the
opponent in a rolling frenzy)
Air Dodge: Escape(similar to Mewtwo's, slightly longer, and isn't seeable where he happens to be like Mewtwo is)

Final Smash(es)
When Brian grabs the Smash Icon, he gets 2 seconds to choose a following move by pressing Up, Back, Down, or Forward on the Control Stick. Default is
Forward.
Up: Extinction(The ultimate fire spell selects the highest damaged opponent, and if they have over 100% and more than 1 Life, then lose a stock(but stay in the same
place)
Back: Avalanche(The extremely powerful rock spell launches Boulders in a similar fashion to Onix's Rock Throw from SSB64, with wider range, but much less
height. The damage is 10% per boulder)
Down: Walking Water(This giant water spell starts by creating a Water Pillar 3 itself, and sending it forward for tremendous damage, but little knockback. Causes
about 20% to each opponent)
Forward: Ultimate Wind(Unlike the other spells, this one targets all opponents, including weak monsters if applicable. They take 30% damage each.)
If Brian has 150% or more damage, the moves change to these.
Up: Power Staff 2(A red beam appears below Brian and shoots upwards...doing no damage, though. For 30 seconds, he does double the damage he normally
would for pure Physical attacks only, in other words, with his staff.)
Back: Magic Barrier(a small red bubble creates over him, and then a somewhat larger bubble goes around him. For 20 seconds, all non-physical attacks, including
items, do absolutely nothing to Brian. However, Fans will break his shield even with a weak attack or throw. And Shield Breaker destroys it automatically.)
Down: Healing Level 2(Brian heals 30% damage onto himself.)
Forward: Weaken All(all opponents cannot use their normal shield for 10 seconds)

Taunt 1: He lifts his staff above his head, and circles it, then slams it into the ground.
Taunt 2: Brian twirls his staff on his finger for about 2 seconds.
Taunt 3: He casts a spell called Spirit Armor 2, which sends a blue pillar around him and shoots very high upward. No actual effect applies, though.

Winning Taunt 1: He spins his staff and jumps up, via his classic winning taunt from Quest 64.
Winning Taunt 2: He puts his hand up to his staff and his staff is in a horizontal position, then creates a Red X that falls onto him, basically backfiring a Silence spell
and casting it on himself.
Winning Taunt 3: He quickly runs, then falls on his face. His staff stands up by itself, and glows a bright yellow, then finally dances for a little bit.

Costumes-
White
Brown/Blue
Green
Yellow
Red

Stats-
Weight: 2
Power: 4
Speed: 3
Jump: 2
Usage: 1

Codec Message:

Snake: Colonel, who is that?
Colonel: That's Brian, Snake, an unknown magic user much like Zelda is. He hails from an even more unknown game called Quest 64.
Snake: More fairy tales again.
Colonel: Hardly. His abilities take from multiple elements and he can unleash all kinds of different elemental attacks.
Snake: I've gone through enough elements to not worried about some kid.
Colonel: He is pretty young, true, but Snake, don't judge by size or age. Brian's attacks are quite deadly.
Snake: You're got to be kidding me!
Colonel: I wish I was Snake...
 

Collective of Bears

King of Hug Style
Joined
Nov 10, 2007
Messages
6,507
Location
North Carolina
NNID
Gark430
3DS FC
1805-3069-0371

This rag-tag band of Heroes joins the fray! The Mystery Men have appeared!

Overview
The Mystery Men is probably my biggest project so far. With seven movesets in one, it's about the most diverse character ever!


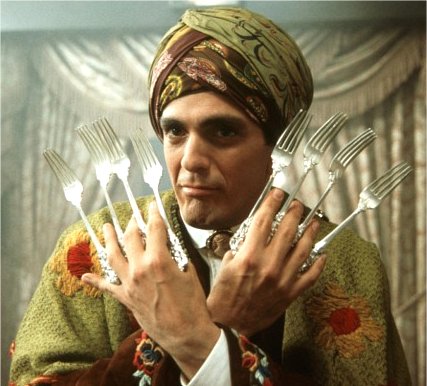
The Blue Raja
The fastest character. He flings forks with a deadly accuracy. He lacks kill power, but has ways to keep opponents away using his projectiles until they are at a high enough % to be killed.

Stats
Size: 3.5
Power: 2
Speed: 4
Weight: 2.5
Jump: 3.5
Range: 3

Tilts
A: Pulls out two forks and slashes with them repeatedly
Forward Tilt: Stabs forward with two forks
Up Tilt: Slashes a fork upward
Down Tilt: Stabs low with a two forks.

Smashes
Forward Smash: Gets out his Large Pie Server and stabs with it forcefully.
Up Smash: Uses two Pie Servers and stabs up with both of them.
Down Smash: Uses two Pie Serves and stabs them both into the ground, then pulls them out.

Aerials
Neutral Air: Stabs a fork forward and kicks back at the same time.
Forward Air: Uses two forks and stabs many times quickly.
Back Air: Kicks both legs back like Luigi
Up Air: Stabs a fork up, then spins and slices with another one
Down Air: Uses dual Pie Servers and stabs down. Meteor Smash.

Throws
Grab A: Stabs with a fork
Forward Throw: Flings many forks at the ground. The opponent runs away from them and then trips.
Back Throw: Leaps behind them and fires many forks at them rapidly.
Up Throw: Leaps behind them and stabs a fork into the opponent's rear, making them jump up.
Down Throw: Slams down, then fires many forks at them.

Specials

B: Fork Fling
The Blue Raja fires fork after fork. Are about as strong as Falco's Lasers and a bit faster, but have less range. Sometimes, he will throw a Pie Server, which does more damage and knockback, or a Spoon, which is essentialy a dud.

Side B: Fork Fumble
The Blue Raja opens a small trunk filled with forks and lobs a few out. They land on the ground and stay there. When you or an opponent step on one, you leap up in pain. The fork then dissapears.

Up B: Fork Rope
The Blue Raja fires forks at the edge, which get get stuck together one after another until they get to the Blue Raja. He then grabs the Fork Wire and grabs the ledge. In a nutshell, a reversed Tether recovery.

Down B: Four Forks to the Floor (Alliteration ftw)
The Blue Raja throws four forks in a downward trajectory. If they hit an enemy, the forks pin them to the floor for a short time, allowing the Blue Raja to get in close and attack. Useful for setting up kills.

Taunts

Taunt 1: Twirls a fork in his hand
Taunt 2: Bows and says, "May the forks be with you."
Taunt 3: Swaps out with the Spleen


The Spleen
The most unpredictable character on the team, he uses his deadly rear to leave opponents breathless!

Stats
Size: 3.5
Power: 2
Speed: 4
Weight: 2.5
Jump: 3.5
Range: 3

Tilts
A: Two quick punches
Forward Tilt: Roundhouse kick
Up Tilt: Passes gas, sending him up a short way while he uppercuts.
Down Tilt: Sweeping kick

Smashes
Forward Smash: Turns around and blows a powerful fart.
Up Smash: Does a handstand and farts
Down Smash: Delivers a fart that covers a large area.

Aerials
Neutral Air: Does a forward flip while farting
Forward Air: Kicks with both legs
Back Air: Farts, propelling The Spleen forward a short way.
Up Air: Bends over and farts, sending the Spleen downward.
Down Air: Delivers a powerful fart downward. Meteor Smash.

Throws
Grab A: Karate chops their neck.
Forward Throw: Turns and blows them away with a fart.
Back Throw: Slams them behind him and farts, sending them backward.
Up Throw: Strains a bit, then delivers a super-powerful fart that sends them both shooting up. The Spleen then throws the enemy down.
Down Throw: Slams down and gives them a heaping portion of BEEF STEW.

Specials

B: Canned Tornado
The Spleen throws Canned Tornado at the ground, which he is enveloped in. He can move during this attack, but it is not at fast as the Mach Tornado, so it's best used at close range. The Tornado can't lift off the ground.

Side B: Silent But Deadly
The Spleen turns and farts. But wait... You can't see it? Right! The fart travels in a straight path, but the speed is erratic and changes every time you use the attack, When the attack lands, the opponent takes a bit of damage and falls over.

Up B: Rump Rocket
The Spleen farts, which carries him up similar to ROB's Jets. The gas under him deals damage. But here's a twist: When you Smash this attack, he goes flying up like the Wario Waft!

Down B: Hold It In!
The Spleen starts to strain, attempting to hold in a powerful fart. When the button is released. The Spleen goes flying forward, leaving a trail of flatulence behind him.

Up Next: The Shoveler!
 

Collective of Bears

King of Hug Style
Joined
Nov 10, 2007
Messages
6,507
Location
North Carolina
NNID
Gark430
3DS FC
1805-3069-0371
I'm working on the Blue Raja right now, and I'll do The Spleen tomorrow. I plan doing one a day until they're all done. Expect him soon, I'm working on his specials right now.
 

HeoandReo

Smash Apprentice
Joined
May 16, 2008
Messages
157
I'm gonna work on 2 movesets today, so my updating to the list and my reviews will be a little delayed for now.

For the record, I'm going to work on Chun-Li, and... myself as a tourist?

You'll see...
 

B.B.

Smash Rookie
Joined
May 6, 2008
Messages
7
Location
Madrid, Spain.
My Tingle moveset.
Sorry for my poor english, :(


TINGLE
VERSION: 3.1

Character Moveset

A attacks:
A: Weak punch. Damage: 3%. Range: short.
Second A: Second weak punch. Damage: 2%. Range: short.
Third A: A.ss's knock (in Spanish: "culatazo"). Damage: 5%. Range: short.

Normal attacks:
Up-tilt: Vertical micro-jump. Damage: 4%. Range: medium.
D-tilt: Low kick. Damage: 6%. Range: short.
F-tilt: Kick, like Mario's forward tilt. Damage: 4%. Range: short.
Dash attack: Tackle with his head. Damage: 8%. Range: short-medium.

Air attacks:
Neutral-air: Aerial somersault. Damage: 4%. Range: medium.
Forward-air: Knee's knock. Damage: 5%. Range: short.
Back-air: Tingle stretchs up one arm. He has a rupee in the hand. Damage: 8%. Range: short-medium.
Up-air: Tingle stretchs up his arms. Damage: 3% for every punch. Damage: short-medium.
Down-air: Aerial kick. Damage: 6%. Range: medium. Meteor Smash.

Smash attacks:
Forward Smash: Double horizontal kick. Damage for the first kick: 4% minimum, 7% maximum. Damage for the second kick: 6% minimum, 10% maximum. Range: medium.
Up Smash: Butt. Damage: 8% minimum, 13% maximum. Range: short-medium.
Down Smash: Tingle gets a shovel, and he digs. Great KO movement. Damage: 10% minimum, 18% maximum. Range: medium-long.

Special Attacks:
Neutral Special: Tingle throws one rupee. The rupee has a nearly straight trajectory. Tingle can recharge this attack, to throw the rupee farer away. Damage: 2%. Range: very long.
Side Special: Tingle throws his dog. Like the Olimar's Fsmash. Damage: 10%. Range: medium-long.
Up Special: Tingle's Red Balloon. Tingle can use this balloon four times. He can glide during the attack. Like the Kirby and Jigglypuff jumps.
Down Special: Tingle uses a small balloon to protect him for the enemy projectiles. The balloon resist three projectiles, and burst. If the balloon burst, Tingle must wait 40 seconds to use the attack.

Grab:
Grab: normal grab. Range: short.
Grab knock: Headers. Damage: 3% every header.
Grab and frontal throw: Tingle uses his belly. Damage: 6%.
Grab and back throw: A.ss knock. Damage: 8%.
Grab and up throw: Double punch. Damage: 6%.
Grab and down throw: Five weak kicks. Damage: 2% every kick.

Final Smash: Kulurin SMASH: Ankle, Knuckle and David Jr. appear during 10 seconds. Like the King Dedede's Final Smash.

Taunts:
Side Taunt: His famous dance.
Up Taunt: Tingle takes out a pencil and a sheet to draw a map.
Down Taunt: Tingle shows a bag with rupees.

More information:
Jumps in air: 1.
Glide?: No.
Wall Jump?: No.
 

Red Arremer

Smash Legend
Joined
Nov 27, 2005
Messages
11,437
Location
Vienna
The Blue Raja is cool. ^^

Also, I've finished Gilius Thunderhead (Page 28), so discuss! I eventually will add a stage for him, we'll see. :>
 

Darkurai

Smash Master
Joined
Aug 20, 2007
Messages
3,012
NEWCOMER


...wait...what!?

SUPER SMASH BROS. BRAWL JOINS THE BRAWL

The box to Super Smash Bros. Brawl is a rather weak fighter, but makes up for it with great attack speed.

Size: 4/10
Power: 5/10
Weight: 4/10
Attack speed: 9/10
Walking Speed: 3/10
Dash speed: 6/10
Fall Speed: 6/10
Jumping: 4/10
Traction: 10/10
Wall-jump: No
Wall Cling: No
Crawl: No
Glide: No
Tether: No

Standard Combo
A: Tilts forward and hits with the pointy corner of the box.
AA: Pushes itself forward and hits with the thin side of the box.
AAA: Spins itself around and hits with the wide flat front of the box.

Tilts
Forward: Spins itself slightly to swipe at someone with the thin side of the box.
Up: Tilts back and swipes upward with the top pointy corner of the box.
Down: Tilts towards the background (its crouch animation) and spins to swip at someone in front of it with the top of the box.

Aerials
Neutral: The box spins in the air.
Forward: The box spins in the air 90 degrees to smack someone. If it hits right, it's a meteor smash.
Down: The box gains downward momentum and attempts to slam the opponent to the ground. Similar to Sonic's and Zamus'.
Up: The box flips itself upwards to hit someone with the back of the box.
Back: The box opens and smacks whoever's there.

Smashes
Forward: The box opens up and closes sharply on whoever is there.
Up: The box opens up and lays on the ground, inside-down, then closes quickly to hop into the air and knock anyone there upward.
Down: The box lays on its thin side and starts to spin around.

Specials
Neutral Special: SD Card
The box opens up and throws out an SD card. Similar to Mario's Fireball. The SD card does virtually no knockback, but decent damage.

Forward Special: Instruction Booklet
The box opens up and slaps someone with the instruction booklet. Does decent knockback.

Up Special: YOU MUST RECOVER
The box opens up and uses the instruction booklet as a sort of parachute and floats upwards. Similar to Snake's up special.

Down Special: CD Spin
The Brawl disc flies out and rolls along the stage until it hits someone or falls off. Similar to R.O.B.'s down special in that it can be charged.

FINAL SMASH: Wii Remote
There is suddenly a brilliant flash! Everyone close to the box cannot move! A cursor (the hand from the Wii Menu) appears and grabs people and throws them off the stage! More damage means you fly farther, but even at 0 it does a decent amount of knockback and damage. The box cannot be harmed during this time.

Other
Grab: A tether grab. The box uses the instruction booklet to grab someone.
Grab Attack: Flips the page in the booklet to slap the person being held.
Edge Grab: Grabs the edge by opening slightly and holding it between the two sides of the box.
Edge Attack (Under 100%): Rolls up onto the ledge and spins on the ground.
Edge Attack (Over 100%): Flips up onto the ledge and swipes slowly at someone.

Taunts
Up taunt: Opens up and spins the disc in its spot.
Side taunt: The box spins around.
Down taunt: The box falls over and gets up.

Entrance
A giant hand comes down from the sky and places the box down on the field.

Victory Poses
1. The box balances on one of its corners.
2. The box spins on one of its corners.
3. A hand comes down, opens the box, and takes the disc out.

Kirby Hat
Kirby balances the box on his head.

Codec Conversation
Snake: Otacon, what the heck is going on!?
Otacon: What's wrong, Snake?
Snake: There's a giant video game box here that's attacking me!
Otacon: Ah, that's the Super Smash Bros. Brawl box.
Snake: But this is Super Smash Bros. Brawl!
Otacon: Yes it is.
Snake: That-that doesn't make any sense...
Otacon: No Snake. No it doesn't.

Alternate Colors
Red: Fire Emblem: Radiant Dawn
Blue: Super Paper Mario
Green: The Legend of Zelda: Twilight Princess
Dark: Oh snaps.
 

Darkurai

Smash Master
Joined
Aug 20, 2007
Messages
3,012
Hey guys, thanks for all the positive response the the game box.

So here's a look at my next moveset.

CHALLENGER APPROACHING


D

Deleted member

Guest
Any ideas on how to fill up the missing moves on my Lucky Day set?
 
Status
Not open for further replies.
Top Bottom