
-
Welcome to Smashboards, the world's largest Super Smash Brothers community! Over 250,000 Smash Bros. fans from around the world have come to discuss these great games in over 19 million posts!
You are currently viewing our boards as a visitor. Click here to sign up right now and start on your path in the Smash community!
It appears that you are using ad block :'(
Hey, we get it. However this website is run by and for the community... and it needs ads in order to keep running.
Please disable your adblock on Smashboards, or go premium to hide all advertisements and this notice.
Alternatively, this ad may have just failed to load. Woops!
Please disable your adblock on Smashboards, or go premium to hide all advertisements and this notice.
Alternatively, this ad may have just failed to load. Woops!
The Ninja, a Complete Sheik guide
- Author OkayP.
- Creation date
Because I feel like my official main is not respected enough nor given enough attention or credit, I am writing an EVERYTHING you need to know guide where in the future an aspiring Sheik player can learn theory, advanced Sheik specific techniques, basic stage movement and really everything basic and advanced all put together. It's a work in progress and in the end will be VERY massive.
Constructive criticism is not only accepted but I am ASKING for it because this is my first published guide. Hopefully I will be able to add new info to it weekly for the foreseeable future.
This is a guide that explains in detail everything you will ever need to know about Sheik, in Smash Bros. MELEE. If I missed anything, or you have any questions or comments, leave them in the comments and ask to email me and I will leave the details over that. Before I begin I would also like to add that this is a SHEIK guide, I will not be going over “Terms” such as “Wave dashing”, L-canceling etcetera, because I feel like it would be a waste of my time seeing how many guides have been written on that specific subject matter. You can find these guides all over the internet and especially Smash Boards
This guide is divided into sections of gameplay in a glossary of "Spoiler" Tabs. So you can find something quickly for reference or to clear up questions about specifics and so on.
ENJOY AND PLEASE LEAVE A COMMENT!
[collapse="Why Sheik?"]
Sheik has long been known as "top tier" in the game. However, I feel as though she doesn’t receive all the respect or ‘hype’ she really deserves. Multiple players have been able to reach success with this character: M2K, KDJ, Amsah, Captain Jack, and Shroomed. These players all have their own, very unique, very intelligent play styles. The point is, Sheik is an incredibly versatile character. One can adapt her tools to their own playstyle, and with enough practice and feel for her, you can become great.
Tools:
•Sheik although technically not a complete character (Because of her transformation into Zelda) is far more versatile and just an all around better character than in my opinion all but two other characters in the game (Falco and Peach).
• Sheik has arguably the best projectile in the game: Needles. Massive priority, good range, combo potential, edge guard potential etc...
•Easily the most useful aerial move set in the game
•Guaranteed or almost guaranteed combos off her downthrow with almost every character
•Her recovery, though argued as mediocre, is rather good, giving her invincibility frames, allowing her to stall on the edge, as well as two main parts to it, with which many tricks can be mastered.
•Almost every move she has leads directly or indirectly into her main killers: F-air, B-air, and U-air
•One of the best shields in the game, and the best by far in the high tiers
•Wall jump (So many possibilities....)
•Good weight for survival and combos
[/collapse]
[collapse="Neutral Game"]
Sheik has a rather balanced neutral game, able to be played multiple ways: Air primary, Grab and tilt primary, and Needle Camp Primary. All of which have pros and cons, I personally prefer to stay Air primary, but with a good amount of grab attempts to stay unpredictable and for mind games. Here is a list of pros vs cons of each "Primary" and how I, in my personal opinion believe they should be played.
[collapse="Air Primary"]
Air Primary is both a very risky, and very high reward method for the neutral game. Any good Sheik player will tell you that the hardest time a Sheik has in a match, is when there being juggled, especially without a jump. Air Primary is based mostly on jumping in with either F-airs, N-airs, or B-airs. All of which can lead to directly to either a *Dash attack to grab-read, or an immediate F-air repeat, etc. Its very hard hitting if your approach is good, as well as your tech skill being developed enough to stay safe after and during your landing after each approach. The number one thing you have to be extremely careful of is when you approach, you're intentionally putting yourself into the air, and if the opponent reads you, with either a U-tilt (Depending on character) Shield grab, Shine, or any other move that propels you into the air, then you will get juggled hard, and die. There is only one effective and mostly reliable strategy to not dying immediately after the juggle: SAVE your double jump, no matter how much damage you're taking DO NOT use your double jump in the attempt to escape. Just keep coming down with N-airs, or D-airs, and hopefully you can tap them with a hit box from either before they juggle you again. Eventually if this continually fails, they will try to move you to either side of the stage in the attempt to edge guard you, once they jump off the stage to hit you, you want to USE your double jump to jump over them, further away from them (coupled with your DI), or (this is risky if read but if not an almost guaranteed punish-edge guard) fast fall till you wouldn't regularly be able to recover WITHOUT your double jump, then you jump up with either a B-air, or a U-air, aiming for them. Regardless of whether or not you hit them, up-b ONTO the stage and proceed with the edge guard accordingly. So really there are equal pros and cons to this strategy, listed below.
PROS:
If executed well, it sets up for an immediate combo and edge guard.
Can kill on its own if opponent is at mid-high, to high damage.
Little guess work and reads, and relies mostly on spacing the shield and possible counter attack.
Not extremely tech demanding.
CONS:
Punishable to death, if good DI is not applied.
Becomes predictable if not mixed with aspects of Grab and/or Needle camp Primary.
Not very effective or reliable against campy opponents, ESPECIALLY against ledge campers, (Pro examples are M2K and Hax)
SAVE YOUR DOUBLE JUMP. [/collapse]
[collapse="Grab Primary"]
Grab Primary is a whole different ball game. Grab Primary is all about mind games, and reads (Making it slightly less reliably consistent then the other two strategies). It consists obviously of almost all grabs, but also of tilts and jabs. This Strategy requires a large amount of tech ability due to its large requirement for platform movement through wavedashing, triangle jumps, shield dropping, and just as many possible forms of movement as possible. The idea of Grab Primary is to pressure the opponent into shield or onto a platform, through empty tomahawks, platform triangle jumping, tilting and jabbing their shield, and just going too fast for them. Applying empty pressure to them is the most basic way I can explain it. If you're doing it well enough, they will either retreat to the ledge, their shield, or a platform. If they retreat to the ledge, use Sheiks overpowered Needles, Down Smash, N-air, Dtilit, Fthrow, B-air, D-air, Jab, And Ftilt to edge guard and take the stock. However be weary near the ledge against another Sheik, Marth, Pikachu, Jigs, and Fox, as all can effectively turn the situation around with the company of ledge invincibility frames.
If they retreat to a platform, you can either hard read N-air their shield, into grab. Or you can double jump Needle their shield into waveland grab, but this becomes less guaranteed with less needles charged. If they fail to shield, you can U-air, F-air, or still go for a double jump-Needle approach.
Their last option is to hug shield, which is both their safest, or most risky option, depending on the character. (A list of risk depending on character and how to deal with it is listed in a later section.) Deal with this accordingly. If they simply take the pressure and fail to respect you, congrats, you have a free jump-needle-grab.
PROS:
Regularly, very safe if proper tech skill is applied to movement.
Mostly guaranteed follow ups if proper technique is applied.
Multiple ways to execute.
Easy to apply to almost any style of play (Campy, Aggressive, etc...)
Low-Mid risk and Mid reward.
CONS:
High tech skill requirement to fully stay safe after approach.
High dexterity requirement.
Reactionary requirement.
Works better or worse depending on opponent.
Often needs preparation (Needles) to stay safe and keep pressure on opponent.
Loses effectiveness on FD and FoD.
[/collapse]
[collapse="Needle Camp Primary"]
Needle camp Primary is (as the name would lead to believe) a very campy and patient strategy. The main idea is to use the platforms and weave between them while throwing needles to interrupt any approach from the opponent. In order to be really effective with this strategy, you MUST learn how to play around with the platforms: Wave landing/dashing, shield dropping, triangle jumping, ledge cancelling, needle cancelling, etc, etc... But of course, what is camping without a strong punish game. The point of stopping the opponent with needles, is to continuously LOOK FOR OPENINGS. Whether it's waiting for them to get in their shield, or for them to retreat to the ledge in an attempt to avoid needles, or them throwing out a laggy move in desperation to hit you, you need to find someway in. As soon as you can get a dash attack (Highish risk if they shield it) or a dash grab or just regular grab, you can start working on them through Sheiks pretty easy and simple combos.
I CANNOT physically stress enough how important it is that you practice and master needle cancelling and needle turn arounds to be well versed in this strategy. Something known, but rarely utilize is the needle-attack stall technique. Needles, have a hurtbox coupled with their hitbox. This means that they can be attacked. Also, needles don't despawn for a considerable amount of time after they hit the ground, a platform, a wall, etc... This mechanic allows "Needle attack stall." Executed as such.
1. Get needles.
2. On a platform stage, jump to in the center while facing towards the opponent.
3. While you're still higher than the side platforms, needle the platforms and fast fall to get some on the ground.
4. Carry on accordingly
PROS:
If executed well, very hard to punish safely.
Frustrates opponents, making them not always play great.
Very defensive play style.
Low risk.
If learned well, can be coupled with good edge guarding for low percentage kills.
CONS:
Very high level of tech skill required.
High amount of tech dexterity required.
Can be out camped by lasers, missiles, pills, and even Marth's (or Roy's) sword.
If you mess up, you have to retreat, or approach. Neither are very safe, unless you practice A LOT on the ledge.
Not effective on FD.
[/collapse]
All of these strategies can be intertwined and adjusted to YOUR playstyle. This is just my opinion on how each INDIVIDUAL strategy should be played, but my way is not by any means "The right way." Please, if you wish to learn or get better with Sheik, learn the basics of these primaries, and then find out which way you like to play.
[/collapse]
[collapse="Edge Guarding"]
Sheik has a very very efficient and effective edge guard game, literally being able to cover every option, just not all at the same time. but that is where skill comes into play anyway.Below is a fairly in depth guide on the best way to edge guard each character in most if not all situations according to the current meta-game.
Edge guarding and the techniques required to do so changes with every character. A list of in-detail edge guarding for each character is below. As far as generic strategy, I really just recommend hitting them down to the Y-(either) Zone, and then capitalizing with invincible B-airs, F-airs, N-airs, and occasionally U-airs (Stage spiking) Unlike with most other characters, Sheik doesn't have a highly abusable on stage edge guarding tactic. She does however, thrive greatly off stage.
I will refer to each "block" or "area" as its color (Green=G, Blue=B, and Yellow=Y) and its relevance to the red line.(Inside=I or Outside=O) Secondly, I will put two different ways to edge guard: On stage, AND Off stage.
[collapse="img"][/collapse]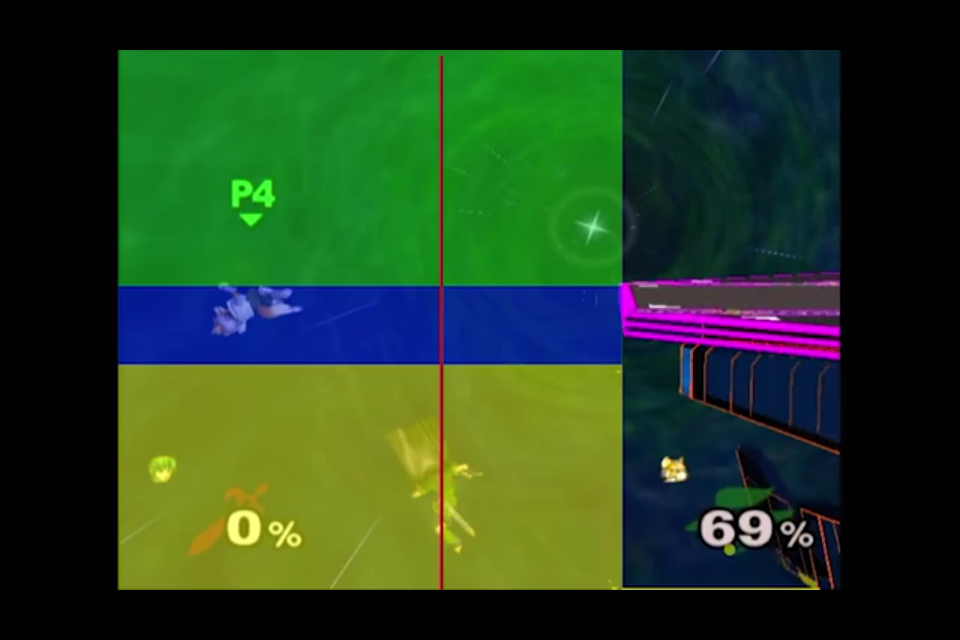
[collapse="Dr. Mario/Mario"]
The "Marios" Have a very different angles to guard then the high tiers and most other characters as a whole. Its important to watch the "Down-B" option with Mario but less so with Doc
Just watch their movements carefully, and watch out for fireballs and pills on their return.
ON stage edge guarding these two on stage can theoretically (but only theoretically) be impossible. This is because of their MASSIVE edge magnet. (The area the game registers where they can grab the ledge)
If you want to stay VERY VERY safe, and not jump off, the only thing you can do is to needle them at two angles. The goal of ON stage edge guarding for "The Marios" is to kill them BEFORE they reach the I-Y zone. If they get knocked out to EITHER of the G, you can double jump needle them to knock them down to the B zone. From there, if they are on the outside, they HAVE to fall down to the Y zone or risk getting needled down to it anyway. If they are smart, they will DI to the I-Y zone because once they reach here, you HAVE to jump off to ensure an edge guard (But this still is not guaranteed with Mario because of his “wall jump up be option” and to guarantee you need to treat it the same as a samus’ zair option which i’ll go into in samus’ edge guarding explanation . If however, they don't DI under the stage to the I-Y zone, and don't have a jump, you can throw ANOTHER needle at them, and they will die either from a laggy cape, or from getting hit. If they do have a jump, you should still throw the needle, but be prepared to D-air them. (Jumping up, and D-airing the ledge right when they come in contact with it, sending them upwards, with a possible F-air follow up.
OFF stage edge guarding is generally more dangerous. But for Sheik, off stage is her great strong point. Once Sheik jumps off stage, many options that "The Marios" have disappear. If they are in either G zone, run out jump ONCE and N-air, continually DIing towards them until you hit them. (in case they choose to cape you.) Once you do N-air them, they should be in the B zone, (if they are in the I-B zone, just wavedash onto the ledge and continually B-air them.) from there, you want to get them as far from the stage as possible, but without being too risky, possible try to F-air them or B-air them. If they fall into the O-Y zone and still have a jump, you should try to F-air/B-air them. Otherwise just wait, shoot needles and let them die staying safe. If they reach the I-Y zone, fall back, and hit them with a F-air or N-air. Remember though, they're not dead till you see the stock disappear.
[/collapse]
[collapse="Luigi"]
With a much less predictable recovery, Luigi can at times prove difficult to get the best of IF the opponent has a good Down-Special and it’s charged. Otherwise you can simply knock them away from the stage a minimal amount, this is because unlike Mario’s, or Doc’s “Super Jump Punch”, Luigi doesn’t gain ANY horizontal distance from his Up-Special, making him remarkably easy to edge-guard (Given the options presented above are not present)
ON: Unlike the “Marios’”, Luigi is generally easy to edge guard on stage (Via. Needles) so long as the given Luigi player is either unskilled at the “Down-B” recovery option, or has not gained access to it. (Access is gained by using the grounded version of the move at least once before attempting to use the recovery option of the move [The Luigi must do this after each recovery usage to regain access])
If the Luigi ends up off stage in the I-G area, I recommend simply jumping to their current position and N-airing them (safest option while facing towards them) This will hopefully knock them straight out if you hit the with the correct spacing. (The tip of her foot, just a few pixels above them). By that point you should prepare for an almost imminent “Side-B” and really just jump up and try to read with a B-air. Try to land immediately to cover their options accordingly.
to be completely honest Luigi’s only real option in the blue zone (either) is to "Side-b" to get directly under the ledge to prepare for an “Up-B” if they don’t have a “Down-B” option. If they do have the option, then really its best to work on your reaction, to cover their options.
OFF:The idea with Luigi is to stay extremely safe, using “N-airs” and “B-airs” to wall them away until they reach the Y area. Then try to “N-air” them and keep them under and away from the stage.
To begin with, if they are in the G area, strong hit “B-air” them to keep them away from the stage, or “N-air” them straight out like you would do ON stage. Really you should treat it the same way as you would ON stage but just keep walling them out with Back airs.
To deal with the “Down-B” you should really just shino stall to refresh invincibility and then “N-air them beneath the stage”
[/collapse]
[/collapse]