
Fortress
Smash Master
So, I figured we could rap about common mine formations, traps, and mindgames both known and hypothetical. I'll get the ball rolling with some placements that I use, which I thought were pretty basic. These are mostly offensive ones, and I think we could definitely benefit from some talk about defensive placements as well, for both recovery off-stage and dealing with pressure.
All of the formations I'm going to post are either well-established already (such as the Funnel), or completely 'what if' kind of ideas. Discuss your formations, these ones if you wish, and what's been proven to work, and not work.
[collapse=Wall Approach Formation]
 [/collapse]
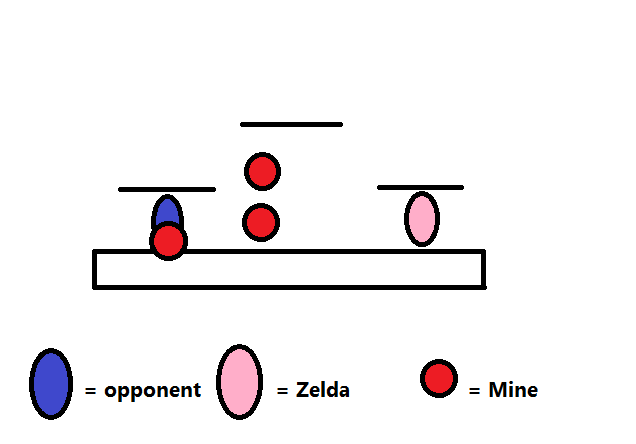
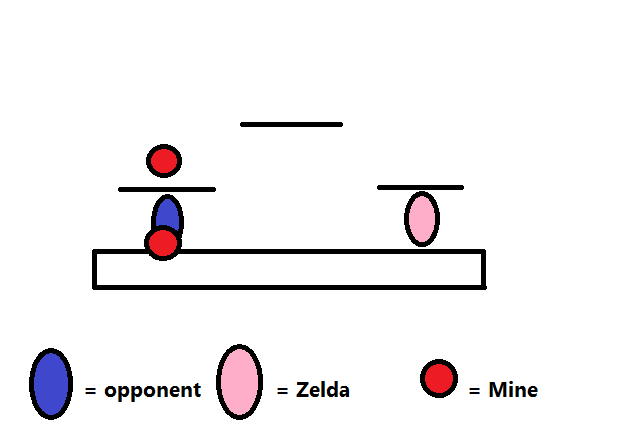
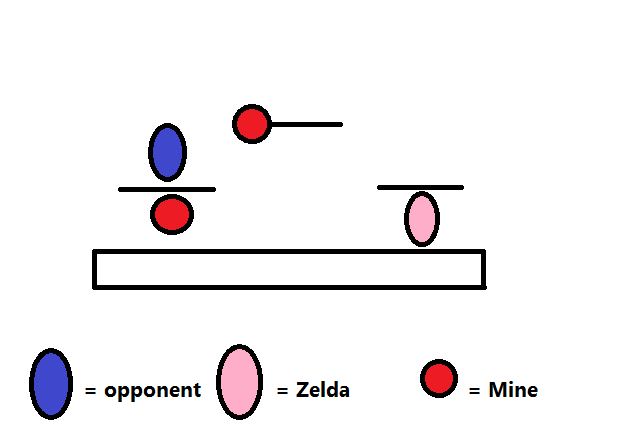
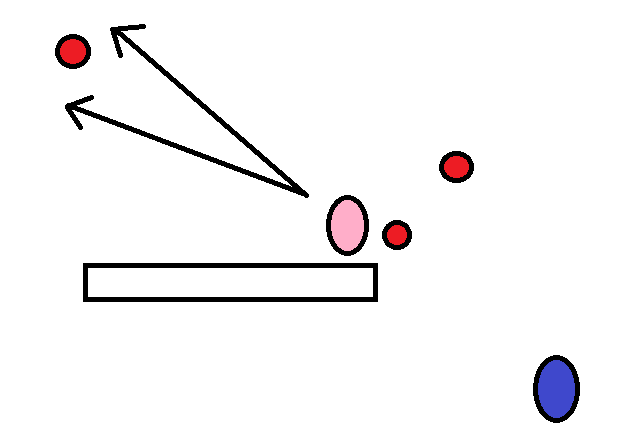
The Wall Approach can be used to provide cover for Zelda during an attempt at a direct, head-on rushdown. The third mine, placed directly on the opponent, is an optional mine placement which can be used to force your opponent either up or back, with the wall still providing you cover to approach. The goal is to limit the opponent's horizontal control of the stage, giving Zelda an opportunity to approach for a grab or aerial.
[collapse=Firewall]
 [/collapse]
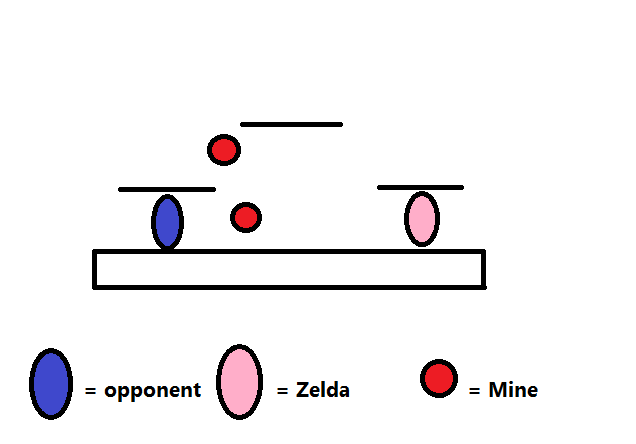
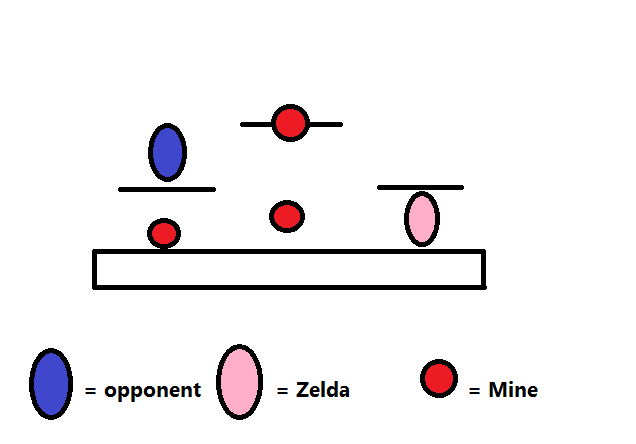
The goal of the Firewall is similar to that of the standard Wall formation in that you want to limit your opponent's horizontal control. In addition, the placement of the upper mine will force any sort of aerial approach against you from the top platform to utilize a double jump to reach it safely, or to not want to approach the upper platform to begin with. With the Firewall, you not only gain horizontal control, but you gain a slight vertical advantage as well with the closer placement of the upper mine.
[collapse=Cage Formation]
 [/collapse]
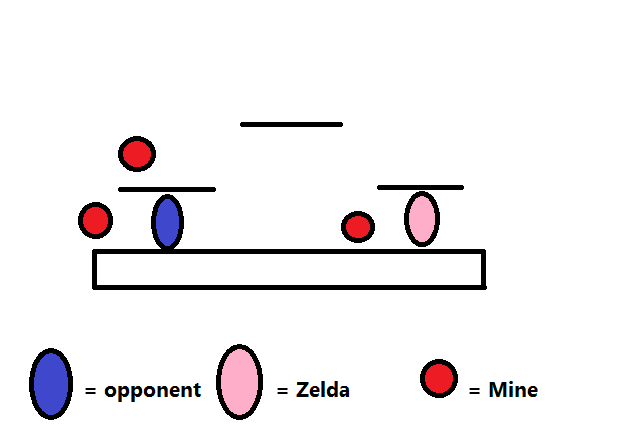
The Cage formation is a sort of reverse wall, limiting horizontal control for you opponent, but in that they have trouble retreating instead of approaching. The goal is to force out an approach from your opponent. Though, this particular placement is difficult to set up in that you leave yourself pretty open while doing so. Placing a mine nearby before attempting this setup is encouraged. The wall doesn't have to be complete to force the approach. Simply leaving yourself 'open' while performing the setup can be enough to entice your opponent into making the attempt at a rush, which is where the mine closest you (which you should place first) will come in handy.
[collapse=Platform Funnel]
 [/collapse]
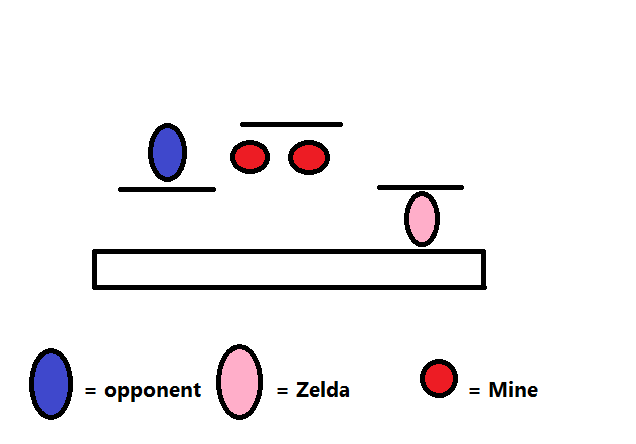
The goal of this particular formation is pretty obvious. Force a vertical response from your opponent. The uppermost platform should ideally provide cover should your opponent try and get above you, and you should have plenty of options should they try and fall through.
[collapse=Coal-Walk Formation]
 [/collapse]
For the Coal-Walk, you'll want to set up a mine above your opponent, and place one at their feet. Your goal here is to force them away from you and off of the stage, or towards you by preventing use of the platform above. A 'panic response' is what you're going for.
[collapse=Platform Trap Formation]
 [/collapse]
The goal of the Platform Trap is to limit every option your opponent has. You can threaten damage with a platform drop, which they can negate by blocking the mine with an aerial, which you can take advantage of. You can limit the use of the platform above them, no matter how unlikely it is they would use it, and by placing a mine at the 'center' of the stage, but just below platform-level, you limit a direct approach from the platform, while your mine is too low to be nailed with a tilt and snuffed out.
[collapse=Vertical Trap Formation]
 [/collapse]
The Vertical Trap aims to limit your opponent to movement options involving going up or down to approach you. With a re-enforced wall, you can ensure that they won't stamp out your formation with just one attack. Even if they do make the move of trying to snuff out your mine, you've still got the other, just out of range, and they have just wasted their time trying to take out your mine.
[collapse=Basic Funnel Formation]
 [/collapse]
The venerable funnel is one you've likely seen in every high-level Zelda match, and probably used yourselves. Giving your opponent one option to approach you from on purpose will set you up perfectly for any sort of follow-up you can think of. Holes in your defenses can only work in your favor when they're of your design.
All of the formations I'm going to post are either well-established already (such as the Funnel), or completely 'what if' kind of ideas. Discuss your formations, these ones if you wish, and what's been proven to work, and not work.
[collapse=Wall Approach Formation]
The Wall Approach can be used to provide cover for Zelda during an attempt at a direct, head-on rushdown. The third mine, placed directly on the opponent, is an optional mine placement which can be used to force your opponent either up or back, with the wall still providing you cover to approach. The goal is to limit the opponent's horizontal control of the stage, giving Zelda an opportunity to approach for a grab or aerial.
[collapse=Firewall]
The goal of the Firewall is similar to that of the standard Wall formation in that you want to limit your opponent's horizontal control. In addition, the placement of the upper mine will force any sort of aerial approach against you from the top platform to utilize a double jump to reach it safely, or to not want to approach the upper platform to begin with. With the Firewall, you not only gain horizontal control, but you gain a slight vertical advantage as well with the closer placement of the upper mine.
[collapse=Cage Formation]
The Cage formation is a sort of reverse wall, limiting horizontal control for you opponent, but in that they have trouble retreating instead of approaching. The goal is to force out an approach from your opponent. Though, this particular placement is difficult to set up in that you leave yourself pretty open while doing so. Placing a mine nearby before attempting this setup is encouraged. The wall doesn't have to be complete to force the approach. Simply leaving yourself 'open' while performing the setup can be enough to entice your opponent into making the attempt at a rush, which is where the mine closest you (which you should place first) will come in handy.
[collapse=Platform Funnel]
The goal of this particular formation is pretty obvious. Force a vertical response from your opponent. The uppermost platform should ideally provide cover should your opponent try and get above you, and you should have plenty of options should they try and fall through.
[collapse=Coal-Walk Formation]
For the Coal-Walk, you'll want to set up a mine above your opponent, and place one at their feet. Your goal here is to force them away from you and off of the stage, or towards you by preventing use of the platform above. A 'panic response' is what you're going for.
[collapse=Platform Trap Formation]
The goal of the Platform Trap is to limit every option your opponent has. You can threaten damage with a platform drop, which they can negate by blocking the mine with an aerial, which you can take advantage of. You can limit the use of the platform above them, no matter how unlikely it is they would use it, and by placing a mine at the 'center' of the stage, but just below platform-level, you limit a direct approach from the platform, while your mine is too low to be nailed with a tilt and snuffed out.
[collapse=Vertical Trap Formation]
The Vertical Trap aims to limit your opponent to movement options involving going up or down to approach you. With a re-enforced wall, you can ensure that they won't stamp out your formation with just one attack. Even if they do make the move of trying to snuff out your mine, you've still got the other, just out of range, and they have just wasted their time trying to take out your mine.
[collapse=Basic Funnel Formation]
The venerable funnel is one you've likely seen in every high-level Zelda match, and probably used yourselves. Giving your opponent one option to approach you from on purpose will set you up perfectly for any sort of follow-up you can think of. Holes in your defenses can only work in your favor when they're of your design.

 )
)
") (covers both dthrow DI options for a timer kill or a collision>kick kill)
(covers both dthrow DI options for a timer kill or a collision>kick kill)