• Welcome to Smashboards, the world's largest Super Smash Brothers community! Over 250,000 Smash Bros. fans from around the world have come to discuss these great games in over 19 million posts!

    You are currently viewing our boards as a visitor. Click here to sign up right now and start on your path in the Smash community!

Minesweeper: Mine Formations and You

Status
Not open for further replies.

Fortress

Smash Master
Joined
Oct 2, 2013
Messages
3,097
Location
Kalispell, MT
So, I figured we could rap about common mine formations, traps, and mindgames both known and hypothetical. I'll get the ball rolling with some placements that I use, which I thought were pretty basic. These are mostly offensive ones, and I think we could definitely benefit from some talk about defensive placements as well, for both recovery off-stage and dealing with pressure.

All of the formations I'm going to post are either well-established already (such as the Funnel), or completely 'what if' kind of ideas. Discuss your formations, these ones if you wish, and what's been proven to work, and not work.

[collapse=Wall Approach Formation]
[/collapse]

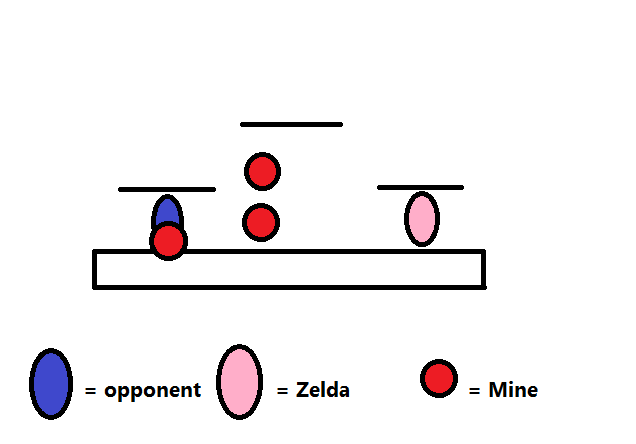
The Wall Approach can be used to provide cover for Zelda during an attempt at a direct, head-on rushdown. The third mine, placed directly on the opponent, is an optional mine placement which can be used to force your opponent either up or back, with the wall still providing you cover to approach. The goal is to limit the opponent's horizontal control of the stage, giving Zelda an opportunity to approach for a grab or aerial.

[collapse=Firewall]
[/collapse]

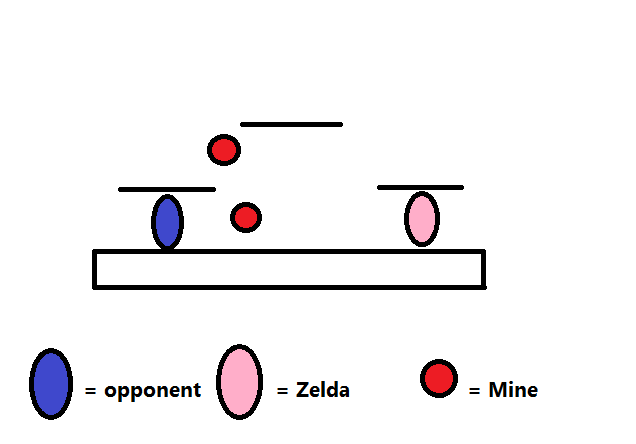
The goal of the Firewall is similar to that of the standard Wall formation in that you want to limit your opponent's horizontal control. In addition, the placement of the upper mine will force any sort of aerial approach against you from the top platform to utilize a double jump to reach it safely, or to not want to approach the upper platform to begin with. With the Firewall, you not only gain horizontal control, but you gain a slight vertical advantage as well with the closer placement of the upper mine.

[collapse=Cage Formation]
[/collapse]

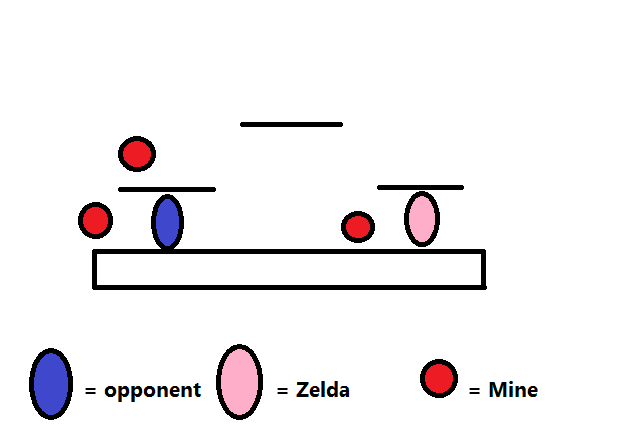
The Cage formation is a sort of reverse wall, limiting horizontal control for you opponent, but in that they have trouble retreating instead of approaching. The goal is to force out an approach from your opponent. Though, this particular placement is difficult to set up in that you leave yourself pretty open while doing so. Placing a mine nearby before attempting this setup is encouraged. The wall doesn't have to be complete to force the approach. Simply leaving yourself 'open' while performing the setup can be enough to entice your opponent into making the attempt at a rush, which is where the mine closest you (which you should place first) will come in handy.

[collapse=Platform Funnel]
[/collapse]

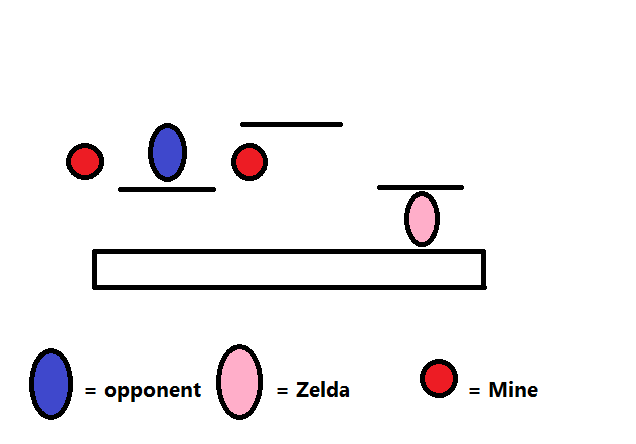
The goal of this particular formation is pretty obvious. Force a vertical response from your opponent. The uppermost platform should ideally provide cover should your opponent try and get above you, and you should have plenty of options should they try and fall through.

[collapse=Coal-Walk Formation]
[/collapse]

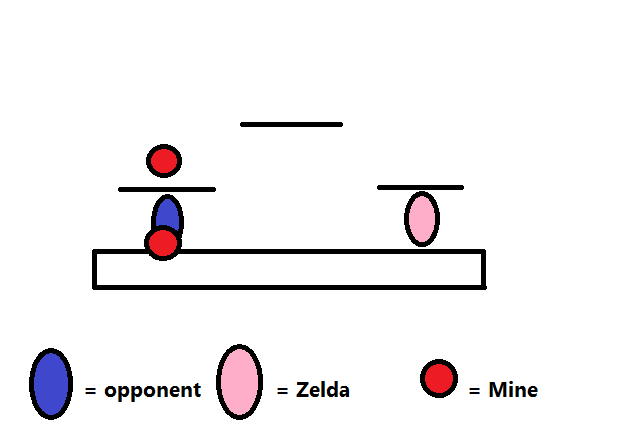
For the Coal-Walk, you'll want to set up a mine above your opponent, and place one at their feet. Your goal here is to force them away from you and off of the stage, or towards you by preventing use of the platform above. A 'panic response' is what you're going for.

[collapse=Platform Trap Formation]
[/collapse]

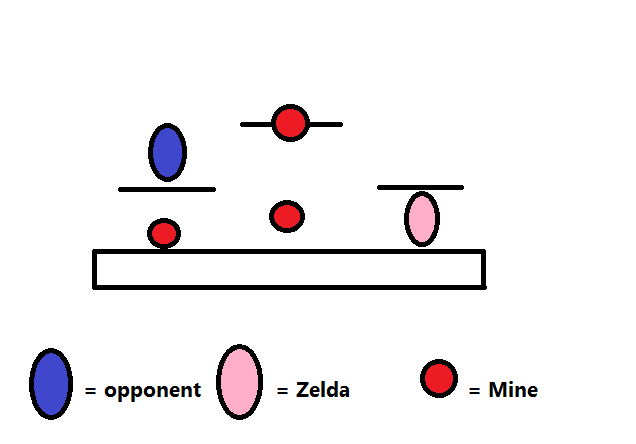
The goal of the Platform Trap is to limit every option your opponent has. You can threaten damage with a platform drop, which they can negate by blocking the mine with an aerial, which you can take advantage of. You can limit the use of the platform above them, no matter how unlikely it is they would use it, and by placing a mine at the 'center' of the stage, but just below platform-level, you limit a direct approach from the platform, while your mine is too low to be nailed with a tilt and snuffed out.

[collapse=Vertical Trap Formation]
[/collapse]

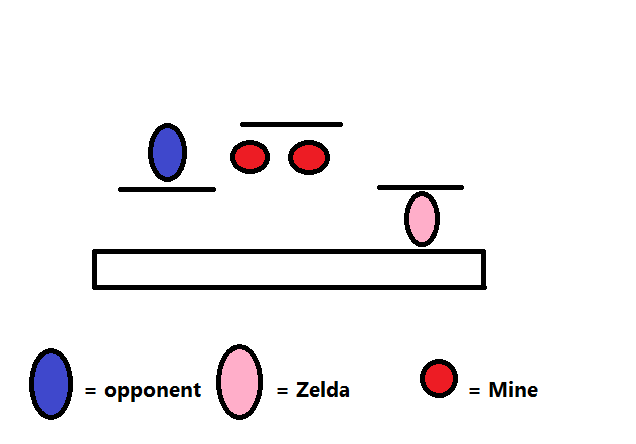
The Vertical Trap aims to limit your opponent to movement options involving going up or down to approach you. With a re-enforced wall, you can ensure that they won't stamp out your formation with just one attack. Even if they do make the move of trying to snuff out your mine, you've still got the other, just out of range, and they have just wasted their time trying to take out your mine.

[collapse=Basic Funnel Formation]
[/collapse]

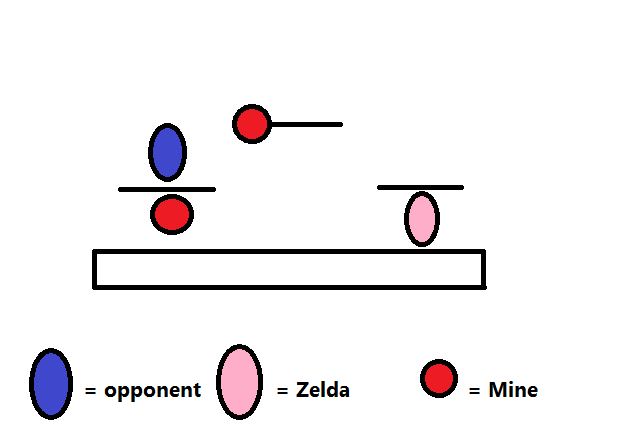
The venerable funnel is one you've likely seen in every high-level Zelda match, and probably used yourselves. Giving your opponent one option to approach you from on purpose will set you up perfectly for any sort of follow-up you can think of. Holes in your defenses can only work in your favor when they're of your design.
 

WhiteLightnin

Smash Journeyman
Joined
Nov 25, 2013
Messages
217
Location
Albuquerque, NM
So, I figured we could rap about common mine formations, traps, and mindgames both known and hypothetical. I'll get the ball rolling with some placements that I use, which I thought were pretty basic. These are mostly offensive ones, and I think we could definitely benefit from some talk about defensive placements as well, for both recovery off-stage and dealing with pressure.

All of the formations I'm going to post are either well-established already (such as the Funnel), or completely 'what if' kind of ideas. Discuss your formations, these ones if you wish, and what's been proven to work, and not work.

[collapse=Wall Approach Formation]
[/collapse]

The Wall Approach can be used to provide cover for Zelda during an attempt at a direct, head-on rushdown. The third mine, placed directly on the opponent, is an optional mine placement which can be used to force your opponent either up or back, with the wall still providing you cover to approach. The goal is to limit the opponent's horizontal control of the stage, giving Zelda an opportunity to approach for a grab or aerial.

[collapse=Firewall]
[/collapse]

The goal of the Firewall is similar to that of the standard Wall formation in that you want to limit your opponent's horizontal control. In addition, the placement of the upper mine will force any sort of aerial approach against you from the top platform to utilize a double jump to reach it safely, or to not want to approach the upper platform to begin with. With the Firewall, you not only gain horizontal control, but you gain a slight vertical advantage as well with the closer placement of the upper mine.

[collapse=Cage Formation]
[/collapse]

The Cage formation is a sort of reverse wall, limiting horizontal control for you opponent, but in that they have trouble retreating instead of approaching. The goal is to force out an approach from your opponent. Though, this particular placement is difficult to set up in that you leave yourself pretty open while doing so. Placing a mine nearby before attempting this setup is encouraged. The wall doesn't have to be complete to force the approach. Simply leaving yourself 'open' while performing the setup can be enough to entice your opponent into making the attempt at a rush, which is where the mine closest you (which you should place first) will come in handy.

[collapse=Platform Funnel]
[/collapse]

The goal of this particular formation is pretty obvious. Force a vertical response from your opponent. The uppermost platform should ideally provide cover should your opponent try and get above you, and you should have plenty of options should they try and fall through.

[collapse=Coal-Walk Formation]
[/collapse]

For the Coal-Walk, you'll want to set up a mine above your opponent, and place one at their feet. Your goal here is to force them away from you and off of the stage, or towards you by preventing use of the platform above. A 'panic response' is what you're going for.

[collapse=Platform Trap Formation]
[/collapse]

The goal of the Platform Trap is to limit every option your opponent has. You can threaten damage with a platform drop, which they can negate by blocking the mine with an aerial, which you can take advantage of. You can limit the use of the platform above them, no matter how unlikely it is they would use it, and by placing a mine at the 'center' of the stage, but just below platform-level, you limit a direct approach from the platform, while your mine is too low to be nailed with a tilt and snuffed out.

[collapse=Vertical Trap Formation]
[/collapse]

The Vertical Trap aims to limit your opponent to movement options involving going up or down to approach you. With a re-enforced wall, you can ensure that they won't stamp out your formation with just one attack. Even if they do make the move of trying to snuff out your mine, you've still got the other, just out of range, and they have just wasted their time trying to take out your mine.

[collapse=Basic Funnel Formation]
[/collapse]

The venerable funnel is one you've likely seen in every high-level Zelda match, and probably used yourselves. Giving your opponent one option to approach you from on purpose will set you up perfectly for any sort of follow-up you can think of. Holes in your defenses can only work in your favor when they're of your design.
Haha this is awesome and a great idea! Thanks for making this. I'll be happy to help contribute.
 

TimeSmash

Smash Champion
Joined
Aug 23, 2006
Messages
2,669
Location
Inside a cheesecake
NNID
nintend64
Just commenting on this to say this is awesome, and that I am looking forward to what we can come up with!

Edit: If there are order specific patterns in which the fireballs need to be set up, try numbering them via 1, 2, and 3 either inside the red dot or with an arrow pointing to it
 
Last edited:

Fortress

Smash Master
Joined
Oct 2, 2013
Messages
3,097
Location
Kalispell, MT
Yeah, I thought about numbering them, too. I'll do that for the future ones. So far, I think the funnel formation is the most effective. I mean, when your opponent spots a 'hole' in your minefield, and takes advantage of your 'mistake', it just sets you up for so much.
 

Arcalyth

GLS | root
Joined
Oct 1, 2012
Messages
650
Location
West MI
Vertical trap seems to work in theory but not generally in practice. It is possible to swat out multiple fireballs with one attack, especially in the case of characters with sex kicks, aerial disjoint, and/or multi-hit moves and the time and space control you lose from "reinforcing" the wall isn't worth the negligible benefit.

that said it's a really bad habit for me to break personally :-x
 

Fortress

Smash Master
Joined
Oct 2, 2013
Messages
3,097
Location
Kalispell, MT
That makes sense, using one of Zelda's attacks as the other part of the 'wall'. Threatening with a heel or nair to force your opponent to get up and away or below without actually using them sounds smart.
 

Chesstiger2612

Smash Lord
Joined
Jun 1, 2013
Messages
1,753
Location
Bonn, Germany
Great post I look forward to discuss the advantages and disadvantages of these setups. One note, did you include the b-throw setups Zhime uses? Or can you use some of the mentioned for it?
 

Fortress

Smash Master
Joined
Oct 2, 2013
Messages
3,097
Location
Kalispell, MT
The Zhime setups offstage for d-airs and the corner setup for B-throw on a recovering opponent are the only ones I know of. Feel free to jump in and elaborate more specifically on them.
 

Chesstiger2612

Smash Lord
Joined
Jun 1, 2013
Messages
1,753
Location
Bonn, Germany
I just saw them a few times on stream basically setting up one din far diagonally away for b-throw don't know that much more. You have to change the distance/angle dependent on percentage and fastfaller/floaties
 

Downdraft

Smash Ace
Joined
Mar 16, 2014
Messages
556
Location
Huntsville, AL
I just saw them a few times on stream basically setting up one din far diagonally away for b-throw don't know that much more. You have to change the distance/angle dependent on percentage and fastfaller/floaties
I tried practicing the throws into Din's Fire a little on DeDeDe. If you can grab the opponent immediately after releasing Din's then 2-3 pummels can be used to time a f-throw, u-throw, or b-throw into Din's Fire. F-throw seemed tougher to use.

I would love to learn some Din's into sweetspotted D-air setups. Meteor Heel is a close second to a critically sweet spotted Lightning or Reverse Lightning Kick in terms of awe and gratification.
 

Chesstiger2612

Smash Lord
Joined
Jun 1, 2013
Messages
1,753
Location
Bonn, Germany
Just as a note: In some cases the setup shouldn't work because of DI, the explosion has a circle hitbox, which means the success rate is dependent on distance (because the angle difference covered decreases with increasing distance). That should mean it is easier to land at lower %s (probably more mid%s because b-throw isn't your best throw at low %s) and gets more and more DI dependent on higher percents. Most people won't know the angle though and will DI wrong so that gets more important against players with MU experience.
 

Downdraft

Smash Ace
Joined
Mar 16, 2014
Messages
556
Location
Huntsville, AL
Throwing into an exploding mine or meteor heeling someone after they've bounced off a mine can up your opponents' intensity.
Out of the serious Zelda mains, my Zelda is probably average at best, but she gets complaints from my group.
 

WhiteLightnin

Smash Journeyman
Joined
Nov 25, 2013
Messages
217
Location
Albuquerque, NM
As far as the placement for the Din's backthrow setup you want to have it placed where it covers the highest or near highest DI they could angle as that is what is optimum for surviving normally against Zelda's backthrow. If they DI off the side, which is usually regarded as bad DI, they will most likely be KO'd or at least in an extremely bad recovery position. If they DI up, they will get KO'd if the Zelda timed it right. Of course it's situational but most people will go for the optimum DI as there is the chance the Zelda will mess up allowing them to live.
 

Kaeldiar

Smash Ace
Joined
Dec 18, 2013
Messages
563
Location
MDVAiridian City
So me and WhiteLightning were talking about these and we thought of a different "Coal Walk." When we saw the title, we both thought of placing 3 of them on the ground. This forces your opponent to approach you from the air, and possibly use a double jump barring excellent platform use or Falcon's aerial speed. So...

Coal Walk 2: place 3 of them on the ground, or near the ground. Preferably near, as it will cover more area
 

Downdraft

Smash Ace
Joined
Mar 16, 2014
Messages
556
Location
Huntsville, AL
So me and WhiteLightning were talking about these and we thought of a different "Coal Walk." When we saw the title, we both thought of placing 3 of them on the ground. This forces your opponent to approach you from the air, and possibly use a double jump barring excellent platform use or Falcon's aerial speed. So...

Coal Walk 2: place 3 of them on the ground, or near the ground. Preferably near, as it will cover more area
I can imagine a few characters that would render that setup ineffective.
Perhaps we should also discuss versus which characters a particular set would be a bad idea.
 

Fortress

Smash Master
Joined
Oct 2, 2013
Messages
3,097
Location
Kalispell, MT
Ganondorf and any character with a decent down tilt or projectile can just eat right through it. Placing three is a time-waster, and a waste of the aerial mine option.
 

Zerudahime

Smash Apprentice
Joined
Sep 30, 2009
Messages
145
Location
Johnstown, PA
Remember: These are not guaranteed, but they work for me very often.
Advanced placements


Op o---o---o---- Z (triple threat, din bouncer 1 [can space midstage, or op on ledge, if on ledge], use side taunt to bounce OP and keep 4 fireballs on the field until expl occurs. If by some chance they fall out, Dsmash will launch them back into the fire quickly after they hit your sidetaunt. Shielding doesnt help, it makes it worse for them. This is a very solid and basic trap. If they are clanking, allow them to fight through, refresh as necessary until they are in range, and Jab/SH nayru them into the fire.)


----o
o
-Op-o---- Z (triforce, will break a shield with telecancel behind op>bair crit to shrink shield and keep them shielding)


--------o
----o
OP_Z-* _____ (Z-bouncer formation 1 [must use dthrow -- the * is so they get hit from dthrow>nair sending them behind zelda into the backmines, that in itself is a placement], yes Z for Zhime :p )


--------o
-----------o
-------o R_Z (Z-bouncer formation 2 [dsmash] R is roll from ledge
--------OP


----------------------o 110%
-----o
OP__o---Z-----------_____ (Zhime bthrow =p) In order to get this to work, 75% is roughly a 45deg angle with survival DI. anything above that, the angle becomes slightly more acute. use wisdom to calculate by doing a primer Bthrow to gauge the opponents typical DI.


-----o
--o
OP_Z___ (din bouncer 3 [Fthrow, leads to fair or uair]. ) Must stay within 10 frames of fthrow release, space dins closer as necessary.


Timer trip:

----------o
oOP__o____Z (Timed expl trip 1) The idea here is to set the first 2 as a wall, set the last behind the OP and
drive it into the floor and hold B, this will cause the OP to take the hit of the last din, continue holding b, and you will detonate the first 2 set mines as the OP is launched into their expl from the 3rd dins KB. This causes the dins to remain on 2 separate timers, so timing is imperative.

Note for teleporting characters: As Fortress illustrated, leave openings in some of your formations at any given opportunity when teleports are expected. Plan for them and slam them with Utilt for the KO when weaving through your obstacle course.

learn to refresh as necessary to keep the remaining Key mine active. [planned explosion]

@ Fortress Fortress , placing 3 is far from a time waster. It leads to more extensions and adds the ability to trip the original timer when necessary. 3 placed dins during recovery is always better than 2 or 1. Keep in mind, you also need to bide your time, and telecancel through while refreshing until mid stock%s while your formations still exist. Dins works in combination with Telecancel. Its a synergistic approach to placement and formation/timing. =D

These are just a few of the really important ones. I took them from my dins formation notebook. Almost all of these setups are in my combo videos, and Gallos Rated M series of videos 1 2 and 3. :p

http://www.youtube.com/watch?v=jsDw9cLyBio -- reference for traps in game

There are a ton more that I use in different situations with altered sized mines set for larger, smaller explosions, but this is meant to be an outline to help you all get the feel for placements. I encourage you all to experiment as dins fire is easily the most complex projectile in the game when used correctly.
 
Last edited:

Kaeldiar

Smash Ace
Joined
Dec 18, 2013
Messages
563
Location
MDVAiridian City
I can imagine a few characters that would render that setup ineffective.
Perhaps we should also discuss versus which characters a particular set would be a bad idea.
You place the first far away from you, then the next one close, then the next one the closest. It obviously doesn't work against everyone...but when you place one, especially low, they may be more likely to jump over it than diffuse it, especially if you are far away. When they do this, the second placement forces them to make a hasty decision. Avoiding the Din's by using their second jump or air dodging, or diffusing with a d-air. Either way, it makes them do something they don't want to.All of these Din's formations are situational, of course. Coal Walk 2 is just another option. Not the best, but allows for more mind games, and let's face it: mind games are Zelda's best friend

EDIT: Also, Fortress, you should make pretty pictures for Zhime's formations :D Please?
 
Last edited:

Fortress

Smash Master
Joined
Oct 2, 2013
Messages
3,097
Location
Kalispell, MT
EDIT: Also, Fortress, you should make pretty pictures for Zhime's formations :D Please?
I'm pretty inactive on Smashboards as of late, so it'll be good to see you guys doodle up posts like the OP and keep brainstorming.

[collapse=Zhime Meteor Option]
[/collapse]

Ideally, your opponent should hit the lower mine and bounce right up into your d-air. By hanging at the ledge, you threaten b-airs, which can possibly cause an opponent to remain overly-cautious of your position and stay as far away from you and the mine as possible, possibly forcing a high recovery onto the stage, punishable by ledgehopped f-airs. On the other hand, your opponent might opt to simply remain as far away from you, the ledge, and your mines as possible until an opening appears. If that happens, your opponent should be out of literally every option they have (jumps, AGT options, tether, recovery attack) which will net you a free kill. You can also snag your opponent with a grab should they choose the former 'solution' and land on the stage, allowing an easy B-throw kill. Worst-case scenario, you get your opponent high above or on the stage and get a f-air, which might not kill depending on distance from the wall.

Alternatively, you can play it extra safe, and place a mine at or above the ledge of the stage. Those trying to go above your lower mine but still want the ledge over landing on the stage outright risk hitting the mine, setting you up for an easy-mode b-air kill. This minimizes the risk to Zelda, but potentially allows a free recovery for your opponent.

In both cases, this formation is strong against Link/Roy/Mario 'swooping'-type recoveries in which the opponent is likely to bump into the formation. Those with heavy armor, tethers, or good air mobility can neutralize this formation.

Remember, no 'solution' to your mine setup should be a true solution for the opponent. Forcing your opponents to put themselves into poor positions based on your mine placement only strengthens the threat of Zelda's options, and the beauty of it is that she doesn't even need to use them for your opponent to realize this. If your opponent moves above your mine setup, that should instantly mean a free throw or b-air/f-air during their recovery landing lag. If they panic into your mines based on your decision to move out to them and threaten b-air/f-air, then that should mean an automatic d-air each time. You can force your opponent to give you an absolute answer to every opportunity that arises for you.

[collapse=Zhime B-Throw into Explosion]
[/collapse]

Those of you here are probably most familiar with this formation. While simple in principal, the formation can prove difficult in practice without experience. It's somewhat DI-dependent, and more-so percent/character-dependent. The idea is to simply get a mine in the opposite corner of your opponent's position, and snag them on recovery for a B-throw/detonation kill. Extra mines at or near the ledge can be useful in forcing an opponent into grab range. Use when B-throw alone won't kill, but is just barely survivable on its own.

More of a high-level formation when compared to the others. You may find more consistent results with the previous formation.
 
Last edited:

Arcalyth

GLS | root
Joined
Oct 1, 2012
Messages
650
Location
West MI
......o
...Z...o dthrow --> choose your death :) (covers both dthrow DI options for a timer kill or a collision>kick kill)

*zelda is facing left in this example
 
Last edited:

PB&J

Smash Hero
Joined
Apr 25, 2007
Messages
5,758
Location
lawrenceville, GA
Remember: These are not guaranteed, but they work for me very often.
Advanced placements


Op o---o---o---- Z (triple threat, din bouncer 1 [can space midstage, or op on ledge, if on ledge], use side taunt to bounce OP and keep 4 fireballs on the field until expl occurs. If by some chance they fall out, Dsmash will launch them back into the fire quickly after they hit your sidetaunt. Shielding doesnt help, it makes it worse for them. This is a very solid and basic trap. If they are clanking, allow them to fight through, refresh as necessary until they are in range, and Jab/SH nayru them into the fire.)


----o
o
-Op-o---- Z (triforce, will break a shield with telecancel behind op>bair crit to shrink shield and keep them shielding)


--------o
----o
OP_Z-* _____ (Z-bouncer formation 1 [must use dthrow -- the * is so they get hit from dthrow>nair sending them behind zelda into the backmines, that in itself is a placement], yes Z for Zhime :p )


--------o
-----------o
-------o R_Z (Z-bouncer formation 2 [dsmash] R is roll from ledge
--------OP


----------------------o 110%
-----o
OP__o---Z-----------_____ (Zhime bthrow =p) In order to get this to work, 75% is roughly a 45deg angle with survival DI. anything above that, the angle becomes slightly more acute. use wisdom to calculate by doing a primer Bthrow to gauge the opponents typical DI.


-----o
--o
OP_Z___ (din bouncer 3 [Fthrow, leads to fair or uair]. ) Must stay within 10 frames of fthrow release, space dins closer as necessary.


Timer trip:

----------o
oOP__o____Z (Timed expl trip 1) The idea here is to set the first 2 as a wall, set the last behind the OP and
drive it into the floor and hold B, this will cause the OP to take the hit of the last din, continue holding b, and you will detonate the first 2 set mines as the OP is launched into their expl from the 3rd dins KB. This causes the dins to remain on 2 separate timers, so timing is imperative.

Note for teleporting characters: As Fortress illustrated, leave openings in some of your formations at any given opportunity when teleports are expected. Plan for them and slam them with Utilt for the KO when weaving through your obstacle course.

learn to refresh as necessary to keep the remaining Key mine active. [planned explosion]

@ Fortress Fortress , placing 3 is far from a time waster. It leads to more extensions and adds the ability to trip the original timer when necessary. 3 placed dins during recovery is always better than 2 or 1. Keep in mind, you also need to bide your time, and telecancel through while refreshing until mid stock%s while your formations still exist. Dins works in combination with Telecancel. Its a synergistic approach to placement and formation/timing. =D

These are just a few of the really important ones. I took them from my dins formation notebook. Almost all of these setups are in my combo videos, and Gallos Rated M series of videos 1 2 and 3. :p

http://www.youtube.com/watch?v=jsDw9cLyBio -- reference for traps in game

There are a ton more that I use in different situations with altered sized mines set for larger, smaller explosions, but this is meant to be an outline to help you all get the feel for placements. I encourage you all to experiment as dins fire is easily the most complex projectile in the game when used correctly.
Listen to this man
 

ECHOnce

Smash Lord
Joined
Feb 22, 2014
Messages
1,191
Location
Bellevue, WA
Z----------Op----------[EDGE]

--------------------------O
Z---o------Op---------[EDGE]
[
extra din on ground is for resetting the timer]


One smart setup I've seen a Zelda friend of mine do is to predict where you and the opponent will be in maybe 10sec, and then set one large (level 3) din nearby just above there(cries deeply) *their head-level. This may be by the ledge, which Try knock them down within the blast range, and reset the timer as needed; you might need to replace the large din too. (since you may not have enough time to lay a large one when you're about to replace it, you can just lay a second large din on top of the original with the first/second din after it).


---------------------------O
-----o-Z----------/Op\-[EDGE]
[slashes mean to show that Op is knocked down on the ground]


---------------------------O
-----o-Z-*-------/Op\-[EDGE]
[
final din laid before approach can be in front/behind you, but shouldn't be too far from the largest din]


If the opponent is, at any point, knocked down on the ground in the blast range of the large din, lay a level 1 or 2 -sized din a short distance away at torso/head-height (either behind you, or between you and the opponent, depending on how far you are away). It should be far enough so that the opponent would be able to quickly put out both this new din and the large din in one instance, making them more inclined to run away or go straight for you, but their blast ranges should cover a fair amount of the space in-between.


----------------------------O
-----o----*--(Z)---Op--[EDGE]
[
parenthesis mean to show Z is shielding]


As they get up or while they're still on the ground, run up to them; you should pass by the newest small din you just set, if it wasn't already behind you. As you wait for the 3sec detonation, stall by running up and shielding. Attacking is an option, but that may invite their retreat, which isn't what you want; shielding encourages ideas of attacking you, or somehow preparing for an OOS action.

*If they try to put out the largest Din, lightning kick them in the back, get a free grab, or start a combo.

*If they approach on the ground, shield grab or JC Nayru OOS.

*If the approach from the air or try to jump away, jump OOS and try catch them with a Nair. Fair is ok if the Din is just about to explode; you just need to be careful about knocking them into it and ousting it before the explosion. Don't hit then with anything else that'll knock them out of the blast range either.

It's ok if these attacks fail and they attack/grab you instead, since the objective was to stall until the explosion hits. By the time you've set the final small din, they may have gotten up. That means you have to stall for 3 second from that moment. Running up to them and shielding takes maybe 1sec. Any reaction from them, and your response (suggestions above) may take 0.5sec - 2sec. Grabs are the best staller, whether it's yours or the opponents. Knocking them down again can work too, but it gives them the option of using the getup invincibility again. If you still have another 0.5sec - 1.5sec, chances are your positioning resembles what it did when you started running up and shielding; he just got up (standing) and you just put up shield or were still approaching.

The situation has been reset. Repeat the suggested OOS options above. So long as he didn't hit you in a way that places you closer to the larger din than himself, you should be able to. If he did, try to reset the positioning, abandon the stalling tactic completely and just go for another hit or retreat, or reset the timer and try again.

- - - - - - - - - -

Obviously, we've all probably had some variance of this "stall and catch them in the Level-3 Din explosion to get scrumptious kills/damage" idea at some point, and have come up with some similar method. Just figured that I'd put it up in lots of detail for those that (like myself) haven't consciously implemented any Din setups into our gameplay. (Hence all the detail; I was having trouble trying to figure exactly what options Zelda has to stall the opponent, which actions encourage their retreat, etc.) Of course, the other method of catching them in Level-3 dins would be the crazy Zhime B-throw, or just hitting them into it some other way, but...thats hard to get down xD so here's an alternative.
 
Last edited:

TimeSmash

Smash Champion
Joined
Aug 23, 2006
Messages
2,669
Location
Inside a cheesecake
NNID
nintend64
Can I link this in the ToW thread when I actually have time? This thread just continues to be a constant stream of awesome
 

WhiteCrow

Smash Journeyman
Joined
Jan 16, 2014
Messages
284
Location
Portland, OR
Does anyone have a picture of Din's final hitbox? At each size? I can't find one anywhere, in the hitbox thread or otherwise.
 
Status
Not open for further replies.
Top Bottom