Heroofhatz
Smash Journeyman
How to Train your Dragon:
An in depth guide into the metagame of Charizard in P:M 3.0.2
An in depth guide into the metagame of Charizard in P:M 3.0.2
Enter the Dragon
A Little Background Info
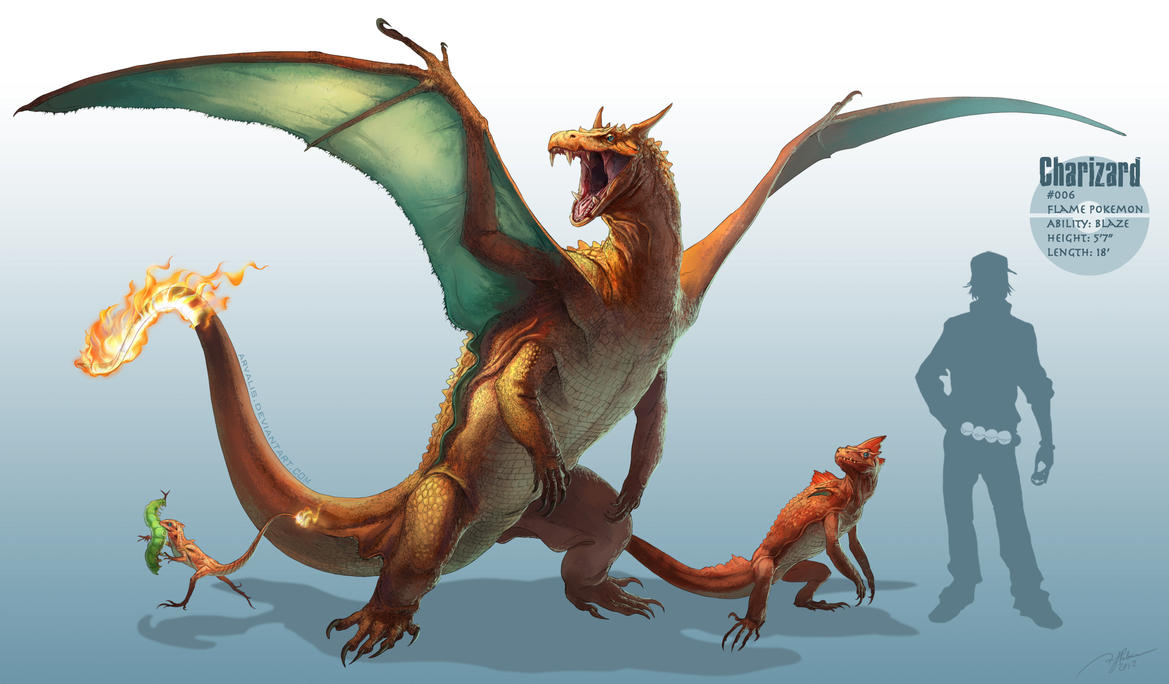
Charizard originally hails from the Pokémon franchise and is one of the most iconic Pokémon of all time. He is listed as #6 in the Pokédex as the Flame Pokémon, a Fire/Flying type and the final evolution of Charmander. In the Pokémon games he is praised for his amazing attack power and he is also one of the few Pokémon who has the ability to Mega Evolve. Overall he is a very beloved character from the franchise.
Charizard in P:M 3.02
However in Smash, he operates very differently.
Charizard has been changed very drastically from his Brawl incarnation. He’s gotten a heck of a lot faster and is the king of skies. In general, Zard can be played as a passive aggressive or a bait and punish character. You can either apply safe pressure to your opponent from afar to get good stage positioning and force an error, or use your crazy fast speed to outrun then and punish any of their mistakes.
He has pretty amazing spacing tools that are pretty safe, as well as enough anti air moves to make a battleship jealous. In addition, he has one of the best aerial chase games of any character in the game. In addition he has amazing gimping potential on almost the entire cast.
He’s amazingly well balanced as far as MU’s, there isn’t a ton that he doesn’t have at least some answer to.
Why Choose Charizard?
Well the first reason you should pick him up is because he’s a dragon, nuff said.
But besides that, there are actually good reasons to choose him as a main. He plays radically different from the rest of the cast, and thus makes it hard for other people to figure out what he’s doing. There’s also nothing about him that makes some MU’s unwinnable for him, he’s generally very balanced. In addition, the technical stuff behind him isn’t very difficult, all you really need to learn are the applications of your very diverse moveset.
Pros & Cons
Even in Project M Zard isn’t perfect, there are some things that he does amazingly, but then there are some things that aren’t so nice about him.
Pros:
-Really Fast
-Excellent spacing potential
-Has several very good launchers
-Really solid crouch cancel (CC) options
-Amazing recovery options
-Nair can nullify sweet spots from recovering characters
-Great aerial priority and aerial chasing potential with super jumps
-A lot of his best moves are hugely disjointed
-Has a bunch of really solid out of shield (OOS) options
-Really solid throw and tech chasing game
-Heavy, so he can take quite a few hits before he goes down
-He’s also floaty, which gives him a chance to jump out of a lot of combos
Cons:
-He’s fat, large hurtboxes suck
-He can get juggled really hard by some characters
-Doesn’t have a projectile
-Has a tough time against projectile heavy characters
-Tech animations are longer than usual
Move Analysis
This section is net dedicated to the frame data for Zard, since that is already in another forum. Instead this is a rough analysis of what each move is used for.
Jab
Combo Starter, Anti Air, Disjointed
Jab is your primary defensive move for anyone in front of you, especially characters that like to SHFFL Nair at you. It’s also a pretty good combo starter.
Ftilt
Kill Move, Spacing Move
This move is primary used when your opponent is trying to play more of a footsie game with you, but don’t be fooled, this move has a ton of kill power
Dtilt
Combo Starter, Disjointed, Gimping Move
Primary used for Crouch Canceling, it’s a fabulous combo starter and defensive move in general. However, the flame at the end of the tail can also be used to gimp people
Utilt
Combo Starter
This move is almost exclusively used when as opponent is above you to set up for combos. The horizontal range makes it more tricky to use in most other circumstances.
Fsmash
Kill Move
This move has amazing kill potential, almost as much as DK’s fully charged giant punch. Though it is tricky to hit with the sweet spot so it’s more often used off of a hard read.
Dsmash
Tech Chase, Combo Starter
This is one of your primary tech chasing moves. The range of the move means you can cover multiple teching options, and it sets up very nicely for some of Zard’s more potent combos.
Usmash
Combo Starter, Disjointed, Kill Move, Anti Air
If your opponent is above you, this should be one of your go to moves. Fast and pretty disjointed, it’s amazing for hitting anyone above you. It is also a decent kill move on floatier characters.
Nair
Combo Starter, Disjointed, Gimping Move, Spacing Move, Anti Air
This is probably Zard’s most potent moves, useful for all the above things and much else besides which are discussed in great detail in this guide.
Fair
Kill Move, Combo Starter
This move has two main functions. Sweetspotted it’s a pretty potent kill move, but if you can hit with the sour spot (on the shoulder), it’s a very good combo move.
Dair
Combo Starter, Gimping Move, Tech Chase
As with all meteor smashes, it can be used to gimp people offstage. However the main function of this move is very similar to Falcon’s Dair, to set up for kill combos, more often than not off of tech chase reads.
Uair
Combo Starter
Fthrow
Kill Move
Bthrow
Combo Starter
Dthrow
Tech Chase
Uthrow
Kill Move
Neutral B
Gimping Move, Spacing Move
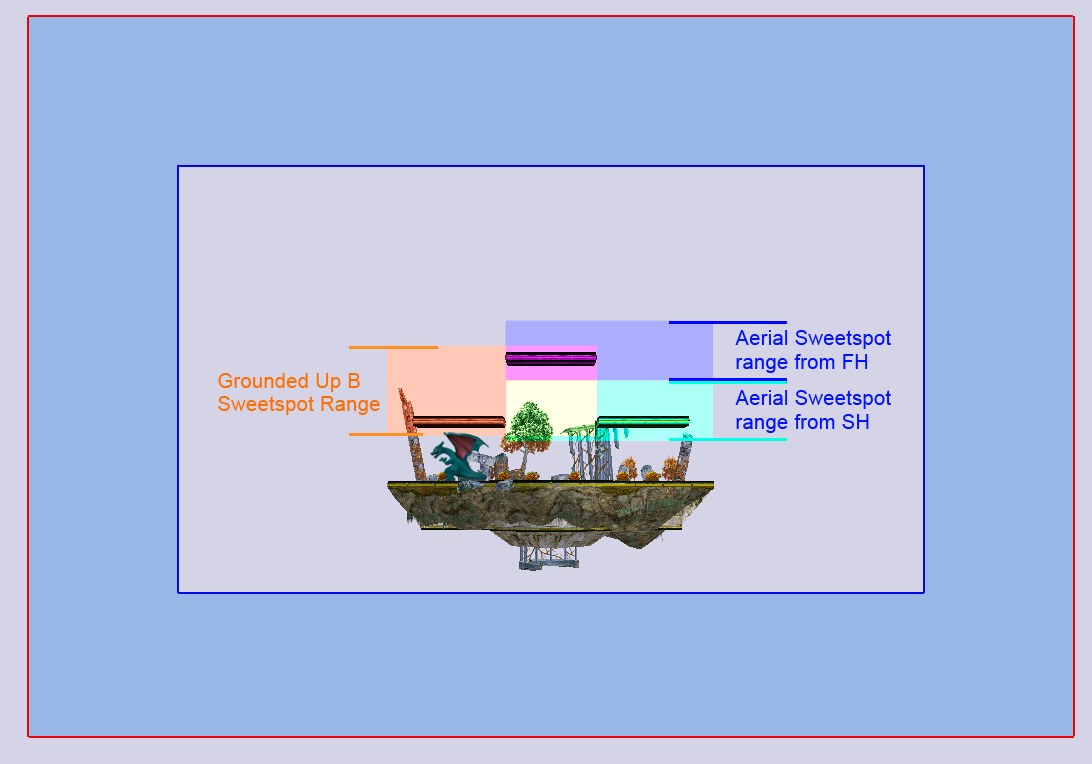
Up B
Kill Move, GTFO Move
Side B
Kill Move
Down B
Neutral Game
This is the place where everything starts in a match; so learning the neutral game is essential to any Zard player to learn. Knowing how to get stage positioning and how to safely pressure your opponent in crucial to getting mileage.
Speed
As mentioned before, Zard is pretty crazy fast; he’s actually the 5th fastest character speed when it comes to dashes. This being said, he can very easily keep pace with characters like Falcon and Fox. Dash dancing and wavedashing at a medium distance from your opponent is a great way to play a bait and punish sort of game because unlike Fox or Falcon, Zard doesn’t have a ton of great safe on shield options for rush down.
If you want a good example of how Zard can be played very grounded and very fast, be sure to check out some of Metroid’s videos up on the forums.
Spacing
This, this is where Zard is very very good with respect to the rest of the cast. He has a few moves at his disposal to make spacing the neutral game very advantageous for him.
First of all there’s Nair (you’ll learn to love this move), more specifically there’s Reverse Aerial Rush (RAR) Nair. RAR Nair is very safe on an opponents shield, and even if it is completely whiffed. However, this is only true UNDER CERTAIN CIRCUMSTANCES.
First of all, DON’T TRY AND HIT WITH THE STARTUP HITBOX IF THEY ARE ON THE GROUND. Because Nair isn’t a multi-hit move, as soon as it touches your opponent it can’t hit them again. It’s the same principle as Link’s grounded Up B. If you block it, then you can just stand in it even though it still has an active hitbox. Thus if you hit with the startup, you are missing out on the incredibly useful coverage that the backswing gives you with respect to grounded opponents. The ONLY time that this can be safe is if you start your Nair the moment you touch the ground, the shield stun will give you enough time to L cancel and reset yourself.
The one omission to the rule stated above is if your opponent is in the air, because obviously they can’t block in the air and with the exception of Link Zair or Ivy’s Bair, there really isn’t any air moves that can outspace it effectively. However, keep in mind that characters with high air mobility like Wario and Peach generally have an easier time punishing Nair, since they mostly approach from the air at a diagonal to your body. Thus if you whiff the startup of Nair, they can just fly in and hit you because the backswing only covers the ground behind you. But one way to counter this is to full hop RAR Nair, because it is a pretty amazing anti air when used with good spacing (it wrecks Puff and Peach pretty badly). But in addition to that it can also be used on grounded opponents and sort of covers two options. If you space it so the start up starts above your opponent, then they have two options. If they jumped, then they’ll get hit and more than likely comboed afterwards. If they stayed grounded in shield, they don’t have enough jump acceleration to jump out of shield and hit you before the backswing comes back and covers you, then you should have enough time and space to fall back away and hit another Nair on their shield just as you land, making it decently safe.
A more preferred way to spacing RAR Nair is to try and aim with the backswing of the tail. This way, you’re covering the ground and it’s late enough in your jump you should have plenty of time to L cancel and reset yourself
Another thing to consider is jumping straight up or away from your opponent out of the RAR. A true RAR requires that you maintain your forward momentum by backwards jumping out of the turn animation. If you keep the stick steady though and just neutral jump, or reverse it and jump the opposite way, essentially you get an instant turn around Nair but a little more safe. This is nicer in some aspects because unless they are moving forward there’s no way for them to pressure you with WD OOS.
Your other main spacing tool is Jab. It’s an incredibly fast, decently disjointed anti air that shuts down a lot of SHFFL approaches. Most notable things that it is good against is stuff like Falcon’s and Fox’s Nair. It’s also one of your key combo starters, so any hits by it usually means big damage afterwards. Keep in mind that this move is not safe on shield and should be used with discretion to avoid punishes. Also keep in mind that this move can also be crouch canceled out of a dash for an instant standing jab, which is a good mixup if your opponent is expecting you to approach.
Another less commonly used spacing tool is Ftilt. Although it isn’t super safe on shield and seems pretty laggy, it’s actually quite fast on start up, has IASA frames about 10 frames before the move ends, the head is invincible for a couple of frames, and has really good KB. If your opponent is trying to force you to play a more footsies game with them, don’t feel afraid to throw this move out.
Stage Control
Now that you have the basics of the neutral, let’s apply that to forcing your opponent into mistakes with stage positioning. Stage positioning is an incredibly important part of any smash game, heck any fighting game in general.
Dash Dancing:
This is one of the most common forms of stage control in the game. By dashing back and forth, you are keeping your movements ambiguous to your opponent so they may try and throw out a move and then retreat to a worse stage position upon whiffing. When backed into a corner, a lot of players will try and throw out something to keep themselves safe, which you can then bait and punish accordingly
Applying Pressure:
As discussed earlier, Nair is a great way to apply pressure to your opponent from a distance. But a step up from that is something called Nair walling. Essentially it’s really simple, stand with your back to your opponent and start SHFFL Nair-ing. Keep in mind that this isn’t safe in and of itself, so try and mix it up with some dash dance RAR Nairs but try your best to keep them pinned to a side of the stage where they have nowhere to run.
Anti-Projectile Game
Some of Zard’s most troublesome MU’s are the ones where his opponent has a solid projectile at his disposal. Most well known of these are Link, Falco, Ivysaur, and Mario. Since Zard is so huge, it can be very hard to dodge around their projectiles…
But who ever said anything about dodging them? You’ve got moves that got you covered! Most common of these are RAR Nair (what isn’t it good for) and Jab.
If you can turn yourself around and hit the projectile with Nair, you’ll destroy it and take no damage in the process. This option is also preferred because if you can get the startup close enough to your opponent as they start throwing the projectile, you will more than likely hit them with the backswing and push them back into a worse stage positioning. The only problem with Nair is that it takes a bit of prediction on the part of the Zard playeer to actually make it work effectively, too late and you get hit, too early and you just got baited into jumping. Nairing projectiles is more commonly preferred when your back is already turned to your opponent and you can advancing Nair towards them and gain some stage control while you at it.
If you are facing your opponent however, your best option is Jab. Fast and disjointed, it will clank with almost any projectile, and can sometimes even hit your opponent at the same time. Best example of this is against Mario. A lot of Mario’s like to use fireballs to approach and then hit confirm off of them, but if you can time it so that you hit the fireball at just the right time, you can clank with the fireball while still hitting your opponent and setting them up for follow ups.
Another key part of Zard’s anti projectile game is power shielding. All this takes is a ton of practice learning to shield the frame a projectile is going to hit you. But one thing to make this a bit easier is to run and then cancel the dash by shielding, since your hurtboxes are changing right when you transition from the dash to the shield it's a little bit easier.
If you don’t feel like Jabbing, there’s always Ftilt, but it isn’t recommended as much cause the hitbox doesn't get to far before it clanks, but it looks like he’s eating whatever projectile you clank with so at least it looks funny.
Offensive Maneuvers
Once you get the hang of winning the neutral game it’s time to style all over your opponent with combos. Just keep in mind that Zard is the king of the skies, so the majority of your main combos are going to be air combos starting with launchers.
Launchers
Jab:
As previously mentioned, this move is amazing. Super fast, clanks with projectiles, disjointed, and it’s even a combo starter! On pretty much any character you can link jab in to dash Usmash. You can also possibly get an Fair in depending on DI and character, which can set up for the Zard Ken Combo. However, if you’re playing a fast faller you can knock them down and force a tech for a tech chase opportunity. Also if you’re playing a fast faller and they’re stupid enough to DI into the jab (common when you jab them offstage) then you can Fsmash right after it as well.
Dtilt:
This move functions almost exactly the same as jab in regards to combos, usually Usmash/possible tech chases on fast fallers. But what makes this a little more useful is how good it is when you crouch cancel an incoming attack and respond with this move.
Usmash:
Usmash will soon become one of your favorite moves. With how disgustingly disjointed the hitboxes are, you’ll be able to anti air almost anything above you. But as far as the combos are concerned, well it depends on percent and the character you’re fighting. On most heavy fast fallers, Usmash will lead Sky Attack or Pseudo Sky Attack since they can usually jump out of any follow ups you try with super jump. One of the best ways to use this move to try and force your opponent to burn their double jump and then hit them with Usmash. Without a jump, Usmash chains into super jump Uair a almost all the time since your opponent can’t jump.
Dsmash:
This move is most commonly used out of a tech chase because it can cover multiple tech options, but it also one of your best moves for setting up into Uair strings. It has a pretty incredible amount of hitstun, and the launch trajectory is straight up, which is perfect for Sky Attack. On fast fallers, it is a combo into side B (you may have to super jump or normal jump to get the spacing right) at almost percent above 65%.
Fun fact, Dair acts almost the same as Dsmash as far as combos are concerned, just with more hitstun to make some things easier.
Utilt:
Although this move may seem to be overshadowed by Usmash’s range and sheer disjointedness, it is actually incredibly useful. Unlike Usmash, Utilt almost always combos into Sky Attack, making it very useful if you have your opponent above you and you want to start comboing them but don’t want to risk Usmash not having enough hitstun to do so. However, due to the worse range on it, it’s more often used when somebody is above you on a platform or off of a Dair/Dsmash that didn’t quite send your opponent high enough to get Sky Attack.
Combos
Sky Attack:
The first and most iconic Zard combo is called Sky Attack (well I mean it’s a better name than Uair Uair up B). This combo is usually performed after a Usmash, Dsmash, Utilt, Dair, or Uair which launches your opponent right above you. You then Super Jump and Uair as you rise to launch them above you again, then jump and Uair again, and even one more time if they aren’t high enough. Once you’ve put them high up in the air right above your head, Up B and watch the salt flow as they die at pretty early percents.

Pseudo Sky Attack:
The set up for this combo is the same as for normal Sky Attack; launch them above you and super jump and then Uair. However, in this combo, your opponent is wise enough to DI the Uair to the side, thus not letting you jump Uair again. In this case they think they’re safe…but don’t forget that you have Glair. After hitting them with a Uair, look at the DI and then Glide to line up the angle if it’s a little off (don't’ worry, they’ll be in hitstun long enough for you to slightly angle) then BAM, hit em with a Glair. This combo has about the same killing potential as the regular Sky Attack; so don’t feel afraid to use it.

The Zard Ken Combo:
The setups into this combo vary, but the most common is a Bthrow that your opponent DI’s into you. This combo involves hitting with the shoulder (weak) hitbox of Fair and then double jump to Dair. If you get this combo offstage, you can follow it up with another Dair or event a footstool depending on the character. If you get this onstage you can punish a missed tech with a falling Uair back into Dair for a pillar-esque combo.

Footstool combo:
While this combo isn’t the most useful in terms of raw killing ability, it is an amazing mixup when your opponent is blocking your aerial approaches. Because of the way footstooling works on shields, it will act kind of like a grab as in it will temporarily stun them out of their shield. There is a pretty precise window in which if you Nair you will hit them during this stun. The timing is pretty much as soon as you jump off of their head. While this isn’t super useful, it can get you some free damage and set up for a tech chase.
Throws and Tech Chasing
Because of Zard’s fast speed and excellent grab range, tech chasing is incredibly important to learn. There are two main moves that Zard uses to set up tech chase opportunities, Dthrow and Bthrow.
Dthrow:
This throw functions a lot like Fox’s Dthrow, it adds damage and will immediately ground your opponent after the throw is completed. There are two different ways that this tech chase goes, depending on whether your opponent techs or does not tech the throw. As you read this section, keep in mind that tech chasing requires a bit of prediction of what you expect your opponent to do, always be watching for teching patterns and habits to abuse.
Off of a no tech, Zard gets a couple frames of advantage after the throw to hit the opponent, enough time for a jab, which sets up into it’s own combos. However, it is totally possible with Zard’s speed to dash dance just out of range of a wake up attack and regrab almost any option. However, considering how great the jab sets up for combos, it’s almost always preferred to jab a no tech.
If you opponent does know how to tech this throw, then it actually sort of makes your life easier. Because of the frame advantage that Zard gets off of a Dthrow, a regrab is almost guaranteed on any character (except those with very long/ambiguous tech rolls like G&W and Mewtwo). But besides just regrab, you also have Dsmash, which because of how the move functions can set up an inescapable tech chase. For example, if you throw your opponent when you’re right next to the edge, Dsmash hits in a wide enough radius to punish almost any tech option besides no tech or neutral tech (cause some chars can react fast enough). However, Dsmash is for the most part a read on your opponents tech patterns, but it is also an almost guaranteed set up into a death combo on any character, so don’t be afraid to use it.
It is worth mentioning at this point that Dthrow has one situation where it pretty much sets up into an infinite tech chase. If you can knock you opponent onto a platform and waveland onto the platform, you can grab them and Dthrow them. Here’s the cool part though, Dsmash covers the entire platform, so any tech options they have will always get beaten if they try and roll away, and neutral tech can just be regrabbed into the same situation. If they don’t tech, don’t jab them unless you know you can kill them, because they are most likely going to try and get behind you where you have less options, but if you short hop Dair, it functions just as good as a Dsmash and you can still get combos off of it. Be very inclined to abuse platform tech chases though, they put you in a super advantageous position and can lead to death combos for the most part.
Bthrow:
Bthrow in itself does not always set up for tech chasing opportunities unless a character is at low percent or a fast faller. However it is in some sense a DI trap. If your opponent DI’s into you to avoid getting grounded, Fair is pretty guaranteed or even Usmash. However if you do get them grounded and they are forced to tech, sort of treat it like the Dthrow tech chases, regrabs and eventually try and hit a Dsmash for kills, or try and set it up so that you can throw your opponent off stage since Zard has such strong options against recovering characters.
It is worth it to mention that Bthrow is a very efficient option to getting your opponent to land grounded on a platform, which sets up for Dthrow platform tech chases.
Platforms
Knocking someone onto a platform sets up an extremely advantageous position for yourself, and you have a plethora of options.
Usmash:
Probably the safest and easiest is just to Usmash under your opponent when you read their tech roll. Sets up nicely for some stuff. Be wary though if you opponent gets time to block it, then can very easily shield drop and punish you.
Waveland grab:
This is the option that can easily get you a lot of mileage. When you knock your opponent onto a platform jump up and waveland onto that platform. Grab them and Dthrow them.
Footstool:
This is pretty uncommon but still useful. This is more used for when your opponent has already gotten up and has enough time to shield an incoming attack. If you just jump up right above them and footstool, you can get a Nair and hopefully force them into a bad situation again.
Dair:
This is more of a hard read off of their tech, but if you can jump above the platform and Dair them, they’ll be perfectly set up for a Sky Attack Combo.
Kill Moves
Luckily, when your opponent gets to higher percent, Zard has a lot of solid kill moves so you don’t get stuck at the awkward Marth percent. These will be listed in their order of most useful.
Bair:
This move hurts, especially when sweetspotted. It’s also really freaking fast and is amazing when you drop through a platform.
Fair:
Despite the bad range, this move has weirdly strong knockback on sweetspot.
Ftilt:
Also another very potent move for killing, though a bit risky at times cause it’s a little laggy on the end. However, since this move can be CC very quickly out of a dash, it is still incredibly useful for getting a solid hit in on your opponent.
Usmash:
On lower ceiling stages this kills relatively early, especially on floaty characters (which are generally the hardest to get a good hit on). Just be careful about high ceiling stages like Dreamland.
Heat Wave:
This move has a ton of knockback on the sweetspot, though because of the laggy startup, it is harder to actually connect with this move.
Nair:
While it is rare for this move to kill fast fallers, it works wonders against a lot of floaty characters, but then again, only on lower ceiling stages probably when they are already in the air will this kill reliably.
Fsmash:
While uncommon to hit with, this move has crazy knockback. Sweetspotted this move has about the same knock back as DK’s fully charged Giant Punch. But it is only really done off of a hard read.
Edgeguarding
This is one aspect of Zard’s game that is especially strong. Whether offstage or onstage, he has an option for almost any recovery.
Nair:
Funny how we always seem to get back to this move, must be really useful or something… It turns out that Nair is also a semi spike that can hit well below the ledge (fun fact it can actually hit under smashville), thereby nullifying sweet spots by characters. If you face away from the ledge and short hop SHFFL Nair, you should end up with the backswing of the tail hitting well below and away from the ledge. Also without amazing DI, it acts virtually as a semi spike, giving you the opportunity to ledgehog and gimp them.
If you are having a tough time reading your opponents recovery patterns with reverse Nair, then there is another solution. If you grab the ledge, then ledghop onto the stage and Nair, you’ll get the semi spike hitbox right on the ledge, gimping anyone that didn’t sweet spot.

Dtilt:
Dtilt is another great onstage edgeguard. Try and space it so that you’ll be hitting your opponent with the flame hitbox at the end of the tail. Done correctly, anything that isn’t a sweet spot will get hit back at a very low trajectory, effectively killing pretty much anyone.
Heat Wave:
Heat Wave is a little bit more risky edgeguard since the startup takes a while, but like a lot of his moves, it will beat out sweet spots and will kill pretty much any character if it connects. It’s also pretty effective offstage if your opponent starts to get predictable with their recoveries.
Flamethrower:
This one is a little more character specific. This technique is only guaranteed on fast fallers, especially the spacies. Since Flamethrower is classified as a projectile, it some weird properties when clashing with moves. For the most part it will hit any of the spacies out of their recoveries, and since they fall so fast they can’t SDI out of the Flamethrower. If you then end the FT, they’ll fall and be forced to up B at a bad angle, a spaced Dtilt, reverse Nair or even Heat Wave should finish them off. Note that this is especially good because it works at any percent and is essentially a gimp, try to throw them offstage then hit them with this move.
Defensive Maneuvers
Out of shield options
Luckily for Zard, he has an out of shield (OOS) option for nearly any situation so let’s cover the basics.
If your opponent is in front of you applying pressure, shield grab is one of your best options because of it’s speed and range.
If your opponent crosses you up in shield, jump and Nair and you should connect with a hit (however, used against some shorter characters it won’t connect as reliably). Bair works very good as well, but is a little slower than Nair. However it should also be mentioned that you should be wary of getting into OOS wars with your opponent. Say for example your opponent crosses you up, and you Nair OOS, but they block. If you’re quick, you’ll land in shield before they can Bair OOS. If you ever get in this situation, a good mixup is just to empty jump, waveland, grab. Most people won’t see it coming.
If your opponent is pressuring you from above, you can jump cancel an Usmash OOS. However be aware of characters with disjoints falling on you, because Usmash will generally trade at best with them
If your opponent is just putting on a lot of safe pressure really close to your shield (shine pressure from spacies for example), you can use up B OOS. This is a pretty classic GTFO move. The reason it’s such a good option is because Zard is invincible during the first 4 frames of the move and the first active hitbox comes out on frame 4. This being said, if you time it right you will always beat shine because you are invincible. This is also super effective against Falco since if he is trying to pillar you and full hops, you can Up B OOS and you will hit him and generally come out on top. The one piece of advice with this move is that if whiffed or blocked it is very unsafe, so try and aim to land on a top platform to reduce the end lag. Also be aware that it can be crouch cancel teched, which can turn into a problem if you aren’t careful, so try and use it at higher percents where crouch cancel teching it is much harder.
Evasion tactics
This section is about what sorts of tactics you can use when your opponent is coming back with spawn invincibility.
Probably the most common of these is just to super jump way up, most of the cast won’t be able to chase you up that high, and then use a glide mixup as you fall back down or Nair as you fall onto a platform to hit below that platform. You can also use Heat Wave as you land if your opponent likes to hit you right as you land, or you can use it in the air to boost yourself to the other side of the stage.
You can also use glide camping to keep yourself invincible on the ledge, but beware because it isn’t fully invincible and if you get hit out of it, you are without a glide and in a bad situation for the most part.
Crouch Canceling
Because of Zard’s weight, he can crouch cancel even at very high percents. This is very useful against a lot of the cast that like to jump in with softer hitting moves to set up for combos. Dtilt really shines here because it acts as a launcher and a combo starter so your opponent will get hit up into the air for a combo. Dtilt is more commonly used if your opponent lands in front of you, seeing as it only hits in front of you. Dsmash is your other option, and is very good if your opponent crosses you up. However, it is slower so be careful of who you are fighting because they might be able to stay safe regardless.
Besides trying to counter your opponent with crouch canceling, it can also be used in a special way to make you live for a long time. This is a technique that originally started with G&W in Brawl called bucket breaking, but transfers to Zard just as well. Essentially when you get hit with a strong move at high percent and you are crouch canceling, you sort of just get hit into the floor and slide along the ground off the edge at very high speed. However as soon as you are off stage, your character goes into a neutral state in the air, which means you can glide. Because glide stops all of your momentum, you can live for a lot of percent because you can immediately stop your momentum the moment you get hit offstage.
Ledge Tech
Despite what a lot of people think, being on the ledge of a stage isn’t the worst thing for you. The invincibility granted from grabbing the ledge is an incredibly useful tool. Zard has a plethora of on the ledge options to help get him back onstage in an advantageous position.
Glide Camping:
While this isn’t necessarily a way to get back onstage, it’s a mind game of some sort. How this is performed is when you are handing on the ledge, press down and then B to drop from the ledge and immediately start gliding. You should hover right next to the ledge then regrab it. Performed quickly enough, it is almost fully invincible, but there are a couple of frames where you are vulnerable even if done frame perfect. By doing this, you can set up a mind game with the next two ledge options.
Glair:
Glide attacking from the ledge is one of your fastest options, it has a few invincibility frames near the start and it has a fast start up. It also has some amazing priority and range, rather deceptive in all honesty. This is great against characters that like to stand a bit back from the ledge and punish your ledge options. This is fast enough that it will catch them off guard. And in addition to being able to attack people with it, there is also a specific angle where you can actually waveland the Glair and get a combo off of some of the hitboxes or just get onstage with minimal lag. These two techniques combined with glide camping make it a very scary mixup.
Zero lag glide canceling:
Another very useful technique is a glide cancel that can put on onstage with no landing animation of added lag, so you can act immediately upon touching the ground. This involves grabbing the ledge, immediately gliding, tilting slighty up and instantly canceling the glide. If done correctly, you will land onstage in a neutral state with no landing lag. When combined with glide camping and Glair, it creates a very nice mixup..
Reverse Jump Nair:
This is a pretty decently safe option out of all of your ledge options. What it involves is jumping away from the ledge so that your back is facing the ledge. Immediately Nair when you change directions. This should hit people onstage and keep you generally pretty safe offstage. You can do it again but aim for the back swing to try and force your opponent to back off and let you onstage, or you can just neutral jump and Nair again just to put some shield pressure on, then glide back to the ledge and reset yourself.

Heat Wave:
Although it may be a little laggy on start up, you can ledgehop heat wave in such a way that you fall right back to the ledge perfectly safe. This is a really good option if you’re opponent is at a medium distance from the ledge trying to bait you to doing a Glair. If you use this and they miss the punish on the startup, you’ll be perfectly safe.
Flamethrower:
If you’ve really scared your opponent away from the ledge, but they are still fast enough to jump in and hit you, try ledge hop flamethrower. It may seem like a bad idea, but if it hits your opponent, they can only DI out and away, meaning you’ve reset the game back to neutral.
Platforms
While Zard likes having his opponents on platforms, he himself isn’t too adverse to being caught above his opponent on a platform. There are a couple of different options you can use to counter your opponent below you.
Nair:
The neat thing about Nair is that the lower part of it can hit people well below you, including under platforms. You can time it so that the tail swings under the platform right as you land so that your opponent will have a hard time punishing you.
Shield Dropping:
This is a much more general smash mechanic. By pressing down at a very specific angle on the control stick while shielding on a platform you will drop through without dropping your shield. This is most commonly used when somebody hit’s your shield from below you with a laggy move. Since you can buffer shield inputs slightly in PM, input it when the shield stun is almost over so you’ll fall through, then immediately fast fall Uair and try and set up for a combo.
You Must Recover!
COMING SOON!
Past the Basics: Advanced Techniques for Zard
The "Metroid Method"
The Metroid Method is a phrase coined by a couple of Zard mains when Metroid made an introduction video about playing Charizard. This isn't necessarily a technique, but rather a control scheme which helps a lot with Charizard.
If you go into the controls screen for Brawl, you know that you can change all sorts of buttons like the Y or X button to footstool or special. But something that he discovered (this is actually a remnant from Brawl reworked in PM) is that you can change the Cstick controls. If you set it to "Attack" instead of "Smash" you get a couple of funny things happening.
First of all, you lose Fsmash with the Cstick, however, you still maintain Usmash and Dsmash. Instead, Fsmash is replied by two new inputs, Ftilt is Forward on the Cstick, and Jab is Backwards on the Cstick. You also lose the ability to Usmash OOS unfortunately, but it still can be performed using the up A method.
What this gives you access to is being able to hold down on the analog stick so you crouch cancel, then you can press back on the Cstick to jab without having to stand up. This allows for a true CC Jab and CC Ftilt, which is good for being defensive with CC-ing, but also for CC out of a Dash and instantly Ftilt-ing or Jabbing.
It should also be known that you can Nair with any of the corners of the Cstick while airborne, as if we needed another reason to use that move.
Stage Choices
COMING SOON!
MINDGAMES!
COMING SOON!
Frequently Asked Questions
Q: Why do you Nair so much?
A: Because Charizard is secretly a Nairplane.
Glossary
Reverse Aerial Rushing (RAR): A technique used to instantly turn around out of a dash by jump canceling the pivot animation.
Directional Influence (DI): A technique used to influence the direction you are sent when hit by a move.
Credits
Idea and planning: Hatz!
Text: Hatz! and Blunted Mask
Editing: The Charizard Skype Chat
Gifs: Lava Latte COMING SOON!
Frame Data : JOE!
Version History
1.0.1 Text color added and "Metroid Method" added
1.0.2 Gifs of SA, PSA, and ledge R Nair added
Last edited:

 .
. s to all the
 brothers.
 DDD = 151