Zantetsu
Smash Master
Disclaimer: This guide only focuses on loop points and nothing else. If your track has any other problems such as being too quiet or too loud, there are other guides that go over that subject.
If there's one thing that bugs me more than anything when it comes to BRSTM's, it's the fact that people, most of the time, fail to loop their tracks properly. I've had a big list of BRSTM's for my customized soundtrack, and about 90% of the ones I've downloaded that claim to be looped, aren't done so well, if at all. Now, some people may not be bothered by this, but to me, a BRSTM is completely pointless if it doesn't loop properly. So, I've created this guide in hopes that I don't have to edit many tracks anymore, and so you can learn a very simple way of looping your tracks rather than playing the guessing game in Brawlbox.
Now, first off, you will need the following programs to follow this guide properly:
Audacity: A very good audio editing program. Very simple and powerful.
Brawlbox: Used to edit your loop points for your BRSTM.
Okay, now you're going to need both your original WAV file and your BRSTM file for this process. If you have both of these, you may skip to step 2. If you don't have your WAV file, continue reading.
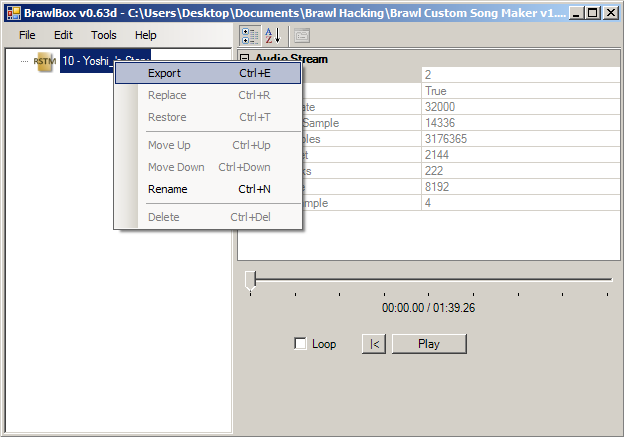
1. To obtain your WAV file from your BRSTM, open your BRSTM file in Brawlbox. Once it's open, right click on the BRSTM in Brawlbox and select "Export." By default, this should be ready to save as a WAV file. Save it to the location of your choice.
2. Open the WAV file in Audacity. Before we go any further, click the "View" tab, followed by the "Set Selection Format" tab, and then click "samples (snap to samples)." Now, Use Audacity's Selection Tool and Zoom Tool (which are located around the top left of the program) to navigate and explore your audio file. Audacity makes finding loop points easier by allowing you to select specific areas in your track, without having to insert samples or pressing a button as the loop point passes by. Once you've found your first loop point that you would like to use, mark it with your selection tool.
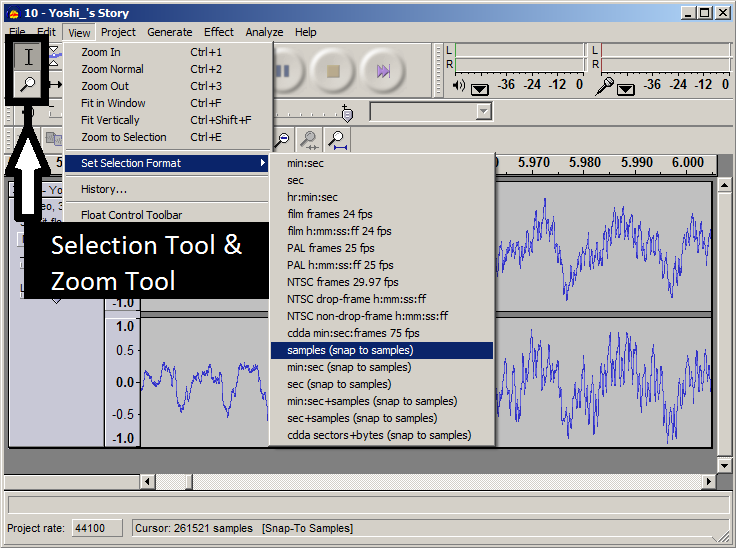
3. Now that you've found your starting loop point, look at the bottom of Audacity for it's location (it should be displayed in samples). You'll want to access this number in the near future, so for now, just minimize Audacity.
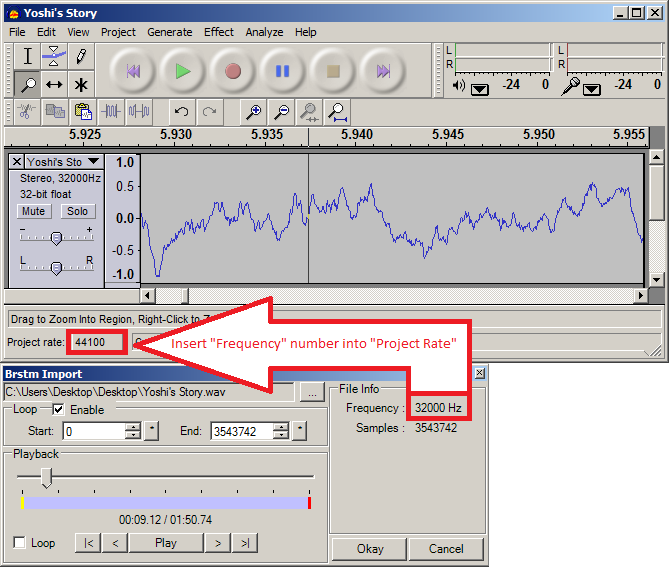
4. Now, if you haven't already had your BRSTM opened in Brawlbox, you'll want to do so now. Open Brawlbox. Click the "File" tab, followed by the "New" tab, and then click "Brstm Audio Stream." Locate your wav file, and open it. Now you'll get a window titled "Brstm Import" that will allow you to start editing loop points. When this window opens up, there's something you'll need to check before continuing. On the right side of the window, you'll notice a section titled "File info." You'll have to make sure that the number after "Frequency:" matches the Project Rate in Audacity. For example, the song I'm editing has a 32000 hz frequency rate, which is different than Audacity's default (44100). So, I'll have to insert 32000 into Audacity's Project Rate section so that Audacity will give me the correct samples. If they already match, you may continue with the tutorial.
5. Return to Audacity and locate that number at the bottom of the window. Insert the number into the "Start" field and play the song. If your song played from where you set your marker in Audacity, then congratulations! Now you have the loop point you found in Audacity put into Brawlbox!
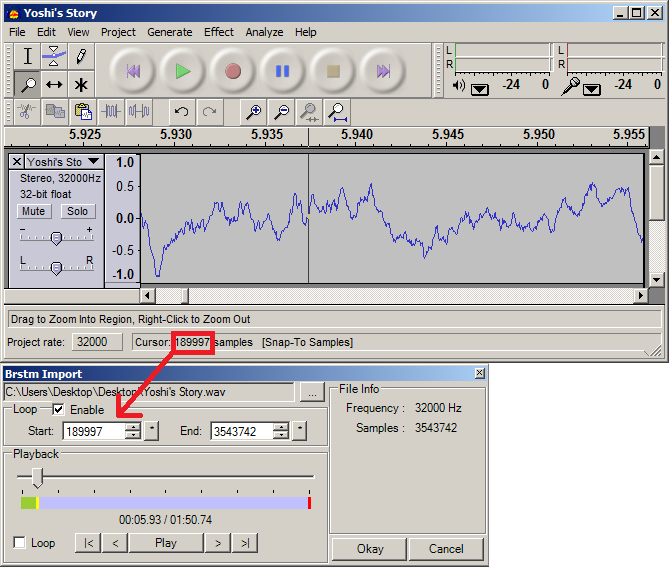
6. For the other loop point location, all you'll need to do is find it in Audacity. Go back to Audacity, find your ending loop point, and insert it's Sample number from Audacity into Brawlbox.
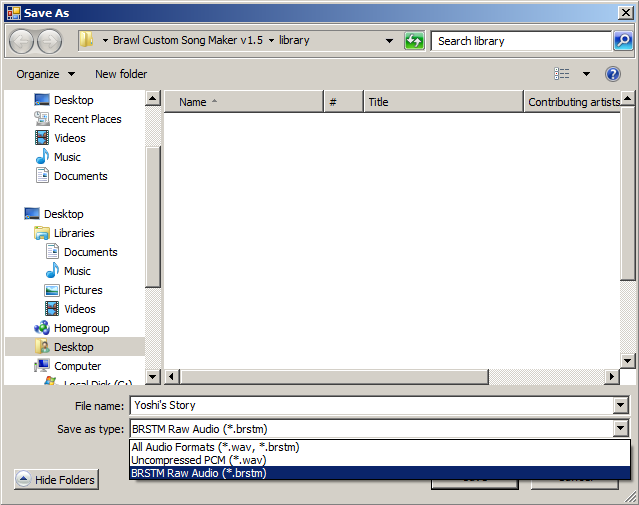
7. Once this is all done, test it out! Play through the song on loop and check if it sounds nice. When everything is all set and done, press the "Okay" button in the Brstm Import window. After the Brstm Import window closes, you'll be left with Brawlbox. All you need to do now is save the file as a Brstm. Click the "File" tab, followed by "Save as.. ". Make sure you save it as a BRSTM file by checking the "Save as type:" drop-down box. You will want it to read "BRSTM Raw Audio (*.BRSTM)." If that is selected, all that's left to do is choose your file name and you'll have finished a nicely looped track!
This has been my first tutorial, so it might have it's flaws. I looked around the forum and couldn't find any thread dedicated to looping tracks so I figured we could use one, even if it may be a simple task. I figured since most tracks I download aren't looped properly, then this tutorial will benefit at least some people. I hope you've understood all of this and if you have any questions, reply to the thread and I'll be sure to get back to you as quickly as possible. Thank you for your time.
Credits to: libertyernie for telling me how to make this process faster. His advice has been added to the guide.
If there's one thing that bugs me more than anything when it comes to BRSTM's, it's the fact that people, most of the time, fail to loop their tracks properly. I've had a big list of BRSTM's for my customized soundtrack, and about 90% of the ones I've downloaded that claim to be looped, aren't done so well, if at all. Now, some people may not be bothered by this, but to me, a BRSTM is completely pointless if it doesn't loop properly. So, I've created this guide in hopes that I don't have to edit many tracks anymore, and so you can learn a very simple way of looping your tracks rather than playing the guessing game in Brawlbox.
Now, first off, you will need the following programs to follow this guide properly:
Audacity: A very good audio editing program. Very simple and powerful.
Brawlbox: Used to edit your loop points for your BRSTM.
Okay, now you're going to need both your original WAV file and your BRSTM file for this process. If you have both of these, you may skip to step 2. If you don't have your WAV file, continue reading.
1. To obtain your WAV file from your BRSTM, open your BRSTM file in Brawlbox. Once it's open, right click on the BRSTM in Brawlbox and select "Export." By default, this should be ready to save as a WAV file. Save it to the location of your choice.

2. Open the WAV file in Audacity. Before we go any further, click the "View" tab, followed by the "Set Selection Format" tab, and then click "samples (snap to samples)." Now, Use Audacity's Selection Tool and Zoom Tool (which are located around the top left of the program) to navigate and explore your audio file. Audacity makes finding loop points easier by allowing you to select specific areas in your track, without having to insert samples or pressing a button as the loop point passes by. Once you've found your first loop point that you would like to use, mark it with your selection tool.

3. Now that you've found your starting loop point, look at the bottom of Audacity for it's location (it should be displayed in samples). You'll want to access this number in the near future, so for now, just minimize Audacity.
4. Now, if you haven't already had your BRSTM opened in Brawlbox, you'll want to do so now. Open Brawlbox. Click the "File" tab, followed by the "New" tab, and then click "Brstm Audio Stream." Locate your wav file, and open it. Now you'll get a window titled "Brstm Import" that will allow you to start editing loop points. When this window opens up, there's something you'll need to check before continuing. On the right side of the window, you'll notice a section titled "File info." You'll have to make sure that the number after "Frequency:" matches the Project Rate in Audacity. For example, the song I'm editing has a 32000 hz frequency rate, which is different than Audacity's default (44100). So, I'll have to insert 32000 into Audacity's Project Rate section so that Audacity will give me the correct samples. If they already match, you may continue with the tutorial.

5. Return to Audacity and locate that number at the bottom of the window. Insert the number into the "Start" field and play the song. If your song played from where you set your marker in Audacity, then congratulations! Now you have the loop point you found in Audacity put into Brawlbox!

6. For the other loop point location, all you'll need to do is find it in Audacity. Go back to Audacity, find your ending loop point, and insert it's Sample number from Audacity into Brawlbox.
7. Once this is all done, test it out! Play through the song on loop and check if it sounds nice. When everything is all set and done, press the "Okay" button in the Brstm Import window. After the Brstm Import window closes, you'll be left with Brawlbox. All you need to do now is save the file as a Brstm. Click the "File" tab, followed by "Save as.. ". Make sure you save it as a BRSTM file by checking the "Save as type:" drop-down box. You will want it to read "BRSTM Raw Audio (*.BRSTM)." If that is selected, all that's left to do is choose your file name and you'll have finished a nicely looped track!

This has been my first tutorial, so it might have it's flaws. I looked around the forum and couldn't find any thread dedicated to looping tracks so I figured we could use one, even if it may be a simple task. I figured since most tracks I download aren't looped properly, then this tutorial will benefit at least some people. I hope you've understood all of this and if you have any questions, reply to the thread and I'll be sure to get back to you as quickly as possible. Thank you for your time.
Credits to: libertyernie for telling me how to make this process faster. His advice has been added to the guide.

