
I am not a professional and will not pretend to be one. Take this guide with a grain of salt.
Zap=Side-B 1
Zapple=Side-B 2
Kazap=Side-B 3
Frizz=Neutral-B 1
Frizzle=Neutral-B 2
Kafrizz=Neutral-B 3
Woosh=Up-B 1
Swoosh=Up-B 2
Kaswoosh=Up-B 3
NEUTRAL: Neutral with Hero can be very difficult due to his lack of burst options and safe moves. Instead, you will be conditioning jumps and over-aggression with your long range specials while occasionally mixing it up with grabs and spaced shield pressure. Many of your neutral wins will be reads and guesses, so you must take close attention to any habits, no matter how small. While this is true for most characters, this applies especially to Hero since he requires expert precision and timing. The margin for error is essentially nil.
Your main tools for conditioning are gonna be frizz and zap. Frizz is best for gathering safe info on jump habits. It being reactable and weak means that opponents are less likely to be scared or respect it. As a result, they often jump over it as getting hit only deals 8%. If they jump, they are probably confident in their movement and ability to punish. If they shield, it likely means that they are someone who is very comfortable in shield and may be prone to getting grabbed. The zap spells on the other hand are useful for understanding how your opponent likes to deal with threatening and powerful moves. Zap can dish out decent damage and is very safe if spaced correctly. However, it is very easy to jump over so it must be used with caution. Similar to frizz, you can use it to study habits with higher risk but a correspondingly high reward.
Up-tilt is useful for calling out jumps above you, down tilt safe poke on overeager opponents, and forward tilt is a risky way to call out dash attacks and extreme mashing. Dash attack is good for calling out retreating enemies but whiffing leaves you wide open. Forward air is your main tool for hard committing to an anti-air, Neutral air fulfills the same role but less risky, Down air is good for calling out spotdodge, and up air is for shield pressure and calling out spotdodge. Jab is a good “get off me” tool and will do good damage. its decently disjointed and may be used to punish spotdodges as well as jab lock.
Grab is only for punishing obviously unsafe moves, dash grab is only for punishing laggy options and calling out people holding shield. Pivot grab is good for punishing roll get up, spotdodge, rolls in general, regular get up, and over aggressive approaches.
In general, you should position yourself just outside burst range as to be able to react to options and make sure that many of your laggy moves are safe. You will also want to be comfortable when being rushed down. Up air and down tilt will be your main ways to relieve close range pressure as they are safe because of upairs raw frame data and down tilts low-profile and decent pushback. Long range is NOT an optimal range for hero. At this range he will get outzoned and all his projectiles will be completely reactable bar top decks. Its only useful for camping to keep a lead or restore MP.
There is no “best move” in neutral. Instead, you will be playing a free form style neutral combining whatever feels natural to you. As always, your neutral success will be based off of your fundamentals and overall understanding of the game.
Once you have a read on the opponents habits, land a hit to lead into advantage.
Advantage: Your advantage will not be determined by many combos or frame traps. Instead, he will be using lots of reads and big hits that deal big damage. Your best throw generally for damage and stage control is back-throw, for edgeguarding Forward-throw, for combos Down-throw, for kills Up-throw. Pummel is useful for chip damage and MP recovery.
Possible strings and combos
D-Throw>Up-air>up-air>up-air>up-air>up-air. (Exclusive to bowser, DK, D3, and K. Rool)
D-Throw>Up-air>Neutral-air
D-Throw>Forward-air (Not true but will frametrap into grab)(Can extend with an grab but not true)
D-Throw>Forward-smash (big bodies only, frame-perfect)
D-Throw>Neutral-air
U-Throw>Up-air
U-Throw>Neutral-air
Up-air>up-air>up-air>up-air
Up-air>up-air>neutral-air
Up-air>up-tilt
Up-air>up-smash
Up-air>neutral-air
Frizz>Neutral-air
Frizz>Up-air>Up-air
Up-air>Kafrizz
Frizz>Zap
Many of these combos do between 30%-50%
As you can see, the combos for the this character are very linear and rely on 3-4 moves to reliably combo. Aside from combos, he also has good tech chase potential. Forward-air, forward-throw, Jab, and forward-tilt all reliably lead into tech chases. Hero has only 1 jab lock tool, being his jab 1 and 2. The easiest punish off of a jab-lock is a Down-smash as well as being high reward due to being a smash attack with a crit chance. Forward-smash is harder to hit, but has dramatically higher reward. If you want the highest reward guaranteed, you can do a kafrizz. If the opponent does tech, you also have multiple low risk high reward options. If timed right, kafrizz covers all tech options which leads into either 40% or a K.O. Zapple done correctly should cover tech in, tech in-place, miss-tech, and get-up attack. It whiffs against tech away however. Certain menu options also are great for tech chases.
Edgeguarding is very important for Hero. As Hero struggles in neutral greatly, he must take action whenever he can to ensure he gets the most out of advantage. Edgeguarding with Hero is easier than lots of other characters due to his far reaching recovery and strong aerials. The most simple edgeguarding tool is Forward-air. It has good power and disjoint, allowing it to beat out many recovery moves and kill at lower % ranges than you would expect. Hitting someone at about 50% will generally leave them unable to recover unless they are gifted with good recovery moves like quick attack, bomb/C4-recoveries, or flip kick. On the down-side however, it is slow and has few active frames that require you to have a read on how the opponent will recover. Combining it with baits like pretending to go low or high is the best way to utilize it. Neutral-air and Up-air have almost no use in edgeguarding due to their low power and having vertical launch angles. Back-air is great against characters with linear recoveries or if you are trying to stage spike. Its excellent power and extreme disjoint allow you to beat any recovery with a hitbox. For stage spikes, you should jump offstage and time it so that when the enemy hits ledge it will 2-frame while jumping onstage. This can lead to stage-spike kills, great damage if they tech, and you do not give up stage control on whiff. If you plan on using it as a raw kill move off the side, it must be done with a hard read or when the opponent is forced to recover in a predictable way. Down-air can be used to spike offstage opponents or to 2-frame. It has an amazing disjoint and incredible K.O. power, making it especially useful against opponents with a disjointed recovery. However, it has high endlag so you should be wary when using. His zap line of spells are not good for edgeguarding and are usually subpar or even bad options to choose during edgeguard sequences. Frizzle is good for onstage snipes due to its long range and high knockback, which can kill at surprisingly low %. Kafrizz is useful for predicting jumps as if it hits it will K.O. or deal a ton of damage at no risk to you. However, you must make sure that you have enough MP to recover afterwards. Swoosh is another of Hero’s plentiful stage spiking options due to low hitstun making it difficult to react to and subsequently tech. It also uses little MP, so whiffing is not a problem especially since you can immediately land onstage with little lag. Kaswoosh is used similarly to swoosh except with a larger margin of error due to longer lasting hitboxes and more damage. However, due to having higher hitstun it is much easier to tech. It also takes twice the MP of swoosh. You may use down-tilt as a low risk 2-framing option, however it will have low reward with little damage and only a few MP recovered. Forward-smash can be used but it very risky and hard to time. Dash attack is possible, but similarly to Forward-smash, it risky. Menu has a plethora of edgeguarding moves that 2-frame or hit below the ledge, such as magic burst.
Ledgeguarding is weaker than his edgeguarding, but still very powerful. Menu is very powerful here and should be used to fish for 2-framing options to punish ledge stall or jump off ledge. All of Hero’s normals are bad for ledge trapping save down-tilt which can reliably hit stalling opponents and is very low risk. Swoosh and Kaswoosh are his only “normal” specials that are good for ledge-trapping, as they are very active and may cover multiple options. Beyond this, his ledge trapping is reliant on menu and your own fundamentals regarding ledge trapping.
Juggling is like every other character except for one singular absolutely amazing move. Up-tilt. This move essentially carries Hero’s juggling. It has exceptionally long range to the point when only a Sephiroth down-air is capable of even trading with it. Up-tilt will do decent damage and knockback and will force airdodges. It frame-traps into most moves, and baiting out airdodges is very easy. As an added bonus, this move can be infuriating. Being such an annoying move, its useful for getting people riled up to get them playing very aggressively and predictable. At high enough %’s, it will even start killing without buffs. For reference, it will start killing lightweights at 120%, midweights at 135%, and heavies at 150%. If for some reason you don’t want to use this absolutely incredible move, you can use Up-air or Neutral-air.
Raw kill moves (If buffs needed, will be underlined)(If 2 buffs needed, bold): Up-tilt, Forward-tilt, Dash-attack, Forward-smash, Down-smash, Up-smash, Forward-air, Back-air, Down-air, Zap, Zapple, Kazap, Frizzle, Kafrizz, Kaswoosh. Up-throw, Back-throw, Forward-throw, Jab, Up-air, Down-tilt, Neutral-air, Down-throw.
Reminder, in advantage state, you are smelling for blood. If you play hero in a way that is steadily building damage, you are not using his biggest strength. The strength being your bravery, confidence, and your ability to takes stocks extremely early.
Disadvantage: Hero’s disadvantage is, as the kids say, stinky poopoo butt. Hero is tall and heavy, so he is very easy to combo. When pressured he has limited options and the few he does have are only useful for dealing damage and resetting neutral. This section is going to mainly be focused on how to escape disadvantage and how to avoid getting into it.
Being comboed as Hero can be frustrating, and it is understandable. However, while being comboed you use keep calm. You are going to want to DI and SDI in ways that make it difficult to combo you (DI away), awkward to react to (SDI), or unexpected (DI in odd directions that are not common). SDI is mostly applicable in low % settings where most moves do not send into tumble or when fighting characters with many multi hits. DI is better when you are in mid % combos as more moves send you into tumble and knockback increases. Common mistakes when being comboed are mashing options. Buffering an airdodge or an attack is not good for Hero. Buffering airdodge is predictable and easily punishable, and buffering attacks is bad since none of you moves will have the range or speed to break combos. Buffering options also messes with DI/SDI, so thats an added weakness.
Being pressured in shield is one of Hero’s biggest weaknesses. While he has a very fast OOS option in woosh (frame 7), it only tacks on a little damage and simply resets the neutral. However, it can be improved with platforms where it can string into moves on hit if the opponent mashes attack out of hit stun. If it whiffs, you could try to retreat to the platform to avoid a punish. Hero also has the universal grab, however it only leads to mediocre damage and it has very short range. In fact, it has the second shortest range in the game right behind Link, Fox, and Diddy. Use it sparingly.
Recovery for Hero is a big challenge. Your main tools for recovery are zoom and woosh. When sent barely offstage, try to recover with just jumps and airdodges, as to avoid wasting MP. When sent a fair bit offstage, try to recover with a woosh, which will make sure you survive while wasting little MP. When sent at very far angles, and you don’t wanna fish for zoom, it it best to double jump and swoosh. When sent very far offstage by a spike or your jump was caught, use kaswoosh for the maximum height. When you are sent to the edge, almost touching the blast zone, use menu to fish for zoom, which will bring you back to stage in a random area. You can airdodge during the second half of it or jump out, allowing you to avoid being sharked by other players. Keep in mind that your recoveries do not have hitboxes on Hero himself. You must avoid attacks from above, especially spikes. When you are low on MP, recovering is almost impossible at times. For this, if you are low on MP, always take stage control. You need it to gain back MP passively.
When being juggled do not airdodge. You should go to ledge instead, as many players simply with wait out the airdodge. You also have bad landing attacks, so attacking from juggling sucks.
Being ledge on ledge is surprisingly good for hero. While you stall on ledge, you gain MP and you have multiple options if you have the MP. One option is ledge drop jump side B. This is a low risk option that gets you out of the corner and if it is blocked, you are only going to eat a grab. Another option is ledge drop jump up b onto stage, which can net some damage while fully taking you out of the corner. However, if it whiffs, you are likely to get punished as you are in free fall. Finally, the most risky option, ledge drop jump Kafrizz. This can kill, net sweet damage, and absolutely rattle your opponents mental state. However, you waste a lot of MP, and whiffing leaves you in an awful position.
Menu:
In order to organize these spells, I will organize them into 4 category’s.
Slash attacks
Projectiles
Buffs
Misc
Slash attacks:
Flame Slash is essentially a forward smash with twice the range and power that 2 frames very easily. It starts on a very fast frame 6, making it faster than many of his normal moves. It has a sweet spot at the blade that is very strong, dealing a whopping 25% and kills at 90% at the ledge. The sour spot does 18% and has much more range than the sweet spot, but kills considerably later. The sourspot is located on the flames produced by the blade. Has great horizontal and vertical range. With psych up and oomph, the sweet spot can easily break shields and does amazing damage.
Kacrackle slash is the ice equivalent of flame slash. It shares the same frame data and hit boxes with flame slash. Hitting it results in trapping the opponent in ice, allowing you to rack up damage very quickly. It does 19% at the sweetspot and 14% at the sour spot. The sweetspot keeps opponents in the ice for longer. Breaks shields with psych up and oomph.
Metal slash does 1% damage to non-metal opponents with no knock back. It instantly kills metal characters however. Due to the fact that it is only useful in item parties and the hero ditto, it is his worst slash attack. Does marginally more damage with psych up and oomph.
Hatchet man deals a massive 40% and instantly breaks shields. It can kill at 0 if he has either psych up or oomph. However, it has an awful 37 frame startup, making it extremely hard to hit. Whiffing often means getting punished by a smash attack or a highly damaging combo due to his immense end lag.
Projectiles
Bang is a small projectile that creates an explosion upon hitting something or after traveling a set distance. If all hits connect, it can deal 17%. It has respectable knockback, killing at about 130%.
Kaboom starts life as a small projectile until it hits an opponent or treavleing a set distance. When that happens, it suddenly transforms into a violent explosion with a massive wind box and deals 30%, and can kill at as little as 80%. Difficult to DI, making it more likely to kill earlier than usual. It is +2 on shield, meaning that Hero gets to act first. Deals immense shield damage. Highly punishable on whiff.
Sizz is a small projectile that bursts into flames upon hitting anything. If it does not hit anything, it simply disappears. It deals 13% and lacks KO potential, however it is useful for zoning and racking up damage. Unsafe on shield.
Sizzle is very similar to sizz. However, it is faster, stronger, and travels more distance. It deals 24% and kills at the ledge at 100%. Unsafe on shield.
Whack is a small purple and black projectile that does 1%. Slow travel speeds, but travels a long distance. However, it also possesses the ability to kill instantly at any %, literally deleting the stock. The chance of killing instantly increases greatly the more % the opponent has. It will always kill instantly at 160% and above. Due to these qualities, it is one of Hero’s most feared spells that demands respect whenever it appears, lest the opponent risks dying at 0%. Reflecting whack can make it travel in odd directions… Unsafe on shield
Thwack is similar to whack in its instant kill property’s. However, the difference is how the projectile functions. Thwack is a large projectile that appears in front of Hero and does 3% if it doesn’t instakill. High startup and unsafe on shield.
Snooze instantly put the opponent to sleep. Slow, but large. Travels a fair distance, about 10 meters. Unsafe on shield. Snoozed opponents usually eat an f-smash or a down b spell, leading to a KO. Mashing makes them wake up sooner. Aerial opponents are put to sleep for less time. The time of sleep increases with %
Buffs
Oomph increase the damage and knockback your moves do, at the cost of defense. You do 1.6x damage, and 1.1x knockback, but you will take 1.2x more % when you are hit. It only affects melee hits, not projectiles. His best buff, as it causes basic strings to do over 50% easily, and a fully charged forward smash with break shields. Most notably, it makes his side b much safer and stronger, due to its properties as a disjointed hit box rather than a projectile.
Psych up increases the damage and knockback your moves do for 1 hit only. Increases Hero's shield damage dealt by 1.65×, knockback output by 1.2×, and damage output by 1.2×. With oomph, it can be used to break shields with fair, BAIR, dair, dash attack, any smash attack, forward tilt, up tilt, and either kacrackle slash or flame slash. Will also make hatchet man a one OHKO.
Heal, well, heals hero. It heals by 11% and can be used twice per stock. Resets back to 2 uses if he takes a stock or loses a stock. Use on sight, unless you are at 0% or if it will put you back into Luigi 0-death range.
Bounce is one of his best buffs. It is a reflector that increases projectile damage by 1.5×, and projectile speed by 1.4×. Its best quality is that you can move while using it, being very oppressive against characters like olimar and the Belmont’s.
Acceleratle makes hero the fastest character in the game, increasing his mobility to the point where every one of his movement stats is the highest in the game. He becomes faster than Sonic on the ground and fatse than limit cloud in the air. However, he is incredibly difficult to control, taking a significant degree of practice to control. He also is easier to kill, taking 1.1x the knockback when he is hit.
Misc
Magic burst is one of the hero’s scariest moves. It is an energy blast covering hero that does more damage the more MP he has. At full MP, it does 60% and kills at 20%. It also covers about 1/3 of most stages, making it a free edge guard against most characters. However, it also consumes all your MP. This makes it very risky to use it a hit is not guaranteed.
Kamikazee Instantly kills you. However, it also instantly kills any opponent above 30%, making it highly useful if you have a lead. You are also fully intangible, making it useful for challenging strong moves. It also has the property of ignoring shields completely, meaning the only way to avoid it is spotdodge or airdodge. Its also as big as a full MP magic burst. Widely feared, and for good reason. Also only needs 1 MP, so it’s useful for use when low on MP.
Kaclang turned you into metal, but in the bad way. It renders you complete immobile, and invincible to all forms of attack, including grabs. Has a hit box in the air which can kill at respectable %’s, but good luck hitting it. Never use in the Hero ditto, lest you get hit by metal slash at 0%. Is useful for stalling in doubles especially when waiting for a respawn.
Zoom is a free recovery. It zips up you from one part of the stage to a random location. The chance of getting it increases when offstage.
Hocus Pocus grants a random effect, most of which negative, some positive. It can…
Make him giant
give him invincible
refill his MP to 100
Slow him with a timer
Reduce MP to 0
make him poisoned
make himself sleep
Make him small.
Give him a flower on his head
Make him invisible
Choose a random menu spell.
Best used for item parties and casual matches. Don’t use in competitive, unless you can afford to take the risk.
Overall, Hero is patient but heavy hitting sword fighter and spell caster. He loves midrange combat but he struggles in close quarters pressure and a weak long range. He will be able to absolutely blowup opponents who become predictable or over aggressive, but he in turn will be combo food and take lots of % off of most combos. To make full use of his kit, you will need great mental fortitude and great fundamentals. This character may not be seen as the game breaker from his release, but be warned. He is not a character to take lightly.
Here are some other resources if you want to learn more about this character:
 ultimateframedata.com

 docs.google.com
 docs.google.com
Zap=Side-B 1
Zapple=Side-B 2
Kazap=Side-B 3
Frizz=Neutral-B 1
Frizzle=Neutral-B 2
Kafrizz=Neutral-B 3
Woosh=Up-B 1
Swoosh=Up-B 2
Kaswoosh=Up-B 3
NEUTRAL: Neutral with Hero can be very difficult due to his lack of burst options and safe moves. Instead, you will be conditioning jumps and over-aggression with your long range specials while occasionally mixing it up with grabs and spaced shield pressure. Many of your neutral wins will be reads and guesses, so you must take close attention to any habits, no matter how small. While this is true for most characters, this applies especially to Hero since he requires expert precision and timing. The margin for error is essentially nil.
Your main tools for conditioning are gonna be frizz and zap. Frizz is best for gathering safe info on jump habits. It being reactable and weak means that opponents are less likely to be scared or respect it. As a result, they often jump over it as getting hit only deals 8%. If they jump, they are probably confident in their movement and ability to punish. If they shield, it likely means that they are someone who is very comfortable in shield and may be prone to getting grabbed. The zap spells on the other hand are useful for understanding how your opponent likes to deal with threatening and powerful moves. Zap can dish out decent damage and is very safe if spaced correctly. However, it is very easy to jump over so it must be used with caution. Similar to frizz, you can use it to study habits with higher risk but a correspondingly high reward.
Up-tilt is useful for calling out jumps above you, down tilt safe poke on overeager opponents, and forward tilt is a risky way to call out dash attacks and extreme mashing. Dash attack is good for calling out retreating enemies but whiffing leaves you wide open. Forward air is your main tool for hard committing to an anti-air, Neutral air fulfills the same role but less risky, Down air is good for calling out spotdodge, and up air is for shield pressure and calling out spotdodge. Jab is a good “get off me” tool and will do good damage. its decently disjointed and may be used to punish spotdodges as well as jab lock.
Grab is only for punishing obviously unsafe moves, dash grab is only for punishing laggy options and calling out people holding shield. Pivot grab is good for punishing roll get up, spotdodge, rolls in general, regular get up, and over aggressive approaches.
In general, you should position yourself just outside burst range as to be able to react to options and make sure that many of your laggy moves are safe. You will also want to be comfortable when being rushed down. Up air and down tilt will be your main ways to relieve close range pressure as they are safe because of upairs raw frame data and down tilts low-profile and decent pushback. Long range is NOT an optimal range for hero. At this range he will get outzoned and all his projectiles will be completely reactable bar top decks. Its only useful for camping to keep a lead or restore MP.
There is no “best move” in neutral. Instead, you will be playing a free form style neutral combining whatever feels natural to you. As always, your neutral success will be based off of your fundamentals and overall understanding of the game.
Once you have a read on the opponents habits, land a hit to lead into advantage.
Advantage: Your advantage will not be determined by many combos or frame traps. Instead, he will be using lots of reads and big hits that deal big damage. Your best throw generally for damage and stage control is back-throw, for edgeguarding Forward-throw, for combos Down-throw, for kills Up-throw. Pummel is useful for chip damage and MP recovery.
Possible strings and combos
D-Throw>Up-air>up-air>up-air>up-air>up-air. (Exclusive to bowser, DK, D3, and K. Rool)
D-Throw>Up-air>Neutral-air
D-Throw>Forward-air (Not true but will frametrap into grab)(Can extend with an grab but not true)
D-Throw>Forward-smash (big bodies only, frame-perfect)
D-Throw>Neutral-air
U-Throw>Up-air
U-Throw>Neutral-air
Up-air>up-air>up-air>up-air
Up-air>up-air>neutral-air
Up-air>up-tilt
Up-air>up-smash
Up-air>neutral-air
Frizz>Neutral-air
Frizz>Up-air>Up-air
Up-air>Kafrizz
Frizz>Zap
Many of these combos do between 30%-50%
As you can see, the combos for the this character are very linear and rely on 3-4 moves to reliably combo. Aside from combos, he also has good tech chase potential. Forward-air, forward-throw, Jab, and forward-tilt all reliably lead into tech chases. Hero has only 1 jab lock tool, being his jab 1 and 2. The easiest punish off of a jab-lock is a Down-smash as well as being high reward due to being a smash attack with a crit chance. Forward-smash is harder to hit, but has dramatically higher reward. If you want the highest reward guaranteed, you can do a kafrizz. If the opponent does tech, you also have multiple low risk high reward options. If timed right, kafrizz covers all tech options which leads into either 40% or a K.O. Zapple done correctly should cover tech in, tech in-place, miss-tech, and get-up attack. It whiffs against tech away however. Certain menu options also are great for tech chases.
Edgeguarding is very important for Hero. As Hero struggles in neutral greatly, he must take action whenever he can to ensure he gets the most out of advantage. Edgeguarding with Hero is easier than lots of other characters due to his far reaching recovery and strong aerials. The most simple edgeguarding tool is Forward-air. It has good power and disjoint, allowing it to beat out many recovery moves and kill at lower % ranges than you would expect. Hitting someone at about 50% will generally leave them unable to recover unless they are gifted with good recovery moves like quick attack, bomb/C4-recoveries, or flip kick. On the down-side however, it is slow and has few active frames that require you to have a read on how the opponent will recover. Combining it with baits like pretending to go low or high is the best way to utilize it. Neutral-air and Up-air have almost no use in edgeguarding due to their low power and having vertical launch angles. Back-air is great against characters with linear recoveries or if you are trying to stage spike. Its excellent power and extreme disjoint allow you to beat any recovery with a hitbox. For stage spikes, you should jump offstage and time it so that when the enemy hits ledge it will 2-frame while jumping onstage. This can lead to stage-spike kills, great damage if they tech, and you do not give up stage control on whiff. If you plan on using it as a raw kill move off the side, it must be done with a hard read or when the opponent is forced to recover in a predictable way. Down-air can be used to spike offstage opponents or to 2-frame. It has an amazing disjoint and incredible K.O. power, making it especially useful against opponents with a disjointed recovery. However, it has high endlag so you should be wary when using. His zap line of spells are not good for edgeguarding and are usually subpar or even bad options to choose during edgeguard sequences. Frizzle is good for onstage snipes due to its long range and high knockback, which can kill at surprisingly low %. Kafrizz is useful for predicting jumps as if it hits it will K.O. or deal a ton of damage at no risk to you. However, you must make sure that you have enough MP to recover afterwards. Swoosh is another of Hero’s plentiful stage spiking options due to low hitstun making it difficult to react to and subsequently tech. It also uses little MP, so whiffing is not a problem especially since you can immediately land onstage with little lag. Kaswoosh is used similarly to swoosh except with a larger margin of error due to longer lasting hitboxes and more damage. However, due to having higher hitstun it is much easier to tech. It also takes twice the MP of swoosh. You may use down-tilt as a low risk 2-framing option, however it will have low reward with little damage and only a few MP recovered. Forward-smash can be used but it very risky and hard to time. Dash attack is possible, but similarly to Forward-smash, it risky. Menu has a plethora of edgeguarding moves that 2-frame or hit below the ledge, such as magic burst.
Ledgeguarding is weaker than his edgeguarding, but still very powerful. Menu is very powerful here and should be used to fish for 2-framing options to punish ledge stall or jump off ledge. All of Hero’s normals are bad for ledge trapping save down-tilt which can reliably hit stalling opponents and is very low risk. Swoosh and Kaswoosh are his only “normal” specials that are good for ledge-trapping, as they are very active and may cover multiple options. Beyond this, his ledge trapping is reliant on menu and your own fundamentals regarding ledge trapping.
Juggling is like every other character except for one singular absolutely amazing move. Up-tilt. This move essentially carries Hero’s juggling. It has exceptionally long range to the point when only a Sephiroth down-air is capable of even trading with it. Up-tilt will do decent damage and knockback and will force airdodges. It frame-traps into most moves, and baiting out airdodges is very easy. As an added bonus, this move can be infuriating. Being such an annoying move, its useful for getting people riled up to get them playing very aggressively and predictable. At high enough %’s, it will even start killing without buffs. For reference, it will start killing lightweights at 120%, midweights at 135%, and heavies at 150%. If for some reason you don’t want to use this absolutely incredible move, you can use Up-air or Neutral-air.
Raw kill moves (If buffs needed, will be underlined)(If 2 buffs needed, bold): Up-tilt, Forward-tilt, Dash-attack, Forward-smash, Down-smash, Up-smash, Forward-air, Back-air, Down-air, Zap, Zapple, Kazap, Frizzle, Kafrizz, Kaswoosh. Up-throw, Back-throw, Forward-throw, Jab, Up-air, Down-tilt, Neutral-air, Down-throw.
Reminder, in advantage state, you are smelling for blood. If you play hero in a way that is steadily building damage, you are not using his biggest strength. The strength being your bravery, confidence, and your ability to takes stocks extremely early.
Disadvantage: Hero’s disadvantage is, as the kids say, stinky poopoo butt. Hero is tall and heavy, so he is very easy to combo. When pressured he has limited options and the few he does have are only useful for dealing damage and resetting neutral. This section is going to mainly be focused on how to escape disadvantage and how to avoid getting into it.
Being comboed as Hero can be frustrating, and it is understandable. However, while being comboed you use keep calm. You are going to want to DI and SDI in ways that make it difficult to combo you (DI away), awkward to react to (SDI), or unexpected (DI in odd directions that are not common). SDI is mostly applicable in low % settings where most moves do not send into tumble or when fighting characters with many multi hits. DI is better when you are in mid % combos as more moves send you into tumble and knockback increases. Common mistakes when being comboed are mashing options. Buffering an airdodge or an attack is not good for Hero. Buffering airdodge is predictable and easily punishable, and buffering attacks is bad since none of you moves will have the range or speed to break combos. Buffering options also messes with DI/SDI, so thats an added weakness.
Being pressured in shield is one of Hero’s biggest weaknesses. While he has a very fast OOS option in woosh (frame 7), it only tacks on a little damage and simply resets the neutral. However, it can be improved with platforms where it can string into moves on hit if the opponent mashes attack out of hit stun. If it whiffs, you could try to retreat to the platform to avoid a punish. Hero also has the universal grab, however it only leads to mediocre damage and it has very short range. In fact, it has the second shortest range in the game right behind Link, Fox, and Diddy. Use it sparingly.
Recovery for Hero is a big challenge. Your main tools for recovery are zoom and woosh. When sent barely offstage, try to recover with just jumps and airdodges, as to avoid wasting MP. When sent a fair bit offstage, try to recover with a woosh, which will make sure you survive while wasting little MP. When sent at very far angles, and you don’t wanna fish for zoom, it it best to double jump and swoosh. When sent very far offstage by a spike or your jump was caught, use kaswoosh for the maximum height. When you are sent to the edge, almost touching the blast zone, use menu to fish for zoom, which will bring you back to stage in a random area. You can airdodge during the second half of it or jump out, allowing you to avoid being sharked by other players. Keep in mind that your recoveries do not have hitboxes on Hero himself. You must avoid attacks from above, especially spikes. When you are low on MP, recovering is almost impossible at times. For this, if you are low on MP, always take stage control. You need it to gain back MP passively.
When being juggled do not airdodge. You should go to ledge instead, as many players simply with wait out the airdodge. You also have bad landing attacks, so attacking from juggling sucks.
Being ledge on ledge is surprisingly good for hero. While you stall on ledge, you gain MP and you have multiple options if you have the MP. One option is ledge drop jump side B. This is a low risk option that gets you out of the corner and if it is blocked, you are only going to eat a grab. Another option is ledge drop jump up b onto stage, which can net some damage while fully taking you out of the corner. However, if it whiffs, you are likely to get punished as you are in free fall. Finally, the most risky option, ledge drop jump Kafrizz. This can kill, net sweet damage, and absolutely rattle your opponents mental state. However, you waste a lot of MP, and whiffing leaves you in an awful position.
Menu:
In order to organize these spells, I will organize them into 4 category’s.
Slash attacks
Projectiles
Buffs
Misc
Slash attacks:
Flame Slash is essentially a forward smash with twice the range and power that 2 frames very easily. It starts on a very fast frame 6, making it faster than many of his normal moves. It has a sweet spot at the blade that is very strong, dealing a whopping 25% and kills at 90% at the ledge. The sour spot does 18% and has much more range than the sweet spot, but kills considerably later. The sourspot is located on the flames produced by the blade. Has great horizontal and vertical range. With psych up and oomph, the sweet spot can easily break shields and does amazing damage.
Kacrackle slash is the ice equivalent of flame slash. It shares the same frame data and hit boxes with flame slash. Hitting it results in trapping the opponent in ice, allowing you to rack up damage very quickly. It does 19% at the sweetspot and 14% at the sour spot. The sweetspot keeps opponents in the ice for longer. Breaks shields with psych up and oomph.
Metal slash does 1% damage to non-metal opponents with no knock back. It instantly kills metal characters however. Due to the fact that it is only useful in item parties and the hero ditto, it is his worst slash attack. Does marginally more damage with psych up and oomph.
Hatchet man deals a massive 40% and instantly breaks shields. It can kill at 0 if he has either psych up or oomph. However, it has an awful 37 frame startup, making it extremely hard to hit. Whiffing often means getting punished by a smash attack or a highly damaging combo due to his immense end lag.
Projectiles
Bang is a small projectile that creates an explosion upon hitting something or after traveling a set distance. If all hits connect, it can deal 17%. It has respectable knockback, killing at about 130%.
Kaboom starts life as a small projectile until it hits an opponent or treavleing a set distance. When that happens, it suddenly transforms into a violent explosion with a massive wind box and deals 30%, and can kill at as little as 80%. Difficult to DI, making it more likely to kill earlier than usual. It is +2 on shield, meaning that Hero gets to act first. Deals immense shield damage. Highly punishable on whiff.
Sizz is a small projectile that bursts into flames upon hitting anything. If it does not hit anything, it simply disappears. It deals 13% and lacks KO potential, however it is useful for zoning and racking up damage. Unsafe on shield.
Sizzle is very similar to sizz. However, it is faster, stronger, and travels more distance. It deals 24% and kills at the ledge at 100%. Unsafe on shield.
Whack is a small purple and black projectile that does 1%. Slow travel speeds, but travels a long distance. However, it also possesses the ability to kill instantly at any %, literally deleting the stock. The chance of killing instantly increases greatly the more % the opponent has. It will always kill instantly at 160% and above. Due to these qualities, it is one of Hero’s most feared spells that demands respect whenever it appears, lest the opponent risks dying at 0%. Reflecting whack can make it travel in odd directions… Unsafe on shield
Thwack is similar to whack in its instant kill property’s. However, the difference is how the projectile functions. Thwack is a large projectile that appears in front of Hero and does 3% if it doesn’t instakill. High startup and unsafe on shield.
Snooze instantly put the opponent to sleep. Slow, but large. Travels a fair distance, about 10 meters. Unsafe on shield. Snoozed opponents usually eat an f-smash or a down b spell, leading to a KO. Mashing makes them wake up sooner. Aerial opponents are put to sleep for less time. The time of sleep increases with %
Buffs
Oomph increase the damage and knockback your moves do, at the cost of defense. You do 1.6x damage, and 1.1x knockback, but you will take 1.2x more % when you are hit. It only affects melee hits, not projectiles. His best buff, as it causes basic strings to do over 50% easily, and a fully charged forward smash with break shields. Most notably, it makes his side b much safer and stronger, due to its properties as a disjointed hit box rather than a projectile.
Psych up increases the damage and knockback your moves do for 1 hit only. Increases Hero's shield damage dealt by 1.65×, knockback output by 1.2×, and damage output by 1.2×. With oomph, it can be used to break shields with fair, BAIR, dair, dash attack, any smash attack, forward tilt, up tilt, and either kacrackle slash or flame slash. Will also make hatchet man a one OHKO.
Heal, well, heals hero. It heals by 11% and can be used twice per stock. Resets back to 2 uses if he takes a stock or loses a stock. Use on sight, unless you are at 0% or if it will put you back into Luigi 0-death range.
Bounce is one of his best buffs. It is a reflector that increases projectile damage by 1.5×, and projectile speed by 1.4×. Its best quality is that you can move while using it, being very oppressive against characters like olimar and the Belmont’s.
Acceleratle makes hero the fastest character in the game, increasing his mobility to the point where every one of his movement stats is the highest in the game. He becomes faster than Sonic on the ground and fatse than limit cloud in the air. However, he is incredibly difficult to control, taking a significant degree of practice to control. He also is easier to kill, taking 1.1x the knockback when he is hit.
Misc
Magic burst is one of the hero’s scariest moves. It is an energy blast covering hero that does more damage the more MP he has. At full MP, it does 60% and kills at 20%. It also covers about 1/3 of most stages, making it a free edge guard against most characters. However, it also consumes all your MP. This makes it very risky to use it a hit is not guaranteed.
Kamikazee Instantly kills you. However, it also instantly kills any opponent above 30%, making it highly useful if you have a lead. You are also fully intangible, making it useful for challenging strong moves. It also has the property of ignoring shields completely, meaning the only way to avoid it is spotdodge or airdodge. Its also as big as a full MP magic burst. Widely feared, and for good reason. Also only needs 1 MP, so it’s useful for use when low on MP.
Kaclang turned you into metal, but in the bad way. It renders you complete immobile, and invincible to all forms of attack, including grabs. Has a hit box in the air which can kill at respectable %’s, but good luck hitting it. Never use in the Hero ditto, lest you get hit by metal slash at 0%. Is useful for stalling in doubles especially when waiting for a respawn.
Zoom is a free recovery. It zips up you from one part of the stage to a random location. The chance of getting it increases when offstage.
Hocus Pocus grants a random effect, most of which negative, some positive. It can…
Make him giant
give him invincible
refill his MP to 100
Slow him with a timer
Reduce MP to 0
make him poisoned
make himself sleep
Make him small.
Give him a flower on his head
Make him invisible
Choose a random menu spell.
Best used for item parties and casual matches. Don’t use in competitive, unless you can afford to take the risk.
Overall, Hero is patient but heavy hitting sword fighter and spell caster. He loves midrange combat but he struggles in close quarters pressure and a weak long range. He will be able to absolutely blowup opponents who become predictable or over aggressive, but he in turn will be combo food and take lots of % off of most combos. To make full use of his kit, you will need great mental fortitude and great fundamentals. This character may not be seen as the game breaker from his release, but be warned. He is not a character to take lightly.
Here are some other resources if you want to learn more about this character:
Hero — Ultimate Frame Data
Mobile-friendly Frame Data for Hero in Super Smash Bros. Ultimate.
Hero Shield Safety
Normal Regular Hero SH/FH Aerial:,Advantage on shield Nair,-6/-6 Bair (sweetspot),-9/-9 Bair (sourspot),-10/-9 Fair (sweetspot),-8/-7 Fair (sourspot),-8/-8 Uair,-5/-5 Dair (sweetspot),-13/-12 Dair (sourspot),-14/-14 First/Last frame Smash:,Advantage on shield Fsmash (sweetspot),-36/-34 Fsmash (s...
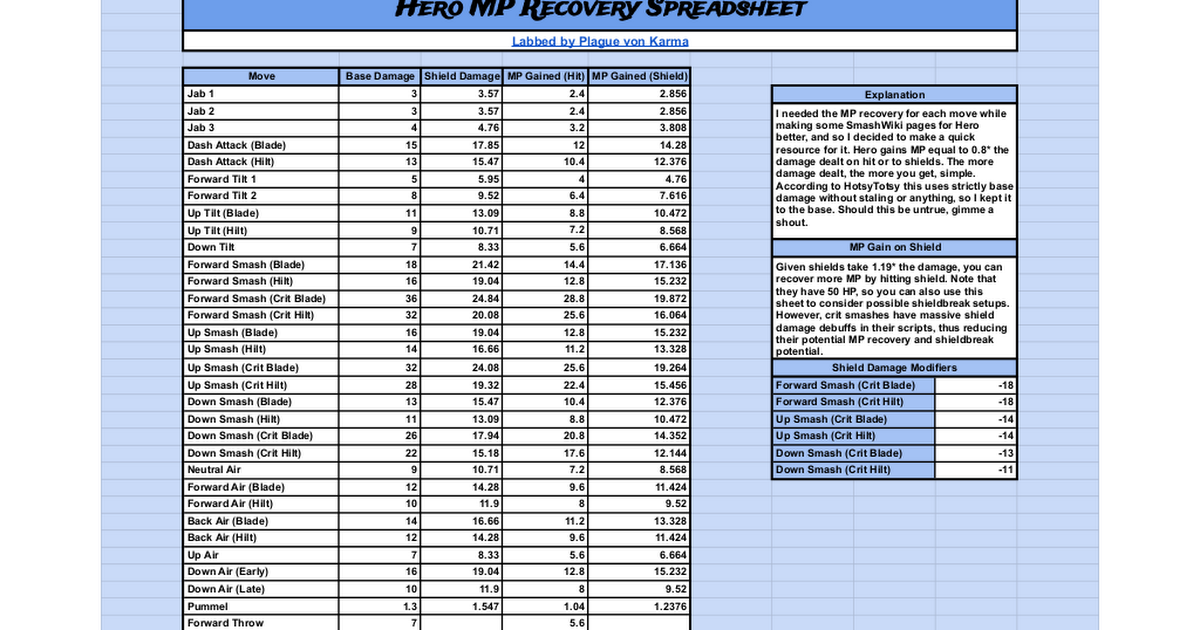
Hero MP Recovery Spreadsheet
Landing Page Hero MP Recovery Spreadsheet <a href="https://twitter.com/PlagueVonKarma">Labbed by Plague von Karma</a> Move,Base Damage,Shield Damage,MP Gained (Hit),MP Gained (Shield) Jab 1,3,3.57,2.4,2.856,Explanation Jab 2,3,3.57,2.4,2.856,I needed the MP recovery for each move while making s...
