
- Game Versions
- Smash Wii U

This is going to be an in-depth breakdown and semi guide for Charizard in Smash 4. I don't really have a reason for creating this beyond an urge. Nonetheless it should hopefully shed some light on the character overall as he's a character with overall some of the least exposure among the cast. For what it's worth this guide is coming from someone who has invested approximately 200+ hours into Charizard overall during the space of Smash 4's life span.
---
-- Attributes and Misc --
The first thing I want to cover is Charizard's overall character attributes and other noteworthy miscellaneous elements of the character:

'Charizard's Hurtbox - Courtesy of meshimaX'
'Charizard's Hurtbox - Courtesy of meshimaX'
Weight - 116 (4th)
-
Initial Walk Velocity - 0.12 (32nd)
Walk Acceleration - 0 (49-58th)
Max Walk Velocity - 1.2 (15-16th)
Initial Dash Velocity - 1 (58th)
Max Run Velocity - 2 (9th)
Traction - 0.04 (56-57th)
-
Max Jumps - 3
Jumpsquat - 7 frames (52-57th)
Soft Landing Lag - 2 frames
Hard Landing Lag - 5 frames
Short Hop Air Time - 34 frames
Full Hop Air Time - 53 frames
Max Horizontal Air Velocity - 0.92 (47th)
Max Fall Speed - 1.4 (40-41st)
Max Fast Fall Speed - 2.24 (39-41st)
Air Acceleration - 0.05 (39-44th)
Air Deceleration - 0.01 (10-55th)
Gravity - 0.11 (10-12th)
-
Spot Dodge - Intangible 3-18/FAF: 28 (35-51st)
Forward Roll - Intangible 4-18/FAF: 33 (50-52nd)
Backward Roll - Intangible 4-18/FAF: 33 (50-52nd)
Air Dodge - Intangible 3-18/FAF: 34 (34-51st)
The Good:
- Weight: Charizard's weight is obviously a big bonus in terms of allowing him to survive for longer than most. Being the 4th heaviest in the game coupled with solid recovery options means Charizard's stocks shouldn't be vanishing until beyond 150%+ in quite a lot of cases. Though again this is all obvious.
- Jumps: Having an extra mid-air jump allows for a little more flexibility in terms of landing and moving in neutral, as well as obviously assisting in his recovery.
- Walk Speed: Charizard's ground speed is very respectable, being the 2nd fastest among the super-heavyweights (to DK's 1.3) and top 15 overall tied with Mewtwo. Although his initial walk speed is a little below average and his walk acceleration is bad, his walk is still central to his overall micro-spacing and approach. Also, it's easily the dankest walk in the game besides Bayonetta's. That in itself makes it worth using.
- Run Speed: Charizard's run speed is easily the best out of any super-heavy and generally a shining outlier in terms of his movement. His ability to quickly close the gap on the ground allows him to effectively whiff punish laggy attempts at mid to long range zoning and also helps in terms of his ability to shark underneath characters, particularly on stages with platforms.
- Skid: While I don't have the frame data for Charizard's skid length off hand (this also isn't constant and changes slightly depending on whether you're at max run speed/you're 'slow running' or not), it's one of the fastest in the game just below characters like Bowser. This gives him relatively quick access to his ground options out of his fast run without having to commit to shield.
The Neutral:
- Fall Speed: Charizard's floatiness is both a blessing and a curse. It allows him to avoid certain setups more easily, but also serves as a contributing factor that leaves him more susceptible to certain things like juggles.
The Bad and the Ugly:
- Size: Being particularly large in fighting games is almost never a good thing, and Zard suffers the size issue moreso than almost any other character in the game barring Ganon. While Zard isn't necessarily the largest character, the other super-heavies generally remedy he size issue a little better than him (though it's still a bad issue for them and generally serves as a detriment). The real cherry to all of this though is Charizard's head hurtbox. For some reason, this part of his hurtbox is far larger than it should be. This is an incredibly critical yet often unsung issue because in various animations he leaves his head hanging forward (even during his idle). Here is an example of this: https://gfycat.com/ColdCloseLark All the characters in this gfy have inferior standing grab range to Zard yet they're all able to grab him out of his grab range because of his head hurtbox.
- Overall Air Physics: Despite his 3 jumps, Charizard's air physics as a whole are pretty awful. The combination of his poor air mobility combined with his low mid air jump height and his aforementioned size makes it incredibly difficult for him to escape aerial pressure via movement.
- Initial Dash Speed: Because his initial dash speed is slow despite his fast run speed, this lessens the effectiveness of his foxtrot and notably his perfect pivot (which is dependent on a character's initial dash speed and traction, normally low traction characters have long perfect pivots but Charizard is probably the only one that doesn't).
- Traction: Charizard for some reason decided to oil his feet for this game and his traction has drastically decreased from Brawl becoming the joint 2nd lowest in the game. This lessens the effectiveness of his out of shield game due to him getting pushed back from attacks further. He's also unable to exploit some of the sliding techs that comes with low traction due to the nature of his attacks/grabs.
- Rolls/Techs: The frame data for Charizard's rolls is pretty damn bad, but standard for heavies. The real problem is the distance they travel combined with his aforementioned size, which lead me to believe Charizard has easily some of the worst rolls in the game. They have some of the lowest horizontal displacement in the game, meaning certain options that would normally only cover one option cover multiple. For instance, various characters are able to catch both his rolls/his ledge roll with an on the spot FSmash or move of some sorts because he sticks his fat neck out while rolling. This is yet another contributing factor to his already poor disadvantaged state.
- Gravity: Charizard is one of the unfortunate characters with what I like to call a poor fall speed to gravity ratio. For those who don't know, gravity is an attribute in Smash 4 that affects acceleration to max fall speed but in addition to this, from Brawl onwards it also serves as an additional multiplier for vertical knockback. Characters with high gravity suffer additional vertical knockback, typically to compensate for their fall speed (Fox has both the highest fall speed and gravity in the game, as a result these essentially level out and make him die at percents off the top that correlate with his weight, unlike in Melee where he would die off the top very late). Charizard has a relatively high gravity and a low fall speed, making him die earlier off the top than his weight would suggest.
---
-- Moveset --
This section serves to break down Charizard's individual moves in detail, understanding their utility, frame data and overall safety. To clarify a couple things quickly:
FAF: First Actionable Frame. The first frame at which a character is able to act out of an action.
Advantage: An attack's advantage on block. There are two values here, one for post shield drop and one for pre shield drop (OoS). Dropping shield takes 7 frames but it's from here you have access to all your moves again, otherwise in shield you only have access to spotdodge, rolls, shield grab and jump cancelled options (like USmash and Up B).
Credit to KingJigglypuff for the hitbox references.
- Jab 1 -
Hitbox Active: 4-5
FAF: 23
Base Damage: 3%
Angle: 120/361/361
Advantage (Shield Drop): -8
Advantage (OoS): -15
- Jab 2 -
Hitbox Active: 5-6
FAF: 26
Base Damage: 4%
Angle: 80/55/30
Advantage (Shield Drop): -9
Advantage (OoS): -16
- Jab 3 -
Hitbox Active: 7-9
FAF: 34
Base Damage: 5%
Angle: 70/60/50/45
Advantage (Shield Drop): -15
Advantage (OoS): -22
Charizard's jab is easily one of his best moves, ranks as one of the best jabs overall in the game and is the centrepiece to how the character plays overall. It's the fastest attack among all the attacks of the super-heavies hitting from frame 4, serves as his primary post shield drop punish option, it deals great damage, has good range (jab 3 in particular having about as much range and disjoint as FTilt) and solid knockback enough to kill at high percents if fresh, however since this move sees such frequent use it will almost never be fresh at percents where it can kill. The end lag of the move is just low enough such that you can catch your opponent with certain mix-ups from jab 2 such as grab and Up B, and jab 1 is able to jab lock, though it's rather unreliable. For jab 3, the hitboxes hit at different angles depending on where on the wing you hit. The hitboxes closer to the tip of the wing hit at lower angles. It's not without its flaws however. It can be occasionally unreliable up close and reel the foe too close during jab 1 such that the next two hits whiff, and it's not the safest jab out there but don't let this deter you from abusing this.
~
- Dash Attack -
Hitbox Active: 10-12 -> 13-20
FAF: 40
Base Damage: 11% -> 8%
Angle: 50/60
Advantage (Shield Drop): -14
Advantage (OoS): -21
This is Zard's primary zone breaking and approach option. Not the best dash attack in the world but it has decent active frames, decent startup and high base knockback alongside a pretty good angle allowing him to effectively establish stage control with it. However that's about it and Charizard gets nothing in the way of combos off of this move at any percent. This move is best used when your opponent whiffs at mid range or if you have conditioned your opponent to not expect your approach. Pretty standard.
~
- FTilt -
Hitbox Active: 11-13
FAF: 43
Base Damage: 11/7/11/7%
Angle: 40/361/40/361
Advantage (Shield Drop): -15/-17 (sweet/sour)
Advantage (OoS): -22/-24
This move is a bit of a mixed bag. On one hand its lateral range is fantastic, with the end portion of his tail acting as an effective disjoint, and it hits respectably hard, with its sweetspot hitboxes being able to kill at around the 110% mark. It can also be angled and the downward version can be used to catch people trying to recover to the ledge, potentially ending their stock early if you catch their two frames of ledge vulnerability. On the other hand its end lag prevents this move from being the zoning option that one would like it to be as it's only remotely safe at max spacing and often not particularly safe to whiff. Its sourspots are also bad, being both unsafe and unrewarding. Overall this is a move to use relatively sparingly, mixing it in as part of your zoning and ledge traps.
~
- UTilt -
Hitbox Active: 9-13
FAF: 34
Base Damage: 8%
Angle: 96
Advantage (Shield Drop): -11
Advantage (OoS): -18
A solid anti-air and one of Charizard's only ground moves that he can do while sliding. UTilt has low enough base knockback and low enough cooldown such that at very low percents it can combo into itself or USmash, but also high enough knockback growth such that it can kill at high percents. Good at catching and trapping landings as well as pressuring below platforms due to its impressive vertical disjoint thanks to his intangible wings but its poor horizontal range and overall lack of safety prevents it from being useful vs ground level opponents unless they're particularly large. It also lost the lingering hitboxes it had in Brawl, so it's not quite as good at punishing airdodges as it used to be.
~
- DTilt -
Hitbox Active: 7-8 (windbox) -> 9-10
FAF: 31
Base Damage: 10%
Angle: 30
Advantage (Shield Drop): -7
Advantage (OoS): -14
Charizard's primary ground spacing option that has good range, base knockback, angle and decent safety on block. The angle can help set up for some low percent tech chase attempts, but beyond that Charizard doesn't really get anything off of this move. This is a case of a move that is necessary and important, but not quite good enough for what it is. It's a little too slow for what it is, lacks disjoint (unlike DK and Bowser DTilts) and not quite strong enough either. A little too much base knockback for combos, too little growth to serve as a high percent kill move and its hitboxes don't hit low enough to serve as a move that's effective at catching the two frames of ledge vulnerability. It fills an essential gap in Charizard's moveset, but not particularly well. Nonetheless this move will see relatively frequent use if simply because of its relative safety on block when spaced. It also has a windbox to help the move's consistency but this can often cause some funky scenarios if Charizard is hit or grabbed before the hitbox but during the windbox.
~
- FSmash -
Hitbox Active: 22 -> 23-24 (Invincible 22-25)
FAF: 70
Base Damage: 17% -> 17/14%
Angle: 45
Advantage (Shield Drop): -29/-30 (sweet/sour)
Advantage (OoS): -36/-37
One of Charizard's highest knockback options (fully charged the sweetspot can kill at around 45%), this move has great horizontal range and invincibility frames during its hitbox active frames allowing it to brute force through certain things however that is where its strengths end because beyond that this move is awful. One of the critical reasons being is that it's much less rewarding than other FSmashes of its sort of speed. All 4 of the other super-heavies have stronger FSmashes in terms of damage and to add insult to injury they're all safer than Charizard's as well. The icing on the rotten cake is the fact that this move has a sourspot which reduces its effectiveness significantly especially considering the sourspot occurs at a max spacing range (so you're essentially rewarded less for spacing this move well). It's incredibly slow start-up means it can't be used as an effective punish vs most things, and its severe endlag means that it's incredibly easy to hard punish both on block and whiff. The invincibility frames do not serve as decent compensation for all the shortcomings of this move. Use only as a hard read, a shield break punish or after a jab lock.
~
- USmash -
Hitbox Active: 6 (aerial only) -> 7-11 + 17-21
FAF: 49
Base Damage: 5% + 11%
Angle: 110 (aerial only) -> 140/100/280 + 83
Advantage (Shield Drop): -30/-16 (first/second hits)
Advantage (OoS): -38/-23
In contrast to his awful FSmash, Charizard's USmash is fantastic and would be up there as one of the best in the game if not for a couple of shortcomings. It's the 2nd fastest USmash in the game vs aerial opponents, 3rd vs grounded ones; it does great damage and knockback able to kill at around 110%, serves as one of his best out of shield options and is a fantastic anti-air. As patches have progressed the move has become steadily more reliable (as well as stronger) and the back hitbox of the first hit is even capable of jab locking. It's relatively unsafe but that's a fair trade-off for all the strengths this move has. The critical issue however is its unreliability in certain scenarios, the critical one being vs cross-ups. Opponents that are behind Charizard will only ever get hit by the first hitbox unless they're large and immediately behind him, leaving the move unsafe on hit in these scenarios. Nonetheless this is still a move you should abuse.
~
- DSmash -
Hitbox Active: 14-16
FAF: 61
Base Damage: 16%
Angle: 33/33/46/46
Advantage (Shield Drop): -28
Advantage (OoS): -35
The middle ground smash attack for Charizard. Incredible horizontal range and disjoint and surprising vertical range with good damage and knockback for its speed. Hits both sides of him at once so it's fantastic and catching unsafe landings and rolls and it hits below the ledge so it's a strong option for catching low recoveries and two frame ledge vulnerability. However it's also incredibly unsafe and has a ton of endlag so it's not an option you can commit to too often. Nonetheless it's still overall respectable for what it is and shouldn't be forgotten, simply used sparingly.
~
- NAir -
Hitbox Active: 9-25
FAF: 60
Landing Lag: 20
Autocancel: 1-3, 31>
Base Damage: 12/9/9/9%
Angle: 361
Advantage (Shield Drop): -5/-6 (sweet/sour)
Advantage (OoS): -12/-13
Optimal Autocancel Advantage (Shield Drop): +5/+4 (sweet/sour)
Optimal Autocancel Advantage (OoS): -2/-3
This move, like DTilt, is a move that fills an incredibly essential hole in Charizard's moveset but unfortunately not quite effectively enough. NAir covers a wide arc over a long period of time, deals decent damage and serves as Charizard's central (and more often than not 'only') combo starting normal. The sourspot is capable of jab locking at low percents if you're able to get a hard knockdown off (which is only really possible on stages with platforms), while the sweetspot can kill at high percents. The primary saving grace of this move is its early autocancel window, allowing it to autocancel on rising short hop late fastfall only 6 frames after the hitboxes terminate. This is strong vs opponents prone to empty hopping often particularly if their empty hop is relatively high (though FAir in general is a faster option), however using it in this way isn't particularly safe and leaves Charizard susceptible to easy shield grabs or other punishes. Landing NAir is pretty much always unsafe, so this move has to be hit late and autocancelled in order to be safe and the best way to exploit this is through full hop or double jump falling NAir. Mastering the autocancel timing for this move is ABSOLUTELY ESSENTIAL in order for this character to apply any sort of decent pressure. There are two other critical issues with this move as well. The first is that its hitbox comes out too late and ends too early, consequently not matching its visual indicators and preventing it from being used to punish cross-ups or space on shield at ground level as the move would indicate. The second is that the move's hitboxes are tiny and combined with Charizard's large size and how slow the move is this move loses (or at best trades) with just about everything. Overall this move is a mixed bag that, as aforementioned, fills a void in certain elements of Charizard's gameplay but not very well. It's good at starting combos, zoning vs aerial opponents, ledge traps and platform pressure but its bad hitboxes and the awkward nature of how it has to be timed hamper its overall effectiveness.
~
- FAir -
Hitbox Active: 8-9 -> 10-11
FAF: 47
Landing Lag: 22
Autocancel: 1-4, 35>
Base Damage: 12% -> 13%
Angle: 361 -> 34
Advantage (Shield Drop): -6
Advantage (OoS): -13
Optimal Autocancel Advantage (Shield Drop): -11/-14 (sweet/sour)
Optimal Autocancel Advantage (OoS): -18/-21
This is overall a very solid aerial, coming out at a respectable frame 8 and being strong (sweetspot FAir being capable of killing at around 85% at the ledge) as well as being Charizard's go to combo finisher and a decent zoning tool. This move autocancels on rising short hop (requires frame perfection but it's easy thanks to buffering) so it's useful if done retreating, however this move is held back from being as good a zoning tool as it could be due to a combination of its arc not being particularly large and its landing lag making it not particularly safe on landing vs a good number of characters. For the most part though it's a move that Charizard should be using very often.
~
- BAir -
Hitbox Active: 14-16
FAF: 46
Landing Lag: 24
Autocancel: 1-4, 44>
Base Damage: 16/14/11/11
Angle: 361
Advantage (Shield Drop): -5/-6/-8 (sweet/middle/sour)
Advantage (OoS): -12/-13/-15
Charizard's explosive wild card. If you follow me on Twitter you'll know how often I sing praises of this move because honestly this move is what, in my opinion, allows this character to stand a chance at all at high level. Having the 3rd longest lateral range and the 2nd highest knockback of any BAir in the game, this move's destructive power absolutely cannot be slept on because with max rage it's capable of ending stocks at as low as 60% from centre stage. To top it all off the move, unlike similar strength BAirs, is safe on block at max range due to its immense range and high shield pushback. The move is terrifying both on stage and off but it's not without its setbacks. It's unsafe at anything less than max range as well as being a little slow and somewhat awkward to land due to the nature of the arc it hits (his tail also goes slightly into the z-axis during the move making its hitboxes even more awkward) but do not let that deter you from using this move particularly when your opponent is at mid/high percents or offstage. As one attack whiff could mean the swift end of their stock.
~
- UAir -
Hitbox Active: 12-15 (Head Intangible 11-15)
FAF: 46
Landing Lag: 20
Autocancel: 1-4, 41>
Base Damage: 13
Angle: 85
Advantage (Shield Drop): -4
Advantage (OoS): -11
This move is a strange one, and one Charizard can't really exploit too well due to the nature of his physics. One of the most critical issues of this move is, similar to NAir, its hitboxes come out too late, coming out when his head is pretty much already straight up as opposed to when it's out forward. The head intangibility alongside its power are its main selling points, allowing Charizard to brute force offensive landing attempts but Charizard's air physics don't allow him to effectively chase with this move, and its aerial endlag, landing lag and the nature of its hitbox make the move unsafe in almost every instance. It can be used as a makeshift combo starter at low percents though, but it's rather awkward and not really advised.
~
- DAir -
Hitbox Active: 18-20 -> 21-26
FAF: 52
Landing Lag: 33
Autocancel: 1-3, 41>
Base Damage: 14% -> 8%
Angle: 270 -> 55/361
Advantage (Shield Drop): -16/-20 (sweet/sour)
Advantage (OoS): -23/-27
A pretty standard, fairly strong meteor with a good hitbox used typically for edgeguarding with limited on stage utility due to its severe landing lag and mediocre autocancel window. It benefits from a lingering hitbox that can create some unorthodox setups but doesn't really guarantee anything true for Charizard. The move is also able to jab lock at low percents if you're able to secure a hard knockdown. Not really too much to say about this move. What you see is what you get.
~
- Grab -
Hitbox Active: 8-9
FAF: 34
- Dash Grab -
Hitbox Active: 10-11
FAF: 42
- Pivot Grab -
Hitbox Active: 11-12
FAF: 40
His standing and pivot grabs have good range, with the pivot grab being incredibly disjointed. His dash grab is pretty awful though due to poor range, punishable endlag and relatively slow startup. Charizard's grabs aren't particularly amazing and due to his mediocre pressure game he can sometimes find it hard to get the grabs unless the opponent spaces on his block particularly poorly (especially due to his awful traction). A far cry from his fantastic Brawl grabs.
~
- FThrow -
Weight Dependent: Yes
Base Damage: 10%
Angle: 40
Endlag: 27/31/36
This throw is primarily a positioning throw, one that should be opted for near the ledge or when your opponent is out of the percent ranges for DThrow to combo. A decent throw overall that can also secure high percent DI mixup kills if your opponent is fearing the UThrow at the ledge. However, due to its high endlag it has no combo potential.
~
- BThrow -
Weight Dependent: Yes
Base Damage: 10%
Angle: 361
Endlag: 2/3/3
The backward version of FThrow with a slightly different angle but the same knockback values. The catch with this throw is that unlike FThrow it's endlag is exceptionally low allowing for Charizard to combo out of it at low percents into FAir. However be weary that this is a weight dependent throw, so the animation is slower vs heavier characters and faster vs lighter ones (although there's only a 1 frame difference in endlag, the throw at the very least becomes easier to DI for heavier characters).
~
- UThrow -
Weight Dependent: No
Base Damage: 8+3%
Angle: 70
Endlag: 21
A kill throw that at first seems like one of the strongest in the game but was born with the curse of an awful angle. The 70 degree angle that Charizard's UThrow is cursed with means that the move becomes heavily influenced by DI. Consequently good DI (down and away perpendicular to the angle of the throw) will allow the opponent to survive approximately 25-30% later than normal, which means this throw will not consistently kill until around 130% even with rage vs most of the cast unless below a platform. This makes it overall worse than a lot of horizontal kill throws that will kill near the ledge at around 110%, since the ledge is naturally a place where it's easier to pressure your opponent to secure a grab. This throw is terrifying on the Duck Hunt stage however, and you can get some unorthodox combos at low percents if your opponent doesn't DI away (there's literally zero reason not to DI this throw away though).
~
- DThrow -
Weight Dependent: No
Base Damage: 1%x6
Angle: 70
Endlag: 18
Charizard's primary combo throw that's able to secure follow-ups until mid/mid-late percents depending on fall speed. What makes this throw fantastic is that Charizard has guaranteed follow-ups regardless of opponent DI, and the slow nature of the animation makes it easy to react to the opponent's DI and opt for the proper follow up. The move that covers the most is FAir. NAir can be used at lower percents for less damage but superior positioning and regrab potential, while UAir covers DI in. USmash can also be used at very low percents vs fastfallers and larger characters for the most damage off of DThrow.
~
- Flamethrower -
Hitbox Active: 20, 27, 34, 41...
FAF: 71
Base Damage: 2/1%
Angle: 45/58
Advantage (Shield Drop): -17
Advantage (OoS): -24
Flamethrower I would rank overall as Charizard's best and most important special. Alongside jab it stands as one of the central moves in his kit and is his best mid-range zoning tool as well as an absurdly good edgeguarding tool to the point of being borderline brain-dead. I would go as far to say that in most cases, if a character's neutral options serve to invalidate Flamethrower for the most part Charizard automatically loses against that character. It's that important. While the damage isn't particularly amazing, typically ranging from anything between about 1 to 12% depending on spacing and character, it's incredibly important for control. At the ledge, it's hilarious how many recoveries in the game fall victim to Charizard just holding B. Certain characters ideally require you to be at different distances from the ledge for this to be truly effective, but once you've controlled where you ideally want your opponent to be placed after landing a Flamethrower you can go for the DAir to complete the edgeguard and secure the stock. There are a couple of other things to take note of however. One is that Flamethrower can whiff point blank vs certain characters (the best way to attempt to remedy this is to aim Flamethrower down). The other is that due to its low damage output, alongside the fact that it's likely to be used relatively frequently, it begins to lose to other moves easily, particularly projectiles and other item based moves.
~
- Flare Blitz -
Hitbox Active: 23- (15% Damage Based Armour: 23-)
FAF: 102
Damage: 4+15%
Recoil: 5+5%
Angle: 60 -> 361
Advantage (Shield Drop): -51
Advantage (OoS): -58

Going from his best special to his worst, Flare Blitz is a bit of a mess as a move. It's very strong, travels a great distance allow it to be a good option to tech chase and serves as a good recovery tool despite the fact that he receives 5% recoil from simply activating the move however it has a plethora of problems. The first being the recoil compared to the damage. You deal a net of 9% upon successfully landing the move which is rather pathetic if the move doesn't kill. This is for a move that vs certain characters can get you killed at around 60 if they shield it because it's not only absurdly unsafe on block as it is but to add insult to injury it forces him into a hard knockdown unless it's edge cancelled off a platform (which requires an incredibly precise spacing), meaning he becomes susceptible to jab locks. This hard knockdown also means that even if Charizard successfully lands Flare Blitz he is unable to capitalise afterwards and thus you'll often just return to neutral unless you knocked them far enough offstage such that you can persist with an edgeguard. And to top all this off the move on occasion likes to not work correctly and not have both hits connect, leaving you at a percent deficit and a disadvantageous position for LANDING THE MOVE. If you have confidence in the read you're going to commit to then it can be strong, but the risk/reward ratio is far too skewed to justify using this move anything more that once in a blue moon in a competitive 1v1 setting.
~
- Fly -
Hitbox Active: 9-10 + 16-26 (Rehit Rate: 3) + 27-28 (Super Armour: 4-15)
Landing Lag: 30
Base Damage: 5+2+4% (Max Total 17%)
Angle: 70/95/80 -> 72/90/90 -> 75
Charizard's primary recovery move, it's not particularly exceptional as a recovery move due to its relatively poor height and once he reaches the top of it he becomes incredibly vulnerable. The move's hitboxes are also unorthodox, being placed in front of Zard as opposed to on him, leaving his head exposed and vulnerable to attacks from directly above. This also hampers the move's out of shield utility vs cross-ups as well as its overall reliability. Despite these it's still pretty decent due to the combination of high damage and knockback alongside super armour at the start. It's a move that's most destructive when you've conditioned your opponent not to expect it, as you can use it to power through your opponent's approach or landing attempt and secure a stock sub 100%. The move is a very heavy commitment otherwise.
~
- Rock Smash -
Hitbox Active: 24-26 + 27 + 28-46 (Super Armour: 5-23)
FAF: 72
Base Damage: 14+6+3% (Max Total 29%)
Angle: 60 -> 60 -> 70
Advantage (Shield Drop): N/A (the shards are random)
Advantage (OoS): N/A
This move has a couple of primary uses. The first is for holding advantage state if you read that your opponent is going to try to offensively (or sometimes defensively) retaliate. The super armour frames of Rock Smash allow you to power through attacks then strike back for a meaty chunk of damage. This can be particularly useful for tech chasing, as jump cancelling this move at ground level will allow you to slide additional distance, covering potentially every tech option barring tech/roll in if spaced correctly. The second is for helping with Charizard's landing. Being one of two effective landing options he has (the other being autocancelled NAir), this can be used to power through your opponent's juggle attempts if you read that they're going to attempt to attack. However be weary that this move is very unsafe on block (despite dealing a lot of shield damage) so if they shield it you can be hard punished. The super armour of this move turn it into an important utility move for Charizard and one that's worth using relatively often. Keep in mind that since the armour occurs on frame 5 it's as effective a combo breaker as one may hope.
---
-- Gameplan and Combos --
Charizard typically wants to play a methodical mid-ranged zoning game utilising Jab, NAir, FAir, DTilt and Flamethrower primarily whilst exploiting his super solid ground movement. It's also worth mixing in empty hops to force baits then come down with a fast fall FAir or autocancel NAir. Look for opportunities to secure grabs but don't necessarily fish for them as while Charizard's throw game is good, his grabs are not particularly great and often leave him vulnerable. Once your opponent has reached around 60-90% (depending on your own rage) begin to look for the BAir. Condition your opponent to expect it and try to open them up with other options such as grabs (opting for FThrow and BThrow for positioning and damage) or delayed ground normals. You need to make sure that BAir is a move that strikes complete fear into your opponent because it's just that destructive. Once the opponent reaches around 110-135% (again rage and weight dependent) begin to go for the UThrow, as it should begin to kill around this mark even with good DI (the most severe case being DDD who doesn't die to no rage UThrow with good DI until beyond 170%). If you're able to force your opponent offstage Flamethrower more often than not will be your go to edgeguarding option as it allows you to remain safe on stage. If facing a character with a more vulnerable or linear recovery you can afford to go offstage to edgeguard with any of Charizard's aerials barring UAir. Be weary of their aerial endlag though, particularly on NAir.
Two other key elements of using Charizard effectively are the ability to shark and the ability to effectively condition your opponent making use of Charizard's overall kit to make the opponent want to opt for certain options, allowing you to read and hard punish those options. Once the opponent is above Charizard he becomes rather fearsome particularly if he remains grounded and doesn't commit to chasing his opponent too high. USmash is an absurdly good tool at sharking due to its speed, power and disjoint. A well timed USmash is incredibly hard to challenge from above, so the opponent will try to find ways around that move primarily. It's here you can begin to mix-up higher commitment moves like NAir and BAir (these are higher commitment because they require Charizard to go into the air, which automatically leaves him more vulnerable than on the ground due to the nature of his physics). It's incredibly crucial to know when to use your options repetitively and when to mix them up so you're able to condition your opponent into expecting certain options and consequently are able to sustain advantage as long as possible.
For example, let's say we have Charizard at high % (around 120%) but not high enough to die from most throws in the game, while the opponent is sitting at around 90%. As Charizard UThrow under a platform (like the top Battlefield platform) is an option, so naturally you're going to want to shadow under said platform and look for a grab. Having conditioned your opponent to expect the grab, your opponent will likely attempt to play anti-grab, baiting your shield grab with a double jump and attempting to wall you out. Consequently, Charizard can answer back to this by anti-airing the foe prior to landing with Fly. This is particularly effective if Fly is an option you haven't opted for particularly often. The opponent likely won't expect it, and the only way to realistically avoid it would be to airdodge anticipating it, which of course puts them in a vulnerable position to get grabbed. This is merely an example. Interactions of course develop past this. Remain aware and diligent as a player!
Charizard's largest struggles stem from his disadvantage and landing. Although he has a 3rd jump, his poor air physics and slow, high commitment aerials make it difficult to find ways to land vs certain characters. Due to his slow aerials and the nature of their hitboxes, characters that commit to an option that Charizard is able to airdodge are often able to continue the pressure even after the airdodge because Charizard simply doesn't have a quick and effective retaliation. His fastest options are Fly and Rock Smash, both are incredibly heavy commitments that could lead to heavy punishes. Meanwhile NAir and DAir are very slow ways of hitting below Charizard, the former having rubbish hitboxes, losing out to a plethora of other moves and the latter also being very unsafe. Adding on to the fact that Charizard's rolls, tech roll and ledge game are pretty awful, it can be difficult getting out of disadvantage when you're put into it. Thankfully, Charizard is very heavy and durable and can often survive to very high % so it can afford to take a beating. Furthermore, although his primary combo breakers (Fly and Rock Smash) are very high commitment, they're potentially also very rewarding, the former able to seal stocks relatively low with rage and the latter dealing 30% fresh vs low % opponents.
In terms of recovery and off the ledge, try to avoid using Flare Blitz except as a mix-up vs low mobility characters who can't catch the high Flare Blitz or if you absolutely have to (attempt to sweetspot the ledge by initiating Flare Blitz slightly below it, as the ledge grab box is above Charizard's head as opposed to in line with it). Your jumps and Fly are often sufficient to make it back, but if you've lost your jumps Flare Blitz may be a necessity. As a rare mix-up on stages like Smashville, you can Flare Blitz under the stage but this isn't really advised as your opponent can react and be at the opposite ledge by the time you get to it. Since Charizard's fat head sticks over the ledge, hanging leaves him more vulnerable than anyone else so typically you'll have to opt for a ledge option pretty swiftly. Alongside the conventional ledge options, drop back to instant double jump FAir vs aggressive opponents (one must drop back instead of down to allow the FAir to autocancel) as well as drop down/back to empty double jump vs shielding opponents. If they commit to grab, you can opt for jab. If they continue shielding you can grab them. Depends on your opponent's ledge habits.
Charizard isn't a particularly combo heavy character. His go to bread and butters are very basic, centred around NAir and DThrow. He does have a couple of other things that I will mention though:
- Primary BnBs -
UTilt x2 (low %s)
UTilt -> USmash (low %s)
Full Hop AC Sweet/Sour NAir -> Jab combo (low to mid %s)
Full Hop AC Sweet/Sour NAir -> DTilt (low %s)
Full Hop AC Sour NAir -> FTilt (low %s)
Full Hop AC Sour NAir -> Dash Attack (mid %s)
DThrow -> FAir (low to mid %s vs no DI/DI away)
DThrow -> NAir (low to mid %s vs no DI/DI in)
DThrow -> UAir (low to mid %s vs DI in)
DThrow -> USmash (low %s vs fast fallers and large characters)
BThrow -> FAir (low %s vs light to mid weights, preferably larger ones)
- Secondary and Advanced BnBs -
Falling UAir -> UTilt (low %s)
Falling UAir -> USmash (low %s)
Falling UAir -> NAir (mid %s)
Falling UAir -> UAir (mid %s)
NAir -> knock off platform -> Sour NAir jab lock -> any of the above
NAir -> knock off platform -> Sweet DAir jab lock -> any of the above (low %s)
Short Hop Sour NAir -> knockdown + missed tech -> turnaround jump cancelled USmash jab lock -> FSmash (very tight mid %s)
DThrow -> perfect pivot BAir (very tight mid %s)
- Mix-Ups -
Jab 1 -> Jab 2 -> grab (high %s provided jab 2 hits up)
Jab 1 -> Jab 2 -> Up B (high %s provided jab 2 hits up)
Jab 1 -> (Jab 2) -> DTilt
DTilt -> Flare Blitz tech chase
DTilt -> jump cancelled Rock Smash tech chase
Short Hop Sour NAir -> Short Hop FAir (mid %s)
DThrow -> NAir -> Regrab (low %s)
UThrow -> FAir (low %s vs DI in)
UThrow -> Flare Blitz (low %s vs DI in)
UThrow -> Fly (low %s vs DI in, can kill off platforms)
---
-- Stages --
Charizard's stage choice typically depends on the match-up he's playing but he definitely has his natural stage preferences. This section expresses my opinion on each stage, justifying each of the key elements of each stage and how they benefit or detract from Charizard's gameplay:
- Battlefield -
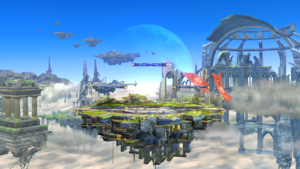
Overall I'd rank this as Charizard's best stage. NAir occupies a lot of space on the stage, strengthening his overall zoning capabilities. He gains landing options thanks to the platforms, though can struggle vs characters who are really good at applying pressure below them. He himself is pretty good at sharking and pressuring underneath the platforms, particularly the side ones with UTilt. The wide blastzones further assist his overall ability to survive while the platforms grant assistance to UThrow. Charizard is also able to rising full hop NAir and FAir and land on the side platforms and autocancel, which is helpful for his pressure game.
- Final Destination -
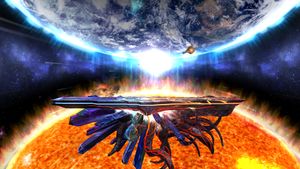
Not a great stage for Charizard, but not absolutely terrible either. The focus becomes primarily on Charizard's ground game due to the absence of platforms, which is overall the stronger element of Charizard's game. However, the large flat space means that he can be more easily camped as he has fewer methods of approach.
- Smashville -
This stage is often referred to as the most neutral stage in the game for good reason. Charizard doesn't reap any notable benefits here comparative to other characters, though due to its smaller size it's a generally better stage vs characters that tend to camp. Full hop NAir autocancels on the platform and empty full hop is effective since it's a near ideal height for quickly landing on the platform. As well as this, FThrow and BThrow can kill very early if done of the platform while it's at its closest points to the blastzone, and he can recover under the stage with Flare Blitz. Beyond that though the layout isn't too conducive to Charizard's zoning so it's a pretty average pick.
- Town & City -
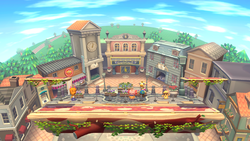
One of Charizard's better stages. Similar to Battlefield the platforms give Charizard additional places to land and move, though the biggest draw-in is the low ceiling particularly when combined with the platform arrangement when the platforms are present can lead to some very early UThrow kills. When the platforms are gone it essentially becomes Final Destination until they return again. The stage grants quite a bit of room to move, and the platforms make it easier to get around your opponent's camping attempts. Like on Smashville, Charizard can also recover under the stage with Flare Blitz.
- Dreamland -

At first this seems like it would be amazing for Charizard. It's essentially Battlefield with a low ceiling right? Incorrect. The nuances in the platforms changes the dynamic for Charizard quite significantly, as his zoning and platform pressure become less effective as he is unable to autocancel full hop NAir and FAir on the side platforms, while the wind disrupts his ground game. Once again though, the platforms do allow for earlier UThrow kills, even earlier than Battlefield due to the lower ceiling height.
- Lylat Cruise -

The stage's platform heights are good for short hop and full hop NAir pressure and sharking with USmash, however the tilt affects how both NAir and FAir autocancel as if he lands on a higher incline typically they won't autocancel making them substantially less safe. The stage is also disruptive to Charizard's recovery as he's relatively prone to getting caught under the lips of the stage while trying to Up B. Overall a stage you'll typically want to avoid as Charizard due to the detriment it has to his neutral.
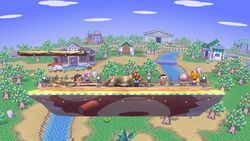
- Duck Hunt -

This is another stage that is fantastic vs characters who aren't able to heavily camp Charizard thanks to the combination of plenty of breathing room, ground space and of course the tree on the far left which leads to some of the cheesiest platform UThrow kills in the game. If Charizard is able to the lead on this stage he can assume to camp under and near the tree and try to bait the opponent to come to him, sealing stocks after only a few hits to a UThrow on the top platform of the tree. Vs characters who can camp Charizard however it's significantly worse as there's a much greater gap to traverse in order to break into your ideal zone, and the amount of air space means Charizard can get quite easily air camped as well.
---
-- Afterword --
I'm going to be honest, in my opinion Charizard isn't a particularly good character at all. Through a combination of large glaring issues alongside a plethora of smaller ones, as well as strengths that aren't quite able to compensate he struggles in the majority of match-ups in Smash 4, only having a small handful of what I believe to be advantageous ones. While some of the fundamental elements of his character are more solid than the other super-heavies, he lacks the explosive "guaranteed" ways to kill that DK and Bowser have off their grabs while also generally being the weakest of the super-heavies with not enough speed and mobility to compensate. Coupled with a poor aerial game and disadvantaged state, as well as in my opinion one of the lowest skill ceilings in Smash 4 the meta for this character is likely to simply hit a roadblock due to his overall lack of depth and reliance of fundamentals as well as awareness of a few critical things (a fundamentals reliant character that isn't fundamentally strong is flawed by design).
With all that you'd wonder why I, or anyone, would play this character at all. Simply put despite all of this I find him incredibly fun and endearing. The methodical approach to his gameplay combined with explosive power of his normals (back air back air back air) is enticing to me, alongside the simple fact that Charizard has always been one of my favourite Pokemon. Although Charizard isn't particularly good, that doesn't mean he's completely incapable of causing an upset. This is Smash 4 after all.
Praise be to the Lit Back Air
~SilentDoom
