Alright, time for me to pitch in. Some of this may be a repeat of some stuff said earlier, don't mind me.
- PROJECTILES: FORCING REACTIONS, NOT SCORING HITS
One of the first things you absolutely need to learn with a character like Link, is just what it means to
put a projectile onto the board. A lot of players not only carelessly toss out their projectiles fishing for a hit, and a lot of players get those hits, but the point of a projectile isn't the hit itself,
the point is the reaction you're fishing for when your opponent is faced with the projectile itself.
Let's break it down as simply as we can get here, and start with Link's boomerang. When thrown directly at the opponent, they have a few different options:
block, dodge, jump, attack, get hit. An important point to make, is that when you toss out your projectile, you
should not be moving around the stage. If you are in the neutral game (your opponent is not knocked down, in hitstun, recovering), stand still when putting out your boomerang. I can't stress that enough. The point of the projectile is to force a reaction out of the opponent while
maintaining your advantageous position, you're trying to get them to
commit to some action. If you
yourself are committed to a jump arc while throwing your boomerang, you are giving up your
own position at the same time, and possibly giving up more desirable followups. So, again, when you throw your boomerang at the opponent, stand still such that you can still threaten with your physical position on the screen, and be prepared for responses like the jump in, the spot dodge, and simply attacking through your projectile.
With that in mind, it's also important to know that a projectile can
cover spaces that Link himself does not need to or want to cover.
- FUNDAMENTAL CONCEPTS ON CHARACTER POSITIONING
To illustrate my next talking point, we need to look at just
where you and your opponent are at their strongest and weakest, which will help explain where to be putting your projectiles.
Imagine a scenario like this one.
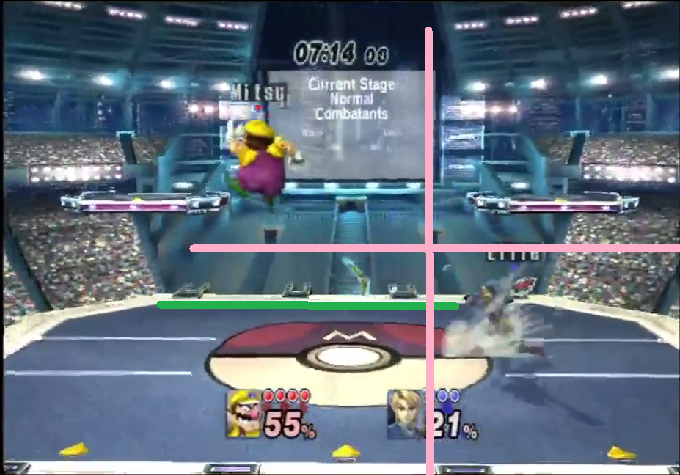
[collapse=Link covering space with his boomerang, limiting opponent's options]
[/collapse]
Link is in
quadrant 1. His boomerang will be passing through
quadrant 2. Wario is in
quadrant 3. The space above Link is
quadrant 4. This is the type of situation you need to be setting up as much as you possibly can. Since the boomerang is covering all of the space in front of Link, Link knows that Wario is now committed to the aerial approach. Since Link is positioned such that quadrant 4 is on a platform, Wario's aerial approaches are limited, and Link now has an even
stronger idea of where Wario is going to be. This whole situation is set up such that Wario's options are limited as much as the can possibly be, removing risks and guesswork for the Link player. With Wario committed to that
one space, Link has to do much less thinking, and has a much clearer idea of what can and will hit, and what he shouldn't be using.
In a situation where
the opponent is in quadrant two and you are in quadrant one (the neutral game, where you're both on the ground), you need to understand just what that means. Both players are at their
absolute strongest when in these positions. They have access to
at least fifteen different commands (all attacks, shield, grab, and rolls/dodges). Not only that, but off of short hop, your character has quick access to
nine more (ten more if you have a zAir, like Link). You need to use Link's projectiles such that your opponent is never in that position, or there for as little time as possible. Limiting their options and removing risks is how you will win games, and you force those situations with your projectiles.
In the neutral game, you have a couple of different ways to throw your boomerang. Firstly, you can throw it up and above the opponent,
covering space in both quadrants 2 and 3. The advantage here is that you've limited your opponent's aerial approaches. Your hitbox covers that entire area for a short time, and during that time it's a really safe bet that your opponent's main options are going to be to come in at you, or jump straight up, or up and back. They won't have as easy a time jumping
in on you, and that removes a
lot of guesswork for Link. Now, that's not to say that it's safe to just run in and start hacking, or that it's your best option even if you
could. No, you need to establish stage control through consistent pressure. If your opponent is still down on the ground with you, you should never run in on them, even with the airspace covered. They still have
all of the options we mentioned before, and your boomerang won't be out for long. While you have that space limited, Link has options that can pressure opponents while keeping him safe at the same time. zAir and Bombs are two key tools he has to work in conjunction with the boomerang. Failing those options, Link can simply move forward with jabs and short hopped fAirs, slowly inching the opponent towards the edge of the stage. It's all about limiting options and forcing reactions, you
never want to over-commit and blow the advantage you are building.
I can go into much more detail on the topic of character positioning and
quadrant positioning at another time if you wish, and I will continue this thing later, but I've gotta go for now.
 I've been trying to learn link for a bit and I still don't really know what i should be looking at to work on.