
Soulless9922
Smash Rookie
- Joined
- Jun 7, 2009
- Messages
- 3
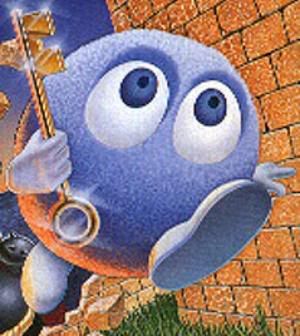
Lolo
Attributes:
 Medium Weight
Small (Kirby/Jigglypuff Sized)
Speed (Slightly Slower Than Kirby’s Dash)
Medium/Heavy knockback
Features:
Perfect round body
Hands and Feet (but no Arms or Legs)
Big eyes
Short stubby tail
Notes:
Lolo has no dash ability (therefore having no dash attack or dash grab) but has movement inbetween walking and running.
Lolo has a push factor. When walking, any items or opponents will be pushed in front on Lolo. An opponent can walk past Lolo when Lolo is stationary, but not when he is walking.
Lolo is a puzzle solver, but in this game he has the ability to turn the stage into his own personal puzzle. Lolo can (and must) absorb energy from his opponent in order to place objects and assistants to strategize against opponents on any given stage. Lolo has to perform three energy absorbing attacks in order to use a special. When he has the needed energy to use a special he will flash lightly.
Because of Lolo’s extremely short limbs, most of his attacks consist of psychic energy, channeled through head/body or hands.
Grab:
Lolo turns sideways and puts his little hand out, any opponent within a normal grab range will be pulled to Lolo’s hand.
Roll Dodge:
Lolo slides to the right or left on his feet, which leave blue streaks on the ground when he does.
Spot Dodge:
Lolo glows light blue for a normal spot dodge duration in which time all enemy attacks pass through Lolo harmlessly.
Lolo can also attack while glowing, making it easier to punish enemies.
Lolo has a few frames of vulnerability before the glow is initiated. (to keep the move from being abused)
Specials
Neutral Special:
(Actualize) Can be used while on the ground to create an Object or Helper in front of Lolo to assist him. (Objects and Helpers described in Up Special) Can’t be used next to an edge or in air.
(Rock Blast)
 When used next to a Rock created by Lolo, the Rock will explode shooting debris forward. An opponent on the other side of the Rock will receive heavy knockback that kills at small percents. (50% or higher for most characters)
(Arrow)
 When used next to an Emerald Framer an arrow pointing forward will be placed on the block making it only able to be pushed in that direction.
Down Special (Bridge):

Once Lolo flashes with full energy he can use this move.
Lolo can spawn a wooden bridge for three different purposes, strategically or vitally.
Bridge acts just like a platform, players can double tap the down button to go through it.
Bridge is destructible. (Like Wario’s Bike)
Lolo can spawn a bridge at a ledge. This will eliminate the current edge (making it unable to be grabbed) and creates a new edge that can be grabbed at the end of the bridge. This can be used to help an ally that cannot quite reach the edge of the stage or stop an opponent from reaching the edge with a vertical recovery.
If Lolo uses the down special on the ground away from an edge, a bridge will be spawned standing up vertically. This can be used to block projectiles or block a player from getting to a part of the stage.
The last way to use the bridge, (and possible the most important way, being Lolo’s only recovery move) when used in the air a bridge is spawned underneath Lolo and falls down. Lolo can use his fast fall to land onto the bridge where he can jump off or use ground attacks on the bridge while falling in the air.
Side Special (Magic Bullet):


Once Lolo flashes with full energy he can use this move.
Lolo fires a bullet of white energy forward at a fast speed which encases the enemy in an egg.
The bullet moves about ¾ the distance of Fox’s Illusion.
The opponent can hit any button repeatedly to get out of the egg, requiring more buttons to be pressed the higher the percentage they have.
Any damage dealt to an opponent in an egg by Lolo or an ally is reduced by half.
Any energy stolen from an opponent in an egg by Lolo or ally Lolo is also reduced by half.
Lolo can push the egg freely wherever he wants, most likely off the nearest cliff.
If Lolo has collected enough energy to fire a second Magic Bullet at the enemy while they are still encased within an egg, they are shot off to the side or off a ledge. Good for killing opponents at low percents if they are not quick enough.
Up Special (Menu):
A small menu appears above Lolo which displays different options to pick from. The option selected determines which Object or Helper is created with the Neutral Special.
Objects and Helpers will disappear after Lolo dies.
Emerald Framers and Rocks are created with little to no stall.
Helpers take about 3 seconds to form, starting with an outlining box, then the helper appears within it, then the box disappears and the helper becomes active.
Up to three objects can be on the field at a time, and up to two helpers.
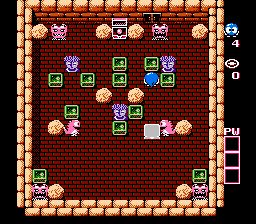
Objects that can be placed:
 Emerald Framer.
 A green block that can be pushed left and right by any player. Since Lolo’s push priority is higher than any other character, Lolo can push a player from behind the Emerald Framer.
Rock.
 An unmovable object. The rock exists only to block players, either Lolo or opponents. The rock can only be destroyed by Lolo’s Rock Blast attack.
Helpers that can be placed:
Medusa:
 Medusa stays stationary and has a shot cool down of five seconds. Medusa shoots wickedly fast horizontally and vertically and does a fair amount of damage and knockback. Can shoot down through platforms. (Range of entire screen. Can’t shoot through walls, Rocks, or Emerald Framers.)
Don Medusa:
 Don Medusa runs back and forth on the ground and has a shot cool down of two seconds. Don Medusa can do damage by running into an opponent or shooting them with a fast moving knife. (Not as fast as Medusa) Low knockback but large range while moving. (Range of entire screen. Can’t shoot through, walls, Rocks, or Emerald Framers.)
Gol.
 A sleeping dragon that stays stationary and faces either left or right. When an enemy comes within a certain distance of Gol, the sleeping dragon will awaken. Gol shoots a steady stream of fireballs at an opponent if the opponent is in front of him. Small knockback, good for racking up damage. (Range of entire screen. Can’t shoot through walls, Rocks, or Emerald Framers.)
Normal Moves
Neutral Ground Attack: A small burst of energy appears in front of Lolo. Lolo remains in the idle state when doing this (as if with little effort) and the attack can be done as fast as the player can hit the button, doing one damage per hit. The move does NO knockback to the opponent. (Like Fox’s blaster) This move absorbs the opponent’s energy, making it easy to quickly hit the opponent three times to have full energy. This move can be used while the opponent is grabbed by Lolo.
Forward Tilt: Lolo kicks forward with his foot and also shoots a forward push of energy in front of his kick. Two hits, low knockback, good for spacing. (Absorbs +1 energy from the opponent)
Up Tilt: Energy spirals from Lolo’s head/body and points out diagonally in a cone shape, resembling a horn. The move pierces the opponent and launches them diagonally with good knockback. (Absorbs +1 energy from the opponent.)
Down Tilt: Lolo slides his foot around in front of him doing fair knockback. If the move hits an opponent hanging on a ledge, the opponent will be shot down.
Forward Smash: Lolo compacts energy in front of him as he charges. When he releases the energy it sprays forwards, doing more damage the more it hits an opponent. The amount of damage the opponent takes from this attack determines how much knockback they receive. This attack launches opponents forward at a 25 degree angle.
Up Smash: Lolo turns to face the screen and compacts energy in two spheres in both his hands as he charges. When he releases he will spin slightly and the spheres will spin around (causing some damage to anyone it hits on the way) and collide with each other above Lolo creating a small explosion. This explosion deals great knockback to any opponent caught in it. Slow start up but good reward.
Down Smash: Lolo again turns toward the screen and then holds his hands inward. The longer Lolo charges this attack the stronger he glows blue. When released Lolo will push out his hands, channeling his energy through them. (Like Lucario’s Down Smash but with wider range) Lolo’s enemies are launched to the side with decent knockback. Short stall with start up and end lag.
Neutral Air: Lolo tucks his hands and feet in and closes his eyes, then discharges energy in multiple spots surrounding his body. Each hit absorbs energy from the opponent, so one successful hit can bring Lolo to full charge. Where the opponent is hit by this attack determines where they will be launched. (So if an opponent is hit by the bottom bursts they can be spiked down making the move a meter smash of sorts) The move also has a sweet spot, if the opponent is hit by ALL the bursts (For example Lolo is right on the opponent) they receive much more knockback.
Forward Air: Lolo holds energy compacted in front of him then releases it forward. This move can be held as long as the A button is held down and then released to attack. When hit the opponent is launches straight forward. (Absorbs +1 energy from opponent)
Up Air: Lolo flips forward and kicks above him, launching the opponent forward. Good knockback and good for keeping opponents off the stage.
Back Air: Lolo channels energy through his hands and uses his mouth to blow it into a sphere; all while turning around and launching it forward. This move turns Lolo around in the air and leaves him facing that direction. The bubble sphere of energy moves as a projectile and “pops” shortly after shot. OK knockback that sends the opponent diagonally. Slow start up but good range.
Down Air: Lolo claps his feet together beneath him to spike an opponent downward. Not a very powerful meteor smash but no startup stall.
Edge Grab Attack: This move is unique to other edge grab attacks in that it can be done without getting up off the edge. While Lolo is hanging, a small mushroom cloud shaped energy attack appears on the ground next to the ledge. This launches the opponent straight up, which can give Lolo time to get on the stage or time to follow up with another attack.
Ground Recovery Attack: Energy spins around Lolo, protecting him as he rolls onto his feet. (Absorbs +1 energy from opponent)
Forward Grab Throw: The opponent is launched forward by a ball of energy.
Up Grab Throw: The opponent is launched in the air by a series of small energy bursts. (Absorbs up to full energy from opponent)
Back Grab Throw: The opponent is turned around and launched by a ball of energy.
Down Grab Throw: Lolo pulls the opponent underneath him, jumps into the air and fires down into the opponent surrounded by blue energy. The move receives some ending lag. The move does good damage and good knockback, but can only be used when Lolo has collected enouch energy and is flashing. (Lolo can quickly steal energy with the Neutral Attack before performing this attack)

Final Smash: King Egger appears floating above Lolo. He laughs then covers a larger area with his magic; any opponents caught in the radius are turned to stone. Once an opponent has become stone, Lolo can simply push them off the stage to their death. Opponents stay encased in stone for 30 seconds. The move has a lot of beginning lag (while he floats and laughs) but an opponent caught is an almost guaranteed death.
Alternate Colors: When the green Lolo, all his energy attacks turn green as well. When red, Lolo actually becomes Lala (with a bow on her head) and all energy attacks turn red.

Attributes:
Features:
Notes:
Grab:
Roll Dodge:
Spot Dodge:
Specials
Neutral Special:
Down Special (Bridge):
Side Special (Magic Bullet):
Up Special (Menu):
Normal Moves
Neutral Ground Attack: A small burst of energy appears in front of Lolo. Lolo remains in the idle state when doing this (as if with little effort) and the attack can be done as fast as the player can hit the button, doing one damage per hit. The move does NO knockback to the opponent. (Like Fox’s blaster) This move absorbs the opponent’s energy, making it easy to quickly hit the opponent three times to have full energy. This move can be used while the opponent is grabbed by Lolo.
Forward Tilt: Lolo kicks forward with his foot and also shoots a forward push of energy in front of his kick. Two hits, low knockback, good for spacing. (Absorbs +1 energy from the opponent)
Up Tilt: Energy spirals from Lolo’s head/body and points out diagonally in a cone shape, resembling a horn. The move pierces the opponent and launches them diagonally with good knockback. (Absorbs +1 energy from the opponent.)
Down Tilt: Lolo slides his foot around in front of him doing fair knockback. If the move hits an opponent hanging on a ledge, the opponent will be shot down.
Forward Smash: Lolo compacts energy in front of him as he charges. When he releases the energy it sprays forwards, doing more damage the more it hits an opponent. The amount of damage the opponent takes from this attack determines how much knockback they receive. This attack launches opponents forward at a 25 degree angle.
Up Smash: Lolo turns to face the screen and compacts energy in two spheres in both his hands as he charges. When he releases he will spin slightly and the spheres will spin around (causing some damage to anyone it hits on the way) and collide with each other above Lolo creating a small explosion. This explosion deals great knockback to any opponent caught in it. Slow start up but good reward.
Down Smash: Lolo again turns toward the screen and then holds his hands inward. The longer Lolo charges this attack the stronger he glows blue. When released Lolo will push out his hands, channeling his energy through them. (Like Lucario’s Down Smash but with wider range) Lolo’s enemies are launched to the side with decent knockback. Short stall with start up and end lag.
Neutral Air: Lolo tucks his hands and feet in and closes his eyes, then discharges energy in multiple spots surrounding his body. Each hit absorbs energy from the opponent, so one successful hit can bring Lolo to full charge. Where the opponent is hit by this attack determines where they will be launched. (So if an opponent is hit by the bottom bursts they can be spiked down making the move a meter smash of sorts) The move also has a sweet spot, if the opponent is hit by ALL the bursts (For example Lolo is right on the opponent) they receive much more knockback.
Forward Air: Lolo holds energy compacted in front of him then releases it forward. This move can be held as long as the A button is held down and then released to attack. When hit the opponent is launches straight forward. (Absorbs +1 energy from opponent)
Up Air: Lolo flips forward and kicks above him, launching the opponent forward. Good knockback and good for keeping opponents off the stage.
Back Air: Lolo channels energy through his hands and uses his mouth to blow it into a sphere; all while turning around and launching it forward. This move turns Lolo around in the air and leaves him facing that direction. The bubble sphere of energy moves as a projectile and “pops” shortly after shot. OK knockback that sends the opponent diagonally. Slow start up but good range.
Down Air: Lolo claps his feet together beneath him to spike an opponent downward. Not a very powerful meteor smash but no startup stall.
Edge Grab Attack: This move is unique to other edge grab attacks in that it can be done without getting up off the edge. While Lolo is hanging, a small mushroom cloud shaped energy attack appears on the ground next to the ledge. This launches the opponent straight up, which can give Lolo time to get on the stage or time to follow up with another attack.
Ground Recovery Attack: Energy spins around Lolo, protecting him as he rolls onto his feet. (Absorbs +1 energy from opponent)
Forward Grab Throw: The opponent is launched forward by a ball of energy.
Up Grab Throw: The opponent is launched in the air by a series of small energy bursts. (Absorbs up to full energy from opponent)
Back Grab Throw: The opponent is turned around and launched by a ball of energy.
Down Grab Throw: Lolo pulls the opponent underneath him, jumps into the air and fires down into the opponent surrounded by blue energy. The move receives some ending lag. The move does good damage and good knockback, but can only be used when Lolo has collected enouch energy and is flashing. (Lolo can quickly steal energy with the Neutral Attack before performing this attack)
Final Smash: King Egger appears floating above Lolo. He laughs then covers a larger area with his magic; any opponents caught in the radius are turned to stone. Once an opponent has become stone, Lolo can simply push them off the stage to their death. Opponents stay encased in stone for 30 seconds. The move has a lot of beginning lag (while he floats and laughs) but an opponent caught is an almost guaranteed death.
Alternate Colors: When the green Lolo, all his energy attacks turn green as well. When red, Lolo actually becomes Lala (with a bow on her head) and all energy attacks turn red.