
TomBoComBo
Smash Ace
- Joined
- Jan 31, 2014
- Messages
- 544
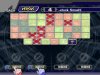
Ok, so I've made off-the stage N-airs a staple of my game. OBVIOUSLY this technique only works on certain members of the cast and in different situations. Here is the Character Select with a color coded overlay for effectiveness of the rising N-air. I will explain every match-up and why I think it does or does not work.
Colors are coded as follows:
Green- Always Safe, best possible way to gimp this character
Yellow- Moderately safe, some are situational, some have reasons why it's not as safe.
Red- Possible usage, either the option is very rare, or it's not safe to do it or it only is viable at high percents
X- Don't go off the stage to Rising-Nair this character unless they are at kill percent, even then it's very unsafe.
From top to bottom, here we go:
Wario (R): maneuverability in the air makes a Rising N-air difficult, and Wario's Up-B trades with N-air. Situational, but a ledgehog or F-air works better
Mario (R): if Mario throws out fireballs on recovery, Rising N-air is not an option because the fireball will gimp. Mario also has his cape and his Up-B can stage spike if you try too low. Situational, will almost never work against a smart Mario player.
Luigi (Y): Luigi is marred by a Rising N-air as long as it's not too low. Also, if Luigi has a charge on his Tornado recovery (Down-B), a Rising N-air may need to be timed after that or forgone all together. Luigi's missile trades with Nair and will send Yoshi horizontal, but the missile is more potent and will gain more from the trade than the N-air will.
Peach (Y): Rising N-air can be used to cover options when Peach runs out of her DJ float. It can also be used to get her out of her float. As far as Peach's Up-B goes, the hitboxes have very strange priority and it may not be the best idea to try and Rising N-air that. (not much personal experience with that)
Bowser (X): Rising N-air from underneath Bowser will get you gimped. Rising N-air even with Bowser will get eaten by Bowser's Up-B and you'll gain nothing but % from the risk. The only use for Rising N-air on Bowser is only viable wayyyyy off the stage when Bowser's at kill percent.
Yoshi (R): Yoshi vs Yoshi, he has the same options to Rising aerial you back. If you can bait that out of him while at very low percentage and eat it with your own armor, then a Rising N-air will do a good job. Other than that, it's unsafe
DK (R): The same problem as with Bowser will return here. But, DK's Up-B will carry you back if you try from underneath.
Ditty Kong (Y): It's safe except if you're caught underneath Ditty's Side-B and it also Depends on where the broken rockets decide to go. Both the Side-B and Up-B recoveries are eaten by N-air
C. Falcon (Y): Super safe except when you get too low below Falcon's Aerial Raptor Boost recovery. Obviously, you'll be spiked if that's the case. Don't worry about Up-B's command grab, all hitboxes of N-air have priority. N-air beats out Raptor boost as well, so long as Falcon is not directly overhead.
Wolf (G): If you knock Wolf off the stage, Rising N-air is the very best option to gimp him. It eats both recoveries and Wolf has no answer to it in any way/shape/form.
Fox (G): Has a slightly better chance of survival than Wolf thanks to the completely horizontal Side-B recovery, but Rising N-air off the stage is a fantastic option for gimping Fox.
Falco (Y): Being a space animal, Falco has the same weakness to Rising N-air as Fox and Wolf, but since his Side-B recovery has a meteor hitbox, it makes gimping that require more careful timing.
Ice Climbers (Y): (I personally have little experience in this matchup) I seriously doubt that Ice Climbers' Up-B has as much Priority as Yoshi's N-air. Same with the tornado recovery. I think it's useful at the very least
Zelda (X): Zelda is a terrible matchup for Yoshi in general. Rising N-air has no real effect on teleport recoveries, and Zelda has an arsenal of aerial tools that screw with Yoshi's game. Therefore I don't recommend it.
Sheik (R): Not a good idea unless you can do it quickly and at high percents. Teleport recovery.
Link (X): as far as link's Up-B recovery goes, a Rising N-air isn't the tool to use, it's better to strike from the top, not the bottom or the middle. For his Tether, Rising N-air is Viable enough, but Since Link has the option to do either Up-B or a Tether at the distance it requires, it's a relatively unsafe option to take.
Toon Link (R): In order for a Rising N-air to be effective on Toon Link, it needs to be far off the stage or aimed at his Tether. Toon Link's Up-B eats N-air and kills all momentum. Unsafe, but still doable.
GanonDorf (Y): Having a similar recovery to Falcon means that Ganon is also weak to a Rising N-air. With Ganon, you have to be even more careful of a Side-B recovery, make sure the tip of the foot is hitting at least as high as Ganon's chest. Any lower and He'll command Grab you and that's a stock trade.
Mewtwo (R): Teleport Recovery and too many aerial options to ward away Rising N-air.
Lucario (G): Rising-Nair is the best way to punish Lucario when he's recovering even or below the stage. N-air as a whole, Boot and all, eats Lucario's recovery. Multiple N-airs may be required for a complete gimp.
Pikachu (G): If you can predict the recovery, N-air will eat both Pika's Missile and Up-B recovery.
Jiggs (X): Just not safe, you can probably guess why
Squirtle (R): Not a safe option, Squirtle has options to protect himself against a Rising N-air and his Up-B has very high priority. The good part is that if he stuffs an attempt, you just get carried back to stage. But it's not worth trying most of the time
Ivysaur (Y): Ivy is a tricky character to Rising N-air. You have to be patient but at the same time quick. You can either wait on the ledge for the moment after her Tether attaches to the ledge, then FF Rising N-air, OR you can Time it so you FF running off the stage and hit Ivy right before she throws her Up-B out. Both are effective as hell, but the timing has to be correct.
Charizard (R): try only quickly at high percents. Both recoveries eat/trade with N-air in Charizard's favor.
Samus (G): If yout toss out an egg or two, you can make the Samus think about a Tether recovery. In this case, you treat her the same way you would treat Ivy. In this case, if she decides to Up-B last minute, you're carried back to stage, no harm no fowl.
ZSS (Y): Rising N-air from the Ledge (FF then Rising N-air) is good here as long as the ZSS doesn't recover too low. Going out on ZSS for a Rising N-air is risky if she still has her Down-B bounce, in this case she can hybrid Footstool you and you die for your trouble. After the bounce however, Rising N-air is a good option at med-high percentages
Lucas (R): Rising N-air is very situational vs Lucas. If he uses the Tether Recovery, your timing has to be very fast, and the N-air has to start perfectly when his tether hits the ledge. If he Up-B recovers, your spacing has to be flawless so that only the boot of the N-air connects. If you can do that, Lucas will be knocked back shortly and you'll have to do it again and again until you get a solid hit or you get him to the point of just killing with a ledgehog.
Ness (R): Since Ness lacks a tether, Rising N-air is slightly more useful, but really only for preventing a sweet spot on the ledge. If you can get Ness close to the stage, but in the case of having to use Up-B to recover, staying on the stage and N-airing with the boot of the box is very effective. Again, this has to be done multiple times in a row, but it's on the stage, so it's less complicated than a Rising N-air off the stage
Pitt (X): (little experience with Pitt) Pitt seems to have enough means to throw out an aerial to answer Yoshi as he approaches. I think if Rising N-air is done quick enough at mid-high percents, it can be effective. but t may never be a safe option.
Kirby (X): Kirby's aerials, including Up-B, have more priority than Yoshi's N-air and Kirby has 5 jumps to put those out. It's almost always a bad idea to try it.
Metaknight (R): Same concept as Kirby but slightly more safe because metaknight's recoveries will knock you up or carry you back to stage. Still not a safe option until high percents
DeDeDe (Y): If you FF off the stage and land it quickly, Rising N-air is effective on DeDeDe. It's only useful otherwise if you can space so that only the Boot of the hitbox lands so you don't trade with a weak hit from an Up-B.
Ike (G): Ike's Side-B recovery is stuffed by a Rising N-air (or just regular if high enough) and his Up-B can be gimped with a well timed N-air or a well timed Dash attack. In the event that the Ike wants to prevent getting N-aired, he's forced to hit you with Side-B, which will make him forfeit the stock.
Marth (R): It's very effective to Rising N-air Marth, But if the Marth has any smarts, he can simply Up-B early and eat all momentum you have. This makes a Rising N-air as a Gimp very unsafe.
Roy (Y): Same concept as using it on Marth, but much safer because Roy's Up-B will carry you back to stage rather than gimp your momentum. Just be careful in case of stage spikes or if Roy gets a super weak hit off of his Up-B.
Olimar (Y): I imagine that Rising N-air is very effective on Olimar because he has very limited means of getting back to stage. (I have almost no experience against Olimar so this is only concept)
ROB (X): Rising N-air is almost never a good idea against ROB just because of how his recovery works. D-tilts are a better option than going all the way out on ROB.
G&W (Y): N-air eats G&W's Up-B and G&W doesn't have any real way to stop a Rising N-air except trading with the turtle or protecting himself with N-air.
Snake (R): Snake's Up-B trades with N-air and knocks Yoshi weakly horizontal. In this case, Yoshi is dead and Snake can just Up-B again.
Sonic (Y): N-air boot eat all of Sonic's recoveries, but you have to be very quick and precise about where and when you start a Rising N-air. Remember that sonic and act out of Up-B.
There we Have it. If there are any issues/questions go ahead and comment.
Attachments
-
 150.3 KB Views: 144