• Welcome to Smashboards, the world's largest Super Smash Brothers community! Over 250,000 Smash Bros. fans from around the world have come to discuss these great games in over 19 million posts!

    You are currently viewing our boards as a visitor. Click here to sign up right now and start on your path in the Smash community!

"Monado, show me the way!" Shulk's Attack Angles

Big-Cat

Challenge accepted.
Joined
Jul 24, 2007
Messages
16,176
Location
Lousiana
NNID
KumaOso
3DS FC
1590-4853-0104
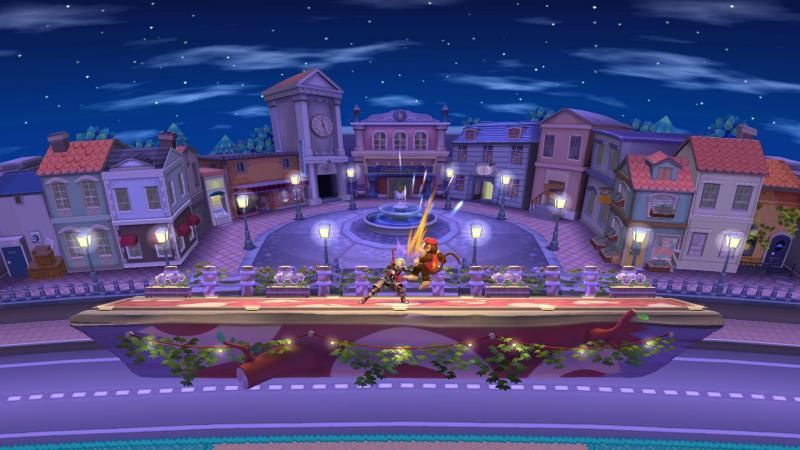
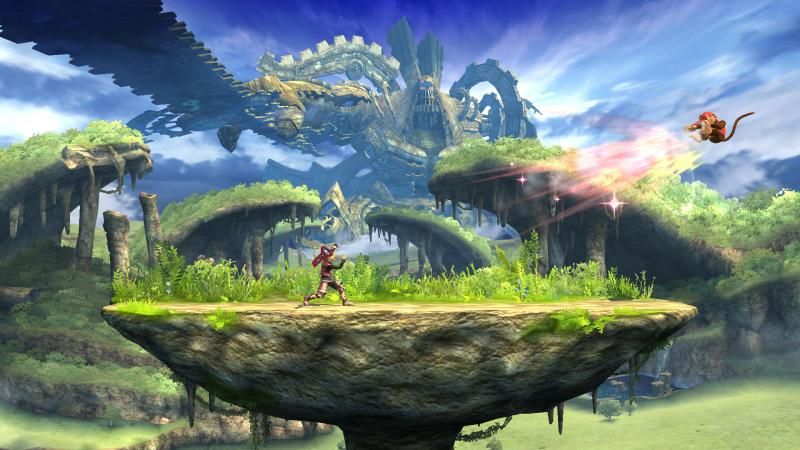
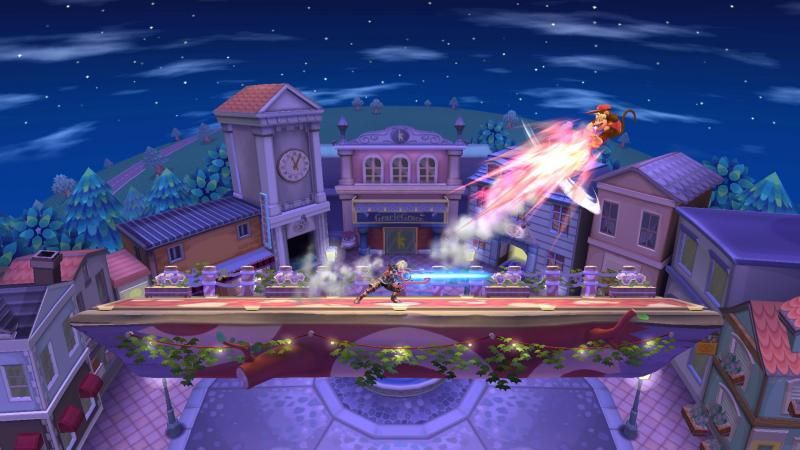
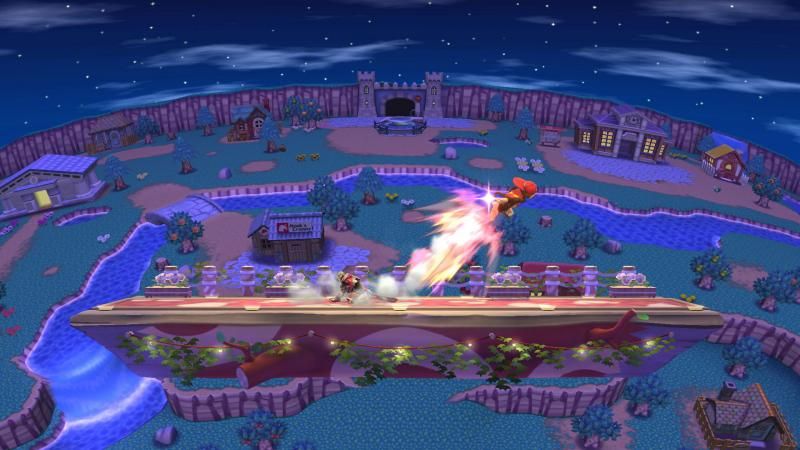
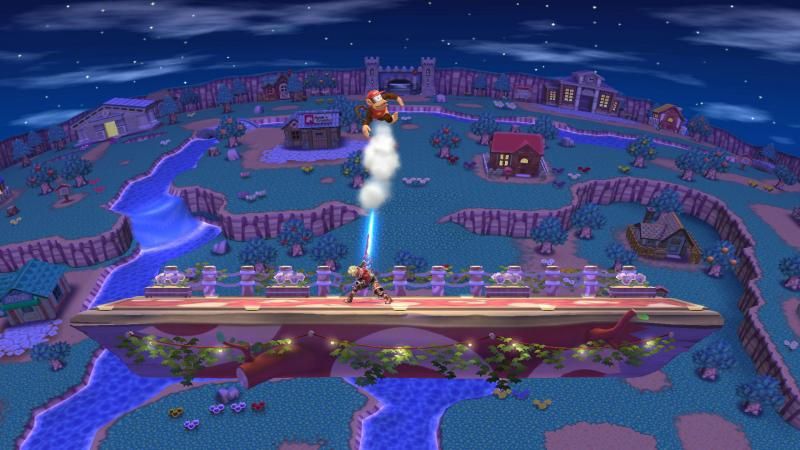
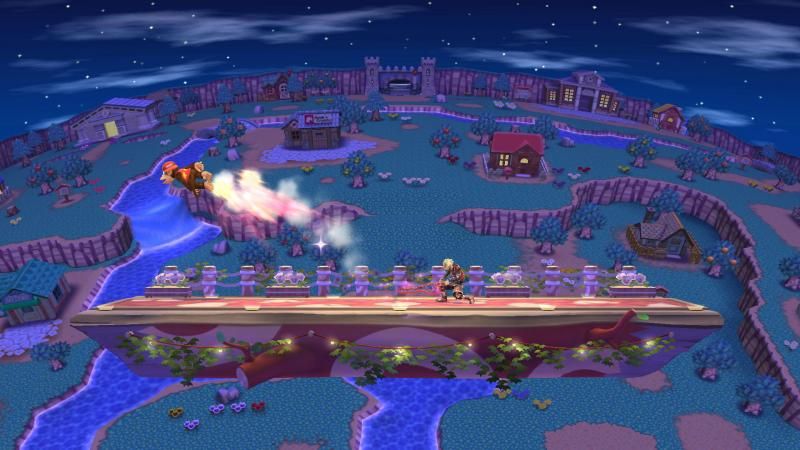
Today, I finally got an understanding of how DI works. In order to fully utilize DI, I had to find out the angle my attacks launched the opponent so I would know my followup options. At first, I was gonna make a stage with angle markers, but this was way too hard to do in stage builder. Instead, I just took snapshots of the attacks being done WITHOUT DI involved. Here's what I did to take these pictures.

1. Set opponent to Diddy (or whoever really).
2. All attacks were done point blank.
3. Diddy was positioned at the center of the stage.
4. Handicap for Diddy was set to 100%. This was to better see the trajectory angle.
5. Moves were fresh.
6. Set Diddy to human so there will be no DI.

I was informed that there were sweet and sour spots for some attacks. If you can take the snapshots to show the difference, please feel free to contribute. This applies to crouch canceling unless a formula can be determined for that applying across the roster.

[collapse="Jab: A, AA, AAA"]


[/collapse]
[collapse="Tilts: DTilt, FTilt, FTilt-Edge, UTilt, DA"]


[/collapse]
[collapse="Smash: USmash, UFSmash, FSmash, DFSmash, DSmash"]


[/collapse]
[collapse="Aerials: UAir, BAir, DAir, FAir, NAir"]


[/collapse]
[collapse="Throws: BThrow, UThrow, DThrow, FThrow"]


[/collapse]
[collapse="Specials: Air Slash, Back Slash, Back Slash from Behind"]


[/collapse]
 
Last edited:

Big-Cat

Challenge accepted.
Joined
Jul 24, 2007
Messages
16,176
Location
Lousiana
NNID
KumaOso
3DS FC
1590-4853-0104
I'm going to be doing this for Bowser later as he's my other main. All the other characters....

DO IT YOURSELF!
 
Joined
Jun 8, 2009
Messages
18,990
I'm going to be doing this for Bowser later as he's my other main. All the other characters....

DO IT YOURSELF!
I'd try to help but the 3DS version looks ugly as ****. Then again, I'll still get snap shots for this thread
 

Big-Cat

Challenge accepted.
Joined
Jul 24, 2007
Messages
16,176
Location
Lousiana
NNID
KumaOso
3DS FC
1590-4853-0104
Looks like I forgot one attack, the dash attack. I also added a picture showing if you hit with the outer hitbox of FTilt. From the looks of it, hitting at the sourspot increases the angle of knockback.
 

erico9001

You must find your own path to the future.
Joined
Jul 13, 2014
Messages
1,670
Location
Wiscooonsin
NNID
Erico9001
3DS FC
1091-8215-3292
But isn't this all in the frame data?
  • BEGIN shulk
  • **********
  • Jab1
  • Frame 5- 6: 3.5% 100f/40w 60°
  • Frame 5- 6: 3.5% 100f/40w 70°
  • Frame 5- 6: 3.5% 100f/40w 88°
  • Max Damage: 3.5%
  • Enables transition to next jab state on real frame 11
  • Jab2
  • Frame 5- 7: 3.5% 100f/52w 66°
  • Frame 5- 7: 3.5% 100f/52w 70°
  • Frame 5- 7: 3.5% 100f/52w 80°
  • Max Damage: 7%
  • Enables transition to next jab state on real frame 12
  • Jab3
  • Frame 12-13: 5.3% 60b/100g (KO@ 257%) 50° Slash
  • Frame 14-14: 4.2% 70b/100g (KO@ 294%) 70° Slash
  • Max Damage: 12.3%
  • Dash Attack
  • Frame 15-16: 11% 70b/80g (KO@ 182%) 60° Slash
  • Max Damage: 11%
  • F-tilt (normal)
  • Frame 12-13: 13% 30b/92g (KO@ 140%) 361° Slash
  • Frame 12-13: 11.5% 30b/92g (KO@ 159%) 361° Slash
  • Max Damage: 13%
  • U-tilt
  • Frame 11-23: 8% 70b/90g (KO@ 185%) 85° Slash
  • Frame 13-23: 7% 65b/85g (KO@ 241%) 108° Slash
  • Max Damage: 8%
  • D-tilt
  • Frame 10-11: 9% 45b/90g (KO@ 229%) 60° 0.3-Trip Slash
  • Frame 10-11: 7% 45b/90g (KO@ 284%) 60° 0.3-Trip Slash
  • Max Damage: 9%
  • F-smash (high)
  • Frame 14-16: 5.5% 100f/28w 10° 1.5-Hitlag
  • Frame 14-16: 5.5% 100f/28w 40° 1.5-Hitlag
  • Frame 14-16: 5.5% 100f/28w 78° 1.5-Hitlag
  • Frame 23-23: 13% 30b/125g (KO@ 94%) 361° 2.0-Hitlag Pierce
  • Frame 23-23: 11.5% 30b/125g (KO@ 108%) 361° 2.0-Hitlag Pierce
  • Max Damage: 18.5%
  • Smash charge window on real frame 9
  • F-smash (normal)
  • Frame 14-15: 5.5% 100f/28w 10° 1.5-Hitlag
  • Frame 14-15: 5.5% 100f/28w 40° 1.5-Hitlag
  • Frame 14-15: 5.5% 100f/28w 78° 1.5-Hitlag
  • Frame 23-23: 13% 30b/115g (KO@ 104%) 361° 2.0-Hitlag Pierce
  • Frame 23-23: 11.5% 30b/115g (KO@ 119%) 361° 2.0-Hitlag Pierce
  • Max Damage: 18.5%
  • Smash charge window on real frame 9
  • F-smash (low)
  • Frame 14-16: 5.5% 100f/28w 10° 1.5-Hitlag
  • Frame 14-16: 5.5% 100f/28w 40° 1.5-Hitlag
  • Frame 14-16: 5.5% 100f/28w 78° 1.5-Hitlag
  • Frame 23-23: 13% 30b/115g (KO@ 104%) 361° 2.0-Hitlag Pierce
  • Frame 23-23: 11.5% 30b/115g (KO@ 119%) 361° 2.0-Hitlag Pierce
  • Max Damage: 18.5%
  • Smash charge window on real frame 9
  • U-smash
  • Frame 18-21: 4.5% 100f/110w 105° Ground-Target-Only
  • Frame 18-29: 4.5% 40f/70w 92°
  • Frame 18-29: 4.5% 100f/60w 92°
  • Frame 30-33: 13.5% 45b/98g (KO@ 124%) 89° Pierce
  • Max Damage: 13.5%
  • Smash charge window on real frame 11
  • D-smash
  • Frame 18-19: 14% 50b/95g (KO@ 113%) 45° Slash
  • Frame 18-19: 14% 50b/95g (KO@ 130%) 55° Slash
  • Frame 18-19: 14% 50b/95g (KO@ 106%) 361° Slash
  • Frame 18-19: 11% 50b/95g (KO@ 137%) 361° Slash
  • Frame 23-24: 12% 50b/95g (KO@ 120%) 45° Slash
  • Frame 23-24: 12% 50b/95g (KO@ 139%) 55° Slash
  • Frame 23-24: 12% 50b/95g (KO@ 112%) 361° Slash
  • Frame 23-24: 10% 50b/95g (KO@ 137%) 361° Slash
  • Frame 28-29: 10% 55b/90g (KO@ 137%) 45° Slash
  • Frame 28-29: 10% 55b/90g (KO@ 160%) 55° Slash
  • Frame 28-29: 10% 55b/90g (KO@ 127%) 361° Slash
  • Frame 28-29: 8% 55b/90g (KO@ 162%) 361° Slash
  • Frame 35-36: 8% 60b/90g (KO@ 144%) 361° Slash
  • Frame 35-36: 6% 60b/90g (KO@ 193%) 361° Slash
  • Frame 41-42: 4% 60b/90g (KO@ 266%) 361° Slash
  • Max Damage: 50%
  • Smash charge window on real frame 5
  • Nair
  • Frame 13-30: 8% 40b/100g (KO@ 212%) 50° Slash
  • Frame 13-30: 7% 40b/100g (KO@ 237%) 50° Slash
  • Max Damage: 8%
  • Enables transition to Nair landing state (landing lag) on real frame 1
  • Cancels transition to Nair landing state (landing lag) on real frame 80
  • Fair
  • Frame 14-18: 7.5% 46b/100g (KO@ 191%) 361° Slash
  • Frame 14-18: 6% 46b/100g (KO@ 230%) 361° Slash
  • Max Damage: 7.5%
  • Enables transition to Fair landing state (landing lag) on real frame 1
  • Cancels transition to Fair landing state (landing lag) on real frame 57
  • Bair
  • Frame 18-22: 12% 35b/100g (KO@ 134%) 361° Slash
  • Frame 21-22: 8% 35b/100g (KO@ 197%) 361° Slash
  • Max Damage: 12%
  • Enables transition to Bair landing state (landing lag) on real frame 1
  • Cancels transition to Bair landing state (landing lag) on real frame 79
  • Uair
  • Frame 14-15: 5% 100f/60w 100° 1.2-Hitlag
  • Frame 24-25: 10% 55b/100g (KO@ 147%) 88° 1.2-Hitlag Pierce
  • Frame 24-25: 7.5% 55b/100g (KO@ 193%) 88° 1.2-Hitlag Pierce
  • Max Damage: 15%
  • Enables transition to Uair landing state (landing lag) on real frame 1
  • Cancels transition to Uair landing state (landing lag) on real frame 79
  • Dair
  • Frame 14-15: 7% 100f/20w 160° 1.2-Hitlag Ground-Target-Only
  • Frame 14-15: 5% 100f/20w 172° 1.2-Hitlag Aerial-Target-Only
  • Frame 23-24: 11% 10b/90g (KO@ 263%) 270° Pierce Aerial-Target-Only
  • Frame 23-24: 11% 10b/85g (KO@ 200%) 361° Pierce
  • Frame 23-24: 10% 55b/85g (KO@ 156%) 361° Pierce
  • Max Damage: 18%
  • Enables transition to Dair landing state (landing lag) on real frame 1
  • Cancels transition to Dair landing state (landing lag) on real frame 78
  • Grab
  • Frame 7- 8: Grab
  • Enables state transition on real frame 9
  • Dash Grab
  • Frame 9-10: Grab
  • Enables state transition on real frame 11
  • Pivot Grab
  • Frame 10-11: Grab
  • Enables state transition on real frame 12
  • Pummel
  • Frame 5- 5: 3% 100f/30w 361° 1.5-Hitlag
  • Max Damage: 3%
  • F-throw
  • Frame 1-14: 8% 60b/70g (KO@ 249%) 45°
  • Frame 15-16: 3% 100f/50w 361° 1.2-Hitlag Slash
  • Max Damage: 11%
  • B-throw
  • Frame 1-17: 9% 70b/63g (KO@ 230%) 135°
  • Frame 18-19: 3% 100f/50w 361° 1.2-Hitlag Pierce
  • Max Damage: 12%
  • U-throw
  • Frame 1-19: 4% 60b/80g (KO@ 389%) 88°
  • Frame 20-21: 3% 30b/120g (KO@ 346%) 361° 1.5-Hitlag Pierce
  • Max Damage: 7%
  • D-throw
  • Frame 1-22: 4% 75b/115g (KO@ 242%) 50°
  • Frame 23-24: 3% 0b/100g (KO@ 503%) 361° 1.2-Hitlag Pierce
  • Max Damage: 7%
  • Back Slash (startup)
  • Frame 31-41: 16%(+7) 30b/100g (KO@ 101%) 140° 1.5-Hitlag Slash Away-Facing-Target-Only
  • Frame 31-41: 14%(+7) 30b/100g (KO@ 118%) 140° 1.5-Hitlag Slash Away-Facing-Target-Only
  • Frame 31-41: 10%(+7) 30b/100g (KO@ 166%) 361° 0.8-Hitlag Slash
  • Frame 31-41: 9%(+7) 30b/100g (KO@ 184%) 361° 0.8-Hitlag Slash
  • Frame 34-41: 16%(+7) 30b/100g (KO@ 101%) 140° 1.5-Hitlag Slash Away-Facing-Target-Only
  • Frame 34-41: 14%(+7) 30b/100g (KO@ 118%) 140° 1.5-Hitlag Slash Away-Facing-Target-Only
  • Frame 34-41: 10%(+7) 30b/100g (KO@ 166%) 361° 0.8-Hitlag Slash
  • Frame 34-41: 9%(+7) 30b/100g (KO@ 184%) 361° 0.8-Hitlag Slash
  • Max Damage: 16%
  • Back Slash Leap (startup)
  • Frame 28-29: 12%(+7) 30b/100g (KO@ 139%) 140° 1.5-Hitlag Slash Away-Facing-Target-Only
  • Frame 28-29: 11%(+7) 30b/100g (KO@ 152%) 140° 1.5-Hitlag Slash Away-Facing-Target-Only
  • Frame 28-29: 6%(+7) 30b/100g (KO@ 259%) 361° 0.8-Hitlag Slash
  • Frame 28-29: 4%(+7) 30b/100g (KO@ 349%) 361° 0.8-Hitlag Slash
  • Max Damage: 12%
  • Back Slash Charge (startup)
  • Frame 31-32: 15%(+7) 30b/100g (KO@ 109%) 140° 1.5-Hitlag Slash Away-Facing-Target-Only
  • Frame 31-32: 13%(+7) 30b/100g (KO@ 128%) 140° 1.5-Hitlag Slash Away-Facing-Target-Only
  • Frame 31-32: 6%(+7) 25b/100g (KO@ 268%) 361° 0.8-Hitlag Slash
  • Frame 31-32: 4%(+7) 25b/100g (KO@ 361%) 361° 0.8-Hitlag Slash
  • Max Damage: 15%
  • Begins super armor on real frame 1
  • Ends super armor on real frame 31
  • Back Slash (fall)
  • Frame 1- 2: 16%(+7) 30b/100g (KO@ 101%) 140° 1.5-Hitlag Slash Away-Facing-Target-Only
  • Frame 1- 2: 14%(+7) 30b/100g (KO@ 118%) 140° 1.5-Hitlag Slash Away-Facing-Target-Only
  • Frame 1- 2: 10%(+7) 30b/100g (KO@ 166%) 361° 0.8-Hitlag Slash
  • Frame 1- 2: 9%(+7) 30b/100g (KO@ 184%) 361° 0.8-Hitlag Slash
  • Max Damage: 16%
  • Back Slash Leap (fall)
  • Frame 1- 2: 16%(+7) 30b/100g (KO@ 101%) 140° 1.5-Hitlag Slash Away-Facing-Target-Only
  • Frame 1- 2: 14%(+7) 30b/100g (KO@ 118%) 140° 1.5-Hitlag Slash Away-Facing-Target-Only
  • Frame 1- 2: 10%(+7) 30b/100g (KO@ 166%) 361° 0.8-Hitlag Slash
  • Frame 1- 2: 9%(+7) 30b/100g (KO@ 184%) 361° 0.8-Hitlag Slash
  • Max Damage: 16%
  • Back Slash Charge (fall)
  • Frame 1- 2: 11%(+7) 30b/100g (KO@ 152%) 140° 1.5-Hitlag Slash Away-Facing-Target-Only
  • Frame 1- 2: 9%(+7) 30b/100g (KO@ 184%) 140° 1.5-Hitlag Slash Away-Facing-Target-Only
  • Frame 1- 2: 4%(+7) 25b/100g (KO@ 361%) 361° 0.8-Hitlag Slash
  • Frame 1- 2: 3.5%(+7) 25b/100g (KO@ 395%) 361° 0.8-Hitlag Slash
  • Max Damage: 11%
  • Back Slash (landing)
  • Frame 1- 2: 15%(+10) 25b/100g (KO@ 114%) 140° 1.5-Hitlag Slash Away-Facing-Target-Only
  • Frame 1- 2: 13%(+10) 25b/100g (KO@ 133%) 140° 1.5-Hitlag Slash Away-Facing-Target-Only
  • Frame 1- 2: 10%(+10) 25b/100g (KO@ 172%) 361° 0.8-Hitlag Slash
  • Frame 1- 2: 9%(+10) 25b/100g (KO@ 190%) 361° 0.8-Hitlag Slash
  • Max Damage: 15%
  • Back Slash Leap (landing)
  • Frame 1- 4: 18%(+10) 25b/100g (KO@ 91%) 140° 1.5-Hitlag Slash Away-Facing-Target-Only
  • Frame 1- 4: 16%(+10) 25b/100g (KO@ 105%) 140° 1.5-Hitlag Slash Away-Facing-Target-Only
  • Frame 1- 4: 10%(+10) 25b/100g (KO@ 172%) 361° 0.8-Hitlag Slash
  • Frame 1- 4: 8%(+10) 25b/100g (KO@ 211%) 361° 0.8-Hitlag Slash
  • Max Damage: 18%
  • Back Slash Charge (landing)
  • Frame 1- 2: 14%(+10) 25b/100g (KO@ 123%) 140° 1.5-Hitlag Slash Away-Facing-Target-Only
  • Frame 1- 2: 12%(+10) 25b/100g (KO@ 144%) 140° 1.5-Hitlag Slash Away-Facing-Target-Only
  • Frame 1- 2: 6%(+10) 22b/100g (KO@ 273%) 361° 0.8-Hitlag Slash
  • Frame 1- 2: 4.5%(+10) 22b/100g (KO@ 339%) 361° 0.8-Hitlag Slash
  • Frame 3- 4: 7%(+10) 25b/100g (KO@ 123%) 140° 1.5-Hitlag Slash Away-Facing-Target-Only
  • Frame 3- 4: 6%(+10) 25b/100g (KO@ 144%) 140° 1.5-Hitlag Slash Away-Facing-Target-Only
  • Frame 3- 4: 4%(+10) 22b/100g (KO@ 273%) 361° 0.8-Hitlag Slash
  • Frame 3- 4: 3%(+10) 22b/100g (KO@ 339%) 361° 0.8-Hitlag Slash
  • Max Damage: 14%
  • Air Slash (first hit)
  • Frame 10-11: 6% 100f/140w 78° Slash
  • Frame 10-11: 6% 100f/135w 91° Slash
  • Frame 10-11: 6% 100f/100w 85° Slash
  • Frame 12-14: 5% 100f/80w 86° Slash
  • Frame 12-14: 5% 100f/78w 80° Slash
  • Frame 15-17: 5% 100f/43w 52° Slash
  • Frame 15-17: 5% 100f/43w 70° Slash
  • Max Damage: 6%
  • Enables state transition on real frame 10
  • Enables forward ledge grabs on real frame 10
  • Enables all ledge grabs on real frame 40
  • Advancing Air Slash (first hit)
  • Frame 10-11: 6% 100f/120w 60° Slash
  • Frame 10-11: 6% 100f/100w 60° Slash
  • Frame 10-11: 6% 100f/90w 60° Slash
  • Frame 12-14: 5% 100f/80w 55° Slash
  • Frame 12-14: 5% 100f/78w 55° Slash
  • Frame 15-17: 5% 100f/43w 45° Slash
  • Max Damage: 6%
  • Enables state transition on real frame 10
  • Enables forward ledge grabs on real frame 10
  • Enables all ledge grabs on real frame 40
  • Mighty Air Slash (first hit)
  • Frame 10-11: 9% 100f/140w 78° Slash
  • Frame 10-11: 9% 100f/135w 91° Slash
  • Frame 12-14: 7% 100f/100w 80° Slash
  • Frame 15-15: 7% 100f/80w 52° Slash
  • Max Damage: 9%
  • Enables state transition on real frame 10
  • Enables forward ledge grabs on real frame 10
  • Enables all ledge grabs on real frame 40
  • Air Slash (second hit)
  • Frame 15-16: 5.5% 35b/170g (KO@ 168%) 48° 1.3-Hitlag Slash
  • Max Damage: 5.5%
  • Advancing Air Slash (second hit)
  • Frame 11-12: 8% 35b/130g (KO@ 162%) 48° 1.3-Hitlag Slash
  • Max Damage: 8%
  • Mighty Air Slash (second hit)
  • Frame 15-16: 10% 55b/80g (KO@ 196%) 80° 2.0-Hitlag Slash
  • Max Damage: 10%
  • Vision (fast hit)
  • Frame 21-21: 13% 70b/94g (KO@ 112%) 50° 2.0-Hitlag Slash Unblockable
  • Frame 21-21: 10% 70b/94g (KO@ 147%) 50° 2.0-Hitlag Slash Unblockable
  • Max Damage: 13%
  • Dash Vision (fast hit)
  • Frame 13-13: 11% 70b/94g (KO@ 108%) 35° 2.0-Hitlag Slash Unblockable
  • Frame 13-13: 8% 70b/94g (KO@ 147%) 35° 2.0-Hitlag Slash Unblockable
  • Max Damage: 11%
  • Power Vision (fast hit)
  • Frame 41-44: 20% 70b/100g (KO@ 60%) 50° 2.0-Hitlag Slash Unblockable
  • Frame 41-44: 17% 70b/100g (KO@ 76%) 50° 2.0-Hitlag Slash Unblockable
  • Max Damage: 20%
  • Vision (normal hit)
  • Frame 8- 9: 10% 70b/84g (KO@ 166%) 50° 2.0-Hitlag Slash Unblockable
  • Frame 8- 9: 7% 70b/84g (KO@ 228%) 50° 2.0-Hitlag Slash Unblockable
  • Max Damage: 10%
  • Dash Vision (normal hit
  • Frame 8-11: 8% 70b/84g (KO@ 166%) 35° 2.0-Hitlag Slash Unblockable
  • Frame 8-11: 5% 70b/84g (KO@ 244%) 35° 2.0-Hitlag Slash Unblockable
  • Max Damage: 8%
  • Power Vision (normal hit)
  • Frame 12-17: 17% 70b/100g (KO@ 76%) 50° 2.0-Hitlag Slash Unblockable
  • Frame 12-17: 14% 70b/100g (KO@ 96%) 50° 2.0-Hitlag Slash Unblockable
  • Max Damage: 17%
  • Final Smash
  • Frame 20-22: 3% 100f/200w 80° Unblockable
  • Max Damage: 3%
  • Final Smash
  • Frame 1- 2: 5% 105b/180g (KO@ 77%) 361°
  • Max Damage: 5%
  • Final Smash
  • Frame 15-34: 2% 80f/1w 361°
  • Frame 245-246: 12% 80f/1w 361°
  • Max Damage: 34%
  • **********
  • END shulk
 

Big-Cat

Challenge accepted.
Joined
Jul 24, 2007
Messages
16,176
Location
Lousiana
NNID
KumaOso
3DS FC
1590-4853-0104
Some of the angles don't line up with the visuals. It says FTilt has a 361 degree kb angle yet in my pic it looks more like 45.
 

Big-Cat

Challenge accepted.
Joined
Jul 24, 2007
Messages
16,176
Location
Lousiana
NNID
KumaOso
3DS FC
1590-4853-0104
Considering that even the frame data doesn't mention different angles for the attacks for the different arts, probably not.
 

Masonomace

Yeah Shulk, get stuck in!
Joined
Apr 10, 2010
Messages
4,622
Location
Independence, MO
NNID
Masonomace
I would only see the Buster & Smash Arts alter the angles of the attacks but I doubt they'd alter it much, not to mention that the sweet & sourspots of moves differ as well. Hopefully I'll have the sourspot DI angle images to here.
 
Top Bottom