
~Radiance~
Meow-Meow, Choco-Chow
First I hate the title, someone give me a pun of some sort. I wanted something about new dog old tricks or something, but i'm at an impasse for a name lol.
So this isn't really a guide per-say, but more of a discussion on the application of Aura Sphere wavebouncing.
For those who do not know what wavebouncing is, its shifting your momentum while in the air by pressing the opposite direction you are facing immediately after pressing your special button. this can be done with any special move, but Aura Sphere is by far the most useful special for Lucario. Due to changes in smash 4 involving slightly more hit-stun and most importantly the changes to SDI which allow for multi-hit moves to be harder to escape, Lucario can make more practical use of his Aura Sphere Charge. Lucario's Aura Sphere is not as easy to DI out of as it was in brawl due to these changes. With proper use of certain setups and mind-games, it is possible to string stuff together and hit with the reverse side of Aura Sphere when wavebounced correctly.
If you are a TL;DR'er, here's what's going down: This guide is gonna show ways to use wavebouncing as Lucario, and you can implement them should you choose to.
DISCLAIMER: None of the following are guaranteed. These are by no means combos but rather are mixups that can be added into Lucario's arsenal should you choose to. With that, lets talk about its uses on the ledge
One note: it is rather important that you make sure not to wavebounce to high up on the stage as it can leave you vulnerable. Make sure to drop down a bit, then wavebounce on stage.
Wavebounce Mixups/Approaches
At a glance approaching with AS sounds awful, which is pretty true, but using it as a mixup to get in can work well. These mixups should be used sparingly. If used correctly they can throw the opponent off as they will not know when a wavebounce is coming, but its very easy to tell when you are trying to do it if used improperly. Be Creative!
Empty SH Fakeout
This mixup is a good mind-game. From an empty SH you can instead FF and run in and grab, or simply jump away. This mixup is probably the easiest to work with and the input isn't too tricky. If your opponent sits in shield the entire time you are SH'ing remember that the AS damage will beat out grabs, so if they are trying to bait for a shield grab you can use this mixup to counter that.
SH Fair to wavebounce

After doing a Fair and DI'ing back you can use this method. In my experience this is best to do as part of a scenario. If you Fair your opponent and it connects follow up with fair strings or any other mix up, but if they shield the fair DI back and wavebounce in. It will most likely eat through their shield at this point, and if nothing else the only option they have is to roll away leaving you in a good position the entire exchange. they only issue would be if you fair their shield and they respond by doing an aerial OoS.
FH Fair to FF Wavebounce

The execution on this one is slightly harder as you need to FF, DI back, and Wavebounce all in a short time frame. It is however a good mixup that can throw your opponents off. This one I took from a set I watched Junebug play in. Pro's are its relatively safe, you can choose to back out after the initial Fair if you don't feel like its an option you want to pursue.
There are naturally more setups for this technique, but from a neutral game these seem to be the most reliable and consistent ways I have found to get in. With that being said, lets move on to the fun stuff.
Strings and Mixups with Wavebouncing
Please remember that none of these are guaranteed. Your opponent can jump out of most of these options, so it is up to you to decide how to follow up. if you read a jump you can always shield during the Aura charge and FH/DJ Bair for a punish. See what they do and punish accordingly.
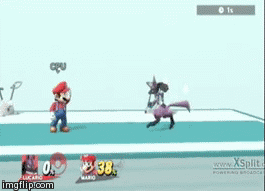
AS Charge to Shield Drop Grab
This is probably my favorite mixup. If you shield relatively fast after you hit with the charge you can usually drop shield and buffer a turn around grab. while they can jump away this can be a good initial mixup if your opponent is trying to aggro through the sphere or simply has slow reaction time.
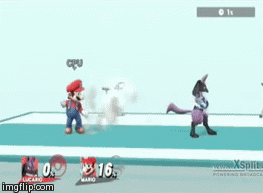
AS Charge to Dair 1 and 2

This is another good mixup. because Dair comes out fast and you can do it OoS it is a fairly safe option and can usually punish those who have decent reaction time when the grab mixup wont work. Dair is dependent on how close you are to them however, and it may miss. Thankfully it has low cooldown so you can typically roll or run away if it whiffs, or you can choose to stay on the offensive.
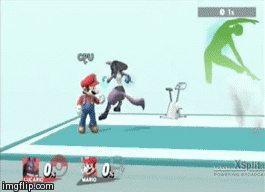
AS Charge to Dair 1 Mixups
Dair to Grab

Dair to FP Grab

There are technically many mixups that can come from this if only Dair 1 hits. MythTrainerInfinity mentioned that if your opponent tries to buffer a shield and they are too far up it can cause them to air dodge into the ground, meaning a Dsmash could follow up.
For the two Gif's above its really a matter of preference. Side B can kill early and typically Dair 1 only pops up at higher percents and on lighter characters. If your opponent spot dodges the grab part they can be hit by the aura blast as well, which is also nice. Grab is a great mixup with Dair 1 as well due to the combos that can come off of Uthrows. Choose whatever you like, and don't feel that only these 2 options can come out of a Dair 1 follow up. You can also keep dashing and doing Dair 1 over and over.
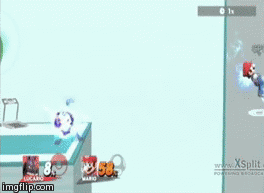
AS Charge to Drop Shield Utilt

this mix up is nice. it can cover air dodges and if your opponent jumps out it has low enough lag that It is safe to throw out. The only issue is that with having to drop shield its a lot like grab in that people may get out of it often even though Utilt comes out fast. At low percents it can lead into some nice strings such as this:
Keep in mind again that strings like this aren't guaranteed, it's merely a postulation into follow ups.
ONE FINAL CHEESY FOLLOW UP
If your opponent is offstage AS Charge is really silly and can edge-guard some characters well. If your opponent tries to DI above you there is the possibility you could get a really cheese kill by canceling the charge and performing Usmash OoS.
This technique has many possible uses. Many are just for flash and show, but have possible applications in the meta if used in various ways. This guide is in no way meant to make the statement that this mix up should be used and that it is good, It is merely more tech that Lucario can use and in my opinion adds to the overall fun technical level of Lucario. Try some of these out and see what happens if you like, you never know what may come of it
Good? Bad? Useless? Exasperating to read? Let me know your opinions and if anything seems off or if there is anything you feel I missed. I tried to use as many of the different AS setups as I could in the follow up Gif's to show what it would look like. Happy Aura Doge'ing!

So this isn't really a guide per-say, but more of a discussion on the application of Aura Sphere wavebouncing.
For those who do not know what wavebouncing is, its shifting your momentum while in the air by pressing the opposite direction you are facing immediately after pressing your special button. this can be done with any special move, but Aura Sphere is by far the most useful special for Lucario. Due to changes in smash 4 involving slightly more hit-stun and most importantly the changes to SDI which allow for multi-hit moves to be harder to escape, Lucario can make more practical use of his Aura Sphere Charge. Lucario's Aura Sphere is not as easy to DI out of as it was in brawl due to these changes. With proper use of certain setups and mind-games, it is possible to string stuff together and hit with the reverse side of Aura Sphere when wavebounced correctly.
If you are a TL;DR'er, here's what's going down: This guide is gonna show ways to use wavebouncing as Lucario, and you can implement them should you choose to.
DISCLAIMER: None of the following are guaranteed. These are by no means combos but rather are mixups that can be added into Lucario's arsenal should you choose to. With that, lets talk about its uses on the ledge
Ledge Wavebounce
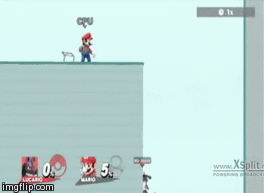
In Brawl a common tactic for getting on the ledge was to air dodge onto the stage, but now with 40 frames of landing lag its much less of a viable option to get on stage. This tech has been around since brawl, and it really is about the same in terms of safety and viability. It guards your back, and since grab armor is now null it can be a good way to secure getting back onstage.
One note: it is rather important that you make sure not to wavebounce to high up on the stage as it can leave you vulnerable. Make sure to drop down a bit, then wavebounce on stage.
Wavebounce Mixups/Approaches
At a glance approaching with AS sounds awful, which is pretty true, but using it as a mixup to get in can work well. These mixups should be used sparingly. If used correctly they can throw the opponent off as they will not know when a wavebounce is coming, but its very easy to tell when you are trying to do it if used improperly. Be Creative!
Empty SH Fakeout
This mixup is a good mind-game. From an empty SH you can instead FF and run in and grab, or simply jump away. This mixup is probably the easiest to work with and the input isn't too tricky. If your opponent sits in shield the entire time you are SH'ing remember that the AS damage will beat out grabs, so if they are trying to bait for a shield grab you can use this mixup to counter that.
SH Fair to wavebounce
After doing a Fair and DI'ing back you can use this method. In my experience this is best to do as part of a scenario. If you Fair your opponent and it connects follow up with fair strings or any other mix up, but if they shield the fair DI back and wavebounce in. It will most likely eat through their shield at this point, and if nothing else the only option they have is to roll away leaving you in a good position the entire exchange. they only issue would be if you fair their shield and they respond by doing an aerial OoS.
FH Fair to FF Wavebounce
The execution on this one is slightly harder as you need to FF, DI back, and Wavebounce all in a short time frame. It is however a good mixup that can throw your opponents off. This one I took from a set I watched Junebug play in. Pro's are its relatively safe, you can choose to back out after the initial Fair if you don't feel like its an option you want to pursue.
There are naturally more setups for this technique, but from a neutral game these seem to be the most reliable and consistent ways I have found to get in. With that being said, lets move on to the fun stuff.
Strings and Mixups with Wavebouncing
Please remember that none of these are guaranteed. Your opponent can jump out of most of these options, so it is up to you to decide how to follow up. if you read a jump you can always shield during the Aura charge and FH/DJ Bair for a punish. See what they do and punish accordingly.
AS Charge to Shield Drop Grab
This is probably my favorite mixup. If you shield relatively fast after you hit with the charge you can usually drop shield and buffer a turn around grab. while they can jump away this can be a good initial mixup if your opponent is trying to aggro through the sphere or simply has slow reaction time.
AS Charge to Dair 1 and 2
This is another good mixup. because Dair comes out fast and you can do it OoS it is a fairly safe option and can usually punish those who have decent reaction time when the grab mixup wont work. Dair is dependent on how close you are to them however, and it may miss. Thankfully it has low cooldown so you can typically roll or run away if it whiffs, or you can choose to stay on the offensive.
AS Charge to Dair 1 Mixups
Dair to Grab
Dair to FP Grab
There are technically many mixups that can come from this if only Dair 1 hits. MythTrainerInfinity mentioned that if your opponent tries to buffer a shield and they are too far up it can cause them to air dodge into the ground, meaning a Dsmash could follow up.
For the two Gif's above its really a matter of preference. Side B can kill early and typically Dair 1 only pops up at higher percents and on lighter characters. If your opponent spot dodges the grab part they can be hit by the aura blast as well, which is also nice. Grab is a great mixup with Dair 1 as well due to the combos that can come off of Uthrows. Choose whatever you like, and don't feel that only these 2 options can come out of a Dair 1 follow up. You can also keep dashing and doing Dair 1 over and over.
AS Charge to Drop Shield Utilt
this mix up is nice. it can cover air dodges and if your opponent jumps out it has low enough lag that It is safe to throw out. The only issue is that with having to drop shield its a lot like grab in that people may get out of it often even though Utilt comes out fast. At low percents it can lead into some nice strings such as this:
Keep in mind again that strings like this aren't guaranteed, it's merely a postulation into follow ups.
ONE FINAL CHEESY FOLLOW UP
If your opponent is offstage AS Charge is really silly and can edge-guard some characters well. If your opponent tries to DI above you there is the possibility you could get a really cheese kill by canceling the charge and performing Usmash OoS.
This technique has many possible uses. Many are just for flash and show, but have possible applications in the meta if used in various ways. This guide is in no way meant to make the statement that this mix up should be used and that it is good, It is merely more tech that Lucario can use and in my opinion adds to the overall fun technical level of Lucario. Try some of these out and see what happens if you like, you never know what may come of it
Good? Bad? Useless? Exasperating to read? Let me know your opinions and if anything seems off or if there is anything you feel I missed. I tried to use as many of the different AS setups as I could in the follow up Gif's to show what it would look like. Happy Aura Doge'ing!
Last edited:
")