• Welcome to Smashboards, the world's largest Super Smash Brothers community! Over 250,000 Smash Bros. fans from around the world have come to discuss these great games in over 19 million posts!

    You are currently viewing our boards as a visitor. Click here to sign up right now and start on your path in the Smash community!

Official Melee Texture Hack Thread

Achilles1515

Smash Master
Joined
Jun 18, 2007
Messages
3,211
Location
Cincinnati / Columbus OH
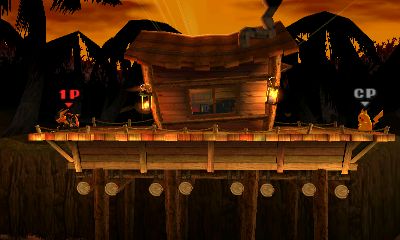
Is anybody here good at Stage hacking or able to direct me to a guide for doing it? I saw the For Glory version of Jungle Japes on a Smash 3ds stream and had the idea of hacking the Melee version to be more like it, while retaining the platform in the middle.

Here's the Smash 3ds version:
And Melee:
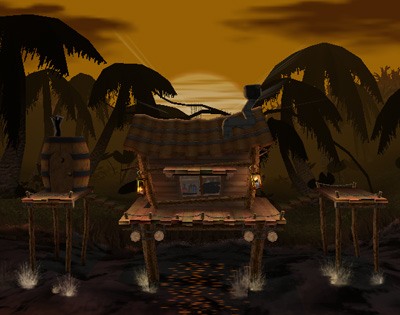

I think you could make a really cool stage by taking the melee version and removing the water and claptraps, and then either removing the side platforms or pushing them into the middle to make one big stage, like the Green Greens hack that everyone uses. I don't know anything about stage hacking now, but this seems pretty doable by pushing the level of the water down below the blast zone (or moving the stage up and altering the blast zones).
I like the idea but basically no one knows how to do stage hacking. Milun is the only one and he is no longer active in the Melee Workshop.

Also, this request does not belong in the texture thread.
 

DRGN

Technowizard
Moderator
Joined
Aug 20, 2005
Messages
2,179
Location
Sacramento, CA
You must convert PlMsRe.dat to PlMsNr.dat by manually replacing every texture with Melee Toolkit. This is the most tedious part to be honest. If there were a 'batch' option like 'export all' or 'replace all' it would be faster.
You can use my DAT Overwriter tool to do the 'replace all' part. At least for most characters or textures, sinces most character textures don't have palettes. I think Marth only has like two textures that have palettes IIRC. And it'll be especially easy if you make a Placements file with offsets & file names. (I don't know how much sense my quick run-down on those made in the other thread, but if you have any questions, feel free to ask.)

How do you organize your tpls; do you keep them all in one folder, or keep them in the individual folders within Steelia's packs?
 

OmnipotentSpoon

Smash Cadet
Joined
Mar 8, 2014
Messages
37
Hmm... I'm trying to figure out how to get poses that you want for all skins of a character. Does anyone know if you could use the tools that TASers use to record inputs but only after you've chosen your character and skin? Like you pick the skin and then it runs through the inputs to get to that pose and pauses. Or does it only record the movie in dolphin, which is what I've found after googling.
 

DRGN

Technowizard
Moderator
Joined
Aug 20, 2005
Messages
2,179
Location
Sacramento, CA
No, you can't include picking different characters/costumes in Dolphin's recordings.

But it is possible using external tools to automatically control Dolphin. Honestly though it's kind of complex, not perfect, and would probably need a guide. Or certainly at least its own thread.
 

OmnipotentSpoon

Smash Cadet
Joined
Mar 8, 2014
Messages
37
No, you can't include picking different characters/costumes in Dolphin's recordings.

But it is possible using external tools to automatically control Dolphin. Honestly though it's kind of complex, not perfect, and would probably need a guide. Or certainly at least its own thread.
Darn. Thanks for the info.
 

Goxplex

Smash Apprentice
Joined
May 16, 2013
Messages
139
Location
Panamá
You can use my DAT Overwriter tool to do the 'replace all' part. At least for most characters or textures, sinces most character textures don't have palettes. I think Marth only has like two textures that have palettes IIRC. And it'll be especially easy if you make a Placements file with offsets & file names. (I don't know how much sense my quick run-down on those made in the other thread, but if you have any questions, feel free to ask.)

How do you organize your tpls; do you keep them all in one folder, or keep them in the individual folders within Steelia's packs?
Thanks for the info. I was using DAT overwriter and PNG to TPL tool today, and these tools are amazing and make stage/character texture hacking much easier. I don't really organize my tpls, I just put them all in one folder whenever I need them.
 

Goxplex

Smash Apprentice
Joined
May 16, 2013
Messages
139
Location
Panamá
I must be doing something wrong but I can't figure out what it is. But if I end the match and start another match it loads the second texture. I've tried 3 different ISOs with GCrebuilder and the toolpack.
Here's the process I'm doing, see anything wrong?
1. Open the ISO in Dolphin and find a good pose, pause the game
2. Save the state with Shift+F1 or using the menus
3. Screenshot
4. Close the ISO
5. Open the same ISO in GCrebuilder and find the texture I want to change
6. Import a 2nd texture (has to be the character/color) over the 1st
7. Close the ISO in GCrebuilder
8. Open the ISO in Dolphin and hit F1 or load previous state

Not sure if it's relevant but I have Dolphin 4.0.2
OK, I think I found a solution. We must use Dolphin's 'load custom textures' feature. This loads custom textures while the game is already running, and it works with save states. The only problem is that I don't know how these files are named, and we would need to rename each separate texture we want to insert with the filename that Dolphin assigned to the original dumps.

Here is a quick test I did (I really should start using my desktop for melee hacking and recording videos lol, my laptop its a toaster):

I think this topic needs it's own thread, can someone create it?
 
Last edited:

DRGN

Technowizard
Moderator
Joined
Aug 20, 2005
Messages
2,179
Location
Sacramento, CA
Thanks for the info. I was using DAT overwriter and PNG to TPL tool today, and these tools are amazing and make stage/character texture hacking much easier.
Cool. Glad to hear it. :)

To further streamline things, I've been thinking, what if we had an archive like this, but which used PNG images? Then, I assume converting a costume from one color slot to another would be really easy using those tools. For example, if you wanted to convert Pinstripe Falcon to the gray costume alt instead of his current blue alt, you would do this:

1) Download the Pinstripe Falcon pack (the PNG version)
2) Drag-and-drop all of the images onto the PNG to TPL converter (assuming we don't divide up the textures to individual folders for these packs, which I see little to no advantage in.)
3) Copy the gray costume .dat file (PICaGy.dat) and the placements file to the same folder with the images.
4) Drag and drop all of the files above (TPLs/DAT/Placements.txt) onto the DAT Overwriter exe

And that's it. You'd have your new gray alt .dat with Pinstripe Falcon inside. I actually think even that process could be made to be even simper, but the key would still be in having a library of PNG texture packs (with original file names, to make automation easier) rather than TGA. I mean, technically, I could make a GIMP plugin that ties into my PNG to-from TPL.bat, which would allow it to convert strait from TGA to TPL, but that would be a sloppier, roundabout solution. And not only that, but it would mean longer processing times, and that anyone who wanted to use the tool would have to install GIMP. :p
 
Last edited:

Goxplex

Smash Apprentice
Joined
May 16, 2013
Messages
139
Location
Panamá
Cool. Glad to hear it. :)

To further streamline things, I've been thinking, what if we had an archive like this, but which used PNG images? Then, I assume converting a costume from one color slot to another would be really easy using those tools. For example, if you wanted to convert Pinstripe Falcon to the gray costume alt instead of his current blue alt, you would do this:

1) Download the Pinstripe Falcon pack (the PNG version)
2) Drag-and-drop all of the images onto the PNG to TPL converter (assuming we don't divide up the textures to individual folders for these packs, which I see little to no advantage in.)
3) Copy the gray costume .dat file (PICaGy.dat) and the placements file to the same folder with the images.
4) Drag and drop all of the files above (TPLs/DAT/Placements.txt) onto the DAT Overwriter exe

And that's it. You'd have your new gray alt .dat with Pinstripe Falcon inside. I actually think it could be made to be even simper, but the key would still be in having a library of PNG texture packs (with original file names, to make automation easier) rather than TGA. I mean, technically, I could make a GIMP plugin that ties into my PNG to-from TPL.bat, which would allow it to convert strait from TGA to TPL, but that would be a sloppier, roundabout solution. And not only that, but it would mean longer processing times, and that anyone who wanted to use the tool would have to install GIMP. :p
Going to try this tomorrow! Do you have any tips for identifying Dolphin's texture dumps?
 

DRGN

Technowizard
Moderator
Joined
Aug 20, 2005
Messages
2,179
Location
Sacramento, CA
Identifying them? As in which are for a character, and which are for stages/effects/etc.? No, not really; aside from emptying the texture dump folder before loading the match or screen where the textures you're after are going to be. All I know about the images is that the filename that Dolphin gives them is some kind of hash of the image, so it's supposed to be unique to that texture (which is really good for us). I think I remember reading somewhere that the hash also takes any palette it may have into consideration too, but I'm not sure about that, because I think I may have seen two of the same texture appear before, but with one of them lacking colors. Maybe you've seen that too?

Although I just had an idea. What if we made a stage where everything was pure black? Then, if you delete the images in the dumps folder, and load the stage with only 1 character, theoretically you should just be able to easily scan through the dumps folder and pick out everything not black. All that would remain would be that character's textures.
 

Goxplex

Smash Apprentice
Joined
May 16, 2013
Messages
139
Location
Panamá
Identifying them? As in which are for a character, and which are for stages/effects/etc.? No, not really; aside from emptying the texture dump folder before loading the match or screen where the textures you're after are going to be. All I know about the images is that the filename that Dolphin gives them is some kind of hash of the image, so it's supposed to be unique to that texture (which is really good for us). I think I remember reading somewhere that the hash also takes any palette it may have into consideration too, but I'm not sure about that, because I think I may have seen two of the same texture appear before, but with one of them lacking colors. Maybe you've seen that too?

Although I just had an idea. What if we made a stage where everything was pure black? Then, if you delete the images in the dumps folder, and load the stage with only 1 character, theoretically you should just be able to easily scan through the dumps folder and pick out everything not black. All that would remain would be that character's textures.
Another option, if we just want to know the dumps filenames, is to replace each texture inside a .dat file with a single color (lime green for example) and a number above the color (like 00, 01, 02, 03, etc). This would make them easier to identify in the dump folder. We are going to replace them anyway, so it doesn't matter if the image is different.

UPDATE: Ok, I tried this and it works but the procedure is extreamly tedious. It would be really easy if I knew of tools that did the following things:

1. Extract all the texture TPLs that are inside a .DAT (like melee toolkit does but with multiple files).

2. Rename every X filename to Y filename.
Example:

If the filename is Texture 1 change it to GALE01_abc01_14
If the filenamename is Texture 2 change it to GALE01_gtd3d_14
If the filename name is Texture 3 change it to GALE01_asda3_14

Do you guys know a program able to do any of these things? Specially the second one.
 
Last edited:

DRGN

Technowizard
Moderator
Joined
Aug 20, 2005
Messages
2,179
Location
Sacramento, CA
UPDATE: Ok, I tried this and it works but the procedure is extreamly tedious. It would be really easy if I knew of tools that did the following things:

1. Extract all the texture TPLs that are inside a .DAT (like melee toolkit does but with multiple files).

2. Rename every X filename to Y filename.
Example:

If the filename is Texture 1 change it to GALE01_abc01_14
If the filenamename is Texture 2 change it to GALE01_gtd3d_14
If the filename name is Texture 3 change it to GALE01_asda3_14

Do you guys know a program able to do any of these things? Specially the second one.
Are you just referring to the operation of your idea of using Dolphin's 'load custom textures' feature to make identical CSPs? Or would one of those tools be for something else? And extract them into what, PNG?

As for program 2, that would be easy to make, but it faces a similar problem as many other tools, in that you'd also need to write another kind of "placements" file, but for associating one file name with another. Otherwise there's no way that the program or script could know what it should be renaming files to (unless you find the algorithm Dolphin uses to generate the filenames).

Edit: Oh I think I see what you're thinking about for the first program. You want a method for taking apart .dats that were already made by others.... (At first I was once again thinking about a library of original PNG texture packs as a solution. Although I still think that would be great, it wouldn't help here of course.)
 
Last edited:

Goxplex

Smash Apprentice
Joined
May 16, 2013
Messages
139
Location
Panamá
Are you just referring to the operation of your idea of using Dolphin's 'load custom textures' feature to make identical CSPs? Or would one of those tools be for something else? And extract them into what, PNG?

As for program 2, that would be easy to make, but it faces a similar problem as many other tools, in that you'd also need to write another kind of "placements" file, but for associating one file name with another. Otherwise there's no way that the program or script could know what it should be renaming files to (unless you find the algorithm Dolphin uses to generate the filenames).

Edit: Oh I think I see what you're thinking about for the first program. You want a method for taking apart .dats that were already made by others.... (At first I was one again thinking about a library of original PNG texture packs as a solution. Although I still think that would be great, it wouldn't help here of course.)
Everything i said was for the CSP method using Dolphin's load custom texture feature. And yes, program 2 would be great even if we have to write the placements file, because it would be just one time per character. :)

Yeah, I want the 'batch TPL extractor' to export custom textures made by users, maybe in PNG or TPL format (we could transform them to PNG using your tool).

I think that your idea of a PNG library of the original textures is great. Let me know if you need help with that.
 
Last edited:

DRGN

Technowizard
Moderator
Joined
Aug 20, 2005
Messages
2,179
Location
Sacramento, CA
I think that if several of us did a couple characters each, maybe a few colors every now and then, it wouldn't be too bad. Should I go ahead and make a thread for it, or just collect them in a post like Steelia did?

So what does everyone think? Do we have any volunteers?

Example benefit. I think then creating new textures would also be easier.
 
Last edited:

DRGN

Technowizard
Moderator
Joined
Aug 20, 2005
Messages
2,179
Location
Sacramento, CA
2. Rename every X filename to Y filename.
Example:

If the filename is Texture 1 change it to GALE01_abc01_14
If the filenamename is Texture 2 change it to GALE01_gtd3d_14
If the filename name is Texture 3 change it to GALE01_asda3_14

Do you guys know a program able to do any of these things? Specially the second one.
Well, I know of one now, because I just wrote it! Here you go: Renamer for Goxplex.bat

To use it, create a file called "New Names.txt", which is where you'll write all of the name changes that you want. Write one entry per line, with this format: [old name], [new name]
  • No brackets.
  • Don't need the file extension (be sure to exclude it for the new names).
  • Note the comma separating them.
For example:
GALE01_abc123_0, filename1
GALE01_123abc_1.png, filename2
GALE01_123456f_1.tpl, filename3
tst2,filenameAlpha
test_image.txt, IhasFilename

Any of those lines would work. It won't hurt anything to keep the file extension for the old name, but you don't want to put it in the new name, because it will include it in the actual new name (e.g. creating filename2.png.png). Furthermore, file type doesn't matter (it will just use the extension of the original file), so you can use this for either PNGs or TPLs (or whatever else).

Once you have your New Names.txt, put it in the same directory as the script. Now, select all of the images who's names you want to change, and drag-and-drop them onto the script (thanks to some magic, the images don't need to be in the same directory as the script). All of the images should be renamed accordingly.

One more thing, if you edit the file, you'll see a line that says "set newNamesFile=New Names.txt". You can change the part after the equal sign to a different file if you want to use a different one. I figure that would b easier than copying different files in and out of the folder if you need to swap between different ones.

Keep in mind I haven't done a lot of testing on this, since I literally just made it. But I think it'll work. Good luck! And let me know how it goes.
 

CeLL

Smash Lord
Joined
Jan 26, 2014
Messages
1,026
Location
Washington
Thanks @Goatlink for giving me the ability to make a formal post!
Purin Flower Pack! 20 Different Purin Flower Recolors!

All Flowers over Flower Purin (PlPrRe.dat)
* Flowers are made by Doqtor Kirby in Melee Toolkit. Flower image textures included.
Download the Purin Flower Pack via Dropbox.

Crown Pack is not next. More on this later. ;)
I'm literally excited for the crown pack lol. And I barely ever play Purin lol
 

Goxplex

Smash Apprentice
Joined
May 16, 2013
Messages
139
Location
Panamá
Well, I know of one now, because I just wrote it! Here you go: Renamer for Goxplex.bat

To use it, create a file called "New Names.txt", which is where you'll write all of the name changes that you want. Write one entry per line, with this format: [old name], [new name]
  • No brackets.
  • Don't need the file extension (be sure to exclude it for the new names).
  • Note the comma separating them.
For example:
GALE01_abc123_0, filename1
GALE01_123abc_1.png, filename2
GALE01_123456f_1.tpl, filename3
tst2,filenameAlpha
test_image.txt, IhasFilename

Any of those lines would work. It won't hurt anything to keep the file extension for the old name, but you don't want to put it in the new name, because it will include it in the actual new name (e.g. creating filename2.png.png). Furthermore, file type doesn't matter (it will just use the extension of the original file), so you can use this for either PNGs or TPLs (or whatever else).

Once you have your New Names.txt, put it in the same directory as the script. Now, select all of the images who's names you want to change, and drag-and-drop them onto the script (thanks to some magic, the images don't need to be in the same directory as the script). All of the images should be renamed accordingly.

One more thing, if you edit the file, you'll see a line that says "set newNamesFile=New Names.txt". You can change the part after the equal sign to a different file if you want to use a different one. I figure that would b easier than copying different files in and out of the folder if you need to swap between different ones.

Keep in mind I haven't done a lot of testing on this, since I literally just made it. But I think it'll work. Good luck! And let me know how it goes.
Thanks for this! This is going to make everything easier. This is amazing!!!
 

DRGN

Technowizard
Moderator
Joined
Aug 20, 2005
Messages
2,179
Location
Sacramento, CA
Oh, Goxplex, there was something else I forgot to mention. In Dolphin's graphics, there's an option (under the Graphic's "Hacks" tab) called Texture Cashe. It's a slider actually. And if you move it all the way to 'safe', it's supposed to prevent textures from not being updated into RAM. Maybe that could help when loading from savestages, to have it update with the textures on the iso. My other guess would be to hack the savestate and replace the textures that are there, if they are indeed saved in it.
 

Achilles1515

Smash Master
Joined
Jun 18, 2007
Messages
3,211
Location
Cincinnati / Columbus OH
Dolphin's save state files are compressed RAM snapshots which does not make it a trivial process to search for it's elements. But @InternetExplorer saved the day, as always (a few months ago).

Dolphin 4.0-2182 No Save State Compress(64-bit),zip

Still, the save state is not a 1:1 copy of the RAM, but you should be able to search for whatever hex words you are looking for.

I'm digging your guys' passion for the best.
 
Last edited:

T4Varsity

Smash Apprentice
Joined
Mar 20, 2010
Messages
77
Location
Las Vegas, NV
With all this talk about how to make good/uniform CSPs, I was playing classic mode and had a good idea. I realized that the poses at the beginning of each round of Classic mode are actual poses of the character models and not just pictures, so they include whatever texture hacks you have in your ISO. Check it out:
Each character has (at least) two poses based on whether they're the player or the opponent:
and pretty much all of the characters have at least one that looks good. So, you could use this to create identical screenshots for different character costumes and then use Goxplex's photoshop method to turn them into CSPs. You could also figure out where the textures behind the characters are stored and replace them with solid colors to make it that much simpler in photoshop. Getting all of the left-side screenshots would obviously be easy since you can choose which costume is used, but for the right-side screenshots you'd probably have to port each costume to that character's neutral costume (since it selects neutral costumes for opponents by default) and then play classic mode until you get your desired character as an opponent. I think you could use this method to make some really nice, professional-looking character select screens.
 
Last edited:

CeLL

Smash Lord
Joined
Jan 26, 2014
Messages
1,026
Location
Washington
With all this talk about how to make good/uniform CSPs, I was playing classic mode and had a good idea. I realized that the poses at the beginning of each round of Classic mode are actual poses of the character models and not just pictures, so they include whatever texture hacks you have in your ISO. Check it out:
Each character has (at least) two poses based on whether they're the player or the opponent:
and pretty much all of the characters have at least one that looks good. So, you could use this to create identical screenshots for different character costumes and then use Goxplex's photoshop method to turn them into CSPs. You could also figure out where the textures behind the characters are stored and replace them with solid colors to make it that much simpler in photoshop. Getting all of the left-side screenshots would obviously be easy since you can choose which costume is used, but for the right-side screenshots you'd probably have to port each costume to that character's neutral costume (since it selects neutral costumes for opponents by default) and then play classic mode until you get your desired character as an opponent. I think you could use this method to make some really nice, professional-looking character select screens.
I really like this idea, someone should do it.
 

Goxplex

Smash Apprentice
Joined
May 16, 2013
Messages
139
Location
Panamá
With all this talk about how to make good/uniform CSPs, I was playing classic mode and had a good idea. I realized that the poses at the beginning of each round of Classic mode are actual poses of the character models and not just pictures, so they include whatever texture hacks you have in your ISO. Check it out:
Each character has (at least) two poses based on whether they're the player or the opponent:
and pretty much all of the characters have at least one that looks good. So, you could use this to create identical screenshots for different character costumes and then use Goxplex's photoshop method to turn them into CSPs. You could also figure out where the textures behind the characters are stored and replace them with solid colors to make it that much simpler in photoshop. Getting all of the left-side screenshots would obviously be easy since you can choose which costume is used, but for the right-side screenshots you'd probably have to port each costume to that character's neutral costume (since it selects neutral costumes for opponents by default) and then play classic mode until you get your desired character as an opponent. I think you could use this method to make some really nice, professional-looking character select screens.
Amazing idea. Gonna try this tonight.

We should replace the background texture with magenta color, and also delete the icons, text and black bars that are above the models.
 
Last edited:

DRGN

Technowizard
Moderator
Joined
Aug 20, 2005
Messages
2,179
Location
Sacramento, CA
I've had an idea for getting consistent CSPs for a while now, but I simply have not had the slightest amount of time to play with it. I don't know if anybody remembers, but I asked about finding Dolphin's memory addresses for the camera a page or so back. Well, that was for a different project I'm working on (or at least really wanting to get back to working on, since I've actually been working on updates to my texture programs recently), but I realized soon after Goxplex started talking about this CSP work that using those offsets would be absolutely AMAZING for this. Think about it, you could start a match, get the exact pose you want (just check what frame of the action they are in and write it down), then check those memory locations for the camera's position. After you get your first screenshot, you load up the next texture, load up the stage, set their pose, and then set those memory locations to what you had before. You should come out with an exact image as the first time, but with your different costume! Parts of this could even be scripted to make the process quicker. And the "configuration" to get a specific shot could be shared as well, so anyone who creates a new texture could then go ahead and create a CSP that matches those already created (which I think we totally should be including with the textures in the OP, btw). I think this is a bit better than the above method, because we could use any pose/angle.

So, someone, please! Find those memory addresses! XD It would help me out with my other project a great deal too (which is something for the entire smash community, not just the Melee Workshop).
 
Last edited:

Achilles1515

Smash Master
Joined
Jun 18, 2007
Messages
3,211
Location
Cincinnati / Columbus OH
Every Stage has a Plain Magenta Background and No Stage Textures (1.02) [Achilles]
04452C70 FF00FF00
04453000 00C40000

Debug Dolphin --> Vs. Match --> Pause.

Pause camera offsets are from 0x452F88 to 0x452FA4. They are all 32-bit floating point numbers. You can move the camera around and see them change. You can also set them to values and the camera will move accordingly.

I highly suggest using the 20XX Pack to hide the [pause] HUD and either use the "Control All Humans" code or manually map controller inputs for all characters to one controller. All four players will do the same action at the same time and you can just pause, cycle through the players, and force camera positions.

In the first line of the code, FF00FF is the RGB hex value for magenta. This can be changed to whatever you want.
 

Goxplex

Smash Apprentice
Joined
May 16, 2013
Messages
139
Location
Panamá

Name: Neutral Link CSP
Made by: Goxplex
Download: https://www.dropbox.com/s/ax22juav186bb47/Link%20-%20Neutral%20CSP%20by%20Goxplex.rar?dl=0


Name: Red Link CSP
Made by: Goxplex
Download: https://www.dropbox.com/s/3du3q5thxw48n7a/Red Link CSP by Goxplex.rar?dl=0


Name: Blue Link CSP
Made by: Goxplex
Download: https://www.dropbox.com/s/bwlwztnqadyzh5f/Blue Link CSP by Goxplex.rar?dl=0


Name: Black Link CSP
Made by: Goxplex
Download: https://www.dropbox.com/s/uirxz2zet1wqbzl/Black Link CSP by Goxplex.rar?dl=0


Name: White Link CSP
Made by: Goxplex
Download: https://www.dropbox.com/s/20bak3ryhk17tgn/White Link CSP by Goxplex.rar?dl=0


Name: SC2 Redux Link CSP (Original)
Made by: Goxplex (Credit to .S & Siro for the texture hack)
Download: https://www.dropbox.com/s/pyff43rdzdhytg5/SC2 Redux Link CSP (Original) by Goxplex.rar?dl=0


Name: Neutral Ganon CSP
Made by: Goxplex
Download: https://www.dropbox.com/s/csj6s6ruyoi2brr/Neutral Ganon CSP by Goxplex.rar?dl=0


Name: Red Ganon CSP
Made by: Goxplex
Download: https://www.dropbox.com/s/jkcejpzhrvl228y/Red Ganon CSP by Goxplex.rar?dl=0


Name: Blue Ganon CSP
Made by: Goxplex
Download: https://www.dropbox.com/s/3hk0jrola9ldbuq/Blue Ganon CSP by Goxplex.rar?dl=0


Name: Green Ganon CSP
Made by: Goxplex
Download: https://www.dropbox.com/s/zjqm8vnpt4aisz2/Green Ganon CSP by Goxplex.rar?dl=0


Name: Purple Ganon CSP
Made by: Goxplex
Download: https://www.dropbox.com/s/2n3p207wt71csv0/Purple Ganon CSP by Goxplex.rar?dl=0
 
Last edited:

Sempai

Smash Ace
Joined
Apr 9, 2007
Messages
614
Location
Wildwood/St.Louis, MO
Thanks for the info. I was using DAT overwriter and PNG to TPL tool today, and these tools are amazing and make stage/character texture hacking much easier. I don't really organize my tpls, I just put them all in one folder whenever I need them.
Where are these programs? Are there instructions on how to use them? AKA, replacing the CSPs with the cool ones goxplex has made.

Excuse my ignorance.
 

Goxplex

Smash Apprentice
Joined
May 16, 2013
Messages
139
Location
Panamá
Where are these programs? Are there instructions on how to use them? AKA, replacing the CSPs with the cool ones goxplex has made.

Excuse my ignorance.
You can find those tools in this thread with an explanation of how to use them, althought they don't work with CSPs yet, so you must manually insert them with hex editor. Here is a tutorial that explains the whole process, but you can skip to the part where he inserts the TPLs (the CSP files I made) wich is around minute 3:20.


Veggies

Smash Journeyman
Joined
Mar 9, 2014
Messages
367
Location
Gunsan-Si, South Korea
Here is how to load custom CSPs through dolphin without having to add them into the MnSlChr.usd/dat, as that gets very tedious and also causes desyncs on Netplay.

Step 1
Go to Dolphin and Select the "Graphics" Option


Step 2
Select the Advanced tab in the Graphics window and make sure "Dump Textures" is enabled.


Step 3
Go in-game and load the CSPs you would like to replace (I.E If I wanted to replace Fox's blue CSP I would select Fox, and then change to the blue costume, and then exit dolphin, as the texture would have been dumped since it was loaded.)

Step 4
Go to "C:\Users\YOUR_USER_NAME_HERE\Documents\Dolphin Emulator\Dump\Textures\GALE01" and find the texture you want to replace.

Copy this file to "C:\Users\YOUR_USER_NAME_HERE\Documents\Dolphin Emulator\Load\Textures\GALE01" or just simply copy the name of the file.

Step 5
Place the CSP/Texture you want to have in your game into "C:\Users\YOUR_USER_NAME_HERE\Documents\Dolphin Emulator\Load\Textures\GALE01" and rename it to what the file's name was when it was dumped.


Step 6
Finally, deselect Dump Textures.


I hope this is easy to understand, I tried to make it stupid-people proof.
 
Last edited:

DRGN

Technowizard
Moderator
Joined
Aug 20, 2005
Messages
2,179
Location
Sacramento, CA
Every Stage has a Plain Magenta Background and No Stage Textures (1.02) [Achilles]
04452C70 FF00FF00
04453000 00C40000

Debug Dolphin --> Vs. Match --> Pause.

Pause camera offsets are from 0x452F88 to 0x452FA4. They are all 32-bit floating point numbers. You can move the camera around and see them change. You can also set them to values and the camera will move accordingly.

I highly suggest using the 20XX Pack to hide the [pause] HUD and either use the "Control All Humans" code or manually map controller inputs for all characters to one controller. All four players will do the same action at the same time and you can just pause, cycle through the players, and force camera positions.

In the first line of the code, FF00FF is the RGB hex value for magenta. This can be changed to whatever you want.
Oh ho! Boy, I got a lot more work in front of me now, haha. Can't wait to get to this though. I did finally get a 1.02 copy, so I can try this hopefully this weekend.

Very nice hack. Does it get rid of effects too? Like for example the sparkles that appear in the background of FD or Battlefield (I forgot which), or the water effects on FoD? Not that it really matters, since we only really need this to work on one stage.


Here is how to load custom CSPs through dolphin without having to add them into the MnSlChr.usd/dat, as that gets very tedious and also causes desyncs on Netplay.

Step 1
Go to Dolphin and Select the "Graphics" Option


Step 2
Select the Advanced tab in the Graphics window and make sure "Dump Textures" is enabled.


Step 3
Go in-game and load the CSPs you would like to replace (I.E If I wanted to replace Fox's blue CSP I would select Fox, and then change to the blue costume, and then exit dolphin, as the texture would have been dumped since it was loaded.)

Step 4
Go to "C:\Users\YOUR_USER_NAME_HERE\Documents\Dolphin Emulator\Dump\Textures\GALE01" and find the texture you want to replace.

Copy this file to "C:\Users\YOUR_USER_NAME_HERE\Documents\Dolphin Emulator\Load\Textures\GALE01" or just simply copy the name of the file.

Step 5
Place the CSP/Texture you want to have in your game into "C:\Users\YOUR_USER_NAME_HERE\Documents\Dolphin Emulator\Load\Textures\GALE01" and rename it to what the file's name was when it was dumped.


Step 6
Finally, deselect Dump Textures.


I hope this is easy to understand, I tried to make it stupid-people proof.
Great method. Especially for working on new hacks, since you can just edit the images right in that folder, then just quickly close and re-open Dolphin to see how the changes look.


Btw, all, it looks like I should be able to get my PNG to-from TPL converter to do images with palettes. However, copying the hex out of them may* be a slightly different process than what you're used to (different offsets). Hope that's cool. If not, well, I have something else up my sleeves that may help anyway.

*Depends on what PNGs you're working on.
 
Last edited:

T4Varsity

Smash Apprentice
Joined
Mar 20, 2010
Messages
77
Location
Las Vegas, NV

Name: SC2 Redux Link CSP (Original)
Made by: Goxplex (Credit to .S & Siro for the texture hack)
Download: https://www.dropbox.com/s/pyff43rdzdhytg5/SC2 Redux Link CSP (Original) by Goxplex.rar?dl=0


Name: Red Link CSP
Made by: Goxplex
Download: https://www.dropbox.com/s/3du3q5thxw48n7a/Red Link CSP by Goxplex.rar?dl=0


Name: Blue Link CSP
Made by: Goxplex
Download: https://www.dropbox.com/s/bwlwztnqadyzh5f/Blue Link CSP by Goxplex.rar?dl=0


Name: Black Link CSP
Made by: Goxplex
Download: https://www.dropbox.com/s/uirxz2zet1wqbzl/Black Link CSP by Goxplex.rar?dl=0


Name: White Link CSP
Made by: Goxplex
Download: https://www.dropbox.com/s/20bak3ryhk17tgn/White Link CSP by Goxplex.rar?dl=0


Name: Neutral Ganon CSP
Made by: Goxplex
Download: https://www.dropbox.com/s/csj6s6ruyoi2brr/Neutral Ganon CSP by Goxplex.rar?dl=0


Name: Red Ganon CSP
Made by: Goxplex
Download: https://www.dropbox.com/s/jkcejpzhrvl228y/Red Ganon CSP by Goxplex.rar?dl=0


Name: Blue Ganon CSP
Made by: Goxplex
Download: https://www.dropbox.com/s/3hk0jrola9ldbuq/Blue Ganon CSP by Goxplex.rar?dl=0


Name: Green Ganon CSP
Made by: Goxplex
Download: https://www.dropbox.com/s/zjqm8vnpt4aisz2/Green Ganon CSP by Goxplex.rar?dl=0


Name: Purple Ganon CSP
Made by: Goxplex
Download: https://www.dropbox.com/s/2n3p207wt71csv0/Purple Ganon CSP by Goxplex.rar?dl=0
Those Link ones look so damn good!!
 

101pie101

Smash Cadet
Joined
Jul 21, 2014
Messages
66
Location
In The Melee Workshop
Here is how to load custom CSPs through dolphin without having to add them into the MnSlChr.usd/dat, as that gets very tedious and also causes desyncs on Netplay.

Step 1
Go to Dolphin and Select the "Graphics" Option


Step 2
Select the Advanced tab in the Graphics window and make sure "Dump Textures" is enabled.


Step 3
Go in-game and load the CSPs you would like to replace (I.E If I wanted to replace Fox's blue CSP I would select Fox, and then change to the blue costume, and then exit dolphin, as the texture would have been dumped since it was loaded.)

Step 4
Go to "C:\Users\YOUR_USER_NAME_HERE\Documents\Dolphin Emulator\Dump\Textures\GALE01" and find the texture you want to replace.

Copy this file to "C:\Users\YOUR_USER_NAME_HERE\Documents\Dolphin Emulator\Load\Textures\GALE01" or just simply copy the name of the file.

Step 5
Place the CSP/Texture you want to have in your game into "C:\Users\YOUR_USER_NAME_HERE\Documents\Dolphin Emulator\Load\Textures\GALE01" and rename it to what the file's name was when it was dumped.


Step 6
Finally, deselect Dump Textures.


I hope this is easy to understand, I tried to make it stupid-people proof.
Great idea! I will try this method.:)
 

CeLL

Smash Lord
Joined
Jan 26, 2014
Messages
1,026
Location
Washington
Is there anywhere I can get Falcon's back texture without the logo? I'm too bad at editing images to remove it myself lol
 
Top Bottom