• Welcome to Smashboards, the world's largest Super Smash Brothers community! Over 250,000 Smash Bros. fans from around the world have come to discuss these great games in over 19 million posts!

    You are currently viewing our boards as a visitor. Click here to sign up right now and start on your path in the Smash community!

Make Your Move 12: Now with accurate title! MYM12 is closed! MYM 13 is Open!

MasterWarlord

Smash Champion
Joined
Aug 24, 2008
Messages
2,911
TUBBA BLUBBA


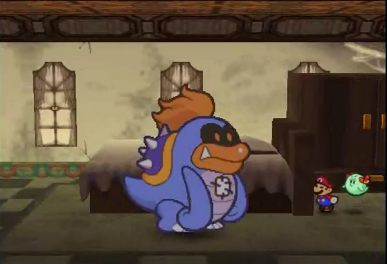
Tubba Blubba was a fairly ordinary and cowardly HMA. When Bowser obtained the wish granting Star Rod in Paper Mario, though, he made Tubba Blubba one of his commanders in exchange for the wish to become invulnerable. The Star Rod, being a fickle thing, tacked on a single side effect to the wish – he would only be invulnerable so long as his heart was not inside his body, and his heart became a sentient being. Tubba Blubba hid his heart away while he became the owner of a fortress stocked with mass guards of his race, and terrorized the nearby forest of Boos – we’re not talking Toads or Goombas here. So much as the mention of his name would cause the Boos to be terrified, as he ate a massive amount of them. While Tubba Blubba’s heart was imbued with some magical powers, Tubba Blubba himself was a hilariously bad fighter once he was reunited with his heart, not being used to people actually being able to hurt him. Tubba is actually rather cowardly, only thinking of himself as a traditional HMA because everyone else thinks of him as one. . .Though to be fair, he –does- hate the Boos for playing tricks on him in the past, and finds them absolutely delicious.

STATS


Size: 13
Weight: 12
Traction: 7.5
Falling Speed: 7
Aerial Speed: 7
Jumps: 7
Aerial Control: 3.5
Ground Movement: 3

While Tubba looks like a rather generic HMA, he’s essentially the largest humanoid boss in Paper Mario, and his castle emphasizes his size as there’s mass furniture there made for a giant like him. As if this does not solidify his HMA status enough, he pounds the ground with his buttocks to destroy his castle as he chases after Mario. Tubba stands at 1.25x Ganondorf’s height, and is just as wide as Bowser. Much like the Koopa King, Tubba Blubba actually has some decent aerial movement, but his lack of aerial control means it’s very difficult to make use of. In the least, Tubba has some actual half decent jumps and not –super- high falling speed to make use of it.

And no, Tubba does not get any hitstun or grab resistances despite having 13 size and 12 weight. At all. Have fun with that.

SPECIALS


NEUTRAL SPECIAL – VOMIT


Tubba Blubba vomits up his heart forwards a platform. This makes it a hitbox that deals 8% and weak knockback that KOs at 150%. As soon as the heart comes out, you gain control of it over Tubba Blubba. Tubba will still respond to attack inputs, but his movement will consist of mindlessly approaching the foe with his walk. As you should know, this makes Tubba Blubba invulnerable – foes will have to kill Tubba’s heart instead of him at this point. They both share a damage percentage, and if the heart dies you will regain full control of Tubba as he becomes vulnerable again.

As far as what the heart does, it has 7 moves to its name due to Tubba Blubba still having a completely full moveset. These moves are done by pressing the shield button – Tubba Blubba has no use for a shield or dodges when he becomes invulnerable. Below is a set of statistics for the heart.

Traction: 10
Aerial Control: 10
Aerial Speed: 7.5
Jumps: 5.5
Falling Speed: 4
Ground Movement: 2.5
Size: 1.5
Weight: 1

Slightly smaller than Jigglypuff and just as light, the heart obviously must hide behind Tubba’s invulnerable body if it wants to survive. While it can only shuffle about very slowly along the ground, it can hop about along the ground with surprising speed. Both Tubba Blubba and the heart can be attacking at the same time.

No, this move is not useless once you vomit up the heart. If used, Tubba Blubba will vomit up a platform worth of puke in front of himself in a laggy rate. The initial vomiting pushes foes back to the end of the line of puke in a large hitbox and deals 12 hits of 1%. The lingering nature of the puke as it goes forwards makes this futile to dodge outside of avoiding the first few hits, making it very preferable to shield. While this does minimal shield damage, it does decent shield stun and massive shield push, pushing foes to the end of the puke range anyway. After the initial puking, the vomit sticks around and functions like Brawl ice. The good traction of both Tubba Blubba and his heart makes them less vulnerable to this than others, along with Tubba’s hesitance to dash when his heart is out.

SIDE SPECIAL – DEVOUR


Tubba Blubba bends forwards to bring his mouth to the ground, giving the move shockingly good horizontal range, before chomping in a laggy motion. Used on his heart, this will cause Tubba to devour it and become vulnerable again. Used on a foe, Tubba will devour them in a standard issue grab escape. Inside his belly, foes are dealt 3% per half second trapped. Tubba and his heart can move around with a foe inside his belly to reposition themselves. Tubba can devour multiple foes at a time, and can also devour traps and minions. They will escape automatically after 5 seconds, but if Tubba’s stomach is hit with an attack that does 16% or more (Whether or not he’s invulnerable) he’ll be forced to spit them out early. Tubba can also eat items, in which case they will be dissolved inside his body once 5 seconds pass.

If you want to actually “throw” things that you’ve “grabbed” via eating, all that’s needed is to input Neutral B to puke, in which case foes will be unable to DI out of the 12 hits thanks to being right in the heat of the hitbox and will take full damage. Something to note is that for every half second Tubba has something devoured (Aside from his heart), his next puke will have the range extended by a quarter of a platform and have 2 extra hits added on. This can stack infinitely, enabling you to prepare a massive puke to either cover most of the stage in vomit or to send the foe a good ways towards/entirely off the blast zone.

UP SPECIAL – SENTINEL


These flying creatures patrolled the entrance to Tubba’s castle, throwing out any unwanted guests without fail. Upon being summoned from one of Tubba’s orders, the sentinel will come down from the top blast zone above their intended target, Tubba immediately free to move. If both Tubba and his heart are on the ground, it will target the foe nearest to Tubba himself. If Tubba’s body is in the air, it will target him. If both the body and the heart are in the air, the sentinel will target the heart.

In any case, the sentinel goes down to reach the intended target at Captain Falcon’s dashing speed before attempting to grab them in an impressively fast motion. No matter who it grabs, it will attempt to drag them to the top blast zone. Characters who are grabbed by the Sentinel can still attack, able to knock off the sentinel by depleting its’ mere 11 stamina, but have no control over their movement. How fast the character is dragged upwards depends on their weight – poor Tubba is only moved upwards at the speed of Jigglypuff’s falling speed. The heart, on the other hand, is pulled up as fast as the Sentinel came down, the Sentinel making a mad dash to the top blast zone at Captain Falcon’s dash speed.

If you yourself are being pulled up by the Sentinel, you can move horizontally at Ganondorf’s dashing speed. In the case of Tubba being pulled up by the Sentinel while the heart is out, he will automatically move in the nearest foe’s direction. Needless to say, this move makes Tubba’s body require significantly less babysitting from the heart, as it means that foes can’t casually bait the body off-stage to kill it. Keep in mind that you can only have one of these out at a time, and if the Sentinel is actually killed another one can’t be brought in for 3 seconds.

DOWN SPECIAL – BUTT SLAM


Tubba goes to perform his infamous castle shattering butt stomp, falling at the same speed as Bowser’s. Tubba jumps in the air and forwards if on the ground initially like the Down Specials of Bowser and Yoshi. As Tubba comes down, he does at bare minimum 15% and spiking knockback as strong as Ganon’s dair. For every Ganondorf he falls beyond the first, though, 4% is added to the power of the move, along with increasing the power of the spike by 1.2X. This can be theoretically used as an off-stage gimper, because Tubba can choose to cancel out of this move whenever he wants unlike other moves of this type. This is more potent in combination with his Up Special, as Tubba can just get carried back into the air once he’s done if he’s already being carried.

Butt stomping the stage will create an indent in it centered on where Tubba landed, with slopes on the side of the indent to connect it to the rest of the stage. The Tubba-width indent will be at minimum as deep as Wario, with an extra Kirby being added to the depth of the indent for every Ganondorf Tubba fell beyond the main one. It’d certainly be nice if Tubba could get to the top blast zone to make a massive indent via his Up Special, but Tubba is carried up incredibly slowly, and this would leave the heart horrifically vulnerable. Granted, setting up a massively deep pit without your heart out is something to consider. All damage to the stage Tubba does is repaired on his death. Unlike most moves of these types, Tubba –CAN- outright destroy the stage rather than just leaving indents if he goes deep enough. If this is used on a paper thin platform, though, Tubba must bend the platform more than Marth’s height for it to “crack”.

Actual uses for this terraforming will become more clear as we go on, but one immediate thing to take note of is how puke behaves in response to slopes. Puke will trickle down to the bottom of a slope to the indent in the middle. . .But what’s more notable is that it will pool up if more puke is vomited there, able to increase in height to potentially make a little lake that covers up the entirety of the pit. Characters treat the puke like Brawl water, and can drown in this water – unlike Brawl water, characters’ drowning timers will actually keep going while they’re underwater rather than just while they’re swimming about at the surface. There is also a 1.5 second window with when a character leaps out of the puke pool before their drowning timer is reset, meaning a casual shorthop won’t save them. Characters take 3% per half second while they’re swimming in vomit, identical to when they’re being digested. . .As a matter of fact, foes can drown inside Tubba Blubba’s stomach when devoured for an insta KO, but this is almost impossible until obscenely high percentages such as 200%. However, if you vomit characters out into more vomit, their drowning timer won’t be refreshed. The same applies if you devour a character swimming in vomit. Tubba and his heart do not take damage from the puke water, and Tubba’s body cannot drown in it if his heart is separated from it.

If Tubba butt stomps into a pool of vomit, he’ll splash some of the vomit up on the sides for a largely pointless interaction, as unless the pool is completely full it will most likely just hit the slopes on the side of the indent and fall back into the main pool. The vomit will of course be knocked more forcefully if Tubba did a bigger cannonball, and the vomit drags foes with it as it does the usual 3% and flinching per half second (Though it’s easy to DI out).

If Tubba does a forceful enough butt stomp, though, he can potentially hit the bottom of the pool and the ground below to continue terraforming the stage even when puke is already in the pit. Yes, this means Tubba can cause the entire pit of puke to leak out through a hole in the bottom, it pushing foes out through it at Mario’s dash speed and still doing 3% and flinching per half second.

SHIELD ATTACKS


DOWN SHIELD SMASH – HEART ATTACK


Aside from vomiting, this is probably the single most important attack in the set – this is the heart’s signature attack in the boss battle, having a very long charge time of a full 2 seconds, slightly longer than that of a Warlock Punch. If completed, a horde of 20-30 miniature hearts will spawn around the foe and attack them for 20-30 hits of 1% and flinching from all angles. These hits home in at Captain Falcon’s dash speed and the hearts spawn in a circle around the foe, making attempting to outrun the mini hearts futile. They don’t all home in at once, though, instead doing so over 1.5 seconds. Attempting to dodge the hearts will avoid about 7 or so hits, but you’ll still be taking 13-23% unavoidably. Shielding the hits is the main response – if all of these hit a shield, they’ll take out about three fifths of it. Tubba’s heart cannot begin charging this attack again until all the mini hearts are gone, though is free to move once they’re summoned.

What makes this so viable when it’s not even a KO move? The range. The infinite range means all you have to do is keep your invulnerable body around to defend the heart, and the start-up suddenly is no longer an issue. This move is also the main outside hitbox that’s a worthy threat, making it much more feasible to hit with Tubba’s obnoxiously laggy moves when they have to constantly avoid this move you’ll inevitably end up spamming.

Yes, the heart can use smashes in the air.

FORWARD SHIELD SMASH – SPINOUT


The heart does its’ best imitation of Jigglypuff’s Neutral Special Rollout – the heart shares more with Jigglypuff than a similar size and weight. The heart’s version is only about .7x as strong as Jigglypuff’s, though otherwise it’s identical. Unlike Rollout, the heart can pick up and lose momentum via slopes, even with no charge whatsoever. Used at the top of a slope, this is a very easy way for the heart to flee. The heart also will gain momentum as strong as going down a slope if it goes over Brawl Ice (AKA ordinary, non-Brawl water puke). Gaining speed will also increase the power of this move, it maxing out at a power 1.2x as strong as a fully charged rollout. This move has notably less end lag than Rollout – AKA, the heart can actually move around again before it loses all of its’ momentum. This alone can make charging the Heart Attack more feasible, as you move away from foes while charging.

UP SHIELD SMASH – SHRIEK


The heart lets out an otherworldly squeal as a magic green blobby object protrudes from itself. You can then move around the blob at Ganon’s dashing speed through the air for 5-15 seconds, an ominous green trail following behind it for aesthetic effect. The blob does nothing until the duration expires or you press the shield button again, at which point it evaporates into nothing as it lets out the shriek of a Boo. This is largely a method of manipulating Tubba, who is horrified of the things and will dash a platform away from the shriek if this is used within a Bowser width of him. If used further than a platform away from him, Tubba will just stare in the direction where the shriek came from for a second, dumbfounded, though still responding to attack orders.

As far as how the foe reacts, using this in front of them will cause the foe to trip, though take no damage. Using it behind them will force them to turn around in a manner not unlike Mario’s cape. The range is nearly point blank, and if foes are particularly paranoid of the green blob they can destroy it with any attack that causes flinching to cause it to let out the shriek early. The most useful application of this on foes, though, is when they’re shielding. If the blob is overlapping a foe’s shield, then it will deal a massive amount of shield damage, bringing the shield down to absolute minimum health no matter how high the shield was, though not shattering it. In addition, the shield will muffle the shriek inside of itself, meaning Tubba won’t react to it.

NEUTRAL SHIELD – SPIN


The heart does a generic spin, dealing 10 hits of 1% and flinching before dealing a final hit that does 4% and knockback that kills at 175%. While this doesn’t have the range you’d want out of a GTFO move, it’s very fast. This move is probably most notable for how much it completely and utterly rapes shields with the many, many hits.

FORWARD SHIELD – RUSH


The heart goes horizontal and suddenly zooms forward half a platform at Sonic’s dash speed head-first, dealing a strong 8% and knockback that kills at 160% for how fast the move comes out, though with awkward ending lag. This move is largely notable for the fact that the power is boosted by momentum, capping at 25% and knockback that kills at 80%. Yikes! The main thing counteracting the raw potential power of this move is the fact that. . .Well. . .You’re launching your primary weak point right into the enemy’s face. That said, recovering isn’t a problem if you overlaunch yourself – the Sentinel is all but a perfect recovery for the heart.

UP SHIELD – FLIPPER


The heart does a single flip, the lower portion of it becoming a hitbox as it flings things upwards for 5% and vertical knockback that KOs at 200%. Probably the best you’re going to get for a traditional GTFO attack, though the horribly weak power doesn’t emphasize the “out” part as much as one would like.

If you have momentum when you used this move, two thirds of your momentum will be lost when you use it, while the foe will gain half of the momentum you had as they get shot directly upwards. This is a good way to launch the foe to start aerial combat with Tubba’s body, and the fact the heart loses so much speed means that it won’t necessarily need a Up Special Sentinel to help it survive – rather important, given that a lot of the time Tubba will be using said Sentinel when he wants to engage in aerial combat.

DOWN SHIELD – SLIDE


The heart leans backwards to go horizontal, then slides forward along the ground. The heart slides forward a third of a platform before retreating back in a very quick motion, though it will still travel forwards a small amount. Spamming this attack will cause the heart to slowly travel forwards like similar Brawl dtilts.

This attack deals 5% and weak knockback that won’t feasibly KO. A third of the time, though, the move trips foes instead of dealing the knockback to them, disabling them for Tubba to clobber them. This cannot be relied on due to luck, though, leaving the main function of the move being shield poking. The heart is already very short, and this move brings it even lower to the ground. With all the means you have of damaging shields/the fact you have two characters, this practically substitutes as a grab, much less considering the heart has no actual grab hitbox to call its’ own.

If used in the air, this move will have the heart go at a diagonally downward angle. This version of the move is a fair bit more powerful, dealing 7% and knockback that KOs at 175%, knocking foes back towards the ground. This is the heart’s only attack that deals downwards knockback, making it useful for either knocking foes into vomit or just preventing them from approaching over Tubba’s body.

STANDARDS


NEUTRAL ATTACK – TAIL SWEEP


Tubba Blubba spins in place while extending out his stubby tail as far as he can manage. Contact with his tail deals 5% and pushes foes about a set platform away from you while tripping them, assuming you don’t hit someone in the air somehow. This move has a pretty awkwardly long duration – Tubba spinning all the way around is pretty awkward. The move has little in the way of starting lag, though – as Tubba spins, his tail immediately becomes a hitbox – it doesn’t wait until it’s in front of Tubba to do so. Hitting somebody standing in front of you with the move is fairly impractical, but if they’re just trying to get past you (Probably to get at the heart), this is an easy way to try to prevent it.

DASHING ATTACK – BELLY FLOP


Tubba Blubba performs Dedede’s dashing attack, though the animation is a lot more intentional, giving a stupid evil grin as he does it. For all intents and purposes, it is indeed Dedede’s dashing attack, though it has interactions with Brawl Ice and slopes (Yes, of any kind), Tubba sliding a fair bit while performing this move on top of such locations. Tubba’s hitbox is kept 100% in-tact as he slides, just as powerful as ever, and if he reaches a puke pool he will splash some puke out of it like when he uses the Butt Slam.

If you belly flop on top of a prone foe, this becomes a grab hitbox, them unable to escape until the end of the ride and taking an extra 3% per second until then.

FORWARD TILT – GROUND POUND


Tubba Blubba laggily slams the ground in front of him in an animation that is identical to his official art pose. His fists deal a meaty 14% and knockback that kills at 85%. Regardless, this is a rather difficult sell with the lag on the move, hence why the move has earthshaking properties. A Bowser width portion of the ground in front of where Tubba’s fists slam down will generate a hitbox that lasts half a second, dealing 10% and diagonally forwards/upwards knockback that kills at 135%.

The heart is vulnerable to any earthshaking effects Tubba creates, taking the knockback of them but not the damage or stun. This can be used to launch the heart forwards to either get it away from the foe, or to help it build up momentum to clash with them.

If the earthshaking overlaps where a puke pool would be, the puke will get launched in a similar manner to when Tubba Butt Slams into the pool. The puke will drag foes with it and deal 3% and flinching per half-second, it being launched as far as Jigglypuff would be at 50%. What with Tubba being invulnerable, this can be a good source of camping in combination with Heart Attack on a foe who is stupid enough to do set-ups. Perhaps better yet is combining this with launching the heart – the launched vomit can prevent the foe from dealing with the heart as it comes to ram them if both are launched simultaneously.

UP TILT – SNOOZE
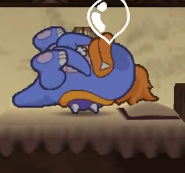


Tubba tumbles over onto his back and falls asleep over a bit under a second (Dealing 10% and knockback that KOs at 150%) – he is shown to be just as lazy as his infamously tired Clubba army. Tubba Blubba is horribly, horribly vulnerable in this state, but that doesn’t matter terribly when he’s invulnerable. The point of interest, here, is a giant Wario sized snotbubble that is generated above Tubba’s head as he sleeps. If Tubba is attacked whatsoever, or anything comes into contact with the snot bubble, said snot bubble will explode, dealing 20% and knockback that KOs at 70%. Tubba will proceed to run after the offending character at 1.5X his normal dashing speed for 2.5 seconds, though he’ll just look around stupidly for a painful second of lag if his heart was the cause of him waking up. Without any –true- help from the heart besides it existing, this move can serve as a decent anti-air for foes who are trying to jump over you.

This can potentially serve as a trap if you’re particularly confident with your abilities with the heart. If you’re not so skilled, you can just sit with Tubba’s body overlapping you while charging up a heart attack, then unleash it when the foe arrives and try to launch them into the bubble. If they try to attack you, they’ll immediately be waking Tubba.

DOWN TILT – POUND


Tubba Blubba turns to the screen and slams his arms down on either side of him, giving the move good range and some surprising speed. The range is a bit better than DK’s dsmash and it’s just as fast, but this move is unfortunately on a tilt, so it only comes in at 12% and knockback that kills at 140%. Tubba Blubba has far more impressive feats of strength for his smashes than the likes of this. . .

Whereas on DK such a move serves as GTFO, on Tubba it serves as a way to catch foes who are running away from your invincible state. If you’re on top of a foe, this move will catch most characters who roll away, especially ones who are stupid enough to think they can roll behind you. Sure, it can be shielded, but Tubba has more than enough ways to deal with those.

SMASHES


FORWARD SMASH – RAMPAGE


Tubba Blubba kicks some dirt up behind him for the charging animation before running forwards in a full bull charge, head first, once the charge is released. Tubba travels at 6.5-8/10 dashing speed based off charge, and travels 1.5-4 platforms, stopping at edges. As Tubba runs forwards, his head deals mass multiple hits of dragging/flinching knockback and 1%, roughly 30 if all of them connect. Once Tubba comes out of the move, he experiences very minimal ending lag as he continues running forwards, slowing down to go into his regular dash (This is the only way to make him dash when playing as the heart). This can obviously push foes across the stage and into a pool of vomit.

While this move is easily shielded, if any button outside of Shield is pressed again as Tubba charges, Tubba will suddenly buck his head upwards, ending the charge (Though carrying some momentum with him, notably more if he was going over Brawl Ice-esque puke). The buck deals 22-32% and vertical knockback that kills off the top at 90-50%. This has atrocious ending lag, leaving the heart very vulnerable if it misses. All ending lag on this headbutt can be alleviated if you slide forwards into a puke pool.

UP SMASH – LEAP


Tubba Blubba turns to face the screen and crouches so low to the ground with bent knees that he’s practically hugging it. Upon releasing the charge, Tubba Blubba springs up into the air, potentially an absolutely massive distance. Tubba Blubba can go up into the air anywhere from half a platform to 5 platforms based on charge, and as he rockets up he deals 18-28% and knockback that kills at 110-60%.

Unlike similar moves of this type, Tubba remains in the air after his leap, not coming crashing back down. This is the only way to get Tubba up into the air when the heart is out, being a requirement to make use of your aerials. Don’t think you have to hunker down for long periods of time whenever you want access to your aerials, though – just bring out an Up Special Sentinel to hoist up Tubba for prolonged aerial usage. In any case, even outside getting Tubba into the air in general, this move is specifically useful for getting Tubba –high- into the air fast, enabling him to do more severe terraforming with his Butt Slam.

DOWN SMASH – STAMP


Tubba Blubba turns to face the camera and starts stamping in frustration for a move with a long duration, though activates fairly quick and has no end lag. Tubba’s feet are hitboxes that deal 17-27% and diagonal knockback that kills at 155-120%. More important are the earthshaking effects which reach out 1.5-2 Bowsers from either side of Tubba. This earthshaking deals 14-24% and vertical knockback that kills at 140-90%, the knockback not being that strong directly but the angle making it a better killer.

The earthshaking properties on this move have the same properties as those in the ftilt, able to knock around the heart and puke. Unlike the ftilt, this launches puke/the heart directly upwards, meaning this is more of a defensive move. Raising up a wall of puke can be useful to make approaching over it more difficult, and better yet the puke will obey the laws of gravity and fall right back down where it was afterwards. For the heart, this is still useful to get it away from the foe without any fear of arbitrarily launching it off-stage, and if puke is launched with the heart simultaneously the heart can hide behind the disjointed hitboxes.

AERIALS


NEUTRAL AERIAL – BELLY BOUNCE


Tubba Blubba turns to face the camera and puffs out his stomach before jutting it out, dealing a token 5% and knockback that KOs at 225%. More important, though, is that if anybody attacks Tubba with a non-projectile attack, they will bounce off of Tubba Blubba’s belly, taking double the knockback (Along with the standard issue 5%). This is very laggy and awkward, but is far more potent when Tubba’s invulnerable, seeing there’s no risk involved. It’s still a bit awkward to get Tubba in the way to block off a recovery while he’s invulnerable when his movement isn’t fully controllable, though, so don’t get –too- excited.

This move requires some more clever use at times to get the full milage out of it, as foes have next to no reason to attack Tubba Blubba. Him devouring vital traps/minions the foe needs can make them attack him, but otherwise you’ll be relying on using the heart to bait the foe into attacking Tubba’s body. Just don’t expect this hitbox to constantly overlap the heart – the duration of the move isn’t nearly as long as one would like for the start and end lag on it, and the move has abominable landing lag.

FORWARD AERIAL – BELCH


Tubba Blubba pats his belly lightly for some lag before letting out a mighty burp, creating a wind hitbox in front of himself as tall as Peach and a platform long. Anybody within range of the wind hitbox will be pushed to the end almost instantly, taking knockback that KOs at 120% (No stun or damage). As an added bonus, Tubba’s mouth is a hitbox that does 10% and knockback that KOs at 80% directly as it opens.

While this move does not affect puke on the ground/sitting in a pool, puke that has been knocked upwards by earthshaking effects can be influenced by wind hitboxes like this, letting you actually send it at enemies after you knock it into the air. Of course, this hitbox also affects the heart’s momentum, and is typically better than launching the heart if this is all you want to do without changing the trajectory. While this might sound hard to hit with, this aerial is not interrupted if Tubba lands on the ground, in stark contrast to the terrible landing lag of his other aerials.

BACK AERIAL – IMPALE


Attempting to emulate his favorite HMA, Tubba emulates the Koopa King’s bair, jutting out his back. Unfortunately, the spikes on his saddle/shell thing are not nearly as pronounced as Bowser’s, so there’s no impaling to be found here. . .To tell the truth, it doesn’t even knockback, just a crapload of flinching hits of 1%. You soil the name of the Koopa Troop, Tubba! In the least, there are a –lot- of flinching hits, totaling up to 20, and the duration is identical to Bowser’s bair. Don’t expect a foe with common sense to let you get all the hits in before they DI away, though.

This move has an interesting property in that if the landing lag is triggered, the hitbox is still present during the landing lag. If foes were already getting hit before Bowser triggered it, they will typically get pushed slightly to get closer to Tubba and the ground, meaning this can carry over. It is far harder to DI out of the many hits here, making this serve as both a great damage racker and a way to ground the foe.

If this is used in water/puke pools, Tubba must go through the landing lag, floating on his back in the water, before he will enter the normal swimming animation. The spikes are still a hitbox here, though it’s a bit easier for foes to DI to the sides underwater than when they’re against the ground – though it is rather annoying that the water will constantly be pushing them up into the spikes. The pay-off is that you now obviously have them in the puke pool and they’re taking extra damage from it.

UP AERIAL - SLOBBER


Tubba Blubba’s tongue gapes out of his mouth as he opens wide, then he flings it upwards. The tongue is quite large and deals 13 hits of 1% and flinching before dealing a final hit of 3% and vertical knockback that kills at 110%. This covers the foe in a drool status effect that lasts for the same amount of seconds as the amount of hits they were hit by. The drool causes their fall speed to increase by 4, and less importantly increases the chance of random tripping to an actually decent amount. The fairly impressive knockback on the last hit means that the foe will be knocked a good ways into the high with high fall speed, meaning foes will be quite predictable as they come back down. Increasing their fall speed also makes it more difficult for foes to approach over Tubba and reach a heart behind him, again leaving them more predictable.

Foes can “wash off” the drool by entering Brawl water and yes, even a puke pool, giving them some incentive to go there, though unfortunately preventing you from making enemies fall so fast they can’t jump out of the pool.

DOWN AERIAL – SMACK DOWN


Tubba Blubba slams his fists down together in front of him with lag comparable to DK’s fair, dealing 16% and spiking foes powerfully at a diagonal forwards/downwards angle, the knockback competing with Ganon’s dair. Foes will take even more damage from this move if they are knocked into the stage (Assuming they weren’t on it already, in which case they take vertical knockback). Exactly how much damage varies based on how far they were knocked down – they will take an extra 3% per Ganon they were knocked down. If the foe fell more than one Ganon, they will get knocked into prone and make an indent when they hit the stage. The width of the indent is slightly larger than the character who was knocked down, but the depth is one Kirby height for each Ganon the foe fell, aside from the first one.

Aside from working on your set-up and attacking the foe at the same time, this move is ideal as a finisher – if the indent they would make would destroy the stage, the foe will continue taking their knockback as if nothing happened, enabling you to spike foes through the stage. Obviously, this is ideal in combination with a pool of puke, as not only will this enable you to spike foes a further distance for a bigger indent, it will cause the contents of the puke pool to leak out and kill the foe if they somehow survive the spike itself.

GRAB-GAME


GRAB – GLUTTONOUS GRAB


Tubba Blubba has a grab range on par with the almighty penguin king. Unfortunately, he goes about it in a rather clumsy and laggy manner (Though at least he looks at where he’s bloody grabbing, unlike Dedede). Upon successfully grabbing them, Tubba holds the foe upside down by the legs, dangling them in front of him as he stares at them stupidly, drooling in hunger.

PUMMEL – STOMACH ACID


Tubba Blubba vomits up a small amount of stomach acid onto the foe, causing them to take 1% every half second for 1.5 seconds. This pummel can be stacked as much as you desire, though it is on the laggy side of things. As you may have guessed, this pummel will cause people to start getting “dissolved” like when they’re drowning in the puke pool or inside Tubba’s belly. They will dissolve towards their insta KO demise twice as slowly from this, but if you, say, throw them into a puke pool (The status effect won’t stack with this), this is a good way to start the timer ticking a bit earlier.

The heart can still act when you have somebody grabbed, as Tubba must input Z + a direction to throw people when the heart is out. This means you’ll be taking advantage of this pummel more than you think – grabbing foes is a free 20-30% with heart attack if the heart was already through a good chunk of the lag. This means you will find yourself having foes with this status effect on without immediately throwing them into the puke pool more often than not, giving you more incentive to push them into it with your other non-throw moves.

FORWARD THROW – FACEPLANT


Tubba lifts the foe over his head before slamming them onto the ground like a ragdoll. This knocks the foe into prone and deals 12%, and will cause the foe to slide along the stage as they take their totally horizontal knockback that KOs at 150%. Of course, slopes and Brawl Ice will significantly increase the speed they slide at, the former making this throw all too easy to use to send foes into puke pools. The main follow-up to the pummel if the heart isn’t ready.

BACK THROW – SLAM DUNK


Tubba Blubba turns around before curling the foe up into a ball and throwing them at a diagonally downward angle. On contact with the ground, foes take 16% and get pitfalled. Unless he has multiple enemies, though, Tubba will point and laugh at the foe stupidly until they get out. Tubba’s heart can still attack foes while they are pitfalled, of course.

Even without bringing the heart into play, this can do some actual knockback to foes due to the –diagonally- downward angle of it. It even serves as a decent kill method if your back is to the edge (KOs outright at 160%, can kill chars who can’t recover back from it quicker). More importantly, though, you can throw the foe down a slope, sending them to the bottom before they hit the ground and get pitfalled. Best of all, even if there’s a puke pool there, foes will –still- get pitfalled when they hit rock bottom, and their drowning timer will still tick away while they are.

UP THROW – BUCK


Tubba Blubba throws the foe above himself very lightly before leaping up mightily to buck them up with his head, dealing 8% and fairly weak vertical knockback that KOs at 200%. However, the weak knockback is beneficial, as Tubba continues going higher into the air, ending the move about 1.5 Ganons up in it. Until the foe reaches very high percentages, they’ll typically end up in front of Tubba’s face or very slightly above him at worst. This not only serves as another way to get Tubba into the air, but is one of the single best ways to set up a dair, or really any aerial combat scenario you want. Being in Tubba’s face is not a good place to be when he’s –invulnerable-. If their percentage is too high for this to work properly somehow, use uair on them to increase their fall speed and make them fall into place.

DOWN THROW – TANTRUM


Tubba Blubba drops the foe in front of him as he turns to face the camera, then starts doing light stomps en mass – so many stomps that it goes on for about 5 seconds. Tubba’s feet will deal a set 1.5 platforms worth of knockback away to the foe along with 8% initially (In a direction of Tubba’s choosing, forwards by default), but more notably the ground up to 2.5 platforms on either side of Tubba will have constant earthshaking effects as Tubba stomps. The strength of the earthshaking is at its’ strongest right next to where Tubba is stomping, where it does 10% and vertical knockback that kills at 130%. The further away from Tubba, the less knockback and damage that is dealt, with nothing but a Kirby’s worth of set vertical knockback and 1% on the end of the range. Typically, enough stun is dealt from the hits on this earthshaking that you’ll hit the ground again before it wears off, getting hit again.

Foes will naturally incline to go to the edge of the range if they can, as the set initial knockback leaves them closer to it. The smaller knockback means that they are more easily combo’d, though, while if they go back towards Tubba they can potentially get knocked up high enough into the air that they can escape the constant stun.

The constant juggling foes receive on the edge of the range is a particularly nice chance for the heart to go to town for damage racking – it is still affected by the earthshaking hitbox like always, so it doesn’t even have to try to stay on top of the foe. The edge of the stage and puke pools must also be taken into account here, though, as they can limit the range and be used to try to make the foe DI in the direction you want. Most notably, puke pools will have the puke at the top take knockback and become their usual hitboxes briefly (How far the puke shoots up depends on the distance of that part of the pool from Tubba), meaning that reaching the puke pool isn’t an easy escape like one would expect. Still, they, -can- jump out of the pool if they get hit before the puke gets shot out to dodge in time, so this still serves as an effective lure to the pool.

FINAL SMASH
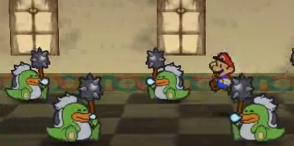


What’s an evil king without an army of evil minions to serve him?! Tubba Blubba points down to the ground with a menacing look on his face, causing an army of 15 Clubbas to be dropped down onto the stage! . . .Tubba’s expression quickly changes to one of panic, though, as he sees that his entire army is, in fact, asleep. They deal 8% and set decent knockback as they fall, but only last 10 seconds. They have to be woken up either by being attacked or being hit by an earthshaking effect/Tubba’s fair, or otherwise just landing in a puke pool. Once they wake up, they chase the foe with Ganondorf’s stats, Wario’s size, 60 stamina, and a clubbing attack with good range that deals 15% and knockback that KOs at 90%. The puke pool seems the obvious way to go, though the Clubbas are rather clumsy at getting out of the puke pool, wasting some of the valuable time they’d be out otherwise. Ideally, you’ll want to launch them at different trajectories at foes, through use primarily of ftilt/fair, though dsmash can be thrown in too when you predict the foe escaping to the skies, one of the safer places to flee the army.

PLAYSTYLE SUMMARY


The most controlling aspect of Tubba’s game is simply the fact that the foe has no choice but to go after the heart, at least at some point. Tubba even has his fair share of ways of attacking from a range via earthshaking hitboxes and burping forward goop at his foes, so hiding can only be accomplished for so long. Even without these options, Tubba’s approach is perfect, what with him being, y’know, invulnerable and all that. You can either try to play conservatively and be very protective of the heart, or you can try to let it join in on the fun. Being protective is generally more preferred earlier on in the stock, as otherwise you’ll find yourself with little to no time to actually produce a giant pool of vomit, for how many tools you have with it once it’s out. The jab, utilt, and dtilt are the most obvious options to prevent foes from passing Tubba to get to the heart spamming the shield dsmash behind him, though dsmash can double as both a way to hit foes on one side and to help the heart evade foes on the other side.

The amount of time it takes to create a pit isn’t the issue, it’s more the fact Tubba has to dedicate himself to creating the pit so strongly that he can become neglectful of his heart, what with him having to get high in the air before performing his Down Special. Launching the heart away with an ftilt can be a wise move before you start it up. Once the pit’s there, Tubba can perform his set-up and defend the heart simultaneously, making matters much easier. It is at this point where you can try to get more offensive with the heart if you want – the fact puking is so potent with the shield supplements this. Even if the heart is being used defensively, you’ll be wanting to time hits with Tubba so that you hit the foe as they come out of their dodge against a Heart Attack, if you’re too far away. If they shield it and you’re far away, you can shieldpoke them from below with one of your many earthshaking effects. If you’re actually in the foe’s face as this occurs, you’ve got yourself a free grab. This is pretty much your most reliable way of landing the somewhat laggy grab, which foes will be otherwise terrified of it given your superb and impressively versatile throws.

With a filled up puke pool, you’ve gained an additional “wall” that you can prevent foes from passing, aside from Tubba himself. Launching puke up out of the pool with earthshaking effects, then belching it forward with fair is impressively potent, and makes going on the offensive with the heart significantly easier, getting some damage in with it without having to wait ages to charge (As well as unstaling the heart attack slightly). Dsmash in particular is almost impassable for characters without fantastic recovery. Some with good aerial movement may be able to air dodge through, but you can hit them as they come out of the dodge with the heart. Tubba can even meet the foe in the middle with a more direct approach, knocking them into it with bair or dair. Dair the foe into the pool is of course one of your ultimate goals, though because of that it’s rather predictable. Thankfully, uthrow serves as a fantastic set-up for it. In any case, with both Tubba and the puke pool as obstacles the foe must overcome, the edges become another viable option to push the foe towards. Bthrow in particular is killer there, and Tubba is not without an edgeguarding game, given his fair and dair, even his nair. With all of this, the foe will have very limited places to run, and pretty much anywhere you knock them can be advantageous to you and played off in some way so long as they are knocked away from the heart.

Dair is a way to instantly finish almost any foe off, certainly, if you send them to the center of a puke pool. But again, it’s rather predictable. One thing you can put your mass coinciding unavoidable attacks to use for is to prevent foes from escaping it to actually drown them. The heart is obviously immensely useful here, and bthrow is a great way to get started if you’re lucky enough to grab a foe with your back to the pool. If you’re going for this playstyle to specifically drown foes, when you’re a distance from the pool and get off a grab you may want to go for dthrow (Otherwise only really useful for damage racking) rather than fthrowing them in directly. The foe may willingly go into the pool themselves just to get out of dthrow’s immediate range, and if they don’t the heart can convince them otherwise. From there, the constant earthshaking on the side of the pool can keep them in quite well along with the heart, starting along their drowning quite nicely. While drowning foes outright may seem rather difficult in general, something you must keep in mind is you will rarely drown them outright – so long as the foe hops out of the acid and into Tubba’s mouth, it can continue inside his belly as the foe gets devoured. Essentially, the puke pool is a way of extending his stomach to the outside world, to enable him to thrive in his gluttony. No longer a wanna-be HMA, the heartless Tubba Blubba is a villain to be feared – he learned from the best, after all.

Regardless of how cut and dry this playstyle may sound and the moveset may present itself, this is largely just the ideal way to play Tubba. Note that he plays incredibly differently on a very casual level, given that you have the option of not vomiting up the heart at all, or you can play without bothering to terraform, in which case you can just attempt more straightforward offense with some help from the heart. This experience can actually become useful later on in professional Tubba play as well, as Tubba will still have to fight in this state for brief periods once his heart is dead. While he's a huge target and will be at high percentages, fighting back is certainly very possible with now fully controllable movement, should you have properly set up the puke pool.

Bloopers:
NEUTRAL AERIAL – CANNONBALL


Tubba Blubba curls up into the typical cannonball position. This causes his whole body to become a hitbox that deals 9% and knockback that KOs at 140% for as long as you hold/rapidly press A, with a minimum duration of one second. As you’d expect, this move has terrible landing lag, but this can be counteracted by either landing in a puke pool, causing vomit to get knocked upwards like when Tubba uses earthshaking moves, or simply use it while being carried by the sentinel, in which case you don’t have to land in the first place. While the landing lag is –VERY- bad, as long as the Warlock Punch start-up lag, if it’s triggered an earthshaking hitbox that reaches out a platform either side of Tubba will be generated, dealing 8% and vertical knockback that kills at 175%. Yes, this still causes puke pools within range to have some of their substance shot up.

If A is pressed specifically when Tubba hits the ground, he’ll remain in his curled up form and bounce off the ground. He typically bounces back up about two thirds of the height he fell, and best of all this still triggers the landing lag earthshaking hitbox. The only penalty here is that this resets the amount of time Tubba can go without canceling the move, so you’re making yourself even more predictable. That doesn’t terribly matter when Tubba’s invulnerable, but bouncing across the stage is unlikely to accomplish much, and you’re largely signing your death warrant if you bounce off the stage with this.

If the landing lag is triggered on a slope, Tubba will roll down to the bottom of it, keeping his hitbox in-tact. He will even attempt to roll to the top of the other side of the slope and launch back into the air if he has the momentum, at which point he can choose to finally cancel the move. You can shoot yourself at multiple angles based off what part of a downward slope you land on, considering how it affects your momentum. Something similar can be done if the pit is filled into a puke pool – you can press A when you land on the puke pool to skip along like a skipping stone, causing a very small amount of puke to splash up, making yourself less painfully predictable when you land in the water.

DOWN THROW – EARTH SHATTER


Tubba Blubba jumps up slightly before throwing the foe under him and plopping down on his ass. This creates a crater like the down special that goes a Wario down. The foe will be left inside of it at the bottom in prone, having taken 16%. If this throw would destroy enough stage to open up a bottom blast zone, the foe will be spiked with power on par with Rob’s dair. Aside from aiding in making a set-up, the nature of the newly created slope the foe is in the middle of will make it quite easy for the foe to tech chase them with its Rollout attack.
 

FrozenRoy

Smash Lord
Joined
Apr 26, 2007
Messages
1,268
Location
Las Vegas, Nevada
Switch FC
SW-1325-2408-7513
Tubba Lard

I always did like Tubba Blubba in the original. Easy, sure, but he had some cool personality, and he looked awesome. Liked Macho Grubba from TTYD too, even if I misread his name as Nacho Grubba the first time I fought him...good times...oh, but I'm getting off track.

The primary idea here is, of course, Tubba Blubba vomiting up his heart to become invincible, just like how he was invincible in the games when seperated from his heart.

Admittedly, though, thinking on it more...I sort of wonder why Tubba Blubba is a terraformer, when you consider how much the set revolves around it. I mean, Tubba Blubba is not someone you think as a creator or shaper or such, he's a guy drunk on his own invincibility and revealed to be more of a coward when it runs out. He just never really shows the kind of stuff expected in a terraformer, so rereading it, I think it comes off as a bit odd. The puke makes sense though given the other major aspect of Tubba Blubba is the very obvious fact that he likes eating, so chomping and puking makes sense. I dunno.

Up Tilt I do not really like. We have a snot bubble that just sort of does damage equal to smashes and such on an Up Tilt, while not really doing many functions of an Up Tilt, though I guess it does hit up...it really does not fit with the theme of the set either, in my opinion, which requires a bit more kineticism. Yes, Tubba Blubba sleeping makes sense, but the way it is done is not satisfactorily put down, in my opinion.

Down Throw seems like it's...um...not a throw at all. Why is this not a Down Smash or something? In fact, the Down Smash is eerily similiar to it. Range is also a small issue, but is understandable in this case, as it certainly makes sense for it to hit very far to both sides.

Aside from that, the set brings some standard things along that prevent it from being actually bad, with the terraforming and puke working out fine and a fair amount of good usages of the fact you'll be invincible. The NAir is especially fun in this regard. I also enjoy the Up Smash leaving him in the air, as not only is it effective for his playstyle, but it is an overall cool effect. Also I love how he has a stupid evil grin on the Dash Attack. Heart Attack combined with the invincible body also creates a fun little playstyle there, even if it does feel like it gets a bit distracted as the set goes on.

Still, it is not a bad set, just one that did not...well, impress me. Certainly not something I'd put in the echelon of some of your other sets this contest, like Manfred and Garbage Man.

G-Spot

G-Man is a set with a REALLY cool idea. In essence, unlike most Brawl characters, he can just straight-up move through the foe...and by storing projectiles in his briefcase, damage them with just that. It's a really cool idea and Dave plays it pretty well here, with the Up Special and Dash Attack, which gives G-Man a lot of ways to just poof right into the foe and unleash his briefcase load.

There isn't too much interesting stuff to load the briefcase with though, which is a bit unfortunate, though perhaps mildly understandable given the G-Man doesn't really fight...

Indeed, the primary projectile being a pure stunner is a bit dissapointing, but the bird with the wind hitbox is actually pretty neat of a concept, turning G-Man into a sort of walking repulsar.

The D-Throw is horrible, by the way, with the buffing of foes when it can't be taken advantage of too well and such. On the flipside, the presentation is very good, with a very G-Man writing style and good text choose that remains easy on the eyes to read.

Aside from that, not too much to say...it basically has it's concept going for it and that is it. It is probably my favorite set of yours so far though, Dave, possibly below Brash?

Set of +5 Joviality

It's a Tirkaro set, so you know it's gonna be amusing. And, I mean, I read Robo Link MKIII, so yeah. Why am I including that? Because screw you.

This set is quite obviously one that doesn't take itself TOO seriously, between the many luck-based if quite intuitive effects and the moveset which features not too many options for true attacking...but it really gets the feel of DnD across, about how no matter how good you are, you'll end up making hilarious failings no matter how high a level you get.

The organization is also something I love, as sections are interrupted by segments of an appropriate image and writing that sounds like it comes out of a DnD game, perhaps even coming from the campaign this character came from? Similiarly, the playstyle section is written as a conversation between the Fighter and a Rogue in his party, with his strengths and weaknesses coming out in words and thoughts, like a discussion or roleplay. It is all very nice stuff I think and my only complaint is that, perhaps, the text is a bit hard to read between sections due to small size + dark text, but as it is technically not even necessary to read, this is hardly TOO bad.

The set itself could use some more attacks and isn't really all that much, not even to talk about, but I do really love those little blurbs, small ways to bleed in character for one who has none really presented at the start, which made it a very enjoyable read for myself...but seriously, maybe some more attacks would have been nice.
 

Davidreamcatcha

Smash Ace
Joined
Feb 9, 2011
Messages
629
Tubba Blubba

You get the feel of Tubba feeling like he's invincible down quite well, and do a decent job of characterizing the HMA side of him, with him thinking of himself as a massive HMA and whatnot. But, in doing so, you don't pay much attention to the more jokey side of the character, it being mostly restricted to moves like the up tilt and the down throw - if you listen to his dialogue in game, he's talking about Bowser being big and scary and whatnot. I didn't bring this up while I was previewing it due to it being practically impossible to pander to both of these equally without sacrificing what you've written. Skipping away from the characterization for a moment, as I said to you while I was previewing this set, vomit really does seem like an unfitting thing to focus on for this choice of character. You did justify this by saying that it made the eating stuff interesting, which is, as you said, needed for this character. While I agree, I can't feel but think it would've been more fitting to the character if you just gave him generic lava spitting or something. Obviously that can't be changed now and it would come into question either way, but it would make more sense on this character than the puke. This is a solid read, however, and still manages to do a lot of awesome stuff with your invincibility and the heart. While a lot of the set doesn't really live up to the standards set by these two aspects, this is another addition to the library of quality MW sets this contest - though it doesn't come anywhere near the likes of Manfred.

Will edit in Calvin and Hobbes comment when I get the chance.
 

JOE!

Smash Hero
Joined
Oct 5, 2008
Messages
8,075
Location
Dedham, MA
TUBBA BLUBBA:

Welp, you done did it WL.. you got ME to comment a set.

Seeing as it's for one of my favorite bosses in Paper Mario, it's kind of a shame that the set put me off from the get-go with the Nspec's use after he's spat out the heart. I mean, this is a character from Paper Mario, and you got him vomiting everywhere... the hell man? (also, speaking of Paper, it's never mentioned but is he paper thin or more "fleshed out"? <.<) I feel as if the set would have been fine for the most part without this inclusion, and having the Nspec (while invincible) been a simple anti-air or such with a wind box, and keep the "spitting out forcefully" interaction with Side Special, or even an alternate method to get foes in your gut by making it an Upward facing Side B similar to how his head leans back to swallow his heart again in PM. I dunno, its just hard to imagine a cowardly, goofy villain such as Tubba constantly spewing all over the place when the grossest thing he does in the games is just put his heart back in his body, and eat a few ghosts.

Now that that's off my chest, lets look at the rest of the set, which I found to be quite fitting once you ignore the puke parts, as they usually just build up to getting the foe in the pool to drown / splash it at them (hippo). First up is the Heart's momentum thing with Side ShieldSpec... how does it gain momentum outside the attack? If it's like Rollout, the move only ends after X distance or if you hit something, but you never specified what X distance is, so I can easily see the "momentum letting you charge Heart Attack on the fly!" being kinda wasted here as you either can't cancel the attack, or fly off an edge (which could then let you Up B and DownShield, but w/e). Second, the Dthrow I think would have been better as the blooper version in all honesty as it offers a second method to create a pit, which could then be used for defensive/spacing purposes with the heart as it alters enemy movement and all that jazz.

To sum it up, I feel like you -almost- had a perfect set for him, but in the end the vomiting as well as some odd moves here and there just pushed it in a direction I didn't particularly care for...
 

JOE!

Smash Hero
Joined
Oct 5, 2008
Messages
8,075
Location
Dedham, MA
double post but w/e


ZELEND POKEMON MOVEMENT
What is Zelend you may ask? And what does it have to do with Pokemon? Well, to put it simply: Zelend is the name of my "Fakemon" region that houses 150 new Pokemon of my design, for use primarily in Pokemon Tabletop Adventures (a pokemon themed D-20 game).

I will be showcasing one of the new pokes in an upcoming project for MYM13, and invite the rest of MYM to do so too! Two members besides me are already confirmed for making sets for at least one of the pokemon, and who could really pass up a chance to make a set for something so new? All the mons have their names, typing, abilities and even stats listed to use as a base, but only a few have movepools listed. While some may see that as an issue, I see it as a challenge: given one's own knowledge of how pokemon works with the moves and all that, as well as the new ones I've made up, wouldn't it be fun to see how a new pokemon could use the moves in a moveset based on it's attributes, and not some listing?

If you choose to join in on making one of these guys, whether it be stand-alone or more ambitious with a trainer (there are gym leaders and even E4 members made for the storyline!), I'd be more than happy to create pictures or whatever you need to get your creative juices flowing!


Click the starters to see the fake-dex, and dont be afraid to post ideas!​


Bionichute

Smash Champion
Joined
Jun 30, 2012
Messages
2,151
So I am a new guy and I made an account just for this thread, and so I ask, is MYM12 over? And if it is, when will the next one start? Cause I got a moveset all ready and I don't know if this is over or not.:c
 
D

Deleted member

Guest
Welcome to the community! You have another few days - the contest ends on the 3rd. After that, there will be about a month before the next one, so if you're anxious to post, you may want to do so now.
 

Bionichute

Smash Champion
Joined
Jun 30, 2012
Messages
2,151
Welcome to the community! You have another few days - the contest ends on the 3rd. After that, there will be about a month before the next one, so if you're anxious to post, you may want to do so now.
Thaanksss.

RAYMAN MOVESET! YEAH!


Rayman is a weird thing that doesn’t have anything connecting is arms and legs to his body. He hangs out with his friends, Globox and The Bubble Dreamer, in a big tree sleeping. He goes on adventures and saves the world from many villains, like robot pirates and giant robots. There was also something about rabbits but nobody likes to talk about that.

SPECIALS!

Neutral special: Telescopic Fist
Rayman spins his fist and throws it at his opponent. Depending on how long you charge it, the farther it goes and the more damage it does. If it glows yellow it goes 4 blocks and does 20%. If it glows white it goes 2 blocks and does 10%. If it doesn’t glow it goes half a block and does 5%. Rayman can both move around while charging the move, and while the fist is flying out. After the move is done it circles back to wherever Rayman is, giving it a chance to hit someone again. Rayman can’t attack while the fist is out.

Side special: Energy Ball
Rayman throws a fast moving yellow ball. The ball travels across the screen and does 5%. Rayman can throw them rapidly, but every time he does he gets pushed back a little.

Up special: Heli-Hair
Rayman’s hair spins around really fast, allowing him to glide to safety. If used on the ground, Rayman creates a gust of wind with his hair that pushes opponents upward.

Down Special: Combat Fatigues
Rayman pulls out a can with a smiley face on it and is covered in a glowing light. When the light fades, which takes two seconds, he is in a different costume. These costumes changes one of his moves into something new. There are five different colored cans he can use, and they get chosen randomly. The costumes are on a time limit though. It can be used in the air, but only the yellow one will be activated.

Green: Rayman’s S-special now throws a tornado, which, when it hits someone, stuns and minifies them. Lasts 15 seconds.
Red: All of Rayman’s moves do 10% more damage, but he becomes very heavy. Lasts 13 seconds.
Blue: The S-special now launches a chain which latches onto opponents and sends electric shocks through their body for 1% every millisecond. Lasts 14 seconds.
Orange: The S-special launches a controllable missile which does 35%. Lasts 10 seconds.
Yellow: Rayman can fly with his U-special. It also creates a vortex that sucks nearby players in. Lasts 18 seconds.


STATS!

Power: 6
Weight: 4
Walking Speed: 5
Dashing Speed: 8
Falling Speed: 4
Size: Mario's height.
Jumping: 7
Crouching: 9
Traction: 8
Wall Cling: Yup.
Crawling: Uh huh.


STANDARD MOVES! YAY?

A: Rayman hunches over and does a short punch in front of him. Does 3%.

AAAA: Rayman does three short punches, and then a long one. The long punch does 5%.

Dash: Rayman outstretches his fists and spins around, doing 6%.

Forward Tilt: Does a long punch that goes half a block away for 5%.

Up Tilt: Rayman pulls off a large uppercut that does 5%.

Down Tilt: Rayman performs a leg sweep that does 3% and launches opponents into the air.

Forward Smash: Rayman charges up his fist and lets go a large punch that goes a block and a half and does 10%.

Up Smash: Rayman charges up and does a large, powerful uppercut for 10%.

Down Smash: Rayman becomes a flurry of punches and kicks and anyone unlucky enough to get caught by it is dealt 15%.

Neutral Air: Rayman performs a midair kick and then an overhead punch in rapid succession. Does 6%.

Forward Air: Kicks both feet out and does 4%. 2 second ending lag.

Back Air: twists around and performs two kicks and an overhead punch. Does 9%

Up Air: Pulls off an upwards kick for 5%.

Down Air: Rayman flings himself towards the ground incredibly fast, and anyone directly beneath him will get 20% damage, while anyone caught in the shockwave will be launched into the air. 4 second ending lag.


GRABS!

Grab Attack: Rayman grabs the opponent by the arm with one hand and pummels them by slapping them in the face for 2% each hit.

Forward Throw: Rayman throws the opponent to the ground and then kicks him like a soccer ball, launching him and doing 17%.

Back Throw: Rayman throws his opponent over his shoulder, causing them to fly at a tall arc and doing 15% when they land.

Up Throw: Rayman pushes the opponent upwards with his Heli-Hair and then lets them fall down, doing 10%.

Down Throw: Rayman pushes his opponent down and jumps on them three times, for 5% each.


FINAL SMASH!
Hi Ho Moskito!


Rayman's friend the Moskito appears and offers him a lift. Rayman then hops aboard and flies across the stage. While riding the Moskito Rayman can do two things, fire fast moving, rapid fire projectiles that do 5% each, and suck up opponents, aim, and fire them at other opponents! Damage depends on how big opponent is.

Playstyle. BOOORING

Rayman is meant to be an "All Rounder" type character, good for any situation. Falling to your death? Pull out your yellow can and fly to safety! Fighting a large enemy? Use the green can to shrink him down! Fighting an army of light weights? Use the red can and maul them! Speedy character you can't catch? Use the blue can to snag him!

ALL THE EXTRA STUFF

TAUNTS:
Side: Rayman pulls his body off and dribbles it like a basketball.
Up: Rayman stretches his mouth open and sticks out his tongue.
Down: Rayman uses his hair to lift him slightly off the ground.

Entrance: Rayman teleports in, stretches his arms out and gives a big grin.

WIN POSES
Win 1: Gives a big peace sign.
Win 2: Lets out a big "Yahoo!" and gives two thumbs up to the losers behind him.
Win 3: A wooden cutout of a large woman and a skinny man falls from the sky, which Rayman pops his head out from behind.
Lose pose: Rayman claps like normal, but wait a minute and he will walk off, leaving his floating, disembodied hands clapping.

Icon: An Electoon face.


Kirby Hat: Kirby gains Rayman's hair and the ability to shoot his fist.

Alternate colors:
-The palm of Rayman's gloves turn green, as does his hair, body, and the tops of his shoes, while his fingers and the bottom of his shoes turn red.
-His body, the tops of his shoes, and the palms of his gloves turn red, while his hair, the bottom of his shoes, and his fingers turn blue.
-Rayman's hair, body, and the tops of his shoes turn blue, while his hands and the bottom of his shoes turn green.
-Rayman becomes Bad Rayman, his evil clone.
-Rayman's hair turns black, his body turns leopard print, and his shoes and hands become flesh colored.
-Rayman's hair become brown, his body becomes pink and gains a flower print, while his hands and shoes become flesh colored, and his shoes gain a sandal like printing on them.

PLEASE FEEL FREE TO TELL ME HOW BAD IT IS!
 

Katapultar

Smash Lord
Joined
Nov 24, 2008
Messages
1,284
Location
Australia
[collapse="Rayman"]I must welcome you to Make Your Move, Bionichute. I somewhat remember this character from the Nintendo 64 game so I can understand the expressive yet cheesy headers emulating his generic heroy "cheerfulness". Can't help but think there might be a bit too much vagueness shrouding the set regarding Rayman's abilities and the specific nature of the attacks, which is very important for reader enjoyment - generally basic stuff like kill percentages, how fast a projectile moves and the effects of the Down Special costumes (I can visualize his Side Special, a very small ball, which you could get a power-up to recharge during the N64 game later on). I just think there isn't enough information and possibly referencing to hook people in, or at least if that's what you're after given the extras and your current avatar. What you've done isn't too bad for your first time however (you might want to put the stats before the Specials), though it would be fun to see more from you regardless.[/collapse]
 

Bionichute

Smash Champion
Joined
Jun 30, 2012
Messages
2,151
I just think there isn't enough information and possibly referencing to hook people in
What do you mean by "Referencing"? Do you mean pictures? Because I can do pictures.

I'd like to note that almost everything in the moveset is a reference to a Rayman game.
 

Katapultar

Smash Lord
Joined
Nov 24, 2008
Messages
1,284
Location
Australia
What do you mean by "Referencing"? Do you mean pictures? Because I can do pictures.

I'd like to note that almost everything in the moveset is a reference to a Rayman game.
Sorry. It's not really that big a deal, mostly that it wouldn't seem obvious to those who haven't played the game and it might go over their heads ("Referencing" is basically me advising the use of information regarding which game the move came from, but it's not something everyone does or has to do). Some pictures would be excellent though.
 
D

Deleted member

Guest
Awesome first set, Bionichute. I'll get a better comment up a little later, I hope you have more plans for sets.
 

Nicholas1024

Smash Lord
Joined
Mar 14, 2009
Messages
1,075
Hey there Bionichute, welcome to MYM. After looking over Rayman, (which is fairly standard work for a newbie), there's a few things you could improve upon.

As often happens, the first point I'd stress here is detail. A lot of moves here don't really give enough information to get a good feel for how they'd work in brawl. For instance, let's take the forwards smash. You mention it does 10%, and that it's a large punch. That's all well and good, but is it a quick smash, like MK's down smash? Is it rather slow but with insane knockback, like Snake's forwards smash? Or is it something in between? Another related point would be the distance said punch covers. Although sometimes you can get away with stuff like "a quick punch forwards with decent range", this is Rayman we're talking about. He could potentially punch just the area in front of him, or half a stage away. Without details like that, it's rather hard to understand stuff.

The second (and more important) thing is to have some idea of a play style in mind. This is pretty difficult to describe, but I'd recommend just going around and reading some sets made by veterans. The idea is that you want some more complicated idea or goal beyond "Hit the opponent until they die", and try to work each move into contributing towards that goal. It can be difficult to truly make a good play style (It wasn't until my second MYM that I made my first truly good set, and I had a top MYM'er review it and help me with some of the rougher points), but it's very rewarding once you pull it off, and arguably the standard by which sets are judged here in MYM.

Anyway, I hope you stick around to make some more move sets, as we could always use some new faces around here.
 

majora_787

Smash Hero
Joined
Jun 23, 2007
Messages
6,122
Location
Texas
It's cool that you made a set for Rayman. That's a pretty cool starting point for MYM as far as character choice. But I'm going to bounce some things offa you here, and you try them in future sets at your leisure. Generally speaking, one line moves are bad. What we try to no with movesets is make a sort of centerpiece of the set, and make every move unique and useful to the character. Even I'm not that great at making EVERY SINGLE MOVE totally helpful in its own unique way to the character while staying in-character, but it's always good to try to get as close to that as you can. :D I hope to see you do well next contest. Shame you had to pop in so late.
 

smashbot226

Smash Master
Joined
Sep 1, 2007
Messages
3,027
Location
Waiting for you to slip up.
Welcome to the contest, Biochute, and I must say I absolutely enjoy your choice in character. Rayman is someone who I wanted to see made for a while and you did well for a first effort. You definitely have potential, but should work on your setting ability. For instance, most sets try and make every move relevant to the playstyle, or central focus of the set. While versatility/well-roundedness isn't such a bad thing, your combat fatigues special move seems to be too reliant on luck factor in order to function properly. For instance, you claim that the yellow fatigues are important for recovery in the playstyle but what if you don't get yellow? Issues like these are what ails your set and should be examined should you want to make a set in the future. Like I said, good first attempt, but critique and advice is just as necessary.
 
D

Deleted member

Guest


Ameno-sagiri is one of the final bosses of Persona 4, a demi-god who covers all of Inaba – the home town of the player's party members – in a debilitating fog, driving the people who live there crazy. Before that point, the fog foreshadows the death of the playable cast; the town becomes misty on nights when they are in danger, giving the sign that someone trapped in the television world has to be saved. Eventually, the weather conditions become extreme enough that everyone starts to panic, Inaba becomes a ghost town and nearly everyone bar the protagonists believes sensational lies broadcast by the media, which cause them to wear gas masks, or hide away in-doors. The fog is indeed more threatening than it seems, however, and leaving it alone would eventually result in the innocent townsfolk of Inaba being transformed into unthinking monsters, as Ameno-sagiri believes is the desire of all men. As the theme of Persona 4 is pursuing the truth, Ameno-sagiri stands as the ultimate challenge to the player: it obscures reality, deceives free people into a form of slavery, as it thinks this will save humanity from despair.


This boss defies statistics in the typical sense. His size is gigantic. Perfectly spherical, he is as wide as Battlefield, and the top of his body expands to a Bowser over the top platform of Battlefield. He will always spawn in the centre of the stage. Moving stages are either banned, or are stuck on a pre-set, selectable segment. If a stage is too small to accompany him, it doesn't matter – the lower portion of him is sunken into a flat, black shadow that expand half a platform out either side of him, and constantly send out a stream of black waves along the floor horizontally beyond that as well, which go as far as the blast zones. These waves are of no use to Ameno-sagiri – the black shadow below him is his platform – but they can act as a fall-through platform to opponents, if only intermittently (the waves are a Bowser wide and there's a platform of distance between each wave, they travel at Fox's dash speed). This makes every stage Ameno-sagiri plays on into a halfway walk-off. (Ameno-sagiri comes with his own stage above the skies of Inaba where he is fought in the game; this stage only accessible through this boss fight due to there being no natural platforms.)

You may be thinking that these waves form the entirety of the opponent's 'ground,' with Ameno-sagiri's size being so huge. He actually spawns in the background of the stage, taking up no room at all – players can walk around where he is freely, his entire body still constituting a hurtbox for opponents. Ameno-sagiri actually has no weight, nor does he move at all: he spawns at the centre of the stage, on the main platform, and will stay there for all of the match. This is a Brawl boss at its heart – with HP, depleting his stamina to nil is how you defeat this boss. Ameno-sagiri cannot be grabbed, nor does he take any form of stun or knockback. The player can set the HP themselves, which makes this boss plausible with a single character, but it will default to 2000HP with a three player enemy team and that is the intended way to fight the boss. Don't let that deter you from going for that single-player challenge. On the topic of single-player, there can only be one Ameno-sagiri in a match at once, due to his gigantic size and gross control over the match.

Movement still comes into play. What you move is not Ameno-sagiri's body, but rather his eye – you control the huge, circular, multi-coloured iris at the centre of his eye, specifically. Ameno-sagiri starts every match looking straight at the screen and players, but moving around the directional inputs allows the player to “aim” his eye wherever they want, which is critical in attacking. The eye can be aimed in any direction, or to view the stage directly in front of Ameno-sagiri, where players, as previously mentioned, can try to attack the boss. As you can imagine, the eye has a brisk movement speed to allow the player ease of use, when they may also have to juggle the locations of several opponents.


Neutral Special: Bewildering Fog


A putrid yellow, thick fog is spread out from the many holes surrounding the outside of Ameno-sagiri's body, filling the stage, Ameno-sagiri's entire body shaking [in pain?] while he uses the move. The attack automatically goes on for two seconds, but the input can be held to continuously produce fog, visually filling the screen with more fog and also creating different effects. After an extra three seconds, enemy projectiles and traps are obscured; five seconds obscures opponents so that only their silhouette is visible; seven seconds obscures the enemy entirely. Being in the fog deals passive damage of 3-6% damage a second. The charge for the move maxes out at ten seconds total, at which point Ameno-sagiri eases out of his stressed stance. The fog will degrade over time and weaken before eventually dissipating, at a speed that is a third of how long it takes to produce fog. For example, maxing out the charge on the move would give you nine seconds of pure madness where nothing but Ameno-sagiri and his attacks are visible before enemy silhouettes are again visible. Using this move does leave you incredibly open to enemy assault.

Your fog acts as a great way to tell where your attack hitboxes will come out, as your vision sees straight through the fog. The player controls Ameno-sagiri's eyeball, in a scope of varying shapes and sizes, which denote the viewpoint of the creature from his skewed perspective. If Ameno-sagiri is looking right at the screen, a circular shape twice the size of Bowser is revealed, the stage there now appearing to everyone in the match as if there is no fog. If Ameno-sagiri looks in any direction, it creates a line that starts out two Bowsers wide and expands out near infinitely, gaining a small amount of width as it goes but eventually fading out - only completely disappearing out on stages the size of New Pork City. In terms of appearance, the scope is slanted, due to the fact that Ameno-sagiri is sagging into the background and looking down at the stage. Your line of sight isn't stopped by any platform or solid surface, and can see the span of the whole stage in a single glance.

Aside from this being a great way of better understanding your unorthodox controls - many of Ameno-sagiri's hitboxes are formed with his line-of-sight used as a proxy - the fog enables friendly fire if it wasn't on already, and teamwork becomes a necessity if the opponents want to defeat Ameno-sagiri. They may want to risk being attacked, to see what is real, by stepping into range of your eye. Ameno-sagiri can play this to his advantage by leading the opponents into a trap or simply ignore the opponents and force them to come to him. Foes may vary in importance, especially in a group of opponents of varying skill sets and characters with different damage outputs - pick and choose which enemy to follow, leave them to their own devices... whatever your choice, it will always easily build into a greater strategy.

Side Special: Summon Shadows


Ameno-sagiri leans back into the pool of shadows beneath. Out of the newly-formed crevasse in front of Ameno-sagiri, disturbing figures called shadows emerge, having between 15-20HP. Unlike your neutral special, this move is a toggle, but having it on means you cannot access your down special - inputting that move will abruptly end this move. The shadows wander forward aimlessly at Bowser's walking speed - by the mist god's clairvoyance or their unique body type, they cannot fall through the gaps between the waves of shadow emitted under Ameno-sagiri. Their bodies are a similar shape to Bowser's, but look malnourished, have multiple spindly arms and they crawl along in an ooze, similar to a slug. Shadow monsters can be grabbed, but are dealt knockback at the same strength as Bowser at 0%, meaning that it is difficult for the opponents to stop them flooding the entire stage unless destroying them outright. Ameno-sagiri spawns between one and two of these per second - the bigger, the longer they take to crawl out of the revealed cesspool. Their size varies in width, having a random width from that of Jigglypuff to Bowser's and Marth's height, wider shadows having greater HP.

The shadows have a limited set at first, with just two attacks - firstly, swiping their scythe-like arms downward in a hitbox similar in lag and size to Dedede's forward smash when a foe comes within half a platform, dealing 15% damage and impaling the foe on the ground for a moment of stun akin to an uncharged Zamus down smash. If the shadow comes within a Kirby of an opponent they perform their second attack, a grab, where the shadow's body attempts to latch onto the opponent and cover them in its gooey liquid. If they succeed, the foe is caught in a grab hitbox for a pummel, dealing constant 2% damage. If the foe escapes the grab, the shadow is destroyed, but is several times quicker than the fastest Brawl pummel. As the pummel progresses, the mask of the shadow slowly starts to creep its way up to the foe's face, and once pummeled ten times, the foe is launched vertically with low knockback: this is no pummel KO. What remains is a transformed shadow; it has become a true shadow of the opponent.


Shadows look near identical to the person they copy, only with slight changes in appearance that can only be seen if you take a close look at the character. A shadow has access to the same moveset as the person they've copied, and are, for now, controlled by an aggressive, intelligent AI and always allied to Ameno-sagiri. They retain the statistics of the player they copied (including percentage) and have to be KO'd traditionally by the enemy. Importantly, they can be grabbed and dealt knockback like a regular character! Shadows are unique - a shadow monster that latches onto a player that has a shadow already, initiates a standard grab, and all damage dealt by their pummel is subtracted from the relevant shadow's percentage, the shadow being destroyed once the foe escapes the move. Shadow monsters are not hostile to other shadows at any point. In a team match, this can translate to the enemy fighting a ditto match, while Ameno-sagiri watches.

Down Special: Quake


Swaying very slightly back in his shadow pool, with charge comparable to Ike's uncharged forward smash, Ameno-sagiri then pounds the floor multiple times, a thunderous rumble visible and audible as the entire screen shakes. This creates white shockwaves beneath Ameno-sagiri that travel away from both sides of him, at Sonic's dashing speed and in a straight line, even if they run out of solid ground beneath them. Ameno-sagiri creates between six shockwaves, spawning two a second. Each shockwave deals 8% damage to foes and can KO at 160%, the shockwaves also having a small amount of hitstun, so that you are guaranteed to hit an opponent with every recurring shockwave if the first is successful. The quake dissipates all the waves emanating across the edges of the stage as the shockwaves pass over them, allowing you to get rid of the 'walk-off' trait of Ameno-sagiri if at any point it becomes disadvantageous, though only for a small amount of time. The delay between the shockwaves being sent out and actually getting to the waves means you have to plan ahead for this, but your shadow waves take long enough to spread back over the same area that you have a comfortable cushion of time for a gimp.

The shadow monsters roaming the stage are not ruined by their new found lack of a floor at all - the shockwaves detach them from the ground, where they take abandon their slug form for an aerial-bound ball form: being half, to just as big as Bowser. The shadow monsters represent the two types of dungeon-level enemies in Persona 3 and 4; the slugs and the flying spherical ones. This new form has half as much weight, but is twice as fast, travelling randomly through the air unless it comes within its usual half a platform proximity of an opponent, where it will give chase, boosting its movement speed by double again until the foes gets out of range. Its regular attack is replaced by a more potent one - a continued slapping with tentacles that extend out a Kirby in front of the shadow, dealing 6% damage each hit and a few frames of hitstun. Unlike their previous form, aerial shadow monsters have to collide their hurtbox with an opponent to grab them and attempt a copy, though especially in the thickest fog, it can be all too easy to surprise predictable foes. The pummel has the same rate of damage, but the shadow monster drops the opponent down to the ground with low vertical knockback if successful. The frenzied shadow monsters in the air make for some very good coverage of even a huge stage, plus gives aerial-centric foes something to worry about.


Up Special: God's Judgement


Blinking and opening his eye again with the lag of Ike's forward tilt, Ameno-sagiri's line-of-sight mentioned earlier in the neutral special becomes visible even without fog, taking on a holy, golden tint. An opponent who is scanned over by any part of your eyesight in the next 5 seconds, suddenly has a golden stand as wide as a battlefield platform appear below them, and two massive gavels the size of Ganondorf ascend up before instantly coming back down on top of the foe, causing 20% damage and KOing at 140%. The platform's small walls keep the foe from falling out of the attack's range, or rolling, but doesn't prevent them from dodging or shielding - though the gavels take out most of a shield's health. The platform lingers in place for a few seconds before dissipating, giving any of your shadows a mode of recovery - if an opponent attempts to make use, the gavels will attack them again. The time when the foe is dodging or shielding, is also a great time to coordinate a double team with your shadows. Once the 5 seconds are up for the attack, Ameno-sagiri quickly blinks again and his vision returns to normal. The move can be cancelled before the full five seconds is up, the cost being end lag identical to the move's start lag.

The bright and holy light of God's Judgement scares away your shadow monsters, allowing you an easy way to influence their erratic path. The sight of the beam of light within a platform of their front side causes the shadow monsters to turn around and travel at double their normal rate if on the ground, the aerial form heading in a straight line perpendicular to the line of sight you create with God's judgement. Both of these will re-follow their normal behavioural patterns after a few seconds of running away, but this is still more than enough to do some basic, fast re-organisation. The easiest way to get shadow monsters on either side or down in front of you is to simply use the move on the first batch of monsters in your side special, allowing the rest to come out into their natural placement, though the ordering can obviously be reversed depending on which side you want to fill first. Being hit by the beam causes constant 1% damage to your shadows, but speeds them up by double and this can stack with the buff they get from running away too. Nonetheless, you can kill your shadow monsters with this attack.


Your true shadows actually have a far deeper interaction with the beam of light. They take the damage that the shadow monsters do from the beam, but do not actively avoid it like they do. Over time, their appearance becomes wholly less humanoid and they begin to regain shadow monster features. In terms of their moveset, after five seconds in the beam, they will lose their entire standards or aerials, depending on if they were on the ground or in the air, respectively. At this point, they lose the ability to jump and become a blob again or take on an odd form half-resembling the aerial form of shadow monsters previously mentioned, but obviously become huge bait in the air. Five seconds of further light will transform the shadow even more, them first losing their grab game, then their smashes progressively, allowing the player to stop midway. If further exposed to the light, the next five seconds will progressively reduce the shadow's specials - protracted use causes the shadow to revert entirely back into a very weak shadow monster. At any point, shadows still have access to their retained moves, only spamming them more as they have nothing else.

The purpose of this is that in any reverted form - even if they are only lacking their aerials or standards - the shadow regains its ability to absorb a foe into themselves and 'copy' their moveset, this time copying the part of their moveset which is missing from their own. A shadow missing aerials or standards who attempts to copy the character it is a copy of, will replace that section of moves with the other, though altering moves where it fits [a down aerial instead causing the stall-and-fall boot to come out the front of a fleshy part of the shadow]. The statistics of the two fighters are also combined if successful, averaging out with bias toward whoever makes up the most 'DNA' of the shadow and giving back access to the shadow of one normally-controlled character, jumps and all. You can indeed revert a combined shadow and make even more insane creations using over two characters. What this move also does is refresh the ability of regular shadow monsters to copy an existing opponent - the true shadow no longer exists - allowing you a potentially huge amount of shadows in play.


Grab: Squint
Ameno-sagiri squints his eye, in the fog showing his line of vision to thin out drastically the longer the grab input is held, minimising in size to as slim as Mario. As it gets thinner, it becomes faster to move. If the input is released and no opponent or true shadow comes into view, the move ends with no end lag. Once a character walks into the thinned line of sight, Ameno-sagiri focuses in on them, his line of sight expanding out again and following them in a non-standard 'grab.' From here, you can cancel out of the move by pressing the grab input, or input a direction along with the grab to initiate a throw, or the standard or special inputs to access your two pummels. Anyone caught in your 'grab' can be thrown at once as long as they are in contact with your eye sight, and if following a shadow, you can still throw opponents or other shadows along with them if they are in range of your eye. An opponent will find it very difficult to outrun your eye, and will have to simply wait until they can dodge a specific throw, as they all ignore shields, making them easier to combo. You can use your Up Special and maintain the move, but once it ends, you are forced out of grab state. While following an opponent, you have full access to the rest of your moveset, allowing you to easy punish a camping or overly defensive opponent. You may follow your own shadows too, allowing you to support them passively.

Pummel: Mind Control


Ameno-sagiri emits semi-transparent, dark rings of energy in the direction of the foe he's following, catching them in the only actual grab state in his grab game. The pummel comes out a little fast by the Brawl average, the foe taking 3% each hit. As the foe is pummelled more and more, their body blackens, eventually looking like the picture above, and they temporarily become Ameno-sagiri's minion and directly controls the victim instead. This takes between 4-8 pummels based on their damage percentage, and also becomes up to twice as hard as the opponent travels over a platform away from Ameno-sagiri's main body. A foe that escapes the pummel will slowly have the blackened effects wear off over time, but if re-grabbed quickly can be easily brainwashed. The mind control will refresh mashing for the normal grab, giving you that much time to do with the opponent's body what you want. If the pummel is used on a shadow, this effect is achieved instantly and can last forever unless the grab input is double-tapped, manually relinquishing control. Ameno-sagiri's eye will follow the opponent or shadow under his control with his eye wherever they walk, illuminating through the fog if there is one. This pummel is avoided by forcing another character or shadow in-between the recipitent and Ameno-sagiri, at which point that character will instead be 'pummelled' and caught in Ameno-sagiri's grab game. In a team game, this translates to your allies choosing to sacrifice themselves or not, in a singleplayer game you have the entire shadow community at your disposal. Brainwashed, foes or shadows can still be 'thrown.'

A character under the effect of mind control can attack alongside Ameno-sagiri, but this requires the player to use their taunts. Being that this is no longer the character themselves but Ameno-sagiri controlling them, it would make sense he'd get rid of any semblance of individuality they have. Using the left taunt, the character's aura will flare up, indicating that the character attacks first, while Ameno-sagiri can use his attacks if an input is given directly after one for the character. The right taunt causes Ameno-sagiri's eye to widen slightly and the shadow's aura to lessen, indicating the opposite: Ameno-sagiri attacks first, while an opponent's attacks after that. The up taunt causes both Ameno-sagiri's eye to widen and the character's aura to flare up, allowing you to attack with both at once using a single input. The down taunt does two things: one press causes the same physical changes as your right taunt, as Ameno-sagiri takes control entirely, merely controlling the opponent's movement to make them follow the pattern of his eye, and attacks by himself with the character doing nothing. A second press resets all aforementioned effects, so that you solely control the character again. When not directly controlling a character or when they are not the first ordered, smash attacks default to charging all the way up to max. On your own shadows, these effects are very important, as they allow you to circumvent the inevitable issues that come with controlling any kind of opponent imaginable. On a temporarily brainwashed foe, you can still have a moment of utterly destroying their allies or destroying their own set-ups by double-teaming.

Special Pummel: Cripple
A glowing and garishly yellow ring surrounds each combatant within grab range of Ameno-sagiri, now encircling them for the duration of the move. Ameno-sagiri controls the travel of these rings onto their intended targets with directional inputs, and they remain in place even when said targets move out of grab range. When the ring hits the opponent, if they don't dodge, it causes 8% damage and a second of flinching knockback as the ring turns into a discharge of static energy that electrifies their entire body. What's worse is if the opponent was using any move when hit by the ring - in which case, Ameno-sagiri concentrates the energy into a part of their body, crippling them so that they can no longer use that specific move for the rest of their current stock. Ameno-sagiri can spam multiple of these rings within the five seconds that the move lasts by pressing the pummel button again, and potentially cripple several moves - while powerful, this makes the move even more telegraphed as Ameno-sagiri has to stop and start pushing the rings towards the foes. If an opponent tries to use a move that is crippled, they instead flinch and take 3% damage. On shadows, the move does exactly the same thing (though shadows are intelligent enough not to use moves that have been crippled). Though it is true that Ameno-sagiri couldn't care less about his minions, this does serve as a great way to get rid of specific moves from controlled shadows, as you input exactly what you want replace without any of the hassle. There's also something to be said for simply getting rid of an extremely overpowered smash or other high damage input that would end the match far quicker if left alone, especially if you've already created a shadow that has the move.

Up Throw: Contortion
The line-of-sight glows a strange and unsettling colour of green, creating obscuring wavy patterns behind opponents and shadows caught within Ameno-sagiri's grab. In an instant, Ameno-sagiri captures all of them within this huge grab hitbox, pulls the lowest one down to the ground if they aren't on it already, then quickly looks around in a full turn, causing opponents to be ricochet'd off the stage for 10-20% damage depending on the height they fell and knockback the same as Kirby's up throw, or simply landing on the floor in prone if still in the air when Ameno-sagiri made his full turn. Shadows and controlled opponents land neatly on their feet, not taking damage or knockback. The exact landing point can be slightly tweaked with directional input. This is easily dodged in this form, but becomes impossible to air dodge if used on an opponent directly in front of Ameno-sagiri's eye - the entire area becoming a huge vortex of energy that spins the enemy around and causing constant damage that eventually adds up to 15% and the same knockback as Mario's back throw, the foe themselves becoming a hitbox that deals the damage and knockback of a thrown item at their size. The primary usage of the move will be the former, of course, but the latter does act as a great dissuasion. The function of the move is multi-faceted - it allows you to 'reset' a match-up between a shadow and the opponent or simply cause them to dodge and lose their momentum. It also lets you fling a foe into a bed of waiting shadow monsters, or one of your shadows into a vulnerable group of opponents. The vertical positioning of the move means you benefit greatly from having an airborne shadow attacking a standing opponent, though at the same time, if a foe is flighty, the ricochet at move's end leaves them more vulnerable than they were.

Side Throw: Eye Beam
Ameno-sagiri fires out a surging yellow laser from his eye, shooting the entirety of his vision but with the same width of only a Kirby for its entire length. The beam itself causes constant hits that can be DI'd out of starting at 10%, with knockback a quarter as powerful as Lucario's final smash. Shadows merely treat this like a wall. The beam can be continued and is given suction on-par with Ganondorf's up tilt, effectively screwing over any attempts to roll under it, and can be continued for up to five seconds. In this time you can also rotate the beam around at Captain's Falcon dash speed with side directional inputs, but doing so gives you unforgiving ending lag that means you need the upper hand before move's end, or any advantage is lost. What the beam does in a match is block off part of the stage so that an opponent is trapped on a certain part of the stage, usually to be even more combo'd up by your shadows, or allowing your minions time to cool off as the opponent has to jump back over you to fight them. The controlled aspect of the move lets you fight off any barrage of projectiles, as they are destroyed by the beams, but also gives you an even easier way of moving your minions, letting you barge them around to any specific location you like. While the previous move lets you use an opponent's traps against them whilst mind controlled or use your shadows as a meat shield on the other side of you, this move is focused purely on destroying set-ups not so conveniently handled.

Down Throw: Hammer of God
A single gavel the width of Bowser is summoned in similar appearance to the ones in your up speical, hovering over the heads of everyone in your grab range. The gavel hammers down upon being summoned, causing 14% damage and knockback the same as Ganondorf's dair on aerial opponents, though is many times as telegraphed for an air dodge. The move can be delayed for up to a second, though the hammer does not follow the opponent once summoned - without being struck immediately, other parts of the hammer deal the same damage, but weaker vertical knockback upward, the same as most up aerials. Used on an grounded opponent, the move pitfalls them, which has obvious advantage, but is obviously easier to dodge due to rolling. The move purposefully misses your shadows, though it does hit your shadow monsters. It doesn't do any damage, but it will pitfall them like opponents on the ground, or strike them down if they're in the air - though the latter requires some serious pre-requisite in terms of positioning your shadows, it is mostly the former you want. Pitfalled shadow monsters remain underground until an opponent steps on that spot, then they grab them. The only visible part of this trap is a crack left in the stage, and this is covered up easily by your fog. With more shadows under your control or opponents, you can use this move well in stashing shadows, either as traps, or to make room for more.


Standard Attack: Blink


This jab is only achieved through a single press of the input, a second will make use of Ameno-sagiri's corresponding smash attack instead. Ameno-sagiri simply closes his eye, then open it, hitting whatever is in the path of his vision with a small spark of energy for 8% damage and slight hitstun. This has remarkably low lag on both ends for Ameno-sagiri, far below the average for jabs in Brawl. The time it takes for the attack to hit the opponent depends on their distance, though the move will take at most a second to reach them. Aside from being harder to dodge, this also allows you to do something else in the meanwhile, or the opponent to move out of your range - a subtle mindgame, but it's ripe for the picking nonetheless. What this move acts as foremost is a way to help out your shadows - especially those under your control - as attacking the opponent using a simple, fast move that has no hitbox is very good basic double-team fodder for your minions, and has some of the lowest lag in the entirety of Ameno-sagiri's arsenal.

Down Tilt: Umbra
Leaning forward and concentrating on the shadow of doubt that he rests upon, Ameno-sagiri uses his telekinetic powers to hold back the flow of dark waves across the stage, having a similar effect as his down special. Ameno-sagiri only holds back enough of it to create a Mario-sized pile on both sides. Piles like this are eventually carried away by wave current produced at the move's end, becoming a hitbox that damages for 10% on contact and knockback that KO's at 180%. This pile can be increased in size to a metric Ganondorf if the move is spammed, stopping the pile from moving for up to six seconds before the clog in the system becomes too much to stop. On the outset this seems like a far better path to take in denying your opponent the walk-off talked about at the start of the set, but is pure death for any wandering shadow monsters and requires you following up with a Quake directly afterward if you want to save them, guaranteeing killing those shadow monsters off with the move, or making yourself so predictable the opponent will definitely avoid the down special's actual attack. Your shadow monsters become bunched up when moving toward the piles, more than one can move them. If you shine your up special directly on them, however they will run right past them, giving you a way to direct your piles further in toward you for a tighter cage or more outward to surprise foes. The immediate function of this move may merely seem to make your opponent dodge or jump out of its way, but it becomes far clearer when you have a shadow and opponent below your eye - this move gives you a great way to block the two in from both sides, forcing a showdown. You have enough leeway before the pile is pushed away by your waves that you may be able to get a faster move like your blink in to help, though you also have plenty of other ways to help an ally in this situation.

Side Tilt: Galgalim Eyes


Ameno-sagiri's eye takes position slightly to the left or right, depending on which side is input by the player, brewing up a harsh, blue-tinted storm a platform in size and as long as the distance from Ameno-sagiri's eye to the ground, which travels across the battlefield at Bowser's dashing speed. The storm damages opponents for constant 2% and drags them along with similar knockback as Whispy Woods' stage hazard, though the obvious escape is jumping over the very apparent hitbox or edge-hogging. The edge may actually not be too great of an idea to camp, as the hitbox will take a little while to pass over it and make the opponent a big target if they wait for that, or simply blow them away again, gimping or harming their recovery if it hits them again. The wind hitboxes of the move make this a great, easy way to combo the foe with a controlled shadow, using the wind like a wall that constantly pushes the opponent back towards your shadow. To limit this insane gimping power, you can only have one at a time on either side of you. Pressing the input a second time causes the corresponding storm to blow up in a flashy blue explosion at the centre of the storm that takes as long as a Falcon Punch, similar to Din's Fire in size. The attack causes 6% damage on contact and leaves any foe hit by it taking passive damage of 1% a second as well as flinching knockback for five further seconds. This is obviously great when you can time it to hit an opponent who you've forced onto the edge, though destroys your storm and can be air dodged easily due to how long it takes for the attack to self-destruct.

Up Tilt: Foolish Whisper
Ameno-sagiri tenses the spouts on his body, causing a small amount of them out of the players' view to shoot a fine amount of liquid over the top of the screen. Seconds later, a shower of liquid rains over the stage like the arrow hazard in WarioWare's stage, appearing in the form of dozens of Pokéball-sized blobs of shadow. Unlike the WarioWare stage's shower of arrows, each projectile can be destroyed by any attack and multiple can be destroyed at once, though a foe is unlikely to be able to kill them all in one go, unless distracting themselves from the fight at hand to accomplish that. If a foe comes into contact with the blob they take 3% passive damage. The blobs home in as much as Samus' missiles, which is to say not much, and only when the opponent comes within a close proximity. In the least, this forces the opponent to shield when it comes out if they want to avoid taking damage. Blobs that miss any target land on the stage as a generic goop, emitting an unpleasant looking green gas. They can still be destroyed in this state, but deal the same damage, and can coat anything - including opponents - and be blown around by your side tilt as any good goop can, making it a rather versatile trap, if only in adding some flavour to your other set-ups. If the blobs hit a character, they obscure that part of the character's body. This can give you a weak mindgame in the fog, when a shadow of one team member exists and the other is disorientated, creating some confusion amongst players as you cover up parts of the character, such as their eyes, that differ from the shadow's.


Shield: Beast Eye
The iris in Ameno-sagiri's eye concentrates, the entire eye glowing a strange white colour. A perfect circle is created in front of Ameno-sagiri that is as big as two Bowsers, taking as long to finish as does any character drawing a shield. This translucent bubble is white in colour and can be dragged across the stage with the directional input when the shield input is pressed, though doesn't seem to have any immediate effect. Ameno-sagiri can create up to two of these, being able to swap control between them with the two shoulder buttons on a controller or by tapping the shield button multiple times. By pressing the standard input while moving a sphere, the sphere morphs into the shape of Ameno-sagiri's eye, and takes on its appearance, now acting as a second platform for your eye-based attacks. This second eye directs all attacks to the same area as your original, though has a different slant on things and as you direct both at the same time, you can easily just aim the eye where you want it individually to hit and ignore the former eye's attack. By pressing the standard button while moving the second created shield, it also becomes an eye, but this leaves the one on Ameno-sagri's body whitened out and useless. Instead of it leading the attack, the first eye of your two shields now takes precedent.

Depending on the positioning of the eyes, this allows you to truly skew your hitboxes and make escape impossible for opponents, as well as actually win on huge stages. All eyes share a single grab game - it's just the throws that have to be dodged between each, allowing twice the range, and potentially twice the difficulty of escaping. Even when the eye on Ameno-sagiri's body is dead, you can use moves that control Ameno-sagiri's body. Simply hold the shield input to erase your third eye, returning control and dominance to the first again. If you attempt to create a shield while controlling another character with mind control, you create the shield directly on their position. This is relevant for what else can be done with the shield other than creating another eye. The shields have no physical appliance and can be walked through or attacked with no apparent effect. Your body remains a hurtbox throughout, but active eyes also constitute hurtboxes, giving foes something else of yours to attack.

Special Input: Buffing and Nerfing
Pressing the special input while on a shield causes it to expand slightly, spamming the button lets you increase it to as big as four Bowsers. Holding the input decreases the size of the shield down to as low as one Bowser. At any point you can still switch to that shield as an eye and it saves any changes you made so that they return if you leave the eye. Pressing the special input along with a direction causes the white sphere to take on a certain colour, and status effects that change the attributes of any players within its circumference - including opponents, shadows and controlled foes. Pressing left causes the shield to take on a pure red colour, boosting the attack damage and knockback of players [tarukaja] within the shield by 1.1x, this can be increased to up to 1.5x by continuously pressing the input. Pressing right causes the shield to take on a pure blue colour, buffing the shielding power of players [rakukaja] by the same amounts as prior mentioned, as well as giving very weak super-armour that negates the knockback of one attack, and up to two more right after the first with a more powerful shield. Pressing down causes the shield to take on a pure green colour, boosting the attack speed of players within the shield [sukukaja] by the same amounts as well as increasing aerial control to give them better accuracy in the air. These effects can be combined - the shield becoming a blend of the colours, the shading depending on the dominance of each respective buff. Pressing up cancels all of these effects (dekaja) and returns the shield to its pure white form.

If the shield is buffed to any degree, it becomes vulnerable to Ameno-sagiri's attacks alone - by dealing 10-20% damage to your own shield, depending on their size, you cause it to shatter . This deals the negative corresponding status effect to everyone within the shield, meaning 0.9-0.4x damage and so forth [tarunda, rakunda, sukunda]. This doesn't affect you or your eyes, but can affect your shadows, thus can backfire. If nothing else, this will totally insure that no one can out-camp you, but you first need to defend it before it can be deployed negatively. The negative status effects last for the entire stock of opponents, or the rest of the life of a shadow. Playing King of the Hill with your buffed areas and then cruelly taking them away and leaving the opponent with a practically destroyed character, while you're sitting pretty with an outright superior copy of them, is both a very good feeling and almost impossible to come back from alone. Unfortunately, you'll need to be playing effectively against the enemy whilst doing all of this, and actually getting these huge nerfs or buffs, as well as putting them to good use, will require a lot of skill.


Side Smash: Agidyne


Turning his body to face in the chosen direction, Ameno-sagiri charges a ball of fire, taking as long as Lucas' up smash to do so. The size of the ball grows from that of Kirby to Bowser within that span of time, all the while being a hitbox that deals 12% damage and low knockback in the opposite direction, acting as another good wall for your minions to slap up against, this time elevated in to the air. Once finished charging the move, Ameno-sagiri shoots it straight forward in a direction that default to straight, but can be angled slightly as well. If the fireball hits anything, it detonates in a Bowser-sized explosion, to twice that size, and deals 20-30% damage, as well as knockback that KO's at 200-180%. Your shadows can interrupt the path of the projectile with their hurtbox, and fail to deflect it, but can detonate it by attack the fireball. Mindless shadow monsters setting off the ball aren't as much a negative as they first seem, this is more useful than it seems, due to them only attacking when a foe is very close-by. You can also catch the fireball in your side throw, Eye Beam, causing it to spin around the beam and lose its current momentum. When the move ends, or when you move away, the fireball will be launched in a direction perpendicular to the beam, allowing you to easily re-direct it back into the air and away from the ground, keeping it from exploding uselessly on the floor. The fireball is frozen in place if caught in your grab, and can be forced to hit an opponent if they are grabbed above the fireball in the right position so that when you use your up throw, they are lowered right on top.

Up Smash: Garudyne

Ameno-sagiri's eyesight can be seen looking right down to the ground in front of him, the player able to position the eye so that its two Bowser-wide target can be moved over the stage. The range of this move is increased by the fact you can use your walk-off shadow waves as 'ground,' letting you place it off-stage. After charging up for as long as a Zelda up smash, Ameno-sagiri unleashes a green, upside down cone-shaped hurricane in the place chosen, it being half to one platform in width and Ganondorf's height, to twice that. The hurricane deals 5% every second an opponent spends in it, and the input can be held during the tornado for slightly longer than Luigi's down special can to increase its velocity, spitting out opponents and KO'ing at 210-190%. If you do not do this and let the projectile sit, it will spit the opponent out randomly left or right once it has dealt 30%, which takes a few seconds, or the opponent can exit after only a third of that damage through DI'ing. This gives you the option of following up on the attack, and is especially viable if you've got a reliable shadow ready to pummel them on one side, giving them little option but to go one way, making them predictable for your planned assault. The projectile lasts for eight seconds.

Your own shadows are boosted by the wind rather than damaged by it when hit: if a shadow jumps in the middle of the hurricane, they will be boosted several, to many Ganondorfs in distance up into the air (depending on their weight), giving you a quick, if difficult way to help them recover. With two eyes using this smash, if you didn't max out the charge, the second eye will continue charging unless you use the input again immediately after, but in this time, you can adjust the second eye to shoot a second Garudyne away from the first. This gives you a very basic combo between the two tornados, and is very effective at, as stated above, blocking off one half of the foe's escape routes. The tornado catches up projectiles and other leftovers on the stage just as it does opponents, but only if they're going at a moderate pace. Foes within the tornado can be hit with your projectiles this way, but unless you're precise in placing projectiles under such duress, it is difficult to place projectiles within the tornado where there is an opponent. However, it is possible to hit them with a projectile within the tornado, as they will fly around faster than any non-featherweight foe, forcing them to DI out more, aiding to your pressure game.

Down Smash: Bufudyne


The line-of-sight of Ameno-sagiri is used again here, the attack charging as you gain free reign of controls, at half their normal speed. As you move over a shadow or opponent, they gain an icy, white aura that strokes a highlighting line around their body, this lasting for as long as they're in your sight. The move takes as almost twice as long to charge as Lucas' down smash, so keeping the foe in your slowed down eyesight may be a challenge, though you can always opt to simply follow a shadow. In any case, once you've finished charging, any character with the above aura is covered with a cube-shaped block of ice before it is split into four pieces, and the foe is left frozen as if hit by a Lucas' PK Freeze [or a Freezie], also taking 15-25% damage, being frozen for as long, or up to 1.5x as long depending on charge. For opponents, this is made more viable especially when you have a second eye out, as your range is greatly increased at no extra cost. Fire-based attacks can burn any character out of the freeze status effect fast, and this may be brought into real use when a foe is off-stage and plummeting to their deaths in a team game. If that fails, these icicles also have standard HP of 20-30HP depending on charge.

The move also works on your own shadows... the use of which is mostly for recovery, but also can help stall or simply defend a shadow who is taking a beating. While they still take damage, they don't take knockback in this form and can be dragged around by your grab like any other projectile, also letting you drop them on enemies for 10-15% damage depending on the height of the fall and low knockback. Once a foe turns their back on that shadow, ostensibly due to others on the stage or Ameno-sagiri having low enough percentage that they go for a kill, you have more than enough fire-based attacks to thaw them out quickly later on when you have the opportunity. Likewise, in a team game a team may be forced to focus on freeing a frozen opponent like this, particularly if they were the ones carrying the team. When botched - no characters are within range of the eyes when charge is maxed out - Ameno-sagiri can extend the move on for a few more seconds. If any characters come into range in this time, they are struck with the attack instead.


Double-Tap Smash: Nebula Oculus

This input is achieved by double-tapping the standard input, rather than initiating a jab attack. Ameno-sagiri blinks as in his jab, before building up a ring of orange energy in front of him, allowing the player to point the line-of-sight in any direction they want during charge time. Once complete, Ameno-sagiri shoots a beam of energy as wide as Bowser, or 1.5x that with charge, that has infinite range, dealing constant 4% damage to foes and incredibly fast flinching to, practically stunning them in place and dragging them along with the beam. How long you can pull along the beam for is set at five seconds, though, meaning you can't just push a foe off-stage to their deaths from the centre of the stage. The charge time here is comparable to the start-up on Lucario's final smash, and the speed plus feel of moving the beam is similar here too, if quite a bit faster. With two eyes, you have two beams, but connecting them causes somewhat of a beam struggle - the centre of it becoming a huge explosion the size of Bowser, but can be bigger with charge, which deals 20% and KO's at 160% on contact to foes. The beam destroys the liquid blobs in your up tilt in an explosion the same size, but half as powerful as a Bob-Omb, allowing you to blow up a row of mines, so to speak.

If you use this beam on your shadow monsters, you start to melt them away, and in one usage you can burn a shadow monster the size of Bowser to death if you concentrate fully on him. The shadow monsters don't take any damage from the attack, this is a straight interaction. While being melted like this, shadows emit a poignant gas from their bodies that is as wide as they are, the height of it depending on how long they were melted for. This gas causes poison damage of 3% a second to foes, but has a far greater purpose in fog. Reacting with your neutral special mist, it creates a darkened section of it that stands in place, refusing to ascend any longer. This patch of the fog can deal passive damage to foe that can be increased from 3-6% depending on the thickness of the fog. At the highest, densest form of fog, the poisoned mist becomes solid and acts as a teleport for shadows - when they touch it, they transform temporarily into a liquid form, the shadow able to exit out of a selectable part of the darkened fog. The liquid blobs from your up tilt will also get stuck on these, and they can be used as platforms if the shadows or shadow monsters land specifically on top of them. This can be a life-saver if you unwittingly eradicate your shadow waves and leave a shadow in danger, or need to extend the life of your lemming shadow monsters before they fall off the edge of the stage. The poisoned mist will only be destroyed naturally if the current fog is allowed to run dry.


Up Special Smash: Ageynastra


Mirroring the animation in his up special, Ameno-sagiri's eyesight instead takes on a crazed orange colour instead of angelic yellow, and expands out slightly as the move is charged, taking twice as long to initially finish and charge as Dedede's up smash. Unlike your up special, what matters here is where you're looking - wherever the end of your eyesight rests, be it the stage, platforms or the top blastzone - the patch at the end of your vision becomes tinted orange as well. So if you look straight down at the stage, a patch as wide as two Bowsers on the ground is created. If you look at the top blastzone, the same is true, though it will be a little smaller due to your degrading vision. The actual size of this target can actually be increased from two Bowsers up to two platforms in width, thus the long charge time. The purpose of all this set-up is setting the impact zone of your attack. Over the next few seconds, the entire span of the screen from the opposite side of the screen to your orange patch becomes highlighted in orange, as a shower of meteorites fall. The meteorites are all match half of Mr. Saturn in terms of size and are cramped enough to take up one-third of all the space available, falling at a military pace of Fox's fall speed. Each meteorites deals 5% damage and low knockback, though of course it adds up. Each meteorite has a small trail of fire behind it, which deals 3% on contact and low upward knockback. The meteorites shower lasts for 5-10 seconds depending on charge time.

Aside from being excessively flashy, the move serves as your best way to cut off parts of the stage or gimp off-stage. Depending on the slant of your eyesight when you select the patch - if you're looking dramatically left to the edge of the stage, the meteorites will also be slanted left - you can cause a whole section to be cut off. This can be as extravagant as blocking off the entire horizontal section of the stage where Ameno-sagiri's eye rests, or simply cut off a diagonal slice of the stage so that an aerial-born opponent can only access most of their playstyle on one half of the stage. While active, meteorites can be influenced by attacks individually and even caught in your grab game along with opponents, constantly maintaining their regular damage and knockback. This may not be too effective from your standard position, but from a different one created by your shield game, you can push the meteorites into an edge-hogging opponent, or send them crashing down on an opponent camping above or below the stage, depending on your vantage point. When mind controlling a character, this move acts as a great way to keep foes from approaching you, giving the character you're playing a fantastic pressuring tool and when they come out, can bat them around just as much as can Ameno-sagiri.

Side Special Smash: Crush
Ameno-sagiri leans slight back on one side as in his side special, but then staying in that position without any shadow monsters crawling out from under him, charging up. This takes about twice as long as it takes to charge up a Marth forward smash. Ameno-sagiri now pushes only a small amount of his huge body onto the stage, the screen rumbling slightly as he does this, pounding the ground where normally he would summon shadows. The area of the attack is as wide as a platform and as high as Kirby, to up to two platforms in width and as high as Ganondorf depending on charge time. Unsurprisingly, this attack is terrifyingly powerful, dealing 30-45% damage and KOing at 60-35%. After charging, however, the attack has awful start lag on par with a Warlock Punch, making the move both telegraphed and predictable where it hits. However, if you get an opponent... or anything not allied under there in general, it is pretty much dead.

This move doesn't affect your true shadows, but does your shadow monsters. It splatters them like flies underneath Ameno-sagiri's body, being vomited out of the respective side of him in projectile form - the size of this projectile depends on the amount of shadow monsters quashed, and obviously varies as well depending on how much force was applied. The muck is shot two platforms, to five platforms at the speed of Fox's laser. Being hit by the muck deals 10% damage and KO's at 180%, though it also sits out as a trap on the stage for ten seconds with the same damage, though only weak vertical knockback before dissipating into the stage - purged from the stage by Ameno-sagiri. The projectile will never travel over a Mario above ground, making it mostly a trap or further deterrent put on the end of the move to make it more viable with skilled, or simply fast opponents who would never be caught by the main usage of the move. While only out for a short period, the goop can be used as shadow monsters can in your double-tap smash, and its time on stage is refreshed as long as you are melting it away with your laser. While a bit of a long-shot, this can actually create a small flowchart of attacks which end in your shadow recovering, while the opponent suffers for your simplified set-up, due to you remaining offensive - that is, if the foe is baited into playing that predictably.


Down Special Smash: Megidola

Again, mirroring the initial sequence of his down special [these moves do have some minor visual differences and are not meant to be so similar to their special counterparts as to mind game foes], Ameno-sagiri leans back in his shadow pool and creates a sphere of pure, glowing white energy above his eye. This start up phase has the charge time of twice, to three times the length of Lucas' up smash. The ball itself remains the same size of a little bigger than Kirby, but the glowing aura that surrounds it, along with static and sparks that, grow as big as Bowser as the move is charged. Ameno-sagiri is free to move the ball along at a similar speed to the Earthbound boys' PK Thunder. Once the input is released or maxed out, a beam as wide as Pikachu's Thunder is released going down at the speed of Pikachu's down special too, lasting for as long in the air before dissipating. The bolt of energy deals 15% damage and is a meteor smash as strong as DK's forward aerial. The really effective part of the attack comes when the beam hits solid ground, as it ignites an area as high as Kirby and as wide as three to five platforms in bright, explosive white energy, damaging for 15-30%, KO'ing at 220-200%. The hitbox stays out as long as it's being powered by the descending beam - though it may not be extremely powerful, this move has such a wide hitbox that it makes for a great finisher at high percentages.

If Quake is a knife that cuts shadow monsters from the floor, Megidola is the gun that shoots them to their graves. Any shadow or shadow monsters caught within range of the attack - either in its beam form or when it hits the ground - is immediately destroyed, in a glowing white blitz. Their entire body is turned white, with flashing white rays of light surrounding them, and an explosion the same as an exploded white bomb is created that extends out to double the size of what was killed, dealing constant 3% damage to foes who are caught and low knockback. These explosions, like smart bomb ones, stack on opponents, but in this case so does the damage and knockback - by simply surrounding the foe with lots of shadows and successfully pulling off this move, it's possible to KO a foe reliably at around 200%. You do have better and more viable KO options, but this is really great for finishing a match by simply grabbing the foe as a shadow and killing off most of your minions in one attack, knowing you won't need them once the foe is defeated. The attack becomes its most powerful when used on the poisonous mist created by burning shadows in your Double-Tap Smash. The same explosion happens as with other shadows, but the entire area where the poison mist was becomes a powerful hitbox, KO'ing at 100%. Let your shadows escape through the shadows, then purge those same shadows to KO your opponents.


All-Seeing Eye: Subliminal Messages


Don't feel, think. That is the motto of Ameno-sagiri, a calculating and evil god who wishes to bring a new age of slavery down upon all of mankind, and apparently Brawl as well. He can function okay on his own - he can score hits, with difficulty, without any of the shadows or other complex set-up, but that is where the real fun comes from with this boss. The set-up is as easy as toggling the side special on or off, filling the stage easily with your shadow monsters. From there, you only need to hit a foe toward, or into a shadow monster to create your first true minion. You can continue building new creations, breaking down old ones or blending the two to make abominations of numerous quantity - the choice comes down to allowing the time to play on the options given to you, or making the best of what you have. Moves like your Down Special Smash, Side Special Smash and Double-Tap Smash specifically award the perseverance of a master in spawning shadow monsters, in the form of a powerful attack, but more often than that a grander strategy is reward - placing shadows in the right place so that they can combo the foe up against the wind in your Side Tilt, or the fireball building up in your Side Smash. What distinguishes this kind of play from other characters is that you are directly controlling every aspect of Ameno-sagiri's playstyle, right down to his pawns. Your Pummel and Special Pummel let you get into the gritty, naked details, whilst not putting yourself in the firing line - back up your shadows with your own attacks, there's no simpler way of double-teaming an opponent.

To this end, setting up your shield game so that you have a view of the entirety of the stage, and can attack any hiding place the foe may have, is of the utmost importance in keeping the foe from simply ignoring your advance. Ameno-sagiri doesn't just shine his spotlight through the fog, he exposes any opponent who is trying to run away into a single place and stay there, or using a predictable attack pattern to try and whittle down damage. This is because of your eyesight. Your infinitely-ranged eye, or eyes if you have shields up, can easily penetrate any defence with a wide variety of versatile moves - you have the faster, more combo-relevant moves like the Jab, while also having moves like Down Smash that are meant for dealing with opponents that are carelessly pervading the lines of sight. The foe has nowhere to run, and thus has to stay on the offensive or be aggressively-defensive, but can't to the point of not attacking Ameno-sagiri. The stamina that the boss has means the foes have to prioritise him over everything that isn't an immediate threat, to end the match more quickly - not only because he benefits from a long set-up more than most other characters, but because if they do not, the match can go on indefinitely. Ameno-sagiri benefits from stalling on a basic level - he can make complex collections of shadows or build up buffed shields in compact areas where he can attack from with controlled minions more effectively. Of course when you have moves like Up Special and Up Special Smash, Ameno-sagiri is fantastic at pressuring foes, but even his most simple attack - the neutral special - essentially puts a timer on the match, as the opponent is constantly taking damage. They have to recuperate that dealt damage onto Ameno-sagiri or his puppets, they have to take the initiative, giving the boss the time he needs to set-up.

The exact speed of your eye is never explicitly mentioned, this is because it would have to be a complex system mostly decided on by programmers, when it comes to the exact speed and momentum of the thing. This largely isn't important - what is, is that it provides a versatile conduit for attacks that, along with your non-existent body, gives you an infinite amount of space in which to lay out traps, minions, or other well-laid plans. At first what seems like a weakness, for the set's playability more than the strength of its playstyle, is that it is highly unorthodox - you have no weight, no mass at all really, you may as well be playing a stage. However, you are about in control of the stage as you possibly could be, as you are uninhibited by knockback or pressure when attacking. The downside is that you indeed have to bear the brunt of attacks without having any escape yourself. You are trapped, and only by taking the bodies of others can you gain this privilege. At this point, you are not nearly as limited as other body stealing characters are - they become your body, singular. You can attack at the same time without any clunky functionality or juggling the same inputs between two characters. With your Pummel, you can even set the exact chords that are struck by your control over a foe or your shadow, allowing you or the foe to lead, or simply have one of them bow out. If you want to you can control either Ameno-sagiri or the brainwashed pawn on their own, the other simply waiting in the wings until you choose to use them. It's an open-ended system, to accommodate any kind of character within your playstyle.

The players that step in to fight Ameno-sagiri are more important than anything. The symmetry of their movesets become crucial, in ways that they were never intended to be before - Ameno-sagiri's forceful mashing together of movesets may not always have the prettiest results, but with the right support it can get the job done. On Brawl characters, you can combine a more versatile Samus with a low-percentage killer like Ganondorf, splicing together standards and specials to create a hybrid that is the best of both worlds. In MYM Brawl, you can take a moveset like Bowser Jr. and give him Nappa's extremely good pressuring tools to make his goop that much more irresistible. The passage of time comes into huge effect too - after you've set that goop, you can feel free to get rid of those moves and replace them with the rest of Nappa's arsenal, whilst also crippling Nappa so that yours is the superior Pokémon. This, whilst you're pressuring large parts of the stage with Side Tilt and Down Throw, pushing around the characters you're fighting against as well as ordering around your own kind. When the odds are stacked against the foe, it becomes almost impossible for them to come back - especially if you can get any kind of effective nerf on them. This part of your playstyle, buffing and nerfing, is on a whole other level to the rest. You can not only build an entirely new moveset from other characters, but play to their strengths by focusing on certain aspects of them, or make up for failings.

You can create a super soldier out of the weakest character, then rub it in their face, leaving a buffed area up as constant insult as you can turn it against them at any time. What stops this from becoming frustrating is that all the time you spend setting up complex systems, you are losing percentage as the foe can use more-or-less any attack to damage you, and that's one attack closer to your defeat. Fortunately, your set-ups aren't just a fancy animation and a large amount of damage, they do play into a double-team scenario well too. Whilst moves like your Up Smash, Down Smash and Double-Tap Smash have the obvious rescuing paradigm attached, less obvious ones like your Side Special Smash and Down Special Smash act as very effective ways to block off parts of the stage. Whatever the character you're controlling needs - be it less stage, a wall, such as in your Down Tilt, or simply a bout of flinching knockback from your Jab - Ameno-sagiri has a move to fit the situation. It's not that specialised, but it's simple and easy to multi-task while controlling two characters. In a team game, the enemy has to approach the match-up with a certain level of preparedness and strategy to stand a chance against an Ameno-sagiri player who can micro well with a minion under his wing. Ameno-sagiri is certainly a character who can come into a match like that, having a set plan in mind, and execute it, by focusing down on a certain player or character, or using a certain character's weakness to his advantage. There is strategy at play here that makes for an exciting match-up on both sides.

The previous five paragraphs may give you the impression Ameno-sagiri lacks a unique playstyle, but he really does not, it's just a bit more steamlined, partly to deal with such huge baggage as dealing with any character in the roster. Much of it is pretty self-explanatory. He is such gigantic, lumbering force of nature, that an overtly complex and prodding playstyle wouldn't fit. Ameno-sagiri has no shortage of KO moves - the problem is their telegraphed nature and predictable range. What Ameno-sagiri can see, the foe can see, after all. This is where your mist comes into play: obscuring the stage brings the foe to you, making them vulnerable to attacks that otherwise seem hard to land. You have basic traps, even with a move such as your Down Throw that makes summoned minions into one. A foe who isn't entirely aware of their whereabouts can easily be led into such traps, especially when you have moves like Up Throw at your disposal to outright force them into them. Projectiles like your Agidyne Side Smash and Down Quake become a lot more scary when you don't know where you're going, and not knowing for sure if you're hitting Ameno-agiri adds another layer of uncertainty to the match-up, necessitating a procedural and careful playstyle on part of the opponent. Ameno-sagiri benefits from the foe making mistakes, playing mindlessly, fooling them into believing the false truth about the match and sit back into a match where they think they have the upper hand, before Ameno-sagiri shines a truthful light on a part of the match they had forgotten, or hoped had disappeared into the fog. It is in these moments that your cunning and wit can overpower any opponent.
 
Last edited by a moderator:

Bionichute

Smash Champion
Joined
Jun 30, 2012
Messages
2,151
For instance, you claim that the yellow fatigues are important for recovery in the playstyle but what if you don't get yellow?
I actually DID address that.

ME said:
It can be used in the air, but only the yellow one will be activated.
I probably just phrased it weirdly, but if you use the move in the air only the yellow combat fatigue will activate.

Thanks for all the criticism guys!
 

Violenceman

Smash Journeyman
Joined
May 3, 2012
Messages
381
NNID
Ash316
Darkwing Duck


I am the terror that flaps in the night! I am the bomb-omb that spawns in front of your smash attack! I...AM DARKWING DUCK!

Cloud of smoke and he appears, Darkwing Duck swoops onto the field of battle! He has grown weary of the violence cluttering up his streets and he is ready to take down this hoard of criminals and evildoers. Except most of the brawlers don't appear to be especially evil. However, last he checked, disturbing the peace was still a crime and he is not about to let it go unpunished. Some might say taking on a cavalcade of violent, super-powered warriors all by himself is more than a little dangerous. Well if that's case, Darkwing would respond, then let's get dangerous!


Stats:
Size: 4/10
Weight: 4/10
Jumping: 7/10
Falling speed: 3/10
Walk speed: 6/10
Run speed: 6/10
Power: 5/10
Knockback: 3/10


Standard Attacks:

Neutral Attack: Kung Pow Duck - Despite his clumsiness, Darkwing is proficient in martial arts and he shows it off here. He is able to execute a 5-hit combo, first with a judo chop, followed by a quick kick between the legs, then an elbow to the face, a 180 spin with a knuckle jab, then finishing it off with another spin back to face forward and delivering a high kick. The move features low knockback, as to keep the enemy close for the full combo, since the attacks grow in strength as the combo increases. 1%/2%/3%/4%/5% Damage

Dash Attack: Patented Flying Web Kick - Darkwing launches himself forward with a flying kick. If it does not connect, Darkwing takes a second to regain his footing upon landing. 9% Damage

Foward Attack: Pistol Whip - Darkwing takes the butt end of his gas gun and strikes anyone in front of him on the head. This attack has a 10% chance of stunning the enemy for a second or two, allowing for a follow up attack. 7% Damage

Up Attack: Emergency Umbrella - Darkwing always keeps an umbrella handy and he will open it above his head for a moment before retracting it and putting it away. not only will it damage anyone overhead, it will also protect him from any incoming projectiles. 5% damage

Down Attack: Cape Fear - Darkwing ducks low and twirls his cape around slightly above the ground with slightly greater range than his other standard attacks. 5% damage


Smash Attacks:

Forward Smash: Haymaker - Darkwing loads his gas gun with a boxing glove apparatus. Upon releasing the smash attack, the boxing glove extends out a short distance, delivering a powerful Punch-Out hit. This attack features exceptionally high knockback. 11-15% Damage

Up Smash: Tazing Ritual - Darkwing's gas gun also comes with a tazer attachment! He jams his gun skyward, the end of it sparking with electricity. Anyone who it makes contact with is thoroughly shocked. 10-13% Damage

Down Smash: Seismesphere - Darkwing will chuck a small blue orb onto the ground at his feet, causing hunks of ground around him to jut upward and outward like a protective ring around him, before crumbling away. 13% damage


Aerial Attacks:

Neutral Air: Inflation - Darkwing will pull one of the buttons on his coat, causing it to swell up like an inflating life jacket before diminishing back to normal size. 5% damage

Forward Air: Cape Crusading - Darkwing snaps his cape forward, causing it to go into a rigid blade-like weapon. Once it extends out fully, it will return to its natural state. 6% Damage

Backward Air: Boom Kick - Darkwing whips himself around 360 degrees, delivering a mighty roundhouse kick behind him. 7% damage

Up Air: Fedora Swipe - Darkwing takes his hat off and swings it over his head. It does minimal damage, but will drastically halt the targets forward momentum. It is also a very quick move and can be used repeatedly. 2% damage

Down Air: Paddle Drop - Darkwing will dive down toward the ground head-first. Anyone he comes in direct contact with in the air will be pushed down with him, although damage won't be dealt until they reach the ground. Flicking the control stick in any opposite direction will pull Darkwing out of the move and return to normal fall speed. 9% Damage


Special Attacks:

Neutral Special: Gas Gun - Indeed, it looks like Darkwing's gas gun can actually be used for its intended purpose. With an (ocassional) shout of "Suck gas, evildoer!", DW will fire a gas canister from the end of the gun that will explode into a cloud of gas when it comes in contact with anything (character, environment, projectile, etc.) that covers an area of about 1.5x standard character height and 2.5x standard character width. The gas cloud will last for five seconds before dissipating, and if the oldest gas cloud will vanish immediately if there are more than three clouds for a single player on screen. Holding down the Special button will let Darkwing charge the gun (which can be done while moving around and jumping), which will launch the canister faster and further. There are actually 5 different varieties of gas canisters at Darkwing's disposal, which can be switched out using the standard taunt. The rotation is as follows:

  • Nerve Gas (Red Canister): The standard canister the DW starts with. This red gas cloud will deal 8% damage for every second an opponent spends inside the cloud.
  • [Toxic Gas (Green Canister): This green gas cloud will inflict a poisoned state on anyone who enters it (indicated by green bubbles above the character's head). The poisoned status lasts for 5 seconds and deals 3% damage a second. The 5 second countdown will not start until the cloud is vacated, and it will reset if the poisoned charcter re-enters a Toxic Gas cloud. If a recovery item is consumed, it will cure the poison status.
  • Amnesia Gas (Blue Canister): This blue gas cloud will inflict an amnesia status effect on anyone who enters it (indicated by a question mark above the character's head).The amnesia status lasts for 5 seconds, during which period that character cannot use any of their special attacks. The 5 second countdown will not start until the cloud is vacated, and it will reset if the opponent re-enters an Amnesia Gas cloud. If a recovery item is consumed, it will cure the amnesia status.
  • Confusion Gas (Violet Canister): This violet gas cloud will inflict an disoriented status effect on anyone who enters it (indicated by a black swirl above the character's head). The disorient status lasts for 5 seconds, during which period the character's movement controls are reversed (up is down, left is right, etc). The 5 second countdown will not start until the cloud is vacated, and it will reset if the opponent re-enters an Confusion Gas cloud. If a recovery item is consumed, it will cure the confusion status.
  • Concussion Canister (Orange Canister): No gas in this shot; it just explodes on contact for 12% damage. Surprise!

Forward Special: Glue Grenade - Darkwing will pull out a white sphere from inside his coat, wind up a pitch, and chuck it forward in an arcing path. If it lands a hit on an opponent it will explode and cover them in glue, sticking them to the spot. If someone is in mid-air, they will stick to the ground wherever they land. The glue bond will prevent anyone from moving, although they can still preform standard and special attacks (as long as they don't involve any movement). The maximum duration of the glue effect is 3 seconds, but struggling (mashing buttons and control stick) could break the bond quicker, determined by the character's damage percentage. 0% to 30% can break free after the first second, 31% to 60% can break free after 2 seconds, and 61% and higher can only break free after 3 seconds. In addition, a powerful enough hit (13% damage or more) or a grab can also break the glue bond. Additional glue grenades will not restart the timer or add to the effect, and after breaking free, there is a second where the character is immune to being glued again. If the glue grenade does not make contact with an opponent and hits the ground, it will create a glue puddle that will cause a similar effect if someone walks onto it. If undistrubed, the glue puddle will dissipate after 7 seconds. This move has a minor delay to it while Darkwing winds up his pitch.

Up Special: The Duck Knight Rises - Darkwing wraps his cape around himself and leaps upward into the sky with an out-stretched fist. At the apex of the jump, Darkwing will unfurl his cape and, holding onto the edges, snap it outward. The cape now functions like a glider and Darkwing can glide through the air for a longer horizontal recovery. 6% Damage during upward leap, 9% Damage for cape snap at the peak of the jump.

Down Special: Dramatic Reveal - Darkwing throws down a smoke bomb, creating a plume of smoke around him, dealing damage to anyone in the area. Darkwing then vanishes from the screen. He will reappear a second later in another plume of smoke, dealing another round of damage. If the control stick is tilted in any of the eight major directions (up, up-right, right, etc.) during the moment of disappearing, Darkwing will reappear several yards away from his initial location. Otherwise, he will reappear where he started. In the air, the smoke bomb will burst at Darkwing's feet. 5% - 10% damage from smoke plume, depending on how much of the smoke hits.


Grab Maneuvers:

Grab/Pummel: Plunger Shot - Darkwing's gas gun has another extra feature, namely the ability to fire a plunger with a rope attached to it. The plunger will stick to anyone it hits and Darkwing will pull them in close. From there he can administer some hand-to-hand justice, employing a series of elbow jabs, gut punches, and headbutts, each administering 5% damage. This can do up to 20% is the hold is not broken early. the distance the plunger goes is slightly longer than Link's Hookshot. This grab can also be used to grapple to the edge of a platform.

Forward Throw: Bon Voyage/Back So Soon - Darkwing takes aim and fires his gun again at a 50 degree angle, sending the opponent flying outward while still attached to the plunger, dealing 5% damage in the process. The rope will continue to be stay tethered between the two until the opponent either hits the ground (the plunger is released) or reaches a distance greater than how far the plunger travels during Plunger Shot (the rope is released). If the control stick is flicked in the opposite direction before the tether is broken, Darkwing will tug the gun quickly, pullling the opponent back down to the ground in front of him, dealing 13% damage and sending the enemy careening in the opposite direction with slightly less force than the original Bon Voyage shot.

Backward Throw: Double Reverse/Back So Soon - Darkwing flips around 180 degrees, dragging his captured emeny with him, and fires his gun at 40 degree angle. The mechanics of this throw work identical to that of Bon voyage and Back so Soon, with the directions obviously reversed, except that the force of landing during Back So Soon is upped to 15% damage.

Up Throw: Misfire - Darkwing takes aim by pointing his gas gun straight upward (balancing the opponent above him) and fires. However, something goes wrong and a small explosion erupts from the end of the gun, dealing 8% damage and sending the enemy rocketing skyward. If Darkwing has used his gas gun quite a bit before attempting this throw, there is a 20% chance the explosion will be much larger than normal, upping the damage to 15% and dealing 5% damage to Darkwing.

Down Throw: Gas Assault - Darkwing drags his grabbed target onto the ground beneath his feet, pressing the gas gun to their back. He then unleashes a torrent of mustard-colored gas, dealing a quick barrage of 2% damage hits for a grand total of 12% damage. Once the barrage stops, the opponent is shot out either to the left or right at a 30 degree angle. Although the damage of Gas Assault is racked up quickly, the move can be interrupted from an outside source to minimize the damage dealt.


Unique Mechanics

Blunderbuss - When Darkwing goes to throw a weapon or item he was holding, he instead loads it into his gun and fires it, allowing it to fly a further distance than a normal throw.

Cape Flourish - When Darkwing activates a shield, he spends a second twirling his cape around himself before activating his shield. Any projectile that hits him during this cape twirl will be reflected back toward where it originated, albeit slower and less powerful.


Final Smash

Let's Get Dangerous: After shouting his signature catchphrase, Darkwing lets out a whistle and Launchpad flies onto the stage in the Thunderquack. Darkwing jumps in and you gain control of the small aircraft. It can fly all around the stage and switch the way it is facing. The standard attack button will fire missles in a straight line across the screen while the special attack button will drop bombs from below. After the duration of the FS is over, Launchpad says "uh-oh" and Darkwing jumps out of the cockpit as the Thunderquack plummets downward until it crashes onto the stage and explodes. 25% damage per missle, 35% damage per bomb and 50 - 70% damage from crash, depending on how close to the core of the crash the enemy is.


Playstyle:

Darkwing knows that criminals are a superstitious and cowardly lot. However, a duck in a purple outfit does not strike exactly fear into the hearts of his enemies, so he has to use the element of surprise and fear of the unknown to his advantage. An arsenal of wild card manuvers allows him to keep anyone who isn't paying the utmost attention to him on their toes.

Although he has several gizmos and tools at his disposal, Darkwing's gas gun is his main feature. Whether dishing out damage or imparing your enemy's effectiveness, the variety of gasses give Darkwing the ability to adjust his own strategy to his opponent's weaknesses (or just keep constantly switching it up to keep his enemies guessing what gas they will have to deal with). Of course, keeping the opponent in the gas cloud increases it's effectiveness, so the glue grenades make a good supplement to the gas gun (in a team battle, having a teammate grab hold of an opponent while you fire a gas canister at them works well too). And if you are having trouble landing a hit with the glue grenades, you can also hide in the gas, since DW is not affected by his own gas, and can use his plunger gun to reel unsuspecting foes into the cloud. DW's arial and standard attacks do fair damage to compensate for the more sneaky and manipulative special attacks, so work those into your glue and gas routines. You can also use the glue grenade to stick someone down before nailing them with a smash attack, but keep in mind that they are able to still attack while stuck.

Darkwing's Dramatic Reveal move can help you get the drop on your opponent when they are least suspecting it, and can actually work as a recovery move as well, if you feel the Duck Knight Rises will leave you exposed while gliding. This gives Darkwing a lot of leeway in smaller stages or ones with lots of gaps. But he plays best in larger areas with plenty of land to make use of his gas and glue attacks, and where his light weight can't be used against him.


Extras:


Logo: Darkwing's Gas Gun

Stage Entrance: A cloud of smoke erupts and darkwing appears in the midst of it.

Taunts:
1 - Darkwing tosses a new gas canister in the air and catches it in the muzzle of his gun. This will change the canister used by his Gas Gun.
2 - Darkwing wraps his cape around himself and waggles his eyebrows up and down several times.
3 - Darkwing twirls a pair of handcuffs around his finger several times.


Stage: Audubon Bay Bridge


The large suspension bridge that spans the Audubon Bay in St. Canard and also houses Darkwing's secret lair (in the tower). The bridge extends across the whole stage, with occassional cars and trucks driving across the bridge that can deal 7% damage if they hit. The fight can also be taken to the suspension cables all the way up to the top of the two high-rise towers segementing the stage into left, center, and right. Other hazards include Gosslyn and Honker driving the Ratcatcher (Darkwing's motorcycle) out of one tower, down the suspension cable in the center and into the other tower, dealing 6% damage if they hit. On the left, Megavolt will sometimes appear with a power generator that will shoot our bolts of lightning in various directions (5% damage) and on the right, Quackerjack may appear and release a swarm of chattering teeth that will bite down and grab hold and deal 3 bites of 2% damage each. Both baddies can be dispatched with a few hits before they are able to launch their attacks.


---------------------------------------------

Sorry for vanishing after my first post for so long! Thanks for everyone who offered advice on my Ico & Yorda character set. I really wanted to make use of their interesting mechanic, but upon actually creating the moves, I realized how limiting the attacks could be if I wanted to keep the feel authentic. Darkwing offered a much greater variety of possibilities, so hopefully this one feels less gimmicky and more rounded and interesting!
 

Katapultar

Smash Lord
Joined
Nov 24, 2008
Messages
1,284
Location
Australia
[collapse="Ameno-Sagiri"]You've definitely done a surprisingly good job at handling Ameno-Sagiri as a boss character, especially with the obscuring nature of the fog and implementation of the Shadows (in how you use their overworld appearance as a generalization) - having played the game, this is definitely awesome stuff. Furthermore, you take a lot of extreme liberties with the intense Shadow interactions and eye duplication via shield game that's very easy to get lost in, or at least for me (I'll admit the same thing happened for me with Smot, a set that shares the feel of this one given the minion interactions and smash-charge-time-comparisons). The balance of this set is very strange indeed given the HP can be set by the players, though Ameno-Sagiri seems like he'd need a ton of HP given how much time he's going to be dedicating to setting up fog and playing around with his minions (if he has 2000HP in a 3v1 he should have about 666HP for a 1v1).

That said, I love the opening move where you blanket the entire stage in fog in order to "obscure the truth" from your enemies, forcing them to get into the ocular range of your eye in order to seek out the truth at the cost of risking their lives like the Investigation Team did. The Up Special and Grab, however, I feel are a bit too effective in pursuing this, mostly because how fast the eye moves around is not given in exact terms - the impact is softened when one remembers the 3v1 design of the set, however, but in a 1v1 it would be all too easy to spam the Up Special, or at least I feel. Continuing on with the subject of the fog, I do kind of wish it didn't fade away so easily and perhaps more was done with it (though I can understand that just like in the game, it's a temporary effect albeit one that doesn't make Ameno-Sagiri invincible like in P4) when he's supposed to be the god of fog. The Shadows are cool in how they're implemented, indeed, though they kind of turn the fog into an afterthought when they can be seen and reveal a foe's presence in there - not trying to hit on the playstyle or anything, mind you. Only when I think about it do I feel that the playstyle of utterly controlling Shadows is not really all that fitting for Ameno-Sagiri, nor is your description of him being cunning (you describe him as being calculating and evil when he just wants what's best for humanity albeit being misguided, he's not genuinely evil) - he's a god of fog who spreads doubt and brings about change via obscuring the truth, not the God of Shadows, though I guess having an entire set based around messing with foes inside the fog would be difficult when he has those powerful moves he uses in-game as the monstrous force he is. I just don't think him playing around with Shadows like toys and manipulating them is all too fitting for him, something somewhat brought about by the Smadian style of movesetting (I feel there might be a bit too many Shadow-interactive moves, maybe, if some possibly forced). You may have your own counter-argument on this however.

Despite my fairly long and trivial complaint, this was not at all a disappointing read for the somewhat questionable direction you took this character, which does not detract too much for me in actuality. It does do a good job at being a pretty fun boss, albeit a very, very bizarre one that feels difficult to balance but is done so rather well when none of the damage percentages are too extreme, if aside from the eye-moves I questioned before. Not to mention it's all for a giant eye with no limbs, too, so who knows how much potential boss characters could have in the future.[/collapse]


[collapse="Darkwing Duck"]Nice to see another set from you Violenceman - I loved Ico and Yorda, and the many pictures this set contains makes it look pretty fun, along with the hilarious opening line and many comical attacks. You knew what you were doing with your last set, and definitely so with this one, which I feel has more playstyle with the incorporation of the Specials. You have a good set-up going with the characterization via your opening line for the playstyle section, if some of the moves and interactions are fairly straightforward such as using the glue grenade to pin a foe for your gas gun - there are some good options to pull from this actually, especially when you can just jump into the cloud and take advantage of the foe's disposition such as with the nerve gas and my favorite the amnesia gas. Perhaps 8% a second is a little extreme when you can deal a passive 40% over 5 seconds, though foes can escape from it and it's a good way to apply shield pressure. Your main attacks are straightforward and simple enough to not neglect DW of a melee game for attacking foes with while they're stuck from your glue (though they could do with some more detail such as their knockback output, especially with the standard attacks), and the smashes actually flow surprisingly well with it because of their range for keeping DW safe but also not being too powerful with their damage output - the F-Smash's high knockback also serves as a surprising bit of balance when it knocks enemies away, too. I mostly wish the Down Special served a better purpose for the playstyle, (Up Special is fair enough in being a recovery) as being a simple teleportation move doesn't feel sneaky enough what with the likes of MK's Dimensional Cape and it also feels a bit weird in terms of animation execution.

This set has confirmed to me you definitely know what you're doing with your movesetting and show a lot of promise, only you haven't quite broadened your capabilities as of yet with the nature of the attacks being able to function together freely and support each other, but you have the idea of playstyle and characterization well grasped. Nonetheless, I greatly look forward to your next project, regardless of whether you accomplish the aforementioned or not.[/collapse]
 

Junahu

Smash Ace
Joined
Nov 15, 2005
Messages
899
Location
Shropshire Slasher
FA pushes Junahu into actual insanity. Also Junahu sucks, but you knew that already..

[COLLAPSE="FA comment rowr"]
Etranger
Am I the only one who thinks that no damage and knockback just makes for horribly lopsided match-ups as a rule? Without the ability to deal either of those things, it removes a key point of interaction between players, making matches go in a much more linear fashion I feel.
What the hell!? Are you disagreeing with MY idea!? How dare you!
Well, not to agree with the guy lord, but it does kinda suck. But wasn't that the point? I mean, she is like, a baby right?
Exactly! What kind of baby can throw a punch? I'll tell you, none that I've met!
You punch babies!? Oh how awful!

All Etranger can really do is push and pull or occasionally make an attack backfire, which gives me the impression she's not really all that good of a gimper. What's especially concerning is she has no recovery move on her Up Special. She has above average jumps, but with no recovery move that puts her still very low on the recovery tier list...
She can teleport, you idiot!
Yeah, but um.. not upwards, unless she's like far from the stage.
Are you siding with him!? You're MY vassal! Besides, maybe Etranger doesn't gimp like the Brawl dumbasses. Maybe she doesn't need to go upwards.
yyyyyyeeaa----I'm not seeing it

Not to mention her air game consists of 5 basically useless moves, when you blatantly could've added -SOMETHING- to aid in her attempts to gimp the foe which she horribly needs to make the set less tedious. Instead, you have a Back Aerial which you literally never give a use for that just buffs the foe's attack of all things.
Well I'm sorry you're such a worthless peon that you can't think for yourself.

If you want to talk about your beloved intuitiveness, I doubt any new player in their right mind would ever touch this character, seeing a lot of useless gimmicky crap before thinking that they have absolutely no way to win with this character and just giving up. Their are harder characters to play -WELL-, but not much is more alienating than a character who cannot kill save for complicated as hell exploits, especially when their attacks are doing no damage or knockback and making the -FOE- giant or giving them a bloody duplicate.
!? You're the guy who wrote Kyubey! You have no right to complain!
I actually had fun as Etranger. But I play Free-For-All with items on... so maybe I don't count..


Fuka
It's funny, on my first read of this set I really loved it. The Item World was such a bloody brilliant concept and her ability to play around with it in almost a playground fashion is really something. You can turn the stage into hitboxes, tunnel through this crazy arena, reshape it to your will, and launch baseballs all over it. Perhaps even drop a Prinny down on the foe from the various high positions it provides you, or slam the foe through the stage and then place other blocks above them to move them higher up or a spinning block as a means to force them into another pitfalling. There's a ton of room to play around in the Item World, and given both that and the base concept being insanely cool you would think the set's in SV territory for me, especially considering even her back-up game on land with the baseballs is at least decent. Heck it isn't broken due to killing the opponent in the Item World not killing them, just stunning them and giving Fuka a power boost which she can use to finish them off back in the real world...
Awwwww yeeeeah! Plus one Super Vote! That's one step closer to ruling the world with a harem of shirtless hunks.
Is it a gift, or do you work hard to be such a braindead bitch? You haven't read the rest of this tripe yet, this guy hates you almost as much as I do.
No way! He said he loves the concept and that's all that matters in MYM. And look! Look! "the set's in SV territory for me", I'm not even paraphrasing that. He said it, it's a binding contract!

... the fact that Fuka is capable of easily finding a spot where the opponent can no longer interact with her and just repeatedly murdering Prinnies as the most efficient way to get a buff.
Hey! I have to work really hard for my cheap exploits ya know. Most of the time there's nowhere for me to even hide. Most I usually find, is a place I can camp from that the other guy can't get to easily.
Well boo hoo. Maybe if you didn't explicitly state otherwise in the playstyle section, we wouldn't be in this mess.
Shut up! I was tired! Being in a dream can be exhausting sometimes, and you're certainly not helping.

What actually pushes the set into the realms of being downright terrible though...
... you're a cock tease
...the extremely random tacky effects you slap on to a lot of things.
Hey! I thought long and hard to make these attacks!
No you didn't! You made my lord Valvatorez write your detestable indulgence!

Dash speed boost out of a random move that serves no playstyle relevance
DESCO is dissapointed that you don't excercise your brain more. You won't be a very helpful pawn once DESCO becomes a final boss.
I bet this chump doesn't even play Baseball!
...What does that have to do with ANYTHING?

Tacky additional effects on the bat like the Side Special
It's my special Lv200 Legendary Sleep Bat! I filled it with Hypnotists! Would you rather I summon a gigantic Pringer mech and pilot it? Because I can totally do that too.

spiting sleep status effects
Because I'm sure Jigglypuff players really care that their Neutral B doesn't work on one character, when it already fails on everyone else anyway. Useless pink puffball...

Very, very disappointed in this set thinking it over.
I'm sorry a moveset for a character you don't know or care about has failed to reach your standards.
Apologising through gritted teeth. Clearly this is another of my lord's many talents...

Old Man Geo
Well, now that I've gotten my hatred of the first 2 sets out of the way, I actually do like Geo.
An honestly positive comment? Mwha haha! Such an intrigueing power. I must disect this man... *drool*

It's none-too revolutionary and a bit tacky with the status effects themselves.
You call that a complaint? I command you to transform into a 7 armed hummingbird, and blast me with 7,000 degree molten punches. You will call out "Your pyramids have tacky effects!" as you hit me.
um, I don't think anyone can do that. Stop giving out such unreasonable commands.

Obviously if I had any complaints, I feel the throws and aerials could be more playstyle relevant. The throws serve basic spacing purposes but I think you could've done more with them and the aerials are extremely straightforward and don't serve the playstyle at all save as necessary regular attacks.
I think there's a certain elegance to making similar inputs perform similar tasks, don't you? When a man is in the air, the time for thinking is over. You attack!
Who gave you permission to speak so straightforwardly? You're supposed to only answer the comment in a vague cryptic sense! I order you to detach your arms and shoot a thousand lude limericks at me from the bloody stumps!
As you wish.[/COLLAPSE]
 

BKupa666

Barnacled Boss
Moderator
Joined
Aug 12, 2008
Messages
7,788
Location
Toxic Tower
Jarvis


Jarvis the Jar Collector is one of the more unorthodox portrait ghosts encountered in Luigi's Mansion. Although his capture is not mandatory to complete the game, if Luigi disturbs his slumber in the Ceramics Studio, Jarvis will emerge from an antique jar and challenge the man in green to a game of Whack-a-Mole. If Luigi can blast Jarvis seven times with an Ice Elemental as he teleports between his many vases, he'll get an opportunity to vacuum up the crafty spirit for treasure (after a struggle, mind you). Otherwise, he'll be banished from the room; in other words, he gets nothing! He loses! Good day, sir.

According to the Super Mario Wiki, his name is also allegedly ‘an obvious pun’ of the common name, Travis. What a revelation.


Statistics

Traction ~ 10
Aerial Movement ~ 3
Size ~ 3
Jumps ~ 2
Movement ~ 2
Weight ~ 2
Fall Speed ~ 1


Spending his time at the bottom of a jar has done little to develop Jarvis' movement-based abilities. His six lowest stats added together are barely higher than his highest one, creating a rather underwhelming impression. While Jarvis himself is indeed vulnerable, his devious evasive tactics are enough to preserve him well into any match. His equally clever methods for punishing opponents bent on disturbing his jars are sure to haunt them should they handle Jarvis like any old lightweight.

Specials

Neutral Special - Jar Generate
Jarvis faces the screen and begins concentrating heavily over .5 second, having super armor during this startup period. During this time, tapping the control stick in any direction will cause Jarvis to cast the jar he generates in that direction, with the default direction being horizontally along the ground. Jars are Olimar-sized, traveling in a straight line off the blast zone at Mario's dash speed, although if B is held, the jar will accelerate, generally reaching around Sonic's dash speed by the time it leaves the stage. With a second tap of B, Jarvis freezes his jar, placing it onstage if it's traveling in its default path or levitating it in the air if it's launched upward. Although jars remain upright when traveling, rather than spinning, only Jarvis can use their tops as platforms, due to their surface holes; they serve as platforms to him whether they are stationary or levitating. If foes come in contact with a moving jar, they'll suffer no damage, but get pushed annoyingly back from Jarvis. Stationary jars have 15 HP, which any character, including Jarvis, can lower to shatter them.

An esteemed jar collector like Jarvis isn't limited to generating a single jar; on the contrary, with one use of this move, he can create an entire menagerie of ceramic vases. Jarvis exits his concentrated state .5 second after levitating a jar; should A and a direction be tapped after the first jar, Jarvis will immediately spawn and levitate as many additional jars as he pleases. These control identically to the first jar, with the exception of the player holding A to speed up these jars and tapping it to stop them. Needless to say, creating a large quantity of jars hampers foes attempting to attack Jarvis while they're levitating, filling the stage with (admittedly destructible) obstacles Jarvis is able to use to his advantage in the process.


Down Special - Transparency
Jarvis pulls off a classic ghost trick, fading into a state of invisibility over a split second, during which he possesses super armor. He is able to attack and suffer from attacks while invisible, throughout the seven second maximum duration of the status. Although Jarvis' methods for determining his location while invisible don't stray far from flickering in and out of the visible realm and using noise-making attacks, the jars created by his Neutral Special remain visible upon being generated...at least for the time being. Said time being comes to an end when Jarvis' crouch comes into play.

Now seems to be an appropriate time to introduce Jarvis' crouch in tandem with his vases. If crouch is inputted overtop a vase, Jarvis will slink down into the jar, hiding himself from sight; inside jars, he's in his regular stance, rather than his crouching one, requiring an upward tap of the control stick to rise up and having access to a few beneficial camping moves. Hiding inside a jar provides Jarvis with very temporary protection, as foes will whittle down its meager stamina and knock him away quickly. Though subsequent tactics can transform hiding in jars into a viable technique, Jarvis' invisibility modifies his very jars themselves. By crouching into a jar while invisible, Jarvis renders it invisible as well; unlike Jarvis himself, jars remain invisible permanently, unless destroyed or crouched into while visible. Because understanding the position of jars is vital to finishing off Jarvis, confusing opponents by attacking thin air as if destroying an invisible jar or moving around a jar while invisible may prove absolutely destructive to opponents' games. For lightweight Jarvis, this is a valuable card to hold.


Side Special - Poison Mushroom
Jarvis' mouth enlarges slightly, spewing forth a Poison Mushroom the same size as a fungi item, but faceless and a much darker tint than the Brawl variety (unless they are used while their owner is invisible, in which case they have no tint at all). These travel along a bouncing path, reaching a Ganondorf at the apex of each bounce, which carries them forward a platform at Mario's dash speed. Should one come in contact with a foe, they'll shrink instantly, as if playing a Mini Brawl (coins fly from the victim, as in Luigi's Mansion, although this is a mere visual). They'll remain in this state for seven seconds before regaining their size. Jarvis cannot have more than one mushroom onstage at a time, although he can regurgitate a new fungus while a previous one is still bouncing, causing the first to vanish (he cannot stack the effect on foes). Though shrunken foes are not at an immediate risk, due to Jarvis' lack of traditional KO moves, they are still vulnerable to one of Jarvis' more shrewd tricks.

Although regular-sized foes are pushed back if they try using Jarvis' jars as regular platforms, miniature foes experience a whole new fate. Instead, they plunge into its depths, causing a magnifying glass not unlike those used when foes leave the screen to appear around it, revealing its contents. To miniature foes, each jar is about half Battlefield's width and five Ganondorfs high, with three platforms half the size of those on Battlefield spaced evenly apart on each jar wall. As the timer on shrunken foes' effect does not decrease while they're in a jar (much like the human body submarines in Fantastic Voyage-esque films), they must leap out of the jar's top to return to the stage outside and, subsequently, grow. Jars cannot be shattered from the inside.

However, once Jarvis has his foe in his own domain, he's not about to let them slink away without punishment; he can crouch over vases to follow shrunken foes into them, retaining his size to fill roughly 75 percent of the mini-stage. He can now rack damage without the fear of them escaping his pitiful movement, delaying their escape with moves that become much more effective for a 'giant' ghost in close quarters. Of note, Jarvis can use jars and mushrooms as projectiles inside a jar, them staying their regular size like other projectiles on giant characters, but cannot place jars (they shatter upon being stopped) or further shrink foes. Once foes have shrunken, of course, they might expect to be on the lookout for one of five moves Jarvis can throw out to drag them into one of his jars. Having spent all that time brainstorming revenge in a painting, Jarvis' plans are far more duplicitous; he'll be working to ensure his foes fall into his jars on their own, whether it be out of paranoia or mere stupidity.

Although the ability to shrink opponents may appear broken for Jarvis to posses while on a team, he'll have a much tougher time keeping foes in jars when their teammate can simply shatter the jar from the outside to free their companion. Jarvis may become useful for his mushroom alone, putting the pressure on his teammate to defend him rather than to assault the opposing team.


Up Special - Materialize
Jarvis makes a ghostly noise and vanishes instantly, having a generic teleport recovery with half the range of Mewtwo's in Melee. Needless to say, for a character who may very well find himself knocked offstage again and again, this deficiency is rather worrisome. Should he make frequent use of this move while crouching inside jars, on the other hand, he'll be able to escape this fate for quite some time. Inside jars, Jarvis becomes able to teleport into other jars before popping up in them as he does in his 'battle.' Although a mere tap of the input and a direction causes Jarvis to teleport into the jar closest to him on the chosen side, holding the input allows him to 'charge' his teleport, moving into more distance jars if so desired (a half second of charge allows Jarvis to move into jars up to half of Final Destination away).

In combination with his invisibility mindgames, Jarvis can (figuratively) run circles around foes, gaining options for traversing the stage he never had with his initial movement, of lack thereof. By teleporting into an invisible jar while visible, Jarvis can remove this status from it, while he can cozy down in a seemingly random location onstage if he does so while invisible. Teleporting into a visible jar while invisible results in Jarvis obscuring the jar from sight as well, while teleporting into one in a visible state still provides him with movement he can use to pop up behind unsuspecting foes and attack. The option to materialize in a set location aids the player in determining Jarvis' location while invisible if they don't want to blatantly give it away by using Neutral Special. Much like Diddy's Peanut Popgun, Jarvis may shield while charging a teleport to cancel it; he still makes a ghostly noise upon doing so, which, if he’s invisible, can further confuse foes into thinking he traveled when he may, in fact, have not. His myriad of defensive options aside, if a distant miniature foe has fallen into a jar, Jarvis can quickly materialize in said jar before they escape, preparing to make the most of an offensive opportunity he won't want to miss.


Standards

Jab - Spirit Whirl
With virtually no lag, Jarvis spins around once, taking on a close range hitbox on his body. While contact with him deals a mere 4% and slight knockback, it does flip foes around to face the opposite direction, potentially sparing Jarvis from an onslaught of attacks if he spins in the middle of an assault. His spinning can also smack around foes with ease inside a jar, where his body turns into a gigantic hitbox of doom (albeit one that can still be shielded due to not dealing unholy damage). Should Jarvis spin while coming into contact with any projectiles, he'll reflect them away, suffering none of their damage in the process. This includes his own jars as they're floating along after their initial creation. These can be held in their onstage flight path for quite some time, as Jarvis can teleport between placed jars to continually reflect them back and forth, essentially playing tennis with himself.

Dash Attack - Ghostly Glide
Jarvis leans his bulbous head forward and immediately begins gliding forward at his slow dash speed. This is a keep-on-truckin' dash attack that automatically ends at ledges, with Jarvis skidding to a halt with low end lag. Upon contact with a foe, Jarvis thrusts through them, popping them up into the air lightly while dealing 5%. He is able to turn around with his excellent traction to psuedo-juggle foes with several hits, but his vulnerability from above significantly decreases the reliability of this strategy. Jarvis does have the option of using this move inside a jar, pushing against it to drag it forward along the stage at a slightly slower speed than his regular dash.

Foes caught in front of a jar suffer multiple light hits of 1% they must DI away from, as well as 10% and vertical knockback KOing around 160% if he manages to crush a foe between two jars. If Jarvis has spread a few invisible jars here and there, the threat of this crushing looms over foes, making the air a more appealing place to be. Although foes can still shatter moving jars, pushing them around from the inside also serves as a more direct way to position them onstage. Using this inside a jar with miniature foes threatens them with a large hitbox, but if landed, will likely knock them out of the jar; that said, it can still be handy should a foe attempt to, say, set up traps at the jar's bottom to give Jarvis trouble.


Forward Tilt - Head Bonk
Jarvis swings his head forward lightly, dealing 5% and low horizontal knockback. Although Jarvis has poor priority in this state, he has a period of super armor during the move, which lasts until he has finished swinging his head. If he is attacked during this time (but no later), he'll rear back in place for half a second, before swinging his head forward again with twice its initial force, dealing 10% and more moderate knockback.

This increase in power reaches its limit after Jarvis has been knocked back four times, with all subsequent headbutts dealing 25% and knockback KOing around 90%. While Jarvis is punishable using this move in his regular form, as foes can shield his initial bonk before retaliating, it becomes quite dangerous in his giant form, where each hit deals more damage and knockback. If shrunken foes attempting to stun the giant Jarvis don't dodge these bonks, the impact will have them bouncing against the jar walls, possibly for quite some time, before falling back toward the jar's bottom, having to start their escape all over again. Jarvis may also be able to pull off a few hits with this by teleporting into a jar a foe is attempting to attack, popping out and attacking to abosrb the blow with his lowered head before springing forward to punish the assailant.


Down Tilt - Ethereal Dust
Jarvis raises up slightly before slamming his lower end into the ground over .35 second. Although his body itself deals a meager 5% and brief stun, his collision with the stage releases a bit of fuchsia ghost dust from his body. This dust is about half the length and height of Hand Slap's shockwave, traveling from both sides of Jarvis at Mario's dash speed for two seconds before fading away. These dust waves do a measly 3-4% and trip opponents, serving as makeshift defensive tools. Should he create invisible waves while he's (you guessed it) invisible, his foes may seem to trip randomly, although Jarvis alone knows this is not the case.

By slamming down inside a jar, Jarvis is able to send waves along the jar's walls and out at approaching foes, potentially tripping them up before they can attack and giving their owner time to teleport away. The waves actually surround aerial jars for a brief period, forcing foes to attack with a bit more priority if they wish to damage the jar. With shrunken foes inside one alongside him, Jarvis' waves not only deal slightly more damage in their enlarged state, but prevent foes from teching against the jar's walls as they wind upward. Since knocking foes around a jar is common for giant Jarvis, preventing them from regaining control with multiple waves keeps him in the driver's seat of the ensuing chaos.


Up Tilt - Shadow Sphere
Rearing back slightly, Jarvis spits a Pokeball-sized orb of darkness in an arc half of Battlefield's length. The spheres disappear after this range, not allowing Jarvis to teleport to the top blast zone and camp down at hapless foes beyond their reach. During the brief startup period, the projectile's trajectory can be angled slightly up or down, with the latter option allowing Jarvis to spit balls down at foes after popping out of a jar. In spite of this, their primary use is as camping tools inside of jars; each ball deals 6% and a bit of stun, not unlike that of a Fireball.

The minimal lag between shooting each ball allows Jarvis to spit up multiple projectiles in one sitting, baiting foes into a range close enough for an easy Poison Mushroom hit. If he's positioned his jars well, Jarvis can teleport between two jars on both sides of a foe, spitting out orbs on one side before materializing on the other side and coughing up more before the first ones hit the ground. With the possibility of invisible orbs thrown into the mix, this is a fluid tool Jarvis can take advantage of most anywhere on stage; its most notable disadvantage, of course, is the fact that it can't be put to good use by giant Jarvis. However, if a Jarvis player has good aim, they can camp into a jar from the outside after trapping a foe inside, raining down giant balls of shadow into the container to spike foes back toward its bottom.


Smashes

Forward Smash - Jar Barrage
With no jars placed onstage, Jarvis' eyes merely flash while nothing happens, like a Pikmin-less Olimar using a Smash. Should jars be placed on the stage, however, Jarvis will levitate all the jars a set distance in front of him up a Mario (if they're grounded; aerial jars don't rise prior to the attack), casting them horizontally forward in the air to create a barrage of damaging obstacles. Depending on his charge time, Jarvis will levitate all jars two platforms away and a Ganondorf high (below him as well, if he uses the move from a platform), to four platforms away and two Ganondorfs high. Jars soar horizontally at Fox's dash speed, knocking foes back a short set distance while dealing 5-8% apiece. Because Jarvis can only send out one barrage at a time, a second input of F-Smash while one barrage is currently out causes Jarvis to cease his levitation, dropping all jars to the ground, where they deal 5% to those they land on.

The invisibility of both jars and Jarvis himself play a key role in the usefulness of this Smash. Any invisible jars laid out in range of the Smash are included in Jarvis' barrage, potentially adding multiple invisible hitboxes into the mix. This tactic is especially useful if Jarvis is able to move these invisible projectiles into range, or even position himself in the range of existing invisible jars while invisible. Fearful foes will often choose to jump and recover over a barrage to avoid what they cannot see, especially when they're miniature and, therefore, have slightly higher recoveries than usual. Jarvis can capitalize on this defensive ploy by stopping the barrage directly beneath them, causing them to fall helplessly back down into a jar. Should an aerial jar be dropped from a barrage onto a grounded one with a foe inside, it will block off its opening. Captured foes must deal 15% to this new obstruction to break through, essentially turning the two jars into one large, vertical one. If giant Jarvis is inside with them, he can waylay their efforts by wrapping D-Tilt shockwaves around the ceiling to defend it, or, if the upper jar is invisible, punish the foe after they lag from unknowingly hitting the ceiling.

Jars will enter a barrage whether or not a character (Jarvis included) is inside; this gives Jarvis a way to push foes to the blast zone, as foes leaping out of jars may very well just leap up into additional pushy hitboxes, as well as a fleeing tactic that lets him teleport between jars traveling away from foes, popping out and pursuers to keep them away. Inside a jar, Jarvis may hold foes inside until they are offstage, before dropping a jar overtop them to seal their fate and teleporting to safety. Jars enter their soaring state fairly quickly, and seemingly randomly if Jarvis is invisible upon initiating the move; that said, Jarvis cannot move until the jars begin soaring forward (although when he is able, teleporting to jars outside his range and reflecting the soaring ones with jab can really heat things up). Jars can still be destroyed during this move, and must be placed carefully to begin with for the move to have much use. Of course, when all goes well, this can quickly rise above the pack as one of Jarvis' most multifunctional tools.


Down Smash - Flipped Off
Jarvis squats down, spinning slightly in place while sending out a vertical pink wave of sorts to both sides. These waves are as thick as Mario and from one to two Ganondorfs tall, traveling from one to three platforms on both sides at Falcon's dash speed. Unlike the waves fro D-Tilt, these iterations have no impact on opponents; instead, should they come in contact with a jar, they'll cause the jar to flip over instantly, with its flat bottom facing upward. Foes can now use flipped jars as platforms to stand on, an ability they may find handy in a number of situations. Flipped jars give opponents an easier way to pursue Jarvis if he decides to camp from an aerial platform, a method for handling F-Smash, as they can simply hop from moving jar to jar if need be, or simply an invisible portion of stage miniature foes can be certain they won't fall into, unlike the regular jars that may be hidden from sight as well. Should Jarvis hit a flipped jar with a second D-Smash, however, the jars will return to their upright state. Foes caught on top of the jars when this happens may get juggled by the jar's top, or, if miniature, get bamboozled into falling into it. Baiting foes to land on jars with an initial D-Smash before taking advantage of them with a second use requires careful timing, although Jarvis has a bit more leeway with this trickery upon becoming invisible.

Flipping jars while shrunken foes are caught inside them leads to a rather different outcome. The jar flips over them, placing its underside above them, instead of the hole through which they would escape. To get out of the jar now, foes must deal 15% to the ceiling to break through (unless Jarvis has positioned multiple jars on top of each other, creating multiple barriers to destroy). If inside the flipped jar with them, Jarvis has an additional surface he can bounce foes against without the threat of hitting them up and out. While a foe is taking the time to break out, he may also behave productively by moving jars around or altering their visibility. Offstage, flipped jars are problematic to escape from while falling, giving Jarvis an additional gimping tool to use in combination with F-Smash. That is, if he flips the jars only when foes are unable to use them as jump-refreshing platforms...


Up Smash - Shard Blast
Jarvis begins concentrating in place, closing his eyes slightly before releasing an arc of ghostly energy around himself with slightly less lag than Lucas' U-Smash. The arc extends out one platform to each side of Jarvis and one Mario high, to two platforms and 2.5 Marios. While the energy on its own deals no actual damage, should any pots be caught in the arc of energy, they'll explode immediately. Jar blasts create Wario-sized explosions, dealing 10% and spiking foes with moderate force (which translates to vertical knockback if they're grounded). Jars explode with little warning, and can thus cause havoc if clustered together in mass, creating essentially one giant hitbox for foes to dodge.

If airborne, this spiking hitbox can spell trouble for foes attempting to leap over Jarvis' jars, as well as those recovering back to solid ground. The mindgames invisible exploding jars provide should need little explanation by now, of course. Should Jarvis use the move inside his own jar, he'll destroy it, along with any jars on its outside. This can push back foes preparing to attack a jar he's hiding in, although he'll need to act quickly immediately afterward to ensure his continued safety. If used while inside a jar with a small opponent, additional fun can be had, as they're automatically caught in the blast. Although using this will immediately take foes out of a jar, it is an effective finishing blow, especially offstage, or if one jar is stacked over another to create a larger explosion. If, for some reason, giant Jarvis is being comboed inside a jar, he can detonate it early to save himself.


Aerials

Neutral Air - Vanish
With a tap of the input, Jarvis vanishes from sight for .5 second, losing his hurtbox, before reappearing in place, dealing 8% and lightly repelling foes overlapping him. However, if the input is held, Jarvis will remain invisible for up to a whole second, allowing the player to tap the control stick in any direction to determine where he will appear, a platform away. If Jarvis is hiding in a jar while invisible, he may vanish through its walls to the stage outside, deceiving foes into attacking the jar, thinking he’s still inside. Little do they know, he may be preparing an assault on them in the meantime. If things are getting heated inside a jar with a miniature foe, Jarvis can also escape early if necessary. This move is helpful for evading foes in most situations, but it’s certainly no Cape Glitch; Jarvis suffers an unpleasant .75 second of end lag after reappearing, practically inviting foes to punish him if he gets reckless with vanishing.

Forward Air - Ice Breath
Jarvis leans forward slightly over .4 second, spitting a Deku Nut-sized sphere of ice in a platform-length horizontal line that can be aimed during the startup period. Should it come in contact with a foe, it will freeze them in a block of ice for a second, dealing 5% in the process. Jarvis may use any other move to knock this block around to a convenient location (including F-Air, which will push frozen foes, rather than stacking its effect). In addition to giving Jarvis a way to position foes close to, or even overtop a jar when they break out, Jarvis may spit ice at a jar itself for a different effect. Upon doing so, the surfaces inside the jar become slick for nine seconds; when a character lands on any of its platforms, they’ll suffer slight lag, slipping around due to poor traction. When the characters with quick jumps and recoveries enter a jar, Jarvis could find it in his best interest to use this move to ensure their escape is anything but quick. If he can freeze a foe in a block inside a frozen jar, their block can even slide right back to the jar’s bottom off a slippery platform. Now that’s just cold!

Back Air - Suction
Jarvis spins his head around quickly and begins sucking air, creating a Bowser-sized field of suction behind him. This move is inputted slightly differently than Jarvis’ other aerials; a single tap of the input starts the suction, while a second one ends it (with it ending automatically if Jarvis lands onstage). This allows the player to use the control stick, taking advantage of Jarvis’ excellent aerial movement to travel across the stage while inhaling. If he catches a foe in his suction field, he’ll quickly exhale, pushing them back with moderate force. Jars and mushrooms, on the other hand, are held in his suction, allowing him to directly move them as long as they’re in his field (multiple objects can be moved at once). When he ends the move or DIs too far away to influence an object, both jars and mushrooms will continue traveling their original paths. Aside from being helpful in positioning jars, if a squeamish foe is proving difficult to shrink, Jarvis may have to simply turn himself (and his mushroom) invisible, before dragging it right into the foe himself.

Up Air - Headbutt
Jarvis essentially performs DK’s U-Air, albeit with around half its power, dealing 6% and KOing foes at 170%. While similar moves are generally used to juggle foes around the stage, an option Jarvis can use advantageously, he is more easily able to achieve multiple hits with this move in combination with his jars, without which his foes can more easily retaliate against him. If Jarvis has placed a jar in the air and flipped it with D-Smash, he may juggle foes against its roof, or, if he’s stacked two aerial jars over each other, he can headbutt up through the lower jar’s bottom to bounce foes against the ceiling before they can break it. Inside jars, giant Jarvis can accomplish this same feat, albeit much more directly and easily. Due to not being a godforsaken dirty ape, of course, the priority on Jarvis’ headbutt is a fair deal lower, limiting its use to some extent.

Down Air - Drill Blast
Jarvis begins spinning like a drill, plummeting straight down at Sonic’s dash speed with little warning. Upon hitting solid ground, he creates a Bowser-sized explosion of purple dust, which expands to this maximum size over .5 second (the same time as Jarvis’ end lag) and lasts for a second before vanishing. If Jarvis hits a foe while plummeting, his opponent is dragged down with him, suffering light hits of 2% each half second. The explosion deals an underwhelming 5%, but pushes foes back quite a bit, around half of Final Destination’s length. This move becomes exceptionally useful if Jarvis can drag a foe into a Poison Mushroom, as the move’s damage will increase slightly the moment the foe shrinks. Plummeting into a jar also serves to prolong the move’s duration; the impact also pushes aerial jars to the ground at Luigi's dash speed, naturally leading to a KO strategy when there is no ground. Because Jarvis creates his landing explosion whether he lands on the stage or overtop a jar (whether it is flipped or not), his methods for pushing the foe around the stage are rather extensive. He just has to capitalize on this pushiness by actually dealing damage sometime or another…

Grab-Game

Grab - Levitation
Jarvis' eyes flash slightly, as a Wario-sized sphere of light appears in front of him with the lag of DK's grab. Should he catch an opponent, jar or mushroom (or multiple objects) in this light, the light will envelop them, stunning them slightly so Jarvis can direct them around the stage at Mario's dash speed. He remains stationary while his target is being moved around; although there's no limit to how long he can move around a jar or mushroom, foes can mash free after .5 second (although this period is slightly longer if they have more damage). Using the control stick lightly after the initial grab controls the target's movement, while a more firm tap results in Jarvis using a throw. Inputting a roll or shield results in Jarvis ceasing his levitation, saving himself before foes can get past his jar (which pushes foes as if sent out by Neutral Special) or mushroom and attack his vulnerable self. Although he can grab foes inside a jar, if he whiffs the move, he'll still be able to manually move the jar and its contents around onstage.This is generally most effective in short bursts while foes are suffering knockback and therefore cannot interrupt the grab. Jars moved offstage will not float unless they were floating in the air to begin with.

Pummel - Flash
Jarvis' eyes glow again, causing the sphere of light enveloping the foe to pulsate slightly, dealing 1% and stunning them ever so slightly. This speedy pummel is Jarvis' best option for damaging his victim while moving them around, while also serving to keep them in his clutches for just a bit longer. If Jarvis has filled the stage with his handiwork, this extra time may be all he needs to earn a big payoff.

Forward/Back Throw - Red-Faced Rampage
Jarvis releases his foe and immediately vanishes, before appearing either in front of or behind them, steaming red with anger. His body now possesses a hitbox dealing 10% and moderate spiking knockback for three seconds, during which he is free to pursue the foe however he sees fit. Although he can immediately jump into a sluggish foe immediately after appearing next to them, a more appropriate option will often be to mobilize jars with F-Smash or Neutral Special, teleporting between them to pursue the opponent wherever they may go. Keep in mind that Jarvis’ goal may not be to directly hit his foe, but rather to steer them in a set direction (forward or backward), toward an area of the stage where they’ll struggle. The panic the move can generate when Jarvis is invisible is also a sight to behold: a foe who starts levitating may begin air dodging multiple times, fearful of Jarvis pursuing them, with or without invisible jars to aid him.

Down Throw - Sinking Shadow
Jarvis forcefully lowers his levitated foe a Ganondorf downward, dealing no damage (yet) and sending them down with moderate force. Although this is not necessarily a surefire KO offstage, it can certainly aid Jarvis in finishing off recovering foes. Should Jarvis’ foe come in contact with the ground, they’ll suffer 5% while getting buried into the earth, entering a pitfall effect on normal terrain. Inside a jar, however, Jarvis lowers his shrunken victim underneath the jar’s bottom, placing them in prone while the crushing jar deals 1% per second. They must then use exclusively get-up attacks to lower the jar bottom’s 15 HP to break back inside; during this time, Jarvis may prepare additional pain above them. If Jarvis buries a jar or mushroom, on the other hand, he’ll place it into the ground entirely, where it lies in wait, in case any poor sap attempts to dig one of their precious tunnels. They’ll have to tunnel past these buried obstacles to avoid being blocked by jars or shrunken, or at least try to, if Jarvis has hidden them away while invisible.

Up Throw - Rocketeer
Jarvis begins levitating his foe upward, forcing them vertically at Mario’s dash speed for a second before releasing his hold. If the move actually did damage, it would be an ideal method for KOing foes off the screentop, since a move must actually harm foes while they’re offscreen for the KO to register. In combination with a flipped jar, on the other hand, Jarvis’ aerial boost can give foes a real headache. By shrinking a foe before boosting them into a flipped jar’s ceiling, they’ll not only suffer a bit of lag from the collision, but pull the jar up with them at half the levitation’s regular speed. By teleporting into a jar near the screentop and using U-Smash at this point, Jarvis could find himself able to finish off opponents he’s sent into orbit. This is considering he doesn’t just slam a small foe into a jar positioned overtop another one for a bit of stun before continuing his assault on them.

Final Smash
Final Smash - Pot Head Plot
Jarvis vanishes from sight, as the screen goes dark and rumbling is heard. A second later, characters find themselves stuck inside a giant jar, as wide as Final Destination with the regular three platforms spaced evenly apart on each side. However, in this jar, leaping out of the jar’s top pulls foes into an unknown vortex for an instant KO; in addition, the jar has no bottom, KOing foes who fall into it. After this stage arises, giant Jarvis emerges from its bottom, having super armor in addition to his regular moveset, which he can now use to either spike opponents into the depths or attack them off the screentop. This latter option allows Jarvis to attack more freely in this twelve second state, as he loses the problem of knocking foes free from the jar. The stage blackens and returns to normal after Jarvis’ time runs out.

Playstyle

Despite his unimpressive stature, Jarvis isn’t without damage-dealing options. His problem lies in his inability to use them effectively in regular melee combat. Sure, his moves aren’t terribly slow, but they do lack pretty much every other admirable trait: they’re not powerful, they lack range due to their small hitboxes, and their priority is negligible. He also lacks the option of traversing the stage with any speed whatsoever, whether it be for chasing an opponent or fleeing from them. Such long odds for victory come across as rather jarring at a first glance.

Upon a second glance, jarring emerges as Jarvis’ bread and butter method for controlling the flow of matches. His Neutral Special aids him in creating multiple jars at once, sending them all over the stage so they can occupy open space while pushing back foes hoping to interrupt their collector. A somewhat understated aspect of these jars is their ability to shield Jarvis from foes, simply by existing; they serve as effective, replaceable barriers that Jarvis can move around, flip and turn invisible to throw foes off the scent. That said, the more noticeable use of jars overshadows this barrier function for a reason; jars provide Jarvis with a handful of checkpoints to teleport to for much freer movement. Checkpoints he can later use to corner foes so they’re the ones with punishable restricted movement…

Once he has arranged a series of jars, Jarvis can flaunt his versatility with ease, especially in combination with his invisibility. If he’s turned crouched into a few jars while invisible to hide them before moving them around, foes will have little clue as to Jarvis’ exact location, while he himself can determine this with a quick flash of Down Special or Neutral Special. Foes, on the other hand, are stuck second guessing where Jarvis will reappear based on his brief flashes and the time he spends charging his teleports (which may not even be accurate due to the move being cancelable). While foes can still beat up on Jarvis during this time, they’ll have to hit him first, which can prove difficult when he has multiple jars that provide him with an easy escape. He can then punish failed attacks with an F-Tilt, U-Tilt or grab, flee while camping back at attackers with F-Smash, and bait them into the air by flipping jars and rendering them usable platforms. Moves like F-Throw and dragging (invisible) projectiles with B-Air keep foes on their toes until he can ultimately land the one hit that arguably matters most: that of the Poison Mushroom.

Of course, miniature foes are still perfectly capable of fleeing from Jarvis, especially with their more pronounced jumps and ability to avoid Jarvis' already small hitboxes. Still, however advantageous these small differences may be, they still come at a large cost: rather than being bumped harmlessly up upon hitting jar openings, miniature foes fall right in, like flies into a fly trap. While waiting out their negative status effect, foes will likely try to stay in motion and on the ground, avoiding becoming a sitting duck Jarvis can boost into the air before smacking back down into a jar. Jarvis' best strategy is to let his opponents' fear of his invisible self or jars play right into his nonexistent hands, perhaps by sandwiching a running foe between jars with a dash attack, or deceiving a foe into thinking a field of jars lies before them that they must attack through, knocking them into the air as they attack nothing (or immediately coaxing them into the air if he detonates jars with U-Smash). Jarvis' options for pushing a foe around in midair so they fall back into a jar are plentiful; even if they try attacking back, he can force them into landing lag on a flipped jar, before turning it over to pull them into it.

However he chooses to go about capturing his shrunken foe, Jarvis can join them inside a jar immediately afterward, teleporting in, crouching in from above, or using N-Air to vanish through its walls. Inside the jar's magnifying glass, the battle becomes much more hectic, as the tide of battle turns in Jarvis' favor at last. His large size (compared to that of his foes, who must escape for their status effect to wear off) allows him to finally begin whaling on foes to keep them in his clutches. Moves like F-Tilt, D-Air, and even flying jars (which are still usable inside a jar, despite Jarvis being unable to place them) can build damage on foes as they bounce repeatedly off of walls, frequently unable to tech and cancel their momentum due to that D-Tilt. A fair amount of damage can generally be built on captured foes before they escape, which they are still able to do, thanks to their ability to attack giant Jarvis (although his jab is great for near instant retaliation), as well as the possibility of him hitting them out of the jar's opening by accident.

Jarvis can squeeze even more damage out of a single capture by flipping a jar over while a foe is inside, stacking jars on top of each other after a capture, or D-Throwing a foe to place them under a jar. These options give him more time to assault his victims as they attack through the jar's bottom. In the scenario that Jarvis manages to capture, say, a Dedede inside his jar, he can still create chaos from the jar's outside to avoid that chaingrab. Camping into a jar, where his projectiles enter in as monstrous balls of pain, or freezing it with F-Air to make its platforms dangerously slippery, gives him time to mobilize the jar with F-Smash or blast it to smithereens with a satisfying U-Smash.

Through building a significant amount of damage inside a jar, Jarvis can KO regular foes at high damage levels, simply by sneaking up and using a regular attack, or, if he can pop out at a shrunken foe with a moderate amount of damage, send them flying before they regain their mass. These options, of course, are accompanied by his multi-faceted gimping game. Aside from dragging a foe offstage in an F-Smash jar barrage, or off the screentop with an U-Throw, D-Smash, U-Smash combo, a crafty player can ignore traditional knockback altogether. Instead of using knockback to send foes off a blast zone, Jarvis can instead use it and a handful of looping D-Tilts to keep foes bouncing around inside a jar while he pushes it over an edge with dash attack, F-Smash, or grab. Letting a grounded jar plummet with a foe inside (or stomping and aerial one down with D-Air), stacking a jar on top and teleporting to safety may sound cruel, but when you consider the struggles Jarvis had to undergo to get to that point, the eventual KO can be considered no less than a well-earned reward. Although Jarvis possesses glaring weaknesses like most portrait ghosts, his supernatural cunning and ghostly abilities give him the means to spin the match around, just like a record, baby. Through the creation and manipulation of his beloved, potentially fearsome jars, Jarvis the Jar Collector can guarantee his opponents face an infinitely more terrifying reality inside their very depths.


Extras

Up Taunt - Haughty Laughter
Jarvis makes his gargling laugh several times in quick succession, bobbing his head back and forth slightly.

Side Taunt - Huff and Puff
Jarvis takes several deep, wheezing breaths, puffing a bit of icy air to either side.

Down Taunt - Sneaky Spectre
Jarvis spins into the ground like a drill so only his eyes and upper head poke out. He glances back and forth mysteriously, before returning to the surface.

Entrance - In Your Vase
A simple vase full of flowers appears onstage, shuddering slightly for a split second. Jarvis quickly pops out, causing the vase to vanish in a puff of ghostly mist, it having been a mere illusion of his.

Victory Pose #1 - Eternal Slumber
A simple jar rests onstage, shuddering slightly as Jarvis' ghostly snores emerge from it. The long battle must have tuckered the guy out...

Victory Pose #2 - Whack-a-Ghost
Four jars lay in a square pattern onstage, with a single jar in its center. Full of energy, Jarvis teleports between the jars, popping his head up every split second in a different jar.

Victory Pose #3 - Musical Jars
Jarvis bobs his head back and forth to his victory theme, gazing at the screen in his doleful manner.

Victory Theme - Goodnight!
The quick, yet effective game over jingle from Luigi's Mansion rings in the background, haunting the match losers and providing Jarvis with a sense of evil satisfaction.

Loss Pose - Bashful Ghost
Jarvis sits in a jar in the background, facing the ground with a slight red tint in his face. Whether his new complexion is due to embarrassment or anger is anyone's guess.
 

Katapultar

Smash Lord
Joined
Nov 24, 2008
Messages
1,284
Location
Australia
[collapse="Jarvis"]A Kupa set for a fairly low potential character (when I heard the name in the chat I thought it was going to be a DKC generic snake minion who hides in jars) that doesn't get excessively awkward, aside from the glaringly powerful F-tilt that can potentially go against the otherwise well-crafted feel of the weak character. He also feels quite a lot like a Luigi's Mansion enemy with the cat-and-mouse game and being able to get enemies inside your jar of which he feels especially well-suited to among the enemy list in the game. It's a different take on a genre you've explored before, differentiated by making your main obstacles invisible and actually trying to get enemies to jump into the jars when they've been shrunk, which is pretty clever. I only have a few minor questions as to whether Jarvis is using his ground game or aerial game by default when inside a jar or whether it's determined by whether he's on the ground or in the air, and the obvious yet trivial problem of (possibly) being able to stall by throwing out a jar to the top blast zone and teleporting up there. Aside from that, Jarvis pretty much gets all his defensive abilities and potential to be viable from being invisible given how utterly weak he is without it and how unlike some other invisible sets the foe won't suffer any consequences for simply walking into a jar. The set does a pretty good job playing on what little it focuses on in that matter, if being a good but not -great- set that's not trying to broaden it's horizons or be revolutionary given the one-shot nature of the character. Overall I do like it, to put it simply.[/collapse]
 

MasterWarlord

Smash Champion
Joined
Aug 24, 2008
Messages
2,911
MYM 12 STATS​

Remember those stats Joe did back in MYM 9? I decided it's been too long since we've had one of those. That, and it is overly amusing to brag about super heavy/large/slow characters.

If a number is not directly listed, I look for comparisons to existing characters for stats. If a direct comparison to an existing character is made, then I use that character's stat directly, according to the charts in the collapse tag. If the stat is compared to that of a Brawl character's but is not said to be exactly the same, I give a rough estimate, as noted by a "~". Characters are ranked within their tiers by my best guesses as to who would weigh most, making the most sense for their playstyles and character.

Brawl Size Chart:


Brawl Weight Chart:


Brawl Dashing Speed Chart:


MYM 12 Size Chart:

Character|Size
***|***
Ameno Sagiri|~112.5
***|***
Growing Man (Max)|~110
***|***
Basaran|35
***|***
Garbage Man|30
***|***
Coach (Coachman)|27
***|***
Woodcutter (Once'ler)|~25
Phaedra|25
***|***
Oogie Boogie (Max)|21+
***|***
Gooper Blooper|20
***|***
Prospector's Box|18
Dark Falz|18
***|***
Smot|~16
***|***
Bouldergeist|15
***|***
Black Hole Bowser|14
***|***
Tubba Blubba|13
Sentinel|13
***|***
Phantoon|11
Red-Eyes Zombie Dragon|~11
Rhyperior|11
***|***
Tropius|10
Master Hand|10
Doomsday|10
Cap'n Bowser|10
Bowser the Brash|10
Bowser Sphnix|10
Hardin|~10
Oogie Boogie|10
Coachman|10
Wizard Bowser|10
Lexaeus|10
Kang (Platform)|10
Grim Poppet|10
***|***
Two-Headed King Rex|~9.5
***|***
Hockey Man|9
Dark Dusk Spirit|~9
Tempura Wizard|9
Kang (No Platform)|9
Angel (n88)|9
Kang's Minions|9
Once'ler|9
Equius Zahhak|9
***|***
Nova|~8.5
***|***
Pontius|8
Ratigan|8
Xaldin|8
Red Tornado|8
Sovereign Slayer|8
Chakravartin|8
Zasalamel|8
Cop (Von Karma)|8
Marluxia|8
Weird Rider|8
Xemnas|8
Beholder|8
Doc Scratch|8
***|***
Captain Hook|7.5
Star-Lord|7.5
Vergil|7.5
***|***
Y2X|7
Count Bleck|7
Amadeus|7
Veran|7
Saix|7
Manfred Von Karma|7
Paper Man|7
Xigbar|7
G-Man|7
Bartz Klauser|7
Vexen|7
Scizor|7
Merric|7
Luxord|7
Lilly|7
Naoto|7
Obese Zombie (Necromancer)|~7
Black Puddle Queen|7
Hobbes|7
Kirika|7
Yu Narukami|7
Night's End Sorceror|7
Cacturne|7
***|***
Wilhelmina|6.5
Chantique|6.5
Alice|6.5
***|***
Axel|6
Player99|6
Elsa Maria|6
Chandelure|6
Yorda|6
Terezi|6
Poison Ivy|6
Larxene|~6
Prospector|6
Ampharaos|6
Zoya|6
Gray|6
Demyx|6
Water Clone (Demyx, Neutral B)|6
Water Clone (Demyx, Down B)6
Fuka|6
***|***
Mona|5.5
Medusa|~5.5
***|***
Engineer|5
Gardevoir|5
Himawari|~5
Sakurako|~5
Karkat|5
Hanako|5
Ico|5
Cryogonal|5
Isamu|5
Shiftry|5
Pooh|5
Roxas|5
Iron Tail|5
Zexion|5
Grox Empire|5
***|***
Necromancer|4.5
***|***
Azula|4
Darkwing Duck|4
Zombie (Necromancer)|4
Shana|4
Dry Bones|~4
Khamsin Nbh'w|~4
Bouldergeist (True Form)|4
Galvantula|4
***|***
Cappy (Cap)|~3.5
Quote|~3.5
Yutaka|~3.5
***|***
Tetra|3
Angel (Kibble)|3
Rayman|3
Zombie Master|3
Jarvis|3
Calvin|3
***|***
Etranger|~2.5
Skull Servant|~2.5
Cappy (Capless)|~2.5
Kabu|~2.5
***|***
Ratigan's Minions|2
Rin|2
Agiri|2
Billy Hatcher|2
Tiki|2
Burning Skull Head|2
Twizzy|~2
Sir Slippy|~2
Noddy|~2
***|***
Tubba's Heart|1.5
Scarfy|~1.5
***|***
Growing Man (Minimum)|1
Medusa (Boss)|1
Rattata|~1
***|***
Giroro|0.5
Amp|0.5
Keroro|0.5
Kululu|0.5
Dororo|0.5
Tamama|0.5

MYM 12 Weight Chart:

Character|Weight
***|***
Tubba Blubba (Heartless)|∞
Ameno Sagiri|∞
Master Hand|∞
Bouldergeist|∞
***|***
Basaran|60
***|***
Phaedra|35
***|***
Obese Zombie (Necromancer)|27
***|***
Gooper Blooper|25
***|***
Garbage Man|22.5
***|***
Abyss|20
Oogie Boogie|20
***|***
Black Hole Bowser|15
Dark Falz|15
Once'ler's Woodcutter|15
***|***
Smot|14
***|***
Rhyperior|12
Tubba Blubba|12
Sentinel|12
***|***
Kabu|~11
***|***
Kang (Platform)|10
Doomsday|10
Bowser Sphinx|10
Bowser the Brash|10
Wizard Bowser|10
Phantoon|10
Hardin|10
Lexaeus|10
Coachman|10
Chakravartin|10
Scizor|10
***|***
Cap'n Bowser|9.5
Two Headed King Rex|~9.5
Dark Dusk Spirit|9.5
***|***
Tropius|9
Pontius|9
Equius Zahhak|9
Red Tornado|9
Nova|9
Zombie (Necromancer)|9
***|***
Kang (No Platform)|8.5
Kang's Soldiers|8.5
***|***
Ratigan|8
Y2X|8
Beholder|8
Elsa Maria|8
Saix|8
Angel (N88)|8
Prospector|8
Shiftry|8
Tempura Wizard|8
Grox Empire|8
***|***
Zasalamel|7.5
Captain Hook|7.5
***|***
Hockey Man|7
Pooh|7
Sovereign Slayer|7
Doc Scratch|7
Weird Rider|7
Hobbes|7
***|***
Star-Lord|6.5
Manfred Von Karma|6.5
***|***
Red Eyes Zombie Dragon|~6
Luxord|6
Player99|6
Ampharaos|6
Vexen|6
Khamsin Nbh'w|6
Cacturne|6
Gray|~6
Elemental Knight Regulus|6
***|***
Prospector's Box|~5.5
Iron Tail|5.5
Himawari|~5.5
***|***
Xaldin|5
Vergil|5
Karkat|5
Amadeus|5
Medusa|5
Once'ler|5
Axel|5
Lilly|5
Ico|5
Mona|5
Roxas|5
Demyx|5
Hanako|5
Billy Hatcher|5
Quote|~5
Tetra|5
***|***
Alice|4.5
Grim Poppet|4.5
Sakurako|~4.5
***|***
Poison Ivy|4
Marluxia|4
Old Man Geo|4
Bartz Klauser|4
Darkwing Duck|4
Fibrizo| ~4
Jeanne D'Arc|~4
Yu Narukami|~4
Azula|4
Wilhelmina|4
Fuka|4
Zexion|4
Shana|4
Emi|4
Rayman|4
Count Bleck|4
***|***
G-Man|3.5
Larxene|~3.5
Cop (Von Karma)|3.5
Rin|3.5
Skull Servant|~3
***|***
Engineer|3
Medusa (Boss)|3
Veran|3
Black Puddle Queen|3
Chantique|3
Skeleton (Abyss)|~3
Revenant (Zasalamel)|~3
Merric|3
Yorda|3
Terezi|3
Zoya|3
Naoto|3
Chandelure|3
Galvantula|3
Night's End Sorceror|3
Necromancer|3
Tiki|3
Calvin|3
***|***
Water Clone (Demyx, Down B)|~2.5
Burning Skull Head|~2.5
***|***
Homunculus (Max)|2
Xemnas|2
Xigbar|2
Isamu|2
Ratigan's Minions|2
Zombie Master|2
Gardevoir|2
Dry Bones|2
Jarvis|2
Montresor|2
Iron Tail's Spider|2
Blooper Buddy|2
Paper Man|2
Amp|2
***|***
Yutaka|~1.5
Angel (Kibble)|1.5
Rattata|1.5
***|***
Homunculus/Substitute (Minimum)|1
Bouldergeist (True Form)|1
Tubba's Heart|1
Kirika|1
Water Clone (Demyx, Neutral B)|~1
Growing Man (Minimum)|1
Cryogonal|1
Etranger|1
***|***
Agiri|0.5
Cappy|0.5
Sir Slippy|0.5
Noddy|0.5
Scarfy|0.5
Twizzy|0.5
Giroro|0.5
Keroro|0.5
Tamama|0.5
Dororo|0.5
Kululu|0.5

MYM 12 Dashing Speed Chart:

Character|G.Speed
***|***
Nova|11
Angel (Gameface)|~11
***|***
Angel (n88)|9.5
Emi|~9.5
***|***
Medusa (Boss)|9
Cryogonal|9
Isamu|9
Roxas|9
Ico|9
***|***
Rattata|~8.5
***|***
Kang (Platform)|8
Zoya|8
Agiri|8
Jeanne D'Arc|8
Naoto|8
Terezi|8
Rayman|8
Axel|8
Kirika|8
Black Puddle Queen|8
Star-Lord|8
Hanako|8
***|***
Elemental Knight Regulus|7.5
Vergil|7.5
***|***
Shana|7
Azula|7
Negi|7
Chantique|7
Garbage Man (Max)|7
Tetra|7
Marluxia|7
Wilhelmina|7
Bartz Klauser|7
Karkat|7
Chakravartin|7
Y2X|7
Scizor|7
Veran|7
Yorda|7
Dry Bones|7
Night's End Sorceror|7
Sentinel|7
Paper Man|7
Doomsday|7
Merric|7
Engineer|7
***|***
Angel (Kibble)|~6
Darkwing Duck|6
Poison Ivy|6
Rin|6
Tiki|6
Calvin|6
Alice|6
Demyx|6
Sakurako|~6
Gray|6
Mona|6
Etranger|~6
Once'ler|6
***|***
Medusa|5
Quote|5
Saix|5
Player99|5
Captain Hook|5
Kang (No Platform)|5
Weird Rider|5
Abyss|5
Zasalamel|5
Cop (Von Karma)|5
Vexen|5
Sovereign Slayer|5
Khamsin Nbh'w|~5
Cap'n Bowser|5
Bowser Sphinx|5
Ratigan|5
Tempura Wizard|5
Bouldergeist (True Form)|5
Pooh|5
***|***
Smot|4.5
Old Man Geo|~4.5
Himawari|~4.5
***|***
Master Hand|4
Phaedra|4
Red Tornado|4
Xennas|4
Hobbes|4
Black Hole Bowser|4
Zexion|4
Xigbar|4
Grox Empire|4
Count Bleck|4
Xaldin|4
Cacturne|4
G-Man|4
Pontius|4
Coachman|4
Amadeus|4
Lilly|4
**|***
Dororo|~3.5
Keroro|~3.5
Tamama|~3.5
Giroro|~3.5
***|***
Hockey Man|3
Galvantula|3
Phantoon|3
Tubba Blubba|3
Gooper Blooper|3
Iron Tail|3
Luxord|3
Zombie Master|3
Manfred Von Karma|3
Necromancer|3
Chandelure|3
***|***
Tubba's Heart|2.5
Bowser the Brash|2.5
***|***
Shiftry|2
Ampharaos|2
Gardevoir|2
Wizard Bowser|2
Beholder|2
Tropius|2
Prospector|2
Jarvis|2
***|***
Doc Scratch|1.5
Yutaka|1.5
***|***
Basaran|1
Grim Poppet|1
Lexaeus|1
Equius Zahhak|1
Rhyperior|1
Oogie Boogie|1
Hardin|1
Garbage Man (Minimum)|1
***|***
Elsa Maria|0.5
Zombie (Necromancer)|0.5
Dark Dusk Spirit|0.5
***|***
Skull Servant|0.25
***|***
Obese Zombie (Necromancer)|0.17
***|***
Dark Falz|0
Kululu|0
Bouldergeist|0
Ameno Sagiri|0
 

JOE!

Smash Hero
Joined
Oct 5, 2008
Messages
8,075
Location
Dedham, MA
you forgot aerial stats which are much more important in regards t combo-ability of heavies and ****
 

MasterWarlord

Smash Champion
Joined
Aug 24, 2008
Messages
2,911
you forgot aerial stats which are much more important in regards t combo-ability of heavies and ****
This was largely done for more entertaining purposes than anything else, and fall speed comparisons aren't the most entertaining thing to look over. The other stat that I actually considered doing was Air Speed, but not enough sets list it - none of the ones that don't use numerical stats have it, and even then some of those sets don't list it.
 

ForwardArrow

Smash Ace
Joined
Aug 17, 2011
Messages
503
Darkwing Duck
First of all I do have to acknowledge that you have some decently creative ideas in the specials and a couple of the throws. There are a couple moves where you just have a random luck factor tossed in to try to make the move more creative, but then there are a few like the Forward Throw and the Neutral Special that are legitamately solid. You also form an, admittedly not very focused, playstyle around the gas thanks to the glue grenades and the Forward Throw serving to position the foe there and keep them there. You also put in a fairly versatile collection of gases for him to capitalize on, making this a fair bit more interesting than pressuring them into a basic trap. It's still admittedly very lacking beyond about 4 moves though, given that for the most part you just resorted to extremely basic stuff that hardly has any relevance to the gas game or teleports. At least you got the feel of the character across nicely through the animations, but in the future I'd like it if you tried and worked a bit harder on the non-Special moves, tried to make them a bit more relevant to the centerpiece. Considering how little you've participated so far though, this set is far from bad, actually extremely solid.

Tubba Blubba
The main appeal of this set I think is the collaboration between the heart and Tubba, the heart being the main reason Tubba's base moveset is at all usable due to his massive lag becoming less of an issue and the constant threat of a heart attack weighing over the foe's head. It's a lot more versatile than your average two character set, given the ability for both characters to play in either a campy manner or go offensive, and there is obviously a fair bit of flow with the slopes and puke pools due to it being a Warlord set. Most of Tubba's simpler inputs are at least fairly helpful in allowing him to move around in a more reasonable manner due to his otherwise awkward movement with the heart out. It serves as a somewhat necessary balancing factor to having the heart in play, given otherwise a combination of that and Tubba's invincibility could easily overwhelm the opponent. The slopes are admittedly hardly used in ways we haven't seen before, but it's perfectly functional and adds a bit to the playstyle.

The problem is, I can't say I find the base playstyle anything all that interesting. The dynamic between the heart and Tubba is pretty solid and you play off that decently by using the puke coming out of pools due to earthquakes as a shield... past that it's really just fairly generic gang up, using Tubba's attacks to just provide additional pressure or put the opponent in the air for... not as much reason as I'd like given that the heart isn't any better an aerial fighter than a grounded one due to the way it's inputs work. There's not a lot of creativity to the actual inputs, you come up with some decent ones like the Dair and Pummel but for the most part it's just fairly basic manipulation of the slopes and puke pools that doesn't add much to his game and ends up feeling fairly redundant. Honestly commenting this set I hate to say it, but the whole thing comes across as a bit lacking and doesn't really measure up to your other stuff this contest, particularly when I will be honest when I say the base concepts aren't as strong as I feel they've been with your other sets. In your defense, this isn't exactly a super high potential character and I'm not sure you could've done much better with him than you did here.

Jarvis
I must say, a giant wall of pink coming from you was not exactly what I expected. Far from unreadable, but a bit disturbing.

I must say I've actually never been a fan of fly or fly style set bases, not so much because the concept is bad but it usually becomes extremely basic pressure to get the foe into a zone where you can casually destroy them. To my surprise, it's more about baiting and use of invisibility to trap foes in jars here, playing an elaborate game of whack-a-mole in which eventually results in them being trapped within an admittedly fairly basic pseudo-fly. What makes this a bit more fun is that you can stack and flip jars, plus Jarvis himself can join in on the fun with his giant form. Surprisingly, you actually keep the amount of options Jarvis has in jars to an amount which doesn't make him awkwardly flowcharty and obnoxious to play against, and the few you have are at least somewhat interesting with his ability to freeze jars and such. Heck with the invisibility and such even his surface game is pretty fun, given he can create mass confusion as to what exactly is going on with his jars, not to mention a counter is far more useful when the foe has no idea when you're going to use it.

If I had to complain about this set, I guess I feel that there are a few inputs that don't really expand on his game as much as I'd like... and I think Jarvis is an awkwardly good gimper. I mean, it's really darn easy for him to just casually FSmash a jar off a ledge if it's reasonably close with a foe inside, and once he does that with the options he has he's got more than enough tricks to ensure the opponent dies. It doesn't require particularly much skill and frankly makes him a lot less interesting in my honest opinion, especially what with how easy that is to make happen. I suppose with how easy it is for him to warp between jars too he's extremely frustrating to actually hit, much less when he can go invisible. I'm a bit of a hypocrite having made Gamzee, but even still. None-the-less, it's still a pretty darn fun set most of the time, just brought down a bit by awkward balance problems.

Ameno-Sagiri
Given the basis for this set, AKA giant monster in the background who makes duplicates of player characters to fight... I can't say I was too excited for it. It's such an easy concept to screw up, and I wasn't sure you were going to pull it off. I was proven wrong in the best possible way. The mind control system you set up is incredibly clever, being able to switch the order of who is attacking or just not attack at all with one player is as good as I could ask for, basically allowing the Ameno player to combine it's attacks with the other players in whatever manner it pleases. You also put together a lot of clever utility for your shadows, via various methods of crippling foes so you can have a superior version of them with things like the Forward Tilt. A particular highlight of the set is probably that utterly amazing shield game though. Aside from the base input which allows him an additional vantage point to attack and a way to decrease his predictability, the shields he can set up for those buffs and potential nerfs are absolutely fantastic, both in terms of being an extremely clever concept and how they are utilized. It adds an absurd amount of depth to the spacing Ameno is capable of as well as how he utilizes the shadows.

I don't think I need to tell you that your interactions are good here. You give an absurd wealth of playgroundy options that help out your shadow minions, being able to create cycles to keep them alive, platforms for them to work off, cages, protective ice cages that turn them into bludgeons... for the most part, it's completely brilliant, and when you aren't doing that you're at least making good use of the fog or giving Ameno his own versatile ways to beat up on the foe, something that given his status he absolutely needs. Not to mention the fog mindgames, which while not the main focus of the set are still fun in their own right and work well into his gameplan. I guess if I had to nitpick, I do find the base concept almost distatefully out of tune with how characters in the game normally play, what with how he ignores knockback as well as movement in general... but you have the mind control to allow him to play as a regular character, and it certainly establishes his own niche if the amazing mind control and utilization of enemy movesets wasn't enough. Could certainly say this is one of my favorites in the contest.

[COLLAPSE="Commenting on comments on comments"]Also Junahu first of all let me congratulate you on that response, I was terribly amused. Figured you would respond but not like that. (CLAP)

@Etranger: On the subject of the Bair, I guess I will admit there are very situational uses for it given the ability to manipulate your knockback, perhaps for barrier positioning purposes, but it will happen on such a rare occasion it feels to me as though the move would largely never be touched. And I guess I just feel she could've used another move along the lines of her clone special to help her out and that move in particular stuck out to me as doing nothing.

@Fuka: You make a point that she usually has to work for a place to grind... and perhaps I was wrong about her always having a house to duck into. That said, given the randomly generated nature of the stage, wouldn't it frequently end up where the foe has no access to certain portions of the stage whilst Fuka does due to her wall run which pretty much allows her to casually traverse the stage in a way no other foes could. Sure Meta Knight or Kat's Medusa could pursue her pretty much wherever, but those are exceptions rather than the rule. I just think she's more than a bit too good at getting out of the way and stalling.[/COLLAPSE]
 

JOE!

Smash Hero
Joined
Oct 5, 2008
Messages
8,075
Location
Dedham, MA
No comment on the comments you said you would comment while commenting about our comments on the xat?


Davidreamcatcha

Smash Ace
Joined
Feb 9, 2011
Messages
629
VVV READ THIS BEFORE THE MOVESET VVV
CAPTURE THE FLAG
^^^ READ THIS BEFORE THE MOVESET ^^^


A long time in the future in a galaxy far far away, this mode exists. Probably by Super Smash Brothers 8 or so, as this is a massive 10 vs 10 team battle that can only be played online, as everybody only has a limited field of vision around themselves. Naturally, a high powered console and a superb online server are required for this, so we’re obviously not pretending this is going to be around any time soon. And of course, we’re also assuming this involves MYM characters, so make that Super Smash Brothers 79 for them to get the rights to all of them.

The only playable stages for this mode are absolutely massive to accommodate the amount of people – not even Hyrule Temple and New Pork are valid. The smallest of CTF stages are vaguely similar to Hyrule Temple, but with the lower half having as much ground as the top half and the ground in the middle extending all the way to the blast zones to force players to go through the middle.

As stated earlier, players have limited vision, as the camera would be so zoomed out on some of the larger CTF stages that it’d simply be impossible. There are several different camera zones throughout the stage, and if you walk out of one the camera will show the new zone you move into instead of the old one. No compromising. For a stage like the larger Hyrule Temple we just discussed, there’d be 5 of these camera zones, two to split the lower and upper half of the stage and one in the passage in the middle that players use to transverse the two halves of the stage.

The object of the game is to, of course, capture the flag. The flag starts in a corner in each team’s half of the stage. It can be picked up like an item by either side (So a team can relocate their flag as they see fit), though taking any form of hitstun causes you to drop it. For you to score a point, you have to bring the flag back to your team’s flag. The flag doesn’t magically teleport back into the base after being left idle, so when a defending teammate grabs their own flag they’ll want to hastily bring it back to their base away from the enemy flag. . .Though you can always just throw it off a cliff or eat it with Wario's chomp to make it respawn back at the base. The winner is determined based off who has the most points after a set time limit. If the amount of flag points is equal, it combines the KOs/self destructs of the players as if the game were a standard time match.

. . .But why should you hunker down in any one particular place in the stage with the flag, such as your base? Isn’t there mindgame potential putting the flag in the enemy’s “base”? Well, perhaps if this somehow managed to be implemented into a game with dull characters like Brawl, but this is Super Smash Brothers 79. All of those defensive/set-up/trap MYM characters are around, and they’ll inevitably be setting up a hellish fortress around the flag. The game actually encourages this to boot – at the start of the match there’s a divider in the middle of the map that sticks around for 30 seconds, giving both teams plenty of time to set-up. Furthermore, while team attack is enabled in this mode, traps will still only give beneficial effects to allies/negative ones to enemies as if it were turned off.

While competitive play of this mode generally always feature well balanced teams with a relatively equal amount of characters on offense and defense, what about when you’re just randomly searching for other players and none of your allies are capable of laying traps? Thankfully the stages have various stockpiles of traps you can grab like items then place wherever in the bases. They’re somewhat subpar, but it’s better then nothing and somebody’s gotta guard the flag.

If a player gets KOd, they respawn in their base after a lengthy 30 seconds. While they’re waiting, they can view all the camera zones that at least one of their teammates is in, swapping between them with casual presses of A. Only your damage percentage is displayed with a portrait like normal, whenever another player gets hit their damage percentage flashes briefly above them. Names are not visible before or during the match, but are shown afterwards for you to add people to your friends list and what-not. SSB 79, remember?​


THE ENGINEER
Start prayin', boy.


"This amiable, soft-spoken good ol' boy from tiny Bee Cave, Texas loves barbecues, guns, and higher education. Natural curiosity, ten years as a roughneck in the west Texas oilfields, and eleven hard science PhDs have trained him to design, build and repair a variety of deadly contraptions."

The Engineer is one of 9 playable classes from the Team Fortress series. This class can build various machines; such as Sentry Guns, Dispensers and Teleporters to assist his team. This makes up for his adequate firepower, allowing him to hold up certain areas of the map with the greatest of ease. In terms of personality, The Engineer is likely the sanest of the characters found in the game - but still has quite a streak of madness going on.

Just like his foil, The Spy, The Engineer is only playable in Capture The Flag Mode.


Stats
Gotta move that gear up!


Traction: 9
Jumps: 8
Ground Movement: 7
Fall Speed: 6
Aerial Speed: 5
Size: 5
Aerial Control: 5
Weight: 3

A little sidenote about a mechanic of the Engineer's - whenever he builds something, he announces that he's doing so. If allies are in the same Camera Zone, or only 1 Camera Zone away from him, they will hear his yell as a small Wrench icon appears on their screen for a second before vanishing. This allows allies of the Engineer to know that he's building something if they wish to defend him in setup, or reap the rewards it may have. Of course, Spies disguised as an ally will get the message too - incredibly bothersome to deal with in your case, though it also helps balance the metagame a bit in the favor of the sneaky french rogue.


All buildings that the Engineer makes, surprisingly, stay right where they are when he dies. On that note, if any of the Engineer's buildings are destroyed while he wasn't in the camera zone and wasn't the one who destroyed it, a notification will flash on his screen 5 seconds after it's been destroyed - the delay can punish The Engineer a bit in case he's been inattentive, but also keeps the Spy/Engineer matchup from leaning too close to The Engie.


Metal


As you might've expected if you're at all familiar with the character, Engineer has an ammo mechanic. The Metal Counter takes up a small portion of the Engineer's screen, being located directly next to his damage percentage. It's nothing more than a number inside a nifty little box, not too distracting for the player. The Engineer spawns with 300 metal per stock. This is also the cap for metal you can earn, unable to go past 300. This will very likely be depleted quickly if you know what you're doing. The amount of metal you have will obviously affect most of the Engineer's attacks, he's simply unable to perform metal costing attacks if the amount you have is insufficient. You regain metal everytime you die, of course.

Fortunately, the Engineer has many ways to get more metal. In addition to getting metal through certain moves, simply eliminating a foe will refill 100 metal right off the bat.
In addition - in any event where a building is destroyed, a pile of metal will be left where it was. The Engineer can walk over this to add 50 Metal to his Metal Counter. The foe can do this as well, really doing nothing but simply eliminating it off the field, however - unless he's an enemy Engineer, in which case it will be added to his own metal.


Specials
Down Special
The Engineer pulls out a small PDA-like device as he turns to the screen with a maniacal grin on his face, looking quite like the header pic as he does so. From here, he stands completely still with you able to move the control stick left or right to change the camera zone you're viewing - you can view 3 camera zones to the left or right of The Engineer, this can be laglessly cancelled out of by pressing the shield input and will also be cancelled out of upon you being hit. You can't perform this while inside the respawn point to prevent obvious cheapness - though despite this disadvantage, this serves as an incredible tactical advantage for The Engineer. It enables him to view what the enemy team is made up of prior to the start of the round, as well as enabling him to set up a proper defense as enemies will be constantly approaching him.

By pressing the down special input again (or holding it when first starting this), a different menu will be brought up, showcasing every building you have up in icons. You can cycle through these with the control stick, and press the standard input while on their icon to detonate it - destroying it in a small explosion that deals 8% to anyone nearby - you can check up on the status of your buildings with this, though it is incredibly easy to get knocked out of it - taking any form of hitstun or knockback will cause the menu to disappear.

Neutral Special
Upon pressing the input, The Engineer pulls out a toolbox and holds it out in front of him in a lagless motion. The Engineer can move normally while carrying the toolbox, but cannot shield or attack. While the Engineer is holding the toolbox, a holographic blueprint constantly remains on the ground in front of the Engineer. Pressing A will cancel the move with .30 seconds of lag, the toolbox disappearing from The Engineer's hands. Pressing the Special Input will cause Engineer to laglessly begin this move, eating 130 of Engineer's Metal. Holding the Special Input instead of just pressing it will cause him to instantly place the box in front of him if he has enough metal.

Once the Engineer begins this move, he slams the toolbox onto the location where the blueprint was, exclaiming "Buildin' a Sentry!" The Toolbox unfolds and unveils the Engineer's Sentry Gun over a period of 3 seconds, the Sentry is not at all connected to the Engineer at this point in time, so he can move about and attack normally during this. Though, it is pretty stupid to completely abandon it considering how it only takes 15% damage to destroy all buildings undergoing construction.

The Sentry itself is currently about the size of a crouching Wario. Right now, the Sentry has 30% Stamina. Only one Sentry per Engineer may be on the field at a time. It has a pretty decent range overall - it covers 1.5 Battlefields on both sides of itself, as well as firing at foes 1.5 Ganons into the air.

Once the Sentry has detected a target within range, it will turn to them if they are behind it or above it, taking about half a second to do so if they are behind or above it, and immediately begin firing bullets at them. The Sentry fires 4 bullets per second. Each bullet deals 5% damage and no knockback, while the bullets don't normally flinch, the 4th bullet will always deal some flinch. In addition, the Sentry can only fire at one target at the time - meaning that it can fall quickly to an overwhelming enemy party. Considering how weak this is, you're going to want to be around to assist the Sentry and upgrade it.

The Sentry is, of course, not stupid. It will only fire at the opposing team, but can be fooled - if Spies or foes like that are disguised as a member of your team, you're going to be in for a tough time.

LEVEL 2 SENTRY


Like the in-game sentries, the Sentry Gun is upgradable. The Sentry can be upgraded to Level 2 by feeding it an additional 100 metal. The Sentry is upgradable whenever it is at full health and at full ammo, feeding it metal whenever your Sentry doesn't have full health or ammo will repair it instead. The amount of metal currently in your Sentry is displayed in a holographic number above the Sentry. Once you've achieved Level 2, the Sentry will upgrade itself, dual miniguns sprouting from it's side and adjusting it's height to be slightly taller then it was before. The Sentry retains the same firing rate but has more damaging bullets; each of the bullets now dealing 6% damage rather then 5%. In addition, it gets a 5% health boost.

LEVEL 3 SENTRY


Taking yet another 100 Metal to upgrade to Level 3... Upon upgrading to Level 3, The Sentry is increased to about the height of Mario. Like the Level 2 Sentry, the Level 3 Sentry retains bullet capacity, firing rate and even the bullet damage, but has an even more threatening surprise. After every 4 bullets fired, the Sentry will fire a rocket the size of Samus's Missile with a disjointed hitbox at the foe. The rocket deals 20% damage and incredibly high knockback - meaning that building it up to this point is 100% worth it due to the fact you can actually allow your Sentry to competently kill at this point, the flinch from your 4th bullet should be enough to hold them in place for the rocket - while it's speed i s far faster than Samus's, we'd like to have some insurance, no? It will also increase in health by 5%, adding up to 40%. It'll take a massive raid from the other team to kill that monster...

Side Special


This move begins with a toolbox state identical to the Sentry Gun's, though it will only take 80 metal to fuel this.

Once the Engineer begins this move, he places the toolbox down where the blueprint was, bragging "Erectin' a Dispenser!" The Toolbox unfolds to reveal the Engineer's Dispenser over a 2 second period. Like the Sentry Gun, one of your moves later on will speed up the construction of this. As with the Sentry, Engie can move normally during the construction of his Dispenser.

The Dispenser stands at around Mario's height and has 25% stamina, functioning as a completely solid wall. You may only have one built at a time. What exactly does the Dispenser do? Well, the Dispenser's effect is a somewhat passive one. By being a Battlefield Platform away from the Dispenser, you will heal 3% every second - this includes all of your team-mates, forming what could be called a central hub that they'll all flock to. This has the unfortunate effect of also healing anyone disguised as a team-mate, making Spies and some foes like Clayface and Doppleori extremely pesky to deal with.

An effect more exclusive to The Engineer himself with the Dispenser: Every 3 seconds, the Dispenser gains exactly 10 metal. By standing within a BFP of the Dispenser, you can collect all the metal the Dispenser is currently holding, the Dispenser having a maximum capacity of 100 metal. A small number listing how much metal your Dispenser currently contains floats above it at all times. A destroyed Dispenser will only reap 50 metal, however - it doesn't give out any of the metal it obtained once it's destroyed.

LEVEL 2 DISPENSER


As with a good majority of the buildings in the Engineer's arsenel, the Dispenser is indeed upgradable. Feeding your Dispenser 100 Metal will cause it to upgrade to Level 2. It's upgradable whenever it is at full health and at full ammo, feeding it metal whenever your Dispenser doesn't have full health or ammo will repair it blah blah blah. The amount of metal your Dispenser needs to upgrade itself is above the Dispenser, below the "containing number". Upon becoming Level 2, the Dispenser becomes slightly taller then it was before. The rate of metal dispensed is increased at this stage, the metal gained every 3 seconds being raised from 10 to 30. In addition, it now administers 4% health per second, instead of 3%.

LEVEL 3 DISPENSER


It takes yet another additional 100 metal to upgrade the Dispenser to Level 3, the Dispenser revealing a new compartment that makes it even taller then it was. Making it to level 3 is more minor, but worth it. The healing is buffed another 1%, now giving out a full 5% per second. In addition, the metal gained every 3 seconds increased from 30 to 50.

Up Special

Same toolbox state as the other, taking 100 metal to build.

When the Engineer puts down the toolbox, he cries "Teleporter Entrance/Exit comin' up!" A teleporter is revealed over a 3 second period. This has the same move-around properties as the other buildings.

The teleporter is extremely low to ground, and has 20% stamina. The effects of course are extremely obvious, as the name would indicate. By using this input a second time, you can create a second teleporter identical in building time and metal it takes to the first. By entering the first teleporter, anyone standing over it will instantly be warped to the second one - this includes foes as well, allowing you to potentially teleport them into more dangerous situations. However, there's a cooldown period of 3 seconds after someone teleports, the teleporter not functioning at that time. Still, this is incredibly beneficial for setting up across the map - set up a well-defended zone and plop down a teleporter exit to warp in some allies. Your teleporters don't disappear when you die, also meaning you can plop right back in after you respawn.

The increase in levels are more minor compared to the Sentry and the Dispenser, but still noticeable. The teleporter holds an extra 5% stamina with every upgrade, and subtracts 2 seconds off the cooldown. At level 3, there is no cooldown, allowing you to instantly have allies warped in at the drop of a hat.

Only your allies and disguised enemies are able to use your teleporters, it'd be largely pointless for normal enemies too anyway, considering the entrance will often be in your base with the exit right by your Dispensers - where your allies can cluster. By the way - if a character is standing on an exit when someone teleports, that character will take 7% damage and take knockback the moment they teleport, preventing two characters from being in the same spot at once.


Standards

Down Tilt
The Engineer swings a wrench in a downward arc in front of himself. This acts as a simple GTFO move, dealing 4% and some minor knockback. Obviously far more notable: if you hit a building with this, 50 of your metal (all if you have less) will be given to the building for upgrades.

In addition, simply striking a building undergoing construction with this attack will cause 1 second to be taken off of the time it takes to be built, providing you with a quick method of building these objects - especially good if you need a quicker defense method. You can strike it multiple times for this effect, considering it's slightly faster than Ganon's dtilt, you can use it multiple times to speed up their construction efficiently.


Jab
The Engineer quickly steps forward with a punch from his gloved hand - dealing 4% and light stun, subsequent presses of the input will have him deal a punch that deals 3% and stun, with the final input being a power uppercut that deals 6% and good knockback. While this obviously gives him some form of self-defense during setup, this is good to throw out against enemies under fire from a Sentry thanks to it's relatively short startup time.

Forward Tilt
The Engineer extracts a pistol from his belt and begins firing it forward, firing 4 bullets before stopping. The bullets travel the distance of Final Destination at the speed of one of Fox's blasts, moving in a completely straight path. Each bullet only deals 3% and some minor hitstun, though this is more than enough for your purposes. The main thing about this is that the hitstun will cause foes carrying the flag to immediately drop it, as well as just being useful against escaping foes in general - slowing them down for them to get hit in the face by a rocket, or into an ally's attack.

Up Tilt

The Engineer places down a red box in front of himself while yelling "We've got a Repair Node comin' up!" As with the likes of the Dispenser and the Sentry, this building appears over the course of 4 seconds, during which the Engineer can move around do what he likes - and can dtilt it to decrease the time it takes. It costs 100 metal to build. Once this is built, it's about the height of Mario and acts as a wall - though it has no physical effects at first. What does this do? Well, when the Repair Node is around, every 4 seconds, it administers 5% health to any Engineer-made traps/buildings 1.5 Battlefields around it, allowing you to feasibly wander away from your zone for a few seconds.

The Repair Node has 25% stamina.


Dash Attack
The Engineer leaps forward a small distance (around .75 Battlefield Platforms) holding his fist back, and delivering a devastating haymaker upon his landing. He can't be knocked out of this leap once he starts it, only being able to be knocked away after the swing. The swing itself deals 10% damage and high knockback, being one of the Engineer's only real killers. This is good for retreating foes, though can also bring a lone raider to their knees - leap forward and send 'em flyin' away! Useful during setup, no?

Smashes
Down Smash

The Engineer faces the screen as he builds something in front of him, a small cloud of dust forming as he pounds away with a wrench. After a moment, The Engineer emerges with a cry of "Anthill's coming up now!" as he admires the small red box in front of him. The Anthill takes about 3 seconds to finish constructing and it takes about 100-140 metal to build based on charge. It can take 16% before disappearing. Once it's built initially, the Anthill doesn't seem to do much...


Until a second later, in which one of the above creatures pops out of the Anthill. This is an Ant-Bot, and they're extremely small, beating out even Pikmin in terms of smallness. They will constantly patrol the area, always moving but never going past a Battlefield away from the Anthill. The Anthill spawns about 1 Ant-Bot every 3 seconds, and can have 4-8 out at a time, depending on charge.

If any foe comes within a Battlefield of the Anthill, all nearby Ant-Bots go on alert and move towards them at Bowser's walk speed. Once they're within a Battlefield Platform of the foe, they blink once and explode a second later - this deals 8% damage and high knockback, being a decent killer. If the Ant-Bot is hit by any attack before then, it will explode in a hitbox dealing 4% if a foe is near by it. Outside providing you with helpful little guardians who protect a zone around the Anthill, they provide one of your few actual killers. Their slow walking speed can be their downfall, though it makes things like your pummel and your special down smash more useful...


Up Smash

The Engineer places a toolbox onto the ground in front of himself, unveiling the sentry seen above over the course of 1 second. This is one of the few buildings Engie doesn't yell about considering it's more sleathy purposes. Still - ain't that a cute little gun? This is a Mini-Sentry, a more compact version of the Engineer's normal Sentry - it acts just like the Sentry, but with a few notable differences. For one, it is a completely separate building from the normal Sentry - a Mini-Sentry and a normal Sentry can coexist without any problems, it shares the same range, but only takes about 90-120 metal to build, based on charge. It's slightly smaller than the normal Sentry, but only has 10-20% stamina, and turns to foes twice as quick as the normal Sentry.

However, it suffers massively in terms of damage - it deals a paltry 2% rather than 4% per bullet, meaning that the maximum it can deal per second is 4%. The Mini-Sentry can't be healed or upgraded unlike the normal Sentry, however, meaning that it's relatively pointless to build it near the rest of your tools, especially considering it really can't defend your Dispensers and Amplifiers very well. These are best as distractions, considering how easily they'll be destroyed. Build one while you set up a bigger tool, such as an actual Sentry - you can always place on of these in the foe's base without much hassle due to the low building time, of course, but it will be destroyed there extremely fast without your support. Though one of your most obvious strategies will come with your forward special smash...


Forward Smash


It's time for some Frontier Justice! The Engineer pulls out this weapon and begins loading it with shells. During the charging and startup phase of this attack, the Engineer instantly gains superarmor. If a foe hits him during the startup, he will take the damage but suffer no hitstun or knockback and instantly perform the fully charged version of this attack. As for the attack itself, The Engineer fires his shotgun forward in a standard shotgun blast - it covers the distance of Battlefield in front of himself before disappearing. As you may expect, this attack is more effective up close. It deals 10-17% and decent knockback up close, with the damage being reduced the further out it goes to the point where being at the very end of the blast will only deal 3-9% damage.

Given the recoil of the gun, The Engineer stumbles back a Battlefield Platform immediately after he fires the weapon. Given the superarmor, this is extremely relevant - he can stand in front of his buildings and soak damage for a moment before he stumbles backwards into what could very well be the zone in which you have them set up.

Of course, there's one more aspect that needs to be talked about here - the battery on top of the shotgun. This is wirelessly connected to your buildings. This only becomes relevant once a building becomes destroyed, however. Once a building is destroyed, the next time you use this attack, it will deal 2x damage and knockback as the battery on the shotgun glows. This effect only happens if your building contributed to a kill, however (if it attacked a foe at least 10 seconds before their death or was the one that actually killed them). For every kill it dealt, you get one of these powered up attacks. This works extremely well in the case of a retreat - fire charged up shotgun blasts as you stumble backwards, hopefully falling back towards an ally or into a different camera zone.

You'll obviously only be reaping these benefits from your Sentries and Anthill, though, as they're the only ones that can actually kill people.


Special Smashes
Special Up Smash

The Engineer begins whacking at the area in front of himself so fast that a large dust cloud forms around him. After a second, the area clears up as The Engineer cries out "Amp's up!" The Engineer has just built an Amplifier as wide and tall as Bowser, using up about 100-130 metal.

Now, this Amplifier has an effect that benefits your allies (not you), to an incredible extent. Any allies or disguised enemies a Battlefield around the Amplifier will start dealing 2x damage! The characters will have this buff until they leave this zone, but it still provides them with a bit of defense. This obviously works best with ranged characters, though if enemies approach this area, close-ranged characters can fight back. The Amplifier actually has an incredibly useful effect, but has the minimal health of 15-25% to show for it. However, your allies should be crowded around it enough to be able to soak up damage.


Special Down Smash
The Engineer pulls out his wrench and quickly begins building something on the ground, announcing "Metal Hand bein' made!" to all allies around him. After the Engineer gets up, there will be no indication of any sort of trap having been made at that spot, outside 80-100 metal being taken from our southern friend.

However, if anyone steps over the spot where The Engineer was working, true to his word, a metal hand will pop out of the ground and grab the trespassing foe! The metal hand actually resembles his own Gunslinger a bit...when a foe is grabbed by the hand, they can't move but can still attack, and will need to deal the hand 15-28% damage to break free (usually accomplished by down tilts and the like). This allows you to hold them in place for a quick beating, however, and can also give you an extra second to upgrade your buildings while they're preoccupied.

If an item is thrown over the hand, the hand will grab it and hold it in place, not releasing it until the damage is dealt to it. This is especially useful in the case of the flag, forcing foes to have to go through an annoying process to get it. You can also work with your team's Spy to have it grab fake flags for a trick that'll infuriate the other team. You can only have one hand present at a time, however, which can limit this a bit.


Special Forward Smash
The Engineer extracts a flash grenade, and tosses it forward 2 Battlefield Platforms forward. This isn't as random as it seems, but the source is a bit obscure: it originates from Team Fortress Classic.

Now, the moment the grenade hits the foe or the ground, there will be a blinding flash that covers up the entire camera zone. This only covers the screen for about 1-4 seconds depending on charge time. Given the fact that you can toss this from a different camera zone, you can toss this at a camera zone you know is enemy-infested to prepare for an ambush from you and the rest of the raiders, allowing you to set up a mini-sentry undercover (normal sentries are possible, but really won't happen often in serious gameplay unless the enemy's team is incredibly incompetent). In addition, this can also be a great retreat option - throw down a flash grenade and get you and your group out of there.

You can only use one of these every 8 seconds.


Grab Game

The Engineer extends an arm outward, attempting to grab foes. While this has decent speed, the range is mediocre. Still, this can be useful for catching a foe passing by you due to the incredible speed, or even just throwing it out to overwhelm a foe trying to move away from your sentry.

When The Engineer grabs a foe, he will chuckle darkly as he holds them. With his other hand, he will extract his pistol and point it at the foe's head. He is able to walk and jump with the foes while he has them grabbed like this, (holding the z button/whatever you have the grab input set as + direction is the only way to activate a throw).

Now, if The Engineer is struck while he is holding this varmit - the person who attacked him will find that he has complete superarmor as he fires the weapon straight at his hostage. They take 15% damage and high knockback in an unavoidable shot - this allows The Engineer to make quick escapes, being able to take hostages to further his goals.

You can grab allies like this, of course, which makes this invaluable for Spychecking. You can grab a suspected Spy and hold him under heavy fire - the foes will do the rest. However, your throws also have beneficial effects when used on teammates.


Pummel
The Engineer presses the gun directly into the side of the foe's face for a .20 second period before drawing it back. Now, if the foe attempts to button mash out while the gun is pointed to their face, The Engineer will fire it and blow them skyhigh - having the same properties as the earlier attack. This obviously makes it much harder to escape his grabs without taking any sort of damage, forgivable considering his extremely poor range. But this also works good at delaying the foe's escape if you're waiting for a team-mate to arrive...

Up Throw
The Engineer quickly plays a game of leapfrog with the foe - he jumps up and bounces off their noggin, footstooling off them. This only deals some light stun so they can't immediatly come back and get the Engineer, but puts The Engineer up 3 Battlefield Platforms. You can use this to escape from potentially dangerous situations, but this also has a practical effect against allies. He can use them to get himself to a more out-of-reach position - one that he may not be able to reach normally, and build a zone there.

Side Throw
The Engineer swings his wrench like a bat directly into the foe's stomach. (If throwing backwards, he shoves them behind himself first before swinging it into their stomach). This motion actually deals 6% damage to the foe and causing them to be pushed backwards a good 3 Battlefield Platforms or so. This acts, of course, as one of the more archetypical Davian "lol shove them towards your zone" attack, but serves far more of a purpose as you can also shove them towards the attack of your allies.

While this is obviously less effective against allies, you can shove them away from incoming projectiles if need be.


Down Throw
The Engineer attaches a small device to the stomach of whoever he has grabbed. From here, they aren't released from the grab and must button mash out as normal, though the Engineer can't throw them from this state. Rather, The Engineer can pummel in this state to wind up a small dial on the front of the device.

What does this do? After they exit the grab, a countdown begins going down on the device. It lasts 30 seconds by default, with each pummel increasing it by 10 seconds. What does this do when the countdown is up? Well, if you have a teleporter exit when the countdown is up, the one who has the device stuck on them as well as anyone within a Battlefield Platform of themselves will be instantly teleported to the exit.

Beneficial to allies in that they can be teleported back to your exit, which is likely right by your safe zone - on the other hand, this is great against foes, as they can be teleported right into your team and all of your buildings waiting for them. The device is deactivated upon the person wearing it dying, which also has the side benefit of letting you know if someone -has- died when they don't come back.


Building Grab Game

The Engineer actually has a unique grab against his buildings. Rather than actually grabbing them, he pulls out his wrench and beats it against the hand not holding the wrench, thinking about what to do with the building. You still have to be close to them for this to work, however.

Only one of The Engineer's throws actually release him from the grab, he must otherwise shield to get out of this, as the building will certainly be putting up no resistance.


Pummel
The Engineer begins adjusting various things on the building using his wrench, this is a pummel that can only be exited by pressing the pummel input again.

Now, for every second you were doing this to the building in question, 4 seconds will be added to a timer. After the timer activates, a large shield engulfs the building in question - it will still perform it's functions as normal, but will now take 1/2 the damage from all external sources. The shield only lasts 5 seconds and only one can be placed on a building during it's sad and short life, however. Use it wisely.

This move is most often used when you have to leave the zone, obviously, especially when some extra defense is needed if you suspect the raiding enemies may arrive soon.


Up Throw
The Engineer presses a button on the building in question, causing it to fold back into a toolbox. After .50 seconds, The Engineer hauls it over his shoulder with a cry of "Heavy load comin' through!" He can move normally while carrying the toolbox, though cannot attack. Surprisingly, being dealt damage and whatnot will not make him drop the toolbox, as he holds on to it no matter what.

By pressing any input while carrying the toolbox, the Engineer will drop it in front of himself as it reforms back into what it was when he picked it up. The reforming process is the same process as it being initially built, only twice as fast. This can be a good way to move things, of course, but you can also move through teleporters while holding these, enabling you to set up buildings while in the cover of your base before bringing them out into the battleground.


Back Throw
The Engineer reaches into a compartment inside the building, fiddling with it using his wrench. Each time you use this throw, 50 metal is taken away from the building you're using this against, and added back to your metal counter - this obviously won't work if it has less than 50, and yes, your buildings can downgrade if you take away the amount that was used for their upgrade.

Forward Throw
The Engineer places his wrench up to the building in question and begins tinkering with it, this does nothing if you have no metal. However, if you have 60 metal on hand, all of the damage that your building has taken will completely heal. This works well, very obviously, when you have a building that's undergoing heavy fire from an assault - though one of your key times to use this is after an assault is cleared out, as you can't be knocked out of the grab.

Down Throw
The Engineer chuckles darkly to himself, as he places a small device onto the building in question and begins fiddling with it using the wrench until you input a different throw or exit the grab. For every second The Engineer fiddles with said device, it adds 30 seconds to a small time counter that appears above the building in question (only allies and disguised enemies can see this). When you exit this, a countdown starts. After the time passes (30 seconds without any presses), the device instantly blows up in a smart bomb explosion-sized blast that deals 20% and high knockback to all those around it. The building simply being destroyed before that will cause the device to deactivate. Once the countdown is set, there is no stopping it from exploding, it will explode even if you are lugging it around. The main purpose here is just attaching the device when you know that the game's going to be up soon, and going out with a bang as the enemy heads into your zone.

Aerials

Neutral Aerial
The Engineer suddenly begins striking at the air underneath himself with his wrench. This is at an incredibly fast rate, so much that a cloud of dust actually forms around the wrench. After a moment later, a jet platform (the color is the same color as your team's) appears at the location The Engineer was striking at (which means you will be standing on it when this ends), as he cries out "Platform up!" It takes about 90 metal to build and takes 25% damage before it's destroyed, after which, everything on it will fall to the ground below. Surprisingly, The Engineer can have quite a few of these - up to 3 if he so chooses. This can be really useful with the raiding party - the platform is completely solid, projectiles can't go through it, providing some temporary cover. It can serve as an excellent place to put down your own buildings, of course, but can also serve as cover for a zone you have set up in the middle of the map.

Naturally, one of your best ways of getting up here is using your up throw against an ally. Though you can use your high jump height to get up here normally, of course.

By leaning the control stick slightly to the right or the left, The Engineer will build the platform at a slight angle - it getting more of an obvious angle if you push it far more strongly. This gives you five possible positions your platform can be in. This obviously provides you with more versatile cover.


Forward Aerial
The Engineer quickly removes the power cord from his belt, using his texan heritage to tie it into a lasso before tossing it forward (with it being able to angled slightly) - quicker then it sounds, but still somewhat laggy. Yes, this is constantly on his character model. It extends 2 BFPs outwards.

If the Engineer catches a foe, item or an ally, they are obviously move to to his position - being released just a Mario in front of him him as the Engineer becomes vulnerable for half a second, tying the cable back on. He is obviously able to be hit by those fairs and whatnot, though this serves as a useful attack in many ways. For one, you are able to drag retreating foes back into your zone with this, allowing yourself to take a few blows to keep them away from accomplishing their goals, such as grabbing the flag or simply. You can even pull allies out of harm's way, and perhaps up to positions they wouldn't normally be able to reach (especially your platform, effective in keeping you from wasting a teleporter to get one character up there)

You can also use this as a tether recovery if the map has an offstage - while it's not a good one, persay, it functions well when you need to get to higher ground and also works considering ol' Engie doesn't have a typical recovery with his teleporters.


Back Aerial
The Engineer, in a moment of desperation, quickly juts out his legs behind himself. This is exactly what you were expecting when you read the first sentence - it deals 5% damage and light knockback, and spaces the Engineer a Battlefield Platform away from his enemy. I know, it's cliche. But the Engineer needs a spacer during his set-up time - as well as a spacer in general to help him get back to his zone.

Up Aerial
The Engineer enters a spinning animation as he holds his wrench out alongside him, with a very small bit of starting lag. This motion deals 8% damage and decent knockback, as well as having a decent bit of range. This works very well when shorthopped, possibly adding another move into Engineer's groundgame as well.

An important factor of this move: if any projectiles come in contact with The Engineer's wrench as he spins, a large CLANG! will be heard as the projectile is reflected. While the timing is somewhat precise, this can definitely help with defending your safe zone from wayward projectiles.


Down Aerial
The Engineer performs a stall and fall downwards, not going quite as fast as others can claim to, quite slower than that of the Ice Climbers' stall and fall. He enters a sitting position as he holds his arms out to the side here, dealing 9% and minor knockback to foes he encounters on his path.

While a semi-decent escape method while you're high up in the air, the real fun starts if you land on your Sentry or a Mini-Sentry. When this happens, The Engineer sits on them as though they were Broncos, two buttons sprout up on the sides of the Sentry that the Engineer grabs on to. In this state, The Engineer takes manual control of his buildings - angling up and down will cause the Sentry to angle itself up and down, quite like a cracker launcher, and turning will cause it to turn with the same turning lag it had before. Pressing the standard input will cause you to fire a single bullet (holding it will cause them to be rapidly fired), while pressing the special button will fire a rocket if you're on level 3 of your normal Sentry.

You can use this to fire at enemies out of the Sentry's range, by sacrificing the auto-control for a manual one. The bullets and rockets will traverse until they reach the end of the camera zone, upon which, they disappear. The Sentry being destroyed while you're on it gives yourself 8% and high knockback, though simply taking 5% or jumping off in this state will cause you to leave it and reverting the Sentry back to auto-control.


Final Smash
Saddle up, boys. It's 'bout time you met the Engineer.
A large truck drives in from the background, the same one seen in the Meet the Engineer video, to the Engineer's current position. The windows are completely tinted, so you can't tell who's driving. 5 Sentry Guns of all different levels are placed haphazardly on the truck, firing upon anyone who steps near the truck. The truck itself is constantly in the background, meaning the Sentries are immune to any form of damage - allowing you to add even more defense on to a zone, or simply start building one.

After 12 seconds, The Engineer pulls out a Red Shed Beer from a back pocket and takes a swig, satisfied with a hard day's work, as the truck drives off with the Sentries onboard.


Playstyle Summary

This heavy caliber, tripod-mounted, little ol' number designed by me...built by me...and you'd best hope...not pointed at you.
The Engineer is, surprisingly, not a pure defensive character. Sure, he's constantly setting up traps, but he's really one of the few members of the raiding party that's doing so. Oh, sure, you can attempt to play The Engineer as a straight defensive character. Of course, you're really are wasting his potential that way. You'll be taking away those valuable teleporters and sticking them over by the flag. You have no real use of devices such as the Repair Node or the Dispenser, as nothing is really going to be damaged most of the time. In fact, when are you going to need the Amplifier? Allies that are defending are likely going to be disapproving of you because of your sheer quantity of traps and how much room they'll take up. When everyone is tending to their own business and a Spy waltzes in and stabs you, your stuff is as good as gone, and you've wasted a decent amount of effort.

Creating a zone for his team and maintaining it is the Engineer's utmost goal. He wants the raiding party to have somewhere to fall back to should their approach go awry, somewhere where they can heal up and properly defend themselves while they do so, thanks to the Dispenser and the Amplifier. He suffers without the team nearby, and can work extremely well with their assistance - some of your moves work much better with them nearby, and some of your moves directly help them out - such as the previously mentioned Dispensers and Amplifiers, though Teleporters are also a huge help.

When first creating a zone, you'll want to make sure that the camera zone you're entering is clear of enemies - or create enough of a distraction to prevent them from taking you and your buildings down in a Texas minute. Flash Grenades and Mini-Sentries works extremely well when setting up as distractions, though your team can also help you out with this. You can set up platforms now, either as cover or simply as a place for your allies to flock to - especially campers. As soon as you have a Sentry up, you're going to want to tend to it for a bit. Sentries are, of course, decent damage-rackers if enemy raiders are close enough to the gun. However, the chance of actually killing someone with it is slim-to-none until it is at level 3 and is launching rockets everywhere - you or your allies are going to want to provide some actual KOing power to it. Though devices such as your anthill can also provide killing power, it's best done with an ally to cover you. From here, you'll start building everything that can help your team out - Dispensers, Amplifiers, and the most helpful of all - Teleporters.

The importance of Teleporters really can't be understated - plopping an entrance in your base and an exit on the field will allow you to transport you and the ally back onto the field in the jiffy, though the price of this comes with it needing to be defended 24/7, meaning you'll often want them right by your Sentry. One particularly useful strategy is to start building your devices in the base, then, with the cover of an ally, run out and set up an exit before running back to your buildings. UThrow a Sentry and haul it out into the teleporter, plop it down and start bringing it all in. These will often form the basis of your team, allowing you all to meet up at a central point.

Though, what if your zone isn't able to hold up? Perhaps because everything was too close to each other and it got destroyed in one fell swoop? Were you or your team not being attentive enough? Well, when your zone's going and you need to start running away, you need to think up a plan. One of the best things to do is take a hostage with your grab - while the enemy team will be more than happy to damage both them and you in a lot of cases, you'll be dealing a decent amount of damage to them, and possibly bringing them to the grave with you. You can even bring your hostage into the path of some ant-bots if needed. Unable to obtain a hostage? Both of your forward smashes are your friends. Should you have a special fsmash ready to use, you can possibly blind the foes and make an escape while you plop down a Mini-Sentry to occupy them. If you have a normal fsmash, you can use all of the accumulated damage you've gained from your buildings and unleash some good ol' revenge on them. Even without a flash grenade, one of the best things for the Engineer to do is just run. He can even plop down a Mini-Sentry by quickly using a dsmash as he retreats. This isn't exactly the most brilliant idea considering how many enemies may be chasing you, but if you have a small amount chasing you, you can plop down a Mini-Sentry and continue retreating while they attempt to destroy it during construction, or even deal with it should it be fully built as he retreats.

The Engineer is a versatile trap-setter, but works best when he can gain some assistance The Engineer is useful to his team even when he's waiting to respawn, his Sentry keeps shooting, his Dispensers keep dispensing, his Teleporters keep teleporting, his Repair Nodes keeping repairing, his Amplifiers keep amplifying. He'll never capture the flag himself, but he can certainly help the team in the push towards it. That's the thing about the Engineer: he acts as the anchor of the team. He can administer health and assist his team in the push forward, but without them he's absolutely nothing.

This playstyle was terrible, but it was worth a shot, eh?


The answer...is a gun. If that don't work? Use more gun.
 
Last edited:

Katapultar

Smash Lord
Joined
Nov 24, 2008
Messages
1,284
Location
Australia
[collapse="The Engineer"]I was not expecting a moveset for this MYM-exclusive game mode anytime soon, so this is gonna be a hard one to judge. The fact that this character is designed to be played in a different mode along with a character from the same series and the metal mechanic shows how ridiculously true he's trying to be to his own series (along with referencing the Spy in certain moves albeit with good cause for the game despite doing nothing to benefit the set itself, assuming he'll always be in the game...though it does bring a few sets of mine to mind who would work well in the game mode).

Something that leaps at me about this set right from the get-go is that The Engineer is clearly designed to be a set-up character who -should- be superior to other characters in doing so given he can only be played in CTF, but fails to do that. A very technical character who has to watch over a mechanic along with a crapton of other constructs, it doesn't help that it takes 5 seconds to build a single turret which eats up at your mechanic in such a way that means you can only build 2 - I'm obviously aware that your entire team gets 30 seconds to set-up at the start of CTF sessions and that your partners are capable of protecting you during the time, but honestly, there are many other MYM characters who are capable of using their time much more proficiently than Engineer and would be much more useful in a fight than him. Put simply, both the metal mechanic AND set-up time required to build something ruin the fun and practicality of making these traps and somewhat obligate players to make a dispenser in the first place, or at least pretty much not giving them much of a choice in the matter. Even if you kept the metal mechanic in and made the set-ups instantaneous or vice versa I still wouldn't like it that much. This section of the comment might seem trivial, but when we're comparing this guy to other characters who can out-perform him substantially it's pretty serious, or at least in my books.

Aside from that, as an actual moveset, it does function like a proper Brawl one aside from the fact that Engineer will almost never be able to set-up those traps, but it doesn't really do too much despite attempting to be a toolbox character, or at least be all that unique aside from a few things he can do with his buildings. It's trying to give as much service to the character as possible, but isn't really accomplishing much at all that way. On a positive note however, the set has almost no signs of tackiness (maybe aside from the U-throw but I don't really know the character well enough and it might be in-character for him given his jump stat), though that's only really a minor note. Summing things up, it's pretty much The Engineer's design as a support character, his problematic building mechanics which make him feel extremely limited and the generically random nature of said buildings as generic supporters which don't really do much for me if anything at all, especially given they're supposed to be used in-tandem with other characters and it doesn't really feel special. The way in which the set was headed with the character and game mode, this was expected, however. It's not my least favorite set of yours, but not a good one in my eyes either.[/collapse]
 

Davidreamcatcha

Smash Ace
Joined
Feb 9, 2011
Messages
629
Something that leaps at me about this set right from the get-go is that The Engineer is clearly designed to be a set-up character who -should- be superior to other characters in doing so given he can only be played in CTF, but fails to do that.
The Engineer is hardly a traditional set-up character, considering the fact he's actively trying to assist his team in the push to the flag while most other set-up characters are back camping around the flag. If The Engineer tries to play traditional setup, he's going to very likely be shunned by the other traditional characters by how much crap he has that is dependent on them actually attacking (Amplifier), as well as stuff that benefits only him (the Dispenser has no use considering the fact that barely anyone will get past their defensive fortress, the Repair Node)

A very technical character who has to watch over a mechanic along with a crapton of other constructs, it doesn't help that it takes 5 seconds to build a single turret which eats up at your mechanic in such a way that means you can only build 2 - I'm obviously aware that your entire team gets 30 seconds to set-up at the start of CTF sessions and that your partners are capable of protecting you during the time, but honestly, there are many other MYM characters who are capable of using their time much more proficiently than Engineer and would be much more useful in a fight than him.
It's not like it isn't easy to get more metal - your machines hit someone who dies in the next second, metal. You die, you get metal. Some of your stuff gets destroyed? If you're not an idiot, you're likely going to be able to get 50 metal back.

Put simply, both the metal mechanic AND set-up time required to build something ruin the fun and practicality of making these traps and somewhat obligate players to make a dispenser in the first place, or at least pretty much not giving them much of a choice in the matter.
Please give me a situation in which you -wouldn't- want to build a Dispenser. They benefit you and they benefit the team in such a massive way that there's really no reason not to.

Even if you kept the metal mechanic in and made the set-ups instantaneous or vice versa I still wouldn't like it that much. This section of the comment might seem trivial, but when we're comparing this guy to other characters who can out-perform him substantially it's pretty serious, or at least in my books.
But those are the characters partying back by the flag.

Aside from that, as an actual moveset, it does function like a proper Brawl one aside from the fact that Engineer will almost never be able to set-up those traps, but it doesn't really do too much despite attempting to be a toolbox character, or at least be all that unique aside from a few things he can do with his buildings.
You realize that the Engineer is playing in maps that are 2 times the size of Temple at bare minimum? It's such a ridiculously easy problem to fix, and the Engineer has ways of covering for his buildings during the time in which they're constructing. There's also the down tilt to speed it up a fair bit, and the fact that his allies know that he's building something if they're even a camera zone away lets them defend him if needed. Even without the allies, he still has the metal hand and the ftilt - the metal hand doesn't have the set-up of the other buildings, and can hold a foe in place - Engie can use his fsmash superarmor or a shorthopped utilt to stop any projectiles they may send up at the building. The Ftilt delivers hitstun that can keep them from reaching it in time.

Summing things up, it's pretty much The Engineer's design as a support character, his problematic building mechanics which make him feel extremely limited and the generically random nature of said buildings as generic supporters which don't really do much for me if anything at all, especially given they're supposed to be used in-tandem with other characters and it doesn't really feel special.
The Engineer is not as limited as you say he is, though I will agree that he is somewhat restricted without an ally onhand: that's the point of the thing. Given the fact that the mode we're speaking of has massive 10 on 10 battles, it'd be pretty bloody useless if the buildings were "special" rather than a massive help to your team.
 
Last edited:

ProfPeanut

Smash Ace
Joined
Oct 1, 2008
Messages
727
"One shudders to imagine what inhuman thoughts lie behind that mask..."


Chandelure


1648456542484.png


Chandelure is a most al-Luring Pokemon, though a rare sight on the continent of Unova. The final form of a unique line of fiery spirits, Chandelure's hypnotic ghostly flames are most visible in the dead of night, leading away many wayward people and mons who only seek a safe guide. They say those strange flames are used to burn up the very soul, leaving behind only the body of the life taken. No one really knows if it's true, but a ghost like Chandelure must be burning something to keep its flames lit.


Statistics


Size: 6

Weight: 3

Ground Speed: 3

Air Speed: 4

Traction: 6

Jump Height: 5

Fall Speed: 2


Oh dear, Chandelure's much slower than it'd like to be. Passable air control is all that separates it from Mewtwo's terrible Melee stats, as it's quite light, medium-sized and rather slow. On the other hand, no one really sets limits like these on movesets that lack the firepower to make up for it.


Specials


Side Special - Shandelier Ball


Chandelure envelopes itself in a shadowy ball. If Chandelure isn't interrupted that moment, the Hothead-sized ball will leave Chandelure behind as it moves forward at the pace of Ganondorf's dash. The ball travels a distance of five Stage Builder units before dissipating, during which it phases through anything and everything; any foe or minion that touches it or attacks it while within a Battlefield platform away from it will flinch (10%) and be afflicted with a most unusual status effect.


This cursed shadow ball covers the foe in Chandelure's otherworldly flames, flames not meant to be burning on other characters. Those purple flames aren't anything like the usual fire to be dealt by fire types; they're a brand of cursed flames that even other Chandelures aren't immune to. Cursed foes take 2% every second, and any damage they may deal with non-projectile attacks is halved in value, crippling their melee game. Energy projectiles that they may create while cursed will be wreathed in those purple flames, projectiles that will be harmlessly absorbed by Chandelure should it touch them. Chandelure also seems to store these projectiles into a charge that fills up at 20%, though what it does with that charge is meant for later. Cursed flames last for about eight seconds, but Chandelure can add to the duration if it burns its foes with its other attacks (which depends on the flame's potency), while refreshing it entirely if it can curse the foe once more.


Oh, but there's another trick Chandelure can do with the shadow ball. By holding down the input, Chandelure somehow turns itself into the shadow ball and moves forward just like the ball does while leaving behind an illusion of itself. It won't last long; the illusion obeys all movement inputs, but it can't attack and bursts the moment Chandelure emerges from the shadow ball by either traveling the set distance or releasing the input. While Chandelure has a bit of end lag as it reveals itself, it can actually be struck out of the shadow ball if a daring foe strikes at it, taking the full brunt of the attack while its illusion dissipates. The illusion itself takes appropriate knockback as well for as long as it exists, but the burst it creates, although initially the size of Chandelure itself, will curse any foe that it strikes as well as damaging them (10%). Furthermore, any fire that strikes the illusion will increase the radius of the burst at the ratio of a SBU for every 6% dealt.


Tricky, tricky fate. Safer perhaps to just go with the former version and attack at the same time while risk being attacked. Or take advantage of the likelihood that no one would risk striking the shadow ball, letting them go for the ill-fated afterimage. Choose not to attack, even, while sending a shadow ball out just to make foes act cautiously when approaching or rush at the ball instead if they're careless enough. It also makes a fine recovery by itself, if used properly.


Neutral Special - Soul Wisps


A small, strangely reddish wisp of fire is spat out of Chandelure's main flame, rising to the tip before stopping. Tilting left or right as it stops determines which direction the wisp will first go as it proceeds to revolve around Chandelure in either a counterclockwise or clockwise direction, otherwise allowing the wisp to choose randomly. The wisp passes through the stage even as it encircles an area large enough to cover Bowser at the rate of Mario's fireballs. These wisps will disappear after four rotations or until they strike a foe, flinching that foe (8%) and causing a different status effect as the wisp ignites something deep in their soul. It's very unpleasant, having your soul forcibly set on fire; it feel much like something unbelievably spicy burning inside your body. Superspicy, even.


For a refresher, foes will be forced to dash around as they spit out fireballs (1%) that flinch and slightly push others away, the fireballs shooting out of their mouths at a rate of 10 fireballs a second in an up-and-down fashion at 60, 30, 0 and -30 degrees. Oh, that may sound like a useless and even detrimental thing to do with any other character, but Chandelure can actually do something with the foe's uncontrollable stream of fireballs, what with its cursed flames able to overlap with the foe's fiery outline. The status lasts for ten seconds by itself, and can't be refreshed until it ends.


Chandelure can do much more with the wisps that fly around it. By holding down the input, Chandlure can rapidly increase the radius that its wisps travel from the minimum to a Smart Bomb explosion in just half a rotation. The wisp will keep on traveling as it adjusts to its new path, speeding up as well as it maintains the same number of rotations per few seconds as it originally did. At the widest, wisps can move at a blistering speed, though they're far harder to land when they're so far away from Chandelure. Once they reach the maximum, a wisp's path radius will begin to shrink to the minimum if the input is still held down; once it reaches that with the input still held down, the radius will grow again. Chandelure can only have up to three wisps encircling it at once, each of them using Chandelure as their center while Chandelure moves about the arena. Wisps will encircle illusions left behind by the Side Special until Chandelure reveals itself again, on which the wisps will travel back to Chandelure once their path lets them fly back to it like a distant comet.


While a wisp may seem slow, Chandelure is free to make use of the directions and paths that they travel, as well as the timing that Chandelure can spit the wisps out, to land that convenient status on the foe,. Perhaps it can even hold down the input most of the time to keep the wisps in a state of flux, letting go when it needs one of its other specials or when the moment to land a wisp on a foe arrives.


Up Special - Ghost Ceiling


A translucent, ethereal piece of ceiling appears a SBU above Chandelure. It's as wide as the platforms on Battlefield, but that's only for appearance; only Chandelure can make use of them as ghostly chains attach it to the ceiling and pull it up, rendering it a true chandelier for the moment. Yes, 'platform' does describe this prop better than 'ceiling', but that implies some sort ground-dependent trap or effect which can be exploited with this. A novel idea, but perhaps better suited to another moveset.


Chandelure is well attached to the ceiling and unable to move elsewhere, only able to swing left and right through movement inputs in order to angle itself and change its position to up to 45 degrees. Chandelure is able to use its complete ground-game while attached to this ceiling including its grab and smash attacks, and can take advantage of the higher position and angles offered. By either jumping or tapping down, Chandelure releases its chains as it then rises up with a single restored jump (so no double-jumping if Chandelure already exhausted it) or simply drops down. While getting struck by an attack normally makes Chandelure swing wildly, three attacks exceeding 5% will break the chains and send it flying. Chandelure could also become a punching bag just as easily, especially if a foe loses the cursed flames while still breathing fireballs.


Even after the chains dissipate, the ceiling will still remain. Chandelure can reattach itself to the ceiling by tapping up while being at most a SBU underneath it, but it can get rid of the ceiling by tapping the input once more, which will cause the ceiling to combust in a ghostly blaze. It's dangerous to foes, alright, with rapid flinching knockback that pushes upwards (1%) and adds to the duration of cursed flames by half a second, but it also takes about three seconds for the ceiling to fully disappear, after which Chandelure is free to make another one. Chandelure can also only hang onto a ceiling for a total of eight seconds; the ceiling makes a creaking sound two seconds before the limit is reached, and breaks into pieces should Chandelure still hang on. Chandelure will freefall in that event, and can't create another ceiling until three seconds later.


Use it for recovery, use it for the vantage point, use it to negate a lethal strike once the hitstun ends. Chandelure can't use it whenever it pleases, though, so use it wisely.


Down Special - Smog


Chandelure rises a bit before spinning rapidly, pushing away foes; a moment later, it releases a sooty gray smog around itself. This smog spreads out to two and a half SBUs on both sides of Chandelure while covering one SBU in height, treating any stage it might run into as a solid object. Chandelure can only have twice this much amount of smog onstage at any time, with the oldest of it disappearing if it uses this more than twice.


Anything in this black smog is only visible by their silhouettes, which function identically to whatever they do. Well, unless you're a ghost or ethereal spirit of some sort, in which case you'll be completely hidden behind this ghostly smog. Of course, the area itself is quite small, so it shouldn't be that easy for many larger enemy spirits to take advantage of it. Oddly enough, Chandelure itself isn't invisible behind this smog; its purple flames can still be seen behind the gray curtain it spews out, but the rest of its body is as good as unseen.


Fire and light are visible behind the smog, albeit dimly so. Chandelure's wisps, for example, are impossible to hide. However, attacks involving darkness or shadows are all but completely concealed behind the smog, which includes the likes of Chandelure's shadow ball and ethereal ceiling. Chandelure's attacks thus become much more difficult to read behind the smog unless the enemy knows the meaning of every tilt that its flames do, although half the time, Chandelure doesn't tilt its body before it attacks.


Attacks


Jab - Ember


Chandelure shakes the flames on its arms, releasing six small dark embers that scatter out from the flames before slowly falling to the ground. The embers each deal outwards flinching knockback (1%) before disappearing, and fall slowly enough to land half a second after input, wherein they'll persist for another half second before fading if they don't hit anyone. This is all assuming that one tapped once the input, as repeatedly tapping it makes Chandelure shake its arms a bit more to release four more embers every two thirds of a second.


The embers fan out enough such that the outermost ones reach beyond Chandelure's hitbox and make this jab somewhat usable for striking beyond Chandelure's range. These embers can be seen behind smog and each add one second to the duration of any cursed fire that the foe may be afflicted with.The initial jab may pester foes enough for Chandelure to either make its getaway or use another attack; used from a ceiling, Chandelure can rain down a tall or wide smattering of these embers, given enough time.


Forward Tilt - Hex


Chandelure slightly tilts towards wherever it is facing and creates a spectral eye symbol half a SBU away; it immediately bursts, releasing some sort of ghastly energy. A disjointed strike, the burst (12%) deals low knockback, can't be seen beneath smog, and has almost no start lag and a bit of end lag.


Oddly, this attack does high yet poorly scaling knockback to anyone with a status effect on him or her, such as cursed flames or fireball spitting. Perhaps Chandelure may not want an afflicted foe in its face for the moment; it has other options for damage racking at close range, after all.


Dash Attack - Confuse Ray


Chandelure immediately turns around, spinning as it does so while a faint ball of light glows within it. Chandelure then dashes towards the other direction as the confusion ray then travels forward at Chandelure's own dash speed. As you can guess, the confuse ray is visible behind the smog, and only travels straight for five SBUs before fading for good.


Should this projectile actually strike a foe, the foe will temporarily have their direction inputs scrambled. It is a confusion ray, after all. Button mashing about should shake off the effect more quickly, unless one can survive for three seconds of it. Even without tilting the movement input, afflicted foes will still attack in an unintended direction, perhaps even leaving themselves open for Chandelure to take advantage of.


Up Tilt - Flame Burst


Chandelure's main flame spits out a dark fireball the size of a Charge Shot, which slowly rises to the height of a platform on Battlefield. At its peak, which it reaches in half a second, the fireball bursts in a capsule-radius explosion (16%), dealing potent knockback to anyone struck at the core and increasing the duration of cursed fir by three seconds. Seems it only deals a third as much damage, knockback and duration increase to anyone hit at the edge of the burst, however, to the point that only anyone at the core of the burst would be dealt the full blow. On the other hand, the fireball will also burst if it strike a foe before reaching its peak.


With only a few moments of starting lag to deal with, and no end lag, Chandelure can easily create this fireballs to deter aerial approaches. It won't want to use this when foes threaten from the sides, but it can easily move away after throwing out the fireball, or tilt by swinging from a ceiling to change the angle of the attack.


Down Tilt - Candle Dip


Chandelure faces the screen, then extends and dips both its arms outwards. Its arms move fast enough to flinch anyone they hit (6%) and push them away before quickly curling back. This attack covers both sides of Chandelure and is almost impossible to see behind smog, as Chandelure doesn't necessarily tilt its flames until it attacks.


What do you mean, it's usually the Down Smash that covers both sides of a character? Chandelure would rather just get one quick attack in before following up with something else, or perhaps defend its sides while swinging from a ceiling.


Capture


Grab - Shadow Tag


Without warning, a dark grey circular pulse emits out of Chandelure, its interior greyish with Chandelure in the center. Chandelure remains in place as the circle expands outwards in all directions at the rate of Ganondorf's dash speed; if Chandelure takes three hits that exceed 3% in damage, the grab ends. This circle is impossible to spot behind smog.


Tapping the grab again will halt the circle and end the grab if no one is caught inside. See, not only must Chandelure catch an opponent within this shadow circle (so long as they are mostly within the circumference), but the circle's radius must be twice the size of the largest foe caught inside for it to work. Yet if Chandelure pulls it off, the whole circle darkens while Chandelure continues to remain in place, during which any other foes outside the circle may run inside and be caught in this strange grab as well. It is strange, as foes are free to do whatever they wish within the circle; getting grabbed this way doesn't interrupt them at all.


Chandelure has actually tagged its foes within this spectral circle. Should any foe within the circle touch the circumference, Chandelure will instantly teleport to that foe's location, relocating the circle and gaining a few frames of invincibility. There's no use running away from Chandelure's sphere of influence, for as long as the grab persists. With multiple foes, it's inevitable that someone else will suddenly find themselves outside the circle should Chandelure teleport, but Chandelure will quickly teleport back to those foes now outside the circle should this happen - bringing along any other foes overlapping with Chandelure as well. A simple misstep can result in all three opponents suddenly finding themselves right under Chandelure's shadow.


Chandelure can only use its pummel and throws while tagging opponents, possible by either tapping the attack button or tilting in any of the four directions Only after using any of its throws does the grab end, after which Chandelure must act quickly as its foes make use of their newfound freedom. Chandelure may also use this grab in the air thanks to the ceiling that it may attach itself to, though teleporting will also wrench it out of the ceiling's chains while it continues to float eerily.


Pummel - Flame Split


Within its darkened zone, Chandelure generates a thin pulse of ghost fire that travels outwards and up to the circle's edge. Any foe struck (3%) will flinch briefly and have any cursed fire on them last one second longer. For some reason, Chandelure itself heals 3% every time its pummel hits a foe, allowing it to recover 9% should it catch 3 foes that don't have minions or companions with them. Chandelure can only use this every second or so, but it should use this at least once before the foe gets too close to knock it out of its grab.


Up Throw - Night Shade


A wavy darker pulse is emitted out of Chandelure that travels as slowly as Mario's fireballs. Foes will want to avoid this pulse at all costs, however, as this pulse seems to inflict cursed fire upon any foe it touches; you may remember that re-inflicting this effect can also renew the duration on those who already have it. The pulse also pushes foes outwards until it stops - midway to the circle's radius. Seems like this throw only covers the inner half of the circle, while anyone who can tread the space between the circle's rim and the pulse should be able to escape. Once the pulse reaches its limit, it recedes back into Chandelure as quickly as it came, and the throw ends.


The attack is invisible behind smog, so in some cases, Chandelure's foes may not even be aware of the incoming pulse until it's too late. Easily Chandelure's best deterrent for foes that come too close, as it can perform its throws even while under hitstun. Yet perhaps Chandelure only needs the option to perform this to keep foes away, as it racks up no damage by using this. Not directly, anyway.


Left Throw - Fire Spin


Oh, so perhaps the foe thinks they can exploit this tagging by bringing Chandelure where it doesn't want to be? Then they may not expect the whole rim of the circle suddenly igniting, dealing damage (1%) every third of a second and flinching foes away. Chandelure too surrounds itself in fire and begins spinning very quickly in place, doing twice as much damage while somehow becoming invulnerable while doing so. Any cursed fire will last half a second longer with every rapid hit.


Chandelure still teleports if the foe can force their way through the rim. The only way to avoid this is to simply remain in the area of the circle not wreathed in fire, and wait until three seconds elapse, after which the throw ends and the grab disappears.


Right Throw - Memento


Two balls of light identical to the one made by the dash attack appear within the circle, one above and one below Chandelure, and both three fourths of the radius away from it. They immediately revolve around Chandelure once in a clockwise motion, moving at Captain Falcon's dash speed as they sweep across the outer area within the circle. These lights confuse anyone they pass through while also flinching (8%), and are almost as large as half the radius of the circle.


Chandelure may input left as the lights appear to have them move counterclockwise instead. This is far better for defending the outer area of Chandelure's circle, as struck foes are more likely to accidentally trip upon the rim in their random mashing before the throw ends.


Down Throw - False Light


Chandelure ends the grab - yet the circle still persists. At this point, any foe brave enough to touch its rim will discover that the tag no longer works, as the circle now exists only to fool them. Chandelure can act as it pleases once it inputs this, though it's easier to pretend that the grab is still working while on the ground or attached to a ceiling by simply standing still. Behind smog, Chandelure may even get away with charging its smash attacks, or simply striking or moving before the foe realizes what has happened.


Aerials


Neutral Air - Curse Fumes


Chandlure turns a bit to its right as black fumes start rising out of its arm flames. It then spins around, twirling the fumes around as a hitbox - not only do the arms knock foes away (8%), but they also inflict (or refresh) cursed fire upon them as well.


The attack doesn't extend out of Chandelure's hurtbox, but it has little ending and landing lag, making it easy to use. It's also an incredibly quick way to inflict cursed fire, if Chandelure can land it. Range versus speed, as they may say.


Forward Air - Swinging Lights


Tilting forward, Chandelure sweeps through the air as though pulled back like a playground swing, reaching up to a SBU away. As it does so, it dodges all attacks until it reaches the apex of its swing and tilts the other way. Upon swinging back, it instead strikes anyone in the way (14%), dealing decent knockback that sends foes flying behind Chandelure and perhaps KOing at 150%. Chandelure then realigns itself back to its neutral stance, which takes a while; better than landing in the middle of the attack, wherein Chandelure scrapes across the ground before floating back to position.


This can be an unexpected attack for any foe approaching from either side of Chandelure. It's not meant to be used traditionally, but perhaps for when a foe spewing fireballs with none of the curses thinks they can trap it in a close-range inferno. Chandelure may even swing close enough to its ceiling and cancel its attack by latching onto the ceiling instead.


Back Air - Astonish


Chandelure suddenly turns around, its eyes flashing out. Though the flash is small, the effects are not - any foe struck (5%) will be start tumbling regardless of what they were doing. On grounded foes, this results in them tripping.


Beyond Chandelure turning around at the end with little ending or landing lag to suffer, this attack is quite…functional, to say the least. It should be easy to shorthop-spam this attack, which may be useful for immediate close-range that sends foes back down.


Down Air - Drop of a Lamp


Chandelure stalls for a moment as it faces the screen, then plummets straight down, spinning its arms around all the while. Until it crashes into the stage, it drags along any foes struck by the black point beneath it, knocking away anyone else hit by its arms (10%). On landing, any foes dragged along are pitfalled (9%) as Chandelure then pulls itself out of the ground.


Given the long landing lag on this, it's best to try and hit with this attack rather than using it recklessly. Using this above a void is a guaranteed KO for you unless the option of Chandecide presents itself. Then again, Chandelure may choose to use this above one of its ceilings to suddenly halt its descent as spectral chains latch onto it once more.


Up Air - Flicker


Chandelure's flames grow out to a SBU in height, wavering even further and acting as a lingering hitbox that strikes every eighth of a second (2%) for half a second. Oh dear, what a dreadfully functional attack, may as well make it a flipkick if only Chandelure had feet. The flames will stoke cursed fire for another second per hit


The attack does guard well against those planning to fall from above Chandelure, as well as coming out with no starting lag and only a bit of end lag. In fact, Chandelure's whole aerial game seems to be fast on the release bar its Forward Air, with not as much power as its other attacks. Perhaps it has other high-range moves at its disposal instead?


Smashes


Oh my, but a final reminder. Recall that Chandelure could absorb the projectiles made by foes afflicted with cursed flames? Well, Chandelure also secretly builds up a charge depending on the power of those absorbed projectiles, a charge that maxes out at 20%. This charge directly feeds into its next smash attack, emptying to apply itself to the charging time and allowing Chandelure to use its powerful flames more quickly. With luck, Chandelure may even get away with an instantaneous fully-charged smash attack.


Down Smash - Imprison


Chandelure's main body is engulfed in ghost fire as it charges this move, a fire that then drops down on release. This purplish independentfire lasts between two and ten seconds before dying out, stopping upon any stage it may land upon and being otherwise identical to Ness's Side Special (1%-1.4% per half second), keeping cursed flames burning for half a second longer per hit. Well, there's also the fact that whenever a fire hitbox collides with this fire, the fire will move towards the source of that hitbox at Ganondorf's dash speed until it reaches the spot where the attack came from.


While the fire can't climb upwards, it can easily become a hindrance to anyone who wishes to land back on the main platform. Chandelure can rain these down from its ghostly ceiling, and make as many as it wants, littering the stage with these lonely dangerous fires. Chandelure can also use its own flame-based attacks to make the fire move back to it, from a single rotating wisp to the fire wheel it makes with its Forward Throw. Any other character shouldn't have too much trouble avoiding it, assuming they aren't somehow creating a constant stream of fire.


Up Smash - Overheat


Facing the screen, Chandelure bends its arms inwards as its flames seem to stoke themselves while charging. Chandelure then unleashes a circular burst of fire from its body that expands in all directions, dealing numerous flinching hits (3%-4.2% per sixth of a second) as it travels and stoking cursed flames for one second longer per hit. Once the attack expands to a SBU in radius, which it accomplishes in half a second, another fire flares out from the circumference of the attack and reaches half a SBU further, dealing significant knockback (10%-14%) that KOs at 160%-120%. Chandelure suffers half a second of ending lag from such an exhaustive move.


While it defends from any and all angles, Chandelure can be easily punished from whiffing such a wide-reaching attack, as well as failing to strike foes with the second flare. The initial, inner flare is meant for racking damage and isn't easy to DI, although it won't push foes outwards. As the attack isn't hindered by the stage, Chandelure can be particularly cruel to those attempting to recover, although their damage will decide whether such an attempt will either save them via upwards knockback, or doom them through the force of it.


Forward Smash - Inferno


Chandelure focuses its main flame, which straightens out as it charges; good luck seeing that behind the smog. Upon release, Chandelure focuses its flames even further for as long as it charged the attack, doubling the amount of time between input and attack release; Chandelure may move or jump around without attacking as it focuses, however. Chandelure then swiftly tilts its whole body 90 degrees forward, although the movement stick can be tilted at this moment to change the direction, then spins on its axis as its flames suddenly grow one to three SBUs in length, incinerating any foe they touch (15%-21%) and dealing knockback that KOs at 150%-100%. Chandelure, meanwhile, is pushed back from the force of the flames it creates, traveling between one and three SBUs away over one second as it fires its deadly inferno. Once the fire dies down, Chandelure realigns itself, spinning down in a helpless state should it end up in the air. Cursed fire will last three seconds longer if it's stoked, though the foe inflicted with it probably won't survive long enough for that to matter.


Such a powerful lingering hitbox is Chandelure's most potent attack, dealing its knockback immediately upon contact. With a full charge gathered from absorbing flames, Chandelure needs only tap the input, then move into position as it waits a further two seconds before unleashing the inferno. The ghost ceiling will hold Chandelure by the chains should it use the attack from there, such that it swings back into place once the attack ends. With practice, Chandelure may even use this as a horrifically potent gimping tool.


Final Smash - Chandelier's Curse


What's that, Chandelure burnt up the Smash Ball? I suppose there's no stopping it from covering the entire screen with smog, as the entire stage is then wreathed in ghostly purple flames that curse foes with flames and burn and burn and burn (4% every half second). Yet Chandelure itself becomes a dim orb behind the smog that repels flames up to a SBU in radius away; the only safe spot in this inferno. Chandelure can only move around in this state, with foes probably in hot pursuit to avoid the flames licking around them.


Yet upon pressing A, Chandelure creates an orb identical to its appearance that splits and moves in a different direction. This orb too repels the flames, but it only lasts for three seconds before disappearing, with the flames around it quickly consuming the space left along with any foes that followed the wrong guide Oh yes, Chandelure can generate as many of these as it wants, but it wants to do so smartly, leaving false trails all around as it pretends to be the guide in this raging fire. The stage will burn for twelve seconds before all the smog and flames mysteriously disappear, leaving behind all the survivors. Was it all a ghostly trick of the imagination, or some strange reality imposed by the chandelier? Who knows for sure.


1648456585510.png
Playstyle
1648456598039.png


There's only one state that Chandelure wants its foes in: perpetual burning. All it takes a simple affliction of its cursed flames, possible through clever manipulation of the shadow ball or simply punishing overzealous foes, and Chandelure only needs to keep them stoking in order to tip the match to its favor. It's quite essential to land that status effect before hitting foes with the wisps, although a smart player can probably get away with doing just that with good timing between wisps and the shadow ball.


Chandelure wants to use every advantage at its disposal to make itself all the harder to deal with. How easy it is, for example, to cover a sizable portion of the stage in smog and attack from there. Render your moves all the more difficult to read, whether charging smash attacks, preparing a grab or mixing up your shadow balls even further. While Chandelure can't hide making those shadow balls (its flame disappears as it engulfs itself in shadows, making it obvious), its foes will always have a harder time avoiding what they can't see.


Chandelure's stage control is incredible, with an infinite-reaching grab, a pseudo-float through its ceiling, lingering fires from the Down Smash and wisp projectiles that strike from the oddest directions. If Chandelure can combine all these tools, it can trap foes in a fiery prison within its shadow-tagged circle, flames dancing around the chandelier. as it passively charges its smash attacks thanks to the fireballs of spiced foes. The further they run from Chandelure, the easier it is catch them in the grab and then pummel them to ashes.


There is, of course, opponent behavior to take into account. Shall they run up to Chandelure regardless of them purple flames they spew out, feeding the foe that they seek to combo to death before they themselves are KO'd? Shall they instead run away to where it's easier to avoid Chandelure's attempts to stoke the cursed flames, making themselves open to being tagged by the grab? Chandelure is still slow and vulnerable, and needs to play its zoning tools correctly to reach beyond its various melee attacks, necessitating that it respond to its foe's reactions as all characters must.


Chandelure can let the foe burn until their percentage is high enough, but why not quicken the process with smash attacks? Behind smog and with a full charge, Chandelure becomes a backdraft waiting to blaze through opponents and scorch their damages until their stock is burnt away too. There's no option for Chandelure's foes but to keep going at the ghostly flame, and hope to come out of the inferno alive.


Last edited:

ProfPeanut

Smash Ace
Joined
Oct 1, 2008
Messages
727
MYMini#0 - The only mini really worth left doing for me.

1648456708590.png

1648456734713.png

Tetra is a young pirate captain who shows up in Wind Waker and ends up helping resolve that chapter of the Legend of Zelda saga. She’s also Zelda’s reincarnation and a wielder of the Triforce of Wisdom, but don’t expect any Down Special transformation move here; after a life of piracy on the Great Sea, Tetra finds her own methods of fighting good enough. Headstrong, crafty, and possessing a trademark wink of awesome, she brings a blend of straightforward trickiness to the battlefield, knife and wits in tow. Tetra has joined the Brawl!


Statistics


Size: 3

Weight: 5

Ground Speed: 7

Air Speed: 7

Traction: 5

Jump Height: 8

Fall Speed: 3

Wall Jump

Crawling


Tetra’s pretty quick on her feet, though not as fast as Zelda’s other counterpart. Couple this with her jumps, which can both reach as high as one-and-a-half Ganondorfs, and she’s got the ability to both add or close space between herself and other characters without even using her specials. Then again, being light and somewhat floaty has its disadvantages of being easy to knock out, so she'll need that kind of mobility.


Specials


Neutral Special: Pirate Cannon


Tetra pulls out a circular Party Ball-sized cannon, already loaded, from the ground. Huh, there's another object secretly littered all over the stage. She can't use this move in the air, or if she already has a cannon out. Tetra has super armor and immunity to grabs during the one second it takes to prepare the cannon, after which she's free to move about on her own while the cannon fires away. They do have fuses. Cannonballs travel in an arc curving downwards; where else are they supposed to go, in a straight line? What crazy world did you get that from?


Without additional input, the cannon will fire a shot as slow as a thrown Bonsly at 45 degrees. But a charge can be set by holding down B during the start-up lag; it'll also remember what angle the analog stick is tilting towards. Once Tetra's done preparing it, the cannon will bob up and down as it further charges the shot so that the cannon ball flies faster and farther, taking as long as four seconds before snapping to its set angle and laying siege. At maximum charge, the cannonball rockets out as fast as an arrow!


The cannonballs themselves (10%-30%) have some ridiculous knockback scaling, KOing from 160% to 80%. They’ll plow through other projectiles, but explode upon contact with any solid platform or character, creating a big wall of cel-shaded smoke (1%) that’ll make anyone not directly hit by the cannonball flinch slightly. Tetra and any other character can hide in the smoke to pull off whatever move, as it lasts three seconds before dissipating. The cannons themselves only disappear after the cannonball explodes or leaves the screen (though they aren’t affected by the upper blast line).


Oh, and one last (very important) thing: Tetra does not have immunity from any cannon shots. So don’t be stupid with the charges, or she’ll know just who to blame for those suicide deaths.


Side Special: Grappling Hook


In 0.4 seconds, Tetra brings out that handy hook-on-a-rope from Wind Waker. Toon Link’s happy with his hookshot anyway, so he won’t mind. This is obviously a tether recovery, but it doesn't snap to ledges easily; you'll need some good aim to grab a ledge from far away.


Tetra will then throw the grappling hook forward, covering three SBUs in distance in a few frames. Holding down B for up to two seconds will make Tetra swing the hook around until release, wherein it will travel faster and fly up to six SBUs instead. The hook will latch onto any opponent or object it connects with; if it doesn’t, it’ll drop upon reaching its limit while Tetra frowns at your lousy timing. Then she’ll have to spend one to two seconds reeling it back.


If it latches onto an opponent (4%), shielded or not, Tetra will then tug the rope which will fling the opponent to the spot right in front of her. The hook will then be released, and Tetra will have a few frames to grab or attack as the opponent lands. Even against a heavier foe, Tetra can reel them in with the power of game physics, but she gains the option to tilt towards the foe in that situation. Should that occur, Tetra will instead tug the rope, then combine the tension with a leap to send herself flying at the opponent. The foe still can’t do anything until she lands in front of him while releasing the hook.


If the grappling hook instead catches an item or a physical projectile (such as rockets and ahem cannonballs) Tetra will tug the hook back immediately, bringing the item towards her. This action still takes up a few frames of time, during which holding down B gives Tetra another option. She can spin the item around herself twice (which takes 0.25 seconds) once it arrives before throwing the item back at high speed!


If not, Tetra will either hold onto the item once it comes to her, discarding any item she may have been previously holding, or throw it behind her if it can't be held, such as an arrow or Waddle Dee. Remember, though, explosive projectiles are better for blowing characters up than for holding on to.


Up Special: Catapult


A catapult pops out right where Tetra is, similar to the one on Pirate Ship. What do you mean, it's not safe? Pirates do this all the time.


After a tiny duration, Tetra will be launched from the catapult in an arc. She’s actually propelled from the momentum of the catapult, which can sustain her for one and a half seconds until she reaches the highest point of the arc: three Bowsers further and three Ganondorfs higher from her original position. Her body’s tilted to whatever direction she’s flying to while the momentum is active, reverting to a normal falling stance afterwards. Also, she can attack and dodge right after leaving the catapult. Helpless? Not Tetra.


There are two additional settings that will change the aim of the catapult. Tilt up before Tetra's launched, and she'll fly four Ganondorfs high but only one Bowser forward. Tilt forward, and she’ll go four Bowsers ahead, but only one Ganondorf high.


The catapult will stay onscreen for three seconds before disappearing, during which Tetra can’t pull out another one. Any other character who walks into a catapult will be launched to the same angle that Tetra was, except that they’re flung reeling until they reach the peak of the arc. In the air, the catapult will drop straight down, but will still be capable of launching other characters, and no one probably wants to be flung to the stage wall while recovering.


Down Special: Fool’s Bait


Tetra prepares a powerful horizontal strike with her blade. Except that she really won’t. Huh.


For the duration of this move (0.5 seconds), Tetra will look exactly as if she were charging up her forward smash. There are three tricks that happen in this stance:


1. If an attack from an opponent close enough to Tetra connects, Tetra will dodge and roll behind that character, then deliver a blow at their back with the knife hilt. This will stun the character for a duration based on the addition of two factors: the damage that would have been dealt (ranging from half a second for a quick jab to two whole seconds for a fully charged smash attack) and the opponent’s percentage.


2. If an opponent dodges to a position behind her (whether sidestepping or rolling), Tetra will turn around the moment they become vulnerable and deliver a powerful slash (18%) capable of KOing at 100%.


3. If a projectile comes Tetra’s way, she’ll flip directly up into the air dodging any attacks before being able to move again while airborne; the projectile isn’t stopped.


Using this special in the air will make her imitate her back aerial instead, which turns Tetra around. Only the first trick works here, wherein a melee attack will be deflected and returned by a meteor smash (5%).


Of course, if nothing comes Tetra’s way, she’ll spend one more half second pretending to charge her forward smash, then straighten up with a disappointed look. In the air, she’ll just glance behind her shoulder with a frown instead of attacking. Stupid newbies thinking they can spam countermoves.


Ground Attacks


Jab: Knife Slash


Tetra does a left-downwards swipe (2%) with her knife. Naturally, hitting A two more times makes this move more effective, in which case Tetra will follow it up with a rightwards swipe (3%) and end with a downwards stab (4%) into the area in front of her. This is one of Tetra’s few close-quarters moves, good for quick damage and having an actual direct attack.


Dash Attack: Off Ship


Tetra leaps straight forward, moving faster than her dash speed. If she hits someone, that someone's going to get kicked back (8%) horizontally while Tetra lands two SBUs away, which makes this a great attack for dealing fast damage while maintaining distance. If she doesn't hit someone, she'll just dodge-roll as she lands one BFP forward before resuming a neutral stance - unless she ends up leaping or rolling off the stage. Better recover before Tetra loses a stock then.


Forward Tilt: Blade Swinging


Tetra swings the grappling hook in a horizontal leftward arc, which would be an odd move if it weren't for the fact that the hook is holding onto Tetra's knife. The knife-hook strikes an area one SBB away (12%), knocking opponents another SBB back. The rope will flinch anyone it hits (1%), but it's pretty ineffectual, and the end lag is punishable, so this move is better against those who are far enough for the sweetspot to hit.


Up Tilt: Over-Head


Tetra readies her knife behind her, then makes a wide slash forward (9%), the knife's arc sweeping the area above and in front of her. It covers quite some space in a disjointed hitbox, and deals decent enough knockback to lay some pressure off of you, yet the start-up lag and end lag are less than ideal. Nonetheless, Tetra has few other options for keeping opponents away when they get close, if she wants to stand her ground.


Down Tilt: Trip Up


Tetra, lying on the ground, makes a quick stab (4%) in front of her. The move is quick and has a small range, but it'll trip anyone who gets hit by it unless they're crouching or already tripped, wherein they'll just flinch instead. Tetra can dodge some moves and attack at the same time with this, but a simple short hop from anyone dodges this move in return.


Ledge Attack: Cast Off


Wait, what? Well, their move is kinda unique to be worth noting, and I promise there isn't a get-up attack later on. Tetra hangs onto ledges with one hand, leaving the other free; with this attack, Tetra will hoist herself up quickly, then throw out a grappling hook. It only goes as far as two SBUs, but if it hits an opponent, that foe will be pulled and flung off-stage while Tetra safely rolls away from the ledge. If the hook doesn't connect, Tetra will just pull it back while climbing onto the edge of the platform. By 100%+ damage, she’ll settle for leftward slash (3%) at the area near the ledge as she pulls herself up.


Aerials


Neutral Air: Pirate Spin


Tetra spins twice horizontally with her knife outstretched (7%, 9%), dealing little enough knockback with the first spin so as to knock them off with the second one. The hitbox is a line perpendicular to Tetra’s body, meaning that using this move while Tetra’s flung from the catapult will tilt the hitbox accordingly. Alone, it’s a good close-combat air move with short landing lag, but combined with her up special, Tetra can fly over foes while smacking their hurt boxes from above.


Forward Air: Two Ways


Tetra does an initial upwards slash from below with her knife (8%), which knocks foes back slightly. Then she throws the knife, which is now attached to the grappling hook again. It arcs downwards (6%) and does much more knockback; while this disjointed attack covers a large area in front of Tetra, the move itself has terrible landing lag, making it better for spacing when Tetra’s higher up in the air. As you can imagine, you don't want to hit foes with the rope portion (1%) of this, which won't flinch them long enough for you to get away.


Back Air: Rear Guard


Tetra turns the other way and stab forward (9%) with her knife. While the knockback is decent, and the landing lag is small, the start-up lag takes 0.5 seconds and Tetra will end up with her back turned to any foes who may have been in front of her. Useful to turn around, maybe, but more useful for combining with the Down Special to fool opponents.


Up Air: Unfurl the Sails


Tetra flings the grappling hook straight upwards, which will reach a range of one SBU before being pulled back quickly. There's no knife attached this time, so anyone it hits (5%) will be caught by the hook; Tetra will then pull that character downwards, effectively spiking them. This can't be used as a tether recovery, only as a way to pull foes from the sky. The ending and landing lag isn't pleasant, so aim well.


Down Air: Hoist the Sails


In an opposite variation of the previous aerial, Tetra throws the grappling hook straight below her instead, with the same range and lousy ending lag. Any character caught by the hook (5%) will be thrown skywards for quite a distance, though Tetra herself will be flung downwards as a result. Tetra will land pretty quickly instead if she lands on the ground this way, however; good aim is supposed to be encouraged and taken advantage of.


Throwdown


Grab: Plunder


Tetra grabs at whoever is in front of her with her hand. This makes her grab like any other - well, if every other grab stole things like Franklin Badges and Screw Balls from the victim, and put them onto Tetra. Heck, she even takes any item that the foe was holding, hanging onto to it after release. As for a pummel, whacking the foe with the knife hilt (2%) is good enough for her; she's not planning on holding them there.


Forward Throw: Overboard


Tetra holds the foe down as she pulls out the…cannon? Is she…yes, it looks like Tetra loads the foe into the cannon before firing it straight at the ground (10%). The opponent rebounds out diagonally with enough force to KO at 160% while a wall of smoke with the same properties as a cannonball explosion obscures the area Tetra stood in, except that she won’t take damage from it. It takes Tetra a whole second to pull this move off as well, but she won’t have invulnerability this time; if you have a cannon set up already, Tetra just tosses the foe forward (5%) with negligible knockback like any other character would. As to why Tetra doesn’t use this with her neutral special instead, I’m guessing characters just aren’t reliably aerodynamic. Just ask Toon Link.


Back Throw: Keelhaul


Tetra flings the foe right behind her, then strikes with her knife (12%), sending the foe flying and skidding at the floor. The set knockback of this move will make the opponent land one BFP away in a knocked-down state before skidding. This throw sends foes the furthest, so it's better for when Tetra wants an opponent as far away as possible. Then again, if there isn't a floor...well, the foe won't be helpless for that long anyway.


Up Throw: To The Mast


Tetra takes a moment’s breath before throwing the opponent (5%) straight above her. The foe will be flung as high as two Samus before descending, reeling upwards in that time period. Meanwhile, Tetra’s free to dash off once the opponent’s airborne. Preferably away from the cannonball explosion.


Down Throw: Marooned


Tetra does a short hop before kicking the foe (9%) with both her feet. She leaps back 1 SBU while the foe is left lying knocked down on the same spot; by the time Tetra lands, the opponent will be able to dodge any grappling hook she throws out, ruling out chaingrabs. The strange thing about this throw, however, is that Tetra gains invincibility frames during the move. This lets her put someone else in the line of fire while she escapes from an incoming opponent – or cannonball.


Smashes


Forward Smash: Fool’s Fate


Tetra, hunching a bit, begins to charge a horizontal slash with her blade from her left. When released, she’ll suddenly roll forward, dodging all attacks, then perform a powerful slash once she’s back on her feet, the arc of which hits everyone in front of her (14%-20%). and behind her (14%-20%). Of course, that roll traveled some distance; one and a half SBUs’ worth of distance, actually. The forward slash deals really impressive knockback that kills from 120%-70%, but the back slash has a set knockback that will fling them right behind where Tetra stood just moments ago. This smash attack is no direct way of KOing foes, but alternating this with her down special is sure to leave opponents crying.


Down Smash: Clear the Deck


Tetra seems to perform the same charging action, but now it looks like she’s going to hit the ground instead. She’s also standing straight up and slightly twisting her body. Upon release, Tetra throws the knife at the ground – except that it’s actually connected to the grappling hook, which Tetra’s got a hold on. She makes an initial spin with the knife-hook, sweeping the area immediately around her (5%-7%), then extends the rope enough on the second spin to hit anyone one Bowser length away (8%-11%) before pulling the knife back. The initial spin has a set knockback that will put opponents in the range of the knife of the second spin, which launches opponents horizontally and KOs at 170%-120%. The rope still deals negligible damage by itself (1%), and the whole move can be dodged by a short hop. Certainly not by a spot-dodge, though.


Up Smash: Clear the Skies


Tetra performs the exact same charging animation as her down smash. But this time, on release, Tetra does a jump that would dodge Ike’s dash attack while performing a single wide spinning slash that hits her left and right (5%-7%) before delivering a vertical slash below herself (11.4%-16%). The hitboxes are as disjointed as her up tilt and reach farther than her knife usually can by itself, though not as far as when attached to her grappling hook. The spin slash spikes the opponent, sending them directly downwards; unfortunately, it can be dodged simply be ducking. The last strike knocks opponents straight upwards, KOing at 110%-60%, but it's pretty much impossible to land unless the foe's right below Tetra. The move ends as Tetra lands on the ground again.


Much like Tetra’s down special and forward smash/back aerial, her up smash and down smash have the same charging animation, but they also have the same start-up lag and possess disjointed hitboxes. Anyone who’s close by when Tetra prepares either smash can only either guess correctly or move outta there.


Final Smash: Blades of Wisdom


This is the part where you expect to see a pirate ship come into either the background or foreground and barrage the stage. In reality, though, Tetra’s crew isn’t very good at sailing to distant arenas without the help of their captain, making this option out of the question. Hey, you already read this far knowing there isn't any "transform into Toon Zelda" move. But here's where being a descendant of a magical royal bloodline can be useful to Tetra for once!


Tetra’s knife starts glowing brightly as she flips it in the air. After catching it, she does a slash that would OHKO anyone right in front of her; from the strike, the three Triforce triangles shoot outwards in a cone, each spinning horizontally and flying at the same speed as Cresselia’s crescent attack. They behave like Toon Link’s Boomerang if the boomerang was a whole Battlefield platform long; after traveling 3/4s of Battlefield’s length, they’ll fly back to Tetra and spin past her until they reach their range limit and come back again. Since Tetra’s free to move around, she can make the triangles curve straight into the opponents, who’ll get caught in a 1%-per-0.2-second hitbox until they’re separated from the triangle by the stage or until the Final Smash ends. Once the triangles cross past Tetra for the fourth time, they’ll slow down until they reach end of their range limit, then disappear in a bright flash (20%), which will KO anyone easily. Of course, with three flying hitboxes whirling at your whim, it shouldn’t be too hard to catch opponents by that time.


Playstyle


Tetra's moveset is quite the mix of utility; it's a mish-mash of attacks with different roles that are much more efficient and dangerous when used in tandem with each other. A landed Grappling Hook can lead to a quick Jab combo or grab, a Down Throw can be followed up by a Dash Attack, being launched from a Catapult makes aerials more potent, a Forward Smash follows a successful Forward Tilt, a Back Throw into a pit leads to a gimping falling catapult, a Down Tilt can set up for a Down Smash and stunning a foe provides an opportunity for a sweetspotted up smash. And that's all without regarding your cannon that's laying waste to the stage.


Tetra will need to make the damage rise before trying anything risky for a KO, but landing attacks won’t be too hard in the early parts. Her Grappling Hook and Catapult coupled with her good mobility make her approach game pretty darn ridiculous, even against MYM sets. Fling yourself in, dash-attack, grapple them, or smoke them out with a cannonball; there's little room for foes to escape from this pesky pirate. Her attacks strike quickly and with decent reach, and give her enough time to dart away at the right moment before darting back in. As the match continues, your opponent will find himself unable to get rid of you as long as you can keep the pressure up.


Tetra's Pirate Cannon is a valuable asset, and there's not much harm in setting it up whenever you're able to. It can cover the area above you simply by bobbing, making any foe wary of where and when it will shoot; remember, only you know those details. You can dissuade foes from staying on the ground or hanging in the air with a few shots, then throw a curveball to surprise them. Set it at high charges so the shot can speed across the stage or so it can fly high up just to come down again. Low charges give you more immediate range and assured covering smoke. The knockback is very attractive, but your opponents can and will spot-dodge any shots if they’re quick enough. That’s where your throws and positioning attacks can shine, holding them in place or keeping them out of the actual safe zone as a cannonball crashes down. You can also stand between your foe and the cannon for a bit of false security before sidestepping or using you down special past the flying cannonball.


Tetra may have only two sets of moves that look alike, but that’s enough ways to make someone lose a stock. Exploit those spot decisions players make, and hopefully you'll punish them for choosing wrongly. Using Down Special after flinging yourself at the opponent with the Catapult is good fun, but so is landing the sweetspot of your Forward Smash on someone who flash stepped away. Your Up/Down Smash can make your immediate area a dangerous place for your foes, who may either choose boldly or rather not guess.


Of course, playing carelessly or overpredicting can land Tetra in some hot water herself. Getting spot-dodged on the Grappling Hook, using your Forward Smash while they roll behind you, or missing with your Up Aerial in a short hop give your foes time to space themselves or press their own attack. Don’t forget your opponents are also free to grab and chuck you at your own cannonball if you’re not careful. You have the ability to flee when you need to get away yourself, and just tapping B when setting up Pirate Cannon will make it shoot immediately at anyone who thinks they can KO you when you're done.


Tetra still plays as in-Smash as she did back in MYM10, but why should that devalue her moveset? If the foe wants to get rid of her that badly, they'll have to come and get her before she drags them into her field of battle instead, cannonballs raining down.


Extras


Entrance

An upwards puff of grey cel-shaded smoke explodes onstage. Tetra appears, winks, then pulls her knife out of the scabbard.


Taunting

- Tetra sighs with her hands on her hips, expressing a mixture of "All in a day's work." and "Was that it? Boy, that was easy."

- She pulls out the Pirate Charm (this thing), tosses it up and catches it before putting it back.

- Trademark wink + sound that plays during trademark wink. Because no one can match Tetra's wink.


[collapse="Snake Codec Conversation"]Snake: Otacon, what's with this small pirate girl running all over the place?"

Otacon: That's Tetra, Snake. She may not look like it, but she's the leader of a band of pirates that sail around the Great Sea. She's also actually the chosen wielder of the Triforce of Wisdom.

Snake: Wait, so doesn't that mean she's one of Zelda's reincarnations? Fate sure works in weird ways.

Otacon: That may be so, but don't take her lightly for her size. She may not be very strong, but she's got a lot of tricks up her sleeves and moves quickly, so watch out.

Snake: Gotcha.

[/collapse]


Alternative Costumes

- Blue vest, purple shirt, red scarf and sash (default)

- Red vest, yellow shirt, orange scarf and sash.

- Light green vest, brown shirt, dark green scarf and sash.

- Light blue vest, white shirt, dark blue scarf and sash.

- White vest, grey shirt, black scarf and sash


Victory

- Tetra tosses her knife, then rolls to where it lands before catching it. She then stands up in a relaxed pose, free hand on hip

- She does a mock version of Link's victory pose, doing two feint slices then giggling as she sheathes her knife.

- Crossing her arms, Tetra winks at the screen. Stand tall, Tetra, stand tall.


Match-ups (with every Prof set made so far)

Advanced apologies foe how terrible these might turn out. I'll probably edit these with feedback.


Vs. Octavia 60/40


Tetra's grappling hook easily pulls the cellist pony off her feet, assuming Tetra can catch her when her Forward Tilt isn't walling the way. It's easy to dodge Octavia's notes thanks to the Down Special, and Tetra isn't going to make the mistake of attacking her from directly above or below. Just don't get too cocky; dodging it once won't stop those notes form coming back as a vengeful grab, and Tetra doesn't want to be force-positioned into the way of her cannonballs. Octavia's not as easy to deal with when she's on her four hooves either, with a plethora of distancing and shielding attacks to defend herself. But on the cello, she'll have a hard time defending against Tetra; the poor pony's not too hard a hitbox for our pirate to follow even when riding her Up Special.


Vs. Jack Skellington 40/60


Those pumpkin bombs are not good for catapulting about, so Tetra's approach is a bit shot here. Thankfully, she has enough pseudo-dodges and semi-jumps built into her attacks so that she doesn't need to bring her shield out as much as Jack would like, nor is so crippled by sticking to the ground. Such a tall figure makes a good target for the cannon and the grappling hook alike too. But on the other hand, Jack has wide range on most of his attacks, and Tetra can't do anything about the ghost mist waiting to scare her out of this or that approach. He also loves to juggle foes, and Tetra has little to counter that sort of tactic bar her Down Air and the rare catapult. And please don't get grabbed. Tetra does not want to have to guess which of her advantages the pumpkin king decided to booby trap.


Vs. Po 20/80


Aside from invalidating cannonballs with a quick counter, easily outprioritizing Tetra's short-ranged knife, and preferring close combat…yeah, Po's got a massive upper hand here. For such a big guy, he's just that well-suited for melees, able to switch to dealing with another trick at a moment's notice. The only thing against him, really, is Tetra's grappling hook, which can yank him out of position or swipe his food bowl away. But Tetra literally has nothing else to approach the panda with, so he doesn't need to risk his meal just to goad the pirate into attacking. Tetra has her counter-stun to deal with overzealousness, but half of Po's attacks are light enough to not rebound back at him for long anyway.


Vs. Aisling 45/55


A mist-covered staged and the threat of wolves behind any possible patch of of it really ruins Tetra's long-range options and mobility. Heck, Aisling's even better at weaving across the stage than Tetra is, and can also handicap her with a single grab; if she wants to deal with this elusive fairy, she'll have to do it before Aisling gets away with concealing the whole battlefield in mist. At least Aisling can't match Tetra's close-range options, and she's actually pretty vulnerable if Tetra can catch her. Her wolf form might even be easier to deal with, as her size and jointed attacks can be dealt with by the pirate. Then again, Tetra can't play too aggressively or she'll set off more vapor glyphs than she can deal with, and an impasse of mist and wolves behind it are the sort of thing Tetra can't fight. She can only wait for Aisling to make her move, and make the best out of what she has to deal with from there.


Vs. Gardevoir 65/35


Screens are a tad pointless here when Tetra can just use her grappling hook to pull Gardevoir out of her forts, negating the threat of her grab game. While the screens still damper Tetra's cannonballs even when Gardevoir doesn't solidify them, they're still alright for knocking screens out of Gardevoir's reach. Gardevoir will try and get her screens to follow Tetra around so as to deal with her mobility, and will obviously throw as many projectiles and pseudo-grabs as it can to hinder Tetra's approach. And believe me, Tetra won't have that easy a time dodging so many projectiles. But Tetra can deal with the psychic much more easily in the air; just avoid striking at the moment Gardevoir uses her Up Air to reflect the knockback on you. And even the, with so much close quarter combat on the pirate's side, it shouldn't be hard to hinder Gardevoir's attempts at setting up more screens, or push to a position where there isn't a screen between Tetra and Gardevoir. Just be careful with your long-range attacks, or you'll give Gardevoir the charge she needs from her screens to turn the tide.


Vs. Tropius 50/50


Whirlwinds ruining your catapult and cannonball options? At least Tropius is a semi-slow beast, easily punished or stunned if he whiffs his attempts to blow or stomp Tetra out. Tetra can easily snatch those fruit of the Tropius' trees with her grappling hook, so the dinosaur will more likely whip up his leaf storms and throw in some leech seeds for good measure rather than make too many trees. While Tetra can just catapult through Tropius wind gusts, that sort of thing becomes harder the more damage she takes from all those darn leaves. And not to mention that with her cannon kind of shut down, Tetra lacks KO options against someone who can chill in the air all day long. She'll need to keep him to the earth and stop him from whipping up those twisters in the first place if she wants to win, and before Tropius can build up his solarbeam of insta-KO.


Vs. Zexion 75/25


Tetra's quite good at depriving Zexion of the health charges he wants for his clones, as she can leap over those flying lexicons like no one's business, and her grappling hook gives a safe option for rooting out Zexion when her tries to either charge or counter. Zexion just lacks the tools for effectively dealing with someone capable of moving above and behind him while grounded; his air game, meanwhile, has more options for dealing with such, so Tetra should discourage that kind of thing or wait until he lands. He'll more likely spawn clones just to take cannonball shots and hook grabs in his place, so Tetra ought to rely more on remaining close to deal damage. Zexion can't get away with his grab or smash attacks while the pirate's close on his trail.


Vs. Lexaeus 40/60


Since close combat is nigh-suicidal for the light pirate, she'll have to rely on her cannonballs to take down Lexaeus and his rock spires. Her counter-stun happens to be very effective on someone with such brutish attacks, stunning Lexaeus for a long time if Tetra plays it right Still, while her Down Tilt turns any focus point to her side, Tetra still needs to stay light on her feet to both avoid rogue attacks and strike back whenever Lexaeus attempts to power himself up. Lexaeus is just too dangerous at all points of the match to attack relentlessly; let him generate his own opening, and Tetra can use her wits to dodge past and strike back.


Vs. Xaldin 45/55


Staying close is tricky work when your opponent can command his lances to strike you when you're busy. But striking someone from above is tricky work as well when said someone has a counter-stun for such an occasion. That's the only thing Xaldin has to deal with Tetra's cannonball barrage anyway, otherwise having almost as much to watch out for as Tetra does with Xaldin's lances. At least the wily pirate can use her hook to yank out lances headed straight at her, basically removing them from Xaldin's reach. Xaldin wins any attempts to out prioritize on the ground, and his air game is more powerful than our pirate can deal with, so Tetra needs to rely more on her specials to combat this equally manipulative foe, and get a cannonball in his face.


Vs. Ampharos 60/40


Oh look, another character that laughs off cannonballs, this time with a light beam that throws them off course. Tetra can just stay a medium distance from Ampharos to deal with it; too far for its melee attacks to reach, to close for its Forward Smash or its charging tricks to be feasible. Tetra can just dodge or feint Signal beam anyway, and her hook laughs off the electric sheep's specialized shield. Too close, and Tetra risks getting stunned or paralyzed, and her light weight can't withstand an electric beatdown.


Vs. Cryogonal 75/25


Yeah, Tetra's not gonna fall for any of this snowflake's tricks. Use the hook to rat Cryogonal out of its shenanigans, or use the catapult to quickly fly out of the haze and check for Side Special illusions. All the while, Cryogonal is too deathly afraid of a cannonball smashing its face in because of its low vertical speed and likelihood to get KOd, though it has enough melee options to combat Tetra. Too bad its Forward Smash icicles can be flung back at it, but at least it can make the stage more slippery than Tetra can deal with, as well as easily grabbing her to lay some pressure off.


Vs. Chandelure 50/50


Cannonballs versus flames? No contest; Chandelure needs to remain wary of the cannon at all times, since it lacks the options to deflect, damper or escape from it. Tetra's damage output is crippled if she gets burned by cursed fire, and her Down Special isn't so effective in dodging wisps, but Tetra will more likely stick close to the chandelier to beat it down before it tries anything else. When stuck with a curry effect, Tetra will need to watch for when Chandelure suddenly throws out a buffed smash attack, but if she isn't afflicted with cursed fire, she can otherwise stay at just the right range to pepper it back with fireballs and her Forward Tilt without getting cursed. But Chandelure's flames linger too long to be dodged feasibly, and its own melee game matches Tetra's.


Vs. Winnie-the-Pooh 65/35


Scroll down and read that set first, you missed your chance to vote for Tetra back in MYMX anyway. So, this character quickly makes easily-stolen pots of free health? Tetra's catapult lets her stay above the eventual honey flood, but those bees are another matter entirely. Heck, that giant honey pot makes for a pretty good shield against cannonballs if Pooh decides to camp out in there; only Tetra's cannon and Dash attack can really tip it over. While the pirate clearly outranges the bear and can jump up to the reaches of the tree, Pooh can just keep on healing off the damage if he can stay out of Tetra's grasp, which can be done with the help of his props and a lot of honey, as well as some timely dodges.


Vs. Tetra 50/50


Don't you know, mirror match-ups are important to analyze! Obviously, you'll be using the same tactics against each other; whoever can hit or hook the other first wins. Your cannonballs will be the real deciding factor here, though, zoning or providing ammunition for one to hook and fling at the other. May the one with greater skill be the victor.
1648456952359.png
 
Last edited:

ProfPeanut

Smash Ace
Joined
Oct 1, 2008
Messages
727
In Which I End With A Most Unusual Moveset For A Bear

Winnie-the-Pooh


Winnie-the-Pooh.png


Size: 5

Weight: 7

Ground Speed: 5

Air Speed: 3

Traction: 8

Jump Height: 4

Fall Speed: 5

Crawling

Winnie-the-Pooh is a classic literary character whose Disney iteration precedes his original self in terms of fame. Regardless, he has always been a simple, kind fellow who's always been there for his friends in their adventures around the Forest. He also has soft spot for honey, what with one of his earliest stories involving a plan to disguise himself as a cloud to steal honey from bees, which ended in a mud-covered bear with his hands stuck facing upwards. And to this day, I am still not sure just why that was why he was always called Pooh-
"Hallo there! Are you writing about me?"
Why, yes. People are going to play as you in a game, and I need to explain how that will work.
"A game, you say? How do I play this game, exactly?"
Well, normally, it's a game of Who Can Avoid Falling Into A Pit First, but I don't think you'd do too well in it. There's much bumping into people and flying about, the sort of thing someone such as yourself might not enjoy.
"Oh, bother. Do I really have to play that game?"
Well, sort of. It's one of the goals if you want to win. But for you, Pooh, you have much more interesting goal that will let you win the game, and it has to do with a lot of honey.
"Honey? Hmm, I think I would love a smackerel of honey right now."
Neutral Special - In Which We Find Honey Pots And The Method Of Victory

First off, you're going to need honey pots. Now, I know you can't call them out of thin air -
"Well, life would be so much easier if I could."
- so I'm going to do it for you. Give me one second, move around as you wish. There now. pop
"Oh my! Where did that come from?"
I drew it into the battle, of course, and right above you so you could catch it. I can make some more even if you're holding one, though it'll take me just as long to make it, and they'll drop to the ground instead. Taste some, if you want.
"I think I shall. Um, you wouldn't mind if I tasted some every second or so while I'm holding this Small Pot of Honey, would you?"
Not at all. You can even use all your other moves while holding a honey pot. Each pot holds 15 ounces of honey, and since you scoop up about one ounce at a time eating like that, you should be able to empty it in fifteen seconds if you're uninterrupted.
"Uninterrupted? Oh, bother, those other characters don't look so friendly."
Indeed. If you get hit by a Strong Attack, you'll let go of the pot, which will fly off from the force of the attack and spill any contents it had across the stage. Even if you don't let go of it, you can't eat honey while stunned from such attacks. On the ground, honey behaves like any other liquid except that it spreads out much more slowly, and a full pot's worth of honey will cover a Block in length when spread out.
"Bother, I can't believe someone would just waste honey like that."
No, I'm afraid you can't eat it from there. Honey, being both slippery and sticky, cuts traction in half and makes anyone who walks across it twice more likely to trip, while also doubling the amount of time it takes to get up or jump off the ground. That means you too, Pooh.
"It is harder to deal with honey when it's not in a honey pot where it belongs. I think I can crawl through it, but I'll be covered in it if there's enough honey to be covered with."
Honey pots can be picked up by anyone else and thrown off the stage; they can also be eaten out of honey. Since they're Drawn, they can't be destroyed by anything else, and they'll stay around even after they're emptied of honey. Now, you do remember that you'll need to eat this honey to win the game, right? For each minute or stock set in the match, prioritizing the former-
"Preporitiding the Foredirt?"
- I mean, well, er, if there's a time limit, you'll need to eat 30 ounces of honey for each minute in it. If there's no time limit, and you have stocks instead, you'll need to eat that much honey for each stock instead. Look down there, at that number next to your portrait, and you'll see a yellow bar next to it showing how much honey left you'll have to eat. After that, you'll only need to guzzle down any single pot filled with honey, and if you can do that before you run out of time or lives, you'll be immediately declared the winner.
"A game of eating honey? How exciting! But what about everyone else?"
They'll still be trying to knock you into a pit, unfortunately. That involves making that number down there increase, but you can keep it down just by eating honey, which will heal you for at least 1% per ounce. I don't ned to tell you just how sweet honey is, but here it also heals for another 1% per ounce for every 30% that you have on that number down there. So while you can slowly heal yourself early in the game, you can gradually heal for very large amounts against Very Fierce Characters.
Jab
Don't worry, Pooh, you have a whole moveset to help you with this. Normally, you can just suck the honey off of your hands with this if you get honey on them, which happens whenever you do put your hands in honey without cleaning it off. Maybe you can crawl on honey and thus get a good ounce on both of them. With honey pots, it will let you concentrate more on eating honey while you stand in place.
"Well, it would be nice to look at what I'm supping for supper. This is, I think, two or three times more than just a taste of honey."
Other characters will eat only two ounces of honey if they use this move with a honey pot-
"Wait just a minute, you mean they can steal this honey? Oh, bother."
Yes, but they won't passively eat from it since they'll be too busy fighting. They might be able to throw them at you, even, and deal damage and weak knockback. Maybe you could-?
"I would rather not. Honey pots should only be used for eating honey from, and an empty honey pot is for putting honey back into. If I can, that is. So there you are."
At least swap a honey pot in hand with one on the ground. Just double-tap instead of holding it, and remember to check the honey pot you receive.
Dash
I suppose I could help you keep them from stealing the pots, then. Since you can run quite fast for a Bear, using this lets you pick up any Small Pots of Honey you run into and stack them in your arms.
"Oh, like spring cleaning? I could stack the pots one after another, I think."
Indeed, you can do this for as long as you hold down the move, though it would be quite silly if you could still eat honey while doing so. Once you're done, you can stop the dash and hold onto the first pot while you quickly set the remaining pots down on the ground, neatly lined up in a row.
"It doesn't take too long, does it? I hope not. What if I run into someone while holding all those pots?"
I suppose you'll both get knocked back as though you tripped. You'll still hang onto the first pot, but I'm afraid all the others will tumble down and spill their contents.
Forward Tilt
You can put up your hands as though a Giant Pot of Honey were sliding towards you to stop it.
"A Giant Pot of Honey? I'm afraid I don't see one, but I much rather would like to."
In time, Pooh. You can hold this out as long as you like, and move back to your normal stance quickly, but you can't eat honey at the same time. If a person bumps into your hands, you can tilt forward and start pushing them while slowly walking forward, turning them around if they were facing your way. You'll move at double the speed if you're pushing them over honey.
"That sounds like a Very Easy Thing To Do. Can't everyone do that?"
They could, but they have other moves they'd rather be doing. Also, if they tilt against you, the both of you will be at a standstill until someone lets go. If you stop the move there while they're pushing, they'll end up leaning too far and tripping in place. Of course, if they dash towards the direction you're pushing, they'll move ahead of you and you'll end up dashing forward to stop from instantly tripping. Well, if you're still pushing, that is.
Up Tilt
The move I just talked about works whether you have a Small Pot of Honey or not. This is a bit different, since here you can put your arms upwards, ready to support anyone or anything that falls upon your hands.
"Or maybe just holding a honey pot facing down so that the honey falls down faster?"
That too, at a good rate of three ounces a second. On the other hand, the pot will be thrown out of your grasp by any sort of attack this way. Now, any person who falls on either the palms of your hands or the pot will land as though they touched the ground.; you must imagine that this is a Small Place To Land, so you'd have to use this at The Right Moment.
I suppose if you stop holding the input while someone's resting above you, they'll tumble down without that support holding them up. You can also hold this out to catch a honey pot early or stack one above the first before letting it down.
Down Tilt:
You shouldn't have a problem crawling forward and back, Pooh. You won't trip, and you can still even snack on honey.
"Oh bother, this honey on the floor is sticking to me though. Is there really another move I can do from here?"
Well, you can slide a honey pot forward with your arms. Since you won't throw, you may as well place it back down with this move, where you can push it such that it slides forward a two Blocks in length, tripping anyone standing in the way and pushing any other Small Pots of Honey it runs into along with it. I'm afraid it'll only travel half as far through honey, though.
Since it doesn't look like you'll be letting go of that Small Pot of Honey anytime soon, you can use this to push them off Into A Pit when they're empty. If you don't have a Small Pot of Honey, you can just push forward with your hands. While it doesn't reach far at all, any Small Pots of Honey on the ground you push will move forward in the same way.
"But that doesn't sound like it helps me eat honey at all. It sounds like just a way to make people trip down. Though I guess it also means they won't take my honey, which means one thing means a lot of things. Bother."
Side Special - In Which We Choose A Larger Alternative

"I've been thinking, if people just keep knocking these honey pots out of my hands, then it's not going to be easy for me to eat honey, is it?"
Right you are, but you'll have to give me four seconds before I can Draw an alternative. You may not want to stand under this. pop SLAM
"Oh my, is that the Giant Honey Pot you mentioned earlier?"
Indeed, big enough to fit a Large Fierce Character in it, acting as a solid wall and holding 90 ounces of honey in total. It sizes two Blocks in length and height, so it should take you two good jumps to-plop
That was quick. Well. Ahem. Giant pots weigh a great deal, even more so if they're full of honey. While inside the giant pot, you should be able to eat 4 ounces of honey a second while the pot protects you from most attacks, and you'll also refill any Small Pots in your hands if they're lacking in honey. Then again, so can anyone else. Remember, I can't see you nor whatever else is inside through the walls of the honey pot. Just jump, and you'll climb out of the pot's rim while covered in honey before jumping off. Then again, if someone else strikes the upper half of the giant pot with a strong enough attack, they may be able to tip it over and-sploosh-dump its contents on the other side.
"Oh, help! I would rather be swimming in the honey than lying on it."
Well, at least the rest of it is lathering most of the stage, spilling over the sides and pushing anyone else that it drips on downwards. Don't worry, it'll fill up any Small Pots of Honey in the way
"But I can't eat honey from there. And now there's just an empty giant pot here. Oh, bother."
There should still be a bit of honey left in there, maybe 10 ounces or so. But I'm not going to draw another one until that first one is pushed offstage first. You can do that just by running against it, or by continuously tipping it to roll it forward. I should mention that on a Honey-Covered Surface, a giant pot is twice more likely to slide than tip over.
When a giant honey pot has a third or less of its honey emptied, anyone inside can move as easily as they normally would. Well, when inside a giant honey pot, that is. If someone dodge-rolls into one the walls from the inside, they'll have a much, much easier time tipping the giant pot in that direction, so it's not as easy to just push Someone Trapped Inside into a pit than you'd think. People pushing on the same wall from both sides will probably cancel each other's efforts out, though. Anyone can also stand on top of the honey pot if it's tipped, though they won't be able to break it with any attacks since it's Drawn.
Grab
Say, Pooh, here's a simple action. You can simply reach out like this and hold a person right in front of you with your hands.
"I can? Because I'm not too bad at Reaching, and I don't think I'm that bad at Holding Things either, especially when it comes to honey."
Well, not too bad a grab, though your hands are certainly unable to reach into the honey pot at the moment. Say, try shaking them a little.
"Are you sure? I don't really want to hurt anybody by shaking them."
You won't, don't worry. That's really there to shake off any honey that they might be covered in, maybe even other Gooey Things they might be covered in, which will then fall onto the ground. I did mention that anyone could get covered in honey and act as though they were walking on it if they were swamped by enough of it, right? I think you should be able to shake honey off of a Friend, too.
"A Friend? You mean I can play this game with a friend?"
Sometimes, but other times it'll be just you and another person. If you're playing with a Friend, then the two if you can win either by you eating enough honey or him (or her) winning the Who Can Avoid Falling Into A Pit First game.
Forward Throw
If you have a Friend in hand, then the easiest thing for you to do after shaking honey off of them is to let them go with a pat on the back. You can add a friendly push to it as well so that they can start dashing straight ahead, too. I don't see why you can't do this with someone not so friendly either, though.
"But they might trip on the honey if they're not careful. So I should ask politely before pushing a friend forward."
Back Throw
"However, I think that if I had a Friend with me, I would like to give him some honey instead."
Just seat your Friend on the ground then. No, that's their tripped state, but I suppose it will do. Pooh, is that another pot of honey in your hand?
"Well, I thought I could give him the one I already had, but it looked like it was empty. So I had to put my Friend down while looking into the other Small Pots of Honey around to see if they had honey. It may take a while, I admit, but I can't let them go without putting some honey into their hands."
I don't see how this would work if you don't have any Small Pots of Honey around, though. Hang on, I could just Draw something while you have someone grabbed. Silly me. Say, what if they're already holding onto something?
"Oh, well, let me think…well, I suppose I'd have to keep this honey pot then. But I would rather give one first."
Down Throw
"On the other hand, it would be nice to get into that Giant Pot of Honey. I think I shall climb onto my Friend's shoulders. I hope he won't mind."
Maybe not your Friend, but what about anyone else? They could easily knock you off once you're standing on them, if you don't jump immediately.
"Then I shall have to jump. But a Friend would let me stay and walk to the Giant Pot of Honey so that I may wait until I am close enough to jump into it."
Up Throw
Pooh, why not try putting a little strength into it and throwing whoever you're holding upwards?
"Hm, perhaps my friend would like a boost upwards. I could try…heave, ho! Oh bother, they only went as far as I could have jumped. And I believe they're tumbling as well."
They should recover a moment after falling. You can also tilt back or forth to influence how far forward or back you can throw them, but it's not really further than a Block away. Potentially, you could easily help them into a Giant Pot of Honey, or you could just run away if that character is quite Fierce.
Up Special - In Which We Relive An Early Adventure

Of course, you'll still need a way to recover. Just wait for a second, please.
"Hm? Oh, what a marvelous red balloon this is. Is it for me?"
Indeed. You can walk on the ground while holding it, and use your other moves at the same time. Then again, if you have both a honey pot and a balloon, I'm afraid you can't do anything except walk, jump and snack on honey unless you let go of either of those things. Perhaps in this case, just let go of the honey pot with that normal move where you usually eat more.
Balloons won't do anything until your feet are off the ground, in which case it'll float upwards quite slowly while carrying any Bears holding the string up with it. In the air, you should still be able to snack on honey, even while the balloon floats higher and higher. The balloon will also hold you from flying too far from a Strong Attack as long as it's not hit as well, such that you'll only be dealt half the force to be precise. Pooh, you should probably know that everyone is also playing Who Can Avoid Flying Into The Clouds as well.
"So I can't go too high, and I can't go too low. This is a very strange game."
Just use the same move you used to ask for a balloon, and you'll let go. Don't try think too much how that works exactly, because otherwise you'll just use any of your other moves. I also can't draw you another Balloon until you land back on the ground.
"Say, how is it you can draw a honey pot and a balloon at the same time?"
Actually, I can't. These aren't the only Drawn Objects you'll have to make use of, and they each take a bit of time to make, but I can't draw two or more of them at once. I suggest you try stay out of trouble while I Draw honey pots so that I can get you a Balloon in time. You can also use your Back Throw with this, and you can give someone a Balloon instead of a Small Pot of Honey, wherein they'll also float up if they take their feet off the ground.
"Hmm, I think they'd rather have the honey, but a Balloon is nice too."
They can also release the Balloon in the same way. Being Drawn, the Balloon won't be popped anytime soon.
Neutral Air
I say, Pooh, have you gotten yourself covered in honey?
"I believe so, though I don't really mind it."
It's not always good for you, really. Here, you can try shaking your limbs around in order to shake the honey off of yourself, allowing it to land on the ground. There now, free of any goop that was on your persona.
"My purse sonar?"
Yourself, that is. You've also made a good effort of pushing everyone else off of your personal space, it seems.
"Say, Narrator, didn't you say I could do these moves while also having a smackerel to eat?"
Why yes, though this isn't one of them, since your hands are shaking around wildly and such. If you have a Small Pot of Honey, which I think you hold mostly with your left hand, then your left arm won't join into the move, but that's situational in itself.
Forward Air
Now, try to tense your arms up and give a good shove forward.
"Like this? I hope that won't hurt anybody."
It will push them away a good deal, but it shouldn't hurt them. Still, it's going to take you a bit of time to ready that move, so they might dodge in time. Then again, Giant Pots of Honey can't dodge. You shouldn't have too hard a time pushing a Giant Honey Pot either back upright or into a pit. You can even push forward with a Small Pot of Honey instead of your palms for a bit more strength.
Up Air
Now, try stretching up with at least one of your arms and then motion it forward and down, a bit like doing a Stoutness Exercise. Firstly, you should be able to grab onto the edge of a Giant Pot of Honey this way. Others could too if they could do the same thing, but most don't.
"It's a good thing that I practice my Stoutness Exercises, then. Does that mean I can jump and then use this move to climb into a Giant Pot of Honey?"
Quite so. Now, you could also use this move to grab and hold onto anyone right above or in front of yourself. Unlike the first time you hold onto people, you can grab onto characters and ride them upon their backs, traveling upon them and snacking on honey in the meantime.
A Friend will let you travel anywhere, but another character will probably try and shake you off, which would take two or three moves on their part depending on what they do. Of course, unless they can hit behind their backs, you shouldn't be taking any damage. Depending on whoever falls faster, the both of you will fall at that speed, and you'll also combine your weights for the moment. You can jump off at any time with a jump.
Down Air
Sometimes, you may want to just get back on the ground where it's safer to eat. Try curling up like you're about to cannonball into a pool, then plummet downwards. I'll make sure you're Well Armored during your descent, so you won't get knocked out of it.
"Oof! That was quick. Oh, bother, I think I landed on someone on the ground."
They can get back up, but you'll be able to move off first. Anyone you might fall upon who's airborne will be knocked to the side a good distance, though they won't be harmed by Falling Bears. If you use this with a honey pot, you can instead face down and put it below yourself, letting the pot do the falling while eating a good three ounces a second. Just be warned that you'll take quite some time getting your head out of that pot when you land.
"I think I shall also use this to jump into a Giant Pot of Honey, if I can manage it."
Back Air
I think you'll need to move around the air a bit faster than that, Pooh. Have you tried tumbling about? Just lean forward a bit, then throw your weight back.
"Ah - this is - quite - dizzying!"
Oh, sorry about that. But you should be able to move left or right with much better control now, and you can stay ahead of characters trying to juggle you upwards before you can land. Then again, you can't eat honey or use any of you other moves until you land or flinch from something.
Down Special - In Which We Discover A Very Tall Centerpiece

"Say, are you Drawing again right above me? It looks like a Very Tall Something to me."
I'm not done with it yet. I'll need ten seconds with this one, so move along and don't fall off into a pit until I'm done with this.
"Oh, I see. This Very Tall Something is actually a Tree."
Five Blocks high, with the trunk half a Block wide. It'll have branches that are each between a Platform and a Block long, and are spaced at least a Block above each other or the ground. There should be at least two branches on either side, and four at the most, but it's all random really. Anyone can stand on the part of the branch close to the trunk like a Platform, but if they stand on the far, thin ends, they'll just tumble downwards for a while. You can put Small Pots of Honey on the branches and even cover them in honey, though a Giant Pot of Honey will just break the branches. Characters can also grab onto the branches from below if they have a move that works like your Up Air, which you yourself can use to grab onto branches.
A Tree, being Drawn, won't be erased from the game anytime soon by anything. Its trunk and branches won't obstruct anyone, and anyone can also climb up the trunk like a Ladder, though only half as quickly at the best. There's also a large hole up there near the top, put right above the topmost branch. You should hear something familiar up there.
"Well, I hear a buzzing-noise. And the only reason I know for making a buzzing-noise is because you're a bee. And the only reason for being a bee that I know of I know of is making honey."
You can climb up to that topmost branch, and from there you should be able to reach into the whole and snack on the honey from way up there. There's a practically endless supply of honey up there, which you can eat at the same rate you'd eat from a Giant Pot of Honey, and even refill any Small Pots of Honey in hand, but you will have to watch for the bees.
"Oh, bother. Won't they just sting me if I climb onto that branch up there?"
Yes, if they're still there, in which case they'll fly back in afterwards. If a strong enough attack hits the trunk of the tree, the bees will come out by themselves in a Large Fierce Swarm. They'll fly to sting the nearest character, so you may want to stay away, Pooh. There's a lot of flinching and prickling when it comes to angry bees, as you know, so you may want to wait for about twelve seconds before the bees fly back to their hive.
Now, this is important, Pooh. After catching up, bees will swarm around a character for at least three seconds before they decide to fly to another character that's at least a Platform in distance away. However, bees find characters covered in honey much more important than those who aren't. They'll fly past clean characters to chase honey-coated ones, sting such characters for at least five seconds, and won't attack anyone else unless they're right next to that character.
"I like this tree, but I wonder if I would like it just as much if it were somewhere else too."
Easily done, but you'll need to give me two seconds to erase the first tree and the bees that come with it before I can draw another one.
Forward Smash
Pooh, here's three more moves that I think you'll like. You just hold them down while I start to Draw something, and I'll finish it the moment you release the move. As long as you're holding down the move, you can still run around and jump, and the Drawing will show up on your very spot when it's done. If anything else from the other moves above is being Drawn, it will be paused for the moment while I work on this. Now, you may want to start dashing the other way-whoosh
"Oh, bother. That was a wind if I ever felt one."
Depends on how long you held the move down. It could slowly push any Small Pots of Honey for the three seconds that it lasts, or it could force the heaviest characters to the end of its three-Blocks-long path. It won't push a Giant Pot of Honey unless it's mostly empty, and it'll only rustle the Tree's branches at the most. However, it's quite effective for keeping bees off of your trail of you can manage it, since Drawn objects do affect each other. If you run against it, you should be able to mostly fight against it and keep on your toes.
While you can only start holding this sort of move down on the ground, this one can take effect up in the air if you release it while airborne. It may give that push that a Bear With A Balloon needs to go places.
Down Smash
You may want to step back, Pooh, if you'll look down at your feet.
"Oh, is that a Trap I see? It's a good thing I saw it, or I would have fallen into it."
Indeed, I was going to warn you that a few moments after the Trap is set, you'd fall into it as easily as anyone else. It wasn't too hard to draw, just had to erase the stage and stamp a cover onto it, even if you can't see it. The Trap will bury the first character to step on it, keeping them buried between half a second and three seconds. I should mention that for some reason, bees will ignore buried characters. It might be because of all that dirt or something else. You can't use this on Tree branches, but on a Giant Pot of Honey, it can act as a quick escape in and out of it so long as Trap is facing the right way.
Up Smash
"Hm, I think I have come up with a Very Good Idea. Do you think you could Draw me a Distraction?"
Well, I could come up with a sturdy scarecrow that could block attacks and take maybe 40% before breaking, if you'll give me the time. I'll have to plant it on the ground below you, though I guess I can put it on Tree branches too.
"What about right now?"
Oh, er, sorry. Without time, I can only put these two twigs tied together and dressed in a shirt. It probably won't last after taking 10%.
"That's alright. Now then, I'll use that move where I usually get some honey on from this pot, pouring just the right amount of honey, and there we are."
Pooh, did you just cover that thing in honey?
"Well, only enough from this pot to cover it, I think, five ounces or something? Anyway, there should be enough left here for me to have a smackerel of- oh, bother, the bee's are back."
Huh. Well. So it seems. The bees are swarming that makeshift Distraction as though it were another character without actually stinging it. I think you may have found something to help stop getting hit by both bees and other characters, Pooh.
Final Smash
Say, Pooh, just how did you get that glowing orb that was flying around?
"I think it was the bees who got it for me. Or maybe it wasn't. I didn't think I'd get it, but it seems I did. What does it do, exactly?"
Well, I do believe it results in, say, a veritable flood of honey falling down from the center of the stage. 200 ounces, to be exact. You'll have to avoid being swept away by it first, but there should be more than enough left for you to win the game.
Playstyle - In Which We Come To The End Of This Moveset

"This is what I learned. Instead of playing Who Can Avoid Falling Into A Pit First, I only have to eat as much honey as my tummy can carry. That sounds like a good plan."
That's true, but we still need to type a Playstyle.
"Excuse me, but what is a Clay Still?"
It's a Proper Explanation For Playing A Game.
"Oh, is that what it means? I thought you already did that."
Well, I still need to put it all together. For example, you can start the game with the Small Pots of Honey, gradually getting more honey around the stage and into the meter before trying your Larger Honey Sources. Or you could skip to getting a Tree or a Giant Pot of Honey Drawn onstage as quickly as possible while just avoiding the other characters. Drawn objects won't go away even if you do Fall Into A Pit, so except for the Distraction, the only way to really be rid of them is to push them Into A Pit.
"But those others have an easy time knocking honey out of my hands or emptying pots. All that's doing is getting honey around the place."
But then again, honey is very hard to get rid of, so the others will just have a harder time doing what they want to do instead. Meanwhile, you can stay off of the ground by using a Giant Pot of Honey, Balloon or Tree, or riding upon the backs of others. There's no limit to the amount of Small Pots of Honey you can make, so you don't need to worry about others throwing them out. But you can only eat so much honey at once.
I suppose if you don't mind the waste of honey at some point, or if some other character jumped into it first, you can tip over a Giant Pot of Honey to spill its contents all over the stage, where you can easily slide it off and get another one. Those empty Giant Pots make a decent place to hide and eat honey in peace, even if you can't use any of your other moves while inside of them.
Even if you don't do so well in your First Chance, you'll eventually have all the things you need all over the place to use by the middle or end of the game. You will have to wait it out before you can win, after all, but you can only do that by slowing everyone else from making you Fall Into A Pit
"It seems to me to simply be a matter of not getting hit by people. Because it wouldn't be very nice to get hit while having a smackerel of something to eat."
You have to be fair, Pooh, some people only get by by hitting people to win. Even with all the honey slowing down that goal, you can't stop them from doing that entirely.
"Oh, well then, I suppose that's just the way of things."
You could always dodge, you know.
"Oh, I could? Well, I never noticed that. Does everyone else get these things?"
Yes, as well as a shield, which you can use as well to defend yourself. You also need to avoid those bees, as well as the other things that others will use to make you Fall Into A Pit. You do still have your aerials, smashes and other moves to help you stay out of danger, and you must use them wisely to last long enough.
"So as long as I don't Fall Into A Pit and eat enough honey, then I win the game? I'm not sure how that works, but I like that game."
I'm glad you do. So long for now, Pooh.
 
Last edited:

Katapultar

Smash Lord
Joined
Nov 24, 2008
Messages
1,284
Location
Australia
[collapse="Chandelure"]So this was what all the Superspicy curry research was for? Even if the actual Brawl effect of shooting fireballs out of one's mouth is downright weird and would be considered greatly tacky if a MYMer had been the one to make the effect in their moveset (I'll admit it does feel a bit strange for a Pokemon of such nature to inflict a "comical" effect on the foe, though it would be very easy to change the animation to a more fitting one), you do a pretty decent job playing it off via showing the ability to absorb the fire, if it has the potential to backfire in your face the moment a foe is not cursed. Speaking of curses, I realize that Chandelure's underwhelming recovery is quite well balanced when the foe is dealing half their damage output when cursed, further establishing how important it is to inflict via Side Special and N-air.

The main concepts introduced do lend themselves to a solid structure, if one that feels a bit weak and slightly underwhelming when we finally get to the very end given that the nature of the status-effect inflicting moves and arguably the Down Special would have been an omen for something great to come via their exploitation. It mostly comes down to battering the foe to increase the curse fires' length for survival, yet also combining it with curry effect which you'd need to refresh every once in a while - that said, it wouldn't be too difficult for foes to run away from Chandelure given how slow he is and stationary his game is, though you do have a few camping tools if not too much to make foes approach. There's also the smoke, though I don't think too many moves lent themselves to the purpose of obscuring, or at least sounded convincing enough to do so despite the idea working very well with Cahndelure's character.

This was a set I feel had some fairly decent ideas and bouts of character, if not either fully taken advantage of as much as I'd like (setting foes on fire feels the slightest off for Chandelure to pursue as a career). What's there is there however, and it's an alright set.[/collapse]


[collapse="Winnie-the-Pooh"]Certainly a different direction from your previous set, and with a very daring way of having Pooh win the match at that! One obviously can't expect to get much mileage from the set if they approach it like a normal one, in which case I must put my Junahu Cap on. The concept is a tight one, instantly introducing Pooh as a character who wants to sit alone and eat honey all day, and is perfectly blunt about it - the writing it indeed distracting at times for those who actually want to make something of the concepts and executional layouts of the set, but rather I see it serving as a source of entertainment. Especially with the grab, which adds another portion of Pooh's character and tackles grabs in a interesting light via the writing style. It doesn't ever get too boring during parts, if only at the Aerials at worst (though that can't be helped), even helping introduce a new element with every Special attack and add more with the last bunch of Smashes, making for some good moveset ordering. In the end it becomes clear that Pooh is incredibly simple-minded like the playstyle is, only with some added creations to help with the nature of the series and the odd occurrences every now and then, and Pooh's amusing interpretation of complicated words like "persona" and "playstyle" help further elaborate this. Even from a standard moveset point of view, the playstyle isn't even all that boring as you might think despite having the most simplest goal in a "fight" ever when you have those giant honey pots, bees and trees - off the subject, it's amusing for you the author to put yourself in the position as the storyteller and creator of objects (I'm somewhat familiar enough with the series to understand it being accurate), and while the drawing aspect can get a little vague at times it would make enough sense from an actual Brawling point of view. This is you putting your superb writing style to the finest of uses, and it's absolutely superb when viewed from this perspective as yet another form of art a moveset can take and one of the reasons I hold Jack in such reverence (I still prefer him more to this set) - others might question this opinion of mine, save for Junahu, but this is very good as a piece of literature and getting that feel of the series across quite marvelously. I'm glad you were willing to focus your writing efforts into such a project even when you've taken a completely different approach this contest from the last, an aspect of your sets I greatly enjoy and hope you'll continue to aspire to even in future contests.[/collapse]
 

FrozenRoy

Smash Lord
Joined
Apr 26, 2007
Messages
1,268
Location
Las Vegas, Nevada
Switch FC
SW-1325-2408-7513
The Seven-Colored Puppeteer

Alice Margatroid

The Dollmaker's Playlist (Over an hour of music for you to enjoy! Listen to some while you read...I highly recommend the third on the list)

Alice Margatroid is a character from the Touhou series of bullet hell games, a human-turned-magician. She is pretty powerful, but never fights at her full power, as she is afraid of losing while going all out and being at the end of her ropes. She corrolates power to the colors, a recurring theme in the game she first appears in, Perfect Cherry Blossom.

Her speciality is dolls, which she freely uses as her primary means of battle. Being a bullet hell series, they are mostly used to shoot out projectiles, but the fighters and other materials show they are also armed with a variety of weapons that can make them decent melee fighters. Her objective is to make a completely autonomous doll with it's own thoughts that moves on it's own, like a human rather than a programmed doll.

She is a bit anti-social, living in the Forest of Magic and, while offering those who get lost to stay the night at her home, she rarely engages in conversation and simply works on her dolls which fill the place, giving a somewhat creepy atmosphere. She does seem to have a soft spot for children and sometimes goes into the nearby human village to give them doll and puppet shows.

(Author's Note: I was unable to finish the coloring of the set as I wished, so some other coloring has been used for now. The coloring I want will hopefully be edited in later.)

Statistics

Alice is generally a normal human in appearance, very similiar in bodyshape to Zelda or Peach, although she does not wear a dress or the like. She is also not particularly heavy, but she is also not super light either...just under Pit, I would wager. Movement-wise, Alice is very average, around Mr. Game & Watch, although she is very floaty with good air movement, which makes her a competent aerial character. Alice is not one to really want to approach anyway, though.

Jump-wise, she goes fairly high, though not absurdly so. No glide, wall jumps, crouching...not much to talk about here. On to the moveset, yes?

Specials

Side Special: White Sign "Chalk-White Russian Dolls"

Alice takes out a doll, which looks like the one in that picture at the start, and flings it forward one Battlefield platform's length, the doll connected to one of her hands via string. While Alice has the doll taken out but before she has flinged it, you can input a different direction to have her place it the same distance that direction instead. The doll will hang there indefinitely, only disappearing when destroyed, when Alice is KO'd or when Alice uses a move which recall dolls. The doll itself has 30 HP and does absolutely nothing. That's right, it just sits there! Totally harmless...

...Unless it is destroyed, in which case it will produce a small explosion. You see, Alice fills all of her dolls with gunpowder...no, I'm not kidding, she really does do that. This type of doll is filled with a particularly large amount of it, making it a great tool of a trap. The explosion's radius isn't great, so projectiles can pick it off, but it's horrible to set one off with a physical attack. It deals 15% damage and good knockback, which KOs at around 130%: Not great, but not bad either, and it allows Alice chances to keep the foe from recovering.

I should also note around now that the doll can be damaged by anything, including her doll minions and Alice herself. Theoritically, you could even set off a chain of these, if you got enough to 15 HP or less and set one off. She can also be damaged by their explosion. You can only have ten string-attached dolls out at once, so trying to set more than that will simply cause the move to do nothing. Alice might be dexterious enough to manipulate one doll with each of her fingers, which is what the strings attach to, but she simply cannot do more than one per finger.

Of course, someone has to attack it that much too, and who would attack this obvious doll trap after seeing it once?

Neutral Special: The Dollmaker of Bucharest

Wait, "doll minions?", you may have asked whe I mentioned them just above. Yes, Alice does have doll minions, and this is what you will use to summon them!

With a simple press of the Special button, Alice will take out a doll, looks the same as any other save for the lack of string, and simply...place it on the ground, where it will begin moving. The dolls are very petite, the smallest "character" in the game in size, and weight the same as Jigglypuff, though they do start at 0% damage. They only have 30 HP, so it's usually easier to deplete that then knock them off. The dolls have relatively rudamentary attacks and their AI is not amazing, but they do have three modes. Alice only has the energy to keep three dolls around at a time like this.

The default mode, which you will get if you just press B, is Attack Mode. It is the most simple mode. The doll will do everything in it's power to attack the opponent. The dolls have decent movement speed and are a bit floaty, allowing helpful chasing chances, and in addition have actually pretty good jumps(Getting the normal amount as any character) and even a psuedo-recovery move, so they are pretty helpful as pursuing.

The second mode, which you will get if you press B and then move the control stick left or right while Alice is putting down the doll, is Defend Alice. This mode is exactly what it sounds like: The dolls will stay near Alice and do everything in their power to protect her. Alice's dolls have an adorable little shield, which they can actually use to defend against projectiles, so they can be useful cover. They will also gladly give up their expendable existance to defend Alice from an attack, be it by them interrupting it with their own or even using a defensive move to sacrifice themselves.

FInally, there is the last mode, which is gotten by pressing B and then moving the control stick down while Alice is putting down the doll. It is Defend Area. The doll will be instructed to defend an area a total of one Battlefield platform around it, with the starting point of where the Doll is placed being the middle. The doll will attack anyone who enters it's "area" relentlessly, even going after characters in the air, and only relenting when they leave the zone the doll is protecting. The doll is smart enough to get away from people standing just outside of it's zone and trying to hit it, as well. The doll is generally more defensive when nobody is near the zone and relentlessly aggressive when it is breached.

This move has another use though, but only when used right next to any doll, which will cause Alice to pick up said doll and tinker with it for a moment. This will heal the doll half of any damage it has taken. So if a doll has taken 10% damage, you'll heal 5%, and so on. Alice will then put the doll back in it's place, letting it resume whatever duties it may have had. If Alice picks up a minion doll with this, simply move the control stick in a direction to change it's AI setting: Left/Right will be Defend Alice, Down is Defend Area and Up is Attack Mode. Certainly very useful!

Up Special: Curse "Eerily Luminous Shanghai Dolls"

Alice takes out a doll and tosses it the same distance as her Russian Dolls, connected it to one of her fingers via string. The doll, just like the ones from the Side Special, will sit wherever it was placed until it is destroyed. And just like those dolls, it has 30 HP. Indeed, it even looks the same. It can also be angled just before it is thrown in the exact same way. This one functions quite differently, though, as it instead acts as a projectile platform, shooting out projectiles once every second. These projectiles are shaped a lot like an arrowhead and do not travel far, disappearing about a Battlefield platform's length from where they are fired, maybe even a bit less. They do low hitstun and little knockback, but do 6% damage each, and the doll does shoot out four of them, in a pattern that looks sort of like a half-circle. They're just a bit too far from each other to usually hit with more than one or two, though if you say...stand next to the doll, you'll take all four to the face. The projectiles will also not go through platforms or walls, obviously. They are fired in the general direction of the nearest foe, though it is certainly not very on-target.

Buuut you can change the kind of doll you place, by holding down B while using this move. The doll placed is identical in all aspects save for the type of projectile it shoots, a thin red laser that deals 9% damage and some weak knockback. The laser fires a little slower than the other projectile, a decent bit under half a second later, as a non-damaging tracing laser is sent out first, then the damaging laser shot at the same angle. It also does pretty decent hitstun, though it is easier to dodge than the first projectiles, due to the warning, but it's range is infinite. It's always fired straight at the nearest foe and goes straight. Unlike the Side Special dolls, these dolls do not have enough gunpowder in them to do any serious damage and their dying explosion is extremely small and does nothing to anyone.

Mixing up the types of dolls are the key to scoring a victory, between the two projectile platforms and the explosive dolls. Alice can do very little with improper doll placement.

Down Special: Puppeteer Sign "Maiden's Bunraku"

""Bunraku" is the name for traditional Japanese puppet theater. "Maiden's Bunraku" is a style of performance where a Bunraku puppet, normally controlled by up to three people, is controlled by only one girl."

Sometimes, you might want to mix up what dolls are where, but there's really no way too. Maybe you have a lot of dolls out and so don't want to recall them all. Or most likely, you just want to confuse your opponent. Whatever the case, you have Doll Mix.

Alice swiftly turns her back to the camera, yanking the string of every doll attached to her along the way, sort of slumping like a doll whose strings have been cut herself as she holds all the dolls close in her arms, re-arranging them in a manner that cannot be seen. Then, with one hard thrust of her arms to each side, Alice sends the dolls flying back to the exact spots they were before...with the exception of the fact that which doll is where has been totally randomized. While it might take a moment for you to readjust to the changing conditions, it'll take your opponent a while too: Especially when you consider that you might have just swapped a non-explosive doll for an explosive one and there is no way to tell until it either attacks or doesn't. Needless to say this hesitation can be used for further set-up time for Alice or possibly even to try to get in an attack.

The starting lag is variable: The closer all your dolls are to you, the quicker it is. It never gets too large, though. The force from the dolls being sent out is actually quite large and so produces a strong attack if you are very close to Alice when she sends them back out, dealing 18% damage and knockback that kills at 90%. It's very hard to land though, so you'll likely only get it off if a teammate distracts the foe and hits them into you or in an FFA brawl. The ending lag is also fairly bad.

Dolls


Illustrated Here: One of Alice's dolls.

A short section on dolls to make sure everyone got that and also to put down the dolls moveset.

Stringed dolls are dolls connected to Alice's fingers by string. If these get placed and stay out, they count towards a ten-doll limit. Side Special and Up Special put out these types of dolls. If a doll is not placed and simple comes out temporarily, as you will see in...say...the F-Tilt later, then it does not count towards this limit.

Doll minions are placed with the Neutral Special and are not connected by string. They instead have rudimentary AI. You can only have three out.

The doll minions have the following moveset.
The doll's moves are not divided into input. The most common weapons for a doll are a lance and a small shield, so that is what they come equipped with here.

Shield: The doll raises it's shield forward. This halves it's speed on the ground and in the air, but it can still move, and completely neutralizes projectiles that clang against the shield, just like Link's shield when he is stationary. The doll also gets a bit more starting lag from having to pull the shield to the side to attack. Dolls use of this move will vary based on what mode they are in: Defend Alice dolls will generally have at least one doll doing this in front and, if she has multiples on here, one behind her doing this, unless she is moving around a lot, in which case they might put them down to better keep up with her. Attacking dolls might put it up for approaching foes, but aside from that, will largely ignore it. And defend area dolls will only put it up if somebody starts projectile spamming them from outside their area.

Shield Bracer: A variation of Shield. The doll puts it's shield up and braces, making it unable to move. Aside from making projectiles bounce off, it has no real visible effect, unless the attack hits both the doll and something else. The reason it's Shield Bracer is because the doll is bracing for impact and absorbing the attack. Anything hit with an attack the doll also got hit by while using Shield Bracer deals half damage and knockback to anything behind it. This is pretty much exclusively used by dolls set to defend Alice, but it is quite effective. Note that it can be gotten around by simply angling attacks over their head so as not to hit the doll or using aerials.

Aerial Shield Bracer: An aerial varient of Shield Bracer. It's the same move, but in the air. Does not effect falling speed. It'll protect against angling attacks above or aerials...but now you can hit Alice with lower attacks instead of angled higher attacls or for some characters like Jigglypuff or Rattata even just normal-size attacks.

Lance Charge: The doll sticks it's lance forward, before charging about half a Battlefield platform forward. It's not very strong, dealing 7% damage and a bit low knockback, but it comes out pretty fast, doesn't have all that much end lag and can be used with the shield out without putting it away. Attack dolls will use this to help their approach a fair amount, Defend Area dolls tend to use it if the foes stay near the edges or to get close and Defend Alice dolls rarely use it at all.

Lance Poke: The doll pokes it's lance forward very quickly. 3% damage, but speed comparable to most jabs with little lag. Generally only used when a quick attack is required.

Rising Lance: The doll thrusts it's lance upward while jumping up, causing it to rise while performing this attack. It comes out fairly quick, does 9% damage and decent knockback, but has a bit long ending lag. The doll will end up in the air after this as well. All doll modes like to use this as a general anti-aerial attack from the ground.

Aerial Rising Lance: Rising Lance, but performed in the air. Sends the doll up just a bit, so they'll use this to recover if hit over the side.

Triple Poke: The doll quickly pokes three times in front of it, dealing three hits of 2% damage, barely longer starting lag wise than Lance Poke, with similiar range and end lag, exchanging less knockback for more damage. Used similiarly with Lance Poke's timing.

Lance Thrust: The doll pulls back the lance for a somewhat lengthy starting animation and thus starting lag, before thrusting it harsly forward. It doesn't go too far, but it goes a bit further than most of your other ranged attacks, and is the doll minions "killing move". It deals 14% damage and KOs at around...let's say 115%. End lag is average. Attack dolls use this primarily and dolls set to defend Alice will hardly ever use it.

Air Stab: An aerial stabbing forward of the lance and one of the doll's two aerial attacks. It hits forward and a bit up with decent range, starts pretty quickly but has somewhat above average end lag and deals a keen 11% damage with decent knockback, might KO around 150%, making it a fairly well rounded attack.

Stall Then Fail Lance: Could you guess this was a Stall-Then-Fall? Yes, the doll puts the lance under itself, then comes plummeting downwards at a very quick rate, think Toon Link's DAir. It deals a somewhat low 8% damage, but if the opponent is hit quickly after the startup, they'll be quite powerfully spiked down, though this is rare. Much more common is the below average upwards knockback of any other time. It does have quick start up and little end lag, though, so dolls will gladly use this to quickly return to the ground.


Standards

Jab: Counter Arguement

Alice takes out a doll and...holds it in front of her, her other arm covering her face and her body braces. Hitting the opponent with the doll coming out does a pathetic 2% damage and flinching knockback, though it is one of the quickest jabs in the game. As you may have guessed, though, this move changes if the opponent hits you, making it a counter as the doll explodes. The explosion is not quite as powerful as the Side Special's, dealing 12% damage and knockback that kills at 160%, but Alice won't take any damage from the countered attack, at least.

She will, however, take damage from the explosion. She braced herself when she took the doll out, though, so it's not all that bad, taking 6% damage and merely being scooted back a little, sliding across the ground. Still, self-damage is self-damage. The move comes out very quick and has decent duration, but the end lag isn't good at all and it doesn't do all that much for a counter. It is, however, one of her very few moves that works at a melee range or, indeed, is a traditional melee-esque attack at all. So don't forget it!

Up Tilt: Doll Pirouette

Alice takes out a stringed doll and throws it up just above her head, where it spins around for a bit, before returning to her. The attack is relatively quick to come out, a bit short-ranged, misses most characters on the ground and deals six hits of 2% damage, making it a fairly useful anti-air attack. The ending lag is a tad higher than average, though. This move does, however, have two other quirks.

First off is that, if you hold down the A button, Alice will increase how high she throws it. Holding it for the entire starting animation makes it go up a Ganondorf, somewhat extending the starting lag. The timing for this can be very tricky to learn, but once it is, you can place the doll at any height between starting and Ganondorf fairly easy.

Secondly is that Alice can still move and attack while the attack is being performed. Given this attack lasts for a pretty long time with all the rotations, this is very useful, as it allows you to toss up an anti-air move while approaching or leaving, or just move while the aerially-approaching opponent is caught in the hits. Do note that you will still take the end lag, though this can also be useful, as it will interrupt other ending lag you may be taking, essentially possibly replacing longer ending lag with shorter ending lag...but it can also interrupt starting lag or attacks, so be careful with the timing, or you will just interrupt your own attacks.

Down Tilt: SP Wall

Alice yanks the string of the closest active stringed doll to her. If she doesn't have one out, she will simply take one out with the same amount of lag. All the same, the doll will proceed to circulate Alice, going in front of her, circling into the back/foreground, going around the back and so on around her. The doll retains the hitpoints it had when it was yanked to her or, if placed, has 30 HP.

The key point of this move, however, is that if a move would strike Alice while a doll is in front of her, the doll will lessen the damage by acting as a wall. Each doll added to this wall lessens the damage taken by 3% and the knockback by just a tad, perhaps allowing some more barely-survivals, but the damage reduction can also reach some fairly high levels. The maximum amount of dolls you can have on this is three, so you can reduce up to 9% damage from attacks, which is VERY sizeable. ...Of course, at the same time, any doll you have around you for SP Wall still counts towards your limit, so the more you have defending you, the less you have attacking or being explosive decoys or whatnot.

Dolls placed when you have none out with this will do nothing, but the other two types of dolls will do special things if yanked to it. Explosive dolls in SP Wall will still explode with the same force they had when placed, though they'll damage Alice. Projectile dolls will fire a single, short projectile as they rotate out, which dissipates quickly, but can interrupt particularly long moves someone tries to hit Alice with. Don't forget, the dolls can still be destroyed.

Forward Tilt: Doll Legion

One of Alice's few melee-style moves! Yes, finally, a move you can use up close...sort of. Anyway, thrusting her arm forward, Alice will throw forward a whole six dolls, all in a cluster! They'll all have their lances out, or rather, take them out while being thrown, becoming a hitbox. Alice then yanks them back. The dolls do good damage for a tilt, 11%, and have high base knockback but almost no knockback scaling, so you can send opponents relatively far, but this won't KO pretty much ever.

This attack actually has a blindspot right in front of Alice. If you stand there, the dolls won't have taken out their lances yet and unless you are super large, it'll go right past you. This attacks comes out very fast for a tilt, but it has terrible end lag as Alice yanks the dolls back. It also has low shieldstun, so beware this getting shielded! The dolls do not count towards the ten doll limit despite being stringed, since they do not stay out. This is true for all of Alice's moves of a similiar nature, where she only temporarily takes out stringed dolls.

This move has a few important uses in your arsenl. Most notably, it is an excellent way to hit foes who get past your many dolls, although it should be noted it is not for face-to-face combat, you may prefer her grab or a risky jab. You might also remember that explosive dolls could be exploded by your own attacks: This is an excellent way to set one off and still be out of range.

Smashes

Up Smash: Death Pirouette

You might remember a long time ago, I mentioned moves that will recall the dolls. This is one such move, along with your Down Smash. Inputting this move with no dolls out will cause nothing to happen. However, while one or more dolls are out, Alice will make a quick finger snapping motion. All dolls attached to Alice via string proceed to take out lances and spin around at an incredinly fast speed, looking a lot like Link's spin attack, albeit blue. The dolls themselves go fast they become almost a blur.

This doesn't translate to their movement speed, though, as they will merely very slowly move towards Alice during this time. Charging time does not increase damage or knockback, but rather how fast they move, eventually merely going down to "slow". The attack itself does sorta meh damage for a Smash Attack, 14%, but does deal good knockback making it one of Alice's chief KO moves, KOing at around 140%. After a few moments of spinning, Alice will stop the move by yanking every doll out back, allowing you to re-place them wherever you want.

This attack starts up pretty quickly, especially for a smash attack, but Alice cannot move or use attacks during the duration of this move, leaving her somewhat vulnearable unless she has some minions protecting her or you hit the opponent. End lag is similiarly fairly small, as Alice will use the momentum the dolls had towards her to increase how fast they are returned to her.

Down Smash: Seeker Wire

The other smash attack that recalls your dolls. When this attack is used, Alice will send out a red laser, not too thick but relatively long...let's say half a Battlefield platform, give or take? This laser will travel Alice's wire to the first doll out that she placed chronologically, staying a constant hitbox. When it gets to it, it will proceed to angle itself to go after the second doll you chronologically placed, and so on until it has gone to every single doll you have out, at which point it seeks in on the opponent and angles itself after where they are at that moment, though it will not follow them. If you blow up a doll before it has gotten to it or targetted it, it will skip that doll. If you destroy a doll it has targetted, then it will continue on it's path, but not continue seeking out and instead keep going until it goes off stage or hits something, where it disappears.

The laser itself does some pretty keen damage, a solid 17% regardless of the charge, but it deals absolutely no knockback despite dealing good hitstun and shieldstun/damage. This is actually not a bad thing, as if you decide to set up dolls close, you can potentially repeatedly hit them with this between the wire over and over, breaking their shield or racking up some insane damage. This does start pretty fast...but the ending lag is absolutely horrendous! Indeed, you want to make sure you hit with this or have some good protection around you, or you're gonna be sent flying fairly far.

Oh, you are probably wondering what charging does, since I mentioned it does not increase damage. Charging instead increases speed: It's not particularly fast at the start, going at about the speed of Link's dash, but at full charge you'll see it go as fast as Diddy Kong. The extra speed allows it to possibly combine into more labyrinthine combinations as it traverses distance faster or simply to become harder to dodge. Of course, charging up AND dealing with the end lag makes you highly vulnearable...

Do also note that you can only have one Seeker Wire attack out at once.

Forward Smash: Magic Sign "Artful Sacrifice"

Artful Sacrifice is a very simple spell, but it has also become something a lot of people know about Alice in terms of her attacks. Possibly because it is so simple.

The attack begins by Alice taking out a doll, holding it in her hand as she spins her arms twice and flinging it forward an impressive Battlefield platform away. If the doll makes contact with a foe at any time, this gunpowder-heavy doll explodes for a small-ranged but high-damaging 17-21% and knockback that KOs at 120%-85%. Alice won't fling it further if you charge it, as charging time comes before she winds her arms up, instead adding more gunpowder for more damage.

This doll will not explode if it just lands on the ground, though. Instead, it will get up with a very rudimentary AI: Indeed, all they are smart enough to do is go forward and go around placed dolls so as not to explode on them. Oh, and to turn around if there is a wall in front of them. And no, they can't jump!

What they can do is blend in with your doll minions, which they look identical too. While their AI is too dumb and their lack of attacks a bit too obviously to totally blend in, the fact that they are walking around just like them can certainly be confusing, especially with a foe already remembering things like which dolls are explosive and not, which minions are set to what and possibly even the ordering of dolls. Plus you can still just plain hit them into it and use it as a sort of moving trap. This doll is very fragile and will explode at the lightest touch, even on Alice if she is not careful, and any hit will destroy it instantly. So while this tool is quite powerful given it's damage and good knockback, it is also dangerous, and requires some setup to make it truly effective.

Grab Game

Grab: Doll Grab

Alice throws forward a string doll in a similiar manner to how Olimar uses a Pikmin for his grab, with the doll grabbing, at a range a bit lower than Olimar's blue or white pikmin grabs, but longer than anyone else in the game. The doll will not return to Alice, but instead is the one who grabs on to the opponent. Just like the F-Tilt, the stringed dolls from this do not count towards the ten-doll limit due to not staying around permanantly.

Pummel: Curse Sign "Hourai Doll"

Alice's pummel is not a very traditional pummel at all, so let's go at length about it. Instead of dealing damage, Alice simply makes a movement that sort of activates the doll, before taking the string off. The opponent is totally free to move around at this point...but as I said, the doll has sort of been activated, or in other words, set to explode. And after five seconds, it will do right on the opponent, though it does not have much power, only 12% damage and knockback that KOs at around 150%, but it's gunpowder has been put it in such a way as to give it a better explosive range.

Now, while the doll can't be knocked off, it certainly is avoidable...you can roll-dodge it, you can shield it, you can spot dodge it, air dodge. You know, that sort of thing. Of course, the opponent still must be aware of this, since if they're in hitstun or something, they're gonna go boom right there...or perhaps they get a bit careless and start fighting and lose track of the timer. No matter what, it gives them yet another thing to fret over.

And perhaps they don't just want to let it blow up anywhere...you see, this explosion doesn't just damage the opponent, but will also hurt Alice and her dolls. So maybe instead the foe wants to try and get in close to deal some good harm to your setup, especially if you cluster up your dolls...but they have to be careful, since this will set off explosive dolls, and if they lose track of the right kind of doll, well, it's not going to be pretty for either their shield or their health usually. You can even clear out minions like this, but of course this is risky, as they will attack and maybe your shield breaks or you get stuck in stun...or worse, you blow up an Artful Sacrifice doll and make it all worse. They can even attack you with it! But of course, that risks them being blown up by, say, getting hit by an F-Tilt or maybe they even get regrabbed and held on too until ka-bam.

If you regrab the foe, you can't add more of these dolls, but you can use the pummel to have the doll you used the grab the foe this time work on the time-detonation doll, dealing 1-2% damage as it works. Each use of the pummel causes the timer to go up by 1 second, allowing you to delay the explosion and keep the foe on guard more or possibly confuse the foe.

Forward Throw: Toss

This very simple throw is the first of Alice's. Or her doll's, I suppose. Anyway, the doll simply tosses the foe forward, dealing 8% damage and somewhat low knockback that doesn't scale much, though the trajectory is quite low.

Although the move is not special, it has a variety of functions in Alice's moveset, as you can use it to toss foes consistantly into explosive Forward Smash dolls or in front of projectile dolls that, thanks to the low knockback scaling, is reliable at most damage percents. It also makes a reliable tool to get a little breathing space, as even if it doesn't do much knockback, combined with the length of the grab it can still keep the foe further away, though Forward Tilt will send foes farther.

Up Throw: Curse "Hanged Hourai Dolls"

The doll performs a sort of suplex-style "fly into the air" thing, such as by Metaknight and Kirby, with the exception of how high it goes, only a little taller than a Ganondorf, and the fact that the doll doesn't go down, as Alice pulls back hard on the line, as if trying to pull the foe to her...but pulling it so tightly and harshly simply causes the string to snap. The opponent does take 4% damage from the tightening string, however.

But just because the string snapped doesn't mean the doll is useless. As you may have remembered from the pummel, the grabbing doll is explosive, and while Alice did not properly set up a time-based detonation, the doll being on the foe means it can still explode. In fact, it functions just like the wired dolls, taking 30 HP worth of damage before exploding with the same force as the pummel doll. While the foe's attacks will not necessarily hit the doll, Alice certainly can along with her dolls. You might want to use this to apply a bit of pressure on the opponent, especially if you use your doll minions more aggressively.

The doll automatically loses it's grip after five seconds, falling to the ground uselessly and disappearing like an item. You cannot have multiples of this on the foe, but you can have one of these and a timed doll on them, and the timed doll will cause damage to this doll. If Alice uses an Up Throw while she already has one of these attached, the doll merely loses it's grip when the string snaps and falls away uselessly. Alice obviously discards the string after use, so don't think that this counts to your limit.

Also of interesting note is that the foe will end up in the air after this attack, roughly wherever the doll grabbed them, so you have the potential for followups with your as of yet unintroduced aerials.

Back Throw: Doll Explosives

The doll throws the foe backwards, which means hurtling right at Alice, as she takes out an explosive doll and chucks it forward. This doll does 15% damage and knockback that KOs at around 130% making it a good throw for both knockback and damage purposes. The doll throwing the foe also does 4% damage. But if you delve a bit deeper, you'll find this is more of a battle than you might think.

You see, the foe can DI when being thrown to avoid a simple normal doll thrown by this, but Alice can aim the doll a little up or down by tilting the control stick just before she tosses the doll. Alice must be very good with her DI reading to properly hit the foe with this, or the explosive doll will simply harmlessly explode away from the foe and, as Alice must pull back the grabbing doll after tossing the explosive one, is left wide open to punishment from the foe. This is a throw about unbridled skill reading with a nice KO reward at the end. It is also by far her strongest throw.

Down Throw: Doll Recall

Alice simply recalls the doll to her while it still has the foe grabbed. The momentum from this will cause the foe to slide about one Battlefield platform behind Alice. They take four hits of 1% damage while being dragged to Alice, but that's all, making it a particularly low damage throw.

However, it does let you space the foe behind you, making it a key option among your throws to place the foe where you want. The fact it puts them a Battlefield platform away also sets you up for an F-Tilt, as while they won't go that far, they do have enough range to make a foe think twice about approach. You can alternately use it to get some space to roll away while placing the foe to a side more favorable to your current doll setup.

In layman's terms, pure zoning.

Aerials:

Zair: Doll Poke

For those who do not know, a ZAir is performed by certainly characters using their grab in the air. In Brawl, Link, Toon Link, Samus and Lucas can all perform this, but Lucas' deals no damage and is strictly for tether recovery.

Alice's ZAir simply causes her to throw a doll out in front of her, string connected and lance out. It goes fairly far, a bit further than Samus' ZAir, and deals 6% and flinching to an opponent who is hit by the doll, though absolutely no knockback. It's long range and short lag on both ends makes it a good move to use for an active retreat, though it deals very little damage and such. It also functions as a repeatable mid-air tether recovery, functioning as one of Alice's two recovery moves. Like most tether recoveries, though, it is vulnearable to edgehogging. The fact it is repeatable, however, can make it a bit harder.

Neutral Aerial: Maiden Kick

Alice thrusts her leg forward for a simple and familiar kick. It deals 11% damage and, like most moves of this type, is a Sex Kick that will eventually go down to 6% damage. Knockback is actually pretty decent at the start, though of course lower as it goes on. It's a bit short range, unlike most of Alice's moves.

However, it still occupies a fairly key part of Alice's game, despite being uninteresting. Since most of Alice's moves will not hit people directly in front of her, such as her F-Tilt and FAir, using the Neutral Aerial gives you an up close option for if the opponent breaches your defenses. Short hopped NAirs are valuable options for approach combined with doll minions set to attack or a good way to retreat while getting a hit in, in addition to simply being a close up option. So yeah.

Forward Aerial: Doll Panic

In an animation virtually just like Alice's Forward Tilt, Alice thrusts her arm forward and shoots out six stringed dolls. Just like in the games, Alice can essentially use her Forward Tilt in the air, though this is very important anyway, as it allows Alice a way to safely explode explosive dolls from a distance in the air, such as ones placed too far away from a platform to reach from the platform, plus being a nice ranged aerial. Just like the grounded version, however, it whiffs if the opponent is next to you, so spacing is required. Starting lag is average and ending lag is a bit higher than usual, but this move being performed in the air has slightly different damage properties. It still deals 11% damage, but it's knockback is a very shallow, sending the opponent a bit down and forward, high base but very low knockback scaling deal. This makes it an excellent way to gimp foes going off the stage, unless they have a decent recovery, or just to hit foes off the stage. It will virtually never KO unless your opponent is close to the blast zone or has, say, DK-like recovery, however.

Up Aerial: Dollcopter

Alice tosses a doll-on-a-string upwards in a manner similiar to her Up Tilt, the doll begins to rise after going up half a Ganondorf, taking Alice with it! Here's her recovery, folks, right on the Up Aerial. Gotta put it somewhere. The doll will send Alice up a Ganondorf upon use, before the string can't take the pressure and snaps, sending the doll flying up until it hits the blast zone or a ceiling, wherein it disappears. The doll deals a lot of damage if all of the hits connect, 8 hits of 2%, but it is unlikely too due to the upward movement. Note that you cannot use this to infinitely stall, as it goes half as high each time, and after four uses, it won't even send you up, merely slowing your descent. Staying on the ground for one second per use will refresh each use, until it is full again. Quick start-ip.

Down Aerial: Aerial Toss

Alice takes out a non-stringed, explosive doll, and tosses it HARD downwards. This causes it to go flying downward at a pretty high speed, exploding on contact with anything, including the ground. It deals 17%, like an uncharged F-Smash, and deals upwards knockback that KOs at around 110%, though it has a bit of a start-up due to Alice needing to wind up before throwing it, the ending lag isn't so bad. It only hits straight below Alice, so it isn't very variable in that regard. The explosion will damage Alice as well, so it is a bit of a suicidal strike against enemies directly under you...might want to use the NAir's hitbox for people right under you.

Final Smash: Testing "Goliath Doll"

Alice summons a MASSIVE doll with the Smash Ball, which also gives it it's AI. The doll is absurdly huge, the size of Giga Bowser, and has constant super armor. It also has 60 HP, which if depleted, will end it early and before it's amazing 20 second lasting time. KOing Alice will also end it. The doll is equipped with some basic attacks that are, unsurprisingly, quite powerful. It can run over people for a simple 5% and light knockback, it has a giant slash with dual swords with ludicrous range, though close to the ground, which deals 20% and excellent knockback, along with a downward slash to get people right in front of it fast, which deals 13% and high knockback. It also has an upward slash that deals 15% and upwards knockback and hits things that might get above it with a giant disjointed hitbox.

The attacks are quick, but still dodgable, and an opponent who dies might be able to take it out due to the HP. Still, it is quite powerful...

Playstyle:


Before we go right into the playstyle, a quick reminder of how dolls work, in case you lost it in all that text.

Stringed dolls as seen in the Side Special, Up Special and Down Tilt have a Ten doll limit on them. You can only have ten dolls between them.

Doll Minions are summoned through the Neutral Special are limited to three total.

Temporary Stringed Dolls are seen in the Up Tilt, Forward Tilt and so on. These do not count towards a limit because they do not stay out past the move. You can still use your Forward Tilt even if you have ten dolls out between Side Special, Up Special and Down Tilt.

As for the playstyle itself...

Alice plays as a very defensive, sheltered sort of character, befitting her nature. She wants to put out dolls with the Up Special to keep the foe pressured, mixing up their time to keep the foe off kelter and carefully choosing the shot type to hit the foe. Mixing in dolls from Side Special prevents the foe from just destroying your dolls without thought and can make them delay, in addition to being a KO method, which only gets worse when your Down Special can randomize them all and cause hesitation, perhaps allowing escape or approach.

This is combined with her doll minions, which can serve three functions. First off, they can make Alice the ultimate defensive warrior when combined with her Down Tilt and all of your minions defending, shrugging off damage from the hardest hitting of characters with Shield Bracer and damage reduction, which is quite a scary thought. They can also provide your offensive, sending them to attack the foe while you stay out of arm's length, helped along by projectile support. And, of course, setting them to defend an area can make them a vicious zoning tool, making an area very hard to stay in and, with all three, really essentially banning part of a stage without a lot of effort expended to destroy something Alice can easily replace.

Her KO options, while not all easy, are fairly plentiful. Forward Smash blending in to the minions or simply hitting the foe is a good way to go about it, but using Forward Tilt to blow up an explosive doll from the Side Special or simply tricking them into hitting it is another good way, along with the sudden Up Smash when a foe least expects it or pelting them with a Down Aerial. Not to mention the time bomb doll from the Pummel and Up Throw, which keep a foe on their toes and can score a clear KO. Knocking them closer to the edge with Forward Aerial or Forward Tilt can be a good way to increase the time they kill.

Damage racking is also not an issue, with a proper Down Smash easily able to pour it on alongside the minion's attacking, projectiles and normal attacks. What is an issue, however, is Alice's own survival, as her recovery is either poor and a bit predictable(Up Aerial) or edgehogged easily(ZAir, a tether). Combined with her light weight, you want to play Alice a bit carefully, especially later in a stock. You might even want to place some projectile dolls near an edge to discourage chasing you off it.

Also remember that Alice requires proper spacing. Forward Tilt and Forward Aerial don't work with foes right next to you, but are quite good otherwise, Down Throw and Forward Throw are good for spacing foes into or around dolls and she has very few attacks that just hit in front of her. This also means that, even if it's just for a Forward Throw, you will be using the grab a fair deal.
 

ForwardArrow

Smash Ace
Joined
Aug 17, 2011
Messages
503
THE SET SUBMISSION PERIOD FOR MAKE YOUR MOVE 12 IS NOW OVER

Now that I have your attention, this doesn't mean the contest on a whole is over. Now we're going to judge for the Top 50, but we need your vote. And if you want to vote, first thing you need to do is show your appreciation for some sets. There are two ways to do this, detailed below.

First Method: Advertise 3 sets made this contest, which basically means, talk about 3 sets you like and why you like them, so that way nobody gets left out at the end of the contest.

Second Method: Make a Top 10 list with a particular theme. That theme can just be favorites overall, but none-the-less basically make a Top 10 about sets in this contest and only in this contest. This can be done during either the advertising or voting week, while advertisements can only be made during the advertising week.


Aside from that, you need to have at least posted a set this contest. You have until 12 PM EST July 10th to get your advertisements in, and then the voting period will start. Have fun set reading, advertising, or possibly just lying back if you don't feel like voting.

FYI, due to technical difficulties n88's set is not disqualified despite being late
 
Top Bottom