• Welcome to Smashboards, the world's largest Super Smash Brothers community! Over 250,000 Smash Bros. fans from around the world have come to discuss these great games in over 19 million posts!

    You are currently viewing our boards as a visitor. Click here to sign up right now and start on your path in the Smash community!

Make Your Move 12: Now with accurate title! MYM12 is closed! MYM 13 is Open!

Rychu

Thane of Smashville
Joined
Jul 5, 2010
Messages
817
3DS FC
1908-0105-4965
Cripple Team
I still don't particularly like the set after actually reading more deeply, but I feel like i should address the things in the set i DID like in the moveset to make up for the bad comment I gave it. I actually do really like the side special for a team set, as it would work well in general with any team set that it's on. That, and the control scheme is pretty well thought out and seems to be fairly easy to get used to in game and would be actually pretty seamless. That said, while there are good points to the set, the things I don't like outweigh the the things i do. That puddle teacup special is like...you know, I usually don't mind tacky, but this is just a bit too much for even me. As for the other moves... well, i can't really speak for them too much, as while they work for the set, none are all too memorable or great. To be fair, I do like the character actions in the set, as well as the actual way the characters physically work together, but aside from that, I don't feel the set has enough to it to really like.

Metapod used Hardin!
For a newcomer set, this looks really good, I really like the presentation here. As for the set itself, It's got some neat ideas to it, and you do a good job describing exactly what;s going on. I do hope you decide to make more, because this is a very promising start.
 

JOE!

Smash Hero
Joined
Oct 5, 2008
Messages
8,075
Location
Dedham, MA
why are there even sets for crippled people.... like, this should be a no-no (implying you're making people fight with literal handicaps)
 

Kholdstare

Nightmare Weaver
Joined
Oct 10, 2008
Messages
1,441
why are there even sets for crippled people.... like, this should be a no-no (implying you're making people fight with literal handicaps)
Logic doesn't apply in the Smash Bros universe when it comes to why characters are fighting each other.
 

ForwardArrow

Smash Ace
Joined
Aug 17, 2011
Messages
503
Y2X
I would actually say in some ways Y2X is a little similar to Karkat earlier in the contest in how they both focus on a crippling status effect to slowly wreck a foe. I admit I prefer Karkat's approach to it, but for what it's worth you actually did a perfectly solid job here. The "generic" moves here actually manage to flow together pretty well in the context of the mechanic, due to the fact that they are in fact fast and as such it makes them effective at keeping the corruption going. The Down Special also gives him some necessary survivability to keep up with the foe due to the absurdly high percents he needs them to reach via the corruption, while the Up Special can help keep pace with them and give you a sort of constant, nigh-unstoppable approach. You do branch into some fun stuff with the risk-reward Corruption pummel and the Down Smash which gives some lockdown that while not too oppressive at least helps land your KO moves.

At the same time, I'm not going to say the set is perfect. I wish you had given an explanation for how Y2X gets back into his body with the Corruption pummel, otherwise the move is awkwardly suicidal. Maybe I missed something, I'm not the greatest set reader in the world, but I did not see anything in there specifying that. Awkward nitpick aside, the non-Smash moves could have used a bit more variety in how they worked with the playstyle. Yes, just dealing damage and knockback might be enough on some level, but I still feel you could've found some stronger ways to incorporate them with the corruption, such as playing off the damage over time element a bit. The moves could still be simple, but when you have a bunch of moves that serve extremely similar purposes it begins to become filler for me. That said, it's still a set that you clearly tried and succeeded at making functional in Brawl, while on top of that providing a fun enough playstyle for MYM to enjoy.

Bouldergeist
Stationary characters are a very difficult genre, I still consider Vol Opt one of my greatest failures, so tackling one is always a bit ambitious. I can't say it entirely works out for Bouldergeist though, largely because I don't quite think he's good enough at shielding himself. Yes you have the spires which wall the opponent off some, but between their low stamina and the fact that they can actually be jumped over, I question how effective they are at impeding foes, and the hands just feel like they will be dying extremely fast due to their nature. For what it's worth, the moves -DO- function as decent defense from a playstyle perspective, with the Boos at least providing some form of additional defense as long as you're careful with them and the general defensive/campy nature of the set.

That said, the set doesn't really flow that well past that, with his main real point of flow being "lolcamping" and a hole he can make in the stage to pressure the foe into. The hole is probably the more interesting of these two aspects, but it has been done a fair few times before and arguably a lot better. That said, the prospect of having two floating hands does work into it decently enough... the main problem is that regardless of this, the moves don't really work together. There aren't even really any soft interactions, the moves just kind of exist and while they achieve the same general goal there is fairly little cohesion. I would not say this set is outright bad or anything, but it is heavily flawed. That said, if this is what you're weaker entries look like nowadays this is still a pretty big step up Geto.

Nova
Frankly, I don't find this an easy set to comment because frankly, it is extremely... lacking. There is pretty little to talk about with regards to this set, it is slightly different than typical "running" characters in that he's not really going for Hit and Run, rather sort of circling the foe and pestering them with weak but frequent blasts. There's also a rather decent concept on the Down Special which allows him to sacrifice all of said speed for power... if albeit said transition somehow feels even more lacking than Khamsin's golem in that there is absolutely no flow to him once he uses said transformation. There are a couple concepts in here I did like past that, the delayed Smashes are kind of fun, but in reality it hardly coheres into anything remarkable, and even on the specials there are some awkwardly irrelevant inputs. I'm looking at you Neutral Special. But yeah, it's a pretty shallow and bland set, though I suppose it does some things that are unique.

Emi
You see Kat, I have at least been able to respect all of your sets this contest. Yes, even Keroro Platoon. I suppose there was a point where that had to come to an end. Emi is a bit of a wreck from the start, with the first obvious problem being how darn fast she goes. I could absolutely forgive her reaching or exceeding Sonic's dash speed via a variety of buffing moves or something, but she STARTS that fast. And then she gets even more obscenely fast via the Side Smash, Down Special, and the bloody Up Smash which feels completely unneeded considering how darn fast she is already going. I suppose you could throw off the foe's timing, but you don't really give her any effective ways to mindgame it to my knowledge. Either way, not only is said speed kind of unnecessary at points, it actually becomes awkward to control. Suiciding with Sonic's dash does in fact happen on a regular basis, and while Emi stops at ledges with some moves I get a feeling she would be extremely hard to control.

The playstyle here is pretty darn awkward too, what with Emi just attempting to effectively... drag the foe along for a race? Yeesh, the whole way that Neutral Special works is awkward, what with her randomly exhausting the foe via said training and said move basically just feeling like a fancy spacing measure. Why does Emi even space anyway? Well she does have dust clouds and wind hitboxes, which are created in an extremely weird manner(she can randomly add them onto her dashes... it just feels kind of wrong to me how the system works). I suppose I get what you were trying to do with the dust clouds, but all of their effects feel just kind of "there", not really played off in any way. It's also very tacky how they work with that they seem to choke the foe and randomly cause them damage upon performing any action, I vaguely see your logic behind this but against anyone with enhanced physical stamina at all it just feels absurd. Then you get into stuff like the Down Throw which causes them to take damage and knockback from being exhausted... yeah to the point, this set is -EXHORBITANTLY- tacky.

When it comes down to it, I don't much like the playstyle you've created either. The dust clouds and wind hitboxes add a little bit too it, but ultimately what it comes down too is a very bizarre take on momentum that doesn't manage to be any more interesting, but a lot tackier. Considering how bad a standard momentum set would be considered nowadays, you can imagine how with all that tackiness it'd end up being downright terrible. What feels particularly bad here is that Emi even comes across as downright sadistic. Forcing the opponent through choking dust clouds, dragging them along with her at highly uncomfortable speeds and beating on them all the while, it just feels more like some sort of monstrous antagonist Warlord would make as opposed to a crippled schoolgirl.

Hanako and Lilly
The first thing that needs to be addressed about this set is that the combo aspects of Lilly feel really bad. You do nothing to prevent the creation of a specific "always use" flowchart aside from Hanako's presense, and with how she feels almost useless as a way to heckle the foe I would say that she won't end up changing as much as I might like. Sure there is some gimping you can do which breaks up the monotony a little bit, but not enough for my tastes. There is a long and short version of the cane to add a little variety, but it's ultimately not nearly enough to spice up that aspect of the set. The other thing about this set, I suppose, is the whole thing comes across as very bland. Yes, there's little tackiness, but one of the specials is a generic tripping trap, and the others are some(admittedly adorable) grab hitboxes from Hanako(by the way, she becomes way less effective against characters without arms, which bugs me a fair bit). Past that the moves don't get anymore exciting, if anything even less so with her just doing a bunch of generic cane pokes and Hanako having a shove and some throws that position a little bit.

For what it's worth though, I would agree that the set does have some good qualities too it. As horrifically awkward as the control scheme is, uniting them eliminates that problem, while at the same time creating a whole new issue in that it makes you far more predictable. The balance between offense and defense here is pretty interesting and makes the set a fair bit deeper than it would be otherwise(admittedly, otherwise it would be extremely shallow). Aside from that the characterization is pretty enjoyable, with both girls playing... surprisingly accurately to how I would expect them too. You avoid any real tackiness bar a slightly awkward walling Up Smash, and considering how absurdly tacky the other two sets in this movement are and the character choice I can't say I'm not unimpressed. I admit that as far as I'm concerned the set amounted to fairly little, but all things considered I am glad I read it.


Rin comment tomorrow, I can barely keep my eyes open.
 

Katapultar

Smash Lord
Joined
Nov 24, 2008
Messages
1,284
Location
Australia
Emi
You see Kat, I have at least been able to respect all of your sets this contest. Yes, even Keroro Platoon. I suppose there was a point where that had to come to an end. Emi is a bit of a wreck from the start, with the first obvious problem being how darn fast she goes. I could absolutely forgive her reaching or exceeding Sonic's dash speed via a variety of buffing moves or something, but she STARTS that fast. And then she gets even more obscenely fast via the Side Smash, Down Special, and the bloody Up Smash which feels completely unneeded considering how darn fast she is already going. I suppose you could throw off the foe's timing, but you don't really give her any effective ways to mindgame it to my knowledge. Either way, not only is said speed kind of unnecessary at points, it actually becomes awkward to control. Suiciding with Sonic's dash does in fact happen on a regular basis, and while Emi stops at ledges with some moves I get a feeling she would be extremely hard to control.

The playstyle here is pretty darn awkward too, what with Emi just attempting to effectively... drag the foe along for a race? Yeesh, the whole way that Neutral Special works is awkward, what with her randomly exhausting the foe via said training and said move basically just feeling like a fancy spacing measure. Why does Emi even space anyway? Well she does have dust clouds and wind hitboxes, which are created in an extremely weird manner(she can randomly add them onto her dashes... it just feels kind of wrong to me how the system works). I suppose I get what you were trying to do with the dust clouds, but all of their effects feel just kind of "there", not really played off in any way. It's also very tacky how they work with that they seem to choke the foe and randomly cause them damage upon performing any action, I vaguely see your logic behind this but against anyone with enhanced physical stamina at all it just feels absurd. Then you get into stuff like the Down Throw which causes them to take damage and knockback from being exhausted... yeah to the point, this set is -EXHORBITANTLY- tacky.

When it comes down to it, I don't much like the playstyle you've created either. The dust clouds and wind hitboxes add a little bit too it, but ultimately what it comes down too is a very bizarre take on momentum that doesn't manage to be any more interesting, but a lot tackier. Considering how bad a standard momentum set would be considered nowadays, you can imagine how with all that tackiness it'd end up being downright terrible. What feels particularly bad here is that Emi even comes across as downright sadistic. Forcing the opponent through choking dust clouds, dragging them along with her at highly uncomfortable speeds and beating on them all the while, it just feels more like some sort of monstrous antagonist Warlord would make as opposed to a crippled schoolgirl.

Is it just me, or do your comments always come off as being significantly less negative than I'd imagine them? Most of this comes from "logistical" problems over actually attacking the playstyle, so I think I should explain myself. Emi can walk and run faster than Sonic (Marth runs faster than Sonic), but not dash, or at least initially - my interpretation of implementing a normal human into Brawl is to have their movement abilities be reflected on actual human standards, but I can understand that one might think there should be a limit of sorts given all these worlds are mixing together. I'd like to think that Emi has an advantage over others via running because of her prosthetics (yes I do randomly interpret them as making her faster than a normal human). Making Emi run faster than what you'd want to think otherwise comes with having some rather weak potential, because I most certainly don't feel it right to make her outright punch or kick.

Emi's not actually exhausting her foe via her Neutral Special (I never say that anywhere) but rather dragging them around in a logical manner via outmaneuvering them since they cannot keep up with her in the first place. The "spacing" factor is quite obviously designed to force the foe off the ledge or so via some gimping tactics or positioning them in a better place for you to run into with the dash. I'll admit that dust clouds are weird when you can add them onto your dash and that perhaps Emi should have had an animation where she scraped her metal foot across the ground to signify this in a logical manner - dust clouds were designed to give Emi something to work with. And in the case of the D-throw, I do not mention anywhere at all that the foe is being exhausted - Emi's the one putting the extra effort in, though to make it actually make sense I should make it that she kicks the foe away to actually deal the knockback...I'll edit that it in right now actually. The playstyle is definitely not anything breathtaking, but I reckon it's pretty good via working with the likes of Emi.

Also, this may come as a little surprising, but I actually kinda really like that you consider Emi sadistic....it fits her quite well, like, a lot so. Sadism isn't just fitting only to genuine villains, you know...there's a thing called comic relief! While that doesn't quite apply to the nature of the series, Emi is somewhat ruthless in the series in her own way in that she keeps pushing the main protagonist to exercise, and while not in an extreme manner where she'd outright ignore his obvious health needs, this is Brawl where the obvious thing is to KO the foe and really it represents Emi's disposition to the entire thing if she's just trying to drag enemies around her.

When there are magic characters and what have you that have far more potential for playstyles and making sets like these via playstyles is completely impossible without being called out for numerous things, something I've had the liberty of experiencing a fair few times, one really has to question if it is really possible to make a "good" set for these types of characters at all? Maybe it's not about making a good set for them, but rather pleasing everyone. Trying to be creative results in "tackiness", and trying not to be results in "bland".

Most of your points are aimed at the "tackiness". I was thinking that perhaps your comment would make me dislike my own set, but really it hasn't done that for me. You see, I quite like it if for effectively being a poor man's Yutaka. Some main goals with the set were to have a playstyle that avoided the momentum genre cliche but to also make the player want to run around, because that's what Emi actually likes doing - not just simply run into the foe but be given a reason to run around the stage, hence the creation of the dust clouds. I'm actually fairly proud of that. Making the actual dash the attack rather than a Dash Attack or Side Special was also intentional, because you see, "attacks" can be triggered on demand and the player has control over them while "mechanics" they do not, like Lucio Fulci's zombies for example. In the game, Emi is first met via running into the protagonist and almost giving him a heart attack, but she didn't mean to do so, something that was out of her control, hence why I made it into a mechanic rather than an attack. One could question WHY when no other character in Brawl does this same thing when they run into another character, but really an aspect of Emi is being brought into the Brawl that nobody else is known for hence why they do not have it as a mechanic. Emi's Neutral Special I felt fitted her character to a T given that she takes the main protagonist out on runs and has a kind of effect on people to lift their spirits maybe, but is quite pushy - this is somewhat taken to extremes in Brawl, as I mentioned, but do you just want Emi to randomly stop running when she outpaces her foe and forces them to lie prone on the floor? That might make Emi out to be inconsiderate, but in a way I'm representing her inability to take the athletic abilities of others into consideration when running with them of which she does in the actual series...I guess it's kind of played out comically here.

All I can say is that I feel I pulled off Emi's character really well in the set with what she's trying to achieve via running around and dragging her foes along for the ride - also managed to really set a mood with the change in my usual writing style for those who saw the playful tone...that was in fact intentional. A lot of logistical matters can be called out, but there obviously wasn't really any other direction to go in without making it a generic momentum set that makes Emi run around the stage to build up momentum and slam into the foe for one big hit. Many things considered tacky I was able to justify, but in the end everyone has their own opinion of "tacky" - I just hope that perhaps people can appreciate these sets for what they were trying to do, representing those who don't have what most others do, even if it will be heralded as the "worst" movement ever.

I'd also like to tell everyone that I had this set virtually complete before this competition started, so my confidence is by no means at any risk.
 

ForwardArrow

Smash Ace
Joined
Aug 17, 2011
Messages
503
Admittedly, my commentary there was a bit lacking in substance because I was half-asleep by the time I wrote that. Really should have just wrote it in the morning.
 

smashbot226

Smash Master
Joined
Sep 1, 2007
Messages
3,027
Location
Waiting for you to slip up.
Cap'n Bowser is less a result of bad set-making and more a consequence of when a set-maker goes into a movement, or moveset, with the wrong ideology. Regardless of your own abilities Jun, believing in a set wherein pirate Bowser is not a pirate-flavored Bowser, but Bowser dressed up as a pirate, goes against the general theme of the movement. Even Bowser the Brash felt like a cowboy at times even though he's clearly Rollercoaster Tycoon Bowser. Even with your edits, this did feel like a somewhat lazy effort; it's one of the few sets this contest where I admit to being bored at certain points in the set, mainly because of the uninspired specials and generic playstyle. Larxene is a definite indicator of what you can do, Jun, but Cap'n is a reminder of how you should never approach a character for the character.

Bowser the Brash is another Davian set that shares qualities with pretty much all of his non-Dutchman sets thus far: a tertiary vehicle and fore/background emphasis bordering on fetishism. However, he doesn't escape from these similar set's issues either; much like Once-ler, Brash tries to do too many things at once and doesn't really succeed at doing one particular thing. His pop gun is largely irrelevant to his main gameplan, i.e. play Traintrack Tycoon, and only serves to perform potential infinites with unhealthy abuse of FTilt. Don't even get me started on the Coachman coins either, since that seems less like an input and more like an obligatory jab at another user, which likely is the case considering this is you we're talking about. What the set does right, though, is actually forge a playstyle: stall abuse on the train, of course! I guess roping foes along for the ride is also a dependable go-to for such a thing, but you've got too many stuff floating around as wasted space that the only thing keeping this above Cap'n is the presence of a playstyle. Which you don't even go in-depth with. Not to worry, I'm sure you can think of something like Fly again.
And by you I naturally mean MW

Black Hole Bowser is the first set of this movement I didn't find boring (Poo to those claiming this is masturbatory aid, as you clearly haven't read jack-all this entire contest). He's got some sort of subtle playstyle in here underneath all the projectiles and air-to-ground attacks, I would assume. Unfortunately, I was far too overwhelmed with the unsubtle purpose of this set; plant bombs and render the entire stage unplayable due to mass amounts of Bullet Bills/Snifits/Lasers/etc. Then again, you never were one for subtlety. Regardless, this set does what the last two failed; create a concise moveset for a character cosplaying as someone with a separate identity and set of powers. It's something that raised my hopes for the rest of this movement, despite how deceptively, perhaps disappointingly so, straightforward BHB ended up being.

I'm gonna cut this short as my flight is leaving right about now. Will continue off in another post.
 
D

Deleted member

Guest
[COLLAPSE="DELETED FOR LEGAL REASONS"]Cap'n Bowser's characterisation is unique, I'll concede to that – apparently it's based on the idea that Mario Party 2 is a play, so this is just Bowser playing dress-up. From this viewpoint, it makes sense that all Bowser can do is play with his sword... and apparently shoot dice out of a cannon, drop Bowser spaces – you know, the usual. I don't think this angle is inherently bad, but you never do anything remotely interesting with it, or inform the reader about what's happening. A tacky alternate costume for Bowser in the end. It's a big extra! How interesting is that to me, personally? Not at all. I don't like the Vanilla Bowser moveset, I don't like what is introduced here – the dice feels unnecessary, the Bowser space is as basic of a trap you can get. There is nothing else that's worth mentioning. Moves exist for tangential purposes: juggle your dice, set up a specific boring combo, or are cloned moves that offer nothing new. However, it is not intended to be a full moveset in the first place. Even with that crazy explanation about the play, which no normal person would think of who has played these games, I question the reasoning behind this design choice. In the chatroom you said that you were merely trying to present a different type of moveset, as a movement to you means a diverse group of sets centred around one subject. Strange, as I recall you remarking upon the lack of uniformity in several movements of the past, and this set misleads the reader into thinking the character has absolutely zero potential. One may draw several conclusions from all of the preceding comment (was it laziness, was it intentional?), but this was a quickly-designated, hurriedly produced moveset, so I'll refrain from dragging this comment on any further. [/COLLAPSE]

KING BOWSER
MYmini Week #17: Diamond Jubilee


An alternate costume of a glorious deleted set [HERE]. I'm going to explain why to all the inevitable Make Your Warlord idiots right here in a screencap [HERE]. This is for the TRUE Mario Party 2 canon! As with all of the masterpieces by Clark Pearce, I only need change one or two moves to make it perfect for any other character -- eureka!

Side Special Crown Toss

King Bowser takes his crown and he tosses it. This deals 5% damage and high knockback, but the crown also acts as a boomerang. This is because King K. Rool can't be in Brawl, so why not reference him? The crown's spikes also act as a grab hitbox of 2.0x difficulty, and the crown can be influenced by running away from it, letting you make it go really fast if you run really far away. By using the side special when the crown is out King Bowser can throw multiple crowns, for the ultimate party!

Back Aerial Crown Impale

Instead of using his move from Brawl, Bowser instead takes off his crown, or spawns a new one, and symultaneously puts it behind himself, extending it out to have the same exact dimensions as his regular back aerial. This is just for fun, and deals 12% and has a sweetspot for an even sweet spot of KOing! By using this move when a crown toss crown is coming back, you connect-four and make a crown cube, making it look like a square. This crown acts like a 3 on Bowser's additional weight, making him the heaviest of the Brawl roster.

Final Smash King's Game


King Bowser says SUPER KAWAII~ ^_^ in a suitably gruff voice, summoning multiple numbers of sticks from his claw like a magic trick. The other characters in the match have to now go up to King Bowser and take a straw by standing next to him and pressing the item get input, the match freezing until they do so. The effects of this are random depending on what straw they get.

[Straw #) Its effect]
1) A chair spawns that Bowser sits on, the other character sits on his lap.
2) King Bowser gives a piggyback to the character.
3) A chair spawns again, the character rests their head on Bowser's lap.
4) Bowser throws the opponent to the floor and performs dthrow three times in a row.
5) Giga Bowser transformation, except with a hilariously cute little crown
6) A powerful PUNCH for 25% with high KO power.
7) Clark Pearce appears and says stop that repeatedly [HERE], has stats of Mario at 100%, first character to KO it gets an extra stock.
8) Cap'n Bowser Vanilla shows up and becomes your ally
9) The final smash does nothing.

So there's this new Cap'n Bowser now, and it's a huge improvement over the old. The treasure chest is one of the best additions I've seen done in a remake for a set, giving incentive to use the simpler spacing moves plus adding some tastiness to the set's characterisation. The moves added that aren't too exciting, at least take advantage of unique elements from this design and as you would want from this moveset above all else, actually has you coming up with smart animations despite the limitations (arm cannon misfire on an aerial? Genius!). I have my gripes – it's not unique from a gameplay perspective, nor is it casual friendly when it involves stun (was this compensation for those deriding the original set?) and that is a one-two punch that kills most of the set's appeal immediately. On the other hand, underhanded and forced effects, stun included, do feel at home on a Mario Party set of any sort, and are reined in here, tactful and simplistic, while still taken advantage of fairly well. Not bad.

It's funny how Bowser the Brash ends: “GIMME ALL YER COINS!!” Why does Brash use coins as a weapon in the moveset? I thought in Mario Party collecting more coins than the other players was a goal – they're lower priority than stars, but there's never a reason to give them away for free. The train mechanic felt almost as awkward to me, and let me be very specific about why. For one, the Wild West board is all train tracks, I don't remember the train being able to drive on ice, lava or in space. Forgiveable, if not for its constant presence in any Brash match. For two, I dislike when sets play around too liberally using the dodge system in Smash Bros. I disapprove of characters acting bizarrely, only being able to dodge into an adjacent space in the background or foreground, so that mechanics like this are supplemented. Same goes for the drinking special. Using the background is fine – Pokémon Trainer is proof the engine's flexible – it seems unfitting for it to be a battlefield. You don't take into account that characters dodge into the foreground in Brawl half the time... a criminal error on a set that hinges on a specific part of the Brawl engine being altered only a small amount to make a flowing playstyle. The lasso, pancake status effect, and a couple ways to guarantee shots [in a single tilt and throw] also give the sense that lockdown in this set is far too easy. The set attempts some good characters bits – I dislike the nature of the dirt circle aesthetically, but that was an interesting way of incorporating “spaces.” Using the lasso as a leash on the opponent, dragging them into your incoming train, is a nice touch for this Bowser. Tethers are getting to be overdone now, though and this one wasn't nearly able to carry the set. I recommend you re-evaulate how you make sets, as it doesn't seem you're getting any enjoyment out of the process, when you keep writing these singular movesets, with recurring problems to boot.

Black Hole Bowser's really smart about how it handles what could be surmised as individualised rushdown, avoiding the traps of making it too automatic, whilst still making Bowser seem competent, and powerful in his own shell. At the same time, it's well-balanced. For very in-character reasons, the opponent gains a huge buff if attacking him from behind, and you work to this quirk in all possible ways. This is further complimented by the second “Bowser space” of the movement and the laser cannon – what I feel is significant here is that this super attack is not intended to be used that dreadfully much, but is more a constant pressuring tool. This is exactly what I wanted out of this movement, coming up with exciting ways to symbolise the strategic play of Mario Party, and you went a step further in making him a true heavyweight male antagonist. The playstyle comes over real cool when it's centred around a chase across the stage, and benefits greatly from your standard, grounded approach to many of the tertiary inputs, so no filler to be found. I have two minor complaints: the pits I do not like, they betray what was just described and go overboard in making Bowser overly defensive, plus I wasn't entirely assured the lockdown options were completely balanced given how opponents need their basic mobility to counter his super aggressive playstyle. I would, however, attend this Bowser Party, and probably bring the beer too.

The mechanic on Bowser Sphinx, that is irrelevant by the set's own admittance, seems a waste of potential. There are good ideas dotted here and there – the islands are a very clever way of interpreting the Mystery Land board's layout, the primary example. Similarly, teleporting with the Tiki heads is a bit of a revelation for the character, and the set has promise at that point, in combination with expectations from that second mechanic. The set doesn't capitalise on any of these aspects and descends into simply spamming projectiles over and over – that, or moves that don't add anything to the playstyle except a slither of versatility, just by virtue of doing something slightly different than what else the set offers. It's underwhelming stuff, and disappointing after you gave yourself such a strong set-up.
 

MasterWarlord

Smash Champion
Joined
Aug 24, 2008
Messages
2,911
Wine Cellar​

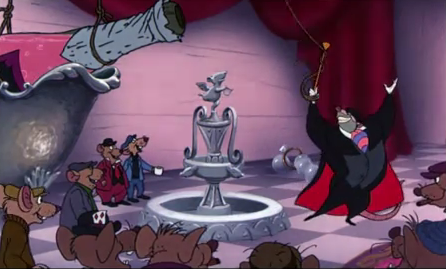
Ratigan’s hideout, a human wine cellar, is where Ratigan is first introduced to the viewers and has his villain song, the World’s Greatest Criminal Mind. The stage is about 1.65X as wide as Final Destination and has a fairly high top blast zone with walk-offs on either side of the stage. Ratigan’s hired help seem fine to just watch the fight for their entertainment, considering their boss isn’t around.


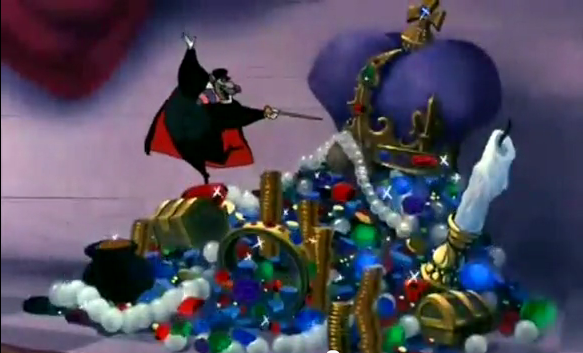
On the far right side of the stage is a mountain of Ratigan’s various stolen riches, which are clearly taken from royalty as evidenced by the crown. This is a slope that covers half of Final Destination, being 2.5x as tall as Ganondorf at the peak. The crown at the top of the slope is solid and can potentially block foes off from being KO’d off this blast zone unless they are knocked over it, but if the crown is attacked from behind it will slide down the slope, the front of it turning into a hitbox. The attack must be as strong as Bowser’s ftilt at minimum to make it slide down, and stronger attacks will make it slide down more strongly/more powerfully. As an example, Bowser’s Fsmash will cause it to slide all the way to the center of the stage, dealing 25% and knockback that KOs at 80% on contact.

30 seconds after the crown slides down the slope, four of Ratigan’s minions will attempt to go carry it back to its’ rightful place. Don’t want the place untidy when the boss gets back, after all. If you attack the minions whatsoever, they’ll stop, enabling you to prevent them from simply resetting the hazard. Alternatively, the crown is still solid the whole time, meaning you can ride on top of the crown if you wish as a mobile camping platform.


In the center of the stage is a fountain that’s 1.5x as wide as a crouching Snake, by default, empty. The outer rim of the fountain is solid, but can be walked up like a small slope from the outside. You only have to jump to get over it from the inside. The statue in the middle of the fountain is not solid at all but blocks projectiles like the statues on Castle Siege. Like said statues, this can be destroyed, but has a very beefy 100 HP. Once destroyed, it’s gone for the rest of the match.


There’s a pull string next to the fountain that can be pulled by any player by simply standing next to it and pressing A. Pulling the string is a laggy motion that takes Warlock Punch lag to complete, and cannot be canceled out of. If nobody’s willing to do it, note that the drunkard mouse will attempt to pull the string every 25-45 seconds with the same lag, though attacking him with anything will interrupt him.

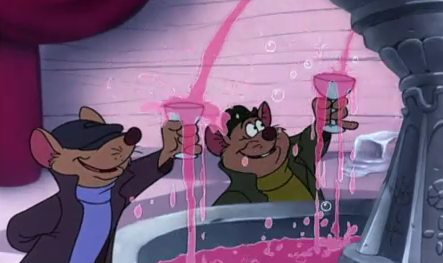
Successfully pulling the string will cause the cork from the bottle to come off as it lowers down to pour wine into the fountain. This will cause Ratigan’s minions to swarm the fountain to drink up the beer, though they’re still in the foreground/background and un-attackable. . .While they’re drinking, that is. Every 2-6 seconds at random, one of the minions will stop drinking and drunkenly enter the fight. They will actively pursue the nearest foe, attempting to hit them with drunken punches for 8% and knockback that kills at 145%, but their drunkenness causes them to stagger back a platform at random on a regular basis. Hitting them with any attack will cause them to fall back into one of the Z planes, passing out.

If a character enters prone inside the fountain when there is wine in it, they will get drunk. They will also get drunk if the wine is poured directly on top of them out of the bottle. This causes them to stagger back a platform every 4-6 seconds. This will not interrupt their attacks, meaning it can potentially enable you to use attacks defensively while moving backwards. Note that any attack that would deal downward knockback to them or simply does no knockback, though, will cause the drunk character to trip. After 20-30 seconds, the drunken effect expires as the character falls into prone (Yes, they can potentially get drunk immediately again if they splash down into the wine again).

The minions will continue lapping up the wine until every last one of them has gotten drunk and left, and seeing there’s 12 minions this means that the wine will be around for 24-72 seconds. Drinking the wine yourself will require one less minion to do so until the wine runs out and someone must pull the string again to get wine.

When there is wine about, the mice will not bother putting the crown back on top of the pile of stolen loot when it’s been knocked down, either being too busy drinking or being drunk. They will only do so once there are at least four sober mice (They get up from being KO’d 30 seconds after passing out). This generally prevents both of the hazards from happening at the same time and thus keeps the chaos from reaching too high of levels on too regular of a basis.
 

Davidreamcatcha

Smash Ace
Joined
Feb 9, 2011
Messages
629
Rin is another Smashbot set that shares qualities with pretty much all of his non-MODOK sets thus far: long-winded move descriptions and tacky emphasis bordering on fetishism. However, she doesn't escape from these similar set's issues either; much like Coachman, Rin tries to do too many things at once and doesn't really succeed at doing one particular thing. His pop gun is largely irrelevant to his main gameplan, i.e. play Mario Paint, and only serves to perform potential infinites with unhealthy abuse of FTilt. Don't even get me started on the painting either, since that seems less like an input and more like an obligatory jab at characterization itself, which likely is the case considering this is you we're talking about. What the set does right, though, is how unfitting this is for a schoolgirl character: it's hillarious, of course! I guess Katapultar is also a dependable go-to for such a thing, but you've got too many stuff floating around as wasted space that the only thing keeping this above Freaky Fred is the lack of Freak Points. Which is how tacky this is. Not to worry, I'm sure you can think of something like the Analyze Cubes again.
And by you I naturally mean Capcom

Rin

This is literally the tackiest thing I have ever read. It's barely above Freaky Fred, and everyone knows how much I hate -THAT- set. No, the character is not an excuse for this - it's a bloody schoolgirl.

The Neutral Special is the first problem right off the bat. Yes, she has that whole thing about "olol she's a mind reader and she can paint what other people want to see" very likely added retroactively. Even ignoring the standing still and attention detracted thing, there's no reason why they should suffer lag after viewing the painting. The whole inspiration zone thing is incredibly horrid too, and seems to exist only to add some more generic creativity - is a Rin player expected to remember where every single creativity zone on every single stage is?

The Down Special is also a horrid offender - it's a counter that has her...do nothing but look behind her. Her staring will apparently keep the foe standing in place for 2 seconds. As I feel you may have picked up on in the parody of your comment, this is as bad as a Katapultar moveset where he forces abilities onto characters they have no place being on. Considering how much you worship him, though, it's fitting. Side Special also has parts that seem as though they're only there for playstyle and serve to give her more magic syndrome - explain to me how, exactly, the paint goes through the shield to get to the foe? The whole "oh hey everything is an inspiration zone if you mess up your canvas" is also an example of this shoehorning.

There are plenty of moves with effects that make no sense regarding the animation. Jab has a kick that somehow adds to the time they spend staring at the painting, basically being shoehorned in for the sake of an interaction. Up Tilt just has her trip over nothing, and the "fake crouch" shit is fairly bad. Down Tilt literally should not be an attack, and the paint interaction is just one of the biggest examples of a forced interaction in this set. Down Smash, however, is the biggest abomination. It makes more sense with cigar smoke, sure, that's a cartoon staple. But a cigarette is so...tiny. Never mind the fact that it HOMES IN ON PEOPLE. Not much needs to be said about the Neutral Aerial, considering it somehow just pushes away the foe from the shock of her simply waking up and somehow obscures things with the obnoxious bubble. Never mind the fact it's a sleeping input in midair.

Point is: This is probably one of the worst sets made this contest, if not the worst. It's essentially a generic spacing/stall for time so you can set up a stunning painting. It's a generic concept by itself, but you really do nothing to make it all interesting outside piling on tack. Never mind the fact that you hardly have anything she can do to KO foes once she has them stunned. Oh, one last thing before I go:

Pushing all her modest weight against the opponent, Rin causes her former steed to topple over and onto the ground facing up. With a bored look in her eye, Rin tumbles off her opponent and turns around, back in her normal stance. Other than causing 9% damage with clearly no knockback, you can also assume that this move happens to cover Rin and her enemy in paint. Not the case here: only the enemy gets paint-laden, while Rin comes out clean as a whistle assuming she wasn't already covered in paint. There's honestly not much else I could say about this move, mostly because the properties speak for itself. DThrow leaves Rin in the most advantageous position possible in terms of raw wake-up potential: it deals the most damage, it puts foes in a prone state against a frame-advantaged Rin, and it covers the foe in paint. If you truly want to force your foe into a difficult decision, try pulling this DThrow off over paint and see what mistakes they'll make, and what you'll capitalize on.
Read that animation. How the fuck does this cover the foe in paint? Adding on to that, how does that get the foe covered and not Rin?
 
Last edited:

BKupa666

Barnacled Boss
Moderator
Joined
Aug 12, 2008
Messages
7,788
Location
Toxic Tower
Gooper Blooper


A gargantuan squid debuting in Super Mario Sunshine, Gooper Blooper is responsible for the massive amount of ink-like oil polluting Ricco Harbor. To defeat the monstrous Blooper, Mario must yank off each of his four tentacles before attacking his face. However, even this doesn't faze Gooper Blooper; he is the game's most recurring boss, appearing twice more to wreak havoc. He later makes appearances in various Mario sports games, holding a tennis racket in each tentacle or tilting a cruise ship baseball field. Gooper Blooper also serves as a boss in the incomparable Super Princess Peach and the Mario and Sonic sequel...whoop dee frickin' doo.

LINKS:

  • Boss Fight Montage - Yeah, all three fights are near identical, but you have to admit, his defeat method is noteworthy.
  • Playlist - Order some calamari, sit back and relax, as this saltwater symphony soothes your soul.
Statistics

Weight o O o O o 25
Size o O o O o 20
Traction o O o O o 10
Fall Speed o O o O o 9
Jumps o O o O o 5
Movement o O o O o 3
Aerial Movement o O o O o 1


Despite having a boss-esque weight and frame, Gooper Blooper has mediocre movement capabilities at the best of times. He will often find himself fighting from a stationary position with occasional bursts of movement, rather than constantly navigating the stage. This slothfulness can lead to problems when offensive opponents are all too content to dash right in and apply pressure. However, by taking full advantage of the ranged strategies he is 'armed' with, Gooper Blooper can follow a more effective path to victory.

Due to his awkward body, it seems worthwhile to explain Gooper Blooper's onstage stature. He sits with his four tentacles held passively on the ground, a pair of them folded into both the foreground and background. These appendages are safe from damage (background attacks being the exception), although Gooper Blooper does use them frequently to attack, which renders them vulnerable. In addition, when Gooper Blooper finally starts getting launched (after taking upward of 275%), his tentacles flow underneath him freely, ridiculously open to more attacks; when the big squid falls, he falls hard. Gooper Blooper 'dashes' by waving his tentacles slightly to glide, while flapping them powerfully for both jumps.
Physical Traits
  • Gooper Blooper's main body suffers half as much hitstun from attacks, and is immune to regular stun and pitfalls. He cannot trip or be knocked into prone.
  • Gooper Blooper's four tentacles take no stun or knockback, but if a single one is dealt 120%, it detaches from his body, wriggling around harmlessly before fading away; each tentacle lost subtracts 2 units from Gooper Blooper's weight. A new tentacle sprouts up in its place after fifteen seconds.
  • Throws deal 1.5 times their regular damage to Gooper Blooper's tentacles and face, which, unlike those of most 3 vs. 1 sets, are perfectly open to grabs, although Gooper Blooper can escape (or attack free) from grabs to any of his parts twice as quickly.
  • Gooper Blooper is incapable of rolling or shielding; the former causes him to face the other direction, while the latter has him face the screen, lifting a pair of tentacles up a platform length away from him on either side to protect his main body from harm.
  • His spot and air dodges cover only his tentacles, as he lifts them to avoid damage. Because their resting position are in the background by default, Gooper Blooper is able to spot dodge at any time during tentacle attacks to cancel them automatically. This comes in handy, as his tentacles are constantly used in battle, rather than left in idle.
  • With fewer or no tentacles, Gooper Blooper's appendage attacks often become less effective or unusable, while his animations change; his gliding 'dash' and jumps, for example, become awkward hops without tentacles.
Specials

Neutral Special - Ink Blot
A spherical bubble of black goop emerges from Gooper Blooper's mouth over .35 second, where it hesitates slightly before being fired in the chosen direction, with the shot being horizontal by default. The oil-ink hybrid travels half the distance of Final Destination at a pathetic speed (half that of Ganondorf's dash) before descending to the ground and creating a puddle. If the input is held down, Gooper Blooper charges his blob from slightly smaller than Kirby's size to slightly larger than that of Bowser. The size of goop puddles range from one to three character widths based on this charge, covering this space for the lifespan of a banana peel before dissolving while dealing 1% per second to characters who stand in it. Opponents struck by the bubble suffer 7-8% and fairly strong knockback, KOing around 115%.

Characters cannot spread this variety of goop by dashing through it, although it still messes up opponents' traction quite a bit, increasing their likelihood of tripping substantially as well. However, if splattered with it directly, foes have a 50 percent chance of tripping or entering freefall upon dodging or rolling for the next ten seconds (this effect can be stacked), as the goop blocks their vision to hinder defensive maneuvers, Mario Kart-style. This leaves foes with shielding as their most reliable option, which Gooper Blooper can use blobs to mess with as well (read more under F-Throw, where said messing is most prominent). The versatility with which Gooper Blooper can spit out a goop bubble increases its usefulness significantly. Gooper Blooper is able to spit out a barrage of small bubbles if the input is tapped, angling them up and down to his liking, or charge one or two larger balls to give his foes real trouble. Although the slow bubbles will not quickly rack up damage on distant opponents, they can certainly hinder their approach, as foes have much more difficulty dodging through the sluggish projectiles. Bubble barrages can be equally problematic for foes in the air, as Gooper Blooper can leak down the oil while leaping away to push opponents back while creating slick slicks between them and his landing location.


Side Special - Blooper Buddy
A Sunshine-style Blooper appears in one of Gooper Blooper's tentacles, as he tosses it lightly forward a platform with the speed of throwing a Waddle Dee. These Wario-sized galoots meander back and forth over a platform-long area at half of Ganondorf's walk speed until a foe enters this range, upon which they pull themselves after the nearest character at Ganondorf's dash speed. Contact with a Blooper deals 10% and moderate set horizontal knockback, although to be frank, they're far from a threat at melee range. Bloopers weigh as much as Meta Knight at 50% and possess 25 HP each; three are able to coexist onstage at a time.


Where Bloopers really come in handy is in the ink blobs they spew every five seconds; these Deku Nut-sized projectiles travel in a platform-long arc to the ground, dealing 5% and minute stun to characters in their path. Upon landing, these mini-blobs create puddles half as large as the ones from Gooper Blooper's Neutral Special (they last for half as long as well). While Bloopers are a poor substitute for actually spitting out ink blots to create puddles, the blobs they ejaculate add ten seconds each to the goop's timer, keeping it fresh and dangerous. Gooper Blooper has a number of attacks for positioning his minions to his advantage, a skill the Bloopers themselves seem to have mastered as well. If a foe shields, a Blooper will push at it while it's still attached to the foe's body, dealing quite a bit of shield stun while pushing the foe back into their master's inner or outer layer, depending on which way the minion is facing.


Down Special - Whirlpool
Gooper Blooper stretches his four tentacles out their full length (three platforms) over .55 second, before spinning around in place while dragging them on the ground. He makes one full rotation over approximately 1.5 second, dealing four hits of 7% with all of each tentacle during this time (although knockback is slightly stronger toward the tentacles' ends). He is capable of holding this animation out as long as he wishes, although he does suffer dizzily from an above average cooldown period. While each hits deals mediocre knockback, useful for little more than bouncing foes into the air where their descent can be prolonged by spinning Bloopers minions up after them as anti-air distractions, they are extraordinarily handy at chipping away at opponents' defenses.

The tentacles cannot be dodged due to their presence in the background, and when foes use their only alternative, their shield, they'll find each hit deals a large amount of shieldstun. Gooper Blooper can take advantage of broken shields by pushing foes through the layer of his choice, or toy with it in an entirely different manner you're getting closer to reading. In addition, if Gooper Blooper drags his tentacles through a puddle of oil, he'll spread the oil around him, creating a ring of the stuff at a very close range. He'll mostly certainly find this useful when foes attempt to attack his vulnerable self in this inner layer, where they'll now be slipping and sliding around at his mercy instead of getting off too many hits.


Up Special - Super Blooper
Gooper Blooper lets out a roar, pushing himself three Ganondorfs up into the air over a second, tentacles raised, before crashing to the ground over half this time (similarly to him bursting from the crates in his first boss fight). This jump can be angled to the left or right, with Gooper Blooper sacrificing as much vertical distance as he gains horizontally (a maximum of three-fourths of Final Destination). Contact with Gooper Blooper in the air deals a minimal 5%, although getting caught under him deals 20% and spikes foes powerfully to the ground, where they'll suffer the same amount of damage and get pitfalled if Gooper Blooper lands on them.

Most often, Gooper Blooper will find himself making a great leap from one portion of the stage to another rather than dashing away. Yes, the move can function as a last-ditch recovery, but Gooper Blooper's near second of landing lag and requirement of landing on the stage (he is unable to grab ledges due to his size) does not increase his durability much at all. Even when bounding around onstage, Gooper Blooper must make use of his aerials and Specials while making his leap lest he be punished, up above his terrestrial defense; this is an ideal time to spray down a load of goop projectiles to make reaching Gooper Blooper even more of a chore. If Gooper Blooper aims his barrage well enough, he can bide himself time to fortify a new defensive fortress upon landing, as his blobs will have either pressured the foe into the remnants of his old fortress, or preoccupied them by forming new puddles between the foe and their cephalopod adversary.
Grab-Game

Grab - Suction
Gooper Blooper reaches a tentacle forward three platforms with average lag, attempting to snag an opponent. Should he do so, he'll lift them from the ground, holding them like a captive seaman; his grab takes twice as long as most to escape from. His throws deal little real damage, but can effectively space foes from his outer layer, giving Gooper Blooper time to fortify the inner two. If the grab input is tapped multiple times, Gooper Blooper can extend one tentacle after another, with approximately a half second in between grabs. This grants him the ability to hold multiple foes at once, with him throwing them in the order he picked them up. Grabbing multiple foes prevents stragglers from punishing Gooper Blooper as he prepares to throw a single victim.

Of course, it's not just victims themselves Gooper Blooper can snatch up. If an opponent is shielding when Gooper Blooper grabs them, he'll begin suctioning at their shield with the end of his tentacle. At this time, both the Gooper Blooper player and the opponent can begin mashing the grab input and control stick, respectively, to suction the shield right off of them or prevent Gooper Blooper from doing so, also respectively. Gooper Blooper's throws enable him to use his opponent's shield as cover for his own body by tossing it in various projective ways. He can also toss it away from the perimeter of his outermost layer, sending the owner of a shield chasing after it to retrieve it, which they can do by dodging into it for it to reappear over them. Gooper Blooper relinquishes shields if, and only if the tentacle holding it is attacked off, or if his main body suffers knockback.

When separated from its owner, a shield can still take damage and be broken, although teammates can attack a shield back at its owner for them to retrieve it (as they cannot dodge into any shield but their own). If the shield goes offstage or is broken, it regrows onto its owner over a twelve second period, giving Gooper Blooper plenty of time to take advantage of their defenselessness. Gooper Blooper holds a terrific hand when he's leeching onto and pulling away multiple shields at once, as he can still attack during this time, but foes are at the very least vulnerable to outside elements such as Bloopers while mashing free, and about to lose a valuable tool at the best of times.


Pummel - Squeeze
Gooper Blooper clenches his tentacles at an average speed, dealing 5% to all characters he is currently holding. Although Gooper Blooper has a good chance of throwing all victims he picks up due to their extended escape time, this at least guarantees him -some- damage on them in case they manage to free themselves. When used on a shield Gooper Blooper has snared, he crushes the shield in his grasp, dealing the pummel's damage to the shield. While 5% isn't all that helpful for actually breaking shields in a timely manner, it can shrink enemy shields a fairly significant amount. Smaller shields not only travel faster when Gooper Blooper throws them, but are less likely to be reunited with their owner, who has a smaller target to dodge into, and whose teammates are less able to attack their friend's shield back to them without breaking it themselves.

Forward Throw - Bouncing Barrier
Gooper Blooper reels back his tentacle as long as the input is held, before tossing his foe to the ground anywhere from one to three platforms away, depending on charge time (which doesn't exceed that of a smash attack). This deals 10% and places the opponent in prone in any of the three layers of hazards Gooper Blooper has at his disposal, vulnerable to both the elements of said layer and additional foes Gooper Blooper tosses into the same layer to collide with the first. Fear of the latter option may persuade foes to roll into one of Gooper Blooper's other layers, which he can try predicting and punishing; the roll itself may also slip foes up if they were coated in ink. That said, unless he is tossing multiple foes to the outermost first layer, Gooper Blooper is best off putting each victim he grabs in a separate zone, preventing them from teaming up on him and allowing him to annihilate each isolated opponent.

When handling a shield, Gooper Blooper tosses the shield like any opponent, dealing the throw's damage to it. However, instead of lying haplessly on the ground, the shield bounces along the ground, rising a Ganondorf into the air with each platform it travels, with it moving at Mario's dash speed. Gooper Blooper can attack and break bouncing shields, although merely shrinking them can often give Gooper Blooper even more of a leg up in coaxing his foe around the stage. A smaller shield can rise up to three Ganondorfs into the air over three platforms' distance while traveling at Fox's dash speed, being positively annoying for a foe to recapture, especially if it bounces up a series of stage platforms, or even worse, into a series of ink blobs Gooper Blooper can spit out after it.

If an ink blob hits the shield, its properties aren't changed at all, but it does enlarge slightly, becoming bloated with goop. A regular sized shield can become as large as half a Smart Bomb blast with five or so blobs, although goop leaks from the shield as it is held out or attacked, shrinking it back down while creating small puddles onstage. A larger shield is easier to reclaim and does provide foes with more defense, but also gives Gooper Blooper more opportunities to steal the opponent's frequently-used tool again. When enlarged, a foe's shield is even more tempting for them to use, but also a much larger target for the likes of Gooper Blooper's grab and his shield-stunning minions.

Of course, the slow ink blobs are unlikely to hit any shield except one moving at its slower, maximum size, so Gooper Blooper won't be able to have his shield-shrinking cake and eat it too. At times, it may be enough for Gooper Blooper to simply toss a shield away to send his foe chasing it away from him, giving him more time to set up his slippery shenanigans. He can also bounce the shield in front of him to defend himself, enlarging it to cover most of his body; when used against offensive opponents, a stray attack may attack the shield clear to Gooper Blooper's other side, past the point of retrieval, saving Gooper Blooper from the hit in the process.


Back Throw - Momentum Toss
Gooper Blooper begins spinning the arm holding his victim in a small rotation, doing so for as long as the input is held (although the foe can mash free during this time), before hurling his captive behind him. While spinning, the foe suffers 1% per second, in addition to 5% upon being thrown. They travel horizontally from one to three platforms anywhere from Mario to Fox's dash speed, depending on his charge time. By altering the length of time Gooper Blooper winds up his foe, he can throw them into any of his three layers at his discretion. He can also alter the momentum with which he throws multiple foes, causing them to collide in midair and suffer additional damage.

Finally, upon grabbing a shield, Gooper Blooper can toss it behind him for it to travel the corresponding platform distance before rolling away at a slightly slower speed. If all of his opponents are trying to pack together on one side of Gooper Blooper to triple team him, this can result in the loss of their shields, as they are unable to reach his other side to retrieve them in time. The threat of this loss may cause foes to split up to cover both of his sides, prepared to save any thrown shields; this forces Gooper Blooper to pay closer attention to foes, but lessens the threat of each opponent as well.


Down Throw - Anchored Down
Gooper Blooper stretches his tentacle down, casually placing his victim underneath his massive body. This leaves the opponent trapped, suffering 1% per second until they DI out from under their captor, which can take a while. if he spins with a foe under him, he'll grind them into the ground for 3% per second, racking up damage quite rapidly. Crushing an opponent to detain them can bide Gooper Blooper time to fortify his inner layer to damage the foe further once they escape.

If Gooper Blooper places a shield under him instead, he'll also put the pressure on opponents, albeit indirectly. Since shields can't actually DI, foes must approach Gooper Blooper and push him back to retrieve their shield before it shatters from the constant damage. Of course, he'll be expecting the onslaught of powerful attacks meant to knock him off his stolen shield(s), so he can read and punish these with layer-specific attacks to keep foes at bay as they draw near. This said, Gooper Blooper should pay attention to the shield(s) under him; if they break before foes reach him, he'll be less obligated to stick around and block them, rather than leaping away for additional set-up if necessary.


Up Throw - Oil Mixer
Gooper Blooper turns to face away from the screen, before tossing all opponents in his grasp straight up into the air, dealing 5% and coating them in a goop effect. Alongside the opponent(s) are two ink blobs, retaining all their regular properties, with one moving slightly diagonally to each side of the characters. However, in their current aerial state, this is the least of their worries; they must now navigate past either of the two blobs to avoid falling back down into Gooper Blooper's waiting layers. This is easier said than done when every other dodge of theirs may result in a footstool effect; with little more to do than use their aerial DI, Gooper Blooper's victims will be in a highly predictable state, allowing him to take advantage of them in whatever layer they land in. That, or they could suffer the extra damage and extended goop time of passing through a blob. As a rule, the more opponents Gooper Blooper has grabbed, the more chaotic this throw becomes.

Should Gooper Blooper hold onto a shield or three instead, he'll throw the shields into the air, each coated in goop so as to be identical. Now, if he's thrown just one shield, the player can tap the control stick during the throw's brief startup to select which direction he shoots the actual shield, while the other two black balls are simple ink blobs (the shield is in center position by default). Until the slow-moving shield reaches the apex of its flight path and begins to fall back to earth, which takes quite a while, foes have no way of knowing which orb to recover as their shield. This can put foes in a tricky situation where they must sacrifice their shield for a short time, or risk dodging into a blob of goop rather than a mere laggy shield. Meanwhile, with multiple shields in hand, foes can rest assured that all three black blobs are actual shields. However, since characters can only dodge into and recover their own shields, they have no way of knowing which one is theirs, considering the telltale primary colors of each player's shield is obscured. Any number of shields tossed into the air can provide Gooper Blooper with an anti-air blockade, while multiple ones can bait in a number of foes, rendering them vulnerable as they struggle to recover their own tool.
Standards

Jab - Tentacle Slap
Gooper Blooper lifts a single tentacle with a growl over .45 second before slamming it down three platforms away. This deals 10% and pushes opponents back a short set distance, not giving them time to punish the fallen tentacle's brief end lag before Gooper Blooper reels it back. Even if he whiffs a slap, additional taps of the input cause Gooper Blooper to repeat the jab, using a different tentacle each time to create a sustainable zone of pain. While a single landed hit can push a foe back out of range, the danger of multiple blows can draw a foe closer to Gooper Blooper, where they will not be hit.

One slap after another can also result in foes shielding, whether after a spot dodge for prolonged defense or as their only option after being gooped. Gooper Blooper isn't limited to simple slaps either; as long as the input is held, Gooper Blooper will hold up his tentacle, not gaining power in his following slap, but possibly throwing off and punishing opponents eager to dodge as soon as the startup commences. While this is all fine and dandy, the move's use decreases rapidly once Gooper Blooper starts losing tentacles, it being a great visual indicator of Gooper Blooper's vulnerability before his appendages regrow.


Dash Attack - Tentacle Rise
Gooper Blooper's tentacles enlarge slightly, as he squiggles them beneath him to dash; this new hitbox covers a platform to either side of Gooper Blooper, one Mario tall. While traveling forward, Gooper Blooper's tentacles deal multiple hits of 4%, holding opponents near the perimeter of the hitbox. This enables Gooper Blooper to drag them through any minions or goop blobs in his path, as well as pick up the former himself to transport them to a new area, where he can set up new rings of trouble.

While the monstrous monstrosity continues squiggling as long as the input is held, if the A button is tapped during this time, Gooper Blooper raises his main body a Marth off the ground, holding this pose until A is tapped again to lower him down (the move itself stops when the input is released). Above the ground, Gooper Blooper not only has the ability to avoid dangerous grounded hitboxes, he has a whole new array of angles at which to shoot his ink blobs, most notably down at most opponents. Gooper Blooper must have at least one tentacle on each side of his body to perform this move; otherwise, unable to squiggle, he leaps from his hopping dash in a clumsy, laggy lunge, dealing 15% and pitfalling foes.


Forward Tilt - Tentacle Barrier
Gooper Blooper quickly raises the tentacles he has on one side of his body in front of him, with them extending up three platforms and enlarging slightly so they form a wall of sorts 1.5 Mario widths thick. After the move is inputted, holding A while moving the control stick back and forth allows Gooper Blooper to move this wall around up to two platforms in front of him. Opponents who come in contact with the tentacles suffer 5% and moderate hitstun, allowing Gooper Blooper to push foes back through layers and their contents as if operating a bulldozer.

If the control stick is flicked down while Gooper Blooper is moving his tentacles around, he moves the outermost half portion of his tentacles into the background for half a second before bringing them back into the foreground. If a dodging foe comes in contact with his tentacles, they suffer the move's damage and trip, but if they're stuck in between the portion of tentacles in the foreground and background, encircled by them so to speak, Gooper Blooper can pull the foe to him as well. He can push foes and minions between layers, encircle the latter to provide a thin barrier of tentacle hurtbox defense, or even use this defense on himself at the possible cost of his limb. This purpose becomes less effective with a single tentacle on one of Gooper Blooper's sides, and entirely useless without them there.


Down Tilt - Shockwave
Gooper Blooper uses his tentacles to lift his body up slightly for .3 second before slamming it down powerfully, creating a platform-length shockwave on either side of him. At half this range, Gooper Blooper can pitfall foes as he lands, dealing 10% in addition to the identical damage from the wave, which launches foes up with knockback KOing around 145%. The move is also buffed if Gooper Blooper has spun a circle of goop around him; his slam will produce a Olimar-sized wave of goop, pushing to the perimeter of the sludge before shrinking away. This carries opponents back at Mario's dash speed, dealing 3% per half second. While opponents won't necessarily be caught in goop waves for an extended period of time, they can serve as effective moves for transferring opponents to Gooper Blooper's middle layer from his inner one. By sending out multiple waves, Gooper Blooper can also push minions around, trick foes into jumping up into aerial hazards, or even sweep them right over the stage edge. Each wave's range decreases by one quarter for each tentacle Gooper Blooper loses.

Up Tilt - Propeller Blades
Gooper Blooper lifts his tentacles into the air, spinning the round ends of each pair around on both sides of him to create a spinning hitbox. As long as the input is held, he continues spinning his appendages; during this time, they can be directed diagonally left or right with the control stick. By default, Gooper Blooper's tentacles cover the air over his inner layer, two Ganondorfs high, although when extended entirely one direction, they are 1.5 Ganondorfs high, covering the air over his outer layer. Opponents caught in the physical spinning of the tentacles suffer multiple light hits of 5%, having to DI out to escape; upon reaching the perimeter of the Hothead-sized hitbox, they are flung from Gooper Blooper with knockback KOing around 130%. What better way to scoop up foes falling down from a botched aerial assault after being bombarded by goop blobs, eh?

Even if the attack itself isn't landed, Gooper Blooper can still influence his opponent; the upper half of his whirling tentacles contains a moderately powerful wind hitbox, extending a Mario upward. These can push foes into goop blobs, or if stretched close enough to their slow flight path, the goop blobs themselves, pushing them down at the stage or boosting their horizontal movement to further antagonize foes. This usefulness comes at a slight cost: Gooper Blooper's tentacles are fairly vulnerable from the ground while spinning in the air, requiring a multi-layered defense if multiple foes are to be kept from shredding through their HP.
Smashes

Forward Smash - Dirty Bubble
A small, seemingly-solid orb appears from Gooper Blooper's mouth, as he blows into it to pump it from the size of a Pokeball to the maximum size of three-quarters of a Smart Bomb Blast. During this charge time, Gooper Blooper can angle the trajectory at which he launches the bubble, enabling him to keep foes trying to avoid it in its horizontal path (though it does bounce off of surfaces). Upon release, the bubble moves at half an Aura Sphere's speed, dealing no damage to characters it hits, but rebounding them slightly. It appears the thick layer of filthy film surrounding the bubble is preventing their entry...

However, by damaging foes and knocking them back, Gooper Blooper can use their heightened momentum to launch them through the exterior and into the sphere. Foes with around 50% will push into the bubble slightly, but not enter it, instead rebounding (likely) into Gooper Blooper's inner layer with slightly more force than usual; those with upward of 100%, on the other hand, are generally knocked fully in with their momentum, as the bubble continues traveling forward, carrying its captor(s).

Bubbles on their own are great for dragging characters into layers further from Gooper Blooper, or simply out of his face. A bubble can be popped from its inside or outside by lowering its 25 HP. Because Gooper Blooper can seal in minions alongside fighters, foes can be distracted from meeting this requirement, keeping them trapped for quite some time. Also notably, a group of teammates alone can have a tough time if team attack is on, eliminating the easy option of mindless attack spam. Bubbles aren't just useful for their prison cell purpose. Gooper Blooper can attack foes against one from the outside, bouncing them into attacks repeatedly until the bubble pops from the damaging of the flying character (seen when teammates collide; this does not impact the bubble when characters are launched fully into it). He can also attack bubbles to alter their direction or movement speed, although this too, can pop them if done excessively. One bubble can exist onstage at a time.

To further hinder bubbled characters, Gooper Blooper has an alternate strategy to ensure characters stay trapped for an extended period of time. If he fires a bubble into an oil blob, the oil will be absorbed by the bubble, filling its interior with liquid. Smaller bubbles only require a single blob collision to have the majority of the bubble's interior filled, while larger bubbles require two or three blobs before the liquid filling becomes substantial (otherwise, the blob becomes a mere puddle inside). Characters inside a bubble as the liquid seeps in are forced into a swimming state, floating with their head bobbing at the surface. They cannot drown inside a bubble, but are instead forced to laggily leap from the goop to attack free (too bad Ganondorf's not around to stomp them out). The bubble can also be filled before foes enter it, immediately putting them in this floating state upon being launched in.

Aside from giving 'swimming' foes the goop effect, this method of detainment is ideal for when Gooper Blooper finally goes for a gimp KO. If a bubble loses all its HP while carrying goop, or if it is filled to the brim, the goop falls to the stage to form a puddle. In midair, this arc-shaped spread of falling gunk deals 5%, pushing internal opponents downward. If even bogging a foe down in a blast zone-bound bubble of goop won't finish them off, popping the bubble to sprinkle them down may result in just that. Popping a floating goop bubble after it has reached a clean portion of stage may also prove more efficient in spreading the stuff than simply sending oil blots every which way.


Down Smash - Goop Geyser
Gooper Blooper faces the screen, digging all of his outermost tentacle on both sides into the stage over .65 second. On release, Gooper Blooper pokes the round ends of his tentacles above the ground, spewing a geyser of oil from their ends into the air. The charge time determines the width and height of the geyser, ranging from one to two Ganondorfs high and half a platform to a full platform wide (in other words, as thick as one layer at maximum charge). A geyser traps characters in multiple hits of 3-4%, pushing them out of the stream to the left or right, depending on which side they were closer to upon making contact, over .75 second. Characters caught in the geyser's center are pushed up and out over the same time frame. Expulsion from the geyser knocks foes back with force able to KO from 160-145%. The addition of the goop effect on victims accompanies each of these outcomes.

The versatility of Gooper Blooper's geysers comes partly from their mobility, partly from their divisive properties. While the move is charging, the geyser-producing tentacle on each side of Gooper Blooper follows the nearest foe on that side around at Fox's dash speed out of sight, under the ground. Whether a foe is traveling toward or away from Gooper Blooper through his layers, he'll be ready to catch them in his stream at a moment's notice (possibly on both sides at once). By delaying his geyser, Gooper Blooper can mindgame foes, scaring them into reckless, punishable dodging, or even shielding (this goop is absorbed into shields as well).

As for hitting the geyser itself, its ability to launch a group of foes (or minions) either left, right, or up, depending on where in the stream they made contact, can easily divide up a party of attackers. The geyser launching them in different directions after the slight delay of multiple hits both increases each foe's vulnerability and gives Gooper Blooper time to decide on how to attack them most accurately. With the use of external elements such as Blooper and slow ink blots, he is also able to coax foes into a certain area before erupting the stream, sending them whichever direction he decides to be most beneficial (often into the air, where projectile juggling becomes prominent). As a last ditch option, because Gooper Blooper is quite vulnerable upon whiffing the move, he can erupt the geyser early if he knows a foe won't be hit, creating a brief barrier of safety.

Although this move can still be used when Gooper Blooper has fewer tentacles, if he's missing tentacles on one side, he'll have to turn to face left or right before using the move to ensure his desired side of foes gets targeted (he cannot target both sides while handicapped).


Up Smash - Raining Oil
Gooper Blooper roars while charging, before taking .6 second to spit a series of Kirby-sized goop balls off the screentop in a line two Ganondorfs high. Should these hit a foe, they'll deal 12-17%, the goop effect and moderately strong horizontal knockback, although the meat and potatoes of the move is yet to come. The move's charge determines the delay until the balls rain down from the skies again. Because foes have no way to know when balls will begin to plummet, the charging of this move is quite sensitive, with only small fractions of a second causing the balls to stay up three or so seconds longer (at maximum charge, the balls fall after thirty seconds). The projectile oil drops fall in small groups at a time, in an arc formation not unlike PK Starstorm, splattering the ground within three platforms of Gooper Blooper's sides. These do the same damage listed above, albeit now with minimal vertical knockback that can combo into additional dropping balls.

This is but the grounded impact of the move, as is the case with most spikes; in the air, the projectiles slowly push foes back toward the earth while damage-racking. Armed with other such aerial weapons as ink blots, launched Bloopers and bouncy bubbles, Gooper Blooper can push a foe all the way up to the screentop before raining them back down again for quite an insane session of juggling. Large dark spheres also aid Gooper Blooper by requiring foes passing through his layers to watch the skies, in addition to their sides, for potential hazards (while bloating any shields and filling any bubbles they hit in the process). The move's inherent unpredictability adds a delicious degree of suspense to Gooper Blooper's matches, as long as the player remembers the approximate time the balls are set to drop and therefore, when to capitalize on said dropping. Don't let Gooper Blooper's balls become an 'inert' part of his game.
Aerials

Neutral Air - Gooper Copter
Gooper Blooper spreads his four tentacles around him over .55 second, with two reaching into the background while the other two extend out a platform. If the input is held, he'll extend these tentacles to reach out to three platforms' distance over a second; regardless, whenever the input is released, he'll spin around twice, letting out a ferocious bellow. His midair momentum is halved upon spinning, which enables Gooper Blooper to survive onstage even longer than usual (get rid of his tentacles to lessen this effect), as well as remain midair longer as he moves from one set of layers to another. His tentacles themselves deal 6-18% depending on their length, knocking foes horizontally with force that KOs around 110%.

Because the background tentacles can hit dodging foes, much like Down Special, foes are often made to fastfall below their enemy to avoid his blows, potentially landing in goopy layers in the process. A slight wind effect also exists at the end of Gooper Blooper's tentacles, giving him ways to push around ink blots, bubbles and whatnot in midair, effectively sending forth a wall of protection while he flees to safer grounds. Of course, the move is much less safe to use with less tentacles, as this opens not only opportunities for foes to dodge at close range, but chances to interrupt the attack as well.


Forward Air - Ink Blast
Gooper Blooper inhales slightly for .8 second, before spewing out an obscure cloud of ink a platform wide and a Ganondorf tall. This cloud moves three platforms horizontally at Ganondorf's dash speed before vanishing; Gooper Blooper can have up to two ink clouds out at a time. Though their movement (and Gooper Blooper's behemoth size) denies them the ability to obscure massive amounts of the stage, the ink clouds can move right along with ink blots for a short time, keeping their direction a secret if Gooper Blooper follows up F-Air with a quick Neutral Special or three. Used from a short-hop, these clouds can also create confusion if one is spit to both of Gooper Blooper's sides. Although clouds deal no damage, getting caught in one as it is initially released stuns foes slightly, allowing Gooper Blooper to use it for the age-old squid trick of inking his foe before fleeing to a new location. Despite these uses, these ink clouds do little to substantially alter their owner's playstyle, as they fail to hide many of his moves due to their abnormally large hitboxes.

Back Air - Squiggling Cephalopod
Gooper Blooper turns onto his front, pointing his tentacles horizontally behind him over .6 second. Once they're in place, he begins waving them around in place, filling up a fair deal of space with all four tentacles. Although this move puts him in an awkward position if he spaces poorly, allowing foes to attack from underneath, he has a great deal of foes he ensnares in the multiple 2-3% hits of his appendages. Much like the whipping moves of Diddy or Ivysaur, Gooper Blooper waves his tentacles with more urgency when A is tapped during the input. While foes are held in place upon initial contact with Gooper Blooper's tentacles, this waving allows Gooper Blooper to carry foes a set amount away from him before stopping the move. Used best for dragging foes through aerial obstructions, Gooper Blooper can also distance multiple foes from his main body, or simply push foes into the layer of his choice after short-hopping the move (hopefully whatever he's placed in each layer will be enough to cover for his landing lag).

Up Air - Leaping Squid
Gooper Blooper lets his tentacles flow somewhat freely beneath him before pushing himself vertically two Ganondorfs over .75 second. The upper portion of his body now becomes a strong hitbox, dealing 12% and average vertical knockback KOing around 135%. The vertical gain of Gooper Blooper's leap is halved with each subsequent use of the move while he is airborne, preventing this from being much of a recovery at all (due to him not targeting ledges). Onstage, on the other hand, he is able to leap above a collection of projectiles before continuing to fire down blots and bubbles at opponents already preoccupied with the existing ones. In addition, should Gooper Blooper feel ballsy, he can short-hop a leap while a foe is trying to leap over him, possibly to join a teammate on his other side, to punish his advances while keeping the opposing team separated. The move's height is decreased slightly (but not significantly) when Gooper Blooper has fewer tentacles.

Down Air - Tentacle Drill
Gooper Blooper quickly pulls his tentacles together, pointing them beneath him in a downwards arrow before plummeting to the ground at a rapid pace. His tentacles plow through opponents, dealing 15% and knockback KOing around 130%, before embedding in the earth; upon this, Gooper Blooper lags for half a second, before pulling his tentacles back out, showering the area three platforms to either side of him in dirt particles. These cover the air for an additional second, dealing 30 light hits of 1% per side.

Because Gooper Blooper suffers no lag after pulling out his tentacles, he can take advantage of his particles' stunning properties by preparing layer attacks or beginning an attack. Although he may not want to target foes with the goop effect, as they'll be using their shield for defense, shrinking it into a smaller grab target, the particles may tempt other foes into using their shield alongside spot dodges to avoid all the hits. This telegraphed option, in turn, can make shield-stealing even easier. At its root, the move is also great for returning Gooper Blooper to solid ground at high speeds should this be necessary, as well as keeping airborne attackers from touching down with the particles' hitboxes. Indeed, this latter use can be made use of rather handily from a short-hop (unless Gooper Blooper lacks tentacles, of course).
Final Smash

Final Smash - 'Ello Beastie
Gooper Blooper roars, sending all foes spinning into the air. They touch down again in the ocean, on the perimeter of a spinning maelstrom, which pulls them in at Ganondorf's dash speed. At the center of this fierce storm is Gooper Blooper himself in an enlarged state, seemingly dragging his tentacles along in the whirlpool to keep it going. This whirlpool is comprised of three quasi-layers, much like Gooper Blooper's onstage defenses, although each layer here is two platforms long. Foes can navigate these layers by swimming around, as well as jumping or landing on the rare piece of debris pulled into the vortex. However, their movement is quite easily hindered by Gooper Blooper's hunting tactics from his comfortable resting point.

With a tap of B, Gooper Blooper can launch up a barrage of Bowser-sized goop balls, which fall down a split second later in both sides of the outer layer at random over two seconds. Each one deals 15% while spiking the foe into the depths, decreasing their ability to swim away. When A is inputted, Gooper Blooper roars, summoning three Bloopers to swim up from each side in the middle layer; these swim after opponents for five seconds, leeching onto them if they make contact to deal constant damage while forcing the foe to shake them off before swimming. Finally, in the inner layer, Gooper Blooper's tentacles serve as the final obstacle, spinning in and out of the background constantly. If one hits an opponent, it will grab them and pull them under for an instant KO. This Final Smash lasts for twenty seconds before a sea storm obscures the screen, revealing the characters back on the regular stage as it clears up.
Playstyle
Gooper Blooper's versatility as a boss is topped only by his ability to fend off and overcome multiple opponents. His ability to set up a cornucopia of menacing traps on the ground while polluting the air with a plethora of projectiles often leaves foes with minuscule windows for attacking Gooper Blooper. Even the most coherent team of three may find itself scattered every which way upon being confronted by a barrage of sluggish ink blots, or chasing after stray shields. Despite this abundance of strategic options, Gooper Blooper is rarely able to hunker down in a single location, but must instead play his matches in a nomadic manner, moving from place to place to limit the vulnerability of his large body. Should he fail to do so, he'll feel the impact of foes slowly chipping away at him, starting with a loss of potency in tentacle moves and possibly ending in a hapless mercy KO.

Like any self-sufficient sea create, Gooper Blooper is able to endure these hardships by assembling a formidable defense of his own, in the form of his three layers of pain. Once these are assembled, generally through Gooper Blooper stalling opponents with a barrage of ink blots while setting up, foes will find that each layer contains a single prominent attack strategy to either waylay them, isolate them, or push them into Gooper Blooper's other layers. His outer layer, for example, is far enough away to allow for foes in it to be struck easily by tentacle attacks. If Gooper Blooper can throw some inky hits into the mix to put a goop effect on his foe, he'll bring out their shield, allowing him to steal it away or bloat it past its regular dimensions for an easier steal down the road. From there, he can either toss it away with F-Throw, sending its owner on a wild chase, or weigh it down with D-Throw, baiting foes in if they wish to retrieve it (tentacle attacks on their own can coerce foes inward or outward depending on their spacing as well). Meanwhile, Gooper Blooper can infest his middle layer with Blooper minions, which patrol around while refreshing any goop in the other two layers or pushing shielding foes into them, depending on which direction they're facing (which Gooper Blooper can change through a simple jab). Lastly, Gooper Blooper's inner layer can prove treacherous to traverse due to the goop he can spread around himself with Down Special, allowing him to slam foes with D-Tilt and repeated bounces from an F-Smash bubble before sending them back with assorted short-hopped aerials.

Punctuating the focal points of each layer are a series of longer-ranged moves that Gooper Blooper can use to reach into the zone of his choice, influencing the foes within in. His D-Smash geysers target foes regardless of the layer they're in, letting Gooper Blooper active them when he's positioned a foe to travel in, out, or up upon hitting the stream. This is, of course, possible with manipulative moves such as F-Tilt and U-Tilt. U-Smash can drop ink bombs on foes in any layer, while N-Air, B-Air and D-Air all reach out in various ways to ensure foes are constantly on their toes. Should Gooper Blooper wish to mix up his layers a bit, he need not flee entirely just yet. By simply 'walking' back a few paces, using Dash Attack, or shields from a bubble or a foe for protection, Gooper Blooper can turn an inner layer into a middle one, a middle layer into an outer one, and an outer one into yet another stage hazard. Although hazards generally typical of one specific layer, such as Bloopers, remain functional during this transition, if Gooper Blooper wishes to start from a fresh state, he can merely knock them away before remodeling his layers as he sees fit. Although preparing layers does require smart use of projectiles, Gooper Blooper's ability to not only bombard foes with ink blots, but to spread them around with N-Air, U-Tilt, a bubble, or even knocking their goop from bloated shields makes this far less of a chore than it may seem. Once even a single layer is ready, the others tend to fall into place before too long, as chances are, at least one foe will be too busy dealing with the new layer to prevent Gooper Blooper's developments.

These ink blots so prominently featured during this set-up phase have just as much value elsewhere in Gooper Blooper's battles. They can also become effective tools for blocking off areas of stage in the right hands. If blots are spread liberally throughout the air, Gooper Blooper can prevent foes on opposite sides of their adversary from jumping over to reunite; aerial ink blots can also keep foes grounded while Gooper Blooper is holding out such hitboxes as Down Special, possibly coaxing out a shield to bloat and/or steal. However, if pressed by a particularly strong offensive foe, Gooper Blooper may also decide to add an aerial dimension to his gameplay after pushing his foe into the air with D-Tilt or (the more devilish) U-Throw. When aimed properly, multiple ink blots can juggle foes all over the stage; a bubble added to the mix provides aid by bouncing foes into the projectiles, while U-Smash (timed properly) sprinkles them right back down into more waiting projectiles, or into the ground layers themselves. There's little doubt to the idea that Gooper Blooper can rack damage on opponents by dragging them in and out of multiple sets of layers, multiple times, or by tossing aerial foes willy-nilly amongst his projectiles. That said, his matches are most often won by his ability to use his dominance over these realms to damage-rack individual foes separately, whether they be on opposite sides of his body or up above in the air, or lack thereof. He can rely on outside influences such as Bloopers to defend himself against multiple foes to some extent, but a healthy team attack is often quite difficult for the surprisingly-fragile boss to handle.

In fact, for the sake of his tentacles and even his stock, Gooper Blooper may find it imperative that he flee to another portion of stage by bounding over the fray with Up Special. Not only must he ensure he crashes down on a safe(r) portion of stage, he must keep his foes below occupied so they won't simply leap up and attack his tentacles from below, unobstructed. Yet again, his most viable tool for this is the ink blot, which can be used as an anti-air tool to squeeze the last ounce of use from Gooper Blooper's old layers before they become replaced by new ones. Without the air as a viable way of reaching their gargantuan foe, rival teams have no option but to slog through Gooper Blooper's old zones, dealing with surviving Bloopers and the slipperiness of the goop puddles they've refreshed. If Gooper Blooper can make a safe landing while keeping his foes bogged down with his former zones, he'll have no trouble setting up camp again, forming a new trio of layers around himself to keep the match flowing right along. Should Gooper Blooper find himself teamed up against while escaping, he does have U-Air, D-Air and Dash Attack as emergency measures, and can even toss a bloated, stolen shield as a barrier (possibly tricking foes into damaging their own protective tool in the process), although none are able to ensure absolute defense for such a massive hurtbox.

Once Gooper Blooper has accumulated enough damage on a foe to finish them off, he can shift his efforts from keeping a foe isolated to pushing them tauntingly out of reach of their teammates, who do have ways to save them that they'll be tempted to use. As an example, if Gooper Blooper juggles a foe around with ink blots, their teammates can save them by attacking the blots, gaining the goop effect but allowing the team to descend back to the earth. Despite these heroics, Gooper Blooper can take advantage of the teammates' intervention by setting up a dangerous zone below for them to land in, or by shooting an F-Air ink cloud into their midst so each foe risks attacking their partner due to a temporary lack of vision (this distraction may allow him to continue bombarding a foe with projectiles, juggling them right off the screentop to a Star KO). If he's knocked in a poor foe into a goop-filled bubble to float sadly away, their teammates are able to rush after them to burst their encasement; however, if the bubble is near the edge, the release of the goop inside may very well cause the demises of the outside foes as well as the inside one, raining them all down for a delicious triple KO. As long as these foes are damaged enough to the point where Gooper Blooper can knock them apart with ease if he somehow gets overwhelmed (which he might not be able to do if they have low damage, hence the threat of a team), his KO options become quite potent, whether he's finishing off each defenseless fool one by one or wishing them a nice vacation as they journey to the depths of the blast zone, all together.

While Gooper Blooper players have scads of strategy at their fingertips for dealing with an enemy team of three, the primary skill they'll need to bring to the table themselves is good, old-fashioned endurance. Gooper Blooper has the weight and escape tactics for surviving a long, painful fight, but if foes aren't fought off vigorously at all times, one tentacle loss can lead to another. With just a few strong attacks from each teammate, a towering squid can be reduced into quivering calamari until his tentacles grow back, a process long enough to keep him horrifically vulnerable to an embarrassing KO. So long as Gooper Blooper can use his multi-layered playstyle intelligently and craftily enough to deal with the wealth of opposing tactics foes confront him with, he won't even need to make three boss appearances before he can score a dominant win over all who oppose his reign of (inky) black supremacy.
Extras

Up Taunt - Giant Squid Scream
Gooper Blooper opens his mouth wide and lets out an echoing angry noise, much like those in his boss fight..

Side Taunt - False Victory
Gooper Blooper suddenly becomes entirely flat and takes on a pink color, falling into the background in shock. He reveals this to be a mere playing dead trick as he quickly regains his shape again and reenters the foreground.

Down Taunt - Ink Leak
A black puddle emerges from Gooper Blooper's underside; he glances down at it and blushes slightly pink for a second before it vanishes.

Entrance - Oh, Crate
A pile of randomly-colored crates rests onstage, a single tentacle poking out suspiciously. Without warning, Gooper Blooper performs his leaping Up Special out of the crates, landing on top of them to shatter them. He roars angrily and raises his tentacles slightly, preparing for a brutal boss fight to the death.

Victory Pose #1 - Cephalopod Celebration
Gooper Blooper raises his outer two tentacles above his head, clasping them together and shaking them as if they were fists, squealing contently all the while.

Victory Pose #2 - Spin the Squid
Gooper Blooper performs Down Special to the extreme, spinning around rapidly while surrounded by Blooper minions. Somehow having gained intelligence since their fight appearances, these Bloopers leap into the air whenever a tentacle comes around, although they appear oblivious to this, seemingly only leaping in mindless happiness.

Victory Pose #3 - Blot Blower
Gooper Blooper tries to blow an inky black bubble from his mouth, but it pops all over his face like bubblegum. Not seeming to care about this turn of events, Gooper Blooper lets out several yelping noises while wiggling his tentacles slightly.

Victory Theme - Successful Squid
An excerpt from the Super Mario Sunshine boss theme accompanies Gooper Blooper's victory over his three opponents.

Loss Pose - The End?
Gooper Blooper lies on his back, seemingly out like a light. However, from time to time, his tentacles will wiggle oddly, much like those of various undead Asian delicacies. Still hungry?
 

Katapultar

Smash Lord
Joined
Nov 24, 2008
Messages
1,284
Location
Australia
[collapse="Gooper Blooper"]A rather interesting take for your late second set - it's one that comes with a fair few merits yet at the same time there are many things one could call out against it...funny how you never directly state Gooper Blooper's a boss set you constantly imply such throughout the set, especially when he has stupidly good range on his tentacle attacks despite being vulnerable from those areas to a degree - aside from that however, the set doesn't FEEL all that overpowered, so there's a surprising sense of deceit going on in which one would think they'd be able to take on the big beastie on their own and this might even be possible. It's something that I can't help but applaud.

Taking a foe's shield is somewhat fascinating, if extremely awkward for the nature of the character (even if it is a Mario Boss), and would be much more appreciated with an actual magic-using character of sorts. That said, it's somewhat interesting how it all plays into each other to a degree - taking a foe's shield in the first place can somewhat be considered a "balancing measure" when he has that extreme range to play off with, though you can kinda just grab the foe again whilst holding their shield at the same time except when you consider this is a boss set and all. There's also the fact that without the shield stealing and simply exploiting the foe's need to dodge moves like your Neutral Special, minions and U-Smash the set would have somewhat followed a different path with actually grabbing and throwing the foes - said throws aren't amazingly interesting when used on foes bar the U-throw, and the range at which you can potentially toss enemies for would probably be an instant kill in certain circumstances via a B-throw if you're at the edge of the stage. This seems like a set where one could have an easy time picking out something to banter about, but really thinking about it all in the context of boss sets and how you kind of have to be careful about choosing to grab a foe's shield and them at the same time when you have 2 others to deal with implies a pretty good sense of flow.

Given the initial set-up of "giant" character who can't shield/dodge and is a "gooper" gave me doubts initially, and while there -might- be a few inevitable design iffies about the set given the nature of the character (though there would be no point in me only focusing on them), in the end this boss set impressed me quite a bit with its surprisingly clever design and blurring the lines of being a 1v1 or a 3v1...it might be strangely beneficial for certain types of foes to fight him 1v1 when they can't be mindgamed via which shield is theirs. Props to you, Koops.[/collapse]
 

FrozenRoy

Smash Lord
Joined
Apr 26, 2007
Messages
1,268
Location
Las Vegas, Nevada
Switch FC
SW-1325-2408-7513
This is my MYMini entry. Fo shizzle.

Two-Headed King Rex

Two-Headed King Rex is a pretty generic Normal Monster in the Yu-Gi-Oh! Trading Card Game. About the only notable thing is it was used a few times by Rex Raptor in the anime. Fun fact! It's Japanese roar is actually what was used in the dub for Blue-Eyes White Dragon's roar, because the dubbers thought that the unique roar would better be suited to a major monster then one that appears for maybe five minutes in three episodes.

Statistics

King Rex here stands a little taller than Ganondorf in height and just a bit less wide than Bowser, giving him a very large size. Despite this, he is not as heavy, being a little lighter than Donkey Kong, which is not a good combination. On the plus side, though, it is a good deal more agile than all of those, being a bit faster than Donkey Kong with good traction.

He is also somewhat decent in the air, having above average airspeed but just a tad below average control. It's wings let it go a bit higher in the air, but it's not an aerial player nor can they carry it's large body too far, so it only gets a single extra midair jump. It also has a glide, though it drops pretty fast due to it's weight. On the plus side, it won't put you into helpless if you are out of jumps, even if you can't glide again until you land. So, uh, whoo.

Oh, he also has a mechanic...

Mechanic: Two as One

King Rex's mechanic comes from the primary and obvious thing about it: It has two heads! This means that during many moves, mostly involving the heads, King Rex can actually attack during it with it's other head, allowing him to have two hitboxes out at once. Theoritically speaking, you could use this to infinitely attack...but you can't move, so you won't be getting anyone outside of your range, and it's not like this erases end lag or start lag either...

Special

Neutral Special: Flame Breath

King Rex is one of the few dinosaurs ever seen to use fire breath in the anime, so somewhat unsurprising it has one. With this, King Rex lurches one head forward, blowing out a billowing breath of fire. This has a bit shorter range than Bowser's version, but it decays half as fast and recharges twice as fast. It deals very similiar damage, little hits of around 2% that cause flinching, it's easy enough to DI out of.

Notice how I said that one head lurches forward, though? You can still use head-based attacks with your other head while this is going on, even using this very move again, in which case the other head will turn to the side opposite the first one and start blowing fire on it's own timer, causing you to cover both sides of you. Very nice! Tap B to start this move, then either tap it again for the second flame breath or hold it down to stop the move before the second head. Or input another appropriate possible move to use it. The two heads have different recharge times, so remember that!

Down Special: Earthrocker

King Rex raises both of it's clawed hands high, balled into fists, before slamming them into the ground. This mighty if somewhat slow to start slam does 17% damage and pretty high knockback, KOing around...oh...let's say 110%.

The key thing that happens, though, is that when you slam against the ground, two rock spikes jut up from the stage, uprooted from the force of your blow. These will pretty much never hit if you hit with the fists, but if you whiffed, they'll deal a keen 10% and about 140% killing knockback. The tops of the spikes remain a hitbox while they are out, dealing 7% damage and set knockback that isn't too high, but is high enough that you can DI away from them after getting hit once. These will stay out on the field for a solidly long 12 seconds, but they will steadily get smaller over that time, until during the last second only the tips barely stick out. This is a solid way for King Rex to slightly make the stage more to his liking or simply as an annoying damager and wall offer. Use it at will, but note the end lag is poor.

Because of the way that King Rex raises and lower it's arms during this move, you can't use your heads during it.

Side Special: Rockcrasher

King Rex slams a fist in front of him, sending a shockwave through the earth. The shockwave travels slowly, a bit slower than Ganondorf's dash speed, so you can easily outrun it. But what does it do?

Well, when it gets half a Battlefield platform close to any foe, the shockwave shoots up and causes a chunk of the stage, about Bowser-sized, to shoot up at the foe. This chunk deals some good damage at a solid 12% and similiarly solid knockback that kills at around 130%. Unless it hits a wall or something, it'll go flying off the stage. If it hits a wall though, it will fall to the ground and stay there, like a little on-the-ground slightly-elevated platform rock thing. All the same, the area where the rock got ejected out of will form a small pit the size of the stage that got shot out.

If this move itself would go into one of those pits, then it wll follow it or in other words, go under it. This can be an effective way to delay it a little or to hit people who get in there and stay in there. Because of the fact that it goes slower than you, it can also be used as an approach or psuedo-moving-trap.

The starting lag with this is a bit slow, but the ending lag isn't bad. Useful for approaching. Do not that just like the Down Special, you can't attack with your heads at the same time.

Up Special: Wingflapper

King Rex musters all of his strength and flaps his wings hard. This causes a small wind hitbox in front of him, pretty weak, but more importantly causes him to raise up. In essence, he goes up about half the size of Wings of Icarus, but unlike that move, King Rex can use this again if he's hit out of it. It's really just a boring recovery, though.

It's a one day set, gimme a bit of a break, eh?

Standards:

Jab: Swipe

King Rex swipes once, then if you hit A, swipes again with his claws. It's really just a basic jab...3% damage followed by 4% on the second, slightly stronger swipe. This move does have some decent knockback on the second hit, though, killing at roughly 210%. The first hit can be used with head attacks, but the way the second's animation goes means it can't. And, of course, if you use the first attack to lead into a head attack, you can't use the second hit. Both hits come out very fast, like a good jab, with minimal ending lag. So whoo.

Forward Tilt: Bite

King Rex sends one mouth forward, extending it's neck to the best of it's ability to give it extremely good range, somewhere in the area of 3/4th of a Battlefield platform, before biting down. The bite itself is fairly strong, dealing a neat 11% damage and...odd knockback. You see, King Rex actually flicks his head up a little when it bites, causing the foe to follow that trajectory if hit, or in other words, this attack causes the foe to be dealt backwards-upwards knockback. It has decent base knockback, but the knockback scaling keeps it from killing until...let's say 170%.

It starts out fairly fast and has average ending lag.

As you may have guessed, the odd knockback properties are used, especially when you consider that you have a head you can attack with behind you...

Up Tilt: Chomp

King Rex's head shoots up in a way that practically mirrors Bite, except it's upwards, chomping down on the foe for 11% damage and some good knockback that kills at around 155%. This move's key use is forming a combo with the Forward Tilt. At lower damage %s and/or on bigger characters, this forms a true combo, or in other words it will always hit if done right, while later on it provides a non-true combo which can be DIed out of. Smaller characters and characters with higher %s are easier able to DI away and make it a non-true combo sooner. It's lag is similiar to Bite in all ways.

Use this to rack up damage at lower %s with Bite or simply as an anti-air move. Obviously, Bite and Chomp are two head attacks that can be used at any time, so don't be afraid too.

Down Tilt: Stomp

King Rex gives a hard stomp to the ground just in front of him. This move has high damage and knockback for a tilt, 14% and vertical knockback that kills at around 120% respectively, but it's hitbox is incredibly small, essentially being "right next to King Rex". Combined with it's somewhat lengthy start lag, though it has little end lag, it's hard to hit with.

This move has a somewhat well hidden secondary use, though, which is that it sends a small little shockwave diagonally through the ground, which has the same knockback properties as the tilt itself. While it normally won't do anything, if an opponent is hiding inside the stage or, more importantly, if it manages to go through the stage, such as if used close enough to the edge or next to a pit, it will exit the ground and retain it's shockwave/knockback properties, decaying somewhat quickly but being a good-sized moving hitbox. Because of the low ending lag, you can use this close to a pit, hit a foe trying to get out of a pit back into it, then when they get hit up from the tilt, try to hit them back in again! Pretty neat, don't you think?

Down Smash: Shockcrack

King Rex raises it's arms high in an animationg disturbingly similiar to it's Down Special, before bringing them down for 15-19% damage and good KOing knockback, KOing at precisely 100%. It has somewhat good range due to the size of King Rex's arms, but it's got a bit heavy starting lag, although it's ending lag is fairly low for a smash attack.

The key thing for this move though is the creation of shockwaves from it's impact, one to each side. These shockwaves don't do much to foes, though the 1% and tripping is much appreciated, but will also cause shockwaves from your Side Special to end prematurely, allowing you to shoot out the rock at any time and giving you greater control of your pit placement. While not necessarily an interaction, they also run over the top of the pits bottoms, meaning foes can be tripped a lot if they are stuck inside a pit when King Rex launches this move. Learn the intricacies of this move and it will serve you well.

Forward Smash: Fireballer

King Rex quickly spits out a fireball of about 1.5x Kirby's size in front of him. This move has pretty quick start-up for a smash attack, although it's end lag is slightly above average, as the fireball travels 2 Battlefield platforms, dealing 14-17% damage and knockback that only kills at a somewhat dissapointing 145%.

This move, like many tilts and smashes, can be angled up and down, which provides some ways to switch it up. Angle it up and the fireball will be sent at a diagonal arc, hindering aerial approaches, getaways and general shenanigans, while pressing down does the opposite, sending it downwards, which is seemingly useless, although it can hit in a pit, I suppose...

Except that when the fireball stops, it leaves behind a lingering fire hitbox for 3 seconds. So down-angling not only allows you to hit a pit, but fill that pit with fire, particularly small pits can be even entirely filled with pits and force the foe into an unwanted DI position, while upward-angled fireballs will have their lingering hitbox gently fall to the earth, making it a sort of falling trap. The lingering hitbox deals constant 2% damage with virtually no knockback, necessitating either DIng away or being hit out of it.

And, of course, there's the value of having a long-range projectile you can fire while attacking thanks to being able to use it with head attacks...

Up Smash: Head Crack

King Rex whips a head upwards while hopping a little. Compared to his other two smashes, it's a bit generic, although it has average lag on both sides, making it a good middle of the road option. It's a decent but not great KOer, knocking out at 125%, and deals a solid enough 15-18% damage. It also has some pretty good range thanks to hopping plus the good extension of King Rex's neck.

The primary fun thing to do with this? Combine it with another head attack thanks to the hop! You can basically short hop a grounded head attack and do some odd things, such as giving yourself new angles with the F-Smash or an easier time catching aerial foes with the F-Tilt or the like. Aside from that, it's just a strong upwards attack, standard for an Up Smash.

Dash Attack: Chase Chomp

King Rex slows down to 3/4th of it's normal dashing speed, while it's head chomps madly in front of it, being a constant hitbox of 10% damage that KOs at a late 180%. This is a somewhat odd keep dashing attack, as King Rex won't stop the attack until he reaches a ledge or until you hit A without a direction again, which allows you to use another head move while using this. In essence, you can now perform a head move while staying on motion, allowing you to do weird things like fire of fireballs behind you while moving forward or essentially short hop with your Up Smash. It's simple, but pretty neat, huh? Unfortunately, you can't dash in the middle of an actual attack, so this has to be the first attack if you want to do those.

Do note that your dashing speed is slowed and this has some decent end lag, though. The start lag is very low, however.

Grab Game

Grab:

King Rex's grab is somewhat normal, and yet somewhat not. It functions as an ordinary of nicely ranged grab, as King Rex extends it's neck and tries to grab the foe in it's jaws, it's range about the same as His Royal Penguini. It has oddly long ending lag if you miss, though...

Well, not entirely oddly. Because 1. This is a head attack you can use another attack during! But perhaps more importantly, 2. This is an extremely angle-able grab, in addition to the fact you can grab with your other head, which also allows you to grab multiple opponents(You throw the first one you grabbed first). Angle-able, you say?

Yes, angle-able. When you input the grab, flick the control stick in a direction and the head will shoot out to try and grab in that direction! You can shoot it out in eight directions, up/down/left/right and the diagonals, giving you unprecedented control over where your grab goes and the ability to grab aerial foes. Combined with the potential double-grab and you have a very dangerous grabbing game.

Pummel: Chew

King Rex chews on the foe for 2% damage. Average speed pummel. If you have two foes grabbed, it pummels both.

Forward Throw: Indigestion

King Rex...does not actually throw the foe. Instead, it begins breathing fire up while continuing to hold them in it's mouth, dealing 2% damage at a fairly fast rate. Opponents must simply escape the grab, any progress they have made escaping up until this is used is counted of course, to get out. Needless to say, the more damage on the foe, the more you can rack up with this. It goes faster than the pummel, so don't bother with the pummel if you plan on this throw.

While in this state, you must be careful, as you want to throw the foe away by hitting A before they escape, which will cause King Rex to lightly toss the foe forward for 6% damage and weak knockback and hitstun. If you don't do it before they escape naturally, they will escape in a frame advantage and probably get a quick attack off on you, plus you miss out on 6% damage...but of course, you want to squeeze out all the damage you can...

Back Throw: Flame Spitter

King Rex tosses the foe backwards and spits a fireball at it. It's quicker and so only half as big as the Forward Smash fireball, deals only 9% damage(The toss itself does 5%, so 14% if it all hits) and disappear after only a Battlefield platform. AND the fireball can be DI'd away from at a reasonable %! Terrible.

The good thing about this throw is that the angle of it allows you to hit someone who has been grabbed by your other hitbox to be hit by the fireball instead of the person you throw, allowing you to rack damage on the second person in exchange for losing damage on the first. So that is sort of nifty.

Down Throw: Flare Burst

King Rex throws the foe to the ground and pins them under one of it's feet, which deals 3% damage, before spitting a big burst of fire right into their face, which extends against the stage half a Battlefield platform to each side. The fire deals 10% damage, although it is too shallow to hit any other grabbed foes due to the grab animation, and sends knockback that doesn't KO until 250% onto the foe. What this does do, however, is superheat the floor for the next three seconds. This causes anyone who stands on it to take 1% damage per 1/4th second they are on it, giving a bit of an annoying damage bonus to people in an area. This will go right over pits, though, and not superheat them.

Of course, if they go down there to hide, they are vulnearable to you, aren't they?

Up Throw: STRONG Toss

King Rex's most simple throw. He simply gives the foe a mighty upwards toss, which deals 12% damage and is his best KOing throw, though it still only KOs starting at 175%. Straight vertical knockback. Nothing else really interesting about it.

Aerials

Neutral Aerial: Quick Bite

King Rex does a very quick bite in front of it. It doesn't extend far, so it doesn't have as much range as a normal King Rex move, but it gains a lot of speed from this, coming out quick and having little end lag, making it a useful quick GTFO move. It deals decent but not really killing knockback. It's damage output is poor though, a meager 6%. Hit A and the other head will bite behind you, or use another head-based aerial to work with this!

Forward Aerial: Headmasher

King Rex rears a head back, before slamming it forward. Most of it is a sourspot, dealing 12% damage and good but not great upwards knockback, but if you hit with the head-part while it is swinning down, it turns into a fairly strong meteor smash that deals 14%. This has a pretty fast start-up surprisingly and not too bad of end lag either, but the sweetspot is a bit hard, so you'll mostly just be using this as a fairly strong forward-based attack or as an alternative to your Down Aerial spike, which is more suited for pit shenanigans than off-stage or mid-air spiking.

Down Aerial: Smashfoot

King Rex raises a foot high before slamming it down, providing a powerful spike with an extreme 15% damage too it...though it has some really bad starting lag. The ending lag is virtually non-existant, though, but this makes it hard to land on people in open space. It's primary use is that it can make it hard to escape pits, due to the vastly decreased range of dodging possibilities, making it a superior pit-trapping option to the forward aerial. Not much else really special there.

Back Aerial: Headswinger

King Rex swiftly swings one of its heads behind it, dealing 11% damage and somewhat low knockback, though it starts out quite quick, even if it's not as fast as the Neutral Aerial. It has somewhat odd ending lag though, a little heavy. It's your basic backwards aerial GTFO, but you can do some pretty neat stuff with it and your FAir and NAir. At least covering a lot of space, you know? And it can make it hard to air dodge away...

Up Aerial: German Dinoplex

The only really interesting King Rex aerial. King Rex...reaches up and tries to grab the foe? Oh my god, it's the dreaded aerial grab hitbox! It's pretty much only right on top of him, so it's a bit tricky to hit with...

...But land it and King Rex will, with all of his might, rocket upwards! It's very similiar to other suplex-style moves like Kirby's up throw. Anyway, King Rex will soon come back down with the foe: If you were off-stage, this is a pretty easy KO, but if you land on the stage, you'll get a solid hit of 12% in and the foe will land in prone in front of you. While this might not be the most useful thing ever on flat ground, they can just roll away and all, but with a wall nearby or in a pit, the foe's get-up options can be quite limited and allow you to do some fun things. This has a bit bad ending lag if it whiffs, but at least starts well.

Final Smash: King Kong Rex

King Rex turns into a generic giant form. It's 6:10 AM, I do not feel like messing with a final smash.

Playstyle

King Rex's playstyle? Not too complex...King Rex damage racks with some low level combos using it's two heads at the start, while you want to use your pits and the stage projectile from them to somewhat limit the foe's options, which along with the rock spikes can leave the foe a bit pressed for options.

And when you litter the stage with some residual fire or throw in some tripping from your D-Smash or become a moving death-hitbox of doom with your Dash Attack + Head Attacks? Well, then the foe is in trouble.

You do have some annoying issues, though. Your only real way to deal with projectiles is the rock spikes or to hide in pits, so campers can be annoying, and you do not really have a great aerial game. You want to keep foes grounded and/or in pits where you can rip them up and spit them out. In FFAs, your grab possibilities are also quite nice, with your damage racking F-Throws and the like.

This section might be a bit poor, but it's a one day set that I did not spend most of the day on and it's now 6:20 AM as I finish this. Cut me some slack.
 

Conren

Smash Apprentice
Joined
Feb 17, 2009
Messages
90
Location
Boston
NNID
Conren1
3DS FC
5086-4445-8944
Emi Ibarazaki

I like the interactions in her moveset. She seems like she would be a very fun character to play, even if you're new with her and constantly loosing control. Maybe even because of that. If I could suggest one thing, it's to add a picture refference to her legs, seeing as how her moveset prominantly features them. I do have to ask though, if her legs are lighter and safer than regular legs, how do they cause trample damage?

Hanako and Lilly

Seems interesting. You did a good job at making the controls work for two characters. Although to me it just seems like you're controlling Lilly with Hanako taking a supportiong role, but that's just the psychological effect of tying a character to the control stick. The sort of "fusion" that they do also seems fun.

Rin Tezuka

I really like this set, even just the flavor of it makes it worth playing. Rin seems like a very fun character. Although I feel that the writing style could've used the same humor as the quotes placed, but I realize that could be a bit difficult to pull off.

...

Next sets in the work:
 

Katapultar

Smash Lord
Joined
Nov 24, 2008
Messages
1,284
Location
Australia
[collapse="Two-Headed King Rex"]Most certainly not bad for a one-day attempt and a fair bit more likable than Zombie Master when you can combo certain attacks at your free will via two heads. Perhaps a few of the moves like the F-Smash's large hitbox and good damage for a projectile (along with being able to attack with another head at the same time), Dash Attack's constant hitbox and Down/Side Special messing with the stage seem a little extreme for King Rex in terms of where he stands as a monster and the fact that he can already attack with two heads, where you have biting attacks that can KO on solid levels alone. He's mentioned to have a good deal of lag on his moves at the start of the set however - it's quite interesting when you take into account the certain moves that use a head and the ones which don't, especially with ones like the U-Smash that change your vantage point and Standard that lets you trade a second head attack for a more powerful body blow - simply the idea of it, though. Being designed to be a combo character, I do imagine that in some ways the stage indents and pollution is not really suited to King Rex's style as a Normal Monster and beast, not being taken into account with the set too much and being somewhat intrusive at the same time for interest. Mostly my own interpretation, but the comboing of the two heads alone with simple bites and beastly body blows as their main KO moves would have been interesting enough for me, or even being able to "use both heads to attack as one" as stated in the Monster's description.[/collapse]
 

ProfPeanut

Smash Ace
Joined
Oct 1, 2008
Messages
727
MYMini#17 - I'm losing count of these, Jun.


King of Opera
1647792955520.png

King of Opera is one of many simple app games to found on the iPhone and iPad. It is also hilariously fun, and now it's a Smash Bros. mode! While it can be played in any stage, I'd rather you watch this video in order to imagine a Final Destination-esque opera platform floating in a circular theatre. The music which plays in that video is the music for this stage, and it matches this mode ideally!

All four players spawn equidistant from the center of the stage, taking into account their fastest movement speed before spacing them. Yes, you should really play this with four people, as this isn't a mode to be played seriously. There'll even be temporary platforms that characters may spawn on if the stage is completely flat or asymmetrical; they'll go away once the match starts. On average, someone like Mario will start five Stage Builder units away from the center of the stage, where a spotlight will spawn the moment the match starts (if the stage is too bright, it'll darken to the point that the spotlight is well and visible).

There's one alteration to the current physics engine that you ought to be aware of first, though. In this mode, the damage ratio's been set to 1.7, which means that any really strong hit will pretty much KO whoever they hit even at 0%, somewhat like those Classic matches where you knock out numerous clones of the same character. It's not going to be an insta-KO with other strong moves, however You still have a damage percentage, but's it's probably not going to rise far before shattering. Also, gravity's twice as heavy, so you may want to stick to your ground game.

So, what makes this different from a weaker Super Sudden Death mode? That spotlight, that's what. The moment a character reaches the spotlight, it'll focus on that character and follow him/her/it around the stage. As long as a character has the attention of the spotlight, he/she/it will start gaining points that show above a character's percentage at a rate of 1 per second. If you're playing on the opera stage, characters will even sing in tandem with the background music, no matter who they are. A nice and infeasible easter egg, but not everyone has a...pleasant voice. I hear Demyx doesn't sing as well as one might think.

The moment a character is attacked and sent off the main stage (as in, the stage is no longer under them), the spotlight will immediately switch to whoever dealt the blow and start following that character around instead, giving points to the victor. This will also happen should a character leave the view of the camera, which is likely to happen when playing with those who deal upwards knockback. If a character suicides or falls off the stage by him/her/itself, the spotlight will shine down on a random part of the stage that isn't the respawn point and catch the next person to walk into it.

And of course, someone else can KO the person with the spotlight to nab it, and then the fourth person can do just that to the third, and then maybe the first or second can steal it back when they respawn...yeah, you can see where this is going. Once the match ends, the one with the most points wins, obviously.

I should mention one more thing...this mode is timed similar to a timed or coin match. Once there's only one-third of the time left (for example, twenty seconds in a one-minute match), the character with the least points gains a horned Viking hat. Don't worry, it's not an extra hitbox, it's just a visual indicator that said character now takes knockback normally and deals knockback at a damage ratio of 2.0. Haven't you ever considered letting the last placer come back by letting them bulldoze through everyone else? Should a different character suddenly have the least points, the Viking hat will instantly teleport to that players head, bringing its buffs along with it.

This mode is the kind you choose for a really great party, wherein its almost mandatory to go for the opera stage just for the orchestra to play in the background while everyone KOs everyone else like silly for the sake of a spotlight to sing under. If there's any strategy to really speak of, it's to try and force opponents off-stage without KOing them such that they'll have to spend time recovering to get back into the fight instead of respawning quickly. Honestly, though, do me a favor and just have fun with it.
 
Last edited:

tirkaro

Smash Champion
Joined
Jun 24, 2006
Messages
2,808
Location
but a pig in the sun
(No, this is not a set for the Dragon's Crown Fighter)

THE FIGHTER

After The Fighter was ultimately left forgotten in his original SRPG, he decided to leave the world of Cyberspace in exchange for a more simple life as a loner in the Pen & Paper world. No longer a mere weakling, The Fighter trained day after day learning to live up to his name. He now lives as a defender of the weak, armed with his trusty Longsword and Shield. The Fighter's imposing nature and sheer will strikes fear into the hearts of his enemies.

STATS

STR- 19
DEX- 10
CON- 14
INT- 10
WIS- 14
CHR- 8

BASE ATK +11; CMB +15; CMD 28


This particular fighter is a defender, first and foremost. This doesn't make him what you'd call a "defensive" character though, as he's surely no 52 AC turtle. No, the fighter defends through sheer elbow grease and a will to keep fighting. Despite his 10 Dex, that only applies in terms of his attacking speed; his movement is is as slow as the average King of Evil. Even if he's a bit on the sluggish side in terms of movement, The Fighter will be attacking a whole lot, as that's sort of his thing. A great offense after all is the best defense, and nowhere does this shine more than with The Fighter.

THE D20 SYSTEM

Every time The Fighter preforms any action besides walking, running, or jumping once, he secretly rolls 1d20 in the background. While this isn't quite as much as a deciding presence as it is in his source material, he is still prone to getting Natural 20s and Natural 1s. Essentially, The Fighter has a 5% chance to either automatically fail his action, or automatically succeed with flying colors. In most cases, this results in either his attack missing, or his attack becoming a Critical Hit. During a Critical Hit, the opponent takes twice as much damage and knockback. This of course isn't universal for all his moves, which will be noted.

DAMAGE ROLLS

You'll notice that most of the damage calculations listed in this character sheet aren't straightforward- instead, attacks are listed by things like 1d10+5%. Meaning once The Fighter attacks you, the game will roll invisible dice determining the damage output. In this case, the game will roll a single d10 and add 5. So if you roll max damage, your damage output for that attack will be 15%.

ARMOR CLASS

The Fighter has 21 AC, or Armor Class. How this takes form in MYM is simple; The Fighter can only be effected 15% of the time by any non-magic projectile, non-grab attack that deals damage under 10%. They just simply bounce right off his armor. An attack that deals 11% damage has only a 30% chance of hitting, while an attack dealing 15% has a 50% chance of hitting him. This goes up to a mighty 20% blow, which has an 80% chance of hitting. However, the opponent's luck will go no further than that. A workaround of course is that any Smash Attack charged to some noticeable degree will hit him 100% of the time.

SHIELD

Pressing the shield button will, logically, cause The Fighter to take out his shield for defense. The Fighter can move around at a pace half his walking speed, and leave his shield out indefinitely. This causes his AC to go up by 10, making him completely unaffected by any attack weaker than a well-charged smash. However, when he DOES get hit by one, he takes the usual amount of damage as well as being stumbled for about 1 second. Additionally, it takes .6 seconds to put your shield down, meaning you should only let down your guard when it's safe. The Fighter cannot perform an Attack of Opportunity while guarding of course.

COMBAT MANEUVER DEFENSE

The Fighter is a pretty big guy, being somewhere around Ganondorf and Bowser in terms of width and height. This is somewhat relevant as an enemy cannot pass through The Fighter. Running through him does nothing, while any attack that would normally send the opponent on his opposite side only has a half chance of doing such. As you could tell, this makes Fighter quite heavyset, giving him a considerable amount of stamina on the battlefield.

ATTACK OF OPPORTUNITY

With his large size and mighty stature, The Fighter "threatens" a SSB-sized area in front of him. This invisible "threatened" box is mainly there to mark a neat feature of The Fighter's: any opponent that moves out, tries to trigger a ranged attack, tries to grab him, or tries to do a healing/buffing move within his "threatened" area provokes an Attack of Opportunity from the fighter. This Attack of Opportunity, or AoO, takes the form of a split-second Melee swing of his longsword that hits 55% of the time. Getting hit by it deals 1d10+6% damage and good-ish knockback, causing you to stop whatever it was you were doing and knocking you at least out of his threatened area.


SPECIALS

As Fighter readied his gear, the overwhelming feel of dread and doubt haunted his every piece of equipment.
But for every sacrifice he made, his ultimate purpose came ever so closer.
What purpose this was had suffered under his pain, but it was still in plain sight.
With firm grip of his finely crafted sword, our hero left the confines of the Inn at sunrise, not even stopping for a mug or nourishment.

NEUTRAL B- +1 LONGSWORD

Is it not but a given? The most essential of The Fighter's moves, you won't really be causing much damage without it. With little startup, The Fighter will swing his sword down, covering his entire threatened area. If he misses, he'll be penalized with a good degree of cooldown time. But if he hits, he'll deal a potent 2d10+5 damage with good knockback. However, right before the enemy is about to be knocked back, they'll be put in a rather noticeable "hitstun" state. This hitstun state allows The Fighter to follow up with two more Longsword attacks! However, the 2nd attack has a 30% chance of missing while the 3rd has a 55% chance of missing. (And this isn't even taking into account the ever-present a Natural 1.) In a 1-on-1 duel with little interference though, you have little to lose in most cases. These extra two attacks deal 1d10+3 damage with the same knockback as the first attack.

UP B- JUMP CHECK

Now let's get into jumping. With absolutely no skill points put into Acrobatics, jumping is a very, very fickle process for The Fighter. He can only jump exactly once with the Analog stick/jump button, and this jump is so small even The King of Evil himself would laugh upon it. It's just enough to get you onto elevated platforms. With his Up Special, The Fighter will have to resort to desperate measures, as the air is generally where he does not want to be. He leaps up or double jumps in the air to the best of his abilities, with different effects depending on the d20 dice roll-
Natural 1: The Fighter plummets directly to the ground in a helpless state.
2-5: The Fighter just barely manages to gain some air, about slightly less than his usual jump.
6-10: The Fighter gains slightly more air than his actual jump, and deals 1d4+5% damage to foes in the way of his leap.
11-15: The Fighter jumps at the length of Mario's Super Jump Punch and deals 2d4+5 damage to enemies.
16-19: The Fighter leaps forward with his sword guiding him, striking upwards much like Marth's recovery. This deals 1d10+7 damage.
Natural 20: By a miracle brought upon by the luck and freedom Goddess Desna, The Fighter is carried along by a gust of wind that allows him to quickly travel anywhere on the stage and take no falling damage for 7 seconds.

Wait, Falling Damage? Yes, I suppose I should mention that. Every time The Fighter falls at a length longer than an SBB, he's prone to taking falling damage. For every vertical length as long as an SBB, he takes 1d6% damage, that constantly stacks on the longer he falls. (So a fall the length 3 SBBs would be 3d6% damage.) It's sort of a drawback, but of course, if he falls on top of an opponent, they'll take that same amount of damage while cushioning The Fighter's fall by about -10% damage. (Note that landing also rolls a d20 in the background. If he gets a Natural 1, the damage will be followed up by a good 1.5 seconds of cooldown lag, while a Natural 20 results in no damage taken by the Fighter at all.)

SIDE B- COMPOSITE LONGBOW

Depending on which one you used last, The Fighter will replace either his sword or shield with a Masterwork Composite +1 Longbow. It takes him about 1.5 seconds to put his weapon of choice away and take out the Bow, and a further .6 seconds to actually use the thing, meaning this should only be used in cases where a ranged strike would make the most sense.
With the bow out, Fighter can rapid fire up to 3 Arrows within a 10 SBB radius. While these arrows appear to home in perfectly on any opponent, it's not quite that simple. See, the first arrow has a 10% chance to miss the opponent, followed by a 30% chance with the 2nd arrow and a 50% chance with the third. They each do 1d8+7% damage, which unlike other attacks, has it's Damage and knockback tripled in the case of a Natural 20.
Likewise, using any attack that involves the weapon you discarded for the bow will make him go through a 1 second animation to put the bow away and take out the weapon.

DOWN B- SHIELD SLAM

The fighter plays no gimmicks and horizontally smacks the doe with his shield. It's a tiny bit more sluggish than the sword, both in terms of startup and cooldown, and does 1d10+5% damage. So why even bother using this over the Longsword attack?
Simple; The Fighter can use this attack directly out of his shield, eliminating the startup lag if you take a defensive position. Additionally, pressing Down B again directly after successfully slamming the enemy with your shield will let him follow up with a Bull Rush! The Bull Rush takes the form of a powerful shoulder tackle that has an 85% chance of hitting, and deals a further 1d10+5 damage. However, the knockback on the Bull Rush is absolutely huge, rivaling a fully charged Forward Smash from the King of Koopas. The Rush is basically a 1-hit-kill on the chance of it landing on a Natural 20; in the case of a Natural 1 however, not only does he miss, but Fighter is sent tumbling down to the ground in a knockdown state, leaving him greatly open.


STANDARDS

The harsh winds of Blight put more of a toll on Fighter than any terrain he previously encountered.
To make matters worse, a quick perception check gave him the realization that he was being hunted by a pack of ravenous Arctic Owlbears.
The frozen hell surrounding him had no time nor care to ensure his well-being.
It was all up to him to make the best of this situation.

A- RUN

Wait, you mean The Fighter needs an entire button just to simply run? Well, not quite. While he can still run without the button, it's still quite slow, being even slower than SSBB Ganondorf. If you need to get The Fighter somewhere fast, your best bet is to slam on the A button and hold it while moving. Like this, Fighter will discard his weapons and bolt forth, his husky armor surprisingly not weighing him down as much. During this dash, The Fighter may feel free to run as fast as Marth to get wherever he must go. Be wary however, as letting go of this button will make Fighter bring out his weapons once again. While Fighter can still move his normal speed while taking 2 seconds to draw his weapons again, it still leaves him quite open to attack. Running is unwieldy, but vital in many cases.

DASH ATTACK- DODGE AND COVER

While dashing normally, this move isn't much. The Fighter simply does an evasive roll that sends him clumsily tumbling down at an accelerated speed forward about 1 Battlefield platform. During this, his AC is temporarily doubled, even during it's somewhat noticable cooldown time for him to get up.
Now, doing this while running (which is done by instantly tapping A again upon letting it go) will buff it up a good deal. The roll now goes as far as 2 BFPs, and has an 80% chance of dealing 1d10+6 damage to the opponent if they make contact with you, while the AC double is the same. This time however, instead of getting up at the end, The Fighter may choose to lie AND crawl on the ground for an indefinite amount of time while keeping the AC bonus by holding A. His crawl is just as sluggish as you'd expect it to be, but it's still handy in some situations.
Also, the d20 still comes into play during this move. Getting a natural 1 will result in Fighter clumsily tripping and falling, gaining nothing but 1.6 seconds of being left open. The Natural 20 however will allow him to be completely invincible during his roll as well as going twice as far. (Note that he cannot roll of a ledge.) It also deals twice as much damage and knockback during the Running variation as one would expect.

FORWARD TILT- POWER ATTACK

When this command is activated, The Fighter will flash briefly. After this lagless flash, the next attack The Fighter will make will have an added 20% chance to miss his target. This is of course payment for the fact that his next attack will also be 20% more powerful. Doing this again will buff those percentages up to 40%, and then again to 60%. Use this if you're feeling confident.

DOWN TILT- LUNGE

A sister to Power Attack, however, they cannot stack on top of eachother. As you would expect, Fighter flashes in a manner completely identically to Power Attack, but has a different effect. This time, The Fighter completely sacrifices his AC. He can't even guard anymore! However, his next melee attack will now have a range increase of about 1 SBB. Quite a dramatic improvement indeed, and makes for some impressive mindgames when used intelligently alongside Power Attack.
Keep in mind though that whiffing a Lunge results in an added 1 second cooldown time.

UP TILT- PERCEPTION/CLIMB CHECK

It cannot be stressed just how vertically challenged Fighter is. That does not mean he's utterly helpless however. As something of a relative to his Up B, this is also heavily effected by the d20. First Fighter will take .5 seconds to roll a perception check. If the d20 lands on 2-19, he'll discover a pillar in the background made of rocks, bricks, or whatever makes the most sense for the stage at hand. Both Fighter and anyone else on the battlefield may freely climb this pillar like a ladder. The size of the pillar is dependent on what number the d20 rolls; it starts at half a vertical BFP, and maximizes at 5 SBBs. This is especially useful for landing Fighter's Dair.
Now, if the die lands on a nat 1, Fighter will get no pillar. Instead, he will only be rewarded with Snakes! Yes, 4 small vipers crawl out of the background, noticeably startling Fighter, and try to attack him. They're relatively weak, doing only 1d2 damage per attack and having only 4 hp, but they're still pretty annoying. In addition, getting attacked by a snake results in a 40% chance of being fatigued by it's venom. Getting fatigued results in your speed, AC, and damage being halved for about 10 seconds.
On the other hand, getting a natural 20 results in an infinitely tall pillar made of solid gold.
Keep in mind that only one of these pillars can be out at a time, and they last for 30 seconds. (And yes, you still have to wait for 30 seconds to use this move again even if you get a Nat 1.)


SMASHES

"Your technique has grown sloppy since last time, my brethren."
Fighter's former sparring partner had sneered on the other side, sword still ready in hand whilst Fighter was briefly brought to his knees.
"Did you not call yourself a hero? Was that not why you left? Most of all, are you still chasing after that silly myth the lady with the harp told you?"
Indeed the Fighter had suddenly remembered the story the lady with the Harp had told him one day.
Said woman later disappeared without a trace briefly after her rescue from the abandoned mansion inhabited by the vengeful spirit of Guza.
He promised, somehow, he would find the subject of her story.
Even when closing his blood-stained eyes, he could see the faint vision of the lady, guiding him along when lost.
Shaking off the fluids of battle he had accumulated, Fighter thrust himself forward, sword in hand, shouting his very lungs off.
Of course, all his former partner had to respond with was a mere smirk.


FORWARD SMASH- STEP UP

While the fighter may be bulky, his sheer iron will gives him enough motivation to act more maneuverable than he looks. Such does this show with Step up, which allows him to close the gap in on a wary foe.
To make it simple, if the opponent moves away from The Fighter, inputting the forward smash command will allow him to instantly dash that exact same distance the opponent cowered away from him.
Note this only works if the opponent is completely adjacent to The Fighter and are 2.5 SBBs away from him. It's a bit situational, especially if you're fighting a wiser foe, but one should never turn away from a chance at free movement, as you probably want to be in the opponent's face as much as possible.


DOWN SMASH- COUP DE GRACE

A seemingly unremarkable move, Fighter makes a downward longsword swing with a good amount of startup lag. This swing does still have decent amount of range on it, and deals 2d10+1~7% damage with good knockback, making it a fine kill move.
It's secondary use however is far, far deadlier. If the opponent is in a shieldbroken, sleep, paralyzed, or otherwise helpless state, Fighter will instead do a 1.7 second long downwards stab right into their vital regions. This variation is unaffected by the d20, as it cannot miss. It deals 54% damage and is an instant-ko under a majority of circumstances.

UP SMASH- SHIELD MASTERY

With little time for gimmicks, Fighter takes a small amount of startup time to thrust his shield upwards with such force, it causes any foe directly above him to take 1d10+5% damage along with great upwards knockback. The attack has a pretty nasty cooldown time, but luckily, nothing can hit you from above while the entire attack is in effect. Use wisely against attacks from above.


AERIALS

Fighter never really liked heights.
In fact, he never really prepared for such a situation.
After all, he thought to himself, just stay on the ground and you'll be fine, right?
Sadly, he had no time to remember that motto as he soared through the air, holding onto dear life to the wing belonging to the Great Red Dragon he had been sent to slay.
To make matters worse, the pack of the Dragon's flying underlings were swarming around him like antibodies, ready to pluck him off and send him flying down to his doom at any moment's notice.
If he had no techniques prepared for air combat, he sure as hell had better invent them now.


NEUTRAL AERIAL- REFLEX CHECK

If it was not obvious enough, the air is the one place the Fighter is greatly impaired. In fact, you'll have relatively few opportunities to even take to the air in the first place. Nonetheless, he still has at least a few options in aerial situations: when it comes to attacking, your longsword attack is your best bet. But when inevitably forced into a hairy airborne situation, one neat tool you have is your Reflex Check. Basically, this allows you to grab onto anything while in the air. Grabbing onto an opponent or partner will deal them no damage- instead, The Fighter holds onto them and causes them to sink like a rock, as if being made of metal. Fighter can then let go at any moment by pressing A again. The amount of other things Fighter can grab onto range from large non-energy based projectiles, a variety of props/henchmen, and certain stage hazards. All of these require separate degrees on intricate timing, save for the rare case of a Nat 20. On nat 20, the Fighter can easily grab any of the above with far more forgivable timing as well as energy projectiles, damaging hazards, and basically anything within the range of possibility.
When grabbing onto an opponent, the opponent can use any damaging aerial to try and shake you off; it the attack surpasses your Armor Class, you are automatically knocked away.


FORWARD AERIAL- DIVE BOMB

When you don't feel like temporarily hitching a ride on a foe, there's always this more aggressive, enemy-specific variation; The Fighter will quickly lunge forward a short degree and arc himself downward. Any enemy caught in his lunge will plummet down at an even faster speed than the Reflex Check variation, and a successful connect with the ground will transition them both into The Fighter's Down Throw.
Keep in mind that you cannot cancel this, so a miscalculated leap -or god forbid, an inconvenient Nat 1- can be very deadly. On a nat 20 however, the grab has a far increased hitbox and can be cancelled out of.


DOWN AERIAL- DOWN THRUST

Basic, but wholly necessary. The Fighter will thrust his sword down, sending him falling directly to the bottom. The attack itself does 2d10% damage, but that's not all that matters here- while falling from lengthy heights, falling damage is also incorporated into the damage mix. A successful hit will result in no falling damage taken by the Fighter, all of it being transferred to the opponent.
On a natural 20, a successful connect causes the ground to shake and the earth to rise up, dealing damage very similarly to a proper Coup De Grace, meaning a 1-hit-kill most of the time. However, a natural 1 will result in The Fighter stumbling while landing, dealing no damage to the opponent and having all the damage that would be dealt to his foes being transferred straight to him. Quite a high risk, high reward situation the d20 plays with this move.

BACK AERIAL- BACK KICK

The Fighter extends his legs out towards the back, resulting in an attack that deals 1d10% damage on contact with decent knockback. It's not very good when used as an attack, but it's ideal for dealing with and shaking off tricky foes trying to get you from behind. On a natural 1, this results in nothing but a fumble followed by instant helpless state. A nat 20 on contact however will cause the scene to briefly pause as the Fighter quickly turns around and follows up with his Neutral Special.

UP AERIAL- BLADE UPPER

Oddly, this move is more of a "proper" recovery for The Fighter. Essentially the Fighter yells out while thrusting his blade upwards, Shoryuken-style. This brings him a short but at least noticeable distance upwards while dealing 2d10+2% damage and short knockback to any unlucky foe. On a natural 1, The Fighter instead just stumbles about with his sword, gaining no further air, dealing no damage, and cannot do the move again for the duration of his airtime. On a Natural 20, The Fighter skillfully does the move 3 times in a row, with all the airtime and damage output that comes with it.


GRAPPLE CHECK

"I have to say, were you always this savage?" Fighter's Elven rogue partner had questioned while getting in critical hits against the undead Lord that Fighter had held down.
"If I hadn't met you back during the incident in Upper Bethholme, I'd have sworn you an Orc Barbarian."
Fighter had felt indifferent at the remark.
"Of course, I found it odd how attached you were to me. Saying that I looked just like a harp lady of sorts. I'll never understand your human ways it appears."
She had finally finished off the Lord before he so much had the chance to fight back.
Fighter could finally let go of his rotten body, and leave it to rest again in the soil.
"You do know I'll live far beyond your lifetime, right? Even at my nubile age, I'm old enough to be your grandmother."
Fighter didn't quite mind what she was implying, rather taking his time to explore further into the dungeon of legend.
"You don't exactly talk much, do you?"

The Fighter's grab game is as simple as simple can be. After all, grabbing while being a Sword and Board fighter is strange enough as it is. Nonetheless, the Fighter bearhugs forward with little regard of whatever is in his hands, resulting in a rather notable cooldown time on whiff. A natural 1 results causes him to stumble and roll forward, doing 1d6 damage and a tripped state to whoever got in the way of his roll. A Natural 20 results in a grab with a far wider hitbox and unescapable hold for about 10 seconds. His pummel is a basic knee smash, dealing 1d2 damage.

FORWARD THROW- ROLL MANEUVER

The Fighter rolls forward twice with his opponent still in grasp, followed by a throw that deals 1d10+5 damage and decent enough knockback. It takes a short while to recover yourself back up, but the opponent should be far enough away to be harmless in most situations.

BACK THROW- HOLD/SUPLEX

In a move mainly optimized for teams, The Fighter holds and locks the opponent by the arms for 5 seconds and is free to drag them about at a sluggish pace. For these 5 seconds, a 3rd party can come in and dish out as much damage to the opponent as these 5 seconds allow. After the time is up, Fighter follows up with a German suplex that deals 1d8+3 damage.

DOWN THROW- PIN

The Fighter will preform the obvious and pin the opponent down, assisted largely in part by his heavy armor. For every second the Fighter has the opponent pinned, they take 1d6 damage. But the real meat of this move is how the length of the pin is decided; once the move is in effect, two virtual d20s will appear over the scene, one representing the Fighter and another for the opponent. They'll spin rapidly for 2 seconds, and will stop via either a button press on each side's end or said 2 seconds running out. If the Fighter's roll is higher than his opponent, the Pin goes on for 2 more seconds where the cycle repeats. When the opponent gets a higher roll, only then will they break free.
If the Fighter receives 3 successful rolls in a row, he may choose to follow up any time with another throw. If the opponent makes the first roll however, they'll slip free so easily, The Fighter will be left open for about .9 seconds.

UP THROW- IMPALE

For when you need to deliver that extra dose of pain, this throw will have Fighter impale the foe on his longsword for 1d10+5% damage. After the initial impalement, you may input the control stick in any direction for Fighter to swing his sword, sending the opponent flying a good distance. If you fail to input the direction during the animation, Fighter will instead choose a random path.


FINAL SMASH- HERO POINT

"What's wrong? You didn't forget the fundamentals already, did you?"
his mentor exclaimed before laughing heartily, in a bout of tough love.
Fighter would have responded had he'd not been diverting all his spare energy to resisting the weight of the Dragon's claw.
Instead, he merely thought to himself this wasn't the time to die.
He was a defender, first and foremost, and inattentive use of his skills would spell doom for the seemingly small village he swore to protect.
The road to hell was the least of his worries right now.
"Haha. I see that usual fire in your eyes, how they crackle with the force of an Great Elemental!
It's all up to you now, as I left with nothing else to teach you."
The vision of his mentor disappeared into thin air and smoke.
One last surge of energy arose in his chest, the final wind to carry him to victory.


When Fighter glows with an awesome power, you know he's being serious. Tapping from unknown reserves of power, The Fighter will use his Final Smash to charge forward and automatically home in on the closest opponent, slicing through any obstacles in his way. Of course, the range of his charge is only within a 2 SBB circular radius. Upon contact with a victim, The Fighter will go into the most glorious cutscene-style animation possible involving a sword and shield. What animation this is will be left ambiguous, but I will tell you to just imagine the most amazing-looking attack your mind can ever come up with. It looks better than whatever your mind came up with. That is how good it is.
Once the cutscene is done, the opponent is left flying, being a 1 hit KO. As this attack deals with Hero Points, the d20 does not effect it at all.
As another quirk to the move, if the Fighter is knocked out while glowing, he will not lose a stock or point. Instead, he'll just jump back onto the stage, with the Final Smash used up and gone for good.


THE ONLY GUIDE TO VICTORY YOU'LL NEED


At long last, the Fighter's ordeal was over. To be quaint, he had no idea how he survived either. He was plagued with doubt, even in the throes of victory.
"C'mon, what's with that frowny face?" the Elven Rogue had questioned. "Don't tell me you forgot what it meant to be a Fighter of your stature already! After all, you're the one who kept going on about it."
Indeed his mind was scrambled and laid back within the grounds of the now-peaceful village. He decided to collect himself, drowning away the sounds of children playing and vendors selling their newest wares.
"You remember, right? To be a Fighter of the sword and board, one must always stay as close as possible to their opponent. After all, you ARE a defender." she recited on.
To key to defense, as the Fighter recalled, is not just turtling along with your mighty armor. It's also to strike fear into the hearts of your enemies. They must force the opponent to question their judgement at every turn.
The Rogue hopped and playfully walked throughout the rim of the town fountain as our Fighter merely laid down within the peaceful square, occasionally pelted with flying balls and hoops belonging to the local children.
"I mean, I see you all the time, actively punishing your opposition for even trying to make an escape from your reach. It seems you're really deadset in keeping your distance close, no?"
Indeed the Fighter's main options were restricted to close combat, so he had to fashion as many ways to keep the opponent in close quarters as possible.
"Well, it's not like you're entirely worthless when set against a smarter foe either. After all, your mighty armor combined with that shield eats through ranged attacks like it's nothing!" the Rogue spoke while balancing on the very rim of the fountain.
Well, it's not like he was entirely invincible against said enemies either. After all, speed was never a priority for him, leaving him open quite more often than he liked.
The Rogue jumped down into the Fighter's lap, before he could so much notice it.
"Though if you ask me, being a defender isn't always about 'defense.' No, all the defenders worth a pence that I know of all did their job by kicking *** and taking names!" The Rogue energetically punched the air to further her point. "Though I guess to do that, you'll have to be creative with your skills. Y'know, mix it up and adapt to the situation. Well, that's what I do anyway."
The Fighter lifted himself up and brushed off his Elven companion, landing skillfully on her feet. True enough it seemed, as the heart of battle always lied within the depths of one's soul. And through all the fighting and subsequent rewards, the Fighter's journey still was not over.
"Oh yeah, we still gotta find that one harp lady and that enchanted book she spoke of, right? Well, can't it wait? You work so much, you can afford a night on the town."
It's not like our hero was about to leave so early anyway. A night of food, drink, and recreation was a fine diversion from the battlefield Fighter was so used to. And by all means, would it not hurt to grow a bit more accustomed to the village he worked so hard to defend?
"Well what are you waiting for? Baker Francis is handing out free cupcakes on the corner!" The Elf girl excitedly shouted while running off into the square. Fighter was pretty sure the handouts were for children only, but she acted enough of one that Francis would probably make no difference of her.
 

Katapultar

Smash Lord
Joined
Nov 24, 2008
Messages
1,284
Location
Australia
[collapse="The Fighter"]Didn't expect you to be making a set anytime soon, Tirk, and one of continuity from your previous work none the less. That said, while the set isn't in a overly humorous tone you'd expect it feels as if it's being told in a completely different language with all those obscure die references, and not to mention hordes of mechanics which seem like they've been wormed in to make the character absolute to his source material, or at least I'm assuming he's come from a D&D game of sorts. There's no denying the unique flavor in which you compose your sets of which scents here, however, but placing many mechanics at the beginning with obscure telling methods that the rest of the set kind of has to play off in such a way that you have to know them to understand the character kind of takes some of the fun away in terms of enjoying the set and especially wanting to play as the character when some of the animations and what not will occur for no discernible reason (this is assuming the die do not appear in any way or form on the battlefield, but they appearing at all would be somewhat strange). I do somewhat like the balancing implications brought about by this "luck" matter, however, and the U-tilt is stupidly hilarious.

Actually, the set is rather sneaky because one would think it to be serious, as in the opening statement, but as it goes down it really starts to get goofy as you take over in the normal Tirky style of making The Fighter clumsy, actually forcing those "set-up" moves on him because he totally hasn't prepared for the situation at hand....where are those practical inputs!? Is he really a hero, or just some guy who thinks he is but is a total wuss?

This set would be quite lacking in terms of playing, but I did very much enjoy it for even the slightest humorous implications and surprising satire (lol, falling damage and grabbing onto random things with his N-air) in which one can very easily enjoy the set for. Great to see you're still in action.[/collapse]
 

SirKibble

Smash Champion
Joined
May 2, 2008
Messages
2,400
MYmini

Cosplay:
Scarlet Rain


Scarlet Rain is a character from the anime Accel World. Accel World takes place in a futuristic setting in which all people are outfitted with “Neuro Linkers,” small wireless accessories that attach to the neck, which allow them personal file storage, internet access, etc. wherever they go. Within this setting there exists an underground game program called Brain Burst, which allows users to accelerate themselves beyond the natural flow of time into what is essentially a virtual reality based upon the real world around them. Users take on a variety of avatars aligned to different colored legions in an attempt to prove their superiority in battle and attain the highest level possible with their avatars.

Scarlet Rain is one such avatar, that of Yuniko Kouzuki, a hotheaded fifth-grader who, despite her small size and relative youth compared to many users of Brain Burst, certainly has the firepower and skill to back up the abundance of trash talk she deals out. She also exploits real life to achieve victory over her opponents, being able to take on a dangerously cute personality before switching to her natural self and thereby cause her foes to lower their guard. Truly, she is a fearsome opponent. In fact, Scarlet Rain is currently the only level 9 red-aligned avatar, and is, by merit of that, the leader of the red legion, more commonly known as the “Red King.” (<--- tangential royalty tie-in)


Down Special: Transform
Scarlet Rain is renowned for her ability to finish the majority of her battles without moving an inch, and the technique used here is the key to that. This move causes the Scarlet Rain seen above to quickly transform into a massive tank-like behemoth with a seemingly-endless supply of incredible firepower. The tank is about two stage builder units high and wide, and the total transformation time is about as long as a Falcon Punch. This can only be done standing on the ground. When transforming into the tank, Scarlet Rain has superarmor and any opponents who touch her receive moderate knockback, though she deals no damage. This move is also used to transform out of the tank, which takes just as long but lacks the superarmor and knockback bonuses. While in the tank, Scarlet Rain cannot move around, but gains access to far stronger moves than she has without it. The tank can turn to face left or right, though not quite as quickly as a normal character does so. Still, it’s not terribly long. The tank has full knockback resistance, but takes damage as normal. It also receives hitstun, but not in the traditional sense. Attacks made against her tank will significantly slow any attack Scarlet is in the middle of performing, but will not fully interrupt it as they would a normal character. Also worthy of note is the fact that the cosplaying character loses access to their non-special moves in tank form, though they will retain them in Scarlet’s normal form. This is a very resilient cosplay, and a difficult one to knock out of the cosplaying character.

Up Special: Afterburner
In normal mode, Scarlet Rain releases a stream of searing flames from the bottoms of her feet, propelling her slowly upward. She can move horizontally at a good speed while the flames continue, but the vertical recovery potential isn’t the best, as the flames don’t push her up very quickly. The afterburner can be used for up to one second each time she goes airborne, and need not be used all at once. The flames reach down about half a stage builder unit, dealing 5% fire damage with weak knockback.

The tank version is not a recovery, since the massive machine has no need for one, but is rather the tank’s only good option for attacking at close range (the red legion’s specialty is long-ranged combat). Tilting backward slightly, the tank fires a large burst of flames from its back end along the ground. The flames are about a Bowser high and travel 1.5 Battlefield platforms rather quickly before disappearing. The wall of fire deals only 8% damage on the initial hit, but sets opponents hit ablaze for the next five seconds, during which they’ll take 2% damage with no knockback per second. The effect can be renewed, but not stacked, by hitting with the attack again. This attack happens relatively quickly (for an attack from a giant tank, that is), and as stated, hits behind Scarlet Rain.

Side Special: Hailstorm Domination
Scarlet Rain (if in normal mode) whips out a small red futuristic-looking gun and fires a shot forward. The projectile, a small missile comparable to Samus’s, is heat-seeking and therefore will chase the opponent with a pretty tight homing ability. However, with proper maneuvering, the opponent can redirect the missile to target Scarlet Rain instead, if she comes into its path and is the closest character to it. Upon impact or after travelling a total distance equal to Final Destination (the missile moves at about two-thirds the speed of PK Thunder), the missile will explode, dealing 12% damage and pretty good knockback to nearby characters.

The tank version is, naturally, considerably more powerful. It’s slower on the startup, but fires a whopping six of the aforementioned missiles forward from the front-top part of Scarlet’s tank. These spread out into the sky briefly before starting to home in, but can likewise be redirected to hit Scarlet Rain instead. This can be prevented to a great extent by using the Afterburner first, as opponents who are on fire will virtually always attract the attention of the heat-seeking missiles over characters who are not. Moreover, they’ll home in a little faster and be harder to avoid for your unlucky foe!

Neutral Special: Heat Blast Saturation
This attack allows Scarlet Rain to release built-up heat energy in the form of an attack. Before getting into the specifics, note that this move charges over time, taking about a minute to fully charge. However, the process is sped up by Scarlet Rain taking damage, and doubly sped up if that damage is fire-based. In other words, your opponents redirecting your missiles into you is not all bad, as it buffs this move up very quickly. Of course, excessive damage will cause you to lose the cosplay, so this must be considered as well.

In her normal form, Scarlet Rain hops a short distance backward, leaving on the ground where she was standing a red-hot glowing mine about twice the size of a Motion Sensor Bomb. Any opponent who touches it will cause the mine to explode, dealing 5 - 25% damage and knockback that ranges from just above flinching to very good. Scarlet Rain herself cannot be affected by this explosion.

The tank form instead charges up for a moment, then fires a laser-like beam of heat energy in whatever direction the control stick is tilted, with size ranging from R.O.B.’s laser to Samus’s Final Smash depending on charge. The powerful blast travels all the way across the screen, through any solid obstacles in the way, and deals 10 - 35% damage. However, it is also somewhat exhausting and has a lot of ending lag, in addition to using up all your stored heat energy.​
 

MasterWarlord

Smash Champion
Joined
Aug 24, 2008
Messages
2,911
HMA ??? PROFIT

Y2X basically boils down to a rushdown character, in the least by MYM Brawl standards. He has little to differentiate how he plays directly, he simply has a unique motive for –why- he wants to stick to the foe like glue. Wanting to constantly keep foes corrupted is a decent motive, and making some of his rushdown improved via homing properties on corrupted foes rather than making him generically fast is somewhat interesting. Unfortunately, that only makes up a few moves, and that trap on the smash and possession on the grab feel rather overpowered on corrupted foes. . .Much less in tandem, as you just walk them into the trap. I guess he has a arbitrary lack of KO moves though (Despite HMA status), so his damage racking prowess makes some sense.

KUPA SET THAT’S NOT RATIGAN

Gooper Blooper’s anti-shield game is pretty fun, and makes this a very unique 3v1 boss. Robbing foes of shields (In very inventive ways) while making it more difficult for them to dodge is quite appealing and makes up for Gooper Blooper’s relative frailness, though he could use a bit in the way of number crunched up KO moves. Even Gooper Blooper’s arbitrary boss disabler is pretty bloody unique (fsmash bubble), serving as both a spacing method and a way to get foes covered in goop. There’s a lot to love here.

Complaints? The most obvious complaint is how tacky it is to steal somebody’s shield. . .No, not by magic, like, Mr. Mime. Here, Gooper Blooper just physically rips it off of foes, leaving a very awkward taste in my mouth. It feels more awkward when you take into account this is a character with no shortage of potential, that you have to resort to giving him some Smash Bros. specific magical ability. You put it to enough great use I’m willing to forgive it, but it’s not something that is easily tossed aside. A more minor complaint is this is probably the set of yours I’ve had the most difficulty reading in quite a while – you struggle a lot to describe where his tentacles physically are in a good portion of moves, dashing attack being one of the biggest examples. That, and I have no idea what you’re talking about when you go on about Gooper Blooper’s “layers”. I would not normally bring this up either, but after such an awkward reading experience it doesn’t help the long playstyle summary was almost completely useless.

FA GOES EMO OVER KAT COMMENT

Dark Falz is indeed somewhat boring for a boss, with just some generic spacers to put foes in the way of mindless n88 projectile spam and a handful of traps. The highlight is undoubtedly the grab-game and its’ ability to make foes hesitant to attack you – I found the way where there was no way to tell what foe’s soul was grabbed insanely tacky and hated it the moment I read it, so I don’t know why you didn’t go with Kat’s more in-character method of showcasing who’s soul it was. With how it is now, -everybody- is afraid to attack him the moment you get one soul. It’s already bad enough on the one foe, as it’s pretty painfully lockdownish when Dark Falz can take this time when foes can’t attack him to produce to produce insta KO clouds or whatever else. Some of the things he can do with the portals provide for some more elaborate set-ups that are actually interesting, though it seems better to keep the souls inside of himself for the most part so foes can’t attack him, and the best thing to put in the portals is insta death clouds anyway. In hindsight, this set feels like something we could point people to as an example of flowcharts and lockdown.

PLORF/MW/GETO JOINT

I’m sorry to tell you, but there’s not really a whole lot going for Bouldergeist. He has a few moves that are decent individually, but I’m really struggling to see the playstyle that I saw quite clearly in Cole and the Appetizer. The interactions that aren’t that uncommon even don’t serve much playstyle purpose, being more there just for flash. It just feels very difficult to forgive on a character with such massive potential that so many people considered him over the years. As far as basic build, I do like how you’ve set up Bouldergeist, with his hands able to be destroyed, his head and his hands able to attack at the same time, and his head being reduced to his true form. All good stuff, but I find it very arbitrary/casual unfriendly that you have to go through such lengths to get his head to move when it’s not even in-character/contributes nothing to the playstyle.

TSUNDERE IS THE WORST CLICHÉ EVER MADE

Shana pressures characters without wasting time to create her set-up, doing so as she attacks foes. If she absolutely wants to do it, she can use her time freeze, later on in the match, which flows nicely into her shield pressuring game. The shield pushing in general makes a lot more sense with all of the lingering flames, as not only can you push foes into them, pushing a –shielding- foe into them specifically is more beneficial here. Even the throws manage to provide some nice support (The one that uses fire as an ammo bank and the other one that makes the shields burn up), shocking in a set like this when sets like Sayaka with similar strong playstyle but limited flow all but throw them away.

Now for complaints, because I am obligated to antagonize this set. I think the biggest complaint is just how bloody tacky moving the fire is – moving it at all is tacky, but the method as to –HOW- you do is what’s really tacky. Uair/dair might’ve been one thing to move them up and down, but uair and bair. . .? Then, to move it left and right, you have to use the Up Special. . .But only in the air. If you’re on the ground, you have to use ftilt instead. That’s some choice tacky ribs right there.

The nair triangles, as awesome as they are, feel like they’d be difficult to use in the context of actually constantly fighting the foe with melee moves, where Shana’s most at home. Most everything Shana’s done is created passively as a bonus, and you simply exploit whatever you’ve done, as the fire is beneficial no matter where it shows up. I guess she has some reason to sometimes play more defensively to charge up, but still, the main purpose of the nair sounds like it would be more to just be Jeice and go up into the air to hide and camp. Attacking through triangles is just a way to fill up the screen with hitboxes most of the time, but they have to be attacked at very specific angles if you want them to actually hit the foe, taking away focus from attacking them.

And yes, I am being somewhat of a hippo and doing what I hate here by building upon my own assumptions to get further and further away from the vision of the set, something DM is infamous for, but I have a reason. . .Shana’s massive aerial capabilities feel very under-elaborated upon in this moveset, just thrown in at the start because of the character then just left in as an after-thought. This seems like the most practical application of the flight to me – why else go so high into the air and what-not? The largely neglected flight and how you make her essentially a fire elementalist makes me treat this as a char with high potential rather than one with low potential.

Now as negative as this tone is, that first paragraph still holds up pretty well, and she still is largely just going on the defensive in brief bursts to set-up more fire and charge her sword. The main thing is it just seems like in certain match-ups (The entire brawl cast, for example) that camping would be preferable. Very much a character for MYM Brawl, though that’s obviously quite preferable for me. Regardless, I do feel that her flight needs a bigger nerf. . .Much less when she could quite possibly take Jeice’s place on top 13 OP.

CHARACTER PITY: THE SET

Here is an actual character where character pity can actually be given, a character leagues more difficult than the relative obvious movesets of Rin and Lilly/Hanako (Yes, Emi is legitimately difficult). You manage to really capture the underpowered feel of the character in Rattata, while still making him actually viable unlike Goomba. Rattata very easily feels like he could be number crunched up very slightly while keeping this feel in-tact. Rattata only really struggles to get the first bit of damage, as after that Super Fang comes into play and damage percentages skyrocket up to percentages where Rattata can actually KO. That by itself is pretty brilliant, but I also like Rattata’s emphasis on hit and run a lot. Run Away is the obvious move for this, but there’s some more subtle other moves where Rattata moves as he attacks, helping to contribute to this feel of hit and run combat. It’s pretty much as good of a Rattata moveset as one could ask for, even if I’d like it to be more focused. Your movesetting approach was a very natural fit on this character, where bland filler is more forgivable.
 

Katapultar

Smash Lord
Joined
Nov 24, 2008
Messages
1,284
Location
Australia
[collapse="Kirby Enemy Team"]Am I the only one who took the implication of "Nightmare Pull" as you controlling an "emissary" of the big bad Nightmare using these jolly old minions to thump Kirby and those other do-gooders? That's pretty clever, and somewhat explains the strange teamwork of these little peeps. You do manage to make all these respective minions feel very underpowered only for a bigger picture to be painted when they're all put together, but when each of these minions themselves are underwhelming, the set itself feels somewhat similar on a whole level.

I can appreciate most of your sets for what they try to do, this one included to a degree, displaying your love for Tag Teams. My thing with this set though, and tag teams as a whole, is that you're trying to stuff more than one character into a singular moveset and as a result you have to sacrifice a lot in the process when each of those characters could have had movesets of their own - what each characters does feels underwhelming, and not even the potential interactions and infinitely potential combinations with other characters brings it up for me, so you end up with something slightly fragmented and small respective ideas that don't create something big in the end. Feel free to label me as a hypocrite for making Keroro Platoon. I usually like the little stuff going on in your sets such as the attention given to certain Brawl Mechanics, but I feel this set kind of went on a different path and had to give up much of that in being experimental. The fact that it's a "Junahu Hugo Set" speaks for itself. [/collapse]


[collapse="Poison Ivy"]I'm a bit of a hipster on Poison Ivy, and that's probably because the simplistic yet vague nature of the set doesn't float my boat, especially when you bring in something as flexibly complex as the Side Special tether. It could also be that I posted a set with a similar Side Special concept before this one. Nonetheless, this is the kind of set and style where it really feels you have to be "in the zone" to get all the gist of it, especially when you don't post any information or backstory on the character and assume that everyone knows about her or has to look it up. That said, I don't have a problem with what Ivy does and she's portrayed in a somewhat fair manner, though I do question the logic of the F-Smash quite a bit when rolling deals THAT much damage. Not something I'm willing to whine over however. There are a few things going for this set like the tethering vines and plant turrets, though I feel those concepts aren't all that strong nor are backed up all that well by the rest of the moves. Under-elaboration is truly a very, very, VERY big problem for me with this set however, as you're somewhat forced to guess an overall playstyle of sorts where we don't get to see or hear your opinion on the subject of which makes a good deal of those moves feel very weak for me. You posted a backstory for Penguin back in MYM11, and I would somewhat suggest doing so for Ivy along with the likes of a playstyle section instead of leaving MYMers in the dark. [/collapse]
 

Conren

Smash Apprentice
Joined
Feb 17, 2009
Messages
90
Location
Boston
NNID
Conren1
3DS FC
5086-4445-8944


MERRIC

Merric is a mage that hails straight from the very first Fire Emblem game. He has been a great inspiration for later wind mages.

ATTRIBUTES

Dash Speed 7/10
Air Speed 9/10
Fall Speed 4/10
Jump 7/10
Air Jump 8/10
Traction 3/10
Weight 3/10

Merric is ever so slightly taller than Zelda, with a corresponding arm reach. Merric fights mainly using wind-based spells, but has spells of other elements as well, and all performed with stylish gestures.

It should be noted that there is a difference between a wind effect, and a wind attack. A wind effect is an invisible hitbox that moves opponents without damaging them, and will have a "Wind Effect" tag if an attack generates one. Wind attacks are green colored spells that do damage, and are usually in the shape of a crescent blade.


SPECIALS

Neutral Special - Excalibur

Merric's signature attack. It can be charged by holding down the special button. While charging, Merric creates a white orb in front of him for every second charged. After placing three orbs in a triangle formation, Excalibur becomes fully charged and Merric automatically unleashes it.

Excalibur gains more range, size, and power the longer it's charged. When the special button is simply tapped, Merric shoots a small green air blade that travels 3 SBBs and only does 5% damage with minimal knockback.

When Excalibur is fully charged, Merric unleashes a two-Merric-tall air blade that travels the length of Final Destination. The blade can carry and opponent and continuously attack him with 3% damage hits. The total amount of damage done is dependent on how far the opponent is dragged, which is highly affected by different variables like opponent weight, current damage, traction (if they're grounded) and floatyness. Against a grounded Bowser at 0%, it can do about 21% damage. Against an airborn Jigglypuff at 100% damage and at point blank range, it can do a massive 81% damage!

When Excalibur has traveled it's full length, it bursts outward, with fair knockback growth, to anyone still trapped in it. It's still potentially a great killer due to the sheer damage this move can make. However, you have to space it well to get an opponent caught in the blast.

A fully charged Excalibur is also a great stage clearer. At it's wake, explosions are set off, Warios are knocked off their bikes, liquids, gases, and dust left by other characters are blown away, and all manner of items and severed shields are carried off, to be lost in the dark depths below the stage.

Forward Special - Bolting
5% - 22%

Merric rears one arm back as the attack charges. When the special button is released, a lightning bolt strikes down in front of Merric. The range and damage of the bolt depends on how long the attack is charged. At minimal charge it strikes down at point blank range. At full charge it goes the whole length of Final Destination. Since there is no indication of where the bolt will land, it is difficult to aim, and difficult for the opponent to predict. It is a meteor smash.

Down Special - Counter

Merric hunches a little and crosses his arms, creating a round magical shield that can block the next attack. When hit, he will strike back with one of five spells, depending on damage of the attack:

1% - 9%: Wind
Merric strkes back with the most basic of wind spells, doing 10% damage with minimal knockback. The range is enough that it can be effectively used as a counter to projectiles.

10% - 19%: Thunder
Merric shocks the opponent for 15% damage. The stun of the shock lasts long enough for Merric to do another attack.

20% - 29%: Fire
Merric shoots a fireball that enflames the opponent for 1 second, doing 27% damage.

30% - 39%: Blizzard
An icicle materialises on the opponent, doing 35% damage, and having a good chance of freezing.

40%+ : Meteor
More of an Easter egg than anything, but if Merric ever gets hit with an attack that does 40% damage, Merric will summon a Bowser sized meteor that will fall to Merric's location and reflect back 1.1 times the ammount of damage that Merric blocked.

Up Special - Fimbulvetr

Merric spreads out his arms and conjurs a freezing tornado around him. The tornado covers a 2x2 SBB area and does several 1% damage hits on opponents, for a total of 21% damage if all hits connect and has a chance of freezing.

When used on the ground, it can be directed along the ground for, at most, 3 SBB before disappearing.

When used in the air, it will carry Merric with it and can moved freely through the air. It's large size and multiple hits makes it easier to recover.


STANDARD ATTACKS

Neutral Attack - Shaver
2%, 3%, 1%...

He waves his left hand towards his side for 2% damage, then waves his right hand for 3%, then holds his hand forward, shooting a storm of small green air blades for 1% damage each, and can be held indefinately. Can rack up a lot of damage from the sheer speed. However, the blades are so weak that a heavier character might just be able to attack through them in mid combo. Does not have transcendant priority, oddly enough.

Forward Tilt - Passage
7%

Merric brings hands together on his right side. Then he brings them forward, his right hand extending farther and doing a sort of rise motion, dealing 7% damage.

Wind Effect: Two, 1 SBB sized wind effects, on each side of Merric, and both move in the direction Merric is facing. The front wind effect merely pushes the opponent about 2 SBBs away. The back one is more powerful, and will actually lift and carry the opponent into the front wind effect. If Merric snags a foe with the very tip of the back wind, he'll usually have enough time to grab him.

Down Tilt - Rise
4%

From his crouch position, Merric performs a sweep on the ground in front of him with his hand. This does little more than flinch the opponent but has a small chance of tripping.

Wind Effect: a SBB Sized wind effect in front of Merric that lifts opponents. If the opponent is in the middle of a ground attack it will naturally be canceled. This is a good move to set up some finishers, as well as get ground oriented opponents airborn.

Up Tilt - Air Juggle
5%

Merric waves his hand above him with his fingers somewhat wiggling.

Wind Effect: Similar to Down Tilt, but forms above Merric and can keep the opponent aloft for half a second after the gesture. This gives Merric enough time to follow-up with an attack. Attacks that make a character fall fast can resists this effect, however.

Dash Attack - Tornado

While sliding from his dash momentum, Merric puts his hands flatly together near him, then stretches his arms out to create a green, bowser-sized tornado in front of him. This traps the opponent and constantly hits them with 1% damage hits for a total of about 12% damage. It's a good aproach attack and is also effective at blocking damageable projectiles. However, due to how far Merric slides before the attack comes out, it's not useful at close range opponents.

SMASH ATTACKS
As an added aesthetic, whenever Merric is charging a smash attack, a glowing white magic circle appears on the floor where he is standing.

Forward Smash - Compression
16% - 22%

Merric holds out his open hand foward, with his other hand sort of drawing figures in the air as he charges. Right before the attack comes out he closes his hand, cause four wind blades to materialize around the spot in front of him. The wind blades crash together in the center of the spot, dealing damage, and high knockback.

Wind Effect: After the four wind blades crash together, a backlash is created. Four wind effects move a small way outward from the center of the attack. The forward and downward moving winds can still be useful as edge-guarding moves, if Merric manages to miss with the main attack. The up moving wind however, can mistakenly give an opponent a boost, although still indirectly protecting you.

Down Smash - Force Ball
12% - 16%

Wind Effect: This move actually starts with the wind effect. As Merric charges Force Ball, he holds his hand down, drawing in wind from above, left, and right of him. This is usful for sucking in opponents for the main attack...

After he's finished charging his green force ball, Merric let's go of it, creating a large green blast all around him. This has some good knockback, but it's mostly a crowd clearer. The blast is so big, even Merric gets launch up about half his height, but thankfully without any damage to him.

Careful when charging, you don't want to draw an attack towards you!

Up Smash - Lightning
17% - 23%

When charging, Merric puts his hand up, and rythmically moves the fingers of his other hand. When the attack is released, 1-4 lightning bolts hit the spot above his hand. Creating a large amount of stun and is his best killer among his smash attacks. If an opponent gets hit by one of the individual lightning bolts, they'll take 5% damage and a good amount of stun, and launch mostly horizontal.

Can also be used to clear a crowd of opponents above Merric.

AIR ATTACKS

Neutral Air - Barrier
1%...

Merric holds out his arms in a "Y" form and creates a spinning green globe around him that can continuously hit opponents. Can be extended by tapping the attack button. The last hit sends the opponent a small distance away. This is mostly a defensive move, and can even deflect projectiles, but without changing their owners.

Forward Air - Elfire

Merric puts his hand forward and creates a fireball that stays just in front of his hand. As Merric falls, the fireball can trap opponents and continuously hit them with 2% damage. If Merric lands before the attack finishes, the fireball will do one final burst that does 10% damage, but fairly weak knockback. If all hits connect, this attack can do 24% damage, but would require that Merric start the attack at a certain distance above the ground. This is mostly a damage racker.

Down Air - Wind Boost
9%

While doing hand signs, Merric kicks downward for fair damage and little knockback.

Wind Effect: A downward gust of wind tha comes from of Merric's foot. It's a fairly weak pseudo-meteor smash that doesn't that doesn't give the opponent their second jump back. Unless of course, Merric's foot actually managed to connect. It can also be used to slow down Merric's descent, somewhat.

Up Air - Aerial Force Ball
12%

Merric strikes upward with his hand and creates a green ball that blast outwards. The blast isn't as big as the grounded version, but actually hosts a stronger knocback and is Merric's strongest finisher among aerial attacks.

Wind Effect: Briefly before the ball is formed, wind is drawn in from all four directions. This can aid in landing the attack.

Back Air - Air Cushion
10%

This has the same properties as the Down Air attack, exept Merric kicks backwards, and the wind effect moves backwards. Also it doesn't spike. It's main use is to propel Merric a little forward. Combined with Down Air, this can aid in Merric's recovery.


GRAB & THROWS

Grab - Beckon

Merric has the same grab range as Zelda. A reverse Forward Tilt is the best way to set Merric's grab, as slightly implied by the name.

Pummel - Slicer
1%

Miniature green wind blades come from all direction to pepper Merric's foe. The blades come in set's of three, doing 1% damage each.

Forward Throw - Aerotoss
3%

With the power of a strong wind aiding him, Merric throws his opponent far. His strongest throw, and even if the opponent doesn't get KO'd, this can still set-up Merric's edge-guarding game.

Wind Effect: That strong wind mentioned can also push away opponents, just not very far.

Down Throw - Floorshocker
11%

Merric throws his opponent down as a lightning bolt hits him. The opponent then bounces off to a random direction. Can be used as a chaingrab if Merric predicts the bounce direction, or through sheer reflexes.

Up Throw - Heaven's Grasp
15%

Merric holds the opponent up, and several lightning bolts hit him for high knockback. This move boasts a very high amount of stun before the opponent is sent flying straight up. This is Merric's strongest vertical KO option.

Back Throw - Whirlwind Throw
5%

Merric throws his opponent backwards and evelopes them in a cyclone. The cyclone moves half the distance of Final Destination before dissipating and throwing the opponent 3 SBBs away. During the cyclone portion, the trapped opponent gains knockback resistance up to a certain velocity. As a benchmark: Bowser's uncharged forwards smash is just strong enough to free Mario at 0% damage. The cyclone can set off explosives so this is great if you want to throw the opponent through a line of explosives or other hazards. Although, that's situational.


FINAL SMASH

Starlight

Merric grabs the smash ball! Once activated, Merric spreads out his arms, and tilts thems slightly upwards. This halts him if he happens to be in mid air. Immediately, the background transitions into space scene with a gigantic spiral galaxy and several stray stars. Several of which come right out of the background and begin orbiting around Merric. They leave enough room around Merric to avoid overlapping him. Merric slowly moves his arms behind him, then quickly stretches them forward with his hands open, shooting the formation of stars forward as it spins. Anyone caught by one of the stars will be trapped along the edge of the formation as it continues forward. Their only means of escape at this point is to tech off the ground, assuming the star formation is even overlapping the ground. Once the formation of stars reaches near the end of the screen, it will dart straight up, taking anyone trapped by it, and star KO them without fail, becoming a part of the galaxy.

PLAYSTYLE

Merric is a tricky fighter. With his tilt attacks, as well as his down smash and up aerial to a certain extent, he can manipulate the spacing of his opponents and set them up for damage rackers. Although if he's not careful, he could drive an attack right towards him. Like neutral attack, forward air, neutral air, and Fimbulvetr. He also has many powerful attacks to KO his opponents, such as Excalibur, up smash, and forward and up throw. His attacks also have larg hitboxes that offer him a safe approach as well as defensive options.

The gestures he makes, although masterfully fast, still have noticeable startup lag, and tend to project his coming attacks to anyone familiar with them. For a wind mage, his recovery only gives an average distance, although he stall a bit with his down and back aerials.

Merric does have two long range attacks, but require a lot of mastery to bring the best out of them.

One thing to note is that Merric is much better in a team. While his setups require a bit of precise timing to exploit, his teammate can react to them quicker. He's also good with someone who can set-up traps.
 

Katapultar

Smash Lord
Joined
Nov 24, 2008
Messages
1,284
Location
Australia
[collapse="Merric"]Merric holds his own on a similar level to Hardin, but doesn't quite appeal as much. I do see some of the implications of this guy being hard to master like the Side Special and risky wind hitboxes and they are pretty cool, though. I guess simply the fact that he has two charging moves that can't be stored, somewhat weakening the impact compared to store-able moves - moves like the Down Special and Up Special do kind of feel underelaborated and rather powerful, such as questioning where some of those spells from the former hit and if the latter deals any hitstun, how fast it moves and so on. (it is very wide though) Guess I feel that Merric has a fair few more interesting attacks than Hardin, but doesn't have as much of a solid playstyle despite indeed having one, a somewhat versatile one. Most certainly interesting to see you fill in all those FE gaps for that franchise.[/collapse]
 

JOE!

Smash Hero
Joined
Oct 5, 2008
Messages
8,075
Location
Dedham, MA
WL, if you possess them while in a viral field they can still move to get to the clockwork, just slower, that and it wont really be an issue unless you have a fresh field that you jump them into for a max of like, 15 seconds if they have no concept of DI.
 
D

Deleted member

Guest
Hey guys, just posting to announce the end date of Make Your Move 12. It'll be at the end of the 30th of June. The exact timing will be decided closer to the date, though it's extremely likely to be the end of the day for GMT or PST.

I'd also like to draw your attention to this stadium post. It's to do with leadership changes - and is very important for people who follow that gang. Sadly, we can't update the OP about these changes, so tell anyone who doesn't follow the thread. Thanks!
 

Davidreamcatcha

Smash Ace
Joined
Feb 9, 2011
Messages
629
http://www.youtube.com/watch?v=JirmUGt-DhA - Credit to Sundance for a concept.

THE G-MAN

Rise and sssshine, Misssster....Freeman. Rissse...and...sssshine.


The G-Man is a central character in the Half-Life series. He constantly carries a briefcase at his side and speaks with an odd speech impediment, he presents himself as a business man working under mysterious employers. He stalks the player characters in each Half Life game, making his first real appearance in the ending of each Half-Life, making numerous cameo appearances in the levels following up to that scene. G-Man makes an offer of "employment" to Gordon Freeman, opening up a portal and letting Freeman walk inside. G-Man keeps Freeman frozen in space and time for 12 years, before releasing him after the Earth has been taken over by a malevolent alien species known as the Combine. G-Man observes Gordon defeat the Combine, until observing him destroy the Combine's capital of City 17. He freezes time and reflects on how much progress Gordon has made, before putting Gordon back in status. However, alien allies of the Human Resistance, known as the Vortiguants, manage to find Freeman and release him from status. G-Man seems to have no control over Freeman's fate at this point, though he seems to want to take it back as shown by his "heart-to-hearts" with Dr. Freeman.

The G-Man is a complete enigma in terms of who he is and what his purpose is. It is shown he has complete knowledge of everyone and everything, is able to pass through objects, can freeze and bend time to his will, and teleport - his power is completely godlike. All that is known is that he is not man - he is more of a spirit.

Stats

Wake up and....sssmell the assshes.


Traction: 10
Size: 7
Aerial Control: 7
Jumps: 7
Aerial Speed: 5
Fall Speed: 4
Ground Movement: 4
Weight: 3.5


While The G-Man may appear to be man, he is most certainly not man...his stats reflect this. While he may appear to have normal human stats at first, several notable odd quirks such as his perfect traction and floatiness are...off-putting, to say the least.

A subtle mechanic about The G-Man: he, rather oddly, can phase through characters when he walks through them, unlike other Brawl characters. In addition, he can occupy the same exact space as other characters - him becoming slightly transparent so both can be seen. This does, however, mean that the G-Man will never be cornered - he always has an escape route out.


Specials

Down Special
The G-Man takes his briefcase and holds it in front of himself, holding it open for as long as you hold the button. Considering he is always carrying the briefcase, it is not at all laggy for him to pull out the briefcase - it's rather quick to pull it out and pull it back in, as a matter of fact. The briefcase can be angled much like a cracker launcher, allowing you to shield the front of your body with it. ...To be honest, to, this serves as a lousy shield - it doesn't protect jack. So, what is the true purpose of the briefcase?

It forms a very light suction around itself, should a projectile or an item come into contact with the briefcase, they will get sucked in. That's no ordinary briefcase...it will begin to glow for each one that's in there, the effect becoming stronger and stronger if there are more inside. The briefcase can hold 5 projectiles/items at a time - if another is absorbed, the first absorbed one will be shot out as the latest one is sucked in.

Each projectile/item inside the G-Man's briefcase increases his weight by .5. This does, of course, cap at 2.5...boosting his weight up to a full 6, increasing his survivability. G-Man's own projectiles won't increase his weight, however...

As I've said before, The G-Man can phase through his foes as he simply strolls along. If you pass by a foe while something is inside your briefcase, it will glow incredibly bright as all of the effects off the projectile are placed onto your foe. Carrying items inside your briefcase can make the G-Man into a projectile bomber! Items that need to be thrown in order to active such as pokeballs or smart bombs don't activate when they collide with an opponent. If you collide with an opponent while carrying these items, they do as much damage as being tossed.

If you have items such as bob-ombs and charge shots stored inside you, those will act normally once you collide with an enemy. Thus, charge shots and fireballs inside you, they'll deal the normal damage and knockback they were supposed to deal upon collision.

Projectiles can only stay inside the G-Man's briefcase for 12 seconds before disappearing.

Neutral Special
The G-Man holds his hand out in front of himself, it pulsing with bright blue energy. This isn't that quick, taking about .40 seconds to start-up and is quite similar to Fox's down special in that it must be held down for the effect to continue - otherwise it is a very brief use.

When this is used, anything in front of The G-Man will immediately freeze - frozen in time, having the same range as Mewtwo's down special. The G-Man's foes will be frozen in the action they were in for .50 seconds before they immediately unfreeze at the point where they left off, likely hitting the G-Man in the face if he's still there. You can obviously hold this out and just wait for foes to walk into it, though that's pretty damn stupid considering they can just jump over you and punish you from above. Still, you can throw this out to evade headstrong foes and just run away before they reactivate.

The far more relevant use comes with projectiles - if they come in contact with the area of effect, they will freeze in place. They will stay frozen in place for twice the time G-Man holds out the input (6 seconds if he holds it out for 3, etc). They still act as active hitboxes during this time, and will actively hurt the G-Man if he walks into them. Considering his many options for evading, however, this shouldn't at all be likely. This is more so contributing to interactions with his own projectiles, though can also help if he wants to keep the foe's projectile onstage and suck it up later.

Side Special
The G-Man makes a quick clawing motion at the area in front of him with his free hand, taking about as long to perform as Mario's fsmash. If he's hit at any point during this initial animation, the lingering effects will not happen and he will take all knockback or hitstun involved in the attack. If he successfully completes it, however, a dark blue lambda appears at the spot he clawed at - it's roughly the size of a Smash Ball and is constantly pulsing and surging with electrical energy. The lambda represents a tear in reality that the G-Man creates...it will only stay out for 6 seconds, but The G-Man has the ability to have 5 on stage at a time - meaning he can litter the field with these.

Coming into contact with a reality tear will have you be stunned in place for about .20 seconds before you can move around again, the effect is similar to a paralyzer shot with the difference being that you won't be dealt any knockback at the end - you're simply able to start moving again, with the reality tear being activated again .10 seconds after it stuns you. In midair, it will stun you in midair - holding you in place until it lets you go, at which point you'll begin falling again (you won't regain recovery/jumps, even if you were in the middle of them when you came in contact with the tear.) You can obviously be hit out of stun by these, which is very likely what the G-Man wants to do.

The G-Man himself can store these reality tears inside his briefcase to make himself a stunning hitbox to all of his foes - something he can very easily capitalize on. Their effects will stack, the max limit here being only 4 Reality Tears stacking on each other (a full .80 seconds) o prevent him from being -THAT- broken. Alternatively, he can launch them with ftilt to create stunning projectiles...

Up Special
A door-shaped portal (tall as Ganon wide as Bowser) appears in the background behind The G-Man, who simply nods as the door disappears - this is a somewhat slow action, having the same lag properties as Ganon's forward smash. If The G-Man is hit before the door disappears, the action is cancelled. Now, the door remains onstage if The G-Man pulls this off without being hit, though it will remain completely invisible. G-Man can have 5 of these doors out at a time, the creation of a new door will cause the disappear of the first door you've made.

By pressing up in front of a door you've made, it will appear again and the G-Man will enter it - at this time you can choose a direction - the G-Man will reappear in the door closest to the direction you picked. Naturally, you can't use this if you only have one door made. The door you enter through will disappear as soon as you enter it. Naturally, this allows G-Man to make quick escapes to move across the stage with the greatest of ease...foes will never catch him, much like Gordon chasing him down a steel corridor. He can also teleport through these doors to take advantage of projectiles stored, such as standing in a place where he knows the foe will be knocked too. He does face some lag when he exits from a door, however...

Now, if you use this offstage - a door will appear in the background behind the G-Man, who nods and enters it as he stalls in midair - if he is hit at any time during this, the recovery will end as G-Man falls into helplessness. This obviously puts him into a random door, falling into helplessness if it was in midair - though all other doors will disappear when you do this. Given how this will completely kill off all chances for recovery, now is the time when foes will want to kill you the most, considering the lag that you face when you exit a door...

But that lag is pretty invalid if you have projectiles stored, no? You'll never be able to take down the G-Man when he exits the door, considering that simply touching him when he exits means you'll be damaged by whatever projectile he has inside his briefcase.

Standards

Dash Attack
The G-Man continues his normal dashing animation for as long as you hold the input. If you simply tap it or don't hold it at all, The G-Man will flicker and instantly reappear a Battlefield Platform forward, not falling into helplessness if he's offstage. Holding the input allows you to charge the distance, holding it for 3.5 seconds will give you the max distance of 3 Battlefield Platforms. He has some lag when reappearing, so this could be easily punished by foes - but of course, the purpose of this is to get the drop on unsuspecting foes. This works best when you have a projectile stored, as you can attempt to teleport into a foe dashing away or abuse a foe's end lag, as you can evade an attack and simply run into a point where their hitbox won't be active.

By tapping the button twice in a row, The G-Man will teleport backwards - this has the same effect as teleporting normally, with the obvious difference that he just moves backwards instead of forward. You can, of course, get the drop on foes chasing you with this - the normal animation means they won't suspect a thing...

Jab
The G-Man adjusts his tie - his signature animation in every Half-Life game, he always performs this while making a cameo. This has about the same duration and lag as Ganon's jab all around. True to his cameo appearances, The G-Man can't be hurt while adjusting his tie. He will only take damage, with no hitstun or knockback being dealt. Outside being a generic counter that increases G-Man's survivability, it also serves as an immense defense against approaching foes in that if they're dashing straight at you, you can throw this out to have them dash straight past you...which is really quite bad for them if you have projectiles stored. Your tears can also hurt them immensely, forcing them to stop right in their tracks and making them wide open for a hit...

Forward Tilt
The G-Man swings his briefcase outwards with one hand, this is angleable in 3 directions - similar to Mario's ftilt and about 70% of MYM ftilts. This is a very quick action that deals about 5% and gives some light knockback to foes - direct physical fighting is not G-Man's forte.

Whenever you use this with a projectile inside of your suitcase, it has the obvious effect you've been waiting for. It phases through the suitcase, glowing a dark blue color. It travels a completely straight path in the direction you chose at Bowser's dash speed and doesn't stop until it makes it offstage/hits the foe - the hitbox is completely the same, despite the firing method/direction possibly being different. It will not disappear until it goes offscreen or re-enters the G-Man's briefcase, upon which the 10 seconds begin counting down again.

Up Tilt
The G-Man raises his free hand above his head, after an awkward .30 second period, a green vortex the size of a Smash Ball appears in his hand. It has a suction effect much like Kirby's neutral special all around itself, sucking projectiles and foes from a Battlefield Platform away (both horizontally and vertically). This can be held out by holding the input, the suction growing by one Battlefield Platform every 1.5 seconds. While a decent way of moving the foe closer to the G-Man (and possibly through any Reality Tears you may have), this obviously works far better with his projectile manipulation as he is able to suck projectiles back towards himself.

Down Tilt
The G-Man points at the ground in front of himself in an ominous, yet stoic manner. You must press a direction in a second or the G-Man will simply exit out. If you do press a direction, the area around him glows blue for a moment, but that's about it. The G-Man then exits out.of this stance.

However, if the foe steps into the area where the G-Man pointed his finger (it's about as wide as a Battlefield Platform and as tall as Ganon, giving it some decent range). They are teleported in the direction that the G-Man picked. While an obvious spacer, this can also redirect projectiles that entered the area - in case G-Man wants to continue his projectile domination game or redirect enemy projectiles towards his briefcase...

Smashes

Forward Smash
The G-Man points forward with his free hand ominously, as a dark black crow materializes from his shoulder and begins flying forward. It's about the size of Pit's arrows, also able to be angled in a similar manner during the startup of the move - it only moves as fast as Mario's dash, however. The crow, upon contact with a foe pushes foes forward with a wind hitbox before disappearing into a black mist. The distance pushed depends on charge, ranging from 1-2.5 BFPs. The fact that you can aim it like Pit's arrows makes this a versitiale spacer as well as a potential way of getting foes offstage. The crow will not disappear until it comes into contact with the foe or it goes offstage, and it can be stored in G-Man's briefcase like any other projectile...that obviously isn't a normal crow. This will, of course, make you an instant hitbox on contact as well as simply allowing you to release this with your ftilt - though it obviously isn't as good as the initial release in this move.


Down Smash
The G-Man places a small box on the ground in front of himself, it glowing dark blue and making a strange beeping noise - considering that The G-Man has been seen arming bombs in Half Life: Opposing Force, there's no reason why he wouldn't bring a surprise of his own...he can only have one of these onstage at a time, though it can be surprisingly worth it.

10-30 seconds after it's placed on-stage, depending on charge, the box will explode - creating an explosion as wide as Bowser and as tall as Ganon - it deals 16-22% and high knockback to all those who come into contact with it, being the G-Man's best KO move. Though, up until that point, the box can be thrown around like a normal item dealing minimal damage from being thrown - though it can still blow up mid-throw. It will disappear by being thrown offstage, obviously. By pressing his jab while holding the box, The G-Man will add 5 seconds on to the detonation time, adjusting it in a very swift motion. Tilting and shielding/jabbing will still cause him to throw it. Still, keeping it onstage like this can be useful as another projectile in G-Man's game...

The G-Man can put his box in his suitcase like any other item - it can and will explode will inside it, injuring the G-Man. However, he can also use it as a method of psychological intimidation for the foe - he can warp from door to door, teleporting all over the place, waiting for the key moment to throw the bomb at that. Alternatively? Suicide Bomb them. Considering his small weight, though, The G-Man is more likely to die from that then his foes. Absorbing their projectiles could be the key to fixing that problem, however...

You can also create an explosion and stop it with time stop - allowing you to hold out the hitbox for a brief moment, giving you a key moment of having that powerful hitbox linger.


Up Smash
The G-Man's eyes glow blue as he puts his free hand to his chin, smirking, for the charging animation. When the actual move starts, The G-Man leaps slightly into the air, arms to his sides as he looks up in triumph - he floats for the duration of this move (imagine Ganondorf floating taunt in terms of height off ground/slight animation reference). In a mere moment, his body turns completely blue and becomes a silhouette - contact with it deals 5 hits of 2-4% and launches foes upwards. The G-Man turns back to normal after this is done, getting back on the ground without any hesitation. Given how his body is the only hitbox here, this is a move you'll primarily be using to KO foes while overlapping them - this is also incredibly useful if you have reality tears in your briefcase, as you can have them stunned then follow up with this.

In a manner much like Snake's up smash, you can use this while moving forward - the primary use here is to pressure the foe with the multiple hits, as well as their shield - given the G-Man wants to tear down their defense as much as he can. Considering how often the G-Man will be playing hit and run in his quest to evade the foe, this is a welcome move.

Grab Game

The G-Man stretches out one arm, holding his briefcase in the other. This is a decent grab by all accounts, minus the short range. He holds the foe rather calmly for such a delicate situation...


Pummel
Both the foe and The G-Man flicker for a moment - just as the G-Man does in his Breencasts, and the foe takes 2% damage.


Up Throw
The G-Man brings the foe in even closer, before the screen turns completely green for a second. During this moment, you're going to want to choose a direction - pressing down on solid ground or pressing no direction at all will simply cause The G-Man and the foe to reappear and the foe to break out of his grasp.

Should you choose a direction, the G-Man and the foe will be teleported in that direction in what is an exact clone of Zelda's teleport - neither of the two will enter a footstooled or a helpless state after this, both able to attack immediately after - meaning you'll want to bring them into a situation where they can't defend, such as into a reality tear, no?


Forward Throw
The G-Man, in a rare display of physical fighting competence, grabs the foe and pins them to the ground. They begin taking constant damage of 1% per second, but more importantly, the time in which they need to button mash to escape is refreshed. The G-Man can use this to...prepare for unforeseen consequences, whether it be for an oncoming projectile or an explosion just waiting to happen.


Back Throw
The G-Man shoves the foe slightly, moving them out of his grasp, before he begins floating backwards, making his way across 3 Battlefield Platforms before the foe can get up and stop him. Considering his rather pathetic weight at first, he can use this as a method of escaping if he isn't ready to kill the foe yet. Simply move away from the foe and exit to one of your doors, or bait them into using one of their projectiles.


Down Throw
The G-Man puts his hands to his foe's chest, the foe growing bright blue before they dim, causing the G-Man to glow blue as the foe falls into prone, exiting the throw. The G-Man has decided that the foe was no longer working with him, taking matters into his own hands...this causes the foe's last-used projectile (or a random one/their only projectile) to appear in his briefcase, allowing him to gain them even if the foe is being uncooperative. This simply acts as a prone-and-run method if they have none, and has the bonus of dealing 5% even if they have no projectiles.


Aerials


Neutral Aerial
The G-Man crosses his arms across his chest before swiping them to his sides, briefcase still in hand. When The G-Man does this, a wind hitbox appears all around himself - it pushes foes away, the distance they're pushed increasing depending on how much damage they've taken. This is a natural follow-up to up throw and an easy way to push foes into midair reality tears, though it's also very good if you need protection from a gimp - this also works wonders against recovering foes, on that note.

This also pushes away all projectiles that come into contact with the wind...while this is obviously not as effective as the down special for storing projectiles, this is your all purpose way of manipulating projectiles that have been shot out from your ftilt while you're in midair...


Forward Aerial
The G-Man points in front of himself. If a foe is somehow hit by his initial finger (it is an incredibly small hitbox, one that is incredibly difficult to land considering how awkward the starting lag on this is...much easier if they are stunned in place. Reality Tears, anyone?), they glow a deep blue color and take 3% and entering a footstooled state, contributing greatly to the G-Man's offstage game.

As the G-Man points, a small blue beam of energy is fired from his finger. It's as wide as one of Fox's beams and moves at Ganon's dash speed, it deals 5% and decent knockback to foes it comes in contact with. This, of course, gives you more projectile fodder to work with.


Back Aerial
The G-Man swings his briefcase backwards, it shimmering with a blue glow. This deals 6% damage and light knockback to those who come in contact with it, but the quick startup gives him a way to defend against foes approaching from behind.

If he hits one of his own projectiles with this (either a projectile/item spawned by him, or a "converted" one, most likely made by your forward tilt), it will become a completely blue silhouette and become "magnetized" to him. For the next 4 seconds, the projectile will follow behind the G-Man at it's normal speed - meaning it can often trail behind him, which makes your forward throw stalling far more useful. After these 4 seconds are up, the projectile loses this property and begins following whatever movement pattern it was following before - if it was an item, it will drop to the ground if it had no pattern.


Up Aerial
The G-Man makes a plucking motion with his fingers, just as he does in the second picture at the top of this moveset - this has no visible effect outside this animation, at least it would seem to be that way. However, if you're at least 2 Ganondorfs underneath G-Man when he makes the plucking motion - you will be pushed up to his location by a wind hitbox, still able to attack the entire way. Attacks that alter your movement don't work here, as it would seem. It should be noted how screwed the G-Man is with this scenario, as the foe can easily use their generic flipkick up air to punish him - though the G-Man can use this to pull them up to timed explosions or reality tears underneath himself, and then punish them - also contributing greatly to his offstage game.


Down Aerial
The G-Man turns to the screen and swings his briefcase downwards as though it were a hammer - having similar startup time to Mario's fair, making it somewhat impossible to use in combination with the uair if the foe is quick enough. This deals 8% and does some very light downwards knockback, though this really can't gimp or spike foes, if that's what you're wondering. It can still deal a bit of damage to foes offstage if he's chasing after them.

This also lets out a projectile inside the briefcase if there is one inside, firing it downwards - same properties as ftilt. This allows you to fire them downwards, of course, possibly at offstage foes to hinder their recovery...

Extras


Entrance
The G-Man walks in from the background, adjusting his tie ominously.


Up Taunt
The G-Man flickers a bit, as a small chirping sound is heard.


Side Taunt
The G-Man leans forward, whispering "Prepare for unffforesssseen consssequencess..."


Down Taunt
"We'll sssee..." The G-Man hisses, angrily. "ABOUT THAT!"


Victory Pose 1
The G-Man, rather sarcastically, states "Wisely done!" to his foes.


Victory Pose 2
The G-Man simply hisses "This is where I get off..." as adjusts his tie, walking offscreen.


Victory Pose 3
The G-Man simply turns to the foes, hissing "No regretsssss..."

The right...man in the wrong...place can make all the...diffffference in the world.
 
Last edited:

Katapultar

Smash Lord
Joined
Nov 24, 2008
Messages
1,284
Location
Australia
[collapse="The G-Man"]Do you find it weird that the first thing I thought when seeing G-Man's backstory and stats was Doc Scratch? The concept is very different however, and exciting: store mass projectiles and turn your intangible body into a damaging hitbox of which is capitalized on very, very well with the Up Special and Dash Attack, almost amazingly so. This moveset is even significantly less iffy and questionable in logistical manners than most of your others, similar to the likes of Dutchman (minus the D-throw in which I'll pretend he's making time faster for them instead of being infuriating).

I would come very close to genuinely loving this set if for the base concepts introduced in the Specials, but I have numerous qualms about how the set goes about its business that drags it down for me. While the projectile absorption is great, G-Man only has his generic stunning lambdas and bomb to suck up (the crow doesn't count because there's no way for G-Man to put it in his briefcase unless it's reflected, and that pushing effect is somewhat overwhelming when 4 BFPs is longer than Battlefield), of which the latter is capable of killing himself unless he has projectiles stored up via the former...the rules of a projectile hitting the foe when they overlap with G-Man aren't completely clear, though I suspect that only the last projectile sucked in will hit the foe as not only would it be somewhat overpowered if they all hit at the same time (then again, we have Oil Panic and it's the foe's fault for using those projectiles in the first place) but all that extra weight G-Man would have otherwise put on will not help him survive his bombing. There is the stacking effect of the lambdas, however. Most of this is situational and really G-Man can only play to his fullest against foes who use projectiles. I also somewhat found there to be a lack of moves that take advantage of the intangibility mechanic when its implementation would be ridiculously easy to take advantage of in organic ways - most of the focus is on simple spacers for those underwhelming stunners (why use the Side Special when you have THAT B-air) and that bomb which, you don't have to kill yourself with but can at least shoot out at foes with the F-tilt. Without it or any items/projectiles to take advantage of however, G-Man is quite a weak character.

This set ALMOST feels like a step-up for you of sorts, mostly evident with the base concept and significantly less tackiness with the supernatural elements of the character. I could have liked this set a lot more if those great intangibility mechanics and projectiles of sorts were taken advantage of, though I guess some people might complain about "storing one's own projectiles" and your implementation of the situational nature of such was probably intentional on your part - you do have projectiles to manipulate but not enough (both projectiles are somewhat awkward), and the set kind of goes in a rather generic direction with the time bomb as it carries on. Still my favorite set from you this contest, however.[/collapse]
 

ForwardArrow

Smash Ace
Joined
Aug 17, 2011
Messages
503
Rin
I must say, this is exactly the sort of thing I was dreading would come out of the KS movement. The set really is tacky as hell, with some pretty terrible mischaracterization of opponents on the Neutral Special and it all goes downhill from there. There are some animations in the set which just feel horrifically awkward, I get possibly grabbing a foe between one's two feet, but grabbing them with a foot when you aren't a bird or something is utterly preposterous. And then you have the one move where a paintbrush just pops out of her midriff and she is somehow able to twist the opponent around in circles at such a rate they spin for the next 3 seconds... by wrapping her legs around their neck and spinning herself. What. Some attacks have terribly tacky side effects, the jab being a particularly egregious example. Apparently, adding the opponent to her collection of odd people somehow increases the amount of stun they take. It's not just obvious tacky here, there's some more subtle yet still obnoxious stuff with that very same jab piercing super armor for god knows what reason.

David's rambled to you enough about the tacky, as has everyone in chat, so we may as well move onto other problems. The core concept for the set is one that is incredibly dull and awkward to play off. She creates paintings that... slow down nearby foes and eventually stun them? It's terribly uninteresting from a gameplay perspective to begin with, and Rin doesn't really play off the benefits of the stun(not the stun is at all a good idea to play off, but even still) or the decreased movement/attack speed, they're just kind of there as your awkward reward. The whole set feels like it's coming up with redundant ways to spread paint not for anything actually interesting, just to spread your inspiration zone so you can place your painting wherever. It makes the moves a lot less relevant when you actually have a painting up to begin with. I suppose you can place a painting at a different point on the stage? That hardly feels worth dedicating almost the entire moveset too. Not to mention she feels awkwardly underpowered, largely due to number crunching reasons, but really she lacks almost completely in the way of competant KO moves and her damage racking is incredibly awkward, to say the least. Don't even get me started on that her own ability to spread paint makes it almost worthless to have the opponent do it for you, making the process of covering the stage in the stuff absurdly simplistic.

That alone would be enough to make this set atrocious, and I haven't even gone into a lot of the other extremely tacky stuff she does(again, refer to David's comment or pretty much any chat conversation about Rin), but the thing is this character isn't even hard. Paint could be used for a lot of things, and I would've happily accepted even a generic slip n' slide or paintball projectiles over the stuff you did in this set. When you're having a paintbrush pop out of her midriff, I really think I would have rather you let her do all sorts of weird stuff with the paint in a Bowser Jr. esque manner wouldn't be any worse, at least on some level managing to be interesting from a playstyle perspective. I guess maybe you wanted to have her gameplay effects feel mundane due to her not having any special powers or anything... but even then you have jabs that randomly pierce super armor and such. As it stands, the set is tacky to the point it's almost headache inducing, has one of the blandest playstyles I've ever seen, and incredibly unpleasant to read(your writing style is still very tedious to get through). Between stuff like this, Xigbar, and Coachman I think you're headed down the wrong path and you could really use some help...

Gooper Blooper
Obviously, there are a lot of positive things to say about this set. Your take on shield damage/manipulation is actually really unique, robbing the foes of something that's pretty essential to them against this particular character and using this to bait them towards where you want them is perfectly cool on it's own. You actually take it up a notch by throwing in goop interactions with the shield to expand it to your benefit in multiple ways, or perhaps even using it as a method of self-defense. Aside from that, the spacing itself becomes a bit more interesting in the context of Gooper Blooper's 3 "set up zones" one where his tentacles are more opportune to hit foes, one right up next to himself, and one away from the tentacles. While you'd think you just want foes out of the zone directly in front of yourself, placing a bunch of Blooper minions there as well as goop, or perhaps a bubble might be enough to make that actually interesting, particularly when you can wall their friends off with your tentacles.

Aside from that, you do come up with as Warlord said a really awesome "standard boss lockdown tool" in the bubble, and manage to make Gooper not impossibly static with his constant need to move about the stage. I suppose what detracts from the set for me a bit is the rather bland nature of the set-ups and spacing itself. Yes, there's a bit more of an interesting use for said spacing here than the usual, but all the same it's still pretty bland in how it works. Same with the set-ups, it's always the same fairly standard goop lying on the ground and bloopers, which makes the three layer aspect of his spacing game a lot less interesting than it could be. At the very least, you give enough reason not to just have an "ideal range" for Gooper to place opponents in. If I had to level any other complaints against the set, I guess he feels very underpowered for a boss(not to mention I don't really feel this character strikes me as... awe-inspiring enough to serve as a boss. He's a giant character at most) with how he isn't in fact especially durable and his attacks honestly feeling awful weak by boss standards. None-the-less, the good very much outweighs the bad here, so well done Kupa.

Mic_128
Probably the main thing that impresses me about this set is the fact that you actually managed to pull off a legitamate atmosphere here. The distant, sort of creepy feel of G-Man comes across well here, and stuff that would normally feel tacky actually works here due to his incredibly bizarre inhuman nature. I would say more-so than Marvin the character actually ended up working out for you, really.

Surprisingly, I actually feel this set is pretty decent conceptually too. It's a bit of an awkward way to utilize projectiles on some level, but the fear that is created of overlapping with G-Man is kind of fun, especially in the context of stuff like the Dash Attack and Up Special which give him all sorts of nifty tricks to overlap himself with the foe. What helps too is that the Up Special in particular actually gives a lot of use to the more generic spacing stuff in the set as you place the opponent over a door to teleport on top of them. Unfortunately, the projectiles which G-Man makes himself are a bit awkward for the purposes of the set. There's some basic stun stuff which I obviously dislike because I'm not a fan of stun to begin with(it's never fun to capitalize on since there's always one best way), and a time bomb that G-Man doesn't want to use the overlap method with because that will just end up hurting him too. Obviously, you have the foe's projectiles too... but problems come up when the opponent has no decent projectile to give you or is willing to give you. Aside from that, you do run out of decent ways to play off this by the time we hit the grabs and aerials, where you're just frantically trying to create flow by spacing foes into extremely generic stun traps. Or worse yet, giving the foe a -BUFF- of all things that is just supposed to make them more cocky or invalidating previously made moves with the Bair.

This aside, G-Man isn't exactly an easy character to make a set for, and he -IS- interesting in the context of opponents with projectiles, particularly ones with fancy effects attached. The atmosphere and concepts here are actually overall pretty darn solid and leave me with a better taste in my mouth than I expected. I only wish the execution was at least substantial, but the set falls a little flat with how weak it gets at points.
 

Conren

Smash Apprentice
Joined
Feb 17, 2009
Messages
90
Location
Boston
NNID
Conren1
3DS FC
5086-4445-8944
Tiki


TIKI

The Manakete princess and daughter of Nagi. After a great war that nearly wiped out her tribe, Tiki was placed in a centuries long sleep. Kind of like another princess, come to think of it. Until one day, Bantu, a surroget father of sorts, woke her from her sleep, and her adventures began...

Fire Emblem
Fire Emblem: Heroes of Light and Shadow

ATTRIBUTES

6/10 Dash Speed
5/10 Air Speed
3/10 Fall Speed
5/10 Jump
4/10 Air Jump
3/10 Traction
3/10 Weight

Tiki is around the same height as Ness, but thinner. Her crouch, where she sits down and hugs her legs closely, makes her a very small target. She normally has poor stats, with only average mobility and a fast roll speed to compensate. In this state, Tiki has only one attack:


Neutral Attack - Push Attack
2%

Using all the strength she can muster, Tiki pushes with both hands, leaning forward as much as she can. This move has very little stun, and practically no knockback.


However, whenever little Tiki tries to do any other attack, something a little different happens. Using the dragonstone she's holding, she quickly transform into her Divine Dragon form...


ATTRIBUTES

7/10 Dash Speed
8/10 Air Speed
7/10 Fall Speed
5/10 Jump
4/10 Air Jump
9/10 Traction
10/10 Weight

...then does the attack in her transformed state. Transformation takes only 4 frames to achieve.

When in her dragon form, Tiki becomes a little taller than bowser, but still thinner. She gains a large boost in power, weight, reach, and shield size, while still having good attack speed. She also gains a 2nd mid-air jump, as well as the ability to glide.

Tiki will stay in her dragon form until she does one of the following moves: Crouch, roll, sidestep, air dodge, trip, and taunt. Unlike attacking, she transforms during those moves. She will also return to human form if she is knocked into the air by an attack. However, knockback only counts her weight when she was hit, so she doesn't take a penalty from the weight reduction.

Tiki will also transform if she tries to do a 2nd mid-air jump or glide from her human form.


SPECIALS

Neutral Special - Divine Breath
3%...

Tiki breaths out a stream of dragon breath that's similar to Bowser's fire breath, except it's white. Tiki's breath attack also has bigger individual pieces and last longer, but because they go slower, so they don't reach as far as Bowser's breath attack.

Divine Breath has long stun time. If an opponent is caught in it while shielding, it can stun him long enough for Tiki to use a grab or another move to try and shield break.

Tiki can angle her Divine Breath up and down. Angling it quickly can effectively fan out the attack due to how slow it moves.

When Kirby uses this move, he'll transform into a dragon during the attack, but then automatically change back to normal once the attack is over.

Forward Special - Dragon Claw
16%

Tiki moves forward faster than her regular dash, for 2 SBBs, and grabs an oponent if they're in the way. Once grabbed, she throws the opponent backwards at a high angle. She can then try to follow-up with an aerial. This move is best used sparringly to catch an opponent off guard, even if they're playing defensively. Divine Breath is a good setup for this.

It can also be used as a recovery and it will essentually make Tiki trade places with her opponent. It does leave Tiki helpless so it should be used with caution.

Down Special - Counter
14%

Tiki curls up a bit in a defensive stance and blocks the next attack. If hit, she'll counterattack by shooting out a special version of her Divine Breath that travels fast along the ground for 3 SBBs. It can hit multiple opponents as well as send them in a trajectory towards Tiki.

Due to the range of the counterattack, this is most useful in bringing a projectile user closer to Tiki.

Up Special - Manakete Rage
37%

Tiki begins glowing with a golden aura, she'll then move straight up, dragging any opponent she hits, then come back down to the same height as when she started the move. The attack can be angled left or right, in which case she'll move in an upwards arc path and it's what makes this a recovery move.

This move does continues damage to the opponent she's dragging, for a total of 22% damage if the opponent is caught right in the begining. If Tiki hits the ground before the move ends, her aura will burst outwards a bit, doing 15% damage to anyone touching her and dealing fairly strong knockback.

This can do a total of 37% damage, but the long startup lage makes it difficult to connect with the first hit.

STANDARD ATTACKS

Neutral Attack - Double Claw
4%, 5%

This is Tiki's alternate Neutral Attack that she can do when she's already transformed. Tiki slashes with one hand, then with the other hand. The first hit quickly stuns the opponent without knockback and can be followed with a different attack. The second hit is only really useful if Tiki's feeling clausterphobic. Won't kill until very high damages.

Forward Tilt - Shattering Bite
15%

Tiki stretches her neck and bites forward. The attack does extra shield damage. This is good move to use after a blocked Neutral Special, giving it a good chance to break the shield. It's reach also makes it useful to outrange the opponent and outprioritize weak attacks.

Down Tilt - Ankle Drag
11%

Tiki sweeps her claw along the ground and pulls her opponent closer. Well, not exactly, it's doesn't have a grab hit box, it just has fixed knockback that knocks the opponent towards Tiki. It also has a good chance of tripping, which is appropriate considering how the attack looks.

This is a good way to pull in an opponent that's trying to outrange you, especially when done from Tiki's normal crouching position, which is likely the case.

If you keep the control stick pointed down when the move is over, Tiki will stay in her crouching position as a dragon, making it the only way that Tiki can crouch in dragon form.

Up Tilt - Mist Veil
9%

Tiki breathes dragon breath above her and leaves an arc shaped trail over her. The trail lasts for a second and is a good trap against aerial attacks since it covers a sizeable space. Opponents caught in the "veil" will take a good amount of stun and little knockbac. This gives a good opportunity to use the up special, or an aerial attack.

Dash Attack - Trample
5%, 6%, 6%

Tiki dashes forward and slashes three times as she's running. Her feet do an extra 3% damage with each step and will knock an opponent into the main attack if they happen to be very low on the ground. This is a good move to use when tech-chasing, or on a tripped opponent.

This attack has the most noticeable start-up lag when transforming before it, so it's best used when Tiki is already transformed.


SMASH ATTACKS

Forward Smash - Breath Burst
24% - 33%

Tiki leans back while while breathing in deeply, then causes an explosion of her breath attack in front of her. The attack is a very large disjointed hitbox that can kill early. It also leaves Tiki relatively safe from a shield grab due to the range and pushing power of this attack.

Down Smash - Earth Breaker
15% - 22%

Tiki jumps a little bit up and stomps on the ground. The main attack has good knockback and is a viable killer. After stomping, two shockwaves are sent out on each side of Tiki, at about the same range as her forward tilt, and has a very high chance of tripping. This can be followed up with a Neutral Special, or Dash Attack.

Up Smash - Drill Fang

Tiki jumps into the air and spins like a drill, hitting multiple times. If all hits connect, this does 23% - 32%, depending on the charge. The last hit of this attack has the strongest upwards knockback in her moveset. This is best used after trapping an opponent with an Up Tilt.


AIR ATTACKS

Neutral Air - Bright Wheel
13%

Tiki spins once backwards by propelling herself with her dragon breath. This is a fairly large attack that can catch some of the more agile aerial fighters. The angle of the attack knockback depends on how long it's been out, making it a bit difficult to DI properly, although it has moderate knockback.

Forward Air - Bitedown
16%

Tiki swings her head downwards while biting. This has a bit of a long startup, but it can meteor smash during the entire attack and has strong knockback. It's also useful for tripping an opponent from the air, even if Tiki gets hit in return.

Down Air - Talon Stomp
20%

Tiki's other meteor smash. She stomps downwards with her feet, simple enough. This accelerates her downward movement and is great as an edgeguarding move since she can still grab the edge during it. She can also cancel the attack by air dodging. This can potentially KO a grounded opponent at high damage.

Up Air - Takedown
15%

Tiki swings her head upwards and bites. If the opponent is hit with her body, they recieve and upwards knockback that has a fair KO potential. However, if they are hit with he very tip of Tiki's bite, they'll be sent straight down and hit the floor prone. It is technically a meteor smash, but is impractical for that purpose due to the ending lag. The main use of this attack is to bring an opponent down to earth right away, since the biting portion has her longest upwards range.

Back Air - Tail Whip
14%

Tiki whips her tail backwards, ending it with an upwards flick. It has very nice range with good knockback, and is a nasty surprise to anyone who tries to attack Tiki from behind.

Glide Attack - Divine Rain
4%, 4%, 4%

Tiki shoots three breath balls down-forward. This is useful for disrupting the opponent while Tiki recovers.


GRAB & THROWS

Grab - Crushing Fang

Tiki reaches forward and bites the opponent, pulling them back. This has a very long range for a non-tether grab.

Pummel - Purify
3%

Tiki envelops her opponent in her white dragon breath. Each hit comes at medium speed.

Forward Throw - Human Fireball
5%

Tiki shoots her opponent forward, and enveloped in her white dragon breath, dealing 6% to any who gets hit by this attack.

Down Throw - Holy Blast

Tiki drops her opponent and blasts him with her dragon breath. This attack has some upwards knockback and can lead to other attacks.

Up Throw - Catapult
6%

Tiki grabs her opponent with her claws and flies upwards. Using the momemtum of her flight, she catapults her opponent straight up. This leaves her in her normal falling state. Can KO at high damage%.

Back Throw - Cover Fire
5%

Like forward throw, but the opponent is shot backwards. These throws are mainly used as projectiles for Tiki in case she's facing a team.


FINAL SMASH

DIVINE WRATH

Tiki begins filling with power. So much so, that white smokes starts billowing from her mouth. She then spits out a ball of divine breath that quickly swells up to the size of a full charged hothead. The projectile moves faster than Sonic's dash speed. When it hits a target, it explodes, doing 45% damage and massive knockback in a large area.

PLAYSTYLE

Tiki is a close range fighter with lots of power and attacks with large hitboxes, some of wich are disjointed. She has many options to help her approach the oponent, like Forward Special, Dash Attack, and Forward Air. She can even bring oponents closer to her with Down Tilt, Up Air, and Down Special. Another option is to approach in human form, where she's quite good at dodging projectiles, and where she essentually outranges anyone due to opponents having to get closer to her for their melee attacks. This becomes riskier as she takes damage, however.

Once close she has plenty of ways to rack damage, like Neutral Special, and her pummel. She also has plenty of setups for her killing attacks, like Neutral Attack (both types), Down Tilt, and Up Tilt. Remember that as long as she stays in dragon form, her attacks are fairly fast.

Tiki is not without weaknesses. Her human form becomes a liability at even moderately high damages. Oponents can exploit this by tripping her and making her change back to human form. Her get up attack may not be useful here since she can be hit mid-transformation. She's also vulnerable to throws, which can easily change her back to human form and lead to another attack.

In a way, she's a glass canon, who needs to strike a good balance between her two forms during combat.


[COLLAPSE="Alternate Forms"]In Fire Emblem, Tiki has the distinction of being the only playable Manakete that can transform into different types of dragons, so long as she has the corrosponding dragonstone. (Well... one other Manakete can do it, but only with a glitch).

In her character select portrait there are five dragonstones to be found. If you put the cursor on one of the alternate dragonstones and tap it, you can play as a different dragon! Although the other dragon forms deal less knockback with their attacks and, with the exeption of wyvern, don't have have a second mid-air jump and the ability to glide, they still have some differences that might make them worth playing.


Fire Dragon

In this form, Tiki gains a higher boost in ground speed, and her breath attacks are fire elemental.


Ice Dragon

Tiki gains the most weight in this form, and her breath attacks have a chance of freezing.


Wyvern

In this form, Tiki has faster air speed, slower falling speed. She also gains a second mid-air jump and gliding ability, just like in divine dragon form. Wyvern form is somewhat smaller and lighter than the other forms, and has a shorter physical range. Breath attacks are fire elemental as well.


Mage Dragon

Also known as demon dragon. In this form, Tiki gains more physical reach with her attacks, and her breath attacks are of the magic type.[/COLLAPSE]


inside and unassuming frame, lies a big power
 

Katapultar

Smash Lord
Joined
Nov 24, 2008
Messages
1,284
Location
Australia
[collapse="Tiki"]You're pretty persistent, man - another Fire Emblem set, and on the same page as your second nonetheless! The dragon transformation is pretty cool, though it feels that Tiki might as well always be in it since even if she's knocked into the air or so she can just recover again. The dragon form itself does feel a little underwhelming (are dragons really that small in the FE Universe?) and could possibly do with a buff - if you're worried about balance simply have Tiki require a time limit or something before she can transform again.

I unfortunately feel that Tiki is somewhat the weakest of your 3 sets. Her playstyle doesn't feel quite up to scratch when most of the moves are overly simplistic and serve to drag a foe into another, also feeling too reminiscent to Charizard's from Brawl (her physique and attack similarities do take away a lot of excitement). I don't think this is the best possible or most fitting path you could have taken for Tiki given she's a -dragon- (I'm not sure whether giving EVERY FE character a counter is suitable), though to be fair you're still learning. There's really quite a lot more you could have brought out and delivered with this interesting character choice rather than making her a Charizard "clone" - don't be afraid to be a bit more daring with your movesetting and the abilities your character possesses (reading a whole bunch of sets might help you for that), for thinking outside the box tends to be very rewarding. If you want to continue making movesets the way you are however I won't stop you. [/collapse]
 
D

Deleted member

Guest
Fairly random comments. More to come.

Roy, you've finally done it with Rattata – shocking I'm sure, weeks after I told you this in chat. This set pulls off the characterisation of the rat Pokémon in such a succinct way, it is astounding how in-smash it is at the same time. This set is very easy to imagine working with only minor tweaking in Brawl. The deeper links made from the specials leaking down to every other input in the set is paramount to its success – primarily, the neutral special fang. It's a straightforward interpretation for a moveset from a Pokémon, but fits well here due to the very nature of Rattata, a thought that rings true throughout as you have the nipping, running away and so on. However “easy” this set is only helps to make it look more fitting on the Pokémon. It's an enjoyable read too, thanks to those notes on the origin of moves. Just keep in mind how important specials and characterisation are in the future and you'll be well on your way to making sets as good as this one.

I found Bouldergeist awkward in how he controls. His hands picking up his head to reposition it is indeed awkward, and he comes across as a bit of a Tiki Tong or Master Hand simply by virtue of his body shape when the character doesn't seem to fit the bill that exactly. The way that moves are split between the hands together and separate also came across as limiting them to the extent of making the character not viable through lack of versatility, especially when many of these focus on these huge telegraphed moves or ones that are played defensively. It just doesn't feel like a natural transformation from Bouldergeist to the core after it has been beaten up, in terms of playstyle or functionality. There's also nothing aside from the statistical changes that makes me think this is Bouldergeist over Master Hand, Crazy Hand and Tabuu's head popping up through Final Destination, which is always something I look for in sets such as this.

Dark Falz is by no means a reprehensible set, it has a handful of neat ideas and merely fails to execute on them well enough to make for an interesting full moveset. What you do attempt along the way is admirable – the animations are fun, the actual functions of the moves at least explore the broken aspects a boss should – it stumbles over its own flow too much to the point that these inputs end up killing the set's balance. I don't need to touch upon the instant death combined with the soul orbs. That grab game is surprisingly good for how simple it is in giving Dark Falz versatility in a way that defines him from other bosses, reminding me of the kind of shenanigans Iron Tail got up to at its best. In fact, had the set's moves not seemed so repetitive conceptually at times, or insisted on breaking the soul stealing, I would have liked it overall. Saying that, it's not outright bad either, and I'm a little sad that it hasn't found its home with any fans at all.

As far as Tirk sets go, The Fighter is probably my favourite, but it has its fair share of problems. First of all, the unorthodox use of luck from tabletop games was handled smartly, similar to the earlier set Rattata, whereby allowing an identical translation of another game's mechanic actually makes for plenty of fun when the curve is so forgiving, essentially just letting you “crit” or “miss” most of the time. The nuance is in taking advantage of these opportune moments, and trying to take the bad times in your stride. What made me dislike the set, sadly, was the lack of actual attacks, especially in the last half of the moveset. The smashes are situational, most of the aerials aren't important considering how bad he is in the air, one trying to remedy that via a second recovery. Not that a lacking recovery is bad at all, I just wish you embraced the concept fully and gave him a generic sword swing here or there, granted giving some flair to those moves as well. As is, it's weighed down by trying to have all these tacky effects on standards, smashes and aerials, making the few laggy attacks he has that much more predictable.
 

DiamondFox

Banned via Warnings
Joined
Jun 4, 2010
Messages
35
Meth: Movesets

Walter: Sundance
Skyler: MT
Walter Jr.: Plorf

Ted: HR

Hank: Smashbot

Jesse: Agi
Badger: PC
Skinny: Khold
Combo: Tirk

Spooge: Twilt
Spooge's Skank: Silver

Saul: David

Gus: Smady
Mike: MW
Gale: FA
Tyrus: Kupa
Victor: Nick
Los Pollos Manager: Kat

Hector Salamanca: Rool
Tuco Salamanca: DM
Juan Bolsa: Junahu
Eladio Vuente: Chief Mendez
 

ForwardArrow

Smash Ace
Joined
Aug 17, 2011
Messages
503
Rattata
This set's a lot better than I've come to expect from you over the course of the contest Froy. The playstyle here actually flows a bit due to the nature of Hustle, Run Away, and Super Fang. It gives Rattata a fun little hit and run game where he darts around the foe, gnawing at them and bashing them with his tail, before eventually skyrocketing their percent for the killing blow. Yeah, the attacks themselves are a bit simplistic by nature, but this isn't exactly a character who could do anything super creative without it feeling extremely tacky. It's pretty filler heavy, and admittedly the base moves don't really flow together all that well, but at the very least with the overlying mechanic it all ends up working out pretty nicely. I don't even feel the grab is offensive in the least... though admittedly, this type of move has been done before, see Pachurisu and Emolga. I suppose the set doesn't feel all -THAT- exciting in actual gameplay either, feeling like a decent hit and run set until the point where it comes down to spamming Super Fang. Honestly, as cool as the move is just spamming it on the foe once they reach a reasonable percent isn't particularly fun in and of itself. None-the-less, it's nice to see you pull out something I'm actually willing to vote, it seems all this time commenting and set-reading is finally paying off.
 

FrozenRoy

Smash Lord
Joined
Apr 26, 2007
Messages
1,268
Location
Las Vegas, Nevada
Switch FC
SW-1325-2408-7513
Hard On

Hardin is actually a fairly interesting set, especially as a beginner. I think Flame Lance is a pretty interesting attack on someone like this, who is so slow and heavy, and it gives you incentive to clash out energy attacks, which even helps with a lot of campers, like Pikachu. Great Shield is also a really cool move: I always sort of hated how some Counters do not do well against multihitters, so this was neat, plus it actually acknowledges Momentum Cancelling! It is probably the best part of the set.

Aside from that, he has mostly just some Brawl style, one-two line attacks that do not provide too much, but hey, it's still not bad. And the fact he seems to have a decent edgeguarding game despite being aerially challenged is neat. And he has a grab mechanic, albeit a very specific one.

Behold the mustache of power!

Dork Falz

Geto already used Dark Failz, so I had to use a different silly name...

Can you guess I do not like this moveset? I doubt I have much to say, but even among 3v1 bosses, he is a tad strong. His only real weakness is pressure which is quite hard to do, though not TOO hard, I guess...aside from the grab game.

The grab is a really cool idea, though! I'd love to see it messed with again...however, the problem is it is pretty badly executed, especially like as Warlord said, there was an easy in-character way to tone it down. Aside from that, Falz basically generates an instant death cloud and tries to get people into it, because it's way better to just use instant death than the other stuff. It's a 3 second charge time, but it is both savable and Falz has decent stalling, and at that point with the soul stuff it gets a bit hard to do too much. And...aside from that, Falz reminds me of Kang in the sense that he is not much interesting outside of a key few things. So, yeah, shrug. Not a set I liked, nor a lot of other people it seems.

Also, at first I thought the image looked silly...but I swear, every time I look at Falz in it, it seems to get a bit freakier. That was a good choice of picture, at least.
 

ForwardArrow

Smash Ace
Joined
Aug 17, 2011
Messages
503
I shall erase your very existance!


Chakravartin, the Creator

Useful Links:
Boss Fight(24:50 for this particular form)
Battle Theme


Chakravartin is the main antagonist and true final boss of Asura's Wrath. He is the god over the world, though not exactly a just god, repeatedly creating and destroying the world as a means to create himself a heir. He also manipulates the humans, deities, and monsters inhabiting the world in order to make his will happen. In particular, a man named Asura caught his interest, and after Asura succeeded in several of his "tests", he believed he was a rightful successor.

Asura was not compliant however, and refused to take the position from Chakravartin. This provoked a battle between the two, him eventually taking the form depicted above and used in this moveset, a silvery humanoid with the ability to freeze time, generate swords, and even fling objects that appear to be black and white suns at Asura. He's extremely powerful and durable, being a god after all, but perhaps a bit too confident in his own abilities...


Stats

Weight
10​
Traction
10​
Recovery
9​
Size
8​
Movement Speed
7​
Aerial Speed
6​

Chakravartin actually has a pretty nice set of stats, being mobile, as well as an aerial heavyweight, giving him a high level of survivability. Fitting for a god no? He's pretty much the exact same size as Ganondorf on that note.

One last thing is that Chakravartin has double Peach's float in which he can move upwards as well at half it's normal speed. He also moves a little faster than Peach, about 1.25x her float speed.


Specials

Neutral Special

Chakravartin raises a single hand, as 4 small gray swords spawn in front of him in a wall like formation. You can charge this attack for a second longer to increase the number of swords to a maximum of 10. The swords will always stack up to be about twice as tall as he is, regardless of charge, higher charges spawning them closer together. He then points forwards, and the swords launch at Fox's dash speed, each dealing 1.5% and not even a flinch on it's own, as well as converging over the course of the flight path.

The key thing about these swords is that the more of them hit the foe at the same time, the more knockback they will take. So if a full wave of 4 swords hits the foe, they'll take small horizontal knockback, whereas an entire fully charged wave of 10 will deal knockback that KOs at 140%. You can potentially send the knockback power of this move through the roof with more swords... if you manage to set it up so that more swords are out than 10. How are you going to pull that off? You'll see shortly. The spacing has to be pretty precise in order for all the swords to hit the foe, unfortunately, as after converging they will diverge again rather quickly. This is still an effective move though, as aside from serving as your main KO method it also allows you to spam the screen with projectiles, putting the opponent under rather constant pressure, especially with Chakravartin's projectile manipulation that you'll see later.

If used in the air, Chakravartin will turn towards the ground and launch the attack towards the floor.


Down Special

Chakravartin creates two spheres of dark energy in his hands, before slamming them together with half a second of lag. This won't deal any damage or knockback... rather, it will invert the colors of everything on the screen and freeze them in place, save for Chakravartin, who can move around normally. In a sense, time has just been stopped. The period for which it stays stopped depends, at the start of the match Chakravartin has 2 seconds worth of time, and gains an additional second's worth over the span of 7 seconds. There is in fact no cap on this, so if you're willing too you can just spend the entire match building up to one massive time stop.

Obviously, it would be a bit unfair just to let Chakravartin hit foes freely during a time stop, so if he uses a melee attack on them it will just do nothing, and projectiles freeze in midair. Note that Chakravartin cannot spawn his projectiles exactly on top of each other, so you can't just stand in place and use this to create a massive number of swords that will all hit the foe at once. You'll have to be move creative than that with your positioning. Grabs can be used on opponents during this time, but that will immediately take you out of the time stop. Using Down Special during a time stop will immediately end it, with any time you had left preserved.

This is if you hold the button down however. Merely tapping Down B will cause Chakravartin to just point forwards a finger and freeze the closest projectile to him for twice as much time as he could stop the whole screen. Double tapping Down Special will unfreeze the nearest frozen projectile instead. Note that a wave of swords counts as one projectile. This is actually pretty quick, much faster than a standard time stop, and does not drain any time from you. Obviously, this gives you a whole new slew of options for landing more swords on the foe at once, by freezing and unfreezing at the correct opportunities and positioning the waves where best you'll land more swords, as well as giving you more options for bullet hell. Players ignore swords that are frozen in time, being able to walk past them without any damage or knockback.

This gives you a lot of ways to place swords, and also a method of completely flooding the screen with them. No they aren't dangerous on their own, but opponents will have to be careful to avoid clusters of them, and being hit by 2 at once means a flinch. It keeps players constantly on their toes, for sure.


Side Special

Chakravartin raises his hand above his head, before putting up a single finger. A massive sphere that looks to be a black and white sun appears above his finger, before he points forwards, launching it diagonally forwards towards the ground. On contact, the sun explodes in a wave of monochrome energy, dealing 18% and knockback that KOs at 90%. This seems extremely powerful, especially given the massive size of the sun(it's about 6x the size of Samus' Fully Charged charge shot), but this attack has a very large amount of start up lag before he fires it, and the star-like object travels very slowly, at two thirds Ganondorf's dash speed.

The sun doesn't explode when time stopped... which brings me to my next point. Inside the sun, players(including Chakravartin) will take 1% per second... and time is slowed to a third it's normal speed. So obviously, you can use this to store and position projectiles while having them be dangerous to the opponent if you manage to get them inside the sun as well. This will apply whether a foe is stuck inside the sphere when it initially spawns or goes inside it during a time stop, though it will explode on them should they touch the border of it while it is unfrozen. It's pretty easy to air dodge and avoid, however. You can only have one of these in existence at a time, but none-the-less it can cut off a large swath of the stage... which is pretty helpful when you're trying to precisely space the opponent for an attack.


Up Special

Chakravartin holds his hands to his sides as a large quantity of black and white energy begins erupting below him. This energy deals strong set horizontal knockback and no damage... but rather causes the stage directly below him to slowly rise up into a Bowser width hill at the rate of 1.5 Ganondorf heights per second. This caps out at 4 Ganondorf heights. If used in the air, it will still raise the stage in the same way as long as there is stage beneath him, though the energy is sadly on the ground, giving Chakravartin a bit less direct of defense. The hill can be walked or ran up, but at half one's normal movement speed. Obviously, this terraforming will have plenty of interactions later on, but a useful trick to keep in mind is using the Side Special between two mountains that are just BARELY spaced that widely apart to create a very hard to avoid time slowing zone. Top it off by bombarding with some aerial Neutral Special projectiles or later moves in the set...

If there is no ground underneath you, this will instead create a massive force of invisible energy below you (though some black and white specs will fly up as well), which pushes you and opponents up at the rate of Captain Falcon's dash speed. Chakravartin can only keep this variation up for 2 seconds though per visit to the air, so keep that in mind. Between this, your jumps, and your massive weight, Chakravartin will be surviving for an impressive amount of time... which he very much needs too, given how much work it takes for him to get that KO he so desires.


Standards

Jab

Chakravartin holds out a hand as 4 more swords spawn in front of him in a similar way to the Neutral Special, with a larger amount of lag. The swords will then launch at the opponent at Mario's dash speed, homing in on them and traveling one after another. Obviously, this makes this a lot less useful for getting multiple hits at once on a foe, but at the same time, it's a bit more frustrating for them to just avoid, although with no flinch being dealt by an individual sword the incentive to dodge or shield it isn't as high as it would otherwise be. That aside you can spam this as much as you want to utterly flood the stage with homing swords as well, and with some of your methods of messing with the positioning that can become freakishly annoying for your opponent to work with, particularly if you can get two waves of swords colliding with the foe at once so they pretty much have to shield or roll around the projectile.

Forward Tilt

Chakravartin holds up one finger and grins at the opponent for a brief period of start-up lag. If the opponent hits him or even runs into him at this time, they are stopped in place by an invisible barrier as Chakravartin tauntingly says "Weak. Very Weak." They are then launched backward with very strong set knockback and 12%, and the knockback can be angled during the start up lag. If it's angled down the foe will end up in prone on the floor. This serves as a rather nice counter, but it has some heavy end lag if Chakravartin misses while he looks on a bit disappointed at the opponent.

The other use for this is that you can also reflect projectiles about with this(without the taunting remark), including your own. I shouldn't need to tell you why Chakravartin likes this, particularly since you can rearrange the timing of your homing swords.


Up Tilt

Chakravartin thrusts his hand downwards and a wave of energy expands out of him, creating a ring that will grow to a battlefield platform in radius before fading out. It expands outwards at slightly slower than Mario's dash speed, and deals 9% and flinching knockback. This has a lot of start-up lag, but actually next to no cool down so Chakravartin is free to play off it or freeze the wave at any point. Speaking of freezing it, Time Stopping the wave does not stop it from being a hitbox, so you can potentially use it as a versatile trap and zoning tool, helpful considering you want the opponent at the converging point of several swords or between mountains or what have you. Foes can still roll/dodge through them pretty easily though.

Reflecting this move has a slightly interesting interaction as it causes the wave to collapse inwards at the same speed it expands, and at the point of conversion it creates an explosion the size of a Bomb-omb blast which deals 13% and strong set upwards knockback. Again, more zoning tricks about particularly when you consider Chakra's ability to move past a wave and then shrink it back in on a foe.


Down Tilt

Chakravartin conjures a black sphere with his hand in a similar manner to his time stop, though rather than using it to stop time, he merely sweeps it down below him, dealing 8% and mediocre upwards knockback. It's a pretty unexciting move for the most part, and slower than you'd probably like an attack like this to be, although the range is deceptively solid.

If you press any direction during the start-up lag though, Chakravartin instead tosses the sphere forwards at the same speed waves move, AKA slightly slower than Mario's dash speed. It still deals the same mediocre damage and knockback and takes even longer to fire off, but it travels 3 battlefield platforms and pulls in your other projectiles that are within half a battlefield platform of it. The key thing about this is that it will pull swords together, so even once the sphere stops pulling them together they remain a move powerful hitbox. The Neutral Special wave will split apart, but the homing swords are not stuck together effectively as one. With repeated use of this you can potentially make as powerful a homing projectile as you really want, but the problem is a mere dodge or shield will ruin all of your hard work. It's still a viable strategy though, particularly in the context of the Up Smash.

Your other projectile, the wave, will actually be pulled towards this, allowing you to make ovals with your Up Tilt as opposed to just circular chambers, a rather handy tool that increases the versatility of the Up Tilt quite a bit. Unfortunately, it's not powerful enough to do any more than slightly alter the trajectory of your sun, though in large quantities you could potentially use it to redirect it's path a fair bit. Time stopping this will cause it to stop pulling in projectiles while it is frozen... which may not be such a bad thing, really. And you can set these up flying in all different directions and stopped at different points to guide your swords around with a great deal of precision, allowing you to potentially juggle far, far more of them on screen at once than you already could and with more convenient positioning, very handy when you're trying to land so many swords at once.


Dash Attack

Chakravartin floats up and generates a sword much larger than the ones he usually creates, which he then hops on and rides forwards at twice the movement speed of your Neutral Special swords. Pressing another button while he is riding the sword will cause Chakravartin to dismount and the sword to disappear. You can press up or down though, to move the sword higher up into the air or lower towards the ground, to maximum of a Ganondorf height in the air. This particular sword counts as 6 swords hitting an opponent at once, and due to it's high speed you can potentially collide with at the same time a bunch of other swords do...


Smashes

Forward Smash

Chakravartin displays he's far more than some pathetically campy creature by lunging forwards at Sonic's dash speed, traveling for .4-.75 seconds and dealing 10% and strong backwards knockback with unfortunately mediocre growth, only KOing at 240%. He also travels even faster on a downwards slope, 1.75x Sonic's dash speed, allowing him to traverse them even more quickly. The main thing about this move is due to the knockback if used at close range(and the start up isn't too bad), it will leave you and the opponent quite far apart. And Chakravartin is pretty campy most of the time, so that's not a terrible position to be in.

You can actually cancel out of this move while he's travelling forwards by pressing FSmash again, which has him halt his momentum over the course of the next stage builder block into a flying kick, which deals 16% and enormous but set forwards knockback. If the stage happens to be escalated into a slope or a wall or what have you in front of him, he will kick that, causing a small earthquake which deals half the damage and knockback a Battlefield platform on each side of him, though the knockback sends the foe upwards. This hitbox actually lingers for about half a second too. This obviously gives some additional use to elevating the stage as you can turn the ground around you into a hitbox.

If Chakravartin slides off a platform with this, he'll be boosted in the direction the platform was slanted if there was a slant, keeping his momentum as he travels through the air but immediately canceling into his air game. This is handy for plenty of reasons, perhaps most notably allowing you to catch up to one of your projectiles that's higher up in the air.


Up Smash

Chakravartin lifts his arm above his head, before a massive storm of black and white energy surges up around him, travelling all the way up to the top blast zone. This lingers for a large period of time and deals 19%-26% and very powerful set horizontal knockback. Unfortunately, the start up is pretty enormous, taking as long as a Warlock Punch to execute... though the start up is super armored and anti grab armored. This basically gives the foe no choice but to shield it or run away, and this move does a -LOT- of shield damage. Running away isn't that hard though considering the hitbox is about 1.5x the width of a Battlefield platform in total... though if you use this near an elevation, that can potentially make it impossible for the opponent to just run away, forcing them to shield... and then get the shield broken by another attack, which then lets Chakravartin possibly even set up a finishing blow with swords. This is gonna depend a bit on your frozen swords as well as Down Tilt projectiles though, so we're not talking Lucario Remix style straightforward combos.

Aside from that, there's a somewhat handy interaction with the suns in that this move will in fact push them upwards at Ganondorf's dash speed for the duration of the move. Placing them higher in the air is actually rather handy, especially considering the diagonal nature of their fall. This attack seems very very good due to the spacing it provides not to mention it's use in the context of slopes, but it unfortunately has a downside. Considering he uses this manuever rather sparingly in the boss fight to ward off Asura, he's only going to be using it sparingly in his matches too since it has to recharge in a similar manner to ROB's laser. It takes 16 seconds to fully recharge, using it before then will produce a much weaker line that's only as thick as Chakravartin himself and dealing half damage and knockback, not to mention losing the super armor. You'll want to use this move on a rather sparing basis, truth be told.


Down Smash

Chakravartin raises his fist before bending down and slamming his hand into the ground with incredible force, dealing 20%-28% and knockback that sadly scales slowly so it will only really KO at 175%-120%. This move unfortunately has similar start-up lag to the Up Smash... and unlike the Up Smash, has an extremely precise hitbox to land and no sort of super armor or anything. Fortunately, there's extremely little cool down lag on the attack, but it's a pretty atrocious KO move... and the only one you're going to get unless the foe has a really terrible recovery and you pull off your FSmash or USmash right up next to a ledge. Well, that is if you aren't going the route of landing mass swords on the opponent.

Fortunately, that isn't the only thing this move does. Upon hitting the ground, it causes a wave of debris to fly, traveling upwards at Ganondorf's dash speed. On contact it deals rapid hits that add up to 15%, and it will travel upwards 2-4 Ganondorf heights. The wave is slightly wider than a Battlefield platform, and parts of it can be slowed by a Sun to split it apart. Unfortunately, the Down Tilt is not capable of diverting this particular projectile, perhaps due to it's different nature from Chakravartin's own spawned projectiles. After flying up the wave will come crashing down for a second hit, this time falling twice as fast as it went up, but it's pretty easy to not get hit by both movements of the wave.

Of course, that's assuming you don't use this attack on a slope. If part of the wave flies out of the slope, that part of the wave will instead fire in an arc forwards, a distance based on how high it is up the slope and how long you charged the attack. The wave of debris also starts off tilted in the direction of the slope itself, but gradually rotates until it faces the opposite direction and eventually collides flat with the ground. This will only hit the opponent once, but actually allows you to camp with this... though it's not the absolute best camping tool due to it's extremely slow speed. Still, it's something a bit slower moving to work in conjunction with your other projectiles, nice to have ones that travel at different speeds when the opponent really needs to dodge some of them, especially considering this one can easily flinch the foe into another one.

So with all that out of the way, the real utility for this move comes from the fact that when you time stop it, the wave will function as a platform/wall. Albeit a pretty flimsy one, it can be destroyed if 40 damage is dealt to it. None-the-less, this opens up a ton of options for Chakravartin, allowing him to place rings up in the air as well as on the ground for one, create new vantage points to fire swords from and pin opponents against(especially useful in that unlike your slopes, they can potentially become hitboxes themselves). Or just serve as a general positioning tool, particularly with it's threat to unfreeze at any second, while you try to put the opponent in just the right spot for all the swords to converge on them at once.

If you're feeling particularly gutsy, you can actually attempt to play god with this and go for some complete stage redesign. You see, using the Up Smash on a wave of debris, frozen or no, will actually propel it upwards further. So in conjunction with that interaction, you can pretty much completely redesign the stage. The main fun thing that comes out of this is building towards the blast zones as a method of giving you additional KO methods with your Forward and Up Smash, though they still aren't the easiest moves in the world to land, it's certainly a bit easier than a sword set-up. That aside, this is going to take a fair bit of work to get too, and it's pretty easy for your opponent to ruin your progress towards this sort of KO method. Combining both methods for the sake of unpredictability and versatality though, as well as the volatile nature of your platforms... that's where this sort of set-up truly shines, should you pull it off.


Aerials

Neutral Aerial

Chakravartin snaps his fingers, causing a Kirby sized area in front of him to flash white, dealing 5% and weak diagonally forwards knockback. This is actually highly spammable, and in combination with your float this can serve as a very effective method of juggling the foe across the stage to exactly where you want them, or possibly even up to where you want them. You can also hold down the input for up to half a second to extend the range of this attack, to a maximum of 1.5 battlefield platforms, though the height is the same. It's a fairly versatile close combat method, perhaps the best Chakravartin has, though it lacks in power and becomes a lot worse at higher percents where opponents can avoid consecutive hits much more easily.

This move has other utility though. You see, all of your stage creation tools, however nifty, have one key problem. They'll still stop your projectiles from traveling where you want them to go. You can of course time stop them to circumvent this, but it still ends up a bit awkward. This move gives them a lot more freedom of movement, as it will delete any segment of stage it comes into contact with for 5 seconds. So potentially, you can drill a hole through your terraforming and stage creation for your projectiles to go through. Pretty useful, is it not?


Forward Aerial

Chakravartin reaches forwards a short distance, and if he grabs onto a foe, he will proceed to dive-bomb the ground, grabbing them and carrying them down with him. On contact with the ground this deals 10% and diagonal knockback that KOs at 250% to the foe, though in the air they can escape with grab difficulty. Admittedly, Chakravartin falls pretty fast though, making this a decent suicide KO method.

Aside from that, if Chakravartin hits a slope with this, rather than landing on it, he will slide along it still gripping the foe, dealing them 2% for each Bowser length they travel as well. This makes this move far more than a generic suicide KO, it's actually extremely useful for positioning foes at a point of sword intersection in a direct fashion. You'll need to have slopes set up correctly beforehand, be it the ones made with your Up Special or your Down Smash. That and if you've been playing stage creator to a rather ridiculous degree, you can potentially build huge quantities of damage with this, although that is admittedly very impractical.


Back Aerial

Chakravartin reaches out a single hand behind him, and foes standing behind him are suddenly launched away by some sort of telekinetic force, dealing 3% but some actually rather solid horizontal knockback away from Chakravartin. It's a decent deterrent, but suffers from an unfortunate degree of end lag that makes it sort of impractical at times.

Aside from that, this is another move which will send projectiles flying in the opposite direction in the same manner as the Forward Tilt. If you happen to zip past them with one of your movement abilities, this is a nice way to send them flying right back at the foe. You can actually hold down A to delay the launch too, for up to a second, which will increase the speed and power the swords are fired away with, maxing out at 2.5% and actually dealing a flinch with each sword. If you catch a sword wave with this, you can turn it into a powerful KO move, but stopping or changing it's momentum in any way other than straight up reflecting or freezing it will cause it to lose the power boost. So no, you can't build up it's power any more with this.


Up Aerial

Chakravartin looks upwards before performing... a generic flip kick. How wonderful. This deals 9% and mediocre upwards knockback, though it isn't a terrible juggler. It's at the very least useful in the context of your float in the same way the Neutral Aerial is, albeit it's less spammable and a lot less specific in where you move people too.

The thing about this move that makes it a touch more interesting is that you can delay it by holding down A. This can help you screw with the opponent's dodges a bit, which is nice when they're already struggling with projectiles flying through the air. That can get very overwhelming if you play your cards right. Aside from that, while he's facing up like this, you can actually use the Neutral Special to fire the swords upwards. This will come in handy quite frequently, serving as the other main reason to delay the move. See, even though it's a flip kick it is relevant.


Down Aerial

Chakravartin swings his leg back and delivers a crushing kick below him, dealing an initial hit of... 10% and no knockback, just hitstun. Given the large amount of start up lag, that's a bit disappointing. A minute period of time though, a massive amount of dark energy is released from the point of contact, dealing 16% and a ridiculous spike that absolutely shames Ganondorf's Dair. Somewhere around like 3x the knockback, if you hit with this on a foe off stage it is going to kill them. That said, there's nearly a Falcon Punch worth of start up lag, and it will only pitfall opponent's on the ground.

This has two other uses though, in that you can kick your mountains or the monochrome suns. In the case of a mountain, it will actually destroy the mountain, collapsing it back into the stage. This gives you the ability to undo your own terraforming in case you would ever want too, perhaps to give your projectiles more leeway in terms of movement without the help of the Nair. After all, micromanaging them can get annoying.

Kicking a sun is a bit more interesting, in that it will actually cause a shockwave to travel through the sun. The wave travels through at Ganondorf's dash speed... but that's actually pretty fast in the context of time being slowed down three times. Any projectiles the wave passes through are disturbed, temporarily thrown about before returning to the path they were originally on. This makes for some quick and easy damage if there are swords in there, as it's extremely hard for the opponent to dodge all this. The problem is this will in fact use up the swords, but those things are admittedly pretty expendable on a whole. You make 4 just by tapping the B button, after all.


Grab Game

Grab

Despite being a god, Chakravartin has no qualms about physically grabbing his opponent, picking them up by the throat in a chokehold. This has very good range for a grab, extending a bit beyond the apparent hitbox, but is slightly slower than usual.

Pummel

Chakravartin releases some monochrome energy into the foe as you hold down the pummel, dealing very rapid hits of 1%. Even merely tapping it will hit the foe twice.

Forward/Back Throw

Chakravartin grabs the foe and rolls forwards with them, gripping them the whole while and travelling at nearly Mario's dash speed. You can hold this down in either direction until the foe escapes the grab. On slopes, Chakravartin travels faster, about 1.5x his normal speed. Sort of like the Fair, this move is largely useful for repositioning foes towards exactly where you want them to be, in the midst of a mass sword intersection.

Pressing up or down during this actually allows you to "throw" the opponent. Pressing up will have Chakravartin merely toss them into the air for 7% and a good bit of set upwards knockback. Pressing down will have him leave the opponent on the floor, pummeling them for 10 hits of 1% while saying "You are not worthy!" More importantly though, Chakravartin can in fact launch into the air doing this, still gripping onto the opponent if he happens to roll forwards off an upwards slanting slope or roll off a platform. During this time he will just fly forwards in the direction he was currently rolling at the same speed until he hits a blast zone, the floor, or the opponent breaks out of the grab. Hitting the floor will just continue the throw.


Up Throw

Chakravartin produces a tendril of red and black energy from his finger which flies into the foe as they crackle with power, taking 8% and weak upwards knockback. Not noteworthy on it's own, admittedly. That said, when the opponent takes out their shield now, there will be tendrils constricting it, dealing the person holding out the shield 4% per second, as well as reducing the strength of the shield by half and giving it far more lag to put away. This effect lasts for 10 seconds or until the foe's shield is broken, whichever comes first. This obviously makes shielding not just painful for the foe, but far less useful than it was before due to it's weakened strength and increased lag times.

You might question the relevance of this particular status effect, considering Chakravartin isn't necessarily a shield breaker. Well, a trick that opponents can use against Chakravartin to cause him difficulty is actually shielding his projectiles. You see, they do deal as much shield damage as you'd expect, but it dissipates them, allowing opponents to remove parts of your set ups with their shield at key points. Between this and forcing the foe to shield your Up Smash, you do have ways to cripple this particular strategy and get in all the sword or sun set-ups you desire.


Down Throw

Chakravartin merely releases the foe and snaps his fingers. Suddenly, all swords on screen cease their current behavior patterns, or if they were frozen in time they unfreeze, and point towards the opponent. The swords will all begin to converge on them now, with the furthest sword travelling in first and as soon as it becomes the same distance from the foe as a nearer sword that sword will join too. This continues until every sword is in motion, and then hits the point of intersection, them travelling at Mario's dash speed all the while. With a large number of sword waves on screen, this is probably going to spell death for the foe... if it hits.

You see, the swords are smart enough to avoid obstacles, but aren't quite smart enough to track the foe if they actually move away from that point. So what's your job? Use every other trick you have to keep them there. Freeze a monochrome sun over the position to make them more predictable. Place slopes nearby to hold them still. Stop time and create a barrage of bullet hell around them that should keep them in place. Reposition them with your Forward/Back Throw or Fair. Anything you can to make sure this hits, because if it misses all your swords will disappear. And that's a bit of a shame, since you worked so hard to make all them.


Final Smash


Chakravartin's giant form appears in the background, and begins conjuring up spheres made up of golden energy. It will launch these at the stage at a rate of one every 1.5 seconds, which will initially arrive in the center of the screen and the relentlessly home in on opponents. Unfortunately, their tracking is very poor, if they miss an opponent they'll fly far past them. On contact with anything they explode for 18% and knockback that KOs at 90%. Chakravartin's giant form will stay in the background for 18 seconds before disappearing.

So given this is a fairly easy to dodge Final Smash, it's not all too good right? Well, except for the fact that all of Chakravartin can still use all his standard issue projectile manipulation on it, making it much easier to guide them around. Aside from that, given the sheer amount of stuff flying around on screen anyway these won't be as easy to dodge as the foe hopes...


Playstyle

The first thing that should immediately come to mind with Chakravartin is bullet hell. Yes, you can produce an absolutely ridiculous quantity of projectiles with your Neutral Special, and you have ways to constantly redirect them to control where they go, so you will on some level be doing some screen flooding. The inevitable problem is that for all the projectiles you have out with the Neutral Special, they aren't really threatening. Without any flinch, the opponent will hardly even have to dodge them, and with Chakravartin's mediocre KO moves they can afford to take some damage.

This is all assuming you don't have them grouped up, perhaps using the Down Tilt or your reflection moves have the swords flying together, dealing knockback as one and allowing you to flinch the foe. Now they have a serious problem, as while there are fewer projectiles on screen getting hit by them can be rather deadly as they will chain into more and Chakravartin can even set-up a bit during this time. The key purpose of swords though is to gather as many as you can together to KO with, but they are a versatile tool, perfectly capable of being used to preoccupy the foe in waves.

Speaking of setting up KOs, that is what all of your zoning is so useful for. Considering the brief time span you have to take advantage of your projectiles, even with various ways to catch them, you're going to need to do everything in your arsenal to make sure the opponent ends up at the KO point. Your Side Special suns are an excellent starting point, covering a large swath of the stage and being dangerous to dodge, as well as making the foe highly predictable while they are trapped inside them. Aside from that, the Up Tilt waves can serve as useful zoning tools as well, while the opponent can roll through them the inside of a ring is unsafe with how Chakravartin can collapse it on them... or just play off the ring's edges.

You also have some more direct zoning tactics as well. Your Nair, aside from making sure that projectiles do not just crash into walls, can juggle opponents across the stage very nicely in conjunction with your float. Both your Side Throw and Fair can get the opponent to the point of sword intersection with relatively little difficulty. Terraforming in the proper locations can cause foes to steer clear, or you can use the Down Smash debris as almost a prison to keep the opponent where you want them. If you're really crazy, you can even use other swords to zone, keeping two or more KO combinations going at once. I'm not sure, but I think you might call that swordception.

The Time Stop itself is something to consider, as by nature Chakravartin's going to be a bit... campy at the start of the match, given his need to build it up. Actually using a full screen time stop is high risk, high reward. On one hand, yes it allows you to put all your projectiles into place, potentially creating a nasty bullet hell scenario for the opponent to dodge. On the other, it gives you much less ability to keep control over your projectiles, as they'll unfreeze rather quickly so you'll struggle to keep them in position for any reasonable length of time. That aside, this will come in mighty handy at the end of a stock, helping you make sure that they're not going to be able to dodge the sword storm as easily as they're hoping too with even more firepower raining down on them.

There's a lot more to the set than that, but that's the basic gist of how you're going to get to your KO with him. The more intricate stuff, I'm going to leave up to you to figure out. You've read the set, I've talked about a lot of the soft interactions as well, and frankly I like to leave a little bit of this up to the reader to figure out.


Boss Mode

Being a god, it's only right that Chakravartin is able to take on foes 3 on 1. In his boss mode, Chakravartin seems to radiate a bit more power... but more notably, upon his entrance, changes the nature of the entire stage. The entire battlefield turns into a solid gray platform which appears to flow into the black background, all color on the stage and all background objects disappearing. Stage obstacles still appear, but they've... changed. For example, the lava on Norfair is replaced by just a glowing white liquid, the ultimate chimera is just a black blob with white dots for eyes and huge teeth, water is just replaced with a transparent liquid, you get the idea. Everything is sort of dulled out.

Obviously Chakravartin gets some major stat and moveset buffs to accommodate 3 foes at once. These are to be listed in detail below.

>Chakravartin's weight has been increased to 30/10, slightly lighter than average for a boss. That said, considering his godlike recovery and small frame in comparison to some bosses, you still have more than enough survivability.
>Chakravartin's float is greatly buffed, having 6x the length of Peach's float. He still moves at the same speed, however.
>If hitstun is taken 3 times in the span of 0.8 seconds, Chakravartin will not take any more hitstun until those 0.8 seconds are up
>Chakravartin escapes grabs three times as fast as a normal character. He takes no stun from grab releases and throws.
>Status effects and KO mechanics have halved effect on Chakravartin

>Chakravartin's Neutral Special summons twice as many swords as it normally would.
>The Down Special charges up at a rate of one second of time stop per four seconds of time the stock goes on for.
>The Side Special sun no longer slows down Chakravartin himself, and deals 2% per second. You can have two of them out at a time now.
>The Up Special raises up the terrain 3 times as fast. No time to waste when you have three foes charging you at once. >Similar to the Neutral Special, the jab's quantity of swords doubles
>The Forward Tilt deals 1.5x as much damage, and loses a lot of the terrible end lag. Projectiles reflected by this get a 1.3x boost in damage and knockback, though this sadly doesn't stack.
>The Up Tilt expands to twice it's normal maximum size and deals 12% now.
>The Down Tilt is largely the same, just a lot faster to use. This will make it a fair bit easier to micromanage your projectiles when you have so many opponents at once.
>Forward Smash is buffed to 1.7x the normal damage and knockback
>Up Smash has slightly improved range, and will now break an entire shield in one shot. Also deals 25%-33% and has even higher set knockback.
>Down Smash has massively improved speed, only taking half a second to perform now.
>Neutral Aerial is pretty obscenely fast by this point, to the point it combos into itself very nicely until high percents. Even then it's a good juggler.
>Fair deals 1.5x as much damage and knockback upon hitting the ground, and it's twice as hard to escape as a normal grab
>The Bair charges to it's previous point in half a second, now maxing out at 3.5% per sword. Aside from that it has less end lag.
>The Up Aerial deals double damage and can kill at 120%.
>The Down Aerial is even more ludicrously powerful, and can spike through the stage. It sends an additional shockwave through suns now as well.
>The pummel now deals about 12% per second. Kind of warranted considering there's no way you're holding onto the foe for any extensive period of time.
>The Side Throw has him move about 1.5x faster and deal 13% and knockback that KOs at 150% on contact, making it acceptable even in the context of other opponents.
>The Up Throw has a change which isn't entirely obvious at first. If a foe with the status effect comes into contact with another foe, that other foe will also get the status effect. Particularly useful if you use the Side Throw or Fair to slam them into each other.
>The Down Throw has all swords move towards the foe at twice Sonic's dash speed. That's pretty absurd, and makes it very very hard for the foe to avoid... perhaps the other opponents can tank some of the hits for them?


The suffering this world has seen... was all to choose my heir...
 

Katapultar

Smash Lord
Joined
Nov 24, 2008
Messages
1,284
Location
Australia
[collapse="Chakravartin"]You seem keen on tampering with genres you've already explored and recycling, and this set feels similar to some stuff you've done in this contest (and Homura of course). It's very basic with the Neutral Special swords and the methods of controlling, not being too revolutionary, but it does actually manage to be fairly solid piece of work on its own that actually functions without being too focused, too unfocused or simply leaving a bad taste anywhere. There's quite a bit to like about the set when you get to mess around with the stage via the lengthy D-Smash and create that gigantic overkill sun to store your projectiles with (even though it's very difficult to imagine how large that size comparison is or a character's air dodge being able to actually...dodge it), and the slight glimmer of characterization in those aforementioned moves with the aiming of the Neutral Special warrants some careful aiming. It's a set I didn't think too much of when I was previewing it but somewhat felt myself liking a bit more when I came to re-read it here given how balanced it is, there being fairly good reason for you to be proud when you've been down in the dumps this competition. [/collapse]
 

The Warrior of Many Faces

Smash Apprentice
Joined
Mar 22, 2012
Messages
101
Location
Everywhere and nowhere, as location is meaningless
Wow, is the contest really almost over? Hopefully I’ll be able to review all the sets before it ends…

***

CRYOGONAL

The presentation here was… odd, to say the least. I wasn’t a fan, because it was so fragmented. On the other hand, it makes sense for Cryogonal, so…

However, Aurora Beam and Haze together makes for some interesting mindgames. Foes might decide just not to move in Haze at all, which could play right into your hands… or they might just decide to avoid it, which is a bit inconvenient but can be used. Confuse Ray adds to the mindgames: is Cryogonal really where he looks like he is? Not quite as useful if people have decent projectiles, though, since you can’t jump out of their way. Sure you have Rapid Spin, but since you’re controlling the orbs instead of Cryogonal…

The grabgame helps with the whole mindgame thing since they can’t tell if they’re grabbed, especially in Haze. Perhaps a tad overpowered, but since Cryogonal has difficulty pulling off its stuff to begin with, it’s forgivable. Haze has drawbacks, but Cryogonal can’t function without it at all, leaving him in a bit of a no-win situation here.

Overall, I can see what you were trying to do here: a camper/trapper with a healthy dose of mindgames. You also made it quite clear that he has drawbacks as well, among which are reliable KO methods and its own fragility. Still, this all makes sense in the context of Cryogonal, making this a fairly well-done set, even though I don’t particularly like it.


***

TIGGAH

…what. I don’t know if this is your own creation or the product of the same sort of mind that brought us Cupcakes, but I can never think of Winnie-the-Pooh the same way again.

Aside from the… “tail”… I can’t say anything is particularly wrong with the set… he’s mostly melee, but with Piglets for range, which helps him out a bit.

…sorry, I just can’t get past the whole “tail” thing. I’m done with this one.


***

CAP’N BOWSER

An interesting take on Bowser, although I personally prefer the original. The range on this guy is nice, giving Bowser something he desperately needs, but the whole pirate angle is not my preference. Still, the set works just fine, using Side Special or Neutral Special to advance and then smashing the foe with pure bulk. Up Special cannons help discourage air attackers quite nicely, although it’s not as if Bowser really needed that.

The treasure chests, I must admit, are the worst bit, because it’s a little tacky. From what I can tell, foes trapped inside are completely incapable of escaping on their own. Granted, having to jump in or have it thrown at them helps balance things, but even so, there’s absolutely no reason not to throw them off once you have them in there, which is the root of the problem. It’s practically a guaranteed KO.

Otherwise, this set works pretty well. I don’t think pirate really suits Bowser and those chests could use a nerf, but other than that it’s good.


***

BOWSER THE BRASH

This just does not feel like Bowser. Simple as that. Lassos, popguns, all well and good for a Western Bowser… but it feels like you’ve used too much Western and forgotten the Bowser. I realize the aerials are Bowser-y, but that’s just not enough.

That said, the train zoning and the ability to control it via a coin bag is quite good. Very elegant, especially factoring in your ability to anchor yourself to it with a lasso or Back Aerial. I like the Final Smash as well. On the other hoof, force-feeding alcohol milk just feels tacky. Overall, this just doesn’t do it for me.


***

BLACK HOLE BOWSER

Okay, so the forcefield is cool, but I really don’t like that ginormous laser. I don’t know why, especially since I liked Tropius’s Solarbeam… Nonetheless, not a fan of that one. Maybe it’s because you made a point of Bowser being vulnerable to it and then gave him an out. I dunno.

The jet, though, that I like. It’s a useful recovery without being obnoxious (upon reflection, Azula doesn’t have much excuse for a 20-second recovery). The Neutral Aerial is also quite fun, with the possibility of changing the direction of rotation. Simple but mindgamey. Similarly the Forward Smash. The Pummel is an interesting little mindgame as well, as you noted, even if people can tell that you’re pummeling them.

An interesting take on Bowser, and a well-done one, even if I inexplicably dislike that laser.


***

BOWSER SPHINX

These mechanics are just plain cool. Perhaps not as useful as some mechanics, but it gives you something to root for once you’re out of stock… heck, you might even get a KO or two out of it. After all, just because the perpetrator is the one the saucer follows doesn’t mean that he/she is the only one having to worry about the bombs. Then there’s the possibility of throwing the golden Bob-Omb off-stage to get the saucers to bomb stuff. Sure, it’s risky, but if you’re sure you can avoid the bombs most of the time…

The fire breath is a nice ranged option here, certainly a good way to hinder approaches. However, I find the stage-rending to be a bit… out-of-place. Certainly Bowser can do that, and it’s useful, but it just seems… I dunno, random. Not quite matching the theme. Not to mention the Fridge Logic involved with splitting a scrolling stage or, say, Corneria.

The Down Throw also seems a little random. Sure, having a foe out of the way for three whole seconds can be handy, but it seems at odd with the whole Bob-Omb thing, which dictates that foes remain onscreen as much as possible. Then again, maybe it’s just so you know where they’re going to reappear and attack them when they show up… okay, so maybe that makes more sense than I thought.

Oh, and that jab’s knockback? Way too ridiculous. It synergizes well, I’ll grant that, but it’s a jab. The point of it is to be weak.

Nonetheless, this fits together fairly well, and I might actually like playing as Bowser Sphinx. Camping’s fun!


***

WIZARD BOWSER

Invisible Boo minions? I like this set already, especially with the potential to mob a foe with them and then use the Darkness Lamp to totally mess them up. Heck, freezing them into stone is handy as well, for either recovery or damage, even if the foe can also take advantage of it. The ability of the grab to reposition them is a little tacky, but quite effective. Plus those other spirits from Forward Smash to supplement the Boos!

As for that Final Smash, if there’s such thing as a more twisted version of Giga Bowser, I don’t want to see it. Yeesh, talk about Nightmare Fuel…

Overall, this is a lovely set, Bowser being supplemented by his ghostly
minions and black magic. Minions are always good, but even if they fail or just aren’t usable against this particular foe, he’s still got the fact that he’s big and bulky on his side. Heck, I’d love to play as this guy! He’d be a lot of fun.

Finally, frog transformation? I’d claim you stole my idea except it’s for a set I haven’t managed to post yet. XP
 
D

Deleted member

Guest
User Rankings Weeks #16, #17, #18

Welcome to the User Rankings! Every Monday, I'll be compiling the entire of the last week's activity in the thread and showing off, just who is the most active member? The point of this exercise is to recognise the most dedicated among us – those make your movers who are currently pushing the boundaries, as well as highlighting all movesets made by them.

To get on this list, you need to have made a moveset in this or a previous Make Your Move, as well as having posted in the Make Your Move 11 thread. The cut-off point for tallying is 3:59PM on Sunday EST, 5:59PM PMT or 11:59PM GMT; other removals or changes are at my own discretion. The breakdown of points is as follows:
30 points for a Moveset
5 points for a Comment
4 points for a Secondary Submission
2 points for a Secondary Submission Comment
1 point for a Regular Post
+Regular Posts do not stack
+Secondary Submissions are MYminis, Joke Movesets and other miscellaneous submissions
Another three-weeker! Sorry about the long absence, this is a busy time for yours truly and I've had to put the User Rankings on hold [especially when they awkwardly end up being due the night before an exam]. But that shouldn't be a problem for much longer, and the contest is almost over! As we near the end of Make Your Move 12, how was this tri-week? Fairly active, in fact, harbouring a couple of smaller movements and some people delivering dozens of comments.

In first place was Roy, posting the awesome Rattata along with a mini moveset for Two-Headed King Rex. Roy's our boy indeed, as he also commented many, many sets, mostly in a catch up style. In second, unsurprisingly, was Kat, posting Emi and as usual, commenting every set almost as soon as it is released. He isn't losing first at this point, I think. Last but not least, in third we had Conren, posting three sets practically back-to-back - Hardin, Merric and Tiki. Truly an impressive start for a newcomer in the thread, and I'm sure we'll all be waiting in anticipation to see how his career turns out in the future.

Overall User Rankings


Points: 152, Movesets: Scizor, Night's End Sorcerer, Zombie Master, Demyx, Rattata, Two-Headed King Rex

Points: 124, Movesets: Agiri, Fibrizo, Yutaka, Kirika, Medusa Gorgon, Cherry, Luxord, Keroro Platoon, Sakurako & Himawari, Oogie Boogie, Jeanne D'Arc, Emi Ibarazaki

Points: 105, Movesets: Hardin, Merric, Tiki

Points: 91, Movesets: Doc Scratch, Elsa Maria, Grim Poppet, Dark Falz

Points: 75, Movesets: The Coachman, Xigbar, Xemnas, Star-Lord, Rin Tezuka

Points: 54, Movesets: The Necromancer, Zasalamel, Garbage Man, The Prospector, Manfred Von Karma, Black Hole Bowser

Points: 50, Movesets: The Weird Rider, Bouldergeist

Points: 44, Movesets: Smot, Manfred Von Karma, Wizard Bowser

Points: 40, Movesets: Karkat, Terezi, Tempura Wizard, Count Bleck, Phantoon, Sovereign Slayer

Points: 35, Movesets: Cacturne, The Beholder

Points: 35, Movesets: Captain Hook, Once-Ler, Iron Tail, Bowser the Brash, G-Man

Points: 30, Movesets: Rhyperior, Player99, Y2X

Points: 30, Movesets: Amps, Chantique, Kang, Angel, Paper Man, Sphinx Bowser, Nova

Points: 30, Movesets: Shana, Lilly & Hanako

Points: 30, Movesets: Professor Ratigan, Gooper Blooper

Points: 30, Movesets: The Fighter

Points: 5

Points: 4, Movesets: Gardevoir, Tropius, Zexion, Laxaeus, Xaldin, Ampharos, Cryogonal

Points: 4, Movesets: Angel, Gray Fullbuster, Quote, Khamsin Nbh'w, Wilhelmina
 

The Warrior of Many Faces

Smash Apprentice
Joined
Mar 22, 2012
Messages
101
Location
Everywhere and nowhere, as location is meaningless
RATTATA

If anyone had told me that I’d like a set made for Rattata of all things, I’d have laughed them off. Congrats, Roy, you’ve proven me gloriously wrong! :D

Super Fang remains very true to the intent of the original move, plus giving Rattata something very unique in its instantaneous damage racking. Imagine that in a 2v2 with Rattata teamed with, say, Bowser? The possibilities are endless! Run Away plus Rattata’s impressive speed gives it massive mobility, and Hustle makes it even more mobile and more damaging! Use Super Fang to rack damage, then Hustle and try a Hyper Fang or Double-edge for the KO. Simple, but difficult enough to pull off to keep things fair.

And Pursuit is surprisingly amusing, since I had this vision of Ganondorf fleeing from a small but highly determined rodent. Too funny! :D Also, if it means anything, I quite like that grab. Unorthodox? Yes. Makes sense for Rattata? Heck yes. The Final Smash was also quite amusing: where’s there’s one rat in plain sight, there’s a dozen or more hiding elsewhere… oh wait, they’re out here. Oh crap.

Overall, this is a great set, one that is not only interesting but also works pretty well in-smash. Rattata in the next SSB? Yes please!


***

Y2K

This kinda reminds me of Player99 in reverse. Instead of stacking buffs on yourself, you’re stacking debuffs on everyone else. It’s an interesting idea, one that I think I prefer over Player99.

Not that Y2K doesn’t have any buffs, considering the Neutral Special, which is an interesting defensive option… but unless a foe is corrupted, there doesn’t seem to be much reason to use it. Y2K is offensive, needing to forward his corruption as much as possible, so unless you’re trying to damage rack a corrupted foe, there’s little reason to buff unless you’ve got an energy-themed camper to approach.

Up Special is a very interesting recovery, one with disastrous potential if you get it wrong… and not so useful if you’ve been gimped a few times. Nonetheless, its perfect vertical recovery gives it balance, and the ability to home in on corrupted foes makes things interesting.

And then there’s the repairing, which works so freaking well on corrupted foes that everyone with sense will be avoiding your corrupt spines like the plague! On the other hand, that’s all of its standards, four aerials, two smashes, a special, the down throw, and possibly the grab, so that’ll be hard to do.

And then there’s the possession! Obviously overpowered even with the added vulnerability, but I’m sure you know that, and besides, it’s too cool to leave out! Seriously, as if it wasn’t hard enough to avoid corruption already…

This is a way cool set, far better than Player99, even with that somewhat out-of-place Neutral Special.
 
Top Bottom