- Joined
- Jul 30, 2007
- Messages
- 15,371
- NNID
- VenusBloom
- 3DS FC
- 0318-9184-0547
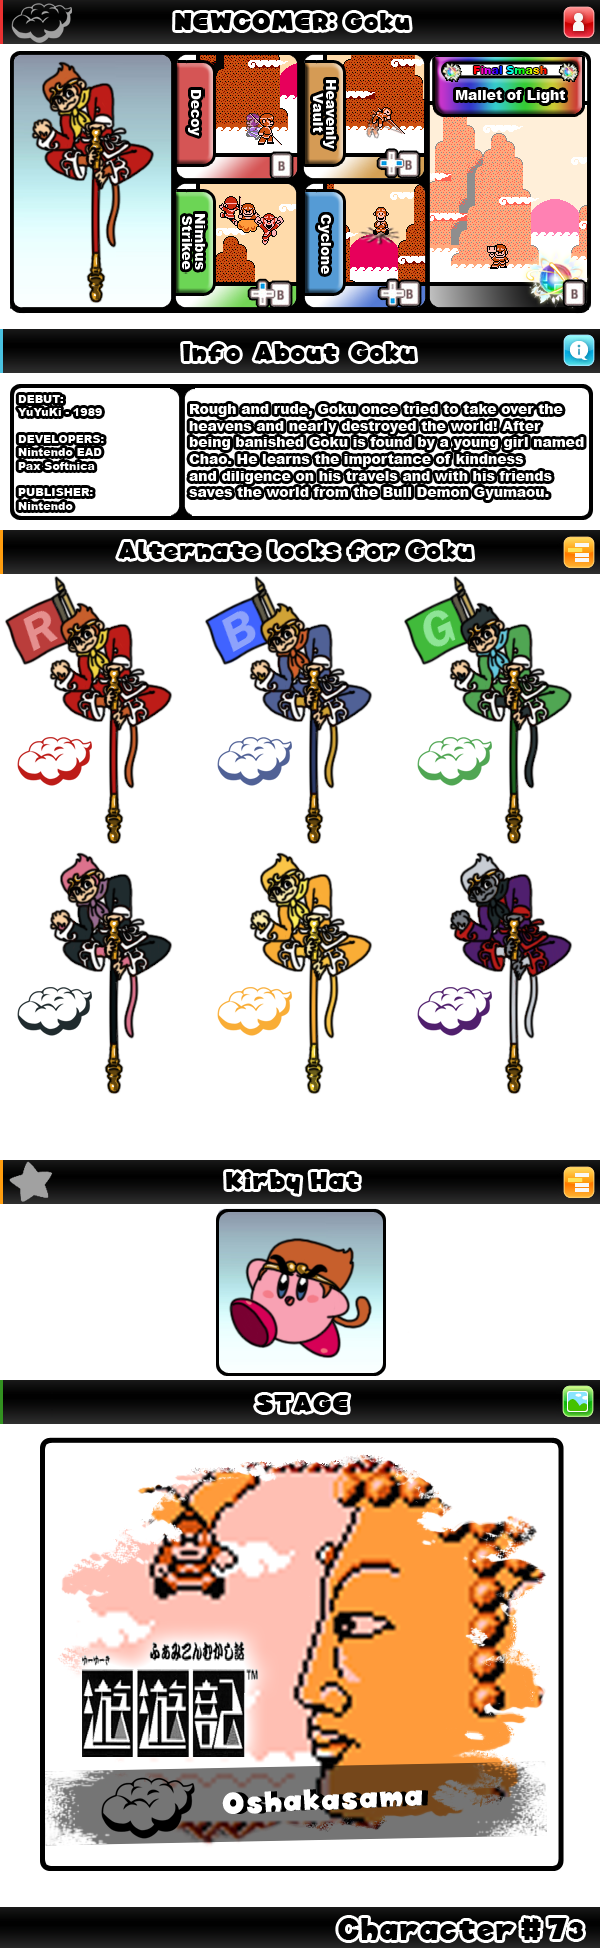
That's right! Goku, the Martial Arts Monkey Master enters the Fray!

Wait...not THAT Goku! I meant THIS Goku!


ふぁみこんむかし話 遊遊記と猿のついて
ABOUT YUYUKI AND GOKU
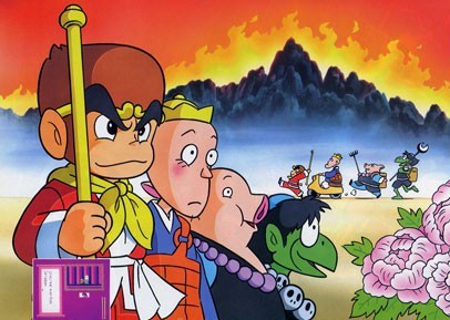
Goku is the main character from the game YuYuki. It is the second installment of the Famicon Mukashibanashi series; the first being Shin Onigashima. Goku is the ill-tempered, rude, rough, and selfish protagonist who tried to take over heaven with his ally, Gyumao. However, for his actions, he was casted down into the world below. However, he is found by a girl named Chao and from her, he learns kindness, selflessness, diligence, and patience. Despite this, he is found by the peacekeeper of the heavens Oshakashima and is imprisoned for his past crimes. Chao then sets out on a quest to retrieve the Gavel of Light in order to save her monkey friend.
Seven years later, the Heavens and Earth are invaded by Goku's old ally, Gyumao. The Gods decided to release Goku from his imprisonment ONLY if he agreed to take down his former friend and ally. Once he defeats Gyumaro, he will be freed from his chains. However, to ensure that he will comply with the gods demands, he was fitted with a headband that restricted his power. Whenever Goku went out of control, the lecherous monk Sanzo was able to take control over Goku's body. However, the dim-witted monk sometimes interpreted Goku's antics as evil and stopped Goku from fighting which, at times, did more harm from good. Also accompanying Goku was the pig demon Hakkai who can transform at will but has a very lazy and greedy personality and the kappa demon Gojo who can read minds but is a alcoholic. But with the guidance from his friend Chao, Goku transformed from a angry and selfish monkey demon to a kind and courageous warrior.
YuYuKi is the successor of Shin Onigashima. It is based off the story Journey to the West, an epic Chinese poem that focuses on Sun Wukong, Goku's fictional counterpart. While Shin Onigashima depended on puzzles, YuYuKi depended on the narrative - forcing players to remember specific details and to discern information from texts and the storyline in order to complete the game. Therefore, is more focused on story than in battle or game play. Goku, while he does fight in the game, is limited by attacks since the focus is not on the fighting aspect. I took many of his attacks from his fictional counterpart, Sun Wukong as well as incorporated the aspect of "Character Change". In YuYuKi, the character change command causes the player to switch characters. I took this into account when making his move set.
スマブラに猿のついて
ABOUT GOKU IN SMASH BROS.
When I sat to design Goku, I wanted to focus on versatility as his main attribute. Most his attacks can be altered to fit where he as at on the stage to maximize his potential. Goku's specials all allow Goku to have a flexible play style. Goku is a fast and agile warrior who uses his staff however ranged attacks. He has impressive speed in both the air and on the ground. Additionally, his small body structure makes him a hard to hit target. He is roughly the same size as Toon Link. However, due to a lack of armor and gear, he is fairly light and can be KO'd by powerful attacks. She can close in distances but yet can retreat if need be.
His attacks, while not extremely strong or brutal, can alternate between close and far attacks. It allows for Goku to be very versatile in his attacks. Additionally, his speed allows him to back up in the opponent is on the offensive. Much of specials can be used for for defensive and offensive purposes. He can also surprise his opponents with attacks such as his Neutral B Pole Gust and his Side and Down B attacks.
猿の統計
GOKU'S STATS
GOKU'S STATS
Height: 4
Weight: 3
Movement: 7
Jumps: 8
Fall Speed: 4
Aerial Movement: 7
Traction: 4
猿の必殺ワザ
GOKU'S SPECIAL B MOVES
GOKU'S SPECIAL B MOVES
Neutral B - Pole Gust
Goku chucks his monkey pole forward. It can be charged for the maximum length. However, this does not affect the speed of the actual throw. If it does not hit anyone, it becomes lodged into the ground and stays there. Pressing B again will cause Goku to summon the Pole back to him which can hit opponents as it travels back. A uncharged pole attack travels roughly the length of 3 Mario bodies. A mid-charged pole will travel 8 Mario bodies, and a full charged Pole Gust can travel the full length of Battlefield. If the Pole is thrown and it falls off the stage and into the end of the screen, the pole will magically return to Goku 10 seconds after vanishing. When Goku does not have his pole, he does the same attacks but with his fists. All of his attacks are decreased in power by 5% and lack the reach. When the attack is executed in mid-air, Goku hovers slightly in the air. This can only be done once though.
A fully charged pole Gust does 12% damage with average vertical knock back. Goku does experience noticeable ending lag after the throw. A uncharged Pole Gust does 5% damage and below average vertical knockback. It has the same amount of ending lag as a fully charged Pole Gust. During the fully charged Pole Gust, Goku has superarmor during the throwing animations. However, a uncharged Gole Gust can be interrupted during the throwing animations by an attack. Pole Gust can also be used as a shield poke since it does extra damage on shields if it hits in the center of the shield. After Pressing B again once the pole is lodged in the ground, it will return back. It does 3% damage for each hit it does. When it hits an opponent, there is a slightly vacuum effect that drags the opponent back to Goku. However, the vacuum effect is fairly weak and does not affect the opponents movements.
Side B - Assist
Goku summons one of his teammates to aid him in battle. Each character has a different property and aids Goku in some way, shape, or form. It also shows that Goku no longer hogs the battles for himself but calls for the aid of his team mates. Here are the following characters you can summon:
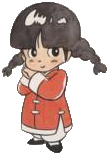
Chao
Chao will appear and begin to pray in front of Yuyuki. During this time, any attacks that she receives and will be negated. Once her prayer is finished, half of the damage will be transferred to Goku. Basically, if she receives 20% damage by the end of her prayer, it will take off 10% of Goku's damage percentage. While an excellent guard and heal technique, Chao will only appear in front of Goku. During the prayer, Goku is able to move around but is unable to attack. The prayer itself lasts around 8 seconds. Once it ends, a flash of light will emit from Chao and balls of light will shoot towards Goku. Once it comes into contact with him, he will be healed instantly. If he is KO'd right when he receives the healing, it will be canceled. Additionally, Chao and the Assists will vanish if Goku is KO'd.
Sanzo (the monk)
Sanzo appears and immediately shoots forward on his scooter "Ryukichi". He shoots straight out and will travel until he careens off the ledge. If it hits an opponent, he will slightly stop, and the Home Run bat sound effect will sound off. It will launch opponents after the hit. It does 15% damage and above average knock back; no matter of where or when it hits.
Hakkai (the pig)
Hakkai will appear and transform into a exact copy of Goku. It will then begin to move independently of Goku. Hakkai will not attack though but he will move, run, jump, dash, shield, roll, and other types of movements. If Hakkai is hit, he will detonate 3 seconds after the attack. It does 18% damage but it has average to below average vertical knockback. Hakkai can commit suicide but he will attempt to grab the ledge. Since he can't attack, he can only do the second jump.
Gojo (the kappa (the turtle looking frog thing))
Gojo will appear and use telepathy to confuse your opponents. It will momentarily put opponents into a 3 second daze or it will cause a 3 second helpless state in the air. It is a very quick attack and Gojo will vanish after the attack. In all it takes 4 seconds to execute. However, Goku suffers from ending lag after the attack. It is a good technique to set up a hit and run maneuver with.
Down B - Transformation
Goku can transform into one of six specific items. The Items are randomized but cannot be transformed consecutively. Goku can be in the transformed state for 12 seconds unless he presses B to undo the transformation or is KO'd. He can transform into the following:
[COLLAPSE="Transform Images"]


 [/COLLAPSE]
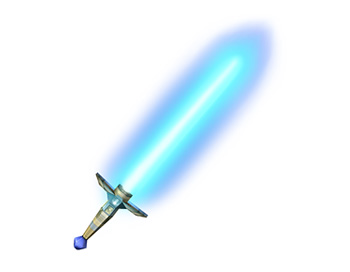
Beam Saber - Goku has access to all the basic attacks and Smash attacks of the Beam Saber. However, he is unable to perform any Special B attacks, throw, grab onto ledges, roll, grab a Final Smash, or perform a Special Recovery Move. However, he can move right and left, duck, shield, jump and double jump, and air dash. This gives Goku an excellent range for attack and can change of his play style. However, his Beam Saber is slightly slower than the original and is 5% weaker. For example, his A button does 7% damage while the Smash does 20%.
Paper Fan - Goku has access to all the basic attacks and Smash attacks of the Paper Fan. However, he is unable to perform any Special B attacks, throw, grab onto ledges, roll, grab a Final Smash, or perform a Special Recovery Move. However, he can move right and left, duck, shield, jump and double jump, and air dash. The Paper Fan has the same properties and damages save for its forward Smash. It only does 5% damage.
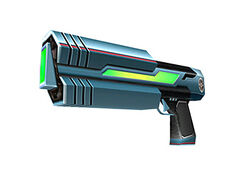
Ray Gun - Goku has access to all the basic attacks of the Ray Gun. However, he is unable to perform any Special B attacks, smashes, throw, grab onto ledges, roll, grab a Final Smash, or perform a Special Recovery Move. Since the Ray Gun does not have any smash attack, it can only shoot with A. It has a slower rate of fire but it has unlimited shots. It does 10% damage like the original.
Star Rod - Goku has access to all the basic attacks and Smash attacks of the Star Rod. However, he is unable to perform any Special B attacks, throw, grab onto ledges, roll, grab a Final Smash, or perform a Special Recovery Move. It has unlimited amount of shots but it does 2% less damage than the original. Basically, its basic A attack only does 8% damage while its Smash attack only does 10%. It has the same travel distance as the original.
Bomb-omb - Goku is unable to attack at all in the Bomb-omb form. However, he can walk and jump around the stage. He is unable to perform a second jump, dash, throw, roll, final smash or shield. Pressing B will result in the Bomb-omb exploding prematurely. It does not have a timed fused but if Goku receives any damage, he will explode. It does 15% damage compared to the 25% in SSBB. It also has a smaller blast radius. Goku all receives 5% damage after the explosion.
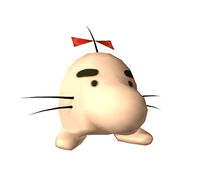
Mr. Saturn - Goku is unable to attack at all in the Mr. Saturn form. However, he can walk and jump around the stage. He is unable to perform a second jump, dash, shield, throw, final smash, roll, etc. He is able to be picked up and throw at opponents. He is also able to be attacked. Any damage from being thrown or attack amounts to 1% damage; no matter how strong the attack is. This is a pretty useless transformation.

Up B Recovery Move - Flying Nimbus
Goku summons his magical cloud to carry him into the sky. It functions much like R.O.B's thrust abilities. Pressing and holding up B will allow Goku to move upwards into the sky. However, letting will cause Goku to enter into a free fall. The differences between Flying Numbs to Robo Burner is that is has a slightly less vertical recovery distance and it has noticeable start up lag compared to Robo Burner. While it is a good strategy to activate it, deactivate it, attack, activate it etc, the start up and ending lag slightly dampens the effectiveness of the attack. However it is an excellent recovery move that moves more horizontally than vertically.
Goku chucks his monkey pole forward. It can be charged for the maximum length. However, this does not affect the speed of the actual throw. If it does not hit anyone, it becomes lodged into the ground and stays there. Pressing B again will cause Goku to summon the Pole back to him which can hit opponents as it travels back. A uncharged pole attack travels roughly the length of 3 Mario bodies. A mid-charged pole will travel 8 Mario bodies, and a full charged Pole Gust can travel the full length of Battlefield. If the Pole is thrown and it falls off the stage and into the end of the screen, the pole will magically return to Goku 10 seconds after vanishing. When Goku does not have his pole, he does the same attacks but with his fists. All of his attacks are decreased in power by 5% and lack the reach. When the attack is executed in mid-air, Goku hovers slightly in the air. This can only be done once though.
A fully charged pole Gust does 12% damage with average vertical knock back. Goku does experience noticeable ending lag after the throw. A uncharged Pole Gust does 5% damage and below average vertical knockback. It has the same amount of ending lag as a fully charged Pole Gust. During the fully charged Pole Gust, Goku has superarmor during the throwing animations. However, a uncharged Gole Gust can be interrupted during the throwing animations by an attack. Pole Gust can also be used as a shield poke since it does extra damage on shields if it hits in the center of the shield. After Pressing B again once the pole is lodged in the ground, it will return back. It does 3% damage for each hit it does. When it hits an opponent, there is a slightly vacuum effect that drags the opponent back to Goku. However, the vacuum effect is fairly weak and does not affect the opponents movements.
Side B - Assist
Goku summons one of his teammates to aid him in battle. Each character has a different property and aids Goku in some way, shape, or form. It also shows that Goku no longer hogs the battles for himself but calls for the aid of his team mates. Here are the following characters you can summon:
Chao
Chao will appear and begin to pray in front of Yuyuki. During this time, any attacks that she receives and will be negated. Once her prayer is finished, half of the damage will be transferred to Goku. Basically, if she receives 20% damage by the end of her prayer, it will take off 10% of Goku's damage percentage. While an excellent guard and heal technique, Chao will only appear in front of Goku. During the prayer, Goku is able to move around but is unable to attack. The prayer itself lasts around 8 seconds. Once it ends, a flash of light will emit from Chao and balls of light will shoot towards Goku. Once it comes into contact with him, he will be healed instantly. If he is KO'd right when he receives the healing, it will be canceled. Additionally, Chao and the Assists will vanish if Goku is KO'd.
Sanzo (the monk)
Sanzo appears and immediately shoots forward on his scooter "Ryukichi". He shoots straight out and will travel until he careens off the ledge. If it hits an opponent, he will slightly stop, and the Home Run bat sound effect will sound off. It will launch opponents after the hit. It does 15% damage and above average knock back; no matter of where or when it hits.
Hakkai (the pig)
Hakkai will appear and transform into a exact copy of Goku. It will then begin to move independently of Goku. Hakkai will not attack though but he will move, run, jump, dash, shield, roll, and other types of movements. If Hakkai is hit, he will detonate 3 seconds after the attack. It does 18% damage but it has average to below average vertical knockback. Hakkai can commit suicide but he will attempt to grab the ledge. Since he can't attack, he can only do the second jump.
Gojo (the kappa (the turtle looking frog thing))
Gojo will appear and use telepathy to confuse your opponents. It will momentarily put opponents into a 3 second daze or it will cause a 3 second helpless state in the air. It is a very quick attack and Gojo will vanish after the attack. In all it takes 4 seconds to execute. However, Goku suffers from ending lag after the attack. It is a good technique to set up a hit and run maneuver with.
Down B - Transformation
Goku can transform into one of six specific items. The Items are randomized but cannot be transformed consecutively. Goku can be in the transformed state for 12 seconds unless he presses B to undo the transformation or is KO'd. He can transform into the following:
[COLLAPSE="Transform Images"]
Beam Saber - Goku has access to all the basic attacks and Smash attacks of the Beam Saber. However, he is unable to perform any Special B attacks, throw, grab onto ledges, roll, grab a Final Smash, or perform a Special Recovery Move. However, he can move right and left, duck, shield, jump and double jump, and air dash. This gives Goku an excellent range for attack and can change of his play style. However, his Beam Saber is slightly slower than the original and is 5% weaker. For example, his A button does 7% damage while the Smash does 20%.
Paper Fan - Goku has access to all the basic attacks and Smash attacks of the Paper Fan. However, he is unable to perform any Special B attacks, throw, grab onto ledges, roll, grab a Final Smash, or perform a Special Recovery Move. However, he can move right and left, duck, shield, jump and double jump, and air dash. The Paper Fan has the same properties and damages save for its forward Smash. It only does 5% damage.
Ray Gun - Goku has access to all the basic attacks of the Ray Gun. However, he is unable to perform any Special B attacks, smashes, throw, grab onto ledges, roll, grab a Final Smash, or perform a Special Recovery Move. Since the Ray Gun does not have any smash attack, it can only shoot with A. It has a slower rate of fire but it has unlimited shots. It does 10% damage like the original.
Star Rod - Goku has access to all the basic attacks and Smash attacks of the Star Rod. However, he is unable to perform any Special B attacks, throw, grab onto ledges, roll, grab a Final Smash, or perform a Special Recovery Move. It has unlimited amount of shots but it does 2% less damage than the original. Basically, its basic A attack only does 8% damage while its Smash attack only does 10%. It has the same travel distance as the original.
Bomb-omb - Goku is unable to attack at all in the Bomb-omb form. However, he can walk and jump around the stage. He is unable to perform a second jump, dash, throw, roll, final smash or shield. Pressing B will result in the Bomb-omb exploding prematurely. It does not have a timed fused but if Goku receives any damage, he will explode. It does 15% damage compared to the 25% in SSBB. It also has a smaller blast radius. Goku all receives 5% damage after the explosion.
Mr. Saturn - Goku is unable to attack at all in the Mr. Saturn form. However, he can walk and jump around the stage. He is unable to perform a second jump, dash, shield, throw, final smash, roll, etc. He is able to be picked up and throw at opponents. He is also able to be attacked. Any damage from being thrown or attack amounts to 1% damage; no matter how strong the attack is. This is a pretty useless transformation.
Up B Recovery Move - Flying Nimbus
Goku summons his magical cloud to carry him into the sky. It functions much like R.O.B's thrust abilities. Pressing and holding up B will allow Goku to move upwards into the sky. However, letting will cause Goku to enter into a free fall. The differences between Flying Numbs to Robo Burner is that is has a slightly less vertical recovery distance and it has noticeable start up lag compared to Robo Burner. While it is a good strategy to activate it, deactivate it, attack, activate it etc, the start up and ending lag slightly dampens the effectiveness of the attack. However it is an excellent recovery move that moves more horizontally than vertically.
猿の最後の切りふだ
GOKU'S FINAL SMASH
Gavel of Light
Goku summons and hold aloft the Gavel of Light. When activated, Goku switches it out for his pole. He can swing the gavel of light which will then eject massive amounts of light energy. It has twice the reach of his pole despite being smaller, increases his speed by 5%, and his jump by 8%. It's effects is much like Wario's Final Smash. When swung, it blasts opponents away. The Final Smash itself lasts around 12 seconds unless Goku commits suicide or is KO'd. he has Superarmor and cannot flinch from attacks. It has a number of attacks:
Neutral A - Gavel Swing: A simple swing that blasts out light energy in front of him. It does around 18% damage and high knock back.
Forward Smash - Gavel Smash: Smashes the gavel in front of him. It does around 30% damage and high vertical knock back.
Up Smash - Gavel Push: Pushes the gavel up above his head. It does around 28% damage and high vertical knockback.
Down Smash - Gavel Pound: Slams the gavel down into the ground. It does 15% damage and can ground opponents for 8 seconds.
Nair - Gavel Twirl: Twirls around while holding the gavel. It does 16% damage and moderate knock back.
Dair - Gavel Descent: Falls down into the ground and slams the gavel into the ground. It does 31% damage and extremely high vertical knockback.
Uair - Gavel Force: An aerial version of his Up Smash. Does 26% damage and vertical knockback.
B - Light Burst: Shoots out a burst of light that travels across the stage. It does 25% damage and high knockback. It has a long ending lag thus is not best to be spammed.
Gavel of Light is a fairly effective Final Smash that allows Goku to travel and attack in the stage. However, he can die by going off the ledge and is unable to recovery. Most of Goku's FS attacks can KO opponents as low as 40% so attack fast and strong in order to reap the rewards.
猿の技セット
GOKU'S MOVE SET
Standard Attacks
Neutral A:Pole Tap
Goku pokes his pole forward. It is a very quick attack with decent range. However, compared to his tilts, it has the shortest range of them all. He grips his pole at the end and middle thus hitting the opponent with the tip. It does almost non-existant knockback and is unable to KO opponents lower than 630%. However, it does push the opponent slightly back during the stun animations which is helpful if opponents are pressuring Goku. It does 5% damage total. However, due to its quickness and no start up/ending lag, it is a very reliable move for Goku.
Neutral AA:Pole Poke
After the first A, Goku then steps a bit closer and thrusts his pole even further out. It has better range compared to his Neutral A attack and it does 8% damage. Additionally, it has below average vertical knockback. While it is lower than some of his tilts, it is noticeably better than his Neutral A. However, he does have a little ending animation lag near the end of the attack. The hit box is at the tip of the pole.
Neutral AAA (continuous):Pole Barrage
After the second AA tap, quickly tapping A will result in Goku unleashing random pole pokes at the opponent. They do 2% damage each and are very fast. However, the attacks priority is fairly weak thus allowing for stronger attacks to cancel them out. It has no ending lag and Goku is vulnerable from behind. It is a good edge guarding attacking but will not cancel out Special B recovery moves.
Dash A:Pole Sweep
Golu rushes forward and slashes his pole in front of him. It hits opponents in the middle area unless the character is small in which it is a head hit. It is a very quick attack that has no start up or ending lag. However, the animations are a bit decieving. It only connects when the pole is at the quarter point of its animation sequence. Meaning there is a 1 second delay which inputting the attack and the attack connecting. Additionally, the hitbox is located along the side of the pole. It does horizontal knockback and is a good pressuring attack. Due to no ending lag, Goku is able to attack or move out of the Dash A attack with relative ease.
F-Tilt:Pole Ram
Goku steps forward and them slams the point of the pole downwards and slams the opponent into the ground. While it does not appear to have much length at first, the step Goku takes is important since it closes the gap inbetween Goku and the opponent. It can spike opponents as low as 100% and does vertical knockback. It can KO opponents around 150%. However, it is a slower attack that has minimal start up lag and moderate ending lag. It does around 10% damage and an additonal 2% if it spikes up. It is decent for setting up aerial combos at high percentages. However, due to the ending lag, most low percentage opponents are out of the stun animations before Goku can do a aerial combo.
U-Tilt:Pole Shove
Goku graps his pole on either end and slightly jumps up and shoves the pole upwards. It has a wide hit box area due to the length of the pole. It does around 12% damage and average vertical knockback. It has decent priority but it often canceled out by aerial attacks. It is especially vulnerable to Dairs like Link, Yoshi, Sonic, Ganondorf, etc. They will foten break the attacks guard. As well, it has moderate start up lag and a slight ending lag. It is much better at setting up aerial combos than F-Tilt is.
D-Tilt:Tail Poke
One of Goku`s attacks that relies on something other than his pole. Goku turns around and pokes the opponent with his tail. While it is one of his weaker tilts, the attack itself is fairly quick. However, it suffers from a long start up lag since he has to turn around. However, after the attack, Goku spins around quickly thus minimazling his ending lag. If D-Tilt is executed followed by a continuous A button mash, he will not turn around and will continue poking with his tail. It is an excellent shield poke due to this reason. It does around 4% damage and is considered his weakest tilt. It dsoes does low knockback but it does much more compared to his Neutral A.
Smashes
F-Smash:Pole Fury
Goku holds his pole back, steps forward, and then thrusts it out by holding it at the butt of the pole. This smash has the longest distance due to the initial first step and the length of the pole. It does around 15% uncharged and 22% fully charged. It does average to above average vertical knockback. As well, it has a distant hit box that can catch opponents by surprise and can pressure them. It also allows Goku to control the distance between him and his opponents. It is a very good edge guarding attack to its length. However, the attack has noticable start up and ending lag. The smash is also the slowest in terms of speed. It does have good piriority and can cancel out weaker tilt, smash, and even projectile attacks.
U-Smash:Pole Spear
Goku takes his pole, holds it at the butt, and thrusts it up high aboce him much like Marths U-Smash. It has incredible range and the hit box is located at the tip of the pole. It can also cancel out some weaker aerial attacks and even a few Dairs like Link and Sonic. However, the timing has to be perfect to cancel them out. It does around 18% uncharged and 25% charged. While it lacks the length of his F-Smash, it does much more damage compared to his F-Smash. It also has very little start up and ending lag thus makling it a powerful and reliable move. However, the attack does leave Goku vulnerable on the ground during the attack animation and the ending lag animation.
D-Smash:Pole Twirl
Goku takes the pull, grips it with his feet, and spins around on his head. He does 3-5 spins in total; depending on how long the attack was charged. It is able to hit 3 to 5 trimes and does 5% damage each hit. It totals to 15% uncharged and 20% damage fully charged. It does vertical knockback. While not a powerful attack, it does protect Goku from both sides and is a fairly long attack in terms of animation frames. It also creates a vacuum effect that pulls opponents into the attack. It has a little start up and ending lag but is dwarved by the length of its attack animation frames. It has decent priority but can be canceled out by stronger charged smash attacks. While Guy can be attacked during the attack animation frames, the distant hitboxes make it hard for characters to approach him.
Misc.
Ledge Attack:Pole Cut
Goku launches himself over the ledge and cuts down like a katana. It his a downward clicing motion. It is a very quick and far reaching attack that is great at surprising opponents. It does around 4% damage and vertical knockback. While not a damaging attack, its speed and quickness is its strong point.
100% Ledge Attack:Pole Power
Goku pulls him up from the ledge, and then slams the butt of the pole into the opponent. While it lacks the length of the Pole Cut attack, it has much more power and knock back potential. It does 8% knockback and horizontal knockback. It basically launches opponents backwards along the ground. It has a little ending lag at the end.
Floor Attack:Rising Monkey
Goku spins around, does a small hand stand, and springs up and kicks with his feet. A fairly quick attack that launches opponents in the air. It is a powerful kick attack that does 6% damage and vertical knockback. It also has no ending animations.
Aerials
Nair:Pole Storm
Goku spins around while extending his pole upwards. He makes 6 quick rotations before stopping. It does 2% damage each hit thus totaling to 12% damage. If the attack hits at the last animation, it does the most amount of horizontal knock back. It is a good attack since it protects Goku at all sides and has decent priority. However, it has moderate landing lag and is a horrible short hop attack. Overall, it is a decent and flashy Nair attack and on eof his better aerials.
Fair:Pole Strike
Goku brings up his pole high over his head, and then swings downwards while spreading out his legs. By far it has the widest hitbox arc. It has a total of 8 possible hitboxes. It does vertical knockback and does 14% damage at the initital hit. It considered his best Aerial attack due to no start up or landing animations, the quickness and wdith of the attaclk, and it can be shorthopped. If the attack hits th eopponent at the lowest point of the arc, it can do a meteor strike and a bottom KO.
Bair:Back Kick
Goku turns backward and kicks out his with foot. It has the shortest range after his D-Tilt and is his weakest aerial by far. It only does 8% damage and horizontal knockback. It also has weak pirority compared to his other aerials. However, it has no lag and is a fairly quick attack that can be shorthopped and executed several times before landing.
Dair:Heavenly Spear
Goku hops onto on the butt of his pole and descends down quickly. It is a very powerful Dair that can penetrate most attacks and can even drain shields considerably. The attack does suffer from moderate to long start up and ending lags; especially if Goku lands on the stage. His pole become stuck in the ground and there is a 3 second lapse where he pulls it out. However, if the attack connects, it is capable of doing 24% damage and can meteor strike opponents for a bottom KO. Once his attack lands on a opponent, he exits the attack animations and has no ending lag. It has very good priority and can even cancel out most uncharged U-Smashes and even some charged U-Smashes. However, it run the risks of the long ending lag if it misses or a suicide if down outside of the stage.
U-SmashPole Hurricane
Goku grabs his pole with both hands and twirls it up above him. He does 3 rotations and each rotation hits at 5% damage thus totaling to 15% damage overall. It is a good attack, much like his Nair, that protects him from above due to the disjointed hitboxes. However, it has weak priority and is weak from above. It also causes Goku to hover momentarily when executed. However, it is incredibly useful as a recovery move. It can stall his descent when in a pinch though. It does horizontal knockback and, much like his Nair, does the most at the last animation attack frame.
Throws
Grab
Goku has a fairly quick grab but has a short range. He grabs the opponent and shoves them into his armpit. Since Goku has a fairly bully'ish personality; this fits him to a T.
Pummel:Noogie
Goku slams his fist into the opponents head and grinds it. It is a moderately slow pummel and does around 3% damage.
F-Throw:Pole Butt Slam
Goku slams his opponent into the ground and then slams the butt of his pole into the opponent. It is a fairly quick throw but it does decent damage at 8%. However, it does no knockback.
B-Throw:Back Slap
Goku swings the opponent around and slaps the opponent in the back. The opponent stumbles forward and falls down. It does 5% damage. However, it is a very fast throw despite the low damage percentage. It does vertical knockback.
U-Throw:Pole Thrust
Goku hits the opponent upwards and then slams the pole into the opponent. It knocks the opponent high into the air. It does around 10% and does high vertical knock back. It is his best throw due to the high damage and knock back.
D-Throw:Pole Pogo
Goku slams the opponent into the ground. He then climbs on top of the pole and begins jumping up and down on the opponent like a pogo stick. It does 6% damage for 3 hits. It is a longer throw than most but powerful throw.
色の種類と演出とコスチュームなど
GOKU'S PALETTE SWAP, ANIMATIONS, COSTUMES, ETC
Coming Soon!
Palette Swaps

Brown (Normal)
Blue (Blue Team)
Green (Green Team)
Red (Red Team)
Orange
Yellow
Pink
BlackWhite
ふぁみこんむかし話 遊遊記と猿なんで?
WHY GOKU AND YUYUKI?
可
PROS
-Goku has only appeared in one game as a main character and that is YuYuki. However, he did appear in Kirby's Dream Land 3 where he was found in a secret area. Chao tasked Kirby in finding Goku and bringing him back to her. So while he has yet to be playable in some form, he did appear as a crossover in a series created by Sakurai. While I doubt this increases his chances exponentially, Sakurai knows of this character.
- YuYuKi was fairly popular upon it's release; in part because of Dragon Ball. Additionally, the story itself, Journey to the West, is often a very popular motif in Japanese literature and media. Franchises such as Dragon Ball, Sayuki, Love Hina, and many others utilizes the elements from Journey to the West in their story lines. Why not bring it into Smash.
- Goku has a large amount of potential to draw from - both from his YuYuKi adaptation and from his fictional counterpart, Wukong. He has the potential to have a unique playstyle and move set.
- He is a Retro/Classical character with some history with Nintendo. Plus, he is the successor of Takamaru. I would think he would be a good candidate to revive considering his relationship with Takamaru.
- His inclusion would cause quite a stir with Dragon Ball fanboys and ruining Dragon Ball fan boys dreams and expectations of Son Goku being playable is a tantalizing idea.
否
CONS
- YuYuKi Goku is fairly unknown to the Western market since he was a Japanese character only. As well, he has yet to see a recent appearance in 12 years. Relevancy hurts his chances of being playable
- YuYuKi has a whole is a small and obscure franchise that might not be able to offer much into Smash Bros.
- Nintendo and Sakurai might be interested in reviving other classical/retro characters such as Takamaru, Mach Rider, and Lip.
- There are other more deserving/likely Retro/Classical characters such as Takamaru, Mach Rider, Lip, Prince Sable, Duck Hunt Dog, Sheriff, etc than Goku.
- Dragon Ball fan boys might see this as a slap in the face and revolt. There are so many of them that such a uprising might be the end of the world as we know it.
議論と反駁
ARGUMENTS AND REBUTTALS
Coming Soon!
 ), so I'd be down to have him be playable in Smash.
 ), but personally I wouldn't complain at his addition.
  )
)