• Welcome to Smashboards, the world's largest Super Smash Brothers community! Over 250,000 Smash Bros. fans from around the world have come to discuss these great games in over 19 million posts!

    You are currently viewing our boards as a visitor. Click here to sign up right now and start on your path in the Smash community!

Week in Review Issue #10

Status
Not open for further replies.

Venus of the Desert Bloom

Cosmic God
Super Moderator
Premium
BRoomer
Writing Team
Joined
Jul 30, 2007
Messages
15,415
NNID
VenusBloom
3DS FC
0318-9184-0547
The Week in Review Edition #10
3/17 - 3/21
Writers:

@ Venus of the Desert Bloom Venus of the Desert Bloom
@TumblrFamous
@ --- ---


Editor:
@Aerodrome

Banner by @ Rocket Raccoon Rocket Raccoon

Last week started great with much expectations with a possible Yoshi reveal on Friday. All of these hopes and expectations crashed and burned though with Yoshi not being revealed. In fact, it was a new 3DS stage from the Japan-only game "Tomodoachi Collection". This week (and the week before), proved to be good for the Nintendo 3DS as three stages: Tortimer Island, Lumiose City, and Tomodachi Colletion are revealed in a generally short period of time. This could be an indiciation that Sakurai is starting to focus more on the 3DS version. As mentioned earlier, the week started out great with confirmation that the franchise Captain Rainbow would be represented in Super Smash Bros. This representation came in the chubby form of a Little Mac trophy as he appeared in the game Captain Rainbow. Tuesday continued with the hype and excitement with a Pokemon X/Y stage revealed: Luimose City. Not much was shown of the stage though. Wednesday was either a good or bad reveal for Zelda fans as it was confirmed that Zelda's Din Fire had its explosive power increased though many thought it was best for it to be faster. Thursday confirmed the return of the Motion-Sensor Bomb ins an expected redesign. Many thought Yoshi would be revealed due to the North American release of Yoshi'ew New Island for Nintendo 3DS. While most characters are revealed following the Japanese release of their game, Diddy Kong was revealed during the western release of Donkey Kong Country: Tropical Freeze. However, this could of course be attributed to Little Mac being revealed prior during the Valentines Day Direct. Regardless, Friday proved to be an ill and dissapointing day for Yoshi mains and Smash fans who was expecting the green dinosaur. Instead, the third 3DS stage "Tomodachi Collection" was revealed.


I would like to say a big and huge thank you to:


[*} @TumblrFamous for writing Thursday's article.

[*} @ Mario & Sonic Guy Mario & Sonic Guy for writing the amazing Rosalia Analysis Part 2.

@APC99 for writing the great Mario veteran analysis.

@ --- --- for writing Friday's PotD.

[*} @Groose for taking the interview.

@ Smady Smady
@MasterWarlord
@JOE!
@ForwardArrow
@FrozenRoy

Thank you guys for helping compile information concerning the MYM Thread of the Week and putting up with my barrage of questions :)

[*] Lastly, to all of the Smashboards users who posts really make up what the WiR is. Without your insightful (and crazy) posts, this thread would not exist so thank you very much!

Previous Issues

[collapse=Previous Issues]
To view the previous issues
Issue #1
Issue #2
Issue #3
Issue #4
Issue #5
Issue #6
Issue #7
Issue #8
Issue #9
[/collapse]

Want to help or contribute?

[collapse=Rules and Other Infos]This is the first edition of "The Week in Review". The Week in Review will be a series of articles I have made throughout the week concerning the Pic of Day through using posts, threads, and MiiVerse to pool information and opinions about Super Smash Bros. for Wii U and 3DS . However, the articles are not only limited to my own observation but to those of the larger Smash 4 community. Users are encouraged to submit articles and observations as well as opinions concerning the pictures that were updated throughout the week. I will explain how you can contribute later.
So what can you expect from this thread? On Friday, I will update the thread with a new article which will contain the Pic of the Day, other relevant images, information, I will also be pulling out interesting and thought provoking posts that have popped up throughout the week on the various threads such as the Wii U Discussion thread, 3DS Discussion Thread, MiiVerse Photo Thread, Roster Discussion Thread, character support threads as well as the Super Smash Bros, Wii U/3DS Backroom thus linking them altogether. In addition, I will also be adding up any information that Sakurai has revealed outside of the website/MiiVerse such as interviews and news articles.
I will open the thread on the weekend for people to talk about how the week went and comment on the articles. However, I will be closing the thread on Monday in order to prevent premature discussion about the weeks updates. I will be operating on Japanese Standard Time since both myself and Sakurai (OMG both of us in the same sentence?!?!?!) live on JST. View the JST Page in order to fully understand how time works.

Additionally, while this thread will focus on solely the Pic of the Day, I will sometimes allow pieces to be written about Smashboards, the Smash Community, MiiVerse, or Sakurai information. Additionally, once we have more information regarding the nature of the character, I will allow a user to write up an in-depth analysis of a character, veteran or newcomer. So come show your stuff!

Why is this thread needed?
We do have various discussion threads pertaining to various aspects of Smash. However, this is less of a discussion thread and more like a newsletter. I intend to present the facts and portray an unbiased review of the week. It will also serve as a hub to collect information, pictures, and articles that have been released in a weekly format thus allowing users to review the past weeks for better understanding how to predict future updates or to comb through information in an effective manner. It will also serve as a place to users to present their information, opinions, and observations in a semi-academical format. More information is listed below. If you see an interesting, funny, thought-provoking, or ridiculous post either on the SWF or on MiiVerse, PM me about it and I will include it! If you want me to remove you from a certain Tag, PM me and I will take you off.

Also, I wanted to use this space to allow users to be creative and constructive in speculating Smash in a more journalistic manner. I will not edit any posts except if they are inappropriate, bypass the censor, hateful in nature, or irrelevant.

How can I help?

You can contribute to this thread in many ways.
1) You can serve as a guest writer. This is done by contacting me via PM and apply to be a guest writer for the current week. I am able to allow or refuse the guest writer based on past credentials and reputation within the Smash 4 community so please keep that in mind.

After approval, I can either give you a piece to write OR you can choose one yourself. It should be focused on a particular Pic of the Day. Please promptly let me know which one you intend to. If I do not hear from you within a day, I will not accept an article. The article itself should be professionally written with little to no grammar or spelling mistakes. Any sources should be cited with a link to direct readers. While I understand some updates may be hard to write for, please write at least two paragraphs for each update. Unless it is an update of Luigi's nose but I am sure someone can find some Freudian psycho-analysis about that update. Please refer to the first edition post about how to write an article (though I am pretty sure many journalist/lit majors can do a much better job than I can lol).

2) You can help me gather posts that are excellent or at least interesting in nature. PM me any posts concerning a particular update and I will then add it to the articles. I frequent the above mentioned threads on a daily basis but I obviously miss things so I am heavily dependent on everyone getting me those great and thought-provoking posts. I want this thread to showcase what the brilliant minds in the Smash 4 community can do!

3) While you can discuss past and future weeks, please refrain from dissecting or analyzing the previous/future weeks and save that for the current week.

4) Could someone be a dear and make a banner for this thread. It's not urgent but a banner would be grand.[/collapse]
Table of Contents

1.1 Day #1: More than a Month of Final Smashes
2.1 Day #2: The Grand Mario Tour
3.1 Day #3: Sleeping on the Job
4.1 Day #4: Sakurai's Gone Nutty!
5.1 Day #5:
6.1 Week Overview
7.1 Editorials
8.1 Week in Review Interview: Groose
9.1 Character Analysis: Rosalina Part 2 by @ Mario & Sonic Guy Mario & Sonic Guy
10.1 Thread of the Week: MYM
11.1 Mario Analysis by @APC99


More than a Month of Final Smashes
03/17/14
Day#1: Monday
Writer: Venus of the Desert Bloom


While absent from most if not all of the Pic of the Days, Final Smashes and, in aprticular, the Smash Ball graces both MiiVerse and the website on Monday. Sakurai is quoted with saying:

"Pic of the day. That item that brings victory one step closer...the Smash Ball! Of course everyone wants it! Come to think of it, I haven't introduced any of the Final Smashes yet... Then again, if I introduced every single one, it'd take over a month's worth of posts."
Since the Official E3 trailer, only three Final Smashes have yet to be see:

Wii Fit Trainer 's Final Smash "Wii Fit".


Little Mac's Final Smash "Giga Mac"


Samus' Final Smash "Zero Laser" which was also revealed during the E3 Super Smash Bros. Brawl trailer.

However, it is important to note that while those three Final Smash's were confirmed; they were not featured in the Picture of the Day and not verbally confirmed by Sakurai. With Sakurai's quote, some were trying to figure how many characters Sakurai is referring to:

>Every Single 1

>Over a month

>1 month usually has about 30 days

>Over 30 chars confirmed
@JOE!

But also not more than 60 otherwise he would have said 2 months.

INTERESTING
@Aerodrome
5 days, 4 weeks, Skip weekends = around 20-21 days. 24 characters revealed = over a month of Final Smash's.
He post pics only on weekends which means there are still only 23 characters.
Jonathan on MiiVerse
TigerWaffl on MiiVerse
It kinda bugs me how everyone only cares about predicting how many fighters will be in the roster. Come on guys! The REAL news is that the Smash Ball has returned!
Jάymεη on MiiVerse
I had the same conclusion, until i realized that he only posts weekdays... which is about 20 per month... :( I still think 30+ characters is a very safe bet though.
@TheNotSoShyGuy

Considering that the SSB4 roster will be the same size or larger as Brawl, it is not an over-statement that Final Smash updates will take more than a month. Just counting all returning veterans minus Charizard, Squirtle, and Ivysaur, it would have 37 days to feature a PotD and MiiVerse update for each returning veteran. However, as mentioned before, weekends are not taken into consideration.

Let's say that Sakurai starts to make a mad spree of Final Smash updates starting from April 1st. It would take from April 1st to May 7th just to complete each veterans Final Smash. Then take into account Little Mac's, Villagers, Ms. Fit, and Mega Man....we would then be at 41 characters and at May 13th. And let's say we get 45 characters, 10 more than Brawl. We would then be at May 21st. Of course this is all speculation but is about a month and a half.

What I am trying to illustrate that, not counting weekends, it would take 47ish days with 45 characters. However, taking into account the weekends as a waiting period, it would take 51 days to reveal all of the character's Final Smashes. This is what I think Sakurai was referring to. Yes, weekends do not have updates but we are still waiting for Final Smashes to be updated.

Then again, it also doesn't take into account if Samus/Zero Suit Samus' FS as well as Zelda and Shiek's would be introduced together.

Many fans were voicing their opinions on how Final Smashes should look:
I'd prefer a video for individual Final Smash demonstrations. Pics don't do justice to a Final Smash's true effectiveness (DK's and Ice Climbers' come to mind).
@IsmaR

villager’s final smash should be crazy red comes and buys all the other characters.
Chris on MiiVerse

Tips for other newcomers' final smashes: Mega Man-Super Adapter Villager- Firework Festival Rosallina- Luma Army
Real on Miiverse

If you could sakurai, just show us a few of the final smashes once in a while, and leave the rest them a secret, giving us a chance to see their beauty on our own.
Nate of MiiVerse

While others feel that this bodes well for future Final Smash updates:
I'd say we are getting a Final Smash pic tomorrow, but I remembered that Sakurai is a troll, so he probably won't.
@Mega Bidoof

I feel that while we might not get one immediately, this does certain bode well for future Final Smash updates since Sakurai acknowledged that they have yet to be confirmed. I believe starting from Monday, we will begin to see more updates concerning Final Smashes. However, will the PotD be able to do them justice or will a video/multiple pictures be needed? Let us know!


Things Confirmed for Monday:

1) Smash Ball returns
2) It will take more than a month to reveal each character's Final Smash.
3) Slightly updated design


The Grand Mario Tour
03/11/14
Day #2: Tuesday
Writer: Venus of the Desert Bloom


Tuesday was a rare quadruple whammy from Sakurai that completely took everyone by surprise. Sakurai posted four pictures relating to the "Super Mario Bros 3D land" complete with pictures and comments. It was like the Brawl Dojo all over again!
Ha this update reminded me on how the dojo was run. Multiple pics and information on one topic.

Stage seems like Rainbow Cruise.
@mygamecube


Sakurai said:
"Pic of the day. Here's some info on the Nintendo 3DS stage called Super Mario 3D Land! First, it advances by side-scrolling…"


"Then you continue into the valley--it's in 3D Land, after all. The protruding stone blocks change the angles of the platforms."


"After that, back to side-scrolling. Now it gets you moving--you'll have to trot downhill here."


"And finally, you get back on rails to go farther into the stage. It takes roughly two minutes to complete a lap, and at the end you go into a giant pipe that takes you back to the beginning. …I know this sequence goes above and beyond a traditional Pic of the Day, so consider this a little something extra on the side from me."
This is the first time we got more than two pictures related to the PotD and there's a high possibility that we might see this happen again with updates such as Final Smashes and stages. However, it is worth noting that Sakurai stated that "I know this sequence goes above and beyond a traditional Pic of the Day, so consider this a little something extra on the side from me." Could he be sweetening the masses due to bad news? Does he feel bad for not giving us Yoshi last week? Those are some questions that were running in some heads with this newest update. It definitely was a surprise and one that a lot of people liked:

Wow. Four pictures in one pic of the day.
@MasterLuigi

Wow, I bet there's gonna be an interesting Event match here.
@Time/SpaceMage

I wonder if he will be doing more updates like this for other moving stages.

Today was a nice surprise. Maybe he will do more of these as the release date approaches...
@ Frostwraith Frostwraith

Love the stage, I wonder what it'll be called though, theres no way they'd just call it super mario 3D Land
@Sonicguy726

It could just be a prototype name. Would prefer "3D Mushroom Kingdom" though.
@KingShadow

I loved this update! This stage looks really cool. I wonder if the Wii U version will have a "Super Mario 3D World" stage.
@Tepig2000

Well, that's a lot of info for one day. Thanks Sakurai!

We have been getting a LOT of 3DS pics lately. Can't complain though, since that's the one I'm getting first.
@ FalKoopa FalKoopa


I can imagine the site blowing up again if he does this kind of update for Pyrosphere.
@IsmaR

Of course, tournament viability was brought up:

Ooo, another stage that will I won't be able to play on in a competative game. Mmmmm.
@Psymon

It pains me to think this stage may not be tourney legal. It looks like a lot of fun.
@sonicbrawler182

The Super Smash Bros. series competitive play isn't the main focus of the games, as it's a Party-Game/Fighter hybrid. Who cares if this stage is tourney legal or not? People who are able to enjoy the game as a whole, and love it for all the features it has, are Nintendo's main target audience, and the people who play smash competitively are the last things on Nintendo's minds.
@Ixbrain

Great, finally got some info on this one! Ain't gonna be good for tourneys though.
@KingShadow

Whether this stage will be tournament legal or not will be brought up in a future Stage Analysis article. So what exactly is this stage and what doe sit represent?

It appears this stage was based off from World 1-1 from Super Mario 3D Land.


The last portion of the stage, before netering the pipe appears to be based off from World 1-4.


For further reading, check out the SSB Wiki for this stage:

This stage as a whole is based on the Nintendo 3DS game of the same name with each part of the level referencing levels from the game.

The castle area is roughly based around World 1-1 with changes to layout of the platforms and the platforms themselves. The area is also a lot closer to Peach's Castle than it was in Super Mario 3D Land.

The valley area's closest resemblance is World 8-2 in that both levels have steep rock cliffs with grass on top; however, the resemblance ends there as the level in Super Mario 3D Land did not have moving platforms (other than ones that move in a circular pattern) or gray rocks protruding from the cliff sides. The cliff walls are also more red than they are in original game. Other than World 8-2, there are no levels that resemble the valley area.

The downhill area is roughly based on World 4-1. In World 4-1 the player navigates through the level by scaling steep cliff sides with grass tops. In this stage, the design of the soil found on the smaller cliffs with grass have been retained, and the gray rock cliff walls seen in the background are designed around the taller cliff walls in World 4-1. The level also has trees with rounded tops, which were also retained in this stage. However, the goal of World 4-1 was located on top of a tree-like structure perched on top of the cliff which means the player is mostly going upward, unlike in this stage where the battle goes downhill.

The rotating blocks area comes from World 4-3, Special 3-2,and Special 6-4. While rotating block platforms originate from New Super Mario Bros. Wii, World 1-5 and World 3-5, the design of the blocks originate from Super Mario 3D Land. In the levels that feature the rotating blocks, the level takes place in the sky above clouds, but in this stage they're closer towards the ground.

The water area originates from a few different levels. The idea of players on moving platforms come from World 1-4, but the background and scenery of the stage mostly resemble World 6-1. The design of the moving platform; however, is different than from Super Mario 3D Land as the moving platforms in the game moved by the player standing on a side of the platform featuring arrows. The platform would then move in that direction by the two wheels on the sides along rails. The platforms in this stage do not feature the arrows and the wheels, and its movement on the rail is not based on the player, but instead moves automatically. This area of the stage also feature stage hazards called Skewers, which are spiked pillars that lunge in the direction it's pointing. Skewers first appeared in Super Mario World, and have returned in recent Mario games. In Super Mario 3D Land Skewers do not appear in either World 1-4 nor 6-1, but only appear in certain Airship levels, World 3-Airship and World 6-Airship. The design of the Skewers have also been retained. In this stage, Skewers lunge upwards from the water below as stage hazards.
http://www.ssbwiki.com/Super_Mario_3D_Land

And certainly, the PotD has been treating the 3DS version very well with so many pictures and information.

This is turning out to be the Month of 3DS Stage Info, what with Tortimer Island, Lumiose City, Tomodachi, and now 3D Land elaboration.

Hope next month ends up being the Month of Pyrosphere Wii U Stage Info.
@Sehnsucht

While I doubt much speculation can be drawn from this, it could mean that either the 3DS version was not in a playable state when the site was first launched or that Sakurai simply wants to focus more on the 3DS version lately.

Since last week, the number of 3DS and Wii U PotD has been even (not the total number). As of Tuesday, there has been a equal number of Wii U and 3DS updates since 03/03/20014.

3DS
Mario 3D Land: 1
Tomodachi Collection: 1
Lumiose City: 1
Tortimer Island: 1
Little Mac S-Smash: 1
Ganondorf's Mothers: 1

Wii U
Smash Ball: 1
Motion-Sensor Bomb: 1
Zelda: 1
Fat Mac: 1
Dedede: 1
Bumper: 1

https://miiverse.nintendo.net/titles/14866558073037299863/14866558073037300685

It is interesting to note this "trend" started with the Kotake and Koume update on March 3rd which happened to be a Monday. I could possibly mean a more focus on the 3DS version than we previously saw before and an attempt made by Sakurai to balance out the two concerning the PotD.

Things confirmed for Tuesday:

1) Super Mario Bros 3D Land will be a Rainbow Cruise-like stage and divided into parts.
2) First quadruple picture update

Sleeping on the Job
03/19/14
Day #3: Wednesday
Writer: Venus of the Desert Bloom


Sakurai said:
"Pic of the day. Fallen Rosalina. Strange how calm and nonchalant she looks even when she takes damage. Is it because she's from outer space?"
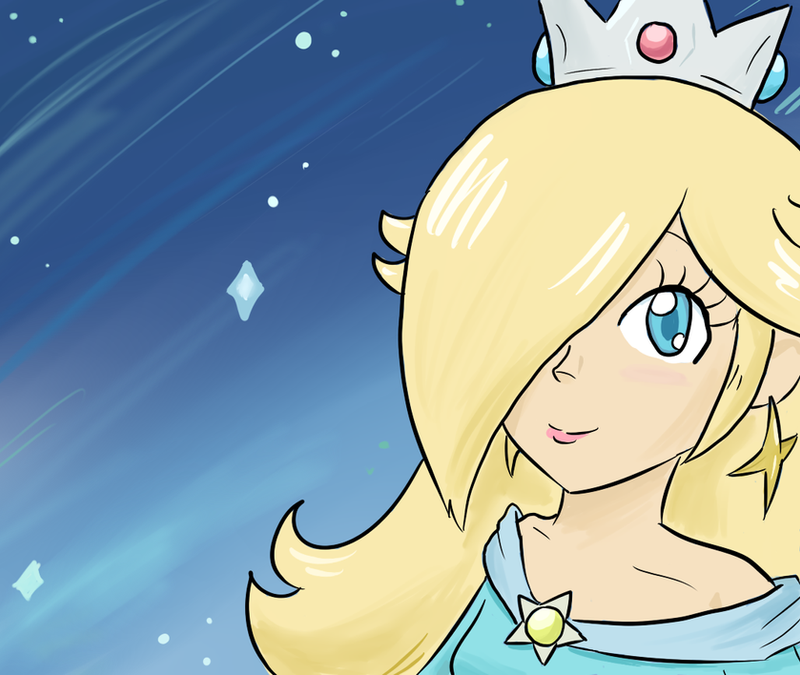
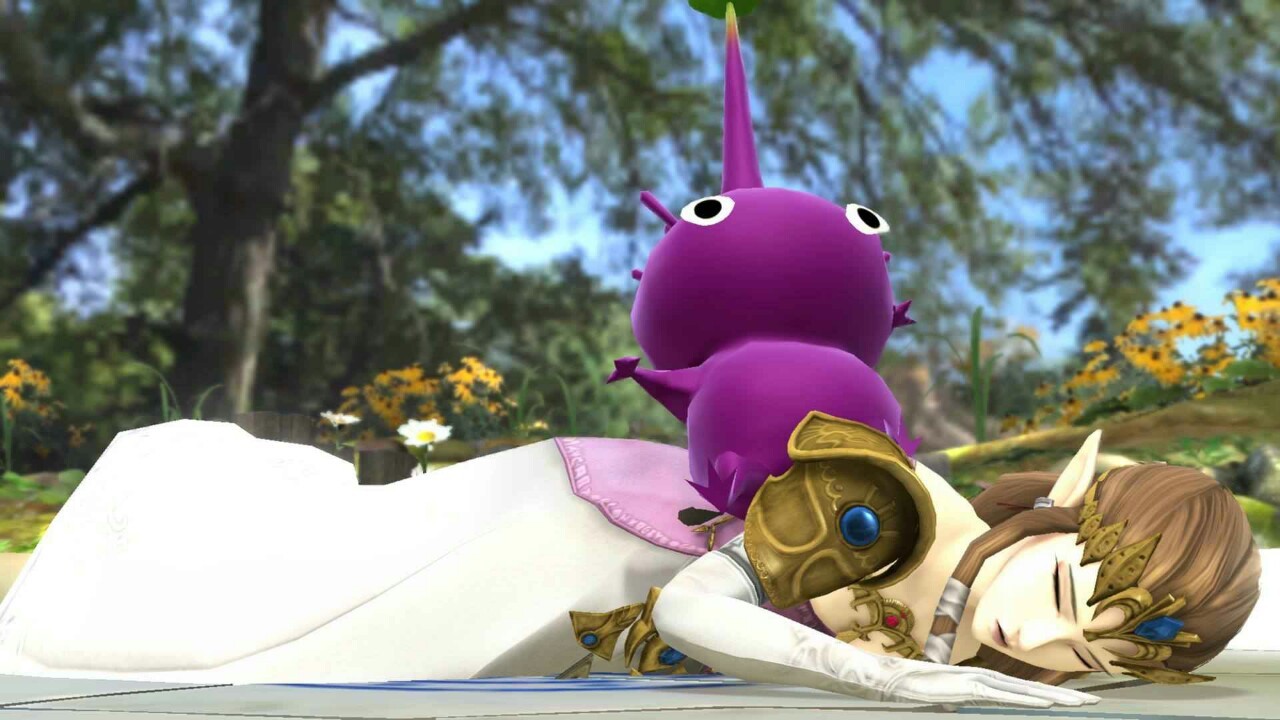
Rosalina graces the PotD yet again with a slightly suggestive comment provided by the great Sakurai. However....

lewd......
@Ndayday

You're all a bunch of perverts.
@Tollhouse


But some were able to glean some sort of information from this update:


Well they can't all be incredible. We get to see Rosy's lying down animation I guess?
@Guybrush20X6

Well, you guys did want a Wii U pic.

Tomorrow is going to be the big day this week, as there's (finally) a new game coming out in Japan (Mario Party).
@ThatWasPeachy

Guys, that's Timmy/Tommy, not Nook.
@Chris Baker


Clearly there is a pattern here...I sense a fetish...

Rosalina just looks far too good though, jaysus christ...
[/quote]
@sonicbrawler182

Regardless, the picture wasn't really nothing worth noting save for.....

Now that I think about I actually would like this pic to become a meme :p
@KingofPhantoms47

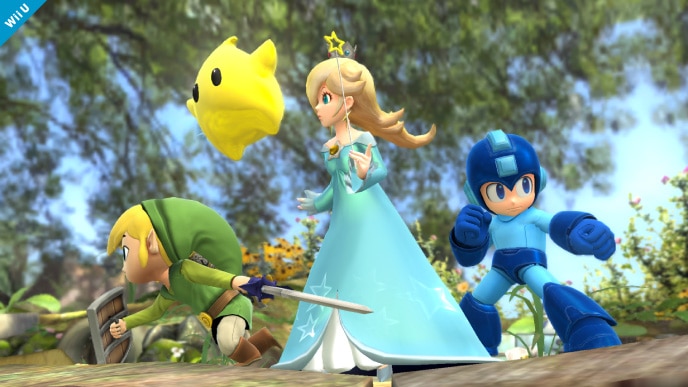
Sakurai seems to a penchant for taking pictures of snoozing princesses and lords. It makes you wonder. As always, it is great to see Rosalina in all of her cosmicness as well as the Smashville stage. However, I must say this HAS to be the shortest article I have ever written!


Things Confirmed for Wednesday:

1.) Picture of Rosalina's hurt animation.


Sakurai’s Gone Nutty!
3/20/2014
Day #4: Thursday
Writer: TumblrFamous


Oh Sakurai, most of us were certain we were getting a reveal today! And yet again, you dupe us! As most of you know, it has been almost a month since our last reveal (Diddy Kong). It being the release date for the games Mario Party: Island Tour and Metal Gear Solid V, many people were expecting something.
Snake? Snake!!! SNAKEEEEEEEEEEEEEEE!!!!
@ZombieVito

I predict Sakurai will reveal a character of some sort. Hoepfully, Yoshi, Wario, Ness or, the long shot, Solid Snake, which is highly unlikely.
@APC99

Island Tour comes out tomorrow in Japan? If so it's likely to be Wario or no one, I'll stick with no one.
@Oniric Spriter

However, what we got was not what most had in mind. Sakruai updated Miiverse with a Pic of Diddy Kong and his Peanut Popgun, firing at Bowser.

WOW
IT'S NOTHING
@McDuckletts

While most people either complained over the fact that it was another "filler pic", or presumed there would be a reveal on Friday, a few smart individuals picked up on something new in the picture.

I never used Diddy much in Brawl, but before when his pop gun blew up I thought he just blew up in smoke and nothing happened. This is showing it has a hitbox now, so if I'm not mistaken, buff?
@Neo Zero

Wait a minute...

The explosion hurt Bowser...

That's new.
@ Swamp Sensei Swamp Sensei

Yes, that's right. There was actually something new hidden in the picture all along! According to Sakurai, Diddy's Peanut Popgun has received quite a substantial buff!

Pic of the day. The Peanut Popgun now deals a powerful attack when it explodes. It'll be difficult to hit your target, but when you succeed, the explosion will really blow your enemies away. Give it a shot when you break someone's shield.
-Masahiro Sakurai

So, it seems the Peanut Popgun has in fact gotten a buff. When Diddy was introduced in Brawl, his Neutral Special, the Peanut Popgun, was an odd projectile attack. On Brawl's Dojo, it was given a little summary of what it can do:

This is Diddy’s projectile weapon. You can boost the speed of your shots by holding down the button...

But if you hold it down too long, the gun explodes, so be careful.
-Brawl Dojo

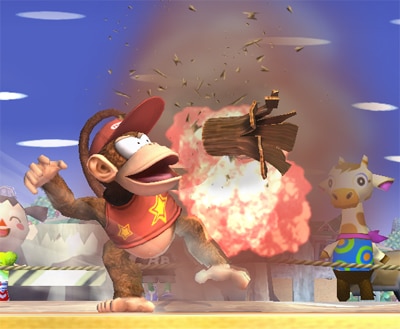
As said, if held too long, the gun will explode, rendering Diddy's "peanut shot" useless. In Brawl, there was no hitbox on the explosion of the gun. Now, however, there seems to be a powerful hitbox on the explosion, meaning that Diddy has a powerful attack at his disposal. However, Sakurai says that it will be rather difficult to hit your opponent. The Peanut Popgun will likely remain having a rather slow buildup to its explosion, so Diddy users should plan to use this attack carefully. As Sakurai said, it can be useful when you break the opponent's shield, and then go in for the powerful explosion to "really blow them away".

With another buff for Diddy (a possible compensation for losing one banana, perhaps), it yet again proves that Sakurai is really changing up characters. However, users are still antsy for a character reveal. Most people are betting on one tomorrow, so will we see one then?

Things Confirmed for Thursday:

1. Diddy has yet another buff: the explosion on his Peanut Popgun now has a powerful hitbox.

Lightning Flash!
03/21/2015

Day #5
Writer: @ --- ---


Sakurai said:
Pic of the day. The most powerful commander of the Forces of Nature, Lightning Flash Phosphora!!

Sakurai said:
…is a Trophy. The detail in her scarf is amazing.
For those who don't know, Phosphora appears as one of Viridi's Generals in Kid Icarus: Uprising, and can command electricity.
Throughout her level (Chapter 14) and even during her boss fight, she teases/flirts with Pit as well as calling Palutena an old women. While later in the game she assists Pit as he storms Palutena's Temple to stop the Chaos Kin. Her "electrifying" personality and fashion style has led her to become a fan favorite from the game.


Things Confirmed for Friday:

1.) Phosphora from Kid Icarus: Uprising is a standard trophy.
2.) That there will be Original Trophy Models.

@Radical Beam
I'm happy to see that Sakurai isn't simply reusing character models. Melee was awesome because of the original trophies. Hopefully we get a lot of remodels, even if they are just trophies.

Granted I don't think trophy models are that big of deal, based on the Little Mac (Captain Rainbow) pic, chances are that most models will at least be updated to an extent as to make them more presentable in HD.

That said, Sakurai did go all out on Phosphora as shown by her Lightning Scarf, and you can tell he's very proud.

@Fatmanonice
It does make me wonder with Viridi and Phosphora now being disconfirmed, who Sakurai's ultimately going to choose to be the AT for the Kid Icarus franchise. There's so many possibilities even with two of the games' major characters biting the dust.
I would have thought most people were betting on Magnus or the Eggplant Wizard. Who ever it is, it will be a good Pic of the Day upon their reveal.

@iDOWN
Phosphora is from Kid Icarus: Uprising, which is a 3DS game, so you'd think Phosphora's trophy would be for 3DS, as well. This is from the Saria Trophy PotD in January.

"Pic of the day. There will be trophies in the 3DS and Wii U games, and each version will boast different types and models. The 3DS trophies will be mainly from handhelds and the Wii U version will feature trophies from the home-console games."

It does say types and models and not just trophies in general, so who knows. Where I was going at with this was that Phosphora could be an Assist Trophy, which is why her model is so well-done, but then I noticed her fingers are separate. hahaha.
@ Admiral Pit Admiral Pit
This pretty much is the pic for the 2-year KIU anniversary, and I approve of the shocking reveal. I'm eager to see more KI characters in HD in the future. <3
@TumblrFamous
I just like all the KI stuff we're getting. It's preparing us for an inevitable Palutena.
Sakurai said:
 
Last edited by a moderator:

Venus of the Desert Bloom

Cosmic God
Super Moderator
Premium
BRoomer
Writing Team
Joined
Jul 30, 2007
Messages
15,415
NNID
VenusBloom
3DS FC
0318-9184-0547
Week in Interview: Groose
@Groose

You may know him from the Rate your Chances thread...or the Who Would You Rather Have Thread....or the Philosophy: Why do we want certain characters thread....or the Would you like the "leak" to be true thread. Or his support threads for King Harkinan, Rawk Hawk, and Professor Elvin Gadd....or you just simply know him from his fantastic Groose avy! Yes, this week's interview is none other than that stylin' goovin' red-haired Zelda wantin' man above all other men...GROOSE! He is here to spill the beans about everything...that he wishes to spill. I hope you enjoy this interview as we try to discover what exactly lies underneath that mess of perfectly shampooed hair.

1) How long have you been a member on Smashboards and why did you join?
Going by my account information, I've been here since E3. That's the major reason I had to make an account and get involved; my hype-level was just so high that I had to be able to discuss things with other people.

I've been a spectator since well before then, however. Shortly before E3 2013, I was watching everyone freak out and make predictions for what they'd show. Also, I spent hours checking things out back in 2012; I'm certain I had an account back then, but I was never very active and have no idea what my log-in information might have been.

2) What is your favorite part of Smashboards? What is your least favorite part?
Well... this is a pretty difficult. I'd guess I'd say my favorite part is the Smash 4 Character Discussion boards, and my least favorite part is the arrogance that some users here have. People stereotype Smashboards as being elitist; although I definitely disagree with this, there are still enough people with "holier than thou" attitudes that I can see why some people generalize that.

3) Will you be getting Super Smash Bros. for Wii U or 3DS?
The 3DS one is a day one midnight purchase for me. I don't own a Wii U, and one doesn't seem to be in my budget for the near future; however, I will try to get that one as soon as I am in a more secure financial position.

4) Who are your Mains in 64/Melee/Brawl? Who do you plan to main in Smash 4?

I don't really play a lot of Smash 64 now, so it's hard for me to pick a definitive main. I mostly mess around with Captain Falcon nowadays, but when I was a kid, I usually went with DK.

In Melee, I play as Mewtwo. He may be horrible competitively, but I play on a lower level so tiers doesn't really apply. I play Melee and Brawl around the same amount; I suppose the primary reason I end up picking Mewtwo in Melee is because he's not available in Brawl.

In Brawl, I pick Toon Link the most, but I do play a fair amount of Pikachu as well. For some reason, they're the two characters who just feel right to me when I'm playing as them, moreso than anyone in any other installment.

5) Who is your most wanted newcomer for Smash 4? More than one answer is ok.
When I was younger, I used to play a lot of Donkey Kong Country on the Gameboy Advanced. Of course, "Donkey Kong Country" and "young" don't mix very well; those games were hard as heck, and I'd end up getting stuck quite frequently and for days at a time... especially at the final boss fights. Catch my drift?

Honestly, I think it took me two weeks or more to beat K. Rool in DKC2, and words cannot express how awesome that blunderbuss was. I really wanted to take control of K. Rool, and Smash would be the perfect way to do so.

6) What stages would you like to see included in Super Smash Bros. for Wii U/3DS? Past stages included?

I spend the majority of my time speculating about characters because they're what really concerns me. I tend not to get too concerned with the stage selection; however, I do want a Bowser's Castle stage and I think a Dr. Mario stage would be really fun. I did want a Galaxy stage, and I think the one we're getting looks amazing.

I'm more concerned with past stages than anything else. I'd love for a Corneria/Sector Z-style stage on the back of the Great Fox; it's just become a part of Smash Bros. for me. I'd also love to see Hyrule Temple return; some may complain that it's too big and promotes stalling, but I've always loved it.

I'm saving the best for last: I'd love to see either a reprisal of the original or perhaps an entirely new Pokefloats stage. Pokefloats was my favorite stage in all of Smash Bros., and I'd really like to see something like that return. Sure, it's gimmicky as heck; however, it's just an out-and-out fun stage.

7) What would you like to see improved or expanded from Super Smash Bros. Brawl?
Let's get the obvious out of the way first--I'd really like to see online mode run a whole lot smoother than Brawl's. One thing that may not be so obvious is that I'm actually pulling for an expanded Spectator mode; I found the original fairly addictive, and I'd love to see it expanded upon in some way.

Outside of online, I suppose I'd like to see better events. Melee's Events were pretty good, but Brawl's weren't so great; I really think they should be able to make some this time that surpass both games.

Stage Builder will hopefully return with a much better variety than before. The one in Brawl had so much potential, but it just fell short in my eyes. I sunk hours into it, but I was just never satisfied with how my stages turned out.

Finally, my main concern is the character roster. I'd love for them to make it as large as they can possibly get it. It's quite obvious that this is by far the main thing I'm interested about for right now.

8) What was your most favorite Smash Bros. moment/memory?

Three really stand out among the rest. The first was when I was a little kid. I had asked for either an N64 or a Gamecube for Christmas, and I wasn't really expecting to get either--and certainly not the Gamecube. ...but to my surprise, the last present under the tree was a Gamecube, packaged with Super Smash Bros. I remember breaking it open and playing Classic Mode as Bowser right away.

The second memory is from roughly a month later. I had either thought I had all of the game's characters unlocked, or I had given up hope of unlocking the others. Anyway, I remember coming in from sledding (there was a big snowstorm the day before) and plugging in Melee. I played a match and seeing the new character message... and it was Mewtwo, one of my favorite characters at the time! I was so surpised and so stoked.

The third memory is one that I'm sure a lot of you can relate to: going to check the daily Smash Bros. DOJO post and seeing Sonic the Hedgehog staring back at me. That moment wasn't as surprising as Mewtwo's, but it was possibly even better.

9) Where did your username come from?
When I joined, I went through the list of characters I wanted or considered possible for getting into Smash; alas, I was way to late. So I decided to fall back and choose the name of one of my favorite video game characters: Groose.

10) You run the Rate their Chances as well as help out in a number of other Smash 4 related games. Do you feel they help contribute to the Smash Bros. community and in particular the Smash 4 community? What have you learned from running the Rate their Chances? What are some games ideas you would like to try out?
Yeah, I feel games like Rate Their Chances are pretty essential in bringing the community together. Things like the Roster Discussion Thread and the Social Thread move a bit too quickly to really foster a great discussion, and individual character support threads are a bit too limited in their scope. I feel that games are one of the few chances where we really can unite and have a lot of fun.

What have I learned? I'd like to say that I've learned to work efficiently and on a steady schedule, but we all know that those two statements aren't really true. *Laughs* I guess I know the users on the Smash 4 board better than the majority of people; after all, I do see their ratings on a daily basis.

As for game ideas I'd like to try out... I'm not sure. Most of the time, people come to me with suggestions, and I just roll with them. I've talked with KingShadow before about starting a roster rating game that applies RTC-style principles, but it looks like neither of us would have time to run it.

11) What is your favorite genre of music and why? What bands do you like?

My favorite genre is classic rock. I really can't explain why, so I guess I'll just say that it's what I grew up with and it's really just a part of who I am. My personal favorite band is Led Zeppelin (and my favorite song is Achilles Last Stand), but I'm also a big fan of the Rolling Stones, Guns 'n Roses, and Aerosmith. I also enjoy metal, classical, and VGM.

Really, the only genre I don't like is rap. I respect it, but I just don;t like listening to it. The only concert I've ever been to, though, was the Symphony of the Goddesses.

12) If you had a cool $10 million, what would you spend it on?
Bribing Sakurai to reveal the final roster. In all seriousness, I really couldn't give that answer. I'm a pretty logic-and-reason oriented person, so I'd probably carefully plan what I'd do with it when the time came. My top priority would be securing the future, however, and I'm sure donations would be a part of it.

13) Please tell us one thing about yourself that we may not know?
I've cosplayed before--as Groose, no less. It was at the Symphony of the Goddess concert a few months ago in Philly; so many people came up to take pictures with me, and it was pretty exhilarating. I couldn't talk at the time because of a recent surgery, so that also made it interesting. It was a pretty fun experience, and while I don't intend to make it a hobby, I'm certainly not opposed to cosplaying again.

Thank you @Groose for sitting down and agreeing to an interview. Check back again next week for the next interview! It could be you!​
 
Last edited:

Venus of the Desert Bloom

Cosmic God
Super Moderator
Premium
BRoomer
Writing Team
Joined
Jul 30, 2007
Messages
15,415
NNID
VenusBloom
3DS FC
0318-9184-0547
Rosalina Character Analysis - Part 2
Author: Mario & Sonic Guy


Introduction
Welcome to the second part of my Rosalina Character Analysis article. This week, I'll cover the extra contents that I did not cover last week. This includes Rosalina's model overview, matchup speculation, the Kirby Hat, and even her recolors and alternate outfit. Much like with part one, this part of the article will contain speculation at certain spots.

Additional Content
Model Overview


Unlike with Peach and Zelda, Rosalina's own dress isn't as heavily detailed, but instead, the dress shows star-like patterns below the waist. However, the rims of the dress sleeves are much more noticeable, and are even given some extra detail when viewed up close.

Of course, one of the most noticeable attributes to Rosalina's model is that the inside of her dress is given cosmic details, making her dress more unique from that of Peach's dress and Zelda's dress. Interestingly though, this type of detail has lead to a lot of jokes where people say that the universe is inside Rosalina's own dress. Even Sakurai joked around with the scenario at one point.

Overall, Rosalina's model has shown to be quite well done, and meets the standards that all the other Mario Universe character models have; good detail, while maintaining a cartoonish feel.

Stock Icon


Franchise Logo


Rosalina is part of the Mario Universe, which is sorted into four franchises; Mario, Donkey Kong, Yoshi, and Wario. The Mario franchise is the primary franchise, and the one that Rosalina has been most involved in.

Interestingly, Rosalina does have her own signature logo, which is the Grand Star. Despite this, however, Rosalina has never had her own series, unlike with Donkey Kong, Yoshi, and Wario. In a way, her dilemma is similar to that of Bowser, who also has his own distinct logo. Strangely, Luigi uses the Mario franchise logo too, even though he's the main character in the Luigi's Mansion titles.

Alternate Outfits


Super Mario 3D World introduced the Fire Rosalina power-up for Rosalina. The power-up changed Rosalina's dress color to red, and her hair style is given a ponytail.

Rosalina has other power-ups as well, but Fire Rosalina is the only power-up where Rosalina keeps her dress, instead of putting on a cat suit, or a Hammer Bro suit.

On an additional note, the Fire Rosalina outfit could reference 3D World even further by giving Rosalina the Multiplayer's Crown as well.


Kirby Hat


When Kirby copies Rosalina, he'll get hold of her crown, but because the crown is rather identical to that of Princess Peach's crown, Kirby could also have Rosalina's hair to make the cap more different.

Regarding the special move that Kirby copies, he'll be able to summon his own Luma, who will follow Kirby's standard attack commands. Additionally, Kirby's Hammer would also be altered so that it'll act like the Luma Shot special.

Much like with Rosalina's Luma though, Kirby's Luma would suffer the same flaws, but another flaw is that if Kirby loses his cap, his Luma will automatically be KO'd.

Recolors


Much like with everyone else, Rosalina would also receive her own set of recolors. The colors would go as follows...

1: Default
2: Red (used for the Red Team in Team Battles)
3: Blue (used for the Blue Team in Team Battles)
4: Green (used for the Green Team in Team Battles)
5: Yellow
6: White

The 7th recolor is actually the Fire Rosalina alternate outfit.

[collapse=Shoe Colors]
[/collapse]

Action Poses
This section simply speculates on certain poses, including those that we haven't seen Rosalina use yet.

Idle 1: Rosalina simply stands straight while levitating.


Idle 2: Rosalina tilts her back a little while looking around.


Idle 3: Rosalina balances her star wand with her left hand.


Squat: Rosalina bends down low. It's unknown if she can also crawl, however.


Sleep: Rosalina gets down on her knees, and closes her eyes.

Dizzy: Rosalina puts her right hand on her face while feeling dazed.


Swim: Rosalina spreads her arms around to move in the water.

Sidestep Dodge: Rosalina might dodge in the same manner as Peach.

Battering Item: Rosalina swings the battering item with her right hand. When used as a smash attack, she'll swing the item in an uppercut-like manner.

Hammer Usage: Rosalina uses her magic to spin the hammer around her. This gives her horizontal coverage.


Home-Run Bat Smash Attack: Rosalina holds onto the bat with both hands, and charges up the swing. She'll then swing the bat very hard. Rosalina will temporarily put away her star wand for this animation.

Heavy Container Carry: Rosalina lifts the heavy container with her magic. This does not affect her movement speed, but she can't jump while carrying the heavy container.


Heavy Container Throw: Rosalina uses her magic to throw the heavy container at the direction she chooses.

Knockdown (facing up): Rosalina lays on the ground, while showing a relaxed feeling.


Knockdown (facing down): Rosalina lays on the ground, but with her back facing upwards. Like when she's face-up, Rosalina shows a relaxed feeling.

Fanfare Contents


While we may not know what Rosalina's actions will be after winning a Group Mode match, the following contents will simply speculate on them.

Victory Theme: A short remix of the Good Egg Galaxy's background music, most notably the final portion of the track before it loops.

Victory Pose 1: The Luma hops onto Rosalina's arms, while Rosalina says "We won" in a humble manner. The two then look at the screen while Rosalina is levitating. This animation is simply a replication of the one in the trailer.

Victory Pose 2: The Luma spins around Rosalina while she's praying. Afterwards, Rosalina will open her eyes, and the Luma will land onto her arms. The two then look at the screen.

Victory Pose 3: Rosalina waves her star wand around while the Luma jumps for joy. She'll then put her right hand on her chest and look at the screen. The Luma will wave its right arm during the process.

Losing Pose: Rosalina maintains a positive mood while clapping her hands. The Luma, however, will show a sad expression.

Easter Egg: If Rosalina defeats Mario, the Luma will have Mario's cap on its head. Mario will also show a unique losing animation, where he simply scratches his head; his cap would also be missing. If more than one Mario was fighting, the one in last place will not have his cap present. However, if there's a draw between Marios, then the one who has taken the most damage will not have his cap.


Crowd Chant
Female spectators: Ro-sa-li-na!
Male spectators: Lu-ma!

Voice Clip Speculation
Rosalina has various voice clips for whatever incident she's in. The following simply speculates on some of her reactions.

Damage Voice Clip: Rosalina replicates one of her damage voice clips from Mario Kart Wii, preferably the one where she simply grunts.

KO'd Voice Clip: Rosalina replicates one of her damage voice clips from Mario Kart 7.

Star KO'd Voice Clip: Rosalina uses her voice clip for falling into an abyss, but it'll gradually fade out the further away she is from the battlefield.

Doc Louis's Advice
If Little Mac has a secret taunt, Doc Louis could give him some advice, regarding his opponents. The following are quotes that Doc Louis could say, involving Rosalina.

Before the first KO: Hey, Mac baby. Rosalina is a versatile battler with her Luma partner. When she attacks, the Luma attacks as well. Find their flaws, and take advantage of them.

After the first KO, but tied with Rosalina: Hey, son. I hear that Rosalina enjoys the fine taste of Star Bits. Let's feed her some stars of our own! *laughs*

Little Mac is winning: That Luma of her's could be trouble Mac. Show them that you mean business!

Rosalina is winning: Don't let this girl's beauty distract you son. Catch Rosalina while she's vulnerable, and let the fists fly!

Second intermission: Mmmm...mmm! That is one lovely dress that she's wearing there. Seems like I can see the whole universe through it.

Pit's Secret Taunt
Pit could be given a secret taunt, where he speaks with Palutena, regarding any one of his opponents. The following is a conversation that could be made, regarding Rosalina.

Pit: Lady Palutena, who's the woman with the star-shaped creature?

Palutena: Her name is Rosalina. She's known as the guardian of the cosmos, and the adopted mother of the Lumas.

Pit: So she's basically a goddess who raises aliens?

Palutena: Pretty much. As a young girl, Rosalina tried to help a stray Luma find its mother. However, during that time, Rosalina's own family passed away, leaving her without a mother or father.

Pit: That's quite sad to hear.

Palutena: Yes, but despite this, Rosalina managed to make a new family by raising the many different Lumas that exist throughout the universe. Each Luma has the ability to become a new planet, a new galaxy, or even a Power Star, making them very important to us.

Pit: But where do they even live? Surely Rosalina has a home.

Palutena: Rosalina lives at the Comet Observatory, which also operates like a space ship. It also serves as a nursery for the Lumas, thanks to the Grand Stars that keep it active.

Pit: Okay, now I feel even more paranoid.

Palutena: Relax Pit, Rosalina is actually a very gentle person, and the Lumas are very peaceful as well. In fact, Mario actually saved them when the Comet Observatory's Power Stars got stolen.

Pit: After hearing that, I'm beginning to pity her. I guess even a goddess has her tough moments in life.

Palutena: I wouldn't underestimate her though. Rosalina may be gentle at heart, but she's also strong in combat, especially while working together with the Luma. If you're not careful out there, they might send you to another galaxy.

Pit: Thanks for the warning there...

Palutena: No problem Pit, good luck out there.

Pros & Cons Overview
The following is simply an overall checklist of Rosalina's strengths and weaknesses.

Pros
+Rosalina is very versatile in her combat options.
+Rosalina offers good range for her attacks.
+Rosalina's attacks are rather quick in execution.
+Rosalina's grab game is strong, with no major flaws.
+Rosalina has a long recovery, making her difficult to KO sideways.
+Rosalina's edge-guarding options are expanded further with the Luma.
+Gravitational Pull renders most projectile games useless.
+Rosalina's floaty attributes make it difficult for her opponents to combo her.
+Rosalina is difficult to pull off grab games against while the Luma is present.
+The Luma offers Rosalina extra protection while approaching.

Cons
-Rosalina is a tall character, and as such, is a big target.
-Rosalina's weight is below average, which does make her more vulnerable to being sent flying early.
-Rosalina's floaty attributes make her easier to Star KO at low damage percentages.
-The Luma's stamina is limited.
-Rosalina can be vulnerable to gang attacks in a multi-man battle.
-Rosalina isn't very speedy while moving on the ground.

Other Notes
Because Rosalina is so diverse with the way that she can fight, this could make her a very tricky fighter to conquer for a lot of fighters. Of course, because of the Luma, learning how to use Rosalina effectively could take a while to accomplish.

While being tall may not sound very good for Rosalina, her pros may easily outweigh her cons, which could give her a lot of matchups where she's either at an advantage, or evenly matched.

On the positive point of view, Rosalina may excel quite well against any fighter who's either short, or has a very poor reach. Rosalina may also excel strongly against fighters who are not very mobile, especially if their attacks are slow and/or easily punishable, as they might have a hard time approaching her without having to contend with the Luma as well.

In terms of the very mobile fighters, they could keep things evenly matched against Rosalina if their approach options are manageable, but if their attacks are slow and/or easy to punish, that could easily put the matchup in Rosalina's favor. One final note to keep in mind is that the Luma can potentially interrupt grab games, which could make Rosalina almost impossible to chain grab. And even if the Luma does get contained, that could be a wasted effort for the opponent if Rosalina can instantaneously summon a new Luma at any time, regardless of her situation.

On the negative point of view, Rosalina's poor matchups might just be limited to fighters who possess long-ranged direct attacks that they can take advantage of, but even then, those fighters would need to plan their attacks wisely to avoid any punishment; this could result in them only really having a slight advantage.

If anything, multiple fighters would have to gang up on Rosalina to have any chance of containing her; the Luma can't protect Rosalina against everyone after all. Likewise, fighters would have to keep tabs on Rosalina's recovery to be able to counter it properly. High mobility may help, but not without any reliable finishing attacks.

Ultimately, Rosalina looks like she could be a high-ranking fighter, if not top-tiered, but it will come down to how effective her battle plan is when the game is finally released. Likewise, her defensive options need to be taken into account as well.

Multiple Player Involvement


When facing more than one opponent at a time, Rosalina probably has to do some defensive tactics to avoid being ganged up on. Only one Luma can be present at a time, so when facing multiple opponents, it'll probably be a better idea to keep the Luma close.

In terms of the multi-man battles, including Multi-Man Brawl, because the opponents will have the tendency to gang up on Rosalina, it'll probably be vital to keep the Luma close at all times. In the Cruel Brawl game mode, however, because of the large handicap advantage that the CPU players tend to get there, they may be too much for Rosalina and the Luma to cope with; of course, pretty much every fighter suffers from that very same problem.

When aiding teammates, Rosalina could use the Luma to defend her allies, but if "Friendly Fire" is active, the Luma could end up being a liability instead. Rosalina could also use Gravitational Pull to shield her allies from incoming projectile attacks.

While dealing with just one opponent is simple enough for Rosalina, when it comes down to facing multiple opponents, a strong defense is also required for her to achieve victory.

Master Hand & Crazy Hand


Rosalina's battle against the Master Hand could actually be an interesting one, as she can deal twice as much damage to him with the Luma's assistance.

In terms of handling the Master Hand's attacks, Rosalina could use Gravitational Pull to redirect the bullets that Master Hand fires with his gun attack. As for his walking attack, the Luma could simply take the hit, ending his attack early. The Luma could also do all the approaching when dealing with the laser attack. For most other attacks, Rosalina simply has to pay close attention to Master Hand's attack actions.

If Crazy Hand is in the battle as well, Rosalina could kill two birds with one stone by having the Luma attack one hand, while she attacks the other. However, with double the hands comes double the attacks that she needs to watch out for. Because Rosalina is a floaty character, just about any combination attack that the Master Hand and Crazy Hand uses will likely send her flying quite easily.

When the Crazy Hand is all alone, however, he becomes a tad easier to defeat.

Matchup Speculation: Confirmed Characters


With Rosalina matching up against 23 other confirmed fighters in a roster that could be as big as 45 participants, she'll have a good deal of competition to contend with. While the game is still in development, the biggest part of Rosalina's game is putting pressure on her adversaries with a combination of the Luma, and her direct approach options.

Be advised that I'm not exactly a competitive player, so some of my matchup result inputs might be highly debatable.

Matchup Table


Strong Advantage
Zelda

Advantage
Mario, Luigi, Peach, Bowser, Donkey Kong, Link, Kirby, Pikachu, Olimar, Sonic, Villager, Wii Fit Trainer, Little Mac

Even
Diddy Kong, Toon Link, Samus, Fox, Lucario, Pit, Mega Man

Disadvantage
King Dedede, Marth

Strong Disadvantage
None

Mirror Match
Rosalina

Mario
Mario has always been well-known for being an all-around fighter with no major strengths or weaknesses. However, against Rosalina, Mario will probably have a good deal of problems on his hands.

First off, Mario doesn't have the best attack range, and may often find himself being outranged by Rosalina's direct assaults, on the ground, and in the air. The Luma even adds to the mess, as Mario isn't the strongest fighter out there, and simply caping the Luma won't be enough to keep it at bay.

In terms of recovery, Mario's Super Jump Punch may be a minor nuisance to the Luma, but Rosalina could easily counter the recovery with her down aerial. Overall, Mario doesn't offer much, if any pressure against Rosalina, and may often find himself on the losing end of the battle.

Luigi
Luigi has always tried to get out of his brother's shadow, but trying to do so against Rosalina may not be an easy task at all. Much like with Mario, Luigi also seems to lack the attack range to outrange Rosalina.

However, Luigi's Luigi Cyclone does enable him to score multiple hits, giving him one way to cope with Rosalina's direct assaults. On the other hand, this is also a bad option when you realize that having all the hits blocked will leave Luigi vulnerable to Rosalina's grab game. Alternatively, there's the Green Missile, but all that Rosalina needs to do is have the Luma absorb the impact of the attack, stopping it in its tracks; even a misfire can meet the same fate.

Recovery-wise, the Luma can just get in the way of Green Missile, and Rosalina could just use her down aerial to stop the Super Jump Punch. Simply put, Luigi, like Mario, may not able to offer Rosalina much pressure, and could be losing a lot against her because of it.

Peach
Princess Peach has been known for her vegetable usage, especially considering that it's her only projectile attack. However, her vegetable spamming is pretty much futile against Rosalina, thanks to Gravitational Pull rendering them useless.

Additionally, Peach isn't all that mobile, so simply approaching Rosalina involves trying to get past the Luma's attacks. But even if she does reach Rosalina, Peach may often see herself getting outranged, as only her forward smash has the range for getting to Rosalina.

Recovery-wise, Peach's horizontal recovery is quite long, but trying to make a safe landing may not happen with Rosalina's different edge-guarding maneuvers, and if Peach takes out her parasol, she'll be a wide-open target for the Luma to punish at will. One of the few things that do work in Peach's favor is that Toad can counter the Luma's attacks, but Rosalina can simply grab Peach to avoid taking a hit from Toad's spores. In general, Peach may find it tough coping with Rosalina's more versatile battle plan.

Bowser
After what Bowser did to her home, Rosalina is set to get her revenge against the reptilian tyrant. Like in Melee and Brawl, Bowser is a big target, and as such, makes him easy pickings for the Luma to build up some damage. And to add to this, Bowser is very heavy, making him very vulnerable to any attack combinations that the Luma lands on him. Bowser may try to counter the Luma with his own attacks, such as his Fire Breath, but he's often been known for being slow on foot. Therefore, even if Bowser does contain one Luma, Rosalina can just summon another one to annoy him with.

Of course, Bowser does have some strong points, such as his attack range, and an improvement to his running speed. The Bowser Bomb also offers a mention, since if it receives any invincibility frames, Rosalina's up tilt may not be able to stop Bowser from crushing her. Of course, Rosalina could easily just get out of the way, and then punish Bowser afterwards.

Recovery-wise, the Flying Fortress doesn't exactly have the greatest attack range, and as such, a simple down aerial from Rosalina may just send the Koopa King packing. Bowser may have received some improvements, but being combo vulnerable does mean that he has to take extreme caution while directly attacking; one wrong move could result in Bowser getting slaughtered by Rosalina's own attacks.

Rosalina
Mirror match dilemma. Results will come down to who's more skilled.

Donkey Kong
He may be back to kick some tail, but Donkey Kong will need to be very cautious against Rosalina's battle plans. Like Bowser, Donkey Kong is also a big target for the Luma to combo around, and while Donkey Kong could swat the Luma away with his own attacks, a lot of his attacks have vulnerability frames that could be taken advantage of.

Donkey Kong doesn't exactly strike fast with his strongest attacks, and the attacks that are fast will often leave Donkey Kong wide-open for a counterattack. Rosalina can simply shield off most of Donkey Kong's approaches, and retaliate hard, regardless of how quick-moving Donkey Kong may be on the ground. However, Rosalina will need to watch out for a full power Giant Punch while approaching.

Another problem that Donkey Kong faces is his aerials, as a lot of them are either slow in execution, or do not have good vertical distance; all of which Rosalina could easily counter at will, even while on the ground. Recovery-wise, Spinning Kong only protects Donkey Kong from horizontal onslaughts, so the Luma would have to attack from above. Likewise, Rosalina could just deliver a down aerial, and that'll shut down the Spinning Kong's recovery.

Overall, Donkey Kong can't really risk attacking Rosalina without being punished back, especially when his best options against Rosalina are only on the ground.

Diddy Kong
The big bad banana peel spammer strikes again, as Diddy rejoins the fight. With Diddy Kong, his greatest strength is his reliance on banana peels, but Rosalina is not a fighter who will charge into battle recklessly. Gravitational Pull would render the banana peels useless, and the Luma can just be used to avoid the banana peels altogether. Also, the Peanut Popgun's usage becomes pointless, even with the buffs that it has received.

Diddy may end up having to take the more direct approach without his banana peels if he expects to handle Rosalina. Fortunately, Diddy's arms are now more flexible, giving him at least one way to cope with Rosalina's attack range. However, reliance on the forward tilt may eventually result in a stale moves dilemma if Diddy doesn't have any extra arm-flexible attacks.

In terms of recovery, the Rocketbarrel Boost has some offensive properties, but it'll easily take a Luma's Star Bit shower to cut it loose. On an additional note, the Rocketbarrel, being an unshieldable projectile, is one of the few projectiles that Gavitational Pull may not have any effect against.

Overall, this matchup may simply come down to who can pressure who harder, but without his banana peel game, Diddy may find Rosalina to be an annoying opponent to contend with.

Link
Link's projectile arsenal may seem like a good way to pressure an adversary, but thanks to Rosalina's Gravitational Pull, no projectile that Link has will do him any good. In fact, Rosalina could even use Link's own bombs against him. Without projectile reliance, Link has to focus more on a direct battle, and since he's not exactly a mobile fighter, approaching Rosalina alone will probably be a chore. The Master Sword does help Link try to contain the Luma, but when one falls, another can take its place.

Another issue that Link has is his attack speed, as some of his attacks are slow in execution, and easy to punish. The Clawshot can serve as a way to grab Rosalina, but the Luma can end up intervening if Link doesn't throw Rosalina quickly enough. Regarding recovery, the Spin Attack offers horizontal and vertical distance, but Rosalina could easily retaliate once the attack ends. Link might find it hard to contend with Rosalina's versatile combat options, and he could see himself getting pressured more often.

Zelda
Zelda has always suffered from her very poor approach methods, as not only is she very slow, but her only projectile, Din's Fire, is way too predictable. And despite of the power buff that Din's Fire has received, it's easily blocked. Rosalina might have very little to worry about against Zelda, as she can simply send the Luma into battle, and that alone will probably give Zelda plenty of problems.

Because Zelda is very slow on foot, even if she does manage to bring down one Luma, a new one can simply enter the fight, and keep Zelda contained. In fact, Zelda might find herself having to face Lumas more often than Rosalina herself. This could mean that while Zelda is getting pummeled all over, Rosalina stays fresh and clean for a good portion of the battle. And even if Zelda does manage to reach Rosalina, it probably won't take much for Rosalina to send her packing.

In the recovery department, Farore's Wind does give Zelda a long recovery, but her helpless state after using it will make her an open target for even more punishment by Rosalina or her Luma. Rosalina is probably the last fighter that Zelda wants to be fighting, as her inability to deliver any kind of pressure against her could mean that she's almost guaranteed to lose. Zelda's only saving grace will probably be if she's still able to transform into Sheik.

Toon Link
Although similar to Link, Toon Link is more nimble, and his attacks execute quicker as well. While one of Toon Link's strengths is his projectile usage, he should refrain from using them at Rosalina, as her Gravitational Pull move could easily neutralize them. Toon Link can use his sword to keep the Luma contained, and thanks to his quicker attack speed, has an easier time attacking Rosalina directly.

However, Toon Link will still need to be weary of Rosalina's grab game, since one blocked attack will potentially lead to trouble for him. The Hookshot can also be used to grab Rosalina, but the Luma could easily interrupt Toon Link if it's close by.

In terms of recovery, Toon Link's Spin Attack has the same ups and downs as Link's. It should also be noted that thanks to his quick footwork, Toon Link is able to catch up to Rosalina whenever she's in a helpless condition. Overall, Toon Link might be able to fare better against Rosalina than Link, so it'll probably come down to how Toon Link can adapt to Rosalina's battle plan.

Samus
Samus's weapon arsenal does run into a brick wall against Rosalina's Gravitational Pull. Likewise, Rosalina can use the Luma as a shield, protecting herself from Samus's Charge Shot special. As such, having to fight directly will probably be Samus's best option. Fortunately for Samus, a lot of her attacks offer good range and speed, but at the same time, she does have to risk getting caught in Rosalina's attack range to get anywhere. The Grapple Beam could be used to grab Rosalina, but because it's not exactly fast, Rosalina could easily punish Samus for using that attack maneuver.

In the recovery department, the Screw Attack may be able to keep the Luma away, but not Rosalina's down aerial or up tilt. In general, Samus does have the quick attack power to keep Rosalina busy, but she does need to tread cautiously to avoid taking any punishment from her.

Kirby
Kirby may have befriended a Luma, but he'll have to put his friendship with it behind him while fighting Rosalina. Kirby is a short fighter, and doesn't exactly have the best attack range, which is a problem considering how wide-ranging some of Rosalina's attacks are. The Final Cutter's projectile could get redirected by Gravitational Pull, and the Hammer is easily punishable if it's still slow in execution.

Fortunately, Kirby's inhale move may give him the key that he needs to keep the match more even, but it does come down to how Kirby can utilize Rosalina's Luma Summoning special. Using Stone to attack from above may seem like a good move to counter Rosalina's up tilt, but sadly, this will give Rosalina an opportunity to punish Kirby with her grab game.

Recovery-wise, Kirby can perform up to five mid-air jumps, so keeping him from recovering could prove to be tricky without the Luma's Star Bits. Overall, Kirby's short and limited attack range might put him at a disadvantage against Rosalina's attack range, but if he can copy Rosalina, the match could turn into a Luma combat competition that could go either way, or at least until Kirby loses the cap.

King Dedede
King Dedede is a big target, just like with Bowser and Donkey Kong. However, Dedede wields one tool that could save him from Rosalina's onslaught, which is his long-ranged hammer. Against the Luma, Dedede can simply keep it at bay with his hammer, and standard attacks, and thanks to his mechanical hammer, Dedede could safely attack Rosalina without having to fear about her attack range much.

However, resorting to his strongest hammer attacks is not really a smart move, as their slow execution gives Rosalina a chance to retaliate and potentially mess up Dedede hard, whether it's by herself, or by sending the Luma into harm's way. Likewise, the dash attack should be avoided, as that's very punishable. Another option for Dedede is using his inhale move to keep Rosalina away. Dedede also has his own lethal grab game that he could use to his advantage, but due to the Luma, it may not take long before his grab game on Rosalina gets interrupted.

Recovery-wise, Dedede has four mid-air jumps, but he falls like an anvil, which makes defending himself against the Luma rather risky. The Super Dedede Jump is a powerful third jump that could do some serious damage to Rosalina, but without invincibility frames, a simple up tilt may be enough for Rosalina to counter that attack.

Overall, Dedede may have a slight advantage with his hammer, but because he can't risk using his strongest hammer attacks against Rosalina, he'll have to mix up his hammer usage to avoid any stale move issues.

Fox
Fox is fast on foot, and fast with most of his attacks. He also wields a rapid-firing Blaster, which can easily rack up damage. However, Rosalina could simply redirect the lasers with her Gravitational Pull, rendering the Blaster ineffective. It should also be noted that the Luma isn't actually a projectile, and as such, will not be reflected by Fox's Reflector.

As such, to give Rosalina a run for her money, Fox will probably need to play mind games with his quick feet and various attack maneuvers, while at the same time, watching out for the Luma's attack maneuvers. Fox also needs to be weary of Rosalina's attack range, as she could potentially stop some of Fox's approaches rather easily. The Fire Fox is a long range attack, but since it only scores one hit on opponents, Rosalina could just shield herself, and then punish Fox afterwards. The Fox Illusion could help in Fox's mind games, thanks to its long range, and tricky to punish traits.

It should be noted, however, that Fox falls quite fast for a lightweight, which means that if Rosalina manages to grab Fox, she could send him flying upwards, and follow up with repeated up tilts, juggling Fox as a result. Recovery-wise, the Fox Illusion's horizontal range helps make up for Fox's weak aerial speed, along with potentially avoiding the Luma, but the helpless state drawback is a huge opportunity for Rosalina to pulverize him. As for the Fire Fox, the Luma might find it hard to counter that move without Star Bits, but a simple down aerial by Rosalina may be enough to stop Fox. Now, if Fox is able to put Rosalina at a tough spot himself, his fast footwork could enable him to keep up with Rosalina's recovery, and considering the power of his up aerial, could potentially score a Star KO during the process.

This matchup simply comes down to how well Fox can execute his mind games, as his first challenge is simply getting past Rosalina's longer range. But if Fox ever falls victim to Rosalina's grabs, he'll probably risk getting juggled to death with almost no way to retaliate.

Pikachu
Pikachu is short and quick on its feet, but like most other short characters, does suffer from a rather short attack range. This does not bode well against Rosalina, as her longer attack range could keep Pikachu from doing much to her directly. Likewise, trying to utilize Thunder Jolt may simply result in Rosalina using Gravitational Pull to render it useless. Similarly, Pikachu's Thunder could easily be redirected by Gravitational Pull as well, but if Rosalina is helpless, Pikachu may be able to pull off at least one Thunder, but after that, the attack may just get redirected.

The Luma's presence does add to the issues as well, as its variable hitboxes could easily go toe-to-toe with Pikachu's attacks. Of course, Pikachu may be able to use Thunder to keep the Luma away for a while. Skull Bash is Pikachu's longest ranged attack, but seeing as Rosalina can either shield herself, or have the Luma take the impact of the attack, it's not very efficient on offense.

Recovery-wise, the Luma can simply wall Skull Bash, but Quick Attack is trickier to counter until after Pikachu enters its helpless state. Overall, Pikachu's nimble footwork might not be enough if it's not able to get past Rosalina's direct assaults without getting pummeled hard.

Lucario
The Aura Pokemon returns, keeping its aura mechanics during the process. With Lucario, everything about its aura mechanics involve its damage, along with how far ahead or behind it is in a battle.

Against Rosalina, however, Lucario could find it hard to deliver much pressure against her and the Luma to start out. Aura Sphere likely won't get anywhere with Gravitational Pull being able to redirect it, and if its damage is low, Lucario won't be able to deliver much knockback to Rosalina, and could actually get punished by her afterwards. But once its damage starts to build up, Lucario will become much more dangerous, and could potentially clobber not just the Luma, but outreach Rosalina's direct attack options as well. Of course, when its damage is high, Rosalina only needs to score one strong hit to KO Lucario.

However, being KO'd will actually work to Lucario's advantage, since when it's trailing a match, Lucario's aura-based attacks become much stronger, which could give Rosalina something to be very concerned about. But if Lucario is leading a match, it loses its KO power, and may end up struggling against Rosalina and her Luma once more. Simply put, Lucario actually has to be losing to really be a threat to Rosalina, so any chances that it has in winning against her will probably come down to if it can hold onto a slight lead when time runs out. In a sudden death situation, however, it will probably come down to attack priority, and if Lucario can get past the Luma.

On a side note, Lucario's aura mechanics also have an effect on its recovery, as when its aura is strong, Extreme Speed will travel quite far; this might make it tough for Rosalina to counter its recovery while it's losing.

Marth
Marth has always been infamous for his high mobility and long reach with his sword, and since the tip of Marth's sword deals the most damage, simply keeping his distance while attacking can prove to be bad for his adversary.

Rosalina could experience some problems against Marth, since his sword not only messes up the Luma, but his fast long-ranged sword attacks enable him to cope with most of Rosalina's direct assaults. This in return could limit Rosalina's safe attack options, requiring her to play more defensively. Even trying to grab Marth could be an issue with the sword getting in the way. Rosalina's recovery skills could even be hindered by Marth's high mobility.

Of course, not everything works in Marth's favor, as his Counter move equals a grab attempt opportunity for Rosalina, and if Marth attacks too closely, he'll risk getting shield-grabbed if his attacks are blocked. Likewise, Marth's recovery does have a limited horizontal distance that Rosalina can take advantage of.

Regardless, Marth's high mobility, long reach, and quick sword play, may give him the upper hand against Rosalina on most occasions, but he'll have to play smart as well to avoid any punishment.

Pit
Pit has received a couple new moves since his days in Brawl, but how his Upperdash Arm and Guardian Orbitars will operate is currently unclear. His combat options against Rosalina are reduced, thanks to Gravitational Pull's ability to possibly redirect Palutena's Arrow. Additionally, Pit isn't exactly a heavy hitter, as a lot of his attacks simply lack the power to KO things at low damage percentages.

The Luma could also prove to be a nuisance for Pit if he's not able to brush it off quickly. One strength that Pit does have, however, is that his blades do offer him a decent reach, which might help him cope with Rosalina's reach to some extent. Also, the Upperdash Arm seems to offer a good attack range itself, though Pit will need to be aware that if that move gets blocked, he'll be in trouble.

Pit can perform up to three mid-air jumps, and can glide, which can make him rather tricky to edge-guard. The Wings of Icarus should also be kept in mind, as it enables Pit to stay clear of most of Rosalina's assaults while recovering. Overall, Pit probably has to fight with caution while facing Rosalina and her Luma, but he at least has some tactics that could keep the match from being entirely one-sided.

Olimar
Olimar's Pikmin usage gives him various ways to fight against his opponents, whether it's by attacking directly, or by camping out from a distance. Against Rosalina, however, camping may not be the best option, especially if Gravitational Pull can neutralize Pikmin Throw. As a result, Olimar will probably have to take a more direct approach with his Pikmin usage.

Rosalina, on the other hand, can stay safe at a distance, and have the Luma do all the combat. Of course, depending on which Pikmin Olimar uses, he may be able to keep the Luma contained to some degree. In terms of direct combat, Rosalina's attack range could repel a lot of Pikmin onslaughts, which could limit Olimar's best offense to the Pikmin Chain. Olimar's grab games may also be hindered by Rosalina's reach, and even if Olimar does manage to grab Rosalina, the Luma could just get in Olimar's way.

In the recovery department, Pikmin Chain operates as a tether recovery, making it rather difficult to counter, and thanks to the new ledge grabbing mechanics, edge-hogging is not an option. Olimar may be a tough competitor with his Pikmin crew, but because Rosalina can potentially put a good deal of pressure on his Pikmin onslaughts, Olimar could have it pretty rough against her.

Sonic
Sonic may be the fastest runner in the world, but he'll have to hold back his reckless traits with Rosalina. Sonic's greatest strength is his speed, which does help him slip past the Luma, but his approach options are not without flaws.

First off, Sonic's attack range isn't all that impressive, as Rosalina can potentially outreach a good portion of Sonic's attack maneuvers, and he isn't exactly a fast attacker. Secondly, Sonic lacks power, so he's not really able to send Rosalina flying very far without building up her damage, which itself is an issue. Even the Spin Dash and Spin Charge are flawed in that they're easily blocked by shielding, and Rosalina's reach could even counter those moves with the right timing. The third issue is the fact that Sonic has to resort to close combat for pretty much every one of his attacks, and as such, is vulnerable to being shield-grabbed if Rosalina blocks any of his direct assaults; this can even include the down aerial.

In the recovery department, Sonic's Spring Jump makes him quite difficult to edge-guard, and he's not entirely helpless after using the third jump either. However, as mentioned already, Sonic's limited attack range does mean that his attack options could easily be countered by Rosalina's up tilt. In terms of countering Rosalina's recovery, Sonic can't really do much, and even if he does damage Rosalina while she's helpless, his lack in power does mean that Rosalina could just retaliate with her down aerial.

Overall, Sonic might find Rosalina to be a very tough opponent for him, and may often find himself on the losing end of the battle, regardless of his high speed running.

Villager
A newcomer himself, the Villager utilizes a lot of different tools for his combat options. However, he may find that Rosalina will be a tough road block to deal with. First off, the Villager's Collect move isn't able to do anything against Rosalina's attack options, since the Luma isn't even a projectile. Secondly, the Villager's attack range isn't exactly the greatest, and a portion of his attacks are rather slow in execution, both of which Rosalina could take advantage of.

In terms of the Villager's trees, Rosalina isn't exactly a fighter who would simply charge head on without a battle plan. If anything, she'll have the Luma take care of the trees, rendering them quite useless for the Villager. The Villager's net acts as a long range grab, which he could use to grab Rosalina safely, but the Luma could easily interfere with the grab attempt at will.

Regarding the Gyroid, it's not entirely clear on how it works on offense, nor do we really know its recovery properties, but if the Luma isn't able to stop the move simply by coming into contact with the Gyroid, Rosalina may have to wait until the Villager is vulnerable again. Countering the Balloon Helmet is a no-brainer for the Luma, since a couple Star Bits will pop the balloons, sending the Villager packing.

In general, the Villager could probably find himself in a checkmate situation quite fast if Rosalina is able to use the Luma to deal with his game plans.

Mega Man
Mega Man is a projectile utility belt, and may prove to be rather annoying for Rosalina to deal with. While Gravitational Pull may protect Rosalina from just about every one of Mega Man's projectiles, Mega Man is able to use the Mega Buster as a way to approach Rosalina, regardless of whether or not the shots are ineffective.

To keep Mega Man from getting close, Rosalina may have to use her normal shield against some of his projectile attacks, so that way, she can retaliate quicker. Of course, some of Mega Man's projectiles could actually be used against him if Rosalina uses Gravitational Pull on the right ones. Rosalina does need to be aware of the Crash Bomber though, as depending on how it operates, she might have to avoid it another way. There's also the Hard Knuckle to keep in mind, thanks to its long range and power.

It should also be noted that Mega Man has some quick close combat attacks too, such as his Mega Upper, and as such, may send Rosalina flying if she doesn't react fast enough. While recovering, Mega Man can use Rush Coil to jump very high, potentially saving him from taking any beatings from the Luma.

Mega Man is, overall, more of a nuisance than an actual threat for Rosalina, but that's not to say that she should be taking him lightly.

Wii Fit Trainer
The Wii Fit Trainer is probably one of the more complex newcoming fighters to figure out as a whole. What we do know is that she's primarily a close range fighter, with her only projectile attack being the Tether Ball. Rosalina's Gravitational Pull may be able to counter the Tether Ball, and even be used against the Wii Fit Trainer. Regarding close combat, the Wii Fit Trainer is a pretty tall fighter, and her highly athletic physique does give her arm and leg attacks a decently good reach. This may give the Luma some issues, but Rosalina could simply block those hits and retaliate real hard.

In fact, the Wii Fit Trainer might not have much if any approaches that are safe to use against Rosalina, as Rosalina's own attack range could outreach the Wii Fit Trainer's, regardless of her options. When recovering, the Wii Fit Trainer uses the Hula Hoop special for her third jump. That move does give her a decent recovery that could spare her from the Luma, but Rosalina could simply counter her while she's in her helpless state.

She may train and stay fit as much as possible, but the Wii Fit Trainer's lack of safe approach options could prove to be her downfall against Rosalina's more diverse approach options.

Little Mac
Little Mac has faced off against plenty of big-time boxers, along with Donkey Kong during his career. One of his greatest strengths is his high mobility on the ground, and a good portion of his attacks feature invincibility frames. However, Little Mac is all about close combat, and against Rosalina, he has to fight cautiously against her.

First off, Little Mac's invincibility frames are easily countered by grabs, and since Little Mac has to risk attacking head on, one blocked hit will likely be enough for Rosalina to start pummeling away with her own battle plan. In terms of his 1-hit KO Punch, Little Mac could find the Luma to be a nuisance, as it could easily keep him from being able to hold his charge.

Another problem that Little Mac has is that he's not an aerial fighter; once Rosalina throws Little Mac upwards, she could safely juggle him from below with her up tilt. In terms of Little Mac's recovery, it's apparently not very good, and could even be punishable with the right timing. Now, if Little Mac is able to send Rosalina flying himself, his quick feet does give him the ability to reach Rosalina while she's helpless, but using aerials to attack likely won't be a smart move, especially if they're punishable.

Overall, Little Mac's big time flaw may be his grab game vulnerability, which could give him problems not just against Rosalina, but even King Dedede and the Ice Climbers may put Little Mac at a serious disadvantage.

Matchup Speculation: Unconfirmed Veterans
Although the following characters have not been confirmed yet, they should still be taken into consideration when talking about Rosalina's potential matchups. Not all veterans will be mentioned though.

Again, my matchup result inputs may be highly debatable.

Matchup Table


Strong Advantage
Ganondorf, Squirtle, Jigglypuff

Advantage
Yoshi, Wario, Sheik, Pokemon Trainer, Charizard, Ivysaur, Captain Falcon, Ness, Ice Climbers, Mr. Game & Watch, R.O.B.

Even
Zero Suit Samus, Falco, Wolf

Disadvantage
None

Strong Disadvantage
None

Matchup Unknown
Meta Knight

Yoshi
The only member of the original eight to not be confirmed yet, Yoshi has been a unique fighter for his flinch resistant mid-air jump, and egg shield. He can also utilize his eggs for long range strikes. However, the eggs may find themselves getting neutralized by Rosalina's Gravitational Pull, rendering them ineffective for Yoshi's approach.

Yoshi is also unusually weak, with very few reliable finishes, all of which require him to attack Rosalina head-on; a bad dilemma, considering Rosalina's attack range. The Luma may also be able to toy around with Yoshi, as its grab immunity renders Egg Lay useless.

When recovering, Yoshi's mid-air jump can help him get past the Luma, but his aerial attack options may end up falling short of getting past Rosalina's up tilt. On an additional note, the Yoshi Bomb could also be easily countered.

Overall, Yoshi might have to hope that he gets some move adjustments, because if he maintains his Brawl elements, Rosalina may end up clobbering him easily.

Wario
The greedy game maker and treasure hunter has been well-known in Brawl for his unusually short size for a heavyweight. Wario also has an unpredictable air game, thanks to his high air mobility. However, Wario does have an issue that Rosalina could easily take advantage of, and that's his mediocre attack range. Also, portions of Wario's attacks have startup lag, which the Luma could counter with ease.

Anyway, a lot of Wario's best attacks require him to be close to his enemies, but because Rosalina's attacks have the potential to outreach him, his best attack option gets limited to the forward smash, which itself can be countered with shield-grabs. The Wario Waft also gets a mention, as Wario has to be directly close to Rosalina to be able to do anything to her with it. Regarding the Wario Bike, Wario may get flinch resistance from his bike, but all that Rosalina needs to do is attack from above to knock him off.

In the recovery department, Wario has three ways to recover, which includes his Wario Bike, Wario Waft, and Corkscrew specials. He can use them to try to recover, but Wario will have to watch out for the Luma during the process. Wario is also very mobile in the air, which could make it tricky for Rosalina to attack him before he touches ground. On a side note, when trying to counter Rosalina's recovery, Wario's only good opportunity to strike is while she's helpless.

Wario may be a tricky fighter, but being outranged by Rosalina's attacks could mean that his matchups against her won't be in his favor.

Sheik
Sheik used to be quite mighty in Melee before getting nerfed for Brawl. Still, when compared to Zelda, Sheik is much more mobile, but as a drawback, her attack power does take a drop. As such, Sheik might not be able to send Rosalina flying very far without building up her damage. The Needle Storm may run into a brick wall by Gravitational Pull, and while the Chain may seem like a way to cope with Rosalina's reach, it's not exactly a strong weapon. Also, because of Sheik's low power, the Luma may be able to take more hits before going down.

In terms of Sheik's direct approach options, a lot of her direct attacks can simply be blocked and then punished by Rosalina's own grab game. Recovery-wise, Vanish does create an explosion that could damage the Luma, but upon reappearing, she's an open target for Rosalina to clobber. Also, Vanish is short-ranged when compared to Zelda's Farore's Wind. Sheik's situation might not be as poor as Zelda's, but with her lack of power and long range options, she'll probably find Rosalina and her Luma to be pretty tough to handle.

Ganondorf
The mighty king of evil was once a feared competitor in the world of Super Smash Bros. Melee, but in Super Smash Bros. Brawl, he became nothing more than a joke, having no good matchups at all. Rosalina only makes Ganondorf struggle even more, as he's very sluggish, and has no safe approaches at all, even while airborne. Even the Luma could mess up Ganondorf at any time. Flame Choke may sound like a good approach, but all that Rosalina has to do is dodge it, and Ganondorf is in big trouble.

Even in the recovery department, the Luma could simply counter the Dark Dive with just about any attack maneuver. Ganondorf does have a few attacks with a good reach, but they won't exactly get him anywhere if he can't even get to Rosalina, and since Rosalina can always summon a new Luma at will, Ganondorf may simply run into a deja vu scenario every time.

Needless to say, against Rosalina, Ganondorf may not stand a chance against her at all. If Ganondorf wants to avoid this situation, he'd better hope that he either gets a drastic moveset makeover, or reverts back to his Melee ways.

Zero Suit Samus
Without her power suit, Samus is much more agile, and her weapon of choice changes to the Paralyzer. She can use the Paralyzer as a way to deal with Rosalina's reach, in that she can convert it into a Plasma Whip to attack from a distance. Additionally, unlike the Paralyzer's projectile blasts, the Plasma Whip isn't affected by Gravitational Pull, so that does give Zero Suit Samus an advantage.

However, a lot of Zero Suit Samus's attacks lack power, which could be an issue when trying to keep the Luma away. Likewise, the Plasma Whip is Zero Suit Samus's only really good option for outreaching Rosalina, and that could lead to a stale moves dilemma if she doesn't mix up her Plasma Whip usage. Plasma Wire's reach could spare Zero Suit Samus from taking a down aerial from Rosalina though. On a side note, Zero Suit Samus's grab attempt is laggy in execution, which can make it easy to punish if she doesn't paralyze Rosalina with her down smash first.

In the recovery department, Plasma Wire is used as a tether recovery, and thanks to the new ledge grabbing mechanics, edge-hogging is no longer the answer to stopping that move. Of course, there's also the Flip Jump, which may be easier for Rosalina or the Luma to counter. When countering Rosalina's recovery, Zero Suit Samus could use her speed to catch up with her while she's helpless.

Simply put, while Zero Suit Samus may not have the greatest attack arsenal for dealing with Rosalina head-on, the usage of the Plasma Whip at least gives her a chance to keep things even.

Meta Knight
Oh boy, Meta Knight. That guy has been very notorious for having no terrible matchups, even against those who could easily outreach him. Anyway, even though Meta Knight's reach might not be as long as Rosalina's, he could still pose some problems for her in the use of his Mach Tornado and Drill Rush specials.

Of course, Meta Knight's potential heavily relies on the game play elements that he has to cope with. Brawl may have been a blessing for Meta Knight, but it's unclear how well he'll work in Smash 4 if he does return (which seems pretty likely). As such, this type of matchup can't really be speculated on very well at the moment.

Falco
Fox's ace pilot has made a name for himself ever since he joined the fray in Melee. Falco may not be as fast as Fox, but his longer reach does help with his approach tactics. Of course, against Rosalina, Falco will have to tread with caution. The Blaster's lasers may easily get redirected by Gravitational Pull, so long distance attacking may not the best option for Falco.

Fortunately, Falco does have some quick attacks that could keep the Luma at bay, which even includes his Reflector. In fact, Falco could even use his Reflector as a way to attack Rosalina while staying clear of her reach, though he does need to keep in mind that Rosalina could shield the move and retaliate afterwards. The Fire Bird scores multiple weak hits, which may mean that Rosalina will need to alter her defense to counter that attack. The Falco Phantasm could be used for mind game purposes, especially considering that it's a tricky move to punish.

Falco does need to keep in mind, however, that he falls fast, and if Rosalina sends him flying vertically, she could juggle him around with up tilts. In the recovery department, Falco Phantasm offers good horizontal distance that could give the Luma issues, but leaves Falco vulnerable to Rosalina's counterattack. As for the Fire Bird, Rosalina's down aerial may be enough to stop Falco from recovering. If Rosalina is the one trying to recover, Falco might have to wait until Rosalina is helpless before he can effectively attack her, especially if Rosalina's Launch Star special protects her from the impact of Falco's down aerial.

Falco does have the tricks to keep the matchup interesting for Rosalina, but it may simply come down to how well he can execute his mind games against her.

Wolf
Big bad Wolf O'Donnell joined the Smash Bros. fray with his mobile and rather quick offensive assaults, and has done whatever he could to bring down Star Fox.

Anyway, Wolf has some tricks up his sleeve that could catch Rosalina off-guard, one of which is his forward smash, which doubles as an approach method. The Fire Wolf can also be used for long range attacking, and its ability to score multiple hits does mean that Rosalina might have to find a different way to counter the attack.

When facing the Luma, Wolf has the attacks to keep it contained to an extent, but using the Reflector against it is out of the question. The lasers that Wolf's Blaster fires could end up being redirected by Gravitational Pull, but the attached bayonet can still be used for direct assaults. In the aerial department, Wolf has some attacks that could help him cope with Rosalina's direct attacks, but he would have to attack in a diagonal path to avoid taking an up tilt to the face.

Recovery-wise, Wolf's recovery is considered unsafe, and does run into problems once he enters his helpless state. Wolf Flash does follow a diagonal path, and may spare Wolf from the Luma's attacks, but because his aerial speed ends up taking a plummet, he becomes an easy bull's eye for Rosalina to clobber. As for the Fire Wolf, the move has some angling issues that Rosalina could take advantage of with her down aerial. Now, if Rosalina is trying to recover, Wolf's best opportunity to strike is when she's helpless, since at any other time, she'll simply counter Wolf with her down aerial.

Nevertheless, Wolf is a rather cunning participant who could give Rosalina an interesting matchup, even if neither side has an actual advantage.

Pokemon Trainer
The Pokemon Trainer is unique for having three different Pokemon on his team; Charizard, Squirtle, and Ivysaur. However, his Pokemon are flawed in that they have a stamina system that can hinder their attack power if they're out for too long.

Rosalina could easily take advantage of the Pokemon Change by grabbing the next Pokemon once it pops out. As such, when it comes time to switch Pokemon, the Pokemon Trainer's Pokemon might have to get some distance to avoid that dilemma. However, the Luma should also be kept in mind, as it could interfere with the Pokemon Change as well.

Overall, the Pokemon Trainer's Pokemon Change special may be difficult to pull off safely if Rosalina is able to pressure his Pokemon up close, and from a distance.

Charizard
Charizard is the heaviest member of the Pokemon Trainer's team, and it has some heavy-hitting attacks that Rosalina might need to keep in mind while she's facing it. Fortunately for Rosalina, Charizard isn't exactly very mobile when it's not dashing, and its attacks aren't exactly fast either, and the ones that are fast tend to have ending lag that Rosalina could easily use to her advantage.

Interestingly, Charizard's Rock Smash has projectile properties, which could mean that Gravitational Pull can render the attack useless. When dealing with the Luma, Charizard can't really rely on its strongest attacks against it, or else it may see itself getting countered hard. Charizard does have a pro in its grabs though, as its long neck gives it a good reach for grabbing Rosalina. But with the Luma roaming around, Charizard's grab game could easily be interrupted.

Recovery-wise, Charizard only has two mid-air jumps, and it isn't exactly a fast glider. However, Fly does seem to offer it some invincibility frames that could save it from the impact of Rosalina's down aerial.

Like the other Pokemon in the Pokemon Trainer's team, Charizard suffers from the stamina system, which can hinder its KO power. As such, it may not take very long before Charizard has to make a tactical retreat. Sadly, Charizard might be the only member of the Pokemon Trainer's team who has the least amount of issues against Rosalina, but even then, the fact that the stamina system affects Charizard's potential could be enough for it to be at a disadvantage.

Squirtle
Squirtle is a short and very light member of the Pokemon Trainer's team, and is probably the least threatening of the three Pokemon for Rosalina. First off, Squirtle's reach isn't very good, which could make it easy pickings for Rosalina's long range attacks. Also, its Water Gun special could easily be redirected by Gravitational Pull. When facing the Luma, Squirtle's long range options are mostly limited to its up smash and Waterfall moves.

When recovering, Squirtle does have a rather good aerial speed, but after it uses Waterfall, the air speed takes a drop. Also, Rosalina could simply counter Waterfall with her down aerial.

Squirtle does suffer from the stamina system, so when it comes time to retreat, Squirtle could use its quick aerials and walking speed to find a good spot to perform the switch. However, because Squirtle may find itself at a huge disadvantage against Rosalina, the poor matchup for it could force it to switch out too soon, and that may leave Ivysaur not feeling fully refreshed for using its attacks to their fullest.

Ivysaur
Ivysaur is like the middleweight of the Pokemon Trainer's team, and much like Squirtle, doesn't exactly have the best approach options. Razor Leaf could easily get redirected by Gravitational Pull, and its best KO moves are either easily blocked, or have a poor reach.

Ivysaur's vines do offer it a good reach for its grabs though, but because the Luma could mess up Ivysaur's grab game, it may be very hard for it to pull off its grab game effectively. Bullet Seed could be a nuisance for Rosalina, however, but only really while she's close to it, and that's usually resolved by having the Luma charge in to fight.

Ivysaur also suffers from a poor air game, and that could make it easy for Rosalina to juggle around. As for Ivysaur's recovery, Vine Whip is its tether recovery, and thanks to the new edge-grabbing mechanics, can no longer be edge-hogged. As such, Rosalina's ability to counter Ivysaur all comes down to sending it flying too far for Vine Whip to grab any ledges. Ivysaur's power does take a drop once the stamina system starts to take its toll, which may force it to have to retreat.

Much like with Squirtle, Ivysaur may face a good deal of issues while facing Rosalina, but it at least has a few attack options that could be a minor nuisance for her.

Jigglypuff
Jigglypuff went down the wrong road when it returned for Brawl, and it hasn't been the same ever since. Jigglypuff's greatest strength is its high aerial mobility and short size. However, Jigglypuff faces a huge flaw in that its attack range is quite poor, and that's very bad against Rosalina, who has attacks that could easily outreach every kind of attack maneuver that the Balloon Pokemon has. Even the Luma may give Jigglypuff some issues, though at the same time, Jigglypuff could use its quick aerials to push the Luma back.

Despite this, however, Jigglypuff pretty much has nothing that could give Rosalina any trouble, as even Rollout can just be shielded, and Rest requires it to make contact with Rosalina for the move to be effective. Recovery-wise, Jigglypuff could Pound as much as it wants, but that might not save it from Rosalina's edge-guarding options.

Needless to say, Jigglypuff may face heavy pressure from Rosalina's superior reach, and it could be a fighter that Rosalina will almost never lose to.

Captain Falcon
Captain Falcon is well-known for his raw power and high mobility. However, his approach options are not the greatest, and a lot of his attacks are slow in execution, which is not something that he wants while fighting Rosalina.

Rosalina could take advantage of Captain Falcon's flaws by having the Luma mess around with him. Because he can't attack quickly, even with his best aerials (most notably the forward aerial), Captain Falcon may receive a good thrashing from the Luma if he doesn't tread carefully. As for his Raptor Boost and Falcon Kick, Rosalina could easily block them and then punish Captain Falcon with her grab game.

Recovery-wise, the Luma's grab immunity means that the Falcon Dive can't do anything to it. As a result, Rosalina can just edge-guard Captain Falcon with the Luma, shutting him down.

Overall, Captain Falcon may end up losing a lot to Rosalina, as his lack of ways to get past Rosalina's attack speed and range could prove to be his downfall against her.

Ness
Ness may possess PSI-powers, but that really hasn't helped him much in the Smash Bros. competitions. Anyway, Ness is a slow character with a rather poor reach, which Rosalina could easily take advantage of. To add to the trouble, Ness doesn't have the best smash attacks, and a lot of his projectile attacks may easily be neutralized by the Gravitational Pull, which does include the PK Flash. Rosalina could even send the Luma to take advantage of Ness's limited attack options.

In terms of aerial approaches, Ness doesn't have much in that department either, and Rosalina may even punish them just by shield-grabbing. Recovery-wise, the Luma could easily shut down PK Thunder, just by taking a hit from the projectile.

There really isn't much to say about Ness, except for that he'll probably find himself losing a lot to Rosalina.

Ice Climbers
Popo and Nana are quite infamous in Smash Bros. for their ability to clobber a lot of fighters with their grab game. However, their grab range is not very good, and that could prove to be a problem that Rosalina may take advantage of.

While together, Popo and Nana can deal a good amount of damage with their hammers, as the hammers have a decent reach. That could give the Luma some trouble, as its approaches would get stopped in their tracks. Because of this, the Luma might be better off staying close to Rosalina, so that way it can keep Rosalina covered from the Ice Climbers' approaches.

In fact, having the Luma around may be Rosalina's answer to countering the Ice Climbers' grab game; if Popo and Nana somehow manage to get past Rosalina's attack range, the Luma can take action and interfere with their grab game at will.

If the Ice Climbers ever want to get anywhere with their grab game, they'll need to take out the Luma first, but that could be a wasted effort if Rosalina can summon another one, even when she gets grabbed. Likewise, Rosalina's attack range may outreach the Ice Climbers' grab range, keeping their grab game in check. One additional note to keep in mind is that Popo and Nana need to stick together, or else they could fall victim to Rosalina's own grab game. Recovery-wise, Belay is only effective if Popo and Nana are together, so if Rosalina takes out the CPU-controlled Ice Climber, the other one's recovery will suffer.

This matchup may have a lot of questionable scenarios, but considering that the Ice Climbers' grab game is their trump card most of the time, they could end up dealing with a slight disadvantage against Rosalina, simply for the fact that the Luma's potentially inevitable interference could shut down their grab game before it even has a chance to get started; this could really limit the Ice Climbers' combat options.

Mr. Game & Watch
The resident of Flat Zone has gone through a lot after joining the fray in Melee, becoming more manageable in combat. Mr. Game & Watch (Mr. G&W) has a decent arsenal of heavy-hitting attacks that could send Rosalina packing, but the main challenge that he'll face is actually being able to land them.

A decent amount of Mr. G&W's attacks only deliver one hit, and if blocked, could leave him at the mercy of Rosalina's own attacks. When coping with the Luma, Mr. G&W may have to resort to his quicker attacks to keep it contained. Regarding Chef, the food that Mr. G&W tosses could easily be stopped by Gravitational Pull. Oil Panic will not have any use against Rosalina, as the Luma operates as her long distance weapon.

Mr. G&W also suffers from being a very lightweight fighter, and if Rosalina grabs him, she could easily send him flying vertically and take advantage of his poor vertical endurance. In the recovery department, Fire gives Mr. G&W a way to get past the Luma, and the Parachute helps slow down his descent. Additionally, Mr. G&W is merely semi-helpless, as he can still fight back, but seeing as his aerials are predictable to counter, Mr. G&W may end up taking an up tilt to oblivion if he's damaged enough.

Overall, Mr. G&W may have problems getting anywhere against Rosalina and her defensive options, especially when his very light frame makes him easy for Rosalina to wipe out.

R.O.B.
R.O.B. is a rather interesting fighter who has ways to camp his opponents. Unfortunately, its Robo Beam and Gyro may easily be redirected or neutralized by Rosalina's Gravitational Pull, with the latter even being used against it.

Without its projectile options, R.O.B.'s approach methods start to break down. R.O.B. also lacks power, as its strongest attacks either suffer from startup lag, or do not have a good range. Because of this, R.O.B. may have some issues keeping the Luma at bay. R.O.B. is also a relatively big target, and is heavy in weight, which could make it very easy for Rosalina to take advantage of her grab game against it. In fact, R.O.B. has a vulnerability to juggling, thanks to its weight. Recovery-wise, R.O.B.'s Robo Burner does give it a good recovery, but if Rosalina or the Luma are able to edge-guard its recovery, it'll be in deep trouble.

R.O.B. may simply find Rosalina to be a troublesome opponent, especially if its camping game is ineffective against her.

Conclusions


Despite all the hardships that Rosalina had to cope with, Sakurai saw a lot of potential in her, and decided to implement her into the Smash Bros. series as a playable character. With the Luma by her side, Rosalina might prove to be a highly efficient fighter who can find various ways to keep her opponents off balance. In fact, Rosalina could prove to be one of the best fighters in the game, thanks to her versatility.

If any character was to represent the Super Mario Galaxy titles, Rosalina was pretty much the best pick for the job, thanks to her very important role in the Mario Universe. Rosalina has also shown that characters don't necessarily have to be heavily involved in mainstream titles to be strongly suggested; sometimes, the smallest role can have a huge impact on the story.

Rosalina might end up being an unlockable character, but I feel that that'll make her much more rewarding to play as. Good things typically come to those who wait after all.

If you have any comments or criticisms, regarding my two-part article, feel free to state your opinions. Just keep in mind that everything on this article is subject to change, so don't assume that what I've brought up will come to pass.

And with that, this ends my Rosalina article. It took me quite a while to set this all up, as I had to review a lot of Rosalina's moves, and figure out how some of them may operate. The torch will now be passed on to ThatWasPeachy, who will be making the Wii Fit Trainer article for next week.

For more information on Rosalina, refer to her article at the Super Mario Wiki.

But until then, M&SG is signing out. Thank you for your time, and keep on Smashing as well.
 
Last edited by a moderator:

Venus of the Desert Bloom

Cosmic God
Super Moderator
Premium
BRoomer
Writing Team
Joined
Jul 30, 2007
Messages
15,415
NNID
VenusBloom
3DS FC
0318-9184-0547
Thread of the Week
Writer: Venus of the Desert Bloom


Make Your Move (MYM)
http://smashboards.com/threads/make...housand-batman-van-waluigi-mach-rider.345878/

Make Your Move or also known as "MYM" is considered to be an integral part of Smashboards and has some of those most dedicated members in all of the forums. It has become its own institution and has weathered the forum changes, DDoS, being stickied and unstickied multiple times, moving to different forums, and everything else that would break many other groups and threads. Yet, due to a core of dedicated members, MYM has weathered all obstacles and continues to persevere well into 2014. In essence, the MYM is a thread dedicated for forming unique and interesting move sets for a variety of characters - not just constrained to Nintendo-only franchises. It has a history that few threads, social groups, and secret societies have.

The very first Make Your Move was first established back during the pre-Brawl hype on November 11, 2007. Created by @Fawriel, the original thread can be found here. Members emphasize less on Nintendo icons and even less about likeliness. In fact, likeliness isn't even a factor that is considered when developing ideas for move sets. It is more about developing unique and interesting move sets for characters you would love to see including in Smash Bros. despite how unlikely they are.

FrozenRoy said:
The spirit of this contest is that there's no holds barred on what characters are allowed. Remember all those times when you were told, "they can't possible be in Smash Bros!" Make Your Move is open to any ideas no matter how ridiculous.
That is why some of the leading character move sets may surprise you because of them having nothing to do with Smash or Nintendo.

To view the many movesets that were created, visit this page. How many movesets have been made since 2007?

@JOE! stating:
2295 and counting!
Some notable members have created a large number of move sets. @ Smady Smady stated

Warlord has over a 100 sets all on his own and Junahu I'm sure is closing in on that number too, as they've been around practically the longest at this point. Most of the top community members tend to have at least 20 movesets accumulated, and when you consider that there have been hundreds of authors, it quickly stacks up to an incredible number.
@MasterWarlord also added

If you check our backlog of movesets on the stadium and bunker, you will more likely than not find a moveset for some obscure favorite character of yours.
The sheer amount of move sets created for almost any character is pretty astounding and is a testament to the dedication and perseverance of MYM.

The History

As I mentioned before, MYM was first established in November and has continued until the lastet installment, MYM 15 which was created in February 2014. Here us a list of the previous MYM and the date of their creation:

MYM was originally started by @Fawriel but ownership has changed hands whenever it restarts. The following members have at one point ran MYM:

@Fawriel (MYM1)
@GreatClayMonkey (MYM2)
@Commander Blitzkrieg (MYM3)
@SirKibble (MYM4)
@MasterWarlord (MYM5)
@Hyper_Ridley (MYM6)
@ Smady Smady (MYM7)
@MarthTrinity (MYM8)
@Junahu (MYM9)
@BKupa666 (MYM10)
@ Smady Smady (MYM11)
@LegendofLink (MYM12)
@ForwardArrow (MYM13)
@ Smady Smady (MYM14)
@FrozenRoy (MYM15)

Many of these leaders were from when MYM first started or came later. With the leader of MYM changing every incarnation, changes occur as well as splits within the community. However, it only causes the community to grow stronger.

I asked @JOE!, @MasterWarlord, and @ Smady Smady about the state of MYM when they first joined it:

JOE! said:
I started back in MYM6, in a state very similar to that of today given all the hype building up for Brawl's release. Throughout time however, especially after brawl's release, many people have come and gone leaving only a good handful of dedicated moveset makers to form the MYM community and grow as "movesetters".

This caused a bit of a divide a few years back as while the long-timers got more creative and outlandish with their concepts (Imagine all the possibilities you can do with smash inputs, now imagine what you could do when said inputs interacted with each other, and all sorts of other wackiness.. and you get characters that can do thinks like summon fully AI minions or even change the stage layout!) as people seemed to have gotten bored of "In-smash" movesets in favor of super creative ones, which scared away newcomers. As of late though, there has been a healthy mix of fantastic and more down to earth sets as people have come to realize that while you can certainly create amazing additions to the "engine", there is still plenty of material to work with just under their nose with known / current smash mechanics and gameplay.

However, one of the other leaders could probably get into much more detail here.
Smash Daddy said:
I started in Make Your Move 3 and we're currently on Make Your Move 15. When I first came to MYM it was insanely active, the thread basically functioned as a social thread in that age. Most of the changes I've seen over the years have been for the better, as for the most part, movesets now tend to get their deserved feedback and there is more dedication to helping new users improve, as well as fairness in judging what set is best for the end of contest when users vote on the 'top fifty movesets'. I'd say this is largely due to the social aspect of the threads moving to a browser-based chat, and recently to Skype, as it means the thread is left entirely for set authors to interact uninhibited by off-topic discussion.
When I began there were none of the archiving sites to store the various MYM articles and previous contest's set lists. The MYM community is fastidious about preserving its history. It may actually be slightly overwhelming if you're a new user to see hundreds of articles, some totally unrelated to movesets and more to how it should be run, though I think it's fascinating to read up on the community's growth. I've seen many users getting into the community using those archives as a jumping off point to do their own thing, and it's a huge inspiration for me and makes me very proud of what hard-working members have done for us.
MasterWarlord said:
In MYM 3, MYM was largely like any other moveset making thread on the internet, though it was the most active and allowed characters from any platforms. The contest element of the threads introduced the unique aspect of quality to MYM, resulting in actual improvement over the years that flourished into what you can see in the thread today. Movesets would also largely get lost in the thread back during MYM 3, but they are now all largely guaranteed commentary from a couple of our veteran moveset makers.

Some members try to bark down creativity as “tacky” nowadays, though at this point there is now a decent mix of creativity and more simplistic movesets. I would argue that they’ve actually somewhat begun to meet in the middle in terms of what will appeal to the largest amount of people, so it’s a nice compromise.
I'm much newer than almost all of leadership: JOE! began in MYM6, Smash Daddy entered in MYM3 as did MasterWarlord and the closest to me would be ForwardArrow, who entered in MYM10. I, on the other hand, joined in Make Your Move 12. MYM's state was pretty good, having just finished the uproarious and active Make Your Move 11, but I would say the biggest difference is that the atmosphere for joining is much friendlier now than a few contests ago. While I wouldn't say MYM12 had an oppressive feel or anything, it felt decidedly more unfriendly than Make Your Move does now, and I feel everyone has both opened up and mellowed out some more now. I would also say what is considered "good" in a moveset has changed, tooting my own horn here but in part to me (along with the re-emergance of darth_meanie in Make Your Move 14 and some newcomers like BridgesWithTutrtles), and the divide between wildly creative movesets and more execution-based, "in-smash" or "simple" movesets has decreased, which has led to quite some interesting times. As someone who trends more towards the latter, simpler movesets, I certainly am pleased to see them pop up more, but I'm also glad to see this didn't mean the destruction of the wild and messy ones: Just because they're not my style doesn't mean I want them gone, after all.

I can't say much on the full evolution of Make Your Move since 2007, having been here so little, but the biggest observable change I can see is that everybody, even people who seem to just be popping into the thread for the first time, seems to be more knowledgable about game design and how Brawl works. Everyone is a bit smarter and sharper now. I'd also say that, again and more in just my time period, Make Your Move has just become a nicer place to be, from chat to comments.
@FrozenRoy

MYM has certainly changed and has had its share of troubles. However, it's important to note that many of the staff members were not from the original MYM1. It is important for the group to have new members who perfect the art of creating move sets and continue to bolster the community. Everyone starts from the level 1 but with enough hard work and dedication, can climb up to lvl 99.

Each leader has also helped out the MYM in some sort of fashion as a staff leader or coordinator. Currently, the staff consists of:

@FrozenRoy
Your Make Your Move 15 contest OP and Make Your Move 14 winner, FrozenRoy is an enthusiastic leader with a high activity rate and an inviting personality. He might be a bit dumb at times, but he's always willing to help out if someone asks for advice! One of the rare people who has been in multiple contests and Top Tenned in each. Known for his production of Touhou sets.
@MasterWarlord
MasterWarlord has been around almost as long as Make Your Move has been and is pretty much the definition of an MYM living legend. Winner of Make Your Move 8 and Make Your Move 6, he is one of the elite of elite who has won multiple contests. Has top 10'd in every contest he has entered, something considerably impressive given his extreme longevity. He may be a bit hard to approach, but his Make Your Move knowledge is invaluable. His production of the "Heavyweight Male Antagonist" is legendary.
@ Smady Smady
Winner of Make Your Move 11 and Make Your Move 12, Smady is one of only three people to have won multiple contests, and the only one to do so consecutively. Smash Daddy is known for his friendly approach to newcomers and strong commentary and setmaking ability and has also been around for a great time, making him another invaluable senior member of Leadership. One of only two people to get both first and second in a contest. Probably best known for his production of poison typed Pokemon and Illbleed sets.
@ForwardArrow
ForwardArrow is the man who won Make Your Move 13 and is rising to become a veteran member of Leadership as a household name. With a sharp mind, ForwardArrow's creative thinking has earned him high placings in previous contests, and he has a knack for being an active and useful commenter. He is the other member who has gotten 1st and 2nd in a contest and the only to do so without a tie. Best known for his production of characters that are "odd" or have "odd" powers and Magic: The Gathering cards.
@JOE!

JOE may be the only Leader to have never won a contest, but his stream of attempts at gathering activity and his continued help with MYMinis makes him a good leader. His "RankCom" style of comments gives a new style all his own to set discussion and he is known for having an excellent grasp on the mechanics that makes Brawl tick and tock. His "Trainer JOE" series of Trainer sets are quite famous and he enjoys large projects.
MYM has a long tradition of fostering creativity and instilling knowledge of the Smash Bros. mechanics into the move sets members create. This has been perfected throughout the years with the rules changing and being refined to accomodate advancements in the Smash community and new information related to Smash Bros. MYM encourages move set makers to think outside of the box and create interesting move sets to characters that are otherwise never thought about in regards to Smash speculation.

How to Make Your Move

Often, these sort of questions are asked :
  • What does a Moveset ‘need’ for it to count?
  • Moveset making looks hard… how do I improve?
  • How do I write a move set?
For those who are unsure the difference between a sweetspot or a sourspot, what knock back or a spike is, or other general Smash terms - it is best to do some research first. This can be done by either browsing through the various movesets posted on MYM such as this one:

MasterWarlord said:
SLOTH


Sloth is amongst the most obscure homunculi, being absent from the first questionable at best anime adaption of Full Metal Alchemist. Sloth has very low intelligence, comparable to Gluttony, but is even more cut off from society than him due to his job. Sloth is tasked with digging gigantic interconnected tunnels under the nation to use for transmutation circles, entirely with his bare hands. Sloth has several human lifetimes and super strength to make this possible, but given his namesake it times him a long time.

When it comes time for his masters to use him in combat, Sloth is very possibly the deadliest of sins, as anyone who has been in MYM well knows. His strength is not only without match, it dwarfs the strength of the next best candidates, along with his strong thick skin. The other issue at hand is that in combination with his strength, Sloth is actually incredibly fast, again far faster than anyone in the series by a large margin. Unlike his strength, though, he is significantly lazier with his speed, only able to use it in short bursts. Even if he was less stupid, the abuse of his speed seems to physically exhaust him.

Statistics

Size: 12
Weight: 11
Traction: 10
Falling Speed: 9
Jumps: 6
Aerial Speed: 5
Aerial Control: 3
Ground Movement: 1

Sloth is exceedingly large, standing a good head taller than Ganondorf while taking up as much horizontal space as DK or Dedede. He gets nothing in the realm of direct hitstun resistances, he’d rather just wait for his enemies to be done whaling on him rather than actually do anything about it.

SPECIALS

NEUTRAL SPECIAL – EFFORT

Sloth lets out an annoyed groan, and nothing else immediately happens. For the next 8 seconds, though, Sloth’s starting and ending lag on all of his moves is cut by two thirds, giving him only one third of his usual lag. His ground movement also increases to Captain Falcon’s, and his first jump now goes higher than Falco’s. After the 8 seconds are up, Sloth falls over in a heap into prone and falls asleep immediately (Being put to sleep always put him in prone), even in the air. To add insult to injury, foes can continue comboing poor Sloth while he’s asleep, as he is so incredibly lazy that if he is woken up early by an attack, he will STILL take a full second to wake up afterwards. In the least Sloth can just wake up on his own quickly at low percentages, as sleep is a fairly weak state to button mash out of. Regardless, Sloth cannot use this move again for 16 seconds after he wakes up.

While Sloth has agreed to put in some effort briefly, he never thought he’d have to be putting up with resistance. He can be knocked out of the move early if he takes 16%, gets grabbed, or gets knocked into prone/tripped, the last case making him fall asleep like if the timer went out normally. Sloth is nothing short of a powerhouse during this time with all the speed and power in the world, but if foes don’t want to run around like Sloth got some kind of Final Smash they’ll basically have to return Sloth’s berserker attitude.

DOWN SPECIAL – WORK

Sloth starts digging into the ground slowly at a leisurely pace, digging out a Kirby sized indent of ground per half second for as long as the button is held. If Sloth uses this move in the air, it becomes a stall then fall and an actual hitbox as Sloth puts all of his weight into a single foot. This is roughly as powerful as Dedede’s Up Special, knocking foes straight down. If Sloth hits the ground, he’ll create a Wario sized indent in the stage. Rather than a straight hole in the ground this move creates slopes, with the ground on the sides of the main targeted ground sloping down into the pit. You can actually run down and up the other side of such slopes without ever entering an aerial state, not “falling in”. All terraforming is reset on Sloth’s death. On a stage with no depth to the ground or paper thin platforms, Sloth simply bends them into the desired shapes.

Sloth’s set up is rather embarrassingly slow normally, but it gets far faster if he’s putting in effort. The raw lag reduction enables Sloth to do set-up without much fear of punishment, generally able to bring up his shield before the foe can hit him for setting up due to his ending lag being so brief. Of course, if you intend to spam it over and over with the foe in your face it’s not nearly as safe, but it’s not like you have no way to knock foes away with your massive power and currently high speed moves.

Any character in prone on a slope will slide downwards at a speed variant based off how steep the slope is. While Sloth has any moves that hit the foe into prone, this is very good news for Sloth himself, as if he falls asleep on a slope he can take some “action” by sliding away from the foe.

SIDE SPECIAL – ROCK

Sloth grits his teeth and strains himself as he pulls up a boulder from the ground somewhere between the sizes of Wario and DK with this move, having lag on par with Ike’s fsmash. He can walk around while holding it at half his (Worst in the game) normal speed, or at Mario’s dash speed when putting in effort. Pressing a button other than B causes Sloth to drop the boulder, while pressing B causes him to very laggily throw it forwards a platform for 13% and knockback that KOs at 160%. When the boulder is falling not from being thrown, say if you just drop it off-stage, it deals 10% and downward knockback that KOs at 175%, but can KO an off-stage foe sooner of course. Sloth can press Side B in front of a boulder on the ground to pick it up again.

Boulders can roll down slopes if placed on them, gaining more momentum the farther they travel and the steeper the slope is. Having to go up a slope will of course slow their momentum quite quickly in the same manner, and traveling along regular ground also slows their momentum. For a quick measurement, a boulder rolling down the entirety of the right slope on Melee Yoshi’s Island will be going just over Captain Falcon’s dashing speed by the time it reaches the bottom. At such a speed, it would be dealing 27% and knockback that KOs at 100%, the cap.

Foes can deal knockback to boulders, as heavy as Bowser at 65%. It is relatively easy to knock a boulder off of a flat stage, but if a boulder is stuck down at the bottom of where two slopes meet it can be quite difficult as the boulder just falls/rolls back down where it was quite quickly. Sloth is vulnerable to his own boulders, but cannot deal knockback to them. Sloth can catch any boulder rolling at him with Side Special with very forgiving timing, though he does have to awkwardly take the time put it down afterwards if there’s a foe in his face.

UP SPECIAL – CHAINS

Sloth has two chains attached to both of his wrists, wrapped around his arms by default, and with this move he throws out one of his arms to send out the chain at any angle desired. The chain has a maximum reach of 3 platforms and shoots out at the rate of Captain Falcon’s dash. Only the end of the chain is a hitbox during this move, dealing 8% and knockback that KOs at 160%. If the end of the chain comes in contact with a ledge, it will unsurprisingly tether to it. This move will hit foes off the ledge and tether simultaneously, and does not put Sloth in helpless, much like the project M tethers. Sloth cannot use any moves until the chain goes out the full length or hits something in the way to stop it, with the exception of throwing out his chain on his other arm with a second use of his Up Special, giving him further power over edge hoggers.

If Sloth does not hit a ledge with this move, the chain will stay extended, laying limp on the ground. Sloth has to reel in the chain before he can use Up Special again. Inputting Up B with your chains both thrown out has Sloth automatically reel them in, pulling them in a Bowser width per 0.1 seconds, able to cancel out of this into shield whenever he wants. If Sloth only has one chain thrown out, he can choose to reel it in instead of throwing out his other chain by double tapping the input. If he wants to reel in only one chain when both are thrown out, Sloth can double tap the move and input left or right for the corresponding chain. If both of them are in the same direction, inputting behind Sloth will have him reel in the one closer to him and visa versa.

If this move is input when Sloth is standing directly in front of a boulder (You have to be overlapping it, not just in the general vicinity), Sloth will tie the ends of one of his chains to the boulder, connecting him to it via a chainlink tether. Sloth cannot move away from the boulder more than the maximum chain length normally, though if he’s putting in effort he can dash at Ganon’s dashing speed at the end of the reach, pulling the boulder along with him. If Sloth is knocked away farther than the maximum chain length, then the remainder of the knockback from that point on is split between Sloth and the boulder. Sloth obviously cannot go farther than the boulder allows him to go regardless of the extra knockback he’ll take, and he’ll presumably already have taken a good chunk of it from just reaching the maximum reach of the chain. Foes can break the chain link by attacking the boulder for 35 damage.

Sloth cannot use his Up Special specifically on chains attached to boulders, though he can use Up B up against the boulder again to untie himself to it if he wants. Regardless, he has plenty of other moves to make use of this as a “ball and chain” style weapon.

GRAB-GAME

GRAB - GRAB

Sloth doesn’t directly restrain the foe as he lurches forwards, placing his hands on their shoulders, with the foe doing the same to him if his grab lands. Sloth’s grab has good range for a physical grab on par with Dedede’s, though it has .4 seconds of lag, very poor for a brawl grab. With effort, your grab is essentially Dedede’s with no strings attached.

Z PUMMEL - STRENGTH

Sloth goes to push against the foe, actively pushing them back a Pokeball width per press of Z. The foe can mash Z just as well to push him back the same distance, and the grab ends if either character pushes the other one off a cliff. If putting in effort, Sloth will push the foe 1.3 Pokeball widths per press of Z to give him an advantage. Things get significantly more rigged with slopes thrown into the mix, as whoever is pushing the other one down a slope will push the victim half a Pokeball width further with each press of Z. Characters cannot push foes any further if they reach the maximum range of a chain they’re tied to a boulder/other object with.

On characters shorter than Mario, Sloth won’t bother reaching down all the way and will just scoop them up in front of him for his grab. Sloth just has to walk forwards casually here, but only the foe’s lower half is restrained, enabling them to punch at Sloth or whatever else they choose to fight back.

A PUMMEL - PUNCH

Sloth takes one of his hands off the foe’s shoulders and punches them in the face for 5% damage. Sloth cannot mash to outmuscle the foe during this time, a good .2 seconds, during which the foe can push him a decent distance. This increases the grab escape difficulty by half the regular with each pummel. If this pummel is spammed and the foe attempts to button mash out of the grab normally without using the Z Pummel at all, they will take a rather long time to get out of the grab, and pushing Sloth off a cliff will often get them out faster.

It should be noted that pressing every single button and even rotating the control stick helps to contribute to getting out of a grab regularly, and that it’s very difficult to match a person mashing a single button when you’re mashing absolutely everything on the controller to get out as quickly as possible. In addition, in Sloth’s unique case, hitting the Z button does not contribute to escaping the grab normally. Timewasting is one of the largest goals with this pummel system, giving Sloth somewhat of a breather before he can put in effort again.

B PUMMEL - CHAINED

Assuming Sloth has a chain directly on him not thrown out, Sloth ties the chain around the foe’s neck. Otherwise, this pummel is unusable. This massively increases the survivability of both characters involved, as the foe is treated like a boulder with unique weight as far as dragging them along. This also means that Sloth can abuse all of his chain moves on foes like they were a boulder tied onto the end of it. They can break the portion of the chain tied to themselves by dealing it 35 damage as usual.

If both characters dash against one another at opposite ends of the chain, their weight and dashing speed ranks are added up, and whoever’s is higher can pull the other one around at a speed that is the difference of those two values (They cannot dash faster than they can normally because of this). Sloth’s regular value is 11 weight + 1 dashing speed for 12, which is generally the average. As an example, Sonic has a value of 5 weight + 10 dashing speed, so his total is 15, enabling him to pull Sloth around with a 3/10 dashing speed. If Sloth is putting in effort, though, his dashing speed is Captain Falcon’s, giving him a value of 9 dashing speed and a perfect total of 20 to pull anybody around he pleases, most at fairly high speeds.

If Sloth is tied to a foe and inputs Up Special next to a boulder, he will tie his end of the chain to the boulder. If double tapped, he will tie his other chain to it as normal. Pressing Up B next to the boulder again is the same, but has Sloth tie it back to himself if only pressed once. This has Sloth lose one of his chains permanently, though once the foe frees themselves from their end Sloth will automatically tie it around his arm laglessly whenever he touches the end of the chain. If that end is unreachable, he can just go get it off the boulder. This is used rarely, but it’s a nice option in your toolset if the foe intends to suicide with a stall then fall or something.

FORWARD THROW - SLIDE

In the single most recurring Warlord move, Sloth overpowers the enemy to knock them onto their backs in prone, places his foot on them, then slides them forwards. This deals 9% and knockback that KOs at 165% as the enemy slides forwards in prone. If the knockback would send the foe into a slope, this can of course be used to extend said “knockback” as they slide down the slope, though as soon as their regular knockback expires they can react while sliding down the slope, they will just be moving down while doing so. If they really don’t want to go down, they can use a backwards roll to resist it.

The real mileage of this move comes from sliding a foe up a slope, though, not down one. If the foe was at a low percentage, they won’t reach the top of said slope and will just start sliding down back towards Sloth when all is said and done. Even if the foe doesn’t get in range of your melee attacks, Sloth has many long range moves, mostly with his chain (Such as Up B), that can hit the foe from whatever distance they choose to go from prone if he predicts the timing correctly. A faster Sloth can also attempt to actually keep up with the foe’s knockback in this move, in order to be able to use a melee attack on them at higher percents.

DOWN THROW - STOMP

Sloth again pushes the foe to the ground, then stomps on them with his full weight. This deals 11% and vertical knockback that KOs at 160%. If the foe is at the edge, Sloth will actually push them off before using this move, revealing that the knockback is actually downwards and is only normally vertical because it’s being used on a grounded foe. This throw of course makes Sloth’s pummel game from the grab have a more direct threat than stalling, bringing foes to the edge in order to use this throw. If you make a slope directly against an edge, you can set-up a very direct and easy KO method, but at the price of any boulders there rolling straight off the stage, much less Sloth himself when he falls asleep. It also makes grabs in such a place far more predictable if you make your intentions so obvious.

BACK THROW - SPIN

Sloth picks up the foe by the legs and spins around several times before letting them go flying behind him, performing a more heavyweight version of the Mario bthrow for 15% and knockback that KOs at 130%, though won’t kill if you’re down in a pit for obvious reasons. Regardless, it’s his best KO throw if dthrow is unusable for such purpose.

If the foe is chained when he uses this move, Sloth will stomp down on the chain as the foe reaches the maximum length of it, causing a snapping sound akin to Snake’s pummel as all of the rest of the throw’s momentum is painfully transferred to the foe’s neck. For each extra platform they would’ve flown off in that direction, the foe takes an additional 2% from this throw. This can rack up more and more bonus damage based off how much damage the foe already has. Sloth is regularly very behind in damage percentage, so this is useful for catching up and for getting an already damaged foe more on his level to make it more difficult to escape grabs. He also generally can’t KO very easily regardless of high percentages if he grabs/pushes a foe into a pit anyway, due to being lower down for vertical KOs and slopes to his sides for horizontal ones.

UP THROW – SMASH

Sloth bear hugs the victim and jumps off the ground 2 Ganon heights, moving the victim around in his arms on the way up to get in a position for a nice piledriver on the way up before coming crashing back down. On contact with the ground, Sloth deals 16% to the foe and knockback at a 75 degree angle (Diagonal, but mostly vertical) that KOs at 180%.

On contact with the ground, Sloth creates an indent in the stage as if he’d used an aerial Down Special at that position. Many MYM characters have throws like this to help them set up without having to worry about the foe, but Sloth’s advantage is he can actually move into position with his pummeling to still set it up wherever he wants. The grab-game is already a massive tool for Sloth when not putting in effort to stall for time, but this can also enable you to get up some set-up without getting punished for it or putting any effort in. In particular, this can help you set something up on a platform above you due to the jump, as you go through the bottom of it before landing on the top of it. Jumping up to a platform can also help this throw KO a lot sooner as you come up out of a pit close to the ground and get higher than the main ground level.

STANDARDS

NEUTRAL ATTACK - CHAINS

If Sloth has no chains extended, he’s looking at a free copy of Sheik’s Side Special when he uses this move, able to spin one chain around in front of him as he directs it around with the control stick as long as he keeps the jab going. Sloth flails his chain about significantly slower than Sheik, it moving around at only a third of the speed, and only getting a boost to 1.3x the power. If a boulder is at the end of this chain, it deals triple the damage of the chain, but increases starting lag to .4 seconds.

If a chain is extended, Sloth may choose what chain he will use by holding down A to use that chain, or rapidly pressing A to use the regular one. If both are extended, the same applies, but the one closer to Sloth will be considered “regular”. Any chain that is extended out will perform the move differently as Sloth just flails that entire chain around with his arm. This causes the entire length of the chain to become a hitbox that deals 7% and vertical knockback that KOs at 180%, the boulder not becoming a hitbox at all in this version.

If you have a foe tied to you and get close to them to use the melee range version of the move, it will not hurt them at all, and of course there won’t be extra starting lag. What the move will do is force the foe into the air, interrupting whatever grounded action they were doing with a 1 frame flinch. Once they are in the air, from this move or otherwise, Sloth can also then flail the chain into the ground to make them suffer the landing lag of their move.

FORWARD TILT - WHIP

Sloth casts out a chain like in the Up Special if none are cast out, prioritizing the longest one if one is, though only casts it out a single platform. Sloth does a thrust of his arm either way, doing it as the chain is cast out if necessary, that causes a ripple effect to travel through the chain. The chain goes up a small ways, not a hitbox, before slamming back down into the ground. The chain does 8% and vertical knockback that KOs at 170%. The move has horrible ending lag after Sloth casts out the chain, him not being able to move until 2/3 platforms worth of chain have already slammed down, though he is free after that. When putting in effort, Sloth can throw out this hitbox while being able to attack with other moves before the attack is finished.

If the foe is chained when Sloth does this attack, they get cast out the same way they would with Up Special, though when the end of the chain gets slammed they will take 12% and vertical knockback that KOs at 140%. Foes are perfectly capable of dodging this slam as they connect with the ground. Notably, chains will wrap around edges during this move as they are specifically slammed down, not particularly good as a edgeguard due to how specific it is. If a foe is chained, though, they will get slammed against the bottom of the stage, making the vertical knockback instead stage spike them downwards. They can still avoid the slamming hitbox, but they’ll still be dangling off the edge either way and briefly under the stage. Even if they do get hit, the fact they’re chained to Sloth (Or even a boulder) means that they won’t be able to finish taking their knockback to their death, eventually just dangling there in place, though Sloth can make it quite difficult for them to get back, especially if putting in effort. Whenever a foe is dangling off-stage and is only being kept alive because of a chain they’re attached to, they may climb up the portion of the dangling chain like a ladder.

UP TILT - SWAT

Sloth swats his hand over his head in the classic half-arch arc popular with characters of his build, including the likes of DK and Bowser. This is very noticeably slower than the mentioned moves, even slower than Bowser’s, but more powerful as expected, dealing 12% and knockback away from where the hand currently is that KOs at 150%. The hand is also a hitbox for the whole move, and with Sloth being as large as he is it gives him some good coverage and is very capable of hitting foes in front of himself.

The move of course becomes much faster in effort mode, being about as spammable as DK’s utilt and giving Sloth a move to mindlessly spam on the ground as a great get away move whenever he wants. To use the move more offensively with effort, it’s no secret that the biggest and most abusable hitbox of moves such as this is above the character. If Sloth is near but not at the top/bottom of a slope, he can use this to hit people with this huge portion of the hitbox very liberally as it’s aimed directly at them. While in the middle of a slope, the top of the hitbox will still be aimed to hit a person approaching Sloth from the front in the air, still giving it some more offensive use than being aimed directly above him.

DOWN TILT - LAUNCHER

Sloth clasps his hands together as he lowers them to the ground in front of him, then swings them upwards in a single fluent motion. This deals 12% and rather high knockback, but it’s at a 45 degree angle behind Sloth, making it KO rather late at an average of 160% because of the bad angle. The move has some slight lag on both ends to the point you wouldn’t say it’s outright fast, but individually both of the pockets of lag would be quite manageable.

This unique angle of knockback is useful in the context of slopes. If your back is facing up the slope, then this knockback angle will shoot them up parallel to the slope without making them crash into it, actually making it one of the better KO options directly within one. If your back is facing inside the slope and the foe is on higher ground than you, this can knock foes into the mass open air in-between/above two slopes, a place few people generally want to be when Sloth will have access to both his ground and aerial game as he chooses. This move’s lag is very kind to Sloth when in effort mode as well, making this described situation a good set-up before going to town on the foe.

DASHING ATTACK - ROLL

Sloth quickly curls up into an oversized ball and uses his momentum to roll forwards, turning into a hitbox a bit larger than his rolling boulders that follows an identical set of rules for speed and power. If not putting in effort, Sloth barely gets any momentum at all without a slope and comes out of the move with bad ending lag, though with effort Sloth already starts out with two thirds of the max momentum he can have. Even when being lazy about it, Sloth can get some considerable power working by going down a slope.

Sloth can cancel out of the move at any time by inputting anything, but it will leave him in a heap in his stomach prone state, sliding forwards a bit further with his remaining momentum he had. If Sloth gets some momentum up and launches himself off a slope, he can cancel out of the move completely for free in the air. This fact, in combination with the fact that Sloth slides down slopes in prone anyway, makes Sloth’s rapidly approaching momentum hitbox less predictable as Sloth has the option to cancel it into a slower get-up attack, or just go into prone and essentially perform a roll past/away from the foe. It becomes a nice approaching option for an effort based Sloth, even without a slope to make use of.

Using this move in combination with boulders, chained to you or not, has some good potential. Whichever order you and the boulder slide down a slope, the second one can attempt to hit a dodging foe, and having one roll down in front of you enables you to use it as something of a meat shield. Going in front of a boulder can enable you to use the boulder behind you to cancel your ending lag and come out of prone as quickly as possible. In this scenario, if the foe gets hit by either you or the boulder and you get hit by it, you’ll likely get knocked in the same direction as the foe, helping you to keep up the pressure on the foe even further at the cost of some self damage (Hopefully the boulder doesn’t deal 16% to you). On the other hand, you can still have the boulder roll down behind you and not get hit by it, as you can enter prone and time your backwards roll to go back past it as it comes by.

SMASHES

FORWARD SMASH – CHARGE

Sloth hunkers down close to the ground as he charges up the smash. On release, Sloth rockets forwards at absurd speeds as he kicks off the ground behind him with his legs with incredible force. He travels anywhere from a Bowser width to 3 platforms width based on charge, dealing 28% and knockback that KOs at 90% to anybody who dares get in his way. He moves practically instantly, going 1.5x Sonic’s dashing speed to his destination. The move has essentially no start-up outside of charging, some 5 frames at best. When the move is over, though, Sloth falls asleep instantly at his target destination, even in the air if necessary.

This is a very horrifying move, though if Sloth intends to abuse the range he has to be cautious to not go off the edge with this move or else he’ll have basically killed himself. Slopes help immensely with this, as if you start the move standing on a slope Sloth will charge to the bottom of it and stop there. Charging up a slope lets you “launch” yourself up, making tiny slopes useful for this purpose, or charge most of the way up, fall asleep, and slide back down in prone. If you are standing at the top of a slope facing straight forwards, you can also enable yourself to charge straight over it to the other side. Needless to say, this can also help greatly with traversing wacky scrolling/giant stages, and can help cover your sleep if you charge off to a good perch.

If a boulder is tied to Sloth, his sheer speed will cause it to jerk along with him half the distance he charges. The boulder can reach up to three quarters max momentum from full charge, continuing to roll along afterwards with said momentum. If the boulder was close enough to Sloth when he used this, it can potentially roll over him, near guaranteed if Sloth charges down/up a slope. The boulder can wake Sloth up, though he’ll be taking a heavy hit for it and even then still lazily taking a second to get up afterwards. It takes quite high percentages for this second to be less than the time Sloth would wake up normally, and it also takes very high percentages for Sloth to not care about a little extra damage.

You’ll mainly be using this as a way to hit foes who dodge/shield the move with a second attack. If they dodge, they’ll usually get hit by the boulder, whereas if they shield both hits their shield will almost inevitably end up broken if the move had more than, say, a quarter charge. While Sloth can’t strongly capitalize on a broken shield from this move except at low percentages when he wakes up fast, it makes everybody lose and stalls for time for Sloth to be able to use his Neutral Special again.

This move already makes use of Sloth’s super speed, so it does not get sped up by Neutral Special. Instead, the range of the charge is increased from 1.5 platforms to four fifths of Battlefield’s width based off charge. Having actual range without charging is very scary indeed, but this move is constantly going to be a thing on the foe’s mind. Ideally, you’d like to use this move to end your session of Neutral Special since this move brings you out of it afterwards even if you had extra time, but that’s incredibly obvious and predictable. Why would you use it earlier when you’re wasting the precious time you’re putting in effort? This gives more point in throwing it out earlier when not as expected.

DOWN SMASH – SPIN

Sloth extends out his arms and spins around one and a half times for a sort of lariat. Because he spins around such a specific amount of times, he ends up facing the opposite way he does originally. This move has .4 seconds of start-up lag and another half second of duration, so it’s not fast by any stretch of the imagination, though there is at least small ending lag. Sloth’s body deals 3-5 hits of 5% and flinching before doing a final hit for 7-10% and knockback that KOs at 170-130% at the end.

If a chain is not reeled in, it will spin around Sloth with this move. The chain spins around in a 3D manner, going through Z planes and swinging past the camera even if the chain was particularly far extended out. The chains are not hiboxes when not in the main fighting plane, only becoming hitboxes when they briefly pass through it, dealing 7-12% and knockback that KOs at 150-130%. While the chains will be extended out the same distance from Sloth, they will end up on the opposite side of him as they were before, enabling you to easily reposition them. If a chain would go through a solid object, such as the stage, because of this move, Sloth will lower that arm as the chain just lays limp against it for the remainder of the move. If you want to use this move in a slope, you generally can’t abuse the full reach of the chains unless it’s very steep, and you’ll want to be standing on it to angle the move properly.

With a boulder tied to a chain, the boulder will be a hitbox that deals 11-15% and knockback that KOs at 135-100% as it passes by. For each boulder tied to Sloth with chains, the starting lag increases by .2 seconds as he musters up the necessary strength, so this can’t be abused as easily as you might want to keep boulders in the center stage. If Sloth is putting in effort, it’s nigh impossible to knock away the boulder via knockback with a starting lag of .2 seconds for the move with one boulder, also preventing foes from hitting the boulder for most of the move’s duration.

If this move is used on a foe, they can attack as they’re swung around through the Z planes, though if they break off of the chain during the move they’ll take knockback that KOs at 100% in the direction they were currently being swung. If the foe is swung into a solid object, they will take 15% and collapse into prone. Being swung past an idle boulder will also deal them 10%, or just get them hit by whatever hitbox it had if it had momentum. Foes are a hitbox as powerful as the boulder during this move, which is generally irrelevant in 1v1 but can be used to knock the boulders around to multitask.

UP SMASH – THRUST

Sloth throws up his arm with the longest extended chain, causing 1-3 platforms worth of the length to be shot up completely vertical, the rest of the chain just kind of flopping over uselessly not a hitbox while the rest is more erect. Along the way, the chain deals 14-22% and knockback in the direction it’s currently going that KOs at 180-155%. If Sloth has no chains extended out, he will unravel one with this move automatically the amount the charge dictates. Sloth can double tap the move to use the move on the opposite chain he would normally. This alone is a nice option for Sloth to have, as he uses the long range version of the jab to make a large static hitbox above himself for as long as he keeps it up barring gravity, or uses ftilt to slam down the chain in front of him.

This move has a second “hit” on it if Sloth pushes the button a second time once the move is complete, as Sloth grabs onto the chain with both hands and gives it a tug downwards. This causes the chain to come rocketing down at high speeds comparable to Meta Knight’s dash, though it’s not a hitbox as it does so. This can let Sloth have a chain fully “extended” while having the whole chain just at a lump at his feet, though has more interesting implications with a boulder (Which again adds .2 seconds of starting lag) or foe tied to the other end of the chain. A boulder will gain downwards momentum to become a powerful hitbox, gaining full momentum if the move is fully charged. A foe, on the other hand, has to come meet Sloth in a head on clash as they get forcefully pulled towards him.

This move has minimal starting lag, though it takes quite a while for the chain to get fully extended out up in the air. Whether or not the second hit is performed, the move has some ending lag before Sloth can act. If Sloth did the tug on the chains, he will have to wait for the chain, the chain will already have come down 1.5 platforms (Or 0.5 with effort) before he can act, meaning he needs more charge for more reaction time before any object tied to it comes to reach him.

In the case of a boulder, the main issue is just even getting out of the way of the thing so it can hit the foe. If a boulder lands on a slope after this, it will have full momentum going down the slope, making this a great way to build momentum on the boulder “in place”, or create an extra disjointed hitbox for an effort mode Sloth to take advantage of offensively. Maybe you don’t even want to avoid it and are setting it up to cancel out some kind of end lag?

Used on the foe, it’s an obvious set-up for a big follow up of some kind. While the foe is not in any form of stun state, if for some reason you want to bail on this you can just perform any variety of chain moves with complete safety. By using the ftilt, you can select how far away you want the foe spaced away from you by using it when the foe is a certain distance above you. If you use the jab with good timing when the foe goes to attack you from overhead, you can cast them out in front of you and smack them against the ground to cancel their landing lag. Your superarmored moves are also pretty obvious choices for such a forced clash from the opponent.

AERIALS

NEUTRAL AERIAL – CHAIN

In one of his absolute longest moves, Sloth takes the longer one of his two chains (shorter with a double tap of A) and swings it in a complete clockwise arc around himself, going in a 2D circle around him before ending up back in the original position it was. If no chains are out, he will cast one out a single platform. The chain in this move deals 8% and knockback that KOs at 170%, but the duration of the move actually gets significantly faster if the chain in question isn’t extended out as far. Extended out one platform, the duration of the move is about .4 seconds, and .4 further seconds for each additional platform extended out. With a boulder tied to you, .2 seconds of lag are added immediately, with .2 further seconds for each platform extended out after that.

This aerial is far too laggy to use in its entirety in almost any context, even with effort. The catch is this move has little starting, no ending, and most importantly no landing lag of any kind. While the hitbox will immediately cease if Sloth enters landing lag, the chain will still be wherever it was before, barring gravity. The dsmash is generally safer and most times often even outright faster to reposition the chain, especially with a boulder, but Sloth can make small movements of the chain with this move more immediately in his attack plan when putting in effort.

This aerial is mostly worth it for the consequences on a foe tied to the chain being used. As in the ftilt, if the foe is ever slammed against the ground with this move they will take 12% and knockback that KOs at 140%. Unlike in the ftilt, the fact that this move is an aerial means Sloth can immediately start repositioning himself as soon as he starts it up. While Sloth’s aerial movement is bad and not improved with effort, he can still fastfall on demand, enabling him to land on a foe as they get slammed against the ground. They will be forced to dodge the slam, leaving Sloth free to grab them or whatever else he wants. Of course, you run the risk of the foe hitting you out of the move before this point, so this isn’t some end all solution.

FORWARD AERIAL – BIG PUNCH

Sloth does a very long winded .7 (42 frames) second overhead swing punch, raising his hand above his head before punching it forwards in an arc in an animation quite similar to Ganon’s fair, dealing a meaty 17% and knockback that KOs at 120%. The move has relatively small (8 frames) ending and surprisingly small landing lag (4 frames) as well, so this move is actually safer to use close to the ground due to being able to cancel out of it quicker. Granted, using it very close to the ground means you’ll never finish the starting lag before the hitbox comes out. Slopes provide a nice compromise, allowing you to jump out and away from the slope to use the move before retreating back to the slope if you want to get out of the move.

This move has superarmor on frames 27-42 of the starting lag and the attack’s duration, so all you really have to worry about is getting knocked out of the move on the first .45 seconds of lag as Sloth doesn’t so much mind the damage. This move makes a nice response to a foe forced to come your way tugged down from usmash because of this superarmor and can be one of the better pay-offs, as well as a more natural move to attempt to use in a gimping attempt.

This becomes one of Sloth’s single best moves in his entire moveset when putting in effort, being reduced to 14 frames of starting lag with frames 10-14 retaining the superarmor. It should be noted that regardless of the superarmor, one of the ways to knock Sloth out of his Neutral Special is dealing a mere 16% to him, so taking any additional damage will actually matter for 8 seconds, making this move less easy to throw out.

BACK AERIAL – NAP

Getting tired of punching the foe, Sloth has come up with a brilliant way to incorporate one of his favorite things into an attack – falling over. Sloth goes to fall over backwards in mid-air, the attack starting up near immediately, but with a long .4 second duration and another .3 seconds of ending lag. As soon as Sloth starts falling over, his back becomes a hitbox that deals 14% and spikes foes as strongly as Rob’s dair. The entire attack duration is superarmored (Nobody dares come between Sloth and his sleep), and if Sloth lands on the ground at any time he will immediately enter his back prone state.

This is an extremely defensive move, not just for the superarmor but for the fact that it moves Sloth’s massive hurtbox around, making it a good way to evade foes approaching from above. You can follow the move up after evading a hit with a get-up attack once lying on the ground, and also further manage to play evasive with Sloth’s gigantic hurtbox by letting it slide away on slopes. A more offensive Sloth interested in effort can also appreciate this move, as he cancels out of the move early by landing in anticipation of a possible dodge and follows up with a quick get-up attack as they come out of said dodge.

UP AERIAL – SMASH

Sloth looks above himself, crouching his head back slightly, as he balls up his hands into fists and smacks them into each other above his head. Sloth’s hands are pretty massive, even without having their size exaggerated, enabling Sloth to deal 12% and vertical knockback that’s either upwards or downwards based off whether the foe hits the top or the bottom of the hands, KOing at 155%. This move has some 23 frames of starting lag, though Sloth’s hands are superarmored during the actual attack (Unfortunately, only his hands this time).

There is a tiny sweetspot in this move located directly in the center of Sloth’s hands that requires you to nail foes directly with the move rather than having them just “fall in” to the exterior of the hitbox, that deals 19% and spikes foes as strongly as Ganon’s dair. Actually hitting with this move with anything other than dumb luck will generally require Sloth to fastfall through a foe into a precise position, which can be done much easier with a pit by giving Sloth some actual distance to fall without being off-stage. This move also makes a very nice choice of follow up to the usmash on a chained foe if you want the full payoff of the move, as the foe doesn’t have control over their vertical momentum in the move. The superarmor on Sloth’s hands comes far more into play on foes coming from above, enabling him to actually tank something. In general, this move is nice as anti-air, and pits enable you to make anti-air a more common thing to use if necessary.

DOWN AERIAL – STOMP

Sloth kicks out his legs in front of him as goes down at a 75 degree angle in a psuedo stall then fall, his feet knocking foes downwards at the same angle he’s going with repeated hits of 4% and set knockback. Should all 6 hits connect over the course of the move, highly unlikely, you’ll have dealt 24% by the end of it. There still is some useless stall on this move alleviated with effort mode, but Sloth shoots down downwards and slightly forwards only a platform’s reach. When the platform’s reach is done with, Sloth exits the so called stall then fall, meaning he can use this to drag foes downwards without killing himself then recover.

This move is unique against grounded foes in that this move is a psuedo grab (It can be shielded but otherwise behaves as a grab) against them that knocks them into prone and has Sloth stay on top of them for the remainder of the hits, potentially sliding down a slope on the foe’s back. Whether or not you land on a foe, the move’s angle enables you to use it offensively when coming down a slope. Unlike the rest of Sloth’s aerials, this move actually has BAD landing lag, not good, as Sloth’s weight gets put forcefully onto his knees, so it’s generally the way to go with the move. If you’re not by a slope, the move is still nice for dragging an enemy into one. Foes will still slide slightly against the ground even without a slope, about a Kirby width, helpful to get the extra distance needed to reach a slope. As soon as Sloth’s momentum on the foe stops, he will get up off of them, so if there is no slope this will only net you one extra hit.

FINAL SMASH – BIG PUNCH

Sloth reels back his arm as the camera zooms in on him, then rockets forwards 1.5 platforms as he throws it out for a punch. This deals 35% and knockback that KOs at 60%. He could come up with a better way to kill the foe, but what’s the point of that?

If Sloth has a foe on his chain, he will instead reel the chain in with absolutely ungodly speed as he attempts to grab the foe, this being the point where the foe has to dodge to avoid the final smash. If Sloth successfully grabs the foe, he will tether his second chain onto them, wrapping it around their ankles. Sloth will then proceed to stretch the two chains out with his super strength as a death cry from the foe is heard as he rips them in half, blood splattering everywhere as they get insta killed.


PLAYSTYLE SUMMARY

At first glance, Sloth’s Neutral Special may look like he’s turning the game into a glorified match of tag, as foes just attempt to run from the omnipotent Sloth when he’s putting in effort and Sloth running away from the foe when he’s busy being lazy. The foe can still knock Sloth out of the move and carry on as if nothing ever happened, though, rather than having to treat Effort Mode like Sloth activated some Final Smash, so this is generally the desirable way enemies will react. As far Sloth not running away when he’s tired out. . .He’s too tired to run away to start with, when he has a dashing speed slower than Jigglypuff. He has to do his best to fend for himself and make some progress until he can put in some effort in again. Of course, even ignoring Sloth’s massive comboable frame and slow attacks, the foe has twice as much time to “go to town” on Sloth, so he’ll almost inevitably end up behind in damage percentage. Sloth works at his own pace, though, and is far more concerned about the foe’s damage than his own.

Sloth will of course take something of a beating as he performs set-up to terraform the stage, and the most common play by a mile is to activate Effort mode immediately to start getting up a nice big pit in the middle of the stage and a boulder fast. While he’ll take a far bit of damage doing it, it’s typically nothing much that he can’t handle, and it’s worth it to get it out of the way quick. If you didn’t get as much done in your initial session as you wanted, you can find some time to use a uthrow or two when you go to grab the foe later on.

When playing as a lazy Sloth, one of the best things you can do is go for grabs to stall the foe, especially early on, with the intricate pummeling system. If you don’t have much use for the other throws at the time, you can get into position for a uthrow for further set-up, or try to catch up in damage with the bthrow. Landing lots of grabs can be accomplished by making use of nair and bair’s landing lag to produce quick hitboxes before transition into another move. Further damage during this phase of Sloth’s game will typically rely on his long range chain moves, such as jab, ftilt, and dsmash.

When it comes time to put a beating on the foe for some revenge, Sloth can use his ftilt or usmash (Or a combination thereof) to create a delayed hitbox for him to approach with and use another move, the earlier mentioned bair and and nair, boulders in general (Particularly with the usmash), and using the Up Special offensively very directly by throwing out one to bait a dodge, then the second quickly after. If foes won’t come into the pit, pummels, fthrow, and dair are all amongst the most obvious ways to bring them there. Even bthrow can work for this purpose and multitask for damage, as the long set knockback can sometimes send the foe right where you need them. Big set-up moves mostly involve the foe being chained, the biggest ones being ftilt, usmash, and nair. Usmash and nair are more about landing an additional hit, while ftilt can more directly lead to a situation where you go after the foe to kill them as you slam them under the stage. Tethering yourself to a foe has much more offensive presence when you’re putting in effort, as the foe won’t have much if any free time to just break free of the chain. It also means they will prefer to attack instead of dodge if possible, multitasking to try to hit you and their chain, making your superarmored aerials more potent in this context as you can more reliably predict an attack instead of a dodge.

When Sloth only has a couple seconds left that he’s willing to put in effort, the whole game becomes a lot more frantic in those couple of seconds. Foes will become more willing to just run from you if they haven’t knocked you out of the move yet, as they won’t be gaining much by going offensive. Having a foe tethered to you to prevent their fleeing is very useful here as you use some chain move on them, though any chain move will do for a last hit if they’re not tethered to get in a last hit. Ftilt is very nice in particular on a chained foe in this context, as even when they inevitably dodge the hit on the underside of the stage they’ll have quite a ways to traverse to get back to you. You generally want to get down to the bottom of a pit for your inevitable incoming nap, though just being on a slope is better as it enables you to get there eventually anyway while also having some form of action while asleep. Needless to say, fsmash is amongst the biggest of factors in the last couple seconds of Sloth’s Neutral Special, and you can use paranoia of it to scare the foe into just about anything. It doesn’t hurt to just throw it out at the end when it’s an unsure hit, but using it to land in a pit can make sure you at least won’t get quite as horribly punished on whiff.

When it comes time to kill the foe, the most common moves you’re looking at are fsmash and dashing attack, usually in combination with boulders, along with dthrow. With how many grabs Sloth lands, dthrow is actually quite possibly the most common way the foe will end up dying. The only thing that prevents it from being your absolute preferred way of doing it is the fact that if you grab a foe in a pit, you’ll have to push them uphill to reach the edge, making this KO method actually better outside of a pit. Venturing outside the depths of a pit leaves Sloth more vulnerable to being killed himself, though the dthrow is also nice because foes will typically predict you intend to just send them back in the pit.

Fsmash and dashing attack only truly reach their peak with boulders chained to Sloth, giving foes multiple hitboxes to avoid. Dashing attack is the much safer option of the two as Sloth just rolls past the boulder in prone and never risks getting hit if he so chooses, while fsmash is a sudden burst that can be thrown out as a surprise option. When you have as much set-up to do as you do at the beginning of a match, tethering yourself to a boulder is generally more reserved for survivability reasons as Sloth’s percentage rises. If Sloth has played correctly, the foe’s percentage should hopefully be rising too, though, so he can make use of these moves relying on being tethered to a boulder then in a very natural manner.

Sloth’s durability is his greatest asset as a super heavyweight with a good and functional tether recovery, though it only truly reaches the massive heights it does because of his ability to tether himself to a boulder and the foe. The boulder can constantly roll back into place in the center of a deep abyss of a pit, requiring the foe to break the link. If Sloth really wants to go insane on survival, he can potentially have made two smaller pits and chain himself to two boulders in each, though this will severely limit his offensive presence compared to his full potential. Tethering himself to a foe requires the foe to break the chain before they can even think about killing Sloth, and in this case breathing down the foe’s neck with heavy pressure is actually the only thing keeping you alive. Rather than 2 boulders, a foe and one boulder is generally most preferable, with the foe typically being too occupied with their own chain to ever bother with the boulder’s. While the nair is too hopelessly laggy to use with any competency on boulders, you can use the dsmash and usmash to play keep away with it to some success.
Here are a list of some of the staffs favorite/notable move sets. Please take a look through them and use them to improve on your writing movesets.

RozenRoy said:
ForwardArrow said:
Smash Daddy said:
Or you can also read up various articles on the SSB Wiki page as well as use your favorite character for reference:

Helpful Links

For more information regarding MYM and move sets, it is a good idea to check out The Bunker.


The Bunker (or The Plaza) catalogs the many move sets created for MYM for members to look through and draw inspiration from. It also contains helpful tutorials, articles )such as Top 10s, reviews, and even debates) as well as announcements and notices.

You can also visit the The Stadium for more information and MYM15 move sets and announcements.


Smash Daddy said:
where the latest contest/thread's sets are archived and it's updated frequently, mostly by one of our key members, Katapultar. There are other useful links in the OP of Make Your Move 15 to those who may be interested.
Finally, there is the Whiteboard.


...a forum introduced in Make Your Move 14, that allows for the posting of sets in bite-sized chunks for a preview. This is a handy resource for any member of the community to post what they have of a completed set, to get advice from others. It also has a section to post old uncompleted sets or archive work that has been made unreadable on SWF, due to coding changes, such as sets that are wholly images and have unfortunately been re-sized.
Though it is important to note that you need to be a member to view the forum.

Finally, recommended by @MasterWarlord, this article is helpful for any newcomer to the MYM scene. It was written by one of the past leaders and influential MYM member @SirKibble. In addition, MasterWarlord had this to say:

I will also say that if you want to get a better idea of standards, you’d be best off simply reading some of the modern movesets posted in the contest, as well as reading the commentary on those sets by other members. Some of our now key members were at one point long time lurkers.
Lastly, @FrozenRoy supplied me with a helpful link:
I also read a specific article when I started MYMing, by the now pretty much departed member King K. Rool, called
The Black Box Opens Up, containing Rool discussing about 8 MYMs worth of movesets and some discussion on the history of Make Your Move. It's a very long article and so perhaps not something to start with, but a studious reading of it is something I credit with first catapulting me to creating "good" movesets.
While there might seem to be a lot of links, they serve to making move sets more enjoyable and a more interactive experience.

How Can I Enter?

So you have an idea you want to put into a move set. How can you go about doing that? What credentials do you need? Do you need experience? What sort of format should I follow?

If you skimmed through the various move sets available in The Bunker and The Stadium as well as the MYM threads, you will have noticed that many of the members have turned their posts to literal works of art. However, this is most definitely not a prerequisite. While it may seem intimidating, the members of MYM are open to many types of formats and move sets.

However, there is one rule that a move set has to follow:

The only requirements for a set are that it has the full amount of inputs, that includes specials, standards, smashes, aerials and a grab, as well as a picture of the character. That's usually all that's needed to get a basic understanding of a moveset. There is far more you can do in a moveset other than that, but it's fine if you just want to post the bare minimum and focus on the fundamentals. In the past we've had members who love to post extras (stages, assist trophies, story modes) and all of that is welcome if it's what you prefer to post.
Meaning that a full move set is required and a move set that only includes Specials and a Final Smash will not be counted into the annals of MYM history. Therefore, basics, nuetrals, smashes, specials, aerials, grabs/throws/pummels, and misc as well as a Final Smash is required to submit a move set. As I mentioned earlier, check various MYM move sets or the SSB wiki to look through the move sets for each character.

While experience and knowledge in making move sets/fighting games is definitely a plus, it is not necessarily required.

JOE! said:
Anybody can enter MYM! We take in folks of all background and skill levels as long as they are willing to put in the effort and join the community.

To enter, all you need to do is post something in the thread that fits in with either the main contest or one of our various "MYMinis" (a sort of mini-contest that has people make up various "smaller" bits of the game, such as a new item or event match). But even stopping in to say hi is fine too!
Smash Daddy said:
Any type of moveset is welcome, although if you have any talent you are encouraged to show it off. We've had set authors who make elaborate animated images that portray their character's model in-game performing moves, but there are many others who simply excel at writing and understanding the way Smash Bros works in intricate ways. If you spend enough time in the community, you're bound to find a niche.
So we now have a move set constructed but do I need to post pictures, gifs, and videos? It is not a requirement but doing so helps illustrate your point. If you recall, I posted Smash Daddy's "Sloth" submission earlier. However, that is totally dependent on description rather than pictures and videos. This takes a good amount of writing skill and the ability to describe a move in detail so the reader is able to understand. However, you are welcomed to include pictures and videos to illustrate your point. Take this submission as an example:

FrozenRoy said:
Ordinary Magician

Marisa Kirisame


Ordinary Playlist (NOTE: Currently pretty messed up due to inability to edit playlist. Listen to Magus Night at least!)

If Reimu is Touhou's quintessential Player 1, then Marisa Kirisame (Also known as the "Black-White") is it's eternal Player 2, appearing in the second most amount of games behind only Reimu herself and being playable for the majority of them. Marisa is, in many ways, Reimu's polar opposite. Reimu is honest, Marisa lies as a habit, though neither are particularly good about it. When confronted by the high judge of the dead, who has the power to see everything in black and white terms, and is told that her sin is she lies too much...her reply is that she has never told a lie in her life. She's that kind of girl. She'll even often lie and say she is Reimu to see how people react, though the most common reaction is to know she isn't.

She is a very straightforward and informal person who uses a boyish manner of speech, often ending her sentences with "ze", ze. Ze being something used at the end of verbs/words to add a rough or implote tone to them. Despite this, Marisa does not use a masculine type of speech, as can be seen by the fact she doesn't use "ore" to refer to herself in the first person. Thus, her speech pattern is more of casual impoliteness and boyishness.

Marisa is a thief, and to an extent a kleptomaniac, and this often becomes a defining trait in fanon works. Canonically, she often travels to the Scarlet Devil Mansion to steal books from resident librarian Patchouli Knowledge and even thinks about plundering the palace she is in, despite it being home to the mind reader right in front of her, though she does not do so when the mind reader chides her for it. Her logic is that since she steals mostly from youkai, who will greatly outlive any human, they can just have their stuff back once she dies of old age.

The most prominent thing that marks her as Reimu's polar opposite, however, is their talent. Reimu is a naturally gifted shrine maiden who has almost everything come to her, so she is very lazy and rarily trains. By comparison, and a nice change of pace for her general character archetype, Marisa is a totally normal human who has worked feverishly to perfect her magic and is most likely the hardest working person in all of Gensokyo. Through this, she has risen to quite possibly be the second strongest danmaku player in Gensokyo, able to defeat gods, people who hurl suns at her, a buddhist monk and more. All despite being a normal human. Hence, she earns the tital "Ordinary Magician". Her elemental affinity is for rain/water (Her surname, Kirisame, means "Drizzle"), but she prefers to rely on light and heat magic, along with explosives. She also frequently uses mushrooms in her magic. Shroomer jokes are common. Her book, The Grimoire of Marisa, collects her knowledge and thoughts on all the Spellcards she sees, and if she can reverse engineer the magic, a testament to both her thievery and her hard work.

Marisa's fanon self is remarkably consistant with her canon self. The largest point of contention comes from shipping, as Marisa is an extreme girl magnet in fanon...though even in canon, she has some nice ship tease and has love powered spells. Her most common ships are with fellow magicians Alice Margatroid and Patchouli Knowledge, no doubt helped by Marisa and Alice's extremely snark filled partnership in Imperishable Night and the fact she constantly visits (and steals books from) Patchouli Knowledge. She is also very commonly paired with Reimu, since they are playable and Marisa frequently visits the shrine (and is one of the ones Reimu seems to actually welcome). Other common ships include being paired with Nitori Kawashiro (Cute kappa engineer), Flandre Scarlet (Vampire loli who can destroy anything and has been locked in a basement for 495 years. Marisa suggests trying to hook her up with Reimu, but she has much better chemistry with Marisa and they are considered to be playmates outside of shipping generally), Sakuya Izayoi (Time stopping maid), Rinnosuke Morichika (The one man in Touhou who isn't a cloud), Mima (Her PC-98 mentor who may or may not even be canon anymore) and Yuuka Kazamai (Who she stole the Master Spark from).

Finally, the other thing that often fluctuates is if Marisa is jealous of Reimu and the fact that she is so strong while being so lazy. Interpertations range from actually being proud of being #2 in strength (Which is most supported in canon), to feeling like she has to prove herself against Reimu or even to help other, weaker people (Such as in Touhou Tag Dream, which ends in crushing defeat even though she pulls out all the stops).

All-in-all, Marisa is one of THE most popular Touhou characters.

Statistics


Marisa does not stand on the ground like most Brawl characters, but rather sits her butt on her broom and uses it to travel the stage, like so:


Note that images in this moveset will likely often show her standing. That is because a lot of the moves are shown in Scarlet Weather Rhapsody and Hisoutensoku, where she did fight on the ground, and not in Hopeless Masquerade, where she moves on her broom like so.

Marisa moves fairly fast on her broomstick, but not blazingly so usually, a bit slower than Marth in overall speed. Size-wise, she is fairly wide due to the addition of the broom, but because she is sitting she doesn't go as tall as she normally would, even with the broom levitating. Her overall size is comperable to Wolf. Marisa is not particularly heavy, but she is also not particularly light, slightly below Luigi in weight. She has fairly good traction and can turn on a dime on her broom.

Marisa flies through the air with top end air speed, like Wario, but is very floaty, like Samus. Her aerial control is also above average, though not too great, and she has two extra mid-air jumps on top of her normal jump and midair jump, though all of them are pretty average for their respective class of jump. Marisa can also glide on her broom, taking a more traditional witches' position on it, and zip about at her ground speed with much better control than Brawl characters. She has no other special abilities.

Marisa doesn't actually need her broom to fly, but she loves to do so, as it keeps up her witchy appearance.

Specials


Neutral Special: Love Sign "Master Spark"

"Marisa's lesson on how to "Spark"

* Concentrate your mind
* Mutter the spell to Mini-Hakkero tenderly
* Aim at someone you don't like
* Now unleash your annihilation of love! "


Despite being stolen/copied from Yuuka Kazami, with Marisa modifying it as she sees fit, Marisa has turned Love Sign "Master Spark" into her signature attack. In Brawl, it makes it's appearance as a chargable attack in the vein of Samus' Charge Shot, but much more lethal.

To charge it, Marisa mutters tender words of love into her Mini-Hakkero (that's the octagonal thing you often see her holding), with total charge time comperable to Samus' charge shot. Releasing early produces a fairly pathetic multicolored laser that even at the last stage before full charge only does 9% damage and some hitstun without much knockback.

Once fully charged (with Marisa gaining a rainbow look on her flashes instead of boring white), however, Marisa can release the full power of the Master Spark! It's a huge, multicolored laser, as seen in the image above. It's a constant hitbox (Think of it more like a flashlight you flick on and off than a bullet) that travels about 3/4ths the distance of Battlefield while also appearing the height of one and a half Ganondorfs. It basically serves to cover as much of the screen as one could reasonably hope for, while also being absurdly powerful, doling out 30% damage and knocking foes cleanly off the screen at 75% damage. Master Spark lasts for an entire second, so it can be difficult to avoid. Shielding it can work, though, as your shield will only break at the end if you shield it at the start with a full powered shield, breaking just after the hitbox is gone.

Master Spark's biggest issue is it's lag, as it is a bit laggier than Ganondorf's volcano kick up tilt, which clocks in at 82 frames (60 frames = 1 second), taking about 1.5 seconds to start up, not counting the charge time. While she is firing off this move, however, she can activate any traps she has on the field at the time and foes can be in hitstun and such and so. Master Spark can only be fired forwards, so getting behind Marisa is the easiest way to avoid it. Marisa has super armor and anti-grab armor during Master Spark's startup and attack, which is good and bad. On one hand, she can't be prevented from activating it...but on the other, enemies who get behind her can murder her because she won't be nknocked away.

With proper timing and use, however, Master Spark is one of the deadliest attacks in the game.

Side Special: Comet "Blazing Star"

Marisa places her Mini-Hakkero into the bushy part of her broom, shooting part facing out, and leaps onto said broom, standing on it like she was surfing.


Yeah, just like that. The Mini-Hakkero bursts to life, producing a small laser that boosts the broom's speed. Marisa can now ride around like this as long as she likes, with her speeds being boosted to slightly higher than Captain Falcon's and her air speed being boosted even higher than before! Marisa can use almost her entire moveset while riding her broom like this, with the most notable exceptions being moves that require the Mini-Hakkero (since it is on the broom and all). Other moves will be handled on a case-by-case basis...though most of the time, these moves just become a new move.

Enemies who run into Marisa from the front take 7% damage and are thrown forward, though the hitbox is not quite as far in front as one might expect and it has no priority, so Marisa can't just dash around everywhere and outprioritize everything. Like Wario, she can be grabbed out of her broom. The Kirby-width laser trail behind her deals 9% damage and knocks foes away behind her. Marisa will be unable to stop going forward and even when "idle" will move forward slowly. In addition, this means she can use her moveset while moving.

While Marisa gains speed here, she loses traction and turning speed. She now has noticable lag when turning around, making it difficult to pursue, and slides much further than usual. Marisa does not get off her broom by tapping up, but instead by tapping down, which causes her to sit her booty back down and grab the Mini-Hakkero, returning it to her hands. This is because tapping up will cause Marisa to pop the broom into the air and jump, allowing her to keep the speed boost into the air and assault foes aerially. She only gets one jump while riding the broom this way, however, and it cannot be refreshed by exiting and re-entering this move in mid-air. It can, however, be used even if all of Marisa's other jumps have been used, making it Marisa's recovery in a way akin to Wario's bike. It takes a moment for pressing down to register, so you can still input down moves. Marisa can also double tap back in mid-air to turn direction during this move, allowing her unprecedented aerial mobility.

Obviously, Marisa cannot use the Master Spark due to her Mini-Hakkero being in used, but pressing B does give Marisa something big, turning it into the spell the move is named after...


While the boost is not QUITE this ridiculously huge in terms of lasers, it does cause the laser powering her broom to flair up to a Battlefield platform in length and turbocharge! Marisa now rockets around the stage at 1.5x Sonic's speed, with perfect turning ability that allows her to near-instantly change direction! Marisa can still use her entire moveset during this time, as she can while riding it naturally, but it gets much more crazy with the huge speed, the speed boost lasting 2.5 seconds. Running into Marisa from the front deals 17% damage that KOs at 150%, while the laser in the back deals a scorching 20% damage, though it does not KO until 200%. Lasers tend to burn more than knock away.

Thanks to her perfect turning ability, it is possible, if extremely tricky, to control. Marisa should do well to learn how to as well, because her Mini-Hakkero will burn out after this, causing her to lose all boosts for 5 seconds, meaning her Side Special basically becomes useless for a while. In addition, she will be unable to activate Master Spark, though she may still charge it. Note that the boost has starting lag, a decent amount actually, so it can be prevented by hitting Marisa and planned for.

Blazing Star is an incredibly versatile tool for allowing Marisa to move while attacking, blaze forward with devastating attacks and completely dominate in movement under her Mini-Hakkero's power, but can also leave her burnt out from using it and the Mini-Hakkero boost can be baited, as Marisa needs proper set-up to avoid enemies just shielding it (Sidestepping is ineffective due to the trailing laser, as are rolls) or using other defensive measures.

Up Special: Grand Stardust


Marisa takes out a capsule-sized flash, it looks like a bottle, and hurtles it forward in an arc similiar to Yoshi's Egg Toss (And is aimable as such), causing it to explode on contact with...well, just about anything, as seen above! The flask is fairly potent, doling out 15% damage and KOing at 180%, and it doesn't take long for Marisa to recover from throwing them or toss them, although it only goes about 3/4ths the distance of Egg Toss. In addition, the explosion is perfectly capable of harming Marisa in return, and can be snagged like an item and then thrown back at Marisa...though she can, in turn, grab it and throw it herself, like the world's most explosive game of hot potato.

The ability to throw this projectile while moving during Blazing Star is particularly amazing, as she can toss it forward and react to the opponent's reaction to it, or even press back on the control stick and throw it behind her! Driving past someone who side stepped you and your little laser under your normal Side Special, only to toss a flash behind you and blow them up as they return is sheer delight. Just be very aware of the damage your explosives can do to yourself.

Down Special: Light Sign "Earthlight Ray"


Marisa throws yet another flask in front of of herself, once again in an Egg Toss arc with aimability, but for only half the distance. In addition, these flasks do not glow to signal that they are active until they embed themselves in the ground, making them easy to distingush from your Grand Stardust attack. Marisa can charge this attack to throw either 1 flask at any charge below full or 3 flasks. These flasks do not activate on their own, but instead activate when you hit Down Special again. Like how SNake's Down Special works! This also means that without charging you only get one out due to being unable to place another. The charge time, fortunately, is not too long.

When you activate these, they'll explode into lasers that go two Ganondorfs into the air, though they are not too particularly thick, aimed up and slightly to the right. Hitting these will smack one away for 14% damage and KO at about 175%, and three of them can spam the battlefield a decent deal. Just like her Up Special, Marisa can be perfectly harmed by these flasks, so she must pay care not to spring the trap on herself! This is especially true when zooming around with your Side Special.

When you pump up Blazing Star with B, it can be a great idea to place one of these in the confusion and try to catch the opponent unaware as they try to dodge your wild broomplay. Just be careful: The high speeds makes it very easy to accidentally slam right into one after activating! This is also the best way to cover your Master Spark, since being hit won't knock you out of it and Marisa can activate it during Master Spark. A versatile and powerful spell. And yes, Marisa makes a thumbs down gesture when activating the flasks.

Smashes


Up Smash: Magic Sign "Stardust"

Marisa closes her arms and concentrates her magical power, before throwing them up and creating a shower of stars above her.


The attack doesn't look like this, but the stars do.

This star shower is a single hitbox that deals 19%-22% damage and KOs at 155%-130% with upwards knockback and covers a good deal of vertical and horizontal range, making it an extremely effective anti-air, but it's laggy on the start as Marisa gathers her magic and she has some good ending lag at the end as well. While most of the stars twinkle out and fade away, some will remain: 2 at no charge and 4 at full charge. These appear scattershot in the range of the attack and last for 5 seconds.

These stars do not deal damage or act as platforms or anything, but instead work as surfaces that Marisa can reflect her projectiles off of. These will not reflect opponent's projectiles, so don't expect to be able to use it as a defensive technique. It also keeps the angle the projectile was fired at, not directly turning it around. For example, a projectile that goes up and to the right won't be reflected down and to the left, but UP and to the left. It will even reflects parts of her Master Spark laser, allowing her to turn parts of her huge laser chunk into a labyrinth of lasers. Another fun use of this is to bounce your flasks off it, as they don't count as "solid" (and don't act solid, so people can pass through them), so the flasks won't explode off them...with proper placement, you can even constantly keep a flask bouncing off of one or two stars, allowing you to "delay" the flask's falling and exploding.

Down Smash: Star Sign "Milisecond Pulsar"


Marisa grips her broom tight and accelerates to great speeds. If her Side Special has not been activated, she attaches her Mini-Hakkero to it temporarily for this move. Her entire body becomes a blur as she circles an area totallying a Battlefield platform in length...though since it is a circle, it only hits where it started and a Battlefield platform away, meaning it has a pretty large blindspot. Starting lag is a bit long, but becomes very short under your Side Special due to not needing to attach the Hakkero, while the ending lag is also a bit long as Marisa orients herself. Marisa ends up a Battlefield away from where she started and will not be stopped by walls.

While Marisa is spinning, she'll throw any projectiles (be them her own or her opponents) that come at her forwards into the circle, which means that she can use this as a reflector of sorts, though a very poor one (It doesn't damage the foe to reflect their projectiles) and to strike with attacks while creating a deadly middle. Opponents will also be lightly "sucked" towards the middle if they dodge the attack and are in-between the spaces where she zooms around due to suction.

While under her souped up Blazing Star power, Marisa will also wildly have stars fire out from behind her broom. These only deal 4% damage and flinching, but go quite far and make it hard to dodge from behind where Marisa started. This attack deals 18%-21% damage and KOs at 140%-115%, but is increased to 21%-25% and KOing at 100%-75% while under the effect of your boosted Blazing Star.

Forward Smash: Witching Blast


Marisa grips her broom tightly during charging, giving a smug grin as she does so and throughout the whole attack. Once fired, she stops in place, skidding while under Blazing Star and absolutely grinding to a halt when it's souped up and holds her broom in front of her like a rifle, firing off a nice, big magic missile from it, as seen above. This thing explodes on impact and is a strong Marisa killer, dealing 24%-28% damage and KOing at 95%-85%. The missile travels at the speed of Samus' maxed charge shot and has infinite range, so it's pretty great, though the starting lag is high and the power of shooting a magic missile like a rifle causes Marisa to fly back a Battlefield platform in recoil. Marisa can still move on her broom during charge of this move under Blazing Star, but will come to a halt pretty much as soon as it starts...though combined with the ending lag blowing her back, this can make it a psuedo-dodge.

Since it has infinite range, you're free to bounce this bad boy blast around for as long as you want or can off your stars. The one thing to be worried about is this is another move that can damage Marisa, so keeping it around is also quite dangerous to you. Very, very dangerous. It is also very useful as a way to quickly stop your momentum and reorient yourself under boosted Blazing Star.

Standards


Jab: Shooter Star

Marisa places her hands together and uses magical energy to shoot out a single star that travels half a Battlefield platform, dealing a mere 4% damage with extremely weak knockback. The star will then stay there for 4 seconds, acting like her reflecting Up Smash stars. Since you can aim this attack during start-up, it essentially allows you to more perfectly place your reflections, but in exchange it lasts a second less. In addition, this attack is a bit slow for a jab on both ends, so it isn't the best defensive move...at particularly low %s, Marisa might get retaliation even if she hits for this if the opponent has a quick enough move and is close enough due to the weak knockback. It is, however, ranged and thus disjointed and it's not like it's laggy compared to non-jabs.

Up Tilt: Bosky Sweeper


Marisa grabs her broom and boosts it up one and a half Ganondorfs into the air, handle first, creating stars as it trails her. The broom deals a somewhat supbar 8% damage, but pops foes into the air with high base knockback with low knockback growth, meaning Marisa sends people pretty high into the air regardless of the %. She'll create a trail of stars behind her as she rises, and getting hit in the boost from the broom's ascension is 10% damage and a spike on par with Mario's FAir. This move creates three reflecting stars in the pattern you see above, like a slightly curved wall. This is both good and bad. On one hand, it is a nice way to create multiple stars in a consistant and useful pattern...but on the other, opponents can use it like a "wall" to hide behind your projectiles and have the stars just reflect them back. You may hold down A during this move to not make any stars at all. They last for 5 seconds.

While under the effect of your Side Special, Marisa will boost into the air twice as fast, dealing twice as much damage both from rising and from boosting, while now KOing off the top at 160% when hitting with the broom. This does, however, come with the price of increasing the ending lag: Very managable outside of Blazing Star, but quite high inside it as Marisa must orient herself from the rapid ascension. Starting lag is swift in both cases. Marisa can use this move to get into the air without using her jump during Blazing Star, giving her a roundabout way to double jump in it.

Forward Tilt: Narrow Spark


Marisa grasps her hands together, pushes them out, then...KIRISAMEHAMEHAAAAAAA! That's not quite what happens, but she does fire a narrow spark of laser forwards, which deals 12% damage to anyone it touches, though it's knockback is pretty weak. This beam is like Master Spark in that it is continuous, like R.O.B.'s final smash, and not fired like Fox's lasers. This move can be held out for a theoritically infinite amount of time by holding down A, like a repeating jab, but lasts about half a second otherwise. It has really good horizontal coverage...but as you can see, it isn't very wide, and it doesn't cover the top or back of Marisa at all.

Marisa can aim this move up or down a little, which helps her refract it with stars to get a laser labyrinth of reflection going. Since it can be held out as long as you want, you can keep the labyrinth up for as long as the stars remain. If you're really good with star placement, you can even reflect only half the laser to create some truly bizarre scenarios. Starting lag is okay, but the ending lag is a bit long.

Marisa cannot use Narrow Spark while she is under Blazing Star, so it gets turned into a new forward tilt, as Marisa grips on to her broom and performs a single 360 spin. She'll continue to rocket forward as she does so, dealing 14% damage to anyone she crashes into and KOing them at 190%. In addition, this will cause the laser powering her to turn around with her, which means she can use this move to "whip" the laser forward as a ranged attack. This is especially potent if you're in powered up Blazing Star mode due to it's increased size. The spin will also increase to 19% damage and KO at 155%. This move comes out fast, but it has quite poor ending lag...moreso if you're under the powered up Blazing Star's effect.

Down Tilt: Marisa Grinding

Marisa grips her broom and turns it forward while she drops it to the ground, causing it to grind with an audible noise. While not under Blazing Star it has pathetic range, but she'll go further and further the faster and faster she was going under Blazing Star, though the damage remains the same at 11% damage that doesn't KO for quite some time. Blazing Star does, however, add some sparks to the move that shower forward half a Battlefield platform for 4% damage and not even flinching. Marisa will grind to a halt during this move, which allows you to stop and catch up with what is going on when you're flying around, thus letting you determine your course of action.

If you press A at or near the end of the grind, Marisa will use this as a chance to kick off the ground and turn around. This allows you a way to turn around while attacking, albeit slowly, and can also surprise people who dodge or shield the attack with the laser behind you during Blazing Star. Rushing in with this and then turning around is an effective hit and run technique. Starting lag and ending lag aren't too bad, though it has a fairly long duration.

Dash Attack: Marisa's Bulletproof Bloomers


Marisa puts her feet to the ground, grabs her broom and launches herself forward butt first. She launches herself fairly far, almost a Battlefield platform, and will deal a solid 10% damage to anyone hits with surprisingly high base knockback...though with little growth. Still, Marisa can bump foes away at pretty much any %. As you may have guessed from the name, projectiles bounce right off Marisa's booty as she flies...which, yes, is a canon part of this attack. Must be those bulletproof bloomers.

This move cannot be used under Blazing Star: You'll instead get your Forward Tilt. This move is a nice approaching option for Marisa when she doesn't want to deal with the downsides of Blazing Star, such as the lesser jumps. Starting and ending lag are pretty low, with the exception of when shielded, which causes the ending lag to shoot up quite high. So he careful about abusing this.

Grab Game


Grab: Stealing the Precious Thing

Marisa performs a quick side swipe at the foe, a blazingly fast grab with limited range, though she has a good dash grab. Under Blazing Star, her grab range becomes significently increased. Marisa is free to travel around the stage as she sees fit while under Blazing Star, pressing the grab or shield button plus a direction initiating a throw, pummel remaining unchanged. She cannot use any moves.

Pummel: Thievery

Marisa aggressively grabs at the foe for a quick 1% damage pummel. During a Coin Match, this will give Marisa far more coins than she normally would from hitting with a 1% move...but who plays Coin Matches?

Down Throw: Supernova Flask

Marisa summons a string of rainbow, star-filled energy and uses it as makeshift rope to tie a flask to her opponent, then tosses the foe to the ground and slightly behind her. This whole process only deals 3% damage and leaves the opponent in prone, but it leaves an explosive flask strapped to the opponent. This flask is set to a timer of 5 seconds, after which it promptly explodes for 15% damage that KOs at 180%. It flashes during the last second so opponents have a sense of when to dodge.

Using this move as a nice way to put some pressure on the foe is nice and it is particularly potent to force dodges at specific times...but like all of Marisa's flasks, she is perfectly capable of being harmed by the explosion. Because of this, Marisa has to be careful not to let the foe use the flask as a suicide bomb and hit her with it, especially by...say...shielding close to her.

When used on Blazing Star, Marisa throwing the foe away will cause them to land on her laser thruster unless they tech the prone. If they tech away from Marisa, then they should avoid even the powered up laser...but the foe is thrown to the ground quite fast after getting tied up. Marisa can hold down A, the grab button or down to delay throwing the foe away for up to half a second as well. Pay absolute attention when you get tied up!

Back Throw: Closure Sign "Big Crunch"

Marisa grips the opponent tight and fills them with a starry, purple colored magical energy which deals 6% damage, before tossing them behind her for 4% more damage. The opponent is thrown too far up to land in the laser behind your broom during either Blazing Star, so don't even think about it.

This throw will put the opponent in a Big Crunch themselves and just like how the universe will collapse upon itself like it expanded, objects will move to crush the opponent and crunch them in. To put it in more simple terms, it causes projectiles which get close to the opponent to get attracted and lightly home in on the opponent. Objects have to get pretty close to the opponent for this to happen...about a Bowser size in a perfect circle around them. Still, this is pretty useful, and even lasers will warp their paths some to follow the foe! Combined with reflecting off stars and you can make it very difficult for the foe to navigate a lot.

Up Throw: Strato Fraction


Marisa tosses the foe into the air and releases first bursts of magic into the air. The toss deals 4% and one of the projectiles forms a true combo with it for 7% damage, while the other four projectiles spread out over a Battlefield platform to both sides and will never hit the foe, though they deal the same 7% damage and okay upwards knockback. Since they fall straight down once they spread out, they'll reflect straight up off your stars, so with proper placement (or quick reflexes with the jab) you can cause these starlight projectiles to be left on the field until they disappear from the screen like a trap. They last for 5 seconds and perform an important duty in terms of trapping: They allow Marisa to trap the air.

Forward Throw: Palm Pickpocket

Marisa places both her palms on her opponent, concentrates and releases a close range laser blast that deals 14% damage and sends foes flying a good distance, KOing at around 235%. The foe is sent too high up to be hit by the front of your broom during Blazing Star, but you can jump at the foe to put them in a hard place when they recover from this move's minimal hitstun. While her palms are gathering energy on the foe, she'll use her magic to drain the opponent of any buffs they might have on them and take them for herself...sneaky thief! Finally, it is your most straight-up damaging throw.

Aerials


Neutral Aerial: Broom Buster

Marisa takes her broom out from under her and gives it a 360 spin that covers her whole body, dealing 12% damage to anyone it hits and knockback that'll KO at around 240%. Marisa's descent is slowed during this move, which means she can use it on her way to recover. It also doesn't take long to recover as she easily slides back onto it after the spin ends, though it is a bit long in terms of starting lag. Still, it is one of Marisa's few good shorthopped aerials and is pretty solid in midair too.

This move can't be used while under Blazing Star. Marisa does not gain an extra Neutral Aerial to compensate for this, either, making it one of her few options that is simply totally eradicated under Blazing Star.

Forward Aerial: Taboo Slam

Marisa snags her from from under her and raises it high above her head, before bringing it down harshly in front of her for 16% damage and strong, shallow knockback forwards that KOs at 155% or so. While the shallow knockback is cool for killing, the really cool thing is to swing this during Blazing Star, as Marisa will keep the laser going out! Not only does it look cool, but the range gets nice and long...be careful that you'll be knocked back about half a Battlefield platform in recoil during powered up Blazing Star.

One unfortunate fact about this move is that it has pretty high starting lag and fairly long ending lag, graduating to pretty long under Blazing Star...so you need to be real careful about using this one and it can be a bit difficult to hit with.

Up Aerial: Up Sweep


Marisa grips her broom tight and performs a quick upwards shuttle loop! She travels in a full 360 degree circle like this, ending up a bit lower than she started. Enemies who are hit take 11%, save for near the end as she slows down, where it goes down to 7%. Knockback varies depending on where in her loop Marisa hits the foe, like MK's Shuttle Loop, and deals significantly less near the end as she slows down. The quick start-up lag of this move allows you to use it as a defensive move, either by dodging a strike or countering it with a quick hit, but it has kinda long ending lag and Marisa ends up further down from where she began, so it can't stall. Aside from that, pretty standard. Much deadlier under Blazing Star.

Down Aerial: Marisa Bomber

Marisa grips her broom, stalls, and then dives down diagonally in front of her, falls! It is a pretty slow stall than fall, a bit faster than Ice Climber speed, dealing 8% and weak good knockback to anyone she strikes. Upon touching the ground, she suffers surprisingly low ending lag, but it has decently high starting lag for a stall than fall.

Under Blazing Star, this moveset is much cooler, as Marisa will go much faster, about Zamus' DAir speed, double the damage and 1.5x the knockback! She also will cause a nice, hurtbox covering explosion as she crashes into the ground, which deals 1.5x the damage and 1.25x the knockback of the original, non-boosted fall...though it drastically increases ending lag. With strict timing, you can press A as Marisa hits the ground, causing her to kick off it and launch up and diagonally into the air until she reaches the same height as she was when she started the stall than fall, though obviously she has moved horizontally. The explosion still occurs of course, though this does not count as landing and she can only do this once per air trip. Under souped up Blazing Star, the damages are increased to 2.25x and 2x the damage and knockback on the fall and the same to the explosion, in addition to making it a decent deal larger, making this a deadly attack...though with some of the worst ending lag in the game. Marisa can still, with even more strict timing, kick off the ground with this via A, and can do it infinitely with this version. In fact if she runs into a wall or something with this then she can kick off that too! In short, play a game of Marisa Pinball and let your worries melt away.

Back Aerial: Sweep Aside


Marisa performs a lightning fast spin, turning into a blur similar to her down smash, but for a much shorter amount of time and with less speed. Those hit by her take 13% damage and some decent knockback, enough to KO at 165% or so. Marisa isn't going fast enough to throw projectiles into the middle like her Down Smash, but this move will turn her around and is quick to start-up, which gives her a nice edge in the air...just be careful as this move is pretty badly punishable. Under Blazing Star, this move has a longer duration, and Marisa can move left and right during the move.

Final Smash: Love-Colored Master Spark

Oh dear, it appears Marisa has grabbed the Smash Ball.


Marisa first begins by preparing more than just a normal Master Spark, sending out a thin laser...


This is quite similiar to Link and Toon Link's start of their Final Smashes, but with more lag. In exchange, it hits multiple players and goes the length of Final Destination. Those hit by this start-up to the Final Smash take 1% damage and are stuck until Marisa's attack begins, which is the same 1.5 seconds as your Master Spark. Those not hit by this will want to take cover from...well...


LOVE COLORED...MASTER...SPAAAAAARK!

Yeah, it's 2x the size and range of Zero Laser, deals 100% damage and KOs at like 20% or 30%. If you get hit by this, it's game over for your life. It also has a long duration, which is for good and for ill. It means it is basically impossible for anything to dodge or do other tricks to it...but Marisa has super armor, anti-grab armor and so on during this attack and absolutely no defense from the back but will still take damage. If an opponent gets behind her during the charge time, they can go to town on damaging her while she is helpless to do anything. Be careful when sparking.

(Author's Note: This move has many names, as can be seen by the images. I went with the name "Love-Colored Master Spark".)

Playstyle: Lasers, Girls and Thievery


This section of the Grimoire appears to be missing. All that remains on the shreds are some notes...

- LASERSLASERSLASERSLASERSMASTERSPARK
- Flask when you fast. Solves spotdodgers, discourages shielders, hampers rollers and scares mailmen!
- Practice Blazing Star a lot before using it a bunch in serious, competitive matches. Try to stay inside the boundaries.
- Never forget the advantages of setting up reflection paths, especially with lasers.
- You can grab while blazing around.
- Compared to other Brawl fighters, you aren't a strong defensive fighter. Go all out, blitz the foe and don't let up!
- Steal plenty of love from friend, foe and audience <3

Extras

Alt Colors


Up Taunt

Marisa takes out a mushroom and flicks it into the air, popping it into her mouth and eating it. Heals 1%. Foes can grab the mushroom for 1% healing.

Side Taunt

Marisa stands on her broom and makes a surfing motion in place.

Down Taunt

Marisa takes out The Grimoire of Marisa and jots down some notes, her eyes watching the nearest foe or ally.

Up Taunt (Blazing Star)

Like Wario, Marisa has different taunts during Blazing Star. Marisa turns to the camera and makes a heart with her fingers, winking at the camera. Makes the audience more likely to cheer for her.

Down Taunt (Blazing Star)

Marisa does a handstand on the broom while still rocketing forward. Ludicrously dangerous.

Side Taunt (Blazing Star)

Marisa throws a mushroom in the path of the laser propelling her forward, causing the laser to sparkle pretty colors. This effect continues for a while, but has no actual gameplay effect...it just looks pretty.
Commenting
So you finally posted your move set and you wonder...."Now what?"

Now is the time for commenting. This is when members take a look at your submission and critique it. This sounds scarier than it actually is. While members might be hard in there criticism, I would like to point out that both positive critcism and negative criticism can be considered as construstive criticism then done right. So don't be too dissapointed if the staff and members respond negatively to your move set. They are doing that so you can improve next time and to encourage you to perfect your craft.

You can also choose to critique the other member's move sets. However, there are a few rules to consider when critiquing and how to avoid nonconstructive criticism:

There is nothing pleasant about criticism. Even the best intentioned critique still stings. People like to be right, correct, and accomplished, and when they're not, it hurts to hear the truth, no matter how nice your critic tries to be. Still, those who strive to improve, value direct feedback no matter how painful. And as long as the critic is not being malicious, he or she can actually build a higher level of trust by providing constructive criticism carefully and empathetically.

So whether you are reviewing an employee, family member or friend, here are five tips for giving criticism in a way it will be appreciated and well received. I also put notes to the receiver as to how you can make the most of the critique.

1. Have Clear Objectives

Ask yourself what is the best possible outcome of this critique. If you are simply venting with no intention, you won't likely achieve anything but rancor and resentment. Perhaps you are only prolonging an eventual termination in which case why waste energy and emotion while putting off the inevitable.

On the other hand, if you find yourself the target of an attack, see if you can diffuse the situation by asking your critics what they hope to accomplish. In the best case, you may get an understanding of the real issue. In the worst case, you'll know it's time to make a graceful exit willingly.

2. Create a Neutral Environment

Consider the time and place for your critique. It usually helps not to critique in front of a crowd, which generally leads to humiliation. Human Resource policies may require a third party, but better to make sure that person is fairly neutral so no one feels ganged upon. The best way to neutralize the tension is with appropriate humor. You can build rapport and take down defenses by sharing your own personal experience of silly mistakes you have made in your career. This helps the subject relate to your humanity before addressing his or her own inadequacies.

If you're the one in the hot seat and you feel threatened or embarrassed by your environment when being critiqued, speak up. Ask to move to a private area or to set up an appointment in the near future. Prepare yourself for the information you will receive. Be attentive with open body language so your critic relaxes as well.

3. Use Fewer Words With More Meaning

Your subject has a strong inner voice during a critique and is likely anxious, so keep your critique brief and to the point. The more you say, the more likely you will distract from the key points and make them hard to remember. Plan your conversation in advance and in writing so the subject can walk away with clear direction on how to improve.

When you're on the receiving end, let your critic speak their mind. If you debate on the spot, you'll appear closed and defensive. Better to agree to consider the feedback in the moment. Then you can revisit the conversation with careful thought and perhaps a little critique of your own if warranted. You'll be taken more seriously when your response is thoroughly contemplated and well articulated.

4. Align the Criticism With the Subject's Goals

A self-serving critique falls upon deaf ears. Know your subjects well enough to explain how your suggestions will help them achieve their desired objectives. If they are invested in the outcome, they'll likely be more open to suggestion, regardless of how they feel about you or other people involved. For example, if their goal is to be an amazing boss, then dealing with other people's objections becomes integral to their success. Provide the context for advancement and the critique will be welcomed.

When you're the one being critiqued try stepping outside yourself. Listen objectively to what's being said. If you are clear on your goals, you'll be able to better identify and filter the good advice from the unwarranted ranting of lunatics.

5. Encourage Self-Critique

Instead of simply laying out a list of offenses, describe scenarios from an objective viewpoint and ask key questions so your subject can draw their own conclusions about their weaknesses. Lead them with questions to understand from a management perspective why a different behavior is more suitable. When making statements, stay away from direct attacks. Use "I" language and speak from your own experience.

http://www.inc.com/kevin-daum/how-to-give-and-recieve-positive-criticism.html[/url]
By following those examples and encouraging members to try better next time, you are fostering a positive attitude within MYM as well as your own standing within it. Constantly giving both un-constructive positisive/negative feedback is going to lose your credibility within the group.

Here is a great example of constructive feedback from @ForwardArrow

Come on MYM your better than this, we got all these sets from both new and old people and almost no comments on any of them.
Zoroark
This set's been fairly popular as of late and thinking on it I understand why it's so well liked a fair bit better. The use of invisibility and duplicates is very intuitive and in smash, which is usually one of the most prominent problems with invisibility based sets, and it ends up being both easy to pick up and play as well as having a decent bit of depth to it, what with abusing the early disguise for some possible set ups and kills or disguising yourself as one of your AI duplicates. There's some interesting stuff even beyond the specials here, what with the possibility of invisible lingering hitboxes(though the Fair probably shouldn't have one for reasons Warlord pointed out), hit and run with the Up Smash which flows fairly well into the various ways Zoroark has to hide and disguise himself, and the mirrored F/BThrow for the ability to re-disguise yourself.


What I don't like comes down to 2 things. I feel that while a lot of moves are good for utilizing the various mindgames, a lot of them like the Down Smash and most of the aerials/standards barely acknowledge that they exist. I'm not saying I want dense move interactions on this set or anything, that's hardly even possible on a Pokemon set and that's not the kind of appeal it's going for, but I feel like at least having the move be easier to sweetspot if the foe can't see you or have some sort of special trick you can pull in conjunction with the invisibility would be cool. What actually bothers me more than though, is that while you created a very intuitive system for the disguise to work, the fact that Zoroark can potentially capitalize on it to the point of achieving KOs, fully replicating their recovery which in many cases is far better than his, among other things feels very wrong to me, there are some things characters can perform which are outside the bounds of his power and the sheer "realness" of the illusion makes him awkwardly nigh-omnipotent with it, rather than the intended nature of being just a fake. It's a sacrifice for gameplay sure, something I entirely respect, but all the same it makes absolutely no sense, which is a shame when the set is otherwise very solid aesthetically.

Profiteur
The problems with this set have been pretty much told to you over and over again, it's a really really tacky moveset where the moves all operate on extremely selective logic. It's hardly offensive in it's tackyness as it doesn't really mistreat the foe's characterization and the powers all feel like stuff that makes some degree of sense on the character, but at the same time the sheer amount of awkward logic makes him feel like he'd be nigh impossible to pick up and play, especially when using a move without the right set up can flat out destroy his gameplan.

I do think that's a shame because once you get past that, Profiteur does a lot of small things with ammo bank that really add up to it being a very enjoyable set. I actually like the bit where he actively wants his shield broken as it can give him a massive boost to his wealth, and the minion, while simple, can be applied to his set in some very interesting ways. I also like that building up all this cash does feel extremely rewarding, in that the attacks that expend it in large amounts or give it over to the foe do a huge amount of damage and knockback, making the fact that you can lose a lot of it in one go into a fairly high risk, high reward game. What does interfere with my ability to really enjoy the set is that a lot of the time, is that the bit where the attacks can really ruin his set-up if you use them at the wrong time, and should he fall under pressure he may just have to choose between not defending himself properly or having his set up destroyed. Which is a shame, because aside from that the interactions with the coin piles and the way the way you handle ammo bank mechanics is very interesting, but I can't wholeheartedly endorse it due to the issues with tackiness and his difficulty in properly using his set up(though to a degree it does create some good risk-reward, at least).

Van
I get the impression you actually put a fair amount of effort into this set, very clearly trying to define the characters seemingly passive-agressive nature by making the majority of his set projectiles, and also managed to give him a surprisingly well defined playstyle. He camps and that's so he can keep the opponent out of close range so he can build up his coin mechanic, and then unleash a large attack with that. Admittedly camping based playstyles are very common in Make Your Move but you wouldn't really have known that beforehand, and it's not a badly executed one at that. It's not exactly perfect admittedly, I wish you wouldn't actively specify moves as being "his worst X", because it's not really good design to have moves be purposefully bad. I also feel that you could've done a little more with the coins, as he only really has one move he can expend them on. I'd look to the set I commented just above for some more ways to utilize them, albeit I do appreciate the somewhat more careful approach taken here. Lastly, I'd prefer it if the Uair/Dair and Fair/Bair weren't mirrored, it'd give him a bit more versatility. For all my nitpicks though, it's a very solid first set and you should go make more.
Simply saying:

This move set is crap
Is considered un-construcive negative criticism and is generally frowned upon.

So is this

Really? Gypsy Danger? That's a 4th party character and is unlikely! Stupid choice!
That is just breaking the rules of MYM as any character, 1st, 2nd, 3rd, 4th, 5th, etc etc etc party are all excepted as long as the poster can make an interesting and fun move set from it. Following these rules and being mindful of how to give constructive criticism will ultimately help and improve your critiquing as well as handeling criticism

MYMini and Challenge MYMini

While browsing through MYM, you may have noticed something called MYMini

[/URL]
http://mymbunker.wordpress.com/mymini/

MYMinis are all about the little things in Brawl that people all too frequently forget about; EXTRAS! Stages, AssistTrophies, SSE levels. The themed mini contests known as MYminis test your ability to make these wonderful extras.
If you want to try your hand at something other than making am ove set, maybe a MYMini is more your speed? @JOE! posted the first MYM14 MYMini back in January.

http://smashboards.com/threads/make...-van-waluigi-mach-rider.345878/#post-16212095

The prompt was:
With the latest generation of pokemon upon us, there is sure to be a new wave of Generation 6 poke-sets!

This week is simple enough, create a STAGE for all of them to call home. The entire Kalos Region is up for grabs in terms of setting, so pick your favorite location from the games and get to it!
Then again later in January...

Mr Nintendo himself has always been in Smash Bros, but not all of his items have been!

This week the theme is ITEMS! Given the huge history of the series, I wonder what new Power-Ups Mario could give to Smash and MYM characters to use? Make one up!
As of March 18th, a new MYMini was announced by JOE!
MYMini TIME!


Celebrating 20 years, there wouldn't even be a Smash bros if it weren't for Kirby!


The theme for this mini is to celebrate everybody's favorite Pink Puffball!
Seeing as Kirby has amassed a cast of characters that few rival over the years, how about we make an Assist Trophy out of one of the many, colorful Kirby Characters?
In addition to the MYMini, there is the Challenge MYMini. What are exactly the differences?


Challenge minis, what are those? These are feature length minis that span multiple weeks and multiple deadlines. Do you have the sticktoitiveness and foresight to complete back-to-back minis?
They are basically long-term MYMini's that cover a certain subject instead of a character or concept. So far, the current one currently b eing ran by @Junahu is:
So permit me to introduce a Challenge MYmini for MYM15;


ooh, a custom logo. Surely this Challenge MYmini means business!
The Challenge MYmini for MYM15 dives into a fantasy I'm sure many of you have had; "What if I made a Smash Bros style game?". Over the course of MYM15, you will be designing your own little Smash Bros-em-up; Rosters, Items, Stages, Modes etc. The result, hopefully, will be a nice snapshot of the kinds of Smash games each MYMer would like to see made.

There's no need to restrict yourself in any way. This is all just fantasy anyway, so dream as big and as improbable as you want. You don't even ultimately need to design a Smash Bros game. Feel free to tease your groundbreaking gaming experience in any direction you like.

Also, do not feel intimidated by the fact this is a Challenge MYmini. The challenges I will be setting out for everyone are simply a guideline. There are no disqualifications; feel free to do as much, or as little, work as you wish.
If you want to forge ahead and take your work in a different direction, that's fine too.​


Part 1: Build your Roster
Of course, every game needs to start somewhere. And the best place to start (for us at least) is your roster!​
The roster forms the heart and soul of many games; they are the characters your players get to play as. They are your avatars to duke it out with. A good roster is varied, thematically congruent, and works to identify your game as something really special. But your roster needn't be anything like that, it could just be some random characters you like.

A theme would be nice though, so start thinking about how your chosen characters slot together, and the type of aesthetic that their existance lends to your new game.

There is a single rule to follow for your roster; every character on it needs to have had a moveset at some point. That means only picking characters who have existing movesets, or taking suitable movesets and adapting them to fit your characters. You don't neccessarily need to stick to a character's moveset as it is written. You might eventually want to make changes to it so that the character fits better into your game.
The roster can be as big as you like. 12 characters is a good starting place for a roster, and you can always add more characters to the roster later.

Oh, you can also include actual Smash Bros characters in your roster.

Okay, so once you've gathered the greatest characters from across MYM to do battle, you need to introduce us all to them. Make a post in the thread featuring a list of your characters (please include links to the movesets your characters will have), along with a short introductory blurb for each combatant. An image of each character would be nice too, so we can look at the roster and see what everyone looks like.

However, the Challenge MYMini has progressed to Phase 3


It has been a long while, but I'm finally back to kick off part 3 of this challenge mini. Where did part 2 go? We did it in secret.


Part 3: Design an example stage

In part 1 we designated the roster. In part 2 we provided an overall specification as to exactly what kind of experiences we were wanting to create. For part 3 of this challenge mini, we will prototype a single stage to explore the potential of the game and our rosters.

The goal is to design a stage that is either neutral (i.e. not favouring one playstyle or another) or design a stage that actively explores the potential of the roster/game. The important thing here is not the stage itself; you can actually get away with just a brief summary of what it looks like. What is most important is how the design of the stage works with the roster you have and the game's engine.

For example, a character who can terraform the stage, clearly needs enough stage to terraform. Characters that rely exclusively on traps will have a tough time on a scrolling or morphing stage. And if the main mode of your game is different from Smash's, your stages would need to fit with the altered ruleset.


So while you may have missed out, go ahead and jump into this Challenge MYMini

http://smashboards.com/threads/make...-van-waluigi-mach-rider.345878/#post-16218127

There have been also special MYM Events in previous installments.

MYM Pokedex
Mega Man franchise

Differences between MYM and General Moveset Thread

You may be confused to what is the different between the MYM and the General Moveset Thread. Besides one being in Character Discussion and the other in Wii U Discussion and on ebeing stickied while the other not, they sort of have the same premise...to create move sets.

However, The general Moveset Thread is also for discussing confirmed movesets as speculate on unrevealed moves for confirmed characters. As well, for those afraid to enter into MYM, this might be a more peaceful and relaxed altenrative compared to MYM.

However, one way is to use the General Moveset Discussion to practice making move sets and, when you feel you are ready, to move to the MYM. Some members of MYM do post in the General MOveset Thread to provide feedback and advice. MYM provides a more interactive and hands-on approach to create movesets and has more of a dedicated community rather than the General Moveset Thread more "free for all" design.

The Future of MYM
With Super Smash Bros. for Wii U/3DS looming on the horizon, how does it bode for MYM? MYM has constantly adjusted according to new information and gaming styles. One example is the finishing move that is performed after a jabbing combo. How has this affected MYM move sets?

Here is what JOE!, Smash Daddy, MasterWarlord, and FrozenRoy has said about the future of MYM:
JOE! said:
MYM seems to be on the rise as of late with lots of newcomers making content, so it's looking up! The release of Smash4 will definitely leave an impact in terms of any new mechanics or items it brings to the field, as it will open the door to more "grounded" ideas or simply new ones to flow forth. For example, Little Mac has shown that having a Meter in smash isn't that far fetched!
Smash Daddy said:
Smash 4 will bring a bevy of new gameplay changes that will alter the movesets in Make Your Move. It will be interesting to see how our community manages with the transition, as no one remains from the very beginning where there had to be users who didn't want to make Brawl movesets. I remember back in the times before Brawl on Smash Boards and the attitude towards making sets has only matured, generally the way users react to the way the game works are incremental because there is so much to learn about a new game's mechanics. Even today there are parts of Brawl that haven't been fully-explored yet by Make Your Move.

The future of Make Your Move lies in its past. We're a tightly-knit community that is basically a small group of friends who talk every day and have known each other since we were in high school, or whatever the equivalent in other countries. However we are always on the lookout for promising newcomers to our community, and try to encourage them to do their best. As long as we remain as welcoming to new users, MYM will always have a bright future.
MasterWarlord said:
Smash 4 has and will continue to increase interest in our thread through proxy, as this is the time most people want to make movesets for their favorite characters to enter Smash. The engine will also undoubtedly undergo many changes, as we change from designing movesets for SSB4 as opposed to Brawl once the game is out a couple months and we fully grasp the mechanics. I personally have grown very accustomed to Brawl’s mechanics for moveset designing and may still make some for it. Any moveset for one of the main 4 (5 counting 3DS) Smash Bros games should be allowed in the contest.
Make Your Move's future seems pretty strong! There's been some grumblings about the activity level, usually because we get some stretches without a huge amount of activity due to how long contests can be, but I don't see it as a large problem, and we seem to have settled into a consistant number. We get some newcomers every contest, some even stick around, and that allows us to replenish our losses as people move on to other things, so we seem sustainable enough to keep our current size and rate. The biggest thing that would help Make Your Move's future would be a bunch of newcomers without many losses to actively increase our size! But regardless, Make Your Move seems like it'll keep stable into the future.
@FrozenRoy

MYM is not going anywhere any time soon and could see a MYM20 or even a MYM30 if dedicated members continue to keep it alive by making fun and interesting move sets.

Staff Comments

FrozenRoy said:
As mentioned, I recommend reading the SSBWiki to find out more about Brawl, the ideas behind it and why things in Brawl are good and whatnot. Reading Smashboards stuff about this is also good. The biggest thing when writing movesets, in my opinion, is motivation: Movesets tend to be much better if you're excited by what you are doing or an idea or the character and are easier to write. Don't be held back by fear or what other people think of your movesets: It's always good to digest what people think of them and to take in criticism, if it is constructive anyway, but ultimately what matters is if YOU like what you made. Reading and commenting movesets is something else I highly recommend: Doing these things often helps you make your own movesets by giving you ideas, letting you better organize your thoughts and to delve deeper into why you like or disliked certain things in the movesets, which in turn can be applied to how you view your own movesets. You shouldn't necessarily go into moves thinking it has to be unique: Do what is logical for the character, think on what you want to do with the moveset, and if you get unique stuff out of it there you go. The whole is greater than the pieces in it: Think about how your character would logically play and how you want your character to play as you write the moves or at the start of the moveset and use that to help enrich the moveset. Perhaps, for example, you want your character to be a rushdown berserker with an aerial weakness for whatever reason the character would be, you should think of what would be both the most fitting and most fun way of making them rushdown and consider what you will have to do to give them an aerial weakness (For example, such a character probably has an Up Tilt and Up Smash that do not cover much ground or have other issues, even if they're not /useless/).

Since mention was made of moveset organization, which is text color pictures etc, I recommend not worrying too much about that to start with: Essentially my entire first contest I used a very simple organization style that sometimes colored text until Alice (And continued to use it until afterwards for quite a while: Even my current organization essentially plays with that formula). Plain white text divided into sections with inputs listed and such is fine to start with, though it is usually harmless enough to add in text color...just make sure to preview it and make sure it is readable on the background. Once you get comfortable, it is usually easy to make pretty looking stuff. Finally, previewing out your sets is often a good way to get feedback: If you plan on staying in MYM for a while, signing up for the Whiteboard and posting some previews is a good idea. I also find that joining the community Skype chat is a good idea because it allows you to bounce ideas off of other members in real time, receive real time feedback and otherwise get a more chatty, less posty, response to your stuff...and also to see how other people do stuff they talk about.
ForwardArrow said:
If you get inspiration for a set on the fly, that's generally a good sign. Saying your going to make a character, not actually having any ideas for them, and trying to force out a set anyway almost never works out that well. That's not to say intense thought and planning haven't resulted in some amazing sets, but you have to be able to improvise a bit when you make sets. Also while this is going to sound a little bit weird, the best places to get inspiration is by taking a break from the internet in general. At least from what I've observed, my set inspiration usually comes from the times I spend in class(which probably isn't the best thing to be thinking about when your trying to do work, do not endanger your academic career thinking about set work), going on walks, and just going out in general.

Reading feedback is probably the best way to improve, as it allows you to understand the good aspects of your own style, as well as what mistakes to avoid in the future. Other movesets are probably the next most important source of information on improving, as you can see what you like and dislike about them and incorporate that yourself. Commenting a moveset in particular is a great exercise to think about setmaking, as it lets you more firmly establish what you liked and disliked about it and how you can use it yourself. Writing things down is good for dedicating them to memory.

Lastly, don't set arbitrary ceilings for yourself. Never say "I can't outdo this set" because given enough time and effort, you absolutely can and will. Human beings have an enormous capacity to learn and improve, and with each set you make and read you'll learn more and more how to create higher quality work.

If you don't have a ton of time on hand for Make Your Move or don't really want to get invested in the community, making a really high quality set is harder, but thinking on the character and how you feel they'd fight, particularly in the context provided by Smash Bros, as well as other bits like parts of their personality you want to bring across and what ideas you want to convey in their set can help you solidiify your inspiration into something enjoyable even if you don't have terribly much experience. Never doubt your own style either, take into account what people say but everyone has things to bring to the community and the right set can swing even the most jaded of your opponents. I've seen it done before, I have ever managed to do so myself.
Smash Daddy said:
Number one: stay true to your original idea. You should plan out what you want to do in a set as a general rule, unless you're being experimental, at which point you're already well-versed in movesets! Once you know what you want out of a moveset, try to keep it on track to that vision you had at the start. If you're having a problem motivating yourself to write, simply write whatever you can, even if you don't feel it is a substantial amount. Simply writing down what is in your head will help to get the creative juices flowing and is the best way to get over any writer's block. If you're having problems creating a certain move, try to think outside the box: how can I play upon what I have already implemented?

Always remember to read many movesets and comment them if you truly want to become good. Practice and understanding of how others make sets is the best way to improve.

Overview
Make Your Move is one of the longest running threads and has a rich history that spanned back to pre-Brawl 2007. Since then, it has had 15 installments and continues strong to this day. This is due to a core of dedicated members and the introduction of new members. Time and time again, groups have fallen due to a lack of new members. Without new members comes in, the group stagnates and ends up alienating new members. Thankfully, MYM has avoided this and has always welcomed new members into its ranks. So if you are interested in creating move sets, read about move sets, critiquing them, or participating in non-moveset events such as MYMini and Challenege MYMini's; I highly suggest that you check out Make Your Move 15.​
 
Last edited:

Venus of the Desert Bloom

Cosmic God
Super Moderator
Premium
BRoomer
Writing Team
Joined
Jul 30, 2007
Messages
15,415
NNID
VenusBloom
3DS FC
0318-9184-0547
Mario


Writer: APC99

As usual, the red-clad plumber is back again, making this his 4th playable appearance in the Smash Bros. series, a perfect record. However, has Mario received any changes since Brawl? Has he regained anything from past incarnations? Let's look to see what SSB4 has in store for the Nintendo mascot.

Appearance:


From this comparison by @Curmudgeon, you can tell that Mario’s changed very little in appearance since Brawl. First off, Mario’s color palette is much brighter than Brawl’s more realistic take. Not only is his red hat and shirt more similar to Melee’s model, but his overalls are less photo-realistic and more cartoony, much like his current appearances in games such as the New Super Mario Bros. series, Super Mario 3D Land and several of his spin-off sports outings. The shoes are also a much lighter color than they were in Brawl. He also seems a bit sleeker, something that the newest incarnations have achieved as well. Looks as if his transfer to HD was something appreciated.

As an example, here are some of Mario’s more recent designs that have arisen between the end of Brawl’s development up into the first trailer revealed at E3 2013 (Images taken from Super Mario Galaxy, Mario Party DS, New Super Mario Bros. Wii, New Super Mario Bros. 2, Mario & Luigi: Dream Team and Mario Kart 7, respectively).


Moveset:

Mario’s moveset appears majorly unchanged, but it is worth noting which attacks we know for sure are returning, and if anything new has been added to them for a buff or nerf.

Special Attacks:


Standard Special: Fireball

The Fireball’s origins are from the original Super Mario Bros. in 1985 for the NES, where picking up a Fire Flower would allow Mario to chuck fireballs at his opponents, as opposed to jumping on their heads.


In Super Smash Bros., Mario (and his brother Luigi) use the Fireball as a projectile attack. The Fireball, when launched, will travel a short distance, do minor damage and force the opponent to flinch, as most fire-based attacks do. Mario’s fireballs, to be specific, will fall to the ground, and lose momentum each time they bounce. Because of this, they’re more effective when fired from higher locations, or at downward slopes, traveling further. When they hit a wall or upward angle, they’ll bounce backwards, being more defensive to protect from behind. A skilled Mario player can spam fireballs to approach. The move is also considered more effective in the air, negating lag.


In SSB4, it appears the Fireballs will remain mostly the same, as seen in Little Mac’s trailer. A minor detail has been added, however: the fireballs appear to be more realistic this time around. The fireballs release smoke and ash during their travel, as seen above.


Side Special: Cape

The Cape originates from the Cape Feather power-up in Super Mario World for the SNES, where Mario could hover using a yellow cape.


In Super Smash Bros. Melee and beyond, the Cape is used by Mario to flip opponents to face the opposite direction, or to reflect projectiles. By itself, the cape has no knockback and doesn't make the opponent flinch unless they are grabbing. It doesn't interrupt attacks, but instead switches the direction of the opponent. This can be used to prevent opponents from recovering, but was deemed useless by Brawl's Auto-Snap feature, where an opponent would grab onto a ledge no matter the direction they face. However, much like other reflecting attacks, if the attack is powerful enough to break a shield, reflecting it with the Cape is useless, and Mario will enter the stunned animation. The Cape also slightly boosts Mario forward in aerial combat, meaning it's usually used in recovery to aid the poor Super Jump Punch.


In SSB4, we haven't seen footage of the Cape, but from snapshots, it appears the Cape is unchanged from it's previous incarnations. Until we see the Cape in full motion, there's not enough information to see if it's been nerfed or buffed.


Up Special: Super Jump Punch

The Super Jump Punch originates from Mario’s jumping prowess. In the original Super Mario Bros., Mario (and Luigi) use incredibly powerful jumps to crush enemies, break blocks and collect coins.


In Super Smash Bros., both Mario and Luigi utilize the Super Jump Punch. In this move, they burst upward diagonally, but mostly vertically, to recover. If this attack collides with a foe, Mario will use his fists to physically knock coins out of the opponent in a multi-hit attack. The last hit deals little knockback, but can Star KO if close to the blastlines, more prominent in Brawl. Specifically, Mario’s variation has moderate knockback, but is a poor recovery due to short range and being easily edgeguarded. Combined with Cape in Brawl, Mario can use this as a good horizontal recovery.


In SSB4, the move appears unchanged. Although other characters such as Kirby, Samus and Pit have had older moves updated with new appearances, the coins released still have their Super Mario 64 design, rather than the new updated design seen in current Mario games. A small note is that, as seen in the E3 trailer, the last hit of the Super Jump Punch makes a higher-pitched noise than before. Looking at hitbox data from the previous games, it appears this was intended for all previous games, but hasn’t been implemented until now.


Down Special: F.L.U.D.D.

F.L.U.D.D. is Mario's down special, replacing the Mario Tornado from Smash 64 & Melee. F.L.U.D.D. originated as Mario's sole "power-up" in Super Mario Sunshine for the GameCube. In the game, Mario encounters this water cannon on Isle Delfino, and uses it to clean up the pollution and graffiti. The F.L.U.D.D. had several nozzles, including the Squirt Nozzle (the only nozzle used in Smash Bros.), which sprayed water at enemies, the Hover Nozzle, which allowed Mario to hover for a limited time, the Rocket Nozzle, which burst Mario upwards into the sky, and the Turbo Nozzle, which allowed Mario to dash faster. F.L.U.D.D. was supposedly built by Professor Elvin Gadd, and has some form of AI which allows it to talk to Mario.


In Super Smash Bros. Brawl, Mario gained the F.L.U.D.D. as his new Down Special. By using this move, Mario charges up for a few seconds, and then can use the move again to release a stream of water using the Squirt Nozzle, with distance depending on how long you charged the move. It doesn't deal damage, but pushes opponents backwards depending on how much you've charged. You can also aim the spray with the Control Stick. Like other moves, the charge can be saved with the shield button, and being struck while charging will lose the charge. The move, although mostly considered a bother, can be used in many helpful ways, such as "gimping", a.k.a. spraying an opponent during their recovery to push them away, which doesn't give them another chance to recover, or using the F.L.U.D.D. while an opponent is attacking to trap them in freeze frames, allowing Mario to approach.


In SSB4, F.L.U.D.D. returns as Mario's move, with the Mario Tornado remaining his Down Aerial. Strangely, the F.L.U.D.D.'s spray seems to be thicker than in Brawl. If this means it's more powerful or has better range is unknown at the time of this writing. We see it in full action during Rosalina's trailer, where she seems to redirect it with ease.

Standard Attacks:


Jab/ Neutral Combo: Combo Kick
Jabs w/ right, then left, then kicks with his right foot. Originate from Mario's attack combo in Super Mario 64. First hit jab locks characters laying on the ground. Appears to be the same as before.


Forward Tilt: Power Kick
Does a spinning back kick with his right leg. Has average damage and knockback, but better reach than most tilts. Appears to be the same as before.


Up Tilt: Uppercut
Delivers an uppercut while spinning. Seems to originate from a move in Super Mario RPG: Legend of the Seven Stars for the SNES. Average damage, but above-average knockback, allowing this move to perform as an amazing juggler, leading into other attacks. Appears to be the same as before.


Down Tilt: Crouch Kick
Sweeps low to the ground with his leg. While it has quick start-up, it deals low damage, has low hitstun, high ending lag, low knockback and very short reach. Appears to be the same as before.


Dash Attack: Slide Kick
Slides forward and kicks with both feet. Originates from one of Mario's attacks in Super Mario 64. It features low diagonal knockback behind Mario, which makes it harder to follow up on. Appears to be the same as before.


Smash Attacks:


Forward Smash: Fire Smash
Steps back and then forward, blasting flames from his palm, Mario's most powerful attack and a great finisher, derived from Mario's link to pyrokinesis in many games. It has incredibly quick start-up, can be angled up or down as well, and is among Mario's best-reaching moves, but has some ending lag which can be used against him. Sweetspot it right on the flame, and damage and knockback increase. If it's fully charged and angled upwards, it can KO at rather low percentages. Appears to be the same as before.


Up Smash: Head Snap
Sends opponents flying with a headbutt. Has quick start-up lag and low ending lag, with good base knockback and knockback scaling, but only average KO power. It's considered Mario's only other option for a finisher besides his Forward Smash, as it can KO vertically under 150%. Appears to be the same as before.


Down Smash: Breakdance Kick
Performs a breakdance sweep, originating from one of Mario's attacks in Super Mario 64. Like most of Mario's other attacks, it has quick start-up and end lag, but short reach. Stronger than his tilts and aerials, but isn't reliable enough to KO under 150%. In the Mega Man vs. Mario match shown at E3, this particular move appears to be much stronger in knockback, as seen above. It's unknown if this will carry over to the final version, as Mario's Down Smash has not been seen since.

Aerials:


Neutral Aerial: Drop Kick
Performs a sex kick in the air. Looks similar to one of Mario's attacks in Super Mario 64. It's quick start-up can be used to end combos or chainthrows, but has low knockback and short reach. Appears to be the same as before.


Forward Aerial: Meteor Punch
Swings his fist downwards. It's a slow meteor smash with under-average power if sweetspotted. Even though it's a weak meteor smash that you can have difficulty landing, it has the benefit of sending opponents flying horizontally instead of vertically. If sourspotted, it knocks opponents in a horizontal trajectory with OK knockback. Appears to be the same as before.


Back Aerial: Rear Kick
Spins and kicks backwards, acting similarily to his forward aerial in the original Super Smash Bros. for the N64. Quick start-up with decent reach and knockback. It can KO at extremely high percentages, but not underneath 150% save for edgeguarding situations. Appears to be the same as before.


Up Aerial: Flip Kick
Does a somersault and kicks upwards. It features short start-up and end lag, but low knockback. It's useful for juggling at low to mid percentages. Appears to be the same as before.


Down Aerial: Mario Tornado
Spins with fists closed, then strikes with both on opposite sides. The move was originally his Down Special in both Super Smash Bros. 64 and Super Smash Bros. Melee, but was moved to the Down Aerial when F.L.U.D.D. became the new Down Special. It takes inspiration from the Spin Jump ability Mario can perform in Super Mario World. Barely any start-up with short reach, but some end lag. The final hit has some low knockback properties, and if is landed on the ground, can help lead into a Down Smash. Appears to be the same as before.

Throws:


Forward Throw: Spin Chuck
Mario spins the opponent around once, and then throws them in front of him. It has low knockback scaling, even for a throw. It's usually used to get an opponent to the edge. Appears to be the same as before.


Back Throw: Spin Throw
Mario spins around several times, and then releases the opponent behind him. It takes inspiration from the Bowser fights in Super Mario 64, where Mario would grab Bowser by the tail and spin him around to attempt to throw him into bombs fencing the arena. While it's a slow throw, anybody who connects with him while he's spinning the opponent is dealt damage, literally turning the opponent into a weapon. This is Mario's strongest and most damaging throw, and it's knockback scaling is high enough to KO opponents at 185%. Because of it's slowness, however, it's easy for the opponent to DI, limiting KO potential. It appears to be the same as before.


Up Throw: Vertical Hurl
Mario throws his opponent up into the air. It's got good base knockback, but low knockback scaling. It can be followed up by an Up Aerial juggle, but is inferior to the Down Throw for juggling purposes. Appears to be the same as before.

Miscellaneous:


Up Taunt
Mario becomes Super Mario, in the same manner he does in the original Super Mario Bros. for the NES, and all 3 previous Smash Bros. games. Appears to be the same as before.


Side Taunt
Mario takes off his hat, twirls around and then puts his hat back on. This seems to take inspiration from the Level Clear animation in New Super Mario Bros. for the DS. Appears to be the same as before.


Down Taunt
Mario spins in the air, and then falls on his back with legs up in the air. Inspired by the death animation in the original arcade Donkey Kong. Appears to be the same as before.

Also noteworthy is Mario's dodges. We've seen that both his air dodge and sidestep appear to be the same as before, as seen below:


As well as his normal idle animation, where he fixes his hat:


He also apparently has no changes in his jumping animation:


Or in his damaged form, only being more expressive. And we've seen Mario fallen or getting beat up QUITE often.


They really did put Mario as this game's sandbag, didn't they?

Overview:


Mario, since Brawl, has really had no big changes to his abilities. And this carries over into SSB4, where Mario remains as simple as before, easy to pick up, the perfect tutorial character. However, he seems to have become a bit more powerful, with his Down Smash and Down Special both seemingly buffed to aid him in his gimping and juggling techniques. We're still missing his down throw, pummel and varied attacks such as ledge attack, tripped attack and such, but with most of Mario's moveset confirmed, it's nice to know there's one character that remains the same for over a decade of smashing.

Who do YOU want to see analyzed for the next Week in Review? Sound off below and maybe you'll see them in the next issue!
 
Last edited:

Venus of the Desert Bloom

Cosmic God
Super Moderator
Premium
BRoomer
Writing Team
Joined
Jul 30, 2007
Messages
15,415
NNID
VenusBloom
3DS FC
0318-9184-0547
Misc Information/Requests

The WiR is a huge commitment for me. I typically spend anywhere from an hour to 5 hours of my day making sure the WiR is as good as it can be. But I do have a job that I constantly have to prepare and study for as long as taking online classes myself and studying Japanese to further my career. Not to mention I have a social life, a wife, and commitments that conflicts with the WiR.

Therefore, I depend A LOT on outside help. If you would like to help write a WiR, please contact me via Private Message and we can work out the details. If you have any idea or would like to contribute something different, I am open to ideas. For example, the veteran analysis was entirely @APC99’s idea. I could also use some help in finding quotes, watching threads, and proofreading. If you see some interesting posts that you think may help me in writing the WiR, simply quote it in a Private Message or quote/tag me in your post on that thread. That way, I am sure to read it and within its context.

Secondly, I want to open to three Requests I have for people. If you are interested in helping out, please put "____________ Submission" so I know what you are applying for.

Veteran Analysis Schedule

3/24-3/28 - Luigi (tentatively @ FalKoopa FalKoopa )
3/31-4/04 - Peach
4/07-4/11 - Bowser
4/14-4/18 - Link
4/21 - 4/25 - Zelda
4/28 - 5/02 - Toon Link
5/05-5/09 - Donkey Kong
5/12 - 5/16 - Diddy Kong
5/19 -5/23 - Kirby (@APC99)
5/26 - 5/30 - King Dedede (@APC99)
6/02 - 6/06 - Pikachu
6/09 - 6/13 - Lucario
6/16 - 6/20 - Fox
6/23 - 6/27 - Pit
6/30 - 7/04 - Olimar
7/07 - 7/11 - Marth
7/14 - 7/18 - Sonic (@APC99)

This is a tentative schedule that is bound to change when veterans are revealed. In addition, if this format does not work, I will change it for a more flexible, less restrictive format. If you are interested in covering any of those, let me know through PM!

Little Mac Newcomer Analysis


Are you planning on maining Mac? Was he one of your most wanted characters? Or are you interested in writing about him? I am looking for a capable writer to help cover the Little Mac analysis. What is needed?
  1. Commitment (You will be expected to have each part finished by Friday.)
  2. Detail and Thoroughness (Make sure you are detailed and thorough in your analysis. This includes move sets, stats, game play, speculated match ups, etc).
  3. Professionalism (Please be organized when writing and keep a professional attitude. Formatting and design is very important.
  4. Look at the previous Newcomer Analysis as an example on how to write them.
  5. Don't be afraid to ask for help
  6. Make it your own. I said before to look at the previous Newcomer Analysis but also make it personal. Feel free to make some changes if you want.
If you want to write up a analysis on Little Mac, hit me up on PM.


Pyrosphere Stage Analysis Co-Author
Pyrosphere is a huge thing for Smash fans for many reasons. In particular, it is to one of the most requested characters in Smash history, Ridley. The Pyrosphere is almost too big for myself to cover so I am requesting a co-author to help me write up about the stage and Ridley's connection to it. If you are interested in helping cover the stage, please send me a PM. The date to finish the article is currently unknown.
 
Last edited:

Vintage Creep

Smash Master
Joined
Oct 8, 2012
Messages
4,671
Location
Silent Hill
NNID
VintageCreep
My review:

This week sucked.
Graphics: 6/10
Audio: no audio / 10
Gameplay: 2/10
Longevity: 67/10 too ****ing long
This week gets a **** YOU SAKURAI / 10. Would never play again.
 

FalKoopa

Rainbow Waifu
BRoomer
Joined
Dec 16, 2012
Messages
32,231
Location
India/भारत
3DS FC
1650-3685-3998
Switch FC
SW-5545-7990-4793
This Week overall wasn't that great, really, though I wouldn't call it the worst week by far. Anyways, this weeks WiR is great as always. APC99's Mario analysis is nice, and so is the history of the MYM contest.
 

Venus of the Desert Bloom

Cosmic God
Super Moderator
Premium
BRoomer
Writing Team
Joined
Jul 30, 2007
Messages
15,415
NNID
VenusBloom
3DS FC
0318-9184-0547
My review:

This week sucked.
Graphics: 6/10
Audio: no audio / 10
Gameplay: 2/10
Longevity: 67/10 too ****ing long
This week gets a **** YOU SAKURAI / 10. Would never play again.
It wasn't exciting to write save for Tuesday's update. That was fairly fun to write about. I liked that one.

I focused more in additional features this week compared to the actual updates.
 

Admiral Pit

Smash Hero
Joined
Feb 20, 2008
Messages
8,722
Location
Skyworld
NNID
GoldAngelPit
3DS FC
0903-2895-3694
Tuesday with the multiple pics was gonna be my favorite one of the underwhelming week, and then we had a shocking pic for today which turned to be my favorite one of the week. <3 Still, the week wasn't that great though in honesty.
 

Venus of the Desert Bloom

Cosmic God
Super Moderator
Premium
BRoomer
Writing Team
Joined
Jul 30, 2007
Messages
15,415
NNID
VenusBloom
3DS FC
0318-9184-0547
Phosphorus was an exciting addition as a trophy. I love her 3D model. I will be adding some additional content come next week.

I admit I did utter "Holy ****in christ!" When I saw her image but then didn't see a newcomer banner and quickly realized she was just a trophy.

I was kinda hoping she would be an assist. Still could be though.
 
Last edited:

Admiral Pit

Smash Hero
Joined
Feb 20, 2008
Messages
8,722
Location
Skyworld
NNID
GoldAngelPit
3DS FC
0903-2895-3694
They spell it "Phosphora", although she's known as "Ereka" in the Japanese version if not mistaken.

You know she still looks amazing. That scarf for sure. Sakurai even mentioned the scarf looking so detailed in the 2nd pic. <3
 

Mario & Sonic Guy

Old rivalries live on!
Joined
Sep 18, 2007
Messages
22,423
Location
Mushroom Kingdom
NNID
TPitch5
3DS FC
5327-1637-5096
Sorry about the delay for the second part of my Rosalina article people. The reasoning for the delay was simply due to what today's pic of the day would've featured.

Anyway, part 2 is finally out, and it's a long conclusion to my analysis on Rosalina.
 

The Real Gamer

Smash Hero
Joined
May 7, 2008
Messages
9,166
Location
Atlanta, Georgia
3DS FC
3437-3797-6559
Another great article but if I had one critique I would say that the match up chart in the character analysis is largely unnecessary for the sheer amount of work it requires. There's still far too much we don't know about the game to make accurate assessments.

Yeah it's just speculation but it seems like a lot of work for something that's based on such a small amount of information.
 

---

鉄腕
Super Moderator
BRoomer
Joined
Jan 27, 2008
Messages
13,505
Location
Michigan
NNID
TripleDash
3DS FC
1719-3728-6991
Switch FC
SW-1574-3686-1211
Slightly updated for Friday. I'll add some quotes later today when I get the time.

Good to see Phosphora in HD. Hopefully we get the music from her level as well.

 
Last edited:

Admiral Pit

Smash Hero
Joined
Feb 20, 2008
Messages
8,722
Location
Skyworld
NNID
GoldAngelPit
3DS FC
0903-2895-3694
Slightly updated for Friday. I'll add some quotes later today when I get the time.

Good to see Phosphora in HD. Hopefully we get the music from her level as well.

Maybe my post about her somewhere in the daily pic thread can be part of this review sometime. :p
And cheers to that music. <3 Although I still wish we had more KI stuff this month.
 

Venus of the Desert Bloom

Cosmic God
Super Moderator
Premium
BRoomer
Writing Team
Joined
Jul 30, 2007
Messages
15,415
NNID
VenusBloom
3DS FC
0318-9184-0547
Slightly updated for Friday. I'll add some quotes later today when I get the time.

Good to see Phosphora in HD. Hopefully we get the music from her level as well.

I rearranged it just slightly it so your comments came before the "Things Confirmed for Friday". Thank you Try! Take your time, There's no rush :)
 
D

Deleted member

Guest
Glad to see that Groose was interviewed!

Also, I see that Mario got his own section... hmm...
If you like, I can help out with the Luigi article. I am probably going to be a bit busy next week, so that will prove to be difficult for me to do. I also may not have the best knowledge of Smash. I can do it if it isn't the next veteran article next week. However, I can contribute to it if you like; I've been a Luigi main since the beginning.
 

Swamp Sensei

Today is always the most enjoyable day!
BRoomer
Joined
Jan 4, 2013
Messages
38,037
Location
Um....Lost?
NNID
Swampasaur
3DS FC
4141-2776-0914
Switch FC
SW-6476-1588-8392
Great read but...

Gravitational Pull isn't going to be THAT good.
 

---

鉄腕
Super Moderator
BRoomer
Joined
Jan 27, 2008
Messages
13,505
Location
Michigan
NNID
TripleDash
3DS FC
1719-3728-6991
Switch FC
SW-1574-3686-1211
Added quotes. This issue is finally complete, sorry for any wait.

Not that great of a week for reveals, but it was definitely fun...WHENWILLWEGETACHARACTERTHISMONTH!? :laugh:
 

Venus of the Desert Bloom

Cosmic God
Super Moderator
Premium
BRoomer
Writing Team
Joined
Jul 30, 2007
Messages
15,415
NNID
VenusBloom
3DS FC
0318-9184-0547
Ah, I haven't took that portion out yet. I am looking for more artwork or banners for other parts of the WIR. The thread of the week, stage analysis, interviews, etc.

I recently made a new banner but have yet to fully finish it. I think I will be switching them every now and then to keep things fresh.
 

Smady

Smash Master
Joined
Apr 29, 2007
Messages
3,307
Location
K Rool Avenue
That article on MYM was awesome and I enjoyed that Groose interview, though I need to read more of the other stuff. Great work.
 

Venus of the Desert Bloom

Cosmic God
Super Moderator
Premium
BRoomer
Writing Team
Joined
Jul 30, 2007
Messages
15,415
NNID
VenusBloom
3DS FC
0318-9184-0547
That article on MYM was awesome and I enjoyed that Groose interview, though I need to read more of the other stuff. Great work.
I'm glad you liked it Smash daddy! You and the rest of the MYM team really helped me out!

Things to be updated tomorrow:
Veteran Analysis Schedule
Request Newcomer Analysis
Request for a co-author for a Stage Analysis.
 
Last edited:

Aduross

Smash Apprentice
Joined
Apr 13, 2013
Messages
139
Location
The M.S. Prima Vista
Was a pretty slow week, but I'm always pretty content with any info we get. If you're working on the Little Mac analysis next, I put together an album of the Little Mac GIFs from his trailer for convenience. If the article writer would be interested, that is:

http://imgur.com/a/Lg5z6#4

Additionally, if you'd like similar GIFs from other trailers or gameplay videos in the future, I wouldn't mind making some. If that's at all useful.
 
Last edited:

Admiral Pit

Smash Hero
Joined
Feb 20, 2008
Messages
8,722
Location
Skyworld
NNID
GoldAngelPit
3DS FC
0903-2895-3694
Just letting you know that one of the Phosphora pics have been replaced by today's POTD. A minor fix needed.
 
Last edited:

Substitution

Deacon Blues
Joined
Dec 27, 2013
Messages
28,756
Location
Denial
NNID
MisterVideo
Just letting you know that one of the Phosphora pics have been replaced by today's POTD. A minor fix needed.
What do you mean?
The chicken was always there. Staring, watching.
Laughing at our pitiful existence even when we didn't notice it.
It never left. It just, comes back, when you look away.

Why fear it? We'll just have to accept it.
Humans are so finicky that way, they just want things to be like it always is.
Wasn't it always there? Think about it.
Why was there a switch? One would assume a change up. But maybe it's different.
Or maybe something else.

Maybe it's just denial getting in the way.
It wasn't there because you refused to acknowledge it's existence.
Now, maybe if you had a more open mind, you would've seen the bigger picture beforehand.
I never get that, why do people only see just one picture?

They never see the picture behind the picture.
Why is that?
 
Status
Not open for further replies.
Top Bottom