
Hi-Hatz
Smash Cadet
- Joined
- Nov 19, 2014
- Messages
- 59
- NNID
- Vrillyhoo
*The thread is still incomplete, but there is enough information now that the "W.I.P." is unnecessary.
**Custom Fighters: Off
0. Introduction
1. Technique Details
2. Stage Summaries
0. Introduction
This is a thread for information pertaining to Ganondorf-specific stage options. I have compiled everything here myself with an emphasis on tournament standard and stage-specific technique. If it doesn't involve stage-tech or isn't 100% consistent, then it probably won't be mentioned here. Ganondorf has a respectable amount of tricks up his sleeve fresh out of the gate, and so this thread will be dedicated to simply holding that knowledge.
Edit: This thread will now include general stage summaries and my opinions as well.
Edit Edit: This thread will now link to or copy/paste other people's opinions on request.
C-C-C-Edit: I'm going to put a change-log here now so you can know about future edits!
Change-log:
1. Technique Details
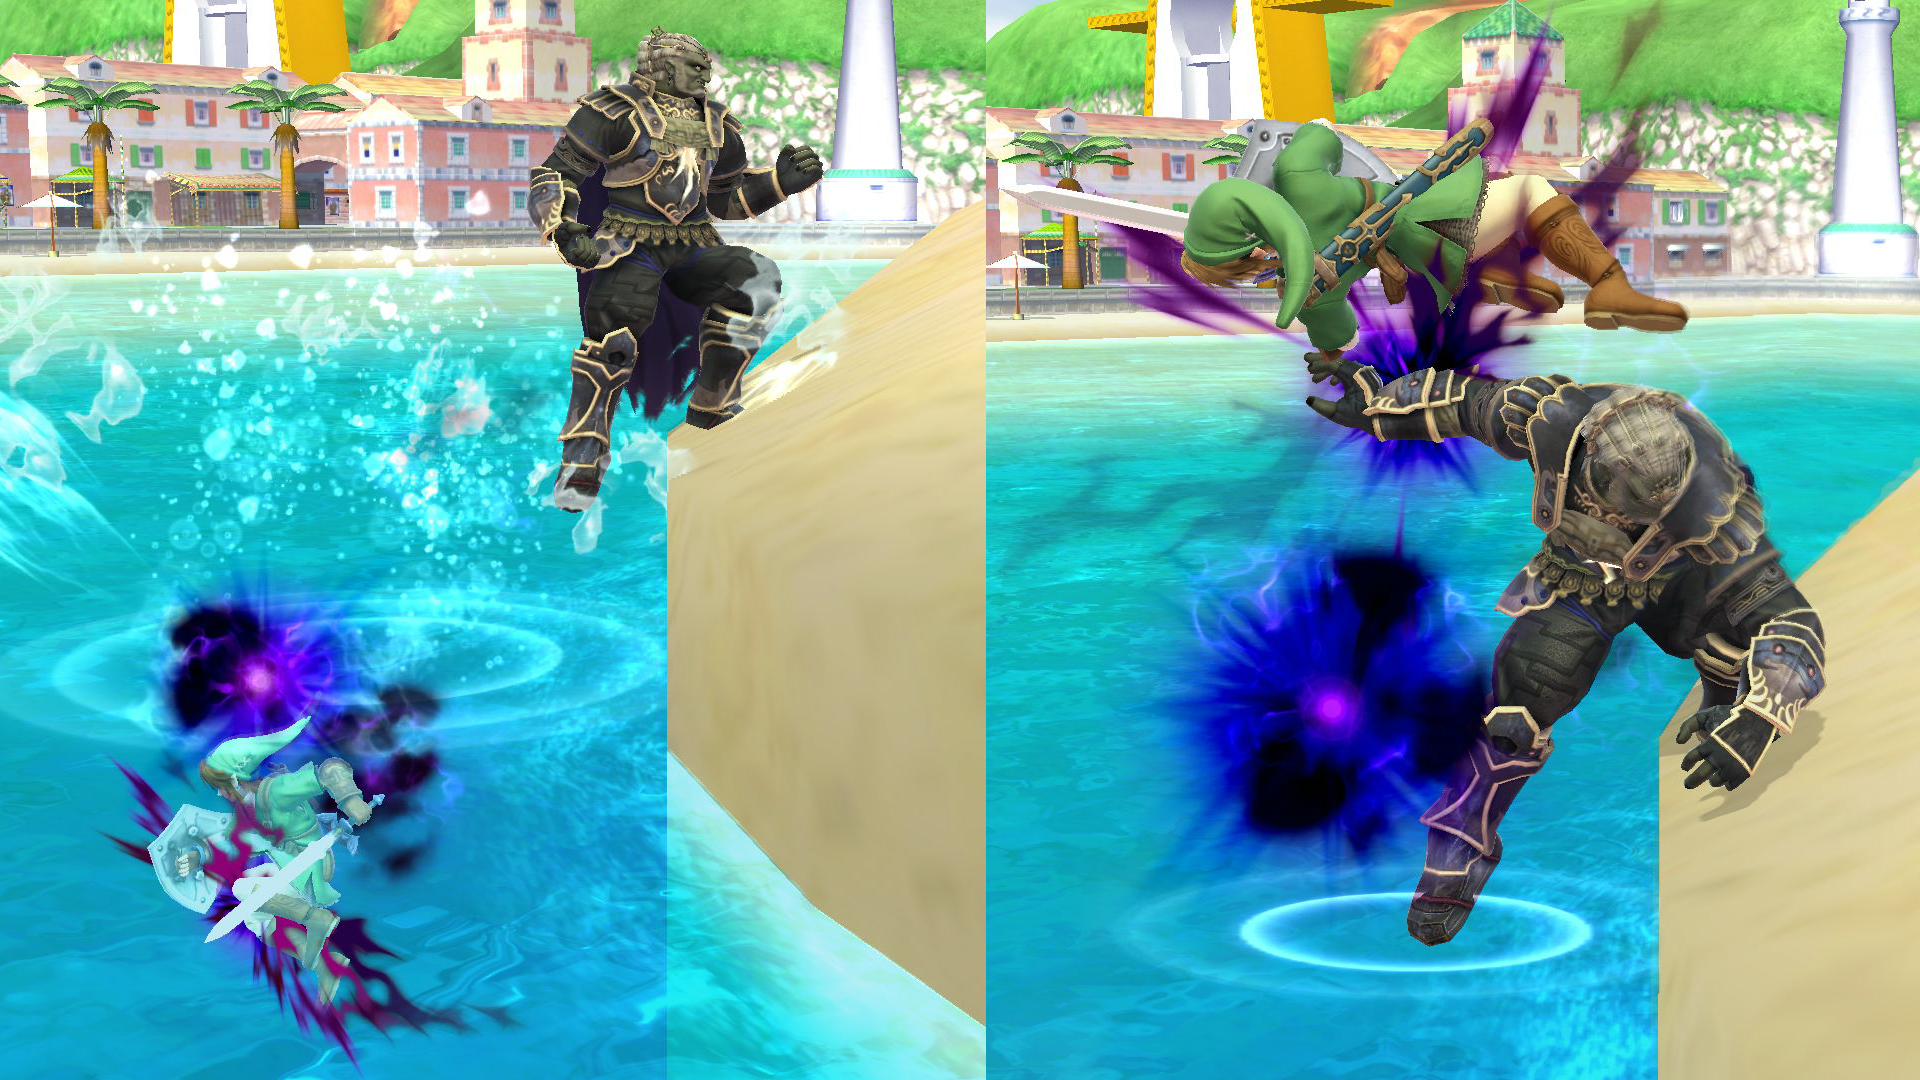
Wizard's Foot Cancelling:
![]()
When you start a grounded Wizard's Foot from the correct position, the ending gets canceled over the ledge and you are able to act out of it immediately. A surefire way to set it up on any stage is to roll away from the ledge twice after having rolled onto it as far as possible. This technique greatly enhances Ganondorf's mobility, especially when chasing after an enemy who is soon to recover. You can also bait an aerial or a Flame Choke on faster characters who would immediately chase after you from behind. [Cancel locations will be indicated by solid lines with solid arrows in the Stage Summaries section.]
Wizard's Foot (Collided) Cancelling:
![]()
If you are going to collide with somebody during your Wizard's Foot, then you will have to start it closer to the ledge in order to cancel it. Cancelling a Wizard's Foot while taking the enemy off-stage can be a really good set-up for kills at any percent, and if you're just going to get shielded anyway, then at least you'll have a better chance of not being punished. [Cancel locations will be indicated by dashed lines with dashed arrows in the Stage Summaries section.]
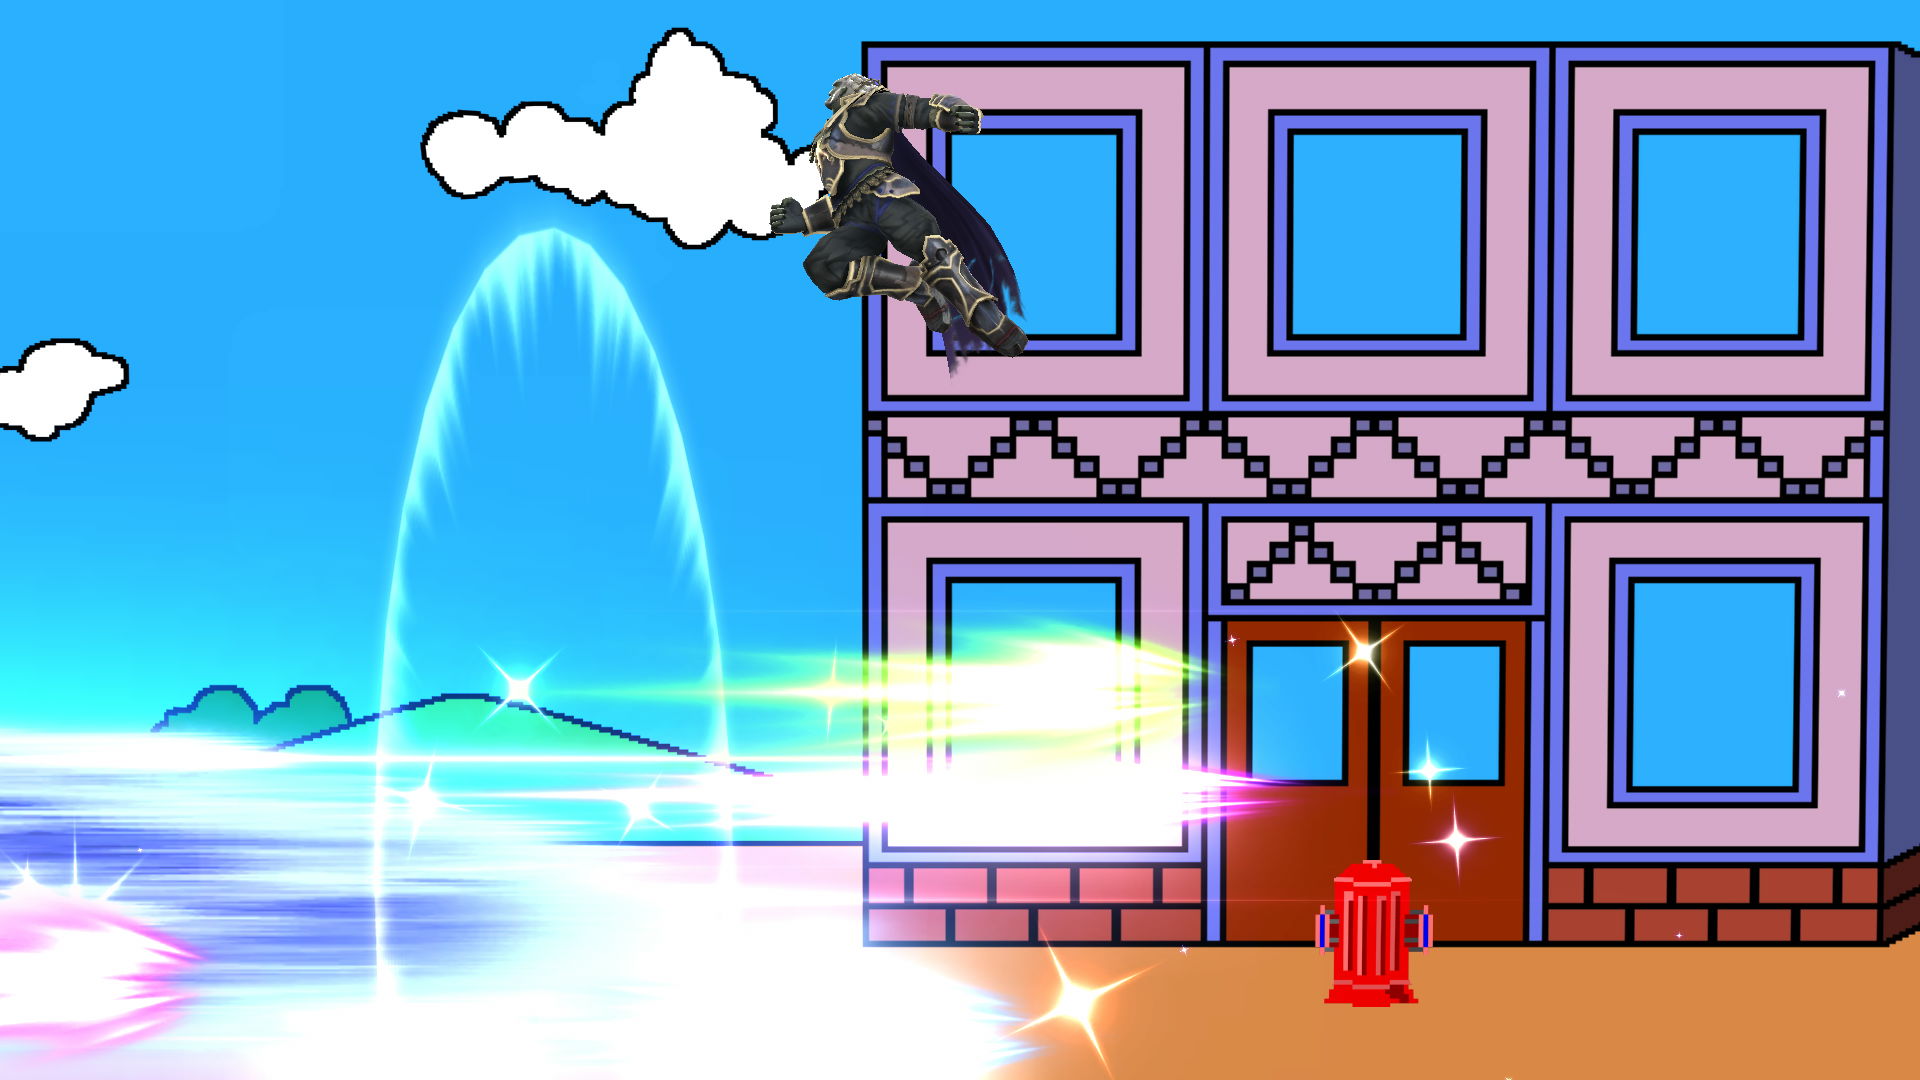
Wizard's Foot Into Walls:
![]()
When Ganondorf does his grounded Wizard's Foot into a wall, it sends him flying into the air like a big, glorious idiot. This useless "technique" has one of the longest animations ever, so there is virtually no competitive scenario where you would ever want to do this. Or is there? Just be mindful when you're facing a wall.
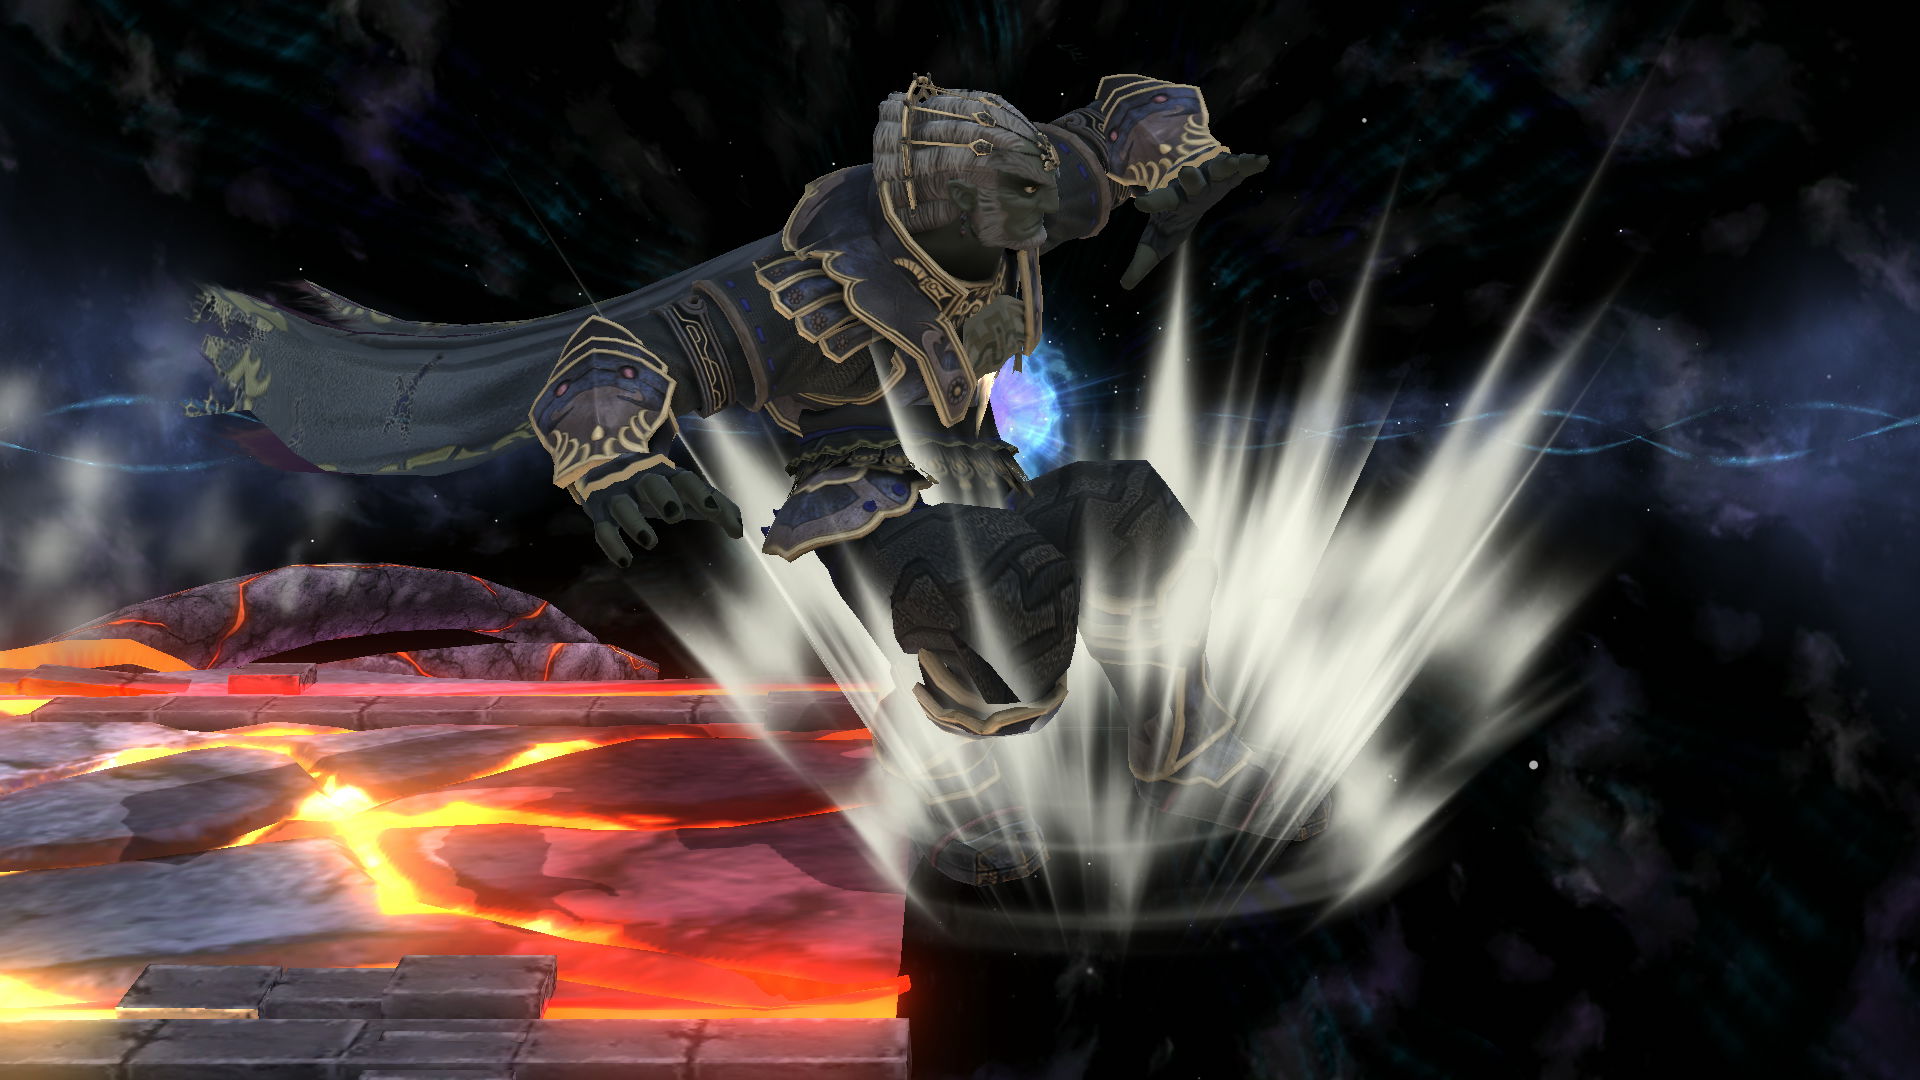
Wizard's Foot Platform Drop Cancel:
![]()
Another unfortunately pointless technique. You can cancel Ganondorf's platform drop by immediately inputting a Wizard's Foot, but the rainbow of awesome that comes out is a bust without a hitbox. (Credits to @A2ZOMG for being my source.)
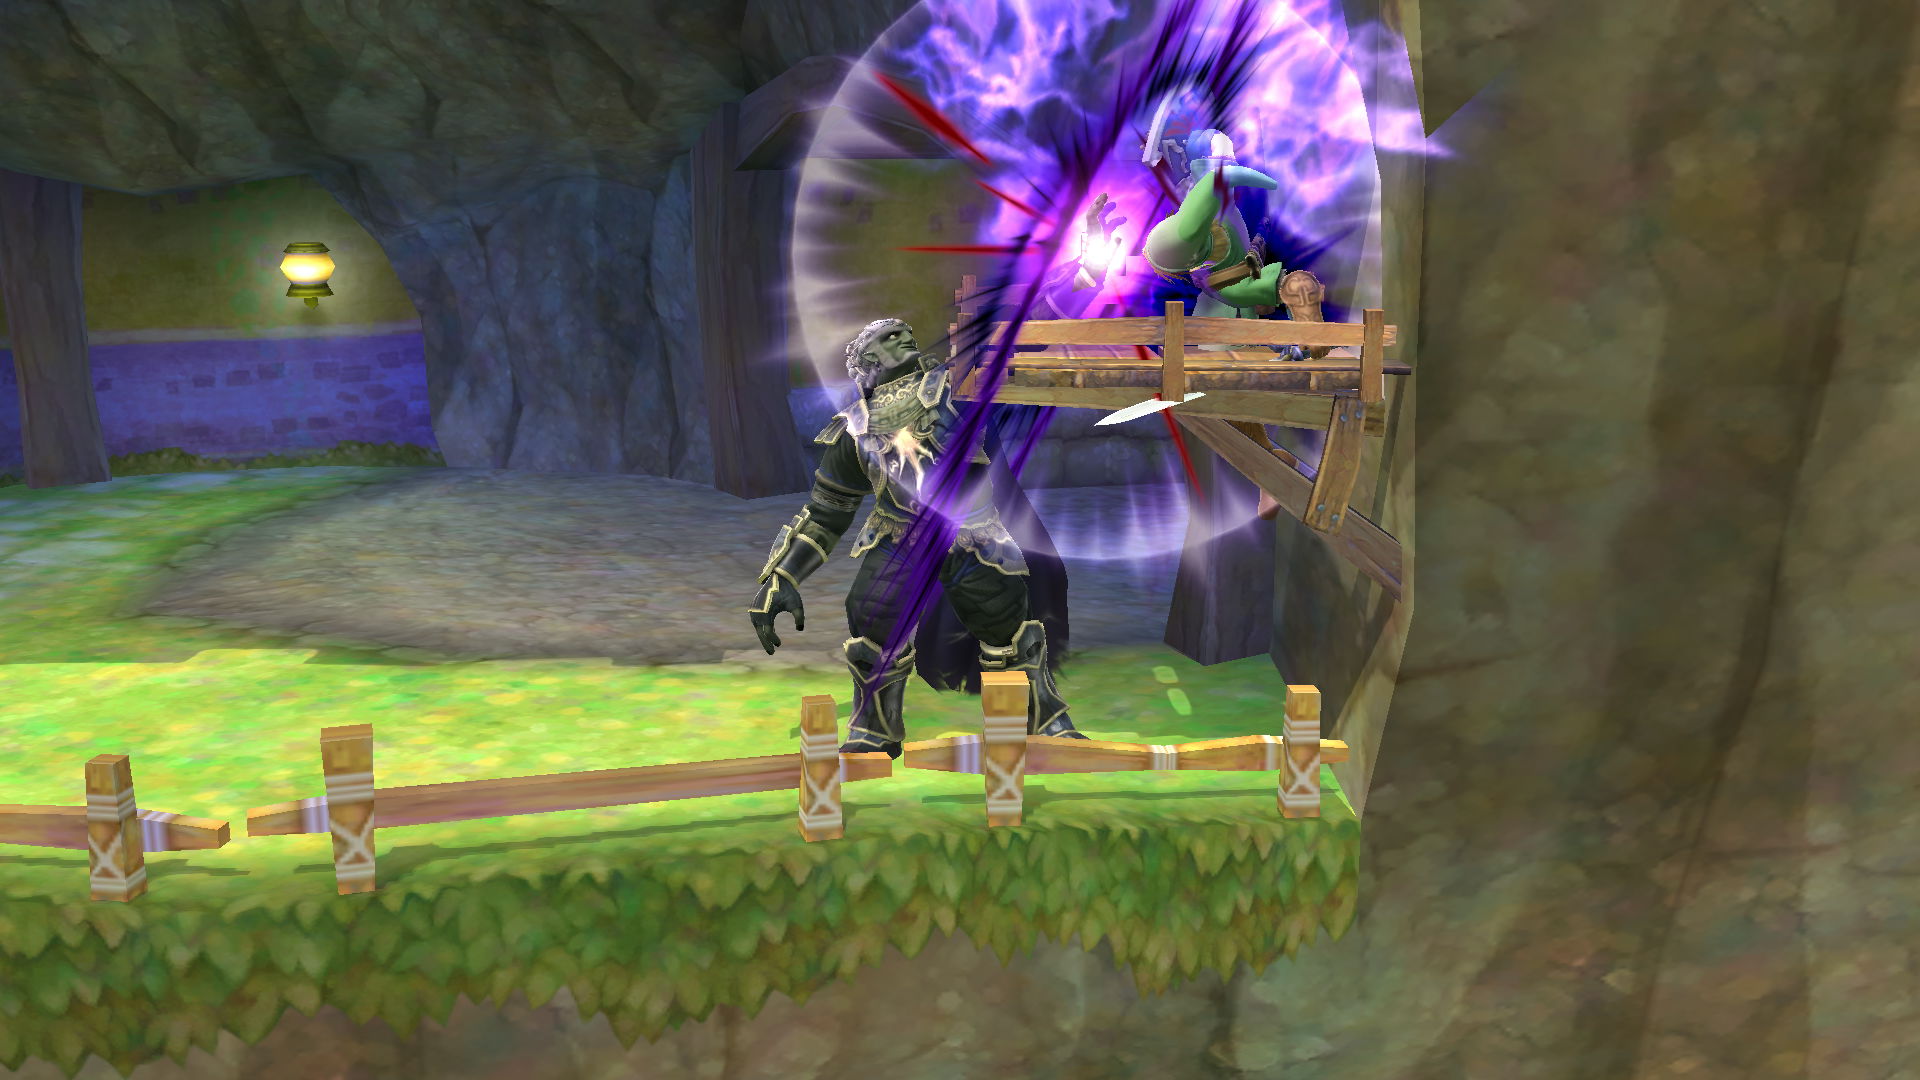
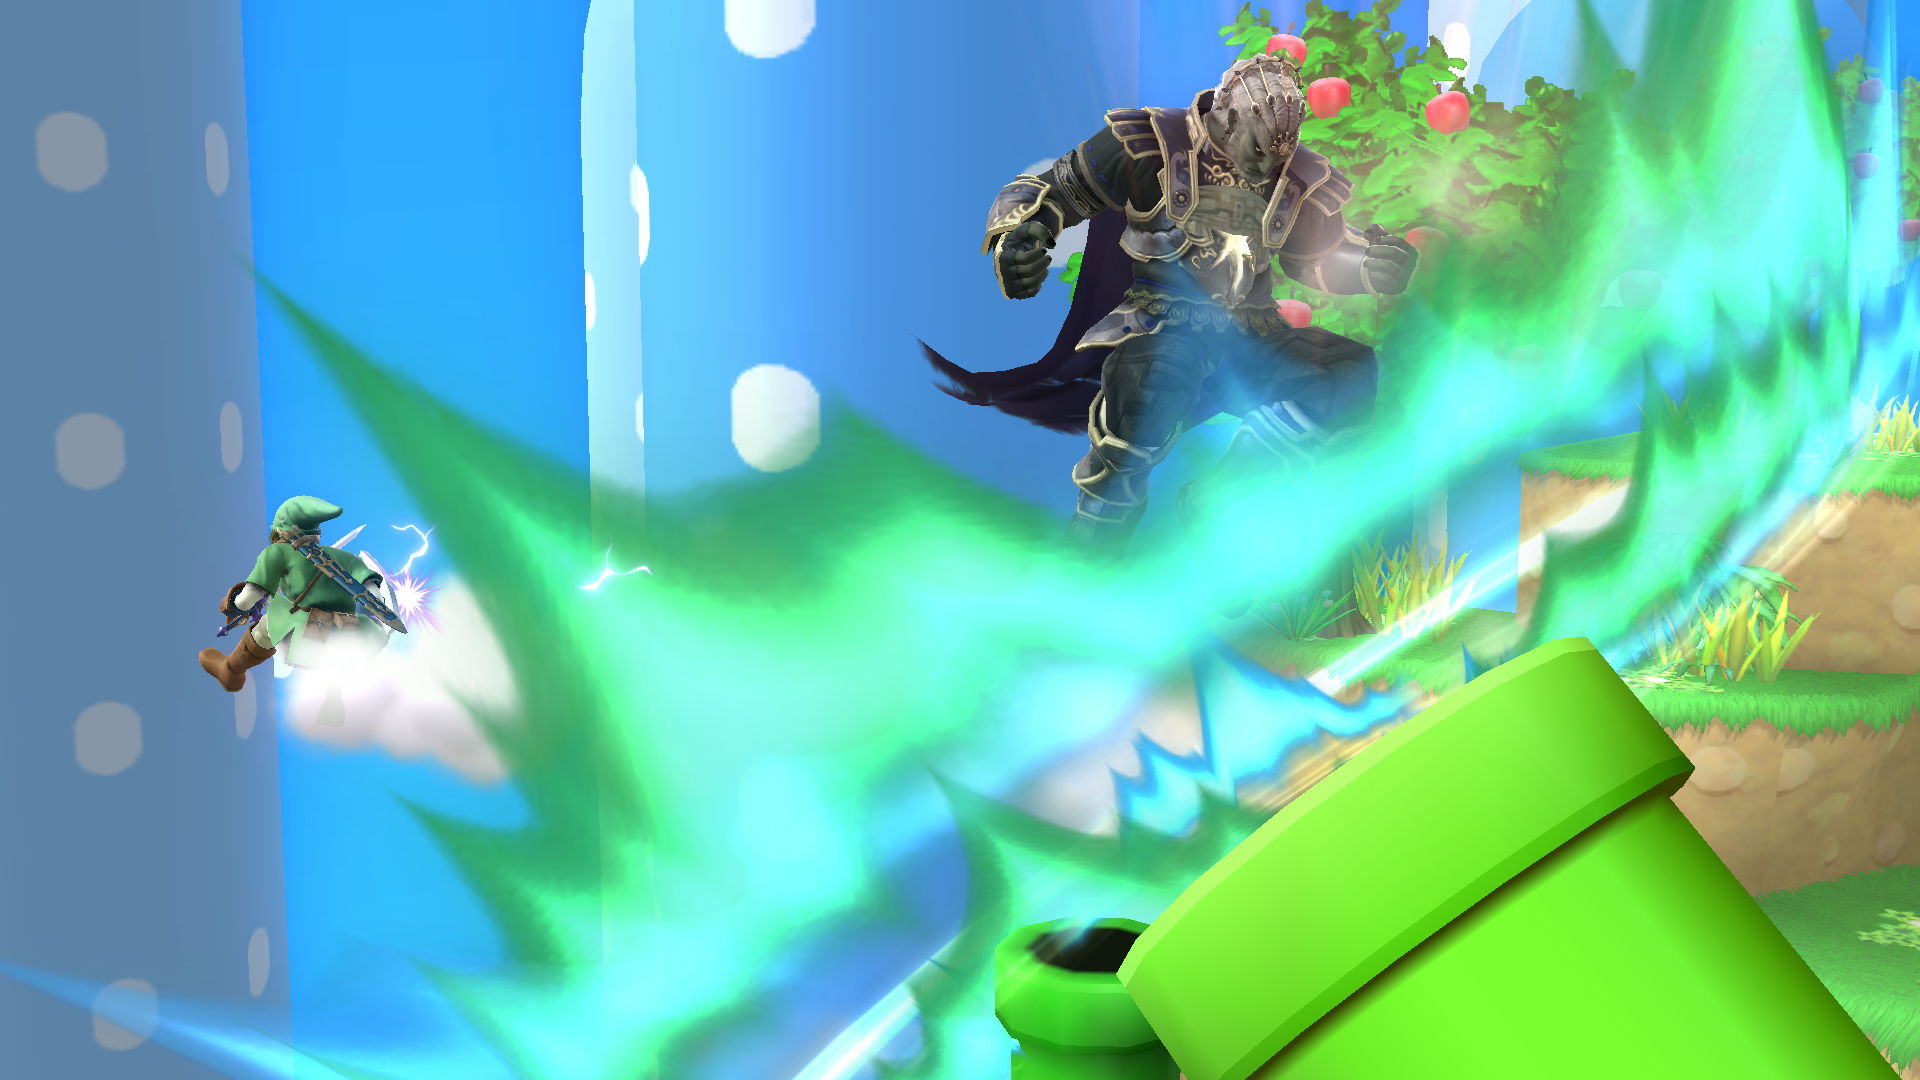
Dark Dive Sharking:
![]()
On some stages, you can shark people with Dark Dive like really hard. There is a risk-reward factor as you try to "DD-Punch" further and further into certain stages, as you may end up gimping yourself. Also note that your punch can be shielded, and it's wholly possible that a shielded punch might cause your untimely demise. It is best to only attempt this move during your initial recoveries, when you still have some ledge-invincibility waiting for you, but if you think your enemy is going to hang back from the ledge for whatever reason, then you can give them the middle finger with this. [DD-Punch locations where you can shark and still recover will be indicated by solid square areas in the Stage Summaries section.]
Dark Dive Over Ledge:
![]()
Holding Down will prevent Ganon from grabbing the ledge during his Dark Dive. This can be used to catch people that think it's okay to just teeter over you. You can punch them or grab them depending on your spacing; just remember to stop holding Down so you don't kill yourself. (Credits to @Apple Jelly for being my source.)
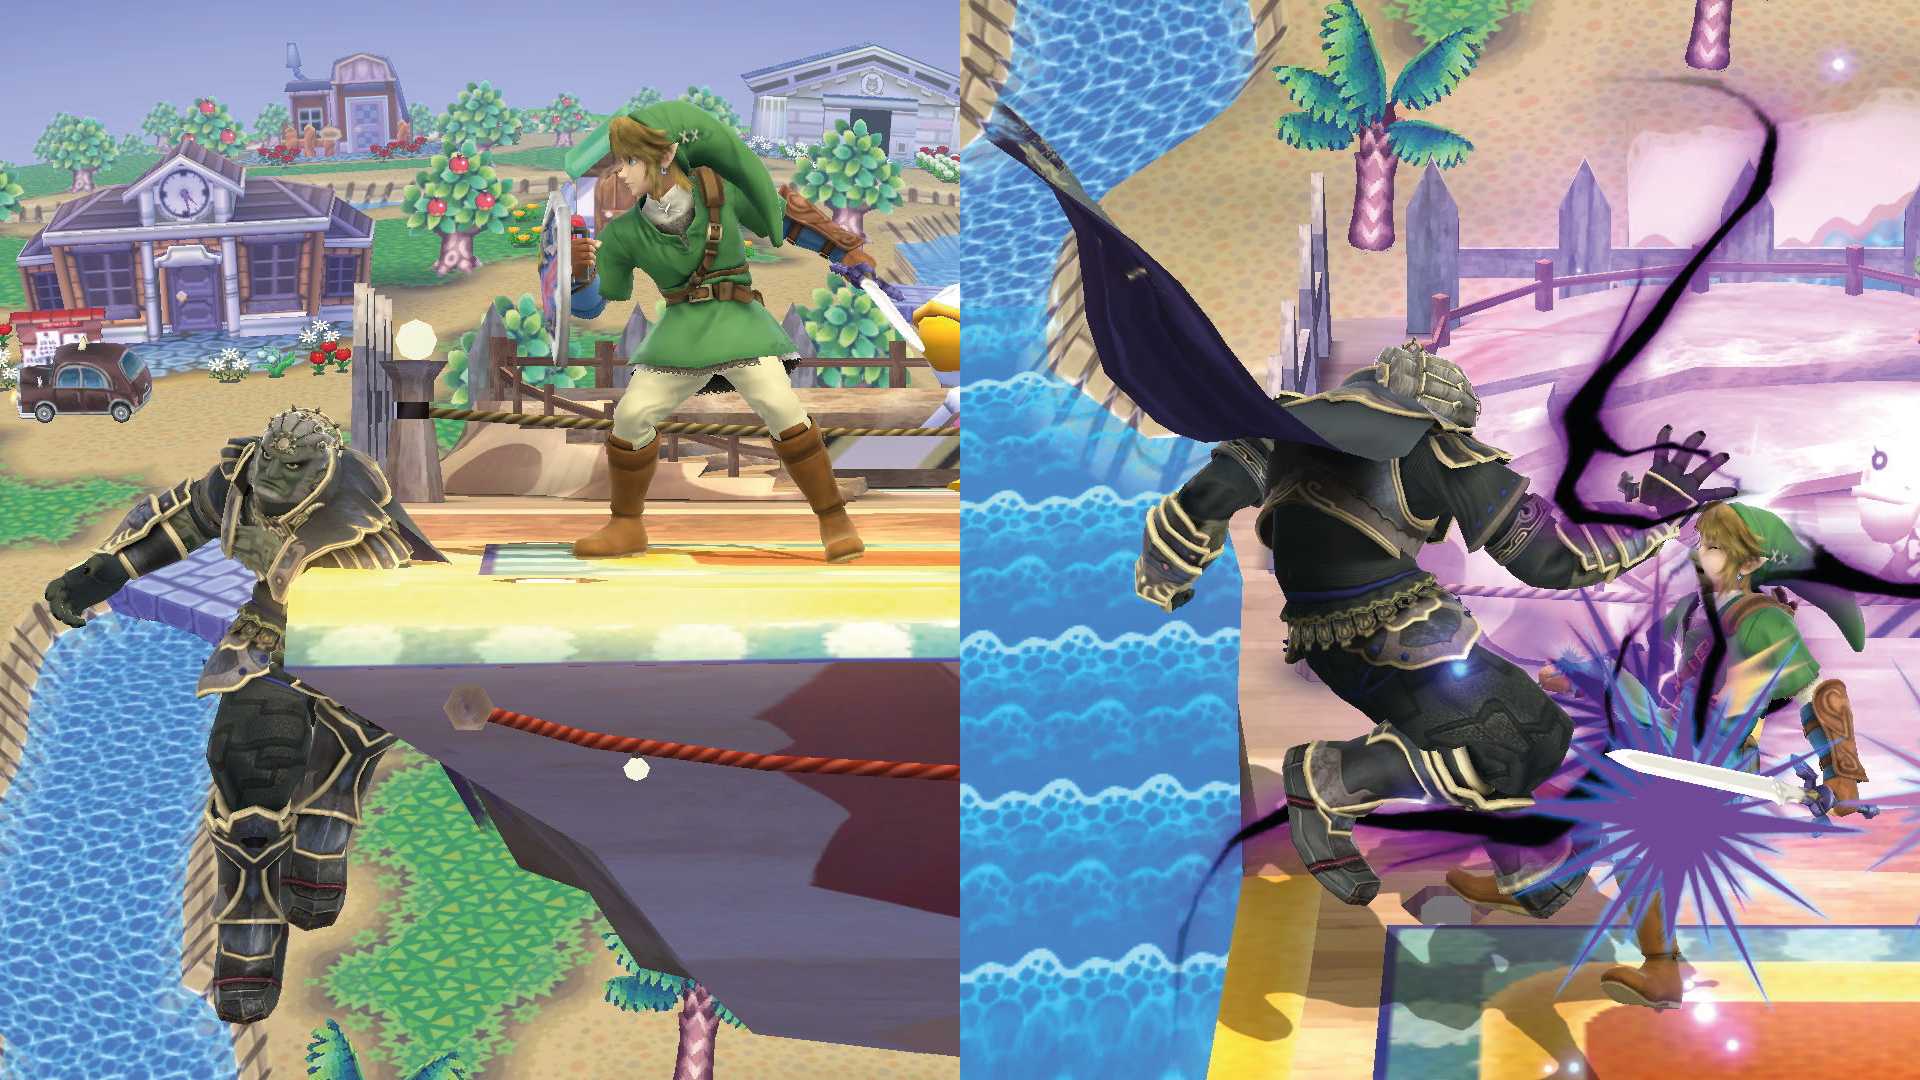
Flame Choke Ledge Lag Cancel:
![]()
This works on any ledge that you can grab, and it makes for a faster Ganondorf. To understand this tech, stand next to a ledge and perform a smooth, short hopped Forward Air off of the ledge so that Ganondorf will brush against the ledge and continue to fall: He doesn't grab the ledge on the way down. Try that same move again while immediately adding a Flame Choke toward the ledge, and that Flame Choke will snap you to the ledge with no animation and no lag. You can cancel all five of Ganondorf's aerials and his air dodge in this manner, and you can also use it in other situations where you might otherwise just keep falling. (Credits to @Ray_Kalm for being my source.)
Flame Choke Onto Platforms:
![]()
Ganondorf's grounded Flame Choke will consistently put certain characters onto certain platforms instead of the ground below, and not knowing about this could botch an otherwise guaranteed follow-up. Utilizing this knowledge, however, Ganondorf is able to put his enemies in even worse positions while increasing his own options dramatically. ["Plat-Choke" platforms will be indicated by solid lines in the Stage Summaries section.]
Aerial Flame Choke Onto Slanted Ledges:
![]()
The downward momentum from Ganondorf's Aerial Flame Choke can slide him partway down a slope. If there is a ledge at the end of your momentum, then both characters will typically land near it, but on certain ledges, you can drop your enemy off of the ledge while Ganondorf himself stays on it. When this does work, your enemy is able to act fairly quickly out of it, but only if it doesn't take them by surprise. This is a very circumstantial option that could potentially lead to a good gimp.
Meteor Smash/Spike/Dunk Onto Slanted Ledges:
![]()
When you spike somebody from their standing position (assuming no tech), they will generally bounce straight up, but if you spike them from the air (assuming no tech), then they will bounce according to the slant of the ground below them. It's extremely rare, but there will be situations where this can be the earliest kill option.
2. Stage Summaries
Here you will find helpful summaries with pictures that illustrate key stage-related techniques. Everything is an extremely close approximation, so let me know if you find anything contrary to what I've put here. Summaries will be broken up into counters and bans, Ganon-specific information, and general information.
Final Destination:
![]()
*Final Destination is currently [Neutral] in the Apex rule-set.
Counter:
Ban:
 summary:
While it's definitely a great place to take certain characters, Final Destination just doesn't have much going on for Ganondorf. If you can manage the Gentleman's Clause, there are better choices to be found amongst the multitude of Ω stages.
General summary:
It's time to flex your neutral game! This is typically going to be an undesirable stage for Ganondorf, because he has terrible horizontal speed and can't do much about projectiles, but this is also the perfect place to overpower somebody with raw, neutral game talent. Ganon likes platforms, but sometimes the enemy just likes them more, so when you need to get all of the distractions out of the way, just come here. When you get knocked into the air, don't forget to come down near the ledges; falling toward the main part of the stage severely limits your options when people are below you.
Ω Battlefield:
![]()
*Ω Battlefield is currently a [Counter] in the Apex rule-set.
Counter:
Ban:
summary:
Ω Battlefield, like regular Battlefield, is one of the few stages where Ganondorf can shark with Dark Dive, and the range is ridiculous, but it's also easier to gimp yourself on the deeper attempts, since the edges of the stage have been stretched out a bit. The stage itself is wider than regular Battlefield, so you also have to take that into account when you are planning to do a Wizard's Kick. This is an excellent choice for an Ω stage, but perhaps not the best, because it will mess with your ability to master regular Battlefield, and that stage is going to be one of your most frequented.
General summary:
See: Final Desintation
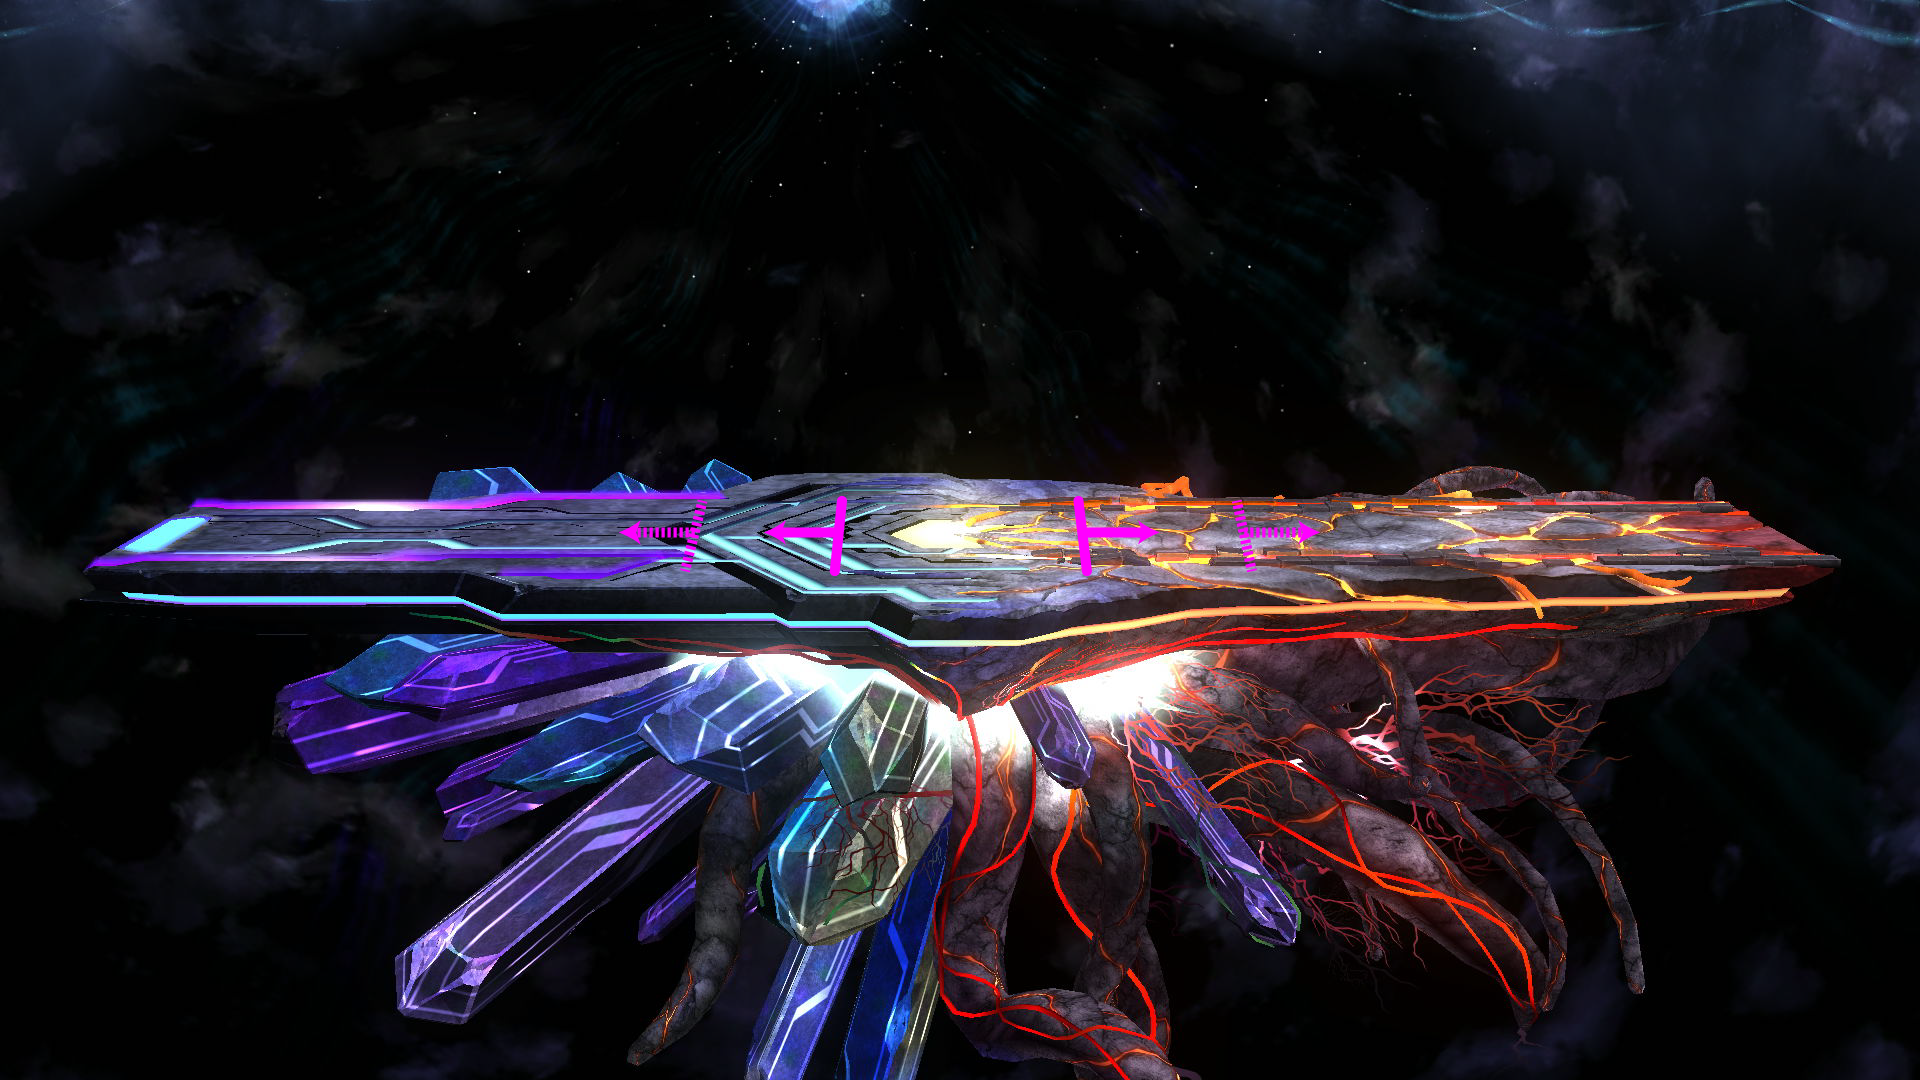
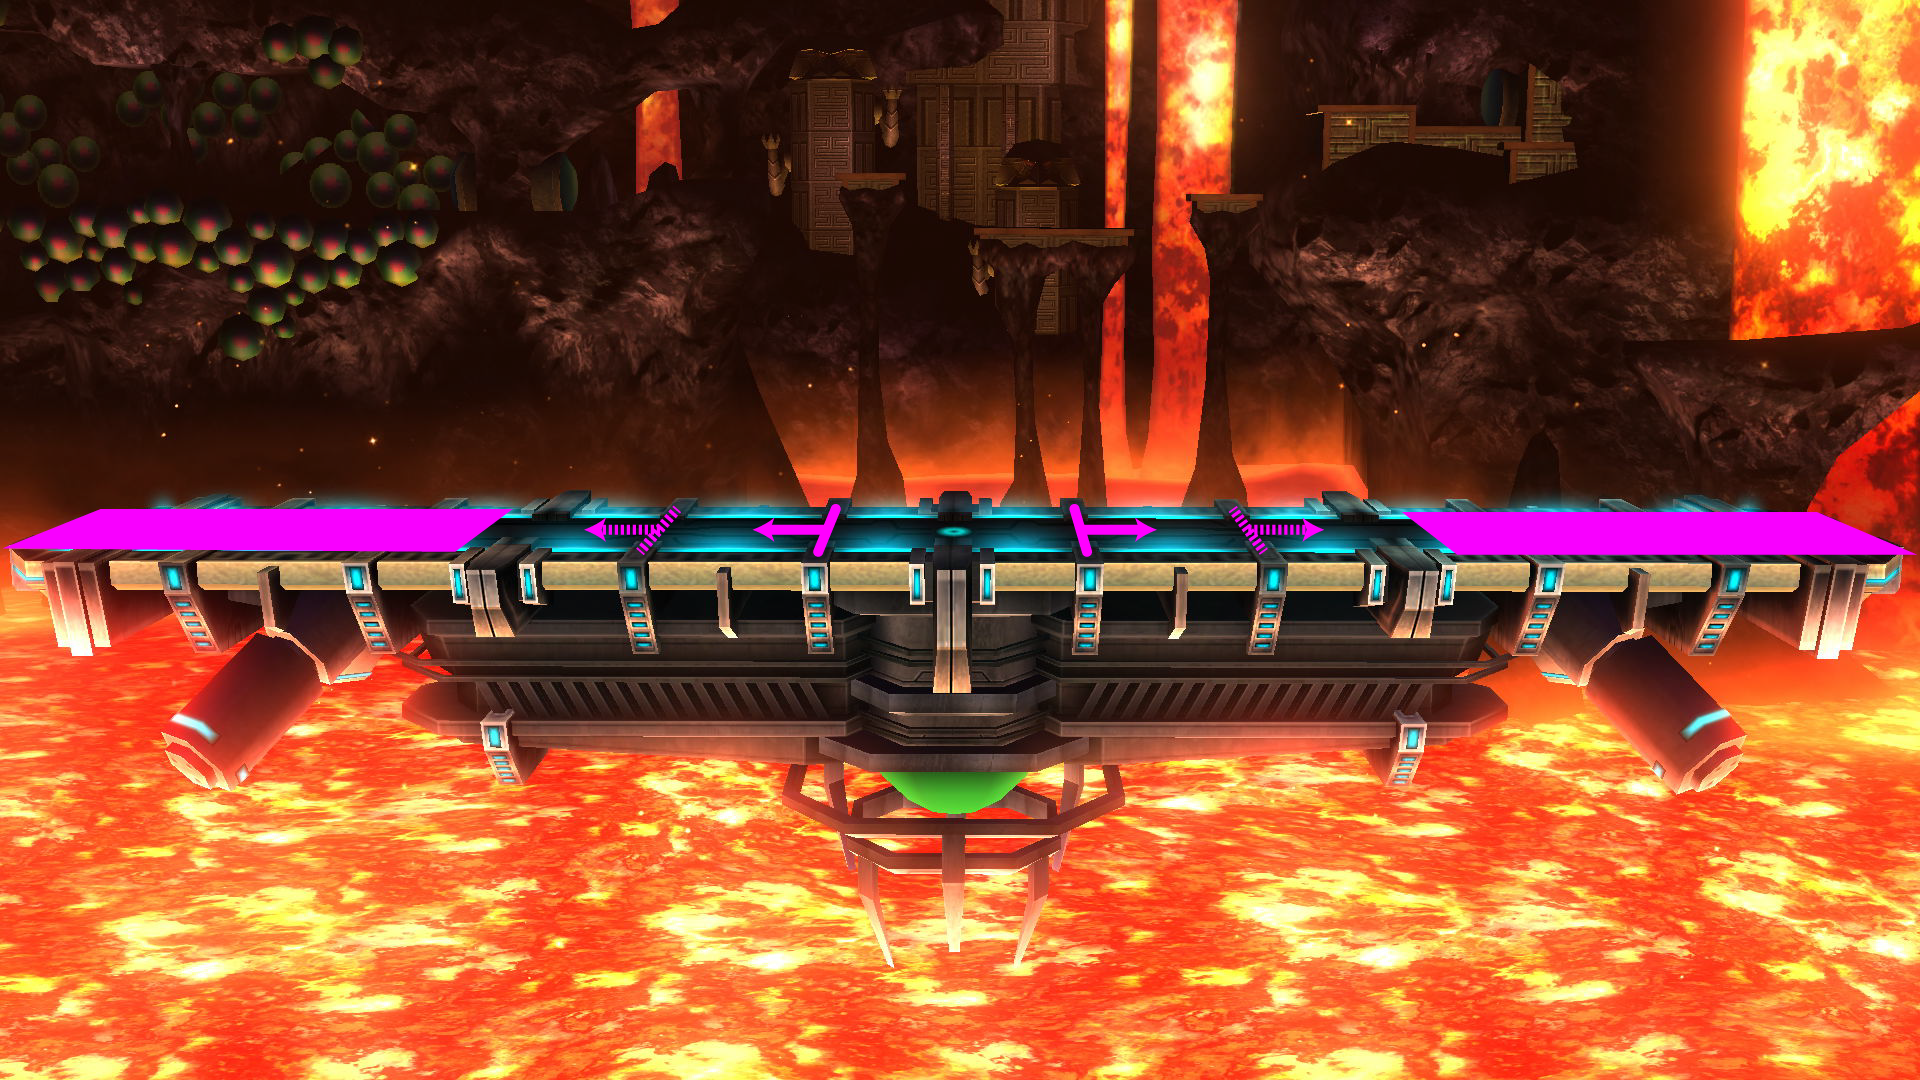
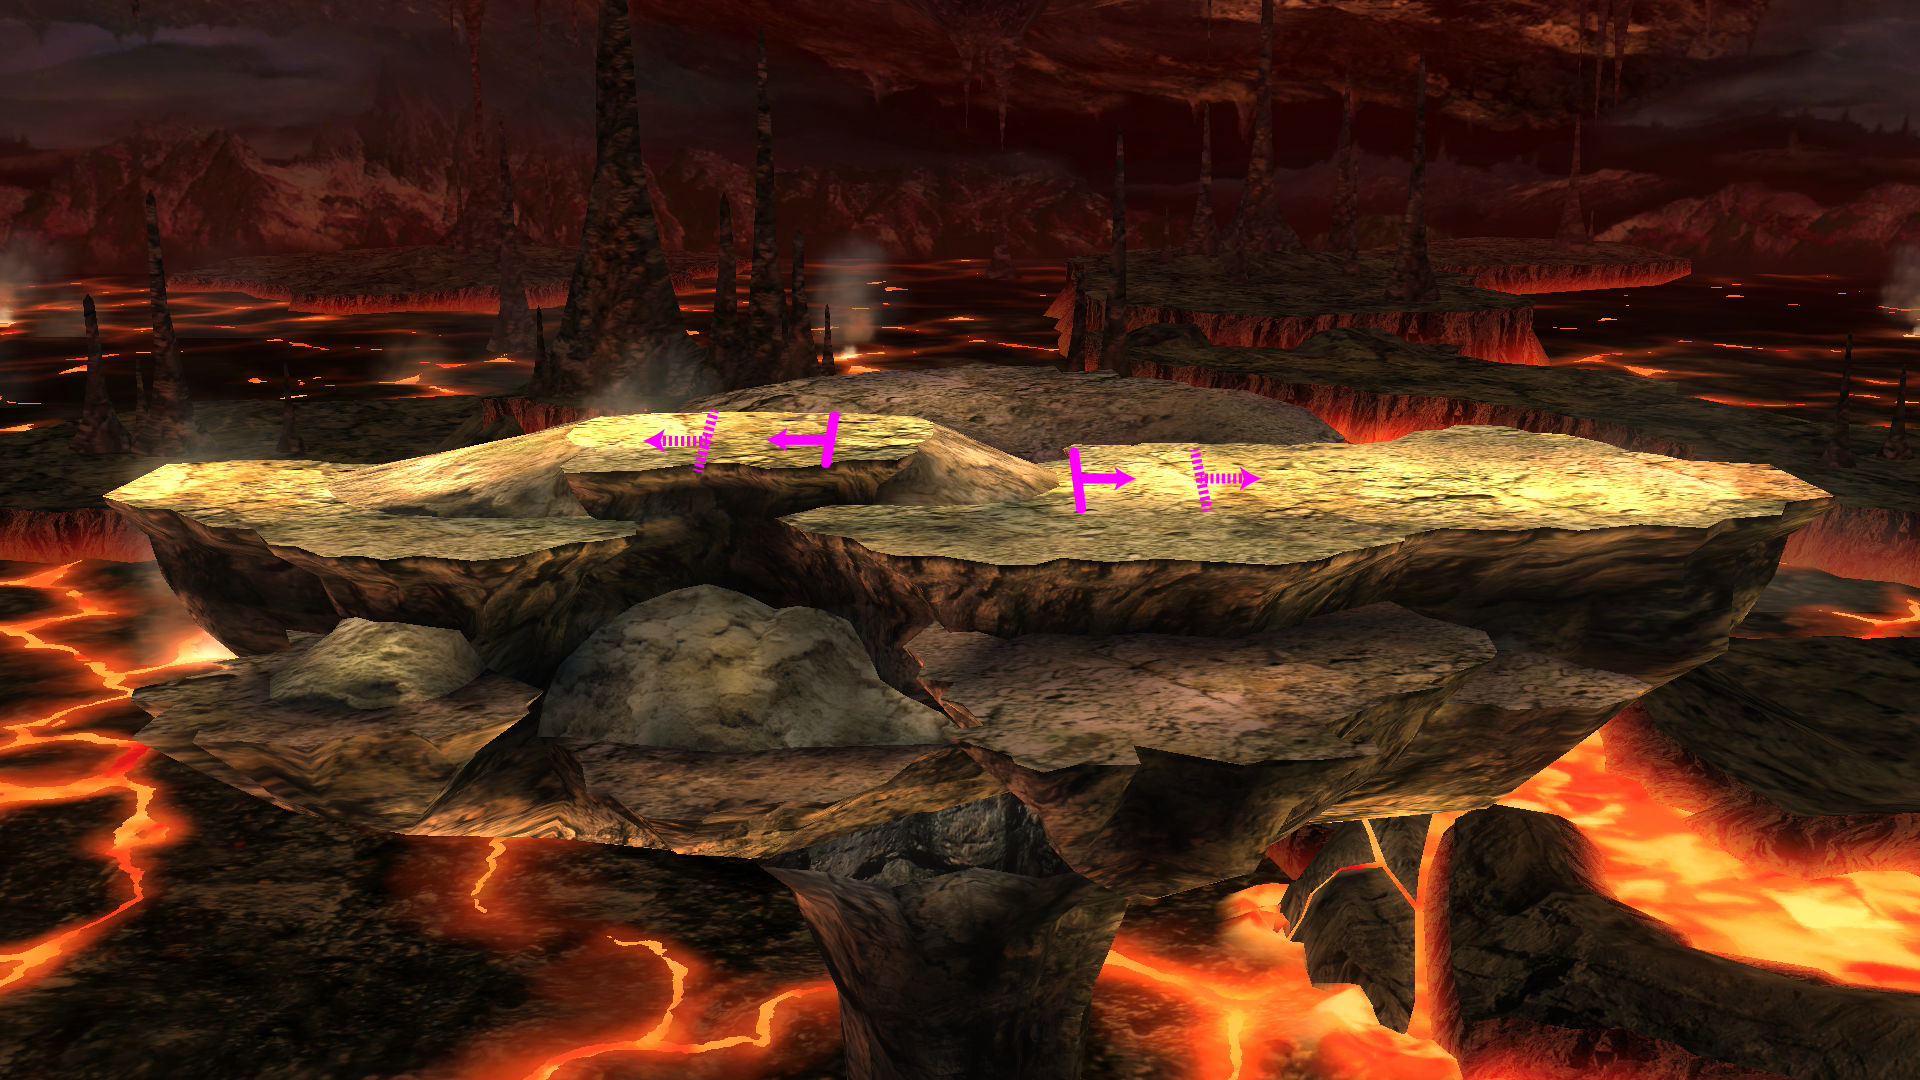
Ω Norfair:
![]()
*Ω Norfair is currently a [Counter] in the Apex rule-set.
Counter:
Ban:
summary:
The difference between most Ω stages is minimal, but Ω Norfair is actually set up to be the perfect pick for Ganondorf. Where most people just see another Final Destination, Ganondorf sees Wizard's Foot Cancelling made easy, and Ω Norfair is one of the only stages that allows you to DD-Punch the hell out of both sides of it. Come for the fiery inferno; stay for the sick music.
General summary:
See: Final Destination
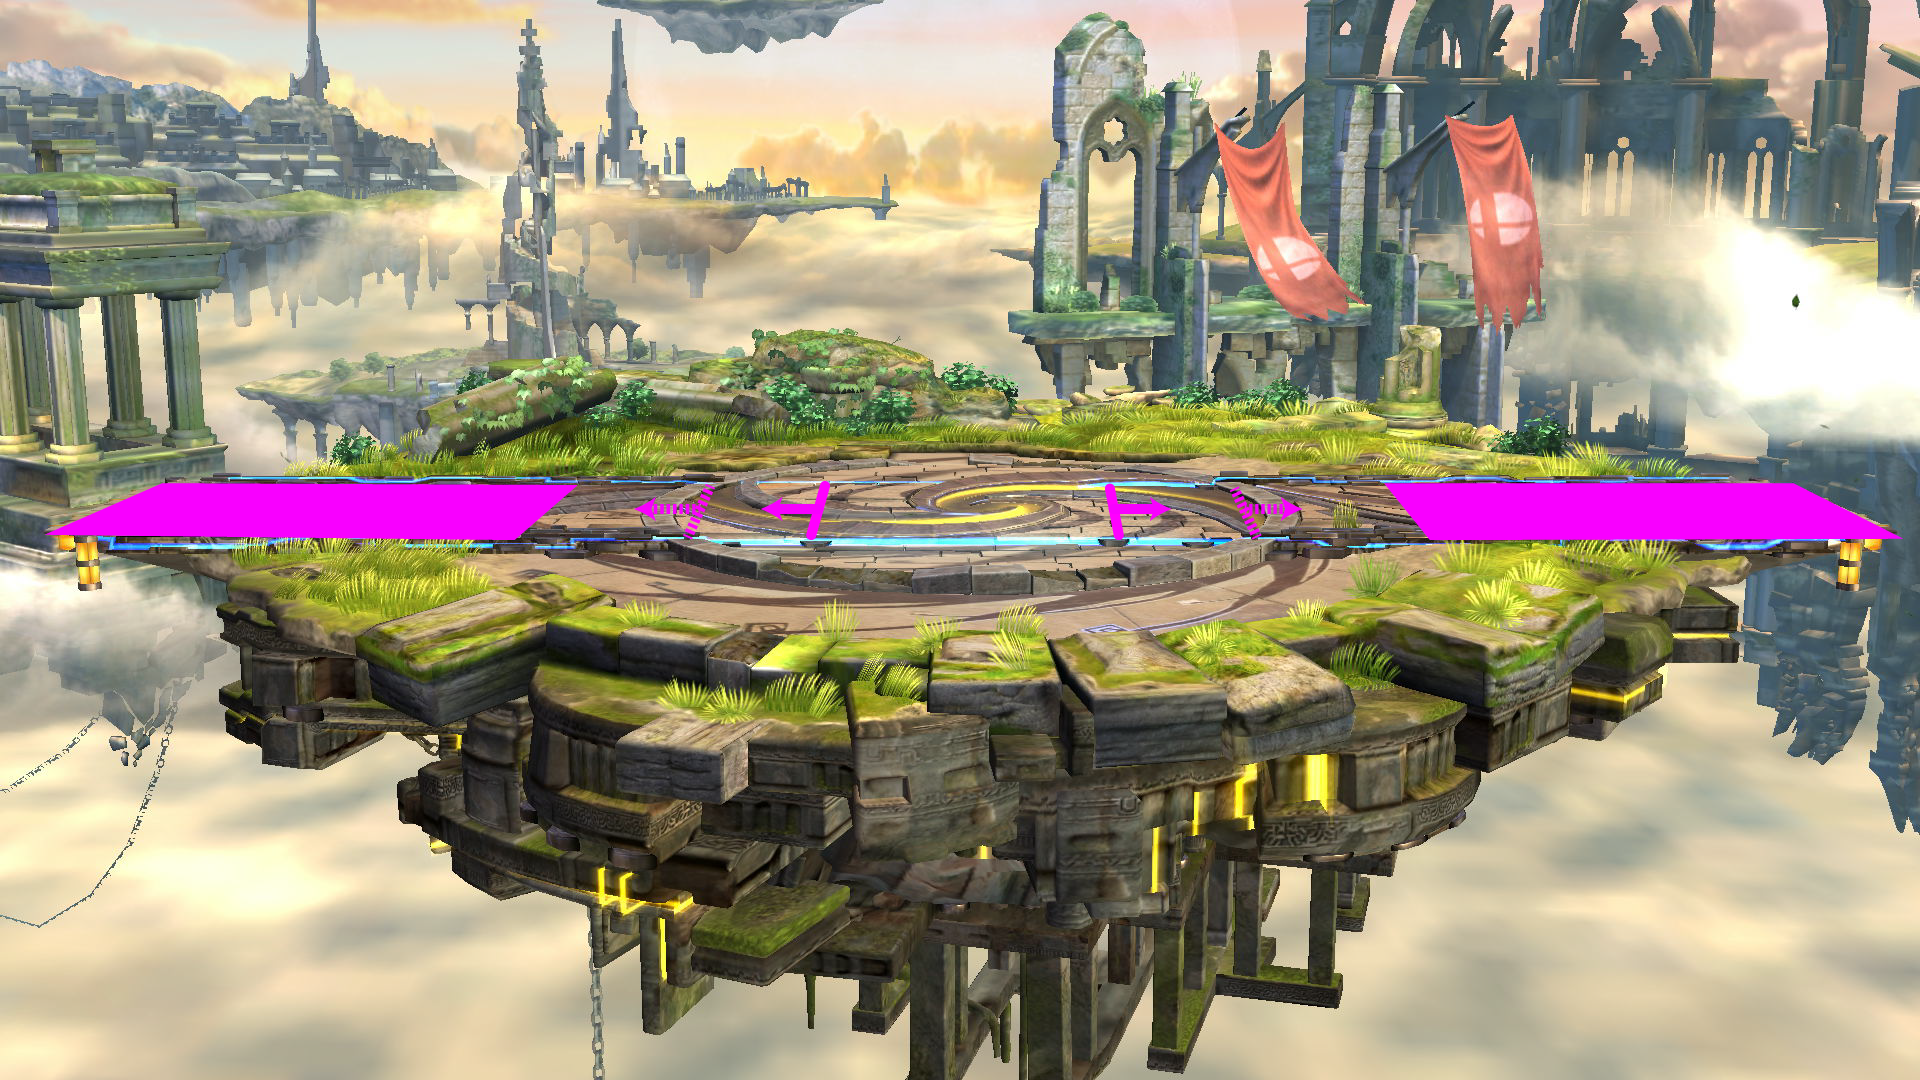
Battlefield:
![]()
*Battlefield is currently [Neutral] in the Apex rule-set.
Counter:
Ban:
summary:
Battlefield is a robust neutral that affords Ganon all of his best techniques. The range on Dark Dive's punch is sure to amaze those who have never seen it before, and a whopping 18 characters can be Flame Choked onto the lower platforms (which are low enough to be short hopped onto). You can also Flame Choke most of the roster from the bottom platforms to the top, but you probably shouldn't kid yourself like that. Stage-specific techniques are just the beginning for Ganondorf, so take this neutral and align it with the dark side.
Characters that can be choked onto the lower platforms:
Characters that can be choked onto the higher platform:
General summary:
This is most likely going to be your best neutral because of the platforms and the myriad of techniques you can pull off. Choke people onto the platforms, Up Smash people from under them; you can even Forward Smash a Rosalina who is standing under you from on top of the platforms! If a character has a projectile that controls your approach, then approach from the platforms for safety, but don't be a slouch with your shield. Unless a character is crossing you up to land for a grab, be ready to count jumps and shield every last aerial until it's absolutely safe to move. Don't throw out bad spikes just because you're above someone, either. Battlefield is all about waiting til the last moment to commit to a landing option, so keep them guessing and keep your attacks spaced safely in the meantime.
Additional summaries:
@ _Magus_
has this to say about Battlefield:
Smashville:
_Magus_
has this to say about Battlefield:
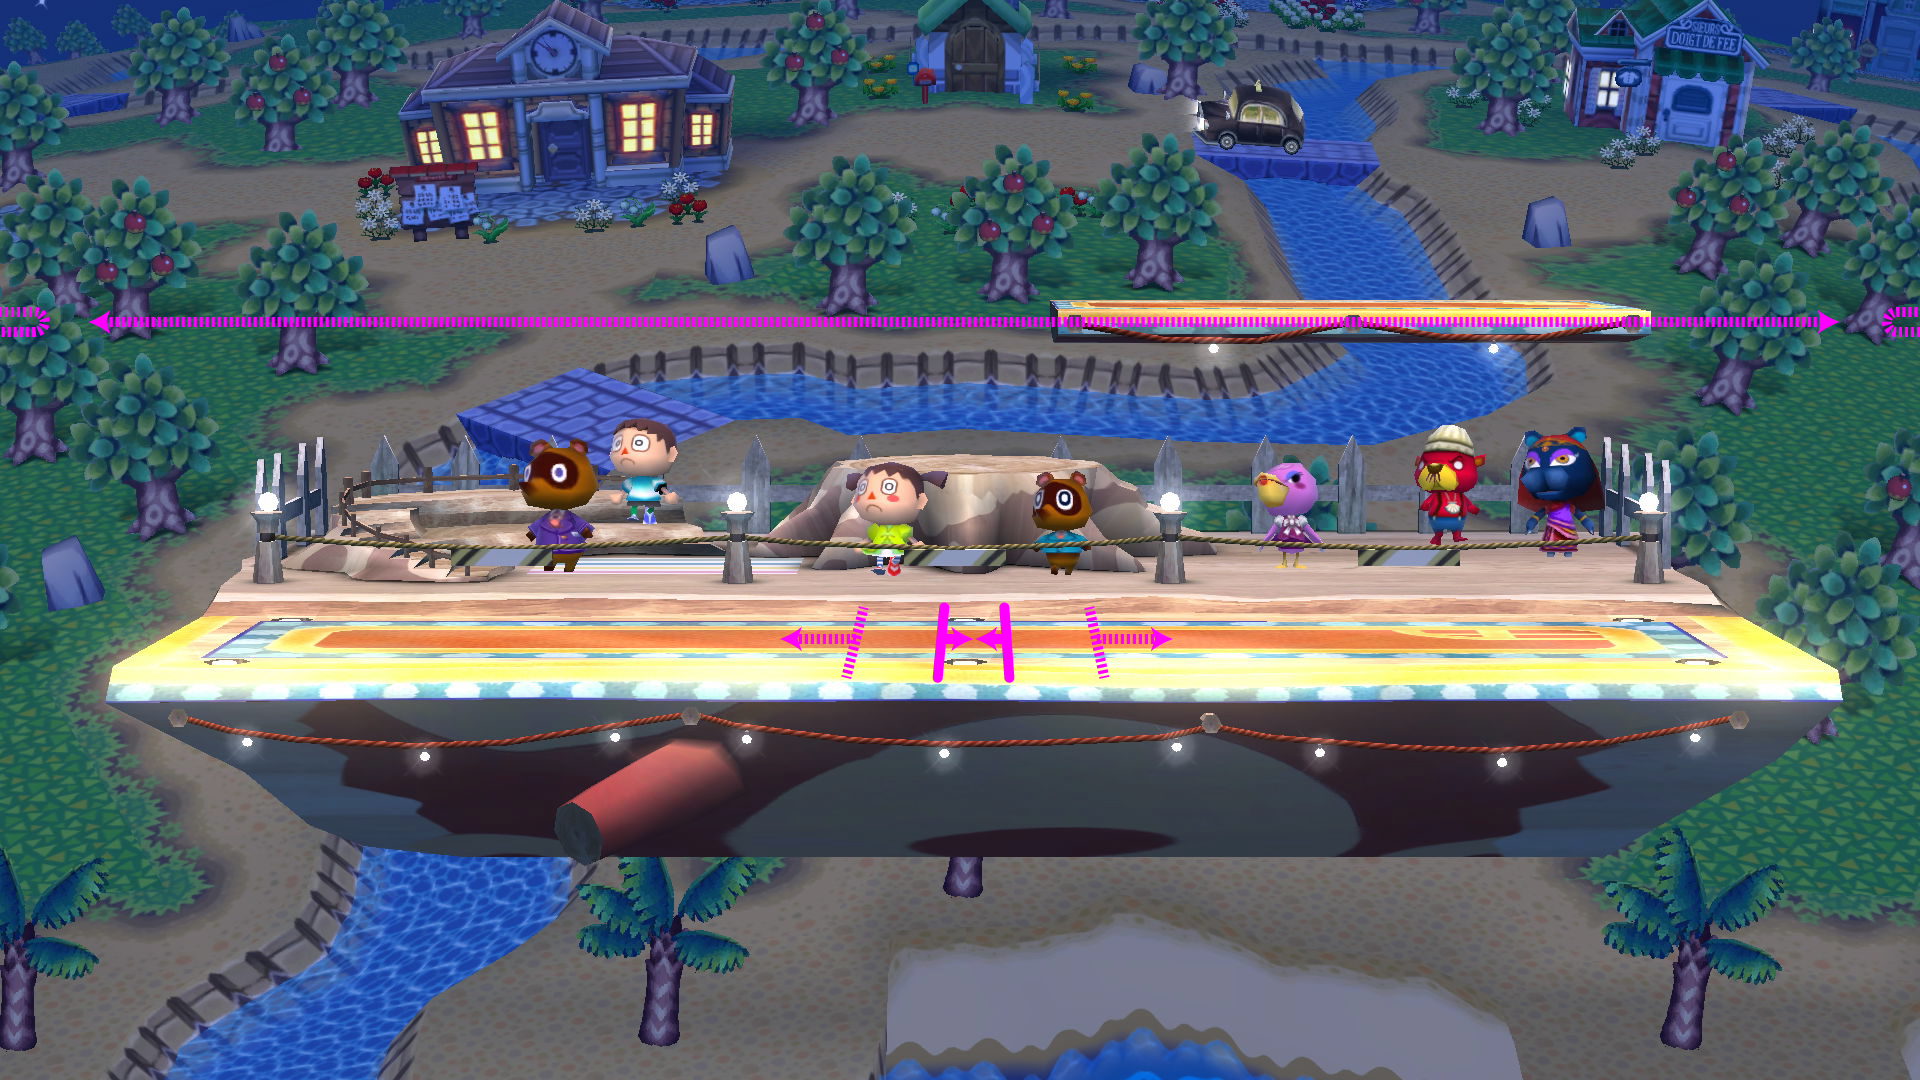
Smashville:
![]()
*Smashville is currently [Neutral] in the Apex rule-set.
Counter:
Ban:
summary:
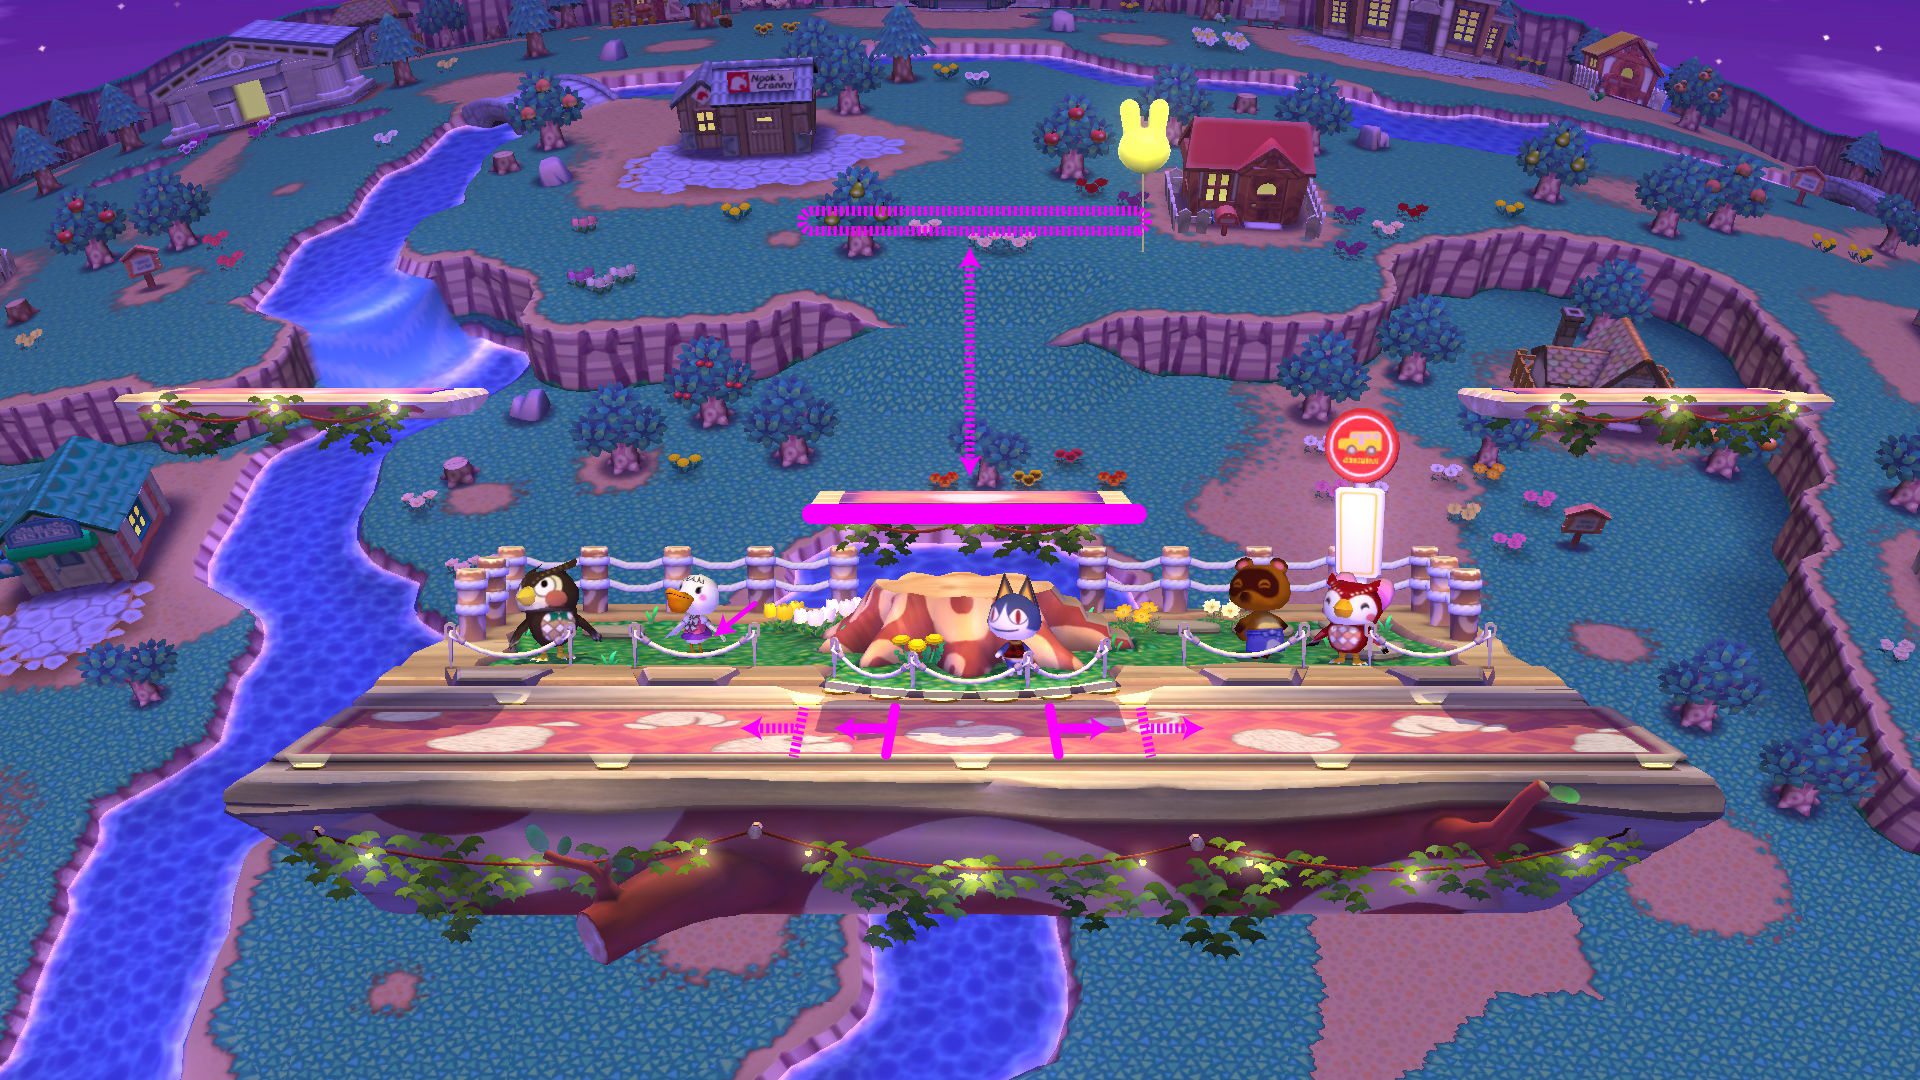
The lone, moving platform of Smashville can offer an enormous boon to whoever is ready to exert their control over it, but there is nothing special about it for Ganondorf: You can't even full hop onto it. This can still be a wonderful stage to take people to, but you won't be doing anything particularly unique here.
General summary:
This is a good neutral to take people to when you need a platform for mobility. Double jump onto the platform from a safe distance and prepare to protect yourself as the platform carries you to your destination. Instead of dropping down on people though, you will often be looking to get people into the air after you. Remember that you run "faster" while you're on the platform, so don't just stand still on it unless the enemy is far away. If you have a hard time using the platform from above, that's because it's best used from below. Get people onto it and make them afraid to come down. Your pokes will become safer as the platform carries them out of punish distance. You can Up Smash people from under the platform as well. The platform becomes a different monster entirely when it's over the ledge, though. Drop down from it for dangerous (or safe) gimps and pressure, but try not to land on it unless it's the only option, because you're probably getting knocked right back off.
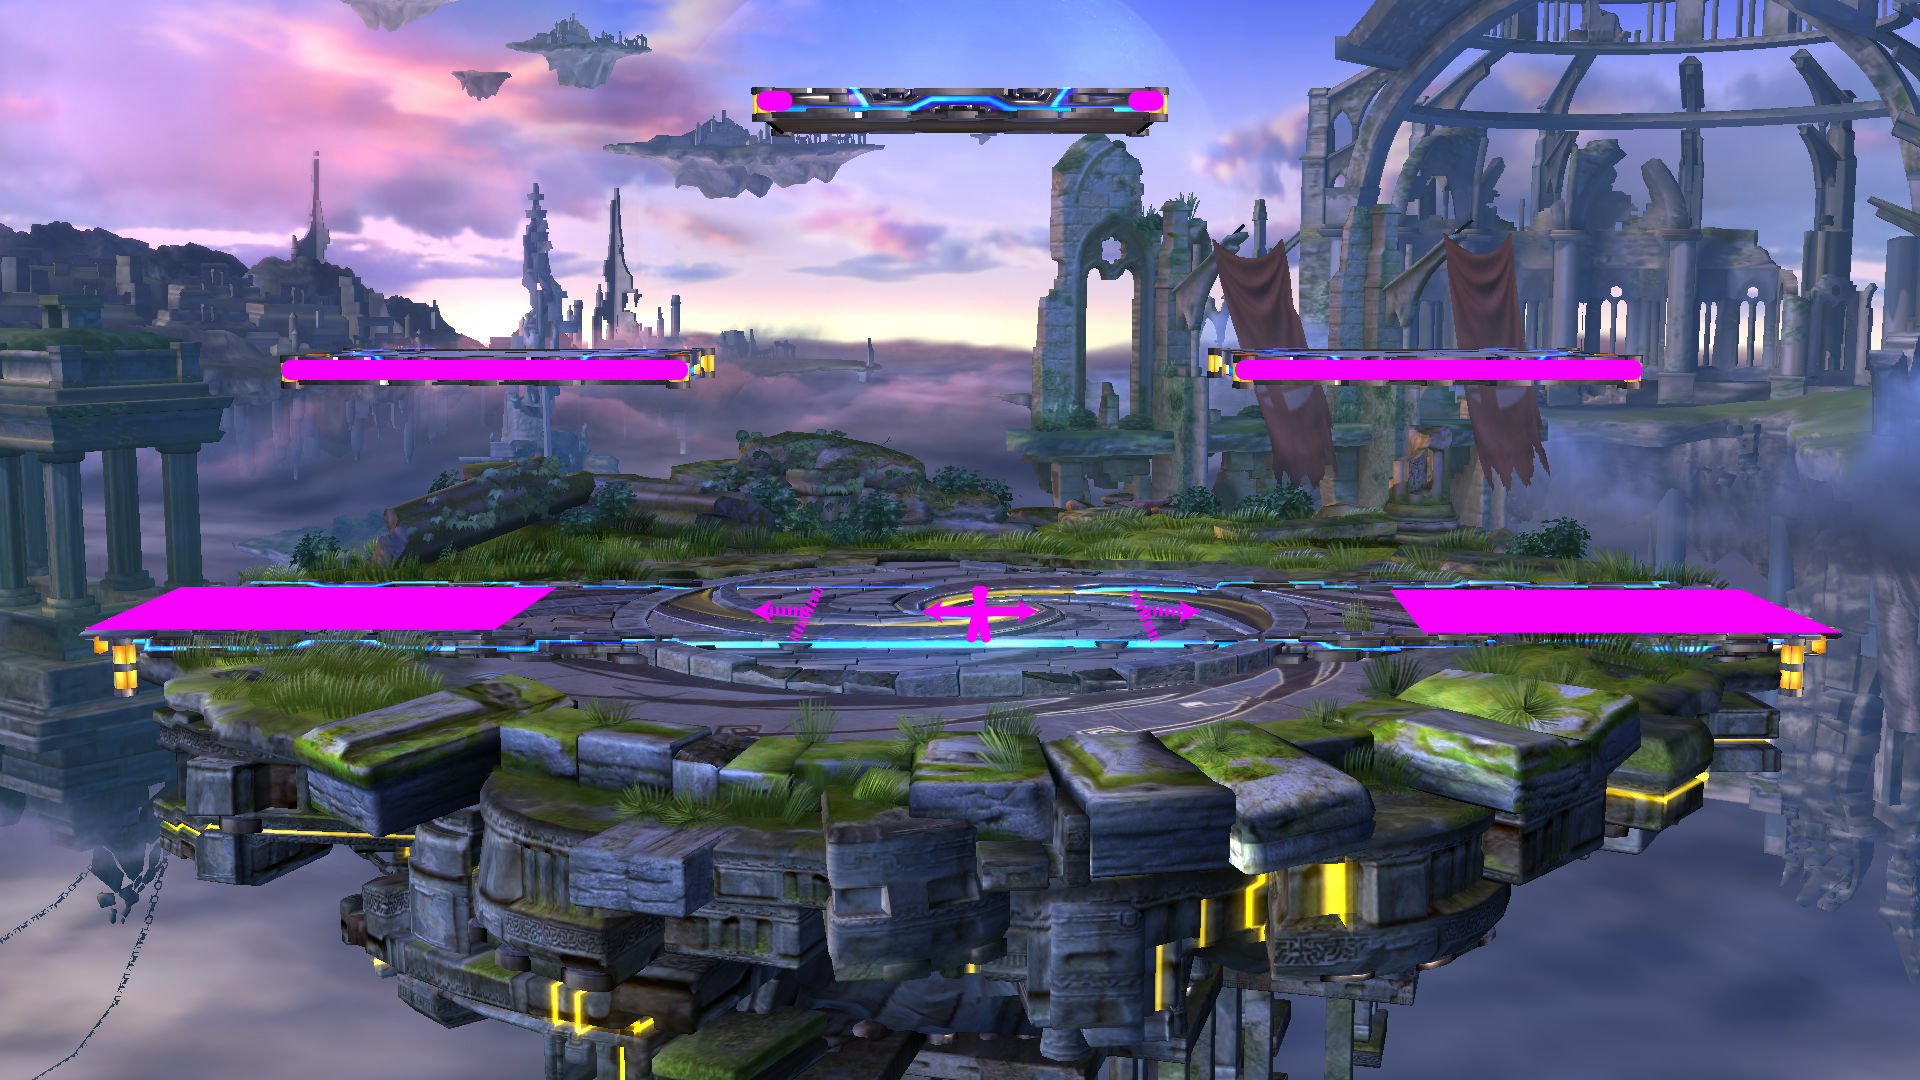
Lylat Cruise:
![]()
*Lylat Cruise is currently a [Counter] in the Apex rule-set.
summary:
As Lylat Cruise teeters back and forth, options are given and options are taken away, and not even your Wizard's Foot Cancel is safe. Depending on where you're standing and when, Ganondorf can choke almost all (or none) of the roster onto the platforms above him (the middle one is taller but the outer ones are useful). It's even possible to DD Punch here, but it's not exactly the safest thing you can do. You counter-pick most stages because you hope you're better there; you counter Lylat because you hope the enemy is worse.
General summary:
Counter:
Ban:
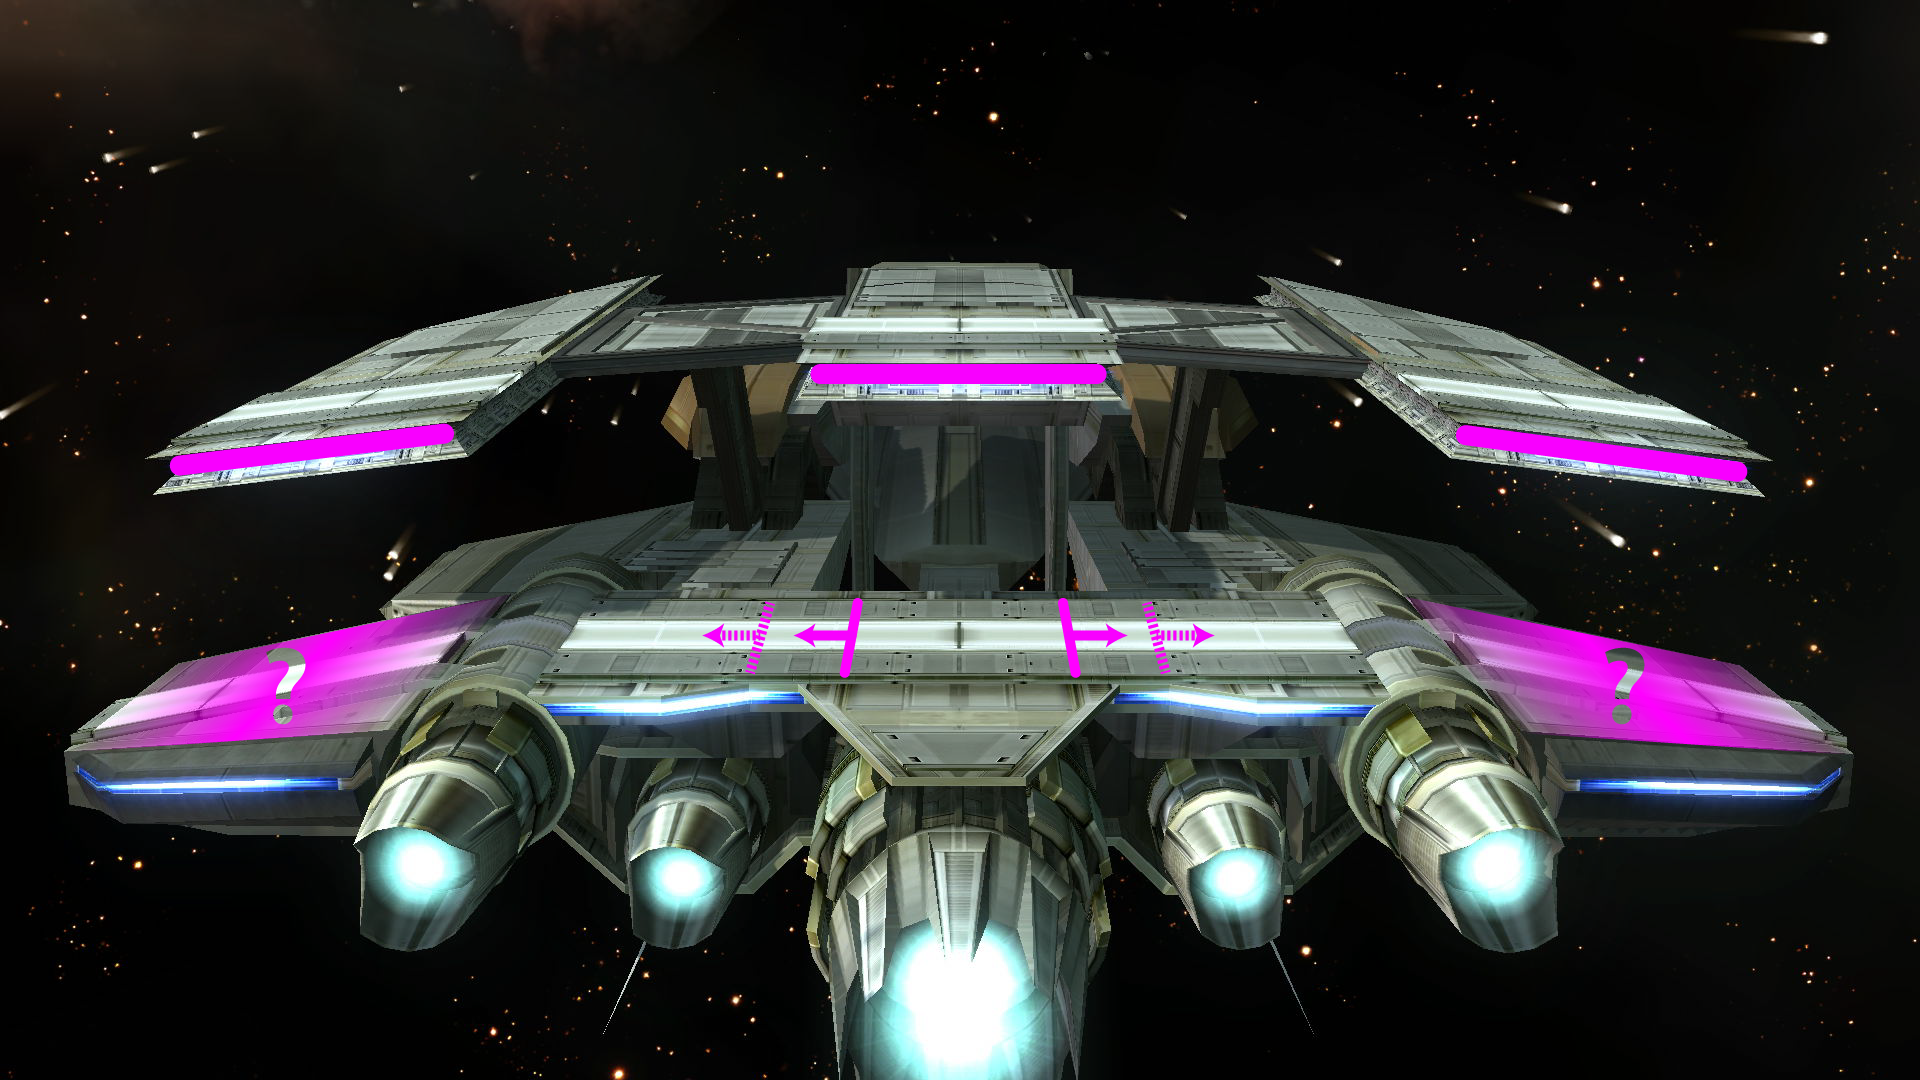
Duck Hunt:
![]()
*Duck Hunt is currently a [Counter] in the Apex rule-set.
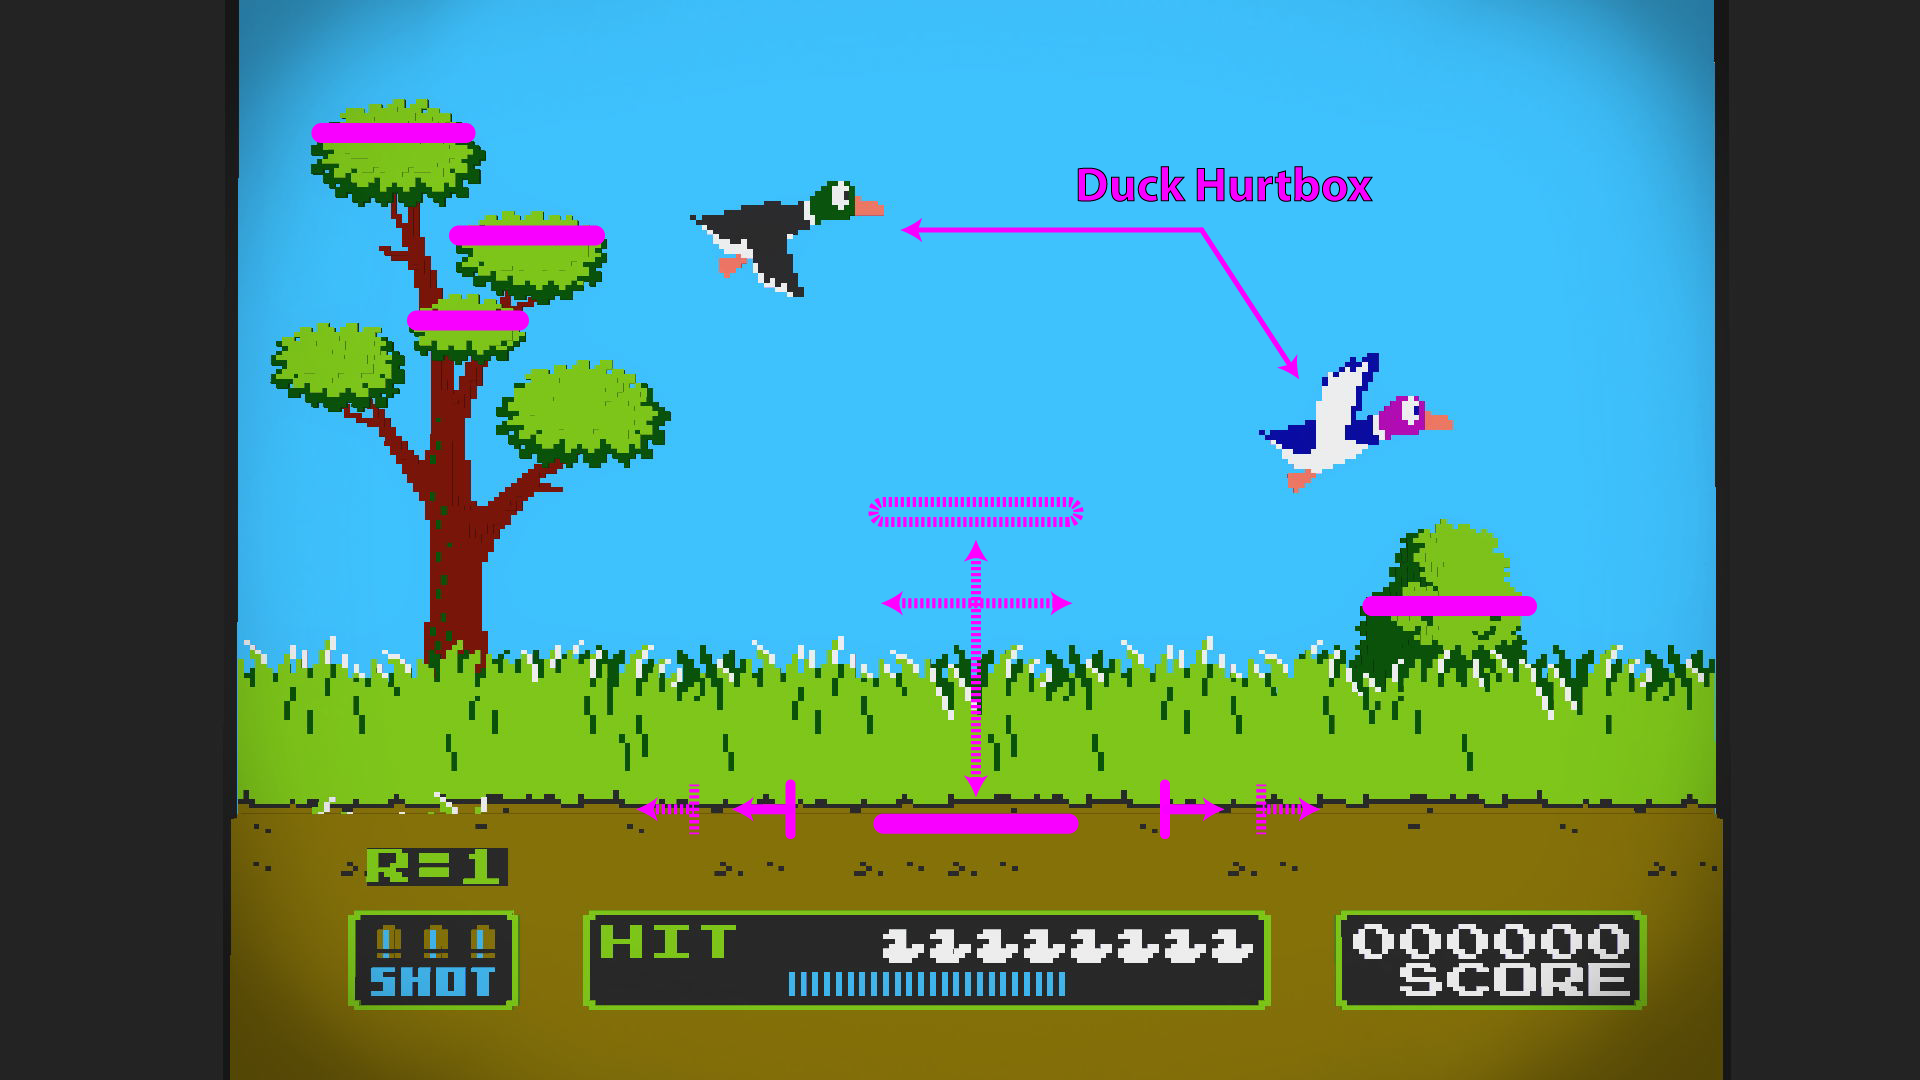
summary:
Duck Hunt is a potentially eye-spraining stage that is equally quirky in its layout. The platform on the right is so high that only 3 characters can be Flame Choked onto it, but it might be worth the consideration just because of how narrow it is. Also worth your consideration is what the enemy can do on the numerous platforms to the left. I would have included Plat-Choke information for them, but you kinda don't belong over there.
Characters that can be choked onto the right platform:
General summary:
Counter:
Ban:
Kongo Jungle 64:
Town and City:
Halberd:
Castle Siege:
Delfino Plaza:
Skyloft:
**Custom Fighters: Off
0. Introduction
1. Technique Details
2. Stage Summaries
0. Introduction
This is a thread for information pertaining to Ganondorf-specific stage options. I have compiled everything here myself with an emphasis on tournament standard and stage-specific technique. If it doesn't involve stage-tech or isn't 100% consistent, then it probably won't be mentioned here. Ganondorf has a respectable amount of tricks up his sleeve fresh out of the gate, and so this thread will be dedicated to simply holding that knowledge.
Edit: This thread will now include general stage summaries and my opinions as well.
Edit Edit: This thread will now link to or copy/paste other people's opinions on request.
C-C-C-Edit: I'm going to put a change-log here now so you can know about future edits!
Change-log:
1/14/15 - 0.5 - Made change-log. Technique list is tentatively complete. Ganon-specific information and pictures mostly complete for every legal stage except for Delfino. No general summaries, no counters/bans except for Town and City.
1. Technique Details
Wizard's Foot Cancelling:
When you start a grounded Wizard's Foot from the correct position, the ending gets canceled over the ledge and you are able to act out of it immediately. A surefire way to set it up on any stage is to roll away from the ledge twice after having rolled onto it as far as possible. This technique greatly enhances Ganondorf's mobility, especially when chasing after an enemy who is soon to recover. You can also bait an aerial or a Flame Choke on faster characters who would immediately chase after you from behind. [Cancel locations will be indicated by solid lines with solid arrows in the Stage Summaries section.]

If you are going to collide with somebody during your Wizard's Foot, then you will have to start it closer to the ledge in order to cancel it. Cancelling a Wizard's Foot while taking the enemy off-stage can be a really good set-up for kills at any percent, and if you're just going to get shielded anyway, then at least you'll have a better chance of not being punished. [Cancel locations will be indicated by dashed lines with dashed arrows in the Stage Summaries section.]
When Ganondorf does his grounded Wizard's Foot into a wall, it sends him flying into the air like a big, glorious idiot. This useless "technique" has one of the longest animations ever, so there is virtually no competitive scenario where you would ever want to do this. Or is there? Just be mindful when you're facing a wall.

Another unfortunately pointless technique. You can cancel Ganondorf's platform drop by immediately inputting a Wizard's Foot, but the rainbow of awesome that comes out is a bust without a hitbox. (Credits to @A2ZOMG for being my source.)

On some stages, you can shark people with Dark Dive like really hard. There is a risk-reward factor as you try to "DD-Punch" further and further into certain stages, as you may end up gimping yourself. Also note that your punch can be shielded, and it's wholly possible that a shielded punch might cause your untimely demise. It is best to only attempt this move during your initial recoveries, when you still have some ledge-invincibility waiting for you, but if you think your enemy is going to hang back from the ledge for whatever reason, then you can give them the middle finger with this. [DD-Punch locations where you can shark and still recover will be indicated by solid square areas in the Stage Summaries section.]
Holding Down will prevent Ganon from grabbing the ledge during his Dark Dive. This can be used to catch people that think it's okay to just teeter over you. You can punch them or grab them depending on your spacing; just remember to stop holding Down so you don't kill yourself. (Credits to @Apple Jelly for being my source.)

This works on any ledge that you can grab, and it makes for a faster Ganondorf. To understand this tech, stand next to a ledge and perform a smooth, short hopped Forward Air off of the ledge so that Ganondorf will brush against the ledge and continue to fall: He doesn't grab the ledge on the way down. Try that same move again while immediately adding a Flame Choke toward the ledge, and that Flame Choke will snap you to the ledge with no animation and no lag. You can cancel all five of Ganondorf's aerials and his air dodge in this manner, and you can also use it in other situations where you might otherwise just keep falling. (Credits to @Ray_Kalm for being my source.)
Ganondorf's grounded Flame Choke will consistently put certain characters onto certain platforms instead of the ground below, and not knowing about this could botch an otherwise guaranteed follow-up. Utilizing this knowledge, however, Ganondorf is able to put his enemies in even worse positions while increasing his own options dramatically. ["Plat-Choke" platforms will be indicated by solid lines in the Stage Summaries section.]
The downward momentum from Ganondorf's Aerial Flame Choke can slide him partway down a slope. If there is a ledge at the end of your momentum, then both characters will typically land near it, but on certain ledges, you can drop your enemy off of the ledge while Ganondorf himself stays on it. When this does work, your enemy is able to act fairly quickly out of it, but only if it doesn't take them by surprise. This is a very circumstantial option that could potentially lead to a good gimp.
When you spike somebody from their standing position (assuming no tech), they will generally bounce straight up, but if you spike them from the air (assuming no tech), then they will bounce according to the slant of the ground below them. It's extremely rare, but there will be situations where this can be the earliest kill option.
2. Stage Summaries
Here you will find helpful summaries with pictures that illustrate key stage-related techniques. Everything is an extremely close approximation, so let me know if you find anything contrary to what I've put here. Summaries will be broken up into counters and bans, Ganon-specific information, and general information.
Final Destination:
*Final Destination is currently [Neutral] in the Apex rule-set.
Counter:
Ban:
summary:While it's definitely a great place to take certain characters, Final Destination just doesn't have much going on for Ganondorf. If you can manage the Gentleman's Clause, there are better choices to be found amongst the multitude of Ω stages.
General summary:
It's time to flex your neutral game! This is typically going to be an undesirable stage for Ganondorf, because he has terrible horizontal speed and can't do much about projectiles, but this is also the perfect place to overpower somebody with raw, neutral game talent. Ganon likes platforms, but sometimes the enemy just likes them more, so when you need to get all of the distractions out of the way, just come here. When you get knocked into the air, don't forget to come down near the ledges; falling toward the main part of the stage severely limits your options when people are below you.
*Ω Battlefield is currently a [Counter] in the Apex rule-set.
Counter:
Ban:
summary:Ω Battlefield, like regular Battlefield, is one of the few stages where Ganondorf can shark with Dark Dive, and the range is ridiculous, but it's also easier to gimp yourself on the deeper attempts, since the edges of the stage have been stretched out a bit. The stage itself is wider than regular Battlefield, so you also have to take that into account when you are planning to do a Wizard's Kick. This is an excellent choice for an Ω stage, but perhaps not the best, because it will mess with your ability to master regular Battlefield, and that stage is going to be one of your most frequented.
General summary:
See: Final Desintation
*Ω Norfair is currently a [Counter] in the Apex rule-set.
Counter:
Ban:
summary:The difference between most Ω stages is minimal, but Ω Norfair is actually set up to be the perfect pick for Ganondorf. Where most people just see another Final Destination, Ganondorf sees Wizard's Foot Cancelling made easy, and Ω Norfair is one of the only stages that allows you to DD-Punch the hell out of both sides of it. Come for the fiery inferno; stay for the sick music.
General summary:
See: Final Destination
*Battlefield is currently [Neutral] in the Apex rule-set.
Counter:
Ban:
summary:Battlefield is a robust neutral that affords Ganon all of his best techniques. The range on Dark Dive's punch is sure to amaze those who have never seen it before, and a whopping 18 characters can be Flame Choked onto the lower platforms (which are low enough to be short hopped onto). You can also Flame Choke most of the roster from the bottom platforms to the top, but you probably shouldn't kid yourself like that. Stage-specific techniques are just the beginning for Ganondorf, so take this neutral and align it with the dark side.
Characters that can be choked onto the lower platforms:
Characters that can be choked onto the higher platform:
General summary:
This is most likely going to be your best neutral because of the platforms and the myriad of techniques you can pull off. Choke people onto the platforms, Up Smash people from under them; you can even Forward Smash a Rosalina who is standing under you from on top of the platforms! If a character has a projectile that controls your approach, then approach from the platforms for safety, but don't be a slouch with your shield. Unless a character is crossing you up to land for a grab, be ready to count jumps and shield every last aerial until it's absolutely safe to move. Don't throw out bad spikes just because you're above someone, either. Battlefield is all about waiting til the last moment to commit to a landing option, so keep them guessing and keep your attacks spaced safely in the meantime.
Additional summaries:
@
*Smashville is currently [Neutral] in the Apex rule-set.
Counter:
Ban:
summary:The lone, moving platform of Smashville can offer an enormous boon to whoever is ready to exert their control over it, but there is nothing special about it for Ganondorf: You can't even full hop onto it. This can still be a wonderful stage to take people to, but you won't be doing anything particularly unique here.
General summary:
This is a good neutral to take people to when you need a platform for mobility. Double jump onto the platform from a safe distance and prepare to protect yourself as the platform carries you to your destination. Instead of dropping down on people though, you will often be looking to get people into the air after you. Remember that you run "faster" while you're on the platform, so don't just stand still on it unless the enemy is far away. If you have a hard time using the platform from above, that's because it's best used from below. Get people onto it and make them afraid to come down. Your pokes will become safer as the platform carries them out of punish distance. You can Up Smash people from under the platform as well. The platform becomes a different monster entirely when it's over the ledge, though. Drop down from it for dangerous (or safe) gimps and pressure, but try not to land on it unless it's the only option, because you're probably getting knocked right back off.
*Lylat Cruise is currently a [Counter] in the Apex rule-set.
summary:As Lylat Cruise teeters back and forth, options are given and options are taken away, and not even your Wizard's Foot Cancel is safe. Depending on where you're standing and when, Ganondorf can choke almost all (or none) of the roster onto the platforms above him (the middle one is taller but the outer ones are useful). It's even possible to DD Punch here, but it's not exactly the safest thing you can do. You counter-pick most stages because you hope you're better there; you counter Lylat because you hope the enemy is worse.
General summary:
Counter:
Ban:
*Duck Hunt is currently a [Counter] in the Apex rule-set.
summary:Duck Hunt is a potentially eye-spraining stage that is equally quirky in its layout. The platform on the right is so high that only 3 characters can be Flame Choked onto it, but it might be worth the consideration just because of how narrow it is. Also worth your consideration is what the enemy can do on the numerous platforms to the left. I would have included Plat-Choke information for them, but you kinda don't belong over there.
Characters that can be choked onto the right platform:
General summary:
Counter:
Ban:
*Kongo Jungle 64 is currently a [Doubles Only Counter] in the Apex Rule-set.
summary:
Plat-Chokes and fancier Wiz-Foot Cancels are actually possible, but it wouldn't be wise to actually go for them. Instead, pay attention to the recovery barrel, and don't forget that you can tech the blast after you've taken advantage of the invincibility.
General summary:
Counter:
Ban:
summary:Plat-Chokes and fancier Wiz-Foot Cancels are actually possible, but it wouldn't be wise to actually go for them. Instead, pay attention to the recovery barrel, and don't forget that you can tech the blast after you've taken advantage of the invincibility.
General summary:
Counter:
Ban:
Town and City changes consistently between 2 different platform set-ups.
*Town and City is currently a [Counter] in the Apex rule-set.
Counter:
Ban:
Town and City Map 1:
![]()
summary:
There's a decent bit of stuff going on here, but the only thing you can do is choke R.O.B. onto the center platform. It might be cool if you can put him on it as the stage transitions, but even that won't necessarily amount to anything.
Characters that can be choked onto the center platform:
General summary:
Town and City Map 2:
![]()
summary:
You can get some fancy cancels when the platforms come together, but this is another one of those things that you probably shouldn't ever go out of your way for.
General summary:
*Town and City is currently a [Counter] in the Apex rule-set.
Counter:
Ban:
Town and City Map 1:
 summary:
There's a decent bit of stuff going on here, but the only thing you can do is choke R.O.B. onto the center platform. It might be cool if you can put him on it as the stage transitions, but even that won't necessarily amount to anything.
Characters that can be choked onto the center platform:
General summary:
Town and City Map 2:
 summary:
You can get some fancy cancels when the platforms come together, but this is another one of those things that you probably shouldn't ever go out of your way for.
General summary:
Halberd changes consistently between 2 maps after transitioning from a brief starting map.
*Halberd is currently a [Counter] in the Apex rule-set.
Counter:
Ban:
Halberd Map 1:
![]()
summary:
WARNING: There is absolutely nothing for you here!
General summary:
Halberd Map 2:
![]()
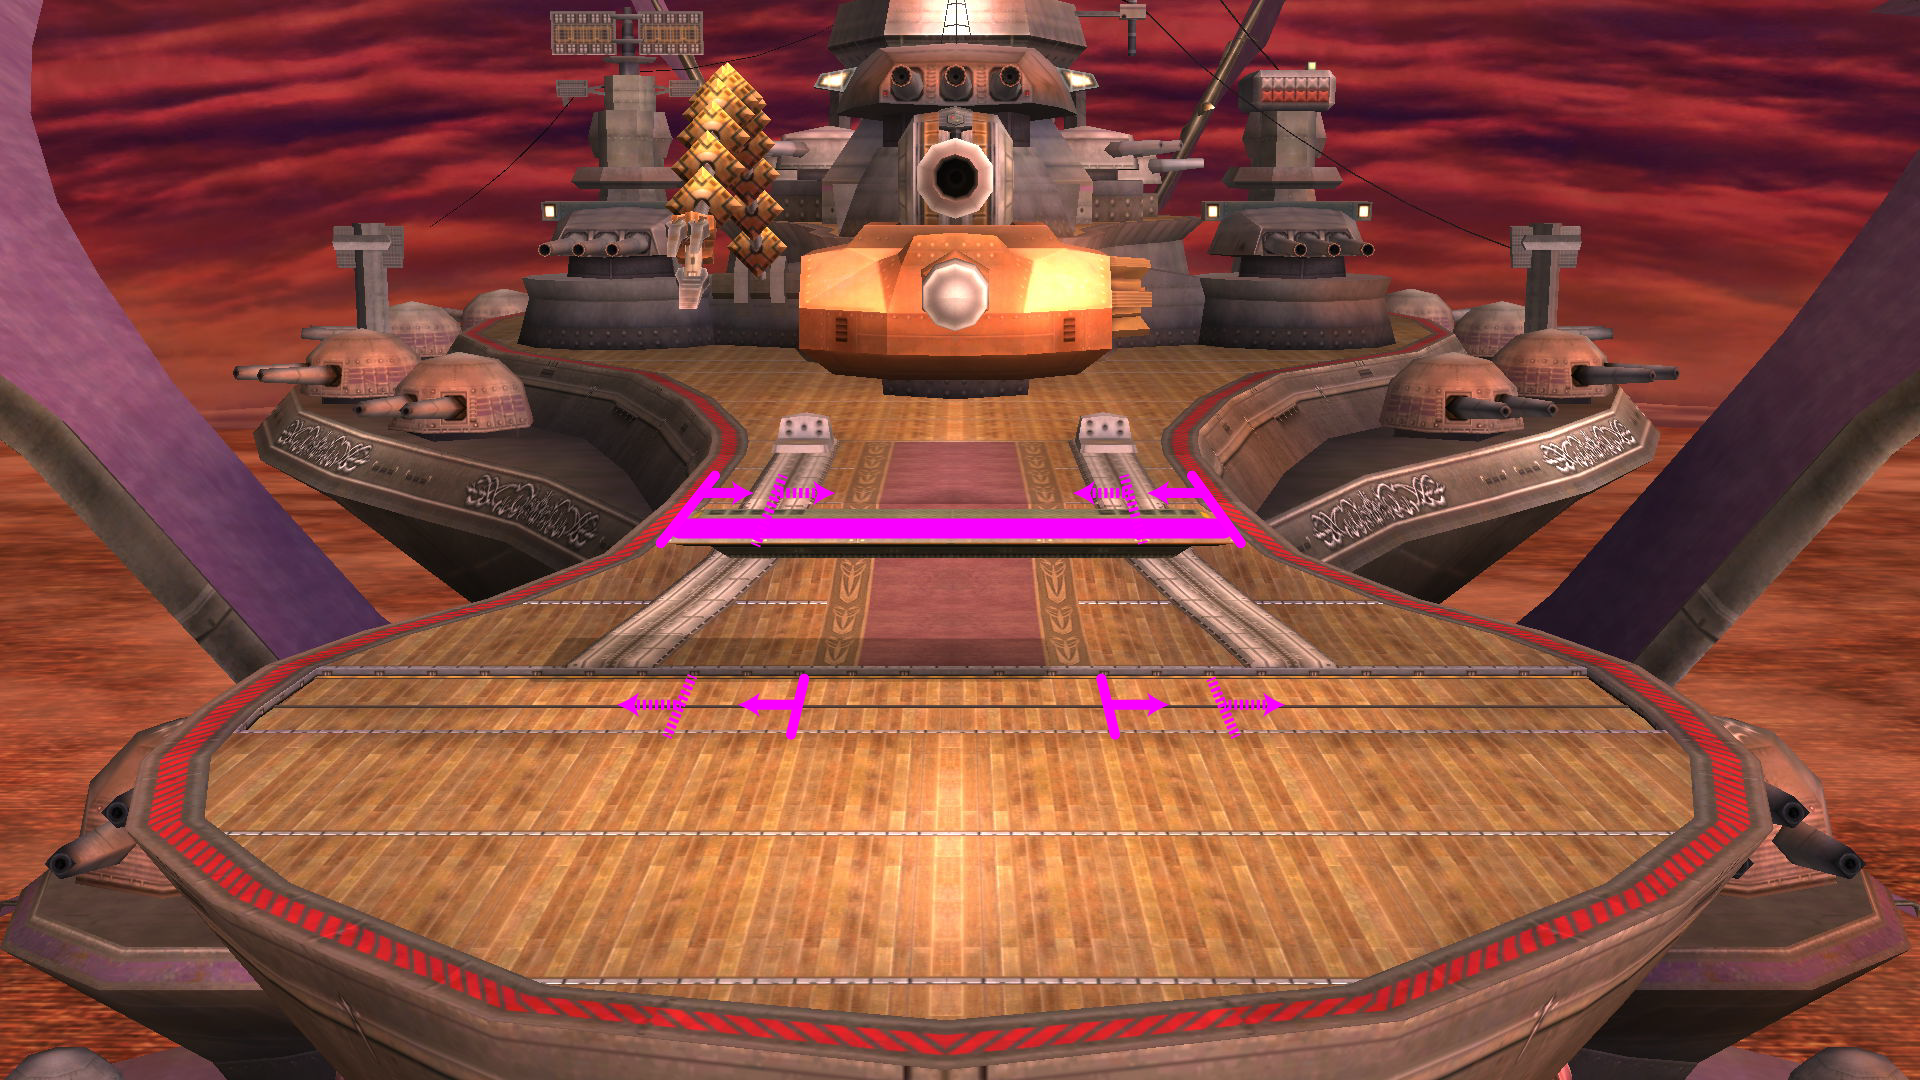
summary:
Once again, R.O.B. is the only character who can always be choked onto the platform, but you can put a lot of other characters onto it depending on where you Flame Choke them. This is a really nice platform that affords you some easy cancels in the heat of battle, and the cancels come just as easy on the ground as well.
Characters that can be choked onto the platform:
General summary:
Halberd Map 3:
![]()
summary:
The platform is the same as before, but it's now much lower to the ground (you can even full hop onto it). There are too many planks on the ground for you to see where to do your Wizard's Foot, so you should look for the notches in the side of the indented area instead. Feel free to Warlock Punch the claw if you're feeling stylish, but don't try that with the cannon or the laser.
Characters that can be choked onto the platform:
General summary:
*Halberd is currently a [Counter] in the Apex rule-set.
Counter:
Ban:
Halberd Map 1:
 summary:
WARNING: There is absolutely nothing for you here!
General summary:
Halberd Map 2:
 summary:
Once again, R.O.B. is the only character who can always be choked onto the platform, but you can put a lot of other characters onto it depending on where you Flame Choke them. This is a really nice platform that affords you some easy cancels in the heat of battle, and the cancels come just as easy on the ground as well.
Characters that can be choked onto the platform:
General summary:
Halberd Map 3:
 summary:
The platform is the same as before, but it's now much lower to the ground (you can even full hop onto it). There are too many planks on the ground for you to see where to do your Wizard's Foot, so you should look for the notches in the side of the indented area instead. Feel free to Warlock Punch the claw if you're feeling stylish, but don't try that with the cannon or the laser.
Characters that can be choked onto the platform:
General summary:
Castle Siege changes consistently between 3 maps.
*Castle Siege is currently a [Counter] in the Apex rule-set.
Counter:
Ban:
Castle Siege Map 1:
![]()
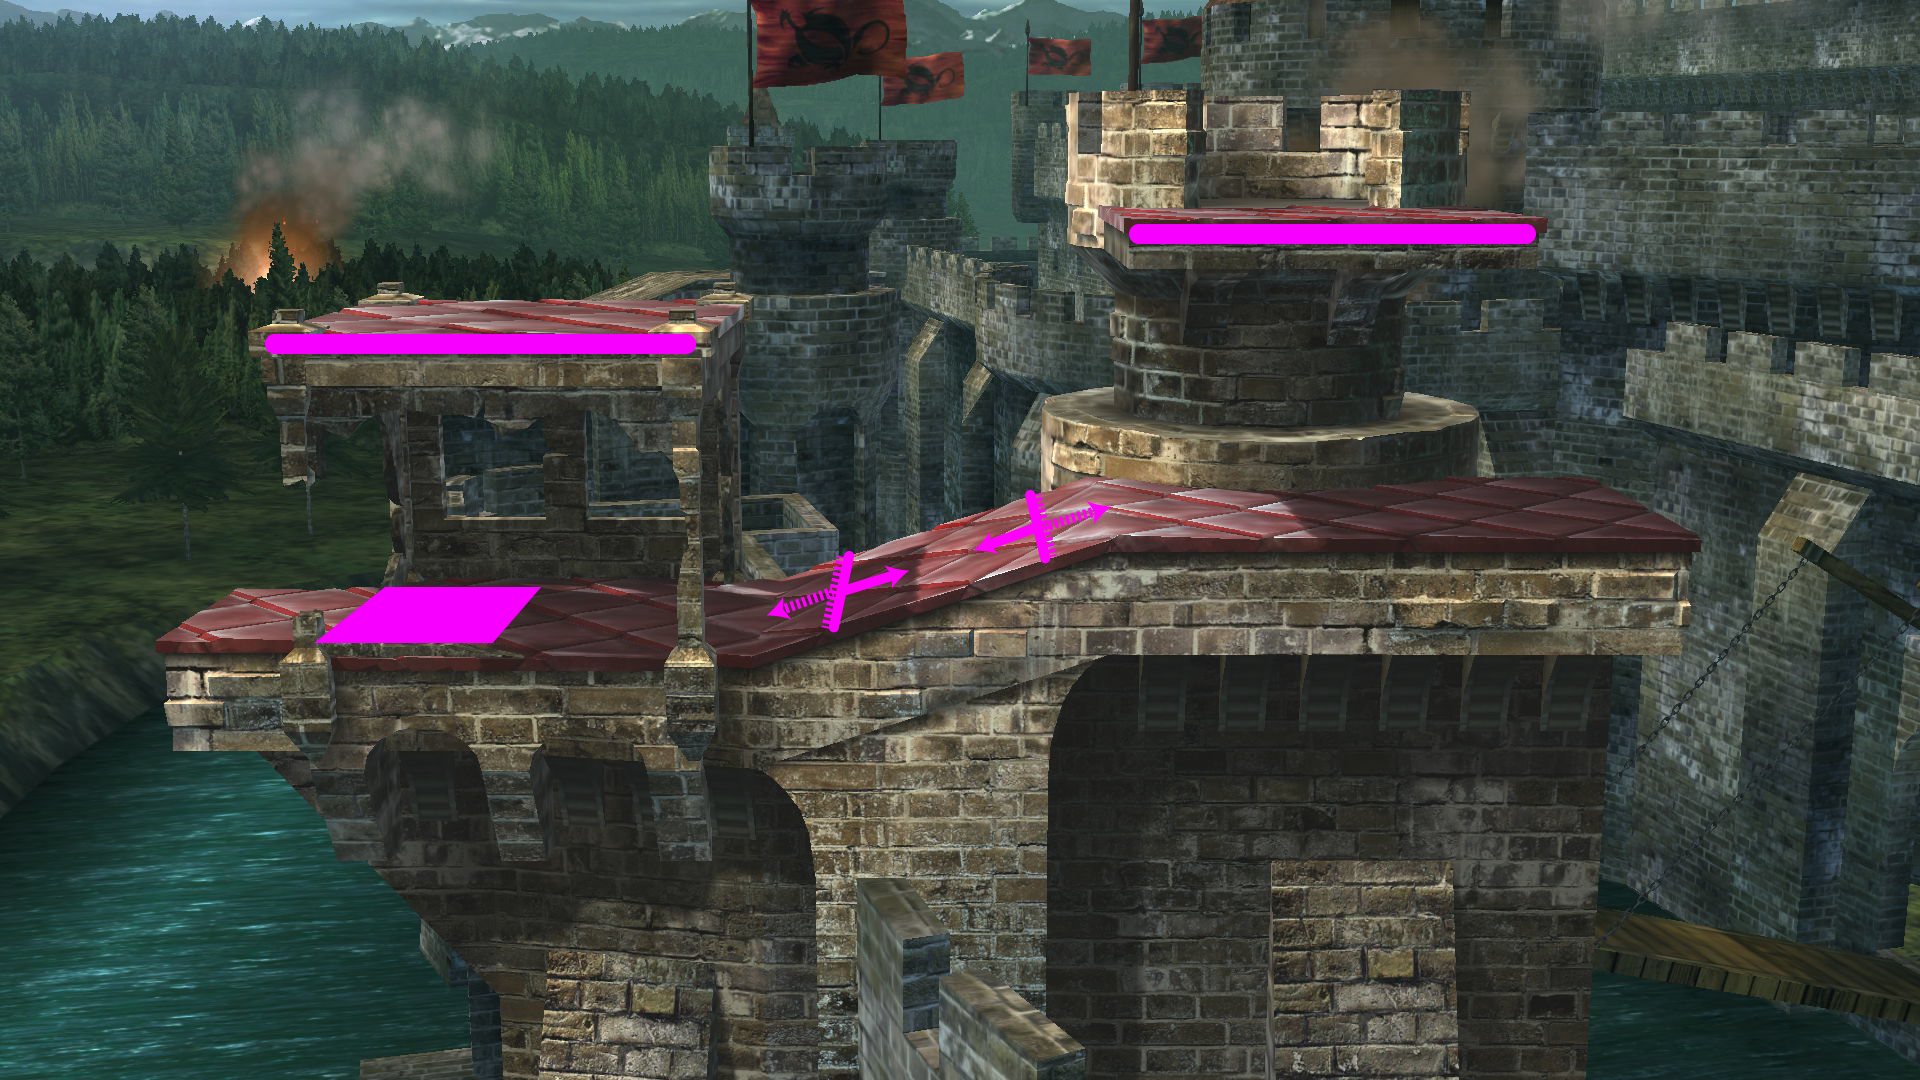
summary:
There are no more lips on either side of this Brawl classic, meaning Ganondorf can now recover into the sides of the stage without risking a self-destruct. Dark Dive can hit characters on the left side of the stage, but the range is smaller and it's somewhat harder to pull off. Each Wiz-Foot mark also serves as the Wiz-Foot (Collided) mark for the opposing ledge. Five characters can be Flame Choked onto the left platform, but the right platform is actually slightly closer to the ground, allowing two more characters (Diddy Kong and Meta Knight) to be choked onto it as well. Let's go!
Characters that can be choked onto the left platform:
Characters that can be choked onto the right platform:
General summary:
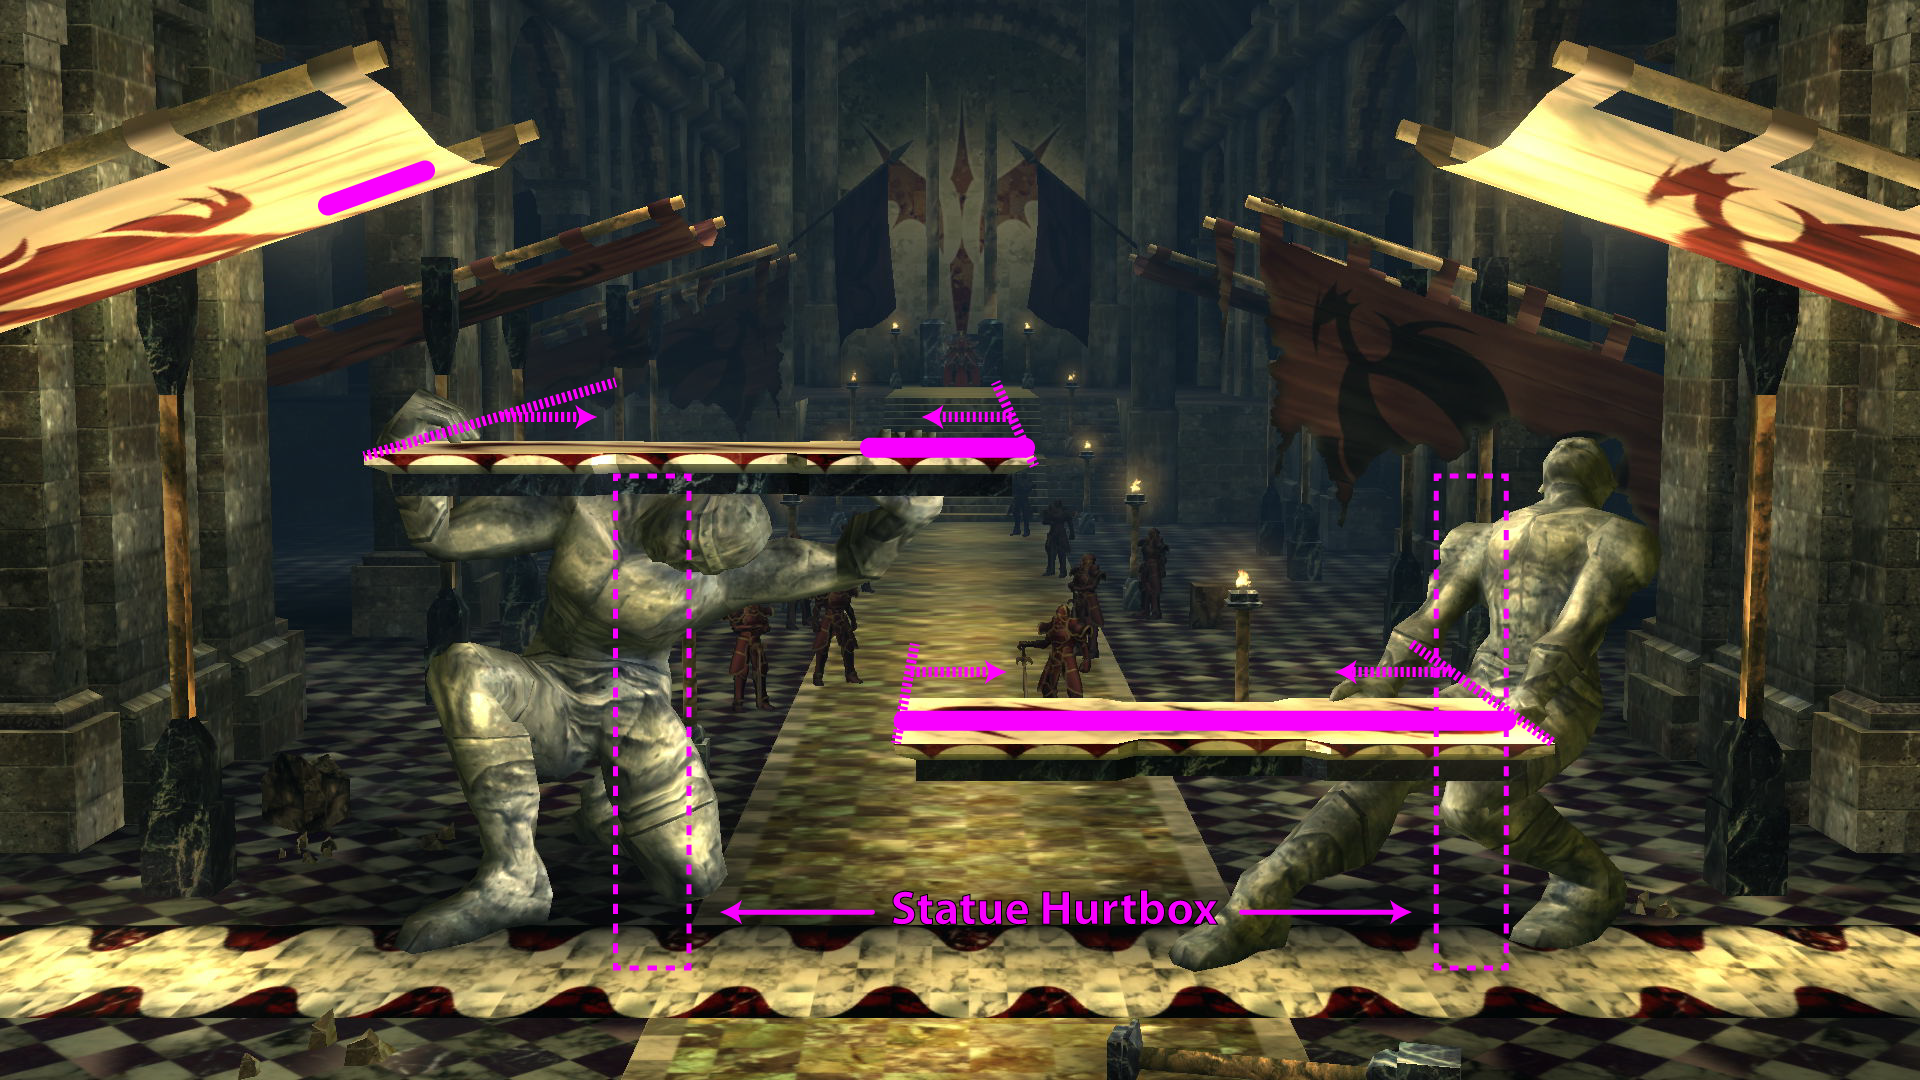
Castle Siege Map 2:
![]()
summary:
All of these platforms are different heights from one another, and you are unlikely to utilize any but the bottom one (you can full hop onto it, too), but you can put people onto any one of them nonetheless (the highest platform takes the most, but don't bother). You can cancel your Wiz-Kicks on the main platforms if you hit something first, and the statue on the right actually counts as that "something" too. The high, diagonal platforms would have Wiz-Foot markers if I could have zoomed out more, but only so you can get the hell out of there even faster.
Characters that can be choked onto the lower platform:
Characters that can be choked onto the higher platform:
General summary:
Castle Siege Map 3:
![]()
summary:
Well, it's a teetering Final Destination with bad markings. At least it matches Ganondorf's aesthetics?
General summary:
*Castle Siege is currently a [Counter] in the Apex rule-set.
Counter:
Ban:
Castle Siege Map 1:
 summary:
There are no more lips on either side of this Brawl classic, meaning Ganondorf can now recover into the sides of the stage without risking a self-destruct. Dark Dive can hit characters on the left side of the stage, but the range is smaller and it's somewhat harder to pull off. Each Wiz-Foot mark also serves as the Wiz-Foot (Collided) mark for the opposing ledge. Five characters can be Flame Choked onto the left platform, but the right platform is actually slightly closer to the ground, allowing two more characters (Diddy Kong and Meta Knight) to be choked onto it as well. Let's go!
Characters that can be choked onto the left platform:
Characters that can be choked onto the right platform:
General summary:
Castle Siege Map 2:
 summary:
All of these platforms are different heights from one another, and you are unlikely to utilize any but the bottom one (you can full hop onto it, too), but you can put people onto any one of them nonetheless (the highest platform takes the most, but don't bother). You can cancel your Wiz-Kicks on the main platforms if you hit something first, and the statue on the right actually counts as that "something" too. The high, diagonal platforms would have Wiz-Foot markers if I could have zoomed out more, but only so you can get the hell out of there even faster.
Characters that can be choked onto the lower platform:
Characters that can be choked onto the higher platform:
General summary:
Castle Siege Map 3:
 summary:
Well, it's a teetering Final Destination with bad markings. At least it matches Ganondorf's aesthetics?
General summary:
Delfino Plaza changes variably between 4 platform-based maps and 9 other maps.
*Delfino Plaza is currently a [Counter] in the Apex rule-set.
Counter:
Ban:
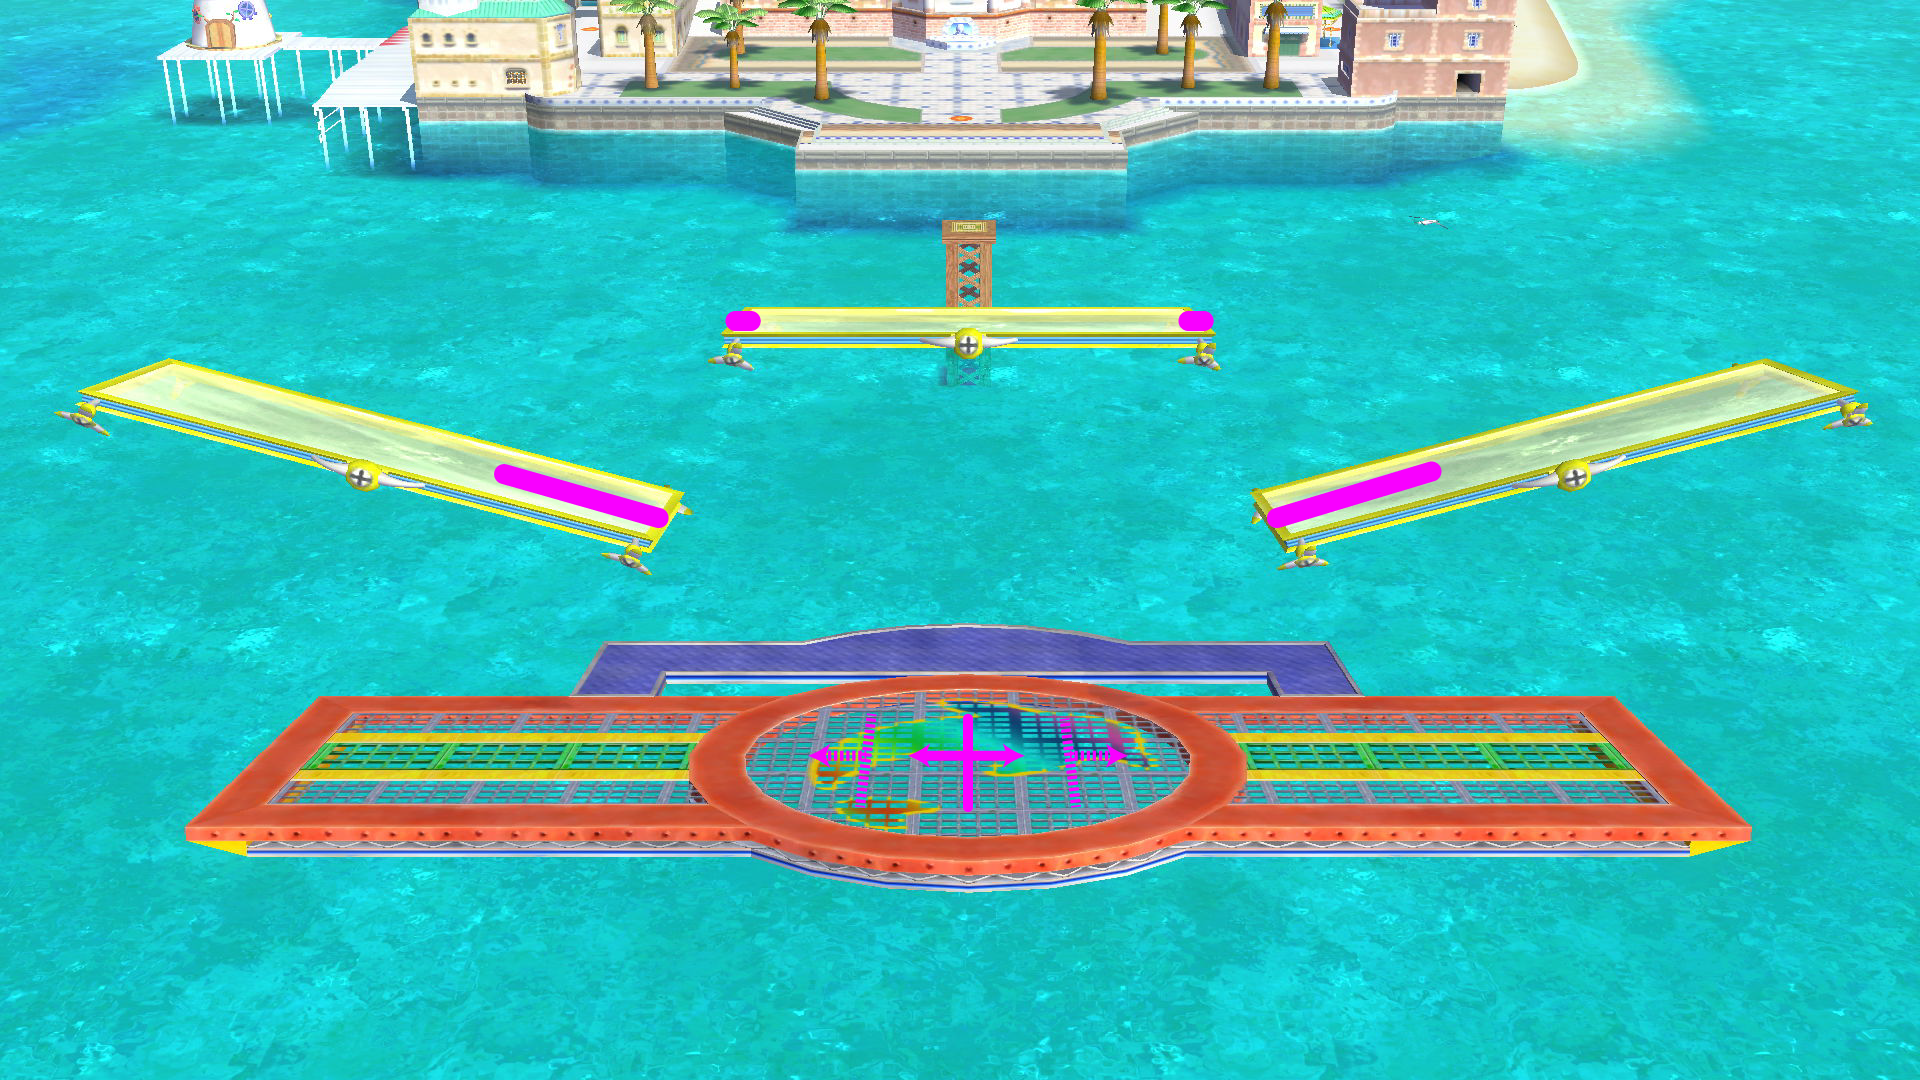
Delfino Plaza Map 1:
![]()
summary:
The main thing to know about all of the platform variations is that they all share the same base platform, so your ability to cancel Wizard's Foot from this area will remain consistent. This map, which always appears first, has two platforms that you can choke characters onto, and the top platform is wide enough for you to cancel your Wiz-Kicks, too. You can also double jump from the ground to the ends of the top platform.
Characters that can be choked onto the lower platform:
Characters that can be choked onto the higher platform:
General summary:
Delfino Plaza Map 2:
![]()
summary:
General summary:
Delfino Plaza Map 3:
![]()
summary:
Characters that can be choked onto the left platform:
General summary:
Delfino Plaza Map 4:
![]()
summary:
General summary:
Delfino Plaza Map 5:
summary:
General summary:
Delfino Plaza Map 6:
summary:
General summary:
Delfino Plaza Map 7:
summary:
General summary:
Delfino Plaza Map 8:
summary:
General summary:
Delfino Plaza Map 9:
summary:
General summary:
Delfino Plaza Map 10:
summary:
General summary:
Delfino Plaza Map 11:
summary:
General summary:
Delfino Plaza Map 12:
![]()
summary:
Absolutely nothing to see here.
General summary:
Don't get gimped like a fool.
Delfino Plaza Map 13:
summary:
General summary:
*Delfino Plaza is currently a [Counter] in the Apex rule-set.
Counter:
Ban:
Delfino Plaza Map 1:
 summary:
The main thing to know about all of the platform variations is that they all share the same base platform, so your ability to cancel Wizard's Foot from this area will remain consistent. This map, which always appears first, has two platforms that you can choke characters onto, and the top platform is wide enough for you to cancel your Wiz-Kicks, too. You can also double jump from the ground to the ends of the top platform.
Characters that can be choked onto the lower platform:
Characters that can be choked onto the higher platform:
General summary:
Delfino Plaza Map 2:
 summary:
General summary:
Delfino Plaza Map 3:
 summary:
Characters that can be choked onto the left platform:
General summary:
Delfino Plaza Map 4:
 summary:
General summary:
Delfino Plaza Map 5:
summary:General summary:
Delfino Plaza Map 6:
summary:General summary:
Delfino Plaza Map 7:
summary:General summary:
Delfino Plaza Map 8:
summary:General summary:
Delfino Plaza Map 9:
summary:General summary:
Delfino Plaza Map 10:
summary:General summary:
Delfino Plaza Map 11:
summary:General summary:
Delfino Plaza Map 12:
 summary:
Absolutely nothing to see here.
General summary:
Don't get gimped like a fool.
Delfino Plaza Map 13:
summary:General summary:
Skyloft changes variably between X platform-based maps and X other maps.
*Skyloft is currently [Banned] in the Apex rule-set.
*Skyloft is currently [Banned] in the Apex rule-set.
Last edited: