
6Mizu
Smash Champion
I decided to make this since the all of the old versions were inactive and no one was taking time to update them. I promise I'll update and help keep this active, as long others help me. ")
This is the older one that no one updated or kept up w/ http://www.smashboards.com/showthread.php?t=235461
We'll be doing all of the one that haven't been done by the old one above.
First we'll discuss something simple........
Overall this stage is a great neutral for Snake.
-Tilting of stage is perfect for grenades.
-Tilting of stage at certain parts = messing w/ Peach's Float, Falco's lasers/Phantasm, plankers. -This maybe a small stage but camping is still possible here.
-Vertical Death Boundaries are very close, which means easy Bair, Fthrow, and Ftilt kills.
-Nades can be bouced off of Shy Guys.
-Don't land w/ aerials on the platforms (obvious)
-Nades slide off of the both sides of the stage. (Cook nades let them slide off and use them for Edge Guarding)
-Thunderstroming does not work here (SH D-air laglessly), such as Ganon or Pikachu.
-With the use of D-smash, C4, and Nades the long platform in the middle is a sort of "barrier".
-U-air, B-air, N-air and U-tilt are great for Platform Pressuring.
-Long platform allows for easier approach (for Snake), if ever need. Such as against Mario.
-Try not to stay on the long platform for very long, this lead to juggeling etc.
-Stay grounded.
-Hard toss most Nades that are thrown out , otherwise they'll end up getting stuck on the platform.
-On this stage like most other small stage, such as SV or BF, cooking your nades will help you camp, and avoid CQC. (not that Snake's bad @ CQC or anything)
-At high percents do not tech the walls. (It'll help Snake recover).
C4/Mine placement:
-Place Mines or C4 towards the tips of the platforms.
-Place Mines/C4s on the portion of the stage that slightly tilts inward. This will help w/ Edguarding and aid in stopping appraoches.
-Also, for edge guarding place Mine/C4s on the very tips of the stage , which points outward.
Everyone not listed under character lists (to take/not to take lists) are undecided.
Character to take here:
-Falco
-R.O.B.
-Bowser
-Ganon
-Lucas
-GW
Characters not to take here:
-Olimar
-Lucario
-Link (harder to gimp here)
-Marth
-Kirby
-MK
-DK
Overall Ratio: 7/10
Summary for 1st portion:
1st part of the stage is small, you can get really early kills here.
1st phase: The lips can ruin a lot of recoveries, use that to your advantage against those chars. C4 is fairly difficult to see, as nades can be. The slant lets nades drop down, so you can be tricky with that. fairly low ceiling allows for early utilt KOs if you can rack up damage fast enough or if you get back to the phase with opponent at high %. The slant allows you to dodge some projectiles easier.
1st part : It's good for Snake although it's too small but it's
good for grenades. You can let the grenade slide to the slant
part. You can put C4 (Down launch) on top of a platform.
It's a great advantage against big targets and characters
like Donkey Kong, Ganondorf, Bowser. Snake's up tilt
is also good for this. When an enemy is on top of the
top of the platform, use the up tilt. But Snake can be knocked off
the stage easily because it's small. (Despite him being heavy
but at some percent maybe 50% or above.) Avoid using
Snake's recovery in this part.
Summary for 2nd portion:
2nd part of the stage, if you can grab them near the edges, dthrow tech chasing is really easy. They'll almost always roll away from the walk-off. Camping here is somewhat more difficult though, as the statues stop your grenades.
2nd phase: Great part to be sneaky with C4. Plant it while your opponent is distracted OR in between the transition and let it fall and figure out where it is to bait your opponent into it. The pillar things are good and bad depending on the matchup. It helps against Diddy to stop bananas, but stops your camping game too. If you're playing DDD or low % vs Falco, don't be stupid and stay off the ground floor or free stock for opponent. The ceiling from the ground is REALLY high so don't waste an attempted utilt KO that you aren't sure will KO unless on a platform. As said, tech chasing is easier on this phase if you're on the ground. As said, most opponents will roll away from the blast zone when grabbed near there for fear of easy ftilt KO. If not they may just get up attack, so be prepared and punish. Your opponent may try to KO you in a similar way here too, so be careful when close to the blast zone. Don't get out smarted. Definitely the most gimmicky phase.
Summary for 3rd portion:
3rd part of the stage is a lot like FD. Just play like you would on FD, and watch the stage's tilt when recovering.
3rd part: This is a good place for Snake too. Grenade stripping
here is the best thing to do. It will roll though the
ground (Best if cooked). Put C4s here is great especially
at the time when the stage is slanting. The
best place to put it is that the tip of the stage.
Use grenade stripping to make it explode but it's
useless against people with controlled
projectiles or stuff.
Overall: It's a good stage for Snake but don't think
that you will win for sure and you have the upper
hand or something. Your battling someone who's
better than you, you're dead or not.
Character to take here:
-MK
-Mario
-Link
-DK(?)
-Ganon
-TL
-Samus
-Zamus
-Lucario
-Marth
-Ike
-Lucas
-Sonic
-Ness
-Jiggs
-Bowser
-Pit
-R.O.B.
Characters not to take here:
-DDD, Diddy, Pikachu, Falco (CG walkoff gayness)
-
Neutral to take here:
-GW
-Luigi
-Peach
-Yoshi
-Wario
-Sheik
-Kirby
-Fox
-Wolf
-Pikachu
-Pokemon Trainer
-Snake (obviously)
Overall Ratio: 8/10
Characters to take here:
Characters not to take here:
K, here's a stage....that's gonna take a while to discuss.


Summary:
-Snake doesn't do to well with the multiple transformations.
-The Dead Tree poration is pratty bad, because of the wall the tree creates (infinite CG, semi-locks, etc.).
-Some of the transformations have semi-locks.
-The Water stage's Windmill is a lot of trouble for Snake; he can easily get juggled there, and easily die there. Stay away from the windmill at death percents.
-Rock stage is pretty bad for Snake; Snake can't really "camp" here....and the other player will not appraoche you if you stand in the middle or the far right.
-The foreat portions is probably the best for snake it has 3 platforms the help snake get kills.
-Snake has trouble w/ character that can easily juggles him, and characters that have good mobilty
-
C4/Mine placement:
-Lip of stage (C4 can hit people).
-Any platform.
Characters to take here:
-Lucas
-ness
-Ike
-Lucario
-PT
-Falcon
-Pit
-ZSS
-Toon link
-ganon
-Zelda/shiek
-Link
-Yoshi
-DK
-bowser
-Luigi
-Mario
Characters not to take here:
-Diddy (?)
-DDD
-Falco
-Wario (?)
-Peach
-MK
-Olimar
-Fox (?)
-Pikachu
-Marth
-G&W
-Sonic
-Kirby
-ICs
Any transform specific Trixies/AT's:
-F-smash will cancel if used during a transformation.
-F-tilt someone against a wall, then follw S.D.I.
-Stick the a wall.
-F or B-throw toward a wall > follow SDI.
Overall Ratio: 6.5/10 (?)
-Amazing for camping.
-No platforms=Stronger ground game needed.
-No platforms also mean a higher possibility of being juggled.
-Snake D.I. Limit is prety high;around 180% to 200% with good D.I./spacing.
-Big "Lip" to **** our recovery or help it if you tech the stage after C4-ing your self.
-DACUS/DA/U-Smash are perfect for this stage!
-Stay away from the edges unless your edge-guarding.
-Control the dead center of the stage.
-and that's it, this stage is pretty straight forward, other things having to do with stage will come with experience.
C4/Mine placement:
Any where
Everyone not listed under character lists (to take/not to take lists) are undecided.
Character to take here:
-*Marth
-*Falco
-Luigi
-Peach
-Bowser
-Donkey Kong
-Diddy
-Yoshi
-*Wario
-Link
-Zelda
-Sheik
-Ganondorf
-*TL
-Sasmus
-ZSS
-ROB
-Kirby
-MK
-Fox
-Wolf
-Cpt. Falcon
-*Pikachu
-Pokemon Trainer
-Lucario
-Jiggz
-Ike
-Ness
-Lucas
-G&w
-Sonic
Characters not to take here:
-*Marth
-*Falco
-Mario (It's pointless, he'll jump over everything and shoot fireballz)
-*Wario
-*TL
-Pit
-IC
-Olimar
-*Pikachu
-King DeDeDe
*-The Astrid means...that this character is on both because....it depends on the player opinion. (Go where ever you feel more comfortable)
Overall Ratio:8.5/10
The Ship:
-Considered the worst portion of RC.
-Difficult to Tech Chase
-Difficult to use Mines/C4, like on normal stages.
-The wall is the last place you want to get caught.
-Most of Snake's normal game play is "weakened" here.
-Small area, which allows Snake to have good stage control.
-DCAUS straight into the wall cause you Mortar to blow up on the wall.
The Accent:
-This portion is also another difficult for Snake there is a lot to adapt to.
-C4s and Mines work great here.
-Stay away from left when going up, it's pretty much a walk off.
-***remember you cannot fall through all platforms.
-Also, learn to adapt to the accent as you fight your opponent, this will come with practice.
The pendulum:
-***Remember you can fall through it.
-It's best to control the Falling Blocks.
Side Scrolling:
-Best portion of the stage for Snake.
-Use mines, U-tilt, and C4 here these moves will kill extremely early here due to the LOW ceiling.
-Adapt to the moving stage
-This is a lot better than the ship, so using all of Snake's moves here will be a lot better.
C4/Mine placement:
The Ship:
-The 2 small platforms.
-Towards the back of the ship.
The Accent:
-Pretty much anywhere.
The Side Scrolling:
-Platforms
Character to take here:
-Diddy Kong
-Mario
-Luigi
-Peach
-Bowser
-DK
-Yoshi
-Link
-Zelda
-Shiek
-Ganon
-TL
-Samus
-Cpt Falcon
-Ike
-Ness
-Lucas
-ICs
Characters not to take here:
-MK
-G&W
-Wario
-DDD
-Kirby
-
Overall Ratio:5.5/10

Summary:
- Learn to tech on reaction, if you don't your gonna get combo'ed HARD. Also, mix it up, tech tech jumps or don't tech on purpose.
- Getting hit by falling blocks = Spiked
- No matter what control the center of the stage.
- Small vertical death zones = killing earlier, and dieing earlier.
- Lower ceiling = Killing earlier.
- Use nades to blow up explosive blocks this = pressure and getting kills.
- Snake can destroys the blocks with Utilt and Ftilt (for it ftilt depends)
- Side-b is pretty decent here.
- Be careful with DA / DACUS here, this will get you blown up.
- If the blocks have completely made the wall they make, set up explosives and crouches close to them. (if you opponent doesn't have items to throw)
- Wind boxes are great if your in the middle, because they're the ultimate pressure; but if your on the left or right sides of the stage and these are going expect to gain A LOT of damage or maybe even lose a stock.
- Apples these can heal a bit, but more importantly they are great items! If they hit a shield they have a lot of shield stun, and other wise they kill pretty D*** early. Once apples are out...you want to incorporate them w/ your grenades this equals, this is amazing stage control.
- U-smash can do wonders here it'll help you keep pressure on you opponent and help you keep control of the stage.
C4/Mine placement:
- On blocks
- Platforms (this is great for pressure and keeping your opponent at the left/right portions of the stage).
- The Left/right portions of the stage.
- pretty much anywhere, except for the dead center of the stage (between the two platforms).
Everyone not listed under character lists (to take/not to take lists) are undecided.If someone is listed twice it's which ever you feel more comfortable with.
Character to take here:
- MK
- Mario
- Luigi
- Peach
- Bowser
- Yoshi
- Link
- Sheik
- Zelda
- Ganon
- Toon Link
- Samus
- ZSS
- ROB
- Wolf
- Falcon
- Pikachu
- Pokemon Trainer
- Marth
- Ike
- Lucas
- Ness
- Sonic
Characters not to take here:
- MK
- G&W- Ban this against him.
- DDD-Ban this against him.
- Falco- Ban this against him?
- Diddy Kong
-
-
Overall Ratio:7.5/10
C4/Mine placement:
Everyone not listed under character lists (to take/not to take lists) are undecided.If someone is listed twice it's which ever you feel more comfortable with.
Character to take here:
Characters not to take here:
Overall Ratio:?/10
Discuss!
Have at it, I'll help along the way.
This is the older one that no one updated or kept up w/ http://www.smashboards.com/showthread.php?t=235461
We'll be doing all of the one that haven't been done by the old one above.
First we'll discuss something simple........
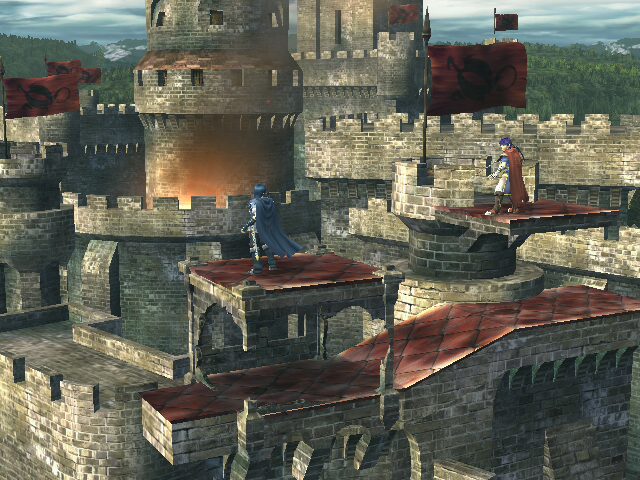
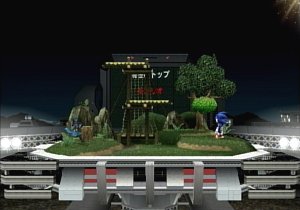
Yoshi's Island

Summary:
Overall this stage is a great neutral for Snake.
-Tilting of stage is perfect for grenades.
-Tilting of stage at certain parts = messing w/ Peach's Float, Falco's lasers/Phantasm, plankers. -This maybe a small stage but camping is still possible here.
-Vertical Death Boundaries are very close, which means easy Bair, Fthrow, and Ftilt kills.
-Nades can be bouced off of Shy Guys.
-Don't land w/ aerials on the platforms (obvious)
-Nades slide off of the both sides of the stage. (Cook nades let them slide off and use them for Edge Guarding)
-Thunderstroming does not work here (SH D-air laglessly), such as Ganon or Pikachu.
-With the use of D-smash, C4, and Nades the long platform in the middle is a sort of "barrier".
-U-air, B-air, N-air and U-tilt are great for Platform Pressuring.
-Long platform allows for easier approach (for Snake), if ever need. Such as against Mario.
-Try not to stay on the long platform for very long, this lead to juggeling etc.
-Stay grounded.
-Hard toss most Nades that are thrown out , otherwise they'll end up getting stuck on the platform.
-On this stage like most other small stage, such as SV or BF, cooking your nades will help you camp, and avoid CQC. (not that Snake's bad @ CQC or anything)
-At high percents do not tech the walls. (It'll help Snake recover).
C4/Mine placement:
-Place Mines or C4 towards the tips of the platforms.
-Place Mines/C4s on the portion of the stage that slightly tilts inward. This will help w/ Edguarding and aid in stopping appraoches.
-Also, for edge guarding place Mine/C4s on the very tips of the stage , which points outward.
Everyone not listed under character lists (to take/not to take lists) are undecided.
Character to take here:
-Falco
-R.O.B.
-Bowser
-Ganon
-Lucas
-GW
Characters not to take here:
-Olimar
-Lucario
-Link (harder to gimp here)
-Marth
-Kirby
-MK
-DK
Overall Ratio: 7/10
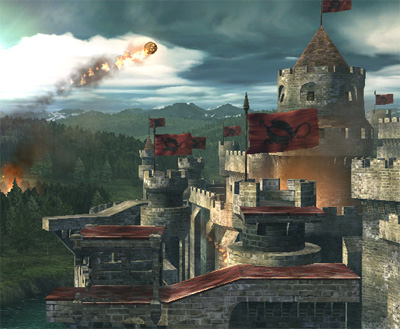
Castle Seige
Copied and posted from old thread.
Copied and posted from old thread.
Summary for 1st portion:
1st part of the stage is small, you can get really early kills here.
1st phase: The lips can ruin a lot of recoveries, use that to your advantage against those chars. C4 is fairly difficult to see, as nades can be. The slant lets nades drop down, so you can be tricky with that. fairly low ceiling allows for early utilt KOs if you can rack up damage fast enough or if you get back to the phase with opponent at high %. The slant allows you to dodge some projectiles easier.
1st part : It's good for Snake although it's too small but it's
good for grenades. You can let the grenade slide to the slant
part. You can put C4 (Down launch) on top of a platform.
It's a great advantage against big targets and characters
like Donkey Kong, Ganondorf, Bowser. Snake's up tilt
is also good for this. When an enemy is on top of the
top of the platform, use the up tilt. But Snake can be knocked off
the stage easily because it's small. (Despite him being heavy
but at some percent maybe 50% or above.) Avoid using
Snake's recovery in this part.
Summary for 2nd portion:
2nd part of the stage, if you can grab them near the edges, dthrow tech chasing is really easy. They'll almost always roll away from the walk-off. Camping here is somewhat more difficult though, as the statues stop your grenades.
2nd phase: Great part to be sneaky with C4. Plant it while your opponent is distracted OR in between the transition and let it fall and figure out where it is to bait your opponent into it. The pillar things are good and bad depending on the matchup. It helps against Diddy to stop bananas, but stops your camping game too. If you're playing DDD or low % vs Falco, don't be stupid and stay off the ground floor or free stock for opponent. The ceiling from the ground is REALLY high so don't waste an attempted utilt KO that you aren't sure will KO unless on a platform. As said, tech chasing is easier on this phase if you're on the ground. As said, most opponents will roll away from the blast zone when grabbed near there for fear of easy ftilt KO. If not they may just get up attack, so be prepared and punish. Your opponent may try to KO you in a similar way here too, so be careful when close to the blast zone. Don't get out smarted. Definitely the most gimmicky phase.
Summary for 3rd portion:
3rd part of the stage is a lot like FD. Just play like you would on FD, and watch the stage's tilt when recovering.
3rd part: This is a good place for Snake too. Grenade stripping
here is the best thing to do. It will roll though the
ground (Best if cooked). Put C4s here is great especially
at the time when the stage is slanting. The
best place to put it is that the tip of the stage.
Use grenade stripping to make it explode but it's
useless against people with controlled
projectiles or stuff.
Overall: It's a good stage for Snake but don't think
that you will win for sure and you have the upper
hand or something. Your battling someone who's
better than you, you're dead or not.
Character to take here:
-MK
-Mario
-Link
-DK(?)
-Ganon
-TL
-Samus
-Zamus
-Lucario
-Marth
-Ike
-Lucas
-Sonic
-Ness
-Jiggs
-Bowser
-Pit
-R.O.B.
Characters not to take here:
-DDD, Diddy, Pikachu, Falco (CG walkoff gayness)
-
Neutral to take here:
-GW
-Luigi
-Peach
-Yoshi
-Wario
-Sheik
-Kirby
-Fox
-Wolf
-Pikachu
-Pokemon Trainer
-Snake (obviously)
Overall Ratio: 8/10
Jungle Japes

Summary:
Characters to take here:
Characters not to take here:
K, here's a stage....that's gonna take a while to discuss.
Pokemon Stadium:1
Summary:
-Snake doesn't do to well with the multiple transformations.
-The Dead Tree poration is pratty bad, because of the wall the tree creates (infinite CG, semi-locks, etc.).
-Some of the transformations have semi-locks.
-The Water stage's Windmill is a lot of trouble for Snake; he can easily get juggled there, and easily die there. Stay away from the windmill at death percents.
-Rock stage is pretty bad for Snake; Snake can't really "camp" here....and the other player will not appraoche you if you stand in the middle or the far right.
-The foreat portions is probably the best for snake it has 3 platforms the help snake get kills.
-Snake has trouble w/ character that can easily juggles him, and characters that have good mobilty
-
C4/Mine placement:
-Lip of stage (C4 can hit people).
-Any platform.
Characters to take here:
-Lucas
-ness
-Ike
-Lucario
-PT
-Falcon
-Pit
-ZSS
-Toon link
-ganon
-Zelda/shiek
-Link
-Yoshi
-DK
-bowser
-Luigi
-Mario
Characters not to take here:
-Diddy (?)
-DDD
-Falco
-Wario (?)
-Peach
-MK
-Olimar
-Fox (?)
-Pikachu
-Marth
-G&W
-Sonic
-Kirby
-ICs
Any transform specific Trixies/AT's:
-F-smash will cancel if used during a transformation.
-F-tilt someone against a wall, then follw S.D.I.
-Stick the a wall.
-F or B-throw toward a wall > follow SDI.
Overall Ratio: 6.5/10 (?)
The public has decided! And we are now discussing:
Final Destination

Summary:Final Destination
-Amazing for camping.
-No platforms=Stronger ground game needed.
-No platforms also mean a higher possibility of being juggled.
-Snake D.I. Limit is prety high;around 180% to 200% with good D.I./spacing.
-Big "Lip" to **** our recovery or help it if you tech the stage after C4-ing your self.
-DACUS/DA/U-Smash are perfect for this stage!
-Stay away from the edges unless your edge-guarding.
-Control the dead center of the stage.
-and that's it, this stage is pretty straight forward, other things having to do with stage will come with experience.
C4/Mine placement:
Any where
Everyone not listed under character lists (to take/not to take lists) are undecided.
Character to take here:
-*Marth
-*Falco
-Luigi
-Peach
-Bowser
-Donkey Kong
-Diddy
-Yoshi
-*Wario
-Link
-Zelda
-Sheik
-Ganondorf
-*TL
-Sasmus
-ZSS
-ROB
-Kirby
-MK
-Fox
-Wolf
-Cpt. Falcon
-*Pikachu
-Pokemon Trainer
-Lucario
-Jiggz
-Ike
-Ness
-Lucas
-G&w
-Sonic
Characters not to take here:
-*Marth
-*Falco
-Mario (It's pointless, he'll jump over everything and shoot fireballz)
-*Wario
-*TL
-Pit
-IC
-Olimar
-*Pikachu
-King DeDeDe
*-The Astrid means...that this character is on both because....it depends on the player opinion. (Go where ever you feel more comfortable)
Overall Ratio:8.5/10
RAINBOW CRUISE (I got the rainbow colored letter idea from old thread)

Summary:
The Ship:
-Considered the worst portion of RC.
-Difficult to Tech Chase
-Difficult to use Mines/C4, like on normal stages.
-The wall is the last place you want to get caught.
-Most of Snake's normal game play is "weakened" here.
-Small area, which allows Snake to have good stage control.
-DCAUS straight into the wall cause you Mortar to blow up on the wall.
The Accent:
-This portion is also another difficult for Snake there is a lot to adapt to.
-C4s and Mines work great here.
-Stay away from left when going up, it's pretty much a walk off.
-***remember you cannot fall through all platforms.
-Also, learn to adapt to the accent as you fight your opponent, this will come with practice.
The pendulum:
-***Remember you can fall through it.
-It's best to control the Falling Blocks.
Side Scrolling:
-Best portion of the stage for Snake.
-Use mines, U-tilt, and C4 here these moves will kill extremely early here due to the LOW ceiling.
-Adapt to the moving stage
-This is a lot better than the ship, so using all of Snake's moves here will be a lot better.
C4/Mine placement:
The Ship:
-The 2 small platforms.
-Towards the back of the ship.
The Accent:
-Pretty much anywhere.
The Side Scrolling:
-Platforms
****How grenades will be affected if thrown down.

Credit to Etecoon
Everyone not listed under character lists (to take/not to take lists) are undecided.
Credit to Etecoon
Character to take here:
-Diddy Kong
-Mario
-Luigi
-Peach
-Bowser
-DK
-Yoshi
-Link
-Zelda
-Shiek
-Ganon
-TL
-Samus
-Cpt Falcon
-Ike
-Ness
-Lucas
-ICs
Characters not to take here:
-MK
-G&W
-Wario
-DDD
-Kirby
-
Overall Ratio:5.5/10
Green Greens
Summary:
- Learn to tech on reaction, if you don't your gonna get combo'ed HARD. Also, mix it up, tech tech jumps or don't tech on purpose.
- Getting hit by falling blocks = Spiked
- No matter what control the center of the stage.
- Small vertical death zones = killing earlier, and dieing earlier.
- Lower ceiling = Killing earlier.
- Use nades to blow up explosive blocks this = pressure and getting kills.
- Snake can destroys the blocks with Utilt and Ftilt (for it ftilt depends)
- Side-b is pretty decent here.
- Be careful with DA / DACUS here, this will get you blown up.
- If the blocks have completely made the wall they make, set up explosives and crouches close to them. (if you opponent doesn't have items to throw)
- Wind boxes are great if your in the middle, because they're the ultimate pressure; but if your on the left or right sides of the stage and these are going expect to gain A LOT of damage or maybe even lose a stock.
- Apples these can heal a bit, but more importantly they are great items! If they hit a shield they have a lot of shield stun, and other wise they kill pretty D*** early. Once apples are out...you want to incorporate them w/ your grenades this equals, this is amazing stage control.
- U-smash can do wonders here it'll help you keep pressure on you opponent and help you keep control of the stage.
C4/Mine placement:
- On blocks
- Platforms (this is great for pressure and keeping your opponent at the left/right portions of the stage).
- The Left/right portions of the stage.
- pretty much anywhere, except for the dead center of the stage (between the two platforms).
Everyone not listed under character lists (to take/not to take lists) are undecided.If someone is listed twice it's which ever you feel more comfortable with.
Character to take here:
- MK
- Mario
- Luigi
- Peach
- Bowser
- Yoshi
- Link
- Sheik
- Zelda
- Ganon
- Toon Link
- Samus
- ZSS
- ROB
- Wolf
- Falcon
- Pikachu
- Pokemon Trainer
- Marth
- Ike
- Lucas
- Ness
- Sonic
Characters not to take here:
- MK
- G&W- Ban this against him.
- DDD-Ban this against him.
- Falco- Ban this against him?
- Diddy Kong
-
-
Overall Ratio:7.5/10
Brinstar

Summary:
C4/Mine placement:
Everyone not listed under character lists (to take/not to take lists) are undecided.If someone is listed twice it's which ever you feel more comfortable with.
Character to take here:
Characters not to take here:
Overall Ratio:?/10
Discuss!
Have at it, I'll help along the way.
- <3 from Mizu
 I simply was explanining why nades seem to function differently on YI as compared to say FD.