THE HIDDEN BLOCK
MARIO'S HITBOX REPOSITORY
CURRENT COINAGE: 100
DISCLAIMER
(read this you Goombas)
The following is a combination of definite facts and approximate drawings. While the data is certain and the frames are almost certain, BrawlBox is a pain and some rotations are a tricky little piece of crap, so take the bubbles with a grain of salt.
INTRODUCTION
(text text text)
What's a hitbox repository, you ask? It's a place where you put hitbox-related data. Therefore, you'll see informative stuff here.
Note that this is manual drawing, not hacks. Any old sap nowadays can display hitboxes in-game, but they can only show position and size, and you can't see the character's body through them. I'm including some other info here. Not only can you see at a glance which hitbox is the sweetspot (thanks to the alongside numbers), but how big any disjoint is (transparency is cool yo) and an obvious yet unintrisuve angle indicator.
While you may be thinking "beh, this'll be approximate at best", you're not completely right. I lay out these images with up to eight decimal places of precision; usually the hardest part is measuring how big to draw things, which often makes errors obvious.
LEGEND
(the interpreter)
I don't exactly do things by the book all the time. Here's the legend of stuff to look for:
Angle: The angle of a hitbox is displayed as a line. Usually, the angle is given assuming the target is to the right of the attacker; the exception is for if the hitboxes are completely behind the attacker, for which the angle will be shown as reversed. The Sakurai angle is displayed as a star shape; other special angles may have other symbols.
Clang: Most hitboxes have a solid border. Those that do not - that is, they have a dashed border - are transcendent.
Type/Effect: The colour of a hitbox and its angle indicator/border show its type and effect - usually this is only important in the Subspace Emissary, but it's also important if you want to know which hitboxes set things on fire and such. If there's demand I'll put a legend in, but it's mostly just there for a splash of colour.
Damage/Knockback: The numbers displayed for each hitbox are its damage, base knockback, and knockback scaling (in that order).
Layering: You can tell by the images that some hitboxes are "on top" of others. These are the hitboxes that "win out" if the target is hit by more than one of the attack's hitboxes at once.
THE REPOSITORY
(here-a we go)
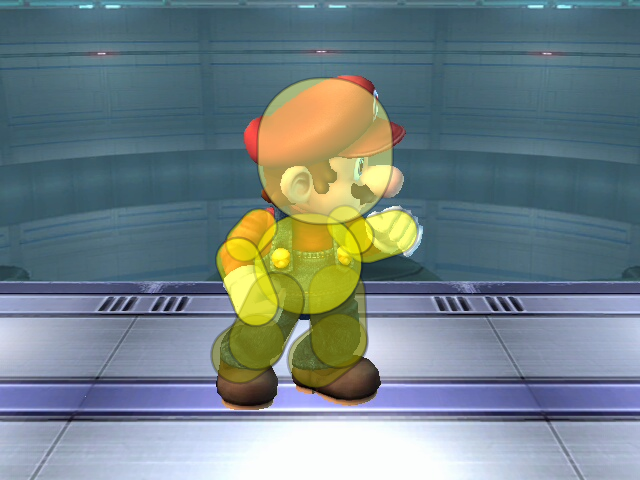
Mario's Hurtboxes
Hurtbox 1: Waist
Hurtbox 2: Head
Hurtbox 3: Right upper arm
Hurtbox 4: Left upper arm
Hurtbox 5: Right lower arm
Hurtbox 6: Left lower arm
Hurtbox 7: Right upper leg
Hurtbox 8: Left upper leg
Hurtbox 9: Right lower leg
Hurtbox 10: Left lower leg
I'll have you know this up front: Mario's hurtbox is, for whatever reason, asymmetrical. His belly is 0.45 units off-center (for comparision, it's 5.3 units wide in this image), and his lower arms have a 0.4-unit difference in the Y-direction (that is, when he's in the T-pose, his right lower arm is higher than his left). The arms are probably a coding error (it'd be fixed by removing a minus sign), while the belly may be to compensate for his sideways standing animation or something.
The hurtbox colours represent a set of four bits that every hurtbox has. I don't know 100% what the bits mean, but it looks pretty clear that they have something to do with body zones (i.e. how the game knows if you got hit in the head/midsection/leg etc for high/middle/low damage animations).
Jab
Hit 1
Hitbox 0: 3% damage, angle of *, 15/100 fixed knockback, attached to left upper arm, Hand/Normal
Hitbox 1: 3% damage, angle of *, 10/100 fixed knockback, attached to chest, Hand/Normal
Hitbox 2: 3% damage, angle of 80, 15/100 fixed knockback, attached to left lower arm, Hand/Normal
Mario's jab 1 is generally unremarkable, although it has a surprising amount of depth. Unlike most other attacks, it's the middle hitbox that wins out in a tie. The body segment does slightly less knockback than the other two. The fist hitbox hits at an 80 degree angle instead of the Sakurai angle, so opponents at a distance will be lifted off the ground a bit, similar to Luigi's jab; however it's the lowest in the stack and therefore will not hit in close range.
Hit 2
Hitbox 0: 2% damage, angle of *, 18/100 fixed knockback, attached to right upper arm, Hand/Normal
Hitbox 1: 2% damage, angle of *, 15/100 fixed knockback, attached to chest, Hand/Normal
Hitbox 2: 2% damage, angle of 80, 25/100 fixed knockback, attached to right lower arm, Hand/Normal
Jab 2 is a bit more diverse than jab 1. The knockback is still fixed but rather varied; foes that are farther away will get sent a touch farther (nothing significant, but may be useful to know). The middle hitbox is still top of the stack here, making it most likely to hit in close range. Again, the fist sends opponents vertically instead of horizontally, and its range is pretty good.
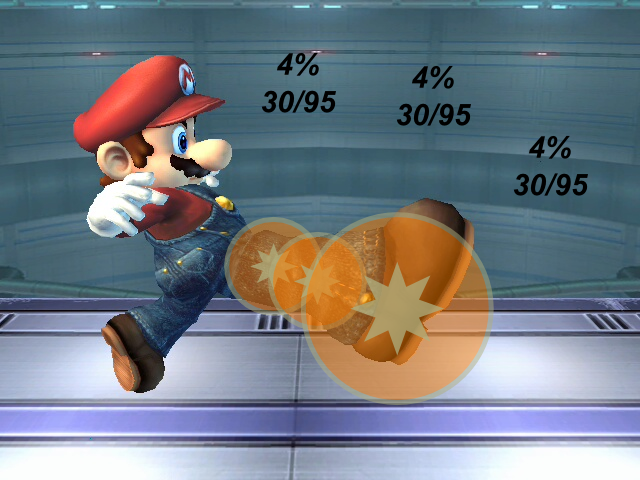
Hit 3
Hitbox 0: 4% damage, angle of *, 30/95 knockback, attached to right lower leg, Foot/Normal
Hitbox 1: 4% damage, angle of *, 30/95 knockback, attached to right lower leg, Foot/Normal
Hitbox 2: 4% damage, angle of *, 30/95 knockback, attached to right lower leg, Foot/Normal
Part-wise, none of the bubbles are unique; they all deal the same damage and knockback. That said, the far hitbox shrinks in size as Mario's foot does (it's size 5 for two frames and size 3.6 for two frames); from what I can tell this is actually somewhat unique.
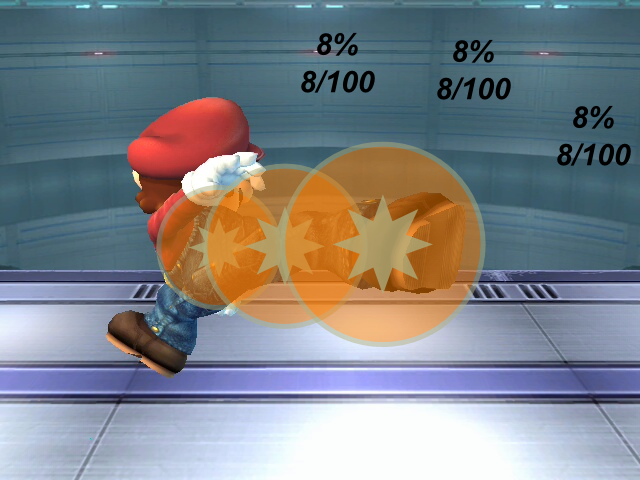
F-Tilt
Angled up
Angled side
Angled down
Hitbox 0: 8% damage, angle of *, 8/100 knockback (13/100 when angled down), attached to right lower leg, Foot/Normal
Hitbox 1: 8% damage, angle of *, 8/100 knockback (13/100 when angled down), attached to right upper leg, Foot/Normal
Hitbox 2: 8% damage, angle of *, 8/100 knockback (13/100 when angled down), attached to hip, Foot/Normal
To be honest there's not much I can say about the f-tilt, since all the hitboxes are the same. However, it is interesting to note it does minimally more knockback when angled down - seriously, what's the point of that. I suppose at higher percentages it can change things.
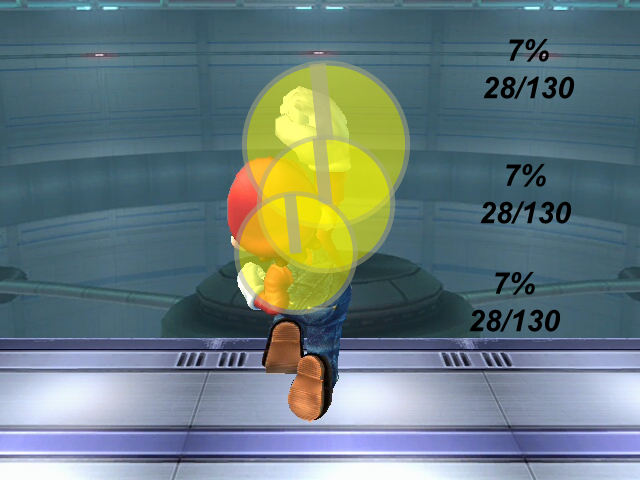
U-Tilt
Hitbox 0: 7% damage, angle of 96, 28/130 knockback, attached to neck, Hand/Normal
Hitbox 1: 7% damage, angle of 96, 28/130 knockback, attached to right lower arm, Hand/Normal
Hitbox 2: 7% damage, angle of 96, 28/130 knockback, attached to right lower arm, Hand/Normal
Not much to say here either, except that it has more base knockback and almost as much knockback scaling as Luigi's f-smash. It only does half the damage though, so don't expect big things from it.
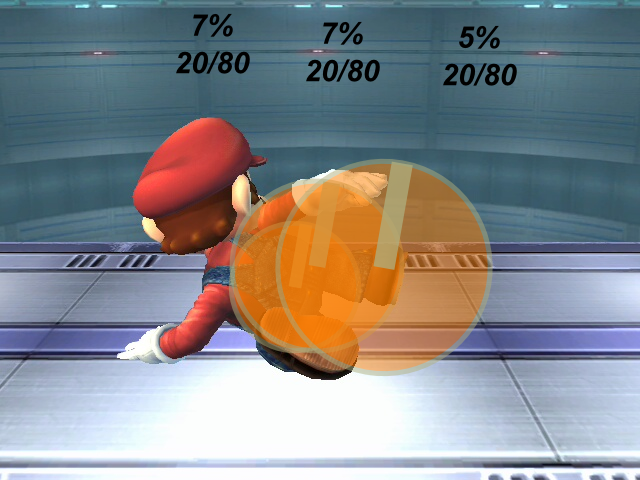
D-Tilt
Hitbox 0: 5% damage, angle of 80, 20/80 knockback, attached to right toes, Foot/Normal, 40% trip chance
Hitbox 1: 7% damage, angle of 80, 20/80 knockback, attached to right lower leg, Foot/Normal, 40% trip chance
Hitbox 2: 7% damage, angle of 80, 20/80 knockback, attached to hip, Foot/Normal, 40% trip chance
The d-tilt's sourspot is highest in the stack, so it'll hit in a tie. This explains why it can be a pain sometimes to get the 7% damage out of it, despite the fact it has twice the hitboxes. This does not explain why d-tilt sucks.
Dash
Clean
Hitbox 0: 9% damage (+1 on shield), angle of 110, 70/50 knockback, attached to Mario's movement, Foot/Normal
Hitbox 1: 9% damage (+1 on shield), angle of 80, 70/50, knockback, attached to Mario's movement, Foot/Normal
When I first made this image, I thought "well this explains a bit". The large hitbox almost completely eclipses the smaller one, making it a crapshoot should you actually connect with it, sending the enemy in the opposite direction. It's really too bad the window is so tiny; it would be great for mindgames if you could actually control (via timing) which one hits.
Late
Hitbox 0: 7% damage (+1 on shield), angle of 120, 45/30 knockback, attached to Mario's movement, Foot/Normal
Hitbox 1: 7% damage (+1 on shield), angle of 70, 45/30 knockback, attached to Mario's movement, Foot/Normal
As for the late hit...um, what the heck? Why would you put in a hitbox that is guarenteed to never hit anything? This may be a case of "it's the late hit, just make it smaller and lower the damage" without actually seeing the result.
U-Smash
Hitbox 0: 14% damage (19.6% fully charged), angle of 83, 32/90 knockback, attached to head, Head/Normal
Hitbox 1: 14% damage (19.6% fully charged), angle of 83, 32/90 knockback, attached to chest, Head/Normal
U-smash is pretty normal as far as important things go; both hitboxes are identical. Because of the animation, the move will hit faster if you're facing away from the opponent; note that I also reversed the angle indicators for that particular image for clarity, since it's pretty dang hard to hit someone standing in front of you on those frames. Mario's head is intangible for the same frames that the hitboxes exist.
D-Smash
Hit 1
Hitbox 0: 15% damage (21% fully charged), angle of *, 40/73 knockback, attached to nothing, Foot/Normal
Hitbox 1: 15% damage (21% fully charged), angle of *, 40/73 knockback, attached to nothing, Foot/Normal
Hit 2
Hitbox 0: 12% damage (16.8% fully charged), angle of *, 35/75 knockback, attached to nothing, Foot/Normal
Hitbox 1: 12% damage (16.8% fully charged), angle of *, 35/75 knockback, attached to nothing, Foot/Normal
There's nothing notable to say about this one.
F-Smash
Angled up
Hitbox 0: 15% damage (21% fully charged), angle of *, 25/100 knockback, attached to left lower arm, Hand/Normal
Hitbox 1: 15% damage (21% fully charged), angle of *, 25/100 knockback, attached to right shoulder, Hand/Normal
Hitbox 2: 18% damage (25.2% fully charged), angle of *, 25/90 knockback, attached to left wrist, Hand/Flame, transcendent
Angled side
Hitbox 0: 14% damage (19.6% fully charged), angle of *, 25/100 knockback, attached to left lower arm, Hand/Normal
Hitbox 1: 14% damage (19.6% fully charged), angle of *, 25/100 knockback, attached to right shoulder, Hand/Normal
Hitbox 2: 17% damage (23.8% fully charged), angle of *, 25/90 knockback, attached to left wrist, Hand/Flame, transcendent
Angled down
Hitbox 0: 13% damage (18.2% fully charged), angle of *, 25/100 knockback, attached to left lower arm, Hand/Normal
Hitbox 1: 13% damage (18.2% fully charged), angle of *, 25/100 knockback, attached to right shoulder, Hand/Normal
Hitbox 2: 16% damage (22.4% fully charged), angle of *, 25/90 knockback, attached to left wrist, Hand/Flame, transcendent
First off, the middle hitbox is at the top of the stack, while the sweetspot is at the bottom. While this means the sourspot takes precedence if both parts connect, the size of the sweetspot (just over twice the radius of the middle hitbox) makes it easy to hit with when spaced correctly. Flat characters can crouch under an f-smash that's angled up, but otherwise doing so has no drawback, and should probably always be done. (Side note: The hitboxes look strangely spaced out. It's not like anything will avoid being hit if they squeeze inside, but...)
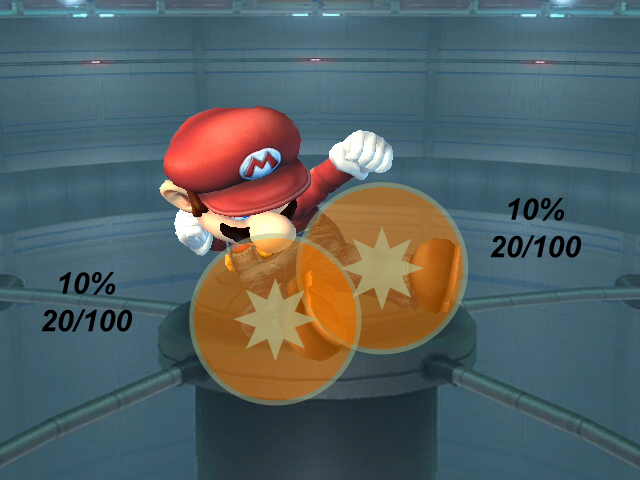
Nair
Clean
Hitbox 0: 10% damage, angle of *, 20/100 knockback, attached to right lower leg, Foot/Normal
Hitbox 1: 10% damage, angle of *, 20/100 knockback, attached to left lower leg, Foot/Normal
Late
Hitbox 0: 5% damage, angle of *, 13/90 knockback, attached to right lower leg, Foot/Normal
Hitbox 1: 5% damage, angle of *, 13/90 knockback, attached to left upper leg, Foot/Normal
First off, let me say that it's dang hard to do these images for sex kicks; it's near impossible to tell what frame it is. Other than that, it's pretty clear how much the nair's range changes between the two stages; if you don't know the clean hit lasts 4 frames.
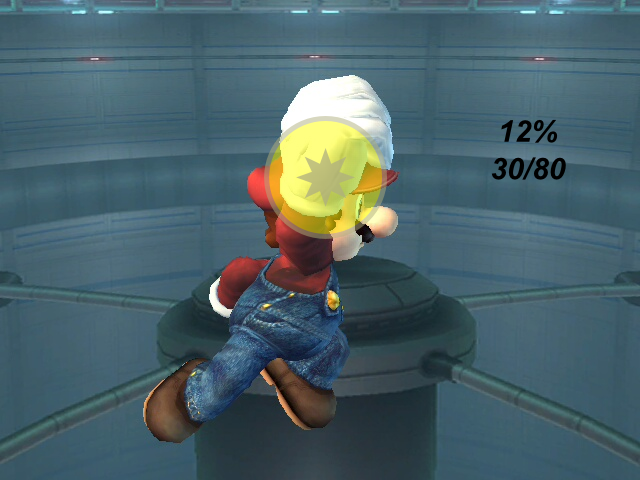
Fair
Early
Hitbox 0: 12% damage, angle of *, 30/80 knockback, attached to right lower arm, Hand/Normal
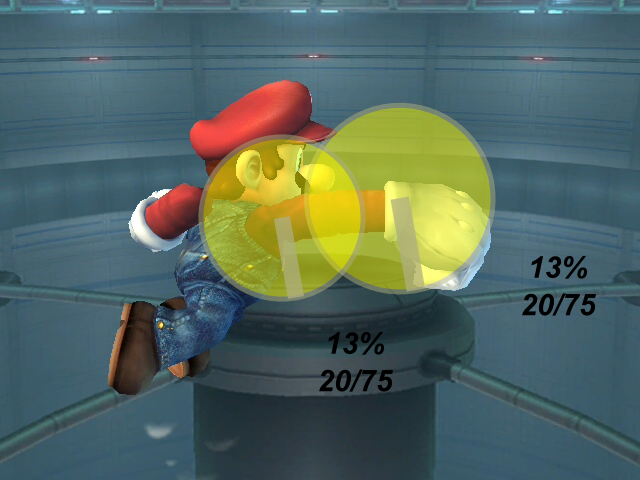
Clean
Hitbox 0: 13% damage, angle of 280 (that is, -80), 20/75 knockback, attached to right upper arm, Hand/Normal
Hitbox 1: 13% damage, angle of 280 (that is, -80), 20/75 knockback, attached to right lower arm, Hand/Normal
Late
Hitbox 0: 10% damage, angle of *, 20/80 knockback, attached to right upper arm, Hand/Normal
Hitbox 1: 10% damage, angle of *, 20/80 knockback, attached to right lower arm, Hand/Normal
Fair is a pretty cool guy, eh KOs peeps and doesn't afraid of anything.
Bair
Clean
Hitbox 0: 12% damage, angle of *, 10/95 knockback, attached to right lower leg, Foot/Normal
Hitbox 1: 12% damage, angle of *, 10/95 knockback, attached to right upper leg, Foot/Normal
Late
Hitbox 0: 7% damage, angle of *, 7/90 knockback, attached to right lower leg, Foot/Normal
Hitbox 1: 7% damage, angle of *, 7/90 knockback, attached to right upper leg, Foot/Normal
Bair ain't very interesting hitbox-wise, but only doing this for interesting attacks would leave out half a character's moveset.
Uair
Hitbox 0: 11% damage, angle of 45, 9/100 knockback, attached to right upper leg, Foot/Normal
Hitbox 1: 11% damage, angle of 45, 9/100 knockback, attached to right lower leg, Foot/Normal
Because the hitboxes don't change size or position relative to the bones as the animation goes on, the ending segment doesn't perfectly match up with the visuals (the hitboxes are designed to mesh with the max extension on most of these kinds of attacks).
Dair
Hits 1-5 (I ain't doin' 5 individiual indistinct images here)
Hitbox 0: 1% damage, angle of 94, 10/100 fixed knockback, attached to nothing, Spin/Normal, 1.5x SDI ability
Hitbox 1: 1% damage, angle of 94, 10/100 fixed knockback, attached to nothing, Spin/Normal, 1.5x SDI ability
Hitbox 2: 1% damage, angle of 94, 10/100 fixed knockback, attached to nothing, Spin/Normal, 1.5x SDI ability
Hit 6
Hitbox 0: 7% damage, angle of 75, 80/80 knockback, attached to nothing, Spin/Normal
Landing hit
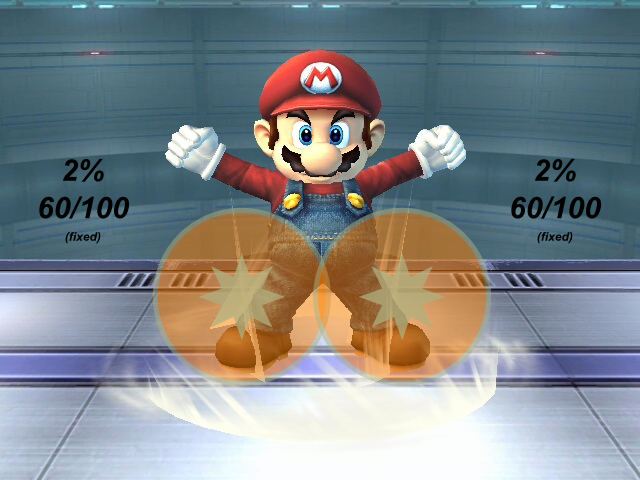
Hitbox 0: 2% damage, angle of *, 60/100 fixed knockback, attached to nothing, Foot/Normal
Hitbox 1: 2% damage, angle of *, 60/100 fixed knockback, attached to nothing, Foot/Normal
Dair's repeated hits have pretty cool range bottom-side. (No, there's no way that's an error; the hitbox's center is actually placed below Mario's baseline.) The last hit is also kind of big. While you probably don't care, it's kind of weird how the landing hit is considered a Foot attack.
Shield
Okay so it's not a hitbox. It's still a bubble with a size.
Grabs
Standing
Running
Pivot
Not much to say here.
Pummel
Hitbox 0: 3% damage, angle of *, 30/100 fixed knockback, attached to nothing, Head/Normal, transcendent, always knocks forwards
Can't say much about this that isn't obvious.
F-Throw
Throw: 9% damage, angle of 45, 60/65 knockback, Normal
I don't particulary care if throws aren't hitboxes; I'm still doing this thing for them.
B-Throw
Collision
Hitbox 0: 8% damage, angle of *, 20/100 knockback, attached to victim, Throwing/Normal, transcendent
Throw
Throw: 12% damage, angle of 45, 70/63 knockback, Normal
As far as I can tell, the swing collision hitbox is the same size no matter who the target is.
U-Throw
Throw: 8% damage, angle of 90, 70/72 knockback, Normal
The highest knockback scaling of Mario's throws.
D-Throw
Throw: 6% damage, angle of 80, 75/50 knockback, Normal
Eh, I got nothing.
Floor (back)
Hit 1
Hitbox 0: 6% damage (+1 on shield), angle of *, 80/50 knockback, attached to right ankle, Foot/Normal, transcendent
Hitbox 1: 6% damage (+1 on shield), angle of *, 80/50 knockback, attached to left ankle, Foot/Normal, transcendent
Hitbox 2: 6% damage (+1 on shield), angle of *, 80/50 knockback, attached to right lower leg, Foot/Normal, transcendent
Hit 2
Hitbox 0: 6% damage (+1 on shield), angle of *, 80/50 knockback, attached to right ankle, Foot/Normal, transcendent
Hitbox 1: 6% damage (+1 on shield), angle of *, 80/50 knockback, attached to left ankle, Foot/Normal, transcendent
Hitbox 2: 6% damage (+1 on shield), angle of *, 80/50 knockback, attached to right lower leg, Foot/Normal, transcendent
Hitbox 3: 6% damage (+1 on shield), angle of *, 80/50 knockback, attached to nothing, Foot/Normal, transcendent
What a big cluster. Floor attacks in general aren't very impressive.
Floor (front)
Hit 1
Hitbox 0: 6% damage (+1 on shield), angle of *, 80/50 knockback, attached to nothing, Hand/Normal, transcendent
Hitbox 1: 6% damage (+1 on shield), angle of *, 80/50 knockback, attached to nothing, Hand/Normal, transcendent
Hitbox 2: 6% damage (+1 on shield), angle of *, 80/50 knockback, attached to nothing, Hand/Normal, transcendent
Hit 2
Hitbox 0: 6% damage (+1 on shield), angle of *, 80/50 knockback, attached to nothing, Hand/Normal, transcendent
Hitbox 1: 6% damage (+1 on shield), angle of *, 80/50 knockback, attached to nothing, Hand/Normal, transcendent
Hitbox 2: 6% damage (+1 on shield), angle of *, 80/50 knockback, attached to nothing, Hand/Normal, transcendent
The shorter-ranged of Mario's two floor attacks.
Floor (trip)
Hit 1
Hitbox 0: 5% damage (+1 on shield), angle of *, 60/50 knockback, attached to nothing, Foot/Normal
Hitbox 1: 5% damage (+1 on shield), angle of *, 60/50 knockback, attached to nothing, Foot/Normal
Hitbox 2: 5% damage (+1 on shield), angle of *, 60/50 knockback, attached to nothing, Foot/Normal
Hit 2
Hitbox 0: 5% damage (+1 on shield), angle of *, 60/50 knockback, attached to nothing, Foot/Normal
Hitbox 1: 5% damage (+1 on shield), angle of *, 60/50 knockback, attached to nothing, Foot/Normal
Hitbox 2: 5% damage (+1 on shield), angle of *, 60/50 knockback, attached to nothing, Foot/Normal
Nothing to say here, other than the usual "why is sitting down considered worse than lying down" tripe.
Edge (fast)
Hitbox 0: 8% damage (+1 on shield), angle of 45, 110/100 fixed knockback, attached to right ankle, Foot/Normal, transcendent
Hitbox 1: 8% damage (+1 on shield), angle of 45, 110/100 fixed knockback, attached to left ankle, Foot/Normal, transcendent
Hitbox 2: 6% damage (+1 on shield), angle of 45, 110/100 fixed knockback, attached to head, Foot/Normal, transcendent
Hitbox 3: 6% damage (+1 on shield), angle of 45, 110/100 fixed knockback, attached to nothing, Foot/Normal, transcendent
Not really sure what the fourth (bottom-most) hitbox is doing there, but otherwise this is pretty expected.
Edge (slow)
Hitbox 0: 10% damage (+1 on shield), angle of *, 110/100 fixed knockback, attached to nothing, Foot/Normal, transcendent
Hitbox 1: 10% damage (+1 on shield), angle of *, 110/100 fixed knockback, attached to nothing, Foot/Normal, transcendent
Hitbox 2: 10% damage (+1 on shield), angle of *, 110/100 fixed knockback, attached to nothing, Foot/Normal, transcendent
Hitbox 3: 10% damage (+1 on shield), angle of *, 110/100 fixed knockback, attached to nothing, Foot/Normal, transcendent
Nothing to say about this one. Both edge attacks appear to have about the same range.
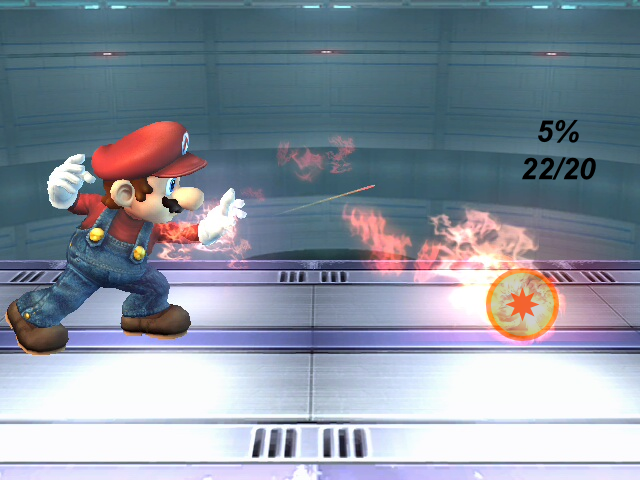
Fireball
Hitbox 0: 5% damage, angle of *, 30/25 knockback, attached to fireball's center, Typeless/Flame, 0.3x freeze frames, absorbable, reflectable, always knocks forwards
Hitbox 0: 5% damage, angle of *, 22/20 knockback, attached to fireball's center, Typeless/Flame, 0.3x freeze frames, absorbable, reflectable, always knocks forwards
Hitbox 0: 5% damage, angle of *, 11/15 knockback, attached to fireball's center, Typeless/Flame, 0.3x freeze frames, absorbable, reflectable, always knocks forwards
That's right, the fireball does more knockback at the start of its life. It's strong for 6 frames, then middling for 11 frames, and then weak after that. The difference is minor but I'm sure you've seen it. The fireball also gets a bit smaller at the same time - its size goes from 2.4 to 2.2 and then 2.
Cape
Hitbox 0: 8% damage (+4 on shield), angle of 110, 0/0 knockback, attached to nothing, Weapon/Reverse, transcendent, 30% trip chance
Hitbox 1: 8% damage (+4 on shield), angle of 110, 0/0 knockback, attached to nothing, Weapon/Reverse, transcendent, 30% trip chance
Hitbox 0: 6% damage (+4 on shield), angle of 110, 0/0 knockback, attached to nothing, Weapon/Reverse, transcendent, 30% trip chance
Hitbox 1: 6% damage (+4 on shield), angle of 110, 0/0 knockback, attached to nothing, Weapon/Reverse, transcendent, 30% trip chance
Yup, the aerial version has a bigger hitbox. It can also reflect for 3 frames longer. Speaking of reflection, it may not be based on the hitboxes - the hitboxes are only out for 3 frames, but the move's defensive collision events are 25 (grounded) or 28 (aerial) frames apart. Also, I don't see the point in giving the move an angle if it does no knockback.
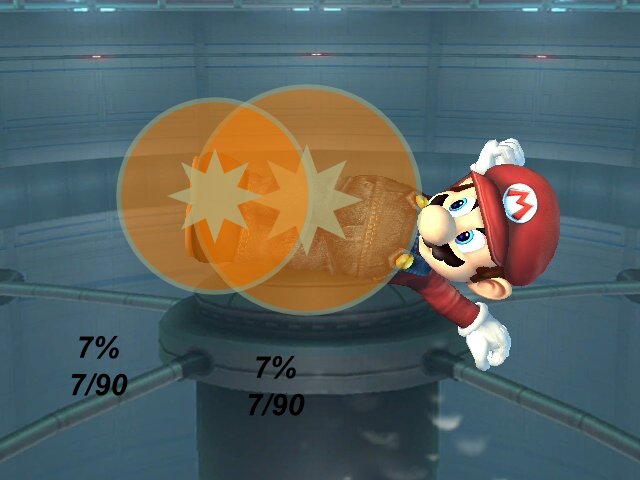
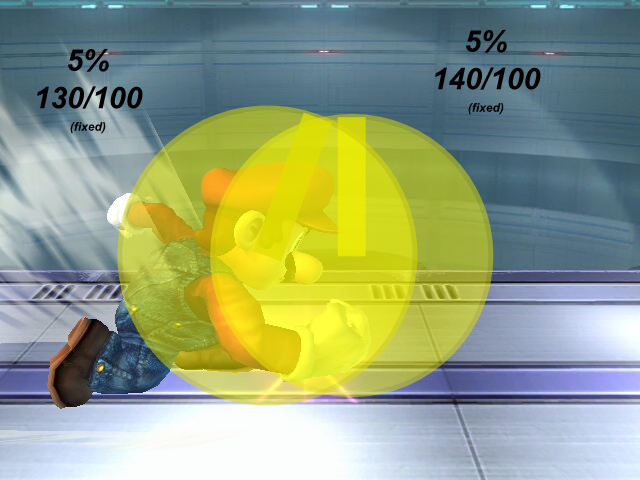
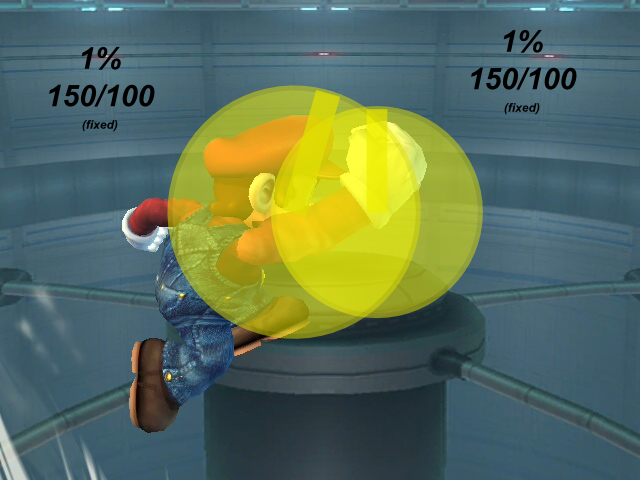
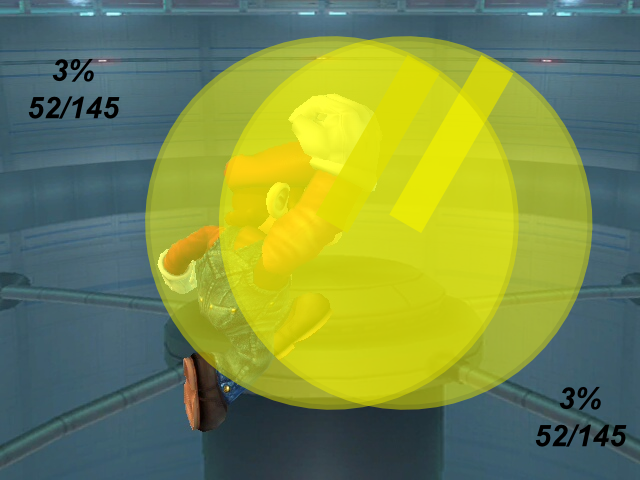
Super Jump Punch
Hitbox 0: 5% damage, angle of 70, 130/100 fixed knockback, attached to nothing, Arm/Coin
Hitbox 1: 5% damage, angle of 90, 140/100 fixed knockback, attached to nothing, Arm/Coin
Hitbox 0: 1% damage, angle of 74, 150/100 fixed knockback, attached to nothing, Arm/Coin
Hitbox 1: 1% damage, angle of 90, 150/100 fixed knockback, attached to nothing, Arm/Coin
Hitbox 0: 1% damage, angle of -, 90/100 fixed knockback, attached to nothing, Arm/Coin
Hitbox 1: 1% damage, angle of -, 120/100 fixed knockback, attached to nothing, Arm/Coin
Hitbox 0: 3% damage, angle of 60, 52/145 knockback, attached to nothing, Arm/Coin
Hitbox 1: 3% damage, angle of 60, 52/145 knockback, attached to nothing, Arm/Coin
The angle of "-" I don't know much about. I think it means "make the angle follow whatever direction the attacker is moving". (For tech guys: The angle is encoded as 365, if you know more than I do let me know.) Other than that HOLY DOOLEY DISJOINT!
F.L.U.D.D.
Hitbox 0: 0% damage, angle of 55, 32/100 knockback, attached to each bit of water, Weapon/Water, reflectable, always knocks forwards
This is a Water-effect attack, so its knockback changes a bit when used on PT's Pokémon. But it's not a Water-type attack (it's Weapon), so Water stickers won't have any effect. (I think that's how it works...) Charging the move increases the knockback; I think a fully-charged FLUDD does approximately 1.9x knockback. Using the move, regardless of charge, produces exactly 12 blobs of water.
Mario Finale
Hitbox 0: 3% damage, angle of 32, 40/100 knockback, attached to bigger fireball, Typeless/Flame, transcendent, 0.7x SDI ability, 0.2x freeze frames, rehit rate of 7, unshieldable, always knocks forwards
Hitbox 1: 2% damage, angle of 32, 40/100 knockback, attached to smaller fireball, Typeless/Flame, transcendent, 0.7x SDI ability, 0.2x freeze frames, rehit rate of 7, unshieldable, always knocks forwards
EAT IT, PENGUINFACE


")