Welcome to Smashboards, the world's largest Super Smash Brothers community! Over 250,000 Smash Bros. fans from around the world have come to discuss these great games in over 19 million posts!
You are currently viewing our boards as a visitor. Click here to sign up right now and start on your path in the Smash community!
It appears that you are using ad block :'(
Hey, we get it. However this website is run by and for the community... and it needs ads in order to keep running.
Please disable your adblock on Smashboards, or go premium to hide all advertisements and this notice. Alternatively, this ad may have just failed to load. Woops!
Mii Fighters were a weird new Addition to Smash. One that I think went over quiet well.
Each Mii Fighter Both Had it's own moves, and Some it borrowed from other fighters, I think this system was great, and I'd honestly love to see more characters like this, and Miis seem to work perfectly
Currently There are the: Mii Brawler - Fist Fighter
Borrows from Zero Suit, Little Mac, Falcon, while having a ton of his own moves
Mii Swordfighter - Sword Fighter (Obviously)
Borrows from Marth, Ike, Link, and Meta Knight while Still having a lot of his own moves
Mii Gunner - Arm Canon Fighter
borrows from Zelda, Samus, Fox, Robin, Sheik, and Ness, while Still having Quite a Bit of her Own
My Ideas for New Ones Are: Mii Wizard - Fights with Magic
Stand Specials
1. An Attack Similar to PK Freeze
2. A Slow Blast of Short Range Fire
3. A Quick Bolt of Weak Long Ranged Lightning
Side Specials
1. Slow moving Ball of Light
2. A Din's Fire Like Move except with Dark Magic.
3. a sort of Flame Dash, possibly a bit similar to Fox's Side Special
Up Specials
1. A Warp like Zelda's
2. A Robin Like Push up with Magic
3. Create a Platform Below him for a matter of moment, long enough to jump off, then it disappears.
Down Specials
1. Something Similar to Pikachu's Thunder
2. Nayru's Love Style Counter
3. Similar to Nosferatu Mii Lancer - Uses a Lance
Stand Spec.
1. Arrow Shoot (Link Style)
2. Spear Spin (Meta Knight Style Spin with longer range)
3. Charged Spear Throw (Multi Toss Spear Throw)
Side Spec.
1. Spear Toss
2. Spear Storm(a Flurry of hits with the tip of the spear)
3. Spear Peirce (Meta Knight Side Special)
Up Spec.
1. Spear Copter (Ala Bandana Dee)
2. Rocket Spear (The Spear Acts as a Rocket
3. Spear Jump (Your mii Jumps on the Spear for a third jump, no damage)
Down Spec.
1. Counter
2. Shockwave (Stick the spear into the ground causing a shockwave)
3. Spear Spin (Works like Cape, it turns the enemy around Mii Slammer - Uses a Hammer
Stand
1. Hammer Boomerang (Think Strike Raid from Kindom Hearts but with a Hammer)
2. Hammer Golf (You Mii Hits a bowling Ball as if it was a Golf Ball.
3. Icey Hammer (Ice Climber's N Specicial , R.I.P.)
Side
1. Kirby Hammer Flip
2. Hammer Uppercut (An Running/Jumping Uppercutt with the Hammer, good for both Horizontal,and Vertical Recovery
3. Jumping Slam (Backslash, but With a Hammer
Up
1. Dedede Jump
2. Hammer Copter
3. Explosive Hammer (you put the hammer beneath you, It blows up, and your sent upward.)
Down
1. Dedede Jet Hammer
2. Hammer Pound(Works kinda like DK's Down Special, but less spammy)
3. Hammer Counter
(There May be a thread for this already, if there is, I'm sorry.)
(Feel free to post with your suggestion of what kind of Mii fighter you'd like as DLC)
- Arrow Shot: Chargable arrow that increases in power and distance as you charge it. (Like Link's bow)
- Arrow Snipe: Not chargable, always flies straight forward, but large power reduction.
- Arrow Explosion: Explodes on contact. Far slower and less ranger, but lots of damage and knockback.
Side Special:
- Bow Cutter: Slashes forward with the bow. Sweetspots at the tip, sourspots near the start. Decent knockback and damage.
- Camouflage: Changes colour to suit background and walks forward, attacking when 'b' is released and reverting back to original colour. (Like Greninja's shadow sneak)
- Bomb Throw: Throws a bomb a short distance away that explodes on contact. Low range, slow and heavy, good knockback, decent power.
Up Special:
- Tether Arrow: Shoots an arrow upward (can be guided when shot) that is attached to a tether. If arrow hits someone, Mii Archer is pulled up to them and can hit them up-close. No knockback, low power, but excellent range. Can be attached to walls. (Left vulnerable afterwards, so no chain-tethering on walls or anything)
- Stealth Jump: Jumps a huge distance up, able to hop on players when falling. Hard to maneuver while using move. Cannot be canceled mid-jump.
- Vertical Arrow: Works almost identical to Yoshi's egg bomb, but goes much farther up and provides recovery almost equivalent to Little Mac's up-b (as it holds onto the arrow for a bit after shooting when in the air), but is left vulnerable when used in the air.
Down Special:
- Tree Shot: Spawns a tree beneath Mii Archer and shoots from on top, doing lots of damage. Arrow can be aimed slightly up and down before shooting. Villagers can cut down the tree after it is spawned to punish/counter, but it disappears shortly after shooting.
- Jumping Barrage: Jumps into the air and shoots 3 arrows diagonally downward in the direction Mii Archer is facing, each doing decent damage. No knockback on any of them but the last one. Does not jump when used in the air (but still shoots, of course).
- Smokescreen: Throws a smoke bomb down and Mii Archer disappears for about half a second, leaving it immune until it comes back. Minimal starting/ending lag, and the smoke bomb does only slight damage and knockback. Cannot move somewhere else while disappeared, and does not attack when returning. When in the air, still throws the smoke bomb down, but does not disappear- however, it does to more damage and has more knockback when used this way.
*Note: Even no-knockback moves still cause flinching. Just saying, to prevent any confusion that they work like Fox's laser.
I like the idea of a Mii Wizard, but I see him as a Mii Gunner with a bit less damage and a bit more CC, such as freezes, DoT's, the like.
I also have an idea for the Mii Rogue, who would use an in-and-out style that the Mii Fighters don't seem to have. The Mii Rogue would probably play similar to Sheik, Greninja, Lucario, Mega Man, and the like.
Mii Rogue:
B:
1. Stealth (Turns the guy invisible, plain and simple.)
2. Blade Toss (Think Mega Man's neutral B, but it stops at 1 target, can't be picked up, and does more damage.)
3. Leap Away (Feint Jump from the Mii Fighter's set, but controllable like Sheik's Down Special and doesn't have the second jump. Low Lag.)
Side B:
1. Blade Spray (Fires out 3 daggers; one straight forward, one diagonally down, and one diagonally up. All 3 deal damage. Short range.)
2. Ankle Slash (Greninja's Side Special, but instead of a knockback, the foe is knocked prone if hit.)
3. Poison Blades (Sheik's Neutral Special, but the "needles" deal less damage and apply a DoT.)
Down B:
1. Smoke Bomb (Creates a cloud of smoke. Again, plain and simple.)
2. Back Stab (Lucario's Down B, effectively.)
3. Sticky Grenade (Have Link's bombs stick to things, and you have this.)
Up B:
1. Shadow Leap (Shiek's Up B/ Meta Knight's Down B/ you get the idea.)
2. Dashing Cutter (Ike and Kirby's Up B, but the foe takes less damage and gets a DoT.)
3. Airsassinate (Dash towards the nearest airborne foe, deal damage, HUGE knockback.)
Design: It’s a Mii in a robe, wielding a Gandalf-esque staff[1]. The wizard hat is optional.
Series Symbol: Super Smash Bros.
Stats (Overview):
Speed: 2.2-2.8/5 (Mii Wizards are the slowest Mii class, moving around even more slowly than Mii Gunners.)
Strength: 3.4-3.9/5 (Mii Wizards have attack power in between Mii Brawlers and Mii Swordfighters, with a few moves of exceptionally high or low power. They also have even better range than Mii Gunners. This is at the expense of their attacks having very poor startup lag, glaring blind spots near the Mii Wizard’s location, or a tendency to blow up in their faces at point-blank range, making close-range combat absolutely out of the question.)
Defense: 1.8/5 (As previously mentioned, Mii Wizards are relatively helpless up close, due to the poor start-up lag of their attacks. This is not helped by their low movement speed making it hard for them to keep their distance, nor by the fact that many of their attacks can be reflected or absorbed.)
Weight: 2.9-3.5/5 (Mii Wizards have the same weight as other Miis.)
Jump: 2.8-3.4/5 (Mii Wizards jump higher than Mii Swordfighters, but not as high as Gunners or Brawlers.)
Recovery: 2.9-3.5/5 (Mii Wizards have generally good up specials, and the ability to float, albeit very briefly.)
Special Movements: Float (only lasts for 0.5 seconds, unlike Peach’s)
Attributes (Detailed Summary):
Walking Speed: 0.89
Dashing Speed: 1.18
Air Speed: 0.9
Falling Speed (Maximum): 1.3
Falling Speed (Acceleration):
Falling Speed (Fast-Fall): 2.08 (60% increase)
Weight: 100
Jump Force (Ground):
Jump Force (Short Hop):
Jump Force (Double Jump):
Jump Delay (in frames):
Meteor Cancel Window (in frames): 25
Roll Length (in frames):
Roll Intangibility Frames:
Roll Distance:
Roll Speed:
Sidestep Length (in frames):
Sidestep Intangibility Frames:
Air Dodge Length (in frames):
Air Dodge Intangibility Frames:
Traction: ?
(All attributes assume a Mii of average height and weight.)
Because three types of Mii Fighter weren’t enough, here’s a new class suited for representing spellcasting characters, like, say, Cackletta, Grodus, Gandalf, Jessica (Dragon Quest VII), Albus Dumbledore, Harry Potter, Marisa Kirisame, Isaac (Lost Magic), Elsa, et cetera, et cetera. They are the slowest of the Miis and have the second-best attack power along with the best range, but their attacks take a while to cast, making them sitting ducks in close-range combat. Thus, they have to use their high range to battle from afar in order to stand a chance.
Equipment Used:
Offense: Staff Defense: Raiment or Coat Speed: Boots
On-screen appearance: The Mii Wizard’s cloak appears on the stage, and in a swirl of magical energy, the Mii Wizard emerges from it.
Special Notes: Like other Mii Fighters, the damage of Mii Wizards’ attacks is influenced by their size. All damage values below assume a medium-sized Mii.
Almost all of the Mii Wizard’s attacks are associated with some sort of element – fire, cold, electric, acid, earth, air, light, darkness, or force. This will be listed after the name of the attack.
Basic Attacks:
Jab Combo:
Attack #1 (Element: None): A quick bop with the Mii Wizard’s staff, dealing 3% damage. This is the fastest attack in the Mii Wizard’s arsenal by far. Attack #2 (Element: Electric): A zap with a small bolt of lightning, dealing 4% damage. This is slightly slower than the preceding attack, to the point where foes with low damage may have their hitstun wear off fast enough to defend themselves against this attack. Jab infinite (Element: Electric): A sustained lightning bolt that paralyzes enemies and does 1% damage per second. Once caught, it’s virtually impossible for foes to escape, but there is a downside. If kept up for more than 3 seconds, it intensifies and starts to do 2% damage per second, but the backlash causes some lightning to spray into the Mii Wizard him/herself, causing 1% recoil damage to them every 2 seconds. The jab infinite can be concluded with a larger lightning bolt that does 4% damage and launches victims; like Robin’s jab combo, the jab infinite is an alternative to the jab finisher, rather than transitioning into the jab finisher. Jab finisher (Element: Fire): The Mii Wizard lets loose a blast of fire from his/her hands that launches foes and does 6% damage. Like many of the Mii Wizard’s attacks, it has great range.
Tilt Attacks:
Forward Tilt:Enervation (Element: Darkness): The Mii Wizard generates a black cloud from their staff that creeps forward at a somewhat slow pace, reaching a maximum distance equivalent to the Mii Gunner’s forward smash. Enemies caught in the cloud suffer 7% damage, a small amount of knockback, and a small reduction to their stats. The stat reduction works similarly to the Dark Emperor’s debuffs. The attack can’t KO until around 400% (though it does have fairly good base knockback), and it’s just overall slow, with a moderately slow startup time and long execution time, along with noticeable ending lag. It’s one of the game’s rare examples of a tilt attack that’s actually slower than the same character’s equivalent smash attack (though not by a huge margin). The stat reduction is temporary (lasting for roughly 20 seconds), but it can stack with itself (or Energy Drain, the second alternate neutral special), resetting the duration with each consecutive hit, so a character repeatedly hit with the forward tilt will find themselves becoming laughably weak… eventually. The black cloud can be absorbed or reflected. Up Tilt:Sunburst[MB2] (Element: Light): The Mii Wizard holds up his/her staff, which glows for a moment, then suddenly erupts with a wide cylindrical burst of light. The burst of light does 10% damage and a large amount of knockback – mostly horizontal with some vertical lift. It can KO at around 110%. Bizarrely for an up tilt, its vertical range isn’t particularly impressive, but its horizontal range is amazing, capable of engulfing the entire width of Battlefield if performed from the center. However, it is pretty slow. Down Tilt: Earthen Grasp (Element: Earth): The Mii Wizard slams their staff on the ground, doing 2% damage to foes within point-blank range and weakly semi-spiking them. About 36 frames later, a hand composed of the terrain itself bursts forth from the ground about 3 character lengths in front of the Mii Wizard, weakly popping any foe it collides with up into the air for 2% damage, then clenches shut, doing 4% damage to characters it catches and trapping them. The hand then sinks back into the ground, crushing any foes it managed to seize for 6% damage and slamming them into the ground, leaving them buried. If executed on a soft (pass-through) platform, all hits except for the initial staff strike do 1% less damage, but the final hit meteor smashes foes through the platform instead of burying them, similarly to a Pitfall. In total, the attack hits 4 times for 14% damage (or 11% on a soft platform), and each hit is designed to directly lead into the next. The first two hits have set knockback, so an enemy hit by the staff strike is guaranteed to be hit by the erupting hand unless they tech-roll away (or are metal, in which case their weight and falling speed are so exaggerated that they’ll hit the ground outside the area where the hand emerges). Likewise, the erupting hand hits enemies right into the area where the hand clench will hit. The hand clench is a grab hitbox that only works on aerial characters, so foes who dodged or blocked the second hit will be missed by the third (unless they somehow wound up in the hitbox’s area anyways, such as by short hopping). The fourth hit is automatically, unavoidably landed on characters struck by the third, and cannot be landed on characters not grabbed by the third hit. As a final note, the staff strike has good start-up (almost as good as the jab), and only works at absolute point-blank range; the three successive hits only work a moderate distance away from the Mii Wizard. This leaves a rather large blind spot at close-mid-range, and as the Mii Wizard is stuck holding their staff in the ground until the entire attack is done, using this attack while a foe is in the blind spot is just asking for punishment. Also, since the staff strike only connects at point-blank range, it is likely to miss entirely, so in practice, the attack is usually limited to its final three hits, dealing a total of 12% damage (or 9% on a soft platform).
Dash Attack: Magic Spear (Element: Force): The Mii Wizard thrusts his/her staff forward, generating a long, narrow projectile – a spear made of pure energy – that flies a large distance forward before succumbing to gravity and falling to the ground. It does 5% damage and semi-spikes opponents. The spear can be reflected, but not absorbed.
Ledge Attack: Acid Spray (Element: Acid): The Mii Wizard launches a spray of acid from his/her staff as (s)he climbs the ledge, which can hit 3 times for 2% damage per hit, for a total of 6% damage. The acid briefly paralyzes opponents, similarly to a Kihunter’s acid. The acid spray can be absorbed or reflected.
Rising Attack: Yin-Yang Bolts (Element: Light & Darkness): The Mii Wizard launches two orbs to his/her left and right as he/she gets up: a light orb in front and a dark orb behind. The light orb does 5% damage and travels faster and farther than the dark orb, while the dark orb does 8% damage and has a lot of knockback – enough to KO at 120%. Both orbs can be absorbed or reflected.
Smash Attacks:
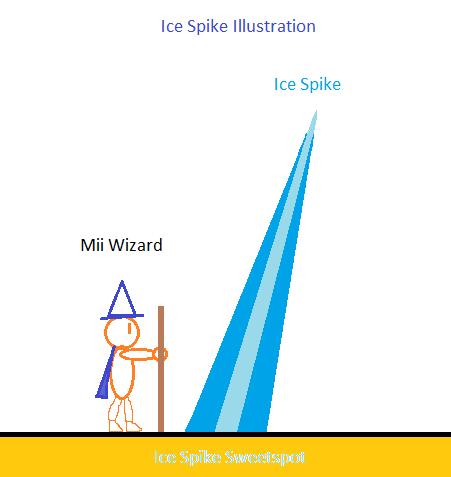
Forward Smash:Fireball (Element: Fire): The Mii Wizard launches a small glowing red sphere from the tip of his/her staff. It flies straight forward, up to a maximum distance of halfway across Final Destination, and explodes either at the end of its range or upon colliding with any solid entity (a character, a wall, a floor, a breakable item or stage element, etc.). The red sphere does 2%-2.8% damage on contact, and the explosion does 13-18.2% damage at the core of the explosion or 11-15.4% damage at the outer edge. The explosion is roughly the same size as Palutena’s Explosive Flame, and the center hitbox has far more knockback than the outer one. While this attack’s start-up isn’t that horrible (in fact, it’s quicker than Enervation), the fireball’s explosion can harm the Mii Wizard and his allies (though the fireball itself can pass harmlessly through allies without doing damage or blowing up if Team Attack is turned off), making using it at point-blank range a bad idea (and by “bad”, I mean “suicidal”). As a side note, it is possible to reflect or absorb the fireball, but the explosion can only be absorbed, not reflected. Up Smash:Ice Spike (Element: Cold): The Mii Wizard conjures up a tall spire of ice to erupt from the ground in front of them, stabbing foes for 17%-23.8% damage and launching them up and slightly forward; it can KO at around 70%. It has similar vertical reach to Palutena’s Up-Smash, and the ice spire is wider, especially at the base, but the core of the spire (e.g. the sharp part) is a sweetspot; the edges of the spire do a mere 10%-14% damage, with weak semi-spiking knockback that KOs around 180%. The spire emerges from the ground at a slight angle, giving it better horizontal reach, though foes significantly above the Mii Wizard, yet nearby on a horizontal axis, will be largely unaffected. Like many of the Mii Wizard’s attacks, it has rather long startup lag, which, combined with the unconventional orientation of the hitbox, makes landing the sweetspot somewhat difficult; indeed, the sheer power of the sweetspot is partially a compensation for the difficulty of landing the sweetspot. To help give a better idea of where the attack’s hitboxes are located, I have made an illustration of what the attack looks like immediately post-execution, when the spire is at maximum size:
Down Smash:Call Lightning Storm[MB3] (Element: Electric): The Mii Wizard generates a storm cloud above his/her head, similarly to Pikachu’s Thunder, and fires two lightning bolts down at an angle to hit the ground on either side of him/her. The lightning bolts deal 14%-19.6% damage each, which is increased to 14.5%-20.3% damage at the point where they hit the ground. The storm cloud forms above the Mii Wizard’s head, so the lightning bolts travel diagonally downward. The attack starts as soon as the animation begins; indeed, the charging animation involves feeding more power to the storm cloud, so if the Mii Wizard is interrupted while charging, the attack just immediately goes off. Of course, it takes a while to create the storm cloud, and a bit more time to begin feeding power to the cloud, so the attack does have significant startup lag in a sense. However, it also has unusually high vertical reach for a down smash, on par with Ice Spike. As an aside, repeatedly performing the input for a down smash while a storm cloud is present allows the Mii Wizard to call down several lightning bolts in quick succession, essentially canceling both the starting and ending lag into repeatedly performing the attack. This can only be done up to 10 times consecutively, and can only be done at all if the Mii Wizard doesn’t flinch while performing the attack (so he/she can remain in the attack animation). The lightning bolts can be absorbed or reflected by a character who is in midair, but not by a character on the ground. Also, a reflected lightning bolt keeps the same trajectory it had before, meaning that it won’t hit the Mii Wizard; the reflecting character simply “steals” the attack. An absorbed lightning bolt, however, will be erased from play.
Aerial Attacks:
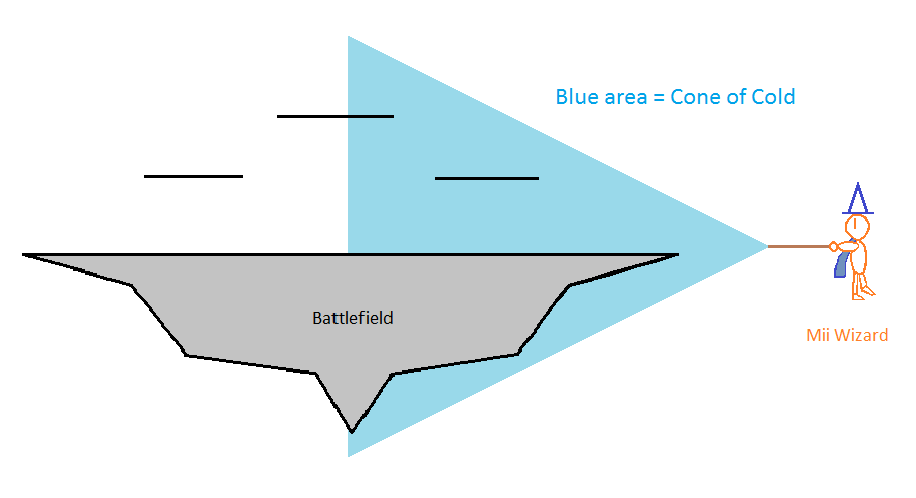
Neutral Aerial: Sand Spiral (Element: Earth): The Mii Wizard conjures a sandstorm around him/herself, which covers a large area and lingers for 2.5 seconds after activation, even if the Mii Wizard lands before its duration expires. It steadily damages enemies within the area of effect and weakly pushes them away, similarly to Palutena’s Heavenly Light. However, also like Heavenly Light, it doesn’t even cause foes to flinch. The sandstorm takes a while to conjure up. Compared to Heavenly Light, it has less vertical reach and more horizontal reach, though it also reaches below the Mii Wizard. While the sandstorm is active, the Mii Wizard’s falling speed is slightly reduced. Forward Aerial:Burning Hands (Element: Fire): The Mii Wizard extends their free hand and lets loose a cone-shaped blast of fire. It has moderate range and does 8% damage, and is one of the Mii Wizard’s faster attacks. It also has decent knockback, capable of KOing at around 150%. Like Cone of Cold, its vertical range expands as it travels further out from the Mii Wizard’s location. Back Aerial:Cone of Cold (Element: Cold): The Mii Wizard builds up power in their staff, then unleashes it in a large wave of frost aimed directly behind them. This wave of frost can do up to 15% damage at the tip of the Mii Wizard’s staff, but loses some power the further away it goes from the Mii Wizard, doing a mere 8% damage at the very edge of its (horizontal) range. Speaking of its range, it can hit a stupefyingly large area – so large that words can’t do it justice, so I’m going to have to illustrate it again. No, really, it can cover nearly half of Battlefield, from offstage. Its vertical range grows as it extends outwards, so it’s easier to hit from farther away; it can make a great edgeguarding or edgeguard-breaking tool, and can also punish retreats. Oh, and since it’s an ice attack, it can also freeze enemies. The trade-off for all of this? The knockback is merely average (worse than Burning Hands), and the startup lag is really, really bad (a whopping 45 frames), to the point where, if you try to use it from a short hop, you’re likely to hit the ground and cancel the attack before it can actually go off (or hit the ground in the middle of the attack and cut it short).
Up Aerial:Lightning Bolt (Element: Electric): The Mii Wizard raises his/her staff into the air, and a bolt of lightning erupts from it. This does 11% damage and has roughly 1.5× the reach of the Mii Gunner’s up aerial, as well as randomly zigzagging left and right. However, like most of the Mii Wizard’s attacks, it’s rather slow, and the horizontal movement of the bolt is random, so there’s no real guarantee of connecting except at the tip of the staff. Down Aerial:Sunbeam (Element: Light): The Mii Wizard swings his/her staff below him/her in an arc from front to back, sweeping the area below him/her with a beam of concentrated light. This beam hits rapidly, doing 1% damage per 10 frames of exposure while gently pushing them ahead of the beam; on average, it tends to do 12-14% damage to a character, though against wide targets (like Master Hand or Master Beast), it can do ludicrous damage. It tends to do slightly more damage to characters whose models are horizontally oriented (such as when prone, or certain characters’ crouching animations). The final hit can launch enemies, though the knockback isn’t good enough to KO until around 270%. It’s also a slow attack in general, with high start-up and ending lag, bad ending lag, and a long execution time.
Throws:
Grab: Wind Tunnel (Element: Air): The Mii Wizard conjures up a small tornado from the palm of his/her hand to suck a foe in.[2] This grab operates very similarly to Pac-Man’s, having a startlingly long range, but a lot of ending lag if it whiffs. Pummel:Finger of Death (Element: Darkness): The Mii Wizard zaps the foe with negative energy (read: darkness), doing a base of 6% damage. This damage value is multiplied by a random value ranging from 0.6× to 6×, so the pummel can actually end up doing anywhere from 3.6% to 36% damage [MB4]. Yes, that is 36% damage with a pummel. It’s also a very, very slow pummel, and the random factor means that it can’t be counted on to do massive damage, so the DPS isn’t absurdly high. Forward Throw: Ice Flowers (Element: Cold): The Mii Wizard conjures sharp ice crystals beneath the foe, dealing 11% damage, freezing the enemy, and launching them up and forward like Peach’s forward tilt. Back Throw: Emerald Flame Fist (Element: Fire): The Mii Wizard swats the foe behind him/her with his/her staff, doing 3% damage, then whirls around and suddenly punches the foe in the face with a flame-ignited fist, dealing 9% damage and powerfully semi-spiking the foe. It rivals Ness’s backwards throw in deadliness, capable of KOing at 100%. Up Throw:Call Lightning (Element: Electric): The Mii Wizard pins the foe beneath his/her staff (doing 1% damage in the process) and uses it as a lightning rod to zap the life out of them. This does 24% damage to the foe and 12% damage to the Mii Wizard. (Holding a lightning rod while lightning is currently flowing through it is hazardous to your health.) When the lightning bolt fades, it blasts the foe up into the air. Down Throw: Land Womb (Element: Earth): The Mii Wizard magically opens up a hole in the ground and drops the foe in, then closes the hole up, dealing 8% damage and burying the foe (if on a solid platform) or dealing 6% damage and dropping them through the ground (if on a pass-through platform).
Special Moves:
Neutral Special (Default):Magic Missile (Element: Force): The Mii Wizard releases 5 magical missiles from the tip of his/her staff. These missiles quickly travel directly towards the nearest enemy, unerringly adjusting for changes in the enemy’s position; this means that they literally cannot be avoided with standard evasive maneuvers like jumping or running away. They also have a limited ability to compensate for obstacles in their path, which means that they're capable of going around small bits of terrain to reach their target (though a large wall, ceiling, or floor between the Mii Wizard and the nearest valid target will still thwart them). However, they can still be blocked, and like most attacks, they do not ignore intangibility frames from dodging. They can also be absorbed or reflected, and they do have a tendency to miss foes directly above or below the Mii Wizard, due to their short lifespan expiring by the time they manage to turn around. They can only travel a distance equivalent to 3/4ths of the way across Final Destination before petering out. Magic Missiles do 3% damage each, and don’t have a lot of knockback, so they’re not a finishing move; they’re better suited to racking up damage. They are somewhat spammable, but like most of the Mii Wizard’s moves, have fairly bad start-up time. Neutral Special (Custom 1):Disarming Bolt[MB5] (Element: None (uncharged) or Electric (charged)): The Mii Wizard fires a quick magical bolt from the tip of his/her staff, which flies straight ahead at a moderate speed. This bolt only does 4% damage and causes minimal flinching (similar to Falco’s Blaster, except with even less flinching), but it has very quick startup and ending lag (a little slower than Falco’s Blaster), ignores shields, and is guaranteed to cause the foe to drop any item that they may be carrying. On the other hand, its range is somewhat short, with its maximum travel distance being roughly 3/5 the length of Final Destination. The bolt can be briefly charged by holding the special button, similarly to Zero Suit Samus’s Paralyzer. The bolt can be charged for a maximum of 1 second, with 4 stages of charge after the uncharged bolt. Each charge stage adds more properties to the bolt and enhances some existing properties; the charge cannot be held, and is released as soon as the button is released or maximum charge is attained. Each charge level retains the previous level’s properties unless otherwise stated. Charging the move for at least 0.25 second adds an electrical effect and increases the knockback and range a little. Charging it for at least 0.5 second increases the knockback and range a little more, increases the damage from 4% to 5%, resets the charge of any auto-charge specials the foe may have (including unconventional-charge specials such as Robo Beam, Robo Burner, and Wario Waft) to a completely uncharged state, and instead of merely making the foe drop their held item, it applies a powerful vertical push effect to the foe’s held item (if any), launching it high into the air. Charging it for at least 0.75 second increases the knockback still further – especially the knockback scaling (to the point where it goes from not KOing until around 600% to being able to KO around 200%), adds a bit more to the range (so it now goes a bit more than 2/3 the length of Final Destination), increases the damage from 4% to 6%, increases the speed of the bolt, replaces the previous level’s vertical item-pushing effect with a horizontal one (so the foe’s held item will be blown backwards, most likely off the stage entirely), and adds a very brief paralysis effect (as in, the foe is frozen in place for roughly 5 frames, regardless of their damage). A full charge adds even more to the knockback and range (so it now KOs at around 140% and travels the entire length of Final Destination), increases the damage from 4% to 7%, increases the base length of the paralysis effect to 10 frames, extends the paralysis effect based on the foe’s damage (adding 1 frame to the paralysis effect for every 10% damage on the foe), stops the foe from charging any moves (automatically or otherwise) for 3 seconds after the hit, and reorients the item-push effect so the foe’s held item is blown towards the Mii Wizard rather than away from them (so the Mii Wizard can catch it). Regardless of charge level, the bolt outright ignores regular shields, but it can still be reflected or absorbed, so don’t think it’ll get through a Reflector or PSI Magnet. (Because it is considered unblockable, it cannot be defended against with a counterattacking move.) Neutral Special (Custom 2):Energy Drain (Element: Darkness): The Mii Wizard unleashes a black magical bolt from the tip of his/her staff. This bolt does 20% damage and, if it connects, temporarily reduces all of the victim’s stats, similarly to the Dark Emperor’s debuff on the Find Mii stage. The debuff effect is greater than that of Enervation, and like the aforementioned forward tilt, can be used repeatedly on the same target to reduce their stats even further and extend the duration of the debuff. Enervation and Energy Drain stack with each other, and can be used in conjunction to drop a target’s stats to laughably low levels. Like Enervation, the debuff lasts for 20 seconds, but the duration can be reset by hitting the foe again with Enervation or Energy Drain. However, the bolt has somewhat weak knockback (KOing at about 160%), travels slowly, and has a relatively short range (by the Mii Wizard’s standards, anyways), with its maximum distance being halfway across Final Destination. It can also be reflected or absorbed.
Side Special (Default):Gust of Wind (Element: Air): The Mii Wizard winds up (no pun intended), then spins their staff around in their hands quickly, doing 2% damage and minor knockback to foes at point-blank range. More importantly, the staff spin acts as a conduit to generate a great blast of wind that affects everyone in a wide area directly in front of the Mii Wizard, pushing them a large distance away. Side Special (Custom 1):Cloudkill (Element: Acid): The Mii Wizard briefly builds up power, then generates a large cloud of toxic gas some distance in front of him/her. This gas slows down characters that travel through it (similarly to a Timer or Ashley’s dark cloud) and deals damage to them at a rate of 3% per second, similar to the amaranthine gas from Brawl. The Mii Wizard is not immune to his/her own toxic gas, though it does have a reduced effect on him/her (less slowdown and only 1% damage every 1.5 seconds). The cloud lasts for 6 seconds – unless it gets caught in a wind effect (like Latias and Latios, Kirby’s and King Dedede’s Inhale, Robin’s Elwind, Ike’s Tempest, Wario’s Inhaling Chomp etc.), which disperses it immediately and removes it from play. (Note that it specifically has to be a wind effect; non-wind push or pull effects, like Mario’s F.L.U.D.D., will not disperse the toxic cloud, but non-pushing wind effects, like Robin’s Elwind, will disperse it.) The startup of this attack is pretty bad, and trying to generate a toxic cloud while one is already present simply fails. Side Special (Custom 2):Holy Bolt (Element: Light): This is an auto-charge special. The uncharged version operates like a slightly slower but stronger variant of Falco’s Blaster (for reference – it can be fired more rapidly than Disarming Bolt), doing 3% damage per shot and causing victims to flinch. The range is extremely long – about 1.5× the length of Final Destination. The attack can also be aimed by slightly tilting the control stick up or down (as if angling a forward tilt or forward smash). Charging the attack adds 2% damage and a bit of knockback for every 0.5 second spent charging. Strictly speaking, there is no limit to how much it can be charged; it’s entirely possible to charge it to OHKO levels of power and beyond. However, charging for more than 6 seconds (in total) incurs a 2% chance per second[3] that the Holy Bolt will explode in the Mii Wizard’s face, dealing its full damage (but no knockback) to the Mii Wizard him/herself and leaving him/her wide open to punishment. The projectile can also be absorbed or reflected.
Up Special (Default):Teleport (Element: None): The Mii Wizard vanishes, then reappears in a puff of smoke a large distance away. It functions very similarly to Zelda’s Farore’s Wind, except that there’s no hitbox at the initial warp, while there is a large hitbox at the end of the warp which does 8% damage and stuns enemies. This recovery covers a lot of distance and cannot be interrupted while it travels, but it suffers the same shortcomings of Farore’s Wind, including a loss of momentum at the end and a lack of flexibility in where the Mii Wizard can go (the distance is pre-set and travel is limited to the 8 cardinal directions). Up Special (Custom 1):Dimension Door (Element: None): A door leading into the very fabric of space itself appears in the background behind the Mii Wizard, who is sucked inside. While this is going on, and for roughly 2.2 seconds afterwards, a sort of shimmering light appears on the screen a short distance above the Mii Wizard, and can be moved around with the Control Stick (or whatever the current control scheme uses). It moves somewhat slowly, but can be moved around freely; think of it like a cursor. (It’s like the small ball of electricity that appears during Pikachu’s Volt Tackle, except slower and easier to control.) About 2.2 seconds after the Mii Wizard has been sucked through the first door, a second door appears at the location where the shimmering light was, and the Mii Wizard tumbles out. Technically, the Mii Wizard is helpless after emerging from the door; however, he/she will be in a tumbling animation, similar to Olimar after using End of Day (which means that the Mii Wizard cannot cancel the tumbling state on his/her own before hitting the ground… or the bottom blast line). Because the Mii Wizard is tumbling, he/she must tech upon hitting the ground, or else land flat on his/her back or face, leaving him/herself quite vulnerable. The ledge sweetspot is also rather small. The distance that can be gained through Dimension Door is much lower than Teleport, but Dimension Door is much more flexible. Also, like Teleport, the Mii Wizard is completely intangible and immune to attack while being transported – which, as previously mentioned, takes around 2.2 seconds, making this useful as a dodge maneuver. However, the startup lag is longer than Teleport, and as previously mentioned, the Mii Wizard is put in a special tumbling state afterwards, highly vulnerable to attack. Also, much like Teleport, Dimension Door strips the Mii Wizard of his/her midair momentum at the end, which can hinder recovery if the warp comes up short. Up Special (Custom 2):Fly (Element: None): The Mii Wizard enchants him/herself to briefly float through the air. For 1.8 seconds, he/she can move around in the air freely, and is even able to use aerial attacks and air dodges normally. When the flight time expires, the Mii Wizard drops down, but is not helpless and can still use aerial attacks, air dodges, and any of his/her special moves except Fly again. The Mii Wizard under the effects of Fly moves much more quickly than the cursor of Dimension Door, but the duration is shorter, so Fly’s maximum distance is about the same as Dimension Door’s. Fly also allows the Mii Wizard to keep midair momentum afterwards. Basically, in comparison to Dimension Door, Fly makes the Mii Wizard more vulnerable during the actual recovery, but less vulnerable afterwards.
Down Special (Default):Energy Transformation Field (Element: None): This move generates a red vortex in front of the Mii Wizard that works similarly to Lucas’s PSI Magnet, right down to the detail of causing about 9% damage to foes touching it when it’s dropped. It can absorb any attack that PSI Magnet, Oil Panic, or Absorbing Vortex could absorb. The Mii Wizard cannot turn around manually, but will automatically turn around to absorb an eligible attack from behind. However, instead of restoring the Mii Wizard’s health, absorbed attacks are instead used to buff the Mii Wizard’s offense. The first absorbed attack grants the Mii Wizard a 1.2× multiplier to his/her attack power (both damage and knockback); this multiplier is increased by 0.1× for every 1% damage the attack would have dealt. So, for instance, absorbing an attack that would do 30% damage grants a 1.5× attack multiplier. The buff lasts for 10 seconds by default, but absorbing an attack while a buff is active increases its duration by 1 second for every 2% damage the attack would have done, rounding down; so, absorbing an attack that would do less than 2% damage wouldn’t prolong the buff at all, while absorbing an attack that would do 30% damage would prolong it by 15 seconds. Once the buff expires, absorbing another attack will grant a new buff. Down Special (Custom 1): Mirror Image (Element: None): This attack is an auto-charge special, like Samus’s Charge Shot. It can be charged for a maximum of 4 seconds. Upon the move being executed, the Mii Wizard splits in two, generating a clone of him/herself. One of the two is the real Mii Wizard, and is controlled by the Mii Wizard’s player, taking damage as normal. The other is a fake, which is controlled by the AI and is perfectly capable of attacking and being attacked, but only has 20 HP plus 10 more HP for every second the attack was charged (+1 HP per 6 frames spent charging), for a maximum of 60 HP. The fake Mii Wizard acts completely independently of the real one (so, no, the two will not operate in sync like the Ice Climbers), and can do everything the original can do except create another mirror image. Even when the clone is not being attacked, it loses HP at a rate of 2 per second. The fake Mii Wizard vanishes when its HP runs out or the real Mii Wizard gets KO'd, though it can be KO’d prematurely if it passes a blast line. The Mii Wizard cannot use this move, or even charge it, while he/she already has a mirror image. Down Special (Custom 2):Traveling Hole[MB6] (Element: Darkness): While the special button is held, a black hole in the ground emerges from the Mii Wizard’s shadow and travels along the ground, similarly to Greninja’s Shadow Sneak. If the hole passes beneath a character, they fall in, sustaining 10% damage and either being buried or dropping through the platform like they were hit with a Pitfall. Note that the attack can only affect characters on the ground.
Final Smash: Storm of Vengeance (Element: Electric): The Mii Wizard conjures a large storm cloud that covers the upper blast line, dealing roughly 3% electric damage to all characters that pass through it (and consequentially stealing any and all vertical KOs scored during the Final Smash’s duration for the Mii Wizard, as well as messing up certain up throws (Kirby, Meta Knight, Charizard)). The storm cloud then proceeds to quickly and haphazardly zap the stage with 30 lightning bolts, each of which does 10% damage. (Yes, on paper, this Final Smash can do up to 300% damage; in practice, it virtually never will, though it can and often does do over 60%.) The lightning bolts do high Sakurai-angle knockback, and can easily end up bouncing unlucky victims between them repeatedly until they’re smacked off the screen. The storm cloud lasts for 10 seconds, after which its 30 lightning bolts are spent and it disperses. The Mii Wizard is free to act while the storm cloud rains lightning bolts onto the stage, and is immune to their own storm cloud and lightning bolts.
Taunts:
Up Taunt: The Mii Wizard twirls his/her staff above his/her head. Side Taunt: The Mii Wizard adjusts his/her cloak. Down Taunt: The Mii Wizard slams his/her staff into the ground in a direct imitation of one of Gandalf’s more famous moments.
Victory Taunt A: The Mii Wizard generates three orbs – one of fire, one of lightning, and one of ice – and sets them to orbit above the tip of his/her staff. Victory Taunt B: The Mii Wizard serenely chants. Victory Taunt C: The Mii Wizard performs some pyrotechnics.
[1] This would describe the staff’s appearance with the Mii Wizard’s Standard Outfit; different outfits can change the staff’s appearance. For instance, an X-Naut outfit will make the staff take on a futuristic appearance, like the staff Grodus wields in Paper Mario: The Thousand-Year Door. I can’t be bothered to go into more detail, as I don’t feel comfortable with taking sole responsibility to come up with all of the costumes.
[2] I believe there’s a character from InuYasha who can do something like this.
[3] The chance to explode is not cumulative; it is simply checked once per second.
[MB2]While named for the Dungeons & Dragons spell, this move is actually more closely based on one of Gandalf’s signature spells. Indeed, it could very well be that explosion of light that he creates during the “YOU SHALL NOT PASS!” moment, except flatter.
[MB3]While named for the Dungeons & Dragons spell, this attack is actually more closely based on Cackletta’s lightning bolt attack from Mario & Luigi: Superstar Saga.
[MB4]All modifiers that would be applied to the damage of a pummel (e.g. Mii Wizard's size, Mii Wizard's Offense, enemy's Defense, Mii Wizard's Arms boosts, Energy Transformation Field, etc.) are applied only to the base damage. The range of possible multipliers is always 0.6× to 6×.
[MB5]This move is an Expy of the Expelliarmus spell from the Harry Potter series.
[MB6]This move is similar to Cackletta’s black hole attack in Mario & Luigi: Superstar Saga. In fact, it’s directly based on it, except that it just plain buries opponents (or drops them through the ground) instead of any teleport-into-the-sky-and-drop-victims-while-increasing-their-weight shenanigans.