• Welcome to Smashboards, the world's largest Super Smash Brothers community! Over 250,000 Smash Bros. fans from around the world have come to discuss these great games in over 19 million posts!

    You are currently viewing our boards as a visitor. Click here to sign up right now and start on your path in the Smash community!
General Moveset Thread

Status
Not open for further replies.

JOE!

Smash Hero
Joined
Oct 5, 2008
Messages
8,075
Location
Dedham, MA
@ shortie: need more moves there lol.

Also, should prob work on the "advanced" tutorial...
 

JOE!

Smash Hero
Joined
Oct 5, 2008
Messages
8,075
Location
Dedham, MA
JOE'S MOVESET TUTORIAL: ADVANCED IDEAS AND MECHANICS

Back again to talk about the next step in making movesets: making your character truly stand out!
STEP 1: Character traits!
Similar to steps 1 and 2 in the previous tutorial, step one of the "advanced" portion looks at what your character is capable of, not just what he/she can do. To clarify, lets take a look at a moveset again:
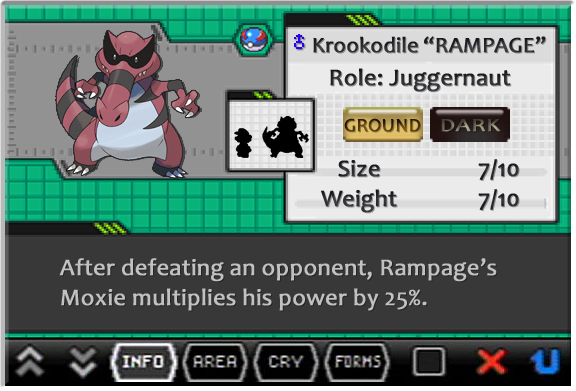
Taken from "Trainer JOE!", Krookodile (nicknamed Rampage) is a Ground/Dark crocodile that is both fairly bulky and powerful, while retaining some key speed in his moveset. However, the fun part is in his ability "Moxie", which in the Pokemon games raises his attack 1 stage with every KO he lands. In his moveset, this special mechanic increases the power and damage of all his moves by 1/4 per KO he scores. Essentially doing the same thing, but lets see how that ties in with his game plan...​

B: CRUNCH
Holding B has Rampage open those massive jaws of his for as long as you want, with the ability to even angle the head up and down as you do so. Releasing B has them clamp down nigh instantly, with a hitbox for 12% at the very edge of his mouth that does mediocre KB. If caught anywhere else, the foe will get trapped in his jaws while the player is able to both mash B or A to damage the foe, doing hits of 2% up to 4 times a second with standard grab difficulty for the foe to escape. Upon release, the foe also takes 3% and is tossed lightly by Rampage "spitting" them out, all the while he is also able to angle his head, influencing the direction they are thrown at the end.
The main benefit of crunch as a damaging move is actually kinda self explanatory: his jaws. His massive maw makes a hitbox about the size of Ganon's Ftilt that can grab at any time, and do a ton of damage once a foe is trapped. At 4 hits a second, you will on average be doing at least 8%, 11% when you release the foe. With just 1 boost from Moxie this becomes 10% a second, 12% with 2 boosts, and so on. This will end up being his bread and butter for most fights as it is a great way to add on damage and catch foes, just be on the side of caution of spacing when you do this, as you are immobile and can eat items, including volatile ones.​

SIDE B: DIG
Diving forward at about the speed of Yoshi's egg roll, Rampage burrows into the stage, leaving only his eyes/top of the head and a lump of moving soil about the size of Squirtle while crouching visible, severely shrinking his hurtbox. From here, you can move as normal, tilting the control stick to go slowly, and jerking it to speed forward at your standard dash speed all the while being a hitbox for 8% and popping foes up slightly on hit, complete with a small "dirt" effect like with Zard's Dsmash when you dash.
There are a few catches that come with the ability to become so much smaller, while gaining a permanent hitbox and easy movement however. First and most obvious is that you can still easily be hit by most any sort of Dtilt/Smash, as you cannot shield or anything. Second, you cannot turn around and you automatically stop at edges, seeing as it is a 2D playing field after all. Lastly, you are stuck in Dig until pressing B or A yet again, which will have Rampage force himself upward with identical lag to the start-up, but this time being a hitbox for 8% still. An amazing approach option, Dig allows Rampage to have a method of approach while being both offensive and defensive, with the ability to lay still while "submerged", and waiting for the opportunity to strike, all the while also being able to charge forward and deliver a bit of pain to foes as well. At low % the pop-out attack when you exit can even combo into some other moves like Crunch or Sand Tomb.
UP B: SAND TOMB
With about the same start up as DK's Up B, spinning 3 times like Falco does with his jab (yet not nearly as fast), Ramp whips up a swirling cone of Sand the size of a mach tornado! The sand comes up after the 1st spin, and will rotate 3 times total, leaving Rampage free after 2 and giving him a bit of a frame advantage on hit. Foes can be hit up to 5 times by this move, with Rampage's body hitting twice for 3.5%, and the much larger swirling sand hitting 3 times for the same amount, often you will have foes trapped in the vortex however as it moves forward about a kirby as the attack goes on. At the end of the attack, the "vortex" becomes the Wolf Blaster to Mach Tornado's Fox, knocking foes generally horizontally or diagonally upward with the last hit, but trapping them for at least the 3 hits of the sand none the less. (10-17% normal, 13-21% and so on with Moxie).
In the air the move behaves similarly, but with no ground to work with, Rampage will simply spin about 4 times while covered in sand, doing the same damage but not linking as well, while being able to move similarly to a mix between MK's Drill Rush and Charizard's Fly, while only having the reach of Dimensional Cape, making for a rather poor, if not versatile recovery due to the movement.
Similar in use to Crunch, but with generally less prediction required, Sand Tomb allows you to trap a foe as a set-up maneuver due to the frame advantage if you hit with it, and doubles as a great damage-racker with Moxie. Unlike Crunch however, it has a noticeable start up time and is semi-useless offensively in the air, making it's use better off grounded.
SWITCH-IN: PURSUIT
Rampage is one of the three who have a Switch-In attack for when he appears on the field, meaning that upon switching into battle he automatically performs this attack from his pokeball.
Upon release, Rampage will immediately rush forward at about Sheik's Dash Speed while covered in a blackish aura, slightly crouched, traveling about a platform and a half before swinging his head up with a roar, before quickly going to a neutral state. The rush part of this move does 8% with KB akin to Zard's Dtilt, whereas the swing at the end has similar power, but hits for 12%, killing much earlier, but lacks super armor like the dash does.
Pursuit is a great move for Rampage as even though it doesn't benefit from Moxie, it is perhaps the most useful way to start it. After dealing with a foe with another team mate, hopefully one with a switch-out move that makes them set-up bait, a good pursuit at the right place can score an easy kill for him, starting that boost that makes him such a menacing fighter. Aside from that, it also has a good deal of range and speed (as well as SA) to make it a solid attack in general to rush in with if need be, especially if he's next in line after a team member gets defeated.
Seeing as his damage output increases when he gets a KO, 3 of his specials (well, the only specials he can use normally) deal multiple hits, or linger for quite a while to take advantage of said boost in order to wrack up insane %'s quickly when he has steam going. Even better, as part of a trainer set his "Switch-in" attack allows him to pop into battle and immediately get the ball rolling!​
However, how does this relate to the moveset you want to make? Simple: make sure any special mechanic you have flows with the character.​
Like I did with Krookodile and Moxie, both are built around one another. Krookodile's set takes full advantage of building Moxie, while Moxie works to improve Krookodile. IMO the best mechanics feed into themselves through the character, kind of like P:M Lucario and his changed "Super Aura". He naturally fights via fast paced combos, and the better he fights the more reliably/quickly he builds charge. Charge then allows him to perform finishing moves and/or extend combos/recovery, then build up more.​
By contrast, simply slapping a mechanic onto a character for the sake of it has equally bad results as the good results of a natural one. The set following Krookodile was Archeops, which had "Defeatist" as a gimmick that nerfed him severely if he was over 100%. While in-character for the pokemon, it did little for his gameplay other than give an excuse to make him extra-broken for the time he'd be alive. This unfortunately turned him into a "suicide lead" for teams MYMers thought up, and while not invalid, stagnated his potential very quickly.​

STEP 1.5: Mechanics as a focal point!
Sometimes sets can combine the good part of polarizing mechanics like "Defeatist", and make them natural like "Moxie". While rarely great, the examples that have central mechanics really shine, such as with n88_2004's
Spiritomb is portrayed as a ghostly entity that is connected to the "odd keystone" item. His entire gameplay thus revolves around how it is the keystone that must be destroyed and not Spiritomb himself in order to land KOs! While still hittable, even if he goes wayyy past the blast zone, one must pick up the keystone like the would Bonsly and toss it offstage. They move slowly while carrying it, like with Bonsly, and if hit drop the item automatically. This creates a unique metagame for the ghost/dark type that revolves around protecting a literally key weak point the entire match.
I wouldn't recommend going this far unless you have an idea you can really make work with the character. But, it -can- work if you do it right!​
STEP 2: Move-Driven-Mechanics!
Slightly different than "general" mechanics are move-driven/move-specific mechanics. For example, your character may have a Neutral Special that builds up a charge, be it a projectile or some super-strength attack, the special lets you build up and maintain "energy". Normally, the charge is only meant for that one move, but others have used such thing for other purposes such as using the charge in other moves (for example, pre-charging the NSpecial could charge all your special moves, but cost the charge), or even change your stats as you charge/hold a charge to give choice to even charging / using the move!
Other moves can do things such as apply buffs to allies / debuffs to enemies, commonly including Damage over Time and slowing down foes, and mess with the base mechanics of smash by altering the character's moves/shield/etc.​
A special type of move-driven mechanic is found in Brawl: Traps. Traps, used primarily by Snake and Diddy Kong, are any sort of hazardous item/area created by the character on the stage. Traps can really be anything, but generally either fall into a 1-time use (C4) or lingering effect (Nanners) and either hurt or incapacitate foes in some way.
Lastly, the most exotic move-mechanic is seen only with DDD and Olimar: Summoning. Summoning brings a new character to the field to work with you, and while Brawl limits it to barely having an AI / being a simple tool, others have worked summons into full-blown pets and minions! A good example is found in Plorf's "Pharaoh Man" in the current MYM13 thread (also a good source for the Nspecial charge I talked about earlier!) where his Dspec will create an area that summons small, mummy-robots over time. The Mummies have a simple grab attack, but can otherwise do other tasks seen later in the set. While simple, other examples have gone as far as being able to influence the AI of minions with intelligence equivalent to lvl 7 -9 computer opponents!
Play around with combinations of all these effects and you'll quickly realize the potential you can create using tools seen in-smash. Just don't get too crazy or you'll make something that's not even for the same game!​
STEP 3: Interactions!
Speaking of combining effects, interactions are a huge part of MYM. Simply put, interactions occur when you combine the (special) effects of two or more moves (in a sequence). For example, a magic character could have a side special that traps the foe in a magic orb. While they are in the orb, the character's other moves interact with it in a special way that they wouldn't do otherwise from simply dealing more damage but no KB, to adding a new special effect to them!
Things can get real complex real fast when you add interacting moves to the mix, especially with a character that also has character mechanics and move mechanics, but if done right the result can be incredible. Example: A character who summons minions that interact with his Dsmash and Side Special traps each in their own way (they will pick up the Side special traps and make them mobile, whereas they will try and throw foes purposely at the Dsmash ones), and cause a status effect when Ko'ed via HP depletion.​
There's not much more to add here other than the hint of having moves work off each other mechanically instead of functionally (comboing vs hard-coded to have a new effect), so experiment with what you find interesting and fun!​
STEP 4: New Moves!
Probably the most controversial of the "advanced" portion is rightfully the most extreme: messing with the game mechanics themselves.
Having neat interactions and specials are one thing, but having a character that has a back-tilt, Shield-Special, and air throws? That's a whole new can of worms. I strongly caution against doing this unless you are "augmenting" an existing move, as it can come off as tacky / just weird if not done right. Augmenting refers to altering the properties of existing moves, such as having a Zair but have it actually be some sort of air grapple or attack, instead of a tether. Or having a shield like Yoshi: unique to the character with it's own properties, a character with a real shield like link could use it when they "shield" for example.
As I said, be careful if you try and add to the existing set-up as while done well in some instances (a character that splits in two for example could have a range of B standards and aerials and A standards + aerials to relate to the two of them), it is -very- easy to mess up a set with this.​

STEP 5: Summary!
To wrap it up, the advanced part of move-setting simply involves exploring the options we covered in the first tutorial in a new, creative light. Think of a new mechanic that drives your character, how their moves effect their opponent or even the stage, and even your other attacks. But most importantly, just let your mind loose and really dig into what your character could pull off given the smash engine!
With MYM14 around the corner, hopefully some of you may even take a crack at the concepts listed here :)
 

Pheta Ray

Smash Ace
Joined
Oct 14, 2012
Messages
816
Location
Kerry, Ireland
PROFESSOR OAK, POKEMON TRAINER


======================
====== Charmeleon ======
======================


A: Punch (3%)
AA: Punch, slash (3%, 4%)
AAA: Punch, slash, kick (3%, 4%, 4%)

F-tilt: Swipes tail at opponent (8%)
D-tilt: Sweeps twice at feet with claws (7%)
U-tilt: Headbutts the air above him (8%)

N-air: Sweeps claws in an arc around his body (10%)
U-air: Slashes up then forwards with claws (12%)
F-air: Turns and whips tail, then faces back (11%) [360 degree turn]
D-air: Kicks down (11%)

Pummel: Headbutts opponent (2% x hits)
U-throw: Tosses into the sky (13%)
D-throw: Throws down and steps on opponents neck (13%)
F-throw: Spins 720 degrees and throws (14%)
B-throw: Tosses behind body and flicks with flame tail (14%)

U-smash: Blows a burst of fire from mouth upwards (14%)
D-smash: Slashes around user's body below the waistline (13%) [Covers both sides of user]
F-smash: Shoves claws forwards with a burst of flame from mouth (16%) [User will reel back when charging]

Neutral-B: Ember (3-4% per hit) [Shoots jets of embers at opponent]
Forward-B: Quick Attack + Slash (14%) [Dashes forwards and slashes once quickly]
Down-B: Change to Dragonite
Up-B: Shoots fire from mouth to propel body upwards (13%) [Can be angled]

U-Taunt: Blows smoke up and around body
D-Taunt: Stomps on ground and roars
F-Taunt: Wags tail cutely and smiles


======================
======= Dragonite =======
======================

A: Punch (5%)
AA: Punch, tail whip (5%, 4%)
AAA: Punch, tail whip, uppercut (5%, 4%, 6%)

F-tilt: Punches hard (8%)
D-tilt: Jabs twice at feet (4%, 5%)
U-tilt: Pushes wings upwards (8%)

N-air: Spins 360 degrees (12%)
U-air: Shoves wings upwards (13%)
F-air: Flashes wings forwards to blow a gust of heavy air (14%)
D-air: Kicks down with legs (13%)

Pummel: Knees to body (2-4% x hits)
U-throw: Slams down to get body into the air (14%)
D-throw: Tosses down on ground and steps on stomach (16%)
F-throw: Kicks forwards (16%)
B-throw: Throws back and slams with tail (16%)

U-smash: Punches upwards while spinning 360 degrees (17%)
D-smash: Punches into earth with a fire fist (15%)
F-smash: Dragon Rage (18%) [Bursts a yellow-blue flame]

Neutral-B: Twister (5% x # of hits)
Forward-B: Hyper Beam (5%-20%) [Like R.O.B.'s laser, takes time to charge]
Down-B: Change to Charmeleon
Up-B: Fly (16%) [Spins upwards while rising]

U-Taunt: Flares wings and roars
D-Taunt: Stomps on the ground three times
F-Taunt: Roars and wags tails
 

Junahu

Smash Ace
Joined
Nov 15, 2005
Messages
899
Location
Shropshire Slasher
Characterization; using gameplay to endear and inform

Preamble
Hello there. Like JOE and FrozenRoy, I primarily skulk around in MakeYourMove. I've written a handful of the more complex and theoretical tutorials, along with more than a couple of divisive movesets. Hopefully I'm not intruding too much by writing a tutorial here. My writing is hardly the friendliest or the most inviting. And this tutorial will be covering an absurdly complicated subject that even MYM hasn't mastered yet. This is cutting edge stuff, so feel free to ignore it entirely if it sounds like too much work. In fact, I've placed the entire tutorial inside this collapsible box. Open it if you dare (woooOOOOoo)

Why Characterization is important
Getting audiences invested and interested in the affairs of fictional characters is paramount when developing Intellectual Property (and especially fighting game IPs).​
As humans, we are social creatures, and we feel naturally closer to characters we can empathise or understand. Once we think of a fictional character like a friend, a rival, or even an extension of our own selves, we are far more likely to buy things that involve that character. It's simply more profitable to have likeable characters than it is to fill the ranks with generic stock.​
Within the context of games specifically, characters are something of a gateway into the game. They're the face of the game that attracts purchase, and their actions are the guiding hand that gets players comfortable with the gameplay. Their personalities and conflicts give us the context that drives our adventure, or makes us cheer for our chosen charge.​

How Characterization manifests itself
In other types of media, there are two basic means of informing an audience of a character's personality. You can either explicitly state it, or you can imply it through their actions. Games are unique in that there is a third strata to characterization; how the player and character interact. This is a complicated, uncertain, business, but it is one of the most important facets in making a great video game.​
To take an example, let's talk about Mario. His stated characterization (his role in the plot of the game) is that he has the determined and immutable goal of rescueing Princess Peach.​
Beyond this determination however, Mario's personality is entirely manifested through the player's actions. And in turn, the player's actions are guided by the level design and specific mechanics of the game itself. To put it simply, gameplay defines character. You can't have a guy collecting billions of gold trinkets and then have a cutscene pretending he isn't interested in material wealth.​
Mario's levels are expansive, and invite the player to sprint and leap through them recklessly. Secrets and grottos entice players into making detours, yet the limited clock keeps them on task. Keeping momentum usually requires trickier jumps or other tricks, but typically leads to the more rewarding paths. Even a single hit from an enemy can kill Mario, yet extra lives promise another try, and the enemy's predictable nature can be easily overcome.​
All of these aspects lead to Mario feeling acrobatic and thrill seeking. He loves the open air (as opposed to the oppressive low ceilings of the castle levels), and passively views enemies as incidental, unthreatening, or even useful. Even in a life or death situation, Mario is having fun.​
In contrast to Mario, someone like Kid Icarus' Pit is almost the exact opposite. Despite his bulging health bar, and unchallenging, plodding speed, Pit feels a lot more vulnerable. Or rather, his world feels much more threatening. Mario is free to ignore his enemies, but Pit's feeble run, and the underworld's oppressive layout demands that he tackle absolutely every enemy in his path. And while his hp buffers him against multiple assaults, recovering that hp involves a costly visit to the game's very limited number of shops. Levels are long, and absolutely devoid of checkpoints. A single mistake, or one hit too many, could make Pit tumble all the way back down. There is no time limit, and Pit can be strengthened by killing many enemies (to earn stronger arrows, and to collect currency for life-saving items) and visiting dangerous grottos. A cautious player, a cautious Pit, will have a better chance of succeeding.​
Neither game has any in game text that explains their personalities. You don't read about how brave Pit is, or how free-spirited Mario is, you experience it. And that experience is what you remember of the game.​

Characterization in Movesets
Designing with characterization in mind is innately difficult, because it relies on a number of unknowable quantities. There are few hard rules to follow, but the end goal is to make the player feel the characterization of the character. Therefore you are looking for ways to communicate with the player, using only the actions of their character and the scenarios of the game. Body language is important, as is the nitty gritty of what each action is good for.

Characterization is almost an infinitely deep subject. I've split it into the 6 different "layers" listed below;

Top Layer: Superficial Characterization
At the very top, we ask "what is the character famous for doing?" "what can I put in the moveset that will get players to recognise this character?". This is superficial characterization, because it doesn't explore the 'why?' of a character's actions, it simply gives us a tool from their past that we remember. Mario's FLUDD is certainly memorable, but other than that one game it was in, what does this thing have to do with Mario?​
Despite being the easiest and shallowest level of characterization, Superficial characterization is very important. It is the first layer that players will experience, and players want to be reassured that they are indeed playing as THE Mario, or THE Link.​
2nd Layer: Extrapolative Characterization
Here we take the character we have and ask "what could this character do that would be realistically within his character to do?". Many of the simple kicks and punches movesets employ are at this level of characterization. This is the extrapolative layer because we are expanding beyond their existing actions, yet still expressing a pre-established personality. Again, these moves don't answer the 'why?', but they do explore a little of their potential as characters.​
3rd Layer: In-Practice Characterization
At this point, we finally reach the 'why?', and then use that 'why' to better define our attacks . We ask "what is it about these tools that the characters have, that determines their personality?". Once we get this answer, we can start adapting those tools into Smash Bros' unique gameplay.​
It's at this layer that we take individual moves and try to flesh them out in a way that is cohesive to the characterization. "How do we make Bowser into an feral, aggressor who would spitefully KO himself to take down an opponent?". "How do we make Dedede view those minions he has as nothing but ammo to throw?". "Can we have a move where Mario reverses the opponent's momentum, turning the opponent into the architect of their own demise?".​
If you can reach this layer with even a few attacks, your moveset's characterization will shine. The character will feel that much more "alive", because they are doing things for reasons that make sense to that character.​
4th Layer: Player Characterization
At this layer, we bring the player themselves into the mix. "How do we get the player to naturally play the character in a way that fits their personality?". This is a truly difficult layer to master, because it involves the entire moveset and what it is capable of doing, not just the playing style that has been layed out for the player. Think about what the moveset as a whole is encouraging the player to do. Think about how players will accommodate (or surpass) the moveset's weaknesses. Think about potentially abuseable moves, and what it says about the character if the player wants to spam them.​
At this layer, you want to encourage the player to have similar motivations and goals as the character does, so that they start thinking alike too.​
5th Layer: Inter-Player Characterization
Something of a meta-layer for Player-Characterization, here we try to predict how the moveset will react to other movesets in our game. "What will the player do when they encounter a tough matchup? What will they change about the way they play this character?". This is an important layer too, because it involves multiple characters interacting with one another, which is the entire point of the game. Weaknesses, strengths, and the eb and flow of matches can define how different characters feel about one another. Does Ganondorf feel frustrated at Link using projectiles to keep him at arm's length? Is Link aprehensive of what Ganondorf can do if he closes the distance between them, or does he have the tools to escape?​
Bottom Layer: Inventive Characterization
The bottom layer, the most meta-layer of them all, throws out the rule that we have to communicate an existing personality, and instead uses the moveset to invent new personality. Captain Falcon IS this layer. His character was all but invented through his Smash Bros moveset. He used to be nothing but a name and a picture. Now he's one of the most endearingly awesome characters Nintendo has.​
Using this layer yourself means asking the question "what can being in Smash Bros do for this character? What aspects of their personality could not be explored, or even defined, in their own genre of game?"​

A detailed guideline to designing characterization
Knowing the 6 layers we can use to design a well characterized moveset, we can move on to trying to make practical use of them. The following guideline is extremely thorough, involving far more research and planning than even MYM usually affords. Think of the following as a theoretical ideal for an individual designing movesets;

Step 0 is understanding the engine you're designing a moveset for. This is kind of absolutely 100% vital. If you don't know Smash Bros, you aint making Smash Bros sets. And this isn't limited to the mechanics of the game, nor its intricasies. You also need to understand the underlieing rules it has for how various characters, objects and properties are represented in Smash Bros. There's a certain order to the chaos, and the more you understand of it, the better a moveset you can create to fit it.

Step 1, most sensibly, is choosing the character you're making a moveset for. The Smash Bros engine does inherently limit the types of characters that will be viable as movesets (pacifists are exceedingly difficult to make believable) but otherwise your limits are simply your imagination. Choosing a character you like personally will make the moveset making process much more enjoyable.
But other than the character, you need to start pinning down what 'iteration' or 'interpretation' of the character you'll be using. For example, if your character comes from an RPG, then their personality at the start of that game, will be markably different to their personality at the finale. Another, specific example, is King K.Rool, who adopts a different persona in every Donkey Kong game.

Step 2, is to research that character, paying special attention to what kind of emotional attachment players get towards that character in-game (assuming your character is indeed a video game character). Play the game, noting iconic actions and central personality traits as you go. Try to look up additional official information on your character. Instruction manuals, developer interviews, side-games etc.
Once you've exhausted official research, you should try to gauge how other players/fans react to that character. Find forums for the game in question, search for wacky plot theories or hot debates on your character. Pay attention to the kinds of players that are making these assertions, their ages, their experiences with the game etc. You want to put together a list of expectations, things that players are assuming about your character that you can play to or imply.

Step 3, is to organise the research you've performed to create a list of signature actions and personality traits. Pair up signature attacks with the input you think they'd be most suitable on. The special attacks are typically the best places for these. Try not to be overly specific at this stage, as you may need to tweak the specifics of how moves work in order to characterize them better.
Mario, for example, needs a move where he jumps, because he's almost synonymous with jumping. And that pairs very well with the Up-Special, as it allows him to recover from offstage.

Step 4, at this point you should have a sufficient foot in the door to begin thinking about an overall "playstyle"; basic goals, actions and advantages that the player can leverage to KO the opponent or defend themselves from KO. You want this playstyle to loosely adhere to the character's personality. But don't force it. The choice to play a certain way must be a choice that the player is allowed to make themselves, otherwise it isn't meaningful, and it makes the player feel restricted.

Step 5, once you have a general playstyle set up, dissect it. Break it apart into its fundamental elements and challenges (how will the character approach his foe, or does he not need approach at all? What is the ideal reaction the opponent could give to the character attempting to fullfill a given goal? Are there multiple goals that the character can play to at the same time? etc). You will eventually come up with a list of simple questions that, when answered, will give you a rock-solid guideline for creating your moveset. If you're still not sure, try to break down some of your questions into more questions, until you have enough specifics to understand just what your moveset needs.

Step 6 is simply, create that moveset. Imagine moves that obey or enhance the answers you gave about the playstyle the character will have. Ensure that the character has the tools they need to carry out their playstyle. Give the player additional options for doing things that you want the player to get creative with (more projectiles? more KO moves? more set-ups?). More options will also make that part of a playstyle more adaptable, and easier to carry out in general.
Also be sure that the moveset also obeys negative qualities that you decided on (i.e. weaknesses). Be careful that, in the process of filling your moveset, you didn't accidentally remove a weakness you wanted your character to have. You may have to return to Step 5 in order to flesh out the playstyle a little more, so you understand what potential remains to be filled.

Step 7, with a full moveset in front of you, explore what you've just created. Imagine this character in a variety of situations and with a variety of differently skilled players. Run through likely actions and reactions, not just with pros that innately understand the moveset, but also with beginners who are just now trying the moveset for the first time. Try to predict exploits that will cause pros to play the moveset differently, and individual moves that newcomers will latch onto as being 'strong'. See if the new player has the ability and the opportunity to discover the deeper aspects of a moveset (without being told by someone else), and see if there is sufficient depth and variety in the moveset so that experts can continue to adapt their tactics to the ever changing 'meta-game'.
If you find something that doesn't work, then ask "why doesn't this work?", then try to use that answer to return to Step 6 or Step 5 and fix the problem.
Note that as well as being functionally cohesive, the moveset needs to make sense in terms of characterization. Ask yourself how far out of their way a player needs to go in order to make the character act "out-of-character". The most important kind of player to endear your character to, is the low level player, as the high level player is already attached to the character (and the Smash Bros games as a whole)​
 

Demna

Smash Lord
Joined
May 5, 2013
Messages
1,356
Location
Kuwait
3DS FC
1478-4225-1103
Character:- Darkrai

Neutral Special: Shadow ball - Similar to mewtwo's shadow ball in melee.

Side Special: Darkvoid - sends out a portal of darkness; whoever gets caught in it will be put to sleep be vulnerable for a second (or two).

Up Special: Teleport - Darkrai fades into the darkness and reappears where the control stick is directed.

Down-special: Dark Pulse - deals shadow damage in a small radius around himself.
 

8-peacock-8

Smash Hero
Joined
Jul 23, 2012
Messages
9,337
Location
Somewhere
Basic Combo: Punch, Punch, Spin kick​
Side Tilt: Side Kick
Up Tilt: Headbutt
Down Tilt: Foot Sweep
Side Smash: Deals a strong punch. (His arm will be engulfed in a mini version of his giant energy glove)
Up Smash: Flip kick
Down Smash: The RED HERO jumps up and punches the ground. This causes small chunks of ruble to launch out of the ground to hit opponents. (Like his Side Smash, his arm will be engulfed in a mini version of his energy glove)
Dash Attack: Karate Kick
Neutral Air: Sex kick (Yes it's the name of a common move in Smash bros)
Forward Air: Elbow Drop (Meteor Smash)
Down Air: Spinning Lariat (The Hero's arm will be engulfed in a mini energy glove in this move also)
Up Air: Flip Kick
Back Air: Spin kicks
Edge Attack: The Hero punches forward with his energy glove. (It's at it's normal size in this instance)
Pummel: The Red Hero will be doing gut punches.
Up Throw: The Red Hero deals a powerful uppercut.
Down Thrown: The Red Hero slams the victim on the ground and slams his energy fist down on the opponent.
Forward Throw: Red hero slashes his victim with his Viewtiful Joe scarf/cape. This causes the victim to spin backward.
_______________________________________

B: Energy Pistol - A hologram of the Green hero appears behind the Red Hero and summons his pistol to fire at enemies.
Forward B: Charging Fist - The Red Hero charges and punches forward at high speed with his energy glove. This move needs to be charged up. to have full effect.
Down B: Karate SLASH! - The Red Heroe will slam down his energy hand down with a powerful karate chop.
Up B: Chain! - A hologram of the Blue Hero appears behind the Red Hero and summons the chain to grapple onto the edge of the stage. (Tether Recovery)

Final Smash: WONDERFUL 101! ASSEMBLE! - The Hero summons the Blue, Green, Yellow, White, Black, and Pink Heroes to attack his opponents. (The Yellow, Black, White, and Pink heroes are on the box art.)
 

Weeginji

Smash Cadet
Joined
Dec 23, 2012
Messages
43
Not sure why I didn't post this here earlier. Must have forgotten or something. Anyhow, here's my Shulk moveset.

[COLLAPSE="Stats and Description"]Running Spd.: Moderate
Air Spd.: Fast
Falling Spd.: Floaty
Power: Moderate
Atk. Spd.:Slow to Moderate
Atk. Range: Unmatched
Weight: Moderate
Recovery: Moderate

Shulk is a mid-range fighter with mostly middling stats, aside from his range and attack speed. The Monado is a very large sword and grants Shulk what is easily the longest overall direct attack range in the game, and will even extend for certain attacks a la the Beam Sword. The drawbacks to Shulk’s incredible range are his generally slow attack speed and his only moderate attack power. Shulk is meant to be a “poking” character, playing offensively but using his long range to attack from a safe distance. His floaty falling and quick air speed help him to escape close-combat by hopping, as well as assist his so-so recovery (it also matches Xenoblade’s jump physics quite well IMO). Shulk also has a few more tactical moves in his arsenal in the forms of most of his specials.
[/COLLAPSE]
[COLLAPSE="Specials"]Neutral- Monado Buster- Shulk calls out “Monadooo!” extending the Monado, then yells “Buster!” as he slashes downward and slams the Monado into the ground. The move is slow and telegraphed, like the Falcon Punch, and is only somewhat on the strong side. However, the Monado extends to an incredible size, able to reach halfway across Pokemon Stadium.

Side- Monado Purge- Shulk reels back, and then fires a projectile wave from the Monado while calling out the attack’s name. Though the move starts somewhat slowly, the wave travels quickly. It only does moderate-low damage, but surrounds the opponent in an aura that leaves them unable to shield or use specials (Single Button!), lasting for about 4 seconds. The initial sword strike that releases the wave also does damage, and drags the opponent in to ensure that the wave will hit. On the ground the animation resembles Stream Edge, while in the air it is the classic Monado Purge.

Down- Counter Shield- Shulk’s eyes glow blue as he receives a vision of the future. If he is hit during this time, he casts Monado Shield on himself, simultaneously releasing a burst of ether that does low damage and hits all surrounding enemies. The shield lasts for about four seconds, making Shulk invincible for its duration. Shulk is vulnerable for a split second before his eyes begin to glow, as well as afterward if he is not hit during the vision.

Up- Monado Cyclone- Shulk calls out the attack name and leaps into the air at a diagonal angle, the Monado held above his head and a whirlwind surrounding him. The attack only goes about as high as Mario’s Super Jump Punch, and has a slight starting delay. It does one hit for moderate damage, but also pushes away anyone beside Shulk for its duration. The push forces a topp-er...trip on grounded opponents. The push does not reach the area above Shulk, leaving him vulnerable to overhead attacks. Shulk enters helpless state after using this move.[/COLLAPSE]
[COLLAPSE="Normals"]A, A, A- Two horizontal sword slashes and a downward slash. Come out moderately fast, do low damage, and have good reach.

Side Tilt- Shulk leans back for a moment then does a side kick. The move does low damage at the leg, but has a sweetspot at the foot. When the foot connects, the move becomes ELECTRIC GUTBUSTAH and does higher, electrical damage and more knockback.

Up Tilt- Shulk does an overhead slash. Comes out somewhat slow, but has good range. Moderate power. Also strikes in front and behind Shulk.

Crouch Attack- Shulk does a low kick. This is one of Shulks faster, shorter ranged attacks. Low damage.

Forward Smash- Shulk performs Turn Strike, spinning a 360 before slashing diagonally. One of his slower attacks, but also stronger. Has good range.

Upward Smash- Shulk hoists the Monado above his head with both hands and stabs directly upward. The Monado extends during this move, giving it great range, but it comes out somewhat slowly and does only moderate damage. The hitbox also does not extend to Shulk’s sides.

Downward Smash- Shulk performs WAAAR SWING, spinning around with the Monado held out. Good range, somewhat slow, moderate damage.

N-air- Shulk spins 3 times with the Monado held close to himself. Moderatey fast and short ranged, with gradually decreasing power like most N-airs.

F-air- Shulk performs Air Slash, slashing diagonally upward with the Monado. The Monado extends during this move to give it great range. Somewhat slow. Moderate damage.

U-air- Shulk performs SOOOARING TEMPEST, or at least a two-handed, watered down version. Shulk spins the Monado above his head multiple times. Does several small hits, and is somewhat fast. The hitbox is actually more to Shulk’s sides than directly above himself, making him somewhat vulnerable to overhead attacks when also in the air.

B-air- Shulk gets into batting position in midair and swings behind himself. The Monado extends for this move. Is somewhat slower and stronger than his F-air.

D-air- Shulk stabs the Monado downward while flipping upside-down. The Monado does not extend, but the Monado still reaches very far downward. The move is somewhat slow and does moderate damage, but Meteor Smashes if the very tip connects.

Dash Attack- Shulk performs GALE SLASH, sliding forward a little and stabbing. The Monado reaches very far but does not extend. Somewhat slow, moderate damage.[/COLLAPSE]
[COLLAPSE="Grabs, Ledge, & Floor Attacks"]
Grabs
As per Sakurai's statement on the Dojo, Shulk's throws are on the weaker side since he can't use any powers to make them stronger.

Pummel- Shulk knees the opponent.

Forward- Shulk kicks the opponent forward.

Upward- Shulk tosses the opponent upward.

Downward- Shulk throws the opponent to the ground and performs HAMMAAAH BEAT. Hammering the opponent with the Monado.

Backward- Shulk tosses the opponent behind himself and performs Back Slash.

Ledge Attacks

<100%-Shulk climbs up and slashes horizontally.

>100%-Shulk climbs up slowly and uppercuts (Bone Uppah?) with his free hand.

Floor Attacks

Face-down- Shulk stabs the Monado forward, and then strikes behind him with the pommel.

Face-up- Shulk gets to his feet in a crouch, and then does a 360 slash as he rises.[/COLLAPSE]
[COLLAPSE="Final Smash"]Final Smash

*SPOILERIFFIC VERSION! Skip unless you've beaten Xenoblade Chronicles*

Monado III- Shulk unleashes the Monado III. Shulk is invulnerable, and all attacks now do strong damage. Attacks that extend the Monado, including Monado Buster, now reach even further.


*Non-Spoileriffic Version*

Super Monado Buster- Shulk points the Monado upward, extending it, and then performs a larger and more powerful version of Monado Buster with a full-arc swing that hits everywhere but beneath him. A damaging trail of ether follows the slash that stays around for about half a second, making it more difficult to dodge. The Monado does small hits that draw the opponent inward during the extending portion of the move. Shulk's falling speed slows considerably when this is used in the air.[/COLLAPSE]

[COLLAPSE="Misc."]Intro
A Defense Force hover transport descends onto the stage with its door open. Shulk hops out and brandishes the Monado.

Emblem
A silhouette of the Monado pointing downward at an angle, imitating the title screen/box art.

Taunts
Up- Shulk pumps his fist into the air with the Monado in it and shouts “Come on!” as a blue aura surrounds him. Copied from Xenoblade’s Battle Soul Art, but has no effect.

Side- Shulk puts the Monado away and stands up straight for a moment. He holds his chin and taps his foot in thought and says “Hmmm…”, then switches back to battle stance. Copies an idle animation from Xenoblade.

Down- Shulk says “Huh?” and relaxes his battle stance as his eyes glow blue and he has a vision. After gazing for a moment, the vision ends and he hurriedly shifts himself back into stance.

Idle Animations
• Shulk’s combat stance is somewhat crouched, with the Monado held out to the side. Copied directly from Xenoblade Chronicles.
• Shulk will shift the Monado in front of himself as if trying to guard with it.
• Shulk will take one hand off the Monado and hold his chin with it, contemplating.

Victory Animations
• Shulk puts the Monado onto his back and lets out a sigh of relief. He then takes out a book, sits on the ground, and begins reading it.
• Shulk pumps the Monado into the air twice and says “That wasn't so hard!”, then puts it over his shoulder.
• Shulk slashes the Monado twice, hops a 360 on the second slash, and points it toward the screen on landing, saying “Now you know the Monado’s power!”

Victory Fanfare
Remix of the “Secret Area” fanfare: http://www.youtube.com/watch?v=wryI07kDr6k[/COLLAPSE]
 

Knight Dude

Keeping it going.
Joined
Mar 10, 2013
Messages
21,230
Location
The States
NNID
Kaine-Rodgers
3DS FC
0232-7749-6030
A while ago I had made a moveset for Megaman Starforce. I posted it in the MYM thread I but I forgot to post it here too. Better late than never I suppose.
Though it should be said that this was the first moveset I had done. So its definitely a bit rough around the edges. But aside from that I do like how the moveset turned out as far as a first run goes. I might update this one some more another day though.

I did remove a little bit of clutter from the original post though.


Play-Style Idea
Geo's playstyle should mostly be focused on being able to rush down the opponent with close range attacks, as he has a variety of close range battle cards from his games as well as his partner Omega-Xis. Megaman, in his many incarnations is known for his vast pool of long range attacks, while the moveset SFMM is mostly rush-down from what I have in mind I also have a certain "gimmick" in mind that can represent the gun-play aspect of Megaman as well. It should be noted that, while SFMM has better horizontal K.O. game, he still has a couple combos dedicated to vertical combat.


Overall Stats: Megaman should be a character with balanced stats across the board. The only major stat he should be lacking in is his air movement. While the only two stats that are noticeably higher are his jumping height and weight.

Ground Speed 6/10: Megaman should have some decent ground speed to make sure he can keep himself as close to, or as far from, any opponents as he needs to be.

Air Speed 4/10: In order to balance his above average ground speed Megaman should have a little bit trouble in the air.

Size: 5.5/10: This version of Megaman should be slightly taller than Peach.

Weight 7/10: Megaman might be a kid, but he's wearing armor so he should be heavier than average.

Fall Speed 5/10: Megaman should have average falling speed.

Jump Height 7/10: Having come from a franchise that mostly revolves around platforming, it would kinda make sense that any form of Megaman is good at jumping. For comparison's sake, Megaman's first jump should be as high as Mario's while his second jump is high as Luigi's. Like most characters, Megaman can only jump twice on the ground.

Traction 6/10: Megaman should have slightly above average traction.

Extra Stuff: Megaman's extra traits are similar to other Megamen, namely X. Megaman should be able to jump off of walls similar to some other Megaman characters. Unlike Diddy Kong Megaman dosen't stick to the walls, rather he has the ability to slide down on the wall slowly.

Here's what he looks like as Megaman

Here's what Omega-Xis,his EM-being partner looks like:

Moveset-wise, Omega-Xis can mostly serve as Geo's "finisher weapon" most of the moves that would involve Omega-Xis somewhat slow but very powerful.
Starforce Megaman Moveset:

A moves

AAA: First Megaman does a basic jab with his right hand then he attacks using a move similar to the syncro hook his left, and does a kick to the gut with his left leg. Each hit does 5% damage. Last hit has a little knockback. This should just be a basic combo, nothing too special about it. Each of the attacks should be somewhat fast, about as fast as Mario's AAA combo.

Forward + A: A quick roundhouse kick from the right leg. Does about 8% damage. Decent horizontal knockback. This attack, if timed correctly should be able to combo into his basic three hit combo. This should be his second fastest A move on the ground. This move can also serve for poking the opponent.

Up + A: Megaman morphs his arm into a greenish-blue beam sword and he slashes his sword upward. Does around 11%. Decent vertical knockback. Like his forward A, it can be comboed in to his basic three hit attacks. This is meant to serve as an alternative basic combo for those that prefer vertical combos. This move is his slowest Non-Smash A move, it's main advantage is its larger than average hitbox.

Down + A: A quick low kick that does about 9%. Very, very little knockback. This move is pretty much meant for poking your opponent getting in a little bit of damage. In order to serve as a decent poke move this move is very quick, For comparison, It should be faster than Luigi's Down+A. The attack also has more range than Luigi's as Megaman sticks his leg out further.

Dash + A: Slide: Megaman does a sliding kick,similar to Classic Megaman that deals 7% of damage. Decent knockback. This slide kick should be a bit faster than Mario's and it should have slightly more range too.

Forward + Smash: Beast Slash: Megaman summons Omega-Xis to use the Beast Slash. Uncharged does 15% damage, full charge does 30% damage. Sends the enemy flying horizontally. This Smash attack should take about 2 seconds to fully charge, and it serves as one of his main KO moves. The only real disadvantage of Megaman's Forward + Smash, is that the Beast Slash is rather slow, both in charging up and in the actual attack animation. For comparison, the animation for the Beast Slash should be slightly faster than Brawl's Falcon Punch.

The animation of Megaman's Forward Smash should look similar to the Beast Slash in the Starforce games. Omega-Xis lunges ahead of Megaman and slashes the enemy.


Up + Smash: Megaman does a backflip kick with both legs. Uncharged does 13% damage, full charge does 26%. Sends the enemy flying up into the sky. The main purpose of this move is obviously to serve as a vertical finisher. It should be noted that the Up + Smash is faster than his Forward + Smash but is notably weaker when fully charged.

Down + Smash: Megaman does a powerful sweep kick with his left leg. Uncharged does 11%, full charge does 22%. Decent knockback. This should be his weakest Smash move, in terms of knockback. As it mainly serves to keep enemies off your back instead acting as a finisher. At higher percentages however, around 75% or so, the Down + Smash can land a quick ground vertical K.O.

B moves

B: Mega-Buster: Megaman uses his signature arm cannon to shoot people up.The Mega-Buster has three levels of power, uncharged, semi-charge, and full-charge. Uncharged shots have the smallest hitbox, they can be shot quickly while moving. Of course, its also the weakest, only dealing 5% damage per shot. Uncharged shots have little to no knockback. Uncharged shots are about the same size as uncharged Super-Scope shots and are yellow and gold. Holding the B-button down for about 1 second Megaman can shoot a semi-charged shot. Semi-charged shots are about 1 1/2 times larger and deal 13% damage per shot. Semi-charged shots are the same two shades of green as Omega-Xis' aura. Holding the B-button down for about 3 seconds Megaman can shoot a fully-charged shot. Fully-charged shots are the largest and are shot at the same speed when shot. Fully charged shots deal 23% damage and sent the enemy flying horizontally. The fully charge shots are colored blue and light-blue. The fully-charge shots are about the same size as Samus' full-charge shot. The shots fired from the Mega-Buster are about as fast as Falco's blaster. No matter the charge level, the buster shots can fired at the same speed once the B-Button is no longer held. The buster shots have the same range as Falco's blaster as well, regardless of charge level. The Mega-Buster shots explode on contact, no matter the charge level of the buster shot. it should be noted that unlike Samus, letting go of the B-button will release the buster shot.


Weapon Changing/Taunting: This is an idea that is normally seen in quite a few Megaman fan-movesets but, honestly; I think its a good idea. We already have taunts that do damage(albeit very little)so having taunts that can alter or enhance special attacks seems like the next step. Here's the idea I have for the weapon changing.

Up-Taunt: Switch to Plasma Gun: By pressing the Up Button on the D-Pad, Geo will hold a Battle Card above his head that will brightly glow yellow/golden. Once he does this Geo's Mega-Buster will change into the Plasma Gun. The Plasma Gun shoots a ball of electric energy at the opponent. The Plasma Gun does the same amount of damage as the semi-charge shot(13%). But the Plasma Gun is a bit slower and has 10% less range. The Plasma Gun can't be charged, so you'll constantly have the raw power of the semi-charge shot, but with less speed and range. The main advantage of the Plasma Gun however, is to stun foes when fired for about 1 second. This will leave enemies wide open for a finishing attack. The secondary advantage for the Plasma Gun is that is can pass through enemies instead of exploding on contact. Meaning that if you have good timing you can hit 2 or even 3 enemies with a plasma shot, giving you the chance to take out multiple opponents. Pressing Up-Taunt again while the Plasma Gun is equipped will cause Geo to hold another Battle Card above his head, this time it will glow the same two light green colors as Omega-Xis' aura. This indicates that you've switched back to the Mega-Buster.

The Plasma Shot's Buster on Megaman's arm should look kinda like this:


Side-Taunt: Switch to Mech Flame: By pressing the Left Button or Right Button on the D-pad, Geo will draw a Battle Card and hold it right in front of him and it will glow red/orange. This signifies you switched to the Mech Flame. Pressing and holding the B Button with the Mech Flame equipped will cause Megaman to spray a continuous stream of fire from his buster. You can hold the attack for 4 seconds as the flame fades away slowly. The attack does 3 hits per second and does 2% per hit. So attacking an enemy with the Mech Flame at full power deals 24% damage. Unlike Bowser or Charizard, Megaman's Mech Flame is shot straight in front of him. This gives this attack more horizontal range. But it can be a it hard to enemies on lower levels. Pressing either of the Side-Taunt buttons on the D-pad while the Mech Flame is equipped will cause Geo to draw a Battle Card and hold it right in front of him and it will glow the same two light green colors as Omega-Xis' aura. This means that the Mega-Buster has been re-equipped.

The Mech Flame's Buster on Megaman's arm should look kinda like this:


Down-Taunt: Switch to Chain Bubble: By pressing the Down Button on the D-Pad, Geo will draw a Battle card and hold it behind him. The card will glow navy/blue this means that the Chain Bubble gun is equipped. When the Chain Bubble is shot, it will split in 3 directions, forward, up-forward, and down-forward. Each Chain Bubble shot has he same range as Ness' PK Fire. Each Chain Bubble deals 7% damage per shot. Each Chain Bubble explodes on contact. The biggest advantage of the Chain Bubble is to hit enemies on higher and lower levels. Pressing the Down Button on the D-Pad while the Chain Bubble is equipped Geo will draw a Battle card and hold it behind him. and it will glow the same two light green colors as Omega-Xis' aura. This means that the Mega-Buster has been re-equipped.


Forward + B: Million Kick: In the Megaman Starforce games, Megaman can obtain a powerful move called the Million Kick, where he does a flurry of kicks at blinding speeds. You can keep attacking by pressing the B-button repeatedly while holding forward. The Million Kick does 6% per hit, but has very little knockback. Mostly used for Edge-Guarding and racking up damage for a finishing move. Megaman stands still when using this move, both on the ground and in mid-air. This move can also be done right after the AAA combo, if you have the right timing. This move can be comboed into some mid-air moves such as Up+Air, Neutral+Air, and Forward+Air. In terms of speed this is the fastest move in all of Megaman's moveset.
This is what the Million Kick looks like:


Up + B: Heat Upper: Another attack seen in the Starforce Games, Megaman hand is lit on fire and he uppercuts the enemy. This can work as a vertical recovery attack. The attack would do 9 hits, with the first 8 hits dealing 2%(16% in total)damage each and the last hit dealing 5% damage. Has decent knockback. This move can work well for vertical K.O.s. Like most recovery attacks, Megaman will enter a free fall state after using the Heat Upper.

Down + B: Tornado Dance: Another attack Megaman can use in the Starforce games. Megaman spins his whole body around so quickly that his body is wrapped in a tornado. This move can work kinda like Metaknight's Mach Tornado. The Tornado Dance does 10 hits, with each hit dealing 2% or 3% damage. This move's secondary function should work as a horizontal recovery, while the attack is used in mid-air. If the Tornado Dance is used on the ground, Megaman will attack in place. The Tornado Dance can rack up damage quickly, to make up for its lack of knockback or K.O. potential. After the Tornado Dance is used, Megaman won't actually enter a freefall state. But if the Tornado dance is used for a second time in mid-air, Megaman will no longer move forward, instead he will only attack in place, as if he was on the ground using the attack.

The Tornado Dance should look as flashy as the Battle Card picture.


Mid-Air Moves

A(in mid-air): Megaman kicks forward dealing 9% damage that has a little bit of knockback. Think of this kick being similar to Mario's Neutral Air, but the kick has a bit more range, since Geo is a bit taller. The Neutral Air's main purpose for poking the enemy, while the secondary purpose is to extend certain combos.

Forward+Air: Megaman summons Omega-Xis and punches forward. The attack deals 13% damage. Decent horizontal knockback. This attack's main advantage is that the attack has a large hitbox making it easier to hit enemies. The biggest drawback of this move is its speed. Given the decent damage output and the large hitbox, this is Megaman's slowest move.

Back+Air: Megaman does a spinning horizontal slash with his sword that deals 7% damage, but this move has decent knockback. This move mostly serves as a means to push the enemy back in order to keep your distance, if you want to rely on long range combat. Holding down the A button will have Megaman continually spin while descending. But he will descend faster than normal.

Up+Air: Megaman attacks with a backflip kick with his left leg. The attack does around 12% damage that has little bit of knockback. The main purpose of this move will keep the enemy in mid-air a bit longer, though it should be a bit risky as Megaman's mid-air game is his main drawback.

Down+Air: Shooting Star: Megaman does a dive kick that does 12% damage that has decent vertical knockback. This move mostly serves as a way to keep Megaman on the ground. This move can be canceled into Tornado Dance as well as the Heat Upper.


Throws


Grab Range: Megaman's grab range is above average. When Megaman grabs an enemy, he can do more than just a normal grab. By pressing the button, Megaman does a basic grab with decent range. But holding down the button, Megaman will use Omega-Xis to reel the target in closer, in a similar manner as Link or Samus.But compared to Link and Samus the grab range doesn't travel as far. When done in Mid-Air, Omega-Xis will automatically be summoned, regardless if the button was held or not.

Throw+A: Megaman punches whoever he grabs in the gut. Each hit does 4%

Throw+Forward: Megaman shoots his buster at close range dealing 11% damage. This throw has a little bit knockback. This is just the basic throw, nothing too flashy.

Throw+Back: Megaman summons Omega-Xis behind him, who chucks the enemy behind him very quickly. dealing 14% damage. This throw has great horizontal knockback. This is the throw mostly used to get in any quick knockouts, it doesn't do much damage but makes up for it with being able to send the enemy flying. In terms of sheer knockback, this throw is the most powerful.

Throw+Up: Megaman Summons Omega-Xis who then, strikes the enemy with a quick slash that deals 12% damage. this throw has great vertical knockback.This throw, while not quit as good as the back throw should be available to those who prefer vertical knockouts.


Throw+Down: Megaman summons Omega-Xis, who then grabs the enemy with both hands and slams them down, This throw does 24% damage, making it the strongest throw, but it has no knockback. This throw is mostly mean for racking up damage or to serve at the end of a basic ground combo.

Final Smash

(Option 1)Zerker Form:
I chose Zerker Form as its one of the easier forms to implement in the game, without changing his gameplay style too drastically. Zerker Form can more or less work in a similar manner as Wario-Man. Instead of unleashing a single powerful attack, Megaman cranks all of his attacks to 11 for a relatively short amount of time(about 15-25 seconds)and he becomes completely invincible during the Final Smash. Each of Megaman's Zerker Form attacks deal 3 times as much damage as his normal form. However there are a few differences when it comes to his moveset when in this form. Megaman's Forward Smash in no longer the Beast Slash that he uses with Omega-Xis. Instead its the Zerker Form's signature attack, the Thunder Slash. The Thunder Slash has Megaman grab his sword with both hands, and he slams down the blade with great force. Another move that is changed is his Forward+Air, Megaman no longer uses Omega-Xis for this attack, instead Megaman stabs forward with his blade with great force. Megaman's basic AAA combo is also changed. Instead of punching twice and then kicking, Megaman slashes horizontally, then vertically, then boots the enemy forward. Each hit of this forms AAA, deals 15% damage per hit. Even with another weapon equipped, Megaman will switch back to the Mega-Buster, once the Final Smash was activated. Like all of his other moves, the Mega-Buster will deal 3 times as much damage. The Mega-Buster also gains an electric spark effect while in Zerker Form.
 

Weeginji

Smash Cadet
Joined
Dec 23, 2012
Messages
43
I don't think my moveset or it's presentation are really up to standard for that.
 

Swamp Sensei

Today is always the most enjoyable day!
BRoomer
Joined
Jan 4, 2013
Messages
37,928
Location
Um....Lost?
NNID
Swampasaur
3DS FC
4141-2776-0914
Switch FC
SW-6476-1588-8392
I don't think my moveset or it's presentation are really up to standard for that.
You were invited by the man in charge of the whole thing dude.

He doesn't just invite anyone. He saw something special. Give it a go. :D
 

Weeginji

Smash Cadet
Joined
Dec 23, 2012
Messages
43
Oh, I know that he's in charge, but that doesn't make me a great deal more confident really. I find my moveset a little on the basic side.

Still, I think I'll consider posting it after cleaning and sprucing it up a bit.
 

TheLastJinjo

Banned via Warnings
Joined
May 30, 2013
Messages
9,220
Location
Luigi


B: Toungue (Does not lay egg, damages while in mouth, spits you back out.)
B forward: Egg Roll (Gets people caught in ground, Like the pitfall item)
B Up: Egg Throw ( Explodes, Like link's bomb)
Second Jump: Works more like it does in the original Yoshi's Island except it goes the same height)

FINAL SMASH: Lullaby (Heals self completely, does not affect other opponents.)

Colors: Green, Orange, Brown, Purple, Black, White.

He is much faster and agile than Yoshi and more ADORABLE!!!!!!!!!! He is always sitting down when stationary, and laying down when ducking.
 

God Robert's Cousin

Smash Hero
Joined
May 20, 2013
Messages
5,300
Location
Dustbowl
NNID
RepaignPalsims
3DS FC
4339-2483-2603
So assuming Toon Link gets more changes to his moveset in SSB4, I'd prefer it if he had different specials but kept similar regular moves. As such, here's a nifty little idea to remove Toon Link's clone status for good.

Neutral Special: Grappling Hook - Pressing B takes out Link's Grappling Hook, which he swings above him over his head. During this "mode", Link can still move around at a reduced rate. Pressing B again makes Toon Link throw his Grappling Hook, which does damage from afar and will steal an item straight from the opponent if they're carrying one. It also acts as a tether.
Side Special: Deku Leaf - Toon Link takes out a big leaf almost as big as him. On the ground, it creates a ball of air that pushes the opponent back very far if it hits them. In the air, in addition to the ball of air, Toon Link is pushed back the opposite direction with just as much force, making it a decent side-recovery. Using it when in a helpless falling-state makes him use it as a parachute to descend slower.
Up Special: Hurricane Spin - Very similar to his previous Up Special, the Hurricane Spin requires a bit of charging like Diddy Kong's Jetpack. If fully charged, however, Toon Link goes flying upwards in a spiral of yellow spinning energy. If fully charged on the ground, it lasts for a whole 5 seconds, horizontally sucks the opponent in, does a barrage of hits, and sends the opponent flying with the last hit. This comes at the drawback, however, in that Link is dazed for a few seconds after the attack is complete, leaving him to be very vulnerable if his attack misses.
Down Special: Iron Boots - Toon Link does a short hop and puts on his Iron Boots, which effectively gives him a Metal Box effect. Falling down on an opponent from above while wearing them additionally triggers an automatic foot-stool hop that does damage to the opponent. Your jumps and movement speed is greatly reduced, however, and you can only equip and unequip them on the ground, meaning one has to use them strategically.
Final Smash: Ballad of Gales - A tornado forms in the background, creating a strong gust that blows Toon Link's opponents to the side. Unless the opponent has an extremely good side-recovery, they'll have a hard time recovering if knocked to the side the wind is blowing towards. Toon Link is unaffected by the gale and actually moves slightly faster during the duration of the Final Smash.
 

TheLastJinjo

Banned via Warnings
Joined
May 30, 2013
Messages
9,220
Location
Luigi
So assuming Toon Link gets more changes to his moveset in SSB4, I'd prefer it if he had different specials but kept similar regular moves. As such, here's a nifty little idea to remove Toon Link's clone status for good.

Neutral Special: Grappling Hook - Pressing B takes out Link's Grappling Hook, which he swings above him over his head. During this "mode", Link can still move around at a reduced rate. Pressing B again makes Toon Link throw his Grappling Hook, which does damage from afar and will steal an item straight from the opponent if they're carrying one. It also acts as a tether.
Side Special: Deku Leaf - Toon Link takes out a big leaf almost as big as him. On the ground, it creates a ball of air that pushes the opponent back very far if it hits them. In the air, in addition to the ball of air, Toon Link is pushed back the opposite direction with just as much force, making it a decent side-recovery. Using it when in a helpless falling-state makes him use it as a parachute to descend slower.
Up Special: Hurricane Spin - Very similar to his previous Up Special, the Hurricane Spin requires a bit of charging like Diddy Kong's Jetpack. If fully charged, however, Toon Link goes flying upwards in a spiral of yellow spinning energy. If fully charged on the ground, it lasts for a whole 5 seconds, horizontally sucks the opponent in, does a barrage of hits, and sends the opponent flying with the last hit. This comes at the drawback, however, in that Link is dazed for a few seconds after the attack is complete, leaving him to be very vulnerable if his attack misses.
Down Special: Iron Boots - Toon Link does a short hop and puts on his Iron Boots, which effectively gives him a Metal Box effect. Falling down on an opponent from above while wearing them additionally triggers an automatic foot-stool hop that does damage to the opponent. Your jumps and movement speed is greatly reduced, however, and you can only equip and unequip them on the ground, meaning one has to use them strategically.
Final Smash: Ballad of Gales - A tornado forms in the background, creating a strong gust that blows Toon Link's opponents to the side. Unless the opponent has an extremely good side-recovery, they'll have a hard time recovering if knocked to the side the wind is blowing towards. Toon Link is unaffected by the gale and actually moves slightly faster during the duration of the Final Smash.


Firstly the iron boots would only be useful when you're in the air and he'd look stupid doing that. And even if they give you a metal box effect, there'd be a limit. It's really useless.

Also I think there are plenty other tools that could be MUCH better. Maybe use some from each Toon Link's timeline. Spirit Tracks, Minish Cap, Phantom Hourglass etc.

He could use the whirlwind, Flame Rod, Skull/Megaton Hammer.
 

God Robert's Cousin

Smash Hero
Joined
May 20, 2013
Messages
5,300
Location
Dustbowl
NNID
RepaignPalsims
3DS FC
4339-2483-2603
They'd be useful for staying on the ground and not getting knocked around. The effect wouldn't have a limit because it's a move, not an item, meaning the limit would be removed. And please don't use points like "that would look stupid" when that's a matter of subjectivity.

You're free to make your own variant of a new Toon Link moveset if you want. I merely took the items from Wind Waker because of their relevancy with the new WWHD coming out soon. If you believe your ideas are much better than mine, feel free to express that.
 

TheLastJinjo

Banned via Warnings
Joined
May 30, 2013
Messages
9,220
Location
Luigi
They'd be useful for staying on the ground and not getting knocked around. The effect wouldn't have a limit because it's a move, not an item, meaning the limit would be removed. And please don't use points like "that would look stupid" when that's a matter of subjectivity.

You're free to make your own variant of a new Toon Link moveset if you want. I merely took the items from Wind Waker because of their relevancy with the new WWHD coming out soon. If you believe your ideas are much better than mine, feel free to express that.
If they have no limit why do have to equip them?
 

God Robert's Cousin

Smash Hero
Joined
May 20, 2013
Messages
5,300
Location
Dustbowl
NNID
RepaignPalsims
3DS FC
4339-2483-2603
Because the boots function in an on-off mode way. Down B puts them on, Down B again takes them off.

I don't think this is the place to be debating this. Unless I'm mistaken, this thread is for moveset ideas, not arguing whether or not they work. I just don't want to de-rail the thread is all.
 

FrozenRoy

Smash Lord
Joined
Apr 26, 2007
Messages
1,261
Location
Las Vegas, Nevada
Switch FC
SW-1325-2408-7513
You were invited by the man in charge of the whole thing dude.

He doesn't just invite anyone. He saw something special. Give it a go. :D
You don't need an invitation to join MYM. :) You can join if you just walk on in, regardless on if you've never heard of it before. So don't worry about invites (or set quality: Though if you wanna work on it more before entering, go ahead) and join on in!

(Also, JOE isn't in charge of the whole thing :p)
 

JOE!

Smash Hero
Joined
Oct 5, 2008
Messages
8,075
Location
Dedham, MA
If they have no limit why do have to equip them?
Ever hear of a toggle?

Put on the iron boots and you suddenly are a lot harder to combo, hit back with projectiles, KO and in general move. The downside being that you yourself are now slower and succeptable to falling like a ton of bricks off-stage. You get to turn this effect on or off based on how you want to use the move and trade maneuverability and survival with it.

Never call something stupid on a whim unless you can explain why.
 

mimgrim

Smash Hero
Joined
Jun 20, 2013
Messages
9,233
Location
Somewhere magical
If it is alright for me to participate in this.

First off an edit to Ganondorf's moveset

Neutral Special - Dark Blast: Raises his hand and a explosion of darkness comes out of it, it's slow, poweful, and has decent range. I know it sounds similar to his punch, he doesn't move foward with it or anything... I can't explain it good. >_<

Side Special - Combo attack with his sword, kinda like how Marth works but totally different in animation, much slowe, more powerful with great knockback, and not nearly as many combos, has a dark auroa around, and a tiny bit easier to peform.

Down Special - Twilight Shift; He shifts into Twilight for a short time (like 15-30 seconds?) and can posses another character for that short period. After first use it need to fully charge up again before you can use it a aditional time. There would be a penalty if you suicide with the player you posses, like minus a life/point.
Up Special - Twilight Teleport - Creates a Twilight portal for him to teleport a short distance.

And now for Waluigi;

Basic combo - Forehand attack with a tennis racket, then a backhand hit, then a lob to finish it. Short range.

Side tilt - Stronger version of forehand attack. Short range.

Down tilt - Stronger version of lob attack. Short range

Up tilt - Slice attack with tennis racket. Short range.

Side Smash - Baseball bat attack. Mid range.

Down smash - Golf cub attack. Mid range.

Up smash - Throws basket ball into the air. Long range.

Neutral Speciall - Throws a baseball, can throw multiple ones. Long range.

Side Special - Bunces a basket ball down the way he is facing. Long range.

Down Special - Charges up a kart and drives it. Long range.

Up Special - Undeicided.
 

Toxicroaker

Smash Lord
Joined
Jun 16, 2013
Messages
1,278
Location
Everywhere
3DS FC
4184-2367-6702
[collapse=Kyurem Moveset by me (Toxicroaker)]


ground attacks


neutral: a bite then an attack with one wing then a stomp. 5% -> 5% -> 8% = 18%

forward tilt: sweeps its head horizontally. 7%

down tilt: low punches. 4%

up tilt: wings shoot up. 6%

dash: body slams. 12%


aerial attacks


neutral: bites. 7%

forward: spins like a drill for one-two spins. 6% -> 7% = 13%

down: meteor mashes down by encasing itself in an ice ball and plummeting down very fast. 18%

up: around 8-12 mini ice chunks fly up in the air: 1% or 2% = 12% to 18%

back: thrusts legs backwards. 7%


smash attacks

forward: a huge bite that will freeze for 0.5 seconds. uncharged, 20% charged, 25%

down: encases its head in a ball of ice and smashes down breaking the ice ball on the ground (or opponent). uncharged, 19% charged, 28%

up: a short powerful jump. uncharged 18% charged 21%


grabs and throws


grab: grabs the opponent with by far the shortest grabbing range in the whole game. N/A

pummel: hits the opponent with his head. 3%

forward throw: sets the opponent on the ground and kicks them like a football. 16%

backward throw: spins around and around then releases. 14%

down throw: sets the opponent down and freezes a big ice block over them witch then drops on them. 18%

up throw: throws the opponent upwards a tiny bit and then strong headbutts them. 15%


special attacks


neutral: glaciate, an attack that will make five large icicles rotate around and can be moved with the control stick that smash together when the button is released. direct 17% mini-explosion 3%

side: outrage, will charge forward for a long time and stops when it hits a target falling into a helpless state if it runs off a cliff. 37%

down: blizzard, a small blizzard is created around Kyurem freezing opponents for one second if hit. 20%

up: dragon tail, spins as if doing a roll while getting a third high jump and knocking enemies back very far if hit and Kyurem goes into a helpless state afterwards. 12%

final smash: Final fusion, the DNA splicers float above him and hits him turning him into Black Kyurem and he attacks using freeze shock by creating a ball of electrically charged ice and throwing it at the opponent using electric damage having extreme knock back but not nearly as much as most final smashes. but it then turns into White Kyurem and uses ice burn by creating multiple beams of reddish purple energy and firing it at opponents doing fire damage and having around the same knock back as freeze shock. 31% -> 46% = 77%


taunts


one: a large roar

two: stomps its feet three times

three: breaths out frost while slowly swinging its head back

victory poses


one: jumps up and freezes a number one ice block under it to stand on

two: the DNA splicers float above it as if it is going to activate

three: roars while holding glaciate above him [/collapse]
[collapse=Bowser Jr./Shadow Mario Moveset by me (Toxicroaker)]


Bowser Jr.


ground attacks


neutral: scratches with his claws up to three times. 3% -> 2% -> 4% = 9%

forward tilt: jabs his paintbrush outwards. 6%

down tilt: grabs a turtle shell and sweeps it below himself. can be green or red. green shell 9% red shell 11%

up tilt: a very short hop along with a headbutt. 7%

dash: retracts into his shell and spins forward a little. 13%


aerial attacks


neutral: faces the screen and spins (like kirby does). 10%

forward: thrusts both legs in front of himself. 11%

down: lowers his paintbrush underneath him and jabs downward (like link/toon link). 12%

up: sweeps his paintbrush over his head. 9%

back: retracts inside of his shell and spins backward. 14%


smash attacks


forward: sweeps his paintbrush in front of him. uncharged, 13% charged, 17%

down: goes into his shell and spins (like bowser). uncharged, 17% charged, 22%

up: stands on his hands and kicks upward. uncharged, 11% charged, 15%


grabs and throws


grab: grabs with a paint whip like links grab. N/A

pummel: bites the opponent. 3%

forward throw: hits the foe with his paintbrush as if it was a bat. 7%

backward throw: throws the opponent backwards over his head. 6%

down throw: throws the opponent on the ground. 7%

up throw: throws the opponent upwards and jump headbutts. 7%


special attacks


neutral: fireball, a small fireball that acts like mario's fireball is breathed out but it does less damage than mario's and instead of disappearing it will burst leaving a tiny patch of fire for 1-2 seconds. direct 2% leftover fire 1%

side: blaster, a random thing will be shot out of a big gun that bowser jr holds a bullet bill, a green shell, or a bomb-omb. bullet bills go in a straight line and explode on impact though some will track the target. a green shell will act like a green shell item but with considerably less knock back. a bomb-omb will be shot out in an ark and will explode on impact. chances of getting each items are bullet bill 30%, tracking bullet bill 3 1/3%, green shell 33 1/3%, and bomb-omb 33 1/3%. damage is, bullet bill 10%, green shell 8%, and bomb-omb 8%

down: transform, turns into shadow mario. N/A

up: Clown car, bowser jr. gets in his clown car that propels him upward for a short time damaging anyone hit and then disappears leaving bowser jr. in a helpless state afterwards. 5%

final smash: Megahammer, bowser jr. jumps backwards off the stage and megahammer rises up with him in it and will slam its hammer down targeting the nearest target with huge damage and knock-back. 50%-57%


taunts


one: pulls up his mask and looks at a green coopa shell then puts both his mask and shell back.

two: shoots a fireball up in the air a tiny bit and then swallows it.

three: jumps up and down shaking his fist as if very angry.

victory poses

one: flies around on his clown car saying "yes yes".

two: twirls his brush around like a ninja would and accidentally hits himself in the head and falls down on his back.

three: roars at the screen and then stands there with a grin on his face.


Shadow Mario


ground attacks


neutral: a punch, another punch, and a kick. 2% -> 3% -> 5% = 10%

forward tilt: covers his hand in paint then punches. 7%

down tilt: sweeps a leg across the ground hitting one side. 6%

up tilt: swipes his paintbrush upwards. 8%

dash: holds his paintbrush out and spins it like a baton as a multi-hit move (like pit's side b). 2% per hit


aerial attacks


neutral: grabs his paintbrush and does a flying somersault with it outstretched having high ending lag if he hits the ground before it is finished. 14%

forward: takes his cap off and swings it in front of himself three times very quickly. 3% per hit

down: kicks downward and plummets down very fast (like sonic's or sheik's down aerial). 8%

up: does mario's classic punch jump. 9%

back: quickly turns around and swipes with his paintbrush leaving a small bit of ink in the air for a second. paintbrush 6% paint 2%


smash attacks


forward: extends out his hand and a ball of ink explodes in front of him (like Mario's). uncharged, 16% charged, 20%

down: jumps up a tiny bit and punches the ground with a shock wave of paint on both sides. uncharged, fist 14% wave 11% charged, fist 22% wave 16%

up: fist pumps three times with only the third one having kill potential. uncharged, 5% -> 5% -> 6% charged, 7% -> 7% -> 9%


grabs and throws


pummel: headbutts. 3%

forward throw: shadow mario spins around once then throws his opponent in front of him. 9%

backward throw: he whirls around several times then throws his opponent backwards. 12%

down throw: shadow mario slams his opponent into the ground. 6%

up throw: he throws his opponent high into the air. 8%


special attacks


neutral: polluted piranha plant, shadow mario holds out a polluted piranha plant that attacks foes that attack him or eats any item that is close enough. 1.5% damage the enemies attack would have done

side: paintball, a large paintball will be shot out and act kind of like zelda's din's fire accept instead of doing high damage and knock-back it will do little damage and little to no knock-back but instead cover the opponent in ink slowing them down 50% and making their jump 25% lower for 2.5 seconds. 6%

down: transform, turns into Bowser Jr. N/A

up: color portal, paints a M with two dots over each top point in the air goes into it and teleports in whichever direction the control stick is pointed and sends the user in a helpless state in and the portal stays in the air for a few seconds being able to be used by anyone else during that time and does no damage. N/A

final smash: paint puddle, Shadow Mario summons a layer of sludge all over the ground slowing all characters walking and running speed to 50% and reducing there first jump height by 70% and the second one by 30% and only shadow mario can grab ledges, walk, run, and jump normal. N/A


taunts


one: a geyser of paint shoots up from underneath him and he acts like he is surfing with his paintbrush and then the geyser goes back down.

two: he faces the audience and his eyes glow intensely red.

three: he holds out a polluted piranha plant that bites and sucks on his face until he pulls it off.

victory poses


one: spins in a circle with his paintbrush painting a circle of red goop around him and looks up with red eyes.

two: paints boxing gloves on his hand and punches the air like you would when playing wii sports boxing without the controller.

three: a brick wall is there with him and he paints shadow mario's signature m on the wall and then looks at the screen and his eyes suddenly snap red.[/collapse]
 

Venus of the Desert Bloom

Cosmic God
Super Moderator
Premium
BRoomer
Writing Team
Joined
Jul 30, 2007
Messages
15,336
NNID
VenusBloom
3DS FC
0318-9184-0547
Question: Can I post non-Nintendo character move sets or are we only allowed to post up Nintendo-only characters? (i.e. no Lightning, Batman, Booker DeWitt, Ironman, etc).

Here is a move set I made for Saki Amamiya from Sin and Punishment. I will add more when time allows for it. This is a older moveset and, therefore, isn't as polished or perfected. I will be adding more details and information to the attacks section later.

Saki`s Move Set

Special B Moves

Neutral B: Cannon Sword: Saki pulls out his gun and, while holding down B, release a stream of bullets. However, once the ammo is depleted, Saki must wait to it can restock itself. His gun has twenty rounds of ammo until it runs out. Cannon Sword can be altered by Saki’s Down B move Manual/Target Lock On which will be explained in detail then. Opponents stand stand next to Saki when he pulls out his Cannon Sword receive 5% damage with medium knock back. Saki can shoot ammo while jumping, running, crouching, or crawling.

Side B: Dashing Strike: Saki will rush in a straight line for 3 seconds. It can also be used as a recovery move however. Additionally, Saki can wall jump if he lands near a wall and reset his second jump. If a opponent is hit by this attack, Saki will pause and the opponent will be electrocuted. This exchange happens for 2 seconds. It has a high vertical and horizontal knock back as well as KO potential but a slow lag after wards. If Saki hits a opponent in mid air, there will be no free fall allowing him to move, attack, or dodge after the initial attack. Does 14-17% damage.

Up B: Bullet Storm: Saki will jump in the air in a display of acrobatic prowess. During the attack, Saki will release a hail of bullets (usually around six rounds of ammo) which will spray in different directions. Each bullet does 10% damage. It has very low KO potential but it is one of the highest recovery moves for a non-flying character. If executed while on the ground, it will propel Saki from the end of Final Destination to the middle of the stage in one leap.

Down B: Manual/Auto Lock On: Saki to switches ammo types. Manual ammo is stronger, slower, or only moves in a straight line. When performing any attack that requires a gun, it will use up ammo. The gun can carry only 20 rounds of ammo of each ammo type and then needs 30 seconds to recharge that ammo type. Target Lock On ammo is faster, weaker, but automatically locks on to the closest opponent unless they are too far away or can obstacle lies in the way. For example, a player playing as Saki uses up his Manual ammo so, in order to perform the other attacks, he has to switch to Target Lock On Ammo to fight. If the player runs out of both ammo, he has to rely on grabs and physical based attacks with the beam sword. Saki begins flashing red when the ammo has 3 rounds left. Once Saki runs out of his bullets,
his gun flashes red as well.

Manual ammo does 3% damage. Manual ammo is slow but strong and recharges faster while Auto Lock-On Ammo does 2% damage and is faster, but weaker and recharges slower. As well, Auto Lock On ammo does not stun opponents much like Fox’s lasers in Melee. Thus, Manual Ammo does 60% damage when fully used while Auto Lock On does 40% damage when fully used.

It takes roughly 3 seconds for Saki to switch ammo and can be down in mid-air. If Saki is KO’d or falls of the stage, all his ammo goes back to 20/20.

Final Smash: Ruffian Transformation: Saki transforms into a Ruffian, a super being that resembles a robot. View the video here at 5:18. Saki gains a huge amount of bonuses which include +20% damage, +20 speed, and +20 damage resistance and possesses infinite super armor. Saki can release powerful energy blasts from his guns by pressing B that travel across the field and causes between 30-45% damage. Near the end of the Final Smash, Saki will stop and a massive shock wave will shoot from his body resulting in an additional 10% damage with a high knock back.

Saki is about as large as Giga Bowser albeit more thinner and actually less heavy. He is able to jump, walk, and crouch but unable to evade or run. In addition, by performing a second jump and holding; Saki is able to momentarily levitate himself from the ground. In addition of power energy blasts, pressing A will cause Saki to perform a beam saber slash attack. Pressing forward will deliver a much larger but slower beam slash. Overall, Saki's Final Smash has incredible reach yet slow but powerful attacks.


Ground Moves


Normal
  • Neutral Attack – Delivers three hits. One is a short saber strike that does 2% damage, a second stronger hit with a long reach that does 3% damage, and then a final attack where Saki begins shooting the opponent. Holding down the A button allows Saki to continue shooting. It does damage depending on the ammo being used. A low knock back after the opponent is hit with the bullets.
  • Dash Attack – performs a running dash where Saki slices with his Cannon Sword. Damage only occurs after Saki rushes past. It has moderate vertical knockback damage and hits 3 times with 3% damage for total of 9% damage.
  • Forward Tilt – Leans forward and performs a vertical cut using his Cannon sword. Hits 4 times with 2% damage with each hit thus totaling to 8% damage.
  • Down Tilt – Performs a sweeping sword strike that has high vertical and horizontal knock back at high percentages. Can KO. Does 5 hits at 3% damage for each hit thus totaling to 15% damage.
  • Up Tilt – Thrusts his sword in an arc cutting above his head. Does 3 hits for 2% damage for for each hit thus totaling for 6%. Low damage but moderate vertical knock back.
Smash Attacks
  • Forward Smash – Saki begins shooting the opponent. Hold down the A button to continue shooting. Release the A button to swing Saki’s sword forward but only does 1 hit at 5% damage. The bullet attack can do an additional 3%-60% or 2%-40% damage with an additional 3% damage. This damage fully depends on what ammo is used and how many rounds is used. In total in can do between 8%-65% or 7%-45% damage.
  • Up Smash – Performs a upward sword thrust followed by a burst of gunfire that can be continued by holding down A. Same physics as the Forward Smash but less knock back and reversed with the sword attack first and gun fire second. Gunfire can be disrupted by attacks.
  • Down Smash – Does a round house ground kick along with a burst of gun fire. It pumps out 6 rounds. The round house does 20% damage plus additional damage from the bullets depending on the ammo used. Thus the attack can do between 32% damage or 38% damage depending on the ammo used.
Other attacks
  • Ledge attack -Saki quick jumps onto the stage and squeezes off 2 rounds of ammo. Does 6% damage or 4% damage; depending on the ammo used.
  • 100% Ledge attack – Saki pulls himself up, hoists himself up into a flipping jump over the opponent and with his cannon sword extended. Deals 2% with 5 hits each thus totaling at 10% damage.
  • Floor attack – Rises and slices on one side of his body, then the other. Does 7%.
Aerial Attacks
  • Neutral Aerial – Saki spins around in the air with his cannon sword extended. Hits 3 times with a 3% damage at each hit thus totaling at 9% damage with some Hit Stun at the end.
  • Forward Aerial – Swings his cannon sword forward for 5% damage that 5 times for a total of 25% damage with a high horizontal knockback.
  • Back Aerial – Saki shoots 4 rounds behind him. Deals 12% or 8% damage depending on the ammo used.
  • Up Aerial – Swipes in an arc above his head. It has little start-up lag and a moderate amount of ending lag, and has a wide hitbox with low vertical reach. It has low vertical knockback, making it effective as a juggler, but ineffective for the purpose of KOing. Does 12%.
  • Down Aerial – Saki turns upside down and starts shooting right below him. He squeezes off 10 rounds at once in this attack. The last bullet is a possible meteor strikes. Manual ammo does 30% while Auto Lock On does 20% damage. It suspends opponents in mid air.
Grabs & Throws
  • Pummel – Hits his opponent with his elbow. Very fast but only does 2% damage.
  • Forward Throw – pushes his opponent and then slashes forward with his cannon sword. Hits 4 times with 2% damage each thus totaling at 8%.
  • Back Throw – Throws the opponent backwards like a judo throw and fires a 3 round burst at the opponent. The throw does 2% damage while the bullets do 9% or 6% damage thus totaling to 11% or 8% damage.
  • Up Throw – Throws the opponent upward and fires off 4 rounds of ammo. The throw does 1% damage while the bullets does 12% or 8% damage thus totaling at 13% or 8% damage.
  • Down Throw – Slams the opponent on the ground for 4% damage and fires 3 rounds into him. Manual deals 9% while the Auto Lock On does 6% damage thus totaling to a overall 13% or 10% damage.
Extras

Proposed Taunts
  • Left – Saki twirls his gun in his fingers and says “Is that all you’ve got?”
  • Right – Saki ruffles his hair in the back and kicks at the ground and sighs.
  • Up – Saki points his gun dramatically at different points and then raises it next to his head and says “Time to move!”
  • Down – He puts one foot out and leans on a knee with his elbow with his gun hanging listlissy at his side. He then says “C’mom, I don’t have all day.”
Proposed Winning Poses
  • Saki transforms into his Ruffian self and jets out of the screen.
  • Saki jumps, spins, in the air and lands in a crouching stance. he then says “Mission Accomplished”.
  • Saki is sitting on the ground, taking a rest. His gun rests in one hand as it hangs down between his knees. He then smiles.
Victory Theme
  • The “Victory Theme” but made to sound very techno and dubsteppish.
Proposed Stage Entrance
  • Comes zooming down from a lift platform seen in the games and flips off it. He then un holsters his gun.
Audience Cheer
  • Let`s go, Saki! Let`s go, Saki!
Idle Moves
  • Saki takes his gun and checks it.
  • Saki cracks his neck twice.
Kirby Hat
  • Saki`s yellow hair cut and pony tail.
 

Z1GMA

Smash Hero
Joined
Sep 10, 2008
Messages
5,523
Location
Sweden
Sami - Advance Wars

A: Punch 3%
AA: Punch, Knee 3%
AAA: Punch, Knee, Assault Rifle Butt 3%

Ftilt - Bullet Strap: Whips her Bullet Strap in front of her. 11%
Utilt - Pistol Juggle: Juggels a pistol above her once. 8%
Dtilt - Crouch Kick: A crouching kick. 7%

Nair - Bullet Strap Sweep: Sweeps the strap around her. 8%
Bair - Back Kick : A Back Kick. 9%
Uair - Uzi Spray: Sprays above her with an Uzi (very low range). 1,1,1,1,1,1,1,1,1,1 (10%)
Fair - Rifle Swing: Swings her Assault Rifle in front of her. 12%
Dair - Double Kick: Kicks down twice. 4, 6 (10%) Spike.

Fsmash - Bazooka Blast: Fires a Bazooka on the ground, in front of her. 23%
Usmash - Rifle Thrust: Thrusts her Assault Rifle above her head. 19%
Dsmash - Double Grenade: Throws a grenade on each side of her. 18%

Pummel - Pistol Butt: Knocks a pistol to the opponent's head. 2%
Dthrow - Capture Stomp: Sami Jumps on the opponent several times (classic Sound Effect). 13%
Uthrow - Rifle Uppercut: 8%
Fthrow - Rifle Butt: 9%
Bthrow - Rifle Butt Back: 9%

Dash Attack - War Kick: A leaping kick. 9%

Neutral B - Assault Rifle:
Sami fires 3 Round Bursts with her Assault Rifle.
3% per bullet.
Knockback is similar Shiek's needles.

Side B - Mini Tank:
Sami places a Remote Controlled Mini Tank on the ground.
You can go back/forth and fire the cannon, as well as selfdestruct to regain control over Sami.
Up/down controls the aim. Fire with A.
10% damage, medium knockback.

Down B - CO Power, Double Time:
This manouver charges up over time.
When fully charged (about 30 seconds), press down B to activate it, and Sami yells "Double Time!".
For 5 seconds, all opponents are 50% slower.

Up B - City Capture (Original idea by The Tuninator) :

A "captured" building raises up under Sami, sending her up.
Opponents hit on the way suffer 8% damage.
The building itself stays for 1 sec, and deals 3% damage when ran ran into.

Final Smash - CO Power, Victory March:
All opponents are 70% slower for 20 seconds, and all Sami's attacks are x3 more powerful.
Dthrow is insta-KO.
 

Hippopotasauce

Smash Lord
Joined
Jul 3, 2013
Messages
1,659
NNID
Hippopotasauce
[collapse=Karate Joe - Rhythm Heaven]​
Specials -
Standard B – Hit 3
Holding the B button will charge up a burst of punches that can go up to three in one go. Without being charged, a low level single punch is thrown. However, charging for .75 seconds will increase this to 2 punches, and at 1.5 seconds you give off 3. In cases where you hit with more than one punch, the character being attacked is stunned until the final one. Not similar to DK’s giant punch in the fact that you cannot retain the punch and store it for later.
Side B – Bomb Kick
From Rhythm Heaven for the DS, you spin in a circle and kick a bomb to the side as a projectile. The bomb acts as an item and may be picked up, but explodes on contact with the ground or another player. The bomb flies straight momentarily before losing momentum and drifting downwards. The kick itself also acts as an attack. It is not chargeable.
Down B – Combo
From Rhythm Heaven Fever is the combo move. A high-risk/high-reward type move. It’s very similar in style to the Mario Tornado and Pikachu’s down A. Not unlike the two moves, characters hit by the attack are locked until the finish which is a high power uppercut. However, should the opponent dodge, the combo ends with a small spin on the ground rather than an uppercut. This leaves Karate Joe open to be attacked.
Up B – See-Saw
See, from Rhythm Heaven Fever’s See-Saw, assists with the See-Saw recovery by teleporting in with see-saw, allowing Karate Joe to jump upwards, possibly into opponents and other players. Comparable to Sonic and Mega Man’s recoveries, but more similar to G&W’s Fire Up-B. Like Fire, players coming in contact with an opponent’s see-saw will be hurt, and anyone in the way of Karate Joe’s trajectory will be punished as well. It will disappear very quickly after however.
Final Smash - Karate Man
Reigning from his own minigame is the final smash Karate Man. He unleashes a barrage of attacks and items from his games, and shoots them all out in a beam of projectiles similar to Pokemon Trainer’s Final Smash. He first sends out a wave of a couple of bombs, and then goes all out, throwing everything in the series he’s known for. Pots, Soccer Balls, and who knows what else, will be thrown at the opponent. If you’re caught in the middle of the beam, he’ll finish you off with an immense uppercut. Even if you manage to get out of the way, you’re sure to have been hit with at least some splash damage.

Smash Attacks
Up Smash: A Dough-Dude from Working Dough appears beneath Karate Joe’s feet, assisting with launching him upwards, knocking opposition to the ceiling.
Down Smash: Like the Crop Stompers of Crop Stomp, Karate Joe lifts his foot up and then sends it down with great force, affecting players both in front and in back of him.
Forward Smash: He thrashes drum sticks from Drum Lessons out in front of him.

Tilts
Standard A – The combo from Figure Fighter; two jabs with one arm, and a third with the other.
Forward Tilt – Using the tennis racket from Rhythm Rally, Karate Joe sweeps in front of himself from top to bottom.
Up Tilt – A book from Cheer Readers is held spine down above his head and then forced open. The hitbox is wide but it does little knockback.
Down Tilt – Karate Joe crouches, holds onto Marshall from Rhythm Heaven Fever, and allows him to bite the opponent.

Grabs
His initial grab is the grasping move from Packing Pests.
Pummel – Chops the opponent with his hand.
Forward Throw – Using the ‘pa-pa-pa-punch’ move from Space Dancers, the opponent is his multiple times and then shot forward.
Up Throw – The opponent is uppercut upwards.
Back Throw – Spins on a chair from Board Meeting then slams it, flinging the opponent backwards.
Down Throw – The mallet from Showtime is brought out and slammed into the opponent.

Aerials
N Air – Strikes the pose from Lockstep.
F Air – The “Whoa, you go big guy!” move from Ringside is used, with the quirk of knocking the opponent forward when used once, and upwards when used twice.
B Air – Turns and jabs behind himself with a paintbrush from Power Calligraphy.
U Air – Does two quick overhead strikes with the Bachi from Drummer Duel.
D Air – Again from Space Dancers, Karate Joe kicks downwards.

Other Moves
Dash Attack – The sword of the Wandering Samurai is swept diagonally until Karate Joe skids to a stop.
Ledge Recovery – Karate Joe throws himself slightly above the platform, kicks out with both of his legs together, and then gets back on his feet.

Other Animation and Tidbits -

Idle 1 – Crosses his arms and taps his foot to the music.
Idle 2 - Stretches his arms out to limber up.
Taunt 1 – Strikes a pose like ‘pose for the fans’ from Ring Side
Taunt 2 – Eats a dumpling like Munchy Monk for the DS
Taunt 3 – Claps, smugly
Evade - The jumping animation from Rhythm Fighter
Entry animation – His name appears and he punches through it from beneath like the Karate Man intro.
Winning Animations –
1. Strikes the superb pose from Karate Man for the Wii (A karate chop with his mouth wide open)
2. Strikes the superb pose from Karate Man for the DS (An air kick with his arms in front of his face)
3. Strikes the superb pose from Karateka for the GBA (Hand on hip and giving a thumbs up)
Victory music: Superb - http://www.youtube.com/watch?v=9ZhYB5tmLGk [/collapse]
 

Venus of the Desert Bloom

Cosmic God
Super Moderator
Premium
BRoomer
Writing Team
Joined
Jul 30, 2007
Messages
15,336
NNID
VenusBloom
3DS FC
0318-9184-0547
Those are great move sets! I'm still on the fence on Karate Joe but that move set seems fairly convincing.
 

Hong

The Strongest
Joined
Jul 6, 2004
Messages
23,550
Making a moveset from an obscure Famicom game I liked. Also had a sequel on the PC Engine, and has a bit of a cult-following.

Valkyrie

She is a combo-oriented character that uses defensive tools for offensive means, trading speed for ease in plowing through enemy attacks.


Specials
B: Shield Boomerang
Valkyrie throws her shield a few metres distance where it will spin in place for a half second before returning. This a multi-hitting attack that pulls the enemy in as it hits going in and out, so it is excellent for setting up both combos and finishers. The setback to this move is Valkyrie cannot block while her shield is not with her, though she can still dodge if R is held.

B Forward: Shield Dash
Valkyrie dashes forward with her shield, blocking projectiles and gaining super armour against weak attacks, in addition to plowing her adversary. This move has little after-lag, but cannot immediately follow itself.

B Up: Angelic Ascent
Inspired by scenes and story, she spawns wings and swoops forward-upwards in an arc, slashing anyone in the way and setting them up for the next part of the attack. The wings dissipate into feathers and she does a sword-plant on the way down. She will grab the ledge going up or down.

B Down: Lightning
This move copies "Lightning Thrust" from Namco's "Tales Of" series. Valkyrie raises her shield before thrusting her sword forward, and a bolt of lightning will strike whence it connects. This lightning starts out weak, but grows stronger both over time and with damage dealt, the sword glowing when it is ready. The startup of this move has super armour while fully charged, and it is intended be both a counter and a finisher, rounding off her arsenal. The charge is expended on miss.

Final Smash: Grand Valkyrie
Valkyrie holds the sword up in both hands, it is enveloped with light and grows massive in size, before she brings it crashing down. This has roughly as much KO power as Great Aether, but won't OHKO heavier or fresh characters.


Smash Attacks
Forward Smash
A shielded-shoulder check. Has brief super armour on start up, but little range. It really smarts on connection, though.

Upward Smash
An inverted version of the Thunder special, Valkyrie courses with electricity before she raises her sword and shoots lightning skywards and resonating lightning around her.

Down Smash
Valkyrie punches her shield to the ground, causing the ground beneath her to crack and send shockwaves to either side. While this move does not cause knockback and only flinches at low percentages, fighters will fall from the might at higher charges and damage percentages, setting up possible tech-chase. Both range and damage increases with charge.

Normals
A
A horizontal shield swipe followed by a sword thrust. Quick one-two that is ideal for creating space in a bad engagement.

Forward Tilt
Sword swipe that starts low and curves upwards, good for set-ups.

Up Tilt
Spins the sword above her head from the blade, sort of like you would spin a disc or pizza pan. This multhitter hits nearby at both sides and sends them up.

Down Tilt
Shameless crouching kick. This one does not come out as fast as others, though it has a lower trajectory on knockback for gimps.

Dash Attack
A turning spin slice that will strike twice in front.

Aerial Neutral
A corkspin with the sword extended.

Forward Aerial
Aerial sword-punch. Takes some practice to hit with, but pays off with excellent knockback.

Back Aerial
Reversal shield swipe, turning Valkyrie around. Doesn't knock the enemy far, and has nice hitstun, so you can follow it up.

Up Aerial
Think... an upside-down version of Captain Falcons stomp.

Down Aerial
Valkyrie holds a large old-fashioned copper key by the shaft and swipes it downwards with her legs apart. This is one of the faster meteor smashes, but does not have the most range.


Throws
Grab
This one is interesting. Valkyrie has a simple grab while standing, but her dash grab will have her breifly sprout angelic wings to glide forward a short distance. This increases risk on miss, but grants a little extra reach.

Attack
Another shameless kick to the legs, because I am desperate to have this character use more kicks. :(

Forward
Valkyrie pulls them in turned away from her and pulls her sword across their chest. Somehow in the Smash Bros universe, this has standard knockback!

Back
Valkyrie jumps up and stomps on their head, sending them backwards on a low trajectory

Up
Valkyrie throws them upwards and launches a fireball at them, exploding and sending them flying. Fans would be upset if she didn't get this somewhere!

Down
Valkyrie slams them on the ground and they bounce, where she then grabs their leg and slams them to each side before throwing forward.

--

In closing, I know people might question the absence of the treasured fireball spell, but I think depriving the character of a projectile and forcing her to use her shield techniques to close the gap makes for more engaging gameplay.
 

kikaru

Smash Ace
Joined
Dec 1, 2011
Messages
890
Location
Some small and insignificant country town, WA.
3DS FC
0705-2807-1422
This is just a collection of movesets I've made throughout my time here at SmashBoards, most of them will just be special attacks only for the time being. (Though Isaac's moveset is the most complete at the moment) I will slowly update all of them to have full moves/updated whenever I'm not studying for school/ MCAT/ fishing/ etc.

http://smashboards.com/entries/moveset-compilation.4791/
 

ErictheLone

Smash Apprentice
Joined
Jun 27, 2013
Messages
79
Little Mac Moveset

Pieced together using ideas posted by smashboards members Yoichi Hiruma, Shinhed-Echi, ErictheLone, VenusoftheDesertBloom, JohnKnight1 and others


Series Symbol: Boxing Glove with a Star

Music:
Punch Out Theme.
EVERY REMIX from Punch-Out!! Wii

Stages: WVBA Boxing Arena, complete with Louis Codecs.

Alt colors: Doc Louis colors, Pink jogging suit, Champion suit, other assorted colors.


The moves:


We wanted to give Mac a Dempsey Roll type move where he's bobbing and weaving while still aggressively approaching the opponent.

Instead we've given Mac a unique sidestep dodge. If you hold forward quickly after inputting the dodge Mac will actually move forward a bit, vice-versa going backwards. There you have it: a Dempsey roll without using any move slots. To balance this out, Mac will suffer increased damage and knock back if he is hit while you are doing this.


Standard moves

A-A: One-two punch
A->: Hook to the chin
A-/\: Uppercut straight
A-V: Crouching jab

Dash attack - NSMB punch - Little Mac runs (like the infamous running cutscene), but his pumping fists will actually hit the opponent when you input the attack. Animation does not change, so it can be unpredictable, as it just looks like he's just running at you.

AERIALS

neutral air - Speed bag punch (that thing where boxers roll their fists rapidly punching the small bag)
foward - Lunging punch (This is the main punch you see in PO!! NES)
Bair - Rotating aerial hook (knocks away)
Up - Leaping celebration fist pump (seen in PO!! Wii when Mac wins a match) - Mac joyfully leaps into the air punching with one fist.
down - Bonzai crusher - Meteor spike. This is Piston Honda's signature move, only downward.

SMASHES

up smash - Winner's fist pump - The double fist pump you see when Mac wins a match in PO!! NES.
Dsmash - Spin Punch (Super Macho Man) - A spinning punch that hits first in front, then behind. Normally Little Mac wouldn't use such a technique, but with the certainty of opponents surrounding him, Mac decided it would be best to practice something like this.
FSmash - Fierce straight - A basic strong, fast straight punch. Mac moves forward slightly while doing it.


SPECIAL ATTACKS


Down B - Guard- Mac contracts himself into a deep defensive position. This move grants 50% reduced damage and knockback from direct attacks and physical type projectiles. If overused (more than two or three uses in a short time) Mac will enter a "pink" fatigued state in which he is unable to move fast and recieves 150% damage and knockback. This lasts for about 7 seconds. Mac will gain a star if he counter attacks with any normal attack quickly after the block is hit.

Neutral B - KO PUNCH/Sportsmanship - A strong punch that is chargeable and storeable. To charge, Mac does several bicep curls until he starts glowing. Instead of dealing powerful knockback, it does 23% damage and knocks the ememy down. Unlike a normal state of knockdown, the victim must rapidly tap the buttons to stand back up or wait out the duration of the condition (about 5 seconds unless you hit them - then it wears off immediately). If Mac does not attack while the opponent is down he will get a star and his damage will be reduced anywhere from 10% to 100%...a reward for sportsmanship, depending on the % level of the opponent at the time. There can be some strategy here... Sometimes you will be faced with the decision of going for the health or going for the sure kill.

Side B - Skipping Rope - In Punch Out Wii training cutscenes Little Mac is shown skipping rope very fast. Little did we know how fast. Turns out the speed he generates creates enough lift to carry him through the air...in the smash universe at least. In the air it is a pseudo recovery move, covering decent horizontal distance with minimal upward direction. It's effectiveness as a recovery increases with every star you get. It also reflects projectiles and thrown items.

up B - Star Punch/Uppercut - The Star Punch is Mac's signature attack. With no stars it is a basic weak uppercut, dealing about 6-7%, low knockback, more of a combo move at this point. Average vertical recovery with no stars.
On the ground:

1 Star: A decently powerful upward strike, does not jump. 10-12% but decent knockback. Good vertical recovery.
2 Stars: Even Stronger. No jump still. Just a strong powerful upward punch, 15-20 damage, above average knockback. Very good vertical recovery.
3 Stars: Very Strong, very fast. A jumping uppercut while spinning once. Vertical knockback is extreme, and will KO at medium damage, around 50-70%. The attack itself deals 25-30 damage. Excellent vertical recovery.


Grabs:

Most people suggest a double handed punch, like Bear Hugger's Bear Hug, or to clench an opponent.
I suggest to use one of Mac's signature abilities: The Stun Punch.
Also known as "The Dizzy Punch", Mac will do a quick jab that stuns the opponent. From there...
Pummel: Mac will repeatedly punch the opponent.
Forward: Mac will punch the opponent with enough force to spin the opponent around similar to the Cape. Mac can follow up with a number of attacks. Reference to Disco Kid KO cutscene.
Up: Mac deals a punch to the gut and follows it up with a powerful upwards strike.
Back: Mac runs behind the enemy, and punchs while whirling around to face them.
Down. Punches enemy who grows a flower on their head, and then falls down. The flower does what it does in Brawl. Reference to Don

Flamenco's KO Cutscene, in which his rose turns black and wilts, attached to his body as he is KO'd.
NOTE: Each character has a unique thing flying over their head when stunned by the Dizzy Punch. (i.e. Mario has his hat flying in circles over his head, Luigi has his, Peach has crowns flying in circles over her head, Bowser has Koopa Shells, etc.) As a reference to the Wii installment.

Final Smash: Shadow Boxer

Mac enters the foreground of the screen. A light shines from behind casting his shadow onto the battlefield. The shadow will do whatever you do and is immune from the opponents' attacks. However you can die if your shadow falls off the stage.

...

or Giga Mac if you like.


Taunts:
Up: Jump ropes in place.
Side: Punches in place.
Down: Mac begins doing situps.

Victory Theme:
Punch-Out Victory Theme.

Victory Poses.
1. Lifts the belt in the air, saying "WOOHOO!" Doc with him, eating chocolate.
2. Is lifted onto Doc's shoulder by Doc.
3. Doc lifts his arm up, as Mac looks happy.

Star System.

How to GAIN Stars

Successfully pull of Infiltration will all 3 hits with correct timing. Correct timing implies that you hit them again JUST as the brief hitstun wears off.
Attack an enemy while they are taunting.
Attack an enemy while they are charging a Smash Attack.
Attack an enemy, interrupting an attack by them.
Hit an enemy with a 0 Star Up Special.
Successfully land a fully charged Smash Attack.
Attack after Dodging/Sidestepping


How to Lose Stars:
Die.
Use the Star Punch.
Take a lot of damage.
Be hit by a Smash Attack.
(Note: Being KO'd, or Using the Star Punch uses all the stars. Taking a lot of damage or being hit by a Smash Attack lowers your

Star Count by one.)
 

Yoichi Hiruma

Smash Journeyman
Joined
Aug 17, 2013
Messages
478
Location
Virginia, USA
Little Mac Moveset

Pieced together using ideas posted by smashboards members Yoichi Hiruma, Shinhed-Echi, ErictheLone, VenusoftheDesertBloom, JohnKnight1 and others


Series Symbol: Boxing Glove with a Star

Music:
Punch Out Theme.
EVERY REMIX from Punch-Out!! Wii

Stages: WVBA Boxing Arena, complete with Louis Codecs.

Alt colors: Doc Louis colors, Pink jogging suit, Champion suit, other assorted colors.


The moves:


We wanted to give Mac a Dempsey Roll type move where he's bobbing and weaving while still aggressively approaching the opponent.

Instead we've given Mac a unique sidestep dodge. If you hold forward quickly after inputting the dodge Mac will actually move forward a bit, vice-versa going backwards. There you have it: a Dempsey roll without using any move slots. To balance this out, Mac will suffer increased damage and knock back if he is hit while you are doing this.


Standard moves

A-A: One-two punch
A->: Hook to the chin
A-/\: Uppercut straight
A-V: Crouching jab

Dash attack - NSMB punch - Little Mac runs (like the infamous running cutscene), but his pumping fists will actually hit the opponent when you input the attack. Animation does not change, so it can be unpredictable, as it just looks like he's just running at you.

AERIALS

neutral air - Speed bag punch (that thing where boxers roll their fists rapidly punching the small bag)
foward - Lunging punch (This is the main punch you see in PO!! NES)
Bair - Rotating aerial hook (knocks away)
Up - Leaping celebration fist pump (seen in PO!! Wii when Mac wins a match) - Mac joyfully leaps into the air punching with one fist.
down - Bonzai crusher - Meteor spike. This is Piston Honda's signature move, only downward.

SMASHES

up smash - Winner's fist pump - The double fist pump you see when Mac wins a match in PO!! NES.
Dsmash - Spin Punch (Super Macho Man) - A spinning punch that hits first in front, then behind. Normally Little Mac wouldn't use such a technique, but with the certainty of opponents surrounding him, Mac decided it would be best to practice something like this.
FSmash - Fierce straight - A basic strong, fast straight punch. Mac moves forward slightly while doing it.


SPECIAL ATTACKS


Down B - Guard- Mac contracts himself into a deep defensive position. This move grants 50% reduced damage and knockback from direct attacks and physical type projectiles. If overused (more than two or three uses in a short time) Mac will enter a "pink" fatigued state in which he is unable to move fast and recieves 150% damage and knockback. This lasts for about 7 seconds. Mac will gain a star if he counter attacks with any normal attack quickly after the block is hit.

Neutral B - KO PUNCH/Sportsmanship - A strong punch that is chargeable and storeable. To charge, Mac does several bicep curls until he starts glowing. Instead of dealing powerful knockback, it does 23% damage and knocks the ememy down. Unlike a normal state of knockdown, the victim must rapidly tap the buttons to stand back up or wait out the duration of the condition (about 5 seconds unless you hit them - then it wears off immediately). If Mac does not attack while the opponent is down he will get a star and his damage will be reduced anywhere from 10% to 100%...a reward for sportsmanship, depending on the % level of the opponent at the time. There can be some strategy here... Sometimes you will be faced with the decision of going for the health or going for the sure kill.

Side B - Skipping Rope - In Punch Out Wii training cutscenes Little Mac is shown skipping rope very fast. Little did we know how fast. Turns out the speed he generates creates enough lift to carry him through the air...in the smash universe at least. In the air it is a pseudo recovery move, covering decent horizontal distance with minimal upward direction. It's effectiveness as a recovery increases with every star you get. It also reflects projectiles and thrown items.

up B - Star Punch/Uppercut - The Star Punch is Mac's signature attack. With no stars it is a basic weak uppercut, dealing about 6-7%, low knockback, more of a combo move at this point. Average vertical recovery with no stars.
On the ground:

1 Star: A decently powerful upward strike, does not jump. 10-12% but decent knockback. Good vertical recovery.
2 Stars: Even Stronger. No jump still. Just a strong powerful upward punch, 15-20 damage, above average knockback. Very good vertical recovery.
3 Stars: Very Strong, very fast. A jumping uppercut while spinning once. Vertical knockback is extreme, and will KO at medium damage, around 50-70%. The attack itself deals 25-30 damage. Excellent vertical recovery.


Grabs:

Most people suggest a double handed punch, like Bear Hugger's Bear Hug, or to clench an opponent.
I suggest to use one of Mac's signature abilities: The Stun Punch.
Also known as "The Dizzy Punch", Mac will do a quick jab that stuns the opponent. From there...
Pummel: Mac will repeatedly punch the opponent.
Forward: Mac will punch the opponent with enough force to spin the opponent around similar to the Cape. Mac can follow up with a number of attacks. Reference to Disco Kid KO cutscene.
Up: Mac deals a punch to the gut and follows it up with a powerful upwards strike.
Back: Mac runs behind the enemy, and punchs while whirling around to face them.
Down. Punches enemy who grows a flower on their head, and then falls down. The flower does what it does in Brawl. Reference to Don

Flamenco's KO Cutscene, in which his rose turns black and wilts, attached to his body as he is KO'd.
NOTE: Each character has a unique thing flying over their head when stunned by the Dizzy Punch. (i.e. Mario has his hat flying in circles over his head, Luigi has his, Peach has crowns flying in circles over her head, Bowser has Koopa Shells, etc.) As a reference to the Wii installment.

Final Smash: Shadow Boxer

Mac enters the foreground of the screen. A light shines from behind casting his shadow onto the battlefield. The shadow will do whatever you do and is immune from the opponents' attacks. However you can die if your shadow falls off the stage.

...

or Giga Mac if you like.


Taunts:
Up: Jump ropes in place.
Side: Punches in place.
Down: Mac begins doing situps.

Victory Theme:
Punch-Out Victory Theme.

Victory Poses.
1. Lifts the belt in the air, saying "WOOHOO!" Doc with him, eating chocolate.
2. Is lifted onto Doc's shoulder by Doc.
3. Doc lifts his arm up, as Mac looks happy.

Star System.

How to GAIN Stars

Successfully pull of Infiltration will all 3 hits with correct timing. Correct timing implies that you hit them again JUST as the brief hitstun wears off.
Attack an enemy while they are taunting.
Attack an enemy while they are charging a Smash Attack.
Attack an enemy, interrupting an attack by them.
Hit an enemy with a 0 Star Up Special.
Successfully land a fully charged Smash Attack.
Attack after Dodging/Sidestepping


How to Lose Stars:
Die.
Use the Star Punch.
Take a lot of damage.
Be hit by a Smash Attack.
(Note: Being KO'd, or Using the Star Punch uses all the stars. Taking a lot of damage or being hit by a Smash Attack lowers your

Star Count by one.)
Thanks for the recognition!
I'm still gonna post mine though.
Little Mac Moveset
A,A,A-Jab combo: alternating left and right. If you continue pressing A, he'll continue to Jab. Can be comboed into Up tilt.
Up Tilt-Hook: He'll quickly punch upwards, and should you press Up+A again, he'll continue to hook upwards, sort of like a

second jab combo, only upwards. Can Be comboed into Jab. Knocks items out of enemy's hands as a reference to Soda Popinski.
(Note. Hits are not as fast as other infinite combos, but deal enough hitstun to combo opponents temporarily. Can combo into

Up Special)
Side Tilt-Straight Punch: A simple, straight punch.
Down Tilt-Low Blow: Quick, low, ducking jab.
Dash Attack: Quick running punch. Causes opponent to fall down. (See Bald Bull KO Cutscene, Punch-Out!! Wii)
Ledge attack: Climbs back onto stage, then punches.

Guard: Blocks face with gloves while surronunded by shield.
Dodge Roll: Quickly sidesteps to the side of the opponent.
Dodge: Tilts body to dodge, such as in his own games.

Smashes:
Side Smash: A strong, forward punch. Decent damage and knockback.
Up Smash: Strong upward hook. Slightly below average vertical knockback, but strong damage.
Down Smash: Spins while punching. Damage is below average, only about 15% for each side, but is ridiculously fast in

execution/attack speed.

Air:
Neutral: Spins around while punching.
Forward: Punches straight twice, exhaling sharply. Ya know, like boxers do.
Back: Back Knuckle Punch
Up: Punches upwards quickly.
Down: Meteor Smash Punch downwards, similar to Samus' Dair.

Specials
Neutral Special: KO PUNCH. A strong punch that is chargeable, but not storeable. Rather than winding up, he will just prepare

the punch, by bringing his arm back. Sort of like a Falcon Punch. Except instead of dealing powerful knockback, it knocks the

ememy down. Unlike a normal state of knockdown, the victim must rapidly tap the buttons to stand back up. Should Little Mac

Taunt while the enemy is knocked down like this, he will regain health.

Side Special: Infiltration. Rushes forward, infiltrating the enemy's defenses should he touch an enemy. He dodges most

attacks as he rushes forward. Pressing B again will follow up with a second punch, and again for a third. If timed correctly,

the three punches strung together will beget a Star.

Up Special: Star Punch: The Star Punch is Mac's signature attack. It easily breaks through shields. With no stars it is a

basic weak uppercut, dealing about 6-7%.
On the ground:
1 Star: A decently powerful upward strike, does not jump. 10-12% but decent knockback.
2 Stars: Even Stronger. No jump still. Just a strong powerful upward punch, 15-20 damage, above average knockback.
3 Stars: Very Strong, very fast. A jumping uppercut while spinning once. Vertical knockback is extreme, and will KO at medium

damage, around 50-70%. The attack itself deals 25-30 damage. Mac's finshing move.
Works similarly in the air. Does not propel him upward a very far distance.
Down Special: Taunt Block.
Everyone has been suggesting a counter for a down special, and I agree. Mac is based around dodging and blocking. Mine can be

used offensively or defensively however. It works like this.
Mac assumes a defensive stance, covering his face with his gloves. If an opponent should attack him while he assumes the

stance, Mac will block in and counter with a strong punch. PLEASE NOTE that this move is different than other counters. This

move is to be used in ANTICIPATION of an attack, as the window of opportunity for the counter to work lasts only a split

second. However, when Mac assumes the stance, if he is close to an enemy, it will force them to taunt. This is a reference to

Punch-Out!! Wii. In Punch- Out!! Wii his opponents often underestimate him, and show this by taunting him.

Grabs:
Most people suggest a double handed punch, like Bear Hugger's Bear Hug, or to clench an opponent.
I suggest to use one of Mac's signature abilities: The Stun Punch.
Also known as "The Dizzy Punch", Mac will do a quick jab that stuns the opponent. From there...
Pummel: Mac will repeatedly punch the opponent.
Forward: Mac will punch the opponent with enough force to spin the opponent around similar to the Cape. Mac can follow up

with a number of attacks. Reference to Disco Kid KO cutscene.
Up: Mac deals a punch to the solar plexis (gut) and follows it up with a powerful upwards strike. Knocks food out of them as

a reference to Glass Joe and King Hippo KO scenes.
Back: Mac runs behind the enemy, and punchs while whirling around to face them.
Down. Punches enemy who grows a flower on their head, and then falls down. The flower does what it does in Brawl. Reference

to Don Flamenco's KO Cutscene, in which his rose turns black and wilts, attached to his body as he is KO'd.
NOTE: Each character has a unique thing flying over their head when stunned by the Dizzy Punch. (i.e. Mario has his hat

flying in circles over his head, Luigi has his, Peach has crowns flying in circles over her head, Bowser has Koopa Shells,

etc.) As a reference to the Wii installment.

Final Smash: Champion Combo.
Many people wanted *ahem* Roid Rage as his FS. Many people wanted a combo ending in a 3 Star Punch. Well as it turns out, in

Punch-Out!! Wii, there is such a thing.
During the final battle with Mr. Sandman in Title Defense mode, after a long and arduous battle, he will unleash his trump

card. A LONG Dreamland Express, with multiple lightning quick and powerful uppercuts. And after that, should the attack fail,

he will be exhausted. So exhausted that he is in infinite stun. Little Mac is then free to combo him to his heart's content,

and slowly depleting Sandman's health, while also building Stars. The final blow can then be a 3 Star Punch, strong enough to

put Sandman down in the dirt once and for all.
The final smash inspired by this would be a punch, that if it connects, would be followed by a long combo of punches, ending

with a 3 Star Punch, just like in the game's Finale.

Taunts:
Up: Jump ropes in place.
Side: Punches in place.
Down: Mac begins doing situps.

Victory Theme:
Punch-Out Victory Theme.

Victory Poses.
1. Lifts the belt in the air, saying "WOOHOO!" Doc with him, eating chocolate.
2. Is lifted onto Doc's shoulder by Doc.
3. Doc lifts his arm up, as Mac looks happy.

Note:
Unique Star System.

How to GAIN Stars:
Successfully pull of Infiltration will all 3 hits with correct timing. Correct timing implies that you hit them again JUST as

the brief hitstun wears off.
Attack an enemy while they are taunting.
Attack an enemy while they are charging a Smash Attack.
Attack an enemy, interrupting an attack by them.
Hit an enemy with a 0 Star Up Special.
Successfully land a fully charged Smash Attack.
Attack after Dodging/Sidestepping
Landing a Ledge Attack

How to Lose Stars:
Die.
Use the Star Punch.
Take a lot of damage.
Be hit by a Smash Attack.
(Note: Being KO'd, or Using the Star Punch uses all the stars. Taking a lot of damage or being hit by a Smash Attack lowers your Star Count by one.)

Taunting will show the number of stars you have over Mac's head.

Style and Strategy.

Mac is ALL about technique. It's about combos, skill, and knowing when to use each move. Mac's main strengths include combos, attack speed, and decent strength and knock back. His jump height is slightly above average. However, his main weaknesses are his fast falling speed, his pretty low weight, and his subpar recovery. However, his side special provides decent horizontal recovery. He does, however recover quickly from knockback and hitstun, having an innate ability to bounce back quickly from attacks, like in his own game. Getting Stars can be rather difficult. His most reliable method of getting stars are his Up and Down Specials. Comboing into his Up Special can beget a star quickly. Forcing the enemy taunt with the Down Special can also yield a star, or even TWO if he attacks a taunting enemy witha fully charged Smash Attack. Besides the Star System, Mac has one other Unique Trait. Mac dodges and sidesteps quickly, like in his own games, and can follow up almost immediately with an attack after dodging. (i.e. After sidestepping, Mac will follow up with a unique attack, a quick punch that begets a star, similar to a ledge attack.)
 

Chris Sifniotis

Smash Journeyman
Joined
Aug 19, 2013
Messages
265
Location
Sydney, Australia
NNID
chrissifniotis
I have a question; I've been developing move sets for characters to put into Super Smash Flash 2, under the hope it'll allow for custom characters. Most characters have no real connection to Nintendo in any way, what is the position of this thread about the move sets for third party, fourth party, and entirely non-Nintendo characters?
 

the8thark

Smash Lord
Joined
Oct 28, 2013
Messages
1,273
Ok here is my Ryu Hayabusa moveset. It's in spoiler tags because it's full of GIFs that will take a few seconds to load.

Playing Style
Ryu Hayabusa would be based off his NES style. Sure he does feature in modern games but none of them are on Nintendo and since SSB is mainly for characters featured on games on Nintendo consoles, I think that's fair. And better in a way as NES ninja skills would make for a very good SSB Wii U Character. He is fast, agile, able to climb walls, swing a sword, create a double of himself and let some really cool ninpo (Ninja magic.) His weakness? He is very light weight and is easily flung around a lot. This is evident in the NES games as hits send him flying. And his jump height is average. Not high and not low.

Moveset


A - Dragon Sword
Down + A - I have not thought of a move for this. Possibly just a ducking sword stab.


Left + A or Right + A - Dragon Sword Upgraded


Smash + A - Hard Kick


Up + A - Spin Slash (also works as a recovery move)


Left + A or Right + A while in the air - Aerial Dragon Slash or an Aerial punch/kick (I have GIFs for both options)


Aerial Recovery Move - Spin Slash. This means Ryu has no 2nd jump. Just one jump and the recovery. This is because I feel a 2nd jump with the wall climbing is a little OP.

B- Shuriken


Left + B or Right + B - Windmill Shuriken


Hold B for a few seconds without moving - Create a clone. The clone lasts for a short time (different to NG2) and only does 50% damage but mimics all of Ryu's moves.


Up + B - Fire Ninpo


Down + B - Fireball Ninpo


Throw - Nothing fancy here, just an average throw.

Block - Ryu parries the enemies moves with his sword

Super special ability from Smash Ball - Art of the Fire Wheels Ninpo (only if Smash Balls exist in SSB Wii U) - Makes Ryu invincible for a limited time and damaging anyone who comes into contact with the Fire Wheel.


Character Ability - Wall Climbing


the8thark

Smash Lord
Joined
Oct 28, 2013
Messages
1,273
I've also created a moveset for Earthworm Jim.

Play Style
Jim would be a mid weight character. Gets knocked around a little but not as much as a light weight. He is pretty agile, has some decent A and B moves, can use himself as a whip and to glide. Jim is basically a worm in a special suit. The head part in the suit is all of Jim but for SSB purposes we will classify Jim in the suit as the character.

Move Set
I will just write a basic move set now. If you want me to make GIFs of them feel free to let me know and I'll do the best I can.

A
Jim does a basic punch.

Left + A or Right + A
Jim uses his head as a whip to hit the enemies

Smash + A
Very short ranged Plasma shot from his gun. (Think the plasma shot from the EJW1 game SNES). Short range because it's only an A move.

Up + A
Helicopter head. Jim spins his head around like the blades of a helicopter allowing him to glide slowly down to the ground.

Down + A
Slide kick

Left + A or Right + A while in the air
Snot (a character in the EJW series) lives in Jim's backpack). And he shoots out of the hack for a second diagonally across for a melee move.

B
Jim attacks with his little red gun. It works like a little machine gun. Spamming B to keep firing. Jim can't move while firing the gun though. This is pretty long range but pretty weak. Also I would also the knock back from this would be small or non existent. Would have to balance that.

Left + B or Right + B
Bubble gun. Short range and does no damage but anyone hit by the bubbles are stunned for a few seconds.

Up + B
Pulls a rocket out of his pocket and uses it to launch himself into the air. This is his recovery move too.

Down + B
A cow drops from the sky damaging anything it hits with a satisfying moo.

Throw
Jim uses his worm head to get extra reach to latch on to people and bring them closer to grab them.

Block
Jim's arms (on the super suit of cause, worms have no arms) create a shield to protect him.

Super special ability from Smash Ball
Peter Puppy appears on screen follows random characters (basically getting in their way a lot). The first person to hit Peter Puppy in any way at all turns him into a monster to pretty much kick the crap out of whoever hit him. (Yes you can use this defensively to get another player to hit Peter. Even 1% damage to Peter will trigger monster Peter.

Taunt
Jim stands still for a second and screams out catch phrases like "Eat Dirt" and others.
 

ClubbyBear

Smash Journeyman
Joined
Aug 28, 2013
Messages
394
I have a question; I've been developing move sets for characters to put into Super Smash Flash 2, under the hope it'll allow for custom characters. Most characters have no real connection to Nintendo in any way, what is the position of this thread about the move sets for third party, fourth party, and entirely non-Nintendo characters?
For SSF2, YOU'll have to make the sprites
 

Amical

Smash Journeyman
Joined
Mar 3, 2013
Messages
246
Location
Kalos
NNID
Amical
3DS FC
1306-6214-4139
If Star Fox gets another rep, it's going to be Krystal, and she offers so much individuality and possibilities that the human mind cannot even fathom.

KRYSTAL'S MOVE SET:

- Staff Attacks

>AAA:
Krystal punches, then kicks, then swings her staff. (Comes out very quickly, ends fairly quickly. Punch and kick are short ranged, staff swing is medium ranged. Knockback is good and launches forward at a 45 degree angle. Does 12 damage total when fresh. First hit does 2 damage, second does 3, and third does 7. Not a kill move.)
> Dash Attack:
Krystal rushes forward and swings her staff in an upward motion. (Comes out semi-slowly, like Marth's Dash Attack. Long ranged. Knockback is decent and launches forward at a 45 degree angle. Does 8 damage when fresh. Not a kill move.)
> F Tilt:
Krystal stabs forward with her staff. (Comes out almost immediately. Long ranged. Knockback good and launches straight forward. Does 10 damage when fresh. Only a kill move at higher percents.)
> U Tilt:
Krystal quickly spins her staff above her, like a helicopter. (Comes out very quickly, ends very quickly. Medium ranged above her. Knockback is small and launches straight upward. Does 6 damage when fresh. Not a kill move.)
> D Tilt:
Krystal crouches and swings her staff horizontally in front of her. (Comes out fairly quickly. Long ranged. Knockback is minimal and launches at an 80 degree angle forward, allowing for it to combo into itself. Does 5 damage when fresh. Not a kill move.)
> F Air:
Krystal swings her staff vertically in front of her. (Comes out very quickly. Long ranged. Knockback is good and launches straight forward. Does 10 damage when fresh. Kill move, but at higher percents.)
> U Air:
Krystal backflips and slashes above her with her staff. (Comes out almost immediately. Long ranged. Knockback is minimal and launches straight upward, allowing it to easily combo into itself. Does 7 damage when fresh. Not a kill move.)
> D Air:
Krystal stabs her staff downward. (Comes out semi-slowly. Long ranged. Knockback acts as a powerful meteor. Does 11 damage when fresh. Kill move at low percents when off-stage.)
> B Air:
Krystal spins and slashes horizontally behind her, using both hands. (Comes out semi-quickly. Long ranged. Knockback is good and launches straight backward. Does 13 damage when fresh. Kill move.)
> N Air:
Krystal rapidly spins her staff around, forming a circle around her. (Comes out fairly quickly. Medium ranged. Hits multiple times, and the final hit's knockback is minimal, and launches the opponent back in the direction they came from. Does 14 damage if all hits connect when fresh. Not a kill move.)
> F Smash:
Krystal uses both hands to slash the staff diagonally in front of her. (Comes out fairly quickly. Long ranged. Knockback is great and launches straight forward. Does 14 damage when fresh. Kill move.)
> U Smash:
Krystal stabs the staff straight up, and it is surrounded in flames. (Comes out very quickly. Long ranged. Knockback is good and launches straight up. Does 16 damage when fresh. Kill move, but at higher percents. Does fire damage.)
> D Smash:
Krystal stabs the staff into the ground, creating a quake around her. (Comes out semi-slowly. Range extends slightly above her head because of the staff, and it has medium range on either side of her because of the quake. Knockback is great and launches straight forward or backward if it hits with the quake, and launches straight up if it hits with the staff. Does 18 damage when fresh. Great kill move.)
> Neutral B:
Krystal shoots ice from the tip of her staff, like Charizard's fire breath. The angle can be controlled. (Comes out semi-quickly. Long ranged. Knockback works exactly like Charizard's fire breath. Starts at 10 damage per second, and slowly decreases to 1 damage per second. Not a kill move. Does ice damage.)
> Side B:
Krystal takes a great leap forward, flips, and slashes with her staff. Can be used in the air. (Comes out fairly quickly. The jump goes a long distance, and the slash is medium ranged. Knockback is good and launches at a 30 degree angle forward. Does 13 damage when fresh. Kill move, but only at higher percents.)
> Up B:
Krystal uses the staff to launch herself up a great vertical distance. Horizontal distance is minimal. Krystal can use aerials out of this move, like Snake's recovery. (Comes out fairly quickly. The jumping motion has a hitbox, which hits multiple times and finally launches forward or backward at a 70 degree angle. This move always does 15 damage if all hits connect. Only a kill move at very high percents.)

DOWN B: STANCE CHANGE
(Krystal changes stances between her Staff Stance and her Assault Stance. The change starts on frame 1 and ends on frame 5, allowing for a quick transition. If she is holding her staff, she puts it in a sheath on her back, and pulls out a blaster from a holster on her hip. If she is holding the blaster, she puts it in its holster and draws her staff.)

- Assault Attacks

> AAA:
Krystal swings her blaster in front of her, punches, and then kicks. (Comes out fairly quickly, ends fairly quickly. Swing is medium ranged, punch is short ranged, and the kick is medium ranged. Knockback is decent and launches forward at a 45 degree angle. Does a total of 13 damage when fresh. First hit does 3 damage, second hit does 4, and third does 6. Not a kill move.)
> Dash Attack:
This is one of Krystal's very few real "clone" moves. It is exactly the same as Fox's Dash Attack.
> F Tilt:
This move looks the same as Falco's F Tilt. However, the only difference is in knockback: it launches straight forward, does 10 damage when fresh, and is a kill move at higher percents.
> U Tilt:
Krystal does a quick backflip, kicking above her with both legs and landing gracefully back on her feet. (Comes out very quickly. Medium ranged. There are two hits, one for each leg, and the second kick has good knockback that launches straight upward. Does 12 damage when fresh if both hits connect. Kill move at high percents.)
> D Tilt:
Krystal crouches down and swings her legs in front of her. (Comes out fairly quickly. Medium ranged. Knockback is decent and launches at a 45 degree angle forward. Does 7 damage when fresh. Not a kill move.)
> F Air:
Krystal kicks, spins, and kicks again in quick succession. (Comes out fairly quickly, ends semi-quickly. Medium ranged. Knockback is good on both hits, making it much harder to air dodge, and launches straight forward. Each kick does 7 damage when fresh. Kill move at higher percents.)
> U Air:
Krystal backflips and throws a grenade a very short distance above her, creating a medium-sized explosion. (Comes out semi-slowly. Long ranged. Knockback is great and launches straight upward. Does 15 damage when fresh. Kill move.)
> D Air:
Krystal throws a quickly-exploding grenade beneath her, creating a medium-sized explosion. (Comes out semi-quickly. Long ranged. Knockback is decent and launches straight up, but only about enough to get opponents above her head a short distance, allowing this move to lead into her N Air, which will be explained shortly. Does 9 damage when fresh. Only a kill move at very high percents.)
> B Air:
Krystal spins and kicks behind her. (Comes out very quickly. Medium ranged. Knockback is good and launches straight backward. Does 10 damage when fresh. Only a kill move at higher percents.)
> N Air:
Krystal does the splits and a backflip at the same time, creating two hitboxes spinning around her. (Comes out very quickly. Medium ranged. Knockback is decent on both legs, launching in the direction that the opponent came from. Each leg does 10 damage when fresh. Not a kill move.)
> F Smash:
Krystal leaps forward with a spinning kick. (Comes out fairly quickly. The leap carries her a short distance, and the kick is medium ranged, lasting for the entire leap. Knockback is good and launches forward at a 30 degree angle. Kill move at higher percents.)
> U Smash:
Krystal does an uppercut, and when the opponent is above her, she throws out several grenades toward them, which create a big explosion. (The uppercut comes out semi-quickly, and knocks the opponent straight up, only slightly above her, and it only does 1 damage. However, it stuns the opponent long enough so they cannot do anything while Krystal quickly throws the grenades at them. The grenades come out immediately after the uppercut. They create a large hitbox above her, like Lucas's U Smash. Knockback is a bit stronger than even Fox's U Smash, launching straight up. The grenades do 20 damage when fresh. Definitely a kill move. However, if Krystal misses with the uppercut, she will still throw grenades, and the cool down is laggy, so she can be punished hard for it. But if the uppercut DOES connect, then the grenades will always hit, no matter how the opponent DIs.)
> D Smash:
Krystal plants a sensor bomb. (Comes out semi-slowly. The bomb will explode when a player steps on it. Knockback is good and launches straight up. Does 12 damage always. Kill move at higher percents.)
> Neutral B:
Krystal shoots her blaster. The lasers are green. (Comes out fairly quickly. The lasers can shoot slightly faster than Falco's. Knockback is minimal, stunning the opponent for half a second. Always does 3 damage per laser beam. Not a kill move.)
> Side B:
This move has two effects.
If the player is already holding forward and then presses B, Krystal will quickly throw a grenade. (Comes out fairly quickly. Grenade launches as far as Snake's do when thrown normally. They explode after 2 seconds. Knockback is decent, launching the opponent in a random direction upward, but not downward or to the sides. Always does 8 damage. Not a kill move.)
If the player presses forward and B at the same time, then Krystal pulls out a missile launcher and fires a missile. (Comes out semi-slowly. The missile itself travels very quickly, and will explode after ten seconds if it doesn't hit anything. On contact, knockback is good, and launches the opponent in the same direction that the missile hit from. Always does 15 damage. Kill move at higher percents.)
> Up B:
Krystal pulls out a jet pack and is able to fly around freely for five seconds. After the five seconds, she free falls. This move can be cancelled into her aerials, but has no hitbox. (Comes out semi-quickly.)

-Throws (Both Stances)

> Normal Grab
Krystal lunges forward and grabs, giving her grab range similar to something between D3's and Marth's.
> Dash Grab
Krystal's Dash Grab has a much shorter range.
>Pummel
Krystal punches the opponent with her staff in hand. (Always does 1% per pummel. Pummels are moderately fast.)
> F Throw
Krystal throws the opponent into the air slightly, then slashes with her staff. (Knockback is good and launches forward. Does 10 damage when fresh. Kill throw at higher percents.)
> U Throw
Krystal throws the opponent up into the air and shoots them multiple times with her blaster, like Fox's U Throw. (Does 7 damage when fresh. Not a kill throw.)
> D Throw
Krystal slams the opponent on the ground and shoots them with her blaster, popping them into the air a short distance. (Does 10 damage when fresh. Not a kill throw, but good for leading into other attacks.)
> B Throw
Krystal tosses the opponent behind her, then spins and slashes with her staff. (Knockback is good and launches straight backward. Does 8 damage when fresh. Kill throw at higher percents.)

- Miscellaneous

> Normal Get-Up Attack
Krystal spins around, swiping her staff on either side of her. There are two hitboxes.
> Get-Up Attack above 100%
Krystal slowly stands and stabs with her staff on either side of her, first in front, then behind.
> Ledge Attack
Krystal flips onto the stage, swinging her staff in front of her.
> Ledge Attack above 100%
Krystal slowly gets up, flips and kicks in front of her.

Final Smash: Demon Sniper
Krystal pulls out a demon sniper from thin air, and fires it across the stage. The bullet works like Marth's FS and Zelda's FS combined, going through everything. It instantly kills anyone in its straight path.

Play Style:
Krystal is a character that allows you to choose between two options while fighting: A ranged fighter, or a close ranged fighter. While in her Staff Stance, she is mainly a horizontal killer. Your objective is to space your opponent with her staff, similar to Marth's style. She can rack up damage in this stance with her good speed and range. Good pokes for her are her F Tilt and D Tilt. While in her Assault Stance, she becomes a vertical killer. Your objective is to control the stage with her sensor bomb and grenades, stop approaches with her missile launcher, and rack up damage with her swift attacks if your opponent gets too close. Her U Smash will easily kill around 100% on most characters with no DI, but it is high risk, so it should only be used when the timing is absolutely perfect. However, her melee range is shorter than that of her Staff Stance.

Other Comments:
All her moves in her Staff Stance have more priority than the moves in her Assault Stance.
Krystal is a medium weight character.

Behold, the most extremely unique and versatile character of all time: Krystal.
(Credits to Guybrush for the "Stance Change" idea.)
 
Status
Not open for further replies.
Top Bottom