
ZTD | TECHnology
Developing New TECHnology
Hey there penguin lovers, it's your main penguin TC coming at you with another informative metagame advancement thread. Today, I want to talk to you about something we know about but just don't abuse. Of course if you read the title, you know its about Full Hop Auto Canceled Dairs. Its a relatively simple tool, but its something I just don't see Dededes abusing too much. And the interesting part is that this works on a majority of legal stages. The key is to Auto Cancel them onto platforms to create more opportunities, and gain some safe shield poking tactics. And by opportunities...well..you'll see what I mean soon ")
WHERE WE CAN PERFORM THIS
Battlefield
|
Yes, can be performed at all times.
Battleship Halberd
|
Yes, but only the phase with the platform.
Brinstar
|
No, cannot be performed here.
Castle Siege
|
Yes, but only on Phase 1 and 2.
Delfino Plaza
|
Yes, but only on certain phases.
Final Destination
|
No, cannot be performed here.
Frigate Orpheon
|
Yes, but only at certain times.
Lylat Cruise
|
Yes, can be performed at all times.
Pokemon Stadium 1
|
Yes, can be performed at all times.
Pokemon Stadium 2
|
Yes, but only on Electric and Rock phases.
Rainbow Cruise
|
Yes, but only on certain phases.
Smashville
|
No, cannot be performed here.
Yoshi's Island
|
Yes, but only when the platform is tilted down.
[collapse=Battlefield]

- You can Full Hop Auto Cancel your Dairs on the two lower platforms from the ground or even from the lower platforms to the higher center one. You just need to make sure that you Dair immediately when you jump otherwise you will suffer the laggy animation.
[/collapse]
[collapse=Battleship Halberd]
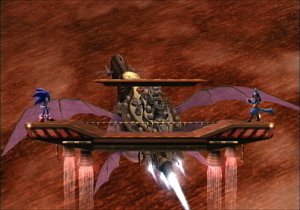
If you look you can see that on each side of the bottom platform, there's slopes. At the top of the slope, you can perform the technique here and land on higher platform without the lag.

Here you can perform this on the ground to the higher platform with ease.
[/collapse]
[collapse=Castle Siege]

- Here on the left hand side, you can use it from the slope onto the small platform on far left of the stage. You need to be in the middle of the slope though.

- You can use this technique to land laglessly on the very top platforms by jumping from the platforms below them (where DK and Zamus are in the picture). You can do this on both sides despite the stage not being symmetrical.
[/collapse]
[collapse=Delfino Plaza]

- On this phase you can AC your Dairs from the middle platform to the top one.
[/collapse]
[collapse=Frigate Orpheon]

- The platform on the right side elevates and stops completely level with the rest of the bottom platform of the stage. When the platform is at its lowest point of you wont be able to AC your Dairs. However when its elevating or descending you can do it.

On the top of the slopes (similar to Halberd) you can use the technique to land on the higher platform without the lag.
[/collapse]
[collapse=Lylat Cruise]

- You can perform the technique on all 3 of the higher platforms. However, you have to practice this because the times you can and can't do this depends on how the stage is tilting. ALWAYS pay attention to HOW the stage is tilting. The platforms themselves are also on a slight slant. You generally want to do this when the side of the stage you're on is lowered. You CAN do this on the middle platform but the opportunity to is REALLY short.
[/collapse]
[collapse=Pokemon Stadium 1]

- You can perform this technique from the ground on either of the side platforms without too much effort. Similar to Battlefield, you need to do the Dair immediately while jumping though.

Here on the Fire Type phase, you can perform it from far left platform onto the top of the tree stump.

- Here on the Water Type phase, you can use this from the platform tha Link is under to the one right of it.

On the Rock Type phase of the stage, gives a lot of opportunities since the there's a lot of small platforms. You can do it from the top platform onto the giant rock. You can do in the middle platforms that Mario is far right off. The platforms are all really close together making this easy to do.

On the Grass Type phase, you can use the technique to land laglessly with Dair on the platform that is above Diddy, by using it on the platform Diddy is on.
[/collapse]
[collapse=Pokemon Stadium 2]

Welcome to the Ground Type phase of the stage. On the right side of the stage you can do this from the middle platform to the top one. And on the left side you can perform this on the slant on the dirt mound onto the platform on the left.
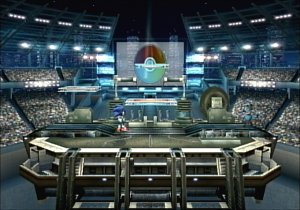
Its really easy to do this on the Electric Type phase of the stage. You can perform it from the ground to the platform in the middle. You can even do it from the middle platform, to the smaller one above that as well. You can do it from the conveyor belt to the platform on the left also just time it correctly.
[/collapse]
[collapse=Rainbow Cruise]

This stage has a LOT of opportunities to use this. So many that I am going to update this a little later. For now, I'll say that it works on the ship, the 2nd phase once you leave the ship and on select parts on the last phase before you return to the ship. More details to come
[/collapse]
[collapse=Yoshi's Island]

The giant platform in the middle has to be on a slant (perform it on the lower side) for this to work here.
[/collapse]
So yeah there's a lot of places you can use this. But now you're probably wondering why should I consider adding this to my game.
WHY SHOULD WE USE THIS?
Dair holds a lot of potential for comboing since it pops people up into the air. The key to comboing with this, however it making sure that your opponent is into towards you and not away from you. Doing this is relatively easy however. If your opponent is on the left of you, just use Full hop Dair towards them and try to knick them with the left of the hammer or the center. If you hit them with the right of it they'll be sent flying to the right and away from you. And vice versa for if your opponent if right on you.
Also you can still combo using this move while the opponent is behind you. In this case you would Dair while moving backwards. So if your opponent is to the right of you and youre facing the other way, you would try to hit them with the right or center of your hammer.
Now keep in mind, that these are not guaranteed. Dair can be DIed out of before the last hit connects being a 7 hit move. Following up is also not 100% fullproof if they DI correctly. These are simply options that can be used when they've been hit in a favorable trajectory at 0 to low percents.
Now let's see what kind of things we can do when we Auto Cancel the Dairs on a higher up platform.
DAIR TO GRAB
[collapse=Click to view the GIF]

[/collapse]
Now this can be performed facing backwards or forwards of course. As you can see its possible to net a grab if you hit them in your direction. And of course in most cases that means a chaingrab. Either way scoring a free grab like this is always a plus.
DAIR TO UP TILT
[collapse=Click to view the GIF]

[/collapse]
This will work until about low-mid percents on a lot of the cast since Up-Tilts vertical range is really good. And at low percents, you may be able to follow up from the Up-Tilt (generally on heavier characters) with a Nair or another Up-Tilt.
DAIR TO BAIR
[collapse=Click to view the GIF]

[/collapse]
As you can see you also land a Bair like this. Technically you could land a Bair from a Dair anyway during your jumps, but its just another option you have if you end up landing a Full Hop Dair while moving backward.
DAIR TO DAIR
[collapse=Click to view the GIF]

[/collapse]
Pretty good if your opponent is bad at SDIing this. Dair to Dair does a nice amount of damage and allows for a follow up like the classic Dair to Fair.
DAIR TO DOWN SMASH
[collapse=Click to view the GIF]

[/collapse]
Yep, even Down Smash can connect like this. The fun part is how Down Smash hits the opponent behind and can give you a chance at a Bair if the opponent is heavy (not guaranteed).
You can also land, Swallow, Down Tilt, Up Smash, and Uair and Nair depending on the DI. I just wanted to show a few examples of what you can do after youve landed a AC'ed Dair.
And that's it folks! Hopefully you got a better idea of what you can do with this fun little technique and where you can abuse it. Remember that the followups are not guaranteed, but they do often times work. Hopefully, you can add this to your game and give yourself some more options for sexy penguin combo goodness. As always, thank you for reading and keep repping that penguin.
- TC

WHERE WE CAN PERFORM THIS
[collapse=Battlefield]
- You can Full Hop Auto Cancel your Dairs on the two lower platforms from the ground or even from the lower platforms to the higher center one. You just need to make sure that you Dair immediately when you jump otherwise you will suffer the laggy animation.
[/collapse]
[collapse=Battleship Halberd]
If you look you can see that on each side of the bottom platform, there's slopes. At the top of the slope, you can perform the technique here and land on higher platform without the lag.
Here you can perform this on the ground to the higher platform with ease.
[/collapse]
[collapse=Castle Siege]
- Here on the left hand side, you can use it from the slope onto the small platform on far left of the stage. You need to be in the middle of the slope though.
- You can use this technique to land laglessly on the very top platforms by jumping from the platforms below them (where DK and Zamus are in the picture). You can do this on both sides despite the stage not being symmetrical.
[/collapse]
[collapse=Delfino Plaza]
- On this phase you can AC your Dairs from the middle platform to the top one.
[/collapse]
[collapse=Frigate Orpheon]
- The platform on the right side elevates and stops completely level with the rest of the bottom platform of the stage. When the platform is at its lowest point of you wont be able to AC your Dairs. However when its elevating or descending you can do it.
On the top of the slopes (similar to Halberd) you can use the technique to land on the higher platform without the lag.
[/collapse]
[collapse=Lylat Cruise]
- You can perform the technique on all 3 of the higher platforms. However, you have to practice this because the times you can and can't do this depends on how the stage is tilting. ALWAYS pay attention to HOW the stage is tilting. The platforms themselves are also on a slight slant. You generally want to do this when the side of the stage you're on is lowered. You CAN do this on the middle platform but the opportunity to is REALLY short.
[/collapse]
[collapse=Pokemon Stadium 1]
- You can perform this technique from the ground on either of the side platforms without too much effort. Similar to Battlefield, you need to do the Dair immediately while jumping though.
Here on the Fire Type phase, you can perform it from far left platform onto the top of the tree stump.
- Here on the Water Type phase, you can use this from the platform tha Link is under to the one right of it.
On the Rock Type phase of the stage, gives a lot of opportunities since the there's a lot of small platforms. You can do it from the top platform onto the giant rock. You can do in the middle platforms that Mario is far right off. The platforms are all really close together making this easy to do.
On the Grass Type phase, you can use the technique to land laglessly with Dair on the platform that is above Diddy, by using it on the platform Diddy is on.
[/collapse]
[collapse=Pokemon Stadium 2]
Welcome to the Ground Type phase of the stage. On the right side of the stage you can do this from the middle platform to the top one. And on the left side you can perform this on the slant on the dirt mound onto the platform on the left.
Its really easy to do this on the Electric Type phase of the stage. You can perform it from the ground to the platform in the middle. You can even do it from the middle platform, to the smaller one above that as well. You can do it from the conveyor belt to the platform on the left also just time it correctly.
[/collapse]
[collapse=Rainbow Cruise]
This stage has a LOT of opportunities to use this. So many that I am going to update this a little later. For now, I'll say that it works on the ship, the 2nd phase once you leave the ship and on select parts on the last phase before you return to the ship. More details to come
[/collapse]
[collapse=Yoshi's Island]
The giant platform in the middle has to be on a slant (perform it on the lower side) for this to work here.
[/collapse]
So yeah there's a lot of places you can use this. But now you're probably wondering why should I consider adding this to my game.
WHY SHOULD WE USE THIS?
Dair holds a lot of potential for comboing since it pops people up into the air. The key to comboing with this, however it making sure that your opponent is into towards you and not away from you. Doing this is relatively easy however. If your opponent is on the left of you, just use Full hop Dair towards them and try to knick them with the left of the hammer or the center. If you hit them with the right of it they'll be sent flying to the right and away from you. And vice versa for if your opponent if right on you.
Also you can still combo using this move while the opponent is behind you. In this case you would Dair while moving backwards. So if your opponent is to the right of you and youre facing the other way, you would try to hit them with the right or center of your hammer.
Now keep in mind, that these are not guaranteed. Dair can be DIed out of before the last hit connects being a 7 hit move. Following up is also not 100% fullproof if they DI correctly. These are simply options that can be used when they've been hit in a favorable trajectory at 0 to low percents.
Now let's see what kind of things we can do when we Auto Cancel the Dairs on a higher up platform.
DAIR TO GRAB
[collapse=Click to view the GIF]
[/collapse]
Now this can be performed facing backwards or forwards of course. As you can see its possible to net a grab if you hit them in your direction. And of course in most cases that means a chaingrab. Either way scoring a free grab like this is always a plus.
DAIR TO UP TILT
[collapse=Click to view the GIF]
[/collapse]
This will work until about low-mid percents on a lot of the cast since Up-Tilts vertical range is really good. And at low percents, you may be able to follow up from the Up-Tilt (generally on heavier characters) with a Nair or another Up-Tilt.
DAIR TO BAIR
[collapse=Click to view the GIF]
[/collapse]
As you can see you also land a Bair like this. Technically you could land a Bair from a Dair anyway during your jumps, but its just another option you have if you end up landing a Full Hop Dair while moving backward.
DAIR TO DAIR
[collapse=Click to view the GIF]
[/collapse]
Pretty good if your opponent is bad at SDIing this. Dair to Dair does a nice amount of damage and allows for a follow up like the classic Dair to Fair.
DAIR TO DOWN SMASH
[collapse=Click to view the GIF]
[/collapse]
Yep, even Down Smash can connect like this. The fun part is how Down Smash hits the opponent behind and can give you a chance at a Bair if the opponent is heavy (not guaranteed).
You can also land, Swallow, Down Tilt, Up Smash, and Uair and Nair depending on the DI. I just wanted to show a few examples of what you can do after youve landed a AC'ed Dair.
And that's it folks! Hopefully you got a better idea of what you can do with this fun little technique and where you can abuse it. Remember that the followups are not guaranteed, but they do often times work. Hopefully, you can add this to your game and give yourself some more options for sexy penguin combo goodness. As always, thank you for reading and keep repping that penguin.
- TC
