
PM Custom Stagelist Creator Alpha has released! Check this post for more instructions.
I've heard this request a lot recently: "How do I get that one build on that stream with the tournament stages and stuff?"
Simple, you make it
In this thread I'll explain how to make a custom Stage Select Screen (SSS), and how to add a logo to the Character Select Screen (CSS). Some of it will be really easy like replacing an image file, while other steps will be a bit more complicated like using a hex editor. And if you don't care to hex edit or can't get the software, I've provided 5 different sample stagelists (10-14 stages each) for you to install straight from the Project M Launcher. So let's jump right in!
(All addons have been tested and are 100% tournament viable with vanilla PM 3.5.)
What You'll Need
Essentials:
1) Project M 3.5
2) Project M Stagelist Starter Pack
For Customizing:
3) BrawlBox v0.71
4) HxD Hex Editor
In addition to all this stuff, the Stagelist Starter Pack also comes with a Rules.psd file for plugging your social media and specifying the number of bans. You can replace the Project M logo in Base Common5.pac -> sc_selmap_en -> MiscData[20] -> Textures -> bg_icon. The font used in this psd file was also included.
If you guys have any more questions, please let me know! Shoutouts to Lunchables, Theytah, and Mewtwo2000 for making this all possible. Now let's see those custom stagelists!
Simple, you make it
In this thread I'll explain how to make a custom Stage Select Screen (SSS), and how to add a logo to the Character Select Screen (CSS). Some of it will be really easy like replacing an image file, while other steps will be a bit more complicated like using a hex editor. And if you don't care to hex edit or can't get the software, I've provided 5 different sample stagelists (10-14 stages each) for you to install straight from the Project M Launcher. So let's jump right in!
(All addons have been tested and are 100% tournament viable with vanilla PM 3.5.)
What You'll Need
Essentials:
1) Project M 3.5
2) Project M Stagelist Starter Pack
For Customizing:
3) BrawlBox v0.71
4) HxD Hex Editor
The Stagelist Starter Pack zip file comes with an addons folder that has prebuilt sample stagelists you can install as addons. To install these addons, simply copy the Sample Stagelist Addons folder to the root of your SD card. If done successfully, you should see this in the addon menu in your launcher. You can swap between these stagelists on the fly just by installing the addon you want. You can also easily go back to vanilla 3.5 just by uninstalling the addon. Your options are:
1) Tourney Pack v1 Stagelist - 10 Legal Stages
![]()
This is the premier tournament pack that was used at Xanadu towards the end of the PM 3.02 era. With the addition of new Norfair, you can find the reasoning behind this 10 stage list here.
2) Infinity and Beyond Stagelist - 11 Legal Stages
![]()
Infinity and Beyond, a local tournament in DFW Texas, runs this stagelist with Lylat instead of Norfair. It also adds on Fountain of Dreams as a counterpick. Pretty solid and tight list.
3) Current Xanadu Stagelist - 12 Legal Stages
![]()
This is the stagelist Smash @ Xanadu currently uses on Tuesday nights. With the addition of Distant Planet and Fountain of Dreams, this stagelist is still debatably small enough to keep 2 bans, however it might be enough to warrant 3.
4) SOJ's Picks - 13 Legal Stages
![]()
This is the bottom 2 rows minus Distant Planet.
5) Bottom 2 rows of PM 3.5's SSS - 14 Legal Stages
![]()
Literally just the bottom 2 rows of vanilla 3.5. The way I like to play this is 13 stages with Yoshi's Story for singles only and Distant Planet for doubles only.
Note: You can still use these addons even if you load Project M through a USB. Since the file structure is still the same, simply put the addons on your card and load the PM Launcher. Install the addon you want, and it will work once you boot through your USB.
Note 2: If you get a crash when installing an addon, update from the launcher or copy this to /projectm/launcher/updates
http://projectmgame.com/downloads/launcher/launcher-1.11.7z
1) Tourney Pack v1 Stagelist - 10 Legal Stages

This is the premier tournament pack that was used at Xanadu towards the end of the PM 3.02 era. With the addition of new Norfair, you can find the reasoning behind this 10 stage list here.

Infinity and Beyond, a local tournament in DFW Texas, runs this stagelist with Lylat instead of Norfair. It also adds on Fountain of Dreams as a counterpick. Pretty solid and tight list.
3) Current Xanadu Stagelist - 12 Legal Stages

This is the stagelist Smash @ Xanadu currently uses on Tuesday nights. With the addition of Distant Planet and Fountain of Dreams, this stagelist is still debatably small enough to keep 2 bans, however it might be enough to warrant 3.

This is the bottom 2 rows minus Distant Planet.
5) Bottom 2 rows of PM 3.5's SSS - 14 Legal Stages

Literally just the bottom 2 rows of vanilla 3.5. The way I like to play this is 13 stages with Yoshi's Story for singles only and Distant Planet for doubles only.
Note 2: If you get a crash when installing an addon, update from the launcher or copy this to /projectm/launcher/updates
http://projectmgame.com/downloads/launcher/launcher-1.11.7z
So let's start with the easy stuff. To get your logo on the CSS, it's as simple as opening up Brawlbox, replacing a texture, and saving. If you've downloaded the Stagelist Starter Pack, unzip the contents to a folder and you'll find it comes with a Base Common5.pac. This is the file that contains the logo. Once you've downloaded Brawlbox, use it to open the Base Common5 file. You'll find the texture you're looking for inside sc_selcharacter_en -> MiscData[30] -> Textures.
![]()
The file you're looking for is at the very bottom of that list of textures. It's named "bg_icon", and is a picture with the dimensions 256 x 128 pixels. This is important because you can only replace this file with another png image of the same size. To replace the file, simply right click on the file and choose "Replace". Find your logo and insert it into the file. Once done, press ctrl + s to save. Easy enough, right?
![]()

The file you're looking for is at the very bottom of that list of textures. It's named "bg_icon", and is a picture with the dimensions 256 x 128 pixels. This is important because you can only replace this file with another png image of the same size. To replace the file, simply right click on the file and choose "Replace". Find your logo and insert it into the file. Once done, press ctrl + s to save. Easy enough, right?

The SSS consists of 2 parts that work together.
1) A series of textures and animations inside common5.pac that have all the possible outcomes.
2) A code in the gct file that tells the game how many and the order of stages it should put on both Page 1 & 2.
Just like the CSS, to get your SSS to have all these different colors and labels, all you have to do is replace textures inside the common5.pac. Luckily all the major work for this has already been done thanks to Lunchables. You'll find a folder in the Stagelist Starter Pack called Stagelist Textures. Inside that folder you'll see this:
![]()
This folder contains all the possible combinations for making a stagelist. Once you've planned out what you want your list to look like, you can start looking through these folders for the appropriate files.
If you have the Base Common5.pac still open, you can find these textures inside sc_selmap_en -> MiscData[80] -> Textures.
![]()
Scroll through these texture files and find the ones you want to replace. Look through the Stagelist Textures folders to find the appropriate replacement files. Once that's done, all that's left with this file is renaming it from "Base Common5.pac" -> "common5.pac" and placing it in your SD:/projectm/pf/system/ folder.
Now comes the fun part, editing the codes. If you haven't already, download HxD hex editor and install it on your computer. Now, in the Stagelist Stater Pack folder, you'll find a Base Codes (11 stages).gct file. This contains the default PM 3.5 codes in addition to a modified SSS. In order to modify the order and the number of stages on the SSS, you need to know how this code works, and luckily it's pretty simple.
Project M codes work in 8 byte (16 bits) format. This means one line of code will look like this:
00 00 00 00 00 00 00 00
So to correctly view the codes, open up the gct file in HxD and then go to View -> Bytes per row. For the purpose of this tutorial, change the value to 8 so we can read the codes easier.
Now the code we're looking for is buried deep within this codeset, so let's find it. Go to Search -> Find or press ctrl+f to bring up the search feature. When searching, it is important to make sure you change the Datatype to "Hex-values". Now search for this line of code:
2D05FFFF 418A0014
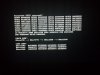
That will bring you inside the SSS code, specifically the line right before the codes required to modify the stagelist. I've highlighted all the lines that make up the stagelist inside the Base Codes file, so try to find them in your file.
![]()
Let's breakdown what's going on here. First you have these two lines:
00 6B 92 9C 00 00 00 0B
06 6B 99 D8 00 00 00 0B
These two lines of code determine the size of the stagelist for Page 1, specifically the last 2 digits on each line. Remember, this is in hex so you have to convert to decimal first to understand. '0B' in hex translates to '11' in decimal. You can find this out easily with Window's Calculator. Simply open up the calculator, go to 'View' and click on 'Programmer'. There you can type in a number in decimal and see what it would be in hex (and vice versa) by clicking on the radio buttons.
Unfortunately, the common5.pac I've supplied only supports stagelists that are 10, 11, 12, 13, 14, and 21 stages (this translates to 0A, 0B, 0C, 0D, 0E, and 15 in hex respectively). If there is demand for different sized stagelists I'd be happy to add support, but I will not go over how to make a stagelist a different size than these presets.
You can modify these codes in HxD by highlighting them and then typing in a new value. Once you change both of these lines, you're ready to write the order for Page 1. This part is easy, as each stage is represented by a 2 digit code. All you have to do is look up the code for the stages you want (found below), and list them out in order from top left to bottom right. The Base Codes file provided looks like this, so you'll notice the next two lines of code will list out all of those stages in order.
0E 0C 15 01 18 17 1C 0F
00 1A 23 00 00 00 00 00
0E is Lylat, 0C is Yoshi's Island Brawl, and so and so forth. Here is the list of IDs for each stage:
Remember, each line of code has to be 8 bytes long, so once you finish putting together a list, you have to format it into lines of 8 stages. At the end of the list, if you don't have 8 stages to finish the last line, simply add 00's until you have 8 bytes per line. The game will not read these extra stages, so you can technically put whatever you want.
Once you're done with Page 1, you'll find the following lines are for Page 2, formatted in the same fashion.
00 6B 92 A4 00 00 00 15
06 6B 9A 58 00 00 00 15
The 15 on both of those lines controls the number of stages for Page 2, which is currently 21 stages. Since this is bigger than the 11 stages on Page 1, you'll notice that it takes 3 lines to list out all the stages.
16 1E 12 09 04 0B 07 1F
06 10 0D 14 02 20 2B 03
28 1D 21 25 27 00 00 00
Modify those lines the exact same way and that's it. Save the file as RSBE01.gct and place it in your SD card in the SD:/codes/ folder.
Note: If Project M is freezing when you launch, it's likely that you've messed up something in this code. Double check to make sure you have the correct length and order of stages set.
1) A series of textures and animations inside common5.pac that have all the possible outcomes.
2) A code in the gct file that tells the game how many and the order of stages it should put on both Page 1 & 2.
Just like the CSS, to get your SSS to have all these different colors and labels, all you have to do is replace textures inside the common5.pac. Luckily all the major work for this has already been done thanks to Lunchables. You'll find a folder in the Stagelist Starter Pack called Stagelist Textures. Inside that folder you'll see this:

This folder contains all the possible combinations for making a stagelist. Once you've planned out what you want your list to look like, you can start looking through these folders for the appropriate files.
If you have the Base Common5.pac still open, you can find these textures inside sc_selmap_en -> MiscData[80] -> Textures.

Scroll through these texture files and find the ones you want to replace. Look through the Stagelist Textures folders to find the appropriate replacement files. Once that's done, all that's left with this file is renaming it from "Base Common5.pac" -> "common5.pac" and placing it in your SD:/projectm/pf/system/ folder.
Now comes the fun part, editing the codes. If you haven't already, download HxD hex editor and install it on your computer. Now, in the Stagelist Stater Pack folder, you'll find a Base Codes (11 stages).gct file. This contains the default PM 3.5 codes in addition to a modified SSS. In order to modify the order and the number of stages on the SSS, you need to know how this code works, and luckily it's pretty simple.
Project M codes work in 8 byte (16 bits) format. This means one line of code will look like this:
00 00 00 00 00 00 00 00
So to correctly view the codes, open up the gct file in HxD and then go to View -> Bytes per row. For the purpose of this tutorial, change the value to 8 so we can read the codes easier.
Now the code we're looking for is buried deep within this codeset, so let's find it. Go to Search -> Find or press ctrl+f to bring up the search feature. When searching, it is important to make sure you change the Datatype to "Hex-values". Now search for this line of code:
2D05FFFF 418A0014
That will bring you inside the SSS code, specifically the line right before the codes required to modify the stagelist. I've highlighted all the lines that make up the stagelist inside the Base Codes file, so try to find them in your file.

Let's breakdown what's going on here. First you have these two lines:
00 6B 92 9C 00 00 00 0B
06 6B 99 D8 00 00 00 0B
These two lines of code determine the size of the stagelist for Page 1, specifically the last 2 digits on each line. Remember, this is in hex so you have to convert to decimal first to understand. '0B' in hex translates to '11' in decimal. You can find this out easily with Window's Calculator. Simply open up the calculator, go to 'View' and click on 'Programmer'. There you can type in a number in decimal and see what it would be in hex (and vice versa) by clicking on the radio buttons.
Unfortunately, the common5.pac I've supplied only supports stagelists that are 10, 11, 12, 13, 14, and 21 stages (this translates to 0A, 0B, 0C, 0D, 0E, and 15 in hex respectively). If there is demand for different sized stagelists I'd be happy to add support, but I will not go over how to make a stagelist a different size than these presets.
You can modify these codes in HxD by highlighting them and then typing in a new value. Once you change both of these lines, you're ready to write the order for Page 1. This part is easy, as each stage is represented by a 2 digit code. All you have to do is look up the code for the stages you want (found below), and list them out in order from top left to bottom right. The Base Codes file provided looks like this, so you'll notice the next two lines of code will list out all of those stages in order.
0E 0C 15 01 18 17 1C 0F
00 1A 23 00 00 00 00 00
0E is Lylat, 0C is Yoshi's Island Brawl, and so and so forth. Here is the list of IDs for each stage:
Code:
00  Battlefield
01  Final Destination
02  Delfino Plaza
03  Dracula's Castle
04  Metal Cavern HD
05  Peach's Castle
06  Kongo Jungle 64
07  Rumble Falls
08  Pirate Ship
09  Hyrule Castle HD
0A  Norfair
0B  Frigate Orpheon
0C  Yoshi's Island (Brawl)
0D  Halberd
0E  Lylat Cruise
0F  Pokémon Stadium 2
10  Saffron 64
11  Port Town Aero Dive
12  Infinite Glacier
13  Flat Zone 2
14  Castle Siege
15  WarioWare, Inc.
16  Distant Planet
17  Skyworld
18  Fountain of Dreams
19  New Pork City
1A  Smashville
1B  Shadow Moses Island
1C  Green Hill Zone
1D  PictoChat
1E  Hanenbow
1F  Temple
20  Yoshi's Story (Melee)
21  Skyloft
22  Onett
23  Dreamland HD
24  Rainbow Cruise
25  Corneria
26  Big Blue
27  Brinstar
28  Pokémon Stadium 1
2B Training RoomOnce you're done with Page 1, you'll find the following lines are for Page 2, formatted in the same fashion.
00 6B 92 A4 00 00 00 15
06 6B 9A 58 00 00 00 15
The 15 on both of those lines controls the number of stages for Page 2, which is currently 21 stages. Since this is bigger than the 11 stages on Page 1, you'll notice that it takes 3 lines to list out all the stages.
16 1E 12 09 04 0B 07 1F
06 10 0D 14 02 20 2B 03
28 1D 21 25 27 00 00 00
Modify those lines the exact same way and that's it. Save the file as RSBE01.gct and place it in your SD card in the SD:/codes/ folder.
Note: If Project M is freezing when you launch, it's likely that you've messed up something in this code. Double check to make sure you have the correct length and order of stages set.
In addition to all this stuff, the Stagelist Starter Pack also comes with a Rules.psd file for plugging your social media and specifying the number of bans. You can replace the Project M logo in Base Common5.pac -> sc_selmap_en -> MiscData[20] -> Textures -> bg_icon. The font used in this psd file was also included.
If you guys have any more questions, please let me know! Shoutouts to Lunchables, Theytah, and Mewtwo2000 for making this all possible. Now let's see those custom stagelists!
Last edited:


")