Superstar
Smash Champion
Port Forwarding P2P For Dummies v1
P2P is short for Peer 2 Peer. When it comes to Smash, P2P is the fastest method of online play available. Limited only to 1v1s, it connects both players directly, rather than using a server [such as EGX] as a 3rd party. The result is the lowest delay Smash possible. However, setting up this P2P is a bit tricky, so I hope this clears any confusion you may have. This method is ONLY if you have a router. If you don’t have a router, well…try it anyways. I don’t know what’ll happen. Probably you won’t even need to port forward in the first place.
This is not to teach you how to netplay, this is to go from netplay to P2P. You should already have a working Project64k or Mupen64k. Also, some connections just seem to not work with P2P. Post if you’re having any problems.
If someone actually cares to put this somewhere else, you can, but replace this paragraph with the link to the original article. To prevent people asking me, yadayadayada.
Some Terminology
This is a “dummy’s” guide after all. So, some definitions on complicated material is a must.
Server – A computer that “hosts” something like a website, or, in the case of EGX, hosts connections for both players.
IP Address – Makes one computer different from another. There is a local and an external IP, so if you and your little brother share a router, you’ll both have the same external IP, but different local IPs. You forward a port to your local IP, and give your external IP to your opponents. More on this later. IPs are in the format XXX.XXX.XXX.XXX
Port – It’s basically a section of your IP. Different internet stuff can be done on different ports. Appears at the end of an IP address like this: XXX.XXX.XXX.XXX:YYYYY. Ports don’t have to be 5 numbers, and these are what you are forward, hence “Port” Forwarding”.
Firewall – Like a screening/limiting of your internet connection. Port Forwarding is actually removing the firewall off one port.
Web browser – Many people surprisingly don’t know what this is. It’s what you use to go on the internet, and by default it’s Internet Explorer.
Step 1: Setting up the P2P client
You can’t play P2P right out of the box, so you need to set up the client. I assume you have Project64k. If you have Mupen, the same might apply, unless you have Malva’s build, which already comes with P2P.
Get acquainted with your emulator. Go into your Project64k folder, and look for a file called kailleraclient.dll [.dll might not show up depending on your computer]. If you don’t see it, chances are you DON’T have Project64k, rather Project64, and you should download Project64k [the one WITH netplay]. KailleraClient is what’s loaded when you click netplay, and this needs to be replaced with the P2P client.
You can download the newest P2P here. However, this isn’t the version of P2P most people use, because it doesn’t support normal Kaillera. Rather, use the November client, or the September if that suits your fancy. I provided a link to the November client, and Malva supplied the September one.
November: http://www.megaupload.com/?d=5UG0DT5P
September: http://www.megaupload.com/?d=MGP9SM0H.
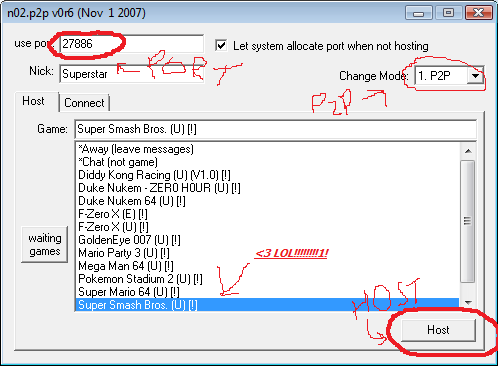
Once you acquire the P2P client, replace the kailleraclient.dll in your Project64 folder with it. Once you start netplay, it should look something like this:

Do not question me on my game choice, I took my little brother’s ROM list.
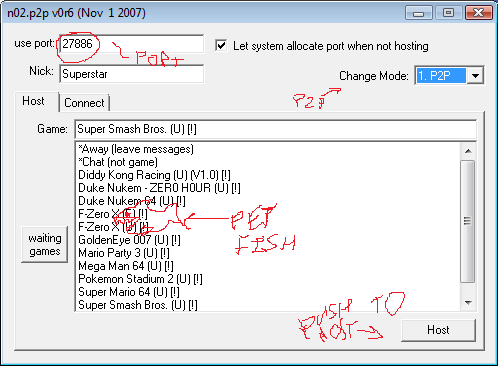
The use port is what has to be forwarded. Make sure the drop down says “P2P”. If there’s no dropdown, you made a mistake.
Step 2: Forwarding P2P
Chances are, your router has a firewall. Since P2P requires a direct connection, you won’t be able to host a game while this firewall is up. At this point, you can do one of two things. You can turn off your firewall, or you can keep your firewall up and forward a port. Forwarding a port maintains most of your security, so it’s the best option for many. You can also set up a DMZ, but that is outside the scope of this guide. Just know that DMZ disables a firewall for one computer.
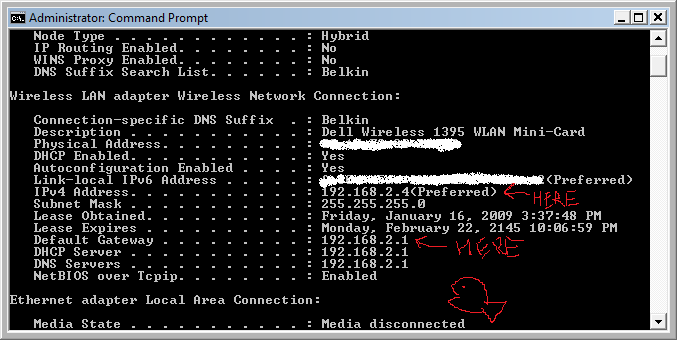
Forwarding a port means turning off your firewall for one port, and this is the port you will use for P2P. For now, I will acquaint you with your new best friend. Go into Command Prompt. To open it, go to Start->Run, and type in cmd, or go to Start->Programs->Accessories->Command Prompt. Once you’re in, type in ipconfig /all, and press enter. You’ll get a screen like this:

Will I die for giving my local IP? No.
You need to acquire several IP addresses from this printout. By several, I mean 2. You need to get your router’s IP, which should be next to “Default Gateway”, and your local IP. A local IP differs from an external IP. A Local IP is your address on the local network, and an external IP is your address on the internet. Since port forwarding functions on the local level, you need a local IP. If it offers a choice between IPv4 and IPv6, you need IPv4.
I’m using a wireless network, so my info is under Wireless LAN. Yours might be under Ethernet, which is a wired connection. If you have Hamachi, you’ll see a section called “Ethernet Adaptor Hamachi”. Do NOT get that one. You’ll know it’s Hamachi if the IP is in the format 5.XXX.XXX.XXX.
To actually forward a port, open a Web Browser, type your router’s IP, and then press Enter. You’ll arrive into your router’s settings, and this is where it gets complicated. Every router is different, so you have to find out how to forward your particular router. For this, I recommend this site:
http://portforward.com/english/routers/port_forwarding/routerindex.htm
Somewhere on the front page of your router settings, it should say your router’s brand and number. Mine, for example, is a Belkin F5D7231-4. Search for your router on that page, and view the Default Guide, which there should be a link for after you click your router’s page.
There are some things to keep in mind. First, if your router asks for an IP field, it’s your local IP address that it wants. Second, I do not know what P2P requires, TCP or UDP [it does not matter what they mean]. To be safe, forward both, or, if you can only pick one, do a port forward for each. The port to forward is whatever you plan on putting in use port, and for both starting and ending port put the same one. MAKE SURE YOUR SETTING IS ENABLED, save your settings, and you’re done.
Test it out with a buddy. You and your buddy need the same version of P2P, and your buddy needs your external IP. Start up the P2P Client, host, and hit “whatismyip”. Your IP should now appear on the screen, with your port right after, in the format:
X.X.X.X Port
Show it to your friend like this [through any communication method]:
X.X.X.X ort
ort
Your friend needs to connect to you, so make sure he is using the connect tab. If whatismyip is failing, then go this site: http://www.whatismyip.org/, and give it to him in the same format as listed above [just, with the port you forwarded].
If it works, bravo, P2P is set up.
Step 3: Maintenance
Very often, P2P will work one day and fail the next. This usually happens because of a router restart. If that ever happens, check ipconfig /all, and see if your local IP changed. If so, redo Step 2. After a while, this becomes so easy it’s automatic.
P2P is short for Peer 2 Peer. When it comes to Smash, P2P is the fastest method of online play available. Limited only to 1v1s, it connects both players directly, rather than using a server [such as EGX] as a 3rd party. The result is the lowest delay Smash possible. However, setting up this P2P is a bit tricky, so I hope this clears any confusion you may have. This method is ONLY if you have a router. If you don’t have a router, well…try it anyways. I don’t know what’ll happen. Probably you won’t even need to port forward in the first place.
This is not to teach you how to netplay, this is to go from netplay to P2P. You should already have a working Project64k or Mupen64k. Also, some connections just seem to not work with P2P. Post if you’re having any problems.
If someone actually cares to put this somewhere else, you can, but replace this paragraph with the link to the original article. To prevent people asking me, yadayadayada.
Some Terminology
This is a “dummy’s” guide after all. So, some definitions on complicated material is a must.
Server – A computer that “hosts” something like a website, or, in the case of EGX, hosts connections for both players.
IP Address – Makes one computer different from another. There is a local and an external IP, so if you and your little brother share a router, you’ll both have the same external IP, but different local IPs. You forward a port to your local IP, and give your external IP to your opponents. More on this later. IPs are in the format XXX.XXX.XXX.XXX
Port – It’s basically a section of your IP. Different internet stuff can be done on different ports. Appears at the end of an IP address like this: XXX.XXX.XXX.XXX:YYYYY. Ports don’t have to be 5 numbers, and these are what you are forward, hence “Port” Forwarding”.
Firewall – Like a screening/limiting of your internet connection. Port Forwarding is actually removing the firewall off one port.
Web browser – Many people surprisingly don’t know what this is. It’s what you use to go on the internet, and by default it’s Internet Explorer.
Step 1: Setting up the P2P client
You can’t play P2P right out of the box, so you need to set up the client. I assume you have Project64k. If you have Mupen, the same might apply, unless you have Malva’s build, which already comes with P2P.
Get acquainted with your emulator. Go into your Project64k folder, and look for a file called kailleraclient.dll [.dll might not show up depending on your computer]. If you don’t see it, chances are you DON’T have Project64k, rather Project64, and you should download Project64k [the one WITH netplay]. KailleraClient is what’s loaded when you click netplay, and this needs to be replaced with the P2P client.
You can download the newest P2P here. However, this isn’t the version of P2P most people use, because it doesn’t support normal Kaillera. Rather, use the November client, or the September if that suits your fancy. I provided a link to the November client, and Malva supplied the September one.
November: http://www.megaupload.com/?d=5UG0DT5P
September: http://www.megaupload.com/?d=MGP9SM0H.
Once you acquire the P2P client, replace the kailleraclient.dll in your Project64 folder with it. Once you start netplay, it should look something like this:

Do not question me on my game choice, I took my little brother’s ROM list.
The use port is what has to be forwarded. Make sure the drop down says “P2P”. If there’s no dropdown, you made a mistake.
Step 2: Forwarding P2P
Chances are, your router has a firewall. Since P2P requires a direct connection, you won’t be able to host a game while this firewall is up. At this point, you can do one of two things. You can turn off your firewall, or you can keep your firewall up and forward a port. Forwarding a port maintains most of your security, so it’s the best option for many. You can also set up a DMZ, but that is outside the scope of this guide. Just know that DMZ disables a firewall for one computer.
Forwarding a port means turning off your firewall for one port, and this is the port you will use for P2P. For now, I will acquaint you with your new best friend. Go into Command Prompt. To open it, go to Start->Run, and type in cmd, or go to Start->Programs->Accessories->Command Prompt. Once you’re in, type in ipconfig /all, and press enter. You’ll get a screen like this:

Will I die for giving my local IP? No.
You need to acquire several IP addresses from this printout. By several, I mean 2. You need to get your router’s IP, which should be next to “Default Gateway”, and your local IP. A local IP differs from an external IP. A Local IP is your address on the local network, and an external IP is your address on the internet. Since port forwarding functions on the local level, you need a local IP. If it offers a choice between IPv4 and IPv6, you need IPv4.
I’m using a wireless network, so my info is under Wireless LAN. Yours might be under Ethernet, which is a wired connection. If you have Hamachi, you’ll see a section called “Ethernet Adaptor Hamachi”. Do NOT get that one. You’ll know it’s Hamachi if the IP is in the format 5.XXX.XXX.XXX.
To actually forward a port, open a Web Browser, type your router’s IP, and then press Enter. You’ll arrive into your router’s settings, and this is where it gets complicated. Every router is different, so you have to find out how to forward your particular router. For this, I recommend this site:
http://portforward.com/english/routers/port_forwarding/routerindex.htm
Somewhere on the front page of your router settings, it should say your router’s brand and number. Mine, for example, is a Belkin F5D7231-4. Search for your router on that page, and view the Default Guide, which there should be a link for after you click your router’s page.
There are some things to keep in mind. First, if your router asks for an IP field, it’s your local IP address that it wants. Second, I do not know what P2P requires, TCP or UDP [it does not matter what they mean]. To be safe, forward both, or, if you can only pick one, do a port forward for each. The port to forward is whatever you plan on putting in use port, and for both starting and ending port put the same one. MAKE SURE YOUR SETTING IS ENABLED, save your settings, and you’re done.
Test it out with a buddy. You and your buddy need the same version of P2P, and your buddy needs your external IP. Start up the P2P Client, host, and hit “whatismyip”. Your IP should now appear on the screen, with your port right after, in the format:
X.X.X.X Port
Show it to your friend like this [through any communication method]:
X.X.X.X
 ort
ortYour friend needs to connect to you, so make sure he is using the connect tab. If whatismyip is failing, then go this site: http://www.whatismyip.org/, and give it to him in the same format as listed above [just, with the port you forwarded].
If it works, bravo, P2P is set up.
Step 3: Maintenance
Very often, P2P will work one day and fail the next. This usually happens because of a router restart. If that ever happens, check ipconfig /all, and see if your local IP changed. If so, redo Step 2. After a while, this becomes so easy it’s automatic.


