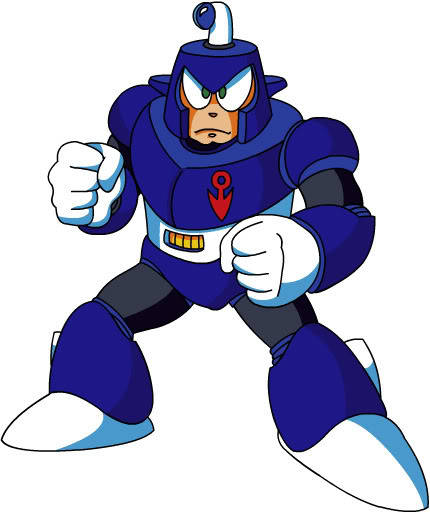
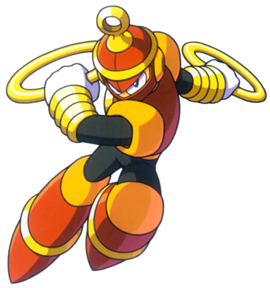
• Welcome to Smashboards, the world's largest Super Smash Brothers community! Over 250,000 Smash Bros. fans from around the world have come to discuss these great games in over 19 million posts!

    You are currently viewing our boards as a visitor. Click here to sign up right now and start on your path in the Smash community!

Make Your Move 14 - This is Snake, I'm done here

APC99

Smash Master
Joined
Jun 12, 2013
Messages
4,244
Location
Appleton, WI
NNID
APC-99
3DS FC
3840-8265-8211
Quick Man

It's yet again a very simple but coherent set coming from you APC. There's nothing too exciting, the set being very Brawl-ish, There's one or things that set me off, like the QuickBlade and QuickShield which are QuickMan.EXE's moves, but overall it's pretty. There's not much to say, the set being very standard, but I'm waiting for Magnet Man, I hope he'll be at least as good as Elec Man. Continue like that!
Thanks! I'm trying to make at least 3 other movesets including Magnet Man. I wanted to use some NetNavi moves for the Robot Masters to round out the moveset, which is where Elec Man got his Set Coil from. There's been some difficulties lately, so it may take a while. Quick Man didn't really have a play style in my eyes like Elec Man (except for run quick or die) and Magnet Man should have a good one. Then I'll do two "joke" characters to include if I feel like it, but they probably won't have a cool play style.
 

ForwardArrow

Smash Ace
Joined
Aug 17, 2011
Messages
502
King Boo
I have to admit this set is a lot wackier than I'd expect from JOE, and when I went to look into the set more I was surprised that was far from entirely due to Smady's decisions. Some of the crazier moves, like DSmash and USpecial, actually came from JOE, and I am one of those people who does not think that's a bad thing. If anything the moves still, barring Up Special, all feel very in smash and in some ways in touch with JOE's style, while still managing to be shockingly creative and actually flowing in some interesting ways with the general invisibility, spiked balls, traps, and DTilt. I'm not of the belief that the portal is really all that bad myself, it's poorly worded but it's perfectly possible to punish King Boo reviving out of it, especially considering the 2nd kill will come much easier. The move's problem is just writing style and number crunching with it's actual time holding the foe captive, and I don't think those are big enough problems to punish the entire set for. Plus it's a fun way of connecting your stage elements together, recovering with some risk-reward attached since foes can soak up damage to kill you, even creating a little bullet hell with different speed ghosts, and it generally works in cool ways with the NSpecial invisibility.

Speaking of that, I really like the ability to turn just about anything you want invisible in this set, reminding me of Spy's invisible spray from back in MYM7 only actually fitting to character and the applications for it are fun, if maybe slightly imbalanced in the case of the portal and the painting, and the surprising amount of mileage you get out of relatively simplistic moves like Nair and Uair with their unorthodox hitboxes. In terms of flow no it's not exactly super dense on interactions, but what is there allows to play in some shockingly unique ways, I think my favorite of which just being the ability to move inside the floor the way he does and use his enjoyably crazy upwards hitboxes like Uair and USmash to pester foes from below. Course there is also the ability to distract foes and make working around your set ups vastly more complicated with one of the best executed pummel KOs I have ever seen, feeling shockingly balanced yet creating a very interesting game between King Boo and the foe as they try to bust the portrait open and regain their stock. It does have flaws though, I won't deny that I've found it very easy to nitpick parts of the set(such as the terrible blue flames mechanics, I don't think damage over time is really a particularly relevant mechanic to this set even with the foe getting trapped in the portal for 2 seconds, which wasn't really a good idea to start with, and then it just makes shields invisible which is a really really painfully tacky status effect if I've ever seen one). The writing also could get awkward at times, referring to things like the diamond on King Boo's head and some obscure graphic on Final Destination to indicate how high a wave is is a very inefficient way of actually indicating size, as almost no-one will actually be able to figure it out without thinking on it for several seconds, making for some difficult reading. It's nothing that drags down this set for me especially much, but I think I really would've liked it more if moves that were used for awkward blue flame effects could've been used to tie together some parts of the set a little nicer, because as is there is flow, but I feel that certain elements could've been connected and make the set feel as a whole more cohesive. It's certainly worthy of some praise though for how many cool concepts it introduces though, and it reminds me a fair bit of Marin, which you said was your favorite set in the contest, didn't you JOE?

Blizzard Man
You know 2 contests ago with Hockey Man and Gray Fullbuster I think MYM kinda got tired of the whole "create an ice rink to slide on" concept. At least with those two sets though, they try to give any depth to their concept with something other than a couple created slopes to roll snowballs down, which frankly isn't a very exciting concept when all it does is make a slightly bigger hitbox and just allow you to spam the screen a bit more. When it's not doing that it's just doing stuff that doesn't even flow in at all like the... well about 75% of this set barely acknowledges the existance of snow other than "this move gets slightly better when you're sliding on it because it's meant to be used while moving". It's not even like the generic attacks are tasteful by generic attack standards, with the Up Tilt being an awkwardly broken anti-air by cancelling every attack in existence and being a lingering trap you can make as much of as you'd ever want, while not even being slow enough to really counterbalance it, or just a generic projectile that gets mirrored onto the Nair. Hell, the set fails at being in smash at times when it just has a random smash dedicated to basically making your snow worse but preserving it's lifespan. Speaking of which, for the life of me I am slightly bothered by how fast this guy moves by sliding along level snow. You need a slope to build momentum, that's how physics work. You don't magically accelerate to become one of the fastest characters in the game on level SNOW. Ice maybe, but not snow which if anything slows you down. I'll admit the set manages some basic form of flow at points with the prospects of rolling snowballs along slopes and a couple attacks that take advantage of them in palatable ways, but they're few and far between in this set.

Vyse
I'm going to be the token downer on this set and say I don't think it's better than Chu Chus, on the basis that Chu Chus relied less on a painfully awkward mechanic with element switching, that assigns every character an element when said elements do not exist in the actual game, then modifying attacks damage to enemeis of a specific element anyway if Vyse is that element because screw consistency. What's a standout problem in that mechanic is how badly he screws over characters who are double weak, because they take a noticeably larger amount of damage from Vyse's attacks than anyone else, or just the fact that people have to memorize a chart and every character affinity when some of them don't even make sense(why the heck is Sho ICE of all things?) I know MYM sets are not all intuitive, but having the memorize that much just seems like a pain. Past that, I feel the set really just comes down to tech chases, combos, and follow ups, fairly standard in smash stuff which if anything might be better without that obnoxious mechanic weighing it down, though it will occasionally allow for decent mid combo options. Side Special, Dash Attack, and Up Special serve as(in Side Special's case, somewhat overpowered) enablers to these standard combos and tech chases that feel... ultimately rather bland and occasionally frustrating foes rather than extending actual depth in comboing.

I guess the use of his moves becomes a tad bit more interesting in the context of 2v2, such as making the skeleton shield into something you'd ever actually see come up again, but it's problematic to me that it is never mentioned outside of the context of 2v2 and just serving as a gimmicky counter in 1v1 with no flow into the rest of the set. Even in 2v2 though, aside from requiring more strategy with the element switching I don't feel you give his moves strong enough application, Down Smash feeling a bit too weak in it's effect to really have an impact worth damaging your ally over, or in other cases the animation just coming across as ridiculous. How does he boost them up with his arms in Up Tilt when he's also swinging his swords upward? I won't deny there's an existent 1v1 playstyle and some of the 2v2 stuff is at least functional, but the set doesn't really manage much beyond just existing and not being heavily flawed past it's initial mechanic to me. I really wish it went anywhere beyond that, but there's not really any unique concepts held here and the execution feels just as banal as what it's based on.
 

Z1GMA

Smash Hero
Joined
Sep 10, 2008
Messages
5,523
Location
Sweden

Ring Man - MM4

Size: 6
Weight: 5
Ground: 7
Air: 5
Jump: 7
Fall: 7

Specials

^B Ring Hunter
Ring Man performs a small jump 45' up and forward. Slightly futher than Solo Popo's ^B.
However, if there's a ring in play, Ring Man Air Dashes to the ring closest to him and grabs it, and then enters freefall.
The Air Dash deals 9% damage. Medium knockback.

B Ringerang
Ring Man throws a ring in a fast fashion, reaching a little past Half of Final Destination. It can be angeled up/down 35'.
It moves very fast, stalls for 1 sec at max range, then returns to the host.
Damage 7%,. Low knockback.
Max 2 Ringerangs can be in play at any time.
(This ring works with "Ring Hunter".)

>B Ring Chain
Ring Man link 5 rings together, forming a chain, and swings it infront of him.
Similar speed to ZSS' whip.
When the opponent is close to you, it binds them in a special Grapple State.
When further away, they get hit and sent away with medium knockback. 13% damage.
(Can also be used as a Tether Recovery.)

*Grapple State
No pummeling, but you can throw them in all 4 directions, using the Ring Chain.
Dthrow: 14% damage. Medium knockback.
Fthrow: 12% damage. Medium/high knockback.
Bthrow: 13% damage. High knockback.
Uthrow: 12% damage. Medium/high knockback.

vB Tactical Ring
Ring Man sets a slightly bigger ring on the ground.
When you input down B the next time, the ring will come to you.
Damage 10%. Medium Knockback.
(This ring works with "Ring Hunter".)

Jabs

A: Forearm Smack. 2%
AA: Second Forearm Smack. 2%
AAA: Head Ring Headbutt. 5%. Medium Knockback.

Titls

Ftilt: Kick. 9%. Low/medium Knockback.
Utilt: Head Ring Thrust. 10%. Medium Knockback.
Dtilt: Ring Twirl. Ring Man twirls a ring on the ground infront of him. 7%. Low knockback.

Smashes

Dsmash: Foot Hula Hoop. A ring is used Hula Hoop Style with the foot, hitting ifront and behind Ring Man. 14%. Medium/high knockback.
Usmash: Dual Rings. Ringman pulls out two rings, one in each hand, then slams them together above his head. 18%. High Knockback.
Fsmash: Giant Ring. A giant ring is summoned and swung forward. 21%. High/very high knockback.

Aerials

Nair: Hula Hoop. 10%. (6% Sex Kick) Low/medium knockback.
Bair: Back Kick 11%. Medium Knockback.
Uair: Ring Juggle. A ring is juggled once. 10%. Low/medium knockback.
Fair: Ring Swing. A ring is swung forwards, starting above. 13%. Medium knockback.
Dair: Ring Twirl 2. Ring Man twirls a ring under himself. 2,2,2,2,2,2, (12%). Low/medium knockback.

Dash Attack

Dash Attack: Double Forearm. 11%. Medium knockback.

Grabs

Pummel: Ring Smack. 3%
Fthrow: Ring Strike. Ring Man strikes them with a ring. 9%. Medium Knockback.
Bthrow: Ring Fling. Ring Man puts a ring around the opponent and flings them behind him. 10%. High knockback.
Uthrow: Forearm Uppercut. 9%. Medium knockback.
Dthrow: Ring Twirl 3. Ring Man throws the opponent on the ground and twirls a ring on him. 10%. Medium/low knockback.

Final Smash

Hyper Hula Hoop: Ring Man starts Hula Hooping with a gigantic ring. 18% damage. Super High knockback.
Lasts for 20 seconds.

Taunts
^: Ring Spin. Ring Man spins a small ring on his finger, above his head.
>: Ring Balancing. Ring Man rolls a small ring on his arm, out to his hand and back.
v: Spin and shine. Ring Man spins around, stops, then his little Head Ring shines.


Stage Entrance
Ring Flip: A ring apprears and starts spinning, then Ring Man is magically flipped into the stage.

Victory Theme
00:00 - 00:08
 

APC99

Smash Master
Joined
Jun 12, 2013
Messages
4,244
Location
Appleton, WI
NNID
APC-99
3DS FC
3840-8265-8211
I'm bumping this. Gonna finish Magnet Man and two others for the contest, so I'll try to get Magnet Man up soon.
 

Venus of the Desert Bloom

Cosmic God
Super Moderator
Premium
BRoomer
Writing Team
Joined
Jul 30, 2007
Messages
15,317
NNID
VenusBloom
3DS FC
0318-9184-0547
I'm not sure if you can do this but can you claim characters? I'm interested in creating a Skull Man and Snake Man move set.
 

TheKalmarKing

Smash Apprentice
Joined
Mar 7, 2013
Messages
162
I'll be absent for the next week, but I plan to release Ares shortly after my return so stay tuned
 

APC99

Smash Master
Joined
Jun 12, 2013
Messages
4,244
Location
Appleton, WI
NNID
APC-99
3DS FC
3840-8265-8211
Happy day! Here you guys go!

DWN-018
MAGNET MAN

Description:

After Mega Man defeat Dr. Wily the second time, the doctor claimed he was a changed man. He and Dr. Light teamed up again to create 8 new Robot Masters as well as a peacekeeping robot named Gamma. All they needed were the 8 Energy Elements, which the Robot Masters were designed to mine for. Somehow, the Robot Masters went haywire. Mega Man had to stop them once more. The “leader” of the bunch was Magnet Man, who could attract and repel all. August 28, 200X. The Robot Masters were repaired by Dr. Light and stored in chambers under Light Labs alongside their predecessors. Mega Man had more challenges ahead, including Break Man. But that’s another story. Several years later, at the celebration of Mega Man’s entry in the Smash Tournament, all Robot Masters were activated. Magnet Man desired to fight alongside his brother. So he left alongside some of his brothers and got ready to fight. His magnetic abilities are able to pull in all weight classes at a high speed, but his moves are powerful enough to send heavy-hitters flying. However, he does have a weakness: electricity. Sheik’s chain, Olimar’s yellow Pikmin, Samus’ Charge Shot and Pikachu as a whole could be enough to KO Magnet Man at a high percentage.


Statistics:

Weight: 6/10. Magnet Man weighs in as much as his brother Mega Man, but is a bit more floaty due to his powers of magnetism.

Size: 5/10. Magnet Man stands as tall as his brother as well, but his magnetic field can outsize him as it expands and decreases to his will.

Ground Speed: 5/10. Magnet Man is well-rounded on the ground, but at any time can push away from the magnetic forces of the field and become faster in the air.

Air Speed: 7/10. As stated, his control over magnetic forces allows him to push against the ground and attack freely. In fact, once in the air, he can only use his Magnetic Pull move to return to the ground. This works well for evading attacks, and gaining practice on aerials. Unfortunately, not only is his most powerful aspect (grabs) unavailable, his attacks can also push him away, but of course he can push himself back into the arena and land back on solid ground.

Fall Speed: 1/10. If he doesn’t use Magnetic Pull, Magnet Man can fall only if attacked, but still falls at a very slow rate. This is one major disadvantage in air, but it’s a great advantage in recovery, as if he’s nearly KO’d and is above the arena, he still has time to fall on the ledge before death to survive.


Special Attacks:

Neutral Special: Magnet Missile. Magnet Man fires three miniature magnets from his wrist and they home in on an opponent, or go a distance and then crash. A more descriptive way of saying it is that they leave Magnet Man’s wrist and go horizontally until they find and enemy and then ascend into the sky and crash down, causing 4% damage each. If they are interrupted during their horizontal takeoff, they will explode and deal 2% each. If the targeted opponent is wearing a Metal Box, the Magnet Missiles will home in quicker but deal 3% damage instead. They are mostly invulnerable to attacks, but can be repelled by a reflecting attack or an electric attack, making it a very useful weapon for fights against characters like Jigglypuff, Link and Donkey Kong.

Side Special: Magnet Hole Blast. Taking a cue from MagnetMan.EXE, Magnet Man throws a non-homing Magnet Missile. If anyone touches the Magnet Missile, he’ll summon a purple orb of energy that he throws at the Magnet Missile, dealing 11% damage and repelling the opponent. It’s a twist on defense moves like Lucario’s, Marth’s and Jigglypuff’s, and it can be used to also attract the opponent by charging it longer.

Up Special: Forces of the Master. He kneels and places his palms on the ground, then pushing off as magnetic waves surround him, each wave dealing 5%. This can be used to propel Magnet Man upwards in the air, and to recover as well. In the air, instead of kneeling, he stretches his arms out and slams them to the side of his body, creating the same magnetic waves. He can be controlled during this state, similarly to Lucario’s Up Special. He has to recharge (about 30 seconds) before he can use this move again, as he can stay in the air.

Down Special: Magnetic Pull. He poses like he does in his boss intro in Mega Man 3, and a barely visible pink field surrounds him. During this state, any opponent will be lifted off their feet towards Magnet Man, allowing him to perform great combos and grab his opponents. In the air, this move will pull him towards the ground, allowing him to regain his grabs and combos.

Standard Attacks:


Neutral Standard: Magnet Man positions out his fist like Mario’s Side Smash and it sends magnetic pulses out. They don’t travel far but deal 2% damage. He can combo this to alternate hands and then elbow the opponent.

Side Standard: He holds a magnet in each hand and points them in opposite directions. This pulls in opponents slightly, but can also deal 5% damage and repel them if too close.

Up Standard: Uppercut. Like Mega Man, Magnet Man performs an infamous Shoryuken. But it deals 7% damage and leaves the opponent in the air, not allowed to touch the ground for about 2 seconds. If they near the ground, a 1% shockwave of magnetic energy will surround them giving them 2 extra seconds in the air. Cheap? Yes. But he’s Magnet Man. Do you expect him to let you just fall when he can pummel you in the air?

Down Standard: Magnet Man releases a blast of magnetic energy around him, pulling in objects around him and dealing 4% damage to anyone in the blast.

Dash Attack: Magnet Man performs a very Magneto-like pose as he crosses his arms and stops in his tracks, dealing 5% damage and pushing the opponent at high speeds.

Smash Attacks:


Side Smash: Magnet Man does a roll in air and then bursts out in a pose like this (Magneto’s a big inspiration for the attractive Robot Master :awesome:)

It deals 17% damage and can either grab the opponent or push them at high speeds.

Up Smash: Magnet Man spins around and then does the Hadouken pose above him, juggling the opponent above him and dealing 14% damage.

Down Smash: Magnet Man’s body pixelates and becomes two aura-like copies (one red, one blue) that each uppercut the opponent and then phase back together. It deals 9% if you get stuck in the phasing part of Magnet Man’s body (both times) but it deals 6% if you get hit by either copy and repels you, making a possible 15% move. This move is a reference to North-South Tackle from MagnetMan.EXE.


Aerial Attacks:


Neutral Aerial: Magnet Man clenches his fist and magnetic forces surround it. This deals 4% damage and pulls in opponents for combos.

Side Aerial: Magnet Man fires one Magnet Missile that deals 4%. It acts similar to the Ray Assist Trophy’s Missiles instead of the normal physics.

Up Aerial: Magnet Man performs a kick that sends the opponent skyward and deals 6% damage.

Down Aerial: He spins around, creating a twister of magnetic force that pulls in more items and opponents. This attack can reflect projectiles like Link’s Arrows, Sheik’s Needles and Mega Man’s Metal Blades due to their metal properties, but not attacks like Mario’s Fireball, R.O.B.’s Laser or Ness’ PK Pulse due to their properties.

Back Aerial: He performs a move that looks similar to Ganondorf’s Melee Taunt, but with legs stretched out further. This attracts an opponent and lasts about 5 seconds. If an opponent is successfully attracted, Magnet Man will descend from his aerial stance onto the floor and perform a grab on the opponent, allowing you to pummel in the air, each dealing 2% until you hit the ground where you can now continue pummeling or throw your opponent.

Grab Game:

Grab: Magnet Man gets into a T-position as he hovers and opponents are dragged towards him. It’s the largest grab range out of any character.

Pummel: Magnet Man clutches his fists as the opponents cringe in pain as the magnetic fields crush them. Deals 2% per hit.

Up Throw: Magnet Man flies into the air and blasts his magnetic field, creating a paralyzing shock wave as the opponents are juggled into the sky. Deals 9% damage.

Side Throw: Magnet Man’s magnet on his head flies off and circulates around the opponent, paralyzing them for Magnet Man to combo with. Deals 5% damage.

Down Throw: Magnet Man does a spin as the opponent is drawn in closer and then Magnet Man pushes them away. Deals 8% damage.

Back Throw: Magnet Man does a backflip and pulls the opponent near him similarly to Magnet Pull and then sends out a Magnet Missile. If all hits connect, it can deal a whopping 12%.

Miscellaneous:


Final Smash: Forces Unknown. Magnet Man zooms to the top of the stage and motions as magnetic forces change the stage. Items are now flying up in the air, and opponents are spinning around in your grasp. You now can do several things:

  • Neutral Special: You grab a nearby object (item, projectile, other fighter) and slam it into the ground. This can work if there is more than one opponent, as you can “kill two birds with one stone” by throwing one opponent at the other. Each hit cause 14% damage.
  • Up Special: You intensify the gravity around you. This can heighten objects into the sky, as well as get an easy KO.
  • Down Special: Appearing Blocks suddenly shine, dealing 17% to anybody who touches them. As they flash quickly, it can be easy to use these against your opponent.
  • Side Special: He creates a Giant Springer from spare metal he collects from above and it bounces down, then back up. Each hit will cost 12%.

This lasts as long as Final Smashes like Pikachu’s, Sonic’s, Yoshi’s and Diddy Kong’s, making it a very useful attack.

Taunts:

  • Up Taunt: Magnet Man performs his boss pose from Mega Man 3.
  • Side Taunt: Magnet Man hovers and spins around as magnetic fields spin around him.
  • Back Taunt: Magnet Man launches a Magnet Missile as it zooms around him and sticks to his face, only for him to pull it off.
  • Down Taunt: Magnet Man hovers as his lower body (all but head and arms) debuild, but magnetically recombine again.

Kirby Hat: Kirby wears Magnet Man’s helmet and can now perform Magnet Missile. His pose when obtaining Magnet Missile is now more similar to the Mega Man Weapon Get pose.

Victory Theme: Same as Mega Man.

Logo: Same as Mega Man.
 

Katapultar

Smash Lord
Joined
Nov 24, 2008
Messages
1,258
Location
Australia
Here you go!

[collapse=Ring Man]This just might be the shortest set in the contest :p. Short is certainly not a bad thing, especially with a Robot Master, though it could use just a bit more detail on the moves (they do have just enough to understand them from a basic level), like knockback direction when necessary but most importantly what kind of uses the move has in the overall playstyle - you'll see on Smash Wiki and guides for existing characters that most of their moves have surprising uses to them and that they tend to play in a certain way. This'd make your sets more interesting to read, because while King had some good inspiration behind him and Youtube videos showcasing his moves for reference, Ring Man doesn't feel very inspired (which I don't blame you for, since Robot Masters don't have a lot to draw from, but that doesn't mean he -can't- be interesting). You might even want to read some sets in this contest (or the previous ones) for an idea of what you can do if you put your mind to it, especially the Robot Master sets from the previous contests of which were more or less in the same boat as you.

For the actual set itself, the Neutral Special boomering and Down Special tactical ring are interesting on their own, and could be a fair bit better if there were more ways for these to support/be supported by the rest of the set; how about more ways to manipulate the tactical ring or even knock around your rings with your basic moves for interesting interactions? Rings have plenty of potential despite being simplistic objects, like being able to trap people or whatnot. Also, from an aesthetic point of view, Ring Man seems to have some magic ring powers as based on his entrance animation, him summoning rings out of nowhere and his genie-like appearance - moves where he summons hula-hoops out of nowhere like Wii Fit Trainer kind of hurt the image I have for him as a fighter, especially that Final Smash. That might be good to remember for the future.

So, overall, I'd say it's certainly not as good as King, but you can at least use it as a stepping stone for the future in regards to what you might be critiqued about. I can at least guess you like the Mega Man series from your avatar though, so keep at it!
 

APC99

Smash Master
Joined
Jun 12, 2013
Messages
4,244
Location
Appleton, WI
NNID
APC-99
3DS FC
3840-8265-8211
OK, if anybody wants to dissect my 4 movesets for me, you're welcome to. I'm curious as to see which is the best.
 

Katapultar

Smash Lord
Joined
Nov 24, 2008
Messages
1,258
Location
Australia
[collapse=Zod]The only non-Mega Man moveset. Though the presentation is a bit rough, it gets a ton of comparison points for being one of the amusing-to-read sets in the entire contest. This is pretty consistent too, so good job on that. Some of the moves are missing details, but that's a worthy sacrifice for the writing. It is certainly a unique way to start a movesetting career in comparison to the 3 Robot Master, actually being interesting to go back and read. I also like how you've been consistent with providing a backstory on how each character entered brawl. I know this is a poor excuse for a comment, but it was written with the other 3 in mind. You get to know this at least![/collapse]
 

APC99

Smash Master
Joined
Jun 12, 2013
Messages
4,244
Location
Appleton, WI
NNID
APC-99
3DS FC
3840-8265-8211
[collapse=Zod]The only non-Mega Man moveset. Though the presentation is a bit rough, it gets a ton of comparison points for being one of the amusing-to-read sets in the entire contest. This is pretty consistent too, so good job on that. Some of the moves are missing details, but that's a worthy sacrifice for the writing. It is certainly a unique way to start a movesetting career in comparison to the 3 Robot Master, actually being interesting to go back and read. I also like how you've been consistent with providing a backstory on how each character entered brawl. I know this is a poor excuse for a comment, but it was written with the other 3 in mind. You get to know this at least![/collapse]

Thanks! If you still have time, could you review the other 3? not trying to be demanding, I just really want some pros and cons to improve for my next moveset.
 

Katapultar

Smash Lord
Joined
Nov 24, 2008
Messages
1,258
Location
Australia
This could totally become a new service in Make Your Move. It might as well be now that it's happening.

[collapse=Tingle]I kind of want this guy in the next Super Smash Bros game, but then again I don't really care that much about Nintendo newcomers in the first place, other than Kid Icarus/Pokemon.

Something I noticed when I first skimmed this set was that Tingle has a weight stat of.....99. Lol :starman:(we have movesets that are meant to be fought with 3 characters, and even they never get that heavy!). You -might- want to fix that, but then again all of us MYMers who've attempted to edit their sets in this new setting on SWF know that our BBCoding seems to get wrecked in the process, and we already know how much Tingle really weighs with the Mario comparison. It's good you have an idea of how Tingle plays with a playstyle section, and have seemingly thought this out before writing the moves, though we tend to put the playstyle section after the moves since readers have already seen the moves that we're talking about and trying to convey on how they work in their overall gameplan.

Tingle's Up Special is actually fairly interesting in how holding it for longer creates more balloons, though I do think 1 second is far too long to blow up one balloon, especially when we're not told the approximate distance each one carries Tingle before popping - I would say that Tingle should be able to blow up one balloon very quickly, say within 0.2 seconds, but blowing up consecutive balloons takes longer since he's physically exhausting himself. One balloon could carry Tingle say, the distance Wario's Corkscew covers, and he's able to use his aerial attacks while flying since that'd make it interesting and there's no reason why he shouldn't be able to if his hands are free (combine this with the Specials?). I do think it's very bizarre that Tingle can randomly glide using a balloon since that makes absolutely no sense at all, and doesn't seem to hold much merit. I was sort of under the impression that Tingle would be able to use his projectiles when floating up with his balloon, increasing his annoying factor while giving them an interesting use.

Rupee Toss is somewhat interesting for the trivia it provides on a Tingle game along with feeling right for him to do something random when taking his Assist Trophy appearance in Brawl into account. It's sort of hard to be interested in these other 3 Specials though, not only being a little bland but also somewhat redundant with being projectiles, as if being a throwback to Link in his Smash appearances. As far as being a Smash set, Villager and Mega Man both have some fun-looking moves with interesting effects, whereas I'd say Tingle has a lot more room for creativity, especially when pulling out a ton of props from nowhere would be perfectly acceptable and far more interesting than mostly using his body to attack. I can somewhat imagine Tingle laying out a trap with one of his attacks like with the D-Smash input, even.

Tingle is somewhat true to character in the set, but not in the most interesting way as far as the entire set is concerned. Want to force approaches? Blow up a balloon and the foe will have to come to you lest you get lots of time to fly around and dive bomb them with projectiles and stuff. Not ALL the moves have to super interesting and creative, just that some of the inputs with leniency like the Specials and Smashes could afford to interconnect or be ways in which other moves can play off. Perhaps the aerials and stuff, even the simplest ones, have a way to work with the playstyle established in the beginning, just that they're not elaborated on enough for anyone to notice or it's just not that interesting.

All and all, a decent attempt, if not quite there yet. Hopefully you were able to learn something from everything I've said.
 

APC99

Smash Master
Joined
Jun 12, 2013
Messages
4,244
Location
Appleton, WI
NNID
APC-99
3DS FC
3840-8265-8211
I think I shall review all movesets on 9 and 10th page (not made by me!) with no expertise in critique whatsoever.

[collapse=Z1GMA's Ring Man]
Another Robot Master moveset! Cool! Anyway, I noticed that Ring Man's got a great playstyle which kinda reminds me of Olimar and the Pikmin (I don't know how, it just does) but doesn't really channel the Mega Man part of him. This may just be preference talking, which I really hope it's not, but I think that besides the Ring Boomerang, there's really not much that references his history in Mega Man. I'm really sorry if I sound like "if I did it", but I feel you could've done something with stage obstacles (those coiled-looking platforms, UGH!), maybe those hippos or the exploding ring mini-bosses, even if it wasn't using them literally, but maybe using the rings to make the hippo's platform, or a move exploding rings around him. Heck, maybe even throw in some NetNavi moves if you want to! That's just suggestions from me, but I actually see only one problem in my eyes: The final smash. It just looks underwhelming to me. Ring Man just hula-hooping around just kinda seems like if Link had his boomerang grow in his Final Smash, or Luigi ate a Super Mushroom and used the Green Missile. But in all seriousness, a short and sweet moveset with a great playstyle, but not enough reference to the source material and a lackluster Final Smash. [/collapse]

[collapse=FallKoopa's Tingle]
Tingle's just a cool and weird character. To me's he's the Waluigi of the Zelda reps: A possible spin-off rep to the series. And they're both portrayed as creepy people on the Internet. Anyway, the moveset's cool. It seems to be missing things like Final Smash and the other additions like Taunts and such, but that's perfectly fine. His moveset looks quirky yet effective, making him a great character just to float around in air and spam other players until they're annoyed and high-damage, then KO them with a Force Gem, Firework or Rupee. In that case, some may say he's got a similar playstyle to Pit :troll:. All jokes aside, a really cool moveset, although I seem to notice a lack of maps. I'm not sure how they could fit in, but I would be really impressed if you found a way to introduce them somehow if you ever update it. I noticed a lot of stuff that just seemed to be out-of-place, like the U-Smash and U-Throw. They didn't seem right for Tingle. To summarize, great moveset, some things missing, but classic playstyle and strangely fitting moves, with the exception of a few. [/collapse]

[collapse=Pacman9's Pac-Man]
This surprised me. I used to make "basic" movesets with my friends, and basically our Special Attacks and Final Smash were exactly the same for Pac-Man. Except for Double Trouble. Not only is that the strangest idea for Pac-Man, it seems really easy to spam. I have to give you credit though for thinking outside of the box and not giving Pac-Man his chomp for his neutral special. The use of the Galaga ship, although clever, seemed out of place to me, as does the Grappling Hook, Skate Slice and the presentation of the Pac-Dot Chain. I'd actually say it would be cooler for Pac-Man to just chomp Pac-Dots normally without a ghost in his 3D form, but apparently I'm one of the only people who likes his 3D appearance. In summary, good moveset with some unexpected turns, for better or for worse. [/collapse]

[collapse=Z1GMA's King]
I know nothing about Tekken moves or wrestling moves in general (I've only played it once and lost within a minute), but he seems like a good fighter. I didn't understand the playstyle well, but you seem to have fixed it in Ring Man, so cool. I like the idea of a character who's dependent on grabbing (BESIDES chain-grabbing) so I enjoyed it a lot. Besides, the guy's got a cheetah head! He looks like he could be a villain in Batman or something! The lack of a projectile adds to the macho-wrestler playstyle, so all is forgiven. The Final Smash looks cool, and would be awesome if it was sped up and performed faster. And dear god that sheep stage should be his home stage! In summary, a cool character with a original playstyle, but a lot of it was lost in translation to a person like me who is not knowledgable in the ways of Tekken and professional fighting. Plus dat sheepy music. [/collapse]

[collapse=Getocoolaid's Blizzard Man]
I do not like slow characters, I cannot be patient. So that's one drawback so far. There's still the "preferences" I had with Z1GMA's Ring Man missing, such as little representation of source material and the Final Smash doesn't seem too amazing. However, the playstyle is still interesting with stage control. I may have gotten lost and missed it, but maybe Blizzard Man could be slow on land, but uber-fast on snow? The Blizzard Attack and the rolling move are in the moveset too, so I've got nothing too much to complain about, besides the lack of curling puck enemies as projectiles, which would be really cool as they could have the same properties of Blizzard Man as stated above: Slow on land, uber-fast on snow. I have to give you credit on the use of the skis, as you use them very well in the moveset. In summary, good use of Blizzard Man's weapons and stage control, but slowness and low reference to source material can turn away possible players. [/collapse]

I've been lazy and decided to do King Boo's tomorrow, as well as try to make my other movesets. Any idea when the contest will be over? And how long would it be until the next one starts?
 

Katapultar

Smash Lord
Joined
Nov 24, 2008
Messages
1,258
Location
Australia
The contest should end when we hit the 100-set mark, which will probably be by the end of this year at the rate the contest is going - to make it end earlier, lots of sets are appreciated! In short, you pretty much have all the time in the world to make whatever you like.
 

APC99

Smash Master
Joined
Jun 12, 2013
Messages
4,244
Location
Appleton, WI
NNID
APC-99
3DS FC
3840-8265-8211
The contest should end when we hit the 100-set mark, which will probably be by the end of this year at the rate the contest is going - to make it end earlier, lots of sets are appreciated! In short, you pretty much have all the time in the world to make whatever you like.

Thanks! One last question: How long is it usually between Make Your Moves? In other words, after 14 ends, how long will it usually take for 15 to come around?
 

Smady

Smash Master
Joined
Apr 29, 2007
Messages
3,307
Location
K Rool Avenue
Thanks! One last question: How long is it usually between Make Your Moves? In other words, after 14 ends, how long will it usually take for 15 to come around?
It takes a month. One week for advertising other sets (which every voter is required to do 3 times), a week for voting, a week for the leadership to put out the top fifty, and another week to prepare for the next contest. It can be shorter than that because putting the top fifty usually only takes about half a week because of changes to the traditional way the top fifty was constructed.

You know, I'm quite tempted to do a Shade Man set, in the middle of all this robot master chaos.
 

Conren

Smash Apprentice
Joined
Feb 17, 2009
Messages
90
Location
Boston
NNID
Conren1
3DS FC
5086-4445-8944
GUTS MAN
DLN-004​
"I've got Guts!"​

Guts Man was the foreman of Dr. Light's robot construction crew before being reprogrammed by Doctor Wily for evil construction duties.

Megaman

ATTRIBUTES
1/10 Dash Speed
1/10 Air Speed
7/10 Fall Speed
7/10 Jump
5/10 Air Jump
9/10 Traction
10/10 Weight

Guts Man is one full head taller than Megaman. He is able to move and jump faster than most other characters when carrying a heavy item, like crates and barrels.

SPECIALS

Standard Special - Super Arm
15%

Guts Man reaches into the ground and pulls out a guts block and carries it overhead with one arm.

Item: Guts Block
The guts block is a large rock block that counts as a heavy item and blocks projectiles. Guts blocks can be thrown and on contact deal 15% damage and then break into four smaller rock projectiles that fall down and can each deal 3% damage. Although you're only likely to hit with one of those projectiles unless it's used on a crowd or a boss. Guts blocks also break into projectiles if they're damaged enough from attacks or from falling.

Naturally, guts blocks can't be created if Guts Man is airborn.

Using Super Arm while already holding a guts block (or any item for that matter) will set it down. Using this move, Guts Man can stack blocks on top of each other. Super Arm can also be used to pick up guts blocks (or any free item) which is the only way 1Guts Man gan grab a heavy item while he's airborn. It's also useful fro grabbing a stack of blocks.

Side Special - Pickaxe
8%

Guts Man takes a cue from Picket Man and throws a pickaxe. The pickaxe arcs before falling to 6 SBBs away from Guts Man. A rather slow and a bit difficult to aim projectile but they are strong enough to destroy guts blocks in two hits for some devestation on any opponent that's near them.

Down Special - Dig
12%

Guts Man stands on his head then burrows underground. While underground Gutsman can move left and right as small amounts of dust jumps up to show where he is. If any button is pressed, or if 5 seconds pass, Guts Man will jump out of the ground with an uppercut that does 12% damage. If a heavy item is above gutsman before he jumps up, he'll automatically grab it. If Guts Man digs through a fall through platform he'll dig right out the bottom.

Up Special - Guts Stomp
17%

Guts Man jumps up, then starts falling with his feet stretched out. Any opponent that gets caught on his way down gets hit for 17% damage. When Guts Man lands, he creates a shockwave outwards 2 SBBs that leaves any standing opponent prone. It also damages items, which can cause a chain reaction with stacked guts blocks. The initial jump can be angled left or right for recovery purposes.


NORMAL ATTACKS

Standard Attack Combo
4%, 5%

Guts Man does a cross with his right hand, then an uppercut with his left hand in a very basic combo.

Strong Side
12%

A one arm backhand, can KO at 75%.

Strong Down
10%

Guts Man sweeps the ground in front of him with one arm. Has upwards knocback that KOs at 65%.

Strong Up
13%

Guts Man swings his arm above his head to swat puny opponents. Can KO at 70%.

Dash Attack
10%

Guts Man rams forward with his head, using his hard hat to deal 10% damage and knockback that KOs at 80%.


SMASH ATTACKS

Side Smash
20% - 28%

Guts Man holds both his hands at his side, then smacks the opponent with with both of them. He puts so much effort into the hit, that both arms, along with his torso, spins once around his body! KOs at 50% - 40%.

Down Smash
14% - 19.6%

Facing the screen, Guts Man holds both arms out and slams them down, hitting on both sides of him for somewhat upwards knocback that KOs at 60% - 50%.

Up Smash
15% - 21%

Guts Man squats down with both arms flexed inwards, then jumps up to do an upwards headbutt. Can KO at 60% - 50%.


AIR ATTACKS

Neutral Air
13%

Guts Man spins his torso once with both arms outstretched, hitting on both sides of him for moderate knocback.

Forward Air
14%

A meteor smash, Guts Man holds both his arms above his head then swings them down.

Back Air
12%

Guts Man looks over his shoulder then punches backwards, because as a robot he can totally do that. Can KO at 50%.

Down Air
16%

Guts Man's legs spin, hitting several times for a total of 16% damage. Has very little downwards knocback.

Up Air
14%

Guts Man does an uppercut that does upwards knockback which can KO at 60%.


GRAB ATTACKS

Grab & Pummel
3%

Guts Man holds the opponent by the shoulders. A fairly big grab range due to his big arms. For his pummel, Guts Man squeezes his opponent with a crushing force.

Forward Throw
6%

Guts Man punches the opponent in the guts. Can KO at 60%.

Back Throw
7%

Guts Man spins his torso while still holding his opponent then lets them go, hurling the opponent. Can KO at 55%.

Down Throw
8%

Guts Man drops the opponent flat, then he does a body drop on them. Does upwards knockback that is mostly used as a setup.

Up Throw
9%

Guts Man holds the opponent above his head using one arm in a special grab hold. During this grab hold, Guts Man can move around and can do simple throws with the attack button for 9% damage that KOs at 50%. Guts Man can attempt "gutscide" when holding the opponent with this move.


FINAL SMASH

Guts Tank


Using the power of technology, Guts Man transforms into a Guts Tank for 20 seconds. Guts Tank can move forwards and backwards, but turning around requires tilting the joystick rather than smashing it. Guts Tank can somehow still jump, and it's one jump is as high as Guts Man's double jump. Pressing the attack button will have Guts Tank punch. He can do a two hit combo for 15% damage each hit. Dashing can crush opponents for 20% damage. Pressing the special button will open his front hatch wich releases a Met.


Minion: Met
Mets walk around the stage, periodically shooting three bullets from their mouths that deal 3% damage each. Mets have 10 stamina, and their indestructible helmets make attacks from above useless.

PLAYSTYLE

Create blocks, cause chain reactions, then finish your opponent off with one of the many KO moves. Simple enough.
 

FrozenRoy

Smash Lord
Joined
Apr 26, 2007
Messages
1,261
Location
Las Vegas, Nevada
Switch FC
SW-1325-2408-7513
The contest should end when we hit the 100-set mark, which will probably be by the end of this year at the rate the contest is going - to make it end earlier, lots of sets are appreciated! In short, you pretty much have all the time in the world to make whatever you like.
As a note, the contest doesn't necessarily end when we hit the 100-set mark, that is merely the minimum.
 

Z1GMA

Smash Hero
Joined
Sep 10, 2008
Messages
5,523
Location
Sweden
DIVE MAN
dives in!
While reading-tune:​
Facts
Dive Man, the One Man Navy, made his first appearance in Mega Man 4 (NES).
He is a "more brawn than brain" type of Robot Master, and in Mega Man 4 he attacks Mega Man with a barrage of homing torpedos as well as a ramming Torpedo Tackle.
In fitting with his Naval disposition, he is a good listener, but quite ironically for being an aquatic robot, he tends to suffer from motion sickness easily, perhaps referring to the fact that submarines are designed primarily for underwater use. Dive Man does not like Pirate Man, possibly because pirates attack and pillage other sea vessels.
Stats
Weight: 8/10
Size: 8
Ground Speed: 4
Jumps: 4
Air Speed:5
Fall Speed: 6
Traction: 7
Playstyle
Dive Man is at his best when the opponent is a couple feet away from him, but not too far away.
He uses Torpedos as his main projectile, and his Sea Mines can be used for Edge Guarding, Stage Control, or simple mindgames.
Submerge is a tactical move with a couple of good uses and it also grants access to one of his most powerful KO Moves.
His Torpedo Tackle can be used for recovery or as an offensive tackle.
Due to his propellers, he has "Wind Effect" (Similar to Toon Link's Dair), to three of his A Moves.
He doesn't like when ppl are outside his normal Torpedo Range, and suffers when ppl are up close.
Moveset
I've used stuff from Dive Man and his stage to put the moveset together.​
Specials
>B: Torpedo
Dive Man's hatchway, located on his torso, opens and fires a homing Torpedo.
Damage: 7%
Range: 30% less than Samus' homing missiles.
Knockback: Very low (kills at 999%+).
Knockback Direction: Away
First hitbubble at frame: 12
Cooldown: Like Samus' missiles.
Travel Speed: Slighty faster than Samus' homing missiles.​
Homing Effect: They take 250% sharper turns than Samus' missiles.​
If you press and hold B, you can charge it up, thus increasing the Torpedos' Life Time/Range, up to the range of Ness' PK Thunder.
A Max Charge takes 2 seconds.
B: Sea Mine
The Sea Mine is an Underwater Hazard in Mega Man 4. They only appear in Dive Man's stage, appropriately enough. They bob up and down, and are invincible to attacks. They explode after a short while when Mega Man draws near.​
Dive Man sets a Sea Mine on the ground, infront of himself.
It's the size of a Soccer Ball.
It floats right above the ground, bubbing up and down slightly, and if used in the air, it will slowly descend.
When the opponent (or Dive Man) touches it, they suffer a weak hit.
When the opponent gets near it, it starts to flash and then it detonates after 1,5 seconds.
Dive Man's presence does not trigger the mine, though the explosion can hurt him.
The Mine starts to flash after 7 seconds if the opponent doesn't get in its proximity.
It has 15 HP, and detonates right away if destroyed.
The mine comes out at frame: 15​
Mine Touch Damage: 3%
Knockback: Low, set knockback to the height of x3 Luigis. (Kills at 999%+)
Knockback Direction: Up
Explosion Damage: 18%
Explosion Radius: Same as Snake's C4.
Knockback: High (Kills at 110%)
Knockback Direction: Up
Proximity Range: Like Mario's Ftilt.
Other:​
Moves that have "Wind Effect" to them can move the Sea Mine slightly.​
vB: Submerge
Dive Man submerges into the ground, creating a puddle and only showing his periscope.
While submerged your hitbox is as high as 2/3 of a crouching G&W, however the hight of the puddle is the same as Snake's C4.
The Periscope has no hitbox itself, it's just sort of an indicator that shows you where Dive man is, and what direction he is facing.
You can move while submerged (the puddle moves with you).
Commands while Submerged:
Press vB to submerge - press vB (or shield) while submerged, to quickly surface.
Tilt the Control Stick to move.
You can turn around as well.
Periscope Poke:
Press A to execute a low poke with the periscope.
Damage: 7%
Range: Same as ZSS' Dtilt.
Knockback: Low (Kills at 260%)
Knockback Direction: Away but mostly up.
Hitbubble at frame: 6
Cooldown: Same as Mario's Dtilt.
Merge Assault:
Press B to execute a powerful, straight up, rising tackle, and Auto Surface.
This attack is powerful but very punishable.
Damage: 22%
Range: Like Bowser's Usmash.
Knockback: High (Kills at 90%)
Knockback Direction: Up
Hitbubble at frame: 17
Cooldown: Same as Ike's Erruption.​
Other:
Can go under Floating Mines w/o beeing hit.
When hit by an attack you return to normal and suffer the damage+knockback like you normally would.
You can't Submerge in the air.
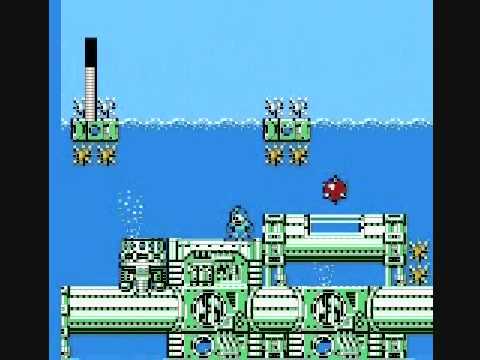
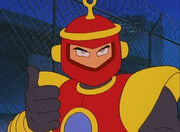
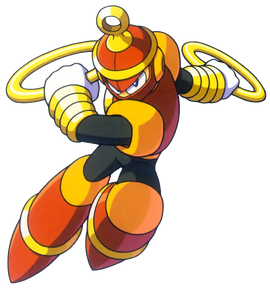
^B: Torpedo Tackle
(Seen on the second and fourth images.)
Dive Man pulls in his limbs slighty and launch himself 45' up/forward, while rotating.
The Range is slighty past one of Pikachu's diagonal Quick Attacks.
If you hold the B Button, he starts to spin, pointing his head 45' up/forward.
The longer you hold the B button, the faster he spins until you reach the maximum and he Auto Launches himself.
A Max Charge takes 4 seconds.
Charging it gives it more range and power.
You can tilt Dive Man down to 0', or up to 90', using the Control Stick while charging.
A fully charged Torpedo Tackle covers 2/3 of Final Destination.
Dive Man goes in a straight line until you reach max range, then falls.
When using it in the air, Dive Man slowly descends while charging.
Uncharged damage: 12%
Range: Slightly past one of Pikachu's two Quick Attacks.
Knockback: Medium (Kills at 160%)
Knockback Direction: Away but mostly up.
Travel Speed: Ganon's Wizard Kick.
Cooldown: Like Pikachu's Skull Bash.​
Fully charged damage: 20%
Range 2/3 of Final Destination.
Knockback: High (Kills at 110%)
Knockback Direction: Away but mostly up.
Travel Speed: C.Falcon's Falcon Kick.
Cooldown: Like Pikachu's Skull Bash.​
Jabs
A: Straight fist
Dive Man throws a weak punch that combos into his AA if desired.​
Damage: 3%​
Range: Like Ike's 1'st Jab.​
Knockback: Very Low, virtually none (Kills at 999%+).​
Knockback Direction: Neutral stun.​
Hitbubble at frame: 4​
Cooldown: Like Link's 1'st Jab.​
AA: Body Check
Dive Man bumbs the opponent with his torso.​
Damage: 6%​
Range: Just slightly longer than his 1'st Jab.​
Knockback: Low (Kills at 280%).​
Knockback Direction: Up/away​
Hitbubble at frame: 3​
Cooldown: Like Mario's 3'rd Jab.​
Tilts
Ftilt: Propeller Kick
(Seen under his foot, in the middle of the image)​
Dive Man executes a Thrust Kick while activating his Foot Propeller, located under his foot.​
Outside of its Hit Range, it gives off a Wind Effect that pushes ppl away.​
Kick Damage: 12%
Range: Slightly longer than Luigi's Ftilt.
Knockback: Med/high (Kills at 120%)
Knockback Direction: Up but mostly away.
Hitbubble at frame: 13
Cooldown: Slightly faster than Ganon's Ftilt.
Wind Damage: 0%​
Range: Slightly longer than Dedede's Ftilt.​
Knockback: The width of Donkey Kong (No stun).
Knockback Direction: Away
Hitbubble at frame: 14
Cooldown: Shares the Kick Cooldown.
(Wind Effect)​
Utilt: Dual fists
Dive Man strike both fists above his head.​
Damage: 9%
Range: Slightly longer than Wario's Utilt.
Knockback: Med (Kills at 160%)
Knockback Direction: Up
Hitbubble at frame: 8
Cooldown: Like Peach's Ftilt.
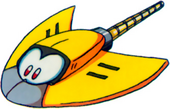
Dtilt: Mantan (Robot Stingray)
Mantan is a manta robot enemy that appears in Dive Man's stage in Mega Man 4. Mantan swims straight, but at times it will veer slightly upward or downward.​
Dive Man sets free a Mantan on the ground.​
It's slightly smaller than a crouching Kirby.​
It immediately goes forward, knocking ppl out of its way.​
Quickly Self Destructs at max range (The Self Destruct is just an animation).​
Damage: 7%
Range: Slightly longer than Charizard's Dtilt.
Knockback: Low/med (Kills at 230%)
Knockback Direction: Up/away
First hitbubble at frame: 8
Cooldown: Same as Ike's Dtilt.
Travel Speed: Slightly faster than Mario's Fire Ball.​
Smashes
Fsmash: Torpedo Failure
(Upper right picture.)​
Dive Man's hatchway starts to shake and swell.
Something is wrong with his Launch System.
A stuck Torpedo then explodes behind the closed hatchway, thus slamming the Hatchway Doors open with extreme force.
Damage: 23%
Range: Like Luigi's Fsmash.
Knockback: High (Kills at 80%)
Knockback Direction: Up/away.
First hitbubble at frame: 20
Cooldown: Like Ganon's Fsmash.
Usmash: Periscope Assault
Dive Man extends his periscope while spinning it like a drill.​
Multi Hit Attack.​
Damage: 2+2+2+2+2+2+2 (14%)
Range: Like ZSS' Usmash.
Knockback last hit: Med (Kills at ???%)
Knockback Direction last hit: Mostly down but also left or right (It's kinda random).
First hitbubble at frame: 15
Cooldown: Same as Wario's Usmash.
Other:​
Semi Spike​
Dsmash: Metal Urchins
(See those spiky things on the bottom, in the gap? In MM4, Mega Man instantly dies if he falls on them.)​
Dive man pulls out two Metal Urchins, one in each hand, and spins around once with the urchins held at Ground Level, hitting both sides twice each.​
The first hit normaly combos into the second more powerful hit.​
They are the size of a Poke Ball.​
Damage: (same for both sides): 4 + 14 (18%)
Range: Like Mario's Dsmash.
Knockback 1'st hit: Very low, virtually none (kills at 999%+)​
Knockback 2'nd hit: High (Kills at 105%)
Knockback Direction: Mostly up but also towards Dive Man.
First hitbubble at frame: 18
Cooldown: Same as Kirby's Dsmash.
Aerials
Nair: Rotation
Dive Man executes a sluggish pirouette, spinning 720'.​
Multi Hit Attack.​
Damage: 2+2+2+2+2 (10%)
Range: Like Zelda's Nair, but with slightly more vertcial range.
Knockback last hit: Med (Kills at 160%).​
Knockback Direction: Away but mostly up.
First hitbubble at frame: 9
Cooldown: Like Donkey Kongs's Nair.
Landing Lag Frames:10​
Fair: Salute
Dive Man Salutes and then delivers a powerful chop infront of him.​
Damage: 20%
Range: Slighty longer than Luigi's Fair.
Knockback: High (Kills at 90%)​
Knockback Direction: Up/away
First hitbubble at frame: 23
Cooldown: Like Ike's Fair.
Landing Lag Frames: 12​
Bair: Reverse and Kick
Dive Man stretches out one of his legs, and makes his Foot Propeller go reverse, sucking ppl in slightly,​
then drags the leg in and executes a Thrust Kick with his other leg.​
Suction Damage: 0%​
Range: Slightly longer than Snake's Bair.​
Knockback (suction): The width of Donkey Kong (No stun).
Knockback Direction: Towards Dive Man.
Hitbubble at frame: 8
Cooldown: Shares the Kick Cooldown.
Landing Lag Frames:15​
(Wind Effect)​
Kick Damage: 12
Range: Just slightly longer than Luigi's Bair.
Knockback: Med (Kills at 140%).​
Knockback Direction: Up/away. Slightly more away.
First hitbubble at frame: 13
Cooldown: Slightly slower than Ganon's Dair.
Landing Lag Frames:15​
Uair: Propeller Burst
Dive Man uses both his Foot Propellers to give him an small Upward Burst, hitting ppl with his head/shoulders.​
Damage: 11%
Range: Like Ness' Uair, but with more width.
Knockback: Med (Kills at 140%)​
Knockback Direction: Up
First hitbubble at frame: 11
Cooldown: Like Zelda's Uair.
Landing Lag Frames: 3​
Other:​
Can be used for Air Stalling.​
Doesn't really help him recover horizontally, since it sort of cancels his horizontally movement slightly.​
Dair: M-422A (Robotic Sensory Hazard)
M-422A is a stationary aquatic enemy from Dive Man's stage. When Mega Man approaches a M-422A, it will move up and down in an attempt to harm him if he passes by them. The M-422A is invincible to Mega Man's attacks. It is found only in Dive Man's stage.​
Dive Man pulls out a M-422A and thrusts it straight down.​
It has a special Sweet Spot to it.​
When Sweet Spotted, Dive Man lets go of it to let it pinch the opponent and then throw him/her in the air.​
It doesn't allow for a garantueed follow-up, but Dive Man gets a good portion of Frame Advantage.​
Damage: 12%
Range: Like Lucario's Dair.
Knockback: Med/high (Kills at 120%)​
Knockback Direction: Away but mostly up.
First hitbubble at frame: 14
Cooldown: Like Donkey Kong's Dair.
Landing Lag Frames: 13​
Sweet Spot Damage:12+5 (17%)​
Range: Center of the move's hitbubble.
Knockback: Low (Kills at 260%).​
Knockback Direction: Up
First hitbubble at frame: 13
Cooldown: Like Donkey Kong's Dair.
Landing Lag Frames: 13​
Dash Attack
Dash Attack: Full speed ahead
Dive Man executes a powerful tackle with both fists held infront of him, using both the momentum and the Foot Propellers.
It creates a very intense vacuum behind him that drags ppl along, Multi Hitting them.
(This vacuum is more powerful than the Wind/Suction in his Ftilt and Bair),​
but it can only hit the opponent if Dive man goes in the opposite direction to where the opponent is.​
Tackle Damage: 13%
Range: Slightly longer than Snake's Dash Attack.
Knockback: Med (Kills at 150%)​
Knockback Direction: Up
First hitbubble at frame: 12
Travel Speed: Like C.Falcon's Falcon Kick.
Cooldown: Like Ganon's Dash Attack.
Vacuum Damage: 1+1+1+1 (4%)
Range: Like Ike's Ftilt.
Knockback: Low (Kills at 999%+)​
Knockback Direction: Up, but mostly towards Dive Man.
First hitbubble at frame: 12
Cooldown: Shares the same cooldown as the tackle.
(Wind Effect)​
Grab Game
Grab:
Dive Man has a normal grab.
However, as soon as he grabs his opponent, his hatchway opens.
Pummel: Close the doors
Dive Man sticks the opponent's head/upper body in the opening of his hatchway and tries to slam the doors shut, which doesn't work since the opponent is in the way.​
Damage: 3%​
Speed: Slow​
Fthrow: Point Blank
Dive Man fires a Torpedo is the opponent's face.
Damage: 11%
Knockback: Med (Kills at 150%).​
Knockback Direction: Up/away
Bthrow: One Arm Throw
Dive Man throws the opponent back, over his head, using only one arm.​
Damage: 10%
Knockback: Med (Kills at 160%)​
Knockback Direction: Up/away
Uthrow: Periscope Ride
Dive Man extends his Periscope just slightly, as he puts the opponent on top of it and sets him/her spinning.​
After one second, the opponent is sent flying.​
Damage: 1+1+1+1+1+1+1+1+1+1 (10%)
Knockback: Med (Kills at 170%).​
Knockback Direction: Up
Dthrow: Mean Machine
Dive Man lifts the opponent up using one arm, pulls out a urchin using the other and drops it on the ground.
He then drops the opponent on the urchin, thus sending him/her into the air.
Damage: 10%
Knockback: Low (Kills at 220%).​
Knockback Direction: Away, but mostly up.
Final Smash
Final Smash: Moby (Giant Robotic Whale)
Moby is a giant robot whale miniboss that appears twice in Dive Man's stage. It attacks with mines, missiles, and by trying to suck Mega Man in.
Moby makes a cameo in Ice Man's and Freeze Man's background from Mega Man: The Power Battle, and as a toy in the background of Clown Man's stage in Mega Man 8.
Dive Man pulls off a Power Hungy pose as calls in Moby for support.
Moby shortly arrives from the sky the same way Mega Man arrives to the stages in the games.​
Moby has been rebiult so that he can hower in the air.​
He howers over the stage similar to Kyogre while attacking the other players with giant, homing torpedos, and will finally blow a cluster of mines Sinking Mines into the air before leaving the battlefield in the same fashion that he arrived.​
The mines then scatter randomly and fall down on the stage.​
Giant Torpedo Damage: 16%
Range: Like Lucas' PK Thunder.
Explosion Radius: Like Snake's C4.​
Knockback: Med/high (Kills at 120%)
Knockback Direction: Up
Travel Speed: Like Lucas' PH Thunder.​
Delay between shots: 2 seconds.​
Sinking Mine Touch Damage: 2%
Knockback: Very low, virtually none (Kills at 999%+)​
Knockback Direction: Neutral Stun.​
Fuse: When they hit the ground. they start to flash, and detonates after 2 seconds.​
Sinking Mine Explosion Damage: 18%
Explosion Radius: Like Snake's C4.​
Knockback: High (Kills at 110%)
Knockback Direction: Up
Fall Speed: Like when Link drops a bomb.​
Other:​
Moby fights for 12 seconds before leaving.​
His body can't hurt players.​
He can't be destroyed.​
Other
Utaunt: Dive Man grabs his periscope and gives it a 3-turn spin, while pulling off a confident pose. It gives off a screwing sound.​
Staunt: Dive Man gives himself an applause by opening and closing his hatchway repeatedly in a fast fashion. It gives off a mechanical sound.​
Dtaunt:
Dive Man performs his classic pose from MM4.​
Stage Entrance
Out of nowhere, a puddle appears, followed by a periscope, then he surfaces.​
Victory Theme
00:00 - 00:16​
 

Koppakirby

Smash Cadet
Joined
Aug 13, 2009
Messages
52
Sorry that there is two sets of the same RM in such a short period of time for one another, but I swear I was working on this before Z1GMA posted his no less valid Ring Man moveset.

Here's some tunes


DWN – 029
Created by Doctor Mikhail Cossack, Ring Man appeared in Megaman 4 as one of the eight Robot Masters working for the Doctor while he was being blackmailed into fighting Megaman for series antagonist Doctor Wily. Allegedly created for the sole purpose of defeating Megaman, he hid out in a large tower area with many eccentric enemies. He is a great strategist with the utmost confidence in his abilities, and he wields the powerful Ring Boomerang.

Statistics:

Weight: 6/10 – Ring Man is slightly heavier than average characters, still being light enough to maneuver but reasonably clunky when he does so.
Size: 6/10 – Ring Man is only slightly larger than Megaman. This puts him at about Luigi’s height, but his stance makes him around as wide as Link.
Walk Speed: 3/10 – Ring Man’s basic walk is a slow and intimidating walk. He approaches only slightly faster than Ganondorf.
Run Speed: 7/10 – Ring Man takes off when you apply pressure to the thumbstick or D-pad. At speeds that don’t quite surpass Sheik, he’s off to the races in a dash.
Air Speed: 5/10 – Ring Man ascends through the air at a speed less than that of Mario, but reaches heights slightly more.
Fall Speed: 4/10 – When he descends, Ring Man in general moves a lot slower than he usually does. This allows him slightly more air time than other characters.

Specials:

Neutral Special – Ring Probe
Ring Man puts out his hand and spawns a small ring about the size of a Pokeball. The ring will then fly above Ring Man, moving at a speed similar to that of Link’s boomerang. It will settle above him at a height about 1.25 Zeldas above him, and follow him as he moves. The probe will do no damage, and up to three can exist at once. They only vanish when another move is used. He cannot use this move in the air.

Side Special – Ring Boomerang
This move is Ring Man’s signature. In a moment, he will toss a Ring Boomerang the length of two stage builder blocks in front of him. The Ring Boomerang is indeed a boomerang, and will return to him even if he moves from his spot after he throws it. At the size of Kirby’s body sans-feet and arms, the boomerangs move at an impressive speed equal to that of Ring Man’s running speed. The boomerangs deal 8% and have a slight flinching effect, but are unlikely to hit the opponent twice at higher percentages due to its tendency to knock over opponents and inflict slight invincibility frames at those percentages. He can have up to three rings out at once. They also pass through solid objects.

Down Special – Slinky
Crouching down for about the amount of time it takes for Snake to plant a mine, Ring Man will unleash a small series of rings in the shape of a slinky, which is about as tall as 1.5 Pokeballs and as wide as a capsule turned on its side. This Slinky will then proceed forward along the ground at Kirby’s walking speed. If they make contact with an opponent, they will deal 5% damage and knock them into the air. Ring Man can make as many as he’d like. They travel the length of the platform they are on before vanishing. If released in the air, it will fall straight down and start its movement as soon as it hits a platform.

Up Special – Trapeze
Ring Man’s arm will cartoonishly extend upward and grab hold of the closest Ring Probe, assuming one exists. If one does not have one, he will enter his helpless fall state. If he does have one, he will pull himself up towards it, grabbing hold. This will only happen if he is within 2.25 Zeldas of a probe, otherwise helpless fall will be entered. He will hold on to it, remaining suspended where it was for up to three seconds, whereupon it will disappear and he will enter helpless fall. He can jump from it, however, and it will restore all his jumps if he has already used them. Coming into contact with him during the pull-up will deal 9% and knock the opponent away slightly at low percentages, but much longer distances at farther percentages. If more than one probe exists at the time, they will continue to move independently after the first one is grabbed.

Standards:

Jab – Ring Man punches forward at the speed of Link’s sword swipes, dealing 6% damage with a slight flinch. In a combo, he will then spin a ring on the tip of his index finger, dealing two consecutive hits of 2% and 3% with more flinch. However, these tiny spinning rings have rather tiny hitboxes.

Dash Attack – Ring Man does a twirl attack that last about the same amount of time as the final twirl in the Mario tornado, dealing 8% with a fair amount of knockback. However, several cool-down frames leave Ring Man open if the attack does not connect with a target.

Side Tilt – Ring Man spawns a small floating and spinning ring (slightly larger than Pokeball) in front of him in a move with a similar length to Mario’s side tilt. It will deal three consecutive hits of 3% before the ring vanishes, leaving a light flinch effect. The move also possesses good priority, making it good for stopping an enemy in his tracks.

Up Tilt – Ring Man does a backflip-kick, a hitbox landing squarely on his feet. It deals one big hit of 8% damage with mild knockback. It lasts about as long as the similar attack from Falco.

Down Tilt – The ring on Ring Man’s head glows and spawns a ring around Ring Man’s waist, which expands until it reaches half a Mario’s width on both sides of Ring Man, at which point it vanishes. This attack lasts about the same amount of time as the side tilt.

Smashes:

Forward Smash – Upon a charge, the ring that Ring Man spawns will be considerably larger, around the size of a Smart Bomb with a slightly larger hitbox to boot. It will also deal 3 consecutive hits of 5%, with a final fourth hit of 6% added on with some slight knockback. Also, the four hits are delivered slower. Ring Man may move away once the opponent is ensnared in the ring. 1.8 seconds are taken before the ring vanishes this time.

Up Smash – Ring Man’s backflip-kick, when charged, gains a larger hitbox which is roughly equivalent to the size of his lower body. It also deals two to three hits of 8% damage as opposed to the one. The knockback is also now flinching, allowing for this move to knock down an airborne assaulter due to the move’s high priority.

Down Smash – The Ring around Ring Man will expand to the width of Wario on either side of him. The attack also moves faster than before, now only taking around the average time as a jab. It deals 11% to foes and knocks them back substantially.

Aerial Attacks:

Neutral Aerial – Ring Man does a midair spin and twirl that lasts as long as Yoshi’s flutterjump. It does no damage and has very little priority, but using this move will increase the hangtime of Ring Man, keeping him at his current vertical level while still able to move left and right.

Forward Aerial – Ring Man throws out his arms in a manner similar to that of Lucas’ forward aerial. It had medium priority and deals 13% damage with medium to high priority. At higher percentages it can knock opponents into the KO boundaries.

Up Aerial – Ring Man looks up and shoots a ring of energy out of the ring on his head. The attack has short range, similar to Ness’ up tilt. However, this short range ring blast is devastating. It clocks in at 12% with high knockback that can kill at higher percentages, although priority is low if the hit happens before the ring can form. It has higher priority once the energy ring forms. The ring is not a projectile; it will dissipate.

Down Aerial – Ring Man brings both of his legs together and then suddenly kicks them downward, going from a sideways square-type shape to two straight pillars, his feet ending them in a V-shape. The full attack deals 12% and strong downward knockback at higher percentages, coupled with higher priority and a length of almost a full second.

Back Aerial – Ring Man reaches out his back arm and makes a large circle with his hand; the entire motion taking about the same length as Zelda’s Din’s Fire summoning animation. The attack deals knockback that is slightly downward tilted, also having a flinch effect. The attack deals 11% damage and has medium priority.

Grab Game:

Grab – Ring Man moves forward a Kirby length with an opened ring, and snaps it around the person he is grabbing, trapping them in the ring. This grab has the same length as Mario’s grab.

Pummel – Ring Man shakes the ring like a hula hoop, the whole motion taking about as long as the final punch in Mario’s standard combo. It deals two hits, one of 3% as the victim slams into the back of the ring, and one of 2% when s/he hits the front.

Forward Throw – Ring Man falls back onto his hands, and deals a swift two-footed kick into the opponent, dealing 13% damage. The attack knocks them forward, before the knockback take an upward spike at the end. The ring around their waste will turn into a Ring Probe, and it will hang the opponent from itself while floating among the other Ring Probes (although it cannot be swung from, and will be summoned if the maximum is already hit.). This puts the opponent in the perfect path to be hit after Ring Man swings off a Ring Probe. It is worth noting that the opponent can struggle away from the Ring Probe, but this takes a minimum of two seconds. The time of the kick is about the length of two of Link’s pummel.

Back Throw – Ring Man grabs the ring with two hands before spinning it around his body multiple times before letting it go, dealing 10% damage. The attack is exactly similar to Mario’s Mario 64-inspired throw, dealing the same damage and the equivalent knockback. The opponent will always fly opposite the direction Ring Man was facing when the attack started, and it will turn him around. At the end of the knockback, the ring will become a Ring Probe like the forward throw.

Up Throw – Ring Man grabs the opponent and smashes the opponent into the ground before bringing them to the top and throwing them two and a half Brawl Bowsers up. The overall shape of the smash is a ring, before the throw. The smash into the ground deals 10% damage and at the top of the arc the ring unfolds into a Ring Probe like the forward throw. The attack lasts the same time as Ness’ up throw.

Down Throw – Ring Man expands the ring’s radius, slips it around his waist, and does a hula motion that deals four hits of 3% as the opponent slams into the sides of the ring and Ring Man, and ends with the ring and opponent flying right about Ring Man, where it transforms into a Ring Probe like the Forward Throw. It lasts the same length as the Mario Tornado.

FINAL SMASH: HOLOCAUST HIPPO

Ring Man teleports off of the stage, and a large Landmaster-sized Hippo replaces him on the battlefield. Contact with the Hippo deals 10% with sufficient knockback to clear you of the hippo. For the next 30 seconds, the hippo will fire a missile half the size of ROB. The missile will home in on the closest opponent, and upon contact will explode with a radius equal to that of a smart bomb(but with the length of a bob-omb) that deals 25% with incredible knockback. If the only opponent is KO’d or invincible due to respawn when it spawns, it will simply circle around where the opponent will be/is, keeping its distance as to not make contact.

Playstyle:

Ring Man is designed to play like a crazy acrobat; swinging from ring to ring. He can avoid damage by using his Ring Probes to full effect, also throwing Ring Boomerangs to keep persistent opponents at bay. His up special can be used to recover, and can even be used to dodge meteor smash attacks. Forward Smash and Down Special may also be able to be used to stall opponents. Make sure you have plenty of Ring Probes; Ring Man is utterly useless without them.

Of course, Ring Man also has to have a good offensive. He will do most of his KO’ing in the air, but first he needs to rack up damage. Luckily, his smashes and tilts should do this well. While landing from a jump, unleashing a slinky could prove to be helpful. Aerials should do the trick, but they are mainly his KO’ing attacks. Wait until you’ve dealt out good damage before busting those out. Good move combinations are the forward smash and the down special, up smash and down smash, and the Ring Boomerang. The Ring Boomerang is your friend. It never hurts to have as many flying around as you can due to their nature of flinching opponents and flying through walls.

Ring Man does his KO’ing in the air; you should know that by now. Stun the opponent with a slinky or Ring Boomerang, and then grab him. After a bit of pummeling, throw that sucker into the air. All of the moves will attach the opponent to a new probe, but the forward throw is recommended because of the less time taken for it to reach its optimum position. Then Ring Man should quickly jolt his way into the air with the up special, and jump off the ring to deliver a striking aerial to vanquish his foe. Ring Man’s aerials are also useful for knocking his opponents out of the air, as is his up smash and tilt.
 

APC99

Smash Master
Joined
Jun 12, 2013
Messages
4,244
Location
Appleton, WI
NNID
APC-99
3DS FC
3840-8265-8211
OK, because I suck at these things, somebody make a Z1GMA's Ring Man vs. Koppakirby's Ring Man post QUICK!
 

StaffofSmashing

Smash Lord
Joined
Jul 5, 2013
Messages
1,100
Location
When you're not looking, I'm there.
NNID
Lolu83
3DS FC
1590-5734-6768
Oh man, I've been working on moveset a for a million years, it's time for my greatest moveset yet

Masked Link Version 2!

(If the image is small, I apologize. My tablet is the worst in the world)

Now, Masked Link is based on the Transformation Masks, but what about the other masks?

Play Style:
Masked Link doesn't have his sword, or a move to switch masks. It's just link without his swords. He uses the other, non transformation masks, as his main way of damage.
Edit: More info! Masked Link v 2's strong point is the effects and combos each move can start up. You can start up a simple juggling tactic, and use the U-Smash to keep juggling opponents. Or you can use the S-Smash to send opponents flying, and use the meteor smashing F-Aerial

Moves:

Tilts and stuff

AAA: Punch, Punch, Spin kick. 3%, 3%, 8%
Dash: Dives while carrying a puppy. Puppy does 4%, Link does 7%
F-Tilt: Roll, 8%
D-Tilt: Downercut, 7%
U-Tilt: Backflip Kick, 7%

Smashes

U-Smash: Uses the Postman's Hat to summon a mailbox to shoot 3 Green Rupees. 6% per rupee.
D-Smash: Uses the Bremen Mask to summon a cucko that jumps over Link. 13%
S-Smash: Uses the Blast Mask to explode. Des 23% and 5 recoil.

Aerials

N-Aerial: Spin Kick, 8%
F-Aerial: Front Flip, 10%
B-Aerial: Backflip, 9%
U-Aerial: Bunny Hood Ear Slap, 5% per ear
D-Aerial: Swings downwards with the Stone Mask, 12%

Specials

N-Special: Uses the Romani Mask to full up a milk bottle. It acts like FLUDD from there.
S-Special: Uses the Bunny Hood to run around. 9%
D-Special: Uses the Kamaro Mask to spin around. 13%
U-Special: Uses the Bunny Hood to do a horizontal leap. 10%

Grabs and stuff
Grab: Swipes right arm
Pummel: Punch, 3%
F-Throw: Tosses the opponent upwards, then swipes forwards with the Giants Mask. 14%
U-Throw: Throws opponent in the air, then uppercuts. 13%
D-Throw: Lays opponent down and jumps on them twice. 5% per jump.


Final Smash: Uses the Giant Mask to grow huge, 19% if he runs unto you.
And there you have it! Masked Link Version 2!
 

Katapultar

Smash Lord
Joined
Nov 24, 2008
Messages
1,258
Location
Australia
o Ring Man o
Dr. Z1GMA Edition
VS
o Ring Man o
Dr. Koopakirby Edition

Who will win?

Two variations of the same robot duke it out for supremacy, both having been made by scientists MYM'ers for Dr.Wily's Dr.Cold's ambitions of world domination. Though conceptually similar, their models vary...the question is though, which one is better?

Both models sport a similar theoretical frame and propulsion unit that gives them enhanced ground and air control, though Dr. Koopa's model is a tad sturdier and is built with a lighter metal, enabling it to stay airborne for longer periods of time whereas Dr. Z1GMA's was build with a heavier metal in mind, making it fall faster. Dr. Koopa never got down to recording the theoretical height his DWN-029 model can reach with its two built-in jumps, though they can be assumed to be average in unison with its airtime, giving Dr. Z1GMA's model a slight advantage in that department. Both models are fairly average in performance, but overall it can be surmised that Dr. Z1GMA's DWN-029 was designed with quick bursts of air in mind whereas Dr. Koopa's was designed to stay airborne for longer while using a lighter, sturdier metal to make up the difference in weight, as to not fall prey in his domain.

Dr. Z1GMA's model specializes in shutting off areas of the battlefield. It can throw out up to 2 rings that behave like boomerangs and pester opponents from afar while simultaneously setting stationary rings that can be made to fly towards where it is. Its main means of recovery is to move to where a stationary ring is, and sports a chain that pokes at enemies from afar. Only sparse details are given in regards to the model's basic means of attacking, though it can be theorized that they're designed to hit enemies close-up after they've been drawn into approaching from projectile spam.

Dr. Koopa's model follows a similar tactical regime, but not quite the same. It deploys rings that hover and follow its movements, while tossing ring boomerangs that boast less power and range than Dr. Z1GMA's model but can pass through solid matter and keep victims in place for further capitalization. It could be surmised that they're meant to be used up-close as they do not possess the range necessary to hit from afar. The model is also capable of assembling rings in the form of a slinky and having them patrol the ground, their numbers potentially infinite but being weak enough to shrug off with your average attack. Tactical rings are used not to damage or control ground, but rather be used for recovery purposes in the face of a steep fall. The model's basic attacking methods are recorded, but seem to only serve as typical offensive at first glance, making them identical in use to Z1GMA's model. Dr. Koopa's records indicate that this model is designed to play acrobatically in conjunction with the ring probes it can create, but needs to set-up and damage-rack beforehand.


Overall, Dr. Koopa's DWN-029 model needs to deploy probes in specific location in order to survive at all, and the log containing the entry They only vanish when another move is used. He cannot use this move in the air. severely limits what the model can do as he must use his recovery right after sending out probes. Dr. Z1GMA's model needs only to put down a tactical ring before being able to pester with its projectile armada. Furthermore, Dr. Koopa's model requires its opponent to be in a specific location in order to score a KO, whereas Dr. Z1GMA's is more versatile and can score a KO from just about anywhere, anytime; the former will have a difficult time juggling the latter when it sports a higher falling speed, but not overall so. Dr. Koopa's model will be hard-pressed to juggle anyway, because Dr. Z1GMA's model can simply deploy a tactical ring and use it to bash at its floaty counterpart and possibly score a KO depending on how high they are to the sky. Dr. Z1GMA's model cannot juggle well due to a situational Up Special and high-falling process and requires its victim on a horizontal plane to be most effective, but is mostly immune to its counterpart's way of KO'ing. It can also outcamp Dr. Koopa's counterpart with rings that travel further and clash with them, along with destroying any slinkies before they become a real threat.

Overall, Dr. Z1GMA's model proves superior with its greater power and quick set-up process, having a juggle-proof installation that hampers Dr. Koopa's bottlenecked model. And so, the winner is...
o Ring Man o
Dr. Z1GMA Edition
 

Z1GMA

Smash Hero
Joined
Sep 10, 2008
Messages
5,523
Location
Sweden
o Ring Man o
Dr. Z1GMA Edition
VS
o Ring Man o
Dr. Koopakirby Edition
I think we all enjoyed this.
Thanks for putting so much effort into it, katapultar.

To be honest, though, I did a pretty sloppy job with Ring Man.
No details like whatsoever.
Both his Ringerang and Tactical Ring work with Ring Hunter. I forgot to mention that.

I'm hoping for someone to do my Dive Man.
I put a ton of effort into his moveset, unlike Ring Man.

Anyway, good job, Katapultar.
I like how you're able to see potential combos, strings, as well as shenanigans and tactics in general, w/o the Moveset Creator mentioning any of it.
I, for one, don't like mentioning my character's ^above - I find it more thrilling if ppl reading it find out themselves.

Wait, did I just critique your critique-skills... :upsidedown:
 

Katapultar

Smash Lord
Joined
Nov 24, 2008
Messages
1,258
Location
Australia
[collapse=Masked Link ver 2]A good start would be to have a picture of Masked Link ver 2, because where you are the set does not qualify to get on the sacred list and become apart of what will eventually be 100, putting aside the fact that there is no Dash Attack or Throws. If you put those in, which should be easier than making a sandwich what with how bare the moves are in their current state, I'd be able to put it on the list. Speaking of pictures, some pictures of the Masks might be nice since not everyone will remember Majora's Mask, let alone have played it.

The bare-bones description make it hard for others to understand what it is you're trying to convey, especially since some of it sounds really awkward, if a little funny. Smash characters usually like to play in a certain way, so how does this guy play? Looking at other people's works will give you a good idea of what's expected, and how you can improve if you want to, since it'd be nice if you could post those 27 sets. If you have any specific questions, be sure to post them in the thread. With that, good luck on your next venture.
 

Z1GMA

Smash Hero
Joined
Sep 10, 2008
Messages
5,523
Location
Sweden
Sorry that there is two sets of the same RM in such a short period of time for one another, but I swear I was working on this before Z1GMA posted his no less valid Ring Man moveset.
No probs, bro.

Two movesets for Ring Man in such a short time, just tells how awesome he is.

Critique on Dive Man wanted.
(I've made some small changes and added a little more detail.)
 

n88

Smash Lord
Joined
Oct 10, 2008
Messages
1,530
Huh. There's a veritable explosion of newcomers here! (And KK's back! Nice to see you, KK.). Welcome all, and sorry about the lack of activity from the community's more senior members. We're going through something of a dry spell right now, but hopefully it'll clear up. While you're waiting for more veterans to chip in, I highly recommend reading and commenting other people's work. If you want people to talk about your sets, it's only fair that you spend some time talking about other people's, eh? Don't worry about whether you're new and inexperienced; reading and providing feedback is a great way of improving your own set-making. I may pitch in with some thoughts when I have a little more free time later tonight.

Also, don't forget that MYM has an extensive back-catalog of movesets, tutorials, and various articles on movesets (and all the other aspects of MYM) over here.
 

TewnLeenk

Can pick up a boulder with relative ease
BRoomer
Joined
Aug 25, 2012
Messages
3,934
Location
Canada
This is my first ever moveset, hope I'm doing this right. Critique would be awesome, thanks!​

HERACROSS
Bug/Fighting
The Single Horn Pokémon. Though docile and gentle, Heracross possesses great strength and power. Their favorite food is the fresh sap of leafy trees.
STATISTICS
WEIGHT: 6 / 10 Heracross actually weighs the exact same as Lucario, 119 lbs.
SIZE: 7 / 10
GROUND SPEED: 8 / 10 When Heracross sprints it glides over the ground with wings out similar to Meta Knight
AIR SPEED: 5 / 10
FALL SPEED: 3 / 10
SPECIALS
Neutral Special: Toxic
Heracross spews forward a blob of purple poisonous goop about 1 Battlefield platform in length. Holding the button will make Heracross hold in the Toxic attack but still able to move around, super effective for fooling opponents. Does 3% damage on impact and continuously does another 2% every 0.5 seconds it's on the opponent. Very similar to Olimar's Pikmin latching onto people and damaging them. The poison goes away after the opponent dashes back and forth at least once. It is then shaken off. Toxic that misses opponents and lands on the ground does 3% damage whenever stepped on. It goes away after around 5 seconds.​
Side Special: Aerial Ace
Heracross is flies forward with it's wings out. About the same speed as Falco's side B. Flies about 2 Battlefield platforms in length. When the opponent is hit with this Heracross uppercuts them and sends them upwards. Does 11% damage and can send opponents flying off stage around 100%. A very effective recovery attack as well. The problem is, if Heracross doesn't hit anybody, it will crash on the ground and will have to get up afterwards.​
Down Special: Counter
Heracross crosses it's arms and closes it's eyes in a very fighter-esque pose. This is just your standard counter attack. Works identically to Ike's Down B in Brawl, except Heracross punches the opponent forward when the attack is countered.​
Up special: Bug Buzz
Heracross opens it's wings and shoots itself upwards. Has about the same trajectory and distance as Mario's Up B attack. Afterwards Heracross falls down. Does about 8% damage if hits an opponent. Good for shorter recoveries. Aerial Ace is the superior long distance recovery move choice.​
STANDARD
Jab: Fury Attack
Heracross swings its spiked arms forward. It has 2 initial swings that deal 3% damage each. If the button is held down Heracross will swing its arms wildly and infinitely dealing about 2% damage each hit. Great for cornering people or to just deal large amounts of minimal damage.​
Forward Tilt: Horn Attack
Heracross swings its horn out in front of if horizontally in a full semi circle swing. Deals around 12% damage with somewhat higher knockback, and good KO strength. A very quick little attack for when Heracross needs to get some space between it and the opponent.​
Down Tilt: Chip Away
Heracross does a full 360 spin on it's face and stomach, effectively swinging its horn at the opponent's feet. Does around 10% damage and has a 20 percent chance to cause the opponent to trip. Another very quick attack which can lead to an opening for other attacks if the opponent trips.​
Up Tilt: Night Slash
Heracross swings its arm up into the air, doing a full semi circle swing. The opponent hit gets a "darkness" after effect similar to Ganondorf's attacks. Does 12% damage and has great horizontal knockback and decent KO power. The attack takes longer to use and is much slower than Heracross' other tilt attacks.​
Dash Attack: Take Down
Heracross puts its shoulder into the opponent while gliding (dashing) over the ground in a similar fashion to a hockey player's bodycheck. Does 6% damage and has a pretty low knockback. This attack, however, doesn't completely slow Heracross down to a stop. Heracross can continue to dash right after using the attack.​
GRAB GAME
Grab: No fancy Pokémon attacks, just a grab
Heracross swings its arms forward and grabs the opponent with both of its arms.​
Pummel: Headbutt
While holding the opponent Heracross lowers its forehead downwards, thus bashing the opponent over the head with its horn. Does 2% per pummel.​
Down Throw: Body Slam
Heracross does a little hop while holding the opponent then throws them into the ground mid-hop. Heracross then proceeds to body slam the opponent with its stomach on their back. Takes the longest out of all its throws. Decent vertical knockback. Does about 11% damage.​
Back Throw: Reversal
Heracross does 2 full 360 degree spins and and chucks the opponent backwards as hard as it can. Decent knockback and about 9% damage for the throw itself. Other opponents hit by the spinning Heracross will take about 5% damage and be knocked back a little.​
Forward Throw: Mega Punch
Heracross holds the opponent in front of it with one hand, and swiftly uses the other hand to provide a massive punch to gut of the foe. Good knockback and about 10% damage for the punch itself.​
Up Throw: Seismic Toss
Heracross hoists the opponent over its head and loads them onto its horn, catapult style. It then lifts its horn up with a great toss and throws the foes skyward. Easily Heracross' best throw with amazing knockback, KOing at around 110%. Does 11% damage for the initial toss.​
SMASHES
Forward Smash: Megahorn
Easily Heracross' most powerful attack. And come on, Megahorn is an awesome name for an attack. Heracross starts in a standing upright position then jumps forward about half a Battlefield platform in distance while swinging its horn downwards at a 90 degree angle. Does 23% uncharged on impact and has great knockback. Can KO around 90-100%. Beware, this attack is slow to pull off, easily about the same time as King Dedede's Side Smash attack. Heracross' horn glows white while swinging, but it's purely aesthetic.​
Down Smash: Brick Break
Heracross smashes both of its fists downwards into the ground causing a mini rocky eruption around it. Great range and covers both the left and right side. Decent vertical knockback and around 17% damage. This attack is very similar to Charizard's Down Smash in Brawl.​
Up Smash: Stone Edge
Pointy rocks surround Heracross' arms, giving it rock spikes for hands, as it thrusts both arms and its horn upwards. The rocks and horn form a perfect triangle at the top of its head. Great upwards knockback and can be sweetspotted on the very tip of the triangle. Does about 15% damage, but happens very quickly.​
AERIAL GAME
Neutral Air: Retaliate
Heracross stretches its arms and legs out to make a "star" formation for a mid air cartwheel. Very basic attack, nothing too special. Does about 6% damage with so-so knockback​
Forward Air: Slash
Heracross slashes forward with one of it's arms in a chopping motion. Similar to Luigi's forward air karate chop attack in Brawl. 10% damage and good knockback, knocking the enemy horizontally either left or right, depending which direction Heracross is facing. Can KO at around 150%.​
Back Air: Shadow Claw
Heracross does a no-look backwards swipe with one of it's arms then turns around and faces that direction. The swipe is purple and causes "darkness damage" like Ganondorf's attacks. No too much knockback and around 9% damage.​
Up Air: Frustration
Heracross furiously swipes its horn upwards in a full semi circle above its head. Good knockback, KOing around 120%. Does about 10% damage.​
Down Smash: Bulldoze
Heracross does a full front flip while swinging its horn downwards. Does about 10% damage and sends people downwards. Great Meteor Smash attack but takes a while to full off. Similar to DK's F Air, the two handed Smash.​
OTHER
Ledge Attack: Cut
Heracross cartwheels back onto the stage, slashing forwards with its arms and horn. About 9% damage.​
100% Ledge Attack: Struggle Bug
Heracross slowly climbs back onto the stage, punching forward with one arm one its gets back on. 11% damage.​
Floor Attack: Flail
Heracross swings its arms, legs and horn around in a frantic rampage with standing up. Hits all directions. 6% damage.​
On screen appearance: Releases from a Poké Ball.​
TAUNTS
Up Taunt: Bulk Up
Heracross lifts both of its arms upwards in a "muscle man" pose while saying "Heracross!" to the camera.​
Side Taunt: Recover
Heracross looks at its arm and notices it somehow has tree sap on itself. It licks the sap off its arm and smiles happily. Takes about 3 full seconds to pull off and recovers 1% damage, because why not.​
Down Taunt: Swagger
Heracross opens up its wings and starts flapping them with a cocky look on its face, lifting up dust clouds all around it.​
FINAL SMASH
Close Combat
Heracross shouts out loudly and starts steaming from its head. It gets covered in a red-ish glowing aura and its fists and horn start glowing white. In this form Heracross moves around on the ground much faster and all of its moves are given a huge knockback and damage boost. It has the same moveset as always, but the attacks are much more powerful. Heracross can now KO opponents who are around 70%. Its jumps are much higher but it's speed in the air remains the same. Lasts for around 10 seconds then Heracross returns to normal. Heracross can still take damage in this form but it will not be knocked back one bit. The damage will just add to its percent gauge.​
PLAY STYLE
Heracross is a pretty powerful character. To fully get the most out of Heracross, you need to play it offensively. Heracross is most useful when rushing head first into battle. It has a combination of attacks that are quick and deal good damage at the same time. Since every single one of Heracross' attacks are physical, except its neutral special Toxic, there really is no benefit to camping or running away as Heracross. A majority of Heracross' attacks have great knockback and are great for KOing. It is also able to take hits too, but not as much heavy weight characters like Dedede.​
Heracross is a physical force to be reckoned with, but does most of its destruction on the ground. Heracross' air game isn't what you'll want to be using most of the time. People who enjoy playing Donkey Kong or Bowser will enjoy the much faster, but just as powerful Heracross.​
(lame pun warning)​
Heracross really is a menace on the battlefield and great for bugging opponents.​
 

Capybara Gaming

Just Vibing
Joined
Feb 5, 2013
Messages
9,485
Location
Big Talking Volcano


VANELLOPE VON SCHWEETZ

Presenting.....the candy-coated best pal of the powerful Wreck-It Ralph.... Vanellope von Schweetz joins the Brawl!

Special Gimmick:
Glitching: Vanellope was a glitch in Wreck-It Ralph (not originally), and by the end of the film she learns to control this ability, escaping from death and saving Ralph using it. She fined toned this ability and can use it to glitch herself behind, in front, above, and all around the stage. In trade for this however, she gives up traction, making her harder to stop once going.

Now let's get on to the moveset.

Specials:
Nuetral: Glitch Transport - This move can be used alongside other moves when pressed at the exact moment. Vanellope prepares to glitch herself. By tilting the control stick, she will go in that direction, in a distance up to three Bowsers forward, depending on the charge, however if Vanellope is hit during charge, she will accidentally glitch herself and not move at all.
Side Special: Candy-Coated Kart - Vanellope hops in her kart that she built with Ralph, and revs up the engine. She then drives forward at incredible speed, causing large damage and knockback. Think if it as a more-powerful Wario Bike. If she glitches with this move, she will go straight through the foe, emerge on the other side, and jump out of the cart performing a kick backwards.
Up Special: Glitch Wall Jump - Vanellope glitches upward. If she hits a wall, and presses the B button again, then she will glitch right off the wall yet again. The distance is rather poor, and cause no damage, but does not leave her helpless.
Down Special: Glitch Stun - Vanellope glitches herself for about 2 seconds, if she is hit during the glitch phase, the foe will take the damage intended for her and be stunned temporarily while being glitched themselves.
------------------
Standard Attacks:
Jab: Street Fight - just like in the credits when Ralph and Vanellope visit Ryu's world. She punches with her left, then her right, then repeats as long as the button is held. She is very rapid with this, and causes low damage, but high hitstun, setting up for huge combos.
Forward Tilt: Vanellope does a small jump kick. This causes low damage and low knockback. She can glitch this move, and when she does, after the kick she glitches behind the foe and does a reverse kick, then lands.
Up Tilt: Vanellope performs her own version of Ryu's Shoryuken attack. She does not go high at all, but provides a stun effect should she decide to glitch when performing this.
Down Tilt: Vanellope performs a low jab kick, imitating Ness to an extent.
Forward Smash: Wreck-It Vanellope - Vanellope charges her fist, like Ralph does in the game. She then releases it, saying "I'm gonna wreck you!" If she glitches, she gains super armor, glitches behind the foe when launched, and performs her Up Tilt.
Up Smash: Vanellope performs a Sonic-esque scissors kick upward. If she glitches, she travels above the foe and stomps them back down.
Down Smash: Spinning Candy Kick - Vanellope jumps into the air slightly and does a roundhouse kick, that hits on both sides of her. If she glitches, she will travel below them and punch upwards.
Ledge Attack: Vanellope jumps onto the stage and smacks with her ponytail, like Shantae would.
100% Ledge Attack: Vanellope jumps onstage and does a Mario-esque ground pound.
Dash Attack: Vanellope runs forward, punching wildly like Luigi.
Nuetral Air: Vanellope does a small kick. Sex Kick.
Forward Air: Vanellope does a diagonal, downward punch.
Up Air: Vanellope flips upside down and kicks with both feet upward.
Back Air: Vanellope kicks backward with both feet.
Down Air: Candy Stomp - Vanellope stomps downward with one foot. Great for meteor smashing.
Grab: Vanellope glitches her hand to grab the opponent, useful as a tether recovery.
Pummel: Vanellope glitches the opponent.
Forward Throw: Vanellope holds the foe with one hand and winds her other hand, releasing a Rayman style charged punch.
Back Throw: Vanellope glitches to the other side of her opponent and kicks backward.
Up Throw: Vanellope throws the foe up and kicks upward with her left foot. Her only throw that can be glitched, if she does, she will go above them and smash them straight back to the ground with a stomp.
Down Throw: Vanellope throws them underneath her and sails downward with fists outstretched, hitting the foe with both fists.
Final Smash: Wreckin' Good Time - Vanellope yells "Come on Ralph, move your molasses!" and Ralph lands on the stage, and puts her on her shoulder. You can then control Ralph, who holds Vanellope on the shoulder. The A button makes Ralph yell "I'm gonna Wreck It!" and perform a powerful punch. The B Button causes him to get angry and start rapid punching forward, and cannot be harmed. If a foe tries to hit Vanellope during this time by attacking the shoulder, he will punch them with great force to protect his pal. After 15 seconds of this carnage, Ralph yells "I got some Wreckin' to do somewhere else!" and disappears, replanting Vanellope on the ground. All of Ralph's move cause tremendous walls of pain, and he can jump while attacking. He cannot shield or grab, but his punching does plenty of damage. Ralph cannot double jump while holding Vanellope, so if you fall off the stage, you cant recover.
---------------------
General Playstyle: Vanellope's playstyle revolves around her glitching ability, making her able to perform extra hits and set up easy combos. She is lightweight, and thus can be easily KO'd, but can't be combo'd or chain-grabbed easily. Sometimes the best option is to glitch and combo, but other times you need to be careful, especially at high percentages.

Attributes:
Jump: 7/10
Recovery: 4/10
Traction: 4/10
Weight: 4/10
Speed: 8/10
Power: 6/10
Air Speed: 7/10
Fall Speed: 6/10
 

FrozenRoy

Smash Lord
Joined
Apr 26, 2007
Messages
1,261
Location
Las Vegas, Nevada
Switch FC
SW-1325-2408-7513
Just as a note to TewnLeenk: I've been working on a Heracross set for a good while, so if you see me post one, yeah.
 

StaffofSmashing

Smash Lord
Joined
Jul 5, 2013
Messages
1,100
Location
When you're not looking, I'm there.
NNID
Lolu83
3DS FC
1590-5734-6768


VANELLOPE VON SCHWEETZ

Presenting.....the candy-coated best pal of the powerful Wreck-It Ralph.... Vanellope von Schweetz joins the Brawl!

Special Gimmick:
Glitching: Vanellope was a glitch in Wreck-It Ralph (not originally), and by the end of the film she learns to control this ability, escaping from death and saving Ralph using it. She fined toned this ability and can use it to glitch herself behind, in front, above, and all around the stage. In trade for this however, she gives up traction, making her harder to stop once going.

Now let's get on to the moveset.

Specials:
Nuetral: Glitch Transport - This move can be used alongside other moves when pressed at the exact moment. Vanellope prepares to glitch herself. By tilting the control stick, she will go in that direction, in a distance up to three Bowsers forward, depending on the charge, however if Vanellope is hit during charge, she will accidentally glitch herself and not move at all.
Side Special: Candy-Coated Kart - Vanellope hops in her kart that she built with Ralph, and revs up the engine. She then drives forward at incredible speed, causing large damage and knockback. Think if it as a more-powerful Wario Bike. If she glitches with this move, she will go straight through the foe, emerge on the other side, and jump out of the cart performing a kick backwards.
Up Special: Glitch Wall Jump - Vanellope glitches upward. If she hits a wall, and presses the B button again, then she will glitch right off the wall yet again. The distance is rather poor, and cause no damage, but does not leave her helpless.
Down Special: Glitch Stun - Vanellope glitches herself for about 2 seconds, if she is hit during the glitch phase, the foe will take the damage intended for her and be stunned temporarily while being glitched themselves.
------------------
Standard Attacks:
Jab: Street Fight - just like in the credits when Ralph and Vanellope visit Ryu's world. She punches with her left, then her right, then repeats as long as the button is held. She is very rapid with this, and causes low damage, but high hitstun, setting up for huge combos.
Forward Tilt: Vanellope does a small jump kick. This causes low damage and low knockback. She can glitch this move, and when she does, after the kick she glitches behind the foe and does a reverse kick, then lands.
Up Tilt: Vanellope performs her own version of Ryu's Shoryuken attack. She does not go high at all, but provides a stun effect should she decide to glitch when performing this.
Down Tilt: Vanellope performs a low jab kick, imitating Ness to an extent.
Forward Smash: Wreck-It Vanellope - Vanellope charges her fist, like Ralph does in the game. She then releases it, saying "I'm gonna wreck you!" If she glitches, she gains super armor, glitches behind the foe when launched, and performs her Up Tilt.
Up Smash: Vanellope performs a Sonic-esque scissors kick upward. If she glitches, she travels above the foe and stomps them back down.
Down Smash: Spinning Candy Kick - Vanellope jumps into the air slightly and does a roundhouse kick, that hits on both sides of her. If she glitches, she will travel below them and punch upwards.
Ledge Attack: Vanellope jumps onto the stage and smacks with her ponytail, like Shantae would.
100% Ledge Attack: Vanellope jumps onstage and does a Mario-esque ground pound.
Dash Attack: Vanellope runs forward, punching wildly like Luigi.
Nuetral Air: Vanellope does a small kick. Sex Kick.
Forward Air: Vanellope does a diagonal, downward punch.
Up Air: Vanellope flips upside down and kicks with both feet upward.
Back Air: Vanellope kicks backward with both feet.
Down Air: Candy Stomp - Vanellope stomps downward with one foot. Great for meteor smashing.
Grab: Vanellope glitches her hand to grab the opponent, useful as a tether recovery.
Pummel: Vanellope glitches the opponent.
Forward Throw: Vanellope holds the foe with one hand and winds her other hand, releasing a Rayman style charged punch.
Back Throw: Vanellope glitches to the other side of her opponent and kicks backward.
Up Throw: Vanellope throws the foe up and kicks upward with her left foot. Her only throw that can be glitched, if she does, she will go above them and smash them straight back to the ground with a stomp.
Down Throw: Vanellope throws them underneath her and sails downward with fists outstretched, hitting the foe with both fists.
Final Smash: Wreckin' Good Time - Vanellope yells "Come on Ralph, move your molasses!" and Ralph lands on the stage, and puts her on her shoulder. You can then control Ralph, who holds Vanellope on the shoulder. The A button makes Ralph yell "I'm gonna Wreck It!" and perform a powerful punch. The B Button causes him to get angry and start rapid punching forward, and cannot be harmed. If a foe tries to hit Vanellope during this time by attacking the shoulder, he will punch them with great force to protect his pal. After 15 seconds of this carnage, Ralph yells "I got some Wreckin' to do somewhere else!" and disappears, replanting Vanellope on the ground. All of Ralph's move cause tremendous walls of pain, and he can jump while attacking. He cannot shield or grab, but his punching does plenty of damage. Ralph cannot double jump while holding Vanellope, so if you fall off the stage, you cant recover.
---------------------
General Playstyle: Vanellope's playstyle revolves around her glitching ability, making her able to perform extra hits and set up easy combos. She is lightweight, and thus can be easily KO'd, but can't be combo'd or chain-grabbed easily. Sometimes the best option is to glitch and combo, but other times you need to be careful, especially at high percentages.

Attributes:
Jump: 7/10
Recovery: 4/10
Traction: 4/10
Weight: 4/10
Speed: 8/10
Power: 6/10
Air Speed: 7/10
Fall Speed: 6/10
This isn't a bad moveset, but not good either, Glitch Transport seems hard to pull off at an even more difficult price to deal with if you DO pull it off. I'm not saying it's a bad mechanic or anything, just it has a ton of room for improvement.
 
Top Bottom