- Joined
- Jan 27, 2008
- Messages
- 13,513
- Location
- Michigan
- NNID
- TripleDash
- 3DS FC
- 1719-3728-6991
- Switch FC
- SW-1574-3686-1211
This guide has been made by the Mega Man/Smash Community for those seeking help in learning the basics of how to play as the Blue Bomber. As such, please give the following people who helped put this together a round of applause:
@ ---
@BBC7 @ChopperDave @fromundaman @Indigo Jeans @
---
@BBC7 @ChopperDave @fromundaman @Indigo Jeans @
 Locke 06
@
Locke 06
@
 Opana
@
Opana
@
 SSGuy
@
SSGuy
@
 Yink
@
Yink
@
 Z1GMA
Z1GMA
This guide will hopefully be updated over time as the meta game evolves. Given this is a community guide, if you interested in writing/re-writing a section feel free to let us know and you could be added to the list of awesome users above.
Table of Contents:
Ix - Acknowledgements
I - Background Info & Character Description
II - Mega Man's Pros & Cons
III - Main Moveset Analysis
IV - Special/Custom Moveset Analysis
V - General Advanced Techniques (courtesy of @
Opana
)
VI - Helpful Links and Other Useful Guides
VII - Guts Man's ***
I - Background Info:
Capcom's Super Fighting Robot has finally joined the battle after many years of anticipation. Also known as the Blue Bomber, Mega Man (Rock Man in Japan) debuted in 1987 for the Famicom/NES and has since then spawned a vast franchise that is well recognized on Nintendo systems.
Following the Classic series, who's incarnation of Mega Man appears in Smash, created in the Year 200X, the scientist: Dr. Light created the helper robot: Rock. But when rival scientist, Dr. Wily steals several of Dr. Light's other robots (known as Robot Masters), Rock has himself upgraded to become: Mega Man, in order to stop his robot brethren and stop Dr. Wily from taking over the world. Using his iconic Mega Buster and Copy Ability, which allows him to use weapons of defeated Robot Masters, Mega Man fights for everlasting peace!
Character Description:
True to his games, Mega Man is all about jumping and shooting, hence, the majority of his moveset is centered around projectiles rather than punches and kicks. As a result, Mega Man does not play like any other character thus far in the Smash series, and may come off as somewhat niche in terms of playstyle.
Mega Man excels at mid-range gamplay and spacing, being able to move in and out of mid/close range attacks with ease (in particular in the air). The Mega Buster has a lot of priority and minor hitstun, allowing him to approach other projectile centered characters and disrupt close range characters with ease. Specials such as the Metal Blade and Crash Bomber help provide additional pressure, zoning, and mind-game opportunities.
For what few close range attacks he has they each allow for good follow ups and racking up damage after grabbing an opponent. Additionally, Mega Man is very good at edge guarding and gimping, pursuing opponents with the Slash Claw or attacking at a distance with a Charge Shot or Meteor Smash (Hard Knuckle). Unlike other characters, Mega Man's Down Specials can also let him keep an active hitbox while shielding/dodging,
However, most of Mega Man's killing attacks are situational or are easily punished. Combos do not exist with this character and juggling is almost non-existent in the standard sense. Being a fast faller and having an above average weight leaves Mega Man easily combo'd at lower percents.
Characters who have reflectors or have chargeable projectile attacks, while not outright counter-picks, also force Mega Man to play much more defensively. Mega Man is very much a character who requires the ability to make good reads and know the limits of each of Mega Man's moves.
II:
Pros:
**Hitbox and Frame Data** ~ @Indigo Jeans

Jab/Forward Tilt/Neutral Air: Mega Buster (aka Lemons)
Damage: 2%, 3% (Sweet Spot), 4% (N-Air Sweet Spot)
Kill%: ~240% (N-Air Sweet Spot)
Mega Man’s Mega Buster is by far the most interesting and at times incredibly in-depth tool that he has in his move set. Instead of being a jab, it is also his N-Air (Neutral Air) and his F-Tilt (Forward Tilt). By first impression, you could say that he is a more controlled Falco with his lasers from previous games. However, Mega Man’s Mega Buster is much more versatile than either iteration of Falco’s neutral B. While Melee Falco’s laser was a vital part in approaching and Brawl’s being a pivotal way to keep enemies away, Mega Man is able to play both offensively and defensively with his buster and this allows him more opportunity to fully take advantage of his preferred range.
You would think that these three moves are all the same, but they are quite different and often are a big deal in regards to the scenario that you are in.
The full duration of F-Tilt can keep opponents at a full Jab Lock while approaching. This allows him to follow up with a Jab Lock more efficiently than others as well and can lead into huge punishes and even kills with U-Tilt and D-Smash.
The strongest part of his Buster will be the actual tip of the cannon (Sweet Spot). This will be the only part where Bowser will receive stun of any kind. While mini hit stun will be dealt with each pellet fired, he will provide stun similar to a normal jab at the tip of the Mega Buster. Applying this with N-Air will provide you with actual knock back that can reach as far as his back leg. This makes retreating N-Air a really strong option when looking to retreat or play it safe in the neutral game. This move can also gimp really well but considering how much you have to commit yourself, but it is not as practical as F-Air (Forward Air) or B-Air (Back Air).
Just like every move Mega Man has, he has to commit a lot when using Jab or even F-Air. This allows characters like Diddy, Sheik, Pikachu and Fox to kite really efficiently and punish accordingly. However, this is where the uniqueness of his Jab comes into play. Being slippery and even short hop retreating can really keep those pesky characters at bay. Zucco has released an excellent video demonstrating how to "short hop pellet" efficient.
~ @
SSGuy
For further basics, look at @
Opana
's Advanced Technique Section
Up-Tilt: Mega Upper (Mega Man 2: The Power Fighters, Marvel Vs. Capcom)
Damage: 17% (Sweet Spot), 12% (Mid Animation), 8% (Ending Animation/Peak of Jump)
Kill %: 89% (Sweet Spot), ~165%,
SHORYUKEN!! Possibly the most satisfying kill move in the entire game, Street Fighter's Shoryuken is a staple within Capcom games, having made it into Mega Man's moveset in various arcade titles and now Smash Bros.
While it can serve as a somewhat effective anti-air attack, this move is at it's best when used on the ground during it's initial sweet spot, which makes a HUGE difference in terms of kill percents if missed. This sweet spot only works on the ground with the opponent being about less than a half character away. As such it can be difficult to pull off, however, this move can be stringed into through an angled Metal Blade or through a Mega Buster chain when the opponent is in a fallen position on the ground. Most importantly though, this move can be acted out of shield, allowing for powerful punishes.
This move does provide invincibility frames (around 5-8), causes Mega Man to leap into the air and half character forward, and is not interruptible until after the peek of the jump. However, after that, it leaves Mega Man heavily vulnerable, making it all the more important to land the sweet spot.
If you are able to land on a low platform somehow (such as on the tip of the platform on Yoshi's Island Brawl) this does cancel out the majority of the ending lag. Additionally, because it carries Mega Man slightly forward, when done on an edge Mega Man will automatically do a ledge grab, allowing for some potential pressuring situations.
Down Tilt: Slide (Mega Man 3)
Damage: 5%, 8% (Sweet Spot)
Kill%: ~228%
Both used as a dodging/mobility option, the recently missing slide (MM9/10) serves as Mega Man's D-Tilt and a Pseudo-Crawl, lowering his hitbox and moving him about 2 characters forward.
Hitting an opponent with this move at the start of the animation deals more damage and knocks the opponent in a 60 degree angle, while the mid-end of the move knocks them in a 45 degree angle.
Like Top Spin, this move is not safe on shield and is easily punished, and follow ups (ex. Flame Sword/Metal Blade) are based on punishing an opponent's landing. Since this move does pop opponents up higher than Top Spin, an opponent may use up their second jump, for some potential gimps.
While this move does lower Mega Man's hitbox somewhat, most projectiles can still hit him compared to just crouching. Thus this move does not serve as a viable approach option.
Side Smash: Charge Shot (Mega Man 4/5)
Damage: 12-13% (Uncharged), 15-18% (Partially Charged), 19-20% (Fully Charged)
Kill %: ~145% (Uncharged), ~100% (Partially Charged), ~80% (Fully Charged)
Minimum Range ~2 characters Max Range ~Half of Final Destination
Technically based off the Super Mega Buster that first appeared in MM5 onward, the Charge Shot acts as one of the few projectile smash attacks in the series. As one charges it increases in size, range, and power, and all forms of it ignore other projectiles. This move is both risky and rewarding and is often dependent on specific match ups.
As it is a projectile, it can be both reflected and or power shielded, meaning you'll have to use this conservatively or be left open for punishment. Against characters with reflectors it's highly advised not to attempt in most situations. However, against characters who have either poor range, recovery, mobility, this is one of Mega Man's better killing moves, especially when edge guarding (though it may not be the best option mind you).
That said, this move is great to throw out as an opponent is landing, such as potentially after a F-Throw or Z-Dropped Metal Blade, or when an attack if whiffed. Additionally, if an opponent foolishly chooses to shield a Crash Bomber, throw this out immediately for an easy punish/major shield damage.
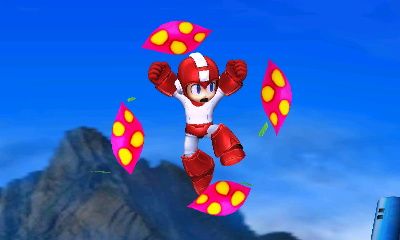
Up Smash: Spark Shock (Spark Man, Mega Man 3)
Damage: 15-16% (Uncharged), 18-19% (Partially Charged), 21-22% (Fully Charged)
Kill %: ~132% (Uncharged), ~115% (Partially Charged), 93% (Fully Charged)
The most reliable/conventional of Mega Man's Smash attacks, this move works completely differently from it's in-game counterpart.
This move is a multiple hit attack and has a slightly disjointed hitbox so this move is good against air dodges/spot dodges and is a viable ledge guard option. Additionally since it comes out somewhat fast, this move is viable as a running U-Smash (and DACUS if you have before V1.04 on the 3DS).
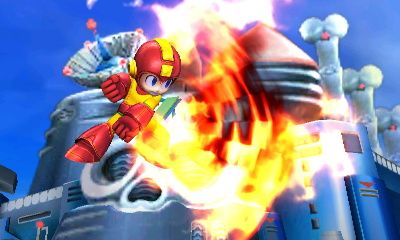
Down Smash: Flame Blast (Flame Man, Mega Man 6)
Strong Hit Damage: 18% (Uncharged), 22-22% (Partially Charged), 24% (Full Charged)
Weak Hit Damage: ~9-11%
Strong Hit Kill %: 96% (Uncharged), ~73% (Partially Charged), 60% (Fully Charged)
As shown in his E3 trailer, this unarguably deals the most knockback out of Mega Man's moveset, killing most of the cast uncharged around ~85%. However, is very risky, as only the initial blast on the ground (technically a sweet spot) deals any form of knockback, and the large amount of ending lag will leave you open.
There is no hitbox around Mega Man himself in the center, it can leave him vulnerable in certain situations. Also, because the flame pillars are narrow, they can be DI'd (Directional Influence) out of. This move is one that should only be attempted, if at all, if you are able to predict a roll or shield drop from an opponent.
Forward Air: Flame Sword (Sword Man, Mega Man 8)
Damage: 8.5%, 5% (Ending Animation)
Kill%: ~265%
A literal flame sword that would make Roy jealous, this move is mainly for racking up damage, spacing, and following up attacks like D-Throw. Despite its looks, because this move has pitiful knockback and is slower than Slash Claw by about 5 frames, this move is not as good for edgeguarding. However, the size of the hitbox, slightly less landing lag than Slash Claw, and the fact that it tends to linger make it for a good move to fast fall with.
Back Air: Slash Claw (Slash Man, Mega Man 7)
Damage: Yellow 3%, Red 4%, Blue 5%,
Kill %: ~145% (If All Hits Connect)
A weapon that's normally used for ripping enemies to pieces also serves as arguably Mega Man's most reliable KO attack. This move is divided into three hits with about 3 frames in between each with each hit being more powerful than the last, with the final hit being the one to send the opponent flying. As all hits need to connect to make this move worthwhile, this move is not very good for short hopping.
Generally you'll want to use this as an edge guarding tool for opponents coming in mid/high, it may also help to grab the ledge while attempting this move. And while on stage, this move is perfect for RARing to the extent that it's a near must for learning how to play this character. Backwards Metal Blades can be used for additional assistance.
*Rule of thumb generally is if the opponent is under you, Flame Sword, if high/horizontal then Slash Claw.
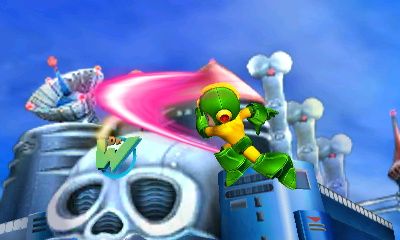
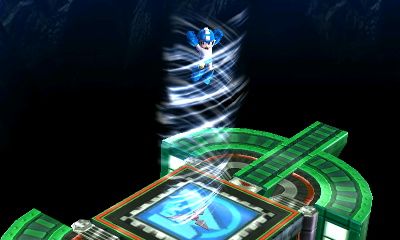
Up Air: Air Shooter (Air Man, Mega Man 2)
Damage: ~3-20% (Depending on Number of Hits)
Kill %: NA
A move that's tough to "beat," this move makes fighting Mega Man from the air very annoying. Dealing up to a whopping 20% (that's fairly reliable), this move creates a small vertical tornado* that forces opponents up into the air (only one tornado at a time), or keeps them hovering in the air if done against a dive-bomb attack, and at high percents/top of the stage can kill.
This move varies in effectiveness, depending upon the opponents weight/air speed/fall speed, but regardless it's a great move for spacing/pressuring/stage control, especially if the opponent has used their 2nd jump already. It has a slightly disjointed hitbox so short hopping with this move for a surprise attack can be a viable form of approaching (it should be noted that OFG this move will never kill).
Throwing out Danger Wrap can allow for additional pressuring, and using any of the Up-Specials (especially Rush Coil) may allow for pursuing. It should be noted that this move only causes minor hitstun during the first couple frames so opponents will still be able to act during it, so pursuing can be risky at times (often double KOs).
*The Wii U version creates a larger tornado. It is not known if this means the hitboxes vary between versions, though most likely this just accounts for it's disjoints.
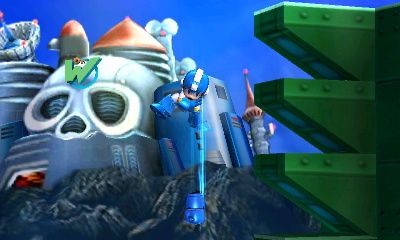
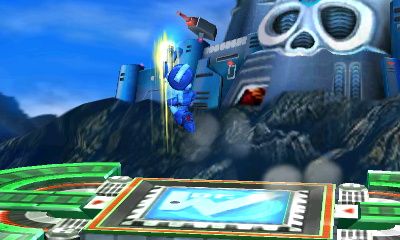
Down Air: Hard Knuckle (Hard Man, Mega Man 3)
Damage: 14% (Starting Animation), 12% (Ending Animation)
Kill %: Meteor Smash (Ending Animation), ~195% (On the Stage),
The only projectile Meteor Smash in the game, moving ~1.5 characters downwards, this move isn't as reliable as it seems.
While the starting animation does deal more damage, only the middle/near end of the animation causes a Meteor Smash. If the opponent hits the starting animation (which is around Mega Man himself), it'll generally do moderate upwards knockback, which is no good.
While possibly safer, unlike other Meteor Smashes or the rest of Mega Man's moveset, this move does require a set distance between you and your opponent (about .75/1 character), and can really only be used reliably when an opponent recovers low/horizontal. It is a decent move, but is entirely situational and is by no means Mega Man's go-to edgeguarding tool.

Dash Attack: Top Spin (Top Man, Mega Man 3)
Damage: 1%, 3% (Final Hit), 10% (If All Hits Connect)
The most useless move in the series returns as Mega Man's dash attack. This move carries Mega Man around 2.5 characters, covering a lot of distance. This move has very little vertical knockback allowing for potential follow ups with Metal Blade, Lemons, Flame Sword, and another Top Spin (though the latter two are risky).
While you "Cant Stop the Top," opponents can easily punish it by shielding or rolling. It's a move that is ultimately high risk/high reward.

Pummel Attack: Super Arm (Guts Man, Mega Man)
Damage: 3%
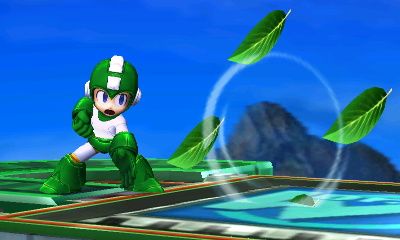
A fairly amusing animation, sadly Mega Man's Pummel, while it deals good damage, is very slow and should only be attempted at higher percents. Arguably the best set up into throws is off of Metal Blade due to it's large hitstun, as well as off of Leaf Shield/Plant Barrier, which can increase damage output to around 20% per throw.
Forward Throw
Damage: 8%
The basic throw attack. Like B-Throw this is for stage control/throwing opponents off edges. Aside from maybe Metal Blade and a thrown Leaf Shield, follow ups are hard to pull off. While weaker damage makes this less preferable to B-Throw, one might be able to follow up into a Charge Shot in certain situations.
Up Throw
Damage: 7%
Kill%: 226%
Compared to D-Throw, this move does deal more damage but at the cost of throwing the opponent higher off the ground making follow ups harder. However, unlike the former, one does have enough time to use/pick up a Metal Blade for additional pressuring, and like the former, jumps/air dodges can potentially be punished if predicted.
Back Throw
Damage: 11%
Kill%: ~187%
Like F-Throw, this move is primarily for stage control rather than attacking, though because it deals the most damage of the two this is probably the preferred option. Additionally at higher percents, this move can serve as a decent killing option.
Down Throw
Damage: 4%
Arguably the cornerstone of Mega Man's bread and butter combos, this is the throw one will most likely use the most as it allows for set ups into Flame Sword (potentially x2), Danger Wrap, Air Shooter, Slash Claw, and N-Air Lemons.
It's best at low %s, however, an opponent can still Air Dodge or jump to avoid a follow up. If that's the case, you can attempt to punish them upon landing with moves such as the Charge Shot, Danger Wrap, and Ice Slasher. For best results it may be best to try and mix up your options and test what your opponent goes for the most often.
Ledge Attack
Damage: 7%
@
This guide will hopefully be updated over time as the meta game evolves. Given this is a community guide, if you interested in writing/re-writing a section feel free to let us know and you could be added to the list of awesome users above.
Table of Contents:
Ix - Acknowledgements
I - Background Info & Character Description
II - Mega Man's Pros & Cons
III - Main Moveset Analysis
IV - Special/Custom Moveset Analysis
V - General Advanced Techniques (courtesy of @
VI - Helpful Links and Other Useful Guides
VII - Guts Man's ***
I - Background Info:
Capcom's Super Fighting Robot has finally joined the battle after many years of anticipation. Also known as the Blue Bomber, Mega Man (Rock Man in Japan) debuted in 1987 for the Famicom/NES and has since then spawned a vast franchise that is well recognized on Nintendo systems.
Following the Classic series, who's incarnation of Mega Man appears in Smash, created in the Year 200X, the scientist: Dr. Light created the helper robot: Rock. But when rival scientist, Dr. Wily steals several of Dr. Light's other robots (known as Robot Masters), Rock has himself upgraded to become: Mega Man, in order to stop his robot brethren and stop Dr. Wily from taking over the world. Using his iconic Mega Buster and Copy Ability, which allows him to use weapons of defeated Robot Masters, Mega Man fights for everlasting peace!
Character Description:
True to his games, Mega Man is all about jumping and shooting, hence, the majority of his moveset is centered around projectiles rather than punches and kicks. As a result, Mega Man does not play like any other character thus far in the Smash series, and may come off as somewhat niche in terms of playstyle.
Mega Man excels at mid-range gamplay and spacing, being able to move in and out of mid/close range attacks with ease (in particular in the air). The Mega Buster has a lot of priority and minor hitstun, allowing him to approach other projectile centered characters and disrupt close range characters with ease. Specials such as the Metal Blade and Crash Bomber help provide additional pressure, zoning, and mind-game opportunities.
For what few close range attacks he has they each allow for good follow ups and racking up damage after grabbing an opponent. Additionally, Mega Man is very good at edge guarding and gimping, pursuing opponents with the Slash Claw or attacking at a distance with a Charge Shot or Meteor Smash (Hard Knuckle). Unlike other characters, Mega Man's Down Specials can also let him keep an active hitbox while shielding/dodging,
However, most of Mega Man's killing attacks are situational or are easily punished. Combos do not exist with this character and juggling is almost non-existent in the standard sense. Being a fast faller and having an above average weight leaves Mega Man easily combo'd at lower percents.
Characters who have reflectors or have chargeable projectile attacks, while not outright counter-picks, also force Mega Man to play much more defensively. Mega Man is very much a character who requires the ability to make good reads and know the limits of each of Mega Man's moves.
II:
Pros:
- Heavier than average (102 weight)
- Great Recovery Options that can be acted out of, nor use up his 2nd jump
- Can Wall Jump
- Above average air speed
- Very good at edge guarding/gimping/foot-stooling
- Excels at Mid-Range Spacing/Pressuring/Gameplay and Edge Guarding
- Custom Specials are more diverse compared to most characters and can help cover certain match-ups
- D-Specials allow for an active hitbox while defending/grabbing
- Nearly every kill move is either situational or are easily punished
- Ability to rack up damage is lower than average
- Suffers from lack of conventional standard attacks, forcing the need for good reads (often off of pellets)
- Reflectors can give him a harder time than most of the cast
- Technically a Fast Faller, leaves him vulnerable to certain combos (like Up-Tilts from Mario/Sheik)
**Hitbox and Frame Data** ~ @Indigo Jeans
Jab/Forward Tilt/Neutral Air: Mega Buster (aka Lemons)
Damage: 2%, 3% (Sweet Spot), 4% (N-Air Sweet Spot)
Kill%: ~240% (N-Air Sweet Spot)
Mega Man’s Mega Buster is by far the most interesting and at times incredibly in-depth tool that he has in his move set. Instead of being a jab, it is also his N-Air (Neutral Air) and his F-Tilt (Forward Tilt). By first impression, you could say that he is a more controlled Falco with his lasers from previous games. However, Mega Man’s Mega Buster is much more versatile than either iteration of Falco’s neutral B. While Melee Falco’s laser was a vital part in approaching and Brawl’s being a pivotal way to keep enemies away, Mega Man is able to play both offensively and defensively with his buster and this allows him more opportunity to fully take advantage of his preferred range.
You would think that these three moves are all the same, but they are quite different and often are a big deal in regards to the scenario that you are in.
The full duration of F-Tilt can keep opponents at a full Jab Lock while approaching. This allows him to follow up with a Jab Lock more efficiently than others as well and can lead into huge punishes and even kills with U-Tilt and D-Smash.
The strongest part of his Buster will be the actual tip of the cannon (Sweet Spot). This will be the only part where Bowser will receive stun of any kind. While mini hit stun will be dealt with each pellet fired, he will provide stun similar to a normal jab at the tip of the Mega Buster. Applying this with N-Air will provide you with actual knock back that can reach as far as his back leg. This makes retreating N-Air a really strong option when looking to retreat or play it safe in the neutral game. This move can also gimp really well but considering how much you have to commit yourself, but it is not as practical as F-Air (Forward Air) or B-Air (Back Air).
Just like every move Mega Man has, he has to commit a lot when using Jab or even F-Air. This allows characters like Diddy, Sheik, Pikachu and Fox to kite really efficiently and punish accordingly. However, this is where the uniqueness of his Jab comes into play. Being slippery and even short hop retreating can really keep those pesky characters at bay. Zucco has released an excellent video demonstrating how to "short hop pellet" efficient.
~ @
For further basics, look at @
Up-Tilt: Mega Upper (Mega Man 2: The Power Fighters, Marvel Vs. Capcom)
Damage: 17% (Sweet Spot), 12% (Mid Animation), 8% (Ending Animation/Peak of Jump)
Kill %: 89% (Sweet Spot), ~165%,
SHORYUKEN!! Possibly the most satisfying kill move in the entire game, Street Fighter's Shoryuken is a staple within Capcom games, having made it into Mega Man's moveset in various arcade titles and now Smash Bros.
While it can serve as a somewhat effective anti-air attack, this move is at it's best when used on the ground during it's initial sweet spot, which makes a HUGE difference in terms of kill percents if missed. This sweet spot only works on the ground with the opponent being about less than a half character away. As such it can be difficult to pull off, however, this move can be stringed into through an angled Metal Blade or through a Mega Buster chain when the opponent is in a fallen position on the ground. Most importantly though, this move can be acted out of shield, allowing for powerful punishes.
This move does provide invincibility frames (around 5-8), causes Mega Man to leap into the air and half character forward, and is not interruptible until after the peek of the jump. However, after that, it leaves Mega Man heavily vulnerable, making it all the more important to land the sweet spot.
If you are able to land on a low platform somehow (such as on the tip of the platform on Yoshi's Island Brawl) this does cancel out the majority of the ending lag. Additionally, because it carries Mega Man slightly forward, when done on an edge Mega Man will automatically do a ledge grab, allowing for some potential pressuring situations.
Down Tilt: Slide (Mega Man 3)
Damage: 5%, 8% (Sweet Spot)
Kill%: ~228%
Both used as a dodging/mobility option, the recently missing slide (MM9/10) serves as Mega Man's D-Tilt and a Pseudo-Crawl, lowering his hitbox and moving him about 2 characters forward.
Hitting an opponent with this move at the start of the animation deals more damage and knocks the opponent in a 60 degree angle, while the mid-end of the move knocks them in a 45 degree angle.
Like Top Spin, this move is not safe on shield and is easily punished, and follow ups (ex. Flame Sword/Metal Blade) are based on punishing an opponent's landing. Since this move does pop opponents up higher than Top Spin, an opponent may use up their second jump, for some potential gimps.
While this move does lower Mega Man's hitbox somewhat, most projectiles can still hit him compared to just crouching. Thus this move does not serve as a viable approach option.
Side Smash: Charge Shot (Mega Man 4/5)
Damage: 12-13% (Uncharged), 15-18% (Partially Charged), 19-20% (Fully Charged)
Kill %: ~145% (Uncharged), ~100% (Partially Charged), ~80% (Fully Charged)
Minimum Range ~2 characters Max Range ~Half of Final Destination
Technically based off the Super Mega Buster that first appeared in MM5 onward, the Charge Shot acts as one of the few projectile smash attacks in the series. As one charges it increases in size, range, and power, and all forms of it ignore other projectiles. This move is both risky and rewarding and is often dependent on specific match ups.
As it is a projectile, it can be both reflected and or power shielded, meaning you'll have to use this conservatively or be left open for punishment. Against characters with reflectors it's highly advised not to attempt in most situations. However, against characters who have either poor range, recovery, mobility, this is one of Mega Man's better killing moves, especially when edge guarding (though it may not be the best option mind you).
That said, this move is great to throw out as an opponent is landing, such as potentially after a F-Throw or Z-Dropped Metal Blade, or when an attack if whiffed. Additionally, if an opponent foolishly chooses to shield a Crash Bomber, throw this out immediately for an easy punish/major shield damage.
Up Smash: Spark Shock (Spark Man, Mega Man 3)
Damage: 15-16% (Uncharged), 18-19% (Partially Charged), 21-22% (Fully Charged)
Kill %: ~132% (Uncharged), ~115% (Partially Charged), 93% (Fully Charged)
The most reliable/conventional of Mega Man's Smash attacks, this move works completely differently from it's in-game counterpart.
This move is a multiple hit attack and has a slightly disjointed hitbox so this move is good against air dodges/spot dodges and is a viable ledge guard option. Additionally since it comes out somewhat fast, this move is viable as a running U-Smash (and DACUS if you have before V1.04 on the 3DS).
Down Smash: Flame Blast (Flame Man, Mega Man 6)
Strong Hit Damage: 18% (Uncharged), 22-22% (Partially Charged), 24% (Full Charged)
Weak Hit Damage: ~9-11%
Strong Hit Kill %: 96% (Uncharged), ~73% (Partially Charged), 60% (Fully Charged)
As shown in his E3 trailer, this unarguably deals the most knockback out of Mega Man's moveset, killing most of the cast uncharged around ~85%. However, is very risky, as only the initial blast on the ground (technically a sweet spot) deals any form of knockback, and the large amount of ending lag will leave you open.
There is no hitbox around Mega Man himself in the center, it can leave him vulnerable in certain situations. Also, because the flame pillars are narrow, they can be DI'd (Directional Influence) out of. This move is one that should only be attempted, if at all, if you are able to predict a roll or shield drop from an opponent.
Forward Air: Flame Sword (Sword Man, Mega Man 8)
Damage: 8.5%, 5% (Ending Animation)
Kill%: ~265%
A literal flame sword that would make Roy jealous, this move is mainly for racking up damage, spacing, and following up attacks like D-Throw. Despite its looks, because this move has pitiful knockback and is slower than Slash Claw by about 5 frames, this move is not as good for edgeguarding. However, the size of the hitbox, slightly less landing lag than Slash Claw, and the fact that it tends to linger make it for a good move to fast fall with.
Back Air: Slash Claw (Slash Man, Mega Man 7)
Damage: Yellow 3%, Red 4%, Blue 5%,
Kill %: ~145% (If All Hits Connect)
A weapon that's normally used for ripping enemies to pieces also serves as arguably Mega Man's most reliable KO attack. This move is divided into three hits with about 3 frames in between each with each hit being more powerful than the last, with the final hit being the one to send the opponent flying. As all hits need to connect to make this move worthwhile, this move is not very good for short hopping.
Generally you'll want to use this as an edge guarding tool for opponents coming in mid/high, it may also help to grab the ledge while attempting this move. And while on stage, this move is perfect for RARing to the extent that it's a near must for learning how to play this character. Backwards Metal Blades can be used for additional assistance.
*Rule of thumb generally is if the opponent is under you, Flame Sword, if high/horizontal then Slash Claw.
Up Air: Air Shooter (Air Man, Mega Man 2)
Damage: ~3-20% (Depending on Number of Hits)
Kill %: NA
A move that's tough to "beat," this move makes fighting Mega Man from the air very annoying. Dealing up to a whopping 20% (that's fairly reliable), this move creates a small vertical tornado* that forces opponents up into the air (only one tornado at a time), or keeps them hovering in the air if done against a dive-bomb attack, and at high percents/top of the stage can kill.
This move varies in effectiveness, depending upon the opponents weight/air speed/fall speed, but regardless it's a great move for spacing/pressuring/stage control, especially if the opponent has used their 2nd jump already. It has a slightly disjointed hitbox so short hopping with this move for a surprise attack can be a viable form of approaching (it should be noted that OFG this move will never kill).
Throwing out Danger Wrap can allow for additional pressuring, and using any of the Up-Specials (especially Rush Coil) may allow for pursuing. It should be noted that this move only causes minor hitstun during the first couple frames so opponents will still be able to act during it, so pursuing can be risky at times (often double KOs).
*The Wii U version creates a larger tornado. It is not known if this means the hitboxes vary between versions, though most likely this just accounts for it's disjoints.
Down Air: Hard Knuckle (Hard Man, Mega Man 3)
Damage: 14% (Starting Animation), 12% (Ending Animation)
Kill %: Meteor Smash (Ending Animation), ~195% (On the Stage),
The only projectile Meteor Smash in the game, moving ~1.5 characters downwards, this move isn't as reliable as it seems.
While the starting animation does deal more damage, only the middle/near end of the animation causes a Meteor Smash. If the opponent hits the starting animation (which is around Mega Man himself), it'll generally do moderate upwards knockback, which is no good.
While possibly safer, unlike other Meteor Smashes or the rest of Mega Man's moveset, this move does require a set distance between you and your opponent (about .75/1 character), and can really only be used reliably when an opponent recovers low/horizontal. It is a decent move, but is entirely situational and is by no means Mega Man's go-to edgeguarding tool.
Dash Attack: Top Spin (Top Man, Mega Man 3)
Damage: 1%, 3% (Final Hit), 10% (If All Hits Connect)
The most useless move in the series returns as Mega Man's dash attack. This move carries Mega Man around 2.5 characters, covering a lot of distance. This move has very little vertical knockback allowing for potential follow ups with Metal Blade, Lemons, Flame Sword, and another Top Spin (though the latter two are risky).
While you "Cant Stop the Top," opponents can easily punish it by shielding or rolling. It's a move that is ultimately high risk/high reward.
Pummel Attack: Super Arm (Guts Man, Mega Man)
Damage: 3%
A fairly amusing animation, sadly Mega Man's Pummel, while it deals good damage, is very slow and should only be attempted at higher percents. Arguably the best set up into throws is off of Metal Blade due to it's large hitstun, as well as off of Leaf Shield/Plant Barrier, which can increase damage output to around 20% per throw.
Forward Throw
Damage: 8%
The basic throw attack. Like B-Throw this is for stage control/throwing opponents off edges. Aside from maybe Metal Blade and a thrown Leaf Shield, follow ups are hard to pull off. While weaker damage makes this less preferable to B-Throw, one might be able to follow up into a Charge Shot in certain situations.
Up Throw
Damage: 7%
Kill%: 226%
Compared to D-Throw, this move does deal more damage but at the cost of throwing the opponent higher off the ground making follow ups harder. However, unlike the former, one does have enough time to use/pick up a Metal Blade for additional pressuring, and like the former, jumps/air dodges can potentially be punished if predicted.
Back Throw
Damage: 11%
Kill%: ~187%
Like F-Throw, this move is primarily for stage control rather than attacking, though because it deals the most damage of the two this is probably the preferred option. Additionally at higher percents, this move can serve as a decent killing option.
Down Throw
Damage: 4%
Arguably the cornerstone of Mega Man's bread and butter combos, this is the throw one will most likely use the most as it allows for set ups into Flame Sword (potentially x2), Danger Wrap, Air Shooter, Slash Claw, and N-Air Lemons.
It's best at low %s, however, an opponent can still Air Dodge or jump to avoid a follow up. If that's the case, you can attempt to punish them upon landing with moves such as the Charge Shot, Danger Wrap, and Ice Slasher. For best results it may be best to try and mix up your options and test what your opponent goes for the most often.
Ledge Attack
Damage: 7%
Last edited:

 )
)