Welcome to Smashboards, the world's largest Super Smash Brothers community! Over 250,000 Smash Bros. fans from around the world have come to discuss these great games in over 19 million posts!
You are currently viewing our boards as a visitor. Click here to sign up right now and start on your path in the Smash community!
It appears that you are using ad block :'(
Hey, we get it. However this website is run by and for the community... and it needs ads in order to keep running.
Please disable your adblock on Smashboards, or go premium to hide all advertisements and this notice. Alternatively, this ad may have just failed to load. Woops!
Neutral Special: Eye Turret
This functions much like Palutena’s Autoreticle but the reticle targeting graphic is far more sinister and monstrous looking. This appearance is borrowed over from Uprising as are the energy shots that are fired.
Side Special: Dark Mines
This functions exactly like Palutena’s Explosive Flame but emits a darkness-infused explosion with dark purple and black flames instead.
Up Special: Warp
This functions much like Palutena’s Up Special with a more darker and shadowy appearance.
Down Special: Counter/Reflective Barrier
Functions much like Palutena‘s Counter in that it can reflect damage back regardless if it’s a melee or projectile. The only difference is that the melee counter will deal a darkness-infused counter while the projectile counter will cause a slight dark effect she reflected.
Final Smash: Monstrous Medusa
Medusa will detach her head, and it will fly forward sending any opponent hit to a cutscene final smash. Once in the cutscene opponents will face an onslaught from Medusa's army before being hit with a final laser from Medusa. Medusa's Head will fly back to Medusa'a body and the battle will resume.
Taunts
Up Taunt: She holds up her staff which emits a sinister purple light.
Down Taunt: Medusa leaves her staff to float and maliciously looks at her side in a thinking pose like she's plotting something. A little nod to one of her Kid Icarus: Uprising sprites.
Right Taunt: Medusa waves out her staff and cackles.
Left Taunt: Medusa uses unholy magic to alternate her face from her usual one to that of her true form with a demonic-looking mono eye.
On-Screen Appearance
Medusa rises out of dark clouds and her eyes quickly flash red similar to her first appearance in Kid Icraus Uprising: Chapter 1.
Idle Poses
Medusa’s eyes momentarily glow red.
Medusa’s snake hair snakes at each other quickly. Medusa looks up angrily.
Victory Poses
Medusa turns her back to the camera while glowing with dark purple energy. She then turns back to face the camera which shows her hideous mono eye form. She then screams at the screen.
She appears in her monstrous gigantic form and holds her staff aloft while laughing. This is unique as she is some distance away from the camera.
She stamps her staff on the ground which causes a purple shadowy wisp to rise up and engulf Medusa as she cackles.
Classic Mode: Extinguish the Light
Medusa fights characters that are holy or based on light in some way.
Round
Opponent
Stage
Music
Notes
References
1
Azura's Back
Zanza the Devine
Mythra utilizes lots of light and electric-oriented skills and attacks.
2
Spear Pillar
Battle! (Chairman Rose)
Jigglypuff is a Fairy-type which is often seen as a Pokémon type that’s primarily light-based.
3
Rainbow Road
Slide Remix
Peach is a princess whose abilities are primarily focused on love and light while Rosalina is a cosmic goddess.
4
Temple
Ballad of the Goddess
Zelda is the Sage of Light while Link is the champion that defeats evil and possesses various anointed weapons. Both hold the Triforce, an ancient holy relic.
5
Dracula's Castle
Vampire Killer (original)
Boss Fight 1 - Kid Icarus: Uprising
6
Palutena's Temple
Boss Fight 1 - Kid Icarus: Uprising
BONUS
Board
the
Platforms
!
Final
Master Hand & Crazy Hand
Reset Bomb Forest (Omega)
Master Hand / Crazy Hand
Master Hand and Crazy Hand are supernatural beings with all of the powers of gods.
Neutral Special: Packing Pests
Barista will lob either a spider or a candy from its mouth toward the opponent. The candies will bounce once before despawning, and the spiders will crawl and do weak damage after landing before they despawn. If the B button is pressed before the projectile lands, it will be swatted down in mid-air, starting the second bounce of the candy early, or starting the crawl phase of the spider.
Side Special: Karate Joe
Barista will chuck a flower pot forward from its mouth, similar to duck hunt’s Side special, but faster and traveling further. Side B will be held for this move, and when it is released Karate Joe will appear wherever the Flower Pot was, and perform a Punch. If The Karate Punch connects with an opponent, a Karate combo will be performed, and if The B Button is pressed when the uppercut connects, it will have increased kickback, and Karate Joe will smile at the camera before despawning.
Up Special: Launch Party
Barista will take the place of the rocket ship from the Launch Party Mini Game. A box will spawn underneath Barista, and a 1,3,5, or 7 will appear. If the B Button is pressed when the number hits 0, then Barista will be launched upward, but not put into free fall, similar to Mega Man and Sonic’s recovery moves. There is a hitbox on this move, but it is not very strong. If the B Button is missed, then the Barista will not travel very far, only About the Vertical distance of Dr. Mario’s recovery.
Down Special: Chorus Kids
The Chorus Kids will appear in a stack behind the Barista, and will sing (scream?) a pulsing note. This will have a visual effect similar to jigglypuffs, where there is a circle of notes around the Chorus Kids. In function this will be similar to Charizard’s and Bowser’s Flames, dealing multiple small hits of damage, with the radius of the scream getting smaller and smaller the longer the note is held. If the B Button is released on one of the Chorus Kid’s pulses then there will be a strong final hit instead of the move just ending. Barista will be singing with its mouth open during this, but will not add to the damage or hitbox.
Final Smash: Ringside Reporter
The Reporter will appear, and a camera flash will appear beside her, and any opponents caught in the flash will be sent to a cutscene. The ringside reporter minigame will play for a couple of seconds, before ending in a final flash and zooming out to see the opponent pictured against the screen on a newspaper. The better score you get while in the minigame portion, the more damage and knockback will be dealt to the opponent.
Taunts
Up Taunt: The Double Date Gophers jump up from the ground and punches the air.
Down Taunt: Barista chases his tail
Right Taunt: Barista falls asleep for a second mimicking his art
Left Taunt: A Built to Scale block moves back and forth once.
On-Screen Appearance
Barista floats in tied to three balloons which pop one by one, like the intro to night walk.
Idle Poses
Barista wags his tail.
Barista puts his paws on his headphones and bops his head to the music.
Victory Poses
Barista appears alongside the Love Rap trio. MC Love says "Fo' Sho'" and the Barista barks with the backup rappers
The Ringside Reporter appears to interview Barista with a simple "Wubadubaduba Zat true?". Barista responds with a bark.
Barista throws a pillow into the air, the camera following the pillow. He then sleeps on it.
Classic Mode: Rhythm Melodies
Barista's route revolves around different kinds of music genres in which a piece of music that closely matches each theming plays in the background with characters and stages all based on that. [Note; the song that is used are all from Rhythm Heaven)
Neutral Special: Handgun
Jill takes her handgun from her hip and fires it once with a tap of the special move button, consecutive taps will make Jill keep firing it. If you hold the Special button and input any horizontal movement she will slowly walk in that direction while having her gun in her hands.
Side Special: Grenade Launcher
Jill takes out her Grenade Launcher and fires a Grenade in an arc in front of her. You gain some aim of the launcher by holding the Side-Special instead of tapping. It starts out with 3 normal Grenade Shells, but once depleted you’ll have to reload by picking one of the Shells in your inventory. This powerful weapon exclusive to Jill can be loaded with three different varieties of shells; Grenade Shells, Acid Shells, and Incendiary Shells.
Up Special: Hookshot
Jill Shoots out a Hookshot at an upward angle. It functions as your typical tether recovery. As an attack, however, the grounded version can grab opponents, dragging them toward Jill.
Down Special: Survival Inventory
Jill swiftly goes into a crouching pose, low enough to avoid mid-level attacks and projectiles. Once in the pose, an inventory appears over her character UI. You’ll consistently be able to make the choice between 6 iconic consumables from the Resident Evil franchise. The inventory closes once you’ve either made a choice by pressing B on an item if you’ve been hit or shielded out of it.
Final Smash: Reach for the S.T.A.R.S.
Jill takes out her trusty Rocket Launcher and shoots once in front of her, everyone caught in the initial blast gets sent into a cinematic. The opponents seem to be in some... Mansion? Then suddenly behind them, a Tyrant appears! Though luckily, Jill wasn't done with her Rocket Launcher just yet as she starts to fire consecutive rockets exploding the entire place in the process.
Taunts
Up Taunt: Jill radios for help by holding a communicator and says "Anyone there?"
Down Taunt: Jill kneels down and looks to the right and then to the left cautiously.
Right Taunt: Jill raises her pistol with both hands close to her face.
Left Taunt: Jill adjusts her beret and says "Enemy is still on the loose..."
On-Screen Appearance
Falls from the top while landing and performing a roll as debris rains down.
Idle Poses
Jill stops moving and rests her head on her hand and goes into a thinking position, with her eyes looking up as she's thinking of a plan on how she'll be surviving the ongoing battle. A reference to her Idle animation in Resident Evil.
Jill suddenly stops moving and slowly looks behind herself with a little visible sweat drop on her face. Hey, who knows, there just might be a zombie behind you right now!
Victory Poses
Jill sets off a flare for a rescue helicopter and signals for help.
Takes a zombie and curb stomps it before saying "Who wants some more!"
Chris Redfield appears next to Jill as she holsters her weapon. Jill says "Mission accomplished," as Chris says "Pack up, we have another one incoming."
Classic Mode: My Last Escape
Fights characters on a 2:00 time limit, referencing the series’ staple escape sequences. Stages are chosen for their dark ambiance.
Round
Opponent
Stage
Music
Notes
References
1
Dracula's Castle
Stage Clear / Title Theme
The opponent comes equipped with the Hocotate Bomb and receives a sudden Final Smash.
2
Shadow Moses Island
Encounter
The opponent tends to avoid conflict.
3
Chemical Plant Zone
Escape from the City
The opponent tends to avoid conflict.
4
Luigi's Mansion
Dragon Battle
Assist Trophies spawns often.
5
Halberd
Meta Knight's Revenge
The match is a free-for-all.
6
Brinstar
Escape
The match is a free-for-all.
BONUS
Race
to
the
Finish
!
Final
Final Destination
Unstopable Nemesis
Bowser transforms into Giga Bowser after taking enough damage.
Neutral Special: Handgun
Leon takes his handgun from his hip and fires it once with a tap of the special move button, consecutive taps will make Leon keep firing it. If you hold the Special button and input any horizontal movement he will slowly walk in that direction while having her gun in his hands.
Side Special: Grenade Launcher
Leon takes out his Grenade Launcher and fires a Grenade in an arc in front of him. You gain some aim of the launcher by holding the Side-Special instead of tapping. It starts out with 3 normal Grenade Shells, but once depleted you’ll have to reload by picking one of the Shells in your inventory. This powerful weapon exclusive to Leon can be loaded with three different varieties of shells; Grenade Shells, Acid Shells, and Incendiary Shells.
Up Special: Hookshot
Leon shoots out a Hookshot at an upward angle. It functions as your typical tether recovery. As an attack, however, the grounded version can grab opponents, dragging them toward Leon.
Down Special: Survival Inventory
Leon swiftly goes into a crouching pose, low enough to avoid mid-level attacks and projectiles. Once in the pose, an inventory appears over his character UI. You’ll consistently be able to make the choice between 6 iconic consumables from the Resident Evil franchise. The inventory closes once you’ve either made a choice by pressing B on an item if you’ve been hit or shielded out of it.
Final Smash: Reach for the S.T.A.R.S.
Leon takes out his trusty Rocket Launcher and shoots once in front of him, everyone caught in the initial blast gets sent into a cinematic. The opponents seem to be in some... Mansion? Then suddenly behind them, a Tyrant appears! Though luckily, Leon wasn't done with her Rocket Launcher just yet as he starts to fire consecutive rockets exploding the entire place in the process.
Taunts
Up Taunt: Leon wipes the sweat from his brow.
Down Taunt: Leon takes his flashlight and points it to the right and to the left while keeping his gun arm steady.
Right Taunt: Leon raises his pistol with both hands close to his face. He then looks to the right and then to the left.
Left Taunt: Leon unloads his handgun and checks his ammo before reloading it.
On-Screen Appearance
Leon appears in a manner like Captain Falcon but in a beat-up police car. He jumps out and arms himself.
Idle Poses
Leon stops moving and rests his head on his hand and goes into a thinking position, with his eyes looking up as he's thinking of a plan on how he'll be surviving the ongoing battle. A reference to his Idle animation in Resident Evil.
Leon suddenly stops moving and slowly looks behind himself with a little visible sweat drop on his face. Hey, who knows, this just might be a zombie behind you right now!
Victory Poses
Leon sets off a flare for a rescue helicopter and signals for help.
Leon pushes down a zombie who is trying to attack him and takes a knife and stages downwards. The killing strike isn’t shown.
Leon takes aim and fires a gas canister behind him which explodes.
Classic Mode: Survive the Horror
All opponents are Giant and based on various monsters Leon faced off against. All battles are Stamina matches.
Neutral Special: Windmill Swords
Takamaru throws out a pair of windmill swords, dealing minor damage but reaching pretty far. Holding the button charges them, cloaking them in fire and adding a third projectile to the mix, at the cost of some range. The charged version is a solid damage dealer and kill tool, but it's also rather risky.
In Mysterious Murasame Castle, Takamaru can use throwing knives as a ranged attack. Various power-ups can be found that increase the number of knives thrown or change them to long-range windmill swords and high-power fireballs. This special pretty much combines all the power-ups, ironically skipping the original knives entirely.
Side Special: Iajutsu Rush
Takamaru sheaths his sword, then rushes forward, slashing all in his way. Uniquely, the initial attack deals decent damage but doesn't actually launch the opponent. Pressing the button again has Takamaru sheath his sword, causing the knockback to kick in. However, it also has a sizeable amount of endlag, making just the rush on its own better for starting combos. This move is wholly original, based on the famous image of samurai and their quick-draw skills
Up Special: Ring Slash
Takamaru sheaths his sword, then rises straight up while slashing around himself. Holding the button increases the distance traveled and sets the sword on fire, greatly increasing the damage output. While mostly original, this move is loosely based on the rook Shogi piece power-up, which allows Takamaru to throw four knives all around himself. It also draws inspiration from the Fireball projectile and its combination with the aforementioned rook piece.
Down Special: Quick-Draw Counter
Takamaru sheaths his sword. Anyone who hits him gets hit with a powerful slash, reaching wide enough to hit multiple opponents. This attack also works as a reflector, throwing back any projectiles that hit Takamaru. This move is based on Takamaru's ability to reflect projectiles with his sword, which is also demonstrated in his smash attacks.
Final Smash: Inazuma Rush
Takamaru sheaths his sword, then releases a burst of lightning, paralyzing all who are hit. He then unleashes a devastating barrage of slashes, ending with one final rush. He caps off the assault by sheathing his sword, after which the opponents are launched. This move is a stylized representation of the powerful Inazuma technique.
Taunts
Up Taunt: Takamaru strikes a pose by raising his sword at his side with both hands, resembling the one from his game's cover art.
Down Taunt: Takamaru sticks his sword into the ground and sits down, meditating.
Right Taunt: A raccoon dog statue appears in a puff of smoke and splits open. Left Taunt: Takamaru dusts off his hakama pants.
On-Screen Appearance
Takamaru appears out of a cloud of smoke like a ninja, referencing his vanish ability in the game.
Idle Poses
Takamaru slightly raised his sword to look at it.
He brushes his ponytail slightly
Victory Poses
He performs several super fast slashes before cutting down the middle which causes the screen to split in half at a diagonal
He cuts down a Ninja in Sprite firm which yields 100 points.
He performs several smashes before charging his blade and performing one Final powerful cut which releases a flash of lightning
Classic Mode: Fashion Show Victim
The opponents features both swordsman and ninjas.
Round
Opponent
Stage
Music
Notes
References
1
Temple
Guardian Battle
2
Arena Ferox
God Shattering Star
3
Great Cave Offensive
(Battlefield)
The Final Battle (vs Dark Crafter)
4
Miitopia
Battle Theme - Miitopia
Mii Costumes present is the generic ninja costume, Ninjara, and Yiga Clan outfit
5
Galar Wild Area
Battle Tower
6
Hyrule Castle
Vs. Monk Maz Koshia Medley
BONUS
Break
the
Targets
!
Final
Murasame
Murasame Castle
Black Ninja
Alternate Costumes
Color
References
Appearances
White
Default
Black
Based on the Ninja enemy
Jacket and pants turn black with the shirt turning white.
Orange
Based on the Tengu and Earth Demon
Jacket turns white, the shirt becomes orange, and the pants become brown.
Red
Based on Lord Aosame
Jacket turns teal with his shirt and pants being dark red.
Teal
Based on Lord Ryokusame
Jacket turns grey, the shirt turns green, and his pants turn teal.
Pink
Based on Lady Momosame
Jacket becomes pink, the shirt becomes green, and pants become yellow
Dark Blue
Based on Lord Akasame
Jacket turns red, and his shirt and pants turn dark blue.
Magenta
Based on Murasame
Jacket turns brown, the shirt is a crimson red, and pants become magenta
Brown
Based on Captain Rainbow Takamaru
Jacket becomes burgandy, the shirt becomes brown, and the pants become green with black stripes running down them. Hair also becomes a darker and duller blue with the skin tone also having a more darker tint to it.
Blue
Based on the Takamaru Sprite
The jacket is a saturated, bright red while the shirt and pants are a bright blue. Takamaru's hair would also be brighter blue.
Purple
Samurai Warriors 3 version of Takamaru
Takamaru retains the red jacket with a duller collar and yellow trimmings, a lavender shirt, white pants, and more darker hair color.
Neutral Special: Mach Tornado
Spins rapidly and forms a tornado around himself. Button mashing both increases the move's duration and makes Galacta Knight ascend slightly; he can also move left and right. Unlike Meta Knight, the attack does multiple hits of damage like its earlier iterations. Galacta Knight’s has a pinkish hue.
Side Special: Drill Rush
Galacta Knight rushes sideways, spinning in the fashion of a drill with his spear outstretched. The flight path can be maneuvered up or down, allowing it to function as a recovery option (although it will render him helpless).
Up Special:Shuttle Loop
Galacta Knight soars high into the air, slashing with his lance pointed upwards. He then swoops downward and rises upward in a fast loop, slashing a second time during the ascent.
Down Special: Knight Beam
He summons three light swords, with quite a bit of startup, which will then release at an angle one after the other. After being released they will last for quite a while and will bounce off of platforms and walls. This move can be angled in every direction except beneath him, unless this move is used in the air in which every direction can be angled.
Final Smash: Judgement Day
When Galacta Knight triggers his final Smash, a butterfly will land on his spear, transforming him into Morpho Knight. Morpho Knight will lunge, forward, and fly upwards. Any opponent caught in the attack will be teleported to the center of the stage for a Greninja/Ike/Cloud style final smash, where Morpho Knight will beat the opponent with his flame sword. Rather than spike the opponent down, however, this final smash will be located at ground level. For the final hit, Morpho Knight will summon two massive swords, Slashing them on both sides of him sending the opponent upwards, and damaging any opponents caught in the crossfire.
Taunts
Up Taunt: - Galacta Knight briefly vanishes and performs several light-speed dashes before reappearing.
Down Taunt: - Galacta Knight wraps himself with his wimgs and rises in the air slightly before spinning and laughing menacingly.
Right Taunt: - Galacta Knight thrusts his spear forward while saying "Come at me"
Left Taunt: - Galacta Turns to face away from the opponent while saying" Weak..." whole his eyes glow brightly.
On-Screen Appearance
Appears within a pink crystal and then shatters it before performing a quick slash spin and stabbing upwards.
Idle Poses
Spreads his wings slightly.
Carresses his sword.
Victory Poses
Swipes once to his right, points his lance upwards then stabs the floor. It’s similar to his entrance animation but has more flair to it.
Levigtates in the air, expands his wings, and flies off into the air; out of sight. He then swoops down and attacks the screen before zooming off again.
Slashes a few times before holding his sword aloft and says "Fear me..."
Classic Mode: The Strongest Warrior
All opponents are characters noted for their immense strength and abilities within their universe. This is because Galacta Knight is seen as the strongest warrior in history and seeks other strong opponents in order to defeat them.
Round
Opponent
Stage
Music
Notes
References
1
Suzaku Castle
Ryu Stage Type B
Ryu is constantly searching for strong opponents. While he isn’t the strongest character in Street Fighter, he is technically the strongest Street Fighter rep in the roster.
2
Spear Pillar
Battle! Gym Leader (Pokemon Sword & Shield)
Mewtwo was one of the strongest Pokemon back in Generation 1 but has since conceded the title to legends like Arceus and Calyrex. Despite this though, Mewtwo still acknowledged as being one of the strongest Pokémon in existence.
3
Bridge of Eldin
Death Mountain
Ganondorf may consistently be defeated by Link in most Legend of Zelda games, he is still a force to be reckoned with. Unlike Ganondorf, Link consistently has to overcome challenges to defeat the King of Evil. Even then, it requires divine intervention of some sort for him to finally finish off the beast.
4
Palutena's Temple
Destroyed Skyworld
Being a goddess, Palutena is light years stronger than most of the Kid Icarus cast. It’s because of her that Pit is capable of fighting as she grants him the power.
5
Night Walk
Remix 10
Despite his appearance, Barista is one of the most over-powered characters in Rhythm Heaven as he is capable of finishing games for players, gives advice, and hands out stamps.
6
North Cave
Decisive Battle
Sephiroth is one of the strongest members of SOLDIER in history who further augmented his power upon transforming into his later forms.
BONUS
Race
to
the
Finish
!
Final
Great Cave Offensive
Kirby Battle Royal: Main Theme
Meta Knight is fought after defeating the first three fighters.
The first battle mimics the fight against Galacta Knight in Star Allies while the fight against Meta Knight is a nod to the battle in Meta Knightmare Ultra.
Neutral Special: Tossed Item
One of the Storable projectiles pulled from the treasure bag is thrown by Grovyle. If you have no items available then Grovyle will throw a Gravelrock, which travels slowly and does weak damage.
Side Special: Bullet Seed / Leach Seed
Grovyle and Celebi's Side Special is Bullet Seed and Leech Seed. When held down, more seeds will come out starting at 2 and ending at 5. Grovyle will shoot down at an angle, and the Seeds will become lodged in the floor similar to Isabelle's Down Special. If the opponent walks over them, they will explode dealing relatively minor damage. They are clumped together, with 5 seeds having a larger hitbox than the 2 seeds. They will all be detonated at once, so the more seeds out will result in more damage being done to the opponent. Leach Sees instead will come out if switched with Celebi. This is identical in function, except it deals significantly less damage and heals Grovyle & Celebi a fraction of that damage.
Up Special: Aerial Ace / Warp Orb
This is a pretty standard recovery, with Grovyle dashing in the air using the move Aerial Ace. This range is pretty poor, somewhere between Falco and Wolf's recoveries. It can also be angled in any direction. Celebi warps and reappears where Grovyle ends up at the end of his recovery during this animation. This attack has a single hit box on it as well, which is weak but still there.
However, If you have a Warp Orb from your Treasure bag, you will instead Teleport when using your Up Special, giving you intangibility and recovery with a much larger range. Down Special: Treasure Bag
Like Hero's Down Special, Grovyle & Celebi's Down Special will open the treasure bag menu from PMD over their stock profile. Unlike Hero's Menu, only one item will appear at a time, with it still being random each time. Additionally, instead of having to cancel out to get a new selection, you can input down to scroll to a new item in the bag. However, you can't scroll back up, so each scroll is a risk, as you may pass on a decent item only to get a worse item, or you can get just the item you need. You can scroll unlimited times, albeit with some frames between each scroll, however being hit will knock you out of the inventory. Grovyle will pull the treasure bag out from behind him during this animation and look through it.
Like Hero's menu, this will also require a meter to use. This time it's the Belly Meter from PMD. It starts at 100, and every scroll of the inventory will decrease the amount of belly you have by five per scroll. Unlike Hero's MP bar, this will slowly decrease over time, not increase, to better mirror how it functions in the source game. The bar can be refilled by pulling Food from the inventory, which will be relatively common. If your Belly meter does reach zero, which will take quite a bit longer than Hero's bar does, you can use your neutral air to eat a blast seed to fill your belly meter by enough to pull one item. If its an apple or another food item that is pulled then you can eat it to refill your belly. If it's another item, eat another blast seed to try again. However, as mentioned earlier eating a blast seed will deal self-damage so there's a price to let your belly reach zero.
A sprite of the items you have available will appear above your belly meter, the same sprites from PMD, with up to 8 items being holdable at a time. If a new item is pulled when at your limit, the first item in your inventory will be replaced.
Final Smash: Future of Darkness
Dusknoir appears in front of Grovyle and grabs any opponent and takes them through a time portal. They appear in the dark future and are ravaged by Sableyes before Dialga performs a Roar of Time, dealing heavy damage and returning them to the present match.
Taunts
Up Taunt: Grovyle slashes the air as Celebi flies around its head
Down Taunt: Groyvle gorwls while Celebi tries to calm him down.
Right Taunt: Grovyle brushes his blades and Celebi floats in a circle around him.
Left Taunt:Grovyvle sits down and rests momentarily while Celebi pats his head.
On-Screen Appearance
Grovyle warps in using a Warp Orb followed by Celebi who arrives via a psychic tear.
Idle Poses
Grovyle jumps into a cautious stance reminiscent of the portrait for Special Episode 5. Celebi giggles softly.
Grovyle brings his leaf blades across each other. Celebi shimmers sightly.
Victory Poses
Note: All voice lines appear as text boxes with portraits as a reference to the source material. These appear above the results HUD.
Grovyle faces away from the camera. He turns to the camera with a Time Gear in hand and tosses a Warp Orb at the ground, vanishing in a cloud of smoke. Celebi flies into view attempting to find him.
Celebi floats around the screen saying “With our power,” cheerfully followed up by a leaping Grovyle that finishes her sentence, “We can surely change the future.”
Grovyle appears with a series of lead-infused cuts and then does a backflip as Celebi zooms in and flies underneath while sparkling with psychic power. They then pose with their backs pressed against each other.
Classic Mode: Baack to the Past
Opponents are all characters who have traveled back in time. In addition, the stages are set to stage morph and include those within the same series, unless not applicable, to simulate “time travel”.
Round
Opponent
Stage
Music
Notes
References
1
Onett / Magicant
Cease to Exist
Ness time travels to when Gyigas was most vulnerable.
2
Yggdrassil's Tower / Find Miitopia
(Battlefield)
The Time of a Decisive Battle
The Luminary is given is given the power to go back in time and defeat the villain.
3
Green Hill Zone / Chemical Plant Zone
Stardust Speedway Bad Future (JP)
Sonic gets sent back in time by Eggman.
4
Arena Ferox / Castle Siege
Destiny (Ablaze)
Lucina goes back in time to save her father's life
5
Peach's Castle / Paper Mario
Gritzy Desert
Mario and Luigi travel to the past to fight off an alien invasion.
6
Hyrule Castle / Great Bay
The Ocarina of Time Medley
Young Link slept in the Sacred Realm while time went by outside. He was able to travel back and forward in time to complete his quest to defeat Ganondorf.
Neutral Special: Octorpedo
It travels in an arc, quite slowly, however dealing heavy damage if it connects and applies the ink effect as well. two missiles can be fired at once, making it quite hard to avoid since they arc, if one is launched in the air followed by one launched on the ground. Additionally, if Neutral B is held down, a larger version of the Octorpedo will be launched instead, which comes out much faster and deals much more damage, almost breaking a full shield.
Side Special: Octowhirl
DJ Octavio's mech would flip on its side, begin to charge and spin horizontally, traveling across the stage or in the air similar to Jigglypuff's or Bowser Jr's Side B. This gives him a much-needed movement option, as well as leaving a trail of ink behind giving him stage control.
Up Special: Octoshower
4 Octocopters would appear and lift Octavio up. These octocopters can be killed similar to how Villager and Isabelle's balloons can be popped. This distance traveled would be comparable to that of Isabelle's, with it decreasing with consecutive uses, as fewer Octocopters will appear. The octocopters will fly away once the recovery is over or the ledge is released, with an extremely weak hitbox on them, similar to Snake's recovery.
Down Special: Takoyaki Bomb
DJ Octavio will launch a Takoyaki bomb, and it will briefly roll before coming to a stop. after one or two seconds it will swell and explode into a geyser of ink. While the geyser won't last as long as they do in his boss battle, it would deal more damage than Isabelle's Down Special, in a multi-hit fashion. If the bomb is hit before it can explode it will be disarmed and not explode, instead simply disappearing.
Final Smash: Dubstep Disco Destruction
DJ Octavio's mech turns into a Disco Ball and it floats up to the center of the screen, similar to Lucario and ZSS. Then DJ Octavio drops a beat and his Octarian army is summoned while an Octarian remix of Calamari Inkantation plays. The Octarian army includes Octocommanders firing their Gatling guns from floating platforms, Octocopters firing Ink balls, Octobombers firing Splat Bombs, and Flooders covering the floor with ink. The attack ends with an Octozeppelin crashing into the stage causing an explosion of ink, dealing strong knockback and damage. Similar in effect to Ness and Lucas's final smashes where a barrage of projectiles come down, this time ink edition.
Taunts
Up Taunt: DJ Octavio performs several disc scratches.
Down Taunt: Lights and lasers shoot up around DJ Octavio as he spins around in his mech.
Right Taunt: He slams his tentacles down on his mech which causes a sudden disc scratch sound.
Left Taunt: Waves his wasabi in a dance formation.
On-Screen Appearance
He is seen with his back to the opponent but then turns his mech around and does a DJ scratch.
Idle Poses
DJ Otcavio does a disc scratch.
Adjusts his helmet
Victory Poses
DJ Ocatbio pulsates with music as he DJ's up a storm; lights flash up all around him.
He tosses two Wasabi in the air and then holds his arms as they land dramatically upright.
Two Sanitized Octolings appear in front of DJ Octavio as he plays music.
Classic Mode: Mech-tacular Performance
All opponents are characters who, at one point in time, piloted a giant mech or there were allusions that they did in their home series.
Round
Opponent
Stage
Music
Notes
References
1
Paper Mario
Mixed-up Scramble
Mario and Luigi on The Paper Mario stage references the mech, Papercraft Mario from Mario & Luigi: Paper Jam.
2
Central Highway
Opening Stage
While Mega Man never piloted a mech, X does multiple times via Ride Armor in Mega Man X. Mario Circuit (Brawl) references the opening stage for Mega Man X.
3
Art Academy
Labo Theme
Mii Brawler wears the Nintendo Labo outfit.
The Mii Brawkee, outfit, and stage is a reference to Nintendo Labo Toy-Con 02.
4
Skyworld
Lightning Chariot Base
Pit once piloted a mech called the Grand Sacred Treasure to battle Hades in Uprising.
5
Gigabyte Ruin
Pink Puffball - Activate!
Kirby presents the game Kirby: Planet Robobot where Kirby pilots a mech
6
Bowser's Castle
Airship Theme - Super Mario Bros. 3
Bowser Jr and the other Koopalings are all characters who pilot a mech-like vehicle in combat.
BONUS
Break
the
Targets
!
Final
Dracula
Chemical Plant Zone (Omega)
Both DJ Octavio and Dr. Eggman are newcomers to Infinite and utilize mechs.
Neutral Special: Hakurei Amulet
Reimu throws out a homing amulet at her opponent. Holding the button increases the size, speed, and power of the amulet, at the cost of weakening the amulet's homing capabilities. The Options fire smaller amulets alongside Reimu's, with similar properties. Based on the iteration of the move used in the fighters.
Side Special: Yin Yang Orb
Reimu throws a large Yin-Yang Orb at the opponent. If it hits a solid surface, it will bounce off of it. The attack can be angled diagonally upwards or downwards, depending on the input. Based on the Yin-Yang Orb moves from the fighters, specifically her held B from Antimony of Common Flowers.
Up Special: Ability to Float
Reimu rises into the air, much like R.O.B.'s up special. Like R.O.B., Reimu does not go into freefall after using the move, allowing her to continue moving and attacking as usual after the button is released. During this move, Reimu is capable of Grazing. An adaptation of Touhou's common ability of flight, Reimu's personal ability to float, and the Focus mechanics of the shooters.
Down Special: Cautionary Border
Reimu uses her talismans to form a square-shaped barrier in front of herself. This barrier will linger for a short amount of time, and destroys all but the strongest projectiles, but will also take damage over time. After taking about 20%-40%, the barrier will break. The size and durability of the barrier increases the more Options Reimu has. Reimu cannot send out a second barrier until the first has dissipated. Based on her Cautionary Border special from Hisoutensoku.
Final Smash: Fantasy Seal
Reimu creates a storm of multicolored orbs that home in on opponents, dealing damage all over the stage. She then ends with one final giant rainbow orb, dealing massive damage to the closest opponent. Based on her signature move and most common Bomb/Spell Card.
Alternate Final Smash - Fantasy Nature: If Reimu's opponent is at 70% or higher (Two opponents with 3-4 players, four in matches of 5-6, and six in games with 7-8), she will send out a burst of energy and talismans, dealing massive damage in a wide radius and instantly killing anyone over 100%. Notably, Mystic Oriental Love Consultation (End of Century) from Hisoutensoku will start playing during the Final Smash and will continue to do so during the results screen if the match is ended with this attack.
Taunts
Up Taunt: Reimu throws her Gohei upwards and lets it fall back into her hands while she laughs.
Down Taunt: Reimu kneels on the ground sipping on a cup of tea. Her face has an open smile with rosy cheeks and closed eyes. She says "Ahh, this is nice."
Right Taunt: Reimu poses as if she's declaring a Spell Card while saying "Come at me! Or not! Tee hee."
Left Taunt: Reimu holds out her arms as a rainbow of colors floats around her.
On-Screen Appearance
Reimu will fly from the background and stop at her spawn location before taking a stance similar to what she does in Hopeless Masquerade onwards.
Idle Poses
Giggles to herself.
Waves her hand in from of her which causes a brief yin-yang symbol to appear.
Victory Poses
Reimu will land near her donation box. She will then open it up to look, then sigh in disappointment at finding it empty.
Reimua sweeps the ground before spinning the broom while looking surprised and then points it forward while saying" SO, you've come, huh?!"
A swirl of sakura petals erupts as Reimu appears amongst it and then holds out a ofuda paper charm. He then says "Better late than never, huh?"
Classic Mode: Radiance of Chromatic Cross
Stamina battles against projectile-heavy females who mainly utilize their projectile attacks. Stages are also traveling or transformative stages.
Round
Opponent
Stage
Music
Notes
References
1
Rainbow Cruise
Eternal Shrine Maiden (Highly Responsive to Prayers)
Peach primarily uses her Neutral Special
2
Spirit Train
The Gensokyo the Gods Loved
Both fighters primarily use their neutral special
3
Poke Floats
The Gensokyo the Gods Loved
Palutena primarily uses the neutral special and side special
BONUS
Race
to
the
Finish
!
5
Pilot Wings
Mii Gunner primarily uses the neutral, side, and down special attacks.
6
Big Blue
Necrofantasia
Jill primarily uses neutral and side special attacks.
BONUS
Break
the
Targets
!
Final
Pac Land
Stirring an Autumn Moon ~ Mooned Insect
Bayonetta favors using the neutral special attack,
Neutral Special: Summon Legion / Send Legion / Dismiss Legion
Lightly tapping the special button will call the Legion. The Limiter Gauge will begin to decrease. If the Legion is called in the air, it will fall along with Officer Howard. It can be moved as it is falling.
Holding the button while moving the move button will move the Legion. The Legion is free to move on the ground while holding the button, though it cannot exceed the distance of the Astral Chain.
Lightly tapping the special button again will dismiss the Legion. The Limiter Gauge will stop decreasing and begin to recharge.
Side Special: Legion Action
The current active Legion will perform its Legion Action. Every action will call toward Officer Howard. Using this move without a Legion active will summon it to use the action and dismiss it right after. See the Legion section for actions.
Up Special: Chain Jump
Officer Howard will send the Sword Legion out (regardless of which Legion is active or selected) and throw it a set distance. After it is thrown, it will pull Officer Howard towards it, Officer Howard dealing light damage as they fly towards their Legion. If used offstage, it will become a Tether Recovery.
Down Special: Legion Skill
The current active Legion will perform a set skill. Each action will decrease the Limiter Gauge by one bar, unless stated otherwise. Using this move without a Legion active will summon it to use the skill and dismiss it right after. See the Legion section for specific skills.
Shield Special: Legion Switch
Officer Howard will switch Legions. Legions can be switched while active. Functions similarly to Monado Arts, where the player can either continuously tap the button for the Legion they want, or hold it to choose Legion. The order will be Sword -> Arrow -> Arm -> Beast -> Axe. The selection menu will have that order clockwise. The currently selected Legion will have its icon displayed in the damage display. This selected Legion will be the one to be sent out if no Legion is currently active.
Final Smash: Legion Sync Attack Finish
Officer Howard begins by riding the Beast Legion a short distance with the Gladius equipped. Anyone hit by this hitbox will be sent into the cutscene, based on the final combo against the true final boss of the game, though sped up to decrease the time taken.
It begins with Officer Howard dragging the opponent on the ground with the Gladius while the Beast Legion dashes forward, then the opponent is launched into the air, where Officer Howard summons and wears the Arm Legion to do a rapid flurry of punches. As the opponent is suspended in the air, the Arrow Legion fires a charged shot at the opponent. Officer Howard calls the Axe Legion to jump up and bring the enemy downwards with a slash. As the opponent is on the ground, Officer Howard and the Sword Legion perform a Chain Bind. This part will deviate from the cutscene and FILE 10 SPOILER Officer Howard will tear out the Legatus core and implant it into their heart, fusing officer and Legion and performing a final attack which ends the cutscene and launches the enemy.
Taunts
Up Taunt:Officer Howard briefly unleashes the Legion who then slashes forward. If the Legion is out, it does a dramatic slash. He will say "Come forth, Legion!"
Down Taunt: Officer Howard pulls out a comically oversized avalanche special ice cream and drops it, then looks at the spilled ice cream longingly. It references an ice cream minigame.
Right Taunt: A phone call symbol appears in front of Officer Howard who then says "Meh, I will take it later.
Left Taunt: Lappy appears and does two fist bumps into the air before leaving. Officer Howard says "Hey, it's Lappy!"
On-Screen Appearance
Officer Howard shows up on a motorcycle like in the first few moments of the game, then in stark contrast with Wario, does an amazing and graceful flip jump off of it before landing on the ground and taking out the X-Baton.
Idle Poses
Shuffles his/her feet.
Runs his/her hand through his/her hair.
Victory Poses
Officer Howard lands from above and then takes their batons and slashes three times before posing.
Summons the Sword Legion as they perform a spinning slash attack together.
Appears along with their twin sibling and they both perform a pose together while brandishing their batons.
Classic Mode: Legion Assault
Opponents are based on enemies found in AstralChain; in particular Chimeras. Stages are also based on techno/sci-fi themes.
Round
Opponent
Stage
Music
Notes
References
1
Mario Galaxy
Ark Mall
Steve, Alex, and the Villagers represents the humans encountered as enemies in the game.
2
Dark
Lylat Cruise
Invaders from Another World
Dark Link and Dark Samus represent the Aberration, corrupted beings who used to be human.
3
Red
Brinstar
Legion Assault
Hero represents the foot soldier, HUM-C-84DF5-00.
4
Black
Tiny
Midgard
Awakening
The R.O.B.s primarily use the Neutral Special.
Mewtwo represents the named Chimera known as Eris which uses four satellite units.
5
Giant
Space Frigate Orpheon
Homonculas B
Ridley is based on the appearance of Homunculus α along with the stage.
6
Red
Officer Howard
Astral Plane
Dark Hero
The alt will be the different gender to what was initially chosen. The Male version or Female version depends on which alt was chosen.
#96. Dr. Eggman Sonic the Hedgehog
Wikia Link Moveset Link
Special Moves
Neutral Special: Badnick
Releasing his hand from his trusty mech, and briefly taking out a comical-looking hand radio, Eggman yells "Attack!" or "Deploy here NOW!", before one of six Badniks arrives to fight alongside him. One of the following may be summoned in a cycle, and only one of each Badnik can be out at a time. There is no time limit to these grunts, as they stay on the field till they are defeated. This is Eggman’s main gimmick, which he uses to overwhelm his opponents. Say hello to Eggman's lovely cycle of Badniks! (Move by GolisoPower )
Motobug: A speedy little robot who's all about taking the ground side of things. It's as fast as Fox's dash and deals 8% damage every time he hits an opponent.
Caterkiller: These little guys are slow, but every part of its body is an active hitbox, hitting anyone for 5% damage. They can only be hit on the head portion of the robot. Otherwise, it will damage any opponents.
Buzz Bomber: A bee-shaped Badnik flies across the skies and occasionally fires a single projectile at a downwards 45-degree angle. They deal 6.5% damage and some medium knockback, but they're helpless while flying.
Orbinaut: A stationary enemy that causes spiked metal balls to orbit around it, alternating between close to the body and far. You can try to kill them, but you'll have to wait until there's a big enough gap in between the spikes. Running into a spike deals 7% damage.
Eggrobo: For the first time since Smash 3DS, the Eggrobo makes a return! He works partially like a cross between Orbinaut and Buzz Bomber, being stationary and firing at anyone in range, just like what it does sometimes in Smash Run! What makes the Eggrobo different is that it takes 3 hits to kill, unlike the previous four.
Egg Pawn: The final robot to summon, the Egg Pawn is armed with a spear and a shield. The shield defends any projectiles passively like Link and Hero, while he jabs with the spear at anyone who gets close enough to the Egg Pawn. Much like the Eggrobo, the Egg Pawn takes three hits to destroy.
Side Special: Egg Hornet
The E-Mech starts to transform until it becomes a miniature version of the Egg Hornet from Sonic Adventure. Afterward, Eggman will fly forward in the Hornet in an arc somewhat similar to Shiek's Bouncing Fish. The Hornet gains a fire outline like in the clip, dealing chip damage to those who touch it, with the Hornet being the main hitbox. While the move has an abysmal startup, it pays off, dealing a hefty amount of damage to opponents hit by it. When they are hit by the move, they will either be launched diagonally upwards, forwards, or diagonally downwards (spike), depending on which part of the move they were hit by. This move kills around 80% and is a good burst option to catch your opponents off guard. But just like in Sonic Adventure, if Eggman hits the ground at the end of the move, he'll become lodged into it for about as long as Luigi would be stuck in the side of the stage from a Misfire. This is your chance to strike!
This move can also be used as a recovery option as it does snap the ledge. However, it will not stop for a while if it doesn't hit the ground, so be wary of that. (Move by Janx_uwu ) Up Special: Egg Mobile
His up special, Egg Mobile, folds the legs of the Egg Walker E-Mech in and allows players to make Eggman fly - more like controlling a spaceship in a shmup than a platformer character. During Egg Mobile mode, Eggman can perform aerial attacks and specials without leaving the mode and can disengage it with the shield button. However, there's a catch - the Egg Mobile has limited fuel, pictured next to Eggman's damage meter. It's modeled after his health meter from Sonic Adventure 2. Egg Mobile mode drains fuel. It's a little similar to R.O.B.'s Up Special that way. However, unlike Robo Burner, it recharges based on proximity to an opponent. The closer to an opponent, the more of those squares on the top of the gauge will light up yellow, and the faster the gauge will recharge. This applies while active, too - normally, the drain is pretty quick, but the proximity recharge rate cancels out some of the drains. In fact: at close distances, you won't use any fuel at all. Heck, depending on balance, you might even get a little bit back. The importance of this whole fuel mechanic is that Eggman can't just park himself too high to hit, but can still be in this flight mode for a majority of the time good while, as long as he uses it to approach his opponent instead of running away. After all, Eggman is usually in a flying machine. (Move by ahemtoday )
Down Special: Giant Laser
An allusion to the Giant Eggman Robo Boss Fight in Sonic & Knuckles. The E-Mech’s belly opens up and by using the powers of the Master Emerald, it fires a huge one-hit laser that goes offscreen. This attack has a 10-second cooldown between uses, and Eggman can move slowly left or right with before he actually fires the laser. This move deals 35% damage with a huge knockback. (Move by @Perkilator )
Final Smash: Death Egg Robot
The iconic boss of Sonic 2, Eggman leaves the stage and enters the Death Egg Robot. It functions much like the Sonic Generations iteration - Or Giga Bowser - Where Eggman aims at an opponent and delivers a mighty punch from the background. This deals 45% damage and has the knockback you expect from a strong Final Smash. (Move by SharkLord )
Taunts
Up Taunt: Eggman stands on top of the E-Mech and raises his right arm high before bowing towards the screen gracefully.
Down Taunt: Doctor Egan puts his hands on his sides and belts out his signature "HOOO-HO-HO-HO-HO" laugh.
Right Taunt: Takes out a Banana and eats it.
Left Taunt: Holds up a Egg Prawn and laughs manically.
On-Screen Appearance
Eggman lowers to the ground aboard the Eggmobile, and it quickly transforms into the E-Mech.
Idle Poses
Eggman gently strokes the right side of his mustache.
Eggman slams a fist on his console as if upset.
Victory Poses
.
Eggman gets out 6 Chaos Emeralds and does this from the bad ending of the first Sonic game.
Eggman laughs hysterically as Egg Robos descends towards the camera.
Slams his hand on his mech and raises a fist forward while saying "I will get you Sonic!"
Classic Mode: Blue Blur Battle
Dr. Eggman's opponents are characters who are blue, a reference to his nemesis, Sonic.
#97. Marin The Legend of Zelda
Wikia Link
Moveset Link
Special Moves
Neutral Special: Legend of Songs
Pressing the special attack button will cause Marin to pull out her Surf Harp, and 6 empty rectangles would appear above her. During this time, Marin can’t move during this but can cancel out by hitting the Neutral Special again. Please note that attacking out this in the middle of battle results in a significant attack startup lag, since you will have to input the entire song. When initiating the harp sequence, players can input the control stick to the right, left, up, or down which will initiate a song, these directions would appear within the empty rectangles when inputted. Please note doing this attack while in the air and over the ledge can result in a self-destruct if not performed quickly enough. While Marin is technically from Link’s Awakening, she has appeared in various Zelda games in different forms and names. One such form is Malon from Ocarina of Time. It’s fitting that she would be able to use music from these games to use in battle. Once the first 6 notes have been played, Marins performs the move she's chosen as the rest of the song she played quietly plays out in the distance. She has a total of 11 songs pulled from various Zelda games.
Side Special: Sea Bubble
Marin releases a watery bubble, its course of trajectory heavily depends on what side you tilt the Side-Special. If held to the side in the center, it will follow a completely horizontal path, if tilting upwards the sea bubble will slowly follow an upward arc, the opposite applies to tilting it a bit downwards. Compared to other projectiles, it is only a bit slower to get out.
Up Special: Cucco Wings
Marin rapidly takes out a Cucco and lifts it above her. The Cucco flies upward while carrying Marin with all of its power before getting visibly tired and slowly falling to the ground. It is maneuverable and covers a decent amount of vertical and horizontal distance depending on how it is maneuvered. Once Marin either lands with the Cuccoo in her hands or once the Cucco gets tired, the Cucco would simply flap out of her hands and vanish away.
Down Special: Conch Horn
Marin takes the Conch Horn out and starts playing on the conch shell. As she leans a bit forward facing the screen while blowing it, coming out the other side of the Horn comes a big sound that takes form around her. This results in all her water attacks getting slightly buffed (a 1.2% multiplier in both damage and knockback) for around 15 seconds, this multiplier cannot stack and if performed again within the 15 seconds it will not be applied. This move takes a while to get out, and everyone caught in the sound gets dealt 8% damage, with medium knockback. To give an idea, it kills around 90% at the ledge. This horn is based on one of the eight instruments in Link's Awakening.
Final Smash: Ballad of the Wind Fish
Marin will call forth a splash of water that will transport the opponent caught in it into a cutscene. (8%)
The cutscene will be reminiscent of the ending of Link's Awakening. Marin will play the 8 instruments near a sleeping Wind Fish, causing it to wake up. Its awakening will cause the dream world to disappear, and the opponent to disappear along with it in a light. Marin is returned to gameplay, where she wipes her eyes groggily, and the opponent is sent flying. (46%, instant KO at >100%)
Taunts
Up Taunt: Marin waves her bell up high and waves it back and forth which causes it to clang.
Down Taunt: She does a cute curtsey to the opponent and giggles.
Right Taunt:She takes out her Harp and strums it quickly while singing a few bars.
Left Taunt: Does a spin and then laughs before adjusting the flower in her hair as it slips off slightly.
On-Screen Appearance
Marin is seen sleeping and then wakes up, yawns, and readies herself.
Marin plays a song on her harp while the Wind Fish flies overhead.
Classic Mode: The Ocean Maiden
All opponents are against fantasy-based characters in a seaside setting which is a reference to the ocean-focused theme of Link's Awakening. Also, every character comes equipped with one item from Legend of Zelda from the start of the match.
Neutral Special: Knife Storm
Impa accumulates up to three knives and throws them forth at light speed similarly to Sheik's Needle Storm but half the projectiles. This variation uses knives instead of needles which is more in line with what Impa uses in her playable appearances. Knife Storm will also go through players and does more damage to shields taking inspiration from Sheik's second custom move for her neutral special, Penetrating Needles.
Side Special: Flashbang
This is a slower version of the Burst Grenade that Impa uses to her advantage. The difference in effect is also apparent, as she deals 9.5% damage as opposed to Sheik's 14.6%, but in turn, anyone facing the explosive will be immediately stunned, as though they were hit with Mewtwo's Disable. Being directly in the blast radius, meanwhile, will stun regardless of orientation. However, the stun doesn't affect airborne opponents, and being inside the blast will simply launch them. You would think she was using a Deku Nut on a trigger with this, and she just might be.
Up Special: Vanish
This would be very similar in function to Sheik’s but, instead of simply producing a cloud of smoke, it produces paper talismans that swirl about upon vanishing and reappearing.
Down Special: Bouncing Fish
Final Smash: Shiekah Dance
Taunts
Up Taunt: She slams her hand onto the ground which causes the SHeikah symbol to appear briefly under her.
Down Taunt: She waves her hand mysteriously in front of her which causes magic to pour out.
Right Taunt:She transforms into a Sage spirit state and moves about quickly before reforming. During this time, she can't be damaged. It's a reference to Impa's role as a Sage in OoT.
Left Taunt: She sits down and patiently meditates before jumping back up; referencing her pose as her older self in SS.
On-Screen Appearance
a Deku Nut drops down from the sky and as it explodes on the ground it reveals Impa in which she immediately throws her black cloak away and gets on a fighting pose.
Idle Poses
Wipes her brown while focusing.
Stands up straight and performs a magical sigil sign.
Victory Poses
.
She performs three flips before landing and vanishing in a puff of smoke.
She appears along with Skyward Sword Zelda. She realizes the "camera" is close by and shields Zelda by pushing her behind herself and stretching her arm to guard the princess.
She waves her cloak in front of her before turning to leave.
Classic Mode: Midnight Bout
Impa will fight characters that relate to being stealthy fitting with her nature as a member of the Sheikah tribe. The stages will also be night-themed stages.
Special Moves
Neutral Special: Defensive Plants
Dave has access to five total Defensive Plants that he can use with two being upgradeable. These are: Sunflower: Costs 15 Sun. It bounces idly and produces 50 Sun every 3 seconds. The Sunflower would glow a bright yellow as it does so and the Sun would automatically add itself into Dave’s counter.
Twin Sunflower: Costs 125 Sun. The Twin Sunflower would behave exactly as its downgrade, but instead of spawning 25 Sun, it would spawn 50 Sun (25 per Sunflower, of course). It also spawns Sun in 3-second intervals, but it is more durable (though not by much)
Torchwood: Costs 100 Sun. Any pea that passes through the torchwood will have its damage multiplied by a factor of 2, leading to massive amounts of damage if a full Gatling pea + torchwood combo lands. It has more health than a standard plant and does not deal contact damage despite the fire.
Wall-nut: Costs 50 Sun. Pretty simple, a wall nut will sit there and soak up damage. Acting like a Minecraft block, it cannot be passed through and will need to be jumped around. However regular peas and other Dave plant projectiles will be able to pass through it.
Tallnut: Costs 125 Sun. The Wall-nut can be upgraded to the Tall-nut. It will act the same as a wall nut, except it will be twice as sturdy and around 2.5 times as tall, requiring multiple jumps for some characters to climb over.
Garlic: Costs 100 Sun. In Smash, the Garlic will release smelly fumes every few seconds with a radius equivalent to a 50-MP Magic Burst that flips opponents, like Mario’s cape does, making it difficult for opponents to hit Crazy Dave while he's close by, as well as a dangerous edge guarding tool.
Escape Root: Costs 225 Sun. When placed, the Escape Root won’t do anything at first, however, when the neutral special is inputted on the ground while the Escape Root is planted, Dave will be taken to the Escape Root’s location and it will disappear after. This can be used for extreme combos and avoiding nasty situations.
Side Special: Turret Plants
Dave has access to five Plants with three upgradeable ones. Peashooter: Costs 100 Sun. When a Peashooter is planted, they will routinely fire peas at the closest enemy damageable entity in a medium interval. Whichever way Crazy Dave was facing when he planted them will be the direction it will fire too. The Peashooter will automatically aim either up or down depending on where the closest player is but only slightly. Their peas are also fairly weak doing minimal damage and flinching but this will put some pressure on the opponent and can lead to combos from Crazy Dave.
Split Pea: Costs 125 Sun. The Split Pea will fire weaker shots behind it and has less of an angle when aiming but keeps pressure on both sides of the stage.
Repeater: Costs 200 Sun. The repeater will act identically to the peashooter, except will fire two peas instead of one, dealing twice as much damage in total.
Gatling Pea: Costs 250 Sun. The Gatling Pea can be upgraded from the repeater and will fire four peas at once, dealing four times as much damage as the peashooter in total. This will keep the opponent in hit stun or in their shield for quite a while, leaving them open to be punished, however, it costs a lot of sun to get to this plant.
Kernal Pult: Costs 100 Sun. When planting this guy, the Kernel-pult will throw nuggets of corn the size of Pikmin at opponents, dealing a measly 4% damage per kernel and dealing hitstun. However, there's a 25% chance that they will launch a large block of butter if all things that deals double the damage and inflicts the Butter effect, which is essentially a stun.
Melon-pult: Costs 300 Sun. The last of the pult family in the first Plants vs. Zombies, the Melon-pult is the heaviest hitting of the three. It will lob melons every few seconds at opponents, which deal 17% per successful hit and 4% in splash damage if anyone gets hit by melon shrapnel.
Winter Melon: Costs 200 Sun. One of the plants Dave sells at Crazy Dave's Twiddydinkies, the Winter Melon is an upgrade to the Melon-pult. It hits even harder than its counterpart and has a slowing effect to boot. It will attack at the same rate as the Melon-pult, but it will deal slightly more damage (24%) and its projectiles will inflict a slowing effect on the enemy's movement for a short amount of time.
Bloomerang: Costs 175 Sun. The Bloomerang will fire off boomerangs at a slower rate than that of a peashooter, which will fly around 3/4 of a stage distance before traveling back, being able to hit the opponent once in both directions, similar to K. Rool's crown. It is a relatively slow-moving projectile but deals more damage than a peashooter.
Up Special: Blover
Crazy Dave raises his pot with a Blover that grew out of it. It would then spin its leaves, causing it to propel Crazy Dave upwards. It’s very similar to K. Rool’s Up Special, but the Blover can last longer than K. Rool’s propeller pack in exchange for not dealing as much damage. Once finished, the Blover would retreat back into its pot, causing Dave to go into free fall with a confused look on his face.
Down Special: Trap Plants
Dave can access five plants with one plant being upgradeable. Potato Mine:Costs 100 Sun. This explosive land mine functions much like Snake’s Down Special. Dave buries the Potato Mine who lies in wait for opponents to walk by. Once they do, the mine explodes with a SPUDOW!, provided it had enough time to arm itself. It has a high radius of damage with more damage dealt to those who stepped directly on the mine with less damage dealt to those on the outside. Hypno Shroom: Costs 125 Sun. When placed, the Hypno-shroom will sway from side to side in a trance. Any opponent that comes into contact with the Hypno-shroom beware, as the Hocus Pocus of Dave’s kit, will randomly give the opponent a status effect to their detriment. Tangle Kelp: Costs 75 Sun. In Smash, they will function sort of the same, being planted in a flower pot with water. When an opponent makes contact with the Tangle Kelp, they will be held in place for a few seconds, similar to a grab. At this point, Dave can rush over and attack or sic more plants on the enemy. After being used once, it will go away. Spikeweed:Costs 100 Sun. The spikeweed will be placed on the floor, Keeping a low profile. Any enemy that steps over it will be launched up with extremely low knock back, dealing 6% damage. Its good for ledge control as well as combining with other plants. Spikerock: Costs 125 Sun. For 125 sun, the Spikeweed can be upgraded to the Spikerock, which deals twice as much damage and has three times the amount of health. Phat Beet:Costs 150 Sun. Whenever opponents get near it will jump up and slam back down, sending out a shockwave. This shockwave doesn't deal much damage, only around 1.2%, but has a guaranteed trip on the opponent. This sets up for roll chases or just standard punishes as well as stage control. In order to combat the power of a trip with such a large radius it doesn't stay out for very long, and is vulnerable from attack from above, as it cannot attack there.
Final Smash: Garden Warfare
Penny speeds past Dave, who gets inside. This triggers a hitbox around the truck, which when activated, would take up to three opponents into a Final Smash. The opponents would fly through time to be dropped onto Dave's lawn and pool, where a large defense awaits them.
Twin Sunflowers glow with large amounts of solar energy, Gatling Peas fire rounds of peas at rapid speed through Torchwoods, Winter Melons lob melons, Cattails throw swathes of their homing spikes, and Gloom Shrooms spew their spores at the opponents, still trapped on the lawn. All while this is happening, Dave upgrades some awaiting Kernel-pults into Cob Cannons. He launches several corn nukes, blasting the opponents and ending the cutscene with a screen of popcorn.
Taunts
Up Taunt: Pulls out a pot and knocks on it while listening.
Down Taunt: Takeoff his hat pot and spits on it. He then polishes it before putting it back on.
Right Taunt: Sniffs himself.
Left Taunt: Pulls out a Taco, applies hot sauce on it, and eats it. Heals him for 1-5% health each time.
On-Screen Appearance
Nonchalantly walks out from Penny who of which appears through a portal similar to the one from the Penny's Pursuit update PvZ 2
Idle Poses
Adjusts his weigth which causes the pot on his head to tilt a bit. Based on his animations in PvZ2,
Scratches his beard furiously as if itching it.
Victory Poses
.
Holds up the sunflower over his head like a trophy overlapping with the actual sun, meanwhile Peashooters and other Sunflowers cheer him on
Runs up and places a Peashooter which then begins to pelt an incoming zombie.
Takes out a Taco and munches down on it.
Classic Mode: Smash vs Zombies
All opponents are against the Zombie Villager on Omega stages with allies that can`t move which represent Plants.
Round
Opponent
Stage
Music
Notes
References
1
Windy Hill Zone
Green only uses the Mega Buster.
Megaman references the Peashooter.
2
Suzaka Castle
Yellow constantly uses the Down Special
Kirby references Wall-nut while Suzaku Castle references the Home Roof.
Neutral Special: Bubblegum Popgun
A chargeable projectile like Diddy's Peanut Popgun, but charging is indicated by a large pink bubble being blown out of the barrel of the gun. It is usually slow upon release but deals 1.3x more damage than a peanut. However, if you're hit while charging this attack or your attack reaches maximum charge, it deals as much as a peanut, but your opponent will be dealt the Gum effect, which limits their movement to about 1 Pichu to the left or right, and greatly reduces their jump height. This lasts for about as long as K. Rool's pre-nerf D-throw or until the afflicted is hit.
Side Special: Monkey Flip
Up Special: Haircopter
Dixie quickly uses her ponytail to pop off and then be sent into free fall, however, this freefall is unique in that she can guide it more accurately and lightly damage enemies that collide with her. Based on her rolling attack from DKC classic.
Down Special: Banana Final Smash: Rocketbarrel Family Barrage
Dixie calls forth her cousin, Kiddy Kong. Together, they straight on Rocketbarrels and zip-zap about the stage; dealing generally more hits than Diddy but with less damage to balance it out. Kiddy will lose his rocket which homes into the opponent as Dixie lets her go and floats back down to the stage
Taunts
Up Taunt: She tosses her hair to the right.
Down Taunt: She blows bubblegum and drinks out of a juice box.
Right Taunt: She does air guitar and then a jump swinging her arms.
Left Taunt: She jumps back and forth on both legs before doing a cute spin.
On-Screen Appearance
A barrel explodes and Dixie floats down with her Propeller Ponytail maneuver and lands on the ground.
Idle Poses
She rubs her right arm.
She plays with her hair.
Victory Poses
Dixie pulls out her guitar and plays on it.
Dixie twirls in with her helicopter hair and then lands while doing a cute pose.
She arrives on Rambi but flies right past the screen. She crosses back and forth several times.
Classic Mode: Get Off My Tail
All opponents are natural tail users which is a reference to her lack of one which she makes up for with her tail.
Round
Opponent
Stage
Music
Notes
References
1
Giant
Garden of Hope
Stickerbrush Symphony
2
Kong Falls
Gear Getaway
is an ally
3
Spear Pillar Omega
Snakey Chantey
is an ally
4
Ashley & Grovyle & Sceptile
Yggdrassil`s Altar
Jungle Japes
is an ally
5
Find Mii
is an ally
6
Brinstar
Crocodile Cocophony
is an ally
BONUS
Race
to
the
Finish
!
Final
Rathalos
Ancient Steppe
is an ally
Alternate Costumes
Color
Reference
Appearance
Pink
Yellow
Based on her 2P sprite in King of Swing
Blue
Based on her 3P sprite in King of Swing
Green
Based on her 4P sprite in King of Swing
Purple
Based on her P2 sprite in DKC2
Cyan
Based on her sister, Tiny Kong
Red
Based on Diddy Kong
Grey
Based on Wrinkly Kong
Turquoise
Based on Kiddy Kong
Auqamarine top and hat with green earrings. She has darker reddish fur and brownish hair.
White
Based on the Super Form for Donkey and Diddy
Blue hat and top with orange earrings and white fur. She has lighter-colored blonde hair.
Black
Based on the black forms of Donkey and Diddy
Yellow hat and top with green earrings and black fur. She sports dark blonde hair.
Orange
Based on the Banana Bird
Orange top and hat with yellow earrings. Slightly orangish fur with orange-red hair.
Neutral Special: Quad Launcher
This wasn’t based on one aspect of the games but an entirely new move. Sami pulls out a rocket launcher that will fire a single-homing rocket. Charging it up not only increases the homing strength of said rocket but can fire up to four homing rockets in quick succession. It has a dramatic shaking sensation when fired which causes smoke to billow out when it’s fired. Side Special: Sniper
While not an actual unit but, rather, a general unit in warfare. A crosshair appears which allows the player to momentarily allow the player to control it while Sami remains still. When the player lets go, Sami pulls off a sniper shot which has large amounts of damage up to 42%. if it's a dead-on-target. Players can see if the target is in focus by the green crosshair turning red. Up Special: Bomber Transport
A Bomber appears and Sami stands on top of it. You can control the direction of the plane. The plane occasionally unloads bombs from below the plane. The plane can be destroyed which will damage Sami but also propel her slightly into the air which aids her. Down Special: Light Machine Gun
Sami Pulls out an LMG a weapon she is seen with in artwork. Sami is prone while using it but she can freely aim her LMG in any direction in front of her. Pressing A while in this form shoots her gun. you can leave prone by jumping
Final Smash: Dual Strike
Sami throws out a Smoke Grenade which traps opponents into the Final Smash. This transports any caught opponents into the map featured in the very first Advance Wars. Sami moves her tank to encounter the opponent which quickly transitions to an actual battle. However, it seems luck is on Sami`s side as she comes with Infantry, Tanks, and even aerial support. Infantry units tear into the opponent while the Tanks fire off several shots. Finally, two Stealth Bombers roar overhead and carpet bomb the location; decimating the opponent. This then moves back to the match with the opponent being launched.
Taunts
Up Taunt: Sami checks the ammo on her gun.
Down Taunt: She taps her earpiece and says "Affirmative".
Right Taunt: A sprite form of an infantryman appears and she salutes it.
Left Taunt: She kneels down and ties her boot.
On-Screen Appearance
Arrives by parachute. Upon landing, she checks around her before readying her weapon.
Idle Poses
Checks her gun
Rubs her shoulder
Victory Poses
A soldier is seen standing on top of a miniature building, and he hops on it three times before it squashes completely flat. The building then springs back up, now completely red, and the camera pans down to see Sami and a few other soldiers celebrating their newest capture.
Sami fires several rounds from her Quad Launcher before standing up to watch them from a distance.
Calls up an escort which causes a ladder to be released from an unseen helicopter. She grabs it and flies away from view. If the player waits long enough, they can see her still hanging to the ladder while the helicopter flies away into the distance.
Classic Mode: Smash Wars Advance
All opponents are based on the COs from Advance Wars. Omega forms represent actual warzones.
Round
Opponent
Stage
Music
Notes
References
1
Golden Plains
Nana doe not appear with Popo.
Pop references the first CO encountered, Olaf.
2
Garden of Hope
Falco represents Eagle, the second CO encountered.
3
Yellow
Cloud Sea of Alrest
Ryu references Kanbei.
4
Unova Pokemon League
Ganondorf references Hawke.
5
Dr. Eggman
Raccoon City
Dr. Eggman references Von Bolt.
6
Giant
Shadow Moses Island
Wolf is a reference to Sturm
BONUS
Race
to
the
Finish
!
Final
Master Hand
Final Destination
Alternate Costumes
Color
Reference
Appearance
Orange
Default
Red
Based on Andy
The top, headband, and pants become red with the pants being a darker red. Her hair becomes brown. Her hip pouch becomes black and her boots become reddish brown. Her armband and gloves also become brown.
Blue
Based on Max
The top stays white while her headband is a cyan color while her pants are dark blue. Her hair turns blue. Her hip pouch becomes darker brown and her boots become a darker blue. Her gloves and armband become blue.
Purple
Based on Nell
Her headband, top, and pants become a full purple while her hair turns blonde. Her hip pouch becomes lighter brown while her boots a greyer-lavender, Finally, her armband becomes purple while her gloves become a light lavender.
White
Based on Jack
Her top and pants become a light lavender. Her boots and hip pouch have a very dark burgundy as well as her gloves. Her armband is dark lavender. Finally, her hair is an orange-yellow color.
Teal
Based on Olaf
Her top becomes aquamarine while her pants become blue. Her bandana and gloves become smoky white. Her hair becomes a rusty orange color. Her boots and hip pouch become amber while her gloves and armband are also light blue.
Yellow
Based on Grit
Her top is yellow along with her bandana while her hair is a light grey-blue color. Her pants are bright blue and she has reddish-brown boots and hip pouch. Finally, her armband is brown while her gloves are a dull yellow.
Grey
Based on Eagle
Her hair is grey while her bandana is yellow. Her top is a navy blue while her pants are a dull cyan color. Her hip pouch is a grey color along with her boots. Finally, she has a blue wristband and grey gloves.
Her top becomes off-white while having a yellow headband. Her pants and boots become maroon while her gloves are also maroon. Her wristband is light brown. Her hair is white.
Neutral Special: Bonus Fruit
Ms. Pac-Man still has the bonus fruit special, but this time it includes the fruit from Ms. Pac-Man, in order: Cherry, Strawberry, Orange, Pretzel (new), Apples, Pears (new), and Bananas (new). The cherry, strawberry, orange, and apple work the same way they do with Pac-Man. The Pretzel bounces erratically, Pears bounce along the floor, and the Banana is thrown like a Boomerang.
Side Special: Power Pellet
Power pellet moves in a rigid 4 directions, but also goes farther.
Up Special: Pac-Jump
Becomes a pixel version of Ms. Pac-man which includes a ribbon.
Down Special: TNT Block
Ms. Pac-Man drops a timed block of TNT at her position that starts slowly counting down from 3 seconds. Unlike with Steve's TNT, damage does not hasten the timer nor is it able to be knocked around. However, Ms. Pac-Man can push it around to a different position before it explodes, and the blast radius is rather enormous.
Final Smash: Super Ms. Pac-Man
Much like Pac-Jump, Ms. Pac-Man turns into a gigantic version of her pixel self complete with a ribbon.
On-Screen Appearance
Similar to Pac-Man's, except she spawns a beauty mark and a pink bow before she spawns and strikes a cute pose for the camera before going into her idle stance.
Idle Poses
Fixes her ribbon.
Looks at the camera and winks.
Taunts
Up Taunt: Does her own form of Namco Roulette which includes the following characters:
Agumon (Digimon)
Lloyd Irving (Tales)
Pooka (Dig Dug)
Klonoa (Klonoa)
Kazumi (Tekken)
KOS-MOS (Xenogears)
Baby Pac-Man (Pac-Man Jr)
Down Taunt: Turns into her sprite form much like Pac-Man but with a ribbon and chomps down several times.
Right Taunt: She puckers her lips and turns to face the camera and winks.
Left Taunt: She twirls in place as ghosts rotate around her.
Victory Poses
She does a similar dance seen in the Atari 2600 where she saunters back and forth.
She holds Baby Pac-Man and cuddles it lovingly before looking at the camera and winking.
Pac-Man in sprite form comes racing across the screen before Ms. Pac-Man in sprite form comes chasing after him. They dash back and forth in this manner.
Classic Mode: Ladies Night Out
All opponents are against male fighters with a female ally.
Gimmick Stock Meter, Max Mode, & Desperation Moves
Iori gains the "Stock" Meter - Another SNK original, this is a gauge with 3 black squares on the right which signify the many “stocks” you have. This meter fills the same way as in most other fighting games: You build a meter for hitting the opponent (whether shielding or not), getting hit yourself, and blocking attacks. When you get a stock, a bright green light appears in one of the squares. In KOF you’d normally get more meter for whiffing special moves, but as that would only encourage camping behavior in Smash, I decided to not include this method of meter obtainment.
The stock meter itself will be based on the one found in King of Fighters ’98 UM, although instead of "ADV" nothing would be written there.
Up to three stocks could be saved up, these stocks can be used for certain Supers which we’ll call Desperation Moves from now! These function like Terry's GO! supers, but will cost a stock each. But that’s not the only thing the Stock Meter can do, you’ll be able to activate Max Mode! You’ll activate this by hitting and performing a neutral special while shielding at the same time. Once Iori is in Max Mode, a timer will appear above the Stock Meter, indicating how long Max Mode will last, which is about 20 seconds. Although the timer drains more when performing special attacks, even when missed. When activated, Iori will strike a pose, gain somewhat of a yellow tint, and the timer will start to drain. This mode makes Iori deal more damage and knockback (a multiplier of about 1.2x) and allows him to use not only stronger variants of his Desperation Moves, but if Iori is above 80%, he’ll be able to use a Hidden Super Desperation Move only during Max Mode! When performing any Desperation Move under Max Mode, the timer will instantly end regardless of the time left.
The stock meter filled with 3 stocks (in Smash these red lights would be green instead) with the Max Mode timer (in this pic being about 3/4th full)
Also, useful thing to note, but to try and simulate the 3v3 aspect of KoF. The Stock Meter does NOT reset in-between Iori’s stocks. So when he loses a life, he still has his meter to try and make a comeback! The Stock Meter doesn't fill up that fast as well, if you'd only hit, it would take about 50% to get a stock.
Special Moves
Neutral Special: 108 Shiki Yamibari
Iori throws his purple flame like a fireball that skims the ground. It is a low projectile that comes out faster than most but with average recovery. Can be held instead of tapped to increase the energy wave's size, travel speed, travel distance, damage, and knockback. If used in the air, Iori will generate a short-ranged burst of purple instead. The aerial variant offers decent knockback and can KO opponents offstage, especially when held instead of tapped.
Side Special: 108 Shiki Tsumakushi
A rushing move in which Iori hops and takes a big flaming swipe downward. Can be held instead of tapped for more travel distance, damage, and knockback. Special input is
+ attack/special, which increases its damage output and knockback in addition to granting intangibility to his attacking arm. The special-inputted version is indicated by a bigger flame being produced. Can cancel his Final Smash. In the source material, this is normally a dragon punch motion, but as that is already In use, I had to modify it to be a quarter-circle forward. Hey, Terry's Burning Knuckle isn’t a quarter-circle forward either in his games! This is a special move that made its debut in the King of Fighters ’98.
Back Special: 127 Shiki Aoibana
Iori quickly slides forward with three motions, punching for the first 2 and jumping with an overhand for the third, in which he slams the opponent into the ground. The active hitboxes are on Iori's arms, and will always get knocked back into the following motion's hitbox for the first 2 motions, no matter the percentage. With the last motion having great knockback. This move is very rewarding to cancel into, especially from jab, as it’s a surefire way to rack up damage. You are going to have to repeat the input for every motion to complete the move (these are what we call rekkas!). This means if you use the standard version, you’ll have to input back special in succession 3 times. Whereas for the traditional input, you’ll have to perform
in succession 3 times. There’s no difference between holding or tapping for this move, as it would be counterintuitive since you’ll have to tap anyways. As for the traditional input variation, that one significantly covers more distance and is slightly more powerful. When performed in the air, only the last motion will come out (Iori will jump forward and deliver an overhand, which can be used as a horizontal recovery), so no need to input it 3 times in that scenario.
Up Special: 100 Shiki Oniyaki
Iori performs a spinning jump while being accompanied by spinning purple flames that cycle around him. Can be held instead of tapped for more distance and damage. If inputted with a
motion, the move will render Iori's entire body intangible on startup, the move itself will have slightly increased travel distance, it will deal more damage and knockback, and the move will consist of 3 hits instead of one. The inputted version is indicated by Iori's howl when successfully activated. It is also much more powerful compared to the regular version, KOing middleweights at around 125% and being an excellent out-of-shield option.
Down Special: 212 Shiki Kotsuki In
Iori shortly runs up to the opponent, slams their head on the ground, then blasts them with fire. In the air, this move would differ slightly, as Iori would simply grab the opponent in front of him, and once grabbed, start to descend quite a bit while Iori is blasting fire into their face until they are automatically freed. And yes, this can be used as a suicide KO if used low enough beneath the stage to reach the lower blast zone, due to the descent not being that long you’ll really have to go deep to make it happen, however, Iori himself will always lose if he and his opponents are on their last stocks in that case. Due to functioning as a grab, it bypasses shields and counterattacks. To perform the input version of this move, you'll have to input
+ attack/special. On the ground, despite having long reach, it has a very slow startup and is quite readable when performed raw as when Iori will have a very notable howl when he starts to run. It is a faster move in the air, as it has to sacrifice range. On the ground, the tapped version only covers about a quarter of Final Destination. The input for this move is half circle back, and when using this variation on the ground, it covers about a third of Final Destination and delivers more damage. When used in the air, the tapped version’s descent is just about a quarter of Final Destination’s vertical length. The input version however goes about a third of FD’s vertical size and largens the hitbox size of Iori’s grab. Even when canceled into this move, it has a moderate enough start-up to give the opponent a chance to attack Iori when he performs it.
Desperation Moves
Little thing to preface, all grounded special cancelable moves are also able to cancel into the normal Desperation Moves, except for the Hidden Super Desperation Move, which will always need to be performed raw. When in Max Mode and performing a Desperation Move, the Max Mode timer will instantly end regardless of the time left.
Name
Damage
Info
Desperation Move 1: Kin 1211 Shiki Yaotome
Normal:
a flurry of slashes: 10%
explosion: 14%
collateral: 13%
Follow-up Ura 316 Shiki Saika:
slashes: 10%
pillar of flame: 12%
Max Mode:
initial slash: 7%
slams: 10%
blast of fire: 12%
When you have one stock, and perform a
+
+ attack/special, Iori will dash across the screen (about half the length of Buster Wolf) and, if he hits the opponent, he performs a flurry of claws and scratches ending off in a blast of purple flames. He is immune to non-throw attacks during the startup flash, where he says his iconic line “Asobi wa owari da!” which translates to “Playtime is over!”. The blast can also hit bystanders within range. This has great knockback, killing as early as 60% at the edge. The initial hit can be canceled into a Final Smash.
Here's the catch with this move though, if performing
2 times in succession during the last hit (the input window is quite tight), you’ll be able to follow up with Ura 316 Shiki Saika, where he does some delayed claw attacks and generates a pillar of purple flames, hitting the foe midair while laughing madly. This has amazing KO potential, killing as early as 40% at the ledge. Though worth noting, to perform this follow-up you’ll need to sacrifice an additional stock on top! This follow-up originates from the King of Fighters 2001.
If performed during Max Mode, this move changes a little and lacks the follow-up. It goes as follows.
Under the effects of the Riot of the Blood, Iori howls, slashes his opponent into the ground, and claws at them repeatedly with his back turned to the camera; after briefly looking over his shoulder, he attacks again with the last hit using his flames. While the final blast’s knockback here is somewhat moderate, this variation racks up a ton of damage.
Desperation Move 2: Ura 108 Shiki Yasakazuki
Hidden Super Desperation Move: Kin 1218 Shiki Yatagarasu
33%
When above 80%, and during Max Mode, on top of sacrificing an extra stock, by performing
2 times in rapid succession: Iori drags his hand on the ground as he howls, then proceeds to do a huge claw slash to his opponent, a bloody, shadowy background accompanies this move whereas the claw slash will leave a black trail behind. Very great anti-air and can kill as low as 30% against middleweights around the ledge. As this move can only be pulled off in certain circumstances, it feels very rewarding. This move is based on Iori’s Neo MAX Super Desperation Move from The King of Fighters XIII. Here it is in video form to get the full experience lol.
Final Smash: Three Sacred Treasures
Based on the ending of the King of Fighters '97, and somewhat of a Smash original. As a result of the Orochi blood coursing through his veins, Iori suddenly enters the Riot of the Blood phase. His eyes light up and he makes a mad dash while slashing with his arms. This is an activation hitbox that hits at most 3 opponents, which takes 1 opponent into a cutscene and has the other two take only the claw damage. Iori lunges towards the opponent, eyes blinded by Orochi and grabs the opponent by the neck.
A huge pillar of flames erupts, engulfing both the opponent and Iori. Iori is still holding on tight. Meanwhile, Kyo Kusanagi and Chizuru Kagura are standing by, and Kyo rushes in with a flaming punch, dealing massive damage. The original KOF '97 ending ends here, but in his Final Smash, Chizuru makes the final blow, using the Yata Mirror to seal the opponent (similarly to Zelda's Final Smash). The cutscene ends and Iori returns to normal, waking up from his feral state.
On-Screen Appearance
He appears from the shadows with his back turned. He then swipes his hand forward while its engulfed in purple flames and turns to face his opponent.
Idle Poses
Opens out his hand and causes purplish fire to burst out. Similar to his animation in the opening of KoF.
He messes with his hair slightly.
Taunts
Up Taunt:Vice and Mature appears next to Iori who says "Kutabarizo konatta ka..." (Eng: I thought you were dead...)
Down Taunt: He grabs his head and laughs sinisterly.
Right Taunt: His hand engulfs in purple fire and he will fling it forward while saying " ".
Left Taunt:He will hunch forward and then lens backward while causing purple fire to shoot up from him.
Defeat Quote
When defeated by Star KO, he will say:
Konomama de wa owaran zoooooooooo!!!
Victory Poses
The camera first focuses overhead as Iori is hunched over chuckling evilly. As the camera pans down, he places a hand on his head as his laughter rises. By the time "IORI" splashes on the screen, Iori has thrown his head back and cackled in a maniacal manner. This is by far one of his most well-known victory animations.
Classic Mode: Shatter Expectations
Iori's Classic Mode is a continued reference to Terry's which is based on King of Fighters.
Round
Opponent
Stage
Music
Notes
References
1
Boxing Ring
Called Team Martial Arts. Each fighter represents a particular art form.
2
Leon
Port Town Aero Dive (Omega)
Called Team Hunters. Each fighter represents a bounty hunter.
3
Bastion Hollow (Omega)
Called Team Fantasy. All characters are from Square-Enix games.
4
Onnet (Omega)
Called Team Youngster. All opponents are younger characters.
5
Officer Howard
Shadow Moses Island (Omega)
Called Team Enforcer. Based on Ikari Warriors.
6
Takamaru,
Mishima Dojo
Called Team Japan. Based on Japanese warriors.
BONUS
Race
to
the
!
Final
King of Fighters Stadium
The Mii Brawlers uses a Kyo costume and Kim costume while Swordfighter uses Nakoruru costume
Neutral Special: Anna’s Secret Shop
Anna is stingy, so she doesn’t just use her best wares all wily-nily. Instead, she buys them from her own shop to make sure she never makes an investment she can’t back up with her credit value.
With her coins though, she can buy stronger weapons. Hold longer to spend more coins for a stronger weapon, Pac-Man Neutral B style. This then results in her sword/dagger being upgraded to variants like a Brave Sword, Levin Sword, Killer Sword, etc. with different properties and different strengths, etc. The upgraded weapon is implemented set-wide like Robin’s aerials. Side Special: Ballista
Inputting the side special readies a Ballista. Due to the nature of the attack, it suffers from significant start-up lag. The trade-off is the damage potential of the attack. She can aim from up to down after inputting the attack. It has high damage potential and can OHKO as low as 25% when hit dead center. Up Special: Fodlan Thrust
Anna thrust her Noatun in Air like FE's Dolphin Slash move, but it's stabbing the Opponent with her Sweet Spot. The Damage is 7.6% and she goes upwards a little longer than Marth for her Recovery. Down Special: Convoy
Anna puts bullion in a chest, investing her coin count in the stash which she then buries underground. If she dies and loses her accrued coins, she can use Down B again on the spot the chest was buried to immediately get back the coins she invested into them at the expense of Anna having less liquid assests on hand if she’s invested gold into a chest.
Final Smash: What a Deal!
Owing to Anna's unique status as a character within the series, I opted to go for a mostly unique Final Smash. It still does have some ties back to the franchise, similar to that of Byleth and Corrin, but it would mostly reference her multiple appearances in the series.
Like with Marth, Roy, and Lucina, the Final Smash starts out with a Critical Hit. Anna spins her dagger in her hand and runs forward, dragging at most 3 opponents into a cutscene, similar to the one that Hero has. Here, every single Anna that has appeared over time would deal a quick strike with a different weapon, before the main Anna swings a bag of gold coins and ends the cutscene with a "Come again soon!" and a finger to her chin.
On-Screen Appearance
Anna walks out of her shop before it Teleports back to her original Location, entering her battle stance.
Idle Poses
She folds her arms.
She suppresses a giggle.
Taunts
Up Taunt:She laughs and points to her chin in typical Anna fashion.
Down Taunt:She holds out a hand and says "Cough it up."
Right Taunt:She pulls out a bag of items and rummages through it before putting it back.
Left Taunt: She takes a sign and places it down. It says "Weapons for sale! Cash only!
Victory Poses
She is flipping a coin up and down and then catches it before saying "Made a bit of coin, tee hee."
She takes a bag and throws it down before hitting on the bag of coin and leaning forward; much like her Awakening pose.
She twirls while saying "It's tough..." and then takes her dagger and points it forward while saying "...making a deal in the heat of battle."
Classic Mode: Profitable Gains
All opponents are against male fighters with a female ally.
Round
Opponent
Stage
Music
Notes
References
1
Hyrule Castle
The Legend of Zelda uses rupees.
2
Smashville
Animal Crossing uses Bells.
3
Stylist,
Beaumonde Arena
Style Savvy and Persona uses dollars and yen respectfully.
4
North Cave
Final Fantasy uses Gil.
5
Saffron City
Pokemon uses P.
6
Crazy Dave,
Moray Towers
Plants vs Zombies uses coins and sun while Splatoon uses gold.
Neutral Special: Spike Ball
The King throws an explosive Spike Ball that rolls forwards until it either hits a player, projectile, or hazard or slows down enough to the point of stopping. In each case, the Spike Ball will explode and King Boo can’t use the attack again until it’s gone. If the Spike Ball is eaten by a character like Kirby, King Dedede, or Wario, it will explode as well. The Spike Ball has a unique property with Luigi’s Poltergust G-00 where Luigi can grab it and shoot it back.
Side Special: Big Boo Blow
King Boo inhales a huge amount of air and blows off so hard that could send opponents far away with far horizontal knockback. It can be used as an anti-recovery move when King Boo stands on Edgs and blows off Opponent to Blast Zone.
It doesn't give any damage, but it can blow you off to Oblivion.
Up Special: Boo Bomb
Similarly to Super Dedede Jump, King Boo will leap into the air and slam downwards dealing a lot of damage with enough power to kill at 60% and will break shields. The ground pound will emit shockwaves that travel along any solid ground and it might just protect him from the attack’s slow getup animation. King Boo will always leap into the air whether he is on the ground or in the air but his vertical distance will be determined by how long the special button is held.
Down Special: Boo Crown Storm
King Boo will gain an intense glint in his eyes as he charges his crown with power. Upon releasing the B button, at least one bolt of lightning will come striking down, similar to Thundaga. However, there's a trick to it: Every 20 frames you can charge up to 5 bolts of lightning, and you can influence where it strikes, starting directly in front of you, in between strikes. Each lightning bolt does 6% damage and medium-low knockback.
Final Smash: Frightening Portrait
Based partially on how he traps Mario and the gang in a portrait in LM3, King Boo pulls up an empty portrait that acts similar to Mega Man’s FS where it sucks in opponents nearby. Once it finishes, it will transport the player to a Mansion-type setting where King Boo will cackle. He then takes an empty portrait and slams it down onto the opponent. While the attack can technically capture up to 7 characters, it will only capture 5 total with the remaining trapped just getting minimal damage. This is rendered by the first characters who get sucked in. The reason why this is mentioned is that when the portrait is pulled back up, the players who were hit get stuck in the portrait. This causes them to be visible in the portrait would lead to some fun compilation videos of every Infinite character getting trapped. They could even get unique poses and such. After that, King Boo will cackle while next to the portrait with lightning flashing. They then transport players back to the stage and will launch them.
On-Screen Appearance
His crown appears first followed by his body from the afterlife. He then shrieks and makes a face at the screen.
Taunts
Up: King Boo will make a silly face similar to these ones.
Right: King King Boo shakes violently while he slobbers - sending spit and drool everywhere
Left: Smaller Boos swirl around King Boo as he looks on somewhat... happily
Down: King Boo disappears with a downwards fade effect - making this a flashy spot-dodge similar to Puff's Down B! - and then reappears with a VERY loud jumpscare scream.
Idle Poses
Rocks back and forth and scowls
Adjusts his crown.
Victory Poses
The camera is focused on a background as 8 portraits of Toads appear. King Boo himself then floats into view of the camera and lets out a cackling laugh. If at least 1 fighter was killed by a Final Smash, any of the portraits will be replaced by that number of fighters. Loosely based on the Game Over animation from Luigi's Mansion 3.
Luigi appears even if a losing fighter while holding a flashlight and looking frightened. King Boo appears and shakes while screaming which scares Luigi away. King boo then cackles.
King Boo is seen floating in the air while waving his arms up and down while smaller Boos dance about him.
Classic Mode: From The Grave
Villainous characters who have died or passed into a death equivalent state but were later revived.
Round
Opponent
Stage
Music
Notes
References
1
Gerudo Valley
The Dark World (Brawl)
Ganondorf's continuous cycle of reincarnation in the Zelda series.
2
Norfair
Vs. Meta Ridley
Meta Ridley is a revived cybernetic form of Ridley.
3
Medusa
Murasame Castle
Kid Icarus Retro Melody
Hades routinely revives Medusa to use as his servant.
4
Minecraft World (Plains)
Clockwork Crafter
Zombies, self-explanatory.
5
Mishima Dojo
Kazuya Mishima, Devil Kazuya
Kazuya was thrown off of a cliff by Heihachi in Tekken 2 and was later brought back by his devil gene. It was also the devil gene that let him survive the first cliff fall.
6
Midgard
One-Wined Angel (Advent)
Sephiroth comes back in some form in Final Fantasy VII: Advent Children. The Mii Swordfighters represent Kadaj, Loz and Yazoo, the remnants of Sephiroth's spirit that let him come back to the living world.
BONUS
Race
to
the
Finish
!
Final
Dracula
Dracula's Castle
Dracula like Ganondorf is routinely revived but strictly every 100 years and is the main enemy of the Belmont clan.
#103. Zagreus Hades Moveset Link Apart of the "In the Name of Hades Bundle" DLC
Special Moves
Neutral Special: Cast
Zagreus casts a bloodstone, it is a slow long-range projectile that can redirect itself to an opponent if aimed close enough, dealing 12.5% damage with no knockback on impact if Zagreus has no boon equipped. Zagreus has three reusable bloodstones and when the Cast hits an enemy, it stays lodged inside the foe until they are killed or 15 seconds elapse, which means Zagreus can't just mindlessly spam these whenever. When the bloodstone falls it can be collected to be launched again. Each god's boon also modifies the speed, area of effect, and additional mechanics of the cast. Three casts, Dionysus, Demeter, and Ares, create a projectile that does damage on its own instead of lodging into enemies. Also, to make multi-Zagreus battles less confusing, the bloodstones will change color depending on Zagreus' color costume.
All boons will affect this special, and their properties are as follow:
Boon
Cast Information
Zeus
Instead of the usual cast, Zagreus casts an electric bolt that can bounce off opponents up to three times, with each bounce having a homing effect. This will not bounce if only playing against one opponent, or if the other opponents are too far from the one that got aimed at. This also deals electric damage to opponents.
Poseidon
The weakest of the cast abilities in terms of damage, Zagreus fires a blast of water forward that deals minor damage but delivers a hefty knockback! A very strong edge-guarding tool.
Demeter
Zagreus plants a crystal that remains in-place and fires a long-range ice stream blast forward for around a 4 seconds period of time. The ice beam can easily be dodged, but if hit it will freeze opponents when at higher percents after dealing small damage over time. An amazing zoning tool. When finished, the bloodstone will summon in its place, waiting to be picked up by Zagreus.
Dionysus
Zagreus throws out an arced bomb-like projectile forward which explodes into a cloud of poison when hitting an opponent or surface, which will stay in effect for around 4 seconds before dissipating and delivering the poison status effect to anyone caught in the fog. This move does deal 5% damage, but no pushback on impact.
Athena
Zagreus fires a slow-moving circular shield forward that delivers strong damage to opponents and reflects projectiles!
Ares
Zagreus fires a slow-moving but multi-hit dark spinning blade forward. It moves slowly but can string opponents along for multiple hits of damage and high-end knockback. This also deals a new debuff called “doom” where after 5 seconds, the opponent with a dark red Ares logo above their heads will be instantly dealt a heavy hit of damage with no knockback, similar to Sephiroth's side-special.
Artemis
Zagreus fires a green fast-moving arrow forward. This special has a 1/6 chance to deal a critical hit which will increase the knockback and damage of the arrow! This projectile also deals heavier damage than other projectiles to shields.
Aphrodite
Zagreus casts a very short-range pink blast of energy forward which deals quite a lot of damage compared to other cast variations. Has the shortest range, but has high damage and knockback potential, and can easily KO at high percentages. This will inflict charm onto foes, which is signified by them being engulfed in a pink aura, and weaken their damage output by 30%.
Side Special: Bull Rush
Another way to recover. Zagreus equips the shield of chaos and charges up. Releasing the special button will cause Zagreus to charge forward and deal a heavy hit of damage and tremendous knockback if charged. As he charges, you'll notice Zagreus accumulating energy around him. When charged to the max, a flash appears and Zagreus is able to travel the half of Final Destination. The shield can also block projectile attacks and melee attacks that deal less than 6% damage, but if hit with something strong, the Shield will break and Zagreus will be left invulnerable for a while. If you're still charging after already being maxed, which is signified by the flash, then the move decreases in power after that point.
The same boons as the normals pretty much apply here as well.
If under the influence of Zeus' boon, the move will gain electric properties
If under the influence of Poseidon's boon, the move will gain 1.2x knockback
If under the influence of Athena's boon, the move will be 1.2x weaker
If under the influence of Artemis' boon, the move has a 1/8th chance of being a critical hit
Up Special: Dash
Zagreus charges, and once the special button releases, dashes to the direction which is indicated by a directional arrow that points towards Zagreus' travel direction before he begins moving. It travels similarly to moves like FireFox. Grounded versions of both moves will stop at edges, and the aerial versions can pass through platforms if down is held on the control pad. If tapped, Zagreus will only perform 1 dash, if held moderately, Zagreus will perform 2, and when held to the end, he will perform 3. Each Dash can be redirected. The standard dash with no boons will deal no damage, but cover a lot of distance.
All boons will affect this special, and their properties are as follow:
Boon
Dash Information
Zeus
Instead of his usual dash, when Zagreus dashes he will release lightning strikes that hit opponents close to him at the starting point of each dash. This variation travels a relatively shorter distance.
Poseidon
Due to the pushback of the waves, this has the most recovery (even compared to the standard version), Zagreus engulfs himself in rushing water as he fastly rushes. With each dash, Zagreus makes splashing waves at the end of it. This recovery deals the least damage but deals impressive pushback to enemies, knocking them far away.
Demeter
A slower and shorter recovery than the rest, Zagreus rushes through the air as he casts a short-range blast of frozen air in front of him with each dash. Opponents at higher percentages (+100%) hit by the ice have a high chance of being momentarily frozen. The dash itself deals no damage, however, the ice does.
Dionysus
Zagreus surrounds himself in a mist of purple bubbles which gets left at the place where he rushes each time. While this distance is moderate, opponents hit by Zagreus in this state will be dealt a poison effect, and no actual raw damage will be dealt.
Athena
Zagreus rushes with his recovery as he is surrounded by four rapid-moving shields that circle around him that reflect any projectiles that hit Zagreus while using the recovery. This recovery is moderate in distance and deals heavy damage and moderate knockback to opponents that Zagreus hit.
Ares
Zagreus rushes, and from where he started each dash a dark buzzsaw is left spinning in his place, dealing multiple hits of damage for a moment before disappearing. Similarly to his cast, this also deals a new debuff called “doom” where after 5 seconds, the opponent with a dark red Ares logo above their heads will be instantly dealt a heavy hit of damage with no knockback.
Artemis
Zagreus rushes while surrounded by green energy that forms the tip of an arrow around him, this Dash deals no damage whatsoever, but for 5 seconds after the dash Zagreus has a higher chance of performing critical hits on all his moves, from a 1/8 chance to a 1/6 one more specifically, this will be signaled with Zagreus flashing green while this is active. This dash has the longest range out of all the boon dashes and even rivals that of the standard one.
Aphrodite
Has the shortest range of all the dashes, Zagreus rushes in recovery as he is surrounded by pink energy and hearts. At each dash, where he ends up, a gulf of pink aura gets summoned which is able to hit opponents. Opponents hit by this recovery will be dealt damage, with no knockback, and will be engulfed in a pink aura, which is a new debuff called "charm" where these opponents now temporarily deal 30% less damage.
Down Special: Boon Select
Pressing Down-B will cause Zagreus to hold out his hand and say, “in the name of Hades!” as three glowing orbs appear above his head. Use the control stick to choose which of the orbs you wish to select, these orbs are called "Boons" and harness the powers of the gods of Olympus!
When choosing a boon, that god’s symbol will appear above of Zagreus’ percentage to indicate which god is helping him. Each god’s Boon gives Zagreus’ special attacks a unique spice to them for a limited amount of time, some will even affect normal moves too! The three Boon options will be random, and an Olympian Boon remains in effect for 30 seconds before Zagreus loses that Boon and returns to normal, in the meantime, Zagreus will not be able to select another Boon and his Down-Special will be rendered futile for the time being. There is then a 5-second cooldown before Zagreus can choose another Boon.
Also just because it's fun when selecting a certain Boon, a voice line and certain sound effects will play from that Boon's god upon accepting their gift like in the game. Gotta love fanservice! The Boons and their respective symbols are as follows.
Boon
Info
Symbol (above %)
Zeus
Signified by a lightning bolt. The Greek all-father Zeus’ boon will give Zagreus’ cast, dash, and other certain attacks an electric effect to them! This boon affects most of Zagreus' normals outside of his grab and throw.
Poseidon
Signified by a blue trident, his Boon generally delivers impressive pushback when using specials and even normals!
Demeter
Signified by an icicle rod, Demeter’s boon will give freezing effects to certain specials. This boon only affects Zagreus' special attacks.
Dionysus
Signified by a purple glass, Dionysus’ boon will allow Zagreus to poison opponents when performing certain specials. This boon only affects Zagreus' special attacks.
Athena
Signified by a shield, Athena’s boon will give Zagreus’ specials a reflector ability. Zagreus will also receive less damage and pushback when using this boon, but deal less damage in general, as all of his normals will deal less damage.
Ares
Signified by a war spear, Ares’ boon will give Zagreus’ specials a deadly multi-hit attack AND a negative status effect called doom where after 5 seconds, the opponent with a dark red Ares logo above their heads will be instantly dealt a heavy hit of damage with no knockback. This boon only affects Zagreus' special attacks.
Artemis
Signified by a bow and arrow, Artemis’ boon effect will give Zagreus’ attacks a chance to critical hit! This boon affects normals too, so go ham with it and try your luck!
Aphrodite
Signified by a heart, when using certain specials, Aphrodite’s boon effects will cause a unique debuff called charm, which will weaken an opponent’s attack power briefly. This status is signified by the opponent being engulfed in a pink aura. This boon only affects Zagreus' special attacks.
Final Smash: There is No Escape
Entrance Animations
Zagreus emerges from a Pool of Styx and says "Again..." if respawning or "Let's start..." when first spawning.
Taunts
Up: Zagreus holds up an item much like how he caught a fish. These items can be: Nectar, Pom of Power, Daedulus Hammer, Centaur Heart, and Food. When picking up Nectar, he says "Looks delicious.", for Pom of Power , he says "A Pom of Power", for Daedulus Hammer, he says "Gods grant me strength.", for Centaur Heart, he says "Look what I found" and for Food, he says "Good enough."
Right: Turns to face the opponent and raises a fist. Based on his appearance during getting a Boon.
Left: Stands straight and folds his arms. Flames appear around him as sparks shoot off.
Down: The Companion Battie appears and bounces around Zagreus while he says "Hey there, little guy."
Idle Poses
Zegreus smolders a while as fire blazes up around him.
Shifts on his foot and turns away from the opponent; his chest facing the camera. Based on his dialog poses.
Victory Poses
Zagreus fishes for a fish and pulls out a Knucklehead, Charp, or Voidskate
A Boon appears and Zagreus touches it and says "In the name of Hades, I accept this." Either Zeus, Dionysus, Poseidon, Ares, or Athena will appear behind via PNG behind Zagreus.
Hades destroys a Wretched Thug which dissipates as Zagreus swings his sword and rests it on his shoulder.
Classic Mode: Escape from Hades
Every battle is modeled after boss battles in Hades.
View attachment 345629 #104. Phoenix Wright Ace Attorney Part of the "A Smashing Turnabout Bundle" DLC
Special Moves
Neutral Special: Objection/Take That!
The one thing everybody seems to remember Ace Attorney by. With this move, Phoenix will wind up, taking a deep breath and readying his arm, before pointing it forward and hollering, "OBJECTION", his pointing finger summoning the speech bubble and text you see in the above picture. This doesn't give you much when it comes to damage, only dealing a measly 7% damage, but if you're hit while winding this up, you can counter it for a base of 1.2x, + 0.1x per piece of Evidence you have in your possession.
Phoenix raises a pointed finger up into the air, winding up and breathing in slightly, before placing a fist on his side, pointing forwards, and shouting, "TAKE THAT!" As he does so, the speech bubble above will be summoned but will be much smaller than the "OBJECTION" from Side Special. This does not have the Side Special's counter properties, but in turn, it's a fast attack that can deal upwards of 16% if you hit.
Side Special: Missile
Missile the dog pounces forth from Phoenix's magical hammerspace. Missile acts as a semi-summoned character but only temporarily. Think of him more like a very high-quality projectile. Missile's initial action will be to pounce forward dealing damage if he hits anyone. Missile will then attempt to jump to Phoenix if he is nearby. If he isn't, Missile will wait until Phoenix gets close to his range. When Missile runs back to Phoenix, the player may input side special attack to command him to bounce off of Phoenix and to pounce forward again in the direction pressed. After this, Missile will definitively disappear. The purpose of this attack will be to extend combos and for the second strike from Missile to be a KO option at higher percentages.
Up Special: Step-ladder
In the air Phoenix will throw a Rope Ladder that can cling onto the stage which he proceeds to climb up, On the ground Phoenix pulls out a stepladder which he climbs, The Stepladder can be knocked down and it deals damage to enemies that it falls on to.
Down Special: Evidence
The Thinker
Sacred Urn
Shichi****o
Carbonated Water Bottle
Autopsy Report
Wiretap
Attorney’s Badge
Metal Detector
Polly
Music Disc
Luminol Fluid
Seashell Pattern Card
Final Smash: Turnabout Trial
Phoenix will throw out a Magatama which will fly forward similar to Kazuya's start-up. The main caught opponent is front and center at the defendant's stand. Phoenix says
"Your fingerprints were at the scene of the crime!"
Cuts to the opponent. The opponent looks shocked.
"You make no attempt to reform yourself!"
Cuts. The opponent looks desperate.
"YOU CAN'T HANDLE THE TRUTH!" while raising his finger.
The opponent looks completely at wit's end as a gigantic Judge gavel appears behind the opponent and slams down onto the opponent.
After the cinematic ends, Phoenix says "I rest my case".
On-Screen Appearance
Phoenix stands before the Judge and says, "The defense is ready, your honor," before he turns and faces the prosecution (a.k.a. the other fighters).
Idle Poses
Phoenix sneezes into their right arm's elbow.
Adjusts his tie.
Taunts
Up Taunt:Phoenix Wright flashes his attorney's badge to the screen.
Down Taunt: Phoenix puts his hands on his hips and looks forward while smugging.
Right Taunt: Smiles while he has his hand behind his head. He also giggles for bit.
Left Taunt:He takes out a piece of paper and slaps it with one hand while looking forward.
Victory Poses
Phoenix Wright is at a court stand. He then slams the stand and points at the screen, saying "The true culprit it you!"
Phoenix shouts Objection and points while Pearl and Maya stand behind him
Phoenix runs it but slips and falls as papers scatter about everywhere.
Classic Mode: On the Defense
All opponents are enemies who have done wrong to the opponents with Phoenix defending them. For this reason, they cannot attack but stand still. Them getting KOd results in a loss.
Round
Opponent
Stage
Music
Notes
References
1
Courtroom
Dr. Eggman is an ally
Dr. Eggman stands convicted of constantly terrorizing Sonic.
2
Courtroom
is an ally
Ganondorf stands convicted of trying to kidnap and kill Zelda and plunging Hyrule into chaos.
3
Courtroom
is an ally
Ridley stands convicted of eating Samus' parents. Dark Samus stands convicted of stealing Samus' identity.
4
Courtroom
is an ally
Wolf is stands convicted of galactic terrorism against authority.
5
Courtroom
DJ Octavio is an ally
DJ Octavio stands convicted of brainwashing and enslaving a people.
6
Courtroom
is an ally
King K. Rool stands convicted of stealing bananas and blowing up islands.
BONUS
Board
the
Platforms
!
Final
Courtroom
is an ally
Bowser and Bowser Jr stand convicted of kidnapping, terrorism, embezzlement, and cheating.
#81ε. Jin Kazama Tekken Part of the "Echo Fighter Pack #1" DLC
Rage Drive:
Jin's Rage Drive requires the input of both A+B during a Crouch Dash. The result is a 4-hit combo: Twin Pistons followed by a short hop straight kick and capped off with a haymaker. This deals a total of 21% with strong knockback. Rage Drive can be activated by down special when in Rage Drive, grab, or via input
Special Moves
Neutral Special: Devil Blaster
Side Special: Demon's Spear
Up Special: Devil Fly
Down Special: Heavens Door
Final Smash: Rage Art
Jin takes flight and swoops under his opponent before shooting them into the sky with a red forehead laser. He then grinds their face along the ground and finishes them off with a second forehead laser.
On-Screen Appearance
Jin is seen pulling his gloves onto his hands before turning towards his opponent. Based on one of his pre-round animations from Tekken 3.
Idle Poses
Taunts
Up Taunt:
Down Taunt:
Right Taunt: Avenger - Jin charges up his right fist by reeling it back and then punches straight forward while taking a short step, dealing major damage and can KO opponents at 55% (early). Based on his unblockable "u/b+1+2" attack that he uses throughout the series since having changed a traditional Mishima fighting style to his own Karate in Tekken 4.
Left Taunt:
Victory Poses
Jin performs one uppercut, followed by a jumping uppercut, before crossing his arms for the camera. Based on a Victory Animation from Tekken 3.
Classic Mode: Dad Issues
All opponents are characters who have had bad interactions, or, outright battles with their fathers.
Round
Opponent
Stage
Music
Notes
References
1
Courtroom
Dr. Eggman is an ally
Dr. Eggman stands convicted of constantly terrorizing Sonic.
2
Courtroom
is an ally
Ganondorf stands convicted of trying to kidnap and kill Zelda and plunging Hyrule into chaos.
3
Courtroom
is an ally
Ridley stands convicted of eating Samus' parents. Dark Samus stands convicted of stealing Samus' identity.
4
Courtroom
is an ally
Wolf is stands convicted of galactic terroism against authority.
5
Courtroom
DJ Octavio is an ally
DJ Octavio stands convicted of brainwashing and enslaving a people.
6
Courtroom
is an ally
King K. Rool stands convicted of stealing bananas and blowing up islands.
BONUS
Board
the
Platforms
!
Final
Courtroom
is an ally
Bowser and Bowser Jr stand convicted of kidnapping, terrorism, embezzlement, and cheating.
#74ε. Rock Howard Fatal Fury/Garou Part of the "Echo Fighter Pack #1" DLC
Special Moves
Neutral Special: Reppuken
The "strong" version is Double Repukken and in the air is a close-ranged burst of wind similar to Terry's Round Wave.
Forward Special: Hard Edge
The input version would also deal with the second hit that it has in the games. Also like Terry, it would have the reversed input being QCF + Attack instead of the original QCB.
Back Special: Overhead Kick
It covers a more vertical range than horizontal so is a better recovery and it also carries the meteor effect that it has Terry's Power Dunk. The input of the Overhead Kick is QCB, different to the one given in KOF XV but it makes sense considering the context.
Up Special: Rising Tackle
Down Special: Crack Counter
Rock's counter move where the counterattacks with a Crack Shoot connect. Crack Counter's input is a DP, while he never used this input for Crack Counter it resembles the input that it has his father Geese Howard from where the moves originate (since is a combination of Geese's Atemi Nage technique and Terry's Crack Shoot).
Super Special Moves
Number 1: Raging Storm
Instead of attacking at the front of the character Rock's attack is AoE around him so attacking vertical.
Number 2: Shine Knuckle
if you are fast enough you can connect a Rising Tackle at the end of the move that it would have an enhanced effect.
Final Smash:NEO Deadly Wave
Rock starts using a move similar to Rage Run (considering that we wouldn't use the move in his regular moveset), if connects he will start a cinematic where he spreads a pair of ki wings and prepares to do an autocombo to the opponent that ends with a burst of energy.
On-Screen Appearance
Rock slowly walks on stage as he pulls his gloves on, then slicks back his hair before he enters a fighting stance. This is the same intro animation as his appearance in The King of Fighters XV.
Idle Poses
Rock quickly fixes his hair by flicking it, based on his animation which plays each time he performs a heavy attack/special move. It can also be done while crouching.
Snaps his wrist forward.
Taunts
Up Taunt: Rock stretches his hand towards the opponent, saying "Shan toshi na!" (Do it properly!). Based on his normal taunt.
Right Taunt: Rock clenches his fist in front of him and then swings it down to his side. References The intro animation where he faces off his father, Geese Howard, in Capcom vs. SNK 2.
Rock tosses his jacket to the background in a similar way to Terry with his hat. This victory pose will always be used if the fight ends with a Shine Knuckle.
Rock's Hand starts to Flow with Blue ki while his eyes turn bright red, then he gets exhausted exclaiming "Chi ga...uzukuno ka!". This victory pose will always be used if the fight ends with Raging Storm or NEO Deadly Rave.
RockRock turns his back to the screen and then slashes engulfs his hand in the blue ki and spins to turn his back to the camera while releasing his ki which forms angelic wings behind him.
Classic Mode: On the Defense
Round
Opponent
Stage
Music
Notes
References
1
Courtroom
Dr. Eggman is an ally
Dr. Eggman stands convicted of constantly terrorizing Sonic.
2
Courtroom
is an ally
Ganondorf stands convicted of trying to kidnap and kill Zelda and plunging Hyrule into chaos.
3
Courtroom
is an ally
Ridley stands convicted of eating Samus' parents. Dark Samus stands convicted of stealing Samus' identity.
4
Courtroom
is an ally
Wolf stands convicted of galactic terrorism against authority.
5
Courtroom
DJ Octavio is an ally
DJ Octavio stands convicted of brainwashing and enslaving a people.
6
Courtroom
is an ally
King K. Rool stands convicted of stealing bananas and blowing up islands.
BONUS
Board
the
Platforms
!
Final
Courtroom
is an ally
Bowser and Bowser Jr stand convicted of kidnapping, terrorism, embezzlement, and cheating.
Neutral Special: Ouka Hoshin
On the floor Sakura shoots a pink projectile that is similar to Power Wave, in the air she shoots an arcing projectile. releasing a pink projectile about the height of Cloud's Blade Beam, but traveling with the speed of Terry's Power Wave. The spiritual energy wave applies a 0.8x damage and knockback debuff to a target's attacks (if it hits) for 8 seconds.
Side Special: Hyakka Ryoryan
Sakura dashes a little bit forwards and slashes her now fiery sword, this reflects. Press B again immediately after to slash a second time but with no dash. This move goes through shields but deals minimal shield damage. It does not leave her in free fall if used in the air and allows her to act almost immediately out of it. Knockback is great, but the damage is minimal, and though it deals multiple hits, each hit is a launcher. Designed to provide a "Get-Off-Me" burst movement option.
Up Special: Showtime Effects
A wire appears connected to Sakura from atop the stage, dropping and attaching to her in about half a second, and pulls her upwards as she poses similarly to her neutral air. A sparkle effect trails behind her. Sakura's an actress, and for a good play, sometimes you need special effects, like flight! It does not leave her in free fall; always gotta have a backup plan in case the effects fail!
Down Special: Makiwara-Giri
A Makiwara board appears and Sakura slashes it, if someone is in between her and the board Sakura does a quick flurry of slashes in addition. The straw deals light flinching damage and keeps them flinching, as the move acts as a counter as well, dealing weak damage but great knockback.
Final Smash: Cherry Blossom Blade
Sakura dashes forward with a more powerful Hyakka Ryoran, shouting "Ogami-san!", catching up to four opponents in her dash, before the stage fades to city background, as cherry blossom petals float through the air. Ichiro Ogami's Koubu appears alongside her own, and the two both rush forward, striking the enemy three times, before Sakura's Koubu raises its blade as in her FSmash, sending out a massive Ouka Hoshin projectile to launch the enemy, and a wave of cherry blossoms transitions the screen back to battle.
On-Screen Appearance
Sakura's Koubu lands on the stage and she hops out.
Idle Poses
Sakura adjusts her bow.
Sakura sheathes out her sword.
Taunts
Up Taunt: Ichiro appears in the background, similar to Rex, and says "You can do it, Sakura-chan!" in Japanese. Sakura blushes with a lightly perturbed expression. The sound effect for when you made a dialogue choice that made a character happy then plays.
Down Taunt: Sakura takes out a Koi-Koi hanafuda card, examines it, then puts it away.
Right Taunt: Sakura closes her eyes, then slashes forward, cutting a raindrop in half. It's very subtle.
Left Taunt: Sakura does a small spinning dance on one foot. Practice makes perfect!
Victory Poses
Note: Whenever Sakura wins, the transition screen is a wave of cherry blossom petals into the victory screen.
Sakura jumps into Ogami's arms in a loving embrace. Ogami says "You did it, Sakura-chan!" The two then perform a victory pose!
Sakura has her eyes closed, and her blade sheathed. She then opens them and has already performed a slashing strike towards the camera. Ichiro stands in the back, examining in awe.
Her Koubu lands on the ground, it's top opens up, and she begins to get out, standing with her foot firmly planted on part of it, her hair blowing in the wind and looking up heroically.
Classic Mode: Against the Demon Council
Each round includes a female character as an ally to represent Sakura forming her combat revenue in Smash
Round
Opponent
Stage
Music
Notes
References
1
(Black)(Black)
Rainbow Cruise
(Omega)
Airship Battle _ Super Mario Bros. 3
(Red) is an ally
The enemies represent Kouma grunts while the stage represents the Shougeimaru Type 1, a specialized blimp.
2
DJ Octavio
Grand Imperial Theatre (Little Lip Theatre variant)
Go Go NYCP!
Reimu (Purple) is an ally
DJ Otcavio is a stand-in for Nobunaga Oda. the main antagonist of Sakura Wars 5. The stage represents the main setting of this game/.
3
Galatca Knight (Giant, metal)
Grand Imperial Theatre (Chartes Noire Variant, Battlefield)
Move Out! Imperial Floral Assualt Group
(blue) is an ally
Galacta Knight is a stand-in for the metallic, knight-like minions of the Phantoms of Paris in Sakura Wars 3.
4
Medusa (Red)
Reset Bomb Forest
Medusa's Final Battle
(yellow) is an ally
Opponent represents Crimson Miroku, the sole female member of the Black Sanctum Council,a n the stage represents the demonic ruined battlegrounds many bosses in the series are fought in.
5
(Black), (Grey, Giant)
Mishima Dojo
Kazuya Mishima, Devil Kazuya
(Orange) is an ally
Lucas represents Jade Setsuna, the child-looking member of the Black Sanctum Council and Kazuya represents Silver Resetsu, his larger and much more imposing "brother". The stage is a reference to the shrine in which they are fought and defeated in the original anime.
6
Castle Siege
Advent One-Winged Angel
Sami (Green) is an ally
Sephiroth represents the final member of the Black Sanctum Council, Aoi Satan. Sami represents Ayame and the stage represents the final battle against him in the original anime.
BONUS
Break
the
Targets
!
Final
then Ganon
Ganon's Battlefield
Calamity Ganon Battle; Declaration! Imperial Floral Assault Group
(red), Reimu (Purple), (Blue), (yellow), (Orange), Sami (Green)
Ganon represents the true universal force that Sakura opposes in the series with Ganon representing this "Demon King". The allies represent the usual ending push to the final boss to win the day.
View attachment 346820 #106. Agumon Digimon Part of the"Smash is the Champions Bundle" DLC
Special Moves
Neutral Special:
Agumon: Pepper Breath: a weak fire projectile that is similar to Sora's Firaga. Deals 6% damage per ball of fire, as well as weak knockback.
Greymon: Nova Blast: a larger fire projectile that deals 10% damage and is more akin to Lucas's PK Fire, dealing higher knockback on bit
Metal Greymon: Giga Destroyer: a chargeable projectile in which MetalGreymon can lock onto an opponent similar to Palutena's Autoreticle as he's charging. At max charge, MetalGreymon releases a barrage of six missiles from its chest towards that opponent's position, dealing 3% damage per missile and knockback dependent on the number of missiles fired. One missile is weak like the Pepper Breath, but all six turn this into a powerful kill move.
Side Special:
Agumon: Dynamite Kick. A flurry of kicks while leaping forward, Liu Kang-style.
Greymon: Horn Impulse. A dashing horn attack.
MetalGreymon: Over Flame. Shoots a wave of fire from his mouth, acting similar to Holy Water, except it travels at 1/4 of Final Destination.
Up Special:
Agumon: Wildfire Uppercut: Agumon will do a Shoryuken while his claws are engulfed in fire. Unlike the Shoryuken though, this will do several hits of damage while dragging the opponent up along with Agumon. If all the hits attacks connect, the final one releases a semi-powerful explosion.
Greymon: Wildfire Uppercut: Greymon lacks the fire aspects of the attack but rather trades it off with a more standard Shoryuken which launches the opponent upon contact with the final hitbox being the most knockback at the pinnacle of the attack. Thanks to Greymon's claws, it has a higher reach.
Metal Greymon: Mega Claw: Instead of giving Metal Greyman a typical slasher rising attack, I decided to get Metal Greymon a Joker-esque Grappling Hook attack with Mega Claw. This fires a metal claw which command grabs the opponent, pulls Metal Greymon in, and causes the Digimon to spike the opponent. It can also be used as a tether grab to latch onto ledges. This gives Metal Graymon some versatility that typically doesn't come with a character for its size.
Down Special:
Cross Fire/Digivolve: When Agumon can activate his Digivolution, holding down the Down Special button will initiate the Digievolve which will either bring Agumon to the Greymon form or Greymon to Metal Greymon. Taking too much damage or getting KOd will cause the character to regress back to Agumon. When not able to activate, it becomes Cross Fire which is a powerful chomp attack that has tremendous start-up lag but has a large hitbox and damage output. It can also swallow and negate items and projectiles. Metal Greymon has the largest hitbox and benefits the most from this attack.
Final Smash: Terra Force
Otherwise known as "Gaia Force", and a signature move of WarGreymon. Agumon/Greymon/Metal Greymon Warp-Digivolves into WarGreymon and flies into the background of the stage. There, the player will have 8 seconds to aim as he's charging. Upon release, the massive orb of energy will fly towards the stage ominously like Bahamut ZERO's Teraflare in Midgar and generates an explosion that makes the Bomber item look like a firecracker in comparison and hits multiple times like the Smart Bomb, dealing 76% damage total.
On-Screen Appearance
A Digivice appears and Agumon jumps out in virtual pet sprite form and then transforms into his 3D form.
Idle Poses
Agumon
Looks behind, then looks up.
Smoke billows out if his mouth.
Greymon
Greymon stomps his feet once.
Fire fumes out of his mouth.
Metal Gryemon
Heavily breathes twice.
His centerpiece glows faintly.
Taunts
Up Taunt:
Agumon: Tosses a meat roll in the air and chomps it with one bite in that direction.
Greymon: Roars upwards.
Metal Greymon: Roars forward while raising his wings upwards.
Down Taunt
Agumon: Slashes twice and says "Agumon!"
Greymon: Stomps three times as fire shoots upward.
Metal Greymon: Powers up with eelctrcity.
Right Taunt
Agumon: Jumps up and down three times.
Greymon: Roars out while crouching down.
Metal Greymon: Metal Greymon emits steam as he performs a strong-man pose.
Left Taunt:
Agumon: Agumon turns around and wags his tail at the opponent.
Greymon: Greymon takes his tail and slams it down behind himself.
Metal Greymon: Metal Greymon spins while spreading his wings and floating a bit.
Victory Poses
Agumon
Agumon Digivolves into Greymon which he will then roar with all his might and faces the screen.
Agumon happily jump up and down.
Agumon slashes three times, does a flip, and then does a pose,
Greymon
Greymon Digivolves into Metal Greymon which he then fires off a beam of fire from his mouth.
Greymon falls asleep.
Greymon fires off some blasts of fire before using his tail to slash through it.
Metal Greymon
Metal Greymon Digivolves into War Greymon which he then scratches his claws in front of him in the shape of an X
Metal Greymon chomps on some meat.
Metal Greymon fires off a barrage of missiles that blast toward the camera.
Classic Mode: Digimon, Digital Monsters
All fighters are monster-like in appearance. In addition, they first fight against a Tiny version, then a medium-sized version, and then a Giant to reference the stages of Digivolution.
#107: Sol Badguy Guilty Gear Apaart of the " Bundle" DLC
Character Gimmick: Tension Gauge
Tension is a part of anything you do and the way it functions in Guilty Gear proper seems like a perfect addition as-is. For the uninitiated, Tension builds up by moving towards your foe and landing attacks. But keep yourself too far away or play too defensively (Dodging, shielding, running away, etc.) and you lose all Tension that you have and gain Tension at 1/5 the rate for 10 seconds after. This, unlike other gauges like MP, Durability, and Limit Gauge, encourages Sol players to get up close and personal with their foe. They're also fuel for Overdrives, which are Super Special Moves that cost 50% Tension to use:
Tyrant Rave (→↓←→+A/B): Effectively a stationary Buster Wolf, Tyrant Rave is an explosive two-hit attack that's great for racking up damage.
1st Hit: 2%, 2nd Hit: 38%
Dragon Install (↓←↓←+A/B): A 7-second temporary transformation that Sol can access to bolster hit movement speed, shorten the frame data on his moves and enhance his Specials The timer is paused whenever Sol hits a foe, initiates a throw, or initiates Tyrant Rave.
Sub Gimmick #1: Roman Canceling: A Shield Special tied to Tension and another must-have. Roman Canceling basically locks your opponent in place with each different color of Roman Cancel corresponding to different situations:
Blue Roman Cancel: Only used when doing nothing.
Yellow Roman Cancel: Can be used while blocking an attack, allowing Sol to counter his foes hard.
Red Roman Cancel: Only used upon striking a foe and during the hitstun or blockstun of a foe.
Purple Roman Cancel: Only used during the late active frames and endlag of a move.
Sub Gimmick #2:Airdashing:A minor mechanic much like Terry's Spot Dodge Attack, but would make Sol feel more like a GG character transplanted into Smash. Moving horizontally as you're jumping would be the "walk" while smashing the jump input horizontally will cause you to burst forwards. Imagine air dodging, but riskier.
Sub Gimmick #3:Gatling Combos: Sol's Jab, F-tilt, U-tilt, D-tilt are interweaved together to make a Dancing Blade-style system, and as such all of the aforementioned inputs have three stages of hits, allowing Sol players to mix up their combos. This means that instead of the usual sequential hits on some foes, Sol can use D-tilt 1, Jab 2, and U-tilt 3 instead of only 3 hits of D-tilt.
Special Moves
Neutral Special: Gunflame/Blockhead Buster
A ground projectile like Terry's Power Wave or Iori's Yami Barai, but unlike their projectiles, Sol has more height than distance in his own move, the distance depends if you tap or hold the button but both versions still are quite short. The aerial variant is a different move called Blockhead Buster (more specifically is the Lvl 1), a move that comes from Order-Sol where Sol does an explosion around the hilt of his weapon.
Side Special: Bandit Revolver/Bandit Bringer
Sol does a series of two jumping kicks regularly, since if you held the button you can do instead the Bandit Bringer, where Sol does a powerful dive punch in a similar way to Terry's Power Dunk. You can make the attacks stronger using the input 236 + attack button ( ↓→ + attack), the Bandit Revolver gains a follow-up kick meanwhile the Bandit Bringer gains meteoric properties.
Back Special: Ground Viper/Riot Stamp
On the ground Sol performs the Ground Viper, a strong, louder, high risk and high-reward attack where he charges forward at the ground delivering a strong uppercut at the end, you can mash the button to increase the distance. Using the input 214 + attack button ( ↓← + attack) instead of a regular uppercut the move ends with a Volcanic Viper.
In the air the move changes to Riot Stamp, Sol hops backward and then he impulses himself with a glyph that appears behind him to do a flying flaming kick. Using the input 214 + attack button ( ↓← + attack) the attack gains knockback.
Up Special: Volcanic Viper
Sol's own DP, he does a powerful burning uppercut using his sword, similar to Ken's Strong Shoryuken but trading some height for a bigger hitbox. The only problem is that the move isn't a very good recovery. Use the command version 623 + attack button ( →↓ + attack) to increase a little the height. Sol also has an input exclusive follow-up called Knockdown, where Sol strikes the opponent to the floor with a kick, the input being 214 + attack button ( ↓← + attack).
Down Special: Fafnir/Breaker
Fafnir is a powerful forward punch that has the same kill power of a Falcon Punch without the needing of being charged (but still being a very slow and easily punishable attack) and a perfect shield breaker. You can use the command 41236 + attack ( ←↓→ + attack) to deal more damage.
In the air this move changes for Breaker, a flaming dive kick that you must be careful to use since it has a slightly diagonal direction and when you use it, doesn't have any stop, so if you use it in a risk, have a nice fall! Should be noted that Breaker doesn't have any motion, unlike Fafnir.
Down Special: Roman Cancel
Using Shield-B while possessing 50% Tension Gauge allows Sol to do a Roman Cancel, which comes in 4 different colors based on conditions, slowing down the foe in a Witch Time-style effect and allowing Sol to follow up with certain moves.
Blue Roman Cancel: Only used when doing nothing.
Yellow Roman Cancel:Can be used while blocking an attack, allowing Sol to counter his foes hard.
Red Roman Cancel: Only used upon striking a foe and during the hitstun or blockstun of a foe.
Purple Roman Cancel: Only used during the late active frames and endlag of a move.
Overdrives
Similar to Terry and (more like) Iori, Sol has Super Special Moves (in his case are called Overdrives), to use an Overdrive you require a certain amount of Tension accumulated in the meter.
Overdrive 1: Tyrant Rave
A 2-hit megaton punch starting explosive uppercut with his free hand before delivering a second punch wreathed in fire magic amplified with his sword. Requires 50% tension and can't be performed in the air. The motion is 632146 + attack button ( →↓←→ + attack).
Overdrive 2: Dragon Install
Sol removes his Gear Suppressor and unleashes his original power as a Gear. A high-risk high-reward super in which Sol’s movement speed is increased, his normals become noticeably faster and safer, his specials are all buffed significantly (see below) and his air grab changes to P.B.B., all this for a max amount of time of 12 seconds (the timer stops during the grab attacks) and with the additional benefit that the time slows a little at the start of the transformation with Sol being invulnerable in the starting frames. When the mode’s natural duration ends and Sol returns to neutral on the ground, he is forced into a lengthy recovery animation, making him incredibly vulnerable to a counter-offensive, the transformation can also be interrupted with a highly damaging move. It can be used at the moment you have 50% tension but that would reduce the amount of time you will have so it's preferable to do it at 100% tension (also you can use Tyrant Rave during Dragon Install if you have 50% or more). The motion is 214214 + attack button ( ↓←↓← + attack).
Spoiler: Changes in the moves during Dragon Install
Has more range and massive damage, but the knockback didn't increase.
Final Smash: Branding Breach
In the start, Sol uses a variant of his DI version of the Ground Viper (being his original Instant Kill, All Guns Blazing). The explosions behind Sol will do damage but only the first character hit will be transported to the rest of the cinematic. In the cinematic part, Sol charges his Junkyard Dog to finish his opponent with a fulminating explosive blow.
During the Dragon Install, instead of just charging against the opponent he uses the Overdrive Heavy Mob Cemetery (the explosions behind will still be there, tho), grabbing the first foe will also leave them to the cinematic part, but it will have some changes in the animation, any of this changes will variate the damage.
If the opponent has 100% or more damage at the end of the Final Smash the enemy will be Instant-Killed and if part of that was their last stock, a DESTROYED text will appear on the screen.
On-Screen Appearance
Sol appears and is seen "smoking" a bullet for his sword, Junkyard Dog. He then spits it and catches it before putting it into his sword.
Whenever a one-on-one match starts between Sol and another player, the screen will have a "Let's Rock" and "Heaven or Hell" intro graphic much like the earlier games.
Idle Poses
Smooths back his hair.
Cracks his neck
Taunts
Up Taunt: Turns his back to the opponent and taps his sword on his shoulder.
Down Taunt:Sol turns his back and stomps down on the ground. This causes cracks on the ground to appear.
Right Taunt:Takes his hand and does a thumbs-down gesture.
Left Taunt:Sol takes the Junkyard Dog and slams it down into the ground.
Victory Poses
Note: Like Joker, Lloyd has a unique victory transition where the screen fades to white and then fades back into the victory screen. A bit different than the usual graphics but points to the original source.
Sol walks away from the camera, cracking his neck for a bit before placing Junkyard Dog on his shoulder. He then looks back at the camera with a smirk and says, "Heh, too easy."
Sol's extends his arm, covered in fire, based on his midmatch victory pose in Strive.
Sol is seen in his Dragon Install form, where he lets out a burst of power and a powerful roar before reverting back to normal, looking up at the camera with a toothy grin afterward. Taken from Xrd.
Much like Joker, Sol has a special victory pose when he defeats a character with his Final Smash, instead of teleporting to the usual victory stage, Sol keeps in the same background of his Final Smash, walking to the horizon saying "I think it's about time to end this thing", if he finishes with his Dragon Install variant it could be similar but he keeps his Dragon Install form.
Like Kazuya Sol's victory announcer would be the announcer from his own game, saying "SOL WINS, STRAIGHT!".
Classic Mode: Heaven and Hell
Opponents are based on both heavenly and infernal properties. Matches are stamina matches at 150% with normal gravity to mimic the way Guilty Gear is played. All stages are Omega forms.
#108: Lara Croft Tomb Raider Apart of the "One Woman Army Bundle" DLC
Character Abilities
Lara can wall cling, wall jump, and crawl.
Run n Gun
Lara's neutral attack, forward tilt, neutral air, back air, and forward air are all tied to her twin guns. When close to an opponent though, she switches to her daggers automatically.
Climbing Gear
When clinging to a wall, she can tilt up and use her climbing gear to climb up the side of the wall.
Special Moves
Neutral Special: Competition Bow
Lara will stand up as she brings out her bow, which she used in the 2013 game and Rise of the Tomb Raider, and pulls back it's string by holding the button. When released, she will shoot an arrow forward that flies a medium distance. Similarly to Sora's Neutral Special, Lara will shoot one of the five different arrows through a rotation every time she uses the special move. This is signified by a white icon next to Lara in her damage percentage.
Standard (a triangle) - Works the same as Link's. The longer the player holds a special button, an arrow will deal more damage and fly a bit faster.
Fire (a flame) - When an arrow hits the opponent, it will set them on fire and makes them flinch, but fires slightly slower than a regular/standard arrow. If it hits the ground, it will leave a flame trial on the ground for a few seconds.
Poison (a skull) - When an arrow hits the ground or a wall, it will release out a small green cloud of mist that slowly deals minor damage to opponents before disappearing.
Explosive (an explosion cloud) - When an arrow hits anything (like either an opponent, a wall, or ground) on contact, it will detonate and cause a strong-damaging explosion with a bigger radius, though it covers less distance than normally.
Penetrating (a red cross) - Deals less damage compared to other arrows, but fires much faster and can hit through multiple opponents on it's path.
Side Special: Excalibur
Taking out the Sword of King Arthur, Lara winds up in a stance similar to Mythra's Lightning Buster, the blade building up with bright green energy. After a maximum of 4 seconds of charge, Lara unleashes a large bolt of green power that travels across the stage and deals 10%-22% damage based on charge, killing anyone at 110%-50% from the center of the stage.
Regardless of charge, there's also a hitbox at the start that deals an additional 10% damage and enough knockback to kill at 82%. The range of the sword is on par with Ragnell, and the energy blast is about as far-reaching as Byleth's fully-charged Failnaught. In turn, however, using Excalibur requires a lot of upper-body strength, so she may need a moment to cool down after use.
Up Special: Grappling Hook
Lara throws out a grappling hook. It is longer than the average tether grab and is able to be aimed holding the button. If it lands, Lara climbs up the rope and then can continue to climb up the stage by another half of the rope’s length.
Down Special: Philosopher's Stone
Lara holds the Philosopher's Stone in her hands as long as the button is held down, changing her bullets to gold bullets at a rate of 1 bullet per gun for each 0.5 seconds. Gold Bullets deal an additional 2% damage and cause fighters to flinch when used, though they fire slightly slower. Lara will automatically use gold bullets as her primary ammo until they're gone, and she can hold up to 12 at a time, as indicated by a bullet gauge above her fighter portrait. Final Smash: Tomb Raider
Lara Croft pulls out a rock and throws it. Once it makes contact with the opponent, it triggers a cinematic where the opponent finds themselves in the middle of a dungeon tomb. The thrown rock triggers a series of booby traps which includes stinging darts shot from the walls, biting snakes that fall from overhead, and finally, the opponent being dropped via a trap door to their doom. There, they are caught by a sarcophagus which explodes. The opponent is then launched. If the opponent becomes over 100%, Lara uses the Amulet of Horas for an instant kill.
On-Screen Appearance
Lara swings on the rope and jumps from it, landing like in her games.
Idle Poses
Lara checks her gun.
Lara flips her braid.
Taunts
Up Taunt:She reaches down to grab something and says "Aha!" with the iconic sound clip being played.
Down Taunt:She empties her clip and puts in a new one. This doesn't have any effect on gameplay.
Right Taunt: Lara pulls out her sunglasses and puts them on. She then takes them off. She says "This just isn't my day."
Left Taunt:She looks around with a flashlight and says "What sort of tomb is this?"
Victory Poses
Lara crosses her arms and looks to do something...only to pull out a shotgun, aim it at the camera and say, "Don't you think you've seen enough," before pulling the trigger. Based on the ending of Tomb Raider 2. The overt sexual references were removed from the original source to avoid sexual themes.
Lara emerges from a pile of leaves and readies her dagger in front of her. She then says "You lost the game."
Lara walks in while holding a torch in one hand and her handgun in the other. She then notices the camera and points her gun while saying "That's as far as you go."
Classic Mode: Protect the Relics
All the matches are based in locations that are tomb/ruin/dungeon-like with opponents who seem the kind to steal from said ruins.
#10ε Ninten MOTHER/Earthbound Apart of the "Echo Fighter Pack #2"
Special Moves Neutral Special: PK Boomerang
This has all of the functions of PK Flash but unleashes a boomerang instead.
Forward Special: PK Fire
Up Special: 4th-D Slip
Ninten is the only one of the MOTHER kids who has a different Up Special. Instead, it functions exactly like Mewtwo's Up Special but utilizes various aspects of Earthbound Beginning's battle black and white menu.
Down Special: PSI Magnet
Final Smash: PK Starstorm
Summons Ana and Teddy and then call forth PK Starstorm like Ness and Lucas.
On-Screen Appearance
Magically vanishes in via 4D Slip
Idle Poses
Shuffles his shoes.
Adjusts his hat
Taunts
Up Taunt: Ninten pulls out a Prime Rib and eats it.
Down Taunt: Pulls out his inhaler and takes a puff of it.
Right Taunt: Ninten turns and faces the camera while walking forward in place.
Left Taunt: Adjusts his scarf while saying "Alright."
Victory Poses
Ninten comes running in, sees a present, andd holds it up high.
Ninten breathes in and out slightly raising his fist defiantly
Ninten, Ana, and Teddy run across the screen and then run back across again.
Classic Mode: New Beginnings
All matches are based on bosses found in the first Mother game.
#63ε Jeanne Bayonetta Apart of the "Echo Fighter Pack #2"
Much like how Bayonetta has Madam Butterfly who appears within Wicked Weaves, Jeanne has Madame Styx as the Wicked Weaves.
Special Moves
Neutral Special: Bullet Climax
Similar in function to Bayonetta's with higher attack and stopping power.
Forward Special: Heel Slide/After Burner Kick
Up Special: Witch Twist
Has less aerial recovery ability in exchange for launching power.
Down Special: Witch Time
It has a smaller window to connect but, when it does, it has a longer effect. If it doesn't fully connect, Moth Within activates.
Final Smash:
On-Screen Appearance
Functions much like Bayonetta's appearance but, instead, emerges from Moth's Within
Idle Poses
Flips her hair.
Beckons the person to come.
Taunts
Up Taunt: Jeanne points both of her guns forward and says "Bring it!"
Down Taunt: Turns back while flipping her hair and quickly pivots while saying "I'll show you REAL strength!"
Right Taunt: She stomps on the ground which causes a burst of magical energy to erupt up.
Left Taunt: She hovers in the air, twirls, and laughs while saying "You're fighting me!"
Victory Poses
She turns to walk away and then pivots back and does a high kick before bringing it down and saying "Such a disappointment!"
She twists in place while unleashing a hail of bullets around her before posing with her guns.
She lands and adjusts her goggles before glaring at the screen and saying "Not a fan of Witches?"
Classic Mode: Thirst for Revenge
Jeanne partners up with characters who have been forcibly taken to fight against their aggressors. This mirrors Jeanne's brainwashing by Balderin the first Bayonetta and then kidnapped by the demons in Bayonetta 2.
Character Gimmick: Strike and Technic Artes
Lloyd can skip through his Arte selection by performing the Up Taunt while on the ground. This will allow Lloyd to access two additional Artes aside from his normal one. These Artes are trade-offs in terms of attributes.
Sub-Gimmick: Overlimit Mode
When Lloyd suffers over 100% damage or 25% damage in Stamina, he gains increased superarmor, no longer flinches, and his attacks do far more damage. He also gains a new Up Special, Rising Phoenix.
Special Moves
Neutral Special: Demon Fang/Double Demon Fang/Fierce Demon Fang
Lloyd fires a single wave projectile that moves forward along the ground like Terry's Power Wave. When performed in the air, it does a single power-infused slash without the projectile
Type
Arte
Description
Technical
Double Demon Fang
In most of the games that have this arte, Double Demon Fang is a ranged attack that sends two projectile waves toward the enemy in quick succession.
Strike
Fierce Demon Fang
The user slams their weapon to the ground, creating a shock wave that damages enemies in a wide arc in front of them.
Side Special: Sonic Thrust/Super Sonic Thrust/Hurricane Thrust
Lloyd thrusts his blade forward like he does his "Sonic Thrust" move. It does 6%.
Type
Arte
Description
Technical
Hurricane Thrust
When activated, the user thrusts at the enemy with enough power to create a burst of wind when the weapon strikes the enemy, damaging it further. The arte will not continue if the initial thrust misses; the burst of wind will appear only if the attack connects with an enemy.
Strike
Super Sonic Thrust
When this arte is executed, the user forcefully thrusts at the enemy, pushing it away.
Up Special: Tempest/Omega Tempest/Psi Tempest/Rising Phoenix
Lloyd will jump into the air and perform a buzzsaw attack. This will propel him in an arc overhead. This particular up special attack is notable for covering on all sides which gives Lloyd a literal swirling hitbox of death as he travels in the air. That being said, the recovery distance is not the best. The above gif is Omega Tempest which lengths then attacks and allows Lloyd vertical traveling. I propose the baseline Tempest as it's that initial jump spin you see in the gif.
Type
Arte
Description
Technical
Omega Tempest
The user spins forward as if initiating a Tempest, then spins directly upward to continue the attack. The user then jumps backward to land close to the same position where this arte was executed.
Strike
Psi Tempest
Essentially, this is a more powerful and wider-ranged form of Tempest, which allows the user to jump to the other side of the field while spinning over the target. Compared to its "Technical" counterpart, Omega Tempest, it hits less but slightly more damage.
When in Overlimit Mode, Lloyd has access to Rising Phoenix. This attack causes Lloyd to jump into the air with great speed, turn, and plummet at an angle while engulfed with a fire effect. This protects him from all incoming damage and his high priority. Down Special: Beast/Raging Beast/Hunting Beast
Beast has been a part of the Tales series for really as long as time itself. Many characters aside from Lloyd can use Beast. In Smash, this is his best killing move with the ability to unleash an ethereal beast-like head that shoots up upon release. Lloyd will forgo utilizing his swords and will slam his shoulder forward. This attack is quite unique as it would have a shockwave effect that pulls in opponents before release and then blows them outwards. It has an extended hitbox as the bestial head grows large and moves forward.
Type
Arte
Description
Technical
Raging Beast
When this arte is used, Lloyd does a spin slash to draw nearby enemies closer to him, then blasts them away, creating the image of a lion's head, identical to the Beast arte.
Strike
Hunting Beast
When this arte is used, Lloyd slams the target with a weakened blast, creating the familiar lion's head image. He then flips into the air and drops to the ground with enough force to create a powerful shock wave that knocks down all enemies around him.
Final Smash: Falcon's Crest
The attack will cause Lloyd to shine just like in the above gif and then unleashes a torrent of spiraling energy that, like Beast and Demonic Circle, traps in opponents and vacuums in nearby ones. During this portion, the Final Smash has yet to trigger. Anyone to manages to stay in with the field of effect for 3 seconds will get then get launched into the air. Lloyd's Final Smash is the only one that lacks the trembling character banner seen when most Final Smashes start but, rather occurs before he unleashes the attack's last hit. This also differs in that it shows Lloyd's ToS character banner as seen in the second gif rather than his character banner for Smash. Prior to unleashing the attack, his two swords change to that of the Material Blades. This aspect is quick and hard to catch unless paying attention so as to not take up too much time. He then gathers a whole bunch of energy before swinging it down, carrying the opponent down in an overdramatic/overpowered stall-and-fall attack that slams the opponent into the ground and then proceeds to launch them up into the air. This can also damage nearby opponents who are near the crash zone. He then hops away.
On-Screen Appearance
Flies in on a Rheaird, jumps off while doing a flip, and then brandishes his twin blades.
Idle Poses
Checks his Exsphere on the back of his hand.
Taps the ground with his boot.
Taunts
Up Taunt:Lloyd holds up his hand and his Exsphere glows brightly. He says " Mom, I hope you were watching... "
Down Taunt:Loyd will
Right Taunt:Lloyd takes out the Spirit Ring and fires off a projectile that has very limited range. It does 1% damage
Left Taunt:Loyd swings both swords forward in an x-pattern and says " There is no meaning in dying! "
Victory Poses
Note: Like Joker, Lloyd has a unique victory transition where the screen fades to white and then fades back into the victory screen. A bit different than the usual graphics but points to the original source.
He throws one of his swords upwards while spinning the other one, then he catches the sword and puts them away before saying "Never had a chance." This is based on his victory animation.
He slashes once and then points his sword forward. He then says " Heh heh. I looked pretty good there, huh? " This is based off his victory animation.
He slashes twice while saying "Alll right!" and then turns to face the camera with his swords out.
Team Battle OnlyIf Lloyd is Player 1, he will do a unique voice line taking from these…
KO Voice Line
I'm sorry...dad...
This is a reference to his dying quote in Tales of Symphonia.
Classic Mode: Journey of Rejuvenation
This classic mode focuses on Lloyd fighting Summon Spirits which were required in order to gain the Material Blade.
#110: Geno Super Mario RPG Apart of the "Beware of the Forest's Mushrooms Bundle" DLC
Character Abilities
Geno has a character mechanic where he will emit an aura right before his Specials connect. When this happens, hitting the special button again will do more damage right when the attack hits. This references his source material from Super Mario RPG.
Special Moves
Neutral Special: Geno Beam
Geno shoots out an energy beam from his arm cannon in front of himself, dealing 9.7% per hit.
However, if you press B before it hits the foe, it increases its damage, speed, and length, making the attack stronger.
Also if you hold B, you could continuously shoot the beam at opponents.
Side Special: Geno Whirl
A highly-telegraphed attack and one of his most infamous. Geno will form a disk of Golden energy in his hand and throw it out on frame 14. Normally if you hit a foe with this it'll deal a measly 6% damage and flinches, allowing Geno some good set-up potential. But there's a catch! If you press the B button the exact frame before it touches a foe's hitbox, you'll deal a critical hit with a much stronger knockback! Not even Kazuya's Electric Wind God Fist was as precise in Smash as this!
Up Special: Geno Comet
Glowing as bright as the star he was before possessing the doll, Geno bolts upwards for a bit. Geno can stop his flight to perform an omnidirectional follow-up at any point in the recovery, adding to his mix-up game. Usually, this does 8% damage and some low-medium knockback, but pressing the button just before hitting a foe allows him to barrage foes with multiple hits, dealing a total of 13% damage and medium-high knockback.
Down Special: Geno Boost
Hold down the Down Special input to raise your attack stat slightly to deal more damage. Letting go for the duration will cause Geno to receive the full benefit but letting go early will have fewer attack damage modifiers. Letting go right before the last arrow vanishes will not only see an attack modifier added but will also give Geno a knockback-resistant buff. Final Smash: Geno Flash
Geno will summon a pillar of light that envelopes him and anyone else nearby. This transports the player to a recreation of a battle from Super Mario RPH with Geno alongside Mario and Mallow. He will then transform into a cannon and lob a powerful projectile which creates a star-shaped burst before launching the opponent. This attached sequence is unique as it renders every character in isometric styling.
On-Screen Appearance
Geno spawns on the stage as doll, but suddenly the star (his soul) crashes into his body, making him alive. Also he gets up after being awoken.
Idle Poses
Shakes his head side to side.
Jumps up and down slightly.
Taunts
Up Taunt: Shakes his head up and down quickly. Based on one of his animations from SMRPG.
Down Taunt:Geno holds out his hands to "stop" the opponent.
Right Taunt:Geno folds his arms and laughs.
Left Taunt: Geno points his Star Gun to the right and to the left. This is a reference to his previous role as a Mii Gunner Outfit for two games.
Victory Poses
Geno turns and folds his arms while facing the screen. Again, based on his victory animation.
Raises his arms into the air which causes his "soul" to leave the Geno doll thus causing it to crumple to the ground. It whirls about before shooting into the air.
Geno drops down from the air which references his attack animation to face Bowyer. He then aims his gun toward the screen.
Classic Mode: STar-Sent Savior
Classic mode is based on the series of events that transpired in Super Mario RPG.
Ratchet throws the Omniwrench like a makeshift boomerang that travels 3/4 the distance of Mega Man's Side Smash before it comes flying back to him. The attack deals a minimum of 13% and hits multiple opponents in its flight path.
Up Special: Thruster-Pack
With the Thruster-Pack, Clank will spawn two jet wings and boost him & ratchet in the air. Unlike the original game where you fly straight, you can aim the control stick to send the duo flying straight forward in any direction.
Down Special: Weapon Select
Holding down special brings up a weapon wheel which allows Ratchet to select from a number of weapons. These include:
Pyrocitor
Warmonger
Plasma Striker
Glove of Doom
RYNO
Bouncer
Buzz Blades
Vortex Grenade
Visibomb Gun
Combuster
Mr. Zurkon
Using these weapons will help upgrade the item.
Pyrocitor
Holding the B button releases a stream of fire that functions similarly to Bowser/Charizard's fire breath Neutral B's. It's a rather weak stream on its own, but the hit rate makes it a sustained damage beast, as it deals with 1% per 5 frames.
Hitting the foe with uninterrupted fire for 1 second inflicts a D.o.T. that deals 12% damage over 10 seconds.
Lavacitor:
The Pyrocitor's direct upgrade in the 2016 reboot, the Lavacitor has a new ability added: after 2 seconds of uninterrupted fire hitting the opponent, they will leave behind a patch of embers similar to Rathalos's fire patches.
Warmonger
Tapping the B button fires a rocket in front of him that deals 15.5% explosive damage and hard knockback.
Holding B allows Ratchet to lock onto an opponent he aims at for more than 30 frames to give the Warmonger's rocket-homing properties.
Peacemaker:
The direct upgrade of the Warmonger in the 2016 reboot. The explosion now releases 8 micro-rockets in every straight and diagonal angle. Each micro-rocket deals 7.3% damage and half the knockback of the normal rocket.
Plasma Striker
Tap B to fire a large bolt that deals slight damage on its own. Uses Marth's headshot mechanics, allowing Ratchet to deal increased damage to opponents if hitting that hitbox.
Holding B allows Ratchet to strafe and jump while attempting to aim, firing the gun once the player releases the B button.
Plasma Slayer:
The direct upgrade of the Plasma Striker in the 2016 reboot. The Plasma Slayer now has piercing properties, making it more akin to Kazuya's Devil Blaster minus the damage reduction.
Glove of Doom
The Glove of Doom is a mechanical glove that Ratchet acquires in the first game, using this will let you drop a tiny orb that grows into a small herd of robots that'll run forward in the direction they are thrown in and explode upon contact with an opponent, this weapon only works on the ground.
Neutral B will have Ratchet drop a small orb that releases a small herd of robots that run straight towards the stage, if they make contact with an opponent, they'll explode leaving them with 10% of damage.
Gold Glove of Doom: This is an upgraded gold variant required in the original, while it likely plays the same as the original in Smash Bros the gold glove uses some upgrades the bots' have in later games, mostly their V2-V5 enhancements were they carry lasers next to them. They'll run forward to their opponents while firing from their lasers, but when they run out they'll detonate and explode.
RYNO
Fire a sphere of energy that creates a portal. The portal itself causes damage at 1.3% per hit. Ejecting from the portal is space debris which will crash down and can spike airborne opponents. It does more damage when it hits directly on rather than a whiff. Due to its nature, it has a lot of lag and is rather predictable but deals high damage. As an Easter Egg, it could drop Nintendo-related content such as an Arwing, a Bowser Statue, Villager's House, or more.
It increases the speed of the portal which allows for quicker portaling.
RYNO ∞
Instead of opening one portal, it opens two portals next to each other dropping the same payload but doubling the pain and hitbox.
Bouncer
When fired, it causes a small explosion to detonate which then causes smaller explosions to arch from the initial one. These are delayed ones that can be deceiving to other players.
The first upgrade causes the bombs that are released to do extended damage over a period of time.
Heavy Bouncer: This version creates an even larger explosion with smaller explosions. The first explosion also has a vacuum effect.
Buzz Blades
It fires a volley of blades that will deal damage. Unlike its source material, it can't ricochet off opponents but, rather, can ricochet off solid objects. This causes it to gain a 2.2x damage magnifier after each ricochet with a total of 6. The attack is a great damage amplifier but not the best to close off stocks.
It fires off more blades per attack thus increasing the overall damage potential as well as the area of effect.
Doom Blade:
Not only does the attack has a damage amplifier for ricochets it performs but it can also leave a poison effect on opponents that get hit by it further increasing the amount of taken damage.
Vortex Grenade
This Grenade works very much like a weaker version of Black Hole which will pull in opponents and levitate them. It doesn't deal damage and its pull is weaker than the item.
It has a pull effect for not only opponents but for items and such as well.
Singularity Grenade:
It has a wider area of effect with a stronger pull that emits tachyon waves which can damage opponents within the bomb. For every damage it does, it has a momentary burst of pull strength.
Visibomb Gun
It functions much like Snake's Remote Missile but it last less range and damage output.
It has better steering with tighter controls with the ability to slow down the rocket by pushing backward.
Mega Visibomb: Increases the overall damage output and its tight controls from the previous upgrade while also increasing the distance it can be remotely controlled.
Combuster
A slow-firing weapon that shoots out blasts of superheated plasma that works great on shields.
The shots do more impact damage which can launch opponents further and has a slightly higher rate of fire.
Magma Combuster: It will continue to burn which deals continuous hits of damage. It can also stay on the stage for a period of time which does environmental damage.
Mr. Zurkon
(Note: Mr. Zurkon is the only weapon with actual voice clips. These include:
“Flee before Mr. Zurkon!”
“Death is too stupid for Mr. Zurkon.”
“Mr. Zurkon conducts a symphony of pain.”
“Say hello to Mr. Zurkon’s little friend!”
“You are no match for the almighty Mr. Zurkon!”
“You are the disease and Mr. Zurkon is the cure!”
“Mr. Zurkon does NOT come in peace!”
Mr. Zurkon will rotate around Ratchet and will fire lasers as it travels. It also absorbs some damage as a type of shield.
Has higher hit points and can suck up damage. The lasers it fires have a wider hitbox.
Zurkon the Destroyer: A different color form of Mr. Zurkon, it fires higher powered lasers that act like a fully powered Thoron but weaker. Zurkon the Destroyer also can absorb more damage. It also has a chance of firing a higher powered-up plasma shot that travels slowly but does high damage; comparable to a Charge Shot.
Final Smash: Black Sheepinator
Ratchet fires a beam that can travel through fighters, turning anyone it hits into a helpless sheep for a total of 8 seconds. The sheep can jump once, can't shield or dodge, and have only a single input: Pressing attack or special will result in them going "Baaaah." Ratchet can freely attack opponents around, though their fluffy wool reduces damage and knockback to them. Opponents with over 100% damage get turned into Black Sheep, which baa, then explode, KO'ing them and dealing damage and knockback to nearby opponents.
Please Note that Ratchet and Clank have an Alternate Costume composed of Rivet and Kit so they will also be sharing animations as well.
On-Screen Appearance
Ratchet's homemade spaceship from the original PS2 game lands in the background of the stage. The cockpit opens as Ratchet snatches Clank and puts the robot on his back and faces the foe.
Idle Poses
Ratchet jumps up slightly and puts his hands on his hips.
Klank pops up and taps Ratchet on the head.
Taunts
Up Taunt:Ratchet throws his Omniwrench into the air but gets distracted by Klank. The wrench then falls and hits him on the head. He then says "Ouch! That stings!" while Ratchet says "Don't get distracted."
Down Taunt: Ratchet hovers in the air using a jetpack and does a small spin while Ratchet also hovers, They do a high five.
Right Taunt:Turns to the screen and takes his Omniwrench, and points it forward. He then says "I won't back down!"
Left Taunt:Mr. Zurkon appears and floats in front of Ratchet and says one of his quotes when he is summoned. Ratchet laughs off the threat.
Victory Poses
Ratchet comes zooming in on a jetpack and turns around with Klank jumping off his back. He then pulls out his Omniwrench and points it forward while saying "You miss me?!
Ratchet swirls his Omniwrench and then points it up in the air. Clank then appears and says "Seems we missed the party."
Ratchet takes out one the guns he has and points it forward towards the screen before saying "Eat plasma" and then fires it.
Classic Mode: The TRUE All Stars Battle Royale
All fighters are those found on Sony Playstation consoles.
Round
Opponent
Stage
Music
Notes
References
1
Shadow Moses Island
Mii Swordfighter uses the Raiden outfit.
Metal Gear Solid first appeared on the PS1 in 1998.
2
Suzaku Castle
Street Fighter first appeared on the PS1 with Street Fighter EX Plus in 1997.
3
Mishima Dojo
Tekken first appeared on the PS1 in 1994.
4
Momentos
The Mii Swordfighters uses the Persona 3 and 4 Protag outfits
Persona Revelations first appeared on the PS1 in 1996 and Persona 5 appeared in 2016 on the PS5.
5
Hollow Bastion
Kingdom Hearts first appeared on the PS2 in 2002.
6
Midgard
Mii Swordfighter uses the Aerith outfit, Mii Gunner uses the Barret outfit and Mii Brawler uses the Tifa outfit.
Final Fantasy first appeared on the PS1 with 7 being the first FF game on a non-Nintendo system.
BONUS
Break
the
Targets
!
Final
Crash
N. Sanity Beach
Crash Bandicoot first appeared on the PlayStation in 1996 and was a Playstation-exclusive series until the early to mid-2000s.
#?: Red Angry Birds Apart of the "Seeing Red Bundle" DLC
Special Moves
Neutral Special: Bied Swap/Bird Launch
Red is capable of swapping between various Birds (Chuck, The Blues, Bomb, Boomerang Bird, Terence, Bubbles, Silver, and Mighty Eagle. This gives Red8 total potential uses. That being said, there is a 25-second cooldown after using one of the birds before it can be reused. If the bird is damaged and "dies" by an attack, the cooldown timer isn't applied. This also applies is the bird flies off the stage. The attack is a two step process. Like Bonus Fruit, the player can cycle through the birds which appears as an icon above Red. By selecting it, the player can then press the neutral special once again to launch the bird. It can be used both on the ground and in the air. This also allows Red to "save" a bird before launching them. This can be used for mind games by delaying launching the bird. Getting KO'd remove any cooldown timers for any given bird. Each bird has its own properties which I will highlight in another post.
Side Special: Red Launch
Unlike the neutral special, Red launches himself. This is done by inputting and holding down the special button which allows Red to be fired in the direction of where the Slingshot is facing. Now, this is where it gets interesting. After holding down the input, the player can then direct the angle at which to launch Red with the available angle being 360 degrees. This allows this move to be extremely affective as both and offensive and recovery move. It's not as useful as other ones due to having to "swing" the slingshot to look upwards or at any angle to aid in recovery. Still, this is an extremely flexible move.
Up Special: Power-Up
Red is the second character to not get a typical recovery move because this will be tied to another move later. Instead, Red can utilize one of several power-ups which can affect all of his specials in some way. The power-ups are Shockwave, Power Potion, Homing Bird, Birdquake, Space Egg, and Mighty Feather. These power points only affect the s[ecials (for now) including the Neutral, Side, and Down. Once you use this power-up, then you are stuck with it unless you die or swap up by pressing up special again and selecting the power-up. Once you swap out, you can't use that power up again until you are KO'd.
Down Special: Bad Piggy Tower
Yes, even the Bad Piggies make an appearance. By holding down the down special, a "blueprint" for a Bad Piggy Tower appears. Red can "cause" it to appear directly in front of him too, like Grenjnja's Shadow Sneak, can move the blueprint on a horizontal plane in front of him. Releasing the input causes the Bad Piggy Tower to appear. There are three variations of the Bad Piggy Tower but they are some rather medium in size with have 6 total Bad Piggies on them. Just the design of the tower changes along with its color. In a team battle, the color of the tower correlates with the color of the team. Doing it in the air will cause the Tower to be taller since it scales Red's height in the air in comparison to the ground. This tower serves many purposes with its main one being a deterrent and obstacle to the damage properties of Aloan Exeggutor. That being said, the main use is to destroy the tower. By launching either one of the birds via Neutral Special or Red via the Side Special, it will cause the Bad Piggy Tower to collapse which causes widespread collateral damage in a way that is somewhat similar to Villager's Down Special. The attack is unique as it has Bomb Rush-like physics where the demolition of the tower is highly dependent on where it was hit, which type of Bird was used, and if any Power-Ups was utilized. This results in no one Down Special resulting in the same amount of damage. This attack is extremely varied. The tower can also be destroyed by other attacks as well by other opponents which can result in Red being damaged or any allies if they are close by. This is the perfect crowd-control attack and is absolute mayhem in 8-player Smash. One funny animation is, once spawning the tower, Red adopts a rather angry look. Only one tower can be built at one time.
Final Smash: Super Red
Red launches himself via Slingshot which, upon hitting the opponent, will trap them in the Final Smash. It transports them to a scene similar to the Angry Birds game. The opponent is trapped in a large Bad Piggy with other Piggies. Red jumps into a super large slingshot which fires him at supersonic speeds. As he reaches the tower, he passes through a wormhole making him become Super Red. He crashes into the tower which causes a burst of red waves to pulsate out. This has two effects: First, it destroys the tower and greatly damages the opponent. Upon destruction, all of the Bad Piggies and any caught opponents crash down around themselves. Anyone past 150% damage will be instantly KO'd. The second effect is those red waves continue after the Final Smash cinematic ends and will pulsate out from where Red initially hit the opponent and will continue until they reach the blast lines. It's possible to avoid these waves as they move in the four cardinal directions rather than a 160-degree radius, getting hit pushes the opponents backward in a wave similar to Mario Finale but with less damage overall. It's more akin to Mario's F.L.U.D.D> in properties.
On-Screen Appearance
Red crashes down at the ground and gets up (Also he screams like in the original game when launched).
Idle Poses
Red grits his teeth.
Red jumps up and down slightly.
Taunts
Up Taunt: Red puts on a mask reminiscent of the one he wore in Angry Birds Space, and the eyeholes light up with red as the plumage on the top of his head sharpens. He goes back to normal after he takes off the mask.
Down Taunt:Red screams in a fit of rage.
Right Taunt:
Left Taunt:Red grimaces with anger while Bad Piggies dance around him.
Victory Poses
There are 4 Reds, one is perched in the slingshot while the other 3 are on the ground - each one on the ground backflips as a "10000" appears above them one by one, and then a final 10000 appears above the Red in the slingshot as his name flashes on the screen
Jumps up and down with the other Angry Birds.
Bad Piggies appear in a tower before Red appears from the background and crashes into the tower; causing it to collapse.
Classic Mode: Meanie Greenies
All of the opponents are green variations of fighters except for Yoshi on stages that have wall-off blast zones.
Neutral Special: Orb of Deception
Works exactly like in LoL, and does more damage on the way back to her. Functions like TLink boomerang will always attempt to return to her
Side Special: Charm
Ahri takes a little to strike a...playfulpose then performs an equally-playful wink to release a heart projectile the size of a Kafrizz that travels as fast as Marth's walk speed. Anybody within 1/3 BF that's hit will take 2% damage, but will be forced to go at max walking speed towards Ahri's location for 2 seconds, or until she strikes them for 1.2x the normal damage and knockback. This Special also has the unique flavor of changing their eyes, similar to when they have a Smash Ball, except this time, their eyes are glowing a bright pink while Charmed.
Up Special: Spirit Rush
In my head, this works like a combo between Bayonetta's Side B and Pikachu's Up B.
Down Special: Fox-Fire
Ahri summons 3 balls of foxfire that constantly float around her like Mega Man's Leaf Shield for 5 seconds. If anybody gets within 1/4 BF of Ahri during that time, the foxfire balls will automatically lock onto them and deal 9% damage total with medium-low knockback at Level 0, prioritizing anybody under the effects of Charm.
Final Smash: Nexus Destruction
When activating this Final Smash, Ahri will rush forwards with a powerful Spirit Rush. If she hits anybody, a cutscene plays out: all caught fighters collide with a Nexus (Pictured above), and the camera pans to see Ahri alongside Jinx, Yasuo, Ashe, and Teemo rushing forwards to go whole ham on the Nexus with their respective abilities. After a bit of relentless barraging, Ahri throws her Orb of Deception at the Nexus, causing it to explode and KO'ing anybody above 100% damage. This Final Smash also affects the victory screen if finishing a match with it: The traditional "GAME!" is replaced with the League of Legends "VICTORY" banner, and it seamlessly transitions to a unique victory animation wherein Ahri and her teammates celebrate their victory.
On-Screen Appearance
Ahri uses the LoL teleport on a ward. Teleport's animation is just a spinning purple light that comes down from the sky
Idle Poses
Ahri throws her orb up in the air and catches it
Ahri backflips then cartwheels
Taunts
Up Taunt: Ahri causes an Orb of Deception to rotate around her in quick succession.
Down Taunt: She hits the ground which causes her nine tails to glow
Right Taunt: Ahri blows a kiss. This can potentially do damage as the kiss moves forward.
Left Taunt: Ahri backflips while hovering in the air.
Victory Poses
Ahri walks away from a nexus exploding, doing the whole "cool guys don't look at explosions" bit.
Floats in the air and giggles while Orbs of Deception float around her.
Camera POV facing the sky shows Ahri looking down at it on her fours. She starts to slowly lean down, looking as though she's about to kiss whoever she's on top of...but then the camera fades to black. Then it fades to another camera perspective and shows Ahri shooting up as she inhales some essence from the previous POV. After her name splashes on-screen, she regains composure and looks at the camera with a teasing grin as though to say, "Well? What were you expecting?"
This Final Smash also affects the victory screen if finishing a match with it: The traditional "GAME!" is replaced with the League of Legends "VICTORY" banner, and it seamlessly transitions to a unique victory animation wherein Ahri and her teammates celebrate their victory.
Classic Mode: Invasion of Runterra
Every opponent is based on a character archetype found in League of Legends.
Round
Opponent
Stage
Music
Notes
References
1
Bridge of Eldin
Ganondorf represents the Fighter class; in particular the Juggernaut sub-class. Bridge of Eldin is based on the map, Proving Grounds.
2
Reimu
The Great Cave Offensive
Reimu represents the Mage class; in particular the Artillery sub-class. The Great Cave Offensive is based on the map, Butcher's Bridge.
3
Castle Siege (Phase 3)
Hero represents the Controller class; in particular the Catcher sub-class. Castle Siege (Phase 3) is based on Magma Chamber.
4
The Summit (Omega)
Greninja represents the Stealth class which is a sub-class of the Slayer class. The Summit is based on the map, Howling Abyss.
5
DJ Octavio
Hakurei Shrine
DJ Octavio represents the Tank class and, partially, the Vanguard sub-class. Hakurei Shrine is a reference to the Temple of Lily and Lotus.
6
Ygdrassil's Altar
Olimar and Alpha represents the Specialist class. Spiral Mountain is a reference to the map, Crystal Scar.
#?: Nightmare Soul Calibur Apart of the "A History of Stage Bundle" DLC
Character Abilities
Guard Impact: By tilting forwards slightly while triggering a Perfect Shield, Nightmare generates a wind box in front of himself that slightly pushes his for away and gives him an opening to strike.
Revenge: Some of Nightmare's moves have counter-frames during start-up. Triggering these frames allows Nightmare to counterattack with Dire Vengeance, an omnidirectional blast the size of Thwack that deals 1.4x the damage he would've taken and also gives him a temporary boost to his stats.
Night Stance: Nightmare has access to three different stances that he can use to mix up his foes.
Night Side: A stance where Nightmare holds the sword with his monstrous hand.
A: Soul Biter: A lunging horizontal chop with Soul Edge. Deals 7% damage and stuns on hit.
Hold A to transition back into Night Side Stance after the attack.
Forward Tilt: Night Front Kick: A lunging thrust kick. Deals 5.2% damage and low knockback.
Back Tilt: Phantom Splitter: An underhanded upwards slash. Can hit above Nightmare and has great horizontal range, to boot. Deals 11.2% damage and medium-high knockback.
Up Tilt: Phantom Star: A telegraphed upwards slash that crumples on hit. Deals 9% damage.
Hold A to transition into Night Behind Stance.
Down Tilt: Skull Chopper: An upwards-angled horizontal sword slash advancing forwards. Is great for trading with shorthopping opponents as Nightmare can avoid many aerials with this attack. Deals 7.7% damage and low-medium knockback.
Night Behind: A stance where Nightmare holds Soul Edge down his back.
A: Knee Kick Rush: An advancing two-hit knee attack. Deals 4% and 5% damage and low-medium knockback.
Side-Tilt: Terror Sweeper: A leaping sweeping sword strike. Deals 7.5% damage and low knockback with a high chance to trip.
Hold A to transition from Terror Sweeper to Night Side Stance.
Up-tilt: Terror Vortex: An underhanded upwards strike with Soul Edge, dealing 7.2% damage and strong knockback.
Double-tap side: Transition into Dash Attack.
Night Lower: A stance where Nightmare crouches, holding Soul Edge level with the ground.
A: Leg Hacker: A hitstun-inducing slice of the legs. Deals 6.1% damage. Hold A to transition into Night Side Stance.
F-tilt: Death Horn Charge: A lunging stab with Soul Edge. If anyone hits, he will smash them into the earth while they’re hung onto Soul Edge. The attack deals 4% and 9% respectively, with the second hit dealing strong horizontal knockback.
Hold A to trade the grab from Death Horn Charge with a transition into Night Behind Stance.
U-tilt: Death Lifting Kick: An upwards-angled knee followed by an upwards kick. Deals 3% and 5% respectively and deals medium-level knockback.
Double-tap joystick: Transition into Dash Attack.
Special Moves
Neutral Special: Soul Wave
A telegraphed, omnidirectional blast around Nightmare 1.5x the size of his Shield. Deals 10% damage and medium-high knockback. If hit during start-up, this attack initiates Dire Vengeance.
Side Special: Double Avenger
A lunging two-hit strike that deals a total of 13% damage and strong knockback. Has excellent disjointed hitboxes and goes 1/3 the width of Battlefield. If hit during start-up, this attack initiates Dire Vengeance.
Up Special: Night Terror
Sprout fiery wings and ascend upwards with a force of a meteor. Tap B again to follow up with a Devil Blaster-like beam downwards. The ascent deals 8% damage and medium-high knockback while the downwards beam deals 14% damage and high knockback.
Down Special: Reversal Edge
A two-stage Special that starts with Nightmare performing a delayed downward slash dealing 6% damage. If he hits, both Nightmare and his opponent (with the closest being prioritized in free-for-alls) will engage in a rock-paper-scissors match that uses the A, B, and Y buttons. Nightmare has a unique set of attacks when engaging, though enemies that aren't another Nightmare will default to their tilts. B beats A, Y beats B, and A beats Y.
A: Calculated Slaughter: A quick and strong horizontal swing that deals 11.5% damage and strong downwards-angled knockback. The opponent uses F-tilt with this button.
B: Crown Splitter: A leaping downwards slash that deals 15.3% damage, strong knockback, and spikes anyone in collateral. The opponent uses U-tilt with this button.
Y: Crimson Fountain:Nightmare reaches forward and grabs the foe, draining a portion of their soul to gain Terror Charge before tossing them away. Deals 9.4% damage and low knockback. The opponent uses D-tilt with this button.
Final Smash: Inferno Unleashed
Nightmare raises Soul Edge heavenwards and causes a massive Soul Wave that catches foes in his wake. In an entirely new environment, Inferno appears and bathes the entire place in fire, damaging them slowly for a brief moment before he flies down with meteoric force and causes an explosion that completely immolates the foes. As the explosion occurs, the camera zooms out to reveal this is happening inside of Soul Edge itself, its single eye an empty gaze at the camera. The entire Final Smash deals a total of 44% damage and extremely strong knockback, and instantly kills at 100%, healing Nightmare for 15% for every kill done this way.
On-Screen Appearance
Nightmare appears on a phantom horse who rears and releases a ghastly neighing sound. It then vanishes while Nightmare drops to the ground.
Idle Poses
He closes his hand with a lot of force like in SC6's character selection screen.
Nightmare slightly pulsates with dark energy slightly.
Taunts
Up Taunt:Nightmare clenches his monstrous fist in front of him and says "I desire your soul."
Down Taunt:Nightmare grasps the SoulEdge with both arms and points it upwards, and says "Consume!"
Right Taunt:Nightmare swings Soul Edge and points in front of him saying "There's no turning back!"
Left Taunt:Stabs downward which causes darkness to erupt around him
Victory Poses
Nightmare swings his sword twice before striking a purpose. Throughout this, he says, "Blood! Darkness! I shall drown the world in both!" Based on his Victory Animation from SC5.
He puts his sword upwards and then lows it like in Soul Calibur 6
Nightmare kneels down while his monster hand pulsates with dark, purple energy. He takes the hand and holds up in front of himself and says "Need...more souls!"
Classic Mode: Stories of Souls
Each character has been a guest fighter in the SoulCalibur series before. Each fight is an Omega form stamina matches.
#11ε Black Shadow F-Zero Apart of the "Echo Fighter Pack #3"
Special Moves
Neutral Special: Shadow Menace
Winding up similarly to his enemy's Falcon Punch, Black Shadow readies his own version. Instead, however, when he punches, the shadowy silhouette of a bull appears around his fist and explodes with shadow on contact with anybody he hits, while retaining the explosive damage that Falcon Punch possesses, although now it is more of a disjoint. Side Special: Tauros Charge
Retaining the properties of Melee Ganondorf's Gerudo Dragon, Black Shadow rushes forwards for a mighty uppercut that deals 17% damage on the ground and 16% in the air. Unlike Gerudo Dragon, however, Black Shadow also possesses armor frames during the charge, much like Dark Pit's Electroshock Arm. Up Special: Shadow Dive
Black Shadow jets upward but, when he latches onto the opponent, he unleashes a surge of shadow energy before launching the opponent away with a blast of shadow power. Down Special: Bull Kick
Dashes forward while unleashing a powerful kick that unleashes dark flames which can even damage opponents as he passes by. Final Smash: Black Bull
Functions much like Blue Falcon but Black Shadow is laughing hysterically in the cockpit.
On-Screen Appearance
The Black Bull drifts onto the stage before Black Shadow hops out of the cockpit and lands with his arms crossed.
Idle Poses
Black Shadow clenches his fists and then unclenches.
Black Shadow raises his fist forward.
Taunts
Up Taunt: Black Shadow puts his fist up, surrounded by black flames
Down Taunt: With Norio Wakamoto's iconic voice (Yes, the legend Norio Wakamoto voices Black Shadow in the F-Zero anime), he says in English, "I'll cr-r-r-r-rush you..." As he says this, he hunches over, curls his fingers, and drags his sole along the ground like the animal his costume is modeled after.
Right Taunt: Black Shadow covers himself in black flames and laughs.
Left Taunt:Black Shadow swipes his cape forward and laughs.
Victory Poses
Black Shadow drops from above and smashes the ground causing a wave of darkness to shoot up.
Black Shadow grabs an unconscious Captain Falcon and holds him up into the air before looking and smirking at the camera.
Black Shadow swipes his cape at the camera which causes a dazzle of darkness to emit in front of the camera.
Classic Mode: Darkness Countdown
Every opponent is a sci-fi/space-themed opponent which is fought on a 1:00 time limit with 2 stocks for the opponent.
#46ε Roll Mega Man
Apart of the "Echo Fighter Pack #3"
Special Moves
Neutral Special: Shadow Blade
It would do more damage than Metal Blade and travel further. However, it cannot be picked up like a regular item, which means DLN mains will have to adapt to losing a lot of crazy setups.
Side Special: Drill Bomb
Roll will fire a projectile similar in shape to the Crash Bomber. Unlike with the Crash Bomber, however, the damage on a foe it latches onto builds up the moment it happens before it performs a single-hit explosion. This mechanical difference does not offset that it deals the same amount of damage and knockback as the Crash Bomber. Up Special: Beat
Functions exactly like the Custom Move in Smash 4, I think beat is a good choice for roll as it not only fits her personality a bit better but also it adds some extra visual variety when compared to Mega Man
Down Special: Star Clash
Functions just like Leaf Shield but the stars spin slightly faster.
Final Smash: Roll Legends
Roll takes a bucket of water and splashes it out. If it makes a connection with the opponent, it triggers a cinematic where Roll utilizes her Roll Buster along with Roll Caskett from Mega Man Legends, Roll.EXE from Mega Man Battle Network, Alia from Mega Man X, Ciel from Mega Man Zero, and Harp Note from Mega Man Star Force.
On-Screen Appearance
Roll comes in riding on Rush which is lifted from Marvel vs Capcom 1 and 2.
Idle Poses
Giggles to herself
Kicks the ground
Taunts
Up Taunt: Eddie teleports in and is seemingly distressed (like he accidentally arrived here). Roll smiles and waves, which calms him down.
Down Taunt: Roll switches her arm to a vacuum and sucks up some dust.
Right Taunt:Beat flies forward from behind her and rests on her arm as she scratches his neck. This is a taunt that lasts until the player presses a button to cancel it.
Left Taunt:Roll takes a brush and cleans the ground fictiously.
Victory Poses
Roll sweeps up skid marks from the fight then notices the camera and strikes a pose with her broom slung over her shoulder and her free hand in a peace sign.
Roll appears with Rush, Eddie, and Beat as she twirls around.
Roll comes running but slips and falls She looks up embarrassed about the scene.
Classic Mode: Cleaning Up Messes
Given Roll is a cleaning robot, every opponent is dirty, filthy, or known for being one of those two.
#?: Doomslayer Doom Apart of the "Thy Smash Ball Subsumed Bundle"
Gimmicks and Mechanics
Special Moves
Neutral Special: Weapon Wheel
By holding down the special button, players can cycle through numerous guns within Doomslayer's inventory which allows him access to the gun via his Jab, Forward Tilt, Neutral Air, and Dash. The weapons are as follows:
Name
Ammo
Description
Combat Shotgun
Pistol
Chaingun
Plasma Rifle
Ballista
Grenade Launcher
Rocket Launcher
Heavy Cannon
Not selecting a gun causes the weapon wheel to cancel out. Each weapon has its own ammo pool and reducing the ammo count to 0 causes the gun to be unable to be selected though Doomslayer can still carry the gun. Performing physical, melee attacks, KOs, or a Glory Kill can cause the ammo count to increase. When carrying an inactive gun that is out of ammo, being close to an opponent causes a punch attack that can help regain ammo.
Side Special: Crucible/Glory Kill/Hell Fist
More detailed write-up coming soon. Doomslayer does an upward swing with the Crucible. When the gauge is filled up, the Mark of the Slayer icon appears above the opponent. Getting in close and hitting side special will change the attack to Glory Kill. This keeps ALL attacks available intact without having to change them during a given situation. Doomslayer can still do a grab while in the Glory state, can still use the Crucible, and has the Glory Kill attack available. If used after landing a Glory Kill, this becomes Blood Punch, a dashing AoE strike that's good for dealing great burst damage.
Up Special: Meathook/V-Jump Boots
The Doom Slayer takes out his Super Shotgun and fires the Meat Hook in the direction of the joystick, automatically snapping to the ledge if he aims there. If aimed at a fighter, they will remain suspended in the air as the Slayer drags himself toward their position. There, one of two options can be done: Press B to release the fighter without sacrificing the Slayer's momentum. Press A to fire a Super Shotgun blast that deals either 16% up close or 8% from far away. If holding the up special neutral will cause a momentary pause before boosting Doomslayer in the air with a midair jump.
Down Special: Equipment Launcher
The Slayer deploys his shoulder gun and shoots one of three options depending on how much you hold the button.
Tap: Frag Grenade - It's very similar to the grenade of Snake though it does more damage with the drawback that has less distance.
Hold Brief: Ice Bomb - The Slayer shoots a cold grenade, trades the damage for the ability to freeze the opponents similar to the Neutral Special of the Ice Climbers.
Hold Long: Flame Belch - The Slayer fires a flamethrower, unlike similar moves like Bowser or Charizard's neutral specials it couldn't be held to maintain the attack.
Final Smash: BFG-10000
The move starts with the Slayer using The Crucible who does a wide front slash, all the opponents who get caught by this attack are send to a cinematic where The Slayer brings his BFG-9000....just to attach it to a different place, then the camera in first person would show the Slayer pointing to the surface of Mars and a shot of outside shows that he was using the upgrade version of the weapon the BFG-10000 to shoot a hole in Mars that destroys the opponents in the process (think in King K. Rool Final Smash but in a bigger scale). If the opponents had 100% of damage or more it would be an instant kill.
On-Screen Appearance
The Slayer enters from a portal opened by VEGA.
Idle Poses
Stomps his foot forward.
Cracks his neck.
Taunts
Up Taunt:Doom Slayer checks his ammo.
Down Taunt:Doom Slayer hits his weapon with his fist to unjam it.
Right Taunt:Doom Slayer takes out a small figurine of himself and fistbumps it. Based on an animation from Doom 2016 when collecting a figurine of himself.
Left Taunt: Takes up the Crucible and holds it up high as it glows with red energy.
Victory Poses
The camera starts pointing at the boots of the Slayer, then raises through his chin where we can see the Slayer taking of his helmet but the camera stops right there, only making the chin visible.
The camera is pointed toward the sky as several Imps are sent careening into the distance from an explosion. The camera pans down to show the Slayer fighting an endless horde of demons without so much as tiring, the freeze shot emulating Doom Eternal's cover art. The continuous animation has the camera pan out over the entire victory platform as the Slayer runs around defeating demons eternally with his vast arsenal.
Doom Slayer has his back to the screen and is helmetless. He then puts his helmet on as he turns to look at the camera.
Classic Mode: Rip and Tear
Every opponent is based on a dark, demonic-like creature with every opponent being giant-sized versions of themselves.
#?: Noah Xenoblade Chronicles Apart of the " DLC" Bundle
Special Moves
Neutral Special: Overclock Buster
The Swordfighter Talent Art. Noah leaps upwards and performs a spinning downward slash. There are two hitboxes: the physical part that deals 17% damage and strong knockback along with immense shield break potential, and the heavily-disjointed energy blade it sprouts that deals 12.5% damage and medium knockback. Because Noah is leaping in the air to do this, there is some major risk of SD'ing off-stage when he uses this, similar to Shulk's Back Slash. Forward Special: Chain Attack: Brave Assault
Noah will slash forward. If the attack connects fully, the opponent will be momentarily stunned which allows Noah to initiate a number of attacks by pressing the special button with reduced frame input lag and damage output. It works much like Marth's side special with the final attack being the most powerful where it launches opponents.
Up Special: Overfall
A Master Art from Taion's starting class, the Tactician. Noah summons a swarm of Mondo and uses them to flow upwards causing him to fly upwards and deal several hits of damage, racking up 13% damage in the process. This move kills at 171% damage from center stage and propels Noah 5 Units upwards. Down Special: Sword Strike
One of the Arts of his starting class, Swordfighter. Noah leans back while charging a hefty, downwards-angled sword slash in front of himself that deals 17% damage and a strong horizontal knockback. Press B while charging to have Mio do her Down Smash instead. Final Smash: Limits Unbound
Noah and Mio strike the opponent together starting a cinematic where they both beat the rival and using the Ouroboros form release the Critical Art Limits Unbound where he does three devastating slashes.
On-Screen Appearance
Noah and Mio walk onto the stage after playing their flutes
Idle Poses
Dusts his jacket off
Looks to the right and then to the left
Taunts
Up Taunt: He takes his sword and thrusts it upwards while saying "I'll tear it all down!"
Down Taunt: He twirls his blade before brandishing it and grunts.
Right Taunt: Noah holds out his sword and holds it horizontally before saying ""Cutting a path to the future!"
Left Taunt: Mio appears and Noah plays a small part of A Life Sent On with their flutes.
Victory Poses
Noah & Mio appear walk forward, take out a flute, an play together. It doesn't matter which one won the match.
Noah takes his sword and slashes it around and then holds it out in front of him "This is our path to the Future!"
He drops down from above and picks himself up before brandishing his blade and saying "Upon this sword...I pledge my strength!"
Defeat Quote
If Noah is defeated, regardless if its a side or side KO, Noah will scream "NOAH!!! NOOO!!!!" offscreen.
Classic Mode: Opposing Factions, Come Together
Noah and Mio were once enemies turned allies. All fighters share a common relationship.
Round
Opponent
Stage
Music
Notes
References
1
& Octoling
Deepsea Metro
Both species were former enemies, but as of Splatoon 2: Octo Expansion, this has changed drastically
2
Green Greens
They debuted as rivals but eventually became friends
3
Venom
Though debuting as bitter enemies, their relationship has upgraded to that of a respected rivalry
BONUS
Break
the
Targets
!
4
Skyworld
Dark Pit started as a third party who went his own ways, but has a tense, if still rather peaceful, relationship with his lighter counterpart
5
Spear Pillar
Semi-based on their conflict in the first Pokemon movie: Mewtwo started as an antagonist, with Pikachu on the opposing side. Mewtwo had a change of heart towards the end of the film, however.
6
Final Destination
A sort of meta take, but Mario & Sonic have had a bitter rivalry since the 90's which eventually evolved to more of a friendship by the 2000's.
Final
Rugal Bernstein
Represents the behind-the-scenes instigator of Xenoblade Chronicles 3's plot, Moebius
Alternate Costume
Factiosholds
#?: Mio Xenoblade Chronicles
Apart of the " DLC" Bundle
Special Moves
Neutral Special: Gemini Strike
The Zephyr Talent Art. Mio will enter a stance and charge ether into her chakrams for a moment before throwing one of her chakrams forwards. Press B within 1 second after throwing and Mio will throw the other. Each chakram deals 9% damage and medium-high knockback on hit. This move also has invulnerability frames leading up to a throw of each chakram, making it a great pseudo-counter.
Forward Special: Chain Attack: Lightning Quick
Works similar to Noah's Side Special but with quicker cuts with even more reduced damage as a result.
Up Special: Ether Cannon
A Master Art from Eunie's starting class, the Medic Gunner. On the ground, Mio uses the gun staff to fire a shot straight ahead that deals 8% damage and a very weak knockback, but is about as spammable as Wolf's Neutral B. In the air, Mio aims the staff opposite of the joystick's direction and uses the blast to propel herself in the direction of the joystick.
Down Special: Wide Slash
One of the Arts of her starting class, Zephyr. Mio crosses her arms with chakrams in hand, then performs a scissor motion that strikes at both sides of her that deals 13% damage and medium horizontal knockback. Press B while charging to have Noah do his Down Smash instead.
Final Smash: Death of 1,000 Cuts
Very similar startup to Noah's but when they take the Ouroboros form she quickly spins to lunge the opponent, then she jumps and does a final strong slash with her body.
On-Screen Appearance
Noah and Mio walk onto the stage after playing their flutes
Idle Poses
Mio brushes away her hair
Mio raises a fist slightly
Taunts
Up Taunt: She stands up tall and then stretches before saying "Keep up the pressure."
Down Taunt: Mio clangs her chakrams together and then points them forward before saying "We'll make it happen!"
Right Taunt: Mio twirls and throws her chakrams in the air before catching them. She giggles as she does this.
Left Taunt: Mio appears and Noah plays a small part of A Life Sent On with their flutes.
Victory Poses
Noah & Mio appear walk forward, take out a flute, and play together. It doesn't matter which one won the match.
Mio does several flips before slashing down with her ring blades. She then says "As I am now, I can't hold back!".
Mio stands up and flicks her hair back before looking down at the camera. She then says "One last stand?"
Defeat Quote
If Mio is defeated, regardless if it's a side or side KO, Noah will scream "YOU HURT MIO!" offscreen.
Classic Mode: Opposing Factions, Come Together
Noah and Mio were once enemies turned allies. All fighters share a common relationship.
Round
Opponent
Stage
Music
Notes
References
1
& Octoling
Deepsea Metro
Both species were former enemies, but as of Splatoon 2: Octo Expansion, this has changed drastically
2
Green Greens
They debuted as rivals but eventually became friends
3
Venom
Though debuting as bitter enemies, their relationship has upgraded to that of a respected rivalry
BONUS
Break
the
Targets
!
4
Skyworld
Dark Pit started as a third party who went his own ways, but has a tense, if still rather peaceful, relationship with his lighter counterpart
5
Spear Pillar
Semi-based on their conflict in the first Pokemon movie: Mewtwo started as an antagonist, with Pikachu on the opposing side. Mewtwo had a change of heart towards the end of the film, however.
6
Final Destination
A sort of meta take, but Mario & Sonic have had a bitter rivalry since the 90's which eventually evolved to more of a friendship by the 2000's.
Final
Rugal Bernstein
Represents the behind-the-scenes instigator of Xenoblade Chronicles 3's plot, Moebius

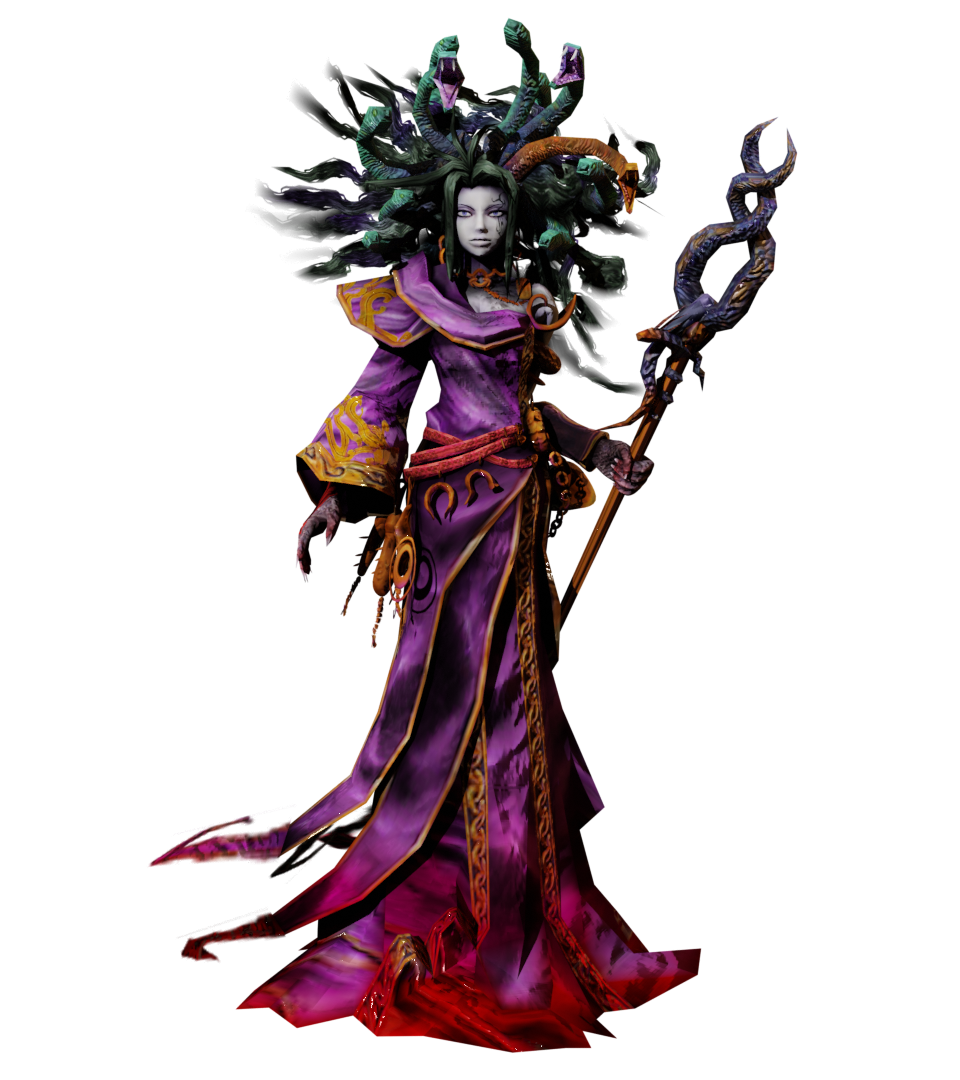


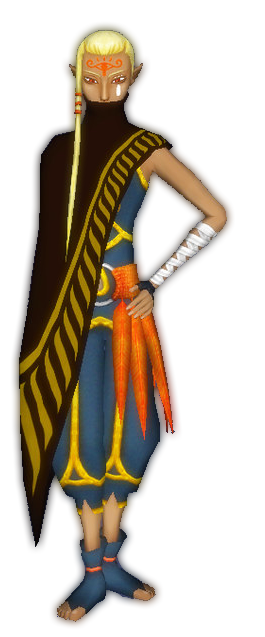
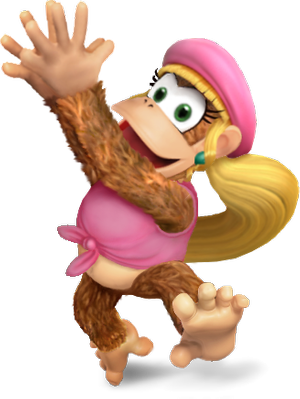
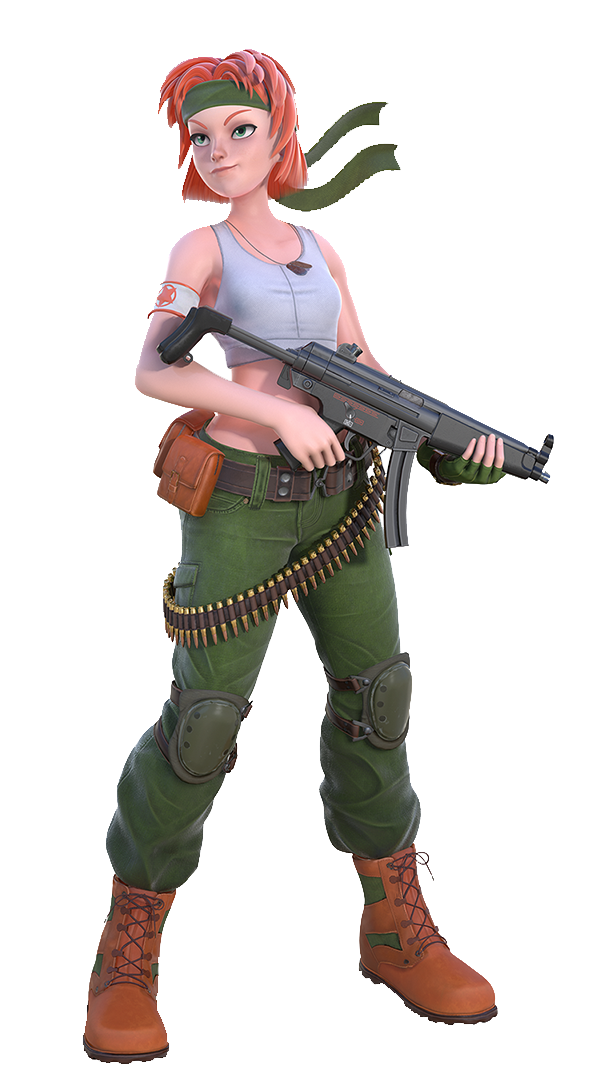


 + attack) to increase a little the height. Sol also has an input exclusive follow-up called Knockdown, where Sol strikes the opponent to the floor with a kick, the input being 214 + attack button ( ↓← + attack).