• Welcome to Smashboards, the world's largest Super Smash Brothers community! Over 250,000 Smash Bros. fans from around the world have come to discuss these great games in over 19 million posts!

    You are currently viewing our boards as a visitor. Click here to sign up right now and start on your path in the Smash community!

TLGD: Zange-chan Social- Toon Goons for Life

Joined
Mar 15, 2008
Messages
10,050
Exploring Norfair: An In-Depth Guide


Table Of Contents
  1. [jumpto="preface"]Preface[/jumpto]
  2. [jumpto="stageoverview"]Stage Overview[/jumpto]
    • [jumpto="stagelayout"]Stage Layout[/jumpto]
    • [jumpto="risinglava"]The Rising Lava[/jumpto]
    • [jumpto="lavawall"]The Lava Wall[/jumpto]
    • [jumpto="lavawave"]The Lava Wave[/jumpto]
    • [jumpto="lavaflares"]The Lava Flares[/jumpto]
    • [jumpto="stagepatterns"]Stage Patterns[/jumpto]
  3. [jumpto="gameplaytactics"]Gameplay/Tactics[/jumpto]
    • [jumpto="strategies"]Strategies[/jumpto]
      • [jumpto="bottom"]Controlling the Bottom[/jumpto]
      • [jumpto="top"]Controlling the Top[/jumpto]
      • [jumpto="ledge"]On the Ledge[/jumpto]
      • [jumpto="staygrounded"]Stay Grounded![/jumpto]
      • [jumpto="runningaway"]Running Away[/jumpto]
    • [jumpto="characterspecific"]Character Specific[/jumpto]
      • [jumpto="techniques"]Techniques, Tricks, and Gimmicks[/jumpto]
      • [jumpto="influence"]Influence on the Cast[/jumpto]
  4. [jumpto="videos"]Videos[/jumpto]
    • [jumpto="datareferencing"]Data Referencing[/jumpto]
    • [jumpto="regularmatches"]Regular Matches[/jumpto]
    • [jumpto="abusingthestage"]Abusing the Stage[/jumpto]
  5. [jumpto="credits"]Credits[/jumpto]


[jumpname]preface[/jumpname]I. Preface

Welcome to Part 1 of my Norfair: In-Depth Guide! Part one will include everything guide-related about Norfair, as in information and strategies, while part two will cover my stance over its legality (after going through public discussion).

This guide took me about half a year to complete, including all the research, compiling, and paced writing that I went through with the help of numerous users which will be credited in the final section of this guide. If there's one thing I learned from making this absurdly large guide, it's that nobody really knows this stage as well as they think they do. There are a lot of false generalizations going around about this stage, and a plethora of footage of users not playing this stage correctly, which leads me to believe that this stage is not very well developed within the competitive community. This, in my opinion, is the source of a lot of the negative light that we see being cast upon this stage, and since this stage is my absolute favorite stage in all of Smash history, I took it upon myself to organize this project.

With that being said, I'm creating this guide with a few goals in mind. Those goals are...
  • To inform my readers of all of the major mechanics of this stage.
  • To teach general strategies that players can use and expand upon in gameplay.
  • To briefly discuss how each character interacts on this stage.
  • To debunk any incorrect facts about this stage, while also providing evidence to back up my own.
  • Improve the quality of future matches on Norfair.
  • Serve as a one-stop reference for everything Norfair.
  • Set a standard on guide making.

It's important to note that this guide is very picture and video heavy. Like I stated before, I wanted to be as clear as possible and use as much evidence as I could. That meant using pictures, videos, and a whoooole lot of text to serve as references to confirm any point or piece of information worth mentioning (so you wouldn't have to!). This guide will be a very, very long read, but for those up for the challenge of reading this guide, I recommend that not only should you read the entire thing, but you should read the entire thing in order, since I carefully ordered each chapter to flow into each other. Also, there will be no TL;DR since it took long enough for me to write all of this the first time I don't want anyone to shortcut their way through this thread. The information is all here for those who are interested, if you don't want to go through it, then it's your loss.

Again, a lot of people helped me out with this guide, so shoutouts to them. I'll list everyone involved in the final section, so check that out at the bottom of this guide. With that said and done, let's get this Norfair thing started!​

*This guide is optimized for Vibrant Skin
 
Joined
Mar 15, 2008
Messages
10,050
[jumpname]stageoverview[/jumpname]II. Stage Overview


[jumpname]stagelayout[/jumpname]Stage Layout


So this is Norfair. It has a non-traditional layout, and is themed over the Norfair levels from the Metroid series. The stage has 5 platforms in total, all organized in a V-shaped layout. All the platforms are of equal length, and each have one ledge in its outer ledge, with the exception of the bottom platform that has 2 ledges. In total, that makes for six ledges, three on each side.

The blastzones on Norfair are quite average, but due to the layout of the stage, you can choose to move closer or farther to it, by moving to either the top or bottom platforms.


Norfair's collision data as shown in BrawlBox

As you can see, the collision data for Norfair is quite interesting. The blue things inside the platforms are the collision areas, or what your character model will stand or collide into. The top platforms are fully permeable (meaning you can go through them from both sides, with the exception of the area above the ledge, which is only semi-permeable from the bottom up (if you stand on the ledge and hit down, you will only crouch as opposed to falling through the platform). The same can be said for the middle platforms.

The bottom platform is different though, due to the strange device thing that's under the platform. The bottom platform acts similarly to the top platforms in the sense that it's fully permeable on all sections but the ledges. The only difference is that the big machine thing hanging from other the platform creates a box of walls that aren't permeable at all, thus, creating a non-permeable floor on the center of the bottom platform. The box of collisions only encases what looks like the core of the mechanism hanging from the bottom platform, and not anything around it (most notably the two tube things hanging from the side), which means that you can go through the two tubes on the side and shark/recover from below. [Video Reference] Also, you can use the vertical collision lines as walls and either tech them, or absorb hits if you ever get hit by a hazard. [Video Reference] Sadly, you cannot wall jump them.

As you can also see in the BrawlBox picture, there are collision boxes wrapped around the capsule on the bottom platform. The capsule only appears when the lava wave hazard appears. Basically, the capsule is wrapped in all four sides with the blue collision walls. It's important to note that the doors are double coated, since one opens the door from outside, and the other keeps you within the capsule when the doors close. Also, if you look closely, there's a blue collision wall on the bottom. If the capsule spawns in any other platform, you can use that collision floor to stage spike your enemies to the bottom blastline, which can change the flow of the game in a fun way. [Video Reference]

One thing to note is that the sole blue collision line that's in the very center of the picture is the floating platform where the Pokemon Trainer will stand on if you choose to play as Pokemon Trainer. You can't stand on that platform, but the Trainer will just chill there in the background.

Something not on the BrawlBox picture is the hazards. Although they aren't a part of the layout per se, I do think it's worth noting that there are four different hazards to this level: Rising Lava, Lava Walls, Lava Waves, and Lava Flares. I will go into detail with them in the next sections.


[jumpname]risinglava[/jumpname]The Rising Lava


Similarly to Brinstar, a pool of lava will rapidly (and abnormally) rise and fall from below the bottom blastline, and over portions of the stage. The altitude that the lava will rise up to will vary from time to time, but normally, the lowest point is far below the bottom blastline (away from the playable field) and the maximum that it'll rise up to would be just below the top platforms. Although the lava doesn't always rise to exact altitudes, they do rise to about the same area frequently. Heights that the lava usually rises to consist of...


  • Under the bottom platform
  • Between the bottom and middle platforms
  • On the middle platforms, barely overlapping the platforms as they bubble
  • Cleanly overlapping the middle platforms, halfway to the top platforms (max height)


A great way to measure the height of the lava would be by using the two pillars in the background for reference.

You can tell when the lava is about to rise because the screen will shake, and will be accompanied by a rumbling sound effect. [Video Reference]The lava can take about 4-6 seconds to rise depending on where it's rising to, and will normally stay afloat for about 4-5 seconds before slowly dropping back down. In almost all cases, the lava will drop down all the way, taking about 4-5 seconds to do so, but there are times where the lava will drop a little bit above the lowest point, and rarely, just near the bottom blastline. When coming in contact with the lava, the lava will deal ~14%, and will send you in an upwards direction (without DI). This will be able to kill players when they're at higher percents depending on the height of the lava, character being hit, and amount of DI involved.

For reference though, I did a rough killing percents test. I had Jigglypuff (lightest), Mario (average), and Bowser (heaviest) get hit by the rising lava while standing on the middle platforms, and used no DI to escape it. Jigglypuff barely survived the hits at ~127%, Mario barely survived at ~141%, and Bowser survived at ~155%. To clarify, that was their percent before they got hit. After the hit, Jigglypuff had 141%, Mario had 155%, and Bowser had 169%. Now, add in your favorite character, variable DI, and variable positioning on the map, and you can get a rough estimate on when you will be dying due to the rising lava in Norfair.

Avoiding the Rising Lava:
In order to avoid the lava, the simplest solution would be to move to higher ground before it covers the ground that you're standing on. Once the lava stops rising, the lava will always go down, so it's just a matter of racing to the top platform until figuring out where the lava is going to stop. The lava can be a bit tricky though, since the hitbox can deceptively extend for a couple of pixels over the lava. [Video Reference] For example, if the lava is just barely overlapping the second platform to the point where the platform is half engulfed in lava, and half not, you can still get hit by the lava below you if you're standing on the clean portion of the platform while the lava is practically touching the platform below you. It's a bit misleading, but once you see it, you can't unsee it. Through experience, you'll be able to tell when it's going to happen and when it's not.

Alternatively, if you find yourself inside the lava while touching the floor (you can do this if you drop from the respawn platform into the lava, if your character uses counter, or if you hold shield as the lava touches your feet), you can escape the lava by bringing up your shield, having the lava hit your shield once, dropping your shield, and quickly jumping away. [Video ReferenceYou don't have to worry about getting hit by the lava when you unshield, the lava rehit rate is 60 frames. [Video Reference] In other words, the lava will hit you once every second exactly, which is plenty of time for you to escape.

This hazard can be difficult to avoid at times because this hazard is the only hazard that's able to overlap with another one of Norfair's hazards. It will overlap with the lava walls, lava flares, and very briefly with the lava wave. Rule of thumb, if the lava rises, always expect a secondary hazard to accompany it at some point.


[jumpname]lavawall[/jumpname]The Lava Walls


A hazard that is unique to Norfair would be the lava walls. Lava walls are giant waterfalls that slowly (and strangely) move closer and closer to the stage, vertically overlapping more than 50% of the play space, forcing combat to relocate to the other end of the stage. The lava wall will come from one of two directions at a time, the left side of the stage, or the right. Unlike the rising lava, the lava wall will always stop at the exact same point over and over, which makes it easier to avoid.

Before the lava enters the screen, the camera will pan drastically to either the left side or the right side, signaling that a lava wave is approaching. The camera pans for different durations (on average for about 7 seconds), but it should always happen before the lava wall appears. The lava wave itself takes about 4 seconds to arrive and disappear from the peak of where it goes to. When the wall reaches its peak, it usually pauses in place for 3-4 seconds before slowly drifting off screen.

Upon contact, the lava wave will do 14%, and will send you in a horizontal direction. The knockback is pretty strong, killing enemies with proper DI around 150%, making it a very dangerous hazard. The proper direction to DI would be upwards in almost all situations, and it's normally best to get hit from as low as possible so that you have enough upwards room to DI to.

Avoiding the Lava Wall:
The easiest way to avoid the lava wall is to simply move away from it. Before the lava wall even shows up on screen, the camera will pan to a certain direction for about 7 seconds, which is more than enough of a cue to start moving towards the opposite side of the stage. On top of that, the lava wall creeps in at a snail's pace, which gives even more time to avoid it.

The challenge of avoiding the lava isn't solely avoiding the wall though, it's trying not to get hit or pressured into it by your opponent. If you're in a position in which you are about to touch the lava wall, a viable option would be to shield the lava as it hits and move either inside the lava (if you're still being pressured), or move away from the lava (if your enemy has already moved away). The lava rehit rate for all lava is 60 frames [Video Reference], which allows you to shield a hit of the lava, drop your shield, move around a bit, pull up your shield again, shield another hit, rinse and repeat. You could do this for quite a while (perhaps three or four safe hits tops) before your shield breaks.

Alternatively, if you are able to snag any of the ledges while the lava wall is out, go for it. That, accompanied with some smart ledgeplay can help buy some time to avoid the wave.

It's worth noting that the only other hazard that the lava wall will overlap with is the rising lava. If this happens, then it's imperative that you relocate to a safer position, specifically to one of the top platforms. If you're inside the lava wall and the rising lava creeps in from under, you can get hit out of the wall by the rising lava, which will only make things worse. Always be aware of the rising lava if you plan on staying inside the wall for a while.


[jumpname]lavawave[/jumpname]The Lava Wave


The lava wall is probably the least intrusive hazard of all of Norfair's hazards, but it's also one of the hardest hitters. The gist of the hazard is that a giant tsunami wave of water develops in the background of the stage, and rapidly rushes over to the stage and consumes the entire play area with a dangerous hitbox for about a split second.

The animation starts off with the wave developing in the background, followed by the capsule forming in one of the five platforms, and the middle platforms doing a 20 frame (1/3rd of a second) scooting animation to the side. The wave will develop for a while, and about 7 seconds into the animation, the wave will hit the play area. When the wave is gone, the capsule will open its doors and disappear about three seconds later. The whole wave animation lasts 560 frames (9.33333 seconds), starting from when the wave begins to develop, and ending when the wave stops moving.

Since the hitbox only lasts for a split second, the trade off is that the attack hits really hard. When getting hit, the wave will send you in an upwards direction, and can kill as early as 100% depending on your character. For reference as to how high the knockback is, here's a post from Raziek:

Without DI, this will kill Marth at 80% (Bottom Platform), 70% (Second tier) or 60% (Top Tier), so make sure you DO NOT GET HIT BY THIS.
Straight from the Norfair guru himself. This transformation is probably the best killer, doing 18% damage each hit.

Avoiding the Lava Wave:
There are many ways to avoid the lava wave. The most obvious solution would be to use the capsule provided by the stage to avoid the wave.


The Capsule, also known as "The Safety Hut", "The Safe House", "The Homeless Shelter", "The Crack House", and "The Cage".

The capsule appears in only one of the five platforms, and there is no known pattern that helps you predict where it will be. In order to use it, one must first hit the side hatches with an attack to open the door (similar to the doors in the Metroid games, which must be shot at to open for some strange reason). Hitting them will open the doors, and the doors will close soon before the wave hits the capsule. The doors will be closed shut until about 2-3 seconds after the wave passes. This is an effective way to avoid the wave, but it's never the best option, seeing as you're closed in a small confined space for a large number of seconds, in which your opponent can easily abuse you in. Sure, you'll avoid the lava, but that's not all that needs avoiding if you trap yourself in here. [Video Reference]

Other options would include shielding, air dodging, spot dodging, ledge invincibility frames, countering, or grabbing through the lava.

Shielding is a good option because it's quick, it always safe, as long as it's out, you will always avoid getting hit (the most that'll happen is that your shield will break), the shield push is minimal, and the shield health removed is barely anything. The only two downsides to this are that you must remain grounded and immobile for a second or so, which means you are susceptible to getting grabbed (explained further down).

Air dodging is my favorite option, since it does no damage to you or your shield at all, you can stay mobile through it, it's easy to time, and as Toon Link, you can Zair immediately afterwards. The only trade-off is that there is a risk to timing it incorrectly. There's a trick to timing it that I always use, and it goes like this: If you plan on air dodging, take note of how filled the screen is with the background wave. The wave starts off small and far away, but as it gets closer, the entire background gets filled with the lava wave, and it passes through the stage. When you notice that the entire screen is covered with the lava wave, wait like half a second, jump, then air dodge. [Video Reference] It takes a bit of practice, and the timing differs from character to character (*cough cough* Peach *cough cough*), but it's definitely effective.

Spot dodging is another option that works, but it's a bit harder to time than the air dodge, and you still retain your immobility as if you were gonna hold your shield. The timing is similar to the air dodge timing though, the only difference would be that instead of waiting half a second, you would wait just a little bit more.

If you are able to safely use other types of invincibility frames, such as ledge invincibility, then by all means go for it. Ledge invincibility frames last forever, the only downside is that you can be punished when the animation is over.

There are a lot of character specific ways to avoid the lava wave as well. Characters with counter attacks such as Ike, Marth and Lucario can simply time a counter against the lava and avoid getting hit. It's fairly safe too. Also, the wave can be jumped over if you're off-screen in the top portion of the stage, and if you're Game and Watch, you can safely parachute through it. [Video Reference]

Although shielding is normally a good strategy (often considered the best strategy to avoid the wall), it leaves you wide open to another viable way for the enemy to safely avoid the knockback. If you have the higher controller port priority (From highest to lowest: P4, P3, P2, P1), you can grab your opponent and engage in a throwing animation, and if the lava hits you mid throw, a grab break will occur. In the grab break, the character being grabbed gets released, eats 36%, and gets hit by the high knockback. The character doing the throwing animation will only eat the 36% and get 0 knockback. [Video Reference]

Last thing worth noting is that this hazard can only be overlapped by the rising lava, but the overlapping is very brief. The overlapping will only be for a second, and it'll happen as the lava is falling down.


[jumpname]lavaflares[/jumpname]The Lava Flares


Probably one of the stage's most intrusive hazards, are the lava flare (also known as geysers, fumes, pillars, squirts, and plumes). The lava flares are squirts of lava that shoot from the background like geysers, and land on various locations on the stage. The amount of flares that can come up will vary, and there is no known pattern of predicting where and how many flares will appear.


This is the area that the flares will shoot at, overlapping both of the top ledges, and every area in between.

The flares can come in a maximum number of three (3) waves, and multiple flares can appear in each wave, and in different spots. To clarify, in this video, you can see that two waves of lava flares occur, and that there are varying amounts of flares that can appear in each wave, and all in different positions. The danger level of this hazard can shift from something subtle like one wave of one flare, to something hectic like the first wave in this video times three.

A single flare would do 18% damage if you get hit by it, and will send you at an upwards diagonal angle depending on where you get hit from. The flare is a hard hitter, and can cause death past 100% depending on where you get hit from.

Preceding the flare would be a vibration on the entire stage, accompanied with a rumbling sound effect. From the second you see the flare appear on the screen, you will have about 1.5 seconds to run away from it if you're on one of the top platforms, a little less than 2 seconds if you're on the bottom platform. The animation for a single flare will last around 3.5 seconds from the moment it appears to the moment it goes off screen.

Avoiding the Lava Flares:
The flares can be tricky to avoid for people who don't know how to avoid them. Just getting this out there quickly, the best way to avoid the flares is to simply run away from it as it's approaching. This is obvious, and usually the case for a lot of situations, but not in all situations, so I'll get into more detail with the hazard right now. Something that a lot of people aren't aware of is how the hitbox of the flare looks like, so I will provide you guys with an estimated visual.


The bright yellow rectangle in the very center is where the lava flare will hit. The two red/orange rectangular boxes next to it will not hit you.

As you can see in the image above, the hitbox for the flare is deceptively thin. It only hits in the yellow-most part of the flare, not on the reddish drips surrounding it. [Video Reference] Because of this, it's rare for flare hitboxes to overlap each other. In most cases, they will just get close, but it's still possible for them to overlap each other. [Video Reference]

So now that you know how the hitboxes look like, and the range in which the flares will get you to, there are a couple of concepts you need to know in order to minimize your chances of getting hit.

The first is that you should not be high in the air when you think they'll arrive. Air dodging does not outlast the flare, nor is it a safe plan at all times, considering that you might be faced with two flares that are right next to each other, and air dodging past one or both of them might be very difficult given the mobility of some characters. There's also the issue with securing your landing, since the platform layout could cause you to land earlier than you may want, causing you to get hit during your landing lag. If you're in high the air, your best bet would be to try to air dodge away and land in a secure location, or to use a character specific trick such as a counter or Fox's phantasm to quickly escape. If you're low in the air, your best option would be to hurry up and get grounded, unless you're Marth and have counter.

The second concept that you must understand is that all of your best options are grounded options against flares. If you can recall earlier when I said that the lava's rehit rate is 60 frames, then understand that this also applies for the flares. Let me make myself very clear: You do not need to hold out your shield for the entire duration of the lava flare. If you shield the flare once (regular shield or powershield), you have exactly one second to Harry Houdini your way out of there. Things like this are unnecessary.


Snake can cover himself with his cardboard box before the lava hits him again. :awesome:

This opens the doors for a lot of escape opportunities. Assuming you powershield the flare, you can instantly drop your shield and freely walk away from the lava, even though it appears to be hitting you. If you use your regular shield to block the flare, you will be stuck in shield stun for a while, but you will also get pushed away from the flare in shield, just enough to get you to the edge of the hitbox. From there, you can drop your shield and freely run away, and do whatever you want. Alternatively, if you're near the ledge, you can grab onto the ledge for free invincibility frames. Depending on where the flare is, you can either hit forward or R to recover, or hold back to move away from the flare with extra invincibility frames. There are numerous things you can do to avoid the flares out of shield, such as dropping your shield and bringing it up back again, rolling away, running away, grabbing the ledge, using counter, and using a quick moving attack. All of them are viable options for different situations, so it's important to be creative.

The third concept that you must learn is that the safest place to be when the flares hit is on the top platforms, and for two different reasons. Reason one being the rising lava, that can overlap this hazard, and because of the ease of access to the area away from the lava flare's reach. You can escape it much faster from the top platforms than from any other platform.


[jumpname]stagepatterns[/jumpname]Stage Pattern


This stage has numerous hazards that can alter the pace of the game. Some of the hazards relocate battles to other parts of the map, some hazards require you to change your strategy, and some can even kill you. When fighting, players are expected to take advantage of the hazards, so one of the more important things to figure out is if there's a pattern between these hazards that the player is able to keep track of, so they can add it to their strategy. The final conclusion of all my research can be found at the end of this section. I thought it would be interesting though to document how exactly I got to my conclusion, so let's get this started!

Before any research was done, this was what we knew:
  • The first minute of every game follows the same rough pattern, which goes like this...
    1. Rising Lava reaches below bottom platform (Level 2-3)
    2. Rising Lava reaches second platform (Level 4-5)
    3. Secondary Hazard Appears (Lava Wall/Flare/Wave)
    4. Rising Lava reaches second platform (Level 4-5)
    5. Secondary Hazard Appears (Lava Wall/Flare/Wave)
  • Selection of secondary hazards is unpredictable. It could be either of the three secondary hazards listed above.

Anything pattern past the one minute mark is based on speculation at that point. Judo777 had made an attempt to find a pattern long before I did, which can be read right here, but in my opinion, the pattern was too loose, and when put in practice, I doubted it's accuracy due to encountering back to back secondary hazards. I wanted to see if his findings were correct using a different method. In attempt to find a pattern, I took down notes on all the hazards that happened in an 8 Minute Fixed Camera match on Norfair.

One thing to take note of is that I had completely forgotten about how the camera pans and shakes before hazards appear. It was a major oversight, but I was too far into the process to ditch it, so I decided to live with it. Since I was unable to see when the camera pans for the Lava Wall, one would have to assume that the lava walls should appear ~7-10 seconds before the lava appears on the graph. It's not really that much of a problem seeing as the panning of the screen is extremely consistent. It always happens, and it lasts about the same amount of time each time.

Last thing to take note of is the timing. The times on the table aren't exact, they are just estimates. I used a stopwatch to time these (the ol' fashioned way ;)), so these times might be +1/-1 seconds off due to my reaction time and millisecond rounding, but no more than that.

Anyways, here are the results for Run #1:

[collapse="Rising Lava Levels Run 1"]Norfair
Lava Rising Run
Run #1


Level 0: Bottom Most Lava Level
Level 1: Levels Between 0 and 2, numerous
Level 2: Slightly Below 1st platform
Level 3: Directly Below 1st platform
Level 4: Under 2nd Platform, no overlapping
Level 5: Overlapping 2nd Platform


Est. Time | Direction | Lava Level
00:08:00| - | 0
00:07:55| /\ | 0
00:07:52| - | 3
00:07:48| \/ | 3
00:07:44| - | 0
00:07:36| /\ | 0
00:07:31| - | 4
00:07:27| \/ | 4
00:07:23| - | 0
00:07:16| /\ | 0
00:07:12| - | 5
00:07:09| \/ | 5
00:07:04| - | 0
00:06:50| /\ | 0
00:06:48| - | 3
00:06:44| \/ | 3
00:06:41| - | 0
00:06:31| /\ | 0
00:06:28| - | 4
00:06:25| \/ | 4
00:06:22| - | 1
00:06:08| /\ | 1
00:06:04| - | 5
00:06:00| \/ | 5
00:05:55| - | 0
00:05:50| /\ | 0
00:05:46| - | 3
00:05:43| \/ | 3
00:05:39| - | 0
00:05:31| /\ | 0
00:05:27| - | 3
00:05:22| \/ | 3
00:05:18| - | 0
00:05:09| /\ | 0
00:05:05| - | 5
00:05:00| \/ | 5
00:04:56| - | 0
00:04:49| /\ | 0
00:04:45| - | 5
00:04:42| \/ | 5
00:04:37| - | 0
00:04:03| /\ | 0
00:04:00| - | 2
00:03:56| \/ | 2
00:03:52| - | 0
00:03:44| /\ | 0
00:03:39| - | 4
00:03:35| \/ | 4
00:03:31| - | 0
00:03:25| /\ | 0
00:03:21| - | 5
00:03:18| \/ | 5
00:03:13| - | 1
00:02:03| /\ | 1
00:02:00| - | 3
00:01:55| \/ | 3
00:01:51| - | 0
00:01:43| /\ | 0
00:01:39| - | 5
00:01:34| \/ | 5
00:01:30| - | 0
00:01:23| /\ | 0
00:01:19| - | 5
00:01:15| \/ | 5
00:01:11| - | 1
00:00:57| /\ | 1
00:00:54| - | 3
00:00:51| \/ | 3
00:00:48| - | 1
00:00:38| /\ | 1
00:00:34| - | 4
00:00:26| \/ | 4
00:00:25| - | 0
00:00:04| /\ | 0
00:00:01| - | 3
[/COLLAPSE]
[COLLAPSE="Secondary Hazards Run 1"]Norfair
Other Hazards
Run #1


(1) Lava Wall Left
(2) Lava Wall Right
(3) Lava Fumes
(4) Lava Wave

**The number in parenthesis corresponds to their altitude in the Y axis of the graph that follows this table.

Est. Time | Hazard (Color Coded) | Detail 00:07:22 | Lava Wall Right | Appears On Screen 00:07:18 | Lava Wall Right | Reaches Peak 00:07:14 | Lava Wall Right | Leaves Peak 00:07:10 | Lava Wall Right | Disappears from Screen 00:06:56 | Lava Fumes | Appears On Screen 00:06:53 | Lava Fumes | Disappears from Screen 00:06:24 | Lava Wall Left | Appears On Screen 00:06:19 | Lava Wall Left | Reaches Peak 00:06:17 | Lava Wall Left | Leaves Peak 00:06:12 | Lava Wall Left | Disappears from Screen 00:05:23 | Lava Wall Left | Appears On Screen 00:05:17 | Lava Wall Left | Reaches Peak 00:05:15 | Lava Wall Left | Leaves Peak 00:05:10 | Lava Wall Left | Disappears from Screen 00:05:00 | Lava Fumes | Appears On Screen 00:04:57 | Lava Fumes | Disappears from Screen 00:04:34 | Lava Wave | Appears On Screen 00:04:28 | Lava Wave | Lava Hits 00:03:58 | Lava Fumes | Appears On Screen 00:03:53 | Lava Fumes | Disappears from Screen 00:03:21 | Lava Wall Right | Appears On Screen 00:03:17 | Lava Wall Right | Reaches Peak 00:03:13 | Lava Wall Right | Leaves Peak 00:03:09 | Lava Wall Right | Disappears from Screen 00:03:02 | Lava Wave | Appears On Screen 00:02:55 | Lava Wave | Lava Hits 00:02:35 | Lava Wave | Appears On Screen 00:02:27 | Lava Wave | Lava Hits 00:01:40 | Lava Wall Left | Appears On Screen 00:01:36 | Lava Wall Left | Reaches Peak 00:01:34 | Lava Wall Left | Leaves Peak 00:01:28 | Lava Wall Left | Disappears from Screen 00:01:12 | Lava Wall Right | Appears On Screen 00:01:08 | Lava Wall Right | Reaches Peak 00:01:05 | Lava Wall Right | Leaves Peak 00:01:01 | Lava Wall Right | Disappears from Screen 00:00:40 | Lava Wall Left | Appears On Screen 00:00:36 | Lava Wall Left | Reaches Peak 00:00:33 | Lava Wall Left | Leaves Peak 00:00:29 | Lava Wall Left | Disappears from Screen 00:00:27 | Lava Wave | Appears On Screen 00:00:20 | Lava Wave | Lava Hits
[/COLLAPSE]
[COLLAPSE="Visuals"]In order to view them in full size, please right click and hit "Open Image".


*During the downtime that happens around the 300 second mark, there was lava movement, but it was withing the same area (movement from Level 1 to Level 1).


*Please refer to the collapse tag that this graph is referencing for what each number in the Y axis represents.


*Third object in the legend was a mistake. It means nothing. Please ignore.
[/COLLAPSE]

Observations: Based on this, I personally could not find a pattern past the one minute mark. The secondary hazards are scattered around in different places, and at the end, you can see a lava wall coupled right next to a lava wave. That right there disproves any theory that secondary hazards start X amount of seconds after the other one ends. This isn't enough information to establish any sort of pattern concerning the secondary hazards, but I could find a pattern with the rising lava.

If you look at the Rising Lava graph, you can see that the lava does have a certain groove to it. Something particularly interesting about the rising lava graph is that the timing of the lava rising is pretty consistent with the rest of the graph, but there are some random breaks that interrupt what would be regular lava flow. Upon seeing this, one would ask themselves, "Why would the lava abruptly stop rising?".

If you look at the secondary hazards graph, you will notice that a lava wave appears in all instances where there is a break in the rising lava. So what does this mean? The rising lava does indeed have a consistent groove to it, but that groove is only interrupted when the stage randomly selects a lava wave. This was a prediction that was made a long time ago by Judo777, and the data from this run (as well as numerous runs I didn't graph out) seem to support his theory. I personally think that this is enough evidence to confirm what Judo said, but if you want to explore deeper, then feel free to watch some videos that I'll provide later on in this section.

So next step would be to pick up where we left off. I needed more statistics so I could figure out a pattern for the secondary hazards. Since Norfair Run #1 was not good enough for me, I decided to graph out four other runs, but instead, only focus on the Secondary Hazards. The first run I used was Dyno vs. Player-1 since it was already available, but for the next three runs, I decided to just record myself messing around in Norfair for 8 minutes with a CPU.

I decided to take advantage of the fact that it wasn't fixed camera mode and decided to start lava walls at the time the camera started panning, as opposed to when the lava first appeared. This time, there are no fancy colored tables, but there are screenshots from Microsoft Excel!

[collapse="Run #2 (Dyno vs. Player-1)"]
Link to video: http://www.youtube.com/watch?feature=player_detailpage&v=h75QIBwHEn0#t=271s
[/collapse]

[collapse="Run #3 (Toon Link vs. CPU Wario)"]
Link to video: http://youtu.be/rtBz9-L7Byg
[/collapse]

[collapse="Run #4 (Metaknight vs. CPU Metaknight)"]
Link to video: http://youtu.be/Glapwiwe0gc
[/collapse]

[collapse="Run #5 (Snake vs. CPU Ike)"]
Link to video: http://youtu.be/UkC3b8hSm7k
[/collapse]

[collapse="Combined Runs"]
[/collapse]

Observations: It took a long time to put all of this together, but after I was doing the numbers for Run #3, I decided to analyze the numbers a bit harder, before putting them into the graph. One of the things I did was write down the times when a hazard initiated in Run #3, and try to see if I could come up with something. The numbers looked like this:

http://img189.imageshack.us/img189/3351/run3stuff.png

Something that caught my eye when I made this was that everything ran somewhat like Judo777 said in his thread. Everything goes off a very rough 30 second timer. However, there was one detail in particular that caught my attention, and that was that NONE of the hazards in the graph started in the 49-40 second and the 19-10 second margin. I thought this was an interesting detail, so I took note of it when I did the rest of the numbers.

After running the rest of the numbers for Runs #4 and #5, I realized that those two runs were consistent with the idea that I figured out in Run #3. So if my theory was correct, then a minute in Norfair would look like this when concerned with secondary hazards...

59-50
50-40
40-30
30-20

20-10
10-00

...where the green area suggests that hazards will appear, and the red area suggests that hazards will not appear.

So after I figured that out, I fixed the graph above so I could show the secondary hazards but with lines coming across it every 10 seconds.

[collapse="Combined Runs (Fixed)"]

[/COLLAPSE]

The graph indeed shows that Run #2 was also consistent with my theory. Just to make sure though, I decided to find a 5th match that I could use to see if my theory remained consistent. The match I used was ESAM vs. Seibrik because the match ran for just under 8 minutes (which was close enough). I didn't gather any numbers for it, but I after looking at it, I confirmed that it was consistent with my theory. Even looking back at Run #1, we can see that the rule remains consistent as well (except for one questionable moment at the end).

Interesting enough though, in that same match, I noticed another detail. There were two periods of time where a hazard was supposed to appear, but it didn't. This means that it's possible that the secondary hazards cycle randomly between Lava Wall Left, Lava Wall Right, Lava Flares, Lava Waves, and neither. This was something that Judo777 also predicted in his thread, which I can now confirm.


Conclusion:
In conclusion, I have reason to believe that there is an easy to follow pattern to Norfair. It goes as follows:

  1. Every match starts out the same.
    • The rising lava goes up to a low altitude, falls, then rises again at a higher altitude, falls again, then rises a third time even higher, while a secondary hazard appears, starting off the pattern for secondary hazards.
  2. The Rising Lava goes up and down in a consistent groove.
    • The altitudes start off low, then get higher and higher, until it goes down again. This repeats over and over.
    • The groove of the Rising Lava can get interrupted by Lava Waves.
  3. The selection between Secondary Hazards are random.
    • Hazards that it can pick from are Lava Walls (Left and Right), Lava Waves, Lava Flares, and Neither.
  4. Secondary Hazards only initiate in specific time frames
    • Hazards can initiate at any time of the match, except for when the clock passes through the XX:50:XX-XX:40:XX mark and the XX:20:XX-XX:10:XX mark.
 
Joined
Mar 15, 2008
Messages
10,050
III. Gameplay/Tactics


[jumpname]strategies[/jumpname]Strategies

There are numerous strategies that should be employed throughout your games in Norfair. After playing on this stage so much, I came up with a few strategies that I felt should be expanded on. It's important to remember that each strategy has it's own set of pros and cons, and because of that, it's a strategy in itself to continually shuffle through these strategies throughout your match, instead of sticking to one of the strategies below for the entire match. Ultimately, your game plan for Norfair should always be to find the most effective combination of strategies, since it's almost always going to be more effective than sticking to one for the majority of the match.


[jumpname]bottom[/jumpname]"Controlling the Bottom"


  • Pros
    • Can gain easy access to both sides of the stage
    • Can attack from below using long-ranged tilts, smashes, projectiles, and aerials
    • Apply pressure to players on other platforms via pseudo-sharking
    • Able to punish landings and falling approaches easily
  • Cons
    • Vulnerable to most hazards
    • Rising Lava, Lava Flares, and to a lesser extent, lava walls can force players to evacuate their advantageous position, and sometimes force them to risky approaches.
    • Closer to the bottom blastline.
    • Can only escape through the sides and upward, not by moving downward through the platform.
    • If you get knocked out of hit horizontally, you have less access to the stage's ledges.

Controlling the bottom platform is in my opinion one of the better strategies to be following in Norfair. The theory behind it is that players that are able to punish aerial approaches, landings, poke through higher platforms using tilts/smashes or sharked aerials, limit approaches, and apply pressure by staying at the bottom of Norfair's V-shaped layout. The way it works is simple. To demonstrate, let's look at this match between Player-1 (Diddy) vs. Dyno (Wario). We're gonna focus on gameplay starting from the 6 minute and 16 second mark to the 7 minute and 10 seconds mark (6:16 - 7:10).


So the first thing we notice is that Diddy is in the lead against Wario, and the Wario made the mistake of giving Diddy the chance to setup on the middle platform. We already know that a patient and fully setup Diddy can be difficult to overcome, but on Norfair, things change a little bit. Right from the start, you can notice that Diddy actually has a very strong presence in the middle platform. He is able to keep one banana on the ground to mess with landings, or throw it up in the air to limit aerial movements by Wario. With the banana in hand, Diddy is now able to step on one of the higher platforms and apply more pressure on Wario, along with the use of his peanut gun. At any given moment, Diddy can drop or throw the banana to attack or limit space, and use an aerial to wall or attack. Diddy also has the option to safely poke through platforms from below using his projectiles and attacks, while Wario doesn't have that option, since he would have to drop from the platform and expose himself if he wants to get a hit in. After being pressured for a while with the peanut gun, the Wario realizes that even though the layout gives Diddy trouble transporting bananas, Diddy only has to control one platform at the moment, which means that Wario is going to have to approach, assuming the Diddy remains patient. However, this is difficult because when approaching from above, Diddy has a plethora of options at his disposal to prevent you from touching the ground. He has his bananas that can punish landings (from a distance too), he has UTilt/USmash that can poke through higher platforms, he has Fair that can pressure Wario offstage or in the air, and Diddy has grab + shield grab that can punish aerial landings.

This is generally what it means to be controlling the bottom-- Having easy access to both sides of the stage, being able to pressure movement from below in a similar fashion to sharking, and being able to punish landings. Theoretically, you're untouchable. A lot of other characters such as Marth, Ike, and King Dedede can do something similar to this using their respective movesets (Raziek outlines how Marth can use his sword to do the same thing in this guide, for those who are interested in reading).

Even though the character at the bottom has a lot of control over the stage, there are cons to it. Norfair's hazards (namely the Rising Lava and the Flares) will often force you out of the bottom platform and onto higher ground. When this happens, bottom control is lost, aerial approaching can be forced for the player on the bottom, and both players must fight to regain control of the bottom again once it's up for grabs. This happens in the 6:53 mark in the video, but in that case, Diddy is quickly able to regain control of the bottom again.

Also, if the Wario were to somehow approach the Diddy safely at the bottom, Diddy's only escape routes would be either moving upward, or to one of the sides. If Diddy were to get hit and sent at a low angle, he would also be closer to the blastline, as well as farther from the rest of the ledges in the map that can aid his recovery. On top of that, Diddy would have less time to pray for the lava to come up and save him, since he has less distance to fall.


[jumpname]top[/jumpname]"Controlling the Top"


  • Pros
    • Can make killing moves kill earlier due to closer positioning to most of the stage's blastzones
    • Lets characters with good Dairs like Peach or Lucario and characters with falling projectiles like Toon Link control enemies below them
    • Easy access to half of the stage's ledges
    • Best place to be when concerned with hazards
    • If you need to get out instantly, you have a lot of escape routes.
  • Cons
    • Vulnerable to pseudo-sharking
    • Lava walls and flares can temporarily force players out of the top platforms, making them have to regain control of it
    • Being closer to the rest of the blastlines can be a double-edged sword.

Controlling the top is generally good in situations where you either need a lot of escape options, need to be safe from hazards, or when you are going for the kill move. When you're on the top platform, you have almost instant access to the top ledge (which means you have easy access to the rest of the ledges), the large, empty space between the top platforms, and to the top and side blastlines.

One of the pros to controlling the top is that it's the safest place to be when concerned with hazards. The rising lava cannot reach you on the top platforms, which means that the only hazards that can reach you there are the lava wave, the lava flares, and one of the lava walls. Even though the lava flares can hit you on the top platforms, you're only a short jump away from being completely out of the lava flare's range, as illustrated in this picture. This only leaves you with the lava wave and one of the lava walls to truly worry about, but those hazards are easy enough to avoid anyways, so the argument that the top platforms being the safest place when concerned with hazards actually has some truth to it.

Another one of the pros for controlling the top is that you're closer to the top and side blastlines, which means your killing potential is increased. The only issue with this is that getting enemies to the top can be tricky, since letting them approach you implies that they are most likely going to be approaching from below, which means that you're gonna get sharked.


[jumpname]ledge[/jumpname]"On the Ledge"


One of the unique qualities of this stage is that there are a total of 6 ledges in it, three on each side of the stage. This opens the doors to soooooo many strategies and cool techniques that I can write for days about how this affects Norfair. Instead of doing that though, I'll just roughly go over a couple of points.

First and foremost, the numerous ledges help characters with poor recoveries recover, by providing three different ledges at each side at three different height levels. If one is taken or being guarded, there are two other ledges available for snagging that the recovering player can use. On that same point, characters like Ness can focus less on aiming their UpB since they have multiple ledges they can aim for that aren't too far from each other. The same can be said for Jigglypuff and her rollout.

The number of ledges on each side also change ledge play and edge guarding completely, since the number of options are increased. The layout of the platforms allow for alternate ledge recovering due to the available lower ledges. No longer is recovering above the ledge your only option! If you're in a higher platform, you can reach the stage by jumping onto a lower platform/ledge and getting on. Likewise, if you're on a lower platform, you can easily pull back and double jump to a higher platform. Alternatively, you can choose to approach from under as if you were sharking, since all the ledges have sections where you can jump through from below.

Ledge recovery receives a heavy buff on Norfair in my opinion, so if you're stuck on the edge, there's no reason to fret. The stage gives you plenty of options, which means there are lots of ways to mix things up and stay unpredictable. Interestingly enough though, even though ledge recovery is buffed, it would be foolish to say that the ledge is an overpowered position. You may have seen this diagram before (made by MetaKirby):


One of the glories of ledge stalling is that you're at a positional advantage that maximizes your options to counter getting hit while minimizing your opponents' options to hit you back. In Norfair, this isn't the case. If your plan is to recover from the ledge, then your options will be buffed, but if you're plan is to stay on the ledge, then you would be putting yourself in a position that's much easier to get harassed from compared to other stages like Smashville. If you're the edgeguarder, what you should be doing is using the platforms along with Norfair's hazards to pressure the planker into moving away from the ledge. Any hazard by default will make the planker want to relocate him or herself to another area of the map, so if that were to happen, you could use Norfair's platforms to chase him while still keeping the option to approach at all angles. What's cool with Norfair though is that since the ledges are quite far apart from each other, it takes time for plankers to move from ledge to ledge. When doing so, they are wasting the precious ledge invincibility frames that make planking so good. If your opponent is trying to ledge stall you by moving from ledge to ledge, attack them between ledges! They will most likely be vulnerable from ledge invincibility and from getting hit in all directions, which will help you swat them out. Obviously, this is much easier said than done. The enemy could be trying to attack you back as he moves away, or he might take the super exaggerated long route to the next platform (dipping really far down to the bottom then using numerous jumps to get back up), but there should always be an angle to attack the planker from. Naming all of them would be ridiculous given the amount of MU combinations and possible encounters, but the gist of all of this is that combatting ledge stalling is essentially reversed in terms of effectivity in comparison to other stages. The staller gets nerfed, the edge guarder gets buffed. The edgeguarder has numerous angles to attack from and can use hazards to his favor, which makes the planker more vulnerable.


[jumpname]staygrounded[/jumpname]"Stay Grounded!"


So let's look at what we've learned so far from this guide. We learned that...

  • Hazards, other than in the first minute of the match, have a rough and hard to predict pattern.
  • Selection between all four secondary hazards are completely unpredictable, which can mean that it is possible to get either all four hazards once in a row, or one hazard four times in a row.
  • The hazards in Norfair are strong killers, and like all hazards, can change the flow of the match depending on how they are used.
  • All hazards can be avoided best by being on the ground, since you have more options at your disposal there.

Following this, I think we all know where I'm going with this, so I'll get to my point. Since Norfair's hazards are as powerful and intrusive as they are, and the pattern is hard to follow with the exception of the first minute, it would be favorable to the player to always expect and be prepared for the hazards, namely the Lava Flares. Since the best place you want to be in is on the ground when one comes up, your best option would be to stay grounded as much as you can, because it's better to play it safe than sorry. To illustrate my point, I'll provide you with this video again:

[yt]wztUF_6WlUw[/yt]
Link: http://www.youtube.com/watch?v=wztUF_6WlUw

Anyways, before we start, let's just ignore the fact that this event happened during the first minute of the match, where there IS a predictable hazard pattern to follow, which means that this event should have never been a surprise to anyone in the first place. For the sake of the explanation, let's just imagine that this happened 3 minutes into the match.

Now onto the video.

The reason why I brought up this particular video again was because this is "that worst case scenario" that you should be envisioning when you think of the "Stay Grounded!" strategy. This is exactly what you want to always expect. We have three lava flares in very close proximity of each other shoot at the middle of the stage, while the rising lava rose all the way to it's highest level, cleanly overlapping the middle platforms. This may seem difficult to avoid in the middle of battle, but the key to avoiding things like this would be through simple exercises in risk assessment.

A Lesson in Risk Assessment said:
Let's put ourselves in the position of the Samus player and break this down:

Pause at 0:00
What are we watching out for? What would be our immediate risks?
  • The lava floor that is already rising.
  • The lava flares that aren't out yet, but I am unsure if they will appear or not.
  • My opponent who I know is going to jump in the air in front of me.

So taking all of your immediate risks into consideration, as well as everything you have learned in this thread so far, what would be your safest option?

A) Attack your opponent before he jumps, and quickly jump out before the lava hits.
B) Attack your opponent as he's in the air, where I am unsure if the lava will reach in time or not.
C) Quickly move backward to the top platform, away from the rising lava and my opponent.

If you picked C, that would be the correct option. Picking option A puts you at the risk of getting hit by your opponent, as well as touching the rising lava. Picking option B would put you in a better position against the rising lava, but would put you at the risk of getting hit by your opponent as well as strip you of all your good options against the lava flares if they were to every suddenly show up. Option C on the other hand, minimizes your risk of getting hit by your opponent, puts you at no risk against the rising lava since it can't reach the top platform, and it puts you at the best possible position to combat a lava flare, should one hit the top platform (on the ground near the outermost ledge). Option C would have been the end of all the trouble for the Samus player, but I'm going to keep on going with this risk assessment demonstration.


Pause at 0:01
It's a second later. Samus takes Option A instead of C, and is now in her shield. Her opponent is directly above her. What should we be watching out for? What are our immediate risks?
  • The rising lava that is still rising and closing up on me.
  • My opponent, who is vulnerably rising above me, and has no decent Down Air to combat me.
  • A lava flare that hasn't shown up yet, but could arrive at any moment.

So taking all of your immediate risks into consideration, as well as everything you have learned in this thread so far, what would be your safest option?

A) Quickly punish ZSS by committing to a slow UpB.
B) Quickly punish ZSS by jumping once and using an aerial.
C) Run to one of the two top platforms.

If you picked C, that would again, be the correct option. Option A will most likely put you in the position to add more % to ZSS' damage meter, but it is a slow attack to recover from once it is initiated. After the attack is done, it leaves Samus with no other options but to helplessly fall downward. Option B would have been a better option, since you don't have to commit to the grand risk of being in a helpless state, but you do put yourself at the risk of getting hit by ZSS. Although you put yourself at less of a risk of getting hit by the rising lava, you're still at the risk of getting hit by an angry wave of lava flares, should one appear over you. Option C on the other hand, lets you avoid the rising lava that you already knew was coming up. It also puts you at a safe distance between your opponent, with the only drawback being that you missed a potential punish. Running to the top also puts you in the best position against future lava flares. Even though you have to put yourself in an aerial position to get there, at least you're close to the ground, unlike in option B where you're in the very middle of the stage.

Let's continue watching the video.


Pause at 0:07
So here, we notice that the Samus player took option A again, and dealt 11% to ZSS. Sadly though, he was put into a helpless position and took a whopping 24% from both the rising lava, and a wild mess of lava flares. She could've avoided it, but instead took too many risks and got punished for them. Now Samus is on the left platform, away from ZSS, and we see that a single lava flare is directly above Samus.

What should we be watching out for? What are our immediate risks?
  • The lava flare above you.
  • Any future lava flares that can hit near you.

So taking all of your immediate risks into consideration, as well as everything you have learned in this thread so far, what would be your safest option?

A) Hold out your shield for the entire duration of the flare.
B) Shield the flare hit once and run to the middle, approaching my opponent.
C) Shield the flare hit once, and run off stage.
D) Shield the flare hit once, and run to the left ledge.

If you picked D, then you are correct. Picking option A would probably keep you safe, but it puts you at the risk of breaking your shield, since you would have to shield two hits from the first lava flare, and possibly two more from any future lava flares that come near by. Option B is a step in the right direction, but it's still not safe enough. By shielding the first hit, you would be safe from that hit, but by running to your opponent, you would have to approach aerially, and we all know that you don't want to be high up in the air during a flare storm. That goes against this whole chapter! Option C is a good option, but not the best. By running off stage, you are not only avoiding the first flare hit, but you are staying away from the lava flare's hitting range, leaving you at no risk of getting hit by a flare. On the other hand, should more flares come up, you would find yourself offstage for too long, and put yourself at the risk of self destructing. Option D is the best option since you get to avoid the first lava hit, and right when you do so, you get to hog some free ledge invincibility frames. While remaining invincible, if you need more time away from the flares, you could easily hold back and safely drift away from the ledge with the help of either your extra invincibility frames, an air dodge, or both!

Aaaand that's it for your lesson in risk assessment.
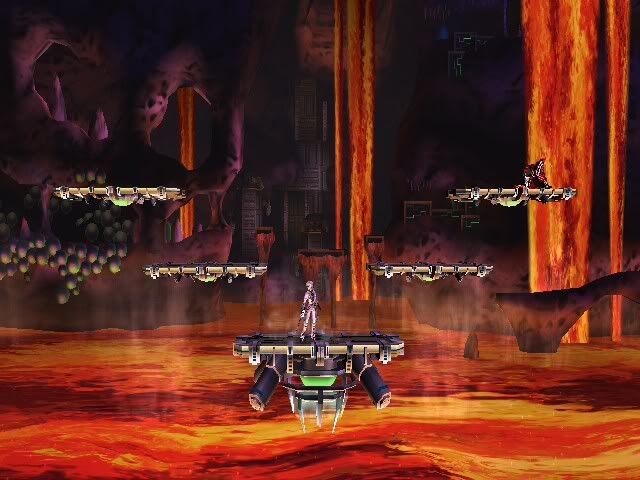
With that, I hope you understand the gist of why we must stay grounded. Since we do not know when the lava flares will come up, we always have to keep that mental note that they may come at any time. You should use this foreknowledge to your advantage and when evaluating all of your risks like how I did above if you want to excel on this stage. Although this kind of exercise is common, it's one that also has to be practiced a lot.


[jumpname]runningaway[/jumpname]"Running Away"


  • Pros
    • Helps with getting time-out wins.
    • Platform layout can assist in defensive maneuvers and stalling tactics.
    • Hazards can help separate combat for short but frequent amounts of time.
    • Stage is larger than most, which helps spread out combat.
  • Cons
    • A lot of the best "hard to reach" places are high in the air or under the stage, which are unsafe locations to hang around in.
    • Hazards can limit routes, and help squeeze combat into smaller confines, making avoiding combat tougher.
    • Some repetitive stalling patterns can be difficult to pull off successfully on a frequent basis, and are easy to punish.
    • Being difficult to hit is not as easy as it looks.

I think it's common knowledge by now that this stage is pretty spacious. The platform arrangement leaves a lot to the imagination in terms of entry and escape. It's because of this that players have looked into how to run away or stall on this stage to their fullest potential. This strategy can be used for numerous purposes, and better with some characters than others, which means that I'm gonna have to get a little in-depth with this.


Gotta make up your mind, which route will you take? :troll:

After taking a gander at the professionally drawn illustration above, you can get a basic understanding of how the stage can help certain characters. Some of those lines can't be navigated by characters like Toon Link or Wario, but pick up any character with a glide like Pit or Metaknight and the doors will open up to you. I'm not gonna delve into every character specific technique since I can go on for hours about that, but I will do overviews of each and every strategy and at times use characters as examples (mostly Sonic).

Running Away to Stay Safe:
This is when you use the stage to stay as safe from harm as possible, by intelligently selecting your safest option at all times instead of taking risky options. Your goal isn't particularly to run the timer, it's to patiently stay away from harm's way, and only attack either when you see an opening to rush in, or when you have a projectile that can attack from a distance. This is a strategy that I can associate best with Toon Link, considering that I main him.

Part of Toon Link's strategy for any stage is to never approach his opponent. This is because his close quarters game isn't all that great, and is much more unsafe than just lobbing projectiles from afar. So what Toon Link will normally do is stay safe by running away, short-hopping projectiles, and when the opportunity presents itself, he might run over for the sword punish. This works better in some stages than others because sometimes the opponent will catch up when there's no more stage left, and Toon Link won't have anywhere else to run. In stages like Final Destination, Toon link will either have to trap himself on the ledge, or find a way to cross his opponent and run to the other side.

This isn't always the case on Norfair, because there are numerous routes where he can go so he can keep on running away. If you saw the professionally drawn illustration above, you would get what I mean. Toon Link can always run backwards for the ledge if anything goes wrong, and he doesn't even have to worry about getting stuck on the ledge either, due to the awesome layout of the ledges. From the ledge, he can go under, over, or through the opponent. He can also try to move to another ledge and reset the situation. Toon Link's alternatives besides the ledge would be his usual escapes, taking to the skies, running past the opponent, going under the platform (if he's on one), or attacking. Norfair gives him more escape routes to choose from, and as he's escaping, he can continue to lob projectiles at his opponent in most of the escape routes.

This might sound all fine and dandy, but there are things that Toon Link has to worry about. For example, hazards can either aid you or screw you over when trying to be safe. if the lava wall comes, your running space is limited, and you'll only have a cramped confine to battle it out with your opponent. There isn't that much space to run in. Same happens with the rising lava and the flares. They can limit space and make options suddenly go away. Also on the subject about hazards, like I mentioned in the "Stay Grounded!" section, although taking to the skies is a good escape, that associates itself with its own risks that one must be aware of. Even if the route looks like your best option, it can still backfire on you if you choose to take it.

Also, running away to stay safe doesn't imply that you're trying to avoid the enemy at all costs and run the timer. What it's implying is that you want to stay out of the enemy's reach, but at the same time, keep him close enough so that you can quickly punish any mistakes he makes. You would sort of be leading him on by playing a game of cat and mouse. Running the timer would be a by-product of the strategy instead of its main focus.

[yt]IfPXhnT1lrc[/yt]
Link: http://youtu.be/IfPXhnT1lrc

The best way to illustrate my point would be with the infamous match between Krystedez and BigLou in MLG Dallas. During the entire duration of the video, you can see Wario popping in and out of Luigi's range trying to be safe and avoid BigLou's attacks, while at the same time, staying close and attacking at every opening he gets.

To get even more specific, we can see that right in the beginning, Wario gets tossed to the top of the stage and is now falling. Instead of approaching Luigi from the air with an attack, Krystedez decides to completely avoid Luigi and use his bike to jump to the other side of the stage. Intelligent choice in options by Krystedez in my opinion, since approaching Luigi head-on is riskier than moving out of the way. He was also in very little danger of being sniped by a hazard since the rising lava and lava wall just finished disappearing.

Quickly after the Wario gets out of Luigi's range, he decides to add pressure to Luigi by grabbing a tire and popping within his range, but still staying a bit far away as opposed to approaching all the way. Wario would be in a good position because he's below Luigi, at a distance while holding a quick projectile, and has a lot of space behind him (as opposed to the Luigi). Krystedez is being relatively safe at this point, which eventually pays off because he ends up landing a hit, and later on, taking the stock.

Throughout the video you'll see Krystedez doing the same strategy of popping in and out of range, slowly adding damage while at the same time being extremely safe. You'll even see Krystedez get the time-out, not because he was aiming to get it, but because it was a by-product of staying safe.


Running Away to Stall for Time
This is what you do when you are a character like Metaknight or Wario who can go into difficult to reach areas, and/or have strong keep away games that take time to overcome. This is very similar to running away to stay safe, but unlike that strategy, your goal is to waste as much time as possible and actively go for that time-out win. It could be because you have a stock lead, and a couple of weak hits won't hurt. It could be because your character has a hard time killing, and running for the timer is better. It could even be because you're a jerk and feel like wasting 8 minutes of everyone's time. Regardless, there are numerous things you have to keep in mind when you run away to stall for time.

First thing is first, you have to know your routes. You have to know all of your escape options very well, and you have to be able to know how to traverse them in a manner that's as efficient as possible (efficiency depends on the character). Every second counts, after all. It's always best to choose routes that your opponent can't normally reach you in. For example, if you're Metaknight, and you're going against a Luigi, areas where Luigi probably wouldn't be able to safely reach you would be under the stage, or very high in the air. That means that as Metaknight, you're going to want to scrooge and air camp as much as possible.

When scrooging, there are a couple of things that you may want to keep in mind. For one, there's a lot of space to cover, so scrooging can actually be a good way to waste time. However, all that space means that it's going to take a lot of time to traverse under the stage. You know... enough time for the opponent to run over to the other side of the stage and wait for your approach. Or for a hazard to completely come out of nowhere and **** you. As a rule of thumb, every time you scrooge, you should always expect your opponent to be waiting for you on the other side, so it's best to never rely on one single route the entire time. Once you're on the other side, you have three ledges you can choose from. Alternatively, you can choose to avoid all the ledges and glide really high up in the air. If there's a hazard, you have to be aware that one may appear at any time, and look for quick escapes to avoid them.

There are numerous ways to camp in the air, so I'm gonna have to divide myself once again. I'll be using Metaknight as an example still.

  • When DAir camping, you'll theoretically be safe from your opponent by timing those Dairs correctly, but you'll run out of jumps eventually. Learn how to cover your landings, especially since your opponent can shark a landing on you.
  • Something I don't recommend anyone to do in Norfair is do a repetitive stalling technique, such as Tornado-ing through between the top platforms, gliding in the air, and using Sonic's B attacks to spin from platform to platform.
    • While in theory it sounds good, in gameplay, it's incredibly risky. It's very easy for the opponent to either reach you in the air, or hit you as you're landing. Doing this repeatedly only makes things easier, because now you're being predictable. Your opponent knows exactly what you're trying to do, and he's actively gonna try to punish it. It isn't like planking where the guy who is trying to approach isgoing to be put into a risky position.
  • If your character has multiple jumps that allow you to easily throw out an aerial in case anyone approaches, that will work much better. It's better to just use your multiple jumps to traverse from top platform to top platform and swat enemies away on reaction than to do some sort of repetitive pattern.

Something to keep note of when you're both scrooging and air camping is the hazards. Like I've said before in the "Stay Grounded!" segment, the hazards can hit you if you're just hanging around in the air, and scrooging is no exception. In this case, the rising lava poses more of a threat than before if you're scrooging (not so much if you're air camping) since it'll squeeze the amount of space you have to work with while gliding. Lava walls will block your path if you try to go from side to side. Flares will snipe you if you're poorly positioned in the stage, and can kill you. The lava wave, although rare, can also hit you in the air if you're reaction time is comparable to that of a turtle's.

An example of all of these tactics being put into use would be Mew2King (Metaknight) vs. RichBrown (Olimar) in MLG. Yes, a M2K video. There are numerous points that I want to cover, so check below the video where I'll link you to specific parts. Oh, and by the way, you might want to watch this video on mute. Just sayin'....

[yt]ybNUjy16yv8[/yt]
Link: http://youtu.be/ybNUjy16yv8

  • 0:44 - Mew2King tries to scrooge, but the rising lava suddenly shows up, forcing him to quickly change his strategy.
  • 3:21 - Mew2King wastes quite a bit of time by scrooging, then planking because he lava wall doesn't let him cross to the other side. Afterwards, he Dair camps while the lava wall is active, tornadoes to the other side. He then tries to scrooge again, but realizes that he'll get hit by the lava wave, so he hides in the capsule. He then proceeds to scrooge and plank, while trying to avoid airborne pikmin. Sooooo much time wasted.
  • 4:36 - Mew2King tries to Dair camp, but he easily gets hit out of it.

Videos of players doing some hardcore stalling tactics on Norfair don't exist to my knowledge, so this is probably as close as we'll get. Basically, Mew2King could scrooge, plank, and air camp for a bit, which helped him waste time, but in turn, he wasn't perfectly safe. He had numerous close encounters, and numerous run-ins with hazards that he had to watch out for. Running away to stall for time can be very effective on Norfair when it works, but it can backfire heavily if something goes wrong.


[jumpname]characterspecific[/jumpname]Character Specific


[jumpname]techniques[/jumpname]"Techniques, Tricks, and Gimmicks"


In this section, I'll be listing any noteworthy character specific tricks, techniques, and gimmicks. If you want me to update this with one of your submissions, either post in this thread, or send me a private message with the following information:

  1. Name of the Technique
  2. Description of the Technique
  3. Video or picture of the technique (to demonstrate as proof)


  • Marth's Counter Stalling - Marth can stall inside the lava wave, flare, or rising lava by using Counter (DownB). This can also be done with Ike and Lucario.
  • Metaknight's Movement Tricks - Metaknight can maneuver the ledges and platforms of Norfair very quickly using his different special attacks very precisely.
  • Grab Armor Invincibility Against Lava - The player with a higher priority controller port can get 0 knockback from a lava hazard if he grabs onto his opponent while getting hit. It works best with the lava wave, if you try it on other hazards, the grabbing character will be sent flying right after he lets go of his opponent.


[jumpname]influence[/jumpname]"Influence on the Cast"


In this section, I'll be going over how each character generally does on each stage. To do this section, I decided to spam the majority of the character boards with a Norfair related survey, since my understanding of the entire cast isn't enough to confidently make a statement for. Instead of me trying to guess my way around some characters, I turned to the people that know their characters the best to give me an informed answer. If any of you guys can recall this message...

What's up _____ mains?

I have a couple of questions I want to ask and I'd like you guys to help me answer them. They're all related to Norfair by the way.

1) How does your character fare with just the stage? Does your character benefit from the layout and the numerous hazards or do they normally hinder you?
2) How does your character generally fare on this stage against certain matchups? Does he excel in a lot of them and only has a few bad MUs, or is he generally bad on this stage against a large portion of the cast?
3) What are some general strategies for your character on this stage? Controlling the center? Stalling? Staying mobile?
4) Overall, would you say that this stage is mostly good for your character, mostly bad, or depends?

Thanks in advance!

This mass survey across most of the character boards is admin approved.
...then this is the section that I will be using this for. So what I did exactly was try to put each character into three groups.

  • Group 1 tells us how your character generally fares on Norfair overall.
    • It's represented by "Good", "Depends", and "Bad".
  • Group 2 tells us what strategy your character excels at the most on Norfair.
    • It's represented by "Center Stage", "All Around", "At the Top", and "CAMPER".
  • Group 3 tells us how this character does in comparison to the rest of the cast.
    • It's represented by a gold star, assuming your character is above average compared to the rest of the cast, otherwise, it's not represented.
    • Characters with a gold star are in most cases one of the reasons why other characters fall under the "depends" category.
      • For example, Norfair is one of Ganon's best stages according to Ganon standards, which means he's labeled under "Good". However, he still gets beat by a lot of different characters, which means that in comparison to them, he's not all that great. However, Toon Link does very well here, and can stack up to the rest of the cast. He doesn't suffer from Ganon's problem, thus, is given a gold star.

Accompanying these three groups is a summary that tries to explain anything noteworthy about your character on Norfair. A lot of these summaries are stolen directly from character boards who already had summaries for Norfair up (I basically copy/pasted them), others were written by myself after discussing it with the mains for said character, and the rest were written by me with the knowledge I already had on the character (Toon Link and ICs come to mind).

Note: This section is subject to change throughout the course of this thread's life, since I'm positive that some character mains will feel that their character isn't being well represented. I'm all for working with the users to clear out any inaccuracies, so if you think that something needs to be clarified, please let me know!

Without further a due, here is the list:


[COLLAPSE="Open Summaries"][GOOD] - Overall good stage for the character, more pros than cons.
[DEPENDS] - Depends on numerous factors, such as matchups and hazard patterns. Could be both good or bad, depending on the situation.
[BAD] - Overall bad stage for the character, more cons than pros.

[CENTER STAGE] - Has a very strong presence in the middle platform.
[ALL AROUND] - Doesn't excel in one strategy in particular, instead, excels in blending numerous strategies fluidly.
[CAMPER] - Good at staying mobile throughout the stage, as opposed to dominating one spot.
[AT THE TOP] - Generally good around the top platforms.

:star: - Good stage for this character compared to the rest of the cast. It's sort of like saying, "This character is top tier on Norfair".

Bowser said:
:bowser2: - [DEPENDS] - [CENTER STAGE]
Norfair is a stage that can be very dangerous - both for Bowser and your opponent, as well. Generally said, the stage is a great place for Bowser, since the huge amount of ledges boost Bowser's mobility and recovery by much. It also allows Bowser to be in his most favourite position - below someone. The layout of Norfair allows Bowser to abuse moves going upward, and as we all know, those are his best. The size of the platforms also make it possible for Bowser to safely use grounded Fortresses and retreat quickly to a ledge thus cancelling off the cooldown. The stage hinders the use of his Grab Release, though. However, with all those upsides, there comes a huge downside to Norfair. Characters with spammable projectiles pretty much **** Bowser here, as well as Meta Knight - as this is one of his best stages. Try to avoid it, but it can be a very good stage against characters who prefer hand-to-hand combat.
Captain Falcon said:
:falcon: - [DEPENDS] - [CENTER STAGE]
Lots of platforms. Our mobility and speed help us get around the platforms with relative ease. The fact that they ascend from the bottom one is nice, since Falcon has an awesome uair, and Falcon Dive is easy to land, on both an opponent and a ledge. Also, there's a cool Falcon Kick glitch thing on the middle stages apparently. The numerous edges make it easier for us to recover, as well as the rising lava and other hazards.

There are some people who just perform here better then us. The list includes, but is not specific to: Marth, PT, R.O.B. and MK. Don't get caught in the blue capsule thing. Let your opponent go for that. Falcon is a big character, and that means the lava is harder to avoid.

It does benefit Falcon immensely if you know how to play it. Try throwing out a punch when the lava comes, if you're a stock ahead. You might be surprised at that you get.
Diddy said:
:diddy: - [DEPENDS] - [CENTER STAGE]
This stage can be deceptive for Diddy in the grand scale. On one end, his MU spread on this stage isn't all that great, and the hazards/layout reduce the effectiveness of bananas, due to the numerous platforms Diddy would have to carry the bananas over, as well as the hazards that the bananas could get trapped under. This isn't the whole case though. The hazards can help Diddy more than they harm him. Flares, being the anti-air hazard that they are, can snipe air campers that Diddy would normally have trouble fighting. Along with that, Diddy is normally always grounded, or close to the ground. If any other hazard were to come up, Diddy would be able to Shield -> Avoid the flares with ease, thus, increasing his chances of getting a kill while minimizing his risk of getting killed in return. The walls and rising lava can also help control space since it reduces the amount of platforms that Diddy has to control, and they can help Diddy with his recovery, if he were to ever run out of jumps. Diddy also has a strong center stage presence since if he gains the lead, he only has to control one platform (the middle one). From the middle, he can reach out to all the other platforms using his peanut gun and bananas, as well as his aerials.
Donkey Kong said:
:dk2: - [GOOD] - [CENTER STAGE]
This stage is great for Donkey Kong, platforms are spaced well, and put where they are for DK's Bair as well as UpB shenanigans. Lava's not too big a problem because we get hit, and we don't care since we're heavy. DK is mobile enough to travel the stage easily
Falco said:
:falco: - [DEPENDS] - [CENTER STAGE]
The layout/hazards can benefit and hurt Falco in numerous ways. The small platforms help out with Falco's close range game, and controlling the stage from the middle is possible with the use of lasers and other aerials, making the enemy want to approach if Falco ever gains the lead. The hazards can also help out Falco control space and gain early kills. Since Falco is normally on the ground (and when he's not, he is a fast faller/has sideB), it is reasonable to expect him to be able to avoid the hazards with relative ease. His MU spread doesn't change all that much on this level either since even though he loses some tricks, he gains new ones.

As for the tricks he loses..... the size of the platforms limit his ability to chaingrab. His full chaingrab is possible through the use of a boost pivot grab, but many characters can escape this than the standard walk/dash chaingrab. Although Falco can control the varying levels with his lasers, his lasers can be easy to avoid, and are normally minimal in assists. The ledges can pose problems in Falco's recovery, seeing as his phantasm needs more precision to prevent zooming past the ledge.
Fox said:
:fox: - [GOOD] - [CENTER STAGE]
Not that much info received here...

This stage buffs Fox's recovery since he has numerous ledges on each side to choose from, plus the hazards that can give him an extra jump if he gets hit by one. The trade-off is that sometimes Fox can phantasm through the ledge, akin to Delfino Plaza. Fox's mobility can get him across the stage very quickly. He has a very deadly USmash that can catch falling players, a projectile that can apply damage to players in higher platforms, as well as good enough aerials to approach from below. The platforms are thin, and encourage close ranged combat.
Game & Watch said:
:gw: - [GOOD] - [ALL AROUND] - :star:
Straight from the GW boards: Norfair has four hazards: The tidal wave of lava that comes with the Pod, the vertical strip of lava, the wall of lava that comes from the side, and lastly, the sea of lava below the stage. Of these hazards, the parachute will protect you from the first two. If your opponent beats you to the Pod, harrass him with nairs and either shield, abuse ledge invinciblity or use up b when the lava comes. If they are standing by in side of the Pod, hit them with a fsmash and then use up b to avoid the lava. If you beat your opponent to the Pod, spam Dsmash like crazy. Also, abuse the hazards in your favor. Hazards often make your opponent come to you, or at the least it makes their movements predictable.

Norfair has six ledges, which gives G&W so many options for recovering, approaching, and camping. G&W can supplement his "approach from the side with the turtle" with his "approach from below with the fishbowl." The platform layout and the ledges allows G&W to take ledgecamping to the extreme. The abilty to quickly transition from ledge to ledge abusing the fishbowl takes his ledgecamping game to a whole new level. The normal counters for ledgecamping do not work on this stage. G&W can easily abuse ledgecamping on this stage, and it's very effective on this stage if you have the patience for it.

The size of the platform is small, which assists your dthrow techchasing on this stage.

Norfair hurts G&W's edgeguarding game quite a bit. Characters that would normally get gimped by G&W seem to return to the stage with ease.

The various heights of the ceilings can be helpful, but you have to be smart. Some characters like Luigi with his Fire Jump Punch kill crazily low on the highest platform; don't get hit by those moves up there. On the other hand, your up smash also kills pretty low there; the fun goes both ways. You would think the best strategy would be to stick high at low percentages and low at high percentages, but don't be silly. If you would die from anywhere, you might as well be on the top. If you are only going to die from the top, why be on the top?

An utilt, usmash, or tipper dsmash will usually seal the deal for you if they are at higher percents on the outermost platforms.
Ganon said:
:ganondorf: - [GOOD] - [CENTER STAGE]
One of Ganon's better stages. The layout allows him to control the center with his Uair and grounded attacks fairly well. The size of the platforms change Ganon's tech chasing game. The stage has numerous ledges that can save Ganon's lackluster recovery, as well as hazards that can potentially save him as well. Ganon's weight allows him to live long, which comes in handy in a stage that has a lot of hazards. The hazards relocate conflicts, which can make approaching easier for Ganon.

He gets ***** by campers (as usual) on this stage, but the pros definitely outweigh the cons for Ganon in Norfair.
Ice Climbers said:
:popo: - [BAD] - [AT THE TOP]
Hazards all interrupt chain grabs. The layout favors campier strategies, which makes it harder to land the grab in the first place. The stage hinders ICs more than it helps them. Not much else to say.
Ike said:
:ike: - [GOOD] - [CENTER STAGE]
A great CP for Ike. There are so many new different paths Ike can take thanks to his normally limiting, linear recovery system. Ike is able to hide in the lava by using Counter -> Shield -> Counter, and it doesn’t count as stalling as you can still hit him with certain projectiles. Platform punishment heaven. Camp the bottom, fly around the upper area with QD. Combo into the lava with moves such as Bair. Ike is amazing and mobile on Norfair. Study this stage to figure out all of the stuff you can do.
Jigglypuff said:
:jigglypuff: - [GOOD] - [ALL AROUND]
The layout is good for Jigglypuff. The stage is large so she has lots of space to abuse her aerial mobility and the multiple ledges give her lots of defensive options. The small size of the platforms also allows for good aerial pressure. She adapts to hazards well with her mobility, and they can help when she has troubles killing. The blastzones can either help or hurt Jiggly when getting killed depending on where she's getting hit from.

Strategy-wise, Jiggly does well in all cases. She can control platforms well with her aerial pressure, she can chase well with her mobility and aerials, and she can run away when she has the lead.
King Dedede said:
:dedede: - [DEPENDS] - [CENTER STAGE]
DDD gains quite a bit from this stage. King Dedede's weight lets him survive until high percents in this stage. The layout gives DDD a huge presence when controlling the bottom platform, due to his exceptional close range game, and high damage racking attacks, that can be coupled with the hazards to cause massive amounts of damage in a short amount of time. Dedede's numerous jumps allow him to stay airbourne if needed, and help him maneuver the stage better.

What hurts DDD is the length of the platforms, which doesn't let him extend his chain-grab all that much. Also, his poor speed hinders him severely against faster characters, making him susceptible to getting heavily outcamped in certain matchups.
Kirby said:
:kirby2: - [DEPENDS] - [CENTER STAGE]
It's an okay map for Kirby, nothing special. Our gimps are stopped by the rising lava flow, we kill people earlier than usual (and die earlier), we can shark platforms... The stage is nothing special for us. There's much better choices in other stages. I guess Kirby could take characters with weak aerial games here, and bair/dair them to death easier than in other maps, but I can't think of anything special Kirby can do here, or of anything else we could take advantage of that would give Kirby a notable advantage over opponents.
Link said:
:link2: - [GOOD] - [ALL AROUND]
One of Link's best stages. Several ledges endorse projectile spamming and quick escapes. Link’s lackluster recovery also benefits from this particular stage selection. Things such as numerous tether-able ledges, rising lava, and a small stage window allow Link to survive as long as other characters and prevent him from getting gimped as frequently. Norfair’s low ceiling allows Link to KO enemies at lower percentages with attacks like Dair and Dsmash. Even though the stage’s uneven platforms discourage the use of Link’s great ground priority, they help Link hit smaller characters like MK with Zair. The stage’s unique design also supports advanced techniques such as bomb planting and gives it applications for gameplay. All in all, Norfair’s stage hazards combined with it’s multiple platform design make it a great counterpick for Link.
Lucario said:
:lucario: - [DEPENDS] - [CENTER STAGE]
This stage isn't exactly the best for Lucario, but he does get some buffs in much appreciated areas. In terms of the layout, he gets some really neat tricks from it. The multiple ledges means that he doesn't have to aim for one ledge all the time when he uses his UpB. He can actually UpB from ledge to ledge if he felt like it. The rising lava can save him as well if he somehow misses a ledge, and he can strategically use his Dair to stall in the air when necessary. His counter can save him in certain situations from the lava hazards, since countering the lava will make him invulnerable to it for a while.

The platform arrangement is what Lucario will struggle with though, since it won't always work with him. He will normally be controlling the bottom, either pressuring/approaching enemies from above using his aerials/projectile, or catching falling enemies with shield grabs or regular attacks. He will also stay on the bottom because his aura will last longer the farther away he is from the blast line. If Lucario is chilling on the top platforms, he's a lot more susceptible to an early death than if he chills on the bottom platform. His aura sphere isn't as effective here due to the three leveled layout. Since it travels only horizontally, it's difficult for him to make the best out of enemies moving vertically.

Lucario doesn't exactly excel here in many matchups, and will most likely ban this stage, since other characters do much better than he will here. That isn't to say that Lucario is bad on Norfair though. He can definitely hold his own in certain matchups. It's just that he has better stages to choose from.
Lucas said:
:lucas: - [GOOD] - [ALL AROUND]
The layout benefits Lucas in the sense that his recovery is buffed, since he doesn't have to depend on just one ledge to recover. Also, the lava can save him from being gimped if he were to ever run out of jumps. The layout of the platforms help him weave around attacks and control space, however, the layout doesn't help him against campy characters, since it makes it difficult to attack defensive players, even with the aid of his multiple projectiles. Lucas' playstyle doesn't focus so much on controlling a particular area of the map so much as is it focuses on controlling multiple platforms, one at a time. He moves around the stage a lot. He's well rounded in his strategies, he doesn't excel in one over another.
Luigi said:
:luigi2: - [DEPENDS] - [CENTER STAGE]
The stage is very MU dependent for Luigi. On one hand, the layout can be good for Luigi because the platforms will allow Luigi to platform pressure and shield pressure other opponents. He can also string together quite a few attacks (Luigi stuff basically) with the aid of the platforms, as well as reach out distant opponents with his Fireballs. Any character that focuses on more grounded combat will be challenged by Luigi since the platforms are also thin, scrunching together combat.

This stage is very bad for Luigi against characters that can outcamp Luigi, since Luigi's slow ground and aerial mobility will have to be worked to the max in order to catch up to his opponent. He can approach in conjunction with his Fireballs to apply some damage, but it will still be a bit tricky in a lot of scenarios.
Mario said:
:mario2: - [DEPENDS] - [CAMPER]
This is a decent stage for Mario, but is still matchup dependent. He will normally be running around the stage trying to stay mobile as opposed to controlling a single area. His fireballs will aid him with this. Mario gets a boost in certain MUs against characters that focus on grounded play, in a very similar fashion to how Luigi will get a boost. Against characters that can outcamp Mario such as MK and Pit, this stage is much much worse, and is basically the deal breaker for Mario, turning this stage from "Good" to "Depends".
Marth said:
:marth: - [DEPENDS] - [CENTER STAGE]
Marth does really really well on Norfair controlling the middle. More information could be found here, but in short, Marth has numerous long ranged attacks that can poke through higher platforms, as well as pressure or poke other from above. He has an easy time catching enemies from above, as well as keeping pressure on the ledge against numerous characters. He has attacks that can save him from lava attacks such as counter, and to a lesser extent, UpB.

His matchups are hit or miss here. They heavily depend on the opponent, and their abilities on Norfair. Marth has trouble against characters that abuse the ledge, or control the center better than Marth can, or that can outcamp him. This isn't to say that he cannot hold his own though.
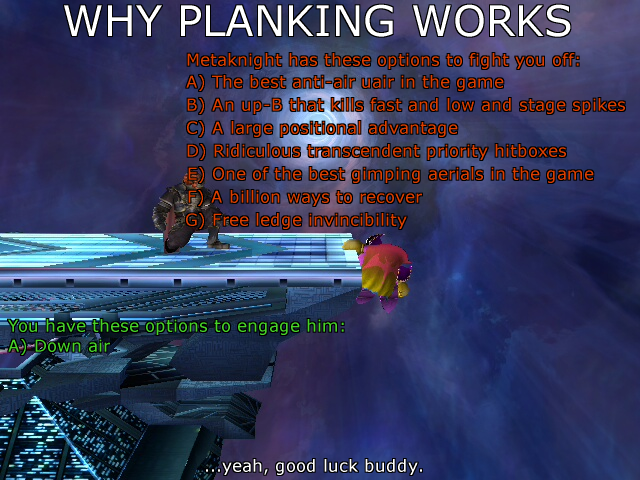
Metaknight said:
:metaknight: - [GOOD] - [ALL AROUND] - :star:
Metaknight is a beast on this stage like he usually is in all stages. Nothing much to say really. His aerial game gets a nice buff since he can shark all the platforms with a combination of Uairs, Nairs, Shuttle Loops, UTilts, etc. He can traverse the stage easily with his multiple jumps + glides, and can reach about any area of the map easily. He has a bunch of movement tricks that help him get around easier. He can quickly control certain platforms using any of his moves, or he can quickly run and avoid combat when he gets the lead like he usually does. He excels in everything here, no surprise.
Ness said:
:ness2: - [GOOD] - [ALL AROUND]
The layout benefits Ness in the sense that his recovery is buffed, since he doesn't have to depend on just one ledge to recover. Also, the lava can save him from being gimped if he were to ever run out of jumps. The layout of the platforms help him weave around attacks and control space, however, the layout doesn't help him against campy characters, since it makes it difficult to attack defensive players, even with the aid of his multiple projectiles. Ness' playstyle focuses on staying mobile and switching from platform to platform, as opposed to controlling just one, although if he had to control one, it would be the bottom. He moves around the stage a lot, and is sort of well rounded in what he does.
Olimar said:
:olimar: - [GOOD] - [CENTER STAGE] - :star:
A very good stage for Olimar. Olimar has a veeery strong presence on the bottom platform, due to his Pikmin. He can pressure/attack enemies above him with Pikmin, as well as using UpB. His grab range will assist him on Norfair's skinny platforms. Enemies falling over him will have to succumb to either his USmash or his shield grab. Multiple ledges heavily assists with Olimar's recovery, which is probably his biggest weakness. He can benefit in almost any matchup on Norfair, even against Metaknight. The terrain on Norfair is "Heavy Metal", which means that the most popular Pikmin color in this stage from most lo least will be: Yellow, Red/Blue, Purple, White.
Peach said:
:peach: - [DEPENDS] - [ALL AROUND]
A tricky one to explain. Although Peach suffers on Norfair against quite a few characters, she has the tools to do well in a variety of cases, and Norfair in general can help her more than hurt her. She has sufficient tools to control the bottom, specifically her turnips, aerials, and tilts that can reach past the platforms above her. She can avoid combat as well as the hazards by intelligently using her float as well as moves like her Side B and UpB to space herself accordingly. For example, she can float above the rising lava and move around if need be, she can side B in situations where she would need a quick escape (or quick pressure), and she can UpB off stage and either wait for one ledge, or wait for the rising lava to save her miraculously. She can control the top well with her Dair, and chilling on the top will help her get early kills (as well as the lava, if things go in her favor).

She does okay in all aspects of the level, but she still suffers against characters like MK and Wario who can abuse her lack of speed, and are all around better at the stage than she is.
Pikachu said:
:pikachu2: - [GOOD] - [ALL AROUND] - :star:
Norfair is not only good for Pikachu, but it's easily one of his best stages, if not, the best. His regular mobility + his UpB allows him to traverse the stage quickly and recover in unpredictable ways. Pikachu's thunder jolts help him control platforms + ledges near him since they wrap all the way around the platforms, forcing approaches. Enemies that approach would either have to do so aerially or from the ledge, both which Pikachu can punish with a variety of moves. He also has some cool tricks on the stage such as thundering near lava walls to trap enemies between walls and control space. All of this makes him very well rounded in terms of strategies.

Against other players, he does very well (arguably better than before), with the exception of Game and Watch, but even then, it's not bad at all. Pikachu also loses some advantages against characters who can get chaingrabbed by Pikachu, since the platforms shorten the distance of the FThrow chaingrab, but he'll still do well overall.
Pit said:
:pit: - [GOOD] - [ALL AROUND] - :star:
This is one of Pit's best stages. Pit's varied mobility can not only get him across the entire level with great ease, but it helps him safely throw hitboxes in numerous places (such as from under the bottom platform). Moves like his mirror shield can help him further avoid Norfair's lava hazards, and will let him do things like hide in the lava wave for up to 3 mirror pushes.

Combat-wise, his aerial and ledge game gets buffed due to the large amount of space and available ledges. His U-Air gives him a reliable way to shark through platforms for extra damage, as well as control space. Hazards help Pit more than they hurt since he can use them to get easier kills, as opposed to getting killed by them easier. Pit's arrows can also assist in controlling space from afar, as well as punish campers who are trying to run away from Pit.

Matchup wise, it benefits him much more than it hurts. The stage gives him a significant boost for numerous matchups, and a lot of the difficulty in his harder matches gets alleviated here. Characters like Metaknight or Wario that are bad for Pit become more manageable in this stage, compared to other stages.
Pokémon Trainer said:
:pt: - [GOOD] - [CENTER STAGE]
stuff
R.O.B. said:
:rob: - [DEPENDS] - [CENTER STAGE]
ROB is very neutral on Norfair, in the sense that he doesn't particularly excel or suffer from anything on this stage. Strategy-wise, what ROB would want to do is control the bottom platform for numerous reasons. Staying on the bottom means that opponents won't abuse his blind spot. From the bottom, he has equal access to both sides, and can reach almost any point of the map quite easily, with the use of his Fair, Bair, Nair, Gyro, Laser, etc. all mixed up with his jumps and UpB. He's good at pressuring opponents from the middle, as well as hitting them or catching falling enemies from there. Although there are a lot of ledges that ROB can relax in, the layout changes ROB's ledge game so that the edgeguarder can attack from more angles, meaning that ROB has to be a little more unique on the edge.

Matchup-wise, ROB doesn't get any particular boosts or nerfs, kind of like what I said in the first sentence. His matchups will mostly depend on how good his opponent is on the stage rather than how good ROB is on the stage. For ROB, Norfair is simply "just another stage" to the list.
Samus said:
:samus2: - [DEPENDS] - [CAMPER]
stuff
Sheik said:
:sheik: - [GOOD] - [CENTER STAGE]
Norfair helps out Sheik very much in numerous ways. First off, Sheik's excellent mobility allows her to move into and out of position very quickly, allowing for quick escapes and quick punishes. The layout of the stage actually helps her stay mobile, since Sheik is extremely fast in both vertical and horizontal movement, but not diagonal. the multi platforms of Norfair help to keep emphasis on horizontal movement over diagonal. The hazards don't give her much trouble because of this, and in fact, help her out more than hurt since hazards buff her kill potential. The center platform is where Sheik would want to be because she has attacks that can poke through platforms as she's standing, as well as good aerials that she can attack/pressure with if enemies decide to stand in different platforms. Additionally, Sheik can excel in all the other platforms, just not the gap of air in the very center of the stage.

Matchup-wise, Norfair helps Sheik out in the majority of her matchups, although there are some matchups that she will still lose in (Metaknight).
Snake said:
:snake: - [DEPENDS] - [CENTER STAGE]
Snake is a hard character to classify. On one hand, the stage does him a LOT of good. Large stage means that he can survive longer, even when getting hit by hazards. He can control entire platforms using well placed mines/projectiles, as well as control platforms with his largely disjointed attacks. The stage has numerous ledges that he can use to his advantage as well. On the flop side, the hazards and the layout on Norfair force him to the air a whole lot more than usual, and although the level is large enough for it to be less of a problem, it is still a problem, and Snake will get abused by it against certain characters.

Matchup-wise, it's not a bad stage for Snake. It's hard to kill him, he can control space like a beast, and his recovery gets a little buffed. However, the stage does require him to be more aerial than normal, and he does suffer more against characters who can either time him out, or juggle him to no end.
Sonic said:
:sonic: - [GOOD] - [CAMPER]
Norfair is one of Sonic's best stages. Although there is no iSDR in Norfair, the lava helps a ton in racking damage and getting kills (one of Sonic's big issues) and spinshot lets you get nearly anywhere on the stage very efficiently. His speed will most certainly be the thing he'll be abusing in this stage the most, since he'll be able to escape any situation that he feels uncomfortable with, as well as quickly punish anything when the opportunity comes. With that being said, he isn't the character that would be controlling a platform, instead, he'll simply keep on moving around the stage and have the opponent chase him until he sees an opening for a punish, then he'll go for it.

Matchup-wise, it's good for him. He does well on the matchups he was already good at, and a lot of other matchups become "safe" for him, such as the MK matchup, which is much more tolerable on this stage than on others.
Toon Link said:
:toonlink: - [GOOD] - [CAMPER] - :star:
This is one of Toon Link's better stages. Some of his most glaring character-specific flaws, namely his poor ledge recovery and landing game, and to a lesser extent his options in paths are less of an issue because of the stage's layout. Numerous ledges give him more options in getting back on stage, numerous routes and platforms give TL infinite options to run away and spam more projectiles, and different platforms + give TL additional options that can change how he lands.

The things that Toon Link was good at already (running away and throwing projectiles) can be done on Norfair to a great extent. He can run to more places, and restrict movement for his opponents using his projectiles. Also, the hazards can make it easier for Toon Link to get his kills, which is another plus. Basically, Toon Link would want to do what he has always been doing in every other stage, because it's still effective on Norfair, and it's harder to abuse his character flaws.

In terms of matchups, all of TL's MUs get better on Norfair, by a significant amount. Characters like Metaknight, although fearful for Toon Link, can at least be easier to manage here than in other stages. Same goes for many other characters.
Wario said:
:wario: - [GOOD] - [CAMPER] - :star:
Wario is a scary character on this stage to numerous characters. Certainly his best strategy on Norfair is to avoid unnecessary using his excellent aerial mobility. The layout gives Wario a lot of space and options to move around in, which means that Wario can be very difficult to catch at times with certain characters. In the mean time, Wario can run away, charge up his fart, selectively bait punishes, or just flat out waste time if he's ever in the lead. When Wario is not in the lead is when things can get tricky.

His aerial mobility allows him to be very difficult to hit, which inflates a lot of his matchups quite a bit in his favor. However, he still has troublesome matchups, such as the MK or GaW matchup, or any matchup with a character that can consistently restrict his options in paths. Norfair is very good for Wario, and comparable to Brinstar, RC, Castle Siege, or any other stage with a lot of space for Wario, but it's debatable how it's ranked amongst those stages.
Wolf said:
:wolf: - [GOOD] - [CAMPER]
Norfair is one of Wolf's best stages. The stage helps Wolf out in numerous ways. For example, numerous ledges buff Wolf's recovery, allowing for more creative approaches. Short sideways blastlines help get Wolf some earlier kills in certain sections of the map. Platform length reduce the effectiveness of other characters' chaingrabs.

Wolf has numerous strategies in Norfair, but his most notable one is jumping around and being annoying. Blastering from a distance to pester opponents without projectiles or using downB for anti-projectile stuff. Once Wolf has the lead just run away with aerials and shine if necessary. Wolf's fair/bair/uair all have great range and come out pretty quickly, plus his great air speed makes it tough to get him. SideB + possible cancels will take Wolf everywhere he needs to go. Platform drop uair is a good defensive retreat, ledges are nice and make it harder for the opponent to gimp us, etc etc. Most importantly, the thing Wolf can do best on Norfair is bair dance, or in less questionable words, retreat bairs all day.

Like I said before, any CG heavy MU gets better here for Wolf, as well as any MUs in which he needs to fight in the air for. Basically, MUs that were once bad become less bad in Norfair, such as the MK, DDD, and Wario MU.
Yoshi said:
:yoshi2: - [GOOD] - [ALL AROUND]
Straight from the echoes in the Yoshi boards:
Yoshi does extremely well with the stage. The layout provides him with many strong locations to hold, since he can Usmash through the bottom of platforms, and the arc of eggs is extremely well suited to the platform layout. He also has amazing mobility to take use of the stage, and he likes the ledges.

Yoshi would be really good on this stage if pocket MK didn't exist. Yoshi can fight well here, run away well here, camp well here, etc. I would imagine he wouldn't do too well against maybe GnW or Wario here, but for the rest of the cast, I would definitely consider this a good CP.

Since Yoshi's a flexible character, he can do a lot of different things with this stage. Camping the center is very effective, as eggs cover a ridiculous portion of the stage, and combined with Usmash and Pivot Grab, people have trouble getting down to us. We can also run away extremely well with the number 1 air speed in the game. Depending on the stock/percent situation and the MU, a combination of holding the center and running away would be a strong way to play the stage.

This stage is GODLIKE for us and if it were legal and MK didn't exist I'd CP it all the time.
Zelda said:
:zelda: - [BAD] - [CENTER STAGE]
Norfair does very little justice for Zelda. Although numerous ledges can boost her recovery, and give her some cool ledge warp tricks, the stage design and hazards promote camping and aerial fighting, both things Zelda isn't very good at. Zelda is very slow, and has a hard time catching up to other faster characters, which only serves as a hindrance to her. She's kinda like a sitting duck in the air, with her slow fall speed, mediocre airspeed, bad aerials. In other words, no safe way to land on solid ground against some characters. What Zelda excels at here is controlling the bottom platform, and not much else because having enemies above her or next to her is what she'll want.

She does bad against almost everyone here, which makes it a stage that she would definitely want to ban.
Zero Suit Samus said:
:zerosuitsamus: - [DEPENDS] - [CENTER STAGE]
no summary
[/COLLAPSE]
 
Joined
Mar 15, 2008
Messages
10,050
[jumpname]legality[/jumpname]IV. Legality


[jumpname]disclaimer[/jumpname]Disclaimer

Before I get started on talking about the legality of this stage, I want to touch up on a couple of points. As of this writing, this stage is banned in most regions, although it has seen the light of day in places such as Nova Scotia, Florida, and in MLG about a year ago. I'm of the opinion that this stage should be legal, and therefore, in this section, I'll be arguing for it's legality. I've spectated a fair share of Norfair debates during the course of this writing, so using that, I've come up with 5 different categories of discussions: Hazards, Counterpick Qualities, Influence on the Cast, Stalling Potential, and Double Standards. In each of those five categories, I'll branch out into different questions that are all related to the topic and answer each of those questions from my point of view. For this writing, I'll be going under the assumption that the reader has read all previous sections, so if you haven't, I would recommend that you do.

[jumpname]arguments[/jumpname]Arguments


[jumpname]hazards[/jumpname]"Hazards"

There's a lot to get into when we talk about hazards, so I'm just going to ramble for about 80 pages. Let's get this started.

"Should we allow stages with hazards in tournaments?"

My answer is yes. Arguments against this would include the fact that stage hazards are secondary elements coming from the stage and not the player, that attack the player(s), deal damage, give knockback, and interfere with what would have been regular player vs. player combat. When playing a match, both players are pit head-to-head in a game to see who can outplay their opponent by manipulating in-game characters in a fight and emerge victorious from it. People who believe that stages with hazards shouldn't be allowed in tournaments probably think the way they do because they want to preserve the integrity of player vs. player combat by having as little interference to the battle as possible, so that the battle will focus on each individual trying to outsmart each other via manipulating their in-game characters. Although there's nothing wrong with player vs. player combat, it would be naive to imply that there isn't, or that there shouldn't be any interaction with the stage at all, especially in Brawl.

It is impossible to interact with your opponent without first interacting with the stage. The opponent is who you battle with, the stage is the terrain you battle on. Unlike other fighting games such as Street Fighter, in which the stages mechanics are all extremely similar to each other, Brawl's stages are much more diverse, with each stage having numerous variations in characteristics and mechanics that differ from each other. Some stages in Brawl have moving parts, some are static, some have numerous arrangements in platforms, some don't have any, some have distant blast lines, some have close blastlines, some have missing blastlines, some have hazards, and lastly, some don't. A quick look at our stage selection screen shows us that Brawl was not meant to be played the same way across every level. In some levels, you play on a simple arrangement of platforms, and in others, you play in exotic locations such as deep in a forest, on moving vehicles, in the middle of a busy racetrack, or in Norfair's case, inside of an active volcanic cavern. Trying to shift our focus in stages to favor a more player vs. player dynamic by reducing the amount of influence a stage can have over a battle so that we can preserve the integrity of PvP combat goes against the design of the game, and can be interpreted as anti-competitive. Other games may demand that players only have to learn how to battle each other within the same box of invisible walls over and over, but in Brawl, the game demands that not only should we learn how to fight our opponents in a simple arrangement of platforms, but it also demands that we know how to battle our opponent inside of a jungle, atop moving vehicles, in the middle of a busy racetrack, and most importantly, inside of a volcanic cavern.

So how does this apply to hazards? Well we know that Brawl has a large selection of levels to choose from that differ almost completely from each other. The fact that they're so different from each other suggests that the game has a large focus on player vs. player vs. stage combat. Since the game has a large focus on stage interaction, it is implied that we should embrace all the different types of stage mechanics as one of the many unique features that are in our game that we should work with, and play it as is. One of the unique feature that certain stages have are hazards, which means that we should accept them into our tournament games with the same respect as we accept stages with different platform layouts or differently sized blast lines.

Re-iterating my point, yes, I believe stages with hazards in them should be tournament legal.
"Are Norfair's hazards too intrusive?"

Although hazards should normally always be legal, there are certain cases where hazards are just "too much" to handle, and in which case, it's stance in legality becomes questioned. I'll stand firmly when I say this: Norfair's hazards aren't intrusive enough to warrant a ban. Of course, when dealing with this subject, one must ask: How much is too much?

It's important to understand the difference between a hazard being "intrusive" and a hazard being "too intrusive". All hazards are intrusive. It is within their nature to intrude on your match as an added obstacle to work around, or an added obstacle to use to your advantage. They are secondary, and they interfere with the regular flow of the match. That is the way hazards were designed, and that's what we've come to accept. Following this logic, all hazards can be considered as intrusive. Norfair's lava is intrusive, Halberd's claws are intrusive, even YI:B's Shy Guys are intrusive.

This means that arguments like...

"The hazards can hit you and can deal damage, or sometimes make you lose an easy stock for no reason. Had it not been there I wouldn't have lost."

....should be tied to a rocket and shot to the surface of the sun. We already established that hazards have a place in Brawl in the last section, and just because a hazard can intrude on your match doesn't mean it's bannable. The question isn't whether it intrudes or not, it's how intrusive is it.

So how intrusive are Norfair's hazards? This is something that's best defined by how difficult it is to avoid. If a hazard is so difficult to avoid that it's unreasonable to expect that a player should avoid it on his own the majority of the time, then it's too intrusive. The strength of a hazard is irrelevant to how intrusive it is, but I'll add strength as a factor just because.


Rising Lava:
The lava covers a large fraction of the stage, but it will never cover the entire stage. Top platforms will never be consumed in lava, so the top platforms (and anything above it) is a safe zone. The rising lava also has a semi-predictable pattern, and gives warnings well before it's arrival on-stage, making it easy to prepare a plan to work around the lava.

The lava does 14% damage, and will only kill at killing percents, which means that it won't cause early deaths (in fact, it'll actually prevent them).
My vote: Not intrusive enough.

Lava Wall:
The lava wall covers more than half of the stage, but there are still 3 platforms, 3 edges, and a lot of aerial space on the remaining side. The entire sequence lasts about 15 seconds, but the lava only peaks in distance for 4 of those seconds. The lava is very easy to react to, since the camera always pans 5-9 seconds before the lava appears, and the lava moves very slowly. It can kill people somewhat early if their DI is bad, but there are numerous things a player can do to minimize those risks (air dodge inside it, DI correctly, DI downward onto platforms, etc.).
My vote: Not intrusive enough

Lava Wave:
Covers the entire screen with lava for a split second. Players get a large warning as well as plenty of time before the hitbox actually arrives. Although it has the most killing potential of all the hazards, it's still very easy to avoid.
My vote: Not intrusive enough

Lava Flares:
A number of narrow squirts of lava come from the background. Number of flares, as well as their location are both random, but their location doesn't exceed a certain range, and the amount of flares can range from numerous to just one. They are the least common of the 3 secondary hazards. Flares can be preceded by a violent rumbling of the screen, but that's not always the case. Hitboxes are very thin, but can be dangerous in certain areas and/or percents. They can cause early deaths depending on the location of the player, as well as the percent. Players have about 1.5 - 2 seconds to react to them from when they first appear on screen, and they last for 2-3 seconds. Each character has numerous viable options for avoiding them, although in some situations, avoiding the flares can be tricky. It's expected that players who know what they're doing should be able to avoid the flares the majority of the times they hit.
My vote: Not intrusive enough


It's reasonable enough to expect players to avoid the hazards on their own, but what would be a trickier subject would be how easy it is to get hit into it. The most intrusive hazards in that sense would be the lava walls, since they cover a large portion of the screen, have the longest duration of all the secondary hazards, and because they are the most common secondary hazard. In that sense, it's the hardest hazard to avoid getting hit by.

However, the left-over space given by the hazard is more than enough space for the hazard to be overly-intrusive. Three levels of platforms, three levels of ledges, and a lot of space on the outside, all sufficient for avoiding your enemy for a measly couple of seconds. It's not to say that one should never get hit by the lava, or be thrown into it, I'm just saying that it's reasonable to expect players to be able to avoid it frequently. This claim holds well judging from the plethora of Norfair videos available, as well as personal experience.


"Are the hazards a detriment to Norfair?"

I think that the hazards are more of a blessing for Norfair than they are a curse. The best way to explain this would be to write out the pros and cons for the hazards, so I'll go ahead and do so.

  • Pros
    • Can close off or restrict portions of the map for short periods of time, which can separate or constrict conflict.
      • It gives campers less space to run away from you, and can interrupt their camping routes suddenly, putting them in difficult situations.
      • Hazards can divide combat which can come in handy when you're in a really tight spot and need some space.
    • All the hazards can assist with recovering.
    • Hazards can make the match go by quicker.
    • All hazards follow a certain rough pattern, but are still unpredictable in ways, strengthening the "Stay Grounded!" argument.
  • Cons
    • Can close off or restrict portions of the map for short periods of time, which can separate or constrict conflict.
      • Hazards like the Rising Lava or the Lava Flares can divide players for a couple of seconds, stalling conflict.
    • Hazards interfere with the regular flow of the match.
    • Secondary hazard choices are unpredictable, which might give the impression that some hits are unfair.

So above this text, we have a list of reasons as to why the hazards can be good or bad for Norfair. So lets get started.

Imagine two stages, one is regular Norfair, and one is Norfair with all hazards turned off. Some of the complaints that Norfair gets related to the hazards is that


"Counterpick Qualities"


"Influence on the Cast"


"Stalling Potential"


"Double Standards"


[jumpname]videos[/jumpname]IV. Videos


[jumpname]datareferencing[/jumpname]Data Referencing[/CENTER]


[jumpname]regularmatches[/jumpname]Regular Matches


2009


2010


2011


[jumpname]abusingthestage[/jumpname]Abusing the Stage


[jumpname]credits[/jumpname]V. Credits


Thanks guys! We worked hard, and made it to the end, but it wasn't fast enough for us to see Samus in her underwear! :mad::mad::mad:


A LOT of people helped me out and rooted for me with this guide, so I want to give everyone who provided feedback a shoutout. It was a monumental project, and neither of them had to help me out, but they did anyways, so I want to give everyone involved a huge thanks for the help. This wouldn't have come out the way it did without all of your collective help. This means so much more than you think to me, and I appreciate all of your help. :)

Organized in alphabetical order:
  • Auspher - For being awesome with that moral support.
  • Everybody who discussed the survey - Giving me insight so I could make the "Influence on the Cast" section. More specifically:
    • CloverLeaf
    • da K.I.D.
    • D. Disciple
    • Espy Kasrani
    • fromundaman
    • fUddO
    • GeneralWoodman
    • Grim Tuesday
    • Ice_Coon45
    • IcyLight
    • InferiorityComplex
    • Inferno3044
    • Ingulit
    • Jimmyfosho
    • JuxtaposeX
    • Kappy
    • Kewkky
    • Luckay4Lyphe
    • Maharba the Mystic
    • Mahgnittoc
    • Mister Eric
    • Player-1
    • Rainbow Mink
    • Raziek
    • Red Ryu
    • Rickerdy-doo-da-day
    • Ryker
    • sk83rty
    • Sold2
    • Tesh
    • Trent
    • Tsubame
    • T-Block
    • vVv ChiboSempai
    • Xeylode
    • xIblisx
    • YarsRevengerson
    • Yink
    • yoshq
  • Everybody who supplied videos of any kind - So I could watch them and use them for reference.
  • John12346 - Helped me re-learn Microsoft Excel after MK26 taught me the first time.
  • John2k4 - Captured Runs 3, 4, and 5 for me in the Stage Patterns section after my capture card broke.
  • MK26 - Patiently taught me how to use Microsoft Excel. Did some statistics on the MLG data that I used.
  • Overswarm - Compiled MLG data and made an interpretation for me, that will be used in Part 2.
  • Raziek - Gave me permission to snag some photos of his, was available for Norfair-related badgering on Skype.
  • Red Ryu - For being semi-drunk while helping me out with Link and Lucario. :cool:
  • Smash Lab - Helped me learn some of the ******** Brawl hacking mumbo jumbo. More specifically:
    • Monk
    • standardtoaster
    • Toomai
  • spunkymp4 - Helped me time things for the "Stage Patterns" section.
  • T-Block - Partnering with me for the "Legality" section.
  • The URC - Gave me status updates on their discussions on Norfair. More specifically:
    • AlphaZealot
    • ESAM
    • Technical Chase
  • Xiivi - Gave me permission to spam the character boards.
If I missed your name, PLEASE tell me! A lot of people helped, too many to remember.
 
Joined
Mar 15, 2008
Messages
10,050
Newest mindgame on the block:

Arrive to the TV station first and turn off the music in the Wii that you're playing in. Only SFX.

The lack of music will excite the opponent less, thus, making them bored faster.

If they get bored, they'll get more anxious with your camping, and when they get anxious, they mess up more.

THIS TOTALLY WORKS I SWEAR IT I'VE BEATEN GOOD PLAYERS WITH THIS TRICK!
 

Supreme Dirt

King of the Railway
Joined
Sep 28, 2009
Messages
7,336
So I've been playing a lot of Toon Link, and my game is really Bomb and Boomerang heavy, probably influenced by my Melee Young Link. Really need to work ZAir into my game and arrow more.

Also, I discovered that my TL goes almost even with a ranked Wario in my region, it's pretty cool. He misjudges just how much range FSmash 2 has. Not to mention even on FD he has so much trouble landing a kill, it's hilarious, I'll be at more than 180%, and still be alive. I'm on the ground for about the amount of time it takes to quick draw then jump.
 

Ussi

Smash Legend
Joined
Mar 9, 2008
Messages
17,154
Location
New Jersey (South T_T)
3DS FC
4613-6716-2183
Newest mindgame on the block:

Arrive to the TV station first and turn off the music in the Wii that you're playing in. Only SFX.

The lack of music will excite the opponent less, thus, making them bored faster.

If they get bored, they'll get more anxious with your camping, and when they get anxious, they mess up more.

THIS TOTALLY WORKS I SWEAR IT I'VE BEATEN GOOD PLAYERS WITH THIS TRICK!
ipod and headphones.
 

Supreme Dirt

King of the Railway
Joined
Sep 28, 2009
Messages
7,336
Fine then.

I'll bring something capable of creating an electromagnetic pulse.

There's no possible way that could go wrong.
 

Supreme Dirt

King of the Railway
Joined
Sep 28, 2009
Messages
7,336
Seriously? I actually spent all last night trying to find a way. After I "mastered" (read: pulled off once) BCAT.
 

Supreme Dirt

King of the Railway
Joined
Sep 28, 2009
Messages
7,336
That thing where you quick draw an arrow backwards without changing what direction you're facing.
 

TheJerm

Smash Champion
Joined
Mar 31, 2007
Messages
2,392
Location
Route 23
Tell them about my sexy bcats mr pj. Also, sir king toon. What is this grab with bomb you speak of?
 

TheJerm

Smash Champion
Joined
Mar 31, 2007
Messages
2,392
Location
Route 23
Haha, there was a Marley fest this past weekend In austin Texas. It was soooooooooooo hype. Thousands of potheads and peace lovers. And cops didn't care what we did. I'm taking a small break until 4/20 cause of that day

:phone:
 

Krystedez

Awaken the Path
Joined
Feb 22, 2010
Messages
4,301
Location
Colorado Springs
So yeah, I used to like TL. And even played him occasionally.

In finding myself, I don't see myself playing with a 10-year old that weilds a tiny-version of the master sword. He's just ... so weird to play as.

( inb4yetyouplayPit:glare: )

And hai TL boards.
 
Top Bottom